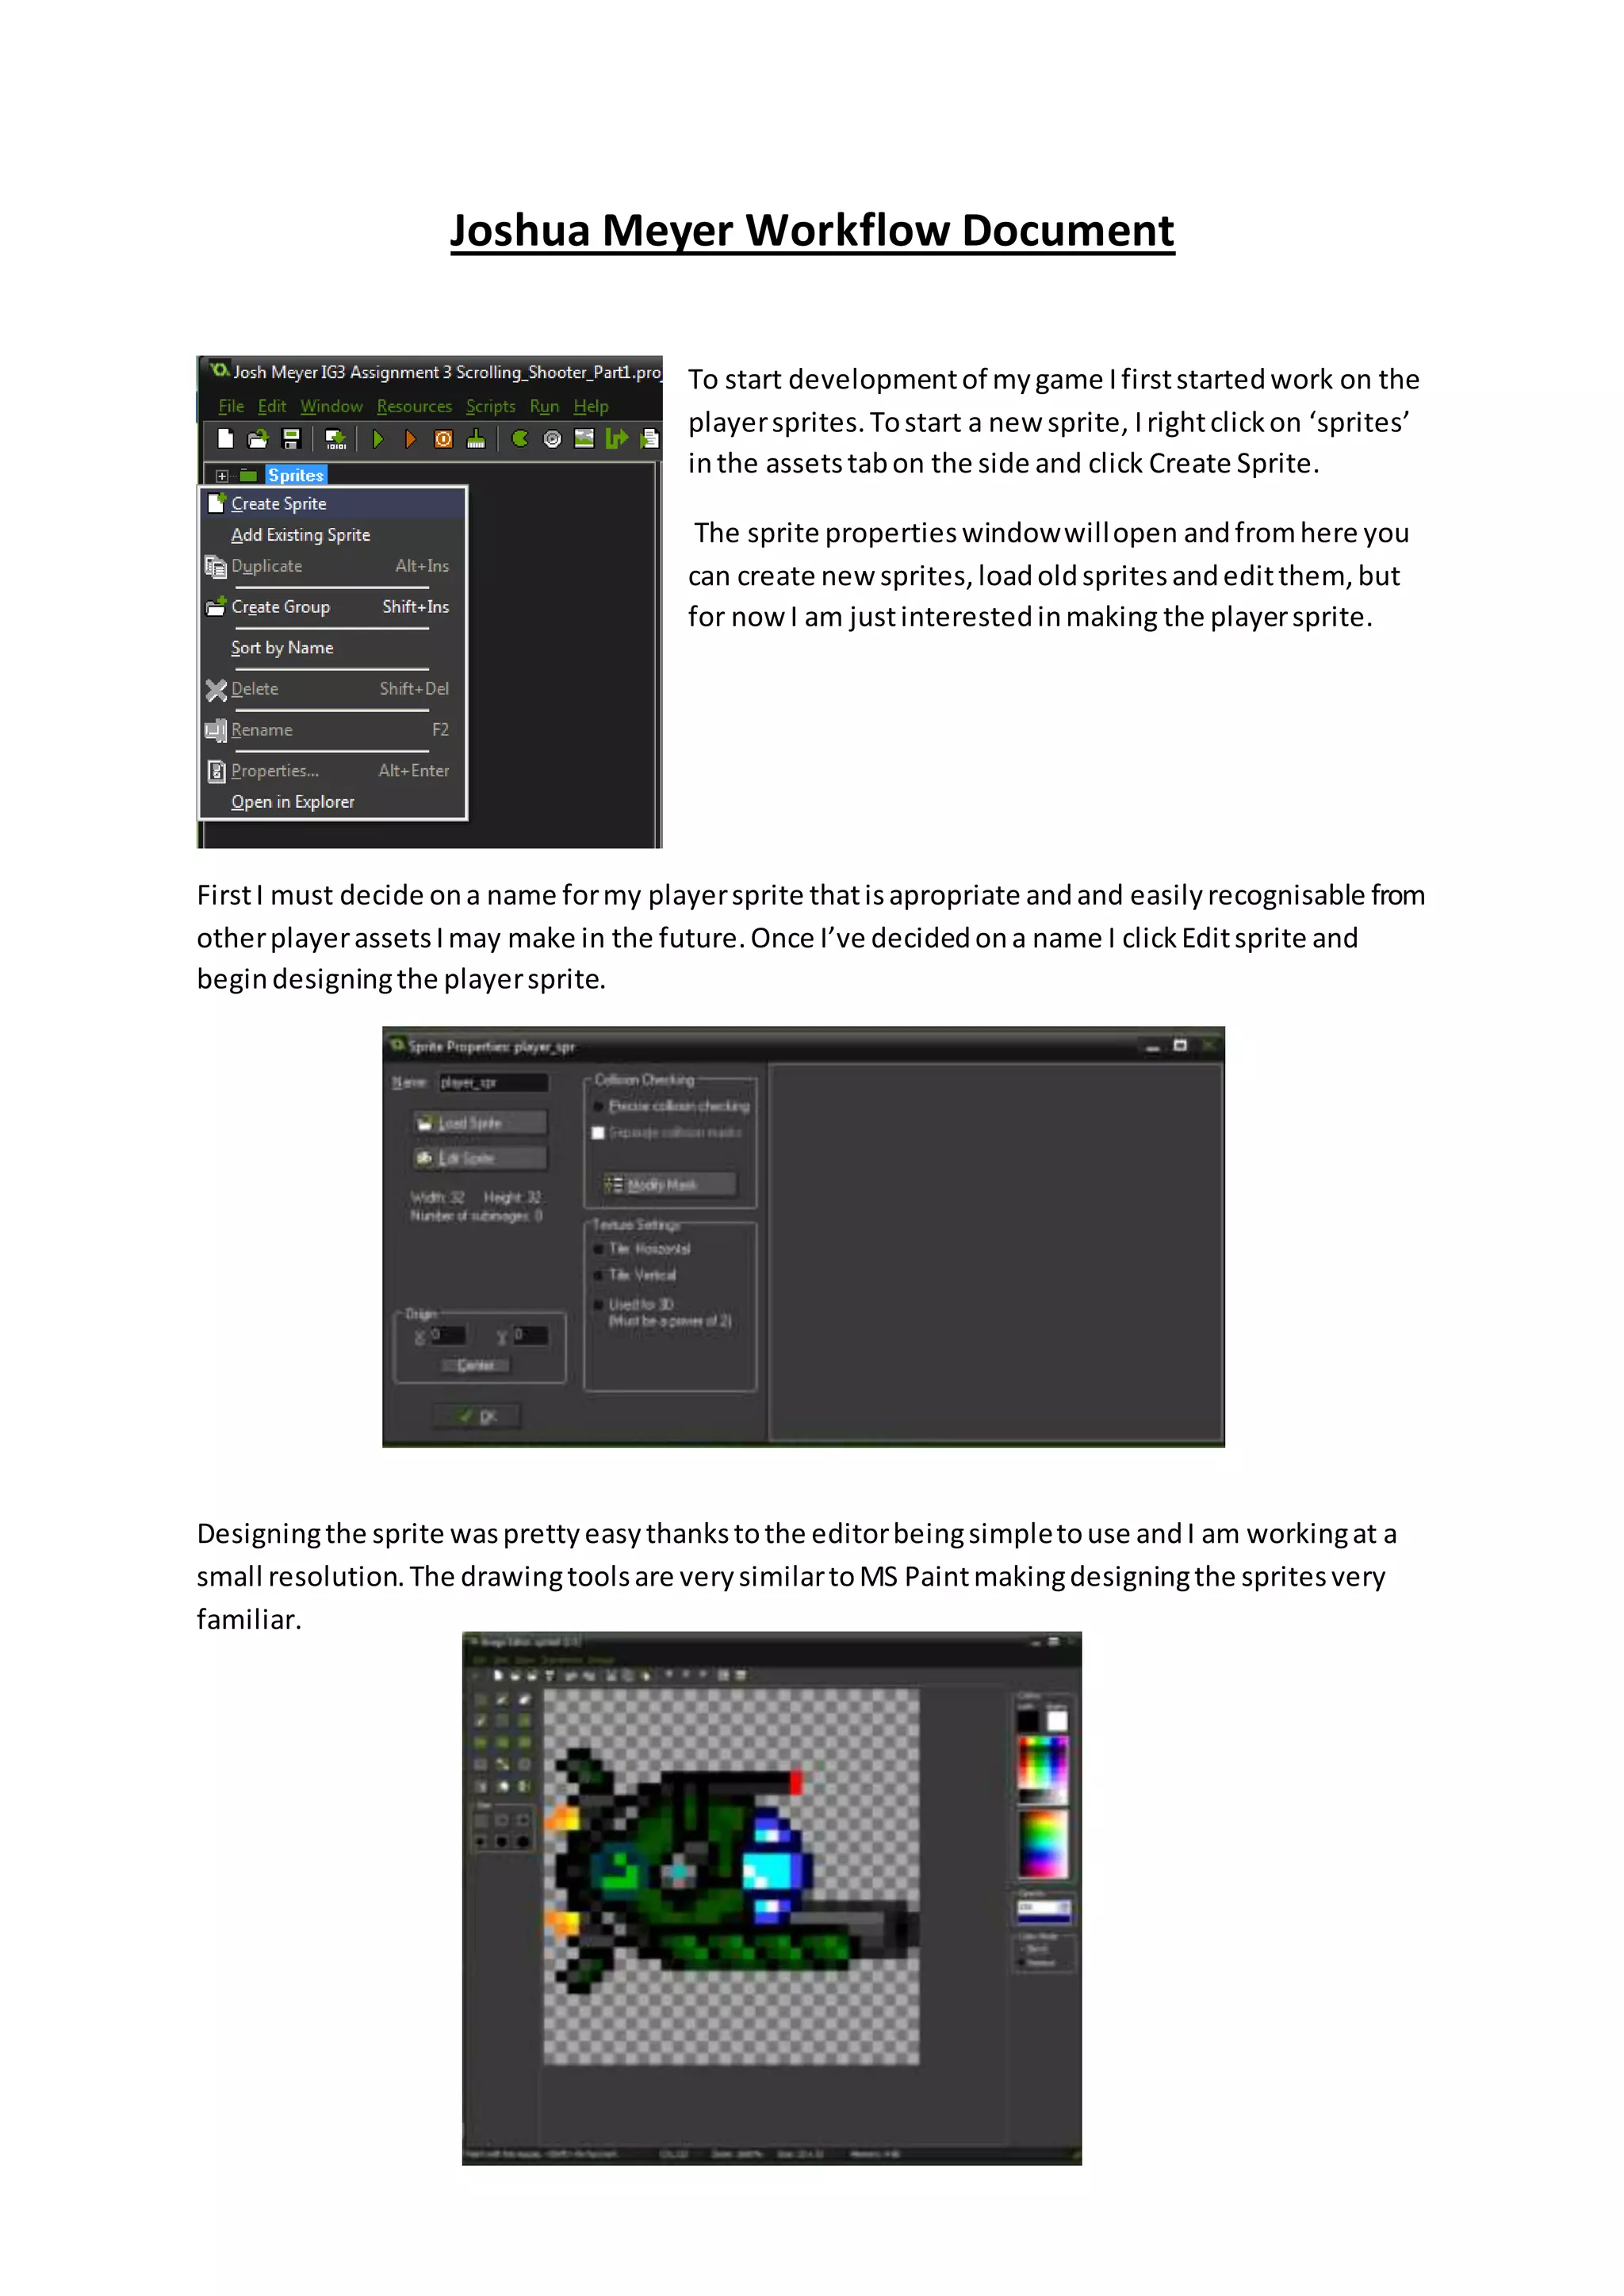
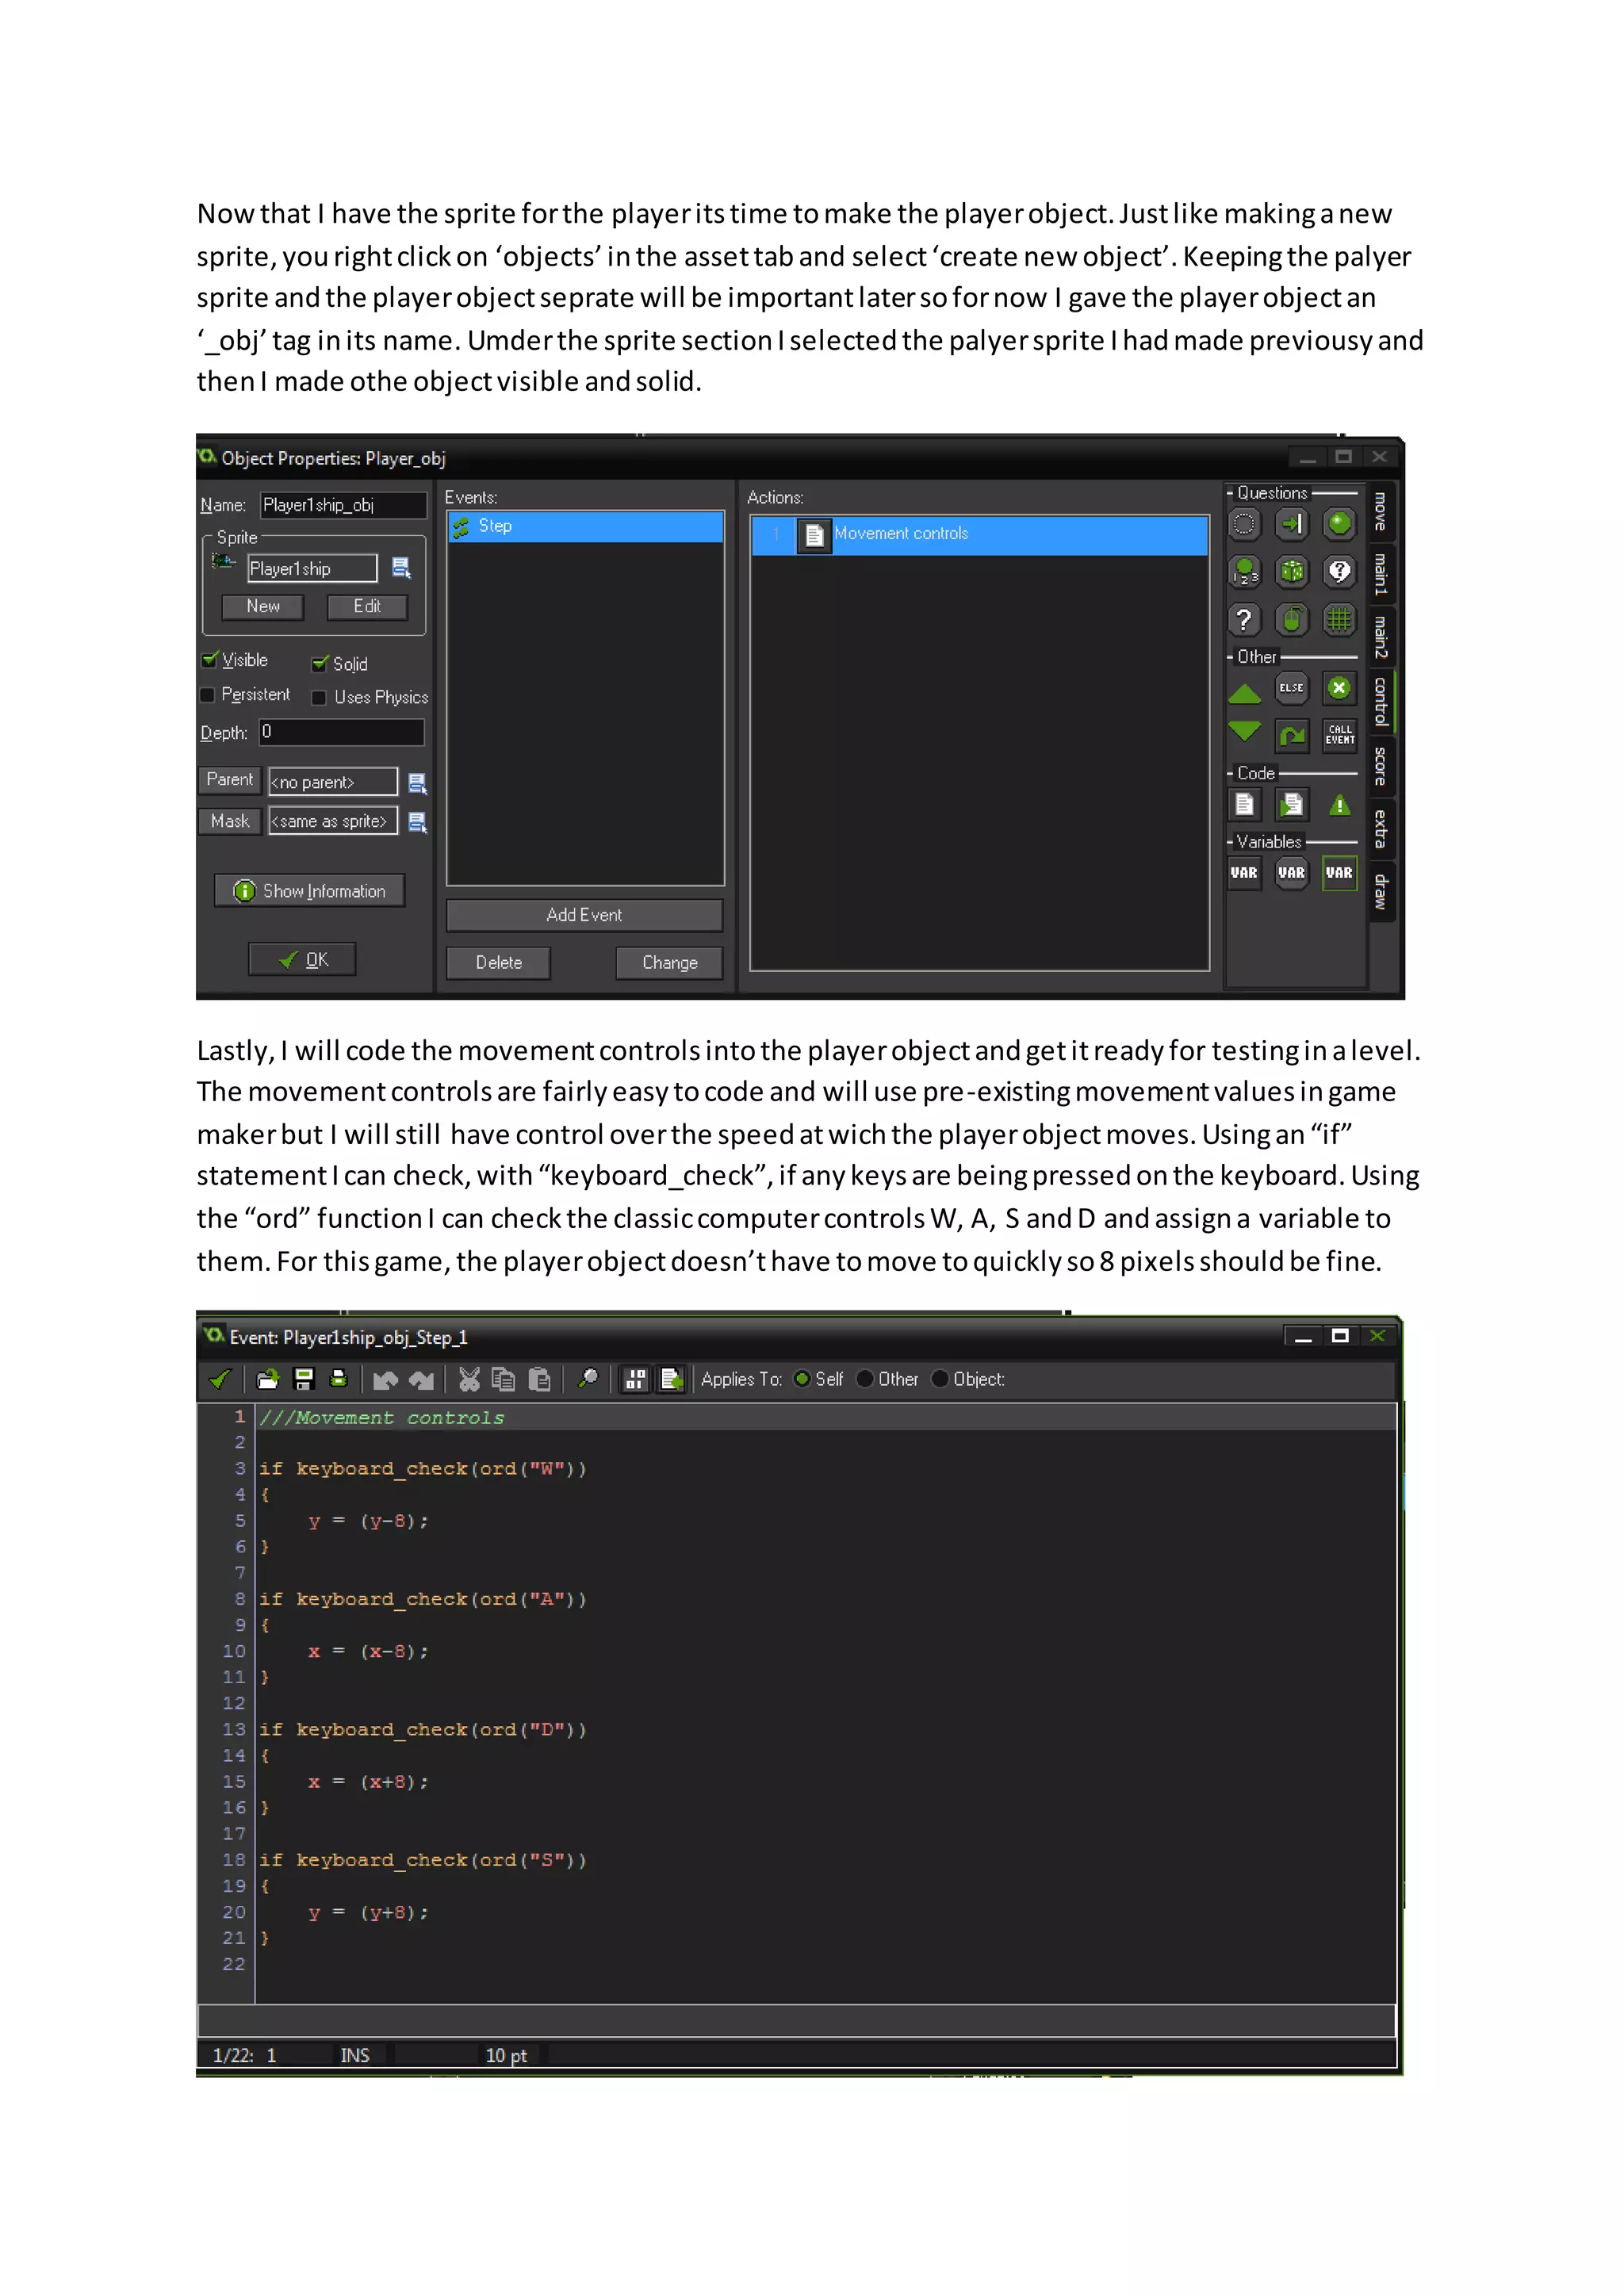
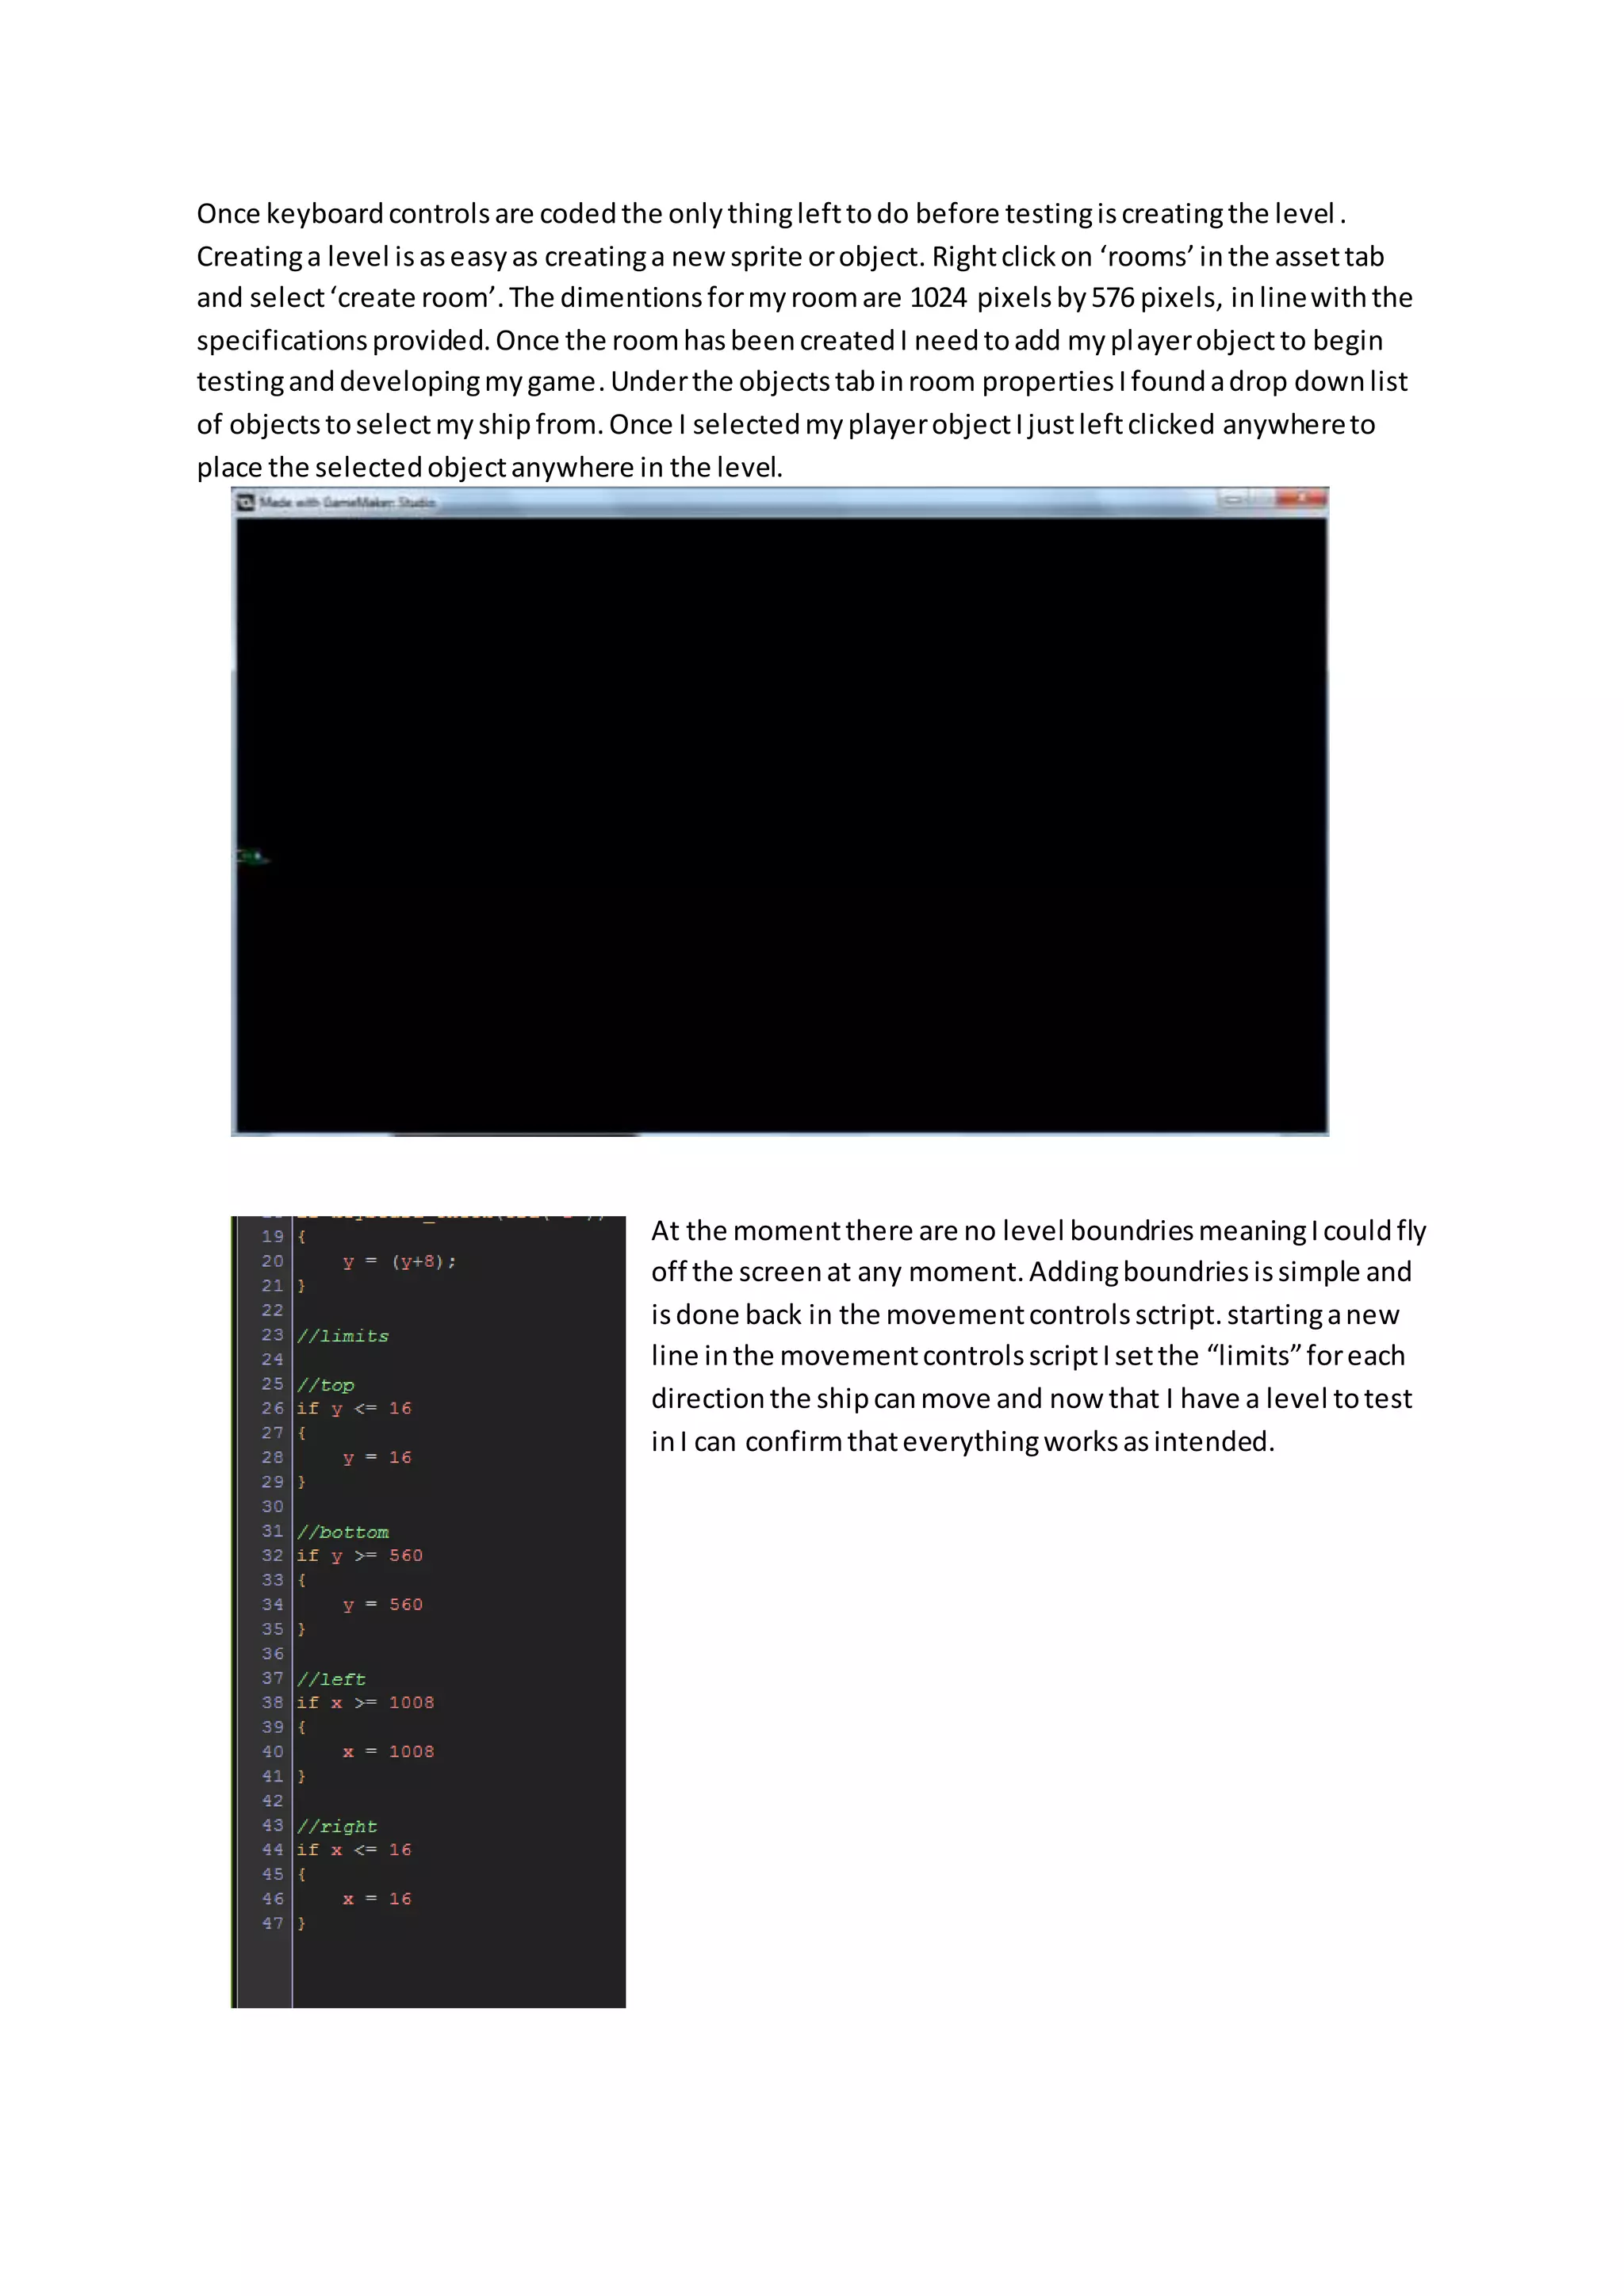
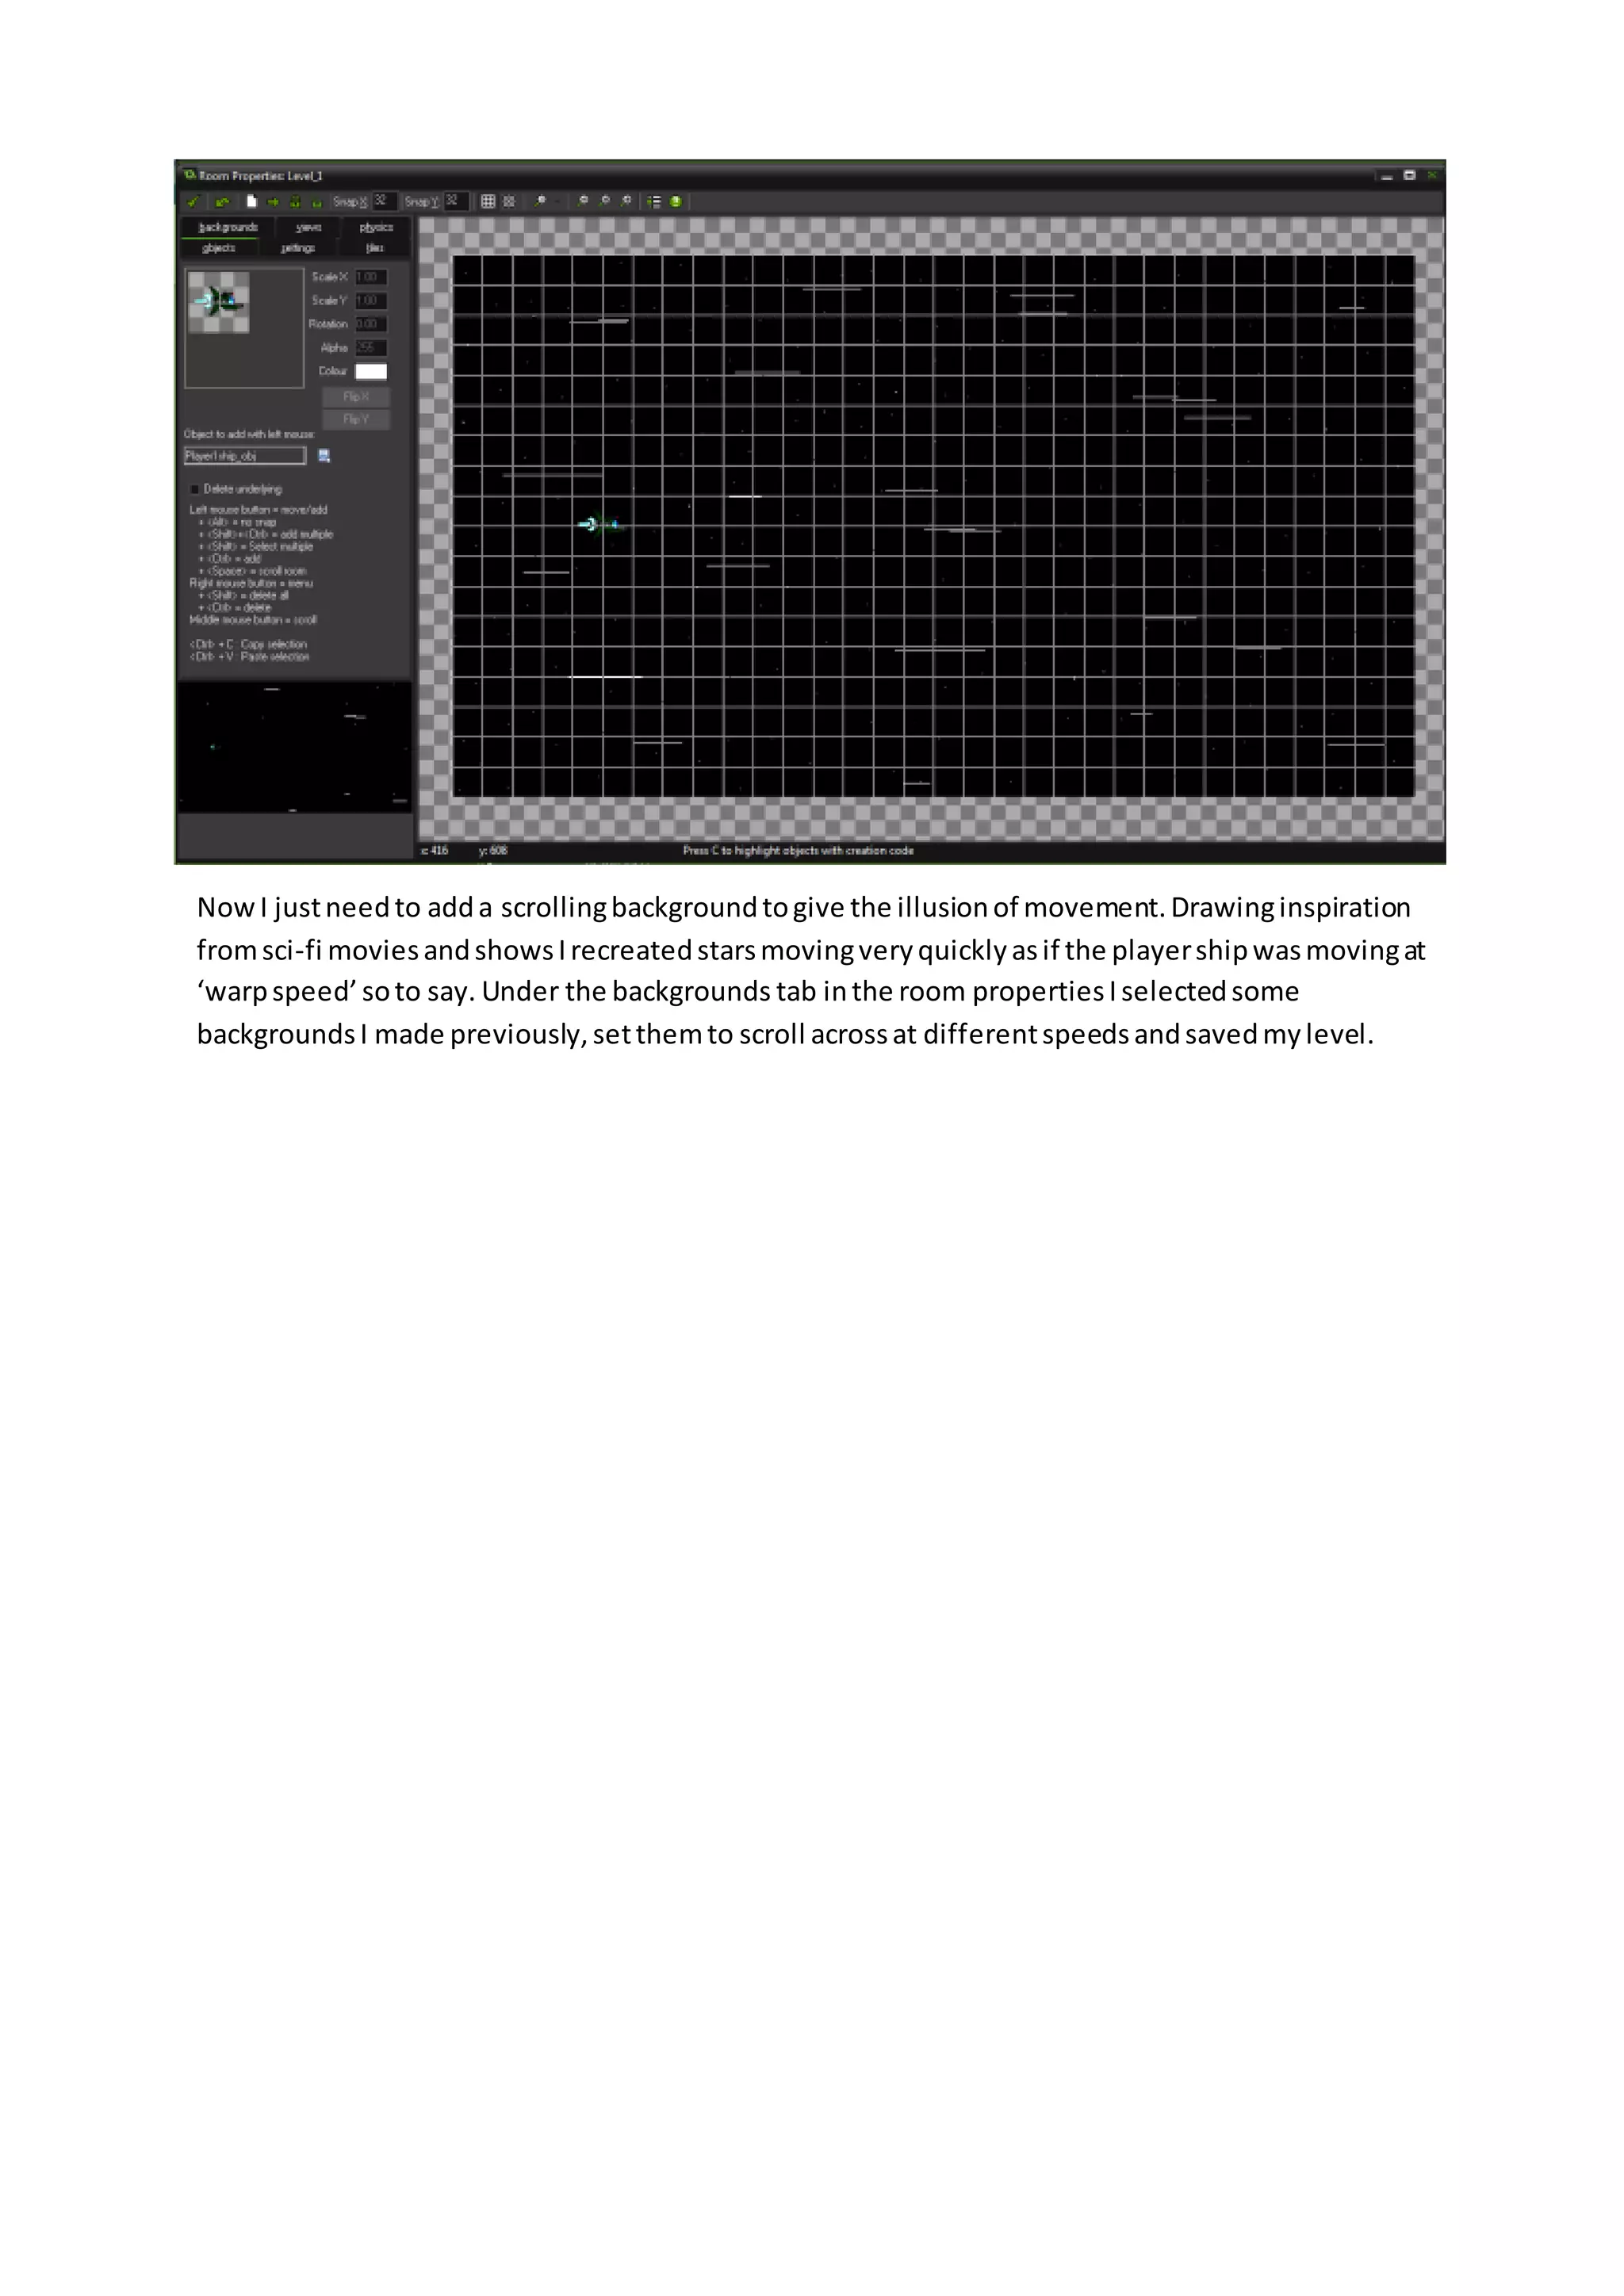
Joshua Meyer Workflow Document 
To start development of my game I first started work on the 
player sprites. To start a new sprite, I right click on ‘sprites’ 
in the assets tab on the side and click Create Sprite. 
The sprite properties window will open and from here you 
can create new sprites, load old sprites and edit them, but 
for now I am just interested in making the player sprite. 
First I must decide on a name for my player sprite that is apropriate and and easily recognisable from 
other player assets I may make in the future. Once I’ve decided on a name I click Edit sprite and 
begin designing the player sprite. 
Designing the sprite was pretty easy thanks to the editor being simple to use and I am working at a 
small resolution. The drawing tools are very similar to MS Paint making designing the sprites very 
familiar.
Now that I have the sprite for the player its time to make the player object. Just like making a new 
sprite, you right click on ‘objects’ in the asset tab and select ‘create new object’. Keeping the palyer 
sprite and the player object seprate will be important later so for now I gave the player object an 
‘_obj’ tag in its name. Umder the sprite section I selected the palyer sprite I had made previousy and 
then I made othe object visible and solid. 
Lastly, I will code the movement controls into the player object and get it ready for testing in a level. 
The movement controls are fairly easy to code and will use pre-existing movement values in game 
maker but I will still have control over the speed at wich the player object moves. Using an “if” 
statement I can check, with “keyboard_check”, if any keys are being pressed on the keyboard. Using 
the “ord” function I can check the classic computer controls W, A, S and D and assign a variable to 
them. For this game, the player object doesn’t have to move to quickly so 8 pixels should be fine.
Once keyboard controls are coded the only thing left to do before testing is creating the level . 
Creating a level is as easy as creating a new sprite or object. Right click on ‘rooms’ in the asset tab 
and select ‘create room’. The dimentions for my room are 1024 pixels by 576 pixels, in line with the 
specifications provided. Once the room has been created I need to add my player object to begin 
testing and developing my game. Under the objects tab in room properties I found a drop down list 
of objects to select my ship from. Once I selected my player object I just left clicked anywhere to 
place the selected object anywhere in the level. 
At the moment there are no level boundries meaning I could fly 
off the screen at any moment. Adding boundries is simple and 
is done back in the movement controls sctript. starting a new 
line in the movement controls script I set the “limits” for each 
direction the ship can move and now that I have a level to test 
in I can confirm that everything works as intended.
Now I just need to add a scrolling background to give the illusion of movement. Drawing inspiration 
from sci-fi movies and shows I recreated stars moving very quickly as if the player ship was moving at 
‘warp speed’ so to say. Under the backgrounds tab in the room properties I selected some 
backgrounds I made previously, set them to scroll across at different speeds and saved my level.
Joshua meyer 2D Game workflow document

Joshua meyer 2D Game workflow document

  • 1.
    Joshua Meyer WorkflowDocument To start development of my game I first started work on the player sprites. To start a new sprite, I right click on ‘sprites’ in the assets tab on the side and click Create Sprite. The sprite properties window will open and from here you can create new sprites, load old sprites and edit them, but for now I am just interested in making the player sprite. First I must decide on a name for my player sprite that is apropriate and and easily recognisable from other player assets I may make in the future. Once I’ve decided on a name I click Edit sprite and begin designing the player sprite. Designing the sprite was pretty easy thanks to the editor being simple to use and I am working at a small resolution. The drawing tools are very similar to MS Paint making designing the sprites very familiar.
  • 2.
    Now that Ihave the sprite for the player its time to make the player object. Just like making a new sprite, you right click on ‘objects’ in the asset tab and select ‘create new object’. Keeping the palyer sprite and the player object seprate will be important later so for now I gave the player object an ‘_obj’ tag in its name. Umder the sprite section I selected the palyer sprite I had made previousy and then I made othe object visible and solid. Lastly, I will code the movement controls into the player object and get it ready for testing in a level. The movement controls are fairly easy to code and will use pre-existing movement values in game maker but I will still have control over the speed at wich the player object moves. Using an “if” statement I can check, with “keyboard_check”, if any keys are being pressed on the keyboard. Using the “ord” function I can check the classic computer controls W, A, S and D and assign a variable to them. For this game, the player object doesn’t have to move to quickly so 8 pixels should be fine.
  • 3.
    Once keyboard controlsare coded the only thing left to do before testing is creating the level . Creating a level is as easy as creating a new sprite or object. Right click on ‘rooms’ in the asset tab and select ‘create room’. The dimentions for my room are 1024 pixels by 576 pixels, in line with the specifications provided. Once the room has been created I need to add my player object to begin testing and developing my game. Under the objects tab in room properties I found a drop down list of objects to select my ship from. Once I selected my player object I just left clicked anywhere to place the selected object anywhere in the level. At the moment there are no level boundries meaning I could fly off the screen at any moment. Adding boundries is simple and is done back in the movement controls sctript. starting a new line in the movement controls script I set the “limits” for each direction the ship can move and now that I have a level to test in I can confirm that everything works as intended.
  • 4.
    Now I justneed to add a scrolling background to give the illusion of movement. Drawing inspiration from sci-fi movies and shows I recreated stars moving very quickly as if the player ship was moving at ‘warp speed’ so to say. Under the backgrounds tab in the room properties I selected some backgrounds I made previously, set them to scroll across at different speeds and saved my level.