mathspp.com feed Stay up-to-date with the articles on mathematics and programming that get published to mathspp.com. 2025-07-23T16:49:02+02:00 Rodrigo Girão Serrão https://mathspp.com/blog/tags/image-processing Beating LinkedIn “Queens” with Python https://mathspp.com/blog/beating-linkedin-queens-with-python 2025-07-23T16:49:02+02:00 2025-02-25T18:40:00+01:00

This is a short account of how I wrote a program that solves all LQueens puzzles from LinkedIn automatically with Python.

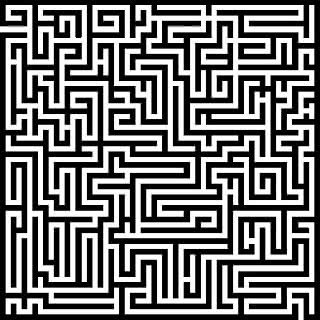
About a year ago LinkedIn started publishing a daily logic puzzle called “Queens”. This puzzle is a crossover between the queen-placing puzzle from chess and Sudoku, and takes place in a square grid with a number of heterogeneous coloured regions, as the image below demonstrates:

A screenshot showing the text "Puzzle 179 Appeared on 26 October 2024" and a coloured grid that is 8 by 8 with 8 coloured regions of heterogeneous shapes.
Queens puzzle #179.

Puzzle rules

The rules for the puzzle are quite simple. You have to place one queen on each coloured region while also making sure that:

  • there is one and only one queen per row and column; and
  • queens cannot touch each other, not even diagonally.

See if you can solve the puzzle above, for example by visiting this unofficial archive. (Make sure to select the same puzzle as I'm showing above, number 179.)

Solving the puzzle

I write algorithms for things like this all the time – which is a bit of a weird thing to be experienced on, but oh well... –, so solving the puzzle in Python was actually quite straightforward.

I decided to represent the board as a list of sets, where each set contains the coordinates of the cells of a coloured region. For example, puzzle 179 shown above would be represented as the following list of sets:

[
    {(0, 1), (4, 0), (0, 0), (7, 0), (2, 0), (3, 0), ...},  # yellow
    {(7, 4), (7, 1), (2, 1), (7, 7), (3, 1), (6, 1), ...},  # orange
    {(2, 4), (0, 4), (0, 3), (1, 4), (0, 6), (0, 2), ...},  # blue
    {(2, 3), (3, 2), (1, 2), (2, 2)},                       # green
    {(6, 2), (4, 3), (4, 2), (3, 3), (5, 2)},               # gray
    {(2, 5), (3, 4), (3, 5), (1, 5)},                       # red
    {(4, 4), (5, 5), (6, 5), (5, 4), (4, 5)},               # purple
    {(0, 7), (2, 7), (3, 7), (4, 6), (5, 7), (1, 7), ...},  # brown
]

The good stuff lies in the function solve. The function solve is a recursive function that accepts the list with coloured groups that don't have a queen yet and returns the list of positions where queens must go.

How does the function know it's done? If it receives an empty list of coloured groups, then that means all groups received a queen, and we can start producing the list of queen positions:

def solve(group_sets):
    if not group_sets:
        return []

    # ...

That's the best possible scenario, because that's when the function is already done. But usually, the function has work to do.

If the list of coloured groups is not empty, then the function looks at the very first coloured group, which should be group_sets[0], and traverses that set of positions, one position at a time:

    for tx, ty in group_sets[0]:

The tx and ty and the x and y coordinates for the tentative position of the queen of the current coloured group. But let us assume, for a second,...

]]>
Finding similar photos https://mathspp.com/blog/finding-similar-photos 2025-07-23T16:49:02+02:00 2023-02-01T00:00:00+01:00

Go through the complete code for a Python project that consists in finding similar photographs in a folder. This tutorial will make use of classical techniques and is suitable for beginners.

Introduction

The photo gallery on my phone is consistently packed with photos that all look (pretty much) the same. Going through batches of photos and looking for near-duplicates is boring, so I thought I would try to use some maths and some Python to help me find images that are very close to one another.

For example, I would like my program to determine that the first two photos in the collage below are pretty much the same, while also saying that the third one is different from the other two.

A collage of three photos of the same seagull. This collag was used in this Python project to see if we can find similar images (or near duplicates) with Python.
Three photos of the same seagull.

This short tutorial will go through the (surprisingly little) code I wrote as an experiment.

Tooling

This short project makes use of the pillow imaging library for Python and does not use any machine learning. To determine our near-duplicate photos, we will be using rudimentary image processing techniques.

GitHub repository

Code

The code for this project can be found in the “Finding similar images” GitHub repo. Feel free to star the repository and fork it to play around with the code.

To get started using the code,

  1. clone the repository;
  2. run poetry install to install the pillow dependency (or install it by hand, if you must); and
  3. run python src/similarity.py.

Images

The repository also includes two folders seagulls and dublin with some real photographs I took, respectively of a seagull and from Dublin. We can use these photographs to test our code.

Algorithm to determine similarity

In order to determine if two images are near duplicates of each other, we need to come up with a simple algorithm to do so. In this project, we will follow this approach:

  1. resize the two images to 16 by 16;
  2. determine the average pixel difference of the two 16 by 16 images; and
  3. check if that average difference is below a threshold value.

This is just a high-level description of what we will be doing together. As we go through the tutorial, I will give you more details regarding what we need to do.

Ready? Let's get started.

Setting up everything

To go through this tutorial, you can clone the repository and use poetry to install the dependencies with poetry install. If you can't be bothered with that, you'll need at least the folders seagulls and dublin from that repository. Then, go ahead and create your file src/similarity.py:

## src/similarity.py
from PIL import Image

seagull = Image.open("seagulls/seagull_1.jpeg")
seagull.show()

If you run this code, it should open the image for you. If it didn't, make sure you have pillow installed (you can follow the instructions in the pillow docs) and make sure the path to the seagulls directory is correct.

If you cloned the repository or if you have a folder structure like mine:

project_folder
| - seagulls
  | - seagull_1.jpeg...
]]>
Solving mazes with programming https://mathspp.com/blog/solving-mazes-with-programming 2024-08-14T19:34:45+02:00 2017-11-29T00:00:00+01:00

I have always loved solving mazes... so naturally I had to write a program to solve mazes for me!

a black and white maze

Take a look at this maze; can you find a path from the upper left entrance in the maze to the lower right exit? Probably you can, and so does the program I wrote!

I wrote a program in Python (making use of pygame and Pillow) to solve any maze given. I did this project several years ago, after learning about Dijkstra's algorithm. I read about the algorithm and decided to implement it, to get a feel for it. I realized that I could apply it to a maze in a picture, if I took each pixel of the image to be a vertex in the graph where I'd apply the method.

I wanted to make my program fairly general, in terms of the mazes that could be given, and so I dwelled with a problem: how to tell if two adjacent pixels should be connected in the graph or not. I knew I only wanted to connect pixels that referred to the path, and not to the walls, so my idea was simple: I supposed that a picture of a maze would have mainly two colours, one for the walls and another for the paths. I leveraged on that to preprocess the image and turn it to a black and white picture, where each pixel would be either completely white or completely black (I did this by finding the average luminosity of a pixel in the image and used that as a threshold; a pixel with luminosity below the average becomes black, otherwise it becomes white). After processing, ask the user for the two points we want to connect; if they have the same colour (say it was white) then it must have been because the paths have been changed into white and thus I need only to consider white pixels.

After we know where to start, where to end, and which colour we care about (either black or white) I apply Dijkstra's algorithm on the graph of the vertices of that colour, where two vertices are connected if the two corresponding pixels are adjacent. Of course I didn't have to explicitly build the graph, as it was given by the pixels in the picture. After a path is found, a red line is drawn. The first version of the script would draw the absolute shortest path, and so it would mainly be adjacent to walls and I found it aesthetically unpleasing. To try and counter that I added a slight element of randomness when drawing the red path. Using my script to solve the maze above we get this drawing:

the maze above but solved with a red line showing the path

which looks like a line I could draw with my pencil, if I managed to not overlap my line with the walls of the maze by accident. The code can be found in this GitHub repo and a downloadable executable can be found here. In both...

]]>