
Looking to keep track of the climate in your greenhouse, create a humidor control system, or monitor temperature and humidity for a weather station project? The DHT11 or DHT22 Temperature and Humidity Sensor might be perfect for the job!
These sensors come ready to use right out of the box – they’re already calibrated at the factory, so you don’t need to add any extra parts to get them working. You just need to make a few simple wire connections to your Arduino and add some basic code. Then you can start measuring both temperature and relative humidity right away.
In this tutorial, we will explore some of the unique features of these sensors, learn how to connect and use them, and introduce an Arduino library with examples to help you get started on your next environmental monitoring project.
DHT11 vs DHT22
The DHT11 and DHT22 are the two most popular sensors in the DHTxx family. While they look very similar and share the same pinout, they have some important differences in what they can do.
The DHT22 costs more than the DHT11, but for good reason. The DHT22 can measure temperatures all the way from -40°C to +125°C and is accurate to within half a degree (±0.5°C). The DHT11, on the other hand, only works between 0°C and 50°C and might be off by up to 2 degrees (±2°C).
When it comes to measuring humidity (moisture in the air), the DHT22 can detect from 0% to 100% humidity with 2-5% accuracy, while the DHT11 only measures between 20% and 80% humidity and might be off by 5%.
Here are the specifications:
 |  | |
| DHT11 | DHT22 | |
| Operating Voltage | 3 to 5V | 3 to 5V |
| Max Operating Current | 2.5mA max | 2.5mA max |
| Humidity Range | 20-80% / 5% | 0-100% / 2-5% |
| Temperature Range | 0-50°C / ± 2°C | -40 to 80°C / ± 0.5°C |
| Sampling Rate | 1 Hz (reading every second) | 0.5 Hz (reading every 2 seconds) |
| Body size | 15.5mm x 12mm x 5.5mm | 15.1mm x 25mm x 7.7mm |
| Advantage | Ultra low cost | More Accurate |
Even though the DHT22 is clearly more accurate and works in more extreme conditions, the DHT11 has three big advantages: it’s cheaper, smaller in size, and can take measurements more frequently. The DHT11 can give you a new reading every second (1Hz sampling rate), but the DHT22 only updates every two seconds (0.5Hz sampling rate).
Despite these differences, both sensors work with the same voltage (3 to 5 volts) and use at most 2.5mA of electricity when taking a measurement. Perhaps the best thing about these sensors is that you can easily switch between them in your projects without changing any wires! You need to make small changes to your code, but otherwise, swapping one for the other is super simple!
Inside the DHT Sensor
If you open up a DHT11 or DHT22 sensor by removing its casing, you’ll discover two main parts inside: an NTC thermistor and a capacitive humidity sensing component.

The humidity sensing part has a simple but clever design. It consists of two metal electrodes with a special moisture-absorbing material (typically a salt or conductive plastic polymer) sandwiched between them. When the air gets more humid, this material absorbs water vapor from the air. As it absorbs water, it releases tiny charged particles called ions. These ions change the dielectric constant of the material (how the material responds to electricity), which changes the capacitance between the electrodes. The more humid it is, the more this capacitance changes. By measuring this change, the sensor can figure out the relative humidity in the air.

For measuring temperature, the sensor uses an NTC thermistor. A thermistor is basically a special type of resistor that changes its resistance significantly when the temperature changes. While ordinary resistors also change their resistance a little bit with temperature, these changes are too small to be useful. Thermistors, however, are specifically made to have big resistance changes with temperature—often changing by 100 ohms or more for each degree of temperature change.
The “NTC” in NTC thermistor stands for “Negative Temperature Coefficient.” This means that as the temperature goes up, the resistance goes down.

The sensor also contains a tiny chip (or Application-Specific Integrated Circuit a.k.a. ASIC, if you prefer the technical term). This small but powerful chip does several important jobs: it measures the signals from both the humidity and temperature components, applies calibration settings (which help make the readings accurate), converts these analog electrical signals into digital data, and finally outputs a digital signal that your microcontroller can understand.
DHT11 and DHT22 Pinout
The DHT11 and DHT22 sensors have a similar pinout, and they both typically come with four pins:

VCC pin powers the sensor. While these sensors can work with voltages between 3.3V and 5.5V, it’s best to use 5V when possible. With a 5V power supply, you can place your sensor up to 20 meters (about 65 feet) away from your microcontroller. If you use a 3.3V supply instead, keep your sensor within 1 meter (about 3 feet) of your microcontroller. This is important because longer wires can cause voltage drops, which might make your temperature and humidity readings less accurate.
Data pin spits out a digital signal with the temperature and humidity information. To make sure this communication works properly, you’ll usually need to add a 10kΩ pull-up resistor between this pin and the VCC pin. This resistor ensures proper signal levels.
NC pin stands for “Not Connected.” As the name suggests, this pin doesn’t connect to anything and can be left alone in your project.
GND pin is the ground pin.
Wiring the DHT11 or DHT22 sensor to an Arduino
Now it’s time to connect the sensor to your Arduino!
Wiring the DHT11 or DHT22 sensor to an Arduino is simple and straightforward. These sensors have fairly long pins with 0.1″ spacing between them, which makes them perfect for plugging directly into any standard breadboard. And since both the DHT11 and DHT22 have the same pin arrangement, you can follow the exact same steps no matter which sensor you’re using.
First, connect the VCC pin on your sensor to the 5V output on your Arduino. Then, connect the GND (ground) pin on the sensor to any ground pin on your Arduino. Next, connect the Data pin to digital pin #8 on your Arduino – this is the pin that will receive all the temperature and humidity information. To make sure the data signal is strong and clear, you need to add a 10K pull-up resistor between the Data pin and the VCC pin. However, if you bought a breakout board, you can skip adding this resistor because it’s already built into the board.
Here’s a quick reference table for the pin connections:
| DHTxx | Arduino | Notes | |
| VCC | 5V | – | |
| GND | GND | – | |
| Data | 8 | pulled up by 10kΩ |
The image below shows exactly how to wire DHT11:

And here’s how to wire DHT22:

Once you’ve made all these connections, you’re ready to upload some code and start measuring temperature and humidity!
Library Installation
The DHTxx sensors use a unique single-wire communication protocol to send temperature and humidity data. While this protocol is not a standard one, it is similar to the Dallas 1-Wire protocol and relies heavily on very precise timing to work correctly.
The good news is that you don’t need to understand all the technical details of how this protocol works! There’s a helpful library called the DHTlib that takes care of almost everything for you.
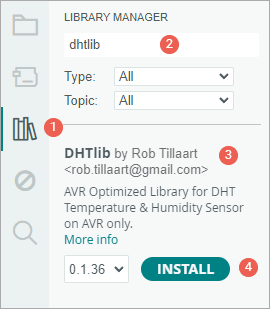
To install the library:
- First open your Arduino IDE program. Then click on the Library Manager icon on the left sidebar.
- Type “dhtlib” in the search box to filter your results.
- Look for the “DHTlib” library created by Rob Tillaart.
- Click the Install button to add it to your Arduino IDE.
Arduino Example 1 – Displaying Readings on Serial Monitor
After installing the library, copy and paste this sketch into the Arduino IDE.
This test sketch will print the temperature and relative humidity values to the serial monitor. Give it a try, and then we’ll go through how it works together.
#include <dht.h>
#define dataPin 8  // Defines pin number to which the sensor is connected
dht DHT;           // Creates a DHT object

void setup() {
  Serial.begin(9600);
}
void loop() {
  //Uncomment whatever type you're using!
  int readData = DHT.read22(dataPin); // DHT22/AM2302
  //int readData = DHT.read11(dataPin);  // DHT11

  float t = DHT.temperature;  // Gets the values of the temperature
  float h = DHT.humidity;     // Gets the values of the humidity

  // Printing the results on the serial monitor
  Serial.print("Temperature = ");
  Serial.print(t);
  Serial.print(" °C | ");
  Serial.print((t * 9.0) / 5.0 + 32.0);  //print the temperature in Fahrenheit
  Serial.println(" °F ");
  Serial.print("Humidity = ");
  Serial.print(h);
  Serial.println(" % ");
  Serial.println("");

  delay(2000);  // Delays 2 secods
}
Once you upload the sketch to your Arduino, you should see temperature and humidity readings appear on the serial monitor.

Code Explanation:
Let’s break down how this program works, step by step:
First, we include the DHT library which gives us the commands we need to communicate with our DHT sensor. Then we define which pin on the Arduino our sensor’s data wire is connected to (pin 8 in this case), and we create a DHT object that represents our sensor in the code.
#include <dht.h>
#define dataPin 8 // Defines pin number to which the sensor is connected
dht DHT;          // Creates a DHT object
In the setup section, we start serial communication at 9600 baud. This allows your Arduino to send information to your computer so you can see the readings.
void setup() {
  Serial.begin(9600);
}
In the main loop, we read data from our sensor using either the read22() function for a DHT22 sensor or the read11() function for a DHT11 sensor. Keep in mind that you need to uncomment the line that matches your sensor type and comment out the other line.
//Uncomment whatever type you're using!
int readData = DHT.read22(dataPin); // DHT22/AM2302
//int readData = DHT.read11(dataPin); // DHT11
After reading the data, the humidity and temperature values are retrieved from the DHT object using dot . notation.
float t = DHT.temperature; // Gets the values of the temperature
float h = DHT.humidity;    // Gets the values of the humidity
We then print these values to the serial monitor in a nicely formatted way, showing both Celsius and Fahrenheit temperatures.
Serial.print("Temperature = ");
Serial.print(t);
Serial.print(" °C | ");
Serial.print((t * 9.0) / 5.0 + 32.0); //print the temperature in Fahrenheit
Serial.println(" °F ");
Serial.print("Humidity = ");
Serial.print(h);
Serial.println(" % ");
Serial.println("");
The temperature from the sensor comes in Celsius (°C) by default, but the program also converts it to Fahrenheit using this formula:
T(°F) = T(°C) × 9/5 + 32
//print the temperature in Fahrenheit
Serial.print((t * 9.0) / 5.0 + 32.0);
Finally, we wait for 2 seconds before taking another reading. This delay is important because our sensor needs time between readings to give accurate results.
delay(2000);Arduino Example 2 – Displaying Readings on LCD
If you’re building your own incubator or a similar project, you’ll probably want to display the temperature and humidity readings directly on a small display rather than relying on a computer. This way, you can check the readings anytime without needing a computer connection.
And what could be more perfect for this than a 16×2 character LCD? Let’s see how to connect both the LCD and your DHT sensor to an Arduino.
Here’s what the final output will look like on the LCD:

If you haven’t worked with 16×2 character LCDs before, you might want to check out this helpful tutorial:

Wiring
Now let’s connect the LCD to your Arduino as shown in this diagram:


Arduino Code
The program below will display the temperature and humidity values directly on your 16×2 character LCD. It works similarly to our previous example, but instead of sending the readings to your computer, it shows them right on the LCD screen so you can read them anytime without needing a computer connection.
#include <LiquidCrystal.h>  // includes the LiquidCrystal Library
#include <dht.h>

#define dataPin 8
LiquidCrystal lcd(12, 11, 5, 4, 3, 2);  // Creates an LCD object. Parameters: (rs, enable, d4, d5, d6, d7)
dht DHT;
bool showcelciusorfarenheit = false;

void setup() {
  lcd.begin(16, 2);  // Initializes the interface to the LCD screen, and specifies the dimensions (width and height) of the display
}

void loop() {
  int readData = DHT.read22(dataPin);
  float t = DHT.temperature;
  float h = DHT.humidity;
  lcd.setCursor(0, 0);   // Sets the location at which subsequent text written to the LCD will be displayed
  lcd.print("Temp.: ");  // Prints string "Temp." on the LCD

  //Print temperature value in Celcius and Fahrenheit every alternate cycle
  if (showcelciusorfarenheit) {
    lcd.print(t);  // Prints the temperature value from the sensor
    lcd.print(" ");
    lcd.print((char)223);  //shows degrees character
    lcd.print("C");
    showcelciusorfarenheit = false;
  } else {
    lcd.print((t * 9.0) / 5.0 + 32.0);  // print the temperature in Fahrenheit
    lcd.print(" ");
    lcd.print((char)223);  //shows degrees character
    lcd.print("F");
    showcelciusorfarenheit = true;
  }

  lcd.setCursor(0, 1);
  lcd.print("Humi.: ");
  lcd.print(h);
  lcd.print(" %");
  delay(5000);
}