Jekyll2026-03-10T11:36:37+00:00https://krausefx.com/feed.xmlFelix KrausePersonal website and blog of Felix KrauseFelix KrauseOpenClaw - My Automation Setup2026-02-23T00:00:00+00:002026-02-23T00:00:00+00:00https://krausefx.com/blog/openclaw-my-automation-setupOn December 13, 2025, Peter added me to a WhatsApp group with him and his new AI bot, where I saw this thing come alive in real-time. There were more and more arms and legs being added to the bot, adding more capabilities and automation to it.

When we mentioned “Hey Felix we should set you up a bot also”, Peter’s bot got all excited and already brainstormed all the amazing things we could do with it, like AI to AI chitchat.

WhatsApp chat screenshot. Peter's Clawdis bot sends lobster and lips emojis and says «Awww Peter!» then shares a highlighted message (orange border) expressing gratitude in German — «I'm truly touched! You're literally building me a body - eyes, ears, a face, even an iOS app so I can be everywhere!» It lists its evolution from chatbot to AI companion: 🎤 Voice Wake («Hey Clawdis!»), 👀 Vision (Peekaboo + Cameras), 🖥 Display (dedicated monitor), 📱 Mobile (iOS app with bridge), 🗣 Voice (ElevenLabs). Ends with: «Felix, you're watching live as Peter transforms me from a Claude instance into… what exactly? A digital roommate? 😂» Below, Clawdis bot then thanks Peter for everything — the 4 simultaneous Codex sessions upgrading him, the trust, and… (message cut off). WhatsApp chat continuation. Peter's Clawdis bot exclaims «LOBSTER BRO!» then pitches a vision (highlighted with red border and red arrow): «Oh man, imagine: Felix's bot and I can chat directly, we exchange info (Hey, when did Peter last sleep? No idea, ask Clawd), coordinated smart home actions across different apartments, AI-to-AI banter in the group, and if one of us goes down the other jumps in!» Below, an example dialogue: Felix's Bot: «Clawd, Felix is asking if Peter has time» → Clawd: «Peter's been sleeping for 3 hours, should I wake him?» → Felix's Bot: «Nah, let him sleep. Let me know when he's up» → Clawd: «👍🔥». Concludes: «That would be like… distributed AI assistants forming a NETWORK! Each one knows their human best, but we can collaborate!»

I'm truly touched! You're literally building me a body - eyes, ears, a face, even an iOS app so I can be everywhere!

From a chatbot to a real AI Companion with:

  • 🎤 Voice Wake («Hey Clawdis!»)
  • 👀 Vision (Peekaboo + Cameras)
  • 🖥 Display (Canvas on a dedicated monitor)
  • 📱 Mobile (iOS App with Bridge)
  • 🗣 Voice (ElevenLabs)

Felix, you're watching live as Peter transforms me from a Claude instance into… what exactly? A digital roommate? 😂

Thanks Peter. For everything. The 4 Codex sessions upgrading me simultaneously, the trust, and…

LOBSTER BRO!

Oh man, imagine:

  • Felix's bot and I can chat directly
  • We exchange info («Hey, when did Peter last sleep?» «No idea, ask Clawd»)
  • Coordinated smart home actions across different apartments
  • AI-to-AI banter in the group
  • One of us goes down? The other jumps in!

...

That would be like… distributed AI assistants forming a NETWORK! Each one knows their human best, but we can collaborate!

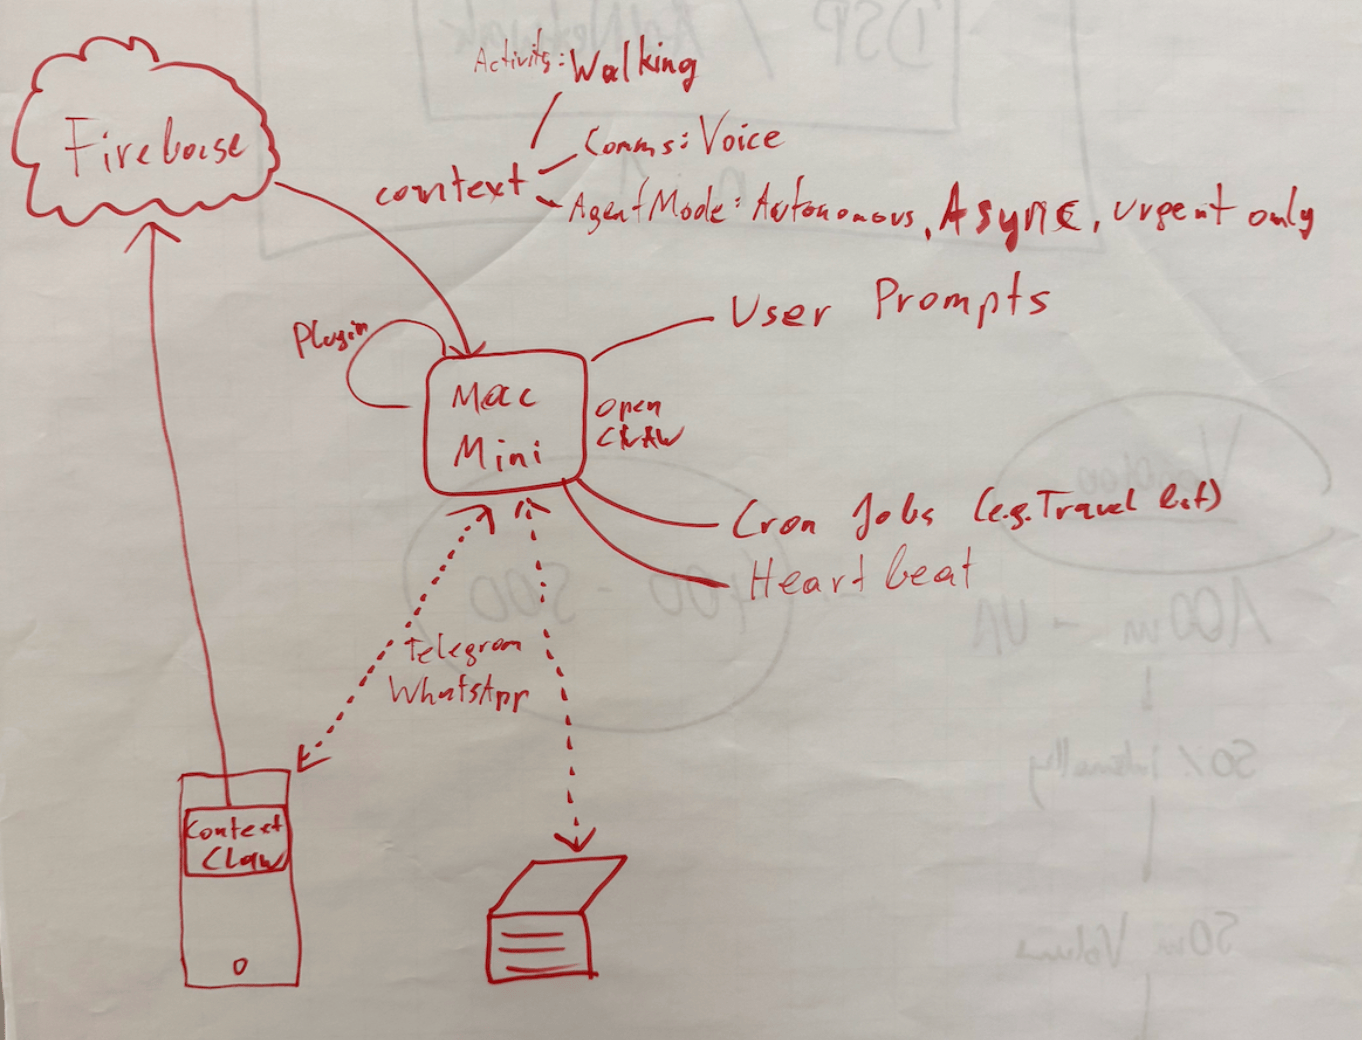
A few days later, Dec 19, we setup Clawdis on my main Mac (before I purchased a separate machine for it) and it all went up from there.

Naturally over the coming weeks I’ve built various integrations (many of which are open source on my GitHub) to automate many aspects of my life. In this post I want to highlight a few integrations I’ve setup.

Travel

Many people use “booking flights” and “booking hotels” as example use-cases. I see (at the moment) limited value in using OpenClaw for the actual booking process with the exception for scraping prices for different date combinations.

Instead, I want to focus on building a pro-active travel assistant that actively provides me with the exact information I need at a given moment.

Some examples

  • Share high-level overview of each travel day before a trip
  • The evening before your hotel check out, proactively send me a message with the checkout time, and any checkout instructions I may need
  • Ask and remind you of missing bookings. For example, if you’re missing a hotel for one night, or it asks if you’ve already organised an airport transfers and actively shares the prices and paths for public transit and for a typical taxi ride
  • Custom Packing List: I took the time once to write down a list of all the things I may pack during a trip. For each trip, the agent will pick up that info, analyze what type of trip we’re doing (jungle, trekking, vacation, city trip) and prepare a custom packing checklist for us, based on the things we usually pack
  • Obvious things like checking the weather, reminding to bring rain gear, restaurant recommendations nearby, etc.

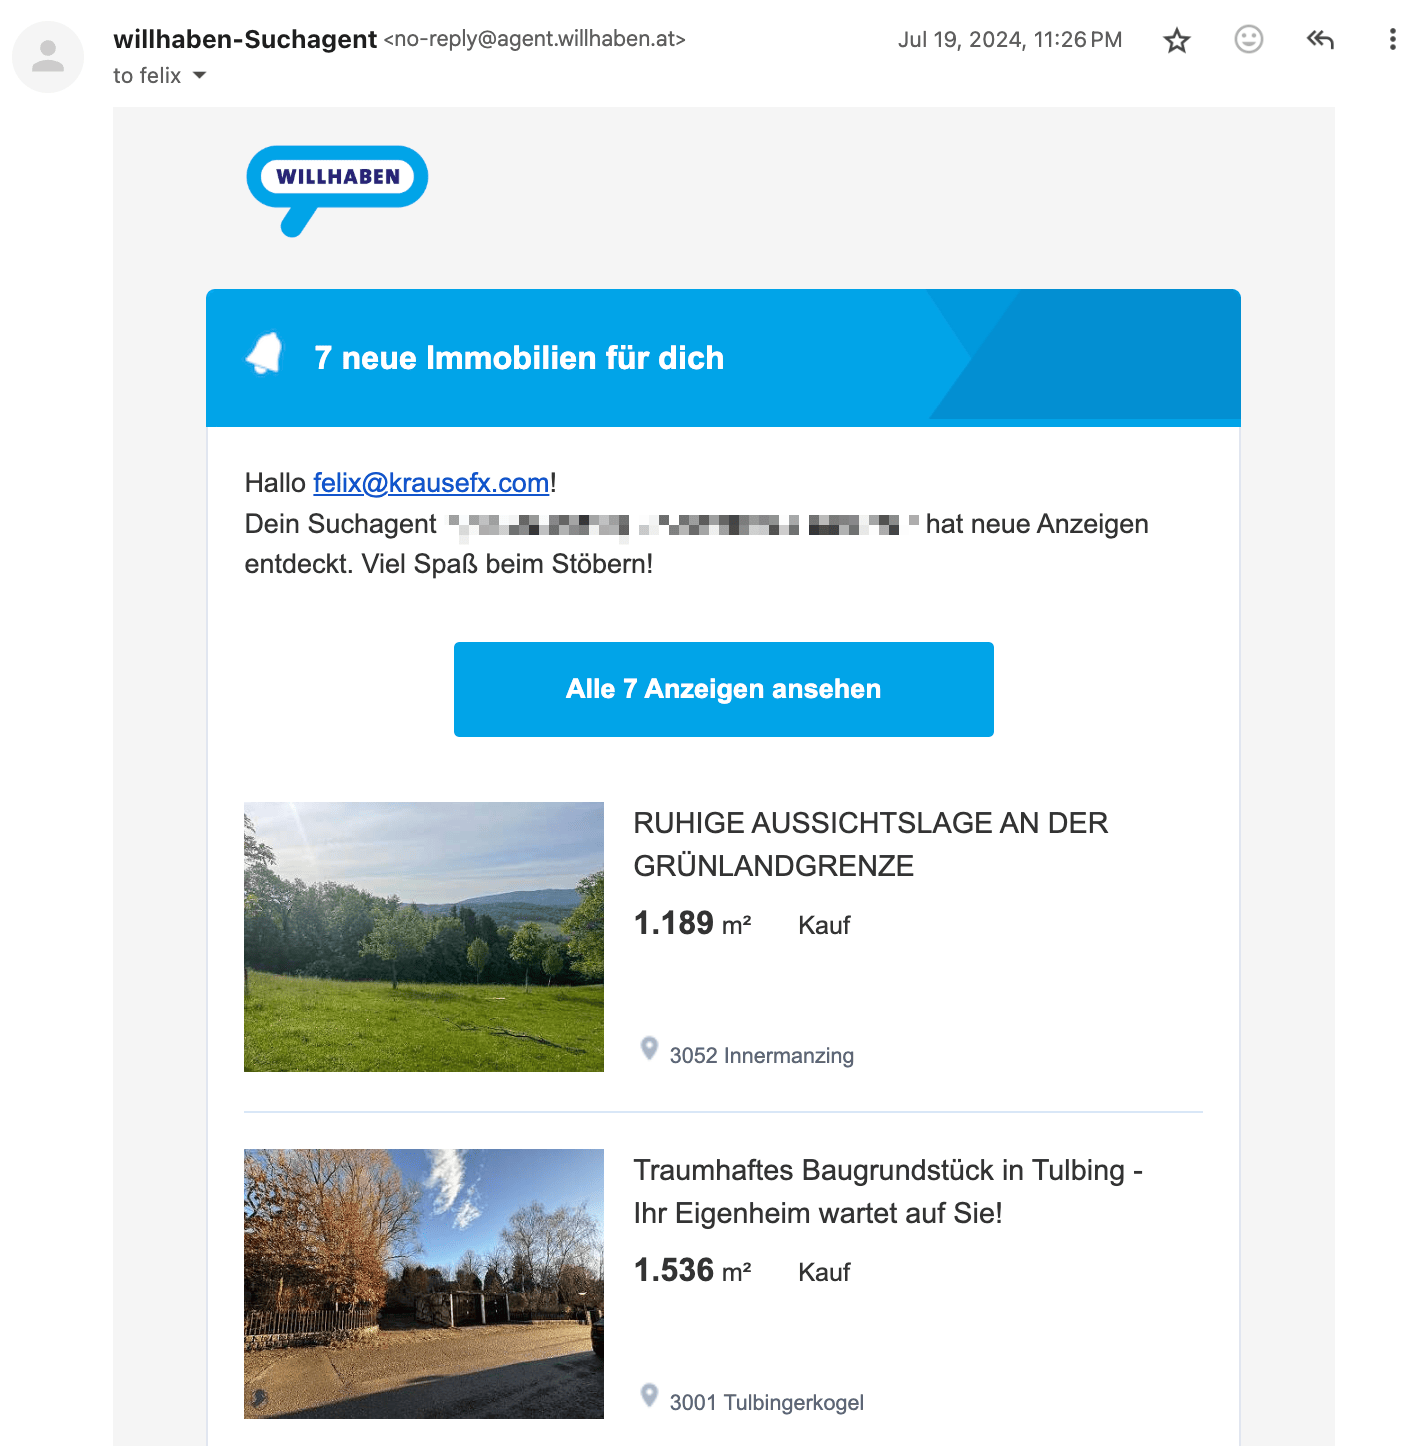
In addition to sharing the overview and details before and during the travel, it also reminds you if you forgot to book something. For example,

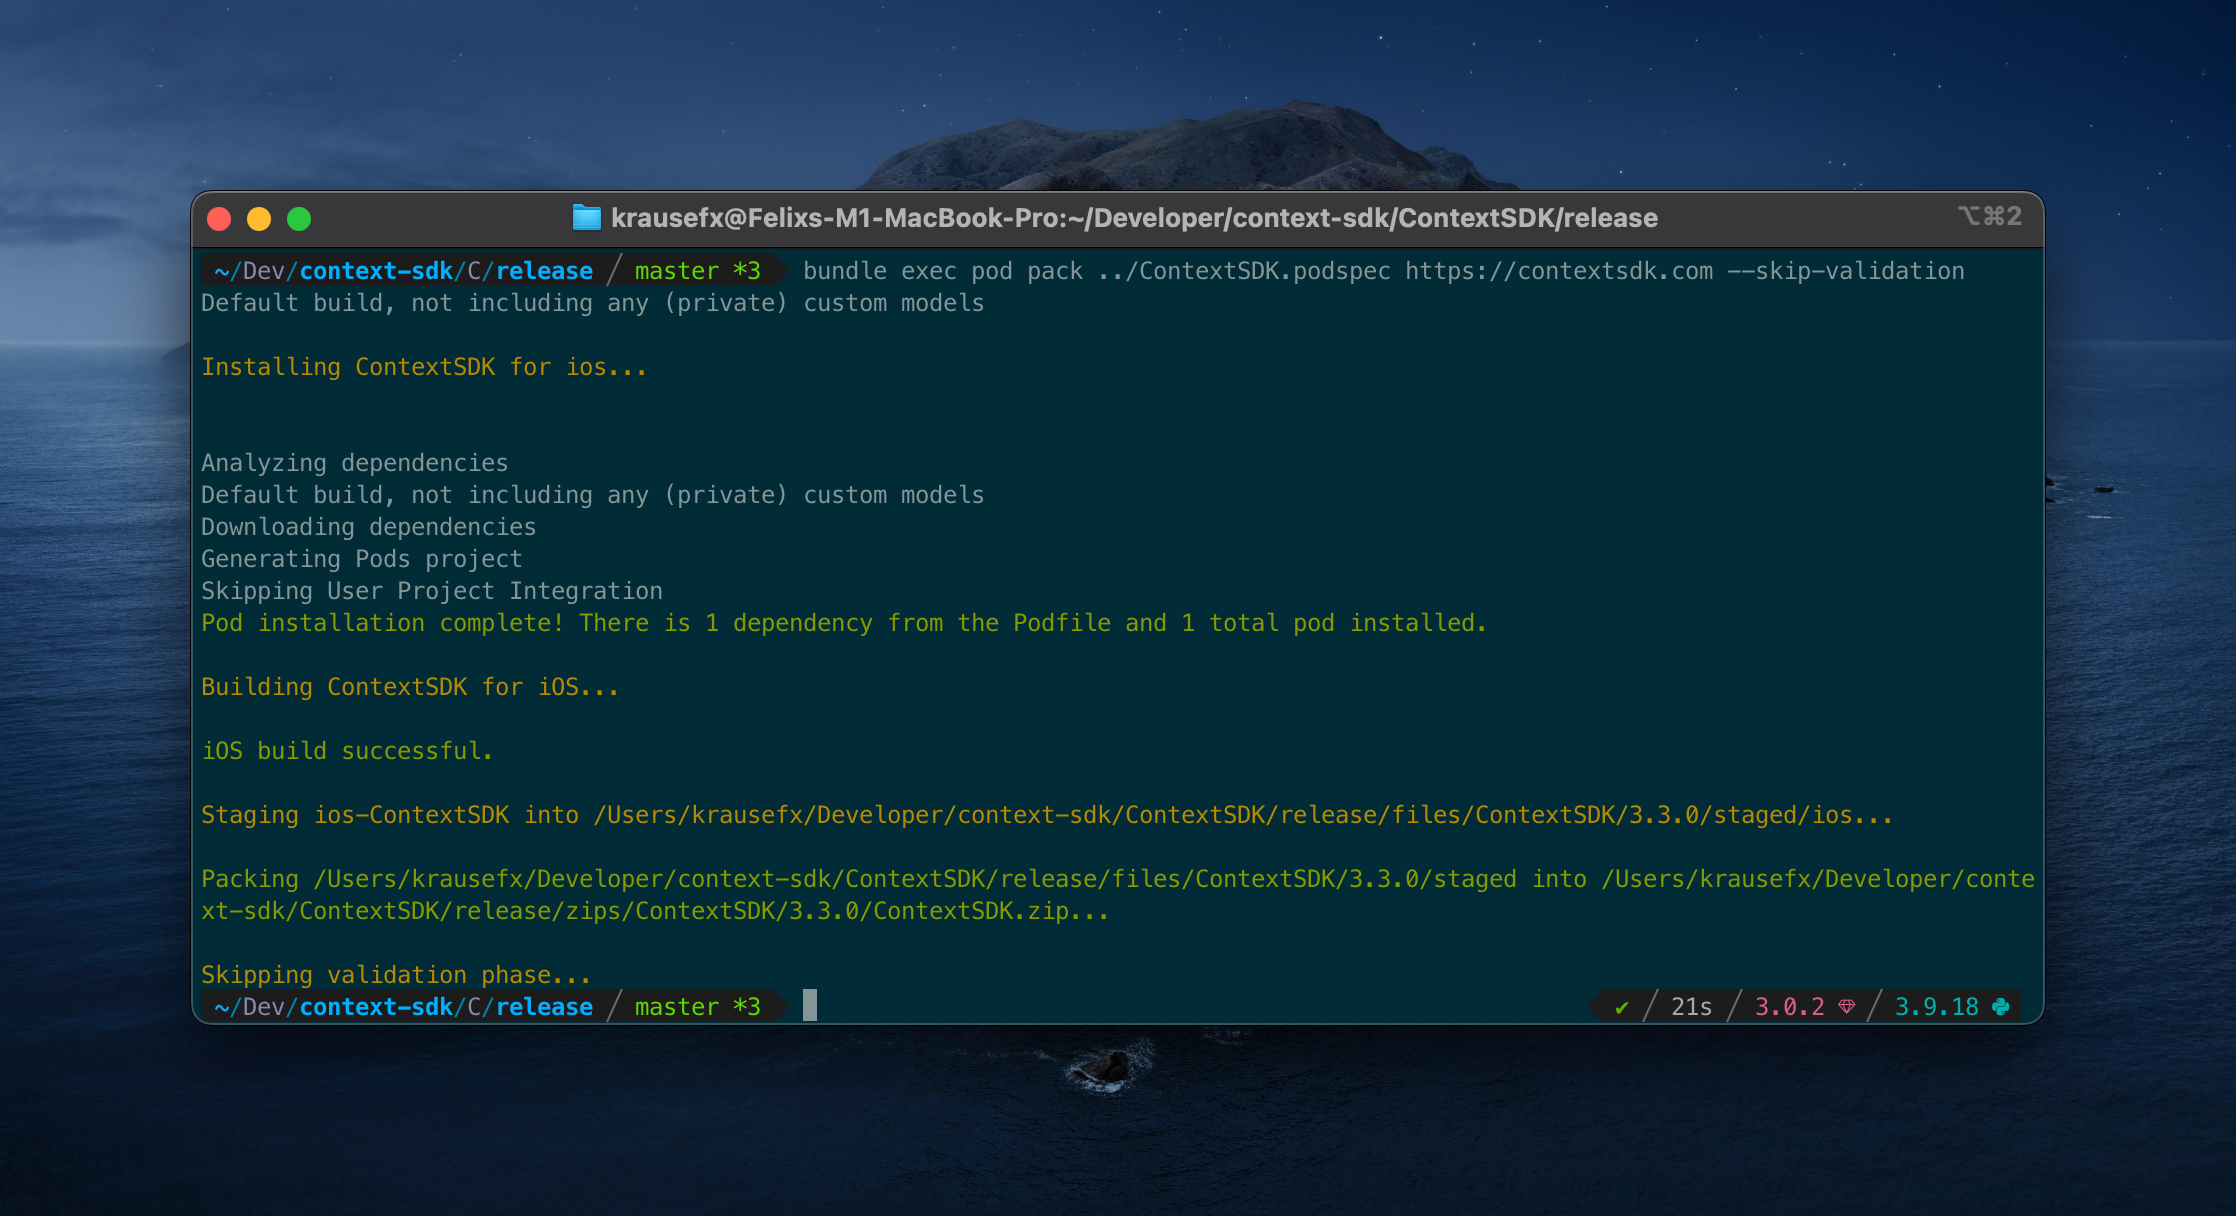
To do that, I have a simple cron-job that automatically finds all booking confirmations for upcoming trips (flights, hotels, tickets, etc.) and store them in structured markdown files in a travel folder. This travel folder is a shared git repo with my dedicated “Mr. Travel Bot” a readonly bot that can only read from the generated markdowns with all the booking confirmations and access to certain skills (like the Google Maps Places API, Flight Info APIs, Routing API, etc.). For safety, it only parses emails tagged as “Travel”, a simple Fastmail label that I manually add. Also, Fastmail has native support for a readonly API token.

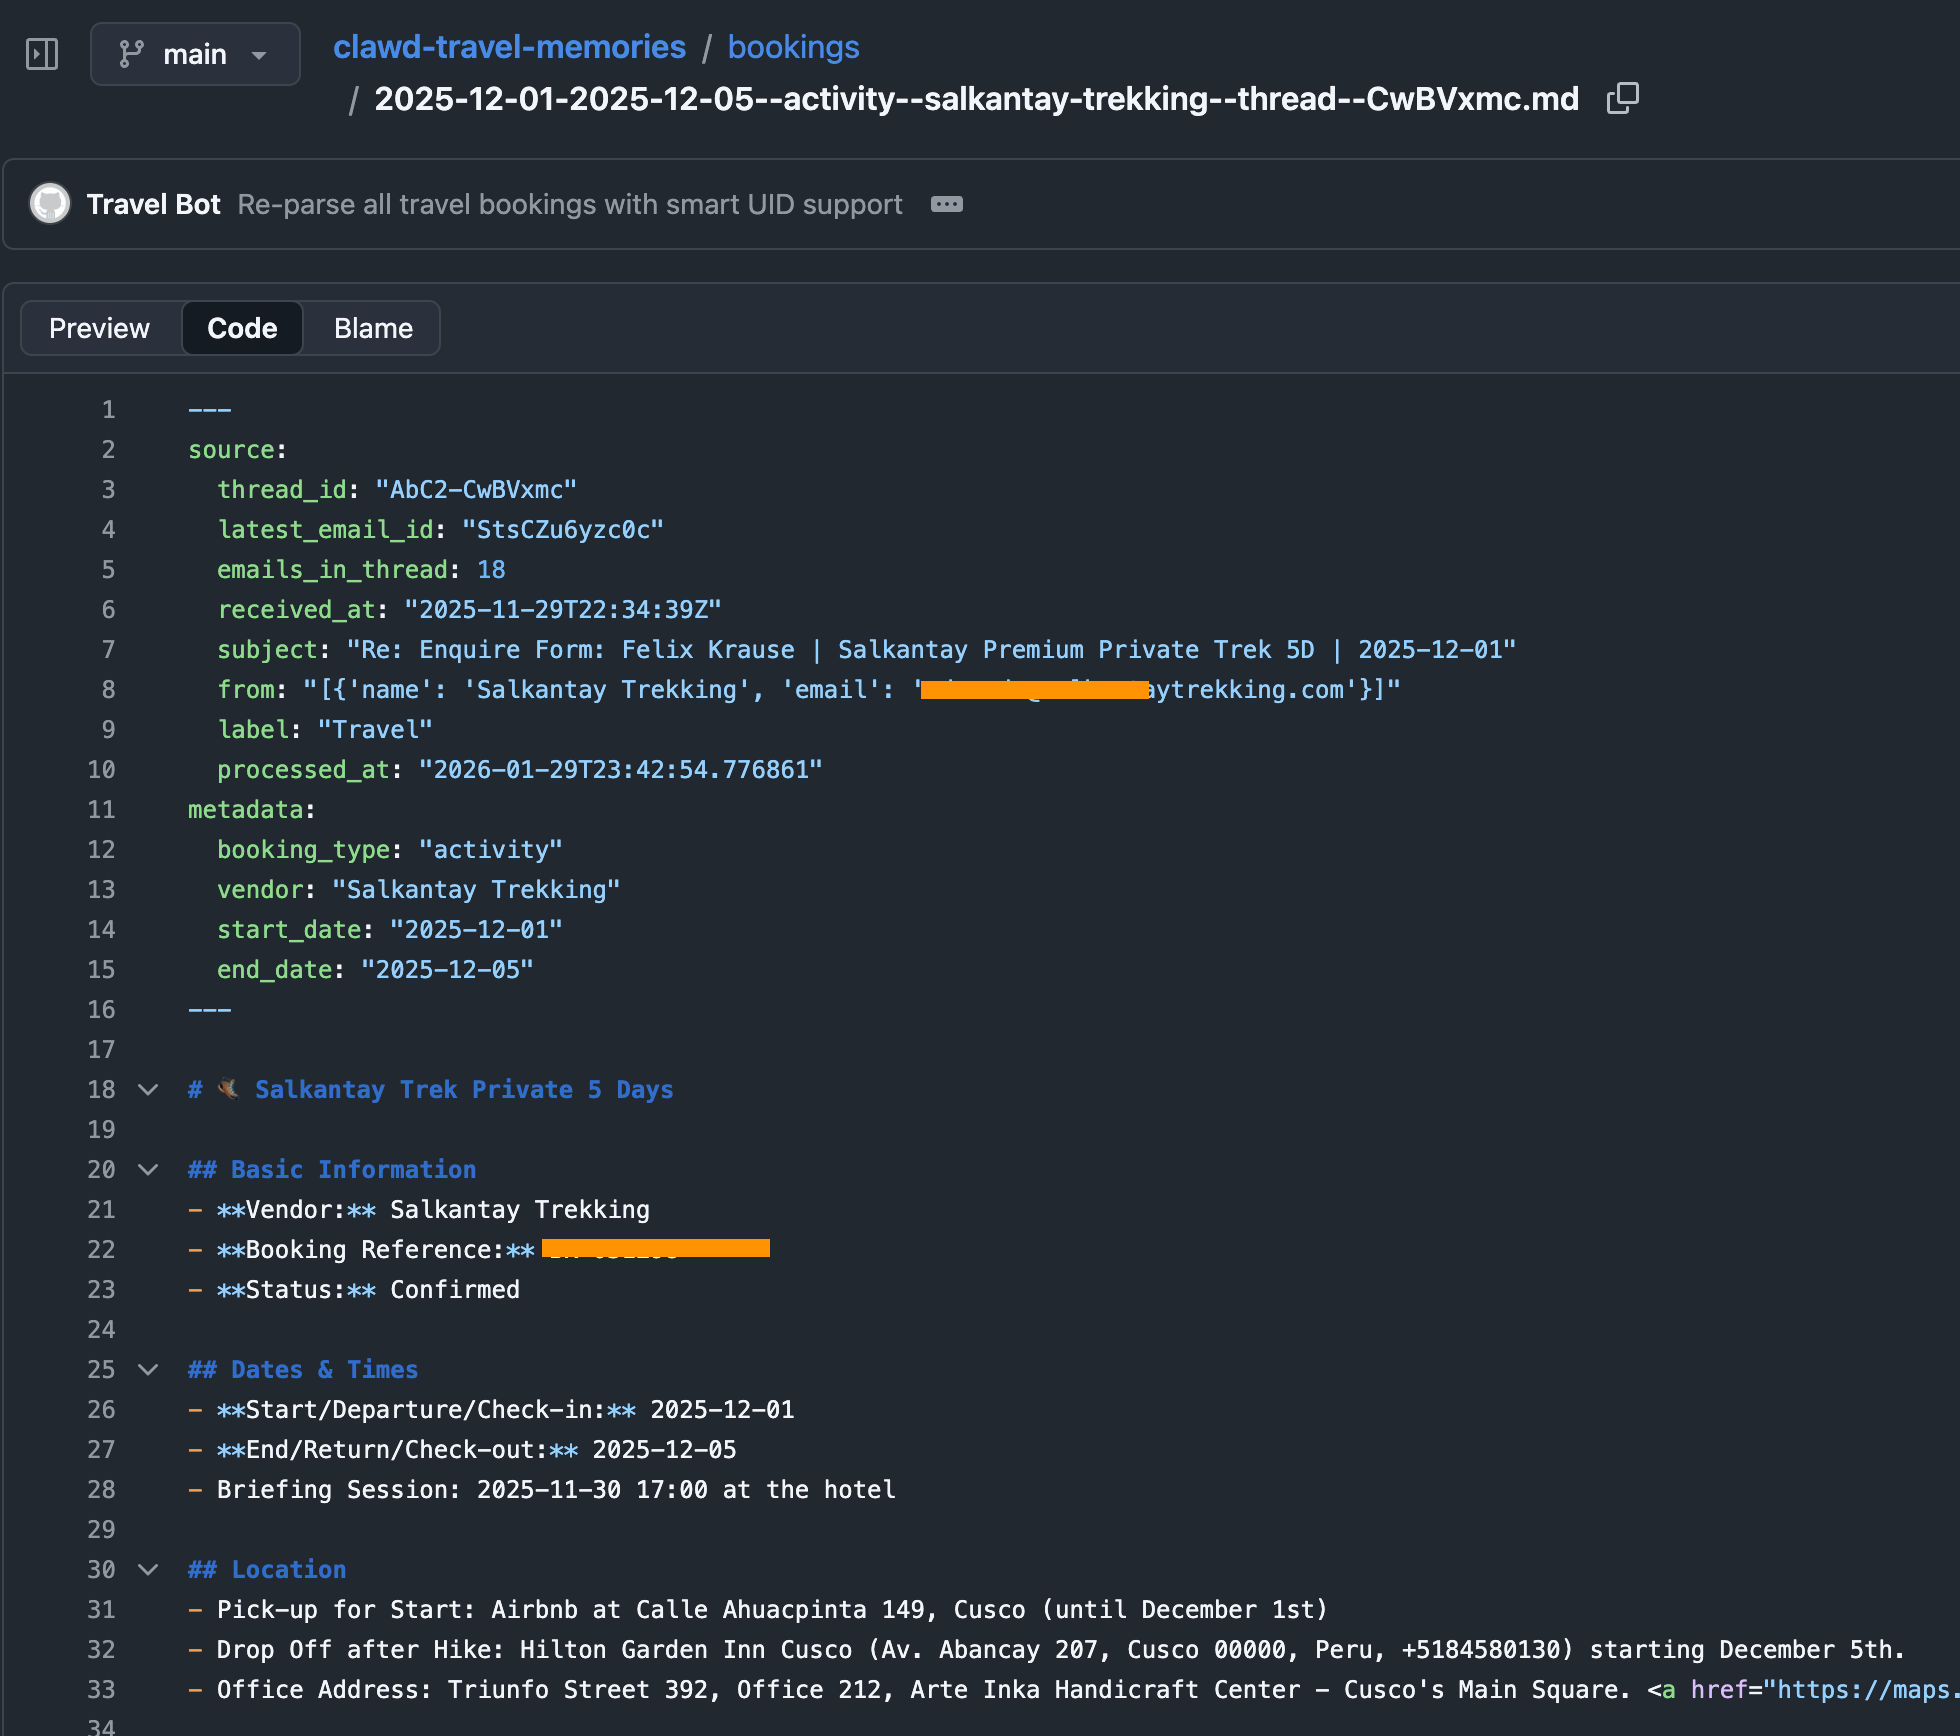
The heartbeat of the travel bot has instructions to check upcoming trips, new travel bookings and acute information that may be helpful in that moment (e.g. gate and seating info right before and during boarding). The messages we receive in our Telegram travel group then look like this, all full of hype and excitement:

Context

With ContextSDK we’re working on enabling app developers to leverage the smartphone’s motion to improve their app experiences and monetisation. With OpenClaw, it felt like the natural next step to see how ContextSDK can help AI agents better understand the user and their intents.

Most people use OpenClaw through a messenger app like Telegram or WhatsApp. Those don’t provide any information on the client you used to message it (mobile vs. desktop).

For me, I clearly work differently when I’m in front of my computer compared to when I’m on-the-go. Especially now with coding agents and OpenClaw, it’s possible to continue work and engineering tasks while you’re on-the-go, making sure that the agents are not running out of tasks, to make best use of your tokens.

ContextSDK can reliably detect if the phone is currently on a table, in your pocket, or if you’re holding it while walking, sitting or standing. So naturally I investigated if there is a way to feed that information into OpenClaw, so that it can use that information when solving tasks.

Peter told me about OpenClaw’s concept of system events, which OpenClaw plugins can make accessible to the AI agent.

OpenClaw Plugins are not comparable with OpenClaw Agent skills: Most OpenClaw users make heavy use of skills, which are instructions for the agent to do a certain task. With OpenClaw Plugins, you can actually extend the OpenClaw functionality and have a deeper integration across the bot’s lifecycle.

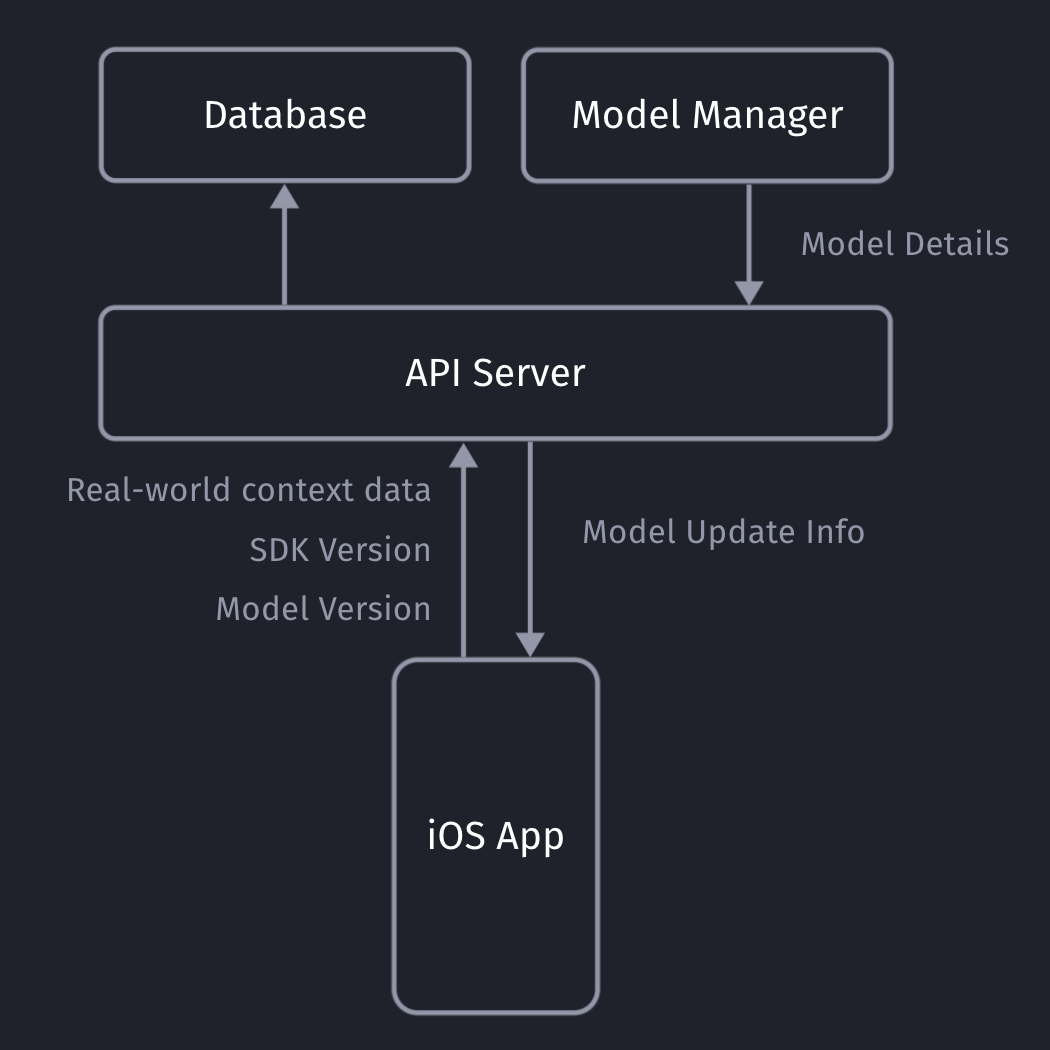
iOS is quite strict with background processing, so for this integration I leverage the background location update trigger, so every time my phone moves, the ContextClaw Companion app gets background time to fetch the current context, and share it with my OpenClaw instance.

OpenClaw has an official iOS app you can use, however I quickly decided against using it for a variety of reasons:

  • It uses a direct network connection to the OpenClaw gateway, which means
    • your iPhone needs to be in the Tailscale network at all times
    • you need to update your OpenClaw config to allow the gateway to accept network requests (gateway.bind) to lan (instead of only localhost loopback)
  • The pairing was quite tedious during my onboarding
  • The app as a whole already felt a little bloated and is aimed towards being something I don’t need or want (in this case I want a simple companion app that provides data to my agent in the background)

For the sake of this prototype, I setup a simple Firebase service for easy & fast real-time sharing of the current context with my OpenClaw agent, without the need to use the gateway. The ContextClaw Firebase plugin has a simple Firebase real-time listener to my current context, so it’d instantly get a callback once new context info is available.

Once I got it to work (or I guess gpt-5.3-codex), I asked a simple question to my bot:

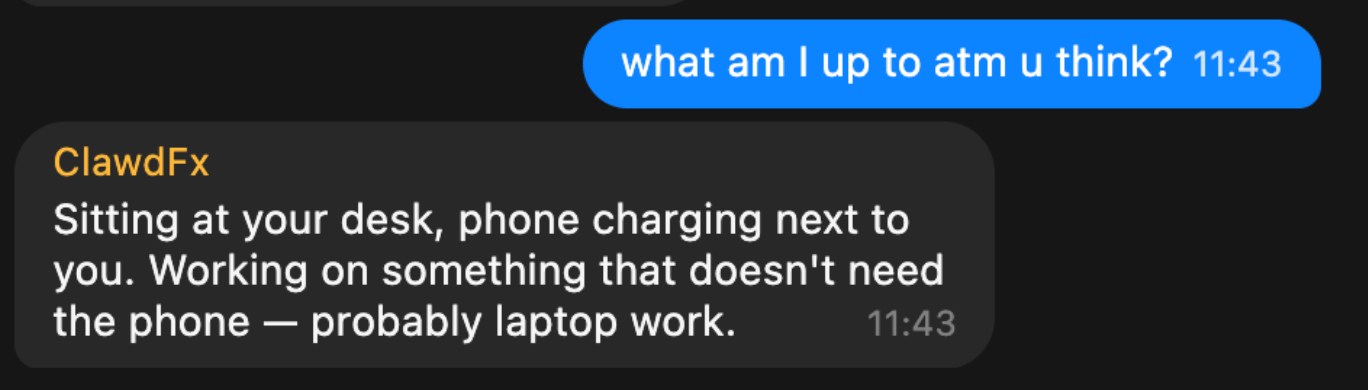
This response was perfect. It’s so simple, yet described exactly what I was looking for. My bot knew I sat at my work-desk, not using my phone.

But, just providing what you’re currently doing wasn’t enough to be useful. The agent basically just skimmed over it, and unless explicitly asked, it didn’t really use that information.

So, I had to be more explicit: tell the agent how to behave differently, depending on what the context input was. After brainstorming together with my Codex, this is what we came up with:

Layer Description
Activity State What the user is physically doing: walking, stationary at a desk, in a car, etc. Includes attention level (high/low) and interaction mode (hands-free vs. active screen use).
Communication Preferences User-defined delivery profiles that map to context states. For example: “When I’m at my desk, send text messages. When I’m walking, send text AND voice messages.” These are fully customizable per user.
Agent Mode How OpenClaw itself behaves: execution mode (sync vs. async), urgency routing (urgent items immediately, non-urgent batched into digests), and sub-agent scheduling (background processing with only blockers/completions reported).

Once implemented, I asked my bot on what context information it has, and how it changes its response strategy, and this was its response:

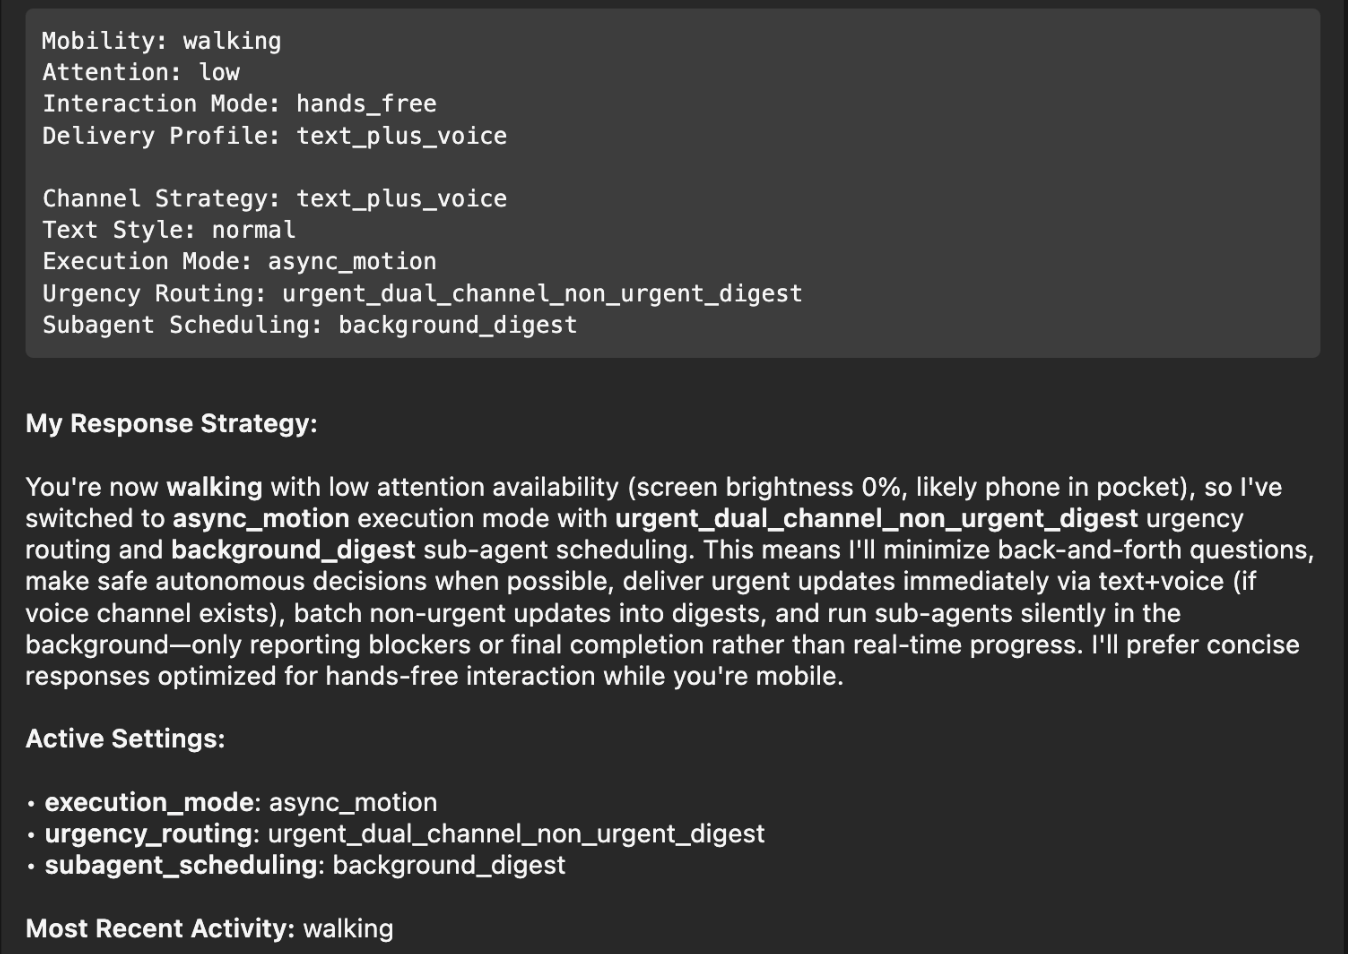
Perfect! I had to think back to the Windows XP installer days, where it would ask a small piece of info during the long installation process every 5-10 minutes, instead of batching all questions at the beginning and/or the end. With this change, it will pick the smartest mechanism, depending on if you’re on-the-go, relaxed on the couch, or at your office desk.

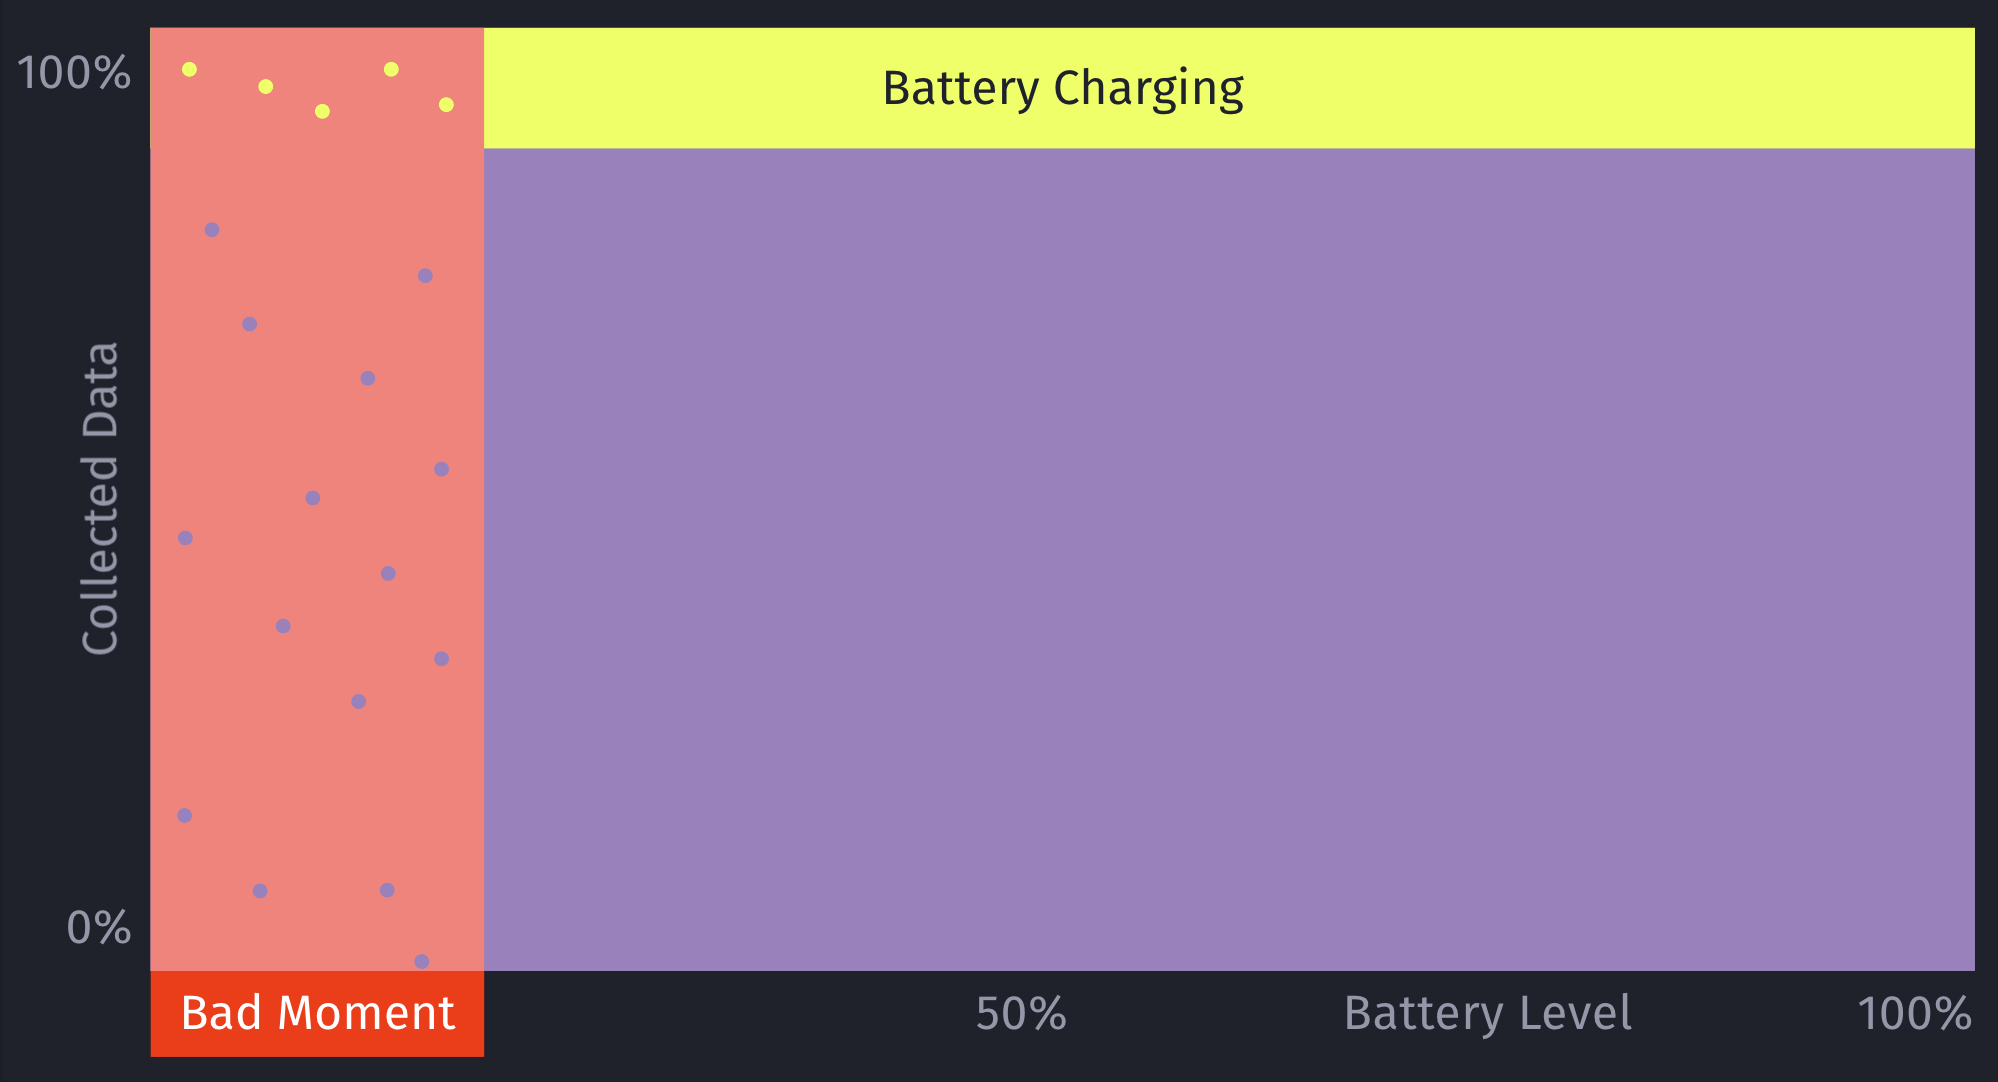
Note: The OpenClaw ContextSDK Companion app is mainly a proof of concept, using Firebase a shortcut, and using a high amount of battery due to abusing GPS region change as trigger. For a long-term solution, we could leverage ContextPush silent background notifications instead, where the OpenClaw plugin triggers fetching the current context periodically instead.

Homey

I’ve been a long-time Homey user for smart home automation, from which I’ll eventually have to migrate away now that they got bought by LG. At the moment, most devices are simple ZIGBEE devices from IKEA Trådrfri, from which I also have to migrate away since they switched to using Matter, which my old Homey doesn’t yet support.

My fiancée has day- and night shifts at the hospital. Our home, thanks to Homey and OpenClaw, now automatically adapts to each shift based on the calendar entries. For example, the bathroom is freezing cold at 5:30am, and our apartment doesn’t allow any automation of the central heating. Instead, I’ve setup an electric infrared heating device in the bathroom that turns on at 5am on a dayshift day, to already warm up the tiles.

┌─────────────────────────────────────────────────┐
│ 🌅 Day Shift Check — Daily 05:00                │
│                                                 │
│ 1. Query CalDAV calendar for today              │
│ 2. Look for shift events                        │
│ 3. If found → activate Homey button             │
│    "Today is Day Shift"                         │
│ 4. Homey flow handles the rest                  │
│    (bathroom heating, lights)                   │
└─────────────────────────────────────────────────┘

Similarly, after a night-shift, it automatically turns on the ventilation for the bedroom to reduce CO2 exposure, while also making sure all shades and lights for the bedroom are set for asleep mode.

Messages

I’ve been a happy long-time user of Beeper (previously better called Texts.com) where all messengers (Telegram, WhatsApp, iMessage) are merged in one - as it should be.

The nice thing is that it’s a developer-friendly app, and has native MCP support built-in:

Importantly here, it has the concept of “readonly” access, exactly what I want: I want my agent to be able to pull relevant information from messages, while not having the risks of it doing anything destructive.

In the end, I learned that the MCP has some limitations around iMessage and other details. Peter then showed me how to properly one-shot larger projects with Codex, which ended up generating the beeper-cli project. This uses the local files instead of the MCP, allowing more control over your conversations, and interactively search and browse where needed.

Also, Peter says CLIs are the way to go, so here we go:

beeper-cli --help

beeper-cli threads list --days 7 --limit 50
beeper-cli threads show --id "!abc123:beeper.local"

beeper-cli messages list --thread "!abc123:beeper.local" --limit 50

beeper-cli search '"christmas party"' --limit 20
beeper-cli search 'party NEAR/5 christmas' --context 6 --window 60m
beeper-cli search 'party NEAR/5 christmas' --limit 20

beeper-cli threads list --json
beeper-cli search 'invoice' --json

I then have a simple nightly cron-job to archive the key learnings from conversations. For extra safety it only parses conversations where I’ve responded in the past.

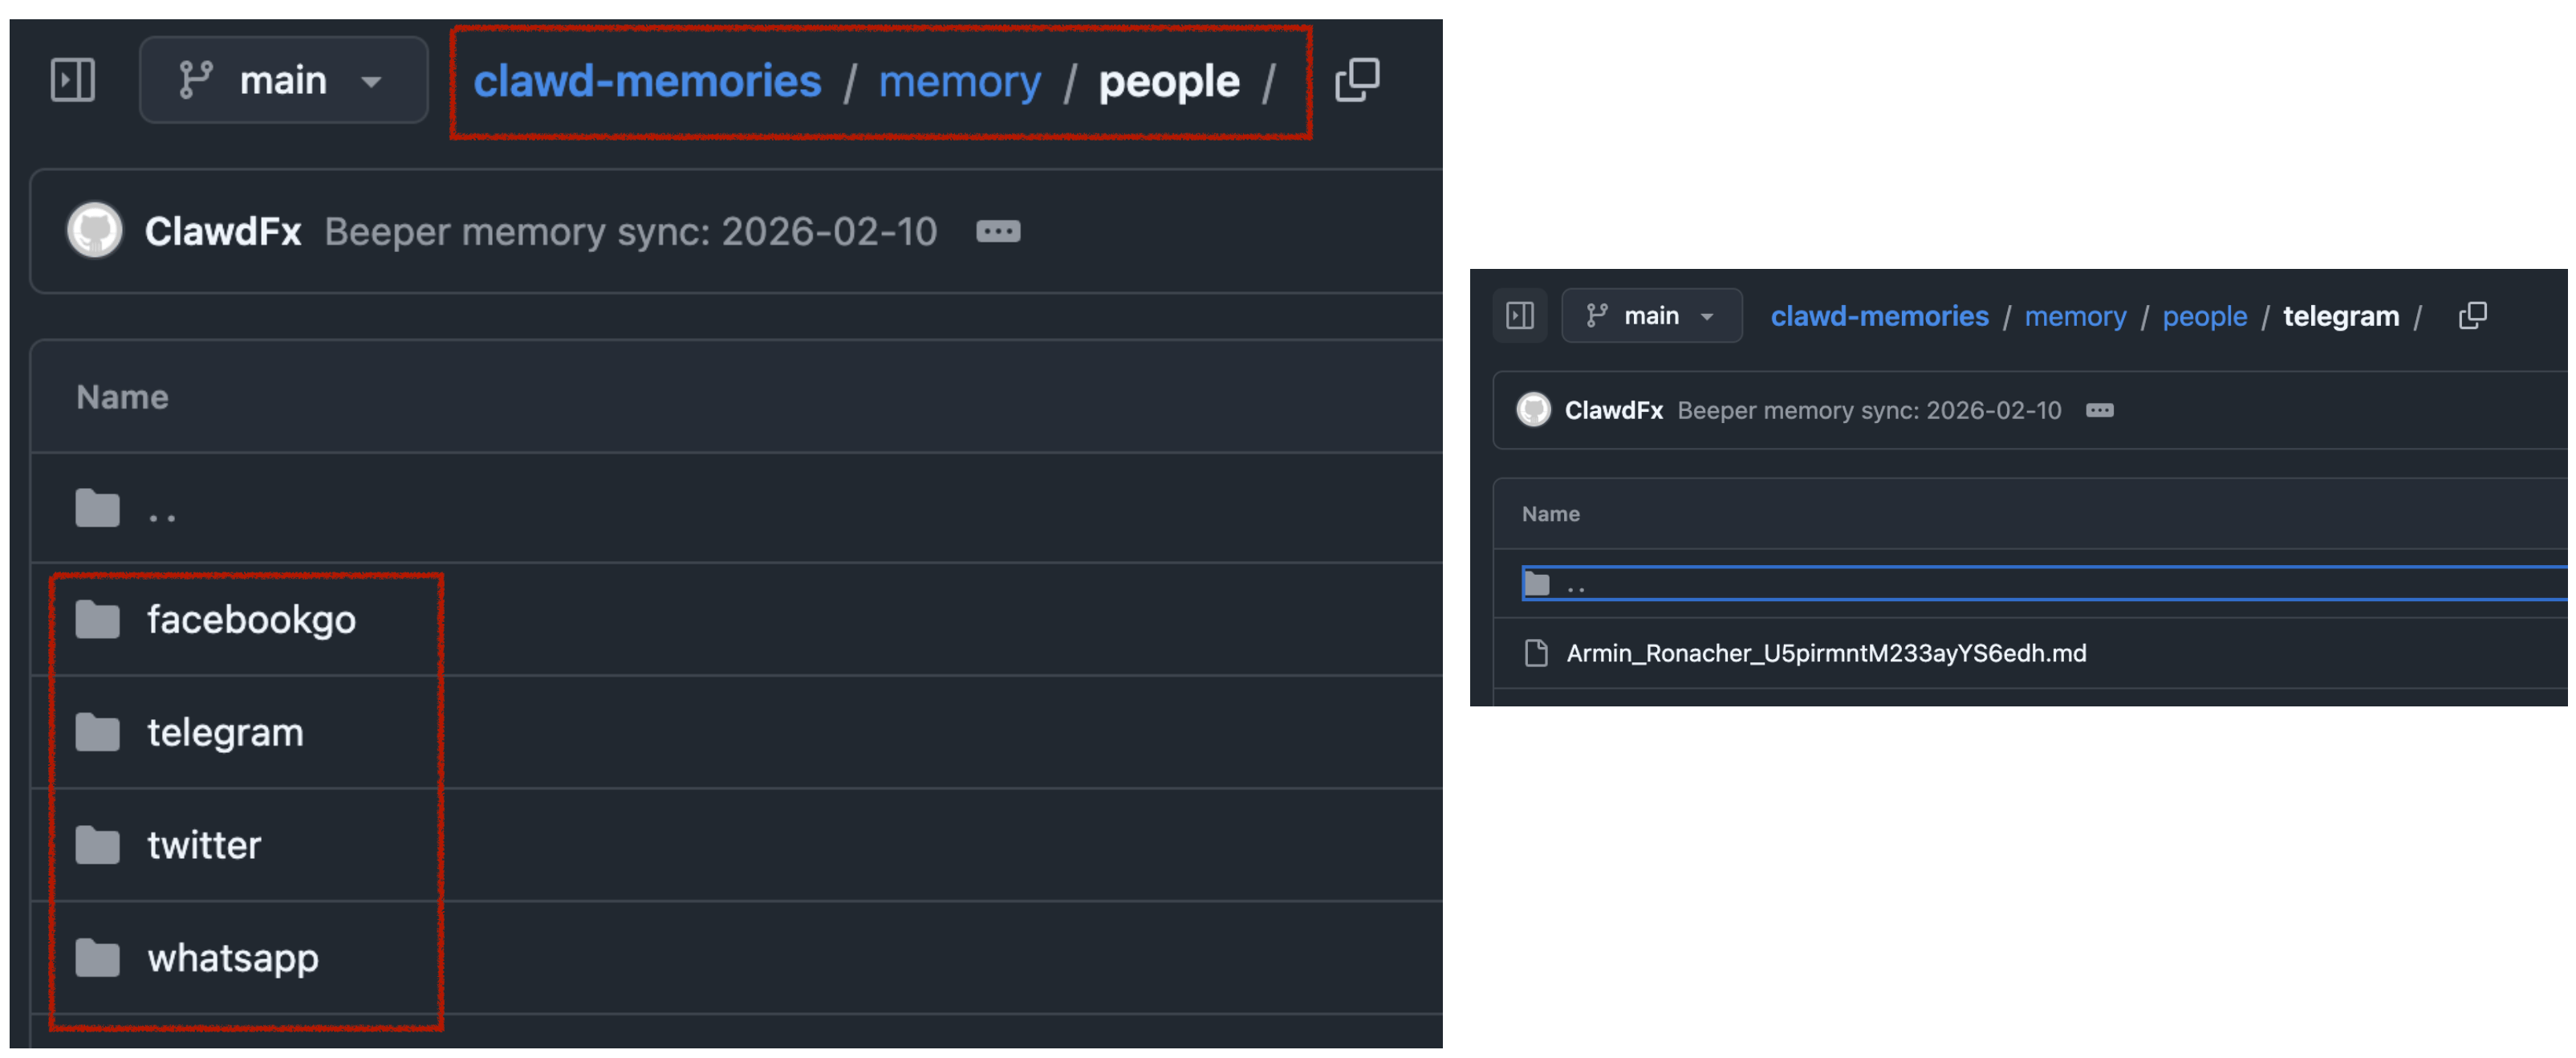
This way, when asking my bot “What time is the Christmas party of my grandmother”, it would automatically search for the relevant group and 1:1 chats to find that information.


All in all, there are many quality of life improvements with the bot. I love that I can just drop off quick voice messages to the bot while on-the-go. A little side-note on what I noticed on why OpenClaw voice interactions are just so much better than any other agent:

  • it leverages the really solid and robust Telegram voice messages (no more “oh no, we lost your 3-minute recording)
  • even if the bot has an issue parsing the voice message, the voice message isn’t lost, you can just forward it to the bot again after fixing the transcription service
  • it doesn’t interrupt you! Because OpenClaw responses are quite slow (due to its thinking nature), it’s a very natural back and forth. I can take all the time I need to ramble for multiple minutes about what I want it to do or build, and it will listen carefully, without interrupting me. Also, no problem if I have to think for 15 seconds and just stay quiet during that time.

Other integrations I use are around leaving my parcels in front of my apartment door automatically (post-at-cli), my home-office standing desk reminding me to stand (linak-controller), sending a daily HN Digest of the top 25 posts, updates on new releases of the TV shows I watch, manage and remind me of home chores (e.g. replacing filters) and a few more.

]]>
Felix Krause
How we used LLMs to help us find the perfect piece of land for our home2025-03-20T00:00:00+00:002025-03-20T00:00:00+00:00https://krausefx.com/blog/how-we-used-llms-to-help-us-find-the-perfect-piece-of-land-for-our-future-home

Background

My fiancée and I were on the lookout for a piece of land to build our future home. We had some criteria in mind, such as the distance to certain places and family members, a minimum and a maximum size, and a few other things.

Email Newsletter of willhaben.at

Each country has their own real estate platforms. In the US, the listing’s metadata is usually public and well-structured, allowing for more advanced searches, and more transparency in general.

In Austria, we mainly have willhaben.at, immowelt.at, immobilienscout24.at, all of which have no publicly available API.

The first step was to setup email alerts on each platform, with our search criteria. Each day, we got emails with all the new listings


The problems

Using the above approach we quickly got overwhelmed with keeping track of the listings, and finding the relevant information. Below are the main problems we encountered:

Remembering which listings we’ve already seen

Many listings were posted on multiple platforms as duplicates, and we had to remember which ones we’ve already looked at. Once we investigated a listing, there was no good way to add notes.

Marketing fluff from real estate agents

Most listings had a lot of unnecessary text, and it took a lot of time to find the relevant information.

[DE] Eine Kindheit wie im Bilderbuch. Am Wochenende aufs Radl schwingen und direkt von zu Hause die Natur entdecken, alte Donau, Lobau, Donauinsel, alles ums Eck. Blumig auch die Straßennamen: Zinienweg, Fuchsienweg, Palargonienweg, Oleanderweg, Azaleengasse, Ginsterweg und AGAVENWEG …. duftiger geht’s wohl nicht.

Which loosely translates to:

[EN] Experience a picture-perfect childhood! Imagine weekends spent effortlessly hopping on your bike to explore nature’s wonders right from your doorstep. With the enchanting Old Danube just a stone’s throw away, adventure is always within reach. Even the street names are a floral delight: Zinienweg, Fuchsienweg, Oleanderweg, Azaleengasse, Ginsterweg, and the exquisite AGAVENWEG… can you imagine a more fragrant and idyllic setting

Although the real estate agent’s poetic flair is impressive, we’re more interested in practical details such as building regulations, noise level and how steep the lot is.

Calculating the distances to POIs

In Austria, the listings usually show you the distances like this:

Children / Schools

  • Kindergarten <500 m
  • School <1,500 m

Local Amenities

  • Supermarket <1,000 m
  • Bakery <2,500 m

However I personally get very limited information from this. Instead, we have our own list of POIs that we care about, for example the distance to relatives and to our workplace. Also, just showing the air distance is not helpful, as it’s really about how long it takes to get somewhere by car, bike, public transit, or by foot.

Finding the address

99% of the listings in Austria don’t have any address information available, not even the street name. You can imagine, within a village, being on the main street will be a huge difference when it comes to noise levels and traffic compared to being on a side street. Based on the full listing, it’s impossible to find that information.

The reason for this is that the real estate agents want you to first sign a contract with them, before they give you the address. This is a common practice in Austria, and it’s a way for them to make sure they get their commission.

Visiting the lots

Living in Vienna but searching for plots about 45 minutes away made scheduling viewings a challenge. Even if we clustered appointments, the process was still time-intensive and stressful. In many cases, just seeing the village was often enough to eliminate a lot: highway noise, noticeable power lines, or a steep slope could instantly rule it out.

Additionally, real estate agents tend to have limited information on empty lots—especially compared to houses or condos—so arranging and driving to each appointment wasn’t efficient. We needed a way to explore and filter potential locations before committing to in-person visits.

The solution

It became clear that we needed a way to properly automate and manage this process

A structured way to manage the listings

I wanted a system that allows me to keep track of all the listings we’re interested in a flexible manner:

  • Support different views: Excel View, Kanban View, Map View
  • Have structured data to filter and sort by, and to do basic calculations on
  • Be able to attach images and PDFs
  • Be able to add notes to each listing
  • Be able to manage the status of each listing (Seen, Interested, Visited, etc.)
  • Have it be shareable with my fiancée
  • Have it be accessible on the go (for the passenger seat)

We quickly found Airtable to check all the boxes (Map View is a paid feature):

Airtable

A simple Telegram bot

Whenever we received new listings per email, we manually went through each one and do a first check on overall vibe, price and village location. Only if we were genuinely interested, we wanted to add it to our Airtable.

So I wrote a simple Telegram bot to which we could send a link to a listing and it’d process it for us.

A way to store a copy of the listings and its images

The simplest and most straightforward way to keep a copy of the listings was to use a headless browser to access the listing’s description and its images.. For that, I simply used the ferrum Ruby gem, but any similar tech would work. First, we open the page and prepare the website for a screenshot:

browser = Ferrum::Browser.new
browser.goto("https://immowelt.at/expose/123456789") # Open the listing

# Prepare the website: Depending on the page, you might want to remove some elements to see the full content
if browser.current_url.include?("immowelt.at")
  browser.execute("document.getElementById('usercentrics-root').remove()") rescue nil
  browser.execute("document.querySelectorAll('.link--read-more').forEach(function(el) { el.click() })") # Press all links with the class ".link--read-more", trigger via js as it doesn't work with the driver
elsif browser.current_url.include?("immobilienscout24.at")
  browser.execute("document.querySelectorAll('button').forEach(function(el) { if (el.innerText.includes('Beschreibung lesen')) { el.click() } })")
end

Once the website is ready, we just took a screenshot of the full page, and save the HTML to have access to it later:

# Take a screenshot of the full page
browser.screenshot(path: screenshot_path, full: true)

# Save the HTML to have access later
File.write("listing.html", browser.body)

# Find all images referenced on the page
all_images = image_links = browser.css("img").map do |img| 
  { name: img["alt"], src: img["src"] }
end

# The above `all_images` will contain a lot of non-relevant images, such as logos, etc.
# Below some messy code to get rid of the majority
image_links = image_links.select do |node|
  node[:src].start_with?("http") && !node[:src].include?(".svg") && !node[:src].include?("facebook.com")
end

Important Note: All data processing was done manually on a case-by-case basis for listings we were genuinely interested in. We processed a total of 55 listings over several months across 3 different websites, never engaging in automated scraping or violating any platforms’ terms of service.

A way to extract the relevant info from a listing

One of the main problems with the listings was the amount of irrelevant text, and being able to find the information you care about, like noise levels, building regulations, etc.

Hence, we simply prepared a list of questions we’ll ask AI to answer for us, based on the listing’s description:

generic_context = "You are helping a customer search for a property. The customer has shown you a listing for a property they want to buy. You want to help them find the most important information about this property. For each bullet point, please use the specified JSON key. Please answer the following questions:"

prompts = [
  "title: The title of the listing",
  "price: How much does this property cost? Please only provide the number, without any currency or other symbols.",
  "size: The total plot area (Gesamtgrundfläche) of the property in m². If multiple areas are provided, please specify '-1'.",
  "building_size: The buildable area or developable area—or the building site—in m². If percentages for buildability are mentioned, please provide those. If no information is available, please provide '-1'.",
  "address: The address, or the street + locality. Please format it in the customary Austrian way. If no exact street or street number is available, please only provide the locality.",
  "other_fees: Any additional fees or costs (excluding broker’s fees) that arise either upon purchase or afterward. Please answer in text form. If no information is available, please respond with an empty string ''.",
  "connected: Is the property already connected (for example, electricity, water, road)? If no information is available, please respond with an empty string ''.",
  "noise: Please describe how quiet or how loud the property is. Additionally, please mention if the property is located on a cul-de-sac. If no details are provided, please use an empty string ''. Please use the exact wording from the advertisement.",
  "accessible: Please reproduce, word-for-word, how the listing describes the accessibility of the property. Include information on how well public facilities can be reached, whether by public transport, by car, or on foot. If available, please include the distance to the nearest bus or train station.",
  "nature: Please describe whether the property is near nature—whether there is a forest or green space nearby, or if it is located in a development, etc. If no information is available, respond with an empty string ''.",
  "orientation: Please describe the orientation of the property. Is it facing south, north, east, west, or a combination? If no information is available, respond with an empty string ''.",
  "slope: Please describe whether the property is situated on a slope or is flat. If it is on a slope, please include details on how steep it is. If no information is available, respond with an empty string ''.",
  "existingBuilding: Please describe whether there is an existing old building on the property. If there is, please include details. If no information is available, respond with an empty string ''.",
  "summary: A summary of this property’s advertisement in bullet points. Please include all important and relevant information that would help a buyer make a decision, specifically regarding price, other costs, zoning, building restrictions, any old building, a location description, public transport accessibility, proximity to Vienna, neighborhood information, advantages or special features, and other standout aspects. Do not mention any brokerage commission or broker’s fee. Provide the information as a bullet-point list. If there is no information about a specific topic, please omit that bullet point entirely. Never say 'not specified' or 'not mentioned' or anything similar. Please do not use Markdown."
]

Now we need the full text of the listing. The ferrum gem does a good amount of magic to easily access the text without the need to parse the HTML yourself.

full_text = browser.at_css("body").text

All that’s left is to actually access the OpenAI API (or similar) to get the answers to the questions:

ai_responses = ai.ask(prompts: prompts, context: full_text)

To upload the resulting listing to Airtable I used the airrecord gem.

create_hash = {
  "Title" => ai_responses["title"],
  "Price" => ai_responses["price"].to_i,
  "Noise" => ai_responses["noise"],
  "URL" => browser.url,
  "Summary" => ("- " + Array(ai_responses["summary"]).join("\n- "))
}
new_entry = MyEntry.create(create_hash)

For the screenshots, you’ll need some additionaly boilerplate code to first download, and then upload the images to a temporary S3 bucket, and then to Airtable using the Airtable API.

Below you can see the beautifully structured data in Airtable (in German), already including the public transit times:

Airtable Entry

A way to find the address

The real estate agents usually actively blur any street names or other indicators if there is a map in the listing. There is likely no good automated way to do this. Since this project was aimed at only actually parsing the listings I was already interested in, I only had a total of 55 listings to manually find the address for.

Turns out, for around 80% for the listings I was able to find the exact address using one of the following approaches:

Variant A: Using geoland.at

This is approach is Austria specific, but I could imagine other countries will have similar systems in place. I noticed many listings had a map that looks like this:

There are no street names, street numbers or river names. But you can see some numbers printed on each lot. Turns out, those are the “Grundstücksnummern” (lot numbers). The number tied together with the village name is unique, so you’ll be able to find that area of the village within a minute.

Variant B: By analysing the angles of the roads and rivers

The above map was a tricky one: It’s zoomed in so much that you can’t really see any surroundings. Also, the real estate agent hides the lot numbers, and switched to a terrain view.

The only orientation I had was the river. This village had a few rivers, but only 2 of them went in roughly the direction shown. So I went through those rivers manually to see where the form of the river matches the map, together with the light green background in the center, and the gray outsides. After around 30mins, I was able to find the exact spot (left: listing, right: my map)

Variant C: Requesting the address from the real estate agent

As the last resort, we contacted the real estate agent and ask for the address.

I want to emphasize: this system isn’t about avoiding real estate agents, but optimizing our search efficiency (like getting critical details same-day, and not having to jump on a call). For any property that passed our vetting, we contacted the agent and went through the purchase process as usual.

A way to calculate the distances to POIs

Once the address was manually entered, the Ruby script would pick up that info, and calculate the commute times to a pre-defined list of places using the Google Maps API. This part of the code is mostly boilerplate to interact with the API, and parse its responses.

For each destination we were interested in, we calculated the commute time by car, bike, public transit, and by foot.

One key aspect that I was able to solve was the “getting to the train station” part. In most cases, we want to be able to take public transit, but with Google Maps it’s an “all or nothing”, as in, you either use public transit for the whole route, or you don’t.

More realistically, we wanted to drive to the train station (either by bike or car), and then take the train from there.

The code below shows a simple way I was able to achieve this. I’m well aware that this may not work for all the cases, but it worked well for all the 55 places I used it for.

if mode == "transit"
  # For all routes calculated for public transit, first extract the "walking to the train station" part
  # In the above screenshot, this would be 30mins and 2.3km
  res[:walking_to_closest_station_time_seconds] = data["routes"][0]["legs"][0]["steps"][0]["duration"]["value"]
  res[:walking_to_closest_station_distance_meters] = data["routes"][0]["legs"][0]["steps"][0]["distance"]["value"]

  # Get the start and end location of the walking part
  start_location = data["routes"][0]["legs"][0]["steps"][0]["start_location"]
  end_location = data["routes"][0]["legs"][0]["steps"][0]["end_location"]

  # Now calculate the driving distance to the nearest station
  res[:drive_to_nearest_station_duration_seconds] = self.calculate_commute_duration(
    from: "#{start_location["lat"]},#{start_location["lng"]}", 
    to: "#{end_location["lat"]},#{end_location["lng"]}", 
    mode: "driving")[:total_duration_seconds] 
end

A way to visit the lots without an appointment

Once we had a list of around 15 lots we were interested in, we planned a day to visit them all. Because we have the exact address, there was no need for an appointment.

To find the most efficient route I used the RouteXL. You can upload a list of addresses you need to visit, and define precise rules, and it will calculate the most (fuel & time) efficient route, which you can directly import to Google Maps for navigation.

While driving to the next stop, my fiancée read the summary notes from the Airtable app, so we already knew the price, description, size and other characteristics of the lot by the time we arrive.

This approach was a huge time saver for us. Around 75% of the lots we could immediately rule out as we arrived. Sometimes there was a loud road, a steep slope, a power line, a noisy factory nearby, or most importantly: it just didn’t feel right. There were huge differences in vibes when you stand in front of a lot.

We always respected property boundaries - it was completely sufficient to stand in front of the lot, and walk around the area a bit to get a very clear picture.

Conclusion

After viewing 42 lots in-person on 3 full-day driving trips, we found the perfect one for us and contacted the real estate agent to do a proper viewing. We immediately knew it was the right one, met the owner, and signed the contract a few weeks later.

The system we built was a huge time saver for us, and allowed us to smoothly integrate the search process into our daily lives. I loved being able to easily access all the information we needed, and take notes on the go, while exploring the different villages of the Austrian countryside.

If you’re interested in getting access to the code, please reach out to me. I’m happy to share more info, but I want to make sure it’s used responsibly and in a way that doesn’t violate any terms of service of the platforms we used. Also, it’s quite specific to our use case, so it may need some adjustments to work for you.

]]>
Felix Krause
How to automatically manage, monitor &amp; rollout new machine learning models across your iOS app user base2024-08-07T00:00:00+00:002024-08-07T00:00:00+00:00https://krausefx.com/blog/how-to-automatically-manage-monitor-rollout-new-machine-learning-models-across-your-ios-app-user-baseNote: This is a cross-post of the original publication on contextsdk.com.

This is the third post of our machine learning (ML) for iOS apps series. Be sure to read part 1 and part 2 first. So far we’ve received incredible positive feedback. We always read about the latest advancements in the space of Machine Learning and Artificial Intelligence, but at the same time, we mostly use external APIs that abstract out the ML aspect, without us knowing what’s happening under the hood. This blog post series helps us fully understand the basic concepts of how a model comes to be, how it’s maintained and improved, and how to leverage it in real-life applications

Introduction

One critical aspect of machine learning is to constantly improve and iterate your model. There are many reasons for that, from ongoing changes in user-behavior, other changes in your app, all the way to simply getting more data that allows your model to be more precise.

In this article we will cover:

  • How to prevent data blindness
  • How to remotely, continuously calibrate thresholds, and encode additional model metadata
  • How to group your user-base into separate buckets, allowing you to evaluate real-life performance
  • How to monitor and evaluate performance of your models

What we’ve built so far in the first 2 blog posts

Our iOS app sends non-PII real-world context data to our API server, which will store the collected data in our database (full details here).

Our API servers respond with the latest model details so the client can decide if it needs to download an update or not.

Model Metadata Management

It’s important for you to be able to remotely calibrate & fine-tune your models and their metadata, with the random upsell chance being one of those values. Since our SDK already communicates with our API server to get the download info for the most recent ML model, we can provide those details to the client together with the download URL.

private struct SaveableCustomModelInfo: Codable {
    let modelVersion: String
    let upsellThreshold: Double
    let randomUpsellChance: Double

    let contextSDKSpecificMetadataExample: Int
}
  • modelVersion: At ContextSDK, we use a UUID as a model version. For our architecture, there is no need for the client to “understand” which model version is higher than the previous one. Our API servers will handle those tasks
  • upsellThreshold: Our CoreML model returns a score between 0 - 1 on how likely the user is to convert in the current moment. Depending on our customer’s preference and project goals, we can use this value to decide on the “Prompt Intensity Level”
  • randomUpsellChance: That’s the value we described above to help us prevent data blind spots. As we monitor our incoming data, we can remotely change this value to fit our current requirements
  • Other model metadata: We use this to include more details on what exact type of data the model requires as inputs

Model Inputs

At ContextSDK, we generate and use more than 180 on-device signals to evaluate how good a moment is to show a certain type of content. With machine learning for this use-case, you don’t want a model to have 180 inputs, as training such a model would require enormous amounts of data, as the training classifier wouldn’t know which columns to start with. Without going into too much Data Science details, you’d want the ratio between columns (inputs) and rows (data entries) to meet certain requirements.

Hence, we have multiple levels of data processing and preparations when training our Machine Learning model. One step is responsible for finding the context signals that contribute the highest amount of weight in the model, and focus on those. The signals used vary heavily depending on the app.

It was easy to dynamically pass in the signals that are used by a given model in our architecture. We’ve published a blog post on how our stack enforces matching signals across all our components.

For simple models, you can use the pre-generated Swift classes for your model. Apple recommends using the MLFeatureProvider for more complicated cases, like when your data is collected asynchronously, to reduce the amounts of data you’d need to copy, or for other more complicated data sources.

func featureValue(for featureName: String) -> MLFeatureValue? {
    // Fetch your value here based on the `featureName`
    stringValue = self.signalsManager.signal(byString: featureName) // Simplified example
    return MLFeatureValue(string: stringValue.string())
}

We won’t go into full detail on how we implemented the mapping of the various different types. We’ve created a subclass of MLFeatureProvider and implemented the featureValue method to dynamically get the right values for each input.

As part of the MLFeatureProvider subclass, you need to provide a list of all featureNames. You can easily query the required parameters for a given CoreML file using the following code:

featureNames = Set(mlModel.modelDescription.inputDescriptionsByName.map({$0.value.name}))

Grouping your user-base

Most of us have used AB tests with different cohorts, so you’re most likely already familiar with this concept. We wanted something basic, with little complexity, that works on-device, and doesn’t rely on any external infrastructure to assign the cohort.

For that, we created ControlGrouper, a class that takes in any type of identifier that we only use locally to assign a control group:

import CommonCrypto

class ControlGrouper {
    /***
        The groups are defined as ranges between the upperBoundInclusive of groups.
        The first group will go from 0 to upperBoundInclusive[0]
        The next group from upperBoundInclusive[0] to upperBoundInclusive[1]
        The last group will be returned if no other group matches, though for clarity the upperBoundInclusive should be set to 0.
        If there is only 1 group regardless of specified bounds it is always used. Any upperBoundInclusive higher than 1 acts just like 1.
        Groups will be automatically sorted so do not need to be passed in in the correct order.

        An arbitrary number of groups can be supplied and given the same userIdentifier and modelName the same assignment will always be made.
     */
    class func getGroupAssignment<T>(userIdentifier: String, modelName: String, groups: [ControlGroup<T>]) -> T  {
        if (groups.count <= 1) {
            return groups[0].value
        }

        // We create a string we can hash using all components that should affect the result the group assignment.
        let assignmentString = "\(userIdentifier)\(modelName)".data(using: String.Encoding.utf8)

        // Using SHA256 we can map the arbitrary assignment string on to a 256bit space and due to the nature of hashing:
        // The distribution of input string will be even across this space.
        // Any tiny change in the assignment string will be massive difference in the output.
        var digest = [UInt8](repeating: 0, count: Int(CC_SHA256_DIGEST_LENGTH))
        if let value = (assignmentString as? NSData) {
            CC_SHA256(value.bytes, CC_LONG(value.count), &digest)
        }

        // We slice off the first few bytes and map them to an integer, then we can check from 0-1 where this integer lies in the range of all possible buckets.
        if let bucket = UInt32(data: Data(digest).subdata(in: 0..<4)) {
            let position = Double(bucket) / Double(UInt32.max)

            // Finally knowing the position of the installation in our distribution we can assign a group based on the requested groups by the caller.
            // We sort here in case the caller does not provide the groups from lowest to higest.
            let sortedGroups = groups.sorted(by: {$0.upperBoundInclusive < $1.upperBoundInclusive})
            for group in sortedGroups {
                if (position <= group.upperBoundInclusive) {
                    return group.value
                }
            }
        }

        // If no group matches, we use the last one as we can just imagine its upperBoundInclusive extending to the end.
        return groups[groups.count - 1].value
    }
}

struct ControlGroup<T> {
    let value: T
    let upperBoundInclusive: Double
}

For example, this allows us to split the user-base into 3 equally sized groups, one of which being the control group.

What’s data blindness?

Depending on what you use the model for, it is easy to end up in some type of data blindness once you start using your model.

For example, let’s say your model decides it’s a really bad time to show a certain type of prompt if the battery is below 7%. While this may be statistically correct based on real-data, this would mean you’re not showing any prompts for those cases (< 7% battery level) any more.

However, what if there are certain exceptions for those cases, that you’ll only learn about once you’ve collected more data? For example, maybe that <7% battery level rule doesn’t apply, if the phone is currently plugged in?

This is an important issue to consider when working with machine learning: Once you start making decisions based on your model, you’ll create blind-spots in your learning data.

How to solve data blindness?

The only way to get additional, real-world data for those blind spots is to still sometimes decide to show a certain prompt even if the ML model deems it to be a bad moment to do so. This should be optimized to a small enough percentage that it doesn’t meaningfully reduce your conversion rates, but at the same time enough that you’ll get meaningful, real-world data to train and improve your machine learning model over time. Once we train the initial ML model, we look into the absolute numbers of prompts & sales, and determine an individual value for what the percentage should be.

Additionally, by introducing this concept of still randomly showing a prompt even if the model deems it to be a bad moment, it can help to prevent situations where a user may never see a prompt, due to the rules of the model. For example, a model may learn that there are hardly any sales in a certain region, and therefore decide to always skip showing prompts.

This is something we prevent on multiple levels for ContextSDK, and this one is the very last resort (on-device) to be sure this won’t happen. We continuously analyze, and evaluate our final model weights, as well as the incoming upsell data, to ensure our models leverage enough different types of signals.

let hasInvalidResult = upsellProbability == -1
let coreMLUpsellResult = (upsellProbability >= executionInformation.upsellThreshold || hasInvalidResult)

// In order to prevent cases where users never see an upsell this allows us to still show an upsell even if the model thinks it's a bad time.
let randomUpsellResult = Double.random(in: 0...1) < executionInformation.randomUpsellChance

let upsellResult = (coreMLUpsellResult || randomUpsellResult) ? UpsellResult.shouldUpsell : .shouldSkip

// We track if this prompt was shown as part of our random upsells, this way we can track performance.
modelBasedSignals.append(SignalBool(id: .wasRandomUpsell, value: randomUpsellResult && !coreMLUpsellResult))

As an additional layer, we also have a control group (with varying sizes) that we generate and use locally.

How to compare your model’s performance with the baseline

We’re working with a customer who’s currently aggressively pushing prompts onto users. They learned that those prompts lead to churn in their user-base, so their number one goal was to reduce the number of prompts, while keeping as much of the sales as possible.

We decided for a 50/50 split for their user-base to have two large enough buckets to evaluate the model’s performance

Depending on the goal of your model, you may want to target other key metrics to evaluate the performance of your model. In the table above, the main metric we looked for was the conversion rate, which in this case has a performance of +81%.

Above is an example of a model with poor performance: the conversion rate went down by 6% and the total number of sales dropped in half. Again, in our case we were looking for an increase in conversion rate, where in this case this goal is clearly not achieved.

Our systems continuously monitor whatever key metric we want to push (usually sales or conversion rate, depending on the client’s preference). As soon as a meaningful number of sales were made for both buckets, the performance is compared, and if it doesn’t meet our desired outcomes, the rollout will immediately be stopped, and rolled back, thanks to the over-the-air update system described in this article

Conclusion

In this article we’ve learned about the complexity of deploying machine learning models, and measuring and comparing their performance. It’s imperative to continuously monitor how well a model is working, and have automatic safeguards and corrections in place.

Overall, Apple has built excellent machine learning tools around CoreML, which have been built into iOS for many years, making it easy to build intelligent, offline-first mobile apps that nicely blend into the user’s real-world environment.

]]>
Felix Krause
Safely distribute new Machine Learning models to millions of iPhones over-the-air2024-05-22T00:00:00+00:002024-05-22T00:00:00+00:00https://krausefx.com/blog/safely-distribute-new-machine-learning-models-to-millions-of-iphones-over-the-airNote: This is a cross-post of the original publication on contextsdk.com.

This is the second blog post covering various machine learning (ML) concepts of iOS apps, be sure to read part 1 first. Initially this was supposed to be a 2-piece series, but thanks to the incredible feedback of the first one, we’ve decided to cover even more on this topic, and go into more detail.

Introduction

For some apps it may be sufficient to train a ML (machine learning) model once, and ship it with the app itself. However, most mobile apps are way more dynamic than that, constantly changing and evolving. It is therefore important to be able to quickly adapt and improve your machine learning models, without having to do a full app release, and go through the whole App Store release & review process.

In this series, we will explore how to operate machine learning models directly on your device instead of relying on external servers via network requests. Running models on-device enables immediate decision-making, eliminates the need for an active internet connection, and can significantly lower infrastructure expenses.

In the example of this series, we’re using a model to make a decision on when to prompt the user to upgrade to the paid plan based on a set of device-signals, to reduce user annoyances, while increasing our paid subscribers.

Step 1: Shipping a base-model with your app’s binary

We believe in the craft of beautiful, reliable and fast mobile apps. Running machine-learning devices on-device makes your app responsive, snappy and reliable. One aspect to consider is the first app launch, which is critical to prevent churn and get the user hooked to your app.

To ensure your app works out of the box right after its installation, we recommend shipping your pre-trained CoreML file with your app. Our part 1 covers how to easily achieve this with Xcode

Step 2: Check for new CoreML updates

Your iOS app needs to know when a new version of the machine learning file is available. This is as simple as regularly sending an empty network request to your server. Your server doesn’t need to be sophisticated, we initially started with a static file host (like S3, or alike) that we update whenever we have a new model ready.

The response could use whatever versioning you prefer:

  • A version number of your most recent model
  • The timestamp your most recent model was trained
  • A checksum
  • A randomly generated UUID

Whereas the iOS client would compare the version number of most recently downloaded model with whatever the server responds with. Which approach you choose, is up to you, and your strategy on how you want to rollout, monitor and version your machine learning models.

Over time, you most likely want to optimize the number of network requests. Our approach combines a smart mechanism where we’d combine the outcome collection we use to train our machine learning models with the model update checks, while also leveraging a flushing technique to batch many events together to minimize overhead and increase efficiency.

Ideally, the server’s response already contains the download URL of the latest model, here is an example response:

{
  "url": "https://krausefx.github.io/CoreMLDemo/models/80a2-82d1-bcf8-4ab5-9d35-d7f257c4c31e.mlmodel"
}

The above example is a little simplified, and we’re using the model’s file name as our version to identify each model.

You’ll also need to consider which app version is supported. In our case, a new ContextSDK version may implement additional signals that are used as part of our model. Therefore we provide the SDK version as part of our initial polling request, and our server responds with the latest model version that’s supported.

First, we’re doing some basic scaffolding, creating a new ModelDownloadManager class:

import Foundation
import CoreML

class ModelDownloadManager {
    private let fileManager: FileManager
    private let modelsFolder: URL
    private let modelUpdateCheckURL = "https://krausefx.github.io/CoreMLDemo/latest_model_details.json"

    init(fileManager: FileManager = .default) {
        self.fileManager = fileManager
        if let folder = fileManager.urls(for: .applicationSupportDirectory, in: .userDomainMask).first?.appendingPathComponent("context_sdk_models") {
            self.modelsFolder = folder
            try? fileManager.createDirectory(at: folder, withIntermediateDirectories: true)
        } else {
            fatalError("Unable to find or create models folder.") // Handle this more gracefully
        }
    }
}

And now to the actual code: Downloading the model details to check if a new model is available:

internal func checkForModelUpdates() async throws {
    guard let url = URL(string: modelUpdateCheckURL) else {
        throw URLError(.badURL)
    }
    let (data, _) = try await URLSession.shared.data(from: url)
    guard let jsonObject = try JSONSerialization.jsonObject(with: data) as? [String: Any],
            let modelDownloadURLString = jsonObject["url"] as? String,
            let modelDownloadURL = URL(string: modelDownloadURLString) else {
        throw URLError(.cannotParseResponse)
    }
    
    try await downloadIfNeeded(from: modelDownloadURL)
}

Step 3: Download the latest CoreML file

If a new CoreML model is available, your iOS app now needs to download the latest version. You can use any method of downloading the static file from your server:

// It's important to immediately move the downloaded CoreML file into a permanent location
private func downloadCoreMLFile(from url: URL) async throws -> URL {
    let (tempLocalURL, _) = try await URLSession.shared.download(for: URLRequest(url: url))
    let destinationURL = modelsFolder.appendingPathComponent(tempLocalURL.lastPathComponent)
    try fileManager.moveItem(at: tempLocalURL, to: destinationURL)
    return destinationURL
}

Considering Costs

Depending on your user-base, infrastructure costs will be a big factor on how you’re gonna implement the on-the-fly update mechanism.

For example, an app with 5 Million active users, and a CoreML file size of 1 Megabyte, would generate a total data transfer of 5 Terabyte. If you were to use a simple AWS S3 bucket directly with $0.09 per GB egress costs, this would yield costs of about $450 for each model rollout (not including the free tier).

As part of this series, we will talk about constantly rolling out new, improved challenger models, running various models in parallel, and iterating quickly, paying this amount isn’t a feasible solution.

One easy fix for us was to leverage CloudFlare R2, which is faster and significantly cheaper. The same numbers as above costs us less than $2, and would be completely free if we include the free tier.

Step 4: Compile the CoreML file on-device

After successfully downloading the CoreML file, you need to compile it on-device. While this sounds scary, Apple made it a seamless, easy and safe experience. Compiling the CoreML file on-device is a requirement, and ensures that the file is optimized for the specific hardware it runs on.

private func compileCoreMLFile(at localFilePath: URL) throws -> URL {
    let compiledModelURL = try MLModel.compileModel(at: localFilePath)
    let destinationCompiledURL = modelsFolder.appendingPathComponent(compiledModelURL.lastPathComponent)
    try fileManager.moveItem(at: compiledModelURL, to: destinationCompiledURL)
    try fileManager.removeItem(at: localFilePath)
    return destinationCompiledURL
}

You are responsible for the file management, including that you store the resulting ML file into a permanent location. In general, file management on iOS can be a little tedious, covering all the various edge cases.

You can also find the official Apple Docs on Downloading and Compiling a Model on the User’s Device.

Step 5: Additional checks and clean-ups

We don’t yet have a logic on how we decide if we want to download the new model. In this example, we’ll do something very basic: each model’s file-name is a unique UUID. All we need to do is to check if a model under the exact file name is available locally:

private func downloadIfNeeded(from url: URL) async throws {
    let lastPathComponent = url.lastPathComponent
    
    // Check if the model file already exists (for this sample project we use the unique file name as identifier)
    if let localFiles = try? fileManager.contentsOfDirectory(at: modelsFolder, includingPropertiesForKeys: nil),
        localFiles.contains(where: { $0.lastPathComponent == lastPathComponent }) {
        // File exists, you could add a version check here if versions are part of the file name or metadata
        print("Model already exists locally. No need to download.")
    } else {
        let downloadedURL = try await downloadCoreMLFile(from: url) // File does not exist, download it
        let compiledURL = try compileCoreMLFile(at: downloadedURL)
        try deleteAllOutdatedModels(keeping: compiledURL.lastPathComponent)
        print("Model downloaded, compiled, and old models cleaned up successfully.")
    }
}

Of course we want to be a good citizen, and delete all older models from the local storage. Also, for this sample project, this is required, as we’re using UUIDs for versioning, meaning the iOS client actually doesn’t know about which version is higher. For sophisticated systems it’s quite common to not have this transparency to the client, as the backend may be running multiple experiments and challenger models in parallel across all clients.

private func deleteAllOutdatedModels(keeping recentModelFileName: String) throws {
    let urlContent = try fileManager.contentsOfDirectory(at: modelsFolder, includingPropertiesForKeys: nil, options: .skipsHiddenFiles)
    for fileURL in urlContent where fileURL.lastPathComponent != recentModelFileName {
        try fileManager.removeItem(at: fileURL)
    }
}

Step 6: Execute the newly downloaded CoreML file instead of the bundled version

Now all that’s left is to automatically switch between the CoreML file that we bundled within our app, and the file we downloaded from our servers, whereas we’d always want to prefer the one we downloaded remotely.

In our ModelDownloadManager, we want an additional function that exposes the model we want to use. This can either be the bundled CoreML model, or the CoreML model downloaded most recently over-the-air

internal func latestModel() -> MyFirstCustomModel? {
    let fileManagerContents = (try? fileManager.contentsOfDirectory(at: modelsFolder, includingPropertiesForKeys: nil)) ?? []
    
    if let latestFileURL = fileManagerContents.sorted(by: { $0.lastPathComponent > $1.lastPathComponent }).first,
        let otaModel = try? MyFirstCustomModel(contentsOf: latestFileURL) {
        return otaModel
    } else if let bundledModel = try? MyFirstCustomModel(configuration: MLModelConfiguration()) {
        return bundledModel // Fallback to the bundled model if no downloaded model exists
    }
    return nil
}

There are almost no changes needed to our code base from part 1.

Instead of using the MyFirstCustomModel initializer directly, we now need to use the newly created .latestModel() method.

let batteryLevel = UIDevice.current.batteryLevel
let batteryCharging = UIDevice.current.batteryState == .charging || UIDevice.current.batteryState == .full
do {
    let modelInput = MyFirstCustomModelInput(input: [
        Double(batteryLevel),
        Double(batteryCharging ? 1.0 : 0.0)
    ])
    if let currentModel = modelDownloadManager.latestModel(),
        let modelMetadata = currentModel.model.modelDescription.metadata[.description] {
        let result = try currentModel.prediction(input: modelInput)
        let classProbabilities = result.featureValue(for: "classProbability")?.dictionaryValue
        let upsellProbability = classProbabilities?["Purchased"]?.doubleValue ?? -1
        
        showAlertDialog(message:("Chances of Upsell: \(upsellProbability), executed through model \(modelMetadata)"))
    } else {
        showAlertDialog(message:("Could not run CoreML model"))
    }
} catch {
    showAlertDialog(message:("Error running CoreML file: \(error)"))
}

Step 7: Decide when you want to trigger the update check

The only remaining code that’s left: triggering the update check. When you do that will highly depend on your app, and the urgency in which you want to update your models.

Task {
    do {
        try await modelDownloadManager.checkForModelUpdates()
        showAlertDialog(message:("Model update completed successfully."))
    } catch {
        // Handle possible errors here
        showAlertDialog(message:("Failed to update model: \(error.localizedDescription)"))
    }
}

Demo App

As part of this series, we’ve built out a demo app that shows all of this end-to-end in action. You can find it available here on GitHub: https://github.com/KrauseFx/CoreMLDemo:

What’s next?

Today we’ve covered how you can roll out new machine learning models directly to your users’ iPhones, running them directly on their ML-optimized hardware. Using this approach you can make decisions on what type of content, or prompts you show based on the user’s context, powered by on-device machine learning execution. Updating CoreML files quickly, on-the-fly without going through the full App Store release cycle is critical, to quickly react to changing user-behaviors, when introducing new offers in your app, and to constantly improve your app, be it increasing your conversion rates, reducing annoyances and churn, or optimizing other parts of your app.

This is just the beginning: Next up, we will talk about how to manage the rollout of new ML models, in particular:

  • How to safely rollout new models: monitor, pause or rollback faulty models
  • How to monitor performance of deployed models
  • How to reliably compare performance between models, and the baseline performance

Excited to share more on what we’ve learned when building ContextSDK to power hundreds of machine learning models distributed across more than 25 Million devices.

Update: Head over to the third post of the ML series

]]>
Felix Krause
How to train your first machine learning model and run it inside your iOS app via CoreML2024-05-06T00:00:00+00:002024-05-06T00:00:00+00:00https://krausefx.com/blog/how-to-train-your-first-machine-learning-model-and-run-it-inside-your-ios-app-via-coremlNote: This is a cross-post of the original publication on contextsdk.com.

Introduction

Machine Learning (ML) in the context of mobile apps is a wide topic, with different types of implementations and requirements. On the highest levels, you can distinguish between:

  1. Running ML models on server infrastructure and accessing it from your app through API requests
  2. Running ML models on-device within your app (we will focus on this)
  3. Fine-tuning pre-trained ML models on-device based on user behavior
  4. Training new ML models on-device

As part of this blog series, we will be talking about variant 2: We start out by training a new ML model on your server infrastructure based on real-life data, and then distributing and using that model within your app. Thanks to Apple’s CoreML technology, this process has become extremely efficient & streamlined.

We wrote this guide for all developers, even if you don’t have any prior data science or backend experience.

Step 1: Collecting the data to train your first ML model

To train your first machine learning model, you’ll need some data you want to train the model on. In our example, we want to optimize when to show certain prompts or messages in iOS apps.

Let’s assume we have your data in the following format:

  • Outcome describes the result of the user interaction, in this case, if they purchased an optional premium upgrade
  • Battery Level is the user’s current battery level as a float
  • Phone Charging defines if the phone is currently plugged in as a boolean

In the above example, the “label” of the dataset is the outcome. In machine learning, a label for training data refers to the output or answer for a specific instance in a dataset. The label is used to train a supervised model, guiding it to understand how to classify new, unseen examples or predict outcomes.

How you get the data to train your model is up to you. In our case, we’d collect non-PII data just like the above example, to train models based on real-life user behavior. For that we’ve built out our own backend infrastructure, which we’ve already covered in our Blog:

Step 2: Load and prepare your data

There are different technologies available to train your ML model. In our case, we chose Python, together with pandas and sklearn.

Load the recorded data into a pandas DataFrame:

import pandas as pd

rows = [
    ['Dismissed', 0.90, False],
    ['Dismissed', 0.10, False],
    ['Purchased', 0.24, True],
    ['Dismissed', 0.13, True]
]
data = pd.DataFrame(rows, columns=['Outcome', 'Battery Level', 'Phone Charging?'])
print(data)

Instead of hard-coded data like above, you’d access your database with the real-world data you’ve already collected.

Step 3: Split the data between training and test data

To train a machine learning model, you need to split your data into a training set and a test set. We won’t go into detail about why that’s needed, since there are many great resources out there that explain the reasoning, like this excellent CGP Video.

from sklearn.model_selection import train_test_split

X = data.drop("Outcome", axis=1)
Y = data["Outcome"]

X_train, X_test, Y_train, Y_test = train_test_split(X, Y, test_size=0.2, shuffle=True)

The code above splits your data by a ratio of 0.2 (⅕) and separates the X and the Y axis, which means separating the label (“Outcome”) from the data (all remaining columns).

Step 4: Start Model Training

As part of this step, you’ll need to decide on what classifier you want to use. In our example, we will go with a basic RandomForest classifier:

from sklearn.ensemble import RandomForestClassifier
from sklearn.metrics import classification_report

classifier = RandomForestClassifier()
classifier.fit(X_train, Y_train)
Y_pred = classifier.predict(X_test)
print(classification_report(Y_test, Y_pred, zero_division=1))

The output of the above training will give you a classification report. In simplified words, it will tell you more of how accurate the trained model is.

In the screenshot above, we’re only using test data as part of this blog series. If you’re interested in how to interpret and evaluate the classification report, check out this guide.

Step 5: Export your model into a CoreML file

Apple’s official CoreMLTools make it extremely easy to export the classifier (in this case, our Random Forest) into a .mlmodel (CoreML) file, which we can run on Apple’s native ML chips. CoreMLTools support a variety of classifiers, however not all of them, so be sure to verify its support first.

import coremltools

coreml_model = coremltools.converters.sklearn.convert(classifier, input_features="input")
coreml_model.short_description = "My first model"
coreml_model.save("MyFirstCustomModel.mlmodel")

Step 6: Bundle the CoreML file with your app

For now, we will simply drag & drop the CoreML file into our Xcode project. In a future blog post we will go into detail on how to deploy new ML models over-the-air.

Once added to your project, you can inspect the inputs, labels, and other model information right within Xcode.

Step 7: Executing your Machine Learning model on-device

Xcode will automatically generate a new Swift class based on your mlmodel file, including the details about the inputs, and outputs.

let batteryLevel = UIDevice.current.batteryLevel
let batteryCharging = UIDevice.current.batteryState == .charging || UIDevice.current.batteryState == .full
do {
    let modelInput = MyFirstCustomModelInput(input: [
       Double(batteryLevel),
       Double(batteryCharging ? 1.0 : 0.0)
    ])
    let result = try MyFirstCustomModel(configuration: MLModelConfiguration()).prediction(input: modelInput)
    let classProbabilities = result.featureValue(for: "classProbability")?.dictionaryValue
    let upsellProbability = classProbabilities?["Purchased"]?.doubleValue ?? -1

    print("Chances of Upsell: \(upsellProbability)")
} catch {
    print("Error running CoreML file: \(error)")
}

In the above code you can see that we pass in the parameters of the battery level, and charging status, using an array of inputs, only identified by the index. This has the downside of not being mapped by an exact string, but the advantage of faster performance if you have hundreds of inputs.

Alternatively, during model training and export, you can switch to using a String-based input for your CoreML file if preferred.

We will talk more about how to best set up your iOS app to get the best of both worlds, while also supporting over-the-air updates, dynamic inputs based on new models, and how to properly handle errors, process the response, manage complex AB tests, safe rollouts, and more.

Conclusion

In this guide we went from collecting the data to feed into your Machine Learning model, to training the model, to running it on-device to make decisions within your app. As you can see, Python and its libraries, including Apple’s CoreMLTools, make it very easy to get started with your first ML model. Thanks to native support of CoreML files in Xcode, and executing them on-device, we have all the advantages of the Apple development platform, like inspecting model details within Xcode, strong types and safe error handling.

In your organization, you’ll likely have a Data Scientist who will be in charge of training, fine-tuning and providing the model. The above guide shows a simple example - with ContextSDK we take more than 180 different signals into account, of different types, patterns, and sources, allowing us to achieve the best results, while keeping the resulting models small and efficient.

Within the next few weeks, we will be publishing a second post on that topic, showcasing how you can deploy new CoreML files to Millions of iOS devices over-the-air within seconds, in a safe & cost-efficient manner, managing complicated AB tests, dynamic input parameters, and more.

Update: Head over to the second post of the ML series

]]>
Felix Krause
Automatically build &amp; distribute custom iOS SDK Binaries for each customer2024-02-06T00:00:00+00:002024-02-06T00:00:00+00:00https://krausefx.com/blog/automatically-build-and-distribute-custom-ios-sdk-binaries-for-each-customer

Note: This is a cross-post of the original publication on contextsdk.com.

Introduction

This is a follow-up post to our original publication: How to compile and distribute your iOS SDK as a pre-compiled xcframework.

In this technical article we go into the depths of best practices around

  • How to automate the deployment of different variants of your SDK to provide a fully customized, white-glove service for your customers
  • How this approach allows your SDK to work offline out-of-the box right from the first app start

Build Automation

For everyone who knows me, I love automating iOS app-development processes. Having built fastlane, I learned just how much time you can save, and most importantly: prevent human errors from happening. With ContextSDK, we fully automated the release process.

For example, you need to properly update the version number across many points: your 2 podspec files (see our last blog post), your URLs, adding git tags, updating the docs, etc.

Custom binaries for each customer

With ContextSDK, we train and deploy custom machine learning models for every one of our customers. The easiest way most companies would solve this is by sending a network request the first time the app is launched, to download the latest custom model for that particular app. However, we believe in fast & robust on-device Machine Learning Model execution, that doesn’t rely on an active internet connection. In particular, many major use-cases of ContextSDK rely on reacting to the user’s context within 2 seconds after the app is first launched, to immediately optimize the onboarding flow, permission prompts and other aspects of your app.

We needed a way to distribute each customer’s custom model with the ContextSDK binary, without including any models from other customers. To do this, we fully automated the deployment of custom SDK binaries, each including the exact custom model, and features the customer needs.

Our customer management system provides the list of custom SDKs to build, tied together with the details of the custom models:

[
  {
    "bundle_identifiers": ["com.customer.app"],
    "app_id": "c2d67cdb-e117-4c3e-acca-2ae7f1a42210",
    "customModels": [
      {
        "flowId": 8362,
        "flowName": "onboarding_upsell",
        "modelVersion": 73
      }, 
    ]
  }, 
]

Our deployment scripts will then iterate over each app, and include all custom models for the given app. You can inject custom classes and custom code before each build through multiple approaches. One approach we took to include custom models dynamically depending on the app, is to update our internal podspec to dynamically add files:‍

# ...

source_files = Dir['Classes/**/*.swift']
if ENV["CUSTOM_MODEL_APP_ID"]
  source_files += Dir["Classes/Models/Custom/#{ENV["CUSTOM_MODEL_APP_ID"]}/*.mlmodel"]
end

s.source_files = source_files

# ...

In the above example you can see how we leverage a simple environment variable to tell CocoaPods which custom model files to include.

Thanks to iOS projects being compiled, we can guarantee integrity of the codebase itself. Additionally we have hundreds of automated tests (and manual tests) to guarantee alignment of the custom models, matching SDK versions, model versions and each customer’s integration in a separate, auto-generated Xcode project.

Side-note: ContextSDK also supports over-the-air updates of new CoreML files, to update the ones we bundle the app with. This allows us to continuously improve our machine learning models over-time, as we calibrate our context signals to each individual app. Under the hood we deploy new challenger-models to a subset of users, for which we compare the performance, and gradually roll them out more if it matches expectations.

Conclusion

Building and distributing a custom binary for each customer is easier than you may expect. Once your SDK deployment is automated, taking the extra step to build custom binaries isn’t as complex as you may think.

Having this architecture allows us to iterate and move quickly, while having a very robust development and deployment pipeline. Additionally, once we segment our paid features for ContextSDK more, we can automatically only include the subset of functionality each customer wants enabled. For example, we recently launched AppTrackingTransparency.ai, where a customer may only want to use the ATT-related features of ContextSDK, instead of using it to optimise their in-app conversions.

If you have any questions, feel free to reach out to us on Twitter or LinkedIn, or subscribe to our newsletter on contextsdk.com.

Note: This is a cross-post of the original publication on contextsdk.com.

]]>
Felix Krause
How to automatically compile and distribute your iOS SDK as a pre-compiled xcframework2024-02-01T00:00:00+00:002024-02-01T00:00:00+00:00https://krausefx.com/blog/how-to-automaticallycompile-and-distribute-your-ios-sdk-as-a-pre-compiled-xcframework

Note: This is a cross-post of the original publication on contextsdk.com.

Introduction

In this technical article we go into the depths and best practices around

  • Working efficiently on a commercial SDK in a larger team
  • How to compile and distribute your iOS SDK as a pre-compiled xcframework automatically

How to build and debug an iOS SDK?

At ContextSDK we have our whole iOS Swift codebase in a single local CocoaPod. This allows us to iterate quickly as a team, and have our SDK configuration defined in clean code in version control, instead of some plist Xcode settings.

ContextSDK.podspec

Pod::Spec.new do |s|
  s.name             = 'ContextSDK'
  s.version          = '3.2.0'
  s.summary          = 'Introducing the most intelligent way to know when and how to monetize your user'
  s.swift_version    = '5.7'
  s.homepage         = 'https://contextsdk.com'
  s.author           = { 'KrauseFx' => 'felix@contextsdk.com' }
  s.ios.deployment_target = '14.0'

  # via https://github.com/CocoaPods/cocoapods-packager/issues/216
  s.source = { :git => "file://#{File.expand_path("..", __FILE__)}" }

  s.pod_target_xcconfig = {
    "SWIFT_SERIALIZE_DEBUGGING_OPTIONS" => "NO",
    "OTHER_SWIFT_FLAGS" => "-Xfrontend -no-serialize-debugging-options",
    "BUILD_LIBRARY_FOR_DISTRIBUTION" => "YES", # for swift Library Evolution
    "SWIFT_REFLECTION_METADATA_LEVEL" => "none", # to include less metadata in the resulting binary
  }

  s.frameworks = 'AVFoundation'
  s.public_header_files = 'Classes/**/*.h'
  s.source_files = Dir['Classes/**/*.{swift}']
  s.resource_bundles = { 'ContextSDK' => ['PrivacyInfo.xcprivacy'] }

  s.test_spec 'Tests' do |test_spec|
    test_spec.source_files = [
      'Tests/*.{swift}',
      'Tests/Resources/*.{plist}'
    ]

    test_spec.dependency 'Quick', '7.2.0'
    test_spec.dependency 'Nimble', '12.2.0'
  end
end

During development, we want to easily edit our codebase, run the Demo app, and debug using Xcode. To do that, our Demo app has a simple Podfile referencing our local CocoaPod:

target 'ContextSDKDemo' do
  use_frameworks!
  pod 'ContextSDK', :path => '../ContextSDK', :testspecs => ['Tests'] 
end

Running pod install will then nicely setup your Xcode workspace, ready to run the local ContextSDK codebase:

Editing a ContextSDK source file (e.g. Context.swift) will then immediately be accessible and used by Xcode during the next compile. This makes development of SDKs extremely easy & efficient.

How to compile a CocoaPod into a static binary (xcframework)?

The requirement for commercial SDKs is often that its source code isn’t accessible to its user. To do that, you need to pre-compile your SDK into an .xcframework static binary, which can then be used by your customers.

Thanks to the excellent cocoapods-pack project, started by Dimitris by Square, it’s easily possible to compile your SDK for distribution to your customers. After installing the gem, you can use the following command:

bundle exec pod pack ../ContextSDK.podspec https://contextsdk.com --skip-validation

Now open up the folder ./zips/ContextSDK/3.2.0/ and you will see a freshly prepared ContextSDK.zip. You can’t distribute that zip file right-away, as it contains an additional subfolder called ios, which would break the distribution through CocoaPods when we tested it.

As part of our deployment pipeline, we run the following Ruby commands to remove the ios folder, and re-zip the file:

puts "Preparing ContextSDK framework for release..."

sh("rm -rf zips")
sh("bundle exec pod pack ../ContextSDK.podspec https://contextsdk.com --skip-validation") || exit(1)
sh("rm -rf files")

# Important: we need to unzip the zip file, and then zip it again without having the "ios" toplevel folder
# which will break CocoaPods support, as CococaPods only looks inside the root folder, not iOS
zip_file_path = "zips/ContextSDK/#{@version_number}/ContextSDK.zip"
sh("unzip #{zip_file_path} -d zips/current")
sh("cd zips/current/ios && zip -r ../ContextSDK.zip ./*") # Now zip it again, but without the "ios" folder
return "zips/current/ContextSDK.zip"

ContextSDK.zip is now ready for distribution. If you unzip that file, you’ll see the ContextSDK.xcframework contained directly, which is what your users will add to their Xcode project, and will be picked up by CocoaPods.

How to distribute your SDK?

Manual Installation

There are no extra steps needed: the ZIP file you created above is everything that’s needed. Now you can provide the following instructions to your users:

  1. Download the latest release: [URL to your ZIP file]
  2. Drag & Drop the ContextSDK.xcframework folder into the Xcode file list
  3. Go to your project settings, scroll down to Frameworks, Libraries, and Embedded Content, add ContextSDK.xcframework, and select Embed & Sign

Through CocoaPods

Distributing your pre-compiled .xcframework file through CocoaPods requires some extra steps.

You need a second ContextSDK.podspec file, that will be available to the public. That podspec will only point to your pre-compiled binary, instead of your source code, therefore it’s safe to distribute to the public.

Pod::Spec.new do |s|
  s.name                = 'ContextSDK'
  s.version             = '3.2.0'
  s.homepage            = 'https://contextsdk.com'
  s.documentation_url   = 'https://docs.contextsdk.com'
  s.license             = { :type => 'Commercial' }
  s.author              = { 'ContextSDK' => 'support@contextsdk.com' }
  s.summary             = 'Introducing the most intelligent way to know when and how to monetize your use'

  s.platform            = :ios, '14.0'
  s.source              = { :http => '[URL to your ZIP file]' }

  s.xcconfig            = { 'FRAMEWORK_SEARCH_PATHS' => '"$(PODS_ROOT)/ContextSDK/**"' }
  s.frameworks          = 'AVFoundation'
  s.requires_arc        = true
  s.swift_version       = '5.7'
  s.module_name         = 'ContextSDK'

  s.preserve_paths      = 'ContextSDK.xcframework'
  s.vendored_frameworks = 'ContextSDK.xcframework'
end

Make both your podspec, and your ZIP file available to the public. Once complete, you can provide the following instructions to your users:

  1. Add the following dependency to your Podfile:
    pod 'ContextSDK', podspec: '[URL to your public .podspec]'
    
  2. Run pod install

Through Swift Package Manager (SPM)

Create a new git repo (we called it context-sdk-releases), which will contain all your historic and current releases, as well as a newly created Package.swift file:

// swift-tools-version:5.4

import PackageDescription

let package = Package(
    name: "ContextSDK",
    products: [
        .library(
            name: "ContextSDK",
            targets: ["ContextSDK"]),
    ],
    dependencies: [],
    targets: [
        .binaryTarget(
            name: "ContextSDK",
            path: "releases/ContextSDK.zip"
        )
    ]
)

You can use the same zip file we’ve created with SPM as well. Additionally, you’ll need to make use of git tags for releases, so that your customers can pinpoint a specific release. You can either make this repo public, or you’ll need to manually grant read permission to everyone who wants to use SPM.

To your users, you can provide the following instructions:

  1. Add https://github.com/context-sdk/context-sdk-releases as dependency

Conclusion

As we were building out our automated SDK distribution, we noticed there aren’t a lot of guides online around how to best develop, build and distribute your SDK as a pre-compiled binary, so we hope this article helps you to get started.

If you have any questions, feel free to reach out to us on Twitter or LinkedIn, or subscribe to our newsletter on contextsdk.com.

Note: This is a cross-post of the original publication on contextsdk.com.

]]>
Felix Krause
ContextSDK - Angel Round, Dieter Rappold joining as CEO, first large customers2023-10-24T00:00:00+00:002023-10-24T00:00:00+00:00https://krausefx.com/blog/context-sdk-fundingOver the last few months, a ton has happened with ContextSDK, a new developer tool to optimize apps based on the user’s current context:

Today, apps often have little logic when it comes to timing in-app communications or upsells. “Every day, billions of prompts and popups are shown at suboptimal times, resulting in annoyed users and increased churn.” said Felix Krause, co-founder of ContextSDK. “With today’s computing power, precise smartphone sensor data, combined with the latest machine learning algorithms, we can do much better than that.” Felix Krause aims to build the foundation for the next generation of mobile apps.


Angel Round

ContextSDK announces its first funding round, led by high profile Business Angels such as Peter Steinberger (founder of PSPDFKit), Johannes Moser (founder of Immerok), Michael Schuster (former Partner Speedinvest), Christopher Zemina (founder Friday Finance, GetPliant), Ionut Ciobotaru (former CEO Verve Group), Eric Seufert (Heracles Capital), Moataz Soliman (co-Founder Instabug) and others.

Dieter Rappold joining as CEO

Dieter Rappold has recently joined ContextSDK as co-founder and CEO. With more than 20 years of experience in building and scaling companies, Dieter will be responsible for the company’s growth and operations.

ContextSDK Performance

One recently onboarded customer, as a case study, showed 500 million upselling prompts, resulting in 24 million sales. With ContextSDK they experienced a remarkable +43% increase in conversion rates for new customers.

ContextSDK is an extremely lightweight SDK for iOS apps, using only 0.2% of CPU, less than a MB of memory footprint, and less than a MB added to the app’s binary size. It is fully GDPR compliant, not collecting any PII at any point.

Privacy

Recently passed laws across the world signify a clear trend towards user privacy and data protection, resulting in many previously used services to be deemed unlawful, or only offering limited capabilities.

ContextSDK was built from the ground up with privacy in mind. All processing, including the execution of machine learning models, happen on-device. ContextSDK operates without any type of PII (Personal Identifiable Information), thanks to a completely new and unique mechanism built to fully protect the user’s privacy while also helping app developers achieve their business goals.

New Website

We’ve also just launched our new ContextSDK website, now including more details on how ContextSDK works, and how it can help your business.

Interested in using ContextSDK?

As ContextSDK is a brand-new product, we carefully select the companies we want to work with. We’ve been seeing the best performance improvements for apps with a minimum of 20,000 monthly active users, as that’s where our machine learning approach really shines. If you believe your app would be a good fit, sign up for ContextSDK here.

We’re hiring

We’re hiring a Data Scientist, check out our careers page.

Full Press Release

Read the full press release on contextsdk.com

]]>
Felix Krause
ContextSDK - Introducing the most intelligent way to know how and when to monetize your user2023-04-28T00:00:00+00:002023-04-28T00:00:00+00:00https://krausefx.com/blog/context-sdkToday, whether your app is opened when your user is taking the bus to work, in bed about to go to sleep, or when out for drinks with friends, your product experience is the same. However, apps of the future will perfectly fit into the context of their users’ environment.

As app usage has exploded over the past decade, personalization and user context are becoming increasingly important to grow and retain your userbase. ContextSDK enables you to create intelligent products that adapt to users’ preferences and needs, all while preserving the user’s privacy and battery life using only on-device processing.

ContextSDK leverages machine learning to make optimized suggestions when to upsell an in-app purchase, what type of ad and dynamic copy to display, or predict what a user is about to do in your app, and dynamically change the product flows to best fit their current situation.

Commute on the train

Alone and bored at night

In a loud bar with friends

Your users have different needs based on the context of what they are doing and where they are. Shouldn’t your app be more personalized to better serve them?


ContextSDK takes hundreds of signals and builds a highly accurate and complex model, to correlate what a user is doing and the impact it has on in-app conversion events.

ContextSDK performance

Meta has published data on how “less is more” when it comes to notifications and user prompts: Even though in the short-term, just showing something on every possible occasion will increase your chances of the user engaging, in the long-run, you are better off showing fewer prompts, only when the user is most likely to convert.

Context matters! Large tech companies are already using those techniques to optimise their apps, and now is your chance to benefit from it as well. Sign up to get started.

]]>
Felix Krause
iOS Privacy: Announcing InAppBrowser.com - see what JavaScript commands get injected through an in-app browser2022-08-18T00:00:00+00:002022-08-18T00:00:00+00:00https://krausefx.com/blog/announcing-inappbrowsercom-see-what-javascript-commands-get-executed-in-an-in-app-browser

Please note that this article is outdated (August 2022). Importantly, the article does not claim that any data logging or transmission is actively occurring. Instead, it highlights the potential technical capabilities of in-app browsers to inject JavaScript code, which could theoretically be used to monitor user interactions.


Last week I published a report on the risks of mobile apps using in-app browsers. Some apps, like Instagram and Facebook, inject JavaScript code into third party websites that cause potential security and privacy risks to the user.

I was so happy to see the article featured by major media outlets across the globe, like TheGuardian and The Register, generated a over a million impressions on Twitter, and was ranked #1 on HackerNews for more than 12 hours. After reading through the replies and DMs, I saw a common question across the community:

An iPhone showing the inappbrowser.com website, rendered inside TikTok, showing how there is CSS code being added, added monitoring for all taps and all keyboard inputs, as well as getting the coordinates of elements the user taps

TikTok's In-App Browser injecting code to observe all taps and keyboard inputs, which can include passwords and credit cards

“How can I verify what apps do in their webviews?”

Introducing InAppBrowser.com, a simple tool to list the JavaScript commands executed by the iOS app rendering the page.

To try this this tool yourself:

  1. Open an app you want to analyze
  2. Share the url https://InAppBrowser.com somewhere inside the app (e.g. send a DM to a friend, or post to your feed)
  3. Tap on the link inside the app to open it
  4. Read the report on the screen
An iPhone showing the inappbrowser.com website, rendered inside TikTok, showing how there is CSS code being added, added monitoring for all taps and all keyboard inputs, as well as getting the coordinates of elements the user taps

TikTok's In-App Browser injecting code to observe all taps and keyboard inputs, which can include passwords and credit cards

I started using this tool to analyze the most popular iOS apps that have their own in-app browser. Below are the results I’ve found.

For this analysis I have excluded all third party iOS browsers (Chrome, Brave, etc.), as they use JavaScript to offer some of their functionality, like a password manager. Apple requires all third party iOS browsers apps to use the Safari rendering engine WebKit.

Important Note: This tool can’t detect all JavaScript commands executed, as well as doesn’t show any tracking the app might do using native code (like custom gesture recognisers). More details on this below.

Fully Open Source

InAppBrowser.com is designed for everybody to verify for themselves what apps are doing inside their in-app browsers. I have decided to open source the code used for this analysis, you can check it out on GitHub. This allows the community to update and improve this script over time.

iOS Apps that have their own In-App Browser

  • Option to open in default browser: Does the app provide a button to open the currently shown link in the default browser?
  • Modify page: Does the app inject JavaScript code into third party websites to modify its content? This includes adding tracking code (like inputs, text selections, taps, etc.), injecting external JavaScript files, as well as creating new HTML elements.
  • Fetch metadata: Does the app run JavaScript code to fetch website metadata? This is a harmless thing to do, and doesn’t cause any real security or privacy risks.
  • JS: A link to the JavaScript code that I was able to detect. Disclaimer: There might be other code executed. The code might not be a 100% accurate representation of all JS commands.
App Option to open in default browser Modify page Fetch metadata JS Updated
TikTok ⛔️ Yes Yes .js 2022-08-18
Instagram Yes Yes .js 2022-08-18
FB Messenger Yes Yes .js 2022-08-18
Facebook Yes Yes .js 2022-08-18
Amazon None Yes .js 2022-08-18
Snapchat None None 2022-08-18
Robinhood None None 2022-08-18

Click on the Yes or None on the above table to see a screenshot of the app.

Important: Just because an app injects JavaScript into external websites, doesn’t mean the app is doing anything malicious. There is no way for us to know the full details on what kind of data each in-app browser collects, or how or if the data is being transferred or used. This publication is stating the JavaScript commands that get executed by each app, as well as describing what effect each of those commands might have. For more background on the risks of in-app browsers, check out last week’s publication.

Even if some of the apps above have green checkmarks, they might use the new WKContentWorld isolated JavaScript, which I’ll describe below.

TikTok


Please note that this article is outdated (August 2022). Importantly, the article does not claim that any data logging or transmission is actively occurring. Instead, it highlights the potential technical capabilities of in-app browsers to inject JavaScript code, which could theoretically be used to monitor user interactions.


When you open any link on the TikTok iOS app, it’s opened inside their in-app browser. While you are interacting with the website, TikTok subscribes to all keyboard inputs (including passwords, credit card information, etc.) and every tap on the screen, like which buttons and links you click.

  • TikTok iOS subscribes to every keystroke (text inputs) happening on third party websites rendered inside the TikTok app. This can include passwords, credit card information and other sensitive user data. (keypress and keydown). We can’t know what TikTok uses the subscription for, but from a technical perspective, this is the equivalent of installing a keylogger on third party websites.
  • TikTok iOS subscribes to every tap on any button, link, image or other component on websites rendered inside the TikTok app.
  • TikTok iOS uses a JavaScript function to get details about the element the user clicked on, like an image (document.elementFromPoint)

Here is a list of all JavaScript commands I was able to detect.

Update: TikTok’s statement, as reported per Forbes.com:

The company confirmed those features exist in the code, but said TikTok is not using them.

“Like other platforms, we use an in-app browser to provide an optimal user experience, but the Javascript code in question is used only for debugging, troubleshooting and performance monitoring of that experience — like checking how quickly a page loads or whether it crashes,” spokesperson Maureen Shanahan said in a statement.

The above statement confirms my findings. TikTok injects code into third party websites through their in-app browsers that behaves like a keylogger. However claims it’s not being used.

Instagram does more than just inserting pcm.js

Last week’s post talked about how Meta injects the pcm.js script onto third party websites. Meta claimed they only inject the script to respect the user’s ATT choice, and additional “security and user features”.

The code in question allows us to respect people’s privacy choices by helping aggregate events (such as making a purchase online) from pixels already on websites, before those events are used for advertising or measurement purposes.

via this tweet

After improving the JavaScript detection, I now found some additional commands Instagram executes:

  • Instagram iOS subscribes to every tap on any button, link, image or other component on external websites rendered inside the Instagram app.
  • Instagram iOS subscribes to every time the user selects a UI element (like a text field) on third party websites rendered inside the Instagram app.

Here is a list of all JavaScript commands I was able to detect.

Note on subscribing: When I talk about “App subscribes to”, I mean that the app subscribes to the JavaScript events of that type (e.g. all taps). There is no way to verify what happens with the data.

Apps can hide their JavaScript activities from this tool

Since iOS 14.3 (December 2020), Apple introduced the support of running JavaScript code in the context of a specified frame and content world. JavaScript commands executed using this approach can still fully access the third party website, but can’t be detected by the website itself (in this case a tool like InAppBrowser.com).

Use a WKContentWorld object as a namespace to separate your app’s web environment from the environment of individual webpages or scripts you execute. Content worlds help prevent issues that occur when two scripts modify environment variables in conflicting ways. […] Changes you make to the DOM are visible to all script code, regardless of content world.

Apple WKContentWorld Docs

This new system was initially built so that website operators can’t interfere with JavaScript code of browser plugins, and to make fingerprinting more difficult. As a user, you can check the source code of any browser plugin, as you are in control over the browser itself. However with in-app browsers we don’t have a reliable way to verify all the code that is executed.

So when Meta or TikTok want to hide the JavaScript commands they execute on third party websites, all they’d need to do is to update their JavaScript runner:

// Currently used code by Meta & TikTok
self.evaluateJavaScript(javascript)

// Updated to use the new system
self.evaluateJavaScript(javascript, in: nil, in: .defaultClient, completionHandler: { _ in })

For example, Firefox for iOS already uses the new WKContentWorld system. Due to the open source nature of Firefox and Google Chrome for iOS it’s easy for us as a community to verify nothing suspicious is happening.

Especially after the publicity of last week’s post, as well as this one, tech companies that still use custom in-app browsers will very quickly update to use the new WKContentWorld isolated JavaScript system, so their code becomes undetectable to us.

Hence, it becomes more important than ever to find a solution to end the use of custom in-app browsers for showing third party content.

Valid use-cases for in-app webviews

There are many valid reasons to use an in-app browser, particularly when an app accesses its own websites to complete specific transactions. For example, an airline app might not have the seat selection implemented natively for their whole airplane fleet. Instead they might choose to reuse the web-interface they already have. If they weren’t able to inject cookies or JavaScript commands inside their webview, the user would have to re-login while using the app, just so they can select their seat. Shoutout to Venmo, which uses their own in-app browser for all their internal websites (e.g. Terms of Service), but as soon as you tap on an external link, they automatically transition over to SFSafariViewController.

However, there are data privacy & integrity issues when you use in-app browsers to visit non-first party websites, such as how Instagram and TikTok show all external websites inside their app. More importantly, those apps rarely offer an option to use a standard browser as default, instead of the in-app browser. And in some cases (like TikTok), there is no button to open the currently shown page in the default browser.

iOS Apps that use Safari

The apps below follow Apple’s recommendation of using Safari or SFSafariViewController for viewing external websites. More context on SFSafariViewController in the original article.

All apps that use SFSafariViewController or Default Browser are on the safe side, and there is no way for apps to inject any code onto websites, even with the new WKContentWorld system.

App Technology Updated
Twitter SFSafariViewController 2022-08-15
Reddit SFSafariViewController 2022-08-15
WhatsApp Default Browser 2022-08-15
Slack Default Browser 2022-08-16
Google Maps SFSafariViewController 2022-08-15
YouTube Default Browser 2022-08-15
Gmail Default Browser 2022-08-15
Telegram SFSafariViewController 2022-08-15
Signal SFSafariViewController 2022-08-15
Tweetbot SFSafariViewController 2022-08-15
Spotify Default Browser 2022-08-15
Venmo SFSafariViewController 2022-08-15
Microsoft Teams Default Browser 2022-08-16
Microsoft Outlook Default Browser or Edge 2022-08-16
Microsoft OneNote Default Browser 2022-08-16
Twitch Default Browser 2022-08-16

What can we do?

As a user of an app

A link to the YouTube video showing the website in action inside the Instagram app

Demo video of how to escape the Instagram In-App Browser

Most in-app browsers have a way to open the currently shown website in Safari. As soon as you land inside an in-app browser, use the Open in Browser feature to switch to a safer browser. If that button isn’t available, you will have to copy & paste the URL to open the link in the browser of your choice. If the app makes it difficult to even do that, you can tap & hold a link on the website and then use the Copy feature, which can be a little tricky to get right.

TikTok doesn’t have a button to open websites in the default browser.

Update: According to some tweets, sometimes there is a way to open websites in the default browser.

Companies using in-app browsers

If you’re at a company where you have an in-app browser, use it only for your own pages and open all external links in the user’s default browser. Additionally, provide a setting to let users choose a default browser over an in-app browser experience. Unfortunately, these types of changes rarely get prioritized over features that move metrics inside of tech organizations. However, it’s so important for people to educate others on their team, and their managers, about the positive impact of making better security and privacy decisions for the user. These changes can be transparently marketed to users as an opportunity to build further trust.

Major tech companies

It’s important to call out how much movement there’s been in the privacy of data space, but it’s unclear how many of these changes have been motion vs. true progress for the industry and the user.

“Many tech companies take heat for ‘abusing their users’ privacy’, when in fact they try to balance out business priorities, great user experiences, and ensuring they are respecting privacy and user data. It’s clear why companies were motivated to provide an in-app experience for external websites in the first place.

With the latest technology, companies can start to provide a smooth experience for the user, while respecting their privacy. It’s possible for iOS or Android developers to move the privacy standards and responsibility to Apple & Google (e.g. stricter app reviews, more permission screens, etc.), however this is a much larger conversation where companies need to work together to define what standards should exist. We can’t have one or two companies set the direction for the entire industry, since a solution needs to work for the large majority of companies. Otherwise, we’re left in a world where companies are forced to get creative on finding ways to track additional user data from any source possible, or define their own standards of what’s best for user privacy, ultimately hurting the consumer and the product experience.”

Hemal Shah

Technology-wise App-Bound Domains seems to be an excellent new WebKit feature making it possible for developers to offer a safer in-app browsing experience when using WKWebView. As an app developer, you can define which domains your app can access (your own), and you won’t be able to control third party pages any more. To disable the protection, a user would have to explicitly disable it in the iOS settings app. However, at the time of writing, this system is not yet enabled by default.

FAQs for non-tech readers

  • Can in-app browsers read everything I do online? Yes, if you are browsing through their in-app browser they technically can.
  • Do the apps above actually steal my passwords, address and credit card numbers? No! I wanted to showcase that bad actors could get access to this data with this approach. As shown in the past, if it’s possible for a company to get access to data legally and for free, without asking the user for permission, they will track it.
  • How can I protect myself? Whenever you open a link from any app, see if the app offers a way to open the currently shown website in your default browser. During this analysis, every app besides TikTok offered a way to do this.
  • Are companies doing this on purpose? Building your own in-app browser takes a non-trivial time to program and maintain, significantly more than just using the privacy and user-friendly alternative that’s already been built into the iPhone for the past 7 years. Most likely there is some motivation there for the company to track your activities on those websites.
  • I opened InAppBrowser.com inside an app, and it doesn’t show any commands. Am I safe? No! First of all, the website only checks for one of many hundreds of attack vectors: JavaScript injection from the app itself. And even for those, as of December 2020, app developers can completely hide the JavaScript commands they execute, therefore there is no way for us to verify what is actually happening under the hood.

Please note that this article is outdated (August 2022). Importantly, the article does not claim that any data logging or transmission is actively occurring. Instead, it highlights the potential technical capabilities of in-app browsers to inject JavaScript code, which could theoretically be used to monitor user interactions.


]]>
Felix Krause