This feature is only available in the Pro version of Independent Analytics.
Like most premium WordPress plugins, Independent Analytics Pro has an annual subscription.
However, it is not a subscription like Spotify or Dropbox. You will never lose access to your data or Independent Analytics Pro after your initial purchase.
When you purchase Independent Analytics Pro, you’ll get the latest version and every update released for the next year. Your license will automatically renew for an additional year at the same price you paid initially.
What happens if I cancel my subscription?
Essentially, nothing.
If you cancel, you just lose access to new versions of Independent Analytics Pro. You can continue using your current version forever.
For example, let’s say you have version 1.5, and your license expires today. Tomorrow, you will continue recording data as usual. Now let’s say version 1.6 comes out a month later with an awesome new feature you want. In order to get 1.6, you will need to renew your license. When you renew, you’ll get version 1.6 and access to every other update released over the coming year.
Is there a lifetime license?
Yes, if you visit the Pricing page, you’ll see a Lifetime toggle button you can click to switch to lifetime pricing.
A lifetime license works exactly the way it sounds; you pay once and get Independent Analytics Pro and all future updates for life. There’s no subscription or further costs.
If something is still unclear to you about our pricing model, please contact us, and we’ll be happy to help.
This feature is only available in the Pro version of Independent Analytics.
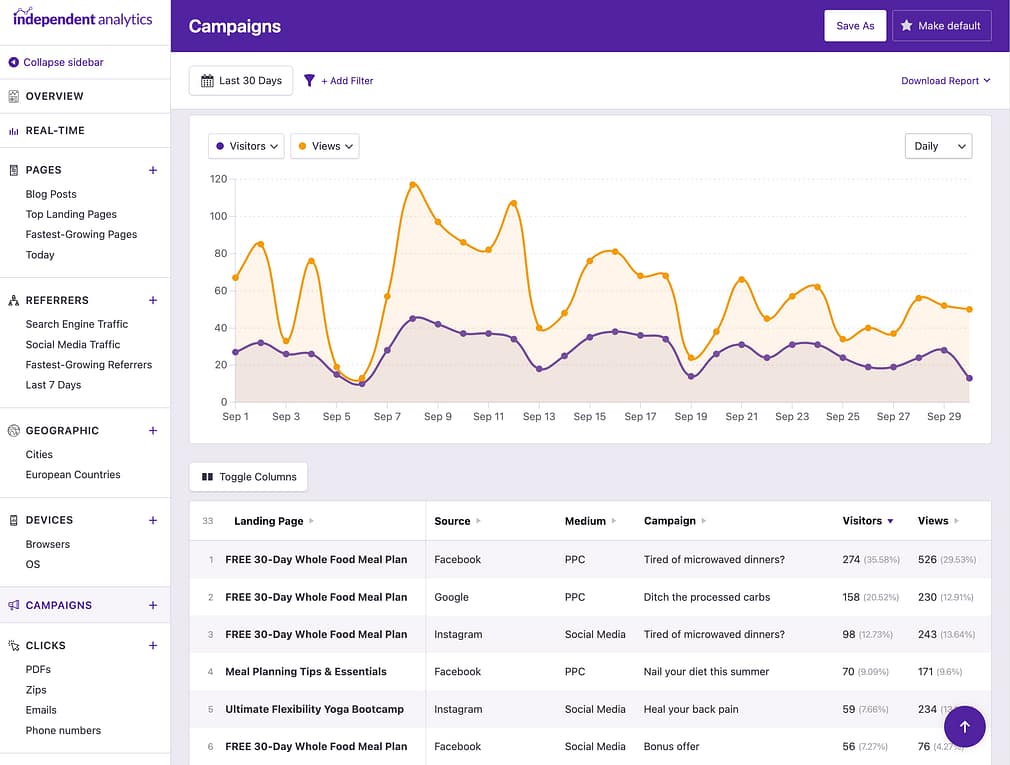
Campaign URLs give you the ability to track exactly which links sent visitors to your site.
For example, let’s say you want to know how many visitors click on the link in your Twitter bio. Using the Campaign URL Builder, you could create a URL like this:
This URL tells us that the source is Twitter, the medium is social media, and this link, in particular, is from your Twitter bio.
In the Campaigns dashboard, you’ll be able to see how many visitors click on this link:
As you can see, Campaign URLs are extremely useful for tracking precisely where your traffic comes from, so you can evaluate the effectiveness of your marketing efforts.
You can use Campaign URLs any time you have control over an external link. This applies to:
Paid ads
Guest posts
Email marketing
Social posts
And more
Now that you understand the value of using campaign URLs, here’s how you can get started creating campaign links:
This feature is only available in the Pro version of Independent Analytics.
Watch the video tutorial here to learn how to use the Campaigns report and the Campaign Builder.
Using the UTM parameters, you can create new links that will be tracked in the Campaigns menu.
While you can type out campaign URLs manually, it’s easy to make a mistake, and if you misspell a parameter name, it won’t be tracked.
For this reason, it’s easier and more reliable to use the Campaign Builder.
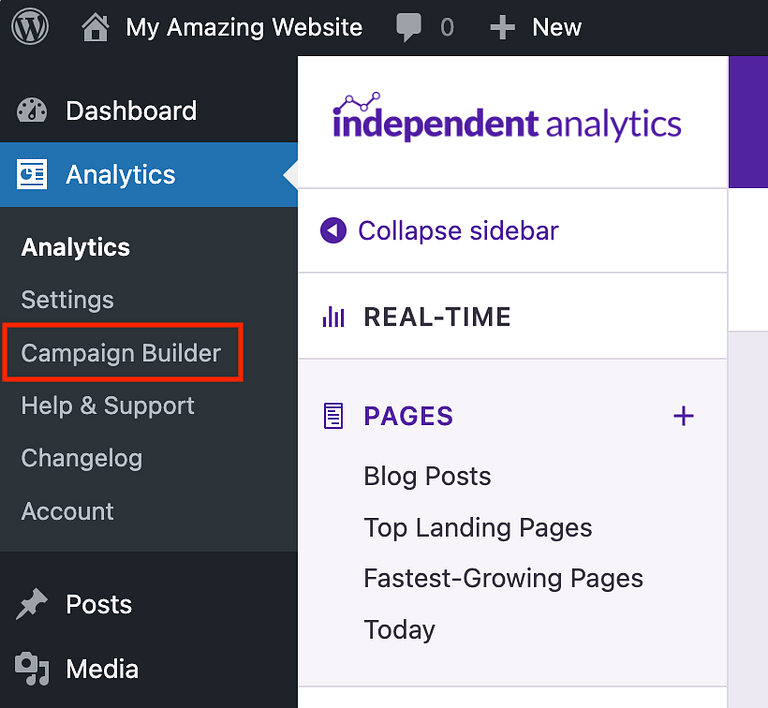
To access the Campaign URL builder, hover your cursor over the Campaigns menu item and click the Campaign Builder link.
You don’t have to create your campaign URLs with the Campaign Builder for them to be tracked. Campaign URLs that are created dynamically by email and ad platforms will be tracked too.
How to use the Campaign Builder
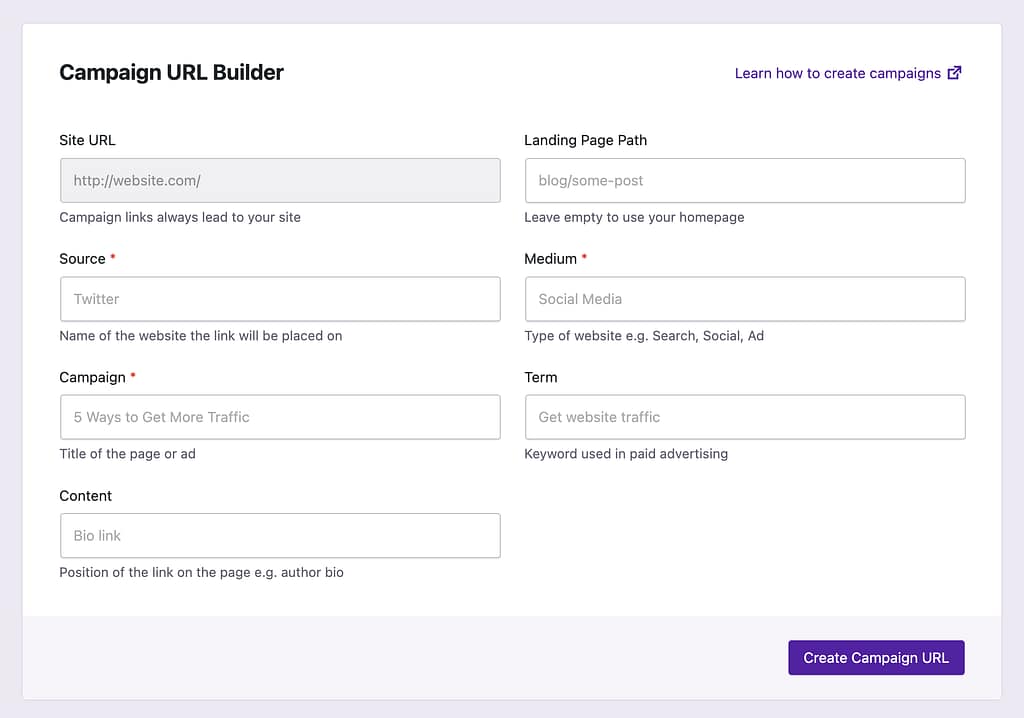
Using the builder is pretty straightforward. Here’s what it looks like:
To create a campaign URL, simply fill out the required fields and any additional fields you’d like to use, and then click the Create Campaign URL button at the bottom.
There are full descriptions of each field/parameter below.
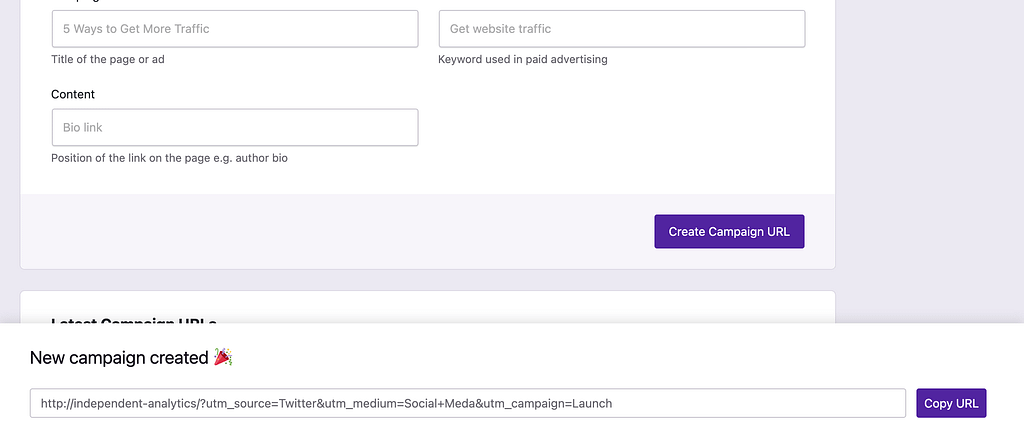
After a moment, you’ll see a notice appear at the bottom of the screen with your new campaign URL and a Copy URL button.
Additionally, the newly created link will be added to the top of your latest campaign URLs.
Tip: keep the spelling the same
If you create a campaign link for Facebook and you enter “Social” into the Medium field, and then you create another campaign link for Facebook but enter “Social Media” into the Medium field, this will make it harder to analyze your links in the Campaigns report.
For instance, if you group your links by Medium, you will see a separate row for “Social” vs. “Social Media.” To help you avoid this, each campaign link has a Copy to Form button.
If you click this button, it will refill the form with the same text you used for this campaign. Then you can make any necessary modifications and create a new link.
This makes it much easier to maintain consistent spelling and naming conventions across your campaigns.
Here’s how to use each field
If you’re new to campaign tracking, all the parameters can be overwhelming. Here’s how to use each parameter.
Landing page path (optional)
Campaign URLs have to point to your site, which is why the Site URL field cannot be edited. Next to it is the Landing Page Path field, which is used to create a link pointing to a specific page on your site.
For example, if your site is called mysite.com and you want to link to mysite.com/blog/awesome-article/, you would enter the following into the Landing Page Path field:
blog/awesome-article/
If you want to link to your homepage, you can leave the Landing Page Path field empty.
Source (required)
The source is the name of the site that sent you traffic, such as Facebook or Etsy.
For email marketing campaigns, you can use the name of the automation/series. For example, “newsletter” or “7-day course.”
Medium (required)
The medium is the type of site the link is on. For instance, you can use “Social” or “Social Media” for a campaign link placed on Facebook.com.
Campaign (required)
Campaigns are more open to interpretation, but they’re generally used to discern between different marketing campaigns on the same medium and source. For example, if you write two guest posts for the same blog, the source and medium would be the same, but you could use the title of the post as the campaign to differentiate between the two posts.
Term (optional)
The Term parameter is mainly used for paid advertising campaigns. You can use it to store the keywords you used for the link so you can track performance on a keyword level. Again, it’s mainly used for paid advertising campaigns.
Content (optional)
The Content parameter is used when multiple links on the same page are present. For instance, imagine you have an email urging readers to purchase a product, and there’s a link in the middle of the email and the bottom. You can use the Content parameter to differentiate between these two links and find out which one is getting the most clicks.
This feature is only available in the Pro version of Independent Analytics.
URL parameters are used to add information to a URL without changing the page it points to.
UTM parameters are a specific set of URL parameters used for tracking the origin of website visitors. These parameters have been adopted by many marketing tools over decades and are essentially standardized.
The UTM parameters are as follows:
utm_source
utm_medium
utm_campaign
utm_term
utm_content
An example URL using UTM parameters might look like this:
When creating campaign links, you’ll notice that the fields have names like “Source,” but the link parameters look like “utm_source.”
You may be wondering, what’s with the “utm” part?
Back in 2005, Google acquired an analytics company called Urchin and rebranded their platform as Google Analytics. Urchin had a campaign tracking feature called “Urchin Tracking Module,” which is where UTM is derived from.
Google Analytics retained this naming convention because it was already widely used. Fast forward 17 years, and we’re doing the same thing.
We know that many of our users already make use of UTM parameters, and we want their transition to Independent Analytics Pro to be as smooth as possible, so we’ve stuck with the same parameter names.
Furthermore, these parameters have been adopted by many other marketing tools and ad platforms, making their use essential for seamless tracking & integration.
This feature is only available in the Pro version of Independent Analytics.
In order to use the Campaigns dashboard, you’ll want to start by creating campaign links with the Campaign Builder.
The links you create will show up in the Campaigns dashboard once they’ve received at least one click. In the Campaigns dashboard, you’ll see every view and visitor that came from a click on a campaign URL.
With this dashboard, you can see exactly how many views and visitors you’ve received from each campaign URL.
With the Campaigns report, you’ve got one centralized location where you can review your campaign performance any time.
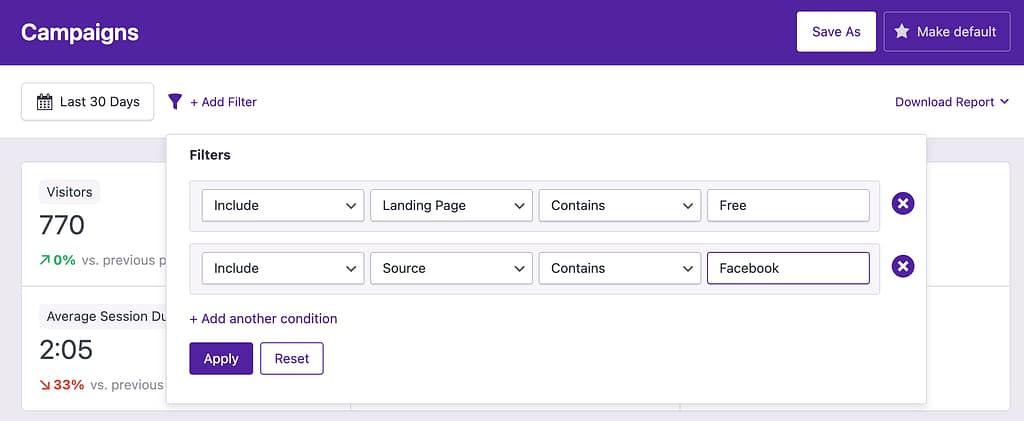
Grouping options
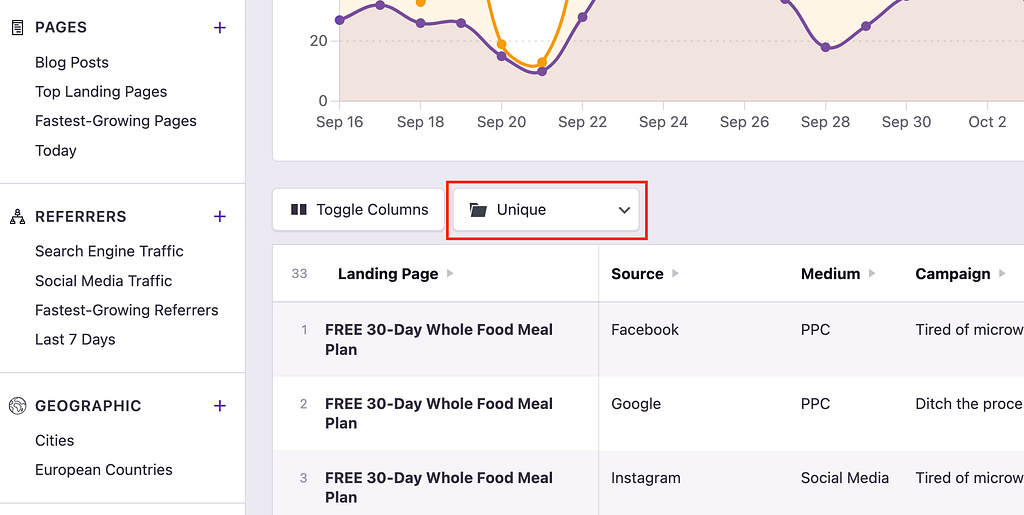
By default, the table will show you every unique campaign. This is very useful, but it can become problematic if you have tons of unique Term and Content fields. This can cause a single campaign to occupy dozens of rows, making it hard to review its performance.
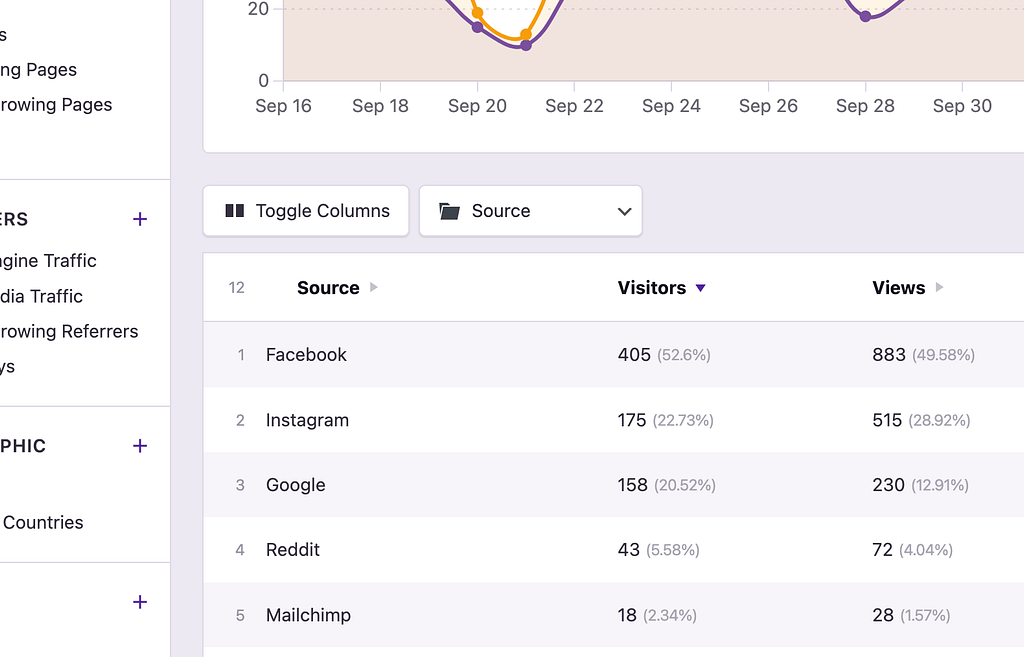
For this reason, you will find a dropdown option above the table that lets you switch the row grouping from Unique to Landing Page, Source, Medium, or Campaign.
For example, if you group the table rows by Source, it will look like this:
This lets you see exactly how many campaign visitors you’ve gotten from individual sources, like Facebook or your Mailchimp emails.
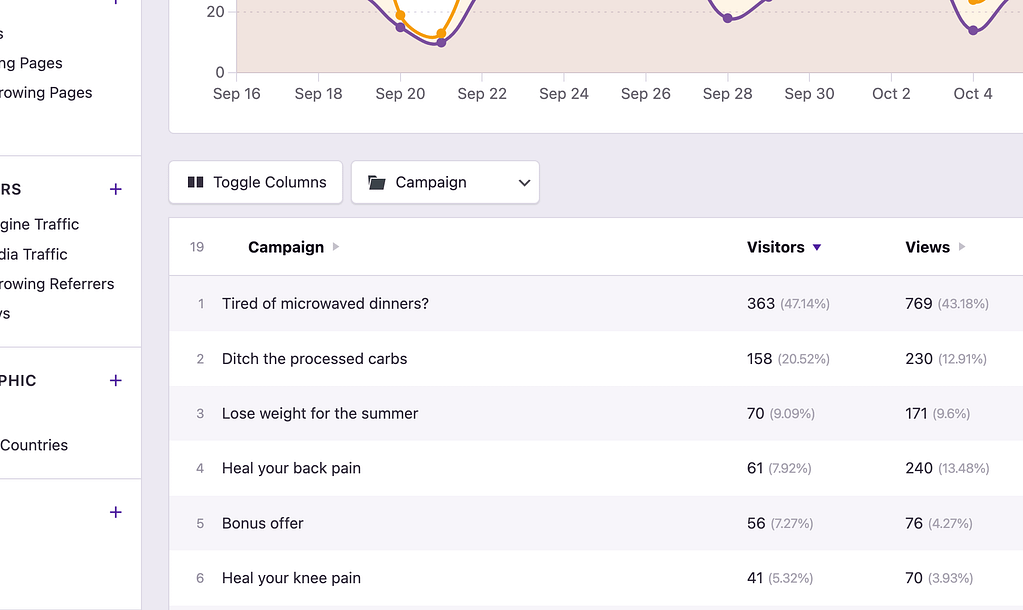
Likewise, you can group the rows by the Campaign field.
This reveals the performance of each campaign, regardless of the landing page, source, or medium. This makes it much easier to evaluate and compare your marketing campaigns to find out which ones are working best.
This feature is only available in the Pro version of Independent Analytics.
Download the plugin
After you checkout, you will receive an email with your download link and license key.
Click the download link in your purchase receipt email, and you’ll get a file called independent-analytics-pro.zip.
If you’re using the Safari browser, it may automatically unzip the file so that you end up with a folder called independent-analytics-pro. If this happens, alt-click the folder and choose the “Compress” option to turn it back into a zip file.
If you did not receive this email, please contact us, and let us know the email address you used at checkout.
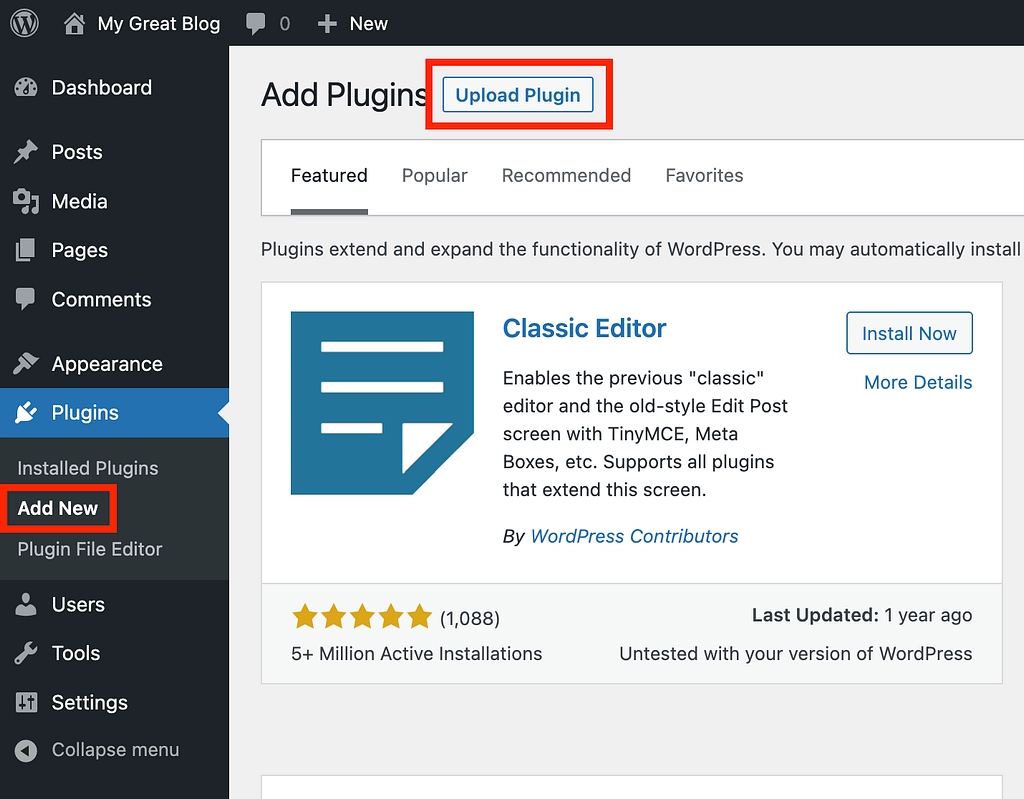
Upload the plugin
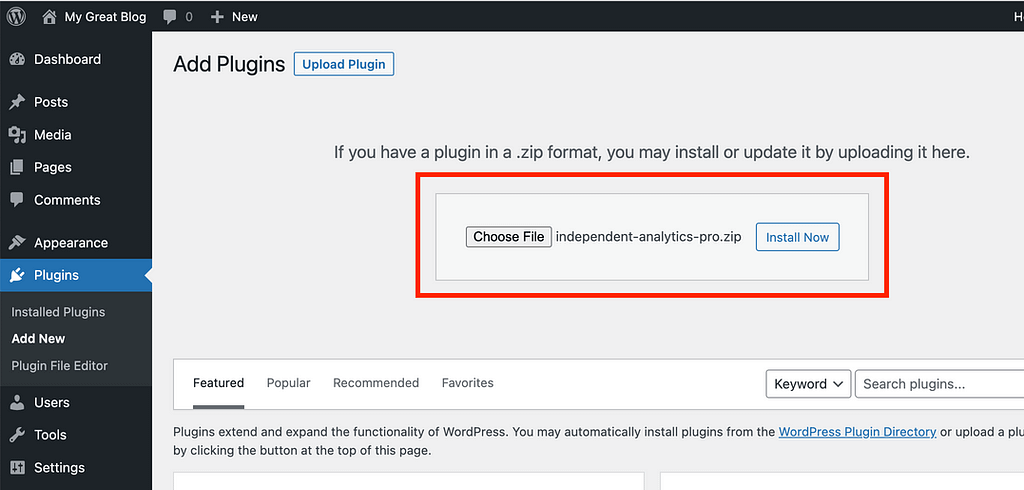
Next, login to your site, visit the Plugins > Add New menu, and click the Upload Plugin button at the top of the page.
In the uploader form that appears on the same page, choose the independent-analytics-pro.zip file and then click the Install Now button.
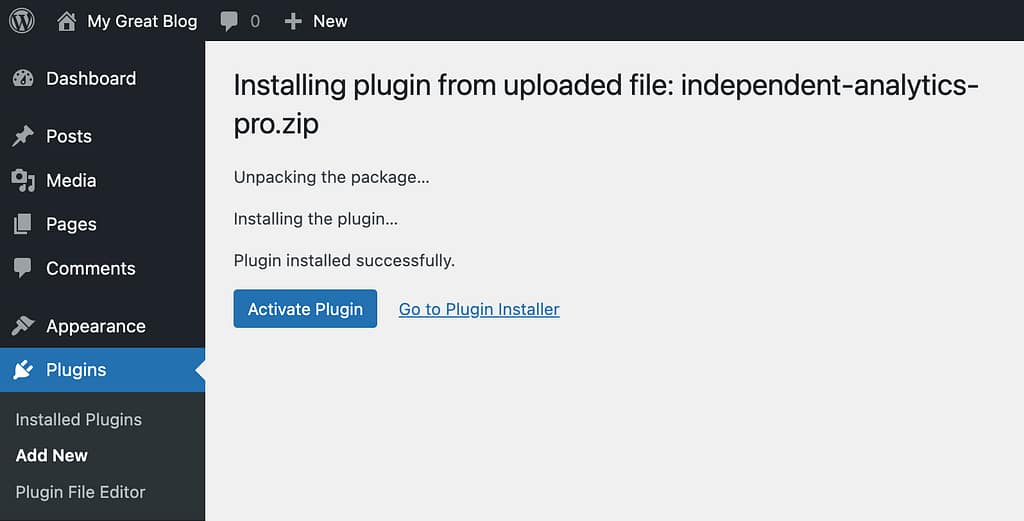
Once the installation is complete, you’ll see a page like this:
Click the Activate Plugin button to complete the activation.
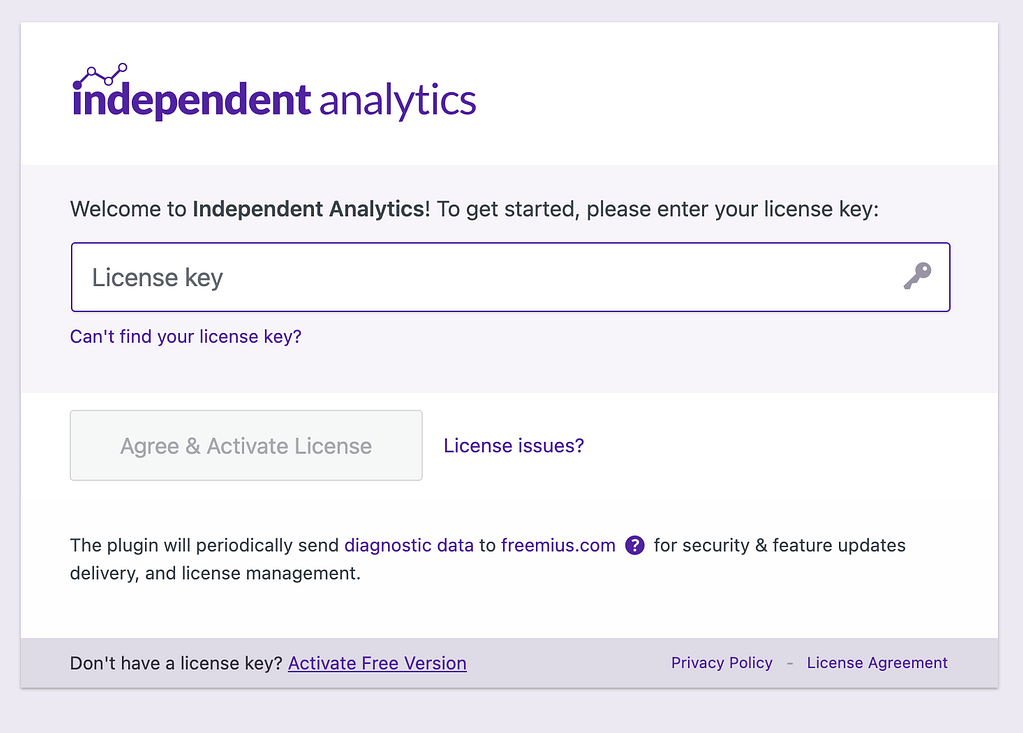
With the plugin installed, the final step is to activate your license key.
The free Independent Analytics plugin will be deactivated automatically when you install the Pro version. You can delete the free plugin from your Plugins menu if you’d like. Only the Pro version is needed.
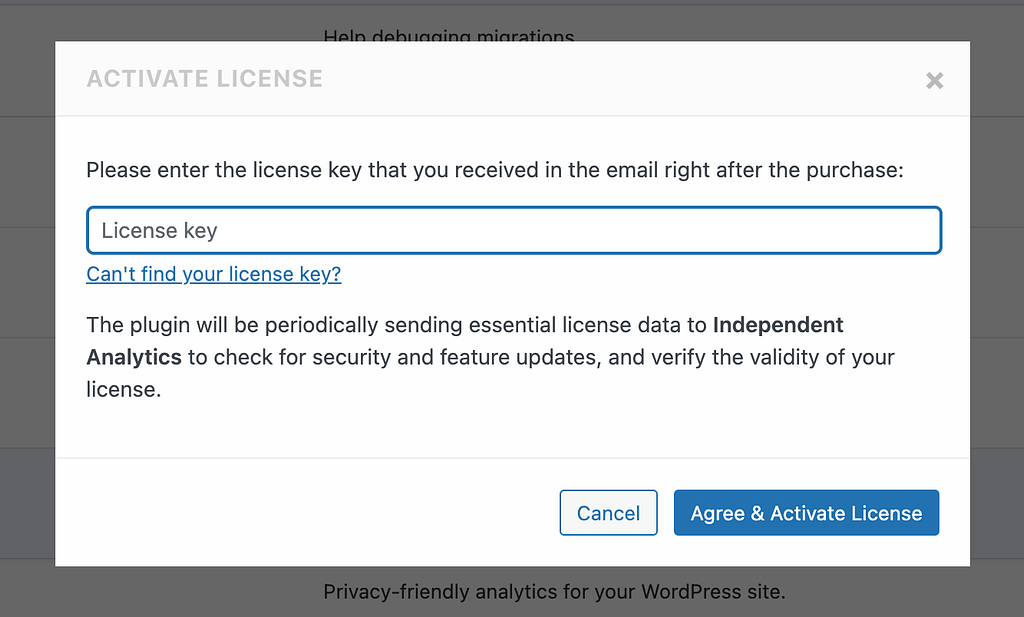
Enter your license key
After clicking the Activate Plugin button in the previous step, you should now see this page requesting a license key:
You can find your license key in the same email that included your download link. Copy and paste it into the license key field and click the Agree & Activate License button.
In just a moment, you’ll be redirected to the Analytics dashboard, and the activation process is complete.
If you don’t see the activation form…
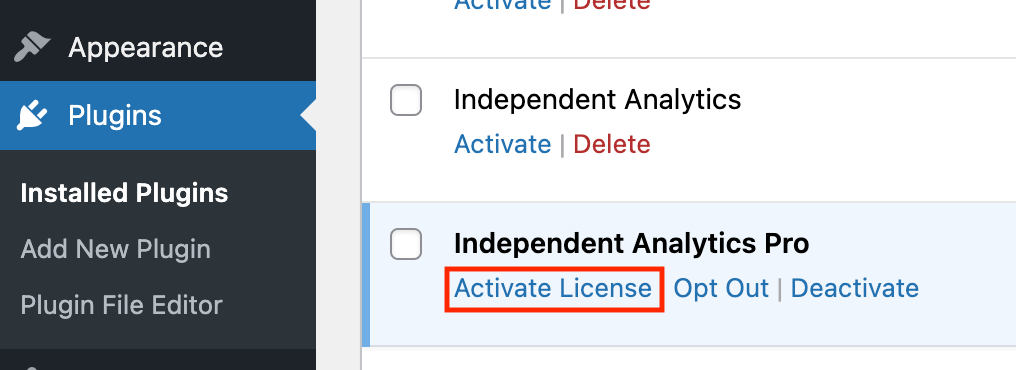
If, for some reason, you don’t see the license activation form when you visit the Analytics menu, you can activate your license key from the Plugins menu instead.
Please visit the Plugins menu and scroll down to the Independent Analytics Pro plugin. Next, click on the Activate License link.
This will open a modal where you can then enter your license key.
Once you’ve entered your license key, all features will be unlocked, and Independent Analytics Pro will be fully activated on your website.
Here’s what to do next
After installing Independent Analytics Pro, you can watch one of our video tutorials to get started with the new features:
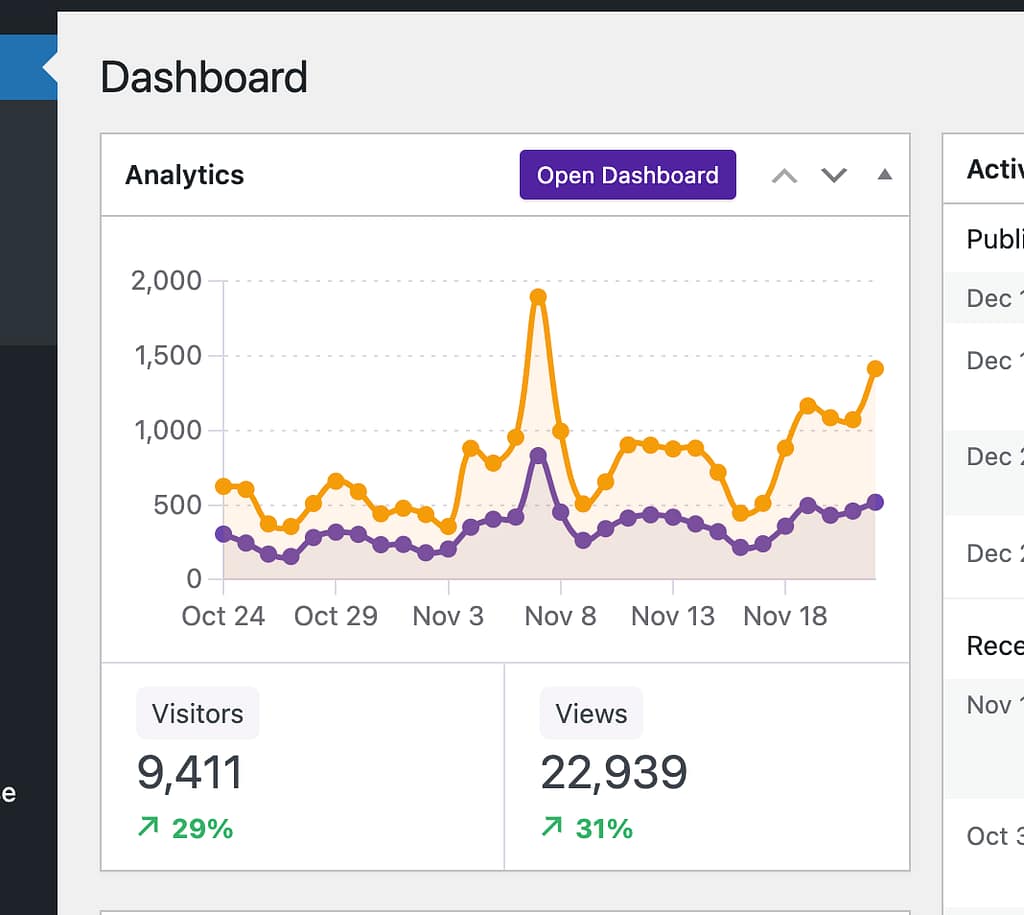
Independent Analytics adds a widget to your admin dashboard with a small chart and your total views and visitors from the last 30 days.
You can click the chart labels to toggle the visibility of their lines
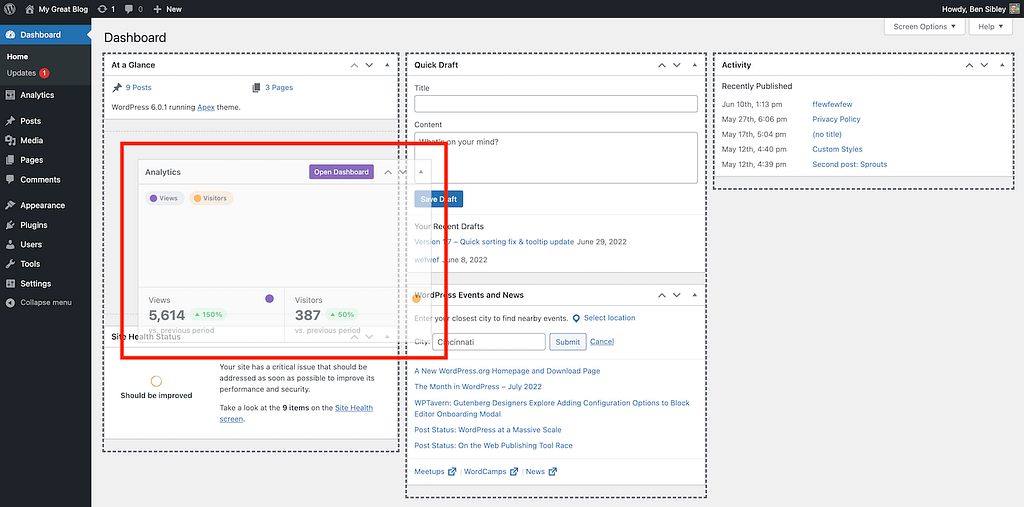
Exactly where it displays in your dashboard depends on how much you’ve customized your widgets already and what widgets other plugins have added.
However, it is simple to reposition it in your dashboard or hide it entirely.
How to reposition the widget
If you hover your cursor over the heading of the widget, you’ll see it change into the drag-and-drop icon. Then you can click and drag to move it into a new position.
You’ll see 1-4 columns depending on the width of your screen, and you can drop it above/below any widget in each column.
Once you drop it, it will remain there whenever you view your dashboard.
Dashboard configurations are set individually for each user, so your modifications here only affect the way you see it.
How to hide the widget
If you’d prefer not to display the dashboard widget, you can hide it.
Visit the Settings, and near the top, locate the Dashboard widget setting.
Click the Disable dashboard widget checkbox and then click the Save Settings button.
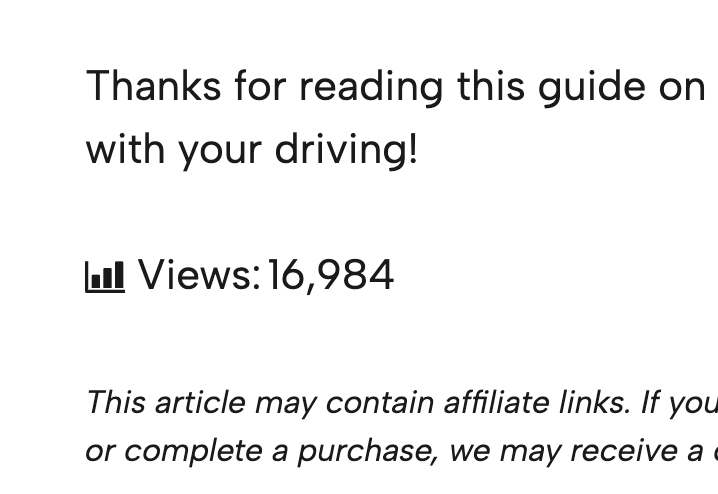
When enabled, the view counter will show up after the content of your posts. It looks like this:
This serves as a form of social proof to let visitors know how many others are reading your content. It can also be helpful if you sell advertising services and want potential clients to see what kind of reach they can expect.
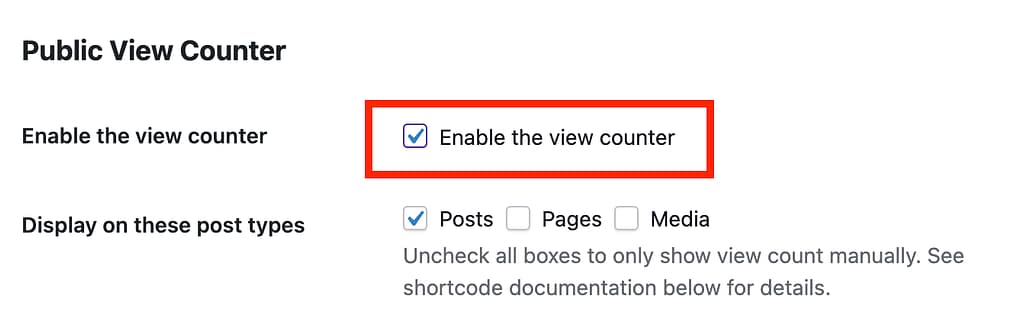
It’s not enabled by default, so the first step is to turn it on.
How to display the view counter
Enabling the view counter is very easy.
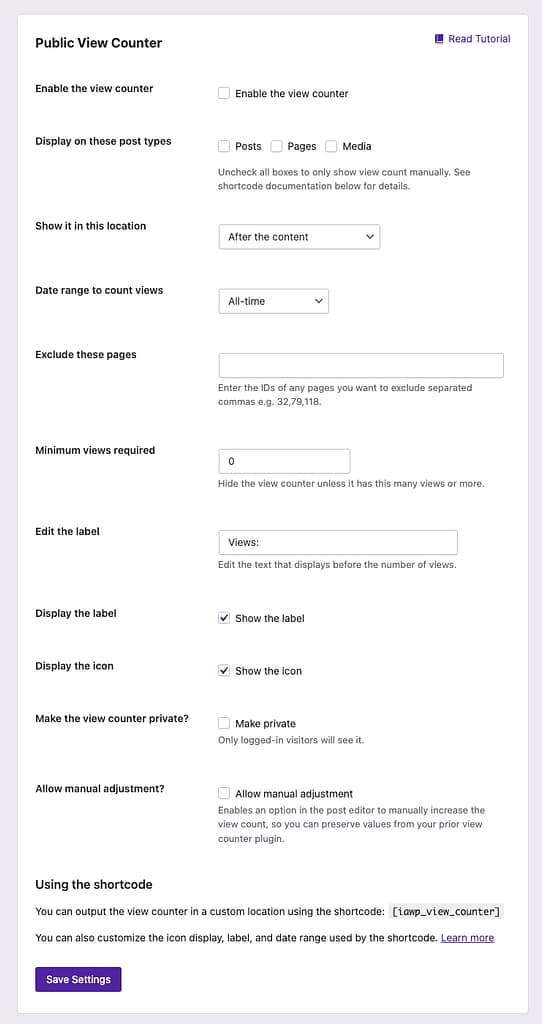
Start by visiting the Settings menu and scroll down to the Public View Counter section.
To enable the counter, all you have to do is check the first box and click the Save settings button.
Once this is complete, the view counter will show up after the content of all your posts, styled the same way as pictured in the screenshot at the beginning of this tutorial.
Choose the post type
By default, the view counter only displays on your posts, but you can quickly enable it on any of your page types.
For example, if you check the Pages box, it will show up after the content of every page on your site. If you have any custom post types, they’ll display here as well.
Change the location
The view counter displays after the content, but you can also display it before the content or both before and after.
Choose the date range
By default, the view counter shows the total number of views the page has gotten. However, you can limit this to a shorter range so that it will only count views from today, the last 30 days, last month, etc.
Exclude individual pages
You can remove the counter from an individual post/page by entering its ID into this input:
This would hide the counter on a page with the ID 258
For example, you could show the view counter on all of your pages except for your homepage by enabling the Pages post type and then entering the homepage’s ID here.
You can follow this brief tutorial if you don’t know how to find the ID of a page: how to find a page’s ID.
Set a minimum view count to display the counter
If you have an established site and switch to using Independent Analytics for your view counters, the count will have to begin from 0. You may not want people to see low counts for some of your pages before they have time to get more views.
In this case, you can make use of the Minimum views required setting.
With this option, you can choose the minimum number of views a post needs to have to show the view counter. For instance, let’s say you have a post with only 12 views, and you don’t want the view counter to show up until it has at least 100. You would set the Minimum views required field to “100,” and the view counter would immediately disappear on that post and only reappear once it’s been viewed 100 times.
Edit the label & icon
If you want to change the text that appears before the count (Views:), you can do so via the label input. If you’d prefer not to show the small chart icon, that can be removed by unchecking the Show the icon box. You also have the option to hide the label completely by unchecking the Show the label checkbox.
Make it private
If you only want the view counter to show up for logged-in visitors of the site, you can make it private.
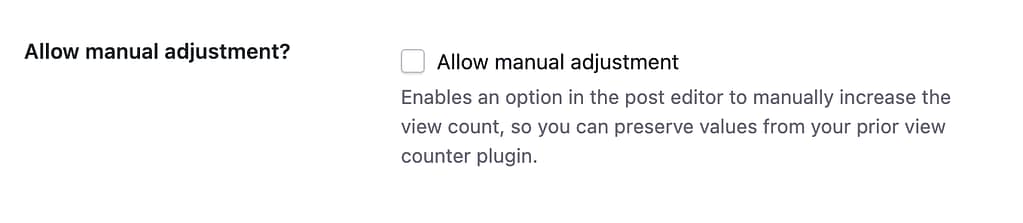
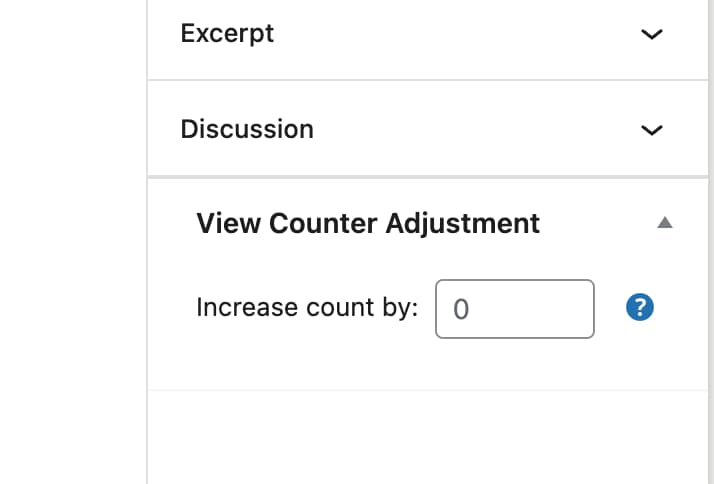
Allow manual adjustment
If you switched from another view counter plugin, you may want to make a manual adjustment to get credit for previous post views. To do that, you can enable this option.
Then, in the post editor, you’ll see this new box where you can enter a manual adjustment.
The value entered here will be added to whatever view count is recorded by Independent Analytics.
If you want to modify this value programmatically for a large number of posts, you can use the iawp_view_counter_adjustment post meta field. You would take your current counts and copy them into that field.
Please note that in order for the View Counter Adjustment setting to appear for a post, the view counter needs to be enabled for the Post page type. The same goes for pages and other post types.
How to use the shortcode
There are times when you may want to output the view counter in a custom location.
For instance, you may want to include the view counter in a widget, an Elementor template, or with your post excerpts on archive pages.
This is where the shortcode comes in handy. You can use it to output the counter wherever you want.
Geo data derived from an IP address is never perfectly accurate. This technology is not like the GPS in your phone used when calling an Uber, where permission is granted for precise tracking. In this case, the visitor’s location is approximated based on their IP address. This ensures the calculated location is nearby, but there is a bit of guesswork involved, which can lead to inaccuracies.
Accuracy estimates
Continent and country locations are accurate roughly 99% of the time. Subdivision accuracy is about 80%, and city accuracy is around 66%.
When a city is incorrectly interpreted, it’s because a nearby city was selected as the most likely location instead. For instance, a visitor in Philadelphia, Pennsylvania, could be recorded as being from Pittsburgh, Pennsylvania. While incorrect, the location is still relatively close. You will not see, however, a location that is wildly inaccurate, like a New York visitor recorded as being in Paris.
In summary, you can have great confidence in the continents and countries reported in the world map and data table, while subdivision and city data should be viewed as more approximate.