-
Notifications
You must be signed in to change notification settings - Fork 1
Expand file tree
/
Copy path9.html
More file actions
273 lines (273 loc) · 23.2 KB
/
Copy path9.html
File metadata and controls
273 lines (273 loc) · 23.2 KB
1
2
3
4
5
6
7
8
9
10
11
12
13
14
15
16
17
18
19
20
21
22
23
24
25
26
27
28
29
30
31
32
33
34
35
36
37
38
39
40
41
42
43
44
45
46
47
48
49
50
51
52
53
54
55
56
57
58
59
60
61
62
63
64
65
66
67
68
69
70
71
72
73
74
75
76
77
78
79
80
81
82
83
84
85
86
87
88
89
90
91
92
93
94
95
96
97
98
99
100
101
102
103
104
105
106
107
108
109
110
111
112
113
114
115
116
117
118
119
120
121
122
123
124
125
126
127
128
129
130
131
132
133
134
135
136
137
138
139
140
141
142
143
144
145
146
147
148
149
150
151
152
153
154
155
156
157
158
159
160
161
162
163
164
165
166
167
168
169
170
171
172
173
174
175
176
177
178
179
180
181
182
183
184
185
186
187
188
189
190
191
192
193
194
195
196
197
198
199
200
201
202
203
204
205
206
207
208
209
210
211
212
213
214
215
216
217
218
219
220
221
222
223
224
225
226
227
228
229
230
231
232
233
234
235
236
237
238
239
240
241
242
243
244
245
246
247
248
249
250
251
252
253
254
255
256
257
258
259
260
261
262
263
264
265
266
267
268
269
270
271
272
273
<!doctype html>
<html lang="zh-CN">
<head>
<meta charset="utf-8" />
<meta name="viewport" content="width=device-width, initial-scale=1" />
<meta name="description" content="CodeClub - Docker 容器连接" />
<meta name="author" content="Jackson" />
<title>Docker 容器连接 - CodeClub</title>
<link rel="icon" type="image/x-icon" href="../../img/logo.png" />
<link rel="preconnect" href="https://fonts.googleapis.com" />
<link rel="preconnect" href="https://fonts.gstatic.com" crossorigin />
<link
href="https://fonts.googleapis.com/css2?family=Inter:wght@300;400;500;600;700&display=swap"
rel="stylesheet"
/>
<link
rel="stylesheet"
href="https://cdnjs.cloudflare.com/ajax/libs/font-awesome/6.5.1/css/all.min.css"
crossorigin="anonymous"
referrerpolicy="no-referrer"
/>
<link rel="stylesheet" href="../../css/main.css" />
<link rel="stylesheet" href="../../css/dark-mode.css" />
<link rel="stylesheet" href="../../css/mobile-optimizations.css" />
<script src="https://cdnjs.cloudflare.com/ajax/libs/marked/12.0.0/marked.min.js"></script>
<style>
.tutorial-page {
max-width: 1200px;
margin: 70px auto 40px;
padding: 0 20px;
display: flex;
gap: 20px;
}
.tutorial-sidebar {
width: 240px;
flex-shrink: 0;
position: sticky;
top: 70px;
max-height: calc(100vh - 90px);
overflow-y: auto;
background: var(--bg-secondary, #fff);
border-radius: 8px;
padding: 16px;
box-shadow: 0 2px 8px rgba(0, 0, 0, 0.08);
}
.tutorial-sidebar h3 {
font-size: 15px;
margin: 0 0 12px;
color: var(--text-primary, #1a1a2e);
padding-bottom: 8px;
border-bottom: 2px solid var(--primary, #3b82f6);
}
.tutorial-sidebar a {
display: block;
padding: 5px 8px;
color: var(--text-secondary, #666);
text-decoration: none;
font-size: 13px;
border-radius: 4px;
line-height: 1.4;
}
.tutorial-sidebar a:hover {
background: var(--primary, #3b82f6);
color: #fff;
}
.tutorial-sidebar a.active {
background: var(--primary, #3b82f6);
color: #fff;
font-weight: 600;
}
.tutorial-main {
flex: 1;
min-width: 0;
}
.tutorial-article {
background: var(--bg-secondary, #fff);
border-radius: 8px;
padding: 32px;
box-shadow: 0 2px 8px rgba(0, 0, 0, 0.08);
}
.tutorial-article h1 {
font-size: 26px;
margin-bottom: 16px;
color: var(--text-primary, #1a1a2e);
border-bottom: 2px solid var(--primary, #3b82f6);
padding-bottom: 12px;
}
.markdown-body {
font-size: 15px;
line-height: 1.8;
color: var(--text-secondary, #333);
}
.markdown-body h1 {
font-size: 24px;
border-bottom: 1px solid var(--border, #e5e7eb);
padding-bottom: 8px;
}
.markdown-body h2 {
font-size: 20px;
border-bottom: 1px solid var(--border, #e5e7eb);
padding-bottom: 6px;
}
.markdown-body h3 {
font-size: 17px;
}
.markdown-body pre {
background: #1e1e2e;
color: #cdd6f4;
padding: 16px;
border-radius: 8px;
overflow-x: auto;
}
.markdown-body code {
font-family: 'Fira Code', 'Cascadia Code', monospace;
font-size: 14px;
}
.markdown-body p code {
background: #f1f5f9;
padding: 2px 6px;
border-radius: 4px;
color: #e83e8c;
}
.markdown-body blockquote {
border-left: 4px solid var(--primary, #3b82f6);
padding: 12px 20px;
margin: 16px 0;
background: #f8fafc;
border-radius: 0 8px 8px 0;
}
.markdown-body img {
max-width: 100%;
border-radius: 8px;
}
.markdown-body table {
border-collapse: collapse;
width: 100%;
margin: 16px 0;
}
.markdown-body table th,
.markdown-body table td {
border: 1px solid var(--border, #e5e7eb);
padding: 8px 12px;
text-align: left;
}
.markdown-body table th {
background: var(--bg-primary, #f8fafc);
font-weight: 600;
}
.markdown-body table tr:nth-child(2n) {
background: var(--bg-primary, #f8fafc);
}
.markdown-body ul,
.markdown-body ol {
padding-left: 24px;
margin: 12px 0;
}
.markdown-body li {
margin: 4px 0;
}
.markdown-body hr {
border: none;
border-top: 1px solid var(--border, #e5e7eb);
margin: 24px 0;
}
.markdown-body a {
color: var(--primary, #3b82f6);
text-decoration: none;
}
.markdown-body a:hover {
text-decoration: underline;
}
.page-navigation {
display: flex;
justify-content: space-between;
margin-top: 24px;
padding-top: 16px;
border-top: 1px solid var(--border, #e5e7eb);
}
.page-nav-link {
color: var(--primary, #3b82f6);
text-decoration: none;
font-weight: 500;
font-size: 14px;
}
.page-nav-link:hover {
text-decoration: underline;
}
.source-link {
margin-top: 16px;
font-size: 13px;
color: var(--text-secondary, #999);
}
.source-link a {
color: var(--primary, #3b82f6);
}
@media (max-width: 768px) {
.tutorial-page {
flex-direction: column;
}
.tutorial-sidebar {
width: 100%;
position: static;
max-height: 200px;
}
}
</style>
</head>
<body>
<nav class="navbar">
<div class="navbar-container">
<a class="navbar-brand" href="../../index.html">
<img src="../../img/logo.png" alt="CodeClub" width="32" height="32" />
<span>CodeClub</span>
</a>
<button class="mobile-menu-toggle" aria-label="切换导航菜单"><span></span><span></span><span></span></button>
<ul class="navbar-nav">
<li><a class="nav-link" href="../../index.html">首页</a></li>
<li><a class="nav-link" href="../../nav.html">网址导航</a></li>
<li><a class="nav-link" href="../../blog/">博客</a></li>
<li><a class="nav-link" href="../../wiki/index.html" target="_blank">WiKi</a></li>
<li><a class="nav-link active" href="../index.html">教程</a></li>
<li><a class="nav-link" href="../../book.html">图书</a></li>
<li><a class="nav-link" href="../../contact.html">联系我</a></li>
<li><a class="nav-link" href="../../about.html">关于我</a></li>
</ul>
</div>
</nav>
<div class="tutorial-page">
<div class="tutorial-sidebar">
<h3>📖 Docker</h3>
<a href="0.html">Docker 教程</a>
<a href="1.html">Docker Desktop</a>
<a href="2.html">Ubuntu Docker 安装</a>
<a href="3.html">CentOS Docker 安装</a>
<a href="4.html">Windows Docker 安装</a>
<a href="5.html">Docker 镜像加速</a>
<a href="6.html">Docker Hello World</a>
<a href="7.html">Docker 容器使用</a>
<a href="8.html">Docker 镜像使用</a>
<a href="9.html" class="active">Docker 容器连接</a>
<a href="10.html">Docker 安装 Nginx</a>
<a href="11.html">Docker 安装 PHP</a>
<a href="12.html">Docker 安装 MySQL</a>
<a href="13.html">Docker 安装 Tomcat</a>
<a href="14.html">Docker 安装 Python</a>
<a href="15.html">Docker 安装 Redis</a>
<a href="16.html">Docker 安装 MongoDB</a>
<a href="17.html">Docker 安装 Apache</a>
<a href="18.html">Docker 命令大全</a>
<a href="19.html">Docker 资源汇总</a>
</div>
<div class="tutorial-main">
<div class="tutorial-article">
<div class="markdown-body" id="md-content"></div>
<div class="page-navigation">
<a href="8.html" class="page-nav-link">← Docker 镜像使用</a>
<a href="10.html" class="page-nav-link">Docker 安装 Nginx →</a>
</div>
<div class="source-link">原文来源:<a href="https://www.runoob.com" target="_blank">菜鸟教程</a></div>
</div>
</div>
</div>
<footer class="footer">
<div class="footer-content"><p>© 2024 CodeClub. All rights reserved.</p></div>
</footer>
<script src="../../js/dark-mode.js"></script>
<script src="../../js/mobile-menu.js"></script>
<script>
const md = `# Docker 容器连接\n\n前面我们实现了通过网络端口来访问运行在 docker 容器内的服务。\n\n\n容器中可以运行一些网络应用,要让外部也可以访问这些应用,可以通过 -P 或 -p 参数来指定端口映射。\n\n\n下面我们来实现通过端口连接到一个 docker 容器。\n\n\n\n---\n\n\n## 网络端口映射\n\n我们创建了一个 python 应用的容器。\n\n\n\n\`\`\`\n\nrunoob@runoob:~$ docker run -d -P training/webapp python app.py\nfce072cc88cee71b1cdceb57c2821d054a4a59f67da6b416fceb5593f059fc6d\n\n\`\`\`\n\n另外,我们可以指定容器绑定的网络地址,比如绑定 127.0.0.1。\n\n\n我们使用 **-P** 绑定端口号,使用 **docker ps** 可以看到容器端口 5000 绑定主机端口 32768。\n\n\n\n\`\`\`\n\nrunoob@runoob:~$ docker ps\nCONTAINER ID IMAGE COMMAND ... PORTS NAMES\nfce072cc88ce training/webapp "python app.py" ... 0.0.0.0:32768->5000/tcp grave_hopper\n\n\`\`\`\n\n我们也可以使用 **-p** 标识来指定容器端口绑定到主机端口。\n\n\n两种方式的区别是:\n\n\n\n- **-P:**是容器内部端口**随机**映射到主机的端口。\n\n- **-p:**是容器内部端口绑定到**指定**的主机端口。\n\n\n\n\`\`\`\n\nrunoob@runoob:~$ docker run -d -p 5000:5000 training/webapp python app.py\n33e4523d30aaf0258915c368e66e03b49535de0ef20317d3f639d40222ba6bc0\n\n\`\`\`\n\n\n\`\`\`\n\nrunoob@runoob:~$ docker ps\nCONTAINER ID IMAGE COMMAND ... PORTS NAMES\n33e4523d30aa training/webapp "python app.py" ... 0.0.0.0:5000->5000/tcp berserk_bartik\nfce072cc88ce training/webapp "python app.py" ... 0.0.0.0:32768->5000/tcp grave_hopper\n\n\`\`\`\n\n另外,我们可以指定容器绑定的网络地址,比如绑定 127.0.0.1。\n\n\n\n\`\`\`\n\nrunoob@runoob:~$ docker run -d -p 127.0.0.1:5001:5000 training/webapp python app.py\n95c6ceef88ca3e71eaf303c2833fd6701d8d1b2572b5613b5a932dfdfe8a857c\nrunoob@runoob:~$ docker ps\nCONTAINER ID IMAGE COMMAND ... PORTS NAMES\n95c6ceef88ca training/webapp "python app.py" ... 5000/tcp, 127.0.0.1:5001->5000/tcp adoring_stonebraker\n33e4523d30aa training/webapp "python app.py" ... 0.0.0.0:5000->5000/tcp berserk_bartik\nfce072cc88ce training/webapp "python app.py" ... 0.0.0.0:32768->5000/tcp grave_hopper\n\n\`\`\`\n\n这样我们就可以通过访问 127.0.0.1:5001 来访问容器的 5000 端口。\n\n\n上面的例子中,默认都是绑定 tcp 端口,如果要绑定 UDP 端口,可以在端口后面加上 **/udp**。\n\n\n\n\`\`\`\n\nrunoob@runoob:~$ docker run -d -p 127.0.0.1:5000:5000/udp training/webapp python app.py\n6779686f06f6204579c1d655dd8b2b31e8e809b245a97b2d3a8e35abe9dcd22a\nrunoob@runoob:~$ docker ps\nCONTAINER ID IMAGE COMMAND ... PORTS NAMES\n6779686f06f6 training/webapp "python app.py" ... 5000/tcp, 127.0.0.1:5000->5000/udp drunk_visvesvaraya\n95c6ceef88ca training/webapp "python app.py" ... 5000/tcp, 127.0.0.1:5001->5000/tcp adoring_stonebraker\n33e4523d30aa training/webapp "python app.py" ... 0.0.0.0:5000->5000/tcp berserk_bartik\nfce072cc88ce training/webapp "python app.py" ... 0.0.0.0:32768->5000/tcp grave_hopper\n\n\`\`\`\n\n**docker port** 命令可以让我们快捷地查看端口的绑定情况。\n\n\n\n\`\`\`\n\nrunoob@runoob:~$ docker port adoring_stonebraker 5000\n127.0.0.1:5001\n\n\`\`\`\n\n\n---\n\n\n## Docker 容器互联\n\n端口映射并不是唯一把 docker 连接到另一个容器的方法。\n\ndocker 有一个连接系统允许将多个容器连接在一起,共享连接信息。\n\ndocker 连接会创建一个父子关系,其中父容器可以看到子容器的信息。\n\n\n\n---\n\n\n### 容器命名\n\n当我们创建一个容器的时候,docker 会自动对它进行命名。另外,我们也可以使用 **--name** 标识来命名容器,例如:\n\n\n\n\n\`\`\`\n\nrunoob@runoob:~$ docker run -d -P --name runoob training/webapp python app.py\n43780a6eabaaf14e590b6e849235c75f3012995403f97749775e38436db9a441\n\n\`\`\`\n\n我们可以使用 **docker ps** 命令来查看容器名称。\n\n\n\n\`\`\`\n\nrunoob@runoob:~$ docker ps -l\nCONTAINER ID IMAGE COMMAND ... PORTS NAMES\n43780a6eabaa training/webapp "python app.py" ... 0.0.0.0:32769->5000/tcp runoob\n\n\`\`\`\n\n\n### 新建网络\n\n下面先创建一个新的 Docker 网络。\n\n\`\`\`\n$ docker network create -d bridge test-net\n\`\`\`\n\n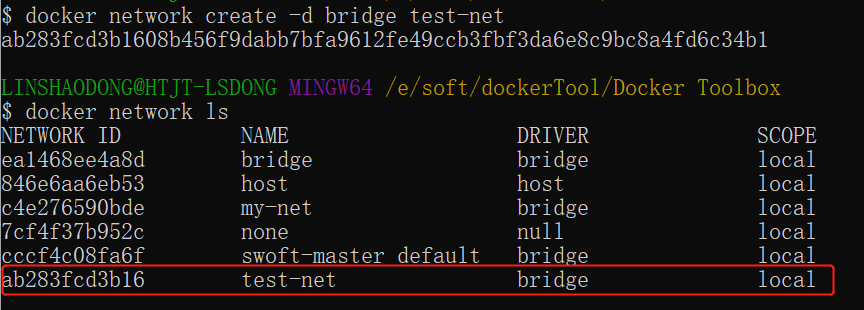\n\n\n参数说明:\n\n\n**-d**:参数指定 Docker 网络类型,有 bridge、overlay。\n\n\n其中 overlay 网络类型用于 Swarm mode,在本小节中你可以忽略它。\n\n\n\n\n### 连接容器\n\n运行一个容器并连接到新建的 test-net 网络:\n\n\n\n\`\`\`\n$ docker run -itd --name test1 --network test-net ubuntu /bin/bash\n\`\`\`\n\n打开新的终端,再运行一个容器并加入到 test-net 网络:\n\n\n\n\`\`\`\n$ docker run -itd --name test2 --network test-net ubuntu /bin/bash\n\`\`\`\n\n点击图片查看大图:\n\n\n[](https://www.runoob.com/wp-content/uploads/2016/05/docker-net2.png)\n下面通过 ping 来证明 test1 容器和 test2 容器建立了互联关系。\n\n\n\n如果 test1、test2 容器内中无 ping 命令,则在容器内执行以下命令安装 ping(即学即用:可以在一个容器里安装好,提交容器到镜像,在以新的镜像重新运行以上俩个容器)。\n\n\n\n\`\`\`\napt-get update\napt install iputils-ping\n\`\`\`\n\n\n在 test1 容器输入以下命令:\n\n\n点击图片查看大图:\n\n\n\n[](https://www.runoob.com/wp-content/uploads/2016/05/docker-net3.png)\n同理在 test2 容器也会成功连接到:\n\n\n点击图片查看大图:\n\n\n[](https://www.runoob.com/wp-content/uploads/2016/05/docker-net4.png)\n这样,test1 容器和 test2 容器建立了互联关系。\n\n\n如果你有多个容器之间需要互相连接,推荐使用 Docker Compose,后面会介绍。\n\n\n\n---\n\n## \n配置 DNS\n\n我们可以在宿主机的 /etc/docker/daemon.json 文件中增加以下内容来设置全部容器的 DNS:\n\n\n\n\`\`\`\n{\n "dns" : [\n "114.114.114.114",\n "8.8.8.8"\n ]\n}\n\`\`\`\n\n设置后,启动容器的 DNS 会自动配置为 114.114.114.114 和 8.8.8.8。\n\n\n配置完,需要重启 docker 才能生效。\n\n\n查看容器的 DNS 是否生效可以使用以下命令,它会输出容器的 DNS 信息:\n\n\n\n\`\`\`\n$ docker run -it --rm ubuntu cat etc/resolv.conf\n\`\`\`\n\n点击图片查看大图:\n\n\n[](https://www.runoob.com/wp-content/uploads/2016/05/docker-net5.png)\n**手动指定容器的配置**\n\n\n如果只想在指定的容器设置 DNS,则可以使用以下命令:\n\n\n\n\`\`\`\n$ docker run -it --rm -h host_ubuntu --dns=114.114.114.114 --dns-search=test.com ubuntu\n\n\`\`\`\n\n参数说明:\n\n\n**--rm**:容器退出时自动清理容器内部的文件系统。\n\n\n**-h HOSTNAME 或者 --hostname=HOSTNAME**: 设定容器的主机名,它会被写到容器内的 /etc/hostname 和 /etc/hosts。\n\n\n**--dns=IP_ADDRESS**: 添加 DNS 服务器到容器的 /etc/resolv.conf 中,让容器用这个服务器来解析所有不在 /etc/hosts 中的主机名。\n\n\n**--dns-search=DOMAIN**: 设定容器的搜索域,当设定搜索域为 .example.com 时,在搜索一个名为 host 的主机时,DNS 不仅搜索 host,还会搜索 host.example.com。\n\n\n点击图片查看大图:\n\n\n[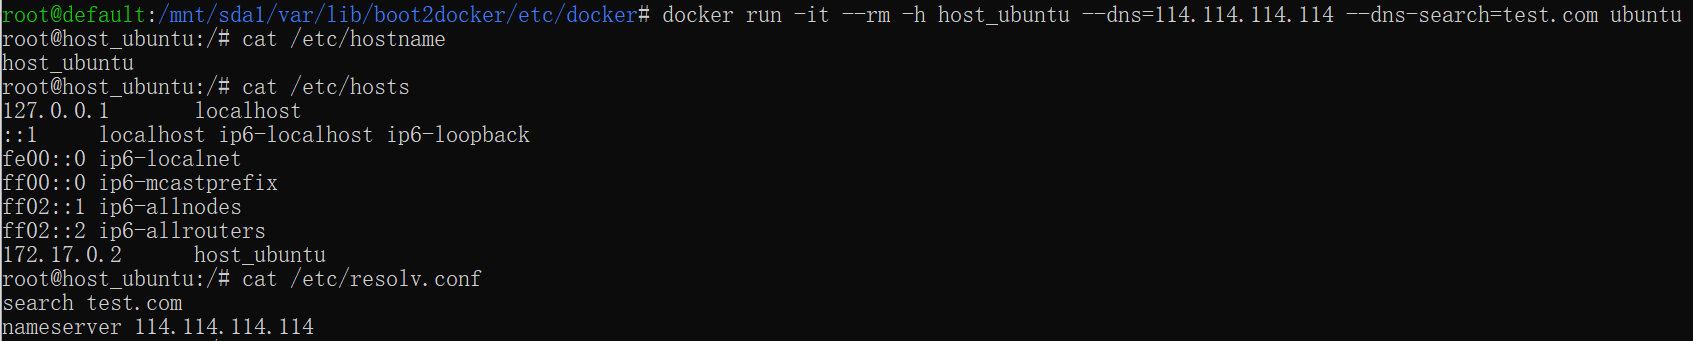](https://www.runoob.com/wp-content/uploads/2016/05/docker-net6.png)\n\n如果在容器启动时没有指定 **--dns** 和 **--dns-search**,Docker 会默认用宿主主机上的 /etc/resolv.conf 来配置容器的 DNS。\n\n \n \n \n \n \n\n \n \n [ Docker 安装 Nginx](http://www.runoob.com/docker/docker-install-nginx.html)\n \n\n \n \n \n \n \n\n\n\n\n\n \n## \n \n \n \n 1 篇笔记\n 写笔记\n\n\n\n\n\n \n\n #0 sssdfsdfsd\n\n 491***752@qq.com\n\n [ 参考地址](https://www.cnblogs.com/hypnus-ly/p/8683215.html)\n\n 352**解决windows系统无法对docker容器进行端口映射的问题**\n\n\n**1、问题:**\n\n\n\n在Windows家庭版下安装了docker,并尝试在其中运行jupyter notebook等服务,但映射完毕之后,在主机的浏览器中,打开localhost:port无法访问对应的服务。\n\n\n\n**2、问题出现的原因:**\n\n\n\n\n\`\`\`\nThe reason you’re having this, is because on Linux, the docker daemon (and your containers) run on the Linux machine itself, so “localhost” is also the host that the container is running on, and the ports are mapped to.\n\nOn Windows (and OS X), the docker daemon, and your containers cannot run natively, so only the docker client is running on your Windows machine, but the daemon (and your containers) run in a VirtualBox Virtual Machine, that runs Linux.\n\`\`\`\n\n\n因为docker是运行在Linux上的,在Windows中运行docker,实际上还是在Windows下先安装了一个Linux环境,然后在这个系统中运行的docker。也就是说,服务中使用的localhost指的是这个Linux环境的地址,而不是我们的宿主环境Windows。\n\n\n\n**3、解决方法:**\n\n\n\n通过命令:\n\n\n\n\n\`\`\`\ndocker-machine ip default # 其中,default 是docker-machine的name,可以通过docker-machine -ls 查看\n\`\`\`\n\n\n找到这个Linux的ip地址,一般情况下这个地址是192.168.99.100,然后在Windows的浏览器中,输入这个地址,加上服务的端口即可启用了。\n\n\n\n比如,首先运行一个docker 容器:\n\n\n\n\n\`\`\`\ndocker run -it -p 8888:8888 conda:v1\n\`\`\`\n\n\n其中,conda:v1是我的容器名称。然后在容器中开启jupyter notebook 服务:\n\n\n\n\n\`\`\`\njupyter notebook --no-browser --port=8888 --ip=172.17.0.2 --allow-root\n\`\`\`\n\n\n其中的ip参数为我的容器的ip地址,可以通过如下命令获得:\n\n\n\n\n\`\`\`\ndocker inspect container_id\n\`\`\`\n\n最后在windows浏览器中测试结果:\n\n\n\n\`\`\`\nhttp://192.168.99.100:8888\n\`\`\`\n[sssdfsdfsd](https://www.runoob.com/note/46832) sssdfsdfsd\n\n 491***752@qq.com\n\n [ 参考地址](https://www.cnblogs.com/hypnus-ly/p/8683215.html)\n\n7年前 (2019-09-17)\n \n\n \n \n\n \n \n \n### 点我分享笔记\n\n \n \n \n \n \n \n [取消](https://www.runoob.comjavascript:;)\n\n\n \n \n \n \n \n \n\n\n 分享笔记\n \n \n \n \n \n \n\n 昵称昵称 (必填)\n 邮箱邮箱 (必填)\n 引用地址引用地址\n \n\n \n \n \n \n\n \n \n\n\n\n\n\n\n\n\n\n \n\n \n\n\n\n\n\n\n \n \n \n \n \n \n\n\n \n \n \n \n \n \n \n \n \n\n\n\n\n\n 在线实例\n\n\n ·[HTML 实例](https://www.runoob.com/html/html-examples.html)\n\n\n ·[CSS 实例](https://www.runoob.com/css/css-examples.html)\n\n\n ·[JavaScript 实例](https://www.runoob.com/js/js-examples.html)\n\n\n ·[Ajax 实例](https://www.runoob.com/ajx/ajax-examples.html)\n\n\n ·[jQuery 实例](https://www.runoob.com/jquery/jquery-examples.html)\n\n\n ·[XML 实例](https://www.runoob.com/xml/xml-examples.html)\n\n\n ·[Java 实例](https://www.runoob.com/java/java-examples.html)\n\n\n\n\n\n 字符集&工具\n\n\n · [HTML 字符集设置](https://www.runoob.com/charsets/html-charsets.html)\n\n\n · [HTML ASCII 字符集](https://www.runoob.com/tags/html-ascii.html)\n\n\n · [JS 混淆/加密](https://www.jyshare.com/front-end/6939/)\n\n\n · [PNG/JPEG 图片压缩](https://www.jyshare.com/front-end/6232/)\n\n\n · [HTML 拾色器](https://www.runoob.com/tags/html-colorpicker.html)\n\n\n · [JSON 格式化工具](https://www.jyshare.com/front-end/53)\n\n\n · [随机数生成器](https://www.jyshare.com/front-end/6680/)\n\n\n\n\n 最新更新\n\n\n ·\n [\n OpenCode 自定义... ](http://www.runoob.com/opencode/opencode-custom-tools.html)\n\n\n ·\n [\n OpenCode Skills ](http://www.runoob.com/opencode/opencode-skills.html)\n\n\n ·\n [\n OpenCode MCP 服... ](http://www.runoob.com/opencode/opencode-mcp.html)\n\n\n ·\n [\n OpenCode LSP 服... ](http://www.runoob.com/opencode/opencode-lsp.html)\n\n\n ·\n [\n OpenCode 权限配置 ](http://www.runoob.com/opencode/opencode-permissions.html)\n\n\n ·\n [\n OpenCode 格式化... ](http://www.runoob.com/opencode/opencode-formatter.html)\n\n\n ·\n [\n OpenCode 自定义... ](http://www.runoob.com/opencode/opencode-commands.html)\n\n\n\n\n 站点信息\n\n\n ·\n [意见反馈](https://www.runoob.commailto:admin@runoob.com)\n\n\n ·\n [免责声明](https://www.runoob.com/disclaimer)\n\n\n ·\n [关于我们](https://www.runoob.com/aboutus)\n\n\n ·\n [文章归档](https://www.runoob.com/archives)\n\n\n\n\n\n\n\n **关注微信**\n\n\n\n \n\n\n\n\n\n\n Copyright © 2013-2026 **[菜鸟教程](https://www.runoob.com//www.runoob.com/)** \n **[runoob.com](https://www.runoob.com//www.runoob.com/)** All Rights Reserved. 备案号:[闽ICP备15012807号-1](https://beian.miit.gov.cn/)\n\n\n\n [ ](https://www.runoob.comjavascript:void(0))\n [](https://www.runoob.comjavascript:void(0))\n [](https://www.runoob.comjavascript:void(0))\n\n\n\n#### 微信关注\n\n `;
document.getElementById('md-content').innerHTML = marked.parse(md);
</script>
</body>
</html>