FastAPI

FastAPI 框架,高效能,易於學習,快速開發,適用於生產環境




文件: https://fastapi.tiangolo.com/zh-hant
程式碼: https://github.com/fastapi/fastapi
FastAPI 是一個現代、快速(高效能)的 Web 框架,用於以 Python 並基於標準的 Python 型別提示來構建 API。
主要特點包含:
- 快速:非常高的效能,可與 NodeJS 和 Go 相當(歸功於 Starlette 和 Pydantic)。最快的 Python 框架之一。
- 極速開發:開發功能的速度可提升約 200% 至 300%。*
- 更少的 Bug:減少約 40% 的人為(開發者)錯誤。*
- 直覺:具有出色的編輯器支援,處處都有 自動補全。更少的偵錯時間。
- 簡單:設計上易於使用與學習。更少的讀文件時間。
- 簡潔:最小化程式碼重複性。每個參數宣告可帶來多個功能。更少的錯誤。
- 穩健:立即獲得可投入生產的程式碼,並自動生成互動式文件。
- 標準化:基於(且完全相容於)API 的開放標準:OpenAPI(之前稱為 Swagger)和 JSON Schema。
* 基於內部開發團隊在建立生產應用程式時的測試預估。
贊助
基石贊助商

金級贊助商








銀級贊助商






評價
「近期大量使用 FastAPI。我實際上打算把它用在我在 微軟 團隊的所有 機器學習服務 上。其中一些正整合進核心的 Windows 與部分 Office 產品。」
「我們採用了 FastAPI 函式庫來啟動一個可供查詢以取得 預測 的 REST 伺服器。」 [for Ludwig]
「Netflix 很高興宣布我們的 危機管理 協調框架 Dispatch 開源!」 [使用 FastAPI 建構]
「如果有人想要打造一個可用於生產環境的 Python API,我強力推薦 FastAPI。它 設計優雅、簡單易用 且 高度可擴展——已成為我們 API-first 開發策略中的 關鍵元件。」
"[...] 近期大量使用 FastAPI。[...] 我實際上打算在我在微軟團隊的所有機器學習服務上使用它。其中一些正在整合到核心的 Windows 產品,以及一些 Office 產品。"
"我們採用了 FastAPI 函式庫來啟動一個 REST 伺服器,供查詢以取得預測。[for Ludwig]"
"Netflix 很高興宣布我們的危機管理協調框架 Dispatch 開源![使用 FastAPI 建構]"
"如果有人想要打造一個可用於生產環境的 Python API,我強力推薦 FastAPI。它設計優雅、簡單易用且高度可擴展,已經成為我們 API first 開發策略中的關鍵元件,推動了許多自動化與服務,例如我們的 Virtual TAC Engineer."
FastAPI 大會
FastAPI Conf '26 將於 2026 年 10 月 28 日 在 荷蘭阿姆斯特丹 舉行。全部關於 FastAPI,來自第一手來源。🎤
FastAPI 迷你紀錄片
在 2025 年底發布了一支 FastAPI 迷你紀錄片,你可以在線上觀看:

Typer,命令列的 FastAPI

如果你不是在做 Web API,而是要建立一個在終端機中使用的 CLI 應用程式,可以看看 Typer。
Typer 是 FastAPI 的小老弟。他立志成為命令列世界的 FastAPI。⌨️ 🚀
需求
FastAPI 是站在以下巨人的肩膀上:
安裝
建立並啟用一個虛擬環境,然後安裝 FastAPI:
$ pip install "fastapi[standard]"

---> 100%
注意:請務必將 "fastapi[standard]" 用引號包起來,以確保在所有終端機中都能正常運作。
範例
建立
建立檔案 main.py,內容如下:
from fastapi import FastAPI

app = FastAPI()


@app.get("/")
def read_root():
    return {"Hello": "World"}


@app.get("/items/{item_id}")
def read_item(item_id: int, q: str | None = None):
    return {"item_id": item_id, "q": q}
或使用 async def...
如果你的程式碼使用 async / await,請使用 async def:
from fastapi import FastAPI

app = FastAPI()


@app.get("/")
async def read_root():
    return {"Hello": "World"}


@app.get("/items/{item_id}")
async def read_item(item_id: int, q: str | None = None):
    return {"item_id": item_id, "q": q}
注意:
如果你不確定,請查看文件中 "In a hurry?" 章節的關於文件中的 async 與 await。
運行
使用以下指令運行伺服器:
$ fastapi dev

 ╭────────── FastAPI CLI - Development mode ───────────╮
 │                                                     │
 │  Serving at: http://127.0.0.1:8000                  │
 │                                                     │
 │  API docs: http://127.0.0.1:8000/docs               │
 │                                                     │
 │  Running in development mode, for production use:   │
 │                                                     │
 │  fastapi run                                        │
 │                                                     │
 ╰─────────────────────────────────────────────────────╯

INFO:     Will watch for changes in these directories: ['/home/user/code/awesomeapp']
INFO:     Uvicorn running on http://127.0.0.1:8000 (Press CTRL+C to quit)
INFO:     Started reloader process [2248755] using WatchFiles
INFO:     Started server process [2248757]
INFO:     Waiting for application startup.
INFO:     Application startup complete.
關於指令 fastapi dev...
指令 fastapi dev 會自動讀取你的 main.py,偵測其中的 FastAPI 應用,並使用 Uvicorn 啟動伺服器。
預設情況下,fastapi dev 會在本機開發時啟用自動重新載入。
可在 FastAPI CLI 文件中閱讀更多資訊。
檢查
使用瀏覽器開啟 http://127.0.0.1:8000/items/5?q=somequery。
你將會看到以下 JSON 回應:
{"item_id": 5, "q": "somequery"}
你已經建立了一個具有以下功能的 API:
- 透過路徑
/和/items/{item_id}接受 HTTP 請求。 - 以上兩個路徑都接受
GET操作(也被稱為 HTTP 方法)。 - 路徑
/items/{item_id}有一個int型別的路徑參數item_id。 - 路徑
/items/{item_id}有一個可選的str查詢參數q。
互動式 API 文件
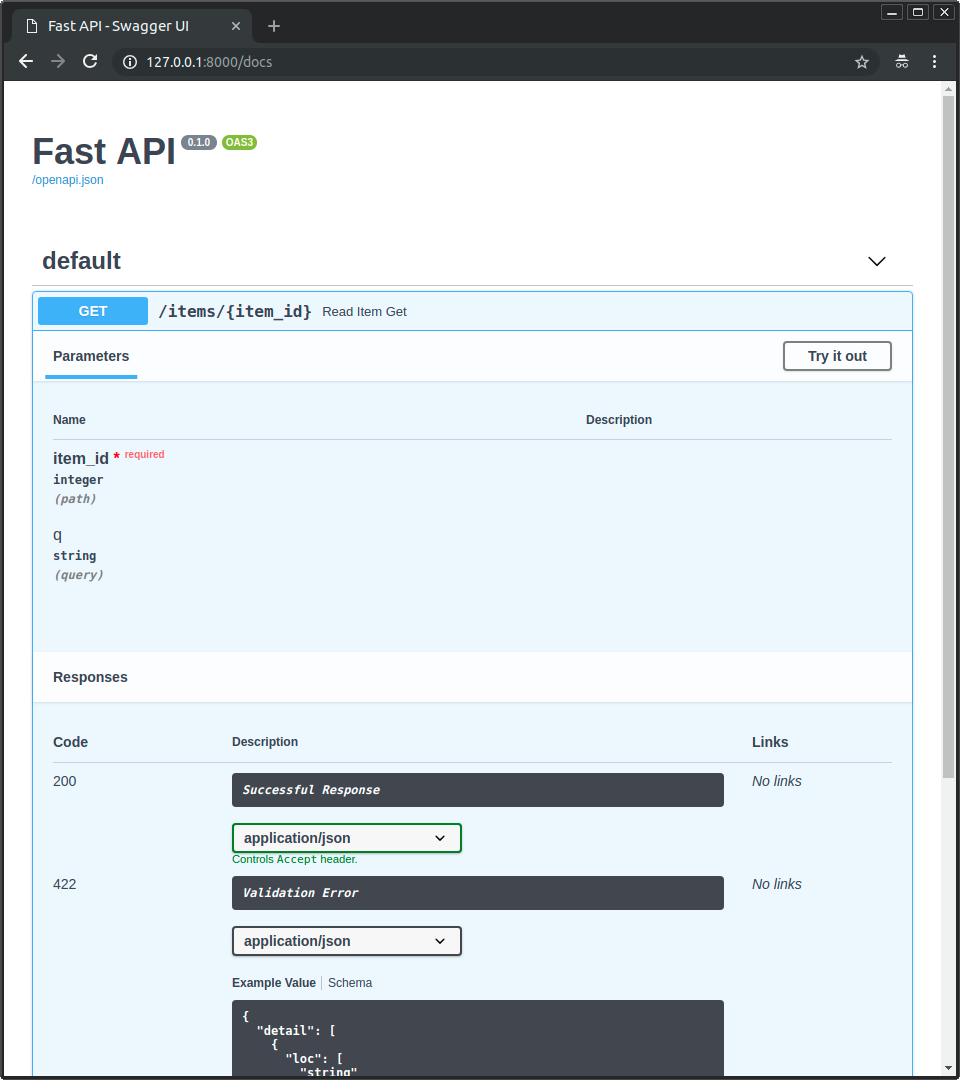
接著前往 http://127.0.0.1:8000/docs。
你會看到自動生成的互動式 API 文件(由 Swagger UI 提供):
替代 API 文件
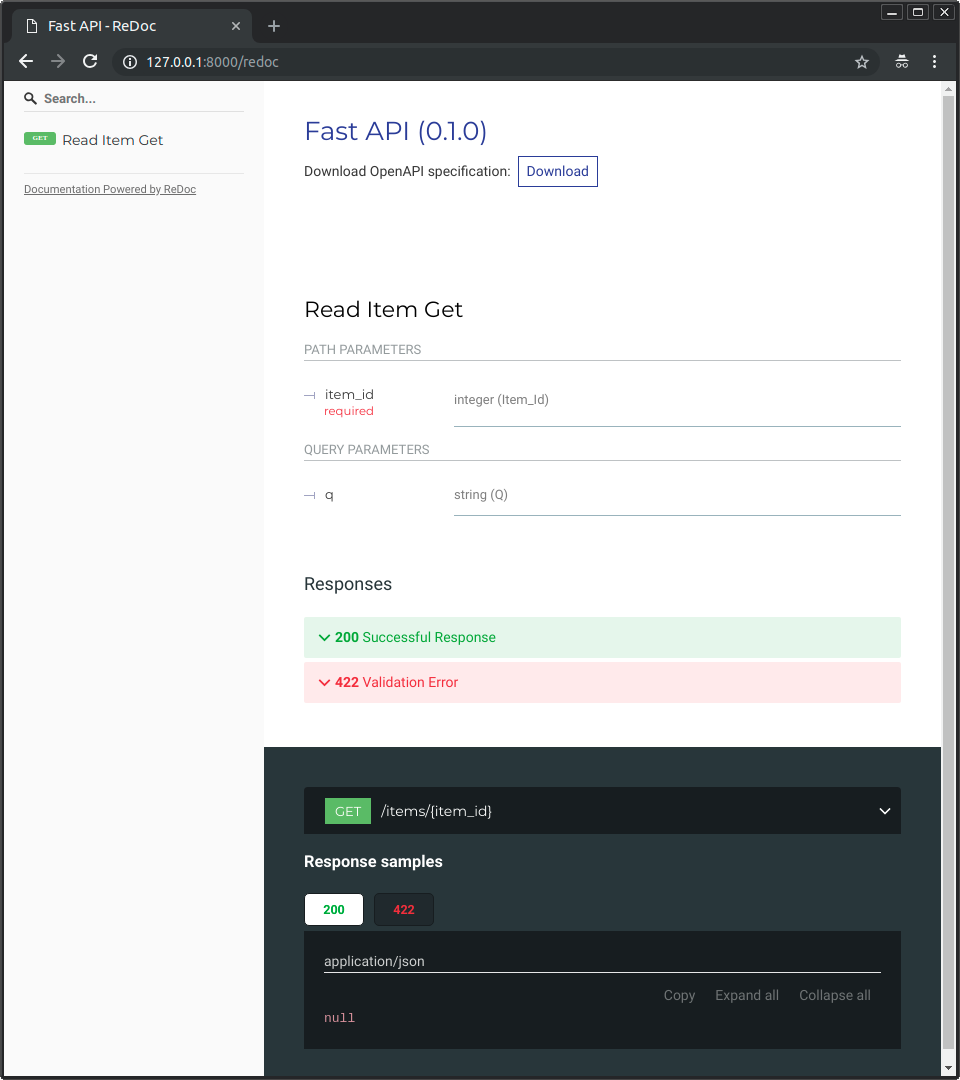
現在前往 http://127.0.0.1:8000/redoc。
你會看到另一種自動文件(由 ReDoc 提供):
範例升級
現在修改 main.py 檔案,使其能從 PUT 請求接收 body。
多虧了 Pydantic,你可以用標準的 Python 型別來宣告 body。
from fastapi import FastAPI
from pydantic import BaseModel

app = FastAPI()


class Item(BaseModel):
    name: str
    price: float
    is_offer: bool | None = None


@app.get("/")
def read_root():
    return {"Hello": "World"}


@app.get("/items/{item_id}")
def read_item(item_id: int, q: str | None = None):
    return {"item_id": item_id, "q": q}


@app.put("/items/{item_id}")
def update_item(item_id: int, item: Item):
    return {"item_name": item.name, "item_id": item_id}
fastapi dev 伺服器應會自動重新載入。
互動式 API 文件升級
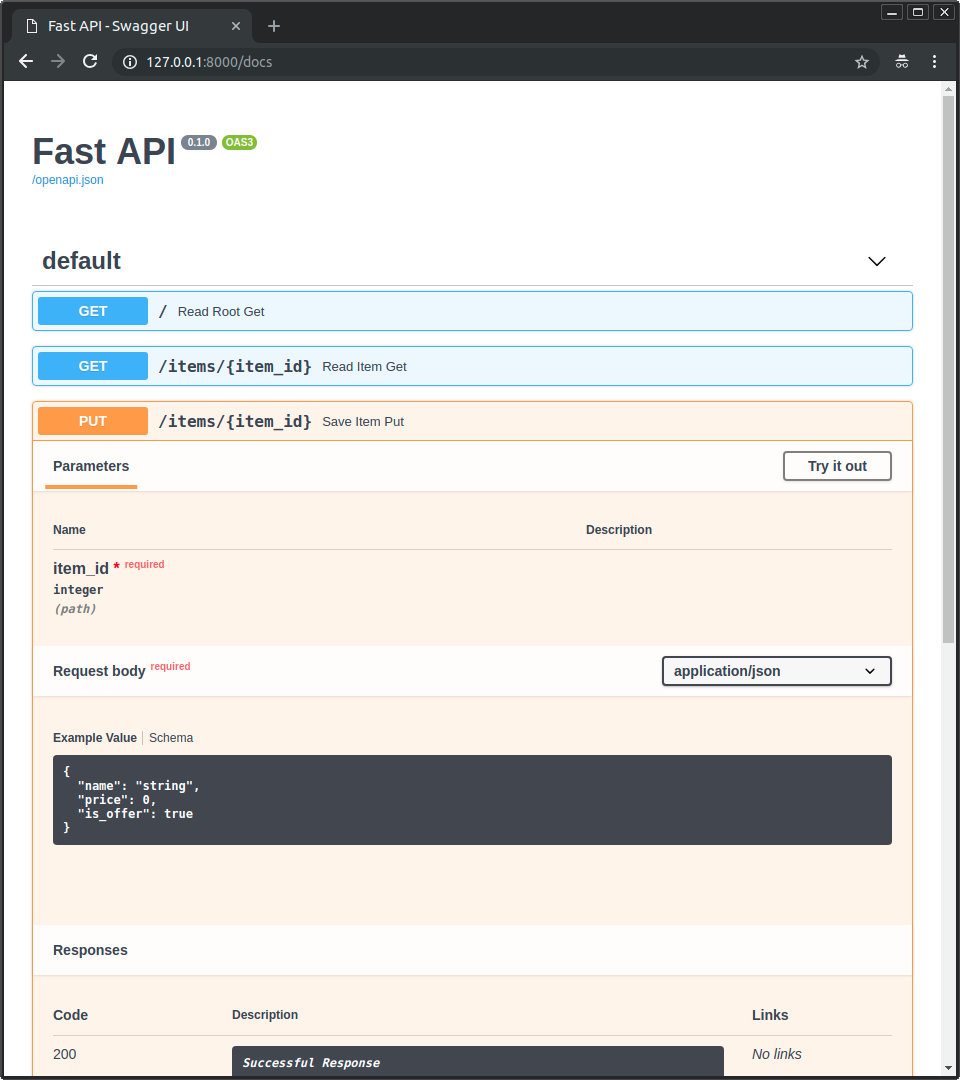
前往 http://127.0.0.1:8000/docs。
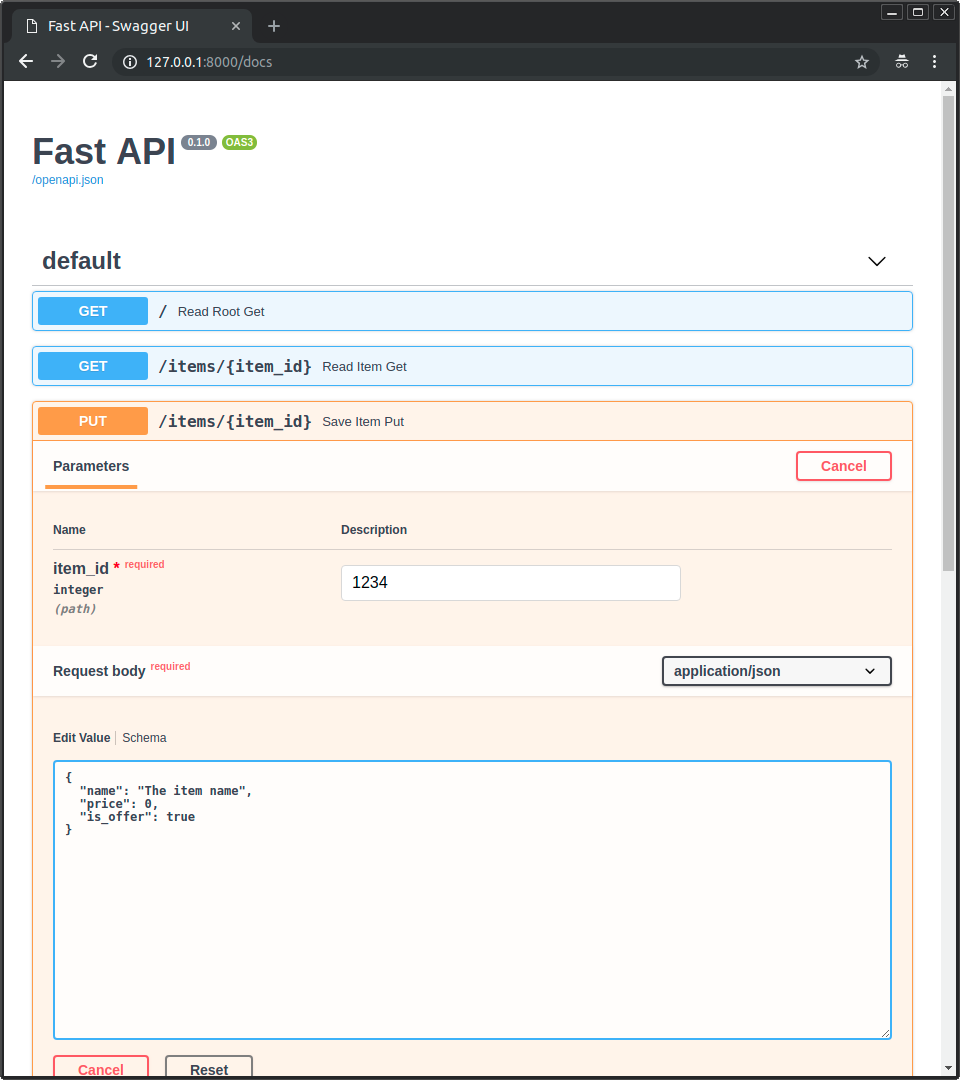
- 互動式 API 文件會自動更新,包含新的 body:
- 點擊「Try it out」按鈕,你可以填寫參數並直接與 API 互動:
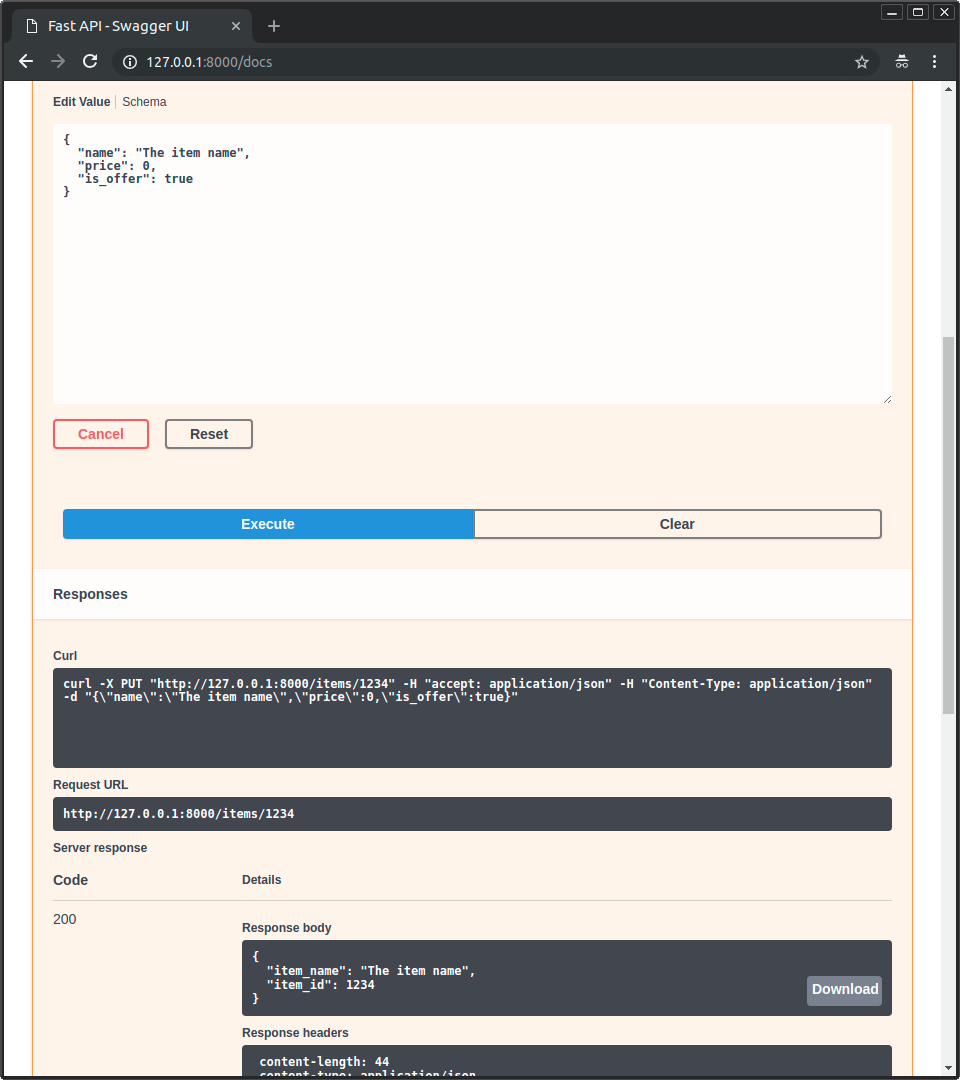
- 然後點擊「Execute」按鈕,使用者介面會與你的 API 溝通、送出參數、取得結果並顯示在螢幕上:
替代 API 文件升級
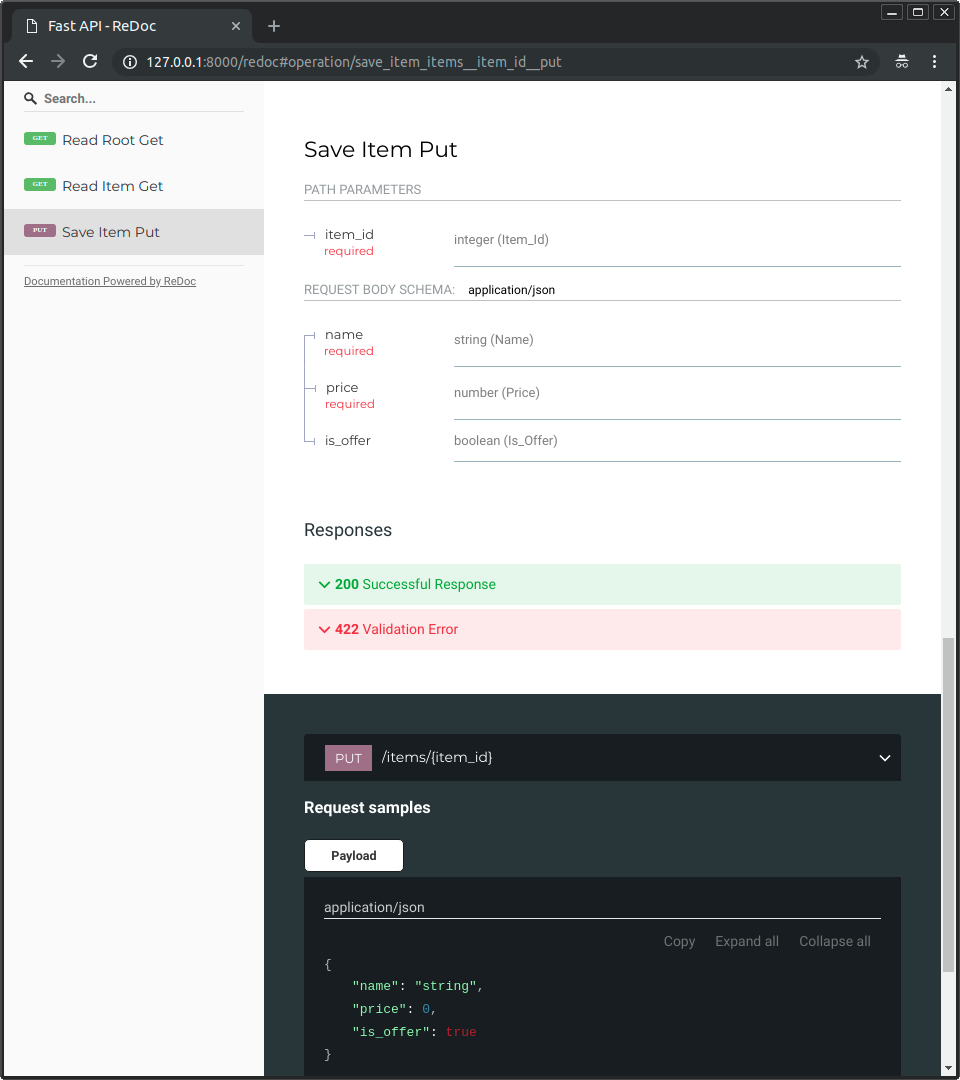
現在前往 http://127.0.0.1:8000/redoc。
- 替代文件也會反映新的查詢參數與 body:
總結
總結來說,你只需在函式參數中一次宣告參數、body 等的型別。
你使用的是現代標準的 Python 型別。
你不需要學新的語法、特定函式庫的方法或類別,等等。
就用標準的 Python。
例如,對於一個 int:
item_id: int
或是一個更複雜的 Item 模型:
item: Item
…透過一次宣告,你將獲得:
- 編輯器支援,包括:
- 自動補全。
- 型別檢查。
- 資料驗證:
- 當資料無效時,自動且清楚的錯誤。
- 即使是深度巢狀的 JSON 物件也能驗證。
- 輸入資料的 轉換:從網路讀入到 Python 資料與型別。包含:
- JSON。
- 路徑參數。
- 查詢參數。
- Cookies。
- 標頭。
- 表單。
- 檔案。
- 輸出資料的 轉換:從 Python 資料與型別轉換為網路資料(JSON):
- 轉換 Python 型別(
str、int、float、bool、list等)。 datetime物件。UUID物件。- 資料庫模型。
- ...還有更多。
- 轉換 Python 型別(
- 自動生成的互動式 API 文件,包含 2 種替代的使用者介面:
- Swagger UI。
- ReDoc。
回到前面的程式碼範例,FastAPI 會:
- 驗證
GET與PUT請求的路徑中是否包含item_id。 - 驗證
GET與PUT請求中的item_id是否為int型別。- 如果不是,客戶端會看到清楚有用的錯誤。
- 在
GET請求中檢查是否有名為q的可選查詢參數(如http://127.0.0.1:8000/items/foo?q=somequery)。- 因為
q參數被宣告為= None,所以它是可選的。 - 若沒有
None,則它會是必填(就像PUT時的 body)。
- 因為
- 對於
/items/{item_id}的PUT請求,以 JSON 讀取 body:- 檢查是否有必填屬性
name,且為str。 - 檢查是否有必填屬性
price,且為float。 - 檢查是否有可選屬性
is_offer,若存在則應為bool。 - 以上也適用於深度巢狀的 JSON 物件。
- 檢查是否有必填屬性
- 自動在 JSON 與 Python 之間轉換。
- 以 OpenAPI 記錄所有內容,可用於:
- 互動式文件系統。
- 為多種語言自動產生用戶端程式碼的系統。
- 直接提供兩種互動式文件網頁介面。
我們只觸及了表面,但你已經了解它的運作方式了。
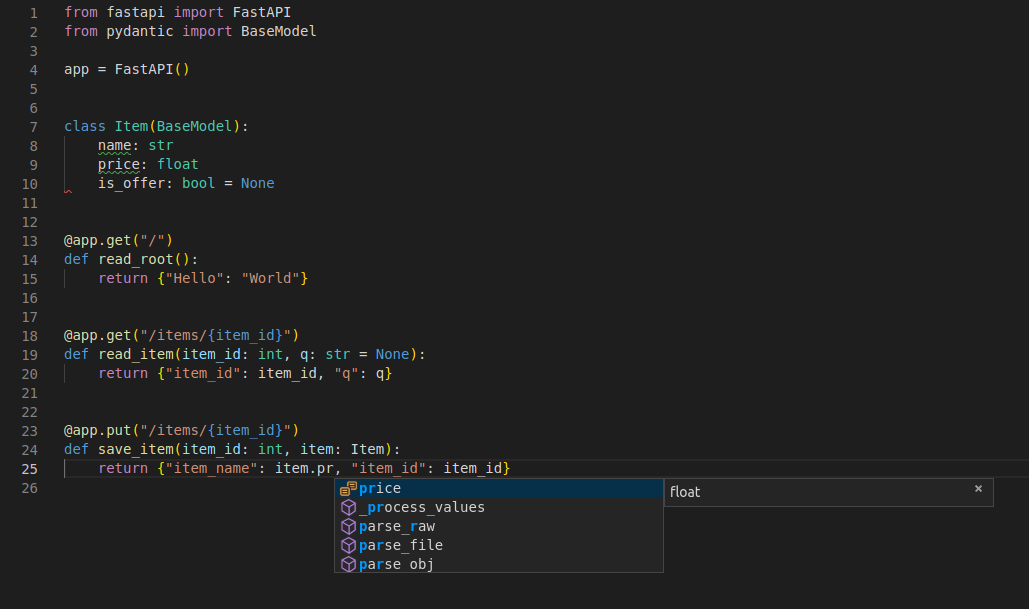
試著把這一行:
return {"item_name": item.name, "item_id": item_id}
…從:
... "item_name": item.name ...
…改為:
... "item_price": item.price ...
…然後看看你的編輯器如何自動補全屬性並知道它們的型別:
若想看包含更多功能的完整範例,請參考 教學 - 使用者指南。
劇透警告:教學 - 使用者指南包含:
- 來自不同來源的參數宣告:例如 headers、cookies、form fields 和 files。
- 如何設定驗證限制,如
maximum_length或regex。 - 一個非常強大且易用的 依賴注入 系統。
- 安全與驗證,包含支援 OAuth2 搭配 JWT tokens 與 HTTP Basic 驗證。
- 宣告深度巢狀 JSON 模型的進階(但同樣簡單)技巧(感謝 Pydantic)。
- 與 Strawberry 及其他函式庫的 GraphQL 整合。
- 許多額外功能(感謝 Starlette),例如:
- WebSockets
- 基於 HTTPX 與
pytest的極其簡單的測試 - CORS
- Cookie Sessions
- ...以及更多。
部署你的應用(可選)
你可以選擇只用一個指令,將 FastAPI 應用部署到 FastAPI Cloud。🚀
$ fastapi deploy

Deploying to FastAPI Cloud...

✅ Deployment successful!

🐔 Ready the chicken! Your app is ready at https://myapp.fastapicloud.dev
CLI 會自動偵測你的 FastAPI 應用並將其部署到雲端。若你尚未登入,系統會開啟瀏覽器以完成驗證流程。
就這樣!現在你可以在該 URL 造訪你的應用。✨
關於 FastAPI Cloud
FastAPI Cloud 由 FastAPI 的同一位作者與團隊打造。
它讓你以最小的努力精簡地完成 API 的建置、部署與存取流程。
它把用 FastAPI 開發應用的開發者體驗帶到部署到雲端的流程中。🎉
FastAPI Cloud 是 FastAPI 與好朋友們 這些開源專案的主要贊助與資金來源。✨
部署到其他雲端供應商
FastAPI 是開源且基於標準。你可以把 FastAPI 應用部署到任何你選擇的雲端供應商。
依照你雲端供應商的指南來部署 FastAPI 應用吧。🤓
效能
獨立的 TechEmpower 基準測試顯示,在 Uvicorn 下運行的 FastAPI 應用是最快的 Python 框架之一,僅次於 Starlette 與 Uvicorn 本身(FastAPI 內部使用它們)。(*)
想了解更多,請參閱測試結果。
依賴套件
FastAPI 依賴 Pydantic 與 Starlette。
standard 依賴套件
當你以 pip install "fastapi[standard]" 安裝 FastAPI 時,會包含 standard 這組可選依賴套件:
Pydantic 會使用:
email-validator- 用於電子郵件驗證。
Starlette 會使用:
httpx- 若要使用TestClient必須安裝。jinja2- 若要使用預設的模板設定必須安裝。python-multipart- 若要支援表單 "解析",搭配request.form()。
FastAPI 會使用:
uvicorn- 用於載入並服務你的應用的伺服器。這包含uvicorn[standard],其中含有一些高效能服務所需的依賴(例如uvloop)。fastapi-cli[standard]- 提供fastapi指令。- 其中包含
fastapi-cloud-cli,可讓你將 FastAPI 應用部署到 FastAPI Cloud。
- 其中包含
不含 standard 依賴套件
如果你不想包含 standard 可選依賴,可以改用 pip install fastapi(而不是 pip install "fastapi[standard]")。
不含 fastapi-cloud-cli
如果你想安裝帶有 standard 依賴、但不包含 fastapi-cloud-cli,可以使用 pip install "fastapi[standard-no-fastapi-cloud-cli]"。
額外可選依賴套件
有些額外依賴你可能也會想安裝。
Pydantic 的額外可選依賴:
pydantic-settings- 設定管理。pydantic-extra-types- 與 Pydantic 一起使用的額外型別。
FastAPI 的額外可選依賴:
授權
本專案以 MIT 授權條款釋出。