"
```
Now, make a request to the OpenAI [Chat Completions API ↗](https://platform.openai.com/docs/guides/gpt/chat-completions-api):
JavaScript
```
export default {
async fetch(request, env, ctx) {
const openai = new OpenAI({
apiKey: env.OPENAI_API_KEY,
});
const url = new URL(request.url);
const message = url.searchParams.get("message");
const messages = [
{
role: "user",
content: message ? message : "What's in the news today?",
},
];
const tools = [
{
type: "function",
function: {
name: "read_website_content",
description: "Read the content on a given website",
parameters: {
type: "object",
properties: {
url: {
type: "string",
description: "The URL to the website to read",
},
},
required: ["url"],
},
},
},
];
const chatCompletion = await openai.chat.completions.create({
model: "gpt-4o-mini",
messages: messages,
tools: tools,
tool_choice: "auto",
});
const assistantMessage = chatCompletion.choices[0].message;
console.log(assistantMessage);
//Later you will continue handling the assistant's response here
return new Response(assistantMessage.content);
},
};
```
Explain Code
Review the arguments you are passing to OpenAI:
* **model**: This is the model you want OpenAI to use for your request. In this case, you are using `gpt-4o-mini`.
* **messages**: This is an array containing all messages that are part of the conversation. Initially you provide a message from the user, and we later add the response from the model. The content of the user message is either the `message` query parameter from the request URL or the default "What's in the news today?".
* **tools**: An array containing the actions available to the AI model. In this example you only have one tool, `read_website_content`, which reads the content on a given website.
* **name**: The name of your function. In this case, it is `read_website_content`.
* **description**: A short description that lets the model know the purpose of the function. This is optional but helps the model know when to select the tool.
* **parameters**: A JSON Schema object which describes the function. In this case we request a response containing an object with the required property `url`.
* **tool\_choice**: This argument is technically optional as `auto` is the default. This argument indicates that either a function call or a normal message response can be returned by OpenAI.
## 3\. Building your `read_website_content()` function
You will now need to define the `read_website_content` function, which is referenced in the `tools` array. The `read_website_content` function fetches the content of a given URL and extracts the text from `` tags using the `cheerio` library:
Add this code above the `export default` block in your `index.js` file:
JavaScript
```
async function read_website_content(url) {
console.log("reading website content");
const response = await fetch(url);
const body = await response.text();
let cheerioBody = cheerio.load(body);
const resp = {
website_body: cheerioBody("p").text(),
url: url,
};
return JSON.stringify(resp);
}
```
Explain Code
In this function, you take the URL that you received from OpenAI and use JavaScript's [Fetch API ↗](https://developer.mozilla.org/en-US/docs/Web/API/Fetch%5FAPI/Using%5FFetch) to pull the content of the website and extract the paragraph text. Now we need to determine when to call this function.
## 4\. Process the Assistant's Messages
Next, we need to process the response from the OpenAI API to check if it includes any function calls. If a function call is present, you should execute the corresponding function in your Worker. Note that the assistant may request multiple function calls.
Modify the fetch method within the `export default` block as follows:
JavaScript
```
// ... your previous code ...
if (assistantMessage.tool_calls) {
for (const toolCall of assistantMessage.tool_calls) {
if (toolCall.function.name === "read_website_content") {
const url = JSON.parse(toolCall.function.arguments).url;
const websiteContent = await read_website_content(url);
messages.push({
role: "tool",
tool_call_id: toolCall.id,
name: toolCall.function.name,
content: websiteContent,
});
}
}
const secondChatCompletion = await openai.chat.completions.create({
model: "gpt-4o-mini",
messages: messages,
});
return new Response(secondChatCompletion.choices[0].message.content);
} else {
// this is your existing return statement
return new Response(assistantMessage.content);
}
```
Explain Code
Check if the assistant message contains any function calls by checking for the `tool_calls` property. Because the AI model can call multiple functions by default, you need to loop through any potential function calls and add them to the `messages` array. Each `read_website_content` call will invoke the `read_website_content` function you defined earlier and pass the URL generated by OpenAI as an argument. \`
The `secondChatCompletion` is needed to provide a response informed by the data you retrieved from each function call. Now, the last step is to deploy your Worker.
Test your code by running `npx wrangler dev` and open the provided url in your browser. This will now show you OpenAI’s response using real-time information from the retrieved web data.
## 5\. Deploy your Worker application
To deploy your application, run the `npx wrangler deploy` command to deploy your Worker application:
Terminal window
```
npx wrangler deploy
```
You can now preview your Worker at `..workers.dev`. Going to this URL will display the response from OpenAI. Optionally, add the `message` URL parameter to write a custom message: for example, `https://..workers.dev/?message=What is the weather in NYC today?`.
## 6\. Next steps
Reference the [finished code for this tutorial on GitHub ↗](https://github.com/LoganGrasby/Cloudflare-OpenAI-Functions-Demo/blob/main/src/worker.js).
To continue working with Workers and AI, refer to [the guide on using LangChain and Cloudflare Workers together ↗](https://blog.cloudflare.com/langchain-and-cloudflare/) or [how to build a ChatGPT plugin with Cloudflare Workers ↗](https://blog.cloudflare.com/magic-in-minutes-how-to-build-a-chatgpt-plugin-with-cloudflare-workers/).
If you have any questions, need assistance, or would like to share your project, join the Cloudflare Developer community on [Discord ↗](https://discord.cloudflare.com) to connect with fellow developers and the Cloudflare team.
```json
{"@context":"https://schema.org","@type":"BreadcrumbList","itemListElement":[{"@type":"ListItem","position":1,"item":{"@id":"/directory/","name":"Directory"}},{"@type":"ListItem","position":2,"item":{"@id":"/workers/","name":"Workers"}},{"@type":"ListItem","position":3,"item":{"@id":"/workers/tutorials/","name":"Tutorials"}},{"@type":"ListItem","position":4,"item":{"@id":"/workers/tutorials/openai-function-calls-workers/","name":"OpenAI GPT function calling with JavaScript and Cloudflare Workers"}}]}
```
---
---
title: Connect to a PostgreSQL database with Cloudflare Workers
description: This tutorial explains how to connect to a Postgres database with Cloudflare Workers. The Workers application you create in this tutorial will interact with a product database inside of Postgres.
image: https://developers.cloudflare.com/dev-products-preview.png
---
[Skip to content](#%5Ftop)
### Tags
[ Postgres ](https://developers.cloudflare.com/search/?tags=Postgres)[ TypeScript ](https://developers.cloudflare.com/search/?tags=TypeScript)[ SQL ](https://developers.cloudflare.com/search/?tags=SQL)
Was this helpful?
YesNo
[ Edit page ](https://github.com/cloudflare/cloudflare-docs/edit/production/src/content/docs/workers/tutorials/postgres.mdx) [ Report issue ](https://github.com/cloudflare/cloudflare-docs/issues/new/choose)
Copy page
# Connect to a PostgreSQL database with Cloudflare Workers
**Last reviewed:** 10 months ago
In this tutorial, you will learn how to create a Cloudflare Workers application and connect it to a PostgreSQL database using [TCP Sockets](https://developers.cloudflare.com/workers/runtime-apis/tcp-sockets/) and [Hyperdrive](https://developers.cloudflare.com/hyperdrive/). The Workers application you create in this tutorial will interact with a product database inside of PostgreSQL.
## Prerequisites
To continue:
1. Sign up for a [Cloudflare account ↗](https://dash.cloudflare.com/sign-up/workers-and-pages) if you have not already.
2. Install [npm ↗](https://docs.npmjs.com/getting-started).
3. Install [Node.js ↗](https://nodejs.org/en/). Use a Node version manager like [Volta ↗](https://volta.sh/) or [nvm ↗](https://github.com/nvm-sh/nvm) to avoid permission issues and change Node.js versions. [Wrangler](https://developers.cloudflare.com/workers/wrangler/install-and-update/) requires a Node version of `16.17.0` or later.
4. Make sure you have access to a PostgreSQL database.
## 1\. Create a Worker application
First, use the [create-cloudflare CLI ↗](https://github.com/cloudflare/workers-sdk/tree/main/packages/create-cloudflare) to create a new Worker application. To do this, open a terminal window and run the following command:
npm yarn pnpm
```
npm create cloudflare@latest -- postgres-tutorial
```
```
yarn create cloudflare postgres-tutorial
```
```
pnpm create cloudflare@latest postgres-tutorial
```
This will prompt you to install the [create-cloudflare ↗](https://www.npmjs.com/package/create-cloudflare) package and lead you through a setup wizard.
For setup, select the following options:
* For _What would you like to start with?_, choose `Hello World example`.
* For _Which template would you like to use?_, choose `Worker only`.
* For _Which language do you want to use?_, choose `TypeScript`.
* For _Do you want to use git for version control?_, choose `Yes`.
* For _Do you want to deploy your application?_, choose `No` (we will be making some changes before deploying).
If you choose to deploy, you will be asked to authenticate (if not logged in already), and your project will be deployed. If you deploy, you can still modify your Worker code and deploy again at the end of this tutorial.
Now, move into the newly created directory:
Terminal window
```
cd postgres-tutorial
```
### Enable Node.js compatibility
[Node.js compatibility](https://developers.cloudflare.com/workers/runtime-apis/nodejs/) is required for database drivers, including Postgres.js, and needs to be configured for your Workers project.
To enable both built-in runtime APIs and polyfills for your Worker or Pages project, add the [nodejs\_compat](https://developers.cloudflare.com/workers/configuration/compatibility-flags/#nodejs-compatibility-flag) [compatibility flag](https://developers.cloudflare.com/workers/configuration/compatibility-flags/#nodejs-compatibility-flag) to your [Wrangler configuration file](https://developers.cloudflare.com/workers/wrangler/configuration/), and set your compatibility date to September 23rd, 2024 or later. This will enable [Node.js compatibility](https://developers.cloudflare.com/workers/runtime-apis/nodejs/) for your Workers project.
* [ wrangler.jsonc ](#tab-panel-7960)
* [ wrangler.toml ](#tab-panel-7961)
JSONC
```
{
"compatibility_flags": [
"nodejs_compat"
],
// Set this to today's date
"compatibility_date": "2026-04-14"
}
```
TOML
```
compatibility_flags = [ "nodejs_compat" ]
# Set this to today's date
compatibility_date = "2026-04-14"
```
## 2\. Add the PostgreSQL connection library
To connect to a PostgreSQL database, you will need the `pg` library. In your Worker application directory, run the following command to install the library:
npm yarn pnpm bun
```
npm i pg
```
```
yarn add pg
```
```
pnpm add pg
```
```
bun add pg
```
Next, install the TypeScript types for the `pg` library to enable type checking and autocompletion in your TypeScript code:
npm yarn pnpm bun
```
npm i -D @types/pg
```
```
yarn add -D @types/pg
```
```
pnpm add -D @types/pg
```
```
bun add -d @types/pg
```
Note
Make sure you are using `pg` (`node-postgres`) version `8.16.3` or higher.
## 3\. Configure the connection to the PostgreSQL database
Choose one of the two methods to connect to your PostgreSQL database:
1. [Use a connection string](#use-a-connection-string).
2. [Set explicit parameters](#set-explicit-parameters).
### Use a connection string
A connection string contains all the information needed to connect to a database. It is a URL that contains the following information:
```
postgresql://username:password@host:port/database
```
Replace `username`, `password`, `host`, `port`, and `database` with the appropriate values for your PostgreSQL database.
Set your connection string as a [secret](https://developers.cloudflare.com/workers/configuration/secrets/) so that it is not stored as plain text. Use [wrangler secret put](https://developers.cloudflare.com/workers/wrangler/commands/general/#secret) with the example variable name `DB_URL`:
Terminal window
```
npx wrangler secret put DB_URL
```
```
➜ wrangler secret put DB_URL
-------------------------------------------------------
? Enter a secret value: › ********************
✨ Success! Uploaded secret DB_URL
```
Set your `DB_URL` secret locally in a `.dev.vars` file as documented in [Local Development with Secrets](https://developers.cloudflare.com/workers/configuration/secrets/).
.dev.vars
```
DB_URL=""
```
### Set explicit parameters
Configure each database parameter as an [environment variable](https://developers.cloudflare.com/workers/configuration/environment-variables/) via the [Cloudflare dashboard](https://developers.cloudflare.com/workers/configuration/environment-variables/#add-environment-variables-via-the-dashboard) or in your Wrangler file. Refer to an example of a Wrangler file configuration:
* [ wrangler.jsonc ](#tab-panel-7956)
* [ wrangler.toml ](#tab-panel-7957)
JSONC
```
{
"vars": {
"DB_USERNAME": "postgres",
// Set your password by creating a secret so it is not stored as plain text
"DB_HOST": "ep-aged-sound-175961.us-east-2.aws.neon.tech",
"DB_PORT": 5432,
"DB_NAME": "productsdb"
}
}
```
TOML
```
[vars]
DB_USERNAME = "postgres"
DB_HOST = "ep-aged-sound-175961.us-east-2.aws.neon.tech"
DB_PORT = 5_432
DB_NAME = "productsdb"
```
To set your password as a [secret](https://developers.cloudflare.com/workers/configuration/secrets/) so that it is not stored as plain text, use [wrangler secret put](https://developers.cloudflare.com/workers/wrangler/commands/general/#secret). `DB_PASSWORD` is an example variable name for this secret to be accessed in your Worker:
Terminal window
```
npx wrangler secret put DB_PASSWORD
```
```
-------------------------------------------------------
? Enter a secret value: › ********************
✨ Success! Uploaded secret DB_PASSWORD
```
## 4\. Connect to the PostgreSQL database in the Worker
Open your Worker's main file (for example, `worker.ts`) and import the `Client` class from the `pg` library:
TypeScript
```
import { Client } from "pg";
```
In the `fetch` event handler, connect to the PostgreSQL database using your chosen method, either the connection string or the explicit parameters.
### Use a connection string
TypeScript
```
// create a new Client instance using the connection string
const sql = new Client({ connectionString: env.DB_URL });
// connect to the PostgreSQL database
await sql.connect();
```
### Set explicit parameters
TypeScript
```
// create a new Client instance using explicit parameters
const sql = new Client({
username: env.DB_USERNAME,
password: env.DB_PASSWORD,
host: env.DB_HOST,
port: env.DB_PORT,
database: env.DB_NAME,
ssl: true, // Enable SSL for secure connections
});
// connect to the PostgreSQL database
await sql.connect();
```
Explain Code
## 5\. Interact with the products database
To demonstrate how to interact with the products database, you will fetch data from the `products` table by querying the table when a request is received.
Note
If you are following along in your own PostgreSQL instance, set up the `products` using the following SQL `CREATE TABLE` statement. This statement defines the columns and their respective data types for the `products` table:
```
CREATE TABLE products (
id SERIAL PRIMARY KEY,
name VARCHAR(255) NOT NULL,
description TEXT,
price DECIMAL(10, 2) NOT NULL
);
```
Replace the existing code in your `worker.ts` file with the following code:
TypeScript
```
import { Client } from "pg";
export default {
async fetch(request, env, ctx): Promise {
// Create a new Client instance using the connection string
// or explicit parameters as shown in the previous steps.
// Here, we are using the connection string method.
const sql = new Client({
connectionString: env.DB_URL,
});
// Connect to the PostgreSQL database
await sql.connect();
// Query the products table
const result = await sql.query("SELECT * FROM products");
// Return the result as JSON
return new Response(JSON.stringify(result.rows), {
headers: {
"Content-Type": "application/json",
},
});
},
} satisfies ExportedHandler;
```
Explain Code
This code establishes a connection to the PostgreSQL database within your Worker application and queries the `products` table, returning the results as a JSON response.
## 6\. Deploy your Worker
Run the following command to deploy your Worker:
Terminal window
```
npx wrangler deploy
```
Your application is now live and accessible at `..workers.dev`.
After deploying, you can interact with your PostgreSQL products database using your Cloudflare Worker. Whenever a request is made to your Worker's URL, it will fetch data from the `products` table and return it as a JSON response. You can modify the query as needed to retrieve the desired data from your products database.
## 7\. Insert a new row into the products database
To insert a new row into the `products` table, create a new API endpoint in your Worker that handles a `POST` request. When a `POST` request is received with a JSON payload, the Worker will insert a new row into the `products` table with the provided data.
Assume the `products` table has the following columns: `id`, `name`, `description`, and `price`.
Add the following code snippet inside the `fetch` event handler in your `worker.ts` file, before the existing query code:
TypeScript
```
import { Client } from "pg";
export default {
async fetch(request, env, ctx): Promise {
// Create a new Client instance using the connection string
// or explicit parameters as shown in the previous steps.
// Here, we are using the connection string method.
const sql = new Client({
connectionString: env.DB_URL,
});
// Connect to the PostgreSQL database
await sql.connect();
const url = new URL(request.url);
if (request.method === "POST" && url.pathname === "/products") {
// Parse the request's JSON payload
const productData = (await request.json()) as {
name: string;
description: string;
price: number;
};
const name = productData.name,
description = productData.description,
price = productData.price;
// Insert the new product into the products table
const insertResult = await sql.query(
`INSERT INTO products(name, description, price) VALUES($1, $2, $3)
RETURNING *`,
[name, description, price],
);
// Return the inserted row as JSON
return new Response(JSON.stringify(insertResult.rows), {
headers: { "Content-Type": "application/json" },
});
}
// Query the products table
const result = await sql.query("SELECT * FROM products");
// Return the result as JSON
return new Response(JSON.stringify(result.rows), {
headers: {
"Content-Type": "application/json",
},
});
},
} satisfies ExportedHandler;
```
Explain Code
This code snippet does the following:
1. Checks if the request is a `POST` request and the URL path is `/products`.
2. Parses the JSON payload from the request.
3. Constructs an `INSERT` SQL query using the provided product data.
4. Executes the query, inserting the new row into the `products` table.
5. Returns the inserted row as a JSON response.
Now, when you send a `POST` request to your Worker's URL with the `/products` path and a JSON payload, the Worker will insert a new row into the `products` table with the provided data. When a request to `/` is made, the Worker will return all products in the database.
After making these changes, deploy the Worker again by running:
Terminal window
```
npx wrangler deploy
```
You can now use your Cloudflare Worker to insert new rows into the `products` table. To test this functionality, send a `POST` request to your Worker's URL with the `/products` path, along with a JSON payload containing the new product data:
```
{
"name": "Sample Product",
"description": "This is a sample product",
"price": 19.99
}
```
You have successfully created a Cloudflare Worker that connects to a PostgreSQL database and handles fetching data and inserting new rows into a products table.
## 8\. Use Hyperdrive to accelerate queries
Create a Hyperdrive configuration using the connection string for your PostgreSQL database.
Terminal window
```
npx wrangler hyperdrive create --connection-string="postgres://user:password@HOSTNAME_OR_IP_ADDRESS:PORT/database_name" --caching-disabled
```
This command outputs the Hyperdrive configuration `id` that will be used for your Hyperdrive [binding](https://developers.cloudflare.com/workers/runtime-apis/bindings/). Set up your binding by specifying the `id` in the Wrangler file.
* [ wrangler.jsonc ](#tab-panel-7958)
* [ wrangler.toml ](#tab-panel-7959)
JSONC
```
{
"$schema": "./node_modules/wrangler/config-schema.json",
"name": "hyperdrive-example",
"main": "src/index.ts",
// Set this to today's date
"compatibility_date": "2026-04-14",
"compatibility_flags": [
"nodejs_compat"
],
// Pasted from the output of `wrangler hyperdrive create --connection-string=[...]` above.
"hyperdrive": [
{
"binding": "HYPERDRIVE",
"id": ""
}
]
}
```
Explain Code
TOML
```
"$schema" = "./node_modules/wrangler/config-schema.json"
name = "hyperdrive-example"
main = "src/index.ts"
# Set this to today's date
compatibility_date = "2026-04-14"
compatibility_flags = [ "nodejs_compat" ]
[[hyperdrive]]
binding = "HYPERDRIVE"
id = ""
```
Explain Code
Create the types for your Hyperdrive binding using the following command:
Terminal window
```
npx wrangler types
```
Replace your existing connection string in your Worker code with the Hyperdrive connection string.
JavaScript
```
export default {
async fetch(request, env, ctx): Promise {
const sql = new Client({connectionString: env.HYPERDRIVE.connectionString})
const url = new URL(request.url);
//rest of the routes and database queries
},
} satisfies ExportedHandler;
```
## 9\. Redeploy your Worker
Run the following command to deploy your Worker:
Terminal window
```
npx wrangler deploy
```
Your Worker application is now live and accessible at `..workers.dev`, using Hyperdrive. Hyperdrive accelerates database queries by pooling your connections and caching your requests across the globe.
## Next steps
To build more with databases and Workers, refer to [Tutorials](https://developers.cloudflare.com/workers/tutorials) and explore the [Databases documentation](https://developers.cloudflare.com/workers/databases).
If you have any questions, need assistance, or would like to share your project, join the Cloudflare Developer community on [Discord ↗](https://discord.cloudflare.com) to connect with fellow developers and the Cloudflare team.
```json
{"@context":"https://schema.org","@type":"BreadcrumbList","itemListElement":[{"@type":"ListItem","position":1,"item":{"@id":"/directory/","name":"Directory"}},{"@type":"ListItem","position":2,"item":{"@id":"/workers/","name":"Workers"}},{"@type":"ListItem","position":3,"item":{"@id":"/workers/tutorials/","name":"Tutorials"}},{"@type":"ListItem","position":4,"item":{"@id":"/workers/tutorials/postgres/","name":"Connect to a PostgreSQL database with Cloudflare Workers"}}]}
```
---
---
title: Send Emails With Postmark
description: This tutorial explains how to send transactional emails from Workers using Postmark.
image: https://developers.cloudflare.com/dev-products-preview.png
---
[Skip to content](#%5Ftop)
### Tags
[ JavaScript ](https://developers.cloudflare.com/search/?tags=JavaScript)
Was this helpful?
YesNo
[ Edit page ](https://github.com/cloudflare/cloudflare-docs/edit/production/src/content/docs/workers/tutorials/send-emails-with-postmark.mdx) [ Report issue ](https://github.com/cloudflare/cloudflare-docs/issues/new/choose)
Copy page
# Send Emails With Postmark
**Last reviewed:** almost 2 years ago
In this tutorial, you will learn how to send transactional emails from Workers using [Postmark ↗](https://postmarkapp.com/). At the end of this tutorial, you’ll be able to:
* Create a Worker to send emails.
* Sign up and add a Cloudflare domain to Postmark.
* Send emails from your Worker using Postmark.
* Store API keys securely with secrets.
## Prerequisites
To continue with this tutorial, you’ll need:
* A [Cloudflare account ↗](https://dash.cloudflare.com/sign-up/workers-and-pages), if you don’t already have one.
* A [registered](https://developers.cloudflare.com/registrar/get-started/register-domain/) domain.
* Installed [npm ↗](https://docs.npmjs.com/getting-started).
* A [Postmark account ↗](https://account.postmarkapp.com/sign%5Fup).
## Create a Worker project
Start by using [C3](https://developers.cloudflare.com/pages/get-started/c3/) to create a Worker project in the command line, then, answer the prompts:
Terminal window
```
npm create cloudflare@latest
```
Alternatively, you can use CLI arguments to speed things up:
Terminal window
```
npm create cloudflare@latest email-with-postmark -- --type=hello-world --ts=false --git=true --deploy=false
```
This creates a simple hello-world Worker having the following content:
JavaScript
```
export default {
async fetch(request, env, ctx) {
return new Response("Hello World!");
},
};
```
## Add your domain to Postmark
If you don’t already have a Postmark account, you can sign up for a [free account here ↗](https://account.postmarkapp.com/sign%5Fup). After signing up, check your inbox for a link to confirm your sender signature. This verifies and enables you to send emails from your registered email address.
To enable email sending from other addresses on your domain, navigate to `Sender Signatures` on the Postmark dashboard, `Add Domain or Signature` \> `Add Domain`, then type in your domain and click on `Verify Domain`.
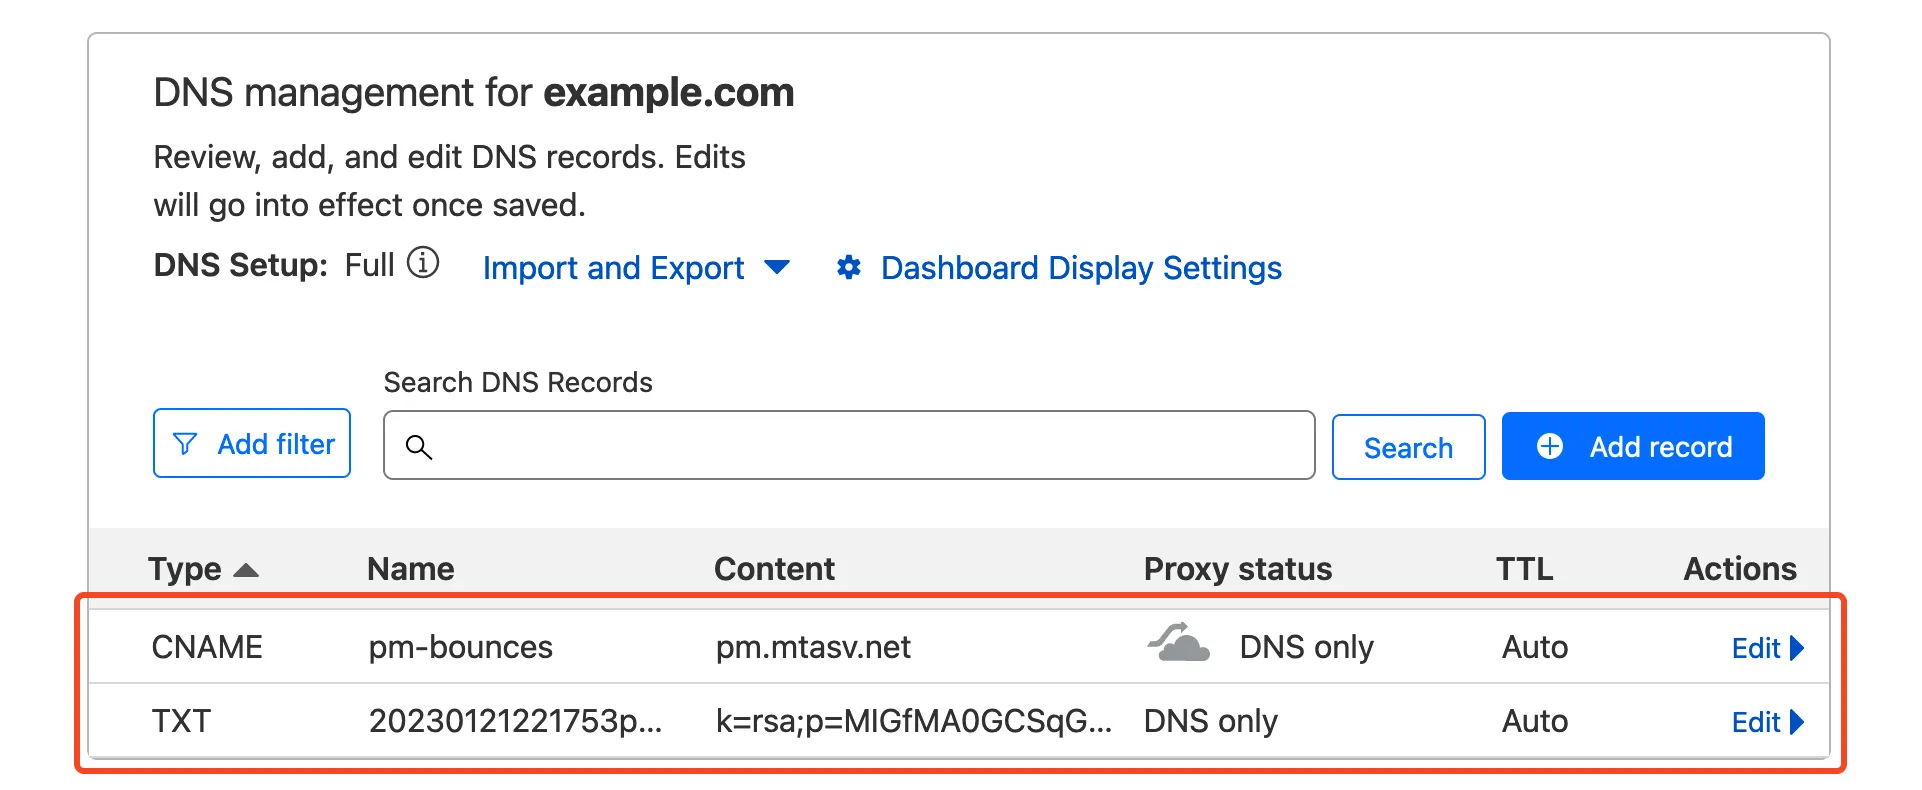
Next, you’re presented with a list of DNS records to add to your Cloudflare domain. On your Cloudflare dashboard, select the domain you entered earlier and navigate to `DNS` \> `Records`. Copy/paste the DNS records (DKIM, and Return-Path) from Postmark to your Cloudflare domain.
Note
If you need more help adding DNS records in Cloudflare, refer to [Manage DNS records](https://developers.cloudflare.com/dns/manage-dns-records/how-to/create-dns-records/).
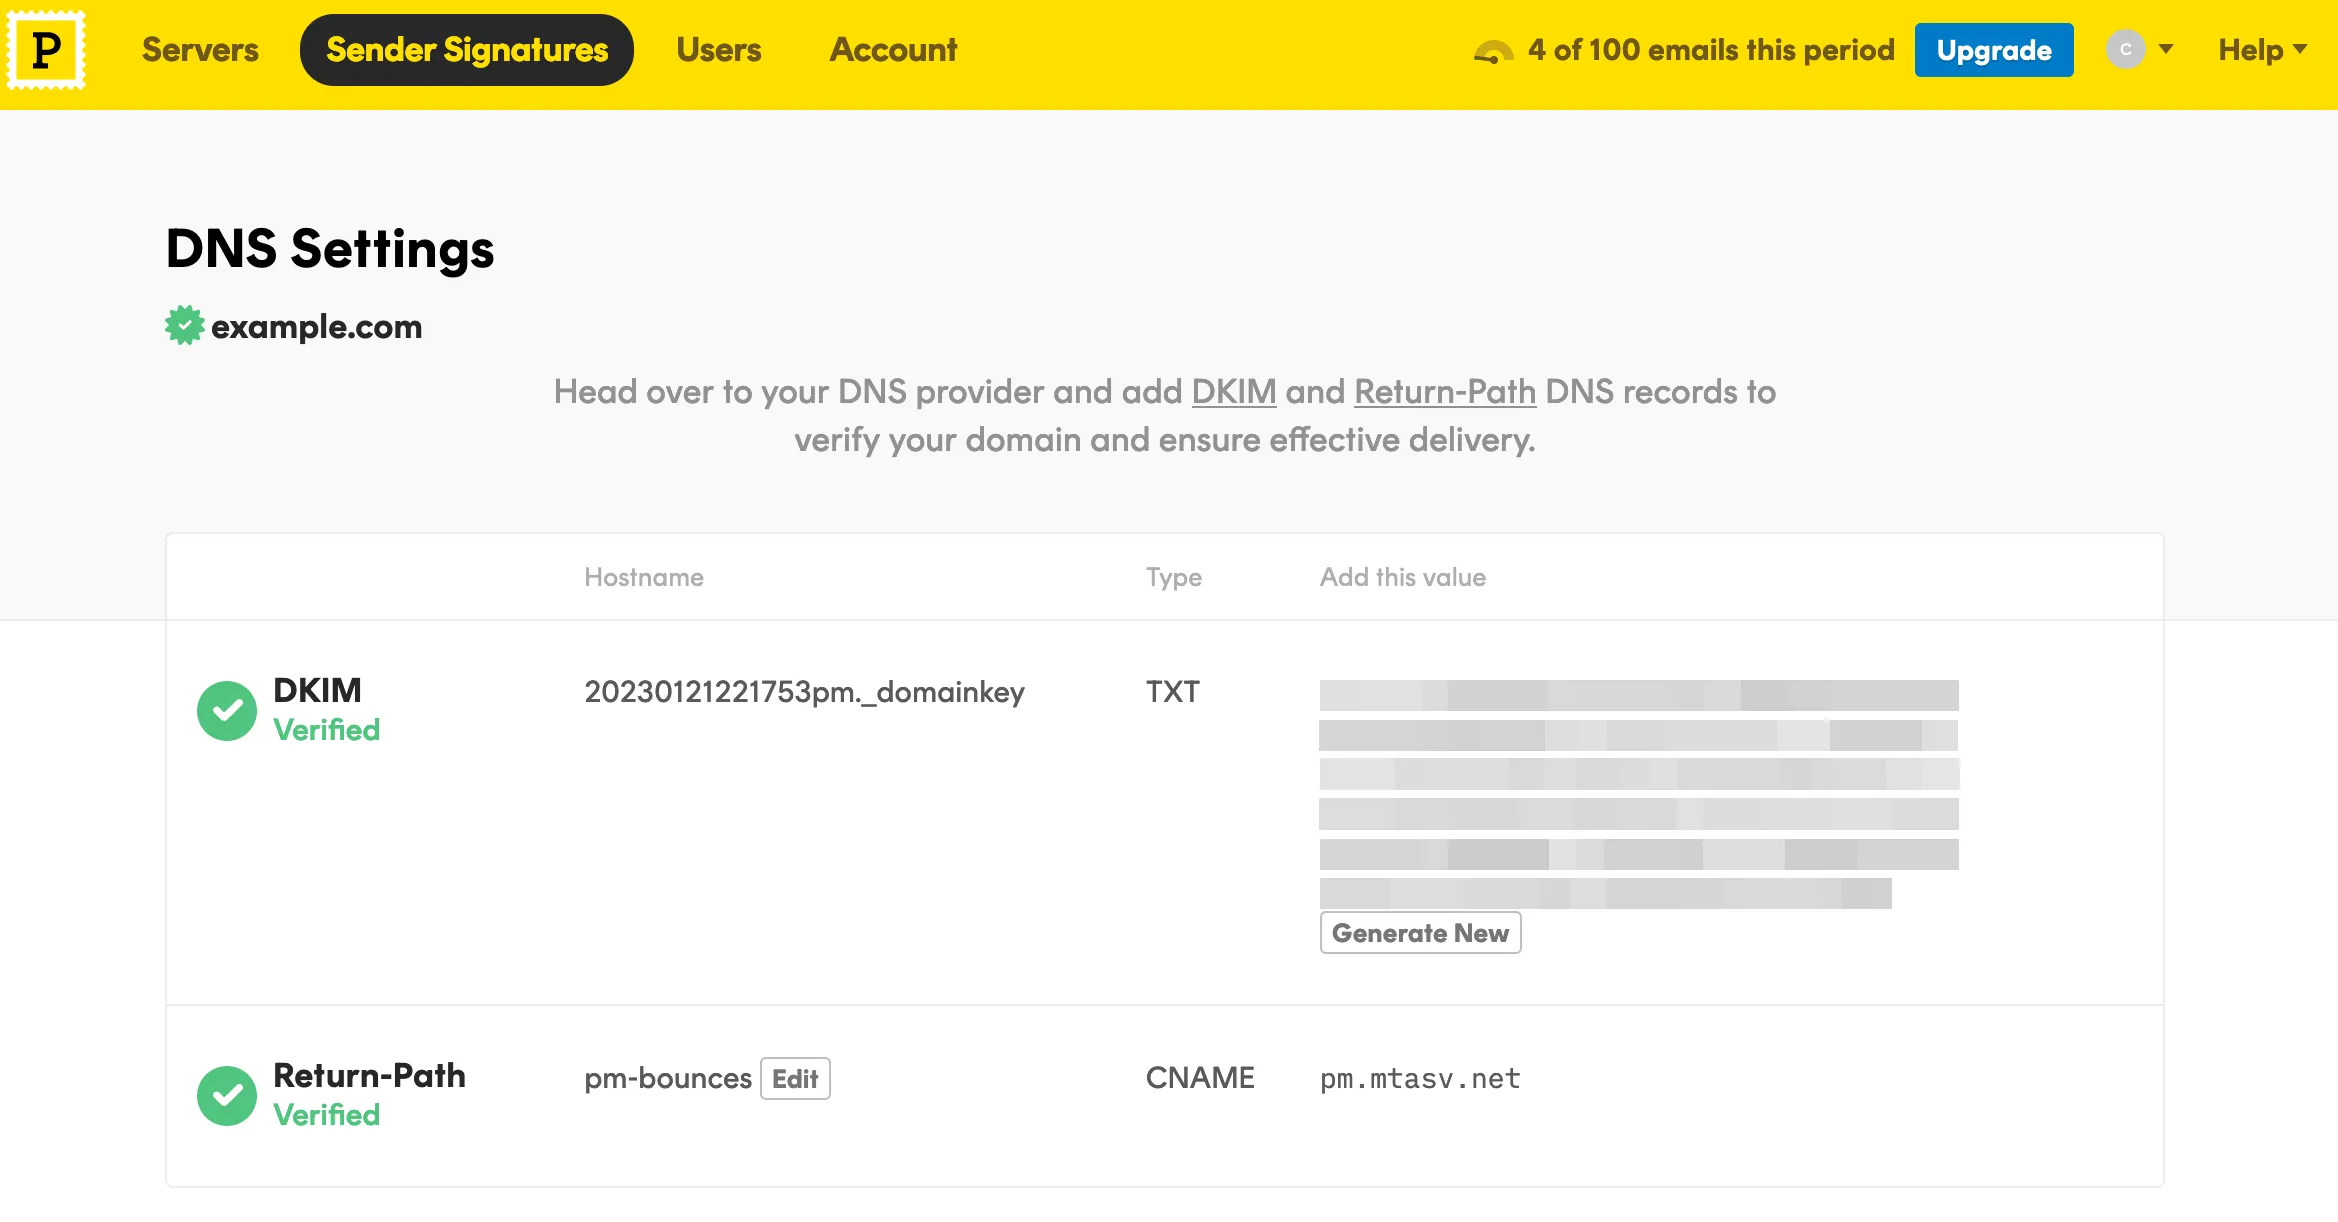
When that’s done, head back to Postmark and click on the `Verify` buttons. If all records are properly configured, your domain status should be updated to `Verified`.
To grab your API token, navigate to the `Servers` tab, then `My First Server` \> `API Tokens`, then copy your API key to a safe place.
## Send emails from your Worker
The final step is putting it all together in a Worker. In your Worker, make a post request with `fetch` to Postmark’s email API and include your token and message body:
Note
[Postmark’s JavaScript library ↗](https://www.npmjs.com/package/postmark) is currently not supported on Workers. Use the [email API ↗](https://postmarkapp.com/developer/user-guide/send-email-with-api) instead.
```
export default {
async fetch(request, env, ctx) {
return await fetch("https://api.postmarkapp.com/email", {
method: "POST",
headers: {
"Content-Type": "application/json",
"X-Postmark-Server-Token": "your_postmark_api_token_here",
},
body: JSON.stringify({
From: "hello@example.com",
To: "someone@example.com",
Subject: "Hello World",
HtmlBody: "Hello from Workers
",
}),
});
},
};
```
Explain Code
To test your code locally, run the following command and navigate to [http://localhost:8787/ ↗](http://localhost:8787/) in a browser:
Terminal window
```
npm start
```
Deploy your Worker with `npm run deploy`.
## Move API token to Secrets
Sensitive information such as API keys and token should always be stored in secrets. All secrets are encrypted to add an extra layer of protection. That said, it’s a good idea to move your API token to a secret and access it from the environment of your Worker.
To add secrets for local development, create a `.dev.vars` file which works exactly like a `.env` file:
```
POSTMARK_API_TOKEN=your_postmark_api_token_here
```
Also ensure the secret is added to your deployed worker by running:
Add secret to deployed Worker
```
npx wrangler secret put POSTMARK_API_TOKEN
```
The added secret can be accessed on via the `env` parameter passed to your Worker’s fetch event handler:
```
export default {
async fetch(request, env, ctx) {
return await fetch("https://api.postmarkapp.com/email", {
method: "POST",
headers: {
"Content-Type": "application/json",
"X-Postmark-Server-Token": env.POSTMARK_API_TOKEN,
},
body: JSON.stringify({
From: "hello@example.com",
To: "someone@example.com",
Subject: "Hello World",
HtmlBody: "Hello from Workers
",
}),
});
},
};
```
Explain Code
And finally, deploy this update with `npm run deploy`.
## Related resources
* [Storing API keys and tokens with Secrets](https://developers.cloudflare.com/workers/configuration/secrets/).
* [Transferring your domain to Cloudflare](https://developers.cloudflare.com/registrar/get-started/transfer-domain-to-cloudflare/).
* [Send emails from Workers](https://developers.cloudflare.com/email-routing/email-workers/send-email-workers/)
```json
{"@context":"https://schema.org","@type":"BreadcrumbList","itemListElement":[{"@type":"ListItem","position":1,"item":{"@id":"/directory/","name":"Directory"}},{"@type":"ListItem","position":2,"item":{"@id":"/workers/","name":"Workers"}},{"@type":"ListItem","position":3,"item":{"@id":"/workers/tutorials/","name":"Tutorials"}},{"@type":"ListItem","position":4,"item":{"@id":"/workers/tutorials/send-emails-with-postmark/","name":"Send Emails With Postmark"}}]}
```
---
---
title: Send Emails With Resend
description: This tutorial explains how to send emails from Cloudflare Workers using Resend.
image: https://developers.cloudflare.com/dev-products-preview.png
---
[Skip to content](#%5Ftop)
### Tags
[ JavaScript ](https://developers.cloudflare.com/search/?tags=JavaScript)
Was this helpful?
YesNo
[ Edit page ](https://github.com/cloudflare/cloudflare-docs/edit/production/src/content/docs/workers/tutorials/send-emails-with-resend.mdx) [ Report issue ](https://github.com/cloudflare/cloudflare-docs/issues/new/choose)
Copy page
# Send Emails With Resend
**Last reviewed:** almost 2 years ago
In this tutorial, you will learn how to send transactional emails from Workers using [Resend ↗](https://resend.com/). At the end of this tutorial, you’ll be able to:
* Create a Worker to send emails.
* Sign up and add a Cloudflare domain to Resend.
* Send emails from your Worker using Resend.
* Store API keys securely with secrets.
## Prerequisites
To continue with this tutorial, you’ll need:
* A [Cloudflare account ↗](https://dash.cloudflare.com/sign-up/workers-and-pages), if you don’t already have one.
* A [registered](https://developers.cloudflare.com/registrar/get-started/register-domain/) domain.
* Installed [npm ↗](https://docs.npmjs.com/getting-started).
* A [Resend account ↗](https://resend.com/signup).
## Create a Worker project
Start by using [C3](https://developers.cloudflare.com/pages/get-started/c3/) to create a Worker project in the command line, then, answer the prompts:
Terminal window
```
npm create cloudflare@latest
```
Alternatively, you can use CLI arguments to speed things up:
Terminal window
```
npm create cloudflare@latest email-with-resend -- --type=hello-world --ts=false --git=true --deploy=false
```
This creates a simple hello-world Worker having the following content:
JavaScript
```
export default {
async fetch(request, env, ctx) {
return new Response("Hello World!");
},
};
```
## Add your domain to Resend
If you don’t already have a Resend account, you can sign up for a [free account here ↗](https://resend.com/signup). After signing up, go to `Domains` using the side menu, and click the button to add a new domain. On the modal, enter the domain you want to add and then select a region.
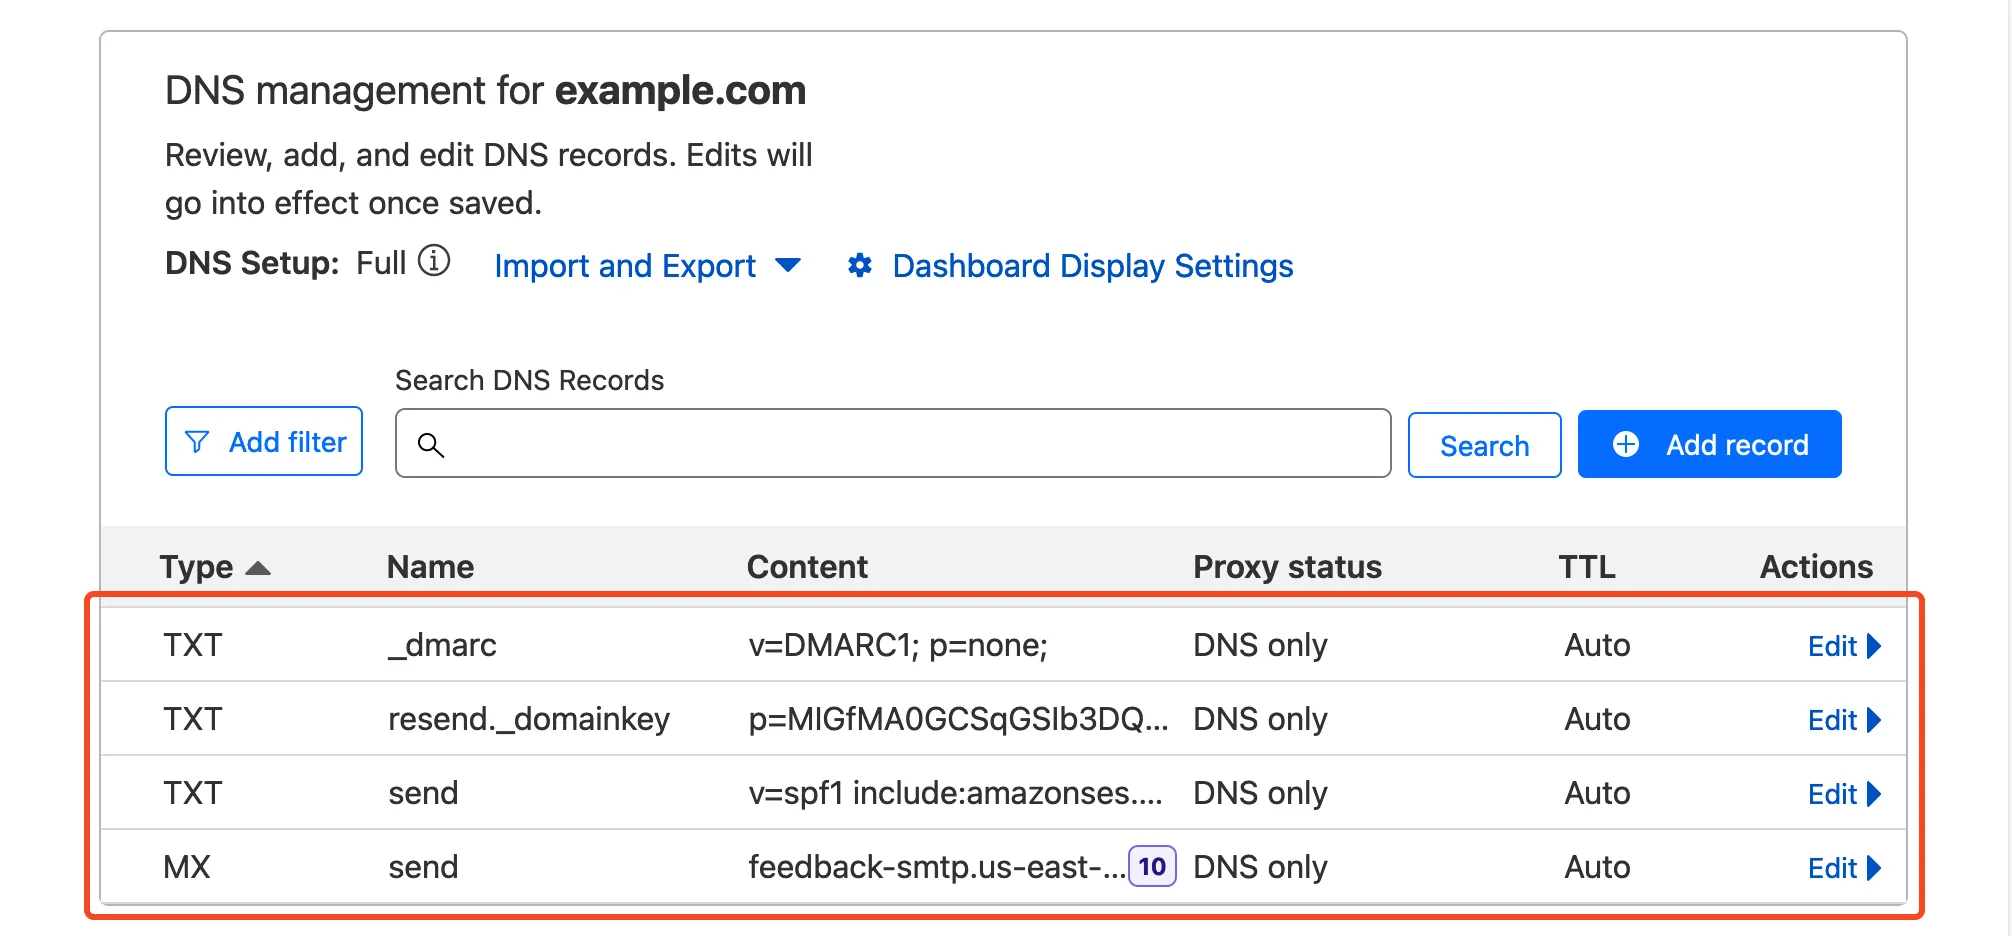
Next, you’re presented with a list of DNS records to add to your Cloudflare domain. On your Cloudflare dashboard, select the domain you entered earlier and navigate to `DNS` \> `Records`. Copy/paste the DNS records (DKIM, SPF, and DMARC records) from Resend to your Cloudflare domain.
Note
If you need more help adding DNS records in Cloudflare, refer to [Manage DNS records](https://developers.cloudflare.com/dns/manage-dns-records/how-to/create-dns-records/).
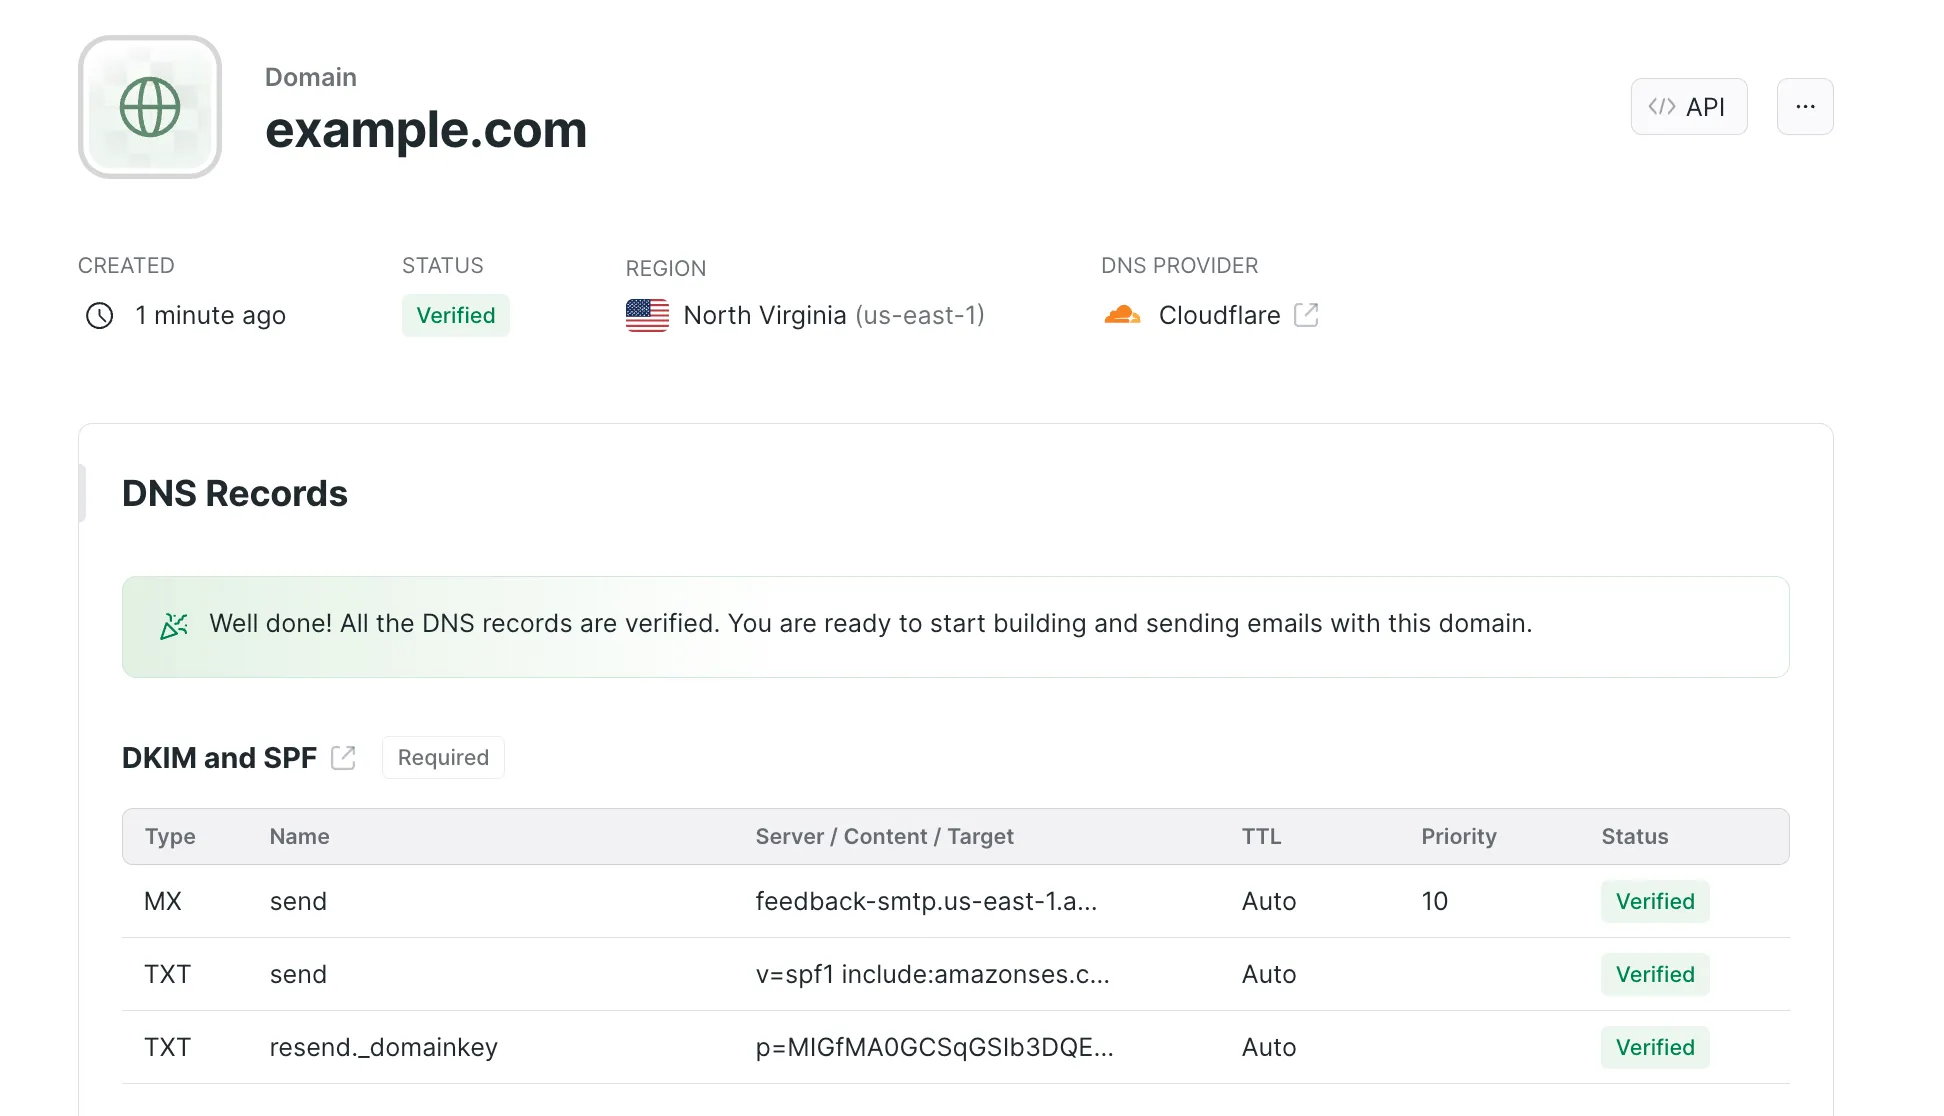
When that’s done, head back to Resend and click on the `Verify DNS Records` button. If all records are properly configured, your domain status should be updated to `Verified`.
Lastly, navigate to `API Keys` with the side menu, to create an API key. Give your key a descriptive name and the appropriate permissions. Click the button to add your key and then copy your API key to a safe location.
## Send emails from your Worker
The final step is putting it all together in a Worker. Open up a terminal in the directory of the Worker you created earlier. Then, install the Resend SDK:
Terminal window
```
npm i resend
```
In your Worker, import and use the Resend library like so:
```
import { Resend } from "resend";
export default {
async fetch(request, env, ctx) {
const resend = new Resend("your_resend_api_key");
const { data, error } = await resend.emails.send({
from: "hello@example.com",
to: "someone@example.com",
subject: "Hello World",
html: "Hello from Workers
",
});
return Response.json({ data, error });
},
};
```
Explain Code
To test your code locally, run the following command and navigate to [http://localhost:8787/ ↗](http://localhost:8787/) in a browser:
Terminal window
```
npm start
```
Deploy your Worker with `npm run deploy`.
## Move API keys to Secrets
Sensitive information such as API keys and token should always be stored in secrets. All secrets are encrypted to add an extra layer of protection. That said, it’s a good idea to move your API key to a secret and access it from the environment of your Worker.
To add secrets for local development, create a `.dev.vars` file which works exactly like a `.env` file:
```
RESEND_API_KEY=your_resend_api_key
```
Also ensure the secret is added to your deployed worker by running:
Add secret to deployed Worker
```
npx wrangler secret put RESEND_API_KEY
```
The added secret can be accessed on via the `env` parameter passed to your Worker’s fetch event handler:
```
import { Resend } from "resend";
export default {
async fetch(request, env, ctx) {
const resend = new Resend(env.RESEND_API_KEY);
const { data, error } = await resend.emails.send({
from: "hello@example.com",
to: "someone@example.com",
subject: "Hello World",
html: "Hello from Workers
",
});
return Response.json({ data, error });
},
};
```
Explain Code
And finally, deploy this update with `npm run deploy`.
## Related resources
* [Storing API keys and tokens with Secrets](https://developers.cloudflare.com/workers/configuration/secrets/).
* [Transferring your domain to Cloudflare](https://developers.cloudflare.com/registrar/get-started/transfer-domain-to-cloudflare/).
* [Send emails from Workers](https://developers.cloudflare.com/email-routing/email-workers/send-email-workers/)
```json
{"@context":"https://schema.org","@type":"BreadcrumbList","itemListElement":[{"@type":"ListItem","position":1,"item":{"@id":"/directory/","name":"Directory"}},{"@type":"ListItem","position":2,"item":{"@id":"/workers/","name":"Workers"}},{"@type":"ListItem","position":3,"item":{"@id":"/workers/tutorials/","name":"Tutorials"}},{"@type":"ListItem","position":4,"item":{"@id":"/workers/tutorials/send-emails-with-resend/","name":"Send Emails With Resend"}}]}
```
---
---
title: Securely access and upload assets with Cloudflare R2
description: This tutorial explains how to create a TypeScript-based Cloudflare Workers project that can securely access files from and upload files to a CloudFlare R2 bucket.
image: https://developers.cloudflare.com/dev-products-preview.png
---
[Skip to content](#%5Ftop)
### Tags
[ TypeScript ](https://developers.cloudflare.com/search/?tags=TypeScript)
Was this helpful?
YesNo
[ Edit page ](https://github.com/cloudflare/cloudflare-docs/edit/production/src/content/docs/workers/tutorials/upload-assets-with-r2.mdx) [ Report issue ](https://github.com/cloudflare/cloudflare-docs/issues/new/choose)
Copy page
# Securely access and upload assets with Cloudflare R2
**Last reviewed:** almost 3 years ago
This tutorial explains how to create a TypeScript-based Cloudflare Workers project that can securely access files from and upload files to a [Cloudflare R2](https://developers.cloudflare.com/r2/) bucket. Cloudflare R2 allows developers to store large amounts of unstructured data without the costly egress bandwidth fees associated with typical cloud storage services.
## Prerequisites
To continue:
1. Sign up for a [Cloudflare account ↗](https://dash.cloudflare.com/sign-up/workers-and-pages) if you have not already.
2. Install [npm ↗](https://docs.npmjs.com/getting-started).
3. Install [Node.js ↗](https://nodejs.org/en/). Use a Node version manager like [Volta ↗](https://volta.sh/) or [nvm ↗](https://github.com/nvm-sh/nvm) to avoid permission issues and change Node.js versions. [Wrangler](https://developers.cloudflare.com/workers/wrangler/install-and-update/) requires a Node version of `16.17.0` or later.
## Create a Worker application
First, use the [create-cloudflare CLI ↗](https://github.com/cloudflare/workers-sdk/tree/main/packages/create-cloudflare) to create a new Worker. To do this, open a terminal window and run the following command:
npm yarn pnpm
```
npm create cloudflare@latest -- upload-r2-assets
```
```
yarn create cloudflare upload-r2-assets
```
```
pnpm create cloudflare@latest upload-r2-assets
```
For setup, select the following options:
* For _What would you like to start with?_, choose `Hello World example`.
* For _Which template would you like to use?_, choose `Worker only`.
* For _Which language do you want to use?_, choose `TypeScript`.
* For _Do you want to use git for version control?_, choose `Yes`.
* For _Do you want to deploy your application?_, choose `No` (we will be making some changes before deploying).
Move into your newly created directory:
Terminal window
```
cd upload-r2-assets
```
## Create an R2 bucket
Before you integrate R2 bucket access into your Worker application, an R2 bucket must be created:
Terminal window
```
npx wrangler r2 bucket create
```
Replace `` with the name you want to assign to your bucket. List your account's R2 buckets to verify that a new bucket has been added:
Terminal window
```
npx wrangler r2 bucket list
```
## Configure access to an R2 bucket
After your new R2 bucket is ready, use it inside your Worker application.
Use your R2 bucket inside your Worker project by modifying the [Wrangler configuration file](https://developers.cloudflare.com/workers/wrangler/configuration/) to include an R2 bucket [binding](https://developers.cloudflare.com/workers/runtime-apis/bindings/). Add the following R2 bucket binding to your Wrangler file:
* [ wrangler.jsonc ](#tab-panel-7962)
* [ wrangler.toml ](#tab-panel-7963)
JSONC
```
{
"r2_buckets": [
{
"binding": "MY_BUCKET",
"bucket_name": ""
}
]
}
```
TOML
```
[[r2_buckets]]
binding = "MY_BUCKET"
bucket_name = ""
```
Give your R2 bucket binding name. Replace `` with the name of the R2 bucket you created earlier.
Your Worker application can now access your R2 bucket using the `MY_BUCKET` variable. You can now perform CRUD (Create, Read, Update, Delete) operations on the contents of the bucket.
## Fetch from an R2 bucket
After setting up an R2 bucket binding, you will implement the functionalities for the Worker to interact with the R2 bucket, such as, fetching files from the bucket and uploading files to the bucket.
To fetch files from the R2 bucket, use the `BINDING.get` function. In the below example, the R2 bucket binding is called `MY_BUCKET`. Using `.get(key)`, you can retrieve an asset based on the URL pathname as the key. In this example, the URL pathname is `/image.png`, and the asset key is `image.png`.
TypeScript
```
interface Env {
MY_BUCKET: R2Bucket;
}
export default {
async fetch(request, env): Promise {
// For example, the request URL my-worker.account.workers.dev/image.png
const url = new URL(request.url);
const key = url.pathname.slice(1);
// Retrieve the key "image.png"
const object = await env.MY_BUCKET.get(key);
if (object === null) {
return new Response("Object Not Found", { status: 404 });
}
const headers = new Headers();
object.writeHttpMetadata(headers);
headers.set("etag", object.httpEtag);
return new Response(object.body, {
headers,
});
},
} satisfies ExportedHandler;
```
Explain Code
The code written above fetches and returns data from the R2 bucket when a `GET` request is made to the Worker application using a specific URL path.
## Upload securely to an R2 bucket
Next, you will add the ability to upload to your R2 bucket using authentication. To securely authenticate your upload requests, use [Wrangler's secret capability](https://developers.cloudflare.com/workers/wrangler/commands/general/#secret). Wrangler was installed when you ran the `create cloudflare@latest` command.
Create a secret value of your choice -- for instance, a random string or password. Using the Wrangler CLI, add the secret to your project as `AUTH_SECRET`:
Terminal window
```
npx wrangler secret put AUTH_SECRET
```
Now, add a new code path that handles a `PUT` HTTP request. This new code will check that the previously uploaded secret is correctly used for authentication, and then upload to R2 using `MY_BUCKET.put(key, data)`:
TypeScript
```
interface Env {
MY_BUCKET: R2Bucket;
AUTH_SECRET: string;
}
export default {
async fetch(request, env): Promise {
if (request.method === "PUT") {
// Note that you could require authentication for all requests
// by moving this code to the top of the fetch function.
const auth = request.headers.get("Authorization");
const expectedAuth = `Bearer ${env.AUTH_SECRET}`;
if (!auth || auth !== expectedAuth) {
return new Response("Unauthorized", { status: 401 });
}
const url = new URL(request.url);
const key = url.pathname.slice(1);
await env.MY_BUCKET.put(key, request.body);
return new Response(`Object ${key} uploaded successfully!`);
}
// include the previous code here...
},
} satisfies ExportedHandler;
```
Explain Code
This approach ensures that only clients who provide a valid bearer token, via the `Authorization` header equal to the `AUTH_SECRET` value, will be permitted to upload to the R2 bucket. If you used a different binding name than `AUTH_SECRET`, replace it in the code above.
## Deploy your Worker application
After completing your Cloudflare Worker project, deploy it to Cloudflare. Make sure you are in your Worker application directory that you created for this tutorial, then run:
Terminal window
```
npx wrangler deploy
```
Your application is now live and accessible at `..workers.dev`.
You have successfully created a Cloudflare Worker that allows you to interact with an R2 bucket to accomplish tasks such as uploading and downloading files. You can now use this as a starting point for your own projects.
## Next steps
To build more with R2 and Workers, refer to [Tutorials](https://developers.cloudflare.com/workers/tutorials/) and the [R2 documentation](https://developers.cloudflare.com/r2/).
If you have any questions, need assistance, or would like to share your project, join the Cloudflare Developer community on [Discord ↗](https://discord.cloudflare.com) to connect with fellow developers and the Cloudflare team.
```json
{"@context":"https://schema.org","@type":"BreadcrumbList","itemListElement":[{"@type":"ListItem","position":1,"item":{"@id":"/directory/","name":"Directory"}},{"@type":"ListItem","position":2,"item":{"@id":"/workers/","name":"Workers"}},{"@type":"ListItem","position":3,"item":{"@id":"/workers/tutorials/","name":"Tutorials"}},{"@type":"ListItem","position":4,"item":{"@id":"/workers/tutorials/upload-assets-with-r2/","name":"Securely access and upload assets with Cloudflare R2"}}]}
```
---
---
title: Set up and use a Prisma Postgres database
description: This tutorial shows you how to set up a Cloudflare Workers project with Prisma ORM.
image: https://developers.cloudflare.com/dev-products-preview.png
---
[Skip to content](#%5Ftop)
### Tags
[ TypeScript ](https://developers.cloudflare.com/search/?tags=TypeScript)[ SQL ](https://developers.cloudflare.com/search/?tags=SQL)[ Prisma ORM ](https://developers.cloudflare.com/search/?tags=Prisma%20ORM)[ Postgres ](https://developers.cloudflare.com/search/?tags=Postgres)
Was this helpful?
YesNo
[ Edit page ](https://github.com/cloudflare/cloudflare-docs/edit/production/src/content/docs/workers/tutorials/using-prisma-postgres-with-workers.mdx) [ Report issue ](https://github.com/cloudflare/cloudflare-docs/issues/new/choose)
Copy page
# Set up and use a Prisma Postgres database
**Last reviewed:** about 1 year ago
[Prisma Postgres ↗](https://www.prisma.io/postgres) is a managed, serverless PostgreSQL database. It supports features like connection pooling, caching, real-time subscriptions, and query optimization recommendations.
In this tutorial, you will learn how to:
* Set up a Cloudflare Workers project with [Prisma ORM ↗](https://www.prisma.io/docs).
* Create a Prisma Postgres instance from the Prisma CLI.
* Model data and run migrations with Prisma Postgres.
* Query the database from Workers.
* Deploy the Worker to Cloudflare.
## Prerequisites
To follow this guide, ensure you have the following:
* Node.js `v18.18` or higher installed.
* An active [Cloudflare account ↗](https://dash.cloudflare.com/).
* A basic familiarity with installing and using command-line interface (CLI) applications.
## 1\. Create a new Worker project
Begin by using [C3](https://developers.cloudflare.com/pages/get-started/c3/) to create a Worker project in the command line:
Terminal window
```
npm create cloudflare@latest prisma-postgres-worker -- --type=hello-world --ts=true --git=true --deploy=false
```
Then navigate into your project:
Terminal window
```
cd ./prisma-postgres-worker
```
Your initial `src/index.ts` file currently contains a simple request handler:
src/index.ts
```
export default {
async fetch(request, env, ctx): Promise {
return new Response("Hello World!");
},
} satisfies ExportedHandler;
```
## 2\. Setup Prisma in your project
In this step, you will set up Prisma ORM with a Prisma Postgres database using the CLI. Then you will create and execute helper scripts to create tables in the database and generate a Prisma client to query it.
### 2.1\. Install required dependencies
Install Prisma CLI as a dev dependency:
npm yarn pnpm bun
```
npm i -D prisma
```
```
yarn add -D prisma
```
```
pnpm add -D prisma
```
```
bun add -d prisma
```
Install the [Prisma Accelerate client extension ↗](https://www.npmjs.com/package/@prisma/extension-accelerate) as it is required for Prisma Postgres:
npm yarn pnpm bun
```
npm i @prisma/extension-accelerate
```
```
yarn add @prisma/extension-accelerate
```
```
pnpm add @prisma/extension-accelerate
```
```
bun add @prisma/extension-accelerate
```
Install the [dotenv-cli package ↗](https://www.npmjs.com/package/dotenv-cli) to load environment variables from `.dev.vars`:
npm yarn pnpm bun
```
npm i -D dotenv-cli
```
```
yarn add -D dotenv-cli
```
```
pnpm add -D dotenv-cli
```
```
bun add -d dotenv-cli
```
### 2.2\. Create a Prisma Postgres database and initialize Prisma
Initialize Prisma in your application:
npm yarn pnpm
```
npx prisma@latest init --db
```
```
yarn dlx prisma@latest init --db
```
```
pnpx prisma@latest init --db
```
If you do not have a [Prisma Data Platform ↗](https://console.prisma.io/) account yet, or if you are not logged in, the command will prompt you to log in using one of the available authentication providers. A browser window will open so you can log in or create an account. Return to the CLI after you have completed this step.
Once logged in (or if you were already logged in), the CLI will prompt you to select a project name and a database region.
Once the command has terminated, it will have created:
* A project in your [Platform Console ↗](https://console.prisma.io/) containing a Prisma Postgres database instance.
* A `prisma` folder containing `schema.prisma`, where you will define your database schema.
* An `.env` file in the project root, which will contain the Prisma Postgres database url `DATABASE_URL=`.
Note that Cloudflare Workers do not support `.env` files. You will use a file called `.dev.vars` instead of the `.env` file that was just created.
### 2.3\. Prepare environment variables
Rename the `.env` file in the root of your application to `.dev.vars` file:
Terminal window
```
mv .env .dev.vars
```
### 2.4\. Apply database schema changes
Open the `schema.prisma` file in the `prisma` folder and add the following `User` model to your database:
prisma/schema.prisma
```
generator client {
provider = "prisma-client-js"
}
datasource db {
provider = "postgresql"
url = env("DATABASE_URL")
}
model User {
id Int @id @default(autoincrement())
email String
name String
}
```
Explain Code
Next, add the following helper scripts to the `scripts` section of your `package.json`:
package.json
```
"scripts": {
"migrate": "dotenv -e .dev.vars -- npx prisma migrate dev",
"generate": "dotenv -e .dev.vars -- npx prisma generate --no-engine",
"studio": "dotenv -e .dev.vars -- npx prisma studio",
// Additional worker scripts...
}
```
Run the migration script to apply changes to the database:
Terminal window
```
npm run migrate
```
When prompted, provide a name for the migration (for example, `init`).
After these steps are complete, Prisma ORM is fully set up and connected to your Prisma Postgres database.
## 3\. Develop the application
Modify the `src/index.ts` file and replace its contents with the following code:
src/index.ts
```
import { PrismaClient } from "@prisma/client/edge";
import { withAccelerate } from "@prisma/extension-accelerate";
export interface Env {
DATABASE_URL: string;
}
export default {
async fetch(request, env, ctx): Promise {
const path = new URL(request.url).pathname;
if (path === "/favicon.ico")
return new Response("Resource not found", {
status: 404,
headers: {
"Content-Type": "text/plain",
},
});
const prisma = new PrismaClient({
datasourceUrl: env.DATABASE_URL,
}).$extends(withAccelerate());
const user = await prisma.user.create({
data: {
email: `Jon${Math.ceil(Math.random() * 1000)}@gmail.com`,
name: "Jon Doe",
},
});
const userCount = await prisma.user.count();
return new Response(`\
Created new user: ${user.name} (${user.email}).
Number of users in the database: ${userCount}.
`);
},
} satisfies ExportedHandler;
```
Explain Code
Run the development server:
Terminal window
```
npm run dev
```
Visit [https://localhost:8787 ↗](https://localhost:8787) to see your app display the following output:
Terminal window
```
Number of users in the database: 1
```
Every time you refresh the page, a new user is created. The number displayed will increment by `1` with each refresh as it returns the total number of users in your database.
## 4\. Deploy the application to Cloudflare
When the application is deployed to Cloudflare, it needs access to the `DATABASE_URL` environment variable that is defined locally in `.dev.vars`. You can use the [npx wrangler secret put](https://developers.cloudflare.com/workers/configuration/secrets/#adding-secrets-to-your-project) command to upload the `DATABASE_URL` to the deployment environment:
Terminal window
```
npx wrangler secret put DATABASE_URL
```
When prompted, paste the `DATABASE_URL` value (from `.dev.vars`). If you are logged in via the Wrangler CLI, you will see a prompt asking if you'd like to create a new Worker. Confirm by choosing "yes":
Terminal window
```
✔ There doesn't seem to be a Worker called "prisma-postgres-worker". Do you want to create a new Worker with that name and add secrets to it? … yes
```
Then execute the following command to deploy your project to Cloudflare Workers:
Terminal window
```
npm run deploy
```
The `wrangler` CLI will bundle and upload your application.
If you are not already logged in, the `wrangler` CLI will open a browser window prompting you to log in to the Cloudflare dashboard.
Note
If you belong to multiple accounts, select the account where you want to deploy the project.
Once the deployment completes, verify the deployment by visiting the live URL provided in the deployment output, such as `https://{PROJECT_NAME}.workers.dev`. If you encounter any issues, ensure the secrets were added correctly and check the deployment logs for errors.
## Next steps
Congratulations on building and deploying a simple application with Prisma Postgres and Cloudflare Workers!
To enhance your application further:
* Add [caching ↗](https://www.prisma.io/docs/postgres/caching) to your queries.
* Explore the [Prisma Postgres documentation ↗](https://www.prisma.io/docs/postgres/getting-started).
To see how to build a real-time application with Cloudflare Workers and Prisma Postgres, read [this ↗](https://www.prisma.io/docs/guides/prisma-postgres-realtime-on-cloudflare) guide.
```json
{"@context":"https://schema.org","@type":"BreadcrumbList","itemListElement":[{"@type":"ListItem","position":1,"item":{"@id":"/directory/","name":"Directory"}},{"@type":"ListItem","position":2,"item":{"@id":"/workers/","name":"Workers"}},{"@type":"ListItem","position":3,"item":{"@id":"/workers/tutorials/","name":"Tutorials"}},{"@type":"ListItem","position":4,"item":{"@id":"/workers/tutorials/using-prisma-postgres-with-workers/","name":"Set up and use a Prisma Postgres database"}}]}
```
---
---
title: Use Workers KV directly from Rust
description: This tutorial will teach you how to read and write to KV directly from Rust using workers-rs. You will use Workers KV from Rust to build an app to store and retrieve cities.
image: https://developers.cloudflare.com/dev-products-preview.png
---
[Skip to content](#%5Ftop)
### Tags
[ Rust ](https://developers.cloudflare.com/search/?tags=Rust)
Was this helpful?
YesNo
[ Edit page ](https://github.com/cloudflare/cloudflare-docs/edit/production/src/content/docs/workers/tutorials/workers-kv-from-rust.mdx) [ Report issue ](https://github.com/cloudflare/cloudflare-docs/issues/new/choose)
Copy page
# Use Workers KV directly from Rust
**Last reviewed:** almost 2 years ago
This tutorial will teach you how to read and write to KV directly from Rust using [workers-rs ↗](https://github.com/cloudflare/workers-rs).
## Before you start
All of the tutorials assume you have already completed the [Get started guide](https://developers.cloudflare.com/workers/get-started/guide/), which gets you set up with a Cloudflare Workers account, [C3 ↗](https://github.com/cloudflare/workers-sdk/tree/main/packages/create-cloudflare), and [Wrangler](https://developers.cloudflare.com/workers/wrangler/install-and-update/).
## Prerequisites
To complete this tutorial, you will need:
* [Git ↗](https://git-scm.com/book/en/v2/Getting-Started-Installing-Git).
* [Wrangler](https://developers.cloudflare.com/workers/wrangler/) CLI.
* The [Rust ↗](https://www.rust-lang.org/tools/install) toolchain.
* And `cargo-generate` sub-command by running:
Terminal window
```
cargo install cargo-generate
```
## 1\. Create your Worker project in Rust
Open a terminal window, and run the following command to generate a Worker project template in Rust:
Terminal window
```
cargo generate cloudflare/workers-rs
```
Then select `template/hello-world-http` template, give your project a descriptive name and select enter. A new project should be created in your directory. Open the project in your editor and run `npx wrangler dev` to compile and run your project.
In this tutorial, you will use Workers KV from Rust to build an app to store and retrieve cities by a given country name.
## 2\. Create a KV namespace
In the terminal, use Wrangler to create a KV namespace for `cities`. This generates a configuration to be added to the project:
Terminal window
```
npx wrangler kv namespace create cities
```
To add this configuration to your project, open the Wrangler file and create an entry for `kv_namespaces` above the build command:
* [ wrangler.jsonc ](#tab-panel-7964)
* [ wrangler.toml ](#tab-panel-7965)
JSONC
```
{
"kv_namespaces": [
{
"binding": "cities",
"id": "e29b263ab50e42ce9b637fa8370175e8"
}
]
}
```
TOML
```
[[kv_namespaces]]
binding = "cities"
id = "e29b263ab50e42ce9b637fa8370175e8"
```
With this configured, you can access the KV namespace with the binding `"cities"` from Rust.
## 3\. Write data to KV
For this app, you will create two routes: A `POST` route to receive and store the city in KV, and a `GET` route to retrieve the city of a given country. For example, a `POST` request to `/France` with a body of `{"city": "Paris"}` should create an entry of Paris as a city in France. A `GET` request to `/France` should retrieve from KV and respond with Paris.
Install [Serde ↗](https://serde.rs/) as a project dependency to handle JSON `cargo add serde`. Then create an app router and a struct for `Country` in `src/lib.rs`:
```
use serde::{Deserialize, Serialize};
use worker::*;
#[event(fetch)]
async fn fetch(req: Request, env: Env, _ctx: Context) -> Result {
let router = Router::new();
#[derive(Serialize, Deserialize, Debug)]
struct Country {
city: String,
}
router
// TODO:
.post_async("/:country", |_, _| async move { Response::empty() })
// TODO:
.get_async("/:country", |_, _| async move { Response::empty() })
.run(req, env)
.await
}
```
Explain Code
For the post handler, you will retrieve the country name from the path and the city name from the request body. Then, you will save this in KV with the country as key and the city as value. Finally, the app will respond with the city name:
```
.post_async("/:country", |mut req, ctx| async move {
let country = ctx.param("country").unwrap();
let city = match req.json::().await {
Ok(c) => c.city,
Err(_) => String::from(""),
};
if city.is_empty() {
return Response::error("Bad Request", 400);
};
return match ctx.kv("cities")?.put(country, &city)?.execute().await {
Ok(_) => Response::ok(city),
Err(_) => Response::error("Bad Request", 400),
};
})
```
Explain Code
Save the file and make a `POST` request to test this endpoint:
Terminal window
```
curl --json '{"city": "Paris"}' http://localhost:8787/France
```
## 4\. Read data from KV
To retrieve cities stored in KV, write a `GET` route that pulls the country name from the path and searches KV. You also need some error handling if the country is not found:
```
.get_async("/:country", |_req, ctx| async move {
if let Some(country) = ctx.param("country") {
return match ctx.kv("cities")?.get(country).text().await? {
Some(city) => Response::ok(city),
None => Response::error("Country not found", 404),
};
}
Response::error("Bad Request", 400)
})
```
Save and make a curl request to test the endpoint:
Terminal window
```
curl http://localhost:8787/France
```
## 5\. Deploy your project
The source code for the completed app should include the following:
```
use serde::{Deserialize, Serialize};
use worker::*;
#[event(fetch)]
async fn fetch(req: Request, env: Env, _ctx: Context) -> Result {
let router = Router::new();
#[derive(Serialize, Deserialize, Debug)]
struct Country {
city: String,
}
router
.post_async("/:country", |mut req, ctx| async move {
let country = ctx.param("country").unwrap();
let city = match req.json::().await {
Ok(c) => c.city,
Err(_) => String::from(""),
};
if city.is_empty() {
return Response::error("Bad Request", 400);
};
return match ctx.kv("cities")?.put(country, &city)?.execute().await {
Ok(_) => Response::ok(city),
Err(_) => Response::error("Bad Request", 400),
};
})
.get_async("/:country", |_req, ctx| async move {
if let Some(country) = ctx.param("country") {
return match ctx.kv("cities")?.get(country).text().await? {
Some(city) => Response::ok(city),
None => Response::error("Country not found", 404),
};
}
Response::error("Bad Request", 400)
})
.run(req, env)
.await
}
```
Explain Code
To deploy your Worker, run the following command:
Terminal window
```
npx wrangler deploy
```
## Related resources
* [Rust support in Workers](https://developers.cloudflare.com/workers/languages/rust/).
* [Using KV in Workers](https://developers.cloudflare.com/kv/get-started/).
```json
{"@context":"https://schema.org","@type":"BreadcrumbList","itemListElement":[{"@type":"ListItem","position":1,"item":{"@id":"/directory/","name":"Directory"}},{"@type":"ListItem","position":2,"item":{"@id":"/workers/","name":"Workers"}},{"@type":"ListItem","position":3,"item":{"@id":"/workers/tutorials/","name":"Tutorials"}},{"@type":"ListItem","position":4,"item":{"@id":"/workers/tutorials/workers-kv-from-rust/","name":"Use Workers KV directly from Rust"}}]}
```
---
---
title: Demos and architectures
description: Learn how you can use Workers within your existing application and architecture.
image: https://developers.cloudflare.com/dev-products-preview.png
---
[Skip to content](#%5Ftop)
Was this helpful?
YesNo
[ Edit page ](https://github.com/cloudflare/cloudflare-docs/edit/production/src/content/docs/workers/demos.mdx) [ Report issue ](https://github.com/cloudflare/cloudflare-docs/issues/new/choose)
Copy page
# Demos and architectures
Learn how you can use Workers within your existing application and architecture.
## Demos
Explore the following demo applications for Workers.
* [Starter code for D1 Sessions API: ↗](https://github.com/cloudflare/templates/tree/main/d1-starter-sessions-api-template) An introduction to D1 Sessions API. This demo simulates purchase orders administration.
* [JavaScript-native RPC on Cloudflare Workers <> Named Entrypoints: ↗](https://github.com/cloudflare/js-rpc-and-entrypoints-demo) This is a collection of examples of communicating between multiple Cloudflare Workers using the remote-procedure call (RPC) system that is built into the Workers runtime.
* [Workers for Platforms Example Project: ↗](https://github.com/cloudflare/workers-for-platforms-example) Explore how you could manage thousands of Workers with a single Cloudflare Workers account.
* [Cloudflare Workers Chat Demo: ↗](https://github.com/cloudflare/workers-chat-demo) This is a demo app written on Cloudflare Workers utilizing Durable Objects to implement real-time chat with stored history.
* [Turnstile Demo: ↗](https://github.com/cloudflare/turnstile-demo-workers) A simple demo with a Turnstile-protected form, using Cloudflare Workers. With the code in this repository, we demonstrate implicit rendering and explicit rendering.
* [Wildebeest: ↗](https://github.com/cloudflare/wildebeest) Wildebeest is an ActivityPub and Mastodon-compatible server whose goal is to allow anyone to operate their Fediverse server and identity on their domain without needing to keep infrastructure, with minimal setup and maintenance, and running in minutes.
* [D1 Northwind Demo: ↗](https://github.com/cloudflare/d1-northwind) This is a demo of the Northwind dataset, running on Cloudflare Workers, and D1 - Cloudflare's SQL database, running on SQLite.
* [Multiplayer Doom Workers: ↗](https://github.com/cloudflare/doom-workers) A WebAssembly Doom port with multiplayer support running on top of Cloudflare's global network using Workers, WebSockets, Pages, and Durable Objects.
* [Queues Web Crawler: ↗](https://github.com/cloudflare/queues-web-crawler) An example use-case for Queues, a web crawler built on Browser Rendering and Puppeteer. The crawler finds the number of links to Cloudflare.com on the site, and archives a screenshot to Workers KV.
* [DMARC Email Worker: ↗](https://github.com/cloudflare/dmarc-email-worker) A Cloudflare worker script to process incoming DMARC reports, store them, and produce analytics.
* [Access External Auth Rule Example Worker: ↗](https://github.com/cloudflare/workers-access-external-auth-example) This is a worker that allows you to quickly setup an external evalutation rule in Cloudflare Access.
## Reference architectures
Explore the following reference architectures that use Workers:
[Fullstack applicationsA practical example of how these services come together in a real fullstack application architecture.](https://developers.cloudflare.com/reference-architecture/diagrams/serverless/fullstack-application/)[Storing user generated contentStore user-generated content in R2 for fast, secure, and cost-effective architecture.](https://developers.cloudflare.com/reference-architecture/diagrams/storage/storing-user-generated-content/)[Optimizing and securing connected transportation systemsThis diagram showcases Cloudflare components optimizing connected transportation systems. It illustrates how their technologies minimize latency, ensure reliability, and strengthen security for critical data flow.](https://developers.cloudflare.com/reference-architecture/diagrams/iot/optimizing-and-securing-connected-transportation-systems/)[Ingesting BigQuery Data into Workers AIYou can connect a Cloudflare Worker to get data from Google BigQuery and pass it to Workers AI, to run AI Models, powered by serverless GPUs.](https://developers.cloudflare.com/reference-architecture/diagrams/ai/bigquery-workers-ai/)[Event notifications for storageUse Cloudflare Workers or an external service to monitor for notifications about data changes and then handle them appropriately.](https://developers.cloudflare.com/reference-architecture/diagrams/storage/event-notifications-for-storage/)[Extend ZTNA with external authorization and serverless computingCloudflare's ZTNA enhances access policies using external API calls and Workers for robust security. It verifies user authentication and authorization, ensuring only legitimate access to protected resources.](https://developers.cloudflare.com/reference-architecture/diagrams/sase/augment-access-with-serverless/)[Cloudflare Security ArchitectureThis document provides insight into how this network and platform are architected from a security perspective, how they are operated, and what services are available for businesses to address their own security challenges.](https://developers.cloudflare.com/reference-architecture/architectures/security/)[Composable AI architectureThe architecture diagram illustrates how AI applications can be built end-to-end on Cloudflare, or single services can be integrated with external infrastructure and services.](https://developers.cloudflare.com/reference-architecture/diagrams/ai/ai-composable/)[A/B-testing using WorkersCloudflare's low-latency, fully serverless compute platform, Workers offers powerful capabilities to enable A/B testing using a server-side implementation.](https://developers.cloudflare.com/reference-architecture/diagrams/serverless/a-b-testing-using-workers/)[Serverless global APIsAn example architecture of a serverless API on Cloudflare and aims to illustrate how different compute and data products could interact with each other.](https://developers.cloudflare.com/reference-architecture/diagrams/serverless/serverless-global-apis/)[Serverless ETL pipelinesCloudflare enables fully serverless ETL pipelines, significantly reducing complexity, accelerating time to production, and lowering overall costs.](https://developers.cloudflare.com/reference-architecture/diagrams/serverless/serverless-etl/)[Egress-free object storage in multi-cloud setupsLearn how to use R2 to get egress-free object storage in multi-cloud setups.](https://developers.cloudflare.com/reference-architecture/diagrams/storage/egress-free-storage-multi-cloud/)[Retrieval Augmented Generation (RAG)RAG combines retrieval with generative models for better text. It uses external knowledge to create factual, relevant responses, improving coherence and accuracy in NLP tasks like chatbots.](https://developers.cloudflare.com/reference-architecture/diagrams/ai/ai-rag/)[Automatic captioning for video uploadsBy integrating automatic speech recognition technology into video platforms, content creators, publishers, and distributors can reach a broader audience, including individuals with hearing impairments or those who prefer to consume content in different languages.](https://developers.cloudflare.com/reference-architecture/diagrams/ai/ai-video-caption/)[Serverless image content managementLeverage various components of Cloudflare's ecosystem to construct a scalable image management solution](https://developers.cloudflare.com/reference-architecture/diagrams/serverless/serverless-image-content-management/)
```json
{"@context":"https://schema.org","@type":"BreadcrumbList","itemListElement":[{"@type":"ListItem","position":1,"item":{"@id":"/directory/","name":"Directory"}},{"@type":"ListItem","position":2,"item":{"@id":"/workers/","name":"Workers"}},{"@type":"ListItem","position":3,"item":{"@id":"/workers/demos/","name":"Demos and architectures"}}]}
```
---
---
title: Development & testing
description: Develop and test your Workers locally.
image: https://developers.cloudflare.com/dev-products-preview.png
---
[Skip to content](#%5Ftop)
Was this helpful?
YesNo
[ Edit page ](https://github.com/cloudflare/cloudflare-docs/edit/production/src/content/docs/workers/development-testing/index.mdx) [ Report issue ](https://github.com/cloudflare/cloudflare-docs/issues/new/choose)
Copy page
# Development & testing
You can build, run, and test your Worker code on your own local machine before deploying it to Cloudflare's network. This is made possible through [Miniflare](https://developers.cloudflare.com/workers/testing/miniflare/), a simulator that executes your Worker code using the same runtime used in production, [workerd ↗](https://github.com/cloudflare/workerd).
[By default](https://developers.cloudflare.com/workers/development-testing/#defaults), your Worker's bindings [connect to locally simulated resources](https://developers.cloudflare.com/workers/development-testing/#bindings-during-local-development), but can be configured to interact with the real, production resource with [remote bindings](https://developers.cloudflare.com/workers/development-testing/#remote-bindings).
## Core concepts
### Worker execution vs Bindings
When developing Workers, it's important to understand two distinct concepts:
* **Worker execution**: Where your Worker code actually runs (on your local machine vs on Cloudflare's infrastructure).
* [**Bindings**](https://developers.cloudflare.com/workers/runtime-apis/bindings/): How your Worker interacts with Cloudflare resources (like [KV namespaces](https://developers.cloudflare.com/kv), [R2 buckets](https://developers.cloudflare.com/r2), [D1 databases](https://developers.cloudflare.com/d1), [Queues](https://developers.cloudflare.com/queues/), [Durable Objects](https://developers.cloudflare.com/durable-objects/), etc). In your Worker code, these are accessed via the `env` object (such as `env.MY_KV`).
## Local development
**You can start a local development server using:**
1. The Cloudflare Workers CLI [**Wrangler**](https://developers.cloudflare.com/workers/wrangler/), using the built-in [wrangler dev](https://developers.cloudflare.com/workers/wrangler/commands/general/#dev) command.
npm yarn pnpm
```
npx wrangler dev
```
```
yarn wrangler dev
```
```
pnpm wrangler dev
```
1. [**Vite** ↗](https://vite.dev/), using the [**Cloudflare Vite plugin**](https://developers.cloudflare.com/workers/vite-plugin/).
npm yarn pnpm
```
npx vite dev
```
```
yarn vite dev
```
```
pnpm vite dev
```
Both Wrangler and the Cloudflare Vite plugin use [Miniflare](https://developers.cloudflare.com/workers/testing/miniflare/) under the hood, and are developed and maintained by the Cloudflare team. For guidance on choosing when to use Wrangler versus Vite, see our guide [Choosing between Wrangler & Vite](https://developers.cloudflare.com/workers/development-testing/wrangler-vs-vite/).
* [Get started with Wrangler](https://developers.cloudflare.com/workers/wrangler/install-and-update/)
* [Get started with the Cloudflare Vite plugin](https://developers.cloudflare.com/workers/vite-plugin/get-started/)
### Defaults
By default, running `wrangler dev` / `vite dev` (when using the [Vite plugin](https://developers.cloudflare.com/workers/vite-plugin/get-started/)) means that:
* Your Worker code runs on your local machine.
* All resources your Worker is bound to in your [Wrangler configuration](https://developers.cloudflare.com/workers/wrangler/configuration/) are simulated locally.
### Bindings during local development
[Bindings](https://developers.cloudflare.com/workers/runtime-apis/bindings/) are interfaces that allow your Worker to interact with various Cloudflare resources (like [KV namespaces](https://developers.cloudflare.com/kv), [R2 buckets](https://developers.cloudflare.com/r2), [D1 databases](https://developers.cloudflare.com/d1), [Queues](https://developers.cloudflare.com/queues/), [Durable Objects](https://developers.cloudflare.com/durable-objects/), etc). In your Worker code, these are accessed via the `env` object (such as `env.MY_KV`).
During local development, your Worker code interacts with these bindings using the exact same API calls (such as `env.MY_KV.put()`) as it would in a deployed environment. These local resources are initially empty, but you can populate them with data, as documented in [Adding local data](https://developers.cloudflare.com/workers/development-testing/local-data/).
* By default, bindings connect to **local resource simulations** (except for [AI bindings](https://developers.cloudflare.com/workers-ai/configuration/bindings/), as AI models always run remotely).
* You can override this default behavior and **connect to the remote resource** on a per-binding basis with [remote bindings](https://developers.cloudflare.com/workers/development-testing/#remote-bindings). This lets you connect to real, production resources while still running your Worker code locally.
* When using `wrangler dev`, you can temporarily disable all [remote bindings](https://developers.cloudflare.com/workers/development-testing/#remote-bindings) (and connect only to local resources) by providing the `--local` flag (i.e. `wrangler dev --local`)
## Remote bindings
**Remote bindings** are bindings that are configured to connect to the deployed, remote resource during local development _instead_ of the locally simulated resource. Remote bindings are supported by [**Wrangler**](https://developers.cloudflare.com/workers/wrangler/), the [**Cloudflare Vite plugin**](https://developers.cloudflare.com/workers/vite-plugin/), and the `@cloudflare/vitest-pool-workers` package. You can configure remote bindings by setting `remote: true` in the binding definition.
### Example configuration
* [ wrangler.jsonc ](#tab-panel-7329)
* [ wrangler.toml ](#tab-panel-7330)
JSONC
```
{
"name": "my-worker",
// Set this to today's date
"compatibility_date": "2026-04-14",
"r2_buckets": [
{
"bucket_name": "screenshots-bucket",
"binding": "screenshots_bucket",
"remote": true,
},
],
}
```
Explain Code
TOML
```
name = "my-worker"
# Set this to today's date
compatibility_date = "2026-04-14"
[[r2_buckets]]
bucket_name = "screenshots-bucket"
binding = "screenshots_bucket"
remote = true
```
When remote bindings are configured, your Worker still **executes locally**, only the underlying resources your bindings connect to change. For all bindings marked with `remote: true`, Miniflare will route its operations (such as `env.MY_KV.put()`) to the deployed resource. All other bindings not explicitly configured with `remote: true` continue to use their default local simulations.
### Integration with environments
Remote Bindings work well together with [Workers Environments](https://developers.cloudflare.com/workers/wrangler/environments). To protect production data, you can create a development or staging environment and specify different resources in your [Wrangler configuration](https://developers.cloudflare.com/workers/wrangler/configuration/) than you would use for production.
**For example:**
* [ wrangler.jsonc ](#tab-panel-7341)
* [ wrangler.toml ](#tab-panel-7342)
JSONC
```
{
"name": "my-worker",
// Set this to today's date
"compatibility_date": "2026-04-14",
"env": {
"production": {
"r2_buckets": [
{
"bucket_name": "screenshots-bucket",
"binding": "screenshots_bucket",
},
],
},
"staging": {
"r2_buckets": [
{
"bucket_name": "preview-screenshots-bucket",
"binding": "screenshots_bucket",
"remote": true,
},
],
},
},
}
```
Explain Code
TOML
```
name = "my-worker"
# Set this to today's date
compatibility_date = "2026-04-14"
[[env.production.r2_buckets]]
bucket_name = "screenshots-bucket"
binding = "screenshots_bucket"
[[env.staging.r2_buckets]]
bucket_name = "preview-screenshots-bucket"
binding = "screenshots_bucket"
remote = true
```
Explain Code
Running `wrangler dev -e staging` (or `CLOUDFLARE_ENV=staging vite dev`) with the above configuration means that:
* Your Worker code runs locally
* All calls made to `env.screenshots_bucket` will use the `preview-screenshots-bucket` resource, rather than the production `screenshots-bucket`.
### Recommended remote bindings
We recommend configuring specific bindings to connect to their remote counterparts. These services often rely on Cloudflare's network infrastructure or have complex backends that are not fully simulated locally.
The following bindings are recommended to have `remote: true` in your Wrangler configuration:
#### [Browser Rendering](https://developers.cloudflare.com/workers/wrangler/configuration/#browser-rendering):
To interact with a real headless browser for rendering. There is no current local simulation for Browser Rendering.
* [ wrangler.jsonc ](#tab-panel-7327)
* [ wrangler.toml ](#tab-panel-7328)
JSONC
```
{
"browser": {
"binding": "MY_BROWSER",
"remote": true
},
}
```
TOML
```
[browser]
binding = "MY_BROWSER"
remote = true
```
#### [Workers AI](https://developers.cloudflare.com/workers/wrangler/configuration/#workers-ai):
To utilize actual AI models deployed on Cloudflare's network for inference. There is no current local simulation for Workers AI.
* [ wrangler.jsonc ](#tab-panel-7331)
* [ wrangler.toml ](#tab-panel-7332)
JSONC
```
{
"ai": {
"binding": "AI",
"remote": true
},
}
```
TOML
```
[ai]
binding = "AI"
remote = true
```
#### [Vectorize](https://developers.cloudflare.com/workers/wrangler/configuration/#vectorize-indexes):
To connect to your production Vectorize indexes for accurate vector search and similarity operations. There is no current local simulation for Vectorize.
* [ wrangler.jsonc ](#tab-panel-7333)
* [ wrangler.toml ](#tab-panel-7334)
JSONC
```
{
"vectorize": [
{
"binding": "MY_VECTORIZE_INDEX",
"index_name": "my-prod-index",
"remote": true
}
],
}
```
TOML
```
[[vectorize]]
binding = "MY_VECTORIZE_INDEX"
index_name = "my-prod-index"
remote = true
```
#### [mTLS](https://developers.cloudflare.com/workers/wrangler/configuration/#mtls-certificates):
To verify that the certificate exchange and validation process work as expected. There is no current local simulation for mTLS bindings.
* [ wrangler.jsonc ](#tab-panel-7337)
* [ wrangler.toml ](#tab-panel-7338)
JSONC
```
{
"mtls_certificates": [
{
"binding": "MY_CLIENT_CERT_FETCHER",
"certificate_id": "",
"remote": true
}
]
}
```
TOML
```
[[mtls_certificates]]
binding = "MY_CLIENT_CERT_FETCHER"
certificate_id = ""
remote = true
```
#### [Images](https://developers.cloudflare.com/workers/wrangler/configuration/#images):
To connect to a high-fidelity version of the Images API, and verify that all transformations work as expected. Local simulation for Cloudflare Images is [limited with only a subset of features](https://developers.cloudflare.com/images/transform-images/bindings/#interact-with-your-images-binding-locally).
* [ wrangler.jsonc ](#tab-panel-7335)
* [ wrangler.toml ](#tab-panel-7336)
JSONC
```
{
"images": {
"binding": "IMAGES" ,
"remote": true
}
}
```
TOML
```
[images]
binding = "IMAGES"
remote = true
```
Note
If `remote: true` is not specified for Browser Rendering, Vectorize, mTLS, or Images, Cloudflare **will issue a warning**. This prompts you to consider enabling it for a more production-like testing experience.
If a Workers AI binding has `remote` set to `false`, Cloudflare will **produce an error**. If the property is omitted, Cloudflare will connect to the remote resource and issue a warning to add the property to configuration.
#### [Dispatch Namespaces](https://developers.cloudflare.com/cloudflare-for-platforms/workers-for-platforms/reference/local-development/):
Workers for Platforms users can configure `remote: true` in dispatch namespace binding definitions:
* [ wrangler.jsonc ](#tab-panel-7339)
* [ wrangler.toml ](#tab-panel-7340)
JSONC
```
{
"dispatch_namespaces": [
{
"binding": "DISPATCH_NAMESPACE",
"namespace": "testing",
"remote":true
}
]
}
```
TOML
```
[[dispatch_namespaces]]
binding = "DISPATCH_NAMESPACE"
namespace = "testing"
remote = true
```
This allows you to run your [dynamic dispatch Worker](https://developers.cloudflare.com/cloudflare-for-platforms/workers-for-platforms/how-workers-for-platforms-works/#dynamic-dispatch-worker) locally, while connecting it to your remote dispatch namespace binding. This allows you to test changes to your core dispatching logic against real, deployed [user Workers](https://developers.cloudflare.com/cloudflare-for-platforms/workers-for-platforms/how-workers-for-platforms-works/#user-workers).
### Unsupported remote bindings
Certain bindings are not supported for remote connections (i.e. with `remote: true`) during local development. These will always use local simulations or local values.
If `remote: true` is specified in Wrangler configuration for any of the following unsupported binding types, Cloudflare **will issue an error**. See [all supported and unsupported bindings for remote bindings](https://developers.cloudflare.com/workers/development-testing/bindings-per-env/).
* [**Durable Objects**](https://developers.cloudflare.com/workers/wrangler/configuration/#durable-objects): Enabling remote connections for Durable Objects may be supported in the future, but currently will always run locally. However, using Durable Objects in combination with remote bindings is possible. Refer to [Using remote resources with Durable Objects and Workflows](#using-remote-resources-with-durable-objects-and-workflows) below.
* [**Workflows**](https://developers.cloudflare.com/workflows/): Enabling remote connections for Workflows may be supported in the future, but currently will only run locally. However, using Workflows in combination with remote bindings is possible. Refer to [Using remote resources with Durable Objects and Workflows](#using-remote-resources-with-durable-objects-and-workflows) below.
* [**Environment Variables (vars)**](https://developers.cloudflare.com/workers/wrangler/configuration/#environment-variables): Environment variables are intended to be distinct between local development and deployed environments. They are easily configurable locally (such as in a `.dev.vars` file or directly in Wrangler configuration).
* [**Secrets**](https://developers.cloudflare.com/workers/wrangler/configuration/#secrets): Like environment variables, secrets are expected to have different values in local development versus deployed environments for security reasons. Use `.dev.vars` for local secret management.
* [**Static Assets**](https://developers.cloudflare.com/workers/wrangler/configuration/#assets) Static assets are always served from your local disk during development for speed and direct feedback on changes.
* [**Version Metadata**](https://developers.cloudflare.com/workers/runtime-apis/bindings/version-metadata/): Since your Worker code is running locally, version metadata (like commit hash, version tags) associated with a specific deployed version is not applicable or accurate.
* [**Analytics Engine**](https://developers.cloudflare.com/analytics/analytics-engine/): Local development sessions typically don't contribute data directly to production Analytics Engine.
* [**Hyperdrive**](https://developers.cloudflare.com/workers/wrangler/configuration/#hyperdrive): This is being actively worked on, but is currently unsupported.
* [**Rate Limiting**](https://developers.cloudflare.com/workers/runtime-apis/bindings/rate-limit/#configuration): Local development sessions typically should not share or affect rate limits of your deployed Workers. Rate limiting logic should be tested against local simulations.
Note
If you have use-cases for connecting to any of the remote resources above, please [open a feature request ↗](https://github.com/cloudflare/workers-sdk/issues) in our [workers-sdk repository ↗](https://github.com/cloudflare/workers-sdk).
#### Using remote resources with Durable Objects and Workflows
While Durable Object and Workflow bindings cannot currently be remote, you can still use them during local development and have them interact with remote resources.
There are two recommended patterns for this:
* **Local Durable Objects/Workflows with remote bindings:**
When you enable remote bindings in your [Wrangler configuration](https://developers.cloudflare.com/workers/wrangler/configuration), your locally running Durable Objects and Workflows can access remote resources. This allows such bindings, although run locally, to interact with remote resources during local development.
* **Accessing remote Durable Objects/Workflows via service bindings:**
To interact with remote Durable Object or Workflow instances, deploy a Worker that defines those. Then, in your local Worker, configure a remote [service binding](https://developers.cloudflare.com/workers/runtime-apis/bindings/service-bindings/) pointing to the deployed Worker. Your local Worker will be then able to interact with the remote deployed Worker, which in turn can communicate with the remote Durable Objects/Workflows. Using this method, you can create a communication channel via the remote service binding, effectively using the deployed Worker as a proxy interface to the remote bindings during local development.
### Important Considerations
* **Data modification**: Operations (writes, deletes, updates) on bindings connected remotely will affect your actual data in the targeted Cloudflare resource (be it preview or production).
* **Billing**: Interactions with remote Cloudflare services through these connections will incur standard operational costs for those services (such as KV operations, R2 storage/operations, AI requests, D1 usage).
* **Network latency**: Expect network latency for operations on these remotely connected bindings, as they involve communication over the internet.
* **CI and non-interactive environments**: If your worker uses [Cloudflare Access](https://developers.cloudflare.com/cloudflare-one/), Wrangler must authenticate with Access when connecting to remote bindings. In non-interactive environments such as CI/CD pipelines, set the `CLOUDFLARE_ACCESS_CLIENT_ID` and `CLOUDFLARE_ACCESS_CLIENT_SECRET` [system environment variables](https://developers.cloudflare.com/workers/wrangler/system-environment-variables/) to authenticate using an [Access Service Token](https://developers.cloudflare.com/cloudflare-one/access-controls/service-credentials/service-tokens/). Without these variables, Wrangler throws an error instead of launching the interactive `cloudflared access login` flow.
### API
Wrangler provides programmatic utilities to help tooling authors support remote binding connections when running Workers code with [Miniflare](https://developers.cloudflare.com/workers/testing/miniflare/).
**Key APIs include:**
* [startRemoteProxySession](#startRemoteProxySession): Starts a proxy session that allows interaction with remote bindings.
* [unstable\_convertConfigBindingsToStartWorkerBindings](#unstable%5Fconvertconfigbindingstostartworkerbindings): Utility for converting binding definitions.
* [experimental\_maybeStartOrUpdateProxySession](#experimental%5Fmaybestartorupdatemixedmodesession): Convenience function to easily start or update a proxy session.
#### `startRemoteProxySession`
This function starts a proxy session for a given set of bindings. It accepts options to control session behavior, including an `auth` option with your Cloudflare account ID and API token for remote binding access.
It returns an object with:
* `ready` ` Promise `: Resolves when the session is ready.
* `dispose` ` () => Promise `: Stops the session.
* `updateBindings` ` (bindings: StartDevWorkerInput['bindings']) => Promise `: Updates session bindings.
* `remoteProxyConnectionString` ` remoteProxyConnectionString `: String to pass to Miniflare for remote binding access.
#### `unstable_convertConfigBindingsToStartWorkerBindings`
The `unstable_readConfig` utility returns an `Unstable_Config` object which includes the definition of the bindings included in the configuration file. These bindings definitions are however not directly compatible with `startRemoteProxySession`. It can be quite convenient to however read the binding declarations with `unstable_readConfig` and then pass them to `startRemoteProxySession`, so for this wrangler exposes `unstable_convertConfigBindingsToStartWorkerBindings` which is a simple utility to convert the bindings in an `Unstable_Config` object into a structure that can be passed to `startRemoteProxySession`.
Note
This type conversion is temporary. In the future, the types will be unified so you can pass the config object directly to `startRemoteProxySession`.
#### `maybeStartOrUpdateRemoteProxySession`
This wrapper simplifies proxy session management. It takes:
* An object that contains either:
* the path to a Wrangler configuration and a potential target environment
* the name of the Worker and the bindings it is using
* The current proxy session details (this parameter can be set to `null` or not being provided if none).
* Potentially the auth data to use for the remote proxy session.
It returns an object with the proxy session details if started or updated, or `null` if no proxy session is needed.
The function:
* Based on the first argument prepares the input arguments for the proxy session.
* If there are no remote bindings to be used (nor a pre-existing proxy session) it returns null, signaling that no proxy session is needed.
* If the details of an existing proxy session have been provided it updates the proxy session accordingly.
* Otherwise if starts a new proxy session.
* Returns the proxy session details (that can later be passed as the second argument to `maybeStartOrUpdateRemoteProxySession`).
#### Example
Here's a basic example of using Miniflare with `maybeStartOrUpdateRemoteProxySession` to provide a local dev session with remote bindings. This example uses a single hardcoded KV binding.
* [ JavaScript ](#tab-panel-7343)
* [ TypeScript ](#tab-panel-7344)
JavaScript
```
import { Miniflare, MiniflareOptions } from "miniflare";
import { maybeStartOrUpdateRemoteProxySession } from "wrangler";
let mf;
let remoteProxySessionDetails = null;
async function startOrUpdateDevSession() {
remoteProxySessionDetails = await maybeStartOrUpdateRemoteProxySession(
{
bindings: {
MY_KV: {
type: "kv_namespace",
id: "kv-id",
remote: true,
},
},
},
remoteProxySessionDetails,
);
const miniflareOptions = {
scriptPath: "./worker.js",
kvNamespaces: {
MY_KV: {
id: "kv-id",
remoteProxyConnectionString:
remoteProxySessionDetails?.session.remoteProxyConnectionString,
},
},
};
if (!mf) {
mf = new Miniflare(miniflareOptions);
} else {
mf.setOptions(miniflareOptions);
}
}
// ... tool logic that invokes `startOrUpdateDevSession()` ...
// ... once the dev session is no longer needed run
// `remoteProxySessionDetails?.session.dispose()`
```
Explain Code
TypeScript
```
import { Miniflare, MiniflareOptions } from "miniflare";
import { maybeStartOrUpdateRemoteProxySession } from "wrangler";
let mf: Miniflare | null;
let remoteProxySessionDetails: Awaited<
ReturnType
> | null = null;
async function startOrUpdateDevSession() {
remoteProxySessionDetails = await maybeStartOrUpdateRemoteProxySession(
{
bindings: {
MY_KV: {
type: "kv_namespace",
id: "kv-id",
remote: true,
},
},
},
remoteProxySessionDetails,
);
const miniflareOptions: MiniflareOptions = {
scriptPath: "./worker.js",
kvNamespaces: {
MY_KV: {
id: "kv-id",
remoteProxyConnectionString:
remoteProxySessionDetails?.session.remoteProxyConnectionString,
},
},
};
if (!mf) {
mf = new Miniflare(miniflareOptions);
} else {
mf.setOptions(miniflareOptions);
}
}
// ... tool logic that invokes `startOrUpdateDevSession()` ...
// ... once the dev session is no longer needed run
// `remoteProxySessionDetails?.session.dispose()`
```
Explain Code
## `wrangler dev --remote` (Legacy)
Separate from Miniflare-powered local development, Wrangler also offers a fully remote development mode via [wrangler dev --remote](https://developers.cloudflare.com/workers/wrangler/commands/general/#dev). Remote development is [**not** supported in the Vite plugin](https://developers.cloudflare.com/workers/development-testing/wrangler-vs-vite/).
npm yarn pnpm
```
npx wrangler dev --remote
```
```
yarn wrangler dev --remote
```
```
pnpm wrangler dev --remote
```
During **remote development**, all of your Worker code is uploaded to a temporary preview environment on Cloudflare's infrastructure, and changes to your code are automatically uploaded as you save.
When using remote development, all bindings automatically connect to their remote resources. Unlike local development, you cannot configure bindings to use local simulations - they will always use the deployed resources on Cloudflare's network.
### When to use Remote development
* For most development tasks, the most efficient and productive experience will be local development along with [remote bindings](https://developers.cloudflare.com/workers/development-testing/#remote-bindings) when needed.
* You may want to use `wrangler dev --remote` for testing features or behaviors that are highly specific to Cloudflare's network and cannot be adequately simulated locally or tested via remote bindings.
### Considerations
* Iteration is significantly slower than local development due to the upload/deployment step for each change.
### Limitations
* When you run a remote development session using the `--remote` flag, a limit of 50 [routes](https://developers.cloudflare.com/workers/configuration/routing/routes/) per zone is enforced. Learn more in[ Workers platform limits](https://developers.cloudflare.com/workers/platform/limits/#routes-and-domains-when-using-wrangler-dev---remote).
```json
{"@context":"https://schema.org","@type":"BreadcrumbList","itemListElement":[{"@type":"ListItem","position":1,"item":{"@id":"/directory/","name":"Directory"}},{"@type":"ListItem","position":2,"item":{"@id":"/workers/","name":"Workers"}},{"@type":"ListItem","position":3,"item":{"@id":"/workers/development-testing/","name":"Development & testing"}}]}
```
---
---
title: Supported bindings per development mode
description: Supported bindings per development mode
image: https://developers.cloudflare.com/dev-products-preview.png
---
[Skip to content](#%5Ftop)
Was this helpful?
YesNo
[ Edit page ](https://github.com/cloudflare/cloudflare-docs/edit/production/src/content/docs/workers/development-testing/bindings-per-env.mdx) [ Report issue ](https://github.com/cloudflare/cloudflare-docs/issues/new/choose)
Copy page
# Supported bindings per development mode
## Local development
**Local simulations**: During local development, your Worker code always executes locally and bindings connect to locally simulated resources [by default](https://developers.cloudflare.com/workers/development-testing/#remote-bindings). This is supported in [wrangler dev](https://developers.cloudflare.com/workers/wrangler/commands/general/#dev) and the [Cloudflare Vite plugin](https://developers.cloudflare.com/workers/vite-plugin/).
**Remote binding connections:**: Allows you to connect to remote resources on a [per-binding basis](https://developers.cloudflare.com/workers/development-testing/#remote-bindings). This is supported in [wrangler dev](https://developers.cloudflare.com/workers/wrangler/commands/general/#dev) and the [Cloudflare Vite plugin](https://developers.cloudflare.com/workers/vite-plugin/).
| Binding | Local simulations | Remote binding connections |
| --------------------------------------- | ----------------- | -------------------------- |
| **AI** | ❌ | ✅ |
| **Assets** | ✅ | ❌ |
| **Analytics Engine** | ✅ | ❌ |
| **Browser Rendering** | ✅ | ✅ |
| **D1** | ✅ | ✅ |
| **Durable Objects** | ✅ | ❌ [1](#user-content-fn-1) |
| **Containers** | ✅ | ❌ |
| **Email Bindings** | ✅ | ✅ |
| **Hyperdrive** | ✅ | ❌ |
| **Images** | ✅ | ✅ |
| **KV** | ✅ | ✅ |
| **Media Transformations** | ❌ | ✅ |
| **mTLS** | ❌ | ✅ |
| **Queues** | ✅ | ✅ |
| **R2** | ✅ | ✅ |
| **Rate Limiting** | ✅ | ❌ |
| **Service Bindings (multiple Workers)** | ✅ | ✅ |
| **Vectorize** | ❌ | ✅ |
| **Workflows** | ✅ | ❌ |
## Remote development
During remote development, all of your Worker code is uploaded and executed on Cloudflare's infrastructure, and bindings always connect to remote resources. **We recommend using local development with remote binding connections instead** for faster iteration and debugging.
Supported only in [wrangler dev --remote](https://developers.cloudflare.com/workers/wrangler/commands/general/#dev) \- there is **no Vite plugin equivalent**.
| Binding | Remote development |
| --------------------------------------- | ------------------ |
| **AI** | ✅ |
| **Assets** | ✅ |
| **Analytics Engine** | ✅ |
| **Browser Rendering** | ✅ |
| **D1** | ✅ |
| **Durable Objects** | ✅ |
| **Containers** | ❌ |
| **Email Bindings** | ✅ |
| **Hyperdrive** | ✅ |
| **Images** | ✅ |
| **KV** | ✅ |
| **Media Transformations** | ✅ |
| **mTLS** | ✅ |
| **Queues** | ❌ |
| **R2** | ✅ |
| **Rate Limiting** | ✅ |
| **Service Bindings (multiple Workers)** | ✅ |
| **Vectorize** | ✅ |
| **Workflows** | ❌ |
## Footnotes
1. Refer to [Using remote resources with Durable Objects and Workflows](https://developers.cloudflare.com/workers/development-testing/#using-remote-resources-with-durable-objects-and-workflows) for recommended workarounds. [↩](#user-content-fnref-1)
```json
{"@context":"https://schema.org","@type":"BreadcrumbList","itemListElement":[{"@type":"ListItem","position":1,"item":{"@id":"/directory/","name":"Directory"}},{"@type":"ListItem","position":2,"item":{"@id":"/workers/","name":"Workers"}},{"@type":"ListItem","position":3,"item":{"@id":"/workers/development-testing/","name":"Development & testing"}},{"@type":"ListItem","position":4,"item":{"@id":"/workers/development-testing/bindings-per-env/","name":"Supported bindings per development mode"}}]}
```
---
---
title: Environment variables and secrets
description: Configuring environment variables and secrets for local development
image: https://developers.cloudflare.com/dev-products-preview.png
---
[Skip to content](#%5Ftop)
Was this helpful?
YesNo
[ Edit page ](https://github.com/cloudflare/cloudflare-docs/edit/production/src/content/docs/workers/development-testing/environment-variables.mdx) [ Report issue ](https://github.com/cloudflare/cloudflare-docs/issues/new/choose)
Copy page
# Environment variables and secrets
Warning
Do not use `vars` to store sensitive information in your Worker's Wrangler configuration file. Use secrets instead.
Put secrets for use in local development in either a `.dev.vars` file or a `.env` file, in the same directory as the Wrangler configuration file.
Note
You can use the [secrets configuration property](https://developers.cloudflare.com/workers/wrangler/configuration/#secrets-configuration-property) to declare which secret names your Worker requires. When defined, only the keys listed in `secrets.required` are loaded from `.dev.vars` or `.env`. Additional keys are excluded and missing keys produce a warning.
Choose to use either `.dev.vars` or `.env` but not both. If you define a `.dev.vars` file, then values in `.env` files will not be included in the `env` object during local development.
These files should be formatted using the [dotenv ↗](https://hexdocs.pm/dotenvy/dotenv-file-format.html) syntax. For example:
.dev.vars / .env
```
SECRET_KEY="value"
API_TOKEN="eyJhbGciOiJIUzI1NiIsInR5cCI6IkpXVCJ9"
```
Do not commit secrets to git
The `.dev.vars` and `.env` files should not committed to git. Add `.dev.vars*` and `.env*` to your project's `.gitignore` file.
To set different secrets for each Cloudflare environment, create files named `.dev.vars.` or `.env.`.
When you select a Cloudflare environment in your local development, the corresponding environment-specific file will be loaded ahead of the generic `.dev.vars` (or `.env`) file.
* When using `.dev.vars.` files, all secrets must be defined per environment. If `.dev.vars.` exists then only this will be loaded; the `.dev.vars` file will not be loaded.
* In contrast, all matching `.env` files are loaded and the values are merged. For each variable, the value from the most specific file is used, with the following precedence:
* `.env..local` (most specific)
* `.env.local`
* `.env.`
* `.env` (least specific)
Controlling `.env` handling
It is possible to control how `.env` files are loaded in local development by setting environment variables on the process running the tools.
* To disable loading local dev vars from `.env` files without providing a `.dev.vars` file, set the `CLOUDFLARE_LOAD_DEV_VARS_FROM_DOT_ENV` environment variable to `"false"`.
* To include every environment variable defined in your system's process environment as a local development variable, ensure there is no `.dev.vars` and then set the `CLOUDFLARE_INCLUDE_PROCESS_ENV` environment variable to `"true"`. This is not needed when using the [secrets configuration property](https://developers.cloudflare.com/workers/wrangler/configuration/#secrets-configuration-property), which loads from `process.env` automatically.
### Basic setup
Here are steps to set up environment variables for local development using either `.dev.vars` or `.env` files.
1. Create a `.dev.vars` / `.env` file in your project root.
2. Add key-value pairs:
.dev.vars/.env
```
API_HOST="localhost:3000"
DEBUG="true"
SECRET_TOKEN="my-local-secret-token"
```
3. Run your `dev` command
**Wrangler**
npm yarn pnpm
```
npx wrangler dev
```
```
yarn wrangler dev
```
```
pnpm wrangler dev
```
**Vite plugin**
npm yarn pnpm
```
npx vite dev
```
```
yarn vite dev
```
```
pnpm vite dev
```
## Multiple local environments
To simulate different local environments, you can provide environment-specific files. For example, you might have a `staging` environment that requires different settings than your development environment.
1. Create a file named `.dev.vars.`/`.env.`. For example, we can use `.dev.vars.staging`/`.env.staging`.
2. Add key-value pairs:
.dev.vars.staging/.env.staging
```
API_HOST="staging.localhost:3000"
DEBUG="false"
SECRET_TOKEN="staging-token"
```
3. Specify the environment when running the `dev` command:
**Wrangler**
npm yarn pnpm
```
npx wrangler dev --env staging
```
```
yarn wrangler dev --env staging
```
```
pnpm wrangler dev --env staging
```
**Vite plugin**
npm yarn pnpm
```
CLOUDFLARE_ENV=staging npx vite dev
```
```
CLOUDFLARE_ENV=staging yarn vite dev
```
```
CLOUDFLARE_ENV=staging pnpm vite dev
```
* If using `.dev.vars.staging`, only the values from that file will be applied instead of `.dev.vars`.
* If using `.env.staging`, the values will be merged with `.env` files, with the most specific file taking precedence.
## Learn more
* To learn how to configure multiple environments in Wrangler configuration, [read the documentation](https://developers.cloudflare.com/workers/wrangler/environments/#%5Ftop).
* To learn how to use Wrangler environments and Vite environments together, [read the Vite plugin documentation](https://developers.cloudflare.com/workers/vite-plugin/reference/cloudflare-environments/)
```json
{"@context":"https://schema.org","@type":"BreadcrumbList","itemListElement":[{"@type":"ListItem","position":1,"item":{"@id":"/directory/","name":"Directory"}},{"@type":"ListItem","position":2,"item":{"@id":"/workers/","name":"Workers"}},{"@type":"ListItem","position":3,"item":{"@id":"/workers/development-testing/","name":"Development & testing"}},{"@type":"ListItem","position":4,"item":{"@id":"/workers/development-testing/environment-variables/","name":"Environment variables and secrets"}}]}
```
---
---
title: Adding local data
description: Populating local resources with data
image: https://developers.cloudflare.com/dev-products-preview.png
---
[Skip to content](#%5Ftop)
Was this helpful?
YesNo
[ Edit page ](https://github.com/cloudflare/cloudflare-docs/edit/production/src/content/docs/workers/development-testing/local-data.mdx) [ Report issue ](https://github.com/cloudflare/cloudflare-docs/issues/new/choose)
Copy page
# Adding local data
Whether you are using Wrangler or the [Cloudflare Vite plugin ↗](https://developers.cloudflare.com/workers/vite-plugin/), your workflow for **accessing** data during local development remains the same. However, you can only [populate local resources with data](https://developers.cloudflare.com/workers/development-testing/local-data/#populating-local-resources-with-data) via the Wrangler CLI.
### How it works
When you run either `wrangler dev` or [vite ↗](https://vite.dev/guide/cli#dev-server), [Miniflare](https://developers.cloudflare.com/workers/testing/miniflare/) automatically creates **local versions** of your resources (like [KV](https://developers.cloudflare.com/kv), [D1](https://developers.cloudflare.com/d1/), or [R2](https://developers.cloudflare.com/r2)). This means you **don’t** need to manually set up separate local instances for each service. However, newly created local resources **won’t** contain any data — you'll need to use Wrangler commands with the `--local` flag to populate them. Changes made to local resources won’t affect production data.
## Populating local resources with data
When you first start developing, your local resources will be empty. You'll need to populate them with data using the Wrangler CLI.
### KV namespaces
Syntax note
Since version 3.60.0, Wrangler supports the `kv ...` syntax. If you are using versions below 3.60.0, the command follows the `kv:...` syntax. Learn more in the [Wrangler commands for KV page](https://developers.cloudflare.com/kv/reference/kv-commands/).
#### [Add a single key-value pair](https://developers.cloudflare.com/workers/wrangler/commands/kv/#kv-key)
npm yarn pnpm
```
npx wrangler kv key put --binding= --local
```
```
yarn wrangler kv key put --binding= --local
```
```
pnpm wrangler kv key put --binding= --local
```
#### [Bulk upload](https://developers.cloudflare.com/workers/wrangler/commands/kv/#kv-bulk)
npm yarn pnpm
```
npx wrangler kv bulk put --binding= --local
```
```
yarn wrangler kv bulk put --binding= --local
```
```
pnpm wrangler kv bulk put --binding= --local
```
### R2 buckets
#### [Upload a file](https://developers.cloudflare.com/workers/wrangler/commands/r2/#r2-object)
npm yarn pnpm
```
npx wrangler r2 object put / --file= --local
```
```
yarn wrangler r2 object put / --file= --local
```
```
pnpm wrangler r2 object put / --file= --local
```
You may also include [other metadata](https://developers.cloudflare.com/workers/wrangler/commands/r2/#r2-object-put).
### D1 databases
#### [Execute a SQL statement](https://developers.cloudflare.com/workers/wrangler/commands/d1/#d1-execute)
npm yarn pnpm
```
npx wrangler d1 execute --command="" --local
```
```
yarn wrangler d1 execute --command="" --local
```
```
pnpm wrangler d1 execute --command="" --local
```
#### [Execute a SQL file](https://developers.cloudflare.com/workers/wrangler/commands/d1/#d1-execute)
npm yarn pnpm
```
npx wrangler d1 execute --file=./schema.sql --local
```
```
yarn wrangler d1 execute