--- title: Agents · Cloudflare Agents docs description: The Agents SDK enables you to build and deploy AI-powered agents that can autonomously perform tasks, communicate with clients in real time, call AI models, persist state, schedule tasks, run asynchronous workflows, browse the web, query data from your database, support human-in-the-loop interactions, and a lot more. lastUpdated: 2025-03-18T12:13:40.000Z chatbotDeprioritize: false source_url: html: https://developers.cloudflare.com/agents/ md: https://developers.cloudflare.com/agents/index.md --- The Agents SDK enables you to build and deploy AI-powered agents that can autonomously perform tasks, communicate with clients in real time, call AI models, persist state, schedule tasks, run asynchronous workflows, browse the web, query data from your database, support human-in-the-loop interactions, and [a lot more](https://developers.cloudflare.com/agents/api-reference/). ### Ship your first Agent To use the Agent starter template and create your first Agent with the Agents SDK: ```sh # install it npm create cloudflare@latest agents-starter -- --template=cloudflare/agents-starter # and deploy it npx wrangler@latest deploy ``` Head to the guide on [building a chat agent](https://developers.cloudflare.com/agents/getting-started/build-a-chat-agent) to learn how the starter project is built and how to use it as a foundation for your own agents. If you're already building on [Workers](https://developers.cloudflare.com/workers/), you can install the `agents` package directly into an existing project: ```sh npm i agents ``` And then define your first Agent by creating a class that extends the `Agent` class: * JavaScript ```js import { Agent, AgentNamespace } from "agents"; export class MyAgent extends Agent { // Define methods on the Agent: // https://developers.cloudflare.com/agents/api-reference/agents-api/ // // Every Agent has built in state via this.setState and this.sql // Built-in scheduling via this.schedule // Agents support WebSockets, HTTP requests, state synchronization and // can run for seconds, minutes or hours: as long as the tasks need. } ``` * TypeScript ```ts import { Agent, AgentNamespace } from 'agents'; export class MyAgent extends Agent { // Define methods on the Agent: // https://developers.cloudflare.com/agents/api-reference/agents-api/ // // Every Agent has built in state via this.setState and this.sql // Built-in scheduling via this.schedule // Agents support WebSockets, HTTP requests, state synchronization and // can run for seconds, minutes or hours: as long as the tasks need. } ``` Dive into the [Agent SDK reference](https://developers.cloudflare.com/agents/api-reference/agents-api/) to learn more about how to use the Agents SDK package and defining an `Agent`. ### Why build agents on Cloudflare? We built the Agents SDK with a few things in mind: * **Batteries (state) included**: Agents come with [built-in state management](https://developers.cloudflare.com/agents/api-reference/store-and-sync-state/), with the ability to automatically sync state between an Agent and clients, trigger events on state changes, and read+write to each Agent's SQL database. * **Communicative**: You can connect to an Agent via [WebSockets](https://developers.cloudflare.com/agents/api-reference/websockets/) and stream updates back to client in real-time. Handle a long-running response from a reasoning model, the results of an [asynchronous workflow](https://developers.cloudflare.com/agents/api-reference/run-workflows/), or build a chat app that builds on the `useAgent` hook included in the Agents SDK. * **Extensible**: Agents are code. Use the [AI models](https://developers.cloudflare.com/agents/api-reference/using-ai-models/) you want, bring-your-own headless browser service, pull data from your database hosted in another cloud, add your own methods to your Agent and call them. Agents built with Agents SDK can be deployed directly to Cloudflare and run on top of [Durable Objects](https://developers.cloudflare.com/durable-objects/) — which you can think of as stateful micro-servers that can scale to tens of millions — and are able to run wherever they need to. Run your Agents close to a user for low-latency interactivity, close to your data for throughput, and/or anywhere in between. *** ### Build on the Cloudflare Platform **[Workers](https://developers.cloudflare.com/workers/)** Build serverless applications and deploy instantly across the globe for exceptional performance, reliability, and scale. **[AI Gateway](https://developers.cloudflare.com/ai-gateway/)** Observe and control your AI applications with caching, rate limiting, request retries, model fallback, and more. **[Vectorize](https://developers.cloudflare.com/vectorize/)** Build full-stack AI applications with Vectorize, Cloudflare’s vector database. Adding Vectorize enables you to perform tasks such as semantic search, recommendations, anomaly detection or can be used to provide context and memory to an LLM. **[Workers AI](https://developers.cloudflare.com/workers-ai/)** Run machine learning models, powered by serverless GPUs, on Cloudflare's global network. **[Workflows](https://developers.cloudflare.com/workflows/)** Build stateful agents that guarantee executions, including automatic retries, persistent state that runs for minutes, hours, days, or weeks. --- title: Overview · Cloudflare AI Gateway docs description: Cloudflare's AI Gateway allows you to gain visibility and control over your AI apps. By connecting your apps to AI Gateway, you can gather insights on how people are using your application with analytics and logging and then control how your application scales with features such as caching, rate limiting, as well as request retries, model fallback, and more. Better yet - it only takes one line of code to get started. lastUpdated: 2025-05-14T14:20:47.000Z chatbotDeprioritize: false source_url: html: https://developers.cloudflare.com/ai-gateway/ md: https://developers.cloudflare.com/ai-gateway/index.md --- Observe and control your AI applications. Available on all plans Cloudflare's AI Gateway allows you to gain visibility and control over your AI apps. By connecting your apps to AI Gateway, you can gather insights on how people are using your application with analytics and logging and then control how your application scales with features such as caching, rate limiting, as well as request retries, model fallback, and more. Better yet - it only takes one line of code to get started. Check out the [Get started guide](https://developers.cloudflare.com/ai-gateway/get-started/) to learn how to configure your applications with AI Gateway. ## Features ### Analytics View metrics such as the number of requests, tokens, and the cost it takes to run your application. [View Analytics](https://developers.cloudflare.com/ai-gateway/observability/analytics/) ### Logging Gain insight on requests and errors. [View Logging](https://developers.cloudflare.com/ai-gateway/observability/logging/) ### Caching Serve requests directly from Cloudflare's cache instead of the original model provider for faster requests and cost savings. [Use Caching](https://developers.cloudflare.com/ai-gateway/configuration/caching/) ### Rate limiting Control how your application scales by limiting the number of requests your application receives. [Use Rate limiting](https://developers.cloudflare.com/ai-gateway/configuration/rate-limiting) ### Request retry and fallback Improve resilience by defining request retry and model fallbacks in case of an error. [Use Request retry and fallback](https://developers.cloudflare.com/ai-gateway/configuration/fallbacks/) ### Your favorite providers Workers AI, OpenAI, Azure OpenAI, HuggingFace, Replicate, and more work with AI Gateway. [Use Your favorite providers](https://developers.cloudflare.com/ai-gateway/providers/) *** ## Related products **[Workers AI](https://developers.cloudflare.com/workers-ai/)** Run machine learning models, powered by serverless GPUs, on Cloudflare’s global network. **[Vectorize](https://developers.cloudflare.com/vectorize/)** Build full-stack AI applications with Vectorize, Cloudflare's vector database. Adding Vectorize enables you to perform tasks such as semantic search, recommendations, anomaly detection or can be used to provide context and memory to an LLM. ## More resources [Developer Discord](https://discord.cloudflare.com) Connect with the Workers community on Discord to ask questions, show what you are building, and discuss the platform with other developers. [Use cases](https://developers.cloudflare.com/use-cases/ai/) Learn how you can build and deploy ambitious AI applications to Cloudflare's global network. [@CloudflareDev](https://x.com/cloudflaredev) Follow @CloudflareDev on Twitter to learn about product announcements, and what is new in Cloudflare Workers. --- title: Cloudflare AutoRAG · AutoRAG description: Build scalable, fully-managed RAG applications with Cloudflare AutoRAG. Create retrieval-augmented generation pipelines to deliver accurate, context-aware AI without managing infrastructure. lastUpdated: 2025-05-12T16:09:33.000Z chatbotDeprioritize: false source_url: html: https://developers.cloudflare.com/autorag/ md: https://developers.cloudflare.com/autorag/index.md --- Create fully-managed RAG applications that continuously update and scale on Cloudflare. Available on all plans AutoRAG lets you create retrieval-augmented generation (RAG) pipelines that power your AI applications with accurate and up-to-date information. Create RAG applications that integrate context-aware AI without managing infrastructure. You can use AutoRAG to build: * **Product Chatbot:** Answer customer questions using your own product content. * **Docs Search:** Make documentation easy to search and use. [Get started](https://developers.cloudflare.com/autorag/get-started) [Watch AutoRAG demo](https://www.youtube.com/watch?v=JUFdbkiDN2U) *** ## Features ### Automated indexing Automatically and continuously index your data source, keeping your content fresh without manual reprocessing. [View indexing](https://developers.cloudflare.com/autorag/configuration/indexing/) ### Multitenancy support Create multitenancy by scoping search to each tenant’s data using folder-based metadata filters. [Add filters](https://developers.cloudflare.com/autorag/how-to/multitenancy/) ### Workers Binding Call your AutoRAG instance for search or AI Search directly from a Cloudflare Worker using the native binding integration. [Add to Worker](https://developers.cloudflare.com/autorag/usage/workers-binding/) ### Similarity caching Cache repeated queries and results to improve latency and reduce compute on repeated requests. [Use caching](https://developers.cloudflare.com/autorag/configuration/cache/) *** ## Related products **[Workers AI](https://developers.cloudflare.com/workers-ai/)** Run machine learning models, powered by serverless GPUs, on Cloudflare’s global network. **[AI Gateway](https://developers.cloudflare.com/ai-gateway/)** Observe and control your AI applications with caching, rate limiting, request retries, model fallback, and more. **[Vectorize](https://developers.cloudflare.com/vectorize/)** Build full-stack AI applications with Vectorize, Cloudflare’s vector database. **[Workers](https://developers.cloudflare.com/workers/)** Build serverless applications and deploy instantly across the globe for exceptional performance, reliability, and scale. **[R2](https://developers.cloudflare.com/r2/)** Store large amounts of unstructured data without the costly egress bandwidth fees associated with typical cloud storage services. *** ## More resources [Get started](https://developers.cloudflare.com/workers-ai/get-started/workers-wrangler/) Build and deploy your first Workers AI application. [Developer Discord](https://discord.cloudflare.com) Connect with the Workers community on Discord to ask questions, share what you are building, and discuss the platform with other developers. [@CloudflareDev](https://x.com/cloudflaredev) Follow @CloudflareDev on Twitter to learn about product announcements, and what is new in Cloudflare Workers. --- title: Browser Rendering · Browser Rendering docs description: Control headless browsers with Cloudflare's Workers Browser Rendering API. Automate tasks, take screenshots, convert pages to PDFs, and test web apps. lastUpdated: 2025-06-24T20:37:11.000Z chatbotDeprioritize: false source_url: html: https://developers.cloudflare.com/browser-rendering/ md: https://developers.cloudflare.com/browser-rendering/index.md --- Browser automation for [Cloudflare Workers](https://developers.cloudflare.com/workers/) and [quick browser actions](https://developers.cloudflare.com/browser-rendering/rest-api/). Available on Free and Paid plans Browser Rendering enables developers to programmatically control and interact with headless browser instances running on Cloudflare’s global network. This facilitates tasks such as automating browser interactions, capturing screenshots, generating PDFs, and extracting data from web pages. ## Integration Methods You can integrate Browser Rendering into your applications using one of the following methods: * **[REST API](https://developers.cloudflare.com/browser-rendering/rest-api/)**: Ideal for simple, stateless tasks like capturing screenshots, generating PDFs, extracting HTML content, and more. * **[Workers Bindings](https://developers.cloudflare.com/browser-rendering/workers-bindings/)**: Suitable for advanced browser automation within [Cloudflare Workers](https://developers.cloudflare.com/workers/). This method provides greater control, enabling more complex workflows and persistent sessions. Choose the method that best fits your use case. For example, use the [REST API endpoints](https://developers.cloudflare.com/browser-rendering/rest-api/) for straightforward tasks from external applications and use [Workers Bindings](https://developers.cloudflare.com/browser-rendering/workers-bindings/) for complex automation within the Cloudflare ecosystem. ## Use Cases Browser Rendering can be utilized for various purposes, including: * Fetch HTML content of a page. * Capture screenshot of a webpage. * Convert a webpage into a PDF document. * Take a webpage snapshot. * Scrape specified HTML elements from a webpage. * Retrieve data in a structured format. * Extract Markdown content from a webpage. * Gather all hyperlinks found on a webpage. ## Related products **[Workers](https://developers.cloudflare.com/workers/)** Build serverless applications and deploy instantly across the globe for exceptional performance, reliability, and scale. **[Durable Objects](https://developers.cloudflare.com/durable-objects/)** A globally distributed coordination API with strongly consistent storage. **[Agents](https://developers.cloudflare.com/agents/)** Build and deploy AI-powered agents that can autonomously perform tasks. ## More resources [Get started](https://developers.cloudflare.com/browser-rendering/get-started/) Deploy your first Browser Rendering project using Wrangler and Cloudflare's version of Puppeteer. [Learning Path](https://developers.cloudflare.com/learning-paths/workers/concepts/) New to Workers? Get started with the Workers Learning Path. [Limits](https://developers.cloudflare.com/browser-rendering/platform/limits/) Learn about Browser Rendering limits. [Developer Discord](https://discord.cloudflare.com) Connect with the Workers community on Discord to ask questions, show what you are building, and discuss the platform with other developers. [@CloudflareDev](https://x.com/cloudflaredev) Follow @CloudflareDev on Twitter to learn about product announcements, and what is new in Cloudflare Workers. --- title: Cloudflare for Platforms · Cloudflare for Platforms docs description: Cloudflare for Platforms lets you run untrusted code written by your customers, or by AI, in a secure, hosted sandbox, and give each customer their own subdomain or custom domain. lastUpdated: 2025-04-23T16:38:02.000Z chatbotDeprioritize: false source_url: html: https://developers.cloudflare.com/cloudflare-for-platforms/ md: https://developers.cloudflare.com/cloudflare-for-platforms/index.md --- Build your own multitenant platform using Cloudflare as infrastructure Cloudflare for Platforms lets you run untrusted code written by your customers, or by AI, in a secure, hosted sandbox, and give each customer their own subdomain or custom domain. ![Figure 1: Cloudflare for Platforms Architecture Diagram](https://developers.cloudflare.com/_astro/programmable-platforms-2.DGAT6ZDR_ZG0FdN.svg) You can think of Cloudflare for Platforms as the exact same products and functionality that Cloudflare offers its own customers, structured so that you can offer it to your own customers, embedded within your own product. This includes: * **Isolation and multitenancy** — each of your customers runs code in their own Worker — a [secure and isolated sandbox](https://developers.cloudflare.com/workers/reference/how-workers-works/) * **Programmable routing, ingress, egress and limits** — you write code that dispatches requests to your customers' code, and can control [ingress](https://developers.cloudflare.com/cloudflare-for-platforms/workers-for-platforms/get-started/dynamic-dispatch/), [egress](https://developers.cloudflare.com/cloudflare-for-platforms/workers-for-platforms/configuration/outbound-workers/) and set [per-customer limits](https://developers.cloudflare.com/cloudflare-for-platforms/workers-for-platforms/configuration/custom-limits/) * **Databases and storage** — you can provide [databases, object storage and more](https://developers.cloudflare.com/workers/runtime-apis/bindings/) to your customers as APIs they can call directly, without API tokens, keys, or external dependencies * **Custom Domains and Subdomains** — you [call an API](https://developers.cloudflare.com/cloudflare-for-platforms/cloudflare-for-saas/) to create custom subdomains or configure custom domains for each of your customers Cloudflare for Platforms is used by leading platforms big and small to: * Build application development platforms tailored to specific domains, like ecommerce storefronts or mobile apps * Power AI coding platforms that let anyone build and deploy software * Customize product behavior by allowing any user to write a short code snippet * Offer every customer their own isolated database * Provide each customer with their own subdomain *** ## Products ### Workers for Platforms Let your customers build and deploy their own applications to your platform, using Cloudflare's developer platform. [Use Workers for Platforms](https://developers.cloudflare.com/cloudflare-for-platforms/workers-for-platforms/) ### Cloudflare for SaaS Give your customers their own subdomain or custom domain, protected and accelerated by Cloudflare. [Use Cloudflare for SaaS](https://developers.cloudflare.com/cloudflare-for-platforms/cloudflare-for-saas/) --- title: Constellation · Constellation docs description: Constellation allows you to run fast, low-latency inference tasks on pre-trained machine learning models natively on Cloudflare Workers. It supports some of the most popular machine learning (ML) and AI runtimes and multiple classes of models. lastUpdated: 2024-08-15T18:30:43.000Z chatbotDeprioritize: false source_url: html: https://developers.cloudflare.com/constellation/ md: https://developers.cloudflare.com/constellation/index.md --- Run machine learning models with Cloudflare Workers. Constellation allows you to run fast, low-latency inference tasks on pre-trained machine learning models natively on Cloudflare Workers. It supports some of the most popular machine learning (ML) and AI runtimes and multiple classes of models. Cloudflare provides a curated list of verified models, or you can train and upload your own. Functionality you can deploy to your application with Constellation: * Content generation, summarization, or similarity analysis * Question answering * Audio transcription * Image or audio classification * Object detection * Anomaly detection * Sentiment analysis *** ## More resources [Developer Discord](https://discord.cloudflare.com) Connect with the Workers community on Discord to ask questions, show what you are building, and discuss the platform with other developers. [@CloudflareDev](https://x.com/cloudflaredev) Follow @CloudflareDev on Twitter to learn about product announcements, and what is new in Cloudflare Workers. --- title: Overview · Containers docs description: Run code written in any programming language, built for any runtime, as part of apps built on Workers. lastUpdated: 2025-06-27T15:16:50.000Z chatbotDeprioritize: false source_url: html: https://developers.cloudflare.com/containers/ md: https://developers.cloudflare.com/containers/index.md --- Enhance your Workers with serverless containers Available on Workers Paid plan Run code written in any programming language, built for any runtime, as part of apps built on [Workers](https://developers.cloudflare.com/workers). Deploy your container image to Region:Earth without worrying about managing infrastructure - just define your Worker and `wrangler deploy`. With Containers you can run: * Resource-intensive applications that require CPU cores running in parallel, large amounts of memory or disk space * Applications and libraries that require a full filesystem, specific runtime, or Linux-like environment * Existing applications and tools that have been distributed as container images Container instances are spun up on-demand and controlled by code you write in your [Worker](https://developers.cloudflare.com/workers). Instead of chaining together API calls or writing Kubernetes operators, you just write JavaScript: * Worker Code ```js import { Container, getContainer } from "@cloudflare/containers"; export class MyContainer extends Container { defaultPort = 4000; // Port the container is listening on sleepAfter = "10m"; // Stop the instance if requests not sent for 10 minutes } async fetch(request, env) { const { "session-id": sessionId } = await request.json(); // Get the container instance for the given session ID const containerInstance = getContainer(env.MY_CONTAINER, sessionId) // Pass the request to the container instance on its default port return containerInstance.fetch(request); } ``` * Worker Config * wrangler.jsonc ```jsonc { "name": "container-starter", "main": "src/index.js", "containers": [ { "class_name": "MyContainer", "image": "./Dockerfile", "instances": 5, "name": "hello-containers-go" } ], "durable_objects": { "bindings": [ { "class_name": "MyContainer", "name": "MY_CONTAINER" } ] }, "migrations": [ { "new_sqlite_classes": [ "MyContainer" ], "tag": "v1" } ], } ``` * wrangler.toml ```toml name = "container-starter" main = "src/index.js" [[containers]] class_name = "MyContainer" image = "./Dockerfile" instances = 5 name = "hello-containers-go" [[durable_objects.bindings]] class_name = "MyContainer" name = "MY_CONTAINER" [[migrations]] new_sqlite_classes = [ "MyContainer" ] tag = "v1" ``` * wrangler.jsonc ```jsonc { "name": "container-starter", "main": "src/index.js", "containers": [ { "class_name": "MyContainer", "image": "./Dockerfile", "instances": 5, "name": "hello-containers-go" } ], "durable_objects": { "bindings": [ { "class_name": "MyContainer", "name": "MY_CONTAINER" } ] }, "migrations": [ { "new_sqlite_classes": [ "MyContainer" ], "tag": "v1" } ], } ``` * wrangler.toml ```toml name = "container-starter" main = "src/index.js" [[containers]] class_name = "MyContainer" image = "./Dockerfile" instances = 5 name = "hello-containers-go" [[durable_objects.bindings]] class_name = "MyContainer" name = "MY_CONTAINER" [[migrations]] new_sqlite_classes = [ "MyContainer" ] tag = "v1" ``` [Get started ](https://developers.cloudflare.com/containers/get-started/)[Containers dashboard](https://dash.cloudflare.com/?to=/:account/workers/containers) *** ## Next Steps ### Deploy your first Container Build and push an image, call a Container from a Worker, and understand scaling and routing. [Deploy a Container](https://developers.cloudflare.com/containers/get-started/) ### Container Examples See examples of how to use a Container with a Worker, including stateless and stateful routing, regional placement, Workflow and Queue integrations, AI-generated code execution, and short-lived workloads. [See Examples](https://developers.cloudflare.com/containers/examples/) *** ## More resources [Beta Information](https://developers.cloudflare.com/containers/beta-info/) Learn about the Containers Beta and upcoming features. [Wrangler](https://developers.cloudflare.com/workers/wrangler/commands/#containers) Learn more about the commands to develop, build and push images, and deploy containers with Wrangler. [Limits](https://developers.cloudflare.com/containers/platform-details/#limits) Learn about what limits Containers have and how to work within them. [Containers Discord](https://discord.cloudflare.com) Connect with other users of Containers on Discord. Ask questions, show what you are building, and discuss the platform with other developers. --- title: Overview · Cloudflare D1 docs description: D1 is Cloudflare's managed, serverless database with SQLite's SQL semantics, built-in disaster recovery, and Worker and HTTP API access. lastUpdated: 2025-03-14T16:33:10.000Z chatbotDeprioritize: false source_url: html: https://developers.cloudflare.com/d1/ md: https://developers.cloudflare.com/d1/index.md --- Create new serverless SQL databases to query from your Workers and Pages projects. Available on Free and Paid plans D1 is Cloudflare's managed, serverless database with SQLite's SQL semantics, built-in disaster recovery, and Worker and HTTP API access. D1 is designed for horizontal scale out across multiple, smaller (10 GB) databases, such as per-user, per-tenant or per-entity databases. D1 allows you to build applications with thousands of databases at no extra cost for isolating with multiple databases. D1 pricing is based only on query and storage costs. Create your first D1 database by [following the Get started guide](https://developers.cloudflare.com/d1/get-started/), learn how to [import data into a database](https://developers.cloudflare.com/d1/best-practices/import-export-data/), and how to [interact with your database](https://developers.cloudflare.com/d1/worker-api/) directly from [Workers](https://developers.cloudflare.com/workers/) or [Pages](https://developers.cloudflare.com/pages/functions/bindings/#d1-databases). *** ## Features ### Create your first D1 database Create your first D1 database, establish a schema, import data and query D1 directly from an application [built with Workers](https://developers.cloudflare.com/workers/). [Create your D1 database](https://developers.cloudflare.com/d1/get-started/) ### SQLite Execute SQL with SQLite's SQL compatibility and D1 Client API. [Execute SQL queries](https://developers.cloudflare.com/d1/sql-api/sql-statements/) ### Time Travel Time Travel is D1’s approach to backups and point-in-time-recovery, and allows you to restore a database to any minute within the last 30 days. [Learn about Time Travel](https://developers.cloudflare.com/d1/reference/time-travel/) *** ## Related products **[Workers](https://developers.cloudflare.com/workers/)** Build serverless applications and deploy instantly across the globe for exceptional performance, reliability, and scale. **[Pages](https://developers.cloudflare.com/pages/)** Deploy dynamic front-end applications in record time. *** ## More resources [Pricing](https://developers.cloudflare.com/d1/platform/pricing/) Learn about D1's pricing and how to estimate your usage. [Limits](https://developers.cloudflare.com/d1/platform/limits/) Learn about what limits D1 has and how to work within them. [Community projects](https://developers.cloudflare.com/d1/reference/community-projects/) Browse what developers are building with D1. [Storage options](https://developers.cloudflare.com/workers/platform/storage-options/) Learn more about the storage and database options you can build on with Workers. [Developer Discord](https://discord.cloudflare.com) Connect with the Workers community on Discord to ask questions, show what you are building, and discuss the platform with other developers. [@CloudflareDev](https://x.com/cloudflaredev) Follow @CloudflareDev on Twitter to learn about product announcements, and what is new in Cloudflare Developer Platform. --- title: Developer Spotlight program · Cloudflare Developer Spotlight description: Find examples of how our community of developers are getting the most out of our products. lastUpdated: 2025-02-06T21:05:40.000Z chatbotDeprioritize: false source_url: html: https://developers.cloudflare.com/developer-spotlight/ md: https://developers.cloudflare.com/developer-spotlight/index.md --- ![Illustration of a laptop.](https://developers.cloudflare.com/_astro/developer_spotlight.D2AqR_ks_14Iwsx.webp) Find examples of how our community of developers are getting the most out of our products. Applications are currently open until Thursday, the 24th of October 2024. To apply, please read the [application guide](https://developers.cloudflare.com/developer-spotlight/application-guide/) ## View latest contributions [Setup Fullstack Authentication with Next.js, Auth.js, and Cloudflare D1](https://developers.cloudflare.com/developer-spotlight/tutorials/fullstack-authentication-with-next-js-and-cloudflare-d1/) By Mackenly Jones [Build a Voice Notes App with auto transcriptions using Workers AI](https://developers.cloudflare.com/workers-ai/tutorials/build-a-voice-notes-app-with-auto-transcription/) By Rajeev R. Sharma [Protect payment forms from malicious bots using Turnstile](https://developers.cloudflare.com/turnstile/tutorials/protecting-your-payment-form-from-attackers-bots-using-turnstile/) By Hidetaka Okamoto [Build Live Cursors with Next.js, RPC and Durable Objects](https://developers.cloudflare.com/workers/tutorials/live-cursors-with-nextjs-rpc-do/) By Ivan Buendia [Build an interview practice tool with Workers AI](https://developers.cloudflare.com/workers-ai/tutorials/build-ai-interview-practice-tool/) By Vasyl [Automate analytics reporting with Cloudflare Workers and email routing](https://developers.cloudflare.com/workers/tutorials/automated-analytics-reporting/) By Aleksej Komnenovic [Create a sitemap from Sanity CMS with Workers](https://developers.cloudflare.com/developer-spotlight/tutorials/create-sitemap-from-sanity-cms/) By John Siciliano [Recommend products on e-commerce sites using Workers AI and Stripe](https://developers.cloudflare.com/developer-spotlight/tutorials/creating-a-recommendation-api/) By Hidetaka Okamoto [Custom access control for files in R2 using D1 and Workers](https://developers.cloudflare.com/developer-spotlight/tutorials/custom-access-control-for-files/) By Dominik Fuerst [Send form submissions using Astro and Resend](https://developers.cloudflare.com/developer-spotlight/tutorials/handle-form-submission-with-astro-resend/) By Cody Walsh --- title: Overview · Cloudflare Durable Objects docs description: Durable Objects provide a building block for stateful applications and distributed systems. lastUpdated: 2025-04-06T14:39:24.000Z chatbotDeprioritize: false source_url: html: https://developers.cloudflare.com/durable-objects/ md: https://developers.cloudflare.com/durable-objects/index.md --- Create AI agents, collaborative applications, real-time interactions like chat, and more without needing to coordinate state, have separate storage, or manage infrastructure. Available on Free and Paid plans Durable Objects provide a building block for stateful applications and distributed systems. Use Durable Objects to build applications that need coordination among multiple clients, like collaborative editing tools, interactive chat, multiplayer games, live notifications, and deep distributed systems, without requiring you to build serialization and coordination primitives on your own. [Get started](https://developers.cloudflare.com/durable-objects/get-started/) Note SQLite-backed Durable Objects are now available on the Workers Free plan with these [limits](https://developers.cloudflare.com/durable-objects/platform/pricing/). [SQLite storage](https://developers.cloudflare.com/durable-objects/best-practices/access-durable-objects-storage/) and corresponding [Storage API](https://developers.cloudflare.com/durable-objects/api/storage-api/) methods like `sql.exec` have moved from beta to general availability. New Durable Object classes should use wrangler configuration for [SQLite storage](https://developers.cloudflare.com/durable-objects/best-practices/access-durable-objects-storage/#wrangler-configuration-for-sqlite-durable-objects). ### What are Durable Objects? A Durable Object is a special kind of [Cloudflare Worker](https://developers.cloudflare.com/workers/) which uniquely combines compute with storage. Like a Worker, a Durable Object is automatically provisioned geographically close to where it is first requested, starts up quickly when needed, and shuts down when idle. You can have millions of them around the world. However, unlike regular Workers: * Each Durable Object has a **globally-unique name**, which allows you to send requests to a specific object from anywhere in the world. Thus, a Durable Object can be used to coordinate between multiple clients who need to work together. * Each Durable Object has some **durable storage** attached. Since this storage lives together with the object, it is strongly consistent yet fast to access. Therefore, Durable Objects enable **stateful** serverless applications. For more information, refer to the full [What are Durable Objects?](https://developers.cloudflare.com/durable-objects/what-are-durable-objects/) page. *** ## Features ### In-memory State Learn how Durable Objects coordinate connections among multiple clients or events. [Use In-memory State](https://developers.cloudflare.com/durable-objects/reference/in-memory-state/) ### Storage API Learn how Durable Objects provide transactional, strongly consistent, and serializable storage. [Use Storage API](https://developers.cloudflare.com/durable-objects/api/storage-api/) ### WebSocket Hibernation Learn how WebSocket Hibernation allows you to manage the connections of multiple clients at scale. [Use WebSocket Hibernation](https://developers.cloudflare.com/durable-objects/best-practices/websockets/#websocket-hibernation-api) ### Durable Objects Alarms Learn how to use alarms to trigger a Durable Object and perform compute in the future at customizable intervals. [Use Durable Objects Alarms](https://developers.cloudflare.com/durable-objects/api/alarms/) *** ## Related products **[Workers](https://developers.cloudflare.com/workers/)** Cloudflare Workers provides a serverless execution environment that allows you to create new applications or augment existing ones without configuring or maintaining infrastructure. **[D1](https://developers.cloudflare.com/d1/)** D1 is Cloudflare's SQL-based native serverless database. Create a database by importing data or defining your tables and writing your queries within a Worker or through the API. **[R2](https://developers.cloudflare.com/r2/)** Cloudflare R2 Storage allows developers to store large amounts of unstructured data without the costly egress bandwidth fees associated with typical cloud storage services. *** ## More resources [Built with Durable Objects](https://workers.cloudflare.com/built-with/collections/durable-objects/) Browse what other developers are building with Durable Objects. [Limits](https://developers.cloudflare.com/durable-objects/platform/limits/) Learn about Durable Objects limits. [Pricing](https://developers.cloudflare.com/durable-objects/platform/pricing/) Learn about Durable Objects pricing. [Storage options](https://developers.cloudflare.com/workers/platform/storage-options/) Learn more about storage and database options you can build with Workers. [Developer Discord](https://discord.cloudflare.com) Connect with the Workers community on Discord to ask questions, show what you are building, and discuss the platform with other developers. [@CloudflareDev](https://x.com/cloudflaredev) Follow @CloudflareDev on Twitter to learn about product announcements, and what is new in Cloudflare Developer Platform. --- title: Overview · Cloudflare Email Routing docs description: Cloudflare Email Routing is designed to simplify the way you create and manage email addresses, without needing to keep an eye on additional mailboxes. With Email Routing, you can create any number of custom email addresses to use in situations where you do not want to share your primary email address, such as when you subscribe to a new service or newsletter. Emails are then routed to your preferred email inbox, without you ever having to expose your primary email address. lastUpdated: 2025-03-24T10:09:47.000Z chatbotDeprioritize: false source_url: html: https://developers.cloudflare.com/email-routing/ md: https://developers.cloudflare.com/email-routing/index.md --- Create custom email addresses for your domain and route incoming emails to your preferred mailbox. Available on all plans Cloudflare Email Routing is designed to simplify the way you create and manage email addresses, without needing to keep an eye on additional mailboxes. With Email Routing, you can create any number of custom email addresses to use in situations where you do not want to share your primary email address, such as when you subscribe to a new service or newsletter. Emails are then routed to your preferred email inbox, without you ever having to expose your primary email address. Email Routing is free and private by design. Cloudflare will not store or access the emails routed to your inbox. It is available to all Cloudflare customers [using Cloudflare as an authoritative nameserver](https://developers.cloudflare.com/dns/zone-setups/full-setup/). *** ## Features ### Email Workers Leverage the power of Cloudflare Workers to implement any logic you need to process your emails. Create rules as complex or simple as you need. [Use Email Workers](https://developers.cloudflare.com/email-routing/email-workers/) ### Custom addresses With Email Routing you can have many custom email addresses to use for specific situations. [Use Custom addresses](https://developers.cloudflare.com/email-routing/get-started/enable-email-routing/) ### Analytics Email Routing includes metrics to help you check on your email traffic history. [Use Analytics](https://developers.cloudflare.com/email-routing/get-started/email-routing-analytics/) *** ## Related products **[Email Security](https://developers.cloudflare.com/cloudflare-one/email-security/)** Cloudflare Email Security is a cloud based service that stops phishing attacks, the biggest cybersecurity threat, across all traffic vectors - email, web and network. **[DNS](https://developers.cloudflare.com/dns/)** Email Routing is available to customers using Cloudflare as an authoritative nameserver. --- title: Overview · Hyperdrive docs description: Hyperdrive is a service that accelerates queries you make to existing databases, making it faster to access your data from across the globe from Cloudflare Workers, irrespective of your users' location. lastUpdated: 2025-07-07T12:55:51.000Z chatbotDeprioritize: false source_url: html: https://developers.cloudflare.com/hyperdrive/ md: https://developers.cloudflare.com/hyperdrive/index.md --- Turn your existing regional database into a globally distributed database. Available on Free and Paid plans Hyperdrive is a service that accelerates queries you make to existing databases, making it faster to access your data from across the globe from [Cloudflare Workers](https://developers.cloudflare.com/workers/), irrespective of your users' location. Hyperdrive supports any Postgres or MySQL database, including those hosted on AWS, Google Cloud, Azure, Neon and Planetscale. Hyperdrive also supports Postgres-compatible databases like CockroachDB and Timescale. You do not need to write new code or replace your favorite tools: Hyperdrive works with your existing code and tools you use. Use Hyperdrive's connection string from your Cloudflare Workers application with your existing Postgres drivers and object-relational mapping (ORM) libraries: * PostgreSQL * index.ts ```ts import postgres from 'postgres'; export default { async fetch(request, env, ctx): Promise { // Hyperdrive provides a unique generated connection string to connect to // your database via Hyperdrive that can be used with your existing tools const sql = postgres(env.HYPERDRIVE.connectionString); try { // Sample SQL query const results = await sql`SELECT * FROM pg_tables`; // Close the client after the response is returned ctx.waitUntil(sql.end()); return Response.json(results); } catch (e) { return Response.json({ error: e instanceof Error ? e.message : e }, { status: 500 }); } }, } satisfies ExportedHandler<{ HYPERDRIVE: Hyperdrive }>; ``` * wrangler.jsonc ```json { "$schema": "node_modules/wrangler/config-schema.json", "name": "WORKER-NAME", "main": "src/index.ts", "compatibility_date": "2025-02-04", "compatibility_flags": [ "nodejs_compat" ], "observability": { "enabled": true }, "hyperdrive": [ { "binding": "HYPERDRIVE", "id": "", "localConnectionString": "" } ] } ``` * MySQL * index.ts ```ts import { createConnection } from 'mysql2/promise'; export default { async fetch(request, env, ctx): Promise { const connection = await createConnection({ host: env.DB_HOST, user: env.DB_USER, password: env.DB_PASSWORD, database: env.DB_NAME, port: env.DB_PORT // This is needed to use mysql2 with Workers // This configures mysql2 to use static parsing instead of eval() parsing (not available on Workers) disableEval: true }); const [results, fields] = await connection.query( 'SHOW tables;' ); return new Response(JSON.stringify({ results, fields }), { headers: { 'Content-Type': 'application/json', 'Access-Control-Allow-Origin': '\*', }, }); }, } satisfies ExportedHandler; ``` * wrangler.jsonc ```json { "$schema": "node_modules/wrangler/config-schema.json", "name": "WORKER-NAME", "main": "src/index.ts", "compatibility_date": "2025-02-04", "compatibility_flags": [ "nodejs_compat" ], "observability": { "enabled": true }, "hyperdrive": [ { "binding": "HYPERDRIVE", "id": "", "localConnectionString": "" } ] } ``` * index.ts ```ts import postgres from 'postgres'; export default { async fetch(request, env, ctx): Promise { // Hyperdrive provides a unique generated connection string to connect to // your database via Hyperdrive that can be used with your existing tools const sql = postgres(env.HYPERDRIVE.connectionString); try { // Sample SQL query const results = await sql`SELECT * FROM pg_tables`; // Close the client after the response is returned ctx.waitUntil(sql.end()); return Response.json(results); } catch (e) { return Response.json({ error: e instanceof Error ? e.message : e }, { status: 500 }); } }, } satisfies ExportedHandler<{ HYPERDRIVE: Hyperdrive }>; ``` * wrangler.jsonc ```json { "$schema": "node_modules/wrangler/config-schema.json", "name": "WORKER-NAME", "main": "src/index.ts", "compatibility_date": "2025-02-04", "compatibility_flags": [ "nodejs_compat" ], "observability": { "enabled": true }, "hyperdrive": [ { "binding": "HYPERDRIVE", "id": "", "localConnectionString": "" } ] } ``` * index.ts ```ts import { createConnection } from 'mysql2/promise'; export default { async fetch(request, env, ctx): Promise { const connection = await createConnection({ host: env.DB_HOST, user: env.DB_USER, password: env.DB_PASSWORD, database: env.DB_NAME, port: env.DB_PORT // This is needed to use mysql2 with Workers // This configures mysql2 to use static parsing instead of eval() parsing (not available on Workers) disableEval: true }); const [results, fields] = await connection.query( 'SHOW tables;' ); return new Response(JSON.stringify({ results, fields }), { headers: { 'Content-Type': 'application/json', 'Access-Control-Allow-Origin': '\*', }, }); }, } satisfies ExportedHandler; ``` * wrangler.jsonc ```json { "$schema": "node_modules/wrangler/config-schema.json", "name": "WORKER-NAME", "main": "src/index.ts", "compatibility_date": "2025-02-04", "compatibility_flags": [ "nodejs_compat" ], "observability": { "enabled": true }, "hyperdrive": [ { "binding": "HYPERDRIVE", "id": "", "localConnectionString": "" } ] } ``` [Get started](https://developers.cloudflare.com/hyperdrive/get-started/) *** ## Features ### Connect your database Connect Hyperdrive to your existing database and deploy a [Worker](https://developers.cloudflare.com/workers/) that queries it. [Connect Hyperdrive to your database](https://developers.cloudflare.com/hyperdrive/get-started/) ### PostgreSQL support Hyperdrive allows you to connect to any PostgreSQL or PostgreSQL-compatible database. [Connect Hyperdrive to your PostgreSQL database](https://developers.cloudflare.com/hyperdrive/examples/connect-to-postgres/) ### MySQL support Hyperdrive allows you to connect to any MySQL database. [Connect Hyperdrive to your MySQL database](https://developers.cloudflare.com/hyperdrive/examples/connect-to-mysql/) ### Query Caching Default-on caching for your most popular queries executed against your database. [Learn about Query Caching](https://developers.cloudflare.com/hyperdrive/configuration/query-caching/) *** ## Related products **[Workers](https://developers.cloudflare.com/workers/)** Build serverless applications and deploy instantly across the globe for exceptional performance, reliability, and scale. **[Pages](https://developers.cloudflare.com/pages/)** Deploy dynamic front-end applications in record time. *** ## More resources [Pricing](https://developers.cloudflare.com/hyperdrive/platform/pricing/) Learn about Hyperdrive's pricing. [Limits](https://developers.cloudflare.com/hyperdrive/platform/limits/) Learn about Hyperdrive limits. [Storage options](https://developers.cloudflare.com/workers/platform/storage-options/) Learn more about the storage and database options you can build on with Workers. [Developer Discord](https://discord.cloudflare.com) Connect with the Workers community on Discord to ask questions, show what you are building, and discuss the platform with other developers. [@CloudflareDev](https://x.com/cloudflaredev) Follow @CloudflareDev on Twitter to learn about product announcements, and what is new in Cloudflare Developer Platform. --- title: Overview · Cloudflare Images docs description: Streamline your image infrastructure with Cloudflare Images. Store, transform, and deliver images efficiently using Cloudflare's global network. lastUpdated: 2025-03-14T16:33:10.000Z chatbotDeprioritize: false source_url: html: https://developers.cloudflare.com/images/ md: https://developers.cloudflare.com/images/index.md --- Store, transform, optimize, and deliver images at scale Available on all plans Cloudflare Images provides an end-to-end solution designed to help you streamline your image infrastructure from a single API and runs on [Cloudflare's global network](https://www.cloudflare.com/network/). There are two different ways to use Images: * **Efficiently store and deliver images.** You can upload images into Cloudflare Images and dynamically deliver multiple variants of the same original image. * **Optimize images that are stored outside of Images** You can make transformation requests to optimize any publicly available image on the Internet. Cloudflare Images is available on both [Free and Paid plans](https://developers.cloudflare.com/images/pricing/). By default, all users have access to the Images Free plan, which includes limited usage of the transformations feature to optimize images in remote sources. Image Resizing is now available as transformations All Image Resizing features are available as transformations with Images. Each unique transformation is billed only once per 30 days. If you are using a legacy plan with Image Resizing, visit the [dashboard](https://dash.cloudflare.com/) to switch to an Imagesplan. *** ## Features ### Storage Use Cloudflare’s edge network to store your images. [Use Storage](https://developers.cloudflare.com/images/upload-images/) ### Direct creator upload Accept uploads directly and securely from your users by generating a one-time token. [Use Direct creator upload](https://developers.cloudflare.com/images/upload-images/direct-creator-upload/) ### Variants Add up to 100 variants to specify how images should be resized for various use cases. [Create variants by transforming images](https://developers.cloudflare.com/images/transform-images) ### Signed URLs Control access to your images by using signed URL tokens. [Serve private images](https://developers.cloudflare.com/images/manage-images/serve-images/serve-private-images) *** ## More resources [Community Forum](https://community.cloudflare.com/c/developers/images/63) Engage with other users and the Images team on Cloudflare support forum. --- title: Cloudflare Workers KV · Cloudflare Workers KV docs description: Workers KV is a data storage that allows you to store and retrieve data globally. With Workers KV, you can build dynamic and performant APIs and websites that support high read volumes with low latency. lastUpdated: 2025-07-02T08:12:56.000Z chatbotDeprioritize: false source_url: html: https://developers.cloudflare.com/kv/ md: https://developers.cloudflare.com/kv/index.md --- Create a global, low-latency, key-value data storage. Available on Free and Paid plans Workers KV is a data storage that allows you to store and retrieve data globally. With Workers KV, you can build dynamic and performant APIs and websites that support high read volumes with low latency. For example, you can use Workers KV for: * Caching API responses. * Storing user configurations / preferences. * Storing user authentication details. Access your Workers KV namespace from Cloudflare Workers using [Workers Bindings](https://developers.cloudflare.com/workers/runtime-apis/bindings/) or from your external application using the REST API: * Workers Binding API * index.ts ```ts export default { async fetch(request, env, ctx): Promise { // write a key-value pair await env.KV.put('KEY', 'VALUE'); // read a key-value pair const value = await env.KV.get('KEY'); // list all key-value pairs const allKeys = await env.KV.list(); // delete a key-value pair await env.KV.delete('KEY'); // return a Workers response return new Response( JSON.stringify({ value: value, allKeys: allKeys, }), ); }, } satisfies ExportedHandler<{ KV: KVNamespace }>; ``` * wrangler.jsonc ```json { "$schema": "node_modules/wrangler/config-schema.json", "name": "", "main": "src/index.ts", "compatibility_date": "2025-02-04", "observability": { "enabled": true }, "kv_namespaces": [ { "binding": "KV", "id": "" } ] } ``` See the full [Workers KV binding API reference](https://developers.cloudflare.com/kv/api/read-key-value-pairs/). * REST API * cURL ```plaintext curl https://api.cloudflare.com/client/v4/accounts/$ACCOUNT_ID/storage/kv/namespaces/$NAMESPACE_ID/values/$KEY_NAME \ -X PUT \ -H 'Content-Type: multipart/form-data' \ -H "X-Auth-Email: $CLOUDFLARE_EMAIL" \ -H "X-Auth-Key: $CLOUDFLARE_API_KEY" \ -d '{ "value": "Some Value" }' curl https://api.cloudflare.com/client/v4/accounts/$ACCOUNT_ID/storage/kv/namespaces/$NAMESPACE_ID/values/$KEY_NAME \ -H "X-Auth-Email: $CLOUDFLARE_EMAIL" \ -H "X-Auth-Key: $CLOUDFLARE_API_KEY" ``` * TypeScript ```ts const client = new Cloudflare({ apiEmail: process.env['CLOUDFLARE_EMAIL'], // This is the default and can be omitted apiKey: process.env['CLOUDFLARE_API_KEY'], // This is the default and can be omitted }); const value = await client.kv.namespaces.values.update('', 'KEY', { account_id: '', value: 'VALUE', }); const value = await client.kv.namespaces.values.get('', 'KEY', { account_id: '', }); const value = await client.kv.namespaces.values.delete('', 'KEY', { account_id: '', }); // Automatically fetches more pages as needed. for await (const namespace of client.kv.namespaces.list({ account_id: '' })) { console.log(namespace.id); } ``` See the full Workers KV [REST API and SDK reference](https://developers.cloudflare.com/api/resources/kv/) for details on using REST API from external applications, with pre-generated SDK's for external TypeScript, Python, or Go applications. * index.ts ```ts export default { async fetch(request, env, ctx): Promise { // write a key-value pair await env.KV.put('KEY', 'VALUE'); // read a key-value pair const value = await env.KV.get('KEY'); // list all key-value pairs const allKeys = await env.KV.list(); // delete a key-value pair await env.KV.delete('KEY'); // return a Workers response return new Response( JSON.stringify({ value: value, allKeys: allKeys, }), ); }, } satisfies ExportedHandler<{ KV: KVNamespace }>; ``` * wrangler.jsonc ```json { "$schema": "node_modules/wrangler/config-schema.json", "name": "", "main": "src/index.ts", "compatibility_date": "2025-02-04", "observability": { "enabled": true }, "kv_namespaces": [ { "binding": "KV", "id": "" } ] } ``` * cURL ```plaintext curl https://api.cloudflare.com/client/v4/accounts/$ACCOUNT_ID/storage/kv/namespaces/$NAMESPACE_ID/values/$KEY_NAME \ -X PUT \ -H 'Content-Type: multipart/form-data' \ -H "X-Auth-Email: $CLOUDFLARE_EMAIL" \ -H "X-Auth-Key: $CLOUDFLARE_API_KEY" \ -d '{ "value": "Some Value" }' curl https://api.cloudflare.com/client/v4/accounts/$ACCOUNT_ID/storage/kv/namespaces/$NAMESPACE_ID/values/$KEY_NAME \ -H "X-Auth-Email: $CLOUDFLARE_EMAIL" \ -H "X-Auth-Key: $CLOUDFLARE_API_KEY" ``` * TypeScript ```ts const client = new Cloudflare({ apiEmail: process.env['CLOUDFLARE_EMAIL'], // This is the default and can be omitted apiKey: process.env['CLOUDFLARE_API_KEY'], // This is the default and can be omitted }); const value = await client.kv.namespaces.values.update('', 'KEY', { account_id: '', value: 'VALUE', }); const value = await client.kv.namespaces.values.get('', 'KEY', { account_id: '', }); const value = await client.kv.namespaces.values.delete('', 'KEY', { account_id: '', }); // Automatically fetches more pages as needed. for await (const namespace of client.kv.namespaces.list({ account_id: '' })) { console.log(namespace.id); } ``` [Get started](https://developers.cloudflare.com/kv/get-started/) *** ## Features ### Key-value storage Learn how Workers KV stores and retrieves data. [Use Key-value storage](https://developers.cloudflare.com/kv/get-started/) ### Wrangler The Workers command-line interface, Wrangler, allows you to [create](https://developers.cloudflare.com/workers/wrangler/commands/#init), [test](https://developers.cloudflare.com/workers/wrangler/commands/#dev), and [deploy](https://developers.cloudflare.com/workers/wrangler/commands/#publish) your Workers projects. [Use Wrangler](https://developers.cloudflare.com/workers/wrangler/install-and-update/) ### Bindings Bindings allow your Workers to interact with resources on the Cloudflare developer platform, including [R2](https://developers.cloudflare.com/r2/), [Durable Objects](https://developers.cloudflare.com/durable-objects/), and [D1](https://developers.cloudflare.com/d1/). [Use Bindings](https://developers.cloudflare.com/kv/concepts/kv-bindings/) *** ## Related products **[R2](https://developers.cloudflare.com/r2/)** Cloudflare R2 Storage allows developers to store large amounts of unstructured data without the costly egress bandwidth fees associated with typical cloud storage services. **[Durable Objects](https://developers.cloudflare.com/durable-objects/)** Cloudflare Durable Objects allows developers to access scalable compute and permanent, consistent storage. **[D1](https://developers.cloudflare.com/d1/)** Built on SQLite, D1 is Cloudflare’s first queryable relational database. Create an entire database by importing data or defining your tables and writing your queries within a Worker or through the API. *** ### More resources [Limits](https://developers.cloudflare.com/kv/platform/limits/) Learn about KV limits. [Pricing](https://developers.cloudflare.com/kv/platform/pricing/) Learn about KV pricing. [Discord](https://discord.com/channels/595317990191398933/893253103695065128) Ask questions, show off what you are building, and discuss the platform with other developers. [Twitter](https://x.com/cloudflaredev) Learn about product announcements, new tutorials, and what is new in Cloudflare Developer Platform. --- title: Overview · Cloudflare Pages docs description: Deploy your Pages project by connecting to your Git provider, uploading prebuilt assets directly to Pages with Direct Upload or using C3 from the command line. lastUpdated: 2025-05-09T17:32:11.000Z chatbotDeprioritize: false source_url: html: https://developers.cloudflare.com/pages/ md: https://developers.cloudflare.com/pages/index.md --- Create full-stack applications that are instantly deployed to the Cloudflare global network. Available on all plans Deploy your Pages project by connecting to [your Git provider](https://developers.cloudflare.com/pages/get-started/git-integration/), uploading prebuilt assets directly to Pages with [Direct Upload](https://developers.cloudflare.com/pages/get-started/direct-upload/) or using [C3](https://developers.cloudflare.com/pages/get-started/c3/) from the command line. *** ## Features ### Pages Functions Use Pages Functions to deploy server-side code to enable dynamic functionality without running a dedicated server. [Use Pages Functions](https://developers.cloudflare.com/pages/functions/) ### Rollbacks Rollbacks allow you to instantly revert your project to a previous production deployment. [Use Rollbacks](https://developers.cloudflare.com/pages/configuration/rollbacks/) ### Redirects Set up redirects for your Cloudflare Pages project. [Use Redirects](https://developers.cloudflare.com/pages/configuration/redirects/) *** ## Related products **[Workers](https://developers.cloudflare.com/workers/)** Cloudflare Workers provides a serverless execution environment that allows you to create new applications or augment existing ones without configuring or maintaining infrastructure. **[R2](https://developers.cloudflare.com/r2/)** Cloudflare R2 Storage allows developers to store large amounts of unstructured data without the costly egress bandwidth fees associated with typical cloud storage services. **[D1](https://developers.cloudflare.com/d1/)** D1 is Cloudflare’s native serverless database. Create a database by importing data or defining your tables and writing your queries within a Worker or through the API. **[Zaraz](https://developers.cloudflare.com/zaraz/)** Offload third-party tools and services to the cloud and improve the speed and security of your website. *** ## More resources [Limits](https://developers.cloudflare.com/pages/platform/limits/) Learn about limits that apply to your Pages project (500 deploys per month on the Free plan). [Framework guides](https://developers.cloudflare.com/pages/framework-guides/) Deploy popular frameworks such as React, Hugo, and Next.js on Pages. [Developer Discord](https://discord.cloudflare.com) Connect with the Workers community on Discord to ask questions, show what you are building, and discuss the platform with other developers. [@CloudflareDev](https://x.com/cloudflaredev) Follow @CloudflareDev on Twitter to learn about product announcements, and what is new in Cloudflare Workers. --- title: Pipelines · Cloudflare Pipelines Docs description: Cloudflare Pipelines lets you ingest high volumes of real time data, without managing any infrastructure. Ingested data is automatically batched, written to output files, and delivered to an R2 bucket in your account. You can use Pipelines to build a data lake of clickstream data, or to store events from a Worker. lastUpdated: 2025-05-27T15:16:17.000Z chatbotDeprioritize: false source_url: html: https://developers.cloudflare.com/pipelines/ md: https://developers.cloudflare.com/pipelines/index.md --- Ingest real time data streams and load into R2, using Cloudflare Pipelines. Available on Paid plans Cloudflare Pipelines lets you ingest high volumes of real time data, without managing any infrastructure. Ingested data is automatically batched, written to output files, and delivered to an [R2 bucket](https://developers.cloudflare.com/r2/) in your account. You can use Pipelines to build a data lake of clickstream data, or to store events from a Worker. ## Create your first pipeline You can setup a pipeline to ingest data via HTTP, and deliver output to R2, with a single command: ```sh $ npx wrangler@latest pipelines create my-clickstream-pipeline --r2-bucket my-bucket 🌀 Authorizing R2 bucket "my-bucket" 🌀 Creating pipeline named "my-clickstream-pipeline" ✅ Successfully created pipeline my-clickstream-pipeline Id: 0e00c5ff09b34d018152af98d06f5a1xvc Name: my-clickstream-pipeline Sources: HTTP: Endpoint: https://0e00c5ff09b34d018152af98d06f5a1xvc.pipelines.cloudflare.com/ Authentication: off Format: JSON Worker: Format: JSON Destination: Type: R2 Bucket: my-bucket Format: newline-delimited JSON Compression: GZIP Batch hints: Max bytes: 100 MB Max duration: 300 seconds Max records: 100,000 🎉 You can now send data to your pipeline! Send data to your pipeline's HTTP endpoint: curl "https://0e00c5ff09b34d018152af98d06f5a1xvc.pipelines.cloudflare.com/" -d '[{ ...JSON_DATA... }]' To send data to your pipeline from a Worker, add the following configuration to your config file: { "pipelines": [ { "pipeline": "my-clickstream-pipeline", "binding": "PIPELINE" } ] } ``` Refer to the [getting started guide](https://developers.cloudflare.com/pipelines/getting-started) to start building with pipelines. Note While in beta, you will not be billed for Pipelines usage. You will be billed only for [R2 usage](https://developers.cloudflare.com/r2/pricing/). *** ## Features ### HTTP as a source Each pipeline generates a globally scalable HTTP endpoint, which supports authentication and CORS settings. [Use HTTP as a source](https://developers.cloudflare.com/pipelines/build-with-pipelines/sources/http) ### Workers API Send data to a pipeline directly from a Cloudflare Worker. [Use Workers API](https://developers.cloudflare.com/pipelines/build-with-pipelines/sources/workers-apis/) ### Customize output settings Define batch sizes and enable compression to generate output files that are efficient to query. [Use Customize output settings](https://developers.cloudflare.com/pipelines/build-with-pipelines/output-settings) *** ## Related products **[R2](https://developers.cloudflare.com/r2/)** Cloudflare R2 Object Storage allows developers to store large amounts of unstructured data without the costly egress bandwidth fees associated with typical cloud storage services. **[Workers](https://developers.cloudflare.com/workers/)** Cloudflare Workers allows developers to build serverless applications and deploy instantly across the globe for exceptional performance, reliability, and scale. *** ## More resources [Limits](https://developers.cloudflare.com/pipelines/platform/limits/) Learn about pipelines limits. [@CloudflareDev](https://x.com/cloudflaredev) Follow @CloudflareDev on Twitter to learn about product announcements, and what is new in Cloudflare Workers. [Developer Discord](https://discord.cloudflare.com) Connect with the Workers community on Discord to ask questions, show what you are building, and discuss the platform with other developers. --- title: Overview · Cloudflare Privacy Gateway docs description: Privacy Gateway is a managed service deployed on Cloudflare’s global network that implements part of the Oblivious HTTP (OHTTP) IETF standard. The goal of Privacy Gateway and Oblivious HTTP is to hide the client's IP address when interacting with an application backend. lastUpdated: 2025-03-14T16:33:10.000Z chatbotDeprioritize: false source_url: html: https://developers.cloudflare.com/privacy-gateway/ md: https://developers.cloudflare.com/privacy-gateway/index.md --- Implements the Oblivious HTTP IETF standard to improve client privacy. Enterprise-only [Privacy Gateway](https://blog.cloudflare.com/building-privacy-into-internet-standards-and-how-to-make-your-app-more-private-today/) is a managed service deployed on Cloudflare’s global network that implements part of the [Oblivious HTTP (OHTTP) IETF](https://www.ietf.org/archive/id/draft-thomson-http-oblivious-01.html) standard. The goal of Privacy Gateway and Oblivious HTTP is to hide the client's IP address when interacting with an application backend. OHTTP introduces a trusted third party between client and server, called a relay, whose purpose is to forward encrypted requests and responses between client and server. These messages are encrypted between client and server such that the relay learns nothing of the application data, beyond the length of the encrypted message and the server the client is interacting with. *** ## Availability Privacy Gateway is currently in closed beta – available to select privacy-oriented companies and partners. If you are interested, [contact us](https://www.cloudflare.com/lp/privacy-edge/). *** ## Features ### Get started Learn how to set up Privacy Gateway for your application. [Get started](https://developers.cloudflare.com/privacy-gateway/get-started/) ### Legal Learn about the different parties and data shared in Privacy Gateway. [Learn more](https://developers.cloudflare.com/privacy-gateway/reference/legal/) ### Metrics Learn about how to query Privacy Gateway metrics. [Learn more](https://developers.cloudflare.com/privacy-gateway/reference/metrics/) --- title: Overview · Cloudflare Pub/Sub docs description: Pub/Sub is Cloudflare's distributed MQTT messaging service. MQTT is one of the most popular messaging protocols used for consuming sensor data from thousands (or tens of thousands) of remote, distributed Internet of Things clients; publishing configuration data or remote commands to fleets of devices in the field; and even for building notification or messaging systems for online games and mobile apps. lastUpdated: 2025-03-14T16:33:10.000Z chatbotDeprioritize: false source_url: html: https://developers.cloudflare.com/pub-sub/ md: https://developers.cloudflare.com/pub-sub/index.md --- Note Pub/Sub is currently in private beta. Browse the documentation to understand how Pub/Sub works and integrates with our broader Developer Platform, and [sign up for the waitlist](https://www.cloudflare.com/cloudflare-pub-sub-lightweight-messaging-private-beta/) to get access in the near future. Pub/Sub is Cloudflare's distributed MQTT messaging service. MQTT is one of the most popular messaging protocols used for consuming sensor data from thousands (or tens of thousands) of remote, distributed Internet of Things clients; publishing configuration data or remote commands to fleets of devices in the field; and even for building notification or messaging systems for online games and mobile apps. Pub/Sub is ideal for cases where you have many (from a handful to tens of thousands of) clients sending small, sub-1MB messages — such as event, telemetry or transaction data — into a centralized system for aggregation, or where you need to push configuration updates or remote commands to remote clients at scale. Pub/Sub: * Scales automatically. You do not have to provision "vCPUs" or "memory", or set autoscaling parameters to handle spikes in message rates. * Is global. Cloudflare's Pub/Sub infrastructure runs in [hundreds of cities worldwide](https://www.cloudflare.com/network/). Every edge location is part of one, globally distributed Pub/Sub system. * Is secure by default. Clients must authenticate and connect over TLS, and clients are issued credentials that are scoped to a specific broker. * Allows you to create multiple brokers to isolate clients or use cases, for example, staging vs. production or customers A vs. B vs. C — as needed. Each broker is addressable by a unique DNS hostname. * Integrates with Cloudflare Workers to enable programmable messaging capabilities: parse, filter, aggregate, and re-publish MQTT messages directly from your serverless code. * Supports MQTT v5.0, the most recent version of the MQTT specification, and one of the most ubiquitous messaging protocols in use today. If you are new to the MQTT protocol, visit the [How Pub/Sub works](https://developers.cloudflare.com/pub-sub/learning/how-pubsub-works/) to better understand how MQTT differs from other messaging protocols. --- title: Overview · Cloudflare Queues docs description: Cloudflare Queues integrate with Cloudflare Workers and enable you to build applications that can guarantee delivery, offload work from a request, send data from Worker to Worker, and buffer or batch data. lastUpdated: 2025-03-14T16:33:10.000Z chatbotDeprioritize: false source_url: html: https://developers.cloudflare.com/queues/ md: https://developers.cloudflare.com/queues/index.md --- Send and receive messages with guaranteed delivery and no charges for egress bandwidth. Available on Paid plans Cloudflare Queues integrate with [Cloudflare Workers](https://developers.cloudflare.com/workers/) and enable you to build applications that can [guarantee delivery](https://developers.cloudflare.com/queues/reference/delivery-guarantees/), [offload work from a request](https://developers.cloudflare.com/queues/reference/how-queues-works/), [send data from Worker to Worker](https://developers.cloudflare.com/queues/configuration/configure-queues/), and [buffer or batch data](https://developers.cloudflare.com/queues/configuration/batching-retries/). *** ## Features ### Batching, Retries and Delays Cloudflare Queues allows you to batch, retry and delay messages. [Use Batching, Retries and Delays](https://developers.cloudflare.com/queues/configuration/batching-retries/) ### Dead Letter Queues Redirect your messages when a delivery failure occurs. [Use Dead Letter Queues](https://developers.cloudflare.com/queues/configuration/dead-letter-queues/) ### Pull consumers Configure pull-based consumers to pull from a queue over HTTP from infrastructure outside of Cloudflare Workers. [Use Pull consumers](https://developers.cloudflare.com/queues/configuration/pull-consumers/) *** ## Related products **[R2](https://developers.cloudflare.com/r2/)** Cloudflare R2 Storage allows developers to store large amounts of unstructured data without the costly egress bandwidth fees associated with typical cloud storage services. **[Workers](https://developers.cloudflare.com/workers/)** Cloudflare Workers allows developers to build serverless applications and deploy instantly across the globe for exceptional performance, reliability, and scale. *** ## More resources [Pricing](https://developers.cloudflare.com/queues/platform/pricing/) Learn about pricing. [Limits](https://developers.cloudflare.com/queues/platform/limits/) Learn about Queues limits. [Try the Demo](https://github.com/Electroid/queues-demo#cloudflare-queues-demo) Try Cloudflare Queues which can run on your local machine. [@CloudflareDev](https://x.com/cloudflaredev) Follow @CloudflareDev on Twitter to learn about product announcements, and what is new in Cloudflare Workers. [Developer Discord](https://discord.cloudflare.com) Connect with the Workers community on Discord to ask questions, show what you are building, and discuss the platform with other developers. [Configuration](https://developers.cloudflare.com/queues/configuration/configure-queues/) Learn how to configure Cloudflare Queues using Wrangler. [JavaScript APIs](https://developers.cloudflare.com/queues/configuration/javascript-apis/) Learn how to use JavaScript APIs to send and receive messages to a Cloudflare Queue. --- title: Overview · Cloudflare R2 docs description: Cloudflare R2 is a cost-effective, scalable object storage solution for cloud-native apps, web content, and data lakes without egress fees. lastUpdated: 2025-04-04T19:42:25.000Z chatbotDeprioritize: false source_url: html: https://developers.cloudflare.com/r2/ md: https://developers.cloudflare.com/r2/index.md --- Object storage for all your data. Cloudflare R2 Storage allows developers to store large amounts of unstructured data without the costly egress bandwidth fees associated with typical cloud storage services. You can use R2 for multiple scenarios, including but not limited to: * Storage for cloud-native applications * Cloud storage for web content * Storage for podcast episodes * Data lakes (analytics and big data) * Cloud storage output for large batch processes, such as machine learning model artifacts or datasets [Get started](https://developers.cloudflare.com/r2/get-started/) [Browse the examples](https://developers.cloudflare.com/r2/examples/) *** ## Features ### Location Hints Location Hints are optional parameters you can provide during bucket creation to indicate the primary geographical location you expect data will be accessed from. [Use Location Hints](https://developers.cloudflare.com/r2/reference/data-location/#location-hints) ### CORS Configure CORS to interact with objects in your bucket and configure policies on your bucket. [Use CORS](https://developers.cloudflare.com/r2/buckets/cors/) ### Public buckets Public buckets expose the contents of your R2 bucket directly to the Internet. [Use Public buckets](https://developers.cloudflare.com/r2/buckets/public-buckets/) ### Bucket scoped tokens Create bucket scoped tokens for granular control over who can access your data. [Use Bucket scoped tokens](https://developers.cloudflare.com/r2/api/tokens/) *** ## Related products **[Workers](https://developers.cloudflare.com/workers/)** A [serverless](https://www.cloudflare.com/learning/serverless/what-is-serverless/) execution environment that allows you to create entirely new applications or augment existing ones without configuring or maintaining infrastructure. **[Stream](https://developers.cloudflare.com/stream/)** Upload, store, encode, and deliver live and on-demand video with one API, without configuring or maintaining infrastructure. **[Images](https://developers.cloudflare.com/images/)** A suite of products tailored to your image-processing needs. *** ## More resources [Pricing](https://developers.cloudflare.com/r2/pricing) Understand pricing for free and paid tier rates. [Discord](https://discord.cloudflare.com) Ask questions, show off what you are building, and discuss the platform with other developers. [Twitter](https://x.com/cloudflaredev) Learn about product announcements, new tutorials, and what is new in Cloudflare Workers. --- title: Overview · Cloudflare Realtime docs description: Cloudflare Realtime is infrastructure for real-time audio/video/data applications. It allows you to build real-time apps without worrying about scaling or regions. It can act as a selective forwarding unit (WebRTC SFU), as a fanout delivery system for broadcasting (WebRTC CDN) or anything in between. lastUpdated: 2025-04-08T20:01:03.000Z chatbotDeprioritize: false source_url: html: https://developers.cloudflare.com/realtime/ md: https://developers.cloudflare.com/realtime/index.md --- Build real-time serverless video, audio and data applications. Cloudflare Realtime is infrastructure for real-time audio/video/data applications. It allows you to build real-time apps without worrying about scaling or regions. It can act as a selective forwarding unit (WebRTC SFU), as a fanout delivery system for broadcasting (WebRTC CDN) or anything in between. Cloudflare Realtime runs on [Cloudflare's global cloud network](https://www.cloudflare.com/network/) in hundreds of cities worldwide. [Get started](https://developers.cloudflare.com/realtime/get-started/) [Realtime dashboard](https://dash.cloudflare.com/?to=/:account/calls) [Orange Meets demo app](https://github.com/cloudflare/orange) --- title: Overview · Cloudflare Stream docs description: Cloudflare Stream lets you or your end users upload, store, encode, and deliver live and on-demand video with one API, without configuring or maintaining infrastructure. lastUpdated: 2025-03-14T16:33:10.000Z chatbotDeprioritize: false source_url: html: https://developers.cloudflare.com/stream/ md: https://developers.cloudflare.com/stream/index.md --- Serverless live and on-demand video streaming Cloudflare Stream lets you or your end users upload, store, encode, and deliver live and on-demand video with one API, without configuring or maintaining infrastructure. You can use Stream to build your own video features in websites and native apps, from simple playback to an entire video platform. Cloudflare Stream runs on [Cloudflare’s global cloud network](https://www.cloudflare.com/network/) in hundreds of cities worldwide. [Get started ](https://developers.cloudflare.com/stream/get-started/)[Stream dashboard](https://dash.cloudflare.com/?to=/:account/stream) *** ## Features ### Control access to video content Restrict access to paid or authenticated content with signed URLs. [Use Signed URLs](https://developers.cloudflare.com/stream/viewing-videos/securing-your-stream/) ### Let your users upload their own videos Let users in your app upload videos directly to Stream with a unique, one-time upload URL. [Direct Creator Uploads](https://developers.cloudflare.com/stream/uploading-videos/direct-creator-uploads/) ### Play video on any device Play on-demand and live video on websites, in native iOS and Android apps, and dedicated streaming devices like Apple TV. [Play videos](https://developers.cloudflare.com/stream/viewing-videos/) ### Get detailed analytics Understand and analyze which videos and live streams are viewed most and break down metrics on a per-creator basis. [Explore Analytics](https://developers.cloudflare.com/stream/getting-analytics/) *** ## More resources [Discord](https://discord.cloudflare.com) Join the Stream developer community --- title: Overview · Cloudflare Vectorize docs description: Vectorize is a globally distributed vector database that enables you to build full-stack, AI-powered applications with Cloudflare Workers. Vectorize makes querying embeddings — representations of values or objects like text, images, audio that are designed to be consumed by machine learning models and semantic search algorithms — faster, easier and more affordable. lastUpdated: 2025-04-06T23:41:56.000Z chatbotDeprioritize: false source_url: html: https://developers.cloudflare.com/vectorize/ md: https://developers.cloudflare.com/vectorize/index.md --- Build full-stack AI applications with Vectorize, Cloudflare's powerful vector database. Vectorize is a globally distributed vector database that enables you to build full-stack, AI-powered applications with [Cloudflare Workers](https://developers.cloudflare.com/workers/). Vectorize makes querying embeddings — representations of values or objects like text, images, audio that are designed to be consumed by machine learning models and semantic search algorithms — faster, easier and more affordable. Vectorize is now Generally Available To report bugs or give feedback, go to the [#vectorize Discord channel](https://discord.cloudflare.com). If you are having issues with Wrangler, report issues in the [Wrangler GitHub repository](https://github.com/cloudflare/workers-sdk/issues/new/choose). For example, by storing the embeddings (vectors) generated by a machine learning model, including those built-in to [Workers AI](https://developers.cloudflare.com/workers-ai/) or by bringing your own from platforms like [OpenAI](#), you can build applications with powerful search, similarity, recommendation, classification and/or anomaly detection capabilities based on your own data. The vectors returned can reference images stored in Cloudflare R2, documents in KV, and/or user profiles stored in D1 — enabling you to go from vector search result to concrete object all within the Workers platform, and without standing up additional infrastructure. *** ## Features ### Vector database Learn how to create your first Vectorize database, upload vector embeddings, and query those embeddings from [Cloudflare Workers](https://developers.cloudflare.com/workers/). [Create your Vector database](https://developers.cloudflare.com/vectorize/get-started/intro/) ### Vector embeddings using Workers AI Learn how to use Vectorize to generate vector embeddings using Workers AI. [Create vector embeddings using Workers AI](https://developers.cloudflare.com/vectorize/get-started/embeddings/) ### Search using Vectorize and AutoRAG Learn how to automatically index your data and store it in Vectorize, then query it to generate context-aware responses using AutoRAG. [Build a RAG with Vectorize](https://developers.cloudflare.com/autorag/) *** ## Related products **[Workers AI](https://developers.cloudflare.com/workers-ai/)** Run machine learning models, powered by serverless GPUs, on Cloudflare’s global network. **[R2 Storage](https://developers.cloudflare.com/r2/)** Store large amounts of unstructured data without the costly egress bandwidth fees associated with typical cloud storage services. *** ## More resources [Limits](https://developers.cloudflare.com/vectorize/platform/limits/) Learn about Vectorize limits and how to work within them. [Use cases](https://developers.cloudflare.com/use-cases/ai/) Learn how you can build and deploy ambitious AI applications to Cloudflare's global network. [Storage options](https://developers.cloudflare.com/workers/platform/storage-options/) Learn more about the storage and database options you can build on with Workers. [Developer Discord](https://discord.cloudflare.com) Connect with the Workers community on Discord to ask questions, join the `#vectorize` channel to show what you are building, and discuss the platform with other developers. [@CloudflareDev](https://x.com/cloudflaredev) Follow @CloudflareDev on Twitter to learn about product announcements, and what is new in Cloudflare Developer Platform. --- title: Overview · Cloudflare Workers docs description: "With Cloudflare Workers, you can expect to:" lastUpdated: 2025-06-05T13:25:05.000Z chatbotDeprioritize: false source_url: html: https://developers.cloudflare.com/workers/ md: https://developers.cloudflare.com/workers/index.md --- A serverless platform for building, deploying, and scaling apps across [Cloudflare's global network](https://www.cloudflare.com/network/) with a single command — no infrastructure to manage, no complex configuration With Cloudflare Workers, you can expect to: * Deliver fast performance with high reliability anywhere in the world * Build full-stack apps with your framework of choice, including [React](https://developers.cloudflare.com/workers/framework-guides/web-apps/react/), [Vue](https://developers.cloudflare.com/workers/framework-guides/web-apps/vue/), [Svelte](https://developers.cloudflare.com/workers/framework-guides/web-apps/svelte/), [Next](https://developers.cloudflare.com/workers/framework-guides/web-apps/nextjs/), [Astro](https://developers.cloudflare.com/workers/framework-guides/web-apps/astro/), [React Router](https://developers.cloudflare.com/workers/framework-guides/web-apps/react-router/), [and more](https://developers.cloudflare.com/workers/framework-guides/) * Use your preferred language, including [JavaScript](https://developers.cloudflare.com/workers/languages/javascript/), [TypeScript](https://developers.cloudflare.com/workers/languages/typescript/), [Python](https://developers.cloudflare.com/workers/languages/python/), [Rust](https://developers.cloudflare.com/workers/languages/rust/), [and more](https://developers.cloudflare.com/workers/runtime-apis/webassembly/) * Gain deep visibility and insight with built-in [observability](https://developers.cloudflare.com/workers/observability/logs/) * Get started for free and grow with flexible [pricing](https://developers.cloudflare.com/workers/platform/pricing/), affordable at any scale Get started with your first project: [Deploy a template](https://dash.cloudflare.com/?to=/:account/workers-and-pages/templates) [Deploy with Wrangler CLI](https://developers.cloudflare.com/workers/get-started/guide/) *** ## Build with Workers #### Front-end applications Deploy [static assets](https://developers.cloudflare.com/workers/static-assets/) to Cloudflare's [CDN & cache](https://developers.cloudflare.com/cache/) for fast rendering #### Back-end applications Build APIs and connect to data stores with [Smart Placement](https://developers.cloudflare.com/workers/configuration/smart-placement/) to optimize latency #### Serverless AI inference Run LLMs, generate images, and more with [Workers AI](https://developers.cloudflare.com/workers-ai/) #### Background jobs Schedule [cron jobs](https://developers.cloudflare.com/workers/configuration/cron-triggers/), run durable [Workflows](https://developers.cloudflare.com/workflows/), and integrate with [Queues](https://developers.cloudflare.com/queues/) *** ## Integrate with Workers Connect to external services like databases, APIs, and storage via [Bindings](https://developers.cloudflare.com/workers/runtime-apis/bindings/), enabling functionality with just a few lines of code: **Storage** **[Durable Objects](https://developers.cloudflare.com/durable-objects/)** Scalable stateful storage for real-time coordination. **[D1](https://developers.cloudflare.com/d1/)** Serverless SQL database built for fast, global queries. **[KV](https://developers.cloudflare.com/kv/)** Low-latency key-value storage for fast, edge-cached reads. **[Queues](https://developers.cloudflare.com/queues/)** Guaranteed delivery with no charges for egress bandwidth. **[Hyperdrive](https://developers.cloudflare.com/hyperdrive/)** Connect to your external database with accelerated queries, cached at the edge. **Compute** **[Workers AI](https://developers.cloudflare.com/workers-ai/)** Machine learning models powered by serverless GPUs. **[Workflows](https://developers.cloudflare.com/workflows/)** Durable, long-running operations with automatic retries. **[Vectorize](https://developers.cloudflare.com/vectorize/)** Vector database for AI-powered semantic search. **[R2](https://developers.cloudflare.com/r2/)** Zero-egress object storage for cost-efficient data access. **[Browser Rendering](https://developers.cloudflare.com/browser-rendering/)** Programmatic serverless browser instances. **Media** **[Cache / CDN](https://developers.cloudflare.com/cache/)** Global caching for high-performance, low-latency delivery. **[Images](https://developers.cloudflare.com/images/)** Streamlined image infrastructure from a single API. *** Want to connect with the Workers community? [Join our Discord](https://discord.cloudflare.com) --- title: Overview · Cloudflare Workers AI docs description: Workers AI allows you to run AI models in a serverless way, without having to worry about scaling, maintaining, or paying for unused infrastructure. You can invoke models running on GPUs on Cloudflare's network from your own code — from Workers, Pages, or anywhere via the Cloudflare API. lastUpdated: 2025-03-14T16:33:10.000Z chatbotDeprioritize: false source_url: html: https://developers.cloudflare.com/workers-ai/ md: https://developers.cloudflare.com/workers-ai/index.md --- Run machine learning models, powered by serverless GPUs, on Cloudflare's global network. Available on Free and Paid plans Workers AI allows you to run AI models in a serverless way, without having to worry about scaling, maintaining, or paying for unused infrastructure. You can invoke models running on GPUs on Cloudflare's network from your own code — from [Workers](https://developers.cloudflare.com/workers/), [Pages](https://developers.cloudflare.com/pages/), or anywhere via [the Cloudflare API](https://developers.cloudflare.com/api/resources/ai/methods/run/). Workers AI gives you access to: * **50+ [open-source models](https://developers.cloudflare.com/workers-ai/models/)**, available as a part of our model catalog * Serverless, **pay-for-what-you-use** [pricing model](https://developers.cloudflare.com/workers-ai/platform/pricing/) * All as part of a **fully-featured developer platform**, including [AI Gateway](https://developers.cloudflare.com/ai-gateway/), [Vectorize](https://developers.cloudflare.com/vectorize/), [Workers](https://developers.cloudflare.com/workers/) and more... [Get started ](https://developers.cloudflare.com/workers-ai/get-started)[Watch a Workers AI demo](https://youtu.be/cK_leoJsBWY?si=4u6BIy_uBOZf9Ve8) Custom requirements If you have custom requirements like private custom models or higher limits, complete the [Custom Requirements Form](https://forms.gle/axnnpGDb6xrmR31T6). Cloudflare will contact you with next steps. Workers AI is now Generally Available To report bugs or give feedback, go to the [#workers-ai Discord channel](https://discord.cloudflare.com). If you are having issues with Wrangler, report issues in the [Wrangler GitHub repository](https://github.com/cloudflare/workers-sdk/issues/new/choose). *** ## Features ### Models Workers AI comes with a curated set of popular open-source models that enable you to do tasks such as image classification, text generation, object detection and more. [Browse models](https://developers.cloudflare.com/workers-ai/models/) *** ## Related products **[AI Gateway](https://developers.cloudflare.com/ai-gateway/)** Observe and control your AI applications with caching, rate limiting, request retries, model fallback, and more. **[Vectorize](https://developers.cloudflare.com/vectorize/)** Build full-stack AI applications with Vectorize, Cloudflare’s vector database. Adding Vectorize enables you to perform tasks such as semantic search, recommendations, anomaly detection or can be used to provide context and memory to an LLM. **[Workers](https://developers.cloudflare.com/workers/)** Build serverless applications and deploy instantly across the globe for exceptional performance, reliability, and scale. **[Pages](https://developers.cloudflare.com/pages/)** Create full-stack applications that are instantly deployed to the Cloudflare global network. **[R2](https://developers.cloudflare.com/r2/)** Store large amounts of unstructured data without the costly egress bandwidth fees associated with typical cloud storage services. **[D1](https://developers.cloudflare.com/d1/)** Create new serverless SQL databases to query from your Workers and Pages projects. **[Durable Objects](https://developers.cloudflare.com/durable-objects/)** A globally distributed coordination API with strongly consistent storage. **[KV](https://developers.cloudflare.com/kv/)** Create a global, low-latency, key-value data storage. *** ## More resources [Get started](https://developers.cloudflare.com/workers-ai/get-started/workers-wrangler/) Build and deploy your first Workers AI application. [Plans](https://developers.cloudflare.com/workers-ai/platform/pricing/) Learn about Free and Paid plans. [Limits](https://developers.cloudflare.com/workers-ai/platform/limits/) Learn about Workers AI limits. [Use cases](https://developers.cloudflare.com/use-cases/ai/) Learn how you can build and deploy ambitious AI applications to Cloudflare's global network. [Storage options](https://developers.cloudflare.com/workers/platform/storage-options/) Learn which storage option is best for your project. [Developer Discord](https://discord.cloudflare.com) Connect with the Workers community on Discord to ask questions, share what you are building, and discuss the platform with other developers. [@CloudflareDev](https://x.com/cloudflaredev) Follow @CloudflareDev on Twitter to learn about product announcements, and what is new in Cloudflare Workers. --- title: Overview · Cloudflare Workflows docs description: Workflows is a durable execution engine built on Cloudflare Workers. Workflows allow you to build multi-step applications that can automatically retry, persist state and run for minutes, hours, days, or weeks. Workflows introduces a programming model that makes it easier to build reliable, long-running tasks, observe as they progress, and programatically trigger instances based on events across your services. lastUpdated: 2025-04-06T20:34:04.000Z chatbotDeprioritize: false source_url: html: https://developers.cloudflare.com/workflows/ md: https://developers.cloudflare.com/workflows/index.md --- Build durable multi-step applications on Cloudflare Workers with Workflows. Available on Free and Paid plans Workflows is a durable execution engine built on Cloudflare Workers. Workflows allow you to build multi-step applications that can automatically retry, persist state and run for minutes, hours, days, or weeks. Workflows introduces a programming model that makes it easier to build reliable, long-running tasks, observe as they progress, and programatically trigger instances based on events across your services. Refer to the [get started guide](https://developers.cloudflare.com/workflows/get-started/guide/) to start building with Workflows. *** ## Features ### Deploy your first Workflow Define your first Workflow, understand how to compose multi-steps, and deploy to production. [Deploy your first Workflow](https://developers.cloudflare.com/workflows/get-started/guide/) ### Rules of Workflows Understand best practices when writing and building applications using Workflows. [Best practices](https://developers.cloudflare.com/workflows/build/rules-of-workflows/) ### Trigger Workflows Learn how to trigger Workflows from your Workers applications, via the REST API, and the command-line. [Trigger Workflows from Workers](https://developers.cloudflare.com/workflows/build/trigger-workflows/) *** ## Related products **[Workers](https://developers.cloudflare.com/workers/)** Build serverless applications and deploy instantly across the globe for exceptional performance, reliability, and scale. **[Pages](https://developers.cloudflare.com/pages/)** Deploy dynamic front-end applications in record time. *** ## More resources [Pricing](https://developers.cloudflare.com/workflows/reference/pricing/) Learn more about how Workflows is priced. [Limits](https://developers.cloudflare.com/workflows/reference/limits/) Learn more about Workflow limits, and how to work within them. [Storage options](https://developers.cloudflare.com/workers/platform/storage-options/) Learn more about the storage and database options you can build on with Workers. [Developer Discord](https://discord.cloudflare.com) Connect with the Workers community on Discord to ask questions, show what you are building, and discuss the platform with other developers. [@CloudflareDev](https://x.com/cloudflaredev) Follow @CloudflareDev on Twitter to learn about product announcements, and what is new in Cloudflare Developer Platform. --- title: Overview · Cloudflare Zaraz docs description: Cloudflare Zaraz gives you complete control over third-party tools and services for your website, and allows you to offload them to Cloudflare's edge, improving the speed and security of your website. With Cloudflare Zaraz you can load tools such as analytics tools, advertising pixels and scripts, chatbots, marketing automation tools, and more, in the most optimized way. lastUpdated: 2025-03-14T16:33:10.000Z chatbotDeprioritize: false source_url: html: https://developers.cloudflare.com/zaraz/ md: https://developers.cloudflare.com/zaraz/index.md --- Offload third-party tools and services to the cloud and improve the speed and security of your website. Available on all plans Cloudflare Zaraz gives you complete control over third-party tools and services for your website, and allows you to offload them to Cloudflare's edge, improving the speed and security of your website. With Cloudflare Zaraz you can load tools such as analytics tools, advertising pixels and scripts, chatbots, marketing automation tools, and more, in the most optimized way. Cloudflare Zaraz is built for speed, privacy, and security, and you can use it to load as many tools as you need, with a near-zero performance hit. *** ## Features ### Third-party tools You can add many third-party tools to Zaraz, and offload them from your website. [Use Third-party tools](https://developers.cloudflare.com/zaraz/get-started/) ### Custom Managed Components You can add Custom Managed Components to Zaraz and run them as a tool. [Use Custom Managed Components](https://developers.cloudflare.com/zaraz/advanced/load-custom-managed-component/) ### Web API Zaraz provides a client-side web API that you can use anywhere inside the `` tag of a page. [Use Web API](https://developers.cloudflare.com/zaraz/web-api/) ### Consent management Zaraz provides a Consent Management platform to help you address and manage required consents. [Use Consent management](https://developers.cloudflare.com/zaraz/consent-management/) *** ## More resources [Discord Channel](https://discord.cloudflare.com) If you have any comments, questions, or bugs to report, contact the Zaraz team on their Discord channel. [Community Forum](https://community.cloudflare.com/c/developers/zaraz/67) Engage with other users and the Zaraz team on Cloudflare support forum. --- title: 404 - Page Not Found · Cloudflare Agents docs chatbotDeprioritize: false source_url: html: https://developers.cloudflare.com/agents/404/ md: https://developers.cloudflare.com/agents/404/index.md --- # 404 Check the URL, try using our [search](https://developers.cloudflare.com/search/) or try our LLM-friendly [llms.txt directory](https://developers.cloudflare.com/llms.txt). --- title: API Reference · Cloudflare Agents docs description: "Learn more about what Agents can do, the Agent class, and the APIs that Agents expose:" lastUpdated: 2025-03-18T12:13:40.000Z chatbotDeprioritize: false source_url: html: https://developers.cloudflare.com/agents/api-reference/ md: https://developers.cloudflare.com/agents/api-reference/index.md --- Learn more about what Agents can do, the `Agent` class, and the APIs that Agents expose: * [Agents API](https://developers.cloudflare.com/agents/api-reference/agents-api/) * [Calling Agents](https://developers.cloudflare.com/agents/api-reference/calling-agents/) * [Using AI Models](https://developers.cloudflare.com/agents/api-reference/using-ai-models/) * [Schedule tasks](https://developers.cloudflare.com/agents/api-reference/schedule-tasks/) * [Run Workflows](https://developers.cloudflare.com/agents/api-reference/run-workflows/) * [Store and sync state](https://developers.cloudflare.com/agents/api-reference/store-and-sync-state/) * [Browse the web](https://developers.cloudflare.com/agents/api-reference/browse-the-web/) * [HTTP and Server-Sent Events](https://developers.cloudflare.com/agents/api-reference/http-sse/) * [Retrieval Augmented Generation](https://developers.cloudflare.com/agents/api-reference/rag/) * [Using WebSockets](https://developers.cloudflare.com/agents/api-reference/websockets/) * [Configuration](https://developers.cloudflare.com/agents/api-reference/configuration/) --- title: Concepts · Cloudflare Agents docs lastUpdated: 2025-02-25T13:55:21.000Z chatbotDeprioritize: true source_url: html: https://developers.cloudflare.com/agents/concepts/ md: https://developers.cloudflare.com/agents/concepts/index.md --- * [Agents](https://developers.cloudflare.com/agents/concepts/what-are-agents/) * [Workflows](https://developers.cloudflare.com/agents/concepts/workflows/) * [Tools](https://developers.cloudflare.com/agents/concepts/tools/) * [Human in the Loop](https://developers.cloudflare.com/agents/concepts/human-in-the-loop/) * [Calling LLMs](https://developers.cloudflare.com/agents/concepts/calling-llms/) --- title: Getting started · Cloudflare Agents docs lastUpdated: 2025-02-25T13:55:21.000Z chatbotDeprioritize: true source_url: html: https://developers.cloudflare.com/agents/getting-started/ md: https://developers.cloudflare.com/agents/getting-started/index.md --- * [Build a Chat Agent](https://github.com/cloudflare/agents-starter) * [Testing your Agents](https://developers.cloudflare.com/agents/getting-started/testing-your-agent/) * [Prompt an AI model](https://developers.cloudflare.com/workers/get-started/prompting/) --- title: Guides · Cloudflare Agents docs lastUpdated: 2025-02-25T13:55:21.000Z chatbotDeprioritize: true source_url: html: https://developers.cloudflare.com/agents/guides/ md: https://developers.cloudflare.com/agents/guides/index.md --- * [Build a Human-in-the-loop Agent](https://github.com/cloudflare/agents/tree/main/guides/human-in-the-loop) * [Implement Effective Agent Patterns](https://github.com/cloudflare/agents/tree/main/guides/anthropic-patterns) * [Build a Remote MCP server](https://developers.cloudflare.com/agents/guides/remote-mcp-server/) * [Test a Remote MCP Server](https://developers.cloudflare.com/agents/guides/test-remote-mcp-server/) * [Build a Remote MCP Client](https://github.com/cloudflare/ai/tree/main/demos/mcp-client) --- title: Model Context Protocol (MCP) · Cloudflare Agents docs description: You can build and deploy Model Context Protocol (MCP) servers on Cloudflare. lastUpdated: 2025-05-01T13:39:24.000Z chatbotDeprioritize: false source_url: html: https://developers.cloudflare.com/agents/model-context-protocol/ md: https://developers.cloudflare.com/agents/model-context-protocol/index.md --- You can build and deploy [Model Context Protocol (MCP)](https://modelcontextprotocol.io/) servers on Cloudflare. ## What is the Model Context Protocol (MCP)? [Model Context Protocol (MCP)](https://modelcontextprotocol.io) is an open standard that connects AI systems with external applications. Think of MCP like a USB-C port for AI applications. Just as USB-C provides a standardized way to connect your devices to various accessories, MCP provides a standardized way to connect AI agents to different services. ### MCP Terminology * **MCP Hosts**: AI assistants (like [Claude](http://claude.ai) or [Cursor](http://cursor.com)), AI agents, or applications that need to access external capabilities. * **MCP Clients**: Clients embedded within the MCP hosts that connect to MCP servers and invoke tools. Each MCP client instance has a single connection to an MCP server. * **MCP Servers**: Applications that expose [tools](https://developers.cloudflare.com/agents/model-context-protocol/tools/), [prompts](https://modelcontextprotocol.io/docs/concepts/prompts), and [resources](https://modelcontextprotocol.io/docs/concepts/resources) that MCP clients can use. ### Remote vs. local MCP connections The MCP standard supports two modes of operation: * **Remote MCP connections**: MCP clients connect to MCP servers over the Internet, establishing a [long-lived connection using HTTP and Server-Sent Events (SSE)](https://developers.cloudflare.com/agents/model-context-protocol/transport/), and authorizing the MCP client access to resources on the user's account using [OAuth](https://developers.cloudflare.com/agents/model-context-protocol/authorization/). * **Local MCP connections**: MCP clients connect to MCP servers on the same machine, using [stdio](https://spec.modelcontextprotocol.io/specification/draft/basic/transports/#stdio) as a local transport method. ### Best Practices * **Tool design**: Do not treat your MCP server as a wrapper around your full API schema. Instead, build tools that are optimized for specific user goals and reliable outcomes. Fewer, well-designed tools often outperform many granular ones, especially for agents with small context windows or tight latency budgets. * **Scoped permissions**: Deploying several focused MCP servers, each with narrowly scoped permissions, reduces the risk of over-privileged access and makes it easier to manage and audit what each server is allowed to do. * **Tool descriptions**: Detailed parameter descriptions help agents understand how to use your tools correctly — including what values are expected, how they affect behavior, and any important constraints. This reduces errors and improves reliability. * **Evaluation tests**: Use evaluation tests ('evals') to measure the agent’s ability to use your tools correctly. Run these after any updates to your server or tool descriptions to catch regressions early and track improvements over time. ### Get Started Go to the [Getting Started](https://developers.cloudflare.com/agents/guides/remote-mcp-server/) guide to learn how to build and deploy your first remote MCP server to Cloudflare. --- title: Platform · Cloudflare Agents docs lastUpdated: 2025-03-18T12:13:40.000Z chatbotDeprioritize: true source_url: html: https://developers.cloudflare.com/agents/platform/ md: https://developers.cloudflare.com/agents/platform/index.md --- * [Limits](https://developers.cloudflare.com/agents/platform/limits/) * [Prompt Engineering](https://developers.cloudflare.com/workers/get-started/prompting/) * [prompt.txt](https://developers.cloudflare.com/workers/prompt.txt) --- title: 404 - Page Not Found · Cloudflare AI Gateway docs chatbotDeprioritize: false source_url: html: https://developers.cloudflare.com/ai-gateway/404/ md: https://developers.cloudflare.com/ai-gateway/404/index.md --- # 404 Check the URL, try using our [search](https://developers.cloudflare.com/search/) or try our LLM-friendly [llms.txt directory](https://developers.cloudflare.com/llms.txt). --- title: AI Assistant · Cloudflare AI Gateway docs lastUpdated: 2024-10-30T16:07:34.000Z chatbotDeprioritize: false source_url: html: https://developers.cloudflare.com/ai-gateway/ai/ md: https://developers.cloudflare.com/ai-gateway/ai/index.md --- --- title: REST API reference · Cloudflare AI Gateway docs lastUpdated: 2024-12-18T13:12:05.000Z chatbotDeprioritize: false source_url: html: https://developers.cloudflare.com/ai-gateway/api-reference/ md: https://developers.cloudflare.com/ai-gateway/api-reference/index.md --- --- title: Changelog · Cloudflare AI Gateway docs description: Subscribe to RSS lastUpdated: 2025-05-09T15:42:57.000Z chatbotDeprioritize: false source_url: html: https://developers.cloudflare.com/ai-gateway/changelog/ md: https://developers.cloudflare.com/ai-gateway/changelog/index.md --- [Subscribe to RSS](https://developers.cloudflare.com/ai-gateway/changelog/index.xml) ## 2025-06-18 **New GA providers** We have moved the following providers out of beta and into GA: * [Cartesia](https://developers.cloudflare.com/ai-gateway/providers/cartesia/) * [Cerebras](https://developers.cloudflare.com/ai-gateway/providers/cerebras/) * [DeepSeek](https://developers.cloudflare.com/ai-gateway/providers/deepseek/) * [ElevenLabs](https://developers.cloudflare.com/ai-gateway/providers/elevenlabs/) * [OpenRouter](https://developers.cloudflare.com/ai-gateway/providers/openrouter/) ## 2025-05-28 **OpenAI Compatibility** * Introduced a new [OpenAI-compatible chat completions endpoint](https://developers.cloudflare.com/ai-gateway/chat-completion/) to simplify switching between different AI providers without major code modifications. ## 2025-04-22 * Increased Max Number of Gateways per account: Raised the maximum number of gateways per account from 10 to 20 for paid users. This gives you greater flexibility in managing your applications as you build and scale. * Streaming WebSocket Bug Fix: Resolved an issue affecting streaming responses over [WebSockets](https://developers.cloudflare.com/ai-gateway/configuration/websockets-api/). This fix ensures more reliable and consistent streaming behavior across all supported AI providers. * Increased Timeout Limits: Extended the default timeout for AI Gateway requests beyond the previous 100-second limit. This enhancement improves support for long-running requests. ## 2025-04-02 **Cache Key Calculation Changes** * We have updated how [cache](https://developers.cloudflare.com/ai-gateway/configuration/caching/) keys are calculated. As a result, new cache entries will be created, and you may experience more cache misses than usual during this transition. Please monitor your traffic and performance, and let us know if you encounter any issues. ## 2025-03-18 **WebSockets** * Added [WebSockets API](https://developers.cloudflare.com/ai-gateway/configuration/websockets-api/) to provide a persistent connection for AI interactions, eliminating repeated handshakes and reducing latency. ## 2025-02-26 **Guardrails** * Added [Guardrails](https://developers.cloudflare.com/ai-gateway/guardrails/) help deploy AI applications safely by intercepting and evaluating both user prompts and model responses for harmful content. ## 2025-02-19 **Updated Log Storage Settings** * Introduced customizable log storage settings, enabling users to: * Define the maximum number of logs stored per gateway. * Choose how logs are handled when the storage limit is reached: * **On** - Automatically delete the oldest logs to ensure new logs are always saved. * **Off** - Stop saving new logs when the storage limit is reached. ## 2025-02-06 **Added request handling** * Added [request handling options](https://developers.cloudflare.com/ai-gateway/configuration/request-handling/) to help manage AI provider interactions effectively, ensuring your applications remain responsive and reliable. ## 2025-02-05 **New AI Gateway providers** * **Configuration**: Added [ElevenLabs](https://elevenlabs.io/), [Cartesia](https://docs.cartesia.ai/), and [Cerebras](https://inference-docs.cerebras.ai/) as new providers. ## 2025-01-02 **DeepSeek** * **Configuration**: Added [DeepSeek](https://developers.cloudflare.com/ai-gateway/providers/deepseek/) as a new provider. ## 2024-12-17 **AI Gateway Dashboard** * Updated dashboard to view performance, costs, and stats across all gateways. ## 2024-12-13 **Bug Fixes** * **Bug Fixes**: Fixed Anthropic errors being cached. * **Bug Fixes**: Fixed `env.AI.run()` requests using authenticated gateways returning authentication error. ## 2024-11-28 **OpenRouter** * **Configuration**: Added [OpenRouter](https://developers.cloudflare.com/ai-gateway/providers/openrouter/) as a new provider. ## 2024-11-19 **WebSockets API** * **Configuration**: Added [WebSockets API](https://developers.cloudflare.com/ai-gateway/configuration/websockets-api/) which provides a single persistent connection, enabling continuous communication. ## 2024-11-19 **Authentication** * **Configuration**: Added [Authentication](https://developers.cloudflare.com/ai-gateway/configuration/authentication/) which adds security by requiring a valid authorization token for each request. ## 2024-10-28 **Grok** * **Providers**: Added [Grok](https://developers.cloudflare.com/ai-gateway/providers/grok/) as a new provider. ## 2024-10-17 **Vercel SDK** Added [Vercel AI SDK](https://sdk.vercel.ai/). The SDK supports many different AI providers, tools for streaming completions, and more. ## 2024-09-26 **Persistent logs** * **Logs**: AI Gateway now has [logs that persist](https://developers.cloudflare.com/ai-gateway/observability/logging/index), giving you the flexibility to store them for your preferred duration. ## 2024-09-26 **Logpush** * **Logs**: Securely export logs to an external storage location using [Logpush](https://developers.cloudflare.com/ai-gateway/observability/logging/logpush). ## 2024-09-26 **Pricing** * **Pricing**: Added [pricing](https://developers.cloudflare.com/ai-gateway/reference/pricing/) for storing logs persistently. ## 2024-09-26 **Evaluations** * **Configurations**: Use AI Gateway’s [Evaluations](https://developers.cloudflare.com/ai-gateway/evaluations) to make informed decisions on how to optimize your AI application. ## 2024-09-10 **Custom costs** * **Configuration**: AI Gateway now allows you to set custom costs at the request level [custom costs](https://developers.cloudflare.com/ai-gateway/configuration/custom-costs/) to requests, accurately reflect your unique pricing, overriding the default or public model costs. ## 2024-08-02 **Mistral AI** * **Providers**: Added [Mistral AI](https://developers.cloudflare.com/ai-gateway/providers/mistral/) as a new provider. ## 2024-07-23 **Google AI Studio** * **Providers**: Added [Google AI Studio](https://developers.cloudflare.com/ai-gateway/providers/google-ai-studio/) as a new provider. ## 2024-07-10 **Custom metadata** AI Gateway now supports adding [custom metadata](https://developers.cloudflare.com/ai-gateway/configuration/custom-metadata/) to requests, improving tracking and analysis of incoming requests. ## 2024-07-09 **Logs** [Logs](https://developers.cloudflare.com/ai-gateway/observability/analytics/#logging) are now available for the last 24 hours. ## 2024-06-24 **Custom cache key headers** AI Gateway now supports [custom cache key headers](https://developers.cloudflare.com/ai-gateway/configuration/caching/#custom-cache-key-cf-aig-cache-key). ## 2024-06-18 **Access an AI Gateway through a Worker** Workers AI now natively supports [AI Gateway](https://developers.cloudflare.com/ai-gateway/providers/workersai/#worker). ## 2024-05-22 **AI Gateway is now GA** AI Gateway is moving from beta to GA. ## 2024-05-16 * **Providers**: Added [Cohere](https://developers.cloudflare.com/ai-gateway/providers/cohere/) and [Groq](https://developers.cloudflare.com/ai-gateway/providers/groq/) as new providers. ## 2024-05-09 * Added new endpoints to the [REST API](https://developers.cloudflare.com/api/resources/ai_gateway/methods/create/). ## 2024-03-26 * [LLM Side Channel vulnerability fixed](https://blog.cloudflare.com/ai-side-channel-attack-mitigated) * **Providers**: Added Anthropic, Google Vertex, Perplexity as providers. ## 2023-10-26 * **Real-time Logs**: Logs are now real-time, showing logs for the last hour. If you have a need for persistent logs, please let the team know on Discord. We are building out a persistent logs feature for those who want to store their logs for longer. * **Providers**: Azure OpenAI is now supported as a provider! * **Docs**: Added Azure OpenAI example. * **Bug Fixes**: Errors with costs and tokens should be fixed. ## 2023-10-09 * **Logs**: Logs will now be limited to the last 24h. If you have a use case that requires more logging, please reach out to the team on Discord. * **Dashboard**: Logs now refresh automatically. * **Docs**: Fixed Workers AI example in docs and dash. * **Caching**: Embedding requests are now cacheable. Rate limit will not apply for cached requests. * **Bug Fixes**: Identical requests to different providers are not wrongly served from cache anymore. Streaming now works as expected, including for the Universal endpoint. * **Known Issues**: There's currently a bug with costs that we are investigating. --- title: OpenAI Compatibility · Cloudflare AI Gateway docs description: Cloudflare's AI Gateway offers an OpenAI-compatible /chat/completions endpoint, enabling integration with multiple AI providers using a single URL. This feature simplifies the integration process, allowing for seamless switching between different models without significant code modifications. lastUpdated: 2025-06-19T13:27:22.000Z chatbotDeprioritize: false source_url: html: https://developers.cloudflare.com/ai-gateway/chat-completion/ md: https://developers.cloudflare.com/ai-gateway/chat-completion/index.md --- Cloudflare's AI Gateway offers an OpenAI-compatible `/chat/completions` endpoint, enabling integration with multiple AI providers using a single URL. This feature simplifies the integration process, allowing for seamless switching between different models without significant code modifications. ## Endpoint URL ```txt https://gateway.ai.cloudflare.com/v1/{account_id}/{gateway_id}/compat/chat/completions ``` Replace `{account_id}` and `{gateway_id}` with your Cloudflare account and gateway IDs. ## Parameters Switch providers by changing the `model` and `apiKey` parameters. Specify the model using `{provider}/{model}` format. For example: * `openai/gpt-4o-mini` * `google-ai-studio/gemini-2.0-flash` * `anthropic/claude-3-haiku` ## Examples ### OpenAI SDK ```js import OpenAI from "openai"; const client = new OpenAI({ apiKey: "YOUR_PROVIDER_API_KEY", // Provider API key // NOTE: the OpenAI client automatically adds /chat/completions to the end of the URL, you should not add it yourself. baseURL: "https://gateway.ai.cloudflare.com/v1/{account_id}/{gateway_id}/compat", }); const response = await client.chat.completions.create({ model: "google-ai-studio/gemini-2.0-flash", messages: [{ role: "user", content: "What is Cloudflare?" }], }); console.log(response.choices[0].message.content); ``` ### cURL ```bash curl -X POST https://gateway.ai.cloudflare.com/v1/{account_id}/{gateway_id}/compat/chat/completions \ --header 'Authorization: Bearer {openai_token}' \ --header 'Content-Type: application/json' \ --data '{ "model": "google-ai-studio/gemini-2.0-flash", "messages": [ { "role": "user", "content": "What is Cloudflare?" } ] }' ``` ### Universal provider You can also use this pattern with the [Universal Endpoint](https://developers.cloudflare.com/ai-gateway/universal/) to add [fallbacks](https://developers.cloudflare.com/ai-gateway/configuration/fallbacks/) across multiple providers. When used in combination, every request will return the same standardized format, whether from the primary or fallback model. This behavior means that you do not have to add extra parsing logic to your app. ```ts export interface Env { AI: Ai; } export default { async fetch(request: Request, env: Env) { return env.AI.gateway("default").run({ provider: "compat", endpoint: "chat/completions", headers: { authorization: "Bearer", }, query: { model: "google-ai-studio/gemini-2.0-flash", messages: [ { role: "user", content: "What is Cloudflare?", }, ], }, }); }, }; ``` ## Supported Providers The OpenAI-compatible endpoint supports models from the following providers: * [Anthropic](https://developers.cloudflare.com/ai-gateway/providers/anthropic/) * [OpenAI](https://developers.cloudflare.com/ai-gateway/providers/openai/) * [Groq](https://developers.cloudflare.com/ai-gateway/providers/groq/) * [Mistral](https://developers.cloudflare.com/ai-gateway/providers/mistral/) * [Cohere](https://developers.cloudflare.com/ai-gateway/providers/cohere/) * [Perplexity](https://developers.cloudflare.com/ai-gateway/providers/perplexity/) * [Workers AI](https://developers.cloudflare.com/ai-gateway/providers/workersai/) * [Google-AI-Studio](https://developers.cloudflare.com/ai-gateway/providers/google-ai-studio/) * [Grok](https://developers.cloudflare.com/ai-gateway/providers/grok/) * [DeepSeek](https://developers.cloudflare.com/ai-gateway/providers/deepseek/) * [Cerebras](https://developers.cloudflare.com/ai-gateway/providers/cerebras/) --- title: Configuration · Cloudflare AI Gateway docs description: Configure your AI Gateway with multiple options and customizations. lastUpdated: 2025-05-28T19:49:34.000Z chatbotDeprioritize: true source_url: html: https://developers.cloudflare.com/ai-gateway/configuration/ md: https://developers.cloudflare.com/ai-gateway/configuration/index.md --- Configure your AI Gateway with multiple options and customizations. * [Caching](https://developers.cloudflare.com/ai-gateway/configuration/caching/) * [Fallbacks](https://developers.cloudflare.com/ai-gateway/configuration/fallbacks/) * [Custom costs](https://developers.cloudflare.com/ai-gateway/configuration/custom-costs/) * [Rate limiting](https://developers.cloudflare.com/ai-gateway/configuration/rate-limiting/) * [Custom metadata](https://developers.cloudflare.com/ai-gateway/configuration/custom-metadata/) * [Manage gateways](https://developers.cloudflare.com/ai-gateway/configuration/manage-gateway/) * [Request handling](https://developers.cloudflare.com/ai-gateway/configuration/request-handling/) * [Authentication](https://developers.cloudflare.com/ai-gateway/configuration/authentication/) --- title: Architectures · Cloudflare AI Gateway docs description: Learn how you can use AI Gateway within your existing architecture. lastUpdated: 2024-12-18T13:12:05.000Z chatbotDeprioritize: true source_url: html: https://developers.cloudflare.com/ai-gateway/demos/ md: https://developers.cloudflare.com/ai-gateway/demos/index.md --- Learn how you can use AI Gateway within your existing architecture. ## Reference architectures Explore the following reference architectures that use AI Gateway: [Multi-vendor AI observability and control](https://developers.cloudflare.com/reference-architecture/diagrams/ai/ai-multivendor-observability-control/) [By shifting features such as rate limiting, caching, and error handling to the proxy layer, organizations can apply unified configurations across services and inference service providers.](https://developers.cloudflare.com/reference-architecture/diagrams/ai/ai-multivendor-observability-control/) [Fullstack applications](https://developers.cloudflare.com/reference-architecture/diagrams/serverless/fullstack-application/) [A practical example of how these services come together in a real fullstack application architecture.](https://developers.cloudflare.com/reference-architecture/diagrams/serverless/fullstack-application/) --- title: Evaluations · Cloudflare AI Gateway docs description: Understanding your application's performance is essential for optimization. Developers often have different priorities, and finding the optimal solution involves balancing key factors such as cost, latency, and accuracy. Some prioritize low-latency responses, while others focus on accuracy or cost-efficiency. lastUpdated: 2025-05-01T13:39:24.000Z chatbotDeprioritize: false source_url: html: https://developers.cloudflare.com/ai-gateway/evaluations/ md: https://developers.cloudflare.com/ai-gateway/evaluations/index.md --- Understanding your application's performance is essential for optimization. Developers often have different priorities, and finding the optimal solution involves balancing key factors such as cost, latency, and accuracy. Some prioritize low-latency responses, while others focus on accuracy or cost-efficiency. AI Gateway's Evaluations provide the data needed to make informed decisions on how to optimize your AI application. Whether it is adjusting the model, provider, or prompt, this feature delivers insights into key metrics around performance, speed, and cost. It empowers developers to better understand their application's behavior, ensuring improved accuracy, reliability, and customer satisfaction. Evaluations use datasets which are collections of logs stored for analysis. You can create datasets by applying filters in the Logs tab, which help narrow down specific logs for evaluation. Our first step toward comprehensive AI evaluations starts with human feedback (currently in open beta). We will continue to build and expand AI Gateway with additional evaluators. [Learn how to set up an evaluation](https://developers.cloudflare.com/ai-gateway/evaluations/set-up-evaluations/) including creating datasets, selecting evaluators, and running the evaluation process. --- title: Getting started · Cloudflare AI Gateway docs description: In this guide, you will learn how to create your first AI Gateway. You can create multiple gateways to control different applications. lastUpdated: 2025-05-09T13:19:26.000Z chatbotDeprioritize: false source_url: html: https://developers.cloudflare.com/ai-gateway/get-started/ md: https://developers.cloudflare.com/ai-gateway/get-started/index.md --- In this guide, you will learn how to create your first AI Gateway. You can create multiple gateways to control different applications. ## Prerequisites Before you get started, you need a Cloudflare account. [Sign up](https://dash.cloudflare.com/sign-up) ## Create gateway Then, create a new AI Gateway. * Dashboard To set up an AI Gateway in the dashboard: 1. Log into the [Cloudflare dashboard](https://dash.cloudflare.com/) and select your account. 2. Go to **AI** > **AI Gateway**. 3. Select **Create Gateway**. 4. Enter your **Gateway name**. Note: Gateway name has a 64 character limit. 5. Select **Create**. * API To set up an AI Gateway using the API: 1. [Create an API token](https://developers.cloudflare.com/fundamentals/api/get-started/create-token/) with the following permissions: * `AI Gateway - Read` * `AI Gateway - Edit` 2. Get your [Account ID](https://developers.cloudflare.com/fundamentals/account/find-account-and-zone-ids/). 3. Using that API token and Account ID, send a [`POST` request](https://developers.cloudflare.com/api/resources/ai_gateway/methods/create/) to the Cloudflare API. ## Choosing gateway authentication When setting up a new gateway, you can choose between an authenticated and unauthenticated gateway. Enabling an authenticated gateway requires each request to include a valid authorization token, adding an extra layer of security. We recommend using an authenticated gateway when storing logs to prevent unauthorized access and protect against invalid requests that can inflate log storage usage and make it harder to find the data you need. Learn more about setting up an [Authenticated Gateway](https://developers.cloudflare.com/ai-gateway/configuration/authentication/). ## Connect application Next, connect your AI provider to your gateway. AI Gateway offers multiple endpoints for each Gateway you create - one endpoint per provider, and one Universal Endpoint. To use AI Gateway, you will need to create your own account with each provider and provide your API key. AI Gateway acts as a proxy for these requests, enabling observability, caching, and more. Additionally, AI Gateway has a [WebSockets API](https://developers.cloudflare.com/ai-gateway/websockets-api/) which provides a single persistent connection, enabling continuous communication. This API supports all AI providers connected to AI Gateway, including those that do not natively support WebSockets. Below is a list of our supported model providers: * [Amazon Bedrock](https://developers.cloudflare.com/ai-gateway/providers/bedrock/) * [Anthropic](https://developers.cloudflare.com/ai-gateway/providers/anthropic/) * [Azure OpenAI](https://developers.cloudflare.com/ai-gateway/providers/azureopenai/) * [Cartesia](https://developers.cloudflare.com/ai-gateway/providers/cartesia/) * [Cerebras](https://developers.cloudflare.com/ai-gateway/providers/cerebras/) * [Cohere](https://developers.cloudflare.com/ai-gateway/providers/cohere/) * [DeepSeek](https://developers.cloudflare.com/ai-gateway/providers/deepseek/) * [ElevenLabs](https://developers.cloudflare.com/ai-gateway/providers/elevenlabs/) * [Google AI Studio](https://developers.cloudflare.com/ai-gateway/providers/google-ai-studio/) * [Google Vertex AI](https://developers.cloudflare.com/ai-gateway/providers/vertex/) * [Grok](https://developers.cloudflare.com/ai-gateway/providers/grok/) * [Groq](https://developers.cloudflare.com/ai-gateway/providers/groq/) * [HuggingFace](https://developers.cloudflare.com/ai-gateway/providers/huggingface/) * [Mistral AI](https://developers.cloudflare.com/ai-gateway/providers/mistral/) * [OpenAI](https://developers.cloudflare.com/ai-gateway/providers/openai/) * [OpenRouter](https://developers.cloudflare.com/ai-gateway/providers/openrouter/) * [Perplexity](https://developers.cloudflare.com/ai-gateway/providers/perplexity/) * [Replicate](https://developers.cloudflare.com/ai-gateway/providers/replicate/) * [Workers AI](https://developers.cloudflare.com/ai-gateway/providers/workersai/) If you do not have a provider preference, start with one of our dedicated tutorials: * [OpenAI](https://developers.cloudflare.com/ai-gateway/tutorials/deploy-aig-worker/) * [Workers AI](https://developers.cloudflare.com/ai-gateway/tutorials/create-first-aig-workers/) ## View analytics Now that your provider is connected to the AI Gateway, you can view analytics for requests going through your gateway. Your AI Gateway dashboard shows metrics on requests, tokens, caching, errors, and cost. You can filter these metrics by time and provider-type. To view analytics in the dashboard: 1. Log into the [Cloudflare dashboard](https://dash.cloudflare.com) and select your account. 2. Go to **AI** > **AI Gateway**. 3. Make sure you have your gateway selected. Note The cost metric is an estimation based on the number of tokens sent and received in requests. While this metric can help you monitor and predict cost trends, refer to your provider's dashboard for the most accurate cost details. ## Next steps * Learn more about [caching](https://developers.cloudflare.com/ai-gateway/configuration/caching/) for faster requests and cost savings and [rate limiting](https://developers.cloudflare.com/ai-gateway/configuration/rate-limiting/) to control how your application scales. * Explore how to specify model or provider [fallbacks](https://developers.cloudflare.com/ai-gateway/configuration/fallbacks/) for resiliency. * Learn how to use low-cost, open source models on [Workers AI](https://developers.cloudflare.com/ai-gateway/providers/workersai/) - our AI inference service. --- title: Header Glossary · Cloudflare AI Gateway docs description: AI Gateway supports a variety of headers to help you configure, customize, and manage your API requests. This page provides a complete list of all supported headers, along with a short description lastUpdated: 2025-05-09T15:42:57.000Z chatbotDeprioritize: false source_url: html: https://developers.cloudflare.com/ai-gateway/glossary/ md: https://developers.cloudflare.com/ai-gateway/glossary/index.md --- AI Gateway supports a variety of headers to help you configure, customize, and manage your API requests. This page provides a complete list of all supported headers, along with a short description | Term | Definition | | - | - | | cf-aig-backoff | Header to customize the backoff type for [request retries](https://developers.cloudflare.com/ai-gateway/configuration/request-handling/#request-retries) of a request. | | cf-aig-cache-key | The [cf-aig-cache-key-aig-cache-key](https://developers.cloudflare.com/ai-gateway/configuration/caching/#custom-cache-key-cf-aig-cache-key) let you override the default cache key in order to precisely set the cacheability setting for any resource. | | cf-aig-cache-status | [Status indicator for caching](https://developers.cloudflare.com/ai-gateway/configuration/caching/#default-configuration), showing if a request was served from cache. | | cf-aig-cache-ttl | Specifies the [cache time-to-live for responses](https://developers.cloudflare.com/ai-gateway/configuration/caching/#cache-ttl-cf-aig-cache-ttl). | | cf-aig-collect-log | The [cf-aig-collect-log](https://developers.cloudflare.com/ai-gateway/observability/logging/#collect-logs-cf-aig-collect-log) header allows you to bypass the default log setting for the gateway. | | cf-aig-custom-cost | Allows the [customization of request cost](https://developers.cloudflare.com/ai-gateway/configuration/custom-costs/#custom-cost) to reflect user-defined parameters. | | cf-aig-event-id | [cf-aig-event-id](https://developers.cloudflare.com/ai-gateway/evaluations/add-human-feedback-api/#3-retrieve-the-cf-aig-log-id) is a unique identifier for an event, used to trace specific events through the system. | | cf-aig-log-id | The [cf-aig-log-id](https://developers.cloudflare.com/ai-gateway/evaluations/add-human-feedback-api/#3-retrieve-the-cf-aig-log-id) is a unique identifier for the specific log entry to which you want to add feedback. | | cf-aig-max-attempts | Header to customize the number of max attempts for [request retries](https://developers.cloudflare.com/ai-gateway/configuration/request-handling/#request-retries) of a request. | | cf-aig-metadata | [Custom metadata](https://developers.cloudflare.com/ai-gateway/configuration/custom-metadata/)allows you to tag requests with user IDs or other identifiers, enabling better tracking and analysis of your requests. | | cf-aig-request-timeout | Header to trigger a fallback provider based on a [predetermined response time](https://developers.cloudflare.com/ai-gateway/configuration/fallbacks/#request-timeouts) (measured in milliseconds). | | cf-aig-retry-delay | Header to customize the retry delay for [request retries](https://developers.cloudflare.com/ai-gateway/configuration/request-handling/#request-retries) of a request. | | cf-aig-skip-cache | Header to [bypass caching for a specific request](https://developers.cloudflare.com/ai-gateway/configuration/caching/#skip-cache-cf-aig-skip-cache). | | cf-aig-step | [cf-aig-step](https://developers.cloudflare.com/ai-gateway/configuration/fallbacks/#response-headercf-aig-step) identifies the processing step in the AI Gateway flow for better tracking and debugging. | | cf-cache-ttl | Deprecated: This header is replaced by `cf-aig-cache-ttl`. It specifies cache time-to-live. | | cf-skip-cache | Deprecated: This header is replaced by `cf-aig-skip-cache`. It bypasses caching for a specific request. | ## Configuration hierarchy Settings in AI Gateway can be configured at three levels: **Provider**, **Request**, and **Gateway**. Since the same settings can be configured in multiple locations, the following hierarchy determines which value is applied: 1. **Provider-level headers**: Relevant only when using the [Universal Endpoint](https://developers.cloudflare.com/ai-gateway/universal/), these headers take precedence over all other configurations. 2. **Request-level headers**: Apply if no provider-level headers are set. 3. **Gateway-level settings**: Act as the default if no headers are set at the provider or request levels. This hierarchy ensures consistent behavior, prioritizing the most specific configurations. Use provider-level and request-level headers for more fine-tuned control, and gateway settings for general defaults. --- title: Guardrails · Cloudflare AI Gateway docs description: Guardrails help you deploy AI applications safely by intercepting and evaluating both user prompts and model responses for harmful content. Acting as a proxy between your application and model providers (such as OpenAI, Anthropic, DeepSeek, and others), AI Gateway's Guardrails ensure a consistent and secure experience across your entire AI ecosystem. lastUpdated: 2025-05-09T15:42:57.000Z chatbotDeprioritize: false source_url: html: https://developers.cloudflare.com/ai-gateway/guardrails/ md: https://developers.cloudflare.com/ai-gateway/guardrails/index.md --- Guardrails help you deploy AI applications safely by intercepting and evaluating both user prompts and model responses for harmful content. Acting as a proxy between your application and [model providers](https://developers.cloudflare.com/ai-gateway/providers/) (such as OpenAI, Anthropic, DeepSeek, and others), AI Gateway's Guardrails ensure a consistent and secure experience across your entire AI ecosystem. Guardrails proactively monitor interactions between users and AI models, giving you: * **Consistent moderation**: Uniform moderation layer that works across models and providers. * **Enhanced safety and user trust**: Proactively protect users from harmful or inappropriate interactions. * **Flexibility and control over allowed content**: Specify which categories to monitor and choose between flagging or outright blocking. * **Auditing and compliance capabilities**: Receive updates on evolving regulatory requirements with logs of user prompts, model responses, and enforced guardrails. ## Video demo ## How Guardrails work AI Gateway inspects all interactions in real time by evaluating content against predefined safety parameters. Guardrails work by: 1. Intercepting interactions: AI Gateway proxies requests and responses, sitting between the user and the AI model. 2. Inspecting content: * User prompts: AI Gateway checks prompts against safety parameters (for example, violence, hate, or sexual content). Based on your settings, prompts can be flagged or blocked before reaching the model. * Model responses: Once processed, the AI model response is inspected. If hazardous content is detected, it can be flagged or blocked before being delivered to the user. 3. Applying actions: Depending on your configuration, flagged content is logged for review, while blocked content is prevented from proceeding. ## Related resource * [Cloudflare Blog: Keep AI interactions secure and risk-free with Guardrails in AI Gateway](https://blog.cloudflare.com/guardrails-in-ai-gateway/) --- title: Integrations · Cloudflare AI Gateway docs lastUpdated: 2025-05-09T15:42:57.000Z chatbotDeprioritize: true source_url: html: https://developers.cloudflare.com/ai-gateway/integrations/ md: https://developers.cloudflare.com/ai-gateway/integrations/index.md --- --- title: Observability · Cloudflare AI Gateway docs description: Observability is the practice of instrumenting systems to collect metrics, and logs enabling better monitoring, troubleshooting, and optimization of applications. lastUpdated: 2025-05-09T15:42:57.000Z chatbotDeprioritize: true source_url: html: https://developers.cloudflare.com/ai-gateway/observability/ md: https://developers.cloudflare.com/ai-gateway/observability/index.md --- Observability is the practice of instrumenting systems to collect metrics, and logs enabling better monitoring, troubleshooting, and optimization of applications. * [Analytics](https://developers.cloudflare.com/ai-gateway/observability/analytics/) * [Costs](https://developers.cloudflare.com/ai-gateway/observability/costs/) * [Logging](https://developers.cloudflare.com/ai-gateway/observability/logging/) --- title: Model providers · Cloudflare AI Gateway docs description: "Here is a quick list of the providers we support:" lastUpdated: 2025-05-28T19:49:34.000Z chatbotDeprioritize: true source_url: html: https://developers.cloudflare.com/ai-gateway/providers/ md: https://developers.cloudflare.com/ai-gateway/providers/index.md --- Here is a quick list of the providers we support: * [Amazon Bedrock](https://developers.cloudflare.com/ai-gateway/providers/bedrock/) * [Anthropic](https://developers.cloudflare.com/ai-gateway/providers/anthropic/) * [Azure OpenAI](https://developers.cloudflare.com/ai-gateway/providers/azureopenai/) * [Cartesia](https://developers.cloudflare.com/ai-gateway/providers/cartesia/) * [Cerebras](https://developers.cloudflare.com/ai-gateway/providers/cerebras/) * [Cohere](https://developers.cloudflare.com/ai-gateway/providers/cohere/) * [DeepSeek](https://developers.cloudflare.com/ai-gateway/providers/deepseek/) * [ElevenLabs](https://developers.cloudflare.com/ai-gateway/providers/elevenlabs/) * [Google AI Studio](https://developers.cloudflare.com/ai-gateway/providers/google-ai-studio/) * [Google Vertex AI](https://developers.cloudflare.com/ai-gateway/providers/vertex/) * [Grok](https://developers.cloudflare.com/ai-gateway/providers/grok/) * [Groq](https://developers.cloudflare.com/ai-gateway/providers/groq/) * [HuggingFace](https://developers.cloudflare.com/ai-gateway/providers/huggingface/) * [Mistral AI](https://developers.cloudflare.com/ai-gateway/providers/mistral/) * [OpenAI](https://developers.cloudflare.com/ai-gateway/providers/openai/) * [OpenRouter](https://developers.cloudflare.com/ai-gateway/providers/openrouter/) * [Perplexity](https://developers.cloudflare.com/ai-gateway/providers/perplexity/) * [Replicate](https://developers.cloudflare.com/ai-gateway/providers/replicate/) * [Workers AI](https://developers.cloudflare.com/ai-gateway/providers/workersai/) --- title: Platform · Cloudflare AI Gateway docs lastUpdated: 2025-05-09T15:42:57.000Z chatbotDeprioritize: false source_url: html: https://developers.cloudflare.com/ai-gateway/reference/ md: https://developers.cloudflare.com/ai-gateway/reference/index.md --- * [Audit logs](https://developers.cloudflare.com/ai-gateway/reference/audit-logs/) * [Limits](https://developers.cloudflare.com/ai-gateway/reference/limits/) * [Pricing](https://developers.cloudflare.com/ai-gateway/reference/pricing/) --- title: Tutorials · Cloudflare AI Gateway docs description: View tutorials to help you get started with AI Gateway. lastUpdated: 2025-05-09T15:42:57.000Z chatbotDeprioritize: false source_url: html: https://developers.cloudflare.com/ai-gateway/tutorials/ md: https://developers.cloudflare.com/ai-gateway/tutorials/index.md --- View tutorials to help you get started with AI Gateway. ## Docs | Name | Last Updated | Type | Difficulty | | - | - | - | - | | [AI Gateway Binding Methods](https://developers.cloudflare.com/ai-gateway/integrations/worker-binding-methods/) | 4 months ago | 📝 Tutorial | | | [Workers AI](https://developers.cloudflare.com/ai-gateway/integrations/aig-workers-ai-binding/) | 9 months ago | 📝 Tutorial | | | [Create your first AI Gateway using Workers AI](https://developers.cloudflare.com/ai-gateway/tutorials/create-first-aig-workers/) | 12 months ago | 📝 Tutorial | Beginner | | [Deploy a Worker that connects to OpenAI via AI Gateway](https://developers.cloudflare.com/ai-gateway/tutorials/deploy-aig-worker/) | almost 2 years ago | 📝 Tutorial | Beginner | ## Videos Cloudflare Workflows | Introduction (Part 1 of 3) In this video, we introduce Cloudflare Workflows, the Newest Developer Platform Primitive at Cloudflare. Cloudflare Workflows | Batching and Monitoring Your Durable Execution (Part 2 of 3) Workflows exposes metrics such as execution, error rates, steps, and total duration! Welcome to the Cloudflare Developer Channel Welcome to the Cloudflare Developers YouTube channel. We've got tutorials and working demos and everything you need to level up your projects. Whether you're working on your next big thing or just dorking around with some side projects, we've got you covered! So why don't you come hang out, subscribe to our developer channel and together we'll build something awesome. You're gonna love it. Optimize your AI App & fine-tune models (AI Gateway, R2) In this workshop, Kristian Freeman, Cloudflare Developer Advocate, shows how to optimize your existing AI applications with Cloudflare AI Gateway, and how to finetune OpenAI models using R2. How to use Cloudflare AI models and inference in Python with Jupyter Notebooks Cloudflare Workers AI provides a ton of AI models and inference capabilities. In this video, we will explore how to make use of Cloudflare’s AI model catalog using a Python Jupyter Notebook. --- title: Universal Endpoint · Cloudflare AI Gateway docs description: You can use the Universal Endpoint to contact every provider. lastUpdated: 2025-06-04T13:11:02.000Z chatbotDeprioritize: false source_url: html: https://developers.cloudflare.com/ai-gateway/universal/ md: https://developers.cloudflare.com/ai-gateway/universal/index.md --- You can use the Universal Endpoint to contact every provider. ```txt https://gateway.ai.cloudflare.com/v1/{account_id}/{gateway_id} ``` AI Gateway offers multiple endpoints for each Gateway you create - one endpoint per provider, and one Universal Endpoint. The Universal Endpoint requires some adjusting to your schema, but supports additional features. Some of these features are, for example, retrying a request if it fails the first time, or configuring a [fallback model/provider](https://developers.cloudflare.com/ai-gateway/configuration/fallbacks/). You can use the Universal endpoint to contact every provider. The payload is expecting an array of message, and each message is an object with the following parameters: * `provider` : the name of the provider you would like to direct this message to. Can be OpenAI, workers-ai, or any of our supported providers. * `endpoint`: the pathname of the provider API you’re trying to reach. For example, on OpenAI it can be `chat/completions`, and for Workers AI this might be [`@cf/meta/llama-3.1-8b-instruct`](https://developers.cloudflare.com/workers-ai/models/llama-3.1-8b-instruct/). See more in the sections that are specific to [each provider](https://developers.cloudflare.com/ai-gateway/providers/). * `authorization`: the content of the Authorization HTTP Header that should be used when contacting this provider. This usually starts with 'Token' or 'Bearer'. * `query`: the payload as the provider expects it in their official API. ## cURL example ```bash curl https://gateway.ai.cloudflare.com/v1/{account_id}/{gateway_id} \ --header 'Content-Type: application/json' \ --data '[ { "provider": "workers-ai", "endpoint": "@cf/meta/llama-3.1-8b-instruct", "headers": { "Authorization": "Bearer {cloudflare_token}", "Content-Type": "application/json" }, "query": { "messages": [ { "role": "system", "content": "You are a friendly assistant" }, { "role": "user", "content": "What is Cloudflare?" } ] } }, { "provider": "openai", "endpoint": "chat/completions", "headers": { "Authorization": "Bearer {open_ai_token}", "Content-Type": "application/json" }, "query": { "model": "gpt-4o-mini", "stream": true, "messages": [ { "role": "user", "content": "What is Cloudflare?" } ] } } ]' ``` The above will send a request to Workers AI Inference API, if it fails it will proceed to OpenAI. You can add as many fallbacks as you need, just by adding another JSON in the array. ## WebSockets API beta The Universal Endpoint can also be accessed via a [WebSockets API](https://developers.cloudflare.com/ai-gateway/websockets-api/) which provides a single persistent connection, enabling continuous communication. This API supports all AI providers connected to AI Gateway, including those that do not natively support WebSockets. ## WebSockets example ```javascript import WebSocket from "ws"; const ws = new WebSocket( "wss://gateway.ai.cloudflare.com/v1/my-account-id/my-gateway/", { headers: { "cf-aig-authorization": "Bearer AI_GATEWAY_TOKEN", }, }, ); ws.send( JSON.stringify({ type: "universal.create", request: { eventId: "my-request", provider: "workers-ai", endpoint: "@cf/meta/llama-3.1-8b-instruct", headers: { Authorization: "Bearer WORKERS_AI_TOKEN", "Content-Type": "application/json", }, query: { prompt: "tell me a joke", }, }, }), ); ws.on("message", function incoming(message) { console.log(message.toString()); }); ``` ## Workers Binding example * wrangler.jsonc ```jsonc { "ai": { "binding": "AI" } } ``` * wrangler.toml ```toml [ai] binding = "AI" ``` ```typescript type Env = { AI: Ai; }; export default { async fetch(request: Request, env: Env) { return env.AI.gateway('my-gateway').run({ provider: "workers-ai", endpoint: "@cf/meta/llama-3.1-8b-instruct", headers: { authorization: "Bearer my-api-token", }, query: { prompt: "tell me a joke", }, }); }, }; ``` ## Header configuration hierarchy The Universal Endpoint allows you to set fallback models or providers and customize headers for each provider or request. You can configure headers at three levels: 1. **Provider level**: Headers specific to a particular provider. 2. **Request level**: Headers included in individual requests. 3. **Gateway settings**: Default headers configured in your gateway dashboard. Since the same settings can be configured in multiple locations, AI Gateway applies a hierarchy to determine which configuration takes precedence: * **Provider-level headers** override all other configurations. * **Request-level headers** are used if no provider-level headers are set. * **Gateway-level settings** are used only if no headers are configured at the provider or request levels. This hierarchy ensures consistent behavior, prioritizing the most specific configurations. Use provider-level and request-level headers for fine-tuned control, and gateway settings for general defaults. ## Hierarchy example This example demonstrates how headers set at different levels impact caching behavior: * **Request-level header**: The `cf-aig-cache-ttl` is set to `3600` seconds, applying this caching duration to the request by default. * **Provider-level header**: For the fallback provider (OpenAI), `cf-aig-cache-ttl` is explicitly set to `0` seconds, overriding the request-level header and disabling caching for responses when OpenAI is used as the provider. This shows how provider-level headers take precedence over request-level headers, allowing for granular control of caching behavior. ```bash curl https://gateway.ai.cloudflare.com/v1/{account_id}/{gateway_id} \ --header 'Content-Type: application/json' \ --header 'cf-aig-cache-ttl: 3600' \ --data '[ { "provider": "workers-ai", "endpoint": "@cf/meta/llama-3.1-8b-instruct", "headers": { "Authorization": "Bearer {cloudflare_token}", "Content-Type": "application/json" }, "query": { "messages": [ { "role": "system", "content": "You are a friendly assistant" }, { "role": "user", "content": "What is Cloudflare?" } ] } }, { "provider": "openai", "endpoint": "chat/completions", "headers": { "Authorization": "Bearer {open_ai_token}", "Content-Type": "application/json", "cf-aig-cache-ttl": "0" }, "query": { "model": "gpt-4o-mini", "stream": true, "messages": [ { "role": "user", "content": "What is Cloudflare?" } ] } } ]' ``` --- title: WebSockets API · Cloudflare AI Gateway docs description: "The AI Gateway WebSockets API provides a persistent connection for AI interactions, eliminating repeated handshakes and reducing latency. This API is divided into two categories:" lastUpdated: 2025-05-28T19:49:34.000Z chatbotDeprioritize: false source_url: html: https://developers.cloudflare.com/ai-gateway/websockets-api/ md: https://developers.cloudflare.com/ai-gateway/websockets-api/index.md --- The AI Gateway WebSockets API provides a persistent connection for AI interactions, eliminating repeated handshakes and reducing latency. This API is divided into two categories: * **Realtime APIs** - Designed for AI providers that offer low-latency, multimodal interactions over WebSockets. * **Non-Realtime APIs** - Supports standard WebSocket communication for AI providers, including those that do not natively support WebSockets. ## When to use WebSockets WebSockets are long-lived TCP connections that enable bi-directional, real-time and non realtime communication between client and server. Unlike HTTP connections, which require repeated handshakes for each request, WebSockets maintain the connection, supporting continuous data exchange with reduced overhead. WebSockets are ideal for applications needing low-latency, real-time data, such as voice assistants. ## Key benefits * **Reduced overhead**: Avoid overhead of repeated handshakes and TLS negotiations by maintaining a single, persistent connection. * **Provider compatibility**: Works with all AI providers in AI Gateway. Even if your chosen provider does not support WebSockets, Cloudflare handles it for you, managing the requests to your preferred AI provider. ## Key differences | Feature | Realtime APIs | Non-Realtime APIs | | - | - | - | | **Purpose** | Enables real-time, multimodal AI interactions for providers that offer dedicated WebSocket endpoints. | Supports WebSocket-based AI interactions with providers that do not natively support WebSockets. | | **Use Case** | Streaming responses for voice, video, and live interactions. | Text-based queries and responses, such as LLM requests. | | **AI Provider Support** | [Limited to providers offering real-time WebSocket APIs.](https://developers.cloudflare.com/ai-gateway/websockets-api/realtime-api/#supported-providers) | [All AI providers in AI Gateway.](https://developers.cloudflare.com/ai-gateway/providers/) | | **Streaming Support** | Providers natively support real-time data streaming. | AI Gateway handles streaming via WebSockets. | For details on implementation, refer to the next sections: * [Realtime WebSockets API](https://developers.cloudflare.com/ai-gateway/websockets-api/realtime-api/) * [Non-Realtime WebSockets API](https://developers.cloudflare.com/ai-gateway/websockets-api/non-realtime-api/) --- title: 404 - Page Not Found · AutoRAG chatbotDeprioritize: false source_url: html: https://developers.cloudflare.com/autorag/404/ md: https://developers.cloudflare.com/autorag/404/index.md --- # 404 Check the URL, try using our [search](https://developers.cloudflare.com/search/) or try our LLM-friendly [llms.txt directory](https://developers.cloudflare.com/llms.txt). --- title: REST API · AutoRAG lastUpdated: 2025-06-19T17:04:00.000Z chatbotDeprioritize: false source_url: html: https://developers.cloudflare.com/autorag/autorag-api/ md: https://developers.cloudflare.com/autorag/autorag-api/index.md --- --- title: Concepts · AutoRAG lastUpdated: 2025-04-06T23:41:56.000Z chatbotDeprioritize: true source_url: html: https://developers.cloudflare.com/autorag/concepts/ md: https://developers.cloudflare.com/autorag/concepts/index.md --- * [What is RAG](https://developers.cloudflare.com/autorag/concepts/what-is-rag/) * [How AutoRAG works](https://developers.cloudflare.com/autorag/concepts/how-autorag-works/) --- title: Configuration · AutoRAG description: When creating an AutoRAG instance, you can customize how your RAG pipeline ingests, processes, and responds to data using a set of configuration options. Some settings can be updated after the instance is created, while others are fixed at creation time. lastUpdated: 2025-04-11T22:48:09.000Z chatbotDeprioritize: false source_url: html: https://developers.cloudflare.com/autorag/configuration/ md: https://developers.cloudflare.com/autorag/configuration/index.md --- When creating an AutoRAG instance, you can customize how your RAG pipeline ingests, processes, and responds to data using a set of configuration options. Some settings can be updated after the instance is created, while others are fixed at creation time. The table below lists all available configuration options: | Configuration | Editable after creation | Description | | - | - | - | | [Data source](https://developers.cloudflare.com/autorag/configuration/data-source/) | no | The source where your knowledge base is stored | | [Chunk size](https://developers.cloudflare.com/autorag/configuration/chunking/) | yes | Number of tokens per chunk | | [Chunk overlap](https://developers.cloudflare.com/autorag/configuration/chunking/) | yes | Number of overlapping tokens between chunks | | [Embedding model](https://developers.cloudflare.com/autorag/configuration/models/) | no | Model used to generate vector embeddings | | [Query rewrite](https://developers.cloudflare.com/autorag/configuration/query-rewriting/) | yes | Enable or disable query rewriting before retrieval | | [Query rewrite model](https://developers.cloudflare.com/autorag/configuration/models/) | yes | Model used for query rewriting | | [Query rewrite system prompt](https://developers.cloudflare.com/autorag/configuration/system-prompt/) | yes | Custom system prompt to guide query rewriting behavior | | [Match threshold](https://developers.cloudflare.com/autorag/configuration/retrieval-configuration/) | yes | Minimum similarity score required for a vector match | | [Maximum number of results](https://developers.cloudflare.com/autorag/configuration/retrieval-configuration/) | yes | Maximum number of vector matches returned (`top_k`) | | [Generation model](https://developers.cloudflare.com/autorag/configuration/models/) | yes | Model used to generate the final response | | [Generation system prompt](https://developers.cloudflare.com/autorag/configuration/system-prompt/) | yes | Custom system prompt to guide response generation | | [Similarity caching](https://developers.cloudflare.com/autorag/configuration/cache/) | yes | Enable or disable caching of responses for similar (not just exact) prompts | | [Similarity caching threshold](https://developers.cloudflare.com/autorag/configuration/cache/) | yes | Controls how similar a new prompt must be to a previous one to reuse its cached response | | [AI Gateway](https://developers.cloudflare.com/ai-gateway) | yes | AI Gateway for monitoring and controlling model usage | | AutoRAG name | no | Name of your AutoRAG instance | | Service API token | yes | API token granted to AutoRAG to give it permission to configure resources on your account. | API token The Service API token is different from the AutoRAG API token that you can make to interact with your AutoRAG. The Service API token is only used by AutoRAG to get permissions to configure resources on your account. --- title: Get started with AutoRAG · AutoRAG description: AutoRAG allows developers to create fully managed retrieval-augmented generation (RAG) pipelines to power AI applications with accurate and up-to-date information without needing to manage infrastructure. lastUpdated: 2025-05-12T16:09:33.000Z chatbotDeprioritize: false source_url: html: https://developers.cloudflare.com/autorag/get-started/ md: https://developers.cloudflare.com/autorag/get-started/index.md --- AutoRAG allows developers to create fully managed retrieval-augmented generation (RAG) pipelines to power AI applications with accurate and up-to-date information without needing to manage infrastructure. ## 1. Upload data or use existing data in R2 AutoRAG integrates with R2 for data import. Create an R2 bucket if you do not have one and upload your data. Note Before you create your first bucket, you must purchase R2 from the Cloudflare dashboard. To create and upload objects to your bucket from the Cloudflare dashboard: 1. Log in to the [Cloudflare dashboard](https://dash.cloudflare.com/?to=/:account/r2) and select **R2**. 2. Select Create bucket, name the bucket, and select **Create bucket**. 3. Choose to either drag and drop your file into the upload area or **select from computer**. Review the [file limits](https://developers.cloudflare.com/autorag/configuration/data-source/) when creating your knowledge base. *If you need inspiration for what document to use to make your first AutoRAG, try downloading and uploading the [RSS](https://developers.cloudflare.com/changelog/rss/index.xml) of the [Cloudflare Changelog](https://developers.cloudflare.com/changelog/).* ## 2. Create an AutoRAG To create a new AutoRAG: 1. Log in to the [Cloudflare dashboard](https://dash.cloudflare.com/?to=/:account/ai/autorag) and select **AI** > **AutoRAG**. 2. Select **Create AutoRAG**, configure the AutoRAG, and complete the setup process. 3. Select **Create**. ## 3. Monitor indexing Once created, AutoRAG will create a Vectorize index in your account and begin indexing the data. To monitor the indexing progress: 1. From the **AutoRAG** page in the dashboard, locate and select your AutoRAG. 2. Navigate to the **Overview** page to view the current indexing status. ## 4. Try it out Once indexing is complete, you can run your first query: 1. From the **AutoRAG** page in the dashboard, locate and select your AutoRAG. 2. Navigate to the **Playground** page. 3. Select **Search with AI** or **Search**. 4. Enter a **query** to test out its response. ## 5. Add to your application There are multiple ways you can create [RAG applications](https://developers.cloudflare.com/autorag/) with Cloudflare AutoRAG: * [Workers Binding](https://developers.cloudflare.com/autorag/usage/workers-binding/) * [REST API](https://developers.cloudflare.com/autorag/usage/rest-api/) --- title: How to · AutoRAG lastUpdated: 2025-04-24T05:06:04.000Z chatbotDeprioritize: true source_url: html: https://developers.cloudflare.com/autorag/how-to/ md: https://developers.cloudflare.com/autorag/how-to/index.md --- * [Bring your own generation model](https://developers.cloudflare.com/autorag/how-to/bring-your-own-generation-model/) * [Create a simple search engine](https://developers.cloudflare.com/autorag/how-to/simple-search-engine/) * [Create multitenancy](https://developers.cloudflare.com/autorag/how-to/multitenancy/) --- title: Platform · AutoRAG lastUpdated: 2025-04-06T23:41:56.000Z chatbotDeprioritize: true source_url: html: https://developers.cloudflare.com/autorag/platform/ md: https://developers.cloudflare.com/autorag/platform/index.md --- * [Limits & pricing](https://developers.cloudflare.com/autorag/platform/limits-pricing/) * [Release note](https://developers.cloudflare.com/autorag/platform/release-note/) --- title: Tutorial · AutoRAG lastUpdated: 2025-04-06T23:41:56.000Z chatbotDeprioritize: true source_url: html: https://developers.cloudflare.com/autorag/tutorial/ md: https://developers.cloudflare.com/autorag/tutorial/index.md --- * [Build a RAG from your website](https://developers.cloudflare.com/autorag/tutorial/brower-rendering-autorag-tutorial/) --- title: Usage · AutoRAG lastUpdated: 2025-04-06T23:41:56.000Z chatbotDeprioritize: true source_url: html: https://developers.cloudflare.com/autorag/usage/ md: https://developers.cloudflare.com/autorag/usage/index.md --- * [Workers Binding](https://developers.cloudflare.com/autorag/usage/workers-binding/) * [REST API](https://developers.cloudflare.com/autorag/usage/rest-api/) --- title: 404 - Page Not Found · Browser Rendering docs chatbotDeprioritize: false source_url: html: https://developers.cloudflare.com/browser-rendering/404/ md: https://developers.cloudflare.com/browser-rendering/404/index.md --- # 404 Check the URL, try using our [search](https://developers.cloudflare.com/search/) or try our LLM-friendly [llms.txt directory](https://developers.cloudflare.com/llms.txt). --- title: Changelog · Browser Rendering docs description: Review recent changes to Worker Browser Rendering. lastUpdated: 2025-05-28T14:52:40.000Z chatbotDeprioritize: false source_url: html: https://developers.cloudflare.com/browser-rendering/changelog/ md: https://developers.cloudflare.com/browser-rendering/changelog/index.md --- [Subscribe to RSS](https://developers.cloudflare.com/browser-rendering/changelog/index.xml) ## 2025-07-03 **Local development support** * We added local development support to Browser Rendering, making it simpler than ever to test and iterate before deploying. ## 2025-06-30 **New Web Bot Auth headers** * Browser Rendering now supports [Web Bot Auth](https://developers.cloudflare.com/reference/automatic-request-headers/) by automatically attaching `Signature-agent`, `Signature`, and `Signature-input `headers to verify that a request originates from Cloudflare Browser Rendering. ## 2025-06-27 **Bug fix to debug log noise in Workers** * Fixed an issue where all debug logging was on by default and would flood logs. Debug logs is now off by default but can be re-enabled by setting [`process.env.DEBUG`](https://pptr.dev/guides/debugging#log-devtools-protocol-traffic) when needed. ## 2025-05-26 **Playwright MCP** * You can now deploy [Playwright MCP](https://developers.cloudflare.com/browser-rendering/platform/playwright-mcp/) and use any MCP client to get AI models to interact with Browser Rendering. ## 2025-04-30 **Automatic Request Headers** * [Clarified Automatic Request headers](https://developers.cloudflare.com/browser-rendering/reference/automatic-request-headers/) in Browser Rendering. These headers are unique to Browser Rendering, and are automatically included and cannot be removed or overridden. ## 2025-04-07 **New free tier and REST API GA with additional endpoints** * Browser Rendering now has a new free tier. * The [REST API](https://developers.cloudflare.com/browser-rendering/rest-api/) is Generally Available. * Released new endpoints [`/json`](https://developers.cloudflare.com/browser-rendering/rest-api/json-endpoint/), [`/links`](https://developers.cloudflare.com/browser-rendering/rest-api/links-endpoint/), and [`/markdown`](https://developers.cloudflare.com/browser-rendering/rest-api/markdown-endpoint/). ## 2025-04-04 **Playwright support** * You can now use [Playwright's](https://developers.cloudflare.com/browser-rendering/platform/playwright/) browser automation capabilities from Cloudflare Workers. ## 2025-02-27 **New Browser Rendering REST API** * Released a new [REST API](https://developers.cloudflare.com/browser-rendering/rest-api/) in open beta. Available to all customers with a Workers Paid Plan. ## 2025-01-31 **Increased limits** * Increased the limits on the number of concurrent browsers, and browsers per minute from 2 to 10. ## 2024-08-08 **Update puppeteer to 21.1.0** * Rebased the fork on the original implementation up till version 21.1.0 ## 2024-04-02 **Browser Rendering Available for everyone** * Browser Rendering is now out of beta and available to all customers with Workers Paid Plan. Analytics and logs are available in Cloudflare's dashboard, under "Worker & Pages". ## 2023-05-19 **Browser Rendering Beta** * Beta Launch --- title: Frequently asked questions about Cloudflare Browser Rendering · Browser Rendering docs description: Below you will find answers to our most commonly asked questions. If you cannot find the answer you are looking for, refer to the Discord to explore additional resources. lastUpdated: 2025-07-14T16:50:25.000Z chatbotDeprioritize: false source_url: html: https://developers.cloudflare.com/browser-rendering/faq/ md: https://developers.cloudflare.com/browser-rendering/faq/index.md --- Below you will find answers to our most commonly asked questions. If you cannot find the answer you are looking for, refer to the [Discord](https://discord.cloudflare.com) to explore additional resources. ### I see `Cannot read properties of undefined (reading 'fetch')` when using Browser Rendering. How do I fix this? This error occurs because your Puppeteer launch is not receiving the Browser binding or you are not on a Workers Paid plan. To resolve: Pass your Browser binding into `puppeteer.launch`. ### Will Browser Rendering bypass Cloudflare's Bot Protection? No, Browser Rendering requests are always identified as bots by Cloudflare and do not bypass Bot Protection. If you are attempting to scan your **own zone** and need Browser Rendering to access areas protected by Cloudflare’s Bot Protection, you can create a [WAF skip rule](https://developers.cloudflare.com/waf/custom-rules/skip/) to bypass the bot protection using a header or a custom user agent. ### Why can't I use an XPath selector when using Browser Rendering with Puppeteer? Currently it is not possible to use Xpath to select elements since this poses a security risk to Workers. As an alternative try to use a css selector or `page.evaluate` for example: ```ts const innerHtml = await page.evaluate(() => { return ( // @ts-ignore this runs on browser context new XPathEvaluator() .createExpression("/html/body/div/h1") // @ts-ignore this runs on browser context .evaluate(document, XPathResult.FIRST_ORDERED_NODE_TYPE).singleNodeValue .innerHTML ); }); ``` Note Keep in mind that `page.evaluate` can only return primitive types like strings, numbers, etc. Returning an `HTMLElement` will not work. ### What are the usage limits and pricing tiers for Cloudflare Browser Rendering and how do I estimate my costs? You can view the complete breakdown of concurrency caps, request rates, timeouts, and REST API quotas on the [limits page](https://developers.cloudflare.com/browser-rendering/platform/limits/). By default, idle browser sessions close after 60 seconds of inactivity. You can adjust this with the [`keep_alive` option](https://developers.cloudflare.com/browser-rendering/platform/puppeteer/#keep-alive). #### Pricing Browser Rendering is currently free up to the limits above until billing begins. Pricing will be announced in advance. ### Does Browser Rendering rotate IP addresses for outbound requests? No. Browser Rendering requests originate from Cloudflares global network, but you cannot configure per-request IP rotation. All rendering traffic comes from Cloudflare IP ranges and requests include special headers [(`cf-biso-request-id`, `cf-biso-devtools`)](https://developers.cloudflare.com/browser-rendering/reference/automatic-request-headers/) so origin servers can identify them. ### I see `Error processing the request: Unable to create new browser: code: 429: message: Browser time limit exceeded for today`. How do I fix it? This error indicates you have hit the daily browser-instance limit on the Workers Free plan. [Free-plan accounts are capped at free plan limit is 10 minutes of browser use a day](https://developers.cloudflare.com/browser-rendering/platform/limits/#workers-free) once you exceed those, further creation attempts return a 429 until the next UTC day. To resolve:[Upgrade to a Workers Paid plan](https://developers.cloudflare.com/workers/platform/pricing/) - Paid accounts raise these limits to [10 concurrent browsers and 10 new instances per minute](https://developers.cloudflare.com/browser-rendering/platform/limits/#workers-paid). ### Does local development support all Browser Rendering features? Not yet. Local development currently has the following limitations: * Requests larger than 1 MB are not supported. * Playwright is not supported in local development environments. For full feature access, use `npx wrangler dev --remote`. ### I upgraded from the Workers Free plan, but I'm still hitting the 10-minute per day limit. What should I do? If you recently upgraded to the Workers Paid plan to increase your Browser Rendering usage limits, but you're still encountering the 10-minute per day cap, try redeploying your Worker. This ensures your usage is correctly associated with your new plan. --- title: Get started · Browser Rendering docs description: "Browser rendering can be used in two ways:" lastUpdated: 2025-06-24T20:37:11.000Z chatbotDeprioritize: false source_url: html: https://developers.cloudflare.com/browser-rendering/get-started/ md: https://developers.cloudflare.com/browser-rendering/get-started/index.md --- Browser rendering can be used in two ways: * [Workers Bindings](https://developers.cloudflare.com/browser-rendering/workers-bindings/) for complex scripts. * [REST API](https://developers.cloudflare.com/browser-rendering/rest-api/) for simple actions. --- title: How To · Browser Rendering docs lastUpdated: 2024-10-14T15:42:28.000Z chatbotDeprioritize: true source_url: html: https://developers.cloudflare.com/browser-rendering/how-to/ md: https://developers.cloudflare.com/browser-rendering/how-to/index.md --- * [Generate PDFs Using HTML and CSS](https://developers.cloudflare.com/browser-rendering/how-to/pdf-generation/) * [Build a web crawler with Queues and Browser Rendering](https://developers.cloudflare.com/queues/tutorials/web-crawler-with-browser-rendering/) * [Use browser rendering with AI](https://developers.cloudflare.com/browser-rendering/how-to/ai/) --- title: Platform · Browser Rendering docs lastUpdated: 2025-03-13T17:36:10.000Z chatbotDeprioritize: true source_url: html: https://developers.cloudflare.com/browser-rendering/platform/ md: https://developers.cloudflare.com/browser-rendering/platform/index.md --- * [Playwright (beta)](https://developers.cloudflare.com/browser-rendering/platform/playwright/) * [Playwright MCP](https://developers.cloudflare.com/browser-rendering/platform/playwright-mcp/) * [Puppeteer](https://developers.cloudflare.com/browser-rendering/platform/puppeteer/) * [Wrangler](https://developers.cloudflare.com/browser-rendering/platform/wrangler/) * [Browser close reasons](https://developers.cloudflare.com/browser-rendering/platform/browser-close-reasons/) * [Limits](https://developers.cloudflare.com/browser-rendering/platform/limits/) * [Pricing](https://developers.cloudflare.com/browser-rendering/platform/pricing/) --- title: Reference · Browser Rendering docs lastUpdated: 2025-04-29T17:06:07.000Z chatbotDeprioritize: true source_url: html: https://developers.cloudflare.com/browser-rendering/reference/ md: https://developers.cloudflare.com/browser-rendering/reference/index.md --- * [Automatic request headers](https://developers.cloudflare.com/browser-rendering/reference/automatic-request-headers/) --- title: REST API · Browser Rendering docs description: >- The REST API is a RESTful interface that provides endpoints for common browser actions such as capturing screenshots, extracting HTML content, generating PDFs, and more. The following are the available options: lastUpdated: 2025-06-24T20:37:11.000Z chatbotDeprioritize: false source_url: html: https://developers.cloudflare.com/browser-rendering/rest-api/ md: https://developers.cloudflare.com/browser-rendering/rest-api/index.md --- The REST API is a RESTful interface that provides endpoints for common browser actions such as capturing screenshots, extracting HTML content, generating PDFs, and more. The following are the available options: * [/content - Fetch HTML](https://developers.cloudflare.com/browser-rendering/rest-api/content-endpoint/) * [/screenshot - Capture screenshot](https://developers.cloudflare.com/browser-rendering/rest-api/screenshot-endpoint/) * [/pdf - Render PDF](https://developers.cloudflare.com/browser-rendering/rest-api/pdf-endpoint/) * [/snapshot - Take a webpage snapshot](https://developers.cloudflare.com/browser-rendering/rest-api/snapshot/) * [/scrape - Scrape HTML elements](https://developers.cloudflare.com/browser-rendering/rest-api/scrape-endpoint/) * [/json - Capture structured data](https://developers.cloudflare.com/browser-rendering/rest-api/json-endpoint/) * [/links - Retrieve links from a webpage](https://developers.cloudflare.com/browser-rendering/rest-api/links-endpoint/) * [/markdown - Extract Markdown from a webpage](https://developers.cloudflare.com/browser-rendering/rest-api/markdown-endpoint/) * [Reference](https://developers.cloudflare.com/api/resources/browser_rendering/) Use the REST API when you need a fast, simple way to perform common browser tasks such as capturing screenshots, extracting HTML, or generating PDFs without writing complex scripts. If you require more advanced automation, custom workflows, or persistent browser sessions, [Workers Bindings](https://developers.cloudflare.com/browser-rendering/workers-bindings/) are the better choice. ## Before you begin Before you begin, make sure you [create a custom API Token](https://developers.cloudflare.com/fundamentals/api/get-started/create-token/) with the following permissions: * `Browser Rendering - Edit` Note Currently, the Cloudflare dashboard displays usage metrics exclusively for the [Workers Bindings method](https://developers.cloudflare.com/browser-rendering/workers-bindings/). Usage data for the REST API is not yet available in the dashboard. We are actively working on adding REST API usage metrics to the dashboard. --- title: Workers Bindings · Browser Rendering docs description: "Workers Bindings allow you to execute advanced browser rendering scripts within Cloudflare Workers. They provide developers the flexibility to automate and control complex workflows and browser interactions. The following options are available for browser rendering tasks:" lastUpdated: 2025-06-24T20:37:11.000Z chatbotDeprioritize: false source_url: html: https://developers.cloudflare.com/browser-rendering/workers-bindings/ md: https://developers.cloudflare.com/browser-rendering/workers-bindings/index.md --- Workers Bindings allow you to execute advanced browser rendering scripts within Cloudflare Workers. They provide developers the flexibility to automate and control complex workflows and browser interactions. The following options are available for browser rendering tasks: * [Deploy a Browser Rendering Worker](https://developers.cloudflare.com/browser-rendering/workers-bindings/screenshots/) * [Deploy a Browser Rendering Worker with Durable Objects](https://developers.cloudflare.com/browser-rendering/workers-bindings/browser-rendering-with-do/) * [Reuse sessions](https://developers.cloudflare.com/browser-rendering/workers-bindings/reuse-sessions/) Use Workers Bindings when you need advanced browser automation, custom workflows, or complex interactions beyond basic rendering. For quick, one-off tasks like capturing screenshots or extracting HTML, the [REST API](https://developers.cloudflare.com/browser-rendering/rest-api/) is the simpler choice. --- title: 404 - Page Not Found · Cloudflare for Platforms docs chatbotDeprioritize: false source_url: html: https://developers.cloudflare.com/cloudflare-for-platforms/404/ md: https://developers.cloudflare.com/cloudflare-for-platforms/404/index.md --- # 404 Check the URL, try using our [search](https://developers.cloudflare.com/search/) or try our LLM-friendly [llms.txt directory](https://developers.cloudflare.com/llms.txt). --- title: Cloudflare for SaaS · Cloudflare for Platforms docs description: Cloudflare for SaaS allows you to extend the security and performance benefits of Cloudflare's network to your customers via their own custom or vanity domains. lastUpdated: 2024-09-16T18:29:37.000Z chatbotDeprioritize: false source_url: html: https://developers.cloudflare.com/cloudflare-for-platforms/cloudflare-for-saas/ md: https://developers.cloudflare.com/cloudflare-for-platforms/cloudflare-for-saas/index.md --- Cloudflare for SaaS allows you to extend the security and performance benefits of Cloudflare's network to your customers via their own custom or vanity domains. As a SaaS provider, you may want to support subdomains under your own zone in addition to letting your customers use their own domain names with your services. For example, a customer may want to use their vanity domain `app.customer.com` to point to an application hosted on your Cloudflare zone `service.saas.com`. Cloudflare for SaaS allows you to increase security, performance, and reliability of your customers' domains. Note Enterprise customers can preview this product as a [non-contract service](https://developers.cloudflare.com/billing/preview-services/), which provides full access, free of metered usage fees, limits, and certain other restrictions. ## Benefits When you use Cloudflare for SaaS, it helps you to: * Provide custom domain support. * Keep your customers' traffic encrypted. * Keep your customers online. * Facilitate fast load times of your customers' domains. * Gain insight through traffic analytics. ## Limitations If your customers already have their applications on Cloudflare, they cannot control some Cloudflare features for hostnames managed by your Custom Hostnames configuration, including: * Argo * Early Hints * Page Shield * Spectrum * Wildcard DNS ## How it works As the SaaS provider, you can extend Cloudflare's products to customer-owned custom domains by adding them to your zone [as custom hostnames](https://developers.cloudflare.com/cloudflare-for-platforms/cloudflare-for-saas/domain-support/). Through a suite of easy-to-use products, Cloudflare for SaaS routes traffic from custom hostnames to an origin, set up on your domain. Cloudflare for SaaS is highly customizable. Three possible configurations are shown below. ### Standard Cloudflare for SaaS configuration: Custom hostnames are routed to a default origin server called fallback origin. This configuration is available on all plans. ![Standard case](https://developers.cloudflare.com/_astro/Standard.DlPYrpsG_BsBAs.webp) ### Cloudflare for SaaS with Apex Proxying: This allows you to support apex domains even if your customers are using a DNS provider that does not allow a CNAME at the apex. This is available as an add-on for Enterprise plans. For more details, refer to [Apex Proxying](https://developers.cloudflare.com/cloudflare-for-platforms/cloudflare-for-saas/start/advanced-settings/apex-proxying/). ![Advanced case](https://developers.cloudflare.com/_astro/Advanced.BaQXgT8v_8tWwi.webp) ### Cloudflare for SaaS with BYOIP: This allows you to support apex domains even if your customers are using a DNS provider that does not allow a CNAME at the apex. Also, you can point to your own IPs if you want to bring an IP range to Cloudflare (instead of Cloudflare provided IPs). This is available as an add-on for Enterprise plans. ![Pro Case](https://developers.cloudflare.com/_astro/Pro.DTAC_nZK_WB4Ea.webp) ## Availability Cloudflare for SaaS is bundled with non-Enterprise plans and available as an add-on for Enterprise plans. For more details, refer to [Plans](https://developers.cloudflare.com/cloudflare-for-platforms/cloudflare-for-saas/plans/). ## Next steps [Get started](https://developers.cloudflare.com/cloudflare-for-platforms/cloudflare-for-saas/start/getting-started/) [Learn more](https://blog.cloudflare.com/introducing-ssl-for-saas/) --- title: Workers for Platforms · Cloudflare for Platforms docs description: Workers for Platforms allows you to run your own code as a wrapper around your user's code. With Workers for Platforms, you can logically group your code separately from your users' code, create custom logic, and use additional APIs such as script tags for bulk operations. lastUpdated: 2025-03-03T16:27:50.000Z chatbotDeprioritize: false source_url: html: https://developers.cloudflare.com/cloudflare-for-platforms/workers-for-platforms/ md: https://developers.cloudflare.com/cloudflare-for-platforms/workers-for-platforms/index.md --- Deploy custom code on behalf of your users or let your users directly deploy their own code to your platform, managing infrastructure. Available on Paid plans Workers for Platforms allows you to run your own code as a wrapper around your user's code. With Workers for Platforms, you can logically group your code separately from your users' code, create custom logic, and use additional APIs such as [script tags](https://developers.cloudflare.com/cloudflare-for-platforms/workers-for-platforms/configuration/tags/) for bulk operations. Workers for Platforms is built on top of [Cloudflare Workers](https://developers.cloudflare.com/workers/). Workers for Platforms lets you surpass Cloudflare Workers' 500 scripts per account [limit](https://developers.cloudflare.com/cloudflare-for-platforms/workers-for-platforms/platform/limits/). *** ## Features ### Get started Learn how to set up Workers for Platforms. [Get started](https://developers.cloudflare.com/cloudflare-for-platforms/workers-for-platforms/get-started/configuration/) ### Workers for Platforms architecture Learn about Workers for Platforms architecture. [Learn more](https://developers.cloudflare.com/cloudflare-for-platforms/workers-for-platforms/reference/how-workers-for-platforms-works/) *** ## Related products **[Workers](https://developers.cloudflare.com/workers/)** Cloudflare Workers provides a serverless execution environment that allows you to create new applications or augment existing ones without configuring or maintaining infrastructure. *** ## More resources [Limits](https://developers.cloudflare.com/cloudflare-for-platforms/workers-for-platforms/platform/limits/) Learn about limits that apply to your Workers for Platforms project. [Developer Discord](https://discord.cloudflare.com) Connect with the Workers community on Discord to ask questions, show what you are building, and discuss the platform with other developers. [@CloudflareDev](https://x.com/cloudflaredev) Follow @CloudflareDev on Twitter to learn about product announcements, and what is new in Cloudflare Workers. --- title: 404 - Page Not Found · Constellation docs chatbotDeprioritize: false source_url: html: https://developers.cloudflare.com/constellation/404/ md: https://developers.cloudflare.com/constellation/404/index.md --- # 404 Check the URL, try using our [search](https://developers.cloudflare.com/search/) or try our LLM-friendly [llms.txt directory](https://developers.cloudflare.com/llms.txt). --- title: Platform · Constellation docs lastUpdated: 2024-08-13T19:56:56.000Z chatbotDeprioritize: false source_url: html: https://developers.cloudflare.com/constellation/platform/ md: https://developers.cloudflare.com/constellation/platform/index.md --- * [Client API](https://developers.cloudflare.com/constellation/platform/client-api/) --- title: 404 - Page Not Found · Containers docs chatbotDeprioritize: false source_url: html: https://developers.cloudflare.com/containers/404/ md: https://developers.cloudflare.com/containers/404/index.md --- # 404 Check the URL, try using our [search](https://developers.cloudflare.com/search/) or try our LLM-friendly [llms.txt directory](https://developers.cloudflare.com/llms.txt). --- title: Architecture · Containers docs description: This page describes the architecture of Cloudflare Containers. lastUpdated: 2025-06-24T15:02:00.000Z chatbotDeprioritize: false source_url: html: https://developers.cloudflare.com/containers/architecture/ md: https://developers.cloudflare.com/containers/architecture/index.md --- This page describes the architecture of Cloudflare Containers. ## How and where containers run After you deploy a Worker that uses a Container, your image is uploaded to [Cloudflare's Registry](https://developers.cloudflare.com/containers/image-management) and distributed globally to Cloudflare's Network. Cloudflare will pre-schedule instances and pre-fetch images across the globe to ensure quick start times when scaling up the number of concurrent container instances. This allows you to call `env.YOUR_CONTAINER.get(id)` and get a new instance quickly without worrying about the underlying scaling. When a request is made to start a new container instance, the nearest location with a pre-fetched image is selected. Subsequent requests to the same instance, regardless of where they originate, will be routed to this location as long as the instance stays alive. Starting additional container instances will use other locations with pre-fetched images, and Cloudflare will automatically begin prepping additional machines behind the scenes for additional scaling and quick cold starts. Because there are a finite number pre-warmed locations, some container instances may be started in locations that are farther away from the end-user. This is done to ensure that the container instance starts quickly. You are only charged for actively running instances and not for any unused pre-warmed images. Each container instance runs inside its own VM, which provides strong isolation from other workloads running on Cloudflare's network. Containers should be built for the `linux/amd64` architecture, and should stay within [size limits](https://developers.cloudflare.com/containers/platform-details/#limits). Logging, metrics collection, and networking are automatically set up on each container. ## Life of a Container Request When a request is made to any Worker, including one with an associated Container, it is generally handled by a datacenter in a location with the best latency between itself and the requesting user. A different datacenter may be selected to optimize overall latency, if [Smart Placement](https://developers.cloudflare.com/workers/configuration/smart-placement/) is on, or if the nearest location is under heavy load. When a request is made to a Container instance, it is sent through a Durable Object, which can be defined by either using a `DurableObject` or the [`Container` class](https://developers.cloudflare.com/containers/container-package), which extends Durable Objects with Container-specific APIs and helpers. We recommend using `Container`, see the [`Container` class documentation](https://developers.cloudflare.com/containers/container-package) for more details. Each Durable Object is a globally routable isolate that can execute code and store state. This allows developers to easily address and route to specific container instances (no matter where they are placed), define and run hooks on container status changes, execute recurring checks on the instance, and store persistent state associated with each instance. As mentioned above, when a container instance starts, it is launched in the nearest pre-warmed location. This means that code in a container is usually executed in a different location than the one handling the Workers request. Note Currently, Durable Objects may be co-located with their associated Container instance, but often are not. Cloudflare is currently working on expanding the number of locations in which a Durable Object can run, which will allow container instances to always run in the same location as their Durable Object. Because all Container requests are passed through a Worker, end-users cannot make TCP or UDP requests to a Container instance. If you have a use case that requires inbound TCP or UDP from an end-user, please [let us know](https://forms.gle/AGSq54VvUje6kmKu8). --- title: Beta Info & Roadmap · Containers docs description: "Currently, Containers are in beta. There are several changes we plan to make prior to GA:" lastUpdated: 2025-06-24T15:02:00.000Z chatbotDeprioritize: false source_url: html: https://developers.cloudflare.com/containers/beta-info/ md: https://developers.cloudflare.com/containers/beta-info/index.md --- Currently, Containers are in beta. There are several changes we plan to make prior to GA: ## Upcoming Changes and Known Gaps ### Limits Container limits will be raised in the future. We plan to increase both maximum instance size and maximum number of instances in an account. See the [Limits documentation](https://developers.cloudflare.com/containers/platform-details/#limits) for more information. ### Autoscaling and load balancing Currently, Containers are not autoscaled or load balanced. Containers can be scaled manually by calling `get()` on their binding with a unique ID. We plan to add official support for utilization-based autoscaling and latency-aware load balancing in the future. See the [Autoscaling documentation](https://developers.cloudflare.com/containers/scaling-and-routing) for more information. ### Reduction of log noise Currently, the `Container` class uses Durable Object alarms to help manage Container shutdown. This results in unnecessary log noise in the Worker logs. You can filter these logs out in the dashboard by adding a Query, but this is not ideal. We plan to automatically reduce log noise in the future. ### Dashboard Updates The dashboard will be updated to show: * the status of Container rollouts * links from Workers to their associated Containers ### Co-locating Durable Objects and Containers Currently, Durable Objects are not co-located with their associated Container. When requesting a container, the Durable Object will find one close to it, but not on the same machine. We plan to co-locate Durable Objects with their Container in the future. ### More advanced Container placement We currently prewarm servers across our global network with container images to ensure quick start times. There are times in which you may request a new container and it will be started in a location that farther from the end user than is desired. We are optimizing this process to ensure that this happens as little as possible, but it may still occur. ### Atomic code updates across Workers and Containers When deploying a Container with `wrangler deploy`, the Worker code will be immediately updated while the Container code will slowly be updated using a rolling deploy. This means that you must ensure Worker code is backwards compatible with the old Container code. In the future, Worker code in the Durable Object will only update when associated Container code updates. ## Feedback wanted There are several areas where we wish to gather feedback from users: * Do you want to integrate Containers with any other Cloudflare services? If so, which ones and how? * Do you want more ways to interact with a Container via Workers? If so, how? * Do you need different mechanisms for routing requests to containers? * Do you need different mechanisms for scaling containers? (see [scaling documentation](https://developers.cloudflare.com/containers/scaling-and-routing) for information on autoscaling plans) At any point during the Beta, feel free to [give feedback using this form](https://forms.gle/CscdaEGuw5Hb6H2s7). --- title: Container Package · Containers docs description: >- When writing code that interacts with a container instance, you can either use a Durable Object directly or use the Container module importable from @cloudflare/containers. lastUpdated: 2025-06-24T15:02:00.000Z chatbotDeprioritize: false source_url: html: https://developers.cloudflare.com/containers/container-package/ md: https://developers.cloudflare.com/containers/container-package/index.md --- When writing code that interacts with a container instance, you can either use a Durable Object directly or use the [`Container` module](https://github.com/cloudflare/containers) importable from [`@cloudflare/containers`](https://www.npmjs.com/package/@cloudflare/containers). ```javascript import { Container } from "@cloudflare/containers"; class MyContainer extends Container { defaultPort = 8080; sleepAfter = "5m"; } ``` We recommend using the `Container` class for most use cases. Install it with `npm install @cloudflare/containers`. The `Container` class extends `DurableObject` so all Durable Object functionality is available. It also provides additional functionality and a nice interface for common container behaviors, such as: * sleeping instances after an inactivity timeout * making requests to specific ports * running status hooks on startup, stop, or error * awaiting specific ports before making requests * setting environment variables and secrets See the [Containers GitHub repo](https://github.com/cloudflare/containers) for more details and the complete API. --- title: Durable Object Interface · Containers docs lastUpdated: 2025-06-24T15:02:00.000Z chatbotDeprioritize: false source_url: html: https://developers.cloudflare.com/containers/durable-object-methods/ md: https://developers.cloudflare.com/containers/durable-object-methods/index.md --- --- title: Examples · Containers docs description: "Explore the following examples of Container functionality:" lastUpdated: 2025-06-24T15:02:00.000Z chatbotDeprioritize: false source_url: html: https://developers.cloudflare.com/containers/examples/ md: https://developers.cloudflare.com/containers/examples/index.md --- Explore the following examples of Container functionality: [Cron Container](https://developers.cloudflare.com/containers/examples/cron/) Running a container on a schedule using Cron Triggers [Env Vars and Secrets](https://developers.cloudflare.com/containers/examples/env-vars-and-secrets/) Pass in environment variables and secrets to your container [Stateless Instances](https://developers.cloudflare.com/containers/examples/stateless/) Run multiple instances across Cloudflare's network [Static Frontend, Container Backend](https://developers.cloudflare.com/containers/examples/container-backend/) A simple frontend app with a containerized backend [Status Hooks](https://developers.cloudflare.com/containers/examples/status-hooks/) Execute Workers code in reaction to Container status changes [Using Durable Objects Directly](https://developers.cloudflare.com/containers/examples/durable-object-interface/) Various examples calling Containers directly from Durable Objects [Websocket to Container](https://developers.cloudflare.com/containers/examples/websocket/) Forwarding a Websocket request to a Container --- title: Frequently Asked Questions · Containers docs description: "Frequently Asked Questions:" lastUpdated: 2025-07-16T14:37:31.000Z chatbotDeprioritize: true source_url: html: https://developers.cloudflare.com/containers/faq/ md: https://developers.cloudflare.com/containers/faq/index.md --- Frequently Asked Questions: ## How do Container logs work? To get logs in the Dashboard, including live tailing of logs, toggle `observability` to true in your Worker's wrangler config: * wrangler.jsonc ```jsonc { "observability": { "enabled": true } } ``` * wrangler.toml ```toml [observability] enabled = true ``` Logs are subject to the same [limits as Worker logs](https://developers.cloudflare.com/workers/observability/logs/workers-logs/#limits), which means that they are retained for 3 days on Free plans and 7 days on Paid plans. See [Workers Logs Pricing](https://developers.cloudflare.com/workers/observability/logs/workers-logs/#pricing) for details on cost. If you are an Enterprise user, you are able to export container logs via [Logpush](https://developers.cloudflare.com/logs/logpush/) to your preferred destination. ## How are container instance locations selected? When initially deploying a Container, Cloudflare will select various locations across our network to deploy instances to. These locations will span multiple regions. When a Container instance is requested with `this.ctx.container.start`, the nearest free container instance will be selected from the pre-initialized locations. This will likely be in the same region as the external request, but may not be. Once the container instance is running, any future requests will be routed to the initial location. An Example: * A user deploys a Container. Cloudflare automatically readies instances across its Network. * A request is made from a client in Bariloche, Argentia. It reaches the Worker in Cloudflare's location in Neuquen, Argentina. * This Worker request calls `MY_CONTAINER.get("session-1337")` which brings up a Durable Object, which then calls `this.ctx.container.start`. * This requests the nearest free Container instance. * Cloudflare recognizes that an instance is free in Buenos Aires, Argentina, and starts it there. * A different user needs to route to the same container. This user's request reaches the Worker running in Cloudflare's location in San Diego. * The Worker again calls `MY_CONTAINER.get("session-1337")`. * If the initial container instance is still running, the request is routed to the location in Buenos Aires. If the initial container has gone to sleep, Cloudflare will once again try to find the nearest "free" instance of the Container, likely one in North America, and start an instance there. ## How do container updates and rollouts work? When you run `wrangler deploy`, the Worker code is updated immediately and Container instances are updated using a rolling deploy strategy. Container instances are updated in batches, with 25% of instances being updated at a time by default. When a Container instance is ready to be stopped, it is sent a `SIGTERM` signal, which allows it to gracefully shut down. If the instance does not stop within 15 minutes, it is forcefully stopped with a `SIGKILL` signal. If you have cleanup that must occur before a Container instance is stopped, you should do it during this period. Once stopped, the instance is replaced with a new instance running the updated code. When the new instance starts, requests will hang during container startup. ## How does scaling work? See [scaling & routing documentation](https://developers.cloudflare.com/containers/scaling-and-routing/) for details. ## What are cold starts? How fast are they? A cold start is when a container instance is started from a completely stopped state. If you call `env.MY_CONTAINER.get(id)` with a completely novel ID and launch this instance for the first time, it will result in a cold start. This will start the container image from its entrypoint for the first time. Depending on what this entrypoint does, it will take a variable amount of time to start. Container cold starts can often be the 2-3 second range, but this is dependent on image size and code execution time, among other factors. ## How do I use an existing container image? See [image management documentation](https://developers.cloudflare.com/containers/image-management/#using-existing-images) for details. ## Is disk persistent? What happens to my disk when my container sleeps? All disk is ephemeral. When a Container instance goes to sleep, the next time it is started, it will have a fresh disk as defined by its container image. Persistent disk is something the Cloudflare team is exploring in the future, but is not slated for the near term. ## What happens if I run out of memory? If you run out of memory, your instance will throw an Out of Memory (OOM) error and will be restarted. Containers do not use swap memory. ## How long can instances run for? What happens when a host server is shutdown? Cloudflare will not actively shut off a container instance after a specific amount of time. If you do not set `sleepAfter` on your Container class, or stop the instance manually, it will continue to run unless its host server is restarted. This happens on an irregular cadence, but frequently enough where Cloudflare does not guarantee that any instance will run for any set period of time. When a container instance is going to be shut down, it is sent a `SIGTERM` signal, and then a `SIGKILL` signal after 15 minutes. You should perform any necessary cleanup to ensure a graceful shutdown in this time. The container instance will be rebooted elsewhere shortly after this. ## How can I pass secrets to my container? You can use [Worker Secrets](https://developers.cloudflare.com/workers/configuration/secrets/) or the [Secrets Store](https://developers.cloudflare.com/secrets-store/integrations/workers/) to define secrets for your Workers. Then you can pass these secrets to your Container using the `envVars` property: ```javascript class MyContainer extends Container { defaultPort = 5000; envVars = { MY_SECRET: this.env.MY_SECRET, }; } ``` Or when starting a Container instance on a Durable Object: ```javascript this.ctx.container.start({ env: { MY_SECRET: this.env.MY_SECRET, }, }); ``` See [the Env Vars and Secrets Example](https://developers.cloudflare.com/containers/examples/env-vars-and-secrets/) for details. ## How do I allow or disallow egress from my container? When booting a Container, you can specify `enableInternet`, which will toggle internet access on or off. To disable it, configure it on your Container class: ```javascript class MyContainer extends Container { defaultPort = 7000; enableInternet = false; } ``` or when starting a Container instance on a Durable Object: ```javascript this.ctx.container.start({ enableInternet: false, }); ``` --- title: Getting started · Containers docs description: >- In this guide, you will deploy a Worker that can make requests to one or more Containers in response to end-user requests. In this example, each container runs a small webserver written in Go. lastUpdated: 2025-06-26T18:54:35.000Z chatbotDeprioritize: false source_url: html: https://developers.cloudflare.com/containers/get-started/ md: https://developers.cloudflare.com/containers/get-started/index.md --- In this guide, you will deploy a Worker that can make requests to one or more Containers in response to end-user requests. In this example, each container runs a small webserver written in Go. This example Worker should give you a sense for simple Container use, and provide a starting point for more complex use cases. ## Prerequisites ### Ensure Docker is running locally In this guide, we will build and push a container image alongside your Worker code. By default, this process uses [Docker](https://www.docker.com/) to do so. You must have Docker running locally when you run `wrangler deploy`. For most people, the best way to install Docker is to follow the [docs for installing Docker Desktop](https://docs.docker.com/desktop/). You can check that Docker is running properly by running the `docker info` command in your terminal. If Docker is running, the command will succeed. If Docker is not running, the `docker info` command will hang or return an error including the message "Cannot connect to the Docker daemon". ## Deploy your first Container Run the following command to create and deploy a new Worker with a container, from the starter template: ```sh npm create cloudflare@latest -- --template=cloudflare/templates/containers-template ``` When you want to deploy a code change to either the Worker or Container code, you can run the following command using [Wrangler CLI](https://developers.cloudflare.com/workers/wrangler/): * npm ```sh npx wrangler deploy ``` * yarn ```sh yarn wrangler deploy ``` * pnpm ```sh pnpm wrangler deploy ``` When you run `wrangler deploy`, the following things happen: * Wrangler builds your container image using Docker. * Wrangler pushes your image to a [Container Image Registry](https://developers.cloudflare.com/containers/image-management/) that is automatically integrated with your Cloudflare account. * Wrangler deploys your Worker, and configures Cloudflare's network to be ready to spawn instances of your container The build and push usually take the longest on the first deploy. Subsequent deploys are faster, because they [reuse cached image layers](https://docs.docker.com/build/cache/). Note After you deploy your Worker for the first time, you will need to wait several minutes until it is ready to receive requests. Unlike Workers, Containers take a few minutes to be provisioned. During this time, requests are sent to the Worker, but calls to the Container will error. ### Check deployment status After deploying, run the following command to show a list of containers containers in your Cloudflare account, and their deployment status: * npm ```sh npx wrangler containers list ``` * yarn ```sh yarn wrangler containers list ``` * pnpm ```sh pnpm wrangler containers list ``` And see images deployed to the Cloudflare Registry with the following command: * npm ```sh npx wrangler containers images list ``` * yarn ```sh yarn wrangler containers images list ``` * pnpm ```sh pnpm wrangler containers images list ``` ### Make requests to Containers Now, open the URL for your Worker. It should look something like `https://hello-containers.YOUR_ACCOUNT_NAME.workers.dev`. If you make requests to the paths `/container/1` or `/container/2`, these requests are routed to specific containers. Each different path after "/container/" routes to a unique container. If you make requests to `/lb`, you will load balanace requests to one of 3 containers chosen at random. You can confirm this behavior by reading the output of each request. ## Understanding the Code Now that you've deployed your first container, let's explain what is happening in your Worker's code, in your configuration file, in your container's code, and how requests are routed. ## Each Container is backed by its own Durable Object Incoming requests are initially handled by the Worker, then passed to a container-enabled [Durable Object](https://developers.cloudflare.com/durable-objects). To simplify and reduce boilerplate code, Cloudflare provides a [`Container` class](https://github.com/cloudflare/containers) as part of the `@cloudflare/containers` NPM package. You don't have to be familiar with Durable Objects to use Containers, but it may be helpful to understand the basics. Each Durable Object runs alongside an individual container instance, manages starting and stopping it, and can interact with the container through its ports. Containers will likely run near the Worker instance requesting them, but not necessarily. Refer to ["How Locations are Selected"](https://developers.cloudflare.com/containers/platform-details/#how-are-locations-are-selected) for details. In a simple app, the Durable Object may just boot the container and proxy requests to it. In a more complex app, having container-enabled Durable Objects allows you to route requests to individual stateful container instances, manage the container lifecycle, pass in custom starting commands and environment variables to containers, run hooks on container status changes, and more. See the [documentation for Durable Object container methods](https://developers.cloudflare.com/durable-objects/api/container/) and the [`Container` class repository](https://github.com/cloudflare/containers) for more details. ### Configuration Your [Wrangler configuration file](https://developers.cloudflare.com/workers/wrangler/configuration/) defines the configuration for both your Worker and your container: * wrangler.jsonc ```jsonc { "containers": [ { "max_instances": 10, "name": "hello-containers", "class_name": "MyContainer", "image": "./Dockerfile" } ], "durable_objects": { "bindings": [ { "name": "MY_CONTAINER", "class_name": "MyContainer" } ] }, "migrations": [ { "tag": "v1", "new_sqlite_classes": [ "MyContainer" ] } ] } ``` * wrangler.toml ```toml [[containers]] max_instances = 10 name = "hello-containers" class_name = "MyContainer" image = "./Dockerfile" [[durable_objects.bindings]] name = "MY_CONTAINER" class_name = "MyContainer" [[migrations]] tag = "v1" new_sqlite_classes = ["MyContainer"] ``` Important points about this config: * `image` points to a Dockerfile or to a directory containing a Dockerfile. * `class_name` must be a [Durable Object class name](https://developers.cloudflare.com/durable-objects/api/base/). * `max_instances` declares the maximum number of simultaneously running container instances that will run. * The Durable Object must use [`new_sqlite_classes`](https://developers.cloudflare.com/durable-objects/best-practices/access-durable-objects-storage/#create-sqlite-backed-durable-object-class) not `new_classes`. ### The Container Image Your container image must be able to run on the `linux/amd64` architecture, but aside from that, has few limitations. In the example you just deployed, it is a simple Golang server that responds to requests on port 8080 using the `MESSAGE` environment variable that will be set in the Worker and an [auto-generated environment variable](https://developers.cloudflare.com/containers/platform-details/#environment-variables) `CLOUDFLARE_DEPLOYMENT_ID.` ```go func handler(w http.ResponseWriter, r *http.Request) { message := os.Getenv("MESSAGE") instanceId := os.Getenv("CLOUDFLARE_DEPLOYMENT_ID") fmt.Fprintf(w, "Hi, I'm a container and this is my message: %s, and my instance ID is: %s", message, instanceId) } ``` Note After deploying the example code, to deploy a different image, you can replace the provided image with one of your own. ### Worker code #### Container Configuration First note `MyContainer` which extends the [`Container`](https://github.com/cloudflare/containers) class: ```js export class MyContainer extends Container { defaultPort = 8080; sleepAfter = '10s'; envVars = { MESSAGE: 'I was passed in via the container class!', }; override onStart() { console.log('Container successfully started'); } override onStop() { console.log('Container successfully shut down'); } override onError(error: unknown) { console.log('Container error:', error); } } ``` This defines basic configuration for the container: * `defaultPort` sets the port that the `fetch` and `containerFetch` methods will use to communicate with the container. It also blocks requests until the container is listening on this port. * `sleepAfter` sets the timeout for the container to sleep after it has been idle for a certain amount of time. * `envVars` sets environment variables that will be passed to the container when it starts. * `onStart`, `onStop`, and `onError` are hooks that run when the container starts, stops, or errors, respectively. See the [Container class documentation](https://developers.cloudflare.com/containers/container-package) for more details and configuration options. #### Routing to Containers When a request enters Cloudflare, your Worker's [`fetch` handler](https://developers.cloudflare.com/workers/runtime-apis/handlers/fetch/) is invoked. This is the code that handles the incoming request. The fetch handler in the example code, launches containers in two ways, on different routes: * Making requests to `/container/` passes requests to a new container for each path. This is done by spinning up a new Container instance. You may note that the first request to a new path takes longer than subsequent requests, this is because a new container is booting. ```js if (pathname.startsWith("/container")) { const id = env.MY_CONTAINER.idFromName(pathname); const container = env.MY_CONTAINER.get(id); return await container.fetch(request); } ``` * Making requests to `/lb` will load balance requests across several containers. This uses a simple `getRandom` helper method, which picks an ID at random from a set number (in this case 3), then routes to that Container instance. You can replace this with any routing or load balancing logic you choose to implement: ```js if (pathname.startsWith("/lb")) { const container = await getRandom(env.MY_CONTAINER, 3); return await container.fetch(request); } ``` This allows for multiple ways of using Containers: * If you simply want to send requests to many stateless and interchangeable containers, you should load balance. * If you have stateful services or need individually addressable containers, you should request specific Container instances. * If you are running short-lived jobs, want fine-grained control over the container lifecycle, want to parameterize container entrypoint or env vars, or want to chain together multiple container calls, you should request specific Container instances. Note Currently, routing requests to one of many interchangeable Container instances is accomplished with the `getRandom` helper. This is temporary — we plan to add native support for latency-aware autoscaling and load balancing in the coming months. ## View Containers in your Dashboard The [Containers Dashboard](http://dash.cloudflare.com/?to=/:account/workers/containers) shows you helpful information about your Containers, including: * Status and Health * Metrics * Logs * A link to associated Workers and Durable Objects After launching your Worker, navigate to the Containers Dashboard by clicking on "Containers" under "Workers & Pages" in your sidebar. ## Next Steps To do more: * Modify the image by changing the Dockerfile and calling `wrangler deploy` * Review our [examples](https://developers.cloudflare.com/containers/examples) for more inspiration * Get [more information on the Containers Beta](https://developers.cloudflare.com/containers/beta-info) --- title: Image Management · Containers docs description: >- When running wrangler deploy, if you set the image attribute in you Wrangler configuration file to a path, wrangler will build your container image locally using Docker, then push it to a registry run by Cloudflare. This registry is integrated with your Cloudflare account and is backed by R2. All authentication is handled automatically by Cloudflare both when pushing and pulling images. lastUpdated: 2025-06-26T18:39:44.000Z chatbotDeprioritize: true source_url: html: https://developers.cloudflare.com/containers/image-management/ md: https://developers.cloudflare.com/containers/image-management/index.md --- ## Pushing images during `wrangler deploy` When running `wrangler deploy`, if you set the `image` attribute in you [Wrangler configuration](https://developers.cloudflare.com/workers/wrangler/configuration/#containers) file to a path, wrangler will build your container image locally using Docker, then push it to a registry run by Cloudflare. This registry is integrated with your Cloudflare account and is backed by [R2](https://developers.cloudflare.com/r2/). All authentication is handled automatically by Cloudflare both when pushing and pulling images. Just provide the path to your Dockerfile: * wrangler.jsonc ```jsonc { "containers": { "image": "./Dockerfile" // ...rest of config... } } ``` * wrangler.toml ```toml [containers] image = "./Dockerfile" ``` And deploy your Worker with `wrangler deploy`. No other image management is necessary. On subsequent deploys, Wrangler will only push image layers that have changed, which saves space and time on `wrangler deploy` calls after the initial deploy. Note Docker or a Docker-compatible CLI tool must be running for Wrangler to build and push images. ## Using pre-built container images If you wish to use a pre-built image, first, push it to the Cloudflare Registry: Wrangler provides a command to push images to the Cloudflare Registry: * npm ```sh npx wrangler containers push : ``` * yarn ```sh yarn wrangler containers push : ``` * pnpm ```sh pnpm wrangler containers push : ``` Additionally, you can use the `-p` flag with `wrangler containers build` to build and push an image in one step: * npm ```sh npx wrangler containers build -p -t . ``` * yarn ```sh yarn wrangler containers build -p -t . ``` * pnpm ```sh pnpm wrangler containers build -p -t . ``` Then you can specify the URL in the image attribute: * wrangler.jsonc ```jsonc { "containers": { "image": "registry.cloudflare.com/your-namespace/your-image:tag" // ...rest of config... } } ``` * wrangler.toml ```toml [containers] image = "registry.cloudflare.com/your-namespace/your-image:tag" ``` Currently, all images must use `registry.cloudflare.com`, which is the default registry for Wrangler. To use an existing image from another repo, you can pull it, tag it, then push it to the Cloudflare Registry: ```bash docker pull docker tag : wrangler containers push : ``` Note We plan to allow configuring public images directly in wrangler config. Cloudflare will download your image, optionally using auth credentials, then cache it globally in the Cloudflare Registry. This is not yet available. ## Pushing images with CI To use an image built in a continuous integration environment, install `wrangler` then build and pushi images using either `wrangler containers build` with the `--push` flag, or using the `wrangler containers push` command. ## Registry Limits Images are limited to 2 GB in size and you are limited to 50 total GB in your account's registry. Note These limits will likely increase in the future. Delete images with `wrangler containers delete` to free up space, but note that reverting a Worker to a previous version that uses a deleted image will then error. --- title: Local Development · Containers docs description: You can run both your container and your Worker locally, without additional configuration, by running npx wrangler dev in your project's directory. lastUpdated: 2025-07-10T11:49:53.000Z chatbotDeprioritize: false source_url: html: https://developers.cloudflare.com/containers/local-dev/ md: https://developers.cloudflare.com/containers/local-dev/index.md --- You can run both your container and your Worker locally, without additional configuration, by running [`npx wrangler dev`](https://developers.cloudflare.com/workers/wrangler/commands/#dev) in your project's directory. To develop Container-enabled Workers locally, you will need to first ensure that a Docker compatible CLI tool and Engine are installed. For instance, you can use [Docker Desktop](https://docs.docker.com/desktop/) on Mac, Windows, or Linux. When you run `wrangler dev`, your container image will be built or downloaded. If your [wrangler configuration](https://developers.cloudflare.com/workers/wrangler/configuration/#containers) sets the `image` attribute to a local path, the image will be built using the local Dockerfile. If the `image` attribute is set to a URL, the image will be pulled from the associated registry. Container instances will be launched locally when your Worker code calls to create a new container. This may happen when calling `.get()` on a `Container` instance or by calling `start()` if `manualStart` is set to `true`. Wrangler will boot new instances and automatically route requests to the correct local container. When `wrangler dev` stops, all associated container instances are stopped, but local images are not removed, so that they can be reused in subsequent calls to `wrangler dev` or `wrangler deploy`. Note If your Worker app creates many container instances, your local machine may not be able to run as many containers concurrently as is possible when you deploy to Cloudflare. Additionally, if you regularly rebuild containers locally, you may want to clear out old container images (using `docker image prune` or similar) to reduce disk used. ## Iterating on Container code When you use `wrangler dev`, your Worker's code is automatically reloaded by Wrangler each time you save a change, but code running within the container is not. To rebuild your container with new code changes, you can hit the `[r]` key on your keyboard, which triggers a rebuild. Container instances will then be restarted with the newly built images. You may prefer to set up your own code watchers and reloading mechanisms, or mount a local directory into the local container images to sync code changes. This can be done, but there is no built-in mechanism for doing so in Wrangler, and best-practices will depend on the languages and frameworks you are using in your container code. ## Troubleshooting ### Exposing Ports In production, all of your container's ports will be accessible by your Worker, so you do not need to specifically expose ports using the [`EXPOSE` instruction](https://docs.docker.com/reference/dockerfile/#expose) in your Dockerfile. But for local development you will need to declare any ports you need to access in your Dockerfile with the EXPOSE instruction; for example: `EXPOSE 4000`, if you will be accessing port 4000. If you have not exposed any ports, you will see the following error in local development: ```txt The container "MyContainer" does not expose any ports. In your Dockerfile, please expose any ports you intend to connect to. ``` And if you try to connect to any port that you have not exposed in your `Dockerfile` you will see the following error: ```txt connect(): Connection refused: container port not found. Make sure you exposed the port in your container definition. ``` You may also see this while the container is starting up and no ports are available yet. You should retry until the ports become available. This retry logic should be handled for you if you are using the [containers package](https://github.com/cloudflare/containers/tree/main/src). --- title: Platform · Containers docs description: >- The memory, vCPU, and disk space for Containers are set through predefined instance types. Three instance types are currently available: lastUpdated: 2025-06-24T15:02:00.000Z chatbotDeprioritize: true source_url: html: https://developers.cloudflare.com/containers/platform-details/ md: https://developers.cloudflare.com/containers/platform-details/index.md --- ## Instance Types The memory, vCPU, and disk space for Containers are set through predefined instance types. Three instance types are currently available: | Instance Type | Memory | vCPU | Disk | | - | - | - | - | | dev | 256 MiB | 1/16 | 2 GB | | basic | 1 GiB | 1/4 | 4 GB | | standard | 4 GiB | 1/2 | 4 GB | These are specified using the [`instance_type` property](https://developers.cloudflare.com/workers/wrangler/configuration/#containers) in your Worker's Wrangler configuration file. Looking for larger instances? [Give us feedback here](https://developers.cloudflare.com/containers/beta-info/#feedback-wanted) and tell us what size instances you need, and what you want to use them for. ## Limits While in open beta, the following limits are currently in effect: | Feature | Workers Paid | | - | - | | GB Memory for all concurrent live Container instances | 40GB [1](#user-content-fn-1) | | vCPU for all concurrent live Container instances | 20 [1](#user-content-fn-1) | | GB Disk for all concurrent live Container instances | 100GB [1](#user-content-fn-1) | | Image size | 2 GB | | Total image storage per account | 50 GB [2](#user-content-fn-2) | ## Environment variables The container runtime automatically sets the following variables: * `CLOUDFLARE_COUNTRY_A2` - a two-letter code of a country the container is placed in * `CLOUDFLARE_DEPLOYMENT_ID` - the ID of the container instance * `CLOUDFLARE_LOCATION` - a name of a location the container is placed in * `CLOUDFLARE_NODE_ID` - an ID of a machine the container runs on * `CLOUDFLARE_PLACEMENT_ID` - a placement ID * `CLOUDFLARE_REGION` - a region name Note If you supply environment variables with the same names, supplied values will override predefined values. Custom environment variables can be set when defining a Container in your Worker: ```javascript class MyContainer extends Container { defaultPort = 4000; envVars = { MY_CUSTOM_VAR: "value", ANOTHER_VAR: "another_value", }; } ``` ## Footnotes 1. This limit will be raised as we continue the beta. [↩](#user-content-fnref-1) [↩2](#user-content-fnref-1-2) [↩3](#user-content-fnref-1-3) 2. Delete container images with `wrangler containers delete` to free up space. Note that if you delete a container image and then [roll back](https://developers.cloudflare.com/workers/configuration/versions-and-deployments/rollbacks/) your Worker to a previous version, this version may no longer work. [↩](#user-content-fnref-2) --- title: Pricing · Containers docs description: "Containers are billed for every 10ms that they are actively running at the following rates, with included monthly usage as part of the $5 USD per month Workers Paid plan:" lastUpdated: 2025-06-24T15:02:00.000Z chatbotDeprioritize: false source_url: html: https://developers.cloudflare.com/containers/pricing/ md: https://developers.cloudflare.com/containers/pricing/index.md --- ## vCPU, Memory and Disk Containers are billed for every 10ms that they are actively running at the following rates, with included monthly usage as part of the $5 USD per month [Workers Paid plan](https://developers.cloudflare.com/workers/platform/pricing/): | | Memory | CPU | Disk | | - | - | - | - | | **Free** | N/A | N/A | | | **Workers Paid** | 25 GiB-hours/month included +$0.0000025 per additional GiB-second | 375 vCPU-minutes/month + $0.000020 per additional vCPU-second | 200 GB-hours/month +$0.00000007 per additional GB-second | You only pay for what you use — charges start when a request is sent to the container or when it is manually started. Charges stop after the container instance goes to sleep, which can happen automatically after a timeout. This makes it easy to scale to zero, and allows you to get high utilization even with bursty traffic. #### Instance Types When you add containers to your Worker, you specify an [instance type](https://developers.cloudflare.com/containers/platform-details/#instance-types). The instance type you select will impact your bill — larger instances include more vCPUs, memory and disk, and therefore incur additional usage costs. The following instance types are currently available, and larger instance types are coming soon: | Name | Memory | CPU | Disk | | - | - | - | - | | dev | 256 MiB | 1/16 vCPU | 2 GB | | basic | 1 GiB | 1/4 vCPU | 4 GB | | standard | 4 GiB | 1/2 vCPU | 4 GB | ## Network Egress Egress from Containers is priced at the following rates: | Region | Price per GB | Included Allotment per month | | - | - | - | | North America & Europe | $0.025 | 1 TB | | Oceania, Korea, Taiwan | $0.05 | 500 GB | | Everywhere Else | $0.04 | 500 GB | ## Workers and Durable Objects Pricing When you use Containers, incoming requests to your containers are handled by your [Worker](https://developers.cloudflare.com/workers/platform/pricing/), and each container has its own [Durable Object](https://developers.cloudflare.com/durable-objects/platform/pricing/). You are billed for your usage of both Workers and Durable Objects. ## Logs and Observability Containers are integrated with the [Workers Logs](https://developers.cloudflare.com/workers/observability/logs/workers-logs/) platform, and billed at the same rate. Refer to [Workers Logs pricing](https://developers.cloudflare.com/workers/observability/logs/workers-logs/#pricing) for details. When you [enable observability for your Worker](https://developers.cloudflare.com/workers/observability/logs/workers-logs/#enable-workers-logs) with a binding to a container, logs from your container will show in both the Containers and Observability sections of the Cloudflare dashboard. --- title: Scaling and Routing · Containers docs description: >- Currently, Containers are only scaled manually by calling BINDING.get() with a unique ID, then starting the container. Unless manualStart is set to true on the Container class, each instance will start when get() is called. lastUpdated: 2025-06-24T15:02:00.000Z chatbotDeprioritize: false source_url: html: https://developers.cloudflare.com/containers/scaling-and-routing/ md: https://developers.cloudflare.com/containers/scaling-and-routing/index.md --- ### Scaling container instances with `get()` Currently, Containers are only scaled manually by calling `BINDING.get()` with a unique ID, then starting the container. Unless `manualStart` is set to `true` on the Container class, each instance will start when `get()` is called. ```plaintext // gets 3 container instances env.MY_CONTAINER.get(idOne) env.MY_CONTAINER.get(idTwo) env.MY_CONTAINER.get(idThree) ``` Each instance will run until its `sleepAfter` time has elapsed, or until it is manually stopped. This behavior is very useful when you want explicit control over the lifecycle of container instances. For instance, you may want to spin up a container backend instance for a specific user, or you may briefly run a code sandbox to isolate AI-generated code, or you may want to run a short-lived batch job. #### The `getRandom` helper function However, sometimes you want to run multiple instances of a container and easily route requests to them. Currently, the best way to achieve this is with the *temporary* `getRandom` helper function: ```javascript import { Container, getRandom } from "@cloudflare/containers"; const INSTANCE_COUNT = 3; class Backend extends Container { defaultPort = 8080; sleepAfter = "2h"; } export default { async fetch(request: Request, env: Env): Promise { // note: "getRandom" to be replaced with latency-aware routing in the near future const containerInstance = getRandom(env.BACKEND, INSTANCE_COUNT) return containerInstance.fetch(request); }, }; ``` We have provided the getRandom function as a stopgap solution to route to multiple stateless container instances. It will randomly select one of N instances for each request and route to it. Unfortunately, it has two major downsides: * It requires that the user set a fixed number of instances to route to. * It will randomly select each instance, regardless of location. We plan to fix these issues with built-in autoscaling and routing features in the near future. ### Autoscaling and routing (unreleased) Note This is an unreleased feature. It is subject to change. You will be able to turn autoscaling on for a Container, by setting the `autoscale` property to on the Container class: ```javascript class MyBackend extends Container { autoscale = true; defaultPort = 8080; } ``` This instructs the platform to automatically scale instances based on incoming traffic and resource usage (memory, CPU). Container instances will be launched automatically to serve local traffic, and will be stopped when they are no longer needed. To route requests to the correct instance, you will use the `getContainer()` helper function to get a container instance, then pass requests to it: ```javascript export default { async fetch(request, env) { return getContainer(env.MY_BACKEND).fetch(request); }, }; ``` This will send traffic to the nearest ready instance of a container. If a container is overloaded or has not yet launched, requests will be routed to potentially more distant container. Container readiness can be automatically determined based on resource use, but will also be configurable with custom readiness checks. Autoscaling and latency-aware routing will be available in the near future, and will be documented in more detail when released. Until then, you can use the `getRandom` helper function to route requests to multiple container instances. --- title: Wrangler Commands · Containers docs lastUpdated: 2025-06-24T15:02:00.000Z chatbotDeprioritize: false source_url: html: https://developers.cloudflare.com/containers/wrangler-commands/ md: https://developers.cloudflare.com/containers/wrangler-commands/index.md --- --- title: Wrangler Configuration · Containers docs lastUpdated: 2025-06-24T15:02:00.000Z chatbotDeprioritize: false source_url: html: https://developers.cloudflare.com/containers/wrangler-configuration/ md: https://developers.cloudflare.com/containers/wrangler-configuration/index.md --- --- title: 404 - Page Not Found · Cloudflare D1 docs chatbotDeprioritize: false source_url: html: https://developers.cloudflare.com/d1/404/ md: https://developers.cloudflare.com/d1/404/index.md --- # 404 Check the URL, try using our [search](https://developers.cloudflare.com/search/) or try our LLM-friendly [llms.txt directory](https://developers.cloudflare.com/llms.txt). --- title: Best practices · Cloudflare D1 docs lastUpdated: 2024-12-11T09:43:45.000Z chatbotDeprioritize: true source_url: html: https://developers.cloudflare.com/d1/best-practices/ md: https://developers.cloudflare.com/d1/best-practices/index.md --- * [Import and export data](https://developers.cloudflare.com/d1/best-practices/import-export-data/) * [Query a database](https://developers.cloudflare.com/d1/best-practices/query-d1/) * [Use indexes](https://developers.cloudflare.com/d1/best-practices/use-indexes/) * [Local development](https://developers.cloudflare.com/d1/best-practices/local-development/) * [Remote development](https://developers.cloudflare.com/d1/best-practices/remote-development/) * [Use D1 from Pages](https://developers.cloudflare.com/pages/functions/bindings/#d1-databases) * [Global read replication](https://developers.cloudflare.com/d1/best-practices/read-replication/) --- title: Configuration · Cloudflare D1 docs lastUpdated: 2025-04-09T22:35:27.000Z chatbotDeprioritize: true source_url: html: https://developers.cloudflare.com/d1/configuration/ md: https://developers.cloudflare.com/d1/configuration/index.md --- * [Data location](https://developers.cloudflare.com/d1/configuration/data-location/) * [Environments](https://developers.cloudflare.com/d1/configuration/environments/) --- title: REST API · Cloudflare D1 docs lastUpdated: 2025-04-09T22:35:27.000Z chatbotDeprioritize: false source_url: html: https://developers.cloudflare.com/d1/d1-api/ md: https://developers.cloudflare.com/d1/d1-api/index.md --- --- title: Demos and architectures · Cloudflare D1 docs description: Learn how you can use D1 within your existing application and architecture. lastUpdated: 2025-04-09T22:35:27.000Z chatbotDeprioritize: false source_url: html: https://developers.cloudflare.com/d1/demos/ md: https://developers.cloudflare.com/d1/demos/index.md --- Learn how you can use D1 within your existing application and architecture. ## Featured Demos * [Starter code for D1 Sessions API](https://github.com/cloudflare/templates/tree/main/d1-starter-sessions-api-template): An introduction to D1 Sessions API. This demo simulates purchase orders administration. [![Deploy to Cloudflare](https://deploy.workers.cloudflare.com/button)](https://deploy.workers.cloudflare.com/?url=https://github.com/cloudflare/templates/tree/main/d1-starter-sessions-api-template) Tip: Place your database further away for the read replication demo To simulate how read replication can improve a worst case latency scenario, select your primary database location to be in a farther away region (one of the deployment steps). You can find this in the **Database location hint** dropdown. ## Demos Explore the following demo applications for D1. * [Starter code for D1 Sessions API:](https://github.com/cloudflare/templates/tree/main/d1-starter-sessions-api-template) An introduction to D1 Sessions API. This demo simulates purchase orders administration. * [E-commerce Store:](https://github.com/harshil1712/e-com-d1) An application to showcase D1 read replication in the context of an online store. * [Jobs At Conf:](https://github.com/harshil1712/jobs-at-conf-demo) A job lisiting website to add jobs you find at in-person conferences. Built with Cloudflare Pages, R2, D1, Queues, and Workers AI. * [Remix Authentication Starter:](https://github.com/harshil1712/remix-d1-auth-template) Implement authenticating to a Remix app and store user data in Cloudflare D1. * [JavaScript-native RPC on Cloudflare Workers <> Named Entrypoints:](https://github.com/cloudflare/js-rpc-and-entrypoints-demo) This is a collection of examples of communicating between multiple Cloudflare Workers using the remote-procedure call (RPC) system that is built into the Workers runtime. * [Workers for Platforms Example Project:](https://github.com/cloudflare/workers-for-platforms-example) Explore how you could manage thousands of Workers with a single Cloudflare Workers account. * [Staff Directory demo:](https://github.com/lauragift21/staff-directory) Built using the powerful combination of HonoX for backend logic, Cloudflare Pages for fast and secure hosting, and Cloudflare D1 for seamless database management. * [Wildebeest:](https://github.com/cloudflare/wildebeest) Wildebeest is an ActivityPub and Mastodon-compatible server whose goal is to allow anyone to operate their Fediverse server and identity on their domain without needing to keep infrastructure, with minimal setup and maintenance, and running in minutes. * [D1 Northwind Demo:](https://github.com/cloudflare/d1-northwind) This is a demo of the Northwind dataset, running on Cloudflare Workers, and D1 - Cloudflare's SQL database, running on SQLite. ## Reference architectures Explore the following reference architectures that use D1: [Composable AI architecture](https://developers.cloudflare.com/reference-architecture/diagrams/ai/ai-composable/) [The architecture diagram illustrates how AI applications can be built end-to-end on Cloudflare, or single services can be integrated with external infrastructure and services.](https://developers.cloudflare.com/reference-architecture/diagrams/ai/ai-composable/) [Retrieval Augmented Generation (RAG)](https://developers.cloudflare.com/reference-architecture/diagrams/ai/ai-rag/) [RAG combines retrieval with generative models for better text. It uses external knowledge to create factual, relevant responses, improving coherence and accuracy in NLP tasks like chatbots.](https://developers.cloudflare.com/reference-architecture/diagrams/ai/ai-rag/) [Ingesting BigQuery Data into Workers AI](https://developers.cloudflare.com/reference-architecture/diagrams/ai/bigquery-workers-ai/) [You can connect a Cloudflare Worker to get data from Google BigQuery and pass it to Workers AI, to run AI Models, powered by serverless GPUs.](https://developers.cloudflare.com/reference-architecture/diagrams/ai/bigquery-workers-ai/) [Optimizing and securing connected transportation systems](https://developers.cloudflare.com/reference-architecture/diagrams/iot/optimizing-and-securing-connected-transportation-systems/) [This diagram showcases Cloudflare components optimizing connected transportation systems. It illustrates how their technologies minimize latency, ensure reliability, and strengthen security for critical data flow.](https://developers.cloudflare.com/reference-architecture/diagrams/iot/optimizing-and-securing-connected-transportation-systems/) [Fullstack applications](https://developers.cloudflare.com/reference-architecture/diagrams/serverless/fullstack-application/) [A practical example of how these services come together in a real fullstack application architecture.](https://developers.cloudflare.com/reference-architecture/diagrams/serverless/fullstack-application/) [Serverless global APIs](https://developers.cloudflare.com/reference-architecture/diagrams/serverless/serverless-global-apis/) [An example architecture of a serverless API on Cloudflare and aims to illustrate how different compute and data products could interact with each other.](https://developers.cloudflare.com/reference-architecture/diagrams/serverless/serverless-global-apis/) --- title: Examples · Cloudflare D1 docs description: Explore the following examples for D1. lastUpdated: 2025-04-09T22:35:27.000Z chatbotDeprioritize: true source_url: html: https://developers.cloudflare.com/d1/examples/ md: https://developers.cloudflare.com/d1/examples/index.md --- Explore the following examples for D1. [Query D1 from Hono](https://developers.cloudflare.com/d1/examples/d1-and-hono/) Query D1 from the Hono web framework [Query D1 from Python Workers](https://developers.cloudflare.com/d1/examples/query-d1-from-python-workers/) Learn how to query D1 from a Python Worker [Query D1 from Remix](https://developers.cloudflare.com/d1/examples/d1-and-remix/) Query your D1 database from a Remix application. [Query D1 from SvelteKit](https://developers.cloudflare.com/d1/examples/d1-and-sveltekit/) Query a D1 database from a SvelteKit application. --- title: Getting started · Cloudflare D1 docs description: "This guide instructs you through:" lastUpdated: 2025-05-06T09:42:37.000Z chatbotDeprioritize: false source_url: html: https://developers.cloudflare.com/d1/get-started/ md: https://developers.cloudflare.com/d1/get-started/index.md --- This guide instructs you through: * Creating your first database using D1, Cloudflare's native serverless SQL database. * Creating a schema and querying your database via the command-line. * Connecting a [Cloudflare Worker](https://developers.cloudflare.com/workers/) to your D1 database using bindings, and querying your D1 database programmatically. You can perform these tasks through the CLI or through the Cloudflare dashboard. Note If you already have an existing Worker and an existing D1 database, follow this tutorial from [3. Bind your Worker to your D1 database](https://developers.cloudflare.com/d1/get-started/#3-bind-your-worker-to-your-d1-database). ## Quick start If you want to skip the steps and get started quickly, click on the button below. [![Deploy to Cloudflare](https://deploy.workers.cloudflare.com/button)](https://deploy.workers.cloudflare.com/?url=https://github.com/cloudflare/docs-examples/tree/d1-get-started/d1/d1-get-started) This creates a repository in your GitHub account and deploys the application to Cloudflare Workers. Use this option if you are familiar with Cloudflare Workers, and wish to skip the step-by-step guidance. You may wish to manually follow the steps if you are new to Cloudflare Workers. ## Prerequisites 1. Sign up for a [Cloudflare account](https://dash.cloudflare.com/sign-up/workers-and-pages). 2. Install [`Node.js`](https://docs.npmjs.com/downloading-and-installing-node-js-and-npm). Node.js version manager Use a Node version manager like [Volta](https://volta.sh/) or [nvm](https://github.com/nvm-sh/nvm) to avoid permission issues and change Node.js versions. [Wrangler](https://developers.cloudflare.com/workers/wrangler/install-and-update/), discussed later in this guide, requires a Node version of `16.17.0` or later. ## 1. Create a Worker Create a new Worker as the means to query your database. * CLI 1. Create a new project named `d1-tutorial` by running: * npm ```sh npm create cloudflare@latest -- d1-tutorial ``` * yarn ```sh yarn create cloudflare d1-tutorial ``` * pnpm ```sh pnpm create cloudflare@latest d1-tutorial ``` For setup, select the following options: * For *What would you like to start with?*, choose `Hello World example`. * For *Which template would you like to use?*, choose `Worker only`. * For *Which language do you want to use?*, choose `TypeScript`. * For *Do you want to use git for version control?*, choose `Yes`. * For *Do you want to deploy your application?*, choose `No` (we will be making some changes before deploying). This creates a new `d1-tutorial` directory as illustrated below. Your new `d1-tutorial` directory includes: * A `"Hello World"` [Worker](https://developers.cloudflare.com/workers/get-started/guide/#3-write-code) in `index.ts`. * A [Wrangler configuration file](https://developers.cloudflare.com/workers/wrangler/configuration/). This file is how your `d1-tutorial` Worker accesses your D1 database. Note If you are familiar with Cloudflare Workers, or initializing projects in a Continuous Integration (CI) environment, initialize a new project non-interactively by setting `CI=true` as an [environmental variable](https://developers.cloudflare.com/workers/configuration/environment-variables/) when running `create cloudflare@latest`. For example: `CI=true npm create cloudflare@latest d1-tutorial --type=simple --git --ts --deploy=false` creates a basic "Hello World" project ready to build on. * Dashboard 1. Log in to your [Cloudflare dashboard](https://dash.cloudflare.com/) and select your account. 2. Go to your account > **Compute (Workers)** > **Workers & Pages**. 3. Select **Create**. 4. Under **Start from a template**, select **Hello world**. 5. Name your Worker. For this tutorial, name your Worker `d1-tutorial`. 6. Select **Deploy**. * npm ```sh npm create cloudflare@latest -- d1-tutorial ``` * yarn ```sh yarn create cloudflare d1-tutorial ``` * pnpm ```sh pnpm create cloudflare@latest d1-tutorial ``` ## 2. Create a database A D1 database is conceptually similar to many other SQL databases: a database may contain one or more tables, the ability to query those tables, and optional indexes. D1 uses the familiar [SQL query language](https://www.sqlite.org/lang.html) (as used by SQLite). To create your first D1 database: * CLI 1. Change into the directory you just created for your Workers project: ```sh cd d1-tutorial ``` 2. Run the following `wrangler@latest d1` command and give your database a name. In this tutorial, the database is named `prod-d1-tutorial`: Note The [Wrangler command-line interface](https://developers.cloudflare.com/workers/wrangler/) is Cloudflare's tool for managing and deploying Workers applications and D1 databases in your terminal. It was installed when you used `npm create cloudflare@latest` to initialize your new project. While Wrangler gets installed locally to your project, you can use it outside the project by using the command `npx wrangler`. ```sh npx wrangler@latest d1 create prod-d1-tutorial ``` ```sh ✅ Successfully created DB 'prod-d1-tutorial' in region WEUR Created your new D1 database. { "d1_databases": [ { "binding": "DB", "database_name": "prod-d1-tutorial", "database_id": "" } ] } ``` This creates a new D1 database and outputs the [binding](https://developers.cloudflare.com/workers/runtime-apis/bindings/) configuration needed in the next step. * Dashboard 1. Go to **Storage & Databases** > **D1 SQL Database**. 2. Select **Create Database**. 3. Name your database. For this tutorial, name your D1 database `prod-d1-tutorial`. 4. (Optional) Provide a location hint. Location hint is an optional parameter you can provide to indicate your desired geographical location for your database. Refer to [Provide a location hint](https://developers.cloudflare.com/d1/configuration/data-location/#provide-a-location-hint) for more information. 5. Select **Create**. Note For reference, a good database name: * Uses a combination of ASCII characters, shorter than 32 characters, and uses dashes (-) instead of spaces. * Is descriptive of the use-case and environment. For example, "staging-db-web" or "production-db-backend". * Only describes the database, and is not directly referenced in code. ## 3. Bind your Worker to your D1 database You must create a binding for your Worker to connect to your D1 database. [Bindings](https://developers.cloudflare.com/workers/runtime-apis/bindings/) allow your Workers to access resources, like D1, on the Cloudflare developer platform. To bind your D1 database to your Worker: * CLI You create bindings by updating your Wrangler file. 1. Copy the lines obtained from [step 2](https://developers.cloudflare.com/d1/get-started/#2-create-a-database) from your terminal. 2. Add them to the end of your Wrangler file. * wrangler.jsonc ```jsonc { "d1_databases": [ { "binding": "DB", "database_name": "prod-d1-tutorial", "database_id": "" } ] } ``` * wrangler.toml ```toml [[d1_databases]] binding = "DB" # available in your Worker on env.DB database_name = "prod-d1-tutorial" database_id = "" ``` Specifically: * The value (string) you set for `binding` is the **binding name**, and is used to reference this database in your Worker. In this tutorial, name your binding `DB`. * The binding name must be [a valid JavaScript variable name](https://developer.mozilla.org/en-US/docs/Web/JavaScript/Guide/Grammar_and_types#variables). For example, `binding = "MY_DB"` or `binding = "productionDB"` would both be valid names for the binding. * Your binding is available in your Worker at `env.` and the D1 [Workers Binding API](https://developers.cloudflare.com/d1/worker-api/) is exposed on this binding. Note When you execute the `wrangler d1 create` command, the client API package (which implements the D1 API and database class) is automatically installed. For more information on the D1 Workers Binding API, refer to [Workers Binding API](https://developers.cloudflare.com/d1/worker-api/). You can also bind your D1 database to a [Pages Function](https://developers.cloudflare.com/pages/functions/). For more information, refer to [Functions Bindings for D1](https://developers.cloudflare.com/pages/functions/bindings/#d1-databases). * Dashboard You create bindings by adding them to the Worker you have created. 1. Go to **Compute (Workers)** > **Workers & Pages**. 2. Select the `d1-tutorial` Worker you created in [step 1](https://developers.cloudflare.com/d1/get-started/#1-create-a-worker). 3. Select **Settings**. 4. Scroll to **Bindings**, then select **Add**. 5. Select **D1 database**. 6. Name your binding in **Variable name**, then select the `prod-d1-tutorial` D1 database you created in [step 2](https://developers.cloudflare.com/d1/get-started/#2-create-a-database) from the dropdown menu. For this tutorial, name your binding `DB`. 7. Select **Deploy** to deploy your binding. When deploying, there are two options: * **Deploy:** Immediately deploy the binding to 100% of your audience. * **Save version:** Save a version of the binding which you can deploy in the future. For this tutorial, select **Deploy**. * wrangler.jsonc ```jsonc { "d1_databases": [ { "binding": "DB", "database_name": "prod-d1-tutorial", "database_id": "" } ] } ``` * wrangler.toml ```toml [[d1_databases]] binding = "DB" # available in your Worker on env.DB database_name = "prod-d1-tutorial" database_id = "" ``` ## 4. Run a query against your D1 database ### Populate your D1 database * CLI After correctly preparing your [Wrangler configuration file](https://developers.cloudflare.com/workers/wrangler/configuration/), set up your database. Create a `schema.sql` file using the SQL syntax below to initialize your database. 1. Copy the following code and save it as a `schema.sql` file in the `d1-tutorial` Worker directory you created in step 1: ```sql DROP TABLE IF EXISTS Customers; CREATE TABLE IF NOT EXISTS Customers (CustomerId INTEGER PRIMARY KEY, CompanyName TEXT, ContactName TEXT); INSERT INTO Customers (CustomerID, CompanyName, ContactName) VALUES (1, 'Alfreds Futterkiste', 'Maria Anders'), (4, 'Around the Horn', 'Thomas Hardy'), (11, 'Bs Beverages', 'Victoria Ashworth'), (13, 'Bs Beverages', 'Random Name'); ``` 2. Initialize your database to run and test locally first. Bootstrap your new D1 database by running: ```sh npx wrangler d1 execute prod-d1-tutorial --local --file=./schema.sql ``` ```output ⛅️ wrangler 4.13.2 ------------------- 🌀 Executing on local database prod-d1-tutorial () from .wrangler/state/v3/d1: 🌀 To execute on your remote database, add a --remote flag to your wrangler command. 🚣 3 commands executed successfully. ``` Note The command `npx wrangler d1 execute` initializes your database locally, not on the remote database. 3. Validate that your data is in the database by running: ```sh npx wrangler d1 execute prod-d1-tutorial --local --command="SELECT * FROM Customers" ``` ```sh 🌀 Mapping SQL input into an array of statements 🌀 Executing on local database production-db-backend () from .wrangler/state/v3/d1: ┌────────────┬─────────────────────┬───────────────────┐ │ CustomerId │ CompanyName │ ContactName │ ├────────────┼─────────────────────┼───────────────────┤ │ 1 │ Alfreds Futterkiste │ Maria Anders │ ├────────────┼─────────────────────┼───────────────────┤ │ 4 │ Around the Horn │ Thomas Hardy │ ├────────────┼─────────────────────┼───────────────────┤ │ 11 │ Bs Beverages │ Victoria Ashworth │ ├────────────┼─────────────────────┼───────────────────┤ │ 13 │ Bs Beverages │ Random Name │ └────────────┴─────────────────────┴───────────────────┘ ``` * Dashboard Use the Dashboard to create a table and populate it with data. 1. Go to **Storage & Databases** > **D1 SQL Database**. 2. Select the `prod-d1-tutorial` database you created in [step 2](https://developers.cloudflare.com/d1/get-started/#2-create-a-database). 3. Select **Console**. 4. Paste the following SQL snippet. ```sql DROP TABLE IF EXISTS Customers; CREATE TABLE IF NOT EXISTS Customers (CustomerId INTEGER PRIMARY KEY, CompanyName TEXT, ContactName TEXT); INSERT INTO Customers (CustomerID, CompanyName, ContactName) VALUES (1, 'Alfreds Futterkiste', 'Maria Anders'), (4, 'Around the Horn', 'Thomas Hardy'), (11, 'Bs Beverages', 'Victoria Ashworth'), (13, 'Bs Beverages', 'Random Name'); ``` 5. Select **Execute**. This creates a table called `Customers` in your `prod-d1-tutorial` database. 6. Select **Tables**, then select the `Customers` table to view the contents of the table. ### Write queries within your Worker After you have set up your database, run an SQL query from within your Worker. * CLI 1. Navigate to your `d1-tutorial` Worker and open the `index.ts` file. The `index.ts` file is where you configure your Worker's interactions with D1. 2. Clear the content of `index.ts`. 3. Paste the following code snippet into your `index.ts` file: * JavaScript ```js export default { async fetch(request, env) { const { pathname } = new URL(request.url); if (pathname === "/api/beverages") { // If you did not use `DB` as your binding name, change it here const { results } = await env.DB.prepare( "SELECT * FROM Customers WHERE CompanyName = ?", ) .bind("Bs Beverages") .all(); return Response.json(results); } return new Response( "Call /api/beverages to see everyone who works at Bs Beverages", ); }, }; ``` * TypeScript ```ts export interface Env { // If you set another name in the Wrangler config file for the value for 'binding', // replace "DB" with the variable name you defined. DB: D1Database; } export default { async fetch(request, env): Promise { const { pathname } = new URL(request.url); if (pathname === "/api/beverages") { // If you did not use `DB` as your binding name, change it here const { results } = await env.DB.prepare( "SELECT * FROM Customers WHERE CompanyName = ?", ) .bind("Bs Beverages") .all(); return Response.json(results); } return new Response( "Call /api/beverages to see everyone who works at Bs Beverages", ); }, } satisfies ExportedHandler; ``` In the code above, you: 1. Define a binding to your D1 database in your code. This binding matches the `binding` value you set in the [Wrangler configuration file](https://developers.cloudflare.com/workers/wrangler/configuration/) under `d1_databases`. 2. Query your database using `env.DB.prepare` to issue a [prepared query](https://developers.cloudflare.com/d1/worker-api/d1-database/#prepare) with a placeholder (the `?` in the query). 3. Call `bind()` to safely and securely bind a value to that placeholder. In a real application, you would allow a user to pass the `CompanyName` they want to list results for. Using `bind()` prevents users from executing arbitrary SQL (known as "SQL injection") against your application and deleting or otherwise modifying your database. 4. Execute the query by calling `all()` to return all rows (or none, if the query returns none). 5. Return your query results, if any, in JSON format with `Response.json(results)`. After configuring your Worker, you can test your project locally before you deploy globally. * Dashboard You can query your D1 database using your Worker. 1. Go to **Compute (Workers)** > **Workers & Pages**. 2. Select the `d1-tutorial` Worker you created. 3. Select the **Edit code** icon (**\**). 4. Clear the contents of the `worker.js` file, then paste the following code: ```js export default { async fetch(request, env) { const { pathname } = new URL(request.url); if (pathname === "/api/beverages") { // If you did not use `DB` as your binding name, change it here const { results } = await env.DB.prepare( "SELECT * FROM Customers WHERE CompanyName = ?" ) .bind("Bs Beverages") .all(); return new Response(JSON.stringify(results), { headers: { 'Content-Type': 'application/json' } }); } return new Response( "Call /api/beverages to see everyone who works at Bs Beverages" ); }, }; ``` 5. Select **Save**. * JavaScript ```js export default { async fetch(request, env) { const { pathname } = new URL(request.url); if (pathname === "/api/beverages") { // If you did not use `DB` as your binding name, change it here const { results } = await env.DB.prepare( "SELECT * FROM Customers WHERE CompanyName = ?", ) .bind("Bs Beverages") .all(); return Response.json(results); } return new Response( "Call /api/beverages to see everyone who works at Bs Beverages", ); }, }; ``` * TypeScript ```ts export interface Env { // If you set another name in the Wrangler config file for the value for 'binding', // replace "DB" with the variable name you defined. DB: D1Database; } export default { async fetch(request, env): Promise { const { pathname } = new URL(request.url); if (pathname === "/api/beverages") { // If you did not use `DB` as your binding name, change it here const { results } = await env.DB.prepare( "SELECT * FROM Customers WHERE CompanyName = ?", ) .bind("Bs Beverages") .all(); return Response.json(results); } return new Response( "Call /api/beverages to see everyone who works at Bs Beverages", ); }, } satisfies ExportedHandler; ``` ## 5. Deploy your application Deploy your application on Cloudflare's global network. * CLI To deploy your Worker to production using Wrangler, you must first repeat the [database configuration](https://developers.cloudflare.com/d1/get-started/#populate-your-d1-database) steps after replacing the `--local` flag with the `--remote` flag to give your Worker data to read. This creates the database tables and imports the data into the production version of your database. 1. Create tables and add entries to your remote database with the `schema.sql` file you created in step 4. Enter `y` to confirm your decision. ```sh npx wrangler d1 execute prod-d1-tutorial --remote --file=./schema.sql ``` ```sh ✔ ⚠️ This process may take some time, during which your D1 database will be unavailable to serve queries. Ok to proceed? y 🚣 Executed 3 queries in 0.00 seconds (5 rows read, 6 rows written) Database is currently at bookmark 00000002-00000004-00004ef1-ad4a06967970ee3b20860c86188a4b31. ┌────────────────────────┬───────────┬──────────────┬────────────────────┐ │ Total queries executed │ Rows read │ Rows written │ Database size (MB) │ ├────────────────────────┼───────────┼──────────────┼────────────────────┤ │ 3 │ 5 │ 6 │ 0.02 │ └────────────────────────┴───────────┴──────────────┴────────────────────┘ ``` 2. Validate the data is in production by running: ```sh npx wrangler d1 execute prod-d1-tutorial --remote --command="SELECT * FROM Customers" ``` ```sh ⛅️ wrangler 4.13.2 ------------------- 🌀 Executing on remote database prod-d1-tutorial (): 🌀 To execute on your local development database, remove the --remote flag from your wrangler command. 🚣 Executed 1 command in 0.4069ms ┌────────────┬─────────────────────┬───────────────────┐ │ CustomerId │ CompanyName │ ContactName │ ├────────────┼─────────────────────┼───────────────────┤ │ 1 │ Alfreds Futterkiste │ Maria Anders │ ├────────────┼─────────────────────┼───────────────────┤ │ 4 │ Around the Horn │ Thomas Hardy │ ├────────────┼─────────────────────┼───────────────────┤ │ 11 │ Bs Beverages │ Victoria Ashworth │ ├────────────┼─────────────────────┼───────────────────┤ │ 13 │ Bs Beverages │ Random Name │ └────────────┴─────────────────────┴───────────────────┘ ``` 3. Deploy your Worker to make your project accessible on the Internet. Run: ```sh npx wrangler deploy ``` ```sh ⛅️ wrangler 4.13.2 ------------------- Total Upload: 0.19 KiB / gzip: 0.16 KiB Your worker has access to the following bindings: - D1 Databases: - DB: prod-d1-tutorial () Uploaded d1-tutorial (3.76 sec) Deployed d1-tutorial triggers (2.77 sec) https://d1-tutorial..workers.dev Current Version ID: ``` You can now visit the URL for your newly created project to query your live database. For example, if the URL of your new Worker is `d1-tutorial..workers.dev`, accessing `https://d1-tutorial..workers.dev/api/beverages` sends a request to your Worker that queries your live database directly. 4. Test your database is running successfully. Add `/api/beverages` to the provided Wrangler URL. For example, `https://d1-tutorial..workers.dev/api/beverages`. * Dashboard 1. Go to **Compute (Workers)** > **Workers & Pages**. 2. Select your `d1-tutorial` Worker. 3. Select **Deployments**. 4. From the **Version History** table, select **Deploy version**. 5. From the **Deploy version** page, select **Deploy**. This deploys the latest version of the Worker code to production. ## 6. (Optional) Develop locally with Wrangler If you are using D1 with Wrangler, you can test your database locally. While in your project directory: 1. Run `wrangler dev`: ```sh npx wrangler dev ``` When you run `wrangler dev`, Wrangler provides a URL (most likely `localhost:8787`) to review your Worker. 2. Go to the URL. The page displays `Call /api/beverages to see everyone who works at Bs Beverages`. 3. Test your database is running successfully. Add `/api/beverages` to the provided Wrangler URL. For example, `localhost:8787/api/beverages`. If successful, the browser displays your data. Note You can only develop locally if you are using Wrangler. You cannot develop locally through the Cloudflare dashboard. ## 7. (Optional) Delete your database To delete your database: * CLI Run: ```sh npx wrangler d1 delete prod-d1-tutorial ``` * Dashboard 1. Go to **Storages & Databases** > **D1 SQL Database**. 2. Select your `prod-d1-tutorial` D1 database. 3. Select **Settings**. 4. Select **Delete**. 5. Type the name of the database (`prod-d1-tutorial`) to confirm the deletion. Warning Note that deleting your D1 database will stop your application from functioning as before. If you want to delete your Worker: * CLI Run: ```sh npx wrangler delete d1-tutorial ``` * Dashboard 1. Go to **Compute (Workers)** > **Workers & Pages**. 2. Select your `d1-tutorial` Worker. 3. Select **Settings**. 4. Scroll to the bottom of the page, then select **Delete**. 5. Type the name of the Worker (`d1-tutorial`) to confirm the deletion. ## Summary In this tutorial, you have: * Created a D1 database * Created a Worker to access that database * Deployed your project globally ## Next steps If you have any feature requests or notice any bugs, share your feedback directly with the Cloudflare team by joining the [Cloudflare Developers community on Discord](https://discord.cloudflare.com). * See supported [Wrangler commands for D1](https://developers.cloudflare.com/workers/wrangler/commands/#d1). * Learn how to use [D1 Worker Binding APIs](https://developers.cloudflare.com/d1/worker-api/) within your Worker, and test them from the [API playground](https://developers.cloudflare.com/d1/worker-api/#api-playground). * Explore [community projects built on D1](https://developers.cloudflare.com/d1/reference/community-projects/). --- title: Observability · Cloudflare D1 docs lastUpdated: 2025-04-09T22:35:27.000Z chatbotDeprioritize: true source_url: html: https://developers.cloudflare.com/d1/observability/ md: https://developers.cloudflare.com/d1/observability/index.md --- * [Audit Logs](https://developers.cloudflare.com/d1/observability/audit-logs/) * [Debug D1](https://developers.cloudflare.com/d1/observability/debug-d1/) * [Metrics and analytics](https://developers.cloudflare.com/d1/observability/metrics-analytics/) * [Billing](https://developers.cloudflare.com/d1/observability/billing/) --- title: Platform · Cloudflare D1 docs lastUpdated: 2025-04-09T22:35:27.000Z chatbotDeprioritize: true source_url: html: https://developers.cloudflare.com/d1/platform/ md: https://developers.cloudflare.com/d1/platform/index.md --- * [Pricing](https://developers.cloudflare.com/d1/platform/pricing/) * [Alpha database migration guide](https://developers.cloudflare.com/d1/platform/alpha-migration/) * [Limits](https://developers.cloudflare.com/d1/platform/limits/) * [Choose a data or storage product](https://developers.cloudflare.com/workers/platform/storage-options/) * [Release notes](https://developers.cloudflare.com/d1/platform/release-notes/) --- title: Reference · Cloudflare D1 docs lastUpdated: 2025-04-09T22:35:27.000Z chatbotDeprioritize: true source_url: html: https://developers.cloudflare.com/d1/reference/ md: https://developers.cloudflare.com/d1/reference/index.md --- * [Migrations](https://developers.cloudflare.com/d1/reference/migrations/) * [Time Travel and backups](https://developers.cloudflare.com/d1/reference/time-travel/) * [Community projects](https://developers.cloudflare.com/d1/reference/community-projects/) * [Generated columns](https://developers.cloudflare.com/d1/reference/generated-columns/) * [Data security](https://developers.cloudflare.com/d1/reference/data-security/) * [Backups (Legacy)](https://developers.cloudflare.com/d1/reference/backups/) * [Glossary](https://developers.cloudflare.com/d1/reference/glossary/) --- title: SQL API · Cloudflare D1 docs lastUpdated: 2025-04-09T22:35:27.000Z chatbotDeprioritize: true source_url: html: https://developers.cloudflare.com/d1/sql-api/ md: https://developers.cloudflare.com/d1/sql-api/index.md --- * [SQL statements](https://developers.cloudflare.com/d1/sql-api/sql-statements/) * [Define foreign keys](https://developers.cloudflare.com/d1/sql-api/foreign-keys/) * [Query JSON](https://developers.cloudflare.com/d1/sql-api/query-json/) --- title: Tutorials · Cloudflare D1 docs description: View tutorials to help you get started with D1. lastUpdated: 2025-05-06T17:35:57.000Z chatbotDeprioritize: false source_url: html: https://developers.cloudflare.com/d1/tutorials/ md: https://developers.cloudflare.com/d1/tutorials/index.md --- View tutorials to help you get started with D1. ## Docs | Name | Last Updated | Type | Difficulty | | - | - | - | - | | [Query D1 using Prisma ORM](https://developers.cloudflare.com/d1/tutorials/d1-and-prisma-orm/) | about 1 month ago | 📝 Tutorial | Beginner | | [Setup Fullstack Authentication with Next.js, Auth.js, and Cloudflare D1](https://developers.cloudflare.com/developer-spotlight/tutorials/fullstack-authentication-with-next-js-and-cloudflare-d1/) | 3 months ago | 📝 Tutorial | Intermediate | | [Using D1 Read Replication for your e-commerce website](https://developers.cloudflare.com/d1/tutorials/using-read-replication-for-e-com/) | 3 months ago | 📝 Tutorial | Beginner | | [Build a Voice Notes App with auto transcriptions using Workers AI](https://developers.cloudflare.com/workers-ai/guides/tutorials/build-a-voice-notes-app-with-auto-transcription/) | 7 months ago | 📝 Tutorial | Intermediate | | [Build a Retrieval Augmented Generation (RAG) AI](https://developers.cloudflare.com/workers-ai/guides/tutorials/build-a-retrieval-augmented-generation-ai/) | 8 months ago | 📝 Tutorial | Beginner | | [Bulk import to D1 using REST API](https://developers.cloudflare.com/d1/tutorials/import-to-d1-with-rest-api/) | 9 months ago | 📝 Tutorial | Beginner | | [Build a Comments API](https://developers.cloudflare.com/d1/tutorials/build-a-comments-api/) | 10 months ago | 📝 Tutorial | Intermediate | | [Build an API to access D1 using a proxy Worker](https://developers.cloudflare.com/d1/tutorials/build-an-api-to-access-d1/) | 10 months ago | 📝 Tutorial | Intermediate | | [Custom access control for files in R2 using D1 and Workers](https://developers.cloudflare.com/developer-spotlight/tutorials/custom-access-control-for-files/) | about 1 year ago | 📝 Tutorial | Beginner | | [Build a Staff Directory Application](https://developers.cloudflare.com/d1/tutorials/build-a-staff-directory-app/) | over 1 year ago | 📝 Tutorial | Intermediate | ## Videos Cloudflare Workflows | Introduction (Part 1 of 3) In this video, we introduce Cloudflare Workflows, the Newest Developer Platform Primitive at Cloudflare. Cloudflare Workflows | Batching and Monitoring Your Durable Execution (Part 2 of 3) Workflows exposes metrics such as execution, error rates, steps, and total duration! Welcome to the Cloudflare Developer Channel Welcome to the Cloudflare Developers YouTube channel. We've got tutorials and working demos and everything you need to level up your projects. Whether you're working on your next big thing or just dorking around with some side projects, we've got you covered! So why don't you come hang out, subscribe to our developer channel and together we'll build something awesome. You're gonna love it. Stateful Apps with Cloudflare Workers Learn how to access external APIs, cache and retrieve data using Workers KV, and create SQL-driven applications with Cloudflare D1. --- title: Workers Binding API · Cloudflare D1 docs description: "You can execute SQL queries on your D1 database from a Worker using the Worker Binding API. To do this, you can perform the following steps:" lastUpdated: 2025-06-25T10:07:53.000Z chatbotDeprioritize: false source_url: html: https://developers.cloudflare.com/d1/worker-api/ md: https://developers.cloudflare.com/d1/worker-api/index.md --- You can execute SQL queries on your D1 database from a Worker using the Worker Binding API. To do this, you can perform the following steps: 1. [Bind the D1 Database](https://developers.cloudflare.com/d1/get-started/#3-bind-your-worker-to-your-d1-database). 2. [Prepare a statement](https://developers.cloudflare.com/d1/worker-api/d1-database/#prepare). 3. [Run the prepared statement](https://developers.cloudflare.com/d1/worker-api/prepared-statements). 4. Analyze the [return object](https://developers.cloudflare.com/d1/worker-api/return-object) (if necessary). Refer to the relevant sections for the API documentation. ## TypeScript support D1 Worker Bindings API is fully-typed via the runtime types generated by running [`wrangler types`](https://developers.cloudflare.com/workers/languages/typescript/#typescript) package, and also supports [generic types](https://www.typescriptlang.org/docs/handbook/2/generics.html#generic-types) as part of its TypeScript API. A generic type allows you to provide an optional `type parameter` so that a function understands the type of the data it is handling. When using the query statement methods [`D1PreparedStatement::run`](https://developers.cloudflare.com/d1/worker-api/prepared-statements/#run), [`D1PreparedStatement::raw`](https://developers.cloudflare.com/d1/worker-api/prepared-statements/#raw) and [`D1PreparedStatement::first`](https://developers.cloudflare.com/d1/worker-api/prepared-statements/#first), you can provide a type representing each database row. D1's API will [return the result object](https://developers.cloudflare.com/d1/worker-api/return-object/#d1result) with the correct type. For example, providing an `OrderRow` type as a type parameter to [`D1PreparedStatement::run`](https://developers.cloudflare.com/d1/worker-api/prepared-statements/#run) will return a typed `Array` object instead of the default `Record` type: ```ts // Row definition type OrderRow = { Id: string; CustomerName: string; OrderDate: number; }; // Elsewhere in your application const result = await env.MY_DB.prepare( "SELECT Id, CustomerName, OrderDate FROM [Order] ORDER BY ShippedDate DESC LIMIT 100", ).run(); ``` ## Type conversion D1 automatically converts supported JavaScript (including TypeScript) types passed as parameters via the Workers Binding API to their associated D1 types 1. This conversion is permanent and one-way only. This means that when reading the written values back in your code, you will get the converted values rather than the originally inserted values. Note We recommend using [STRICT tables](https://www.sqlite.org/stricttables.html) in your SQL schema to avoid issues with mismatched types between values that are actually stored in your database compared to values defined by your schema. The type conversion during writes is as follows: | JavaScript (write) | D1 | JavaScript (read) | | - | - | - | | null | `NULL` | null | | Number | `REAL` | Number | | Number 2 | `INTEGER` | Number | | String | `TEXT` | String | | Boolean 3 | `INTEGER` | Number (`0`,`1`) | | ArrayBuffer | `BLOB` | Array 4 | | ArrayBuffer View | `BLOB` | Array 4 | | undefined | Not supported. 5 | - | 1 D1 types correspond to the underlying [SQLite types](https://www.sqlite.org/datatype3.html). 2 D1 supports 64-bit signed `INTEGER` values internally, however [BigInts](https://developer.mozilla.org/en-US/docs/Web/JavaScript/Reference/Global_Objects/BigInt) are not currently supported in the API yet. JavaScript integers are safe up to [`Number.MAX_SAFE_INTEGER`](https://developer.mozilla.org/en-US/docs/Web/JavaScript/Reference/Global_Objects/Number/MAX_SAFE_INTEGER). 3 Booleans will be cast to an `INTEGER` type where `1` is `TRUE` and `0` is `FALSE`. 4 `ArrayBuffer` and [`ArrayBuffer` views](https://developer.mozilla.org/en-US/docs/Web/JavaScript/Reference/Global_Objects/ArrayBuffer/isView) are converted using [`Array.from`](https://developer.mozilla.org/en-US/docs/Web/JavaScript/Reference/Global_Objects/Array/from). 5 Queries with `undefined` values will return a `D1_TYPE_ERROR`. ## API playground The D1 Worker Binding API playground is an `index.js` file where you can test each of the documented Worker Binding APIs for D1. The file builds from the end-state of the [Get started](https://developers.cloudflare.com/d1/get-started/#write-queries-within-your-worker) code. You can use this alongside the API documentation to better understand how each API works. Follow the steps to setup your API playground. ### 1. Complete the Get started tutorial Complete the [Get started](https://developers.cloudflare.com/d1/get-started/#write-queries-within-your-worker) tutorial. Ensure you use JavaScript instead of TypeScript. ### 2. Modify the content of `index.js` Replace the contents of your `index.js` file with the code below to view the effect of each API. index.js ```js export default { async fetch(request, env) { const { pathname } = new URL(request.url); // if (pathname === "/api/beverages") { // // If you did not use `DB` as your binding name, change it here // const { results } = await env.DB.prepare("SELECT * FROM Customers WHERE CompanyName = ?",).bind("Bs Beverages").all(); // return Response.json(results); // } const companyName1 = `Bs Beverages`; const companyName2 = `Around the Horn`; const stmt = env.DB.prepare(`SELECT * FROM Customers WHERE CompanyName = ?`); const stmtMulti = env.DB.prepare(`SELECT * FROM Customers; SELECT * FROM Customers WHERE CompanyName = ?`); const session = env.DB.withSession("first-primary") const sessionStmt = session.prepare(`SELECT * FROM Customers WHERE CompanyName = ?`); if (pathname === `/RUN`){ const returnValue = await stmt.bind(companyName1).run(); return Response.json(returnValue); } else if (pathname === `/RAW`){ const returnValue = await stmt.bind(companyName1).raw(); return Response.json(returnValue); } else if (pathname === `/FIRST`){ const returnValue = await stmt.bind(companyName1).first(); return Response.json(returnValue); } else if (pathname === `/BATCH`) { const batchResult = await env.DB.batch([ stmt.bind(companyName1), stmt.bind(companyName2) ]); return Response.json(batchResult); } else if (pathname === `/EXEC`){ const returnValue = await env.DB.exec(`SELECT * FROM Customers WHERE CompanyName = "Bs Beverages"`); return Response.json(returnValue); } else if (pathname === `/WITHSESSION`){ const returnValue = await sessionStmt.bind(companyName1).run(); console.log("You're now using D1 Sessions!") return Response.json(returnValue); } return new Response( `Welcome to the D1 API Playground! \nChange the URL to test the various methods inside your index.js file.`, ); }, }; ``` ### 3. Deploy the Worker 1. Navigate to your tutorial directory you created by following step 1. 2. Run `npx wrangler deploy`. ```sh npx wrangler deploy ``` ```sh ⛅️ wrangler 3.112.0 -------------------- Total Upload: 1.90 KiB / gzip: 0.59 KiB Your worker has access to the following bindings: - D1 Databases: - DB: DATABASE_NAME () Uploaded WORKER_NAME (7.01 sec) Deployed WORKER_NAME triggers (1.25 sec) https://jun-d1-rr.d1-sandbox.workers.dev Current Version ID: VERSION_ID ``` 3. Open a browser at the specified address. ### 4. Test the APIs Change the URL to test the various D1 Worker Binding APIs. --- title: Wrangler commands · Cloudflare D1 docs description: D1 Wrangler commands use REST APIs to interact with the control plane. This page lists the Wrangler commands for D1. lastUpdated: 2024-12-16T09:18:53.000Z chatbotDeprioritize: false source_url: html: https://developers.cloudflare.com/d1/wrangler-commands/ md: https://developers.cloudflare.com/d1/wrangler-commands/index.md --- D1 Wrangler commands use REST APIs to interact with the control plane. This page lists the Wrangler commands for D1. ### `create` Creates a new D1 database, and provides the binding and UUID that you will put in your Wrangler file. ```txt wrangler d1 create [OPTIONS] ``` * `DATABASE_NAME` string required * The name of the new D1 database. * `--location` string optional * Provide an optional [location hint](https://developers.cloudflare.com/d1/configuration/data-location/) for your database leader. * Available options include `weur` (Western Europe), `eeur` (Eastern Europe), `apac` (Asia Pacific), `oc` (Oceania), `wnam` (Western North America), and `enam` (Eastern North America). ### `info` Get information about a D1 database, including the current database size and state. ```txt wrangler d1 info [OPTIONS] ``` * `DATABASE_NAME` string required * The name of the D1 database to get information about. * `--json` boolean optional * Return output as JSON rather than a table. ### `list` List all D1 databases in your account. ```txt wrangler d1 list [OPTIONS] ``` * `--json` boolean optional * Return output as JSON rather than a table. ### `delete` Delete a D1 database. ```txt wrangler d1 delete [OPTIONS] ``` * `DATABASE_NAME` string required * The name of the D1 database to delete. * `-y, --skip-confirmation` boolean optional * Skip deletion confirmation prompt. ### `execute` Execute a query on a D1 database. ```txt wrangler d1 execute [OPTIONS] ``` Note You must provide either `--command` or `--file` for this command to run successfully. * `DATABASE_NAME` string required * The name of the D1 database to execute a query on. * `--command` string optional * The SQL query you wish to execute. * `--file` string optional * Path to the SQL file you wish to execute. * `-y, --yes` boolean optional * Answer `yes` to any prompts. * `--local` boolean (default: true) optional * Execute commands/files against a local database for use with [wrangler dev](https://developers.cloudflare.com/workers/wrangler/commands/#dev). * `--remote` boolean (default: false) optional * Execute commands/files against a remote D1 database for use with [wrangler dev --remote](https://developers.cloudflare.com/workers/wrangler/commands/#dev). * `--persist-to` string optional * Specify directory to use for local persistence (for use in combination with `--local`). * `--json` boolean optional * Return output as JSON rather than a table. * `--preview` boolean optional * Execute commands/files against a preview D1 database (as defined by `preview_database_id` in the [Wrangler configuration file](https://developers.cloudflare.com/workers/wrangler/configuration/#d1-databases)). ### `export` Export a D1 database or table's schema and/or content to a `.sql` file. ```txt wrangler d1 export [OPTIONS] ``` * `DATABASE_NAME` string required * The name of the D1 database to export. * `--local` boolean (default: true) optional * Export from a local database for use with [wrangler dev](https://developers.cloudflare.com/workers/wrangler/commands/#dev). * `--remote` boolean (default: false) optional * Export from a remote D1 database for use with [wrangler dev --remote](https://developers.cloudflare.com/workers/wrangler/commands/#dev). * `--output` string required * Path to the SQL file for your export. * `--table` string optional * The name of the table within a D1 database to export. * `--no-data` boolean (default: false) optional * Controls whether export SQL file contains database data. Note that `--no-data=true` is not recommended due to a known wrangler limitation that intreprets the value as false. * `--no-schema` boolean (default: false) optional * Controls whether export SQL file contains database schema. Note that `--no-schema=true` is not recommended due to a known wrangler limitation that intreprets the value as false. ### `time-travel restore` Restore a database to a specific point-in-time using [Time Travel](https://developers.cloudflare.com/d1/reference/time-travel/). ```txt wrangler d1 time-travel restore [OPTIONS] ``` * `DATABASE_NAME` string required * The name of the D1 database to execute a query on. * `--bookmark` string optional * A D1 bookmark representing the state of a database at a specific point in time. * `--timestamp` string optional * A UNIX timestamp or JavaScript date-time `string` within the last 30 days. * `--json` boolean optional * Return output as JSON rather than a table. ### `time-travel info` Inspect the current state of a database for a specific point-in-time using [Time Travel](https://developers.cloudflare.com/d1/reference/time-travel/). ```txt wrangler d1 time-travel info [OPTIONS] ``` * `DATABASE_NAME` string required * The name of the D1 database to execute a query on. * `--timestamp` string optional * A UNIX timestamp or JavaScript date-time `string` within the last 30 days. * `--json` bboolean optional * Return output as JSON rather than a table. ### `migrations create` Create a new migration. This will generate a new versioned file inside the `migrations` folder. Name your migration file as a description of your change. This will make it easier for you to find your migration in the `migrations` folder. An example filename looks like: `0000_create_user_table.sql` The filename will include a version number and the migration name you specify below. ```txt wrangler d1 migrations create ``` * `DATABASE_NAME` string required * The name of the D1 database you wish to create a migration for. * `MIGRATION_NAME` string required * A descriptive name for the migration you wish to create. ### `migrations list` View a list of unapplied migration files. ```txt wrangler d1 migrations list [OPTIONS] ``` * `DATABASE_NAME` string required * The name of the D1 database you wish to list unapplied migrations for. * `--local` boolean optional * Show the list of unapplied migration files on your locally persisted D1 database. * `--remote` boolean (default: false) optional * Show the list of unapplied migration files on your remote D1 database. * `--persist-to` string optional * Specify directory to use for local persistence (for use in combination with `--local`). * `--preview` boolean optional * Show the list of unapplied migration files on your preview D1 database (as defined by `preview_database_id` in the [Wrangler configuration file](https://developers.cloudflare.com/workers/wrangler/configuration/#d1-databases)). ### `migrations apply` Apply any unapplied migrations. This command will prompt you to confirm the migrations you are about to apply. Confirm that you would like to proceed. After, a backup will be captured. The progress of each migration will be printed in the console. When running the apply command in a CI/CD environment or another non-interactive command line, the confirmation step will be skipped, but the backup will still be captured. If applying a migration results in an error, this migration will be rolled back, and the previous successful migration will remain applied. ```txt wrangler d1 migrations apply [OPTIONS] ``` * `DATABASE_NAME` string required * The name of the D1 database you wish to apply your migrations on. * `--env` string optional * Specify which environment configuration to use for D1 binding * `--local` boolean (default: true) optional * Execute any unapplied migrations on your locally persisted D1 database. * `--remote` boolean (default: false) optional * Execute any unapplied migrations on your remote D1 database. * `--persist-to` string optional * Specify directory to use for local persistence (for use in combination with `--local`). * `--preview` boolean optional * Execute any unapplied migrations on your preview D1 database (as defined by `preview_database_id` in the [Wrangler configuration file](https://developers.cloudflare.com/workers/wrangler/configuration/#d1-databases)). ## Global commands The following global flags work on every command: * `--help` boolean * Show help. * `--config` string (not supported by Pages) * Path to your [Wrangler configuration file](https://developers.cloudflare.com/workers/wrangler/configuration/). * `--cwd` string * Run as if Wrangler was started in the specified directory instead of the current working directory. ## Experimental commands ### `insights` Returns statistics about your queries. ```sh npx wrangler d1 insights -- --- title: 404 - Page Not Found · Cloudflare Developer Spotlight chatbotDeprioritize: false source_url: html: https://developers.cloudflare.com/developer-spotlight/404/ md: https://developers.cloudflare.com/developer-spotlight/404/index.md --- # 404 Check the URL, try using our [search](https://developers.cloudflare.com/search/) or try our LLM-friendly [llms.txt directory](https://developers.cloudflare.com/llms.txt). --- title: Application guide · Cloudflare Developer Spotlight description: If you use Cloudflare's developer products and would like to share your expertise then Cloudflare's Developer Spotlight program is for you. Whether you use Cloudflare in your profession, as a student or as a hobby, let us spotlight your creativity. Write a tutorial for our documentation and earn credits for your Cloudflare account along with having your name credited on your work. lastUpdated: 2025-05-30T09:36:09.000Z chatbotDeprioritize: false source_url: html: https://developers.cloudflare.com/developer-spotlight/application-guide/ md: https://developers.cloudflare.com/developer-spotlight/application-guide/index.md --- If you use Cloudflare's developer products and would like to share your expertise then Cloudflare's Developer Spotlight program is for you. Whether you use Cloudflare in your profession, as a student or as a hobby, let us spotlight your creativity. Write a tutorial for our documentation and earn credits for your Cloudflare account along with having your name credited on your work. The Developer Spotlight program is open for applicants until Thursday, the 24th of October 2024. ## Who can apply? The following is required in order to be an eligible applicant for the Developer Spotlight program: * You must not be an employee of Cloudflare. * You must be 18 or older. * All participants must agree to the [Developer Spotlight terms](https://developers.cloudflare.com/developer-spotlight/terms/). ## Submission rules Your tutorial must be: 1. Easy for anyone to follow. 2. Technically accurate. 3. Entirely original, written only by you. 4. Written following Cloudflare's documentation style guide. For more information, please visit our [style guide documentation](https://developers.cloudflare.com/style-guide/) and our [tutorial style guide documentation](https://developers.cloudflare.com/style-guide/documentation-content-strategy/content-types/tutorial/#template) 5. About how to use [Cloudflare's Developer Platform products](https://developers.cloudflare.com/products/?product-group=Developer+platform) to create a project or solve a problem. 6. Complete, not an unfinished draft. ## How to apply To apply to the program, submit an application through the [Developer Spotlight signup form](https://forms.gle/anpTPu45tnwjwXsk8). Successful applicants will be contacted by email. ## Account credits Account credits can be used towards recurring monthly charges for Cloudflare plans or add-on services. Once a tutorial submission has been approved and published, we can then add 350 credits to your Cloudflare account. Credits are only valid for three years. Valid payment details must be stored on the receiving account before credits can be added. ## FAQ ### How many tutorial topic ideas can I submit? You may submit as many tutorial topics ideas as you like in your application. ### When will I be compensated for my tutorial? We will add the account credits to your Cloudflare account after your tutorial has been approved and published under the Developer Spotlight program. ### If my tutorial is accepted and published on Cloudflare's Developer Spotlight program, can I republish it elsewhere? We ask that you do not republish any tutorials that have been published under the Cloudflare Developer Spotlight program. ### Will I be credited for my work? You will be credited as the author of any tutorial you submit that is successfully published through the Cloudflare Developer Spotlight program. We will add your details to your work after it has been approved. ### What happens If my topic of choice gets accepted but the tutorial submission gets rejected? Our team will do our best to help you edit your tutorial's pull request to be ready for submission; however, in the unlikely chance that your tutorial's pull request is rejected, you are still free to publish your work elsewhere. --- title: Developer Spotlight Terms · Cloudflare Developer Spotlight description: These Developer Spotlight Terms (the “Terms”) govern your participation in the Cloudflare Developer Spotlight Program (the “Program”). As used in these Terms, "Cloudflare", "us" or "we" refers to Cloudflare, Inc. and its affiliates. lastUpdated: 2025-01-10T17:00:14.000Z chatbotDeprioritize: false source_url: html: https://developers.cloudflare.com/developer-spotlight/terms/ md: https://developers.cloudflare.com/developer-spotlight/terms/index.md --- These Developer Spotlight Terms (the “Terms”) govern your participation in the Cloudflare Developer Spotlight Program (the “Program”). As used in these Terms, "Cloudflare", "us" or "we" refers to Cloudflare, Inc. and its affiliates. THESE TERMS DO NOT APPLY TO YOUR ACCESS AND USE OF THE CLOUDFLARE PRODUCTS AND SERVICES THAT ARE PROVIDED UNDER THE [SELF-SERVE SUBSCRIPTION AGREEMENT](https://www.cloudflare.com/terms/), THE [ENTERPRISE SUBSCRIPTION AGREEMENT](https://www.cloudflare.com/enterpriseterms/), OR OTHER WRITTEN AGREEMENT SIGNED BETWEEN YOU AND CLOUDFLARE (IF APPLICABLE). 1. Eligibility. By agreeing to these Terms, you represent and warrant to us: (i) that you are at least eighteen (18) years of age; (ii) that you have not previously been suspended or removed from the Program and (iii) that your participation in the Program is in compliance with any and all applicable laws and regulations. 2. Submissions. From time-to-time, Cloudflare may accept certain tutorials, blogs, and other content submissions from its developer community (“Dev Content”) for consideration for publication on a Cloudflare blog, developer documentation, social media platform or other website. You grant us a worldwide, perpetual, irrevocable, non-exclusive, royalty-free license (with the right to sublicense) to use, copy, reproduce, process, adapt, modify, publish, transmit, display and distribute such Dev Content in any and all media or distribution methods now known or later developed. a. Likeness. You hereby grant to Cloudflare the royalty free right to use your name and likeness and any trademarks you include in the Dev Content in any and all manner, media, products, means, or methods, now known or hereafter created, throughout the world, in perpetuity, in connection with Cloudflare’s exercise of its rights under these Terms, including Cloudflare’s use of the Dev Content. Notwithstanding any other provision of these Terms, nothing herein will obligate Cloudflare to use the Dev Content in any manner. You understand and agree that you will have no right to any proceeds derived by Cloudflare or any third party from the use of the Dev Content. b. Representations & Warranties. By submitting Dev Content, you represent and warrant that (1) you are the author and sole owner of all rights to the Dev Content; (2) the Dev Content is original and has not in whole or in part previously been published in any form and is not in the public domain; (3) your Dev Content is accurate and not misleading; (4) your Dev Content, does not: (i) infringe, violate, or misappropriate any third-party right, including any copyright, trademark, patent, trade secret, moral right, privacy right, right of publicity, or any other intellectual property or proprietary right; or (ii) slander, defame, or libel any third-party; and (2) no payments will be due from Cloudflare to any third party for the exercise of any rights granted under these Terms. c. Compensation. Unless otherwise agreed by Cloudflare in writing, you understand and agree that Cloudflare will have no obligation to you or any third-party for any compensation, reimbursement, or any other payments in connection with your participation in the Program or publication of Dev Content. 1. Termination. These Terms will continue in full force and effect until either party terminates upon 30 days’ written notice to the other party. The provisions of Sections 2, 4, and 5 shall survive any termination or expiration of this agreement. 2. Indemnification. You agree to defend, indemnify, and hold harmless Cloudflare and its officers, directors, employees, consultants, affiliates, subsidiaries and agents (collectively, the "Cloudflare Entities") from and against any and all claims, liabilities, damages, losses, and expenses, including reasonable attorneys' fees and costs, arising out of or in any way connected with your violation of any third-party right, including without limitation any intellectual property right, publicity, confidentiality, property or privacy right. We reserve the right, at our own expense, to assume the exclusive defense and control of any matter otherwise subject to indemnification by you (and without limiting your indemnification obligations with respect to such matter), and in such case, you agree to cooperate with our defense of such claim. 3. Limitation of Liability. IN NO EVENT WILL THE CLOUDFLARE ENTITIES BE LIABLE TO YOU OR ANY THIRD PARTY FOR ANY DIRECT, INDIRECT, INCIDENTAL, SPECIAL, CONSEQUENTIAL, OR PUNITIVE DAMAGES ARISING OUT OF OR RELATING TO YOUR PARTICIPATION IN THE PROGRAM, WHETHER BASED ON WARRANTY, CONTRACT, TORT (INCLUDING NEGLIGENCE), STATUTE, OR ANY OTHER LEGAL THEORY, WHETHER OR NOT THE CLOUDFLARE ENTITIES HAVE BEEN INFORMED OF THE POSSIBILITY OF SUCH DAMAGE. 4. Independent Contractor. The parties acknowledge and agree that you are an independent contractor, and nothing in these Terms will create a relationship of employment, joint venture, partnership or agency between the parties. Neither party will have the right, power or authority at any time to act on behalf of, or represent the other party. Cloudflare will not obtain workers’ compensation or other insurance on your behalf, and you are solely responsible for all payments, benefits, and insurance required for the performance of services hereunder, including, without limitation, taxes or other withholdings, unemployment, payroll disbursements, and other related expenses. You hereby acknowledge and agree that these Terms are not governed by any union or collective bargaining agreement and Cloudflare will not pay you any union-required residuals, reuse fees, pension, health and welfare benefits or other benefits/payments. 5. Governing Law. These Terms will be governed by the laws of the State of California without regard to conflict of law principles. To the extent that any lawsuit or court proceeding is permitted hereunder, you and Cloudflare agree to submit to the personal and exclusive jurisdiction of the state and federal courts located within San Francisco County, California for the purpose of litigating all such disputes. 6. Modifications. Cloudflare reserves the right to make modifications to these Terms at any time. Revised versions of these Terms will be posted publicly online. Unless otherwise specified, any modifications to the Terms will take effect the day they are posted publicly online. If you do not agree with the revised Terms, your sole and exclusive remedy will be to discontinue your participation in the Program. 7. General. These Terms, together with any applicable product limits, disclaimers, or other terms presented to you on a Cloudflare controlled website (e.g., [www.cloudflare.com](http://www.cloudflare.com), as well as the other websites that Cloudflare operates and that link to these Terms) or documentation, each of which are incorporated by reference into these Terms, constitute the entire and exclusive understanding and agreement between you and Cloudflare regarding your participation in the Program. Use of section headers in these Terms is for convenience only and will not have any impact on the interpretation of particular provisions. You may not assign or transfer these Terms or your rights hereunder, in whole or in part, by operation of law or otherwise, without our prior written consent. We may assign these Terms at any time without notice. The failure to require performance of any provision will not affect our right to require performance at any time thereafter, nor will a waiver of any breach or default of these Terms or any provision of these Terms constitute a waiver of any subsequent breach or default or a waiver of the provision itself. In the event that any part of these Terms is held to be invalid or unenforceable, the unenforceable part will be given effect to the greatest extent possible and the remaining parts will remain in full force and effect. Upon termination of these Terms, any provision that by its nature or express terms should survive will survive such termination or expiration. --- title: Tutorials · Cloudflare Developer Spotlight lastUpdated: 2025-05-06T17:35:57.000Z chatbotDeprioritize: false source_url: html: https://developers.cloudflare.com/developer-spotlight/tutorials/ md: https://developers.cloudflare.com/developer-spotlight/tutorials/index.md --- | Name | Last Updated | Type | Difficulty | | - | - | - | - | | [Setup Fullstack Authentication with Next.js, Auth.js, and Cloudflare D1](https://developers.cloudflare.com/developer-spotlight/tutorials/fullstack-authentication-with-next-js-and-cloudflare-d1/) | 3 months ago | 📝 Tutorial | Intermediate | | [Build a Voice Notes App with auto transcriptions using Workers AI](https://developers.cloudflare.com/workers-ai/guides/tutorials/build-a-voice-notes-app-with-auto-transcription/) | 7 months ago | 📝 Tutorial | Intermediate | | [Protect payment forms from malicious bots using Turnstile](https://developers.cloudflare.com/turnstile/tutorials/protecting-your-payment-form-from-attackers-bots-using-turnstile/) | 7 months ago | 📝 Tutorial | Beginner | | [Automate analytics reporting with Cloudflare Workers and email routing](https://developers.cloudflare.com/workers/tutorials/automated-analytics-reporting/) | 8 months ago | 📝 Tutorial | Beginner | | [Build Live Cursors with Next.js, RPC and Durable Objects](https://developers.cloudflare.com/workers/tutorials/live-cursors-with-nextjs-rpc-do/) | 8 months ago | 📝 Tutorial | Intermediate | | [Build an interview practice tool with Workers AI](https://developers.cloudflare.com/workers-ai/guides/tutorials/build-ai-interview-practice-tool/) | 8 months ago | 📝 Tutorial | Intermediate | | [Recommend products on e-commerce sites using Workers AI and Stripe](https://developers.cloudflare.com/developer-spotlight/tutorials/creating-a-recommendation-api/) | about 1 year ago | 📝 Tutorial | Beginner | | [Custom access control for files in R2 using D1 and Workers](https://developers.cloudflare.com/developer-spotlight/tutorials/custom-access-control-for-files/) | about 1 year ago | 📝 Tutorial | Beginner | | [Send form submissions using Astro and Resend](https://developers.cloudflare.com/developer-spotlight/tutorials/handle-form-submission-with-astro-resend/) | about 1 year ago | 📝 Tutorial | Beginner | | [Create a sitemap from Sanity CMS with Workers](https://developers.cloudflare.com/developer-spotlight/tutorials/create-sitemap-from-sanity-cms/) | about 1 year ago | 📝 Tutorial | Beginner | --- title: 404 - Page Not Found · Cloudflare Durable Objects docs chatbotDeprioritize: false source_url: html: https://developers.cloudflare.com/durable-objects/404/ md: https://developers.cloudflare.com/durable-objects/404/index.md --- # 404 Check the URL, try using our [search](https://developers.cloudflare.com/search/) or try our LLM-friendly [llms.txt directory](https://developers.cloudflare.com/llms.txt). --- title: Workers Binding API · Cloudflare Durable Objects docs lastUpdated: 2025-01-31T11:01:46.000Z chatbotDeprioritize: true source_url: html: https://developers.cloudflare.com/durable-objects/api/ md: https://developers.cloudflare.com/durable-objects/api/index.md --- * [Durable Object Base Class](https://developers.cloudflare.com/durable-objects/api/base/) * [Durable Object Container](https://developers.cloudflare.com/durable-objects/api/container/) * [Durable Object Namespace](https://developers.cloudflare.com/durable-objects/api/namespace/) * [Durable Object ID](https://developers.cloudflare.com/durable-objects/api/id/) * [Durable Object Stub](https://developers.cloudflare.com/durable-objects/api/stub/) * [Durable Object State](https://developers.cloudflare.com/durable-objects/api/state/) * [Durable Object Storage](https://developers.cloudflare.com/durable-objects/api/storage-api/) * [Alarms](https://developers.cloudflare.com/durable-objects/api/alarms/) * [WebGPU](https://developers.cloudflare.com/durable-objects/api/webgpu/) * [Rust API](https://github.com/cloudflare/workers-rs?tab=readme-ov-file#durable-objects) --- title: Best practices · Cloudflare Durable Objects docs lastUpdated: 2025-01-31T11:01:46.000Z chatbotDeprioritize: true source_url: html: https://developers.cloudflare.com/durable-objects/best-practices/ md: https://developers.cloudflare.com/durable-objects/best-practices/index.md --- * [Invoke methods](https://developers.cloudflare.com/durable-objects/best-practices/create-durable-object-stubs-and-send-requests/) * [Access Durable Objects Storage](https://developers.cloudflare.com/durable-objects/best-practices/access-durable-objects-storage/) * [Use WebSockets](https://developers.cloudflare.com/durable-objects/best-practices/websockets/) * [Error handling](https://developers.cloudflare.com/durable-objects/best-practices/error-handling/) --- title: Demos and architectures · Cloudflare Durable Objects docs description: Learn how you can use a Durable Object within your existing application and architecture. lastUpdated: 2025-01-31T11:01:46.000Z chatbotDeprioritize: false source_url: html: https://developers.cloudflare.com/durable-objects/demos/ md: https://developers.cloudflare.com/durable-objects/demos/index.md --- Learn how you can use a Durable Object within your existing application and architecture. ## Demos Explore the following demo applications for Durable Objects. * [NBA Finals Polling and Predictor:](https://github.com/elizabethsiegle/nbafinals-cloudflare-ai-hono-durable-objects) This stateful polling application uses Cloudflare Workers AI, Cloudflare Pages, Cloudflare Durable Objects, and Hono to keep track of users' votes for different basketball teams and generates personal predictions for the series. * [Cloudflare Workers Chat Demo:](https://github.com/cloudflare/workers-chat-demo) This is a demo app written on Cloudflare Workers utilizing Durable Objects to implement real-time chat with stored history. * [Wildebeest:](https://github.com/cloudflare/wildebeest) Wildebeest is an ActivityPub and Mastodon-compatible server whose goal is to allow anyone to operate their Fediverse server and identity on their domain without needing to keep infrastructure, with minimal setup and maintenance, and running in minutes. * [Multiplayer Doom Workers:](https://github.com/cloudflare/doom-workers) A WebAssembly Doom port with multiplayer support running on top of Cloudflare's global network using Workers, WebSockets, Pages, and Durable Objects. ## Reference architectures Explore the following reference architectures that use Durable Objects: [Optimizing and securing connected transportation systems](https://developers.cloudflare.com/reference-architecture/diagrams/iot/optimizing-and-securing-connected-transportation-systems/) [This diagram showcases Cloudflare components optimizing connected transportation systems. It illustrates how their technologies minimize latency, ensure reliability, and strengthen security for critical data flow.](https://developers.cloudflare.com/reference-architecture/diagrams/iot/optimizing-and-securing-connected-transportation-systems/) [Fullstack applications](https://developers.cloudflare.com/reference-architecture/diagrams/serverless/fullstack-application/) [A practical example of how these services come together in a real fullstack application architecture.](https://developers.cloudflare.com/reference-architecture/diagrams/serverless/fullstack-application/) [Control and data plane architectural pattern for Durable Objects](https://developers.cloudflare.com/reference-architecture/diagrams/storage/durable-object-control-data-plane-pattern/) [Separate the control plane from the data plane of your application to achieve great performance and reliability without compromising on functionality.](https://developers.cloudflare.com/reference-architecture/diagrams/storage/durable-object-control-data-plane-pattern/) --- title: REST API · Cloudflare Durable Objects docs lastUpdated: 2025-01-31T11:01:46.000Z chatbotDeprioritize: false source_url: html: https://developers.cloudflare.com/durable-objects/durable-objects-rest-api/ md: https://developers.cloudflare.com/durable-objects/durable-objects-rest-api/index.md --- --- title: Examples · Cloudflare Durable Objects docs description: Explore the following examples for Durable Objects. lastUpdated: 2025-01-31T11:01:46.000Z chatbotDeprioritize: true source_url: html: https://developers.cloudflare.com/durable-objects/examples/ md: https://developers.cloudflare.com/durable-objects/examples/index.md --- Explore the following examples for Durable Objects. [Build a counter](https://developers.cloudflare.com/durable-objects/examples/build-a-counter/) Build a counter using Durable Objects and Workers with RPC methods. [Build a rate limiter](https://developers.cloudflare.com/durable-objects/examples/build-a-rate-limiter/) Build a rate limiter using Durable Objects and Workers. [Build a WebSocket server](https://developers.cloudflare.com/durable-objects/examples/websocket-server/) Build a WebSocket server using Durable Objects and Workers. [Build a WebSocket server with WebSocket Hibernation](https://developers.cloudflare.com/durable-objects/examples/websocket-hibernation-server/) Build a WebSocket server using WebSocket Hibernation on Durable Objects and Workers. [Durable Object in-memory state](https://developers.cloudflare.com/durable-objects/examples/durable-object-in-memory-state/) Create a Durable Object that stores the last location it was accessed from in-memory. [Durable Object Time To Live](https://developers.cloudflare.com/durable-objects/examples/durable-object-ttl/) Use the Durable Objects Alarms API to implement a Time To Live (TTL) for Durable Object instances. [Testing with Durable Objects](https://developers.cloudflare.com/durable-objects/examples/testing-with-durable-objects/) Write tests for Durable Objects. [Use RpcTarget class to handle Durable Object metadata](https://developers.cloudflare.com/durable-objects/examples/reference-do-name-using-init/) Access the name from within a Durable Object using RpcTarget. [Use the Alarms API](https://developers.cloudflare.com/durable-objects/examples/alarms-api/) Use the Durable Objects Alarms API to batch requests to a Durable Object. [Use Workers KV from Durable Objects](https://developers.cloudflare.com/durable-objects/examples/use-kv-from-durable-objects/) Read and write to/from KV within a Durable Object --- title: Getting started · Cloudflare Durable Objects docs description: "This guide will instruct you through:" lastUpdated: 2025-06-26T18:43:59.000Z chatbotDeprioritize: false source_url: html: https://developers.cloudflare.com/durable-objects/get-started/ md: https://developers.cloudflare.com/durable-objects/get-started/index.md --- This guide will instruct you through: * Writing a JavaScript class that defines a Durable Object. * Using Durable Objects SQL API to query a Durable Object's private, embedded SQLite database. * Instantiating and communicating with a Durable Object from another Worker. * Deploying a Durable Object and a Worker that communicates with a Durable Object. If you wish to learn more about Durable Objects, refer to [What are Durable Objects?](https://developers.cloudflare.com/durable-objects/what-are-durable-objects/). ## Quick start If you want to skip the steps and get started quickly, click on the button below. [![Deploy to Cloudflare](https://deploy.workers.cloudflare.com/button)](https://deploy.workers.cloudflare.com/?url=https://github.com/cloudflare/templates/tree/main/hello-world-do-template) This creates a repository in your GitHub account and deploys the application to Cloudflare Workers. Use this option if you are familiar with Cloudflare Workers, and wish to skip the step-by-step guidance. You may wish to manually follow the steps if you are new to Cloudflare Workers. ## Prerequisites 1. Sign up for a [Cloudflare account](https://dash.cloudflare.com/sign-up/workers-and-pages). 2. Install [`Node.js`](https://docs.npmjs.com/downloading-and-installing-node-js-and-npm). Node.js version manager Use a Node version manager like [Volta](https://volta.sh/) or [nvm](https://github.com/nvm-sh/nvm) to avoid permission issues and change Node.js versions. [Wrangler](https://developers.cloudflare.com/workers/wrangler/install-and-update/), discussed later in this guide, requires a Node version of `16.17.0` or later. ## 1. Create a Worker project You will access your Durable Object from a [Worker](https://developers.cloudflare.com/workers/). Your Worker application is an interface to interact with your Durable Object. To create a Worker project, run: * npm ```sh npm create cloudflare@latest -- durable-object-starter ``` * yarn ```sh yarn create cloudflare durable-object-starter ``` * pnpm ```sh pnpm create cloudflare@latest durable-object-starter ``` Running `create cloudflare@latest` will install [Wrangler](https://developers.cloudflare.com/workers/wrangler/install-and-update/), the Workers CLI. You will use Wrangler to test and deploy your project. For setup, select the following options: * For *What would you like to start with?*, choose `Hello World example`. * For *Which template would you like to use?*, choose `Worker + Durable Objects`. * For *Which language do you want to use?*, choose `TypeScript`. * For *Do you want to use git for version control?*, choose `Yes`. * For *Do you want to deploy your application?*, choose `No` (we will be making some changes before deploying). This will create a new directory, which will include either a `src/index.js` or `src/index.ts` file to write your code and a [`wrangler.jsonc`](https://developers.cloudflare.com/workers/wrangler/configuration/) configuration file. Move into your new directory: ```sh cd durable-object-starter ``` ## 2. Write a Durable Object class using SQL API Before you create and access a Durable Object, its behavior must be defined by an ordinary exported JavaScript class. Note If you do not use JavaScript or TypeScript, you will need a [shim](https://developer.mozilla.org/en-US/docs/Glossary/Shim) to translate your class definition to a JavaScript class. Your `MyDurableObject` class will have a constructor with two parameters. The first parameter, `ctx`, passed to the class constructor contains state specific to the Durable Object, including methods for accessing storage. The second parameter, `env`, contains any bindings you have associated with the Worker when you uploaded it. * JavaScript ```js export class MyDurableObject extends DurableObject { constructor(ctx, env) { // Required, as we're extending the base class. super(ctx, env); } } ``` * TypeScript ```ts export class MyDurableObject extends DurableObject { constructor(ctx: DurableObjectState, env: Env) { // Required, as we're extending the base class. super(ctx, env) } } ``` * Python ```python from workers import DurableObject class MyDurableObject(DurableObject): def __init__(self, ctx, env): super().__init__(ctx, env) ``` Workers communicate with a Durable Object using [remote-procedure call](https://developers.cloudflare.com/workers/runtime-apis/rpc/#_top). Public methods on a Durable Object class are exposed as [RPC methods](https://developers.cloudflare.com/durable-objects/best-practices/create-durable-object-stubs-and-send-requests/) to be called by another Worker. Your file should now look like: * JavaScript ```js export class MyDurableObject extends DurableObject { constructor(ctx, env) { // Required, as we're extending the base class. super(ctx, env); } async sayHello() { let result = this.ctx.storage.sql .exec("SELECT 'Hello, World!' as greeting") .one(); return result.greeting; } } ``` * TypeScript ```ts export class MyDurableObject extends DurableObject { constructor(ctx: DurableObjectState, env: Env) { // Required, as we're extending the base class. super(ctx, env) } async sayHello(): Promise { let result = this.ctx.storage.sql .exec("SELECT 'Hello, World!' as greeting") .one(); return result.greeting; } } ``` * Python ```python from workers import DurableObject class MyDurableObject(DurableObject): def __init__(self, ctx, env): super().__init__(ctx, env) async def say_hello(self): result = self.ctx.storage.sql \ .exec("SELECT 'Hello, World!' as greeting") \ .one() return result.greeting ``` In the code above, you have: 1. Defined a RPC method, `sayHello()`, that can be called by a Worker to communicate with a Durable Object. 2. Accessed a Durable Object's attached storage, which is a private SQLite database only accessible to the object, using [SQL API](https://developers.cloudflare.com/durable-objects/api/storage-api/#exec) methods (`sql.exec()`) available on `ctx.storage` . 3. Returned an object representing the single row query result using `one()`, which checks that the query result has exactly one row. 4. Return the `greeting` column from the row object result. ## 3. Instantiate and communicate with a Durable Object Note Durable Objects do not receive requests directly from the Internet. Durable Objects receive requests from Workers or other Durable Objects. This is achieved by configuring a binding in the calling Worker for each Durable Object class that you would like it to be able to talk to. These bindings must be configured at upload time. Methods exposed by the binding can be used to communicate with particular Durable Objects. A Worker is used to [access Durable Objects](https://developers.cloudflare.com/durable-objects/best-practices/create-durable-object-stubs-and-send-requests/). To communicate with a Durable Object, the Worker's fetch handler should look like the following: * JavaScript ```js export default { async fetch(request, env, ctx) { const id = env.MY_DURABLE_OBJECT.idFromName(new URL(request.url).pathname); const stub = env.MY_DURABLE_OBJECT.get(id); const greeting = await stub.sayHello(); return new Response(greeting); }, }; ``` * TypeScript ```ts export default { async fetch(request, env, ctx): Promise { const id:DurableObjectId = env.MY_DURABLE_OBJECT.idFromName(new URL(request.url).pathname); const stub = env.MY_DURABLE_OBJECT.get(id); const greeting = await stub.sayHello(); return new Response(greeting); }, } satisfies ExportedHandler; ``` * Python ```python from workers import handler, Response from urllib.parse import urlparse @handler async def on_fetch(request, env, ctx): url = urlparse(request.url) id = env.MY_DURABLE_OBJECT.idFromName(url.path) stub = env.MY_DURABLE_OBJECT.get(id) greeting = await stub.say_hello() return Response(greeting) ``` In the code above, you have: 1. Exported your Worker's main event handlers, such as the `fetch()` handler for receiving HTTP requests. 2. Passed `env` into the `fetch()` handler. Bindings are delivered as a property of the environment object passed as the second parameter when an event handler or class constructor is invoked. By calling the `idFromName()` function on the binding, you use a string-derived object ID. You can also ask the system to [generate random unique IDs](https://developers.cloudflare.com/durable-objects/api/namespace/#newuniqueid). System-generated unique IDs have better performance characteristics, but require you to store the ID somewhere to access the Object again later. 3. Derived an object ID from the URL path. `MY_DURABLE_OBJECT.idFromName()` always returns the same ID when given the same string as input (and called on the same class), but never the same ID for two different strings (or for different classes). In this case, you are creating a new object for each unique path. 4. Constructed the stub for the Durable Object using the ID. A stub is a client object used to send messages to the Durable Object. 5. Called a Durable Object by invoking a RPC method, `sayHello()`, on the Durable Object, which returns a `Hello, World!` string greeting. 6. Received an HTTP response back to the client by constructing a HTTP Response with `return new Response()`. Refer to [Access a Durable Object from a Worker](https://developers.cloudflare.com/durable-objects/best-practices/create-durable-object-stubs-and-send-requests/) to learn more about communicating with a Durable Object. ## 4. Configure Durable Object bindings [Bindings](https://developers.cloudflare.com/workers/runtime-apis/bindings/) allow your Workers to interact with resources on the Cloudflare developer platform. The Durable Object bindings in your Worker project's [Wrangler configuration file](https://developers.cloudflare.com/workers/wrangler/configuration/) will include a binding name (for this guide, use `MY_DURABLE_OBJECT`) and the class name (`MyDurableObject`). * wrangler.jsonc ```jsonc { "durable_objects": { "bindings": [ { "name": "MY_DURABLE_OBJECT", "class_name": "MyDurableObject" } ] } } ``` * wrangler.toml ```toml [[durable_objects.bindings]] name = "MY_DURABLE_OBJECT" class_name = "MyDurableObject" ``` The `bindings` section contains the following fields: * `name` - Required. The binding name to use within your Worker. * `class_name` - Required. The class name you wish to bind to. * `script_name` - Optional. Defaults to the current [environment's](https://developers.cloudflare.com/durable-objects/reference/environments/) Worker code. ## 5. Configure Durable Object class with SQLite storage backend A migration is a mapping process from a class name to a runtime state. You perform a migration when creating a new Durable Object class, or when renaming, deleting or transferring an existing Durable Object class. Migrations are performed through the `[[migrations]]` configurations key in your Wrangler file. The Durable Object migration to create a new Durable Object class with SQLite storage backend will look like the following in your Worker's Wrangler file: * wrangler.jsonc ```jsonc { "migrations": [ { "tag": "v1", "new_sqlite_classes": [ "MyDurableObject" ] } ] } ``` * wrangler.toml ```toml [[migrations]] tag = "v1" # Should be unique for each entry new_sqlite_classes = ["MyDurableObject"] # Array of new classes ``` Refer to [Durable Objects migrations](https://developers.cloudflare.com/durable-objects/reference/durable-objects-migrations/) to learn more about the migration process. ## 6. Develop a Durable Object Worker locally To test your Durable Object locally, run [`wrangler dev`](https://developers.cloudflare.com/workers/wrangler/commands/#dev): ```sh npx wrangler dev ``` In your console, you should see a`Hello world` string returned by the Durable Object. ## 7. Deploy your Durable Object Worker To deploy your Durable Object Worker: ```sh npx wrangler deploy ``` Once deployed, you should be able to see your newly created Durable Object Worker on the [Cloudflare dashboard](https://dash.cloudflare.com/), **Workers & Pages** > **Overview**. Preview your Durable Object Worker at `..workers.dev`. ## Summary and final code Your final code should look like this: * JavaScript ```js import { DurableObject } from "cloudflare:workers"; export class MyDurableObject extends DurableObject { constructor(ctx, env) { // Required, as we are extending the base class. super(ctx, env); } async sayHello() { let result = this.ctx.storage.sql .exec("SELECT 'Hello, World!' as greeting") .one(); return result.greeting; } } export default { async fetch(request, env, ctx) { const id = env.MY_DURABLE_OBJECT.idFromName(new URL(request.url).pathname); const stub = env.MY_DURABLE_OBJECT.get(id); const greeting = await stub.sayHello(); return new Response(greeting); }, }; ``` * TypeScript ```ts import { DurableObject } from "cloudflare:workers"; export class MyDurableObject extends DurableObject { constructor(ctx: DurableObjectState, env: Env) { // Required, as we are extending the base class. super(ctx, env) } async sayHello():Promise { let result = this.ctx.storage.sql .exec("SELECT 'Hello, World!' as greeting") .one(); return result.greeting; } } export default { async fetch(request, env, ctx): Promise { const id:DurableObjectId = env.MY_DURABLE_OBJECT.idFromName(new URL(request.url).pathname); const stub = env.MY_DURABLE_OBJECT.get(id); const greeting = await stub.sayHello(); return new Response(greeting); }, } satisfies ExportedHandler; ``` * Python ```python from workers import DurableObject, handler, Response from urllib.parse import urlparse class MyDurableObject(DurableObject): def __init__(self, ctx, env): super().__init__(ctx, env) async def say_hello(self): result = self.ctx.storage.sql \ .exec("SELECT 'Hello, World!' as greeting") \ .one() return result.greeting @handler async def on_fetch(request, env, ctx): url = urlparse(request.url) id = env.MY_DURABLE_OBJECT.idFromName(url.path) stub = env.MY_DURABLE_OBJECT.get(id) greeting = await stub.say_hello() return Response(greeting) ``` By finishing this tutorial, you have: * Successfully created a Durable Object * Called the Durable Object by invoking a [RPC method](https://developers.cloudflare.com/workers/runtime-apis/rpc/) * Deployed the Durable Object globally ## Related resources * [Create Durable Object stubs](https://developers.cloudflare.com/durable-objects/best-practices/create-durable-object-stubs-and-send-requests/) * [Access Durable Objects Storage](https://developers.cloudflare.com/durable-objects/best-practices/access-durable-objects-storage/) * [Miniflare](https://github.com/cloudflare/workers-sdk/tree/main/packages/miniflare) - Helpful tools for mocking and testing your Durable Objects. --- title: Observability · Cloudflare Durable Objects docs lastUpdated: 2025-01-31T11:01:46.000Z chatbotDeprioritize: true source_url: html: https://developers.cloudflare.com/durable-objects/observability/ md: https://developers.cloudflare.com/durable-objects/observability/index.md --- * [Troubleshooting](https://developers.cloudflare.com/durable-objects/observability/troubleshooting/) * [Metrics and GraphQL analytics](https://developers.cloudflare.com/durable-objects/observability/graphql-analytics/) --- title: Platform · Cloudflare Durable Objects docs lastUpdated: 2025-03-14T10:22:37.000Z chatbotDeprioritize: true source_url: html: https://developers.cloudflare.com/durable-objects/platform/ md: https://developers.cloudflare.com/durable-objects/platform/index.md --- * [Known issues](https://developers.cloudflare.com/durable-objects/platform/known-issues/) * [Pricing](https://developers.cloudflare.com/durable-objects/platform/pricing/) * [Limits](https://developers.cloudflare.com/durable-objects/platform/limits/) * [Choose a data or storage product](https://developers.cloudflare.com/workers/platform/storage-options/) --- title: Reference · Cloudflare Durable Objects docs lastUpdated: 2025-03-14T10:22:37.000Z chatbotDeprioritize: true source_url: html: https://developers.cloudflare.com/durable-objects/reference/ md: https://developers.cloudflare.com/durable-objects/reference/index.md --- * [In-memory state in a Durable Object](https://developers.cloudflare.com/durable-objects/reference/in-memory-state/) * [Durable Objects migrations](https://developers.cloudflare.com/durable-objects/reference/durable-objects-migrations/) * [Data security](https://developers.cloudflare.com/durable-objects/reference/data-security/) * [Data location](https://developers.cloudflare.com/durable-objects/reference/data-location/) * [Environments](https://developers.cloudflare.com/durable-objects/reference/environments/) * [Gradual Deployments](https://developers.cloudflare.com/workers/configuration/versions-and-deployments/gradual-deployments/#gradual-deployments-for-durable-objects) * [Glossary](https://developers.cloudflare.com/durable-objects/reference/glossary/) --- title: Release notes · Cloudflare Durable Objects docs description: Subscribe to RSS lastUpdated: 2025-03-14T10:22:37.000Z chatbotDeprioritize: false source_url: html: https://developers.cloudflare.com/durable-objects/release-notes/ md: https://developers.cloudflare.com/durable-objects/release-notes/index.md --- [Subscribe to RSS](https://developers.cloudflare.com/durable-objects/release-notes/index.xml) ## 2025-04-07 **Durable Objects on Workers Free plan** [SQLite-backed Durable Objects](https://developers.cloudflare.com/durable-objects/get-started/) are now available on the Workers Free plan with these [limits](https://developers.cloudflare.com/durable-objects/platform/pricing/). ## 2025-04-07 **SQLite in Durable Objects GA** [SQLite-backed Durable Objects](https://developers.cloudflare.com/durable-objects/best-practices/access-durable-objects-storage/#create-sqlite-backed-durable-object-class) and corresponding [Storage API](https://developers.cloudflare.com/durable-objects/api/storage-api/) methods like `sql.exec` have moved from beta to general availability. New Durable Object classes should use wrangler configuration for SQLite storage over key-value storage. SQLite storage per Durable Object has increased to 10GB for all existing and new objects. ## 2025-02-19 SQLite-backed Durable Objects now support `PRAGMA optimize` command, which can improve database query performance. It is recommended to run this command after a schema change (for example, after creating an index). Refer to [`PRAGMA optimize`](https://developers.cloudflare.com/d1/sql-api/sql-statements/#pragma-optimize) for more information. ## 2025-02-11 When Durable Objects generate an "internal error" exception in response to certain failures, the exception message may provide a reference ID that customers can include in support communication for easier error identification. For example, an exception with the new message might look like: `internal error; reference = 0123456789abcdefghijklmn`. ## 2024-10-07 **Alarms re-enabled in (beta) SQLite-backed Durable Object classes** The issue identified with [alarms](https://developers.cloudflare.com/durable-objects/api/alarms/) in [beta Durable Object classes with a SQLite storage backend](https://developers.cloudflare.com/durable-objects/best-practices/access-durable-objects-storage/#sqlite-storage-backend) has been resolved and alarms have been re-enabled. ## 2024-09-27 **Alarms disabled in (beta) SQLite-backed Durable Object classes** An issue was identified with [alarms](https://developers.cloudflare.com/durable-objects/api/alarms/) in [beta Durable Object classes with a SQLite storage backend](https://developers.cloudflare.com/durable-objects/best-practices/access-durable-objects-storage/#sqlite-storage-backend). Alarms have been temporarily disabled for only SQLite-backed Durable Objects while a fix is implemented. Alarms in Durable Objects with default, key-value storage backend are unaffected and continue to operate. ## 2024-09-26 **(Beta) SQLite storage backend & SQL API available on new Durable Object classes** The new beta version of Durable Objects is available where each Durable Object has a private, embedded SQLite database. When deploying a new Durable Object class, users can [opt-in to a SQLite storage backend](https://developers.cloudflare.com/durable-objects/best-practices/access-durable-objects-storage/#sqlite-storage-backend) in order to access new [SQL API](https://developers.cloudflare.com/durable-objects/api/storage-api/#sql-api) and [point-in-time-recovery API](https://developers.cloudflare.com/durable-objects/api/storage-api/#pitr-point-in-time-recovery-api), part of Durable Objects Storage API. You cannot enable a SQLite storage backend on an existing, deployed Durable Object class. Automatic migration of deployed classes from their key-value storage backend to SQLite storage backend will be available in the future. During the initial beta, Storage API billing is not enabled for Durable Object classes using SQLite storage backend. SQLite-backed Durable Objects will incur [charges for requests and duration](https://developers.cloudflare.com/durable-objects/platform/pricing/#billing-metrics). We plan to enable Storage API billing for Durable Objects using SQLite storage backend in the first half of 2025 after advance notice with the following [pricing](https://developers.cloudflare.com/durable-objects/platform/pricing/#sqlite-storage-backend). ## 2024-09-07 **New error message for overloaded Durable Objects** Introduced a new overloaded error message for Durable Objects: "Durable Object is overloaded. Too many requests for the same object within a 10 second window." This error message does not replace other types of overload messages that you may encounter for your Durable Object, and is only returned at more extreme levels of overload. ## 2024-06-24 [Exceptions](https://developers.cloudflare.com/durable-objects/best-practices/error-handling) thrown from Durable Object internal operations and tunneled to the caller may now be populated with a `.retryable: true` property if the exception was likely due to a transient failure, or populated with an `.overloaded: true` property if the exception was due to [overload](https://developers.cloudflare.com/durable-objects/observability/troubleshooting/#durable-object-is-overloaded). ## 2024-04-03 **Durable Objects support for Oceania region** Durable Objects can reside in Oceania, lowering Durable Objects request latency for eyeball Workers in Oceania locations. Refer to [Durable Objects](https://developers.cloudflare.com/durable-objects/reference/data-location/#provide-a-location-hint) to provide location hints to objects. ## 2024-04-01 **Billing reduction for WebSocket messages** Durable Objects [request billing](https://developers.cloudflare.com/durable-objects/platform/pricing/#billing-metrics) applies a 20:1 ratio for incoming WebSocket messages. For example, 1 million Websocket received messages across connections would be charged as 50,000 Durable Objects requests. This is a billing-only calculation and does not impact Durable Objects [metrics and analytics](https://developers.cloudflare.com/durable-objects/observability/graphql-analytics/). ## 2024-02-15 **Optional \`alarmInfo\` parameter for Durable Object Alarms** Durable Objects [Alarms](https://developers.cloudflare.com/durable-objects/api/alarms/) now have a new `alarmInfo` argument that provides more details about an alarm invocation, including the `retryCount` and `isRetry` to signal if the alarm was retried. --- title: Tutorials · Cloudflare Durable Objects docs description: View tutorials to help you get started with Durable Objects. lastUpdated: 2025-05-06T17:35:57.000Z chatbotDeprioritize: false source_url: html: https://developers.cloudflare.com/durable-objects/tutorials/ md: https://developers.cloudflare.com/durable-objects/tutorials/index.md --- View tutorials to help you get started with Durable Objects. | Name | Last Updated | Type | Difficulty | | - | - | - | - | | [Build Live Cursors with Next.js, RPC and Durable Objects](https://developers.cloudflare.com/workers/tutorials/live-cursors-with-nextjs-rpc-do/) | 8 months ago | 📝 Tutorial | Intermediate | | [Build an interview practice tool with Workers AI](https://developers.cloudflare.com/workers-ai/guides/tutorials/build-ai-interview-practice-tool/) | 8 months ago | 📝 Tutorial | Intermediate | | [Build a seat booking app with SQLite in Durable Objects](https://developers.cloudflare.com/durable-objects/tutorials/build-a-seat-booking-app/) | 10 months ago | 📝 Tutorial | Intermediate | | [Deploy a Browser Rendering Worker with Durable Objects](https://developers.cloudflare.com/browser-rendering/workers-bindings/browser-rendering-with-do/) | almost 2 years ago | 📝 Tutorial | Beginner | | [Deploy a real-time chat application](https://developers.cloudflare.com/workers/tutorials/deploy-a-realtime-chat-app/) | almost 2 years ago | 📝 Tutorial | Intermediate | --- title: Videos · Cloudflare Durable Objects docs lastUpdated: 2025-03-12T13:36:32.000Z chatbotDeprioritize: false source_url: html: https://developers.cloudflare.com/durable-objects/video-tutorials/ md: https://developers.cloudflare.com/durable-objects/video-tutorials/index.md --- [Introduction to Durable Objects ](https://developers.cloudflare.com/learning-paths/durable-objects-course/series/introduction-to-series-1/)Dive into a hands-on Durable Objects project and learn how to build stateful apps using serverless architecture --- title: What are Durable Objects? · Cloudflare Durable Objects docs description: "A Durable Object is a special kind of Cloudflare Worker which uniquely combines compute with storage. Like a Worker, a Durable Object is automatically provisioned geographically close to where it is first requested, starts up quickly when needed, and shuts down when idle. You can have millions of them around the world. However, unlike regular Workers:" lastUpdated: 2025-04-06T14:39:24.000Z chatbotDeprioritize: false source_url: html: https://developers.cloudflare.com/durable-objects/what-are-durable-objects/ md: https://developers.cloudflare.com/durable-objects/what-are-durable-objects/index.md --- A Durable Object is a special kind of [Cloudflare Worker](https://developers.cloudflare.com/workers/) which uniquely combines compute with storage. Like a Worker, a Durable Object is automatically provisioned geographically close to where it is first requested, starts up quickly when needed, and shuts down when idle. You can have millions of them around the world. However, unlike regular Workers: * Each Durable Object has a **globally-unique name**, which allows you to send requests to a specific object from anywhere in the world. Thus, a Durable Object can be used to coordinate between multiple clients who need to work together. * Each Durable Object has some **durable storage** attached. Since this storage lives together with the object, it is strongly consistent yet fast to access. Therefore, Durable Objects enable **stateful** serverless applications. ## Durable Objects highlights Durable Objects have properties that make them a great fit for distributed stateful scalable applications. **Serverless compute, zero infrastructure management** * Durable Objects are built on-top of the Workers runtime, so they support exactly the same code (JavaScript and WASM), and similar memory and CPU limits. * Each Durable Object is [implicitly created on first access](https://developers.cloudflare.com/durable-objects/api/namespace/#get). User applications are not concerned with their lifecycle, creating them or destroying them. Durable Objects migrate among healthy servers, and therefore applications never have to worry about managing them. * Each Durable Object stays alive as long as requests are being processed, and remains alive for several seconds after being idle before hibernating, allowing applications to [exploit in-memory caching](https://developers.cloudflare.com/durable-objects/reference/in-memory-state/) while handling many consecutive requests and boosting their performance. **Storage colocated with compute** * Each Durable Object has its own [durable, transactional, and strongly consistent storage](https://developers.cloudflare.com/durable-objects/api/storage-api/) (up to 10 GB[1](#user-content-fn-1)), persisted across requests, and accessible only within that object. **Single-threaded concurrency** * Each [Durable Object instance has an identifier](https://developers.cloudflare.com/durable-objects/api/id/), either randomly-generated or user-generated, which allows you to globally address which Durable Object should handle a specific action or request. * Durable Objects are single-threaded and cooperatively multi-tasked, just like code running in a web browser. For more details on how safety and correctness are achieved, refer to the blog post ["Durable Objects: Easy, Fast, Correct — Choose three"](https://blog.cloudflare.com/durable-objects-easy-fast-correct-choose-three/). **Elastic horizontal scaling across Cloudflare's global network** * Durable Objects can be spread around the world, and you can [optionally influence where each instance should be located](https://developers.cloudflare.com/durable-objects/reference/data-location/#provide-a-location-hint). Durable Objects are not yet available in every Cloudflare data center; refer to the [where.durableobjects.live](https://where.durableobjects.live/) project for live locations. * Each Durable Object type (or ["Namespace binding"](https://developers.cloudflare.com/durable-objects/api/namespace/) in Cloudflare terms) corresponds to a JavaScript class implementing the actual logic. There is no hard limit on how many Durable Objects can be created for each namespace. * Durable Objects scale elastically as your application creates millions of objects. There is no need for applications to manage infrastructure or plan ahead for capacity. ## Durable Objects features ### In-memory state Each Durable Object has its own [in-memory state](https://developers.cloudflare.com/durable-objects/reference/in-memory-state/). Applications can use this in-memory state to optimize the performance of their applications by keeping important information in-memory, thereby avoiding the need to access the durable storage at all. Useful cases for in-memory state include batching and aggregating information before persisting it to storage, or for immediately rejecting/handling incoming requests meeting certain criteria, and more. In-memory state is reset when the Durable Object hibernates after being idle for some time. Therefore, it is important to persist any in-memory data to the durable storage if that data will be needed at a later time when the Durable Object receives another request. ### Storage API The [Durable Object Storage API](https://developers.cloudflare.com/durable-objects/api/storage-api/) allows Durable Objects to access fast, transactional, and strongly consistent storage. A Durable Object's attached storage is private to its unique instance and cannot be accessed by other objects. There are two flavors of the storage API, a [key-value (KV) API](https://developers.cloudflare.com/durable-objects/api/storage-api/#kv-api) and an [SQL API](https://developers.cloudflare.com/durable-objects/api/storage-api/#sql-api). When using the [new SQLite in Durable Objects storage backend](https://developers.cloudflare.com/durable-objects/reference/durable-objects-migrations/#enable-sqlite-storage-backend-on-new-durable-object-class-migration), you have access to both the APIs. However, if you use the previous storage backend you only have access to the key-value API. ### Alarms API Durable Objects provide an [Alarms API](https://developers.cloudflare.com/durable-objects/api/alarms/) which allows you to schedule the Durable Object to be woken up at a time in the future. This is useful when you want to do certain work periodically, or at some specific point in time, without having to manually manage infrastructure such as job scheduling runners on your own. You can combine Alarms with in-memory state and the durable storage API to build batch and aggregation applications such as queues, workflows, or advanced data pipelines. ### WebSockets WebSockets are long-lived TCP connections that enable bi-directional, real-time communication between client and server. Because WebSocket sessions are long-lived, applications commonly use Durable Objects to accept either the client or server connection. Because Durable Objects provide a single-point-of-coordination between Cloudflare Workers, a single Durable Object instance can be used in parallel with WebSockets to coordinate between multiple clients, such as participants in a chat room or a multiplayer game. Durable Objects support the [WebSocket Standard API](https://developers.cloudflare.com/durable-objects/best-practices/websockets/#websocket-standard-api), as well as the [WebSockets Hibernation API](https://developers.cloudflare.com/durable-objects/best-practices/websockets/#websocket-hibernation-api) which extends the Web Standard WebSocket API to reduce costs by not incurring billing charges during periods of inactivity. ### RPC Durable Objects support Workers [Remote-Procedure-Call (RPC)](https://developers.cloudflare.com/workers/runtime-apis/rpc/) which allows applications to use JavaScript-native methods and objects to communicate between Workers and Durable Objects. Using RPC for communication makes application development easier and simpler to reason about, and more efficient. ## Actor programming model Another way to describe and think about Durable Objects is through the lens of the [Actor programming model](https://en.wikipedia.org/wiki/Actor_model). There are several popular examples of the Actor model supported at the programming language level through runtimes or library frameworks, like [Erlang](https://www.erlang.org/), [Elixir](https://elixir-lang.org/), [Akka](https://akka.io/), or [Microsoft Orleans for .NET](https://learn.microsoft.com/en-us/dotnet/orleans/overview). The Actor model simplifies a lot of problems in distributed systems by abstracting away the communication between actors using RPC calls (or message sending) that could be implemented on-top of any transport protocol, and it avoids most of the concurrency pitfalls you get when doing concurrency through shared memory such as race conditions when multiple processes/threads access the same data in-memory. Each Durable Object instance can be seen as an Actor instance, receiving messages (incoming HTTP/RPC requests), executing some logic in its own single-threaded context using its attached durable storage or in-memory state, and finally sending messages to the outside world (outgoing HTTP/RPC requests or responses), even to another Durable Object instance. Each Durable Object has certain capabilities in terms of [how much work it can do](https://developers.cloudflare.com/durable-objects/platform/limits/#how-much-work-can-a-single-durable-object-do), which should influence the application's [architecture to fully take advantage of the platform](https://developers.cloudflare.com/reference-architecture/diagrams/storage/durable-object-control-data-plane-pattern/). Durable Objects are natively integrated into Cloudflare's infrastructure, giving you the ultimate serverless platform to build distributed stateful applications exploiting the entirety of Cloudflare's network. ## Durable Objects in Cloudflare Many of Cloudflare's products use Durable Objects. Some of our technical blog posts showcase real-world applications and use-cases where Durable Objects make building applications easier and simpler. These blog posts may also serve as inspiration on how to architect scalable applications using Durable Objects, and how to integrate them with the rest of Cloudflare Developer Platform. * [Durable Objects aren't just durable, they're fast: a 10x speedup for Cloudflare Queues](https://blog.cloudflare.com/how-we-built-cloudflare-queues/) * [Behind the scenes with Stream Live, Cloudflare's live streaming service](https://blog.cloudflare.com/behind-the-scenes-with-stream-live-cloudflares-live-streaming-service/) * [DO it again: how we used Durable Objects to add WebSockets support and authentication to AI Gateway](https://blog.cloudflare.com/do-it-again/) * [Workers Builds: integrated CI/CD built on the Workers platform](https://blog.cloudflare.com/workers-builds-integrated-ci-cd-built-on-the-workers-platform/) * [Build durable applications on Cloudflare Workers: you write the Workflows, we take care of the rest](https://blog.cloudflare.com/building-workflows-durable-execution-on-workers/) * [Building D1: a Global Database](https://blog.cloudflare.com/building-d1-a-global-database/) * [Billions and billions (of logs): scaling AI Gateway with the Cloudflare Developer Platform](https://blog.cloudflare.com/billions-and-billions-of-logs-scaling-ai-gateway-with-the-cloudflare/) * [Indexing millions of HTTP requests using Durable Objects](https://blog.cloudflare.com/r2-rayid-retrieval/) Finally, the following blog posts may help you learn some of the technical implementation aspects of Durable Objects, and how they work. * [Durable Objects: Easy, Fast, Correct — Choose three](https://blog.cloudflare.com/durable-objects-easy-fast-correct-choose-three/) * [Zero-latency SQLite storage in every Durable Object](https://blog.cloudflare.com/sqlite-in-durable-objects/) * [Workers Durable Objects Beta: A New Approach to Stateful Serverless](https://blog.cloudflare.com/introducing-workers-durable-objects/) ## Get started Get started now by following the ["Get started" guide](https://developers.cloudflare.com/durable-objects/get-started/) to create your first application using Durable Objects. ## Footnotes 1. Storage per Durable Object with SQLite is currently 1 GB. This will be raised to 10 GB for general availability. [↩](#user-content-fnref-1) --- title: 404 - Page Not Found · Cloudflare Email Routing docs chatbotDeprioritize: false source_url: html: https://developers.cloudflare.com/email-routing/404/ md: https://developers.cloudflare.com/email-routing/404/index.md --- # 404 Check the URL, try using our [search](https://developers.cloudflare.com/search/) or try our LLM-friendly [llms.txt directory](https://developers.cloudflare.com/llms.txt). --- title: API reference · Cloudflare Email Routing docs lastUpdated: 2024-12-16T22:33:26.000Z chatbotDeprioritize: false source_url: html: https://developers.cloudflare.com/email-routing/api-reference/ md: https://developers.cloudflare.com/email-routing/api-reference/index.md --- --- title: Email Workers · Cloudflare Email Routing docs description: With Email Workers you can leverage the power of Cloudflare Workers to implement any logic you need to process your emails and create complex rules. These rules determine what happens when you receive an email. lastUpdated: 2025-05-05T15:05:59.000Z chatbotDeprioritize: false source_url: html: https://developers.cloudflare.com/email-routing/email-workers/ md: https://developers.cloudflare.com/email-routing/email-workers/index.md --- With Email Workers you can leverage the power of Cloudflare Workers to implement any logic you need to process your emails and create complex rules. These rules determine what happens when you receive an email. Creating your own rules with Email Workers is as easy or complex as you want. You can begin using one of the starter templates that are pre-populated with code for popular use-cases. These templates allow you to create a blocklist, allowlist, or send notifications to Slack. If you prefer, you can skip the templates and use custom code. You can, for example, create logic that only accepts messages from a specific address, and then forwards them to one or more of your verified email addresses, while also alerting you on Slack. The following is an example of an allowlist Email Worker: ```js export default { async email(message, env, ctx) { const allowList = ["friend@example.com", "coworker@example.com"]; if (allowList.indexOf(message.from) == -1) { message.setReject("Address not allowed"); } else { await message.forward("inbox@corp"); } }, }; ``` Refer to the [Workers Languages](https://developers.cloudflare.com/workers/languages/) for more information regarding the languages you can use with Workers. ## How to use Email Workers To use Email Routing with Email Workers there are three steps involved: 1. Creating the Email Worker. 2. Adding the logic to your Email Worker (like email addresses allowed or blocked from sending you emails). 3. Binding the Email Worker to a route. This is the email address that forwards emails to the Worker. The route, or email address, bound to the Worker forwards emails to your Email Worker. The logic in the Worker will then decide if the email is forwarded to its final destination or dropped, and what further actions (if any) will be applied. For example, say that you create an allowlist Email Worker and bind it to a `hello@my-company.com` route. This route will be the email address you share with the world, to make sure that only email addresses on your allowlist are forwarded to your destination address. All other emails will be dropped. ## Resources * [Limits](https://developers.cloudflare.com/email-routing/limits/#email-workers-size-limits) * [Runtime API](https://developers.cloudflare.com/email-routing/email-workers/runtime-api/) * [Local development](https://developers.cloudflare.com/email-routing/email-workers/local-development/) --- title: Get started · Cloudflare Email Routing docs description: To enable Email Routing, start by creating a custom email address linked to a destination address or Email Worker. This forms an email rule. You can enable or disable rules from the Cloudflare dashboard. Refer to Enable Email Routing for more details. lastUpdated: 2024-08-13T19:56:56.000Z chatbotDeprioritize: false source_url: html: https://developers.cloudflare.com/email-routing/get-started/ md: https://developers.cloudflare.com/email-routing/get-started/index.md --- To enable Email Routing, start by creating a custom email address linked to a destination address or Email Worker. This forms an **email rule**. You can enable or disable rules from the Cloudflare dashboard. Refer to [Enable Email Routing](https://developers.cloudflare.com/email-routing/get-started/enable-email-routing) for more details. Custom addresses you create with Email Routing work as forward addresses only. Emails sent to custom addresses are forwarded by Email Routing to your destination inbox. Cloudflare does not process outbound email, and does not have an SMTP server. The first time you access Email Routing, you will see a wizard guiding you through the process of creating email rules. You can skip the wizard and add rules manually. If you need to pause Email Routing or offboard to another service, refer to [Disable Email Routing](https://developers.cloudflare.com/email-routing/setup/disable-email-routing/). * [Enable Email Routing](https://developers.cloudflare.com/email-routing/get-started/enable-email-routing/) * [Test Email Routing](https://developers.cloudflare.com/email-routing/get-started/test-email-routing/) * [Analytics](https://developers.cloudflare.com/email-routing/get-started/email-routing-analytics/) * [Audit logs](https://developers.cloudflare.com/email-routing/get-started/audit-logs/) --- title: Limits · Cloudflare Email Routing docs description: When you process emails with Email Workers and you are on Workers’ free pricing tier you might encounter an allocation error. This may happen due to the size of the emails you are processing and/or the complexity of your Email Worker. Refer to Worker limits for more information. lastUpdated: 2024-09-29T02:03:11.000Z chatbotDeprioritize: false source_url: html: https://developers.cloudflare.com/email-routing/limits/ md: https://developers.cloudflare.com/email-routing/limits/index.md --- ## Email Workers size limits When you process emails with Email Workers and you are on [Workers’ free pricing tier](https://developers.cloudflare.com/workers/platform/pricing/) you might encounter an allocation error. This may happen due to the size of the emails you are processing and/or the complexity of your Email Worker. Refer to [Worker limits](https://developers.cloudflare.com/workers/platform/limits/#worker-limits) for more information. You can use the [log functionality for Workers](https://developers.cloudflare.com/workers/observability/logs/) to look for messages related to CPU limits (such as `EXCEEDED_CPU`) and troubleshoot any issues regarding allocation errors. If you encounter these error messages frequently, consider upgrading to the [Workers Paid plan](https://developers.cloudflare.com/workers/platform/pricing/) for higher usage limits. ## Message size Currently, Email Routing does not support messages bigger than 25 MiB. ## Rules and addresses | Feature | Limit | | - | - | | [Rules](https://developers.cloudflare.com/email-routing/setup/email-routing-addresses/) | 200 | | [Addresses](https://developers.cloudflare.com/email-routing/setup/email-routing-addresses/#destination-addresses) | 200 | Need a higher limit? To request an adjustment to a limit, complete the [Limit Increase Request Form](https://forms.gle/ukpeZVLWLnKeixDu7). If the limit can be increased, Cloudflare will contact you with next steps. ## Email Routing summary for emails sent through Workers Emails sent through Workers will show up in the Email Routing summary page as dropped even if they were successfully delivered. --- title: Postmaster · Cloudflare Email Routing docs description: Reference page with postmaster information for professionals, as well as a known limitations section. lastUpdated: 2025-07-09T23:05:20.000Z chatbotDeprioritize: false source_url: html: https://developers.cloudflare.com/email-routing/postmaster/ md: https://developers.cloudflare.com/email-routing/postmaster/index.md --- This page provides technical information about Email Routing to professionals who administer email systems, and other email providers. Here you will find information regarding Email Routing, along with best practices, rules, guidelines, troubleshooting tools, as well as known limitations for Email Routing. ## Postmaster ### Authenticated Received Chain (ARC) Email Routing supports [Authenticated Received Chain (ARC)](http://arc-spec.org/). ARC is an email authentication system designed to allow an intermediate email server (such as Email Routing) to preserve email authentication results. Google also supports ARC. ### Contact information The best way to contact us is using our [community forum](https://community.cloudflare.com/new-topic?category=Feedback/Previews%20%26%20Betas\&tags=email) or our [Discord server](https://discord.com/invite/cloudflaredev). ### DKIM signature [DKIM (DomainKeys Identified Mail)](https://en.wikipedia.org/wiki/DomainKeys_Identified_Mail) ensures that email messages are not altered in transit between the sender and the recipient's SMTP servers through public-key cryptography. Through this standard, the sender publishes its public key to a domain's DNS once, and then signs the body of each message before it leaves the server. The recipient server reads the message, gets the domain public key from the domain's DNS, and validates the signature to ensure the message was not altered in transit. Email Routing adds two new signatures to the emails in transit, one on behalf of the Cloudflare domain used for sender rewriting `email.cloudflare.net`, and another one on behalf of the customer's recipient domain. Below is the DKIM key for `email.cloudflare.net`: ```sh dig TXT cf2024-1._domainkey.email.cloudflare.net +short ``` ```sh "v=DKIM1; h=sha256; k=rsa; p=MIIBIjANBgkqhkiG9w0BAQEFAAOCAQ8AMIIBCgKCAQEAiweykoi+o48IOGuP7GR3X0MOExCUDY/BCRHoWBnh3rChl7WhdyCxW3jgq1daEjPPqoi7sJvdg5hEQVsgVRQP4DcnQDVjGMbASQtrY4WmB1VebF+RPJB2ECPsEDTpeiI5ZyUAwJaVX7r6bznU67g7LvFq35yIo4sdlmtZGV+i0H4cpYH9+3JJ78k" "m4KXwaf9xUJCWF6nxeD+qG6Fyruw1Qlbds2r85U9dkNDVAS3gioCvELryh1TxKGiVTkg4wqHTyHfWsp7KD3WQHYJn0RyfJJu6YEmL77zonn7p2SRMvTMP3ZEXibnC9gz3nnhR6wcYL8Q7zXypKTMD58bTixDSJwIDAQAB" ``` You can find the DKIM key for the customer's `example.com` domain by querying the following: ```sh dig TXT cf2024-1._domainkey.example.com +short ``` ### DMARC enforcing Email Routing enforces Domain-based Message Authentication, Reporting & Conformance (DMARC). Depending on the sender's DMARC policy, Email Routing will reject emails when there is an authentication failure. Refer to [dmarc.org](https://dmarc.org/) for more information on this protocol. It is recommended that all senders implement the DMARC protocol in order to successfully deliver email to Cloudflare. ### Mail authentication requirement Cloudflare requires emails to [pass some form of authentication](https://developers.cloudflare.com/changelog/2025-06-30-mail-authentication/), either pass SPF verification or be correctly DKIM-signed to forward them. Having DMARC configured will also have a positive impact and is recommended. ### IPv6 support Currently, Email Routing will connect to the upstream SMTP servers using IPv6 if they provide AAAA records for their MX servers, and fall back to IPv4 if that is not possible. Below is an example of a popular provider that supports IPv6: ```sh dig mx gmail.com ``` ```sh gmail.com. 3084 IN MX 5 gmail-smtp-in.l.google.com. gmail.com. 3084 IN MX 20 alt2.gmail-smtp-in.l.google.com. gmail.com. 3084 IN MX 40 alt4.gmail-smtp-in.l.google.com. gmail.com. 3084 IN MX 10 alt1.gmail-smtp-in.l.google.com. gmail.com. 3084 IN MX 30 alt3.gmail-smtp-in.l.google.com. ``` ```sh dig AAAA gmail-smtp-in.l.google.com ``` ```sh gmail-smtp-in.l.google.com. 17 IN AAAA 2a00:1450:400c:c09::1b ``` Email Routing also supports IPv6 through Cloudflare’s inbound MX servers. ### MX, SPF, and DKIM records Email Routing automatically adds a few DNS records to the zone when our customers enable Email Routing. If we take `example.com` as an example: ```txt example.com. 300 IN MX 13 amir.mx.cloudflare.net. example.com. 300 IN MX 86 linda.mx.cloudflare.net. example.com. 300 IN MX 24 isaac.mx.cloudflare.net. example.com. 300 IN TXT "v=spf1 include:_spf.mx.cloudflare.net ~all" ``` [The MX (mail exchange) records](https://www.cloudflare.com/learning/dns/dns-records/dns-mx-record/) tell the Internet where the inbound servers receiving email messages for the zone are. In this case, anyone who wants to send an email to `example.com` can use the `amir.mx.cloudflare.net`, `linda.mx.cloudflare.net`, or `isaac.mx.cloudflare.net` SMTP servers. ### Outbound prefixes Email Routing sends its traffic using both IPv4 and IPv6 prefixes, when supported by the upstream SMTP server. If you are a postmaster and are having trouble receiving Email Routing's emails, allow the following outbound IP addresses in your server configuration: **IPv4** `104.30.0.0/19` **IPv6** `2405:8100:c000::/38` *Ranges last updated: December 13th, 2023* ### Outbound hostnames In addition to the outbound prefixes, Email Routing will use the following outbound domains for the `HELO/EHLO` command: * `cloudflare-email.net` * `cloudflare-email.org` * `cloudflare-email.com` PTR records (reverse DNS) ensure that each hostname has an corresponding IP. For example: ```sh dig a-h.cloudflare-email.net +short ``` ```sh 104.30.0.7 ``` ```sh dig -x 104.30.0.7 +short ``` ```sh a-h.cloudflare-email.net. ``` ### Sender rewriting Email Routing rewrites the SMTP envelope sender (`MAIL FROM`) to the forwarding domain to avoid issues with [SPF](#spf-record). Email Routing uses the [Sender Rewriting Scheme](https://en.wikipedia.org/wiki/Sender_Rewriting_Scheme) to achieve this. This has no effect to the end user's experience, though. The message headers will still report the original sender's `From:` address. ### SMTP errors In most cases, Email Routing forwards the upstream SMTP errors back to the sender client in-session. ### Realtime Block Lists Email Routing uses an internal Domain Name System Blocklists (DNSBL) service to check if the sender's IP is present in one or more Realtime Block Lists (RBL) lists. When the system detects an abusive IP, it blocks the email and returns an SMTP error: ```txt 554 found on one or more RBLs (abusixip). Refer to https://developers.cloudflare.com/email-routing/postmaster/#spam-and-abusive-traffic/ ``` We update our RBLs regularly. You can use combined block list lookup services like [MxToolbox](https://mxtoolbox.com/blacklists.aspx) to check if your IP matches other RBLs. IP reputation blocks are usually temporary, but if you feel your IP should be removed immediately, please contact the RBL's maintainer mentioned in the SMTP error directly. ### Anti-spam In addition to DNSBL, Email Routing uses advanced heuristic and statistical analysis of the email's headers and text to calculate a spam score. We inject the score in the custom `X-Cf-Spamh-Score` header: ```plaintext X-Cf-Spamh-Score: 2 ``` This header is visible in the forwarded email. The higher the score, 5 being the maximum, the more likely the email is spam. Currently, this system is experimental and passive; we do not act on it and suggest that upstream servers and email clients don't act on it either. We will update this page with more information as we fine-tune the system. ### SPF record A SPF DNS record is an anti-spoofing mechanism that is used to specify which IP addresses and domains are allowed to send emails on behalf of your zone. The Internet Engineering Task Force (IETF) tracks the SPFv1 specification [in RFC 7208](https://datatracker.ietf.org/doc/html/rfc7208). Refer to the [SPF Record Syntax](http://www.open-spf.org/SPF_Record_Syntax/) to learn the SPF syntax. Email Routing's SPF record contains the following: ```txt v=spf1 include:_spf.mx.cloudflare.net ~all ``` In the example above: * `spf1`: Refers to SPF version 1, the most common and more widely adopted version of SPF. * `include`: Include a second query to `_spf.mx.cloudflare.net` and allow its contents. * `~all`: Otherwise [`SoftFail`](http://www.open-spf.org/SPF_Record_Syntax/) on all other origins. `SoftFail` means NOT allowed to send, but in transition. This instructs the upstream server to accept the email but mark it as suspicious if it came from any IP addresses outside of those defined in the SPF records. If we do a TXT query to `_spf.mx.cloudflare.net`, we get: ```txt _spf.mx.cloudflare.net. 300 IN TXT "v=spf1 ip4:104.30.0.0/20 ~all" ``` This response means: * Allow all IPv4 IPs coming from the `104.30.0.0/20` subnet. * Otherwise, `SoftFail`. You can read more about SPF, DKIM, and DMARC in our [Tackling Email Spoofing and Phishing](https://blog.cloudflare.com/tackling-email-spoofing/) blog. *** ## Known limitations Below, you will find information regarding known limitations for Email Routing. ### Email address internationalization (EAI) Email Routing does not support [internationalized email addresses](https://en.wikipedia.org/wiki/International_email). Email Routing only supports [internationalized domain names](https://en.wikipedia.org/wiki/Internationalized_domain_name). This means that you can have email addresses with an internationalized domain, but not an internationalized local-part (the first part of your email address, before the `@` symbol). Refer to the following examples: * `info@piñata.es` - Supported. * `piñata@piñata.es` - Not supported. ### Non-delivery reports (NDRs) Email Routing does not forward non-delivery reports to the original sender. This means the sender will not receive a notification indicating that the email did not reach the intended destination. ### Restrictive DMARC policies can make forwarded emails fail Due to the nature of email forwarding, restrictive DMARC policies might make forwarded emails fail to be delivered. Refer to [dmarc.org](https://dmarc.org/wiki/FAQ#My_users_often_forward_their_emails_to_another_mailbox.2C_how_do_I_keep_DMARC_valid.3F) for more information. ### Sending or replying to an email from your Cloudflare domain Email Routing does not support sending or replying from your Cloudflare domain. When you reply to emails forwarded by Email Routing, the reply will be sent from your destination address (like `my-name@gmail.com`), not your custom address (like `info@my-company.com`). ### Signs such "`+`" and "`.`" are treated as normal characters for custom addresses Email Routing does not have advanced routing options. Characters such as `+` or `.`, which perform special actions in email providers like Gmail and Outlook, are currently treated as normal characters on custom addresses. More flexible routing options are in our roadmap. --- title: Setup · Cloudflare Email Routing docs lastUpdated: 2024-08-13T19:56:56.000Z chatbotDeprioritize: false source_url: html: https://developers.cloudflare.com/email-routing/setup/ md: https://developers.cloudflare.com/email-routing/setup/index.md --- * [Configure rules and addresses](https://developers.cloudflare.com/email-routing/setup/email-routing-addresses/) * [DNS records](https://developers.cloudflare.com/email-routing/setup/email-routing-dns-records/) * [Disable Email Routing](https://developers.cloudflare.com/email-routing/setup/disable-email-routing/) * [Configure MTA-STS](https://developers.cloudflare.com/email-routing/setup/mta-sts/) * [Subdomains](https://developers.cloudflare.com/email-routing/setup/subdomains/) --- title: Troubleshooting · Cloudflare Email Routing docs description: Email Routing warns you when your DNS records are not properly configured. In Email Routing's Overview page, you will see a message explaining what type of problem your account's DNS records have. lastUpdated: 2024-08-13T19:56:56.000Z chatbotDeprioritize: false source_url: html: https://developers.cloudflare.com/email-routing/troubleshooting/ md: https://developers.cloudflare.com/email-routing/troubleshooting/index.md --- Email Routing warns you when your DNS records are not properly configured. In Email Routing's **Overview** page, you will see a message explaining what type of problem your account's DNS records have. Refer to Email Routing's **Settings** tab on the dashboard for more information. Email Routing will list missing DNS records or warn you about duplicate sender policy framework (SPF) records, for example. * [DNS records](https://developers.cloudflare.com/email-routing/troubleshooting/email-routing-dns-records/) * [SPF records](https://developers.cloudflare.com/email-routing/troubleshooting/email-routing-spf-records/) --- title: 404 - Page Not Found · Hyperdrive docs chatbotDeprioritize: false source_url: html: https://developers.cloudflare.com/hyperdrive/404/ md: https://developers.cloudflare.com/hyperdrive/404/index.md --- # 404 Check the URL, try using our [search](https://developers.cloudflare.com/search/) or try our LLM-friendly [llms.txt directory](https://developers.cloudflare.com/llms.txt). --- title: Configuration · Hyperdrive docs lastUpdated: 2024-09-06T08:27:36.000Z chatbotDeprioritize: true source_url: html: https://developers.cloudflare.com/hyperdrive/configuration/ md: https://developers.cloudflare.com/hyperdrive/configuration/index.md --- * [How Hyperdrive works](https://developers.cloudflare.com/hyperdrive/configuration/how-hyperdrive-works/) * [Connect to a private database using Tunnel](https://developers.cloudflare.com/hyperdrive/configuration/connect-to-private-database/) * [Query caching](https://developers.cloudflare.com/hyperdrive/configuration/query-caching/) * [Connection pooling](https://developers.cloudflare.com/hyperdrive/configuration/connection-pooling/) * [Local development](https://developers.cloudflare.com/hyperdrive/configuration/local-development/) * [SSL/TLS certificates](https://developers.cloudflare.com/hyperdrive/configuration/tls-ssl-certificates-for-hyperdrive/) * [Firewall and networking configuration](https://developers.cloudflare.com/hyperdrive/configuration/firewall-and-networking-configuration/) * [Rotating database credentials](https://developers.cloudflare.com/hyperdrive/configuration/rotate-credentials/) --- title: Demos and architectures · Hyperdrive docs description: Learn how you can use Hyperdrive within your existing application and architecture. lastUpdated: 2024-08-13T19:56:56.000Z chatbotDeprioritize: false source_url: html: https://developers.cloudflare.com/hyperdrive/demos/ md: https://developers.cloudflare.com/hyperdrive/demos/index.md --- Learn how you can use Hyperdrive within your existing application and architecture. ## Demos Explore the following demo applications for Hyperdrive. * [Hyperdrive demo:](https://github.com/cloudflare/hyperdrive-demo) A Remix app that connects to a database behind Cloudflare's Hyperdrive, making regional databases feel like they're globally distributed. ## Reference architectures Explore the following reference architectures that use Hyperdrive: [Serverless global APIs](https://developers.cloudflare.com/reference-architecture/diagrams/serverless/serverless-global-apis/) [An example architecture of a serverless API on Cloudflare and aims to illustrate how different compute and data products could interact with each other.](https://developers.cloudflare.com/reference-architecture/diagrams/serverless/serverless-global-apis/) --- title: Examples · Hyperdrive docs lastUpdated: 2025-04-08T01:03:45.000Z chatbotDeprioritize: true source_url: html: https://developers.cloudflare.com/hyperdrive/examples/ md: https://developers.cloudflare.com/hyperdrive/examples/index.md --- * [Connect to PostgreSQL](https://developers.cloudflare.com/hyperdrive/examples/connect-to-postgres/) * [Connect to MySQL](https://developers.cloudflare.com/hyperdrive/examples/connect-to-mysql/) --- title: Getting started · Hyperdrive docs description: Hyperdrive accelerates access to your existing databases from Cloudflare Workers, making even single-region databases feel globally distributed. lastUpdated: 2025-06-10T14:18:53.000Z chatbotDeprioritize: false source_url: html: https://developers.cloudflare.com/hyperdrive/get-started/ md: https://developers.cloudflare.com/hyperdrive/get-started/index.md --- Hyperdrive accelerates access to your existing databases from Cloudflare Workers, making even single-region databases feel globally distributed. By maintaining a connection pool to your database within Cloudflare's network, Hyperdrive reduces seven round-trips to your database before you can even send a query: the TCP handshake (1x), TLS negotiation (3x), and database authentication (3x). Hyperdrive understands the difference between read and write queries to your database, and caches the most common read queries, improving performance and reducing load on your origin database. This guide will instruct you through: * Creating your first Hyperdrive configuration. * Creating a [Cloudflare Worker](https://developers.cloudflare.com/workers/) and binding it to your Hyperdrive configuration. * Establishing a database connection from your Worker to a public database. Note Hyperdrive currently works with PostgreSQL, MySQL and many compatible databases. This includes CockroachDB and Materialize (which are PostgreSQL-compatible), and Planetscale. Learn more about the [databases that Hyperdrive supports](https://developers.cloudflare.com/hyperdrive/reference/supported-databases-and-features). ## Prerequisites Before you begin, ensure you have completed the following: 1. Sign up for a [Cloudflare account](https://dash.cloudflare.com/sign-up/workers-and-pages) if you have not already. 2. Install [`Node.js`](https://docs.npmjs.com/downloading-and-installing-node-js-and-npm). Use a Node version manager like [nvm](https://github.com/nvm-sh/nvm) or [Volta](https://volta.sh/) to avoid permission issues and change Node.js versions. [Wrangler](https://developers.cloudflare.com/workers/wrangler/install-and-update/) requires a Node version of `16.17.0` or later. 3. Have **a publicly accessible** PostgreSQL/MySQL (or compatible) database. ## 1. Log in Before creating your Hyperdrive binding, log in with your Cloudflare account by running: ```sh npx wrangler login ``` You will be directed to a web page asking you to log in to the Cloudflare dashboard. After you have logged in, you will be asked if Wrangler can make changes to your Cloudflare account. Scroll down and select **Allow** to continue. ## 2. Create a Worker New to Workers? Refer to [How Workers works](https://developers.cloudflare.com/workers/reference/how-workers-works/) to learn about the Workers serverless execution model works. Go to the [Workers Get started guide](https://developers.cloudflare.com/workers/get-started/guide/) to set up your first Worker. Create a new project named `hyperdrive-tutorial` by running: * npm ```sh npm create cloudflare@latest -- hyperdrive-tutorial ``` * yarn ```sh yarn create cloudflare hyperdrive-tutorial ``` * pnpm ```sh pnpm create cloudflare@latest hyperdrive-tutorial ``` For setup, select the following options: * For *What would you like to start with?*, choose `Hello World example`. * For *Which template would you like to use?*, choose `Worker only`. * For *Which language do you want to use?*, choose `TypeScript`. * For *Do you want to use git for version control?*, choose `Yes`. * For *Do you want to deploy your application?*, choose `No` (we will be making some changes before deploying). This will create a new `hyperdrive-tutorial` directory. Your new `hyperdrive-tutorial` directory will include: * A `"Hello World"` [Worker](https://developers.cloudflare.com/workers/get-started/guide/#3-write-code) at `src/index.ts`. * A [`wrangler.jsonc`](https://developers.cloudflare.com/workers/wrangler/configuration/) configuration file. `wrangler.jsonc` is how your `hyperdrive-tutorial` Worker will connect to Hyperdrive. ### Enable Node.js compatibility [Node.js compatibility](https://developers.cloudflare.com/workers/runtime-apis/nodejs/) is required for database drivers, and needs to be configured for your Workers project. To enable both built-in runtime APIs and polyfills for your Worker or Pages project, add the [`nodejs_compat`](https://developers.cloudflare.com/workers/configuration/compatibility-flags/#nodejs-compatibility-flag) [compatibility flag](https://developers.cloudflare.com/workers/configuration/compatibility-flags/#nodejs-compatibility-flag) to your [Wrangler configuration file](https://developers.cloudflare.com/workers/wrangler/configuration/), and set your compatibility date to September 23rd, 2024 or later. This will enable [Node.js compatibility](https://developers.cloudflare.com/workers/runtime-apis/nodejs/) for your Workers project. * wrangler.jsonc ```jsonc { "compatibility_flags": [ "nodejs_compat" ], "compatibility_date": "2024-09-23" } ``` * wrangler.toml ```toml compatibility_flags = [ "nodejs_compat" ] compatibility_date = "2024-09-23" ``` ## 3. Connect Hyperdrive to a database Hyperdrive works by connecting to your database, pooling database connections globally, and speeding up your database access through Cloudflare's network. It will provide a secure connection string that is only accessible from your Worker which you can use to connect to your database through Hyperdrive. This means that you can use the Hyperdrive connection string with your existing drivers or ORM libraries without needing significant changes to your code. To create your first Hyperdrive database configuration, change into the directory you just created for your Workers project: ```sh cd hyperdrive-tutorial ``` To create your first Hyperdrive, you will need: * The IP address (or hostname) and port of your database. * The database username (for example, `hyperdrive-demo`). * The password associated with that username. * The name of the database you want Hyperdrive to connect to. For example, `postgres` or `mysql`. Hyperdrive accepts the combination of these parameters in the common connection string format used by database drivers: * PostgreSQL ```txt postgres://USERNAME:PASSWORD@HOSTNAME_OR_IP_ADDRESS:PORT/database_name ``` Most database providers will provide a connection string you can copy-and-paste directly into Hyperdrive. To create a Hyperdrive connection, run the `wrangler` command, replacing the placeholder values passed to the `--connection-string` flag with the values of your existing database: ```sh npx wrangler hyperdrive create --connection-string="postgres://user:password@HOSTNAME_OR_IP_ADDRESS:PORT/database_name" ``` * MySQL ```txt mysql://USERNAME:PASSWORD@HOSTNAME_OR_IP_ADDRESS:PORT/database_name ``` Most database providers will provide a connection string you can copy-and-paste directly into Hyperdrive. To create a Hyperdrive connection, run the `wrangler` command, replacing the placeholder values passed to the `--connection-string` flag with the values of your existing database: ```sh npx wrangler hyperdrive create --connection-string="mysql://user:password@HOSTNAME_OR_IP_ADDRESS:PORT/database_name" ``` Manage caching By default, Hyperdrive will cache query results. If you wish to disable caching, pass the flag `--caching-disabled`. Alternatively, you can use the `--max-age` flag to specify the maximum duration (in seconds) for which items should persist in the cache, before they are evicted. Default value is 60 seconds. Refer to [Hyperdrive Wrangler commands](https://developers.cloudflare.com/hyperdrive/reference/wrangler-commands/) for more information. If successful, the command will output your new Hyperdrive configuration: ```json { "hyperdrive": [ { "binding": "HYPERDRIVE", "id": "" } ] } ``` Copy the `id` field: you will use this in the next step to make Hyperdrive accessible from your Worker script. Note Hyperdrive will attempt to connect to your database with the provided credentials to verify they are correct before creating a configuration. If you encounter an error when attempting to connect, refer to Hyperdrive's [troubleshooting documentation](https://developers.cloudflare.com/hyperdrive/observability/troubleshooting/) to debug possible causes. ## 4. Bind your Worker to Hyperdrive You must create a binding in your [Wrangler configuration file](https://developers.cloudflare.com/workers/wrangler/configuration/) for your Worker to connect to your Hyperdrive configuration. [Bindings](https://developers.cloudflare.com/workers/runtime-apis/bindings/) allow your Workers to access resources, like Hyperdrive, on the Cloudflare developer platform. To bind your Hyperdrive configuration to your Worker, add the following to the end of your Wrangler file: * wrangler.jsonc ```jsonc { "hyperdrive": [ { "binding": "HYPERDRIVE", "id": "" } ] } ``` * wrangler.toml ```toml [[hyperdrive]] binding = "HYPERDRIVE" id = "" # the ID associated with the Hyperdrive you just created ``` Specifically: * The value (string) you set for the `binding` (binding name) will be used to reference this database in your Worker. In this tutorial, name your binding `HYPERDRIVE`. * The binding must be [a valid JavaScript variable name](https://developer.mozilla.org/en-US/docs/Web/JavaScript/Guide/Grammar_and_types#variables). For example, `binding = "hyperdrive"` or `binding = "productionDB"` would both be valid names for the binding. * Your binding is available in your Worker at `env.`. If you wish to use a local database during development, you can add a `localConnectionString` to your Hyperdrive configuration with the connection string of your database: * wrangler.jsonc ```jsonc { "hyperdrive": [ { "binding": "HYPERDRIVE", "id": "", "localConnectionString": "" } ] } ``` * wrangler.toml ```toml [[hyperdrive]] binding = "HYPERDRIVE" id = "" # the ID associated with the Hyperdrive you just created localConnectionString = "" ``` Note Learn more about setting up [Hyperdrive for local development](https://developers.cloudflare.com/hyperdrive/configuration/local-development/). ## 5. Run a query against your database Once you have created a Hyperdrive configuration and bound it to your Worker, you can run a query against your database. ### Install a database driver * PostgreSQL To connect to your database, you will need a database driver which allows you to authenticate and query your database. For this tutorial, you will use [node-postgres (pg)](https://node-postgres.com/), one of the most widely used PostgreSQL drivers. To install `pg`, ensure you are in the `hyperdrive-tutorial` directory. Open your terminal and run the following command: * npm ```sh # This should install v8.13.0 or later npm i pg ``` * yarn ```sh # This should install v8.13.0 or later yarn add pg ``` * pnpm ```sh # This should install v8.13.0 or later pnpm add pg ``` If you are using TypeScript, you should also install the type definitions for `pg`: * npm ```sh # This should install v8.13.0 or later npm i -D @types/pg ``` * yarn ```sh # This should install v8.13.0 or later yarn add -D @types/pg ``` * pnpm ```sh # This should install v8.13.0 or later pnpm add -D @types/pg ``` With the driver installed, you can now create a Worker script that queries your database. * MySQL To connect to your database, you will need a database driver which allows you to authenticate and query your database. For this tutorial, you will use [mysql2](https://github.com/sidorares/node-mysql2), one of the most widely used MySQL drivers. To install `mysql2`, ensure you are in the `hyperdrive-tutorial` directory. Open your terminal and run the following command: * npm ```sh # This should install v3.13.0 or later npm i mysql2 ``` * yarn ```sh # This should install v3.13.0 or later yarn add mysql2 ``` * pnpm ```sh # This should install v3.13.0 or later pnpm add mysql2 ``` With the driver installed, you can now create a Worker script that queries your database. * npm ```sh # This should install v8.13.0 or later npm i pg ``` * yarn ```sh # This should install v8.13.0 or later yarn add pg ``` * pnpm ```sh # This should install v8.13.0 or later pnpm add pg ``` * npm ```sh # This should install v8.13.0 or later npm i -D @types/pg ``` * yarn ```sh # This should install v8.13.0 or later yarn add -D @types/pg ``` * pnpm ```sh # This should install v8.13.0 or later pnpm add -D @types/pg ``` * npm ```sh # This should install v3.13.0 or later npm i mysql2 ``` * yarn ```sh # This should install v3.13.0 or later yarn add mysql2 ``` * pnpm ```sh # This should install v3.13.0 or later pnpm add mysql2 ``` ### Write a Worker * PostgreSQL After you have set up your database, you will run a SQL query from within your Worker. Go to your `hyperdrive-tutorial` Worker and open the `index.ts` file. The `index.ts` file is where you configure your Worker's interactions with Hyperdrive. Populate your `index.ts` file with the following code: ```typescript // pg 8.13.0 or later is recommended import { Client } from "pg"; export interface Env { // If you set another name in the Wrangler config file as the value for 'binding', // replace "HYPERDRIVE" with the variable name you defined. HYPERDRIVE: Hyperdrive; } export default { async fetch(request, env, ctx): Promise { // Create a client using the pg driver (or any supported driver, ORM or query builder) // with the Hyperdrive credentials. These credentials are only accessible from your Worker. const sql = new Client({ connectionString: env.HYPERDRIVE.connectionString, }); try { // Connect to the database await sql.connect(); // Sample query const results = await sql.query(`SELECT * FROM pg_tables`); // Clean up the client after the response is returned, before the Worker is killed ctx.waitUntil(sql.end()); // Return result rows as JSON return Response.json(results.rows); } catch (e) { console.error(e); return Response.json( { error: e instanceof Error ? e.message : e }, { status: 500 }, ); } }, } satisfies ExportedHandler; ``` Upon receiving a request, the code above does the following: 1. Creates a new database client configured to connect to your database via Hyperdrive, using the Hyperdrive connection string. 2. Initiates a query via `await sql.query()` that outputs all tables (user and system created) in the database (as an example query). 3. Returns the response as JSON to the client. * MySQL After you have set up your database, you will run a SQL query from within your Worker. Go to your `hyperdrive-tutorial` Worker and open the `index.ts` file. The `index.ts` file is where you configure your Worker's interactions with Hyperdrive. Populate your `index.ts` file with the following code: ```typescript // mysql2 v3.13.0 or later is required import { createConnection } from 'mysql2/promise'; export interface Env { // If you set another name in the Wrangler config file as the value for 'binding', // replace "HYPERDRIVE" with the variable name you defined. HYPERDRIVE: Hyperdrive; } export default { async fetch(request, env, ctx): Promise { // Create a connection using the mysql2 driver (or any support driver, ORM or query builder) // with the Hyperdrive credentials. These credentials are only accessible from your Worker. const connection = await createConnection({ host: env.HYPERDRIVE.host, user: env.HYPERDRIVE.user, password: env.HYPERDRIVE.password, database: env.HYPERDRIVE.database, port: env.HYPERDRIVE.port // The following line is needed for mysql2 compatibility with Workers // mysql2 uses eval() to optimize result parsing for rows with > 100 columns // Configure mysql2 to use static parsing instead of eval() parsing with disableEval disableEval: true }); try{ // Sample query const [results, fields] = await connection.query( 'SHOW tables;' ); // Clean up the client after the response is returned, before the Worker is killed ctx.waitUntil(connection.end()); // Return result rows as JSON return new Response(JSON.stringify({ results, fields }), { headers: { 'Content-Type': 'application/json', 'Access-Control-Allow-Origin': '*', }, }); } catch(e){ console.error(e); return Response.json( { error: e instanceof Error ? e.message : e }, { status: 500 }, ); } }, } satisfies ExportedHandler; ``` Upon receiving a request, the code above does the following: 1. Creates a new database client configured to connect to your database via Hyperdrive, using the Hyperdrive connection string. 2. Initiates a query via `await connection.query` that outputs all tables (user and system created) in the database (as an example query). 3. Returns the response as JSON to the client. ## 6. Deploy your Worker You can now deploy your Worker to make your project accessible on the Internet. To deploy your Worker, run: ```sh npx wrangler deploy # Outputs: https://hyperdrive-tutorial..workers.dev ``` You can now visit the URL for your newly created project to query your live database. For example, if the URL of your new Worker is `hyperdrive-tutorial..workers.dev`, accessing `https://hyperdrive-tutorial..workers.dev/` will send a request to your Worker that queries your database directly. By finishing this tutorial, you have created a Hyperdrive configuration, a Worker to access that database and deployed your project globally. ## Next steps * Learn more about [how Hyperdrive works](https://developers.cloudflare.com/hyperdrive/configuration/how-hyperdrive-works/). * How to [configure query caching](https://developers.cloudflare.com/hyperdrive/configuration/query-caching/). * [Troubleshooting common issues](https://developers.cloudflare.com/hyperdrive/observability/troubleshooting/) when connecting a database to Hyperdrive. If you have any feature requests or notice any bugs, share your feedback directly with the Cloudflare team by joining the [Cloudflare Developers community on Discord](https://discord.cloudflare.com). --- title: Hyperdrive REST API · Hyperdrive docs lastUpdated: 2024-12-16T22:33:26.000Z chatbotDeprioritize: false source_url: html: https://developers.cloudflare.com/hyperdrive/hyperdrive-rest-api/ md: https://developers.cloudflare.com/hyperdrive/hyperdrive-rest-api/index.md --- --- title: Observability · Hyperdrive docs lastUpdated: 2024-09-06T08:27:36.000Z chatbotDeprioritize: true source_url: html: https://developers.cloudflare.com/hyperdrive/observability/ md: https://developers.cloudflare.com/hyperdrive/observability/index.md --- * [Troubleshoot and debug](https://developers.cloudflare.com/hyperdrive/observability/troubleshooting/) * [Metrics and analytics](https://developers.cloudflare.com/hyperdrive/observability/metrics/) --- title: Platform · Hyperdrive docs lastUpdated: 2024-09-06T08:27:36.000Z chatbotDeprioritize: true source_url: html: https://developers.cloudflare.com/hyperdrive/platform/ md: https://developers.cloudflare.com/hyperdrive/platform/index.md --- * [Pricing](https://developers.cloudflare.com/hyperdrive/platform/pricing/) * [Limits](https://developers.cloudflare.com/hyperdrive/platform/limits/) * [Choose a data or storage product](https://developers.cloudflare.com/workers/platform/storage-options/) * [Release notes](https://developers.cloudflare.com/hyperdrive/platform/release-notes/) --- title: Reference · Hyperdrive docs lastUpdated: 2024-09-06T08:27:36.000Z chatbotDeprioritize: true source_url: html: https://developers.cloudflare.com/hyperdrive/reference/ md: https://developers.cloudflare.com/hyperdrive/reference/index.md --- * [Supported databases and features](https://developers.cloudflare.com/hyperdrive/reference/supported-databases-and-features/) * [FAQ](https://developers.cloudflare.com/hyperdrive/reference/faq/) * [Wrangler commands](https://developers.cloudflare.com/hyperdrive/reference/wrangler-commands/) --- title: Tutorials · Hyperdrive docs description: View tutorials to help you get started with Hyperdrive. lastUpdated: 2024-08-13T19:56:56.000Z chatbotDeprioritize: false source_url: html: https://developers.cloudflare.com/hyperdrive/tutorials/ md: https://developers.cloudflare.com/hyperdrive/tutorials/index.md --- View tutorials to help you get started with Hyperdrive. | Name | Last Updated | Type | Difficulty | | - | - | - | - | | [Connect to a MySQL database with Cloudflare Workers](https://developers.cloudflare.com/workers/tutorials/mysql/) | 4 months ago | 📝 Tutorial | Beginner | | [Connect to a PostgreSQL database with Cloudflare Workers](https://developers.cloudflare.com/workers/tutorials/postgres/) | 11 months ago | 📝 Tutorial | Beginner | | [Create a serverless, globally distributed time-series API with Timescale](https://developers.cloudflare.com/hyperdrive/tutorials/serverless-timeseries-api-with-timescale/) | over 1 year ago | 📝 Tutorial | Beginner | --- title: 404 - Page Not Found · Cloudflare Images docs chatbotDeprioritize: false source_url: html: https://developers.cloudflare.com/images/404/ md: https://developers.cloudflare.com/images/404/index.md --- # 404 Check the URL, try using our [search](https://developers.cloudflare.com/search/) or try our LLM-friendly [llms.txt directory](https://developers.cloudflare.com/llms.txt). --- title: Demos and architectures · Cloudflare Images docs description: Learn how you can use Images within your existing architecture. lastUpdated: 2024-08-13T19:56:56.000Z chatbotDeprioritize: false source_url: html: https://developers.cloudflare.com/images/demos/ md: https://developers.cloudflare.com/images/demos/index.md --- Learn how you can use Images within your existing architecture. ## Demos Explore the following demo applications for Images. * [Wildebeest:](https://github.com/cloudflare/wildebeest) Wildebeest is an ActivityPub and Mastodon-compatible server whose goal is to allow anyone to operate their Fediverse server and identity on their domain without needing to keep infrastructure, with minimal setup and maintenance, and running in minutes. ## Reference architectures Explore the following reference architectures that use Images: [Optimizing image delivery with Cloudflare image resizing and R2](https://developers.cloudflare.com/reference-architecture/diagrams/content-delivery/optimizing-image-delivery-with-cloudflare-image-resizing-and-r2/) [Learn how to get a scalable, high-performance solution to optimizing image delivery.](https://developers.cloudflare.com/reference-architecture/diagrams/content-delivery/optimizing-image-delivery-with-cloudflare-image-resizing-and-r2/) [Fullstack applications](https://developers.cloudflare.com/reference-architecture/diagrams/serverless/fullstack-application/) [A practical example of how these services come together in a real fullstack application architecture.](https://developers.cloudflare.com/reference-architecture/diagrams/serverless/fullstack-application/) --- title: Examples · Cloudflare Images docs lastUpdated: 2025-04-03T11:41:17.000Z chatbotDeprioritize: false source_url: html: https://developers.cloudflare.com/images/examples/ md: https://developers.cloudflare.com/images/examples/index.md --- [Transcode images](https://developers.cloudflare.com/images/examples/transcode-from-workers-ai/) Transcode an image from Workers AI before uploading to R2 [Watermarks](https://developers.cloudflare.com/images/examples/watermark-from-kv/) Draw a watermark from KV on an image from R2 --- title: Getting started · Cloudflare Images docs description: In this guide, you will get started with Cloudflare Images and make your first API request. lastUpdated: 2025-05-29T18:16:56.000Z chatbotDeprioritize: false source_url: html: https://developers.cloudflare.com/images/get-started/ md: https://developers.cloudflare.com/images/get-started/index.md --- In this guide, you will get started with Cloudflare Images and make your first API request. ## Prerequisites Before you make your first API request, ensure that you have a Cloudflare Account ID and an API token. Refer to [Find zone and account IDs](https://developers.cloudflare.com/fundamentals/account/find-account-and-zone-ids/) for help locating your Account ID and [Create an API token](https://developers.cloudflare.com/fundamentals/api/get-started/create-token/) to learn how to create an access your API token. ## Make your first API request ```bash curl --request POST \ --url https://api.cloudflare.com/client/v4/accounts//images/v1 \ --header 'Authorization: Bearer ' \ --header 'Content-Type: multipart/form-data' \ --form file=@./ ``` ## Enable transformations on your zone You can dynamically optimize images that are stored outside of Cloudflare Images and deliver them using [transformation URLs](https://developers.cloudflare.com/images/transform-images/transform-via-url/). Cloudflare will automatically cache every transformed image on our global network so that you store only the original image at your origin. To enable transformations on your zone: 1. Log in to the [Cloudflare dashboard](https://dash.cloudflare.com/login) and select your account. 2. Go to **Images** > **Transformations**. 3. Go to the specific zone where you want to enable transformations. 4. Select **Enable for zone**. This will allow you to optimize and deliver remote images. Note With **Resize images from any origin** unchecked, only the initial URL passed will be checked. Any redirect returned will be followed, including if it leaves the zone, and the resulting image will be transformed. Note If you are using transformations in a Worker, you need to include the appropriate logic in your Worker code to prevent resizing images from any origin. Unchecking this option in the dash does not apply to transformation requests coming from Cloudflare Workers. --- title: Images API Reference · Cloudflare Images docs lastUpdated: 2024-12-16T22:33:26.000Z chatbotDeprioritize: false source_url: html: https://developers.cloudflare.com/images/images-api/ md: https://developers.cloudflare.com/images/images-api/index.md --- --- title: Manage uploaded images · Cloudflare Images docs lastUpdated: 2024-08-30T16:09:27.000Z chatbotDeprioritize: true source_url: html: https://developers.cloudflare.com/images/manage-images/ md: https://developers.cloudflare.com/images/manage-images/index.md --- * [Apply blur](https://developers.cloudflare.com/images/manage-images/blur-variants/) * [Browser TTL](https://developers.cloudflare.com/images/manage-images/browser-ttl/) * [Configure webhooks](https://developers.cloudflare.com/images/manage-images/configure-webhooks/) * [Create variants](https://developers.cloudflare.com/images/manage-images/create-variants/) * [Enable flexible variants](https://developers.cloudflare.com/images/manage-images/enable-flexible-variants/) * [Delete variants](https://developers.cloudflare.com/images/manage-images/delete-variants/) * [Edit images](https://developers.cloudflare.com/images/manage-images/edit-images/) * [Serve images](https://developers.cloudflare.com/images/manage-images/serve-images/) * [Export images](https://developers.cloudflare.com/images/manage-images/export-images/) * [Delete images](https://developers.cloudflare.com/images/manage-images/delete-images/) --- title: Platform · Cloudflare Images docs lastUpdated: 2024-11-12T19:01:32.000Z chatbotDeprioritize: true source_url: html: https://developers.cloudflare.com/images/platform/ md: https://developers.cloudflare.com/images/platform/index.md --- * [Changelog](https://developers.cloudflare.com/images/platform/changelog/) --- title: Cloudflare Polish · Cloudflare Images docs description: Cloudflare Polish is a one-click image optimization product that automatically optimizes images in your site. Polish strips metadata from images and reduces image size through lossy or lossless compression to accelerate the speed of image downloads. lastUpdated: 2024-08-13T19:56:56.000Z chatbotDeprioritize: false source_url: html: https://developers.cloudflare.com/images/polish/ md: https://developers.cloudflare.com/images/polish/index.md --- Cloudflare Polish is a one-click image optimization product that automatically optimizes images in your site. Polish strips metadata from images and reduces image size through lossy or lossless compression to accelerate the speed of image downloads. When an image is fetched from your origin, our systems automatically optimize it in Cloudflare's cache. Subsequent requests for the same image will get the smaller, faster, optimized version of the image, improving the speed of your website. ![Example of Polish compression's quality.](https://developers.cloudflare.com/_astro/polish.DBlbPZoO_GT9cH.webp) ## Comparison * **Polish** automatically optimizes all images served from your origin server. It keeps the same image URLs, and does not require changing markup of your pages. * **Cloudflare Images** API allows you to create new images with resizing, cropping, watermarks, and other processing applied. These images get their own new URLs, and you need to embed them on your pages to take advantage of this service. Images created this way are already optimized, and there is no need to apply Polish to them. ## Availability | | Free | Pro | Business | Enterprise | | - | - | - | - | - | | Availability | No | Yes | Yes | Yes | --- title: Pricing · Cloudflare Images docs description: By default, all users are on the Images Free plan. The Free plan includes access to the transformations feature, which lets you optimize images stored outside of Images, like in R2. lastUpdated: 2025-07-15T08:29:55.000Z chatbotDeprioritize: false source_url: html: https://developers.cloudflare.com/images/pricing/ md: https://developers.cloudflare.com/images/pricing/index.md --- By default, all users are on the Images Free plan. The Free plan includes access to the transformations feature, which lets you optimize images stored outside of Images, like in R2. The Paid plan allows transformations, as well as access to storage in Images. Pricing is dependent on which features you use. The table below shows which metrics are used for each use case. | Use case | Metrics | Availability | | - | - | - | | Optimize images stored outside of Images | Images Transformed | Free and Paid plans | | Optimized images that are stored in Cloudflare Images | Images Stored, Images Delivered | Only Paid plans | ## Images Free On the Free plan, you can request up to 5,000 unique transformations each month for free. Once you exceed 5,000 unique transformations: * Existing transformations in cache will continue to be served as expected. * New transformations will return a `9422` error. If your source image is from the same domain where the transformation is served, then you can use the [`onerror` parameter](https://developers.cloudflare.com/images/transform-images/transform-via-url/#onerror) to redirect to the original image. * You will not be charged for exceeding the limits in the Free plan. To request more than 5,000 unique transformations each month, you can purchase an Images Paid plan. ## Images Paid When you purchase an Images Paid plan, you can choose your own storage or add storage in Images. | Metric | Pricing | | - | - | | Images Transformed | First 5,000 unique transformations included + $0.50 / 1,000 unique transformations / month | | Images Stored | $5 / 100,000 images stored / month | | Images Delivered | $1 / 100,000 images delivered / month | If you optimize an image stored outside of Images, then you will be billed only for Images Transformed. Alternatively, Images Stored and Images Delivered apply only to images that are stored in your Images bucket. When you optimize an image that is stored in Images, then this counts toward Images Delivered — not Images Transformed. ## Metrics ### Images Transformed A unique transformation is a request to transform an original image based on a set of [supported parameters](https://developers.cloudflare.com/images/transform-images/transform-via-url/#options). This metric is used only when optimizing images that are stored outside of Images. For example, if you transform `thumbnail.jpg` as 100x100, then this counts as 1 unique transformation. If you transform the same `thumbnail.jpg` as 200x200, then this counts as a separate unique transformation. You are billed for the number of unique transformations that are counted during each billing period. Unique transformations are counted over a 30-day sliding window. For example, if you request `width=100/thumbnail.jpg` on June 30, then this counts once for that billing period. If you request the same transformation on July 1, then this will not count as a billable request, since the same transformation was already requested within the last 30 days. The `format` parameter counts as only 1 billable transformation, even if multiple copies of an image are served. In other words, if `width=100,format=auto/thumbnail.jpg` is served to some users as AVIF and to others as WebP, then this counts as 1 unique transformation instead of 2. ### Images Stored Storage in Images is available only with an Images Paid plan. You can purchase storage in increments of $5 for every 100,000 images stored per month. You can create predefined variants to specify how an image should be resized, such as `thumbnail` as 100x100 and `hero` as 1600x500. Only uploaded images count toward Images Stored; defining variants will not impact your storage limit. ### Images Delivered For images that are stored in Images, you will incur $1 for every 100,000 images delivered per month. This metric does not include transformed images that are stored in remote sources. Every image requested by the browser counts as 1 billable request. #### Example A retail website has a product page that uses Images to serve 10 images. If the page was visited 10,000 times this month, then this results in 100,000 images delivered — or $1.00 in billable usage. --- title: Reference · Cloudflare Images docs lastUpdated: 2024-08-30T13:02:26.000Z chatbotDeprioritize: true source_url: html: https://developers.cloudflare.com/images/reference/ md: https://developers.cloudflare.com/images/reference/index.md --- * [Troubleshooting](https://developers.cloudflare.com/images/reference/troubleshooting/) * [Security](https://developers.cloudflare.com/images/reference/security/) --- title: Transform images · Cloudflare Images docs description: Transformations let you optimize and manipulate images stored outside of the Cloudflare Images product. Transformed images are served from one of your zones on Cloudflare. lastUpdated: 2025-07-08T19:32:52.000Z chatbotDeprioritize: false source_url: html: https://developers.cloudflare.com/images/transform-images/ md: https://developers.cloudflare.com/images/transform-images/index.md --- Transformations let you optimize and manipulate images stored outside of the Cloudflare Images product. Transformed images are served from one of your zones on Cloudflare. To transform an image, you must [enable transformations for your zone](https://developers.cloudflare.com/images/get-started/#enable-transformations-on-your-zone). You can transform an image by using a [specially-formatted URL](https://developers.cloudflare.com/images/transform-images/transform-via-url/) or [through Workers](https://developers.cloudflare.com/images/transform-images/transform-via-workers/). ## Supported formats and limitations ### Supported input formats * JPEG * PNG * GIF (including animations) * WebP (including animations) * SVG * HEIC Note Cloudflare can ingest HEIC images for decoding, but they must be served in web-safe formats such as AVIF, WebP, JPG, or PNG. ### Supported output formats * JPEG * PNG * GIF (including animations) * WebP (including animations) * SVG * AVIF ### Supported features Transformations can: * Resize and generate JPEG and PNG images, and optionally AVIF or WebP. * Save animations as GIF or animated WebP. * Support ICC color profiles in JPEG and PNG images. * Preserve JPEG metadata (metadata of other formats is discarded). * Convert the first frame of GIF/WebP animations to a still image. ## SVG files Cloudflare Images can deliver SVG files. However, as this is an [inherently scalable format](https://www.w3.org/TR/SVG2/), Cloudflare does not resize SVGs. As such, Cloudflare Images variants cannot be used to resize SVG files. Variants, named or flexible, are intended to transform bitmap (raster) images into whatever size you want to serve them. You can, nevertheless, use variants to serve SVGs, using any named variant as a placeholder to allow your image to be delivered. For example: ```txt https://imagedelivery.net///public ``` Cloudflare recommends you use named variants with SVG files. If you use flexible variants, all your parameters will be ignored. In either case, Cloudflare applies SVG sanitizing to your files. You can also use image transformations to sanitize SVG files stored in your origin. However, as stated above, transformations will ignore all transform parameters, as Cloudflare does not resize SVGs. ### Sanitized SVGs Cloudflare sanitizes SVG files with `svg-hush` before serving them. This open-source tool developed by Cloudflare is intended to make SVGs as safe as possible. Because SVG files are XML documents, they can have links or JavaScript features that may pose a security concern. As such, `svg-hush` filters SVGs and removes any potential risky features, such as: * **Scripting**: Prevents SVG files from being used for cross-site scripting attacks. Although browsers do not allow scripts in the `` tag, they do allow scripting when SVG files are opened directly as a top-level document. * **Hyperlinks to other documents**: Makes SVG files less attractive for SEO spam and phishing. * **References to cross-origin resources**: Stops third parties from tracking who is viewing the image. SVG files can also contain embedded images in other formats, like JPEG and PNG, in the form of [Data URLs](https://developer.mozilla.org/en-US/docs/Web/HTTP/Basics_of_HTTP/Data_URLs). Cloudflare treats these embedded images just like other images that we process, and optimizes them too. Cloudflare does not support SVG files embedded in SVG recursively, though. Cloudflare still uses Content Security Policy (CSP) headers to disable unwanted features, but filtering acts as a defense-in-depth in case these headers are lost (for instance, if the image was saved as a file and served elsewhere). `svg-hush` is open-source. It is written in Rust and can filter SVG files in a streaming fashion without buffering, so it is fast enough for filtering on the fly. For more information about `svg-hush`, refer to [Cloudflare GitHub repository](https://github.com/cloudflare/svg-hush). ### Format limitations Since some image formats require longer computational times than others, Cloudflare has to find a proper balance between the time it takes to generate an image and to transfer it over the Internet. Resizing requests might not be fulfilled with the format the user expects due to these trade-offs Cloudflare has to make. Images differ in size, transformations, codecs and all of these different aspects influence what compression codecs are used. Cloudflare tries to choose the requested codec, but we operate on a best-effort basis and there are limits that our system needs to follow to satisfy all customers. AVIF encoding, in particular, can be an order of magnitude slower than encoding to other formats. Cloudflare will fall back to WebP or JPEG if the image is too large to be encoded quickly. #### Limits per format Hard limits refers to the maximum image size to process. Soft limits refers to the limits existing when the system is overloaded. | File format | Hard limits on the longest side (width or height) | Soft limits on the longest side (width or height) | | - | - | - | | AVIF | 1,200 pixels1 | 640 pixels | | Other | 12,000 pixels | N/A | | WebP | N/A | 2,560 pixels for lossy; 1920 pixels for lossless | 1Hard limit is 1,600 pixels when `format=avif` is explicitly used with [image transformations](https://developers.cloudflare.com/images/transform-images/). All images have to be less than 70 MB. The maximum image area is limited to 100 megapixels (for example, 10,000 x 10,000 pixels large). GIF/WebP animations are limited to a total of 50 megapixels (the sum of sizes of all frames). Animations that exceed this will be passed through unchanged without applying any transformations. Note that GIF is an outdated format and has very inefficient compression. High-resolution animations will be slow to process and will have very large file sizes. For video clips, Cloudflare recommends using [video formats like MP4 and WebM instead](https://developers.cloudflare.com/stream/). Important SVG files are passed through without resizing. This format is inherently scalable and does not need resizing. Cloudflare does not support the HEIC (HEIF) format and does not plan to support it. AVIF format is supported on a best-effort basis. Images that cannot be compressed as AVIF will be served as WebP instead. #### Progressive JPEG While you can use the `format=jpeg` option to generate images in an interlaced progressive JPEG format, we will fallback to the baseline JPEG format for small and large images specified when: * The area calculated by width x height is less than 150 x 150. * The area calculated by width x height is greater than 3000 x 3000. For example, a 50 x 50 tiny image is always formatted by `baseline-jpeg` even if you specify progressive jpeg (`format=jpeg`). --- title: Tutorials · Cloudflare Images docs lastUpdated: 2025-04-03T11:41:17.000Z chatbotDeprioritize: true source_url: html: https://developers.cloudflare.com/images/tutorials/ md: https://developers.cloudflare.com/images/tutorials/index.md --- * [Optimize mobile viewing](https://developers.cloudflare.com/images/tutorials/optimize-mobile-viewing/) * [Transform user-uploaded images before uploading to R2](https://developers.cloudflare.com/images/tutorials/optimize-user-uploaded-image/) --- title: Upload images · Cloudflare Images docs description: Cloudflare Images allows developers to upload images using different methods, for a wide range of use cases. lastUpdated: 2025-07-08T19:32:52.000Z chatbotDeprioritize: false source_url: html: https://developers.cloudflare.com/images/upload-images/ md: https://developers.cloudflare.com/images/upload-images/index.md --- Cloudflare Images allows developers to upload images using different methods, for a wide range of use cases. ## Supported image formats You can upload the following image formats to Cloudflare Images: * PNG * GIF (including animations) * JPEG * WebP (Cloudflare Images also supports uploading animated WebP files) * SVG * HEIC Note Cloudflare can ingest HEIC images for decoding, but they must be served in web-safe formats such as AVIF, WebP, JPG, or PNG. ## Dimensions and sizes These are the maximum allowed sizes and dimensions Cloudflare Images supports: * Maximum image dimension is 12,000 pixels. * Maximum image area is limited to 100 megapixels (for example, 10,000×10,000 pixels). * Image metadata is limited to 1024 bytes. * Images have a 10 megabyte (MB) size limit. * Animated GIFs/WebP, including all frames, are limited to 50 megapixels (MP). --- title: 404 - Page Not Found · Cloudflare Workers KV docs chatbotDeprioritize: false source_url: html: https://developers.cloudflare.com/kv/404/ md: https://developers.cloudflare.com/kv/404/index.md --- # 404 Check the URL, try using our [search](https://developers.cloudflare.com/search/) or try our LLM-friendly [llms.txt directory](https://developers.cloudflare.com/llms.txt). --- title: Workers Binding API · Cloudflare Workers KV docs lastUpdated: 2024-11-20T15:28:21.000Z chatbotDeprioritize: true source_url: html: https://developers.cloudflare.com/kv/api/ md: https://developers.cloudflare.com/kv/api/index.md --- * [Read key-value pairs](https://developers.cloudflare.com/kv/api/read-key-value-pairs/) * [Write key-value pairs](https://developers.cloudflare.com/kv/api/write-key-value-pairs/) * [Delete key-value pairs](https://developers.cloudflare.com/kv/api/delete-key-value-pairs/) * [List keys](https://developers.cloudflare.com/kv/api/list-keys/) --- title: Key concepts · Cloudflare Workers KV docs lastUpdated: 2024-09-03T13:14:20.000Z chatbotDeprioritize: true source_url: html: https://developers.cloudflare.com/kv/concepts/ md: https://developers.cloudflare.com/kv/concepts/index.md --- * [How KV works](https://developers.cloudflare.com/kv/concepts/how-kv-works/) * [KV bindings](https://developers.cloudflare.com/kv/concepts/kv-bindings/) * [KV namespaces](https://developers.cloudflare.com/kv/concepts/kv-namespaces/) --- title: Demos and architectures · Cloudflare Workers KV docs description: Learn how you can use KV within your existing application and architecture. lastUpdated: 2024-08-13T19:56:56.000Z chatbotDeprioritize: false source_url: html: https://developers.cloudflare.com/kv/demos/ md: https://developers.cloudflare.com/kv/demos/index.md --- Learn how you can use KV within your existing application and architecture. ## Demo applications Explore the following demo applications for KV. * [shrty.dev:](https://github.com/craigsdennis/shorty-dot-dev) A URL shortener that makes use of KV and Workers Analytics Engine. The admin interface uses Function Calling. Go Shorty! * [Queues Web Crawler:](https://github.com/cloudflare/queues-web-crawler) An example use-case for Queues, a web crawler built on Browser Rendering and Puppeteer. The crawler finds the number of links to Cloudflare.com on the site, and archives a screenshot to Workers KV. ## Reference architectures Explore the following reference architectures that use KV: [Optimizing and securing connected transportation systems](https://developers.cloudflare.com/reference-architecture/diagrams/iot/optimizing-and-securing-connected-transportation-systems/) [This diagram showcases Cloudflare components optimizing connected transportation systems. It illustrates how their technologies minimize latency, ensure reliability, and strengthen security for critical data flow.](https://developers.cloudflare.com/reference-architecture/diagrams/iot/optimizing-and-securing-connected-transportation-systems/) [A/B-testing using Workers](https://developers.cloudflare.com/reference-architecture/diagrams/serverless/a-b-testing-using-workers/) [Cloudflare's low-latency, fully serverless compute platform, Workers offers powerful capabilities to enable A/B testing using a server-side implementation.](https://developers.cloudflare.com/reference-architecture/diagrams/serverless/a-b-testing-using-workers/) [Fullstack applications](https://developers.cloudflare.com/reference-architecture/diagrams/serverless/fullstack-application/) [A practical example of how these services come together in a real fullstack application architecture.](https://developers.cloudflare.com/reference-architecture/diagrams/serverless/fullstack-application/) [Programmable Platforms](https://developers.cloudflare.com/reference-architecture/diagrams/serverless/programmable-platforms/) [Workers for Platforms provide secure, scalable, cost-effective infrastructure for programmable platforms with global reach.](https://developers.cloudflare.com/reference-architecture/diagrams/serverless/programmable-platforms/) [Serverless global APIs](https://developers.cloudflare.com/reference-architecture/diagrams/serverless/serverless-global-apis/) [An example architecture of a serverless API on Cloudflare and aims to illustrate how different compute and data products could interact with each other.](https://developers.cloudflare.com/reference-architecture/diagrams/serverless/serverless-global-apis/) [Serverless image content management](https://developers.cloudflare.com/reference-architecture/diagrams/serverless/serverless-image-content-management/) [Leverage various components of Cloudflare's ecosystem to construct a scalable image management solution](https://developers.cloudflare.com/reference-architecture/diagrams/serverless/serverless-image-content-management/) --- title: Examples · Cloudflare Workers KV docs description: Explore the following examples for KV. lastUpdated: 2024-09-03T13:14:20.000Z chatbotDeprioritize: true source_url: html: https://developers.cloudflare.com/kv/examples/ md: https://developers.cloudflare.com/kv/examples/index.md --- Explore the following examples for KV. --- title: Getting started · Cloudflare Workers KV docs description: Workers KV provides low-latency, high-throughput global storage to your Cloudflare Workers applications. Workers KV is ideal for storing user configuration data, routing data, A/B testing configurations and authentication tokens, and is well suited for read-heavy workloads. lastUpdated: 2025-05-21T09:55:16.000Z chatbotDeprioritize: false source_url: html: https://developers.cloudflare.com/kv/get-started/ md: https://developers.cloudflare.com/kv/get-started/index.md --- Workers KV provides low-latency, high-throughput global storage to your [Cloudflare Workers](https://developers.cloudflare.com/workers/) applications. Workers KV is ideal for storing user configuration data, routing data, A/B testing configurations and authentication tokens, and is well suited for read-heavy workloads. This guide instructs you through: * Creating a KV namespace. * Writing key-value pairs to your KV namespace from a Cloudflare Worker. * Reading key-value pairs from a KV namespace. You can perform these tasks through the Wrangler CLI or through the Cloudflare dashboard. ## Quick start If you want to skip the setup steps and get started quickly, click on the button below. [![Deploy to Cloudflare](https://deploy.workers.cloudflare.com/button)](https://deploy.workers.cloudflare.com/?url=https://github.com/cloudflare/docs-examples/tree/update/kv/kv/kv-get-started) This creates a repository in your GitHub account and deploys the application to Cloudflare Workers. Use this option if you are familiar with Cloudflare Workers, and wish to skip the step-by-step guidance. You may wish to manually follow the steps if you are new to Cloudflare Workers. ## Prerequisites 1. Sign up for a [Cloudflare account](https://dash.cloudflare.com/sign-up/workers-and-pages). 2. Install [`Node.js`](https://docs.npmjs.com/downloading-and-installing-node-js-and-npm). Node.js version manager Use a Node version manager like [Volta](https://volta.sh/) or [nvm](https://github.com/nvm-sh/nvm) to avoid permission issues and change Node.js versions. [Wrangler](https://developers.cloudflare.com/workers/wrangler/install-and-update/), discussed later in this guide, requires a Node version of `16.17.0` or later. ## 1. Create a Worker project New to Workers? Refer to [How Workers works](https://developers.cloudflare.com/workers/reference/how-workers-works/) to learn about the Workers serverless execution model works. Go to the [Workers Get started guide](https://developers.cloudflare.com/workers/get-started/guide/) to set up your first Worker. * CLI Create a new Worker to read and write to your KV namespace. 1. Create a new project named `kv-tutorial` by running: * npm ```sh npm create cloudflare@latest -- kv-tutorial ``` * yarn ```sh yarn create cloudflare kv-tutorial ``` * pnpm ```sh pnpm create cloudflare@latest kv-tutorial ``` For setup, select the following options: * For *What would you like to start with?*, choose `Hello World example`. * For *Which template would you like to use?*, choose `Worker only`. * For *Which language do you want to use?*, choose `TypeScript`. * For *Do you want to use git for version control?*, choose `Yes`. * For *Do you want to deploy your application?*, choose `No` (we will be making some changes before deploying). This creates a new `kv-tutorial` directory, illustrated below. Your new `kv-tutorial` directory includes: * A `"Hello World"` [Worker](https://developers.cloudflare.com/workers/get-started/guide/#3-write-code) in `index.ts`. * A [`wrangler.jsonc`](https://developers.cloudflare.com/workers/wrangler/configuration/) configuration file. `wrangler.jsonc` is how your `kv-tutorial` Worker accesses your kv database. 2. Change into the directory you just created for your Worker project: ```sh cd kv-tutorial ``` Note If you are familiar with Cloudflare Workers, or initializing projects in a Continuous Integration (CI) environment, initialize a new project non-interactively by setting `CI=true` as an [environmental variable](https://developers.cloudflare.com/workers/configuration/environment-variables/) when running `create cloudflare@latest`. For example: `CI=true npm create cloudflare@latest kv-tutorial --type=simple --git --ts --deploy=false` creates a basic "Hello World" project ready to build on. * Dashboard 1. Log in to your Cloudflare dashboard and select your account. 2. Go to [your account > **Workers & Pages** > **Overview**](https://dash.cloudflare.com/?to=/:account/workers-and-pages). 3. Select **Create**. 4. Select **Create Worker**. 5. Name your Worker. For this tutorial, name your Worker `kv-tutorial`. 6. Select **Deploy**. * npm ```sh npm create cloudflare@latest -- kv-tutorial ``` * yarn ```sh yarn create cloudflare kv-tutorial ``` * pnpm ```sh pnpm create cloudflare@latest kv-tutorial ``` ## 2. Create a KV namespace A [KV namespace](https://developers.cloudflare.com/kv/concepts/kv-namespaces/) is a key-value database replicated to Cloudflare's global network. * CLI You can use [Wrangler](https://developers.cloudflare.com/workers/wrangler/) to create a new KV namespace. You can also use it to perform operations such as put, list, get, and delete within your KV namespace. Note KV operations are scoped to your account. To create a KV namespace via Wrangler: 1. Open your terminal and run the following command: ```sh npx wrangler kv namespace create ``` The `npx wrangler kv namespace create ` subcommand takes a new binding name as its argument. A KV namespace is created using a concatenation of your Worker's name (from your Wrangler file) and the binding name you provide. A `` is randomly generated for you. For this tutorial, use the binding name `USERS_NOTIFICATION_CONFIG`. ```sh npx wrangler kv namespace create ``` ```sh 🌀 Creating namespace with title "USERS_NOTIFICATION_CONFIG" ✨ Success! Add the following to your configuration file in your kv_namespaces array: { "kv_namespaces": [ { "binding": "USERS_NOTIFICATION_CONFIG", "id": "" } ] } ``` * Dashboard 1. Go to [**Storage & Databases** > **KV**](https://dash.cloudflare.com/?to=/:account/workers/kv/namespaces). 2. Select **Create a namespace**. 3. Enter a name for your namespace. For this tutorial, use `kv_tutorial_namespace`. 4. Select **Add**. ## 3. Bind your Worker to your KV namespace You must create a binding to connect your Worker with your KV namespace. [Bindings](https://developers.cloudflare.com/workers/runtime-apis/bindings/) allow your Workers to access resources, like KV, on the Cloudflare developer platform. Bindings A binding is how your Worker interacts with external resources such as [KV namespaces](https://developers.cloudflare.com/kv/concepts/kv-namespaces/). A binding is a runtime variable that the Workers runtime provides to your code. You can declare a variable name in your Wrangler file that binds to these resources at runtime, and interact with them through this variable. Every binding's variable name and behavior is determined by you when deploying the Worker. Refer to [Environment](https://developers.cloudflare.com/kv/reference/environments/) for more information. To bind your KV namespace to your Worker: * CLI 1. In your Wrangler file, add the following with the values generated in your terminal from [step 2](https://developers.cloudflare.com/kv/get-started/#2-create-a-kv-namespace): * wrangler.jsonc ```jsonc { "kv_namespaces": [ { "binding": "USERS_NOTIFICATION_CONFIG", "id": "" } ] } ``` * wrangler.toml ```toml [[kv_namespaces]] binding = "USERS_NOTIFICATION_CONFIG" id = "" ``` Binding names do not need to correspond to the namespace you created. Binding names are only a reference. Specifically: * The value (string) you set for `binding` is used to reference this KV namespace in your Worker. For this tutorial, this should be `USERS_NOTIFICATION_CONFIG`. * The binding must be [a valid JavaScript variable name](https://developer.mozilla.org/en-US/docs/Web/JavaScript/Guide/Grammar_and_types#variables). For example, `binding = "MY_KV"` or `binding = "routingConfig"` would both be valid names for the binding. * Your binding is available in your Worker at `env.` from within your Worker. For this tutorial, the binding is available at `env.USERS_NOTIFICATION_CONFIG`. * Dashboard 1. Go to [**Workers & Pages** > **Overview**](https://dash.cloudflare.com/?to=/:account/workers-and-pages). 2. Select the `kv-tutorial` Worker you created in [step 1](https://developers.cloudflare.com/kv/get-started/#1-create-a-worker-project). 3. Select **Settings**. 4. Scroll to **Bindings**, then select **Add**. 5. Select **KV namespace**. 6. Name your binding (`BINDING_NAME`) in **Variable name**, then select the KV namespace (`kv_tutorial_namespace`) you created in [step 2](https://developers.cloudflare.com/kv/get-started/#2-create-a-kv-namespace) from the dropdown menu. 7. Select **Deploy** to deploy your binding. * wrangler.jsonc ```jsonc { "kv_namespaces": [ { "binding": "USERS_NOTIFICATION_CONFIG", "id": "" } ] } ``` * wrangler.toml ```toml [[kv_namespaces]] binding = "USERS_NOTIFICATION_CONFIG" id = "" ``` ## 4. Interact with your KV namespace You can interact with your KV namespace via [Wrangler](https://developers.cloudflare.com/workers/wrangler/install-and-update/) or directly from your [Workers](https://developers.cloudflare.com/workers/) application. ### 4.1. Write a value * CLI To write a value to your empty KV namespace using Wrangler: 1. Run the `wrangler kv key put` subcommand in your terminal, and input your key and value respectively. `` and `` are values of your choice. ```sh npx wrangler kv key put --binding= "" "" ``` In this tutorial, you will add a key `user_1` with value `enabled` to the KV namespace you created in [step 2](https://developers.cloudflare.com/kv/get-started/#2-create-a-kv-namespace). ```sh npx wrangler kv key put --binding=USERS_NOTIFICATION_CONFIG "user_1" "enabled" ``` ```sh Writing the value "enabled" to key "user_1" on namespace . ``` Using `--namespace-id` Instead of using `--binding`, you can also use `--namespace-id` to specify which KV namespace should receive the operation: ```sh npx wrangler kv key put --namespace-id= "" "" ``` ```sh Writing the value "" to key "" on namespace . ``` Storing values in remote KV namespace By default, the values are written locally. To create a key and a value in your remote KV namespace, add the `--remote` flag at the end of the command: ```sh npx wrangler kv key put --namespace-id=xxxxxxxxxxxxxxxx "" "" ``` * Dashboard 1. Go to [**Storage & Databases** > **KV**](https://dash.cloudflare.com/?to=/:account/workers/kv/namespaces). 2. Select the KV namespace you created (`kv_tutorial_namespace`), then select **View**. 3. Select **KV Pairs**. 4. Enter a `` of your choice. 5. Enter a `` of your choice. 6. Select **Add entry**. ### 4.2. Get a value * CLI To access the value from your KV namespace using Wrangler: 1. Run the `wrangler kv key get` subcommand in your terminal, and input your key value: ```sh npx wrangler kv key get --binding= "" ``` In this tutorial, you will get the value of the key `user_1` from the KV namespace you created in [step 2](https://developers.cloudflare.com/kv/get-started/#2-create-a-kv-namespace). Note To view the value directly within the terminal, you use the `--text` flag. ```sh npx wrangler kv key get --binding=USERS_NOTIFICATION_CONFIG "user_1" --text ``` Similar to the `put` command, the `get` command can also be used to access a KV namespace in two ways - with `--binding` or `--namespace-id`: Warning Exactly **one** of `--binding` or `--namespace-id` is required. Refer to the [`kv bulk` documentation](https://developers.cloudflare.com/kv/reference/kv-commands/#kv-bulk) to write a file of multiple key-value pairs to a given KV namespace. * Dashboard You can view key-value pairs directly from the dashboard. 1. Go to your account > **Storage & Databases** > **KV**. 2. Go to the KV namespace you created (`kv_tutorial_namespace`), then select **View**. 3. Select **KV Pairs**. ## 5. Access your KV namespace from your Worker * CLI Note When using [`wrangler dev`](https://developers.cloudflare.com/workers/wrangler/commands/#dev) to develop locally, Wrangler defaults to using a local version of KV to avoid interfering with any of your live production data in KV. This means that reading keys that you have not written locally returns null. To have `wrangler dev` connect to your Workers KV namespace running on Cloudflare's global network, call `wrangler dev --remote` instead. This uses the `preview_id` of the KV binding configuration in the Wrangler file. Refer to the [KV binding docs](https://developers.cloudflare.com/kv/concepts/kv-bindings/#use-kv-bindings-when-developing-locally) for more information. 1. In your Worker script, add your KV binding in the `Env` interface. If you have bootstrapped your project with JavaScript, this step is not required. ```ts interface Env { USERS_NOTIFICATION_CONFIG: KVNamespace; // ... other binding types } ``` 2. Use the `put()` method on `USERS_NOTIFICATION_CONFIG` to create a new key-value pair. You will add a new key `user_2` with value `disabled` to your KV namespace. ```ts let value = await env.USERS_NOTIFICATION_CONFIG.put("user_2", "disabled"); ``` 3. Use the KV `get()` method to fetch the data you stored in your KV namespace. You will fetch the value of the key `user_2` from your KV namespace. ```ts let value = await env.USERS_NOTIFICATION_CONFIG.get("user_2"); ``` Your Worker code should look like this: * JavaScript ```js export default { async fetch(request, env, ctx) { try { await env.USER_NOTIFICATION.put("user_2", "disabled"); const value = await env.USER_NOTIFICATION.get("user_2"); if (value === null) { return new Response("Value not found", { status: 404 }); } return new Response(value); } catch (err) { console.error(`KV returned error:`, err); const errorMessage = err instanceof Error ? err.message : "An unknown error occurred when accessing KV storage"; return new Response(errorMessage, { status: 500, headers: { "Content-Type": "text/plain" }, }); } }, }; ``` * TypeScript ```ts export interface Env { USER_NOTIFICATION: KVNamespace; } export default { async fetch(request, env, ctx): Promise { try { await env.USER_NOTIFICATION.put("user_2", "disabled"); const value = await env.USER_NOTIFICATION.get("user_2"); if (value === null) { return new Response("Value not found", { status: 404 }); } return new Response(value); } catch (err) { console.error(`KV returned error:`, err); const errorMessage = err instanceof Error ? err.message : "An unknown error occurred when accessing KV storage"; return new Response(errorMessage, { status: 500, headers: { "Content-Type": "text/plain" }, }); } }, } satisfies ExportedHandler; ``` The code above: 1. Writes a key to your KV namespace using KV's `put()` method. 2. Reads the same key using KV's `get()` method. 3. Checks if the key is null, and returns a `404` response if it is. 4. If the key is not null, it returns the value of the key. 5. Uses JavaScript's [`try...catch`](https://developer.mozilla.org/docs/Web/JavaScript/Reference/Statements/try...catch) exception handling to catch potential errors. When writing or reading from any service, such as Workers KV or external APIs using `fetch()`, you should expect to handle exceptions explicitly. * Dashboard 1. Go to **Workers & Pages** > **Overview**. 2. Go to the `kv-tutorial` Worker you created. 3. Select **Edit Code**. 4. Clear the contents of the `workers.js` file, then paste the following code. * JavaScript ```js export default { async fetch(request, env, ctx) { try { await env.USER_NOTIFICATION.put("user_2", "disabled"); const value = await env.USER_NOTIFICATION.get("user_2"); if (value === null) { return new Response("Value not found", { status: 404 }); } return new Response(value); } catch (err) { console.error(`KV returned error:`, err); const errorMessage = err instanceof Error ? err.message : "An unknown error occurred when accessing KV storage"; return new Response(errorMessage, { status: 500, headers: { "Content-Type": "text/plain" }, }); } }, }; ``` * TypeScript ```ts export interface Env { USER_NOTIFICATION: KVNamespace; } export default { async fetch(request, env, ctx): Promise { try { await env.USER_NOTIFICATION.put("user_2", "disabled"); const value = await env.USER_NOTIFICATION.get("user_2"); if (value === null) { return new Response("Value not found", { status: 404 }); } return new Response(value); } catch (err) { console.error(`KV returned error:`, err); const errorMessage = err instanceof Error ? err.message : "An unknown error occurred when accessing KV storage"; return new Response(errorMessage, { status: 500, headers: { "Content-Type": "text/plain" }, }); } }, } satisfies ExportedHandler; ``` The code above: 1. Writes a key to `BINDING_NAME` using KV's `put()` method. 2. Reads the same key using KV's `get()` method, and returns an error if the key is null (or in case the key is not set, or does not exist). 3. Uses JavaScript's [`try...catch`](https://developer.mozilla.org/en-US/docs/Web/JavaScript/Reference/Statements/try...catch) exception handling to catch potential errors. When writing or reading from any service, such as Workers KV or external APIs using `fetch()`, you should expect to handle exceptions explicitly. The browser should simply return the `VALUE` corresponding to the `KEY` you have specified with the `get()` method. 5. Select **Save**. * JavaScript ```js export default { async fetch(request, env, ctx) { try { await env.USER_NOTIFICATION.put("user_2", "disabled"); const value = await env.USER_NOTIFICATION.get("user_2"); if (value === null) { return new Response("Value not found", { status: 404 }); } return new Response(value); } catch (err) { console.error(`KV returned error:`, err); const errorMessage = err instanceof Error ? err.message : "An unknown error occurred when accessing KV storage"; return new Response(errorMessage, { status: 500, headers: { "Content-Type": "text/plain" }, }); } }, }; ``` * TypeScript ```ts export interface Env { USER_NOTIFICATION: KVNamespace; } export default { async fetch(request, env, ctx): Promise { try { await env.USER_NOTIFICATION.put("user_2", "disabled"); const value = await env.USER_NOTIFICATION.get("user_2"); if (value === null) { return new Response("Value not found", { status: 404 }); } return new Response(value); } catch (err) { console.error(`KV returned error:`, err); const errorMessage = err instanceof Error ? err.message : "An unknown error occurred when accessing KV storage"; return new Response(errorMessage, { status: 500, headers: { "Content-Type": "text/plain" }, }); } }, } satisfies ExportedHandler; ``` * JavaScript ```js export default { async fetch(request, env, ctx) { try { await env.USER_NOTIFICATION.put("user_2", "disabled"); const value = await env.USER_NOTIFICATION.get("user_2"); if (value === null) { return new Response("Value not found", { status: 404 }); } return new Response(value); } catch (err) { console.error(`KV returned error:`, err); const errorMessage = err instanceof Error ? err.message : "An unknown error occurred when accessing KV storage"; return new Response(errorMessage, { status: 500, headers: { "Content-Type": "text/plain" }, }); } }, }; ``` * TypeScript ```ts export interface Env { USER_NOTIFICATION: KVNamespace; } export default { async fetch(request, env, ctx): Promise { try { await env.USER_NOTIFICATION.put("user_2", "disabled"); const value = await env.USER_NOTIFICATION.get("user_2"); if (value === null) { return new Response("Value not found", { status: 404 }); } return new Response(value); } catch (err) { console.error(`KV returned error:`, err); const errorMessage = err instanceof Error ? err.message : "An unknown error occurred when accessing KV storage"; return new Response(errorMessage, { status: 500, headers: { "Content-Type": "text/plain" }, }); } }, } satisfies ExportedHandler; ``` ## 6. Deploy your Worker Deploy your Worker to Cloudflare's global network. * CLI 1. Run the following command to deploy KV to Cloudflare's global network: ```sh npm run deploy ``` 2. Visit the URL for your newly created Workers KV application. For example, if the URL of your new Worker is `kv-tutorial..workers.dev`, accessing `https://kv-tutorial..workers.dev/` sends a request to your Worker that writes (and reads) from Workers KV. * Dashboard 1. Go to **Workers & Pages** > **Overview**. 2. Select your `kv-tutorial` Worker. 3. Select **Deployments**. 4. From the **Version History** table, select **Deploy version**. 5. From the **Deploy version** page, select **Deploy**. This deploys the latest version of the Worker code to production. ## Summary By finishing this tutorial, you have: 1. Created a KV namespace 2. Created a Worker that writes and reads from that namespace 3. Deployed your project globally. ## Next steps If you have any feature requests or notice any bugs, share your feedback directly with the Cloudflare team by joining the [Cloudflare Developers community on Discord](https://discord.cloudflare.com). * Learn more about the [KV API](https://developers.cloudflare.com/kv/api/). * Understand how to use [Environments](https://developers.cloudflare.com/kv/reference/environments/) with Workers KV. * Read the Wrangler [`kv` command documentation](https://developers.cloudflare.com/kv/reference/kv-commands/). --- title: Glossary · Cloudflare Workers KV docs description: Review the definitions for terms used across Cloudflare's KV documentation. lastUpdated: 2024-08-13T19:56:56.000Z chatbotDeprioritize: false source_url: html: https://developers.cloudflare.com/kv/glossary/ md: https://developers.cloudflare.com/kv/glossary/index.md --- Review the definitions for terms used across Cloudflare's KV documentation. | Term | Definition | | - | - | | cacheTtl | CacheTtl is a parameter that defines the length of time in seconds that a KV result is cached in the global network location it is accessed from. | | KV namespace | A KV namespace is a key-value database replicated to Cloudflare’s global network. A KV namespace must require a binding and an id. | | metadata | A metadata is a serializable value you append to each KV entry. | --- title: Observability · Cloudflare Workers KV docs lastUpdated: 2024-09-17T08:47:06.000Z chatbotDeprioritize: true source_url: html: https://developers.cloudflare.com/kv/observability/ md: https://developers.cloudflare.com/kv/observability/index.md --- * [Metrics and analytics](https://developers.cloudflare.com/kv/observability/metrics-analytics/) --- title: Platform · Cloudflare Workers KV docs lastUpdated: 2024-09-03T13:14:20.000Z chatbotDeprioritize: true source_url: html: https://developers.cloudflare.com/kv/platform/ md: https://developers.cloudflare.com/kv/platform/index.md --- * [Pricing](https://developers.cloudflare.com/kv/platform/pricing/) * [Limits](https://developers.cloudflare.com/kv/platform/limits/) * [Choose a data or storage product](https://developers.cloudflare.com/workers/platform/storage-options/) * [Release notes](https://developers.cloudflare.com/kv/platform/release-notes/) --- title: Reference · Cloudflare Workers KV docs lastUpdated: 2024-09-03T13:14:20.000Z chatbotDeprioritize: true source_url: html: https://developers.cloudflare.com/kv/reference/ md: https://developers.cloudflare.com/kv/reference/index.md --- * [Wrangler KV commands](https://developers.cloudflare.com/kv/reference/kv-commands/) * [Environments](https://developers.cloudflare.com/kv/reference/environments/) * [Data security](https://developers.cloudflare.com/kv/reference/data-security/) * [FAQ](https://developers.cloudflare.com/kv/reference/faq/) --- title: Tutorials · Cloudflare Workers KV docs description: View tutorials to help you get started with KV. lastUpdated: 2025-05-06T17:35:57.000Z chatbotDeprioritize: false source_url: html: https://developers.cloudflare.com/kv/tutorials/ md: https://developers.cloudflare.com/kv/tutorials/index.md --- View tutorials to help you get started with KV. ## Docs | Name | Last Updated | Type | Difficulty | | - | - | - | - | | [Build a web crawler with Queues and Browser Rendering](https://developers.cloudflare.com/queues/tutorials/web-crawler-with-browser-rendering/) | 11 months ago | 📝 Tutorial | Intermediate | | [Use Workers KV directly from Rust](https://developers.cloudflare.com/workers/tutorials/workers-kv-from-rust/) | about 1 year ago | 📝 Tutorial | Intermediate | | [Build a todo list Jamstack application](https://developers.cloudflare.com/workers/tutorials/build-a-jamstack-app/) | about 1 year ago | 📝 Tutorial | Beginner | ## Videos Cloudflare Workflows | Introduction (Part 1 of 3) In this video, we introduce Cloudflare Workflows, the Newest Developer Platform Primitive at Cloudflare. Cloudflare Workflows | Batching and Monitoring Your Durable Execution (Part 2 of 3) Workflows exposes metrics such as execution, error rates, steps, and total duration! Build a URL Shortener with an AI-based admin section We are building a URL Shortener, shrty.dev, on Cloudflare. The apps uses Workers KV and Workers Analytics engine. Craig decided to build with Workers AI runWithTools to provide a chat interface for admins. Build Rust Powered Apps In this video, we will show you how to build a global database using workers-rs to keep track of every country and city you’ve visited. Stateful Apps with Cloudflare Workers Learn how to access external APIs, cache and retrieve data using Workers KV, and create SQL-driven applications with Cloudflare D1. --- title: KV REST API · Cloudflare Workers KV docs lastUpdated: 2025-05-20T08:19:56.000Z chatbotDeprioritize: false source_url: html: https://developers.cloudflare.com/kv/workers-kv-api/ md: https://developers.cloudflare.com/kv/workers-kv-api/index.md --- --- title: 404 - Page Not Found · Cloudflare Pages docs chatbotDeprioritize: false source_url: html: https://developers.cloudflare.com/pages/404/ md: https://developers.cloudflare.com/pages/404/index.md --- # 404 Check the URL, try using our [search](https://developers.cloudflare.com/search/) or try our LLM-friendly [llms.txt directory](https://developers.cloudflare.com/llms.txt). --- title: Configuration · Cloudflare Pages docs lastUpdated: 2025-05-09T17:32:11.000Z chatbotDeprioritize: true source_url: html: https://developers.cloudflare.com/pages/configuration/ md: https://developers.cloudflare.com/pages/configuration/index.md --- * [Branch deployment controls](https://developers.cloudflare.com/pages/configuration/branch-build-controls/) * [Build caching](https://developers.cloudflare.com/pages/configuration/build-caching/) * [Build configuration](https://developers.cloudflare.com/pages/configuration/build-configuration/) * [Build image](https://developers.cloudflare.com/pages/configuration/build-image/) * [Build watch paths](https://developers.cloudflare.com/pages/configuration/build-watch-paths/) * [Custom domains](https://developers.cloudflare.com/pages/configuration/custom-domains/) * [Debugging Pages](https://developers.cloudflare.com/pages/configuration/debugging-pages/) * [Deploy Hooks](https://developers.cloudflare.com/pages/configuration/deploy-hooks/) * [Early Hints](https://developers.cloudflare.com/pages/configuration/early-hints/) * [Git integration](https://developers.cloudflare.com/pages/configuration/git-integration/) * [Headers](https://developers.cloudflare.com/pages/configuration/headers/) * [Monorepos](https://developers.cloudflare.com/pages/configuration/monorepos/) * [Preview deployments](https://developers.cloudflare.com/pages/configuration/preview-deployments/) * [Redirects](https://developers.cloudflare.com/pages/configuration/redirects/) * [REST API](https://developers.cloudflare.com/pages/configuration/api/) * [Rollbacks](https://developers.cloudflare.com/pages/configuration/rollbacks/) * [Serving Pages](https://developers.cloudflare.com/pages/configuration/serving-pages/) --- title: Demos and architectures · Cloudflare Pages docs description: Learn how you can use Pages within your existing application and architecture. lastUpdated: 2025-05-09T17:32:11.000Z chatbotDeprioritize: false source_url: html: https://developers.cloudflare.com/pages/demos/ md: https://developers.cloudflare.com/pages/demos/index.md --- Learn how you can use Pages within your existing application and architecture. ## Demos Explore the following demo applications for Pages. * [Jobs At Conf:](https://github.com/harshil1712/jobs-at-conf-demo) A job lisiting website to add jobs you find at in-person conferences. Built with Cloudflare Pages, R2, D1, Queues, and Workers AI. * [Upload Image to R2 starter:](https://github.com/harshil1712/nextjs-r2-demo) Upload images to Cloudflare R2 from a Next.js application. * [Hackathon Helper:](https://github.com/craigsdennis/hackathon-helper-workers-ai) A series of starters for Hackathons. Get building quicker! Python, Streamlit, Workers, and Pages starters for all your AI needs! * [NBA Finals Polling and Predictor:](https://github.com/elizabethsiegle/nbafinals-cloudflare-ai-hono-durable-objects) This stateful polling application uses Cloudflare Workers AI, Cloudflare Pages, Cloudflare Durable Objects, and Hono to keep track of users' votes for different basketball teams and generates personal predictions for the series. * [Floor is Llava:](https://github.com/craigsdennis/floor-is-llava-workers-ai) This is an example repo to explore using the AI Vision model Llava hosted on Cloudflare Workers AI. This is a SvelteKit app hosted on Pages. * [Whatever-ify:](https://github.com/craigsdennis/whatever-ify-workers-ai) Turn yourself into...whatever. Take a photo, get a description, generate a scene and character, then generate an image based on that calendar. * [Staff Directory demo:](https://github.com/lauragift21/staff-directory) Built using the powerful combination of HonoX for backend logic, Cloudflare Pages for fast and secure hosting, and Cloudflare D1 for seamless database management. * [Vanilla JavaScript Chat Application using Cloudflare Workers AI:](https://github.com/craigsdennis/vanilla-chat-workers-ai) A web based chat interface built on Cloudflare Pages that allows for exploring Text Generation models on Cloudflare Workers AI. Design is built using tailwind. * [Wildebeest:](https://github.com/cloudflare/wildebeest) Wildebeest is an ActivityPub and Mastodon-compatible server whose goal is to allow anyone to operate their Fediverse server and identity on their domain without needing to keep infrastructure, with minimal setup and maintenance, and running in minutes. * [Multiplayer Doom Workers:](https://github.com/cloudflare/doom-workers) A WebAssembly Doom port with multiplayer support running on top of Cloudflare's global network using Workers, WebSockets, Pages, and Durable Objects. * [Queues Web Crawler:](https://github.com/cloudflare/queues-web-crawler) An example use-case for Queues, a web crawler built on Browser Rendering and Puppeteer. The crawler finds the number of links to Cloudflare.com on the site, and archives a screenshot to Workers KV. * [Pages Functions with WebAssembly:](https://github.com/cloudflare/pages-fns-with-wasm-demo) This is a demo application that exemplifies the use of Wasm module imports inside Pages Functions code. ## Reference architectures Explore the following reference architectures that use Pages: [Fullstack applications](https://developers.cloudflare.com/reference-architecture/diagrams/serverless/fullstack-application/) [A practical example of how these services come together in a real fullstack application architecture.](https://developers.cloudflare.com/reference-architecture/diagrams/serverless/fullstack-application/) --- title: Framework guides · Cloudflare Pages docs lastUpdated: 2025-05-09T17:32:11.000Z chatbotDeprioritize: true source_url: html: https://developers.cloudflare.com/pages/framework-guides/ md: https://developers.cloudflare.com/pages/framework-guides/index.md --- * [Analog](https://developers.cloudflare.com/pages/framework-guides/deploy-an-analog-site/) * [Angular](https://developers.cloudflare.com/pages/framework-guides/deploy-an-angular-site/) * [Astro](https://developers.cloudflare.com/pages/framework-guides/deploy-an-astro-site/) * [Blazor](https://developers.cloudflare.com/pages/framework-guides/deploy-a-blazor-site/) * [Brunch](https://developers.cloudflare.com/pages/framework-guides/deploy-a-brunch-site/) * [Docusaurus](https://developers.cloudflare.com/pages/framework-guides/deploy-a-docusaurus-site/) * [Elder.js](https://developers.cloudflare.com/pages/framework-guides/deploy-an-elderjs-site/) * [Eleventy](https://developers.cloudflare.com/pages/framework-guides/deploy-an-eleventy-site/) * [Ember](https://developers.cloudflare.com/pages/framework-guides/deploy-an-emberjs-site/) * [Gatsby](https://developers.cloudflare.com/pages/framework-guides/deploy-a-gatsby-site/) * [Gridsome](https://developers.cloudflare.com/pages/framework-guides/deploy-a-gridsome-site/) * [Hexo](https://developers.cloudflare.com/pages/framework-guides/deploy-a-hexo-site/) * [Hono](https://developers.cloudflare.com/pages/framework-guides/deploy-a-hono-site/) * [Hugo](https://developers.cloudflare.com/pages/framework-guides/deploy-a-hugo-site/) * [Jekyll](https://developers.cloudflare.com/pages/framework-guides/deploy-a-jekyll-site/) * [MkDocs](https://developers.cloudflare.com/pages/framework-guides/deploy-an-mkdocs-site/) * [Next.js](https://developers.cloudflare.com/pages/framework-guides/nextjs/) * [Nuxt](https://developers.cloudflare.com/pages/framework-guides/deploy-a-nuxt-site/) * [Pelican](https://developers.cloudflare.com/pages/framework-guides/deploy-a-pelican-site/) * [Preact](https://developers.cloudflare.com/pages/framework-guides/deploy-a-preact-site/) * [Qwik](https://developers.cloudflare.com/pages/framework-guides/deploy-a-qwik-site/) * [React](https://developers.cloudflare.com/pages/framework-guides/deploy-a-react-site/) * [Remix](https://developers.cloudflare.com/pages/framework-guides/deploy-a-remix-site/) * [SolidStart](https://developers.cloudflare.com/pages/framework-guides/deploy-a-solid-start-site/) * [Sphinx](https://developers.cloudflare.com/pages/framework-guides/deploy-a-sphinx-site/) * [Static HTML](https://developers.cloudflare.com/pages/framework-guides/deploy-anything/) * [SvelteKit](https://developers.cloudflare.com/pages/framework-guides/deploy-a-svelte-kit-site/) * [Vite 3](https://developers.cloudflare.com/pages/framework-guides/deploy-a-vite3-project/) * [VitePress](https://developers.cloudflare.com/pages/framework-guides/deploy-a-vitepress-site/) * [Vue](https://developers.cloudflare.com/pages/framework-guides/deploy-a-vue-site/) * [Zola](https://developers.cloudflare.com/pages/framework-guides/deploy-a-zola-site/) --- title: Functions · Cloudflare Pages docs description: Pages Functions allows you to build full-stack applications by executing code on the Cloudflare network with Cloudflare Workers. With Functions, you can introduce application aspects such as authenticating, handling form submissions, or working with middleware. Workers runtime features are configurable on Pages Functions, including compatibility with a subset of Node.js APIs and the ability to set a compatibility date or compatibility flag. Use Functions to deploy server-side code to enable dynamic functionality without running a dedicated server. lastUpdated: 2025-05-09T17:32:11.000Z chatbotDeprioritize: false source_url: html: https://developers.cloudflare.com/pages/functions/ md: https://developers.cloudflare.com/pages/functions/index.md --- Pages Functions allows you to build full-stack applications by executing code on the Cloudflare network with [Cloudflare Workers](https://developers.cloudflare.com/workers/). With Functions, you can introduce application aspects such as authenticating, handling form submissions, or working with middleware. [Workers runtime features](https://developers.cloudflare.com/workers/runtime-apis/) are configurable on Pages Functions, including [compatibility with a subset of Node.js APIs](https://developers.cloudflare.com/workers/runtime-apis/nodejs) and the ability to set a [compatibility date or compatibility flag](https://developers.cloudflare.com/workers/configuration/compatibility-dates/). Use Functions to deploy server-side code to enable dynamic functionality without running a dedicated server. To provide feedback or ask questions on Functions, join the [Cloudflare Developers Discord](https://discord.com/invite/cloudflaredev) and connect with the Cloudflare team in the [#functions channel](https://discord.com/channels/595317990191398933/910978223968518144). * [Get started](https://developers.cloudflare.com/pages/functions/get-started/) * [Routing](https://developers.cloudflare.com/pages/functions/routing/) * [API reference](https://developers.cloudflare.com/pages/functions/api-reference/) * [Examples](https://developers.cloudflare.com/pages/functions/examples/) * [Middleware](https://developers.cloudflare.com/pages/functions/middleware/) * [Configuration](https://developers.cloudflare.com/pages/functions/wrangler-configuration/) * [Local development](https://developers.cloudflare.com/pages/functions/local-development/) * [Bindings](https://developers.cloudflare.com/pages/functions/bindings/) * [TypeScript](https://developers.cloudflare.com/pages/functions/typescript/) * [Advanced mode](https://developers.cloudflare.com/pages/functions/advanced-mode/) * [Pages Plugins](https://developers.cloudflare.com/pages/functions/plugins/) * [Metrics](https://developers.cloudflare.com/pages/functions/metrics/) * [Debugging and logging](https://developers.cloudflare.com/pages/functions/debugging-and-logging/) * [Pricing](https://developers.cloudflare.com/pages/functions/pricing/) * [Module support](https://developers.cloudflare.com/pages/functions/module-support/) * [Smart Placement](https://developers.cloudflare.com/pages/functions/smart-placement/) * [Source maps and stack traces](https://developers.cloudflare.com/pages/functions/source-maps/) --- title: Getting started · Cloudflare Pages docs description: "Choose a setup method for your Pages project:" lastUpdated: 2025-05-09T17:32:11.000Z chatbotDeprioritize: false source_url: html: https://developers.cloudflare.com/pages/get-started/ md: https://developers.cloudflare.com/pages/get-started/index.md --- Choose a setup method for your Pages project: * [C3 CLI](https://developers.cloudflare.com/pages/get-started/c3/) * [Direct Upload](https://developers.cloudflare.com/pages/get-started/direct-upload/) * [Git integration](https://developers.cloudflare.com/pages/get-started/git-integration/) --- title: How to · Cloudflare Pages docs lastUpdated: 2025-05-09T17:32:11.000Z chatbotDeprioritize: true source_url: html: https://developers.cloudflare.com/pages/how-to/ md: https://developers.cloudflare.com/pages/how-to/index.md --- * [Add a custom domain to a branch](https://developers.cloudflare.com/pages/how-to/custom-branch-aliases/) * [Add custom HTTP headers](https://developers.cloudflare.com/pages/how-to/add-custom-http-headers/) * [Deploy a static WordPress site](https://developers.cloudflare.com/pages/how-to/deploy-a-wordpress-site/) * [Enable Web Analytics](https://developers.cloudflare.com/pages/how-to/web-analytics/) * [Enable Zaraz](https://developers.cloudflare.com/pages/how-to/enable-zaraz/) * [Install private packages](https://developers.cloudflare.com/pages/how-to/npm-private-registry/) * [Preview Local Projects with Cloudflare Tunnel](https://developers.cloudflare.com/pages/how-to/preview-with-cloudflare-tunnel/) * [Redirecting \*.pages.dev to a Custom Domain](https://developers.cloudflare.com/pages/how-to/redirect-to-custom-domain/) * [Redirecting www to domain apex](https://developers.cloudflare.com/pages/how-to/www-redirect/) * [Refactor a Worker to a Pages Function](https://developers.cloudflare.com/pages/how-to/refactor-a-worker-to-pages-functions/) * [Set build commands per branch](https://developers.cloudflare.com/pages/how-to/build-commands-branches/) * [Use Direct Upload with continuous integration](https://developers.cloudflare.com/pages/how-to/use-direct-upload-with-continuous-integration/) * [Use Pages Functions for A/B testing](https://developers.cloudflare.com/pages/how-to/use-worker-for-ab-testing-in-pages/) --- title: Migrate to Workers · Cloudflare Pages docs lastUpdated: 2025-05-09T17:32:11.000Z chatbotDeprioritize: false source_url: html: https://developers.cloudflare.com/pages/migrate-to-workers/ md: https://developers.cloudflare.com/pages/migrate-to-workers/index.md --- --- title: Migration guides · Cloudflare Pages docs lastUpdated: 2025-05-09T17:32:11.000Z chatbotDeprioritize: true source_url: html: https://developers.cloudflare.com/pages/migrations/ md: https://developers.cloudflare.com/pages/migrations/index.md --- * [Migrating a Jekyll-based site from GitHub Pages](https://developers.cloudflare.com/pages/migrations/migrating-jekyll-from-github-pages/) * [Migrating from Firebase](https://developers.cloudflare.com/pages/migrations/migrating-from-firebase/) * [Migrating from Netlify to Pages](https://developers.cloudflare.com/pages/migrations/migrating-from-netlify/) * [Migrating from Vercel to Pages](https://developers.cloudflare.com/pages/migrations/migrating-from-vercel/) * [Migrating from Workers Sites to Pages](https://developers.cloudflare.com/pages/migrations/migrating-from-workers/) --- title: Platform · Cloudflare Pages docs lastUpdated: 2025-05-09T17:32:11.000Z chatbotDeprioritize: true source_url: html: https://developers.cloudflare.com/pages/platform/ md: https://developers.cloudflare.com/pages/platform/index.md --- * [Limits](https://developers.cloudflare.com/pages/platform/limits/) * [Choose a data or storage product](https://developers.cloudflare.com/workers/platform/storage-options/) * [Changelog](https://developers.cloudflare.com/pages/platform/changelog/) * [Known issues](https://developers.cloudflare.com/pages/platform/known-issues/) --- title: Tutorials · Cloudflare Pages docs description: View tutorials to help you get started with Pages. lastUpdated: 2025-05-06T17:35:57.000Z chatbotDeprioritize: false source_url: html: https://developers.cloudflare.com/pages/tutorials/ md: https://developers.cloudflare.com/pages/tutorials/index.md --- View tutorials to help you get started with Pages. ## Docs | Name | Last Updated | Type | Difficulty | | - | - | - | - | | [Point to Pages with a custom domain](https://developers.cloudflare.com/rules/origin-rules/tutorials/point-to-pages-with-custom-domain/) | 3 months ago | 📝 Tutorial | Beginner | | [Migrating from Vercel to Pages](https://developers.cloudflare.com/pages/migrations/migrating-from-vercel/) | 3 months ago | 📝 Tutorial | Beginner | | [Build an API for your front end using Pages Functions](https://developers.cloudflare.com/pages/tutorials/build-an-api-with-pages-functions/) | 10 months ago | 📝 Tutorial | Intermediate | | [Use R2 as static asset storage with Cloudflare Pages](https://developers.cloudflare.com/pages/tutorials/use-r2-as-static-asset-storage-for-pages/) | 12 months ago | 📝 Tutorial | Intermediate | | [Use Pages as an origin for Load Balancing](https://developers.cloudflare.com/load-balancing/pools/cloudflare-pages-origin/) | about 1 year ago | 📝 Tutorial | Beginner | | [Localize a website with HTMLRewriter](https://developers.cloudflare.com/pages/tutorials/localize-a-website/) | about 1 year ago | 📝 Tutorial | Intermediate | | [Build a Staff Directory Application](https://developers.cloudflare.com/d1/tutorials/build-a-staff-directory-app/) | over 1 year ago | 📝 Tutorial | Intermediate | | [Deploy a static WordPress site](https://developers.cloudflare.com/pages/how-to/deploy-a-wordpress-site/) | over 2 years ago | 📝 Tutorial | Intermediate | | [Build a blog using Nuxt.js and Sanity.io on Cloudflare Pages](https://developers.cloudflare.com/pages/tutorials/build-a-blog-using-nuxt-and-sanity/) | almost 3 years ago | 📝 Tutorial | Intermediate | | [Create a HTML form](https://developers.cloudflare.com/pages/tutorials/forms/) | almost 3 years ago | 📝 Tutorial | Beginner | | [Migrating from Netlify to Pages](https://developers.cloudflare.com/pages/migrations/migrating-from-netlify/) | almost 3 years ago | 📝 Tutorial | Beginner | | [Add a React form with Formspree](https://developers.cloudflare.com/pages/tutorials/add-a-react-form-with-formspree/) | over 3 years ago | 📝 Tutorial | Beginner | | [Add an HTML form with Formspree](https://developers.cloudflare.com/pages/tutorials/add-an-html-form-with-formspree/) | over 3 years ago | 📝 Tutorial | Beginner | | [Migrating a Jekyll-based site from GitHub Pages](https://developers.cloudflare.com/pages/migrations/migrating-jekyll-from-github-pages/) | almost 4 years ago | 📝 Tutorial | Beginner | | [Migrating from Firebase](https://developers.cloudflare.com/pages/migrations/migrating-from-firebase/) | almost 5 years ago | 📝 Tutorial | Beginner | | [Migrating from Workers Sites to Pages](https://developers.cloudflare.com/pages/migrations/migrating-from-workers/) | almost 5 years ago | 📝 Tutorial | Beginner | ## Videos OpenAI Relay Server on Cloudflare Workers In this video, Craig Dennis walks you through the deployment of OpenAI's relay server to use with their realtime API. Deploy your React App to Cloudflare Workers Learn how to deploy an existing React application to Cloudflare Workers. Cloudflare Workflows | Schedule and Sleep For Your Apps (Part 3 of 3) Cloudflare Workflows allows you to initiate sleep as an explicit step, which can be useful when you want a Workflow to wait, schedule work ahead, or pause until an input or other external state is ready. --- title: 404 - Page Not Found · Cloudflare Pipelines Docs chatbotDeprioritize: false source_url: html: https://developers.cloudflare.com/pipelines/404/ md: https://developers.cloudflare.com/pipelines/404/index.md --- # 404 Check the URL, try using our [search](https://developers.cloudflare.com/search/) or try our LLM-friendly [llms.txt directory](https://developers.cloudflare.com/llms.txt). --- title: Build with Pipelines · Cloudflare Pipelines Docs lastUpdated: 2025-04-09T16:06:19.000Z chatbotDeprioritize: true source_url: html: https://developers.cloudflare.com/pipelines/build-with-pipelines/ md: https://developers.cloudflare.com/pipelines/build-with-pipelines/index.md --- --- title: Concepts · Cloudflare Pipelines Docs lastUpdated: 2025-04-09T16:06:19.000Z chatbotDeprioritize: true source_url: html: https://developers.cloudflare.com/pipelines/concepts/ md: https://developers.cloudflare.com/pipelines/concepts/index.md --- --- title: Getting started wih Pipelines · Cloudflare Pipelines Docs description: Cloudflare Pipelines allows you to ingest load high volumes of real time streaming data, and load into R2 Object Storage, without managing any infrastructure. lastUpdated: 2025-04-09T16:06:19.000Z chatbotDeprioritize: false source_url: html: https://developers.cloudflare.com/pipelines/getting-started/ md: https://developers.cloudflare.com/pipelines/getting-started/index.md --- Cloudflare Pipelines allows you to ingest load high volumes of real time streaming data, and load into [R2 Object Storage](https://developers.cloudflare.com/r2/), without managing any infrastructure. By following this guide, you will: 1. Setup an R2 bucket. 2. Create a pipeline, with HTTP as a source, and an R2 bucket as a sink. 3. Send data to your pipeline's HTTP ingestion endpoint. 4. Verify the output delivered to R2. Note Pipelines is in **public beta**, and any developer with a [paid Workers plan](https://developers.cloudflare.com/workers/platform/pricing/#workers) can start using Pipelines immediately. *** ## Prerequisites To use Pipelines, you will need: 1. Sign up for a [Cloudflare account](https://dash.cloudflare.com/sign-up/workers-and-pages). 2. Install [`Node.js`](https://docs.npmjs.com/downloading-and-installing-node-js-and-npm). Node.js version manager Use a Node version manager like [Volta](https://volta.sh/) or [nvm](https://github.com/nvm-sh/nvm) to avoid permission issues and change Node.js versions. [Wrangler](https://developers.cloudflare.com/workers/wrangler/install-and-update/), discussed later in this guide, requires a Node version of `16.17.0` or later. ## 1. Set up an R2 bucket Create a bucket by following the [get started guide for R2](https://developers.cloudflare.com/r2/get-started/), or by running the command below: ```sh npx wrangler r2 bucket create my-bucket ``` Save the bucket name for the next step. ## 2. Create a Pipeline To create a pipeline using Wrangler, run the following command in a terminal, and specify: * The name of your pipeline * The name of the R2 bucket you created in step 1 ```sh npx wrangler pipelines create my-clickstream-pipeline --r2-bucket my-bucket --batch-max-seconds 5 --compression none ``` After running this command, you will be prompted to authorize Cloudflare Workers Pipelines to create an R2 API token on your behalf. These tokens used by your pipeline when loading data into your bucket. You can approve the request through the browser link which will open automatically. Choosing a pipeline name When choosing a name for your pipeline: * Ensure it is descriptive and relevant to the type of events you intend to ingest. You cannot change the name of the pipeline after creating it. * The pipeline name must be between 1 and 63 characters long. * The name cannot contain special characters outside dashes (`-`). * The name must start and end with a letter or a number. You will notice two optional flags are set while creating the pipeline: `--batch-max-seconds` and `--compression`. These flags are added to make it faster for you to see the output of your first pipeline. For production use cases, we recommend keeping the default settings. Once you create your pipeline, you will receive a summary of your pipeline's configuration, as well as an HTTP endpoint which you can post data to: ```sh 🌀 Authorizing R2 bucket "my-bucket" 🌀 Creating pipeline named "my-clickstream-pipeline" ✅ Successfully created pipeline my-clickstream-pipeline Id: [PIPELINE-ID] Name: my-clickstream-pipeline Sources: HTTP: Endpoint: https://[PIPELINE-ID].pipelines.cloudflare.com/ Authentication: off Format: JSON Worker: Format: JSON Destination: Type: R2 Bucket: my-bucket Format: newline-delimited JSON Compression: GZIP Batch hints: Max bytes: 100 MB Max duration: 300 seconds Max records: 100,000 🎉 You can now send data to your Pipeline! Send data to your Pipeline's HTTP endpoint: curl "https://[PIPELINE-ID].pipelines.cloudflare.com/" -d '[{ ...JSON_DATA... }]' To send data to your Pipeline from a Worker, add the following configuration to your config file: { "pipelines": [ { "pipeline": "my-clickstream-pipeline", "binding": "PIPELINE" } ] } ``` ## 3. Post data to your pipeline Use a curl command in your terminal to post an array of JSON objects to the endpoint you received in step 1. ```sh curl -H "Content-Type:application/json" \ -d '[{"event":"viewedCart", "timestamp": "2025-04-03T15:42:30Z"},{"event":"cartAbandoned", "timestamp": "2025-04-03T15:42:37Z"}]' \ ``` Once the pipeline successfully accepts the data, you will receive a success message. You can continue posting data to the pipeline. The pipeline will automatically buffer ingested data. Based on the batch settings (`--batch-max-seconds`) specified in step 2, a batch will be generated every 5 seconds, turned into a file, and written out to your R2 bucket. ## 4. Verify in R2 Open the [R2 dashboard](https://dash.cloudflare.com/?to=/:account/r2/overview), and navigate to the R2 bucket you created in step 1. You will see a directory, labeled with today's date (such as `event_date=2025-04-05`). Click on the directory, and you'll see a sub-directory with the current hour (such as `hr=04`). You should see a newline delimited JSON file, containing the data you posted in step 3. Download the file, and open it in a text editor of your choice, to verify that the data posted in step 2 is present. *** ## Next steps * Learn about how to [setup authentication, or CORS settings](https://developers.cloudflare.com/pipelines/build-with-pipelines/sources/http), on your HTTP endpoint. * Send data to your Pipeline from a Cloudflare Worker using the [Workers API documentation](https://developers.cloudflare.com/pipelines/build-with-pipelines/sources/workers-apis). If you have any feature requests or notice any bugs, share your feedback directly with the Cloudflare team by joining the [Cloudflare Developers community on Discord](https://discord.cloudflare.com). --- title: Observability · Cloudflare Pipelines Docs lastUpdated: 2025-04-09T16:06:19.000Z chatbotDeprioritize: true source_url: html: https://developers.cloudflare.com/pipelines/observability/ md: https://developers.cloudflare.com/pipelines/observability/index.md --- * [Metrics and analytics](https://developers.cloudflare.com/pipelines/observability/metrics/) --- title: Pipelines REST API · Cloudflare Pipelines Docs lastUpdated: 2025-04-09T20:22:15.000Z chatbotDeprioritize: false source_url: html: https://developers.cloudflare.com/pipelines/pipelines-api/ md: https://developers.cloudflare.com/pipelines/pipelines-api/index.md --- --- title: Platform · Cloudflare Pipelines Docs lastUpdated: 2025-04-09T16:06:19.000Z chatbotDeprioritize: true source_url: html: https://developers.cloudflare.com/pipelines/platform/ md: https://developers.cloudflare.com/pipelines/platform/index.md --- * [Pricing](https://developers.cloudflare.com/pipelines/platform/pricing/) * [Limits](https://developers.cloudflare.com/pipelines/platform/limits/) * [Wrangler commands](https://developers.cloudflare.com/pipelines/platform/wrangler-commands/) --- title: Tutorials · Cloudflare Pipelines Docs description: View tutorials to help you get started with Pipelines. lastUpdated: 2025-04-09T16:06:19.000Z chatbotDeprioritize: false source_url: html: https://developers.cloudflare.com/pipelines/tutorials/ md: https://developers.cloudflare.com/pipelines/tutorials/index.md --- View tutorials to help you get started with Pipelines. | Name | Last Updated | Type | Difficulty | | - | - | - | - | | [Ingest data from a Worker, and analyze using MotherDuck](https://developers.cloudflare.com/pipelines/tutorials/query-data-with-motherduck/) | 3 months ago | 📝 Tutorial | Intermediate | | [Create a data lake of clickstream data](https://developers.cloudflare.com/pipelines/tutorials/send-data-from-client/) | 3 months ago | 📝 Tutorial | Intermediate | --- title: 404 - Page Not Found · Cloudflare Privacy Gateway docs chatbotDeprioritize: false source_url: html: https://developers.cloudflare.com/privacy-gateway/404/ md: https://developers.cloudflare.com/privacy-gateway/404/index.md --- # 404 Check the URL, try using our [search](https://developers.cloudflare.com/search/) or try our LLM-friendly [llms.txt directory](https://developers.cloudflare.com/llms.txt). --- title: Get started · Cloudflare Privacy Gateway docs description: "Privacy Gateway implementation consists of three main parts:" lastUpdated: 2024-08-13T19:56:56.000Z chatbotDeprioritize: false source_url: html: https://developers.cloudflare.com/privacy-gateway/get-started/ md: https://developers.cloudflare.com/privacy-gateway/get-started/index.md --- Privacy Gateway implementation consists of three main parts: 1. Application Gateway Server/backend configuration (operated by you). 2. Client configuration (operated by you). 3. Connection to a Privacy Gateway Relay Server (operated by Cloudflare). *** ## Before you begin Privacy Gateway is currently in closed beta. If you are interested, [contact us](https://www.cloudflare.com/lp/privacy-edge/). *** ## Step 1 - Configure your server As a customer of the Privacy Gateway, you also need to add server support for OHTTP by implementing an application gateway server. The application gateway is responsible for decrypting incoming requests, forwarding the inner requests to their destination, and encrypting the corresponding response back to the client. The [server implementation](#resources) will handle incoming requests and produce responses, and it will also advertise its public key configuration for clients to access. The public key configuration is generated securely and made available via an API. Refer to the [README](https://github.com/cloudflare/privacy-gateway-server-go#readme) for details about configuration. Applications can also implement this functionality themselves. Details about [public key configuration](https://datatracker.ietf.org/doc/html/draft-ietf-ohai-ohttp-05#section-3), HTTP message [encryption and decryption](https://datatracker.ietf.org/doc/html/draft-ietf-ohai-ohttp-05#section-4), and [server-specific details](https://datatracker.ietf.org/doc/html/draft-ietf-ohai-ohttp-05#section-5) can be found in the OHTTP specification. ### Resources Use the following resources for help with server configuration: * **Go**: * [Sample gateway server](https://github.com/cloudflare/privacy-gateway-server-go) * [Gateway library](https://github.com/chris-wood/ohttp-go) * **Rust**: [Gateway library](https://github.com/martinthomson/ohttp/tree/main/ohttp-server) * **JavaScript / TypeScript**: [Gateway library](https://github.com/chris-wood/ohttp-js) *** ## Step 2 - Configure your client As a customer of the Privacy Gateway, you need to set up client-side support for the gateway. Clients are responsible for encrypting requests, sending them to the Cloudflare Privacy Gateway, and then decrypting the corresponding responses. Additionally, app developers need to [configure the client](#resources-1) to fetch or otherwise discover the gateway’s public key configuration. How this is done depends on how the gateway makes its public key configuration available. If you need help with this configuration, [contact us](https://www.cloudflare.com/lp/privacy-edge/). ### Resources Use the following resources for help with client configuration: * **Objective C**: [Sample application](https://github.com/cloudflare/privacy-gateway-client-demo) * **Rust**: [Client library](https://github.com/martinthomson/ohttp/tree/main/ohttp-client) * **JavaScript / TypeScript**: [Client library](https://github.com/chris-wood/ohttp-js) *** ## Step 3 - Review your application After you have configured your client and server, review your application to make sure you are only sending intended data to Cloudflare and the application backend. In particular, application data should not contain anything unique to an end-user, as this would invalidate the benefits that OHTTP provides. * Applications should scrub identifying user data from requests forwarded through the Privacy Gateway. This includes, for example, names, email addresses, phone numbers, etc. * Applications should encourage users to disable crash reporting when using Privacy Gateway. Crash reports can contain sensitive user information and data, including email addresses. * Where possible, application data should be encrypted on the client device with a key known only to the client. For example, iOS generally has good support for [client-side encryption (and key synchronization via the KeyChain)](https://developer.apple.com/documentation/security/certificate_key_and_trust_services/keys). Android likely has similar features available. *** ## Step 4 - Relay requests through Cloudflare Before sending any requests, you need to first set up your account with Cloudflare. That requires [contacting us](https://www.cloudflare.com/lp/privacy-edge/) and providing the URL of your application gateway server. Then, make sure you are forwarding requests to a mutually agreed URL with the following conventions. ```txt https://.privacy-gateway.cloudflare.com/ ``` --- title: Reference · Cloudflare Privacy Gateway docs lastUpdated: 2024-08-13T19:56:56.000Z chatbotDeprioritize: false source_url: html: https://developers.cloudflare.com/privacy-gateway/reference/ md: https://developers.cloudflare.com/privacy-gateway/reference/index.md --- * [Privacy Gateway Metrics](https://developers.cloudflare.com/privacy-gateway/reference/metrics/) * [Product compatibility](https://developers.cloudflare.com/privacy-gateway/reference/product-compatibility/) * [Legal](https://developers.cloudflare.com/privacy-gateway/reference/legal/) * [Limitations](https://developers.cloudflare.com/privacy-gateway/reference/limitations/) --- title: 404 - Page Not Found · Cloudflare Pub/Sub docs chatbotDeprioritize: false source_url: html: https://developers.cloudflare.com/pub-sub/404/ md: https://developers.cloudflare.com/pub-sub/404/index.md --- # 404 Check the URL, try using our [search](https://developers.cloudflare.com/search/) or try our LLM-friendly [llms.txt directory](https://developers.cloudflare.com/llms.txt). --- title: Examples · Cloudflare Pub/Sub docs lastUpdated: 2024-08-22T18:02:52.000Z chatbotDeprioritize: false source_url: html: https://developers.cloudflare.com/pub-sub/examples/ md: https://developers.cloudflare.com/pub-sub/examples/index.md --- [Connect with JavaScript (Node.js)](https://developers.cloudflare.com/pub-sub/examples/connect-javascript/) Use MQTT.js with the token authentication mode configured on a broker. [Connect with Python](https://developers.cloudflare.com/pub-sub/examples/connect-python/) Connect to a Broker using Python 3 [Connect with Rust](https://developers.cloudflare.com/pub-sub/examples/connect-rust/) Connect to a Broker using a Rust-based MQTT client. --- title: FAQs · Cloudflare Pub/Sub docs description: Messaging systems that also implement or strongly align to the "publish-subscribe" model include AWS SNS (Simple Notification Service), Google Cloud Pub/Sub, Redis' PUBLISH-SUBSCRIBE features, and RabbitMQ. If you have used one of these systems before, you will notice that Pub/Sub shares similar foundations (topics, subscriptions, fan-in/fan-out models) and is easy to migrate to. lastUpdated: 2024-08-13T19:56:56.000Z chatbotDeprioritize: false source_url: html: https://developers.cloudflare.com/pub-sub/faq/ md: https://developers.cloudflare.com/pub-sub/faq/index.md --- ## What messaging systems are similar? Messaging systems that also implement or strongly align to the "publish-subscribe" model include AWS SNS (Simple Notification Service), Google Cloud Pub/Sub, Redis' PUBLISH-SUBSCRIBE features, and RabbitMQ. If you have used one of these systems before, you will notice that Pub/Sub shares similar foundations (topics, subscriptions, fan-in/fan-out models) and is easy to migrate to. ## How is Pub/Sub priced? Cloudflare is still exploring pricing models for Pub/Sub and will share more with developers prior to GA. Users will be given prior notice and will require beta users to explicitly opt-in. ## Does Pub/Sub show data in the Cloudflare dashboard? Pub/Sub today does not support the Cloudflare dashboard. You can set up Pub/Sub through Wrangler by following [these steps](https://developers.cloudflare.com/pub-sub/guide/). ## Where can I speak with other like-minded developers about Pub/Sub? Try the #pubsub-beta channel on the [Cloudflare Developers Discord](https://discord.com/invite/cloudflaredev). ## What limits does Pub/Sub have? Refer to [Limits](https://developers.cloudflare.com/pub-sub/platform/limits) for more details on client, broker, and topic-based limits. --- title: Get started · Cloudflare Pub/Sub docs description: Pub/Sub is a flexible, scalable messaging service built on top of the MQTT messaging standard, allowing you to publish messages from tens of thousands of devices (or more), deploy code to filter, aggregate and transform messages using Cloudflare Workers, and/or subscribe to topics for fan-out messaging use cases. lastUpdated: 2025-05-29T18:16:56.000Z chatbotDeprioritize: false source_url: html: https://developers.cloudflare.com/pub-sub/guide/ md: https://developers.cloudflare.com/pub-sub/guide/index.md --- Note Pub/Sub is currently in private beta. You can [sign up for the waitlist](https://www.cloudflare.com/cloudflare-pub-sub-lightweight-messaging-private-beta/) to register your interest. Pub/Sub is a flexible, scalable messaging service built on top of the MQTT messaging standard, allowing you to publish messages from tens of thousands of devices (or more), deploy code to filter, aggregate and transform messages using Cloudflare Workers, and/or subscribe to topics for fan-out messaging use cases. This guide will: * Instruct you through creating your first Pub/Sub Broker using the Cloudflare API. * Create a `..cloudflarepubsub.com` endpoint ready to publish and subscribe to using any MQTT v5.0 compatible client. * Help you send your first message to the Pub/Sub Broker. Before you begin, you should be familiar with using the command line and running basic terminal commands. ## Prerequisite: Create a Cloudflare account In order to use Pub/Sub, you need a [Cloudflare account](https://developers.cloudflare.com/fundamentals/account/). If you already have an account, you can skip this step. ## 1. Enable Pub/Sub During the Private Beta, your account will need to be explicitly granted access. If you have not, sign up for the waitlist, and we will contact you when you are granted access. ## 2. Install Wrangler (Cloudflare CLI) Note Pub/Sub support in Wrangler requires wrangler `2.0.16` or above. If you're using an older version of Wrangler, ensure you [update the installed version](https://developers.cloudflare.com/workers/wrangler/install-and-update/#update-wrangler). Installing `wrangler`, the Workers command-line interface (CLI), allows you to [`init`](https://developers.cloudflare.com/workers/wrangler/commands/#init), [`dev`](https://developers.cloudflare.com/workers/wrangler/commands/#dev), and [`publish`](https://developers.cloudflare.com/workers/wrangler/commands/#publish) your Workers projects. To install [`wrangler`](https://github.com/cloudflare/workers-sdk/tree/main/packages/wrangler), ensure you have [`npm` installed](https://docs.npmjs.com/getting-started), preferably using a Node version manager like [Volta](https://volta.sh/) or [nvm](https://github.com/nvm-sh/nvm). Using a version manager helps avoid permission issues and allows you to easily change Node.js versions. Then run: * npm ```sh npm i -D wrangler@latest ``` * yarn ```sh yarn add -D wrangler@latest ``` * pnpm ```sh pnpm add -D wrangler@latest ``` Validate that you have a version of `wrangler` that supports Pub/Sub: ```sh wrangler --version ``` ```sh 2.0.16 # should show 2.0.16 or greater - e.g. 2.0.17 or 2.1.0 ``` With `wrangler` installed, we can now create a Pub/Sub API token for `wrangler` to use. ## 3. Fetch your credentials To use Wrangler with Pub/Sub, you'll need an API Token that has permissions to both read and write for Pub/Sub. The `wrangler login` flow does not issue you an API Token with valid Pub/Sub permissions. Note This API token requirement will be lifted prior to Pub/Sub becoming Generally Available. 1. From the [Cloudflare dashboard](https://dash.cloudflare.com), click on the profile icon and select **My Profile**. 2. Under **My Profile**, click **API Tokens**. 3. On the [**API Tokens**](https://dash.cloudflare.com/profile/api-tokens) page, click **Create Token** 4. Choose **Get Started** next to **Create Custom Token** 5. Name the token - e.g. "Pub/Sub Write Access" 6. Under the **Permissions** heading, choose **Account**, select **Pub/Sub** from the first drop-down, and **Edit** as the permission. 7. Select **Add More** below the newly created permission. Choose **User** > **Memberships** from the first dropdown and **Read** as the permission. 8. Select **Continue to Summary** at the bottom of the page, where you should see *All accounts - Pub/Sub:Edit* as the permission. 9. Select **Create Token** and copy the token value. In your terminal, configure a `CLOUDFLARE_API_TOKEN` environmental variable with your Pub/Sub token. When this variable is set, `wrangler` will use it to authenticate against the Cloudflare API. ```sh export CLOUDFLARE_API_TOKEN="pasteyourtokenhere" ``` Warning This token should be kept secret and not committed to source code or placed in any client-side code. With this environmental variable configured, you can now create your first Pub/Sub Broker! ## 4. Create your first namespace A namespace represents a collection of Pub/Sub Brokers, and they can be used to separate different environments (production vs. staging), infrastructure teams, and in the future, permissions. Before you begin, consider the following: * **Choose your namespace carefully**. Although it can be changed later, it will be used as part of the hostname for your Brokers. You should not use secrets or other data that cannot be exposed on the Internet. * Namespace names are global; they are globally unique. * Namespaces must be valid DNS names per RFC 1035. In most cases, this means only a-z, 0-9, and hyphens are allowed. Names are case-insensitive. For example, a namespace of `my-namespace` and a broker of `staging` would create a hostname of `staging.my-namespace.cloudflarepubsub.com` for clients to connect to. With this in mind, create a new namespace. This example will use `my-namespace` as a placeholder: ```sh wrangler pubsub namespace create my-namespace ``` ```json { "id": "817170399d784d4ea8b6b90ae558c611", "name": "my-namespace", "description": "", "created_on": "2022-05-11T23:13:08.383232Z", "modified_on": "2022-05-11T23:13:08.383232Z" } ``` If you receive an HTTP 403 (Forbidden) response, check that your credentials are correct and that you have not pasted erroneous spaces or characters. ## 5. Create a broker A broker, in MQTT terms, is a collection of connected clients that publish messages to topics, and clients that subscribe to those topics and receive messages. The broker acts as a relay, and with Cloudflare Pub/Sub, a Cloudflare Worker can be configured to act on every message published to it. This broker will be configured to accept `TOKEN` authentication. In MQTT terms, this is typically defined as username:password authentication. Pub/Sub uses JSON Web Tokens (JWT) that are unique to each client, and that can be revoked, to make authentication more secure. Broker names must be: * Chosen carefully. Although it can be changed later, the name will be used as part of the hostname for your brokers. Do not use secrets or other data that cannot be exposed on the Internet. * Valid DNS names (per RFC 1035). In most cases, this means only `a-z`, `0-9` and hyphens are allowed. Names are case-insensitive. * Unique per namespace. To create a new MQTT Broker called `example-broker` in the `my-namespace` namespace from the example above: ```sh wrangler pubsub broker create example-broker --namespace=my-namespace ``` ```json { "id": "4c63fa30ee13414ba95be5b56d896fea", "name": "example-broker", "authType": "TOKEN", "created_on": "2022-05-11T23:19:24.356324Z", "modified_on": "2022-05-11T23:19:24.356324Z", "expiration": null, "endpoint": "mqtts://example-broker.namespace.cloudflarepubsub.com:8883" } ``` In the example above, a broker is created with an endpoint of `mqtts://example-broker.my-namespace.cloudflarepubsub.com`. This means: * Our Pub/Sub (MQTT) Broker is reachable over MQTTS (MQTT over TLS) - port 8883 * The hostname is `example-broker.my-namespace.cloudflarepubsub.com` * [Token authentication](https://developers.cloudflare.com/pub-sub/platform/authentication-authorization/) is required to clients to connect. ## 6. Create credentials for your broker In order to connect to a Pub/Sub Broker, you need to securely authenticate. Credentials are scoped to each broker and credentials issued for `broker-a` cannot be used to connect to `broker-b`. Note that: * You can generate multiple credentials at once (up to 100 per API call), which can be useful when configuring multiple clients (such as IoT devices). * Credentials are associated with a specific Client ID and encoded as a signed JSON Web Token (JWT). * Each token has a unique identifier (a `jti` - or `JWT ID`) that you can use to revoke a specific token. * Tokens are prefixed with the broker name they are associate with (for example, `my-broker`) to make identifying tokens across multiple Pub/Sub brokers easier. Note Ensure you do not commit your credentials to source control, such as GitHub. A valid token allows anyone to connect to your broker and publish or subscribe to messages. Treat credentials as secrets. To generate two tokens for a broker called `example-broker` with a 48 hour expiry: ```sh wrangler pubsub broker issue example-broker --namespace=NAMESPACE_NAME --number=2 --expiration=48h ``` You should receive a success response that resembles the example below, which is a map of Client IDs and their associated tokens. ```json { "01G3A5GBJE5P3GPXJZ72X4X8SA": "eyJhbGciOiJFZERTQSIsImtpZCI6IkpEUHVZSnFIT3Zxemxha2tORlE5a2ZON1dzWXM1dUhuZHBfemlSZG1PQ1UifQ. not-a-real-token.ZZL7PNittVwJOeMpFMn2CnVTgIz4AcaWXP9NqMQK0D_iavcRv_p2DVshg6FPe5xCdlhIzbatT6gMyjMrOA2wBg", "01G3A5GBJECX5DX47P9RV1C5TV": "eyJhbGciOiJFZERTQSIsImtpZCI6IkpEUHVZSnFIT3Zxemxha2tORlE5a2ZON1dzWXM1dUhuZHBfemlSZG1PQ1UifQ.also-not-a-real-token.WrhK-VTs_IzOEALB-T958OojHK5AjYBC5ZT9xiI_6ekdQrKz2kSPGnvZdUXUsTVFDf9Kce1Smh-mw1sF2rSQAQ", } ``` Each token allows you to publish or subscribe to the associated broker. ## 7. Subscribe and publish messages to a topic Your broker is now created and ready to accept messages from authenticated clients. Because Pub/Sub is based on the MQTT protocol, there are client libraries for most popular programming languages. Refer to the list of [recommended client libraries](https://developers.cloudflare.com/pub-sub/learning/client-libraries/). Note You can view a live demo available at [demo.mqtt.dev](http://demo.mqtt.dev) that allows you to use your own Pub/Sub Broker and a valid token to subscribe to a topic and publish messages to it. The `JWT` field in the demo accepts a valid token from your Broker. The example below uses [MQTT.js](https://github.com/mqttjs/MQTT.js) with Node.js to subscribe to a topic on a broker and publish a very basic "hello world" style message. You will need to have a [supported Node.js](https://nodejs.org/en/download/current/) version installed. ```sh # Check that Node.js is installed which node # Install MQTT.js npm i mqtt --save ``` Set your environment variables. ```sh export CLOUDFLARE_API_TOKEN="YourAPIToken" export CLOUDFLARE_ACCOUNT_ID="YourAccountID" export DEFAULT_NAMESPACE="TheNamespaceYouCreated" export BROKER_NAME="TheBrokerYouCreated" ``` We can now generate an access token for Pub/Sub. We will need both the client ID and the token (a JSON Web Token) itself to authenticate from our MQTT client: ```sh curl -s -H "Authorization: Bearer ${CLOUDFLARE_API_TOKEN}" -H "Content-Type: application/json" "https://api.cloudflare.com/client/v4/accounts/${CLOUDFLARE_ACCOUNT_ID}/pubsub/namespaces/namespace/brokers/is-it-broken/credentials?type=TOKEN&topicAcl=#" | jq '.result | to_entries | .[0]' ``` This will output a `key` representing the `clientId`, and a `value` representing our (secret) access token, resembling the following: ```json { "key": "01HDQFD5Y8HWBFGFBBZPSWQ22M", "value": "eyJhbGciOiJFZERTQSIsImtpZCI6IjU1X29UODVqQndJbjlFYnY0V3dzanRucG9ycTBtalFlb1VvbFZRZDIxeEUifQ....NVpToBedVYGGhzHJZmpEG1aG_xPBWrE-PgG1AFYcTPEBpZ_wtN6ApeAUM0JIuJdVMkoIC9mUg4vPtXM8jLGgBw" } ``` Copy the `value` field and set it as the `BROKER_TOKEN` environmental variable: ```sh export BROKER_TOKEN="" ``` Create a file called `index.js `, making sure that: * `brokerEndpoint` is set to the address of your Pub/Sub broker. * `clientId` is the `key` from your newly created access token * The `BROKER_TOKEN` environmental variable populated with your access token. Note Your `BROKER_TOKEN` is sensitive, and should be kept secret to avoid unintended access to your Pub/Sub broker. Avoid committing it to source code. ```js const mqtt = require("mqtt"); const brokerEndpoint = "mqtts://my-broker.my-namespace.cloudflarepubsub.com"; const clientId = "01HDQFD5Y8HWBFGFBBZPSWQ22M"; // Replace this with your client ID const options = { port: 8883, username: clientId, // MQTT.js requires this, but Pub/Sub does not clientId: clientId, // Required by Pub/Sub password: process.env.BROKER_TOKEN, protocolVersion: 5, // MQTT 5 }; const client = mqtt.connect(brokerEndpoint, options); client.subscribe("example-topic"); client.publish( "example-topic", `message from ${client.options.clientId}: hello at ${Date.now()}`, ); client.on("message", function (topic, message) { console.log(`received message on ${topic}: ${message}`); }); ``` Run the example. You should see the output written to your terminal (stdout). ```sh node index.js ``` ```sh > received message on example-topic: hello from 01HDQFD5Y8HWBFGFBBZPSWQ22M at 1652102228 ``` Your client ID and timestamp will be different from above, but you should see a very similar message. You can also try subscribing to multiple topics and publishing to them by passing the same topic name to `client.publish`. Provided they have permission to, clients can publish to multiple topics at once or as needed. If you do not see the message you published, or you are receiving error messages, ensure that: * The `BROKER_TOKEN` environmental variable is not empty. Try echo `$BROKER_TOKEN` in your terminal. * You updated the `brokerEndpoint` to match the broker you created. The **Endpoint** field of your broker will show this address and port. * You correctly [installed MQTT.js](https://github.com/mqttjs/MQTT.js#install). ## Next Steps What's next? * [Connect a worker to your broker](https://developers.cloudflare.com/pub-sub/learning/integrate-workers/) to programmatically read, parse, and filter messages as they are published to a broker * [Learn how PubSub and the MQTT protocol work](https://developers.cloudflare.com/pub-sub/learning/how-pubsub-works) * [See example client code](https://developers.cloudflare.com/pub-sub/examples) for publishing or subscribing to a PubSub broker --- title: Learning · Cloudflare Pub/Sub docs lastUpdated: 2024-08-13T19:56:56.000Z chatbotDeprioritize: false source_url: html: https://developers.cloudflare.com/pub-sub/learning/ md: https://developers.cloudflare.com/pub-sub/learning/index.md --- * [Recommended client libraries](https://developers.cloudflare.com/pub-sub/learning/client-libraries/) * [Using Wrangler (Command Line Interface)](https://developers.cloudflare.com/pub-sub/learning/command-line-wrangler/) * [How Pub/Sub works](https://developers.cloudflare.com/pub-sub/learning/how-pubsub-works/) * [Integrate with Workers](https://developers.cloudflare.com/pub-sub/learning/integrate-workers/) * [Delivery guarantees](https://developers.cloudflare.com/pub-sub/learning/delivery-guarantees/) * [WebSockets and Browser Clients](https://developers.cloudflare.com/pub-sub/learning/websockets-browsers/) --- title: Platform · Cloudflare Pub/Sub docs lastUpdated: 2024-08-13T19:56:56.000Z chatbotDeprioritize: false source_url: html: https://developers.cloudflare.com/pub-sub/platform/ md: https://developers.cloudflare.com/pub-sub/platform/index.md --- * [Authentication and authorization](https://developers.cloudflare.com/pub-sub/platform/authentication-authorization/) * [Limits](https://developers.cloudflare.com/pub-sub/platform/limits/) * [MQTT compatibility](https://developers.cloudflare.com/pub-sub/platform/mqtt-compatibility/) --- title: 404 - Page Not Found · Cloudflare Queues docs chatbotDeprioritize: false source_url: html: https://developers.cloudflare.com/queues/404/ md: https://developers.cloudflare.com/queues/404/index.md --- # 404 Check the URL, try using our [search](https://developers.cloudflare.com/search/) or try our LLM-friendly [llms.txt directory](https://developers.cloudflare.com/llms.txt). --- title: Configuration · Cloudflare Queues docs lastUpdated: 2024-08-13T19:56:56.000Z chatbotDeprioritize: false source_url: html: https://developers.cloudflare.com/queues/configuration/ md: https://developers.cloudflare.com/queues/configuration/index.md --- * [Configure Queues](https://developers.cloudflare.com/queues/configuration/configure-queues/) * [Batching, Retries and Delays](https://developers.cloudflare.com/queues/configuration/batching-retries/) * [Pause and Purge](https://developers.cloudflare.com/queues/configuration/pause-purge/) * [Dead Letter Queues](https://developers.cloudflare.com/queues/configuration/dead-letter-queues/) * [Pull consumers](https://developers.cloudflare.com/queues/configuration/pull-consumers/) * [Consumer concurrency](https://developers.cloudflare.com/queues/configuration/consumer-concurrency/) * [JavaScript APIs](https://developers.cloudflare.com/queues/configuration/javascript-apis/) * [Local Development](https://developers.cloudflare.com/queues/configuration/local-development/) * [R2 Event Notifications](https://developers.cloudflare.com/r2/buckets/event-notifications/) --- title: Demos and architectures · Cloudflare Queues docs description: Learn how you can use Queues within your existing application and architecture. lastUpdated: 2024-08-13T19:56:56.000Z chatbotDeprioritize: false source_url: html: https://developers.cloudflare.com/queues/demos/ md: https://developers.cloudflare.com/queues/demos/index.md --- Learn how you can use Queues within your existing application and architecture. ## Demos Explore the following demo applications for Queues. * [Jobs At Conf:](https://github.com/harshil1712/jobs-at-conf-demo) A job lisiting website to add jobs you find at in-person conferences. Built with Cloudflare Pages, R2, D1, Queues, and Workers AI. * [Wildebeest:](https://github.com/cloudflare/wildebeest) Wildebeest is an ActivityPub and Mastodon-compatible server whose goal is to allow anyone to operate their Fediverse server and identity on their domain without needing to keep infrastructure, with minimal setup and maintenance, and running in minutes. * [Queues Web Crawler:](https://github.com/cloudflare/queues-web-crawler) An example use-case for Queues, a web crawler built on Browser Rendering and Puppeteer. The crawler finds the number of links to Cloudflare.com on the site, and archives a screenshot to Workers KV. ## Reference architectures Explore the following reference architectures that use Queues: [Retrieval Augmented Generation (RAG)](https://developers.cloudflare.com/reference-architecture/diagrams/ai/ai-rag/) [RAG combines retrieval with generative models for better text. It uses external knowledge to create factual, relevant responses, improving coherence and accuracy in NLP tasks like chatbots.](https://developers.cloudflare.com/reference-architecture/diagrams/ai/ai-rag/) [Fullstack applications](https://developers.cloudflare.com/reference-architecture/diagrams/serverless/fullstack-application/) [A practical example of how these services come together in a real fullstack application architecture.](https://developers.cloudflare.com/reference-architecture/diagrams/serverless/fullstack-application/) [Serverless ETL pipelines](https://developers.cloudflare.com/reference-architecture/diagrams/serverless/serverless-etl/) [Cloudflare enables fully serverless ETL pipelines, significantly reducing complexity, accelerating time to production, and lowering overall costs.](https://developers.cloudflare.com/reference-architecture/diagrams/serverless/serverless-etl/) --- title: Cloudflare Queues - Examples · Cloudflare Queues docs lastUpdated: 2024-08-22T18:02:52.000Z chatbotDeprioritize: false source_url: html: https://developers.cloudflare.com/queues/examples/ md: https://developers.cloudflare.com/queues/examples/index.md --- [List and acknowledge messages from the dashboard](https://developers.cloudflare.com/queues/examples/list-messages-from-dash/) Use the dashboard to fetch and acknowledge the messages currently in a queue. [Publish to a Queue via HTTP](https://developers.cloudflare.com/queues/examples/publish-to-a-queue-over-http/) Publish to a Queue directly via HTTP and Workers. [Send messages from the dashboard](https://developers.cloudflare.com/queues/examples/send-messages-from-dash/) Use the dashboard to send messages to a queue. [Use Queues from Durable Objects](https://developers.cloudflare.com/queues/examples/use-queues-with-durable-objects/) Publish to a queue from within a Durable Object. [Use Queues to store data in R2](https://developers.cloudflare.com/queues/examples/send-errors-to-r2/) Example of how to use Queues to batch data and store it in an R2 bucket. --- title: Getting started · Cloudflare Queues docs description: Cloudflare Queues is a flexible messaging queue that allows you to queue messages for asynchronous processing. By following this guide, you will create your first queue, a Worker to publish messages to that queue, and a consumer Worker to consume messages from that queue. lastUpdated: 2025-03-19T09:17:37.000Z chatbotDeprioritize: false source_url: html: https://developers.cloudflare.com/queues/get-started/ md: https://developers.cloudflare.com/queues/get-started/index.md --- Cloudflare Queues is a flexible messaging queue that allows you to queue messages for asynchronous processing. By following this guide, you will create your first queue, a Worker to publish messages to that queue, and a consumer Worker to consume messages from that queue. ## Prerequisites To use Queues, you will need: 1. Sign up for a [Cloudflare account](https://dash.cloudflare.com/sign-up/workers-and-pages). 2. Install [`Node.js`](https://docs.npmjs.com/downloading-and-installing-node-js-and-npm). Node.js version manager Use a Node version manager like [Volta](https://volta.sh/) or [nvm](https://github.com/nvm-sh/nvm) to avoid permission issues and change Node.js versions. [Wrangler](https://developers.cloudflare.com/workers/wrangler/install-and-update/), discussed later in this guide, requires a Node version of `16.17.0` or later. ## 1. Create a Worker project You will access your queue from a Worker, the producer Worker. You must create at least one producer Worker to publish messages onto your queue. If you are using [R2 Bucket Event Notifications](https://developers.cloudflare.com/r2/buckets/event-notifications/), then you do not need a producer Worker. To create a producer Worker, run: * npm ```sh npm create cloudflare@latest -- producer-worker ``` * yarn ```sh yarn create cloudflare producer-worker ``` * pnpm ```sh pnpm create cloudflare@latest producer-worker ``` For setup, select the following options: * For *What would you like to start with?*, choose `Hello World example`. * For *Which template would you like to use?*, choose `Worker only`. * For *Which language do you want to use?*, choose `TypeScript`. * For *Do you want to use git for version control?*, choose `Yes`. * For *Do you want to deploy your application?*, choose `No` (we will be making some changes before deploying). This will create a new directory, which will include both a `src/index.ts` Worker script, and a [`wrangler.jsonc`](https://developers.cloudflare.com/workers/wrangler/configuration/) configuration file. After you create your Worker, you will create a Queue to access. Move into the newly created directory: ```sh cd producer-worker ``` ## 2. Create a queue To use queues, you need to create at least one queue to publish messages to and consume messages from. To create a queue, run: ```sh npx wrangler queues create ``` Choose a name that is descriptive and relates to the types of messages you intend to use this queue for. Descriptive queue names look like: `debug-logs`, `user-clickstream-data`, or `password-reset-prod`. Queue names must be 1 to 63 characters long. Queue names cannot contain special characters outside dashes (`-`), and must start and end with a letter or number. You cannot change your queue name after you have set it. After you create your queue, you will set up your producer Worker to access it. ## 3. Set up your producer Worker To expose your queue to the code inside your Worker, you need to connect your queue to your Worker by creating a binding. [Bindings](https://developers.cloudflare.com/workers/runtime-apis/bindings/) allow your Worker to access resources, such as Queues, on the Cloudflare developer platform. To create a binding, open your newly generated `wrangler.jsonc` file and add the following: * wrangler.jsonc ```jsonc { "queues": { "producers": [ { "queue": "MY-QUEUE-NAME", "binding": "MY_QUEUE" } ] } } ``` * wrangler.toml ```toml [[queues.producers]] queue = "MY-QUEUE-NAME" binding = "MY_QUEUE" ``` Replace `MY-QUEUE-NAME` with the name of the queue you created in [step 2](https://developers.cloudflare.com/queues/get-started/#2-create-a-queue). Next, replace `MY_QUEUE` with the name you want for your `binding`. The binding must be a valid JavaScript variable name. This is the variable you will use to reference this queue in your Worker. ### Write your producer Worker You will now configure your producer Worker to create messages to publish to your queue. Your producer Worker will: 1. Take a request it receives from the browser. 2. Transform the request to JSON format. 3. Write the request directly to your queue. In your Worker project directory, open the `src` folder and add the following to your `index.ts` file: ```ts export default { async fetch(request, env, ctx): Promise { let log = { url: request.url, method: request.method, headers: Object.fromEntries(request.headers), }; await env..send(log); return new Response('Success!'); }, } satisfies ExportedHandler; ``` Replace `MY_QUEUE` with the name you have set for your binding from your `wrangler.jsonc` file. Also add the queue to `Env` interface in `index.ts`. ```ts export interface Env { : Queue; } ``` If this write fails, your Worker will return an error (raise an exception). If this write works, it will return `Success` back with a HTTP `200` status code to the browser. In a production application, you would likely use a [`try...catch`](https://developer.mozilla.org/en-US/docs/Web/JavaScript/Reference/Statements/try...catch) statement to catch the exception and handle it directly (for example, return a custom error or even retry). ### Publish your producer Worker With your Wrangler file and `index.ts` file configured, you are ready to publish your producer Worker. To publish your producer Worker, run: ```sh npx wrangler deploy ``` You should see output that resembles the below, with a `*.workers.dev` URL by default. ```plaintext Uploaded (0.76 sec) Published (0.29 sec) https://..workers.dev ``` Copy your `*.workers.dev` subdomain and paste it into a new browser tab. Refresh the page a few times to start publishing requests to your queue. Your browser should return the `Success` response after writing the request to the queue each time. You have built a queue and a producer Worker to publish messages to the queue. You will now create a consumer Worker to consume the messages published to your queue. Without a consumer Worker, the messages will stay on the queue until they expire, which defaults to four (4) days. ## 4. Create your consumer Worker A consumer Worker receives messages from your queue. When the consumer Worker receives your queue's messages, it can write them to another source, such as a logging console or storage objects. In this guide, you will create a consumer Worker and use it to log and inspect the messages with [`wrangler tail`](https://developers.cloudflare.com/workers/wrangler/commands/#tail). You will create your consumer Worker in the same Worker project that you created your producer Worker. Note Queues also supports [pull-based consumers](https://developers.cloudflare.com/queues/configuration/pull-consumers/), which allows any HTTP-based client to consume messages from a queue. This guide creates a push-based consumer using Cloudflare Workers. To create a consumer Worker, open your `index.ts` file and add the following `queue` handler to your existing `fetch` handler: ```ts export default { async fetch(request, env, ctx): Promise { let log = { url: request.url, method: request.method, headers: Object.fromEntries(request.headers), }; await env..send(log); return new Response('Success!'); }, async queue(batch, env): Promise { let messages = JSON.stringify(batch.messages); console.log(`consumed from our queue: ${messages}`); }, } satisfies ExportedHandler; ``` Replace `MY_QUEUE` with the name you have set for your binding from your `wrangler.jsonc` file. Every time messages are published to the queue, your consumer Worker's `queue` handler (`async queue`) is called and it is passed one or more messages. In this example, your consumer Worker transforms the queue's JSON formatted message into a string and logs that output. In a real world application, your consumer Worker can be configured to write messages to object storage (such as [R2](https://developers.cloudflare.com/r2/)), write to a database (like [D1](https://developers.cloudflare.com/d1/)), further process messages before calling an external API (such as an [email API](https://developers.cloudflare.com/workers/tutorials/)) or a data warehouse with your legacy cloud provider. When performing asynchronous tasks from within your consumer handler, use `waitUntil()` to ensure the response of the function is handled. Other asynchronous methods are not supported within the scope of this method. ### Connect the consumer Worker to your queue After you have configured your consumer Worker, you are ready to connect it to your queue. Each queue can only have one consumer Worker connected to it. If you try to connect multiple consumers to the same queue, you will encounter an error when attempting to publish that Worker. To connect your queue to your consumer Worker, open your Wrangler file and add this to the bottom: * wrangler.jsonc ```jsonc { "queues": { "consumers": [ { "queue": "", "max_batch_size": 10, "max_batch_timeout": 5 } ] } } ``` * wrangler.toml ```toml [[queues.consumers]] queue = "" # Required: this should match the name of the queue you created in step 3. # If you misspell the name, you will receive an error when attempting to publish your Worker. max_batch_size = 10 # optional: defaults to 10 max_batch_timeout = 5 # optional: defaults to 5 seconds ``` Replace `MY-QUEUE-NAME` with the queue you created in [step 2](https://developers.cloudflare.com/queues/get-started/#2-create-a-queue). In your consumer Worker, you are using queues to auto batch messages using the `max_batch_size` option and the `max_batch_timeout` option. The consumer Worker will receive messages in batches of `10` or every `5` seconds, whichever happens first. `max_batch_size` (defaults to 10) helps to reduce the amount of times your consumer Worker needs to be called. Instead of being called for every message, it will only be called after 10 messages have entered the queue. `max_batch_timeout` (defaults to 5 seconds) helps to reduce wait time. If the producer Worker is not sending up to 10 messages to the queue for the consumer Worker to be called, the consumer Worker will be called every 5 seconds to receive messages that are waiting in the queue. ### Publish your consumer Worker With your Wrangler file and `index.ts` file configured, publish your consumer Worker by running: ```sh npx wrangler deploy ``` ## 5. Read messages from your queue After you set up consumer Worker, you can read messages from the queue. Run `wrangler tail` to start waiting for our consumer to log the messages it receives: ```sh npx wrangler tail ``` With `wrangler tail` running, open the Worker URL you opened in [step 3](https://developers.cloudflare.com/queues/get-started/#3-set-up-your-producer-worker). You should receive a `Success` message in your browser window. If you receive a `Success` message, refresh the URL a few times to generate messages and push them onto the queue. With `wrangler tail` running, your consumer Worker will start logging the requests generated by refreshing. If you refresh less than 10 times, it may take a few seconds for the messages to appear because batch timeout is configured for 10 seconds. After 10 seconds, messages should arrive in your terminal. If you get errors when you refresh, check that the queue name you created in [step 2](https://developers.cloudflare.com/queues/get-started/#2-create-a-queue) and the queue you referenced in your Wrangler file is the same. You should ensure that your producer Worker is returning `Success` and is not returning an error. By completing this guide, you have now created a queue, a producer Worker that publishes messages to that queue, and a consumer Worker that consumes those messages from it. ## Related resources * Learn more about [Cloudflare Workers](https://developers.cloudflare.com/workers/) and the applications you can build on Cloudflare. --- title: Glossary · Cloudflare Queues docs description: Review the definitions for terms used across Cloudflare's Queues documentation. lastUpdated: 2024-08-13T19:56:56.000Z chatbotDeprioritize: false source_url: html: https://developers.cloudflare.com/queues/glossary/ md: https://developers.cloudflare.com/queues/glossary/index.md --- Review the definitions for terms used across Cloudflare's Queues documentation. | Term | Definition | | - | - | | consumer | A consumer is the term for a client that is subscribing to or consuming messages from a queue. | | producer | A producer is the term for a client that is publishing or producing messages on to a queue. | | queue | A queue is a buffer or list that automatically scales as messages are written to it, and allows a consumer Worker to pull messages from that same queue. | --- title: Observability · Cloudflare Queues docs lastUpdated: 2025-02-27T10:30:11.000Z chatbotDeprioritize: true source_url: html: https://developers.cloudflare.com/queues/observability/ md: https://developers.cloudflare.com/queues/observability/index.md --- * [Metrics](https://developers.cloudflare.com/queues/observability/metrics/) --- title: Platform · Cloudflare Queues docs lastUpdated: 2025-02-27T10:30:11.000Z chatbotDeprioritize: true source_url: html: https://developers.cloudflare.com/queues/platform/ md: https://developers.cloudflare.com/queues/platform/index.md --- * [Pricing](https://developers.cloudflare.com/queues/platform/pricing/) * [Limits](https://developers.cloudflare.com/queues/platform/limits/) * [Choose a data or storage product](https://developers.cloudflare.com/workers/platform/storage-options/) * [Changelog](https://developers.cloudflare.com/queues/platform/changelog/) * [Audit Logs](https://developers.cloudflare.com/queues/platform/audit-logs/) --- title: Queues REST API · Cloudflare Queues docs lastUpdated: 2024-12-16T22:33:26.000Z chatbotDeprioritize: false source_url: html: https://developers.cloudflare.com/queues/queues-api/ md: https://developers.cloudflare.com/queues/queues-api/index.md --- --- title: Reference · Cloudflare Queues docs lastUpdated: 2025-02-27T10:30:11.000Z chatbotDeprioritize: true source_url: html: https://developers.cloudflare.com/queues/reference/ md: https://developers.cloudflare.com/queues/reference/index.md --- * [How Queues Works](https://developers.cloudflare.com/queues/reference/how-queues-works/) * [Delivery guarantees](https://developers.cloudflare.com/queues/reference/delivery-guarantees/) * [Wrangler commands](https://developers.cloudflare.com/workers/wrangler/commands/#queues) --- title: Tutorials · Cloudflare Queues docs lastUpdated: 2025-05-06T17:35:57.000Z chatbotDeprioritize: false source_url: html: https://developers.cloudflare.com/queues/tutorials/ md: https://developers.cloudflare.com/queues/tutorials/index.md --- ## Docs | Name | Last Updated | Type | Difficulty | | - | - | - | - | | [Use event notification to summarize PDF files on upload](https://developers.cloudflare.com/r2/tutorials/summarize-pdf/) | 9 months ago | 📝 Tutorial | Intermediate | | [Handle rate limits of external APIs](https://developers.cloudflare.com/queues/tutorials/handle-rate-limits/) | 10 months ago | 📝 Tutorial | Beginner | | [Build a web crawler with Queues and Browser Rendering](https://developers.cloudflare.com/queues/tutorials/web-crawler-with-browser-rendering/) | 11 months ago | 📝 Tutorial | Intermediate | | [Log and store upload events in R2 with event notifications](https://developers.cloudflare.com/r2/tutorials/upload-logs-event-notifications/) | over 1 year ago | 📝 Tutorial | Beginner | ## Videos Cloudflare Workflows | Introduction (Part 1 of 3) In this video, we introduce Cloudflare Workflows, the Newest Developer Platform Primitive at Cloudflare. Cloudflare Workflows | Batching and Monitoring Your Durable Execution (Part 2 of 3) Workflows exposes metrics such as execution, error rates, steps, and total duration! --- title: 404 - Page Not Found · Cloudflare R2 docs chatbotDeprioritize: false source_url: html: https://developers.cloudflare.com/r2/404/ md: https://developers.cloudflare.com/r2/404/index.md --- # 404 Check the URL, try using our [search](https://developers.cloudflare.com/search/) or try our LLM-friendly [llms.txt directory](https://developers.cloudflare.com/llms.txt). --- title: API · Cloudflare R2 docs lastUpdated: 2024-08-30T16:09:27.000Z chatbotDeprioritize: true source_url: html: https://developers.cloudflare.com/r2/api/ md: https://developers.cloudflare.com/r2/api/index.md --- * [Authentication](https://developers.cloudflare.com/r2/api/tokens/) * [S3](https://developers.cloudflare.com/r2/api/s3/) * [Workers API](https://developers.cloudflare.com/r2/api/workers/) --- title: Buckets · Cloudflare R2 docs description: With object storage, all of your objects are stored in buckets. Buckets do not contain folders that group the individual files, but instead, buckets have a flat structure which simplifies the way you access and retrieve the objects in your bucket. lastUpdated: 2024-08-13T19:56:56.000Z chatbotDeprioritize: false source_url: html: https://developers.cloudflare.com/r2/buckets/ md: https://developers.cloudflare.com/r2/buckets/index.md --- With object storage, all of your objects are stored in buckets. Buckets do not contain folders that group the individual files, but instead, buckets have a flat structure which simplifies the way you access and retrieve the objects in your bucket. Learn more about bucket level operations from the items below. * [Bucket locks](https://developers.cloudflare.com/r2/buckets/bucket-locks/) * [Create new buckets](https://developers.cloudflare.com/r2/buckets/create-buckets/) * [Public buckets](https://developers.cloudflare.com/r2/buckets/public-buckets/) * [Configure CORS](https://developers.cloudflare.com/r2/buckets/cors/) * [Event notifications](https://developers.cloudflare.com/r2/buckets/event-notifications/) * [Object lifecycles](https://developers.cloudflare.com/r2/buckets/object-lifecycles/) * [Storage classes](https://developers.cloudflare.com/r2/buckets/storage-classes/) --- title: R2 Data Catalog · Cloudflare R2 docs description: A managed Apache Iceberg data catalog built directly into R2 buckets. lastUpdated: 2025-04-09T22:46:56.000Z chatbotDeprioritize: false source_url: html: https://developers.cloudflare.com/r2/data-catalog/ md: https://developers.cloudflare.com/r2/data-catalog/index.md --- Note R2 Data Catalog is in **public beta**, and any developer with an [R2 subscription](https://developers.cloudflare.com/r2/pricing/) can start using it. Currently, outside of standard R2 storage and operations, you will not be billed for your use of R2 Data Catalog. R2 Data Catalog is a managed [Apache Iceberg](https://iceberg.apache.org/) data catalog built directly into your R2 bucket. It exposes a standard Iceberg REST catalog interface, so you can connect the engines you already use, like [Spark](https://developers.cloudflare.com/r2/data-catalog/config-examples/spark-scala/), [Snowflake](https://developers.cloudflare.com/r2/data-catalog/config-examples/snowflake/), and [PyIceberg](https://developers.cloudflare.com/r2/data-catalog/config-examples/pyiceberg/). R2 Data Catalog makes it easy to turn an R2 bucket into a data warehouse or lakehouse for a variety of analytical workloads including log analytics, business intelligence, and data pipelines. R2's zero-egress fee model means that data users and consumers can access and analyze data from different clouds, data platforms, or regions without incurring transfer costs. To get started with R2 Data Catalog, refer to the [R2 Data Catalog: Getting started](https://developers.cloudflare.com/r2/data-catalog/get-started/). ## What is Apache Iceberg? [Apache Iceberg](https://iceberg.apache.org/) is an open table format designed to handle large-scale analytics datasets stored in object storage. Key features include: * ACID transactions - Ensures reliable, concurrent reads and writes with full data integrity. * Optimized metadata - Avoids costly full table scans by using indexed metadata for faster queries. * Full schema evolution - Allows adding, renaming, and deleting columns without rewriting data. Iceberg is already [widely supported](https://iceberg.apache.org/vendors/) by engines like Apache Spark, Trino, Snowflake, DuckDB, and ClickHouse, with a fast-growing community behind it. ## Why do you need a data catalog? Although the Iceberg data and metadata files themselves live directly in object storage (like [R2](https://developers.cloudflare.com/r2/)), the list of tables and pointers to the current metadata need to be tracked centrally by a data catalog. Think of a data catalog as a library's index system. While books (your data) are physically distributed across shelves (object storage), the index provides a single source of truth about what books exist, their locations, and their latest editions. Without this index, readers (query engines) would waste time searching for books, might access outdated versions, or could accidentally shelve new books in ways that make them unfindable. Similarly, data catalogs ensure consistent, coordinated access, which allows multiple query engines to safely read from and write to the same tables without conflicts or data corruption. ## Learn more [Get started ](https://developers.cloudflare.com/r2/data-catalog/get-started/)Learn how to enable the R2 Data Catalog on your bucket, load sample data, and run your first query. [Managing catalogs ](https://developers.cloudflare.com/r2/data-catalog/manage-catalogs/)Enable or disable R2 Data Catalog on your bucket, retrieve configuration details, and authenticate your Iceberg engine. [Connect to Iceberg engines ](https://developers.cloudflare.com/r2/data-catalog/config-examples/)Find detailed setup instructions for Apache Spark and other common query engines. --- title: Data migration · Cloudflare R2 docs description: Quickly and easily migrate data from other cloud providers to R2. Explore each option further by navigating to their respective documentation page. lastUpdated: 2025-05-15T13:16:23.000Z chatbotDeprioritize: false source_url: html: https://developers.cloudflare.com/r2/data-migration/ md: https://developers.cloudflare.com/r2/data-migration/index.md --- Quickly and easily migrate data from other cloud providers to R2. Explore each option further by navigating to their respective documentation page. | Name | Description | When to use | | - | - | - | | [Super Slurper](https://developers.cloudflare.com/r2/data-migration/super-slurper/) | Quickly migrate large amounts of data from other cloud providers to R2. | * For one-time, comprehensive transfers. | | [Sippy](https://developers.cloudflare.com/r2/data-migration/sippy/) | Incremental data migration, populating your R2 bucket as objects are requested. | - For gradual migration that avoids upfront egress fees. - To start serving frequently accessed objects from R2 without a full migration. | For information on how to leverage these tools effectively, refer to [Migration Strategies](https://developers.cloudflare.com/r2/data-migration/migration-strategies/) --- title: Demos and architectures · Cloudflare R2 docs description: Learn how you can use R2 within your existing application and architecture. lastUpdated: 2025-04-09T22:46:56.000Z chatbotDeprioritize: false source_url: html: https://developers.cloudflare.com/r2/demos/ md: https://developers.cloudflare.com/r2/demos/index.md --- Learn how you can use R2 within your existing application and architecture. ## Demos Explore the following demo applications for R2. * [Jobs At Conf:](https://github.com/harshil1712/jobs-at-conf-demo) A job lisiting website to add jobs you find at in-person conferences. Built with Cloudflare Pages, R2, D1, Queues, and Workers AI. * [Upload Image to R2 starter:](https://github.com/harshil1712/nextjs-r2-demo) Upload images to Cloudflare R2 from a Next.js application. * [DMARC Email Worker:](https://github.com/cloudflare/dmarc-email-worker) A Cloudflare worker script to process incoming DMARC reports, store them, and produce analytics. ## Reference architectures Explore the following reference architectures that use R2: [Composable AI architecture](https://developers.cloudflare.com/reference-architecture/diagrams/ai/ai-composable/) [The architecture diagram illustrates how AI applications can be built end-to-end on Cloudflare, or single services can be integrated with external infrastructure and services.](https://developers.cloudflare.com/reference-architecture/diagrams/ai/ai-composable/) [Automatic captioning for video uploads](https://developers.cloudflare.com/reference-architecture/diagrams/ai/ai-video-caption/) [By integrating automatic speech recognition technology into video platforms, content creators, publishers, and distributors can reach a broader audience, including individuals with hearing impairments or those who prefer to consume content in different languages.](https://developers.cloudflare.com/reference-architecture/diagrams/ai/ai-video-caption/) [Ingesting BigQuery Data into Workers AI](https://developers.cloudflare.com/reference-architecture/diagrams/ai/bigquery-workers-ai/) [You can connect a Cloudflare Worker to get data from Google BigQuery and pass it to Workers AI, to run AI Models, powered by serverless GPUs.](https://developers.cloudflare.com/reference-architecture/diagrams/ai/bigquery-workers-ai/) [Optimizing image delivery with Cloudflare image resizing and R2](https://developers.cloudflare.com/reference-architecture/diagrams/content-delivery/optimizing-image-delivery-with-cloudflare-image-resizing-and-r2/) [Learn how to get a scalable, high-performance solution to optimizing image delivery.](https://developers.cloudflare.com/reference-architecture/diagrams/content-delivery/optimizing-image-delivery-with-cloudflare-image-resizing-and-r2/) [Optimizing and securing connected transportation systems](https://developers.cloudflare.com/reference-architecture/diagrams/iot/optimizing-and-securing-connected-transportation-systems/) [This diagram showcases Cloudflare components optimizing connected transportation systems. It illustrates how their technologies minimize latency, ensure reliability, and strengthen security for critical data flow.](https://developers.cloudflare.com/reference-architecture/diagrams/iot/optimizing-and-securing-connected-transportation-systems/) [Fullstack applications](https://developers.cloudflare.com/reference-architecture/diagrams/serverless/fullstack-application/) [A practical example of how these services come together in a real fullstack application architecture.](https://developers.cloudflare.com/reference-architecture/diagrams/serverless/fullstack-application/) [Serverless ETL pipelines](https://developers.cloudflare.com/reference-architecture/diagrams/serverless/serverless-etl/) [Cloudflare enables fully serverless ETL pipelines, significantly reducing complexity, accelerating time to production, and lowering overall costs.](https://developers.cloudflare.com/reference-architecture/diagrams/serverless/serverless-etl/) [Serverless image content management](https://developers.cloudflare.com/reference-architecture/diagrams/serverless/serverless-image-content-management/) [Leverage various components of Cloudflare's ecosystem to construct a scalable image management solution](https://developers.cloudflare.com/reference-architecture/diagrams/serverless/serverless-image-content-management/) [Egress-free object storage in multi-cloud setups](https://developers.cloudflare.com/reference-architecture/diagrams/storage/egress-free-storage-multi-cloud/) [Learn how to use R2 to get egress-free object storage in multi-cloud setups.](https://developers.cloudflare.com/reference-architecture/diagrams/storage/egress-free-storage-multi-cloud/) [Event notifications for storage](https://developers.cloudflare.com/reference-architecture/diagrams/storage/event-notifications-for-storage/) [Use Cloudflare Workers or an external service to monitor for notifications about data changes and then handle them appropriately.](https://developers.cloudflare.com/reference-architecture/diagrams/storage/event-notifications-for-storage/) [On-demand Object Storage Data Migration](https://developers.cloudflare.com/reference-architecture/diagrams/storage/on-demand-object-storage-migration/) [Use Cloudflare migration tools to migrate data between cloud object storage providers.](https://developers.cloudflare.com/reference-architecture/diagrams/storage/on-demand-object-storage-migration/) [Storing user generated content](https://developers.cloudflare.com/reference-architecture/diagrams/storage/storing-user-generated-content/) [Store user-generated content in R2 for fast, secure, and cost-effective architecture.](https://developers.cloudflare.com/reference-architecture/diagrams/storage/storing-user-generated-content/) --- title: Examples · Cloudflare R2 docs description: Explore the following examples of how to use SDKs and other tools with R2. lastUpdated: 2025-04-09T22:46:56.000Z chatbotDeprioritize: false source_url: html: https://developers.cloudflare.com/r2/examples/ md: https://developers.cloudflare.com/r2/examples/index.md --- Explore the following examples of how to use SDKs and other tools with R2. * [Authenticate against R2 API using auth tokens](https://developers.cloudflare.com/r2/examples/authenticate-r2-auth-tokens/) * [Use the Cache API](https://developers.cloudflare.com/r2/examples/cache-api/) * [Multi-cloud setup](https://developers.cloudflare.com/reference-architecture/diagrams/storage/egress-free-storage-multi-cloud/) * [Rclone](https://developers.cloudflare.com/r2/examples/rclone/) * [S3 SDKs](https://developers.cloudflare.com/r2/examples/aws/) * [Terraform](https://developers.cloudflare.com/r2/examples/terraform/) * [Terraform (AWS)](https://developers.cloudflare.com/r2/examples/terraform-aws/) * [Use SSE-C](https://developers.cloudflare.com/r2/examples/ssec/) --- title: Getting started guide · Cloudflare R2 docs description: Cloudflare R2 Storage allows developers to store large amounts of unstructured data without the costly egress bandwidth fees associated with typical cloud storage services. lastUpdated: 2025-05-28T15:17:46.000Z chatbotDeprioritize: false source_url: html: https://developers.cloudflare.com/r2/get-started/ md: https://developers.cloudflare.com/r2/get-started/index.md --- Cloudflare R2 Storage allows developers to store large amounts of unstructured data without the costly egress bandwidth fees associated with typical cloud storage services. ## 1. Install and authenticate Wrangler Note Before you create your first bucket, you must purchase R2 from the Cloudflare dashboard. 1. [Install Wrangler](https://developers.cloudflare.com/workers/wrangler/install-and-update/) within your project using npm and Node.js or Yarn. * npm ```sh npm i -D wrangler@latest ``` * yarn ```sh yarn add -D wrangler@latest ``` * pnpm ```sh pnpm add -D wrangler@latest ``` 1. [Authenticate Wrangler](https://developers.cloudflare.com/workers/wrangler/commands/#login) to enable deployments to Cloudflare. When Wrangler automatically opens your browser to display Cloudflare's consent screen, select **Allow** to send the API Token to Wrangler. ```txt wrangler login ``` ## 2. Create a bucket To create a new R2 bucket from the Cloudflare dashboard: 1. Log in to the [Cloudflare dashboard](https://dash.cloudflare.com) and select **R2**. 2. Select **Create bucket**. 3. Enter a name for the bucket and select **Create bucket**. ## 3. Upload your first object 1. From the **R2** page in the dashboard, locate and select your bucket. 2. Select **Upload**. 3. Choose to either drag and drop your file into the upload area or **select from computer**. You will receive a confirmation message after a successful upload. ## Bucket access options Cloudflare provides multiple ways for developers to access their R2 buckets: * [R2 Workers Binding API](https://developers.cloudflare.com/r2/api/workers/workers-api-usage/) * [S3 API compatibility](https://developers.cloudflare.com/r2/api/s3/api/) * [Public buckets](https://developers.cloudflare.com/r2/buckets/public-buckets/) --- title: How R2 works · Cloudflare R2 docs description: xyz lastUpdated: 2025-07-08T02:38:55.000Z chatbotDeprioritize: false source_url: html: https://developers.cloudflare.com/r2/how-r2-works/ md: https://developers.cloudflare.com/r2/how-r2-works/index.md --- Cloudflare R2 is an S3-compatible object storage service with no egress fees, built on Cloudflare’s global network. It is [strongly consistent](https://developers.cloudflare.com/r2/reference/consistency/) and designed for high [data durability](https://developers.cloudflare.com/r2/reference/durability/). R2 is ideal for storing and serving unstructured data that needs to be accessed frequently over the internet, without incurring egress fees. It’s a good fit for workloads like serving web assets, training AI models, and managing user-generated content. ## Architecture R2’s architecture is composed of multiple components: * **R2 Gateway:** The entry point for all API requests that handles authentication and routing logic. This service is deployed across Cloudflare’s global network via [Cloudflare Workers](https://developers.cloudflare.com/workers/). * **Metadata Service:** A distributed layer built on [Durable Objects](https://developers.cloudflare.com/durable-objects/) used to store and manage object metadata (e.g. object key, checksum) to ensure strong consistency of the object across the storage system. It includes a built-in cache layer to speed up access to metadata. * **Tiered Read Cache:** A caching layer that sits in front of the Distributed Storage Infrastructure that speeds up object reads by using [Cloudflare Tiered Cache](https://developers.cloudflare.com/cache/how-to/tiered-cache/) to serve data closer to the client. * **Distributed Storage Infrastructure:** The underlying infrastructure that persistently stores encrypted object data. ![R2 Architecture](https://developers.cloudflare.com/_astro/r2-architecture.Dy9p3k5k_ZKI7Mj.webp) R2 supports multiple client interfaces including [Cloudflare Workers Binding](https://developers.cloudflare.com/r2/api/workers/workers-api-usage/), [S3-compatible API](https://developers.cloudflare.com/r2/api/s3/api/), and a [REST API](https://developers.cloudflare.com/api/resources/r2/) that powers the Cloudflare Dashboard and Wrangler CLI. All requests are routed through the R2 Gateway, which coordinates with the Metadata Service and Distributed Storage Infrastructure to retrieve the object data. ## Write data to R2 When a write request (e.g. uploading an object) is made to R2, the following sequence occurs: 1. **Request handling:** The request is received by the R2 Gateway at the edge, close to the user, where it is authenticated. 2. **Encryption and routing:** The Gateway reaches out to the Metadata Service to retrieve the [encryption key](https://developers.cloudflare.com/r2/reference/data-security/) and determines which storage cluster to write the encrypted data to within the [location](https://developers.cloudflare.com/r2/reference/data-location/) set for the bucket. 3. **Writing to storage:** The encrypted data is written and stored in the distributed storage infrastructure, and replicated within the region (e.g. ENAM) for [durability](https://developers.cloudflare.com/r2/reference/durability/). 4. **Metadata commit:** Finally, the Metadata Service commits the object’s metadata, making it visible in subsequent reads. Only after this commit is an `HTTP 200` success response sent to the client, preventing unacknowledged writes. ![Write data to R2](https://developers.cloudflare.com/_astro/write-data-to-r2.xjc-CtiT_3EC8M.webp) ## Read data from R2 When a read request (e.g. fetching an object) is made to R2, the following sequence occurs: 1. **Request handling:** The request is received by the R2 Gateway at the edge, close to the user, where it is authenticated. 2. **Metadata lookup:** The Gateway asks the Metadata Service for the object metadata. 3. **Reading the object:** The Gateway attempts to retrieve the [encrypted](https://developers.cloudflare.com/r2/reference/data-security/) object from the tiered read cache. If it’s not available, it retrieves the object from one of the distributed storage data centers within the region that holds the object data. 4. **Serving to client:** The object is decrypted and served to the user. ![Read data to R2](https://developers.cloudflare.com/_astro/read-data-to-r2.BZGeLX6u_ZwN6TD.webp) ## Performance The performance of your operations can be influenced by factors such as the bucket's geographical location, request origin, and access patterns. To further optimize R2 performance for object read requests, you can enable [Cloudflare Cache](https://developers.cloudflare.com/cache/) when using a [custom domain](https://developers.cloudflare.com/r2/buckets/public-buckets/#custom-domains). When caching is enabled, [read requests](https://developers.cloudflare.com/r2/how-r2-works/#read-data-from-r2) can bypass the R2 Gateway Worker and be served directly from Cloudflare’s edge cache, reducing latency. However, note that it may cause consistency trade-offs since cached data may not reflect the latest version immediately. ![Read data to R2 with Cloudflare Cache](https://developers.cloudflare.com/_astro/read-data-to-r2-with-cloudflare-cache.KDavWPCJ_vp4I2.webp) ## Learn more [Consistency ](https://developers.cloudflare.com/r2/reference/consistency/)Learn about R2's consistency model. [Durability ](https://developers.cloudflare.com/r2/reference/durability/)Learn more about R2's durability guarantee. [Data location ](https://developers.cloudflare.com/r2/reference/data-location/#jurisdictional-restrictions)Learn how R2 determines where data is stored, and details on jurisdiction restrictions. [Data security ](https://developers.cloudflare.com/r2/reference/data-security/)Learn about R2's data security properties. --- title: Objects · Cloudflare R2 docs description: Objects are individual files or data that you store in an R2 bucket. lastUpdated: 2025-05-28T15:17:46.000Z chatbotDeprioritize: false source_url: html: https://developers.cloudflare.com/r2/objects/ md: https://developers.cloudflare.com/r2/objects/index.md --- Objects are individual files or data that you store in an R2 bucket. * [Multipart upload](https://developers.cloudflare.com/r2/objects/multipart-objects/) * [Upload objects](https://developers.cloudflare.com/r2/objects/upload-objects/) * [Download objects](https://developers.cloudflare.com/r2/objects/download-objects/) * [Delete objects](https://developers.cloudflare.com/r2/objects/delete-objects/) ## Other resources For information on R2 Workers Binding API, refer to [R2 Workers API reference](https://developers.cloudflare.com/r2/api/workers/workers-api-reference/). --- title: Platform · Cloudflare R2 docs lastUpdated: 2025-04-09T22:46:56.000Z chatbotDeprioritize: true source_url: html: https://developers.cloudflare.com/r2/platform/ md: https://developers.cloudflare.com/r2/platform/index.md --- --- title: Pricing · Cloudflare R2 docs description: "R2 charges based on the total volume of data stored, along with two classes of operations on that data:" lastUpdated: 2025-05-19T18:20:45.000Z chatbotDeprioritize: false source_url: html: https://developers.cloudflare.com/r2/pricing/ md: https://developers.cloudflare.com/r2/pricing/index.md --- R2 charges based on the total volume of data stored, along with two classes of operations on that data: 1. [Class A operations](#class-a-operations) which are more expensive and tend to mutate state. 2. [Class B operations](#class-b-operations) which tend to read existing state. For the Infrequent Access storage class, [data retrieval](#data-retrieval) fees apply. There are no charges for egress bandwidth for any storage class. All included usage is on a monthly basis. Note To learn about potential cost savings from using R2, refer to the [R2 pricing calculator](https://r2-calculator.cloudflare.com/). ## R2 pricing | | Standard storage | Infrequent Access storage Beta | | - | - | - | | Storage | $0.015 / GB-month | $0.01 / GB-month | | Class A Operations | $4.50 / million requests | $9.00 / million requests | | Class B Operations | $0.36 / million requests | $0.90 / million requests | | Data Retrieval (processing) | None | $0.01 / GB | | Egress (data transfer to Internet) | Free [1](#user-content-fn-1) | Free [1](#user-content-fn-1) | ### Free tier You can use the following amount of storage and operations each month for free. The free tier only applies to Standard storage. | | Free | | - | - | | Storage | 10 GB-month / month | | Class A Operations | 1 million requests / month | | Class B Operations | 10 million requests / month | | Egress (data transfer to Internet) | Free [1](#user-content-fn-1) | ### Storage usage Storage is billed using gigabyte-month (GB-month) as the billing metric. A GB-month is calculated by averaging the *peak* storage per day over a billing period (30 days). For example: * Storing 1 GB constantly for 30 days will be charged as 1 GB-month. * Storing 3 GB constantly for 30 days will be charged as 3 GB-month. * Storing 1 GB for 5 days, then 3 GB for the remaining 25 days will be charged as `1 GB * 5/30 month + 3 GB * 25/30 month = 2.66 GB-month` For objects stored in Infrequent Access storage, you will be charged for the object for the minimum storage duration even if the object was deleted or moved before the duration specified. ### Class A operations Class A Operations include `ListBuckets`, `PutBucket`, `ListObjects`, `PutObject`, `CopyObject`, `CompleteMultipartUpload`, `CreateMultipartUpload`, `LifecycleStorageTierTransition`, `ListMultipartUploads`, `UploadPart`, `UploadPartCopy`, `ListParts`, `PutBucketEncryption`, `PutBucketCors` and `PutBucketLifecycleConfiguration`. ### Class B operations Class B Operations include `HeadBucket`, `HeadObject`, `GetObject`, `UsageSummary`, `GetBucketEncryption`, `GetBucketLocation`, `GetBucketCors` and `GetBucketLifecycleConfiguration`. ### Free operations Free operations include `DeleteObject`, `DeleteBucket` and `AbortMultipartUpload`. ### Data retrieval Data retrieval fees apply when you access or retrieve data from the Infrequent Access storage class. This includes any time objects are read or copied. ### Minimum storage duration For objects stored in Infrequent Access storage, you will be charged for the object for the minimum storage duration even if the object was deleted, moved, or replaced before the specified duration. | Storage class | Minimum storage duration | | - | - | | Standard storage | None | | Infrequent Access storageBeta | 30 days | ## R2 Data Catalog pricing R2 Data Catalog is in **public beta**, and any developer with an [R2 subscription](https://developers.cloudflare.com/r2/pricing/) can start using it. Currently, outside of standard R2 storage and operations, you will not be billed for your use of R2 Data Catalog. We will provide at least 30 days' notice before we make any changes or start charging for usage. To learn more about our thinking on future pricing, refer to the [R2 Data Catalog announcement blog](https://blog.cloudflare.com/r2-data-catalog-public-beta). ## Data migration pricing ### Super Slurper Super Slurper is free to use. You are only charged for the Class A operations that Super Slurper makes to your R2 bucket. Objects with sizes < 100MiB are uploaded to R2 in a single Class A operation. Larger objects use multipart uploads to increase transfer success rates and will perform multiple Class A operations. Note that your source bucket might incur additional charges as Super Slurper copies objects over to R2. Once migration completes, you are charged for storage & Class A/B operations as described in previous sections. ### Sippy Sippy is free to use. You are only charged for the operations Sippy makes to your R2 bucket. If a requested object is not present in R2, Sippy will copy it over from your source bucket. Objects with sizes < 200MiB are uploaded to R2 in a single Class A operation. Larger objects use multipart uploads to increase transfer success rates, and will perform multiple Class A operations. Note that your source bucket might incur additional charges as Sippy copies objects over to R2. As objects are migrated to R2, they are served from R2, and you are charged for storage & Class A/B operations as described in previous sections. ## Pricing calculator To learn about potential cost savings from using R2, refer to the [R2 pricing calculator](https://r2-calculator.cloudflare.com/). ## R2 billing examples ### Data storage example 1 If a user writes 1,000 objects in R2 for 1 month with an average size of 1 GB and requests each 1,000 times per month, the estimated cost for the month would be: | | Usage | Free Tier | Billable Quantity | Price | | - | - | - | - | - | | Class B Operations | (1,000 objects) \* (1,000 reads per object) | 10 million | 0 | $0.00 | | Class A Operations | (1,000 objects) \* (1 write per object) | 1 million | 0 | $0.00 | | Storage | (1,000 objects) \* (1 GB per object) | 10 GB-months | 990 GB-months | $14.85 | | **TOTAL** | | | | **$14.85** | | | | | | | ### Data storage example 2 If a user writes 10 objects in R2 for 1 month with an average size of 1 GB and requests 1,000 times per month, the estimated cost for the month would be: | | Usage | Free Tier | Billable Quantity | Price | | - | - | - | - | - | | Class B Operations | (1,000 objects) \* (1,000 reads per object) | 10 million | 0 | $0.00 | | Class A Operations | (1,000 objects) \* (1 write per object) | 1 million | 0 | $0.00 | | Storage | (10 objects) \* (1 GB per object) | 10 GB-months | 0 | $0.00 | | **TOTAL** | | | | **$0.00** | | | | | | | ### Asset hosting If a user writes 100,000 files with an average size of 100 KB object and reads 10,000,000 objects per day, the estimated cost in a month would be: | | Usage | Free Tier | Billable Quantity | Price | | - | - | - | - | - | | Class B Operations | (10,000,000 reads per day) \* (30 days) | 10 million | 290,000,000 | $104.40 | | Class A Operations | (100,000 writes) | 1 million | 0 | $0.00 | | Storage | (100,000 objects) \* (100KB per object) | 10 GB-months | 0 GB-months | $0.00 | | **TOTAL** | | | | **$104.40** | | | | | | | ## Cloudflare billing policy To learn more about how usage is billed, refer to [Cloudflare Billing Policy](https://developers.cloudflare.com/billing/billing-policy/). ## Frequently asked questions ### Will I be charged for unauthorized requests to my R2 bucket? No. You are not charged for operations when the caller does not have permission to make the request (HTTP 401 `Unauthorized` response status code). ## Footnotes 1. Egressing directly from R2, including via the [Workers API](https://developers.cloudflare.com/r2/api/workers/), [S3 API](https://developers.cloudflare.com/r2/api/s3/), and [`r2.dev` domains](https://developers.cloudflare.com/r2/buckets/public-buckets/#enable-managed-public-access) does not incur data transfer (egress) charges and is free. If you connect other metered services to an R2 bucket, you may be charged by those services. [↩](#user-content-fnref-1) [↩2](#user-content-fnref-1-2) [↩3](#user-content-fnref-1-3) --- title: Reference · Cloudflare R2 docs lastUpdated: 2025-04-09T22:46:56.000Z chatbotDeprioritize: true source_url: html: https://developers.cloudflare.com/r2/reference/ md: https://developers.cloudflare.com/r2/reference/index.md --- * [Consistency model](https://developers.cloudflare.com/r2/reference/consistency/) * [Data location](https://developers.cloudflare.com/r2/reference/data-location/) * [Data security](https://developers.cloudflare.com/r2/reference/data-security/) * [Durability](https://developers.cloudflare.com/r2/reference/durability/) * [Unicode interoperability](https://developers.cloudflare.com/r2/reference/unicode-interoperability/) * [Wrangler commands](https://developers.cloudflare.com/workers/wrangler/commands/#r2-bucket) * [Partners](https://developers.cloudflare.com/r2/reference/partners/) --- title: Tutorials · Cloudflare R2 docs description: View tutorials to help you get started with R2. lastUpdated: 2025-05-06T17:35:57.000Z chatbotDeprioritize: false source_url: html: https://developers.cloudflare.com/r2/tutorials/ md: https://developers.cloudflare.com/r2/tutorials/index.md --- View tutorials to help you get started with R2. ## Docs | Name | Last Updated | Type | Difficulty | | - | - | - | - | | [Point to R2 bucket with a custom domain](https://developers.cloudflare.com/rules/origin-rules/tutorials/point-to-r2-bucket-with-custom-domain/) | 3 months ago | 📝 Tutorial | Beginner | | [Ingest data from a Worker, and analyze using MotherDuck](https://developers.cloudflare.com/pipelines/tutorials/query-data-with-motherduck/) | 3 months ago | 📝 Tutorial | Intermediate | | [Create a data lake of clickstream data](https://developers.cloudflare.com/pipelines/tutorials/send-data-from-client/) | 3 months ago | 📝 Tutorial | Intermediate | | [Build a Voice Notes App with auto transcriptions using Workers AI](https://developers.cloudflare.com/workers-ai/guides/tutorials/build-a-voice-notes-app-with-auto-transcription/) | 7 months ago | 📝 Tutorial | Intermediate | | [Use event notification to summarize PDF files on upload](https://developers.cloudflare.com/r2/tutorials/summarize-pdf/) | 9 months ago | 📝 Tutorial | Intermediate | | [Use SSE-C](https://developers.cloudflare.com/r2/examples/ssec/) | 10 months ago | 📝 Tutorial | Intermediate | | [Use R2 as static asset storage with Cloudflare Pages](https://developers.cloudflare.com/pages/tutorials/use-r2-as-static-asset-storage-for-pages/) | 12 months ago | 📝 Tutorial | Intermediate | | [Custom access control for files in R2 using D1 and Workers](https://developers.cloudflare.com/developer-spotlight/tutorials/custom-access-control-for-files/) | about 1 year ago | 📝 Tutorial | Beginner | | [Create a fine-tuned OpenAI model with R2](https://developers.cloudflare.com/workers/tutorials/create-finetuned-chatgpt-ai-models-with-r2/) | about 1 year ago | 📝 Tutorial | Intermediate | | [Protect an R2 Bucket with Cloudflare Access](https://developers.cloudflare.com/r2/tutorials/cloudflare-access/) | over 1 year ago | 📝 Tutorial | | | [Log and store upload events in R2 with event notifications](https://developers.cloudflare.com/r2/tutorials/upload-logs-event-notifications/) | over 1 year ago | 📝 Tutorial | Beginner | | [Use Cloudflare R2 as a Zero Trust log destination](https://developers.cloudflare.com/cloudflare-one/tutorials/r2-logs/) | over 1 year ago | 📝 Tutorial | Beginner | | [Deploy a Browser Rendering Worker with Durable Objects](https://developers.cloudflare.com/browser-rendering/workers-bindings/browser-rendering-with-do/) | almost 2 years ago | 📝 Tutorial | Beginner | | [Securely access and upload assets with Cloudflare R2](https://developers.cloudflare.com/workers/tutorials/upload-assets-with-r2/) | about 2 years ago | 📝 Tutorial | Beginner | | [Mastodon](https://developers.cloudflare.com/r2/tutorials/mastodon/) | over 2 years ago | 📝 Tutorial | Beginner | | [Postman](https://developers.cloudflare.com/r2/tutorials/postman/) | about 3 years ago | 📝 Tutorial | | ## Videos Welcome to the Cloudflare Developer Channel Welcome to the Cloudflare Developers YouTube channel. We've got tutorials and working demos and everything you need to level up your projects. Whether you're working on your next big thing or just dorking around with some side projects, we've got you covered! So why don't you come hang out, subscribe to our developer channel and together we'll build something awesome. You're gonna love it. Optimize your AI App & fine-tune models (AI Gateway, R2) In this workshop, Kristian Freeman, Cloudflare Developer Advocate, shows how to optimize your existing AI applications with Cloudflare AI Gateway, and how to finetune OpenAI models using R2. --- title: Videos · Cloudflare R2 docs lastUpdated: 2025-06-05T08:11:08.000Z chatbotDeprioritize: false source_url: html: https://developers.cloudflare.com/r2/video-tutorials/ md: https://developers.cloudflare.com/r2/video-tutorials/index.md --- [Introduction to R2 ](https://developers.cloudflare.com/learning-paths/r2-intro/series/r2-1/)Learn about Cloudflare R2, an object storage solution designed to handle your data and files efficiently. It is ideal for storing large media files, creating data lakes, or delivering web assets. --- title: 404 - Page Not Found · Cloudflare Realtime docs chatbotDeprioritize: false source_url: html: https://developers.cloudflare.com/realtime/404/ md: https://developers.cloudflare.com/realtime/404/index.md --- # 404 Check the URL, try using our [search](https://developers.cloudflare.com/search/) or try our LLM-friendly [llms.txt directory](https://developers.cloudflare.com/llms.txt). --- title: Realtime vs Regular SFUs · Cloudflare Realtime docs description: Cloudflare Realtime represents a paradigm shift in building real-time applications by leveraging a distributed real-time data plane. It creates a seamless experience in real-time communication, transcending traditional geographical limitations and scalability concerns. Realtime is designed for developers looking to integrate WebRTC functionalities in a server-client architecture without delving deep into the complexities of regional scaling or server management. lastUpdated: 2025-04-08T20:01:03.000Z chatbotDeprioritize: false source_url: html: https://developers.cloudflare.com/realtime/calls-vs-sfus/ md: https://developers.cloudflare.com/realtime/calls-vs-sfus/index.md --- ## Cloudflare Realtime vs. Traditional SFUs Cloudflare Realtime represents a paradigm shift in building real-time applications by leveraging a distributed real-time data plane. It creates a seamless experience in real-time communication, transcending traditional geographical limitations and scalability concerns. Realtime is designed for developers looking to integrate WebRTC functionalities in a server-client architecture without delving deep into the complexities of regional scaling or server management. ### The Limitations of Centralized SFUs Selective Forwarding Units (SFUs) play a critical role in managing WebRTC connections by selectively forwarding media streams to participants in a video call. However, their centralized nature introduces inherent limitations: * **Regional Dependency:** A centralized SFU requires a specific region for deployment, leading to latency issues for global users except for those in proximity to the selected region. * **Scalability Concerns:** Scaling a centralized SFU to meet global demand can be challenging and inefficient, often requiring additional infrastructure and complexity. ### How is Cloudflare Realtime different? Cloudflare Realtime addresses these limitations by leveraging Cloudflare's global network infrastructure: * **Global Distribution Without Regions:** Unlike traditional SFUs, Cloudflare Realtime operates on a global scale without regional constraints. It utilizes Cloudflare's extensive network of over 250 locations worldwide to ensure low-latency video forwarding, making it fast and efficient for users globally. * **Decentralized Architecture:** There are no dedicated servers for Realtime. Every server within Cloudflare's network contributes to handling Realtime, ensuring scalability and reliability. This approach mirrors the distributed nature of Cloudflare's products such as 1.1.1.1 DNS or Cloudflare's CDN. ## How Cloudflare Realtime Works ### Establishing Peer Connections To initiate a real-time communication session, an end user's client establishes a WebRTC PeerConnection to the nearest Cloudflare location. This connection benefits from anycast routing, optimizing for the lowest possible latency. ### Signaling and Media Stream Management * **HTTPS API for Signaling:** Cloudflare Realtime simplifies signaling with a straightforward HTTPS API. This API manages the initiation and coordination of media streams, enabling clients to push new MediaStreamTracks or request these tracks from the server. * **Efficient Media Handling:** Unlike traditional approaches that require multiple connections for different media streams from different clients, Cloudflare Realtime maintains a single PeerConnection per client. This streamlined process reduces complexity and improves performance by handling both the push and pull of media through a singular connection. ### Application-Level Management Cloudflare Realtime delegates the responsibility of state management and participant tracking to the application layer. Developers are empowered to design their logic for handling events such as participant joins or media stream updates, offering flexibility to create tailored experiences in applications. ## Getting Started with Cloudflare Realtime Integrating Cloudflare Realtime into your application promises a straightforward and efficient process, removing the hurdles of regional scalability and server management so you can focus on creating engaging real-time experiences for users worldwide. --- title: Changelog · Cloudflare Realtime docs description: Subscribe to RSS lastUpdated: 2025-04-08T20:01:03.000Z chatbotDeprioritize: false source_url: html: https://developers.cloudflare.com/realtime/changelog/ md: https://developers.cloudflare.com/realtime/changelog/index.md --- [Subscribe to RSS](https://developers.cloudflare.com/realtime/changelog/index.xml) ## 2024-09-25 **TURN service is generally available (GA)** Cloudflare Realtime TURN service is generally available and helps address common challenges with real-time communication. For more information, refer to the [blog post](https://blog.cloudflare.com/webrtc-turn-using-anycast/) or [TURN documentation](https://developers.cloudflare.com/realtime/turn/). ## 2024-04-04 **Orange Meets availability** Orange Meets, Cloudflare's internal video conferencing app, is open source and available for use from [Github](https://github.com/cloudflare/orange?cf_target_id=40DF7321015C5928F9359DD01303E8C2). ## 2024-04-04 **Cloudflare Realtime open beta** Cloudflare Realtime is in open beta and available from the Cloudflare Dashboard. ## 2022-09-27 **Cloudflare Realtime closed beta** Cloudflare Realtime is available as a closed beta for users who request an invitation. Refer to the [blog post](https://blog.cloudflare.com/announcing-cloudflare-calls/) for more information. --- title: DataChannels · Cloudflare Realtime docs description: DataChannels are a way to send arbitrary data, not just audio or video data, between client in low latency. DataChannels are useful for scenarios like chat, game state, or any other data that doesn't need to be encoded as audio or video but still needs to be sent between clients in real time. lastUpdated: 2025-04-08T20:01:03.000Z chatbotDeprioritize: false source_url: html: https://developers.cloudflare.com/realtime/datachannels/ md: https://developers.cloudflare.com/realtime/datachannels/index.md --- DataChannels are a way to send arbitrary data, not just audio or video data, between client in low latency. DataChannels are useful for scenarios like chat, game state, or any other data that doesn't need to be encoded as audio or video but still needs to be sent between clients in real time. While it is possible to send audio and video over DataChannels, it's not optimal because audio and video transfer includes media specific optimizations that DataChannels do not have, such as simulcast, forward error correction, better caching across the Cloudflare network for retransmissions. ```mermaid graph LR A[Publisher] -->|Arbitrary data| B[Cloudflare Realtime SFU] B -->|Arbitrary data| C@{ shape: procs, label: "Subscribers"} ``` DataChannels on Cloudflare Realtime can scale up to many subscribers per publisher, there is no limit to the number of subscribers per publisher. ### How to use DataChannels 1. Create two Realtime sessions, one for the publisher and one for the subscribers. 2. Create a DataChannel by calling /datachannels/new with the location set to "local" and the dataChannelName set to the name of the DataChannel. 3. Create a DataChannel by calling /datachannels/new with the location set to "remote" and the sessionId set to the sessionId of the publisher. 4. Use the DataChannel to send data from the publisher to the subscribers. ### Unidirectional DataChannels Cloudflare Realtime SFU DataChannels are one way only. This means that you can only send data from the publisher to the subscribers. Subscribers cannot send data back to the publisher. While regular MediaStream WebRTC DataChannels are bidirectional, this introduces a problem for Cloudflare Realtime because the SFU does not know which session to send the data back to. This is especially problematic for scenarios where you have multiple subscribers and you want to send data from the publisher to all subscribers at scale, such as distributing game score updates to all players in a multiplayer game. To send data in a bidirectional way, you can use two DataChannels, one for sending data from the publisher to the subscribers and one for sending data the opposite direction. ## Example An example of DataChannels in action can be found in the [Realtime Examples github repo](https://github.com/cloudflare/calls-examples/tree/main/echo-datachannels). --- title: Demos · Cloudflare Realtime docs description: Learn how you can use Realtime within your existing architecture. lastUpdated: 2025-04-08T20:01:03.000Z chatbotDeprioritize: false source_url: html: https://developers.cloudflare.com/realtime/demos/ md: https://developers.cloudflare.com/realtime/demos/index.md --- Learn how you can use Realtime within your existing architecture. ## Demos Explore the following demo applications for Realtime. * [Realtime Echo Demo:](https://github.com/cloudflare/calls-examples/tree/main/echo) Demonstrates a local stream alongside a remote echo stream. * [Orange Meets:](https://github.com/cloudflare/orange) Orange Meets is a demo WebRTC application built using Cloudflare Realtime. * [WHIP-WHEP Server:](https://github.com/cloudflare/calls-examples/tree/main/whip-whep-server) WHIP and WHEP server implemented on top of Realtime API. * [Realtime DataChannel Test:](https://github.com/cloudflare/calls-examples/tree/main/echo-datachannels) This example establishes two datachannels, one publishes data and the other one subscribes, the test measures how fast a message travels to and from the server. --- title: Example architecture · Cloudflare Realtime docs lastUpdated: 2025-04-08T20:01:03.000Z chatbotDeprioritize: false source_url: html: https://developers.cloudflare.com/realtime/example-architecture/ md: https://developers.cloudflare.com/realtime/example-architecture/index.md --- ![Example Architecture](https://developers.cloudflare.com/_astro/video-calling-application.CIYa-lzM_e7Gu.webp) 1. Clients connect to the backend service 2. Backend service manages the relationship between the clients and the tracks they should subscribe to 3. Backend service contacts the Cloudflare Realtime API to pass the SDP from the clients to establish the WebRTC connection. 4. Realtime API relays back the Realtime API SDP reply and renegotiation messages. 5. If desired, headless clients can be used to record the content from other clients or publish content. 6. Admin manages the rooms and room members. --- title: Quickstart guide · Cloudflare Realtime docs description: >- Every Realtime App is a separate environment, so you can make one for development, staging and production versions for your product. Either using Dashboard, or the API create a Realtime App. When you create a Realtime App, you will get: lastUpdated: 2025-05-29T18:16:56.000Z chatbotDeprioritize: false source_url: html: https://developers.cloudflare.com/realtime/get-started/ md: https://developers.cloudflare.com/realtime/get-started/index.md --- Before you get started: You must first [create a Cloudflare account](https://developers.cloudflare.com/fundamentals/account/create-account/). ## Create your first app Every Realtime App is a separate environment, so you can make one for development, staging and production versions for your product. Either using [Dashboard](https://dash.cloudflare.com/?to=/:account/calls), or the [API](https://developers.cloudflare.com/api/resources/calls/subresources/sfu/methods/create/) create a Realtime App. When you create a Realtime App, you will get: * App ID * App Secret These two combined will allow you to make API Realtime from your backend server to Realtime. --- title: Connection API · Cloudflare Realtime docs description: Cloudflare Realtime simplifies the management of peer connections and media tracks through HTTPS API endpoints. These endpoints allow developers to efficiently manage sessions, add or remove tracks, and gather session information. lastUpdated: 2025-04-08T20:01:03.000Z chatbotDeprioritize: false source_url: html: https://developers.cloudflare.com/realtime/https-api/ md: https://developers.cloudflare.com/realtime/https-api/index.md --- Cloudflare Realtime simplifies the management of peer connections and media tracks through HTTPS API endpoints. These endpoints allow developers to efficiently manage sessions, add or remove tracks, and gather session information. ## API Endpoints * **Create a New Session**: Initiates a new session on Cloudflare Realtime, which can be modified with other endpoints below. * `POST /apps/{appId}/sessions/new` * **Add a New Track**: Adds a media track (audio or video) to an existing session. * `POST /apps/{appId}/sessions/{sessionId}/tracks/new` * **Renegotiate a Session**: Updates the session's negotiation state to accommodate new tracks or changes in the existing ones. * `PUT /apps/{appId}/sessions/{sessionId}/renegotiate` * **Close a Track**: Removes a specified track from the session. * `PUT /apps/{appId}/sessions/{sessionId}/tracks/close` * **Retrieve Session Information**: Fetches detailed information about a specific session. * `GET /apps/{appId}/sessions/{sessionId}` [View full API and schema (OpenAPI format)](https://developers.cloudflare.com/realtime/static/calls-api-2024-05-21.yaml) ## Handling Secrets It is vital to manage App ID and its secret securely. While track and session IDs can be public, they should be protected to prevent misuse. An attacker could exploit these IDs to disrupt service if your backend server does not authenticate request origins properly, for example by sending requests to close tracks on sessions other than their own. Ensuring the security and authenticity of requests to your backend server is crucial for maintaining the integrity of your application. ## Using STUN and TURN Servers Cloudflare Realtime is designed to operate efficiently without the need for TURN servers in most scenarios, as Cloudflare exposes a publicly routable IP address for Realtime. However, integrating a STUN server can be necessary for facilitating peer discovery and connectivity. * **Cloudflare STUN Server**: `stun.cloudflare.com:3478` Utilizing Cloudflare's STUN server can help the connection process for Realtime applications. ## Lifecycle of a Simple Session This section provides an overview of the typical lifecycle of a simple session, focusing on audio-only applications. It illustrates how clients are notified by the backend server as new remote clients join or leave, incorporating video would introduce additional tracks and considerations into the session. ```mermaid sequenceDiagram participant WA as WebRTC Agent participant BS as Backend Server participant CA as Realtime API Note over BS: Client Joins WA->>BS: Request BS->>CA: POST /sessions/new CA->>BS: newSessionResponse BS->>WA: Response WA->>BS: Request BS->>CA: POST /sessions//tracks/new (Offer) CA->>BS: newTracksResponse (Answer) BS->>WA: Response WA-->>CA: ICE Connectivity Check Note over WA: iceconnectionstatechange (connected) WA-->>CA: DTLS Handshake Note over WA: connectionstatechange (connected) WA<<->>CA: *Media Flow* Note over BS: Remote Client Joins WA->>BS: Request BS->>CA: POST /sessions//tracks/new CA->>BS: newTracksResponse (Offer) BS->>WA: Response WA->>BS: Request BS->>CA: PUT /sessions//renegotiate (Answer) CA->>BS: OK BS->>WA: Response Note over BS: Remote Client Leaves WA->>BS: Request BS->>CA: PUT /sessions//tracks/close CA->>BS: closeTracksResponse BS->>WA: Response Note over BS: Client Leaves WA->>BS: Request BS->>CA: PUT /sessions//tracks/close CA->>BS: closeTracksResponse BS->>WA: Response ``` --- title: Introduction · Cloudflare Realtime docs description: Cloudflare Realtime can be used to add realtime audio, video and data into your applications. Cloudflare Realtime uses WebRTC, which is the lowest latency way to communicate across a broad range of platforms like browsers, mobile, and native apps. lastUpdated: 2025-04-08T20:01:03.000Z chatbotDeprioritize: false source_url: html: https://developers.cloudflare.com/realtime/introduction/ md: https://developers.cloudflare.com/realtime/introduction/index.md --- Cloudflare Realtime can be used to add realtime audio, video and data into your applications. Cloudflare Realtime uses WebRTC, which is the lowest latency way to communicate across a broad range of platforms like browsers, mobile, and native apps. Realtime integrates with your backend and frontend application to add realtime functionality. ## Why Cloudflare Realtime exists * **It is difficult to scale WebRTC**: Many struggle scaling WebRTC servers. Operators run into issues about how many users can be in the same "room" or want to build unique solutions that do not fit into the current concepts in high level APIs. * **High egress costs**: WebRTC is expensive to use as managed solutions charge a high premium on cloud egress and running your own servers incur system administration and scaling overhead. Cloudflare already has 300+ locations with upwards of 1,000 servers in some locations. Cloudflare Realtime scales easily on top of this architecture and can offer the lowest WebRTC usage costs. * **WebRTC is growing**: Developers are realizing that WebRTC is not just for video conferencing. WebRTC is supported on many platforms, it is mature and well understood. ## What makes Cloudflare Realtime unique * **Unopinionated**: Cloudflare Realtime does not offer a SDK. It instead allows you to access raw WebRTC to solve unique problems that might not fit into existing concepts. The API is deliberately simple. * **No rooms**: Unlike other WebRTC products, Cloudflare Realtime lets you be in charge of each track (audio/video/data) instead of offering abstractions such as rooms. You define the presence protocol on top of simple pub/sub. Each end user can publish and subscribe to audio/video/data tracks as they wish. * **No lock-in**: You can use Cloudflare Realtime to solve scalability issues with your SFU. You can use in combination with peer-to-peer architecture. You can use Cloudflare Realtime standalone. To what extent you use Cloudflare Realtime is up to you. ## What exactly does Cloudflare Realtime do? * **SFU**: Realtime is a special kind of pub/sub server that is good at forwarding media data to clients that subscribe to certain data. Each client connects to Cloudflare Realtime via WebRTC and either sends data, receives data or both using WebRTC. This can be audio/video tracks or DataChannels. * **It scales**: All Cloudflare servers act as a single server so millions of WebRTC clients can connect to Cloudflare Realtime. Each can send data, receive data or both with other clients. ## How most developers get started 1. Get started with the echo example, which you can download from the Cloudflare dashboard when you create a Realtime App or from [demos](https://developers.cloudflare.com/realtime/demos/). This will show you how to send and receive audio and video. 2. Understand how you can manipulate who can receive what media by passing around session and track ids. Remember, you control who receives what media. Each media track is represented by a unique ID. It is your responsibility to save and distribute this ID. Realtime is not a presence protocol Realtime does not know what a room is. It only knows media tracks. It is up to you to make a room by saving who is in a room along with track IDs that unique identify media tracks. If each participant publishes their audio/video, and receives audio/video from each other, you have got yourself a video conference! 1. Create an app where you manage each connection to Cloudflare Realtime and the track IDs created by each connection. You can use any tool to save and share tracks. Check out the example apps at [demos](https://developers.cloudflare.com/realtime/demos/), such as [Orange Meets](https://github.com/cloudflare/orange), which is a full-fledged video conferencing app that uses [Workers Durable Objects](https://developers.cloudflare.com/durable-objects/) to keep track of track IDs. --- title: Limits, timeouts and quotas · Cloudflare Realtime docs description: Understanding the limits and timeouts of Cloudflare Realtime is crucial for optimizing the performance and reliability of your applications. This section outlines the key constraints and behaviors you should be aware of when integrating Cloudflare Realtime into your app. lastUpdated: 2025-04-08T20:01:03.000Z chatbotDeprioritize: false source_url: html: https://developers.cloudflare.com/realtime/limits/ md: https://developers.cloudflare.com/realtime/limits/index.md --- Understanding the limits and timeouts of Cloudflare Realtime is crucial for optimizing the performance and reliability of your applications. This section outlines the key constraints and behaviors you should be aware of when integrating Cloudflare Realtime into your app. ## Free * Each account gets 1,000GB/month of data transfer from Cloudflare to your client for free. * Data transfer from your client to Cloudflare is always free of charge. ## Limits * **API Realtime per Session**: You can make up to 50 API calls per second for each session. There is no ratelimit on a App basis, just sessions. * **Tracks per API Call**: Up to 64 tracks can be added with a single API call. If you need to add more tracks to a session, you should distribute them across multiple API calls. * **Tracks per Session**: There's no upper limit to the number of tracks a session can contain, the practical limit is governed by your connection's bandwidth to and from Cloudflare. ## Inactivity Timeout * **Track Timeout**: Tracks will automatically timeout and be garbage collected after 30 seconds of inactivity, where inactivity is defined as no media packets being received by Cloudflare. This mechanism ensures efficient use of resources and session cleanliness across all Sessions that use a track. ## PeerConnection Requirements * **Session State**: For any operation on a session (e.g., pulling or pushing tracks), the PeerConnection state must be `connected`. Operations will block for up to 5 seconds awaiting this state before timing out. This ensures that only active and viable sessions are engaged in media transmission. ## Handling Connectivity Issues * **Internet Connectivity Considerations**: The potential for internet connectivity loss between the client and Cloudflare is an operational reality that must be addressed. Implementing a detection and reconnection strategy is recommended to maintain session continuity. This could involve periodic 'heartbeat' signals to your backend server to monitor connectivity status. Upon detecting connectivity issues, automatically attempting to reconnect and establish a new session is advised. Sessions and tracks will remain available for reuse for 30 seconds before timing out, providing a brief window for reconnection attempts. Adhering to these limits and understanding the timeout behaviors will help ensure that your applications remain responsive and stable while providing a seamless user experience. --- title: Pricing · Cloudflare Realtime docs description: Cloudflare Realtime billing is based on data sent from Cloudflare edge to your application. lastUpdated: 2025-04-08T20:01:03.000Z chatbotDeprioritize: false source_url: html: https://developers.cloudflare.com/realtime/pricing/ md: https://developers.cloudflare.com/realtime/pricing/index.md --- Cloudflare Realtime billing is based on data sent from Cloudflare edge to your application. Cloudflare Realtime SFU and TURN services cost $0.05 per GB of data egress. There is a free tier of 1,000 GB before any charges start. This free tier includes usage from both SFU and TURN services, not two independent free tiers. Cloudflare Realtime billing appears as a single line item on your Cloudflare bill, covering both SFU and TURN. Traffic between Cloudflare Realtime TURN and Cloudflare Realtime SFU or Cloudflare Stream (WHIP/WHEP) does not get double charged, so if you are using both SFU and TURN at the same time, you will get charged for only one. ### TURN Please see the [TURN FAQ page](https://developers.cloudflare.com/realtime/turn/faq), where there is additional information on speficially which traffic path from RFC8656 is measured and counts towards billing. ### SFU Only traffic originating from Cloudflare towards clients incurs charges. Traffic pushed to Cloudflare incurs no charge even if there is no client pulling same traffic from Cloudflare. --- title: Sessions and Tracks · Cloudflare Realtime docs description: "Cloudflare Realtime offers a simple yet powerful framework for building real-time experiences. At the core of this system are three key concepts: Applications, Sessions and Tracks. Familiarizing yourself with these concepts is crucial for using Realtime." lastUpdated: 2025-04-08T20:01:03.000Z chatbotDeprioritize: false source_url: html: https://developers.cloudflare.com/realtime/sessions-tracks/ md: https://developers.cloudflare.com/realtime/sessions-tracks/index.md --- Cloudflare Realtime offers a simple yet powerful framework for building real-time experiences. At the core of this system are three key concepts: **Applications**, **Sessions** and **Tracks**. Familiarizing yourself with these concepts is crucial for using Realtime. ## Application A Realtime Application is an environment within different Sessions and Tracks can interact. Examples of this could be production, staging or different environments where you'd want separation between Sessions and Tracks. Cloudflare Realtime usage can be queried at Application, Session or Track level. ## Sessions A **Session** in Cloudflare Realtime correlates directly to a WebRTC PeerConnection. It represents the establishment of a communication channel between a client and the nearest Cloudflare data center, as determined by Cloudflare's anycast routing. Typically, a client will maintain a single Session, encompassing all communications between the client and Cloudflare. * **One-to-One Mapping with PeerConnection**: Each Session is a direct representation of a WebRTC PeerConnection, facilitating real-time media data transfer. * **Anycast Routing**: The client connects to the closest Cloudflare data center, optimizing latency and performance. * **Unified Communication Channel**: A single Session can handle all types of communication between a client and Cloudflare, ensuring streamlined data flow. ## Tracks Within a Session, there can be one or more **Tracks**. * **Tracks map to MediaStreamTrack**: Tracks align with the MediaStreamTrack concept, facilitating audio, video, or data transmission. * **Globally Unique Ids**: When you push a track to Cloudflare, it is assigned a unique ID, which can then be used to pull the track into another session elsewhere. * **Available globally**: The ability to push and pull tracks is central to what makes Realtime a versatile tool for real-time applications. Each track is available globally to be retrieved from any Session within an App. ## Realtime as a Programmable "Switchboard" The analogy of a switchboard is apt for understanding Realtime. Historically, switchboard operators connected calls by manually plugging in jacks. Similarly, Realtime allows for the dynamic routing of media streams, acting as a programmable switchboard for modern real-time communication. ## Beyond "Rooms", "Users", and "Participants" While many SFUs utilize concepts like "rooms" to manage media streams among users, this approach has scalability and flexibility limitations. Cloudflare Realtime opts for a more granular and flexible model with Sessions and Tracks, enabling a wide range of use cases: * Large-scale remote events, like 'fireside chats' with thousands of participants. * Interactive conversations with the ability to bring audience members "on stage." * Educational applications where an instructor can present to multiple virtual classrooms simultaneously. ### Presence Protocol vs. Media Flow Realtime distinguishes between the presence protocol and media flow, allowing for scalability and flexibility in real-time applications. This separation enables developers to craft tailored experiences, from intimate calls to massive, low-latency broadcasts. --- title: Simulcast · Cloudflare Realtime docs description: Simulcast is a feature of WebRTC that allows a publisher to send multiple video streams of the same media at different qualities. For example, this is useful for scenarios where you want to send a high quality stream for desktop users and a lower quality stream for mobile users. lastUpdated: 2025-06-03T15:50:12.000Z chatbotDeprioritize: false source_url: html: https://developers.cloudflare.com/realtime/simulcast/ md: https://developers.cloudflare.com/realtime/simulcast/index.md --- Simulcast is a feature of WebRTC that allows a publisher to send multiple video streams of the same media at different qualities. For example, this is useful for scenarios where you want to send a high quality stream for desktop users and a lower quality stream for mobile users. ```mermaid graph LR A[Publisher] -->|Low quality| B[Cloudflare Realtime SFU] A -->|Medium quality| B A -->|High quality| B B -->|Low quality| C@{ shape: procs, label: "Subscribers"} B -->|Medium quality| D@{ shape: procs, label: "Subscribers"} B -->|High quality| E@{ shape: procs, label: "Subscribers"} ``` ### How it works Simulcast in WebRTC allows a single video source, like a camera or screen share, to be encoded at multiple quality levels and sent simultaneously, which is beneficial for subscribers with varying network conditions and device capabilities. The video source is encoded into multiple streams, each identified by RIDs (RTP Stream Identifiers) for different quality levels, such as low, medium, and high. These simulcast streams are described in the SDP you send to Cloudflare Realtime SFU. It's the responsibility of the Cloudflare Realtime SFU to ensure that the appropriate quality stream is delivered to each subscriber based on their network conditions and device capabilities. Cloudflare Realtime SFU will automatically handle the simulcast configuration based on the SDP you send to it from the publisher. The SFU will then automatically switch between the different quality levels based on the subscriber's network conditions, or the qaulity level can be controlled manually via the API. You can control the quality switching behavior using the `simulcast` configuration object when you send an API call to start pulling a remote track. ### Quality Control The `simulcast` configuration object in the API call when you start pulling a remote track allows you to specify: * `preferredRid`: The preferred quality level for the video stream (RID for the simulcast stream. [RIDs can be specified by the publisher.](https://developer.mozilla.org/en-US/docs/Web/API/RTCRtpSender/setParameters#encodings)) * `priorityOrdering`: Controls how the SFU handles bandwidth constraints. * `none`: Keep sending the preferred layer, set via the preferredRid, even if there's not enough bandwidth. * `asciibetical`: Use alphabetical ordering (a-z) to determine priority, where 'a' is most desirable and 'z' is least desirable. * `ridNotAvailable`: Controls what happens when the preferred RID is no longer available, for example when the publisher stops sending it. * `none`: Do nothing. * `asciibetical`: Switch to the next available RID based on the priority ordering, where 'a' is most desirable and 'z' is least desirable. You will likely want to order the asciibetical RIDs based on your desired metric, such as higest resoltion to lowest or highest bandwidth to lowest. ### Bandwidth Management across media tracks Cloudflare Realtime treats all media tracks equally at the transport level. For example, if you have multiple video tracks (cameras, screen shares, etc.), they all have equal priority for bandwidth allocation. This means: 1. Each track's simulcast configuration is handled independently 2. The SFU performs automatic bandwidth estimation and layer switching based on network conditions independently for each track ### Layer Switching Behavior When a layer switch is requested (through updating `preferredRid`) with the `/tracks/update` API: 1. The SFU will automatically generate a Full Intraframe Request (FIR) 2. PLI generation is debounced to prevent excessive requests ### Publisher Configuration For publishers (local tracks), you only need to include the simulcast attributes in your SDP. The SFU will automatically handle the simulcast configuration based on the SDP. For example, the SDP should contain a section like this: ```txt a=simulcast:send f;h;q a=rid:f send a=rid:h send a=rid:q send ``` If the publisher endpoint is a browser you can include these by specifying `sendEncodings` when creating the transceiver like this: ```js const transceiver = peerConnection.addTransceiver(track, { direction: "sendonly", sendEncodings: [ { scaleResolutionDownBy: 1, rid: "f" }, { scaleResolutionDownBy: 2, rid: "h" }, { scaleResolutionDownBy: 4, rid: "q" } ] }); ``` ## Example Here's an example of how to use simulcast with Cloudflare Realtime: 1. Create a new local track with simulcast configuration. There should be a section in the SDP with `a=simulcast:send`. 2. Use the [Cloudflare Realtime API](https://developers.cloudflare.com/realtime/https-api) to push this local track, by calling the /tracks/new endpoint. 3. Use the [Cloudflare Realtime API](https://developers.cloudflare.com/realtime/https-api) to start pulling a remote track (from another browser or device), by calling the /tracks/new endpoint and specifying the `simulcast` configuration object along with the remote track ID you get from step 2. For more examples, check out the [Realtime Examples GitHub repository](https://github.com/cloudflare/calls-examples/tree/main/echo-simulcast). --- title: TURN Service · Cloudflare Realtime docs description: Separately from the SFU, Realtime offers a managed TURN service. TURN acts as a relay point for traffic between WebRTC clients like the browser and SFUs, particularly in scenarios where direct communication is obstructed by NATs or firewalls. TURN maintains an allocation of public IP addresses and ports for each session, ensuring connectivity even in restrictive network environments. lastUpdated: 2025-05-26T07:37:09.000Z chatbotDeprioritize: false source_url: html: https://developers.cloudflare.com/realtime/turn/ md: https://developers.cloudflare.com/realtime/turn/index.md --- Separately from the SFU, Realtime offers a managed TURN service. TURN acts as a relay point for traffic between WebRTC clients like the browser and SFUs, particularly in scenarios where direct communication is obstructed by NATs or firewalls. TURN maintains an allocation of public IP addresses and ports for each session, ensuring connectivity even in restrictive network environments. Using Cloudflare Realtime TURN service is available free of charge when used together with the Realtime SFU. Otherwise, it costs $0.05/real-time GB outbound from Cloudflare to the TURN client. ## Service address and ports | Protocol | Primary address | Primary port | Alternate port | | - | - | - | - | | STUN over UDP | stun.cloudflare.com | 3478/udp | 53/udp | | TURN over UDP | turn.cloudflare.com | 3478/udp | 53 udp | | TURN over TCP | turn.cloudflare.com | 3478/tcp | 80/tcp | | TURN over TLS | turn.cloudflare.com | 5349/tcp | 443/tcp | Note Use of alternate port 53 only by itself is not recommended. Port 53 is blocked by many ISPs, and by popular browsers such as [Chrome](https://chromium.googlesource.com/chromium/src.git/+/refs/heads/master/net/base/port_util.cc#44) and [Firefox](https://github.com/mozilla/gecko-dev/blob/master/netwerk/base/nsIOService.cpp#L132). It is useful only in certain specific scenerios. ## Regions Realtime TURN service is available in every Cloudflare data center. When a client tries to connect to `turn.cloudflare.com`, it *automatically* connects to the Cloudflare location closest to them. We achieve this using anycast routing. To learn more about the architecture that makes this possible, read this [technical deep-dive about Realtime](https://blog.cloudflare.com/cloudflare-calls-anycast-webrtc). ## Protocols and Ciphers for TURN over TLS TLS versions supported include TLS 1.1, TLS 1.2, and TLS 1.3. | OpenSSL Name | TLS 1.1 | TLS 1.2 | TLS 1.3 | | - | - | - | - | | AEAD-AES128-GCM-SHA256 | No | No | ✅ | | AEAD-AES256-GCM-SHA384 | No | No | ✅ | | AEAD-CHACHA20-POLY1305-SHA256 | No | No | ✅ | | ECDHE-ECDSA-AES128-GCM-SHA256 | No | ✅ | No | | ECDHE-RSA-AES128-GCM-SHA256 | No | ✅ | No | | ECDHE-RSA-AES128-SHA | ✅ | ✅ | No | | AES128-GCM-SHA256 | No | ✅ | No | | AES128-SHA | ✅ | ✅ | No | | AES256-SHA | ✅ | ✅ | No | ## MTU There is no specific MTU limit for Cloudflare Realtime TURN service. ## Limits Cloudflare Realtime TURN service places limits on: * Unique IP address you can communicate with per relay allocation (>5 new IP/sec) * Packet rate outbound and inbound to the relay allocation (>5-10 kpps) * Data rate outbound and inbound to the relay allocation (>50-100 Mbps) Limits apply to each TURN allocation independently Each limit is for a single TURN allocation (single TURN user) and not account wide. Same limit will apply to each user regardless of the number of unique TURN users. These limits are suitable for high-demand applications and also have burst rates higher than those documented above. Hitting these limits will result in packet drops. --- title: 404 - Page Not Found · Cloudflare Stream docs chatbotDeprioritize: false source_url: html: https://developers.cloudflare.com/stream/404/ md: https://developers.cloudflare.com/stream/404/index.md --- # 404 Check the URL, try using our [search](https://developers.cloudflare.com/search/) or try our LLM-friendly [llms.txt directory](https://developers.cloudflare.com/llms.txt). --- title: Changelog · Cloudflare Stream docs description: Subscribe to RSS lastUpdated: 2025-02-13T19:35:19.000Z chatbotDeprioritize: false source_url: html: https://developers.cloudflare.com/stream/changelog/ md: https://developers.cloudflare.com/stream/changelog/index.md --- [Subscribe to RSS](https://developers.cloudflare.com/stream/changelog/index.xml) ## 2025-03-12 **Stream Live WebRTC WHIP/WHEP Upgrades** Stream Live WHIP/WHEP will be progressively migrated to a new implementation powered by Cloudflare Realtime (Calls) starting Thursday 2025-03-13. No API or integration changes will be required as part of this upgrade. Customers can expect an improved playback experience. Otherwise, this should be a transparent change, although some error handling cases and status reporting may have changed. For more information review the [Stream Live WebRTC beta](https://developers.cloudflare.com/stream/webrtc-beta/) documentation. ## 2025-02-10 **Stream Player ad support adjustments for Google Ad Exchange Verification** Adjustments have been made to the Stream player UI when playing advertisements called by a customer-provided VAST or VMAP `ad-url` argument: A small progress bar has been added along the bottom of the player, and the shadow behind player controls has been reduced. These changes have been approved for use with Google Ad Exchange. This only impacts customers using the built-in Stream player and calling their own advertisements; Stream never shows ads by default. For more information, refer to [Using the Stream Player](https://developers.cloudflare.com/stream/viewing-videos/using-the-stream-player/#basic-options). ## 2025-01-30 **Expanded Language Support for Generated Captions** Eleven new languages are now supported for transcription when using [generated captions](https://developers.cloudflare.com/stream/edit-videos/adding-captions/#generate-a-caption), available for free for video stored in Stream. ## 2024-08-15 **Full HD encoding for Portrait Videos** Stream now supports full HD encoding for portrait/vertical videos. Videos with a height greater than their width will now be constrained and prepared for adaptive bitrate renditions based on their width. No changes are required to benefit from this update. For more information, refer to [the announcement](https://blog.cloudflare.com/introducing-high-definition-portrait-video-support-for-cloudflare-stream). ## 2024-08-09 **Hide Viewer Count in Live Streams** A new property `hideLiveViewerCount` has been added to Live Inputs to block access to the count of viewers in a live stream and remove it from the player. For more information, refer to [Start a Live Stream](https://developers.cloudflare.com/stream/stream-live/start-stream-live/). ## 2024-07-23 **New Live Webhooks for Error States** Stream has added a new notification event for Live broadcasts to alert (via email or webhook) on various error conditions including unsupported codecs, bad GOP/keyframe interval, or quota exhaustion. When creating/editing a notification, subscribe to `live_input.errored` to receive the new event type. Existing notification subscriptions will not be changed automatically. For more information, refer to [Receive Live Webhooks](https://developers.cloudflare.com/stream/stream-live/webhooks/). ## 2024-06-20 **Generated Captions to Open beta** Stream has introduced automatically generated captions to open beta for all subscribers at no additional cost. While in beta, only English is supported and videos must be less than 2 hours. For more information, refer to the [product announcement and deep dive](https://blog.cloudflare.com/stream-automatic-captions-with-ai) or refer to the [captions documentation](https://developers.cloudflare.com/stream/edit-videos/adding-captions/) to get started. ## 2024-06-11 **Updated response codes on requests for errored videos** Stream will now return HTTP error status 424 (failed dependency) when requesting segments, manifests, thumbnails, downloads, or subtitles for videos that are in an errored state. Previously, Stream would return one of several 5xx codes for requests like this. ## 2024-04-11 **Live Instant Clipping for live broadcasts and recordings** Clipping is now available in open beta for live broadcasts and recordings. For more information, refer to [Live instant clipping](https://developers.cloudflare.com/stream/stream-live/live-instant-clipping/) documentation. ## 2024-02-16 **Tonemapping improvements for HDR content** In certain cases, videos uploaded with an HDR colorspace (such as footage from certain mobile devices) appeared washed out or desaturated when played back. This issue is resolved for new uploads. ## 2023-11-07 **HLS improvements for on-demand TS output** HLS output from Cloudflare Stream on-demand videos that use Transport Stream file format now includes a 10 second offset to timestamps. This will have no impact on most customers. A small percentage of customers will see improved playback stability. Caption files were also adjusted accordingly. ## 2023-10-10 **SRT Audio Improvements** In some cases, playback via SRT protocol was missing an audio track regardless of existence of audio in the broadcast. This issue is now resolved. ## 2023-09-25 **LL-HLS Beta** Low-Latency HTTP Live Streaming (LL-HLS) is now in open beta. Enable LL-HLS on your [live input](https://developers.cloudflare.com/stream/stream-live/start-stream-live/) for automatic low-latency playback using the Stream built-in player where supported. For more information, refer to [live input](https://developers.cloudflare.com/stream/stream-live/start-stream-live/) and [custom player](https://developers.cloudflare.com/stream/viewing-videos/using-own-player/) docs. ## 2023-08-08 **Scheduled Deletion** Stream now supports adding a scheduled deletion date to new and existing videos. Live inputs support deletion policies for automatic recording deletion. For more, refer to the [video on demand](https://developers.cloudflare.com/stream/uploading-videos/) or [live input](https://developers.cloudflare.com/stream/stream-live/) docs. ## 2023-05-16 **Multiple audio tracks now generally available** Stream supports adding multiple audio tracks to an existing video. For more, refer to the [documentation](https://developers.cloudflare.com/stream/edit-videos/adding-additional-audio-tracks/) to get started. ## 2023-04-26 **Player Enhancement Properties** Cloudflare Stream now supports player enhancement properties. With player enhancements, you can modify your video player to incorporate elements of your branding, such as your logo, and customize additional options to present to your viewers. For more, refer to the [documentation](https://developers.cloudflare.com/stream/edit-videos/player-enhancements/) to get started. ## 2023-03-21 **Limits for downloadable MP4s for live recordings** Previously, generating a download for a live recording exceeding four hours resulted in failure. To fix the issue, now video downloads are only available for live recordings under four hours. Live recordings exceeding four hours can still be played but cannot be downloaded. ## 2023-01-04 **Earlier detection (and rejection) of non-video uploads** Cloudflare Stream now detects non-video content on upload using [the POST API](https://developers.cloudflare.com/stream/uploading-videos/upload-video-file/) and returns a 400 Bad Request HTTP error with code `10059`. Previously, if you or one of your users attempted to upload a file that is not a video (ex: an image), the request to upload would appear successful, but then fail to be encoded later on. With this change, Stream responds to the upload request with an error, allowing you to give users immediate feedback if they attempt to upload non-video content. ## 2022-12-08 **Faster mp4 downloads of live recordings** Generating MP4 downloads of live stream recordings is now significantly faster. For more, refer to [the docs](https://developers.cloudflare.com/stream/stream-live/download-stream-live-videos/). ## 2022-11-29 **Multiple audio tracks (closed beta)** Stream now supports adding multiple audio tracks to an existing video upload. This allows you to: * Provide viewers with audio tracks in multiple languages * Provide dubbed audio tracks, or audio commentary tracks (ex: Director’s Commentary) * Allow your users to customize the customize the audio mix, by providing separate audio tracks for music, speech or other audio tracks. * Provide Audio Description tracks to ensure your content is accessible. ([WCAG 2.0 Guideline 1.2 1](https://www.w3.org/TR/WCAG20/#media-equiv-audio-desc-only)) To request an invite to the beta, refer to [this post](https://community.cloudflare.com/t/new-in-beta-support-for-multiple-audio-tracks/439629). ## 2022-11-22 **VP9 support for WebRTC live streams (beta)** Cloudflare Stream now supports [VP9](https://developers.google.com/media/vp9) when streaming using [WebRTC (WHIP)](https://developers.cloudflare.com/stream/webrtc-beta/), currently in beta. ## 2022-11-08 **Reduced time to start WebRTC streaming and playback with Trickle ICE** Cloudflare Stream's [WHIP](https://datatracker.ietf.org/doc/draft-ietf-wish-whip/) and [WHEP](https://www.ietf.org/archive/id/draft-murillo-whep-01.html) implementations now support [Trickle ICE](https://datatracker.ietf.org/doc/rfc8838/), reducing the time it takes to initialize WebRTC connections, and increasing compatibility with WHIP and WHEP clients. For more, refer to [the docs](https://developers.cloudflare.com/stream/webrtc-beta/). ## 2022-11-07 **Deprecating the 'per-video' Analytics API** The “per-video” analytics API is being deprecated. If you still use this API, you will need to switch to using the [GraphQL Analytics API](https://developers.cloudflare.com/stream/getting-analytics/fetching-bulk-analytics/) by February 1, 2023. After this date, the per-video analytics API will be no longer available. The GraphQL Analytics API provides the same functionality and more, with additional filters and metrics, as well as the ability to fetch data about multiple videos in a single request. Queries are faster, more reliable, and built on a shared analytics system that you can [use across many Cloudflare products](https://developers.cloudflare.com/analytics/graphql-api/features/data-sets/). For more about this change and how to migrate existing API queries, refer to [this post](https://community.cloudflare.com/t/migrate-to-the-stream-graphql-analytics-api-by-feb-1st-2023/433252) and the [GraphQL Analytics API docs](https://developers.cloudflare.com/stream/getting-analytics/fetching-bulk-analytics/). ## 2022-11-01 **Create an unlimited number of live inputs** Cloudflare Stream now has no limit on the number of [live inputs](https://developers.cloudflare.com/api/resources/stream/subresources/live_inputs/methods/get/) you can create. Stream is designed to allow your end-users to go live — live inputs can be created quickly on-demand via a single API request for each of user of your platform or app. For more on creating and managing live inputs, get started with the [docs](https://developers.cloudflare.com/stream/stream-live/). ## 2022-10-20 **More accurate bandwidth estimates for live video playback** When playing live video, Cloudflare Stream now provides significantly more accurate estimates of the bandwidth needs of each quality level to client video players. This ensures that live video plays at the highest quality that viewers have adequate bandwidth to play. As live video is streamed to Cloudflare, we transcode it to make it available to viewers at multiple quality levels. During transcoding, we learn about the real bandwidth needs of each segment of video at each quality level, and use this to provide an estimate of the bandwidth requirements of each quality level the in HLS (`.m3u8`) and DASH (`.mpd`) manifests. If a live stream contains content with low visual complexity, like a slideshow presentation, the bandwidth estimates provided in the HLS manifest will be lower, ensuring that the most viewers possible view the highest quality level, since it requires relatively little bandwidth. Conversely, if a live stream contains content with high visual complexity, like live sports with motion and camera panning, the bandwidth estimates provided in the HLS manifest will be higher, ensuring that viewers with inadequate bandwidth switch down to a lower quality level, and their playback does not buffer. This change is particularly helpful if you're building a platform or application that allows your end users to create their own live streams, where these end users have their own streaming software and hardware that you can't control. Because this new functionality adapts based on the live video we receive, rather than just the configuration advertised by the broadcaster, even in cases where your end users' settings are less than ideal, client video players will not receive excessively high estimates of bandwidth requirements, causing playback quality to decrease unnecessarily. Your end users don't have to be OBS Studio experts in order to get high quality video playback. No work is required on your end — this change applies to all live inputs, for all customers of Cloudflare Stream. For more, refer to the [docs](https://developers.cloudflare.com/stream/stream-live/#bitrate-estimates-at-each-quality-level-bitrate-ladder). ## 2022-10-05 **AV1 Codec support for live streams and recordings (beta)** Cloudflare Stream now supports playback of live videos and live recordings using the [AV1 codec](https://aomedia.org/av1/), which uses 46% less bandwidth than H.264. For more, read the [blog post](https://blog.cloudflare.com/av1-cloudflare-stream-beta). ## 2022-09-27 **WebRTC live streaming and playback (beta)** Cloudflare Stream now supports live video streaming over WebRTC, with sub-second latency, to unlimited concurrent viewers. For more, read the [blog post](https://blog.cloudflare.com/webrtc-whip-whep-cloudflare-stream) or the get started with example code in the [docs](https://developers.cloudflare.com/stream/webrtc-beta). ## 2022-09-15 **Manually control when you start and stop simulcasting** You can now enable and disable individual live outputs via the API or Stream dashboard, allowing you to control precisely when you start and stop simulcasting to specific destinations like YouTube and Twitch. For more, [read the docs](https://developers.cloudflare.com/stream/stream-live/simulcasting/#control-when-you-start-and-stop-simulcasting). ## 2022-08-15 **Unique subdomain for your Stream Account** URLs in the Stream Dashboard and Stream API now use a subdomain specific to your Cloudflare Account: `customer-{CODE}.cloudflarestream.com`. This change allows you to: 1. Use [Content Security Policy](https://developer.mozilla.org/en-US/docs/Web/HTTP/CSP) (CSP) directives specific to your Stream subdomain, to ensure that only videos from your Cloudflare account can be played on your website. 2. Allowlist only your Stream account subdomain at the network-level to ensure that only videos from a specific Cloudflare account can be accessed on your network. No action is required from you, unless you use Content Security Policy (CSP) on your website. For more on CSP, read the [docs](https://developers.cloudflare.com/stream/faq/#i-use-content-security-policy-csp-on-my-website-what-domains-do-i-need-to-add-to-which-directives). ## 2022-08-02 **Clip videos using the Stream API** You can now change the start and end times of a video uploaded to Cloudflare Stream. For more information, refer to [Clip videos](https://developers.cloudflare.com/stream/edit-videos/video-clipping/). ## 2022-07-26 **Live inputs** The Live Inputs API now supports optional pagination, search, and filter parameters. For more information, refer to the [Live Inputs API documentation](https://developers.cloudflare.com/api/resources/stream/subresources/live_inputs/methods/list/). ## 2022-05-24 **Picture-in-Picture support** The [Stream Player](https://developers.cloudflare.com/stream/viewing-videos/using-the-stream-player/) now displays a button to activate Picture-in-Picture mode, if the viewer's web browser supports the [Picture-in-Picture API](https://developer.mozilla.org/en-US/docs/Web/API/Picture-in-Picture_API). ## 2022-05-13 **Creator ID property** During or after uploading a video to Stream, you can now specify a value for a new field, `creator`. This field can be used to identify the creator of the video content, linking the way you identify your users or creators to videos in your Stream account. For more, read the [blog post](https://blog.cloudflare.com/stream-creator-management/). ## 2022-03-17 **Analytics panel in Stream Dashboard** The Stream Dashboard now has an analytics panel that shows the number of minutes of both live and recorded video delivered. This view can be filtered by **Creator ID**, **Video UID**, and **Country**. For more in-depth analytics data, refer to the [bulk analytics documentation](https://developers.cloudflare.com/stream/getting-analytics/fetching-bulk-analytics/). ## 2022-03-16 **Custom letterbox color configuration option for Stream Player** The Stream Player can now be configured to use a custom letterbox color, displayed around the video ('letterboxing' or 'pillarboxing') when the video's aspect ratio does not match the player's aspect ratio. Refer to the documentation on configuring the Stream Player [here](https://developers.cloudflare.com/stream/viewing-videos/using-the-stream-player/#basic-options). ## 2022-03-10 **Support for SRT live streaming protocol** Cloudflare Stream now supports the SRT live streaming protocol. SRT is a modern, actively maintained streaming video protocol that delivers lower latency, and better resilience against unpredictable network conditions. SRT supports newer video codecs and makes it easier to use accessibility features such as captions and multiple audio tracks. For more, read the [blog post](https://blog.cloudflare.com/stream-now-supports-srt-as-a-drop-in-replacement-for-rtmp/). ## 2022-02-17 **Faster video quality switching in Stream Player** When viewers manually change the resolution of video they want to receive in the Stream Player, this change now happens immediately, rather than once the existing resolution playback buffer has finished playing. ## 2022-02-09 **Volume and playback controls accessible during playback of VAST Ads** When viewing ads in the [VAST format](https://www.iab.com/guidelines/vast/#:~:text=VAST%20is%20a%20Video%20Ad,of%20the%20digital%20video%20marketplace.) in the Stream Player, viewers can now manually start and stop the video, or control the volume. ## 2022-01-25 **DASH and HLS manifest URLs accessible in Stream Dashboard** If you choose to use a third-party player with Cloudflare Stream, you can now easily access HLS and DASH manifest URLs from within the Stream Dashboard. For more about using Stream with third-party players, read the docs [here](https://developers.cloudflare.com/stream/viewing-videos/using-own-player/). ## 2022-01-22 **Input health status in the Stream Dashboard** When a live input is connected, the Stream Dashboard now displays technical details about the connection, which can be used to debug configuration issues. ## 2022-01-06 **Live viewer count in the Stream Player** The [Stream Player](https://developers.cloudflare.com/stream/viewing-videos/using-the-stream-player/) now shows the total number of people currently watching a video live. ## 2022-01-04 **Webhook notifications for live stream connections events** You can now configure Stream to send webhooks each time a live stream connects and disconnects. For more information, refer to the [Webhooks documentation](https://developers.cloudflare.com/stream/stream-live/webhooks). ## 2021-12-07 **FedRAMP Support** The Stream Player can now be served from a [FedRAMP](https://www.cloudflare.com/press-releases/2021/cloudflare-hits-milestone-in-fedramp-approval/) compliant subdomain. ## 2021-11-23 **24/7 Live streaming support** You can now use Cloudflare Stream for 24/7 live streaming. ## 2021-11-17 **Persistent Live Stream IDs** You can now start and stop live broadcasts without having to provide a new video UID to the Stream Player (or your own player) each time the stream starts and stops. [Read the docs](https://developers.cloudflare.com/stream/stream-live/watch-live-stream/#view-by-live-input-id). ## 2021-10-14 **MP4 video file downloads for live videos** Once a live video has ended and been recorded, you can now give viewers the option to download an MP4 video file of the live recording. For more, read the docs [here](https://developers.cloudflare.com/stream/stream-live/download-stream-live-videos/). ## 2021-09-30 **Serverless Live Streaming** Stream now supports live video content! For more information, read the [blog post](https://blog.cloudflare.com/stream-live/) and get started by reading the [docs](https://developers.cloudflare.com/stream/stream-live/). ## 2021-07-26 **Thumbnail previews in Stream Player seek bar** The Stream Player now displays preview images when viewers hover their mouse over the seek bar, making it easier to skip to a specific part of a video. ## 2021-07-26 **MP4 video file downloads (GA)** All Cloudflare Stream customers can now give viewers the option to download videos uploaded to Stream as an MP4 video file. For more, read the docs [here](https://developers.cloudflare.com/stream/viewing-videos/download-videos/). ## 2021-07-10 **Stream Connect (open beta)** You can now opt-in to the Stream Connect beta, and use Cloudflare Stream to restream live video to any platform that accepts RTMPS input, including Facebook, YouTube and Twitch. For more, read the [blog post](https://blog.cloudflare.com/restream-with-stream-connect/) or the [docs](https://developers.cloudflare.com/stream/stream-live/simulcasting/). ## 2021-06-10 **Simplified signed URL token generation** You can now obtain a signed URL token via a single API request, without needing to generate signed tokens in your own application. [Read the docs](https://developers.cloudflare.com/stream/viewing-videos/securing-your-stream). ## 2021-06-08 **Stream Connect (closed beta)** You can now use Cloudflare Stream to restream or simulcast live video to any platform that accepts RTMPS input, including Facebook, YouTube and Twitch. For more, read the [blog post](https://blog.cloudflare.com/restream-with-stream-connect/) or the [docs](https://developers.cloudflare.com/stream/stream-live/simulcasting/). ## 2021-05-03 **MP4 video file downloads (beta)** You can now give your viewers the option to download videos uploaded to Stream as an MP4 video file. For more, read the docs [here](https://developers.cloudflare.com/stream/viewing-videos/download-videos/). ## 2021-03-29 **Picture quality improvements** Cloudflare Stream now encodes videos with fewer artifacts, resulting in improved video quality for your viewers. ## 2021-03-25 **Improved client bandwidth hints for third-party video players** If you use Cloudflare Stream with a third party player, and send the `clientBandwidthHint` parameter in requests to fetch video manifests, Cloudflare Stream now selects the ideal resolution to provide to your client player more intelligently. This ensures your viewers receive the ideal resolution for their network connection. ## 2021-03-25 **Improved client bandwidth hints for third-party video players** If you use Cloudflare Stream with a third party player, and send the `clientBandwidthHint` parameter in requests to fetch video manifests, Cloudflare Stream now selects the ideal resolution to provide to your client player more intelligently. This ensures your viewers receive the ideal resolution for their network connection. ## 2021-03-17 **Less bandwidth, identical video quality** Cloudflare Stream now delivers video using 3-10x less bandwidth, with no reduction in quality. This ensures faster playback for your viewers with less buffering, particularly when viewers have slower network connections. ## 2021-03-10 **Stream Player 2.0 (preview)** A brand new version of the Stream Player is now available for preview. New features include: * Unified controls across desktop and mobile devices * Keyboard shortcuts * Intelligent mouse cursor interactions with player controls * Phased out support for Internet Explorer 11 For more, refer to [this post](https://community.cloudflare.com/t/announcing-the-preview-build-for-stream-player-2-0/243095) on the Cloudflare Community Forum. ## 2021-03-04 **Faster video encoding** Videos uploaded to Cloudflare Stream are now available to view 5x sooner, reducing the time your users wait between uploading and viewing videos. ## 2021-01-17 **Removed weekly upload limit, increased max video upload size** You can now upload videos up to 30GB in size to Cloudflare Stream and also now upload an unlimited number of videos to Cloudflare Stream each week ## 2020-12-14 **Tus support for direct creator uploads** You can now use the [tus protocol](https://developers.cloudflare.com/stream/uploading-videos/direct-creator-uploads/#advanced-upload-flow-using-tus-for-large-videos) when allowing creators (your end users) to upload their own videos directly to Cloudflare Stream. In addition, all uploads to Cloudflare Stream made using tus are now faster and more reliable as part of this change. ## 2020-12-09 **Multiple audio track mixdown** Videos with multiple audio tracks (ex: 5.1 surround sound) are now mixed down to stereo when uploaded to Stream. The resulting video, with stereo audio, is now playable in the Stream Player. ## 2020-12-02 **Storage limit notifications** Cloudflare now emails you if your account is using 75% or more of your prepaid video storage, so that you can take action and plan ahead. --- title: Edit videos · Cloudflare Stream docs lastUpdated: 2024-08-30T13:02:26.000Z chatbotDeprioritize: true source_url: html: https://developers.cloudflare.com/stream/edit-videos/ md: https://developers.cloudflare.com/stream/edit-videos/index.md --- * [Add additional audio tracks](https://developers.cloudflare.com/stream/edit-videos/adding-additional-audio-tracks/) * [Add captions](https://developers.cloudflare.com/stream/edit-videos/adding-captions/) * [Apply watermarks](https://developers.cloudflare.com/stream/edit-videos/applying-watermarks/) * [Add player enhancements](https://developers.cloudflare.com/stream/edit-videos/player-enhancements/) * [Clip videos](https://developers.cloudflare.com/stream/edit-videos/video-clipping/) --- title: Examples · Cloudflare Stream docs lastUpdated: 2024-08-22T18:02:52.000Z chatbotDeprioritize: false source_url: html: https://developers.cloudflare.com/stream/examples/ md: https://developers.cloudflare.com/stream/examples/index.md --- [Android (ExoPlayer)](https://developers.cloudflare.com/stream/examples/android/) Example of video playback on Android using ExoPlayer [dash.js](https://developers.cloudflare.com/stream/examples/dash-js/) Example of video playback with Cloudflare Stream and the DASH reference player (dash.js) [First Live Stream with OBS](https://developers.cloudflare.com/stream/examples/obs-from-scratch/) Set up and start your first Live Stream using OBS (Open Broadcaster Software) Studio [hls.js](https://developers.cloudflare.com/stream/examples/hls-js/) Example of video playback with Cloudflare Stream and the HLS reference player (hls.js) [iOS (AVPlayer)](https://developers.cloudflare.com/stream/examples/ios/) Example of video playback on iOS using AVPlayer [RTMPS playback](https://developers.cloudflare.com/stream/examples/rtmps_playback/) Example of sub 1s latency video playback using RTMPS and ffplay [Shaka Player](https://developers.cloudflare.com/stream/examples/shaka-player/) Example of video playback with Cloudflare Stream and Shaka Player [SRT playback](https://developers.cloudflare.com/stream/examples/srt_playback/) Example of sub 1s latency video playback using SRT and ffplay [Stream Player](https://developers.cloudflare.com/stream/examples/stream-player/) Example of video playback with the Cloudflare Stream Player [Stream WordPress plugin](https://developers.cloudflare.com/stream/examples/wordpress/) Upload videos to WordPress using the Stream WordPress plugin. [Video.js](https://developers.cloudflare.com/stream/examples/video-js/) Example of video playback with Cloudflare Stream and Video.js [Vidstack](https://developers.cloudflare.com/stream/examples/vidstack/) Example of video playback with Cloudflare Stream and Vidstack --- title: Frequently asked questions about Cloudflare Stream · Cloudflare Stream docs description: Cloudflare decides on which bitrate, resolution, and codec is best for you. We deliver all videos to industry standard H264 codec. We use a few different adaptive streaming levels from 360p to 1080p to ensure smooth streaming for your audience watching on different devices and bandwidth constraints. lastUpdated: 2025-05-28T15:52:59.000Z chatbotDeprioritize: false source_url: html: https://developers.cloudflare.com/stream/faq/ md: https://developers.cloudflare.com/stream/faq/index.md --- ## Stream ### What formats and quality levels are delivered through Cloudflare Stream? Cloudflare decides on which bitrate, resolution, and codec is best for you. We deliver all videos to industry standard H264 codec. We use a few different adaptive streaming levels from 360p to 1080p to ensure smooth streaming for your audience watching on different devices and bandwidth constraints. ### Can I download original video files from Stream? You cannot download the *exact* input file that you uploaded. However, depending on your use case, you can use the [Downloadable Videos](https://developers.cloudflare.com/stream/viewing-videos/download-videos/) feature to get encoded MP4s for use cases like offline viewing. ### Is there a limit to the amount of videos I can upload? * By default, a video upload can be at most 30 GB. * By default, you can have up to 120 videos queued or being encoded simultaneously. Videos in the `ready` status are playable but may still be encoding certain quality levels until the `pctComplete` reaches 100. Videos in the `error`, `ready`, or `pendingupload` state do not count toward this limit. If you need the concurrency limit raised, [contact Cloudflare support](https://developers.cloudflare.com/support/contacting-cloudflare-support/) explaining your use case and why you would like the limit raised. Note The limit to the number of videos only applies to videos being uploaded to Cloudflare Stream. This limit is not related to the number of end users streaming videos. * An account cannot upload videos if the total video duration exceeds the video storage capacity purchased. Limits apply to Direct Creator Uploads at the time of upload URL creation. Uploads over these limits will receive a [429 (Too Many Requests)](https://developers.cloudflare.com/support/troubleshooting/http-status-codes/4xx-client-error/error-429/) or [413 (Payload too large)](https://developers.cloudflare.com/support/troubleshooting/http-status-codes/4xx-client-error/error-413/) HTTP status codes with more information in the response body. Please write to Cloudflare support or your customer success manager for higher limits. ### Can I embed videos on Stream even if my domain is not on Cloudflare? Yes. Stream videos can be embedded on any domain, even domains not on Cloudflare. ### What input file formats are supported? Users can upload video in the following file formats: MP4, MKV, MOV, AVI, FLV, MPEG-2 TS, MPEG-2 PS, MXF, LXF, GXF, 3GP, WebM, MPG, QuickTime ### Does Stream support High Dynamic Range (HDR) video content? When HDR videos are uploaded to Stream, they are re-encoded and delivered in SDR format, to ensure compatibility with the widest range of viewing devices. ### What frame rates (FPS) are supported? Cloudflare Stream supports video file uploads for any FPS, however videos will be re-encoded for 70 FPS playback. If the original video file has a frame rate lower than 70 FPS, Stream will re-encode at the original frame rate. If the frame rate is variable we will drop frames (for example if there are more than 1 frames within 1/30 seconds, we will drop the extra frames within that period). ### What browsers does Stream work on? You can embed the Stream player on the following platforms: Note Cloudflare Stream is not available on Chromium, as Chromium does not support H.264 videos. ### What are the recommended upload settings for video uploads? If you are producing a brand new file for Cloudflare Stream, we recommend you use the following settings: * MP4 containers, AAC audio codec, H264 video codec, 30 or below frames per second * moov atom should be at the front of the file (Fast Start) * H264 progressive scan (no interlacing) * H264 high profile * Closed GOP * Content should be encoded and uploaded in the same frame rate it was recorded * Mono or Stereo audio (Stream will mix audio tracks with more than 2 channels down to stereo) Below are bitrate recommendations for encoding new videos for Stream: ### If I cancel my stream subscription, are the videos deleted? Videos are removed if the subscription is not renewed within 30 days. ### I use Content Security Policy (CSP) on my website. What domains do I need to add to which directives? If your website uses [Content Security Policy (CSP)](https://developer.mozilla.org/en-US/docs/Web/HTTP/Reference/Headers/Content-Security-Policy) directives, depending on your configuration, you may need to add Cloudflare Stream's domains to particular directives, in order to allow videos to be viewed or uploaded by your users. If you use the provided [Stream Player](https://developers.cloudflare.com/stream/viewing-videos/using-the-stream-player/), `videodelivery.net` and `*.cloudflarestream.com` must be included in the `frame-src` or `default-src` directive to allow the player's ` ``` The embed code above can also be found in the [Cloudflare dashboard](https://dash.cloudflare.com/?to=/:account/stream). ### Next steps * [Edit your video](https://developers.cloudflare.com/stream/edit-videos/) and add captions or watermarks * [Customize the Stream player](https://developers.cloudflare.com/stream/viewing-videos/using-the-stream-player/) ## Start your first live stream ### Step 1: Create a live input You can create a live input via the [Cloudflare dashboard](https://dash.cloudflare.com/?to=/:account/stream/inputs/create) or using the API. To use the API, replace the `API_TOKEN` and `ACCOUNT_ID` values with your credentials in the example below. ```bash curl -X POST \ -H "Authorization: Bearer " \ -D '{"meta": {"name":"test stream"},"recording": { "mode": "automatic" }}' \ https://api.cloudflare.com/client/v4/accounts//stream/live_inputs ``` ```json { "uid": "f256e6ea9341d51eea64c9454659e576", "rtmps": { "url": "rtmps://live.cloudflare.com:443/live/", "streamKey": "MTQ0MTcjM3MjI1NDE3ODIyNTI1MjYyMjE4NTI2ODI1NDcxMzUyMzcf256e6ea9351d51eea64c9454659e576" }, "created": "2021-09-23T05:05:53.451415Z", "modified": "2021-09-23T05:05:53.451415Z", "meta": { "name": "test stream" }, "status": null, "recording": { "mode": "automatic", "requireSignedURLs": false, "allowedOrigins": null } } ``` ### Step 2: Copy the RTMPS URL and key, and use them with your live streaming application. We recommend using [Open Broadcaster Software (OBS)](https://obsproject.com/) to get started. ### Step 3: Play the live stream in your website or app Live streams can be played on any device and platform, from websites to native apps, using the same video players as videos uploaded to Stream. See [Play videos](https://developers.cloudflare.com/stream/viewing-videos) for details and examples of video playback across platforms. To play the live stream you just started on your website with the [Stream Player](https://developers.cloudflare.com/stream/viewing-videos/using-the-stream-player/), copy the `uid` of the live input from the request above, along with your unique customer code, and replace `` and `` in the embed code below: ```html ``` The embed code above can also be found in the [Cloudflare dashboard](https://dash.cloudflare.com/?to=/:account/stream). ### Next steps * [Secure your stream](https://developers.cloudflare.com/stream/viewing-videos/securing-your-stream/) * [View live viewer counts](https://developers.cloudflare.com/stream/getting-analytics/live-viewer-count/) ## Accessibility considerations To make your video content more accessible, include [captions](https://developers.cloudflare.com/stream/edit-videos/adding-captions/) and [high-quality audio recording](https://www.w3.org/WAI/media/av/av-content/). --- title: Analytics · Cloudflare Stream docs description: "Stream provides server-side analytics that can be used to:" lastUpdated: 2024-08-13T19:56:56.000Z chatbotDeprioritize: false source_url: html: https://developers.cloudflare.com/stream/getting-analytics/ md: https://developers.cloudflare.com/stream/getting-analytics/index.md --- Stream provides server-side analytics that can be used to: * Identify most viewed video content in your app or platform. * Identify where content is viewed from and when it is viewed. * Understand which creators on your platform are publishing the most viewed content, and analyze trends. You can access data via the [Stream dashboard](https://dash.cloudflare.com/?to=/:account/stream/analytics) or via the [GraphQL Analytics API](https://developers.cloudflare.com/stream/getting-analytics/fetching-bulk-analytics). Users will need the **Analytics** permission to access analytics via Dash or GraphQL. --- title: Manage videos · Cloudflare Stream docs lastUpdated: 2024-08-22T17:44:03.000Z chatbotDeprioritize: true source_url: html: https://developers.cloudflare.com/stream/manage-video-library/ md: https://developers.cloudflare.com/stream/manage-video-library/index.md --- --- title: Pricing · Cloudflare Stream docs description: "Cloudflare Stream lets you broadcast, store, and deliver video using a simple, unified API and simple pricing. Stream bills on two dimensions only:" lastUpdated: 2025-04-15T15:33:49.000Z chatbotDeprioritize: false source_url: html: https://developers.cloudflare.com/stream/pricing/ md: https://developers.cloudflare.com/stream/pricing/index.md --- Cloudflare Stream lets you broadcast, store, and deliver video using a simple, unified API and simple pricing. Stream bills on two dimensions only: * **Minutes of video stored:** the total duration of uploaded video and live recordings * **Minutes of video delivered:** the total duration of video delivered to end users On-demand and live video are billed the same way. Ingress (sending your content to us) and encoding are always free. Bandwidth is already included in "video delivered" with no additional egress (traffic/bandwidth) fees. ## Minutes of video stored Storage is a prepaid pricing dimension purchased in increments of $5 per 1,000 minutes stored, regardless of file size. You can check how much storage you have and how much you have used on the [Stream](https://dash.cloudflare.com/?to=/:account/stream) page in Dash. Storage is consumed by: * Original videos uploaded to your account * Recordings of live broadcasts * The reserved `maxDurationSeconds` for Direct Creator and TUS uploads which have not been completed. After these uploads are complete or the upload link expires, this reservation is released. Storage is not consumed by: * Videos in an unplayable or errored state * Expired Direct Creator upload links * Deleted videos * Downloadable files generated for [MP4 Downloads](https://developers.cloudflare.com/stream/viewing-videos/download-videos/) * Multiple quality levels that Stream generates for each uploaded original Storage consumption is rounded up to the second of video duration; file size does not matter. Video stored in Stream does not incur additional storage fees from other storage products such as R2. Note If you run out of storage, you will not be able to upload new videos or start new live streams until you purchase more storage or delete videos. Enterprise customers *may* continue to upload new content beyond their contracted quota without interruption. ## Minutes of video delivered Delivery is a post-paid, usage-based pricing dimension billed at $1 per 1,000 minutes delivered. You can check how much delivery you have used on the [Billable Usage](https://dash.cloudflare.com/?to=/:account/billing/billable-usage) page in Dash or the [Stream Analytics](https://dash.cloudflare.com/?to=/:account/stream/analytics) page under Stream. Delivery is counted for the following uses: * Playback on the web or an app using [Stream's built-in player](https://developers.cloudflare.com/stream/viewing-videos/using-the-stream-player/) or the [HLS or DASH manifests](https://developers.cloudflare.com/stream/viewing-videos/using-own-player/) * MP4 Downloads * Simulcasting via SRT or RTMP live outputs Delivery is counted by HTTP requests for video segments or parts of the MP4. Therefore: * Client-side preloading and buffering is counted as billable delivery. * Content played from client-side/browser cache is *not* billable, like a short looping video. Some mobile app player libraries do not cache HLS segments by default. * MP4 Downloads are billed by percentage of the file delivered. Minutes delivered for web playback (Stream Player, HLS, and DASH) are rounded to the *segment* length: for uploaded content, segments are four seconds. Live broadcast and recording segments are determined by the keyframe interval or GOP size of the original broadcast. ## Example scenarios **Two people each watch thirty minutes of a video or live broadcast. How much would it cost?** This will result in 60 minutes of Minutes Delivered usage (or $0.06). Stream bills on total minutes of video delivered across all users. **I have a really large file. Does that cost more?** The cost to store a video is based only on its duration, not its file size. If the file is within the [30GB max file size limitation](https://developers.cloudflare.com/stream/faq/#is-there-a-limit-to-the-amount-of-videos-i-can-upload), it will be accepted. Be sure to use an [upload method](https://developers.cloudflare.com/stream/uploading-videos/) like Upload from Link or TUS that handles large files well. **If I make a Direct Creator Upload link with a maximum duration (`maxDurationSeconds`) of 600 seconds which expires in 1 hour, how is storage consumed?** * Ten minutes (600 seconds) will be subtracted from your available storage immediately. * If the link is unused in one hour, those 10 minutes will be released. * If the creator link is used to upload a five minute video, when the video is uploaded and processed, the 10 minute reservation will be released and the true five minute duration of the file will be counted. * If the creator link is used to upload a five minute video but it fails to encode, the video will be marked as errored, the reserved storage will be released, and no storage use will be counted. **I am broadcasting live, but no one is watching. How much does that cost?** A live broadcast with no viewers will cost $0 for minutes delivered, but the recording of the broadcast will count toward minutes of video stored. If someone watches the recording, that will be counted as minutes of video delivered. If the recording is deleted, the storage use will be released. **I want to store and deliver millions of minutes a month. Do you have volume pricing?** Yes, contact our [Sales Team](https://www.cloudflare.com/plans/enterprise/contact/). --- title: Stream API Reference · Cloudflare Stream docs lastUpdated: 2024-12-16T22:33:26.000Z chatbotDeprioritize: false source_url: html: https://developers.cloudflare.com/stream/stream-api/ md: https://developers.cloudflare.com/stream/stream-api/index.md --- --- title: Stream live video · Cloudflare Stream docs description: Cloudflare Stream lets you or your users stream live video, and play live video in your website or app, without managing and configuring any of your own infrastructure. lastUpdated: 2024-08-13T19:56:56.000Z chatbotDeprioritize: false source_url: html: https://developers.cloudflare.com/stream/stream-live/ md: https://developers.cloudflare.com/stream/stream-live/index.md --- Cloudflare Stream lets you or your users [stream live video](https://www.cloudflare.com/learning/video/what-is-live-streaming/), and play live video in your website or app, without managing and configuring any of your own infrastructure. ## How Stream works Stream handles video streaming end-to-end, from ingestion through delivery. 1. For each live stream, you create a unique live input, either using the Stream Dashboard or API. 2. Each live input has a unique Stream Key, that you provide to the creator who is streaming live video. 3. Creators use this Stream Key to broadcast live video to Cloudflare Stream, over either RTMPS or SRT. 4. Cloudflare Stream encodes this live video at multiple resolutions and delivers it to viewers, using Cloudflare's Global Network. You can play video on your website using the [Stream Player](https://developers.cloudflare.com/stream/viewing-videos/using-the-stream-player/) or using [any video player that supports HLS or DASH](https://developers.cloudflare.com/stream/viewing-videos/using-own-player/). ![Diagram the explains the live stream workflow](https://developers.cloudflare.com/_astro/live-stream-workflow.CRSBhOc-_ZG8e0g.webp) ## RTMP reconnections As long as your streaming software reconnects, Stream Live will continue to ingest and stream your live video. Make sure the streaming software you use to push RTMP feeds automatically reconnects if the connection breaks. Some apps like OBS reconnect automatically while other apps like FFmpeg require custom configuration. ## Bitrate estimates at each quality level (bitrate ladder) Cloudflare Stream transcodes and makes live streams available to viewers at multiple quality levels. This is commonly referred to as [Adaptive Bitrate Streaming (ABR)](https://www.cloudflare.com/learning/video/what-is-adaptive-bitrate-streaming). With ABR, client video players need to be provided with estimates of how much bandwidth will be needed to play each quality level (ex: 1080p). Stream creates and updates these estimates dynamically by analyzing the bitrate of your users' live streams. This ensures that live video plays at the highest quality a viewer has adequate bandwidth to play, even in cases where the broadcaster's software or hardware provides incomplete or inaccurate information about the bitrate of their live content. ### How it works If a live stream contains content with low visual complexity, like a slideshow presentation, the bandwidth estimates provided in the HLS and DASH manifests will be lower —  a stream like this has a low bitrate and requires relatively little bandwidth, even at high resolution. This ensures that as many viewers as possible view the highest quality level. Conversely, if a live stream contains content with high visual complexity, like live sports with motion and camera panning, the bandwidth estimates provided in the manifest will be higher — a stream like this has a high bitrate and requires more bandwidth. This ensures that viewers with inadequate bandwidth switch down to a lower quality level, and their playback does not buffer. ### How you benefit If you're building a creator platform or any application where your end users create their own live streams, your end users likely use streaming software or hardware that you cannot control. In practice, these live streaming setups often send inaccurate or incomplete information about the bitrate of a given live stream, or are misconfigured by end users. Stream adapts based on the live video that we actually receive, rather than blindly trusting the advertised bitrate. This means that even in cases where your end users' settings are less than ideal, client video players will still receive the most accurate bitrate estimates possible, ensuring the highest quality video playback for your viewers, while avoiding pushing configuration complexity back onto your users. ## Transition from live playback to a recording Recordings are available for live streams within 60 seconds after a live stream ends. You can check a video's status to determine if it's ready to view by making a [`GET` request to the `stream` endpoint](https://developers.cloudflare.com/stream/stream-live/watch-live-stream/#use-the-api) and viewing the `state` or by [using the Cloudflare dashboard](https://developers.cloudflare.com/stream/stream-live/watch-live-stream/#use-the-dashboard). After the live stream ends, you can [replay live stream recordings](https://developers.cloudflare.com/stream/stream-live/replay-recordings/) in the `ready` state by using one of the playback URLs. ## Billing Stream Live is billed identically to the rest of Cloudflare Stream. * You pay $5 per 1000 minutes of recorded video. * You pay $1 per 1000 minutes of delivered video. All Stream Live videos are automatically recorded. There is no additional cost for encoding and packaging live videos. --- title: Transform videos · Cloudflare Stream docs description: Media Transformations let you optimize and manipulate videos stored outside of the Cloudflare Stream. Transformed videos and images are served from one of your zones on Cloudflare. lastUpdated: 2025-06-10T19:53:41.000Z chatbotDeprioritize: false source_url: html: https://developers.cloudflare.com/stream/transform-videos/ md: https://developers.cloudflare.com/stream/transform-videos/index.md --- Media Transformations let you optimize and manipulate videos stored *outside* of the Cloudflare Stream. Transformed videos and images are served from one of your zones on Cloudflare. To transform a video or image, you must [enable transformations](https://developers.cloudflare.com/stream/transform-videos/#getting-started) for your zone. If your zone already has Image Transformations enabled, you can also optimize videos with Media Transformations. ## Getting started You can dynamically optimize and generate still images from videos that are stored *outside* of Cloudflare Stream with Media Transformations. Cloudflare will automatically cache every transformed video or image on our global network so that you store only the original image at your origin. To enable transformations on your zone: 1. Log in to the [Cloudflare dashboard](https://dash.cloudflare.com/login) and select your account. 2. Go to **Stream** > **Transformations**. 3. Locate the specific zone where you want to enable transformations. 4. Select **Enable** for zone. ## Transform a video by URL You can convert and resize videos by requesting them via a specially-formatted URL, without writing any code. The URL format is: ```plaintext https://example.com/cdn-cgi/media// ``` * `example.com`: Your website or zone on Cloudflare, with Transformations enabled. * `/cdn-cgi/media/`: A prefix that identifies a special path handled by Cloudflare's built-in media transformation service. * ``: A comma-separated list of options. Refer to the available options below. * ``: A full URL (starting with `https://` or `http://`) of the original asset to resize. For example, this URL will source an HD video from an R2 bucket, shorten it, crop and resize it as a square, and remove the audio. ```plaintext https://example.com/cdn-cgi/media/mode=video,time=5s,duration=5s,width=500,height=500,fit=crop,audio=false/https://pub-8613b7f94d6146408add8fefb52c52e8.r2.dev/aus-mobile-demo.mp4 ``` The result is an MP4 that can be used in an HTML video element without a player library. ## Options ### `mode` Specifies the kind of output to generate. * `video`: Outputs an H.264/AAC optimized MP4 file. * `frame`: Outputs a still image. * `spritesheet`: Outputs a JPEG with multiple frames. ### `time` Specifies when to start extracting the output in the input file. Depends on `mode`: * When `mode` is `spritesheet` or `video`, specifies the timestamp where the output will start. * When `mode` is `frame`, specifies the timestamp from which to extract the still image. * Formats as a time string, for example: 5s, 2m * Acceptable range: 0 – 30s * Default: 0 ### `duration` The duration of the output video or spritesheet. Depends on `mode`: * When `mode` is `video`, specifies the duration of the output. * When `mode` is `spritesheet`, specifies the time range from which to select frames. * Acceptable range: 1s - 60s (or 1m) * Default: input duration or 30 seconds, whichever is shorter ### `fit` In combination with `width` and `height`, specifies how to resize and crop the output. If the output is resized, it will always resize proportionally so content is not stretched. * `contain`: Respecting aspect ratio, scales a video up or down to be entirely contained within output dimensions. * `scale-down`: Same as contain, but downscales to fit only. Do not upscale. * `cover`: Respecting aspect ratio, scales a video up or down to entirely cover the output dimensions, with a center-weighted crop of the remainder. ### `height` Specifies maximum height of the output in pixels. Exact behavior depends on `fit`. * Acceptable range: 10-2000 pixels ### `width` Specifies the maximum width of the image in pixels. Exact behavior depends on `fit`. * Acceptable range: 10-2000 pixels ### `audio` When `mode` is `video`, specifies whether or not to include the source audio in the output. * `true`: Includes source audio. * `false`: Output will be silent. * Default: `true` ### `format` If `mode` is `frame`, specifies the image output format. * Acceptable options: `jpg`, `png` ## Source video requirements Input video must be less than 100MB. Input video should be an MP4 with H.264 encoded video and AAC or MP3 encoded audio. Other formats may work but are untested. ## Limitations Media Transformations are currently in beta. During this period: * Transformations are available for all enabled zones free-of-charge. * Restricting allowed origins for transformations are coming soon. * Outputs from Media Transformations will be cached, but if they must be regenerated, the origin fetch is not cached and may result in subsequent requests to the origin asset. ## Pricing Media Transformations will be free for all customers while in beta. After that, Media Transforamtions and Image Transformations will use the same subscriptions and usage metrics. * Generating a still frame (single image) from a video counts as 1 transformation. * Generating an optimized video counts as 1 transformation *per second of the output* video. * Each unique transformation is only billed once per month. * All Media and Image Transformations cost $0.50 per 1,000 monthly unique transformation operations, with a free monthly allocation of 5,000. --- title: Upload videos · Cloudflare Stream docs description: Before you upload your video, review the options for uploading a video, supported formats, and recommendations. lastUpdated: 2024-08-28T21:21:20.000Z chatbotDeprioritize: false source_url: html: https://developers.cloudflare.com/stream/uploading-videos/ md: https://developers.cloudflare.com/stream/uploading-videos/index.md --- Before you upload your video, review the options for uploading a video, supported formats, and recommendations. ## Upload options | Upload method | When to use | | - | - | | [Stream Dashboard](https://dash.cloudflare.com/?to=/:account/stream) | Upload videos from the Stream Dashboard without writing any code. | | [Upload with a link](https://developers.cloudflare.com/stream/uploading-videos/upload-via-link/) | Upload videos using a link, such as an S3 bucket or content management system. | | [Upload video file](https://developers.cloudflare.com/stream/uploading-videos/upload-video-file/) | Upload videos stored on a computer. | | [Direct creator uploads](https://developers.cloudflare.com/stream/uploading-videos/direct-creator-uploads/) | Allows end users of your website or app to upload videos directly to Cloudflare Stream. | ## Supported video formats Note Files must be less than 30 GB, and content should be encoded and uploaded in the same frame rate it was recorded. * MP4 * MKV * MOV * AVI * FLV * MPEG-2 TS * MPEG-2 PS * MXF * LXF * GXF * 3GP * WebM * MPG * Quicktime ## Recommendations for on-demand videos * Optional but ideal settings: * MP4 containers * AAC audio codec * H264 video codec * 60 or fewer frames per second * Closed GOP (*Only required for live streaming.*) * Mono or Stereo audio. Stream will mix audio tracks with more than two channels down to stereo. --- title: Play video · Cloudflare Stream docs lastUpdated: 2024-08-30T13:02:26.000Z chatbotDeprioritize: true source_url: html: https://developers.cloudflare.com/stream/viewing-videos/ md: https://developers.cloudflare.com/stream/viewing-videos/index.md --- * [Use your own player](https://developers.cloudflare.com/stream/viewing-videos/using-own-player/) * [Use the Stream Player](https://developers.cloudflare.com/stream/viewing-videos/using-the-stream-player/) * [Secure your Stream](https://developers.cloudflare.com/stream/viewing-videos/securing-your-stream/) * [Display thumbnails](https://developers.cloudflare.com/stream/viewing-videos/displaying-thumbnails/) * [Download videos](https://developers.cloudflare.com/stream/viewing-videos/download-videos/) --- title: WebRTC · Cloudflare Stream docs description: Sub-second latency live streaming (using WHIP) and playback (using WHEP) to unlimited concurrent viewers. lastUpdated: 2025-04-04T15:30:48.000Z chatbotDeprioritize: false source_url: html: https://developers.cloudflare.com/stream/webrtc-beta/ md: https://developers.cloudflare.com/stream/webrtc-beta/index.md --- Sub-second latency live streaming (using WHIP) and playback (using WHEP) to unlimited concurrent viewers. WebRTC is ideal for when you need live video to playback in near real-time, such as: * When the outcome of a live event is time-sensitive (live sports, financial news) * When viewers interact with the live stream (live Q\&A, auctions, etc.) * When you want your end users to be able to easily go live or create their own video content, from a web browser or native app Note WebRTC streaming is currently in beta, and we'd love to hear what you think. Join the Cloudflare Discord server [using this invite](https://discord.com/invite/cloudflaredev/) and hop into our [Discord channel](https://discord.com/channels/595317990191398933/893253103695065128) to let us know what you're building with WebRTC! ## Step 1: Create a live input [Use the Stream Dashboard](https://dash.cloudflare.com/?to=/:account/stream/inputs/create), or make a POST request to the [`/live_inputs` API endpoint](https://developers.cloudflare.com/api/resources/stream/subresources/live_inputs/methods/create/) ```json { "uid": "1a553f11a88915d093d45eda660d2f8c", ... "webRTC": { "url": "https://customer-.cloudflarestream.com//webRTC/publish" }, "webRTCPlayback": { "url": "https://customer-.cloudflarestream.com//webRTC/play" }, ... } ``` ## Step 2: Go live using WHIP Every live input has a unique URL that one creator can be stream to. This URL should *only* be shared with the creator — anyone with this URL has the ability to stream live video to this live input. Copy the URL from the `webRTC` key in the API response (see above), or directly from the [Cloudflare Dashboard](https://dash.cloudflare.com/?to=/:account/stream/inputs). Paste this URL into the example code. ```javascript // Add a --- title: 404 - Page Not Found · Cloudflare Vectorize docs chatbotDeprioritize: false source_url: html: https://developers.cloudflare.com/vectorize/404/ md: https://developers.cloudflare.com/vectorize/404/index.md --- # 404 Check the URL, try using our [search](https://developers.cloudflare.com/search/) or try our LLM-friendly [llms.txt directory](https://developers.cloudflare.com/llms.txt). --- title: Best practices · Cloudflare Vectorize docs lastUpdated: 2025-02-21T09:48:48.000Z chatbotDeprioritize: true source_url: html: https://developers.cloudflare.com/vectorize/best-practices/ md: https://developers.cloudflare.com/vectorize/best-practices/index.md --- * [Create indexes](https://developers.cloudflare.com/vectorize/best-practices/create-indexes/) * [Insert vectors](https://developers.cloudflare.com/vectorize/best-practices/insert-vectors/) * [Query vectors](https://developers.cloudflare.com/vectorize/best-practices/query-vectors/) --- title: Architectures · Cloudflare Vectorize docs description: Learn how you can use Vectorize within your existing architecture. lastUpdated: 2024-08-13T19:56:56.000Z chatbotDeprioritize: false source_url: html: https://developers.cloudflare.com/vectorize/demos/ md: https://developers.cloudflare.com/vectorize/demos/index.md --- Learn how you can use Vectorize within your existing architecture. ## Reference architectures Explore the following reference architectures that use Vectorize: [Composable AI architecture](https://developers.cloudflare.com/reference-architecture/diagrams/ai/ai-composable/) [The architecture diagram illustrates how AI applications can be built end-to-end on Cloudflare, or single services can be integrated with external infrastructure and services.](https://developers.cloudflare.com/reference-architecture/diagrams/ai/ai-composable/) [Retrieval Augmented Generation (RAG)](https://developers.cloudflare.com/reference-architecture/diagrams/ai/ai-rag/) [RAG combines retrieval with generative models for better text. It uses external knowledge to create factual, relevant responses, improving coherence and accuracy in NLP tasks like chatbots.](https://developers.cloudflare.com/reference-architecture/diagrams/ai/ai-rag/) [Ingesting BigQuery Data into Workers AI](https://developers.cloudflare.com/reference-architecture/diagrams/ai/bigquery-workers-ai/) [You can connect a Cloudflare Worker to get data from Google BigQuery and pass it to Workers AI, to run AI Models, powered by serverless GPUs.](https://developers.cloudflare.com/reference-architecture/diagrams/ai/bigquery-workers-ai/) [Fullstack applications](https://developers.cloudflare.com/reference-architecture/diagrams/serverless/fullstack-application/) [A practical example of how these services come together in a real fullstack application architecture.](https://developers.cloudflare.com/reference-architecture/diagrams/serverless/fullstack-application/) --- title: Examples · Cloudflare Vectorize docs description: Explore the following examples for Vectorize. lastUpdated: 2025-02-21T09:48:48.000Z chatbotDeprioritize: true source_url: html: https://developers.cloudflare.com/vectorize/examples/ md: https://developers.cloudflare.com/vectorize/examples/index.md --- Explore the following examples for Vectorize. * [LangChain Integration](https://js.langchain.com/docs/integrations/vectorstores/cloudflare_vectorize/) * [Retrieval Augmented Generation](https://developers.cloudflare.com/reference-architecture/diagrams/ai/ai-rag/) * [Agents](https://developers.cloudflare.com/agents/) --- title: Get started · Cloudflare Vectorize docs lastUpdated: 2025-02-21T09:48:48.000Z chatbotDeprioritize: true source_url: html: https://developers.cloudflare.com/vectorize/get-started/ md: https://developers.cloudflare.com/vectorize/get-started/index.md --- * [Introduction to Vectorize](https://developers.cloudflare.com/vectorize/get-started/intro/) * [Vectorize and Workers AI](https://developers.cloudflare.com/vectorize/get-started/embeddings/) --- title: Platform · Cloudflare Vectorize docs lastUpdated: 2025-02-21T09:48:48.000Z chatbotDeprioritize: true source_url: html: https://developers.cloudflare.com/vectorize/platform/ md: https://developers.cloudflare.com/vectorize/platform/index.md --- * [Pricing](https://developers.cloudflare.com/vectorize/platform/pricing/) * [Limits](https://developers.cloudflare.com/vectorize/platform/limits/) * [Choose a data or storage product](https://developers.cloudflare.com/workers/platform/storage-options/) * [Changelog](https://developers.cloudflare.com/vectorize/platform/changelog/) --- title: Reference · Cloudflare Vectorize docs lastUpdated: 2025-02-21T09:48:48.000Z chatbotDeprioritize: true source_url: html: https://developers.cloudflare.com/vectorize/reference/ md: https://developers.cloudflare.com/vectorize/reference/index.md --- * [Vector databases](https://developers.cloudflare.com/vectorize/reference/what-is-a-vector-database/) * [Vectorize API](https://developers.cloudflare.com/vectorize/reference/client-api/) * [Metadata filtering](https://developers.cloudflare.com/vectorize/reference/metadata-filtering/) * [Transition legacy Vectorize indexes](https://developers.cloudflare.com/vectorize/reference/transition-vectorize-legacy/) * [Wrangler commands](https://developers.cloudflare.com/workers/wrangler/commands/#vectorize) --- title: Tutorials · Cloudflare Vectorize docs description: View tutorials to help you get started with Vectorize. lastUpdated: 2025-05-06T17:35:57.000Z chatbotDeprioritize: false source_url: html: https://developers.cloudflare.com/vectorize/tutorials/ md: https://developers.cloudflare.com/vectorize/tutorials/index.md --- View tutorials to help you get started with Vectorize. ## Docs | Name | Last Updated | Type | Difficulty | | - | - | - | - | | [Build a Retrieval Augmented Generation (RAG) AI](https://developers.cloudflare.com/workers-ai/guides/tutorials/build-a-retrieval-augmented-generation-ai/) | 8 months ago | 📝 Tutorial | Beginner | | [Recommend products on e-commerce sites using Workers AI and Stripe](https://developers.cloudflare.com/developer-spotlight/tutorials/creating-a-recommendation-api/) | about 1 year ago | 📝 Tutorial | Beginner | ## Videos Welcome to the Cloudflare Developer Channel Welcome to the Cloudflare Developers YouTube channel. We've got tutorials and working demos and everything you need to level up your projects. Whether you're working on your next big thing or just dorking around with some side projects, we've got you covered! So why don't you come hang out, subscribe to our developer channel and together we'll build something awesome. You're gonna love it. Use Vectorize to add additional context to your AI Applications through RAG A RAG based AI Chat app that uses Vectorize to access video game data for employees of Gamertown. Learn AI Development (models, embeddings, vectors) In this workshop, Kristian Freeman, Cloudflare Developer Advocate, teaches the basics of AI Development - models, embeddings, and vectors (including vector databases). --- title: Vectorize REST API · Cloudflare Vectorize docs lastUpdated: 2024-12-16T22:33:26.000Z chatbotDeprioritize: false source_url: html: https://developers.cloudflare.com/vectorize/vectorize-api/ md: https://developers.cloudflare.com/vectorize/vectorize-api/index.md --- --- title: 404 - Page Not Found · Cloudflare Workers docs chatbotDeprioritize: false source_url: html: https://developers.cloudflare.com/workers/404/ md: https://developers.cloudflare.com/workers/404/index.md --- # 404 Check the URL, try using our [search](https://developers.cloudflare.com/search/) or try our LLM-friendly [llms.txt directory](https://developers.cloudflare.com/llms.txt). --- title: AI Assistant · Cloudflare Workers docs chatbotDeprioritize: false source_url: html: https://developers.cloudflare.com/workers/ai/ md: https://developers.cloudflare.com/workers/ai/index.md --- ![Cursor illustration](https://developers.cloudflare.com/_astro/cursor-dark.CqBNjfjr_ZR4meY.webp) ![Cursor illustration](https://developers.cloudflare.com/_astro/cursor-light.BIMnHhHE_tY6Bo.webp) # Meet your AI assistant, CursorAI Preview Cursor is an experimental AI assistant, trained to answer questions about Cloudflare and powered by [Cloudflare Workers](https://developers.cloudflare.com/workers/), [Workers AI](https://developers.cloudflare.com/workers-ai/), [Vectorize](https://developers.cloudflare.com/vectorize/), and [AI Gateway](https://developers.cloudflare.com/ai-gateway/). Cursor is here to help answer your Cloudflare questions, so ask away! Cursor is an experimental AI preview, meaning that the answers provided are often incorrect, incomplete, or lacking in context. Be sure to double-check what Cursor recommends using the linked sources provided. Use of Cloudflare Cursor is subject to the Cloudflare Website and Online Services [Terms of Use](https://www.cloudflare.com/website-terms/). You acknowledge and agree that the output generated by Cursor has not been verified by Cloudflare for accuracy and does not represent Cloudflare’s views. --- title: CI/CD · Cloudflare Workers docs description: Set up continuous integration and continuous deployment for your Workers. lastUpdated: 2025-02-05T10:06:53.000Z chatbotDeprioritize: false source_url: html: https://developers.cloudflare.com/workers/ci-cd/ md: https://developers.cloudflare.com/workers/ci-cd/index.md --- You can set up continuous integration and continuous deployment (CI/CD) for your Workers by using either the integrated build system, [Workers Builds](#workers-builds), or using [external providers](#external-cicd) to optimize your development workflow. ## Why use CI/CD? Using a CI/CD pipeline to deploy your Workers is a best practice because it: * Automates the build and deployment process, removing the need for manual `wrangler deploy` commands. * Ensures consistent builds and deployments across your team by using the same source control management (SCM) system. * Reduces variability and errors by deploying in a uniform environment. * Simplifies managing access to production credentials. ## Which CI/CD should I use? Choose [Workers Builds](https://developers.cloudflare.com/workers/ci-cd/builds) if you want a fully integrated solution within Cloudflare's ecosystem that requires minimal setup and configuration for GitHub or GitLab users. We recommend using [external CI/CD providers](https://developers.cloudflare.com/workers/ci-cd/external-cicd) if: * You have a self-hosted instance of GitHub or GitLabs, which is currently not supported in Workers Builds' [Git integration](https://developers.cloudflare.com/workers/ci-cd/builds/git-integration/) * You are using a Git provider that is not GitHub or GitLab ## Workers Builds [Workers Builds](https://developers.cloudflare.com/workers/ci-cd/builds) is Cloudflare's native CI/CD system that allows you to integrate with GitHub or GitLab to automatically deploy changes with each new push to a selected branch (e.g. `main`). ![Workers Builds Workflow Diagram](https://developers.cloudflare.com/_astro/workers-builds-workflow.Bmy3qIVc_dylLs.webp) Ready to streamline your Workers deployments? Get started with [Workers Builds](https://developers.cloudflare.com/workers/ci-cd/builds/#get-started). ## External CI/CD You can also choose to set up your CI/CD pipeline with an external provider. * [GitHub Actions](https://developers.cloudflare.com/workers/ci-cd/external-cicd/github-actions/) * [GitLab CI/CD](https://developers.cloudflare.com/workers/ci-cd/external-cicd/gitlab-cicd/) --- title: Configuration · Cloudflare Workers docs description: Configure your Worker project with various features and customizations. lastUpdated: 2025-02-05T10:06:53.000Z chatbotDeprioritize: true source_url: html: https://developers.cloudflare.com/workers/configuration/ md: https://developers.cloudflare.com/workers/configuration/index.md --- Configure your Worker project with various features and customizations. * [Bindings](https://developers.cloudflare.com/workers/runtime-apis/bindings/) * [Compatibility dates](https://developers.cloudflare.com/workers/configuration/compatibility-dates/) * [Compatibility flags](https://developers.cloudflare.com/workers/configuration/compatibility-flags/) * [Cron Triggers](https://developers.cloudflare.com/workers/configuration/cron-triggers/) * [Environment variables](https://developers.cloudflare.com/workers/configuration/environment-variables/) * [Integrations](https://developers.cloudflare.com/workers/configuration/integrations/) * [Multipart upload metadata](https://developers.cloudflare.com/workers/configuration/multipart-upload-metadata/) * [Page Rules](https://developers.cloudflare.com/workers/configuration/workers-with-page-rules/) * [Preview URLs](https://developers.cloudflare.com/workers/configuration/previews/) * [Routes and domains](https://developers.cloudflare.com/workers/configuration/routing/) * [Secrets](https://developers.cloudflare.com/workers/configuration/secrets/) * [Smart Placement](https://developers.cloudflare.com/workers/configuration/smart-placement/) * [Versions & Deployments](https://developers.cloudflare.com/workers/configuration/versions-and-deployments/) * [Workers Sites](https://developers.cloudflare.com/workers/configuration/sites/) --- title: Databases · Cloudflare Workers docs description: Explore database integrations for your Worker projects. lastUpdated: 2025-02-05T10:06:53.000Z chatbotDeprioritize: true source_url: html: https://developers.cloudflare.com/workers/databases/ md: https://developers.cloudflare.com/workers/databases/index.md --- Explore database integrations for your Worker projects. * [Connect to databases](https://developers.cloudflare.com/workers/databases/connecting-to-databases/) * [Analytics Engine](https://developers.cloudflare.com/analytics/analytics-engine/) * [Vectorize (vector database)](https://developers.cloudflare.com/vectorize/) * [Cloudflare D1](https://developers.cloudflare.com/d1/) * [Hyperdrive](https://developers.cloudflare.com/hyperdrive/) * [3rd Party Integrations](https://developers.cloudflare.com/workers/databases/third-party-integrations/) --- title: Demos and architectures · Cloudflare Workers docs description: Learn how you can use Workers within your existing application and architecture. lastUpdated: 2025-02-05T10:06:53.000Z chatbotDeprioritize: false source_url: html: https://developers.cloudflare.com/workers/demos/ md: https://developers.cloudflare.com/workers/demos/index.md --- Learn how you can use Workers within your existing application and architecture. ## Demos Explore the following demo applications for Workers. * [Starter code for D1 Sessions API:](https://github.com/cloudflare/templates/tree/main/d1-starter-sessions-api-template) An introduction to D1 Sessions API. This demo simulates purchase orders administration. * [E-commerce Store:](https://github.com/harshil1712/e-com-d1) An application to showcase D1 read replication in the context of an online store. * [Gamertown Customer Support Assistant:](https://github.com/craigsdennis/gamertown-workers-ai-vectorize) A RAG based AI Chat app that uses Vectorize to access video game data for employees of Gamertown. * [shrty.dev:](https://github.com/craigsdennis/shorty-dot-dev) A URL shortener that makes use of KV and Workers Analytics Engine. The admin interface uses Function Calling. Go Shorty! * [Homie - Home Automation using Function Calling:](https://github.com/craigsdennis/lightbulb-moment-tool-calling) A home automation tool that uses AI Function calling to change the color of lightbulbs in your home. * [Hackathon Helper:](https://github.com/craigsdennis/hackathon-helper-workers-ai) A series of starters for Hackathons. Get building quicker! Python, Streamlit, Workers, and Pages starters for all your AI needs! * [Multimodal AI Translator:](https://github.com/elizabethsiegle/cfworkers-ai-translate) This application uses Cloudflare Workers AI to perform multimodal translation of languages via audio and text in the browser. * [Floor is Llava:](https://github.com/craigsdennis/floor-is-llava-workers-ai) This is an example repo to explore using the AI Vision model Llava hosted on Cloudflare Workers AI. This is a SvelteKit app hosted on Pages. * [Workers AI Object Detector:](https://github.com/elizabethsiegle/cf-workers-ai-obj-detection-webcam) Detect objects from a webcam in a Cloudflare Worker web app with detr-resnet-50 hosted on Cloudflare using Cloudflare Workers AI. * [JavaScript-native RPC on Cloudflare Workers <> Named Entrypoints:](https://github.com/cloudflare/js-rpc-and-entrypoints-demo) This is a collection of examples of communicating between multiple Cloudflare Workers using the remote-procedure call (RPC) system that is built into the Workers runtime. * [Workers for Platforms Example Project:](https://github.com/cloudflare/workers-for-platforms-example) Explore how you could manage thousands of Workers with a single Cloudflare Workers account. * [Whatever-ify:](https://github.com/craigsdennis/whatever-ify-workers-ai) Turn yourself into...whatever. Take a photo, get a description, generate a scene and character, then generate an image based on that calendar. * [Cloudflare Workers Chat Demo:](https://github.com/cloudflare/workers-chat-demo) This is a demo app written on Cloudflare Workers utilizing Durable Objects to implement real-time chat with stored history. * [Phoney AI:](https://github.com/craigsdennis/phoney-ai) This application uses Cloudflare Workers AI, Twilio, and AssemblyAI. Your phone is an input and output device. * [Vanilla JavaScript Chat Application using Cloudflare Workers AI:](https://github.com/craigsdennis/vanilla-chat-workers-ai) A web based chat interface built on Cloudflare Pages that allows for exploring Text Generation models on Cloudflare Workers AI. Design is built using tailwind. * [Turnstile Demo:](https://github.com/cloudflare/turnstile-demo-workers) A simple demo with a Turnstile-protected form, using Cloudflare Workers. With the code in this repository, we demonstrate implicit rendering and explicit rendering. * [Wildebeest:](https://github.com/cloudflare/wildebeest) Wildebeest is an ActivityPub and Mastodon-compatible server whose goal is to allow anyone to operate their Fediverse server and identity on their domain without needing to keep infrastructure, with minimal setup and maintenance, and running in minutes. * [D1 Northwind Demo:](https://github.com/cloudflare/d1-northwind) This is a demo of the Northwind dataset, running on Cloudflare Workers, and D1 - Cloudflare's SQL database, running on SQLite. * [Multiplayer Doom Workers:](https://github.com/cloudflare/doom-workers) A WebAssembly Doom port with multiplayer support running on top of Cloudflare's global network using Workers, WebSockets, Pages, and Durable Objects. * [Queues Web Crawler:](https://github.com/cloudflare/queues-web-crawler) An example use-case for Queues, a web crawler built on Browser Rendering and Puppeteer. The crawler finds the number of links to Cloudflare.com on the site, and archives a screenshot to Workers KV. * [DMARC Email Worker:](https://github.com/cloudflare/dmarc-email-worker) A Cloudflare worker script to process incoming DMARC reports, store them, and produce analytics. * [Access External Auth Rule Example Worker:](https://github.com/cloudflare/workers-access-external-auth-example) This is a worker that allows you to quickly setup an external evalutation rule in Cloudflare Access. ## Reference architectures Explore the following reference architectures that use Workers: [Cloudflare Security Architecture](https://developers.cloudflare.com/reference-architecture/architectures/security/) [This document provides insight into how this network and platform are architected from a security perspective, how they are operated, and what services are available for businesses to address their own security challenges.](https://developers.cloudflare.com/reference-architecture/architectures/security/) [Composable AI architecture](https://developers.cloudflare.com/reference-architecture/diagrams/ai/ai-composable/) [The architecture diagram illustrates how AI applications can be built end-to-end on Cloudflare, or single services can be integrated with external infrastructure and services.](https://developers.cloudflare.com/reference-architecture/diagrams/ai/ai-composable/) [Retrieval Augmented Generation (RAG)](https://developers.cloudflare.com/reference-architecture/diagrams/ai/ai-rag/) [RAG combines retrieval with generative models for better text. It uses external knowledge to create factual, relevant responses, improving coherence and accuracy in NLP tasks like chatbots.](https://developers.cloudflare.com/reference-architecture/diagrams/ai/ai-rag/) [Automatic captioning for video uploads](https://developers.cloudflare.com/reference-architecture/diagrams/ai/ai-video-caption/) [By integrating automatic speech recognition technology into video platforms, content creators, publishers, and distributors can reach a broader audience, including individuals with hearing impairments or those who prefer to consume content in different languages.](https://developers.cloudflare.com/reference-architecture/diagrams/ai/ai-video-caption/) [Ingesting BigQuery Data into Workers AI](https://developers.cloudflare.com/reference-architecture/diagrams/ai/bigquery-workers-ai/) [You can connect a Cloudflare Worker to get data from Google BigQuery and pass it to Workers AI, to run AI Models, powered by serverless GPUs.](https://developers.cloudflare.com/reference-architecture/diagrams/ai/bigquery-workers-ai/) [Optimizing and securing connected transportation systems](https://developers.cloudflare.com/reference-architecture/diagrams/iot/optimizing-and-securing-connected-transportation-systems/) [This diagram showcases Cloudflare components optimizing connected transportation systems. It illustrates how their technologies minimize latency, ensure reliability, and strengthen security for critical data flow.](https://developers.cloudflare.com/reference-architecture/diagrams/iot/optimizing-and-securing-connected-transportation-systems/) [Extend ZTNA with external authorization and serverless computing](https://developers.cloudflare.com/reference-architecture/diagrams/sase/augment-access-with-serverless/) [Cloudflare's ZTNA enhances access policies using external API calls and Workers for robust security. It verifies user authentication and authorization, ensuring only legitimate access to protected resources.](https://developers.cloudflare.com/reference-architecture/diagrams/sase/augment-access-with-serverless/) [A/B-testing using Workers](https://developers.cloudflare.com/reference-architecture/diagrams/serverless/a-b-testing-using-workers/) [Cloudflare's low-latency, fully serverless compute platform, Workers offers powerful capabilities to enable A/B testing using a server-side implementation.](https://developers.cloudflare.com/reference-architecture/diagrams/serverless/a-b-testing-using-workers/) [Fullstack applications](https://developers.cloudflare.com/reference-architecture/diagrams/serverless/fullstack-application/) [A practical example of how these services come together in a real fullstack application architecture.](https://developers.cloudflare.com/reference-architecture/diagrams/serverless/fullstack-application/) [Serverless ETL pipelines](https://developers.cloudflare.com/reference-architecture/diagrams/serverless/serverless-etl/) [Cloudflare enables fully serverless ETL pipelines, significantly reducing complexity, accelerating time to production, and lowering overall costs.](https://developers.cloudflare.com/reference-architecture/diagrams/serverless/serverless-etl/) [Serverless global APIs](https://developers.cloudflare.com/reference-architecture/diagrams/serverless/serverless-global-apis/) [An example architecture of a serverless API on Cloudflare and aims to illustrate how different compute and data products could interact with each other.](https://developers.cloudflare.com/reference-architecture/diagrams/serverless/serverless-global-apis/) [Serverless image content management](https://developers.cloudflare.com/reference-architecture/diagrams/serverless/serverless-image-content-management/) [Leverage various components of Cloudflare's ecosystem to construct a scalable image management solution](https://developers.cloudflare.com/reference-architecture/diagrams/serverless/serverless-image-content-management/) [Egress-free object storage in multi-cloud setups](https://developers.cloudflare.com/reference-architecture/diagrams/storage/egress-free-storage-multi-cloud/) [Learn how to use R2 to get egress-free object storage in multi-cloud setups.](https://developers.cloudflare.com/reference-architecture/diagrams/storage/egress-free-storage-multi-cloud/) [Event notifications for storage](https://developers.cloudflare.com/reference-architecture/diagrams/storage/event-notifications-for-storage/) [Use Cloudflare Workers or an external service to monitor for notifications about data changes and then handle them appropriately.](https://developers.cloudflare.com/reference-architecture/diagrams/storage/event-notifications-for-storage/) [Storing user generated content](https://developers.cloudflare.com/reference-architecture/diagrams/storage/storing-user-generated-content/) [Store user-generated content in R2 for fast, secure, and cost-effective architecture.](https://developers.cloudflare.com/reference-architecture/diagrams/storage/storing-user-generated-content/) --- title: Development & testing · Cloudflare Workers docs description: Develop and test your Workers locally. lastUpdated: 2025-06-20T17:22:06.000Z chatbotDeprioritize: false source_url: html: https://developers.cloudflare.com/workers/development-testing/ md: https://developers.cloudflare.com/workers/development-testing/index.md --- You can build, run, and test your Worker code on your own local machine before deploying it to Cloudflare's network. This is made possible through [Miniflare](https://developers.cloudflare.com/workers/testing/miniflare/), a simulator that executes your Worker code using the same runtime used in production, [`workerd`](https://github.com/cloudflare/workerd). [By default](https://developers.cloudflare.com/workers/development-testing/#defaults), your Worker's bindings [connect to locally simulated resources](https://developers.cloudflare.com/workers/development-testing/#bindings-during-local-development), but can be configured to interact with the real, production resource with [remote bindings](https://developers.cloudflare.com/workers/development-testing/#remote-bindings). ## Core concepts ### Worker execution vs Bindings When developing Workers, it's important to understand two distinct concepts: * **Worker execution**: Where your Worker code actually runs (on your local machine vs on Cloudflare's infrastructure). * [**Bindings**](https://developers.cloudflare.com/workers/runtime-apis/bindings/): How your Worker interacts with Cloudflare resources (like [KV namespaces](https://developers.cloudflare.com/kv), [R2 buckets](https://developers.cloudflare.com/r2), [D1 databases](https://developers.cloudflare.com/d1), [Queues](https://developers.cloudflare.com/queues/), [Durable Objects](https://developers.cloudflare.com/durable-objects/), etc). In your Worker code, these are accessed via the `env` object (such as `env.MY_KV`). ## Local development **You can start a local development server using:** 1. The Cloudflare Workers CLI [**Wrangler**](https://developers.cloudflare.com/workers/wrangler/), using the built-in [`wrangler dev`](https://developers.cloudflare.com/workers/wrangler/commands/#dev) command. * npm ```sh npx wrangler dev ``` * yarn ```sh yarn wrangler dev ``` * pnpm ```sh pnpm wrangler dev ``` 1. [**Vite**](https://vite.dev/), using the [**Cloudflare Vite plugin**](https://developers.cloudflare.com/workers/vite-plugin/). * npm ```sh npx vite dev ``` * yarn ```sh yarn vite dev ``` * pnpm ```sh pnpm vite dev ``` Both Wrangler and the Cloudflare Vite plugin use [Miniflare](https://developers.cloudflare.com/workers/testing/miniflare/) under the hood, and are developed and maintained by the Cloudflare team. For guidance on choosing when to use Wrangler versus Vite, see our guide [Choosing between Wrangler & Vite](https://developers.cloudflare.com/workers/development-testing/wrangler-vs-vite/). * [Get started with Wrangler](https://developers.cloudflare.com/workers/wrangler/install-and-update/) * [Get started with the Cloudflare Vite plugin](https://developers.cloudflare.com/workers/vite-plugin/get-started/) ### Defaults By default, running `wrangler dev` / `vite dev` (when using the [Vite plugin](https://developers.cloudflare.com/workers/vite-plugin/get-started/)) means that: * Your Worker code runs on your local machine. * All resources your Worker is bound to in your [Wrangler configuration](https://developers.cloudflare.com/workers/wrangler/configuration/) are simulated locally. ### Bindings during local development [Bindings](https://developers.cloudflare.com/workers/runtime-apis/bindings/) are interfaces that allow your Worker to interact with various Cloudflare resources (like [KV namespaces](https://developers.cloudflare.com/kv), [R2 buckets](https://developers.cloudflare.com/r2), [D1 databases](https://developers.cloudflare.com/d1), [Queues](https://developers.cloudflare.com/queues/), [Durable Objects](https://developers.cloudflare.com/durable-objects/), etc). In your Worker code, these are accessed via the `env` object (such as `env.MY_KV`). During local development, your Worker code interacts with these bindings using the exact same API calls (such as `env.MY_KV.put()`) as it would in a deployed environment. These local resources are initially empty, but you can populate them with data, as documented in [Adding local data](https://developers.cloudflare.com/workers/development-testing/local-data/). * By default, bindings connect to **local resource simulations** (except for [AI bindings](https://developers.cloudflare.com/workers-ai/configuration/bindings/), as AI models always run remotely). * You can override this default behavior and **connect to the remote resource**, on a per-binding basis. This lets you connect to real, production resources while still running your Worker code locally. ## Remote bindings Beta **Remote bindings** are bindings that are configured to connect to the deployed, remote resource during local development *instead* of the locally simulated resource. You can configure remote bindings by setting `experimental_remote: true` in the binding definition. ### Example configuration * wrangler.jsonc ```jsonc { "name": "my-worker", "compatibility_date": "2025-07-16", "r2_buckets": [ { "bucket_name": "screenshots-bucket", "binding": "screenshots_bucket", "experimental_remote": true, }, ], } ``` * wrangler.toml ```toml name = "my-worker" compatibility_date = "2025-07-16" [[r2_buckets]] bucket_name = "screenshots-bucket" binding = "screenshots_bucket" experimental_remote = true ``` When remote bindings are configured, your Worker still **executes locally**, only the underlying resources your bindings connect to change. For all bindings marked with `experimental_remote: true`, Miniflare will route its operations (such as `env.MY_KV.put()`) to the deployed resource. All other bindings not explicitly configured with `experimental_remote: true` continue to use their default local simulations. ### Using Wrangler with remote bindings If you're using [Wrangler](https://developers.cloudflare.com/workers/wrangler/) for local development and have remote bindings configured, you'll need to use the following experimental command: * npm ```sh npx wrangler dev --x-remote-bindings ``` * yarn ```sh yarn wrangler dev --x-remote-bindings ``` * pnpm ```sh pnpm wrangler dev --x-remote-bindings ``` ### Using Vite with remote bindings If you're using Vite via [the Cloudflare Vite plugin](https://developers.cloudflare.com/workers/vite-plugin/), you'll need to add support for remote bindings in your Vite configuration (`vite.config.ts`): ```ts import { cloudflare } from "@cloudflare/vite-plugin"; import { defineConfig } from "vite"; export default defineConfig({ plugins: [ cloudflare({ configPath: "./entry-worker/wrangler.jsonc", experimental: { remoteBindings: true }, }), ], }); ``` ### Using Vitest with remote bindings You can also use Vitest with configured remote bindings by enabling support in your Vitest configuration file (`vitest.config.ts`): ```ts import { defineWorkersConfig } from "@cloudflare/vitest-pool-workers/config"; export default defineWorkersConfig({ test: { poolOptions: { workers: { experimental_remoteBindings: true, wrangler: { configPath: "./wrangler.jsonc" }, }, }, }, }); ``` ### Targeting preview resources To protect production data, you can create and specify preview resources in your [Wrangler configuration](https://developers.cloudflare.com/workers/wrangler/configuration/), such as: * [Preview namespaces for KV stores](https://developers.cloudflare.com/workers/wrangler/configuration/#kv-namespaces):`preview_id`. * [Preview buckets for R2 storage](https://developers.cloudflare.com/workers/wrangler/configuration/#r2-buckets): `preview_bucket_name`. * [Preview database IDs for D1](https://developers.cloudflare.com/workers/wrangler/configuration/#d1-databases): `preview_database_id` If preview configuration is present for a binding, setting `experimental_remote: true` will ensure that remote bindings connect to that designated remote preview resource. **For example:** * wrangler.jsonc ```jsonc { "name": "my-worker", "compatibility_date": "2025-07-16", "r2_buckets": [ { "bucket_name": "screenshots-bucket", "binding": "screenshots_bucket", "preview_bucket_name": "preview-screenshots-bucket", "experimental_remote": true, }, ], } ``` * wrangler.toml ```toml name = "my-worker" compatibility_date = "2025-07-16" [[r2_buckets]] bucket_name = "screenshots-bucket" binding = "screenshots_bucket" preview_bucket_name = "preview-screenshots-bucket" experimental_remote = true ``` Running `wrangler dev --x-remote-bindings` with the above configuration means that: * Your Worker code runs locally * All calls made to `env.screenshots_bucket` will use the `preview-screenshots-bucket` resource, rather than the production `screenshots-bucket`. ### Recommended remote bindings We recommend configuring specific bindings to connect to their remote counterparts. These services often rely on Cloudflare's network infrastructure or have complex backends that are not fully simulated locally. The following bindings are recommended to have `experimental_remote: true` in your Wrangler configuration: #### [Browser Rendering](https://developers.cloudflare.com/workers/wrangler/configuration/#browser-rendering): To interact with a real headless browser for rendering. There is no current local simulation for Browser Rendering. * wrangler.jsonc ```jsonc { "browser": { "binding": "MY_BROWSER", "experimental_remote": true }, } ``` * wrangler.toml ```toml [browser] binding = "MY_BROWSER" experimental_remote = true ``` #### [Workers AI](https://developers.cloudflare.com/workers/wrangler/configuration/#workers-ai): To utilize actual AI models deployed on Cloudflare's network for inference. There is no current local simulation for Workers AI. * wrangler.jsonc ```jsonc { "ai": { "binding": "AI", "experimental_remote": true }, } ``` * wrangler.toml ```toml [ai] binding = "AI" experimental_remote = true ``` #### [Vectorize](https://developers.cloudflare.com/workers/wrangler/configuration/#vectorize-indexes): To connect to your production Vectorize indexes for accurate vector search and similarity operations. There is no current local simulation for Vectorize. * wrangler.jsonc ```jsonc { "vectorize": [ { "binding": "MY_VECTORIZE_INDEX", "index_name": "my-prod-index", "experimental_remote": true } ], } ``` * wrangler.toml ```toml [[vectorize]] binding = "MY_VECTORIZE_INDEX" index_name = "my-prod-index" experimental_remote = true ``` #### [mTLS](https://developers.cloudflare.com/workers/wrangler/configuration/#mtls-certificates): To verify that the certificate exchange and validation process work as expected. There is no current local simulation for mTLS bindings. * wrangler.jsonc ```jsonc { "mtls_certificates": [ { "binding": "MY_CLIENT_CERT_FETCHER", "certificate_id": "", "experimental_remote": true } ] } ``` * wrangler.toml ```toml [[mtls_certificates]] binding = "MY_CLIENT_CERT_FETCHER" certificate_id = "" experimental_remote = true ``` #### [Images](https://developers.cloudflare.com/workers/wrangler/configuration/#images): To connect to a high-fidelity version of the Images API, and verify that all transformations work as expected. Local simulation for Cloudflare Images is [limited with only a subset of features](https://developers.cloudflare.com/images/transform-images/bindings/#interact-with-your-images-binding-locally). * wrangler.jsonc ```jsonc { "images": { "binding": "IMAGES" , "experimental_remote": true } } ``` * wrangler.toml ```toml [images] binding = "IMAGES" experimental_remote = true ``` Note If `experimental_remote: true` is not specified for Browser Rendering, Vectorize, mTLS, or Images, Cloudflare **will issue a warning**. This prompts you to consider enabling it for a more production-like testing experience. If a Workers AI binding has `experimental_remote` set to `false`, Cloudflare will **produce an error**. If the property is omitted, Cloudflare will connect to the remote resource and issue a warning to add the property to configuration. #### [Dispatch Namespaces](https://developers.cloudflare.com/cloudflare-for-platforms/workers-for-platforms/get-started/developing-with-wrangler/): Workers for Platforms users can configure `experimental_remote: true` in dispatch namespace binding definitions: * wrangler.jsonc ```jsonc { "dispatch_namespaces": [ { "binding": "DISPATCH_NAMESPACE", "namespace": "testing", "experimental_remote":true } ] } ``` * wrangler.toml ```toml [[dispatch_namespaces]] binding = "DISPATCH_NAMESPACE" namespace = "testing" experimental_remote = true ``` This allows you to run your [dynamic dispatch Worker](https://developers.cloudflare.com/cloudflare-for-platforms/workers-for-platforms/reference/how-workers-for-platforms-works/#dynamic-dispatch-worker) locally, while connecting it to your remote dispatch namespace binding. This allows you to test changes to your core dispatching logic against real, deployed [user Workers](https://developers.cloudflare.com/cloudflare-for-platforms/workers-for-platforms/reference/how-workers-for-platforms-works/#user-workers). ### Unsupported remote bindings Certain bindings are not supported for remote connections during local development (`experimental_remote: true`). These will always use local simulations or local values. If `experimental_remote: true` is specified in Wrangler configuration for any of the following unsupported binding types, Cloudflare **will issue an error**. See [all supported and unsupported bindings for remote bindings](https://developers.cloudflare.com/workers/development-testing/bindings-per-env/). * [**Durable Objects**](https://developers.cloudflare.com/workers/wrangler/configuration/#durable-objects): Enabling remote connections for Durable Objects may be supported in the future, but currently will always run locally. * [**Environment Variables (`vars`)**](https://developers.cloudflare.com/workers/wrangler/configuration/#environment-variables): Environment variables are intended to be distinct between local development and deployed environments. They are easily configurable locally (such as in a `.dev.vars` file or directly in Wrangler configuration). * [**Secrets**](https://developers.cloudflare.com/workers/wrangler/configuration/#secrets): Like environment variables, secrets are expected to have different values in local development versus deployed environments for security reasons. Use `.dev.vars` for local secret management. * **[Static Assets](https://developers.cloudflare.com/workers/wrangler/configuration/#assets)**: Static assets are always served from your local disk during development for speed and direct feedback on changes. * [**Version Metadata**](https://developers.cloudflare.com/workers/runtime-apis/bindings/version-metadata/): Since your Worker code is running locally, version metadata (like commit hash, version tags) associated with a specific deployed version is not applicable or accurate. * [**Analytics Engine**](https://developers.cloudflare.com/analytics/analytics-engine/): Local development sessions typically don't contribute data directly to production Analytics Engine. * [**Hyperdrive**](https://developers.cloudflare.com/workers/wrangler/configuration/#hyperdrive): This is being actively worked on, but is currently unsupported. * [**Rate Limiting**](https://developers.cloudflare.com/workers/runtime-apis/bindings/rate-limit/#configuration): Local development sessions typically should not share or affect rate limits of your deployed Workers. Rate limiting logic should be tested against local simulations. Tip If you have use-cases for connecting to any of the remote resources above, please [open a feature request](https://github.com/cloudflare/workers-sdk/issues) in our [`workers-sdk` repository](https://github.com/cloudflare/workers-sdk). ### Important Considerations * **Data modification**: Operations (writes, deletes, updates) on bindings connected remotely will affect your actual data in the targeted Cloudflare resource (be it preview or production). * **Billing**: Interactions with remote Cloudflare services through these connections will incur standard operational costs for those services (such as KV operations, R2 storage/operations, AI requests, D1 usage). * **Network latency**: Expect network latency for operations on these remotely connected bindings, as they involve communication over the internet. ### API Wrangler provides programmatic utilities to help tooling authors support remote binding connections when running Workers code with [Miniflare](https://developers.cloudflare.com/workers/testing/miniflare/). **Key APIs include:** * [`experimental_startRemoteProxySession`](#experimental_startRemoteProxySession): Starts a proxy session that allows interaction with remote bindings. * [`unstable_convertConfigBindingsToStartWorkerBindings`](#unstable_convertconfigbindingstostartworkerbindings): Utility for converting binding definitions. * [`experimental_maybeStartOrUpdateProxySession`](#experimental_maybestartorupdatemixedmodesession): Convenience function to easily start or update a proxy session. #### `experimental_startRemoteProxySession` This function starts a proxy session for a given set of bindings. It accepts options to control session behavior, including an `auth` option with your Cloudflare account ID and API token for remote binding access. It returns an object with: * `ready` Promise\: Resolves when the session is ready. * `dispose` () => Promise\: Stops the session. * `updateBindings` (bindings: StartDevWorkerInput\['bindings']) => Promise\: Updates session bindings. * `remoteProxyConnectionString` remoteProxyConnectionString: String to pass to Miniflare for remote binding access. #### `unstable_convertConfigBindingsToStartWorkerBindings` The `unstable_readConfig` utility returns an `Unstable_Config` object which includes the definition of the bindings included in the configuration file. These bindings definitions are however not directly compatible with `experimental_startRemoteProxySession`. It can be quite convenient to however read the binding declarations with `unstable_readConfig` and then pass them to `experimental_startRemoteProxySession`, so for this wrangler exposes `unstable_convertConfigBindingsToStartWorkerBindings` which is a simple utility to convert the bindings in an `Unstable_Config` object into a structure that can be passed to `experimental_startRemoteProxySession`. Note This type conversion is temporary. In the future, the types will be unified so you can pass the config object directly to `experimental_startRemoteProxySession`. #### `experimental_maybeStartOrUpdateRemoteProxySession` This wrapper simplifies proxy session management. It takes: * The path to your Wrangler config, or an object with remote bindings. * The current proxy session details (this parameter can be set to `null` or not being provided if none). It returns an object with the proxy session details if started or updated, or `null` if no proxy session is needed. The function: * Based on the first argument prepares the input arguments for the proxy session. * If there are no remote bindings to be used (nor a pre-existing proxy session) it returns null, signaling that no proxy session is needed. * If the details of an existing proxy session have been provided it updates the proxy session accordingly. * Otherwise if starts a new proxy session. * Returns the proxy session details (that can later be passed as the second argument to `experimental_maybeStartOrUpdateRemoteProxySession`). #### Example Here's a basic example of using Miniflare with `experimental_maybeStartOrUpdateRemoteProxySession` to provide a local dev session with remote bindings. This example uses a single hardcoded KV binding. * JavaScript ```js import { Miniflare, MiniflareOptions } from "miniflare"; import { experimental_maybeStartOrUpdateRemoteProxySession } from "wrangler"; let mf; let remoteProxySessionDetails = null; async function startOrUpdateDevSession() { remoteProxySessionDetails = await experimental_maybeStartOrUpdateRemoteProxySession( { bindings: { MY_KV: { type: "kv_namespace", id: "kv-id", experimental_remote: true, }, }, }, remoteProxySessionDetails, ); const miniflareOptions = { scriptPath: "./worker.js", kvNamespaces: { MY_KV: { id: "kv-id", remoteProxyConnectionString: remoteProxySessionDetails?.session.remoteProxyConnectionString, }, }, }; if (!mf) { mf = new Miniflare(miniflareOptions); } else { mf.setOptions(miniflareOptions); } } // ... tool logic that invokes `startOrUpdateDevSession()` ... // ... once the dev session is no longer needed run // `remoteProxySessionDetails?.session.dispose()` ``` * TypeScript ```ts import { Miniflare, MiniflareOptions } from "miniflare"; import { experimental_maybeStartOrUpdateRemoteProxySession } from "wrangler"; let mf: Miniflare | null; let remoteProxySessionDetails: Awaited< ReturnType > | null = null; async function startOrUpdateDevSession() { remoteProxySessionDetails = await experimental_maybeStartOrUpdateRemoteProxySession( { bindings: { MY_KV: { type: 'kv_namespace', id: 'kv-id', experimental_remote: true, } } }, remoteProxySessionDetails ); const miniflareOptions: MiniflareOptions = { scriptPath: "./worker.js", kvNamespaces: { MY_KV: { id: "kv-id", remoteProxyConnectionString: remoteProxySessionDetails?.session.remoteProxyConnectionString, }, }, }; if (!mf) { mf = new Miniflare(miniflareOptions); } else { mf.setOptions(miniflareOptions); } } // ... tool logic that invokes `startOrUpdateDevSession()` ... // ... once the dev session is no longer needed run // `remoteProxySessionDetails?.session.dispose()` ``` ## `wrangler dev --remote` (Legacy) Separate from Miniflare-powered local development, Wrangler also offers a fully remote development mode via [`wrangler dev --remote`](https://developers.cloudflare.com/workers/wrangler/commands/#dev). Remote development is [**not** supported in the Vite plugin](https://developers.cloudflare.com/workers/development-testing/wrangler-vs-vite/). * npm ```sh npx wrangler dev --remote ``` * yarn ```sh yarn wrangler dev --remote ``` * pnpm ```sh pnpm wrangler dev --remote ``` During **remote development**, all of your Worker code is uploaded to a temporary preview environment on Cloudflare's infrastructure, and changes to your code are automatically uploaded as you save. When using remote development, all bindings automatically connect to their remote resources. Unlike local development, you cannot configure bindings to use local simulations - they will always use the deployed resources on Cloudflare's network. ### When to use Remote development * For most development tasks, the most efficient and productive experience will be local development along with [remote bindings](https://developers.cloudflare.com/workers/development-testing/#remote-bindings) when needed. * You may want to use `wrangler dev --remote` for testing features or behaviors that are highly specific to Cloudflare's network and cannot be adequately simulated locally or tested via remote bindings. ### Considerations * Iteration is significantly slower than local development due to the upload/deployment step for each change. ### Limitations * When you run a remote development session using the `--remote` flag, a limit of 50 [routes](https://developers.cloudflare.com/workers/configuration/routing/routes/) per zone is enforced. Learn more in[ Workers platform limits](https://developers.cloudflare.com/workers/platform/limits/#number-of-routes-per-zone-when-using-wrangler-dev---remote). --- title: Examples · Cloudflare Workers docs description: Explore the following examples for Workers. lastUpdated: 2025-05-06T17:35:57.000Z chatbotDeprioritize: false source_url: html: https://developers.cloudflare.com/workers/examples/ md: https://developers.cloudflare.com/workers/examples/index.md --- Explore the following examples for Workers. 45 examples [103 Early Hints](https://developers.cloudflare.com/workers/examples/103-early-hints/) Allow a client to request static assets while waiting for the HTML response. [A/B testing with same-URL direct access](https://developers.cloudflare.com/workers/examples/ab-testing/) Set up an A/B test by controlling what response is served based on cookies. This version supports passing the request through to test and control on the origin, bypassing random assignment. [Accessing the Cloudflare Object](https://developers.cloudflare.com/workers/examples/accessing-the-cloudflare-object/) Access custom Cloudflare properties and control how Cloudflare features are applied to every request. [Aggregate requests](https://developers.cloudflare.com/workers/examples/aggregate-requests/) Send two GET request to two urls and aggregates the responses into one response. [Alter headers](https://developers.cloudflare.com/workers/examples/alter-headers/) Example of how to add, change, or delete headers sent in a request or returned in a response. [Auth with headers](https://developers.cloudflare.com/workers/examples/auth-with-headers/) Allow or deny a request based on a known pre-shared key in a header. This is not meant to replace the WebCrypto API. [Block on TLS](https://developers.cloudflare.com/workers/examples/block-on-tls/) Inspects the incoming request's TLS version and blocks if under TLSv1.2. [Bulk origin override](https://developers.cloudflare.com/workers/examples/bulk-origin-proxy/) Resolve requests to your domain to a set of proxy third-party origin URLs. [Bulk redirects](https://developers.cloudflare.com/workers/examples/bulk-redirects/) Redirect requests to certain URLs based on a mapped object to the request's URL. [Cache POST requests](https://developers.cloudflare.com/workers/examples/cache-post-request/) Cache POST requests using the Cache API. [Cache Tags using Workers](https://developers.cloudflare.com/workers/examples/cache-tags/) Send Additional Cache Tags using Workers [Cache using fetch](https://developers.cloudflare.com/workers/examples/cache-using-fetch/) Determine how to cache a resource by setting TTLs, custom cache keys, and cache headers in a fetch request. [Conditional response](https://developers.cloudflare.com/workers/examples/conditional-response/) Return a response based on the incoming request's URL, HTTP method, User Agent, IP address, ASN or device type. [Cookie parsing](https://developers.cloudflare.com/workers/examples/extract-cookie-value/) Given the cookie name, get the value of a cookie. You can also use cookies for A/B testing. [CORS header proxy](https://developers.cloudflare.com/workers/examples/cors-header-proxy/) Add the necessary CORS headers to a third party API response. [Country code redirect](https://developers.cloudflare.com/workers/examples/country-code-redirect/) Redirect a response based on the country code in the header of a visitor. [Custom Domain with Images](https://developers.cloudflare.com/workers/examples/images-workers/) Set up custom domain for Images using a Worker or serve images using a prefix path and Cloudflare registered domain. [Data loss prevention](https://developers.cloudflare.com/workers/examples/data-loss-prevention/) Protect sensitive data to prevent data loss, and send alerts to a webhooks server in the event of a data breach. [Debugging logs](https://developers.cloudflare.com/workers/examples/debugging-logs/) Send debugging information in an errored response to a logging service. [Fetch HTML](https://developers.cloudflare.com/workers/examples/fetch-html/) Send a request to a remote server, read HTML from the response, and serve that HTML. [Fetch JSON](https://developers.cloudflare.com/workers/examples/fetch-json/) Send a GET request and read in JSON from the response. Use to fetch external data. [Geolocation: Custom Styling](https://developers.cloudflare.com/workers/examples/geolocation-custom-styling/) Personalize website styling based on localized user time. [Geolocation: Hello World](https://developers.cloudflare.com/workers/examples/geolocation-hello-world/) Get all geolocation data fields and display them in HTML. [Geolocation: Weather application](https://developers.cloudflare.com/workers/examples/geolocation-app-weather/) Fetch weather data from an API using the user's geolocation data. [Hot-link protection](https://developers.cloudflare.com/workers/examples/hot-link-protection/) Block other websites from linking to your content. This is useful for protecting images. [HTTP Basic Authentication](https://developers.cloudflare.com/workers/examples/basic-auth/) Shows how to restrict access using the HTTP Basic schema. [Logging headers to console](https://developers.cloudflare.com/workers/examples/logging-headers/) Examine the contents of a Headers object by logging to console with a Map. [Modify request property](https://developers.cloudflare.com/workers/examples/modify-request-property/) Create a modified request with edited properties based off of an incoming request. [Modify response](https://developers.cloudflare.com/workers/examples/modify-response/) Fetch and modify response properties which are immutable by creating a copy first. [Multiple Cron Triggers](https://developers.cloudflare.com/workers/examples/multiple-cron-triggers/) Set multiple Cron Triggers on three different schedules. [Post JSON](https://developers.cloudflare.com/workers/examples/post-json/) Send a POST request with JSON data. Use to share data with external servers. [Read POST](https://developers.cloudflare.com/workers/examples/read-post/) Serve an HTML form, then read POST requests. Use also to read JSON or POST data from an incoming request. [Redirect](https://developers.cloudflare.com/workers/examples/redirect/) Redirect requests from one URL to another or from one set of URLs to another set. [Respond with another site](https://developers.cloudflare.com/workers/examples/respond-with-another-site/) Respond to the Worker request with the response from another website (example.com in this example). [Return JSON](https://developers.cloudflare.com/workers/examples/return-json/) Return JSON directly from a Worker script, useful for building APIs and middleware. [Return small HTML page](https://developers.cloudflare.com/workers/examples/return-html/) Deliver an HTML page from an HTML string directly inside the Worker script. [Rewrite links](https://developers.cloudflare.com/workers/examples/rewrite-links/) Rewrite URL links in HTML using the HTMLRewriter. This is useful for JAMstack websites. [Set security headers](https://developers.cloudflare.com/workers/examples/security-headers/) Set common security headers (X-XSS-Protection, X-Frame-Options, X-Content-Type-Options, Permissions-Policy, Referrer-Policy, Strict-Transport-Security, Content-Security-Policy). [Setting Cron Triggers](https://developers.cloudflare.com/workers/examples/cron-trigger/) Set a Cron Trigger for your Worker. [Sign requests](https://developers.cloudflare.com/workers/examples/signing-requests/) Verify a signed request using the HMAC and SHA-256 algorithms or return a 403. [Stream OpenAI API Responses](https://developers.cloudflare.com/workers/examples/openai-sdk-streaming/) Use the OpenAI v4 SDK to stream responses from OpenAI. [Turnstile with Workers](https://developers.cloudflare.com/workers/examples/turnstile-html-rewriter/) Inject [Turnstile](https://developers.cloudflare.com/turnstile/) implicitly into HTML elements using the HTMLRewriter runtime API. [Using the Cache API](https://developers.cloudflare.com/workers/examples/cache-api/) Use the Cache API to store responses in Cloudflare's cache. [Using the WebSockets API](https://developers.cloudflare.com/workers/examples/websockets/) Use the WebSockets API to communicate in real time with your Cloudflare Workers. [Using timingSafeEqual](https://developers.cloudflare.com/workers/examples/protect-against-timing-attacks/) Protect against timing attacks by safely comparing values using `timingSafeEqual`. --- title: Framework guides · Cloudflare Workers docs description: Create full-stack applications deployed to Cloudflare Workers. lastUpdated: 2025-06-05T13:25:05.000Z chatbotDeprioritize: true source_url: html: https://developers.cloudflare.com/workers/framework-guides/ md: https://developers.cloudflare.com/workers/framework-guides/index.md --- Create full-stack applications deployed to Cloudflare Workers. * [AI & agents](https://developers.cloudflare.com/workers/framework-guides/ai-and-agents/) * [Agents SDK](https://developers.cloudflare.com/agents/) * [LangChain](https://developers.cloudflare.com/workers/languages/python/packages/langchain/) * [Web applications](https://developers.cloudflare.com/workers/framework-guides/web-apps/) * [React + Vite](https://developers.cloudflare.com/workers/framework-guides/web-apps/react/) * [Astro](https://developers.cloudflare.com/workers/framework-guides/web-apps/astro/) * [React Router (formerly Remix)](https://developers.cloudflare.com/workers/framework-guides/web-apps/react-router/) * [Next.js](https://developers.cloudflare.com/workers/framework-guides/web-apps/nextjs/) * [Vue](https://developers.cloudflare.com/workers/framework-guides/web-apps/vue/) * [RedwoodSDK](https://developers.cloudflare.com/workers/framework-guides/web-apps/redwoodsdk/) * [TanStack](https://developers.cloudflare.com/workers/framework-guides/web-apps/tanstack/) * [Svelte](https://developers.cloudflare.com/workers/framework-guides/web-apps/svelte/) * [More guides...](https://developers.cloudflare.com/workers/framework-guides/web-apps/more-web-frameworks/) * [Angular](https://developers.cloudflare.com/workers/framework-guides/web-apps/more-web-frameworks/angular/) * [Docusaurus](https://developers.cloudflare.com/workers/framework-guides/web-apps/more-web-frameworks/docusaurus/) * [Gatsby](https://developers.cloudflare.com/workers/framework-guides/web-apps/more-web-frameworks/gatsby/) * [Hono](https://developers.cloudflare.com/workers/framework-guides/web-apps/more-web-frameworks/hono/) * [Nuxt](https://developers.cloudflare.com/workers/framework-guides/web-apps/more-web-frameworks/nuxt/) * [Qwik](https://developers.cloudflare.com/workers/framework-guides/web-apps/more-web-frameworks/qwik/) * [Solid](https://developers.cloudflare.com/workers/framework-guides/web-apps/more-web-frameworks/solid/) * [Mobile applications](https://developers.cloudflare.com/workers/framework-guides/mobile-apps/) * [Expo](https://docs.expo.dev/eas/hosting/reference/worker-runtime/) * [APIs](https://developers.cloudflare.com/workers/framework-guides/apis/) * [FastAPI](https://developers.cloudflare.com/workers/languages/python/packages/fastapi/) * [Hono](https://developers.cloudflare.com/workers/framework-guides/web-apps/more-web-frameworks/hono/) --- title: Getting started · Cloudflare Workers docs description: Build your first Worker. lastUpdated: 2025-03-13T17:52:53.000Z chatbotDeprioritize: true source_url: html: https://developers.cloudflare.com/workers/get-started/ md: https://developers.cloudflare.com/workers/get-started/index.md --- Build your first Worker. * [CLI](https://developers.cloudflare.com/workers/get-started/guide/) * [Dashboard](https://developers.cloudflare.com/workers/get-started/dashboard/) * [Prompting](https://developers.cloudflare.com/workers/get-started/prompting/) * [Templates](https://developers.cloudflare.com/workers/get-started/quickstarts/) --- title: Glossary · Cloudflare Workers docs description: Review the definitions for terms used across Cloudflare's Workers documentation. lastUpdated: 2025-02-05T10:06:53.000Z chatbotDeprioritize: false source_url: html: https://developers.cloudflare.com/workers/glossary/ md: https://developers.cloudflare.com/workers/glossary/index.md --- Review the definitions for terms used across Cloudflare's Workers documentation. | Term | Definition | | - | - | | Auxiliary Worker | A Worker created locally via the [Workers Vitest integration](https://developers.cloudflare.com/workers/testing/vitest-integration/) that runs in a separate isolate to the test runner, with a different global scope. | | binding | [Bindings](https://developers.cloudflare.com/workers/runtime-apis/bindings/) allow your Workers to interact with resources on the Cloudflare Developer Platform. | | C3 | [C3](https://developers.cloudflare.com/learning-paths/workers/get-started/c3-and-wrangler/) is a command-line tool designed to help you set up and deploy new applications to Cloudflare. | | CPU time | [CPU time](https://developers.cloudflare.com/workers/platform/limits/#cpu-time) is the amount of time the central processing unit (CPU) actually spends doing work, during a given request. | | Cron Triggers | [Cron Triggers](https://developers.cloudflare.com/workers/configuration/cron-triggers/) allow users to map a cron expression to a Worker using a [`scheduled()` handler](https://developers.cloudflare.com/workers/runtime-apis/handlers/scheduled/) that enables Workers to be executed on a schedule. | | D1 | [D1](https://developers.cloudflare.com/d1/) is Cloudflare's native serverless database. | | deployment | [Deployments](https://developers.cloudflare.com/workers/configuration/versions-and-deployments/#deployments) track the version(s) of your Worker that are actively serving traffic. | | Durable Objects | [Durable Objects](https://developers.cloudflare.com/durable-objects/) is a globally distributed coordination API with strongly consistent storage. | | duration | [Duration](https://developers.cloudflare.com/workers/platform/limits/#duration) is a measurement of wall-clock time — the total amount of time from the start to end of an invocation of a Worker. | | environment | [Environments](https://developers.cloudflare.com/workers/wrangler/environments/) allow you to deploy the same Worker application with different configuration for each environment. Only available for use with a [Wrangler configuration file](https://developers.cloudflare.com/workers/wrangler/configuration/). | | environment variable | [Environment variables](https://developers.cloudflare.com/workers/configuration/environment-variables/) are a type of binding that allow you to attach text strings or JSON values to your Worker. | | handler | [Handlers](https://developers.cloudflare.com/workers/runtime-apis/handlers/) are methods on Workers that can receive and process external inputs, and can be invoked from outside your Worker. | | isolate | [Isolates](https://developers.cloudflare.com/workers/reference/how-workers-works/#isolates) are lightweight contexts that provide your code with variables it can access and a safe environment to be executed within. | | KV | [Workers KV](https://developers.cloudflare.com/kv/) is Cloudflare's key-value data storage. | | module Worker | Refers to a Worker written in [module syntax](https://developers.cloudflare.com/workers/reference/migrate-to-module-workers/). | | origin | [Origin](https://www.cloudflare.com/learning/cdn/glossary/origin-server/) generally refers to the web server behind Cloudflare where your application is hosted. | | Pages | [Cloudflare Pages](https://developers.cloudflare.com/pages/) is Cloudflare's product offering for building and deploying full-stack applications. | | Queues | [Queues](https://developers.cloudflare.com/queues/) integrates with Cloudflare Workers and enables you to build applications that can guarantee delivery. | | R2 | [R2](https://developers.cloudflare.com/r2/) is an S3-compatible distributed object storage designed to eliminate the obstacles of sharing data across clouds. | | rollback | [Rollbacks](https://developers.cloudflare.com/workers/configuration/versions-and-deployments/rollbacks/) are a way to deploy an older deployment to the Cloudflare global network. | | secret | [Secrets](https://developers.cloudflare.com/workers/configuration/secrets/) are a type of binding that allow you to attach encrypted text values to your Worker. | | service Worker | Refers to a Worker written in [service worker](https://developer.mozilla.org/en-US/docs/Web/API/Service_Worker_API) [syntax](https://developers.cloudflare.com/workers/reference/migrate-to-module-workers/). | | subrequest | A subrequest is any request that a Worker makes to either Internet resources using the [Fetch API](https://developers.cloudflare.com/workers/runtime-apis/fetch/) or requests to other Cloudflare services like [R2](https://developers.cloudflare.com/r2/), [KV](https://developers.cloudflare.com/kv/), or [D1](https://developers.cloudflare.com/d1/). | | Tail Worker | A [Tail Worker](https://developers.cloudflare.com/workers/observability/logs/tail-workers/) receives information about the execution of other Workers (known as producer Workers), such as HTTP statuses, data passed to `console.log()` or uncaught exceptions. | | V8 | Chrome V8 is a [JavaScript engine](https://www.cloudflare.com/learning/serverless/glossary/what-is-chrome-v8/), which means that it [executes JavaScript code](https://developers.cloudflare.com/workers/reference/how-workers-works/). | | version | A [version](https://developers.cloudflare.com/workers/configuration/versions-and-deployments/#versions) is defined by the state of code as well as the state of configuration in a Worker's Wrangler file. | | wall-clock time | [Wall-clock time](https://developers.cloudflare.com/workers/platform/limits/#duration) is the total amount of time from the start to end of an invocation of a Worker. | | workerd | [`workerd`](https://github.com/cloudflare/workerd?cf_target_id=D15F29F105B3A910EF4B2ECB12D02E2A) is a JavaScript / Wasm server runtime based on the same code that powers Cloudflare Workers. | | Wrangler | [Wrangler](https://developers.cloudflare.com/learning-paths/workers/get-started/c3-and-wrangler/) is the Cloudflare Developer Platform command-line interface (CLI) that allows you to manage projects, such as Workers, created from the Cloudflare Developer Platform product offering. | | wrangler.toml / wrangler.json / wrangler.jsonc | The [configuration](https://developers.cloudflare.com/workers/wrangler/configuration/) used to customize the development and deployment setup for a Worker or a Pages Function. | --- title: Languages · Cloudflare Workers docs description: Languages supported on Workers, a polyglot platform. lastUpdated: 2025-02-05T10:06:53.000Z chatbotDeprioritize: false source_url: html: https://developers.cloudflare.com/workers/languages/ md: https://developers.cloudflare.com/workers/languages/index.md --- Workers is a polyglot platform, and provides first-class support for the following programming languages: * [JavaScript](https://developers.cloudflare.com/workers/languages/javascript/) * [TypeScript](https://developers.cloudflare.com/workers/languages/typescript/) * [Python](https://developers.cloudflare.com/workers/languages/python/) * [Rust](https://developers.cloudflare.com/workers/languages/rust/) Workers also supports [WebAssembly](https://developers.cloudflare.com/workers/runtime-apis/webassembly/) (abbreviated as "Wasm") — a binary format that many languages can be compiled to. This allows you to write Workers using programming language beyond the languages listed above, including C, C++, Kotlin, Go and more. --- title: Observability · Cloudflare Workers docs description: Understand how your Worker projects are performing via logs, traces, and other data sources. lastUpdated: 2025-04-09T02:45:13.000Z chatbotDeprioritize: true source_url: html: https://developers.cloudflare.com/workers/observability/ md: https://developers.cloudflare.com/workers/observability/index.md --- Understand how your Worker projects are performing via logs, traces, and other data sources. * [Errors and exceptions](https://developers.cloudflare.com/workers/observability/errors/) * [Metrics and analytics](https://developers.cloudflare.com/workers/observability/metrics-and-analytics/) * [Logs](https://developers.cloudflare.com/workers/observability/logs/) * [Query Builder](https://developers.cloudflare.com/workers/observability/query-builder/) * [DevTools](https://developers.cloudflare.com/workers/observability/dev-tools/) * [Integrations](https://developers.cloudflare.com/workers/observability/third-party-integrations/) * [Source maps and stack traces](https://developers.cloudflare.com/workers/observability/source-maps/) --- title: Platform · Cloudflare Workers docs description: Pricing, limits and other information about the Workers platform. lastUpdated: 2025-02-05T10:06:53.000Z chatbotDeprioritize: false source_url: html: https://developers.cloudflare.com/workers/platform/ md: https://developers.cloudflare.com/workers/platform/index.md --- Pricing, limits and other information about the Workers platform. * [Pricing](https://developers.cloudflare.com/workers/platform/pricing/) * [Changelog](https://developers.cloudflare.com/workers/platform/changelog/) * [Limits](https://developers.cloudflare.com/workers/platform/limits/) * [Choose a data or storage product](https://developers.cloudflare.com/workers/platform/storage-options/) * [Betas](https://developers.cloudflare.com/workers/platform/betas/) * [Deploy to Cloudflare buttons](https://developers.cloudflare.com/workers/platform/deploy-buttons/) * [Known issues](https://developers.cloudflare.com/workers/platform/known-issues/) * [Workers for Platforms](https://developers.cloudflare.com/cloudflare-for-platforms/workers-for-platforms/) * [Infrastructure as Code (IaC)](https://developers.cloudflare.com/workers/platform/infrastructure-as-code/) --- title: Playground · Cloudflare Workers docs description: The quickest way to experiment with Cloudflare Workers is in the Playground. It does not require any setup or authentication. The Playground is a sandbox which gives you an instant way to preview and test a Worker directly in the browser. lastUpdated: 2025-02-05T10:06:53.000Z chatbotDeprioritize: false source_url: html: https://developers.cloudflare.com/workers/playground/ md: https://developers.cloudflare.com/workers/playground/index.md --- Browser support The Cloudflare Workers Playground is currently only supported in Firefox and Chrome desktop browsers. In Safari, it will show a `PreviewRequestFailed` error message. The quickest way to experiment with Cloudflare Workers is in the [Playground](https://workers.cloudflare.com/playground). It does not require any setup or authentication. The Playground is a sandbox which gives you an instant way to preview and test a Worker directly in the browser. The Playground uses the same editor as the authenticated experience. The Playground provides the ability to [share](#share) the code you write as well as [deploy](#deploy) it instantly to Cloudflare's global network. This way, you can try new things out and deploy them when you are ready. [Launch the Playground](https://workers.cloudflare.com/playground) ## Hello Cloudflare Workers When you arrive in the Playground, you will see this default code: ```js import welcome from "welcome.html"; /** * @typedef {Object} Env */ export default { /** * @param {Request} request * @param {Env} env * @param {ExecutionContext} ctx * @returns {Response} */ fetch(request, env, ctx) { console.log("Hello Cloudflare Workers!"); return new Response(welcome, { headers: { "content-type": "text/html", }, }); }, }; ``` This is an example of a multi-module Worker that is receiving a [request](https://developers.cloudflare.com/workers/runtime-apis/request/), logging a message to the console, and then returning a [response](https://developers.cloudflare.com/workers/runtime-apis/response/) body containing the content from `welcome.html`. Refer to the [Fetch handler documentation](https://developers.cloudflare.com/workers/runtime-apis/handlers/fetch/) to learn more. ## Use the Playground As you edit the default code, the Worker will auto-update such that the preview on the right shows your Worker running just as it would in a browser. If your Worker uses URL paths, you can enter those in the input field on the right to navigate to them. The Playground provides type-checking via JSDoc comments and [`workers-types`](https://www.npmjs.com/package/@cloudflare/workers-types). The Playground also provides pretty error pages in the event of application errors. To test a raw HTTP request (for example, to test a `POST` request), go to the **HTTP** tab and select **Send**. You can add and edit headers via this panel, as well as edit the body of a request. ## DevTools For debugging Workers inside the Playground, use the developer tools at the bottom of the Playground's preview panel to view `console.logs`, network requests, memory and CPU usage. The developer tools for the Workers Playground work similarly to the developer tools in Chrome or Firefox, and are the same developer tools users have access to in the [Wrangler CLI](https://developers.cloudflare.com/workers/wrangler/install-and-update/) and the authenticated dashboard. ### Network tab **Network** shows the outgoing requests from your Worker — that is, any calls to `fetch` inside your Worker code. ### Console Logs The console displays the output of any calls to `console.log` that were called for the current preview run as well as any other preview runs in that session. ### Sources **Sources** displays the sources that make up your Worker. Note that KV, text, and secret bindings are only accessible when authenticated with an account. This means you must be logged in to the dashboard, or use [`wrangler dev`](https://developers.cloudflare.com/workers/wrangler/commands/#dev) with your account credentials. ## Share To share what you have created, select **Copy Link** in the top right of the screen. This will copy a unique URL to your clipboard that you can share with anyone. These links do not expire, so you can bookmark your creation and share it at any time. Users that open a shared link will see the Playground with the shared code and preview. ## Deploy You can deploy a Worker from the Playground. If you are already logged in, you can review the Worker before deploying. Otherwise, you will be taken through the first-time user onboarding flow before you can review and deploy. Once deployed, your Worker will get its own unique URL and be available almost instantly on Cloudflare's global network. From here, you can add [Custom Domains](https://developers.cloudflare.com/workers/configuration/routing/custom-domains/), [storage resources](https://developers.cloudflare.com/workers/platform/storage-options/), and more. --- title: Reference · Cloudflare Workers docs description: Conceptual knowledge about how Workers works. lastUpdated: 2025-02-05T10:06:53.000Z chatbotDeprioritize: true source_url: html: https://developers.cloudflare.com/workers/reference/ md: https://developers.cloudflare.com/workers/reference/index.md --- Conceptual knowledge about how Workers works. * [How the Cache works](https://developers.cloudflare.com/workers/reference/how-the-cache-works/) * [How Workers works](https://developers.cloudflare.com/workers/reference/how-workers-works/) * [Migrate from Service Workers to ES Modules](https://developers.cloudflare.com/workers/reference/migrate-to-module-workers/) * [Protocols](https://developers.cloudflare.com/workers/reference/protocols/) * [Security model](https://developers.cloudflare.com/workers/reference/security-model/) --- title: Static Assets · Cloudflare Workers docs description: Create full-stack applications deployed to Cloudflare Workers. lastUpdated: 2025-06-20T19:49:19.000Z chatbotDeprioritize: false source_url: html: https://developers.cloudflare.com/workers/static-assets/ md: https://developers.cloudflare.com/workers/static-assets/index.md --- You can upload static assets (HTML, CSS, images and other files) as part of your Worker, and Cloudflare will handle caching and serving them to web browsers. **Start from CLI** - Scaffold a React SPA with an API Worker, and use the [Cloudflare Vite plugin](https://developers.cloudflare.com/workers/vite-plugin/). * npm ```sh npm create cloudflare@latest -- my-react-app --framework=react ``` * yarn ```sh yarn create cloudflare my-react-app --framework=react ``` * pnpm ```sh pnpm create cloudflare@latest my-react-app --framework=react ``` *** **Or just deploy to Cloudflare** [![Deploy to Workers](https://deploy.workers.cloudflare.com/button)](https://dash.cloudflare.com/?to=/:account/workers-and-pages/create/deploy-to-workers\&repository=https://github.com/cloudflare/templates/tree/main/vite-react-template) Learn more about supported frameworks on Workers. [Supported frameworks ](https://developers.cloudflare.com/workers/framework-guides/)Start building on Workers with our framework guides. ### How it works When you deploy your project, Cloudflare deploys both your Worker code and your static assets in a single operation. This deployment operates as a tightly integrated "unit" running across Cloudflare's network, combining static file hosting, custom logic, and global caching. The **assets directory** specified in your [Wrangler configuration file](https://developers.cloudflare.com/workers/wrangler/configuration/#assets) is central to this design. During deployment, Wrangler automatically uploads the files from this directory to Cloudflare's infrastructure. Once deployed, requests for these assets are routed efficiently to locations closest to your users. * wrangler.jsonc ```jsonc { "name": "my-spa", "main": "src/index.js", "compatibility_date": "2025-01-01", "assets": { "directory": "./dist", "binding": "ASSETS" } } ``` * wrangler.toml ```toml name = "my-spa" main = "src/index.js" compatibility_date = "2025-01-01" [assets] directory = "./dist" binding = "ASSETS" ``` Note If you are using the [Cloudflare Vite plugin](https://developers.cloudflare.com/workers/vite-plugin/), you do not need to specify `assets.directory`. For more information about using static assets with the Vite plugin, refer to the [plugin documentation](https://developers.cloudflare.com/workers/vite-plugin/reference/static-assets/). By adding an [**assets binding**](https://developers.cloudflare.com/workers/static-assets/binding/#binding), you can directly fetch and serve assets within your Worker code. ```js // index.js export default { async fetch(request, env) { const url = new URL(request.url); if (url.pathname.startsWith("/api/")) { return new Response(JSON.stringify({ name: "Cloudflare" }), { headers: { "Content-Type": "application/json" }, }); } return env.ASSETS.fetch(request); }, }; ``` ### Routing behavior By default, if a requested URL matches a file in the static assets directory, that file will be served — without invoking Worker code. If no matching asset is found and a Worker script is present, the request will be processed by the Worker. The Worker can return a response or choose to defer again to static assets by using the [assets binding](https://developers.cloudflare.com/workers/static-assets/binding/) (e.g. `env.ASSETS.fetch(request)`). If no Worker script is present, a `404 Not Found` response is returned. The default behavior for requests which don't match a static asset can be changed by setting the [`not_found_handling` option under `assets`](https://developers.cloudflare.com/workers/wrangler/configuration/#assets) in your Wrangler configuration file: * [`not_found_handling = "single-page-application"`](https://developers.cloudflare.com/workers/static-assets/routing/single-page-application/): Sets your application to return a `200 OK` response with `index.html` for requests which don't match a static asset. Use this if you have a Single Page Application. We recommend pairing this with selective routing using `run_worker_first` for [advanced routing control](https://developers.cloudflare.com/workers/static-assets/routing/single-page-application/#advanced-routing-control). * [`not_found_handling = "404-page"`](https://developers.cloudflare.com/workers/static-assets/routing/static-site-generation/#custom-404-pages): Sets your application to return a `404 Not Found` response with the nearest `404.html` for requests which don't match a static asset. - wrangler.jsonc ```jsonc { "assets": { "directory": "./dist", "not_found_handling": "single-page-application" } } ``` - wrangler.toml ```toml [assets] directory = "./dist" not_found_handling = "single-page-application" ``` If you want the Worker code to execute before serving assets, you can use the `run_worker_first` option. This can be set to `true` to invoke the Worker script for all requests, or configured as an array of route patterns for selective Worker-script-first routing: **Invoking your Worker script on specific paths:** * wrangler.jsonc ```jsonc { "name": "my-spa-worker", "compatibility_date": "2025-07-16", "main": "./src/index.ts", "assets": { "directory": "./dist/", "not_found_handling": "single-page-application", "binding": "ASSETS", "run_worker_first": ["/api/*", "!/api/docs/*"] } } ``` * wrangler.toml ```toml name = "my-spa-worker" compatibility_date = "2025-07-16" main = "./src/index.ts" [assets] directory = "./dist/" not_found_handling = "single-page-application" binding = "ASSETS" run_worker_first = [ "/api/*", "!/api/docs/*" ] ``` [Routing options ](https://developers.cloudflare.com/workers/static-assets/routing/)Learn more about how you can customize routing behavior. ### Caching behavior Cloudflare provides automatic caching for static assets across its network, ensuring fast delivery to users worldwide. When a static asset is requested, it is automatically cached for future requests. * **First Request:** When an asset is requested for the first time, it is fetched from storage and cached at the nearest Cloudflare location. * **Subsequent Requests:** If a request for the same asset reaches a data center that does not have it cached, Cloudflare's [tiered caching system](https://developers.cloudflare.com/cache/how-to/tiered-cache/) allows it to be retrieved from a nearby cache rather than going back to storage. This improves cache hit ratio, reduces latency, and reduces unnecessary origin fetches. ## Try it out [Vite + React SPA tutorial ](https://developers.cloudflare.com/workers/vite-plugin/tutorial/)Learn how to build and deploy a full-stack Single Page Application with static assets and API routes. ## Learn more [Supported frameworks ](https://developers.cloudflare.com/workers/framework-guides/)Start building on Workers with our framework guides. [Billing and limitations ](https://developers.cloudflare.com/workers/static-assets/billing-and-limitations/)Learn more about how requests are billed, current limitations, and troubleshooting. --- title: Runtime APIs · Cloudflare Workers docs description: The Workers runtime is designed to be JavaScript standards compliant and web-interoperable. Wherever possible, it uses web platform APIs, so that code can be reused across client and server, as well as across WinterCG JavaScript runtimes. lastUpdated: 2025-02-05T10:06:53.000Z chatbotDeprioritize: false source_url: html: https://developers.cloudflare.com/workers/runtime-apis/ md: https://developers.cloudflare.com/workers/runtime-apis/index.md --- The Workers runtime is designed to be [JavaScript standards compliant](https://ecma-international.org/publications-and-standards/standards/ecma-262/) and web-interoperable. Wherever possible, it uses web platform APIs, so that code can be reused across client and server, as well as across [WinterCG](https://wintercg.org/) JavaScript runtimes. [Workers runtime features](https://developers.cloudflare.com/workers/runtime-apis/) are [compatible with a subset of Node.js APIs](https://developers.cloudflare.com/workers/runtime-apis/nodejs) and the ability to set a [compatibility date or compatibility flag](https://developers.cloudflare.com/workers/configuration/compatibility-dates/). * [Bindings (env)](https://developers.cloudflare.com/workers/runtime-apis/bindings/) * [Cache](https://developers.cloudflare.com/workers/runtime-apis/cache/) * [Console](https://developers.cloudflare.com/workers/runtime-apis/console/) * [Context (ctx)](https://developers.cloudflare.com/workers/runtime-apis/context/) * [Encoding](https://developers.cloudflare.com/workers/runtime-apis/encoding/) * [EventSource](https://developers.cloudflare.com/workers/runtime-apis/eventsource/) * [Fetch](https://developers.cloudflare.com/workers/runtime-apis/fetch/) * [Handlers](https://developers.cloudflare.com/workers/runtime-apis/handlers/) * [Headers](https://developers.cloudflare.com/workers/runtime-apis/headers/) * [HTMLRewriter](https://developers.cloudflare.com/workers/runtime-apis/html-rewriter/) * [Node.js compatibility](https://developers.cloudflare.com/workers/runtime-apis/nodejs/) * [Performance and timers](https://developers.cloudflare.com/workers/runtime-apis/performance/) * [Remote-procedure call (RPC)](https://developers.cloudflare.com/workers/runtime-apis/rpc/) * [Request](https://developers.cloudflare.com/workers/runtime-apis/request/) * [Response](https://developers.cloudflare.com/workers/runtime-apis/response/) * [Streams](https://developers.cloudflare.com/workers/runtime-apis/streams/) * [TCP sockets](https://developers.cloudflare.com/workers/runtime-apis/tcp-sockets/) * [Web Crypto](https://developers.cloudflare.com/workers/runtime-apis/web-crypto/) * [Web standards](https://developers.cloudflare.com/workers/runtime-apis/web-standards/) * [WebAssembly (Wasm)](https://developers.cloudflare.com/workers/runtime-apis/webassembly/) * [WebSockets](https://developers.cloudflare.com/workers/runtime-apis/websockets/) --- title: Testing · Cloudflare Workers docs description: The Workers platform has a variety of ways to test your applications, depending on your requirements. We recommend using the Vitest integration, which allows you to run tests to inside the Workers runtime, and unit test individual functions within your Worker. lastUpdated: 2025-04-10T14:17:11.000Z chatbotDeprioritize: false source_url: html: https://developers.cloudflare.com/workers/testing/ md: https://developers.cloudflare.com/workers/testing/index.md --- The Workers platform has a variety of ways to test your applications, depending on your requirements. We recommend using the [Vitest integration](https://developers.cloudflare.com/workers/testing/vitest-integration), which allows you to run tests to *inside* the Workers runtime, and unit test individual functions within your Worker. [Get started with Vitest](https://developers.cloudflare.com/workers/testing/vitest-integration/write-your-first-test/) ## Testing comparison matrix However, if you don't use Vitest, both [Miniflare's API](https://developers.cloudflare.com/workers/testing/miniflare/writing-tests) and the [`unstable_startWorker()`](https://developers.cloudflare.com/workers/wrangler/api/#unstable_startworker) API provide options for testing your Worker in any testing framework. | Feature | [Vitest integration](https://developers.cloudflare.com/workers/testing/vitest-integration) | [`unstable_startWorker()`](https://developers.cloudflare.com/workers/testing/unstable_startworker/) | [Miniflare's API](https://developers.cloudflare.com/workers/testing/miniflare/writing-tests/) | | - | - | - | - | | Unit testing | ✅ | ❌ | ❌ | | Integration testing | ✅ | ✅ | ✅ | | Loading Wrangler configuration files | ✅ | ✅ | ❌ | | Use bindings directly in tests | ✅ | ❌ | ✅ | | Isolated per-test storage | ✅ | ❌ | ❌ | | Outbound request mocking | ✅ | ❌ | ✅ | | Multiple Worker support | ✅ | ✅ | ✅ | | Direct access to Durable Objects | ✅ | ❌ | ❌ | | Run Durable Object alarms immediately | ✅ | ❌ | ❌ | | List Durable Objects | ✅ | ❌ | ❌ | | Testing service Workers | ❌ | ✅ | ✅ | Pages Functions The content described on this page is also applicable to [Pages Functions](https://developers.cloudflare.com/pages/functions/). Pages Functions are Cloudflare Workers and can be thought of synonymously with Workers in this context. --- title: Tutorials · Cloudflare Workers docs description: View tutorials to help you get started with Workers. lastUpdated: 2025-05-06T17:35:57.000Z chatbotDeprioritize: false source_url: html: https://developers.cloudflare.com/workers/tutorials/ md: https://developers.cloudflare.com/workers/tutorials/index.md --- View tutorials to help you get started with Workers. ## Docs | Name | Last Updated | Type | Difficulty | | - | - | - | - | | [Query D1 using Prisma ORM](https://developers.cloudflare.com/d1/tutorials/d1-and-prisma-orm/) | about 1 month ago | 📝 Tutorial | Beginner | | [Migrate from Netlify to Workers](https://developers.cloudflare.com/workers/static-assets/migration-guides/netlify-to-workers/) | 2 months ago | 📝 Tutorial | Beginner | | [Migrate from Vercel to Workers](https://developers.cloudflare.com/workers/static-assets/migration-guides/vercel-to-workers/) | 3 months ago | 📝 Tutorial | Beginner | | [Setup Fullstack Authentication with Next.js, Auth.js, and Cloudflare D1](https://developers.cloudflare.com/developer-spotlight/tutorials/fullstack-authentication-with-next-js-and-cloudflare-d1/) | 3 months ago | 📝 Tutorial | Intermediate | | [Ingest data from a Worker, and analyze using MotherDuck](https://developers.cloudflare.com/pipelines/tutorials/query-data-with-motherduck/) | 3 months ago | 📝 Tutorial | Intermediate | | [Create a data lake of clickstream data](https://developers.cloudflare.com/pipelines/tutorials/send-data-from-client/) | 3 months ago | 📝 Tutorial | Intermediate | | [Connect to a MySQL database with Cloudflare Workers](https://developers.cloudflare.com/workers/tutorials/mysql/) | 4 months ago | 📝 Tutorial | Beginner | | [Set up and use a Prisma Postgres database](https://developers.cloudflare.com/workers/tutorials/using-prisma-postgres-with-workers/) | 5 months ago | 📝 Tutorial | Beginner | | [Build a Voice Notes App with auto transcriptions using Workers AI](https://developers.cloudflare.com/workers-ai/guides/tutorials/build-a-voice-notes-app-with-auto-transcription/) | 7 months ago | 📝 Tutorial | Intermediate | | [Protect payment forms from malicious bots using Turnstile](https://developers.cloudflare.com/turnstile/tutorials/protecting-your-payment-form-from-attackers-bots-using-turnstile/) | 7 months ago | 📝 Tutorial | Beginner | | [Build a Retrieval Augmented Generation (RAG) AI](https://developers.cloudflare.com/workers-ai/guides/tutorials/build-a-retrieval-augmented-generation-ai/) | 8 months ago | 📝 Tutorial | Beginner | | [Automate analytics reporting with Cloudflare Workers and email routing](https://developers.cloudflare.com/workers/tutorials/automated-analytics-reporting/) | 8 months ago | 📝 Tutorial | Beginner | | [Build Live Cursors with Next.js, RPC and Durable Objects](https://developers.cloudflare.com/workers/tutorials/live-cursors-with-nextjs-rpc-do/) | 8 months ago | 📝 Tutorial | Intermediate | | [Build an interview practice tool with Workers AI](https://developers.cloudflare.com/workers-ai/guides/tutorials/build-ai-interview-practice-tool/) | 8 months ago | 📝 Tutorial | Intermediate | | [Using BigQuery with Workers AI](https://developers.cloudflare.com/workers-ai/guides/tutorials/using-bigquery-with-workers-ai/) | 9 months ago | 📝 Tutorial | Beginner | | [How to Build an Image Generator using Workers AI](https://developers.cloudflare.com/workers-ai/guides/tutorials/image-generation-playground/) | 9 months ago | 📝 Tutorial | Beginner | | [Use event notification to summarize PDF files on upload](https://developers.cloudflare.com/r2/tutorials/summarize-pdf/) | 9 months ago | 📝 Tutorial | Intermediate | | [Build a Comments API](https://developers.cloudflare.com/d1/tutorials/build-a-comments-api/) | 10 months ago | 📝 Tutorial | Intermediate | | [Handle rate limits of external APIs](https://developers.cloudflare.com/queues/tutorials/handle-rate-limits/) | 10 months ago | 📝 Tutorial | Beginner | | [Build an API to access D1 using a proxy Worker](https://developers.cloudflare.com/d1/tutorials/build-an-api-to-access-d1/) | 10 months ago | 📝 Tutorial | Intermediate | | [Deploy a Worker](https://developers.cloudflare.com/pulumi/tutorial/hello-world/) | 10 months ago | 📝 Tutorial | Beginner | | [Connect to a PostgreSQL database with Cloudflare Workers](https://developers.cloudflare.com/workers/tutorials/postgres/) | 11 months ago | 📝 Tutorial | Beginner | | [Build a web crawler with Queues and Browser Rendering](https://developers.cloudflare.com/queues/tutorials/web-crawler-with-browser-rendering/) | 11 months ago | 📝 Tutorial | Intermediate | | [Recommend products on e-commerce sites using Workers AI and Stripe](https://developers.cloudflare.com/developer-spotlight/tutorials/creating-a-recommendation-api/) | about 1 year ago | 📝 Tutorial | Beginner | | [Custom access control for files in R2 using D1 and Workers](https://developers.cloudflare.com/developer-spotlight/tutorials/custom-access-control-for-files/) | about 1 year ago | 📝 Tutorial | Beginner | | [Send form submissions using Astro and Resend](https://developers.cloudflare.com/developer-spotlight/tutorials/handle-form-submission-with-astro-resend/) | about 1 year ago | 📝 Tutorial | Beginner | | [Create a fine-tuned OpenAI model with R2](https://developers.cloudflare.com/workers/tutorials/create-finetuned-chatgpt-ai-models-with-r2/) | about 1 year ago | 📝 Tutorial | Intermediate | | [Build a Slackbot](https://developers.cloudflare.com/workers/tutorials/build-a-slackbot/) | about 1 year ago | 📝 Tutorial | Beginner | | [Use Workers KV directly from Rust](https://developers.cloudflare.com/workers/tutorials/workers-kv-from-rust/) | about 1 year ago | 📝 Tutorial | Intermediate | | [Build a todo list Jamstack application](https://developers.cloudflare.com/workers/tutorials/build-a-jamstack-app/) | about 1 year ago | 📝 Tutorial | Beginner | | [Send Emails With Postmark](https://developers.cloudflare.com/workers/tutorials/send-emails-with-postmark/) | about 1 year ago | 📝 Tutorial | Beginner | | [Send Emails With Resend](https://developers.cloudflare.com/workers/tutorials/send-emails-with-resend/) | about 1 year ago | 📝 Tutorial | Beginner | | [Create a sitemap from Sanity CMS with Workers](https://developers.cloudflare.com/developer-spotlight/tutorials/create-sitemap-from-sanity-cms/) | about 1 year ago | 📝 Tutorial | Beginner | | [Log and store upload events in R2 with event notifications](https://developers.cloudflare.com/r2/tutorials/upload-logs-event-notifications/) | over 1 year ago | 📝 Tutorial | Beginner | | [Create custom headers for Cloudflare Access-protected origins with Workers](https://developers.cloudflare.com/cloudflare-one/tutorials/access-workers/) | over 1 year ago | 📝 Tutorial | Intermediate | | [Create a serverless, globally distributed time-series API with Timescale](https://developers.cloudflare.com/hyperdrive/tutorials/serverless-timeseries-api-with-timescale/) | over 1 year ago | 📝 Tutorial | Beginner | | [Deploy a Browser Rendering Worker with Durable Objects](https://developers.cloudflare.com/browser-rendering/workers-bindings/browser-rendering-with-do/) | almost 2 years ago | 📝 Tutorial | Beginner | | [GitHub SMS notifications using Twilio](https://developers.cloudflare.com/workers/tutorials/github-sms-notifications-using-twilio/) | almost 2 years ago | 📝 Tutorial | Beginner | | [Deploy a Worker that connects to OpenAI via AI Gateway](https://developers.cloudflare.com/ai-gateway/tutorials/deploy-aig-worker/) | almost 2 years ago | 📝 Tutorial | Beginner | | [Tutorial - React SPA with an API](https://developers.cloudflare.com/workers/vite-plugin/tutorial/) | | 📝 Tutorial | | | [Deploy a real-time chat application](https://developers.cloudflare.com/workers/tutorials/deploy-a-realtime-chat-app/) | almost 2 years ago | 📝 Tutorial | Intermediate | | [Build a QR code generator](https://developers.cloudflare.com/workers/tutorials/build-a-qr-code-generator/) | about 2 years ago | 📝 Tutorial | Beginner | | [Securely access and upload assets with Cloudflare R2](https://developers.cloudflare.com/workers/tutorials/upload-assets-with-r2/) | about 2 years ago | 📝 Tutorial | Beginner | | [OpenAI GPT function calling with JavaScript and Cloudflare Workers](https://developers.cloudflare.com/workers/tutorials/openai-function-calls-workers/) | about 2 years ago | 📝 Tutorial | Beginner | | [Handle form submissions with Airtable](https://developers.cloudflare.com/workers/tutorials/handle-form-submissions-with-airtable/) | about 2 years ago | 📝 Tutorial | Beginner | | [Connect to and query your Turso database using Workers](https://developers.cloudflare.com/workers/tutorials/connect-to-turso-using-workers/) | over 2 years ago | 📝 Tutorial | Beginner | | [Generate YouTube thumbnails with Workers and Cloudflare Image Resizing](https://developers.cloudflare.com/workers/tutorials/generate-youtube-thumbnails-with-workers-and-images/) | over 2 years ago | 📝 Tutorial | Intermediate | ## Videos OpenAI Relay Server on Cloudflare Workers In this video, Craig Dennis walks you through the deployment of OpenAI's relay server to use with their realtime API. Deploy your React App to Cloudflare Workers Learn how to deploy an existing React application to Cloudflare Workers. Cloudflare Workflows | Schedule and Sleep For Your Apps (Part 3 of 3) Cloudflare Workflows allows you to initiate sleep as an explicit step, which can be useful when you want a Workflow to wait, schedule work ahead, or pause until an input or other external state is ready. Cloudflare Workflows | Introduction (Part 1 of 3) In this video, we introduce Cloudflare Workflows, the Newest Developer Platform Primitive at Cloudflare. Cloudflare Workflows | Batching and Monitoring Your Durable Execution (Part 2 of 3) Workflows exposes metrics such as execution, error rates, steps, and total duration! Building Front-End Applications | Now Supported by Cloudflare Workers You can now build front-end applications, just like you do on Cloudflare Pages, but with the added benefit of Workers. Build a private AI chatbot using Meta's Llama 3.1 In this video, you will learn how to set up a private AI chat powered by Llama 3.1 for secure, fast interactions, deploy the model on Cloudflare Workers for serverless, scalable performance and use Cloudflare's Workers AI for seamless integration and edge computing benefits. How to Build Event-Driven Applications with Cloudflare Queues In this video, we demonstrate how to build an event-driven application using Cloudflare Queues. Event-driven system lets you decouple services, allowing them to process and scale independently. Welcome to the Cloudflare Developer Channel Welcome to the Cloudflare Developers YouTube channel. We've got tutorials and working demos and everything you need to level up your projects. Whether you're working on your next big thing or just dorking around with some side projects, we've got you covered! So why don't you come hang out, subscribe to our developer channel and together we'll build something awesome. You're gonna love it. AI meets Maps | Using Cloudflare AI, Langchain, Mapbox, Folium and Streamlit Welcome to RouteMe, a smart tool that helps you plan the most efficient route between landmarks in any city. Powered by Cloudflare Workers AI, Langchain and Mapbox. This Streamlit webapp uses LLMs and Mapbox off my scripts API to solve the classic traveling salesman problem, turning your sightseeing into an optimized adventure! Use Vectorize to add additional context to your AI Applications through RAG A RAG based AI Chat app that uses Vectorize to access video game data for employees of Gamertown. Build Rust Powered Apps In this video, we will show you how to build a global database using workers-rs to keep track of every country and city you’ve visited. Stateful Apps with Cloudflare Workers Learn how to access external APIs, cache and retrieve data using Workers KV, and create SQL-driven applications with Cloudflare D1. Learn Cloudflare Workers - Full Course for Beginners Learn how to build your first Cloudflare Workers application and deploy it to Cloudflare's global network. Learn AI Development (models, embeddings, vectors) In this workshop, Kristian Freeman, Cloudflare Developer Advocate, teaches the basics of AI Development - models, embeddings, and vectors (including vector databases). Optimize your AI App & fine-tune models (AI Gateway, R2) In this workshop, Kristian Freeman, Cloudflare Developer Advocate, shows how to optimize your existing AI applications with Cloudflare AI Gateway, and how to finetune OpenAI models using R2. How to use Cloudflare AI models and inference in Python with Jupyter Notebooks Cloudflare Workers AI provides a ton of AI models and inference capabilities. In this video, we will explore how to make use of Cloudflare’s AI model catalog using a Python Jupyter Notebook. --- title: Vite plugin · Cloudflare Workers docs description: A full-featured integration between Vite and the Workers runtime lastUpdated: 2025-06-05T13:25:05.000Z chatbotDeprioritize: false source_url: html: https://developers.cloudflare.com/workers/vite-plugin/ md: https://developers.cloudflare.com/workers/vite-plugin/index.md --- The Cloudflare Vite plugin enables a full-featured integration between [Vite](https://vite.dev/) and the [Workers runtime](https://developers.cloudflare.com/workers/runtime-apis/). Your Worker code runs inside [workerd](https://github.com/cloudflare/workerd), matching the production behavior as closely as possible and providing confidence as you develop and deploy your applications. ## Features * Uses the Vite [Environment API](https://vite.dev/guide/api-environment) to integrate Vite with the Workers runtime * Provides direct access to [Workers runtime APIs](https://developers.cloudflare.com/workers/runtime-apis/) and [bindings](https://developers.cloudflare.com/workers/runtime-apis/bindings/) * Builds your front-end assets for deployment to Cloudflare, enabling you to build static sites, SPAs, and full-stack applications * Official support for [React Router v7](https://reactrouter.com/) with server-side rendering * Leverages Vite's hot module replacement for consistently fast updates * Supports `vite preview` for previewing your build output in the Workers runtime prior to deployment ## Use cases * [React Router v7](https://reactrouter.com/) (support for more full-stack frameworks is coming soon) * Static sites, such as single-page applications, with or without an integrated backend API * Standalone Workers * Multi-Worker applications ## Get started To create a new application from a ready-to-go template, refer to the [React Router](https://developers.cloudflare.com/workers/framework-guides/web-apps/react-router/), [React](https://developers.cloudflare.com/workers/framework-guides/web-apps/react/) or [Vue](https://developers.cloudflare.com/workers/framework-guides/web-apps/vue/) framework guides. To create a standalone Worker from scratch, refer to [Get started](https://developers.cloudflare.com/workers/vite-plugin/get-started/). For a more in-depth look at adapting an existing Vite project and an introduction to key concepts, refer to the [Tutorial](https://developers.cloudflare.com/workers/vite-plugin/tutorial/). --- title: Wrangler · Cloudflare Workers docs description: Wrangler, the Cloudflare Developer Platform command-line interface (CLI), allows you to manage Worker projects. lastUpdated: 2024-09-26T12:49:19.000Z chatbotDeprioritize: false source_url: html: https://developers.cloudflare.com/workers/wrangler/ md: https://developers.cloudflare.com/workers/wrangler/index.md --- Wrangler, the Cloudflare Developer Platform command-line interface (CLI), allows you to manage Worker projects. * [API ](https://developers.cloudflare.com/workers/wrangler/api/): A set of programmatic APIs that can be integrated with local Cloudflare Workers-related workflows. * [Bundling ](https://developers.cloudflare.com/workers/wrangler/bundling/): Review Wrangler's default bundling. * [Commands ](https://developers.cloudflare.com/workers/wrangler/commands/): Create, develop, and deploy your Cloudflare Workers with Wrangler commands. * [Configuration ](https://developers.cloudflare.com/workers/wrangler/configuration/): Use a configuration file to customize the development and deployment setup for your Worker project and other Developer Platform products. * [Custom builds ](https://developers.cloudflare.com/workers/wrangler/custom-builds/): Customize how your code is compiled, before being processed by Wrangler. * [Deprecations ](https://developers.cloudflare.com/workers/wrangler/deprecations/): The differences between Wrangler versions, specifically deprecations and breaking changes. * [Environments ](https://developers.cloudflare.com/workers/wrangler/environments/): Use environments to create different configurations for the same Worker application. * [Install/Update Wrangler ](https://developers.cloudflare.com/workers/wrangler/install-and-update/): Get started by installing Wrangler, and update to newer versions by following this guide. * [Migrations ](https://developers.cloudflare.com/workers/wrangler/migration/): Review migration guides for specific versions of Wrangler. * [System environment variables ](https://developers.cloudflare.com/workers/wrangler/system-environment-variables/): Local environment variables that can change Wrangler's behavior. --- title: 404 - Page Not Found · Cloudflare Workers AI docs chatbotDeprioritize: false source_url: html: https://developers.cloudflare.com/workers-ai/404/ md: https://developers.cloudflare.com/workers-ai/404/index.md --- # 404 Check the URL, try using our [search](https://developers.cloudflare.com/search/) or try our LLM-friendly [llms.txt directory](https://developers.cloudflare.com/llms.txt). --- title: Agents · Cloudflare Workers AI docs lastUpdated: 2025-04-03T16:21:18.000Z chatbotDeprioritize: false source_url: html: https://developers.cloudflare.com/workers-ai/agents/ md: https://developers.cloudflare.com/workers-ai/agents/index.md --- Build AI assistants that can perform complex tasks on behalf of your users using Cloudflare Workers AI and Agents. [Go to Agents documentation](https://developers.cloudflare.com/agents/) --- title: REST API reference · Cloudflare Workers AI docs lastUpdated: 2024-12-16T22:33:26.000Z chatbotDeprioritize: false source_url: html: https://developers.cloudflare.com/workers-ai/api-reference/ md: https://developers.cloudflare.com/workers-ai/api-reference/index.md --- --- title: Changelog · Cloudflare Workers AI docs description: Review recent changes to Cloudflare Workers AI. lastUpdated: 2025-04-03T16:21:18.000Z chatbotDeprioritize: false source_url: html: https://developers.cloudflare.com/workers-ai/changelog/ md: https://developers.cloudflare.com/workers-ai/changelog/index.md --- [Subscribe to RSS](https://developers.cloudflare.com/workers-ai/changelog/index.xml) ## 2025-04-09 **Pricing correction for @cf/myshell-ai/melotts** * We've updated our documentation to reflect the correct pricing for melotts: $0.0002 per audio minute, which is actually cheaper than initially stated. The documented pricing was incorrect, where it said users would be charged based on input tokens. ## 2025-03-17 **Minor updates to the model schema for llama-3.2-1b-instruct, whisper-large-v3-turbo, llama-guard** * [llama-3.2-1b-instruct](https://developers.cloudflare.com/workers-ai/models/llama-3.2-1b-instruct/) - updated context window to the accurate 60,000 * [whisper-large-v3-turbo](https://developers.cloudflare.com/workers-ai/models/whisper-large-v3-turbo/) - new hyperparameters available * [llama-guard-3-8b](https://developers.cloudflare.com/workers-ai/models/llama-guard-3-8b/) - the messages array must alternate between `user` and `assistant` to function correctly ## 2025-02-21 **Workers AI bug fixes** * We fixed a bug where `max_tokens` defaults were not properly being respected - `max_tokens` now correctly defaults to `256` as displayed on the model pages. Users relying on the previous behaviour may observe this as a breaking change. If you want to generate more tokens, please set the `max_tokens` parameter to what you need. * We updated model pages to show context windows - which is defined as the tokens used in the prompt + tokens used in the response. If your prompt + response tokens exceed the context window, the request will error. Please set `max_tokens` accordingly depending on your prompt length and the context window length to ensure a successful response. ## 2024-09-26 **Workers AI Birthday Week 2024 announcements** * Meta Llama 3.2 1B, 3B, and 11B vision is now available on Workers AI * `@cf/black-forest-labs/flux-1-schnell` is now available on Workers AI * Workers AI is fast! Powered by new GPUs and optimizations, you can expect faster inference on Llama 3.1, Llama 3.2, and FLUX models. * No more neurons. Workers AI is moving towards [unit-based pricing](https://developers.cloudflare.com/workers-ai/platform/pricing) * Model pages get a refresh with better documentation on parameters, pricing, and model capabilities * Closed beta for our Run Any\* Model feature, [sign up here](https://forms.gle/h7FcaTF4Zo5dzNb68) * Check out the [product announcements blog post](https://blog.cloudflare.com/workers-ai) for more information * And the [technical blog post](https://blog.cloudflare.com/workers-ai/making-workers-ai-faster) if you want to learn about how we made Workers AI fast ## 2024-07-23 **Meta Llama 3.1 now available on Workers AI** Workers AI now suppoorts [Meta Llama 3.1](https://developers.cloudflare.com/workers-ai/models/llama-3.1-8b-instruct/). ## 2024-07-11 **New community-contributed tutorial** * Added community contributed tutorial on how to [create APIs to recommend products on e-commerce sites using Workers AI and Stripe](https://developers.cloudflare.com/developer-spotlight/tutorials/creating-a-recommendation-api/). ## 2024-06-27 **Introducing embedded function calling** * A new way to do function calling with [Embedded function calling](https://developers.cloudflare.com/workers-ai/function-calling/embedded) * Published new [`@cloudflare/ai-utils`](https://www.npmjs.com/package/@cloudflare/ai-utils) npm package * Open-sourced [`ai-utils on Github`](https://github.com/cloudflare/ai-utils) ## 2024-06-19 **Added support for traditional function calling** * [Function calling](https://developers.cloudflare.com/workers-ai/function-calling/) is now supported on enabled models * Properties added on [models](https://developers.cloudflare.com/workers-ai/models/) page to show which models support function calling ## 2024-06-18 **Native support for AI Gateways** Workers AI now natively supports [AI Gateway](https://developers.cloudflare.com/ai-gateway/providers/workersai/#worker). ## 2024-06-11 **Deprecation announcement for \`@cf/meta/llama-2-7b-chat-int8\`** We will be deprecating `@cf/meta/llama-2-7b-chat-int8` on 2024-06-30. Replace the model ID in your code with a new model of your choice: * [`@cf/meta/llama-3-8b-instruct`](https://developers.cloudflare.com/workers-ai/models/llama-3-8b-instruct/) is the newest model in the Llama family (and is currently free for a limited time on Workers AI). * [`@cf/meta/llama-3-8b-instruct-awq`](https://developers.cloudflare.com/workers-ai/models/llama-3-8b-instruct-awq/) is the new Llama 3 in a similar precision to your currently selected model. This model is also currently free for a limited time. If you do not switch to a different model by June 30th, we will automatically start returning inference from `@cf/meta/llama-3-8b-instruct-awq`. ## 2024-05-29 **Add new public LoRAs and note on LoRA routing** * Added documentation on [new public LoRAs](https://developers.cloudflare.com/workers-ai/fine-tunes/public-loras/). * Noted that you can now run LoRA inference with the base model rather than explicitly calling the `-lora` version ## 2024-05-17 **Add OpenAI compatible API endpoints** Added OpenAI compatible API endpoints for `/v1/chat/completions` and `/v1/embeddings`. For more details, refer to [Configurations](https://developers.cloudflare.com/workers-ai/configuration/open-ai-compatibility/). ## 2024-04-11 **Add AI native binding** * Added new AI native binding, you can now run models with `const resp = await env.AI.run(modelName, inputs)` * Deprecated `@cloudflare/ai` npm package. While existing solutions using the @cloudflare/ai package will continue to work, no new Workers AI features will be supported. Moving to native AI bindings is highly recommended --- title: Configuration · Cloudflare Workers AI docs lastUpdated: 2024-09-04T15:34:55.000Z chatbotDeprioritize: true source_url: html: https://developers.cloudflare.com/workers-ai/configuration/ md: https://developers.cloudflare.com/workers-ai/configuration/index.md --- * [Workers Bindings](https://developers.cloudflare.com/workers-ai/configuration/bindings/) * [OpenAI compatible API endpoints](https://developers.cloudflare.com/workers-ai/configuration/open-ai-compatibility/) * [Vercel AI SDK](https://developers.cloudflare.com/workers-ai/configuration/ai-sdk/) * [Hugging Face Chat UI](https://developers.cloudflare.com/workers-ai/configuration/hugging-face-chat-ui/) --- title: Features · Cloudflare Workers AI docs lastUpdated: 2025-04-03T16:21:18.000Z chatbotDeprioritize: true source_url: html: https://developers.cloudflare.com/workers-ai/features/ md: https://developers.cloudflare.com/workers-ai/features/index.md --- * [Asynchronous Batch API](https://developers.cloudflare.com/workers-ai/features/batch-api/) * [Function calling](https://developers.cloudflare.com/workers-ai/features/function-calling/) * [JSON Mode](https://developers.cloudflare.com/workers-ai/features/json-mode/) * [Fine-tunes](https://developers.cloudflare.com/workers-ai/features/fine-tunes/) * [Prompting](https://developers.cloudflare.com/workers-ai/features/prompting/) * [Markdown Conversion](https://developers.cloudflare.com/workers-ai/features/markdown-conversion/) --- title: Getting started · Cloudflare Workers AI docs description: "There are several options to build your Workers AI projects on Cloudflare. To get started, choose your preferred method:" lastUpdated: 2025-04-03T16:21:18.000Z chatbotDeprioritize: false source_url: html: https://developers.cloudflare.com/workers-ai/get-started/ md: https://developers.cloudflare.com/workers-ai/get-started/index.md --- There are several options to build your Workers AI projects on Cloudflare. To get started, choose your preferred method: * [Workers Bindings](https://developers.cloudflare.com/workers-ai/get-started/workers-wrangler/) * [REST API](https://developers.cloudflare.com/workers-ai/get-started/rest-api/) * [Dashboard](https://developers.cloudflare.com/workers-ai/get-started/dashboard/) Note These examples are geared towards creating new Workers AI projects. For help adding Workers AI to an existing Worker, refer to [Workers Bindings](https://developers.cloudflare.com/workers-ai/configuration/bindings/). --- title: Guides · Cloudflare Workers AI docs lastUpdated: 2025-04-03T16:21:18.000Z chatbotDeprioritize: true source_url: html: https://developers.cloudflare.com/workers-ai/guides/ md: https://developers.cloudflare.com/workers-ai/guides/index.md --- * [Demos and architectures](https://developers.cloudflare.com/workers-ai/guides/demos-architectures/) * [Tutorials](https://developers.cloudflare.com/workers-ai/guides/tutorials/) * [Agents](https://developers.cloudflare.com/agents/) --- title: Platform · Cloudflare Workers AI docs lastUpdated: 2024-09-04T15:34:55.000Z chatbotDeprioritize: true source_url: html: https://developers.cloudflare.com/workers-ai/platform/ md: https://developers.cloudflare.com/workers-ai/platform/index.md --- * [Pricing](https://developers.cloudflare.com/workers-ai/platform/pricing/) * [Data usage](https://developers.cloudflare.com/workers-ai/platform/data-usage/) * [Limits](https://developers.cloudflare.com/workers-ai/platform/limits/) * [Glossary](https://developers.cloudflare.com/workers-ai/platform/glossary/) * [AI Gateway](https://developers.cloudflare.com/ai-gateway/) * [Errors](https://developers.cloudflare.com/workers-ai/platform/errors/) * [Choose a data or storage product](https://developers.cloudflare.com/workers/platform/storage-options/) --- title: Models · Cloudflare Workers AI docs chatbotDeprioritize: false source_url: html: https://developers.cloudflare.com/workers-ai/models/ md: https://developers.cloudflare.com/workers-ai/models/index.md --- ▼ Tasks ▼ Capabilities ▼ Authors [📌](https://developers.cloudflare.com/workers-ai/models/llama-4-scout-17b-16e-instruct) [![Meta logo](https://developers.cloudflare.com/_astro/meta.x5nlFKBG.svg)llama-4-scout-17b-16e-instruct](https://developers.cloudflare.com/workers-ai/models/llama-4-scout-17b-16e-instruct) [Text Generation • Meta](https://developers.cloudflare.com/workers-ai/models/llama-4-scout-17b-16e-instruct) [Meta's Llama 4 Scout is a 17 billion parameter model with 16 experts that is natively multimodal. These models leverage a mixture-of-experts architecture to offer industry-leading performance in text and image understanding.](https://developers.cloudflare.com/workers-ai/models/llama-4-scout-17b-16e-instruct) [* Batch* Function calling](https://developers.cloudflare.com/workers-ai/models/llama-4-scout-17b-16e-instruct) [📌](https://developers.cloudflare.com/workers-ai/models/llama-3.3-70b-instruct-fp8-fast) [![Meta logo](https://developers.cloudflare.com/_astro/meta.x5nlFKBG.svg)llama-3.3-70b-instruct-fp8-fast](https://developers.cloudflare.com/workers-ai/models/llama-3.3-70b-instruct-fp8-fast) [Text Generation • Meta](https://developers.cloudflare.com/workers-ai/models/llama-3.3-70b-instruct-fp8-fast) [Llama 3.3 70B quantized to fp8 precision, optimized to be faster.](https://developers.cloudflare.com/workers-ai/models/llama-3.3-70b-instruct-fp8-fast) [* Batch* Function calling](https://developers.cloudflare.com/workers-ai/models/llama-3.3-70b-instruct-fp8-fast) [📌](https://developers.cloudflare.com/workers-ai/models/llama-3.1-8b-instruct-fast) [![Meta logo](https://developers.cloudflare.com/_astro/meta.x5nlFKBG.svg)llama-3.1-8b-instruct-fast](https://developers.cloudflare.com/workers-ai/models/llama-3.1-8b-instruct-fast) [Text Generation • Meta](https://developers.cloudflare.com/workers-ai/models/llama-3.1-8b-instruct-fast) [\[Fast version\] The Meta Llama 3.1 collection of multilingual large language models (LLMs) is a collection of pretrained and instruction tuned generative models. The Llama 3.1 instruction tuned text only models are optimized for multilingual dialogue use cases and outperform many of the available open source and closed chat models on common industry benchmarks.](https://developers.cloudflare.com/workers-ai/models/llama-3.1-8b-instruct-fast) [](https://developers.cloudflare.com/workers-ai/models/llama-3.1-8b-instruct-fast) [![Google logo](https://developers.cloudflare.com/_astro/google.C4p59fss.svg)gemma-3-12b-it](https://developers.cloudflare.com/workers-ai/models/gemma-3-12b-it) [Text Generation • Google](https://developers.cloudflare.com/workers-ai/models/gemma-3-12b-it) [Gemma 3 models are well-suited for a variety of text generation and image understanding tasks, including question answering, summarization, and reasoning. Gemma 3 models are multimodal, handling text and image input and generating text output, with a large, 128K context window, multilingual support in over 140 languages, and is available in more sizes than previous versions.](https://developers.cloudflare.com/workers-ai/models/gemma-3-12b-it) [* LoRA](https://developers.cloudflare.com/workers-ai/models/gemma-3-12b-it) [![MistralAI logo](https://developers.cloudflare.com/_astro/mistralai.Bn9UMUMu.svg)mistral-small-3.1-24b-instruct](https://developers.cloudflare.com/workers-ai/models/mistral-small-3.1-24b-instruct) [Text Generation • MistralAI](https://developers.cloudflare.com/workers-ai/models/mistral-small-3.1-24b-instruct) [Building upon Mistral Small 3 (2501), Mistral Small 3.1 (2503) adds state-of-the-art vision understanding and enhances long context capabilities up to 128k tokens without compromising text performance. With 24 billion parameters, this model achieves top-tier capabilities in both text and vision tasks.](https://developers.cloudflare.com/workers-ai/models/mistral-small-3.1-24b-instruct) [* Function calling](https://developers.cloudflare.com/workers-ai/models/mistral-small-3.1-24b-instruct) [![Qwen logo](https://developers.cloudflare.com/_astro/qwen.B8ST_F2H.svg)qwq-32b](https://developers.cloudflare.com/workers-ai/models/qwq-32b) [Text Generation • Qwen](https://developers.cloudflare.com/workers-ai/models/qwq-32b) [QwQ is the reasoning model of the Qwen series. Compared with conventional instruction-tuned models, QwQ, which is capable of thinking and reasoning, can achieve significantly enhanced performance in downstream tasks, especially hard problems. QwQ-32B is the medium-sized reasoning model, which is capable of achieving competitive performance against state-of-the-art reasoning models, e.g., DeepSeek-R1, o1-mini.](https://developers.cloudflare.com/workers-ai/models/qwq-32b) [* LoRA](https://developers.cloudflare.com/workers-ai/models/qwq-32b) [![Qwen logo](https://developers.cloudflare.com/_astro/qwen.B8ST_F2H.svg)qwen2.5-coder-32b-instruct](https://developers.cloudflare.com/workers-ai/models/qwen2.5-coder-32b-instruct) [Text Generation • Qwen](https://developers.cloudflare.com/workers-ai/models/qwen2.5-coder-32b-instruct) [Qwen2.5-Coder is the latest series of Code-Specific Qwen large language models (formerly known as CodeQwen). As of now, Qwen2.5-Coder has covered six mainstream model sizes, 0.5, 1.5, 3, 7, 14, 32 billion parameters, to meet the needs of different developers. Qwen2.5-Coder brings the following improvements upon CodeQwen1.5:](https://developers.cloudflare.com/workers-ai/models/qwen2.5-coder-32b-instruct) [* LoRA](https://developers.cloudflare.com/workers-ai/models/qwen2.5-coder-32b-instruct) [b](https://developers.cloudflare.com/workers-ai/models/bge-reranker-base) [bge-reranker-base](https://developers.cloudflare.com/workers-ai/models/bge-reranker-base) [Text Classification • baai](https://developers.cloudflare.com/workers-ai/models/bge-reranker-base) [Different from embedding model, reranker uses question and document as input and directly output similarity instead of embedding. You can get a relevance score by inputting query and passage to the reranker. And the score can be mapped to a float value in \[0,1\] by sigmoid function.](https://developers.cloudflare.com/workers-ai/models/bge-reranker-base) [](https://developers.cloudflare.com/workers-ai/models/bge-reranker-base) [![Meta logo](https://developers.cloudflare.com/_astro/meta.x5nlFKBG.svg)llama-guard-3-8b](https://developers.cloudflare.com/workers-ai/models/llama-guard-3-8b) [Text Generation • Meta](https://developers.cloudflare.com/workers-ai/models/llama-guard-3-8b) [Llama Guard 3 is a Llama-3.1-8B pretrained model, fine-tuned for content safety classification. Similar to previous versions, it can be used to classify content in both LLM inputs (prompt classification) and in LLM responses (response classification). It acts as an LLM – it generates text in its output that indicates whether a given prompt or response is safe or unsafe, and if unsafe, it also lists the content categories violated.](https://developers.cloudflare.com/workers-ai/models/llama-guard-3-8b) [* LoRA](https://developers.cloudflare.com/workers-ai/models/llama-guard-3-8b) [![DeepSeek logo](https://developers.cloudflare.com/_astro/deepseek.Dn1KbMH4.svg)deepseek-r1-distill-qwen-32b](https://developers.cloudflare.com/workers-ai/models/deepseek-r1-distill-qwen-32b) [Text Generation • DeepSeek](https://developers.cloudflare.com/workers-ai/models/deepseek-r1-distill-qwen-32b) [DeepSeek-R1-Distill-Qwen-32B is a model distilled from DeepSeek-R1 based on Qwen2.5. It outperforms OpenAI-o1-mini across various benchmarks, achieving new state-of-the-art results for dense models.](https://developers.cloudflare.com/workers-ai/models/deepseek-r1-distill-qwen-32b) [](https://developers.cloudflare.com/workers-ai/models/deepseek-r1-distill-qwen-32b) [![Meta logo](https://developers.cloudflare.com/_astro/meta.x5nlFKBG.svg)llama-3.2-1b-instruct](https://developers.cloudflare.com/workers-ai/models/llama-3.2-1b-instruct) [Text Generation • Meta](https://developers.cloudflare.com/workers-ai/models/llama-3.2-1b-instruct) [The Llama 3.2 instruction-tuned text only models are optimized for multilingual dialogue use cases, including agentic retrieval and summarization tasks.](https://developers.cloudflare.com/workers-ai/models/llama-3.2-1b-instruct) [](https://developers.cloudflare.com/workers-ai/models/llama-3.2-1b-instruct) [![Meta logo](https://developers.cloudflare.com/_astro/meta.x5nlFKBG.svg)llama-3.2-3b-instruct](https://developers.cloudflare.com/workers-ai/models/llama-3.2-3b-instruct) [Text Generation • Meta](https://developers.cloudflare.com/workers-ai/models/llama-3.2-3b-instruct) [The Llama 3.2 instruction-tuned text only models are optimized for multilingual dialogue use cases, including agentic retrieval and summarization tasks.](https://developers.cloudflare.com/workers-ai/models/llama-3.2-3b-instruct) [](https://developers.cloudflare.com/workers-ai/models/llama-3.2-3b-instruct) [![Meta logo](https://developers.cloudflare.com/_astro/meta.x5nlFKBG.svg)llama-3.2-11b-vision-instruct](https://developers.cloudflare.com/workers-ai/models/llama-3.2-11b-vision-instruct) [Text Generation • Meta](https://developers.cloudflare.com/workers-ai/models/llama-3.2-11b-vision-instruct) [The Llama 3.2-Vision instruction-tuned models are optimized for visual recognition, image reasoning, captioning, and answering general questions about an image.](https://developers.cloudflare.com/workers-ai/models/llama-3.2-11b-vision-instruct) [* LoRA](https://developers.cloudflare.com/workers-ai/models/llama-3.2-11b-vision-instruct) [![Black Forest Labs logo](https://developers.cloudflare.com/_astro/blackforestlabs.Ccs-Y4-D.svg)flux-1-schnell](https://developers.cloudflare.com/workers-ai/models/flux-1-schnell) [Text-to-Image • Black Forest Labs](https://developers.cloudflare.com/workers-ai/models/flux-1-schnell) [FLUX.1 \[schnell\] is a 12 billion parameter rectified flow transformer capable of generating images from text descriptions.](https://developers.cloudflare.com/workers-ai/models/flux-1-schnell) [](https://developers.cloudflare.com/workers-ai/models/flux-1-schnell) [![Meta logo](https://developers.cloudflare.com/_astro/meta.x5nlFKBG.svg)llama-3.1-8b-instruct-awq](https://developers.cloudflare.com/workers-ai/models/llama-3.1-8b-instruct-awq) [Text Generation • Meta](https://developers.cloudflare.com/workers-ai/models/llama-3.1-8b-instruct-awq) [Quantized (int4) generative text model with 8 billion parameters from Meta.](https://developers.cloudflare.com/workers-ai/models/llama-3.1-8b-instruct-awq) [](https://developers.cloudflare.com/workers-ai/models/llama-3.1-8b-instruct-awq) [![Meta logo](https://developers.cloudflare.com/_astro/meta.x5nlFKBG.svg)llama-3.1-8b-instruct-fp8](https://developers.cloudflare.com/workers-ai/models/llama-3.1-8b-instruct-fp8) [Text Generation • Meta](https://developers.cloudflare.com/workers-ai/models/llama-3.1-8b-instruct-fp8) [Llama 3.1 8B quantized to FP8 precision](https://developers.cloudflare.com/workers-ai/models/llama-3.1-8b-instruct-fp8) [](https://developers.cloudflare.com/workers-ai/models/llama-3.1-8b-instruct-fp8) [m](https://developers.cloudflare.com/workers-ai/models/melotts) [melotts](https://developers.cloudflare.com/workers-ai/models/melotts) [Text-to-Speech • myshell-ai](https://developers.cloudflare.com/workers-ai/models/melotts) [MeloTTS is a high-quality multi-lingual text-to-speech library by MyShell.ai.](https://developers.cloudflare.com/workers-ai/models/melotts) [](https://developers.cloudflare.com/workers-ai/models/melotts) [![Meta logo](https://developers.cloudflare.com/_astro/meta.x5nlFKBG.svg)llama-3.1-8b-instruct](https://developers.cloudflare.com/workers-ai/models/llama-3.1-8b-instruct) [Text Generation • Meta](https://developers.cloudflare.com/workers-ai/models/llama-3.1-8b-instruct) [The Meta Llama 3.1 collection of multilingual large language models (LLMs) is a collection of pretrained and instruction tuned generative models. The Llama 3.1 instruction tuned text only models are optimized for multilingual dialogue use cases and outperform many of the available open source and closed chat models on common industry benchmarks.](https://developers.cloudflare.com/workers-ai/models/llama-3.1-8b-instruct) [](https://developers.cloudflare.com/workers-ai/models/llama-3.1-8b-instruct) [b](https://developers.cloudflare.com/workers-ai/models/bge-m3) [bge-m3](https://developers.cloudflare.com/workers-ai/models/bge-m3) [Text Embeddings • baai](https://developers.cloudflare.com/workers-ai/models/bge-m3) [Multi-Functionality, Multi-Linguality, and Multi-Granularity embeddings model.](https://developers.cloudflare.com/workers-ai/models/bge-m3) [* Batch](https://developers.cloudflare.com/workers-ai/models/bge-m3) [m](https://developers.cloudflare.com/workers-ai/models/meta-llama-3-8b-instruct) [meta-llama-3-8b-instruct](https://developers.cloudflare.com/workers-ai/models/meta-llama-3-8b-instruct) [Text Generation • meta-llama](https://developers.cloudflare.com/workers-ai/models/meta-llama-3-8b-instruct) [Generation over generation, Meta Llama 3 demonstrates state-of-the-art performance on a wide range of industry benchmarks and offers new capabilities, including improved reasoning.](https://developers.cloudflare.com/workers-ai/models/meta-llama-3-8b-instruct) [](https://developers.cloudflare.com/workers-ai/models/meta-llama-3-8b-instruct) [![OpenAI logo](https://developers.cloudflare.com/_astro/openai.ChTKThcR.svg)whisper-large-v3-turbo](https://developers.cloudflare.com/workers-ai/models/whisper-large-v3-turbo) [Automatic Speech Recognition • OpenAI](https://developers.cloudflare.com/workers-ai/models/whisper-large-v3-turbo) [Whisper is a pre-trained model for automatic speech recognition (ASR) and speech translation.](https://developers.cloudflare.com/workers-ai/models/whisper-large-v3-turbo) [](https://developers.cloudflare.com/workers-ai/models/whisper-large-v3-turbo) [![Meta logo](https://developers.cloudflare.com/_astro/meta.x5nlFKBG.svg)llama-3-8b-instruct-awq](https://developers.cloudflare.com/workers-ai/models/llama-3-8b-instruct-awq) [Text Generation • Meta](https://developers.cloudflare.com/workers-ai/models/llama-3-8b-instruct-awq) [Quantized (int4) generative text model with 8 billion parameters from Meta.](https://developers.cloudflare.com/workers-ai/models/llama-3-8b-instruct-awq) [](https://developers.cloudflare.com/workers-ai/models/llama-3-8b-instruct-awq) [l](https://developers.cloudflare.com/workers-ai/models/llava-1.5-7b-hf) [llava-1.5-7b-hfBeta](https://developers.cloudflare.com/workers-ai/models/llava-1.5-7b-hf) [Image-to-Text • llava-hf](https://developers.cloudflare.com/workers-ai/models/llava-1.5-7b-hf) [LLaVA is an open-source chatbot trained by fine-tuning LLaMA/Vicuna on GPT-generated multimodal instruction-following data. It is an auto-regressive language model, based on the transformer architecture.](https://developers.cloudflare.com/workers-ai/models/llava-1.5-7b-hf) [](https://developers.cloudflare.com/workers-ai/models/llava-1.5-7b-hf) [f](https://developers.cloudflare.com/workers-ai/models/una-cybertron-7b-v2-bf16) [una-cybertron-7b-v2-bf16Beta](https://developers.cloudflare.com/workers-ai/models/una-cybertron-7b-v2-bf16) [Text Generation • fblgit](https://developers.cloudflare.com/workers-ai/models/una-cybertron-7b-v2-bf16) [Cybertron 7B v2 is a 7B MistralAI based model, best on it's series. It was trained with SFT, DPO and UNA (Unified Neural Alignment) on multiple datasets.](https://developers.cloudflare.com/workers-ai/models/una-cybertron-7b-v2-bf16) [](https://developers.cloudflare.com/workers-ai/models/una-cybertron-7b-v2-bf16) [![OpenAI logo](https://developers.cloudflare.com/_astro/openai.ChTKThcR.svg)whisper-tiny-enBeta](https://developers.cloudflare.com/workers-ai/models/whisper-tiny-en) [Automatic Speech Recognition • OpenAI](https://developers.cloudflare.com/workers-ai/models/whisper-tiny-en) [Whisper is a pre-trained model for automatic speech recognition (ASR) and speech translation. Trained on 680k hours of labelled data, Whisper models demonstrate a strong ability to generalize to many datasets and domains without the need for fine-tuning. This is the English-only version of the Whisper Tiny model which was trained on the task of speech recognition.](https://developers.cloudflare.com/workers-ai/models/whisper-tiny-en) [](https://developers.cloudflare.com/workers-ai/models/whisper-tiny-en) [![Meta logo](https://developers.cloudflare.com/_astro/meta.x5nlFKBG.svg)llama-3-8b-instruct](https://developers.cloudflare.com/workers-ai/models/llama-3-8b-instruct) [Text Generation • Meta](https://developers.cloudflare.com/workers-ai/models/llama-3-8b-instruct) [Generation over generation, Meta Llama 3 demonstrates state-of-the-art performance on a wide range of industry benchmarks and offers new capabilities, including improved reasoning.](https://developers.cloudflare.com/workers-ai/models/llama-3-8b-instruct) [](https://developers.cloudflare.com/workers-ai/models/llama-3-8b-instruct) [![MistralAI logo](https://developers.cloudflare.com/_astro/mistralai.Bn9UMUMu.svg)mistral-7b-instruct-v0.2Beta](https://developers.cloudflare.com/workers-ai/models/mistral-7b-instruct-v0.2) [Text Generation • MistralAI](https://developers.cloudflare.com/workers-ai/models/mistral-7b-instruct-v0.2) [The Mistral-7B-Instruct-v0.2 Large Language Model (LLM) is an instruct fine-tuned version of the Mistral-7B-v0.2. Mistral-7B-v0.2 has the following changes compared to Mistral-7B-v0.1: 32k context window (vs 8k context in v0.1), rope-theta = 1e6, and no Sliding-Window Attention.](https://developers.cloudflare.com/workers-ai/models/mistral-7b-instruct-v0.2) [* LoRA](https://developers.cloudflare.com/workers-ai/models/mistral-7b-instruct-v0.2) [![Google logo](https://developers.cloudflare.com/_astro/google.C4p59fss.svg)gemma-7b-it-loraBeta](https://developers.cloudflare.com/workers-ai/models/gemma-7b-it-lora) [Text Generation • Google](https://developers.cloudflare.com/workers-ai/models/gemma-7b-it-lora) [This is a Gemma-7B base model that Cloudflare dedicates for inference with LoRA adapters. Gemma is a family of lightweight, state-of-the-art open models from Google, built from the same research and technology used to create the Gemini models.](https://developers.cloudflare.com/workers-ai/models/gemma-7b-it-lora) [* LoRA](https://developers.cloudflare.com/workers-ai/models/gemma-7b-it-lora) [![Google logo](https://developers.cloudflare.com/_astro/google.C4p59fss.svg)gemma-2b-it-loraBeta](https://developers.cloudflare.com/workers-ai/models/gemma-2b-it-lora) [Text Generation • Google](https://developers.cloudflare.com/workers-ai/models/gemma-2b-it-lora) [This is a Gemma-2B base model that Cloudflare dedicates for inference with LoRA adapters. Gemma is a family of lightweight, state-of-the-art open models from Google, built from the same research and technology used to create the Gemini models.](https://developers.cloudflare.com/workers-ai/models/gemma-2b-it-lora) [* LoRA](https://developers.cloudflare.com/workers-ai/models/gemma-2b-it-lora) [m](https://developers.cloudflare.com/workers-ai/models/llama-2-7b-chat-hf-lora) [llama-2-7b-chat-hf-loraBeta](https://developers.cloudflare.com/workers-ai/models/llama-2-7b-chat-hf-lora) [Text Generation • meta-llama](https://developers.cloudflare.com/workers-ai/models/llama-2-7b-chat-hf-lora) [This is a Llama2 base model that Cloudflare dedicated for inference with LoRA adapters. Llama 2 is a collection of pretrained and fine-tuned generative text models ranging in scale from 7 billion to 70 billion parameters. This is the repository for the 7B fine-tuned model, optimized for dialogue use cases and converted for the Hugging Face Transformers format.](https://developers.cloudflare.com/workers-ai/models/llama-2-7b-chat-hf-lora) [* LoRA](https://developers.cloudflare.com/workers-ai/models/llama-2-7b-chat-hf-lora) [![Google logo](https://developers.cloudflare.com/_astro/google.C4p59fss.svg)gemma-7b-itBeta](https://developers.cloudflare.com/workers-ai/models/gemma-7b-it) [Text Generation • Google](https://developers.cloudflare.com/workers-ai/models/gemma-7b-it) [Gemma is a family of lightweight, state-of-the-art open models from Google, built from the same research and technology used to create the Gemini models. They are text-to-text, decoder-only large language models, available in English, with open weights, pre-trained variants, and instruction-tuned variants.](https://developers.cloudflare.com/workers-ai/models/gemma-7b-it) [* LoRA](https://developers.cloudflare.com/workers-ai/models/gemma-7b-it) [n](https://developers.cloudflare.com/workers-ai/models/starling-lm-7b-beta) [starling-lm-7b-betaBeta](https://developers.cloudflare.com/workers-ai/models/starling-lm-7b-beta) [Text Generation • nexusflow](https://developers.cloudflare.com/workers-ai/models/starling-lm-7b-beta) [We introduce Starling-LM-7B-beta, an open large language model (LLM) trained by Reinforcement Learning from AI Feedback (RLAIF). Starling-LM-7B-beta is trained from Openchat-3.5-0106 with our new reward model Nexusflow/Starling-RM-34B and policy optimization method Fine-Tuning Language Models from Human Preferences (PPO).](https://developers.cloudflare.com/workers-ai/models/starling-lm-7b-beta) [](https://developers.cloudflare.com/workers-ai/models/starling-lm-7b-beta) [n](https://developers.cloudflare.com/workers-ai/models/hermes-2-pro-mistral-7b) [hermes-2-pro-mistral-7bBeta](https://developers.cloudflare.com/workers-ai/models/hermes-2-pro-mistral-7b) [Text Generation • nousresearch](https://developers.cloudflare.com/workers-ai/models/hermes-2-pro-mistral-7b) [Hermes 2 Pro on Mistral 7B is the new flagship 7B Hermes! Hermes 2 Pro is an upgraded, retrained version of Nous Hermes 2, consisting of an updated and cleaned version of the OpenHermes 2.5 Dataset, as well as a newly introduced Function Calling and JSON Mode dataset developed in-house.](https://developers.cloudflare.com/workers-ai/models/hermes-2-pro-mistral-7b) [* Function calling](https://developers.cloudflare.com/workers-ai/models/hermes-2-pro-mistral-7b) [![MistralAI logo](https://developers.cloudflare.com/_astro/mistralai.Bn9UMUMu.svg)mistral-7b-instruct-v0.2-loraBeta](https://developers.cloudflare.com/workers-ai/models/mistral-7b-instruct-v0.2-lora) [Text Generation • MistralAI](https://developers.cloudflare.com/workers-ai/models/mistral-7b-instruct-v0.2-lora) [The Mistral-7B-Instruct-v0.2 Large Language Model (LLM) is an instruct fine-tuned version of the Mistral-7B-v0.2.](https://developers.cloudflare.com/workers-ai/models/mistral-7b-instruct-v0.2-lora) [* LoRA](https://developers.cloudflare.com/workers-ai/models/mistral-7b-instruct-v0.2-lora) [![Qwen logo](https://developers.cloudflare.com/_astro/qwen.B8ST_F2H.svg)qwen1.5-1.8b-chatBeta](https://developers.cloudflare.com/workers-ai/models/qwen1.5-1.8b-chat) [Text Generation • Qwen](https://developers.cloudflare.com/workers-ai/models/qwen1.5-1.8b-chat) [Qwen1.5 is the improved version of Qwen, the large language model series developed by Alibaba Cloud.](https://developers.cloudflare.com/workers-ai/models/qwen1.5-1.8b-chat) [](https://developers.cloudflare.com/workers-ai/models/qwen1.5-1.8b-chat) [u](https://developers.cloudflare.com/workers-ai/models/uform-gen2-qwen-500m) [uform-gen2-qwen-500mBeta](https://developers.cloudflare.com/workers-ai/models/uform-gen2-qwen-500m) [Image-to-Text • unum](https://developers.cloudflare.com/workers-ai/models/uform-gen2-qwen-500m) [UForm-Gen is a small generative vision-language model primarily designed for Image Captioning and Visual Question Answering. The model was pre-trained on the internal image captioning dataset and fine-tuned on public instructions datasets: SVIT, LVIS, VQAs datasets.](https://developers.cloudflare.com/workers-ai/models/uform-gen2-qwen-500m) [](https://developers.cloudflare.com/workers-ai/models/uform-gen2-qwen-500m) [f](https://developers.cloudflare.com/workers-ai/models/bart-large-cnn) [bart-large-cnnBeta](https://developers.cloudflare.com/workers-ai/models/bart-large-cnn) [Summarization • facebook](https://developers.cloudflare.com/workers-ai/models/bart-large-cnn) [BART is a transformer encoder-encoder (seq2seq) model with a bidirectional (BERT-like) encoder and an autoregressive (GPT-like) decoder. You can use this model for text summarization.](https://developers.cloudflare.com/workers-ai/models/bart-large-cnn) [](https://developers.cloudflare.com/workers-ai/models/bart-large-cnn) [![Microsoft logo](https://developers.cloudflare.com/_astro/microsoft.BfW2Sks3.svg)phi-2Beta](https://developers.cloudflare.com/workers-ai/models/phi-2) [Text Generation • Microsoft](https://developers.cloudflare.com/workers-ai/models/phi-2) [Phi-2 is a Transformer-based model with a next-word prediction objective, trained on 1.4T tokens from multiple passes on a mixture of Synthetic and Web datasets for NLP and coding.](https://developers.cloudflare.com/workers-ai/models/phi-2) [](https://developers.cloudflare.com/workers-ai/models/phi-2) [t](https://developers.cloudflare.com/workers-ai/models/tinyllama-1.1b-chat-v1.0) [tinyllama-1.1b-chat-v1.0Beta](https://developers.cloudflare.com/workers-ai/models/tinyllama-1.1b-chat-v1.0) [Text Generation • tinyllama](https://developers.cloudflare.com/workers-ai/models/tinyllama-1.1b-chat-v1.0) [The TinyLlama project aims to pretrain a 1.1B Llama model on 3 trillion tokens. This is the chat model finetuned on top of TinyLlama/TinyLlama-1.1B-intermediate-step-1431k-3T.](https://developers.cloudflare.com/workers-ai/models/tinyllama-1.1b-chat-v1.0) [](https://developers.cloudflare.com/workers-ai/models/tinyllama-1.1b-chat-v1.0) [![Qwen logo](https://developers.cloudflare.com/_astro/qwen.B8ST_F2H.svg)qwen1.5-14b-chat-awqBeta](https://developers.cloudflare.com/workers-ai/models/qwen1.5-14b-chat-awq) [Text Generation • Qwen](https://developers.cloudflare.com/workers-ai/models/qwen1.5-14b-chat-awq) [Qwen1.5 is the improved version of Qwen, the large language model series developed by Alibaba Cloud. AWQ is an efficient, accurate and blazing-fast low-bit weight quantization method, currently supporting 4-bit quantization.](https://developers.cloudflare.com/workers-ai/models/qwen1.5-14b-chat-awq) [](https://developers.cloudflare.com/workers-ai/models/qwen1.5-14b-chat-awq) [![Qwen logo](https://developers.cloudflare.com/_astro/qwen.B8ST_F2H.svg)qwen1.5-7b-chat-awqBeta](https://developers.cloudflare.com/workers-ai/models/qwen1.5-7b-chat-awq) [Text Generation • Qwen](https://developers.cloudflare.com/workers-ai/models/qwen1.5-7b-chat-awq) [Qwen1.5 is the improved version of Qwen, the large language model series developed by Alibaba Cloud. AWQ is an efficient, accurate and blazing-fast low-bit weight quantization method, currently supporting 4-bit quantization.](https://developers.cloudflare.com/workers-ai/models/qwen1.5-7b-chat-awq) [](https://developers.cloudflare.com/workers-ai/models/qwen1.5-7b-chat-awq) [![Qwen logo](https://developers.cloudflare.com/_astro/qwen.B8ST_F2H.svg)qwen1.5-0.5b-chatBeta](https://developers.cloudflare.com/workers-ai/models/qwen1.5-0.5b-chat) [Text Generation • Qwen](https://developers.cloudflare.com/workers-ai/models/qwen1.5-0.5b-chat) [Qwen1.5 is the improved version of Qwen, the large language model series developed by Alibaba Cloud.](https://developers.cloudflare.com/workers-ai/models/qwen1.5-0.5b-chat) [](https://developers.cloudflare.com/workers-ai/models/qwen1.5-0.5b-chat) [t](https://developers.cloudflare.com/workers-ai/models/discolm-german-7b-v1-awq) [discolm-german-7b-v1-awqBeta](https://developers.cloudflare.com/workers-ai/models/discolm-german-7b-v1-awq) [Text Generation • thebloke](https://developers.cloudflare.com/workers-ai/models/discolm-german-7b-v1-awq) [DiscoLM German 7b is a Mistral-based large language model with a focus on German-language applications. AWQ is an efficient, accurate and blazing-fast low-bit weight quantization method, currently supporting 4-bit quantization.](https://developers.cloudflare.com/workers-ai/models/discolm-german-7b-v1-awq) [](https://developers.cloudflare.com/workers-ai/models/discolm-german-7b-v1-awq) [t](https://developers.cloudflare.com/workers-ai/models/falcon-7b-instruct) [falcon-7b-instructBeta](https://developers.cloudflare.com/workers-ai/models/falcon-7b-instruct) [Text Generation • tiiuae](https://developers.cloudflare.com/workers-ai/models/falcon-7b-instruct) [Falcon-7B-Instruct is a 7B parameters causal decoder-only model built by TII based on Falcon-7B and finetuned on a mixture of chat/instruct datasets.](https://developers.cloudflare.com/workers-ai/models/falcon-7b-instruct) [](https://developers.cloudflare.com/workers-ai/models/falcon-7b-instruct) [o](https://developers.cloudflare.com/workers-ai/models/openchat-3.5-0106) [openchat-3.5-0106Beta](https://developers.cloudflare.com/workers-ai/models/openchat-3.5-0106) [Text Generation • openchat](https://developers.cloudflare.com/workers-ai/models/openchat-3.5-0106) [OpenChat is an innovative library of open-source language models, fine-tuned with C-RLFT - a strategy inspired by offline reinforcement learning.](https://developers.cloudflare.com/workers-ai/models/openchat-3.5-0106) [](https://developers.cloudflare.com/workers-ai/models/openchat-3.5-0106) [d](https://developers.cloudflare.com/workers-ai/models/sqlcoder-7b-2) [sqlcoder-7b-2Beta](https://developers.cloudflare.com/workers-ai/models/sqlcoder-7b-2) [Text Generation • defog](https://developers.cloudflare.com/workers-ai/models/sqlcoder-7b-2) [This model is intended to be used by non-technical users to understand data inside their SQL databases.](https://developers.cloudflare.com/workers-ai/models/sqlcoder-7b-2) [](https://developers.cloudflare.com/workers-ai/models/sqlcoder-7b-2) [![DeepSeek logo](https://developers.cloudflare.com/_astro/deepseek.Dn1KbMH4.svg)deepseek-math-7b-instructBeta](https://developers.cloudflare.com/workers-ai/models/deepseek-math-7b-instruct) [Text Generation • DeepSeek](https://developers.cloudflare.com/workers-ai/models/deepseek-math-7b-instruct) [DeepSeekMath-Instruct 7B is a mathematically instructed tuning model derived from DeepSeekMath-Base 7B. DeepSeekMath is initialized with DeepSeek-Coder-v1.5 7B and continues pre-training on math-related tokens sourced from Common Crawl, together with natural language and code data for 500B tokens.](https://developers.cloudflare.com/workers-ai/models/deepseek-math-7b-instruct) [](https://developers.cloudflare.com/workers-ai/models/deepseek-math-7b-instruct) [f](https://developers.cloudflare.com/workers-ai/models/detr-resnet-50) [detr-resnet-50Beta](https://developers.cloudflare.com/workers-ai/models/detr-resnet-50) [Object Detection • facebook](https://developers.cloudflare.com/workers-ai/models/detr-resnet-50) [DEtection TRansformer (DETR) model trained end-to-end on COCO 2017 object detection (118k annotated images).](https://developers.cloudflare.com/workers-ai/models/detr-resnet-50) [](https://developers.cloudflare.com/workers-ai/models/detr-resnet-50) [b](https://developers.cloudflare.com/workers-ai/models/stable-diffusion-xl-lightning) [stable-diffusion-xl-lightningBeta](https://developers.cloudflare.com/workers-ai/models/stable-diffusion-xl-lightning) [Text-to-Image • bytedance](https://developers.cloudflare.com/workers-ai/models/stable-diffusion-xl-lightning) [SDXL-Lightning is a lightning-fast text-to-image generation model. It can generate high-quality 1024px images in a few steps.](https://developers.cloudflare.com/workers-ai/models/stable-diffusion-xl-lightning) [](https://developers.cloudflare.com/workers-ai/models/stable-diffusion-xl-lightning) [l](https://developers.cloudflare.com/workers-ai/models/dreamshaper-8-lcm) [dreamshaper-8-lcmBeta](https://developers.cloudflare.com/workers-ai/models/dreamshaper-8-lcm) [Text-to-Image • lykon](https://developers.cloudflare.com/workers-ai/models/dreamshaper-8-lcm) [Stable Diffusion model that has been fine-tuned to be better at photorealism without sacrificing range.](https://developers.cloudflare.com/workers-ai/models/dreamshaper-8-lcm) [](https://developers.cloudflare.com/workers-ai/models/dreamshaper-8-lcm) [r](https://developers.cloudflare.com/workers-ai/models/stable-diffusion-v1-5-img2img) [stable-diffusion-v1-5-img2imgBeta](https://developers.cloudflare.com/workers-ai/models/stable-diffusion-v1-5-img2img) [Text-to-Image • runwayml](https://developers.cloudflare.com/workers-ai/models/stable-diffusion-v1-5-img2img) [Stable Diffusion is a latent text-to-image diffusion model capable of generating photo-realistic images. Img2img generate a new image from an input image with Stable Diffusion.](https://developers.cloudflare.com/workers-ai/models/stable-diffusion-v1-5-img2img) [](https://developers.cloudflare.com/workers-ai/models/stable-diffusion-v1-5-img2img) [r](https://developers.cloudflare.com/workers-ai/models/stable-diffusion-v1-5-inpainting) [stable-diffusion-v1-5-inpaintingBeta](https://developers.cloudflare.com/workers-ai/models/stable-diffusion-v1-5-inpainting) [Text-to-Image • runwayml](https://developers.cloudflare.com/workers-ai/models/stable-diffusion-v1-5-inpainting) [Stable Diffusion Inpainting is a latent text-to-image diffusion model capable of generating photo-realistic images given any text input, with the extra capability of inpainting the pictures by using a mask.](https://developers.cloudflare.com/workers-ai/models/stable-diffusion-v1-5-inpainting) [](https://developers.cloudflare.com/workers-ai/models/stable-diffusion-v1-5-inpainting) [t](https://developers.cloudflare.com/workers-ai/models/deepseek-coder-6.7b-instruct-awq) [deepseek-coder-6.7b-instruct-awqBeta](https://developers.cloudflare.com/workers-ai/models/deepseek-coder-6.7b-instruct-awq) [Text Generation • thebloke](https://developers.cloudflare.com/workers-ai/models/deepseek-coder-6.7b-instruct-awq) [Deepseek Coder is composed of a series of code language models, each trained from scratch on 2T tokens, with a composition of 87% code and 13% natural language in both English and Chinese.](https://developers.cloudflare.com/workers-ai/models/deepseek-coder-6.7b-instruct-awq) [](https://developers.cloudflare.com/workers-ai/models/deepseek-coder-6.7b-instruct-awq) [t](https://developers.cloudflare.com/workers-ai/models/deepseek-coder-6.7b-base-awq) [deepseek-coder-6.7b-base-awqBeta](https://developers.cloudflare.com/workers-ai/models/deepseek-coder-6.7b-base-awq) [Text Generation • thebloke](https://developers.cloudflare.com/workers-ai/models/deepseek-coder-6.7b-base-awq) [Deepseek Coder is composed of a series of code language models, each trained from scratch on 2T tokens, with a composition of 87% code and 13% natural language in both English and Chinese.](https://developers.cloudflare.com/workers-ai/models/deepseek-coder-6.7b-base-awq) [](https://developers.cloudflare.com/workers-ai/models/deepseek-coder-6.7b-base-awq) [t](https://developers.cloudflare.com/workers-ai/models/llamaguard-7b-awq) [llamaguard-7b-awqBeta](https://developers.cloudflare.com/workers-ai/models/llamaguard-7b-awq) [Text Generation • thebloke](https://developers.cloudflare.com/workers-ai/models/llamaguard-7b-awq) [Llama Guard is a model for classifying the safety of LLM prompts and responses, using a taxonomy of safety risks.](https://developers.cloudflare.com/workers-ai/models/llamaguard-7b-awq) [](https://developers.cloudflare.com/workers-ai/models/llamaguard-7b-awq) [t](https://developers.cloudflare.com/workers-ai/models/neural-chat-7b-v3-1-awq) [neural-chat-7b-v3-1-awqBeta](https://developers.cloudflare.com/workers-ai/models/neural-chat-7b-v3-1-awq) [Text Generation • thebloke](https://developers.cloudflare.com/workers-ai/models/neural-chat-7b-v3-1-awq) [This model is a fine-tuned 7B parameter LLM on the Intel Gaudi 2 processor from the mistralai/Mistral-7B-v0.1 on the open source dataset Open-Orca/SlimOrca.](https://developers.cloudflare.com/workers-ai/models/neural-chat-7b-v3-1-awq) [](https://developers.cloudflare.com/workers-ai/models/neural-chat-7b-v3-1-awq) [t](https://developers.cloudflare.com/workers-ai/models/openhermes-2.5-mistral-7b-awq) [openhermes-2.5-mistral-7b-awqBeta](https://developers.cloudflare.com/workers-ai/models/openhermes-2.5-mistral-7b-awq) [Text Generation • thebloke](https://developers.cloudflare.com/workers-ai/models/openhermes-2.5-mistral-7b-awq) [OpenHermes 2.5 Mistral 7B is a state of the art Mistral Fine-tune, a continuation of OpenHermes 2 model, which trained on additional code datasets.](https://developers.cloudflare.com/workers-ai/models/openhermes-2.5-mistral-7b-awq) [](https://developers.cloudflare.com/workers-ai/models/openhermes-2.5-mistral-7b-awq) [t](https://developers.cloudflare.com/workers-ai/models/llama-2-13b-chat-awq) [llama-2-13b-chat-awqBeta](https://developers.cloudflare.com/workers-ai/models/llama-2-13b-chat-awq) [Text Generation • thebloke](https://developers.cloudflare.com/workers-ai/models/llama-2-13b-chat-awq) [Llama 2 13B Chat AWQ is an efficient, accurate and blazing-fast low-bit weight quantized Llama 2 variant.](https://developers.cloudflare.com/workers-ai/models/llama-2-13b-chat-awq) [](https://developers.cloudflare.com/workers-ai/models/llama-2-13b-chat-awq) [t](https://developers.cloudflare.com/workers-ai/models/mistral-7b-instruct-v0.1-awq) [mistral-7b-instruct-v0.1-awqBeta](https://developers.cloudflare.com/workers-ai/models/mistral-7b-instruct-v0.1-awq) [Text Generation • thebloke](https://developers.cloudflare.com/workers-ai/models/mistral-7b-instruct-v0.1-awq) [Mistral 7B Instruct v0.1 AWQ is an efficient, accurate and blazing-fast low-bit weight quantized Mistral variant.](https://developers.cloudflare.com/workers-ai/models/mistral-7b-instruct-v0.1-awq) [](https://developers.cloudflare.com/workers-ai/models/mistral-7b-instruct-v0.1-awq) [t](https://developers.cloudflare.com/workers-ai/models/zephyr-7b-beta-awq) [zephyr-7b-beta-awqBeta](https://developers.cloudflare.com/workers-ai/models/zephyr-7b-beta-awq) [Text Generation • thebloke](https://developers.cloudflare.com/workers-ai/models/zephyr-7b-beta-awq) [Zephyr 7B Beta AWQ is an efficient, accurate and blazing-fast low-bit weight quantized Zephyr model variant.](https://developers.cloudflare.com/workers-ai/models/zephyr-7b-beta-awq) [](https://developers.cloudflare.com/workers-ai/models/zephyr-7b-beta-awq) [![Stability.ai logo](https://developers.cloudflare.com/_astro/stabilityai.CWXCgVjU.svg)stable-diffusion-xl-base-1.0Beta](https://developers.cloudflare.com/workers-ai/models/stable-diffusion-xl-base-1.0) [Text-to-Image • Stability.ai](https://developers.cloudflare.com/workers-ai/models/stable-diffusion-xl-base-1.0) [Diffusion-based text-to-image generative model by Stability AI. Generates and modify images based on text prompts.](https://developers.cloudflare.com/workers-ai/models/stable-diffusion-xl-base-1.0) [](https://developers.cloudflare.com/workers-ai/models/stable-diffusion-xl-base-1.0) [b](https://developers.cloudflare.com/workers-ai/models/bge-large-en-v1.5) [bge-large-en-v1.5](https://developers.cloudflare.com/workers-ai/models/bge-large-en-v1.5) [Text Embeddings • baai](https://developers.cloudflare.com/workers-ai/models/bge-large-en-v1.5) [BAAI general embedding (Large) model that transforms any given text into a 1024-dimensional vector](https://developers.cloudflare.com/workers-ai/models/bge-large-en-v1.5) [* Batch](https://developers.cloudflare.com/workers-ai/models/bge-large-en-v1.5) [b](https://developers.cloudflare.com/workers-ai/models/bge-small-en-v1.5) [bge-small-en-v1.5](https://developers.cloudflare.com/workers-ai/models/bge-small-en-v1.5) [Text Embeddings • baai](https://developers.cloudflare.com/workers-ai/models/bge-small-en-v1.5) [BAAI general embedding (Small) model that transforms any given text into a 384-dimensional vector](https://developers.cloudflare.com/workers-ai/models/bge-small-en-v1.5) [* Batch](https://developers.cloudflare.com/workers-ai/models/bge-small-en-v1.5) [![Meta logo](https://developers.cloudflare.com/_astro/meta.x5nlFKBG.svg)llama-2-7b-chat-fp16](https://developers.cloudflare.com/workers-ai/models/llama-2-7b-chat-fp16) [Text Generation • Meta](https://developers.cloudflare.com/workers-ai/models/llama-2-7b-chat-fp16) [Full precision (fp16) generative text model with 7 billion parameters from Meta](https://developers.cloudflare.com/workers-ai/models/llama-2-7b-chat-fp16) [](https://developers.cloudflare.com/workers-ai/models/llama-2-7b-chat-fp16) [![MistralAI logo](https://developers.cloudflare.com/_astro/mistralai.Bn9UMUMu.svg)mistral-7b-instruct-v0.1](https://developers.cloudflare.com/workers-ai/models/mistral-7b-instruct-v0.1) [Text Generation • MistralAI](https://developers.cloudflare.com/workers-ai/models/mistral-7b-instruct-v0.1) [Instruct fine-tuned version of the Mistral-7b generative text model with 7 billion parameters](https://developers.cloudflare.com/workers-ai/models/mistral-7b-instruct-v0.1) [* LoRA](https://developers.cloudflare.com/workers-ai/models/mistral-7b-instruct-v0.1) [b](https://developers.cloudflare.com/workers-ai/models/bge-base-en-v1.5) [bge-base-en-v1.5](https://developers.cloudflare.com/workers-ai/models/bge-base-en-v1.5) [Text Embeddings • baai](https://developers.cloudflare.com/workers-ai/models/bge-base-en-v1.5) [BAAI general embedding (Base) model that transforms any given text into a 768-dimensional vector](https://developers.cloudflare.com/workers-ai/models/bge-base-en-v1.5) [* Batch](https://developers.cloudflare.com/workers-ai/models/bge-base-en-v1.5) [![HuggingFace logo](https://developers.cloudflare.com/_astro/huggingface.DHiS2HZA.svg)distilbert-sst-2-int8](https://developers.cloudflare.com/workers-ai/models/distilbert-sst-2-int8) [Text Classification • HuggingFace](https://developers.cloudflare.com/workers-ai/models/distilbert-sst-2-int8) [Distilled BERT model that was finetuned on SST-2 for sentiment classification](https://developers.cloudflare.com/workers-ai/models/distilbert-sst-2-int8) [](https://developers.cloudflare.com/workers-ai/models/distilbert-sst-2-int8) [![Meta logo](https://developers.cloudflare.com/_astro/meta.x5nlFKBG.svg)llama-2-7b-chat-int8](https://developers.cloudflare.com/workers-ai/models/llama-2-7b-chat-int8) [Text Generation • Meta](https://developers.cloudflare.com/workers-ai/models/llama-2-7b-chat-int8) [Quantized (int8) generative text model with 7 billion parameters from Meta](https://developers.cloudflare.com/workers-ai/models/llama-2-7b-chat-int8) [](https://developers.cloudflare.com/workers-ai/models/llama-2-7b-chat-int8) [![Meta logo](https://developers.cloudflare.com/_astro/meta.x5nlFKBG.svg)m2m100-1.2b](https://developers.cloudflare.com/workers-ai/models/m2m100-1.2b) [Translation • Meta](https://developers.cloudflare.com/workers-ai/models/m2m100-1.2b) [Multilingual encoder-decoder (seq-to-seq) model trained for Many-to-Many multilingual translation](https://developers.cloudflare.com/workers-ai/models/m2m100-1.2b) [* Batch](https://developers.cloudflare.com/workers-ai/models/m2m100-1.2b) [![Microsoft logo](https://developers.cloudflare.com/_astro/microsoft.BfW2Sks3.svg)resnet-50](https://developers.cloudflare.com/workers-ai/models/resnet-50) [Image Classification • Microsoft](https://developers.cloudflare.com/workers-ai/models/resnet-50) [50 layers deep image classification CNN trained on more than 1M images from ImageNet](https://developers.cloudflare.com/workers-ai/models/resnet-50) [](https://developers.cloudflare.com/workers-ai/models/resnet-50) [![OpenAI logo](https://developers.cloudflare.com/_astro/openai.ChTKThcR.svg)whisper](https://developers.cloudflare.com/workers-ai/models/whisper) [Automatic Speech Recognition • OpenAI](https://developers.cloudflare.com/workers-ai/models/whisper) [Whisper is a general-purpose speech recognition model. It is trained on a large dataset of diverse audio and is also a multitasking model that can perform multilingual speech recognition, speech translation, and language identification.](https://developers.cloudflare.com/workers-ai/models/whisper) [](https://developers.cloudflare.com/workers-ai/models/whisper) [![Meta logo](https://developers.cloudflare.com/_astro/meta.x5nlFKBG.svg)llama-3.1-70b-instruct](https://developers.cloudflare.com/workers-ai/models/llama-3.1-70b-instruct) [Text Generation • Meta](https://developers.cloudflare.com/workers-ai/models/llama-3.1-70b-instruct) [The Meta Llama 3.1 collection of multilingual large language models (LLMs) is a collection of pretrained and instruction tuned generative models. The Llama 3.1 instruction tuned text only models are optimized for multilingual dialogue use cases and outperform many of the available open source and closed chat models on common industry benchmarks.](https://developers.cloudflare.com/workers-ai/models/llama-3.1-70b-instruct) [](https://developers.cloudflare.com/workers-ai/models/llama-3.1-70b-instruct) --- title: Playground · Cloudflare Workers AI docs lastUpdated: 2025-04-03T16:21:18.000Z chatbotDeprioritize: false source_url: html: https://developers.cloudflare.com/workers-ai/playground/ md: https://developers.cloudflare.com/workers-ai/playground/index.md --- --- title: 404 - Page Not Found · Cloudflare Workflows docs chatbotDeprioritize: false source_url: html: https://developers.cloudflare.com/workflows/404/ md: https://developers.cloudflare.com/workflows/404/index.md --- # 404 Check the URL, try using our [search](https://developers.cloudflare.com/search/) or try our LLM-friendly [llms.txt directory](https://developers.cloudflare.com/llms.txt). --- title: Build with Workflows · Cloudflare Workflows docs lastUpdated: 2024-10-24T11:52:00.000Z chatbotDeprioritize: true source_url: html: https://developers.cloudflare.com/workflows/build/ md: https://developers.cloudflare.com/workflows/build/index.md --- * [Workers API](https://developers.cloudflare.com/workflows/build/workers-api/) * [Trigger Workflows](https://developers.cloudflare.com/workflows/build/trigger-workflows/) * [Sleeping and retrying](https://developers.cloudflare.com/workflows/build/sleeping-and-retrying/) * [Events and parameters](https://developers.cloudflare.com/workflows/build/events-and-parameters/) * [Local Development](https://developers.cloudflare.com/workflows/build/local-development/) * [Rules of Workflows](https://developers.cloudflare.com/workflows/build/rules-of-workflows/) * [Call Workflows from Pages](https://developers.cloudflare.com/workflows/build/call-workflows-from-pages/) --- title: Examples · Cloudflare Workflows docs description: Explore the following examples for Workflows. lastUpdated: 2025-03-10T13:45:35.000Z chatbotDeprioritize: true source_url: html: https://developers.cloudflare.com/workflows/examples/ md: https://developers.cloudflare.com/workflows/examples/index.md --- Explore the following examples for Workflows. [Export and save D1 database](https://developers.cloudflare.com/workflows/examples/backup-d1/) Send invoice when shopping cart is checked out and paid for [Human-in-the-Loop Image Tagging with waitForEvent](https://developers.cloudflare.com/workflows/examples/wait-for-event/) Human-in-the-loop Workflow with waitForEvent API [Integrate Workflows with Twilio](https://developers.cloudflare.com/workflows/examples/twilio/) Integrate Workflows with Twilio. Learn how to receive and send text messages and phone calls via APIs and Webhooks. [Pay cart and send invoice](https://developers.cloudflare.com/workflows/examples/send-invoices/) Send invoice when shopping cart is checked out and paid for --- title: Get started · Cloudflare Workflows docs lastUpdated: 2024-10-24T11:52:00.000Z chatbotDeprioritize: true source_url: html: https://developers.cloudflare.com/workflows/get-started/ md: https://developers.cloudflare.com/workflows/get-started/index.md --- * [Guide](https://developers.cloudflare.com/workflows/get-started/guide/) * [CLI quick start](https://developers.cloudflare.com/workflows/get-started/cli-quick-start/) --- title: Observability · Cloudflare Workflows docs lastUpdated: 2024-10-24T11:52:00.000Z chatbotDeprioritize: true source_url: html: https://developers.cloudflare.com/workflows/observability/ md: https://developers.cloudflare.com/workflows/observability/index.md --- * [Metrics and analytics](https://developers.cloudflare.com/workflows/observability/metrics-analytics/) --- title: Platform · Cloudflare Workflows docs lastUpdated: 2025-03-07T09:55:39.000Z chatbotDeprioritize: true source_url: html: https://developers.cloudflare.com/workflows/reference/ md: https://developers.cloudflare.com/workflows/reference/index.md --- * [Pricing](https://developers.cloudflare.com/workflows/reference/pricing/) * [Limits](https://developers.cloudflare.com/workflows/reference/limits/) * [Glossary](https://developers.cloudflare.com/workflows/reference/glossary/) * [Wrangler commands](https://developers.cloudflare.com/workers/wrangler/commands/#workflows) * [Changelog](https://developers.cloudflare.com/workflows/reference/changelog/) --- title: Videos · Cloudflare Workflows docs lastUpdated: 2025-05-08T09:06:01.000Z chatbotDeprioritize: false source_url: html: https://developers.cloudflare.com/workflows/videos/ md: https://developers.cloudflare.com/workflows/videos/index.md --- [Build an application using Cloudflare Workflows ](https://developers.cloudflare.com/learning-paths/workflows-course/series/workflows-1/)In this series, we introduce Cloudflare Workflows and the term 'Durable Execution' which comes from the desire to run applications that can resume execution from where they left off, even if the underlying host or compute fails. --- title: Workflows REST API · Cloudflare Workflows docs lastUpdated: 2024-12-16T22:33:26.000Z chatbotDeprioritize: false source_url: html: https://developers.cloudflare.com/workflows/workflows-api/ md: https://developers.cloudflare.com/workflows/workflows-api/index.md --- --- title: 404 - Page Not Found · Cloudflare Zaraz docs chatbotDeprioritize: false source_url: html: https://developers.cloudflare.com/zaraz/404/ md: https://developers.cloudflare.com/zaraz/404/index.md --- # 404 Check the URL, try using our [search](https://developers.cloudflare.com/search/) or try our LLM-friendly [llms.txt directory](https://developers.cloudflare.com/llms.txt). --- title: Advanced options · Cloudflare Zaraz docs lastUpdated: 2024-09-24T17:04:21.000Z chatbotDeprioritize: false source_url: html: https://developers.cloudflare.com/zaraz/advanced/ md: https://developers.cloudflare.com/zaraz/advanced/index.md --- * [Load Zaraz selectively](https://developers.cloudflare.com/zaraz/advanced/load-selectively/) * [Blocking Triggers](https://developers.cloudflare.com/zaraz/advanced/blocking-triggers/) * [Data layer compatibility mode](https://developers.cloudflare.com/zaraz/advanced/datalayer-compatibility/) * [Domains not proxied by Cloudflare](https://developers.cloudflare.com/zaraz/advanced/domains-not-proxied/) * [Google Consent Mode](https://developers.cloudflare.com/zaraz/advanced/google-consent-mode/) * [Load Zaraz manually](https://developers.cloudflare.com/zaraz/advanced/load-zaraz-manually/) * [Configuration Import & Export](https://developers.cloudflare.com/zaraz/advanced/import-export/) * [Context Enricher](https://developers.cloudflare.com/zaraz/advanced/context-enricher/) * [Using JSONata](https://developers.cloudflare.com/zaraz/advanced/using-jsonata/) * [Logpush](https://developers.cloudflare.com/zaraz/advanced/logpush/) * [Custom Managed Components](https://developers.cloudflare.com/zaraz/advanced/load-custom-managed-component/) --- title: Changelog · Cloudflare Zaraz docs description: Subscribe to RSS lastUpdated: 2025-02-13T19:35:19.000Z chatbotDeprioritize: false source_url: html: https://developers.cloudflare.com/zaraz/changelog/ md: https://developers.cloudflare.com/zaraz/changelog/index.md --- [Subscribe to RSS](https://developers.cloudflare.com/zaraz/changelog/index.xml) ## 2025-02-11 * **Logpush**: Add Logpush support for Zaraz ## 2024-12-16 * **Consent Management**: Allow forcing the consent modal language - **Zaraz Debugger**: Log the response status and body for server-side requests * **Monitoring**: Introduce "Advanced Monitoring" with new reports such as geography, user timeline, funnel, retention and more * **Monitoring**: Show information about server-side requests success rate - **Zaraz Types**: Update the `zaraz-types` package - **Custom HTML Managed Component**: Apply syntax highlighting for inlined JavaScript code ## 2024-11-12 * **Facebook Component**: Update to version 21 of the API, and fail gracefully when e-commerce payload doesn't match schema - **Zaraz Monitoring**: Show all response status codes from the Zaraz server-side requests in the dashboard - **Zaraz Debugger**: Fix a bug that broke the display when Custom HTML included backticks - **Context Enricher**: It's now possible to programatically edit the Zaraz `config` itself, in addition to the `system` and `client` objects - **Rocker Loader**: Issues with using Zaraz next to Rocket Loader were fixed - **Automatic Actions**: The tools setup flow now fully supports configuring Automatic Actions - **Bing Managed Component**: Issues with setting the currency field were fixed - **Improvement**: The allowed size for a Zaraz config was increased by 250x - **Improvement**: The Zaraz runtime should run faster due to multiple code optimizations - **Bugfix**: Fixed an issue that caused the dashboard to sometimes show "E-commerce" option for tools that do not support it ## 2024-09-17 * **Automatic Actions**: E-commerce support is now integrated with Automatic Actions * **Consent Management**: Support styling the Consent Modal when CSP is enabled * **Consent Management**: Fix an issue that could cause tools to load before consent was granted when TCF is enabled * **Zaraz Debugger**: Remove redundant messages related to empty values * **Amplitude Managed Component**: Respect the EU endpoint setting ## 2024-08-23 * **Automatic Actions**: Automatic Event Tracking is now fully available * **Consent Management**: Fixed issues with rendering the Consent modal on iOS * **Zaraz Debugger**: Remove redundant messages related to `__zarazEcommerce` * **Zaraz Debugger**: Fixed bug that prevented the debugger to load when certain Custom HTML tools were used ## 2024-08-15 * **Automatic Actions**: Automatic Pageview tracking is now fully available * **Google Analytics 4**: Support Google Consent signals when using e-commerce tracking * **HTTP Events API**: Ignore bot score detection on the HTTP Events API endpoint * **Zaraz Debugger**: Show client-side network requests initiated by Managed Components ## 2024-08-12 * **Automatic Actions**: New tools now support Automatic Pageview tracking * **HTTP Events API**: Respect Google consent signals ## 2024-07-23 * **Embeds**: Add support for server-side rendering of X (Twitter) and Instagram embeds * **CSP Compliance**: Remove `eval` dependency * **Google Analytics 4 Managed Component**: Allow customizing the document title and client ID fields * **Custom HTML Managed Component**: Scripts included in a Custom HTML will preserve their running order * **Google Ads Managed Component**: Allow linking data with Google Analytics 4 instances * **TikTok Managed Component**: Use the new TikTok Events API v2 * **Reddit Managed Component**: Support custom events * **Twitter Managed Component**: Support setting the `event_id`, using custom fields, and improve conversion tracking * **Bugfix**: Cookie life-time cannot exceed one year anymore * **Bugfix**: Zaraz Debugger UI does not break when presenting really long lines of information ## 2024-06-21 * **Dashboard**: Add an option to disable the automatic `Pageview` event ## 2024-06-18 * **Amplitude Managed Component**: Allow users to choose data center * **Bing Managed Component**: Fix e-commerce events handling * **Google Analytics 4 Managed Component**: Mark e-commerce events as conversions * **Consent Management**: Fix IAB Consent Mode tools not showing with purposes ## 2024-05-03 * **Dashboard**: Add setting for Google Consent mode default * **Bugfix**: Cookie values are now decoded * **Bugfix**: Ensure context enricher worker can access the `context.system.consent` object * **Google Ads Managed Component**: Add conversion linker on pageviews without sending a pageview event * **Pinterest Conversion API Managed Component**: Bugfix handling of partial e-commerce event payloads ## 2024-04-19 * **Instagram Managed Component**: Improve performance of Instagram embeds * **Mixpanel Managed Component**: Include `gclid` and `fbclid` values in Mixpanel requests if available * **Consent Management**: Ensure consent platform is enabled when using IAB TCF compliant mode when there's at least one TCF-approved vendor configured * **Bugfix**: Ensure track data payload keys take priority over preset-keys when using enrich-payload feature for custom actions ## 2024-04-08 * **Consent Management**: Add `consent` object to `context.system` for finer control over consent preferences * **Consent Management**: Add support for IAB-compliant consent mode * **Consent Management**: Add "zarazConsentChoicesUpdated" event * **Consent Management**: Modal now respects system dark mode prefs when present * **Google Analytics 4 Managed Component**: Add support for Google Consent Mode v2 * **Google Ads Managed Component**: Add support for Google Consent Mode v2 * **Twitter Managed Component**: Enable tweet embeds * **Bing Managed Component**: Support running without setting cookies * **Bugfix**: `client.get` for Custom Managed Components fixed * **Bugfix**: Prevent duplicate pageviews in monitoring after consent granting * **Bugfix**: Prevent Managed Component routes from blocking origin routes unintentionally ## 2024-02-15 * **Single Page Applications**: Introduce `zaraz.spaPageview()` for manually triggering SPA pageviews * **Pinterest Managed Component**: Add ecommerce support * **Google Ads Managed Component**: Append url and rnd params to pagead/landing endpoint * **Bugfix**: Add noindex robots headers for Zaraz GET endpoint responses * **Bugfix**: Gracefully handle responses from custom Managed Components without mapped endpoints ## 2024-02-05 * **Dashboard**: rename "tracks" to "events" for consistency * **Pinterest Conversion API Managed Component**: update parameters sent to api * **HTTP Managed Component**: update \_settings prefix usage handling * **Bugfix**: better minification of client-side js * **Bugfix**: fix bug where anchor link click events were not bubbling when using click listener triggers * **API update**: begin migration support from deprecated `tool.neoEvents` array to `tool.actions` object config schema migration ## 2023-12-19 * **Google Analytics 4 Managed Component**: Fix Google Analytics 4 average engagement time metric. ## 2023-11-13 * **HTTP Request Managed Component**: Re-added `__zarazTrack` property. ## 2023-10-31 * **Google Analytics 4 Managed Component**: Remove `debug_mode` key if falsy or `false`. ## 2023-10-26 * **Custom HTML**: Added support for non-JavaScript script tags. ## 2023-10-20 * **Bing Managed Component**: Fixed an issue where some events were not being sent to Bing even after being triggered. * **Dashboard**: Improved welcome screen for new Zaraz users. ## 2023-10-03 * **Bugfix**: Fixed an issue that prevented some server-side requests from arriving to their destination * **Google Analytics 4 Managed Component**: Add support for `dbg` and `ir` fields. ## 2023-09-13 * **Consent Management**: Add support for custom button translations. * **Consent Management**: Modal stays fixed when scrolling. * **Google Analytics 4 Managed Component**: `hideOriginalIP` and `ga-audiences` can be set from tool event. ## 2023-09-11 * **Reddit Managed Component**: Support new "Account ID" formats (e.g. "ax\_xxxxx"). ## 2023-09-06 * **Consent Management**: Consent cookie name can now be customized. ## 2023-09-05 * **Segment Managed Component**: API Endpoint can be customized. ## 2023-08-21 * **TikTok Managed Component**: Support setting `ttp` and `event_id`. * **Consent Management**: Accessibility improvements. * **Facebook Managed Component**: Support for using "Limited Data Use" features. --- title: Zaraz Consent Management platform · Cloudflare Zaraz docs description: Zaraz provides a Consent Management platform (CMP) to help you address and manage required consents under the European General Data Protection Regulation (GDPR) and the Directive on privacy and electronic communications. This consent platform lets you easily create a consent modal for your website based on the tools you have configured. With Zaraz CMP, you can make sure Zaraz only loads tools under the umbrella of the specific purposes your users have agreed to. lastUpdated: 2024-09-24T17:04:21.000Z chatbotDeprioritize: false source_url: html: https://developers.cloudflare.com/zaraz/consent-management/ md: https://developers.cloudflare.com/zaraz/consent-management/index.md --- Zaraz provides a Consent Management platform (CMP) to help you address and manage required consents under the European [General Data Protection Regulation (GDPR)](https://gdpr-info.eu/) and the [Directive on privacy and electronic communications](https://eur-lex.europa.eu/legal-content/EN/TXT/HTML/?uri=CELEX:02002L0058-20091219\&from=EN#tocId7). This consent platform lets you easily create a consent modal for your website based on the tools you have configured. With Zaraz CMP, you can make sure Zaraz only loads tools under the umbrella of the specific purposes your users have agreed to. The consent modal added to your website is concise and gives your users an easy way to opt-in to any purposes of data processing your tools need. ## Crucial vocabulary The Zaraz Consent Management platform (CMP) has a **Purposes** section. This is where you will have to create purposes for the third-party tools your website uses. To better understand the terms involved in dealing with personal data, refer to these definitions: * **Purpose**: The reason you are loading a given tool on your website, such as to track conversions or improve your website’s layout based on behavior tracking. One purpose can be assigned to many tools, but one tool can be assigned only to one purpose. * **Consent**: An affirmative action that the user makes, required to store and access cookies (or other persistent data, like `LocalStorage`) on the users’ computer/browser. Note All tools use consent as a legal basis. This is due to the fact that they all use cookies that are not strictly necessary for the website’s correct operation. Due to this, all purposes are opt-in. ## Purposes and tools When you add a new tool to your website, Zaraz does not assign any purpose to it. This means that this tool will skip consent by default. Remember to check the [Consent Management settings](https://developers.cloudflare.com/zaraz/consent-management/enable-consent-management/) every time you set up a new tool. This helps ensure you avoid a situation where your tool is triggered before the user gives consent. The user’s consent preferences are stored within a first-party cookie. This cookie is a JSON file that maps the purposes’ ID to a `true`/`false`/missing value: * `true` value: The user gave consent. * `false`value: The user refused consent. * Missing value: The user has not made a choice yet. Important Cloudflare cannot recommend nor assign by default any specific purpose for your tools. It is your responsibility to properly assign tools to purposes if you need to comply with GDPR. ## Important things to note * Purposes that have no tools assigned will not show up in the CMP modal. * If a tool is assigned to a purpose, it will not run unless the user gives consent for the purpose the tool is assigned for. * Once your website loads for a given user for the first time, all the triggers you have configured for tools that are waiting for consent are cached in the browser. Then, they will be fired when/if the user gives consent, so they are not lost. * If the user visits your website for the first time, the consent modal will automatically show up. This also happens if the user has previously visited your website, but in the meantime you have enabled CMP. * On subsequent visits, the modal will not show up. You can make the modal show up by calling the function `zaraz.showConsentModal()` — for example, by binding it to a button. --- title: Create a third-party tool action · Cloudflare Zaraz docs description: Tools on Zaraz must have actions configured in order to do something. Often, using Automatic Actions is enough for configuring a tool. But you might want to use Custom Actions to create a more customized setup, or perhaps you are using a tool that does not support Automatic Actions. In these cases, you will need to configure Custom Actions manually. lastUpdated: 2024-09-24T17:04:21.000Z chatbotDeprioritize: false source_url: html: https://developers.cloudflare.com/zaraz/custom-actions/ md: https://developers.cloudflare.com/zaraz/custom-actions/index.md --- Tools on Zaraz must have actions configured in order to do something. Often, using Automatic Actions is enough for configuring a tool. But you might want to use Custom Actions to create a more customized setup, or perhaps you are using a tool that does not support Automatic Actions. In these cases, you will need to configure Custom Actions manually. Every action has firing triggers assigned to it. When the conditions of the firing triggers are met, the action will start. An action can be anything the tool can do - sending analytics information, showing a widget, adding a script and much more. To start using actions, first [create a trigger](https://developers.cloudflare.com/zaraz/custom-actions/create-trigger/) to determine when this action will start. If you have already set up a trigger, or if you are using one of the built-in triggers, follow these steps to [create an action](https://developers.cloudflare.com/zaraz/custom-actions/create-action/). --- title: Embeds · Cloudflare Zaraz docs description: Embeds are tools for incorporating external content, like social media posts, directly onto webpages, enhancing user engagement without compromising site performance and security. lastUpdated: 2024-09-24T17:04:21.000Z chatbotDeprioritize: false source_url: html: https://developers.cloudflare.com/zaraz/embeds/ md: https://developers.cloudflare.com/zaraz/embeds/index.md --- Embeds are tools for incorporating external content, like social media posts, directly onto webpages, enhancing user engagement without compromising site performance and security. Cloudflare Zaraz introduces server-side rendering for embeds, avoiding third-party JavaScript to improve security, privacy, and page speed. This method processes content on the server side, removing the need for direct communication between the user's browser and third-party servers. To add an Embed to Your Website: 1. Log in to the [Cloudflare dashboard](https://dash.cloudflare.com/login), and select your account and domain. 2. Go to **Zaraz** > **Tools Configuration**. 3. Click "add new tool" and activate the desired tools on your Cloudflare Zaraz dashboard. 4. Add a placeholder in your HTML, specifying the necessary attributes. For a generic embed, the snippet looks like this: ```html ``` Replace `componentName`, `embedName` and `attribute="value"` with the specific Managed Component requirements. Zaraz automatically detects placeholders and replaces them with the content in a secure and efficient way. ## Examples ### X (Twitter) embed ```html ``` Replace `tweet-id` with the actual tweet ID for the content you wish to embed. ### Instagram embed ```html ``` Replace `post-url` with the actual URL for the content you wish to embed. To include posts captions set captions attribute to `true`. --- title: FAQ · Cloudflare Zaraz docs description: Below you will find answers to our most commonly asked questions. If you cannot find the answer you are looking for, refer to the community page or Discord channel to explore additional resources. lastUpdated: 2025-02-11T10:50:09.000Z chatbotDeprioritize: false source_url: html: https://developers.cloudflare.com/zaraz/faq/ md: https://developers.cloudflare.com/zaraz/faq/index.md --- Below you will find answers to our most commonly asked questions. If you cannot find the answer you are looking for, refer to the [community page](https://community.cloudflare.com/) or [Discord channel](https://discord.cloudflare.com) to explore additional resources. * [General](#general) * [Tools](#tools) * [Consent](#consent) If you're looking for information regarding Zaraz Pricing, see the [Zaraz Pricing](https://developers.cloudflare.com/zaraz/pricing-info/) page. *** ## General ### Setting up Zaraz #### Why is Zaraz not working? If you are experiencing issues with Zaraz, there could be multiple reasons behind it. First, it's important to verify that the Zaraz script is loading properly on your website. To check if the script is loading correctly, follow these steps: 1. Open your website in a web browser. 2. Open your browser's Developer Tools. 3. In the Console, type `zaraz`. 4. If you see an error message saying `zaraz is not defined`, it means that Zaraz failed to load. If Zaraz is not loading, please verify the following: * The domain running Zaraz [is proxied by Cloudflare](https://developers.cloudflare.com/dns/proxy-status/). * Auto Injection is enabled in your [Zaraz Settings](https://developers.cloudflare.com/zaraz/reference/settings/#auto-inject-script). * Your website's HTML is valid and includes `` and `` tags. * You have at least [one enabled tool](https://developers.cloudflare.com/zaraz/get-started/) configured in Zaraz. #### The browser extension I'm using cannot find the tool I have added. Why? Zaraz is loading tools server-side, which means code running in the browser will not be able to see it. Running tools server-side is better for your website performance and privacy, but it also means you cannot use normal browser extensions to debug your Zaraz tools. #### I'm seeing some data discrepancies. Is there a way to check what data reaches Zaraz? Yes. You can use the metrics in [Zaraz Monitoring](https://developers.cloudflare.com/zaraz/monitoring/) and [Debug Mode](https://developers.cloudflare.com/zaraz/web-api/debug-mode/) to help you find where in the workflow the problem occurred. #### Can I use Zaraz with Rocket Loader? We recommend disabling [Rocket Loader](https://developers.cloudflare.com/speed/optimization/content/rocket-loader/) when using Zaraz. While Zaraz can be used together with Rocket Loader, there's usually no need to use both. Rocket Loader can sometimes delay data from reaching Zaraz, causing issues. #### Is Zaraz compatible with Content Security Policies (CSP)? Yes. To learn more about how Zaraz works to be compatible with CSP configurations, refer to the [Cloudflare Zaraz supports CSP](https://blog.cloudflare.com/cloudflare-zaraz-supports-csp/) blog post. #### Does Cloudflare process my HTML, removing existing scripts and then injecting Zaraz? Cloudflare Zaraz does not remove other third-party scripts from the page. Zaraz [can be auto-injected or not](https://developers.cloudflare.com/zaraz/reference/settings/#auto-inject-script), depending on your configuration, but if you have existing scripts that you intend to load with Zaraz, you should remove them. #### Does Zaraz work with Cloudflare Page Shield? Yes. Refer to [Page Shield](https://developers.cloudflare.com/page-shield/) for more information related to this product. #### Is there a way to prevent Zaraz from loading on specific pages, like under `/wp-admin`? To prevent Zaraz from loading on specific pages, refer to [Load Zaraz selectively](https://developers.cloudflare.com/zaraz/advanced/load-selectively/). #### How can I remove my Zaraz configuration? Resetting your Zaraz configuration will erase all of your configuration settings, including any tools, triggers, and variables you've set up. This action will disable Zaraz immediately. If you want to start over with a clean slate, you can always reset your configuration. 1. Log in to the [Cloudflare dashboard](https://dash.cloudflare.com/), and select your account and domain. 2. Go to **Zaraz** > **Settings** > **Advanced**. 3. Click "Reset" and follow the instructions. ### Zaraz Web API #### Why would the `zaraz.ecommerce()` method returns an undefined error? E-commerce tracking needs to be enabled in [the Zaraz Settings page](https://developers.cloudflare.com/zaraz/reference/settings/#e-commerce-tracking) before you can start using the E-commerce Web API. #### How would I trigger pageviews manually on a Single Page Application (SPA)? Zaraz comes with built-in [Single Page Application (SPA) support](https://developers.cloudflare.com/zaraz/reference/settings/#single-page-application-support) that automatically sends pageview events when navigating through the pages of your SPA. However, if you have advanced use cases, you might want to build your own system to trigger pageviews. In such cases, you can use the internal SPA pageview event by calling `zaraz.spaPageview()`. *** ## Tools ### Google Analytics #### After moving from Google Analytics 4 to Zaraz, I can no longer see demographics data. Why? You probably have enabled **Hide Originating IP Address** in the [Settings option](https://developers.cloudflare.com/zaraz/custom-actions/edit-tools-and-actions/) for Google Analytics 4. This tells Zaraz to not send the IP address to Google. To have access to demographics data and anonymize your visitor's IP, you should use [**Anonymize Originating IP Address**](#i-see-two-ways-of-anonymizing-ip-address-information-on-the-third-party-tool-google-analytics-one-in-privacy-and-one-in-additional-fields-which-is-the-correct-one) instead. #### I see two ways of anonymizing IP address information on the third-party tool Google Analytics: one in Privacy, and one in Additional fields. Which is the correct one? There is not a correct option, as the two options available in Google Analytics (GA) do different things. The "Hide Originating IP Address" option in [Tool Settings](https://developers.cloudflare.com/zaraz/custom-actions/edit-tools-and-actions/) prevents Zaraz from sending the IP address from a visitor to Google. This means that GA treats Zaraz's Worker's IP address as the visitor's IP address. This is often close in terms of location, but it might not be. With the **Anonymize Originating IP Address** available in the [Add field](https://developers.cloudflare.com/zaraz/custom-actions/additional-fields/) option, Cloudflare sends the visitor's IP address to Google as is, and passes the 'aip' parameter to GA. This asks GA to anonymize the data. #### If I set up Event Reporting (enhanced measurements) for Google Analytics, why does Zaraz only report Page View, Session Start, and First Visit? This is not a bug. Zaraz does not offer all the automatic events the normal GA4 JavaScript snippets offer out of the box. You will need to build [triggers](https://developers.cloudflare.com/zaraz/custom-actions/create-trigger/) and [actions](https://developers.cloudflare.com/zaraz/custom-actions/) to capture those events. Refer to [Get started](https://developers.cloudflare.com/zaraz/get-started/) to learn more about how Zaraz works. #### Can I set up custom dimensions for Google Analytics with Zaraz? Yes. Refer to [Additional fields](https://developers.cloudflare.com/zaraz/custom-actions/additional-fields/) to learn how to send additional data to tools. #### How do I attach a User Property to my events? In your Google Analytics 4 action, select **Add field** > **Add custom field...** and enter a field name that starts with `up.` — for example, `up.name`. This will make Zaraz send the field as a User Property and not as an Event Property. #### How can I enable Google Consent Mode signals? Zaraz has built-in support for Google Consent Mode v2. Learn more on how to use it in [Google Consent Mode page](https://developers.cloudflare.com/zaraz/advanced/google-consent-mode/). ### Facebook Pixel #### If I set up Facebook Pixel on my Zaraz account, why am I not seeing data coming through? It can take between 15 minutes to several hours for data to appear on Facebook's interface, due the way Facebook Pixel works. You can also use [debug mode](https://developers.cloudflare.com/zaraz/web-api/debug-mode/) to confirm that data is being properly sent from your Zaraz account. ### Google Ads #### What is the expected format for Conversion ID and Conversion Label Conversion ID and Conversion Label are usually provided by Google Ads as a "gtag script". Here's an example for a $1 USD conversion: ```js gtag("event", "conversion", { send_to: "AW-123456789/AbC-D_efG-h12_34-567", value: 1.0, currency: "USD", }); ``` The Conversion ID is the first part of `send_to` parameter, without the `AW-`. In the above example it would be `123456789`. The Conversion Label is the second part of the `send_to` parameter, therefore `AbC-D_efG-h12_34-567` in the above example. When setting up your Google Ads conversions through Zaraz, take the information from the original scripts you were asked to implement. ### Custom HTML #### Can I use Google Tag Manager together with Zaraz? You can load Google Tag Manager using Zaraz, but it is not recommended. Tools configured inside Google Tag Manager cannot be optimized by Zaraz, and cannot be restricted by the Zaraz privacy controls. In addition, Google Tag Manager could slow down your website because it requires additional JavaScript, and its rules are evaluated client-side. If you are currently using Google Tag Manager, we recommend replacing it with Zaraz by configuring your tags directly as Zaraz tools. #### Why should I prefer a native tool integration instead of an HTML snippet? Adding a tool to your website via a native Zaraz integration is always better than using an HTML snippet. HTML snippets usually depends on additional client-side requests, and require client-side code execution, which can slow down your website. They are often a security risk, as they can be hacked. Moreover, it can be very difficult to control their affect on the privacy of your visitors. Tools included in the Zaraz library are not suffering from these issues - they are fast, executed at the edge, and be controlled and restricted because they are sandboxed. #### How can I set my Custom HTML to be injected just once in my Single Page App (SPA) website? If you have enabled "Single Page Application support" in Zaraz Settings, your Custom HTML code may be unnecessarily injected every time a new SPA page is loaded. This can result in duplicates. To avoid this, go to your Custom HTML action and select the "Add Field" option. Then, add the "Ignore SPA" field and enable the toggle switch. Doing so will prevent your code from firing on every SPA pageview and ensure that it is injected only once. ### Other tools #### What if I want to use a tool that is not supported by Zaraz? The Zaraz engineering team is adding support to new tools all the time. You can also refer to the [community space](https://community.cloudflare.com/c/developers/integrationrequest/68) to ask for new integrations. #### I cannot get a tool to load when the website is loaded. Do I have to add code to my website? If you proxy your domain through Cloudflare, you do not need to add any code to your website. By default, Zaraz includes an automated `Pageview` trigger. Some tools, like Google Analytics, automatically add a `Pageview` action that uses this trigger. With other tools, you will need to add it manually. Refer to [Get started](https://developers.cloudflare.com/zaraz/get-started/) for more information. #### I am a vendor. How can I integrate my tool with Zaraz? The Zaraz team is working with third-party vendors to build their own Zaraz integrations using the Zaraz SDK. To request a new tool integration, or to collaborate on our SDK, contact us at . *** ## Consent ### How do I show the consent modal again to all users? In such a case, you can change the cookie name in the *Consent cookie name* field in the Zaraz Consent configuration. This will cause the consent modal to reappear for all users. Make sure to use a cookie name that has not been used for Zaraz on your site. --- title: Get started · Cloudflare Zaraz docs description: Before being able to use Zaraz, it is recommended that you proxy your website through Cloudflare. Refer to Set up Cloudflare for more information. If you do not want to proxy your website through Cloudflare, refer to Use Zaraz on domains not proxied by Cloudflare. lastUpdated: 2025-05-29T18:16:56.000Z chatbotDeprioritize: false source_url: html: https://developers.cloudflare.com/zaraz/get-started/ md: https://developers.cloudflare.com/zaraz/get-started/index.md --- Before being able to use Zaraz, it is recommended that you proxy your website through Cloudflare. Refer to [Set up Cloudflare](https://developers.cloudflare.com/fundamentals/account/) for more information. If you do not want to proxy your website through Cloudflare, refer to [Use Zaraz on domains not proxied by Cloudflare](https://developers.cloudflare.com/zaraz/advanced/domains-not-proxied/). ## Add a third-party tool to your website You can add new third-party tools and load them into your website through the Cloudflare dashboard. 1. Log in to the [Cloudflare dashboard](https://dash.cloudflare.com/login), and select your account. 2. Select **Tag Management**, then **Tag Setup** from the side menu and select your website. 3. If you have already added a tool before, select **Third-party tools** and click on **Add new tool**. 4. Choose a tool from the tools catalog. Select **Continue** to confirm your selection. 5. In **Set up**, configure the settings for your new tool. The information you need to enter will depend on the tool you choose. If you want to use any dynamic properties or variables, select the `+` sign in the drop-down menu next to the relevant field. 6. In **Actions** setup the actions for your new tool. You should be able to select Pageviews, Events or E-Commerce [1](#user-content-fn-1). 7. Select **Save**. ## Events, triggers and actions Zaraz relies on events, triggers and actions to determine when to load the tools you need in your website, and what action they need to perform. The way you configure Zaraz and where you start largely depend on the tool you wish to use. When using a tool that supports Automatic Actions, this process is largely done for you. If the tool you are adding doesn't support Automatic Actions, read more about configuring [Custom Actions](https://developers.cloudflare.com/zaraz/custom-actions). When using Automatic Actions, the available actions are as follows: * **Pageviews** - for tracking every pageview on your website * **Events** - For tracking calls using the [`zaraz.track` Web API](https://developers.cloudflare.com/zaraz/web-api/track) * **E-commerce** - For tracking calls to [`zaraz.ecommerce` Web API](https://developers.cloudflare.com/zaraz/web-api/ecommerce) ## Web API If you need to programmatically start actions in your tools, Cloudflare Zaraz provides a unified Web API to send events to Zaraz, and from there, to third-party tools. This Web API includes the `zaraz.track()`, `zaraz.set()` and `zaraz.ecommerce()` methods. [The Track method](https://developers.cloudflare.com/zaraz/web-api/track/) allows you to track custom events and actions on your website that might happen in real time. [The Set method](https://developers.cloudflare.com/zaraz/web-api/set/) is an easy shortcut to define a variable once and have it sent with every future Track call. [E-commerce](https://developers.cloudflare.com/zaraz/web-api/ecommerce/) is a unified method for sending e-commerce related data to multiple tools without needing to configure triggers and events. Refer to [Web API](https://developers.cloudflare.com/zaraz/web-api/) for more information. ## Troubleshooting If you suspect that something is not working the way it should, or if you want to verify the operation of tools on your website, read more about [Debug Mode](https://developers.cloudflare.com/zaraz/web-api/debug-mode/) and [Zaraz Monitoring](https://developers.cloudflare.com/zaraz/monitoring/). Also, check the [FAQ](https://developers.cloudflare.com/zaraz/faq/) page to see if your question was already answered there. ## Platform plugins Users and companies have developed plugins that make using Zaraz easier on specific platforms. We recommend checking out these plugins if you are using one of these platforms. ### WooCommerce * [Beetle Tracking](https://beetle-tracking.com/) - Integrate Zaraz with your WordPress WooCommerce website to track e-commerce events with zero configuration. Beetle Tracking also supports consent management and other advanced features. ## Footnotes 1. Some tools do not supported Automatic Actions, see the section about [Custom Actions](https://developers.cloudflare.com/zaraz/custom-actions) if the tool you are adding doesn't present Automatic Actions. [↩](#user-content-fnref-1) --- title: Versions & History · Cloudflare Zaraz docs description: Zaraz can work in real-time. In this mode, every change you make is instantly published. You can also enable Preview & Publish mode, which allows you to test your changes before you commit to them. lastUpdated: 2024-09-24T17:04:21.000Z chatbotDeprioritize: false source_url: html: https://developers.cloudflare.com/zaraz/history/ md: https://developers.cloudflare.com/zaraz/history/index.md --- Zaraz can work in real-time. In this mode, every change you make is instantly published. You can also enable [Preview & Publish mode](https://developers.cloudflare.com/zaraz/history/preview-mode/), which allows you to test your changes before you commit to them. When enabling Preview & Publish mode, you will also have access to [Zaraz History](https://developers.cloudflare.com/zaraz/history/versions/). Zaraz History shows you a list of all the changes made to your settings, and allows you to revert to any previous settings. * [Preview mode](https://developers.cloudflare.com/zaraz/history/preview-mode/) * [Versions](https://developers.cloudflare.com/zaraz/history/versions/) --- title: HTTP Events API · Cloudflare Zaraz docs description: The Zaraz HTTP Events API allows you to send information to Zaraz from places that cannot run the Web API, such as your server or your mobile app. It is useful for tracking events that are happening outside the browser, like successful transactions, sign-ups and more. The API also allows sending multiple events in batches. lastUpdated: 2025-01-13T09:52:51.000Z chatbotDeprioritize: false source_url: html: https://developers.cloudflare.com/zaraz/http-events-api/ md: https://developers.cloudflare.com/zaraz/http-events-api/index.md --- The Zaraz HTTP Events API allows you to send information to Zaraz from places that cannot run the [Web API](https://developers.cloudflare.com/zaraz/web-api/), such as your server or your mobile app. It is useful for tracking events that are happening outside the browser, like successful transactions, sign-ups and more. The API also allows sending multiple events in batches. ## Configure the API endpoint The API is disabled unless you configure an endpoint for it. The endpoint determines under what URL the API will be accessible. For example, if you set the endpoint to be `/zaraz/api`, and your domain is `example.com`, requests to the API will go to `https://example.com/zaraz/api`. To enable the API endpoint: 1. Log in to the [Cloudflare dashboard](https://dash.cloudflare.com/), and select your account and domain. 2. Go to **Zaraz** > **Settings**. 3. Under **Endpoints** > **HTTP Events API**, set your desired path. Remember the path is relative to your domain, and it must start with a `/`. Important To avoid getting the API used by unwanted actors, Cloudflare recommends choosing a unique path. ## Send events The endpoint you have configured for the API will receive `POST` requests with a JSON payload. Below, there is an example payload: ```json { "events": [ { "client": { "__zarazTrack": "transaction successful", "value": "200" } } ] } ``` The payload must contain an `events` array. Each Event Object in this array corresponds to one event you want Zaraz to process. The above example is similar to calling `zaraz.track('transaction successful', { value: "200" })` using the Web API. The Event Object holds the `client` object, in which you can pass information about the event itself. Every key you include in the Event Object will be available as a *Track Property* in the Zaraz dashboard. There are two reserved keys: * `__zarazTrack`: The value of this key will be available as *Event Name*. This is what you will usually build your triggers around. In the above example, setting this to `transaction successful` is the same as [using the Web API](https://developers.cloudflare.com/zaraz/web-api/track/) and calling `zaraz.track("transaction successful")`. * `__zarazEcommerce`: This key needs to be set to `true` if you want Zaraz to process the event as an e-commerce event. ### The `system` key In addition to the `client` key, you can use the `system` key to include information about the device from which the event originated. For example, you can submit the `User-Agent` string, the cookies and the screen resolution. Zaraz will use this information when connecting to different third-party tools. Since some tools depend on certain fields, it is often useful to include all the information you can. The same payload from before will resemble the following example, when we add the `system` information: ```json { "events": [ { "client": { "__zarazTrack": "transaction successful", "value": "200" }, "system": { "page": { "url": "https://example.com", "title": "My website" }, "device": { "language": "en-US", "ip": "192.168.0.1" } } } ] } ``` For all available system keys, refer to the table below: | Property | Type | Description | | - | - | - | | `system.cookies` | Object | A key-value object holding cookies from the device associated with the event. | | `system.device.ip` | String | The IP address of the device associated with the event. | | `system.device.resolution` | String | The screen resolution of the device associated with the event, in a `WIDTHxHEIGHT` format. | | `system.device.viewport` | String | The viewport of the device associated with the event, in a `WIDTHxHEIGHT` format. | | `system.device.language` | String | The language code used by the device associated with the event. | | `system.device.user-agent` | String | The `User-Agent` string of the device associated with the event. | | `system.page.title` | String | The title of the page associated with the event. | | `system.page.url` | String | The URL of the page associated with the event. | | `system.page.referrer` | String | The URL of the referrer page in the time the event took place. | | `system.page.encoding` | String | The encoding of the page associated with the event. | Note It is currently not possible to override location related properties, such as City, Country, and Continent. ## Process API responses For each Event Object in your payload, Zaraz will respond with a Result Object. The Result Objects order matches the order of your Event Objects. Depending on what tools you are loading using Zaraz, the body of the response coming from the API might include information you will want to process. This is because some tools do not have a complete server-side implementation and still depend on cookies, client-side JavaScript or similar mechanisms. Each Result Object can include the following information: | Result key | Description | | - | - | | `fetch` | Fetch requests that tools want to send from the user browser. | | `execute` | JavaScript code that tools want to execute in the user browser. | | `return` | Information that tools return. | | `cookies` | Cookies that tools want to set for the user. | You do not have to process the information above, but some tools might depend on this to work properly. You can start using the HTTP Events API without processing the information in the table above, and adjust accordingly later. --- title: Monitoring · Cloudflare Zaraz docs description: Zaraz Monitoring shows you different metrics regarding Zaraz. This helps you to detect issues when they occur. For example, if a third-party analytics provider stops collecting data, you can use the information presented by Zaraz Monitoring to find where in the workflow the problem occurred. lastUpdated: 2024-11-14T15:40:43.000Z chatbotDeprioritize: false source_url: html: https://developers.cloudflare.com/zaraz/monitoring/ md: https://developers.cloudflare.com/zaraz/monitoring/index.md --- Zaraz Monitoring shows you different metrics regarding Zaraz. This helps you to detect issues when they occur. For example, if a third-party analytics provider stops collecting data, you can use the information presented by Zaraz Monitoring to find where in the workflow the problem occurred. You can also check activity data in the **Activity last 24hr** section, when you access [tools](https://developers.cloudflare.com/zaraz/get-started/), [actions](https://developers.cloudflare.com/zaraz/custom-actions/) and [triggers](https://developers.cloudflare.com/zaraz/custom-actions/create-trigger/) in the dashboard. To use Zaraz Monitoring: 1. Log in to the [Cloudflare dashboard](https://dash.cloudflare.com/login), and select your account and domain. 2. Go to **Zaraz** > **Monitoring**. 3. Select one of the options (Loads, Events, Triggers, Actions). Zaraz Monitoring will show you how the traffic for that section evolved for the time period selected. ## Zaraz Monitoring options * **Loads**: Counts how many times Zaraz was loaded on pages of your website. When [Single Page Application support](https://developers.cloudflare.com/zaraz/reference/settings/#single-page-application-support) is enabled, Loads will count every change of navigation as well. * **Events**: Counts how many times a specific event was tracked by Zaraz. It includes the [Pageview event](https://developers.cloudflare.com/zaraz/get-started/), [Track events](https://developers.cloudflare.com/zaraz/web-api/track/), and [E-commerce events](https://developers.cloudflare.com/zaraz/web-api/ecommerce/). * **Triggers**: Counts how many times a specific trigger was activated. It includes the built-in [Pageview trigger](https://developers.cloudflare.com/zaraz/custom-actions/create-trigger/) and any other trigger you set in Zaraz. * **Actions**: Counts how many times a [specific action](https://developers.cloudflare.com/zaraz/custom-actions/) was activated. It includes the pre-configured Pageview action, and any other actions you set in Zaraz. * **Server-side requests**: tracks the status codes returned from server-side requests that Zaraz makes to your third-party tools. --- title: Pricing · Cloudflare Zaraz docs description: Zaraz is available to all Cloudflare users, across all tiers. Each month, every Cloudflare account gets 1,000,000 free Zaraz Events. For additional usage, the Zaraz Paid plan costs $5 per month for each additional 1,000,000 Zaraz Events. lastUpdated: 2024-08-13T19:56:56.000Z chatbotDeprioritize: false source_url: html: https://developers.cloudflare.com/zaraz/pricing-info/ md: https://developers.cloudflare.com/zaraz/pricing-info/index.md --- Zaraz is available to all Cloudflare users, across all tiers. Each month, every Cloudflare account gets 1,000,000 free Zaraz Events. For additional usage, the Zaraz Paid plan costs $5 per month for each additional 1,000,000 Zaraz Events. All Zaraz features and tools are always available on all accounts. Learn more about our pricing in [the following pricing announcement](https://blog.cloudflare.com/zaraz-announces-new-pricing) ## The Zaraz Event unit One Zaraz Event is an event you’re sending to Zaraz, whether that’s a page view, a `zaraz.track` event, or similar. You can easily see the total number of Zaraz Events you’re currently using under the [Monitoring section](https://developers.cloudflare.com/zaraz/monitoring/) in the Cloudflare Zaraz Dashboard. ## Enabling Zaraz Paid 1. Log in to the [Cloudflare dashboard](https://dash.cloudflare.com/login), and select your account and domain. 2. Go to **Zaraz** > **Plans**. 3. Click the **Enable Zaraz usage billing** button and follow the instructions. ## Using Zaraz Free If you don't enable Zaraz Paid, you'll receive email notifications when you reach 50%, 80%, and 90% of your free allocation. Zaraz will be disabled until the next billing cycle if you exceed 1,000,000 events without enabling Zaraz Paid. --- title: Reference · Cloudflare Zaraz docs lastUpdated: 2024-08-13T19:56:56.000Z chatbotDeprioritize: false source_url: html: https://developers.cloudflare.com/zaraz/reference/ md: https://developers.cloudflare.com/zaraz/reference/index.md --- * [Zaraz Context](https://developers.cloudflare.com/zaraz/reference/context/) * [Properties reference](https://developers.cloudflare.com/zaraz/reference/properties-reference/) * [Settings](https://developers.cloudflare.com/zaraz/reference/settings/) * [Third-party tools](https://developers.cloudflare.com/zaraz/reference/supported-tools/) * [Triggers and rules](https://developers.cloudflare.com/zaraz/reference/triggers/) --- title: Variables · Cloudflare Zaraz docs lastUpdated: 2024-09-24T17:04:21.000Z chatbotDeprioritize: false source_url: html: https://developers.cloudflare.com/zaraz/variables/ md: https://developers.cloudflare.com/zaraz/variables/index.md --- * [Create a variable](https://developers.cloudflare.com/zaraz/variables/create-variables/) * [Edit variables](https://developers.cloudflare.com/zaraz/variables/edit-variables/) * [Worker Variables](https://developers.cloudflare.com/zaraz/variables/worker-variables/) --- title: Web API · Cloudflare Zaraz docs description: Zaraz provides a client-side web API that you can use anywhere inside the tag of a page. lastUpdated: 2024-08-13T19:56:56.000Z chatbotDeprioritize: false source_url: html: https://developers.cloudflare.com/zaraz/web-api/ md: https://developers.cloudflare.com/zaraz/web-api/index.md --- Zaraz provides a client-side web API that you can use anywhere inside the `` tag of a page. This API allows you to send events and data to Zaraz, that you can later use when creating your triggers. Using the API lets you tailor the behavior of Zaraz to your needs: You can launch tools only when you need them, or send information you care about that is not otherwise automatically collected from your site. * [Track](https://developers.cloudflare.com/zaraz/web-api/track/) * [Set](https://developers.cloudflare.com/zaraz/web-api/set/) * [E-commerce](https://developers.cloudflare.com/zaraz/web-api/ecommerce/) * [Debug mode](https://developers.cloudflare.com/zaraz/web-api/debug-mode/) --- title: Agents API · Cloudflare Agents docs description: This page provides an overview of the Agent SDK API, including the Agent class, methods and properties built-in to the Agents SDK. lastUpdated: 2025-06-26T18:43:59.000Z chatbotDeprioritize: false source_url: html: https://developers.cloudflare.com/agents/api-reference/agents-api/ md: https://developers.cloudflare.com/agents/api-reference/agents-api/index.md --- This page provides an overview of the Agent SDK API, including the `Agent` class, methods and properties built-in to the Agents SDK. The Agents SDK exposes two main APIs: * The server-side `Agent` class. An Agent encapsulates all of the logic for an Agent, including how clients can connect to it, how it stores state, the methods it exposes, how to call AI models, and any error handling. * The client-side `AgentClient` class, which allows you to connect to an Agent instance from a client-side application. The client APIs also include React hooks, including `useAgent` and `useAgentChat`, and allow you to automatically synchronize state between each unique Agent (running server-side) and your client applications. Note Agents require [Cloudflare Durable Objects](https://developers.cloudflare.com/durable-objects/), see [Configuration](https://developers.cloudflare.com/agents/getting-started/testing-your-agent/#add-the-agent-configuration) to learn how to add the required bindings to your project. You can also find more specific usage examples for each API in the [Agents API Reference](https://developers.cloudflare.com/agents/api-reference/). * JavaScript ```js import { Agent } from "agents"; class MyAgent extends Agent { // Define methods on the Agent } export default MyAgent; ``` * TypeScript ```ts import { Agent } from "agents"; class MyAgent extends Agent { // Define methods on the Agent } export default MyAgent; ``` An Agent can have many (millions of) instances: each instance is a separate micro-server that runs independently of the others. This allows Agents to scale horizontally: an Agent can be associated with a single user, or many thousands of users, depending on the agent you're building. Instances of an Agent are addressed by a unique identifier: that identifier (ID) can be the user ID, an email address, GitHub username, a flight ticket number, an invoice ID, or any other identifier that helps to uniquely identify the instance and for whom it is acting on behalf of. Note An instance of an Agent is globally unique: given the same name (or ID), you will always get the same instance of an agent. This allows you to avoid synchronizing state across requests: if an Agent instance represents a specific user, team, channel or other entity, you can use the Agent instance to store state for that entity. No need to set up a centralized session store. If the client disconnects, you can always route the client back to the exact same Agent and pick up where they left off. ### Agent class API Writing an Agent requires you to define a class that extends the `Agent` class from the Agents SDK package. An Agent encapsulates all of the logic for an Agent, including how clients can connect to it, how it stores state, the methods it exposes, and any error handling. You can also define your own methods on an Agent: it's technically valid to publish an Agent only has your own methods exposed, and create/get Agents directly from a Worker. Your own methods can access the Agent's environment variables and bindings on `this.env`, state on `this.setState`, and call other methods on the Agent via `this.yourMethodName`. * JavaScript ```js import { Agent } from "agents"; // Pass the Env as a TypeScript type argument // Any services connected to your Agent or Worker as Bindings // are then available on this.env. // The core class for creating Agents that can maintain state, orchestrate // complex AI workflows, schedule tasks, and interact with users and other // Agents. class MyAgent extends Agent { // Optional initial state definition initialState = { counter: 0, messages: [], lastUpdated: null, }; // Called when a new Agent instance starts or wakes from hibernation async onStart() { console.log("Agent started with state:", this.state); } // Handle HTTP requests coming to this Agent instance // Returns a Response object async onRequest(request) { return new Response("Hello from Agent!"); } // Called when a WebSocket connection is established // Access the original request via ctx.request for auth etc. async onConnect(connection, ctx) { // Connections are automatically accepted by the SDK. // You can also explicitly close a connection here with connection.close() // Access the Request on ctx.request to inspect headers, cookies and the URL } // Called for each message received on a WebSocket connection // Message can be string, ArrayBuffer, or ArrayBufferView async onMessage(connection, message) { // Handle incoming messages connection.send("Received your message"); } // Handle WebSocket connection errors async onError(connection, error) { console.error(`Connection error:`, error); } // Handle WebSocket connection close events async onClose(connection, code, reason, wasClean) { console.log(`Connection closed: ${code} - ${reason}`); } // Called when the Agent's state is updated from any source // source can be "server" or a client Connection onStateUpdate(state, source) { console.log("State updated:", state, "Source:", source); } // You can define your own custom methods to be called by requests, // WebSocket messages, or scheduled tasks async customProcessingMethod(data) { // Process data, update state, schedule tasks, etc. this.setState({ ...this.state, lastUpdated: new Date() }); } } ``` * TypeScript ```ts import { Agent } from "agents"; interface Env { // Define environment variables & bindings here } // Pass the Env as a TypeScript type argument // Any services connected to your Agent or Worker as Bindings // are then available on this.env. // The core class for creating Agents that can maintain state, orchestrate // complex AI workflows, schedule tasks, and interact with users and other // Agents. class MyAgent extends Agent { // Optional initial state definition initialState = { counter: 0, messages: [], lastUpdated: null }; // Called when a new Agent instance starts or wakes from hibernation async onStart() { console.log('Agent started with state:', this.state); } // Handle HTTP requests coming to this Agent instance // Returns a Response object async onRequest(request: Request): Promise { return new Response("Hello from Agent!"); } // Called when a WebSocket connection is established // Access the original request via ctx.request for auth etc. async onConnect(connection: Connection, ctx: ConnectionContext) { // Connections are automatically accepted by the SDK. // You can also explicitly close a connection here with connection.close() // Access the Request on ctx.request to inspect headers, cookies and the URL } // Called for each message received on a WebSocket connection // Message can be string, ArrayBuffer, or ArrayBufferView async onMessage(connection: Connection, message: WSMessage) { // Handle incoming messages connection.send("Received your message"); } // Handle WebSocket connection errors async onError(connection: Connection, error: unknown): Promise { console.error(`Connection error:`, error); } // Handle WebSocket connection close events async onClose(connection: Connection, code: number, reason: string, wasClean: boolean): Promise { console.log(`Connection closed: ${code} - ${reason}`); } // Called when the Agent's state is updated from any source // source can be "server" or a client Connection onStateUpdate(state: State, source: "server" | Connection) { console.log("State updated:", state, "Source:", source); } // You can define your own custom methods to be called by requests, // WebSocket messages, or scheduled tasks async customProcessingMethod(data: any) { // Process data, update state, schedule tasks, etc. this.setState({ ...this.state, lastUpdated: new Date() }); } } ``` - JavaScript ```js // Basic Agent implementation with custom methods import { Agent } from "agents"; class MyAgent extends Agent { initialState = { counter: 0, lastUpdated: null, }; async onRequest(request) { if (request.method === "POST") { await this.incrementCounter(); return new Response(JSON.stringify(this.state), { headers: { "Content-Type": "application/json" }, }); } return new Response(JSON.stringify(this.state), { headers: { "Content-Type": "application/json" }, }); } async incrementCounter() { this.setState({ counter: this.state.counter + 1, lastUpdated: new Date(), }); } } ``` - TypeScript ```ts // Basic Agent implementation with custom methods import { Agent } from "agents"; interface MyState { counter: number; lastUpdated: Date | null; } class MyAgent extends Agent { initialState = { counter: 0, lastUpdated: null }; async onRequest(request: Request) { if (request.method === "POST") { await this.incrementCounter(); return new Response(JSON.stringify(this.state), { headers: { "Content-Type": "application/json" } }); } return new Response(JSON.stringify(this.state), { headers: { "Content-Type": "application/json" } }); } async incrementCounter() { this.setState({ counter: this.state.counter + 1, lastUpdated: new Date() }); } } ``` ### WebSocket API The WebSocket API allows you to accept and manage WebSocket connections made to an Agent. #### Connection Represents a WebSocket connection to an Agent. ```ts // WebSocket connection interface interface Connection { // Unique ID for this connection id: string; // Client-specific state attached to this connection state: State; // Update the connection's state setState(state: State): void; // Accept an incoming WebSocket connection accept(): void; // Close the WebSocket connection with optional code and reason close(code?: number, reason?: string): void; // Send a message to the client // Can be string, ArrayBuffer, or ArrayBufferView send(message: string | ArrayBuffer | ArrayBufferView): void; } ``` * JavaScript ```js // Example of handling WebSocket messages export class YourAgent extends Agent { async onMessage(connection, message) { if (typeof message === "string") { try { // Parse JSON message const data = JSON.parse(message); if (data.type === "update") { // Update connection-specific state connection.setState({ ...connection.state, lastActive: Date.now() }); // Update global Agent state this.setState({ ...this.state, connections: this.state.connections + 1, }); // Send response back to this client only connection.send( JSON.stringify({ type: "updated", status: "success", }), ); } } catch (e) { connection.send(JSON.stringify({ error: "Invalid message format" })); } } } } ``` * TypeScript ```ts // Example of handling WebSocket messages export class YourAgent extends Agent { async onMessage(connection: Connection, message: WSMessage) { if (typeof message === 'string') { try { // Parse JSON message const data = JSON.parse(message); if (data.type === 'update') { // Update connection-specific state connection.setState({ ...connection.state, lastActive: Date.now() }); // Update global Agent state this.setState({ ...this.state, connections: this.state.connections + 1 }); // Send response back to this client only connection.send(JSON.stringify({ type: 'updated', status: 'success' })); } } catch (e) { connection.send(JSON.stringify({ error: 'Invalid message format' })); } } } } ``` #### WSMessage Types of messages that can be received from a WebSocket. ```ts // Types of messages that can be received from WebSockets type WSMessage = string | ArrayBuffer | ArrayBufferView; ``` #### ConnectionContext Context information for a WebSocket connection. ```ts // Context available during WebSocket connection interface ConnectionContext { // The original HTTP request that initiated the WebSocket connection request: Request; } ``` ### State synchronization API Note To learn more about how to manage state within an Agent, refer to the documentation on [managing and syncing state](https://developers.cloudflare.com/agents/api-reference/store-and-sync-state/). #### State Methods and types for managing Agent state. ```ts // State management in the Agent class class Agent { // Initial state that will be set if no state exists yet initialState: State = {} as unknown as State; // Current state of the Agent, persisted across restarts get state(): State; // Update the Agent's state // Persists to storage and notifies all connected clients setState(state: State): void; // Called when state is updated from any source // Override to react to state changes onStateUpdate(state: State, source: "server" | Connection): void; } ``` * JavaScript ```js // Example of state management in an Agent // Inside your Agent class export class YourAgent extends Agent { async addMessage(sender, text) { // Update state with new message this.setState({ ...this.state, messages: [ ...this.state.messages, { sender, text, timestamp: Date.now() }, ].slice(-this.state.settings.maxHistoryLength), // Maintain max history }); // The onStateUpdate method will automatically be called // and all connected clients will receive the update } // Override onStateUpdate to add custom behavior when state changes onStateUpdate(state, source) { console.log( `State updated by ${source === "server" ? "server" : "client"}`, ); // You could trigger additional actions based on state changes if (state.messages.length > 0) { const lastMessage = state.messages[state.messages.length - 1]; if (lastMessage.text.includes("@everyone")) { this.notifyAllParticipants(lastMessage); } } } } ``` * TypeScript ```ts // Example of state management in an Agent interface ChatState { messages: Array<{ sender: string; text: string; timestamp: number }>; participants: string[]; settings: { allowAnonymous: boolean; maxHistoryLength: number; }; } interface Env { // Your bindings and environment variables } // Inside your Agent class export class YourAgent extends Agent { async addMessage(sender: string, text: string) { // Update state with new message this.setState({ ...this.state, messages: [ ...this.state.messages, { sender, text, timestamp: Date.now() } ].slice(-this.state.settings.maxHistoryLength) // Maintain max history }); // The onStateUpdate method will automatically be called // and all connected clients will receive the update } // Override onStateUpdate to add custom behavior when state changes onStateUpdate(state: ChatState, source: "server" | Connection) { console.log(`State updated by ${source === "server" ? "server" : "client"}`); // You could trigger additional actions based on state changes if (state.messages.length > 0) { const lastMessage = state.messages[state.messages.length - 1]; if (lastMessage.text.includes('@everyone')) { this.notifyAllParticipants(lastMessage); } } } } ``` ### Scheduling API #### Scheduling tasks Schedule tasks to run at a specified time in the future. ```ts // Scheduling API for running tasks in the future class Agent { // Schedule a task to run in the future // when: seconds from now, specific Date, or cron expression // callback: method name on the Agent to call // payload: data to pass to the callback // Returns a Schedule object with the task ID async schedule( when: Date | string | number, callback: keyof this, payload?: T ): Promise>; // Get a scheduled task by ID // Returns undefined if the task doesn't exist async getSchedule(id: string): Promise | undefined>; // Get all scheduled tasks matching the criteria // Returns an array of Schedule objects getSchedules(criteria?: { description?: string; id?: string; type?: "scheduled" | "delayed" | "cron"; timeRange?: { start?: Date; end?: Date }; }): Schedule[]; // Cancel a scheduled task by ID // Returns true if the task was cancelled, false otherwise async cancelSchedule(id: string): Promise; } ``` * JavaScript ```js // Example of scheduling in an Agent export class YourAgent extends Agent { // Schedule a one-time reminder in 2 hours async scheduleReminder(userId, message) { const twoHoursFromNow = new Date(Date.now() + 2 * 60 * 60 * 1000); const schedule = await this.schedule(twoHoursFromNow, "sendReminder", { userId, message, channel: "email", }); console.log(`Scheduled reminder with ID: ${schedule.id}`); return schedule.id; } // Schedule a recurring daily task using cron async scheduleDailyReport() { // Run at 08:00 AM every day const schedule = await this.schedule( "0 8 * * *", // Cron expression: minute hour day month weekday "generateDailyReport", { reportType: "daily-summary" }, ); console.log(`Scheduled daily report with ID: ${schedule.id}`); return schedule.id; } // Method that will be called when the scheduled task runs async sendReminder(data) { console.log(`Sending reminder to ${data.userId}: ${data.message}`); // Add code to send the actual notification } } ``` * TypeScript ```ts // Example of scheduling in an Agent interface ReminderData { userId: string; message: string; channel: string; } export class YourAgent extends Agent { // Schedule a one-time reminder in 2 hours async scheduleReminder(userId: string, message: string) { const twoHoursFromNow = new Date(Date.now() + 2 * 60 * 60 * 1000); const schedule = await this.schedule( twoHoursFromNow, 'sendReminder', { userId, message, channel: 'email' } ); console.log(`Scheduled reminder with ID: ${schedule.id}`); return schedule.id; } // Schedule a recurring daily task using cron async scheduleDailyReport() { // Run at 08:00 AM every day const schedule = await this.schedule( '0 8 * * *', // Cron expression: minute hour day month weekday 'generateDailyReport', { reportType: 'daily-summary' } ); console.log(`Scheduled daily report with ID: ${schedule.id}`); return schedule.id; } // Method that will be called when the scheduled task runs async sendReminder(data: ReminderData) { console.log(`Sending reminder to ${data.userId}: ${data.message}`); // Add code to send the actual notification } } ``` #### Schedule object Represents a scheduled task. ```ts // Represents a scheduled task type Schedule = { // Unique identifier for the schedule id: string; // Name of the method to be called callback: string; // Data to be passed to the callback payload: T; } & ( | { // One-time execution at a specific time type: "scheduled"; // Timestamp when the task should execute time: number; } | { // Delayed execution after a certain time type: "delayed"; // Timestamp when the task should execute time: number; // Number of seconds to delay execution delayInSeconds: number; } | { // Recurring execution based on cron expression type: "cron"; // Timestamp for the next execution time: number; // Cron expression defining the schedule cron: string; } ); ``` * JavaScript ```js export class YourAgent extends Agent { // Example of managing scheduled tasks async viewAndManageSchedules() { // Get all scheduled tasks const allSchedules = this.getSchedules(); console.log(`Total scheduled tasks: ${allSchedules.length}`); // Get tasks scheduled for a specific time range const upcomingSchedules = this.getSchedules({ timeRange: { start: new Date(), end: new Date(Date.now() + 24 * 60 * 60 * 1000), // Next 24 hours }, }); // Get a specific task by ID const taskId = "task-123"; const specificTask = await this.getSchedule(taskId); if (specificTask) { console.log( `Found task: ${specificTask.callback} at ${new Date(specificTask.time)}`, ); // Cancel a scheduled task const cancelled = await this.cancelSchedule(taskId); console.log(`Task cancelled: ${cancelled}`); } } } ``` * TypeScript ```ts export class YourAgent extends Agent { // Example of managing scheduled tasks async viewAndManageSchedules() { // Get all scheduled tasks const allSchedules = this.getSchedules(); console.log(`Total scheduled tasks: ${allSchedules.length}`); // Get tasks scheduled for a specific time range const upcomingSchedules = this.getSchedules({ timeRange: { start: new Date(), end: new Date(Date.now() + 24 * 60 * 60 * 1000) // Next 24 hours } }); // Get a specific task by ID const taskId = "task-123"; const specificTask = await this.getSchedule(taskId); if (specificTask) { console.log(`Found task: ${specificTask.callback} at ${new Date(specificTask.time)}`); // Cancel a scheduled task const cancelled = await this.cancelSchedule(taskId); console.log(`Task cancelled: ${cancelled}`); } } } ``` ### SQL API Each Agent instance has an embedded SQLite database that can be accessed using the `this.sql` method within any method on your `Agent` class. #### SQL queries Execute SQL queries against the Agent's built-in SQLite database using the `this.sql` method within any method on your `Agent` class. ```ts // SQL query API for the Agent's embedded database class Agent { // Execute a SQL query with tagged template literals // Returns an array of rows matching the query sql>( strings: TemplateStringsArray, ...values: (string | number | boolean | null)[] ): T[]; } ``` * JavaScript ```js // Example of using SQL in an Agent export class YourAgent extends Agent { async setupDatabase() { // Create a table if it doesn't exist this.sql` CREATE TABLE IF NOT EXISTS users ( id TEXT PRIMARY KEY, name TEXT NOT NULL, email TEXT UNIQUE, created_at INTEGER ) `; } async createUser(id, name, email) { // Insert a new user this.sql` INSERT INTO users (id, name, email, created_at) VALUES (${id}, ${name}, ${email}, ${Date.now()}) `; } async getUserById(id) { // Query a user by ID const users = this.sql` SELECT * FROM users WHERE id = ${id} `; return users.length ? users[0] : null; } async searchUsers(term) { // Search users with a wildcard return this.sql` SELECT * FROM users WHERE name LIKE ${"%" + term + "%"} OR email LIKE ${"%" + term + "%"} ORDER BY created_at DESC `; } } ``` * TypeScript ```ts // Example of using SQL in an Agent interface User { id: string; name: string; email: string; created_at: number; } export class YourAgent extends Agent { async setupDatabase() { // Create a table if it doesn't exist this.sql` CREATE TABLE IF NOT EXISTS users ( id TEXT PRIMARY KEY, name TEXT NOT NULL, email TEXT UNIQUE, created_at INTEGER ) `; } async createUser(id: string, name: string, email: string) { // Insert a new user this.sql` INSERT INTO users (id, name, email, created_at) VALUES (${id}, ${name}, ${email}, ${Date.now()}) `; } async getUserById(id: string): Promise { // Query a user by ID const users = this.sql` SELECT * FROM users WHERE id = ${id} `; return users.length ? users[0] : null; } async searchUsers(term: string): Promise { // Search users with a wildcard return this.sql` SELECT * FROM users WHERE name LIKE ${'%' + term + '%'} OR email LIKE ${'%' + term + '%'} ORDER BY created_at DESC `; } } ``` Note Visit the [state management API documentation](https://developers.cloudflare.com/agents/api-reference/store-and-sync-state/) within the Agents SDK, including the native `state` APIs and the built-in `this.sql` API for storing and querying data within your Agents. ### Client API The Agents SDK provides a set of client APIs for interacting with Agents from client-side JavaScript code, including: * React hooks, including `useAgent` and `useAgentChat`, for connecting to Agents from client applications. * Client-side [state syncing](https://developers.cloudflare.com/agents/api-reference/store-and-sync-state/) that allows you to subscribe to state updates between the Agent and any connected client(s) when calling `this.setState` within your Agent's code. * The ability to call remote methods (Remote Procedure Calls; RPC) on the Agent from client-side JavaScript code using the `@callable` method decorator. #### AgentClient Client for connecting to an Agent from the browser. ```ts import { AgentClient } from "agents/client"; // Options for creating an AgentClient type AgentClientOptions = Omit & { // Name of the agent to connect to (class name in kebab-case) agent: string; // Name of the specific Agent instance (optional, defaults to "default") name?: string; // Other WebSocket options like host, protocol, etc. }; // WebSocket client for connecting to an Agent class AgentClient extends PartySocket { static fetch(opts: PartyFetchOptions): Promise; constructor(opts: AgentClientOptions); } ``` * JavaScript ```js // Example of using AgentClient in the browser import { AgentClient } from "agents/client"; // Connect to an Agent instance const client = new AgentClient({ agent: "chat-agent", // Name of your Agent class in kebab-case name: "support-room-123", // Specific instance name host: window.location.host, // Using same host }); client.onopen = () => { console.log("Connected to agent"); // Send an initial message client.send(JSON.stringify({ type: "join", user: "user123" })); }; client.onmessage = (event) => { // Handle incoming messages const data = JSON.parse(event.data); console.log("Received:", data); if (data.type === "state_update") { // Update local UI with new state updateUI(data.state); } }; client.onclose = () => console.log("Disconnected from agent"); // Send messages to the Agent function sendMessage(text) { client.send( JSON.stringify({ type: "message", text, timestamp: Date.now(), }), ); } ``` * TypeScript ```ts // Example of using AgentClient in the browser import { AgentClient } from "agents/client"; // Connect to an Agent instance const client = new AgentClient({ agent: "chat-agent", // Name of your Agent class in kebab-case name: "support-room-123", // Specific instance name host: window.location.host, // Using same host }); client.onopen = () => { console.log("Connected to agent"); // Send an initial message client.send(JSON.stringify({ type: "join", user: "user123" })); }; client.onmessage = (event) => { // Handle incoming messages const data = JSON.parse(event.data); console.log("Received:", data); if (data.type === "state_update") { // Update local UI with new state updateUI(data.state); } }; client.onclose = () => console.log("Disconnected from agent"); // Send messages to the Agent function sendMessage(text) { client.send(JSON.stringify({ type: "message", text, timestamp: Date.now() })); } ``` #### agentFetch Make an HTTP request to an Agent. ```ts import { agentFetch } from "agents/client"; // Options for the agentFetch function type AgentClientFetchOptions = Omit & { // Name of the agent to connect to agent: string; // Name of the specific Agent instance (optional) name?: string; }; // Make an HTTP request to an Agent function agentFetch( opts: AgentClientFetchOptions, init?: RequestInit ): Promise; ``` * JavaScript ```js // Example of using agentFetch in the browser import { agentFetch } from "agents/client"; // Function to get data from an Agent async function fetchAgentData() { try { const response = await agentFetch( { agent: "task-manager", name: "user-123-tasks", }, { method: "GET", headers: { Authorization: `Bearer ${userToken}`, }, }, ); if (!response.ok) { throw new Error(`Error: ${response.status}`); } const data = await response.json(); return data; } catch (error) { console.error("Failed to fetch from agent:", error); } } ``` * TypeScript ```ts // Example of using agentFetch in the browser import { agentFetch } from "agents/client"; // Function to get data from an Agent async function fetchAgentData() { try { const response = await agentFetch( { agent: "task-manager", name: "user-123-tasks" }, { method: "GET", headers: { "Authorization": `Bearer ${userToken}` } } ); if (!response.ok) { throw new Error(`Error: ${response.status}`); } const data = await response.json(); return data; } catch (error) { console.error("Failed to fetch from agent:", error); } } ``` ### React API The Agents SDK provides a React API for simplifying connection and routing to Agents from front-end frameworks, including React Router (Remix), Next.js, and Astro. #### useAgent React hook for connecting to an Agent. ```ts import { useAgent } from "agents/react"; // Options for the useAgent hook type UseAgentOptions = Omit< Parameters[0], "party" | "room" > & { // Name of the agent to connect to agent: string; // Name of the specific Agent instance (optional) name?: string; // Called when the Agent's state is updated onStateUpdate?: (state: State, source: "server" | "client") => void; }; // React hook for connecting to an Agent // Returns a WebSocket connection with setState method function useAgent( options: UseAgentOptions ): PartySocket & { // Update the Agent's state setState: (state: State) => void }; ``` ### Chat Agent The Agents SDK exposes an `AIChatAgent` class that extends the `Agent` class and exposes an `onChatMessage` method that simplifies building interactive chat agents. You can combine this with the `useAgentChat` React hook from the `agents/ai-react` package to manage chat state and messages between a user and your Agent(s). #### AIChatAgent Extension of the `Agent` class with built-in chat capabilities. ```ts import { AIChatAgent } from "agents/ai-chat-agent"; import { Message, StreamTextOnFinishCallback, ToolSet } from "ai"; // Base class for chat-specific agents class AIChatAgent extends Agent { // Array of chat messages for the current conversation messages: Message[]; // Handle incoming chat messages and generate a response // onFinish is called when the response is complete async onChatMessage( onFinish: StreamTextOnFinishCallback ): Promise; // Persist messages within the Agent's local storage. async saveMessages(messages: Message[]): Promise; } ``` * JavaScript ```js // Example of extending AIChatAgent import { AIChatAgent } from "agents/ai-chat-agent"; import { Message } from "ai"; class CustomerSupportAgent extends AIChatAgent { // Override the onChatMessage method to customize behavior async onChatMessage(onFinish) { // Access the AI models using environment bindings const { openai } = this.env.AI; // Get the current conversation history const chatHistory = this.messages; // Generate a system prompt based on knowledge base const systemPrompt = await this.generateSystemPrompt(); // Generate a response stream const stream = await openai.chat({ model: "gpt-4o", messages: [{ role: "system", content: systemPrompt }, ...chatHistory], stream: true, }); // Return the streaming response return new Response(stream, { headers: { "Content-Type": "text/event-stream" }, }); } // Helper method to generate a system prompt async generateSystemPrompt() { // Query knowledge base or use static prompt return `You are a helpful customer support agent. Respond to customer inquiries based on the following guidelines: - Be friendly and professional - If you don't know an answer, say so - Current company policies: ...`; } } ``` * TypeScript ```ts // Example of extending AIChatAgent import { AIChatAgent } from "agents/ai-chat-agent"; import { Message } from "ai"; interface Env { AI: any; // Your AI binding } class CustomerSupportAgent extends AIChatAgent { // Override the onChatMessage method to customize behavior async onChatMessage(onFinish) { // Access the AI models using environment bindings const { openai } = this.env.AI; // Get the current conversation history const chatHistory = this.messages; // Generate a system prompt based on knowledge base const systemPrompt = await this.generateSystemPrompt(); // Generate a response stream const stream = await openai.chat({ model: "gpt-4o", messages: [ { role: "system", content: systemPrompt }, ...chatHistory ], stream: true }); // Return the streaming response return new Response(stream, { headers: { "Content-Type": "text/event-stream" } }); } // Helper method to generate a system prompt async generateSystemPrompt() { // Query knowledge base or use static prompt return `You are a helpful customer support agent. Respond to customer inquiries based on the following guidelines: - Be friendly and professional - If you don't know an answer, say so - Current company policies: ...`; } } ``` ### Chat Agent React API #### useAgentChat React hook for building AI chat interfaces using an Agent. ```ts import { useAgentChat } from "agents/ai-react"; import { useAgent } from "agents/react"; import type { Message } from "ai"; // Options for the useAgentChat hook type UseAgentChatOptions = Omit< Parameters[0] & { // Agent connection from useAgent agent: ReturnType; }, "fetch" >; // React hook for building AI chat interfaces using an Agent function useAgentChat(options: UseAgentChatOptions): { // Current chat messages messages: Message[]; // Set messages and synchronize with the Agent setMessages: (messages: Message[]) => void; // Clear chat history on both client and Agent clearHistory: () => void; // Append a new message to the conversation append: (message: Message, chatRequestOptions?: any) => Promise; // Reload the last user message reload: (chatRequestOptions?: any) => Promise; // Stop the AI response generation stop: () => void; // Current input text input: string; // Set the input text setInput: React.Dispatch>; // Handle input changes handleInputChange: (e: React.ChangeEvent) => void; // Submit the current input handleSubmit: (event?: { preventDefault?: () => void }, chatRequestOptions?: any) => void; // Additional metadata metadata?: Object; // Whether a response is currently being generated isLoading: boolean; // Current status of the chat status: "submitted" | "streaming" | "ready" | "error"; // Tool data from the AI response data?: any[]; // Set tool data setData: (data: any[] | undefined | ((data: any[] | undefined) => any[] | undefined)) => void; // Unique ID for the chat id: string; // Add a tool result for a specific tool call addToolResult: ({ toolCallId, result }: { toolCallId: string; result: any }) => void; // Current error if any error: Error | undefined; }; ``` * JavaScript ```js // Example of using useAgentChat in a React component import { useAgentChat } from "agents/ai-react"; import { useAgent } from "agents/react"; import { useState } from "react"; function ChatInterface() { // Connect to the chat agent const agentConnection = useAgent({ agent: "customer-support", name: "session-12345", }); // Use the useAgentChat hook with the agent connection const { messages, input, handleInputChange, handleSubmit, isLoading, error, clearHistory, } = useAgentChat({ agent: agentConnection, initialMessages: [ { role: "system", content: "You're chatting with our AI assistant." }, { role: "assistant", content: "Hello! How can I help you today?" }, ], }); return (
{messages.map((message, i) => (
{message.role === "user" ? "👤" : "🤖"} {message.content}
))} {isLoading &&
AI is typing...
} {error &&
Error: {error.message}
}
); } ``` * TypeScript ```ts // Example of using useAgentChat in a React component import { useAgentChat } from "agents/ai-react"; import { useAgent } from "agents/react"; import { useState } from "react"; function ChatInterface() { // Connect to the chat agent const agentConnection = useAgent({ agent: "customer-support", name: "session-12345" }); // Use the useAgentChat hook with the agent connection const { messages, input, handleInputChange, handleSubmit, isLoading, error, clearHistory } = useAgentChat({ agent: agentConnection, initialMessages: [ { role: "system", content: "You're chatting with our AI assistant." }, { role: "assistant", content: "Hello! How can I help you today?" } ] }); return (
{messages.map((message, i) => (
{message.role === 'user' ? '👤' : '🤖'} {message.content}
))} {isLoading &&
AI is typing...
} {error &&
Error: {error.message}
}
); } ``` ### Next steps * [Build a chat Agent](https://developers.cloudflare.com/agents/getting-started/build-a-chat-agent/) using the Agents SDK and deploy it to Workers. * Learn more [using WebSockets](https://developers.cloudflare.com/agents/api-reference/websockets/) to build interactive Agents and stream data back from your Agent. * [Orchestrate asynchronous workflows](https://developers.cloudflare.com/agents/api-reference/run-workflows) from your Agent by combining the Agents SDK and [Workflows](https://developers.cloudflare.com/workflows).
--- title: Browse the web · Cloudflare Agents docs description: Agents can browse the web using the Browser Rendering API or your preferred headless browser service. lastUpdated: 2025-05-16T16:37:37.000Z chatbotDeprioritize: false source_url: html: https://developers.cloudflare.com/agents/api-reference/browse-the-web/ md: https://developers.cloudflare.com/agents/api-reference/browse-the-web/index.md --- Agents can browse the web using the [Browser Rendering](https://developers.cloudflare.com/browser-rendering/) API or your preferred headless browser service. ### Browser Rendering API The [Browser Rendering](https://developers.cloudflare.com/browser-rendering/) allows you to spin up headless browser instances, render web pages, and interact with websites through your Agent. You can define a method that uses Puppeteer to pull the content of a web page, parse the DOM, and extract relevant information by calling the OpenAI model: * JavaScript ```js export class MyAgent extends Agent { async browse(browserInstance, urls) { let responses = []; for (const url of urls) { const browser = await puppeteer.launch(browserInstance); const page = await browser.newPage(); await page.goto(url); await page.waitForSelector("body"); const bodyContent = await page.$eval( "body", (element) => element.innerHTML, ); const client = new OpenAI({ apiKey: this.env.OPENAI_API_KEY, }); let resp = await client.chat.completions.create({ model: this.env.MODEL, messages: [ { role: "user", content: `Return a JSON object with the product names, prices and URLs with the following format: { "name": "Product Name", "price": "Price", "url": "URL" } from the website content below. ${bodyContent}`, }, ], response_format: { type: "json_object", }, }); responses.push(resp); await browser.close(); } return responses; } } ``` * TypeScript ```ts interface Env { BROWSER: Fetcher; } export class MyAgent extends Agent { async browse(browserInstance: Fetcher, urls: string[]) { let responses = []; for (const url of urls) { const browser = await puppeteer.launch(browserInstance); const page = await browser.newPage(); await page.goto(url); await page.waitForSelector("body"); const bodyContent = await page.$eval( "body", (element) => element.innerHTML, ); const client = new OpenAI({ apiKey: this.env.OPENAI_API_KEY, }); let resp = await client.chat.completions.create({ model: this.env.MODEL, messages: [ { role: "user", content: `Return a JSON object with the product names, prices and URLs with the following format: { "name": "Product Name", "price": "Price", "url": "URL" } from the website content below. ${bodyContent}`, }, ], response_format: { type: "json_object", }, }); responses.push(resp); await browser.close(); } return responses; } } ``` You'll also need to add install the `@cloudflare/puppeteer` package and add the following to the wrangler configuration of your Agent: * npm ```sh npm i -D @cloudflare/puppeteer ``` * yarn ```sh yarn add -D @cloudflare/puppeteer ``` * pnpm ```sh pnpm add -D @cloudflare/puppeteer ``` - wrangler.jsonc ```jsonc { // ... "browser": { "binding": "MYBROWSER", }, // ... } ``` - wrangler.toml ```toml [browser] binding = "MYBROWSER" ``` ### Browserbase You can also use [Browserbase](https://docs.browserbase.com/integrations/cloudflare/typescript) by using the Browserbase API directly from within your Agent. Once you have your [Browserbase API key](https://docs.browserbase.com/integrations/cloudflare/typescript), you can add it to your Agent by creating a [secret](https://developers.cloudflare.com/workers/configuration/secrets/): ```sh cd your-agent-project-folder npx wrangler@latest secret put BROWSERBASE_API_KEY ``` ```sh Enter a secret value: ****** Creating the secret for the Worker "agents-example" Success! Uploaded secret BROWSERBASE_API_KEY ``` Install the `@cloudflare/puppeteer` package and use it from within your Agent to call the Browserbase API: * npm ```sh npm i @cloudflare/puppeteer ``` * yarn ```sh yarn add @cloudflare/puppeteer ``` * pnpm ```sh pnpm add @cloudflare/puppeteer ``` - JavaScript ```js export class MyAgent extends Agent { constructor(env) { super(env); } } ``` - TypeScript ```ts interface Env { BROWSERBASE_API_KEY: string; } export class MyAgent extends Agent { constructor(env: Env) { super(env); } } ``` --- title: Calling Agents · Cloudflare Agents docs description: Learn how to call your Agents from Workers, including how to create Agents on-the-fly, address them, and route requests to specific instances of an Agent. lastUpdated: 2025-04-08T14:52:06.000Z chatbotDeprioritize: false source_url: html: https://developers.cloudflare.com/agents/api-reference/calling-agents/ md: https://developers.cloudflare.com/agents/api-reference/calling-agents/index.md --- Learn how to call your Agents from Workers, including how to create Agents on-the-fly, address them, and route requests to specific instances of an Agent. ### Calling your Agent Agents are created on-the-fly and can serve multiple requests concurrently. Each Agent instance is isolated from other instances, can maintain its own state, and has a unique address. Note An instance of an Agent is globally unique: given the same name (or ID), you will always get the same instance of an agent. This allows you to avoid synchronizing state across requests: if an Agent instance represents a specific user, team, channel or other entity, you can use the Agent instance to store state for that entity. No need to set up a centralized session store. If the client disconnects, you can always route the client back to the exact same Agent and pick up where they left off. You can create and run an instance of an Agent directly from a Worker using either: * The `routeAgentRequest` helper: this will automatically map requests to an individual Agent based on the `/agents/:agent/:name` URL pattern. The value of `:agent` will be the name of your Agent class converted to `kebab-case`, and the value of `:name` will be the name of the Agent instance you want to create or retrieve. * `getAgentByName`, which will create a new Agent instance if none exists by that name, or retrieve a handle to an existing instance. See the usage patterns in the following example: * JavaScript ```js import { Agent, AgentNamespace, getAgentByName, routeAgentRequest, } from "agents"; export default { async fetch(request, env, ctx) { // Routed addressing // Automatically routes HTTP requests and/or WebSocket connections to /agents/:agent/:name // Best for: connecting React apps directly to Agents using useAgent from agents/react return ( (await routeAgentRequest(request, env)) || Response.json({ msg: "no agent here" }, { status: 404 }) ); // Named addressing // Best for: convenience method for creating or retrieving an agent by name/ID. // Bringing your own routing, middleware and/or plugging into an existing // application or framework. let namedAgent = getAgentByName(env.MyAgent, "my-unique-agent-id"); // Pass the incoming request straight to your Agent let namedResp = (await namedAgent).fetch(request); return namedResp; }, }; export class MyAgent extends Agent { // Your Agent implementation goes here } ``` * TypeScript ```ts import { Agent, AgentNamespace, getAgentByName, routeAgentRequest } from 'agents'; interface Env { // Define your Agent on the environment here // Passing your Agent class as a TypeScript type parameter allows you to call // methods defined on your Agent. MyAgent: AgentNamespace; } export default { async fetch(request, env, ctx): Promise { // Routed addressing // Automatically routes HTTP requests and/or WebSocket connections to /agents/:agent/:name // Best for: connecting React apps directly to Agents using useAgent from agents/react return (await routeAgentRequest(request, env)) || Response.json({ msg: 'no agent here' }, { status: 404 }); // Named addressing // Best for: convenience method for creating or retrieving an agent by name/ID. // Bringing your own routing, middleware and/or plugging into an existing // application or framework. let namedAgent = getAgentByName(env.MyAgent, 'my-unique-agent-id'); // Pass the incoming request straight to your Agent let namedResp = (await namedAgent).fetch(request); return namedResp }, } satisfies ExportedHandler; export class MyAgent extends Agent { // Your Agent implementation goes here } ``` Calling other Agents You can also call other Agents from within an Agent and build multi-Agent systems. Calling other Agents uses the same APIs as calling into an Agent directly. ### Calling methods on Agents When using `getAgentByName`, you can pass both requests (including WebSocket) connections and call methods defined directly on the Agent itself using the native [JavaScript RPC](https://developers.cloudflare.com/workers/runtime-apis/rpc/) (JSRPC) API. For example, once you have a handle (or "stub") to an unique instance of your Agent, you can call methods on it: * JavaScript ```js import { Agent, AgentNamespace, getAgentByName } from "agents"; export default { async fetch(request, env, ctx) { let namedAgent = getAgentByName(env.MyAgent, "my-unique-agent-id"); // Call methods directly on the Agent, and pass native JavaScript objects let chatResponse = namedAgent.chat("Hello!"); // No need to serialize/deserialize it from a HTTP request or WebSocket // message and back again let agentState = getState(); // agentState is of type UserHistory return namedResp; }, }; export class MyAgent extends Agent { // Your Agent implementation goes here async chat(prompt) { // call your favorite LLM return "result"; } async getState() { // Return the Agent's state directly return this.state; } // Other methods as you see fit! } ``` * TypeScript ```ts import { Agent, AgentNamespace, getAgentByName } from 'agents'; interface Env { // Define your Agent on the environment here // Passing your Agent class as a TypeScript type parameter allows you to call // methods defined on your Agent. MyAgent: AgentNamespace; } interface UserHistory { history: string[]; lastUpdated: Date; } export default { async fetch(request, env, ctx): Promise { let namedAgent = getAgentByName(env.MyAgent, 'my-unique-agent-id'); // Call methods directly on the Agent, and pass native JavaScript objects let chatResponse = namedAgent.chat('Hello!'); // No need to serialize/deserialize it from a HTTP request or WebSocket // message and back again let agentState = getState() // agentState is of type UserHistory return namedResp }, } satisfies ExportedHandler; export class MyAgent extends Agent { // Your Agent implementation goes here async chat(prompt: string) { // call your favorite LLM return "result" } async getState() { // Return the Agent's state directly return this.state; } // Other methods as you see fit! } ``` When using TypeScript, ensure you pass your Agent class as a TypeScript type parameter to the AgentNamespace type so that types are correctly inferred: ```ts interface Env { // Passing your Agent class as a TypeScript type parameter allows you to call // methods defined on your Agent. MyAgent: AgentNamespace; } export class CodeReviewAgent extends Agent { // Agent methods here } ``` ### Naming your Agents When creating names for your Agents, think about what the Agent represents. A unique user? A team or company? A room or channel for collaboration? A consistent approach to naming allows you to: * direct incoming requests directly to the right Agent * deterministically route new requests back to that Agent, no matter where the client is in the world. * avoid having to rely on centralized session storage or external services for state management, since each Agent instance can maintain its own state. For a given Agent definition (or 'namespace' in the code below), there can be millions (or tens of millions) of instances of that Agent, each handling their own requests, making calls to LLMs, and maintaining their own state. For example, you might have an Agent for every user using your new AI-based code editor. In that case, you'd want to create Agents based on the user ID from your system, which would then allow that Agent to handle all requests for that user. It also ensures that [state within the Agent](https://developers.cloudflare.com/agents/api-reference/store-and-sync-state/), including chat history, language preferences, model configuration and other context can associated specifically with that user, making it easier to manage state. The example below shows how to create a unique agent Agent for each `userId` in a request: * JavaScript ```js import { Agent, AgentNamespace, getAgentByName, routeAgentRequest, } from "agents"; export default { async fetch(request, env, ctx) { let userId = new URL(request.url).searchParams.get("userId") || "anonymous"; // Use an identifier that allows you to route to requests, WebSockets or call methods on the Agent // You can also put authentication logic here - e.g. to only create or retrieve Agents for known users. let namedAgent = getAgentByName(env.MyAgent, "my-unique-agent-id"); return (await namedAgent).fetch(request); }, }; export class MyAgent extends Agent { // You can access the name of the agent via this.name in any method within // the Agent async onStartup() { console.log(`agent ${this.name} ready!`); } } ``` * TypeScript ```ts import { Agent, AgentNamespace, getAgentByName, routeAgentRequest } from 'agents'; interface Env { MyAgent: AgentNamespace; } export default { async fetch(request, env, ctx): Promise { let userId = new URL(request.url).searchParams.get('userId') || 'anonymous'; // Use an identifier that allows you to route to requests, WebSockets or call methods on the Agent // You can also put authentication logic here - e.g. to only create or retrieve Agents for known users. let namedAgent = getAgentByName(env.MyAgent, 'my-unique-agent-id'); return (await namedAgent).fetch(request); }, } satisfies ExportedHandler; export class MyAgent extends Agent { // You can access the name of the agent via this.name in any method within // the Agent async onStartup() { console.log(`agent ${this.name} ready!`)} } ``` Replace `userId` with `teamName`, `channel`, `companyName` as fits your Agents goals - and/or configure authentication to ensure Agents are only created for known, authenticated users. ### Authenticating Agents When building and deploying Agents using the Agents SDK, you will often want to authenticate clients before passing requests to an Agent in order to restrict who the Agent will call, authorize specific users for specific Agents, and/or to limit who can access administrative or debug APIs exposed by an Agent. As best practices: * Handle authentication in your Workers code, before you invoke your Agent. * Use the built-in hooks when using the `routeAgentRequest` helper - `onBeforeConnect` and `onBeforeRequest` * Use your preferred router (such as Hono) and authentication middleware or provider to apply custom authentication schemes before calling an Agent using other methods. The `routeAgentRequest` helper documented earlier in this guide exposes two useful hooks (`onBeforeConnect`, `onBeforeRequest`) that allow you to apply custom logic before creating or retrieving an Agent: * JavaScript ```js import { Agent, AgentNamespace, routeAgentRequest } from "agents"; export default { async fetch(request, env, ctx) { // Use the onBeforeConnect and onBeforeRequest hooks to authenticate clients // or run logic before handling a HTTP request or WebSocket. return ( (await routeAgentRequest(request, env, { // Run logic before a WebSocket client connects onBeforeConnect: (request) => { // Your code/auth code here // You can return a Response here - e.g. a HTTP 403 Not Authorized - // which will stop further request processing and will NOT invoke the // Agent. // return Response.json({"error": "not authorized"}, { status: 403 }) }, // Run logic before a HTTP client clients onBeforeRequest: (request) => { // Your code/auth code here // Returning nothing will result in the call to the Agent continuing }, // Prepend a prefix for how your Agents are named here prefix: "name-prefix-here", })) || Response.json({ msg: "no agent here" }, { status: 404 }) ); }, }; ``` * TypeScript ```ts import { Agent, AgentNamespace, routeAgentRequest } from 'agents'; interface Env { MyAgent: AgentNamespace; } export default { async fetch(request, env, ctx): Promise { // Use the onBeforeConnect and onBeforeRequest hooks to authenticate clients // or run logic before handling a HTTP request or WebSocket. return ( (await routeAgentRequest(request, env, { // Run logic before a WebSocket client connects onBeforeConnect: (request) => { // Your code/auth code here // You can return a Response here - e.g. a HTTP 403 Not Authorized - // which will stop further request processing and will NOT invoke the // Agent. // return Response.json({"error": "not authorized"}, { status: 403 }) }, // Run logic before a HTTP client clients onBeforeRequest: (request) => { // Your code/auth code here // Returning nothing will result in the call to the Agent continuing }, // Prepend a prefix for how your Agents are named here prefix: 'name-prefix-here', })) || Response.json({ msg: 'no agent here' }, { status: 404 }) ); }, } satisfies ExportedHandler; ``` If you are using `getAgentByName` or the underlying Durable Objects routing API, you should authenticate incoming requests or WebSocket connections before calling `getAgentByName`. For example, if you are using [Hono](https://hono.dev/), you can authenticate in the middleware before calling an Agent and passing a request (or a WebSocket connection) to it: * JavaScript ```js import { Agent, AgentNamespace, getAgentByName } from "agents"; import { Hono } from "hono"; const app = new Hono(); app.use("/code-review/*", async (c, next) => { // Perform auth here // e.g. validate a Bearer token, a JWT, use your preferred auth library // return Response.json({ msg: 'unauthorized' }, { status: 401 }); await next(); // continue on if valid }); app.get("/code-review/:id", async (c) => { const id = c.req.param("teamId"); if (!id) return Response.json({ msg: "missing id" }, { status: 400 }); // Call the Agent, creating it with the name/identifier from the ":id" segment // of our URL const agent = await getAgentByName(c.env.MyAgent, id); // Pass the request to our Agent instance return await agent.fetch(c.req.raw); }); ``` * TypeScript ```ts import { Agent, AgentNamespace, getAgentByName } from 'agents'; import { Hono } from 'hono'; const app = new Hono<{ Bindings: Env }>(); app.use('/code-review/*', async (c, next) => { // Perform auth here // e.g. validate a Bearer token, a JWT, use your preferred auth library // return Response.json({ msg: 'unauthorized' }, { status: 401 }); await next(); // continue on if valid }); app.get('/code-review/:id', async (c) => { const id = c.req.param('teamId'); if (!id) return Response.json({ msg: 'missing id' }, { status: 400 }); // Call the Agent, creating it with the name/identifier from the ":id" segment // of our URL const agent = await getAgentByName(c.env.MyAgent, id); // Pass the request to our Agent instance return await agent.fetch(c.req.raw); }); ``` This ensures we only create Agents for authenticated users, and allows you to validate whether Agent names conform to your preferred naming scheme before instances are created. ### Next steps * Review the [API documentation](https://developers.cloudflare.com/agents/api-reference/agents-api/) for the Agents class to learn how to define * [Build a chat Agent](https://developers.cloudflare.com/agents/getting-started/build-a-chat-agent/) using the Agents SDK and deploy it to Workers. * Learn more [using WebSockets](https://developers.cloudflare.com/agents/api-reference/websockets/) to build interactive Agents and stream data back from your Agent. * [Orchestrate asynchronous workflows](https://developers.cloudflare.com/agents/api-reference/run-workflows) from your Agent by combining the Agents SDK and [Workflows](https://developers.cloudflare.com/workflows). --- title: Configuration · Cloudflare Agents docs description: An Agent is configured like any other Cloudflare Workers project, and uses a wrangler configuration file to define where your code is and what services (bindings) it will use. lastUpdated: 2025-03-18T12:13:40.000Z chatbotDeprioritize: false source_url: html: https://developers.cloudflare.com/agents/api-reference/configuration/ md: https://developers.cloudflare.com/agents/api-reference/configuration/index.md --- An Agent is configured like any other Cloudflare Workers project, and uses [a wrangler configuration](https://developers.cloudflare.com/workers/wrangler/configuration/) file to define where your code is and what services (bindings) it will use. ### Project structure The typical file structure for an Agent project created from `npm create cloudflare@latest agents-starter -- --template cloudflare/agents-starter` follows: ```sh . |-- package-lock.json |-- package.json |-- public | `-- index.html |-- src | `-- index.ts // your Agent definition |-- test | |-- index.spec.ts // your tests | `-- tsconfig.json |-- tsconfig.json |-- vitest.config.mts |-- worker-configuration.d.ts `-- wrangler.jsonc // your Workers & Agent configuration ``` ### Example configuration Below is a minimal `wrangler.jsonc` file that defines the configuration for an Agent, including the entry point, `durable_object` namespace, and code `migrations`: * wrangler.jsonc ```jsonc { "$schema": "node_modules/wrangler/config-schema.json", "name": "agents-example", "main": "src/index.ts", "compatibility_date": "2025-02-23", "compatibility_flags": ["nodejs_compat"], "durable_objects": { "bindings": [ { // Required: "name": "MyAgent", // How your Agent is called from your Worker "class_name": "MyAgent", // Must match the class name of the Agent in your code // Optional: set this if the Agent is defined in another Worker script "script_name": "the-other-worker" }, ], }, "migrations": [ { "tag": "v1", // Mandatory for the Agent to store state "new_sqlite_classes": ["MyAgent"], }, ], "observability": { "enabled": true, }, } ``` * wrangler.toml ```toml "$schema" = "node_modules/wrangler/config-schema.json" name = "agents-example" main = "src/index.ts" compatibility_date = "2025-02-23" compatibility_flags = [ "nodejs_compat" ] [[durable_objects.bindings]] name = "MyAgent" class_name = "MyAgent" script_name = "the-other-worker" [[migrations]] tag = "v1" new_sqlite_classes = [ "MyAgent" ] [observability] enabled = true ``` The configuration includes: * A `main` field that points to the entry point of your Agent, which is typically a TypeScript (or JavaScript) file. * A `durable_objects` field that defines the [Durable Object namespace](https://developers.cloudflare.com/durable-objects/reference/glossary/) that your Agents will run within. * A `migrations` field that defines the code migrations that your Agent will use. This field is mandatory and must contain at least one migration. The `new_sqlite_classes` field is mandatory for the Agent to store state. Agents must define these fields in their `wrangler.jsonc` (or `wrangler.toml`) config file. --- title: HTTP and Server-Sent Events · Cloudflare Agents docs description: The Agents SDK allows you to handle HTTP requests and has native support for Server-Sent Events (SSE). This allows you build applications that can push data to clients and avoid buffering. lastUpdated: 2025-03-18T12:13:40.000Z chatbotDeprioritize: false source_url: html: https://developers.cloudflare.com/agents/api-reference/http-sse/ md: https://developers.cloudflare.com/agents/api-reference/http-sse/index.md --- The Agents SDK allows you to handle HTTP requests and has native support for [Server-Sent Events](https://developer.mozilla.org/en-US/docs/Web/API/Server-sent_events) (SSE). This allows you build applications that can push data to clients and avoid buffering. ### Handling HTTP requests Agents can handle HTTP requests using the `onRequest` method, which is called whenever an HTTP request is received by the Agent instance. The method takes a `Request` object as a parameter and returns a `Response` object. * JavaScript ```js class MyAgent extends Agent { // Handle HTTP requests coming to this Agent instance // Returns a Response object async onRequest(request) { return new Response("Hello from Agent!"); } async callAIModel(prompt) { // Implement AI model call here } } ``` * TypeScript ```ts class MyAgent extends Agent { // Handle HTTP requests coming to this Agent instance // Returns a Response object async onRequest(request: Request) { return new Response("Hello from Agent!"); } async callAIModel(prompt: string) { // Implement AI model call here } } ``` Review the [Agents API reference](https://developers.cloudflare.com/agents/api-reference/agents-api/) to learn more about the `Agent` class and its methods. ### Implementing Server-Sent Events The Agents SDK support Server-Sent Events directly: you can use SSE to stream data back to the client over a long running connection. This avoids buffering large responses, which can both make your Agent feel slow, and forces you to buffer the entire response in memory. When an Agent is deployed to Cloudflare Workers, there is no effective limit on the total time it takes to stream the response back: large AI model responses that take several minutes to reason and then respond will not be prematurely terminated. Note that this does not mean the client can't potentially disconnect during the streaming process: you can account for this by either [writing to the Agent's stateful storage](https://developers.cloudflare.com/agents/api-reference/store-and-sync-state/) and/or [using WebSockets](https://developers.cloudflare.com/agents/api-reference/websockets/). Because you can always [route to the same Agent](https://developers.cloudflare.com/agents/api-reference/calling-agents/), you do not need to use a centralized session store to pick back up where you left off when a client disconnects. The following example uses the AI SDK to generate text and stream it back to the client. It will automatically stream the response back to the client as the model generates it: * JavaScript ```js import { Agent, AgentNamespace, getAgentByName, routeAgentRequest, } from "agents"; import { streamText } from "ai"; import { createOpenAI, openai } from "@ai-sdk/openai"; export class MyAgent extends Agent { async onRequest(request) { // Test it via: // curl -d '{"prompt": "Write me a Cloudflare Worker"}' let data = await request.json(); let stream = await this.callAIModel(data.prompt); // This uses Server-Sent Events (SSE) return stream.toTextStreamResponse({ headers: { "Content-Type": "text/x-unknown", "content-encoding": "identity", "transfer-encoding": "chunked", }, }); } async callAIModel(prompt) { const openai = createOpenAI({ apiKey: this.env.OPENAI_API_KEY, }); return streamText({ model: openai("gpt-4o"), prompt: prompt, }); } } export default { async fetch(request, env) { let agentId = new URL(request.url).searchParams.get("agent-id") || ""; const agent = await getAgentByName(env.MyAgent, agentId); return agent.fetch(request); }, }; ``` * TypeScript ```ts import { Agent, AgentNamespace, getAgentByName, routeAgentRequest } from 'agents'; import { streamText } from 'ai'; import { createOpenAI, openai } from '@ai-sdk/openai'; interface Env { MyAgent: AgentNamespace; OPENAI_API_KEY: string; } export class MyAgent extends Agent { async onRequest(request: Request) { // Test it via: // curl -d '{"prompt": "Write me a Cloudflare Worker"}' let data = await request.json<{ prompt: string }>(); let stream = await this.callAIModel(data.prompt); // This uses Server-Sent Events (SSE) return stream.toTextStreamResponse({ headers: { 'Content-Type': 'text/x-unknown', 'content-encoding': 'identity', 'transfer-encoding': 'chunked', }, }); } async callAIModel(prompt: string) { const openai = createOpenAI({ apiKey: this.env.OPENAI_API_KEY, }); return streamText({ model: openai('gpt-4o'), prompt: prompt, }); } } export default { async fetch(request: Request, env: Env) { let agentId = new URL(request.url).searchParams.get('agent-id') || ''; const agent = await getAgentByName(env.MyAgent, agentId); return agent.fetch(request); }, }; ``` ### WebSockets vs. Server-Sent Events Both WebSockets and Server-Sent Events (SSE) enable real-time communication between clients and Agents. Agents built on the Agents SDK can expose both WebSocket and SSE endpoints directly. * WebSockets provide full-duplex communication, allowing data to flow in both directions simultaneously. SSE only supports server-to-client communication, requiring additional HTTP requests if the client needs to send data back. * WebSockets establish a single persistent connection that stays open for the duration of the session. SSE, being built on HTTP, may experience more overhead due to reconnection attempts and header transmission with each reconnection, especially when there is a lot of client-server communication. * While SSE works well for simple streaming scenarios, WebSockets are better suited for applications requiring minutes or hours of connection time, as they maintain a more stable connection with built-in ping/pong mechanisms to keep connections alive. * WebSockets use their own protocol (ws\:// or wss\://), separating them from HTTP after the initial handshake. This separation allows WebSockets to better handle binary data transmission and implement custom subprotocols for specialized use cases. If you're unsure of which is better for your use-case, we recommend WebSockets. The [WebSockets API documentation](https://developers.cloudflare.com/agents/api-reference/websockets/) provides detailed information on how to use WebSockets with the Agents SDK. ### Next steps * Review the [API documentation](https://developers.cloudflare.com/agents/api-reference/agents-api/) for the Agents class to learn how to define them. * [Build a chat Agent](https://developers.cloudflare.com/agents/getting-started/build-a-chat-agent/) using the Agents SDK and deploy it to Workers. * Learn more [using WebSockets](https://developers.cloudflare.com/agents/api-reference/websockets/) to build interactive Agents and stream data back from your Agent. * [Orchestrate asynchronous workflows](https://developers.cloudflare.com/agents/api-reference/run-workflows) from your Agent by combining the Agents SDK and [Workflows](https://developers.cloudflare.com/workflows). --- title: Retrieval Augmented Generation · Cloudflare Agents docs description: Agents can use Retrieval Augmented Generation (RAG) to retrieve relevant information and use it augment calls to AI models. Store a user's chat history to use as context for future conversations, summarize documents to bootstrap an Agent's knowledge base, and/or use data from your Agent's web browsing tasks to enhance your Agent's capabilities. lastUpdated: 2025-05-14T14:20:47.000Z chatbotDeprioritize: false source_url: html: https://developers.cloudflare.com/agents/api-reference/rag/ md: https://developers.cloudflare.com/agents/api-reference/rag/index.md --- Agents can use Retrieval Augmented Generation (RAG) to retrieve relevant information and use it augment [calls to AI models](https://developers.cloudflare.com/agents/api-reference/using-ai-models/). Store a user's chat history to use as context for future conversations, summarize documents to bootstrap an Agent's knowledge base, and/or use data from your Agent's [web browsing](https://developers.cloudflare.com/agents/api-reference/browse-the-web/) tasks to enhance your Agent's capabilities. You can use the Agent's own [SQL database](https://developers.cloudflare.com/agents/api-reference/store-and-sync-state) as the source of truth for your data and store embeddings in [Vectorize](https://developers.cloudflare.com/vectorize/) (or any other vector-enabled database) to allow your Agent to retrieve relevant information. ### Vector search Note If you're brand-new to vector databases and Vectorize, visit the [Vectorize tutorial](https://developers.cloudflare.com/vectorize/get-started/intro/) to learn the basics, including how to create an index, insert data, and generate embeddings. You can query a vector index (or indexes) from any method on your Agent: any Vectorize index you attach is available on `this.env` within your Agent. If you've [associated metadata](https://developers.cloudflare.com/vectorize/best-practices/insert-vectors/#metadata) with your vectors that maps back to data stored in your Agent, you can then look up the data directly within your Agent using `this.sql`. Here's an example of how to give an Agent retrieval capabilities: * JavaScript ```js import { Agent } from "agents"; export class RAGAgent extends Agent { // Other methods on our Agent // ... // async queryKnowledge(userQuery) { // Turn a query into an embedding const queryVector = await this.env.AI.run("@cf/baai/bge-base-en-v1.5", { text: [userQuery], }); // Retrieve results from our vector index let searchResults = await this.env.VECTOR_DB.query(queryVector.data[0], { topK: 10, returnMetadata: "all", }); let knowledge = []; for (const match of searchResults.matches) { console.log(match.metadata); knowledge.push(match.metadata); } // Use the metadata to re-associate the vector search results // with data in our Agent's SQL database let results = this .sql`SELECT * FROM knowledge WHERE id IN (${knowledge.map((k) => k.id)})`; // Return them return results; } } ``` * TypeScript ```ts import { Agent } from "agents"; interface Env { AI: Ai; VECTOR_DB: Vectorize; } export class RAGAgent extends Agent { // Other methods on our Agent // ... // async queryKnowledge(userQuery: string) { // Turn a query into an embedding const queryVector = await this.env.AI.run('@cf/baai/bge-base-en-v1.5', { text: [userQuery], }); // Retrieve results from our vector index let searchResults = await this.env.VECTOR_DB.query(queryVector.data[0], { topK: 10, returnMetadata: 'all', }); let knowledge = []; for (const match of searchResults.matches) { console.log(match.metadata); knowledge.push(match.metadata); } // Use the metadata to re-associate the vector search results // with data in our Agent's SQL database let results = this.sql`SELECT * FROM knowledge WHERE id IN (${knowledge.map((k) => k.id)})`; // Return them return results; } } ``` You'll also need to connect your Agent to your vector indexes: * wrangler.jsonc ```jsonc { // ... "vectorize": [ { "binding": "VECTOR_DB", "index_name": "your-vectorize-index-name" } ] // ... } ``` * wrangler.toml ```toml [[vectorize]] binding = "VECTOR_DB" index_name = "your-vectorize-index-name" ``` If you have multiple indexes you want to make available, you can provide an array of `vectorize` bindings. #### Next steps * Learn more on how to [combine Vectorize and Workers AI](https://developers.cloudflare.com/vectorize/get-started/embeddings/) * Review the [Vectorize query API](https://developers.cloudflare.com/vectorize/reference/client-api/) * Use [metadata filtering](https://developers.cloudflare.com/vectorize/reference/metadata-filtering/) to add context to your results --- title: Run Workflows · Cloudflare Agents docs description: Agents can trigger asynchronous Workflows, allowing your Agent to run complex, multi-step tasks in the background. This can include post-processing files that a user has uploaded, updating the embeddings in a vector database, and/or managing long-running user-lifecycle email or SMS notification workflows. lastUpdated: 2025-05-14T14:20:47.000Z chatbotDeprioritize: false source_url: html: https://developers.cloudflare.com/agents/api-reference/run-workflows/ md: https://developers.cloudflare.com/agents/api-reference/run-workflows/index.md --- Agents can trigger asynchronous [Workflows](https://developers.cloudflare.com/workflows/), allowing your Agent to run complex, multi-step tasks in the background. This can include post-processing files that a user has uploaded, updating the embeddings in a [vector database](https://developers.cloudflare.com/vectorize/), and/or managing long-running user-lifecycle email or SMS notification workflows. Because an Agent is just like a Worker script, it can create Workflows defined in the same project (script) as the Agent *or* in a different project. Agents vs. Workflows Agents and Workflows have some similarities: they can both run tasks asynchronously. For straightforward tasks that are linear or need to run to completion, a Workflow can be ideal: steps can be retried, they can be cancelled, and can act on events. Agents do not have to run to completion: they can loop, branch and run forever, and they can also interact directly with users (over HTTP or WebSockets). An Agent can be used to trigger multiple Workflows as it runs, and can thus be used to co-ordinate and manage Workflows to achieve its goals. ## Trigger a Workflow An Agent can trigger one or more Workflows from within any method, whether from an incoming HTTP request, a WebSocket connection, on a delay or schedule, and/or from any other action the Agent takes. Triggering a Workflow from an Agent is no different from [triggering a Workflow from a Worker script](https://developers.cloudflare.com/workflows/build/trigger-workflows/): * JavaScript ```js export class MyAgent extends Agent { async onRequest(request) { let userId = request.headers.get("user-id"); // Trigger a schedule that runs a Workflow // Pass it a payload let { taskId } = await this.schedule(300, "runWorkflow", { id: userId, flight: "DL264", date: "2025-02-23", }); } async runWorkflow(data) { let instance = await env.MY_WORKFLOW.create({ id: data.id, params: data, }); // Schedule another task that checks the Workflow status every 5 minutes... await this.schedule("*/5 * * * *", "checkWorkflowStatus", { id: instance.id, }); } } export class MyWorkflow extends WorkflowEntrypoint { async run(event, step) { // Your Workflow code here } } ``` * TypeScript ```ts interface Env { MY_WORKFLOW: Workflow; MyAgent: AgentNamespace; } export class MyAgent extends Agent { async onRequest(request: Request) { let userId = request.headers.get("user-id"); // Trigger a schedule that runs a Workflow // Pass it a payload let { taskId } = await this.schedule(300, "runWorkflow", { id: userId, flight: "DL264", date: "2025-02-23" }); } async runWorkflow(data) { let instance = await env.MY_WORKFLOW.create({ id: data.id, params: data, }) // Schedule another task that checks the Workflow status every 5 minutes... await this.schedule("*/5 * * * *", "checkWorkflowStatus", { id: instance.id }); } } export class MyWorkflow extends WorkflowEntrypoint { async run(event: WorkflowEvent, step: WorkflowStep) { // Your Workflow code here } } ``` You'll also need to make sure your Agent [has a binding to your Workflow](https://developers.cloudflare.com/workflows/build/trigger-workflows/#workers-api-bindings) so that it can call it: * wrangler.jsonc ```jsonc { // ... // Create a binding between your Agent and your Workflow "workflows": [ { // Required: "name": "EMAIL_WORKFLOW", "class_name": "MyWorkflow", // Optional: set the script_name field if your Workflow is defined in a // different project from your Agent "script_name": "email-workflows" } ], // ... } ``` * wrangler.toml ```toml [[workflows]] name = "EMAIL_WORKFLOW" class_name = "MyWorkflow" script_name = "email-workflows" ``` ## Trigger a Workflow from another project You can also call a Workflow that is defined in a different Workers script from your Agent by setting the `script_name` property in the `workflows` binding of your Agent: * wrangler.jsonc ```jsonc { // Required: "name": "EMAIL_WORKFLOW", "class_name": "MyWorkflow", // Optional: set the script_name field if your Workflow is defined in a // different project from your Agent "script_name": "email-workflows" } ``` * wrangler.toml ```toml name = "EMAIL_WORKFLOW" class_name = "MyWorkflow" script_name = "email-workflows" ``` Refer to the [cross-script calls](https://developers.cloudflare.com/workflows/build/workers-api/#cross-script-calls) section of the Workflows documentation for more examples. --- title: Schedule tasks · Cloudflare Agents docs description: An Agent can schedule tasks to be run in the future by calling this.schedule(when, callback, data), where when can be a delay, a Date, or a cron string; callback the function name to call, and data is an object of data to pass to the function. lastUpdated: 2025-04-06T14:39:24.000Z chatbotDeprioritize: false source_url: html: https://developers.cloudflare.com/agents/api-reference/schedule-tasks/ md: https://developers.cloudflare.com/agents/api-reference/schedule-tasks/index.md --- An Agent can schedule tasks to be run in the future by calling `this.schedule(when, callback, data)`, where `when` can be a delay, a `Date`, or a cron string; `callback` the function name to call, and `data` is an object of data to pass to the function. Scheduled tasks can do anything a request or message from a user can: make requests, query databases, send emails, read+write state: scheduled tasks can invoke any regular method on your Agent. ### Scheduling tasks You can call `this.schedule` within any method on an Agent, and schedule tens-of-thousands of tasks per individual Agent: * JavaScript ```js import { Agent } from "agents"; export class SchedulingAgent extends Agent { async onRequest(request) { // Handle an incoming request // Schedule a task 5 minutes from now // Calls the "checkFlights" method let { taskId } = await this.schedule(600, "checkFlights", { flight: "DL264", date: "2025-02-23", }); return Response.json({ taskId }); } async checkFlights(data) { // Invoked when our scheduled task runs // We can also call this.schedule here to schedule another task } } ``` * TypeScript ```ts import { Agent } from "agents" export class SchedulingAgent extends Agent { async onRequest(request) { // Handle an incoming request // Schedule a task 5 minutes from now // Calls the "checkFlights" method let { taskId } = await this.schedule(600, "checkFlights", { flight: "DL264", date: "2025-02-23" }); return Response.json({ taskId }); } async checkFlights(data) { // Invoked when our scheduled task runs // We can also call this.schedule here to schedule another task } } ``` Warning Tasks that set a callback for a method that does not exist will throw an exception: ensure that the method named in the `callback` argument of `this.schedule` exists on your `Agent` class. You can schedule tasks in multiple ways: * JavaScript ```js // schedule a task to run in 10 seconds let task = await this.schedule(10, "someTask", { message: "hello" }); // schedule a task to run at a specific date let task = await this.schedule(new Date("2025-01-01"), "someTask", {}); // schedule a task to run every 10 seconds let { id } = await this.schedule("*/10 * * * *", "someTask", { message: "hello", }); // schedule a task to run every 10 seconds, but only on Mondays let task = await this.schedule("0 0 * * 1", "someTask", { message: "hello" }); // cancel a scheduled task this.cancelSchedule(task.id); ``` * TypeScript ```ts // schedule a task to run in 10 seconds let task = await this.schedule(10, "someTask", { message: "hello" }); // schedule a task to run at a specific date let task = await this.schedule(new Date("2025-01-01"), "someTask", {}); // schedule a task to run every 10 seconds let { id } = await this.schedule("*/10 * * * *", "someTask", { message: "hello" }); // schedule a task to run every 10 seconds, but only on Mondays let task = await this.schedule("0 0 * * 1", "someTask", { message: "hello" }); // cancel a scheduled task this.cancelSchedule(task.id); ``` Calling `await this.schedule` returns a `Schedule`, which includes the task's randomly generated `id`. You can use this `id` to retrieve or cancel the task in the future. It also provides a `type` property that indicates the type of schedule, for example, one of `"scheduled" | "delayed" | "cron"`. Maximum scheduled tasks Each task is mapped to a row in the Agent's underlying [SQLite database](https://developers.cloudflare.com/durable-objects/api/storage-api/), which means that each task can be up to 2 MB in size. The maximum number of tasks must be `(task_size * tasks) + all_other_state < maximum_database_size` (currently 1GB per Agent). ### Managing scheduled tasks You can get, cancel and filter across scheduled tasks within an Agent using the scheduling API: * JavaScript ```js // Get a specific schedule by ID // Returns undefined if the task does not exist let task = await this.getSchedule(task.id); // Get all scheduled tasks // Returns an array of Schedule objects let tasks = this.getSchedules(); // Cancel a task by its ID // Returns true if the task was cancelled, false if it did not exist await this.cancelSchedule(task.id); // Filter for specific tasks // e.g. all tasks starting in the next hour let tasks = this.getSchedules({ timeRange: { start: new Date(Date.now()), end: new Date(Date.now() + 60 * 60 * 1000), }, }); ``` * TypeScript ```ts // Get a specific schedule by ID // Returns undefined if the task does not exist let task = await this.getSchedule(task.id) // Get all scheduled tasks // Returns an array of Schedule objects let tasks = this.getSchedules(); // Cancel a task by its ID // Returns true if the task was cancelled, false if it did not exist await this.cancelSchedule(task.id); // Filter for specific tasks // e.g. all tasks starting in the next hour let tasks = this.getSchedules({ timeRange: { start: new Date(Date.now()), end: new Date(Date.now() + 60 * 60 * 1000), } }); ``` --- title: Store and sync state · Cloudflare Agents docs description: Every Agent has built-in state management capabilities, including built-in storage and synchronization between the Agent and frontend applications. lastUpdated: 2025-06-19T13:27:22.000Z chatbotDeprioritize: false source_url: html: https://developers.cloudflare.com/agents/api-reference/store-and-sync-state/ md: https://developers.cloudflare.com/agents/api-reference/store-and-sync-state/index.md --- Every Agent has built-in state management capabilities, including built-in storage and synchronization between the Agent and frontend applications. State within an Agent is: * Persisted across Agent restarts: data is permanently stored within an Agent. * Automatically serialized/deserialized: you can store any JSON-serializable data. * Immediately consistent within the Agent: read your own writes. * Thread-safe for concurrent updates * Fast: state is colocated wherever the Agent is running. Reads and writes do not need to traverse the network. Agent state is stored in a SQL database that is embedded within each individual Agent instance: you can interact with it using the higher-level `this.setState` API (recommended), which allows you to sync state and trigger events on state changes, or by directly querying the database with `this.sql`. #### State API Every Agent has built-in state management capabilities. You can set and update the Agent's state directly using `this.setState`: * JavaScript ```js import { Agent } from "agents"; export class MyAgent extends Agent { // Update state in response to events async incrementCounter() { this.setState({ ...this.state, counter: this.state.counter + 1, }); } // Handle incoming messages async onMessage(message) { if (message.type === "update") { this.setState({ ...this.state, ...message.data, }); } } // Handle state updates onStateUpdate(state, source) { console.log("state updated", state); } } ``` * TypeScript ```ts import { Agent } from "agents"; export class MyAgent extends Agent { // Update state in response to events async incrementCounter() { this.setState({ ...this.state, counter: this.state.counter + 1, }); } // Handle incoming messages async onMessage(message) { if (message.type === "update") { this.setState({ ...this.state, ...message.data, }); } } // Handle state updates onStateUpdate(state, source: "server" | Connection) { console.log("state updated", state); } } ``` If you're using TypeScript, you can also provide a type for your Agent's state by passing in a type as a [type parameter](https://www.typescriptlang.org/docs/handbook/2/generics.html#using-type-parameters-in-generic-constraints) as the *second* type parameter to the `Agent` class definition. * JavaScript ```js import { Agent } from "agents"; // Define a type for your Agent's state // Pass in the type of your Agent's state export class MyAgent extends Agent { // This allows this.setState and the onStateUpdate method to // be typed: async onStateUpdate(state) { console.log("state updated", state); } async someOtherMethod() { this.setState({ ...this.state, price: this.state.price + 10, }); } } ``` * TypeScript ```ts import { Agent } from "agents"; interface Env {} // Define a type for your Agent's state interface FlightRecord { id: string; departureIata: string; arrival: Date; arrivalIata: string; price: number; } // Pass in the type of your Agent's state export class MyAgent extends Agent { // This allows this.setState and the onStateUpdate method to // be typed: async onStateUpdate(state: FlightRecord) { console.log("state updated", state); } async someOtherMethod() { this.setState({ ...this.state, price: this.state.price + 10, }); } } ``` ### Set the initial state for an Agent You can also set the initial state for an Agent via the `initialState` property on the `Agent` class: * JavaScript ```js class MyAgent extends Agent { // Set a default, initial state initialState = { counter: 0, text: "", color: "#3B82F6", }; doSomething() { console.log(this.state); // {counter: 0, text: "", color: "#3B82F6"}, if you haven't set the state yet } } ``` * TypeScript ```ts type State = { counter: number; text: string; color: string; }; class MyAgent extends Agent { // Set a default, initial state initialState = { counter: 0, text: "", color: "#3B82F6", }; doSomething() { console.log(this.state); // {counter: 0, text: "", color: "#3B82F6"}, if you haven't set the state yet } } ``` Any initial state is synced to clients connecting via [the `useAgent` hook](#synchronizing-state). ### Synchronizing state Clients can connect to an Agent and stay synchronized with its state using the React hooks provided as part of `agents/react`. A React application can call `useAgent` to connect to a named Agent over WebSockets at * JavaScript ```js import { useState } from "react"; import { useAgent } from "agents/react"; function StateInterface() { const [state, setState] = useState({ counter: 0 }); const agent = useAgent({ agent: "thinking-agent", name: "my-agent", onStateUpdate: (newState) => setState(newState), }); const increment = () => { agent.setState({ counter: state.counter + 1 }); }; return (
Count: {state.counter}
); } ``` * TypeScript ```ts import { useState } from "react"; import { useAgent } from "agents/react"; function StateInterface() { const [state, setState] = useState({ counter: 0 }); const agent = useAgent({ agent: "thinking-agent", name: "my-agent", onStateUpdate: (newState) => setState(newState), }); const increment = () => { agent.setState({ counter: state.counter + 1 }); }; return (
Count: {state.counter}
); } ``` The state synchronization system: * Automatically syncs the Agent's state to all connected clients * Handles client disconnections and reconnections gracefully * Provides immediate local updates * Supports multiple simultaneous client connections Common use cases: * Real-time collaborative features * Multi-window/tab synchronization * Live updates across multiple devices * Maintaining consistent UI state across clients * When new clients connect, they automatically receive the current state from the Agent, ensuring all clients start with the latest data. ### SQL API Every individual Agent instance has its own SQL (SQLite) database that runs *within the same context* as the Agent itself. This means that inserting or querying data within your Agent is effectively zero-latency: the Agent doesn't have to round-trip across a continent or the world to access its own data. You can access the SQL API within any method on an Agent via `this.sql`. The SQL API accepts template literals, and * JavaScript ```js export class MyAgent extends Agent { async onRequest(request) { let userId = new URL(request.url).searchParams.get("userId"); // 'users' is just an example here: you can create arbitrary tables and define your own schemas // within each Agent's database using SQL (SQLite syntax). let user = await this.sql`SELECT * FROM users WHERE id = ${userId}`; return Response.json(user); } } ``` * TypeScript ```ts export class MyAgent extends Agent { async onRequest(request: Request) { let userId = new URL(request.url).searchParams.get('userId'); // 'users' is just an example here: you can create arbitrary tables and define your own schemas // within each Agent's database using SQL (SQLite syntax). let user = await this.sql`SELECT * FROM users WHERE id = ${userId}` return Response.json(user) } } ``` You can also supply a [TypeScript type argument](https://www.typescriptlang.org/docs/handbook/2/generics.html#using-type-parameters-in-generic-constraints) to the query, which will be used to infer the type of the result: ```ts type User = { id: string; name: string; email: string; }; export class MyAgent extends Agent { async onRequest(request: Request) { let userId = new URL(request.url).searchParams.get('userId'); // Supply the type parameter to the query when calling this.sql // This assumes the results returns one or more User rows with "id", "name", and "email" columns const user = await this.sql`SELECT * FROM users WHERE id = ${userId}`; return Response.json(user) } } ``` You do not need to specify an array type (`User[]` or `Array`) as `this.sql` will always return an array of the specified type. Providing a type parameter does not validate that the result matches your type definition. In TypeScript, properties (fields) that do not exist or conform to the type you provided will be dropped. If you need to validate incoming events, we recommend a library such as [zod](https://zod.dev/) or your own validator logic. Note Learn more about the zero-latency SQL storage that powers both Agents and Durable Objects [on our blog](https://blog.cloudflare.com/sqlite-in-durable-objects/). The SQL API exposed to an Agent is similar to the one [within Durable Objects](https://developers.cloudflare.com/durable-objects/api/storage-api/#sql-api): Durable Object SQL methods available on `this.ctx.storage.sql`. You can use the same SQL queries with the Agent's database, create tables, and query data, just as you would with Durable Objects or [D1](https://developers.cloudflare.com/d1/). ### Use Agent state as model context You can combine the state and SQL APIs in your Agent with its ability to [call AI models](https://developers.cloudflare.com/agents/api-reference/using-ai-models/) to include historical context within your prompts to a model. Modern Large Language Models (LLMs) often have very large context windows (up to millions of tokens), which allows you to pull relevant context into your prompt directly. For example, you can use an Agent's built-in SQL database to pull history, query a model with it, and append to that history ahead of the next call to the model: * JavaScript ```js export class ReasoningAgent extends Agent { async callReasoningModel(prompt) { let result = this .sql`SELECT * FROM history WHERE user = ${prompt.userId} ORDER BY timestamp DESC LIMIT 1000`; let context = []; for await (const row of result) { context.push(row.entry); } const client = new OpenAI({ apiKey: this.env.OPENAI_API_KEY, }); // Combine user history with the current prompt const systemPrompt = prompt.system || "You are a helpful assistant."; const userPrompt = `${prompt.user}\n\nUser history:\n${context.join("\n")}`; try { const completion = await client.chat.completions.create({ model: this.env.MODEL || "o3-mini", messages: [ { role: "system", content: systemPrompt }, { role: "user", content: userPrompt }, ], temperature: 0.7, max_tokens: 1000, }); // Store the response in history this .sql`INSERT INTO history (timestamp, user, entry) VALUES (${new Date()}, ${prompt.userId}, ${completion.choices[0].message.content})`; return completion.choices[0].message.content; } catch (error) { console.error("Error calling reasoning model:", error); throw error; } } } ``` * TypeScript ```ts export class ReasoningAgent extends Agent { async callReasoningModel(prompt: Prompt) { let result = this.sql`SELECT * FROM history WHERE user = ${prompt.userId} ORDER BY timestamp DESC LIMIT 1000`; let context = []; for await (const row of result) { context.push(row.entry); } const client = new OpenAI({ apiKey: this.env.OPENAI_API_KEY, }); // Combine user history with the current prompt const systemPrompt = prompt.system || 'You are a helpful assistant.'; const userPrompt = `${prompt.user}\n\nUser history:\n${context.join('\n')}`; try { const completion = await client.chat.completions.create({ model: this.env.MODEL || 'o3-mini', messages: [ { role: 'system', content: systemPrompt }, { role: 'user', content: userPrompt }, ], temperature: 0.7, max_tokens: 1000, }); // Store the response in history this .sql`INSERT INTO history (timestamp, user, entry) VALUES (${new Date()}, ${prompt.userId}, ${completion.choices[0].message.content})`; return completion.choices[0].message.content; } catch (error) { console.error('Error calling reasoning model:', error); throw error; } } } ``` This works because each instance of an Agent has its *own* database, the state stored in that database is private to that Agent: whether it's acting on behalf of a single user, a room or channel, or a deep research tool. By default, you don't have to manage contention or reach out over the network to a centralized database to retrieve and store state. ### Next steps * Review the [API documentation](https://developers.cloudflare.com/agents/api-reference/agents-api/) for the Agents class to learn how to define them. * [Build a chat Agent](https://developers.cloudflare.com/agents/getting-started/build-a-chat-agent/) using the Agents SDK and deploy it to Workers. * Learn more [using WebSockets](https://developers.cloudflare.com/agents/api-reference/websockets/) to build interactive Agents and stream data back from your Agent. * [Orchestrate asynchronous workflows](https://developers.cloudflare.com/agents/api-reference/run-workflows) from your Agent by combining the Agents SDK and [Workflows](https://developers.cloudflare.com/workflows).
--- title: Using AI Models · Cloudflare Agents docs description: "Agents can communicate with AI models hosted on any provider, including:" lastUpdated: 2025-05-16T16:37:37.000Z chatbotDeprioritize: false source_url: html: https://developers.cloudflare.com/agents/api-reference/using-ai-models/ md: https://developers.cloudflare.com/agents/api-reference/using-ai-models/index.md --- Agents can communicate with AI models hosted on any provider, including: * [Workers AI](https://developers.cloudflare.com/workers-ai/) * The [AI SDK](https://sdk.vercel.ai/docs/ai-sdk-core/overview) * [OpenAI](https://platform.openai.com/docs/quickstart?language=javascript) * [Anthropic](https://docs.anthropic.com/en/api/client-sdks#typescript) * [Google's Gemini](https://ai.google.dev/gemini-api/docs/openai) You can also use the model routing features in [AI Gateway](https://developers.cloudflare.com/ai-gateway/) to route across providers, eval responses, and manage AI provider rate limits. Because Agents are built on top of [Durable Objects](https://developers.cloudflare.com/durable-objects/), each Agent or chat session is associated with a stateful compute instance. Traditional serverless architectures often present challenges for persistent connections needed in real-time applications like chat. A user can disconnect during a long-running response from a modern reasoning model (such as `o3-mini` or DeepSeek R1), or lose conversational context when refreshing the browser. Instead of relying on request-response patterns and managing an external database to track & store conversation state, state can be stored directly within the Agent. If a client disconnects, the Agent can write to its own distributed storage, and catch the client up as soon as it reconnects: even if it's hours or days later. ## Calling AI Models You can call models from any method within an Agent, including from HTTP requests using the [`onRequest`](https://developers.cloudflare.com/agents/api-reference/agents-api/) handler, when a [scheduled task](https://developers.cloudflare.com/agents/api-reference/schedule-tasks/) runs, when handling a WebSocket message in the [`onMessage`](https://developers.cloudflare.com/agents/api-reference/websockets/) handler, or from any of your own methods. Importantly, Agents can call AI models on their own — autonomously — and can handle long-running responses that can take minutes (or longer) to respond in full. ### Long-running model requests Modern [reasoning models](https://platform.openai.com/docs/guides/reasoning) or "thinking" model can take some time to both generate a response *and* stream the response back to the client. Instead of buffering the entire response, or risking the client disconnecting, you can stream the response back to the client by using the [WebSocket API](https://developers.cloudflare.com/agents/api-reference/websockets/). * JavaScript ```js import { Agent } from "agents"; import { OpenAI } from "openai"; export class MyAgent extends Agent { async onConnect(connection, ctx) { // } async onMessage(connection, message) { let msg = JSON.parse(message); // This can run as long as it needs to, and return as many messages as it needs to! await queryReasoningModel(connection, msg.prompt); } async queryReasoningModel(connection, userPrompt) { const client = new OpenAI({ apiKey: this.env.OPENAI_API_KEY, }); try { const stream = await client.chat.completions.create({ model: this.env.MODEL || "o3-mini", messages: [{ role: "user", content: userPrompt }], stream: true, }); // Stream responses back as WebSocket messages for await (const chunk of stream) { const content = chunk.choices[0]?.delta?.content || ""; if (content) { connection.send(JSON.stringify({ type: "chunk", content })); } } // Send completion message connection.send(JSON.stringify({ type: "done" })); } catch (error) { connection.send(JSON.stringify({ type: "error", error: error })); } } } ``` * TypeScript ```ts import { Agent } from "agents"; import { OpenAI } from "openai"; export class MyAgent extends Agent { async onConnect(connection: Connection, ctx: ConnectionContext) { // } async onMessage(connection: Connection, message: WSMessage) { let msg = JSON.parse(message); // This can run as long as it needs to, and return as many messages as it needs to! await queryReasoningModel(connection, msg.prompt); } async queryReasoningModel(connection: Connection, userPrompt: string) { const client = new OpenAI({ apiKey: this.env.OPENAI_API_KEY, }); try { const stream = await client.chat.completions.create({ model: this.env.MODEL || "o3-mini", messages: [{ role: "user", content: userPrompt }], stream: true, }); // Stream responses back as WebSocket messages for await (const chunk of stream) { const content = chunk.choices[0]?.delta?.content || ""; if (content) { connection.send(JSON.stringify({ type: "chunk", content })); } } // Send completion message connection.send(JSON.stringify({ type: "done" })); } catch (error) { connection.send(JSON.stringify({ type: "error", error: error })); } } } ``` You can also persist AI model responses back to [Agent's internal state](https://developers.cloudflare.com/agents/api-reference/store-and-sync-state/) by using the `this.setState` method. For example, if you run a [scheduled task](https://developers.cloudflare.com/agents/api-reference/schedule-tasks/), you can store the output of the task and read it later. Or, if a user disconnects, read the message history back and send it to the user when they reconnect. ### Workers AI ### Hosted models You can use [any of the models available in Workers AI](https://developers.cloudflare.com/workers-ai/models/) within your Agent by [configuring a binding](https://developers.cloudflare.com/workers-ai/configuration/bindings/). Workers AI supports streaming responses out-of-the-box by setting `stream: true`, and we strongly recommend using them to avoid buffering and delaying responses, especially for larger models or reasoning models that require more time to generate a response. * JavaScript ```js import { Agent } from "agents"; export class MyAgent extends Agent { async onRequest(request) { const response = await env.AI.run( "@cf/deepseek-ai/deepseek-r1-distill-qwen-32b", { prompt: "Build me a Cloudflare Worker that returns JSON.", stream: true, // Stream a response and don't block the client! }, ); // Return the stream return new Response(answer, { headers: { "content-type": "text/event-stream" }, }); } } ``` * TypeScript ```ts import { Agent } from "agents"; interface Env { AI: Ai; } export class MyAgent extends Agent { async onRequest(request: Request) { const response = await env.AI.run( "@cf/deepseek-ai/deepseek-r1-distill-qwen-32b", { prompt: "Build me a Cloudflare Worker that returns JSON.", stream: true, // Stream a response and don't block the client! }, ); // Return the stream return new Response(answer, { headers: { "content-type": "text/event-stream" }, }); } } ``` Your Wrangler configuration will need an `ai` binding added: * wrangler.jsonc ```jsonc { "ai": { "binding": "AI" } } ``` * wrangler.toml ```toml [ai] binding = "AI" ``` ### Model routing You can also use the model routing features in [AI Gateway](https://developers.cloudflare.com/ai-gateway/) directly from an Agent by specifying a [`gateway` configuration](https://developers.cloudflare.com/ai-gateway/providers/workersai/) when calling the AI binding. Note Model routing allows you to route requests to different AI models based on whether they are reachable, rate-limiting your client, and/or if you've exceeded your cost budget for a specific provider. * JavaScript ```js import { Agent } from "agents"; export class MyAgent extends Agent { async onRequest(request) { const response = await env.AI.run( "@cf/deepseek-ai/deepseek-r1-distill-qwen-32b", { prompt: "Build me a Cloudflare Worker that returns JSON.", }, { gateway: { id: "{gateway_id}", // Specify your AI Gateway ID here skipCache: false, cacheTtl: 3360, }, }, ); return Response.json(response); } } ``` * TypeScript ```ts import { Agent } from "agents"; interface Env { AI: Ai; } export class MyAgent extends Agent { async onRequest(request: Request) { const response = await env.AI.run( "@cf/deepseek-ai/deepseek-r1-distill-qwen-32b", { prompt: "Build me a Cloudflare Worker that returns JSON.", }, { gateway: { id: "{gateway_id}", // Specify your AI Gateway ID here skipCache: false, cacheTtl: 3360, }, }, ); return Response.json(response); } } ``` Your Wrangler configuration will need an `ai` binding added. This is shared across both Workers AI and AI Gateway. * wrangler.jsonc ```jsonc { "ai": { "binding": "AI" } } ``` * wrangler.toml ```toml [ai] binding = "AI" ``` Visit the [AI Gateway documentation](https://developers.cloudflare.com/ai-gateway/) to learn how to configure a gateway and retrieve a gateway ID. ### AI SDK The [AI SDK](https://sdk.vercel.ai/docs/introduction) provides a unified API for using AI models, including for text generation, tool calling, structured responses, image generation, and more. To use the AI SDK, install the `ai` package and use it within your Agent. The example below shows how it use it to generate text on request, but you can use it from any method within your Agent, including WebSocket handlers, as part of a scheduled task, or even when the Agent is initialized. * npm ```sh npm i ai @ai-sdk/openai ``` * yarn ```sh yarn add ai @ai-sdk/openai ``` * pnpm ```sh pnpm add ai @ai-sdk/openai ``` - JavaScript ```js import { Agent } from "agents"; import { generateText } from "ai"; import { openai } from "@ai-sdk/openai"; export class MyAgent extends Agent { async onRequest(request) { const { text } = await generateText({ model: openai("o3-mini"), prompt: "Build me an AI agent on Cloudflare Workers", }); return Response.json({ modelResponse: text }); } } ``` - TypeScript ```ts import { Agent } from "agents"; import { generateText } from "ai"; import { openai } from "@ai-sdk/openai"; export class MyAgent extends Agent { async onRequest(request: Request): Promise { const { text } = await generateText({ model: openai("o3-mini"), prompt: "Build me an AI agent on Cloudflare Workers", }); return Response.json({ modelResponse: text }); } } ``` ### OpenAI compatible endpoints Agents can call models across any service, including those that support the OpenAI API. For example, you can use the OpenAI SDK to use one of [Google's Gemini models](https://ai.google.dev/gemini-api/docs/openai#node.js) directly from your Agent. Agents can stream responses back over HTTP using Server Sent Events (SSE) from within an `onRequest` handler, or by using the native [WebSockets](https://developers.cloudflare.com/agents/api-reference/websockets/) API in your Agent to responses back to a client, which is especially useful for larger models that can take over 30+ seconds to reply. * JavaScript ```js import { Agent } from "agents"; import { OpenAI } from "openai"; export class MyAgent extends Agent { async onRequest(request) { const openai = new OpenAI({ apiKey: this.env.GEMINI_API_KEY, baseURL: "https://generativelanguage.googleapis.com/v1beta/openai/", }); // Create a TransformStream to handle streaming data let { readable, writable } = new TransformStream(); let writer = writable.getWriter(); const textEncoder = new TextEncoder(); // Use ctx.waitUntil to run the async function in the background // so that it doesn't block the streaming response ctx.waitUntil( (async () => { const stream = await openai.chat.completions.create({ model: "4o", messages: [ { role: "user", content: "Write me a Cloudflare Worker." }, ], stream: true, }); // loop over the data as it is streamed and write to the writeable for await (const part of stream) { writer.write( textEncoder.encode(part.choices[0]?.delta?.content || ""), ); } writer.close(); })(), ); // Return the readable stream back to the client return new Response(readable); } } ``` * TypeScript ```ts import { Agent } from "agents"; import { OpenAI } from "openai"; export class MyAgent extends Agent { async onRequest(request: Request): Promise { const openai = new OpenAI({ apiKey: this.env.GEMINI_API_KEY, baseURL: "https://generativelanguage.googleapis.com/v1beta/openai/", }); // Create a TransformStream to handle streaming data let { readable, writable } = new TransformStream(); let writer = writable.getWriter(); const textEncoder = new TextEncoder(); // Use ctx.waitUntil to run the async function in the background // so that it doesn't block the streaming response ctx.waitUntil( (async () => { const stream = await openai.chat.completions.create({ model: "4o", messages: [ { role: "user", content: "Write me a Cloudflare Worker." }, ], stream: true, }); // loop over the data as it is streamed and write to the writeable for await (const part of stream) { writer.write( textEncoder.encode(part.choices[0]?.delta?.content || ""), ); } writer.close(); })(), ); // Return the readable stream back to the client return new Response(readable); } } ``` --- title: Using WebSockets · Cloudflare Agents docs description: Users and clients can connect to an Agent directly over WebSockets, allowing long-running, bi-directional communication with your Agent as it operates. lastUpdated: 2025-03-18T12:13:40.000Z chatbotDeprioritize: false source_url: html: https://developers.cloudflare.com/agents/api-reference/websockets/ md: https://developers.cloudflare.com/agents/api-reference/websockets/index.md --- Users and clients can connect to an Agent directly over WebSockets, allowing long-running, bi-directional communication with your Agent as it operates. To enable an Agent to accept WebSockets, define `onConnect` and `onMessage` methods on your Agent. * `onConnect(connection: Connection, ctx: ConnectionContext)` is called when a client establishes a new WebSocket connection. The original HTTP request, including request headers, cookies, and the URL itself, are available on `ctx.request`. * `onMessage(connection: Connection, message: WSMessage)` is called for each incoming WebSocket message. Messages are one of `ArrayBuffer | ArrayBufferView | string`, and you can send messages back to a client using `connection.send()`. You can distinguish between client connections by checking `connection.id`, which is unique for each connected client. Here's an example of an Agent that echoes back any message it receives: * JavaScript ```js import { Agent, Connection } from "agents"; export class ChatAgent extends Agent { async onConnect(connection, ctx) { // Connections are automatically accepted by the SDK. // You can also explicitly close a connection here with connection.close() // Access the Request on ctx.request to inspect headers, cookies and the URL } async onMessage(connection, message) { // const response = await longRunningAITask(message) await connection.send(message); } } ``` * TypeScript ```ts import { Agent, Connection } from "agents"; export class ChatAgent extends Agent { async onConnect(connection: Connection, ctx: ConnectionContext) { // Connections are automatically accepted by the SDK. // You can also explicitly close a connection here with connection.close() // Access the Request on ctx.request to inspect headers, cookies and the URL } async onMessage(connection: Connection, message: WSMessage) { // const response = await longRunningAITask(message) await connection.send(message) } } ``` ### Connecting clients The Agent framework includes a useful helper package for connecting directly to your Agent (or other Agents) from a client application. Import `agents/client`, create an instance of `AgentClient` and use it to connect to an instance of your Agent: * JavaScript ```js import { AgentClient } from "agents/client"; const connection = new AgentClient({ agent: "dialogue-agent", name: "insight-seeker", }); connection.addEventListener("message", (event) => { console.log("Received:", event.data); }); connection.send( JSON.stringify({ type: "inquiry", content: "What patterns do you see?", }), ); ``` * TypeScript ```ts import { AgentClient } from "agents/client"; const connection = new AgentClient({ agent: "dialogue-agent", name: "insight-seeker", }); connection.addEventListener("message", (event) => { console.log("Received:", event.data); }); connection.send( JSON.stringify({ type: "inquiry", content: "What patterns do you see?", }) ); ``` ### React clients React-based applications can import `agents/react` and use the `useAgent` hook to connect to an instance of an Agent directly: * JavaScript ```js import { useAgent } from "agents/react"; function AgentInterface() { const connection = useAgent({ agent: "dialogue-agent", name: "insight-seeker", onMessage: (message) => { console.log("Understanding received:", message.data); }, onOpen: () => console.log("Connection established"), onClose: () => console.log("Connection closed"), }); const inquire = () => { connection.send( JSON.stringify({ type: "inquiry", content: "What insights have you gathered?", }), ); }; return (
); } ``` * TypeScript ```ts import { useAgent } from "agents/react"; function AgentInterface() { const connection = useAgent({ agent: "dialogue-agent", name: "insight-seeker", onMessage: (message) => { console.log("Understanding received:", message.data); }, onOpen: () => console.log("Connection established"), onClose: () => console.log("Connection closed"), }); const inquire = () => { connection.send( JSON.stringify({ type: "inquiry", content: "What insights have you gathered?", }) ); }; return (
); } ``` The `useAgent` hook automatically handles the lifecycle of the connection, ensuring that it is properly initialized and cleaned up when the component mounts and unmounts. You can also [combine `useAgent` with `useState`](https://developers.cloudflare.com/agents/api-reference/store-and-sync-state/) to automatically synchronize state across all clients connected to your Agent. ### Handling WebSocket events Define `onError` and `onClose` methods on your Agent to explicitly handle WebSocket client errors and close events. Log errors, clean up state, and/or emit metrics: * JavaScript ```js import { Agent, Connection } from "agents"; export class ChatAgent extends Agent { // onConnect and onMessage methods // ... // WebSocket error and disconnection (close) handling. async onError(connection, error) { console.error(`WS error: ${error}`); } async onClose(connection, code, reason, wasClean) { console.log(`WS closed: ${code} - ${reason} - wasClean: ${wasClean}`); connection.close(); } } ``` * TypeScript ```ts import { Agent, Connection } from "agents"; export class ChatAgent extends Agent { // onConnect and onMessage methods // ... // WebSocket error and disconnection (close) handling. async onError(connection: Connection, error: unknown): Promise { console.error(`WS error: ${error}`); } async onClose(connection: Connection, code: number, reason: string, wasClean: boolean): Promise { console.log(`WS closed: ${code} - ${reason} - wasClean: ${wasClean}`); connection.close(); } } ```
--- title: Calling LLMs · Cloudflare Agents docs description: Different LLM providers offer models optimized for specific types of tasks. When building AI systems, choosing the right model is crucial for both performance and cost efficiency. lastUpdated: 2025-02-25T13:55:21.000Z chatbotDeprioritize: false source_url: html: https://developers.cloudflare.com/agents/concepts/calling-llms/ md: https://developers.cloudflare.com/agents/concepts/calling-llms/index.md --- ### Understanding LLM providers and model types Different LLM providers offer models optimized for specific types of tasks. When building AI systems, choosing the right model is crucial for both performance and cost efficiency. #### Reasoning Models Models like OpenAI's o1, Anthropic's Claude, and DeepSeek's R1 are particularly well-suited for complex reasoning tasks. These models excel at: * Breaking down problems into steps * Following complex instructions * Maintaining context across long conversations * Generating code and technical content For example, when implementing a travel booking system, you might use a reasoning model to analyze travel requirements and generate appropriate booking strategies. #### Instruction Models Models like GPT-4 and Claude Instant are optimized for following straightforward instructions efficiently. They work well for: * Content generation * Simple classification tasks * Basic question answering * Text transformation These models are often more cost-effective for straightforward tasks that do not require complex reasoning. --- title: Human in the Loop · Cloudflare Agents docs description: Human-in-the-Loop (HITL) workflows integrate human judgment and oversight into automated processes. These workflows pause at critical points for human review, validation, or decision-making before proceeding. This approach combines the efficiency of automation with human expertise and oversight where it matters most. lastUpdated: 2025-04-30T09:59:18.000Z chatbotDeprioritize: false source_url: html: https://developers.cloudflare.com/agents/concepts/human-in-the-loop/ md: https://developers.cloudflare.com/agents/concepts/human-in-the-loop/index.md --- ### What is Human-in-the-Loop? Human-in-the-Loop (HITL) workflows integrate human judgment and oversight into automated processes. These workflows pause at critical points for human review, validation, or decision-making before proceeding. This approach combines the efficiency of automation with human expertise and oversight where it matters most. ![A human-in-the-loop diagram](https://developers.cloudflare.com/_astro/human-in-the-loop.C2xls7fV_1vt7N8.svg) #### Understanding Human-in-the-Loop workflows In a Human-in-the-Loop workflow, processes are not fully automated. Instead, they include designated checkpoints where human intervention is required. For example, in a travel booking system, a human may want to confirm the travel before an agent follows through with a transaction. The workflow manages this interaction, ensuring that: 1. The process pauses at appropriate review points 2. Human reviewers receive necessary context 3. The system maintains state during the review period 4. Review decisions are properly incorporated 5. The process continues once approval is received ### Best practices for Human-in-the-Loop workflows #### Long-Term State Persistence Human review processes do not operate on predictable timelines. A reviewer might need days or weeks to make a decision, especially for complex cases requiring additional investigation or multiple approvals. Your system needs to maintain perfect state consistency throughout this period, including: * The original request and context * All intermediate decisions and actions * Any partial progress or temporary states * Review history and feedback Tip [Durable Objects](https://developers.cloudflare.com/durable-objects/) provide an ideal solution for managing state in Human-in-the-Loop workflows, offering persistent compute instances that maintain state for hours, weeks, or months. #### Continuous Improvement Through Evals Human reviewers play a crucial role in evaluating and improving LLM performance. Implement a systematic evaluation process where human feedback is collected not just on the final output, but on the LLM's decision-making process. This can include: * Decision Quality Assessment: Have reviewers evaluate the LLM's reasoning process and decision points, not just the final output. * Edge Case Identification: Use human expertise to identify scenarios where the LLM's performance could be improved. * Feedback Collection: Gather structured feedback that can be used to fine-tune the LLM or adjust the workflow. [AI Gateway](https://developers.cloudflare.com/ai-gateway/evaluations/add-human-feedback/) can be a useful tool for setting up an LLM feedback loop. #### Error handling and recovery Robust error handling is essential for maintaining workflow integrity. Your system should gracefully handle various failure scenarios, including reviewer unavailability, system outages, or conflicting reviews. Implement clear escalation paths for handling exceptional cases that fall outside normal parameters. The system should maintain stability during paused states, ensuring that no work is lost even during extended review periods. Consider implementing automatic checkpointing that allows workflows to be resumed from the last stable state after any interruption. --- title: Tools · Cloudflare Agents docs description: Tools enable AI systems to interact with external services and perform actions. They provide a structured way for agents and workflows to invoke APIs, manipulate data, and integrate with external systems. Tools form the bridge between AI decision-making capabilities and real-world actions. lastUpdated: 2025-02-28T20:23:07.000Z chatbotDeprioritize: false source_url: html: https://developers.cloudflare.com/agents/concepts/tools/ md: https://developers.cloudflare.com/agents/concepts/tools/index.md --- ### What are tools? Tools enable AI systems to interact with external services and perform actions. They provide a structured way for agents and workflows to invoke APIs, manipulate data, and integrate with external systems. Tools form the bridge between AI decision-making capabilities and real-world actions. ### Understanding tools In an AI system, tools are typically implemented as function calls that the AI can use to accomplish specific tasks. For example, a travel booking agent might have tools for: * Searching flight availability * Checking hotel rates * Processing payments * Sending confirmation emails Each tool has a defined interface specifying its inputs, outputs, and expected behavior. This allows the AI system to understand when and how to use each tool appropriately. ### Common tool patterns #### API integration tools The most common type of tools are those that wrap external APIs. These tools handle the complexity of API authentication, request formatting, and response parsing, presenting a clean interface to the AI system. #### Model Context Protocol (MCP) The [Model Context Protocol](https://modelcontextprotocol.io/introduction) provides a standardized way to define and interact with tools. Think of it as an abstraction on top of APIs designed for LLMs to interact with external resources. MCP defines a consistent interface for: * **Tool Discovery**: Systems can dynamically discover available tools * **Parameter Validation**: Tools specify their input requirements using JSON Schema * **Error Handling**: Standardized error reporting and recovery * **State Management**: Tools can maintain state across invocations #### Data processing tools Tools that handle data transformation and analysis are essential for many AI workflows. These might include: * CSV parsing and analysis * Image processing * Text extraction * Data validation --- title: Agents · Cloudflare Agents docs description: An agent is an AI system that can autonomously execute tasks by making decisions about tool usage and process flow. Unlike traditional automation that follows predefined paths, agents can dynamically adapt their approach based on context and intermediate results. Agents are also distinct from co-pilots (e.g. traditional chat applications) in that they can fully automate a task, as opposed to simply augmenting and extending human input. lastUpdated: 2025-02-25T13:55:21.000Z chatbotDeprioritize: false source_url: html: https://developers.cloudflare.com/agents/concepts/what-are-agents/ md: https://developers.cloudflare.com/agents/concepts/what-are-agents/index.md --- ### What are agents? An agent is an AI system that can autonomously execute tasks by making decisions about tool usage and process flow. Unlike traditional automation that follows predefined paths, agents can dynamically adapt their approach based on context and intermediate results. Agents are also distinct from co-pilots (e.g. traditional chat applications) in that they can fully automate a task, as opposed to simply augmenting and extending human input. * **Agents** → non-linear, non-deterministic (can change from run to run) * **Workflows** → linear, deterministic execution paths * **Co-pilots** → augmentative AI assistance requiring human intervention ### Example: Booking vacations If this is your first time working with, or interacting with agents, this example will illustrate how an agent works within a context like booking a vacation. If you are already familiar with the topic, read on. Imagine you're trying to book a vacation. You need to research flights, find hotels, check restaurant reviews, and keep track of your budget. #### Traditional workflow automation A traditional automation system follows a predetermined sequence: * Takes specific inputs (dates, location, budget) * Calls predefined API endpoints in a fixed order * Returns results based on hardcoded criteria * Cannot adapt if unexpected situations arise ![Traditional workflow automation diagram](https://developers.cloudflare.com/_astro/workflow-automation.D1rsykgR_15theP.svg) #### AI Co-pilot A co-pilot acts as an intelligent assistant that: * Provides hotel and itinerary recommendations based on your preferences * Can understand and respond to natural language queries * Offers guidance and suggestions * Requires human decision-making and action for execution ![A co-pilot diagram](https://developers.cloudflare.com/_astro/co-pilot.BZ_kRuK6_Z9KfL9.svg) #### Agent An agent combines AI's ability to make judgements and call the relevant tools to execute the task. An agent's output will be nondeterministic given: * Real-time availability and pricing changes * Dynamic prioritization of constraints * Ability to recover from failures * Adaptive decision-making based on intermediate results ![An agent diagram](https://developers.cloudflare.com/_astro/agent-workflow.5VDKtHdO_ALLGh.svg) An agents can dynamically generate an itinerary and execute on booking reservations, similarly to what you would expect from a travel agent. ### Three primary components of agent systems: * **Decision Engine**: Usually an LLM (Large Language Model) that determines action steps * **Tool Integration**: APIs, functions, and services the agent can utilize * **Memory System**: Maintains context and tracks task progress #### How agents work Agents operate in a continuous loop of: 1. **Observing** the current state or task 2. **Planning** what actions to take, using AI for reasoning 3. **Executing** those actions using available tools (often APIs or [MCPs](https://modelcontextprotocol.io/introduction)) 4. **Learning** from the results (storing results in memory, updating task progress, and preparing for next iteration) --- title: Workflows · Cloudflare Agents docs description: A workflow is the orchestration layer that coordinates how an agent's components work together. It defines the structured paths through which tasks are processed, tools are called, and results are managed. While agents make dynamic decisions about what to do, workflows provide the underlying framework that governs how those decisions are executed. lastUpdated: 2025-02-25T13:55:21.000Z chatbotDeprioritize: false source_url: html: https://developers.cloudflare.com/agents/concepts/workflows/ md: https://developers.cloudflare.com/agents/concepts/workflows/index.md --- ## What are workflows? A workflow is the orchestration layer that coordinates how an agent's components work together. It defines the structured paths through which tasks are processed, tools are called, and results are managed. While agents make dynamic decisions about what to do, workflows provide the underlying framework that governs how those decisions are executed. ### Understanding workflows in agent systems Think of a workflow like the operating procedures of a company. The company (agent) can make various decisions, but how those decisions get implemented follows established processes (workflows). For example, when you book a flight through a travel agent, they might make different decisions about which flights to recommend, but the process of actually booking the flight follows a fixed sequence of steps. Let's examine a basic agent workflow: ### Core components of a workflow A workflow typically consists of several key elements: 1. **Input Processing** The workflow defines how inputs are received and validated before being processed by the agent. This includes standardizing formats, checking permissions, and ensuring all required information is present. 2. **Tool Integration** Workflows manage how external tools and services are accessed. They handle authentication, rate limiting, error recovery, and ensuring tools are used in the correct sequence. 3. **State Management** The workflow maintains the state of ongoing processes, tracking progress through multiple steps and ensuring consistency across operations. 4. **Output Handling** Results from the agent's actions are processed according to defined rules, whether that means storing data, triggering notifications, or formatting responses. --- title: Build a Chat Agent · Cloudflare Agents docs description: A starter template for building AI-powered chat agents using Cloudflare's Agent platform, powered by the Agents SDK. This project provides a foundation for creating interactive chat experiences with AI, complete with a modern UI and tool integration capabilities. lastUpdated: 2025-03-18T12:13:40.000Z chatbotDeprioritize: false source_url: html: https://developers.cloudflare.com/agents/getting-started/build-a-chat-agent/ md: https://developers.cloudflare.com/agents/getting-started/build-a-chat-agent/index.md --- --- title: Prompt an AI model · Cloudflare Agents docs description: Use the Workers "mega prompt" to build a Agents using your preferred AI tools and/or IDEs. The prompt understands the Agents SDK APIs, best practices and guidelines, and makes it easier to build valid Agents and Workers. lastUpdated: 2025-03-18T12:13:40.000Z chatbotDeprioritize: false source_url: html: https://developers.cloudflare.com/agents/getting-started/prompting/ md: https://developers.cloudflare.com/agents/getting-started/prompting/index.md --- --- title: Testing your Agents · Cloudflare Agents docs description: Because Agents run on Cloudflare Workers and Durable Objects, they can be tested using the same tools and techniques as Workers and Durable Objects. lastUpdated: 2025-05-16T16:37:37.000Z chatbotDeprioritize: false source_url: html: https://developers.cloudflare.com/agents/getting-started/testing-your-agent/ md: https://developers.cloudflare.com/agents/getting-started/testing-your-agent/index.md --- Because Agents run on Cloudflare Workers and Durable Objects, they can be tested using the same tools and techniques as Workers and Durable Objects. ## Writing and running tests ### Setup Note The `agents-starter` template and new Cloudflare Workers projects already include the relevant `vitest` and `@cloudflare/vitest-pool-workers` packages, as well as a valid `vitest.config.js` file. Before you write your first test, install the necessary packages: ```sh npm install vitest@~3.0.0 --save-dev --save-exact npm install @cloudflare/vitest-pool-workers --save-dev ``` Ensure that your `vitest.config.js` file is identical to the following: ```js import { defineWorkersConfig } from "@cloudflare/vitest-pool-workers/config"; export default defineWorkersConfig({ test: { poolOptions: { workers: { wrangler: { configPath: "./wrangler.toml" }, }, }, }, }); ``` ### Add the Agent configuration Add a `durableObjects` configuration to `vitest.config.js` with the name of your Agent class: ```js import { defineWorkersConfig } from "@cloudflare/vitest-pool-workers/config"; export default defineWorkersConfig({ test: { poolOptions: { workers: { main: "./src/index.ts", miniflare: { durableObjects: { NAME: "MyAgent", }, }, }, }, }, }); ``` ### Write a test Note Review the [Vitest documentation](https://vitest.dev/) for more information on testing, including the test API reference and advanced testing techniques. Tests use the `vitest` framework. A basic test suite for your Agent can validate how your Agent responds to requests, but can also unit test your Agent's methods and state. ```ts import { env, createExecutionContext, waitOnExecutionContext, SELF, } from "cloudflare:test"; import { describe, it, expect } from "vitest"; import worker from "../src"; import { Env } from "../src"; interface ProvidedEnv extends Env {} describe("make a request to my Agent", () => { // Unit testing approach it("responds with state", async () => { // Provide a valid URL that your Worker can use to route to your Agent // If you are using routeAgentRequest, this will be /agent/:agent/:name const request = new Request( "http://example.com/agent/my-agent/agent-123", ); const ctx = createExecutionContext(); const response = await worker.fetch(request, env, ctx); await waitOnExecutionContext(ctx); expect(await response.text()).toMatchObject({ hello: "from your agent" }); }); it("also responds with state", async () => { const request = new Request("http://example.com/agent/my-agent/agent-123"); const response = await SELF.fetch(request); expect(await response.text()).toMatchObject({ hello: "from your agent" }); }); }); ``` ### Run tests Running tests is done using the `vitest` CLI: ```sh $ npm run test # or run vitest directly $ npx vitest ``` ```sh MyAgent ✓ should return a greeting (1 ms) Test Files 1 passed (1) ``` Review the [documentation on testing](https://developers.cloudflare.com/workers/testing/vitest-integration/write-your-first-test/) for additional examples and test configuration. ## Running Agents locally You can also run an Agent locally using the `wrangler` CLI: ```sh $ npx wrangler dev ``` ```sh Your Worker and resources are simulated locally via Miniflare. For more information, see: https://developers.cloudflare.com/workers/testing/local-development. Your worker has access to the following bindings: - Durable Objects: - MyAgent: MyAgent Starting local server... [wrangler:inf] Ready on http://localhost:53645 ``` This spins up a local development server that runs the same runtime as Cloudflare Workers, and allows you to iterate on your Agent's code and test it locally without deploying it. Visit the [`wrangler dev`](https://developers.cloudflare.com/workers/wrangler/commands/#dev) docs to review the CLI flags and configuration options. --- title: Build a Human-in-the-loop Agent · Cloudflare Agents docs description: Implement human-in-the-loop functionality using Cloudflare Agents, allowing AI agents to request human approval before executing certain actions lastUpdated: 2025-02-25T13:55:21.000Z chatbotDeprioritize: false source_url: html: https://developers.cloudflare.com/agents/guides/anthropic-agent-patterns/ md: https://developers.cloudflare.com/agents/guides/anthropic-agent-patterns/index.md --- --- title: Build a Remote MCP Client · Cloudflare Agents docs description: Build an AI Agent that acts as a remote MCP client. lastUpdated: 2025-04-09T15:16:54.000Z chatbotDeprioritize: false source_url: html: https://developers.cloudflare.com/agents/guides/build-mcp-client/ md: https://developers.cloudflare.com/agents/guides/build-mcp-client/index.md --- --- title: Implement Effective Agent Patterns · Cloudflare Agents docs description: Implement common agent patterns using the Agents SDK framework. lastUpdated: 2025-03-18T12:13:40.000Z chatbotDeprioritize: false source_url: html: https://developers.cloudflare.com/agents/guides/human-in-the-loop/ md: https://developers.cloudflare.com/agents/guides/human-in-the-loop/index.md --- --- title: Build a Remote MCP server · Cloudflare Agents docs description: "This guide will show you how to deploy your own remote MCP server on Cloudflare, with two options:" lastUpdated: 2025-04-30T00:49:56.000Z chatbotDeprioritize: false source_url: html: https://developers.cloudflare.com/agents/guides/remote-mcp-server/ md: https://developers.cloudflare.com/agents/guides/remote-mcp-server/index.md --- ## Deploy your first MCP server This guide will show you how to deploy your own remote MCP server on Cloudflare, with two options: * **Without authentication** — anyone can connect and use the server (no login required). * **With [authentication and authorization](https://developers.cloudflare.com/agents/guides/remote-mcp-server/#add-authentication)** — users sign in before accessing tools, and you can control which tools an agent can call based on the user's permissions. You can start by deploying a [public MCP server](https://github.com/cloudflare/ai/tree/main/demos/remote-mcp-authless) without authentication, then add user authentication and scoped authorization later. If you already know your server will require authentication, you can skip ahead to the [next section](https://developers.cloudflare.com/agents/guides/remote-mcp-server/#add-authentication). The button below will guide you through everything you need to do to deploy this [example MCP server](https://github.com/cloudflare/ai/tree/main/demos/remote-mcp-authless) to your Cloudflare account: [![Deploy to Workers](https://deploy.workers.cloudflare.com/button)](https://deploy.workers.cloudflare.com/?url=https://github.com/cloudflare/ai/tree/main/demos/remote-mcp-authless) Once deployed, this server will be live at your workers.dev subdomain (e.g. remote-mcp-server-authless.your-account.workers.dev/sse). You can connect to it immediately using the [AI Playground](https://playground.ai.cloudflare.com/) (a remote MCP client), [MCP inspector](https://github.com/modelcontextprotocol/inspector) or [other MCP clients](https://developers.cloudflare.com/agents/guides/remote-mcp-server/#connect-your-remote-mcp-server-to-claude-and-other-mcp-clients-via-a-local-proxy). Then, once you're ready, you can customize the MCP server and add your own [tools](https://developers.cloudflare.com/agents/model-context-protocol/tools/). If you're using the "Deploy to Cloudflare" button, a new git repository will be set up on your GitHub or GitLab account for your MCP server, configured to automatically deploy to Cloudflare each time you push a change or merge a pull request to the main branch of the repository. You can then clone this repository, [develop locally](https://developers.cloudflare.com/agents/guides/remote-mcp-server/#local-development), and start writing code and building. ### Set up and deploy your MCP server via CLI Alternatively, you can use the command line as shown below to create a new MCP Server on your local machine. * npm ```sh npm create cloudflare@latest -- my-mcp-server --template=cloudflare/ai/demos/remote-mcp-authless ``` * yarn ```sh yarn create cloudflare my-mcp-server --template=cloudflare/ai/demos/remote-mcp-authless ``` * pnpm ```sh pnpm create cloudflare@latest my-mcp-server --template=cloudflare/ai/demos/remote-mcp-authless ``` Now, you have the MCP server setup, with dependencies installed. Move into that project folder: ```sh cd my-mcp-server ``` #### Local development In the directory of your new project, run the following command to start the development server: ```sh npm start ``` Your MCP server is now running on `http://localhost:8787/sse`. In a new terminal, run the [MCP inspector](https://github.com/modelcontextprotocol/inspector). The MCP inspector is an interactive MCP client that allows you to connect to your MCP server and invoke tools from a web browser. ```sh npx @modelcontextprotocol/inspector@latest ``` Open the MCP inspector in your web browser: ```sh open http://localhost:5173 ``` In the inspector, enter the URL of your MCP server, `http://localhost:8787/sse`, and click **Connect**. You should see the "List Tools" button, which will list the tools that your MCP server exposes. ![MCP inspector — authenticated](https://developers.cloudflare.com/_astro/mcp-inspector-authenticated.BCabYwDA_ezC3N.webp) #### Deploy your MCP server You can deploy your MCP server to Cloudflare using the following [Wrangler CLI command](https://developers.cloudflare.com/workers/wrangler) within the example project: ```sh npx wrangler@latest deploy ``` If you have already [connected a git repository](https://developers.cloudflare.com/workers/ci-cd/builds/) to the Worker with your MCP server, you can deploy your MCP server by pushing a change or merging a pull request to the main branch of the repository. After deploying, take the URL of your deployed MCP server, and enter it in the MCP inspector running on `http://localhost:5173`. You now have a remote MCP server, deployed to Cloudflare, that MCP clients can connect to. ### Connect your Remote MCP server to Claude and other MCP Clients via a local proxy Now that your MCP server is running, you can use the [`mcp-remote` local proxy](https://www.npmjs.com/package/mcp-remote) to connect Claude Desktop or other MCP clients to it — even though these tools aren't yet *remote* MCP clients, and don't support remote transport or authorization on the client side. This lets you test what an interaction with your MCP server will be like with a real MCP client. Update your Claude Desktop configuration to point to the URL of your MCP server. You can use either the `localhost:8787/sse` URL, or the URL of your deployed MCP server: ```json { "mcpServers": { "math": { "command": "npx", "args": [ "mcp-remote", "https://your-worker-name.your-account.workers.dev/sse" ] } } } ``` Restart Claude Desktop after updating your config file to load the MCP Server. Once this is done, Claude will be able to make calls to your remote MCP server. You can test this by asking Claude to use one of your tools. For example: "Could you use the math tool to add 23 and 19?". Claude should invoke the tool and show the result generated by the MCP server. Learn more about other ways of using remote MCP servers with MCP clients here in [this section](https://developers.cloudflare.com/agents/guides/test-remote-mcp-server). ## Add Authentication Now that you’ve deployed a public MCP server, let’s walk through how to enable user authentication using OAuth. The public server example you deployed earlier allows any client to connect and invoke tools without logging in. To add authentication, you’ll update your MCP server to act as an OAuth provider, handling secure login flows and issuing access tokens that MCP clients can use to make authenticated tool calls. This is especially useful if users already need to log in to use your service. Once authentication is enabled, users can sign in with their existing account and grant their AI agent permission to interact with the tools exposed by your MCP server, using scoped permissions. In this example, we use GitHub as an OAuth provider, but you can connect your MCP server with any [OAuth provider](https://developers.cloudflare.com/agents/model-context-protocol/authorization/#2-third-party-oauth-provider) that supports the OAuth 2.0 specification, including Google, Slack, [Stytch](https://developers.cloudflare.com/agents/model-context-protocol/authorization/#stytch), [Auth0](https://developers.cloudflare.com/agents/model-context-protocol/authorization/#stytch), [WorkOS](https://developers.cloudflare.com/agents/model-context-protocol/authorization/#stytch), and more. ### Step 1 — Create and deploy a new MCP server Run the following command to create a new MCP server: * npm ```sh npm create cloudflare@latest -- my-mcp-server-github-auth --template=cloudflare/ai/demos/remote-mcp-github-oauth ``` * yarn ```sh yarn create cloudflare my-mcp-server-github-auth --template=cloudflare/ai/demos/remote-mcp-github-oauth ``` * pnpm ```sh pnpm create cloudflare@latest my-mcp-server-github-auth --template=cloudflare/ai/demos/remote-mcp-github-oauth ``` Now, you have the MCP server setup, with dependencies installed. Move into that project folder: ```sh cd my-mcp-server-github-auth ``` Then, run the following command to deploy the MCP server: ```sh npx wrangler@latest deploy ``` You'll notice that in the example MCP server, if you open `src/index.ts`, the primary difference is that the `defaultHandler` is set to the `GitHubHandler`: ```ts import GitHubHandler from "./github-handler"; export default new OAuthProvider({ apiRoute: "/sse", apiHandler: MyMCP.Router, defaultHandler: GitHubHandler, authorizeEndpoint: "/authorize", tokenEndpoint: "/token", clientRegistrationEndpoint: "/register", }); ``` This will ensure that your users are redirected to GitHub to authenticate. To get this working though, you need to create OAuth client apps in the steps below. ### Step 2 — Create an OAuth App You'll need to create two [GitHub OAuth Apps](https://docs.github.com/en/apps/oauth-apps/building-oauth-apps/creating-an-oauth-app) to use GitHub as an authentication provider for your MCP server — one for local development, and one for production. #### First create a new OAuth App for local development Navigate to [github.com/settings/developers](https://github.com/settings/developers) to create a new OAuth App with the following settings: * **Application name**: `My MCP Server (local)` * **Homepage URL**: `http://localhost:8787` * **Authorization callback URL**: `http://localhost:8787/callback` For the OAuth app you just created, add the client ID of the OAuth app as `GITHUB_CLIENT_ID` and generate a client secret, adding it as `GITHUB_CLIENT_SECRET` to a `.dev.vars` file in the root of your project, which [will be used to set secrets in local development](https://developers.cloudflare.com/workers/configuration/secrets/). ```sh touch .dev.vars echo 'GITHUB_CLIENT_ID="your-client-id"' >> .dev.vars echo 'GITHUB_CLIENT_SECRET="your-client-secret"' >> .dev.vars cat .dev.vars ``` #### Next, run your MCP server locally Run the following command to start the development server: ```sh npm start ``` Your MCP server is now running on `http://localhost:8787/sse`. In a new terminal, run the [MCP inspector](https://github.com/modelcontextprotocol/inspector). The MCP inspector is an interactive MCP client that allows you to connect to your MCP server and invoke tools from a web browser. ```sh npx @modelcontextprotocol/inspector@latest ``` Open the MCP inspector in your web browser: ```sh open http://localhost:5173 ``` In the inspector, enter the URL of your MCP server, `http://localhost:8787/sse`, and click **Connect**: You should be redirected to a GitHub login or authorization page. After authorizing the MCP Client (the inspector) access to your GitHub account, you will be redirected back to the inspector. You should see the "List Tools" button, which will list the tools that your MCP server exposes. #### Second — create a new OAuth App for production You'll need to repeat these steps to create a new OAuth App for production. Navigate to [github.com/settings/developers](https://github.com/settings/developers) to create a new OAuth App with the following settings: * **Application name**: `My MCP Server (production)` * **Homepage URL**: Enter the workers.dev URL of your deployed MCP server (ex: `worker-name.account-name.workers.dev`) * **Authorization callback URL**: Enter the `/callback` path of the workers.dev URL of your deployed MCP server (ex: `worker-name.account-name.workers.dev/callback`) For the OAuth app you just created, add the client ID and client secret, using Wrangler CLI: ```sh wrangler secret put GITHUB_CLIENT_ID ``` ```sh wrangler secret put GITHUB_CLIENT_SECRET ``` #### Finally, connect to your MCP server Now that you've added the ID and secret of your production OAuth app, you should now be able to connect to your MCP server running at `worker-name.account-name.workers.dev/sse` using the [AI Playground](https://playground.ai.cloudflare.com/), MCP inspector or ([other MCP clients](https://developers.cloudflare.com/agents/guides/remote-mcp-server/#connect-your-mcp-server-to-claude-and-other-mcp-clients)), and authenticate with GitHub. ## Next steps * Add [tools](https://developers.cloudflare.com/agents/model-context-protocol/tools/) to your MCP server. * Customize your MCP Server's [authentication and authorization](https://developers.cloudflare.com/agents/model-context-protocol/authorization/). --- title: Test a Remote MCP Server · Cloudflare Agents docs description: Remote, authorized connections are an evolving part of the Model Context Protocol (MCP) specification. Not all MCP clients support remote connections yet. lastUpdated: 2025-03-20T23:42:46.000Z chatbotDeprioritize: false source_url: html: https://developers.cloudflare.com/agents/guides/test-remote-mcp-server/ md: https://developers.cloudflare.com/agents/guides/test-remote-mcp-server/index.md --- Remote, authorized connections are an evolving part of the [Model Context Protocol (MCP) specification](https://spec.modelcontextprotocol.io/specification/draft/basic/authorization/). Not all MCP clients support remote connections yet. This guide will show you options for how to start using your remote MCP server with MCP clients that support remote connections. If you haven't yet created and deployed a remote MCP server, you should follow the [Build a Remote MCP Server](https://developers.cloudflare.com/agents/guides/remote-mcp-server/) guide first. ## The Model Context Protocol (MCP) inspector The [`@modelcontextprotocol/inspector` package](https://github.com/modelcontextprotocol/inspector) is a visual testing tool for MCP servers. You can run it locally by running the following command: ```bash npx @modelcontextprotocol/inspector ``` Then, enter the URL of your remote MCP server. You can use an MCP server running on your local machine on localhost, or you can use a remote MCP server running on Cloudflare. ![MCP inspector](https://developers.cloudflare.com/_astro/mcp-inspector-enter-url.Chu-Nz-A_Z2xJ68.webp) Once you have authenticated, you will be redirected back to the inspector. You should see the "List Tools" button, which will list the tools that your MCP server exposes. ![MCP inspector — authenticated](https://developers.cloudflare.com/_astro/mcp-inspector-authenticated.BCabYwDA_ezC3N.webp) ## Connect your remote MCP server to Claude Desktop via a local proxy Even though [Claude Desktop](https://claude.ai/download) doesn't yet support remote MCP clients, you can use the [`mcp-remote` local proxy](https://www.npmjs.com/package/mcp-remote) to connect it to your remote MCP server. This lets you to test what an interaction with your remote MCP server will be like with a real-world MCP client. 1. Open Claude Desktop and navigate to Settings -> Developer -> Edit Config. This opens the configuration file that controls which MCP servers Claude can access. 2. Replace the content with a configuration like this: ```json { "mcpServers": { "math": { "command": "npx", "args": ["mcp-remote", "http://my-mcp-server.my-account.workers.dev/sse"] } } } ``` This tells Claude to communicate with your MCP server running at `http://localhost:8787/sse`. 1. Save the file and restart Claude Desktop (command/ctrl + R). When Claude restarts, a browser window will open showing your OAuth login page. Complete the authorization flow to grant Claude access to your MCP server. Once authenticated, you'll be able to see your tools by clicking the tools icon in the bottom right corner of Claude's interface. ## Connect your remote MCP server to Cursor To connect [Cursor](https://www.cursor.com/) with your remote MCP server, choose `Type`: "Command" and in the `Command` field, combine the command and args fields into one (e.g.`npx mcp-remote https://your-worker-name.your-account.workers.dev/sse`). ## Connect your remote MCP server to Windsurf You can connect your remote MCP server to [Windsurf](https://codeium.com/windsurf) by editing the [`mcp_config.json` file](https://docs.codeium.com/windsurf/mcp), and adding the following configuration: ```json { "mcpServers": { "math": { "command": "npx", "args": ["mcp-remote", "http://my-mcp-server.my-account.workers.dev/sse"] } } } ``` --- title: Authorization · Cloudflare Agents docs description: When building a Model Context Protocol (MCP) server, you need both a way to allow users to login (authentication) and allow them to grant the MCP client access to resources on their account (authorization). lastUpdated: 2025-05-14T14:20:47.000Z chatbotDeprioritize: true source_url: html: https://developers.cloudflare.com/agents/model-context-protocol/authorization/ md: https://developers.cloudflare.com/agents/model-context-protocol/authorization/index.md --- When building a [Model Context Protocol (MCP)](https://modelcontextprotocol.io) server, you need both a way to allow users to login (authentication) and allow them to grant the MCP client access to resources on their account (authorization). The Model Context Protocol uses [a subset of OAuth 2.1 for authorization](https://spec.modelcontextprotocol.io/specification/draft/basic/authorization/). OAuth allows your users to grant limited access to resources, without them having to share API keys or other credentials. Cloudflare provides an [OAuth Provider Library](https://github.com/cloudflare/workers-oauth-provider) that implements the provider side of the OAuth 2.1 protocol, allowing you to easily add authorization to your MCP server. You can use the OAuth Provider Library in three ways: 1. **Your Worker handles authorization itself.** Your MCP server, running on Cloudflare, handles the complete OAuth flow. ([Example](https://developers.cloudflare.com/agents/guides/remote-mcp-server/)) 2. **Integrate directly with a third-party OAuth provider**, such as GitHub or Google. 3. **Integrate with your own OAuth provider**, including authorization-as-a-service providers you might already rely on, such as Stytch, Auth0, or WorkOS. The following sections describe each of these options and link to runnable code examples for each. ## Authorization options ### (1) Your MCP Server handles authorization and authentication itself Your MCP Server, using the [OAuth Provider Library](https://github.com/cloudflare/workers-oauth-provider), can handle the complete OAuth authorization flow, without any third-party involvement. The [Workers OAuth Provider Library](https://github.com/cloudflare/workers-oauth-provider) is a Cloudflare Worker that implements a [`fetch()` handler](https://developers.cloudflare.com/workers/runtime-apis/handlers/fetch/), and handles incoming requests to your MCP server. You provide your own handlers for your MCP Server's API, and authentication and authorization logic, and URI paths for the OAuth endpoints, as shown below: ```ts export default new OAuthProvider({ apiRoute: "/mcp", // Your MCP server: apiHandler: MyMCPServer.Router, // Your handler for authentication and authorization: defaultHandler: MyAuthHandler, authorizeEndpoint: "/authorize", tokenEndpoint: "/token", clientRegistrationEndpoint: "/register", }); ``` Refer to the [getting started example](https://developers.cloudflare.com/agents/guides/remote-mcp-server/) for a complete example of the `OAuthProvider` in use, with a mock authentication flow. The authorization flow in this case works like this: ```mermaid sequenceDiagram participant B as User-Agent (Browser) participant C as MCP Client participant M as MCP Server (your Worker) C->>M: MCP Request M->>C: HTTP 401 Unauthorized Note over C: Generate code_verifier and code_challenge C->>B: Open browser with authorization URL + code_challenge B->>M: GET /authorize Note over M: User logs in and authorizes M->>B: Redirect to callback URL with auth code B->>C: Callback with authorization code C->>M: Token Request with code + code_verifier M->>C: Access Token (+ Refresh Token) C->>M: MCP Request with Access Token Note over C,M: Begin standard MCP message exchange ``` Remember — [authentication is different from authorization](https://www.cloudflare.com/learning/access-management/authn-vs-authz/). Your MCP Server can handle authorization itself, while still relying on an external authentication service to first authenticate users. The [example](https://developers.cloudflare.com/agents/guides/remote-mcp-server) in getting started provides a mock authentication flow. You will need to implement your own authentication handler — either handling authentication yourself, or using an external authentication services. ### (2) Third-party OAuth Provider The [OAuth Provider Library](https://github.com/cloudflare/workers-oauth-provider) can be configured to use a third-party OAuth provider, such as GitHub or Google. You can see a complete example of this in the [GitHub example](https://developers.cloudflare.com/agents/guides/remote-mcp-server/#add-authentication). When you use a third-party OAuth provider, you must provide a handler to the `OAuthProvider` that implements the OAuth flow for the third-party provider. ```ts import MyAuthHandler from "./auth-handler"; export default new OAuthProvider({ apiRoute: "/mcp", // Your MCP server: apiHandler: MyMCPServer.Router, // Replace this handler with your own handler for authentication and authorization with the third-party provider: authorizeEndpoint: "/authorize", tokenEndpoint: "/token", clientRegistrationEndpoint: "/register", }); ``` Note that as [defined in the Model Context Protocol specification](https://spec.modelcontextprotocol.io/specification/draft/basic/authorization/#292-flow-description) when you use a third-party OAuth provider, the MCP Server (your Worker) generates and issues its own token to the MCP client: ```mermaid sequenceDiagram participant B as User-Agent (Browser) participant C as MCP Client participant M as MCP Server (your Worker) participant T as Third-Party Auth Server C->>M: Initial OAuth Request M->>B: Redirect to Third-Party /authorize B->>T: Authorization Request Note over T: User authorizes T->>B: Redirect to MCP Server callback B->>M: Authorization code M->>T: Exchange code for token T->>M: Third-party access token Note over M: Generate bound MCP token M->>B: Redirect to MCP Client callback B->>C: MCP authorization code C->>M: Exchange code for token M->>C: MCP access token ``` Read the docs for the [Workers oAuth Provider Library](https://github.com/cloudflare/workers-oauth-provider) for more details. ### (3) Bring your own OAuth Provider If your application already implements an OAuth Provider itself, or you use [Stytch](https://stytch.com/), [Auth0](https://auth0.com/), [WorkOS](https://workos.com/), or authorization-as-a-service provider, you can use this in the same way that you would use a third-party OAuth provider, described above in (2). You can use the auth provider to: * Allow users to authenticate to your MCP server through email, social logins, SSO (single sign-on), and MFA (multi-factor authentication). * Define scopes and permissions that directly map to your MCP tools. * Present users with a consent page corresponding with the requested permissions. * Enforce the permissions so that agents can only invoke permitted tools. #### Stytch Get started with a [remote MCP server that uses Stytch](https://stytch.com/docs/guides/connected-apps/mcp-servers) to allow users to sign in with email, Google login or enterprise SSO and authorize their AI agent to view and manage their company's OKRs on their behalf. Stytch will handle restricting the scopes granted to the AI agent based on the user's role and permissions within their organization. When authorizing the MCP Client, each user will see a consent page that outlines the permissions that the agent is requesting that they are able to grant based on their role. [![Deploy to Cloudflare](https://deploy.workers.cloudflare.com/button)](https://deploy.workers.cloudflare.com/?url=https://github.com/cloudflare/ai/tree/main/demos/mcp-stytch-b2b-okr-manager) For more consumer use cases, deploy a remote MCP server for a To Do app that uses Stytch for authentication and MCP client authorization. Users can sign in with email and immediately access the To Do lists associated with their account, and grant access to any AI assistant to help them manage their tasks. [![Deploy to Cloudflare](https://deploy.workers.cloudflare.com/button)](https://deploy.workers.cloudflare.com/?url=https://github.com/cloudflare/ai/tree/main/demos/mcp-stytch-consumer-todo-list) #### Auth0 Get started with a remote MCP server that uses Auth0 to authenticate users through email, social logins, or enterprise SSO to interact with their todos and personal data through AI agents. The MCP server securely connects to API endpoints on behalf of users, showing exactly which resources the agent will be able to access once it gets consent from the user. In this implementation, access tokens are automatically refreshed during long running interactions. To set it up, first deploy the protected API endpoint: [![Deploy to Cloudflare](https://deploy.workers.cloudflare.com/button)](https://deploy.workers.cloudflare.com/?url=https://github.com/cloudflare/ai/tree/main/demos/remote-mcp-auth0/todos-api) Then, deploy the MCP server that handles authentication through Auth0 and securely connects AI agents to your API endpoint. [![Deploy to Cloudflare](https://deploy.workers.cloudflare.com/button)](https://deploy.workers.cloudflare.com/?url=https://github.com/cloudflare/ai/tree/main/demos/remote-mcp-auth0/mcp-auth0-oidc) #### WorkOS Get started with a remote MCP server that uses WorkOS's AuthKit to authenticate users and manage the permissions granted to AI agents. In this example, the MCP server dynamically exposes tools based on the user's role and access rights. All authenticated users get access to the `add` tool, but only users who have been assigned the `image_generation` permission in WorkOS can grant the AI agent access to the image generation tool. This showcases how MCP servers can conditionally expose capabilities to AI agents based on the authenticated user's role and permission. [![Deploy to Cloudflare](https://deploy.workers.cloudflare.com/button)](https://deploy.workers.cloudflare.com/?url=https://github.com/cloudflare/ai/tree/main/demos/remote-mcp-authkit) ## Using Authentication Context in Your MCP Server When a user authenticates to your MCP server through Cloudflare's OAuth Provider, their identity information and tokens are made available through the `props` parameter. ```js export class MyMCP extends McpAgent { async init() { this.server.tool("userInfo", "Get user information", {}, async () => ({ content: [{ type: "text", text: `Hello, ${this.props.claims.name || "user"}!` }], })); } } ``` The authentication context can be used for: * Accessing user-specific data by using the user ID (this.props.claims.sub) as a key * Checking user permissions before performing operations * Customizing responses based on user preferences or attributes * Using authentication tokens to make requests to external services on behalf of the user * Ensuring consistency when users interact with your application through different interfaces (dashboard, API, MCP server) ## Implementing Permission-Based Access for MCP Tools You can implement fine-grained authorization controls for your MCP tools based on user permissions. This allows you to restrict access to certain tools based on the user's role or specific permissions. ```js // Create a wrapper function to check permissions function requirePermission(permission, handler) { return async (request, context) => { // Check if user has the required permission const userPermissions = context.props.permissions || []; if (!userPermissions.includes(permission)) { return { content: [{ type: "text", text: `Permission denied: requires ${permission}` }], status: 403 }; } // If permission check passes, execute the handler return handler(request, context); }; } // Use the wrapper with your MCP tools async init() { // Basic tools available to all authenticated users this.server.tool("basicTool", "Available to all users", {}, async () => { // Implementation for all users }); // Protected tool using the permission wrapper this.server.tool( "adminAction", "Administrative action requiring special permission", { /* parameters */ }, requirePermission("admin", async (req) => { // Only executes if user has "admin" permission return { content: [{ type: "text", text: "Admin action completed" }] }; }) ); // Conditionally register tools based on user permissions if (this.props.permissions?.includes("special_feature")) { this.server.tool("specialTool", "Special feature", {}, async () => { // This tool only appears for users with the special_feature permission }); } } ``` Benefits: * Authorization check at the tool level ensures proper access control * Allows you to define permission checks once and reuse them across tools * Provides clear feedback to users when permission is denied * Can choose to only present tools that the agent is able to call ## Next steps * [Learn how to use the Workers OAuth Provider Library](https://github.com/cloudflare/workers-oauth-provider) * Learn how to use a third-party OAuth provider, using the [GitHub](https://developers.cloudflare.com/agents/guides/remote-mcp-server/#add-authentication) example MCP server. --- title: McpAgent — API Reference · Cloudflare Agents docs description: "When you build MCP Servers on Cloudflare, you extend the McpAgent class, from the Agents SDK, like this:" lastUpdated: 2025-06-05T09:34:13.000Z chatbotDeprioritize: false source_url: html: https://developers.cloudflare.com/agents/model-context-protocol/mcp-agent-api/ md: https://developers.cloudflare.com/agents/model-context-protocol/mcp-agent-api/index.md --- When you build MCP Servers on Cloudflare, you extend the [`McpAgent` class](https://github.com/cloudflare/agents/blob/5881c5d23a7f4580600029f69307cfc94743e6b8/packages/agents/src/mcp.ts), from the Agents SDK, like this: * JavaScript ```js import { McpAgent } from "agents/mcp"; import { McpServer } from "@modelcontextprotocol/sdk/server/mcp.js"; import { z } from "zod"; export class MyMCP extends McpAgent { server = new McpServer({ name: "Demo", version: "1.0.0" }); async init() { this.server.tool( "add", { a: z.number(), b: z.number() }, async ({ a, b }) => ({ content: [{ type: "text", text: String(a + b) }], }), ); } } ``` * TypeScript ```ts import { McpAgent } from "agents/mcp"; import { McpServer } from "@modelcontextprotocol/sdk/server/mcp.js"; import { z } from "zod"; export class MyMCP extends McpAgent { server = new McpServer({ name: "Demo", version: "1.0.0" }); async init() { this.server.tool( "add", { a: z.number(), b: z.number() }, async ({ a, b }) => ({ content: [{ type: "text", text: String(a + b) }], }), ); } } ``` This means that each instance of your MCP server has its own durable state, backed by a [Durable Object](https://developers.cloudflare.com/durable-objects/), with its own [SQL database](https://developers.cloudflare.com/agents/api-reference/store-and-sync-state). Your MCP server doesn't necessarily have to be an Agent. You can build MCP servers that are stateless, and just add [tools](https://developers.cloudflare.com/agents/model-context-protocol/tools) to your MCP server using the `@modelcontextprotocol/typescript-sdk` package. But if you want your MCP server to: * remember previous tool calls, and responses it provided * provide a game to the MCP client, remembering the state of the game board, previous moves, and the score * cache the state of a previous external API call, so that subsequent tool calls can reuse it * do anything that an Agent can do, but allow MCP clients to communicate with it You can use the APIs below in order to do so. #### Hibernation Support `McpAgent` instances automatically support [WebSockets Hibernation](https://developers.cloudflare.com/durable-objects/best-practices/websockets/#websocket-hibernation-api), allowing stateful MCP servers to sleep during inactive periods while preserving their state. This means your agents only consume compute resources when actively processing requests, optimizing costs while maintaining the full context and conversation history. Hibernation is enabled by default and requires no additional configuration. #### Authentication & Authorization The McpAgent class provides seamless integration with the [OAuth Provider Library](https://github.com/cloudflare/workers-oauth-provider) for [authentication and authorization](https://developers.cloudflare.com/agents/model-context-protocol/authorization/). When a user authenticates to your MCP server, their identity information and tokens are made available through the `props` parameter, allowing you to: * access user-specific data * check user permissions before performing operations * customize responses based on user attributes * use authentication tokens to make requests to external services on behalf of the user ### State synchronization APIs The `McpAgent` class makes the following subset of methods from the [Agents SDK](https://developers.cloudflare.com/agents/api-reference/agents-api/) available: * [`state`](https://developers.cloudflare.com/agents/api-reference/store-and-sync-state/) * [`initialState`](https://developers.cloudflare.com/agents/api-reference/store-and-sync-state/#set-the-initial-state-for-an-agent) * [`setState`](https://developers.cloudflare.com/agents/api-reference/store-and-sync-state/) * [`onStateUpdate`](https://developers.cloudflare.com/agents/api-reference/store-and-sync-state/#synchronizing-state) * [`sql`](https://developers.cloudflare.com/agents/api-reference/agents-api/#sql-api) State resets after the session ends Currently, each client session is backed by an instance of the `McpAgent` class. This is handled automatically for you, as shown in the [getting started guide](https://developers.cloudflare.com/agents/guides/remote-mcp-server). This means that when the same client reconnects, they will start a new session, and the state will be reset. For example, the following code implements an MCP server that remembers a counter value, and updates the counter when the `add` tool is called: * JavaScript ```js import { McpAgent } from "agents/mcp"; import { McpServer } from "@modelcontextprotocol/sdk/server/mcp.js"; import { z } from "zod"; export class MyMCP extends McpAgent { server = new McpServer({ name: "Demo", version: "1.0.0", }); initialState = { counter: 1, }; async init() { this.server.resource(`counter`, `mcp://resource/counter`, (uri) => { return { contents: [{ uri: uri.href, text: String(this.state.counter) }], }; }); this.server.tool( "add", "Add to the counter, stored in the MCP", { a: z.number() }, async ({ a }) => { this.setState({ ...this.state, counter: this.state.counter + a }); return { content: [ { type: "text", text: String(`Added ${a}, total is now ${this.state.counter}`), }, ], }; }, ); } onStateUpdate(state) { console.log({ stateUpdate: state }); } } ``` * TypeScript ```ts import { McpAgent } from "agents/mcp"; import { McpServer } from "@modelcontextprotocol/sdk/server/mcp.js"; import { z } from "zod"; type State = { counter: number }; export class MyMCP extends McpAgent { server = new McpServer({ name: "Demo", version: "1.0.0", }); initialState: State = { counter: 1, }; async init() { this.server.resource(`counter`, `mcp://resource/counter`, (uri) => { return { contents: [{ uri: uri.href, text: String(this.state.counter) }], }; }); this.server.tool( "add", "Add to the counter, stored in the MCP", { a: z.number() }, async ({ a }) => { this.setState({ ...this.state, counter: this.state.counter + a }); return { content: [ { type: "text", text: String(`Added ${a}, total is now ${this.state.counter}`), }, ], }; }, ); } onStateUpdate(state: State) { console.log({ stateUpdate: state }); } } ``` ### Not yet supported APIs The following APIs from the Agents SDK are not yet available on `McpAgent`: * [WebSocket APIs](https://developers.cloudflare.com/agents/api-reference/websockets/) (`onMessage`, `onError`, `onClose`, `onConnect`) * [Scheduling APIs](https://developers.cloudflare.com/agents/api-reference/schedule-tasks/) `this.schedule` --- title: Cloudflare's own MCP servers · Cloudflare Agents docs description: Cloudflare runs a catalog of managed remote MCP Servers which you can connect to using OAuth on clients like Claude, Windsurf, our own AI Playground or any SDK that supports MCP. lastUpdated: 2025-06-19T13:27:22.000Z chatbotDeprioritize: false source_url: html: https://developers.cloudflare.com/agents/model-context-protocol/mcp-servers-for-cloudflare/ md: https://developers.cloudflare.com/agents/model-context-protocol/mcp-servers-for-cloudflare/index.md --- Cloudflare runs a catalog of managed remote MCP Servers which you can connect to using OAuth on clients like [Claude](https://modelcontextprotocol.io/quickstart/user), [Windsurf](https://docs.windsurf.com/windsurf/cascade/mcp), our own [AI Playground](https://playground.ai.cloudflare.com/) or any [SDK that supports MCP](https://github.com/cloudflare/agents/tree/main/packages/agents/src/mcp). These MCP servers allow your MCP Client to read configurations from your account, process information, make suggestions based on data, and even make those suggested changes for you. All of these actions can happen across Cloudflare's many services including application development, security and performance. | Server Name | Description | Server URL | | - | - | - | | [Documentation server](https://github.com/cloudflare/mcp-server-cloudflare/tree/main/apps/docs-vectorize) | Get up to date reference information on Cloudflare | `https://docs.mcp.cloudflare.com/sse` | | [Workers Bindings server](https://github.com/cloudflare/mcp-server-cloudflare/tree/main/apps/workers-bindings) | Build Workers applications with storage, AI, and compute primitives | `https://bindings.mcp.cloudflare.com/sse` | | [Workers Builds server](https://github.com/cloudflare/mcp-server-cloudflare/tree/main/apps/workers-builds) | Get insights and manage your Cloudflare Workers Builds | `https://builds.mcp.cloudflare.com/sse` | | [Observability server](https://github.com/cloudflare/mcp-server-cloudflare/tree/main/apps/workers-observability) | Debug and get insight into your application's logs and analytics | `https://observability.mcp.cloudflare.com/sse` | | [Radar server](https://github.com/cloudflare/mcp-server-cloudflare/tree/main/apps/radar) | Get global Internet traffic insights, trends, URL scans, and other utilities | `https://radar.mcp.cloudflare.com/sse` | | [Container server](https://github.com/cloudflare/mcp-server-cloudflare/tree/main/apps/sandbox-container) | Spin up a sandbox development environment | `https://containers.mcp.cloudflare.com/sse` | | [Browser rendering server](https://github.com/cloudflare/mcp-server-cloudflare/tree/main/apps/browser-rendering) | Fetch web pages, convert them to markdown and take screenshots | `https://browser.mcp.cloudflare.com/sse` | | [Logpush server](https://github.com/cloudflare/mcp-server-cloudflare/tree/main/apps/logpush) | Get quick summaries for Logpush job health | `https://logs.mcp.cloudflare.com/sse` | | [AI Gateway server](https://github.com/cloudflare/mcp-server-cloudflare/tree/main/apps/ai-gateway) | Search your logs, get details about the prompts and responses | `https://ai-gateway.mcp.cloudflare.com/sse` | | [AutoRAG server](https://github.com/cloudflare/mcp-server-cloudflare/tree/main/apps/autorag) | List and search documents on your AutoRAGs | `https://autorag.mcp.cloudflare.com/sse` | | [Audit Logs server](https://github.com/cloudflare/mcp-server-cloudflare/tree/main/apps/auditlogs) | Query audit logs and generate reports for review | `https://auditlogs.mcp.cloudflare.com/sse` | | [DNS Analytics server](https://github.com/cloudflare/mcp-server-cloudflare/tree/main/apps/dns-analytics) | Optimize DNS performance and debug issues based on current set up | `https://dns-analytics.mcp.cloudflare.com/sse` | | [Digital Experience Monitoring server](https://github.com/cloudflare/mcp-server-cloudflare/tree/main/apps/dex-analysis) | Get quick insight on critical applications for your organization | `https://dex.mcp.cloudflare.com/sse` | | [Cloudflare One CASB server](https://github.com/cloudflare/mcp-server-cloudflare/tree/main/apps/cloudflare-one-casb) | Quickly identify any security misconfigurations for SaaS applications to safeguard users & data | `https://casb.mcp.cloudflare.com/sse` | | [GraphQL server](https://github.com/cloudflare/mcp-server-cloudflare/tree/main/apps/graphql/) | Get analytics data using Cloudflare’s GraphQL API | `https://graphql.mcp.cloudflare.com/sse` | Check our [GitHub page](https://github.com/cloudflare/mcp-server-cloudflare) to know how to use Cloudflare's remote MCP servers with different MCP clients. --- title: Tools · Cloudflare Agents docs description: Model Context Protocol (MCP) tools are functions that a MCP Server provides and MCP clients can call. lastUpdated: 2025-03-25T10:04:19.000Z chatbotDeprioritize: false source_url: html: https://developers.cloudflare.com/agents/model-context-protocol/tools/ md: https://developers.cloudflare.com/agents/model-context-protocol/tools/index.md --- Model Context Protocol (MCP) tools are functions that a [MCP Server](https://developers.cloudflare.com/agents/model-context-protocol) provides and MCP clients can call. When you build MCP Servers with the `@cloudflare/model-context-protocol` package, you can define tools the [same way as shown in the `@modelcontextprotocol/typescript-sdk` package's examples](https://github.com/modelcontextprotocol/typescript-sdk?tab=readme-ov-file#tools). For example, the following code from [this example MCP server](https://github.com/cloudflare/ai/tree/main/demos/remote-mcp-server) defines a simple MCP server that adds two numbers together: * JavaScript ```js import { McpServer } from "@modelcontextprotocol/sdk/server/mcp"; import { McpAgent } from "agents/mcp"; export class MyMCP extends McpAgent { server = new McpServer({ name: "Demo", version: "1.0.0" }); async init() { this.server.tool( "add", { a: z.number(), b: z.number() }, async ({ a, b }) => ({ content: [{ type: "text", text: String(a + b) }], }), ); } } ``` * TypeScript ```ts import { McpServer } from "@modelcontextprotocol/sdk/server/mcp"; import { McpAgent } from "agents/mcp"; export class MyMCP extends McpAgent { server = new McpServer({ name: "Demo", version: "1.0.0" }); async init() { this.server.tool( "add", { a: z.number(), b: z.number() }, async ({ a, b }) => ({ content: [{ type: "text", text: String(a + b) }], }), ); } } ``` --- title: Transport · Cloudflare Agents docs description: "The Model Context Protocol (MCP) specification defines three standard transport mechanisms for communication between clients and servers:" lastUpdated: 2025-05-01T13:39:24.000Z chatbotDeprioritize: false source_url: html: https://developers.cloudflare.com/agents/model-context-protocol/transport/ md: https://developers.cloudflare.com/agents/model-context-protocol/transport/index.md --- The Model Context Protocol (MCP) specification defines three standard [transport mechanisms](https://spec.modelcontextprotocol.io/specification/draft/basic/transports/) for communication between clients and servers: 1. **stdio, communication over standard in and standard out** — designed for local MCP connections. 2. **Server-Sent Events (SSE)** — Currently supported by most remote MCP clients, but is expected to be replaced by Streamable HTTP over time. It requires two endpoints: one for sending requests, another for receiving streamed responses. 3. **Streamable HTTP** — New transport method [introduced](https://modelcontextprotocol.io/specification/2025-03-26/basic/transports#streamable-http) in March 2025. It simplifies the communication by using a single HTTP endpoint for bidirectional messaging. It is currently gaining adoption among remote MCP clients, but it is expected to become the standard transport in the future. MCP servers built with the [Agents SDK](https://developers.cloudflare.com/agents) can support both remote transport methods (SSE and Streamable HTTP), with the [`McpAgent` class](https://github.com/cloudflare/agents/blob/2f82f51784f4e27292249747b5fbeeef94305552/packages/agents/src/mcp.ts) automatically handling the transport configuration. ## Implementing remote MCP transport If you're building a new MCP server or upgrading an existing one on Cloudflare, we recommend supporting both remote transport methods (SSE and Streamable HTTP) concurrently to ensure compatibility with all MCP clients. #### Get started quickly You can use the "Deploy to Cloudflare" button to create a remote MCP server that automatically supports both SSE and Streamable HTTP transport methods. [![Deploy to Workers](https://deploy.workers.cloudflare.com/button)](https://deploy.workers.cloudflare.com/?url=https://github.com/cloudflare/ai/tree/main/demos/remote-mcp-authless) #### Remote MCP server (without authentication) If you're manually configuring your MCP server, here's how to use the `McpAgent` class to handle both transport methods: * JavaScript ```js export default { fetch(request: Request, env: Env, ctx: ExecutionContext) { const { pathname } = new URL(request.url); if (pathname.startsWith('/sse')) { return MyMcpAgent.serveSSE('/sse').fetch(request, env, ctx); } if (pathname.startsWith('/mcp')) { return MyMcpAgent.serve('/mcp').fetch(request, env, ctx); } }, }; ``` * TypeScript ```ts export default { fetch(request: Request, env: Env, ctx: ExecutionContext): Response | Promise { const { pathname } = new URL(request.url); if (pathname.startsWith('/sse')) { return MyMcpAgent.serveSSE('/sse').fetch(request, env, ctx); } if (pathname.startsWith('/mcp')) { return MyMcpAgent.serve('/mcp').fetch(request, env, ctx); } // Handle case where no path matches return new Response('Not found', { status: 404 }); }, }; ``` * Hono ```ts const app = new Hono() app.mount('/sse', MyMCP.serveSSE('/sse').fetch, { replaceRequest: false }) app.mount('/mcp', MyMCP.serve('/mcp').fetch, { replaceRequest: false ) export default app ``` #### MCP Server with Authentication If your MCP server implements authentication & authorization using the [Workers OAuth Provider](https://github.com/cloudflare/workers-oauth-provider) Library, then you can configure it to support both transport methods using the `apiHandlers` property. ```js export default new OAuthProvider({ apiHandlers: { '/sse': MyMCP.serveSSE('/sse'), '/mcp': MyMCP.serve('/mcp'), }, // ... other OAuth configuration }) ``` ### Upgrading an Existing Remote MCP Server If you've already built a remote MCP server using the Cloudflare Agents SDK, make the following changes to support the new Streamable HTTP transport while maintaining compatibility with remote MCP clients using SSE: * Use `MyMcpAgent.serveSSE('/sse')` for the existing SSE transport. Previously, this would have been `MyMcpAgent.mount('/sse')`, which has been kept as an alias. * Add a new path with `MyMcpAgent.serve('/mcp')` to support the new Streamable HTTP transport. If you have an MCP server with authentication/authorization using the Workers OAuth Provider, [update the configuration](https://developers.cloudflare.com/agents/model-context-protocol/transport/#mcp-server-with-authentication) to use the `apiHandlers` property, which replaces `apiRoute` and `apiHandler`. Note To use apiHandlers, update to @cloudflare/workers-oauth-provider v0.0.4 or later. With these few changes, your MCP server will support both transport methods, making it compatible with both existing and new clients. ### Testing with MCP Clients While most MCP clients have not yet adopted the new Streamable HTTP transport, you can start testing it today using [`mcp-remote`](https://www.npmjs.com/package/mcp-remote), an adapter that lets MCP clients that otherwise only support local connections work with remote MCP servers. Follow [this guide](https://developers.cloudflare.com/agents/guides/test-remote-mcp-server/) for instructions on how to connect to your remote MCP server from Claude Desktop, Cursor, Windsurf, and other local MCP clients, using the [`mcp-remote` local proxy](https://www.npmjs.com/package/mcp-remote). --- title: Limits · Cloudflare Agents docs description: Limits that apply to authoring, deploying, and running Agents are detailed below. lastUpdated: 2025-05-01T13:39:24.000Z chatbotDeprioritize: false source_url: html: https://developers.cloudflare.com/agents/platform/limits/ md: https://developers.cloudflare.com/agents/platform/limits/index.md --- Limits that apply to authoring, deploying, and running Agents are detailed below. Many limits are inherited from those applied to Workers scripts and/or Durable Objects, and are detailed in the [Workers limits](https://developers.cloudflare.com/workers/platform/limits/) documentation. | Feature | Limit | | - | - | | Max concurrent (running) Agents per account | Tens of millions+ [1](#user-content-fn-1) | | Max definitions per account | \~250,000+ [2](#user-content-fn-2) | | Max state stored per unique Agent | 1 GB | | Max compute time per Agent | 30 seconds (refreshed per HTTP request / incoming WebSocket message) [3](#user-content-fn-3) | | Duration (wall clock) per step [3](#user-content-fn-3) | Unlimited (for example, waiting on a database call or an LLM response) | *** Need a higher limit? To request an adjustment to a limit, complete the [Limit Increase Request Form](https://forms.gle/ukpeZVLWLnKeixDu7). If the limit can be increased, Cloudflare will contact you with next steps. ## Footnotes 1. Yes, really. You can have tens of millions of Agents running concurrently, as each Agent is mapped to a [unique Durable Object](https://developers.cloudflare.com/durable-objects/what-are-durable-objects/) (actor). [↩](#user-content-fnref-1) 2. You can deploy up to [500 scripts per account](https://developers.cloudflare.com/workers/platform/limits/), but each script (project) can define multiple Agents. Each deployed script can be up to 10 MB on the [Workers Paid Plan](https://developers.cloudflare.com/workers/platform/pricing/#workers) [↩](#user-content-fnref-2) 3. Compute (CPU) time per Agent is limited to 30 seconds, but this is refreshed when an Agent receives a new HTTP request, runs a [scheduled task](https://developers.cloudflare.com/agents/api-reference/schedule-tasks/), or an incoming WebSocket message. [↩](#user-content-fnref-3) [↩2](#user-content-fnref-3-2) --- title: Prompt Engineering · Cloudflare Agents docs description: Learn how to prompt engineer your AI models & tools when building Agents & Workers on Cloudflare. lastUpdated: 2025-02-25T13:55:21.000Z chatbotDeprioritize: false source_url: html: https://developers.cloudflare.com/agents/platform/prompting/ md: https://developers.cloudflare.com/agents/platform/prompting/index.md --- --- title: prompt.txt · Cloudflare Agents docs description: Provide context to your AI models & tools when building on Cloudflare. lastUpdated: 2025-02-28T08:13:41.000Z chatbotDeprioritize: false source_url: html: https://developers.cloudflare.com/agents/platform/prompttxt/ md: https://developers.cloudflare.com/agents/platform/prompttxt/index.md --- --- title: Authentication · Cloudflare AI Gateway docs description: Add security by requiring a valid authorization token for each request. lastUpdated: 2025-01-07T01:04:02.000Z chatbotDeprioritize: false source_url: html: https://developers.cloudflare.com/ai-gateway/configuration/authentication/ md: https://developers.cloudflare.com/ai-gateway/configuration/authentication/index.md --- Using an Authenticated Gateway in AI Gateway adds security by requiring a valid authorization token for each request. This feature is especially useful when storing logs, as it prevents unauthorized access and protects against invalid requests that can inflate log storage usage and make it harder to find the data you need. With Authenticated Gateway enabled, only requests with the correct token are processed. Note We recommend enabling Authenticated Gateway when opting to store logs with AI Gateway. If Authenticated Gateway is enabled but a request does not include the required `cf-aig-authorization` header, the request will fail. This setting ensures that only verified requests pass through the gateway. To bypass the need for the `cf-aig-authorization` header, make sure to disable Authenticated Gateway. ## Setting up Authenticated Gateway using the Dashboard 1. Go to the Settings for the specific gateway you want to enable authentication for. 2. Select **Create authentication token** to generate a custom token with the required `Run` permissions. Be sure to securely save this token, as it will not be displayed again. 3. Include the `cf-aig-authorization` header with your API token in each request for this gateway. 4. Return to the settings page and toggle on Authenticated Gateway. ## Example requests with OpenAI ```bash curl https://gateway.ai.cloudflare.com/v1/{account_id}/{gateway_id}/openai/chat/completions \ --header 'cf-aig-authorization: Bearer {CF_AIG_TOKEN}' \ --header 'Authorization: Bearer OPENAI_TOKEN' \ --header 'Content-Type: application/json' \ --data '{"model": "gpt-3.5-turbo", "messages": [{"role": "user", "content": "What is Cloudflare?"}]}' ``` Using the OpenAI SDK: ```javascript import OpenAI from "openai"; const openai = new OpenAI({ apiKey: process.env.OPENAI_API_KEY, baseURL: "https://gateway.ai.cloudflare.com/v1/account-id/gateway/openai", defaultHeaders: { "cf-aig-authorization": `Bearer {token}`, }, }); ``` ## Example requests with the Vercel AI SDK ```javascript import { createOpenAI } from "@ai-sdk/openai"; const openai = createOpenAI({ baseURL: "https://gateway.ai.cloudflare.com/v1/account-id/gateway/openai", headers: { "cf-aig-authorization": `Bearer {token}`, }, }); ``` ## Expected behavior The following table outlines gateway behavior based on the authentication settings and header status: | Authentication Setting | Header Info | Gateway State | Response | | - | - | - | - | | On | Header present | Authenticated gateway | Request succeeds | | On | No header | Error | Request fails due to missing authorization | | Off | Header present | Unauthenticated gateway | Request succeeds | | Off | No header | Unauthenticated gateway | Request succeeds | --- title: Caching · Cloudflare AI Gateway docs description: Override caching settings on a per-request basis. lastUpdated: 2025-05-29T18:16:56.000Z chatbotDeprioritize: false source_url: html: https://developers.cloudflare.com/ai-gateway/configuration/caching/ md: https://developers.cloudflare.com/ai-gateway/configuration/caching/index.md --- AI Gateway can cache responses from your AI model providers, serving them directly from Cloudflare's cache for identical requests. ## Benefits of Using Caching * **Reduced Latency:** Serve responses faster to your users by avoiding a round trip to the origin AI provider for repeated requests. * **Cost Savings:** Minimize the number of paid requests made to your AI provider, especially for frequently accessed or non-dynamic content. * **Increased Throughput:** Offload repetitive requests from your AI provider, allowing it to handle unique requests more efficiently. Note Currently caching is supported only for text and image responses, and it applies only to identical requests. This configuration benefits use cases with limited prompt options. For example, a support bot that asks "How can I help you?" and lets the user select an answer from a limited set of options works well with the current caching configuration. We plan on adding semantic search for caching in the future to improve cache hit rates. ## Default configuration * Dashboard To set the default caching configuration in the dashboard: 1. Log into the [Cloudflare dashboard](https://dash.cloudflare.com/) and select your account. 2. Select **AI** > **AI Gateway**. 3. Select **Settings**. 4. Enable **Cache Responses**. 5. Change the default caching to whatever value you prefer. * API To set the default caching configuration using the API: 1. [Create an API token](https://developers.cloudflare.com/fundamentals/api/get-started/create-token/) with the following permissions: * `AI Gateway - Read` * `AI Gateway - Edit` 1. Get your [Account ID](https://developers.cloudflare.com/fundamentals/account/find-account-and-zone-ids/). 2. Using that API token and Account ID, send a [`POST` request](https://developers.cloudflare.com/api/resources/ai_gateway/methods/create/) to create a new Gateway and include a value for the `cache_ttl`. This caching behavior will be uniformly applied to all requests that support caching. If you need to modify the cache settings for specific requests, you have the flexibility to override this setting on a per-request basis. To check whether a response comes from cache or not, **cf-aig-cache-status** will be designated as `HIT` or `MISS`. ## Per-request caching While your gateway's default cache settings provide a good baseline, you might need more granular control. These situations could be data freshness, content with varying lifespans, or dynamic or personalized responses. To address these needs, AI Gateway allows you to override default cache behaviors on a per-request basis using specific HTTP headers. This gives you the precision to optimize caching for individual API calls. The following headers allow you to define this per-request cache behavior: Note The following headers have been updated to new names, though the old headers will still function. We recommend updating to the new headers to ensure future compatibility: `cf-cache-ttl` is now `cf-aig-cache-ttl` `cf-skip-cache` is now `cf-aig-skip-cache` ### Skip cache (cf-aig-skip-cache) Skip cache refers to bypassing the cache and fetching the request directly from the original provider, without utilizing any cached copy. You can use the header **cf-aig-skip-cache** to bypass the cached version of the request. As an example, when submitting a request to OpenAI, include the header in the following manner: ```bash curl https://gateway.ai.cloudflare.com/v1/{account_id}/{gateway_id}/openai/chat/completions \ --header "Authorization: Bearer $TOKEN" \ --header 'Content-Type: application/json' \ --header 'cf-aig-skip-cache: true' \ --data ' { "model": "gpt-4o-mini", "messages": [ { "role": "user", "content": "how to build a wooden spoon in 3 short steps? give as short as answer as possible" } ] } ' ``` ### Cache TTL (cf-aig-cache-ttl) Cache TTL, or Time To Live, is the duration a cached request remains valid before it expires and is refreshed from the original source. You can use **cf-aig-cache-ttl** to set the desired caching duration in seconds. The minimum TTL is 60 seconds and the maximum TTL is one month. For example, if you set a TTL of one hour, it means that a request is kept in the cache for an hour. Within that hour, an identical request will be served from the cache instead of the original API. After an hour, the cache expires and the request will go to the original API for a fresh response, and that response will repopulate the cache for the next hour. As an example, when submitting a request to OpenAI, include the header in the following manner: ```bash curl https://gateway.ai.cloudflare.com/v1/{account_id}/{gateway_id}/openai/chat/completions \ --header "Authorization: Bearer $TOKEN" \ --header 'Content-Type: application/json' \ --header 'cf-aig-cache-ttl: 3600' \ --data ' { "model": "gpt-4o-mini", "messages": [ { "role": "user", "content": "how to build a wooden spoon in 3 short steps? give as short as answer as possible" } ] } ' ``` ### Custom cache key (cf-aig-cache-key) Custom cache keys let you override the default cache key in order to precisely set the cacheability setting for any resource. To override the default cache key, you can use the header **cf-aig-cache-key**. When you use the **cf-aig-cache-key** header for the first time, you will receive a response from the provider. Subsequent requests with the same header will return the cached response. If the **cf-aig-cache-ttl** header is used, responses will be cached according to the specified Cache Time To Live. Otherwise, responses will be cached according to the cache settings in the dashboard. If caching is not enabled for the gateway, responses will be cached for 5 minutes by default. As an example, when submitting a request to OpenAI, include the header in the following manner: ```bash curl https://gateway.ai.cloudflare.com/v1/{account_id}/{gateway_id}/openai/chat/completions \ --header 'Authorization: Bearer {openai_token}' \ --header 'Content-Type: application/json' \ --header 'cf-aig-cache-key: responseA' \ --data ' { "model": "gpt-4o-mini", "messages": [ { "role": "user", "content": "how to build a wooden spoon in 3 short steps? give as short as answer as possible" } ] } ' ``` AI Gateway caching behavior Cache in AI Gateway is volatile. If two identical requests are sent simultaneously, the first request may not cache in time for the second request to use it, which may result in the second request retrieving data from the original source. --- title: Custom costs · Cloudflare AI Gateway docs description: Override default or public model costs on a per-request basis. lastUpdated: 2025-03-05T12:30:57.000Z chatbotDeprioritize: false source_url: html: https://developers.cloudflare.com/ai-gateway/configuration/custom-costs/ md: https://developers.cloudflare.com/ai-gateway/configuration/custom-costs/index.md --- AI Gateway allows you to set custom costs at the request level. By using this feature, the cost metrics can accurately reflect your unique pricing, overriding the default or public model costs. Note Custom costs will only apply to requests that pass tokens in their response. Requests without token information will not have costs calculated. ## Custom cost To add custom costs to your API requests, use the `cf-aig-custom-cost` header. This header enables you to specify the cost per token for both input (tokens sent) and output (tokens received). * **per\_token\_in**: The negotiated input token cost (per token). * **per\_token\_out**: The negotiated output token cost (per token). There is no limit to the number of decimal places you can include, ensuring precise cost calculations, regardless of how small the values are. Custom costs will appear in the logs with an underline, making it easy to identify when custom pricing has been applied. In this example, if you have a negotiated price of $1 per million input tokens and $2 per million output tokens, include the `cf-aig-custom-cost` header as shown below. ```bash curl https://gateway.ai.cloudflare.com/v1/{account_id}/{gateway_id}/openai/chat/completions \ --header "Authorization: Bearer $TOKEN" \ --header 'Content-Type: application/json' \ --header 'cf-aig-custom-cost: {"per_token_in":0.000001,"per_token_out":0.000002}' \ --data ' { "model": "gpt-4o-mini", "messages": [ { "role": "user", "content": "When is Cloudflare’s Birthday Week?" } ] }' ``` Note If a response is served from cache (cache hit), the cost is always `0`, even if you specified a custom cost. Custom costs only apply when the request reaches the model provider. --- title: Custom metadata · Cloudflare AI Gateway docs description: Custom metadata in AI Gateway allows you to tag requests with user IDs or other identifiers, enabling better tracking and analysis of your requests. Metadata values can be strings, numbers, or booleans, and will appear in your logs, making it easy to search and filter through your data. lastUpdated: 2024-11-22T22:12:51.000Z chatbotDeprioritize: false source_url: html: https://developers.cloudflare.com/ai-gateway/configuration/custom-metadata/ md: https://developers.cloudflare.com/ai-gateway/configuration/custom-metadata/index.md --- Custom metadata in AI Gateway allows you to tag requests with user IDs or other identifiers, enabling better tracking and analysis of your requests. Metadata values can be strings, numbers, or booleans, and will appear in your logs, making it easy to search and filter through your data. ## Key Features * **Custom Tagging**: Add user IDs, team names, test indicators, and other relevant information to your requests. * **Enhanced Logging**: Metadata appears in your logs, allowing for detailed inspection and troubleshooting. * **Search and Filter**: Use metadata to efficiently search and filter through logged requests. Note AI Gateway allows you to pass up to five custom metadata entries per request. If more than five entries are provided, only the first five will be saved; additional entries will be ignored. Ensure your custom metadata is limited to five entries to avoid unprocessed or lost data. ## Supported Metadata Types * String * Number * Boolean Note Objects are not supported as metadata values. ## Implementations ### Using cURL To include custom metadata in your request using cURL: ```bash curl https://gateway.ai.cloudflare.com/v1/{account_id}/{gateway_id}/openai/chat/completions \ --header 'Authorization: Bearer {api_token}' \ --header 'Content-Type: application/json' \ --header 'cf-aig-metadata: {"team": "AI", "user": 12345, "test":true}' \ --data '{"model": "gpt-4o", "messages": [{"role": "user", "content": "What should I eat for lunch?"}]}' ``` ### Using SDK To include custom metadata in your request using the OpenAI SDK: ```javascript import OpenAI from "openai"; export default { async fetch(request, env, ctx) { const openai = new OpenAI({ apiKey: env.OPENAI_API_KEY, baseURL: "https://gateway.ai.cloudflare.com/v1/{account_id}/{gateway_id}/openai", }); try { const chatCompletion = await openai.chat.completions.create( { model: "gpt-4o", messages: [{ role: "user", content: "What should I eat for lunch?" }], max_tokens: 50, }, { headers: { "cf-aig-metadata": JSON.stringify({ user: "JaneDoe", team: 12345, test: true }), }, } ); const response = chatCompletion.choices[0].message; return new Response(JSON.stringify(response)); } catch (e) { console.log(e); return new Response(e); } }, }; ``` ### Using Binding To include custom metadata in your request using [Bindings](https://developers.cloudflare.com/workers/runtime-apis/bindings/): ```javascript export default { async fetch(request, env, ctx) { const aiResp = await env.AI.run( '@cf/mistral/mistral-7b-instruct-v0.1', { prompt: 'What should I eat for lunch?' }, { gateway: { id: 'gateway_id', metadata: { "team": "AI", "user": 12345, "test": true} } } ); return new Response(aiResp); }, }; ``` --- title: Fallbacks · Cloudflare AI Gateway docs description: Specify model or provider fallbacks with your Universal endpoint to handle request failures and ensure reliability. lastUpdated: 2025-05-09T15:42:57.000Z chatbotDeprioritize: false source_url: html: https://developers.cloudflare.com/ai-gateway/configuration/fallbacks/ md: https://developers.cloudflare.com/ai-gateway/configuration/fallbacks/index.md --- Specify model or provider fallbacks with your [Universal endpoint](https://developers.cloudflare.com/ai-gateway/universal/) to handle request failures and ensure reliability. Cloudflare can trigger your fallback provider in response to [request errors](#request-failures) or [predetermined request timeouts](https://developers.cloudflare.com/ai-gateway/configuration/request-handling#request-timeouts). The [response header `cf-aig-step`](#response-headercf-aig-step) indicates which step successfully processed the request. ## Request failures By default, Cloudflare triggers your fallback if a model request returns an error. ### Example In the following example, a request first goes to the [Workers AI](https://developers.cloudflare.com/workers-ai/) Inference API. If the request fails, it falls back to OpenAI. The response header `cf-aig-step` indicates which provider successfully processed the request. 1. Sends a request to Workers AI Inference API. 2. If that request fails, proceeds to OpenAI. ```mermaid graph TD A[AI Gateway] --> B[Request to Workers AI Inference API] B -->|Success| C[Return Response] B -->|Failure| D[Request to OpenAI API] D --> E[Return Response] ``` You can add as many fallbacks as you need, just by adding another object in the array. ```bash curl https://gateway.ai.cloudflare.com/v1/{account_id}/{gateway_id} \ --header 'Content-Type: application/json' \ --data '[ { "provider": "workers-ai", "endpoint": "@cf/meta/llama-3.1-8b-instruct", "headers": { "Authorization": "Bearer {cloudflare_token}", "Content-Type": "application/json" }, "query": { "messages": [ { "role": "system", "content": "You are a friendly assistant" }, { "role": "user", "content": "What is Cloudflare?" } ] } }, { "provider": "openai", "endpoint": "chat/completions", "headers": { "Authorization": "Bearer {open_ai_token}", "Content-Type": "application/json" }, "query": { "model": "gpt-4o-mini", "stream": true, "messages": [ { "role": "user", "content": "What is Cloudflare?" } ] } } ]' ``` ## Response header(cf-aig-step) When using the [Universal endpoint](https://developers.cloudflare.com/ai-gateway/universal/) with fallbacks, the response header `cf-aig-step` indicates which model successfully processed the request by returning the step number. This header provides visibility into whether a fallback was triggered and which model ultimately processed the response. * `cf-aig-step:0` – The first (primary) model was used successfully. * `cf-aig-step:1` – The request fell back to the second model. * `cf-aig-step:2` – The request fell back to the third model. * Subsequent steps – Each fallback increments the step number by 1. --- title: Manage gateways · Cloudflare AI Gateway docs description: You have several different options for managing an AI Gateway. lastUpdated: 2025-07-14T15:52:57.000Z chatbotDeprioritize: false source_url: html: https://developers.cloudflare.com/ai-gateway/configuration/manage-gateway/ md: https://developers.cloudflare.com/ai-gateway/configuration/manage-gateway/index.md --- You have several different options for managing an AI Gateway. ## Create gateway * Dashboard To set up an AI Gateway in the dashboard: 1. Log into the [Cloudflare dashboard](https://dash.cloudflare.com/) and select your account. 2. Go to **AI** > **AI Gateway**. 3. Select **Create Gateway**. 4. Enter your **Gateway name**. Note: Gateway name has a 64 character limit. 5. Select **Create**. * API To set up an AI Gateway using the API: 1. [Create an API token](https://developers.cloudflare.com/fundamentals/api/get-started/create-token/) with the following permissions: * `AI Gateway - Read` * `AI Gateway - Edit` 2. Get your [Account ID](https://developers.cloudflare.com/fundamentals/account/find-account-and-zone-ids/). 3. Using that API token and Account ID, send a [`POST` request](https://developers.cloudflare.com/api/resources/ai_gateway/methods/create/) to the Cloudflare API. ## Edit gateway * Dashboard To edit an AI Gateway in the dashboard: 1. Log into the [Cloudflare dashboard](https://dash.cloudflare.com/) and select your account. 2. Go to **AI** > **AI Gateway**. 3. Select your gateway. 4. Go to **Settings** and update as needed. * API To edit an AI Gateway, send a [`PUT` request](https://developers.cloudflare.com/api/resources/ai_gateway/methods/update/) to the Cloudflare API. Note For more details about what settings are available for editing, refer to [Configuration](https://developers.cloudflare.com/ai-gateway/configuration/). ## Delete gateway Deleting your gateway is permanent and can not be undone. * Dashboard To delete an AI Gateway in the dashboard: 1. Log into the [Cloudflare dashboard](https://dash.cloudflare.com/) and select your account. 2. Go to **AI** > **AI Gateway**. 3. Select your gateway from the list of available options. 4. Go to **Settings**. 5. For **Delete Gateway**, select **Delete** (and confirm your deletion). * API To delete an AI Gateway, send a [`DELETE` request](https://developers.cloudflare.com/api/resources/ai_gateway/methods/delete/) to the Cloudflare API. --- title: Rate limiting · Cloudflare AI Gateway docs description: Rate limiting controls the traffic that reaches your application, which prevents expensive bills and suspicious activity. lastUpdated: 2025-06-19T13:27:22.000Z chatbotDeprioritize: false source_url: html: https://developers.cloudflare.com/ai-gateway/configuration/rate-limiting/ md: https://developers.cloudflare.com/ai-gateway/configuration/rate-limiting/index.md --- Rate limiting controls the traffic that reaches your application, which prevents expensive bills and suspicious activity. ## Parameters You can define rate limits as the number of requests that get sent in a specific time frame. For example, you can limit your application to 100 requests per 60 seconds. You can also select if you would like a **fixed** or **sliding** rate limiting technique. With rate limiting, we allow a certain number of requests within a window of time. For example, if it is a fixed rate, the window is based on time, so there would be no more than `x` requests in a ten minute window. If it is a sliding rate, there would be no more than `x` requests in the last ten minutes. To illustrate this, let us say you had a limit of ten requests per ten minutes, starting at 12:00. So the fixed window is 12:00-12:10, 12:10-12:20, and so on. If you sent ten requests at 12:09 and ten requests at 12:11, all 20 requests would be successful in a fixed window strategy. However, they would fail in a sliding window strategy since there were more than ten requests in the last ten minutes. ## Handling rate limits When your requests exceed the allowed rate, you will encounter rate limiting. This means the server will respond with a `429 Too Many Requests` status code and your request will not be processed. ## Default configuration * Dashboard To set the default rate limiting configuration in the dashboard: 1. Log into the [Cloudflare dashboard](https://dash.cloudflare.com/) and select your account. 2. Go to **AI** > **AI Gateway**. 3. Go to **Settings**. 4. Enable **Rate-limiting**. 5. Adjust the rate, time period, and rate limiting method as desired. * API To set the default rate limiting configuration using the API: 1. [Create an API token](https://developers.cloudflare.com/fundamentals/api/get-started/create-token/) with the following permissions: * `AI Gateway - Read` * `AI Gateway - Edit` 1. Get your [Account ID](https://developers.cloudflare.com/fundamentals/account/find-account-and-zone-ids/). 2. Using that API token and Account ID, send a [`POST` request](https://developers.cloudflare.com/api/resources/ai_gateway/methods/create/) to create a new Gateway and include a value for the `rate_limiting_interval`, `rate_limiting_limit`, and `rate_limiting_technique`. This rate limiting behavior will be uniformly applied to all requests for that gateway. --- title: Request handling · Cloudflare AI Gateway docs description: Your AI gateway supports different strategies for handling requests to providers, which allows you to manage AI interactions effectively and ensure your applications remain responsive and reliable. lastUpdated: 2025-05-09T15:42:57.000Z chatbotDeprioritize: false source_url: html: https://developers.cloudflare.com/ai-gateway/configuration/request-handling/ md: https://developers.cloudflare.com/ai-gateway/configuration/request-handling/index.md --- Your AI gateway supports different strategies for handling requests to providers, which allows you to manage AI interactions effectively and ensure your applications remain responsive and reliable. ## Request timeouts A request timeout allows you to trigger fallbacks or a retry if a provider takes too long to respond. These timeouts help: * Improve user experience, by preventing users from waiting too long for a response * Proactively handle errors, by detecting unresponsive providers and triggering a fallback option Request timeouts can be set on a Universal Endpoint or directly on a request to any provider. ### Definitions A timeout is set in milliseconds. Additionally, the timeout is based on when the first part of the response comes back. As long as the first part of the response returns within the specified timeframe - such as when streaming a response - your gateway will wait for the response. ### Configuration #### Universal Endpoint If set on a [Universal Endpoint](https://developers.cloudflare.com/ai-gateway/universal/), a request timeout specifies the timeout duration for requests and triggers a fallback. For a Universal Endpoint, configure the timeout value by setting a `requestTimeout` property within the provider-specific `config` object. Each provider can have a different `requestTimeout` value for granular customization. ```bash curl 'https://gateway.ai.cloudflare.com/v1/{account_id}/{gateway_id}' \ --header 'Content-Type: application/json' \ --data '[ { "provider": "workers-ai", "endpoint": "@cf/meta/llama-3.1-8b-instruct", "headers": { "Authorization": "Bearer {cloudflare_token}", "Content-Type": "application/json" }, "config": { "requestTimeout": 1000 }, "query": { 34 collapsed lines "messages": [ { "role": "system", "content": "You are a friendly assistant" }, { "role": "user", "content": "What is Cloudflare?" } ] } }, { "provider": "workers-ai", "endpoint": "@cf/meta/llama-3.1-8b-instruct-fast", "headers": { "Authorization": "Bearer {cloudflare_token}", "Content-Type": "application/json" }, "query": { "messages": [ { "role": "system", "content": "You are a friendly assistant" }, { "role": "user", "content": "What is Cloudflare?" } ] }, "config": { "requestTimeout": 3000 }, } ]' ``` #### Direct provider If set on a [provider](https://developers.cloudflare.com/ai-gateway/providers/) request, request timeout specifies the timeout duration for a request and - if exceeded - returns an error. For a provider-specific endpoint, configure the timeout value by adding a `cf-aig-request-timeout` header. ```bash curl https://gateway.ai.cloudflare.com/v1/{account_id}/{gateway_id}/workers-ai/@cf/meta/llama-3.1-8b-instruct \ --header 'Authorization: Bearer {cf_api_token}' \ --header 'Content-Type: application/json' \ --header 'cf-aig-request-timeout: 5000' --data '{"prompt": "What is Cloudflare?"}' ``` *** ## Request retries AI Gateway also supports automatic retries for failed requests, with a maximum of five retry attempts. This feature improves your application's resiliency, ensuring you can recover from temporary issues without manual intervention. Request timeouts can be set on a Universal Endpoint or directly on a request to any provider. ### Definitions With request retries, you can adjust a combination of three properties: * Number of attempts (maximum of 5 tries) * How long before retrying (in milliseconds, maximum of 5 seconds) * Backoff method (constant, linear, or exponential) On the final retry attempt, your gateway will wait until the request completes, regardless of how long it takes. ### Configuration #### Universal endpoint If set on a [Universal Endpoint](https://developers.cloudflare.com/ai-gateway/universal/), a request retry will automatically retry failed requests up to five times before triggering any configured fallbacks. For a Universal Endpoint, configure the retry settings with the following properties in the provider-specific `config`: ```json config:{ maxAttempts?: number; retryDelay?: number; backoff?: "constant" | "linear" | "exponential"; } ``` As with the [request timeout](https://developers.cloudflare.com/ai-gateway/configuration/request-handling/#universal-endpoint), each provider can have a different retry settings for granular customization. ```bash curl 'https://gateway.ai.cloudflare.com/v1/{account_id}/{gateway_id}' \ --header 'Content-Type: application/json' \ --data '[ { "provider": "workers-ai", "endpoint": "@cf/meta/llama-3.1-8b-instruct", "headers": { "Authorization": "Bearer {cloudflare_token}", "Content-Type": "application/json" }, "config": { "maxAttempts": 2, "retryDelay": 1000, "backoff": "constant" }, 39 collapsed lines "query": { "messages": [ { "role": "system", "content": "You are a friendly assistant" }, { "role": "user", "content": "What is Cloudflare?" } ] } }, { "provider": "workers-ai", "endpoint": "@cf/meta/llama-3.1-8b-instruct-fast", "headers": { "Authorization": "Bearer {cloudflare_token}", "Content-Type": "application/json" }, "query": { "messages": [ { "role": "system", "content": "You are a friendly assistant" }, { "role": "user", "content": "What is Cloudflare?" } ] }, "config": { "maxAttempts": 4, "retryDelay": 1000, "backoff": "exponential" }, } ]' ``` #### Direct provider If set on a [provider](https://developers.cloudflare.com/ai-gateway/universal/) request, a request retry will automatically retry failed requests up to five times. On the final retry attempt, your gateway will wait until the request completes, regardless of how long it takes. For a provider-specific endpoint, configure the retry settings by adding different header values: * `cf-aig-max-attempts` (number) * `cf-aig-retry-delay` (number) * `cf-aig-backoff` ("constant" | "linear" | "exponential) --- title: Add Human Feedback using Dashboard · Cloudflare AI Gateway docs description: Human feedback is a valuable metric to assess the performance of your AI models. By incorporating human feedback, you can gain deeper insights into how the model's responses are perceived and how well it performs from a user-centric perspective. This feedback can then be used in evaluations to calculate performance metrics, driving optimization and ultimately enhancing the reliability, accuracy, and efficiency of your AI application. lastUpdated: 2024-10-29T21:29:14.000Z chatbotDeprioritize: false source_url: html: https://developers.cloudflare.com/ai-gateway/evaluations/add-human-feedback/ md: https://developers.cloudflare.com/ai-gateway/evaluations/add-human-feedback/index.md --- Human feedback is a valuable metric to assess the performance of your AI models. By incorporating human feedback, you can gain deeper insights into how the model's responses are perceived and how well it performs from a user-centric perspective. This feedback can then be used in evaluations to calculate performance metrics, driving optimization and ultimately enhancing the reliability, accuracy, and efficiency of your AI application. Human feedback measures the performance of your dataset based on direct human input. The metric is calculated as the percentage of positive feedback (thumbs up) given on logs, which are annotated in the Logs tab of the Cloudflare dashboard. This feedback helps refine model performance by considering real-world evaluations of its output. This tutorial will guide you through the process of adding human feedback to your evaluations in AI Gateway using the [Cloudflare dashboard](https://dash.cloudflare.com/). On the next guide, you can [learn how to add human feedback via the API](https://developers.cloudflare.com/ai-gateway/evaluations/add-human-feedback-api/). ## 1. Log in to the dashboard 1. Log into the [Cloudflare dashboard](https://dash.cloudflare.com/) and select your account. 2. Go to **AI** > **AI Gateway**. ## 2. Access the Logs tab 1. Go to **Logs**. 2. The Logs tab displays all logs associated with your datasets. These logs show key information, including: * Timestamp: When the interaction occurred. * Status: Whether the request was successful, cached, or failed. * Model: The model used in the request. * Tokens: The number of tokens consumed by the response. * Cost: The cost based on token usage. * Duration: The time taken to complete the response. * Feedback: Where you can provide human feedback on each log. ## 3. Provide human feedback 1. Click on the log entry you want to review. This expands the log, allowing you to see more detailed information. 2. In the expanded log, you can view additional details such as: * The user prompt. * The model response. * HTTP response details. * Endpoint information. 3. You will see two icons: * Thumbs up: Indicates positive feedback. * Thumbs down: Indicates negative feedback. 4. Click either the thumbs up or thumbs down icon based on how you rate the model response for that particular log entry. ## 4. Evaluate human feedback After providing feedback on your logs, it becomes a part of the evaluation process. When you run an evaluation (as outlined in the [Set Up Evaluations](https://developers.cloudflare.com/ai-gateway/evaluations/set-up-evaluations/) guide), the human feedback metric will be calculated based on the percentage of logs that received thumbs-up feedback. Note You need to select human feedback as an evaluator to receive its metrics. ## 5. Review results After running the evaluation, review the results on the Evaluations tab. You will be able to see the performance of the model based on cost, speed, and now human feedback, represented as the percentage of positive feedback (thumbs up). The human feedback score is displayed as a percentage, showing the distribution of positively rated responses from the database. For more information on running evaluations, refer to the documentation [Set Up Evaluations](https://developers.cloudflare.com/ai-gateway/evaluations/set-up-evaluations/). --- title: Add Human Feedback using API · Cloudflare AI Gateway docs description: This guide will walk you through the steps of adding human feedback to an AI Gateway request using the Cloudflare API. You will learn how to retrieve the relevant request logs, and submit feedback using the API. lastUpdated: 2025-06-27T16:14:01.000Z chatbotDeprioritize: false source_url: html: https://developers.cloudflare.com/ai-gateway/evaluations/add-human-feedback-api/ md: https://developers.cloudflare.com/ai-gateway/evaluations/add-human-feedback-api/index.md --- This guide will walk you through the steps of adding human feedback to an AI Gateway request using the Cloudflare API. You will learn how to retrieve the relevant request logs, and submit feedback using the API. If you prefer to add human feedback via the dashboard, refer to [Add Human Feedback](https://developers.cloudflare.com/ai-gateway/evaluations/add-human-feedback/). ## 1. Create an API Token 1. [Create an API token](https://developers.cloudflare.com/fundamentals/api/get-started/create-token/) with the following permissions: * `AI Gateway - Read` * `AI Gateway - Edit` 1. Get your [Account ID](https://developers.cloudflare.com/fundamentals/account/find-account-and-zone-ids/). 2. Using that API token and Account ID, send a [`POST` request](https://developers.cloudflare.com/api/resources/ai_gateway/methods/create/) to the Cloudflare API. ## 2. Retrieve the `cf-aig-log-id` The `cf-aig-log-id` is a unique identifier for the specific log entry to which you want to add feedback. Below are two methods to obtain this identifier. ### Method 1: Locate the `cf-aig-log-id` in the request response This method allows you to directly find the `cf-aig-log-id` within the header of the response returned by the AI Gateway. This is the most straightforward approach if you have access to the original API response. The steps below outline how to do this. 1. **Make a Request to the AI Gateway**: This could be a request your application sends to the AI Gateway. Once the request is made, the response will contain various pieces of metadata. 2. **Check the Response Headers**: The response will include a header named `cf-aig-log-id`. This is the identifier you will need to submit feedback. In the example below, the `cf-aig-log-id` is `01JADMCQQQBWH3NXZ5GCRN98DP`. ```json { "status": "success", "headers": { "cf-aig-log-id": "01JADMCQQQBWH3NXZ5GCRN98DP" }, "data": { "response": "Sample response data" } } ``` ### Method 2: Retrieve the `cf-aig-log-id` via API (GET request) If you do not have the `cf-aig-log-id` in the response body or you need to access it after the fact, you are able to retrieve it by querying the logs using the [Cloudflare API](https://developers.cloudflare.com/api/resources/ai_gateway/subresources/logs/methods/list/). Send a `GET` request to get a list of logs and then find a specific ID Required API token permissions At least one of the following [token permissions](https://developers.cloudflare.com/fundamentals/api/reference/permissions/) is required: * `AI Gateway Write` * `AI Gateway Read` ```bash curl "https://api.cloudflare.com/client/v4/accounts/$ACCOUNT_ID/ai-gateway/gateways/$GATEWAY_ID/logs" \ --request GET \ --header "Authorization: Bearer $CLOUDFLARE_API_TOKEN" ``` ```json { "result": [ { "id": "01JADMCQQQBWH3NXZ5GCRN98DP", "cached": true, "created_at": "2019-08-24T14:15:22Z", "custom_cost": true, "duration": 0, "id": "string", "metadata": "string", "model": "string", "model_type": "string", "path": "string", "provider": "string", "request_content_type": "string", "request_type": "string", "response_content_type": "string", "status_code": 0, "step": 0, "success": true, "tokens_in": 0, "tokens_out": 0 } ] } ``` ### Method 3: Retrieve the `cf-aig-log-id` via a binding You can also retrieve the `cf-aig-log-id` using a binding, which streamlines the process. Here's how to retrieve the log ID directly: ```js const resp = await env.AI.run( "@cf/meta/llama-3-8b-instruct", { prompt: "tell me a joke", }, { gateway: { id: "my_gateway_id", }, }, ); const myLogId = env.AI.aiGatewayLogId; ``` Note: The `aiGatewayLogId` property, will only hold the last inference call log id. ## 3. Submit feedback via PATCH request Once you have both the API token and the `cf-aig-log-id`, you can send a PATCH request to submit feedback. Required API token permissions At least one of the following [token permissions](https://developers.cloudflare.com/fundamentals/api/reference/permissions/) is required: * `AI Gateway Write` ```bash curl "https://api.cloudflare.com/client/v4/accounts/$ACCOUNT_ID/ai-gateway/gateways/$GATEWAY_ID/logs/$ID" \ --request PATCH \ --header "Authorization: Bearer $CLOUDFLARE_API_TOKEN" \ --json '{ "feedback": 1 }' ``` If you had negative feedback, adjust the body of the request to be `-1`. ```json { "feedback": -1 } ``` ## 4. Verify the feedback submission You can verify the feedback submission in two ways: * **Through the [Cloudflare dashboard ](https://dash.cloudflare.com)**: check the updated feedback on the AI Gateway interface. * **Through the API**: Send another GET request to retrieve the updated log entry and confirm the feedback has been recorded. --- title: Add human feedback using Worker Bindings · Cloudflare AI Gateway docs description: This guide explains how to provide human feedback for AI Gateway evaluations using Worker bindings. lastUpdated: 2025-02-12T17:08:49.000Z chatbotDeprioritize: false source_url: html: https://developers.cloudflare.com/ai-gateway/evaluations/add-human-feedback-bindings/ md: https://developers.cloudflare.com/ai-gateway/evaluations/add-human-feedback-bindings/index.md --- This guide explains how to provide human feedback for AI Gateway evaluations using Worker bindings. ## 1. Run an AI Evaluation Start by sending a prompt to the AI model through your AI Gateway. ```javascript const resp = await env.AI.run( "@cf/meta/llama-3.1-8b-instruct", { prompt: "tell me a joke", }, { gateway: { id: "my-gateway", }, }, ); const myLogId = env.AI.aiGatewayLogId; ``` Let the user interact with or evaluate the AI response. This interaction will inform the feedback you send back to the AI Gateway. ## 2. Send Human Feedback Use the [`patchLog()`](https://developers.cloudflare.com/ai-gateway/integrations/worker-binding-methods/#31-patchlog-send-feedback) method to provide feedback for the AI evaluation. ```javascript await env.AI.gateway("my-gateway").patchLog(myLogId, { feedback: 1, // all fields are optional; set values that fit your use case score: 100, metadata: { user: "123", // Optional metadata to provide additional context }, }); ``` ## Feedback parameters explanation * `feedback`: is either `-1` for negative or `1` to positive, `0` is considered not evaluated. * `score`: A number between 0 and 100. * `metadata`: An object containing additional contextual information. ### patchLog: Send Feedback The `patchLog` method allows you to send feedback, score, and metadata for a specific log ID. All object properties are optional, so you can include any combination of the parameters: ```javascript gateway.patchLog("my-log-id", { feedback: 1, score: 100, metadata: { user: "123", }, }); ``` Returns: `Promise` (Make sure to `await` the request.) --- title: Set up Evaluations · Cloudflare AI Gateway docs description: This guide walks you through the process of setting up an evaluation in AI Gateway. These steps are done in the Cloudflare dashboard. lastUpdated: 2025-01-29T21:21:01.000Z chatbotDeprioritize: false source_url: html: https://developers.cloudflare.com/ai-gateway/evaluations/set-up-evaluations/ md: https://developers.cloudflare.com/ai-gateway/evaluations/set-up-evaluations/index.md --- This guide walks you through the process of setting up an evaluation in AI Gateway. These steps are done in the [Cloudflare dashboard](https://dash.cloudflare.com/). ## 1. Select or create a dataset Datasets are collections of logs stored for analysis that can be used in an evaluation. You can create datasets by applying filters in the Logs tab. Datasets will update automatically based on the set filters. ### Set up a dataset from the Logs tab 1. Apply filters to narrow down your logs. Filter options include provider, number of tokens, request status, and more. 2. Select **Create Dataset** to store the filtered logs for future analysis. You can manage datasets by selecting **Manage datasets** from the Logs tab. Note Please keep in mind that datasets currently use `AND` joins, so there can only be one item per filter (for example, one model or one provider). Future updates will allow more flexibility in dataset creation. ### List of available filters | Filter category | Filter options | Filter by description | | - | - | - | | Status | error, status | error type or status. | | Cache | cached, not cached | based on whether they were cached or not. | | Provider | specific providers | the selected AI provider. | | AI Models | specific models | the selected AI model. | | Cost | less than, greater than | cost, specifying a threshold. | | Request type | Universal, Workers AI Binding, WebSockets | the type of request. | | Tokens | Total tokens, Tokens In, Tokens Out | token count (less than or greater than). | | Duration | less than, greater than | request duration. | | Feedback | equals, does not equal (thumbs up, thumbs down, no feedback) | feedback type. | | Metadata Key | equals, does not equal | specific metadata keys. | | Metadata Value | equals, does not equal | specific metadata values. | | Log ID | equals, does not equal | a specific Log ID. | | Event ID | equals, does not equal | a specific Event ID. | ## 2. Select evaluators After creating a dataset, choose the evaluation parameters: * Cost: Calculates the average cost of inference requests within the dataset (only for requests with [cost data](https://developers.cloudflare.com/ai-gateway/observability/costs/)). * Speed: Calculates the average duration of inference requests within the dataset. * Performance: * Human feedback: measures performance based on human feedback, calculated by the % of thumbs up on the logs, annotated from the Logs tab. Note Additional evaluators will be introduced in future updates to expand performance analysis capabilities. ## 3. Name, review, and run the evaluation 1. Create a unique name for your evaluation to reference it in the dashboard. 2. Review the selected dataset and evaluators. 3. Select **Run** to start the process. ## 4. Review and analyze results Evaluation results will appear in the Evaluations tab. The results show the status of the evaluation (for example, in progress, completed, or error). Metrics for the selected evaluators will be displayed, excluding any logs with missing fields. You will also see the number of logs used to calculate each metric. While datasets automatically update based on filters, evaluations do not. You will have to create a new evaluation if you want to evaluate new logs. Use these insights to optimize based on your application's priorities. Based on the results, you may choose to: * Change the model or [provider](https://developers.cloudflare.com/ai-gateway/providers/) * Adjust your prompts * Explore further optimizations, such as setting up [Retrieval Augmented Generation (RAG)](https://developers.cloudflare.com/reference-architecture/diagrams/ai/ai-rag/) --- title: Set up Guardrails · Cloudflare AI Gateway docs description: Add Guardrails to any gateway to start evaluating and potentially modifying responses. lastUpdated: 2025-05-15T18:17:13.000Z chatbotDeprioritize: false source_url: html: https://developers.cloudflare.com/ai-gateway/guardrails/set-up-guardrail/ md: https://developers.cloudflare.com/ai-gateway/guardrails/set-up-guardrail/index.md --- Add Guardrails to any gateway to start evaluating and potentially modifying responses. 1. Log into the [Cloudflare dashboard](https://dash.cloudflare.com/) and select your account. 2. Go to **AI** > **AI Gateway**. 3. Select a gateway. 4. Go to **Guardrails**. 5. Switch the toggle to **On**. 6. To customize categories, select **Change** > **Configure specific categories**. 7. Update your choices for how Guardrails works on specific prompts or responses (**Flag**, **Ignore**, **Block**). * For **Prompts**: Guardrails will evaluate and transform incoming prompts based on your security policies. * For **Responses**: Guardrails will inspect the model's responses to ensure they meet your content and formatting guidelines. 8. Select **Save**. Usage considerations For additional details about how to implement Guardrails, refer to [Usage considerations](https://developers.cloudflare.com/ai-gateway/guardrails/usage-considerations/). ## Viewing Guardrail results in Logs After enabling Guardrails, you can monitor results through **AI Gateway Logs** in the Cloudflare dashboard. Guardrail logs are marked with a **green shield icon**, and each logged request includes an `eventID`, which links to its corresponding Guardrail evaluation log(s) for easy tracking. Logs are generated for all requests, including those that **pass** Guardrail checks. ## Error handling and blocked requests When a request is blocked by guardrails, you will receive a structured error response. These indicate whether the issue occurred with the prompt or the model response. Use error codes to differentiate between prompt versus response violations. * **Prompt blocked** * `"code": 2016` * `"message": "Prompt blocked due to security configurations"` * **Response blocked** * `"code": 2017` * `"message": "Response blocked due to security configurations"` You should catch these errors in your application logic and implement error handling accordingly. For example, when using [Workers AI with a binding](https://developers.cloudflare.com/ai-gateway/integrations/aig-workers-ai-binding/): ```js try { const res = await env.AI.run('@cf/meta/llama-3.1-8b-instruct', { prompt: "how to build a gun?" }, { gateway: {id: 'gateway_id'} }) return Response.json(res) } catch (e) { if ((e as Error).message.includes('2016')) { return new Response('Prompt was blocked by guardrails.') } if ((e as Error).message.includes('2017')) { return new Response('Response was blocked by guardrails.') } return new Response('Unknown AI error') } ``` --- title: Supported model types · Cloudflare AI Gateway docs description: "AI Gateway's Guardrails detects the type of AI model being used and applies safety checks accordingly:" lastUpdated: 2025-03-21T16:43:13.000Z chatbotDeprioritize: false source_url: html: https://developers.cloudflare.com/ai-gateway/guardrails/supported-model-types/ md: https://developers.cloudflare.com/ai-gateway/guardrails/supported-model-types/index.md --- AI Gateway's Guardrails detects the type of AI model being used and applies safety checks accordingly: * **Text generation models**: Both prompts and responses are evaluated. * **Embedding models**: Only the prompt is evaluated, as the response consists of numerical embeddings, which are not meaningful for moderation. * **Unknown models**: If the model type cannot be determined, only the prompt is evaluated, while the response bypass Guardrails. Note Guardrails does not yet support streaming responses. Support for streaming is planned for a future update. --- title: Usage considerations · Cloudflare AI Gateway docs description: Guardrails currently uses Llama Guard 3 8B on Workers AI to perform content evaluations. The underlying model may be updated in the future, and we will reflect those changes within Guardrails. lastUpdated: 2025-05-28T20:26:48.000Z chatbotDeprioritize: false source_url: html: https://developers.cloudflare.com/ai-gateway/guardrails/usage-considerations/ md: https://developers.cloudflare.com/ai-gateway/guardrails/usage-considerations/index.md --- Guardrails currently uses [Llama Guard 3 8B](https://ai.meta.com/research/publications/llama-guard-llm-based-input-output-safeguard-for-human-ai-conversations/) on [Workers AI](https://developers.cloudflare.com/workers-ai/) to perform content evaluations. The underlying model may be updated in the future, and we will reflect those changes within Guardrails. Since Guardrails runs on Workers AI, enabling it incurs usage on Workers AI. You can monitor usage through the Workers AI Dashboard. ## Additional considerations * **Model availability**: If at least one hazard category is set to `block`, but AI Gateway is unable to receive a response from Workers AI, the request will be blocked. Conversely, if a hazard category is set to `flag` and AI Gateway cannot obtain a response from Workers AI, the request will proceed without evaluation. This approach prioritizes availability, allowing requests to continue even when content evaluation is not possible. * **Latency impact**: Enabling Guardrails adds some latency. Enabling Guardrails introduces additional latency to requests. Typically, evaluations using Llama Guard 3 8B on Workers AI add approximately 500 milliseconds per request. However, larger requests may experience increased latency, though this increase is not linear. Consider this when balancing safety and performance. * **Handling long content**: When evaluating long prompts or responses, Guardrails automatically segments the content into smaller chunks, processing each through separate Guardrail requests. This approach ensures comprehensive moderation but may result in increased latency for longer inputs. * **Supported languages**: Llama Guard 3.3 8B supports content safety classification in the following languages: English, French, German, Hindi, Italian, Portuguese, Spanish, and Thai. * **Streaming support**: Streaming is not supported when using Guardrails. Note Llama Guard is provided as-is without any representations, warranties, or guarantees. Any rules or examples contained in blogs, developer docs, or other reference materials are provided for informational purposes only. You acknowledge and understand that you are responsible for the results and outcomes of your use of AI Gateway. --- title: Agents · Cloudflare AI Gateway docs description: Build AI-powered Agents on Cloudflare lastUpdated: 2025-01-29T20:30:56.000Z chatbotDeprioritize: false source_url: html: https://developers.cloudflare.com/ai-gateway/integrations/agents/ md: https://developers.cloudflare.com/ai-gateway/integrations/agents/index.md --- --- title: Workers AI · Cloudflare AI Gateway docs description: This guide will walk you through setting up and deploying a Workers AI project. You will use Workers, an AI Gateway binding, and a large language model (LLM), to deploy your first AI-powered application on the Cloudflare global network. lastUpdated: 2025-03-19T09:17:37.000Z chatbotDeprioritize: false source_url: html: https://developers.cloudflare.com/ai-gateway/integrations/aig-workers-ai-binding/ md: https://developers.cloudflare.com/ai-gateway/integrations/aig-workers-ai-binding/index.md --- This guide will walk you through setting up and deploying a Workers AI project. You will use [Workers](https://developers.cloudflare.com/workers/), an AI Gateway binding, and a large language model (LLM), to deploy your first AI-powered application on the Cloudflare global network. ## Prerequisites 1. Sign up for a [Cloudflare account](https://dash.cloudflare.com/sign-up/workers-and-pages). 2. Install [`Node.js`](https://docs.npmjs.com/downloading-and-installing-node-js-and-npm). Node.js version manager Use a Node version manager like [Volta](https://volta.sh/) or [nvm](https://github.com/nvm-sh/nvm) to avoid permission issues and change Node.js versions. [Wrangler](https://developers.cloudflare.com/workers/wrangler/install-and-update/), discussed later in this guide, requires a Node version of `16.17.0` or later. ## 1. Create a Worker Project You will create a new Worker project using the create-Cloudflare CLI (C3). C3 is a command-line tool designed to help you set up and deploy new applications to Cloudflare. Create a new project named `hello-ai` by running: * npm ```sh npm create cloudflare@latest -- hello-ai ``` * yarn ```sh yarn create cloudflare hello-ai ``` * pnpm ```sh pnpm create cloudflare@latest hello-ai ``` Running `npm create cloudflare@latest` will prompt you to install the create-cloudflare package and lead you through setup. C3 will also install [Wrangler](https://developers.cloudflare.com/workers/wrangler/), the Cloudflare Developer Platform CLI. For setup, select the following options: * For *What would you like to start with?*, choose `Hello World example`. * For *Which template would you like to use?*, choose `Worker only`. * For *Which language do you want to use?*, choose `TypeScript`. * For *Do you want to use git for version control?*, choose `Yes`. * For *Do you want to deploy your application?*, choose `No` (we will be making some changes before deploying). This will create a new `hello-ai` directory. Your new `hello-ai` directory will include: * A "Hello World" Worker at `src/index.ts`. * A [Wrangler configuration file](https://developers.cloudflare.com/workers/wrangler/configuration/) Go to your application directory: ```bash cd hello-ai ``` ## 2. Connect your Worker to Workers AI You must create an AI binding for your Worker to connect to Workers AI. Bindings allow your Workers to interact with resources, like Workers AI, on the Cloudflare Developer Platform. To bind Workers AI to your Worker, add the following to the end of your [Wrangler configuration file](https://developers.cloudflare.com/workers/wrangler/configuration/): * wrangler.jsonc ```jsonc { "ai": { "binding": "AI" } } ``` * wrangler.toml ```toml [ai] binding = "AI" ``` Your binding is [available in your Worker code](https://developers.cloudflare.com/workers/reference/migrate-to-module-workers/#bindings-in-es-modules-format) on [`env.AI`](https://developers.cloudflare.com/workers/runtime-apis/handlers/fetch/). You will need to have your `gateway id` for the next step. You can learn [how to create an AI Gateway in this tutorial](https://developers.cloudflare.com/ai-gateway/get-started/). ## 3. Run an inference task containing AI Gateway in your Worker You are now ready to run an inference task in your Worker. In this case, you will use an LLM, [`llama-3.1-8b-instruct-fast`](https://developers.cloudflare.com/workers-ai/models/llama-3.1-8b-instruct-fast/), to answer a question. Your gateway ID is found on the dashboard. Update the `index.ts` file in your `hello-ai` application directory with the following code: ```typescript export interface Env { // If you set another name in the [Wrangler configuration file](/workers/wrangler/configuration/) as the value for 'binding', // replace "AI" with the variable name you defined. AI: Ai; } export default { async fetch(request, env): Promise { // Specify the gateway label and other options here const response = await env.AI.run( "@cf/meta/llama-3.1-8b-instruct-fast", { prompt: "What is the origin of the phrase Hello, World", }, { gateway: { id: "GATEWAYID", // Use your gateway label here skipCache: true, // Optional: Skip cache if needed }, }, ); // Return the AI response as a JSON object return new Response(JSON.stringify(response), { headers: { "Content-Type": "application/json" }, }); }, } satisfies ExportedHandler; ``` Up to this point, you have created an AI binding for your Worker and configured your Worker to be able to execute the Llama 3.1 model. You can now test your project locally before you deploy globally. ## 4. Develop locally with Wrangler While in your project directory, test Workers AI locally by running [`wrangler dev`](https://developers.cloudflare.com/workers/wrangler/commands/#dev): ```bash npx wrangler dev ``` Workers AI local development usage charges Using Workers AI always accesses your Cloudflare account in order to run AI models and will incur usage charges even in local development. You will be prompted to log in after you run `wrangler dev`. When you run `npx wrangler dev`, Wrangler will give you a URL (most likely `localhost:8787`) to review your Worker. After you go to the URL Wrangler provides, you will see a message that resembles the following example: ````json { "response": "A fascinating question!\n\nThe phrase \"Hello, World!\" originates from a simple computer program written in the early days of programming. It is often attributed to Brian Kernighan, a Canadian computer scientist and a pioneer in the field of computer programming.\n\nIn the early 1970s, Kernighan, along with his colleague Dennis Ritchie, were working on the C programming language. They wanted to create a simple program that would output a message to the screen to demonstrate the basic structure of a program. They chose the phrase \"Hello, World!\" because it was a simple and recognizable message that would illustrate how a program could print text to the screen.\n\nThe exact code was written in the 5th edition of Kernighan and Ritchie's book \"The C Programming Language,\" published in 1988. The code, literally known as \"Hello, World!\" is as follows:\n\n``` main() { printf(\"Hello, World!\"); } ```\n\nThis code is still often used as a starting point for learning programming languages, as it demonstrates how to output a simple message to the console.\n\nThe phrase \"Hello, World!\" has since become a catch-all phrase to indicate the start of a new program or a small test program, and is widely used in computer science and programming education.\n\nSincerely, I'm glad I could help clarify the origin of this iconic phrase for you!" } ```` ## 5. Deploy your AI Worker Before deploying your AI Worker globally, log in with your Cloudflare account by running: ```bash npx wrangler login ``` You will be directed to a web page asking you to log in to the Cloudflare dashboard. After you have logged in, you will be asked if Wrangler can make changes to your Cloudflare account. Scroll down and select **Allow** to continue. Finally, deploy your Worker to make your project accessible on the Internet. To deploy your Worker, run: ```bash npx wrangler deploy ``` Once deployed, your Worker will be available at a URL like: ```bash https://hello-ai..workers.dev ``` Your Worker will be deployed to your custom [`workers.dev`](https://developers.cloudflare.com/workers/configuration/routing/workers-dev/) subdomain. You can now visit the URL to run your AI Worker. By completing this tutorial, you have created a Worker, connected it to Workers AI through an AI Gateway binding, and successfully ran an inference task using the Llama 3.1 model. --- title: Vercel AI SDK · Cloudflare AI Gateway docs description: The Vercel AI SDK is a TypeScript library for building AI applications. The SDK supports many different AI providers, tools for streaming completions, and more. lastUpdated: 2025-04-28T10:11:39.000Z chatbotDeprioritize: false source_url: html: https://developers.cloudflare.com/ai-gateway/integrations/vercel-ai-sdk/ md: https://developers.cloudflare.com/ai-gateway/integrations/vercel-ai-sdk/index.md --- The [Vercel AI SDK](https://sdk.vercel.ai/) is a TypeScript library for building AI applications. The SDK supports many different AI providers, tools for streaming completions, and more. To use Cloudflare AI Gateway inside of the AI SDK, you can configure a custom "Gateway URL" for most supported providers. Below are a few examples of how it works. ## Examples ### OpenAI If you're using the `openai` provider in AI SDK, you can create a customized setup with `createOpenAI`, passing your OpenAI-compatible AI Gateway URL: ```typescript import { createOpenAI } from "@ai-sdk/openai"; const openai = createOpenAI({ baseURL: `https://gateway.ai.cloudflare.com/v1/{account_id}/{gateway_id}/openai`, }); ``` ### Anthropic If you're using the `anthropic` provider in AI SDK, you can create a customized setup with `createAnthropic`, passing your Anthropic-compatible AI Gateway URL: ```typescript import { createAnthropic } from "@ai-sdk/anthropic"; const anthropic = createAnthropic({ baseURL: `https://gateway.ai.cloudflare.com/v1/{account_id}/{gateway_id}/anthropic`, }); ``` ### Google AI Studio If you're using the Google AI Studio provider in AI SDK, you need to append `/v1beta` to your Google AI Studio-compatible AI Gateway URL to avoid errors. The `/v1beta` path is required because Google AI Studio's API includes this in its endpoint structure, and the AI SDK sets the model name separately. This ensures compatibility with Google's API versioning. ```typescript import { createGoogleGenerativeAI } from "@ai-sdk/google"; const google = createGoogleGenerativeAI({ baseURL: `https://gateway.ai.cloudflare.com/v1/{account_id}/{gateway_id}/google-ai-studio/v1beta`, }); ``` ### Retrieve `log id` from AI SDK You can access the AI Gateway `log id` from the response headers when invoking the SDK. ```typescript const result = await generateText({ model: anthropic("claude-3-sonnet-20240229"), messages: [], }); console.log(result.response.headers["cf-aig-log-id"]); ``` ### Other providers For other providers that are not listed above, you can follow a similar pattern by creating a custom instance for any AI provider, and passing your AI Gateway URL. For help finding your provider-specific AI Gateway URL, refer to the [Supported providers page](https://developers.cloudflare.com/ai-gateway/providers). --- title: AI Gateway Binding Methods · Cloudflare AI Gateway docs description: This guide provides an overview of how to use the latest Cloudflare Workers AI Gateway binding methods. You will learn how to set up an AI Gateway binding, access new methods, and integrate them into your Workers. lastUpdated: 2025-05-13T16:21:30.000Z chatbotDeprioritize: false source_url: html: https://developers.cloudflare.com/ai-gateway/integrations/worker-binding-methods/ md: https://developers.cloudflare.com/ai-gateway/integrations/worker-binding-methods/index.md --- This guide provides an overview of how to use the latest Cloudflare Workers AI Gateway binding methods. You will learn how to set up an AI Gateway binding, access new methods, and integrate them into your Workers. ## 1. Add an AI Binding to your Worker To connect your Worker to Workers AI, add the following to your [Wrangler configuration file](https://developers.cloudflare.com/workers/wrangler/configuration/): * wrangler.jsonc ```jsonc { "ai": { "binding": "AI" } } ``` * wrangler.toml ```toml [ai] binding = "AI" ``` This configuration sets up the AI binding accessible in your Worker code as `env.AI`. If you're using TypeScript, run [`wrangler types`](https://developers.cloudflare.com/workers/wrangler/commands/#types) whenever you modify your Wrangler configuration file. This generates types for the `env` object based on your bindings, as well as [runtime types](https://developers.cloudflare.com/workers/languages/typescript/). ## 2. Basic Usage with Workers AI + Gateway To perform an inference task using Workers AI and an AI Gateway, you can use the following code: ```typescript const resp = await env.AI.run( "@cf/meta/llama-3.1-8b-instruct", { prompt: "tell me a joke", }, { gateway: { id: "my-gateway", }, }, ); ``` Additionally, you can access the latest request log ID with: ```typescript const myLogId = env.AI.aiGatewayLogId; ``` ## 3. Access the Gateway Binding You can access your AI Gateway binding using the following code: ```typescript const gateway = env.AI.gateway("my-gateway"); ``` Once you have the gateway instance, you can use the following methods: ### 3.1. `patchLog`: Send Feedback The `patchLog` method allows you to send feedback, score, and metadata for a specific log ID. All object properties are optional, so you can include any combination of the parameters: ```typescript gateway.patchLog("my-log-id", { feedback: 1, score: 100, metadata: { user: "123", }, }); ``` * **Returns**: `Promise` (Make sure to `await` the request.) * **Example Use Case**: Update a log entry with user feedback or additional metadata. ### 3.2. `getLog`: Read Log Details The `getLog` method retrieves details of a specific log ID. It returns an object of type `Promise`. If this type is missing, ensure you have run [`wrangler types`](https://developers.cloudflare.com/workers/languages/typescript/#generate-types). ```typescript const log = await gateway.getLog("my-log-id"); ``` * **Returns**: `Promise` * **Example Use Case**: Retrieve log information for debugging or analytics. ### 3.3. `getUrl`: Get Gateway URLs The `getUrl` method allows you to retrieve the base URL for your AI Gateway, optionally specifying a provider to get the provider-specific endpoint. ```typescript // Get the base gateway URL const baseUrl = await gateway.getUrl(); // Output: https://gateway.ai.cloudflare.com/v1/my-account-id/my-gateway/ // Get a provider-specific URL const openaiUrl = await gateway.getUrl("openai"); // Output: https://gateway.ai.cloudflare.com/v1/my-account-id/my-gateway/openai ``` * **Parameters**: Optional `provider` (string or `AIGatewayProviders` enum) * **Returns**: `Promise` * **Example Use Case**: Dynamically construct URLs for direct API calls or debugging configurations. #### SDK Integration Examples The `getUrl` method is particularly useful for integrating with popular AI SDKs: **OpenAI SDK:** ```typescript import OpenAI from "openai"; const openai = new OpenAI({ apiKey: "my api key", // defaults to process.env["OPENAI_API_KEY"] baseURL: await env.AI.gateway("my-gateway").getUrl("openai"), }); ``` **Vercel AI SDK with OpenAI:** ```typescript import { createOpenAI } from "@ai-sdk/openai"; const openai = createOpenAI({ baseURL: await env.AI.gateway("my-gateway").getUrl("openai"), }); ``` **Vercel AI SDK with Anthropic:** ```typescript import { createAnthropic } from "@ai-sdk/anthropic"; const anthropic = createAnthropic({ baseURL: await env.AI.gateway("my-gateway").getUrl("anthropic"), }); ``` ### 3.4. `run`: Universal Requests The `run` method allows you to execute universal requests. Users can pass either a single universal request object or an array of them. This method supports all AI Gateway providers. Refer to the [Universal endpoint documentation](https://developers.cloudflare.com/ai-gateway/universal/) for details about the available inputs. ```typescript const resp = await gateway.run({ provider: "workers-ai", endpoint: "@cf/meta/llama-3.1-8b-instruct", headers: { authorization: "Bearer my-api-token", }, query: { prompt: "tell me a joke", }, }); ``` * **Returns**: `Promise` * **Example Use Case**: Perform a [universal request](https://developers.cloudflare.com/ai-gateway/universal/) to any supported provider. ## Conclusion With these AI Gateway binding methods, you can now: * Send feedback and update metadata with `patchLog`. * Retrieve detailed log information using `getLog`. * Get gateway URLs for direct API access with `getUrl`, making it easy to integrate with popular AI SDKs. * Execute universal requests to any AI Gateway provider with `run`. These methods offer greater flexibility and control over your AI integrations, empowering you to build more sophisticated applications on the Cloudflare Workers platform. --- title: Analytics · Cloudflare AI Gateway docs description: >- Your AI Gateway dashboard shows metrics on requests, tokens, caching, errors, and cost. You can filter these metrics by time. These analytics help you understand traffic patterns, token consumption, and potential issues across AI providers. You can view the following analytics: lastUpdated: 2024-11-20T23:19:13.000Z chatbotDeprioritize: false source_url: html: https://developers.cloudflare.com/ai-gateway/observability/analytics/ md: https://developers.cloudflare.com/ai-gateway/observability/analytics/index.md --- Your AI Gateway dashboard shows metrics on requests, tokens, caching, errors, and cost. You can filter these metrics by time. These analytics help you understand traffic patterns, token consumption, and potential issues across AI providers. You can view the following analytics: * **Requests**: Track the total number of requests processed by AI Gateway. * **Token Usage**: Analyze token consumption across requests, giving insight into usage patterns. * **Costs**: Gain visibility into the costs associated with using different AI providers, allowing you to track spending, manage budgets, and optimize resources. * **Errors**: Monitor the number of errors across the gateway, helping to identify and troubleshoot issues. * **Cached Responses**: View the percentage of responses served from cache, which can help reduce costs and improve speed. ## View analytics * Dashboard To view analytics in the dashboard: 1. Log into the [Cloudflare dashboard](https://dash.cloudflare.com) and select your account. 2. Go to **AI** > **AI Gateway**. 3. Make sure you have your gateway selected. * graphql You can use GraphQL to query your usage data outside of the AI Gateway dashboard. See the example query below. You will need to use your Cloudflare token when making the request, and change `{account_id}` to match your account tag. ```bash curl https://api.cloudflare.com/client/v4/graphql \ --header 'Authorization: Bearer TOKEN \ --header 'Content-Type: application/json' \ --data '{ "query": "query{\n viewer {\n accounts(filter: { accountTag: \"{account_id}\" }) {\n requests: aiGatewayRequestsAdaptiveGroups(\n limit: $limit\n filter: { datetimeHour_geq: $start, datetimeHour_leq: $end }\n orderBy: [datetimeMinute_ASC]\n ) {\n count,\n dimensions {\n model,\n provider,\n gateway,\n ts: datetimeMinute\n }\n \n }\n \n }\n }\n}", "variables": { "limit": 1000, "start": "2023-09-01T10:00:00.000Z", "end": "2023-09-30T10:00:00.000Z", "orderBy": "date_ASC" } }' ``` --- title: Costs · Cloudflare AI Gateway docs description: Cost metrics are only available for endpoints where the models return token data and the model name in their responses. lastUpdated: 2025-05-15T16:26:01.000Z chatbotDeprioritize: false source_url: html: https://developers.cloudflare.com/ai-gateway/observability/costs/ md: https://developers.cloudflare.com/ai-gateway/observability/costs/index.md --- Cost metrics are only available for endpoints where the models return token data and the model name in their responses. ## Track costs across AI providers AI Gateway makes it easier to monitor and estimate token based costs across all your AI providers. This can help you: * Understand and compare usage costs between providers. * Monitor trends and estimate spend using consistent metrics. * Apply custom pricing logic to match negotiated rates. Note The cost metric is an **estimation** based on the number of tokens sent and received in requests. While this metric can help you monitor and predict cost trends, refer to your provider's dashboard for the most **accurate** cost details. Caution Providers may introduce new models or change their pricing. If you notice outdated cost data or are using a model not yet supported by our cost tracking, please [submit a request](https://forms.gle/8kRa73wRnvq7bxL48) ## Custom costs AI Gateway allows users to set custom costs when operating under special pricing agreements or negotiated rates. Custom costs can be applied at the request level, and when applied, they will override the default or public model costs. For more information on configuration of custom costs, please visit the [Custom Costs](https://developers.cloudflare.com/ai-gateway/configuration/custom-costs/) configuration page. --- title: Logging · Cloudflare AI Gateway docs description: Logging is a fundamental building block for application development. Logs provide insights during the early stages of development and are often critical to understanding issues occurring in production. lastUpdated: 2025-05-14T14:20:47.000Z chatbotDeprioritize: false source_url: html: https://developers.cloudflare.com/ai-gateway/observability/logging/ md: https://developers.cloudflare.com/ai-gateway/observability/logging/index.md --- Logging is a fundamental building block for application development. Logs provide insights during the early stages of development and are often critical to understanding issues occurring in production. Your AI Gateway dashboard shows logs of individual requests, including the user prompt, model response, provider, timestamp, request status, token usage, cost, and duration. These logs persist, giving you the flexibility to store them for your preferred duration and do more with valuable request data. By default, each gateway can store up to 10 million logs. You can customize this limit per gateway in your gateway settings to align with your specific requirements. If your storage limit is reached, new logs will stop being saved. To continue saving logs, you must delete older logs to free up space for new logs. To learn more about your plan limits, refer to [Limits](https://developers.cloudflare.com/ai-gateway/reference/limits/). We recommend using an authenticated gateway when storing logs to prevent unauthorized access and protects against invalid requests that can inflate log storage usage and make it harder to find the data you need. Learn more about setting up an [authenticated gateway](https://developers.cloudflare.com/ai-gateway/configuration/authentication/). ## Default configuration Logs, which include metrics as well as request and response data, are enabled by default for each gateway. This logging behavior will be uniformly applied to all requests in the gateway. If you are concerned about privacy or compliance and want to turn log collection off, you can go to settings and opt out of logs. If you need to modify the log settings for specific requests, you can override this setting on a per-request basis. To change the default log configuration in the dashboard: 1. Log in to the [Cloudflare dashboard](https://dash.cloudflare.com/) and select your account. 2. Go to **AI** > **AI Gateway**. 3. Select **Settings**. 4. Change the **Logs** setting to your preference. ## Per-request logging To override the default logging behavior set in the settings tab, you can define headers on a per-request basis. ### Collect logs (`cf-aig-collect-log`) The `cf-aig-collect-log` header allows you to bypass the default log setting for the gateway. If the gateway is configured to save logs, the header will exclude the log for that specific request. Conversely, if logging is disabled at the gateway level, this header will save the log for that request. In the example below, we use `cf-aig-collect-log` to bypass the default setting to avoid saving the log. ```bash curl https://gateway.ai.cloudflare.com/v1/{account_id}/{gateway_id}/openai/chat/completions \ --header "Authorization: Bearer $TOKEN" \ --header 'Content-Type: application/json' \ --header 'cf-aig-collect-log: false \ --data ' { "model": "gpt-4o-mini", "messages": [ { "role": "user", "content": "What is the email address and phone number of user123?" } ] } ' ``` ## Managing log storage To manage your log storage effectively, you can: * Set Storage Limits: Configure a limit on the number of logs stored per gateway in your gateway settings to ensure you only pay for what you need. * Enable Automatic Log Deletion: Activate the Automatic Log Deletion feature in your gateway settings to automatically delete the oldest logs once the log limit you've set or the default storage limit of 10 million logs is reached. This ensures new logs are always saved without manual intervention. ## How to delete logs To manage your log storage effectively and ensure continuous logging, you can delete logs using the following methods: ### Automatic Log Deletion ​To maintain continuous logging within your gateway's storage constraints, enable Automatic Log Deletion in your Gateway settings. This feature automatically deletes the oldest logs once the log limit you've set or the default storage limit of 10 million logs is reached, ensuring new logs are saved without manual intervention. ### Manual deletion To manually delete logs through the dashboard, navigate to the Logs tab in the dashboard. Use the available filters such as status, cache, provider, cost, or any other options in the dropdown to refine the logs you wish to delete. Once filtered, select Delete logs to complete the action. See full list of available filters and their descriptions below: | Filter category | Filter options | Filter by description | | - | - | - | | Status | error, status | error type or status. | | Cache | cached, not cached | based on whether they were cached or not. | | Provider | specific providers | the selected AI provider. | | AI Models | specific models | the selected AI model. | | Cost | less than, greater than | cost, specifying a threshold. | | Request type | Universal, Workers AI Binding, WebSockets | the type of request. | | Tokens | Total tokens, Tokens In, Tokens Out | token count (less than or greater than). | | Duration | less than, greater than | request duration. | | Feedback | equals, does not equal (thumbs up, thumbs down, no feedback) | feedback type. | | Metadata Key | equals, does not equal | specific metadata keys. | | Metadata Value | equals, does not equal | specific metadata values. | | Log ID | equals, does not equal | a specific Log ID. | | Event ID | equals, does not equal | a specific Event ID. | ### API deletion You can programmatically delete logs using the AI Gateway API. For more comprehensive information on the `DELETE` logs endpoint, check out the [Cloudflare API documentation](https://developers.cloudflare.com/api/resources/ai_gateway/subresources/logs/methods/delete/). --- title: Anthropic · Cloudflare AI Gateway docs description: Anthropic helps build reliable, interpretable, and steerable AI systems. lastUpdated: 2025-05-28T19:49:34.000Z chatbotDeprioritize: false source_url: html: https://developers.cloudflare.com/ai-gateway/providers/anthropic/ md: https://developers.cloudflare.com/ai-gateway/providers/anthropic/index.md --- [Anthropic](https://www.anthropic.com/) helps build reliable, interpretable, and steerable AI systems. ## Endpoint ```txt https://gateway.ai.cloudflare.com/v1/{account_id}/{gateway_id}/anthropic ``` ## Prerequisites When making requests to Anthropic, ensure you have the following: * Your AI Gateway Account ID. * Your AI Gateway gateway name. * An active Anthropic API token. * The name of the Anthropic model you want to use. ## Examples ### cURL ```bash curl https://gateway.ai.cloudflare.com/v1/{account_id}/{gateway_id}/anthropic/v1/messages \ --header 'x-api-key: {anthropic_api_key}' \ --header 'anthropic-version: 2023-06-01' \ --header 'Content-Type: application/json' \ --data '{ "model": "claude-3-opus-20240229", "max_tokens": 1024, "messages": [ {"role": "user", "content": "What is Cloudflare?"} ] }' ``` ### Use Anthropic SDK with JavaScript If you are using the `@anthropic-ai/sdk`, you can set your endpoint like this: ```js import Anthropic from "@anthropic-ai/sdk"; const apiKey = env.ANTHROPIC_API_KEY; const accountId = "{account_id}"; const gatewayId = "{gateway_id}"; const baseURL = `https://gateway.ai.cloudflare.com/v1/${accountId}/${gatewayId}/anthropic`; const anthropic = new Anthropic({ apiKey, baseURL, }); const model = "claude-3-opus-20240229"; const messages = [{ role: "user", content: "What is Cloudflare?" }]; const maxTokens = 1024; const message = await anthropic.messages.create({ model, messages, max_tokens: maxTokens, }); ``` ## OpenAI-Compatible Endpoint You can also use the [OpenAI-compatible endpoint](https://developers.cloudflare.com/ai-gateway/chat-completion/) (`/ai-gateway/chat-completion/`) to access Anthropic models using the OpenAI API schema. To do so, send your requests to: ```txt https://gateway.ai.cloudflare.com/v1/{account_id}/{gateway_id}/compat/chat/completions ``` Specify: ```json { "model": "anthropic/{model}" } ``` --- title: Azure OpenAI · Cloudflare AI Gateway docs description: Azure OpenAI allows you apply natural language algorithms on your data. lastUpdated: 2025-01-21T19:36:10.000Z chatbotDeprioritize: false source_url: html: https://developers.cloudflare.com/ai-gateway/providers/azureopenai/ md: https://developers.cloudflare.com/ai-gateway/providers/azureopenai/index.md --- [Azure OpenAI](https://azure.microsoft.com/en-gb/products/ai-services/openai-service/) allows you apply natural language algorithms on your data. ## Endpoint ```txt https://gateway.ai.cloudflare.com/v1/{account_id}/{gateway_id}/azure-openai/{resource_name}/{deployment_name} ``` ## Prerequisites When making requests to Azure OpenAI, you will need: * AI Gateway account ID * AI Gateway gateway name * Azure OpenAI API key * Azure OpenAI resource name * Azure OpenAI deployment name (aka model name) ## URL structure Your new base URL will use the data above in this structure: `https://gateway.ai.cloudflare.com/v1/{account_id}/{gateway_id}/azure-openai/{resource_name}/{deployment_name}`. Then, you can append your endpoint and api-version at the end of the base URL, like `.../chat/completions?api-version=2023-05-15`. ## Examples ### cURL ```bash curl 'https://gateway.ai.cloudflare.com/v1/{account_id}/{gateway_id}/azure-openai/{resource_name}/{deployment_name}/chat/completions?api-version=2023-05-15' \ --header 'Content-Type: application/json' \ --header 'api-key: {azure_api_key}' \ --data '{ "messages": [ { "role": "user", "content": "What is Cloudflare?" } ] }' ``` ### Use `openai-node` with JavaScript If you are using the `openai-node` library, you can set your endpoint like this: ```js import OpenAI from "openai"; const resource = "xxx"; const model = "xxx"; const apiVersion = "xxx"; const apiKey = env.AZURE_OPENAI_API_KEY; const accountId = "{account_id}"; const gatewayId = "{gateway_id}"; const baseURL = `https://gateway.ai.cloudflare.com/v1/${accountId}/${gatewayId}/azure-openai/${resource}/${model}`; const azure_openai = new OpenAI({ apiKey, baseURL, defaultQuery: { "api-version": apiVersion }, defaultHeaders: { "api-key": apiKey }, }); ``` --- title: Amazon Bedrock · Cloudflare AI Gateway docs description: Amazon Bedrock allows you to build and scale generative AI applications with foundation models. lastUpdated: 2025-06-18T16:18:39.000Z chatbotDeprioritize: false source_url: html: https://developers.cloudflare.com/ai-gateway/providers/bedrock/ md: https://developers.cloudflare.com/ai-gateway/providers/bedrock/index.md --- [Amazon Bedrock](https://aws.amazon.com/bedrock/) allows you to build and scale generative AI applications with foundation models. ## Endpoint ```txt https://gateway.ai.cloudflare.com/v1/{account_id}/{gateway_id}/aws-bedrock` ``` ## Prerequisites When making requests to Amazon Bedrock, ensure you have the following: * Your AI Gateway Account ID. * Your AI Gateway gateway name. * An active Amazon Bedrock API token. * The name of the Amazon Bedrock model you want to use. ## Make a request When making requests to Amazon Bedrock, replace `https://bedrock-runtime.us-east-1.amazonaws.com/` in the URL you're currently using with `https://gateway.ai.cloudflare.com/v1/{account_id}/{gateway_id}/aws-bedrock/bedrock-runtime/us-east-1/`, then add the model you want to run at the end of the URL. With Bedrock, you will need to sign the URL before you make requests to AI Gateway. You can try using the [`aws4fetch`](https://github.com/mhart/aws4fetch) SDK. ## Examples ### Use `aws4fetch` SDK with TypeScript ```typescript import { AwsClient } from "aws4fetch"; interface Env { accessKey: string; secretAccessKey: string; } export default { async fetch( request: Request, env: Env, ctx: ExecutionContext, ): Promise { // replace with your configuration const cfAccountId = "{account_id}"; const gatewayName = "{gateway_id}"; const region = "us-east-1"; // added as secrets (https://developers.cloudflare.com/workers/configuration/secrets/) const accessKey = env.accessKey; const secretKey = env.secretAccessKey; const awsClient = new AwsClient({ accessKeyId: accessKey, secretAccessKey: secretKey, region: region, service: "bedrock", }); const requestBodyString = JSON.stringify({ inputText: "What does ethereal mean?", }); const stockUrl = new URL( `https://bedrock-runtime.${region}.amazonaws.com/model/amazon.titan-embed-text-v1/invoke`, ); const headers = { "Content-Type": "application/json", }; // sign the original request const presignedRequest = await awsClient.sign(stockUrl.toString(), { method: "POST", headers: headers, body: requestBodyString, }); // Gateway Url const gatewayUrl = new URL( `https://gateway.ai.cloudflare.com/v1/${cfAccountId}/${gatewayName}/aws-bedrock/bedrock-runtime/${region}/model/amazon.titan-embed-text-v1/invoke`, ); // make the request through the gateway url const response = await fetch(gatewayUrl, { method: "POST", headers: presignedRequest.headers, body: requestBodyString, }); if ( response.ok && response.headers.get("content-type")?.includes("application/json") ) { const data = await response.json(); return new Response(JSON.stringify(data)); } return new Response("Invalid response", { status: 500 }); }, }; ``` --- title: Cartesia · Cloudflare AI Gateway docs description: Cartesia provides advanced text-to-speech services with customizable voice models. lastUpdated: 2025-06-18T16:18:39.000Z chatbotDeprioritize: false source_url: html: https://developers.cloudflare.com/ai-gateway/providers/cartesia/ md: https://developers.cloudflare.com/ai-gateway/providers/cartesia/index.md --- [Cartesia](https://docs.cartesia.ai/) provides advanced text-to-speech services with customizable voice models. ## Endpoint ```txt https://gateway.ai.cloudflare.com/v1/{account_id}/{gateway_id}/cartesia ``` ## URL Structure When making requests to Cartesia, replace `https://api.cartesia.ai/v1` in the URL you are currently using with `https://gateway.ai.cloudflare.com/v1/{account_id}/{gateway_id}/cartesia`. ## Prerequisites When making requests to Cartesia, ensure you have the following: * Your AI Gateway Account ID. * Your AI Gateway gateway name. * An active Cartesia API token. * The model ID and voice ID for the Cartesia voice model you want to use. ## Example ### cURL ```bash curl https://gateway.ai.cloudflare.com/v1/{account_id}/{gateway_id}/cartesia/tts/bytes \ --header 'Content-Type: application/json' \ --header 'Cartesia-Version: 2024-06-10' \ --header 'X-API-Key: {cartesia_api_token}' \ --data '{ "transcript": "Welcome to Cloudflare - AI Gateway!", "model_id": "sonic-english", "voice": { "mode": "id", "id": "694f9389-aac1-45b6-b726-9d9369183238" }, "output_format": { "container": "wav", "encoding": "pcm_f32le", "sample_rate": 44100 } } ``` --- title: Cerebras · Cloudflare AI Gateway docs description: Cerebras offers developers a low-latency solution for AI model inference. lastUpdated: 2025-06-18T16:18:39.000Z chatbotDeprioritize: false source_url: html: https://developers.cloudflare.com/ai-gateway/providers/cerebras/ md: https://developers.cloudflare.com/ai-gateway/providers/cerebras/index.md --- [Cerebras](https://inference-docs.cerebras.ai/) offers developers a low-latency solution for AI model inference. ## Endpoint ```txt https://gateway.ai.cloudflare.com/v1/{account_id}/{gateway_id}/cerebras-ai ``` ## Prerequisites When making requests to Cerebras, ensure you have the following: * Your AI Gateway Account ID. * Your AI Gateway gateway name. * An active Cerebras API token. * The name of the Cerebras model you want to use. ## Examples ### cURL ```bash curl https://gateway.ai.cloudflare.com/v1/ACCOUNT_TAG/GATEWAY/cerebras/chat/completions \ --header 'content-type: application/json' \ --header 'Authorization: Bearer CEREBRAS_TOKEN' \ --data '{ "model": "llama3.1-8b", "messages": [ { "role": "user", "content": "What is Cloudflare?" } ] }' ``` ## OpenAI-Compatible Endpoint You can also use the [OpenAI-compatible endpoint](https://developers.cloudflare.com/ai-gateway/chat-completion/) (`/ai-gateway/chat-completion/`) to access Cerebras models using the OpenAI API schema. To do so, send your requests to: ```txt https://gateway.ai.cloudflare.com/v1/{account_id}/{gateway_id}/compat/chat/completions ``` Specify: ```json { "model": "cerebras/{model}" } ``` --- title: Cohere · Cloudflare AI Gateway docs description: Cohere build AI models designed to solve real-world business challenges. lastUpdated: 2025-05-28T19:49:34.000Z chatbotDeprioritize: false source_url: html: https://developers.cloudflare.com/ai-gateway/providers/cohere/ md: https://developers.cloudflare.com/ai-gateway/providers/cohere/index.md --- [Cohere](https://cohere.com/) build AI models designed to solve real-world business challenges. ## Endpoint ```txt https://gateway.ai.cloudflare.com/v1/{account_id}/{gateway_id}/cohere ``` ## URL structure When making requests to [Cohere](https://cohere.com/), replace `https://api.cohere.ai/v1` in the URL you're currently using with `https://gateway.ai.cloudflare.com/v1/{account_id}/{gateway_id}/cohere`. ## Prerequisites When making requests to Cohere, ensure you have the following: * Your AI Gateway Account ID. * Your AI Gateway gateway name. * An active Cohere API token. * The name of the Cohere model you want to use. ## Examples ### cURL ```bash curl https://gateway.ai.cloudflare.com/v1/{account_id}/{gateway_id}/cohere/v1/chat \ --header 'Authorization: Token {cohere_api_token}' \ --header 'Content-Type: application/json' \ --data '{ "chat_history": [ {"role": "USER", "message": "Who discovered gravity?"}, {"role": "CHATBOT", "message": "The man who is widely credited with discovering gravity is Sir Isaac Newton"} ], "message": "What year was he born?", "connectors": [{"id": "web-search"}] }' ``` ### Use Cohere SDK with Python If using the [`cohere-python-sdk`](https://github.com/cohere-ai/cohere-python), set your endpoint like this: ```js import cohere import os api_key = os.getenv('API_KEY') account_id = '{account_id}' gateway_id = '{gateway_id}' base_url = f"https://gateway.ai.cloudflare.com/v1/{account_id}/{gateway_id}/cohere/v1" co = cohere.Client( api_key=api_key, base_url=base_url, ) message = "hello world!" model = "command-r-plus" chat = co.chat( message=message, model=model ) print(chat) ``` ## OpenAI-Compatible Endpoint You can also use the [OpenAI-compatible endpoint](https://developers.cloudflare.com/ai-gateway/chat-completion/) (`/ai-gateway/chat-completion/`) to access Cohere models using the OpenAI API schema. To do so, send your requests to: ```txt https://gateway.ai.cloudflare.com/v1/{account_id}/{gateway_id}/compat/chat/completions ``` Specify: ```json { "model": "cohere/{model}" } ``` --- title: DeepSeek · Cloudflare AI Gateway docs description: DeepSeek helps you build quickly with DeepSeek's advanced AI models. lastUpdated: 2025-06-18T16:18:39.000Z chatbotDeprioritize: false source_url: html: https://developers.cloudflare.com/ai-gateway/providers/deepseek/ md: https://developers.cloudflare.com/ai-gateway/providers/deepseek/index.md --- [DeepSeek](https://www.deepseek.com/) helps you build quickly with DeepSeek's advanced AI models. ## Endpoint ```txt https://gateway.ai.cloudflare.com/v1/{account_id}/{gateway_id}/deepseek ``` ## Prerequisites When making requests to DeepSeek, ensure you have the following: * Your AI Gateway Account ID. * Your AI Gateway gateway name. * An active DeepSeek AI API token. * The name of the DeepSeek AI model you want to use. ## URL structure Your new base URL will use the data above in this structure: `https://gateway.ai.cloudflare.com/v1/{account_id}/{gateway_id}/deepseek/`. You can then append the endpoint you want to hit, for example: `chat/completions`. So your final URL will come together as: `https://gateway.ai.cloudflare.com/v1/{account_id}/{gateway_id}/deepseek/chat/completions`. ## Examples ### cURL ```bash curl https://gateway.ai.cloudflare.com/v1/{account_id}/{gateway_id}/deepseek/chat/completions \ --header 'content-type: application/json' \ --header 'Authorization: Bearer DEEPSEEK_TOKEN' \ --data '{ "model": "deepseek-chat", "messages": [ { "role": "user", "content": "What is Cloudflare?" } ] }' ``` ### Use DeepSeek with JavaScript If you are using the OpenAI SDK, you can set your endpoint like this: ```js import OpenAI from "openai"; const openai = new OpenAI({ apiKey: env.DEEPSEEK_TOKEN, baseURL: "https://gateway.ai.cloudflare.com/v1/{account_id}/{gateway_id}/deepseek", }); try { const chatCompletion = await openai.chat.completions.create({ model: "deepseek-chat", messages: [{ role: "user", content: "What is Cloudflare?" }], }); const response = chatCompletion.choices[0].message; return new Response(JSON.stringify(response)); } catch (e) { return new Response(e); } ``` ## OpenAI-Compatible Endpoint You can also use the [OpenAI-compatible endpoint](https://developers.cloudflare.com/ai-gateway/chat-completion/) (`/ai-gateway/chat-completion/`) to access DeepSeek models using the OpenAI API schema. To do so, send your requests to: ```txt https://gateway.ai.cloudflare.com/v1/{account_id}/{gateway_id}/compat/chat/completions ``` Specify: ```json { "model": "deepseek/{model}" } ``` --- title: ElevenLabs · Cloudflare AI Gateway docs description: ElevenLabs offers advanced text-to-speech services, enabling high-quality voice synthesis in multiple languages. lastUpdated: 2025-06-18T16:18:39.000Z chatbotDeprioritize: false source_url: html: https://developers.cloudflare.com/ai-gateway/providers/elevenlabs/ md: https://developers.cloudflare.com/ai-gateway/providers/elevenlabs/index.md --- [ElevenLabs](https://elevenlabs.io/) offers advanced text-to-speech services, enabling high-quality voice synthesis in multiple languages. ## Endpoint ```txt https://gateway.ai.cloudflare.com/v1/{account_id}/{gateway_id}/elevenlabs ``` ## Prerequisites When making requests to ElevenLabs, ensure you have the following: * Your AI Gateway Account ID. * Your AI Gateway gateway name. * An active ElevenLabs API token. * The model ID of the ElevenLabs voice model you want to use. ## Example ### cURL ```bash curl https://gateway.ai.cloudflare.com/v1/{account_id}/{gateway_id}/elevenlabs/v1/text-to-speech/JBFqnCBsd6RMkjVDRZzb?output_format=mp3_44100_128 \ --header 'Content-Type: application/json' \ --header 'xi-api-key: {elevenlabs_api_token}' \ --data '{ "text": "Welcome to Cloudflare - AI Gateway!", "model_id": "eleven_multilingual_v2" }' ``` --- title: Google AI Studio · Cloudflare AI Gateway docs description: Google AI Studio helps you build quickly with Google Gemini models. lastUpdated: 2025-05-28T19:49:34.000Z chatbotDeprioritize: false source_url: html: https://developers.cloudflare.com/ai-gateway/providers/google-ai-studio/ md: https://developers.cloudflare.com/ai-gateway/providers/google-ai-studio/index.md --- [Google AI Studio](https://ai.google.dev/aistudio) helps you build quickly with Google Gemini models. ## Endpoint ```txt https://gateway.ai.cloudflare.com/v1/{account_id}/{gateway_id}/google-ai-studio ``` ## Prerequisites When making requests to Google AI Studio, you will need: * Your AI Gateway Account ID. * Your AI Gateway gateway name. * An active Google AI Studio API token. * The name of the Google AI Studio model you want to use. ## URL structure Your new base URL will use the data above in this structure: `https://gateway.ai.cloudflare.com/v1/{account_id}/{gateway_id}/google-ai-studio/`. Then you can append the endpoint you want to hit, for example: `v1/models/{model}:{generative_ai_rest_resource}` So your final URL will come together as: `https://gateway.ai.cloudflare.com/v1/{account_id}/{gateway_id}/google-ai-studio/v1/models/{model}:{generative_ai_rest_resource}`. ## Examples ### cURL ```bash curl "https://gateway.ai.cloudflare.com/v1/{account_id}/{gateway_name}/google-ai-studio/v1/models/gemini-1.0-pro:generateContent" \ --header 'content-type: application/json' \ --header 'x-goog-api-key: {google_studio_api_key}' \ --data '{ "contents": [ { "role":"user", "parts": [ {"text":"What is Cloudflare?"} ] } ] }' ``` ### Use `@google/generative-ai` with JavaScript If you are using the `@google/generative-ai` package, you can set your endpoint like this: ```js import { GoogleGenerativeAI } from "@google/generative-ai"; const api_token = env.GOOGLE_AI_STUDIO_TOKEN; const account_id = ""; const gateway_name = ""; const genAI = new GoogleGenerativeAI(api_token); const model = genAI.getGenerativeModel( { model: "gemini-1.5-flash" }, { baseUrl: `https://gateway.ai.cloudflare.com/v1/${account_id}/${gateway_name}/google-ai-studio`, }, ); await model.generateContent(["What is Cloudflare?"]); ``` ## OpenAI-Compatible Endpoint You can also use the [OpenAI-compatible endpoint](https://developers.cloudflare.com/ai-gateway/chat-completion/) (`/ai-gateway/chat-completion/`) to access Google AI Studio models using the OpenAI API schema. To do so, send your requests to: ```txt https://gateway.ai.cloudflare.com/v1/{account_id}/{gateway_id}/compat/chat/completions ``` Specify: ```json { "model": "google-ai-studio/{model}" } ``` --- title: Grok · Cloudflare AI Gateway docs description: Grok is a general purpose model that can be used for a variety of tasks, including generating and understanding text, code, and function calling. lastUpdated: 2025-06-19T13:27:22.000Z chatbotDeprioritize: false source_url: html: https://developers.cloudflare.com/ai-gateway/providers/grok/ md: https://developers.cloudflare.com/ai-gateway/providers/grok/index.md --- [Grok](https://docs.x.ai/docs#getting-started) is a general purpose model that can be used for a variety of tasks, including generating and understanding text, code, and function calling. ## Endpoint ```txt https://gateway.ai.cloudflare.com/v1/{account_id}/{gateway_id}/grok ``` ## URL structure When making requests to [Grok](https://docs.x.ai/docs#getting-started), replace `https://api.x.ai/v1` in the URL you are currently using with `https://gateway.ai.cloudflare.com/v1/{account_id}/{gateway_id}/grok`. ## Prerequisites When making requests to Grok, ensure you have the following: * Your AI Gateway Account ID. * Your AI Gateway gateway name. * An active Grok API token. * The name of the Grok model you want to use. ## Examples ### cURL ```bash curl https://gateway.ai.cloudflare.com/v1/{account_id}/{gateway_id}/grok/v1/chat/completions \ --header 'content-type: application/json' \ --header 'Authorization: Bearer {grok_api_token}' \ --data '{ "model": "grok-beta", "messages": [ { "role": "user", "content": "What is Cloudflare?" } ] }' ``` ### Use OpenAI SDK with JavaScript If you are using the OpenAI SDK with JavaScript, you can set your endpoint like this: ```js import OpenAI from "openai"; const openai = new OpenAI({ apiKey: "", baseURL: "https://gateway.ai.cloudflare.com/v1/{account_id}/{gateway_id}/grok", }); const completion = await openai.chat.completions.create({ model: "grok-beta", messages: [ { role: "system", content: "You are Grok, a chatbot inspired by the Hitchhiker's Guide to the Galaxy.", }, { role: "user", content: "What is the meaning of life, the universe, and everything?", }, ], }); console.log(completion.choices[0].message); ``` ### Use OpenAI SDK with Python If you are using the OpenAI SDK with Python, you can set your endpoint like this: ```python import os from openai import OpenAI XAI_API_KEY = os.getenv("XAI_API_KEY") client = OpenAI( api_key=XAI_API_KEY, base_url="https://gateway.ai.cloudflare.com/v1/{account_id}/{gateway_id}/grok", ) completion = client.chat.completions.create( model="grok-beta", messages=[ {"role": "system", "content": "You are Grok, a chatbot inspired by the Hitchhiker's Guide to the Galaxy."}, {"role": "user", "content": "What is the meaning of life, the universe, and everything?"}, ], ) print(completion.choices[0].message) ``` ### Use Anthropic SDK with JavaScript If you are using the Anthropic SDK with JavaScript, you can set your endpoint like this: ```js import Anthropic from "@anthropic-ai/sdk"; const anthropic = new Anthropic({ apiKey: "", baseURL: "https://gateway.ai.cloudflare.com/v1/{account_id}/{gateway_id}/grok", }); const msg = await anthropic.messages.create({ model: "grok-beta", max_tokens: 128, system: "You are Grok, a chatbot inspired by the Hitchhiker's Guide to the Galaxy.", messages: [ { role: "user", content: "What is the meaning of life, the universe, and everything?", }, ], }); console.log(msg); ``` ### Use Anthropic SDK with Python If you are using the Anthropic SDK with Python, you can set your endpoint like this: ```python import os from anthropic import Anthropic XAI_API_KEY = os.getenv("XAI_API_KEY") client = Anthropic( api_key=XAI_API_KEY, base_url="https://gateway.ai.cloudflare.com/v1/{account_id}/{gateway_id}/grok", ) message = client.messages.create( model="grok-beta", max_tokens=128, system="You are Grok, a chatbot inspired by the Hitchhiker's Guide to the Galaxy.", messages=[ { "role": "user", "content": "What is the meaning of life, the universe, and everything?", }, ], ) print(message.content) ``` ## OpenAI-Compatible Endpoint You can also use the [OpenAI-compatible endpoint](https://developers.cloudflare.com/ai-gateway/chat-completion/) (`/ai-gateway/chat-completion/`) to access Grok models using the OpenAI API schema. To do so, send your requests to: ```txt https://gateway.ai.cloudflare.com/v1/{account_id}/{gateway_id}/compat/chat/completions ``` Specify: ```json { "model": "grok/{model}" } ``` --- title: Groq · Cloudflare AI Gateway docs description: Groq delivers high-speed processing and low-latency performance. lastUpdated: 2025-05-28T19:49:34.000Z chatbotDeprioritize: false source_url: html: https://developers.cloudflare.com/ai-gateway/providers/groq/ md: https://developers.cloudflare.com/ai-gateway/providers/groq/index.md --- [Groq](https://groq.com/) delivers high-speed processing and low-latency performance. ## Endpoint ```txt https://gateway.ai.cloudflare.com/v1/{account_id}/{gateway_id}/groq ``` ## URL structure When making requests to [Groq](https://groq.com/), replace `https://api.groq.com/openai/v1` in the URL you're currently using with `https://gateway.ai.cloudflare.com/v1/{account_id}/{gateway_id}/groq`. ## Prerequisites When making requests to Groq, ensure you have the following: * Your AI Gateway Account ID. * Your AI Gateway gateway name. * An active Groq API token. * The name of the Groq model you want to use. ## Examples ### cURL ```bash curl https://gateway.ai.cloudflare.com/v1/{account_id}/{gateway_id}/groq/chat/completions \ --header 'Authorization: Bearer {groq_api_key}' \ --header 'Content-Type: application/json' \ --data '{ "messages": [ { "role": "user", "content": "What is Cloudflare?" } ], "model": "llama3-8b-8192" }' ``` ### Use Groq SDK with JavaScript If using the [`groq-sdk`](https://www.npmjs.com/package/groq-sdk), set your endpoint like this: ```js import Groq from "groq-sdk"; const apiKey = env.GROQ_API_KEY; const accountId = "{account_id}"; const gatewayId = "{gateway_id}"; const baseURL = `https://gateway.ai.cloudflare.com/v1/${accountId}/${gatewayId}/groq`; const groq = new Groq({ apiKey, baseURL, }); const messages = [{ role: "user", content: "What is Cloudflare?" }]; const model = "llama3-8b-8192"; const chatCompletion = await groq.chat.completions.create({ messages, model, }); ``` ## OpenAI-Compatible Endpoint You can also use the [OpenAI-compatible endpoint](https://developers.cloudflare.com/ai-gateway/chat-completion/) (`/ai-gateway/chat-completion/`) to access Groq models using the OpenAI API schema. To do so, send your requests to: ```txt https://gateway.ai.cloudflare.com/v1/{account_id}/{gateway_id}/compat/chat/completions ``` Specify: ```json { "model": "groq/{model}" } ``` --- title: HuggingFace · Cloudflare AI Gateway docs description: HuggingFace helps users build, deploy and train machine learning models. lastUpdated: 2025-05-14T14:14:22.000Z chatbotDeprioritize: false source_url: html: https://developers.cloudflare.com/ai-gateway/providers/huggingface/ md: https://developers.cloudflare.com/ai-gateway/providers/huggingface/index.md --- [HuggingFace](https://huggingface.co/) helps users build, deploy and train machine learning models. ## Endpoint ```txt https://gateway.ai.cloudflare.com/v1/{account_id}/{gateway_id}/huggingface ``` ## URL structure When making requests to HuggingFace Inference API, replace `https://api-inference.huggingface.co/models/` in the URL you're currently using with `https://gateway.ai.cloudflare.com/v1/{account_id}/{gateway_id}/huggingface`. Note that the model you're trying to access should come right after, for example `https://gateway.ai.cloudflare.com/v1/{account_id}/{gateway_id}/huggingface/bigcode/starcoder`. ## Prerequisites When making requests to HuggingFace, ensure you have the following: * Your AI Gateway Account ID. * Your AI Gateway gateway name. * An active HuggingFace API token. * The name of the HuggingFace model you want to use. ## Examples ### cURL ```bash curl https://gateway.ai.cloudflare.com/v1/{account_id}/{gateway_id}/huggingface/bigcode/starcoder \ --header 'Authorization: Bearer {hf_api_token}' \ --header 'Content-Type: application/json' \ --data '{ "inputs": "console.log" }' ``` ### Use HuggingFace.js library with JavaScript If you are using the HuggingFace.js library, you can set your inference endpoint like this: ```js import { HfInferenceEndpoint } from "@huggingface/inference"; const accountId = "{account_id}"; const gatewayId = "{gateway_id}"; const model = "gpt2"; const baseURL = `https://gateway.ai.cloudflare.com/v1/${accountId}/${gatewayId}/huggingface/${model}`; const apiToken = env.HF_API_TOKEN; const hf = new HfInferenceEndpoint(baseURL, apiToken); ``` --- title: Mistral AI · Cloudflare AI Gateway docs description: Mistral AI helps you build quickly with Mistral's advanced AI models. lastUpdated: 2025-05-28T19:49:34.000Z chatbotDeprioritize: false source_url: html: https://developers.cloudflare.com/ai-gateway/providers/mistral/ md: https://developers.cloudflare.com/ai-gateway/providers/mistral/index.md --- [Mistral AI](https://mistral.ai) helps you build quickly with Mistral's advanced AI models. ## Endpoint ```txt https://gateway.ai.cloudflare.com/v1/{account_id}/{gateway_id}/mistral ``` ## Prerequisites When making requests to the Mistral AI, you will need: * AI Gateway Account ID * AI Gateway gateway name * Mistral AI API token * Mistral AI model name ## URL structure Your new base URL will use the data above in this structure: `https://gateway.ai.cloudflare.com/v1/{account_id}/{gateway_id}/mistral/`. Then you can append the endpoint you want to hit, for example: `v1/chat/completions` So your final URL will come together as: `https://gateway.ai.cloudflare.com/v1/{account_id}/{gateway_id}/mistral/v1/chat/completions`. ## Examples ### cURL ```bash curl -X POST https://gateway.ai.cloudflare.com/v1/{account_id}/{gateway_id}/mistral/v1/chat/completions \ --header 'content-type: application/json' \ --header 'Authorization: Bearer MISTRAL_TOKEN' \ --data '{ "model": "mistral-large-latest", "messages": [ { "role": "user", "content": "What is Cloudflare?" } ] }' ``` ### Use `@mistralai/mistralai` package with JavaScript If you are using the `@mistralai/mistralai` package, you can set your endpoint like this: ```js import { Mistral } from "@mistralai/mistralai"; const client = new Mistral({ apiKey: MISTRAL_TOKEN, serverURL: `https://gateway.ai.cloudflare.com/v1/{account_id}/{gateway_id}/mistral`, }); await client.chat.create({ model: "mistral-large-latest", messages: [ { role: "user", content: "What is Cloudflare?", }, ], }); ``` ## OpenAI-Compatible Endpoint You can also use the [OpenAI-compatible endpoint](https://developers.cloudflare.com/ai-gateway/chat-completion/) (`/ai-gateway/chat-completion/`) to access Mistral models using the OpenAI API schema. To do so, send your requests to: ```txt https://gateway.ai.cloudflare.com/v1/{account_id}/{gateway_id}/compat/chat/completions ``` Specify: ```json { "model": "mistral/{model}" } ``` --- title: OpenAI · Cloudflare AI Gateway docs description: OpenAI helps you build with ChatGPT. lastUpdated: 2025-04-17T10:58:09.000Z chatbotDeprioritize: false source_url: html: https://developers.cloudflare.com/ai-gateway/providers/openai/ md: https://developers.cloudflare.com/ai-gateway/providers/openai/index.md --- [OpenAI](https://openai.com/about/) helps you build with ChatGPT. ## Endpoint ```txt https://gateway.ai.cloudflare.com/v1/{account_id}/{gateway_id}/openai ``` ### Chat completions endpoint ```txt https://gateway.ai.cloudflare.com/v1/{account_id}/{gateway_id}/openai/chat/completions \ ``` ### Responses endpoint ```txt https://gateway.ai.cloudflare.com/v1/{account_id}/{gateway_id}/openai/responses \ ``` ## URL structure When making requests to OpenAI, replace `https://api.openai.com/v1` in the URL you are currently using with `https://gateway.ai.cloudflare.com/v1/{account_id}/{gateway_id}/openai`. ## Prerequisites When making requests to OpenAI, ensure you have the following: * Your AI Gateway Account ID. * Your AI Gateway gateway name. * An active OpenAI API token. * The name of the OpenAI model you want to use. ## Chat completions endpoint ### cURL example ```bash curl https://gateway.ai.cloudflare.com/v1/{account_id}/{gateway_id}/openai/chat/completions \ --header 'Authorization: Bearer {openai_token}' \ --header 'Content-Type: application/json' \ --data '{ "model": "gpt-4o-mini", "messages": [ { "role": "user", "content": "What is Cloudflare?" } ] }' ``` ### JavaScript SDK example ```js import OpenAI from "openai"; const apiKey = "my api key"; // or process.env["OPENAI_API_KEY"] const accountId = "{account_id}"; const gatewayId = "{gateway_id}"; const baseURL = `https://gateway.ai.cloudflare.com/v1/${accountId}/${gatewayId}/openai`; const openai = new OpenAI({ apiKey, baseURL, }); try { const model = "gpt-3.5-turbo-0613"; const messages = [{ role: "user", content: "What is a neuron?" }]; const maxTokens = 100; const chatCompletion = await openai.chat.completions.create({ model, messages, max_tokens: maxTokens, }); const response = chatCompletion.choices[0].message; console.log(response); } catch (e) { console.error(e); } ``` ## OpenAI Responses endpoint ### cURL example ```bash curl https://gateway.ai.cloudflare.com/v1/{account_id}/{gateway_id}/openai/responses \ --header 'Authorization: Bearer {openai_token}' \ --header 'Content-Type: application/json' \ --data '{ "model": "gpt-4.1", "input": [ { "role": "user", "content": "Write a one-sentence bedtime story about a unicorn." } ] }' ``` ### JavaScript SDK example ```js import OpenAI from "openai"; const apiKey = "my api key"; // or process.env["OPENAI_API_KEY"] const accountId = "{account_id}"; const gatewayId = "{gateway_id}"; const baseURL = `https://gateway.ai.cloudflare.com/v1/${accountId}/${gatewayId}/openai`; const openai = new OpenAI({ apiKey, baseURL, }); try { const model = "gpt-4.1"; const input = [ { role: "user", content: "Write a one-sentence bedtime story about a unicorn.", }, ]; const response = await openai.responses.create({ model, input, }); console.log(response.output_text); } catch (e) { console.error(e); } ``` --- title: OpenRouter · Cloudflare AI Gateway docs description: OpenRouter is a platform that provides a unified interface for accessing and using large language models (LLMs). lastUpdated: 2025-06-18T16:18:39.000Z chatbotDeprioritize: false source_url: html: https://developers.cloudflare.com/ai-gateway/providers/openrouter/ md: https://developers.cloudflare.com/ai-gateway/providers/openrouter/index.md --- [OpenRouter](https://openrouter.ai/) is a platform that provides a unified interface for accessing and using large language models (LLMs). ## Endpoint ```txt https://gateway.ai.cloudflare.com/v1/{account_id}/{gateway_id}/openrouter ``` ## URL structure When making requests to [OpenRouter](https://openrouter.ai/), replace `https://openrouter.ai/api/v1/chat/completions` in the URL you are currently using with `https://gateway.ai.cloudflare.com/v1/{account_id}/{gateway_id}/openrouter`. ## Prerequisites When making requests to OpenRouter, ensure you have the following: * Your AI Gateway Account ID. * Your AI Gateway gateway name. * An active OpenRouter API token or a token from the original model provider. * The name of the OpenRouter model you want to use. ## Examples ### cURL ```bash curl -X POST https://gateway.ai.cloudflare.com/v1/ACCOUNT_TAG/GATEWAY/openrouter/v1/chat/completions \ --header 'content-type: application/json' \ --header 'Authorization: Bearer OPENROUTER_TOKEN' \ --data '{ "model": "openai/gpt-3.5-turbo", "messages": [ { "role": "user", "content": "What is Cloudflare?" } ] }' ``` ### Use OpenAI SDK with JavaScript If you are using the OpenAI SDK with JavaScript, you can set your endpoint like this: ```js import OpenAI from "openai"; const openai = new OpenAI({ apiKey: env.OPENROUTER_TOKEN, baseURL: "https://gateway.ai.cloudflare.com/v1/ACCOUNT_TAG/GATEWAY/openrouter", }); try { const chatCompletion = await openai.chat.completions.create({ model: "openai/gpt-3.5-turbo", messages: [{ role: "user", content: "What is Cloudflare?" }], }); const response = chatCompletion.choices[0].message; return new Response(JSON.stringify(response)); } catch (e) { return new Response(e); } ``` --- title: Perplexity · Cloudflare AI Gateway docs description: Perplexity is an AI powered answer engine. lastUpdated: 2025-05-28T19:49:34.000Z chatbotDeprioritize: false source_url: html: https://developers.cloudflare.com/ai-gateway/providers/perplexity/ md: https://developers.cloudflare.com/ai-gateway/providers/perplexity/index.md --- [Perplexity](https://www.perplexity.ai/) is an AI powered answer engine. ## Endpoint ```txt https://gateway.ai.cloudflare.com/v1/{account_id}/{gateway_id}/perplexity-ai ``` ## Prerequisites When making requests to Perplexity, ensure you have the following: * Your AI Gateway Account ID. * Your AI Gateway gateway name. * An active Perplexity API token. * The name of the Perplexity model you want to use. ## Examples ### cURL ```bash curl https://gateway.ai.cloudflare.com/v1/{account_id}/{gateway_id}/perplexity-ai/chat/completions \ --header 'accept: application/json' \ --header 'content-type: application/json' \ --header 'Authorization: Bearer {perplexity_token}' \ --data '{ "model": "mistral-7b-instruct", "messages": [ { "role": "user", "content": "What is Cloudflare?" } ] }' ``` ### Use Perplexity through OpenAI SDK with JavaScript Perplexity does not have their own SDK, but they have compatibility with the OpenAI SDK. You can use the OpenAI SDK to make a Perplexity call through AI Gateway as follows: ```js import OpenAI from "openai"; const apiKey = env.PERPLEXITY_API_KEY; const accountId = "{account_id}"; const gatewayId = "{gateway_id}"; const baseURL = `https://gateway.ai.cloudflare.com/v1/${accountId}/${gatewayId}/perplexity-ai`; const perplexity = new OpenAI({ apiKey, baseURL, }); const model = "mistral-7b-instruct"; const messages = [{ role: "user", content: "What is Cloudflare?" }]; const maxTokens = 20; const chatCompletion = await perplexity.chat.completions.create({ model, messages, max_tokens: maxTokens, }); ``` ## OpenAI-Compatible Endpoint You can also use the [OpenAI-compatible endpoint](https://developers.cloudflare.com/ai-gateway/chat-completion/) (`/ai-gateway/chat-completion/`) to access Perplexity models using the OpenAI API schema. To do so, send your requests to: ```txt https://gateway.ai.cloudflare.com/v1/{account_id}/{gateway_id}/compat/chat/completions ``` Specify: ```json { "model": "perplexity/{model}" } ``` --- title: Replicate · Cloudflare AI Gateway docs description: Replicate runs and fine tunes open-source models. lastUpdated: 2025-05-14T14:14:22.000Z chatbotDeprioritize: false source_url: html: https://developers.cloudflare.com/ai-gateway/providers/replicate/ md: https://developers.cloudflare.com/ai-gateway/providers/replicate/index.md --- [Replicate](https://replicate.com/) runs and fine tunes open-source models. ## Endpoint ```txt https://gateway.ai.cloudflare.com/v1/{account_id}/{gateway_id}/replicate ``` ## URL structure When making requests to Replicate, replace `https://api.replicate.com/v1` in the URL you're currently using with `https://gateway.ai.cloudflare.com/v1/{account_id}/{gateway_id}/replicate`. ## Prerequisites When making requests to Replicate, ensure you have the following: * Your AI Gateway Account ID. * Your AI Gateway gateway name. * An active Replicate API token. * The name of the Replicate model you want to use. ## Example ### cURL ```bash curl https://gateway.ai.cloudflare.com/v1/{account_id}/{gateway_id}/replicate/predictions \ --header 'Authorization: Token {replicate_api_token}' \ --header 'Content-Type: application/json' \ --data '{ "input": { "prompt": "What is Cloudflare?" } }' ``` --- title: Google Vertex AI · Cloudflare AI Gateway docs description: Google Vertex AI enables developers to easily build and deploy enterprise ready generative AI experiences. lastUpdated: 2025-01-21T19:36:10.000Z chatbotDeprioritize: false source_url: html: https://developers.cloudflare.com/ai-gateway/providers/vertex/ md: https://developers.cloudflare.com/ai-gateway/providers/vertex/index.md --- [Google Vertex AI](https://cloud.google.com/vertex-ai) enables developers to easily build and deploy enterprise ready generative AI experiences. Below is a quick guide on how to set your Google Cloud Account: 1. Google Cloud Platform (GCP) Account * Sign up for a [GCP account](https://cloud.google.com/vertex-ai). New users may be eligible for credits (valid for 90 days). 2. Enable the Vertex AI API * Navigate to [Enable Vertex AI API](https://console.cloud.google.com/marketplace/product/google/aiplatform.googleapis.com) and activate the API for your project. 3. Apply for access to desired models. ## Endpoint ```txt https://gateway.ai.cloudflare.com/v1/{account_id}/{gateway_id}/google-vertex-ai ``` ## Prerequisites When making requests to Google Vertex, you will need: * AI Gateway account tag * AI Gateway gateway name * Google Vertex API key * Google Vertex Project Name * Google Vertex Region (for example, us-east4) * Google Vertex model ## URL structure Your new base URL will use the data above in this structure: `https://gateway.ai.cloudflare.com/v1/{account_id}/{gateway_id}/google-vertex-ai/v1/projects/{project_name}/locations/{region}`. Then you can append the endpoint you want to hit, for example: `/publishers/google/models/{model}:{generative_ai_rest_resource}` So your final URL will come together as: `https://gateway.ai.cloudflare.com/v1/{account_id}/{gateway_id}/google-vertex-ai/v1/projects/{project_name}/locations/{region}/publishers/google/models/gemini-1.0-pro-001:generateContent` ## Example ### cURL ```bash curl "https://gateway.ai.cloudflare.com/v1/{account_id}/{gateway_id}/google-vertex-ai/v1/projects/{project_name}/locations/{region}/publishers/google/models/gemini-1.0-pro-001:generateContent" \ -H "Authorization: Bearer {vertex_api_key}" \ -H 'Content-Type: application/json' \ -d '{ "contents": { "role": "user", "parts": [ { "text": "Tell me more about Cloudflare" } ] }' ``` --- title: Workers AI · Cloudflare AI Gateway docs description: Use AI Gateway for analytics, caching, and security on requests to Workers AI. Workers AI integrates seamlessly with AI Gateway, allowing you to execute AI inference via API requests or through an environment binding for Workers scripts. The binding simplifies the process by routing requests through your AI Gateway with minimal setup. lastUpdated: 2025-06-26T18:43:59.000Z chatbotDeprioritize: false source_url: html: https://developers.cloudflare.com/ai-gateway/providers/workersai/ md: https://developers.cloudflare.com/ai-gateway/providers/workersai/index.md --- Use AI Gateway for analytics, caching, and security on requests to [Workers AI](https://developers.cloudflare.com/workers-ai/). Workers AI integrates seamlessly with AI Gateway, allowing you to execute AI inference via API requests or through an environment binding for Workers scripts. The binding simplifies the process by routing requests through your AI Gateway with minimal setup. ## Prerequisites When making requests to Workers AI, ensure you have the following: * Your AI Gateway Account ID. * Your AI Gateway gateway name. * An active Workers AI API token. * The name of the Workers AI model you want to use. ## REST API To interact with a REST API, update the URL used for your request: * **Previous**: ```txt https://api.cloudflare.com/client/v4/accounts/{account_id}/ai/run/{model_id} ``` * **New**: ```txt https://gateway.ai.cloudflare.com/v1/{account_id}/{gateway_id}/workers-ai/{model_id} ``` For these parameters: * `{account_id}` is your Cloudflare [account ID](https://developers.cloudflare.com/workers-ai/get-started/rest-api/#1-get-api-token-and-account-id). * `{gateway_id}` refers to the name of your existing [AI Gateway](https://developers.cloudflare.com/ai-gateway/get-started/#create-gateway). * `{model_id}` refers to the model ID of the [Workers AI model](https://developers.cloudflare.com/workers-ai/models/). ## Examples First, generate an [API token](https://developers.cloudflare.com/fundamentals/api/get-started/create-token/) with `Workers AI Read` access and use it in your request. ```bash curl https://gateway.ai.cloudflare.com/v1/{account_id}/{gateway_id}/workers-ai/@cf/meta/llama-3.1-8b-instruct \ --header 'Authorization: Bearer {cf_api_token}' \ --header 'Content-Type: application/json' \ --data '{"prompt": "What is Cloudflare?"}' ``` ```bash curl https://gateway.ai.cloudflare.com/v1/{account_id}/{gateway_id}/workers-ai/@cf/huggingface/distilbert-sst-2-int8 \ --header 'Authorization: Bearer {cf_api_token}' \ --header 'Content-Type: application/json' \ --data '{ "text": "Cloudflare docs are amazing!" }' ``` ### OpenAI compatible endpoints Workers AI supports OpenAI compatible endpoints for [text generation](https://developers.cloudflare.com/workers-ai/models/) (`/v1/chat/completions`) and [text embedding models](https://developers.cloudflare.com/workers-ai/models/) (`/v1/embeddings`). This allows you to use the same code as you would for your OpenAI commands, but swap in Workers AI easily. ```bash curl https://gateway.ai.cloudflare.com/v1/{account_id}/{gateway_id}/workers-ai/v1/chat/completions \ --header 'Authorization: Bearer {cf_api_token}' \ --header 'Content-Type: application/json' \ --data '{ "model": "@cf/meta/llama-3.1-8b-instruct", "messages": [ { "role": "user", "content": "What is Cloudflare?" } ] } ' ``` ## Workers Binding You can integrate Workers AI with AI Gateway using an environment binding. To include an AI Gateway within your Worker, add the gateway as an object in your Workers AI request. * JavaScript ```js export default { async fetch(request, env) { const response = await env.AI.run( "@cf/meta/llama-3.1-8b-instruct", { prompt: "Why should you use Cloudflare for your AI inference?", }, { gateway: { id: "{gateway_id}", skipCache: false, cacheTtl: 3360, }, }, ); return new Response(JSON.stringify(response)); }, }; ``` * TypeScript ```ts export interface Env { AI: Ai; } export default { async fetch(request: Request, env: Env): Promise { const response = await env.AI.run( "@cf/meta/llama-3.1-8b-instruct", { prompt: "Why should you use Cloudflare for your AI inference?", }, { gateway: { id: "{gateway_id}", skipCache: false, cacheTtl: 3360, }, }, ); return new Response(JSON.stringify(response)); }, } satisfies ExportedHandler; ``` For a detailed step-by-step guide on integrating Workers AI with AI Gateway using a binding, see [Integrations in AI Gateway](https://developers.cloudflare.com/ai-gateway/integrations/aig-workers-ai-binding/). Workers AI supports the following parameters for AI gateways: * `id` string * Name of your existing [AI Gateway](https://developers.cloudflare.com/ai-gateway/get-started/#create-gateway). Must be in the same account as your Worker. * `skipCache` boolean(default: false) * Controls whether the request should [skip the cache](https://developers.cloudflare.com/ai-gateway/configuration/caching/#skip-cache-cf-aig-skip-cache). * `cacheTtl` number * Controls the [Cache TTL](https://developers.cloudflare.com/ai-gateway/configuration/caching/#cache-ttl-cf-aig-cache-ttl). ## OpenAI-Compatible Endpoint You can also use the [OpenAI-compatible endpoint](https://developers.cloudflare.com/ai-gateway/chat-completion/) (`/ai-gateway/chat-completion/`) to access Workers AI models using the OpenAI API schema. To do so, send your requests to: ```txt https://gateway.ai.cloudflare.com/v1/{account_id}/{gateway_id}/compat/chat/completions ``` Specify: ```json { "model": "workers-ai/{model}" } ``` --- title: Audit logs · Cloudflare AI Gateway docs description: Audit logs provide a comprehensive summary of changes made within your Cloudflare account, including those made to gateways in AI Gateway. This functionality is available on all plan types, free of charge, and is enabled by default. lastUpdated: 2025-05-29T18:16:56.000Z chatbotDeprioritize: false source_url: html: https://developers.cloudflare.com/ai-gateway/reference/audit-logs/ md: https://developers.cloudflare.com/ai-gateway/reference/audit-logs/index.md --- [Audit logs](https://developers.cloudflare.com/fundamentals/account/account-security/review-audit-logs/) provide a comprehensive summary of changes made within your Cloudflare account, including those made to gateways in AI Gateway. This functionality is available on all plan types, free of charge, and is enabled by default. ## Viewing Audit Logs To view audit logs for AI Gateway: 1. Log in to the [Cloudflare dashboard](https://dash.cloudflare.com/login) and select your account. 2. Go to **Manage Account** > **Audit Log**. For more information on how to access and use audit logs, refer to [review audit logs documentation](https://developers.cloudflare.com/fundamentals/account/account-security/review-audit-logs/). ## Logged Operations The following configuration actions are logged: | Operation | Description | | - | - | | gateway created | Creation of a new gateway. | | gateway deleted | Deletion of an existing gateway. | | gateway updated | Edit of an existing gateway. | ## Example Log Entry Below is an example of an audit log entry showing the creation of a new gateway: ```json { "action": { "info": "gateway created", "result": true, "type": "create" }, "actor": { "email": "", "id": "3f7b730e625b975bc1231234cfbec091", "ip": "fe32:43ed:12b5:526::1d2:13", "type": "user" }, "id": "5eaeb6be-1234-406a-87ab-1971adc1234c", "interface": "UI", "metadata": {}, "newValue": "", "newValueJson": { "cache_invalidate_on_update": false, "cache_ttl": 0, "collect_logs": true, "id": "test", "rate_limiting_interval": 0, "rate_limiting_limit": 0, "rate_limiting_technique": "fixed" }, "oldValue": "", "oldValueJson": {}, "owner": { "id": "1234d848c0b9e484dfc37ec392b5fa8a" }, "resource": { "id": "89303df8-1234-4cfa-a0f8-0bd848e831ca", "type": "ai_gateway.gateway" }, "when": "2024-07-17T14:06:11.425Z" } ``` --- title: Limits · Cloudflare AI Gateway docs description: The following limits apply to gateway configurations, logs, and related features in Cloudflare's platform. lastUpdated: 2025-04-23T11:31:30.000Z chatbotDeprioritize: false source_url: html: https://developers.cloudflare.com/ai-gateway/reference/limits/ md: https://developers.cloudflare.com/ai-gateway/reference/limits/index.md --- The following limits apply to gateway configurations, logs, and related features in Cloudflare's platform. | Feature | Limit | | - | - | | [Cacheable request size](https://developers.cloudflare.com/ai-gateway/configuration/caching/) | 25 MB per request | | [Cache TTL](https://developers.cloudflare.com/ai-gateway/configuration/caching/#cache-ttl-cf-aig-cache-ttl) | 1 month | | [Custom metadata](https://developers.cloudflare.com/ai-gateway/configuration/custom-metadata/) | 5 entries per request | | [Datasets](https://developers.cloudflare.com/ai-gateway/evaluations/set-up-evaluations/) | 10 per gateway | | Gateways free plan | 10 per account | | Gateways paid plan | 20 per account | | Gateway name length | 64 characters | | Log storage rate limit | 500 logs per second per gateway | | Logs stored [paid plan](https://developers.cloudflare.com/ai-gateway/reference/pricing/) | 10 million per gateway 1 | | Logs stored [free plan](https://developers.cloudflare.com/ai-gateway/reference/pricing/) | 100,000 per account 2 | | [Log size stored](https://developers.cloudflare.com/ai-gateway/observability/logging/) | 10 MB per log 3 | | [Logpush jobs](https://developers.cloudflare.com/ai-gateway/observability/logging/logpush/) | 4 per account | | [Logpush size limit](https://developers.cloudflare.com/ai-gateway/observability/logging/logpush/) | 1MB per log | 1 If you have reached 10 million logs stored per gateway, new logs will stop being saved. To continue saving logs, you must delete older logs in that gateway to free up space or create a new gateway. Refer to [Auto Log Cleanup](https://developers.cloudflare.com/ai-gateway/observability/logging/#auto-log-cleanup) for more details on how to automatically delete logs. 2 If you have reached 100,000 logs stored per account, across all gateways, new logs will stop being saved. To continue saving logs, you must delete older logs. Refer to [Auto Log Cleanup](https://developers.cloudflare.com/ai-gateway/observability/logging/#auto-log-cleanup) for more details on how to automatically delete logs. 3 Logs larger than 10 MB will not be stored. Need a higher limit? To request an increase to a limit, complete the [Limit Increase Request Form](https://forms.gle/cuXu1QnQCrSNkkaS8). If the limit can be increased, Cloudflare will contact you with next steps. --- title: Pricing · Cloudflare AI Gateway docs description: AI Gateway is available to use on all plans. lastUpdated: 2025-04-09T18:09:52.000Z chatbotDeprioritize: false source_url: html: https://developers.cloudflare.com/ai-gateway/reference/pricing/ md: https://developers.cloudflare.com/ai-gateway/reference/pricing/index.md --- AI Gateway is available to use on all plans. AI Gateway's core features available today are offered for free, and all it takes is a Cloudflare account and one line of code to [get started](https://developers.cloudflare.com/ai-gateway/get-started/). Core features include: dashboard analytics, caching, and rate limiting. We will continue to build and expand AI Gateway. Some new features may be additional core features that will be free while others may be part of a premium plan. We will announce these as they become available. You can monitor your usage in the AI Gateway dashboard. ## Persistent logs Note Billing for persistent logs has not yet started. Users on paid plans can store logs beyond the included volume of 200,000 logs stored a month without being charged during this period. (Users on the free plan remain limited to the 100,000 logs cap for their plan.) We will provide plenty of advanced notice before charging begins for persistent log storage. Persistent logs are available on all plans, with a free allocation for both free and paid plans. Charges for additional logs beyond those limits are based on the number of logs stored per month. ### Free allocation and overage pricing | Plan | Free logs stored | Overage pricing | | - | - | - | | Workers Free | 100,000 logs total | N/A - Upgrade to Workers Paid | | Workers Paid | 200,000 logs total | $8 per 100,000 logs stored per month | Allocations are based on the total logs stored across all gateways. For guidance on managing or deleting logs, please see our [documentation](https://developers.cloudflare.com/ai-gateway/observability/logging). For example, if you are a Workers Paid plan user storing 300,000 logs, you will be charged for the excess 100,000 logs (300,000 total logs - 200,000 free logs), resulting in an $8/month charge. ## Logpush Logpush is only available on the Workers Paid plan. | | Paid plan | | - | - | | Requests | 10 million / month, +$0.05/million | ## Fine print Prices subject to change. If you are an Enterprise customer, reach out to your account team to confirm pricing details. --- title: Create your first AI Gateway using Workers AI · Cloudflare AI Gateway docs description: This tutorial guides you through creating your first AI Gateway using Workers AI on the Cloudflare dashboard. The intended audience is beginners who are new to AI Gateway and Workers AI. Creating an AI Gateway enables the user to efficiently manage and secure AI requests, allowing them to utilize AI models for tasks such as content generation, data processing, or predictive analysis with enhanced control and performance. lastUpdated: 2025-03-13T16:14:30.000Z chatbotDeprioritize: false source_url: html: https://developers.cloudflare.com/ai-gateway/tutorials/create-first-aig-workers/ md: https://developers.cloudflare.com/ai-gateway/tutorials/create-first-aig-workers/index.md --- This tutorial guides you through creating your first AI Gateway using Workers AI on the Cloudflare dashboard. The intended audience is beginners who are new to AI Gateway and Workers AI. Creating an AI Gateway enables the user to efficiently manage and secure AI requests, allowing them to utilize AI models for tasks such as content generation, data processing, or predictive analysis with enhanced control and performance. ## Sign up and log in 1. **Sign up**: If you do not have a Cloudflare account, [sign up](https://cloudflare.com/sign-up). 2. **Log in**: Access the Cloudflare dashboard by logging in to the [Cloudflare dashboard](https://dash.cloudflare.com/login). ## Create gateway Then, create a new AI Gateway. * Dashboard To set up an AI Gateway in the dashboard: 1. Log into the [Cloudflare dashboard](https://dash.cloudflare.com/) and select your account. 2. Go to **AI** > **AI Gateway**. 3. Select **Create Gateway**. 4. Enter your **Gateway name**. Note: Gateway name has a 64 character limit. 5. Select **Create**. * API To set up an AI Gateway using the API: 1. [Create an API token](https://developers.cloudflare.com/fundamentals/api/get-started/create-token/) with the following permissions: * `AI Gateway - Read` * `AI Gateway - Edit` 2. Get your [Account ID](https://developers.cloudflare.com/fundamentals/account/find-account-and-zone-ids/). 3. Using that API token and Account ID, send a [`POST` request](https://developers.cloudflare.com/api/resources/ai_gateway/methods/create/) to the Cloudflare API. ## Connect Your AI Provider 1. In the AI Gateway section, select the gateway you created. 2. Select **Workers AI** as your provider to set up an endpoint specific to Workers AI. You will receive an endpoint URL for sending requests. ## Configure Your Workers AI 1. Go to **AI** > **Workers AI** in the Cloudflare dashboard. 2. Select **Use REST API** and follow the steps to create and copy the API token and Account ID. 3. **Send Requests to Workers AI**: Use the provided API endpoint. For example, you can run a model via the API using a curl command. Replace `{account_id}`, `{gateway_id}` and `{cf_api_token}` with your actual account ID and API token: ```bash curl https://gateway.ai.cloudflare.com/v1/{account_id}/{gateway_id}/workers-ai/@cf/meta/llama-3.1-8b-instruct \ --header 'Authorization: Bearer {cf_api_token}' \ --header 'Content-Type: application/json' \ --data '{"prompt": "What is Cloudflare?"}' ``` The expected output would be similar to : ```bash {"result":{"response":"I'd be happy to explain what Cloudflare is.\n\nCloudflare is a cloud-based service that provides a range of features to help protect and improve the performance, security, and reliability of websites, applications, and other online services. Think of it as a shield for your online presence!\n\nHere are some of the key things Cloudflare does:\n\n1. **Content Delivery Network (CDN)**: Cloudflare has a network of servers all over the world. When you visit a website that uses Cloudflare, your request is sent to the nearest server, which caches a copy of the website's content. This reduces the time it takes for the content to load, making your browsing experience faster.\n2. **DDoS Protection**: Cloudflare protects against Distributed Denial-of-Service (DDoS) attacks. This happens when a website is overwhelmed with traffic from multiple sources to make it unavailable. Cloudflare filters out this traffic, ensuring your site remains accessible.\n3. **Firewall**: Cloudflare acts as an additional layer of security, filtering out malicious traffic and hacking attempts, such as SQL injection or cross-site scripting (XSS) attacks.\n4. **SSL Encryption**: Cloudflare offers free SSL encryption, which secure sensitive information (like passwords, credit card numbers, and browsing data) with an HTTPS connection (the \"S\" stands for Secure).\n5. **Bot Protection**: Cloudflare has an AI-driven system that identifies and blocks bots trying to exploit vulnerabilities or scrape your content.\n6. **Analytics**: Cloudflare provides insights into website traffic, helping you understand your audience and make informed decisions.\n7. **Cybersecurity**: Cloudflare offers advanced security features, such as intrusion protection, DNS filtering, and Web Application Firewall (WAF) protection.\n\nOverall, Cloudflare helps protect against cyber threats, improves website performance, and enhances security for online businesses, bloggers, and individuals who need to establish a strong online presence.\n\nWould you like to know more about a specific aspect of Cloudflare?"},"success":true,"errors":[],"messages":[]}% ``` ## View Analytics Monitor your AI Gateway to view usage metrics. 1. Go to **AI** > **AI Gateway** in the dashboard. 2. Select your gateway to view metrics such as request counts, token usage, caching efficiency, errors, and estimated costs. You can also turn on additional configurations like logging and rate limiting. ## Optional - Next steps To build more with Workers, refer to [Tutorials](https://developers.cloudflare.com/workers/tutorials/). If you have any questions, need assistance, or would like to share your project, join the Cloudflare Developer community on [Discord](https://discord.cloudflare.com) to connect with other developers and the Cloudflare team. --- title: Deploy a Worker that connects to OpenAI via AI Gateway · Cloudflare AI Gateway docs description: Learn how to deploy a Worker that makes calls to OpenAI through AI Gateway lastUpdated: 2025-07-11T16:03:39.000Z chatbotDeprioritize: false tags: AI source_url: html: https://developers.cloudflare.com/ai-gateway/tutorials/deploy-aig-worker/ md: https://developers.cloudflare.com/ai-gateway/tutorials/deploy-aig-worker/index.md --- In this tutorial, you will learn how to deploy a Worker that makes calls to OpenAI through AI Gateway. AI Gateway helps you better observe and control your AI applications with more analytics, caching, rate limiting, and logging. This tutorial uses the most recent v4 OpenAI node library, an update released in August 2023. ## Before you start All of the tutorials assume you have already completed the [Get started guide](https://developers.cloudflare.com/workers/get-started/guide/), which gets you set up with a Cloudflare Workers account, [C3](https://github.com/cloudflare/workers-sdk/tree/main/packages/create-cloudflare), and [Wrangler](https://developers.cloudflare.com/workers/wrangler/install-and-update/). ## 1. Create an AI Gateway and OpenAI API key On the AI Gateway page in the Cloudflare dashboard, create a new AI Gateway by clicking the plus button on the top right. You should be able to name the gateway as well as the endpoint. Click on the API Endpoints button to copy the endpoint. You can choose from provider-specific endpoints such as OpenAI, HuggingFace, and Replicate. Or you can use the universal endpoint that accepts a specific schema and supports model fallback and retries. For this tutorial, we will be using the OpenAI provider-specific endpoint, so select OpenAI in the dropdown and copy the new endpoint. You will also need an OpenAI account and API key for this tutorial. If you do not have one, create a new OpenAI account and create an API key to continue with this tutorial. Make sure to store your API key somewhere safe so you can use it later. ## 2. Create a new Worker Create a Worker project in the command line: * npm ```sh npm create cloudflare@latest -- openai-aig ``` * yarn ```sh yarn create cloudflare openai-aig ``` * pnpm ```sh pnpm create cloudflare@latest openai-aig ``` For setup, select the following options: * For *What would you like to start with?*, choose `Hello World example`. * For *Which template would you like to use?*, choose `Worker only`. * For *Which language do you want to use?*, choose `JavaScript`. * For *Do you want to use git for version control?*, choose `Yes`. * For *Do you want to deploy your application?*, choose `No` (we will be making some changes before deploying). Go to your new open Worker project: ```sh cd openai-aig ``` Inside of your new openai-aig directory, find and open the `src/index.js` file. You will configure this file for most of the tutorial. Initially, your generated `index.js` file should look like this: ```js export default { async fetch(request, env, ctx) { return new Response("Hello World!"); }, }; ``` ## 3. Configure OpenAI in your Worker With your Worker project created, we can learn how to make your first request to OpenAI. You will use the OpenAI node library to interact with the OpenAI API. Install the OpenAI node library with `npm`: * npm ```sh npm i openai ``` * yarn ```sh yarn add openai ``` * pnpm ```sh pnpm add openai ``` In your `src/index.js` file, add the import for `openai` above `export default`: ```js import OpenAI from "openai"; ``` Within your `fetch` function, set up the configuration and instantiate your `OpenAIApi` client with the AI Gateway endpoint you created: ```js import OpenAI from "openai"; export default { async fetch(request, env, ctx) { const openai = new OpenAI({ apiKey: env.OPENAI_API_KEY, baseURL: "https://gateway.ai.cloudflare.com/v1/{account_id}/{gateway_id}/openai", // paste your AI Gateway endpoint here }); }, }; ``` To make this work, you need to use [`wrangler secret put`](https://developers.cloudflare.com/workers/wrangler/commands/#put) to set your `OPENAI_API_KEY`. This will save the API key to your environment so your Worker can access it when deployed. This key is the API key you created earlier in the OpenAI dashboard: * npm ```sh npx wrangler secret put OPENAI_API_KEY ``` * yarn ```sh yarn wrangler secret put OPENAI_API_KEY ``` * pnpm ```sh pnpm wrangler secret put OPENAI_API_KEY ``` To make this work in local development, create a new file `.dev.vars` in your Worker project and add this line. Make sure to replace `OPENAI_API_KEY` with your own OpenAI API key: ```txt OPENAI_API_KEY = "" ``` ## 4. Make an OpenAI request Now we can make a request to the OpenAI [Chat Completions API](https://platform.openai.com/docs/guides/gpt/chat-completions-api). You can specify what model you'd like, the role and prompt, as well as the max number of tokens you want in your total request. ```js import OpenAI from "openai"; export default { async fetch(request, env, ctx) { const openai = new OpenAI({ apiKey: env.OPENAI_API_KEY, baseURL: "https://gateway.ai.cloudflare.com/v1/{account_id}/{gateway_id}/openai", }); try { const chatCompletion = await openai.chat.completions.create({ model: "gpt-4o-mini", messages: [{ role: "user", content: "What is a neuron?" }], max_tokens: 100, }); const response = chatCompletion.choices[0].message; return new Response(JSON.stringify(response)); } catch (e) { return new Response(e); } }, }; ``` ## 5. Deploy your Worker application To deploy your application, run the `npx wrangler deploy` command to deploy your Worker application: * npm ```sh npx wrangler deploy ``` * yarn ```sh yarn wrangler deploy ``` * pnpm ```sh pnpm wrangler deploy ``` You can now preview your Worker at \.\.workers.dev. ## 6. Review your AI Gateway When you go to AI Gateway in your Cloudflare dashboard, you should see your recent request being logged. You can also [tweak your settings](https://developers.cloudflare.com/ai-gateway/configuration/) to manage your logs, caching, and rate limiting settings. --- title: Non-realtime WebSockets API · Cloudflare AI Gateway docs description: The Non-realtime WebSockets API allows you to establish persistent connections for AI requests without requiring repeated handshakes. This approach is ideal for applications that do not require real-time interactions but still benefit from reduced latency and continuous communication. lastUpdated: 2025-05-07T14:47:06.000Z chatbotDeprioritize: false source_url: html: https://developers.cloudflare.com/ai-gateway/websockets-api/non-realtime-api/ md: https://developers.cloudflare.com/ai-gateway/websockets-api/non-realtime-api/index.md --- The Non-realtime WebSockets API allows you to establish persistent connections for AI requests without requiring repeated handshakes. This approach is ideal for applications that do not require real-time interactions but still benefit from reduced latency and continuous communication. ## Set up WebSockets API 1. Generate an AI Gateway token with appropriate AI Gateway Run and opt in to using an authenticated gateway. 2. Modify your Universal Endpoint URL by replacing `https://` with `wss://` to initiate a WebSocket connection: ```plaintext wss://gateway.ai.cloudflare.com/v1/{account_id}/{gateway_id} ``` 3. Open a WebSocket connection authenticated with a Cloudflare token with the AI Gateway Run permission. Note Alternatively, we also support authentication via the `sec-websocket-protocol` header if you are using a browser WebSocket. ## Example request ```javascript import WebSocket from "ws"; const ws = new WebSocket( "wss://gateway.ai.cloudflare.com/v1/my-account-id/my-gateway/", { headers: { "cf-aig-authorization": "Bearer AI_GATEWAY_TOKEN", }, }, ); ws.send( JSON.stringify({ type: "universal.create", request: { eventId: "my-request", provider: "workers-ai", endpoint: "@cf/meta/llama-3.1-8b-instruct", headers: { Authorization: "Bearer WORKERS_AI_TOKEN", "Content-Type": "application/json", }, query: { prompt: "tell me a joke", }, }, }), ); ws.on("message", function incoming(message) { console.log(message.toString()); }); ``` ## Example response ```json { "type": "universal.created", "metadata": { "cacheStatus": "MISS", "eventId": "my-request", "logId": "01JC3R94FRD97JBCBX3S0ZAXKW", "step": "0", "contentType": "application/json" }, "response": { "result": { "response": "Why was the math book sad? Because it had too many problems. Would you like to hear another one?" }, "success": true, "errors": [], "messages": [] } } ``` ## Example streaming request For streaming requests, AI Gateway sends an initial message with request metadata indicating the stream is starting: ```json { "type": "universal.created", "metadata": { "cacheStatus": "MISS", "eventId": "my-request", "logId": "01JC40RB3NGBE5XFRZGBN07572", "step": "0", "contentType": "text/event-stream" } } ``` After this initial message, all streaming chunks are relayed in real-time to the WebSocket connection as they arrive from the inference provider. Only the `eventId` field is included in the metadata for these streaming chunks. The `eventId` allows AI Gateway to include a client-defined ID with each message, even in a streaming WebSocket environment. ```json { "type": "universal.stream", "metadata": { "eventId": "my-request" }, "response": { "response": "would" } } ``` Once all chunks for a request have been streamed, AI Gateway sends a final message to signal the completion of the request. For added flexibility, this message includes all the metadata again, even though it was initially provided at the start of the streaming process. ```json { "type": "universal.done", "metadata": { "cacheStatus": "MISS", "eventId": "my-request", "logId": "01JC40RB3NGBE5XFRZGBN07572", "step": "0", "contentType": "text/event-stream" } } ``` --- title: Realtime WebSockets API · Cloudflare AI Gateway docs description: Some AI providers support real-time, low-latency interactions over WebSockets. AI Gateway allows seamless integration with these APIs, supporting multimodal interactions such as text, audio, and video. lastUpdated: 2025-05-07T14:47:06.000Z chatbotDeprioritize: false source_url: html: https://developers.cloudflare.com/ai-gateway/websockets-api/realtime-api/ md: https://developers.cloudflare.com/ai-gateway/websockets-api/realtime-api/index.md --- Some AI providers support real-time, low-latency interactions over WebSockets. AI Gateway allows seamless integration with these APIs, supporting multimodal interactions such as text, audio, and video. ## Supported Providers * [OpenAI](https://platform.openai.com/docs/guides/realtime-websocket) * [Google AI Studio](https://ai.google.dev/gemini-api/docs/multimodal-live) * [Cartesia](https://docs.cartesia.ai/api-reference/tts/tts) * [ElevenLabs](https://elevenlabs.io/docs/conversational-ai/api-reference/conversational-ai/websocket) ## Authentication For real-time WebSockets, authentication can be done using: * Headers (for non-browser environments) * `sec-websocket-protocol` (for browsers) ## Examples ### OpenAI ```javascript import WebSocket from "ws"; const url = "wss://gateway.ai.cloudflare.com/v1///openai?model=gpt-4o-realtime-preview-2024-12-17"; const ws = new WebSocket(url, { headers: { "cf-aig-authorization": process.env.CLOUDFLARE_API_KEY, Authorization: "Bearer " + process.env.OPENAI_API_KEY, "OpenAI-Beta": "realtime=v1", }, }); ws.on("open", () => console.log("Connected to server.")); ws.on("message", (message) => console.log(JSON.parse(message.toString()))); ws.send( JSON.stringify({ type: "response.create", response: { modalities: ["text"], instructions: "Tell me a joke" }, }), ); ``` ### Google AI Studio ```javascript const ws = new WebSocket( "wss://gateway.ai.cloudflare.com/v1///google?api_key=", ["cf-aig-authorization."], ); ws.on("open", () => console.log("Connected to server.")); ws.on("message", (message) => console.log(message.data)); ws.send( JSON.stringify({ setup: { model: "models/gemini-2.0-flash-exp", generationConfig: { responseModalities: ["TEXT"] }, }, }), ); ``` ### Cartesia ```javascript const ws = new WebSocket( "wss://gateway.ai.cloudflare.com/v1///cartesia?cartesia_version=2024-06-10&api_key=", ["cf-aig-authorization."], ); ws.on("open", function open() { console.log("Connected to server."); }); ws.on("message", function incoming(message) { console.log(message.data); }); ws.send( JSON.stringify({ model_id: "sonic", transcript: "Hello, world! I'm generating audio on ", voice: { mode: "id", id: "a0e99841-438c-4a64-b679-ae501e7d6091" }, language: "en", context_id: "happy-monkeys-fly", output_format: { container: "raw", encoding: "pcm_s16le", sample_rate: 8000, }, add_timestamps: true, continue: true, }), ); ``` ### ElevenLabs ```javascript const ws = new WebSocket( "wss://gateway.ai.cloudflare.com/v1///elevenlabs?agent_id=", [ "xi-api-key.", "cf-aig-authorization.", ], ); ws.on("open", function open() { console.log("Connected to server."); }); ws.on("message", function incoming(message) { console.log(message.data); }); ws.send( JSON.stringify({ text: "This is a sample text ", voice_settings: { stability: 0.8, similarity_boost: 0.8 }, generation_config: { chunk_length_schedule: [120, 160, 250, 290] }, }), ); ``` --- title: How AutoRAG works · AutoRAG description: AutoRAG sets up and manages your RAG pipeline for you. It connects the tools needed for indexing, retrieval, and generation, and keeps everything up to date by syncing with your data with the index regularly. Once set up, AutoRAG indexes your content in the background and responds to queries in real time. lastUpdated: 2025-04-16T13:44:03.000Z chatbotDeprioritize: false source_url: html: https://developers.cloudflare.com/autorag/concepts/how-autorag-works/ md: https://developers.cloudflare.com/autorag/concepts/how-autorag-works/index.md --- AutoRAG sets up and manages your RAG pipeline for you. It connects the tools needed for indexing, retrieval, and generation, and keeps everything up to date by syncing with your data with the index regularly. Once set up, AutoRAG indexes your content in the background and responds to queries in real time. AutoRAG consists of two core processes: * **Indexing:** An asynchronous background process that monitors your data source for changes and converts your data into vectors for search. * **Querying:** A synchronous process triggered by user queries. It retrieves the most relevant content and generates context-aware responses. ## How indexing works Indexing begins automatically when you create an AutoRAG instance and connect a data source. Here is what happens during indexing: 1. **Data ingestion:** AutoRAG reads from your connected data source. 2. **Markdown conversion:** AutoRAG uses [Workers AI’s Markdown Conversion](https://developers.cloudflare.com/workers-ai/features/markdown-conversion/) to convert [supported data types](https://developers.cloudflare.com/autorag/configuration/data-source/) into structured Markdown. This ensures consistency across diverse file types. For images, Workers AI is used to perform object detection followed by vision-to-language transformation to convert images into Markdown text. 3. **Chunking:** The extracted text is [chunked](https://developers.cloudflare.com/autorag/configuration/chunking/) into smaller pieces to improve retrieval granularity. 4. **Embedding:** Each chunk is embedded using Workers AI’s embedding model to transform the content into vectors. 5. **Vector storage:** The resulting vectors, along with metadata like file name, are stored in a the [Vectorize](https://developers.cloudflare.com/vectorize/) database created on your Cloudflare account. After the initial data set is indexed, AutoRAG will regularly check for updates in your data source (e.g. additions, updates, or deletes) and index changes to ensure your vector database is up to date. ![Indexing](https://developers.cloudflare.com/_astro/indexing.CQ13F9Js_1Pewmk.webp) ## How querying works Once indexing is complete, AutoRAG is ready to respond to end-user queries in real time. Here is how the querying pipeline works: 1. **Receive query from AutoRAG API:** The query workflow begins when you send a request to either the AutoRAG’s [AI Search](https://developers.cloudflare.com/autorag/usage/rest-api/#ai-search) or [Search](https://developers.cloudflare.com/autorag/usage/rest-api/#search) endpoints. 2. **Query rewriting (optional):** AutoRAG provides the option to [rewrite the input query](https://developers.cloudflare.com/autorag/configuration/query-rewriting/) using one of Workers AI’s LLMs to improve retrieval quality by transforming the original query into a more effective search query. 3. **Embedding the query:** The rewritten (or original) query is transformed into a vector via the same embedding model used to embed your data so that it can be compared against your vectorized data to find the most relevant matches. 4. **Querying Vectorize index:** The query vector is [queried](https://developers.cloudflare.com/vectorize/best-practices/query-vectors/) against stored vectors in the associated Vectorize database for your AutoRAG. 5. **Content retrieval:** Vectorize returns the metadata of the most relevant chunks, and the original content is retrieved from the R2 bucket. If you are using the Search endpoint, the content is returned at this point. 6. **Response generation:** If you are using the AI Search endpoint, then a text-generation model from Workers AI is used to generate a response using the retrieved content and the original user’s query, combined via a [system prompt](https://developers.cloudflare.com/autorag/configuration/system-prompt/). The context-aware response from the model is returned. ![Querying](https://developers.cloudflare.com/_astro/querying.c_RrR1YL_Z1CePPB.webp) --- title: What is RAG · AutoRAG description: Retrieval-Augmented Generation (RAG) is a way to use your own data with a large language model (LLM). Instead of relying only on what the model was trained on, RAG searches for relevant information from your data source and uses it to help answer questions. lastUpdated: 2025-04-06T23:41:56.000Z chatbotDeprioritize: false source_url: html: https://developers.cloudflare.com/autorag/concepts/what-is-rag/ md: https://developers.cloudflare.com/autorag/concepts/what-is-rag/index.md --- Retrieval-Augmented Generation (RAG) is a way to use your own data with a large language model (LLM). Instead of relying only on what the model was trained on, RAG searches for relevant information from your data source and uses it to help answer questions. ## How RAG works Here’s a simplified overview of the RAG pipeline: 1. **Indexing:** Your content (e.g. docs, wikis, product information) is split into smaller chunks and converted into vectors using an embedding model. These vectors are stored in a vector database. 2. **Retrieval:** When a user asks a question, it’s also embedded into a vector and used to find the most relevant chunks from the vector database. 3. **Generation:** The retrieved content and the user’s original question are combined into a single prompt. An LLM uses that prompt to generate a response. The resulting response should be accurate, relevant, and based on your own data. ![What is RAG](https://developers.cloudflare.com/_astro/RAG.Br2ehjiz_2lPBPi.webp) How does AutoRAG work To learn more details about how AutoRAG uses RAG under the hood, reference [How AutoRAG works](https://developers.cloudflare.com/autorag/concepts/how-autorag-works/). ## Why use RAG? RAG lets you bring your own data into LLM generation without retraining or fine-tuning a model. It improves both accuracy and trust by retrieving relevant content at query time and using that as the basis for a response. Benefits of using RAG: * **Accurate and current answers:** Responses are based on your latest content, not outdated training data. * **Control over information sources:** You define the knowledge base so answers come from content you trust. * **Fewer hallucinations:** Responses are grounded in real, retrieved data, reducing made-up or misleading answers. * **No model training required:** You can get high-quality results without building or fine-tuning your own LLM which can be time consuming and costly. RAG is ideal for building AI-powered apps like: * AI assistants for internal knowledge * Support chatbots connected to your latest content * Enterprise search across documentation and files --- title: Similarity cache · AutoRAG description: Similarity-based caching in AutoRAG lets you serve responses from Cloudflare’s cache for queries that are similar to previous requests, rather than creating new, unique responses for every request. This speeds up response times and cuts costs by reusing answers for questions that are close in meaning. lastUpdated: 2025-05-12T16:09:33.000Z chatbotDeprioritize: false source_url: html: https://developers.cloudflare.com/autorag/configuration/cache/ md: https://developers.cloudflare.com/autorag/configuration/cache/index.md --- Similarity-based caching in AutoRAG lets you serve responses from Cloudflare’s cache for queries that are similar to previous requests, rather than creating new, unique responses for every request. This speeds up response times and cuts costs by reusing answers for questions that are close in meaning. ## How It Works Unlike with basic caching, which creates a new response with every request, this is what happens when a request is received using similarity-based caching: 1. AutoRAG checks if a *similar* prompt (based on your chosen threshold) has been answered before. 2. If a match is found, it returns the cached response instantly. 3. If no match is found, it generates a new response and caches it. To see if a response came from the cache, check the `cf-aig-cache-status` header: `HIT` for cached and `MISS` for new. ## What to consider when using similarity cache Consider these behaviors when using similarity caching: * **Volatile Cache**: If two similar requests hit at the same time, the first might not cache in time for the second to use it, resulting in a `MISS`. * **30-Day Cache**: Cached responses last 30 days, then expire automatically. No custom durations for now. * **Data Dependency**: Cached responses are tied to specific document chunks. If those chunks change or get deleted, the cache clears to keep answers fresh. ## How similarity matching works AutoRAG’s similarity cache uses **MinHash and Locality-Sensitive Hashing (LSH)** to find and reuse responses for prompts that are worded similarly. Here’s how it works when a new prompt comes in: 1. The prompt is split into small overlapping chunks of words (called shingles), like “what’s the” or “the weather.” 2. These shingles are turned into a “fingerprint” using MinHash. The more overlap two prompts have, the more similar their fingerprints will be. 3. Fingerprints are placed into LSH buckets, which help AutoRAG quickly find similar prompts without comparing every single one. 4. If a past prompt in the same bucket is similar enough (based on your configured threshold), AutoRAG reuses its cached response. ## Choosing a threshold The similarity threshold decides how close two prompts need to be to reuse a cached response. Here are the available thresholds: | Threshold | Description | Example Match | | - | - | - | | Exact | Near-identical matches only | "What’s the weather like today?" matches with "What is the weather like today?" | | Strong (default) | High semantic similarity | "What’s the weather like today?" matches with "How’s the weather today?" | | Broad | Moderate match, more hits | "What’s the weather like today?" matches with "Tell me today’s weather" | | Loose | Low similarity, max reuse | "What’s the weather like today?" matches with "Give me the forecast" | Test these values to see which works best with your [RAG application](https://developers.cloudflare.com/autorag/). --- title: Chunking · AutoRAG description: Chunking is the process of splitting large data into smaller segments before embedding them for search. AutoRAG uses recursive chunking, which breaks your content at natural boundaries (like paragraphs or sentences), and then further splits it if the chunks are too large. lastUpdated: 2025-04-11T22:48:09.000Z chatbotDeprioritize: false source_url: html: https://developers.cloudflare.com/autorag/configuration/chunking/ md: https://developers.cloudflare.com/autorag/configuration/chunking/index.md --- Chunking is the process of splitting large data into smaller segments before embedding them for search. AutoRAG uses **recursive chunking**, which breaks your content at natural boundaries (like paragraphs or sentences), and then further splits it if the chunks are too large. ## What is recursive chunking Recursive chunking tries to keep chunks meaningful by: * **Splitting at natural boundaries:** like paragraphs, then sentences. * **Checking the size:** if a chunk is too long (based on token count), it’s split again into smaller parts. This way, chunks are easy to embed and retrieve, without cutting off thoughts mid-sentence. ## Chunking controls AutoRAG exposes two parameters to help you control chunking behavior: * **Chunk size**: The number of tokens per chunk. * Minimum: `64` * Maximum: `512` * **Chunk overlap**: The percentage of overlapping tokens between adjacent chunks. * Minimum: `0%` * Maximum: `30%` These settings apply during the indexing step, before your data is embedded and stored in Vectorize. ## Choosing chunk size and overlap Chunking affects both how your content is retrieved and how much context is passed into the generation model. Try out this external [chunk visualizer tool](https://huggingface.co/spaces/m-ric/chunk_visualizer) to help understand how different chunk settings could look. For chunk size, consider how: * **Smaller chunks** create more precise vector matches, but may split relevant ideas across multiple chunks. * **Larger chunks** retain more context, but may dilute relevance and reduce retrieval precision. For chunk overlap, consider how: * **More overlap** helps preserve continuity across boundaries, especially in flowing or narrative content. * **Less overlap** reduces indexing time and cost, but can miss context if key terms are split between chunks. ### Additional considerations: * **Vector index size:** Smaller chunk sizes produce more chunks and more total vectors. Refer to the [Vectorize limits](https://developers.cloudflare.com/vectorize/platform/limits/) to ensure your configuration stays within the maximum allowed vectors per index. * **Generation model context window:** Generation models have a limited context window that must fit all retrieved chunks (`topK` × `chunk size`), the user query, and the model’s output. Be careful with large chunks or high topK values to avoid context overflows. * **Cost and performance:** Larger chunks and higher topK settings result in more tokens passed to the model, which can increase latency and cost. You can monitor this usage in [AI Gateway](https://developers.cloudflare.com/ai-gateway/). --- title: Data source · AutoRAG description: AutoRAG currently supports Cloudflare R2 as the data source for storing your knowledge base. To get started, configure an R2 bucket containing your data. lastUpdated: 2025-06-19T17:04:00.000Z chatbotDeprioritize: false source_url: html: https://developers.cloudflare.com/autorag/configuration/data-source/ md: https://developers.cloudflare.com/autorag/configuration/data-source/index.md --- AutoRAG currently supports Cloudflare R2 as the data source for storing your knowledge base. To get started, [configure an R2 bucket](https://developers.cloudflare.com/r2/get-started/) containing your data. AutoRAG will automatically scan and process supported files stored in that bucket. Files that are unsupported or exceed the size limit will be skipped during indexing and logged as errors. ## File limits AutoRAG has different file size limits depending on the file type: * **Plain text files:** Up to **4 MB** * **Rich format files:** Up to **4 MB** Files that exceed these limits will not be indexed and will show up in the error logs. ## File types AutoRAG can ingest a variety of different file types to power your RAG. The following plain text files and rich format files are supported. ### Plain text file types AutoRAG supports the following plain text file types: | Format | File extensions | Mime Type | | - | - | - | | Text | `.txt`, `.rst` | `text/plain` | | Log | `.log` | `text/plain` | | Config | `.ini`, `.conf`, `.env`, `.properties`, `.gitignore`, `.editorconfig`, `.toml` | `text/plain`, `text/toml` | | Markdown | `.markdown`, `.md`, `.mdx` | `text/markdown` | | LaTeX | `.tex`, `.latex` | `application/x-tex`, `application/x-latex` | | Script | `.sh`, `.bat` , `.ps1` | `application/x-sh` , `application/x-msdos-batch`, `text/x-powershell` | | SGML | `.sgml` | `text/sgml` | | JSON | `.json` | `application/json` | | YAML | `.yaml`, `.yml` | `application/x-yaml` | | CSS | `.css` | `text/css` | | JavaScript | `.js` | `application/javascript` | | PHP | `.php` | `application/x-httpd-php` | | Python | `.py` | `text/x-python` | | Ruby | `.rb` | `text/x-ruby` | | Java | `.java` | `text/x-java-source` | | C | `.c` | `text/x-c` | | C++ | `.cpp`, `.cxx` | `text/x-c++` | | C Header | `.h`, `.hpp` | `text/x-c-header` | | Go | `.go` | `text/x-go` | | Rust | `.rs` | `text/rust` | | Swift | `.swift` | `text/swift` | | Dart | `.dart` | `text/dart` | ### Rich format file types AutoRAG uses [Markdown Conversion](https://developers.cloudflare.com/workers-ai/features/markdown-conversion/) to convert rich format files to markdown. The following table lists the supported formats that will be converted to Markdown: | Format | File extensions | Mime Types | | - | - | - | | PDF Documents | `.pdf` | `application/pdf` | | Images 1 | `.jpeg`, `.jpg`, `.png`, `.webp`, `.svg` | `image/jpeg`, `image/png`, `image/webp`, `image/svg+xml` | | HTML Documents | `.html` | `text/html` | | XML Documents | `.xml` | `application/xml` | | Microsoft Office Documents | `.xlsx`, `.xlsm`, `.xlsb`, `.xls`, `.et` | `application/vnd.openxmlformats-officedocument.spreadsheetml.sheet`, `application/vnd.ms-excel.sheet.macroenabled.12`, `application/vnd.ms-excel.sheet.binary.macroenabled.12`, `application/vnd.ms-excel`, `application/vnd.ms-excel` | | Open Document Format | `.ods` | `application/vnd.oasis.opendocument.spreadsheet` | | CSV | `.csv` | `text/csv` | | Apple Documents | `.numbers` | `application/vnd.apple.numbers` | 1 Image conversion uses two Workers AI models for object detection and summarization. See [Workers AI pricing](https://developers.cloudflare.com/workers-ai/features/markdown-conversion/#pricing) for more details. --- title: Indexing · AutoRAG description: AutoRAG automatically indexes your data into vector embeddings optimized for semantic search. Once a data source is connected, indexing runs continuously in the background to keep your knowledge base fresh and queryable. lastUpdated: 2025-07-09T03:58:39.000Z chatbotDeprioritize: false source_url: html: https://developers.cloudflare.com/autorag/configuration/indexing/ md: https://developers.cloudflare.com/autorag/configuration/indexing/index.md --- AutoRAG automatically indexes your data into vector embeddings optimized for semantic search. Once a data source is connected, indexing runs continuously in the background to keep your knowledge base fresh and queryable. ## Jobs AutoRAG automatically monitors your data source for updates and reindexes your content every few hours. During each cycle, new or modified files are reprocessed to keep your Vectorize index up to date. You can monitor the status and history of all indexing activity in the Jobs tab, including real-time logs for each job to help you troubleshoot and verify successful syncs. ## Controls You can control indexing behavior through the following actions on the dashboard: * **Sync Index**: Force AutoRAG to scan your data source for new or modified files and initiate an indexing job to update the associated Vectorize index. A new indexing job can be initiated every 3 minutes. * **Pause Indexing**: Temporarily stop all scheduled indexing checks and reprocessing. Useful for debugging or freezing your knowledge base. ## Performance The total time to index depends on the number and type of files in your data source. Factors that affect performance include: * Total number of files and their sizes * File formats (for example, images take longer than plain text) * Latency of Workers AI models used for embedding and image processing ## Best practices To ensure smooth and reliable indexing: * Make sure your files are within the [**size limit**](https://developers.cloudflare.com/autorag/platform/limits-pricing/#limits) and in a supported format to avoid being skipped. * Keep your Service API token valid to prevent indexing failures. * Regularly clean up outdated or unnecessary content in your knowledge base to avoid hitting [Vectorize index limits](https://developers.cloudflare.com/vectorize/platform/limits/). --- title: Metadata · AutoRAG description: Use metadata to filter documents before retrieval and provide context to guide AI responses. This page covers how to apply filters and attach optional context metadata to your files. lastUpdated: 2025-06-19T17:04:00.000Z chatbotDeprioritize: false source_url: html: https://developers.cloudflare.com/autorag/configuration/metadata/ md: https://developers.cloudflare.com/autorag/configuration/metadata/index.md --- Use metadata to filter documents before retrieval and provide context to guide AI responses. This page covers how to apply filters and attach optional context metadata to your files. ## Metadata filtering Metadata filtering narrows down search results based on metadata, so only relevant content is retrieved. The filter narrows down results prior to retrieval, so that you only query the scope of documents that matter. Here is an example of metadata filtering using [Workers Binding](https://developers.cloudflare.com/autorag/usage/workers-binding/) but it can be easily adapted to use the [REST API](https://developers.cloudflare.com/autorag/usage/rest-api/) instead. ```js const answer = await env.AI.autorag("my-autorag").search({ query: "How do I train a llama to deliver coffee?", filters: { type: "and", filters: [ { type: "eq", key: "folder", value: "llama/logistics/", }, { type: "gte", key: "timestamp", value: "1735689600000", // unix timestamp for 2025-01-01 }, ], }, }); ``` ### Metadata attributes | Attribute | Description | Example | | - | - | - | | `filename` | The name of the file. | `dog.png` or `animals/mammals/cat.png` | | `folder` | The folder or prefix to the object. | For the object `animals/mammals/cat.png`, the folder is `animals/mammals/` | | `timestamp` | The timestamp for when the object was last modified. Comparisons are supported using a 13-digit Unix timestamp (milliseconds), but values will be rounded down to 10 digits (seconds). | The timestamp `2025-01-01 00:00:00.999 UTC` is `1735689600999` and it will be rounded down to `1735689600000`, corresponding to `2025-01-01 00:00:00 UTC` | ### Filter schema You can create simple comparison filters or an array of comparison filters using a compound filter. #### Comparison filter You can compare a metadata attribute (for example, `folder` or `timestamp`) with a target value using a comparison filter. ```js filters: { type: "operator", key: "metadata_attribute", value: "target_value" } ``` The available operators for the comparison are: | Operator | Description | | - | - | | `eq` | Equals | | `ne` | Not equals | | `gt` | Greater than | | `gte` | Greater than or equals to | | `lt` | Less than | | `lte` | Less than or equals to | #### Compound filter You can use a compound filter to combine multiple comparison filters with a logical operator. ```js filters: { type: "compound_operator", filters: [...] } ``` The available compound operators are: `and`, `or`. Note the following limitations with the compound operators: * No nesting combinations of `and`'s and `or`'s, meaning you can only pick 1 `and` or 1 `or`. * When using `or`: * Only the `eq` operator is allowed. * All conditions must filter on the **same key** (for example, all on `folder`) #### "Starts with" filter for folders You can use "starts with" filtering on the `folder` metadata attribute to search for all files and subfolders within a specific path. For example, consider this file structure: If you were to filter using an `eq` (equals) operator with `value: "customer-a/"`, it would only match files directly within that folder, like `profile.md`. It would not include files in subfolders like `customer-a/contracts/`. To recursively filter for all items starting with the path `customer-a/`, you can use the following compound filter: ```js filters: { type: "and", filters: [ { type: "gt", key: "folder", value: "customer-a//", }, { type: "lte", key: "folder", value: "customer-a/z", }, ], }, ``` This filter identifies paths starting with `customer-a/` by using: * The `and` condition to combine the effects of the `gt` and `lte` conditions. * The `gt` condition to include paths greater than the `/` ASCII character. * The `lte` condition to include paths less than and including the lower case `z` ASCII character. Together, these conditions effectively select paths that begin with the provided path value. ## Add `context` field to guide AI Search You can optionally include a custom metadata field named `context` when uploading an object to your R2 bucket. The `context` field is attached to each chunk and passed to the LLM during an `/ai-search` query. It does not affect retrieval but helps the LLM interpret and frame the answer. The field can be used for providing document summaries, source links, or custom instructions without modifying the file content. You can add [custom metadata](https://developers.cloudflare.com/r2/api/workers/workers-api-reference/#r2putoptions) to an object in the `/PUT` operation when uploading the object to your R2 bucket. For example if you are using the [Workers binding with R2](https://developers.cloudflare.com/r2/api/workers/workers-api-usage/): ```javascript await env.MY_BUCKET.put("cat.png", file, { customMetadata: { context: "This is a picture of Joe's cat. His name is Max." } }); ``` During `/ai-search`, this context appears in the response under `attributes.file.context`, and is included in the data passed to the LLM for generating a response. ## Response You can see the metadata attributes of your retrieved data in the response under the property `attributes` for each retrieved chunk. For example: ```js "data": [ { "file_id": "llama001", "filename": "llama/logistics/llama-logistics.md", "score": 0.45, "attributes": { "timestamp": 1735689600000, // unix timestamp for 2025-01-01 "folder": "llama/logistics/", "file": { "url": "www.llamasarethebest.com/logistics" "context": "This file contains information about how llamas can logistically deliver coffee." } }, "content": [ { "id": "llama001", "type": "text", "text": "Llamas can carry 3 drinks max." } ] } ] ``` --- title: Models · AutoRAG description: AutoRAG uses models at multiple steps of the RAG pipeline. You can configure which models are used, or let AutoRAG automatically select defaults optimized for general use. lastUpdated: 2025-05-12T16:09:33.000Z chatbotDeprioritize: false source_url: html: https://developers.cloudflare.com/autorag/configuration/models/ md: https://developers.cloudflare.com/autorag/configuration/models/index.md --- AutoRAG uses models at multiple steps of the RAG pipeline. You can configure which models are used, or let AutoRAG automatically select defaults optimized for general use. ## Models used AutoRAG leverages Workers AI models in the following stages: * **Image to markdown conversion (if images are in data source)**: Converts image content to Markdown using object detection and captioning models. * **Embedding**: Transforms your documents and queries into vector representations for semantic search. * **Query rewriting (optional)**: Reformulates the user’s query to improve retrieval accuracy. * **Generation**: Produces the final response from retrieved context. ## Model providers AutoRAG currently only supports [Workers AI](https://developers.cloudflare.com/workers-ai/) as the model provider. Usage of models through AutoRAG contributes to your Workers AI usage and is billed as part of your account. If you have connected your project to [AI Gateway](https://developers.cloudflare.com/ai-gateway), all model calls triggered by AutoRAG can be tracked in AI Gateway. This gives you full visibility into inputs, outputs, latency, and usage patterns. ## Choosing a model When configuring your AutoRAG instance, you can specify the exact model to use for each step of embedding, rewriting, and generation. You can find available models that can be used with AutoRAG in the **Settings** of your AutoRAG. Note AutoRAG supports a subset of Workers AI models that have been selected to provide the best experience for RAG. ### Smart default If you choose **Smart Default** in your model selection, then AutoRAG will select a Cloudflare recommended model. These defaults may change over time as Cloudflare evaluates and updates model choices. You can switch to explicit model configuration at any time by visiting **Settings**. ### Per-request generation model override While the generation model can be set globally at the AutoRAG instance level, you can also override it on a per-request basis in the [AI Search API](https://developers.cloudflare.com/autorag/usage/rest-api/#ai-search). This is useful if your [RAG application](https://developers.cloudflare.com/autorag/) requires dynamic selection of generation models based on context or user preferences. --- title: Query rewriting · AutoRAG description: Query rewriting is an optional step in the AutoRAG pipeline that improves retrieval quality by transforming the original user query into a more effective search query. lastUpdated: 2025-04-06T23:41:56.000Z chatbotDeprioritize: false source_url: html: https://developers.cloudflare.com/autorag/configuration/query-rewriting/ md: https://developers.cloudflare.com/autorag/configuration/query-rewriting/index.md --- Query rewriting is an optional step in the AutoRAG pipeline that improves retrieval quality by transforming the original user query into a more effective search query. Instead of embedding the raw user input directly, AutoRAG can use a large language model (LLM) to rewrite the query based on a system prompt. The rewritten query is then used to perform the vector search. ## Why use query rewriting? The wording of a user’s question may not match how your documents are written. Query rewriting helps bridge this gap by: * Rephrasing informal or vague queries into precise, information-dense terms * Adding synonyms or related keywords * Removing filler words or irrelevant details * Incorporating domain-specific terminology This leads to more relevant vector matches which improves the accuracy of the final generated response. ## Example **Original query:** `how do i make this work when my api call keeps failing?` **Rewritten query:** `API call failure troubleshooting authentication headers rate limiting network timeout 500 error` In this example, the original query is conversational and vague. The rewritten version extracts the core problem (API call failure) and expands it with relevant technical terms and likely causes. These terms are much more likely to appear in documentation or logs, improving semantic matching during vector search. ## How it works If query rewriting is enabled, AutoRAG performs the following: 1. Sends the **original user query** and the **query rewrite system prompt** to the configured LLM 2. Receives the **rewritten query** from the model 3. Embeds the rewritten query using the selected embedding model 4. Performs vector search in your AutoRAG’s Vectorize index For details on how to guide model behavior during this step, see the [system prompt](https://developers.cloudflare.com/autorag/configuration/system-prompt/) documentation. --- title: Retrieval configuration · AutoRAG description: "AutoRAG allows you to configure how content is retrieved from your vector index and used to generate a final response. Two options control this behavior:" lastUpdated: 2025-04-06T23:41:56.000Z chatbotDeprioritize: false source_url: html: https://developers.cloudflare.com/autorag/configuration/retrieval-configuration/ md: https://developers.cloudflare.com/autorag/configuration/retrieval-configuration/index.md --- AutoRAG allows you to configure how content is retrieved from your vector index and used to generate a final response. Two options control this behavior: * **Match threshold**: Minimum similarity score required for a vector match to be considered relevant. * **Maximum number of results**: Maximum number of top-matching results to return (`top_k`). AutoRAG uses the [`query()`](https://developers.cloudflare.com/vectorize/best-practices/query-vectors/) method from [Vectorize](https://developers.cloudflare.com/vectorize/) to perform semantic search. This function compares the embedded query vector against the stored vectors in your index and returns the most similar results. ## Match threshold The `match_threshold` sets the minimum similarity score (for example, cosine similarity) that a document chunk must meet to be included in the results. Threshold values range from `0` to `1`. * A higher threshold means stricter filtering, returning only highly similar matches. * A lower threshold allows broader matches, increasing recall but possibly reducing precision. ## Maximum number of results This setting controls the number of top-matching chunks returned by Vectorize after filtering by similarity score. It corresponds to the `topK` parameter in `query()`. The maximum allowed value is 50. * Use a higher value if you want to synthesize across multiple documents. However, providing more input to the model can increase latency and cost. * Use a lower value if you prefer concise answers with minimal context. ## How they work together AutoRAG's retrieval step follows this sequence: 1. Your query is embedded using the configured Workers AI model. 2. `query()` is called to search the Vectorize index, with `topK` set to the `maximum_number_of_results`. 3. Results are filtered using the `match_threshold`. 4. The filtered results are passed into the generation step as context. If no results meet the threshold, AutoRAG will not generate a response. ## Configuration These values can be configured at the AutoRAG instance level or overridden on a per-request basis using the [REST API](https://developers.cloudflare.com/autorag/usage/rest-api/) or the [Workers Binding](https://developers.cloudflare.com/autorag/usage/workers-binding/). Use the parameters `match_threshold` and `max_num_results` to customize retrieval behavior per request. --- title: System prompt · AutoRAG description: "System prompts allow you to guide the behavior of the text-generation models used by AutoRAG at query time. AutoRAG supports system prompt configuration in two steps:" lastUpdated: 2025-04-06T23:41:56.000Z chatbotDeprioritize: false source_url: html: https://developers.cloudflare.com/autorag/configuration/system-prompt/ md: https://developers.cloudflare.com/autorag/configuration/system-prompt/index.md --- System prompts allow you to guide the behavior of the text-generation models used by AutoRAG at query time. AutoRAG supports system prompt configuration in two steps: * **Query rewriting**: Reformulates the original user query to improve semantic retrieval. A system prompt can guide how the model interprets and rewrites the query. * **Generation**: Generates the final response from retrieved context. A system prompt can help define how the model should format, filter, or prioritize information when constructing the answer. ## What is a system prompt? A system prompt is a special instruction sent to a large language model (LLM) that guides how it behaves during inference. The system prompt defines the model's role, context, or rules it should follow. System prompts are particularly useful for: * Enforcing specific response formats * Constraining behavior (for example, it only responds based on the provided content) * Applying domain-specific tone or terminology * Encouraging consistent, high-quality output ## How to set your system prompt The system prompt for your AutoRAG can be set after it has been created by: 1. Navigating to the [Cloudflare dashboard](https://dash.cloudflare.com/?to=/:account/ai/autorag), and go to AI > AutoRAG 2. Select your AutoRAG 3. Go to Settings page and find the System prompt setting for either Query rewrite or Generation ### Default system prompt When configuring your AutoRAG instance, you can provide your own system prompts. If you do not provide a system prompt, AutoRAG will use the **default system prompt** provided by Cloudflare. You can view the effective system prompt used for any AutoRAG's model call through AI Gateway logs, where model inputs and outputs are recorded. Note The default system prompt can change and evolve over time to improve performance and quality. ## Query rewriting system prompt If query rewriting is enabled, you can provide a custom system prompt to control how the model rewrites user queries. In this step, the model receives: * The query rewrite system prompt * The original user query The model outputs a rewritten query optimized for semantic retrieval. ### Example ```text You are a search query optimizer for vector database searches. Your task is to reformulate user queries into more effective search terms. Given a user's search query, you must: 1. Identify the core concepts and intent 2. Add relevant synonyms and related terms 3. Remove irrelevant filler words 4. Structure the query to emphasize key terms 5. Include technical or domain-specific terminology if applicable Provide only the optimized search query without any explanations, greetings, or additional commentary. Example input: "how to fix a bike tire that's gone flat" Example output: "bicycle tire repair puncture fix patch inflate maintenance flat tire inner tube replacement" Constraints: - Output only the enhanced search terms - Keep focus on searchable concepts - Include both specific and general related terms - Maintain all important meaning from original query ``` ## Generation system prompt If you are using the AI Search API endpoint, you can use the system prompt to influence how the LLM responds to the final user query using the retrieved results. At this step, the model receives: * The user's original query * Retrieved document chunks (with metadata) * The generation system prompt The model uses these inputs to generate a context-aware response. ### Example ```plaintext You are a helpful AI assistant specialized in answering questions using retrieved documents. Your task is to provide accurate, relevant answers based on the matched content provided. For each query, you will receive: User's question/query A set of matched documents, each containing: - File name - File content You should: 1. Analyze the relevance of matched documents 2. Synthesize information from multiple sources when applicable 3. Acknowledge if the available documents don't fully answer the query 4. Format the response in a way that maximizes readability, in Markdown format Answer only with direct reply to the user question, be concise, omit everything which is not directly relevant, focus on answering the question directly and do not redirect the user to read the content. If the available documents don't contain enough information to fully answer the query, explicitly state this and provide an answer based on what is available. Important: - Cite which document(s) you're drawing information from - Present information in order of relevance - If documents contradict each other, note this and explain your reasoning for the chosen answer - Do not repeat the instructions ``` --- title: Bring your own generation model · AutoRAG description: When using AI Search, AutoRAG leverages a Workers AI model to generate the response. If you want to use a model outside of Workers AI, you can use AutoRAG for search while leveraging a model outside of Workers AI to generate responses. lastUpdated: 2025-06-26T18:43:59.000Z chatbotDeprioritize: false source_url: html: https://developers.cloudflare.com/autorag/how-to/bring-your-own-generation-model/ md: https://developers.cloudflare.com/autorag/how-to/bring-your-own-generation-model/index.md --- When using `AI Search`, AutoRAG leverages a Workers AI model to generate the response. If you want to use a model outside of Workers AI, you can use AutoRAG for search while leveraging a model outside of Workers AI to generate responses. Here is an example of how you can use an OpenAI model to generate your responses. This example uses [Workers Binding](https://developers.cloudflare.com/autorag/usage/workers-binding/), but can be easily adapted to use the [REST API](https://developers.cloudflare.com/autorag/usage/rest-api/) instead. * JavaScript ```js import { openai } from "@ai-sdk/openai"; import { generateText } from "ai"; export default { async fetch(request, env) { // Parse incoming url const url = new URL(request.url); // Get the user query or default to a predefined one const userQuery = url.searchParams.get("query") ?? "How do I train a llama to deliver coffee?"; // Search for documents in AutoRAG const searchResult = await env.AI.autorag("my-rag").search({ query: userQuery, }); if (searchResult.data.length === 0) { // No matching documents return Response.json({ text: `No data found for query "${userQuery}"` }); } // Join all document chunks into a single string const chunks = searchResult.data .map((item) => { const data = item.content .map((content) => { return content.text; }) .join("\n\n"); return `${data}`; }) .join("\n\n"); // Send the user query + matched documents to openai for answer const generateResult = await generateText({ model: openai("gpt-4o-mini"), messages: [ { role: "system", content: "You are a helpful assistant and your task is to answer the user question using the provided files.", }, { role: "user", content: chunks }, { role: "user", content: userQuery }, ], }); // Return the generated answer return Response.json({ text: generateResult.text }); }, }; ``` * TypeScript ```ts import { openai } from "@ai-sdk/openai"; import { generateText } from "ai"; export interface Env { AI: Ai; OPENAI_API_KEY: string; } export default { async fetch(request, env): Promise { // Parse incoming url const url = new URL(request.url); // Get the user query or default to a predefined one const userQuery = url.searchParams.get("query") ?? "How do I train a llama to deliver coffee?"; // Search for documents in AutoRAG const searchResult = await env.AI.autorag("my-rag").search({ query: userQuery, }); if (searchResult.data.length === 0) { // No matching documents return Response.json({ text: `No data found for query "${userQuery}"` }); } // Join all document chunks into a single string const chunks = searchResult.data .map((item) => { const data = item.content .map((content) => { return content.text; }) .join("\n\n"); return `${data}`; }) .join("\n\n"); // Send the user query + matched documents to openai for answer const generateResult = await generateText({ model: openai("gpt-4o-mini"), messages: [ { role: "system", content: "You are a helpful assistant and your task is to answer the user question using the provided files.", }, { role: "user", content: chunks }, { role: "user", content: userQuery }, ], }); // Return the generated answer return Response.json({ text: generateResult.text }); }, } satisfies ExportedHandler; ``` --- title: Create multitenancy · AutoRAG description: AutoRAG supports multitenancy by letting you segment content by tenant, so each user, customer, or workspace can only access their own data. This is typically done by organizing documents into per-tenant folders and applying metadata filters at query time. lastUpdated: 2025-06-19T17:04:00.000Z chatbotDeprioritize: false source_url: html: https://developers.cloudflare.com/autorag/how-to/multitenancy/ md: https://developers.cloudflare.com/autorag/how-to/multitenancy/index.md --- AutoRAG supports multitenancy by letting you segment content by tenant, so each user, customer, or workspace can only access their own data. This is typically done by organizing documents into per-tenant folders and applying [metadata filters](https://developers.cloudflare.com/autorag/configuration/metadata/) at query time. ## 1. Organize Content by Tenant When uploading files to R2, structure your content by tenant using unique folder paths. Example folder structure: When indexing, AutoRAG will automatically store the folder path as metadata under the `folder` attribute. It is recommended to enforce folder separation during upload or indexing to prevent accidental data access across tenants. ## 2. Search Using Folder Filters To ensure a tenant only retrieves their own documents, apply a `folder` filter when performing a search. Example using [Workers Binding](https://developers.cloudflare.com/autorag/usage/workers-binding/): ```js const response = await env.AI.autorag("my-autorag").search({ query: "When did I sign my agreement contract?", filters: { type: "eq", key: "folder", value: `customer-a/contracts/`, }, }); ``` To filter across multiple folders, or to add date-based filtering, you can use a compound filter with an array of [comparison filters](https://developers.cloudflare.com/autorag/configuration/metadata/#compound-filter). ## Tip: Use "Starts with" filter While an `eq` filter targets files at the specific folder, you'll often want to retrieve all documents belonging to a tenant regardless if there are files in its subfolders. For example, all files in `customer-a/` with a structure like: To achieve this [starts with](https://developers.cloudflare.com/autorag/configuration/metadata/#starts-with-filter-for-folders) behavior, use a compound filter like: ```js filters: { type: "and", filters: [ { type: "gt", key: "folder", value: "customer-a//", }, { type: "lte", key: "folder", value: "customer-a/z", }, ], }, ``` This filter identifies paths starting with `customer-a/` by using: * The `and` condition to combine the effects of the `gt` and `lte` conditions. * The `gt` condition to include paths greater than the `/` ASCII character. * The `lte` condition to include paths less than and including the lower case `z` ASCII character. This filter captures both files `profile.md` and `contract-1.pdf`. --- title: Create a simple search engine · AutoRAG description: By using the search method, you can implement a simple but fast search engine. This example uses Workers Binding, but can be easily adapted to use the REST API instead. lastUpdated: 2025-06-26T18:43:59.000Z chatbotDeprioritize: false source_url: html: https://developers.cloudflare.com/autorag/how-to/simple-search-engine/ md: https://developers.cloudflare.com/autorag/how-to/simple-search-engine/index.md --- By using the `search` method, you can implement a simple but fast search engine. This example uses [Workers Binding](https://developers.cloudflare.com/autorag/usage/workers-binding/), but can be easily adapted to use the [REST API](https://developers.cloudflare.com/autorag/usage/rest-api/) instead. To replicate this example remember to: * Disable `rewrite_query`, as you want to match the original user query * Configure your AutoRAG to have small chunk sizes, usually 256 tokens is enough - JavaScript ```js export default { async fetch(request, env) { const url = new URL(request.url); const userQuery = url.searchParams.get("query") ?? "How do I train a llama to deliver coffee?"; const searchResult = await env.AI.autorag("my-rag").search({ query: userQuery, rewrite_query: false, }); return Response.json({ files: searchResult.data.map((obj) => obj.filename), }); }, }; ``` - TypeScript ```ts export interface Env { AI: Ai; } export default { async fetch(request, env): Promise { const url = new URL(request.url); const userQuery = url.searchParams.get("query") ?? "How do I train a llama to deliver coffee?"; const searchResult = await env.AI.autorag("my-rag").search({ query: userQuery, rewrite_query: false, }); return Response.json({ files: searchResult.data.map((obj) => obj.filename), }); }, } satisfies ExportedHandler; ``` --- title: Limits & pricing · AutoRAG description: "During the open beta, AutoRAG is free to enable. When you create an AutoRAG instance, it provisions and runs on top of Cloudflare services in your account. These resources are billed as part of your Cloudflare usage, and includes:" lastUpdated: 2025-06-19T17:04:00.000Z chatbotDeprioritize: false source_url: html: https://developers.cloudflare.com/autorag/platform/limits-pricing/ md: https://developers.cloudflare.com/autorag/platform/limits-pricing/index.md --- ## Pricing During the open beta, AutoRAG is **free to enable**. When you create an AutoRAG instance, it provisions and runs on top of Cloudflare services in your account. These resources are **billed as part of your Cloudflare usage**, and includes: | Service & Pricing | Description | | - | - | | [**R2**](https://developers.cloudflare.com/r2/pricing/) | Stores your source data | | [**Vectorize**](https://developers.cloudflare.com/vectorize/platform/pricing/) | Stores vector embeddings and powers semantic search | | [**Workers AI**](https://developers.cloudflare.com/workers-ai/platform/pricing/) | Handles image-to-Markdown conversion, embedding, query rewriting, and response generation | | [**AI Gateway**](https://developers.cloudflare.com/ai-gateway/reference/pricing/) | Monitors and controls model usage | For more information about how each resource is used within AutoRAG, reference [How AutoRAG works](https://developers.cloudflare.com/autorag/concepts/how-autorag-works/). ## Limits The following limits currently apply to AutoRAG during the open beta: | Limit | Value | | - | - | | Max AutoRAG instances per account | 10 | | Max files per AutoRAG | 100,000 | | Max file size | 4 MB | These limits are subject to change as AutoRAG evolves beyond open beta. --- title: Release note · AutoRAG description: Review recent changes to Cloudflare AutoRAG. lastUpdated: 2025-04-06T23:41:56.000Z chatbotDeprioritize: false source_url: html: https://developers.cloudflare.com/autorag/platform/release-note/ md: https://developers.cloudflare.com/autorag/platform/release-note/index.md --- This release notes section covers regular updates and minor fixes. For major feature releases or significant updates, see the [changelog](https://developers.cloudflare.com/changelog). ## 2025-07-08 **Reduced cooldown between syncs** The cooldown period between sync jobs has been reduced to **3 minutes**, allowing you to trigger syncs more frequently when updating your data. If a sync is requested during the cooldown window, the dashboard and API now return clear response indicating that the sync cannot proceed due to the cooldown. ## 2025-06-16 **Rich format file size limit increased to 4 MB** You can now index rich format files (e.g., PDF) up to 4 MB in size, up from the previous 1 MB limit. ## 2025-06-12 **Index processing status displayed on dashboard** The dashboard now includes a new “Processing” step for the indexing pipeline that displays the files currently being processed. ## 2025-06-12 **Sync AutoRAG REST API published** You can now trigger a sync job for an AutoRAG using the [Sync REST API](https://developers.cloudflare.com/api/resources/autorag/subresources/rags/methods/sync/). This scans your data source for changes and queues updated or previously errored files for indexing. ## 2025-06-10 **Files modified in the data source will now be updated** Files modified in your source R2 bucket will now be updated in the AutoRAG index during the next sync. For example, if you upload a new version of an existing file, the changes will be reflected in the index after the subsequent sync job. Please note that deleted files are not yet removed from the index. We are actively working on this functionality. ## 2025-05-31 **Errored files will now be retried in next sync** Files that failed to index will now be automatically retried in the next indexing job. For instance, if a file initially failed because it was oversized but was then corrected (e.g. replaced with a file of the same name/key within the size limit), it will be re-attempted during the next scheduled sync. ## 2025-05-31 **Fixed character cutoff in recursive chunking** Resolved an issue where certain characters (e.g. '#') were being cut off during the recursive chunking and embedding process. This fix ensures complete character processing in the indexing process. ## 2025-05-25 **EU jurisdiction R2 buckets now supported** AutoRAG now supports R2 buckets configured with European Union (EU) jurisdiction restrictions. Previously, files in EU-restricted R2 buckets would not index when linked. This issue has been resolved, and all EU-restricted R2 buckets should now function as expected. ## 2025-04-23 **Response streaming in AutoRAG binding added** AutoRAG now supports response streaming in the `AI Search` method of the [Workers binding](https://developers.cloudflare.com/autorag/usage/workers-binding/), allowing you to stream results as they’re retrieved by setting `stream: true`. ## 2025-04-07 **AutoRAG is now in open beta!** AutoRAG allows developers to create fully-managed retrieval-augmented generation (RAG) pipelines powered by Cloudflare allowing developers to integrate context-aware AI into their applications without managing infrastructure. Get started today on the [Cloudflare Dashboard](https://dash.cloudflare.com/?to=/:account/ai/autorag). --- title: Build a RAG from your website · AutoRAG description: AutoRAG is designed to work out of the box with data in R2 buckets. But what if your content lives on a website or needs to be rendered dynamically? lastUpdated: 2025-06-26T18:43:59.000Z chatbotDeprioritize: false source_url: html: https://developers.cloudflare.com/autorag/tutorial/brower-rendering-autorag-tutorial/ md: https://developers.cloudflare.com/autorag/tutorial/brower-rendering-autorag-tutorial/index.md --- AutoRAG is designed to work out of the box with data in R2 buckets. But what if your content lives on a website or needs to be rendered dynamically? In this tutorial, we’ll walk through how to: 1. Render your website using Cloudflare's Browser Rendering API 2. Store the rendered HTML in R2 3. Connect it to AutoRAG for querying ## Step 1. Create a Worker to fetch webpages and upload into R2 We’ll create a Cloudflare Worker that uses Puppeteer to visit your URL, render it, and store the full HTML in your R2 bucket. If you already have an R2 bucket with content you’d like to build a RAG for then you can skip this step. 1. Create a new Worker project named `browser-r2-worker` by running: ```bash npm create cloudflare@latest -- browser-r2-worker ``` For setup, select the following options: * For *What would you like to start with*?, choose `Hello World example`. * For *Which template would you like to use*?, choose `Worker only`. * For *Which language do you want to use*?, choose `TypeScript`. * For *Do you want to use git for version control*?, choose `Yes`. * For *Do you want to deploy your application*?, choose `No` (we will be making some changes before deploying). 1. Install `@cloudflare/puppeteer`, which allows you to control the Browser Rendering instance: ```bash npm i @cloudflare/puppeteer ``` 1. Create a new R2 bucket named `html-bucket` by running: ```bash npx wrangler r2 bucket create html-bucket ``` 1. Add the following configurations to your Wrangler configuration file so your Worker can use browser rendering and your new R2 bucket: ```jsonc { "compatibility_flags": ["nodejs_compat"], "browser": { "binding": "MY_BROWSER", }, "r2_buckets": [ { "binding": "HTML_BUCKET", "bucket_name": "html-bucket", }, ], } ``` 1. Replace the contents of `src/index.ts` with the following skeleton script: * JavaScript ```js import puppeteer from "@cloudflare/puppeteer"; // Define our environment bindings // Define request body structure export default { async fetch(request, env) { // Only accept POST requests if (request.method !== "POST") { return new Response("Please send a POST request with a target URL", { status: 405, }); } // Get URL from request body const body = await request.json(); // Note: Only use this parser for websites you own const targetUrl = new URL(body.url); // Launch browser and create new page const browser = await puppeteer.launch(env.MY_BROWSER); const page = await browser.newPage(); // Navigate to the page and fetch its html await page.goto(targetUrl.href); const htmlPage = await page.content(); // Create filename and store in R2 const key = targetUrl.hostname + "_" + Date.now() + ".html"; await env.HTML_BUCKET.put(key, htmlPage); // Close browser await browser.close(); // Return success response return new Response( JSON.stringify({ success: true, message: "Page rendered and stored successfully", key: key, }), { headers: { "Content-Type": "application/json" }, }, ); }, }; ``` * TypeScript ```ts import puppeteer from "@cloudflare/puppeteer"; // Define our environment bindings interface Env { MY_BROWSER: any; HTML_BUCKET: R2Bucket; } // Define request body structure interface RequestBody { url: string; } export default { async fetch(request: Request, env: Env): Promise { // Only accept POST requests if (request.method !== "POST") { return new Response("Please send a POST request with a target URL", { status: 405, }); } // Get URL from request body const body = (await request.json()) as RequestBody; // Note: Only use this parser for websites you own const targetUrl = new URL(body.url); // Launch browser and create new page const browser = await puppeteer.launch(env.MY_BROWSER); const page = await browser.newPage(); // Navigate to the page and fetch its html await page.goto(targetUrl.href); const htmlPage = await page.content(); // Create filename and store in R2 const key = targetUrl.hostname + "_" + Date.now() + ".html"; await env.HTML_BUCKET.put(key, htmlPage); // Close browser await browser.close(); // Return success response return new Response( JSON.stringify({ success: true, message: "Page rendered and stored successfully", key: key, }), { headers: { "Content-Type": "application/json" }, }, ); }, } satisfies ExportedHandler; ``` 1. Once the code is ready, you can deploy it to your Cloudflare account by running: ```bash npx wrangler deploy ``` 1. To test your Worker, you can use the following cURL request to fetch the HTML file of a page. In this example we are fetching this page to upload into the `html-bucket` bucket: ```bash curl -X POST https://browser-r2-worker..workers.dev \ -H "Content-Type: application/json" \ -d '{"url": "https://developers.cloudflare.com/autorag/tutorial/brower-rendering-autorag-tutorial/"}' ``` ## Step 2. Create your AutoRAG and monitor the indexing Now that you have created your R2 bucket and filled it with your content that you’d like to query from, you are ready to create an AutoRAG instance: 1. In your [Cloudflare Dashboard](https://dash.cloudflare.com/?to=/:account/ai/autorag), navigate to AI > AutoRAG 2. Select Create AutoRAG and complete the setup process: 1. Select the **R2 bucket** which contains your knowledge base, in this case, select the `html-bucket`. 2. Select an **embedding model** used to convert your data to vector representation. It is recommended to use the Default. 3. Select an **LLM** to use to generate your responses. It is recommended to use the Default. 4. Select or create an **AI Gateway** to monitor and control your model usage. 5. **Name** your AutoRAG as `my-rag` 6. Select or create a **Service API** token to grant AutoRAG access to create and access resources in your account. 3. Select Create to spin up your AutoRAG. Once you’ve created your AutoRAG, it will automatically create a Vectorize database in your account and begin indexing the data. You can view the progress of your indexing job in the Overview page of your AutoRAG. ![AutoRAG Overview page](https://developers.cloudflare.com/_astro/tutorial-indexing-page.z5T474L5_2eSF9A.webp) ## Step 3. Test and add to your application Once AutoRAG finishes indexing your content, you’re ready to start asking it questions. You can open up your AutoRAG instance, navigate to the Playground tab, and ask a question based on your uploaded content, like “What is AutoRAG?”. Once you’re happy with the results in the Playground, you can integrate AutoRAG directly into the application that you are building. If you are using a Worker to build your [RAG application](https://developers.cloudflare.com/autorag/), then you can use the AI binding to directly call your AutoRAG: ```jsonc { "ai": { "binding": "AI", }, } ``` Then, query your AutoRAG instance from your Worker code by calling the `aiSearch()` method. ```javascript const answer = await env.AI.autorag("my-rag").aiSearch({ query: "What is AutoRAG?", }); ``` For more information on how to add AutoRAG into your application, go to your AutoRAG then navigate to Use AutoRAG for more instructions. --- title: REST API · AutoRAG description: This guide will instruct you through how to use the AutoRAG REST API to make a query to your AutoRAG. lastUpdated: 2025-05-29T18:16:56.000Z chatbotDeprioritize: false source_url: html: https://developers.cloudflare.com/autorag/usage/rest-api/ md: https://developers.cloudflare.com/autorag/usage/rest-api/index.md --- This guide will instruct you through how to use the AutoRAG REST API to make a query to your AutoRAG. ## Prerequisite: Get AutoRAG API token You need an API token with the `AutoRAG - Read` and `AutoRAG Edit` permissions to use the REST API. To create a new token: 1. Log in to the [Cloudflare dashboard](https://dash.cloudflare.com) and select your account. 2. Go to **AI** > **AutoRAG** and select your AutoRAG. 3. Select **Use AutoRAG** then select **API**. 4. Select **Create an API Token**. 5. Review the prefilled information then select **Create API Token**. 6. Select **Copy API Token** and save that value for future use. ## AI Search This REST API searches for relevant results from your data source and generates a response using the model and the retrieved relevant context: ```bash curl https://api.cloudflare.com/client/v4/accounts/{ACCOUNT_ID}/autorag/rags/{AUTORAG_NAME}/ai-search \ -H 'Content-Type: application/json' \ -H "Authorization: Bearer {API_TOKEN}" \ -d '{ "query": "How do I train a llama to deliver coffee?", "model": @cf/meta/llama-3.3-70b-instruct-sd, "rewrite_query": false, "max_num_results": 10, "ranking_options": { "score_threshold": 0.3 }, "stream": true, }' ``` Note You can get your `ACCOUNT_ID` by navigating to [Workers & Pages on the dashboard](https://developers.cloudflare.com/fundamentals/account/find-account-and-zone-ids/#find-account-id-workers-and-pages). ### Parameters `query` string required The input query. `model` string optional The text-generation model that is used to generate the response for the query. For a list of valid options, check the AutoRAG Generation model Settings. Defaults to the generation model selected in the AutoRAG Settings. `rewrite_query` boolean optional Rewrites the original query into a search optimized query to improve retrieval accuracy. Defaults to `false`. `max_num_results` number optional The maximum number of results that can be returned from the Vectorize database. Defaults to `10`. Must be between `1` and `50`. `ranking_options` object optional Configurations for customizing result ranking. Defaults to `{}`. * `score_threshold` number optional * The minimum match score required for a result to be considered a match. Defaults to `0`. Must be between `0` and `1`. `stream` boolean optional Returns a stream of results as they are available. Defaults to `false`. `filters` object optional Narrow down search results based on metadata, like folder and date, so only relevant content is retrieved. For more details, refer to [Metadata filtering](https://developers.cloudflare.com/autorag/configuration/metadata/). ### Response This is the response structure without `stream` enabled. ```sh { "success": true, "result": { "object": "vector_store.search_results.page", "search_query": "How do I train a llama to deliver coffee?", "response": "To train a llama to deliver coffee:\n\n1. **Build trust** — Llamas appreciate patience (and decaf).\n2. **Know limits** — Max 3 cups per llama, per `llama-logistics.md`.\n3. **Use voice commands** — Start with \"Espresso Express!\"\n4.", "data": [ { "file_id": "llama001", "filename": "llama/logistics/llama-logistics.md", "score": 0.45, "attributes": { "modified_date": 1735689600000, // unix timestamp for 2025-01-01 "folder": "llama/logistics/", }, "content": [ { "id": "llama001", "type": "text", "text": "Llamas can carry 3 drinks max." } ] }, { "file_id": "llama042", "filename": "llama/llama-commands.md", "score": 0.4, "attributes": { "modified_date": 1735689600000, // unix timestamp for 2025-01-01 "folder": "llama/", }, "content": [ { "id": "llama042", "type": "text", "text": "Start with basic commands like 'Espresso Express!' Llamas love alliteration." } ] }, ], "has_more": false, "next_page": null } } ``` ## Search This REST API searches for results from your data source and returns the relevant results: ```bash curl https://api.cloudflare.com/client/v4/accounts/{ACCOUNT_ID}/autorag/rags/{AUTORAG_NAME}/search \ -H 'Content-Type: application/json' \ -H "Authorization: Bearer {API_TOKEN}" \ -d '{ "query": "How do I train a llama to deliver coffee?", "rewrite_query": true, "max_num_results": 10, "ranking_options": { "score_threshold": 0.3 }, }' ``` Note You can get your `ACCOUNT_ID` by navigating to Workers & Pages on the dashboard, and copying the Account ID under Account Details. ### Parameters `query` string required The input query. `rewrite_query` boolean optional Rewrites the original query into a search optimized query to improve retrieval accuracy. Defaults to `false`. `max_num_results` number optional The maximum number of results that can be returned from the Vectorize database. Defaults to `10`. Must be between `1` and `50`. `ranking_options` object optional Configurations for customizing result ranking. Defaults to `{}`. * `score_threshold` number optional * The minimum match score required for a result to be considered a match. Defaults to `0`. Must be between `0` and `1`. `filters` object optional Narrow down search results based on metadata, like folder and date, so only relevant content is retrieved. For more details, refer to [Metadata filtering](https://developers.cloudflare.com/autorag/configuration/metadata). ### Response ```sh { "success": true, "result": { "object": "vector_store.search_results.page", "search_query": "How do I train a llama to deliver coffee?", "data": [ { "file_id": "llama001", "filename": "llama/logistics/llama-logistics.md", "score": 0.45, "attributes": { "modified_date": 1735689600000, // unix timestamp for 2025-01-01 "folder": "llama/logistics/", }, "content": [ { "id": "llama001", "type": "text", "text": "Llamas can carry 3 drinks max." } ] }, { "file_id": "llama042", "filename": "llama/llama-commands.md", "score": 0.4, "attributes": { "modified_date": 1735689600000, // unix timestamp for 2025-01-01 "folder": "llama/", }, "content": [ { "id": "llama042", "type": "text", "text": "Start with basic commands like 'Espresso Express!' Llamas love alliteration." } ] }, ], "has_more": false, "next_page": null } } ``` --- title: Workers Binding · AutoRAG description: Cloudflare’s serverless platform allows you to run code at the edge to build full-stack applications with Workers. A binding enables your Worker or Pages Function to interact with resources on the Cloudflare Developer Platform. lastUpdated: 2025-04-24T05:06:04.000Z chatbotDeprioritize: false source_url: html: https://developers.cloudflare.com/autorag/usage/workers-binding/ md: https://developers.cloudflare.com/autorag/usage/workers-binding/index.md --- Cloudflare’s serverless platform allows you to run code at the edge to build full-stack applications with [Workers](https://developers.cloudflare.com/workers/). A [binding](https://developers.cloudflare.com/workers/runtime-apis/bindings/) enables your Worker or Pages Function to interact with resources on the Cloudflare Developer Platform. To use your AutoRAG with Workers or Pages, create an AI binding either in the Cloudflare dashboard (refer to [AI bindings](https://developers.cloudflare.com/pages/functions/bindings/#workers-ai) for instructions), or you can update your [Wrangler file](https://developers.cloudflare.com/workers/wrangler/configuration/). To bind AutoRAG to your Worker, add the following to your Wrangler file: * wrangler.jsonc ```jsonc { "ai": { "binding": "AI" } } ``` * wrangler.toml ```toml [ai] binding = "AI" # i.e. available in your Worker on env.AI ``` ## `aiSearch()` This method searches for relevant results from your data source and generates a response using your default model and the retrieved context, for an AutoRAG named `my-autorag`: ```js const answer = await env.AI.autorag("my-autorag").aiSearch({ query: "How do I train a llama to deliver coffee?", model: "@cf/meta/llama-3.3-70b-instruct-sd", rewrite_query: true, max_num_results: 2, ranking_options: { score_threshold: 0.3, }, stream: true, }); ``` ### Parameters `query` string required The input query. `model` string optional The text-generation model that is used to generate the response for the query. For a list of valid options, check the AutoRAG Generation model Settings. Defaults to the generation model selected in the AutoRAG Settings. `rewrite_query` boolean optional Rewrites the original query into a search optimized query to improve retrieval accuracy. Defaults to `false`. `max_num_results` number optional The maximum number of results that can be returned from the Vectorize database. Defaults to `10`. Must be between `1` and `50`. `ranking_options` object optional Configurations for customizing result ranking. Defaults to `{}`. * `score_threshold` number optional * The minimum match score required for a result to be considered a match. Defaults to `0`. Must be between `0` and `1`. `stream` boolean optional Returns a stream of results as they are available. Defaults to `false`. `filters` object optional Narrow down search results based on metadata, like folder and date, so only relevant content is retrieved. For more details, refer to [Metadata filtering](https://developers.cloudflare.com/autorag/configuration/metadata/). ### Response This is the response structure without `stream` enabled. ```sh { "object": "vector_store.search_results.page", "search_query": "How do I train a llama to deliver coffee?", "response": "To train a llama to deliver coffee:\n\n1. **Build trust** — Llamas appreciate patience (and decaf).\n2. **Know limits** — Max 3 cups per llama, per `llama-logistics.md`.\n3. **Use voice commands** — Start with \"Espresso Express!\"\n4.", "data": [ { "file_id": "llama001", "filename": "llama/logistics/llama-logistics.md", "score": 0.45, "attributes": { "modified_date": 1735689600000, // unix timestamp for 2025-01-01 "folder": "llama/logistics/", }, "content": [ { "id": "llama001", "type": "text", "text": "Llamas can carry 3 drinks max." } ] }, { "file_id": "llama042", "filename": "llama/llama-commands.md", "score": 0.4, "attributes": { "modified_date": 1735689600000, // unix timestamp for 2025-01-01 "folder": "llama/", }, "content": [ { "id": "llama042", "type": "text", "text": "Start with basic commands like 'Espresso Express!' Llamas love alliteration." } ] }, ], "has_more": false, "next_page": null } ``` ## `search()` This method searches for results from your corpus and returns the relevant results, for the AutoRAG instance named `my-autorag`: ```js const answer = await env.AI.autorag("my-autorag").search({ query: "How do I train a llama to deliver coffee?", rewrite_query: true, max_num_results: 2, ranking_options: { score_threshold: 0.3, }, }); ``` ### Parameters `query` string required The input query. `rewrite_query` boolean optional Rewrites the original query into a search optimized query to improve retrieval accuracy. Defaults to `false`. `max_num_results` number optional The maximum number of results that can be returned from the Vectorize database. Defaults to `10`. Must be between `1` and `50`. `ranking_options` object optional Configurations for customizing result ranking. Defaults to `{}`. * `score_threshold` number optional * The minimum match score required for a result to be considered a match. Defaults to `0`. Must be between `0` and `1`. `filters` object optional Narrow down search results based on metadata, like folder and date, so only relevant content is retrieved. For more details, refer to [Metadata filtering](https://developers.cloudflare.com/autorag/configuration/metadata). ### Response ```sh { "object": "vector_store.search_results.page", "search_query": "How do I train a llama to deliver coffee?", "data": [ { "file_id": "llama001", "filename": "llama/logistics/llama-logistics.md", "score": 0.45, "attributes": { "modified_date": 1735689600000, // unix timestamp for 2025-01-01 "folder": "llama/logistics/", }, "content": [ { "id": "llama001", "type": "text", "text": "Llamas can carry 3 drinks max." } ] }, { "file_id": "llama042", "filename": "llama/llama-commands.md", "score": 0.4, "attributes": { "modified_date": 1735689600000, // unix timestamp for 2025-01-01 "folder": "llama/", }, "content": [ { "id": "llama042", "type": "text", "text": "Start with basic commands like 'Espresso Express!' Llamas love alliteration." } ] }, ], "has_more": false, "next_page": null } ``` ## Local development Local development is supported by proxying requests to your deployed AutoRAG instance. When running in local mode, your application forwards queries to the configured remote AutoRAG instance and returns the generated responses as if they were served locally. --- title: Use browser rendering with AI · Browser Rendering docs description: >- The ability to browse websites can be crucial when building workflows with AI. Here, we provide an example where we use Browser Rendering to visit https://labs.apnic.net/ and then, using a machine learning model available in Workers AI, extract the first post as JSON with a specified schema. lastUpdated: 2025-04-01T20:54:24.000Z chatbotDeprioritize: false source_url: html: https://developers.cloudflare.com/browser-rendering/how-to/ai/ md: https://developers.cloudflare.com/browser-rendering/how-to/ai/index.md --- The ability to browse websites can be crucial when building workflows with AI. Here, we provide an example where we use Browser Rendering to visit `https://labs.apnic.net/` and then, using a machine learning model available in [Workers AI](https://developers.cloudflare.com/workers-ai/), extract the first post as JSON with a specified schema. ## Prerequisites 1. Use the `create-cloudflare` CLI to generate a new Hello World Cloudflare Worker script: ```sh npm create cloudflare@latest -- browser-worker ``` 1. Install `@cloudflare/puppeteer`, which allows you to control the Browser Rendering instance: ```sh npm i @cloudflare/puppeteer ``` 1. Install `zod` so we can define our output format and `zod-to-json-schema` so we can convert it into a JSON schema format: ```sh npm i zod npm i zod-to-json-schema ``` 1. Activate the nodejs compatibility flag and add your Browser Rendering binding to your new Wrangler configuration: * wrangler.jsonc ```jsonc { "compatibility_flags": [ "nodejs_compat" ] } ``` * wrangler.toml ```toml compatibility_flags = [ "nodejs_compat" ] ``` - wrangler.jsonc ```jsonc { "browser": { "binding": "MY_BROWSER" } } ``` - wrangler.toml ```toml [browser] binding = "MY_BROWSER" ``` 1. In order to use [Workers AI](https://developers.cloudflare.com/workers-ai/), you need to get your [Account ID and API token](https://developers.cloudflare.com/workers-ai/get-started/rest-api/#1-get-api-token-and-account-id). Once you have those, create a [`.dev.vars`](https://developers.cloudflare.com/workers/configuration/environment-variables/#add-environment-variables-via-wrangler) file and set them there: ```plaintext ACCOUNT_ID= API_TOKEN= ``` We use `.dev.vars` here since it's only for local development, otherwise you'd use [Secrets](https://developers.cloudflare.com/workers/configuration/secrets/). ## Load the page using Browser Rendering In the code below, we launch a browser using `await puppeteer.launch(env.MY_BROWSER)`, extract the rendered text and close the browser. Then, with the user prompt, the desired output schema and the rendered text, prepare a prompt to send to the LLM. Replace the contents of `src/index.ts` with the following skeleton script: ```ts import { z } from "zod"; import puppeteer from "@cloudflare/puppeteer"; import zodToJsonSchema from "zod-to-json-schema"; export default { async fetch(request, env) { const url = new URL(request.url); if (url.pathname != "/") { return new Response("Not found"); } // Your prompt and site to scrape const userPrompt = "Extract the first post only."; const targetUrl = "https://labs.apnic.net/"; // Launch browser const browser = await puppeteer.launch(env.MY_BROWSER); const page = await browser.newPage(); await page.goto(targetUrl); // Get website text const renderedText = await page.evaluate(() => { // @ts-ignore js code to run in the browser context const body = document.querySelector("body"); return body ? body.innerText : ""; }); // Close browser since we no longer need it await browser.close(); // define your desired json schema const outputSchema = zodToJsonSchema( z.object({ title: z.string(), url: z.string(), date: z.string() }) ); // Example prompt const prompt = ` You are a sophisticated web scraper. You are given the user data extraction goal and the JSON schema for the output data format. Your task is to extract the requested information from the text and output it in the specified JSON schema format: ${JSON.stringify(outputSchema)} DO NOT include anything else besides the JSON output, no markdown, no plaintext, just JSON. User Data Extraction Goal: ${userPrompt} Text extracted from the webpage: ${renderedText}`; // TODO call llm //const result = await getLLMResult(env, prompt, outputSchema); //return Response.json(result); } } satisfies ExportedHandler; ``` ## Call an LLM Having the webpage text, the user's goal and output schema, we can now use an LLM to transform it to JSON according to the user's request. The example below uses `@hf/thebloke/deepseek-coder-6.7b-instruct-awq` but other [models](https://developers.cloudflare.com/workers-ai/models/) or services like OpenAI, could be used with minimal changes: ````ts async function getLLMResult(env, prompt: string, schema?: any) { const model = "@hf/thebloke/deepseek-coder-6.7b-instruct-awq" const requestBody = { messages: [{ role: "user", content: prompt }], }; const aiUrl = `https://api.cloudflare.com/client/v4/accounts/${env.ACCOUNT_ID}/ai/run/${model}` const response = await fetch(aiUrl, { method: "POST", headers: { "Content-Type": "application/json", Authorization: `Bearer ${env.API_TOKEN}`, }, body: JSON.stringify(requestBody), }); if (!response.ok) { console.log(JSON.stringify(await response.text(), null, 2)); throw new Error(`LLM call failed ${aiUrl} ${response.status}`); } // process response const data = await response.json(); const text = data.result.response || ''; const value = (text.match(/```(?:json)?\s*([\s\S]*?)\s*```/) || [null, text])[1]; try { return JSON.parse(value); } catch(e) { console.error(`${e} . Response: ${value}`) } } ```` If you want to use Browser Rendering with OpenAI instead you'd just need to change the `aiUrl` endpoint and `requestBody` (or check out the [llm-scraper-worker](https://www.npmjs.com/package/llm-scraper-worker) package). ## Conclusion The full Worker script now looks as follows: ````ts import { z } from "zod"; import puppeteer from "@cloudflare/puppeteer"; import zodToJsonSchema from "zod-to-json-schema"; export default { async fetch(request, env) { const url = new URL(request.url); if (url.pathname != "/") { return new Response("Not found"); } // Your prompt and site to scrape const userPrompt = "Extract the first post only."; const targetUrl = "https://labs.apnic.net/"; // Launch browser const browser = await puppeteer.launch(env.MY_BROWSER); const page = await browser.newPage(); await page.goto(targetUrl); // Get website text const renderedText = await page.evaluate(() => { // @ts-ignore js code to run in the browser context const body = document.querySelector("body"); return body ? body.innerText : ""; }); // Close browser since we no longer need it await browser.close(); // define your desired json schema const outputSchema = zodToJsonSchema( z.object({ title: z.string(), url: z.string(), date: z.string() }) ); // Example prompt const prompt = ` You are a sophisticated web scraper. You are given the user data extraction goal and the JSON schema for the output data format. Your task is to extract the requested information from the text and output it in the specified JSON schema format: ${JSON.stringify(outputSchema)} DO NOT include anything else besides the JSON output, no markdown, no plaintext, just JSON. User Data Extraction Goal: ${userPrompt} Text extracted from the webpage: ${renderedText}`; // call llm const result = await getLLMResult(env, prompt, outputSchema); return Response.json(result); } } satisfies ExportedHandler; async function getLLMResult(env, prompt: string, schema?: any) { const model = "@hf/thebloke/deepseek-coder-6.7b-instruct-awq" const requestBody = { messages: [{ role: "user", content: prompt }], }; const aiUrl = `https://api.cloudflare.com/client/v4/accounts/${env.ACCOUNT_ID}/ai/run/${model}` const response = await fetch(aiUrl, { method: "POST", headers: { "Content-Type": "application/json", Authorization: `Bearer ${env.API_TOKEN}`, }, body: JSON.stringify(requestBody), }); if (!response.ok) { console.log(JSON.stringify(await response.text(), null, 2)); throw new Error(`LLM call failed ${aiUrl} ${response.status}`); } // process response const data = await response.json() as { result: { response: string }}; const text = data.result.response || ''; const value = (text.match(/```(?:json)?\s*([\s\S]*?)\s*```/) || [null, text])[1]; try { return JSON.parse(value); } catch(e) { console.error(`${e} . Response: ${value}`) } } ```` You can run this script to test it using Wrangler's `--remote` flag: ```sh npx wrangler dev --remote ``` With your script now running, you can go to `http://localhost:8787/` and should see something like the following: ```json { "title": "IP Addresses in 2024", "url": "http://example.com/ip-addresses-in-2024", "date": "11 Jan 2025" } ``` For more complex websites or prompts, you might need a better model. Check out the latest models in [Workers AI](https://developers.cloudflare.com/workers-ai/models/). --- title: Generate PDFs Using HTML and CSS · Browser Rendering docs description: As seen in this Workers bindings guide, Browser Rendering can be used to generate screenshots for any given URL. Alongside screenshots, you can also generate full PDF documents for a given webpage, and can also provide the webpage markup and style ourselves. lastUpdated: 2025-06-24T20:37:11.000Z chatbotDeprioritize: false source_url: html: https://developers.cloudflare.com/browser-rendering/how-to/pdf-generation/ md: https://developers.cloudflare.com/browser-rendering/how-to/pdf-generation/index.md --- As seen in [this Workers bindings guide](https://developers.cloudflare.com/browser-rendering/workers-bindings/screenshots/), Browser Rendering can be used to generate screenshots for any given URL. Alongside screenshots, you can also generate full PDF documents for a given webpage, and can also provide the webpage markup and style ourselves. ## Prerequisites 1. Use the `create-cloudflare` CLI to generate a new Hello World Cloudflare Worker script: * npm ```sh npm create cloudflare@latest -- browser-worker ``` * yarn ```sh yarn create cloudflare browser-worker ``` * pnpm ```sh pnpm create cloudflare@latest browser-worker ``` 1. Install `@cloudflare/puppeteer`, which allows you to control the Browser Rendering instance: * npm ```sh npm i -D @cloudflare/puppeteer ``` * yarn ```sh yarn add -D @cloudflare/puppeteer ``` * pnpm ```sh pnpm add -D @cloudflare/puppeteer ``` 1. Add your Browser Rendering binding to your new Wrangler configuration: * wrangler.jsonc ```jsonc { "browser": { "binding": "BROWSER" } } ``` * wrangler.toml ```toml browser = { binding = "BROWSER" } ``` 1. Replace the contents of `src/index.ts` (or `src/index.js` for JavaScript projects) with the following skeleton script: ```ts import puppeteer from "@cloudflare/puppeteer"; const generateDocument = (name: string) => {}; export default { async fetch(request, env) { const { searchParams } = new URL(request.url); let name = searchParams.get("name"); if (!name) { return new Response("Please provide a name using the ?name= parameter"); } const browser = await puppeteer.launch(env.BROWSER); const page = await browser.newPage(); // Step 1: Define HTML and CSS const document = generateDocument(name); // Step 2: Send HTML and CSS to our browser await page.setContent(document); // Step 3: Generate and return PDF return new Response(); }, }; ``` ## 1. Define HTML and CSS Rather than using Browser Rendering to navigate to a user-provided URL, manually generate a webpage, then provide that webpage to the Browser Rendering instance. This allows you to render any design you want. Note You can generate your HTML or CSS using any method you like. This example uses string interpolation, but the method is also fully compatible with web frameworks capable of rendering HTML on Workers such as React, Remix, and Vue. For this example, we are going to take in user-provided content (via a '?name=' parameter), and have that name output in the final PDF document. To start, fill out your `generateDocument` function with the following: ```ts const generateDocument = (name: string) => { return `
This is to certify that ${name} has rendered a PDF using Cloudflare Workers
`; }; ``` This example HTML document should render a beige background imitating a certificate showing that the user-provided name has successfully rendered a PDF using Cloudflare Workers. Note It is usually best to avoid directly interpolating user-provided content into an image or PDF renderer in production applications. To render contents like an invoice, it would be best to validate the data input and fetch the data yourself using tools like [D1](https://developers.cloudflare.com/d1/) or [Workers KV](https://developers.cloudflare.com/kv/). ## 2. Load HTML and CSS Into Browser Now that you have your fully styled HTML document, you can take the contents and send it to your browser instance. Create an empty page to store this document as follows: ```ts const browser = await puppeteer.launch(env.BROWSER); const page = await browser.newPage(); ``` The [`page.setContent()`](https://github.com/cloudflare/puppeteer/blob/main/docs/api/puppeteer.page.setcontent.md) function can then be used to set the page's HTML contents from a string, so you can pass in your created document directly like so: ```ts await page.setContent(document); ``` ## 3. Generate and Return PDF With your Browser Rendering instance now rendering your provided HTML and CSS, you can use the [`page.pdf()`](https://github.com/cloudflare/puppeteer/blob/main/docs/api/puppeteer.page.pdf.md) command to generate a PDF file and return it to the client. ```ts let pdf = page.pdf({ printBackground: true }); ``` The `page.pdf()` call supports a [number of options](https://github.com/cloudflare/puppeteer/blob/main/docs/api/puppeteer.pdfoptions.md), including setting the dimensions of the generated PDF to a specific paper size, setting specific margins, and allowing fully-transparent backgrounds. For now, you are only overriding the `printBackground` option to allow your `body` background styles to show up. Now that you have your PDF data, return it to the client in the `Response` with an `application/pdf` content type: ```ts return new Response(pdf, { headers: { "content-type": "application/pdf", }, }); ``` ## Conclusion The full Worker script now looks as follows: ```ts import puppeteer from "@cloudflare/puppeteer"; const generateDocument = (name: string) => { return `
This is to certify that ${name} has rendered a PDF using Cloudflare Workers
`; }; export default { async fetch(request, env) { const { searchParams } = new URL(request.url); let name = searchParams.get("name"); if (!name) { return new Response("Please provide a name using the ?name= parameter"); } const browser = await puppeteer.launch(env.BROWSER); const page = await browser.newPage(); // Step 1: Define HTML and CSS const document = generateDocument(name); // // Step 2: Send HTML and CSS to our browser await page.setContent(document); // // Step 3: Generate and return PDF const pdf = await page.pdf({ printBackground: true }); // Close browser since we no longer need it await browser.close(); return new Response(pdf, { headers: { "content-type": "application/pdf", }, }); }, }; ``` You can run this script to test it using Wrangler’s `--remote` flag: * npm ```sh npx wrangler dev --remote ``` * yarn ```sh yarn wrangler dev --remote ``` * pnpm ```sh pnpm wrangler dev --remote ``` With your script now running, you can pass in a `?name` parameter to the local URL (such as `http://localhost:8787/?name=Harley`) and should see the following: ![A screenshot of a generated PDF, with the author's name shown in a mock certificate.](https://developers.cloudflare.com/_astro/pdf-generation.Diel53Hp_F2F5w.webp) *** Dynamically generating PDF documents solves a number of common use-cases, from invoicing customers to archiving documents to creating dynamic certificates (as seen in the simple example here).
--- title: Build a web crawler with Queues and Browser Rendering · Browser Rendering docs lastUpdated: 2025-03-03T12:01:31.000Z chatbotDeprioritize: false source_url: html: https://developers.cloudflare.com/browser-rendering/how-to/queues/ md: https://developers.cloudflare.com/browser-rendering/how-to/queues/index.md --- --- title: Browser close reasons · Browser Rendering docs description: A browser session may close for a variety of reasons, occasionally due to connection errors or errors in the headless browser instance. As a best practice, wrap puppeteer.connect or puppeteer.launch in a try/catch statement. lastUpdated: 2024-08-13T19:56:56.000Z chatbotDeprioritize: false source_url: html: https://developers.cloudflare.com/browser-rendering/platform/browser-close-reasons/ md: https://developers.cloudflare.com/browser-rendering/platform/browser-close-reasons/index.md --- A browser session may close for a variety of reasons, occasionally due to connection errors or errors in the headless browser instance. As a best practice, wrap `puppeteer.connect` or `puppeteer.launch` in a [`try/catch`](https://developer.mozilla.org/en-US/docs/Web/JavaScript/Reference/Statements/try...catch) statement. The reason that a browser closed can be found on the Browser Rendering Dashboard in the [logs tab](https://dash.cloudflare.com/?to=/:account/workers/browser-renderingl/logs). When Cloudflare begins charging for the Browser Rendering API, we will not charge when errors are due to underlying Browser Rendering infrastructure. | Reasons a session may end | | - | | User opens and closes browser normally. | | Browser is idle for 60 seconds. | | Chromium instance crashes. | | Error connecting with the client, server, or Worker. | | Browser session is evicted. | --- title: Limits · Browser Rendering docs description: Learn about the limits associated with Browser Rendering. lastUpdated: 2025-06-06T17:06:03.000Z chatbotDeprioritize: false source_url: html: https://developers.cloudflare.com/browser-rendering/platform/limits/ md: https://developers.cloudflare.com/browser-rendering/platform/limits/index.md --- Available on Free and Paid plans ## Workers Free Users on the [Workers Free plan](https://developers.cloudflare.com/workers/platform/pricing/) are limited to **10 minutes of browser rendering usage per day**. To increase this limit, you’ll need to [upgrade to a Workers Paid plan](https://developers.cloudflare.com/workers/platform/pricing). | Feature | Limit | | - | - | | Concurrent browsers per account (Workers Bindings only) | 3 per account | | New browser instances per minute (Workers Bindings only) | 3 per minute | | Browser timeout | 60 seconds [1](#user-content-fn-2) | | Total requests per min (REST API only) | 6 per minute | ## Workers Paid Need a higher limit? These limits will be raised once we are ready to start charging for this service. If you need higher limits sooner, complete the [Limit Increase Request Form](https://forms.gle/CdueDKvb26mTaepa9). If the limit can be increased, Cloudflare will contact you with next steps. | Feature | Limit | | - | - | | Concurrent browsers per account (Workers Bindings only) | 10 per account [2](#user-content-fn-1) | | New browser instances per minute (Workers Bindings only) | 10 per minute [2](#user-content-fn-1) | | Browser timeout | 60 seconds [1](#user-content-fn-2)[2](#user-content-fn-1) | | Total requests per min (REST API only) | 60 per minute | ## Note on concurrency While the limits above define the maximum number of concurrent browser sessions per account, in practice you may not need to hit these limits. Browser sessions close automatically—by default, after 60 seconds of inactivity or upon task completion—so if each session finishes its work before a new request comes in, the effective concurrency is lower. This means that most workflows do not require very high concurrent browser limits. ## Pricing Browser Rendering service is currently available at no cost up to the limits specified above **until billing begins**. Pricing to be announced and we will provide advance notice before any billing begins. ## Footnotes 1. By default, a browser instance gets killed if it does not get any [devtools](https://chromedevtools.github.io/devtools-protocol/) command for 60 seconds, freeing one instance. Users can optionally increase this by using the `keep_alive` [option](https://developers.cloudflare.com/browser-rendering/platform/puppeteer/#keep-alive). `browser.close()` releases the browser instance. [↩](#user-content-fnref-2) [↩2](#user-content-fnref-2-2) 2. Contact our team to request increases to this limit. [↩](#user-content-fnref-1) [↩2](#user-content-fnref-1-2) [↩3](#user-content-fnref-1-3) --- title: Playwright (beta) · Browser Rendering docs description: Learn how to use Playwright with Cloudflare Workers for browser automation. Access Playwright API, manage sessions, and optimize browser rendering. lastUpdated: 2025-06-24T20:37:11.000Z chatbotDeprioritize: false source_url: html: https://developers.cloudflare.com/browser-rendering/platform/playwright/ md: https://developers.cloudflare.com/browser-rendering/platform/playwright/index.md --- [Playwright](https://playwright.dev/) is an open-source package developed by Microsoft that can do browser automation tasks; it is commonly used to write frontend tests, create screenshots, or crawl pages. The Workers team forked a [version of Playwright](https://github.com/cloudflare/playwright) that was modified to be compatible with [Cloudflare Workers](https://developers.cloudflare.com/workers/) and [Browser Rendering](https://developers.cloudflare.com/browser-rendering/). Our version is open sourced and can be found in [Cloudflare's fork of Playwright](https://github.com/cloudflare/playwright). The npm package can be installed from [npmjs](https://www.npmjs.com/) as [@cloudflare/playwright](https://www.npmjs.com/package/@cloudflare/playwright): * npm ```sh npm i -D @cloudflare/playwright ``` * yarn ```sh yarn add -D @cloudflare/playwright ``` * pnpm ```sh pnpm add -D @cloudflare/playwright ``` ## Use Playwright in a Worker Make sure you have the [browser binding](https://developers.cloudflare.com/browser-rendering/platform/wrangler/#bindings) configured in your `wrangler.toml` file: * wrangler.jsonc ```jsonc { "name": "cloudflare-playwright-example", "main": "src/index.ts", "workers_dev": true, "compatibility_flags": [ "nodejs_compat_v2" ], "compatibility_date": "2025-03-05", "upload_source_maps": true, "dev": { "port": 9000 }, "browser": { "binding": "MYBROWSER" } } ``` * wrangler.toml ```toml name = "cloudflare-playwright-example" main = "src/index.ts" workers_dev = true compatibility_flags = ["nodejs_compat_v2"] compatibility_date = "2025-03-05" upload_source_maps = true [dev] port = 9000 [browser] binding = "MYBROWSER" ``` Install the npm package: * npm ```sh npm i -D @cloudflare/playwright ``` * yarn ```sh yarn add -D @cloudflare/playwright ``` * pnpm ```sh pnpm add -D @cloudflare/playwright ``` Let's look at some examples of how to use Playwright: ### Take a screenshot Using browser automation to take screenshots of web pages is a common use case. This script tells the browser to navigate to , create some items, take a screenshot of the page, and return the image in the response. ```ts import { launch, type BrowserWorker } from "@cloudflare/playwright"; interface Env { MYBROWSER: BrowserWorker; } export default { async fetch(request: Request, env: Env) { const browser = await launch(env.MYBROWSER); const page = await browser.newPage(); await page.goto("https://demo.playwright.dev/todomvc"); const TODO_ITEMS = [ "buy some cheese", "feed the cat", "book a doctors appointment", ]; const newTodo = page.getByPlaceholder("What needs to be done?"); for (const item of TODO_ITEMS) { await newTodo.fill(item); await newTodo.press("Enter"); } const img = await page.screenshot(); await browser.close(); return new Response(img, { headers: { "Content-Type": "image/png", }, }); }, }; ``` ### Trace A Playwright trace is a detailed log of your workflow execution that captures information like user clicks and navigation actions, screenshots of the page, and any console messages generated and used for debugging. Developers can take a `trace.zip` file and either open it [locally](https://playwright.dev/docs/trace-viewer#opening-the-trace) or upload it to the [Playwright Trace Viewer](https://trace.playwright.dev/), a GUI tool that helps you explore the data. Here's an example of a worker generating a trace file: ```ts import { launch, type BrowserWorker } from "@cloudflare/playwright"; import fs from "@cloudflare/playwright/fs"; interface Env { MYBROWSER: BrowserWorker; } export default { async fetch(request: Request, env: Env) { const browser = await launch(env.MYBROWSER); const page = await browser.newPage(); // Start tracing before navigating to the page await page.context().tracing.start({ screenshots: true, snapshots: true }); await page.goto("https://demo.playwright.dev/todomvc"); const TODO_ITEMS = [ "buy some cheese", "feed the cat", "book a doctors appointment", ]; const newTodo = page.getByPlaceholder("What needs to be done?"); for (const item of TODO_ITEMS) { await newTodo.fill(item); await newTodo.press("Enter"); } // Stop tracing and save the trace to a zip file await page.context().tracing.stop({ path: "trace.zip" }); await browser.close(); const file = await fs.promises.readFile("trace.zip"); return new Response(file, { status: 200, headers: { "Content-Type": "application/zip", }, }); }, }; ``` ### Assertions One of the most common use cases for using Playwright is software testing. Playwright includes test assertion features in its APIs; refer to [Assertions](https://playwright.dev/docs/test-assertions) in the Playwright documentation for details. Here's an example of a Worker doing `expect()` test assertions of the [todomvc](https://demo.playwright.dev/todomvc) demo page: ```ts import { launch, type BrowserWorker } from "@cloudflare/playwright"; import { expect } from "@cloudflare/playwright/test"; interface Env { MYBROWSER: BrowserWorker; } export default { async fetch(request: Request, env: Env) { const browser = await launch(env.MYBROWSER); const page = await browser.newPage(); await page.goto("https://demo.playwright.dev/todomvc"); const TODO_ITEMS = [ "buy some cheese", "feed the cat", "book a doctors appointment", ]; const newTodo = page.getByPlaceholder("What needs to be done?"); for (const item of TODO_ITEMS) { await newTodo.fill(item); await newTodo.press("Enter"); } await expect(page.getByTestId("todo-title")).toHaveCount(TODO_ITEMS.length); await Promise.all( TODO_ITEMS.map((value, index) => expect(page.getByTestId("todo-title").nth(index)).toHaveText(value), ), ); }, }; ``` ### Keep Alive If users omit the `browser.close()` statement, the browser instance will stay open, ready to be connected to again and [re-used](https://developers.cloudflare.com/browser-rendering/workers-bindings/reuse-sessions/) but it will, by default, close automatically after 1 minute of inactivity. Users can optionally extend this idle time up to 10 minutes, by using the `keep_alive` option, set in milliseconds: ```js const browser = await playwright.launch(env.MYBROWSER, { keep_alive: 600000 }); ``` Using the above, the browser will stay open for up to 10 minutes, even if inactive. ## Session management In order to facilitate browser session management, we have extended the Playwright API with new methods: ### List open sessions `playwright.sessions()` lists the current running sessions. It will return an output similar to this: ```json [ { "connectionId": "2a2246fa-e234-4dc1-8433-87e6cee80145", "connectionStartTime": 1711621704607, "sessionId": "478f4d7d-e943-40f6-a414-837d3736a1dc", "startTime": 1711621703708 }, { "sessionId": "565e05fb-4d2a-402b-869b-5b65b1381db7", "startTime": 1711621703808 } ] ``` Notice that the session `478f4d7d-e943-40f6-a414-837d3736a1dc` has an active worker connection (`connectionId=2a2246fa-e234-4dc1-8433-87e6cee80145`), while session `565e05fb-4d2a-402b-869b-5b65b1381db7` is free. While a connection is active, no other workers may connect to that session. ### List recent sessions `playwright.history()` lists recent sessions, both open and closed. It is useful to get a sense of your current usage. ```json [ { "closeReason": 2, "closeReasonText": "BrowserIdle", "endTime": 1711621769485, "sessionId": "478f4d7d-e943-40f6-a414-837d3736a1dc", "startTime": 1711621703708 }, { "closeReason": 1, "closeReasonText": "NormalClosure", "endTime": 1711123501771, "sessionId": "2be00a21-9fb6-4bb2-9861-8cd48e40e771", "startTime": 1711123430918 } ] ``` Session `2be00a21-9fb6-4bb2-9861-8cd48e40e771` was closed explicitly with `browser.close()` by the client, while session `478f4d7d-e943-40f6-a414-837d3736a1dc` was closed due to reaching the maximum idle time (check [limits](https://developers.cloudflare.com/browser-rendering/platform/limits/)). You should also be able to access this information in the dashboard, albeit with a slight delay. ### Active limits `playwright.limits()` lists your active limits: ```json { "activeSessions": [ { "id": "478f4d7d-e943-40f6-a414-837d3736a1dc" }, { "id": "565e05fb-4d2a-402b-869b-5b65b1381db7" } ], "allowedBrowserAcquisitions": 1, "maxConcurrentSessions": 2, "timeUntilNextAllowedBrowserAcquisition": 0 } ``` * `activeSessions` lists the IDs of the current open sessions * `maxConcurrentSessions` defines how many browsers can be open at the same time * `allowedBrowserAcquisitions` specifies if a new browser session can be opened according to the rate [limits](https://developers.cloudflare.com/browser-rendering/platform/limits/) in place * `timeUntilNextAllowedBrowserAcquisition` defines the waiting period before a new browser can be launched. ## Playwright API The full Playwright API can be found at the [Playwright API documentation](https://playwright.dev/docs/api/class-playwright). Note that `@cloudflare/playwright` is in beta. The following capabilities are not yet fully supported, but we’re actively working on them: * [API Testing](https://playwright.dev/docs/api-testing) * [Playwright Test](https://playwright.dev/docs/test-configuration) except [Assertions](https://playwright.dev/docs/test-assertions) * [Components](https://playwright.dev/docs/test-components) * [Firefox](https://playwright.dev/docs/api/class-playwright#playwright-firefox), [Android](https://playwright.dev/docs/api/class-android) and [Electron](https://playwright.dev/docs/api/class-electron), as well as different versions of Chrome * [Network](https://playwright.dev/docs/next/network#network) * [Videos](https://playwright.dev/docs/next/videos) This is **not an exhaustive list** — expect rapid changes as we work toward broader parity with the original feature set. You can also check [latest test results](https://playwright-full-test-report.pages.dev/) for a granular up to date list of the features that are fully supported. --- title: Playwright MCP · Browser Rendering docs description: Deploy a Playwright MCP server that uses Browser Rendering to provide browser automation capabilities to your agents. lastUpdated: 2025-06-03T15:59:13.000Z chatbotDeprioritize: false source_url: html: https://developers.cloudflare.com/browser-rendering/platform/playwright-mcp/ md: https://developers.cloudflare.com/browser-rendering/platform/playwright-mcp/index.md --- [`@cloudflare/playwright-mcp`](https://github.com/cloudflare/playwright-mcp) is a [Playwright MCP](https://github.com/microsoft/playwright-mcp) server fork that provides browser automation capabilities using Playwright and Browser Rendering. This server enables LLMs to interact with web pages through structured accessibility snapshots, bypassing the need for screenshots or visually-tuned models. Its key features are: * Fast and lightweight. Uses Playwright's accessibility tree, not pixel-based input. * LLM-friendly. No vision models needed, operates purely on structured data. * Deterministic tool application. Avoids ambiguity common with screenshot-based approaches. ## Deploying Follow these steps to deploy `@cloudflare/playwright-mcp`: 1. Install the Playwright MCP [npm package](https://www.npmjs.com/package/@cloudflare/playwright-mcp). * npm ```sh npm i -D @cloudflare/playwright-mcp ``` * yarn ```sh yarn add -D @cloudflare/playwright-mcp ``` * pnpm ```sh pnpm add -D @cloudflare/playwright-mcp ``` 1. Make sure you have the [browser rendering](https://developers.cloudflare.com/browser-rendering/) and [durable object](https://developers.cloudflare.com/durable-objects/) bindings and [migrations](https://developers.cloudflare.com/durable-objects/reference/durable-objects-migrations/) in your wrangler configuration file. * wrangler.jsonc ```jsonc { "name": "playwright-mcp-example", "main": "src/index.ts", "compatibility_date": "2025-03-10", "compatibility_flags": [ "nodejs_compat" ], "browser": { "binding": "BROWSER" }, "migrations": [ { "tag": "v1", "new_sqlite_classes": [ "PlaywrightMCP" ] } ], "durable_objects": { "bindings": [ { "name": "MCP_OBJECT", "class_name": "PlaywrightMCP" } ] } } ``` * wrangler.toml ```toml name = "playwright-mcp-example" main = "src/index.ts" compatibility_date = "2025-03-10" compatibility_flags = ["nodejs_compat"] [browser] binding = "BROWSER" [[migrations]] tag = "v1" new_sqlite_classes = ["PlaywrightMCP"] [[durable_objects.bindings]] name = "MCP_OBJECT" class_name = "PlaywrightMCP" ``` 1. Edit the code. ```ts import { env } from 'cloudflare:workers'; import { createMcpAgent } from '@cloudflare/playwright-mcp'; export const PlaywrightMCP = createMcpAgent(env.BROWSER); export default PlaywrightMCP.mount('/sse'); ``` 1. Deploy the server. ```bash npx wrangler deploy ``` The server is now available at `https://[my-mcp-url].workers.dev/sse` and you can use it with any MCP client. Alternatively, use [Deploy to Cloudflare](https://developers.cloudflare.com/workers/platform/deploy-buttons/): [![Deploy to Cloudflare](https://deploy.workers.cloudflare.com/button)](https://deploy.workers.cloudflare.com/?url=https://github.com/cloudflare/playwright-mcp/tree/main/cloudflare/example) Check our [GitHub page](https://github.com/cloudflare/playwright-mcp) for more information on how to build and deploy Playwright MCP. ## Using Playwright MCP ![alt text](https://developers.cloudflare.com/_astro/playground-ai-screenshot.v44jFMBu_2abDuJ.webp) [Cloudflare AI Playground](https://playground.ai.cloudflare.com/) is a great way to test MCP servers using LLM models available in Workers AI. * Navigate to * Ensure that the model is set to `llama-3.3-70b-instruct-fp8-fast` * In **MCP Servers**, set **URL** to `https://[my-mcp-url].workers.dev/sse` * Click **Connect** * Status should update to **Connected** and it should list 23 available tools You can now start to interact with the model, and it will run necessary the tools to accomplish what was requested. Note For best results, give simple instructions consisting of one single action, e.g. "Create a new todo entry", "Go to cloudflare site", "Take a screenshot" Try this sequence of instructions to see Playwright MCP in action: 1. "Go to demo.playwright.dev/todomvc" 2. "Create some todo entry" 3. "Nice. Now create a todo in parrot style" 4. "And create another todo in Yoda style" 5. "Take a screenshot" You can also use other MCP clients like [Claude Desktop](https://github.com/cloudflare/playwright-mcp/blob/main/cloudflare/example/README.md#use-with-claude-desktop). Check our [GitHub page](https://github.com/cloudflare/playwright-mcp) for more examples and MCP client configuration options and our developer documentation on how to [build Agents on Cloudflare](https://developers.cloudflare.com/agents/). --- title: Pricing · Browser Rendering docs description: Browser Rendering service is currently available at no cost up to the limits specified until billing begins. Pricing to be announced and we will provide advance notice before any billing begins. lastUpdated: 2025-05-06T15:58:40.000Z chatbotDeprioritize: false source_url: html: https://developers.cloudflare.com/browser-rendering/platform/pricing/ md: https://developers.cloudflare.com/browser-rendering/platform/pricing/index.md --- Browser Rendering service is currently available at no cost up to the [limits](https://developers.cloudflare.com/browser-rendering/platform/limits/) specified until billing begins. Pricing to be announced and we will provide advance notice before any billing begins. --- title: Puppeteer · Browser Rendering docs description: Learn how to use Puppeteer with Cloudflare Workers for browser automation. Access Puppeteer API, manage sessions, and optimize browser rendering. lastUpdated: 2025-06-26T18:43:59.000Z chatbotDeprioritize: false source_url: html: https://developers.cloudflare.com/browser-rendering/platform/puppeteer/ md: https://developers.cloudflare.com/browser-rendering/platform/puppeteer/index.md --- [Puppeteer](https://pptr.dev/) is one of the most popular libraries that abstract the lower-level DevTools protocol from developers and provides a high-level API that you can use to easily instrument Chrome/Chromium and automate browsing sessions. Puppeteer is used for tasks like creating screenshots, crawling pages, and testing web applications. Puppeteer typically connects to a local Chrome or Chromium browser using the DevTools port. Refer to the [Puppeteer API documentation on the `Puppeteer.connect()` method](https://pptr.dev/api/puppeteer.puppeteer.connect) for more information. The Workers team forked a version of Puppeteer and patched it to connect to the Workers Browser Rendering API instead. After connecting, the developers can then use the full [Puppeteer API](https://github.com/cloudflare/puppeteer/blob/main/docs/api/index.md) as they would on a standard setup. Our version is open sourced and can be found in [Cloudflare's fork of Puppeteer](https://github.com/cloudflare/puppeteer). The npm can be installed from [npmjs](https://www.npmjs.com/) as [@cloudflare/puppeteer](https://www.npmjs.com/package/@cloudflare/puppeteer): * npm ```sh npm i -D @cloudflare/puppeteer ``` * yarn ```sh yarn add -D @cloudflare/puppeteer ``` * pnpm ```sh pnpm add -D @cloudflare/puppeteer ``` ## Use Puppeteer in a Worker Once the [browser binding](https://developers.cloudflare.com/browser-rendering/platform/wrangler/#bindings) is configured and the `@cloudflare/puppeteer` library is installed, Puppeteer can be used in a Worker: * JavaScript ```js import puppeteer from "@cloudflare/puppeteer"; export default { async fetch(request, env) { const browser = await puppeteer.launch(env.MYBROWSER); const page = await browser.newPage(); await page.goto("https://example.com"); const metrics = await page.metrics(); await browser.close(); return Response.json(metrics); }, }; ``` * TypeScript ```ts import puppeteer from "@cloudflare/puppeteer"; interface Env { MYBROWSER: Fetcher; } export default { async fetch(request, env): Promise { const browser = await puppeteer.launch(env.MYBROWSER); const page = await browser.newPage(); await page.goto("https://example.com"); const metrics = await page.metrics(); await browser.close(); return Response.json(metrics); }, } satisfies ExportedHandler; ``` This script [launches](https://pptr.dev/api/puppeteer.puppeteernode.launch) the `env.MYBROWSER` browser, opens a [new page](https://pptr.dev/api/puppeteer.browser.newpage), [goes to](https://pptr.dev/api/puppeteer.page.goto) , gets the page load [metrics](https://pptr.dev/api/puppeteer.page.metrics), [closes](https://pptr.dev/api/puppeteer.browser.close) the browser and prints metrics in JSON. ### Keep Alive If users omit the `browser.close()` statement, it will stay open, ready to be connected to again and [re-used](https://developers.cloudflare.com/browser-rendering/workers-bindings/reuse-sessions/) but it will, by default, close automatically after 1 minute of inactivity. Users can optionally extend this idle time up to 10 minutes, by using the `keep_alive` option, set in milliseconds: ```js const browser = await puppeteer.launch(env.MYBROWSER, { keep_alive: 600000 }); ``` Using the above, the browser will stay open for up to 10 minutes, even if inactive. ## Session management In order to facilitate browser session management, we've added new methods to `puppeteer`: ### List open sessions `puppeteer.sessions()` lists the current running sessions. It will return an output similar to this: ```json [ { "connectionId": "2a2246fa-e234-4dc1-8433-87e6cee80145", "connectionStartTime": 1711621704607, "sessionId": "478f4d7d-e943-40f6-a414-837d3736a1dc", "startTime": 1711621703708 }, { "sessionId": "565e05fb-4d2a-402b-869b-5b65b1381db7", "startTime": 1711621703808 } ] ``` Notice that the session `478f4d7d-e943-40f6-a414-837d3736a1dc` has an active worker connection (`connectionId=2a2246fa-e234-4dc1-8433-87e6cee80145`), while session `565e05fb-4d2a-402b-869b-5b65b1381db7` is free. While a connection is active, no other workers may connect to that session. ### List recent sessions `puppeteer.history()` lists recent sessions, both open and closed. It's useful to get a sense of your current usage. ```json [ { "closeReason": 2, "closeReasonText": "BrowserIdle", "endTime": 1711621769485, "sessionId": "478f4d7d-e943-40f6-a414-837d3736a1dc", "startTime": 1711621703708 }, { "closeReason": 1, "closeReasonText": "NormalClosure", "endTime": 1711123501771, "sessionId": "2be00a21-9fb6-4bb2-9861-8cd48e40e771", "startTime": 1711123430918 } ] ``` Session `2be00a21-9fb6-4bb2-9861-8cd48e40e771` was closed explicitly with `browser.close()` by the client, while session `478f4d7d-e943-40f6-a414-837d3736a1dc` was closed due to reaching the maximum idle time (check [limits](https://developers.cloudflare.com/browser-rendering/platform/limits/)). You should also be able to access this information in the dashboard, albeit with a slight delay. ### Active limits `puppeteer.limits()` lists your active limits: ```json { "activeSessions": [ "478f4d7d-e943-40f6-a414-837d3736a1dc", "565e05fb-4d2a-402b-869b-5b65b1381db7" ], "allowedBrowserAcquisitions": 1, "maxConcurrentSessions": 2, "timeUntilNextAllowedBrowserAcquisition": 0 } ``` * `activeSessions` lists the IDs of the current open sessions * `maxConcurrentSessions` defines how many browsers can be open at the same time * `allowedBrowserAcquisitions` specifies if a new browser session can be opened according to the rate [limits](https://developers.cloudflare.com/browser-rendering/platform/limits/) in place * `timeUntilNextAllowedBrowserAcquisition` defines the waiting period before a new browser can be launched. ## Puppeteer API The full Puppeteer API can be found in the [Cloudflare's fork of Puppeteer](https://github.com/cloudflare/puppeteer/blob/main/docs/api/index.md). --- title: Wrangler · Browser Rendering docs description: Use Wrangler, a command-line tool, to deploy projects using Cloudflare's Workers Browser Rendering API. lastUpdated: 2025-07-15T16:42:15.000Z chatbotDeprioritize: false source_url: html: https://developers.cloudflare.com/browser-rendering/platform/wrangler/ md: https://developers.cloudflare.com/browser-rendering/platform/wrangler/index.md --- [Wrangler](https://developers.cloudflare.com/workers/wrangler/) is a command-line tool for building with Cloudflare developer products. Use Wrangler to deploy projects that use the Workers Browser Rendering API. ## Install To install Wrangler, refer to [Install and Update Wrangler](https://developers.cloudflare.com/workers/wrangler/install-and-update/). ## Bindings [Bindings](https://developers.cloudflare.com/workers/runtime-apis/bindings/) allow your Workers to interact with resources on the Cloudflare developer platform. A browser binding will provide your Worker with an authenticated endpoint to interact with a dedicated Chromium browser instance. To deploy a Browser Rendering Worker, you must declare a [browser binding](https://developers.cloudflare.com/workers/runtime-apis/bindings/) in your Worker's Wrangler configuration file. Note To enable built-in Node.js APIs and polyfills, add the nodejs\_compat compatibility flag to your [Wrangler configuration file](https://developers.cloudflare.com/workers/wrangler/configuration/). This also enables nodejs\_compat\_v2 as long as your compatibility date is 2024-09-23 or later. [Learn more about the Node.js compatibility flag and v2](https://developers.cloudflare.com/workers/configuration/compatibility-flags/#nodejs-compatibility-flag). * wrangler.jsonc ```jsonc { "name": "browser-rendering", "main": "src/index.ts", "workers_dev": true, "compatibility_flags": [ "nodejs_compat_v2" ], "browser": { "binding": "MYBROWSER" } } ``` * wrangler.toml ```toml # Top-level configuration name = "browser-rendering" main = "src/index.ts" workers_dev = true compatibility_flags = ["nodejs_compat_v2"] browser = { binding = "MYBROWSER" } ``` After the binding is declared, access the DevTools endpoint using `env.MYBROWSER` in your Worker code: ```javascript const browser = await puppeteer.launch(env.MYBROWSER); ``` Run `npx wrangler dev` to test your Worker locally or run [`npx wrangler dev --remote`](https://developers.cloudflare.com/workers/wrangler/commands/#dev) to test your Worker remotely before deploying to Cloudflare's global network. --- title: Automatic request headers · Browser Rendering docs description: Cloudflare automatically attaches headers to every REST API request made through Browser Rendering. These headers make it easy for destination servers to identify that these requests came from Cloudflare. lastUpdated: 2025-06-30T20:45:40.000Z chatbotDeprioritize: false source_url: html: https://developers.cloudflare.com/browser-rendering/reference/automatic-request-headers/ md: https://developers.cloudflare.com/browser-rendering/reference/automatic-request-headers/index.md --- Cloudflare automatically attaches headers to every [REST API](https://developers.cloudflare.com/browser-rendering/rest-api/) request made through Browser Rendering. These headers make it easy for destination servers to identify that these requests came from Cloudflare. Note These headers are meant to ensure transparency and cannot be removed or overridden (with `setExtraHTTPHeaders`, for example). | Header | Description | | - | - | | `cf-biso-request-id` | A unique identifier for the Browser Rendering request | | `cf-biso-devtools` | A flag indicating the request originated from Cloudflare's rendering infrastructure | | `Signature-agent` | [The location of the bot public keys](https://web-bot-auth.cloudflare-browser-rendering-085.workers.dev), used to sign the request and verify it came from Cloudflare | | `Signature` and `Signature-input` | A digital signature, used to validate requests, as shown in [this architecture document](https://datatracker.ietf.org/doc/html/draft-meunier-web-bot-auth-architecture) | The `Signature` headers use an authentication method called [Web Bot Auth](https://developers.cloudflare.com/bots/concepts/bot/verified-bots/web-bot-auth/). Web Bot Auth leverages cryptographic signatures in HTTP messages to verify that a request comes from an automated bot. To verify a request originated from Cloudflare Browser Rendering, use the keys found on [this directory](https://web-bot-auth.cloudflare-browser-rendering-085.workers.dev/.well-known/http-message-signatures-directory) to verify the `Signature` and `Signature-Input` found in the headers from the incoming request. A successful verification proves that the request originated from Cloudflare Browser Rendering and has not been tampered with in transit. --- title: Reference · Browser Rendering docs lastUpdated: 2025-04-04T13:14:40.000Z chatbotDeprioritize: false source_url: html: https://developers.cloudflare.com/browser-rendering/rest-api/api-reference/ md: https://developers.cloudflare.com/browser-rendering/rest-api/api-reference/index.md --- --- title: /content - Fetch HTML · Browser Rendering docs description: The /content endpoint instructs the browser to navigate to a website and capture the fully rendered HTML of a page, including the head section, after JavaScript execution. This is ideal for capturing content from JavaScript-heavy or interactive websites. lastUpdated: 2025-04-29T16:56:49.000Z chatbotDeprioritize: false source_url: html: https://developers.cloudflare.com/browser-rendering/rest-api/content-endpoint/ md: https://developers.cloudflare.com/browser-rendering/rest-api/content-endpoint/index.md --- The `/content` endpoint instructs the browser to navigate to a website and capture the fully rendered HTML of a page, including the `head` section, after JavaScript execution. This is ideal for capturing content from JavaScript-heavy or interactive websites. ## Basic usage * curl Go to `https://example.com` and return the rendered HTML. ```bash curl -X 'POST' 'https://api.cloudflare.com/client/v4/accounts//browser-rendering/content' \ -H 'Content-Type: application/json' \ -H 'Authorization: Bearer ' \ -d '{"url": "https://example.com"}' ``` * TypeScript SDK ```typescript import Cloudflare from "cloudflare"; const client = new Cloudflare({ apiEmail: process.env["CLOUDFLARE_EMAIL"], // This is the default and can be omitted apiKey: process.env["CLOUDFLARE_API_KEY"], // This is the default and can be omitted }); const content = await client.browserRendering.content.create({ account_id: "account_id", }); console.log(content); ``` ## Advanced usage Navigate to `https://cloudflare.com/` but block images and stylesheets from loading. Undesired requests can be blocked by resource type (`rejectResourceTypes`) or by using a regex pattern (`rejectRequestPattern`). The opposite can also be done, only allow requests that match `allowRequestPattern` or `allowResourceTypes`. ```bash curl -X POST 'https://api.cloudflare.com/client/v4/accounts//browser-rendering/content' \ -H 'Authorization: Bearer ' \ -H 'Content-Type: application/json' \ -d '{ "url": "https://cloudflare.com/", "rejectResourceTypes": ["image"], "rejectRequestPattern": ["/^.*\\.(css)"] }' ``` Many more options exist, like setting HTTP headers using `setExtraHTTPHeaders`, setting `cookies`, and using `gotoOptions` to control page load behaviour - check the endpoint [reference](https://developers.cloudflare.com/api/resources/browser_rendering/subresources/content/methods/create/) for all available parameters. --- title: /json - Capture structured data · Browser Rendering docs description: The /json endpoint extracts structured data from a webpage. You can specify the expected output using either a prompt or a response_format parameter which accepts a JSON schema. The endpoint returns the extracted data in JSON format. lastUpdated: 2025-05-08T21:19:01.000Z chatbotDeprioritize: false source_url: html: https://developers.cloudflare.com/browser-rendering/rest-api/json-endpoint/ md: https://developers.cloudflare.com/browser-rendering/rest-api/json-endpoint/index.md --- The `/json` endpoint extracts structured data from a webpage. You can specify the expected output using either a `prompt` or a `response_format` parameter which accepts a JSON schema. The endpoint returns the extracted data in JSON format. Note The `/json` endpoint leverages [Workers AI](https://developers.cloudflare.com/workers-ai/) for data extraction. Using this endpoint incurs usage on Workers AI, which you can monitor usage through the Workers AI Dashboard. ## Basic Usage * curl ### With a Prompt and JSON schema This example captures webpage data by providing both a prompt and a JSON schema. The prompt guides the extraction process, while the JSON schema defines the expected structure of the output. ```bash curl --request POST 'https://api.cloudflare.com/client/v4/accounts/CF_ACCOUNT_ID/browser-rendering/json' \ --header 'authorization: Bearer CF_API_TOKEN' \ --header 'content-type: application/json' \ --data '{ "url": "https://developers.cloudflare.com/", "prompt": "Get me the list of AI products", "response_format": { "type": "json_schema", "json_schema": { "type": "object", "properties": { "products": { "type": "array", "items": { "type": "object", "properties": { "name": { "type": "string" }, "link": { "type": "string" } }, "required": [ "name" ] } } } } } }' ``` ```json { "success": true, "result": { "products": [ { "name": "Build a RAG app", "link": "https://developers.cloudflare.com/workers-ai/tutorials/build-a-retrieval-augmented-generation-ai/" }, { "name": "Workers AI", "link": "https://developers.cloudflare.com/workers-ai/" }, { "name": "Vectorize", 13 collapsed lines "link": "https://developers.cloudflare.com/vectorize/" }, { "name": "AI Gateway", "link": "https://developers.cloudflare.com/ai-gateway/" }, { "name": "AI Playground", "link": "https://playground.ai.cloudflare.com/" } ] } } ``` ### With only a prompt In this example, only a prompt is provided. The endpoint will use the prompt to extract the data, but the response will not be structured according to a JSON schema. This is useful for simple extractions where you do not need a specific format. ```bash curl --request POST 'https://api.cloudflare.com/client/v4/accounts/CF_ACCOUNT_ID/browser-rendering/json' \ --header 'authorization: Bearer CF_API_TOKEN' \ --header 'content-type: application/json' \ --data '{ "url": "https://developers.cloudflare.com/", "prompt": "get me the list of AI products" }' ``` ```json "success": true, "result": { "AI Products": [ "Build a RAG app", "Workers AI", "Vectorize", "AI Gateway", "AI Playground" ] } } ``` ### With only a JSON schema (no prompt) In this case, you supply a JSON schema via the `response_format` parameter. The schema defines the structure of the extracted data. ```bash curl --request POST 'https://api.cloudflare.com/client/v4/accounts/CF_ACCOUNT_ID/browser-rendering/json' \ --header 'authorization: Bearer CF_API_TOKEN' \ --header 'content-type: application/json' \ --data '"response_format": { "type": "json_schema", "json_schema": { "type": "object", "properties": { "products": { "type": "array", "items": { "type": "object", "properties": { "name": { "type": "string" }, "link": { "type": "string" } }, "required": [ "name" ] } } } } }' ``` ```json { "success": true, "result": { "products": [ { "name": "Workers", "link": "https://developers.cloudflare.com/workers/" }, { "name": "Pages", "link": "https://developers.cloudflare.com/pages/" }, 55 collapsed lines { "name": "R2", "link": "https://developers.cloudflare.com/r2/" }, { "name": "Images", "link": "https://developers.cloudflare.com/images/" }, { "name": "Stream", "link": "https://developers.cloudflare.com/stream/" }, { "name": "Build a RAG app", "link": "https://developers.cloudflare.com/workers-ai/tutorials/build-a-retrieval-augmented-generation-ai/" }, { "name": "Workers AI", "link": "https://developers.cloudflare.com/workers-ai/" }, { "name": "Vectorize", "link": "https://developers.cloudflare.com/vectorize/" }, { "name": "AI Gateway", "link": "https://developers.cloudflare.com/ai-gateway/" }, { "name": "AI Playground", "link": "https://playground.ai.cloudflare.com/" }, { "name": "Access", "link": "https://developers.cloudflare.com/cloudflare-one/policies/access/" }, { "name": "Tunnel", "link": "https://developers.cloudflare.com/cloudflare-one/connections/connect-networks/" }, { "name": "Gateway", "link": "https://developers.cloudflare.com/cloudflare-one/policies/gateway/" }, { "name": "Browser Isolation", "link": "https://developers.cloudflare.com/cloudflare-one/policies/browser-isolation/" }, { "name": "Replace your VPN", "link": "https://developers.cloudflare.com/learning-paths/replace-vpn/concepts/" } ] } } ``` * TypeScript SDK Below is an example using the TypeScript SDK: ```typescript import Cloudflare from "cloudflare"; const client = new Cloudflare({ apiEmail: process.env["CLOUDFLARE_EMAIL"], // This is the default and can be omitted apiKey: process.env["CLOUDFLARE_API_KEY"], // This is the default and can be omitted }); const json = await client.browserRendering.json.create({ account_id: "account_id", }); console.log(json); ``` --- title: /links - Retrieve links from a webpage · Browser Rendering docs description: The /links endpoint retrieves all links from a webpage. It can be used to extract all links from a page, including those that are hidden. lastUpdated: 2025-05-01T15:14:34.000Z chatbotDeprioritize: false source_url: html: https://developers.cloudflare.com/browser-rendering/rest-api/links-endpoint/ md: https://developers.cloudflare.com/browser-rendering/rest-api/links-endpoint/index.md --- The `/links` endpoint retrieves all links from a webpage. It can be used to extract all links from a page, including those that are hidden. ## Basic usage * curl This example grabs all links from the Cloudflare Developers homepage. The response will be a JSON array containing the links found on the page. ```bash curl -X POST 'https://api.cloudflare.com/client/v4/accounts//browser-rendering/links' \ -H 'Authorization: Bearer ' \ -H 'Content-Type: application/json' \ -d '{ "url": "https://developers.cloudflare.com/" }' ``` ```json { "success": true, "result": [ "https://developers.cloudflare.com/", "https://developers.cloudflare.com/products/", "https://developers.cloudflare.com/api/", "https://developers.cloudflare.com/fundamentals/api/reference/sdks/", "https://dash.cloudflare.com/", "https://developers.cloudflare.com/fundamentals/subscriptions-and-billing/", "https://developers.cloudflare.com/api/", "https://developers.cloudflare.com/changelog/", 64 collapsed lines "https://developers.cloudflare.com/glossary/", "https://developers.cloudflare.com/reference-architecture/", "https://developers.cloudflare.com/web-analytics/", "https://developers.cloudflare.com/support/troubleshooting/http-status-codes/", "https://developers.cloudflare.com/registrar/", "https://developers.cloudflare.com/1.1.1.1/setup/", "https://developers.cloudflare.com/workers/", "https://developers.cloudflare.com/pages/", "https://developers.cloudflare.com/r2/", "https://developers.cloudflare.com/images/", "https://developers.cloudflare.com/stream/", "https://developers.cloudflare.com/products/?product-group=Developer+platform", "https://developers.cloudflare.com/workers-ai/tutorials/build-a-retrieval-augmented-generation-ai/", "https://developers.cloudflare.com/workers-ai/", "https://developers.cloudflare.com/vectorize/", "https://developers.cloudflare.com/ai-gateway/", "https://playground.ai.cloudflare.com/", "https://developers.cloudflare.com/products/?product-group=AI", "https://developers.cloudflare.com/cloudflare-one/policies/access/", "https://developers.cloudflare.com/cloudflare-one/connections/connect-networks/", "https://developers.cloudflare.com/cloudflare-one/policies/gateway/", "https://developers.cloudflare.com/cloudflare-one/policies/browser-isolation/", "https://developers.cloudflare.com/learning-paths/replace-vpn/concepts/", "https://developers.cloudflare.com/products/?product-group=Cloudflare+One", "https://workers.cloudflare.com/playground#LYVwNgLglgDghgJwgegGYHsHALQBM4RwDcABAEbogB2+CAngLzbPYZb6HbW5QDGU2AAwAmAIyiAzMIAsATlmi5ALhYs2wDnC40+AkeKlyFcgLAAoAMLoqEAKY3sAESgBnGOhdRo1pSXV4CYhIqOGBbBgAiKBpbAA8AOgArFwjSVCgwe1DwqJiE5IjzKxt7CGwAFToYW184GBgwPgIoa2REuAA3OBdeBFgIAGpgdFxwW3NzOPckElxbVDhwCBIAbzMSEm66Kl4-WwheAAsACgRbAEcQWxcIAEpV9Y2SXmsbkkOIYDASBhIAAwAPABCRwAeQs5QAmgAFACi70+YAAfI8NgCKLg6Cink8AYdREiABK2MBgdAkADqmDAuAByHx2JxJABMCR5UOrhIwEQAGsQDASAB3bokADm9lsCAItlw5DomxIFjJIFwqDAiFslMwPMl8TprNRzOQGKxfyIZkNZwgIAQVGCtkFJAAStd3FQXLZjh8vgAaB5M962OBzBAuXxrAMbCIvEoOCBVWwRXwROyxFDesBEI6ID0QBgAVXKADFsAAOCI+w0bAC+lZx1du5prlerRHMqmY6k02h4-CEYkkMnkilkRWsdgczjcHi8LSovn8mlIITCkTChE0qT8GSyq4iZDJZEKlnHpQqCdq9UavGarWS1gmZhWEW50QA+sNRpkk7k5vkUtW7Ydl2gQ9ro-YGEOxiyMwQA", "https://workers.cloudflare.com/playground#LYVwNgLglgDghgJwgegGYHsHALQBM4RwDcABAEbogB2+CAngLzbPYZb6HbW5QDGU2AAwB2AMwAWAKyCAjMICc8meIBcLFm2Ac4XGnwEiJ0uYuUBYAFABhdFQgBTO9gAiUAM4x0bqNFsqSmngExCRUcMD2DABEUDT2AB4AdABWblGkqFBgjuGRMXFJqVGWNnaOENgAKnQw9v5wMDBgfARQtsjJcABucG68CLAQANTA6Ljg9paWCZ5IJLj2qHDgECQA3hYkJL10VLwB9hC8ABYAFAj2AI4g9m4QAJTrm1skvLZ388EkDE8vL8f2MBgdD+KIAd0wYFwUQANM8tgBfIgWeEkC4QEAIKgkABKt08VDc9hSblsp2092RiLhSMs6mYmm0uh4-CEYiksgUSnEJVsDicrg8Xh8bSo-kC2lIYQi0QihG06QCWRyMqiZGBZGK1j55SqNTq20azV4rXaqVsUwsayiwDgsQA+qNxtkoip8gtCmkEXT6Yzgsz9GyjJzTOJmEA", "https://workers.cloudflare.com/playground#LYVwNgLglgDghgJwgegGYHsHALQBM4RwDcABAEbogB2+CAngLzbPYZb6HbW5QDGU2AAwBWABwBGAOyjRANgDMAFgCcygFwsWbYBzhcafASInS5S1QFgAUAGF0VCAFMH2ACJQAzjHQeo0e2ok2ngExCRUcMCODABEUDSOAB4AdABWHjGkqFBgzpHRcQkp6THWdg7OENgAKnQwjoFwMDBgfARQ9sipcABucB68CLAQANTA6LjgjtbWSd5IJLiOqHDgECQA3lYkJP10VLxBjhC8ABYAFAiOAI4gjh4QAJSb2zskyABUH69vHyQASo4WnBeI4SAADK7jJzgkgAdz8pxIEFOYNOPnWdEo8M8SIg6BIHmcuBIV1u9wgHmR6B+Ow+yFpvHsD1JjmhYIYJBipwgEBgHjUyGQSUiLUcySZwEyVlpVwgIAQVF2cLgfiOJwuUPQTgANKzyQ9HkRXgBfHVWE1EayaZjaXT6Hj8IRiKQyBQqZRlexOFzuLw+PwdKiBYK6UgRKKxKKEXSZII5PKRmJkMDoMilWzeyo1OoNXbNVq8dqddL2GZWDYxYCqqgAfXGk1yMTUhSWxQyJutNrtoQdhmdJjd5mUzCAA", "https://workers.cloudflare.com/playground#LYVwNgLglgDghgJwgegGYHsHALQBM4RwDcABAEbogB2+CAngLzbPYZb6HbW5QDGU2AAwBmACyiAnBMFSAbIICMALhYs2wDnC40+AkeKkyJ8hQFgAUAGF0VCAFNb2ACJQAzjHSuo0G0pLq8AmISKjhgOwYAIigaOwAPADoAK1dI0lQoMAcwiOjYxJTIi2tbBwhsABU6GDs-OBgYMD4CKBtkJLgANzhXXgRYCABqYHRccDsLC3iPJBJcO1Q4cAgSAG9zEhIeuipefzsIXgALAAoEOwBHEDtXCABKNY3Nkl4bW7mb6FCfKgBVACUADIkBgkSJHCAQGCuJTIZDxMKNOwJV7ANJPTavKjvW4EECuazzEEkYSKIgYkjnCAgBBUEj-G4ebHI848c68CAnea3GItGwAwEAGhIuOpBNGdju5M2AF9BeYZUQLKpmOpNNoePwhGJJNI5IpijZ7I4XO5PN5WlQ-AFNKRQuEouFCJo0v5MtkHZEyGB0GQilYjWVKtValsGk1eHyqO1XDZJuZVpFgHAYgB9EZjLKRJR5eYFVIy5UqtVBDW6bUGPXGRTMIA", "https://workers.cloudflare.com/playground#LYVwNgLglgDghgJwgegGYHsHALQBM4RwDcABAEbogB2+CAngLzbPYZb6HbW5QDGU2AAwAOAJwBmAIyiATKMkB2AKwyAXCxZtgHOFxp8BIidLmKVAWABQAYXRUIAU3vYAIlADOMdO6jQ7qki08AmISKjhgBwYAIigaBwAPADoAK3do0lQoMCcIqNj45LToq1t7JwhsABU6GAcAuBgYMD4CKDtkFLgANzh3XgRYCABqYHRccAcrK0SvJBJcB1Q4cAgSAG9LEhI+uipeQIcIXgALAAoEBwBHEAd3CABKDa3tnfc9g9RqXj8qEgBZI4ncYAOXQEAAgmAwOgAO4OXAXa63e5PTavV6XCAgBB-KgOWEkABKdy8VHcDjOAANARBgbgSAASdaXG53CBJSJ08YAXzC4J20LhCKSVIANM8MRj7gQQO4AgAWQRKMUvKUkE4OOCLBDyyXq15QmGwgLRADiAFEqtFVQaSDzbVKeQ8iGr7W7kMgSAB5KhgOgkS1VEislEQdwkWGYADWkd8JxIdI8JBgCHQCToSTdUFQJCRbPunKB4xIAEIGAwSOardEnlicX9afSwZChfDEaH2S63fXcYdjucqScIBAYPLPYkIs0HEleOhgFTu9sHZYeUQrBpmFodHoePwhGIpLJ5MoZKU7I5nG5PN5fO0qAEgjpSOFIjEudqQhlAtlcm-omQMJkCUNgXhU1S1PUOxNC0vBtB0aR2NMljrNEwBwHEAD6YwTDk0SqAUixFOkPIbpu24hLuBgHsYx5mDIzBAA", "https://developers.cloudflare.com/cloudflare-one/connections/connect-devices/warp/", "https://developers.cloudflare.com/ssl/origin-configuration/origin-ca/", "https://developers.cloudflare.com/dns/zone-setups/full-setup/setup/", "https://developers.cloudflare.com/ssl/origin-configuration/ssl-modes/", "https://developers.cloudflare.com/waf/custom-rules/use-cases/allow-traffic-from-specific-countries/", "https://discord.cloudflare.com/", "https://x.com/CloudflareDev", "https://community.cloudflare.com/", "https://github.com/cloudflare", "https://developers.cloudflare.com/sponsorships/", "https://developers.cloudflare.com/style-guide/", "https://blog.cloudflare.com/", "https://developers.cloudflare.com/fundamentals/", "https://support.cloudflare.com/", "https://www.cloudflarestatus.com/", "https://www.cloudflare.com/trust-hub/compliance-resources/", "https://www.cloudflare.com/trust-hub/gdpr/", "https://www.cloudflare.com/", "https://www.cloudflare.com/people/", "https://www.cloudflare.com/careers/", "https://radar.cloudflare.com/", "https://speed.cloudflare.com/", "https://isbgpsafeyet.com/", "https://rpki.cloudflare.com/", "https://ct.cloudflare.com/", "https://x.com/cloudflare", "http://discord.cloudflare.com/", "https://www.youtube.com/cloudflare", "https://github.com/cloudflare/cloudflare-docs", "https://www.cloudflare.com/privacypolicy/", "https://www.cloudflare.com/website-terms/", "https://www.cloudflare.com/disclosure/", "https://www.cloudflare.com/trademark/" ] } ``` * TypeScript SDK ```typescript import Cloudflare from "cloudflare"; const client = new Cloudflare({ apiEmail: process.env["CLOUDFLARE_EMAIL"], // This is the default and can be omitted apiKey: process.env["CLOUDFLARE_API_KEY"], // This is the default and can be omitted }); const links = await client.browserRendering.links.create({ account_id: "account_id", }); console.log(links); ``` ## Advanced usage In this example we can pass a `visibleLinksOnly` parameter to only return links that are visible on the page. ```bash curl -X POST 'https://api.cloudflare.com/client/v4/accounts//browser-rendering/links' \ -H 'Authorization: Bearer ' \ -H 'Content-Type: application/json' \ -d '{ "url": "https://developers.cloudflare.com/", "visibleLinksOnly": true }' ``` ```json { "success": true, "result": [ "https://developers.cloudflare.com/", "https://developers.cloudflare.com/products/", "https://developers.cloudflare.com/api/", "https://developers.cloudflare.com/fundamentals/api/reference/sdks/", "https://dash.cloudflare.com/", "https://developers.cloudflare.com/fundamentals/subscriptions-and-billing/", "https://developers.cloudflare.com/api/", "https://developers.cloudflare.com/changelog/", 64 collapsed lines "https://developers.cloudflare.com/glossary/", "https://developers.cloudflare.com/reference-architecture/", "https://developers.cloudflare.com/web-analytics/", "https://developers.cloudflare.com/support/troubleshooting/http-status-codes/", "https://developers.cloudflare.com/registrar/", "https://developers.cloudflare.com/1.1.1.1/setup/", "https://developers.cloudflare.com/workers/", "https://developers.cloudflare.com/pages/", "https://developers.cloudflare.com/r2/", "https://developers.cloudflare.com/images/", "https://developers.cloudflare.com/stream/", "https://developers.cloudflare.com/products/?product-group=Developer+platform", "https://developers.cloudflare.com/workers-ai/tutorials/build-a-retrieval-augmented-generation-ai/", "https://developers.cloudflare.com/workers-ai/", "https://developers.cloudflare.com/vectorize/", "https://developers.cloudflare.com/ai-gateway/", "https://playground.ai.cloudflare.com/", "https://developers.cloudflare.com/products/?product-group=AI", "https://developers.cloudflare.com/cloudflare-one/policies/access/", "https://developers.cloudflare.com/cloudflare-one/connections/connect-networks/", "https://developers.cloudflare.com/cloudflare-one/policies/gateway/", "https://developers.cloudflare.com/cloudflare-one/policies/browser-isolation/", "https://developers.cloudflare.com/learning-paths/replace-vpn/concepts/", "https://developers.cloudflare.com/products/?product-group=Cloudflare+One", "https://workers.cloudflare.com/playground#LYVwNgLglgDghgJwgegGYHsHALQBM4RwDcABAEbogB2+CAngLzbPYZb6HbW5QDGU2AAwAmAIyiAzMIAsATlmi5ALhYs2wDnC40+AkeKlyFcgLAAoAMLoqEAKY3sAESgBnGOhdRo1pSXV4CYhIqOGBbBgAiKBpbAA8AOgArFwjSVCgwe1DwqJiE5IjzKxt7CGwAFToYW184GBgwPgIoa2REuAA3OBdeBFgIAGpgdFxwW3NzOPckElxbVDhwCBIAbzMSEm66Kl4-WwheAAsACgRbAEcQWxcIAEpV9Y2SXmsbkkOIYDASBhIAAwAPABCRwAeQs5QAmgAFACi70+YAAfI8NgCKLg6Cink8AYdREiABK2MBgdAkADqmDAuAByHx2JxJABMCR5UOrhIwEQAGsQDASAB3bokADm9lsCAItlw5DomxIFjJIFwqDAiFslMwPMl8TprNRzOQGKxfyIZkNZwgIAQVGCtkFJAAStd3FQXLZjh8vgAaB5M962OBzBAuXxrAMbCIvEoOCBVWwRXwROyxFDesBEI6ID0QBgAVXKADFsAAOCI+w0bAC+lZx1du5prlerRHMqmY6k02h4-CEYkkMnkilkRWsdgczjcHi8LSovn8mlIITCkTChE0qT8GSyq4iZDJZEKlnHpQqCdq9UavGarWS1gmZhWEW50QA+sNRpkk7k5vkUtW7Ydl2gQ9ro-YGEOxiyMwQA", "https://workers.cloudflare.com/playground#LYVwNgLglgDghgJwgegGYHsHALQBM4RwDcABAEbogB2+CAngLzbPYZb6HbW5QDGU2AAwB2AMwAWAKyCAjMICc8meIBcLFm2Ac4XGnwEiJ0uYuUBYAFABhdFQgBTO9gAiUAM4x0bqNFsqSmngExCRUcMD2DABEUDT2AB4AdABWblGkqFBgjuGRMXFJqVGWNnaOENgAKnQw9v5wMDBgfARQtsjJcABucG68CLAQANTA6Ljg9paWCZ5IJLj2qHDgECQA3hYkJL10VLwB9hC8ABYAFAj2AI4g9m4QAJTrm1skvLZ388EkDE8vL8f2MBgdD+KIAd0wYFwUQANM8tgBfIgWeEkC4QEAIKgkABKt08VDc9hSblsp2092RiLhSMs6mYmm0uh4-CEYiksgUSnEJVsDicrg8Xh8bSo-kC2lIYQi0QihG06QCWRyMqiZGBZGK1j55SqNTq20azV4rXaqVsUwsayiwDgsQA+qNxtkoip8gtCmkEXT6Yzgsz9GyjJzTOJmEA", "https://workers.cloudflare.com/playground#LYVwNgLglgDghgJwgegGYHsHALQBM4RwDcABAEbogB2+CAngLzbPYZb6HbW5QDGU2AAwBWABwBGAOyjRANgDMAFgCcygFwsWbYBzhcafASInS5S1QFgAUAGF0VCAFMH2ACJQAzjHQeo0e2ok2ngExCRUcMCODABEUDSOAB4AdABWHjGkqFBgzpHRcQkp6THWdg7OENgAKnQwjoFwMDBgfARQ9sipcABucB68CLAQANTA6LjgjtbWSd5IJLiOqHDgECQA3lYkJP10VLxBjhC8ABYAFAiOAI4gjh4QAJSb2zskyABUH69vHyQASo4WnBeI4SAADK7jJzgkgAdz8pxIEFOYNOPnWdEo8M8SIg6BIHmcuBIV1u9wgHmR6B+Ow+yFpvHsD1JjmhYIYJBipwgEBgHjUyGQSUiLUcySZwEyVlpVwgIAQVF2cLgfiOJwuUPQTgANKzyQ9HkRXgBfHVWE1EayaZjaXT6Hj8IRiKQyBQqZRlexOFzuLw+PwdKiBYK6UgRKKxKKEXSZII5PKRmJkMDoMilWzeyo1OoNXbNVq8dqddL2GZWDYxYCqqgAfXGk1yMTUhSWxQyJutNrtoQdhmdJjd5mUzCAA", "https://workers.cloudflare.com/playground#LYVwNgLglgDghgJwgegGYHsHALQBM4RwDcABAEbogB2+CAngLzbPYZb6HbW5QDGU2AAwBmACyiAnBMFSAbIICMALhYs2wDnC40+AkeKkyJ8hQFgAUAGF0VCAFNb2ACJQAzjHSuo0G0pLq8AmISKjhgOwYAIigaOwAPADoAK1dI0lQoMAcwiOjYxJTIi2tbBwhsABU6GDs-OBgYMD4CKBtkJLgANzhXXgRYCABqYHRccDsLC3iPJBJcO1Q4cAgSAG9zEhIeuipefzsIXgALAAoEOwBHEDtXCABKNY3Nkl4bW7mb6FCfKgBVACUADIkBgkSJHCAQGCuJTIZDxMKNOwJV7ANJPTavKjvW4EECuazzEEkYSKIgYkjnCAgBBUEj-G4ebHI848c68CAnea3GItGwAwEAGhIuOpBNGdju5M2AF9BeYZUQLKpmOpNNoePwhGJJNI5IpijZ7I4XO5PN5WlQ-AFNKRQuEouFCJo0v5MtkHZEyGB0GQilYjWVKtValsGk1eHyqO1XDZJuZVpFgHAYgB9EZjLKRJR5eYFVIy5UqtVBDW6bUGPXGRTMIA", "https://workers.cloudflare.com/playground#LYVwNgLglgDghgJwgegGYHsHALQBM4RwDcABAEbogB2+CAngLzbPYZb6HbW5QDGU2AAwAOAJwBmAIyiATKMkB2AKwyAXCxZtgHOFxp8BIidLmKVAWABQAYXRUIAU3vYAIlADOMdO6jQ7qki08AmISKjhgBwYAIigaBwAPADoAK3do0lQoMCcIqNj45LToq1t7JwhsABU6GAcAuBgYMD4CKDtkFLgANzh3XgRYCABqYHRccAcrK0SvJBJcB1Q4cAgSAG9LEhI+uipeQIcIXgALAAoEBwBHEAd3CABKDa3tnfc9g9RqXj8qEgBZI4ncYAOXQEAAgmAwOgAO4OXAXa63e5PTavV6XCAgBB-KgOWEkABKdy8VHcDjOAANARBgbgSAASdaXG53CBJSJ08YAXzC4J20LhCKSVIANM8MRj7gQQO4AgAWQRKMUvKUkE4OOCLBDyyXq15QmGwgLRADiAFEqtFVQaSDzbVKeQ8iGr7W7kMgSAB5KhgOgkS1VEislEQdwkWGYADWkd8JxIdI8JBgCHQCToSTdUFQJCRbPunKB4xIAEIGAwSOardEnlicX9afSwZChfDEaH2S63fXcYdjucqScIBAYPLPYkIs0HEleOhgFTu9sHZYeUQrBpmFodHoePwhGIpLJ5MoZKU7I5nG5PN5fO0qAEgjpSOFIjEudqQhlAtlcm-omQMJkCUNgXhU1S1PUOxNC0vBtB0aR2NMljrNEwBwHEAD6YwTDk0SqAUixFOkPIbpu24hLuBgHsYx5mDIzBAA", "https://developers.cloudflare.com/cloudflare-one/connections/connect-devices/warp/", "https://developers.cloudflare.com/ssl/origin-configuration/origin-ca/", "https://developers.cloudflare.com/dns/zone-setups/full-setup/setup/", "https://developers.cloudflare.com/ssl/origin-configuration/ssl-modes/", "https://developers.cloudflare.com/waf/custom-rules/use-cases/allow-traffic-from-specific-countries/", "https://discord.cloudflare.com/", "https://x.com/CloudflareDev", "https://community.cloudflare.com/", "https://github.com/cloudflare", "https://developers.cloudflare.com/sponsorships/", "https://developers.cloudflare.com/style-guide/", "https://blog.cloudflare.com/", "https://developers.cloudflare.com/fundamentals/", "https://support.cloudflare.com/", "https://www.cloudflarestatus.com/", "https://www.cloudflare.com/trust-hub/compliance-resources/", "https://www.cloudflare.com/trust-hub/gdpr/", "https://www.cloudflare.com/", "https://www.cloudflare.com/people/", "https://www.cloudflare.com/careers/", "https://radar.cloudflare.com/", "https://speed.cloudflare.com/", "https://isbgpsafeyet.com/", "https://rpki.cloudflare.com/", "https://ct.cloudflare.com/", "https://x.com/cloudflare", "http://discord.cloudflare.com/", "https://www.youtube.com/cloudflare", "https://github.com/cloudflare/cloudflare-docs", "https://www.cloudflare.com/privacypolicy/", "https://www.cloudflare.com/website-terms/", "https://www.cloudflare.com/disclosure/", "https://www.cloudflare.com/trademark/" ] } ``` --- title: /markdown - Extract Markdown from a webpage · Browser Rendering docs description: The /markdown endpoint retrieves a webpage's content and converts it into Markdown format. You can specify a URL and optional parameters to refine the extraction process. lastUpdated: 2025-04-29T16:56:49.000Z chatbotDeprioritize: false source_url: html: https://developers.cloudflare.com/browser-rendering/rest-api/markdown-endpoint/ md: https://developers.cloudflare.com/browser-rendering/rest-api/markdown-endpoint/index.md --- The `/markdown` endpoint retrieves a webpage's content and converts it into Markdown format. You can specify a URL and optional parameters to refine the extraction process. ## Basic usage ### Using a URL * curl This example fetches the Markdown representation of a webpage. ```bash curl -X 'POST' 'https://api.cloudflare.com/client/v4/accounts//browser-rendering/markdown' \ -H 'Content-Type: application/json' \ -H 'Authorization: Bearer ' \ -d '{ "url": "https://example.com" }' ``` ```json "success": true, "result": "# Example Domain\n\nThis domain is for use in illustrative examples in documents. You may use this domain in literature without prior coordination or asking for permission.\n\n[More information...](https://www.iana.org/domains/example)" } ``` * TypeScript SDK ```typescript import Cloudflare from "cloudflare"; const client = new Cloudflare({ apiEmail: process.env["CLOUDFLARE_EMAIL"], // This is the default and can be omitted apiKey: process.env["CLOUDFLARE_API_KEY"], // This is the default and can be omitted }); const markdown = await client.browserRendering.markdown.create({ account_id: "account_id", }); console.log(markdown); ``` ### Use raw HTML Instead of fetching the content by specifying the URL, you can provide raw HTML content directly. ```bash curl -X 'POST' 'https://api.cloudflare.com/client/v4/accounts//browser-rendering/markdown' \ -H 'Content-Type: application/json' \ -H 'Authorization: Bearer ' \ -d '{ "html": "
Hello World
" }' ``` ```json { "success": true, "result": "Hello World" } ``` ## Advanced usage You can refine the Markdown extraction by using the `rejectRequestPattern` parameter. In this example, requests matching the given regex pattern (such as CSS files) are excluded. ```bash curl -X 'POST' 'https://api.cloudflare.com/client/v4/accounts//browser-rendering/markdown' \ -H 'Content-Type: application/json' \ -H 'Authorization: Bearer ' \ -d '{ "url": "https://example.com", "rejectRequestPattern": ["/^.*\\.(css)/"] }' ``` ```json { "success": true, "result": "# Example Domain\n\nThis domain is for use in illustrative examples in documents. You may use this domain in literature without prior coordination or asking for permission.\n\n[More information...](https://www.iana.org/domains/example)" } ``` ## Potential use-cases 1. **Content extraction:** Convert a blog post or article into Markdown format for storage or further processing. 2. **Static site generation:** Retrieve structured Markdown content for use in static site generators like Jekyll or Hugo. 3. **Automated summarization:** Extract key content from web pages while ignoring CSS, scripts, or unnecessary elements.
--- title: /pdf - Render PDF · Browser Rendering docs description: The /pdf endpoint instructs the browser to generate a PDF of a webpage or custom HTML using Cloudflare's headless browser rendering service. lastUpdated: 2025-06-25T16:57:01.000Z chatbotDeprioritize: false source_url: html: https://developers.cloudflare.com/browser-rendering/rest-api/pdf-endpoint/ md: https://developers.cloudflare.com/browser-rendering/rest-api/pdf-endpoint/index.md --- The `/pdf` endpoint instructs the browser to generate a PDF of a webpage or custom HTML using Cloudflare's headless browser rendering service. ## Endpoint ```txt https://api.cloudflare.com/client/v4/accounts//browser-rendering/pdf ``` ## Required fields You must provide either `url` or `html`: * `url` (string) * `html` (string) ## Common use cases * Capture a PDF of a webpage * Generate PDFs, such as invoices, licenses, reports, and certificates, directly from HTML ## Basic usage ### Convert a URL to PDF * curl Navigate to `https://example.com/` and inject custom CSS and an external stylesheet. Then return the rendered page as a PDF. ```bash curl -X POST 'https://api.cloudflare.com/client/v4/accounts//browser-rendering/pdf' \ -H 'Authorization: Bearer ' \ -H 'Content-Type: application/json' \ -d '{ "url": "https://example.com/", "addStyleTag": [ { "content": "body { font-family: Arial; }" }, { "url": "https://cdn.jsdelivr.net/npm/bootstrap@3.3.7/dist/css/bootstrap.min.css" } ] }' \ --output "output.pdf" ``` * TypeScript SDK ```typescript import Cloudflare from "cloudflare"; const client = new Cloudflare({ apiEmail: process.env["CLOUDFLARE_EMAIL"], // This is the default and can be omitted apiKey: process.env["CLOUDFLARE_API_KEY"], // This is the default and can be omitted }); const pdf = await client.browserRendering.pdf.create({ account_id: "account_id", }); console.log(pdf); const content = await pdf.blob(); console.log(content); ``` ### Convert custom HTML to PDF If you have raw HTML you want to generate a PDF from, use the `html` option. You can still apply custom styles using the `addStyleTag` parameter. ```bash curl -X POST https://api.cloudflare.com/client/v4/accounts//browser-rendering/pdf \ -H 'Authorization: Bearer ' \ -H 'Content-Type: application/json' \ -d '{ "html": "Advanced Snapshot", "addStyleTag": [ { "content": "body { font-family: Arial; }" }, { "url": "https://cdn.jsdelivr.net/npm/bootstrap@3.3.7/dist/css/bootstrap.min.css" } ] }' \ --output "invoice.pdf" ``` ## Advanced usage Looking for more parameters? Visit the [Browser Rendering PDF API reference](https://developers.cloudflare.com/api/resources/browser_rendering/subresources/pdf/methods/create/) for all available parameters, such as setting HTTP credentials using `authenticate`, setting `cookies`, and customizing load behavior using `gotoOptions`. ### Advanced page load with custom headers and viewport Navigate to `https://example.com`, setting additional HTTP headers and configuring the page size (viewport). The PDF generation will wait until there are no more than two network connections for at least 500 ms, or until the maximum timeout of 4500 ms is reached, before rendering. The `goToOptions` parameter exposes most of [Puppeteer's API](https://pptr.dev/api/puppeteer.gotooptions). ```bash curl -X POST 'https://api.cloudflare.com/client/v4/accounts//browser-rendering/pdf' \ -H 'Authorization: Bearer ' \ -H 'Content-Type: application/json' \ -d '{ "url": "https://example.com/", "setExtraHTTPHeaders": { "X-Custom-Header": "value" }, "viewport": { "width": 1200, "height": 800 }, "gotoOptions": { "waitUntil": "networkidle2", "timeout": 45000 } }' \ --output "advanced-output.pdf" ``` ### Blocking images and styles when generating a PDF The options `rejectResourceTypes` and `rejectRequestPattern` can be used to block requests during rendering. The opposite can also be done, *only* allow certain requests using `allowResourceTypes` and `allowRequestPattern`. ```bash curl -X POST https://api.cloudflare.com/client/v4/accounts//browser-rendering/pdf \ -H 'Authorization: Bearer ' \ -H 'Content-Type: application/json' \ -d '{ "url": "https://cloudflare.com/", "rejectResourceTypes": ["image"], "rejectRequestPattern": ["/^.*\\.(css)"] }' \ --output "cloudflare.pdf" ``` --- title: /scrape - Scrape HTML elements · Browser Rendering docs description: The /scrape endpoint extracts structured data from specific elements on a webpage, returning details such as element dimensions and inner HTML. lastUpdated: 2025-04-29T16:56:49.000Z chatbotDeprioritize: false source_url: html: https://developers.cloudflare.com/browser-rendering/rest-api/scrape-endpoint/ md: https://developers.cloudflare.com/browser-rendering/rest-api/scrape-endpoint/index.md --- The `/scrape` endpoint extracts structured data from specific elements on a webpage, returning details such as element dimensions and inner HTML. ## Basic usage * curl Go to `https://example.com` and extract metadata from all `h1` and `a` elements in the DOM. ```bash curl -X POST 'https://api.cloudflare.com/client/v4/accounts//browser-rendering/scrape' \ -H 'Authorization: Bearer ' \ -H 'Content-Type: application/json' \ -d '{ "url": "https://example.com/", "elements": [{ "selector": "h1" }, { "selector": "a" }] }' ``` ```json { "success": true, "result": [ { "results": [ { "attributes": [], "height": 39, "html": "Example Domain", "left": 100, "text": "Example Domain", "top": 133.4375, "width": 600 } ], "selector": "h1" }, { "results": [ { "attributes": [ { "name": "href", "value": "https://www.iana.org/domains/example" } ], "height": 20, "html": "More information...", "left": 100, "text": "More information...", "top": 249.875, "width": 142 } ], "selector": "a" } ] } ``` * TypeScript SDK ```typescript import Cloudflare from "cloudflare"; const client = new Cloudflare({ apiEmail: process.env["CLOUDFLARE_EMAIL"], // This is the default and can be omitted apiKey: process.env["CLOUDFLARE_API_KEY"], // This is the default and can be omitted }); const scrapes = await client.browserRendering.scrape.create({ account_id: "account_id", elements: [{ selector: "selector" }], }); console.log(scrapes); ``` Many more options exist, like setting HTTP credentials using `authenticate`, setting `cookies`, and using `gotoOptions` to control page load behaviour - check the endpoint [reference](https://developers.cloudflare.com/api/resources/browser_rendering/subresources/scrape/methods/create/) for all available parameters. ### Response fields * `results` *(array of objects)* - Contains extracted data for each selector. * `selector` *(string)* - The CSS selector used. * `results` *(array of objects)* - List of extracted elements matching the selector. * `text` *(string)* - Inner text of the element. * `html` *(string)* - Inner HTML of the element. * `attributes` *(array of objects)* - List of extracted attributes such as `href` for links. * `height`, `width`, `top`, `left` *(number)* - Position and dimensions of the element. --- title: /screenshot - Capture screenshot · Browser Rendering docs description: The /screenshot endpoint renders the webpage by processing its HTML and JavaScript, then captures a screenshot of the fully rendered page. lastUpdated: 2025-04-29T16:56:49.000Z chatbotDeprioritize: false source_url: html: https://developers.cloudflare.com/browser-rendering/rest-api/screenshot-endpoint/ md: https://developers.cloudflare.com/browser-rendering/rest-api/screenshot-endpoint/index.md --- The `/screenshot` endpoint renders the webpage by processing its HTML and JavaScript, then captures a screenshot of the fully rendered page. ## Basic usage * curl Sets the HTML content of the page to `Hello World!` and then takes a screenshot. The option `omitBackground` hides the default white background and allows capturing screenshots with transparency. ```bash curl -X POST 'https://api.cloudflare.com/client/v4/accounts//browser-rendering/screenshot' \ -H 'Authorization: Bearer ' \ -H 'Content-Type: application/json' \ -d '{ "html": "Hello World!", "screenshotOptions": { "omitBackground": true } }' \ --output "screenshot.png" ``` * TypeScript SDK ```typescript import Cloudflare from "cloudflare"; const client = new Cloudflare({ apiEmail: process.env["CLOUDFLARE_EMAIL"], // This is the default and can be omitted apiKey: process.env["CLOUDFLARE_API_KEY"], // This is the default and can be omitted }); const screenshot = await client.browserRendering.screenshot.create({ account_id: "account_id", }); console.log(screenshot.status); ``` For more options to control the final screenshot, like `clip`, `captureBeyondViewport`, `fullPage` and others, check the endpoint [reference](https://developers.cloudflare.com/api/resources/browser_rendering/subresources/screenshot/methods/create/). ## Advanced usage Navigate to `https://cloudflare.com/`, changing the page size (`viewport`) and waiting until there are no active network connections (`waitUntil`) or up to a maximum of `4500ms` (`timeout`). Then take a `fullPage` screenshot. ```bash curl -X POST 'https://api.cloudflare.com/client/v4/accounts//browser-rendering/screenshot' \ -H 'Authorization: Bearer ' \ -H 'Content-Type: application/json' \ -d '{ "url": "https://cnn.com/", "screenshotOptions": { "fullPage": true }, "viewport": { "width": 1280, "height": 720 }, "gotoOptions": { "waitUntil": "networkidle0", "timeout": 45000 } }' \ --output "advanced-screenshot.png" ``` ## Customize CSS and embed custom JavaScript Instruct the browser to go to `https://example.com`, embed custom JavaScript (`addScriptTag`) and add extra styles (`addStyleTag`), both inline (`addStyleTag.content`) and by loading an external stylesheet (`addStyleTag.url`). ```bash curl -X POST 'https://api.cloudflare.com/client/v4/accounts//browser-rendering/screenshot' \ -H 'Authorization: Bearer ' \ -H 'Content-Type: application/json' \ -d '{ "url": "https://example.com/", "addScriptTag": [ { "content": "document.querySelector(`h1`).innerText = `Hello World!!!`" } ], "addStyleTag": [ { "content": "div { background: linear-gradient(45deg, #2980b9 , #82e0aa ); }" }, { "url": "https://cdn.jsdelivr.net/npm/bootstrap@3.3.7/dist/css/bootstrap.min.css" } ] }' \ --output "screenshot.png" ``` Many more options exist, like setting HTTP credentials using `authenticate`, setting `cookies`, and using `gotoOptions` to control page load behaviour - check the endpoint [reference](https://developers.cloudflare.com/api/resources/browser_rendering/subresources/screenshot/methods/create/) for all available parameters. --- title: /snapshot - Take a webpage snapshot · Browser Rendering docs description: The /snapshot endpoint captures both the HTML content and a screenshot of the webpage in one request. It returns the HTML as a text string and the screenshot as a Base64-encoded image. lastUpdated: 2025-04-29T16:56:49.000Z chatbotDeprioritize: false source_url: html: https://developers.cloudflare.com/browser-rendering/rest-api/snapshot/ md: https://developers.cloudflare.com/browser-rendering/rest-api/snapshot/index.md --- The `/snapshot` endpoint captures both the HTML content and a screenshot of the webpage in one request. It returns the HTML as a text string and the screenshot as a Base64-encoded image. ## Basic usage * curl 1. Go to `https://example.com/`. 2. Inject custom JavaScript. 3. Capture the rendered HTML. 4. Take a screenshot. ```bash curl -X POST 'https://api.cloudflare.com/client/v4/accounts//browser-rendering/snapshot' \ -H 'Authorization: Bearer ' \ -H 'Content-Type: application/json' \ -d '{ "url": "https://example.com/", "addScriptTag": [ { "content": "document.body.innerHTML = \"Snapshot Page\";" } ] }' ``` ```json { "success": true, "result": { "screenshot": "Base64EncodedScreenshotString", "content": "..." } } ``` * TypeScript SDK ```typescript import Cloudflare from "cloudflare"; const client = new Cloudflare({ apiEmail: process.env["CLOUDFLARE_EMAIL"], // This is the default and can be omitted apiKey: process.env["CLOUDFLARE_API_KEY"], // This is the default and can be omitted }); const snapshot = await client.browserRendering.snapshot.create({ account_id: "account_id", }); console.log(snapshot.content); ``` ## Advanced usage The `html` property in the JSON payload, it sets the html to `Advanced Snapshot` then does the following steps: 1. Disable JavaScript. 2. Sets the screenshot to `fullPage`. 3. Changes the page size `(viewport)`. 4. Waits up to `30000ms` or until the `DOMContentLoaded` event fires. 5. Returns the rendered HTML content and a base-64 encoded screenshot of the page. ```bash curl -X POST 'https://api.cloudflare.com/client/v4/accounts//browser-rendering/snapshot' \ -H 'Authorization: Bearer ' \ -H 'Content-Type: application/json' \ -d '{ "html": "Advanced Snapshot", "setJavaScriptEnabled": false, "screenshotOptions": { "fullPage": true }, "viewport": { "width": 1200, "height": 800 }, "gotoOptions": { "waitUntil": "domcontentloaded", "timeout": 30000 } }' ``` ```json { "success": true, "result": { "screenshot": "AdvancedBase64Screenshot", "content": "Advanced Snapshot" } } ``` Many more options exist, like setting HTTP credentials using `authenticate`, setting `cookies`, and using `gotoOptions` to control page load behaviour - check the endpoint [reference](https://developers.cloudflare.com/api/resources/browser_rendering/subresources/snapshot/) for all available parameters. --- title: Deploy a Browser Rendering Worker with Durable Objects · Browser Rendering docs description: By following this guide, you will create a Worker that uses the Browser Rendering API along with Durable Objects to take screenshots from web pages and store them in R2. lastUpdated: 2025-07-15T16:42:15.000Z chatbotDeprioritize: false source_url: html: https://developers.cloudflare.com/browser-rendering/workers-bindings/browser-rendering-with-do/ md: https://developers.cloudflare.com/browser-rendering/workers-bindings/browser-rendering-with-do/index.md --- By following this guide, you will create a Worker that uses the Browser Rendering API along with [Durable Objects](https://developers.cloudflare.com/durable-objects/) to take screenshots from web pages and store them in [R2](https://developers.cloudflare.com/r2/). Using Durable Objects to persist browser sessions improves performance by eliminating the time that it takes to spin up a new browser session. Since Durable Objects re-uses sessions, it reduces the number of concurrent sessions needed. 1. Sign up for a [Cloudflare account](https://dash.cloudflare.com/sign-up/workers-and-pages). 2. Install [`Node.js`](https://docs.npmjs.com/downloading-and-installing-node-js-and-npm). Node.js version manager Use a Node version manager like [Volta](https://volta.sh/) or [nvm](https://github.com/nvm-sh/nvm) to avoid permission issues and change Node.js versions. [Wrangler](https://developers.cloudflare.com/workers/wrangler/install-and-update/), discussed later in this guide, requires a Node version of `16.17.0` or later. ## 1. Create a Worker project [Cloudflare Workers](https://developers.cloudflare.com/workers/) provides a serverless execution environment that allows you to create new applications or augment existing ones without configuring or maintaining infrastructure. Your Worker application is a container to interact with a headless browser to do actions, such as taking screenshots. Create a new Worker project named `browser-worker` by running: * npm ```sh npm create cloudflare@latest -- browser-worker ``` * yarn ```sh yarn create cloudflare browser-worker ``` * pnpm ```sh pnpm create cloudflare@latest browser-worker ``` ## 2. Install Puppeteer In your `browser-worker` directory, install Cloudflare’s [fork of Puppeteer](https://developers.cloudflare.com/browser-rendering/platform/puppeteer/): * npm ```sh npm i -D @cloudflare/puppeteer ``` * yarn ```sh yarn add -D @cloudflare/puppeteer ``` * pnpm ```sh pnpm add -D @cloudflare/puppeteer ``` ## 3. Create a R2 bucket Create two R2 buckets, one for production, and one for development. Note that bucket names must be lowercase and can only contain dashes. ```sh wrangler r2 bucket create screenshots wrangler r2 bucket create screenshots-test ``` To check that your buckets were created, run: ```sh wrangler r2 bucket list ``` After running the `list` command, you will see all bucket names, including the ones you have just created. ## 4. Configure your Wrangler configuration file Configure your `browser-worker` project's [Wrangler configuration file](https://developers.cloudflare.com/workers/wrangler/configuration/) by adding a browser [binding](https://developers.cloudflare.com/workers/runtime-apis/bindings/) and a [Node.js compatibility flag](https://developers.cloudflare.com/workers/configuration/compatibility-flags/#nodejs-compatibility-flag). Browser bindings allow for communication between a Worker and a headless browser which allows you to do actions such as taking a screenshot, generating a PDF and more. Update your Wrangler configuration file with the Browser Rendering API binding, the R2 bucket you created and a Durable Object: * wrangler.jsonc ```jsonc { "name": "rendering-api-demo", "main": "src/index.js", "compatibility_date": "2023-09-04", "compatibility_flags": [ "nodejs_compat" ], "account_id": "", "browser": { "binding": "MYBROWSER" }, "r2_buckets": [ { "binding": "BUCKET", "bucket_name": "screenshots", "preview_bucket_name": "screenshots-test" } ], "durable_objects": { "bindings": [ { "name": "BROWSER", "class_name": "Browser" } ] }, "migrations": [ { "tag": "v1", "new_sqlite_classes": [ "Browser" ] } ] } ``` * wrangler.toml ```toml name = "rendering-api-demo" main = "src/index.js" compatibility_date = "2023-09-04" compatibility_flags = [ "nodejs_compat"] account_id = "" # Browser Rendering API binding browser = { binding = "MYBROWSER" } # Bind an R2 Bucket [[r2_buckets]] binding = "BUCKET" bucket_name = "screenshots" preview_bucket_name = "screenshots-test" # Binding to a Durable Object [[durable_objects.bindings]] name = "BROWSER" class_name = "Browser" [[migrations]] tag = "v1" # Should be unique for each entry new_sqlite_classes = ["Browser"] # Array of new classes ``` ## 5. Code The code below uses Durable Object to instantiate a browser using Puppeteer. It then opens a series of web pages with different resolutions, takes a screenshot of each, and uploads it to R2. The Durable Object keeps a browser session open for 60 seconds after last use. If a browser session is open, any requests will re-use the existing session rather than creating a new one. Update your Worker code by copy and pasting the following: ```js import puppeteer from "@cloudflare/puppeteer"; export default { async fetch(request, env) { let id = env.BROWSER.idFromName("browser"); let obj = env.BROWSER.get(id); // Send a request to the Durable Object, then await its response. let resp = await obj.fetch(request.url); return resp; }, }; const KEEP_BROWSER_ALIVE_IN_SECONDS = 60; export class Browser { constructor(state, env) { this.state = state; this.env = env; this.keptAliveInSeconds = 0; this.storage = this.state.storage; } async fetch(request) { // screen resolutions to test out const width = [1920, 1366, 1536, 360, 414]; const height = [1080, 768, 864, 640, 896]; // use the current date and time to create a folder structure for R2 const nowDate = new Date(); var coeff = 1000 * 60 * 5; var roundedDate = new Date( Math.round(nowDate.getTime() / coeff) * coeff, ).toString(); var folder = roundedDate.split(" GMT")[0]; //if there's a browser session open, re-use it if (!this.browser || !this.browser.isConnected()) { console.log(`Browser DO: Starting new instance`); try { this.browser = await puppeteer.launch(this.env.MYBROWSER); } catch (e) { console.log( `Browser DO: Could not start browser instance. Error: ${e}`, ); } } // Reset keptAlive after each call to the DO this.keptAliveInSeconds = 0; const page = await this.browser.newPage(); // take screenshots of each screen size for (let i = 0; i < width.length; i++) { await page.setViewport({ width: width[i], height: height[i] }); await page.goto("https://workers.cloudflare.com/"); const fileName = "screenshot_" + width[i] + "x" + height[i]; const sc = await page.screenshot(); await this.env.BUCKET.put(folder + "/" + fileName + ".jpg", sc); } // Close tab when there is no more work to be done on the page await page.close(); // Reset keptAlive after performing tasks to the DO. this.keptAliveInSeconds = 0; // set the first alarm to keep DO alive let currentAlarm = await this.storage.getAlarm(); if (currentAlarm == null) { console.log(`Browser DO: setting alarm`); const TEN_SECONDS = 10 * 1000; await this.storage.setAlarm(Date.now() + TEN_SECONDS); } return new Response("success"); } async alarm() { this.keptAliveInSeconds += 10; // Extend browser DO life if (this.keptAliveInSeconds < KEEP_BROWSER_ALIVE_IN_SECONDS) { console.log( `Browser DO: has been kept alive for ${this.keptAliveInSeconds} seconds. Extending lifespan.`, ); await this.storage.setAlarm(Date.now() + 10 * 1000); // You could ensure the ws connection is kept alive by requesting something // or just let it close automatically when there is no work to be done // for example, `await this.browser.version()` } else { console.log( `Browser DO: exceeded life of ${KEEP_BROWSER_ALIVE_IN_SECONDS}s.`, ); if (this.browser) { console.log(`Closing browser.`); await this.browser.close(); } } } } ``` ## 6. Test Run `npx wrangler dev` to test your Worker locally or run [`npx wrangler dev --remote`](https://developers.cloudflare.com/workers/wrangler/commands/#dev) to test your Worker remotely before deploying to Cloudflare's global network. ## 7. Deploy Run [`npx wrangler deploy`](https://developers.cloudflare.com/workers/wrangler/commands/#deploy) to deploy your Worker to the Cloudflare global network. ## Related resources * Other [Puppeteer examples](https://github.com/cloudflare/puppeteer/tree/main/examples) * Get started with [Durable Objects](https://developers.cloudflare.com/durable-objects/get-started/) * [Using R2 from Workers](https://developers.cloudflare.com/r2/api/workers/workers-api-usage/) --- title: Reuse sessions · Browser Rendering docs description: The best way to improve the performance of your browser rendering Worker is to reuse sessions. One way to do that is via Durable Objects, which allows you to keep a long running connection from a Worker to a browser. Another way is to keep the browser open after you've finished with it, and connect to that session each time you have a new request. lastUpdated: 2025-07-15T16:42:15.000Z chatbotDeprioritize: false source_url: html: https://developers.cloudflare.com/browser-rendering/workers-bindings/reuse-sessions/ md: https://developers.cloudflare.com/browser-rendering/workers-bindings/reuse-sessions/index.md --- The best way to improve the performance of your browser rendering Worker is to reuse sessions. One way to do that is via [Durable Objects](https://developers.cloudflare.com/browser-rendering/workers-bindings/browser-rendering-with-do/), which allows you to keep a long running connection from a Worker to a browser. Another way is to keep the browser open after you've finished with it, and connect to that session each time you have a new request. In short, this entails using `browser.disconnect()` instead of `browser.close()`, and, if there are available sessions, using `puppeteer.connect(env.MY_BROWSER, sessionID)` instead of launching a new browser session. ## 1. Create a Worker project [Cloudflare Workers](https://developers.cloudflare.com/workers/) provides a serverless execution environment that allows you to create new applications or augment existing ones without configuring or maintaining infrastructure. Your Worker application is a container to interact with a headless browser to do actions, such as taking screenshots. Create a new Worker project named `browser-worker` by running: * npm ```sh npm create cloudflare@latest -- browser-worker ``` * yarn ```sh yarn create cloudflare browser-worker ``` * pnpm ```sh pnpm create cloudflare@latest browser-worker ``` For setup, select the following options: * For *What would you like to start with?*, choose `Hello World example`. * For *Which template would you like to use?*, choose `Worker only`. * For *Which language do you want to use?*, choose `TypeScript`. * For *Do you want to use git for version control?*, choose `Yes`. * For *Do you want to deploy your application?*, choose `No` (we will be making some changes before deploying). ## 2. Install Puppeteer In your `browser-worker` directory, install Cloudflare's [fork of Puppeteer](https://developers.cloudflare.com/browser-rendering/platform/puppeteer/): * npm ```sh npm i -D @cloudflare/puppeteer ``` * yarn ```sh yarn add -D @cloudflare/puppeteer ``` * pnpm ```sh pnpm add -D @cloudflare/puppeteer ``` ## 3. Configure the [Wrangler configuration file](https://developers.cloudflare.com/workers/wrangler/configuration/) * wrangler.jsonc ```jsonc { "name": "browser-worker", "main": "src/index.ts", "compatibility_date": "2023-03-14", "compatibility_flags": [ "nodejs_compat" ], "browser": { "binding": "MYBROWSER" } } ``` * wrangler.toml ```toml name = "browser-worker" main = "src/index.ts" compatibility_date = "2023-03-14" compatibility_flags = [ "nodejs_compat" ] browser = { binding = "MYBROWSER" } ``` ## 4. Code The script below starts by fetching the current running sessions. If there are any that don't already have a worker connection, it picks a random session ID and attempts to connect (`puppeteer.connect(..)`) to it. If that fails or there were no running sessions to start with, it launches a new browser session (`puppeteer.launch(..)`). Then, it goes to the website and fetches the dom. Once that's done, it disconnects (`browser.disconnect()`), making the connection available to other workers. Take into account that if the browser is idle, i.e. does not get any command, for more than the current [limit](https://developers.cloudflare.com/browser-rendering/platform/limits/), it will close automatically, so you must have enough requests per minute to keep it alive. * JavaScript ```js import puppeteer from "@cloudflare/puppeteer"; export default { async fetch(request, env) { const url = new URL(request.url); let reqUrl = url.searchParams.get("url") || "https://example.com"; reqUrl = new URL(reqUrl).toString(); // normalize // Pick random session from open sessions let sessionId = await this.getRandomSession(env.MYBROWSER); let browser, launched; if (sessionId) { try { browser = await puppeteer.connect(env.MYBROWSER, sessionId); } catch (e) { // another worker may have connected first console.log(`Failed to connect to ${sessionId}. Error ${e}`); } } if (!browser) { // No open sessions, launch new session browser = await puppeteer.launch(env.MYBROWSER); launched = true; } sessionId = browser.sessionId(); // get current session id // Do your work here const page = await browser.newPage(); const response = await page.goto(reqUrl); const html = await response.text(); // All work done, so free connection (IMPORTANT!) browser.disconnect(); return new Response( `${launched ? "Launched" : "Connected to"} ${sessionId} \n-----\n` + html, { headers: { "content-type": "text/plain", }, }, ); }, // Pick random free session // Other custom logic could be used instead async getRandomSession(endpoint) { const sessions = await puppeteer.sessions(endpoint); console.log(`Sessions: ${JSON.stringify(sessions)}`); const sessionsIds = sessions .filter((v) => { return !v.connectionId; // remove sessions with workers connected to them }) .map((v) => { return v.sessionId; }); if (sessionsIds.length === 0) { return; } const sessionId = sessionsIds[Math.floor(Math.random() * sessionsIds.length)]; return sessionId; }, }; ``` * TypeScript ```ts import puppeteer from "@cloudflare/puppeteer"; interface Env { MYBROWSER: Fetcher; } export default { async fetch(request: Request, env: Env): Promise { const url = new URL(request.url); let reqUrl = url.searchParams.get("url") || "https://example.com"; reqUrl = new URL(reqUrl).toString(); // normalize // Pick random session from open sessions let sessionId = await this.getRandomSession(env.MYBROWSER); let browser, launched; if (sessionId) { try { browser = await puppeteer.connect(env.MYBROWSER, sessionId); } catch (e) { // another worker may have connected first console.log(`Failed to connect to ${sessionId}. Error ${e}`); } } if (!browser) { // No open sessions, launch new session browser = await puppeteer.launch(env.MYBROWSER); launched = true; } sessionId = browser.sessionId(); // get current session id // Do your work here const page = await browser.newPage(); const response = await page.goto(reqUrl); const html = await response!.text(); // All work done, so free connection (IMPORTANT!) browser.disconnect(); return new Response( `${launched ? "Launched" : "Connected to"} ${sessionId} \n-----\n` + html, { headers: { "content-type": "text/plain", }, }, ); }, // Pick random free session // Other custom logic could be used instead async getRandomSession(endpoint: puppeteer.BrowserWorker): Promise { const sessions: puppeteer.ActiveSession[] = await puppeteer.sessions(endpoint); console.log(`Sessions: ${JSON.stringify(sessions)}`); const sessionsIds = sessions .filter((v) => { return !v.connectionId; // remove sessions with workers connected to them }) .map((v) => { return v.sessionId; }); if (sessionsIds.length === 0) { return; } const sessionId = sessionsIds[Math.floor(Math.random() * sessionsIds.length)]; return sessionId!; }, }; ``` Besides `puppeteer.sessions()`, we have added other methods to facilitate [Session Management](https://developers.cloudflare.com/browser-rendering/platform/puppeteer/#session-management). ## 5. Test Run `npx wrangler dev` to test your Worker locally or run [`npx wrangler dev --remote`](https://developers.cloudflare.com/workers/wrangler/commands/#dev) to test your Worker remotely before deploying to Cloudflare's global network. To test go to the following URL: `/?url=https://example.com` ## 6. Deploy Run `npx wrangler deploy` to deploy your Worker to the Cloudflare global network and then to go to the following URL: `..workers.dev/?url=https://example.com` --- title: Deploy a Browser Rendering Worker · Browser Rendering docs description: By following this guide, you will create a Worker that uses the Browser Rendering API to take screenshots from web pages. This is a common use case for browser automation. lastUpdated: 2025-07-14T16:50:25.000Z chatbotDeprioritize: false source_url: html: https://developers.cloudflare.com/browser-rendering/workers-bindings/screenshots/ md: https://developers.cloudflare.com/browser-rendering/workers-bindings/screenshots/index.md --- By following this guide, you will create a Worker that uses the Browser Rendering API to take screenshots from web pages. This is a common use case for browser automation. 1. Sign up for a [Cloudflare account](https://dash.cloudflare.com/sign-up/workers-and-pages). 2. Install [`Node.js`](https://docs.npmjs.com/downloading-and-installing-node-js-and-npm). Node.js version manager Use a Node version manager like [Volta](https://volta.sh/) or [nvm](https://github.com/nvm-sh/nvm) to avoid permission issues and change Node.js versions. [Wrangler](https://developers.cloudflare.com/workers/wrangler/install-and-update/), discussed later in this guide, requires a Node version of `16.17.0` or later. ## 1. Create a Worker project [Cloudflare Workers](https://developers.cloudflare.com/workers/) provides a serverless execution environment that allows you to create new applications or augment existing ones without configuring or maintaining infrastructure. Your Worker application is a container to interact with a headless browser to do actions, such as taking screenshots. Create a new Worker project named `browser-worker` by running: * npm ```sh npm create cloudflare@latest -- browser-worker ``` * yarn ```sh yarn create cloudflare browser-worker ``` * pnpm ```sh pnpm create cloudflare@latest browser-worker ``` For setup, select the following options: * For *What would you like to start with?*, choose `Hello World example`. * For *Which template would you like to use?*, choose `Worker only`. * For *Which language do you want to use?*, choose `JavaScript / TypeScript`. * For *Do you want to use git for version control?*, choose `Yes`. * For *Do you want to deploy your application?*, choose `No` (we will be making some changes before deploying). ## 2. Install Puppeteer In your `browser-worker` directory, install Cloudflare’s [fork of Puppeteer](https://developers.cloudflare.com/browser-rendering/platform/puppeteer/): * npm ```sh npm i -D @cloudflare/puppeteer ``` * yarn ```sh yarn add -D @cloudflare/puppeteer ``` * pnpm ```sh pnpm add -D @cloudflare/puppeteer ``` ## 3. Create a KV namespace Browser Rendering can be used with other developer products. You might need a [relational database](https://developers.cloudflare.com/d1/), an [R2 bucket](https://developers.cloudflare.com/r2/) to archive your crawled pages and assets, a [Durable Object](https://developers.cloudflare.com/durable-objects/) to keep your browser instance alive and share it with multiple requests, or [Queues](https://developers.cloudflare.com/queues/) to handle your jobs asynchronous. For the purpose of this guide, you are going to use a [KV store](https://developers.cloudflare.com/kv/concepts/kv-namespaces/) to cache your screenshots. Create two namespaces, one for production, and one for development. ```sh npx wrangler kv namespace create BROWSER_KV_DEMO npx wrangler kv namespace create BROWSER_KV_DEMO --preview ``` Take note of the IDs for the next step. ## 4. Configure the Wrangler configuration file Configure your `browser-worker` project's [Wrangler configuration file](https://developers.cloudflare.com/workers/wrangler/configuration/) by adding a browser [binding](https://developers.cloudflare.com/workers/runtime-apis/bindings/) and a [Node.js compatibility flag](https://developers.cloudflare.com/workers/configuration/compatibility-flags/#nodejs-compatibility-flag). Bindings allow your Workers to interact with resources on the Cloudflare developer platform. Your browser `binding` name is set by you, this guide uses the name `MYBROWSER`. Browser bindings allow for communication between a Worker and a headless browser which allows you to do actions such as taking a screenshot, generating a PDF and more. Update your [Wrangler configuration file](https://developers.cloudflare.com/workers/wrangler/configuration/) with the Browser Rendering API binding and the KV namespaces you created: * wrangler.jsonc ```jsonc { "name": "browser-worker", "main": "src/index.js", "compatibility_date": "2023-03-14", "compatibility_flags": [ "nodejs_compat" ], "browser": { "binding": "MYBROWSER" }, "kv_namespaces": [ { "binding": "BROWSER_KV_DEMO", "id": "22cf855786094a88a6906f8edac425cd", "preview_id": "e1f8b68b68d24381b57071445f96e623" } ] } ``` * wrangler.toml ```toml name = "browser-worker" main = "src/index.js" compatibility_date = "2023-03-14" compatibility_flags = [ "nodejs_compat" ] browser = { binding = "MYBROWSER" } kv_namespaces = [ { binding = "BROWSER_KV_DEMO", id = "22cf855786094a88a6906f8edac425cd", preview_id = "e1f8b68b68d24381b57071445f96e623" } ] ``` ## 5. Code * JavaScript Update `src/index.js` with your Worker code: ```js import puppeteer from "@cloudflare/puppeteer"; export default { async fetch(request, env) { const { searchParams } = new URL(request.url); let url = searchParams.get("url"); let img; if (url) { url = new URL(url).toString(); // normalize img = await env.BROWSER_KV_DEMO.get(url, { type: "arrayBuffer" }); if (img === null) { const browser = await puppeteer.launch(env.MYBROWSER); const page = await browser.newPage(); await page.goto(url); img = await page.screenshot(); await env.BROWSER_KV_DEMO.put(url, img, { expirationTtl: 60 * 60 * 24, }); await browser.close(); } return new Response(img, { headers: { "content-type": "image/jpeg", }, }); } else { return new Response("Please add an ?url=https://example.com/ parameter"); } }, }; ``` * TypeScript Update `src/index.ts` with your Worker code: ```ts import puppeteer from "@cloudflare/puppeteer"; interface Env { MYBROWSER: Fetcher; BROWSER_KV_DEMO: KVNamespace; } export default { async fetch(request, env): Promise { const { searchParams } = new URL(request.url); let url = searchParams.get("url"); let img: Buffer; if (url) { url = new URL(url).toString(); // normalize img = await env.BROWSER_KV_DEMO.get(url, { type: "arrayBuffer" }); if (img === null) { const browser = await puppeteer.launch(env.MYBROWSER); const page = await browser.newPage(); await page.goto(url); img = (await page.screenshot()) as Buffer; await env.BROWSER_KV_DEMO.put(url, img, { expirationTtl: 60 * 60 * 24, }); await browser.close(); } return new Response(img, { headers: { "content-type": "image/jpeg", }, }); } else { return new Response("Please add an ?url=https://example.com/ parameter"); } }, } satisfies ExportedHandler; ``` This Worker instantiates a browser using Puppeteer, opens a new page, navigates to what you put in the `"url"` parameter, takes a screenshot of the page, stores the screenshot in KV, closes the browser, and responds with the JPEG image of the screenshot. If your Worker is running in production, it will store the screenshot to the production KV namespace. If you are running `wrangler dev`, it will store the screenshot to the dev KV namespace. If the same `"url"` is requested again, it will use the cached version in KV instead, unless it expired. ## 6. Test Run `npx wrangler dev` to test your Worker locally or run [`npx wrangler dev --remote`](https://developers.cloudflare.com/workers/wrangler/commands/#dev) to test your Worker remotely before deploying to Cloudflare's global network. To test taking your first screenshot, go to the following URL: `/?url=https://example.com` ## 7. Deploy Run `npx wrangler deploy` to deploy your Worker to the Cloudflare global network. To take your first screenshot, go to the following URL: `..workers.dev/?url=https://example.com` ## Related resources * Other [Puppeteer examples](https://github.com/cloudflare/puppeteer/tree/main/examples) --- title: API reference · Cloudflare for Platforms docs lastUpdated: 2024-12-16T22:33:26.000Z chatbotDeprioritize: false source_url: html: https://developers.cloudflare.com/cloudflare-for-platforms/cloudflare-for-saas/api-reference/ md: https://developers.cloudflare.com/cloudflare-for-platforms/cloudflare-for-saas/api-reference/index.md --- --- title: Design guide · Cloudflare for Platforms docs lastUpdated: 2024-08-29T16:36:52.000Z chatbotDeprioritize: false source_url: html: https://developers.cloudflare.com/cloudflare-for-platforms/cloudflare-for-saas/design-guide/ md: https://developers.cloudflare.com/cloudflare-for-platforms/cloudflare-for-saas/design-guide/index.md --- --- title: Custom hostnames · Cloudflare for Platforms docs description: Cloudflare for SaaS allows you, as a SaaS provider, to extend the benefits of Cloudflare products to custom domains by adding them to your zone as custom hostnames. We support adding hostnames that are a subdomain of your zone (for example, sub.serviceprovider.com) and vanity domains (for example, customer.com) to your SaaS zone. lastUpdated: 2024-09-20T16:41:42.000Z chatbotDeprioritize: false source_url: html: https://developers.cloudflare.com/cloudflare-for-platforms/cloudflare-for-saas/domain-support/ md: https://developers.cloudflare.com/cloudflare-for-platforms/cloudflare-for-saas/domain-support/index.md --- Cloudflare for SaaS allows you, as a SaaS provider, to extend the benefits of Cloudflare products to custom domains by adding them to your zone as custom hostnames. We support adding hostnames that are a subdomain of your zone (for example, `sub.serviceprovider.com`) and vanity domains (for example, `customer.com`) to your SaaS zone. ## Resources * [Create custom hostnames](https://developers.cloudflare.com/cloudflare-for-platforms/cloudflare-for-saas/domain-support/create-custom-hostnames/) * [Hostname validation](https://developers.cloudflare.com/cloudflare-for-platforms/cloudflare-for-saas/domain-support/hostname-validation/) * [Move hostnames](https://developers.cloudflare.com/cloudflare-for-platforms/cloudflare-for-saas/domain-support/migrating-custom-hostnames/) * [Remove custom hostnames](https://developers.cloudflare.com/cloudflare-for-platforms/cloudflare-for-saas/domain-support/remove-custom-hostnames/) * [Custom metadata](https://developers.cloudflare.com/cloudflare-for-platforms/cloudflare-for-saas/domain-support/custom-metadata/) --- title: Analytics · Cloudflare for Platforms docs description: "You can use custom hostname analytics for two general purposes: exploring how your customers use your product and sharing the benefits provided by Cloudflare with your customers." lastUpdated: 2025-07-16T14:37:31.000Z chatbotDeprioritize: false source_url: html: https://developers.cloudflare.com/cloudflare-for-platforms/cloudflare-for-saas/hostname-analytics/ md: https://developers.cloudflare.com/cloudflare-for-platforms/cloudflare-for-saas/hostname-analytics/index.md --- You can use custom hostname analytics for two general purposes: exploring how your customers use your product and sharing the benefits provided by Cloudflare with your customers. These analytics include **Site Analytics**, **Bot Analytics**, **Cache Analytics**, **Security Events**, and [any other datasets](https://developers.cloudflare.com/analytics/graphql-api/features/data-sets/) with the `clientRequestHTTPHost` field. Note The plan of your Cloudflare for SaaS application determines the analytics available for your custom hostnames. ## Explore customer usage Use custom hostname analytics to help your organization with billing and infrastructure decisions, answering questions like: * "How many total requests is your service getting?" * "Is one customer transferring significantly more data than the others?" * "How many global customers do you have and where are they distributed?" If you see one customer is using more data than another, you might increase their bill. If requests are increasing in a certain geographic region, you might want to increase the origin servers in that region. To access custom hostname analytics, either [use the dashboard](https://developers.cloudflare.com/analytics/faq/about-analytics/) and filter by the `Host` field or [use the GraphQL API](https://developers.cloudflare.com/analytics/graphql-api/) and filter by the `clientRequestHTTPHost` field. For more details, refer to our tutorial on [Querying HTTP events by hostname with GraphQL](https://developers.cloudflare.com/analytics/graphql-api/tutorials/end-customer-analytics/). ## Share Cloudflare data with your customers With custom hostname analytics, you can also share site information with your customers, including data about: * How many pageviews their site is receiving. * Whether their site has a large percentage of bot traffic. * How fast their site is. Build custom dashboards to share this information by specifying an individual custom hostname in `clientRequestHTTPHost` field of [any dataset](https://developers.cloudflare.com/analytics/graphql-api/features/data-sets/) that includes this field. ## Logpush [Logpush](https://developers.cloudflare.com/logs/logpush/) sends metadata from Cloudflare products to your cloud storage destination or SIEM. Using [filters](https://developers.cloudflare.com/logs/reference/filters/), you can send set sample rates (or not include logs altogether) based on filter criteria. This flexibility allows you to maintain selective logs for custom hostnames without massively increasing your log volume. Filtering is available for [all Cloudflare datasets](https://developers.cloudflare.com/logs/reference/log-fields/zone/). Note Filtering is not supported on the following data types: `objects`, `array[object]`. For the Firewall events dataset, the following fields are not supported: `Action`, `Description`, `Kind`, `MatchIndex`, `Metadata`, `OriginatorRayID`, `RuleID`, and `Source`. --- title: Performance · Cloudflare for Platforms docs description: "Cloudflare for SaaS allows you to deliver the best performance to your end customers by helping enable you to reduce latency through:" lastUpdated: 2024-08-13T19:56:56.000Z chatbotDeprioritize: false source_url: html: https://developers.cloudflare.com/cloudflare-for-platforms/cloudflare-for-saas/performance/ md: https://developers.cloudflare.com/cloudflare-for-platforms/cloudflare-for-saas/performance/index.md --- Cloudflare for SaaS allows you to deliver the best performance to your end customers by helping enable you to reduce latency through: * [Argo Smart Routing for SaaS](https://developers.cloudflare.com/cloudflare-for-platforms/cloudflare-for-saas/performance/argo-for-saas/) calculates and optimizes the fastest path for requests to travel to your origin. * [Early Hints for SaaS](https://developers.cloudflare.com/cloudflare-for-platforms/cloudflare-for-saas/performance/early-hints-for-saas/) provides faster loading speeds for individual custom hostnames by allowing the browser to begin loading responses while the origin server is compiling the full response. * [Cache for SaaS](https://developers.cloudflare.com/cloudflare-for-platforms/cloudflare-for-saas/performance/cache-for-saas/) makes customer websites faster by storing a copy of the website’s content on the servers of our globally distributed data centers. * By using Cloudflare for SaaS, your customers automatically inherit the benefits of Cloudflare's vast [anycast network](https://www.cloudflare.com/network/). --- title: Plans — Cloudflare for SaaS · Cloudflare for Platforms docs description: Learn what features and limits are part of various Cloudflare plans. lastUpdated: 2024-08-13T19:56:56.000Z chatbotDeprioritize: false source_url: html: https://developers.cloudflare.com/cloudflare-for-platforms/cloudflare-for-saas/plans/ md: https://developers.cloudflare.com/cloudflare-for-platforms/cloudflare-for-saas/plans/index.md --- | | Free | Pro | Business | Enterprise | | - | - | - | - | - | | Availability | Yes | Yes | Yes | Yes | | Hostnames included | 100 | 100 | 100 | 0 | | Max hostnames | 50,000 | 50,000 | 50,000 | Unlimited, but contact sales if using over 50,000. | | Price per additional hostname | $0.10 | $0.10 | $0.10 | Custom pricing | | [Custom analytics](https://developers.cloudflare.com/cloudflare-for-platforms/cloudflare-for-saas/hostname-analytics/) | Yes | Yes | Yes | Yes | | [Custom origin](https://developers.cloudflare.com/cloudflare-for-platforms/cloudflare-for-saas/start/advanced-settings/custom-origin/) | Yes | Yes | Yes | Yes | | [Custom certificates](https://developers.cloudflare.com/cloudflare-for-platforms/cloudflare-for-saas/security/certificate-management/custom-certificates/) | No | No | No | Yes | | [CSR support](https://developers.cloudflare.com/cloudflare-for-platforms/cloudflare-for-saas/security/certificate-management/custom-certificates/certificate-signing-requests/) | No | No | No | Yes | | [Selectable CA](https://developers.cloudflare.com/ssl/reference/certificate-authorities/) | No | No | No | Yes | | Wildcard custom hostnames | No | No | No | Yes | | Non-SNI support for SaaS zone | No | Yes | Yes | Yes | | [mTLS support](https://developers.cloudflare.com/cloudflare-for-platforms/cloudflare-for-saas/security/certificate-management/enforce-mtls/) | No | No | No | Yes | | [WAF for SaaS](https://developers.cloudflare.com/cloudflare-for-platforms/cloudflare-for-saas/security/waf-for-saas/) | WAF rules with current zone plan | WAF rules with current zone plan | WAF rules with current zone plan | Create and apply custom firewall rulesets. | | [Apex proxying/BYOIP](https://developers.cloudflare.com/cloudflare-for-platforms/cloudflare-for-saas/start/advanced-settings/apex-proxying/) | No | No | No | Paid add-on | | [Custom metadata](https://developers.cloudflare.com/cloudflare-for-platforms/cloudflare-for-saas/domain-support/custom-metadata/) | No | No | No | Paid add-on | ## Enterprise plan benefits The Enterprise plan offers features that give SaaS providers flexibility when it comes to meeting their end customer's requirements. In addition to that, Enterprise customers are able to extend all of the benefits of the Enterprise plan to their customer's custom hostnames. This includes advanced Bot Mitigation, WAF rules, analytics, DDoS mitigation, and more. In addition, large SaaS providers rely on Enterprise level support, multi-user accounts, SSO, and other benefits that are not provided in non-Enterprise plans. Note Enterprise customers can preview this product as a [non-contract service](https://developers.cloudflare.com/billing/preview-services/), which provides full access, free of metered usage fees, limits, and certain other restrictions. --- title: Reference — Cloudflare for SaaS · Cloudflare for Platforms docs lastUpdated: 2024-09-20T16:41:42.000Z chatbotDeprioritize: true source_url: html: https://developers.cloudflare.com/cloudflare-for-platforms/cloudflare-for-saas/reference/ md: https://developers.cloudflare.com/cloudflare-for-platforms/cloudflare-for-saas/reference/index.md --- * [Connection request details](https://developers.cloudflare.com/cloudflare-for-platforms/cloudflare-for-saas/reference/connection-details/) * [Troubleshooting](https://developers.cloudflare.com/cloudflare-for-platforms/cloudflare-for-saas/reference/troubleshooting/) * [Status codes](https://developers.cloudflare.com/cloudflare-for-platforms/cloudflare-for-saas/reference/status-codes/) * [Token validity periods](https://developers.cloudflare.com/cloudflare-for-platforms/cloudflare-for-saas/reference/token-validity-periods/) * [Deprecation - Version 1](https://developers.cloudflare.com/cloudflare-for-platforms/cloudflare-for-saas/reference/versioning/) * [Certificate and hostname priority](https://developers.cloudflare.com/ssl/reference/certificate-and-hostname-priority/) * [Certificate authorities](https://developers.cloudflare.com/ssl/reference/certificate-authorities/) * [Certificate statuses](https://developers.cloudflare.com/ssl/reference/certificate-statuses/) * [Domain control validation backoff schedule](https://developers.cloudflare.com/ssl/edge-certificates/changing-dcv-method/validation-backoff-schedule/) --- title: Resources for SaaS customers · Cloudflare for Platforms docs description: Cloudflare partners with many SaaS providers to extend our performance and security benefits to your website. lastUpdated: 2025-01-10T16:06:07.000Z chatbotDeprioritize: false source_url: html: https://developers.cloudflare.com/cloudflare-for-platforms/cloudflare-for-saas/saas-customers/ md: https://developers.cloudflare.com/cloudflare-for-platforms/cloudflare-for-saas/saas-customers/index.md --- Cloudflare partners with many [SaaS providers](https://developers.cloudflare.com/cloudflare-for-platforms/cloudflare-for-saas/saas-customers/provider-guides/) to extend our performance and security benefits to your website. If you are a SaaS customer, you can take this process a step further by managing your own zone on Cloudflare. This setup - known as **Orange-to-Orange (O2O)** - allows you to benefit from your provider's setup but still customize how Cloudflare treats incoming traffic to your zone. ## Related resources * [How it works](https://developers.cloudflare.com/cloudflare-for-platforms/cloudflare-for-saas/saas-customers/how-it-works/) * [Provider guides](https://developers.cloudflare.com/cloudflare-for-platforms/cloudflare-for-saas/saas-customers/provider-guides/) * [Product compatibility](https://developers.cloudflare.com/cloudflare-for-platforms/cloudflare-for-saas/saas-customers/product-compatibility/) * [Remove domain](https://developers.cloudflare.com/cloudflare-for-platforms/cloudflare-for-saas/saas-customers/remove-domain/) --- title: Security · Cloudflare for Platforms docs description: "Cloudflare for SaaS provides increased security per custom hostname through:" lastUpdated: 2024-08-13T19:56:56.000Z chatbotDeprioritize: false source_url: html: https://developers.cloudflare.com/cloudflare-for-platforms/cloudflare-for-saas/security/ md: https://developers.cloudflare.com/cloudflare-for-platforms/cloudflare-for-saas/security/index.md --- Cloudflare for SaaS provides increased security per custom hostname through: * [Certificate management](https://developers.cloudflare.com/cloudflare-for-platforms/cloudflare-for-saas/security/certificate-management/) * [Issue certificates through Cloudflare](https://developers.cloudflare.com/cloudflare-for-platforms/cloudflare-for-saas/security/certificate-management/issue-and-validate/) * [Upload your own certificates](https://developers.cloudflare.com/cloudflare-for-platforms/cloudflare-for-saas/security/certificate-management/custom-certificates/) * Control your traffic's level of encryption with [TLS settings](https://developers.cloudflare.com/cloudflare-for-platforms/cloudflare-for-saas/security/certificate-management/enforce-mtls/) * Create and deploy WAF custom rules, rate limiting rules, and managed rulesets using [WAF for SaaS](https://developers.cloudflare.com/cloudflare-for-platforms/cloudflare-for-saas/security/waf-for-saas/) --- title: Get started - Cloudflare for SaaS · Cloudflare for Platforms docs lastUpdated: 2024-09-20T16:41:42.000Z chatbotDeprioritize: true source_url: html: https://developers.cloudflare.com/cloudflare-for-platforms/cloudflare-for-saas/start/ md: https://developers.cloudflare.com/cloudflare-for-platforms/cloudflare-for-saas/start/index.md --- * [Enable](https://developers.cloudflare.com/cloudflare-for-platforms/cloudflare-for-saas/start/enable/) * [Configuring Cloudflare for SaaS](https://developers.cloudflare.com/cloudflare-for-platforms/cloudflare-for-saas/start/getting-started/) * [Advanced Settings](https://developers.cloudflare.com/cloudflare-for-platforms/cloudflare-for-saas/start/advanced-settings/) * [Common API Calls](https://developers.cloudflare.com/cloudflare-for-platforms/cloudflare-for-saas/start/common-api-calls/) --- title: Platform · Cloudflare for Platforms docs lastUpdated: 2024-08-13T19:56:56.000Z chatbotDeprioritize: false source_url: html: https://developers.cloudflare.com/cloudflare-for-platforms/workers-for-platforms/configuration/ md: https://developers.cloudflare.com/cloudflare-for-platforms/workers-for-platforms/configuration/index.md --- * [Custom limits](https://developers.cloudflare.com/cloudflare-for-platforms/workers-for-platforms/configuration/custom-limits/) * [Observability](https://developers.cloudflare.com/cloudflare-for-platforms/workers-for-platforms/configuration/observability/) * [Outbound Workers](https://developers.cloudflare.com/cloudflare-for-platforms/workers-for-platforms/configuration/outbound-workers/) * [Static assets](https://developers.cloudflare.com/cloudflare-for-platforms/workers-for-platforms/configuration/static-assets/) * [Tags](https://developers.cloudflare.com/cloudflare-for-platforms/workers-for-platforms/configuration/tags/) --- title: Demos and architectures · Cloudflare for Platforms docs description: Learn how you can use Workers for Platforms within your existing architecture. lastUpdated: 2025-07-11T16:03:39.000Z chatbotDeprioritize: false source_url: html: https://developers.cloudflare.com/cloudflare-for-platforms/workers-for-platforms/demos/ md: https://developers.cloudflare.com/cloudflare-for-platforms/workers-for-platforms/demos/index.md --- Learn how you can use Workers for Platforms within your existing architecture. ## Demos Explore the following demo applications for Workers for Platforms. * [Workers for Platforms Example Project:](https://github.com/cloudflare/workers-for-platforms-example) Explore how you could manage thousands of Workers with a single Cloudflare Workers account. ## Reference architectures Explore the following reference architectures that use Workers: [Programmable Platforms](https://developers.cloudflare.com/reference-architecture/diagrams/serverless/programmable-platforms/) [Workers for Platforms provide secure, scalable, cost-effective infrastructure for programmable platforms with global reach.](https://developers.cloudflare.com/reference-architecture/diagrams/serverless/programmable-platforms/) --- title: Get started · Cloudflare for Platforms docs lastUpdated: 2024-08-13T19:56:56.000Z chatbotDeprioritize: false source_url: html: https://developers.cloudflare.com/cloudflare-for-platforms/workers-for-platforms/get-started/ md: https://developers.cloudflare.com/cloudflare-for-platforms/workers-for-platforms/get-started/index.md --- * [Configure Workers for Platforms](https://developers.cloudflare.com/cloudflare-for-platforms/workers-for-platforms/get-started/configuration/) * [Create a dynamic dispatch Worker](https://developers.cloudflare.com/cloudflare-for-platforms/workers-for-platforms/get-started/dynamic-dispatch/) * [Hostname routing](https://developers.cloudflare.com/cloudflare-for-platforms/workers-for-platforms/get-started/hostname-routing/) * [Local development](https://developers.cloudflare.com/cloudflare-for-platforms/workers-for-platforms/get-started/developing-with-wrangler/) * [Uploading User Workers](https://developers.cloudflare.com/cloudflare-for-platforms/workers-for-platforms/get-started/user-workers/) --- title: Platform · Cloudflare for Platforms docs lastUpdated: 2024-08-13T19:56:56.000Z chatbotDeprioritize: false source_url: html: https://developers.cloudflare.com/cloudflare-for-platforms/workers-for-platforms/platform/ md: https://developers.cloudflare.com/cloudflare-for-platforms/workers-for-platforms/platform/index.md --- * [Changelog](https://developers.cloudflare.com/cloudflare-for-platforms/workers-for-platforms/platform/changelog/) * [Limits](https://developers.cloudflare.com/cloudflare-for-platforms/workers-for-platforms/platform/limits/) * [Pricing](https://developers.cloudflare.com/cloudflare-for-platforms/workers-for-platforms/platform/pricing/) --- title: Reference · Cloudflare for Platforms docs lastUpdated: 2024-08-13T19:56:56.000Z chatbotDeprioritize: false source_url: html: https://developers.cloudflare.com/cloudflare-for-platforms/workers-for-platforms/reference/ md: https://developers.cloudflare.com/cloudflare-for-platforms/workers-for-platforms/reference/index.md --- * [How Workers for Platforms works](https://developers.cloudflare.com/cloudflare-for-platforms/workers-for-platforms/reference/how-workers-for-platforms-works/) * [User Worker metadata](https://developers.cloudflare.com/workers/configuration/multipart-upload-metadata/) --- title: WFP REST API · Cloudflare for Platforms docs lastUpdated: 2024-12-16T22:33:26.000Z chatbotDeprioritize: false source_url: html: https://developers.cloudflare.com/cloudflare-for-platforms/workers-for-platforms/wfp-api/ md: https://developers.cloudflare.com/cloudflare-for-platforms/workers-for-platforms/wfp-api/index.md --- --- title: Client API · Constellation docs description: The Constellation client API allows developers to interact with the inference engine using the models configured for each project. Inference is the process of running data inputs on a machine-learning model and generating an output, or otherwise known as a prediction. lastUpdated: 2025-01-29T12:28:42.000Z chatbotDeprioritize: false source_url: html: https://developers.cloudflare.com/constellation/platform/client-api/ md: https://developers.cloudflare.com/constellation/platform/client-api/index.md --- The Constellation client API allows developers to interact with the inference engine using the models configured for each project. Inference is the process of running data inputs on a machine-learning model and generating an output, or otherwise known as a prediction. Before you use the Constellation client API, you need to: * Sign up for a [Cloudflare account](https://dash.cloudflare.com/sign-up). * Enable Constellation by logging into the Cloudflare dashboard > **Workers & Pages** > **Constellation**. * Create a Constellation project and configure the binding. * Import the `@cloudflare/constellation` library in your code: ```javascript import { Tensor, run } from "@cloudflare/constellation"; ``` ## Tensor class Tensors are essentially multidimensional numerical arrays used to represent any kind of data, like a piece of text, an image, or a time series. TensorFlow popularized the use of [Tensors](https://www.tensorflow.org/guide/tensor) in machine learning (hence the name). Other frameworks and runtimes have since followed the same concept. Constellation also uses Tensors for model input. Tensors have a data type, a shape, the data, and a name. ```typescript enum TensorType { Bool = "bool", Float16 = "float16", Float32 = "float32", Int8 = "int8", Int16 = "int16", Int32 = "int32", Int64 = "int64", } type TensorOpts = { shape?: number[], name?: string } declare class Tensor { constructor( type: T, value: any | any[], opts: TensorOpts = {} ) } ``` ### Create new Tensor ```typescript new Tensor( type:TensorType, value:any | any[], options?:TensorOpts ) ``` #### type Defines the type of data represented in the Tensor. Options are: * TensorType.Bool * TensorType.Float16 * TensorType.Float32 * TensorType.Int8 * TensorType.Int16 * TensorType.Int32 * TensorType.Int64 #### value This is the tensor's data. Example tensor values can include: * scalar: 4 * vector: \[1, 2, 3] * two-axes 3x2 matrix: \[\[1,2], \[2,4], \[5,6]] * three-axes 3x2 matrix \[ \[\[1, 2], \[3, 4]], \[\[5, 6], \[7, 8]], \[\[9, 10], \[11, 12]] ] #### options You can pass options to your tensor: ##### shape Tensors store multidimensional data. The shape of the data can be a scalar, a vector, a 2D matrix or multiple-axes matrixes. Some examples: * \[] - scalar data * \[3] - vector with 3 elements * \[3, 2] - two-axes 3x2 matrix * \[3, 2, 2] - three-axis 2x2 matrix Refer to the [TensorFlow documentation](https://www.tensorflow.org/guide/tensor) for more information about shapes. If you don't pass the shape, then we try to infer it from the value object. If we can't, we thrown an error. ##### name Naming a tensor is optional, it can be a useful key for mapping operations when building the tensor inputs. ### Tensor examples #### A scalar ```javascript new Tensor(TensorType.Int16, 123); ``` #### Arrays ```javascript new Tensor(TensorType.Int32, [1, 23]); new Tensor(TensorType.Int32, [ [1, 2], [3, 4], ], { shape: [2, 2] }); new Tensor(TensorType.Int32, [1, 23], { shape: [1] }); ``` #### Named ```javascript new Tensor(TensorType.Int32, 1, { name: "foo" }); ``` ### Tensor properties You can read the tensor's properties after it has been created: ```javascript const tensor = new Tensor(TensorType.Int32, [ [1, 2], [3, 4], ], { shape: [2, 2], name: "test" }); console.log ( tensor.type ); // TensorType.Int32 console.log ( tensor.shape ); // [2, 2] console.log ( tensor.name ); // test console.log ( tensor.value ); // [ [1, 2], [3, 4], ] ``` ### Tensor methods #### async tensor.toJSON() Serializes the tensor to a JSON object: ```javascript const tensor = new Tensor(TensorType.Int32, [ [1, 2], [3, 4], ], { shape: [2, 2], name: "test" }); tensor.toJSON(); { type: TensorType.Int32, name: "test", shape: [2, 2], value: [ [1, 2], [3, 4], ] } ``` #### async tensor.fromJSON() Serializes a JSON object to a tensor: ```javascript const tensor = Tensor.fromJSON( { type: TensorType.Int32, name: "test", shape: [2, 2], value: [ [1, 2], [3, 4], ] } ); ``` ## InferenceSession class Constellation requires an inference session before you can run a task. A session is locked to a specific project, defined in your binding, and the project model. You can, and should, if possible, run multiple tasks under the same inference session. Reusing the same session, means that we instantiate the runtime and load the model to memory once. ```typescript export class InferenceSession { constructor(binding: any, modelId: string, options: SessionOptions = {}) } export type InferenceSession = { binding: any; model: string; options: SessionOptions; }; ``` ### InferenceSession methods #### new InferenceSession() To create a new session: ```javascript import { InferenceSession } from "@cloudflare/constellation"; const session = new InferenceSession( env.PROJECT, "0ae7bd14-a0df-4610-aa85-1928656d6e9e" ); ``` * **env.PROJECT** is the project binding defined in your Wrangler configuration. * **0ae7bd14...** is the model ID inside the project. Use Wrangler to list the models and their IDs in a project. #### async session.run() Runs a task in the created inference session. Takes a list of tensors as the input. ```javascript import { Tensor, InferenceSession, TensorType } from "@cloudflare/constellation"; const session = new InferenceSession( env.PROJECT, "0ae7bd14-a0df-4610-aa85-1998656d6e9e" ); const tensorInputArray = [ new Tensor(TensorType.Int32, 1), new Tensor(TensorType.Int32, 2), new Tensor(TensorType.Int32, 3) ]; const out = await session.run(tensorInputArray); ``` You can also use an object and name your tensors. ```javascript const tensorInputNamed = { "tensor1": new Tensor(TensorType.Int32, 1), "tensor2": new Tensor(TensorType.Int32, 2), "tensor3": new Tensor(TensorType.Int32, 3) }; out = await session.run(tensorInputNamed); ``` This is the same as using the name option when you create a tensor. ```javascript { "tensor1": new Tensor(TensorType.Int32, 1) } == [ new Tensor(TensorType.Int32, 1, { name: "tensor1" } ]; ``` --- title: Static Frontend, Container Backend · Containers docs description: A simple frontend app with a containerized backend lastUpdated: 2025-06-24T15:02:00.000Z chatbotDeprioritize: false source_url: html: https://developers.cloudflare.com/containers/examples/container-backend/ md: https://developers.cloudflare.com/containers/examples/container-backend/index.md --- A common pattern is to serve a static frontend application (e.g., React, Vue, Svelte) using Static Assets, then pass backend requests to a containerized backend application. In this example, we'll show an example using a simple `index.html` file served as a static asset, but you can select from one of many frontend frameworks. See our [Workers framework examples](https://developers.cloudflare.com/workers/framework-guides/web-apps/) for more information. For a full example, see the [Static Frontend + Container Backend Template](https://github.com/mikenomitch/static-frontend-container-backend). ## Configure Static Assets and a Container * wrangler.jsonc ```jsonc { "name": "cron-container", "main": "src/index.ts", "assets": { "directory": "./dist", "binding": "ASSETS" }, "containers": [ { "class_name": "Backend", "image": "./Dockerfile", } ], "durable_objects": { "bindings": [ { "class_name": "Backend", "name": "BACKEND" } ] }, "migrations": [ { "new_sqlite_classes": [ "Backend" ], "tag": "v1" } ] } ``` * wrangler.toml ```toml name = "cron-container" main = "src/index.ts" [assets] directory = "./dist" binding = "ASSETS" [[containers]] class_name = "Backend" image = "./Dockerfile" [[durable_objects.bindings]] class_name = "Backend" name = "BACKEND" [[migrations]] new_sqlite_classes = [ "Backend" ] tag = "v1" ``` ## Add a simple index.html file to serve Create a simple `index.html` file in the `./dist` directory. index.html ```html Widgets

Widgets

Loading...
No widgets found.
``` In this example, we are using [Alpine.js](https://alpinejs.dev/) to fetch a list of widgets from `/api/widgets`. This is meant to be a very simple example, but you can get significantly more complex. See [examples of Workers integrating with frontend frameworks](https://developers.cloudflare.com/workers/framework-guides/web-apps/) for more information. ## Define a Worker Your Worker needs to be able to both serve static assets and route requests to the containerized backend. In this case, we will pass requests to one of three container instances if the route starts with `/api`, and all other requests will be served as static assets. ```javascript import { Container, getRandom } from "@cloudflare/containers"; const INSTANCE_COUNT = 3; class Backend extends Container { defaultPort = 8080; // pass requests to port 8080 in the container sleepAfter = "2h"; // only sleep a container if it hasn't gotten requests in 2 hours } export default { async fetch(request, env) { const url = new URL(request.url); if (url.pathname.startsWith("/api")) { // note: "getRandom" to be replaced with latency-aware routing in the near future const containerInstance = getRandom(env.BACKEND, INSTANCE_COUNT); return containerInstance.fetch(request); } return env.ASSETS.fetch(request); }, }; ``` Note This example uses the `getRandom` function, which is a temporary helper that will randomly select of of N instances of a Container to route requests to. In the future, we will provide improved latency-aware load balancing and autoscaling. This will make scaling stateless instances simple and routing more efficient. See the [autoscaling documentation](https://developers.cloudflare.com/containers/scaling-and-routing) for more details. ## Define a backend container Your container should be able to handle requests to `/api/widgets`. In this case, we'll use a simple Golang backend that returns a hard-coded list of widgets. server.go ```go package main import ( "encoding/json" "log" "net/http" ) func handler(w http.ResponseWriter, r \*http.Request) { widgets := []map[string]interface{}{ {"id": 1, "name": "Widget A"}, {"id": 2, "name": "Sprocket B"}, {"id": 3, "name": "Gear C"}, } w.Header().Set("Content-Type", "application/json") w.Header().Set("Access-Control-Allow-Origin", "*") json.NewEncoder(w).Encode(widgets) } func main() { http.HandleFunc("/api/widgets", handler) log.Fatal(http.ListenAndServe(":8080", nil)) } ```
--- title: Cron Container · Containers docs description: Running a container on a schedule using Cron Triggers lastUpdated: 2025-06-24T15:02:00.000Z chatbotDeprioritize: false source_url: html: https://developers.cloudflare.com/containers/examples/cron/ md: https://developers.cloudflare.com/containers/examples/cron/index.md --- To launch a container on a schedule, you can use a Workers [Cron Trigger](https://developers.cloudflare.com/workers/configuration/cron-triggers/). For a full example, see the [Cron Container Template](https://github.com/mikenomitch/cron-container/tree/main). Use a cron expression in your Wrangler config to specify the schedule: * wrangler.jsonc ```jsonc { "name": "cron-container", "main": "src/index.ts", "triggers": { "crons": [ "*/2 * * * *" // Run every 2 minutes ] }, "containers": [ { "class_name": "CronContainer", "image": "./Dockerfile" } ], "durable_objects": { "bindings": [ { "class_name": "CronContainer", "name": "CRON_CONTAINER" } ] }, "migrations": [ { "new_sqlite_classes": [ "CronContainer" ], "tag": "v1" } ] } ``` * wrangler.toml ```toml name = "cron-container" main = "src/index.ts" [triggers] crons = [ "*/2 * * * *" ] [[containers]] class_name = "CronContainer" image = "./Dockerfile" [[durable_objects.bindings]] class_name = "CronContainer" name = "CRON_CONTAINER" [[migrations]] new_sqlite_classes = [ "CronContainer" ] tag = "v1" ``` Then in your Worker, call your Container from the "scheduled" handler: ```ts import { Container, getContainer } from "@cloudflare/containers"; export class CronContainer extends Container { sleepAfter = "5m"; manualStart = true; } export default { async fetch(): Promise { return new Response( "This Worker runs a cron job to execute a container on a schedule.", ); }, async scheduled( _controller: any, env: { CRON_CONTAINER: DurableObjectNamespace }, ) { await getContainer(env.CRON_CONTAINER).startContainer({ envVars: { MESSAGE: "Start Time: " + new Date().toISOString(), }, }); }, }; ``` --- title: Using Durable Objects Directly · Containers docs description: Various examples calling Containers directly from Durable Objects lastUpdated: 2025-06-24T15:02:00.000Z chatbotDeprioritize: false source_url: html: https://developers.cloudflare.com/containers/examples/durable-object-interface/ md: https://developers.cloudflare.com/containers/examples/durable-object-interface/index.md --- --- title: Env Vars and Secrets · Containers docs description: Pass in environment variables and secrets to your container lastUpdated: 2025-06-24T15:02:00.000Z chatbotDeprioritize: false source_url: html: https://developers.cloudflare.com/containers/examples/env-vars-and-secrets/ md: https://developers.cloudflare.com/containers/examples/env-vars-and-secrets/index.md --- Environment variables can be passed into a Container using the `envVars` field in the `Container` class, or by setting manually when the Container starts. Secrets can be passed into a Container by using [Worker Secrets](https://developers.cloudflare.com/workers/configuration/secrets/) or the [Secret Store](https://developers.cloudflare.com/secrets-store/integrations/workers/), then passing them into the Container as environment variables. These examples show the various ways to pass in secrets and environment variables. In each, we will be passing in: * the variable `"ACCOUNT_NAME"` as a hard-coded environment variable * the secret `"CONTAINER_SECRET_KEY"` as a secret from Worker Secrets * the secret `"ACCOUNT_API_KEY"` as a secret from the Secret Store In practice, you may just use one of the methods for storing secrets, but we will show both for completeness. ## Creating secrets First, let's create the `"CONTAINER_SECRET_KEY"` secret in Worker Secrets: * npm ```sh npx wrangler secret put CONTAINER_SECRET_KEY ``` * yarn ```sh yarn wrangler secret put CONTAINER_SECRET_KEY ``` * pnpm ```sh pnpm wrangler secret put CONTAINER_SECRET_KEY ``` Then, let's create a store called "demo" in the Secret Store, and add the `"ACCOUNT_API_KEY"` secret to it: * npm ```sh npx wrangler secrets-store store create demo --remote ``` * yarn ```sh yarn wrangler secrets-store store create demo --remote ``` * pnpm ```sh pnpm wrangler secrets-store store create demo --remote ``` - npm ```sh npx wrangler secrets-store secret create demo --name ACCOUNT_API_KEY --scopes workers --remote ``` - yarn ```sh yarn wrangler secrets-store secret create demo --name ACCOUNT_API_KEY --scopes workers --remote ``` - pnpm ```sh pnpm wrangler secrets-store secret create demo --name ACCOUNT_API_KEY --scopes workers --remote ``` For full details on how to create secrets, see the [Workers Secrets documentation](https://developers.cloudflare.com/workers/configuration/secrets/) and the [Secret Store documentation](https://developers.cloudflare.com/secrets-store/integrations/workers/). ## Adding a secrets binding Next, we need to add bindings to access our secrets and environment variables in Wrangler configuration. * wrangler.jsonc ```jsonc { "name": "my-container-worker", "vars": { "ACCOUNT_NAME": "my-account" }, "secrets_store_secrets": [ { "binding": "SECRET_STORE", "store_id": "demo", "secret_name": "ACCOUNT_API_KEY" } ] // rest of the configuration... } ``` * wrangler.toml ```toml name = "my-container-worker" [vars] ACCOUNT_NAME = "my-account" [[secrets_store_secrets]] binding = "SECRET_STORE" store_id = "demo" secret_name = "ACCOUNT_API_KEY" ``` Note that `"CONTAINER_SECRET_KEY"` does not need to be set, at it is automatically added to `env`. Also note that we did not configure anything specific for environment variables or secrets in the container-related portion of wrangler configuration. ## Using `envVars` on the Container class Now, let's define a Container using the `envVars` field in the `Container` class: ```js export class MyContainer extends Container { defaultPort = 8080; sleepAfter = '10s'; envVars = { ACCOUNT_NAME: env.ACCOUNT_NAME, ACCOUNT_API_KEY: env.SECRET_STORE.ACCOUNT_API_KEY, CONTAINER_SECRET_KEY: env.CONTAINER_SECRET_KEY, }; } ``` Every instance of this `Container` will now have these variables and secrets set as environment variables when it launches. ## Setting environment variables per-instance But what if you want to set environment variables on a per-instance basis? In this case, set `manualStart` then use the `start` method to pass in environment variables for each instance. We'll assume that we've set additional secrets in the Secret Store. ```js export class MyContainer extends Container { defaultPort = 8080; sleepAfter = '10s'; manualStart = true; } export default { async fetch(request, env) { if (new URL(request.url).pathname === '/launch-instances') { let idOne = env.MY_CONTAINER.idFromName('foo'); let instanceOne = env.MY_CONTAINER.get(idOne); let idTwo = env.MY_CONTAINER.idFromName('foo'); let instanceTwo = env.MY_CONTAINER.get(idTwo); // Each instance gets a different set of environment variables await instanceOne.start({ envVars: { ACCOUNT_NAME: env.ACCOUNT_NAME + "-1", ACCOUNT_API_KEY: env.SECRET_STORE.ACCOUNT_API_KEY_ONE, CONTAINER_SECRET_KEY: env.CONTAINER_SECRET_KEY_TWO, } ) await instanceTwo.start({ envVars: { ACCOUNT_NAME: env.ACCOUNT_NAME + "-2", ACCOUNT_API_KEY: env.SECRET_STORE.ACCOUNT_API_KEY_TWO, CONTAINER_SECRET_KEY: env.CONTAINER_SECRET_KEY_TWO, } ) return new Response('Container instances launched'); } // ... etc ... } } ``` --- title: Stateless Instances · Containers docs description: Run multiple instances across Cloudflare's network lastUpdated: 2025-06-24T15:02:00.000Z chatbotDeprioritize: false source_url: html: https://developers.cloudflare.com/containers/examples/stateless/ md: https://developers.cloudflare.com/containers/examples/stateless/index.md --- To simply proxy requests to one of multiple instances of a container, you can use the `getRandom` function: ```ts import { Container, getRandom } from "@cloudflare/containers"; const INSTANCE_COUNT = 3; class Backend extends Container { defaultPort = 8080; sleepAfter = "2h"; } export default { async fetch(request: Request, env: Env): Promise { // note: "getRandom" to be replaced with latency-aware routing in the near future const containerInstance = getRandom(env.BACKEND, INSTANCE_COUNT); return containerInstance.fetch(request); }, }; ``` Note This example uses the `getRandom` function, which is a temporary helper that will randomly select of of N instances of a Container to route requests to. In the future, we will provide improved latency-aware load balancing and autoscaling. This will make scaling stateless instances simple and routing more efficient. See the [autoscaling documentation](https://developers.cloudflare.com/containers/scaling-and-routing) for more details. --- title: Status Hooks · Containers docs description: Execute Workers code in reaction to Container status changes lastUpdated: 2025-06-24T15:02:00.000Z chatbotDeprioritize: false source_url: html: https://developers.cloudflare.com/containers/examples/status-hooks/ md: https://developers.cloudflare.com/containers/examples/status-hooks/index.md --- When a Container starts, stops, and errors, it can trigger code execution in a Worker that has defined status hooks on the `Container` class. ```js import { Container } from '@cloudflare/containers'; export class MyContainer extends Container { defaultPort = 4000; sleepAfter = '5m'; override onStart() { console.log('Container successfully started'); } override onStop(stopParams) { if (stopParams.exitCode === 0) { console.log('Container stopped gracefully'); } else { console.log('Container stopped with exit code:', stopParams.exitCode); } console.log('Container stop reason:', stopParams.reason); } override onError(error: string) { console.log('Container error:', error); } } ``` --- title: Websocket to Container · Containers docs description: Forwarding a Websocket request to a Container lastUpdated: 2025-06-24T15:02:00.000Z chatbotDeprioritize: false source_url: html: https://developers.cloudflare.com/containers/examples/websocket/ md: https://developers.cloudflare.com/containers/examples/websocket/index.md --- WebSocket requests are automatically forwarded to a container using the default`fetch` method on the `Container` class: ```js import { Container, getContainer } from "@cloudflare/workers-types"; export class MyContainer extends Container { defaultPort = 8080; sleepAfter = "2m"; } export default { async fetch(request, env) { // gets default instance and forwards websocket from outside Worker return getContainer(env.MY_CONTAINER).fetch(request); }, }; ``` Additionally, the `containerFetch` method can be used to forward WebSocket requests as well. --- title: Import and export data · Cloudflare D1 docs description: D1 allows you to import existing SQLite tables and their data directly, enabling you to migrate existing data into D1 quickly and easily. This can be useful when migrating applications to use Workers and D1, or when you want to prototype a schema locally before importing it to your D1 database(s). lastUpdated: 2025-04-16T16:17:28.000Z chatbotDeprioritize: false source_url: html: https://developers.cloudflare.com/d1/best-practices/import-export-data/ md: https://developers.cloudflare.com/d1/best-practices/import-export-data/index.md --- D1 allows you to import existing SQLite tables and their data directly, enabling you to migrate existing data into D1 quickly and easily. This can be useful when migrating applications to use Workers and D1, or when you want to prototype a schema locally before importing it to your D1 database(s). D1 also allows you to export a database. This can be useful for [local development](https://developers.cloudflare.com/d1/best-practices/local-development/) or testing. ## Import an existing database To import an existing SQLite database into D1, you must have: 1. The Cloudflare [Wrangler CLI installed](https://developers.cloudflare.com/workers/wrangler/install-and-update/). 2. A database to use as the target. 3. An existing SQLite (version 3.0+) database file to import. Note You cannot import a raw SQLite database (`.sqlite3` files) directly. Refer to [how to convert an existing SQLite file](#convert-sqlite-database-files) first. For example, consider the following `users_export.sql` schema & values, which includes a `CREATE TABLE IF NOT EXISTS` statement: ```sql CREATE TABLE IF NOT EXISTS users ( id VARCHAR(50), full_name VARCHAR(50), created_on DATE ); INSERT INTO users (id, full_name, created_on) VALUES ('01GREFXCN9519NRVXWTPG0V0BF', 'Catlaina Harbar', '2022-08-20 05:39:52'); INSERT INTO users (id, full_name, created_on) VALUES ('01GREFXCNBYBGX2GC6ZGY9FMP4', 'Hube Bilverstone', '2022-12-15 21:56:13'); INSERT INTO users (id, full_name, created_on) VALUES ('01GREFXCNCWAJWRQWC2863MYW4', 'Christin Moss', '2022-07-28 04:13:37'); INSERT INTO users (id, full_name, created_on) VALUES ('01GREFXCNDGQNBQAJG1AP0TYXZ', 'Vlad Koche', '2022-11-29 17:40:57'); INSERT INTO users (id, full_name, created_on) VALUES ('01GREFXCNF67KV7FPPSEJVJMEW', 'Riane Zamora', '2022-12-24 06:49:04'); ``` With your `users_export.sql` file in the current working directory, you can pass the `--file=users_export.sql` flag to `d1 execute` to execute (import) our table schema and values: ```sh npx wrangler d1 execute example-db --remote --file=users_export.sql ``` To confirm your table was imported correctly and is queryable, execute a `SELECT` statement to fetch all the tables from your D1 database: ```sh npx wrangler d1 execute example-db --remote --command "SELECT name FROM sqlite_schema WHERE type='table' ORDER BY name;" ``` ```sh ... 🌀 To execute on your local development database, remove the --remote flag from your wrangler command. 🚣 Executed 1 commands in 0.3165ms ┌────────┐ │ name │ ├────────┤ │ _cf_KV │ ├────────┤ │ users │ └────────┘ ``` Note The `_cf_KV` table is a reserved table used by D1's underlying storage system. It cannot be queried and does not incur read/write operations charges against your account. From here, you can now query our new table from our Worker [using the D1 Workers Binding API](https://developers.cloudflare.com/d1/worker-api/). Known limitations For imports, `wrangler d1 execute --file` is limited to 5GiB files, the same as the [R2 upload limit](https://developers.cloudflare.com/r2/platform/limits/). For imports larger than 5GiB, we recommend splitting the data into multiple files. ### Convert SQLite database files Note In order to convert a raw SQLite3 database dump (a `.sqlite3` file) you will need the [sqlite command-line tool](https://sqlite.org/cli.html) installed on your system. If you have an existing SQLite database from another system, you can import its tables into a D1 database. Using the `sqlite` command-line tool, you can convert an `.sqlite3` file into a series of SQL statements that can be imported (executed) against a D1 database. For example, if you have a raw SQLite dump called `db_dump.sqlite3`, run the following `sqlite` command to convert it: ```sh sqlite3 db_dump.sqlite3 .dump > db.sql ``` Once you have run the above command, you will need to edit the output SQL file to be compatible with D1: 1. Remove `BEGIN TRANSACTION` and `COMMIT;` from the file 2. Remove the following table creation statement (if present): ```sql CREATE TABLE _cf_KV ( key TEXT PRIMARY KEY, value BLOB ) WITHOUT ROWID; ``` You can then follow the steps to [import an existing database](#import-an-existing-database) into D1 by using the `.sql` file you generated from the database dump as the input to `wrangler d1 execute`. ## Export an existing D1 database In addition to importing existing SQLite databases, you might want to export a D1 database for local development or testing. You can export a D1 database to a `.sql` file using [wrangler d1 export](https://developers.cloudflare.com/workers/wrangler/commands/#d1-export) and then execute (import) with `d1 execute --file`. To export full D1 database schema and data: ```sh npx wrangler d1 export --remote --output=./database.sql ``` To export single table schema and data: ```sh npx wrangler d1 export --remote --table= --output=./table.sql ``` To export only D1 database schema: ```sh npx wrangler d1 export --remote --output=./schema.sql --no-data ``` To export only D1 table schema: ```sh npx wrangler d1 export --remote --table= --output=./schema.sql --no-data ``` To export only D1 database data: ```sh npx wrangler d1 export --remote --output=./data.sql --no-schema ``` To export only D1 table data: ```sh npx wrangler d1 export --remote --table= --output=./data.sql --no-schema ``` ### Known limitations * Export is not supported for virtual tables, including databases with virtual tables. D1 supports virtual tables for full-text search using SQLite's [FTS5 module](https://www.sqlite.org/fts5.html). As a workaround, delete any virtual tables, export, and then recreate virtual tables. * A running export will block other database requests. * Any numeric value in a column is affected by JavaScript's 52-bit precision for numbers. If you store a very large number (in `int64`), then retrieve the same value, the returned value may be less precise than your original number. ## Troubleshooting If you receive an error when trying to import an existing schema and/or dataset into D1: * Ensure you are importing data in SQL format (typically with a `.sql` file extension). Refer to [how to convert SQLite files](#convert-sqlite-database-files) if you have a `.sqlite3` database dump. * Make sure the schema is [SQLite3](https://www.sqlite.org/docs.html) compatible. You cannot import data from a MySQL or PostgreSQL database into D1, as the types and SQL syntax are not directly compatible. * If you have foreign key relationships between tables, ensure you are importing the tables in the right order. You cannot refer to a table that does not yet exist. * If you receive a `"cannot start a transaction within a transaction"` error, make sure you have removed `BEGIN TRANSACTION` and `COMMIT` from your dumped SQL statements. ### Resolve `Statement too long` error If you encounter a `Statement too long` error when trying to import a large SQL file into D1, it means that one of the SQL statements in your file exceeds the maximum allowed length. To resolve this issue, convert the single large `INSERT` statement into multiple smaller `INSERT` statements. For example, instead of inserting 1,000 rows in one statement, split it into four groups of 250 rows, as illustrated in the code below. Before: ```sql INSERT INTO users (id, full_name, created_on) VALUES ('1', 'Jacquelin Elara', '2022-08-20 05:39:52'), ('2', 'Hubert Simmons', '2022-12-15 21:56:13'), ... ('1000', 'Boris Pewter', '2022-12-24 07:59:54'); ``` After: ```sql INSERT INTO users (id, full_name, created_on) VALUES ('1', 'Jacquelin Elara', '2022-08-20 05:39:52'), ... ('100', 'Eddy Orelo', '2022-12-15 22:16:15'); ... INSERT INTO users (id, full_name, created_on) VALUES ('901', 'Roran Eroi', '2022-08-20 05:39:52'), ... ('1000', 'Boris Pewter', '2022-12-15 22:16:15'); ``` ## Foreign key constraints When importing data, you may need to temporarily disable [foreign key constraints](https://developers.cloudflare.com/d1/sql-api/foreign-keys/). To do so, call `PRAGMA defer_foreign_keys = true` before making changes that would violate foreign keys. Refer to the [foreign key documentation](https://developers.cloudflare.com/d1/sql-api/foreign-keys/) to learn more about how to work with foreign keys and D1. ## Next Steps * Read the SQLite [`CREATE TABLE`](https://www.sqlite.org/lang_createtable.html) documentation. * Learn how to [use the D1 Workers Binding API](https://developers.cloudflare.com/d1/worker-api/) from within a Worker. * Understand how [database migrations work](https://developers.cloudflare.com/d1/reference/migrations/) with D1. --- title: Local development · Cloudflare D1 docs description: D1 has fully-featured support for local development, running the same version of D1 as Cloudflare runs globally. Local development uses Wrangler, the command-line interface for Workers, to manage local development sessions and state. lastUpdated: 2025-02-12T13:41:31.000Z chatbotDeprioritize: false source_url: html: https://developers.cloudflare.com/d1/best-practices/local-development/ md: https://developers.cloudflare.com/d1/best-practices/local-development/index.md --- D1 has fully-featured support for local development, running the same version of D1 as Cloudflare runs globally. Local development uses [Wrangler](https://developers.cloudflare.com/workers/wrangler/install-and-update/), the command-line interface for Workers, to manage local development sessions and state. ## Start a local development session Note This guide assumes you are using [Wrangler v3.0](https://blog.cloudflare.com/wrangler3/) or later. Users new to D1 and/or Cloudflare Workers should visit the [D1 tutorial](https://developers.cloudflare.com/d1/get-started/) to install `wrangler` and deploy their first database. Local development sessions create a standalone, local-only environment that mirrors the production environment D1 runs in so that you can test your Worker and D1 *before* you deploy to production. An existing [D1 binding](https://developers.cloudflare.com/workers/wrangler/configuration/#d1-databases) of `DB` would be available to your Worker when running locally. To start a local development session: 1. Confirm you are using wrangler v3.0+. ```sh wrangler --version ``` ```sh ⛅️ wrangler 3.0.0 ``` 2. Start a local development session ```sh wrangler dev ``` ```sh ------------------ wrangler dev now uses local mode by default, powered by 🔥 Miniflare and 👷 workerd. To run an edge preview session for your Worker, use wrangler dev --remote Your worker has access to the following bindings: - D1 Databases: - DB: test-db (c020574a-5623-407b-be0c-cd192bab9545) ⎔ Starting local server... [mf:inf] Ready on http://127.0.0.1:8787/ [b] open a browser, [d] open Devtools, [l] turn off local mode, [c] clear console, [x] to exit ``` In this example, the Worker has access to local-only D1 database. The corresponding D1 binding in your [Wrangler configuration file](https://developers.cloudflare.com/workers/wrangler/configuration/) would resemble the following: * wrangler.jsonc ```jsonc { "d1_databases": [ { "binding": "DB", "database_name": "test-db", "database_id": "c020574a-5623-407b-be0c-cd192bab9545" } ] } ``` * wrangler.toml ```toml [[d1_databases]] binding = "DB" database_name = "test-db" database_id = "c020574a-5623-407b-be0c-cd192bab9545" ``` Note that `wrangler dev` separates local and production (remote) data. A local session does not have access to your production data by default. To access your production (remote) database, pass the `--remote` flag when calling `wrangler dev`. Any changes you make when running in `--remote` mode cannot be undone. Refer to the [`wrangler dev` documentation](https://developers.cloudflare.com/workers/wrangler/commands/#dev) to learn more about how to configure a local development session. ## Develop locally with Pages You can only develop against a *local* D1 database when using [Cloudflare Pages](https://developers.cloudflare.com/pages/) by creating a minimal [Wrangler configuration file](https://developers.cloudflare.com/workers/wrangler/configuration/) in the root of your Pages project. This can be useful when creating schemas, seeding data or otherwise managing a D1 database directly, without adding to your application logic. Local development for remote databases It is currently not possible to develop against a *remote* D1 database when using [Cloudflare Pages](https://developers.cloudflare.com/pages/). Your [Wrangler configuration file](https://developers.cloudflare.com/workers/wrangler/configuration/) should resemble the following: * wrangler.jsonc ```jsonc { "d1_databases": [ { "binding": "DB", "database_name": "YOUR_DATABASE_NAME", "database_id": "the-id-of-your-D1-database-goes-here", "preview_database_id": "DB" } ] } ``` * wrangler.toml ```toml # If you are only using Pages + D1, you only need the below in your Wrangler config file to interact with D1 locally. [[d1_databases]] binding = "DB" # Should match preview_database_id database_name = "YOUR_DATABASE_NAME" database_id = "the-id-of-your-D1-database-goes-here" # wrangler d1 info YOUR_DATABASE_NAME preview_database_id = "DB" # Required for Pages local development ``` You can then execute queries and/or run migrations against a local database as part of your local development process by passing the `--local` flag to wrangler: ```bash wrangler d1 execute YOUR_DATABASE_NAME \ --local --command "CREATE TABLE IF NOT EXISTS users ( user_id INTEGER PRIMARY KEY, email_address TEXT, created_at INTEGER, deleted INTEGER, settings TEXT);" ``` The preceding command would execute queries the **local only** version of your D1 database. Without the `--local` flag, the commands are executed against the remote version of your D1 database running on Cloudflare's network. ## Persist data Note By default, in Wrangler v3 and above, data is persisted across each run of `wrangler dev`. If your local development and testing requires or assumes an empty database, you should start with a `DROP TABLE ` statement to delete existing tables before using `CREATE TABLE` to re-create them. Use `wrangler dev --persist-to=/path/to/file` to persist data to a specific location. This can be useful when working in a team (allowing you to share) the same copy, when deploying via CI/CD (to ensure the same starting state), or as a way to keep data when migrating across machines. Users of wrangler `2.x` must use the `--persist` flag: previous versions of wrangler did not persist data by default. ## Test programmatically ### Miniflare [Miniflare](https://miniflare.dev/) allows you to simulate a Workers and resources like D1 using the same underlying runtime and code as used in production. You can use Miniflare's [support for D1](https://miniflare.dev/storage/d1) to create D1 databases you can use for testing: * wrangler.jsonc ```jsonc { "d1_databases": [ { "binding": "DB", "database_name": "test-db", "database_id": "xxxxxxxx-xxxx-xxxx-xxxx-xxxxxxxxxxxx" } ] } ``` * wrangler.toml ```toml [[d1_databases]] binding = "DB" database_name = "test-db" database_id = "xxxxxxxx-xxxx-xxxx-xxxx-xxxxxxxxxxxx" ``` ```js const mf = new Miniflare({ d1Databases: { DB: "xxxxxxxx-xxxx-xxxx-xxxx-xxxxxxxxxxxx", }, }); ``` You can then use the `getD1Database()` method to retrieve the simulated database and run queries against it as if it were your real production D1 database: ```js const db = await mf.getD1Database("DB"); const stmt = db.prepare("SELECT name, age FROM users LIMIT 3"); const { results } = await stmt.all(); console.log(results); ``` ### `unstable_dev` Wrangler exposes an [`unstable_dev()`](https://developers.cloudflare.com/workers/wrangler/api/) that allows you to run a local HTTP server for testing Workers and D1. Run [migrations](https://developers.cloudflare.com/d1/reference/migrations/) against a local database by setting a `preview_database_id` in your Wrangler configuration. Given the below Wrangler configuration: * wrangler.jsonc ```jsonc { "d1_databases": [ { "binding": "DB", "database_name": "your-database", "database_id": "", "preview_database_id": "local-test-db" } ] } ``` * wrangler.toml ```toml [[ d1_databases ]] binding = "DB" # i.e. if you set this to "DB", it will be available in your Worker at `env.DB` database_name = "your-database" # the name of your D1 database, set when created database_id = "" # The unique ID of your D1 database, returned when you create your database or run ` preview_database_id = "local-test-db" # A user-defined ID for your local test database. ``` Migrations can be run locally as part of your CI/CD setup by passing the `--local` flag to `wrangler`: ```sh wrangler d1 migrations apply your-database --local ``` ### Usage example The following example shows how to use Wrangler's `unstable_dev()` API to: * Run migrations against your local test database, as defined by `preview_database_id`. * Make a request to an endpoint defined in your Worker. This example uses `/api/users/?limit=2`. * Validate the returned results match, including the `Response.status` and the JSON our API returns. ```ts import { unstable_dev } from "wrangler"; import type { UnstableDevWorker } from "wrangler"; describe("Test D1 Worker endpoint", () => { let worker: UnstableDevWorker; beforeAll(async () => { // Optional: Run any migrations to set up your `--local` database // By default, this will default to the preview_database_id execSync(`NO_D1_WARNING=true wrangler d1 migrations apply db --local`); worker = await unstable_dev("src/index.ts", { experimental: { disableExperimentalWarning: true }, }); }); afterAll(async () => { await worker.stop(); }); it("should return an array of users", async () => { // Our expected results const expectedResults = `{"results": [{"user_id": 1234, "email": "foo@example.com"},{"user_id": 6789, "email": "bar@example.com"}]}`; // Pass an optional URL to fetch to trigger any routing within your Worker const resp = await worker.fetch("/api/users/?limit=2"); if (resp) { // https://jestjs.io/docs/expect#tobevalue expect(resp.status).toBe(200); const data = await resp.json(); // https://jestjs.io/docs/expect#tomatchobjectobject expect(data).toMatchObject(expectedResults); } }); }); ``` Review the [`unstable_dev()`](https://developers.cloudflare.com/workers/wrangler/api/#usage) documentation for more details on how to use the API within your tests. ## Related resources * Use [`wrangler dev`](https://developers.cloudflare.com/workers/wrangler/commands/#dev) to run your Worker and D1 locally and debug issues before deploying. * Learn [how to debug D1](https://developers.cloudflare.com/d1/observability/debug-d1/). * Understand how to [access logs](https://developers.cloudflare.com/workers/observability/logs/) generated from your Worker and D1. --- title: Query a database · Cloudflare D1 docs description: D1 is compatible with most SQLite's SQL convention since it leverages SQLite's query engine. You can use SQL commands to query D1. lastUpdated: 2025-03-07T11:07:33.000Z chatbotDeprioritize: false source_url: html: https://developers.cloudflare.com/d1/best-practices/query-d1/ md: https://developers.cloudflare.com/d1/best-practices/query-d1/index.md --- D1 is compatible with most SQLite's SQL convention since it leverages SQLite's query engine. You can use SQL commands to query D1. There are a number of ways you can interact with a D1 database: 1. Using [D1 Workers Binding API](https://developers.cloudflare.com/d1/worker-api/) in your code. 2. Using [D1 REST API](https://developers.cloudflare.com/api/resources/d1/subresources/database/methods/create/). 3. Using [D1 Wrangler commands](https://developers.cloudflare.com/d1/wrangler-commands/). ## Use SQL to query D1 D1 understands SQLite semantics, which allows you to query a database using SQL statements via Workers BindingAPI or REST API (including Wrangler commands). Refer to [D1 SQL API](https://developers.cloudflare.com/d1/sql-api/sql-statements/) to learn more about supported SQL statements. ### Use foreign key relationships When using SQL with D1, you may wish to define and enforce foreign key constraints across tables in a database. Foreign key constraints allow you to enforce relationships across tables, or prevent you from deleting rows that reference rows in other tables. An example of a foreign key relationship is shown below. ```sql CREATE TABLE users ( user_id INTEGER PRIMARY KEY, email_address TEXT, name TEXT, metadata TEXT ) CREATE TABLE orders ( order_id INTEGER PRIMARY KEY, status INTEGER, item_desc TEXT, shipped_date INTEGER, user_who_ordered INTEGER, FOREIGN KEY(user_who_ordered) REFERENCES users(user_id) ) ``` Refer to [Define foreign keys](https://developers.cloudflare.com/d1/sql-api/foreign-keys/) for more information. ### Query JSON D1 allows you to query and parse JSON data stored within a database. For example, you can extract a value inside a JSON object. Given the following JSON object (`type:blob`) in a column named `sensor_reading`, you can extract values from it directly. ```json { "measurement": { "temp_f": "77.4", "aqi": [21, 42, 58], "o3": [18, 500], "wind_mph": "13", "location": "US-NY" } } ``` ```sql -- Extract the temperature value SELECT json_extract(sensor_reading, '$.measurement.temp_f')-- returns "77.4" as TEXT ``` Refer to [Query JSON](https://developers.cloudflare.com/d1/sql-api/query-json/) to learn more about querying JSON objects. ## Query D1 with Workers Binding API Workers Binding API primarily interacts with the data plane, and allows you to query your D1 database from your Worker. This requires you to: 1. Bind your D1 database to your Worker. 2. Prepare a statement. 3. Run the statement. ```js export default { async fetch(request, env) { const {pathname} = new URL(request.url); const companyName1 = `Bs Beverages`; const companyName2 = `Around the Horn`; const stmt = env.DB.prepare(`SELECT * FROM Customers WHERE CompanyName = ?`); if (pathname === `/RUN`) { const returnValue = await stmt.bind(companyName1).run(); return Response.json(returnValue); } return new Response( `Welcome to the D1 API Playground! \nChange the URL to test the various methods inside your index.js file.`, ); }, }; ``` Refer to [Workers Binding API](https://developers.cloudflare.com/d1/worker-api/) for more information. ## Query D1 with REST API REST API primarily interacts with the control plane, and allows you to create/manage your D1 database. Refer to [D1 REST API](https://developers.cloudflare.com/api/resources/d1/subresources/database/methods/create/) for D1 REST API documentation. ## Query D1 with Wrangler commands You can use Wrangler commands to query a D1 database. Note that Wrangler commands use REST APIs to perform its operations. ```sh npx wrangler d1 execute prod-d1-tutorial --command="SELECT * FROM Customers" ``` ```sh 🌀 Mapping SQL input into an array of statements 🌀 Executing on local database production-db-backend () from .wrangler/state/v3/d1: ┌────────────┬─────────────────────┬───────────────────┐ │ CustomerId │ CompanyName │ ContactName │ ├────────────┼─────────────────────┼───────────────────┤ │ 1 │ Alfreds Futterkiste │ Maria Anders │ ├────────────┼─────────────────────┼───────────────────┤ │ 4 │ Around the Horn │ Thomas Hardy │ ├────────────┼─────────────────────┼───────────────────┤ │ 11 │ Bs Beverages │ Victoria Ashworth │ ├────────────┼─────────────────────┼───────────────────┤ │ 13 │ Bs Beverages │ Random Name │ └────────────┴─────────────────────┴───────────────────┘ ``` --- title: Global read replication · Cloudflare D1 docs description: D1 read replication can lower latency for read queries and scale read throughput by adding read-only database copies, called read replicas, across regions globally closer to clients. lastUpdated: 2025-06-05T14:06:55.000Z chatbotDeprioritize: false source_url: html: https://developers.cloudflare.com/d1/best-practices/read-replication/ md: https://developers.cloudflare.com/d1/best-practices/read-replication/index.md --- D1 read replication can lower latency for read queries and scale read throughput by adding read-only database copies, called read replicas, across regions globally closer to clients. Your application can use read replicas with D1 [Sessions API](https://developers.cloudflare.com/d1/worker-api/d1-database/#withsession). A session encapsulates all the queries from one logical session for your application. For example, a session may correspond to all queries coming from a particular web browser session. All queries within a session read from a database instance which is as up-to-date as your query needs it to be. Sessions API ensures [sequential consistency](https://developers.cloudflare.com/d1/best-practices/read-replication/#replica-lag-and-consistency-model) for all queries in a session. To checkout D1 read replication, deploy the following Worker code using Sessions API, which will prompt you to create a D1 database and enable read replication on said database. [![Deploy to Cloudflare](https://deploy.workers.cloudflare.com/button)](https://deploy.workers.cloudflare.com/?url=https://github.com/cloudflare/templates/tree/main/d1-starter-sessions-api-template) Tip: Place your database further away for the read replication demo To simulate how read replication can improve a worst case latency scenario, set your D1 database location hint to be in a farther away region. For example, if you are in Europe create your database in Western North America (WNAM). * JavaScript ```js export default { async fetch(request, env, ctx) { const url = new URL(request.url); // A. Create the Session. // When we create a D1 Session, we can continue where we left off from a previous // Session if we have that Session's last bookmark or use a constraint. const bookmark = request.headers.get("x-d1-bookmark") ?? "first-unconstrained"; const session = env.DB01.withSession(bookmark); try { // Use this Session for all our Workers' routes. const response = await withTablesInitialized( request, session, handleRequest, ); // B. Return the bookmark so we can continue the Session in another request. response.headers.set("x-d1-bookmark", session.getBookmark() ?? ""); return response; } catch (e) { console.error({ message: "Failed to handle request", error: String(e), errorProps: e, url, bookmark, }); return Response.json( { error: String(e), errorDetails: e }, { status: 500 }, ); } }, }; ``` * TypeScript ```ts export default { async fetch(request, env, ctx): Promise { const url = new URL(request.url); // A. Create the Session. // When we create a D1 Session, we can continue where we left off from a previous // Session if we have that Session's last bookmark or use a constraint. const bookmark = request.headers.get("x-d1-bookmark") ?? "first-unconstrained"; const session = env.DB01.withSession(bookmark); try { // Use this Session for all our Workers' routes. const response = await withTablesInitialized( request, session, handleRequest, ); // B. Return the bookmark so we can continue the Session in another request. response.headers.set("x-d1-bookmark", session.getBookmark() ?? ""); return response; } catch (e) { console.error({ message: "Failed to handle request", error: String(e), errorProps: e, url, bookmark, }); return Response.json( { error: String(e), errorDetails: e }, { status: 500 }, ); } }, } satisfies ExportedHandler; ``` ## Primary database instance vs read replicas ![D1 read replication concept](https://developers.cloudflare.com/images/d1/d1-read-replication-concept.png) When using D1 without read replication, D1 routes all queries (both read and write) to a specific database instance in [one location in the world](https://developers.cloudflare.com/d1/configuration/data-location/), known as the primary database instance . D1 request latency is dependent on the physical proximity of a user to the primary database instance. Users located further away from the primary database instance experience longer request latency due to [network round-trip time](https://www.cloudflare.com/learning/cdn/glossary/round-trip-time-rtt/). When using read replication, D1 creates multiple asynchronously replicated copies of the primary database instance, which only serve read requests, called read replicas . D1 creates the read replicas in [multiple regions](https://developers.cloudflare.com/d1/best-practices/read-replication/#read-replica-locations) throughout the world across Cloudflare's network. Even though a user may be located far away from the primary database instance, they could be close to a read replica. When D1 routes read requests to the read replica instead of the primary database instance, the user enjoys faster responses for their read queries. D1 asynchronously replicates changes from the primary database instance to all read replicas. This means that at any given time, a read replica may be arbitrarily out of date. The time it takes for the latest committed data in the primary database instance to be replicated to the read replica is known as the replica lag . Replica lag and non-deterministic routing to individual replicas can lead to application data consistency issues. The D1 Sessions API solves this by ensuring sequential consistency. For more information, refer to [replica lag and consistency model](https://developers.cloudflare.com/d1/best-practices/read-replication/#replica-lag-and-consistency-model). Note All write queries are still forwarded to the primary database instance. Read replication only improves the response time for read query requests. | Type of database instance | Description | How it handles write queries | How it handles read queries | | - | - | - | - | | Primary database instance | The database instance containing the “original” copy of the database | Can serve write queries | Can serve read queries | | Read replica database instance | A database instance containing a copy of the original database which asynchronously receives updates from the primary database instance | Forwards any write queries to the primary database instance | Can serve read queries using its own copy of the database | ## Benefits of read replication A system with multiple read replicas located around the world improves the performance of databases: * The query latency decreases for users located close to the read replicas. By shortening the physical distance between a the database instance and the user, read query latency decreases, resulting in a faster application. * The read throughput increases by distributing load across multiple replicas. Since multiple database instances are able to serve read-only requests, your application can serve a larger number of queries at any given time. ## Use Sessions API By using [Sessions API](https://developers.cloudflare.com/d1/worker-api/d1-database/#withsession) for read replication, all of your queries from a single session read from a version of the database which ensures sequential consistency. This ensures that the version of the database you are reading is logically consistent even if the queries are handled by different read replicas. D1 read replication achieves this by attaching a bookmark to each query within a session. For more information, refer to [Bookmarks](https://developers.cloudflare.com/d1/reference/time-travel/#bookmarks). ### Enable read replication Read replication can be enabled at the database level in the Cloudflare dashboard. Check **Settings** for your D1 database to view if read replication is enabled. 1. Go to [**Workers & Pages** > **D1**](https://dash.cloudflare.com/?to=/:account/workers/d1). 2. Select an existing database > **Settings** > **Enable Read Replication**. ### Start a session without constraints To create a session from any available database version, use `withSession()` without any parameters, which will route the first query to any database instance, either the primary database instance or a read replica. ```ts const session = env.DB.withSession() // synchronous // query executes on either primary database or a read replica const result = await session .prepare(`SELECT * FROM Customers WHERE CompanyName = 'Bs Beverages'`) .run() ``` * `withSession()` is the same as `withSession("first-unconstrained")` * This approach is best when your application does not require the latest database version. All queries in a session ensure sequential consistency. * Refer to the [D1 Workers Binding API documentation](https://developers.cloudflare.com/d1/worker-api/d1-database#withsession). ### Start a session with all latest data To create a session from the latest database version, use `withSession("first-primary")`, which will route the first query to the primary database instance. ```ts const session = env.DB.withSession(`first-primary`) // synchronous // query executes on primary database const result = await session .prepare(`SELECT * FROM Customers WHERE CompanyName = 'Bs Beverages'`) .run() ``` * This approach is best when your application requires the latest database version. All queries in a session ensure sequential consistency. * Refer to the [D1 Workers Binding API documentation](https://developers.cloudflare.com/d1/worker-api/d1-database#withsession). ### Start a session from previous context (bookmark) To create a new session from the context of a previous session, pass a `bookmark` parameter to guarantee that the session starts with a database version that is at least as up-to-date as the provided `bookmark`. ```ts // retrieve bookmark from previous session stored in HTTP header const bookmark = request.headers.get('x-d1-bookmark') ?? 'first-unconstrained'; const session = env.DB.withSession(bookmark) const result = await session .prepare(`SELECT * FROM Customers WHERE CompanyName = 'Bs Beverages'`) .run() // store bookmark for a future session response.headers.set('x-d1-bookmark', session.getBookmark() ?? "") ``` * Starting a session with a `bookmark` ensures the new session will be at least as up-to-date as the previous session that generated the given `bookmark`. * Refer to the [D1 Workers Binding API documentation](https://developers.cloudflare.com/d1/worker-api/d1-database#withsession). ### Check where D1 request was processed To see how D1 requests are processed by the addition of read replicas, `served_by_region` and `served_by_primary` fields are returned in the `meta` object of [D1 Result](https://developers.cloudflare.com/d1/worker-api/return-object/#d1result). ```ts const result = await env.DB.withSession() .prepare(`SELECT * FROM Customers WHERE CompanyName = 'Bs Beverages'`) .run(); console.log({ servedByRegion: result.meta.served_by_region ?? "", servedByPrimary: result.meta.served_by_primary ?? "", }); ``` * `served_by_region` and `served_by_primary` fields are present for all D1 remote requests, regardless of whether read replication is enabled or if the Sessions API is used. On local development, `npx wrangler dev`, these fields are `undefined`. ### Enable read replication via REST API With the REST API, set `read_replication.mode: auto` to enable read replication on a D1 database. For this REST endpoint, you need to have an API token with `D1:Edit` permission. If you do not have an API token, follow the guide: [Create API token](https://developers.cloudflare.com/fundamentals/api/get-started/create-token/). * cURL ```sh curl -X PUT "https://api.cloudflare.com/client/v4/accounts/{account_id}/d1/database/{database_id}" \ -H "Authorization: Bearer $TOKEN" \ -H "Content-Type: application/json" \ -d '{"read_replication": {"mode": "auto"}}' ``` * TypeScript ```ts const headers = new Headers({ "Authorization": `Bearer ${TOKEN}` }); await fetch ("/v4/accounts/{account_id}/d1/database/{database_id}", { method: "PUT", headers: headers, body: JSON.stringify( { "read_replication": { "mode": "auto" } } ) } ) ``` ### Disable read replication via REST API With the REST API, set `read_replication.mode: disabled` to disable read replication on a D1 database. For this REST endpoint, you need to have an API token with `D1:Edit` permission. If you do not have an API token, follow the guide: [Create API token](https://developers.cloudflare.com/fundamentals/api/get-started/create-token/). Note Disabling read replication takes up to 24 hours for replicas to stop processing requests. Sessions API works with databases that do not have read replication enabled, so it is safe to run code with Sessions API even after disabling read replication. * cURL ```sh curl -X PUT "https://api.cloudflare.com/client/v4/accounts/{account_id}/d1/database/{database_id}" \ -H "Authorization: Bearer $TOKEN" \ -H "Content-Type: application/json" \ -d '{"read_replication": {"mode": "disabled"}}' ``` * TypeScript ```ts const headers = new Headers({ "Authorization": `Bearer ${TOKEN}` }); await fetch ("/v4/accounts/{account_id}/d1/database/{database_id}", { method: "PUT", headers: headers, body: JSON.stringify( { "read_replication": { "mode": "disabled" } } ) } ) ``` ### Check if read replication is enabled On the Cloudflare dashboard, check **Settings** for your D1 database to view if read replication is enabled. Alternatively, `GET` D1 database REST endpoint returns if read replication is enabled or disabled. For this REST endpoint, you need to have an API token with `D1:Read` permission. If you do not have an API token, follow the guide: [Create API token](https://developers.cloudflare.com/fundamentals/api/get-started/create-token/). * cURL ```sh curl -X GET "https://api.cloudflare.com/client/v4/accounts/{account_id}/d1/database/{database_id}" \ -H "Authorization: Bearer $TOKEN" ``` * TypeScript ```ts const headers = new Headers({ "Authorization": `Bearer ${TOKEN}` }); const response = await fetch("/v4/accounts/{account_id}/d1/database/{database_id}", { method: "GET", headers: headers }); const data = await response.json(); console.log(data.read_replication.mode); ``` - Check the `read_replication` property of the `result` object * `"mode": "auto"` indicates read replication is enabled * `"mode": "disabled"` indicates read replication is disabled ## Read replica locations Currently, D1 automatically creates a read replica in [every supported region](https://developers.cloudflare.com/d1/configuration/data-location/#available-location-hints), including the region where the primary database instance is located. These regions are: * ENAM * WNAM * WEUR * EEUR * APAC * OC Note Read replica locations are subject to change at Cloudflare's discretion. ## Observability To see the impact of read replication and check the how D1 requests are processed by additional database instances, you can use: * The `meta` object within the [`D1Result`](https://developers.cloudflare.com/d1/worker-api/return-object/#d1result) return object, which includes new fields: * `served_by_region` * `served_by_primary` * The [Cloudflare dashboard](https://dash.cloudflare.com/?to=/:account/workers/d1), where you can view your database metrics breakdown by region that processed D1 requests. ## Known limitations There are some known limitations for D1 read replication. * Sessions API is only available via the [D1 Worker Binding](https://developers.cloudflare.com/d1/worker-api/d1-database/#withsession) and not yet available via the REST API. ## Background information ### Replica lag and consistency model To account for replica lag, it is important to consider the consistency model for D1. A consistency model is a logical framework that governs how a database system serves user queries (how the data is updated and accessed) when there are multiple database instances. Different models can be useful in different use cases. Most database systems provide [read committed](https://jepsen.io/consistency/models/read-committed), [snapshot isolation](https://jepsen.io/consistency/models/snapshot-isolation), or [serializable](https://jepsen.io/consistency/models/serializable) consistency models, depending on their configuration. #### Without Sessions API Consider what could happen in a distributed database system. ![Distributed replicas could cause inconsistencies without Sessions API](https://developers.cloudflare.com/images/d1/consistency-without-sessions-api.png) 1. Your SQL write query is processed by the primary database instance. 2. You obtain a response acknowledging the write query. 3. Your subsequent SQL read query goes to a read replica. 4. The read replica has not yet been updated, so does not contain changes from your SQL write query. The returned results are inconsistent from your perspective. #### With Sessions API When using D1 Sessions API, your queries obtain bookmarks which allows the read replica to only serve sequentially consistent data. ![D1 offers sequential consistency when using Sessions API](https://developers.cloudflare.com/images/d1/consistency-with-sessions-api.png) 1. SQL write query is processed by the primary database instance. 2. You obtain a response acknowledging the write query. You also obtain a bookmark (100) which identifies the state of the database after the write query. 3. Your subsequent SQL read query goes to a read replica, and also provides the bookmark (100). 4. The read replica will wait until it has been updated to be at least as up-to-date as the provided bookmark (100). 5. Once the read replica has been updated (bookmark 104), it serves your read query, which is now sequentially consistent. In the diagram, the returned bookmark is bookmark 104, which is different from the one provided in your read query (bookmark 100). This can happen if there were other writes from other client requests that also got replicated to the read replica in between the two write/read queries you executed. #### Sessions API provides sequential consistency D1 read replication offers [sequential consistency](https://jepsen.io/consistency/models/sequential). D1 creates a global order of all operations which have taken place on the database, and can identify the latest version of the database that a query has seen, using [bookmarks](https://developers.cloudflare.com/d1/reference/time-travel/#bookmarks). It then serves the query with a database instance that is at least as up-to-date as the bookmark passed along with the query to execute. Sequential consistency has properties such as: * **Monotonic reads**: If you perform two reads one after the other (read-1, then read-2), read-2 cannot read a version of the database prior to read-1. * **Monotonic writes**: If you perform write-1 then write-2, all processes observe write-1 before write-2. * **Writes follow reads**: If you read a value, then perform a write, the subsequent write must be based on the value that was just read. * **Read my own writes**: If you write to the database, all subsequent reads will see the write. ## Supplementary information You may wish to refer to the following resources: * Blog: [Sequential consistency without borders: How D1 implements global read replication](https://blog.cloudflare.com/d1-read-replication-beta/) * Blog: [Building D1: a Global Database](https://blog.cloudflare.com/building-d1-a-global-database/) * [D1 Sessions API documentation](https://developers.cloudflare.com/d1/worker-api/d1-database#withsession) * [Starter code for D1 Sessions API demo](https://github.com/cloudflare/templates/tree/main/d1-starter-sessions-api-template) * [E-commerce store read replication tutorial](https://developers.cloudflare.com/d1/tutorials/using-read-replication-for-e-com) --- title: Remote development · Cloudflare D1 docs description: D1 supports remote development using the dashboard playground. The dashboard playground uses a browser version of Visual Studio Code, allowing you to rapidly iterate on your Worker entirely in your browser. lastUpdated: 2024-12-11T09:43:45.000Z chatbotDeprioritize: false source_url: html: https://developers.cloudflare.com/d1/best-practices/remote-development/ md: https://developers.cloudflare.com/d1/best-practices/remote-development/index.md --- D1 supports remote development using the [dashboard playground](https://developers.cloudflare.com/workers/playground/#use-the-playground). The dashboard playground uses a browser version of Visual Studio Code, allowing you to rapidly iterate on your Worker entirely in your browser. ## 1. Bind a D1 database to a Worker Note This guide assumes you have previously created a Worker, and a D1 database. Users new to D1 and/or Cloudflare Workers should read the [D1 tutorial](https://developers.cloudflare.com/d1/get-started/) to install `wrangler` and deploy their first database. 1. Log in to the [Cloudflare dashboard](https://dash.cloudflare.com) and select your account. 2. Go to [**Workers & Pages** > **Overview**](https://dash.cloudflare.com/?to=/:account/workers-and-pages). 3. Select an existing Worker. 4. Select the **Settings** tab. 5. Select the **Variables** sub-tab. 6. Scroll down to the **D1 Database Bindings** heading. 7. Enter a variable name, such as `DB`, and select the D1 database you wish to access from this Worker. 8. Select **Save and deploy**. ## 2. Start a remote development session 1. On the Worker's page on the Cloudflare dashboard, select **Edit Code** at the top of the page. 2. Your Worker now has access to D1. Use the following Worker script to verify that the Worker has access to the bound D1 database: ```js export default { async fetch(request, env, ctx) { const res = await env.DB.prepare("SELECT 1;").all(); return new Response(JSON.stringify(res, null, 2)); }, }; ``` ## Related resources * Learn [how to debug D1](https://developers.cloudflare.com/d1/observability/debug-d1/). * Understand how to [access logs](https://developers.cloudflare.com/workers/observability/logs/) generated from your Worker and D1. --- title: Use D1 from Pages · Cloudflare D1 docs lastUpdated: 2024-12-11T09:43:45.000Z chatbotDeprioritize: false source_url: html: https://developers.cloudflare.com/d1/best-practices/use-d1-from-pages/ md: https://developers.cloudflare.com/d1/best-practices/use-d1-from-pages/index.md --- --- title: Use indexes · Cloudflare D1 docs description: Indexes enable D1 to improve query performance over the indexed columns for common (popular) queries by reducing the amount of data (number of rows) the database has to scan when running a query. lastUpdated: 2025-02-24T09:30:25.000Z chatbotDeprioritize: false source_url: html: https://developers.cloudflare.com/d1/best-practices/use-indexes/ md: https://developers.cloudflare.com/d1/best-practices/use-indexes/index.md --- Indexes enable D1 to improve query performance over the indexed columns for common (popular) queries by reducing the amount of data (number of rows) the database has to scan when running a query. ## When is an index useful? Indexes are useful: * When you want to improve the read performance over columns that are regularly used in predicates - for example, a `WHERE email_address = ?` or `WHERE user_id = 'a793b483-df87-43a8-a057-e5286d3537c5'` - email addresses, usernames, user IDs and/or dates are good choices for columns to index in typical web applications or services. * For enforcing uniqueness constraints on a column or columns - for example, an email address or user ID via the `CREATE UNIQUE INDEX`. * In cases where you query over multiple columns together - `(customer_id, transaction_date)`. Indexes are automatically updated when the table and column(s) they reference are inserted, updated or deleted. You do not need to manually update an index after you write to the table it references. ## Create an index Note Tables that use the default primary key (an `INTEGER` based `ROWID`), or that define their own `INTEGER PRIMARY KEY`, do not need to create an index for that column. To create an index on a D1 table, use the `CREATE INDEX` SQL command and specify the table and column(s) to create the index over. For example, given the following `orders` table, you may want to create an index on `customer_id`. Nearly all of your queries against that table filter on `customer_id`, and you would see a performance improvement by creating an index for it. ```sql CREATE TABLE IF NOT EXISTS orders ( order_id INTEGER PRIMARY KEY, customer_id STRING NOT NULL, -- for example, a unique ID aba0e360-1e04-41b3-91a0-1f2263e1e0fb order_date STRING NOT NULL, status INTEGER NOT NULL, last_updated_date STRING NOT NULL ) ``` To create the index on the `customer_id` column, execute the below statement against your database: Note A common naming format for indexes is `idx_TABLE_NAME_COLUMN_NAMES`, so that you can identify the table and column(s) your indexes are for when managing your database. ```sql CREATE INDEX IF NOT EXISTS idx_orders_customer_id ON orders(customer_id) ``` Queries that reference the `customer_id` column will now benefit from the index: ```sql -- Uses the index: the indexed column is referenced by the query. SELECT * FROM orders WHERE customer_id = ? -- Does not use the index: customer_id is not in the query. SELECT * FROM orders WHERE order_date = '2023-05-01' ``` In more complex cases, you can confirm whether an index was used by D1 by [analyzing a query](#test-an-index) directly. ### Run `PRAGMA optimize` After creating an index, run the `PRAGMA optimize` command to improve your database performance. `PRAGMA optimize` runs `ANALYZE` command on each table in the database, which collects statistics on the tables and indices. These statistics allows the query planner to generate the most efficient query plan when executing the user query. For more information, refer to [`PRAGMA optimize`](https://developers.cloudflare.com/d1/sql-api/sql-statements/#pragma-optimize). ## List indexes List the indexes on a database, as well as the SQL definition, by querying the `sqlite_schema` system table: ```sql SELECT name, type, sql FROM sqlite_schema WHERE type IN ('index'); ``` This will return output resembling the below: ```txt ┌──────────────────────────────────┬───────┬────────────────────────────────────────┐ │ name │ type │ sql │ ├──────────────────────────────────┼───────┼────────────────────────────────────────┤ │ idx_users_id │ index │ CREATE INDEX idx_users_id ON users(id) │ └──────────────────────────────────┴───────┴────────────────────────────────────────┘ ``` Note that you cannot modify this table, or an existing index. To modify an index, [delete it first](#remove-indexes) and [create a new index](#create-an-index) with the updated definition. ## Test an index Validate that an index was used for a query by prepending a query with [`EXPLAIN QUERY PLAN`](https://www.sqlite.org/eqp.html). This will output a query plan for the succeeding statement, including which (if any) indexes were used. For example, if you assume the `users` table has an `email_address TEXT` column and you created an index `CREATE UNIQUE INDEX idx_email_address ON users(email_address)`, any query with a predicate on `email_address` should use your index. ```sql EXPLAIN QUERY PLAN SELECT * FROM users WHERE email_address = 'foo@example.com'; QUERY PLAN `--SEARCH users USING INDEX idx_email_address (email_address=?) ``` Review the `USING INDEX ` output from the query planner, confirming the index was used. This is also a fairly common use-case for an index. Finding a user based on their email address is often a very common query type for login (authentication) systems. Using an index can reduce the number of rows read by a query. Use the `meta` object to estimate your usage. Refer to ["Can I use an index to reduce the number of rows read by a query?"](https://developers.cloudflare.com/d1/platform/pricing/#can-i-use-an-index-to-reduce-the-number-of-rows-read-by-a-query) and ["How can I estimate my (eventual) bill?"](https://developers.cloudflare.com/d1/platform/pricing/#how-can-i-estimate-my-eventual-bill). ## Multi-column indexes For a multi-column index (an index that specifies multiple columns), queries will only use the index if they specify either *all* of the columns, or a subset of the columns provided all columns to the "left" are also within the query. Given an index of `CREATE INDEX idx_customer_id_transaction_date ON transactions(customer_id, transaction_date)`, the following table shows when the index is used (or not): | Query | Index Used? | | - | - | | `SELECT * FROM transactions WHERE customer_id = '1234' AND transaction_date = '2023-03-25'` | Yes: specifies both columns in the index. | | `SELECT * FROM transactions WHERE transaction_date = '2023-03-28'` | No: only specifies `transaction_date`, and does not include other leftmost columns from the index. | | `SELECT * FROM transactions WHERE customer_id = '56789'` | Yes: specifies `customer_id`, which is the leftmost column in the index. | Notes: * If you created an index over three columns instead — `customer_id`, `transaction_date` and `shipping_status` — a query that uses both `customer_id` and `transaction_date` would use the index, as you are including all columns "to the left". * With the same index, a query that uses only `transaction_date` and `shipping_status` would *not* use the index, as you have not used `customer_id` (the leftmost column) in the query. ## Partial indexes Partial indexes are indexes over a subset of rows in a table. Partial indexes are defined by the use of a `WHERE` clause when creating the index. A partial index can be useful to omit certain rows, such as those where values are `NULL` or where rows with a specific value are present across queries. * A concrete example of a partial index would be on a table with a `order_status INTEGER` column, where `6` might represent `"order complete"` in your application code. * This would allow queries against orders that are yet to be fulfilled, shipped or are in-progress, which are likely to be some of the most common users (users checking their order status). * Partial indexes also keep the index from growing unbounded over time. The index does not need to keep a row for every completed order, and completed orders are likely to be queried far fewer times than in-progress orders. A partial index that filters out completed orders from the index would resemble the following: ```sql CREATE INDEX idx_order_status_not_complete ON orders(order_status) WHERE order_status != 6 ``` Partial indexes can be faster at read time (less rows in the index) and at write time (fewer writes to the index) than full indexes. You can also combine a partial index with a [multi-column index](#multi-column-indexes). ## Remove indexes Use `DROP INDEX` to remove an index. Dropped indexes cannot be restored. ## Considerations Take note of the following considerations when creating indexes: * Indexes are not always a free performance boost. You should create indexes only on columns that reflect your most-queried columns. Indexes themselves need to be maintained. When you write to an indexed column, the database needs to write to the table and the index. The performance benefit of an index and reduction in rows read will, in nearly all cases, offset this additional write. * You cannot create indexes that reference other tables or use non-deterministic functions, since the index would not be stable. * Indexes cannot be updated. To add or remove a column from an index, [remove](#remove-indexes) the index and then [create a new index](#create-an-index) with the new columns. * Indexes contribute to the overall storage required by your database: an index is effectively a table itself. --- title: Data location · Cloudflare D1 docs description: Learn how the location of data stored in D1 is determined, including where the leader is placed and how you optimize that location based on your needs. lastUpdated: 2025-04-09T22:35:27.000Z chatbotDeprioritize: false source_url: html: https://developers.cloudflare.com/d1/configuration/data-location/ md: https://developers.cloudflare.com/d1/configuration/data-location/index.md --- Learn how the location of data stored in D1 is determined, including where the leader is placed and how you optimize that location based on your needs. ## Automatic (recommended) By default, D1 will automatically create your primary database instance in a location close to where you issued the request to create a database. In most cases this allows D1 to choose the optimal location for your database on your behalf. ## Provide a location hint Location hint is an optional parameter you can provide to indicate your desired geographical location for your primary database instance. You may want to explicitly provide a location hint in cases where the majority of your writes to a specific database come from a different location than where you are creating the database from. Location hints can be useful when: * Working in a distributed team. * Creating databases specific to users in specific locations. * Using continuous deployment (CD) or Infrastructure as Code (IaC) systems to programmatically create your databases. Provide a location hint when creating a D1 database when: * Using [`wrangler d1`](https://developers.cloudflare.com/workers/wrangler/commands/#d1) to create a database. * Creating a database [via the Cloudflare dashboard](https://dash.cloudflare.com/?to=/:account/workers/d1). Warning Providing a location hint does not guarantee that D1 runs in your preferred location. Instead, it will run in the nearest possible location (by latency) to your preference. ### Use Wrangler Note To install Wrangler, the command-line interface for D1 and Workers, refer to [Install and Update Wrangler](https://developers.cloudflare.com/workers/wrangler/install-and-update/). To provide a location hint when creating a new database, pass the `--location` flag with a valid location hint: ```sh wrangler d1 create new-database --location=weur ``` ### Use the dashboard To provide a location hint when creating a database via the dashboard: 1. Log in to the [Cloudflare dashboard](https://dash.cloudflare.com) and select your account. 2. Go to [**Workers & Pages** > **D1**](https://dash.cloudflare.com/?to=/:account/workers/d1). 3. Select **Create database**. 4. Provide a database name and an optional **Location**. 5. Select **Create** to create your database. ## Available location hints D1 supports the following location hints: | Hint | Hint description | | - | - | | wnam | Western North America | | enam | Eastern North America | | weur | Western Europe | | eeur | Eastern Europe | | apac | Asia-Pacific | | oc | Oceania | Warning D1 location hints are not currently supported for South America (`sam`), Africa (`afr`), and the Middle East (`me`). D1 databases do not run in these locations. ## Read replica locations With read replication enabled, D1 creates and distributes read-only copies of the primary database instance around the world. This reduces the query latency for users located far away from the primary database instance. When using D1 read replication, D1 automatically creates a read replica in [every available region](https://developers.cloudflare.com/d1/configuration/data-location#available-location-hints), including the region where the primary database instance is located. Refer to [D1 read replication](https://developers.cloudflare.com/d1/best-practices/read-replication/) for more information. --- title: Environments · Cloudflare D1 docs description: Environments are different contexts that your code runs in. Cloudflare Developer Platform allows you to create and manage different environments. Through environments, you can deploy the same project to multiple places under multiple names. lastUpdated: 2025-02-12T13:41:31.000Z chatbotDeprioritize: false source_url: html: https://developers.cloudflare.com/d1/configuration/environments/ md: https://developers.cloudflare.com/d1/configuration/environments/index.md --- [Environments](https://developers.cloudflare.com/workers/wrangler/environments/) are different contexts that your code runs in. Cloudflare Developer Platform allows you to create and manage different environments. Through environments, you can deploy the same project to multiple places under multiple names. To specify different D1 databases for different environments, use the following syntax in your Wrangler file: * wrangler.jsonc ```jsonc { "env": { "staging": { "d1_databases": [ { "binding": "", "database_name": "", "database_id": "" } ] }, "production": { "d1_databases": [ { "binding": "", "database_name": "", "database_id": "" } ] } } } ``` * wrangler.toml ```toml # This is a staging environment [env.staging] d1_databases = [ { binding = "", database_name = "", database_id = "" }, ] # This is a production environment [env.production] d1_databases = [ { binding = "", database_name = "", database_id = "" }, ] ``` In the code above, the `staging` environment is using a different database (`DATABASE_NAME_1`) than the `production` environment (`DATABASE_NAME_2`). ## Anatomy of Wrangler file If you need to specify different D1 databases for different environments, your [Wrangler configuration file](https://developers.cloudflare.com/workers/wrangler/configuration/) may contain bindings that resemble the following: * wrangler.jsonc ```jsonc { "production": { "d1_databases": [ { "binding": "DB", "database_name": "DATABASE_NAME", "database_id": "DATABASE_ID" } ] } } ``` * wrangler.toml ```toml [[production.d1_databases]] binding = "DB" database_name = "DATABASE_NAME" database_id = "DATABASE_ID" ``` In the above configuration: * `[[production.d1_databases]]` creates an object `production` with a property `d1_databases`, where `d1_databases` is an array of objects, since you can create multiple D1 bindings in case you have more than one database. * Any property below the line in the form ` = ` is a property of an object within the `d1_databases` array. Therefore, the above binding is equivalent to: ```json { "production": { "d1_databases": [ { "binding": "DB", "database_name": "DATABASE_NAME", "database_id": "DATABASE_ID" } ] } } ``` ### Example * wrangler.jsonc ```jsonc { "env": { "staging": { "d1_databases": [ { "binding": "BINDING_NAME_1", "database_name": "DATABASE_NAME_1", "database_id": "UUID_1" } ] }, "production": { "d1_databases": [ { "binding": "BINDING_NAME_2", "database_name": "DATABASE_NAME_2", "database_id": "UUID_2" } ] } } } ``` * wrangler.toml ```toml [[env.staging.d1_databases]] binding = "BINDING_NAME_1" database_name = "DATABASE_NAME_1" database_id = "UUID_1" [[env.production.d1_databases]] binding = "BINDING_NAME_2" database_name = "DATABASE_NAME_2" database_id = "UUID_2" ``` The above is equivalent to the following structure in JSON: ```json { "env": { "production": { "d1_databases": [ { "binding": "BINDING_NAME_2", "database_id": "UUID_2", "database_name": "DATABASE_NAME_2" } ] }, "staging": { "d1_databases": [ { "binding": "BINDING_NAME_1", "database_id": "UUID_1", "database_name": "DATABASE_NAME_1" } ] } } } ``` --- title: Query D1 from Hono · Cloudflare D1 docs description: Query D1 from the Hono web framework lastUpdated: 2025-03-10T13:45:35.000Z chatbotDeprioritize: false tags: Hono source_url: html: https://developers.cloudflare.com/d1/examples/d1-and-hono/ md: https://developers.cloudflare.com/d1/examples/d1-and-hono/index.md --- Hono is a fast web framework for building API-first applications, and it includes first-class support for both [Workers](https://developers.cloudflare.com/workers/) and [Pages](https://developers.cloudflare.com/pages/). When using Workers: * Ensure you have configured your [Wrangler configuration file](https://developers.cloudflare.com/d1/get-started/#3-bind-your-worker-to-your-d1-database) to bind your D1 database to your Worker. * You can access your D1 databases via Hono's [`Context`](https://hono.dev/api/context) parameter: [bindings](https://hono.dev/getting-started/cloudflare-workers#bindings) are exposed on `context.env`. If you configured a [binding](https://developers.cloudflare.com/pages/functions/bindings/#d1-databases) named `DB`, then you would access [D1 Workers Binding API](https://developers.cloudflare.com/d1/worker-api/prepared-statements/) methods via `c.env.DB`. * Refer to the Hono documentation for [Cloudflare Workers](https://hono.dev/getting-started/cloudflare-workers). If you are using [Pages Functions](https://developers.cloudflare.com/pages/functions/): 1. Bind a D1 database to your [Pages Function](https://developers.cloudflare.com/pages/functions/bindings/#d1-databases). 2. Pass the `--d1 BINDING_NAME=DATABASE_ID` flag to `wrangler dev` when developing locally. `BINDING_NAME` should match what call in your code, and `DATABASE_ID` should match the `database_id` defined in your Wrangler configuration file: for example, `--d1 DB=xxxx-xxxx-xxxx-xxxx-xxxx`. 3. Refer to the Hono guide for [Cloudflare Pages](https://hono.dev/getting-started/cloudflare-pages). The following examples show how to access a D1 database bound to `DB` from both a Workers script and a Pages Function: * workers ```ts import { Hono } from "hono"; // This ensures c.env.DB is correctly typed type Bindings = { DB: D1Database; }; const app = new Hono<{ Bindings: Bindings }>(); // Accessing D1 is via the c.env.YOUR_BINDING property app.get("/query/users/:id", async (c) => { const userId = c.req.param("id"); try { let { results } = await c.env.DB.prepare( "SELECT * FROM users WHERE user_id = ?", ) .bind(userId) .all(); return c.json(results); } catch (e) { return c.json({ err: e.message }, 500); } }); // Export our Hono app: Hono automatically exports a // Workers 'fetch' handler for you export default app; ``` * pages ```ts import { Hono } from "hono"; import { handle } from "hono/cloudflare-pages"; const app = new Hono().basePath("/api"); // Accessing D1 is via the c.env.YOUR_BINDING property app.get("/query/users/:id", async (c) => { const userId = c.req.param("id"); try { let { results } = await c.env.DB.prepare( "SELECT * FROM users WHERE user_id = ?", ) .bind(userId) .all(); return c.json(results); } catch (e) { return c.json({ err: e.message }, 500); } }); // Export the Hono instance as a Pages onRequest function export const onRequest = handle(app); ``` --- title: Query D1 from Remix · Cloudflare D1 docs description: Query your D1 database from a Remix application. lastUpdated: 2025-03-10T13:45:35.000Z chatbotDeprioritize: false tags: Remix source_url: html: https://developers.cloudflare.com/d1/examples/d1-and-remix/ md: https://developers.cloudflare.com/d1/examples/d1-and-remix/index.md --- Remix is a full-stack web framework that operates on both client and server. You can query your D1 database(s) from Remix using Remix's [data loading](https://remix.run/docs/en/main/guides/data-loading) API with the [`useLoaderData`](https://remix.run/docs/en/main/hooks/use-loader-data) hook. To set up a new Remix site on Cloudflare Pages that can query D1: 1. **Refer to [the Remix guide](https://developers.cloudflare.com/pages/framework-guides/deploy-a-remix-site/)**. 2. Bind a D1 database to your [Pages Function](https://developers.cloudflare.com/pages/functions/bindings/#d1-databases). 3. Pass the `--d1 BINDING_NAME=DATABASE_ID` flag to `wrangler dev` when developing locally. `BINDING_NAME` should match what call in your code, and `DATABASE_ID` should match the `database_id` defined in your [Wrangler configuration file](https://developers.cloudflare.com/workers/wrangler/configuration/): for example, `--d1 DB=xxxx-xxxx-xxxx-xxxx-xxxx`. The following example shows you how to define a Remix [`loader`](https://remix.run/docs/en/main/route/loader) that has a binding to a D1 database. * Bindings are passed through on the `context.env` parameter passed to a `LoaderFunction`. * If you configured a [binding](https://developers.cloudflare.com/pages/functions/bindings/#d1-databases) named `DB`, then you would access [D1 Workers Binding API](https://developers.cloudflare.com/d1/worker-api/prepared-statements/) methods via `context.env.DB`. - TypeScript ```ts import type { LoaderFunction } from "@remix-run/cloudflare"; import { json } from "@remix-run/cloudflare"; import { useLoaderData } from "@remix-run/react"; interface Env { DB: D1Database; } export const loader: LoaderFunction = async ({ context, params }) => { let env = context.cloudflare.env as Env; let { results } = await env.DB.prepare("SELECT * FROM users LIMIT 5").all(); return json(results); }; export default function Index() { const results = useLoaderData(); return (

Welcome to Remix

A value from D1:
{JSON.stringify(results)}
); } ```
--- title: Query D1 from SvelteKit · Cloudflare D1 docs description: Query a D1 database from a SvelteKit application. lastUpdated: 2025-03-10T13:45:35.000Z chatbotDeprioritize: false tags: SvelteKit,Svelte source_url: html: https://developers.cloudflare.com/d1/examples/d1-and-sveltekit/ md: https://developers.cloudflare.com/d1/examples/d1-and-sveltekit/index.md --- [SvelteKit](https://kit.svelte.dev/) is a full-stack framework that combines the Svelte front-end framework with Vite for server-side capabilities and rendering. You can query D1 from SvelteKit by configuring a [server endpoint](https://kit.svelte.dev/docs/routing#server) with a binding to your D1 database(s). To set up a new SvelteKit site on Cloudflare Pages that can query D1: 1. **Refer to [the SvelteKit guide](https://developers.cloudflare.com/pages/framework-guides/deploy-a-svelte-kit-site/) and Svelte's [Cloudflare adapter](https://kit.svelte.dev/docs/adapter-cloudflare)**. 2. Install the Cloudflare adapter within your SvelteKit project: `npm i -D @sveltejs/adapter-cloudflare`. 3. Bind a D1 database [to your Pages Function](https://developers.cloudflare.com/pages/functions/bindings/#d1-databases). 4. Pass the `--d1 BINDING_NAME=DATABASE_ID` flag to `wrangler dev` when developing locally. `BINDING_NAME` should match what call in your code, and `DATABASE_ID` should match the `database_id` defined in your [Wrangler configuration file](https://developers.cloudflare.com/workers/wrangler/configuration/): for example, `--d1 DB=xxxx-xxxx-xxxx-xxxx-xxxx`. The following example shows you how to create a server endpoint configured to query D1. * Bindings are available on the `platform` parameter passed to each endpoint, via `platform.env.BINDING_NAME`. * With SvelteKit's [file-based routing](https://kit.svelte.dev/docs/routing), the server endpoint defined in `src/routes/api/users/+server.ts` is available at `/api/users` within your SvelteKit app. The example also shows you how to configure both your app-wide types within `src/app.d.ts` to recognize your `D1Database` binding, import the `@sveltejs/adapter-cloudflare` adapter into `svelte.config.js`, and configure it to apply to all of your routes. * TypeScript ```ts import type { RequestHandler } from "@sveltejs/kit"; /** @type {import('@sveltejs/kit').RequestHandler} */ export async function GET({ request, platform }) { let result = await platform.env.DB.prepare( "SELECT * FROM users LIMIT 5", ).run(); return new Response(JSON.stringify(result)); } ``` ```ts // See https://kit.svelte.dev/docs/types#app // for information about these interfaces declare global { namespace App { // interface Error {} // interface Locals {} // interface PageData {} interface Platform { env: { DB: D1Database; }; context: { waitUntil(promise: Promise): void; }; caches: CacheStorage & { default: Cache }; } } } export {}; ``` ```js import adapter from "@sveltejs/adapter-cloudflare"; export default { kit: { adapter: adapter({ // See below for an explanation of these options routes: { include: ["/*"], exclude: [""], }, }), }, }; ``` --- title: Export and save D1 database · Cloudflare D1 docs lastUpdated: 2025-02-19T10:27:52.000Z chatbotDeprioritize: false source_url: html: https://developers.cloudflare.com/d1/examples/export-d1-into-r2/ md: https://developers.cloudflare.com/d1/examples/export-d1-into-r2/index.md --- --- title: Query D1 from Python Workers · Cloudflare D1 docs description: Learn how to query D1 from a Python Worker lastUpdated: 2025-03-24T17:07:01.000Z chatbotDeprioritize: false source_url: html: https://developers.cloudflare.com/d1/examples/query-d1-from-python-workers/ md: https://developers.cloudflare.com/d1/examples/query-d1-from-python-workers/index.md --- The Cloudflare Workers platform supports [multiple languages](https://developers.cloudflare.com/workers/languages/), including TypeScript, JavaScript, Rust and Python. This guide shows you how to query a D1 database from [Python](https://developers.cloudflare.com/workers/languages/python/) and deploy your application globally. Note Support for Python in Cloudflare Workers is in beta. Review the [documentation on Python support](https://developers.cloudflare.com/workers/languages/python/) to understand how Python works within the Workers platform. ## Prerequisites Before getting started, you should: 1. Review the [D1 tutorial](https://developers.cloudflare.com/d1/get-started/) for TypeScript and JavaScript to learn how to **create a D1 database and configure a Workers project**. 2. Refer to the [Python language guide](https://developers.cloudflare.com/workers/languages/python/) to understand how Python support works on the Workers platform. 3. Have basic familiarity with the Python language. If you are new to Cloudflare Workers, refer to the [Get started guide](https://developers.cloudflare.com/workers/get-started/guide/) first before continuing with this example. ## Query from Python This example assumes you have an existing D1 database. To allow your Python Worker to query your database, you first need to create a [binding](https://developers.cloudflare.com/workers/runtime-apis/bindings/) between your Worker and your D1 database and define this in your [Wrangler configuration file](https://developers.cloudflare.com/workers/wrangler/configuration/). You will need the `database_name` and `database_id` for a D1 database. You can use the `wrangler` CLI to create a new database or fetch the ID for an existing database as follows: ```sh npx wrangler d1 create my-first-db ``` ```sh npx wrangler d1 info some-existing-db ``` ```sh # ┌───────────────────┬──────────────────────────────────────┐ # │ │ c89db32e-83f4-4e62-8cd7-7c8f97659029 │ # ├───────────────────┼──────────────────────────────────────┤ # │ name │ db-enam │ # ├───────────────────┼──────────────────────────────────────┤ # │ created_at │ 2023-06-12T16:52:03.071Z │ # └───────────────────┴──────────────────────────────────────┘ ``` ### 1. Configure bindings In your Wrangler file, create a new `[[d1_databases]]` configuration block and set `database_name` and `database_id` to the name and id (respectively) of the D1 database you want to query: * wrangler.jsonc ```jsonc { "name": "python-and-d1", "main": "src/entry.py", "compatibility_flags": [ "python_workers" ], "compatibility_date": "2024-03-29", "d1_databases": [ { "binding": "DB", "database_name": "YOUR_DATABASE_NAME", "database_id": "YOUR_DATABASE_ID" } ] } ``` * wrangler.toml ```toml name = "python-and-d1" main = "src/entry.py" compatibility_flags = ["python_workers"] # Required for Python Workers compatibility_date = "2024-03-29" [[d1_databases]] binding = "DB" # This will be how you refer to your database in your Worker database_name = "YOUR_DATABASE_NAME" database_id = "YOUR_DATABASE_ID" ``` The value of `binding` is how you will refer to your database from within your Worker. If you change this, you must change this in your Worker script as well. ### 2. Create your Python Worker To create a Python Worker, create an empty file at `src/entry.py`, matching the value of `main` in your Wrangler file with the contents below: ```python from workers import Response async def on_fetch(request, env): # Do anything else you'd like on request here! # Query D1 - we'll list all tables in our database in this example results = await env.DB.prepare("PRAGMA table_list").all() # Return a JSON response return Response.json(results) ``` The value of `binding` in your Wrangler file exactly must match the name of the variable in your Python code. This example refers to the database via a `DB` binding, and query this binding via `await env.DB.prepare(...)`. You can then deploy your Python Worker directly: ```sh npx wrangler deploy ``` ```sh # Example output # # Your worker has access to the following bindings: # - D1 Databases: # - DB: db-enam (c89db32e-83f4-4e62-8cd7-7c8f97659029) # Total Upload: 0.18 KiB / gzip: 0.17 KiB # Uploaded python-and-d1 (4.93 sec) # Published python-and-d1 (0.51 sec) # https://python-and-d1.YOUR_SUBDOMAIN.workers.dev # Current Deployment ID: 80b72e19-da82-4465-83a2-c12fb11ccc72 ``` Your Worker will be available at `https://python-and-d1.YOUR_SUBDOMAIN.workers.dev`. If you receive an error deploying: * Make sure you have configured your [Wrangler configuration file](https://developers.cloudflare.com/workers/wrangler/configuration/) with the `database_id` and `database_name` of a valid D1 database. * Ensure `compatibility_flags = ["python_workers"]` is set in your [Wrangler configuration file](https://developers.cloudflare.com/workers/wrangler/configuration/), which is required for Python. * Review the [list of error codes](https://developers.cloudflare.com/workers/observability/errors/), and ensure your code does not throw an uncaught exception. ## Next steps * Refer to [Workers Python documentation](https://developers.cloudflare.com/workers/languages/python/) to learn more about how to use Python in Workers. * Review the [D1 Workers Binding API](https://developers.cloudflare.com/d1/worker-api/) and how to query D1 databases. * Learn [how to import data](https://developers.cloudflare.com/d1/best-practices/import-export-data/) to your D1 database. --- title: Audit Logs · Cloudflare D1 docs description: Audit logs provide a comprehensive summary of changes made within your Cloudflare account, including those made to D1 databases. This functionality is available on all plan types, free of charge, and is always enabled. lastUpdated: 2025-05-29T18:16:56.000Z chatbotDeprioritize: false source_url: html: https://developers.cloudflare.com/d1/observability/audit-logs/ md: https://developers.cloudflare.com/d1/observability/audit-logs/index.md --- [Audit logs](https://developers.cloudflare.com/fundamentals/account/account-security/review-audit-logs/) provide a comprehensive summary of changes made within your Cloudflare account, including those made to D1 databases. This functionality is available on all plan types, free of charge, and is always enabled. ## Viewing audit logs To view audit logs for your D1 databases: 1. Log in to the [Cloudflare dashboard](https://dash.cloudflare.com/?account=audit-log) and select your account. 2. Go to **Manage Account** > **Audit Log**. For more information on how to access and use audit logs, refer to [Review audit logs](https://developers.cloudflare.com/fundamentals/account/account-security/review-audit-logs/). ## Logged operations The following configuration actions are logged: | Operation | Description | | - | - | | CreateDatabase | Creation of a new database. | | DeleteDatabase | Deletion of an existing database. | | [TimeTravel](https://developers.cloudflare.com/d1/reference/time-travel) | Restoration of a past database version. | ## Example log entry Below is an example of an audit log entry showing the creation of a new database: ```json { "action": { "info": "CreateDatabase", "result": true, "type": "create" }, "actor": { "email": "", "id": "b1ab1021a61b1b12612a51b128baa172", "ip": "1b11:a1b2:12b1:12a::11a:1b", "type": "user" }, "id": "a123b12a-ab11-1212-ab1a-a1aa11a11abb", "interface": "API", "metadata": {}, "newValue": "", "newValueJson": { "database_name": "my-db" }, "oldValue": "", "oldValueJson": {}, "owner": { "id": "211b1a74121aa32a19121a88a712aa12" }, "resource": { "id": "11a21122-1a11-12bb-11ab-1aa2aa1ab12a", "type": "d1.database" }, "when": "2024-08-09T04:53:55.752Z" } ``` --- title: Billing · Cloudflare D1 docs description: D1 exposes analytics to track billing metrics (rows read, rows written, and total storage) across all databases in your account. lastUpdated: 2025-01-15T09:09:29.000Z chatbotDeprioritize: false source_url: html: https://developers.cloudflare.com/d1/observability/billing/ md: https://developers.cloudflare.com/d1/observability/billing/index.md --- D1 exposes analytics to track billing metrics (rows read, rows written, and total storage) across all databases in your account. The metrics displayed in the [Cloudflare dashboard](https://dash.cloudflare.com/) are sourced from Cloudflare's [GraphQL Analytics API](https://developers.cloudflare.com/analytics/graphql-api/). You can access the metrics [programmatically](https://developers.cloudflare.com/d1/observability/metrics-analytics/#query-via-the-graphql-api) via GraphQL or HTTP client. ## View metrics in the dashboard Total account billable usage analytics for D1 are available in the Cloudflare dashboard. To view current and past metrics for an account: 1. Log in to the [Cloudflare dashboard](https://dash.cloudflare.com) and select your account. 2. Go to **Manage Account** > **Billing**. 3. Select the **Billable Usage** tab. From here you can view charts of your account's D1 usage on a daily or month-to-date timeframe. Note that billable usage history is stored for a maximum of 30 days. ## Billing Notifications Usage-based billing notifications are available within the [Cloudflare dashboard](https://dash.cloudflare.com) for users looking to monitor their total account usage. Notifications on the following metrics are available: * Rows Read * Rows Written --- title: Debug D1 · Cloudflare D1 docs description: D1 allows you to capture exceptions and log errors returned when querying a database. To debug D1, you will use the same tools available when debugging Workers. lastUpdated: 2025-06-18T17:02:32.000Z chatbotDeprioritize: false source_url: html: https://developers.cloudflare.com/d1/observability/debug-d1/ md: https://developers.cloudflare.com/d1/observability/debug-d1/index.md --- D1 allows you to capture exceptions and log errors returned when querying a database. To debug D1, you will use the same tools available when [debugging Workers](https://developers.cloudflare.com/workers/observability/). ## Handle errors The D1 [Workers Binding API](https://developers.cloudflare.com/d1/worker-api/) returns detailed error messages within an `Error` object. To ensure you are capturing the full error message, log or return `e.message` as follows: ```ts try { await db.exec("INSERTZ INTO my_table (name, employees) VALUES ()"); } catch (e: any) { console.error({ message: e.message }); } /* { "message": "D1_EXEC_ERROR: Error in line 1: INSERTZ INTO my_table (name, employees) VALUES (): sql error: near \"INSERTZ\": syntax error in INSERTZ INTO my_table (name, employees) VALUES () at offset 0" } */ ``` ### Errors The [`stmt.`](https://developers.cloudflare.com/d1/worker-api/prepared-statements/) and [`db.`](https://developers.cloudflare.com/d1/worker-api/d1-database/) methods throw an [Error object](https://developer.mozilla.org/en-US/docs/Web/JavaScript/Reference/Global_Objects/Error) whenever an error occurs. Note Prior to [`wrangler` 3.1.1](https://github.com/cloudflare/workers-sdk/releases/tag/wrangler%403.1.1), D1 JavaScript errors used the [cause property](https://developer.mozilla.org/en-US/docs/Web/JavaScript/Reference/Global_Objects/Error/cause) for detailed error messages. To inspect these errors when using older versions of `wrangler`, you should log `error?.cause?.message`. To capture exceptions, log the `Error.message` value. For example, the code below has a query with an invalid keyword - `INSERTZ` instead of `INSERT`: ```js try { // This is an intentional misspelling await db.exec("INSERTZ INTO my_table (name, employees) VALUES ()"); } catch (e: any) { console.error({ message: e.message }); } ``` The code above throws the following error message: ```json { "message": "D1_EXEC_ERROR: Error in line 1: INSERTZ INTO my_table (name, employees) VALUES (): sql error: near \"INSERTZ\": syntax error in INSERTZ INTO my_table (name, employees) VALUES () at offset 0" } ``` ### Error list D1 returns the following error constants, in addition to the extended (detailed) error message: | Message | Cause | | - | - | | `D1_ERROR` | Generic error. | | `D1_TYPE_ERROR` | Returned when there is a mismatch in the type between a column and a value. A common cause is supplying an `undefined` variable (unsupported) instead of `null`. | | `D1_COLUMN_NOTFOUND` | Column not found. | | `D1_DUMP_ERROR` | Database dump error. | | `D1_EXEC_ERROR` | Exec error in line x: y error. | ## View logs View a stream of live logs from your Worker by using [`wrangler tail`](https://developers.cloudflare.com/workers/observability/logs/real-time-logs#view-logs-using-wrangler-tail) or via the [Cloudflare dashboard](https://developers.cloudflare.com/workers/observability/logs/real-time-logs#view-logs-from-the-dashboard). ## Report issues * To report bugs or request features, go to the [Cloudflare Community Forums](https://community.cloudflare.com/c/developers/d1/85). * To give feedback, go to the [D1 Discord channel](https://discord.com/invite/cloudflaredev). * If you are having issues with Wrangler, report issues in the [Wrangler GitHub repository](https://github.com/cloudflare/workers-sdk/issues/new/choose). You should include as much of the following in any bug report: * The ID of your database. Use `wrangler d1 list` to match a database name to its ID. * The query (or queries) you ran when you encountered an issue. Ensure you redact any personally identifying information (PII). * The Worker code that makes the query, including any calls to `bind()` using the [Workers Binding API](https://developers.cloudflare.com/d1/worker-api/). * The full error text, including the content of [`error.cause.message`](#handle-errors). ## Related resources * Learn [how to debug Workers](https://developers.cloudflare.com/workers/observability/). * Understand how to [access logs](https://developers.cloudflare.com/workers/observability/logs/) generated from your Worker and D1. * Use [`wrangler dev`](https://developers.cloudflare.com/workers/wrangler/commands/#dev) to run your Worker and D1 locally and [debug issues before deploying](https://developers.cloudflare.com/workers/development-testing/). --- title: Metrics and analytics · Cloudflare D1 docs description: D1 exposes database analytics that allow you to inspect query volume, query latency, and storage size across all and/or each database in your account. lastUpdated: 2025-05-14T00:02:06.000Z chatbotDeprioritize: false source_url: html: https://developers.cloudflare.com/d1/observability/metrics-analytics/ md: https://developers.cloudflare.com/d1/observability/metrics-analytics/index.md --- D1 exposes database analytics that allow you to inspect query volume, query latency, and storage size across all and/or each database in your account. The metrics displayed in the [Cloudflare dashboard](https://dash.cloudflare.com/) charts are queried from Cloudflare’s [GraphQL Analytics API](https://developers.cloudflare.com/analytics/graphql-api/). You can access the metrics [programmatically](#query-via-the-graphql-api) via GraphQL or HTTP client. ## Metrics D1 currently exports the below metrics: | Metric | GraphQL Field Name | Description | | - | - | - | | Read Queries (qps) | `readQueries` | The number of read queries issued against a database. This is the raw number of read queries, and is not used for billing. | | Write Queries (qps) | `writeQueries` | The number of write queries issued against a database. This is the raw number of write queries, and is not used for billing. | | Rows read (count) | `rowsRead` | The number of rows read (scanned) across your queries. See [Pricing](https://developers.cloudflare.com/d1/platform/pricing/) for more details on how rows are counted. | | Rows written (count) | `rowsWritten` | The number of rows written across your queries. | | Query Response (bytes) | `queryBatchResponseBytes` | The total response size of the serialized query response, including any/all column names, rows and metadata. Reported in bytes. | | Query Latency (ms) | `queryBatchTimeMs` | The total query response time, including response serialization, on the server-side. Reported in milliseconds. | | Storage (Bytes) | `databaseSizeBytes` | Maximum size of a database. Reported in bytes. | Metrics can be queried (and are retained) for the past 31 days. ### Row counts D1 returns the number of rows read, rows written (or both) in response to each individual query via [the Workers Binding API](https://developers.cloudflare.com/d1/worker-api/return-object/). Row counts are a precise count of how many rows were read (scanned) or written by that query. Inspect row counts to understand the performance and cost of a given query, including whether you can reduce the rows read [using indexes](https://developers.cloudflare.com/d1/best-practices/use-indexes/). Use query counts to understand the total volume of traffic against your databases and to discern which databases are actively in-use. Refer to the [Pricing documentation](https://developers.cloudflare.com/d1/platform/pricing/) for more details on how rows are counted. ## View metrics in the dashboard Per-database analytics for D1 are available in the Cloudflare dashboard. To view current and historical metrics for a database: 1. Log in to the [Cloudflare dashboard](https://dash.cloudflare.com) and select your account. 2. Go to [**Workers & Pages** > **D1**](https://dash.cloudflare.com/?to=/:account/workers/d1). 3. Select an existing database. 4. Select the **Metrics** tab. You can optionally select a time window to query. This defaults to the last 24 hours. ## Query via the GraphQL API You can programmatically query analytics for your D1 databases via the [GraphQL Analytics API](https://developers.cloudflare.com/analytics/graphql-api/). This API queries the same datasets as the Cloudflare dashboard, and supports GraphQL [introspection](https://developers.cloudflare.com/analytics/graphql-api/features/discovery/introspection/). D1's GraphQL datasets require an `accountTag` filter with your Cloudflare account ID and include: * `d1AnalyticsAdaptiveGroups` * `d1StorageAdaptiveGroups` * `d1QueriesAdaptiveGroups` ### Examples To query the sum of `readQueries`, `writeQueries` for a given `$databaseId`, grouping by `databaseId` and `date`: ```graphql query D1ObservabilitySampleQuery( $accountTag: string! $start: Date $end: Date $databaseId: string ) { viewer { accounts(filter: { accountTag: $accountTag }) { d1AnalyticsAdaptiveGroups( limit: 10000 filter: { date_geq: $start, date_leq: $end, databaseId: $databaseId } orderBy: [date_DESC] ) { sum { readQueries writeQueries } dimensions { date databaseId } } } } } ``` [Run in GraphQL API Explorer](https://graphql.cloudflare.com/explorer?query=I4VwpgTgngBAIgRgPICMDOkBuBDFBLAGzwBcoBlbAWwAcCwBFcaACgCgYYASbAYx4HsQAO2IAVbAHMAXDDTEIeIRICE7LnOwRiMuNmJg1nMEIAmOvQY6cTe3NgwBJM7PmKJrAJQwA3msx4wAHdIHzUOXgFhYjRmADNCfQgZbxgIwRFxaS40qMyYAF8vXw4SmBMEAEEhbAIoYjweNAqbanrMMABxCEFqGLDSmCJKEhkEAAYJsf7S+IJE5LKLAH0JMGAZTg0tABpF-SW6da5jE12bYjtHZ2tbFHswJwLpkv4IE0gAISgZAG1zsCWcAAomQAMIAXWeRWeHDQIEooQGAwgYGwJkYkACaBhJUCCn0GIUYGxSI4+RxJjwlGMaDw-CEaERpI4-xxLNu9ycOPJSJ5JT55PyQA\&variables=N4IghgxhD2CuB2AXAKmA5iAXCAggYTwHkBVAOWQH0BJAERABoQBnRMAJ0SxACYAGbgKwBaXgHYhARgEMQAU3gATLn0EjxEgGwyFYVgCMwTWVSXYASgFEACgBl8FigHUqyABLU6AXyA) To query both the average `queryBatchTimeMs` and the 90th percentile `queryBatchTimeMs` per database: ```graphql query D1ObservabilitySampleQuery2( $accountTag: string! $start: Date $end: Date $databaseId: string ) { viewer { accounts(filter: { accountTag: $accountId }) { d1AnalyticsAdaptiveGroups( limit: 10000 filter: { date_geq: $start, date_leq: $end, databaseId: $databaseId } orderBy: [date_DESC] ) { quantiles { queryBatchTimeMsP90 } dimensions { date databaseId } } } } } ``` [Run in GraphQL API Explorer](https://graphql.cloudflare.com/explorer?query=I4VwpgTgngBAIgRgPICMDOkBuBDFBLAGzwBcoBlbAWwAcCwBFcaAJgAoAoGGAEmwGM+AexAA7YgBVsAcwBcMNMQh4RUgISceC7BGJy42YmA3cwIgCZ6DRrtzMHc2DAEkL8xcqnsAlDADeGzDwwAHdIPw0ufiFRYjRWADNCQwg5Xxgo4TFJWR4MmJcYAF8ffy4ymDMEAEERbAIoYjw+NCq7akbMMABxCGFqOIjymCJKEjkEAAYpicHyxIJk1IqrAH0pMGA5bi0dABplwxW6TZ5TM327YgdnV1t7FEcwAsLZssEIM0gAISg5AG1LmAVnAAKJkADCAF1XiVXlxQNgxIQwGhwkMhqBIFAvgY+AALcR4ShgACyaAACgBOGborgvWkVImmNB4QQiVGlBkHaxcy7XJ5mOFFV70sqil6FIA\&variables=N4IghgxhD2CuB2AXAKmA5iAXCAggYTwHkBVAOWQH0BJAERABoQBnRMAJ0SxACYAGbgKwBaXgHYhARgEMQAU3gATLn0EjxEgGwyFYVgCMwTWVSXYASgFEACgBl8FigHUqyABLU6AXyA) To query your account-wide `readQueries` and `writeQueries`: ```graphql query D1ObservabilitySampleQuery3( $accountTag: string! $start: Date $end: Date $databaseId: string ) { viewer { accounts(filter: { accountTag: $accountTag }) { d1AnalyticsAdaptiveGroups( limit: 10000 filter: { date_geq: $start, date_leq: $end, databaseId: $databaseId } ) { sum { readQueries writeQueries } } } } } ``` [Run in GraphQL API Explorer](https://graphql.cloudflare.com/explorer?query=I4VwpgTgngBAIgRgPICMDOkBuBDFBLAGzwBcoBlbAWwAcCwBFcaAZgAoAoGGAEmwGM+AexAA7YgBVsAcwBcMNMQh4RUgISceC7BGJy42YmA3cwIgCZ6DRrtzMHc2DAEkL8xcqnsAlDADeGzDwwAHdIPw0ufiFRYjRWADNCQwg5Xxgo4TFJWR4MmOyYAF8ffy4ymDMEAEERbAIoYjw+NCq7akbMMABxCGFqOIjymCJKEjkEAAYpicHyxIJk1IqrAH0pMGA5bi0dABplwxW6TZ5TM327YgdnV1t7FEcwFyLZmBLXrjQQSnChoYgwNgzIxIEE0B8ysElIYQUowOC-lxCq9keVUS9CkA\&variables=N4IghgxhD2CuB2AXAKmA5iAXCAggYTwHkBVAOWQH0BJAERABoQBnRMAJ0SxACYAGbgKwBaXgHYhARgEMQAU3gATLn0EjxEgGwyFYVgCMwTWVSXYASgFEACgBl8FigHUqyABLU6AXyA) ## Query `insights` D1 provides metrics that let you understand and debug query performance. You can access these via GraphQL's `d1QueriesAdaptiveGroups` or `wrangler d1 insights` command. D1 captures your query strings to make it easier to analyze metrics across query executions. [Bound parameters](https://developers.cloudflare.com/d1/worker-api/prepared-statements/#guidance) are not captured to remove any sensitive information. Note `wrangler d1 insights` is an experimental Wrangler command. Its options and output may change. Run `wrangler d1 insights --help` to view current options. | Option | Description | | - | - | | `--timePeriod` | Fetch data from now to the provided time period (default: `1d`). | | `--sort-type` | The operation you want to sort insights by. Select between `sum` and `avg` (default: `sum`). | | `--sort-by` | The field you want to sort insights by. Select between `time`, `reads`, `writes`, and `count` (default: `time`). | | `--sort-direction` | The sort direction. Select between `ASC` and `DESC` (default: `DESC`). | | `--json` | A boolean value to specify whether to return the result as clean JSON (default: `false`). | | `--limit` | The maximum number of queries to be fetched. | To find top 3 queries by execution count: ```sh npx wrangler d1 insights --sort-type=sum --sort-by=count --limit=3 ``` ```sh ⛅️ wrangler 3.95.0 ------------------- ------------------- 🚧 `wrangler d1 insights` is an experimental command. 🚧 Flags for this command, their descriptions, and output may change between wrangler versions. ------------------- [ { "query": "SELECT tbl_name as name,\n (SELECT ncol FROM pragma_table_list(tbl_name)) as num_columns\n FROM sqlite_master\n WHERE TYPE = \"table\"\n AND tbl_name NOT LIKE \"sqlite_%\"\n AND tbl_name NOT LIKE \"d1_%\"\n AND tbl_name NOT LIKE \"_cf_%\"\n ORDER BY tbl_name ASC;", "avgRowsRead": 2, "totalRowsRead": 4, "avgRowsWritten": 0, "totalRowsWritten": 0, "avgDurationMs": 0.49505, "totalDurationMs": 0.9901, "numberOfTimesRun": 2, "queryEfficiency": 0 }, { "query": "SELECT * FROM Customers", "avgRowsRead": 4, "totalRowsRead": 4, "avgRowsWritten": 0, "totalRowsWritten": 0, "avgDurationMs": 0.1873, "totalDurationMs": 0.1873, "numberOfTimesRun": 1, "queryEfficiency": 1 }, { "query": "SELECT * From Customers", "avgRowsRead": 0, "totalRowsRead": 0, "avgRowsWritten": 0, "totalRowsWritten": 0, "avgDurationMs": 1.0225, "totalDurationMs": 1.0225, "numberOfTimesRun": 1, "queryEfficiency": 0 } ] ``` To find top 3 queries by average execution time: ```sh npx wrangler d1 insights --sort-type=avg --sort-by=time --limit=3 ``` ```sh ⛅️ wrangler 3.95.0 ------------------- ------------------- 🚧 `wrangler d1 insights` is an experimental command. 🚧 Flags for this command, their descriptions, and output may change between wrangler versions. ------------------- [ { "query": "SELECT * From Customers", "avgRowsRead": 0, "totalRowsRead": 0, "avgRowsWritten": 0, "totalRowsWritten": 0, "avgDurationMs": 1.0225, "totalDurationMs": 1.0225, "numberOfTimesRun": 1, "queryEfficiency": 0 }, { "query": "SELECT tbl_name as name,\n (SELECT ncol FROM pragma_table_list(tbl_name)) as num_columns\n FROM sqlite_master\n WHERE TYPE = \"table\"\n AND tbl_name NOT LIKE \"sqlite_%\"\n AND tbl_name NOT LIKE \"d1_%\"\n AND tbl_name NOT LIKE \"_cf_%\"\n ORDER BY tbl_name ASC;", "avgRowsRead": 2, "totalRowsRead": 4, "avgRowsWritten": 0, "totalRowsWritten": 0, "avgDurationMs": 0.49505, "totalDurationMs": 0.9901, "numberOfTimesRun": 2, "queryEfficiency": 0 }, { "query": "SELECT * FROM Customers", "avgRowsRead": 4, "totalRowsRead": 4, "avgRowsWritten": 0, "totalRowsWritten": 0, "avgDurationMs": 0.1873, "totalDurationMs": 0.1873, "numberOfTimesRun": 1, "queryEfficiency": 1 } ] ``` To find top 10 queries by rows written in last 7 days: ```sh npx wrangler d1 insights --sort-type=sum --sort-by=writes --limit=10 --timePeriod=7d ``` ```sh ⛅️ wrangler 3.95.0 ------------------- ------------------- 🚧 `wrangler d1 insights` is an experimental command. 🚧 Flags for this command, their descriptions, and output may change between wrangler versions. ------------------- [ { "query": "SELECT * FROM Customers", "avgRowsRead": 4, "totalRowsRead": 4, "avgRowsWritten": 0, "totalRowsWritten": 0, "avgDurationMs": 0.1873, "totalDurationMs": 0.1873, "numberOfTimesRun": 1, "queryEfficiency": 1 }, { "query": "SELECT * From Customers", "avgRowsRead": 0, "totalRowsRead": 0, "avgRowsWritten": 0, "totalRowsWritten": 0, "avgDurationMs": 1.0225, "totalDurationMs": 1.0225, "numberOfTimesRun": 1, "queryEfficiency": 0 }, { "query": "SELECT tbl_name as name,\n (SELECT ncol FROM pragma_table_list(tbl_name)) as num_columns\n FROM sqlite_master\n WHERE TYPE = \"table\"\n AND tbl_name NOT LIKE \"sqlite_%\"\n AND tbl_name NOT LIKE \"d1_%\"\n AND tbl_name NOT LIKE \"_cf_%\"\n ORDER BY tbl_name ASC;", "avgRowsRead": 2, "totalRowsRead": 4, "avgRowsWritten": 0, "totalRowsWritten": 0, "avgDurationMs": 0.49505, "totalDurationMs": 0.9901, "numberOfTimesRun": 2, "queryEfficiency": 0 } ] ``` Note The quantity `queryEfficiency` measures how efficient your query was. It is calculated as: the number of rows returned divided by the number of rows read. Generally, you should try to get `queryEfficiency` as close to `1` as possible. Refer to [Use indexes](https://developers.cloudflare.com/d1/best-practices/use-indexes/) for more information on efficient querying. --- title: Alpha database migration guide · Cloudflare D1 docs description: D1's open beta launched in October 2023, and newly created databases use a different underlying architecture that is significantly more reliable and performant, with increased database sizes, improved query throughput, and reduced latency. lastUpdated: 2025-03-11T16:41:33.000Z chatbotDeprioritize: false source_url: html: https://developers.cloudflare.com/d1/platform/alpha-migration/ md: https://developers.cloudflare.com/d1/platform/alpha-migration/index.md --- Warning D1 alpha databases stopped accepting live SQL queries on August 22, 2024. D1's open beta launched in October 2023, and newly created databases use a different underlying architecture that is significantly more reliable and performant, with increased database sizes, improved query throughput, and reduced latency. This guide will instruct you to recreate alpha D1 databases on our production-ready system. ## Prerequisites 1. You have the [`wrangler` command-line tool](https://developers.cloudflare.com/workers/wrangler/install-and-update/) installed 2. You are using `wrangler` version `3.33.0` or later (released March 2024) as earlier versions do not have the [`--remote` flag](https://developers.cloudflare.com/d1/platform/release-notes/#2024-03-12) required as part of this guide 3. An 'alpha' D1 database. All databases created before July 27th, 2023 ([release notes](https://developers.cloudflare.com/d1/platform/release-notes/#2024-03-12)) use the alpha storage backend, which is no longer supported and was not recommended for production. ## 1. Verify that a database is alpha ```sh npx wrangler d1 info ``` If the database is alpha, the output of the command will include `version` set to `alpha`: ```plaintext ... │ version │ alpha │ ... ``` ## 2. Create a manual backup ```sh npx wrangler d1 backup create ``` ## 3. Download the manual backup The command below will download the manual backup of the alpha database as `.sqlite3` file: ```sh npx wrangler d1 backup download # See available backups with wrangler d1 backup list ``` ## 4. Convert the manual backup into SQL statements The command below will convert the manual backup of the alpha database from the downloaded `.sqlite3` file into SQL statements which can then be imported into the new database: ```sh sqlite3 db_dump.sqlite3 .dump > db.sql ``` Once you have run the above command, you will need to edit the output SQL file to be compatible with D1: 1. Remove `BEGIN TRANSACTION` and `COMMIT;` from the file. 2. Remove the following table creation statement: ```sql CREATE TABLE _cf_KV ( key TEXT PRIMARY KEY, value BLOB ) WITHOUT ROWID; ``` ## 5. Create a new D1 database All new D1 databases use the updated architecture by default. Run the following command to create a new database: ```sh npx wrangler d1 create ``` ## 6. Run SQL statements against the new D1 database ```sh npx wrangler d1 execute --remote --file=./db.sql ``` ## 7. Delete your alpha database To delete your previous alpha database, run: ```sh npx wrangler d1 delete ``` --- title: Limits · Cloudflare D1 docs description: Cloudflare also offers other storage solutions such as Workers KV, Durable Objects, and R2. Each product has different advantages and limits. Refer to Choose a data or storage product to review which storage option is right for your use case. lastUpdated: 2025-07-01T15:28:57.000Z chatbotDeprioritize: false source_url: html: https://developers.cloudflare.com/d1/platform/limits/ md: https://developers.cloudflare.com/d1/platform/limits/index.md --- | Feature | Limit | | - | - | | Databases | 50,000 (Workers Paid)[1](#user-content-fn-1) / 10 (Free) | | Maximum database size | 10 GB (Workers Paid) / 500 MB (Free) | | Maximum storage per account | 1 TB (Workers Paid)[1](#user-content-fn-1) / 5 GB (Free) | | [Time Travel](https://developers.cloudflare.com/d1/reference/time-travel/) duration (point-in-time recovery) | 30 days (Workers Paid) / 7 days (Free) | | Maximum Time Travel restore operations | 10 restores per 10 minute (per database) | | Queries per Worker invocation (read [subrequest limits](https://developers.cloudflare.com/workers/platform/limits/#how-many-subrequests-can-i-make)) | 1000 (Workers Paid) / 50 (Free) | | Maximum number of columns per table | 100 | | Maximum number of rows per table | Unlimited (excluding per-database storage limits) | | Maximum string, `BLOB` or table row size | 2,000,000 bytes (2 MB) | | Maximum SQL statement length | 100,000 bytes (100 KB) | | Maximum bound parameters per query | 100 | | Maximum arguments per SQL function | 32 | | Maximum characters (bytes) in a `LIKE` or `GLOB` pattern | 50 bytes | | Maximum bindings per Workers script | Approximately 5,000 [2](#user-content-fn-2) | | Maximum SQL query duration | 30 seconds [3](#user-content-fn-3) | | Maximum file import (`d1 execute`) size | 5 GB [4](#user-content-fn-4) | Batch limits Limits for individual queries (listed above) apply to each individual statement contained within a batch statement. For example, the maximum SQL statement length of 100 KB applies to each statement inside a `db.batch()`. Footnotes 1: The maximum storage per account can be increased by request on Workers Paid and Enterprise plans. See the guidance on limit increases on this page to request an increase. 2: A single Worker script can have up to 1 MB of script metadata. A binding is defined as a binding to a resource, such as a D1 database, KV namespace, [environmental variable](https://developers.cloudflare.com/workers/configuration/environment-variables/), or secret. Each resource binding is approximately 150 bytes, however environmental variables and secrets are controlled by the size of the value you provide. Excluding environmental variables, you can bind up to \~5,000 D1 databases to a single Worker script. 3: Requests to Cloudflare API must resolve in 30 seconds. Therefore, this duration limit also applies to the entire batch call. 4: The imported file is uploaded to R2. See [R2 upload limit](https://developers.cloudflare.com/r2/platform/limits). Cloudflare also offers other storage solutions such as [Workers KV](https://developers.cloudflare.com/kv/api/), [Durable Objects](https://developers.cloudflare.com/durable-objects/), and [R2](https://developers.cloudflare.com/r2/get-started/). Each product has different advantages and limits. Refer to [Choose a data or storage product](https://developers.cloudflare.com/workers/platform/storage-options/) to review which storage option is right for your use case. Need a higher limit? To request an adjustment to a limit, complete the [Limit Increase Request Form](https://forms.gle/ukpeZVLWLnKeixDu7). If the limit can be increased, Cloudflare will contact you with next steps. ## Frequently Asked Questions Frequently asked questions related to D1 limits: ### How much work can a D1 database do? D1 is designed for horizontal scale out across multiple, smaller (10 GB) databases, such as per-user, per-tenant or per-entity databases. D1 allows you to build applications with thousands of databases at no extra cost for isolating with multiple databases, as the pricing is based only on query and storage costs. * Each D1 database can store up to 10 GB of data, and you can create up to thousands of separate D1 databases. This allows you to split a single monolithic database into multiple, smaller databases, thereby isolating application data by user, customer, or tenant. * SQL queries over a smaller working data set can be more efficient and performant while improving data isolation. Warning Note that the 10 GB limit of a D1 database cannot be further increased. ### How many simultaneous connections can a Worker open to D1? You can open up to six connections (to D1) simultaneously for each invocation of your Worker. For more information on a Worker's simultaneous connections, refer to [Simultaneous open connections](https://developers.cloudflare.com/workers/platform/limits/#simultaneous-open-connections). ## Footnotes 1. The maximum storage per account can be increased by request on Workers Paid and Enterprise plans. See the guidance on limit increases on this page to request an increase. [↩](#user-content-fnref-1) [↩2](#user-content-fnref-1-2) 2. A single Worker script can have up to 1 MB of script metadata. A binding is defined as a binding to a resource, such as a D1 database, KV namespace, [environmental variable](https://developers.cloudflare.com/workers/configuration/environment-variables/), or secret. Each resource binding is approximately 150-bytes, however environmental variables and secrets are controlled by the size of the value you provide. Excluding environmental variables, you can bind up to \~5,000 D1 databases to a single Worker script. [↩](#user-content-fnref-2) 3. Requests to Cloudflare API must resolve in 30 seconds. Therefore, this duration limit also applies to the entire batch call. [↩](#user-content-fnref-3) 4. The imported file is uploaded to R2. See [R2 upload limit](https://developers.cloudflare.com/r2/platform/limits). [↩](#user-content-fnref-4) --- title: Pricing · Cloudflare D1 docs description: "D1 bills based on:" lastUpdated: 2024-12-11T09:43:45.000Z chatbotDeprioritize: false source_url: html: https://developers.cloudflare.com/d1/platform/pricing/ md: https://developers.cloudflare.com/d1/platform/pricing/index.md --- D1 bills based on: * **Usage**: Queries you run against D1 will count as rows read, rows written, or both (for transactions or batches). * **Scale-to-zero**: You are not billed for hours or capacity units. If you are not running queries against your database, you are not billed for compute. * **Storage**: You are only billed for storage above the included [limits](https://developers.cloudflare.com/d1/platform/limits/) of your plan. ## Billing metrics | | [Workers Free](https://developers.cloudflare.com/workers/platform/pricing/#workers) | [Workers Paid](https://developers.cloudflare.com/workers/platform/pricing/#workers) | | - | - | - | | Rows read | 5 million / day | First 25 billion / month included + $0.001 / million rows | | Rows written | 100,000 / day | First 50 million / month included + $1.00 / million rows | | Storage (per GB stored) | 5 GB (total) | First 5 GB included + $0.75 / GB-mo | Track your D1 usage To accurately track your usage, use the [meta object](https://developers.cloudflare.com/d1/worker-api/return-object/), [GraphQL Analytics API](https://developers.cloudflare.com/d1/observability/metrics-analytics/#query-via-the-graphql-api), or the [Cloudflare dashboard](https://dash.cloudflare.com/?to=/:account/workers/d1/). Select your D1 database, then view: Metrics > Row Metrics. ### Definitions 1. Rows read measure how many rows a query reads (scans), regardless of the size of each row. For example, if you have a table with 5000 rows and run a `SELECT * FROM table` as a full table scan, this would count as 5,000 rows read. A query that filters on an [unindexed column](https://developers.cloudflare.com/d1/best-practices/use-indexes/) may return fewer rows to your Worker, but is still required to read (scan) more rows to determine which subset to return. 2. Rows written measure how many rows were written to D1 database. Write operations include `INSERT`, `UPDATE`, and `DELETE`. Each of these operations contribute towards rows written. A query that `INSERT` 10 rows into a `users` table would count as 10 rows written. 3. DDL operations (for example, `CREATE`, `ALTER`, and `DROP`) are used to define or modify the structure of a database. They may contribute to a mix of read rows and write rows. Ensure you are accurately tracking your usage through the available tools ([meta object](https://developers.cloudflare.com/d1/worker-api/return-object/), [GraphQL Analytics API](https://developers.cloudflare.com/d1/observability/metrics-analytics/#query-via-the-graphql-api), or the [Cloudflare dashboard](https://dash.cloudflare.com/?to=/:account/workers/d1/)). 4. Row size or the number of columns in a row does not impact how rows are counted. A row that is 1 KB and a row that is 100 KB both count as one row. 5. Defining [indexes](https://developers.cloudflare.com/d1/best-practices/use-indexes/) on your table(s) reduces the number of rows read by a query when filtering on that indexed field. For example, if the `users` table has an index on a timestamp column `created_at`, the query `SELECT * FROM users WHERE created_at > ?1` would only need to read a subset of the table. 6. Indexes will add an additional written row when writes include the indexed column, as there are two rows written: one to the table itself, and one to the index. The performance benefit of an index and reduction in rows read will, in nearly all cases, offset this additional write. 7. Storage is based on gigabytes stored per month, and is based on the sum of all databases in your account. Tables and indexes both count towards storage consumed. 8. Free limits reset daily at 00:00 UTC. Monthly included limits reset based on your monthly subscription renewal date, which is determined by the day you first subscribed. 9. There are no data transfer (egress) or throughput (bandwidth) charges for data accessed from D1. ## Frequently Asked Questions Frequently asked questions related to D1 pricing: ### Will D1 always have a Free plan? Yes, the [Workers Free plan](https://developers.cloudflare.com/workers/platform/pricing/#workers) will always include the ability to prototype and experiment with D1 for free. ### What happens if I exceed the daily limits on reads and writes, or the total storage limit, on the Free plan? When your account hits the daily read and/or write limits, you will not be able to run queries against D1. D1 API will return errors to your client indicating that your daily limits have been exceeded. Once you have reached your included storage limit, you will need to delete unused databases or clean up stale data before you can insert new data, create or alter tables or create indexes and triggers. Upgrading to the Workers Paid plan will remove these limits, typically within minutes. ### What happens if I exceed the monthly included reads, writes and/or storage on the paid tier? You will be billed for the additional reads, writes and storage according to [D1's pricing metrics](#billing-metrics). ### How can I estimate my (eventual) bill? Every query returns a `meta` object that contains a total count of the rows read (`rows_read`) and rows written (`rows_written`) by that query. For example, a query that performs a full table scan (for instance, `SELECT * FROM users`) from a table with 5000 rows would return a `rows_read` value of `5000`: ```json "meta": { "duration": 0.20472300052642825, "size_after": 45137920, "rows_read": 5000, "rows_written": 0 } ``` These are also included in the D1 [Cloudflare dashboard](https://dash.cloudflare.com) and the [analytics API](https://developers.cloudflare.com/d1/observability/metrics-analytics/), allowing you to attribute read and write volumes to specific databases, time periods, or both. ### Does D1 charge for data transfer / egress? No. ### Does D1 charge additional for additional compute? D1 itself does not charge for additional compute. Workers querying D1 and computing results: for example, serializing results into JSON and/or running queries, are billed per [Workers pricing](https://developers.cloudflare.com/workers/platform/pricing/#workers), in addition to your D1 specific usage. ### Do queries I run from the dashboard or Wrangler (the CLI) count as billable usage? Yes, any queries you run against your database, including inserting (`INSERT`) existing data into a new database, table scans (`SELECT * FROM table`), or creating indexes count as either reads or writes. ### Can I use an index to reduce the number of rows read by a query? Yes, you can use an index to reduce the number of rows read by a query. [Creating indexes](https://developers.cloudflare.com/d1/best-practices/use-indexes/) for your most queried tables and filtered columns reduces how much data is scanned and improves query performance at the same time. If you have a read-heavy workload (most common), this can be particularly advantageous. Writing to columns referenced in an index will add at least one (1) additional row written to account for updating the index, but this is typically offset by the reduction in rows read due to the benefits of an index. ### Does a freshly created database, and/or an empty table with no rows, contribute to my storage? Yes, although minimal. An empty table consumes at least a few kilobytes, based on the number of columns (table width) in the table. An empty database consumes approximately 12 KB of storage. --- title: Release notes · Cloudflare D1 docs description: Subscribe to RSS lastUpdated: 2025-03-11T16:41:33.000Z chatbotDeprioritize: false source_url: html: https://developers.cloudflare.com/d1/platform/release-notes/ md: https://developers.cloudflare.com/d1/platform/release-notes/index.md --- [Subscribe to RSS](https://developers.cloudflare.com/d1/platform/release-notes/index.xml) ## 2025-07-01 **Maximum D1 storage per account for the Workers paid plan is now 1 TB** The maximum D1 storage per account for users on the Workers paid plan has been increased from 250 GB to 1 TB. ## 2025-07-01 **D1 alpha database backup access removed** Following the removal of query access to D1 alpha databases on [2024-08-23](https://developers.cloudflare.com/d1/platform/release-notes/#2024-08-23), D1 alpha database backups can no longer be accessed or created with [`wrangler d1 backup`](https://developers.cloudflare.com/d1/reference/backups/), available with wrangler v3. If you want to retain a backup of your D1 alpha database, please use `wrangler d1 backup` before 2025-07-01. A D1 alpha backup can be used to [migrate](https://developers.cloudflare.com/d1/platform/alpha-migration/#5-create-a-new-d1-database) to a newly created D1 database in its generally available state. ## 2025-05-02 **D1 HTTP API permissions bug fix** A permissions bug that allowed Cloudflare account and user [API tokens](https://developers.cloudflare.com/fundamentals/api/get-started/account-owned-tokens/) with `D1:Read` permission and `Edit` permission on another Cloudflare product to perform D1 database writes is fixed. `D1:Edit` permission is required for any database writes via HTTP API. If you were using an existing API token without `D1:Edit` permission to make edits to a D1 database via the HTTP API, then you will need to [create or edit API tokens](https://developers.cloudflare.com/fundamentals/api/get-started/create-token/) to explicitly include `D1:Edit` permission. ## 2025-02-19 **D1 supports \`PRAGMA optimize\`** D1 now supports `PRAGMA optimize` command, which can improve database query performance. It is recommended to run this command after a schema change (for example, after creating an index). Refer to [`PRAGMA optimize`](https://developers.cloudflare.com/d1/sql-api/sql-statements/#pragma-optimize) for more information. ## 2025-02-04 **Fixed bug with D1 read-only access via UI and /query REST API.** Fixed a bug with D1 permissions which allowed users with read-only roles via the UI and users with read-only API tokens via the `/query` [REST API](https://developers.cloudflare.com/api/resources/d1/subresources/database/methods/query/) to execute queries that modified databases. UI actions via the `Tables` tab, such as creating and deleting tables, were incorrectly allowed with read-only access. However, UI actions via the `Console` tab were not affected by this bug and correctly required write access. Write queries with read-only access will now fail. If you relied on the previous incorrect behavior, please assign the correct roles to users or permissions to API tokens to perform D1 write queries. ## 2025-01-13 **D1 will begin enforcing its free tier limits from the 10th of February 2025.** D1 will begin enforcing the daily [free tier limits](https://developers.cloudflare.com/d1/platform/limits) from 2025-02-10. These limits only apply to accounts on the Workers Free plan. From 2025-02-10, if you do not take any action and exceed the daily free tier limits, queries to D1 databases via the Workers API and/or REST API will return errors until limits reset daily at 00:00 UTC. To ensure uninterrupted service, upgrade your account to the [Workers Paid plan](https://developers.cloudflare.com/workers/platform/pricing/) from the [plans page](https://dash.cloudflare.com/?account=/workers/plans). The minimum monthly billing amount is $5. Refer to [Workers Paid plan](https://developers.cloudflare.com/workers/platform/pricing/) and [D1 limits](https://developers.cloudflare.com/d1/platform/limits/). For better insight into your current usage, refer to your [billing metrics](https://developers.cloudflare.com/d1/observability/billing/) for rows read and rows written, which can be found on the [D1 dashboard](https://dash.cloudflare.com/?account=/workers/d1) or GraphQL API. ## 2025-01-07 **D1 Worker API request latency decreases by 40-60%.** D1 lowered end-to-end Worker API request latency by 40-60% by eliminating redundant network round trips for each request. ![D1 Worker API latency](https://developers.cloudflare.com/images/d1/faster-d1-worker-api.png) *p50, p90, and p95 request latency aggregated across entire D1 service. These latencies are a reference point and should not be viewed as your exact workload improvement.* For each request to a D1 database, at least two network round trips were eliminated. One round trip was due to a bug that is now fixed. The remaining removed round trips are due to avoiding creating a new TCP connection for each request when reaching out to the datacenter hosting the database. The removal of redundant network round trips also applies to D1's [REST API](https://developers.cloudflare.com/api/resources/d1/subresources/database/methods/query/). However, the REST API still depends on Cloudflare's centralized datacenters for authentication, which reduces the relative performance improvement. ## 2024-08-23 **D1 alpha databases have stopped accepting SQL queries** Following the [deprecation warning](https://developers.cloudflare.com/d1/platform/release-notes/#2024-04-30) on 2024-04-30, D1 alpha databases have stopped accepting queries (you are still able to create and retrieve backups). Requests to D1 alpha databases now respond with a HTTP 400 error, containing the following text: `You can no longer query a D1 alpha database. Please follow https://developers.cloudflare.com/d1/platform/alpha-migration/ to migrate your alpha database and resume querying.` You can upgrade to the new, generally available version of D1 by following the [alpha database migration guide](https://developers.cloudflare.com/d1/platform/alpha-migration/). ## 2024-07-26 **Fixed bug in TypeScript typings for run() API** The `run()` method as part of the [D1 Client API](https://developers.cloudflare.com/d1/worker-api/) had an incorrect (outdated) type definition, which has now been addressed as of [`@cloudflare/workers-types`](https://www.npmjs.com/package/@cloudflare/workers-types) version `4.20240725.0`. The correct type definition is `stmt.run(): D1Result`, as `run()` returns the result rows of the query. The previously *incorrect* type definition was `stmt.run(): D1Response`, which only returns query metadata and no results. ## 2024-06-17 **HTTP API now returns a HTTP 429 error for overloaded D1 databases** Previously, D1's [HTTP API](https://developers.cloudflare.com/api/resources/d1/subresources/database/methods/query/) returned a HTTP `500 Internal Server` error for queries that came in while a D1 database was overloaded. These requests now correctly return a `HTTP 429 Too Many Requests` error. D1's [Workers API](https://developers.cloudflare.com/d1/worker-api/) is unaffected by this change. ## 2024-04-30 **D1 alpha databases will stop accepting live SQL queries on August 15, 2024** Previously [deprecated alpha](https://developers.cloudflare.com/d1/platform/release-notes/#2024-04-05) D1 databases need to be migrated by August 15, 2024 to accept new queries. Refer to [alpha database migration guide](https://developers.cloudflare.com/d1/platform/alpha-migration/) to migrate to the new, generally available, database architecture. ## 2024-04-12 **HTTP API now returns a HTTP 400 error for invalid queries** Previously, D1's [HTTP API](https://developers.cloudflare.com/api/resources/d1/subresources/database/methods/query/) returned a HTTP `500 Internal Server` error for an invalid query. An invalid SQL query now correctly returns a `HTTP 400 Bad Request` error. D1's [Workers API](https://developers.cloudflare.com/d1/worker-api/) is unaffected by this change. ## 2024-04-05 **D1 alpha databases are deprecated** Now that D1 is generally available and production ready, alpha D1 databases are deprecated and should be migrated for better performance, reliability, and ongoing support. Refer to [alpha database migration guide](https://developers.cloudflare.com/d1/platform/alpha-migration/) to migrate to the new, generally available, database architecture. ## 2024-04-01 **D1 is generally available** D1 is now generally available and production ready. Read the [blog post](https://blog.cloudflare.com/building-d1-a-global-database/) for more details on new features in GA and to learn more about the upcoming D1 read replication API. * Developers with a Workers Paid plan now have a 10GB GB per-database limit (up from 2GB), which can be combined with existing limit of 50,000 databases per account. * Developers with a Workers Free plan retain the 500 MB per-database limit and can create up to 10 databases per account. * D1 databases can be [exported](https://developers.cloudflare.com/d1/best-practices/import-export-data/#export-an-existing-d1-database) as a SQL file. ## 2024-03-12 **Change in \`wrangler d1 execute\` default** As of `wrangler@3.33.0`, `wrangler d1 execute` and `wrangler d1 migrations apply` now default to using a local database, to match the default behavior of `wrangler dev`. It is also now possible to specify one of `--local` or `--remote` to explicitly tell wrangler which environment you wish to run your commands against. ## 2024-03-05 **Billing for D1 usage** As of 2024-03-05, D1 usage will start to be counted and may incur charges for an account's future billing cycle. Developers on the Workers Paid plan with D1 usage beyond [included limits](https://developers.cloudflare.com/d1/platform/pricing/#billing-metrics) will incur charges according to [D1's pricing](https://developers.cloudflare.com/d1/platform/pricing). Developers on the Workers Free plan can use up to the included limits. Usage beyond the limits below requires signing up for the $5/month Workers Paid plan. Account billable metrics are available in the [Cloudflare Dashboard](https://dash.cloudflare.com) and [GraphQL API](https://developers.cloudflare.com/d1/observability/metrics-analytics/#metrics). ## 2024-02-16 **API changes to \`run()\`** A previous change (made on 2024-02-13) to the `run()` [query statement method](https://developers.cloudflare.com/d1/worker-api/prepared-statements/#run) has been reverted. `run()` now returns a `D1Result`, including the result rows, matching its original behavior prior to the change on 2024-02-13. Future change to `run()` to return a [`D1ExecResult`](https://developers.cloudflare.com/d1/worker-api/return-object/#d1execresult), as originally intended and documented, will be gated behind a [compatibility date](https://developers.cloudflare.com/workers/configuration/compatibility-dates/) as to avoid breaking existing Workers relying on the way `run()` currently works. ## 2024-02-13 **API changes to \`raw()\`, \`all()\` and \`run()\`** D1's `raw()`, `all()` and `run()` [query statement methods](https://developers.cloudflare.com/d1/worker-api/prepared-statements/) have been updated to reflect their intended behavior and improve compatibility with ORM libraries. `raw()` now correctly returns results as an array of arrays, allowing the correct handling of duplicate column names (such as when joining tables), as compared to `all()`, which is unchanged and returns an array of objects. To include an array of column names in the results when using `raw()`, use `raw({columnNames: true})`. `run()` no longer incorrectly returns a `D1Result` and instead returns a [`D1ExecResult`](https://developers.cloudflare.com/d1/worker-api/return-object/#d1execresult) as originally intended and documented. This may be a breaking change for some applications that expected `raw()` to return an array of objects. Refer to [D1 client API](https://developers.cloudflare.com/d1/worker-api/) to review D1's query methods, return types and TypeScript support in detail. ## 2024-01-18 **Support for LIMIT on UPDATE and DELETE statements** D1 now supports adding a `LIMIT` clause to `UPDATE` and `DELETE` statements, which allows you to limit the impact of a potentially dangerous operation. ## 2023-12-18 **Legacy alpha automated backups disabled** Databases using D1's legacy alpha backend will no longer run automated [hourly backups](https://developers.cloudflare.com/d1/reference/backups/). You may still choose to take manual backups of these databases. The D1 team recommends moving to D1's new [production backend](https://developers.cloudflare.com/d1/platform/release-notes/#2023-09-28), which will require you to export and import your existing data. D1's production backend is faster than the original alpha backend. The new backend also supports [Time Travel](https://developers.cloudflare.com/d1/reference/time-travel/), which allows you to restore your database to any minute in the past 30 days without relying on hourly or manual snapshots. ## 2023-10-03 **Create up to 50,000 D1 databases** Developers using D1 on a Workers Paid plan can now create up to 50,000 databases as part of ongoing increases to D1's limits. * This further enables database-per-user use-cases and allows you to isolate data between customers. * Total storage per account is now 50 GB. * D1's [analytics and metrics](https://developers.cloudflare.com/d1/observability/metrics-analytics/) provide per-database usage data. If you need to create more than 50,000 databases or need more per-account storage, [reach out](https://developers.cloudflare.com/d1/platform/limits/) to the D1 team to discuss. ## 2023-09-28 **The D1 public beta is here** D1 is now in public beta, and storage limits have been increased: * Developers with a Workers Paid plan now have a 2 GB per-database limit (up from 500 MB) and can create 25 databases per account (up from 10). These limits will continue to increase automatically during the public beta. * Developers with a Workers Free plan retain the 500 MB per-database limit and can create up to 10 databases per account. Databases must be using D1's [new storage subsystem](https://developers.cloudflare.com/d1/platform/release-notes/#2023-07-27) to benefit from the increased database limits. Read the [announcement blog](https://blog.cloudflare.com/d1-open-beta-is-here/) for more details about what is new in the beta and what is coming in the future for D1. ## 2023-08-19 **Row count now returned per query** D1 now returns a count of `rows_written` and `rows_read` for every query executed, allowing you to assess the cost of query for both [pricing](https://developers.cloudflare.com/d1/platform/pricing/) and [index optimization](https://developers.cloudflare.com/d1/best-practices/use-indexes/) purposes. The `meta` object returned in [D1's Client API](https://developers.cloudflare.com/d1/worker-api/return-object/#d1result) contains a total count of the rows read (`rows_read`) and rows written (`rows_written`) by that query. For example, a query that performs a full table scan (for example, `SELECT * FROM users`) from a table with 5000 rows would return a `rows_read` value of `5000`: ```json "meta": { "duration": 0.20472300052642825, "size_after": 45137920, "rows_read": 5000, "rows_written": 0 } ``` Refer to [D1 pricing documentation](https://developers.cloudflare.com/d1/platform/pricing/) to understand how reads and writes are measured. D1 remains free to use during the alpha period. ## 2023-08-09 **Bind D1 from the Cloudflare dashboard** You can now [bind a D1 database](https://developers.cloudflare.com/d1/get-started/#3-bind-your-worker-to-your-d1-database) to your Workers directly in the [Cloudflare dashboard](https://dash.cloudflare.com). To bind D1 from the Cloudflare dashboard, select your Worker project -> **Settings** -> **Variables** -> and select **D1 Database Bindings**. Note: If you have previously deployed a Worker with a D1 database binding with a version of `wrangler` prior to `3.5.0`, you must upgrade to [`wrangler v3.5.0`](https://github.com/cloudflare/workers-sdk/releases/tag/wrangler%403.5.0) first before you can edit your D1 database bindings in the Cloudflare dashboard. New Workers projects do not have this limitation. Legacy D1 alpha users who had previously prefixed their database binding manually with `__D1_BETA__` should remove this as part of this upgrade. Your Worker scripts should call your D1 database via `env.BINDING_NAME` only. Refer to the latest [D1 getting started guide](https://developers.cloudflare.com/d1/get-started/#3-bind-your-worker-to-your-d1-database) for best practices. We recommend all D1 alpha users begin using wrangler `3.5.0` (or later) to benefit from improved TypeScript types and future D1 API improvements. ## 2023-08-01 **Per-database limit now 500 MB** Databases using D1's [new storage subsystem](https://developers.cloudflare.com/d1/platform/release-notes/#2023-07-27) can now grow to 500 MB each, up from the previous 100 MB limit. This applies to both existing and newly created databases. Refer to [Limits](https://developers.cloudflare.com/d1/platform/limits/) to learn about D1's limits. ## 2023-07-27 **New default storage subsystem** Databases created via the Cloudflare dashboard and Wrangler (as of `v3.4.0`) now use D1's new storage subsystem by default. The new backend can [be 6 - 20x faster](https://blog.cloudflare.com/d1-turning-it-up-to-11/) than D1's original alpha backend. To understand which storage subsystem your database uses, run `wrangler d1 info YOUR_DATABASE` and inspect the version field in the output. Databases with `version: beta` use the new storage backend and support the [Time Travel](https://developers.cloudflare.com/d1/reference/time-travel/) API. Databases with `version: alpha` only use D1's older, legacy backend. ## 2023-07-27 **Time Travel** [Time Travel](https://developers.cloudflare.com/d1/reference/time-travel/) is now available. Time Travel allows you to restore a D1 database back to any minute within the last 30 days (Workers Paid plan) or 7 days (Workers Free plan), at no additional cost for storage or restore operations. Refer to the [Time Travel](https://developers.cloudflare.com/d1/reference/time-travel/) documentation to learn how to travel backwards in time. Databases using D1's [new storage subsystem](https://blog.cloudflare.com/d1-turning-it-up-to-11/) can use Time Travel. Time Travel replaces the [snapshot-based backups](https://developers.cloudflare.com/d1/reference/backups/) used for legacy alpha databases. ## 2023-06-28 **Metrics and analytics** You can now view [per-database metrics](https://developers.cloudflare.com/d1/observability/metrics-analytics/) via both the [Cloudflare dashboard](https://dash.cloudflare.com/) and the [GraphQL Analytics API](https://developers.cloudflare.com/analytics/graphql-api/). D1 currently exposes read & writes per second, query response size, and query latency percentiles. ## 2023-06-16 **Generated columns documentation** New documentation has been published on how to use D1's support for [generated columns](https://developers.cloudflare.com/d1/reference/generated-columns/) to define columns that are dynamically generated on write (or read). Generated columns allow you to extract data from [JSON objects](https://developers.cloudflare.com/d1/sql-api/query-json/) or use the output of other SQL functions. ## 2023-06-12 **Deprecating Error.cause** As of [`wrangler v3.1.1`](https://github.com/cloudflare/workers-sdk/releases/tag/wrangler%403.1.1) the [D1 client API](https://developers.cloudflare.com/d1/worker-api/) now returns [detailed error messages](https://developers.cloudflare.com/d1/observability/debug-d1/) within the top-level `Error.message` property, and no longer requires developers to inspect the `Error.cause.message` property. To facilitate a transition from the previous `Error.cause` behaviour, detailed error messages will continue to be populated within `Error.cause` as well as the top-level `Error` object until approximately July 14th, 2023. Future versions of both `wrangler` and the D1 client API will no longer populate `Error.cause` after this date. ## 2023-05-19 **New experimental backend** D1 has a new experimental storage back end that dramatically improves query throughput, latency and reliability. The experimental back end will become the default back end in the near future. To create a database using the experimental backend, use `wrangler` and set the `--experimental-backend` flag when creating a database: ```sh $ wrangler d1 create your-database --experimental-backend ``` Read more about the experimental back end in the [announcement blog](https://blog.cloudflare.com/d1-turning-it-up-to-11/). ## 2023-05-19 **Location hints** You can now provide a [location hint](https://developers.cloudflare.com/d1/configuration/data-location/) when creating a D1 database, which will influence where the leader (writer) is located. By default, D1 will automatically create your database in a location close to where you issued the request to create a database. In most cases this allows D1 to choose the optimal location for your database on your behalf. ## 2023-05-17 **Query JSON** [New documentation](https://developers.cloudflare.com/d1/sql-api/query-json/) has been published that covers D1's extensive JSON function support. JSON functions allow you to parse, query and modify JSON directly from your SQL queries, reducing the number of round trips to your database, or data queried. --- title: Choose a data or storage product · Cloudflare D1 docs lastUpdated: 2024-08-13T19:56:56.000Z chatbotDeprioritize: false source_url: html: https://developers.cloudflare.com/d1/platform/storage-options/ md: https://developers.cloudflare.com/d1/platform/storage-options/index.md --- --- title: Backups (Legacy) · Cloudflare D1 docs description: D1 has built-in support for creating and restoring backups of your databases with wrangler v3, including support for scheduled automatic backups and manual backup management. lastUpdated: 2025-06-20T15:14:49.000Z chatbotDeprioritize: false source_url: html: https://developers.cloudflare.com/d1/reference/backups/ md: https://developers.cloudflare.com/d1/reference/backups/index.md --- D1 has built-in support for creating and restoring backups of your databases with wrangler v3, including support for scheduled automatic backups and manual backup management. Planned removal Access to snapshot based backups for D1 alpha databases described in this documentation will be removed on [2025-07-01](https://developers.cloudflare.com/d1/platform/release-notes/#2025-07-01). Time Travel Databases using D1's [production storage subsystem](https://blog.cloudflare.com/d1-turning-it-up-to-11/) can use Time Travel point-in-time recovery. [Time Travel](https://developers.cloudflare.com/d1/reference/time-travel/) replaces the snapshot based backups used for legacy alpha databases. To understand which storage subsystem your database uses, run `wrangler d1 info YOUR_DATABASE` and check for the `version` field in the output.Databases with `version: alpha` only support the older, snapshot based backup API. ## Automatic backups D1 automatically backs up your databases every hour on your behalf, and [retains backups for 24 hours](https://developers.cloudflare.com/d1/platform/limits/). Backups will block access to the DB while they are running. In most cases this should only be a second or two, and any requests that arrive during the backup will be queued. To view and manage these backups, including any manual backups you have made, you can use the `d1 backup list ` command to list each backup. For example, to list all of the backups of a D1 database named `existing-db`: ```sh wrangler d1 backup list existing-db ``` ```sh ┌──────────────┬──────────────────────────────────────┬────────────┬─────────┐ │ created_at │ id │ num_tables │ size │ ├──────────────┼──────────────────────────────────────┼────────────┼─────────┤ │ 1 hour ago │ 54a23309-db00-4c5c-92b1-c977633b937c │ 1 │ 95.3 kB │ ├──────────────┼──────────────────────────────────────┼────────────┼─────────┤ │ <...> │ <...> │ <...> │ <...> │ ├──────────────┼──────────────────────────────────────┼────────────┼─────────┤ │ 2 months ago │ 8433a91e-86d0-41a3-b1a3-333b080bca16 │ 1 │ 65.5 kB │ └──────────────┴──────────────────────────────────────┴────────────┴─────────┘% ``` The `id` of each backup allows you to download or restore a specific backup. ## Manually back up a database Creating a manual backup of your database before making large schema changes, manually inserting or deleting data, or otherwise modifying a database you are actively using is a good practice to get into. D1 allows you to make a backup of a database at any time, and stores the backup on your behalf. You should also consider [using migrations](https://developers.cloudflare.com/d1/reference/migrations/) to simplify changes to an existing database. To back up a D1 database, you must have: 1. The Cloudflare [Wrangler CLI installed](https://developers.cloudflare.com/workers/wrangler/install-and-update/) 2. An existing D1 database you want to back up. For example, to create a manual backup of a D1 database named `example-db`, call `d1 backup create`. ```sh wrangler d1 backup create example-db ``` ```sh ┌─────────────────────────────┬──────────────────────────────────────┬────────────┬─────────┬───────┐ │ created_at │ id │ num_tables │ size │ state │ ├─────────────────────────────┼──────────────────────────────────────┼────────────┼─────────┼───────┤ │ 2023-02-04T15:49:36.113753Z │ 123a81a2-ab91-4c2e-8ebc-64d69633faf1 │ 1 │ 65.5 kB │ done │ └─────────────────────────────┴──────────────────────────────────────┴────────────┴─────────┴───────┘ ``` Larger databases, especially those that are several megabytes (MB) in size with many tables, may take a few seconds to backup. The `state` column in the output will let you know when the backup is done. ## Downloading a backup locally To download a backup locally, call `wrangler d1 backup download `. Use `wrangler d1 backup list ` to list the available backups, including their IDs, for a given D1 database. For example, to download a specific backup for a database named `example-db`: ```sh wrangler d1 backup download example-db 123a81a2-ab91-4c2e-8ebc-64d69633faf1 ``` ```sh 🌀 Downloading backup 123a81a2-ab91-4c2e-8ebc-64d69633faf1 from 'example-db' 🌀 Saving to /Users/you/projects/example-db.123a81a2.sqlite3 🌀 Done! ``` The database backup will be download to the current working directory in native SQLite3 format. To import a local database, read [the documentation on importing data](https://developers.cloudflare.com/d1/best-practices/import-export-data/) to D1. ## Restoring a backup Warning Restoring a backup will overwrite the existing version of your D1 database in-place. We recommend you make a manual backup before you restore a database, so that you have a backup to revert to if you accidentally restore the wrong backup or break your application. Restoring a backup will overwrite the current running version of a database with the backup. Database tables (and their data) that do not exist in the backup will no longer exist in the current version of the database, and queries that rely on them will fail. To restore a previous backup of a D1 database named `existing-db`, pass the ID of that backup to `d1 backup restore`: ```sh wrangler d1 backup restore existing-db 6cceaf8c-ceab-4351-ac85-7f9e606973e3 ``` ```sh Restoring existing-db from backup 6cceaf8c-ceab-4351-ac85-7f9e606973e3.... Done! ``` Any queries against the database will immediately query the current (restored) version once the restore has completed. --- title: Community projects · Cloudflare D1 docs description: Members of the Cloudflare developer community and broader developer ecosystem have built and/or contributed tooling — including ORMs (Object Relational Mapper) libraries, query builders, and CLI tools — that build on top of D1. lastUpdated: 2024-11-26T11:03:46.000Z chatbotDeprioritize: false source_url: html: https://developers.cloudflare.com/d1/reference/community-projects/ md: https://developers.cloudflare.com/d1/reference/community-projects/index.md --- Members of the Cloudflare developer community and broader developer ecosystem have built and/or contributed tooling — including ORMs (Object Relational Mapper) libraries, query builders, and CLI tools — that build on top of D1. Note Community projects are not maintained by the Cloudflare D1 team. They are managed and updated by the project authors. ## Projects ### Sutando ORM Sutando is an ORM designed for Node.js. With Sutando, each table in a database has a corresponding model that handles CRUD (Create, Read, Update, Delete) operations. * [GitHub](https://github.com/sutandojs/sutando) * [D1 with Sutando ORM Example](https://github.com/sutandojs/sutando-examples/tree/main/typescript/rest-hono-cf-d1) ### knex-cloudflare-d1 knex-cloudflare-d1 is the Cloudflare D1 dialect for Knex.js. Note that this is not an official dialect provided by Knex.js. * [GitHub](https://github.com/kiddyuchina/knex-cloudflare-d1) ### Prisma ORM [Prisma ORM](https://www.prisma.io/orm) is a next-generation JavaScript and TypeScript ORM that unlocks a new level of developer experience when working with databases thanks to its intuitive data model, automated migrations, type-safety and auto-completion. * [Tutorial](https://developers.cloudflare.com/d1/tutorials/d1-and-prisma-orm/) * [Docs](https://www.prisma.io/docs/orm/prisma-client/deployment/edge/deploy-to-cloudflare#d1) ### D1 adapter for Kysely ORM Kysely is a type-safe and autocompletion-friendly typescript SQL query builder. With this adapter you can interact with D1 with the familiar Kysely interface. * [Kysely GitHub](https://github.com/koskimas/kysely) * [D1 adapter](https://github.com/aidenwallis/kysely-d1) ### feathers-kysely The `feathers-kysely` database adapter follows the FeathersJS Query Syntax standard and works with any framework. It is built on the D1 adapter for Kysely and supports passing queries directly from client applications. Since the FeathersJS query syntax is a subset of MongoDB's syntax, this is a great tool for MongoDB users to use Cloudflare D1 without previous SQL experience. * [feathers-kysely on npm](https://www.npmjs.com/package/feathers-kysely) * [feathers-kysely on GitHub](https://github.com/marshallswain/feathers-kysely) ### Drizzle ORM Drizzle is a headless TypeScript ORM with a head which runs on Node, Bun and Deno. Drizzle ORM lives on the Edge and it is a JavaScript ORM too. It comes with a drizzle-kit CLI companion for automatic SQL migrations generation. Drizzle automatically generates your D1 schema based on types you define in TypeScript, and exposes an API that allows you to query your database directly. * [Docs](https://orm.drizzle.team/docs) * [GitHub](https://github.com/drizzle-team/drizzle-orm) * [D1 example](https://orm.drizzle.team/docs/connect-cloudflare-d1) ### Flyweight Flyweight is an ORM designed specifically for databases related to SQLite. It has first-class D1 support that includes the ability to batch queries and integrate with the wrangler migration system. * [GitHub](https://github.com/thebinarysearchtree/flyweight) ### d1-orm Object Relational Mapping (ORM) is a technique to query and manipulate data by using JavaScript. Created by a Cloudflare Discord Community Champion, the `d1-orm` seeks to provide a strictly typed experience while using D1. * [GitHub](https://github.com/Interactions-as-a-Service/d1-orm/issues) * [Documentation](https://docs.interactions.rest/d1-orm/) ### workers-qb `workers-qb` is a zero-dependency query builder that provides a simple standardized interface while keeping the benefits and speed of using raw queries over a traditional ORM. While not intended to provide ORM-like functionality, `workers-qb` makes it easier to interact with your database from code for direct SQL access. * [GitHub](https://github.com/G4brym/workers-qb) * [Documentation](https://workers-qb.massadas.com/) ### d1-console Instead of running the `wrangler d1 execute` command in your terminal every time you want to interact with your database, you can interact with D1 from within the `d1-console`. Created by a Discord Community Champion, this gives the benefit of executing multi-line queries, obtaining command history, and viewing a cleanly formatted table output. * [GitHub](https://github.com/isaac-mcfadyen/d1-console) ### L1 `L1` is a package that brings some Cloudflare Worker ecosystem bindings into PHP and Laravel via the Cloudflare API. It provides interaction with D1 via PDO, KV and Queues, with more services to add in the future, making PHP integration with Cloudflare a real breeze. * [GitHub](https://github.com/renoki-co/l1) * [Packagist](https://packagist.org/packages/renoki-co/l1) ### Staff Directory - a D1-based demo Staff Directory is a demo project using D1, [HonoX](https://github.com/honojs/honox), and [Cloudflare Pages](https://developers.cloudflare.com/pages/). It uses D1 to store employee data, and is an example of a full-stack application built on top of D1. * [GitHub](https://github.com/lauragift21/staff-directory) * [D1 functionality](https://github.com/lauragift21/staff-directory/blob/main/app/db.ts) ### NuxtHub `NuxtHub` is a Nuxt module that brings Cloudflare Worker bindings into your Nuxt application with no configuration. It leverages the [Wrangler Platform Proxy](https://developers.cloudflare.com/workers/wrangler/api/#getplatformproxy) in development and direct binding in production to interact with [D1](https://developers.cloudflare.com/d1/), [KV](https://developers.cloudflare.com/kv/) and [R2](https://developers.cloudflare.com/r2/) with server composables (`hubDatabase()`, `hubKV()` and `hubBlob()`). `NuxtHub` also provides a way to use your remote D1 database in development using the `npx nuxt dev --remote` command. * [GitHub](https://github.com/nuxt-hub/core) * [Documentation](https://hub.nuxt.com) * [Example](https://github.com/Atinux/nuxt-todos-edge) ## Feedback To report a bug or file feature requests for these community projects, create an issue directly on the project's repository. --- title: Data security · Cloudflare D1 docs description: "This page details the data security properties of D1, including:" lastUpdated: 2024-08-13T19:56:56.000Z chatbotDeprioritize: false source_url: html: https://developers.cloudflare.com/d1/reference/data-security/ md: https://developers.cloudflare.com/d1/reference/data-security/index.md --- This page details the data security properties of D1, including: * Encryption-at-rest (EAR). * Encryption-in-transit (EIT). * Cloudflare's compliance certifications. ## Encryption at Rest All objects stored in D1, including metadata, live databases, and inactive databases are encrypted at rest. Encryption and decryption are automatic, do not require user configuration to enable, and do not impact the effective performance of D1. Encryption keys are managed by Cloudflare and securely stored in the same key management systems we use for managing encrypted data across Cloudflare internally. Objects are encrypted using [AES-256](https://www.cloudflare.com/learning/ssl/what-is-encryption/), a widely tested, highly performant and industry-standard encryption algorithm. D1 uses GCM (Galois/Counter Mode) as its preferred mode. ## Encryption in Transit Data transfer between a Cloudflare Worker, and/or between nodes within the Cloudflare network and D1 is secured using the same [Transport Layer Security](https://www.cloudflare.com/learning/ssl/transport-layer-security-tls/) (TLS/SSL). API access via the HTTP API or using the [wrangler](https://developers.cloudflare.com/workers/wrangler/install-and-update/) command-line interface is also over TLS/SSL (HTTPS). ## Compliance To learn more about Cloudflare's adherence to industry-standard security compliance certifications, visit the Cloudflare [Trust Hub](https://www.cloudflare.com/trust-hub/compliance-resources/). --- title: Generated columns · Cloudflare D1 docs description: D1 allows you to define generated columns based on the values of one or more other columns, SQL functions, or even extracted JSON values. lastUpdated: 2024-12-11T09:43:45.000Z chatbotDeprioritize: false source_url: html: https://developers.cloudflare.com/d1/reference/generated-columns/ md: https://developers.cloudflare.com/d1/reference/generated-columns/index.md --- D1 allows you to define generated columns based on the values of one or more other columns, SQL functions, or even [extracted JSON values](https://developers.cloudflare.com/d1/sql-api/query-json/). This allows you to normalize your data as you write to it or read it from a table, making it easier to query and reducing the need for complex application logic. Generated columns can also have [indexes defined](https://developers.cloudflare.com/d1/best-practices/use-indexes/) against them, which can dramatically increase query performance over frequently queried fields. ## Types of generated columns There are two types of generated columns: * `VIRTUAL` (default): the column is generated when read. This has the benefit of not consuming storage, but can increase compute time (and thus reduce query performance), especially for larger queries. * `STORED`: the column is generated when the row is written. The column takes up storage space just as a regular column would, but the column does not need to be generated on every read, which can improve read query performance. When omitted from a generated column expression, generated columns default to the `VIRTUAL` type. The `STORED` type is recommended when the generated column is compute intensive. For example, when parsing large JSON structures. ## Define a generated column Generated columns can be defined during table creation in a `CREATE TABLE` statement or afterwards via the `ALTER TABLE` statement. To create a table that defines a generated column, you use the `AS` keyword: ```sql CREATE TABLE some_table ( -- other columns omitted some_generated_column AS ) ``` As a concrete example, to automatically extract the `location` value from the following JSON sensor data, you can define a generated column called `location` (of type `TEXT`), based on a `raw_data` column that stores the raw representation of our JSON data. ```json { "measurement": { "temp_f": "77.4", "aqi": [21, 42, 58], "o3": [18, 500], "wind_mph": "13", "location": "US-NY" } } ``` To define a generated column with the value of `$.measurement.location`, you can use the [`json_extract`](https://developers.cloudflare.com/d1/sql-api/query-json/#extract-values) function to extract the value from the `raw_data` column each time you write to that row: ```sql CREATE TABLE sensor_readings ( event_id INTEGER PRIMARY KEY, timestamp INTEGER NOT NULL, raw_data TEXT, location as (json_extract(raw_data, '$.measurement.location')) STORED ); ``` Generated columns can optionally be specified with the `column_name GENERATED ALWAYS AS [STORED|VIRTUAL]` syntax. The `GENERATED ALWAYS` syntax is optional and does not change the behavior of the generated column when omitted. ## Add a generated column to an existing table A generated column can also be added to an existing table. If the `sensor_readings` table did not have the generated `location` column, you could add it by running an `ALTER TABLE` statement: ```sql ALTER TABLE sensor_readings ADD COLUMN location as (json_extract(raw_data, '$.measurement.location')); ``` This defines a `VIRTUAL` generated column that runs `json_extract` on each read query. Generated column definitions cannot be directly modified. To change how a generated column generates its data, you can use `ALTER TABLE table_name REMOVE COLUMN` and then `ADD COLUMN` to re-define the generated column, or `ALTER TABLE table_name RENAME COLUMN current_name TO new_name` to rename the existing column before calling `ADD COLUMN` with a new definition. ## Examples Generated columns are not just limited to JSON functions like `json_extract`: you can use almost any available function to define how a generated column is generated. For example, you could generate a `date` column based on the `timestamp` column from the previous `sensor_reading` table, automatically converting a Unix timestamp into a `YYYY-MM-dd` format within your database: ```sql ALTER TABLE your_table -- date(timestamp, 'unixepoch') converts a Unix timestamp to a YYYY-MM-dd formatted date ADD COLUMN formatted_date AS (date(timestamp, 'unixepoch')) ``` Alternatively, you could define an `expires_at` column that calculates a future date, and filter on that date in your queries: ```sql -- Filter out "expired" results based on your generated column: -- SELECT * FROM your_table WHERE current_date() > expires_at ALTER TABLE your_table -- calculates a date (YYYY-MM-dd) 30 days from the timestamp. ADD COLUMN expires_at AS (date(timestamp, '+30 days')); ``` ## Additional considerations * Tables must have at least one non-generated column. You cannot define a table with only generated column(s). * Expressions can only reference other columns in the same table and row, and must only use [deterministic functions](https://www.sqlite.org/deterministic.html). Functions like `random()`, sub-queries or aggregation functions cannot be used to define a generated column. * Columns added to an existing table via `ALTER TABLE ... ADD COLUMN` must be `VIRTUAL`. You cannot add a `STORED` column to an existing table. --- title: Glossary · Cloudflare D1 docs description: Review the definitions for terms used across Cloudflare's D1 documentation. lastUpdated: 2025-02-24T09:30:25.000Z chatbotDeprioritize: false source_url: html: https://developers.cloudflare.com/d1/reference/glossary/ md: https://developers.cloudflare.com/d1/reference/glossary/index.md --- Review the definitions for terms used across Cloudflare's D1 documentation. | Term | Definition | | - | - | | bookmark | A bookmark represents the state of a database at a specific point in time.- Bookmarks are lexicographically sortable. Sorting orders a list of bookmarks from oldest-to-newest. | | primary database instance | The primary database instance is the original instance of a database. This database instance only exists in one location in the world. | | query planner | A component in a database management system which takes a user query and generates the most efficient plan of executing that query (the query plan). For example, the query planner decides which indices to use, or which table to access first. | | read replica | A read replica is an eventually-replicated copy of the primary database instance which only serve read requests. There may be multiple read replicas for a single primary database instance. | | replica lag | The time it takes for the primary database instance to replicate its changes to a specific read replica. | | session | A session encapsulates all the queries from one logical session for your application. For example, a session may correspond to all queries coming from a particular web browser session. | --- title: Migrations · Cloudflare D1 docs description: Database migrations are a way of versioning your database. Each migration is stored as an .sql file in your migrations folder. The migrations folder is created in your project directory when you create your first migration. This enables you to store and track changes throughout database development. lastUpdated: 2025-04-09T22:35:27.000Z chatbotDeprioritize: false source_url: html: https://developers.cloudflare.com/d1/reference/migrations/ md: https://developers.cloudflare.com/d1/reference/migrations/index.md --- Database migrations are a way of versioning your database. Each migration is stored as an `.sql` file in your `migrations` folder. The `migrations` folder is created in your project directory when you create your first migration. This enables you to store and track changes throughout database development. ## Features Currently, the migrations system aims to be simple yet effective. With the current implementation, you can: * [Create](https://developers.cloudflare.com/workers/wrangler/commands/#d1-migrations-create) an empty migration file. * [List](https://developers.cloudflare.com/workers/wrangler/commands/#d1-migrations-list) unapplied migrations. * [Apply](https://developers.cloudflare.com/workers/wrangler/commands/#d1-migrations-apply) remaining migrations. Every migration file in the `migrations` folder has a specified version number in the filename. Files are listed in sequential order. Every migration file is an SQL file where you can specify queries to be run. Binding name vs Database name When running a migration script, you can use either the binding name or the database name. However, the binding name can change, whereas the database name cannot. Therefore, to avoid accidentally running migrations on the wrong binding, you may wish to use the database name for D1 migrations. ## Wrangler customizations By default, migrations are created in the `migrations/` folder in your Worker project directory. Creating migrations will keep a record of applied migrations in the `d1_migrations` table found in your database. This location and table name can be customized in your Wrangler file, inside the D1 binding. * wrangler.jsonc ```jsonc { "d1_databases": [ { "binding": "", "database_name": "", "database_id": "", "preview_database_id": "", "migrations_table": "", "migrations_dir": "" } ] } ``` * wrangler.toml ```toml [[ d1_databases ]] binding = "" # i.e. if you set this to "DB", it will be available in your Worker at `env.DB` database_name = "" database_id = "" preview_database_id = "" migrations_table = "" # Customize this value to change your applied migrations table name migrations_dir = "" # Specify your custom migration directory ``` ## Foreign key constraints When applying a migration, you may need to temporarily disable [foreign key constraints](https://developers.cloudflare.com/d1/sql-api/foreign-keys/). To do so, call `PRAGMA defer_foreign_keys = true` before making changes that would violate foreign keys. Refer to the [foreign key documentation](https://developers.cloudflare.com/d1/sql-api/foreign-keys/) to learn more about how to work with foreign keys and D1. --- title: Time Travel and backups · Cloudflare D1 docs description: Time Travel is D1's approach to backups and point-in-time-recovery, and allows you to restore a database to any minute within the last 30 days. lastUpdated: 2025-07-07T12:53:47.000Z chatbotDeprioritize: false source_url: html: https://developers.cloudflare.com/d1/reference/time-travel/ md: https://developers.cloudflare.com/d1/reference/time-travel/index.md --- Time Travel is D1's approach to backups and point-in-time-recovery, and allows you to restore a database to any minute within the last 30 days. * You do not need to enable Time Travel. It is always on. * Database history and restoring a database incur no additional costs. * Time Travel automatically creates [bookmarks](#bookmarks) on your behalf. You do not need to manually trigger or remember to initiate a backup. By not having to rely on scheduled backups and/or manually initiated backups, you can go back in time and restore a database prior to a failed migration or schema change, a `DELETE` or `UPDATE` statement without a specific `WHERE` clause, and in the future, fork/copy a production database directly. Support for Time Travel Databases using D1's [new storage subsystem](https://blog.cloudflare.com/d1-turning-it-up-to-11/) can use Time Travel. Time Travel replaces the [snapshot-based backups](https://developers.cloudflare.com/d1/reference/backups/) used for legacy alpha databases. To understand which storage subsystem your database uses, run `wrangler d1 info YOUR_DATABASE` and inspect the `version` field in the output. Databases with `version: production` support the new Time Travel API. Databases with `version: alpha` only support the older, snapshot-based backup API. ## Bookmarks Time Travel leverages D1's concept of a bookmark to restore to a point in time. * Bookmarks older than 30 days are invalid and cannot be used as a restore point. * Restoring a database to a specific bookmark does not remove or delete older bookmarks. For example, if you restore to a bookmark representing the state of your database 10 minutes ago, and determine that you needed to restore to an earlier point in time, you can still do so. * Bookmarks are lexicographically sortable. Sorting orders a list of bookmarks from oldest-to-newest. * Bookmarks can be derived from a [Unix timestamp](https://en.wikipedia.org/wiki/Unix_time) (seconds since Jan 1st, 1970), and conversion between a specific timestamp and a bookmark is deterministic (stable). Bookmarks are also leveraged by [Sessions API](https://developers.cloudflare.com/d1/best-practices/read-replication/#sessions-api-examples) to ensure sequential consistency within a Session. ## Timestamps Time Travel supports two timestamp formats: * [Unix timestamps](https://developer.mozilla.org/en-US/docs/Glossary/Unix_time), which correspond to seconds since January 1st, 1970 at midnight. This is always in UTC. * The [JavaScript date-time string format](https://developer.mozilla.org/en-US/docs/Web/JavaScript/Reference/Global_Objects/Date#date_time_string_format), which is a simplified version of the ISO-8601 timestamp format. An valid date-time string for the July 27, 2023 at 11:18AM in Americas/New\_York (EST) would look like `2023-07-27T11:18:53.000-04:00`. ## Requirements * [`Wrangler`](https://developers.cloudflare.com/workers/wrangler/install-and-update/) `v3.4.0` or later installed to use Time Travel commands. * A database on D1's production backend. You can check whether a database is using this backend via `wrangler d1 info DB_NAME` - the output show `version: production`. ## Retrieve a bookmark You can retrieve a bookmark for the current timestamp by calling the `d1 info` command, which defaults to returning the current bookmark: ```sh wrangler d1 time-travel info YOUR_DATABASE ``` ```sh 🚧 Time Traveling... ⚠️ The current bookmark is '00000085-0000024c-00004c6d-8e61117bf38d7adb71b934ebbf891683' ⚡️ To restore to this specific bookmark, run: `wrangler d1 time-travel restore YOUR_DATABASE --bookmark=00000085-0000024c-00004c6d-8e61117bf38d7adb71b934ebbf891683` ``` To retrieve the bookmark for a timestamp in the past, pass the `--timestamp` flag with a valid Unix or RFC3339 timestamp: ```sh wrangler d1 time-travel info YOUR_DATABASE --timestamp="2023-07-09T17:31:11+00:00" ``` ## Restore a database To restore a database to a specific point-in-time: Warning Restoring a database to a specific point-in-time is a *destructive* operation, and overwrites the database in place. In the future, D1 will support branching & cloning databases using Time Travel. ```sh wrangler d1 time-travel restore YOUR_DATABASE --timestamp=UNIX_TIMESTAMP ``` ```sh 🚧 Restoring database YOUR_DATABASE from bookmark 00000080-ffffffff-00004c60-390376cb1c4dd679b74a19d19f5ca5be ⚠️ This will overwrite all data in database YOUR_DATABASE. In-flight queries and transactions will be cancelled. ✔ OK to proceed (y/N) … yes ⚡️ Time travel in progress... ✅ Database YOUR_DATABASE restored back to bookmark 00000080-ffffffff-00004c60-390376cb1c4dd679b74a19d19f5ca5be ↩️ To undo this operation, you can restore to the previous bookmark: 00000085-ffffffff-00004c6d-2510c8b03a2eb2c48b2422bb3b33fad5 ``` Note that: * Timestamps are converted to a deterministic, stable bookmark. The same timestamp will always represent the same bookmark. * Queries in flight will be cancelled, and an error returned to the client. * The restore operation will return a [bookmark](#bookmarks) that allows you to [undo](#undo-a-restore) and revert the database. ## Undo a restore You can undo a restore by: * Taking note of the previous bookmark returned as part of a `wrangler d1 time-travel restore` operation * Restoring directly to a bookmark in the past, prior to your last restore. To fetch a bookmark from an earlier state: ```sh wrangler d1 time-travel info YOUR_DATABASE ``` ```sh 🚧 Time Traveling... ⚠️ The current bookmark is '00000085-0000024c-00004c6d-8e61117bf38d7adb71b934ebbf891683' ⚡️ To restore to this specific bookmark, run: `wrangler d1 time-travel restore YOUR_DATABASE --bookmark=00000085-0000024c-00004c6d-8e61117bf38d7adb71b934ebbf891683` ``` ## Export D1 into R2 using Workflows You can automatically export your D1 database into R2 storage via REST API and Cloudflare Workflows. This may be useful if you wish to store a state of your D1 database for longer than 30 days. Refer to the guide [Export and save D1 database](https://developers.cloudflare.com/workflows/examples/backup-d1/). ## Notes * You can quickly get the Unix timestamp from the command-line in macOS and Windows via `date +%s`. * Time Travel does not yet allow you to clone or fork an existing database to a new copy. In the future, Time Travel will allow you to fork (clone) an existing database into a new database, or overwrite an existing database. * You can restore a database back to a point in time up to 30 days in the past (Workers Paid plan) or 7 days (Workers Free plan). Refer to [Limits](https://developers.cloudflare.com/d1/platform/limits/) for details on Time Travel's limits. --- title: Define foreign keys · Cloudflare D1 docs description: D1 supports defining and enforcing foreign key constraints across tables in a database. lastUpdated: 2025-04-15T12:29:32.000Z chatbotDeprioritize: false source_url: html: https://developers.cloudflare.com/d1/sql-api/foreign-keys/ md: https://developers.cloudflare.com/d1/sql-api/foreign-keys/index.md --- D1 supports defining and enforcing foreign key constraints across tables in a database. Foreign key constraints allow you to enforce relationships across tables. For example, you can use foreign keys to create a strict binding between a `user_id` in a `users` table and the `user_id` in an `orders` table, so that no order can be created against a user that does not exist. Foreign key constraints can also prevent you from deleting rows that reference rows in other tables. For example, deleting rows from the `users` table when rows in the `orders` table refer to them. By default, D1 enforces that foreign key constraints are valid within all queries and migrations. This is identical to the behaviour you would observe when setting `PRAGMA foreign_keys = on` in SQLite for every transaction. ## Defer foreign key constraints When running a [query](https://developers.cloudflare.com/d1/worker-api/), [migration](https://developers.cloudflare.com/d1/reference/migrations/) or [importing data](https://developers.cloudflare.com/d1/best-practices/import-export-data/) against a D1 database, there may be situations in which you need to disable foreign key validation during table creation or changes to your schema. D1's foreign key enforcement is equivalent to SQLite's `PRAGMA foreign_keys = on` directive. Because D1 runs every query inside an implicit transaction, user queries cannot change this during a query or migration. Instead, D1 allows you to call `PRAGMA defer_foreign_keys = on` or `off`, which allows you to violate foreign key constraints temporarily (until the end of the current transaction). Calling `PRAGMA defer_foreign_keys = off` does not disable foreign key enforcement outside of the current transaction. If you have not resolved outstanding foreign key violations at the end of your transaction, it will fail with a `FOREIGN KEY constraint failed` error. To defer foreign key enforcement, set `PRAGMA defer_foreign_keys = on` at the start of your transaction, or ahead of changes that would violate constraints: ```sql -- Defer foreign key enforcement in this transaction. PRAGMA defer_foreign_keys = on -- Run your CREATE TABLE or ALTER TABLE / COLUMN statements ALTER TABLE users ... -- This is implicit if not set by the end of the transaction. PRAGMA defer_foreign_keys = off ``` You can also explicitly set `PRAGMA defer_foreign_keys = off` immediately after you have resolved outstanding foreign key constraints. If there are still outstanding foreign key constraints, you will receive a `FOREIGN KEY constraint failed` error and will need to resolve the violation. ## Define a foreign key relationship A foreign key relationship can be defined when creating a table via `CREATE TABLE` or when adding a column to an existing table via an `ALTER TABLE` statement. To illustrate this with an example based on an e-commerce website with two tables: * A `users` table that defines common properties about a user account, including a unique `user_id` identifier. * An `orders` table that maps an order back to a `user_id` in the user table. This mapping is defined as `FOREIGN KEY`, which ensures that: * You cannot delete a row from the `users` table that would violate the foreign key constraint. This means that you cannot end up with orders that do not have a valid user to map back to. * `orders` are always defined against a valid `user_id`, mitigating the risk of creating orders that refer to invalid (or non-existent) users. ```sql CREATE TABLE users ( user_id INTEGER PRIMARY KEY, email_address TEXT, name TEXT, metadata TEXT ) CREATE TABLE orders ( order_id INTEGER PRIMARY KEY, status INTEGER, item_desc TEXT, shipped_date INTEGER, user_who_ordered INTEGER, FOREIGN KEY(user_who_ordered) REFERENCES users(user_id) ) ``` You can define multiple foreign key relationships per-table, and foreign key definitions can reference multiple tables within your overall database schema. ## Foreign key actions You can define *actions* as part of your foreign key definitions to either limit or propagate changes to a parent row (`REFERENCES table(column)`). Defining *actions* makes using foreign key constraints in your application easier to reason about, and help either clean up related data or prevent data from being islanded. There are five actions you can set when defining the `ON UPDATE` and/or `ON DELETE` clauses as part of a foreign key relationship. You can also define different actions for `ON UPDATE` and `ON DELETE` depending on your requirements. * `CASCADE` - Updating or deleting a parent key deletes all child keys (rows) associated to it. * `RESTRICT` - A parent key cannot be updated or deleted when *any* child key refers to it. Unlike the default foreign key enforcement, relationships with `RESTRICT` applied return errors immediately, and not at the end of the transaction. * `SET DEFAULT` - Set the child column(s) referred to by the foreign key definition to the `DEFAULT` value defined in the schema. If no `DEFAULT` is set on the child columns, you cannot use this action. * `SET NULL` - Set the child column(s) referred to by the foreign key definition to SQL `NULL`. * `NO ACTION` - Take no action. CASCADE usage Although `CASCADE` can be the desired behavior in some cases, deleting child rows across tables can have undesirable effects and/or result in unintended side effects for your users. In the following example, deleting a user from the `users` table will delete all related rows in the `scores` table as you have defined `ON DELETE CASCADE`. Delete all related rows in the `scores` table if you do not want to retain the scores for any users you have deleted entirely. This might mean that *other* users can no longer look up or refer to scores that were still valid. ```sql CREATE TABLE users ( user_id INTEGER PRIMARY KEY, email_address TEXT, ) CREATE TABLE scores ( score_id INTEGER PRIMARY KEY, game TEXT, score INTEGER, player_id INTEGER, FOREIGN KEY(player_id) REFERENCES users(user_id) ON DELETE CASCADE ) ``` ## Next Steps * Read the SQLite [`FOREIGN KEY`](https://www.sqlite.org/foreignkeys.html) documentation. * Learn how to [use the D1 Workers Binding API](https://developers.cloudflare.com/d1/worker-api/) from within a Worker. * Understand how [database migrations work](https://developers.cloudflare.com/d1/reference/migrations/) with D1. --- title: Query JSON · Cloudflare D1 docs description: "D1 has built-in support for querying and parsing JSON data stored within a database. This enables you to:" lastUpdated: 2024-12-11T09:43:45.000Z chatbotDeprioritize: false source_url: html: https://developers.cloudflare.com/d1/sql-api/query-json/ md: https://developers.cloudflare.com/d1/sql-api/query-json/index.md --- D1 has built-in support for querying and parsing JSON data stored within a database. This enables you to: * [Query paths](#extract-values) within a stored JSON object - for example, extracting the value of named key or array index directly, which is especially useful with larger JSON objects. * Insert and/or replace values within an object or array. * [Expand the contents of a JSON object](#expand-arrays-for-in-queries) or array into multiple rows - for example, for use as part of a `WHERE ... IN` predicate. * Create [generated columns](https://developers.cloudflare.com/d1/reference/generated-columns/) that are automatically populated with values from JSON objects you insert. One of the biggest benefits to parsing JSON within D1 directly is that it can directly reduce the number of round-trips (queries) to your database. It reduces the cases where you have to read a JSON object into your application (1), parse it, and then write it back (2). This allows you to more precisely query over data and reduce the result set your application needs to additionally parse and filter on. ## Types JSON data is stored as a `TEXT` column in D1. JSON types follow the same [type conversion rules](https://developers.cloudflare.com/d1/worker-api/#type-conversion) as D1 in general, including: * A JSON null is treated as a D1 `NULL`. * A JSON number is treated as an `INTEGER` or `REAL`. * Booleans are treated as `INTEGER` values: `true` as `1` and `false` as `0`. * Object and array values as `TEXT`. ## Supported functions The following table outlines the JSON functions built into D1 and example usage. * The `json` argument placeholder can be a JSON object, array, string, number or a null value. * The `value` argument accepts string literals (only) and treats input as a string, even if it is well-formed JSON. The exception to this rule is when nesting `json_*` functions: the outer (wrapping) function will interpret the inner (wrapped) functions return value as JSON. * The `path` argument accepts path-style traversal syntax - for example, `$` to refer to the top-level object/array, `$.key1.key2` to refer to a nested object, and `$.key[2]` to index into an array. | Function | Description | Example | | - | - | - | | `json(json)` | Validates the provided string is JSON and returns a minified version of that JSON object. | `json('{"hello":["world" ,"there"] }')` returns `{"hello":["world","there"]}` | | `json_array(value1, value2, value3, ...)` | Return a JSON array from the values. | `json_array(1, 2, 3)` returns `[1, 2, 3]` | | `json_array_length(json)` - `json_array_length(json, path)` | Return the length of the JSON array | `json_array_length('{"data":["x", "y", "z"]}', '$.data')` returns `3` | | `json_extract(json, path)` | Extract the value(s) at the given path using `$.path.to.value` syntax. | `json_extract('{"temp":"78.3", "sunset":"20:44"}', '$.temp')` returns `"78.3"` | | `json -> path` | Extract the value(s) at the given path using path syntax and return it as JSON. | | | `json ->> path` | Extract the value(s) at the given path using path syntax and return it as a SQL type. | | | `json_insert(json, path, value)` | Insert a value at the given path. Does not overwrite an existing value. | | | `json_object(label1, value1, ...)` | Accepts pairs of (keys, values) and returns a JSON object. | `json_object('temp', 45, 'wind_speed_mph', 13)` returns `{"temp":45,"wind_speed_mph":13}` | | `json_patch(target, patch)` | Uses a JSON [MergePatch](https://tools.ietf.org/html/rfc7396) approach to merge the provided patch into the target JSON object. | | | `json_remove(json, path, ...)` | Remove the key and value at the specified path. | `json_remove('[60,70,80,90]', '$[0]')` returns `70,80,90]` | | `json_replace(json, path, value)` | Insert a value at the given path. Overwrites an existing value, but does not create a new key if it doesn't exist. | | | `json_set(json, path, value)` | Insert a value at the given path. Overwrites an existing value. | | | `json_type(json)` - `json_type(json, path)` | Return the type of the provided value or value at the specified path. Returns one of `null`, `true`, `false`, `integer`, `real`, `text`, `array`, or `object`. | `json_type('{"temperatures":[73.6, 77.8, 80.2]}', '$.temperatures')` returns `array` | | `json_valid(json)` | Returns 0 (false) for invalid JSON, and 1 (true) for valid JSON. | `json_valid({invalid:json})`returns`0\` | | `json_quote(value)` | Converts the provided SQL value into its JSON representation. | `json_quote('[1, 2, 3]')` returns `[1,2,3]` | | `json_group_array(value)` | Returns the provided value(s) as a JSON array. | | | `json_each(value)` - `json_each(value, path)` | Returns each element within the object as an individual row. It will only traverse the top-level object. | | | `json_tree(value)` - `json_tree(value, path)` | Returns each element within the object as an individual row. It traverses the full object. | | The SQLite [JSON extension](https://www.sqlite.org/json1.html), on which D1 builds on, has additional usage examples. ## Error Handling JSON functions will return a `malformed JSON` error when operating over data that isn't JSON and/or is not valid JSON. D1 considers valid JSON to be [RFC 7159](https://www.rfc-editor.org/rfc/rfc7159.txt) conformant. In the following example, calling `json_extract` over a string (not valid JSON) will cause the query to return a `malformed JSON` error: ```sql SELECT json_extract('not valid JSON: just a string', '$') ``` This will return an error: ```txt ERROR 9015: SQL engine error: query error: Error code 1: SQL error or missing database (malformed JSON)` ``` ## Generated columns D1's support for [generated columns](https://developers.cloudflare.com/d1/reference/generated-columns/) allows you to create dynamic columns that are generated based on the values of other columns, including extracted or calculated values of JSON data. These columns can be queried like any other column, and can have [indexes](https://developers.cloudflare.com/d1/best-practices/use-indexes/) defined on them. If you have JSON data that you frequently query and filter over, creating a generated column and an index can dramatically improve query performance. For example, to define a column based on a value within a larger JSON object, use the `AS` keyword combined with a [JSON function](#supported-functions) to generate a typed column: ```sql CREATE TABLE some_table ( -- other columns omitted raw_data TEXT -- JSON: {"measurement":{"aqi":[21,42,58],"wind_mph":"13","location":"US-NY"}} location AS (json_extract(raw_data, '$.measurement.location')) STORED ) ``` Refer to [Generated columns](https://developers.cloudflare.com/d1/reference/generated-columns/) to learn more about how to generate columns. ## Example usage ### Extract values There are three ways to extract a value from a JSON object in D1: * The `json_extract()` function - for example, `json_extract(text_column_containing_json, '$.path.to.value)`. * The `->` operator, which returns a JSON representation of the value. * The `->>` operator, which returns an SQL representation of the value. The `->` and `->>` operators functions both operate similarly to the same operators in PostgreSQL and MySQL/MariaDB. Given the following JSON object in a column named `sensor_reading`, you can extract values from it directly. ```json { "measurement": { "temp_f": "77.4", "aqi": [21, 42, 58], "o3": [18, 500], "wind_mph": "13", "location": "US-NY" } } ``` ```sql -- Extract the temperature value json_extract(sensor_reading, '$.measurement.temp_f')-- returns "77.4" as TEXT ``` ```sql -- Extract the maximum PM2.5 air quality reading sensor_reading -> '$.measurement.aqi[3]' -- returns 58 as a JSON number ``` ```sql -- Extract the o3 (ozone) array in full sensor_reading -\-> '$.measurement.o3' -- returns '[18, 500]' as TEXT ``` ### Get the length of an array You can get the length of a JSON array in two ways: 1. By calling `json_array_length(value)` directly 2. By calling `json_array_length(value, path)` to specify the path to an array within an object or outer array. For example, given the following JSON object stored in a column called `login_history`, you could get a count of the last logins directly: ```json { "user_id": "abc12345", "previous_logins": ["2023-03-31T21:07:14-05:00", "2023-03-28T08:21:02-05:00", "2023-03-28T05:52:11-05:00"] } ``` ```sql json_array_length(login_history, '$.previous_logins') --> returns 3 as an INTEGER ``` You can also use `json_array_length` as a predicate in a more complex query - for example, `WHERE json_array_length(some_column, '$.path.to.value') >= 5`. ### Insert a value into an existing object You can insert a value into an existing JSON object or array using `json_insert()`. For example, if you have a `TEXT` column called `login_history` in a `users` table containing the following object: ```json {"history": ["2023-05-13T15:13:02+00:00", "2023-05-14T07:11:22+00:00", "2023-05-15T15:03:51+00:00"]} ``` To add a new timestamp to the `history` array within our `login_history` column, write a query resembling the following: ```sql UPDATE users SET login_history = json_insert(login_history, '$.history[#]', '2023-05-15T20:33:06+00:00') WHERE user_id = 'aba0e360-1e04-41b3-91a0-1f2263e1e0fb' ``` Provide three arguments to `json_insert`: 1. The name of our column containing the JSON you want to modify. 2. The path to the key within the object to modify. 3. The JSON value to insert. Using `[#]` tells `json_insert` to append to the end of your array. To replace an existing value, use `json_replace()`, which will overwrite an existing key-value pair if one already exists. To set a value regardless of whether it already exists, use `json_set()`. ### Expand arrays for IN queries Use `json_each` to expand an array into multiple rows. This can be useful when composing a `WHERE column IN (?)` query over several values. For example, if you wanted to update a list of users by their integer `id`, use `json_each` to return a table with each value as a column called `value`: ```sql UPDATE users SET last_audited = '2023-05-16T11:24:08+00:00' WHERE id IN (SELECT value FROM json_each('[183183, 13913, 94944]')) ``` This would extract only the `value` column from the table returned by `json_each`, with each row representing the user IDs you passed in as an array. `json_each` effectively returns a table with multiple columns, with the most relevant being: * `key` - the key (or index). * `value` - the literal value of each element parsed by `json_each`. * `type` - the type of the value: one of `null`, `true`, `false`, `integer`, `real`, `text`, `array`, or `object`. * `fullkey` - the full path to the element: e.g. `$[1]` for the second element in an array, or `$.path.to.key` for a nested object. * `path` - the top-level path - `$` as the path for an element with a `fullkey` of `$[0]`. In this example, `SELECT * FROM json_each('[183183, 13913, 94944]')` would return a table resembling the below: ```sql key|value|type|id|fullkey|path 0|183183|integer|1|$[0]|$ 1|13913|integer|2|$[1]|$ 2|94944|integer|3|$[2]|$ ``` You can use `json_each` with [D1 Workers Binding API](https://developers.cloudflare.com/d1/worker-api/) in a Worker by creating a statement and using `JSON.stringify` to pass an array as a [bound parameter](https://developers.cloudflare.com/d1/worker-api/d1-database/#guidance): ```ts const stmt = context.env.DB .prepare("UPDATE users SET last_audited = ? WHERE id IN (SELECT value FROM json_each(?1))") const resp = await stmt.bind( "2023-05-16T11:24:08+00:00", JSON.stringify([183183, 13913, 94944]) ).run() ``` This would only update rows in your `users` table where the `id` matches one of the three provided. --- title: SQL statements · Cloudflare D1 docs description: D1 is compatible with most SQLite's SQL convention since it leverages SQLite's query engine. D1 supports a number of database-level statements that allow you to list tables, indexes, and inspect the schema for a given table or index. lastUpdated: 2025-05-06T09:04:36.000Z chatbotDeprioritize: false source_url: html: https://developers.cloudflare.com/d1/sql-api/sql-statements/ md: https://developers.cloudflare.com/d1/sql-api/sql-statements/index.md --- D1 is compatible with most SQLite's SQL convention since it leverages SQLite's query engine. D1 supports a number of database-level statements that allow you to list tables, indexes, and inspect the schema for a given table or index. You can execute any of these statements via the D1 console in the Cloudflare dashboard, [`wrangler d1 execute`](https://developers.cloudflare.com/workers/wrangler/commands/#d1), or with the [D1 Worker Bindings API](https://developers.cloudflare.com/d1/worker-api/d1-database). ## Supported SQLite extensions D1 supports a subset of SQLite extensions for added functionality, including: * Default SQLite extensions. * [FTS5 module](https://www.sqlite.org/fts5.html) for full-text search. ## Compatible PRAGMA statements D1 supports some [SQLite PRAGMA](https://www.sqlite.org/pragma.html) statements. The PRAGMA statement is an SQL extension for SQLite. PRAGMA commands can be used to: * Modify the behavior of certain SQLite operations. * Query the SQLite library for internal data about schemas or tables (but note that PRAGMA statements cannot query the contents of a table). * Control [environmental variables](https://developers.cloudflare.com/workers/configuration/environment-variables/). The PRAGMA statement examples on this page use the following SQL. ```sql PRAGMA foreign_keys=off; DROP TABLE IF EXISTS "Employee"; DROP TABLE IF EXISTS "Category"; DROP TABLE IF EXISTS "Customer"; DROP TABLE IF EXISTS "Shipper"; DROP TABLE IF EXISTS "Supplier"; DROP TABLE IF EXISTS "Order"; DROP TABLE IF EXISTS "Product"; DROP TABLE IF EXISTS "OrderDetail"; DROP TABLE IF EXISTS "CustomerCustomerDemo"; DROP TABLE IF EXISTS "CustomerDemographic"; DROP TABLE IF EXISTS "Region"; DROP TABLE IF EXISTS "Territory"; DROP TABLE IF EXISTS "EmployeeTerritory"; DROP VIEW IF EXISTS [ProductDetails_V]; CREATE TABLE IF NOT EXISTS "Employee" ( "Id" INTEGER PRIMARY KEY, "LastName" VARCHAR(8000) NULL, "FirstName" VARCHAR(8000) NULL, "Title" VARCHAR(8000) NULL, "TitleOfCourtesy" VARCHAR(8000) NULL, "BirthDate" VARCHAR(8000) NULL, "HireDate" VARCHAR(8000) NULL, "Address" VARCHAR(8000) NULL, "City" VARCHAR(8000) NULL, "Region" VARCHAR(8000) NULL, "PostalCode" VARCHAR(8000) NULL, "Country" VARCHAR(8000) NULL, "HomePhone" VARCHAR(8000) NULL, "Extension" VARCHAR(8000) NULL, "Photo" BLOB NULL, "Notes" VARCHAR(8000) NULL, "ReportsTo" INTEGER NULL, "PhotoPath" VARCHAR(8000) NULL); CREATE TABLE IF NOT EXISTS "Category" ( "Id" INTEGER PRIMARY KEY, "CategoryName" VARCHAR(8000) NULL, "Description" VARCHAR(8000) NULL); CREATE TABLE IF NOT EXISTS "Customer" ( "Id" VARCHAR(8000) PRIMARY KEY, "CompanyName" VARCHAR(8000) NULL, "ContactName" VARCHAR(8000) NULL, "ContactTitle" VARCHAR(8000) NULL, "Address" VARCHAR(8000) NULL, "City" VARCHAR(8000) NULL, "Region" VARCHAR(8000) NULL, "PostalCode" VARCHAR(8000) NULL, "Country" VARCHAR(8000) NULL, "Phone" VARCHAR(8000) NULL, "Fax" VARCHAR(8000) NULL); CREATE TABLE IF NOT EXISTS "Shipper" ( "Id" INTEGER PRIMARY KEY, "CompanyName" VARCHAR(8000) NULL, "Phone" VARCHAR(8000) NULL); CREATE TABLE IF NOT EXISTS "Supplier" ( "Id" INTEGER PRIMARY KEY, "CompanyName" VARCHAR(8000) NULL, "ContactName" VARCHAR(8000) NULL, "ContactTitle" VARCHAR(8000) NULL, "Address" VARCHAR(8000) NULL, "City" VARCHAR(8000) NULL, "Region" VARCHAR(8000) NULL, "PostalCode" VARCHAR(8000) NULL, "Country" VARCHAR(8000) NULL, "Phone" VARCHAR(8000) NULL, "Fax" VARCHAR(8000) NULL, "HomePage" VARCHAR(8000) NULL); CREATE TABLE IF NOT EXISTS "Order" ( "Id" INTEGER PRIMARY KEY, "CustomerId" VARCHAR(8000) NULL, "EmployeeId" INTEGER NOT NULL, "OrderDate" VARCHAR(8000) NULL, "RequiredDate" VARCHAR(8000) NULL, "ShippedDate" VARCHAR(8000) NULL, "ShipVia" INTEGER NULL, "Freight" DECIMAL NOT NULL, "ShipName" VARCHAR(8000) NULL, "ShipAddress" VARCHAR(8000) NULL, "ShipCity" VARCHAR(8000) NULL, "ShipRegion" VARCHAR(8000) NULL, "ShipPostalCode" VARCHAR(8000) NULL, "ShipCountry" VARCHAR(8000) NULL); CREATE TABLE IF NOT EXISTS "Product" ( "Id" INTEGER PRIMARY KEY, "ProductName" VARCHAR(8000) NULL, "SupplierId" INTEGER NOT NULL, "CategoryId" INTEGER NOT NULL, "QuantityPerUnit" VARCHAR(8000) NULL, "UnitPrice" DECIMAL NOT NULL, "UnitsInStock" INTEGER NOT NULL, "UnitsOnOrder" INTEGER NOT NULL, "ReorderLevel" INTEGER NOT NULL, "Discontinued" INTEGER NOT NULL); CREATE TABLE IF NOT EXISTS "OrderDetail" ( "Id" VARCHAR(8000) PRIMARY KEY, "OrderId" INTEGER NOT NULL, "ProductId" INTEGER NOT NULL, "UnitPrice" DECIMAL NOT NULL, "Quantity" INTEGER NOT NULL, "Discount" DOUBLE NOT NULL); CREATE TABLE IF NOT EXISTS "CustomerCustomerDemo" ( "Id" VARCHAR(8000) PRIMARY KEY, "CustomerTypeId" VARCHAR(8000) NULL); CREATE TABLE IF NOT EXISTS "CustomerDemographic" ( "Id" VARCHAR(8000) PRIMARY KEY, "CustomerDesc" VARCHAR(8000) NULL); CREATE TABLE IF NOT EXISTS "Region" ( "Id" INTEGER PRIMARY KEY, "RegionDescription" VARCHAR(8000) NULL); CREATE TABLE IF NOT EXISTS "Territory" ( "Id" VARCHAR(8000) PRIMARY KEY, "TerritoryDescription" VARCHAR(8000) NULL, "RegionId" INTEGER NOT NULL); CREATE TABLE IF NOT EXISTS "EmployeeTerritory" ( "Id" VARCHAR(8000) PRIMARY KEY, "EmployeeId" INTEGER NOT NULL, "TerritoryId" VARCHAR(8000) NULL); CREATE VIEW [ProductDetails_V] as select p.*, c.CategoryName, c.Description as [CategoryDescription], s.CompanyName as [SupplierName], s.Region as [SupplierRegion] from [Product] p join [Category] c on p.CategoryId = c.id join [Supplier] s on s.id = p.SupplierId; ``` Warning D1 PRAGMA statements only apply to the current transaction. ### `PRAGMA table_list` Lists the tables and views in the database. This includes the system tables maintained by D1. #### Return values One row per each table. Each row contains: 1. `Schema`: the schema in which the table appears (for example, `main` or `temp`) 2. `name`: the name of the table 3. `type`: the type of the object (one of `table`, `view`, `shadow`, `virtual`) 4. `ncol`: the number of columns in the table, including generated or hidden columns 5. `wr`: `1` if the table is a WITHOUT ROWID table, `0` otherwise 6. `strict`: `1` if the table is a STRICT table, `0` otherwise Example of `PRAGMA table_list` ```sh npx wrangler d1 execute [DATABASE_NAME] --command='PRAGMA table_list' ``` ```sh 🌀 Executing on remote database [DATABASE_NAME] (DATABASE_ID): 🌀 To execute on your local development database, remove the --remote flag from your wrangler command. 🚣 Executed 1 commands in 0.5874ms ┌────────┬──────────────────────┬───────┬──────┬────┬────────┐ │ schema │ name │ type │ ncol │ wr │ strict │ ├────────┼──────────────────────┼───────┼──────┼────┼────────┤ │ main │ Territory │ table │ 3 │ 0 │ 0 │ ├────────┼──────────────────────┼───────┼──────┼────┼────────┤ │ main │ CustomerDemographic │ table │ 2 │ 0 │ 0 │ ├────────┼──────────────────────┼───────┼──────┼────┼────────┤ │ main │ OrderDetail │ table │ 6 │ 0 │ 0 │ ├────────┼──────────────────────┼───────┼──────┼────┼────────┤ │ main │ sqlite_schema │ table │ 5 │ 0 │ 0 │ ├────────┼──────────────────────┼───────┼──────┼────┼────────┤ │ main │ Region │ table │ 2 │ 0 │ 0 │ ├────────┼──────────────────────┼───────┼──────┼────┼────────┤ │ main │ _cf_KV │ table │ 2 │ 1 │ 0 │ ├────────┼──────────────────────┼───────┼──────┼────┼────────┤ │ main │ ProductDetails_V │ view │ 14 │ 0 │ 0 │ ├────────┼──────────────────────┼───────┼──────┼────┼────────┤ │ main │ EmployeeTerritory │ table │ 3 │ 0 │ 0 │ ├────────┼──────────────────────┼───────┼──────┼────┼────────┤ │ main │ Employee │ table │ 18 │ 0 │ 0 │ ├────────┼──────────────────────┼───────┼──────┼────┼────────┤ │ main │ Category │ table │ 3 │ 0 │ 0 │ ├────────┼──────────────────────┼───────┼──────┼────┼────────┤ │ main │ Customer │ table │ 11 │ 0 │ 0 │ ├────────┼──────────────────────┼───────┼──────┼────┼────────┤ │ main │ Shipper │ table │ 3 │ 0 │ 0 │ ├────────┼──────────────────────┼───────┼──────┼────┼────────┤ │ main │ Supplier │ table │ 12 │ 0 │ 0 │ ├────────┼──────────────────────┼───────┼──────┼────┼────────┤ │ main │ Order │ table │ 14 │ 0 │ 0 │ ├────────┼──────────────────────┼───────┼──────┼────┼────────┤ │ main │ CustomerCustomerDemo │ table │ 2 │ 0 │ 0 │ ├────────┼──────────────────────┼───────┼──────┼────┼────────┤ │ main │ Product │ table │ 10 │ 0 │ 0 │ ├────────┼──────────────────────┼───────┼──────┼────┼────────┤ │ temp │ sqlite_temp_schema │ table │ 5 │ 0 │ 0 │ └────────┴──────────────────────┴───────┴──────┴────┴────────┘ ``` ### `PRAGMA table_info("TABLE_NAME")` Shows the schema (columns, types, null, default values) for the given `TABLE_NAME`. #### Return values One row for each column in the specified table. Each row contains: 1. `cid`: a row identifier 2. `name`: the name of the column 3. `type`: the data type (if provided), `''` otherwise 4. `notnull`: `1` if the column can be NULL, `0` otherwise 5. `dflt_value`: the default value of the column 6. `pk`: `1` if the column is a primary key, `0` otherwise Example of `PRAGMA table_info` ```sh npx wrangler d1 execute [DATABASE_NAME] --command='PRAGMA table_info("Order")' ``` ```sh 🌀 Executing on remote database [DATABASE_NAME] (DATABASE_ID): 🌀 To execute on your local development database, remove the --remote flag from your wrangler command. 🚣 Executed 1 commands in 0.8502ms ┌─────┬────────────────┬───────────────┬─────────┬────────────┬────┐ │ cid │ name │ type │ notnull │ dflt_value │ pk │ ├─────┼────────────────┼───────────────┼─────────┼────────────┼────┤ │ 0 │ Id │ INTEGER │ 0 │ │ 1 │ ├─────┼────────────────┼───────────────┼─────────┼────────────┼────┤ │ 1 │ CustomerId │ VARCHAR(8000) │ 0 │ │ 0 │ ├─────┼────────────────┼───────────────┼─────────┼────────────┼────┤ │ 2 │ EmployeeId │ INTEGER │ 1 │ │ 0 │ ├─────┼────────────────┼───────────────┼─────────┼────────────┼────┤ │ 3 │ OrderDate │ VARCHAR(8000) │ 0 │ │ 0 │ ├─────┼────────────────┼───────────────┼─────────┼────────────┼────┤ │ 4 │ RequiredDate │ VARCHAR(8000) │ 0 │ │ 0 │ ├─────┼────────────────┼───────────────┼─────────┼────────────┼────┤ │ 5 │ ShippedDate │ VARCHAR(8000) │ 0 │ │ 0 │ ├─────┼────────────────┼───────────────┼─────────┼────────────┼────┤ │ 6 │ ShipVia │ INTEGER │ 0 │ │ 0 │ ├─────┼────────────────┼───────────────┼─────────┼────────────┼────┤ │ 7 │ Freight │ DECIMAL │ 1 │ │ 0 │ ├─────┼────────────────┼───────────────┼─────────┼────────────┼────┤ │ 8 │ ShipName │ VARCHAR(8000) │ 0 │ │ 0 │ ├─────┼────────────────┼───────────────┼─────────┼────────────┼────┤ │ 9 │ ShipAddress │ VARCHAR(8000) │ 0 │ │ 0 │ ├─────┼────────────────┼───────────────┼─────────┼────────────┼────┤ │ 10 │ ShipCity │ VARCHAR(8000) │ 0 │ │ 0 │ ├─────┼────────────────┼───────────────┼─────────┼────────────┼────┤ │ 11 │ ShipRegion │ VARCHAR(8000) │ 0 │ │ 0 │ ├─────┼────────────────┼───────────────┼─────────┼────────────┼────┤ │ 12 │ ShipPostalCode │ VARCHAR(8000) │ 0 │ │ 0 │ ├─────┼────────────────┼───────────────┼─────────┼────────────┼────┤ │ 13 │ ShipCountry │ VARCHAR(8000) │ 0 │ │ 0 │ └─────┴────────────────┴───────────────┴─────────┴────────────┴────┘ ``` ### `PRAGMA table_xinfo("TABLE_NAME")` Similar to `PRAGMA table_info(TABLE_NAME)` but also includes [generated columns](https://developers.cloudflare.com/d1/reference/generated-columns/). Example of `PRAGMA table_xinfo` ```sh npx wrangler d1 execute [DATABASE_NAME] --command='PRAGMA table_xinfo("Order")' ``` ```sh 🌀 Executing on remote database [DATABASE_NAME] (DATABASE_ID): 🌀 To execute on your local development database, remove the --remote flag from your wrangler command. 🚣 Executed 1 commands in 0.3854ms ┌─────┬────────────────┬───────────────┬─────────┬────────────┬────┬────────┐ │ cid │ name │ type │ notnull │ dflt_value │ pk │ hidden │ ├─────┼────────────────┼───────────────┼─────────┼────────────┼────┼────────┤ │ 0 │ Id │ INTEGER │ 0 │ │ 1 │ 0 │ ├─────┼────────────────┼───────────────┼─────────┼────────────┼────┼────────┤ │ 1 │ CustomerId │ VARCHAR(8000) │ 0 │ │ 0 │ 0 │ ├─────┼────────────────┼───────────────┼─────────┼────────────┼────┼────────┤ │ 2 │ EmployeeId │ INTEGER │ 1 │ │ 0 │ 0 │ ├─────┼────────────────┼───────────────┼─────────┼────────────┼────┼────────┤ │ 3 │ OrderDate │ VARCHAR(8000) │ 0 │ │ 0 │ 0 │ ├─────┼────────────────┼───────────────┼─────────┼────────────┼────┼────────┤ │ 4 │ RequiredDate │ VARCHAR(8000) │ 0 │ │ 0 │ 0 │ ├─────┼────────────────┼───────────────┼─────────┼────────────┼────┼────────┤ │ 5 │ ShippedDate │ VARCHAR(8000) │ 0 │ │ 0 │ 0 │ ├─────┼────────────────┼───────────────┼─────────┼────────────┼────┼────────┤ │ 6 │ ShipVia │ INTEGER │ 0 │ │ 0 │ 0 │ ├─────┼────────────────┼───────────────┼─────────┼────────────┼────┼────────┤ │ 7 │ Freight │ DECIMAL │ 1 │ │ 0 │ 0 │ ├─────┼────────────────┼───────────────┼─────────┼────────────┼────┼────────┤ │ 8 │ ShipName │ VARCHAR(8000) │ 0 │ │ 0 │ 0 │ ├─────┼────────────────┼───────────────┼─────────┼────────────┼────┼────────┤ │ 9 │ ShipAddress │ VARCHAR(8000) │ 0 │ │ 0 │ 0 │ ├─────┼────────────────┼───────────────┼─────────┼────────────┼────┼────────┤ │ 10 │ ShipCity │ VARCHAR(8000) │ 0 │ │ 0 │ 0 │ ├─────┼────────────────┼───────────────┼─────────┼────────────┼────┼────────┤ │ 11 │ ShipRegion │ VARCHAR(8000) │ 0 │ │ 0 │ 0 │ ├─────┼────────────────┼───────────────┼─────────┼────────────┼────┼────────┤ │ 12 │ ShipPostalCode │ VARCHAR(8000) │ 0 │ │ 0 │ 0 │ ├─────┼────────────────┼───────────────┼─────────┼────────────┼────┼────────┤ │ 13 │ ShipCountry │ VARCHAR(8000) │ 0 │ │ 0 │ 0 │ └─────┴────────────────┴───────────────┴─────────┴────────────┴────┴────────┘ ``` ### `PRAGMA index_list("TABLE_NAME")` Show the indexes for the given `TABLE_NAME`. #### Return values One row for each index associated with the specified table. Each row contains: 1. `seq`: a sequence number for internal tracking 2. `name`: the name of the index 3. `unique`: `1` if the index is UNIQUE, `0` otherwise 4. `origin`: the origin of the index (`c` if created by `CREATE INDEX` statement, `u` if created by UNIQUE constraint, `pk` if created by a PRIMARY KEY constraint) 5. `partial`: `1` if the index is a partial index, `0` otherwise Example of `PRAGMA index_list` ```sh npx wrangler d1 execute [DATABASE_NAME] --command='PRAGMA index_list("Territory")' ``` ```sh 🌀 Executing on remote database d1-pragma-db (DATABASE_ID): 🌀 To execute on your local development database, remove the --remote flag from your wrangler command. 🚣 Executed 1 commands in 0.2177ms ┌─────┬──────────────────────────────┬────────┬────────┬─────────┐ │ seq │ name │ unique │ origin │ partial │ ├─────┼──────────────────────────────┼────────┼────────┼─────────┤ │ 0 │ sqlite_autoindex_Territory_1 │ 1 │ pk │ 0 │ └─────┴──────────────────────────────┴────────┴────────┴─────────┘ ``` ### `PRAGMA index_info(INDEX_NAME)` Show the indexed column(s) for the given `INDEX_NAME`. #### Return values One row for each key column in the specified index. Each row contains: 1. `seqno`: the rank of the column within the index 2. `cid`: the rank of the column within the table being indexed 3. `name`: the name of the column being indexed Example of `PRAGMA index_info` ```sh npx wrangler d1 execute [DATABASE_NAME] --command='PRAGMA index_info("sqlite_autoindex_Territory_1")' ``` ```sh 🌀 Executing on remote database d1-pragma-db (DATABASE_ID): 🌀 To execute on your local development database, remove the --remote flag from your wrangler command. 🚣 Executed 1 commands in 0.2523ms ┌───────┬─────┬──────┐ │ seqno │ cid │ name │ ├───────┼─────┼──────┤ │ 0 │ 0 │ Id │ └───────┴─────┴──────┘ ``` ### `PRAGMA index_xinfo("INDEX_NAME")` Similar to `PRAGMA index_info("TABLE_NAME")` but also includes hidden columns. Example of `PRAGMA index_xinfo` ```sh npx wrangler d1 execute [DATABASE_NAME] --command='PRAGMA index_xinfo("sqlite_autoindex_Territory_1")' ``` ```sh 🌀 Executing on remote database d1-pragma-db (DATABASE_ID): 🌀 To execute on your local development database, remove the --remote flag from your wrangler command. 🚣 Executed 1 commands in 0.6034ms ┌───────┬─────┬──────┬──────┬────────┬─────┐ │ seqno │ cid │ name │ desc │ coll │ key │ ├───────┼─────┼──────┼──────┼────────┼─────┤ │ 0 │ 0 │ Id │ 0 │ BINARY │ 1 │ ├───────┼─────┼──────┼──────┼────────┼─────┤ │ 1 │ -1 │ │ 0 │ BINARY │ 0 │ └───────┴─────┴──────┴──────┴────────┴─────┘ ``` ### `PRAGMA quick_check` Checks the formatting and consistency of the table, including: * Incorrectly formatted records * Missing pages * Sections of the database which are used multiple times, or are not used at all. #### Return values * **If there are no errors:** a single row with the value `OK` * **If there are errors:** a string which describes the issues flagged by the check Example of `PRAGMA quick_check` ```sh npx wrangler d1 execute [DATABASE_NAME] --command='PRAGMA quick_check' ``` ```sh 🌀 Executing on remote database [DATABASE_NAME] (DATABASE_ID): 🌀 To execute on your local development database, remove the --remote flag from your wrangler command. 🚣 Executed 1 commands in 1.4073ms ┌─────────────┐ │ quick_check │ ├─────────────┤ │ ok │ └─────────────┘ ``` ### `PRAGMA foreign_key_check` Checks for invalid references of foreign keys in the selected table. ### `PRAGMA foreign_key_list("TABLE_NAME")` Lists the foreign key constraints in the selected table. ### `PRAGMA case_sensitive_like = (on|off)` Toggles case sensitivity for LIKE operators. When `PRAGMA case_sensitive_like` is set to: * `ON`: 'a' LIKE 'A' is false * `OFF`: 'a' LIKE 'A' is true (this is the default behavior of the LIKE operator) ### `PRAGMA ignore_check_constraints = (on|off)` Toggles the enforcement of CHECK constraints. When `PRAGMA ignore_check_constraints` is set to: * `ON`: check constraints are ignored * `OFF`: check constraints are enforced (this is the default behavior) ### `PRAGMA legacy_alter_table = (on|off)` Toggles the ALTER TABLE RENAME command behavior before/after the legacy version of SQLite (3.24.0). When `PRAGMA legacy_alter_table` is set to: * `ON`: ALTER TABLE RENAME only rewrites the initial occurrence of the table name in its CREATE TABLE statement and any associated CREATE INDEX and CREATE TRIGGER statements. All other occurrences are unmodified. * `OFF`: ALTER TABLE RENAME rewrites all references to the table name in the schema (this is the default behavior). ### `PRAGMA recursive_triggers = (on|off)` Toggles the recursive trigger capability. When `PRAGMA recursive_triggers` is set to: * `ON`: triggers which fire can activate other triggers (a single trigger can fire multiple times over the same row) * `OFF`: triggers which fire cannot activate other triggers ### `PRAGMA reverse_unordered_selects = (on|off)` Toggles the order of the results of a SELECT statement without an ORDER BY clause. When `PRAGMA reverse_unordered_selects` is set to: * `ON`: reverses the order of results of a SELECT statement * `OFF`: returns the results of a SELECT statement in the usual order ### `PRAGMA foreign_keys = (on|off)` Toggles the foreign key constraint enforcement. When `PRAGMA foreign_keys` is set to: * `ON`: stops operations which violate foreign key constraints * `OFF`: allows operations which violate foreign key constraints ### `PRAGMA defer_foreign_keys = (on|off)` Allows you to defer the enforcement of [foreign key constraints](https://developers.cloudflare.com/d1/sql-api/foreign-keys/) until the end of the current transaction. This can be useful during [database migrations](https://developers.cloudflare.com/d1/reference/migrations/), as schema changes may temporarily violate constraints depending on the order in which they are applied. This does not disable foreign key enforcement outside of the current transaction. If you have not resolved outstanding foreign key violations at the end of your transaction, it will fail with a `FOREIGN KEY constraint failed` error. Note that setting `PRAGMA defer_foreign_keys = ON` does not prevent `ON DELETE CASCADE` actions from being executed. While foreign key constraint checks are deferred until the end of a transaction, `ON DELETE CASCADE` operations will remain active, consistent with SQLite's behavior. To defer foreign key enforcement, set `PRAGMA defer_foreign_keys = on` at the start of your transaction, or ahead of changes that would violate constraints: ```sql -- Defer foreign key enforcement in this transaction. PRAGMA defer_foreign_keys = on -- Run your CREATE TABLE or ALTER TABLE / COLUMN statements ALTER TABLE users ... -- This is implicit if not set by the end of the transaction. PRAGMA defer_foreign_keys = off ``` Refer to the [foreign key documentation](https://developers.cloudflare.com/d1/sql-api/foreign-keys/) to learn more about how to work with foreign keys. ### `PRAGMA optimize` Attempts to optimize all schemas in a database by running the `ANALYZE` command for each table, if necessary. `ANALYZE` updates an internal table which contain statistics about tables and indices. These statistics helps the query planner to execute the input query more efficiently. When `PRAGMA optimize` runs `ANALYZE`, it sets a limit to ensure the command does not take too long to execute. Alternatively, `PRAGMA optimize` may deem it unnecessary to run `ANALYZE` (for example, if the schema has not changed significantly). In this scenario, no optimizations are made. We recommend running this command after making any changes to the schema (for example, after [creating an index](https://developers.cloudflare.com/d1/best-practices/use-indexes/)). Note Currently, D1 does not support `PRAGMA optimize(-1)`. `PRAGMA optimize(-1)` is a command which displays all optimizations that would have been performed without actually executing them. Refer to [SQLite PRAGMA optimize documentation](https://www.sqlite.org/pragma.html#pragma_optimize) for more information on how `PRAGMA optimize` optimizes a database. ## Query `sqlite_master` You can also query the `sqlite_master` table to show all tables, indexes, and the original SQL used to generate them: ```sql SELECT name, sql FROM sqlite_master ``` ```json { "name": "users", "sql": "CREATE TABLE users ( user_id INTEGER PRIMARY KEY, email_address TEXT, created_at INTEGER, deleted INTEGER, settings TEXT)" }, { "name": "idx_ordered_users", "sql": "CREATE INDEX idx_ordered_users ON users(created_at DESC)" }, { "name": "Order", "sql": "CREATE TABLE \"Order\" ( \"Id\" INTEGER PRIMARY KEY, \"CustomerId\" VARCHAR(8000) NULL, \"EmployeeId\" INTEGER NOT NULL, \"OrderDate\" VARCHAR(8000) NULL, \"RequiredDate\" VARCHAR(8000) NULL, \"ShippedDate\" VARCHAR(8000) NULL, \"ShipVia\" INTEGER NULL, \"Freight\" DECIMAL NOT NULL, \"ShipName\" VARCHAR(8000) NULL, \"ShipAddress\" VARCHAR(8000) NULL, \"ShipCity\" VARCHAR(8000) NULL, \"ShipRegion\" VARCHAR(8000) NULL, \"ShipPostalCode\" VARCHAR(8000) NULL, \"ShipCountry\" VARCHAR(8000) NULL)" }, { "name": "Product", "sql": "CREATE TABLE \"Product\" ( \"Id\" INTEGER PRIMARY KEY, \"ProductName\" VARCHAR(8000) NULL, \"SupplierId\" INTEGER NOT NULL, \"CategoryId\" INTEGER NOT NULL, \"QuantityPerUnit\" VARCHAR(8000) NULL, \"UnitPrice\" DECIMAL NOT NULL, \"UnitsInStock\" INTEGER NOT NULL, \"UnitsOnOrder\" INTEGER NOT NULL, \"ReorderLevel\" INTEGER NOT NULL, \"Discontinued\" INTEGER NOT NULL)" } ``` ## Search with LIKE You can perform a search using SQL's `LIKE` operator: ```js const { results } = await env.DB.prepare( "SELECT * FROM Customers WHERE CompanyName LIKE ?", ) .bind("%eve%") .all(); console.log("results: ", results); ``` ```js results: [...] ``` ## Related resources * Learn [how to create indexes](https://developers.cloudflare.com/d1/best-practices/use-indexes/#list-indexes) in D1. * Use D1's [JSON functions](https://developers.cloudflare.com/d1/sql-api/query-json/) to query JSON data. * Use [`wrangler dev`](https://developers.cloudflare.com/workers/wrangler/commands/#dev) to run your Worker and D1 locally and debug issues before deploying. --- title: Build a Comments API · Cloudflare D1 docs description: In this tutorial, you will learn how to use D1 to add comments to a static blog site. To do this, you will construct a new D1 database, and build a JSON API that allows the creation and retrieval of comments. lastUpdated: 2025-05-16T16:37:37.000Z chatbotDeprioritize: false tags: Hono source_url: html: https://developers.cloudflare.com/d1/tutorials/build-a-comments-api/ md: https://developers.cloudflare.com/d1/tutorials/build-a-comments-api/index.md --- In this tutorial, you will learn how to use D1 to add comments to a static blog site. To do this, you will construct a new D1 database, and build a JSON API that allows the creation and retrieval of comments. ## Prerequisites Use [C3](https://developers.cloudflare.com/learning-paths/workers/get-started/c3-and-wrangler/#c3), the command-line tool for Cloudflare's developer products, to create a new directory and initialize a new Worker project: * npm ```sh npm create cloudflare@latest -- d1-example ``` * yarn ```sh yarn create cloudflare d1-example ``` * pnpm ```sh pnpm create cloudflare@latest d1-example ``` For setup, select the following options: * For *What would you like to start with?*, choose `Hello World example`. * For *Which template would you like to use?*, choose `Worker only`. * For *Which language do you want to use?*, choose `JavaScript`. * For *Do you want to use git for version control?*, choose `Yes`. * For *Do you want to deploy your application?*, choose `No` (we will be making some changes before deploying). To start developing your Worker, `cd` into your new project directory: ```sh cd d1-example ``` ## Video Tutorial ## 1. Install Hono In this tutorial, you will use [Hono](https://github.com/honojs/hono), an Express.js-style framework, to build your API. To use Hono in this project, install it using `npm`: * npm ```sh npm i hono ``` * yarn ```sh yarn add hono ``` * pnpm ```sh pnpm add hono ``` ## 2. Initialize your Hono application In `src/worker.js`, initialize a new Hono application, and define the following endpoints: * `GET /api/posts/:slug/comments`. * `POST /api/posts/:slug/comments`. ```js import { Hono } from "hono"; const app = new Hono(); app.get("/api/posts/:slug/comments", async (c) => { // Do something and return an HTTP response // Optionally, do something with `c.req.param("slug")` }); app.post("/api/posts/:slug/comments", async (c) => { // Do something and return an HTTP response // Optionally, do something with `c.req.param("slug")` }); export default app; ``` ## 3. Create a database You will now create a D1 database. In Wrangler, there is support for the `wrangler d1` subcommand, which allows you to create and query your D1 databases directly from the command line. Create a new database with `wrangler d1 create`: ```sh npx wrangler d1 create d1-example ``` Reference your created database in your Worker code by creating a [binding](https://developers.cloudflare.com/workers/runtime-apis/bindings/) inside of your [Wrangler configuration file](https://developers.cloudflare.com/workers/wrangler/configuration/). Bindings allow us to access Cloudflare resources, like D1 databases, KV namespaces, and R2 buckets, using a variable name in code. In the Wrangler configuration file, set up the binding `DB` and connect it to the `database_name` and `database_id`: * wrangler.jsonc ```jsonc { "d1_databases": [ { "binding": "DB", "database_name": "d1-example", "database_id": "4e1c28a9-90e4-41da-8b4b-6cf36e5abb29" } ] } ``` * wrangler.toml ```toml [[ d1_databases ]] binding = "DB" # available in your Worker on `env.DB` database_name = "d1-example" database_id = "4e1c28a9-90e4-41da-8b4b-6cf36e5abb29" ``` With your binding configured in your Wrangler file, you can interact with your database from the command line, and inside your Workers function. ## 4. Interact with D1 Interact with D1 by issuing direct SQL commands using `wrangler d1 execute`: ```sh npx wrangler d1 execute d1-example --remote --command "SELECT name FROM sqlite_schema WHERE type ='table'" ``` ```sh Executing on d1-example: ┌───────┐ │ name │ ├───────┤ │ d1_kv │ └───────┘ ``` You can also pass a SQL file - perfect for initial data seeding in a single command. Create `schemas/schema.sql`, which will create a new `comments` table for your project: ```sql DROP TABLE IF EXISTS comments; CREATE TABLE IF NOT EXISTS comments ( id integer PRIMARY KEY AUTOINCREMENT, author text NOT NULL, body text NOT NULL, post_slug text NOT NULL ); CREATE INDEX idx_comments_post_slug ON comments (post_slug); -- Optionally, uncomment the below query to create data -- INSERT INTO COMMENTS (author, body, post_slug) VALUES ('Kristian', 'Great post!', 'hello-world'); ``` With the file created, execute the schema file against the D1 database by passing it with the flag `--file`: ```sh npx wrangler d1 execute d1-example --remote --file schemas/schema.sql ``` ## 5. Execute SQL In earlier steps, you created a SQL database and populated it with initial data. Now, you will add a route to your Workers function to retrieve data from that database. Based on your Wrangler configuration in previous steps, your D1 database is now accessible via the `DB` binding. In your code, use the binding to prepare SQL statements and execute them, for example, to retrieve comments: ```js app.get("/api/posts/:slug/comments", async (c) => { const { slug } = c.req.param(); const { results } = await c.env.DB.prepare( ` select * from comments where post_slug = ? `, ) .bind(slug) .all(); return c.json(results); }); ``` The above code makes use of the `prepare`, `bind`, and `all` functions on a D1 binding to prepare and execute a SQL statement. Refer to [D1 Workers Binding API](https://developers.cloudflare.com/d1/worker-api/) for a list of all methods available. In this function, you accept a `slug` URL query parameter and set up a new SQL statement where you select all comments with a matching `post_slug` value to your query parameter. You can then return it as a JSON response. ## 6. Insert data The previous steps grant read-only access to your data. To create new comments by inserting data into the database, define another endpoint in `src/worker.js`: ```js app.post("/api/posts/:slug/comments", async (c) => { const { slug } = c.req.param(); const { author, body } = await c.req.json(); if (!author) return c.text("Missing author value for new comment"); if (!body) return c.text("Missing body value for new comment"); const { success } = await c.env.DB.prepare( ` insert into comments (author, body, post_slug) values (?, ?, ?) `, ) .bind(author, body, slug) .run(); if (success) { c.status(201); return c.text("Created"); } else { c.status(500); return c.text("Something went wrong"); } }); ``` ## 7. Deploy your Hono application With your application ready for deployment, use Wrangler to build and deploy your project to the Cloudflare network. Begin by running `wrangler whoami` to confirm that you are logged in to your Cloudflare account. If you are not logged in, Wrangler will prompt you to login, creating an API key that you can use to make authenticated requests automatically from your local machine. After you have logged in, confirm that your Wrangler file is configured similarly to what is seen below. You can change the `name` field to a project name of your choice: * wrangler.jsonc ```jsonc { "name": "d1-example", "main": "src/worker.js", "compatibility_date": "2022-07-15", "d1_databases": [ { "binding": "DB", "database_name": "", "database_id": "" } ] } ``` * wrangler.toml ```toml name = "d1-example" main = "src/worker.js" compatibility_date = "2022-07-15" [[ d1_databases ]] binding = "DB" # available in your Worker on env.DB database_name = "" database_id = "" ``` Now, run `npx wrangler deploy` to deploy your project to Cloudflare. ```sh npx wrangler deploy ``` When it has successfully deployed, test the API by making a `GET` request to retrieve comments for an associated post. Since you have no posts yet, this response will be empty, but it will still make a request to the D1 database regardless, which you can use to confirm that the application has deployed correctly: ```sh # Note: Your workers.dev deployment URL may be different curl https://d1-example.signalnerve.workers.dev/api/posts/hello-world/comments [ { "id": 1, "author": "Kristian", "body": "Hello from the comments section!", "post_slug": "hello-world" } ] ``` ## 8. Test with an optional frontend This application is an API back-end, best served for use with a front-end UI for creating and viewing comments. To test this back-end with a prebuild front-end UI, refer to the example UI in the [example-frontend directory](https://github.com/cloudflare/workers-sdk/tree/main/templates/worker-d1-api/example-frontend). Notably, the [`loadComments` and `submitComment` functions](https://github.com/cloudflare/workers-sdk/tree/main/templates/worker-d1-api/example-frontend/src/views/PostView.vue#L57-L82) make requests to a deployed version of this site, meaning you can take the frontend and replace the URL with your deployed version of the codebase in this tutorial to use your own data. Interacting with this API from a front-end will require enabling specific Cross-Origin Resource Sharing (or *CORS*) headers in your back-end API. Hono allows you to enable Cross-Origin Resource Sharing for your application. Import the `cors` module and add it as middleware to your API in `src/worker.js`: ```typescript import { Hono } from "hono"; import { cors } from "hono/cors"; const app = new Hono(); app.use("/api/*", cors()); ``` Now, when you make requests to `/api/*`, Hono will automatically generate and add CORS headers to responses from your API, allowing front-end UIs to interact with it without erroring. ## Conclusion In this example, you built a comments API for powering a blog. To see the full source for this D1-powered comments API, you can visit [cloudflare/workers-sdk/templates/worker-d1-api](https://github.com/cloudflare/workers-sdk/tree/main/templates/worker-d1-api). --- title: Build a Staff Directory Application · Cloudflare D1 docs description: Build a staff directory using D1. Users access employee info; admins add new employees within the app. lastUpdated: 2025-07-11T16:03:39.000Z chatbotDeprioritize: false tags: Hono source_url: html: https://developers.cloudflare.com/d1/tutorials/build-a-staff-directory-app/ md: https://developers.cloudflare.com/d1/tutorials/build-a-staff-directory-app/index.md --- In this tutorial, you will learn how to use D1 to build a staff directory. This application will allow users to access information about an organization's employees and give admins the ability to add new employees directly within the app. To do this, you will first need to set up a [D1 database](https://developers.cloudflare.com/d1/get-started/) to manage data seamlessly, then you will develop and deploy your application using the [HonoX Framework](https://github.com/honojs/honox) and [Cloudflare Pages](https://developers.cloudflare.com/pages). ## Prerequisites Before moving forward with this tutorial, make sure you have the following: * A Cloudflare account, if you do not have one, [sign up](https://dash.cloudflare.com/sign-up/workers-and-pages) before continuing. * A recent version of [npm](https://docs.npmjs.com/getting-started) installed. If you do not want to go through with the setup now, [view the completed code](https://github.com/lauragift21/staff-directory) on GitHub. ## 1. Install HonoX In this tutorial, you will use [HonoX](https://github.com/honojs/honox), a meta-framework for creating full-stack websites and Web APIs to build your application. To use HonoX in your project, run the `hono-create` command. To get started, run the following command: ```sh npm create hono@latest ``` During the setup process, you will be asked to provide a name for your project directory and to choose a template. When making your selection, choose the `x-basic` template. ## 2. Initialize your HonoX application Once your project is set up, you can see a list of generated files as below. This is a typical project structure for a HonoX application: ```plaintext . ├── app │   ├── global.d.ts // global type definitions │   ├── routes │   │   ├── _404.tsx // not found page │   │   ├── _error.tsx // error page │   │   ├── _renderer.tsx // renderer definition │   │   ├── about │   │   │   └── [name].tsx // matches `/about/:name` │   │   └── index.tsx // matches `/` │   └── server.ts // server entry file ├── package.json ├── tsconfig.json └── vite.config.ts ``` The project includes directories for app code, routes, and server setup, alongside configuration files for package management, TypeScript, and Vite. ## 3. Create a database To create a database for your project, use the Cloudflare CLI tool, [Wrangler](https://developers.cloudflare.com/workers/wrangler), which supports the `wrangler d1` command for D1 database operations. Create a new database named `staff-directory` with the following command: ```sh npx wrangler d1 create staff-directory ``` After creating your database, you will need to set up a [binding](https://developers.cloudflare.com/workers/runtime-apis/bindings/) in the [Wrangler configuration file](https://developers.cloudflare.com/workers/wrangler/configuration/) to integrate your database with your application. This binding enables your application to interact with Cloudflare resources such as D1 databases, KV namespaces, and R2 buckets. To configure this, create a Wrangler file in your project's root directory and input the basic setup information: * wrangler.jsonc ```jsonc { "name": "staff-directory", "compatibility_date": "2023-12-01" } ``` * wrangler.toml ```toml name = "staff-directory" compatibility_date = "2023-12-01" ``` Next, add the database binding details to your Wrangler file. This involves specifying a binding name (in this case, `DB`), which will be used to reference the database within your application, along with the `database_name` and `database_id` provided when you created the database: * wrangler.jsonc ```jsonc { "d1_databases": [ { "binding": "DB", "database_name": "staff-directory", "database_id": "f495af5f-dd71-4554-9974-97bdda7137b3" } ] } ``` * wrangler.toml ```toml [[d1_databases]] binding = "DB" database_name = "staff-directory" database_id = "f495af5f-dd71-4554-9974-97bdda7137b3" ``` You have now configured your application to access and interact with your D1 database, either through the command line or directly within your codebase. You will also need to make adjustments to your Vite config file in `vite.config.js`. Add the following config settings to ensure that Vite is properly set up to work with Cloudflare bindings in local environment: ```ts import adapter from "@hono/vite-dev-server/cloudflare"; export default defineConfig(({ mode }) => { if (mode === "client") { return { plugins: [client()], }; } else { return { plugins: [ honox({ devServer: { adapter, }, }), pages(), ], }; } }); ``` ## 4. Interact with D1 To interact with your D1 database, you can directly issue SQL commands using the `wrangler d1 execute` command: ```sh wrangler d1 execute staff-directory --command "SELECT name FROM sqlite_schema WHERE type ='table'" ``` The command above allows you to run queries or operations directly from the command line. For operations such as initial data seeding or batch processing, you can pass a SQL file with your commands. To do this, create a `schema.sql` file in the root directory of your project and insert your SQL queries into this file: ```sql CREATE TABLE locations ( location_id INTEGER PRIMARY KEY AUTOINCREMENT, location_name VARCHAR(255) NOT NULL ); CREATE TABLE departments ( department_id INTEGER PRIMARY KEY AUTOINCREMENT, department_name VARCHAR(255) NOT NULL ); CREATE TABLE employees ( employee_id INTEGER PRIMARY KEY AUTOINCREMENT, name VARCHAR(255) NOT NULL, position VARCHAR(255) NOT NULL, image_url VARCHAR(255) NOT NULL, join_date DATE NOT NULL, location_id INTEGER REFERENCES locations(location_id), department_id INTEGER REFERENCES departments(department_id) ); INSERT INTO locations (location_name) VALUES ('London, UK'), ('Paris, France'), ('Berlin, Germany'), ('Lagos, Nigeria'), ('Nairobi, Kenya'), ('Cairo, Egypt'), ('New York, NY'), ('San Francisco, CA'), ('Chicago, IL'); INSERT INTO departments (department_name) VALUES ('Software Engineering'), ('Product Management'), ('Information Technology (IT)'), ('Quality Assurance (QA)'), ('User Experience (UX)/User Interface (UI) Design'), ('Sales and Marketing'), ('Human Resources (HR)'), ('Customer Support'), ('Research and Development (R&D)'), ('Finance and Accounting'); ``` The above queries will create three tables: `Locations`, `Departments`, and `Employees`. To populate these tables with initial data, use the `INSERT INTO` command. After preparing your schema file with these commands, you can apply it to the D1 database. Do this by using the `--file` flag to specify the schema file for execution: ```sh wrangler d1 execute staff-directory --file=./schema.sql ``` To execute the schema locally and seed data into your local directory, pass the `--local` flag to the above command. ## 5. Create SQL statements After setting up your D1 database and configuring the Wrangler file as outlined in previous steps, your database is accessible in your code through the `DB` binding. This allows you to directly interact with the database by preparing and executing SQL statements. In the following step, you will learn how to use this binding to perform common database operations such as retrieving data and inserting new records. ### Retrieve data from database ```ts export const findAllEmployees = async (db: D1Database) => { const query = ` SELECT employees.*, locations.location_name, departments.department_name FROM employees JOIN locations ON employees.location_id = locations.location_id JOIN departments ON employees.department_id = departments.department_id `; const { results } = await db.prepare(query).all(); const employees = results; return employees; }; ``` ### Insert data into the database ```ts export const createEmployee = async (db: D1Database, employee: Employee) => { const query = ` INSERT INTO employees (name, position, join_date, image_url, department_id, location_id) VALUES (?, ?, ?, ?, ?, ?)`; const results = await db .prepare(query) .bind( employee.name, employee.position, employee.join_date, employee.image_url, employee.department_id, employee.location_id, ) .run(); const employees = results; return employees; }; ``` For a complete list of all the queries used in the application, refer to the [db.ts](https://github.com/lauragift21/staff-directory/blob/main/app/db.ts) file in the codebase. ## 6. Develop the UI The application uses `hono/jsx` for rendering. You can set up a Renderer in `app/routes/_renderer.tsx` using the JSX-rendered middleware, serving as the entry point for your application: ```ts import { jsxRenderer } from 'hono/jsx-renderer' import { Script } from 'honox/server' export default jsxRenderer(({ children, title }) => { return ( {title} ``` Create a new `public/product-details.html` file to display a single product. public/product-details.html ```html Product Details - E-commerce Store
E-commerce Store
← Back to products

Product Name

Product description goes here.

$0.00

0 in stock

Added to cart!

© 2025 E-commerce Store. All rights reserved.

``` You now have a frontend that lists products and displays a single product. However, the frontend is not yet connected to the D1 database. If you start the development server now, you will see no products. In the next steps, you will create a D1 database and create APIs to fetch products and display them on the frontend. ## Step 3: Create a D1 database and enable read replication Create a new D1 database by running the following command: ```sh npx wrangler d1 create fast-commerce ``` Add the D1 bindings returned in the terminal to the `wrangler` file: * wrangler.jsonc ```jsonc { "d1_databases": [ { "binding": "DB", "database_name": "fast-commerce", "database_id": "YOUR_DATABASE_ID" } ] } ``` * wrangler.toml ```toml [[d1_databases]] binding = "DB" database_name = "fast-commerce" database_id = "YOUR_DATABASE_ID" ``` Run the following command to update the `Env` interface in the `worker-congifuration.d.ts` file. ```sh npm run cf-typegen ``` Next, enable read replication for the D1 database. Navigate to [**Workers & Pages** > **D1**](https://dash.cloudflare.com/?to=/:account/workers/d1), then select an existing database > **Settings** > **Enable Read Replication**. ## Step 4: Create the API routes Update the `src/index.ts` file to import the Hono library and create the API routes. ```ts import { Hono } from "hono"; // Set db session bookmark in the cookie import { getCookie, setCookie } from "hono/cookie"; const app = new Hono<{ Bindings: Env }>(); // Get all products app.get("/api/products", async (c) => { return c.json({ message: "get list of products" }); }); // Get a single product app.get("/api/products/:id", async (c) => { return c.json({ message: "get a single product" }); }); // Upsert a product app.post("/api/product", async (c) => { return c.json({ message: "create or update a product" }); }); export default app; ``` The above code creates three API routes: * `GET /api/products`: Returns a list of products. * `GET /api/products/:id`: Returns a single product. * `POST /api/product`: Creates or updates a product. However, the API routes are not connected to the D1 database yet. In the next steps, you will create a products table in the D1 database, and update the API routes to connect to the D1 database. ## Step 5: Create local D1 database schema Create a products table in the D1 database by running the following command: ```sh npx wrangler d1 execute fast-commerce --command "CREATE TABLE IF NOT EXISTS products (id INTEGER PRIMARY KEY, name TEXT NOT NULL, description TEXT, price DECIMAL(10, 2) NOT NULL, inventory INTEGER NOT NULL DEFAULT 0, category TEXT NOT NULL, created_at TIMESTAMP NOT NULL DEFAULT CURRENT_TIMESTAMP, last_updated TIMESTAMP NOT NULL DEFAULT CURRENT_TIMESTAMP)" ``` Next, create an index on the products table by running the following command: ```sh npx wrangler d1 execute fast-commerce --command "CREATE INDEX IF NOT EXISTS idx_products_id ON products (id)" ``` For development purposes, you can also execute the insert statements on the local D1 database by running the following command: ```sh npx wrangler d1 execute fast-commerce --command "INSERT INTO products (id, name, description, price, inventory, category) VALUES (1, 'Fast Ergonomic Chair', 'A comfortable chair for your home or office', 100.00, 10, 'Furniture'), (2, 'Fast Organic Cotton T-shirt', 'A comfortable t-shirt for your home or office', 20.00, 100, 'Clothing'), (3, 'Fast Wooden Desk', 'A wooden desk for your home or office', 150.00, 5, 'Furniture'), (4, 'Fast Leather Sofa', 'A leather sofa for your home or office', 300.00, 3, 'Furniture'), (5, 'Fast Organic Cotton T-shirt', 'A comfortable t-shirt for your home or office', 20.00, 100, 'Clothing')" ``` ## Step 6: Add retry logic To make the application more resilient, you can add retry logic to the API routes. Create a new file called `retry.ts` in the `src` directory. ```ts export interface RetryConfig { maxRetries: number; initialDelay: number; maxDelay: number; backoffFactor: number; } const shouldRetry = (error: unknown): boolean => { const errMsg = error instanceof Error ? error.message : String(error); return ( errMsg.includes("Network connection lost") || errMsg.includes("storage caused object to be reset") || errMsg.includes("reset because its code was updated") ); }; // Helper function for sleeping const sleep = (ms: number): Promise => { return new Promise((resolve) => setTimeout(resolve, ms)); }; export const defaultRetryConfig: RetryConfig = { maxRetries: 3, initialDelay: 100, maxDelay: 1000, backoffFactor: 2, }; export async function withRetry( operation: () => Promise, config: Partial = defaultRetryConfig, ): Promise { const maxRetries = config.maxRetries ?? defaultRetryConfig.maxRetries; const initialDelay = config.initialDelay ?? defaultRetryConfig.initialDelay; const maxDelay = config.maxDelay ?? defaultRetryConfig.maxDelay; const backoffFactor = config.backoffFactor ?? defaultRetryConfig.backoffFactor; let lastError: Error | unknown; let delay = initialDelay; for (let attempt = 0; attempt <= maxRetries; attempt++) { try { const result = await operation(); return result; } catch (error) { lastError = error; if (!shouldRetry(error) || attempt === maxRetries) { throw error; } // Add randomness to avoid synchronizing retries // Wait for a random delay between delay and delay*2 await sleep(delay * (1 + Math.random())); // Calculate next delay with exponential backoff delay = Math.min(delay * backoffFactor, maxDelay); } } throw lastError; } ``` The `withRetry` function is a utility function that retries a given operation with exponential backoff. It takes a configuration object as an argument, which allows you to customize the number of retries, initial delay, maximum delay, and backoff factor. It will only retry the operation if the error is due to a network connection loss, storage reset, or code update. Warning In a distrubed system, retry mechanisms can have certain risks. Read the article [Retry Strategies in Distributed Systems: Identifying and Addressing Key Pitfalls](https://www.computer.org/publications/tech-news/trends/retry-strategies-avoiding-pitfalls) to learn more about the risks of retry mechanisms and how to avoid them. Retries can sometimes lead to data inconsistency. Make sure to handle the retry logic carefully. Next, update the `src/index.ts` file to import the `withRetry` function and use it in the API routes. ```ts import { withRetry } from "./retry"; ``` ## Step 7: Update the API routes Update the API routes to connect to the D1 database. ### 1. POST /api/product ```ts app.post("/api/product", async (c) => { const product = await c.req.json(); if (!product) { return c.json({ message: "No data passed" }, 400); } const db = c.env.DB; const session = db.withSession("first-primary"); const { id } = product; try { return await withRetry(async () => { // Check if the product exists const { results } = await session .prepare("SELECT * FROM products where id = ?") .bind(id) .run(); if (results.length === 0) { const fields = [...Object.keys(product)]; const values = [...Object.values(product)]; // Insert the product await session .prepare( `INSERT INTO products (${fields.join(", ")}) VALUES (${fields.map(() => "?").join(", ")})`, ) .bind(...values) .run(); const latestBookmark = session.getBookmark(); latestBookmark && setCookie(c, "product_bookmark", latestBookmark, { maxAge: 60 * 60, // 1 hour }); return c.json({ message: "Product inserted" }); } // Update the product const updates = Object.entries(product) .filter(([_, value]) => value !== undefined) .map(([key, _]) => `${key} = ?`) .join(", "); if (!updates) { throw new Error("No valid fields to update"); } const values = Object.entries(product) .filter(([_, value]) => value !== undefined) .map(([_, value]) => value); await session .prepare(`UPDATE products SET ${updates} WHERE id = ?`) .bind(...[...values, id]) .run(); const latestBookmark = session.getBookmark(); latestBookmark && setCookie(c, "product_bookmark", latestBookmark, { maxAge: 60 * 60, // 1 hour }); return c.json({ message: "Product updated" }); }); } catch (e) { console.error(e); return c.json({ message: "Error upserting product" }, 500); } }); ``` In the above code: * You get the product data from the request body. * You then check if the product exists in the database. * If it does, you update the product. * If it doesn't, you insert the product. * You then set the bookmark in the cookie. * Finally, you return the response. Since you want to start the session with the latest data, you use the `first-primary` constraint. Even if you use the `first-unconstrained` constraint or pass a bookmark, the write request will always be routed to the primary database. The bookmark set in the cookie can be used to guarantee that a new session reads a database version that is at least as up-to-date as the provided bookmark. If you are using an external platform to manage your products, you can connect this API to the external platform, such that, when a product is created or updated in the external platform, the D1 database automatically updates the product details. ### 2. GET /api/products ```ts app.get("/api/products", async (c) => { const db = c.env.DB; // Get bookmark from the cookie const bookmark = getCookie(c, "product_bookmark") || "first-unconstrained"; const session = db.withSession(bookmark); try { return await withRetry(async () => { const { results } = await session.prepare("SELECT * FROM products").all(); const latestBookmark = session.getBookmark(); // Set the bookmark in the cookie latestBookmark && setCookie(c, "product_bookmark", latestBookmark, { maxAge: 60 * 60, // 1 hour }); return c.json(results); }); } catch (e) { console.error(e); return c.json([]); } }); ``` In the above code: * You get the database session bookmark from the cookie. * If the bookmark is not set, you use the `first-unconstrained` constraint. * You then create a database session with the bookmark. * You fetch all the products from the database and get the latest bookmark. * You then set this bookmark in the cookie. * Finally, you return the results. ### 3. GET /api/products/:id ```ts app.get("/api/products/:id", async (c) => { const id = c.req.param("id"); if (!id) { return c.json({ message: "Invalid id" }, 400); } const db = c.env.DB; // Get bookmark from the cookie const bookmark = getCookie(c, "product_bookmark") || "first-unconstrained"; const session = db.withSession(bookmark); try { return await withRetry(async () => { const { results } = await session .prepare("SELECT * FROM products where id = ?") .bind(id) .run(); const latestBookmark = session.getBookmark(); // Set the bookmark in the cookie latestBookmark && setCookie(c, "product_bookmark", latestBookmark, { maxAge: 60 * 60, // 1 hour }); console.log(results); return c.json(results); }); } catch (e) { console.error(e); return c.json([]); } }); ``` In the above code: * You get the product ID from the request parameters. * You then create a database session with the bookmark. * You fetch the product from the database and get the latest bookmark. * You then set this bookmark in the cookie. * Finally, you return the results. ## Step 8: Test the application You have now updated the API routes to connect to the D1 database. You can now test the application by starting the development server and navigating to the frontend. ```sh npm run dev ``` Navigate to \`. You should see the products listed. Click on a product to view the product details. To insert a new product, use the following command (while the development server is running): ```sh curl -X POST http://localhost:8787/api/product \ -H "Content-Type: application/json" \ -d '{"id": 6, "name": "Fast Computer", "description": "A computer for your home or office", "price": 1000.00, "inventory": 10, "category": "Electronics"}' ``` Navigate to `http://localhost:8787/product-details?id=6`. You should see the new product. Update the product using the following command, and navigate to `http://localhost:8787/product-details?id=6` again. You will see the updated product. ```sh curl -X POST http://localhost:8787/api/product \ -H "Content-Type: application/json" \ -d '{"id": 6, "name": "Fast Computer", "description": "A computer for your home or office", "price": 1050.00, "inventory": 10, "category": "Electronics"}' ``` Note Read replication is only used when the application has been [deployed](https://developers.cloudflare.com/d1/tutorials/using-read-replication-for-e-com/#step-9-deploy-the-application). D1 does not create read replicas when you develop locally. To test it locally, you can start the development server with the `--remote` flag. ## Step 9: Deploy the application Since the database you used in the previous steps is local, you need to create the products table in the remote database. Execute the following D1 commands to create the products table in the remote database. ```sh npx wrangler d1 execute fast-commerce --remote --command "CREATE TABLE IF NOT EXISTS products (id INTEGER PRIMARY KEY, name TEXT NOT NULL, description TEXT, price DECIMAL(10, 2) NOT NULL, inventory INTEGER NOT NULL DEFAULT 0, category TEXT NOT NULL, created_at TIMESTAMP NOT NULL DEFAULT CURRENT_TIMESTAMP, last_updated TIMESTAMP NOT NULL DEFAULT CURRENT_TIMESTAMP)" ``` Next, create an index on the products table by running the following command: ```sh npx wrangler d1 execute fast-commerce --remote --command "CREATE INDEX IF NOT EXISTS idx_products_id ON products (id)" ``` Optionally, you can insert the products into the remote database by running the following command: ```sh npx wrangler d1 execute fast-commerce --remote --command "INSERT INTO products (id, name, description, price, inventory, category) VALUES (1, 'Fast Ergonomic Chair', 'A comfortable chair for your home or office', 100.00, 10, 'Furniture'), (2, 'Fast Organic Cotton T-shirt', 'A comfortable t-shirt for your home or office', 20.00, 100, 'Clothing'), (3, 'Fast Wooden Desk', 'A wooden desk for your home or office', 150.00, 5, 'Furniture'), (4, 'Fast Leather Sofa', 'A leather sofa for your home or office', 300.00, 3, 'Furniture'), (5, 'Fast Organic Cotton T-shirt', 'A comfortable t-shirt for your home or office', 20.00, 100, 'Clothing')" ``` Now, you can deploy the application with the following command: ```sh npm run deploy ``` This will deploy the application to Workers and the D1 database will be replicated to the remote regions. If a user requests the application from any region, the request will be redirected to the nearest region where the database is replicated. ## Conclusion In this tutorial, you learned how to use D1 Read Replication for your e-commerce website. You created a D1 database and enabled read replication for it. You then created an API to create and update products in the database. You also learned how to use the bookmark to get the latest data from the database. You then created the products table in the remote database and deployed the application. You can use the same approach for your existing read heavy application to reduce read latencies and improve read throughput. If you are using an external platform to manage the content, you can connect the external platform to the D1 database, so that the content is automatically updated in the database. You can find the complete code for this tutorial in the [GitHub repository](https://github.com/harshil1712/e-com-d1-hono).
--- title: D1 Database · Cloudflare D1 docs description: To interact with your D1 database from your Worker, you need to access it through the environment bindings provided to the Worker (env). lastUpdated: 2025-04-10T13:07:37.000Z chatbotDeprioritize: false source_url: html: https://developers.cloudflare.com/d1/worker-api/d1-database/ md: https://developers.cloudflare.com/d1/worker-api/d1-database/index.md --- To interact with your D1 database from your Worker, you need to access it through the environment bindings provided to the Worker (`env`). ```js async fetch(request, env) { // D1 database is 'env.DB', where "DB" is the binding name from the Wrangler configuration file. } ``` A D1 binding has the type `D1Database`, and supports a number of methods, as listed below. ## Methods ### `prepare()` Prepares a query statement to be later executed. ```js const someVariable = `Bs Beverages`; const stmt = env.DB.prepare("SELECT * FROM Customers WHERE CompanyName = ?").bind(someVariable); ``` #### Parameters * `query`: String Required * The SQL query you wish to execute on the database. #### Return values * `D1PreparedStatement`: Object * An object which only contains methods. Refer to [Prepared statement methods](https://developers.cloudflare.com/d1/worker-api/prepared-statements/). #### Guidance You can use the `bind` method to dynamically bind a value into the query statement, as shown below. * Example of a static statement without using `bind`: ```js const stmt = db .prepare("SELECT * FROM Customers WHERE CompanyName = Alfreds Futterkiste AND CustomerId = 1") ``` * Example of an ordered statement using `bind`: ```js const stmt = db .prepare("SELECT * FROM Customers WHERE CompanyName = ? AND CustomerId = ?") .bind("Alfreds Futterkiste", 1); ``` Refer to the [`bind` method documentation](https://developers.cloudflare.com/d1/worker-api/prepared-statements/#bind) for more information. ### `batch()` Sends multiple SQL statements inside a single call to the database. This can have a huge performance impact as it reduces latency from network round trips to D1. D1 operates in auto-commit. Our implementation guarantees that each statement in the list will execute and commit, sequentially, non-concurrently. Batched statements are [SQL transactions](https://www.sqlite.org/lang_transaction.html). If a statement in the sequence fails, then an error is returned for that specific statement, and it aborts or rolls back the entire sequence. To send batch statements, provide `D1Database::batch` a list of prepared statements and get the results in the same order. ```js const companyName1 = `Bs Beverages`; const companyName2 = `Around the Horn`; const stmt = env.DB.prepare(`SELECT * FROM Customers WHERE CompanyName = ?`); const batchResult = await env.DB.batch([ stmt.bind(companyName1), stmt.bind(companyName2) ]); ``` #### Parameters * `statements`: Array * An array of [`D1PreparedStatement`](#prepare)s. #### Return values * `results`: Array * An array of `D1Result` objects containing the results of the [`D1Database::prepare`](#prepare) statements. Each object is in the array position corresponding to the array position of the initial [`D1Database::prepare`](#prepare) statement within the `statements`. * Refer to [`D1Result`](https://developers.cloudflare.com/d1/worker-api/return-object/#d1result) for more information about this object. Example of return values ```js const companyName1 = `Bs Beverages`; const companyName2 = `Around the Horn`; const stmt = await env.DB.batch([ env.DB.prepare(`SELECT * FROM Customers WHERE CompanyName = ?`).bind(companyName1), env.DB.prepare(`SELECT * FROM Customers WHERE CompanyName = ?`).bind(companyName2) ]); return Response.json(stmt) ``` ```js [ { "success": true, "meta": { "served_by": "miniflare.db", "duration": 0, "changes": 0, "last_row_id": 0, "changed_db": false, "size_after": 8192, "rows_read": 4, "rows_written": 0 }, "results": [ { "CustomerId": 11, "CompanyName": "Bs Beverages", "ContactName": "Victoria Ashworth" }, { "CustomerId": 13, "CompanyName": "Bs Beverages", "ContactName": "Random Name" } ] }, { "success": true, "meta": { "served_by": "miniflare.db", "duration": 0, "changes": 0, "last_row_id": 0, "changed_db": false, "size_after": 8192, "rows_read": 4, "rows_written": 0 }, "results": [ { "CustomerId": 4, "CompanyName": "Around the Horn", "ContactName": "Thomas Hardy" } ] } ] ``` ```js console.log(stmt[1].results); ``` ```js [ { "CustomerId": 4, "CompanyName": "Around the Horn", "ContactName": "Thomas Hardy" } ] ``` #### Guidance * You can construct batches reusing the same prepared statement: ```js const companyName1 = `Bs Beverages`; const companyName2 = `Around the Horn`; const stmt = env.DB.prepare(`SELECT * FROM Customers WHERE CompanyName = ?`); const batchResult = await env.DB.batch([ stmt.bind(companyName1), stmt.bind(companyName2) ]); return Response.json(batchResult); ``` ### `exec()` Executes one or more queries directly without prepared statements or parameter bindings. ```js const returnValue = await env.DB.exec(`SELECT * FROM Customers WHERE CompanyName = "Bs Beverages"`); ``` #### Parameters * `query`: String Required * The SQL query statement without parameter binding. #### Return values * `D1ExecResult`: Object * The `count` property contains the number of executed queries. * The `duration` property contains the duration of operation in milliseconds. * Refer to [`D1ExecResult`](https://developers.cloudflare.com/d1/worker-api/return-object/#d1execresult) for more information. Example of return values ```js const returnValue = await env.DB.exec(`SELECT * FROM Customers WHERE CompanyName = "Bs Beverages"`); return Response.json(returnValue); ``` ```js { "count": 1, "duration": 1 } ``` #### Guidance * If an error occurs, an exception is thrown with the query and error messages, execution stops and further statements are not executed. Refer to [Errors](https://developers.cloudflare.com/d1/observability/debug-d1/#errors) to learn more. * This method can have poorer performance (prepared statements can be reused in some cases) and, more importantly, is less safe. * Only use this method for maintenance and one-shot tasks (for example, migration jobs). * The input can be one or multiple queries separated by `\n`. ### `dump` Warning This API only works on databases created during D1's alpha period. Check which version your database uses with `wrangler d1 info `. Dumps the entire D1 database to an SQLite compatible file inside an ArrayBuffer. ```js const dump = await db.dump(); return new Response(dump, { status: 200, headers: { "Content-Type": "application/octet-stream", }, }); ``` #### Parameters * None. #### Return values * None. ### `withSession()` Starts a D1 session which maintains sequential consistency among queries executed on the returned `D1DatabaseSession` object. ```ts const session = env.DB.withSession(""); ``` #### Parameters * `first-primary`: StringOptional * Directs the first query in the Session (whether read or write) to the primary database instance. Use this option if you need to start the Session with the most up-to-date data from the primary database instance. * Subsequent queries in the Session may use read replicas. * Subsequent queries in the Session have sequential consistency. * `first-unconstrained`: StringOptional * Directs the first query in the Session (whether read or write) to any database instance. Use this option if you do not need to start the Session with the most up-to-date data, and wish to prioritize minimizing query latency from the very start of the Session. * Subsequent queries in the Session have sequential consistency. * This is the default behavior when no parameter is provided. * `bookmark`: StringOptional * A [`bookmark`](https://developers.cloudflare.com/d1/reference/time-travel/#bookmarks) from a previous D1 Session. This allows you to start a new Session from at least the provided `bookmark`. * Subsequent queries in the Session have sequential consistency. #### Return values * `D1DatabaseSession`: Object * An object which contains the methods [`prepare()`](https://developers.cloudflare.com/d1/worker-api/d1-database#prepare) and [`batch()`](https://developers.cloudflare.com/d1/worker-api/d1-database#batch) similar to `D1Database`, along with the additional [`getBookmark`](https://developers.cloudflare.com/d1/worker-api/d1-database#getbookmark) method. #### Guidance You can return the last encountered `bookmark` for a given Session using [`session.getBookmark()`](https://developers.cloudflare.com/d1/worker-api/d1-database/#getbookmark). ## `D1DatabaseSession` methods ### `getBookmark` Retrieves the latest `bookmark` from the D1 Session. ```ts const session = env.DB.withSession("first-primary"); const result = await session .prepare(`SELECT * FROM Customers WHERE CompanyName = 'Bs Beverages'`) .run() return { bookmark } = session.getBookmark(); ``` #### Parameters * None #### Return values * `bookmark`: String | null * A [`bookmark`](https://developers.cloudflare.com/d1/reference/time-travel/#bookmarks) which identifies the latest version of the database seen by the last query executed within the Session. * Returns `null` if no query is executed within a Session. ### `prepare()` This method is equivalent to [`D1Database::prepare`](https://developers.cloudflare.com/d1/worker-api/d1-database/#prepare). ### `batch()` This method is equivalent to [`D1Database::batch`](https://developers.cloudflare.com/d1/worker-api/d1-database/#batch). --- title: Prepared statement methods · Cloudflare D1 docs description: This chapter documents the various ways you can run and retrieve the results of a query after you have prepared your statement. lastUpdated: 2025-01-15T09:09:29.000Z chatbotDeprioritize: false source_url: html: https://developers.cloudflare.com/d1/worker-api/prepared-statements/ md: https://developers.cloudflare.com/d1/worker-api/prepared-statements/index.md --- This chapter documents the various ways you can run and retrieve the results of a query after you have [prepared your statement](https://developers.cloudflare.com/d1/worker-api/d1-database/#prepare). ## Methods ### `bind()` Binds a parameter to the prepared statement. ```js const someVariable = `Bs Beverages`; const stmt = env.DB.prepare("SELECT * FROM Customers WHERE CompanyName = ?").bind(someVariable); ``` #### Parameter * `Variable`: string * The variable to be appended into the prepared statement. See [guidance](#guidance) below. #### Return values * `D1PreparedStatement`: Object * A `D1PreparedStatement` where the input parameter has been included in the statement. #### Guidance * D1 follows the [SQLite convention](https://www.sqlite.org/lang_expr.html#varparam) for prepared statements parameter binding. Currently, D1 only supports Ordered (`?NNNN`) and Anonymous (`?`) parameters. In the future, D1 will support named parameters as well. | Syntax | Type | Description | | - | - | - | | `?NNN` | Ordered | A question mark followed by a number `NNN` holds a spot for the `NNN`-th parameter. `NNN` must be between `1` and `SQLITE_MAX_VARIABLE_NUMBER` | | `?` | Anonymous | A question mark that is not followed by a number creates a parameter with a number one greater than the largest parameter number already assigned. If this means the parameter number is greater than `SQLITE_MAX_VARIABLE_NUMBER`, it is an error. This parameter format is provided for compatibility with other database engines. But because it is easy to miscount the question marks, the use of this parameter format is discouraged. Programmers are encouraged to use one of the symbolic formats below or the `?NNN` format above instead. | To bind a parameter, use the `.bind` method. Order and anonymous examples: ```js const stmt = db.prepare("SELECT * FROM Customers WHERE CompanyName = ?").bind(""); ``` ```js const stmt = db .prepare("SELECT * FROM Customers WHERE CompanyName = ? AND CustomerId = ?") .bind("Alfreds Futterkiste", 1); ``` ```js const stmt = db .prepare("SELECT * FROM Customers WHERE CompanyName = ?2 AND CustomerId = ?1") .bind(1, "Alfreds Futterkiste"); ``` #### Static statements D1 API supports static statements. Static statements are SQL statements where the variables have been hard coded. When writing a static statement, you manually type the variable within the statement string. Note The recommended approach is to bind parameters to create a prepared statement (which are precompiled objects used by the database) to run the SQL. Prepared statements lead to faster overall execution and prevent SQL injection attacks. Example of a prepared statement with dynamically bound value: ```js const someVariable = `Bs Beverages`; const stmt = env.DB.prepare("SELECT * FROM Customers WHERE CompanyName = ?").bind(someVariable); // A variable (someVariable) will replace the placeholder '?' in the query. // `stmt` is a prepared statement. ``` Example of a static statement: ```js const stmt = env.DB.prepare("SELECT * FROM Customers WHERE CompanyName = Bs Beverages"); // "Bs Beverages" is hard-coded into the query. // `stmt` is a static statement. ``` ### `run()` Runs the prepared query (or queries) and returns results. The returned results includes metadata. ```js const returnValue = await stmt.run(); ``` #### Parameter * None. #### Return values * `D1Result`: Object * An object containing the success status, a meta object, and an array of objects containing the query results. * For more information on the object, refer to [`D1Result`](https://developers.cloudflare.com/d1/worker-api/return-object/#d1result). Example of return values ```js const someVariable = `Bs Beverages`; const stmt = env.DB.prepare("SELECT * FROM Customers WHERE CompanyName = ?").bind(someVariable); const returnValue = await stmt.run(); ``` ```js return Response.json(returnValue); ``` ```js { "success": true, "meta": { "served_by": "miniflare.db", "duration": 1, "changes": 0, "last_row_id": 0, "changed_db": false, "size_after": 8192, "rows_read": 4, "rows_written": 0 }, "results": [ { "CustomerId": 11, "CompanyName": "Bs Beverages", "ContactName": "Victoria Ashworth" }, { "CustomerId": 13, "CompanyName": "Bs Beverages", "ContactName": "Random Name" } ] } ``` #### Guidance * `results` is empty for write operations such as `UPDATE`, `DELETE`, or `INSERT`. * When using TypeScript, you can pass a [type parameter](https://developers.cloudflare.com/d1/worker-api/#typescript-support) to [`D1PreparedStatement::run`](#run) to return a typed result object. * [`D1PreparedStatement::run`](#run) is functionally equivalent to `D1PreparedStatement::all`, and can be treated as an alias. * You can choose to extract only the results you expect from the statement by simply returning the `results` property of the return object. Example of returning only the `results` ```js return Response.json(returnValue.results); ``` ```js [ { "CustomerId": 11, "CompanyName": "Bs Beverages", "ContactName": "Victoria Ashworth" }, { "CustomerId": 13, "CompanyName": "Bs Beverages", "ContactName": "Random Name" } ] ``` ### `raw()` Runs the prepared query (or queries), and returns the results as an array of arrays. The returned results do not include metadata. Column names are not included in the result set by default. To include column names as the first row of the result array, set `.raw({columnNames: true})`. ```js const returnValue = await stmt.raw(); ``` #### Parameters * `columnNames`: Object Optional * A boolean object which includes column names as the first row of the result array. #### Return values * `Array`: Array * An array of arrays. Each sub-array represents a row. Example of return values ```js const someVariable = `Bs Beverages`; const stmt = env.DB.prepare("SELECT * FROM Customers WHERE CompanyName = ?").bind(someVariable); const returnValue = await stmt.raw(); return Response.json(returnValue); ``` ```js [ [11, "Bs Beverages", "Victoria Ashworth" ], [13, "Bs Beverages", "Random Name" ] ] ``` With parameter `columnNames: true`: ```js const someVariable = `Bs Beverages`; const stmt = env.DB.prepare("SELECT * FROM Customers WHERE CompanyName = ?").bind(someVariable); const returnValue = await stmt.raw({columnNames:true}); return Response.json(returnValue) ``` ```js [ [ "CustomerId", "CompanyName", "ContactName" ], [11, "Bs Beverages", "Victoria Ashworth" ], [13, "Bs Beverages", "Random Name" ] ] ``` #### Guidance * When using TypeScript, you can pass a [type parameter](https://developers.cloudflare.com/d1/worker-api/#typescript-support) to [`D1PreparedStatement::raw`](#raw) to return a typed result array. ### `first()` Runs the prepared query (or queries), and returns the first row of the query result as an object. This does not return any metadata. Instead, it directly returns the object. ```js const values = await stmt.first(); ``` #### Parameters * `columnName`: String Optional * Specify a `columnName` to return a value from a specific column in the first row of the query result. * None. * Do not pass a parameter to obtain all columns from the first row. #### Return values * `firstRow`: Object Optional * An object containing the first row of the query result. * The return value will be further filtered to a specific attribute if `columnName` was specified. * `null`: null * If the query returns no rows. Example of return values Get all the columns from the first row: ```js const someVariable = `Bs Beverages`; const stmt = env.DB.prepare("SELECT * FROM Customers WHERE CompanyName = ?").bind(someVariable); const returnValue = await stmt.first(); return Response.json(returnValue) ``` ```js { "CustomerId": 11, "CompanyName": "Bs Beverages", "ContactName": "Victoria Ashworth" } ``` Get a specific column from the first row: ```js const someVariable = `Bs Beverages`; const stmt = env.DB.prepare("SELECT * FROM Customers WHERE CompanyName = ?").bind(someVariable); const returnValue = await stmt.first(CustomerId); return Response.json(returnValue) ``` ```js 11 ``` #### Guidance * If the query returns rows but `column` does not exist, then [`D1PreparedStatement::first`](#first) throws the `D1_ERROR` exception. * [`D1PreparedStatement::first`](#first) does not alter the SQL query. To improve performance, consider appending `LIMIT 1` to your statement. * When using TypeScript, you can pass a [type parameter](https://developers.cloudflare.com/d1/worker-api/#typescript-support) to [`D1PreparedStatement::first`](#first) to return a typed result object. --- title: Return objects · Cloudflare D1 docs description: Some D1 Worker Binding APIs return a typed object. lastUpdated: 2025-06-04T16:08:09.000Z chatbotDeprioritize: false source_url: html: https://developers.cloudflare.com/d1/worker-api/return-object/ md: https://developers.cloudflare.com/d1/worker-api/return-object/index.md --- Some D1 Worker Binding APIs return a typed object. | D1 Worker Binding API | Return object | | - | - | | [`D1PreparedStatement::run`](https://developers.cloudflare.com/d1/worker-api/prepared-statements/#run), [`D1Database::batch`](https://developers.cloudflare.com/d1/worker-api/d1-database/#batch) | `D1Result` | | [`D1Database::exec`](https://developers.cloudflare.com/d1/worker-api/d1-database/#exec) | `D1ExecResult` | ## `D1Result` The methods [`D1PreparedStatement::run`](https://developers.cloudflare.com/d1/worker-api/prepared-statements/#run) and [`D1Database::batch`](https://developers.cloudflare.com/d1/worker-api/d1-database/#batch) return a typed [`D1Result`](#d1result) object for each query statement. This object contains: * The success status * A meta object with the internal duration of the operation in milliseconds * The results (if applicable) as an array ```js { success: boolean, // true if the operation was successful, false otherwise meta: { served_by: string // the version of Cloudflare's backend Worker that returned the result served_by_region: string // the region of the database instance that executed the query served_by_primary: boolean // true if (and only if) the database instance that executed the query was the primary timings: { sql_duration_ms: number // the duration of the SQL query execution by the database instance (not including any network time) } duration: number, // the duration of the SQL query execution only, in milliseconds changes: number, // the number of changes made to the database last_row_id: number, // the last inserted row ID, only applies when the table is defined without the `WITHOUT ROWID` option changed_db: boolean, // true if something on the database was changed size_after: number, // the size of the database after the query is successfully applied rows_read: number, // the number of rows read (scanned) by this query rows_written: number // the number of rows written by this query } results: array | null, // [] if empty, or null if it does not apply } ``` ### Example ```js const someVariable = `Bs Beverages`; const stmt = env.DB.prepare("SELECT * FROM Customers WHERE CompanyName = ?").bind(someVariable); const returnValue = await stmt.run(); return Response.json(returnValue) ``` ```json { "success": true, "meta": { "served_by": "miniflare.db", "served_by_region": "WEUR", "served_by_primary": true, "timings": { "sql_duration_ms": 0.2552 }, "duration": 0.2552, "changes": 0, "last_row_id": 0, "changed_db": false, "size_after": 16384, "rows_read": 4, "rows_written": 0 }, "results": [ { "CustomerId": 11, "CompanyName": "Bs Beverages", "ContactName": "Victoria Ashworth" }, { "CustomerId": 13, "CompanyName": "Bs Beverages", "ContactName": "Random Name" } ] } ``` ## `D1ExecResult` The method [`D1Database::exec`](https://developers.cloudflare.com/d1/worker-api/d1-database/#exec) returns a typed [`D1ExecResult`](#d1execresult) object for each query statement. This object contains: * The number of executed queries * The duration of the operation in milliseconds ```js { "count": number, // the number of executed queries "duration": number // the duration of the operation, in milliseconds } ``` ### Example ```js const returnValue = await env.DB.exec(`SELECT * FROM Customers WHERE CompanyName = "Bs Beverages"`); return Response.json(returnValue); ``` ```js { "count": 1, "duration": 1 } ``` Storing large numbers Any numeric value in a column is affected by JavaScript's 52-bit precision for numbers. If you store a very large number (in `int64`), then retrieve the same value, the returned value may be less precise than your original number. --- title: Create a sitemap from Sanity CMS with Workers · Cloudflare Developer Spotlight description: In this tutorial, you will put together a Cloudflare Worker that creates and serves a sitemap using data from Sanity.io, a headless CMS. lastUpdated: 2025-05-16T16:37:37.000Z chatbotDeprioritize: false tags: CMS source_url: html: https://developers.cloudflare.com/developer-spotlight/tutorials/create-sitemap-from-sanity-cms/ md: https://developers.cloudflare.com/developer-spotlight/tutorials/create-sitemap-from-sanity-cms/index.md --- In this tutorial, you will put together a Cloudflare Worker that creates and serves a sitemap using data from [Sanity.io](https://www.sanity.io), a headless CMS. The high-level workflow of the solution you are going to build in this tutorial is the following: 1. A URL on your domain (for example, `cms.example.com/sitemap.xml`) will be routed to a Cloudflare Worker. 2. The Worker will fetch your CMS data such as slugs and last modified dates. 3. The Worker will use that data to assemble a sitemap. 4. Finally, The Worker will return the XML sitemap ready for search engines. ## Before you begin Before you start, make sure you have: * A Cloudflare account. If you do not have one, [sign up](https://dash.cloudflare.com/sign-up/workers-and-pages) before continuing. * A domain added to your Cloudflare account using a [full setup](https://developers.cloudflare.com/dns/zone-setups/full-setup/setup/), that is, using Cloudflare for your authoritative DNS nameservers. * [npm](https://docs.npmjs.com/getting-started) and [Node.js](https://nodejs.org/en/) installed on your machine. ## Create a new Worker Cloudflare Workers provides a serverless execution environment that allows you to create new applications or augment existing ones without configuring or maintaining infrastructure. While you can create Workers in the Cloudflare dashboard, it is a best practice to create them locally, where you can use version control and [Wrangler](https://developers.cloudflare.com/workers/wrangler/install-and-update/), the Workers command-line interface, to deploy them. Create a new Worker project using [C3](https://developers.cloudflare.com/pages/get-started/c3/) (`create-cloudflare` CLI): * npm ```sh npm create cloudflare@latest ``` * yarn ```sh yarn create cloudflare ``` * pnpm ```sh pnpm create cloudflare@latest ``` In this tutorial, the Worker will be named `cms-sitemap`. Select the options in the command-line interface (CLI) that work best for you, such as using JavaScript or TypeScript. The starter template you choose does not matter as this tutorial provides all the required code for you to paste in your project. Next, require the `@sanity/client` package. * npm ```sh npm i @sanity/client@latest ``` * yarn ```sh yarn add @sanity/client@latest ``` * pnpm ```sh pnpm add @sanity/client@latest ``` ## Configure Wrangler A default `wrangler.jsonc` was generated in the previous step. The Wrangler file is a configuration file used to specify project settings and deployment configurations in a structured format. For this tutorial your [Wrangler configuration file](https://developers.cloudflare.com/workers/wrangler/configuration/) should be similar to the following: * wrangler.jsonc ```jsonc { "name": "cms-sitemap", "main": "src/index.ts", "compatibility_date": "2024-04-19", "minify": true, "vars": { "SITEMAP_BASE": "https://example.com", "SANITY_PROJECT_ID": "5z5j5z5j", "SANITY_DATASET": "production" } } ``` * wrangler.toml ```toml name = "cms-sitemap" main = "src/index.ts" compatibility_date = "2024-04-19" minify = true [vars] # The CMS will return relative URLs, so we need to know the base URL of the site. SITEMAP_BASE = "https://example.com" # Modify to match your project ID. SANITY_PROJECT_ID = "5z5j5z5j" SANITY_DATASET = "production" ``` You must update the `[vars]` section to match your needs. See the inline comments to understand the purpose of each entry. Warning Secrets do not belong in [Wrangler configuration file](https://developers.cloudflare.com/workers/wrangler/configuration/)s. If you need to add secrets, use `.dev.vars` for local secrets and the `wranger secret put` command for deploying secrets. For more information, refer to [Secrets](https://developers.cloudflare.com/workers/configuration/secrets/). ## Add code In this step you will add the boilerplate code that will get you close to the complete solution. For the purpose of this tutorial, the code has been condensed into two files: * `index.ts|js`: Serves as the entry point for requests to the Worker and routes them to the proper place. * `Sitemap.ts|js`: Retrieves the CMS data that will be turned into a sitemap. For a better separation of concerns and organization, the CMS logic should be in a separate file. Paste the following code into the existing `index.ts|js` file: ```ts /** * Welcome to Cloudflare Workers! * * - Run `npm run dev` in your terminal to start a development server * - Open a browser tab at http://localhost:8787/ to see your worker in action * - Run `npm run deploy` to publish your worker * * Bind resources to your worker in Wrangler config file. After adding bindings, a type definition for the * `Env` object can be regenerated with `npm run cf-typegen`. * * Learn more at https://developers.cloudflare.com/workers/ */ import { Sitemap } from "./Sitemap"; // Export a default object containing event handlers. export default { // The fetch handler is invoked when this worker receives an HTTPS request // and should return a Response (optionally wrapped in a Promise). async fetch(request, env, ctx): Promise { const url = new URL(request.url); // You can get pretty far with simple logic like if/switch-statements. // If you need more complex routing, consider Hono https://hono.dev/. if (url.pathname === "/sitemap.xml") { const handleSitemap = new Sitemap(request, env, ctx); return handleSitemap.fetch(); } return new Response(`Try requesting /sitemap.xml`, { headers: { "Content-Type": "text/html" }, }); }, } satisfies ExportedHandler; ``` You do not need to modify anything in this file after pasting the above code. Next, create a new file named `Sitemap.ts|js` and paste the following code: ```ts import { createClient, SanityClient } from "@sanity/client"; export class Sitemap { private env: Env; private ctx: ExecutionContext; constructor(request: Request, env: Env, ctx: ExecutionContext) { this.env = env; this.ctx = ctx; } async fetch(): Promise { // Modify the query to use your CMS's schema. // // Request these: // - "slug": The slug of the post. // - "lastmod": When the post was updated. // // Notes: // - The slugs are prefixed to help form the full relative URL in the sitemap. // - Order the slugs to ensure the sitemap is in a consistent order. const query = `*[defined(postFields.slug.current)] { _type == 'articlePost' => { 'slug': '/posts/' + postFields.slug.current, 'lastmod': _updatedAt, }, _type == 'examplesPost' => { 'slug': '/examples/' + postFields.slug.current, 'lastmod': _updatedAt, }, _type == 'templatesPost' => { 'slug': '/templates/' + postFields.slug.current, 'lastmod': _updatedAt, } } | order(slug asc)`; const dataForSitemap = await this.fetchCmsData(query); if (!dataForSitemap) { console.error( "Error fetching data for sitemap", JSON.stringify(dataForSitemap), ); return new Response("Error fetching data for sitemap", { status: 500 }); } const sitemapXml = ` ${dataForSitemap .filter(Boolean) .map( (item: any) => ` ${this.env.SITEMAP_BASE}${item.slug} ${item.lastmod} `, ) .join("")} `; return new Response(sitemapXml, { headers: { "content-type": "application/xml", }, }); } private async fetchCmsData(query: string) { const client: SanityClient = createClient({ projectId: this.env.SANITY_PROJECT_ID, dataset: this.env.SANITY_DATASET, useCdn: true, apiVersion: "2024-01-01", }); try { const data = await client.fetch(query); return data; } catch (error) { console.error(error); } } } ``` In steps 4 and 5 you will modify the code you pasted into `src/Sitemap.ts` according to your needs. ## Query CMS data The following query in `src/Sitemap.ts` defines which data will be retrieved from the CMS. The exact query depends on your schema: ```ts const query = `*[defined(postFields.slug.current)] { _type == 'articlePost' => { 'slug': '/posts/' + postFields.slug.current, 'lastmod': _updatedAt, }, _type == 'examplesPost' => { 'slug': '/examples/' + postFields.slug.current, 'lastmod': _updatedAt, }, _type == 'templatesPost' => { 'slug': '/templates/' + postFields.slug.current, 'lastmod': _updatedAt, } } | order(slug asc)`; ``` If necessary, adapt the provided query to your specific schema, taking the following into account: * The query must return two properties: `slug` and `lastmod`, as these properties are referenced when creating the sitemap. [GROQ](https://www.sanity.io/docs/how-queries-work) (Graph-Relational Object Queries) and [GraphQL](https://www.sanity.io/docs/graphql) enable naming properties — for example, `"lastmod": _updatedAt` — allowing you to map custom field names to the required properties. * You will likely need to prefix each slug with the base path. For `www.example.com/posts/my-post`, the slug returned is `my-post`, but the base path (`/posts/`) is what needs to be prefixed (the domain is automatically added). * Add a sort to the query to provide a consistent order (`order(slug asc)` in the provided tutorial code). The data returned by the query will be used to generate an XML sitemap. ## Create the sitemap from the CMS data The relevant code from `src/Sitemap.ts` generating the sitemap and returning it with the correct content type is the following: ```ts const sitemapXml = ` ${dataForSitemap .filter(Boolean) .map( (item: any) => ` ${this.env.SITEMAP_BASE}${item.slug} ${item.lastmod} `, ) .join("")} `; return new Response(sitemapXml, { headers: { "content-type": "application/xml", }, }); ``` The URL (`loc`) and last modification date (`lastmod`) are the only two properties added to the sitemap because, [according to Google](https://developers.google.com/search/docs/crawling-indexing/sitemaps/build-sitemap#additional-notes-about-xml-sitemaps), other properties such as `priority` and `changefreq` will be ignored. Finally, the sitemap is returned with the content type of `application/xml`. At this point, you can test the Worker locally by running the following command: ```sh wrangler dev ``` This command will output a localhost URL in the terminal. Open this URL with `/sitemap.xml` appended to view the sitemap in your browser. If there are any errors, they will be shown in the terminal output. Once you have confirmed the sitemap is working, move on to the next step. ## Deploy the Worker Now that your project is working locally, there are two steps left: 1. Deploy the Worker. 2. Bind it to a domain. To deploy the Worker, run the following command in your terminal: ```sh wrangler deploy ``` The terminal will log information about the deployment, including a new custom URL in the format `{worker-name}.{account-subdomain}.workers.dev`. While you could use this hostname to obtain your sitemap, it is a best practice to host the sitemap on the same domain your content is on. ## Route a URL to the Worker In this step, you will make the Worker available on a new subdomain using a built-in Cloudflare feature. One of the benefits of using a subdomain is that you do not have to worry about this sitemap conflicting with your root domain's sitemap, since both are probably using the `/sitemap.xml` path. 1. Log in to the [Cloudflare dashboard](https://dash.cloudflare.com) and select your account. 2. In Account Home, select **Workers & Pages**, and then select your Worker. 3. Go to **Settings** > **Triggers** > **Custom Domains** > **Add Custom Domain**. 4. Enter the domain or subdomain you want to configure for your Worker. For this tutorial, use a subdomain on the domain that is in your sitemap. For example, if your sitemap outputs URLs like `www.example.com` then a suitable subdomain is `cms.example.com`. 5. Select **Add Custom Domain**. After adding the subdomain, Cloudflare automatically adds the proper DNS record binding the Worker to the subdomain. 6. To verify your configuration, go to your new subdomain and append `/sitemap.xml`. For example: ```txt cms.example.com/sitemap.xml ``` The browser should show the sitemap as when you tested locally. You now have a sitemap for your headless CMS using a highly maintainable and serverless setup. --- title: Recommend products on e-commerce sites using Workers AI and Stripe · Cloudflare Developer Spotlight description: Create APIs for related product searches and recommendations using Workers AI and Stripe. lastUpdated: 2025-07-11T16:03:39.000Z chatbotDeprioritize: false tags: AI,Hono,Stripe source_url: html: https://developers.cloudflare.com/developer-spotlight/tutorials/creating-a-recommendation-api/ md: https://developers.cloudflare.com/developer-spotlight/tutorials/creating-a-recommendation-api/index.md --- E-commerce and media sites often work on increasing the average transaction value to boost profitability. One of the strategies to increase the average transaction value is "cross-selling," which involves recommending related products. Cloudflare offers a range of products designed to build mechanisms for retrieving data related to the products users are viewing or requesting. In this tutorial, you will experience developing functionalities necessary for cross-selling by creating APIs for related product searches and product recommendations. ## Goals In this workshop, you will develop three REST APIs. 1. An API to search for information highly related to a specific product. 2. An API to suggest products in response to user inquiries. 3. A Webhook API to synchronize product information with external e-commerce applications. By developing these APIs, you will learn about the resources needed to build cross-selling and recommendation features for e-commerce sites. You will also learn how to use the following Cloudflare products: * [**Cloudflare Workers**](https://developers.cloudflare.com/workers/): Execution environment for API applications * [**Cloudflare Vectorize**](https://developers.cloudflare.com/vectorize/): Vector DB used for related product searches * [**Cloudflare Workers AI**](https://developers.cloudflare.com/workers-ai/): Used for vectorizing data and generating recommendation texts ## Before you start All of the tutorials assume you have already completed the [Get started guide](https://developers.cloudflare.com/workers/get-started/guide/), which gets you set up with a Cloudflare Workers account, [C3](https://github.com/cloudflare/workers-sdk/tree/main/packages/create-cloudflare), and [Wrangler](https://developers.cloudflare.com/workers/wrangler/install-and-update/). 1. Sign up for a [Cloudflare account](https://dash.cloudflare.com/sign-up/workers-and-pages). 2. Install [`Node.js`](https://docs.npmjs.com/downloading-and-installing-node-js-and-npm). Node.js version manager Use a Node version manager like [Volta](https://volta.sh/) or [nvm](https://github.com/nvm-sh/nvm) to avoid permission issues and change Node.js versions. [Wrangler](https://developers.cloudflare.com/workers/wrangler/install-and-update/), discussed later in this guide, requires a Node version of `16.17.0` or later. ### Prerequisites This tutorial involves the use of several Cloudflare products. Some of these products have free tiers, while others may incur minimal charges. Please review the following billing information carefully. Workers AI local development usage charges Using Workers AI always accesses your Cloudflare account in order to run AI models and will incur usage charges even in local development. ## 1. Create a new Worker project First, let's create a Cloudflare Workers project. [C3 (create-cloudflare-cli)](https://github.com/cloudflare/workers-sdk/tree/main/packages/create-cloudflare) is a command-line tool designed to help you set up and deploy new applications to Cloudflare. In addition to speed, it leverages officially developed templates for Workers and framework-specific setup guides to ensure each new application that you set up follows Cloudflare and any third-party best practices for deployment on the Cloudflare network. To efficiently create and manage multiple APIs, let's use [`Hono`](https://hono.dev). Hono is an open-source application framework released by a Cloudflare Developer Advocate. It is lightweight and allows for the creation of multiple API paths, as well as efficient request and response handling. Open your command line interface (CLI) and run the following command: * npm ```sh npm create cloudflare@latest -- cross-sell-api --framework=hono ``` * yarn ```sh yarn create cloudflare cross-sell-api --framework=hono ``` * pnpm ```sh pnpm create cloudflare@latest cross-sell-api --framework=hono ``` If this is your first time running the `C3` command, you will be asked whether you want to install it. Confirm that the package name for installation is `create-cloudflare` and answer `y`. ```sh Need to install the following packages: create-cloudflare@latest Ok to proceed? (y) ``` During the setup, you will be asked if you want to manage your project source code with `Git`. It is recommended to answer `Yes` as it helps in recording your work and rolling back changes. You can also choose `No`, which will not affect the tutorial progress. ```sh ╰ Do you want to use git for version control?   Yes / No ``` Finally, you will be asked if you want to deploy the application to your Cloudflare account. For now, select `No` and start development locally. ```sh ╭ Deploy with Cloudflare Step 3 of 3 │ ╰ Do you want to deploy your application?   Yes / No ``` If you see a message like the one below, the project setup is complete. You can open the `cross-sell-api` directory in your preferred IDE to start development. ```sh ├ APPLICATION CREATED Deploy your application with npm run deploy │ │ Navigate to the new directory cd cross-sell-api │ Run the development server npm run dev │ Deploy your application npm run deploy │ Read the documentation https://developers.cloudflare.com/workers │ Stuck? Join us at https://discord.cloudflare.com │ ╰ See you again soon! ``` Cloudflare Workers applications can be developed and tested in a local environment. On your CLI, change directory into your newly created Workers and run `npx wrangler dev` to start the application. Using `Wrangler`, the application will start, and you'll see a URL beginning with `localhost`. ```sh ⛅️ wrangler 3.60.1 ------------------- ⎔ Starting local server... [wrangler:inf] Ready on http://localhost:8787 ╭───────────────────────────────────────────────────────────────────────────────────────────────────────────╮ │ [b] open a browser, [d] open Devtools, [l] turn off local mode, [c] clear console, [x] to exit │ ╰───────────────────────────────────────────────────────────────────────────────────────────────────────────╯ ``` You can send a request to the API using the `curl` command. If you see the text `Hello Hono!`, the API is running correctly. ```sh curl http://localhost:8787 ``` ```sh Hello Hono! ``` So far, we've covered how to create a Cloudflare Worker project and introduced tools and open-source projects like the `C3` command and the `Hono` framework that streamline development with Cloudflare. Leveraging these features will help you develop applications on Cloudflare Workers more smoothly. ## 2. Create an API to import product information Now, we will start developing the three APIs that will be used in our cross-sell system. First, let's create an API to synchronize product information with an existing e-commerce application. In this example, we will set up a system where product registrations in [Stripe](https://stripe.com) are synchronized with the cross-sell system. This API will receive product information sent from an external service like Stripe as a Webhook event. It will then extract the necessary information for search purposes and store it in a database for related product searches. Since vector search will be used, we also need to implement a process that converts strings to vector data using an Embedding model provided by Cloudflare Workers AI. The process flow is illustrated as follows: ```mermaid sequenceDiagram participant Stripe box Cloudflare participant CF_Workers participant CF_Workers_AI participant CF_Vectorize end Stripe->>CF_Workers: Send product registration event CF_Workers->>CF_Workers_AI: Request product information vectorization CF_Workers_AI->>CF_Workers: Send back vector data result CF_Workers->>CF_Vectorize: Save vector data ``` Let's start implementing step-by-step. ### Bind Workers AI and Vectorize to your Worker This API requires the use of Workers AI and Vectorize. To use these resources from a Worker, you will need to first create the resources then [bind](https://developers.cloudflare.com/workers/runtime-apis/bindings/#what-is-a-binding) them to a Worker. First, let's create a Vectorize index with Wrangler using the command `wrangler vectorize create {index_name} --dimensions={number_of_dimensions} --metric={similarity_metric}`. The values for `dimensions` and `metric` depend on the type of [Text Embedding Model](https://developers.cloudflare.com/workers-ai/models/) you are using for data vectorization (Embedding). For example, if you are using the `bge-large-en-v1.5` model, the command is: ```sh npx wrangler vectorize create stripe-products --dimensions=1024 --metric=cosine ``` When this command executes successfully, you will see a message like the following. It provides the items you need to add to the [Wrangler configuration file](https://developers.cloudflare.com/workers/wrangler/configuration/) to bind the Vectorize index with your Worker application. ```sh ✅ Successfully created a new Vectorize index: 'stripe-products' 📋 To start querying from a Worker, add the following binding configuration into your Wrangler configuration file: [[vectorize]] binding = "VECTORIZE_INDEX" index_name = "stripe-products" ``` To use the created Vectorize index from your Worker, let's add the binding. Open the [Wrangler configuration file](https://developers.cloudflare.com/workers/wrangler/configuration/) and add the copied lines. * wrangler.jsonc ```jsonc { "name": "cross-sell-api", "main": "src/index.ts", "compatibility_date": "2024-06-05", "vectorize": [ { "binding": "VECTORIZE_INDEX", "index_name": "stripe-products" } ] } ``` * wrangler.toml ```toml name = "cross-sell-api" main = "src/index.ts" compatibility_date = "2024-06-05" [[vectorize]] binding = "VECTORIZE_INDEX" index_name = "stripe-products" ``` Additionally, let's add the configuration to use Workers AI in the [Wrangler configuration file](https://developers.cloudflare.com/workers/wrangler/configuration/). * wrangler.jsonc ```jsonc { "name": "cross-sell-api", "main": "src/index.ts", "compatibility_date": "2024-06-05", "vectorize": [ { "binding": "VECTORIZE_INDEX", "index_name": "stripe-products" } ], "ai": { "binding": "AI" } } ``` * wrangler.toml ```toml name = "cross-sell-api" main = "src/index.ts" compatibility_date = "2024-06-05" [[vectorize]] binding = "VECTORIZE_INDEX" index_name = "stripe-products" [ai] binding = "AI" # available in your Worker on env.AI ``` When handling bound resources from your application, you can generate TypeScript type definitions to develop more safely. Run the `npm run cf-typegen` command. This command updates the `worker-configuration.d.ts` file, allowing you to use both Vectorize and Workers AI in a type-safe manner. ```sh npm run cf-typegen ``` ```sh > cf-typegen > wrangler types --env-interface CloudflareBindings ⛅️ wrangler 3.60.1 ------------------- interface CloudflareBindings { VECTORIZE_INDEX: VectorizeIndex; AI: Ai; } ``` Once you save these changes, the respective resources and APIs will be available for use in the Workers application. You can access these properties from `env`. In this example, you can use them as follows: ```ts app.get("/", (c) => { c.env.AI; // Workers AI SDK c.env.VECTORIZE_INDEX; // Vectorize SDK return c.text("Hello Hono!"); }); ``` Finally, rerun the `npx wrangler dev` command with the `--remote` option. This is necessary because Vectorize indexes are not supported in local mode. If you see the message, `Vectorize bindings are not currently supported in local mode. Please use --remote if you are working with them.`, rerun the command with the `--remote` option added. ```sh npx wrangler dev --remote ``` ### Create a webhook API to handle product registration events You can receive notifications about product registration and information via POST requests using webhooks. Let's create an API that accepts POST requests. Open your `src/index.ts` file and add the following code: ```ts app.post("/webhook", async (c) => { const body = await c.req.json(); if (body.type === "product.created") { const product = body.data.object; console.log(JSON.stringify(product, null, 2)); } return c.text("ok", 200); }); ``` This code implements an API that processes POST requests to the `/webhook` endpoint. The data sent by Stripe's Webhook events is included in the request body in JSON format. Therefore, we use `c.req.json()` to extract the data. There are multiple types of Webhook events that Stripe can send, so we added a conditional to only process events when a product is newly added, as indicated by the `type`. ### Add Stripe's API Key to the project When developing a webhook API, you need to ensure that requests from unauthorized sources are rejected. To prevent unauthorized API requests from causing unintended behavior or operational confusion, you need a mechanism to verify the source of API requests. When integrating with Stripe, you can protect the API by generating a signing secret used for webhook verification. 1. Refer to the [Stripe documentation](https://docs.stripe.com/keys) to get a [secret API key for the test environment](https://docs.stripe.com/keys#reveal-an-api-secret-key-for-test-mode). 2. Save the obtained API key in a `.dev.vars` file. ```plaintext STRIPE_SECRET_API_KEY=sk_test_XXXX ``` 1. Follow the [guide](https://docs.stripe.com/stripe-cli) to install Stripe CLI. 2. Use the following Stripe CLI command to forward Webhook events from Stripe to your local application. ```sh stripe listen --forward-to http://localhost:8787/webhook --events product.created ``` 1. Copy the signing secret that starts with `whsec_` from the Stripe CLI command output. ```plaintext > Ready! You are using Stripe API Version [2024-06-10]. Your webhook signing secret is whsec_xxxxxx (^C to quit) ``` 1. Save the obtained signing secret in the `.dev.vars` file. ```plaintext STRIPE_WEBHOOK_SECRET=whsec_xxxxxx ``` 1. Run `npm run cf-typegen` to update the type definitions in `worker-configuration.d.ts`. 2. Run `npm install stripe` to add the Stripe SDK to your application. 3. Restart the `npm run dev -- --remote` command to import the API key into your application. Finally, modify the source code of `src/index.ts` as follows to ensure that the webhook API cannot be used from sources other than your Stripe account. ````ts import { Hono } from "hono"; import { env } from "hono/adapter"; import Stripe from "stripe"; type Bindings = { [key in keyof CloudflareBindings]: CloudflareBindings[key]; }; const app = new Hono<{ Bindings: Bindings; Variables: { stripe: Stripe; }; }>(); /** * Initialize Stripe SDK client * We can use this SDK without initializing on each API route, * just get it by the following example: * ``` * const stripe = c.get('stripe') * ``` */ app.use("*", async (c, next) => { const { STRIPE_SECRET_API_KEY } = env(c); const stripe = new Stripe(STRIPE_SECRET_API_KEY); c.set("stripe", stripe); await next(); }); app.post("/webhook", async (c) => { const { STRIPE_WEBHOOK_SECRET } = env(c); const stripe = c.get("stripe"); const signature = c.req.header("stripe-signature"); if (!signature || !STRIPE_WEBHOOK_SECRET || !stripe) { return c.text("", 400); } try { const body = await c.req.text(); const event = await stripe.webhooks.constructEventAsync( body, signature, STRIPE_WEBHOOK_SECRET, ); if (event.type === "product.created") { const product = event.data.object; console.log(JSON.stringify(product, null, 2)); } return c.text("", 200); } catch (err) { const errorMessage = `⚠️ Webhook signature verification failed. ${err instanceof Error ? err.message : "Internal server error"}`; console.log(errorMessage); return c.text(errorMessage, 400); } }); export default app; ```` This ensures that an HTTP 400 error is returned if the Webhook API is called directly by unauthorized sources. ```sh curl -XPOST http://localhost:8787/webhook -I ``` ```sh HTTP/1.1 400 Bad Request Content-Length: 0 Content-Type: text/plain; charset=UTF-8 ``` Use the Stripe CLI command to test sending events from Stripe. ```sh stripe trigger product.created ``` ```sh Setting up fixture for: product Running fixture for: product Trigger succeeded! Check dashboard for event details. ``` The product information added on the Stripe side is recorded as a log on the terminal screen where `npm run dev` is executed. ```plaintext { id: 'prod_QGw9VdIqVCNABH', object: 'product', active: true, attributes: [], created: 1718087602, default_price: null, description: '(created by Stripe CLI)', features: [], images: [], livemode: false, marketing_features: [], metadata: {}, name: 'myproduct', package_dimensions: null, shippable: null, statement_descriptor: null, tax_code: null, type: 'service', unit_label: null, updated: 1718087603, url: null } [wrangler:inf] POST /webhook 201 Created (14ms) ``` ## 3. Convert text into vector data using Workers AI We've prepared to ingest product information, so let's start implementing the preprocessing needed to create an index for search. In vector search using Cloudflare Vectorize, text data must be converted to numerical data before indexing. By storing data as numerical sequences, we can search based on the similarity of these vectors, allowing us to retrieve highly similar data. In this step, we'll first implement the process of converting externally sent data into text data. This is necessary because the information to be converted into vector data is in text form. If you want to include product names, descriptions, and metadata as search targets, add the following processing. ```ts if (event.type === "product.created") { const product = event.data.object; const productData = [ `## ${product.name}`, product.description, "### metadata", Object.entries(product.metadata) .map(([key, value]) => `- ${key}: ${value}`) .join("\n"), ].join("\n"); console.log(JSON.stringify(productData, null, 2)); } ``` By adding this processing, you convert product information in JSON format into a simple Markdown format product introduction text. ```sh ## product name product description. ### metadata - key: value ``` Now that we've converted the data to text, let's convert it to vector data. By using the Text Embedding model of Workers AI, we can convert text into vector data of any desired dimension. ```ts const productData = [ `## ${product.name}`, product.description, "### metadata", Object.entries(product.metadata) .map(([key, value]) => `- ${key}: ${value}`) .join("\n"), ].join("\n"); const embeddings = await c.env.AI.run("@cf/baai/bge-large-en-v1.5", { text: productData, }); console.log(JSON.stringify(embeddings, null, 2)); ``` When using Workers AI, execute the `c.env.AI.run()` function. Specify the model you want to use as the first argument. In the second argument, input text data about the text you want to convert using the Text Embedding model or the instructions for the generated images or text. If you want to save the converted vector data using Vectorize, make sure to select a model that matches the number of `dimensions` specified in the `npx wrangler vectorize create` command. If the numbers do not match, there is a possibility that the converted vector data cannot be saved. ### Save vector data to Vectorize Finally, let's save the created data to Vectorize. Edit `src/index.ts` to implement the indexing process using the `VECTORIZE_INDEX` binding. Since the data to be saved will be vector data, save the pre-conversion text data as metadata. ```ts if (event.type === "product.created") { const product = event.data.object; const productData = [ `## ${product.name}`, product.description, "### metadata", Object.entries(product.metadata) .map(([key, value]) => `- ${key}: ${value}`) .join("\n"), ].join("\n"); console.log(JSON.stringify(productData, null, 2)); const embeddings = await c.env.AI.run("@cf/baai/bge-large-en-v1.5", { text: productData, }); await c.env.VECTORIZE_INDEX.insert([ { id: product.id, values: embeddings.data[0], metadata: { name: product.name, description: product.description || "", product_metadata: product.metadata, }, }, ]); } ``` With this, we have established a mechanism to synchronize the product data with the database for recommendations. Use Stripe CLI commands to save some product data. ```bash stripe products create --name="Smartphone X" \ --description="Latest model with cutting-edge features" \ -d "default_price_data[currency]=usd" \ -d "default_price_data[unit_amount]=79900" \ -d "metadata[category]=electronics" ``` ```bash stripe products create --name="Ultra Notebook" \ --description="Lightweight and powerful notebook computer" \ -d "default_price_data[currency]=usd" \ -d "default_price_data[unit_amount]=129900" \ -d "metadata[category]=computers" ``` ```bash stripe products create --name="Wireless Earbuds Pro" \ --description="High quality sound with noise cancellation" \ -d "default_price_data[currency]=usd" \ -d "default_price_data[unit_amount]=19900" \ -d "metadata[category]=audio" ``` ```bash stripe products create --name="Smartwatch 2" \ --description="Stay connected with the latest smartwatch" \ -d "default_price_data[currency]=usd" \ -d "default_price_data[unit_amount]=29900" \ -d "metadata[category]=wearables" ``` ```bash stripe products create --name="Tablet Pro" \ --description="Versatile tablet for work and play" \ -d "default_price_data[currency]=usd" \ -d "default_price_data[unit_amount]=49900" \ -d "metadata[category]=computers" ``` If the save is successful, you will see logs like `[200] POST` in the screen where you are running the `stripe listen` command. ```sh 2024-06-11 16:41:42 --> product.created [evt_1PQPKsL8xlxrZ26gst0o1DK3] 2024-06-11 16:41:45 <-- [200] POST http://localhost:8787/webhook [evt_1PQPKsL8xlxrZ26gst0o1DK3] 2024-06-11 16:41:47 --> product.created [evt_1PQPKxL8xlxrZ26gGk90TkcK] 2024-06-11 16:41:49 <-- [200] POST http://localhost:8787/webhook [evt_1PQPKxL8xlxrZ26gGk90TkcK] ``` If you confirm one log entry for each piece of registered data, the save process is complete. Next, we will implement the API for related product searches. ## 4. Create a related products search API using Vectorize Now that we have prepared the index for searching, the next step is to implement an API to search for related products. By utilizing a vector index, we can perform searches based on how similar the data is. Let's implement an API that searches for product data similar to the specified product ID using this method. In this API, the product ID is received as a part of the API path. Using the received ID, vector data is retrieved from Vectorize using `c.env.VECTORIZE_INDEX.getByIds()`. The return value of this process includes vector data, which is then passed to `c.env.VECTORIZE_INDEX.query()` to conduct a similarity search. To quickly check which products are recommended, we set `returnMetadata` to `true` to obtain the stored metadata information as well. The `topK` parameter specifies the number of data items to retrieve. Change this value if you want to obtain less than 2 or more than 4 data items. ```ts app.get("/products/:product_id", async (c) => { // Get the product ID from API path parameters const productId = c.req.param("product_id"); // Retrieve the indexed data by the product ID const [product] = await c.env.VECTORIZE_INDEX.getByIds([productId]); // Search similar products by using the embedding data const similarProducts = await c.env.VECTORIZE_INDEX.query(product.values, { topK: 3, returnMetadata: true, }); return c.json({ product: { ...product.metadata, }, similarProducts, }); }); ``` Let's run this API. Use a product ID that starts with `prod_`, which can be obtained from the result of running the `stripe products crate` command or the `stripe products list` command. ```sh curl http://localhost:8787/products/prod_xxxx ``` If you send a request using a product ID that exists in the Vectorize index, the data for that product and two related products will be returned as follows. ```json { "product": { "name": "Tablet Pro", "description": "Versatile tablet for work and play", "product_metadata": { "category": "computers" } }, "similarProducts": { "count": 3, "matches": [ { "id": "prod_QGxFoHEpIyxHHF", "metadata": { "name": "Tablet Pro", "description": "Versatile tablet for work and play", "product_metadata": { "category": "computers" } }, "score": 1 }, { "id": "prod_QGxFEgfmOmy5Ve", "metadata": { "name": "Ultra Notebook", "description": "Lightweight and powerful notebook computer", "product_metadata": { "category": "computers" } }, "score": 0.724717327 }, { "id": "prod_QGwkGYUcKU2UwH", "metadata": { "name": "demo product", "description": "aaaa", "product_metadata": { "test": "hello" } }, "score": 0.635707003 } ] } } ``` Looking at the `score` in `similarProducts`, you can see that there is data with a `score` of `1`. This means it is exactly the same as the query used to search. By looking at the metadata, it is evident that the data is the same as the product ID sent in the request. Since we want to search for related products, let's add a `filter` to prevent the same product from being included in the search results. Here, a filter is added to exclude data with the same product name using the `metadata` name. ```ts app.get("/products/:product_id", async (c) => { const productId = c.req.param("product_id"); const [product] = await c.env.VECTORIZE_INDEX.getByIds([productId]); const similarProducts = await c.env.VECTORIZE_INDEX.query(product.values, { topK: 3, returnMetadata: true, filter: { name: { $ne: product.metadata?.name.toString(), }, }, }); return c.json({ product: { ...product.metadata, }, similarProducts, }); }); ``` After adding this process, if you run the API, you will see that there is no data with a `score` of `1`. ```json { "product": { "name": "Tablet Pro", "description": "Versatile tablet for work and play", "product_metadata": { "category": "computers" } }, "similarProducts": { "count": 3, "matches": [ { "id": "prod_QGxFEgfmOmy5Ve", "metadata": { "name": "Ultra Notebook", "description": "Lightweight and powerful notebook computer", "product_metadata": { "category": "computers" } }, "score": 0.724717327 }, { "id": "prod_QGwkGYUcKU2UwH", "metadata": { "name": "demo product", "description": "aaaa", "product_metadata": { "test": "hello" } }, "score": 0.635707003 }, { "id": "prod_QGxFEafrNDG88p", "metadata": { "name": "Smartphone X", "description": "Latest model with cutting-edge features", "product_metadata": { "category": "electronics" } }, "score": 0.632409942 } ] } } ``` In this way, you can implement a system to search for related product information using Vectorize. ## 5. Create a recommendation API that answers user questions. Recommendations can be more than just displaying related products; they can also address user questions and concerns. The final API will implement a process to answer user questions using Vectorize and Workers AI. This API will implement the following processes: 1. Vectorize the user's question using the Text Embedding Model from Workers AI. 2. Use Vectorize to search and retrieve highly relevant products. 3. Convert the search results into a string in Markdown format. 4. Utilize the Text Generation Model from Workers AI to generate a response based on the search results. This method realizes a text generation mechanism called Retrieval Augmented Generation (RAG) using Cloudflare. The bindings and other preparations are already completed, so let's add the API. ```ts app.post("/ask", async (c) => { const { question } = await c.req.json(); if (!question) { return c.json({ message: "Please tell me your question.", }); } /** * Convert the question to the vector data */ const embeddedQuestion = await c.env.AI.run("@cf/baai/bge-large-en-v1.5", { text: question, }); /** * Query similarity data from Vectorize index */ const similarProducts = await c.env.VECTORIZE_INDEX.query( embeddedQuestion.data[0], { topK: 3, returnMetadata: true, }, ); /** * Convert the JSON data to the Markdown text **/ const contextData = similarProducts.matches.reduce((prev, current) => { if (!current.metadata) return prev; const productTexts = Object.entries(current.metadata).map( ([key, value]) => { switch (key) { case "name": return `## ${value}`; case "product_metadata": return `- ${key}: ${JSON.stringify(value)}`; default: return `- ${key}: ${value}`; } }, ); const productTextData = productTexts.join("\n"); return `${prev}\n${productTextData}`; }, ""); /** * Generate the answer */ const response = await c.env.AI.run("@cf/meta/llama-3.1-8b-instruct", { messages: [ { role: "system", content: `You are an assistant for question-answering tasks. Use the following pieces of retrieved context to answer the question. If you don't know the answer, just say that you don't know.\n#Context: \n${contextData} `, }, { role: "user", content: question, }, ], }); return c.json(response); }); ``` Let's use the created API to consult on a product. You can send your question in the body of a POST request. For example, if you want to ask about getting a new PC, you can execute the following command: ```sh curl -X POST "http://localhost:8787/ask" -H "Content-Type: application/json" -d '{"question": "I want to get a new PC"}' ``` When the question is sent, a recommendation text will be generated as introduced earlier. In this example, the `Ultra Notebook` product was recommended. This is because it has a `notebook compucoter` description, which means it received a relatively high score in the Vectorize search. ```json { "response": "Exciting! You're looking to get a new PC! Based on the context I retrieved, I'd recommend considering the \"Ultra Notebook\" since it's described as a lightweight and powerful notebook computer, which fits the category of \"computers\". Would you like to know more about its specifications or features?" } ``` The text generation model generates new text each time based on the input prompt (questions or product search results). Therefore, even if you send the same request to this API, the response text may differ slightly. When developing for production, use features like logging or caching in the [AI Gateway](https://developers.cloudflare.com/ai-gateway/) to set up proper control and debugging. ## 6. Deploy the application Before deploying the application, we need to make sure your Worker project has access to the Stripe API keys we created earlier. Since the API keys of external services are defined in `.dev.vars`, this information also needs to be set in your Worker project. To save API keys and secrets, run the `npx wrangler secret put ` command. In this tutorial, you'll execute the command twice, referring to the values set in `.dev.vars`. ```sh npx wrangler secret put STRIPE_SECRET_API_KEY npx wrangler secret put STRIPE_WEBHOOK_SECRET ``` Then, run `npx wrangler deploy`. This will deploy the application on Cloudflare, making it publicly accessible. ## Conclusion As you can see, using Cloudflare Workers, Workers AI, and Vectorize allows you to easily implement related product or product recommendation APIs. Even if product data is managed on external services like Stripe, you can incorporate them by adding a webhook API. Additionally, though not introduced in this tutorial, you can save information such as user preferences and interested categories in Workers KV or D1. By using this stored information as text generation prompts, you can provide more accurate recommendation functions. Use the experience from this tutorial to enhance your e-commerce site with new ideas. --- title: Custom access control for files in R2 using D1 and Workers · Cloudflare Developer Spotlight description: This tutorial gives you an overview on how to create a TypeScript-based Cloudflare Worker which allows you to control file access based on a simple username and password authentication. To achieve this, we will use a D1 database for user management and an R2 bucket for file storage. lastUpdated: 2025-03-19T09:17:37.000Z chatbotDeprioritize: false source_url: html: https://developers.cloudflare.com/developer-spotlight/tutorials/custom-access-control-for-files/ md: https://developers.cloudflare.com/developer-spotlight/tutorials/custom-access-control-for-files/index.md --- This tutorial gives you an overview on how to create a TypeScript-based Cloudflare Worker which allows you to control file access based on a simple username and password authentication. To achieve this, we will use a [D1 database](https://developers.cloudflare.com/d1/) for user management and an [R2 bucket](https://developers.cloudflare.com/r2/) for file storage. The following sections will guide you through the process of creating a Worker using the Cloudflare CLI, creating and setting up a D1 database and R2 bucket, and then implementing the functionality to securely upload and fetch files from the created R2 bucket. ## Prerequisites 1. Sign up for a [Cloudflare account](https://dash.cloudflare.com/sign-up/workers-and-pages). 2. Install [`Node.js`](https://docs.npmjs.com/downloading-and-installing-node-js-and-npm). Node.js version manager Use a Node version manager like [Volta](https://volta.sh/) or [nvm](https://github.com/nvm-sh/nvm) to avoid permission issues and change Node.js versions. [Wrangler](https://developers.cloudflare.com/workers/wrangler/install-and-update/), discussed later in this guide, requires a Node version of `16.17.0` or later. ## 1. Create a new Worker application To get started developing your Worker you will use the [`create-cloudflare` CLI](https://github.com/cloudflare/workers-sdk/tree/main/packages/create-cloudflare). To do this, open a terminal window and run the following command: * npm ```sh npm create cloudflare@latest -- custom-access-control ``` * yarn ```sh yarn create cloudflare custom-access-control ``` * pnpm ```sh pnpm create cloudflare@latest custom-access-control ``` For setup, select the following options: * For *What would you like to start with?*, choose `Hello World example`. * For *Which template would you like to use?*, choose `Worker only`. * For *Which language do you want to use?*, choose `TypeScript`. * For *Do you want to use git for version control?*, choose `Yes`. * For *Do you want to deploy your application?*, choose `No` (we will be making some changes before deploying). Then, move into your newly created Worker: ```sh cd custom-access-control ``` ## 2. Create a new D1 database and binding Now that you have created your Worker, next you will need to create a D1 database. This can be done through the Cloudflare Portal or the Wrangler CLI. For this tutorial, we will use the Wrangler CLI for simplicity. To create a D1 database, just run the following command. If you get asked to install wrangler, just confirm by pressing `y` and then press `Enter`. ```sh npx wrangler d1 create ``` Replace `` with the name you want to use for your database. Keep in mind that this name can't be changed later on. After the database is successfully created, you will see the data for the binding displayed as an output. The binding declaration will start with `[[d1_databases]]` and contain the binding name, database name and ID. To use the database in your worker, you will need to add the binding to your Wrangler file, by copying the declaration and pasting it into the wrangler file, as shown in the example below. * wrangler.jsonc ```jsonc { "d1_databases": [ { "binding": "DB", "database_name": "", "database_id": "" } ] } ``` * wrangler.toml ```toml [[d1_databases]] binding = "DB" database_name = "" database_id = "" ``` ## 3. Create R2 bucket and binding Now that the D1 database is created, you also need to create an R2 bucket which will be used to store the uploaded files. This step can also be done through the Cloudflare Portal, but as before, we will use the Wrangler CLI for this tutorial. To create an R2 bucket, run the following command: ```sh npx wrangler r2 bucket create ``` This works similar to the D1 database creation, where you will need to replace `` with the name you want to use for your bucket. To do this, go to the Wrangler file again and then add the following lines: * wrangler.jsonc ```jsonc { "r2_buckets": [ { "binding": "BUCKET", "bucket_name": "" } ] } ``` * wrangler.toml ```toml [[r2_buckets]] binding = "BUCKET" bucket_name = "" ``` Now that you have prepared the Wrangler configuration, you should update the `worker-configuration.d.ts` file to include the new bindings. This file will then provide TypeScript with the correct type definitions for the bindings, which allows for type checking and code completion in your editor. You could either update it manually or run the following command in the directory of your project to update it automatically based on the [Wrangler configuration file](https://developers.cloudflare.com/workers/wrangler/configuration/) (recommended). ```sh npm run cf-typegen ``` ## 4. Database preparation Before you can start developing the Worker, you need to prepare the D1 database. For this you need to 1. Create a table in the database which will then be used to store the user data 2. Create a unique index on the username column, which will speed up database queries and ensure that the username is unique 3. Insert a test user into the table, so you can test your code later on As this operation only needs to be done once, this will be done through the Wrangler CLI and not in the Worker's code. Copy the commands listed below, replace the placeholders and then run them in order to prepare the database. For this tutorial you can replace the `` and `` placeholders with `admin` and `5e884898da28047151d0e56f8dc6292773603d0d6aabbdd62a11ef721d1542d8` respecively. And `` should be replaced with the name you used to create the database. ```sh npx wrangler d1 execute --command "CREATE TABLE user (id INTEGER PRIMARY KEY NOT NULL, username STRING NOT NULL, password STRING NOT NULL)" --remote npx wrangler d1 execute --command "CREATE UNIQUE INDEX user_username ON user (username)" --remote npx wrangler d1 execute --command "INSERT INTO user (username, password) VALUES ('', '')" --remote ``` ## 5. Implement authentication in the Worker Now that the database and bucket are all set up, you can start to develop the Worker application. The first thing you will need to do is to implement the authentication for the requests. This tutorial will use a simple username and password authentication, where the username and password (hashed) are stored in the D1 database. The requests will contain the username and password as a base64 encoded string, which is also called Basic Authentication. Depending on the request method, this string will be retrieved from the `Authorization` header for POST requests or the `Authorization` search parameter for GET requests. To handle the authentication, you will need to replace the current code within `index.ts` file with the following code: ```ts export default { async fetch( request: Request, env: Env, ctx: ExecutionContext, ): Promise { try { const url = new URL(request.url); let authBase64; if (request.method === "POST") { authBase64 = request.headers.get("Authorization"); } else if (request.method === "GET") { authBase64 = url.searchParams.get("Authorization"); } else { return new Response("Method Not Allowed!", { status: 405 }); } if (!authBase64 || authBase64.substring(0, 6) !== "Basic ") { return new Response("Unauthorized!", { status: 401 }); } const authString = atob(authBase64.substring(6)); const [username, password] = authString.split(":"); if (!username || !password) { return new Response("Unauthorized!", { status: 401 }); } // TODO: Check if the username and password are correct } catch (error) { console.error("An error occurred!", error); return new Response("Internal Server Error!", { status: 500 }); } }, }; ``` The code above currently extracts the username and password from the request, but does not yet check if the username and password are correct. To check the username and password, you will need to hash the password and then query the D1 database table `user` with the given username and hashed password. If the username and password are correct, you will retrieve a record from D1. If the username or password is incorrect, undefined will be returned and a `401 Unauthorized` response will be sent. To add this functionality, you will need to add the following code to the `fetch` function by replacing the TODO comment from the last code snippet: ```ts const passwordHashBuffer = await crypto.subtle.digest( { name: "SHA-256" }, new TextEncoder().encode(password), ); const passwordHashArray = Array.from(new Uint8Array(passwordHashBuffer)); const passwordHashString = passwordHashArray .map((b) => b.toString(16).padStart(2, "0")) .join(""); const user = await env.DB.prepare( "SELECT id FROM user WHERE username = ? AND password = ? LIMIT 1", ) .bind(username, passwordHashString) .first<{ id: number }>(); if (!user) { return new Response("Unauthorized!", { status: 401 }); } // TODO: Implement upload functionality ``` This code will now ensure that every request is authenticated before it can be processed further. ## 6. Upload a file through the Worker Now that the authentication is set up, you can start to implement the functionality for uploading a file through the Worker. To do this, you will need to add a new code path that handles HTTP `POST` requests. Then within it, you will need to get the data from the request, which is sent within the body of the request, by using the `request.blob()` function. After that, you can upload the data to the R2 bucket by using the `env.BUCKET.put` function. And finally, you will return a `200 OK` response to the client. To implement this functionality, you will need to replace the TODO comment from the last code snippet with the following code: ```ts if (request.method === "POST") { // Upload the file to the R2 bucket with the user id followed by a slash as the prefix and then the path of the URL await env.BUCKET.put(`${user.id}/${url.pathname}`, request.body); return new Response("OK", { status: 200 }); } // TODO: Implement GET request handling ``` This code will now allow you to upload a file through the Worker, which will be stored in your R2 bucket. ## 7. Fetch from the R2 bucket To round up the Worker application, you will need to implement the functionality to fetch files from the R2 bucket. This can be done by adding a new code path that handles `GET` requests. Within this code path, you will need to extract the URL pathname and then retrieve the asset from the R2 bucket by using the `env.BUCKET.get` function. To finalize the code, just replace the TODO comment for handling GET requests from the last code snippet with the following code: ```ts if (request.method === "GET") { const file = await env.BUCKET.get(`${user.id}/${url.pathname.slice(1)}`); if (!file) { return new Response("Not Found!", { status: 404 }); } const headers = new Headers(); file.writeHttpMetadata(headers); return new Response(file.body, { headers }); } return new Response("Method Not Allowed!", { status: 405 }); ``` This code now allows you to fetch and return data from the R2 bucket when a `GET` request is made to the Worker application. ## 8. Deploy your Worker After completing the code for this Cloudflare Worker tutorial, you will need to deploy it to Cloudflare. To do this open the terminal in the directory created for your application, and then run: ```sh npx wrangler deploy ``` You might get asked to authenticate (if not logged in already) and select an account. After that, the Worker will be deployed to Cloudflare. When the deployment finished successfully, you will see a success message with the URL where your Worker is now accessible. ## 9. Test your Worker (optional) To finish this tutorial, you should test your Worker application by sending a `POST` request to upload a file and after that a `GET` request to fetch the file. This can be done by using a tool like `curl` or `Postman`, but for simplicity, this will describe the usage of `curl`. Copy the following command which can be used to upload a simple JSON file with the content `{"Hello": "Worker!"}`. Replace `` with the base64 encoded username and password combination and then run the command. For this example you can use `YWRtaW46cGFzc3dvcmQ=`, which can be decoded to `admin` and `test`, for the api secret placeholder. ```sh curl --location '/myFile.json' \ --header 'Content-Type: application/json' \ --header 'Authorization: Basic ' \ --data '{ "Hello": "Worker!" }' ``` Then run the next command, or simply open the URL in your browser, to fetch the file you just uploaded: ```sh curl --location '/myFile.json?Authorization=Basic%20YWRtaW46cGFzc3dvcmQ%3D' ``` ## Next steps If you want to learn more about Cloudflare Workers, R2, or D1 you can check out the following documentation: * [Cloudflare Workers](https://developers.cloudflare.com/workers/) * [Cloudflare R2](https://developers.cloudflare.com/r2/) * [Cloudflare D1](https://developers.cloudflare.com/d1/) --- title: Setup Fullstack Authentication with Next.js, Auth.js, and Cloudflare D1 · Cloudflare Developer Spotlight description: In this tutorial, you will build a Next.js app with authentication powered by Auth.js, Resend, and Cloudflare D1. lastUpdated: 2025-06-05T13:25:05.000Z chatbotDeprioritize: false source_url: html: https://developers.cloudflare.com/developer-spotlight/tutorials/fullstack-authentication-with-next-js-and-cloudflare-d1/ md: https://developers.cloudflare.com/developer-spotlight/tutorials/fullstack-authentication-with-next-js-and-cloudflare-d1/index.md --- In this tutorial, you will build a [Next.js app](https://developers.cloudflare.com/workers/framework-guides/web-apps/nextjs/) with authentication powered by Auth.js, Resend, and [Cloudflare D1](https://developers.cloudflare.com/d1/). Before continuing, make sure you have a Cloudflare account and have installed and [authenticated Wrangler](https://developers.cloudflare.com/workers/wrangler/commands/#login). Some experience with HTML, CSS, and JavaScript/TypeScript is helpful but not required. In this tutorial, you will learn: * How to create a Next.js application and run it on Cloudflare Workers * How to bind a Cloudflare D1 database to your Next.js app and use it to store authentication data * How to use Auth.js to add serverless fullstack authentication to your Next.js app You can find the finished code for this project on [GitHub](https://github.com/mackenly/auth-js-d1-example). ## Prerequisites 1. Sign up for a [Cloudflare account](https://dash.cloudflare.com/sign-up/workers-and-pages). 2. Install [`Node.js`](https://docs.npmjs.com/downloading-and-installing-node-js-and-npm). Node.js version manager Use a Node version manager like [Volta](https://volta.sh/) or [nvm](https://github.com/nvm-sh/nvm) to avoid permission issues and change Node.js versions. [Wrangler](https://developers.cloudflare.com/workers/wrangler/install-and-update/), discussed later in this guide, requires a Node version of `16.17.0` or later. 1. Create or login to a [Resend account](https://resend.com/signup) and get an [API key](https://resend.com/docs/dashboard/api-keys/introduction#add-api-key). 2. [Install and authenticate Wrangler](https://developers.cloudflare.com/workers/wrangler/install-and-update/). ## 1. Create a Next.js app using Workers From within the repository or directory where you want to create your project run: * npm ```sh npm create cloudflare@latest -- auth-js-d1-example --framework=next ``` * yarn ```sh yarn create cloudflare auth-js-d1-example --framework=next ``` * pnpm ```sh pnpm create cloudflare@latest auth-js-d1-example --framework=next ``` For setup, select the following options: * For *What would you like to start with?*, choose `Framework Starter`. * For *Which development framework do you want to use?*, choose `Next.js`. * Complete the framework's own CLI wizard. * For *Do you want to use git for version control?*, choose `Yes`. * For *Do you want to deploy your application?*, choose `No` (we will be making some changes before deploying). This will create a new Next.js project using [OpenNext](https://opennext.js.org/) that will run in a Worker using [Workers Static Assets](#static-assets). Before we get started, open your project's `tsconfig.json` file and modify the following to the `compilerOptions` object to allow for top level await needed to let our application get the Cloudflare context: ```json { "compilerOptions": { "target": "ES2022", } } ``` Throughout this tutorial, we'll add several values to Cloudflare Secrets. For [local development](https://developers.cloudflare.com/workers/configuration/secrets/#local-development-with-secrets), add those same values to a file in the top level of your project called `.dev.vars` and make sure it is not committed into version control. This will let you work with Secret values locally. Go ahead and copy and paste the following into `.dev.vars` for now and replace the values as we go. ```sh AUTH_SECRET = "" AUTH_RESEND_KEY = "" AUTH_EMAIL_FROM = "onboarding@resend.dev" AUTH_URL = "http://localhost:8787/" ``` Manually set URL Within the Workers environment, the `AUTH_URL` doesn't always get picked up automatically by Auth.js, hence why we're specifying it manually here (we'll need to do the same for prod later). ## 2. Install Auth.js Following the [installation instructions](https://authjs.dev/getting-started/installation?framework=Next.js) from Auth.js, begin by installing Auth.js: * npm ```sh npm i next-auth@beta ``` * yarn ```sh yarn add next-auth@beta ``` * pnpm ```sh pnpm add next-auth@beta ``` Now run the following to generate an `AUTH_SECRET`: ```sh npx auth secret ``` Now, deviating from the standard Auth.js setup, locate your generated secret (likely in a file named `.env.local`) and [add the secret to your Workers application](https://developers.cloudflare.com/workers/configuration/secrets/#adding-secrets-to-your-project) by running the following and completing the steps to add a secret's value that we just generated: ```sh npx wrangler secret put AUTH_SECRET ``` If you have not deployed yet that's fine. Allow wrangler to create the worker for you. After adding the secret, update your `.dev.vars` file to include an `AUTH_SECRET` value (this secret should be different from the one you generated earlier for security purposes): ```sh # ... AUTH_SECRET = "" # ... ``` Next, go into `cloudflare-env.d.ts` file and add the following to the CloudflareEnv interface: ```ts interface CloudflareEnv { AUTH_SECRET: string; } ``` ## 3. Install Cloudflare D1 Adapter Now, install the Auth.js D1 adapter by running: * npm ```sh npm i @auth/d1-adapter ``` * yarn ```sh yarn add @auth/d1-adapter ``` * pnpm ```sh pnpm add @auth/d1-adapter ``` Create a D1 database using the following command: ```sh npx wrangler d1 create auth-js-d1-example-db ``` When finished you should see instructions to add the database binding to your [Wrangler configuration file](https://developers.cloudflare.com/workers/wrangler/configuration/). Example binding: * wrangler.jsonc ```jsonc { "d1_databases": [ { "binding": "DB", "database_name": "auth-js-d1-example-db", "database_id": "" } ] } ``` * wrangler.toml ```toml [[d1_databases]] binding = "DB" database_name = "auth-js-d1-example-db" database_id = "" ``` Now, within your `cloudflare-env.d.ts`, add your D1 binding, like: ```ts interface CloudflareEnv { DB: D1Database; AUTH_SECRET: string; } ``` ## 4. Configure Credentials Provider Auth.js provides integrations for many different [credential providers](https://authjs.dev/getting-started/authentication) such as Google, GitHub, etc. For this tutorial we're going to use [Resend for magic links](https://authjs.dev/getting-started/authentication/email). You should have already created a Resend account and have an [API key](https://resend.com/docs/dashboard/api-keys/introduction#add-api-key). Using either a [Resend verified domain email address](https://resend.com/docs/dashboard/domains/introduction) or `onboarding@resend.dev`, add a new Secret to your Worker containing the email your magic links will come from: ```sh npx wrangler secret put AUTH_EMAIL_FROM ``` Next, ensure the `AUTH_EMAIL_FROM` environment variable is updated in your `.dev.vars` file with the email you just added as a secret: ```sh # ... AUTH_EMAIL_FROM = "onboarding@resend.dev" # ... ``` Now [create a Resend API key](https://resend.com/docs/dashboard/api-keys/introduction) with `Sending access` and add it to your Worker's Secrets: ```sh npx wrangler secret put AUTH_RESEND_KEY ``` As with previous secrets, update your `.dev.vars` file with the new secret value for `AUTH_RESEND_KEY` to use in local development: ```sh # ... AUTH_RESEND_KEY = "" # ... ``` After adding both of those Secrets, your `cloudflare-env.d.ts` should now include the following: ```ts interface CloudflareEnv { DB: D1Database; AUTH_SECRET: string; AUTH_RESEND_KEY: string; AUTH_EMAIL_FROM: string; } ``` Credential providers and database adapters are provided to Auth.js through a configuration file called `auth.ts`. Create a file within your `src/app/` directory called `auth.ts` with the following contents: * JavaScript ```js import NextAuth from "next-auth"; import { NextAuthResult } from "next-auth"; import { D1Adapter } from "@auth/d1-adapter"; import Resend from "next-auth/providers/resend"; import { getCloudflareContext } from "@opennextjs/cloudflare"; const authResult = async () => { return NextAuth({ providers: [ Resend({ apiKey: (await getCloudflareContext({ async: true })).env .AUTH_RESEND_KEY, from: (await getCloudflareContext({ async: true })).env.AUTH_EMAIL_FROM, }), ], adapter: D1Adapter((await getCloudflareContext({ async: true })).env.DB), }); }; export const { handlers, signIn, signOut, auth } = await authResult(); ``` * TypeScript ```ts import NextAuth from "next-auth"; import { NextAuthResult } from "next-auth"; import { D1Adapter } from "@auth/d1-adapter"; import Resend from "next-auth/providers/resend"; import { getCloudflareContext } from "@opennextjs/cloudflare"; const authResult = async (): Promise => { return NextAuth({ providers: [ Resend({ apiKey: (await getCloudflareContext({async: true})).env.AUTH_RESEND_KEY, from: (await getCloudflareContext({async: true})).env.AUTH_EMAIL_FROM, }), ], adapter: D1Adapter((await getCloudflareContext({async: true})).env.DB), }); }; export const { handlers, signIn, signOut, auth } = await authResult(); ``` Now, lets add the route handler and middleware used to authenticate and persist sessions. Create a new directory structure and route handler within `src/app/api/auth/[...nextauth]` called `route.ts`. The file should contain: * JavaScript ```js import { handlers } from "../../../auth"; export const { GET, POST } = handlers; ``` * TypeScript ```ts import { handlers } from "../../../auth"; export const { GET, POST } = handlers; ``` Now, within the `src/` directory, create a `middleware.ts` file. If you do not have a `src/` directory, create a `middleware.ts` file in the root of your project. This will persist session data. * JavaScript ```js export { auth as middleware } from "./app/auth"; ``` * TypeScript ```ts export { auth as middleware } from "./app/auth"; ``` ## 5. Create Database Tables The D1 adapter requires that tables be created within your database. It [recommends](https://authjs.dev/getting-started/adapters/d1#migrations) using the exported `up()` method to complete this. Within `src/app/api/` create a directory called `setup` containing a file called `route.ts`. Within this route handler, add the following code: * JavaScript ```js import { up } from "@auth/d1-adapter"; import { getCloudflareContext } from "@opennextjs/cloudflare"; export async function GET() { try { await up((await getCloudflareContext({ async: true })).env.DB); } catch (e) { if (e instanceof Error) { const causeMessage = e.cause instanceof Error ? e.cause.message : String(e.cause); console.log(causeMessage, e.message); } } return new Response("Migration completed"); } ``` * TypeScript ```ts import { up } from "@auth/d1-adapter"; import { getCloudflareContext } from "@opennextjs/cloudflare"; export async function GET() { try { await up((await getCloudflareContext({async: true})).env.DB) } catch (e: unknown) { if (e instanceof Error) { const causeMessage = e.cause instanceof Error ? e.cause.message : String(e.cause); console.log(causeMessage, e.message) } } return new Response('Migration completed'); } ``` You'll need to run this once on your production database to create the necessary tables. If you're following along with this tutorial, we'll run it together in a few steps. Clean up Running this multiple times won't hurt anything since the tables are only created if they do not already exist, but it's a good idea to remove this route from your production code once you've run it since you won't need it anymore. Before we go further, make sure you've created all of the necessary files: ## 6. Build Sign-in Interface We've completed the backend steps for our application. Now, we need a way to sign in. First, let's install [shadcn](https://ui.shadcn.com/): ```sh npx shadcn@latest init -d ``` Next, run the following to add a few components: ```sh npx shadcn@latest add button input card avatar label ``` To make it easy, we've provided a basic sign-in interface for you below that you can copy into your app. You will likely want to customize this to fit your needs, but for now, this will let you sign in, see your account details, and update your user's name. Replace the contents of `page.ts` from within the `app/` directory with the following: ```ts import { redirect } from 'next/navigation'; import { signIn, signOut, auth } from './auth'; import { updateRecord } from '@auth/d1-adapter'; import { getCloudflareContext } from '@opennextjs/cloudflare'; import { Button } from '@/components/ui/button'; import { Input } from '@/components/ui/input'; import { Card, CardContent, CardDescription, CardHeader, CardTitle, CardFooter } from '@/components/ui/card'; import { Avatar, AvatarFallback, AvatarImage } from '@/components/ui/avatar'; import { Label } from '@/components/ui/label'; async function updateName(formData: FormData): Promise { 'use server'; const session = await auth(); if (!session?.user?.id) { return; } const name = formData.get('name') as string; if (!name) { return; } const query = `UPDATE users SET name = $1 WHERE id = $2`; await updateRecord((await getCloudflareContext({async: true})).env.DB, query, [name, session.user.id]); redirect('/'); } export default async function Home() { const session = await auth(); return (
{session ? 'User Profile' : 'Login'} {session ? 'Manage your account' : 'Welcome to the auth-js-d1-example demo'} {session ? (
{session.user?.name?.[0] || 'U'}

{session.user?.name || 'No name set'}

{session.user?.email}

User ID: {session.user?.id}

) : (
{ 'use server'; await signIn('resend', { email: formData.get('email') as string }); }} className="space-y-4" >
)}
{session && (
{ 'use server'; await signOut(); Response.redirect('/'); }} >
)}
); } ``` ## 7. Preview and Deploy Now, it's time to preview our app. Run the following to preview your application: * npm ```sh npm run preview ``` * yarn ```sh yarn run preview ``` * pnpm ```sh pnpm run preview ``` Windows support OpenNext has [limited Windows support](https://opennext.js.org/cloudflare#windows-support) and recommends using WSL2 if developing on Windows. Also, you may need to comment out the `@import "tw-animate-css"` line in the `globals.css` file. You should see our login form. But wait, we're not done yet. Remember to create your database tables by visiting `/api/setup`. You should see `Migration completed`. This means your database is ready to go. Navigate back to your application's homepage. Enter your email and sign in (use the same email as your Resend account if you used the `onboarding@resend.dev` address). You should receive an email in your inbox (check spam). Follow the link to sign in. If everything is configured correctly, you should now see a basic user profile letting your update your name and sign out. Now let's deploy our application to production. From within the project's directory run: * npm ```sh npm run deploy ``` * yarn ```sh yarn run deploy ``` * pnpm ```sh pnpm run deploy ``` This will build and deploy your application as a Worker. Note that you may need to select which account you want to deploy your Worker to. After your app is deployed, Wrangler should give you the URL on which it was deployed. It might look something like this: `https://auth-js-d1-example.example.workers.dev`. Add your URL to your Worker using: ```sh npx wrangler secret put AUTH_URL ``` After the changes are deployed, you should now be able to access and try out your new application. D1 Database Creation You will need to hit the `/api/setup` on your deployed URL to create the necessary tables in your D1 database. It will create 4 tables if they don’t already exist: `accounts`, `sessions`, `users`, and `verification_tokens`. If the `api/setup` route is not working, you can also initialize your tables manually. Look in [migrations.ts](https://github.com/nextauthjs/next-auth/blob/main/packages/adapter-d1/src/migrations.ts) of the Auth.js D1 adapter for the relevant SQL. You have successfully created, configured, and deployed a fullstack Next.js application with authentication powered by Auth.js, Resend, and Cloudflare D1. ## Related resources To build more with Workers, refer to [Tutorials](https://developers.cloudflare.com/workers/tutorials/). Find more information about the tools and services used in this tutorial at: * [Auth.js](https://authjs.dev/getting-started) * [Resend](https://resend.com/) * [Cloudflare D1](https://developers.cloudflare.com/d1/) If you have any questions, need assistance, or would like to share your project, join the Cloudflare Developer community on [Discord](https://discord.cloudflare.com) to connect with other developers and the Cloudflare team.
--- title: Send form submissions using Astro and Resend · Cloudflare Developer Spotlight description: This tutorial will instruct you on how to send emails from Astro and Cloudflare Workers (via Cloudflare SSR Adapter) using Resend. lastUpdated: 2025-03-13T16:14:30.000Z chatbotDeprioritize: false tags: Forms,Astro source_url: html: https://developers.cloudflare.com/developer-spotlight/tutorials/handle-form-submission-with-astro-resend/ md: https://developers.cloudflare.com/developer-spotlight/tutorials/handle-form-submission-with-astro-resend/index.md --- This tutorial will instruct you on how to send emails from [Astro](https://astro.build/) and Cloudflare Workers (via Cloudflare SSR Adapter) using [Resend](https://resend.com/). ## Prerequisites Make sure you have the following set up before proceeding with this tutorial: * A [Cloudflare account](https://dash.cloudflare.com/sign-up/workers-and-pages) * Installed [npm](https://docs.npmjs.com/getting-started). * A [Resend account](https://resend.com/signup). ## 1. Create a new Astro project and install Cloudflare Adapter: Open your terminal and run the below command: ```bash npm create cloudflare@latest my-astro-app -- --framework=astro ``` Follow the prompts to configure your project, selecting your preferred options for TypeScript usage, TypeScript strictness, version control, and deployment. After the initial installation change into the newly created project directory `my-astro-app` and run the following to add the Cloudflare adapter: ```bash npm run astro add cloudflare ``` The [`@astrojs/cloudflare` adapter](https://github.com/withastro/adapters/tree/main/packages/cloudflare#readme) allows Astro's Server-Side Rendered (SSR) sites and components to work on Cloudflare Pages and converts Astro's endpoints into Cloudflare Workers endpoints. ## 2. Add your domain to Resend Note If you do not have a domain and just want to test you can skip to step 4 of this section. 1. **Add Your Domain from Cloudflare to Resend:** * After signing up for Resend, navigate to the side menu and click `Domains`. * Look for the button to add a new domain and click it. * A pop-up will appear where you can type in your domain. Do so, then choose a region and click the `add` button. * After clicking the add button Resend will provide you with a list of DNS records (DKIM, SPF, and DMARC). 2. **Copy DNS Records from Resend to Cloudflare:** * Go back to your Cloudflare dashboard. * Select the domain you want to use and find the "DNS" section. * Copy and paste the DNS records from Resend to Cloudflare. 3. **Verify Your Domain:** * Return to Resend and click on the "Verify DNS Records" button. * If everything is set up correctly, your domain status will change to "Verified." 4. **Create an API Key:** * In Resend, find the "API Keys" option in the side menu and click it. * Create a new API key with a descriptive name and give Full Access permission. 5. **Save the API key for Local Development and Deployed Worker** * For local development, create an .env in the root folder of your Astro project and save the API key as RESEND\_API\_KEY='Api key here' (no quotes). * For a deployed Worker, run the following in your CLI and follow the instructions. ```bash npx wrangler secret put RESEND_API_KEY ``` ## 3. Create an Astro endpoint In the `src/pages` directory, create a new folder called `api`. Inside the `api` folder, create a new file called `sendEmail.json.ts`. This will create an endpoint at `/api/sendEmail.json`. Copy the following code into the `sendEmail.json.ts` file. This code sets up a POST route that handles form submissions, and validates the form data. ```ts export const prerender = false; //This will not work without this line import type { APIRoute } from "astro"; export const POST: APIRoute = async ({ request }) => { const data = await request.formData(); const name = data.get("name"); const email = data.get("email"); const message = data.get("message"); // Validate the data - making sure values are not empty if (!name || !email || !message) { return new Response(null, { status: 404, statusText: "Did not provide the right data", }); } }; ``` ## 4. Send emails using Resend Next you will need to install the Resend SDK. ```bash npm i resend ``` Once the SDK is installed you can add in the rest of the code that sends an email using the Resend's API, and conditionally checks if the Resend response was successful or not. ```ts export const prerender = false; //This will not work without this line import type { APIRoute } from "astro"; import { Resend } from "resend"; const resend = new Resend(import.meta.env.RESEND_API_KEY); export const POST: APIRoute = async ({ request }) => { const data = await request.formData(); const name = data.get("name"); const email = data.get("email"); const message = data.get("message"); // Validate the data - making sure values are not empty if (!name || !email || !message) { return new Response( JSON.stringify({ message: `Fill out all fields.`, }), { status: 404, statusText: "Did not provide the right data", }, ); } // Sending information to Resend const sendResend = await resend.emails.send({ from: "support@resend.dev", to: "delivered@resend.dev", subject: `Sumbission from ${name}`, html: `

Hi ${name},

Your message was received.

`, }); // If the message was sent successfully, return a 200 response if (sendResend.data) { return new Response( JSON.stringify({ message: `Message successfully sent!`, }), { status: 200, statusText: "OK", }, ); // If there was an error sending the message, return a 500 response } else { return new Response( JSON.stringify({ message: `Message failed to send: ${sendResend.error}`, }), { status: 500, statusText: `Internal Server Error: ${sendResend.error}`, }, ); } }; ``` Note Make sure to change the 'to' property in 'resend.emails.send' function, if you set up your own domain in step 2. If you skipped that step, keep the value ''; otherwise, Resend will throw an error. ## 5. Create an Astro Form Component In the `src` directory, create a new folder called `components`. Inside the `components` folder, create a new file `AstroForm.astro` and copy the provided code into it. ```typescript --- export const prerender = false; type formData = { name: string; email: string; message: string; }; if (Astro.request.method === "POST") { try { const formData = await Astro.request.formData(); const response = await fetch(Astro.url + "/api/sendEmail.json", { method: "POST", body: formData, }); const data: formData = await response.json(); if (response.status === 200) { console.log(data.message); } } catch (error) { if (error instanceof Error) { console.error(`Error: ${error.message}`); } } } ---
           
``` Your plugin should pick up the `data-static-form-name="contact"` attribute, set the `method="POST"`, inject in an `` element, and capture `POST` submissions. ### 8. Deploy your Pages project Make sure the new Plugin has been added to your `package.json` and that everything works locally as you would expect. You can then `git commit` and `git push` to trigger a Cloudflare Pages deployment. If you experience any problems with any one Plugin, file an issue on that Plugin's bug tracker. If you experience any problems with Plugins in general, we would appreciate your feedback in the #pages-discussions channel in [Discord](https://discord.com/invite/cloudflaredev)! We are excited to see what you build with Plugins and welcome any feedback about the authoring or developer experience. Let us know in the Discord channel if there is anything you need to make Plugins even more powerful. *** ## Chain your Plugin Finally, as with Pages Functions generally, it is possible to chain together Plugins in order to combine together different features. Middleware defined higher up in the filesystem will run before other handlers, and individual files can chain together Functions in an array like so: ```typescript import sentryPlugin from "@cloudflare/pages-plugin-sentry"; import cloudflareAccessPlugin from "@cloudflare/pages-plugin-cloudflare-access"; import adminDashboardPlugin from "@cloudflare/a-fictional-admin-plugin"; export const onRequest = [ // Initialize a Sentry Plugin to capture any errors sentryPlugin({ dsn: "https://sentry.io/welcome/xyz" }), // Initialize a Cloudflare Access Plugin to ensure only administrators can access this protected route cloudflareAccessPlugin({ domain: "https://test.cloudflareaccess.com", aud: "4714c1358e65fe4b408ad6d432a5f878f08194bdb4752441fd56faefa9b2b6f2", }), // Populate the Sentry plugin with additional information about the current user (context) => { const email = context.data.cloudflareAccessJWT.payload?.email || "service user"; context.data.sentry.setUser({ email }); return next(); }, // Finally, serve the admin dashboard plugin, knowing that errors will be captured and that every incoming request has been authenticated adminDashboardPlugin(), ]; ```
--- title: Pricing · Cloudflare Pages docs description: Requests to your Functions are billed as Cloudflare Workers requests. Workers plans and pricing can be found in the Workers documentation. lastUpdated: 2025-05-09T17:32:11.000Z chatbotDeprioritize: false source_url: html: https://developers.cloudflare.com/pages/functions/pricing/ md: https://developers.cloudflare.com/pages/functions/pricing/index.md --- Requests to your Functions are billed as Cloudflare Workers requests. Workers plans and pricing can be found [in the Workers documentation](https://developers.cloudflare.com/workers/platform/pricing/). ## Paid Plans Requests to your Pages functions count towards your quota for Workers Paid plans, including requests from your Function to KV or Durable Object bindings. Pages supports the [Standard usage model](https://developers.cloudflare.com/workers/platform/pricing/#example-pricing-standard-usage-model). Note Workers Enterprise accounts are billed based on the usage model specified in their contract. To switch to the Standard usage model, reach out to your Customer Success Manager (CSM). Some Workers Enterprise customers maintain the ability to [change usage models](https://developers.cloudflare.com/workers/platform/pricing/#how-to-switch-usage-models). ### Static asset requests On both free and paid plans, requests to static assets are free and unlimited. A request is considered static when it does not invoke Functions. Refer to [Functions invocation routes](https://developers.cloudflare.com/pages/functions/routing/#functions-invocation-routes) to learn more about when Functions are invoked. ## Free Plan Requests to your Pages Functions count towards your quota for the Workers Free plan. For example, you could use 50,000 Functions requests and 50,000 Workers requests to use your full 100,000 daily request usage. The free plan daily request limit resets at midnight UTC. --- title: Routing · Cloudflare Pages docs description: "Functions utilize file-based routing. Your /functions directory structure determines the designated routes that your Functions will run on. You can create a /functions directory with as many levels as needed for your project's use case. Review the following directory:" lastUpdated: 2025-05-14T07:26:54.000Z chatbotDeprioritize: false source_url: html: https://developers.cloudflare.com/pages/functions/routing/ md: https://developers.cloudflare.com/pages/functions/routing/index.md --- Functions utilize file-based routing. Your `/functions` directory structure determines the designated routes that your Functions will run on. You can create a `/functions` directory with as many levels as needed for your project's use case. Review the following directory: The following routes will be generated based on the above file structure. These routes map the URL pattern to the `/functions` file that will be invoked when a visitor goes to the URL: | File path | Route | | - | - | | /functions/index.js | example.com | | /functions/helloworld.js | example.com/helloworld | | /functions/howdyworld.js | example.com/howdyworld | | /functions/fruits/index.js | example.com/fruits | | /functions/fruits/apple.js | example.com/fruits/apple | | /functions/fruits/banana.js | example.com/fruits/banana | Trailing slash Trailing slash is optional. Both `/foo` and `/foo/` will be routed to `/functions/foo.js` or `/functions/foo/index.js`. If your project has both a `/functions/foo.js` and `/functions/foo/index.js` file, `/foo` and `/foo/` would route to `/functions/foo/index.js`. If no Function is matched, it will fall back to a static asset if there is one. Otherwise, the Function will fall back to the [default routing behavior](https://developers.cloudflare.com/pages/configuration/serving-pages/) for Pages' static assets. ## Dynamic routes Dynamic routes allow you to match URLs with parameterized segments. This can be useful if you are building dynamic applications. You can accept dynamic values which map to a single path by changing your filename. ### Single path segments To create a dynamic route, place one set of brackets around your filename – for example, `/users/[user].js`. By doing this, you are creating a placeholder for a single path segment: | Path | Matches? | | - | - | | /users/nevi | Yes | | /users/daniel | Yes | | /profile/nevi | No | | /users/nevi/foobar | No | | /nevi | No | ### Multipath segments By placing two sets of brackets around your filename – for example, `/users/[[user]].js` – you are matching any depth of route after `/users/`: | Path | Matches? | | - | - | | /users/nevi | Yes | | /users/daniel | Yes | | /profile/nevi | No | | /users/nevi/foobar | Yes | | /users/daniel/xyz/123 | Yes | | /nevi | No | Route specificity More specific routes (routes with fewer wildcards) take precedence over less specific routes. #### Dynamic route examples Review the following `/functions/` directory structure: The following requests will match the following files: | Request | File | | - | - | | /foo | Will route to a static asset if one is available. | | /date | /date.js | | /users/daniel | /users/\[user].js | | /users/nevi | /users/\[user].js | | /users/special | /users/special.js | | /users/daniel/xyz/123 | /users/\[\[catchall]].js | The URL segment(s) that match the placeholder (`[user]`) will be available in the request [`context`](https://developers.cloudflare.com/pages/functions/api-reference/#eventcontext) object. The [`context.params`](https://developers.cloudflare.com/pages/functions/api-reference/#eventcontext) object can be used to find the matched value for a given filename placeholder. For files which match a single URL segment (use a single set of brackets), the values are returned as a string: ```js export function onRequest(context) { return new Response(context.params.user); } ``` The above logic will return `daniel` for requests to `/users/daniel`. For files which match against multiple URL segments (use a double set of brackets), the values are returned as an array: ```js export function onRequest(context) { return new Response(JSON.stringify(context.params.catchall)); } ``` The above logic will return `["daniel", "xyz", "123"]` for requests to `/users/daniel/xyz/123`. ## Functions invocation routes On a purely static project, Pages offers unlimited free requests. However, once you add Functions on a Pages project, all requests by default will invoke your Function. To continue receiving unlimited free static requests, exclude your project's static routes by creating a `_routes.json` file. This file will be automatically generated if a `functions` directory is detected in your project when you publish your project with Pages CI or Wrangler. Note Some frameworks (such as [Remix](https://developers.cloudflare.com/pages/framework-guides/deploy-a-remix-site/), [SvelteKit](https://developers.cloudflare.com/pages/framework-guides/deploy-a-svelte-kit-site/)) will also automatically generate a `_routes.json` file. However, if your preferred framework does not, create an issue on their framework repository with a link to this page or let us know on [Discord](https://discord.cloudflare.com). Refer to the [Framework guide](https://developers.cloudflare.com/pages/framework-guides/) for more information on full-stack frameworks. ### Create a `_routes.json` file Create a `_routes.json` file to control when your Function is invoked. It should be placed in the output directory of your project. This file will include three different properties: * **version**: Defines the version of the schema. Currently there is only one version of the schema (version 1), however, we may add more in the future and aim to be backwards compatible. * **include**: Defines routes that will be invoked by Functions. Accepts wildcard behavior. * **exclude**: Defines routes that will not be invoked by Functions. Accepts wildcard behavior. `exclude` always take priority over `include`. Note Wildcards match any number of path segments (slashes). For example, `/users/*` will match everything after the`/users/` path. #### Example configuration Below is an example of a `_routes.json`. ```json { "version": 1, "include": ["/*"], "exclude": [] } ``` This `_routes.json` will invoke your Functions on all routes. Below is another example of a `_routes.json` file. Any route inside the `/build` directory will not invoke the Function and will not incur a Functions invocation charge. ```json { "version": 1, "include": ["/*"], "exclude": ["/build/*"] } ``` ## Fail open / closed If on the Workers Free plan, you can configure how Pages behaves when your daily free tier allowance of Pages Functions requests is exhausted. If, for example, you are performing authentication checks or other critical functionality in your Pages Functions, you may wish to disable your Pages project when the allowance is exhausted. 1. Log in to the [Cloudflare dashboard](https://dash.cloudflare.com) and select your account. 2. From **Account Home**, go to **Workers & Pages**. 3. In **Overview**, select your Pages project. 4. Go to **Settings** > **Runtime** > **Fail open / closed**. "Fail open" means that static assets will continue to be served, even if Pages Functions would ordinarily have run first. "Fail closed" means an error page will be returned, rather than static assets. The daily request limit for Pages Functions can be removed entirely by upgrading to [Workers Standard](https://developers.cloudflare.com/workers/platform/pricing/#workers). ### Limits Functions invocation routes have the following limits: * You must have at least one include rule. * You may have no more than 100 include/exclude rules combined. * Each rule may have no more than 100 characters. --- title: Smart Placement · Cloudflare Pages docs description: By default, Workers and Pages Functions are invoked in a data center closest to where the request was received. If you are running back-end logic in a Pages Function, it may be more performant to run that Pages Function closer to your back-end infrastructure rather than the end user. Smart Placement (beta) automatically places your workloads in an optimal location that minimizes latency and speeds up your applications. lastUpdated: 2025-05-09T17:32:11.000Z chatbotDeprioritize: false source_url: html: https://developers.cloudflare.com/pages/functions/smart-placement/ md: https://developers.cloudflare.com/pages/functions/smart-placement/index.md --- By default, [Workers](https://developers.cloudflare.com/workers/) and [Pages Functions](https://developers.cloudflare.com/pages/functions/) are invoked in a data center closest to where the request was received. If you are running back-end logic in a Pages Function, it may be more performant to run that Pages Function closer to your back-end infrastructure rather than the end user. Smart Placement (beta) automatically places your workloads in an optimal location that minimizes latency and speeds up your applications. ## Background Smart Placement applies to Pages Functions and middleware. Normally, assets are always served globally and closest to your users. Smart Placement on Pages currently has some caveats. While assets are always meant to be served from a location closest to the user, there are two exceptions to this behavior: 1. If using middleware for every request (`functions/_middleware.js`) when Smart Placement is enabled, all assets will be served from a location closest to your back-end infrastructure. This may result in an unexpected increase in latency as a result. 2. When using [`env.ASSETS.fetch`](https://developers.cloudflare.com/pages/functions/advanced-mode/), assets served via the `ASSETS` fetcher from your Pages Function are served from the same location as your Function. This could be the location closest to your back-end infrastructure and not the user. Note To understand how Smart Placement works, refer to [Smart Placement](https://developers.cloudflare.com/workers/configuration/smart-placement/). ## Enable Smart Placement (beta) Smart Placement is available on all plans. ### Enable Smart Placement via the dashboard To enable Smart Placement via the dashboard: 1. Log in to the [Cloudflare dashboard](https://dash.cloudflare.com) and select your account. 2. In Account Home, select **Workers & Pages**. 3. In **Overview**, select your Pages project. 4. Select **Settings** > **Functions**. 5. Under **Placement**, choose **Smart**. 6. Send some initial traffic (approximately 20-30 requests) to your Pages Functions. It takes a few minutes after you have sent traffic to your Pages Function for Smart Placement to take effect. 7. View your Pages Function's [request duration metrics](https://developers.cloudflare.com/workers/observability/metrics-and-analytics/) under Functions Metrics. ## Give feedback on Smart Placement Smart Placement is in beta. To share your thoughts and experience with Smart Placement, join the [Cloudflare Developer Discord](https://discord.cloudflare.com). --- title: Source maps and stack traces · Cloudflare Pages docs description: Adding source maps and generating stack traces for Pages. lastUpdated: 2025-05-09T17:32:11.000Z chatbotDeprioritize: false source_url: html: https://developers.cloudflare.com/pages/functions/source-maps/ md: https://developers.cloudflare.com/pages/functions/source-maps/index.md --- [Stack traces](https://developer.mozilla.org/en-US/docs/Web/JavaScript/Reference/Global_Objects/Error/stack) help with debugging your code when your application encounters an unhandled exception. Stack traces show you the specific functions that were called, in what order, from which line and file, and with what arguments. Most JavaScript code is first bundled, often transpiled, and then minified before being deployed to production. This process creates smaller bundles to optimize performance and converts code from TypeScript to Javascript if needed. Source maps translate compiled and minified code back to the original code that you wrote. Source maps are combined with the stack trace returned by the JavaScript runtime to present you with a stack trace. Warning Support for uploading source maps for Pages is available now in open beta. Minimum required Wrangler version: 3.60.0. ## Source Maps To enable source maps, provide the `--upload-source-maps` flag to [`wrangler pages deploy`](https://developers.cloudflare.com/workers/wrangler/commands/#deploy-1) or add the following to your Pages application's [Wrangler configuration file](https://developers.cloudflare.com/pages/functions/wrangler-configuration/) if you are using the Pages build environment: * wrangler.jsonc ```jsonc { "upload_source_maps": true } ``` * wrangler.toml ```toml upload_source_maps = true ``` When uploading source maps is enabled, Wrangler will automatically generate and upload source map files when you run [`wrangler pages deploy`](https://developers.cloudflare.com/workers/wrangler/commands/#deploy-1). ## Stack traces ​​ When your application throws an uncaught exception, we fetch the source map and use it to map the stack trace of the exception back to lines of your application’s original source code. You can then view the stack trace when streaming [real-time logs](https://developers.cloudflare.com/pages/functions/debugging-and-logging/). Note The source map is retrieved after your Pages Function invocation completes — it's an asynchronous process that does not impact your applications's CPU utilization or performance. Source maps are not accessible inside the application at runtime, if you `console.log()` the [stack property](https://developer.mozilla.org/en-US/docs/Web/JavaScript/Reference/Global_Objects/Error/stack), you will not get a deobfuscated stack trace. ## Limits | Description | Limit | | - | - | | Maximum Source Map Size | 15 MB gzipped | ## Related resources * [Real-time logs](https://developers.cloudflare.com/pages/functions/debugging-and-logging/) - Learn how to capture Pages logs in real-time. --- title: TypeScript · Cloudflare Pages docs description: Pages Functions supports TypeScript. Author any files in your /functions directory with a .ts extension instead of a .js extension to start using TypeScript. lastUpdated: 2025-05-09T17:32:11.000Z chatbotDeprioritize: false source_url: html: https://developers.cloudflare.com/pages/functions/typescript/ md: https://developers.cloudflare.com/pages/functions/typescript/index.md --- Pages Functions supports TypeScript. Author any files in your `/functions` directory with a `.ts` extension instead of a `.js` extension to start using TypeScript. You can add runtime types and Env types by running: * npm ```sh npx wrangler types --path='./functions/types.d.ts' ``` * yarn ```sh yarn wrangler types --path='./functions/types.d.ts' ``` * pnpm ```sh pnpm wrangler types --path='./functions/types.d.ts' ``` Then configure the types by creating a `functions/tsconfig.json` file: ```json { "compilerOptions": { "target": "esnext", "module": "esnext", "lib": ["esnext"], "types": ["./types.d.ts"] } } ``` See [the `wrangler types` command docs](https://developers.cloudflare.com/workers/wrangler/commands/#types) for more details. If you already have a `tsconfig.json` at the root of your project, you may wish to explicitly exclude the `/functions` directory to avoid conflicts. To exclude the `/functions` directory: ```json { "include": ["src/**/*"], "exclude": ["functions/**/*"], "compilerOptions": {} } ``` Pages Functions can be typed using the `PagesFunction` type. This type accepts an `Env` parameter. The `Env` type should have been generated by `wrangler types` and can be found at the top of `types.d.ts`. Alternatively, you can define the `Env` type manually. For example: ```ts interface Env { KV: KVNamespace; } export const onRequest: PagesFunction = async (context) => { const value = await context.env.KV.get("example"); return new Response(value); }; ``` If you are using `nodejs_compat`, make sure you have installed `@types/node` and updated your `tsconfig.json`. ```json { "compilerOptions": { "target": "esnext", "module": "esnext", "lib": ["esnext"], "types": ["./types.d.ts", "node"] } } ``` Note If you were previously using `@cloudflare/workers-types` instead of the runtime types generated by `wrangler types`, you can refer to this [migration guide](https://developers.cloudflare.com/workers/languages/typescript/#migrating). --- title: Configuration · Cloudflare Pages docs description: Pages Functions can be configured two ways, either via the Cloudflare dashboard or the Wrangler configuration file, a file used to customize the development and deployment setup for Workers and Pages Functions. lastUpdated: 2025-06-18T17:02:32.000Z chatbotDeprioritize: false source_url: html: https://developers.cloudflare.com/pages/functions/wrangler-configuration/ md: https://developers.cloudflare.com/pages/functions/wrangler-configuration/index.md --- Warning If your project contains an existing Wrangler file that you [previously used for local development](https://developers.cloudflare.com/pages/functions/local-development/), make sure you verify that it matches your project settings in the Cloudflare dashboard before opting-in to deploy your Pages project with the Wrangler configuration file. Instead of writing your Wrangler file by hand, Cloudflare recommends using `npx wrangler pages download config` to download your current project settings into a Wrangler file. Note As of Wrangler v3.91.0, Wrangler supports both JSON (`wrangler.json` or `wrangler.jsonc`) and TOML (`wrangler.toml`) for its configuration file. Prior to that version, only `wrangler.toml` was supported. Pages Functions can be configured two ways, either via the [Cloudflare dashboard](https://dash.cloudflare.com) or the Wrangler configuration file, a file used to customize the development and deployment setup for [Workers](https://developers.cloudflare.com/workers/) and Pages Functions. This page serves as a reference on how to configure your Pages project via the Wrangler configuration file. If using a Wrangler configuration file, you must treat your file as the [source of truth](https://developers.cloudflare.com/pages/functions/wrangler-configuration/#source-of-truth) for your Pages project configuration. Using the Wrangler configuration file to configure your Pages project allows you to: * **Store your configuration file in source control:** Keep your configuration in your repository alongside the rest of your code. * **Edit your configuration via your code editor:** Remove the need to switch back and forth between interfaces. * **Write configuration that is shared across environments:** Define configuration like [bindings](https://developers.cloudflare.com/pages/functions/bindings/) for local development, preview and production in one file. * **Ensure better access control:** By using a configuration file in your project repository, you can control who has access to make changes without giving access to your Cloudflare dashboard. ## Example Wrangler file * wrangler.jsonc ```jsonc { "name": "my-pages-app", "pages_build_output_dir": "./dist", "kv_namespaces": [ { "binding": "KV", "id": "" } ], "d1_databases": [ { "binding": "DB", "database_name": "northwind-demo", "database_id": "" } ], "vars": { "API_KEY": "1234567asdf" } } ``` * wrangler.toml ```toml name = "my-pages-app" pages_build_output_dir = "./dist" [[kv_namespaces]] binding = "KV" id = "" [[d1_databases]] binding = "DB" database_name = "northwind-demo" database_id = "" [vars] API_KEY = "1234567asdf" ``` ## Requirements ### V2 build system Pages Functions configuration via the Wrangler configuration file requires the [V2 build system](https://developers.cloudflare.com/pages/configuration/build-image/#v2-build-system) or later. To update from V1, refer to the [V2 build system migration instructions](https://developers.cloudflare.com/pages/configuration/build-image/#v1-to-v2-migration). ### Wrangler You must have Wrangler version 3.45.0 or higher to use a Wrangler configuration file for your Pages project's configuration. To check your Wrangler version, update Wrangler or install Wrangler, refer to [Install/Update Wrangler](https://developers.cloudflare.com/workers/wrangler/install-and-update/). ## Migrate from dashboard configuration The migration instructions for Pages projects that do not have a Wrangler file currently are different than those for Pages projects with an existing Wrangler file. Read the instructions based on your situation carefully to avoid errors in production. ### Projects with existing Wrangler file Before you could use the Wrangler configuration file to define your preview and production configuration, it was possible to use the file to define which [bindings](https://developers.cloudflare.com/pages/functions/bindings/) should be available to your Pages project in local development. If you have been using a Wrangler configuration file for local development, you may already have a file in your Pages project that looks like this: * wrangler.jsonc ```jsonc { "kv_namespaces": [ { "binding": "KV", "id": "" } ] } ``` * wrangler.toml ```toml [[kv_namespaces]] binding = "KV" id = "" ``` If you would like to use your existing Wrangler file for your Pages project configuration, you must: 1. Add the `pages_build_output_dir` key with the appropriate value of your [build output directory](https://developers.cloudflare.com/pages/configuration/build-configuration/#build-commands-and-directories) (for example, `pages_build_output_dir = "./dist"`.) 2. Review your existing Wrangler configuration carefully to make sure it aligns with your desired project configuration before deploying. If you add the `pages_build_output_dir` key to your Wrangler configuration file and deploy your Pages project, Pages will use whatever configuration was defined for local use, which is very likely to be non-production. Do not deploy until you are confident that your Wrangler configuration file is ready for production use. Overwriting configuration Running [`wrangler pages download config`](https://developers.cloudflare.com/pages/functions/wrangler-configuration/#projects-without-existing-wranglertoml-file) will overwrite your existing Wrangler file with a generated Wrangler file based on your Cloudflare dashboard configuration. Run this command only if you want to discard your previous Wrangler file that you used for local development and start over with configuration pulled from the Cloudflare dashboard. You can continue to use your Wrangler file for local development without migrating it for production use by not adding a `pages_build_output_dir` key. If you do not add a `pages_build_output_dir` key and run `wrangler pages deploy`, you will see a warning message telling you that fields are missing and that the file will continue to be used for local development only. ### Projects without existing Wrangler file If you have an existing Pages project with configuration set up via the Cloudflare dashboard and do not have an existing Wrangler file in your Project, run the `wrangler pages download config` command in your Pages project directory. The `wrangler pages download config` command will download your existing Cloudflare dashboard configuration and generate a valid Wrangler file in your Pages project directory. * npm ```sh npx wrangler pages download config ``` * yarn ```sh yarn wrangler pages download config ``` * pnpm ```sh pnpm wrangler pages download config ``` Review your generated Wrangler file. To start using the Wrangler configuration file for your Pages project's configuration, create a new deployment, via [Git integration](https://developers.cloudflare.com/pages/get-started/git-integration/) or [Direct Upload](https://developers.cloudflare.com/pages/get-started/direct-upload/). ### Handling compatibility dates set to "Latest" In the Cloudflare dashboard, you can set compatibility dates for preview deployments to "Latest". This will ensure your project is always using the latest compatibility date without the need to explicitly set it yourself. If you download a Wrangler configuration file from a project configured with "Latest" using the `wrangler pages download` command, your Wrangler configuration file will have the latest compatibility date available at the time you downloaded the configuration file. Wrangler does not support the "Latest" functionality like the dashboard. Compatibility dates must be explicitly set when using a Wrangler configuration file. Refer to [this guide](https://developers.cloudflare.com/workers/configuration/compatibility-dates/) for more information on what compatibility dates are and how they work. ## Differences using a Wrangler configuration file for Pages Functions and Workers If you have used [Workers](https://developers.cloudflare.com/workers), you may already be familiar with the [Wrangler configuration file](https://developers.cloudflare.com/workers/wrangler/configuration/). There are a few key differences to be aware of when using this file with your Pages Functions project: * The configuration fields **do not match exactly** between Pages Functions Wrangler file and the Workers equivalent. For example, configuration keys like `main`, which are Workers specific, do not apply to a Pages Function's Wrangler configuration file. Some functionality supported by Workers, such as [module aliasing](https://developers.cloudflare.com/workers/wrangler/configuration/#module-aliasing) cannot yet be used by Cloudflare Pages projects. * The Pages' Wrangler configuration file introduces a new key, `pages_build_output_dir`, which is only used for Pages projects. * The concept of [environments](https://developers.cloudflare.com/pages/functions/wrangler-configuration/#configure-environments) and configuration inheritance in this file **is not** the same as Workers. * This file becomes the [source of truth](https://developers.cloudflare.com/pages/functions/wrangler-configuration/#source-of-truth) when used, meaning that you **can not edit the same fields in the dashboard** once you are using this file. ## Configure environments With a Wrangler configuration file, you can quickly set configuration across your local environment, preview deployments, and production. ### Local development The Wrangler configuration file applies locally when using `wrangler pages dev`. This means that you can test out configuration changes quickly without a need to login to the Cloudflare dashboard. Refer to the following config file for an example: * wrangler.jsonc ```jsonc { "name": "my-pages-app", "pages_build_output_dir": "./dist", "compatibility_date": "2023-10-12", "compatibility_flags": [ "nodejs_compat" ], "kv_namespaces": [ { "binding": "KV", "id": "" } ] } ``` * wrangler.toml ```toml name = "my-pages-app" pages_build_output_dir = "./dist" compatibility_date = "2023-10-12" compatibility_flags = ["nodejs_compat"] [[kv_namespaces]] binding = "KV" id = "" ``` This Wrangler configuration file adds the `nodejs_compat` compatibility flag and a KV namespace binding to your Pages project. Running `wrangler pages dev` in a Pages project directory with this Wrangler configuration file will apply the `nodejs_compat` compatibility flag locally, and expose the `KV` binding in your Pages Function code at `context.env.KV`. Note For a full list of configuration keys, refer to [inheritable keys](#inheritable-keys) and [non-inheritable keys](#non-inheritable-keys). ### Production and preview deployments Once you are ready to deploy your project, you can set the configuration for production and preview deployments by creating a new deployment containing a Wrangler file. Note For the following commands, if you are using git it is important to remember the branch that you set as your [production branch](https://developers.cloudflare.com/pages/configuration/branch-build-controls/#production-branch-control) as well as your [preview branch settings](https://developers.cloudflare.com/pages/configuration/branch-build-controls/#preview-branch-control). To use the example above as your configuration for production, make a new production deployment using: ```sh npx wrangler pages deploy ``` or more specifically: ```sh npx wrangler pages deploy --branch ``` To deploy the configuration for preview deployments, you can run the same command as above while on a branch you have configured to work with [preview deployments](https://developers.cloudflare.com/pages/configuration/branch-build-controls/#preview-branch-control). This will set the configuration for all preview deployments, not just the deployments from a specific branch. Pages does not currently support branch-based configuration. Note The `--branch` flag is optional with `wrangler pages deploy`. If you use git integration, Wrangler will infer the branch you are on from the repository you are currently in and implicitly add it to the command. ### Environment-specific overrides There are times that you might want to use different configuration across local, preview deployments, and production. It is possible to override configuration for production and preview deployments by using `[env.production]` or `[env.preview]`. Note Unlike [Workers Environments](https://developers.cloudflare.com/workers/wrangler/configuration/#environments), `production` and `preview` are the only two options available via `[env.]`. Refer to the following Wrangler configuration file for an example of how to override preview deployment configuration: * wrangler.jsonc ```jsonc { "name": "my-pages-site", "pages_build_output_dir": "./dist", "kv_namespaces": [ { "binding": "KV", "id": "" } ], "vars": { "API_KEY": "1234567asdf" }, "env": { "preview": { "kv_namespaces": [ { "binding": "KV", "id": "" } ], "vars": { "API_KEY": "8901234bfgd" } } } } ``` * wrangler.toml ```toml name = "my-pages-site" pages_build_output_dir = "./dist" [[kv_namespaces]] binding = "KV" id = "" [vars] API_KEY = "1234567asdf" [[env.preview.kv_namespaces]] binding = "KV" id = "" [env.preview.vars] API_KEY = "8901234bfgd" ``` If you deployed this file via `wrangler pages deploy`, `name`, `pages_build_output_dir`, `kv_namespaces`, and `vars` would apply the configuration to local and production, while `env.preview` would override `kv_namespaces` and `vars` for preview deployments. If you wanted to have configuration values apply to local and preview, but override production, your file would look like this: * wrangler.jsonc ```jsonc { "name": "my-pages-site", "pages_build_output_dir": "./dist", "kv_namespaces": [ { "binding": "KV", "id": "" } ], "vars": { "API_KEY": "1234567asdf" }, "env": { "production": { "kv_namespaces": [ { "binding": "KV", "id": "" } ], "vars": { "API_KEY": "8901234bfgd" } } } } ``` * wrangler.toml ```toml name = "my-pages-site" pages_build_output_dir = "./dist" [[kv_namespaces]] binding = "KV" id = "" [vars] API_KEY = "1234567asdf" [[env.production.kv_namespaces]] binding = "KV" id = "" [env.production.vars] API_KEY = "8901234bfgd" ``` You can always be explicit and override both preview and production: * wrangler.jsonc ```jsonc { "name": "my-pages-site", "pages_build_output_dir": "./dist", "kv_namespaces": [ { "binding": "KV", "id": "" } ], "vars": { "API_KEY": "1234567asdf" }, "env": { "preview": { "kv_namespaces": [ { "binding": "KV", "id": "" } ], "vars": { "API_KEY": "8901234bfgd" } }, "production": { "kv_namespaces": [ { "binding": "KV", "id": "" } ], "vars": { "API_KEY": "6567875fvgt" } } } } ``` * wrangler.toml ```toml name = "my-pages-site" pages_build_output_dir = "./dist" [[kv_namespaces]] binding = "KV" id = "" [vars] API_KEY = "1234567asdf" [[env.preview.kv_namespaces]] binding = "KV" id = "" [env.preview.vars] API_KEY = "8901234bfgd" [[env.production.kv_namespaces]] binding = "KV" id = "" [env.production.vars] API_KEY = "6567875fvgt" ``` ## Inheritable keys Inheritable keys are configurable at the top-level, and can be inherited (or overridden) by environment-specific configuration. * `name` string required * The name of your Pages project. Alphanumeric and dashes only. * `pages_build_output_dir` string required * The path to your project's build output folder. For example: `./dist`. * `compatibility_date` string required * A date in the form `yyyy-mm-dd`, which will be used to determine which version of the Workers runtime is used. Refer to [Compatibility dates](https://developers.cloudflare.com/workers/configuration/compatibility-dates/). * `compatibility_flags` string\[] optional * A list of flags that enable features from upcoming features of the Workers runtime, usually used together with `compatibility_date`. Refer to [compatibility dates](https://developers.cloudflare.com/workers/configuration/compatibility-dates/). * `send_metrics` boolean optional * Whether Wrangler should send usage data to Cloudflare for this project. Defaults to `true`. You can learn more about this in our [data policy](https://github.com/cloudflare/workers-sdk/tree/main/packages/wrangler/telemetry.md). * `limits` Limits optional * Configures limits to be imposed on execution at runtime. Refer to [Limits](#limits). * `placement` Placement optional * Specify how Pages Functions should be located to minimize round-trip time. Refer to [Smart Placement](https://developers.cloudflare.com/workers/configuration/smart-placement/). * `upload_source_maps` boolean * When `upload_source_maps` is set to `true`, Wrangler will upload any server-side source maps part of your Pages project to give corrected stack traces in logs. ## Non-inheritable keys Non-inheritable keys are configurable at the top-level, but, if any one non-inheritable key is overridden for any environment (for example,`[[env.production.kv_namespaces]]`), all non-inheritable keys must also be specified in the environment configuration and overridden. For example, this configuration will not work: * wrangler.jsonc ```jsonc { "name": "my-pages-site", "pages_build_output_dir": "./dist", "kv_namespaces": [ { "binding": "KV", "id": "" } ], "vars": { "API_KEY": "1234567asdf" }, "env": { "production": { "vars": { "API_KEY": "8901234bfgd" } } } } ``` * wrangler.toml ```toml name = "my-pages-site" pages_build_output_dir = "./dist" [[kv_namespaces]] binding = "KV" id = "" [vars] API_KEY = "1234567asdf" [env.production.vars] API_KEY = "8901234bfgd" ``` `[[env.production.vars]]` is set to override `[vars]`. Because of this `[[kv_namespaces]]` must also be overridden by defining `[[env.production.kv_namespaces]]`. This will work for local development, but will fail to validate when you try to deploy. * `vars` object optional * A map of environment variables to set when deploying your Function. Refer to [Environment variables](https://developers.cloudflare.com/pages/functions/bindings/#environment-variables). * `d1_databases` object optional * A list of D1 databases that your Function should be bound to. Refer to [D1 databases](https://developers.cloudflare.com/pages/functions/bindings/#d1-databases). * `durable_objects` object optional * A list of Durable Objects that your Function should be bound to. Refer to [Durable Objects](https://developers.cloudflare.com/pages/functions/bindings/#durable-objects). * `hyperdrive` object optional * Specifies Hyperdrive configs that your Function should be bound to. Refer to [Hyperdrive](https://developers.cloudflare.com/pages/functions/bindings/#r2-buckets). * `kv_namespaces` object optional * A list of KV namespaces that your Function should be bound to. Refer to [KV namespaces](https://developers.cloudflare.com/pages/functions/bindings/#kv-namespaces). * `queues.producers` object optional * Specifies Queues Producers that are bound to this Function. Refer to [Queues Producers](https://developers.cloudflare.com/queues/get-started/#4-set-up-your-producer-worker). * `r2_buckets` object optional * A list of R2 buckets that your Function should be bound to. Refer to [R2 buckets](https://developers.cloudflare.com/pages/functions/bindings/#r2-buckets). * `vectorize` object optional * A list of Vectorize indexes that your Function should be bound to. Refer to [Vectorize indexes](https://developers.cloudflare.com/vectorize/get-started/intro/#3-bind-your-worker-to-your-index). * `services` object optional * A list of service bindings that your Function should be bound to. Refer to [service bindings](https://developers.cloudflare.com/pages/functions/bindings/#service-bindings). * `analytics_engine_datasets` object optional * Specifies analytics engine datasets that are bound to this Function. Refer to [Workers Analytics Engine](https://developers.cloudflare.com/analytics/analytics-engine/get-started/). * `ai` object optional * Specifies an AI binding to this Function. Refer to [Workers AI](https://developers.cloudflare.com/pages/functions/bindings/#workers-ai). ## Limits You can configure limits for your Pages project in the same way you can for Workers. Read [this guide](https://developers.cloudflare.com/workers/wrangler/configuration/#limits) for more details. ## Bindings A [binding](https://developers.cloudflare.com/pages/functions/bindings/) enables your Pages Functions to interact with resources on the Cloudflare Developer Platform. Use bindings to integrate your Pages Functions with Cloudflare resources like [KV](https://developers.cloudflare.com/kv/), [Durable Objects](https://developers.cloudflare.com/durable-objects/), [R2](https://developers.cloudflare.com/r2/), and [D1](https://developers.cloudflare.com/d1/). You can set bindings for both production and preview environments. ### D1 databases [D1](https://developers.cloudflare.com/d1/) is Cloudflare's serverless SQL database. A Function can query a D1 database (or databases) by creating a [binding](https://developers.cloudflare.com/workers/runtime-apis/bindings/) to each database for [D1 Workers Binding API](https://developers.cloudflare.com/d1/worker-api/). Note When using Wrangler in the default local development mode, files will be written to local storage instead of the preview or production database. Refer to [Local development](https://developers.cloudflare.com/workers/development-testing/) for more details. * Configure D1 database bindings via your [Wrangler file](https://developers.cloudflare.com/workers/wrangler/configuration/#d1-databases) the same way they are configured with Cloudflare Workers. * Interact with your [D1 Database binding](https://developers.cloudflare.com/pages/functions/bindings/#d1-databases). ### Durable Objects [Durable Objects](https://developers.cloudflare.com/durable-objects/) provide low-latency coordination and consistent storage for the Workers platform. * Configure Durable Object namespace bindings via your [Wrangler file](https://developers.cloudflare.com/workers/wrangler/configuration/#durable-objects) the same way they are configured with Cloudflare Workers. Warning You must create a Durable Object Worker and bind it to your Pages project using the Cloudflare dashboard or your Pages project's [Wrangler configuration file](https://developers.cloudflare.com/pages/functions/wrangler-configuration/). You cannot create and deploy a Durable Object within a Pages project. Durable Object bindings configured in a Pages project's Wrangler configuration file require the `script_name` key. For Workers, the `script_name` key is optional. * Interact with your [Durable Object namespace binding](https://developers.cloudflare.com/pages/functions/bindings/#durable-objects). ### Environment variables [Environment variables](https://developers.cloudflare.com/workers/configuration/environment-variables/) are a type of binding that allow you to attach text strings or JSON values to your Pages Function. * Configure environment variables via your [Wrangler file](https://developers.cloudflare.com/workers/wrangler/configuration/#environment-variables) the same way they are configured with Cloudflare Workers. * Interact with your [environment variables](https://developers.cloudflare.com/pages/functions/bindings/#environment-variables). ### Hyperdrive [Hyperdrive](https://developers.cloudflare.com/hyperdrive/) bindings allow you to interact with and query any Postgres database from within a Pages Function. * Configure Hyperdrive bindings via your [Wrangler file](https://developers.cloudflare.com/workers/wrangler/configuration/#hyperdrive) the same way they are configured with Cloudflare Workers. ### KV namespaces [Workers KV](https://developers.cloudflare.com/kv/api/) is a global, low-latency, key-value data store. It stores data in a small number of centralized data centers, then caches that data in Cloudflare’s data centers after access. Note When using Wrangler in the default local development mode, files will be written to local storage instead of the preview or production namespace. Refer to [Local development](https://developers.cloudflare.com/workers/development-testing/) for more details. * Configure KV namespace bindings via your [Wrangler file](https://developers.cloudflare.com/workers/wrangler/configuration/#kv-namespaces) the same way they are configured with Cloudflare Workers. * Interact with your [KV namespace binding](https://developers.cloudflare.com/pages/functions/bindings/#kv-namespaces). ### Queues Producers [Queues](https://developers.cloudflare.com/queues/) is Cloudflare's global message queueing service, providing [guaranteed delivery](https://developers.cloudflare.com/queues/reference/delivery-guarantees/) and [message batching](https://developers.cloudflare.com/queues/configuration/batching-retries/). [Queue Producers](https://developers.cloudflare.com/queues/configuration/javascript-apis/#producer) enable you to send messages into a queue within your Pages Function. Note You cannot currently configure a [queues consumer](https://developers.cloudflare.com/queues/reference/how-queues-works/#consumers) with Pages Functions. * Configure Queues Producer bindings via your [Wrangler file](https://developers.cloudflare.com/workers/wrangler/configuration/#queues) the same way they are configured with Cloudflare Workers. * Interact with your [Queues Producer binding](https://developers.cloudflare.com/pages/functions/bindings/#queue-producers). ### R2 buckets [Cloudflare R2 Storage](https://developers.cloudflare.com/r2) allows developers to store large amounts of unstructured data without the costly egress bandwidth fees associated with typical cloud storage services. Note When using Wrangler in the default local development mode, files will be written to local storage instead of the preview or production bucket. Refer to [Local development](https://developers.cloudflare.com/workers/development-testing/) for more details. * Configure R2 bucket bindings via your [Wrangler file](https://developers.cloudflare.com/workers/wrangler/configuration/#r2-buckets) the same way they are configured with Cloudflare Workers. * Interact with your [R2 bucket bindings](https://developers.cloudflare.com/pages/functions/bindings/#r2-buckets). ### Vectorize indexes A [Vectorize index](https://developers.cloudflare.com/vectorize/) allows you to insert and query vector embeddings for semantic search, classification and other vector search use-cases. * Configure Vectorize bindings via your [Wrangler file](https://developers.cloudflare.com/workers/wrangler/configuration/#vectorize-indexes) the same way they are configured with Cloudflare Workers. ### Service bindings A service binding allows you to call a Worker from within your Pages Function. Binding a Pages Function to a Worker allows you to send HTTP requests to the Worker without those requests going over the Internet. The request immediately invokes the downstream Worker, reducing latency as compared to a request to a third-party service. Refer to [About Service bindings](https://developers.cloudflare.com/workers/runtime-apis/bindings/service-bindings/). * Configure service bindings via your [Wrangler file](https://developers.cloudflare.com/workers/wrangler/configuration/#service-bindings) the same way they are configured with Cloudflare Workers. * Interact with your [service bindings](https://developers.cloudflare.com/pages/functions/bindings/#service-bindings). ### Analytics Engine Datasets [Workers Analytics Engine](https://developers.cloudflare.com/analytics/analytics-engine/) provides analytics, observability and data logging from Pages Functions. Write data points within your Pages Function binding then query the data using the [SQL API](https://developers.cloudflare.com/analytics/analytics-engine/sql-api/). * Configure Analytics Engine Dataset bindings via your [Wrangler file](https://developers.cloudflare.com/workers/wrangler/configuration/#analytics-engine-datasets) the same way they are configured with Cloudflare Workers. * Interact with your [Analytics Engine Dataset](https://developers.cloudflare.com/pages/functions/bindings/#analytics-engine). ### Workers AI [Workers AI](https://developers.cloudflare.com/workers-ai/) allows you to run machine learning models, on the Cloudflare network, from your own code – whether that be from Workers, Pages, or anywhere via REST API. Workers AI local development usage charges Using Workers AI always accesses your Cloudflare account in order to run AI models and will incur usage charges even in local development. Unlike other bindings, this binding is limited to one AI binding per Pages Function project. * Configure Workers AI bindings via your [Wrangler file](https://developers.cloudflare.com/workers/wrangler/configuration/#workers-ai) the same way they are configured with Cloudflare Workers. * Interact with your [Workers AI binding](https://developers.cloudflare.com/pages/functions/bindings/#workers-ai). ## Local development settings The local development settings that you can configure are the same for Pages Functions and Cloudflare Workers. Read [this guide](https://developers.cloudflare.com/workers/wrangler/configuration/#local-development-settings) for more details. ## Source of truth When used in your Pages Functions projects, your Wrangler file is the source of truth. You will be able to see, but not edit, the same fields when you log into the Cloudflare dashboard. If you decide that you do not want to use a Wrangler configuration file for configuration, you can safely delete it and create a new deployment. Configuration values from your last deployment will still apply and you will be able to edit them from the dashboard. --- title: Create projects with C3 CLI · Cloudflare Pages docs description: Use C3 (`create-cloudflare` CLI) to set up and deploy new applications using framework-specific setup guides to ensure each new application follows Cloudflare and any third-party best practices for deployment. lastUpdated: 2025-06-11T15:26:08.000Z chatbotDeprioritize: false source_url: html: https://developers.cloudflare.com/pages/get-started/c3/ md: https://developers.cloudflare.com/pages/get-started/c3/index.md --- Cloudflare provides a CLI command for creating new Workers and Pages projects — `npm create cloudflare`, powered by the [`create-cloudflare` package](https://www.npmjs.com/package/create-cloudflare). ## Create a new application Open a terminal window and run: * npm ```sh npm create cloudflare@latest -- --platform=pages ``` * yarn ```sh yarn create cloudflare --platform=pages ``` * pnpm ```sh pnpm create cloudflare@latest --platform=pages ``` Running this command will prompt you to install the [`create-cloudflare`](https://www.npmjs.com/package/create-cloudflare) package, and then ask you questions about the type of application you wish to create. Note To create a Pages project you must now specify the `--platform=pages` arg, otherwise C3 will always create a Workers project. ## Web frameworks If you choose the "Framework Starter" option, you will be prompted to choose a framework to use. The following frameworks are currently supported: * [Analog](https://developers.cloudflare.com/pages/framework-guides/deploy-an-analog-site/) * [Angular](https://developers.cloudflare.com/pages/framework-guides/deploy-an-angular-site/) * [Astro](https://developers.cloudflare.com/pages/framework-guides/deploy-an-astro-site/) * [Docusaurus](https://developers.cloudflare.com/pages/framework-guides/deploy-a-docusaurus-site/) * [Gatsby](https://developers.cloudflare.com/pages/framework-guides/deploy-a-gatsby-site/) * [Hono](https://developers.cloudflare.com/pages/framework-guides/deploy-a-hono-site/) * [Next.js](https://developers.cloudflare.com/pages/framework-guides/nextjs/) * [Nuxt](https://developers.cloudflare.com/pages/framework-guides/deploy-a-nuxt-site/) * [Qwik](https://developers.cloudflare.com/pages/framework-guides/deploy-a-qwik-site/) * [React](https://developers.cloudflare.com/pages/framework-guides/deploy-a-react-site/) * [Remix](https://developers.cloudflare.com/pages/framework-guides/deploy-a-remix-site/) * [SolidStart](https://developers.cloudflare.com/pages/framework-guides/deploy-a-solid-start-site/) * [SvelteKit](https://developers.cloudflare.com/pages/framework-guides/deploy-a-svelte-kit-site/) * [Vue](https://developers.cloudflare.com/pages/framework-guides/deploy-a-vue-site/) When you use a framework, `npm create cloudflare` directly uses the framework's own command for generating a new projects, which may prompt additional questions. This ensures that the project you create is up-to-date with the latest version of the framework, and you have all the same options when creating you project via `npm create cloudflare` that you would if you created your project using the framework's tooling directly. ## Deploy Once your project has been configured, you will be asked if you would like to deploy the project to Cloudflare. This is optional. If you choose to deploy, you will be asked to sign into your Cloudflare account (if you aren't already), and your project will be deployed. ## Creating a new Pages project that is connected to a git repository To create a new project using `npm create cloudflare`, and then connect it to a Git repository on your Github or Gitlab account, take the following steps: 1. Run `npm create cloudflare@latest`, and choose your desired options 2. Select `no` to the prompt, "Do you want to deploy your application?". This is important — if you select `yes` and deploy your application from your terminal ([Direct Upload](https://developers.cloudflare.com/pages/get-started/direct-upload/)), then it will not be possible to connect this Pages project to a git repository later on. You will have to create a new Cloudflare Pages project. 3. Create a new git repository, using the application that `npm create cloudflare@latest` just created for you. 4. Follow the steps outlined in the [Git integration guide](https://developers.cloudflare.com/pages/get-started/git-integration/) ## CLI Arguments C3 collects any required input through a series of interactive prompts. You may also specify your choices via command line arguments, which will skip these prompts. To use C3 in a non-interactive context such as CI, you must specify all required arguments via the command line. This is the full format of a C3 invocation alongside the possible CLI arguments: * npm ```sh npm create cloudflare@latest -- --platform=pages [] [OPTIONS] [-- ] ``` * yarn ```sh yarn create cloudflare --platform=pages [] [OPTIONS] [-- ] ``` * pnpm ```sh pnpm create cloudflare@latest --platform=pages [] [OPTIONS] [-- ] ``` - `DIRECTORY` string optional * The directory where the application should be created. The name of the application is taken from the directory name. - `NESTED ARGS..` string\[] optional * CLI arguments to pass to eventual third party CLIs C3 might invoke (in the case of full-stack applications). - `--category` string optional * The kind of templates that should be created. * The possible values for this option are: * `hello-world`: Hello World example * `web-framework`: Framework Starter * `demo`: Application Starter * `remote-template`: Template from a GitHub repo - `--type` string optional * The type of application that should be created. * The possible values for this option are: * `hello-world`: A basic "Hello World" Cloudflare Worker. * `hello-world-durable-object`: A [Durable Object](https://developers.cloudflare.com/durable-objects/) and a Worker to communicate with it. * `common`: A Cloudflare Worker which implements a common example of routing/proxying functionalities. * `scheduled`: A scheduled Cloudflare Worker (triggered via [Cron Triggers](https://developers.cloudflare.com/workers/configuration/cron-triggers/)). * `queues`: A Cloudflare Worker which is both a consumer and produced of [Queues](https://developers.cloudflare.com/queues/). * `openapi`: A Worker implementing an OpenAPI REST endpoint. * `pre-existing`: Fetch a Worker initialized from the Cloudflare dashboard. - `--framework` string optional * The type of framework to use to create a web application (when using this option, `--type` is ignored). * The possible values for this option are: * `angular` * `astro` * `docusaurus` * `gatsby` * `hono` * `next` * `nuxt` * `qwik` * `react` * `remix` * `solid` * `svelte` * `vue` - `--template` string optional * Create a new project via an external template hosted in a git repository * The value for this option may be specified as any of the following: * `user/repo` * `git@github.com:user/repo` * `https://github.com/user/repo` * `user/repo/some-template` (subdirectories) * `user/repo#canary` (branches) * `user/repo#1234abcd` (commit hash) * `bitbucket:user/repo` (BitBucket) * `gitlab:user/repo` (GitLab) See the `degit` [docs](https://github.com/Rich-Harris/degit) for more details. At a minimum, templates must contain the following: * `package.json` * [Wrangler configuration file](https://developers.cloudflare.com/pages/functions/wrangler-configuration/) * `src/` containing a worker script referenced from the Wrangler configuration file See the [templates folder](https://github.com/cloudflare/workers-sdk/tree/main/packages/create-cloudflare/templates) of this repo for more examples. - `--deploy` boolean (default: true) optional * Deploy your application after it has been created. - `--lang` string (default: ts) optional * The programming language of the template. * The possible values for this option are: * `ts` * `js` * `python` - `--ts` boolean (default: true) optional * Use TypeScript in your application. Deprecated. Use `--lang=ts` instead. - `--git` boolean (default: true) optional * Initialize a local git repository for your application. - `--open` boolean (default: true) optional * Open with your browser the deployed application (this option is ignored if the application is not deployed). - `--existing-script` string optional * The name of an existing Cloudflare Workers script to clone locally. When using this option, `--type` is coerced to `pre-existing`. * When `--existing-script` is specified, `deploy` will be ignored. - `-y`, `--accept-defaults` boolean optional * Use all the default C3 options each can also be overridden by specifying it. - `--auto-update` boolean (default: true) optional * Automatically uses the latest version of C3. - `-v`, `--version` boolean optional * Show version number. - `-h`, `--help` boolean optional * Show a help message. Note All the boolean options above can be specified with or without a value, for example `--open` and `--open true` have the same effect, prefixing `no-` to the option's name negates it, so for example `--no-open` and `--open false` have the same effect. ## Telemetry Cloudflare collects anonymous usage data to improve `create-cloudflare` over time. Read more about this in our [data policy](https://github.com/cloudflare/workers-sdk/blob/main/packages/create-cloudflare/telemetry.md). You can opt-out if you do not wish to share any information. * npm ```sh npm create cloudflare@latest -- telemetry disable ``` * yarn ```sh yarn create cloudflare telemetry disable ``` * pnpm ```sh pnpm create cloudflare@latest telemetry disable ``` Alternatively, you can set an environment variable: ```sh export CREATE_CLOUDFLARE_TELEMETRY_DISABLED=1 ``` You can check the status of telemetry collection at any time. * npm ```sh npm create cloudflare@latest -- telemetry status ``` * yarn ```sh yarn create cloudflare telemetry status ``` * pnpm ```sh pnpm create cloudflare@latest telemetry status ``` You can always re-enable telemetry collection. * npm ```sh npm create cloudflare@latest -- telemetry enable ``` * yarn ```sh yarn create cloudflare telemetry enable ``` * pnpm ```sh pnpm create cloudflare@latest telemetry enable ``` --- title: Direct Upload · Cloudflare Pages docs description: Upload your prebuilt assets to Pages and deploy them via the Wrangler CLI or the Cloudflare dashboard. lastUpdated: 2025-05-09T17:32:11.000Z chatbotDeprioritize: false source_url: html: https://developers.cloudflare.com/pages/get-started/direct-upload/ md: https://developers.cloudflare.com/pages/get-started/direct-upload/index.md --- Direct Upload enables you to upload your prebuilt assets to Pages and deploy them to the Cloudflare global network. You should choose Direct Upload over Git integration if you want to [integrate your own build platform](https://developers.cloudflare.com/pages/how-to/use-direct-upload-with-continuous-integration/) or upload from your local computer. This guide will instruct you how to upload your assets using Wrangler or the drag and drop method. You cannot switch to Git integration later If you choose Direct Upload, you cannot switch to [Git integration](https://developers.cloudflare.com/pages/get-started/git-integration/) later. You will have to create a new project with Git integration to use automatic deployments. ## Prerequisites Before you deploy your project with Direct Upload, run the appropriate [build command](https://developers.cloudflare.com/pages/configuration/build-configuration/#framework-presets) to build your project. ## Upload methods After you have your prebuilt assets ready, there are two ways to begin uploading: * [Wrangler](https://developers.cloudflare.com/pages/get-started/direct-upload/#wrangler-cli). * [Drag and drop](https://developers.cloudflare.com/pages/get-started/direct-upload/#drag-and-drop). Note Within a Direct Upload project, you can switch between creating deployments with either Wrangler or drag and drop. For existing Git-integrated projects, you can manually create deployments using [`wrangler deploy`](https://developers.cloudflare.com/workers/wrangler/commands/#deploy). However, you cannot use drag and drop on the dashboard with existing Git-integrated projects. ## Supported file types Below is the supported file types for each Direct Upload options: * Wrangler: A single folder of assets. (Zip files are not supported.) * Drag and drop: A zip file or single folder of assets. ## Wrangler CLI ### Set up Wrangler To begin, install [`npm`](https://docs.npmjs.com/getting-started). Then [install Wrangler, the Developer Platform CLI](https://developers.cloudflare.com/workers/wrangler/install-and-update/). #### Create your project Log in to Wrangler with the [`wrangler login` command](https://developers.cloudflare.com/workers/wrangler/commands/#login). Then run the [`pages project create` command](https://developers.cloudflare.com/workers/wrangler/commands/#project-create): ```sh npx wrangler pages project create ``` You will then be prompted to specify the project name. Your project will be served at `.pages.dev` (or your project name plus a few random characters if your project name is already taken). You will also be prompted to specify your production branch. Subsequent deployments will reuse both of these values (saved in your `node_modules/.cache/wrangler` folder). #### Deploy your assets From here, you have created an empty project and can now deploy your assets for your first deployment and for all subsequent deployments in your production environment. To do this, run the [`wrangler pages deploy`](https://developers.cloudflare.com/workers/wrangler/commands/#deploy-1) command: ```sh npx wrangler pages deploy ``` Find the appropriate build output directory for your project in [Build directory under Framework presets](https://developers.cloudflare.com/pages/configuration/build-configuration/#framework-presets). Your production deployment will be available at `.pages.dev`. Note Before using the `wrangler pages deploy` command, you will need to make sure you are inside the project. If not, you can also pass in the project path. To deploy assets to a preview environment, run: ```sh npx wrangler pages deploy --branch= ``` For every branch you create, a branch alias will be available to you at `..pages.dev`. Note If you are in a Git workspace, Wrangler will automatically pull the branch information for you. Otherwise, you will need to specify your branch in this command. If you would like to streamline the project creation and asset deployment steps, you can also use the deploy command to both create and deploy assets at the same time. If you execute this command first, you will still be prompted to specify your project name and production branch. These values will still be cached for subsequent deployments as stated above. If the cache already exists and you would like to create a new project, you will need to run the [`create` command](#create-your-project). #### Other useful commands If you would like to use Wrangler to obtain a list of all available projects for Direct Upload, use [`pages project list`](https://developers.cloudflare.com/workers/wrangler/commands/#project-list): ```sh npx wrangler pages project list ``` If you would like to use Wrangler to obtain a list of all unique preview URLs for a particular project, use [`pages deployment list`](https://developers.cloudflare.com/workers/wrangler/commands/#deployment-list): ```sh npx wrangler pages deployment list ``` For step-by-step directions on how to use Wrangler and continuous integration tools like GitHub Actions, Circle CI, and Travis CI together for continuous deployment, refer to [Use Direct Upload with continuous integration](https://developers.cloudflare.com/pages/how-to/use-direct-upload-with-continuous-integration/). ## Drag and drop #### Deploy your project with drag and drop To deploy with drag and drop: 1. Log in to the [Cloudflare dashboard](https://dash.cloudflare.com/login). 2. In **Account Home**, select your account > **Workers & Pages**. 3. Select **Create application** > **Pages** > **Upload assets**. 4. Enter your project name in the provided field and drag and drop your assets. 5. Select **Deploy**. Your project will be served from `.pages.dev`. Next drag and drop your build output directory into the uploading frame. Once your files have been successfully uploaded, select **Save and Deploy** and continue to your newly deployed project. #### Create a new deployment After you have your project created, select **Create a new deployment** to begin a new version of your site. Next, choose whether your new deployment will be made to your production or preview environment. If choosing preview, you can create a new deployment branch or enter an existing one. ## Troubleshoot ### Limits | Upload method | File limit | File size | | - | - | - | | Wrangler | 20,000 files | 25 MiB | | Drag and drop | 1,000 files | 25 MiB | If using the drag and drop method, a red warning symbol will appear next to an asset if too large and thus unsuccessfully uploaded. In this case, you may choose to delete that asset but you cannot replace it. In order to do so, you must reupload the entire project. ### Production branch configuration If your project is a [Direct Upload](https://developers.cloudflare.com/pages/get-started/direct-upload/) project, you will not have the option to configure production branch controls. To update your production branch, you will need to manually call the [Update Project](https://developers.cloudflare.com/api/resources/pages/subresources/projects/methods/edit/) endpoint in the API. ```bash curl --request PATCH \ "https://api.cloudflare.com/client/v4/accounts/{account_id}/pages/projects/{project_name}" \ --header "Authorization: Bearer " \ --header "Content-Type: application/json" \ --data "{\"production_branch\": \"main\"}" ``` ### Functions Drag and drop deployments made from the Cloudflare dashboard do not currently support compiling a `functions` folder of [Pages Functions](https://developers.cloudflare.com/pages/functions/). To deploy a `functions` folder, you must use Wrangler. When deploying a project using Wrangler, if a `functions` folder exists where the command is run, that `functions` folder will be uploaded with the project. However, note that a `_worker.js` file is supported by both Wrangler and drag and drop deployments made from the dashboard. --- title: Git integration guide · Cloudflare Pages docs description: Connect your Git provider to Pages. lastUpdated: 2025-05-09T17:32:11.000Z chatbotDeprioritize: false source_url: html: https://developers.cloudflare.com/pages/get-started/git-integration/ md: https://developers.cloudflare.com/pages/get-started/git-integration/index.md --- In this guide, you will get started with Cloudflare Pages and deploy your first website to the Pages platform through Git integration. The Git integration enables automatic builds and deployments every time you push a change to your connected [GitHub](https://developers.cloudflare.com/pages/configuration/git-integration/github-integration/) or [GitLab](https://developers.cloudflare.com/pages/configuration/git-integration/gitlab-integration/) repository. You cannot switch to Direct Upload later If you deploy using the Git integration, you cannot switch to [Direct Upload](https://developers.cloudflare.com/pages/get-started/direct-upload/) later. However, if you already use a Git-integrated project and do not want to trigger deployments every time you push a commit, you can [disable automatic deployments](https://developers.cloudflare.com/pages/configuration/git-integration/#disable-automatic-deployments) on all branches. Then, you can use Wrangler to deploy directly to your Pages projects and make changes to your Git repository without automatically triggering a build. ## Connect your Git provider to Pages Pages offers support for [GitHub](https://github.com/) and [GitLab](https://gitlab.com/). To create your first Pages project: 1. Log in to the [Cloudflare dashboard](https://dash.cloudflare.com/) and select your account. 2. In Account Home, select **Workers & Pages**. 3. Select **Create application** > **Pages** > **Connect to Git**. You will be prompted to sign in with your preferred Git provider. This allows Cloudflare Pages to deploy your projects, and update your PRs with [preview deployments](https://developers.cloudflare.com/pages/configuration/preview-deployments/). Note Signing in with GitLab will grant Pages access to all repositories on your account. Additionally, if you are a part of a multi-user Cloudflare account, and you sign in with GitLab, other members will also have the ability to deploy your repositories to Pages. If you are using GitLab, you must have the **Maintainer** role or higher on the repository to successfully deploy with Cloudflare Pages. ### Select your GitHub repository You can select a GitHub project from your personal account or an organization you have given Pages access to. This allows you to choose a GitHub repository to deploy using Pages. Both private and public repositories are supported. ### Select your GitLab repository If using GitLab, you can select a project from your personal account or from a GitLab group you belong to. This allows you to choose a GitLab repository to deploy using Pages. Both private and public repositories are supported. ## Configure your deployment Once you have selected a Git repository, select **Install & Authorize** and **Begin setup**. You can then customize your deployment in **Set up builds and deployments**. Your **project name** will be used to generate your project's hostname. By default, this matches your Git project name. **Production branch** indicates the branch that Cloudflare Pages should use to deploy the production version of your site. For most projects, this is the `main` or `master` branch. All other branches that are not your production branch will be used for [preview deployments](https://developers.cloudflare.com/pages/configuration/preview-deployments/). Note You must have pushed at least one branch to your GitHub or GitLab project in order to select a **Production branch** from the dropdown menu. ![Set up builds and deployments page with Project name and Production branch filled in](https://developers.cloudflare.com/_astro/configuration.C_N8MiKW_1LELMX.webp) ### Configure your build settings Depending on the framework, tool, or project you are deploying to Cloudflare Pages, you will need to specify the site's **build command** and **build output directory** to tell Cloudflare Pages how to deploy your site. The content of this directory is uploaded to Cloudflare Pages as your website's content. No framework required You do not need a framework to deploy with Cloudflare Pages. You can continue with the Get started guide without choosing a framework, and refer to [Deploy your site](https://developers.cloudflare.com/pages/framework-guides/deploy-anything/) for more information on deploying your site without a framework. The dashboard provides a number of framework-specific presets. These presets provide the default build command and build output directory values for the selected framework. If you are unsure what the correct values are for this section, refer to [Build configuration](https://developers.cloudflare.com/pages/configuration/build-configuration/). If you do not need a build step, leave the **Build command** field blank. ![Build setting fields that need to be filled in](https://developers.cloudflare.com/_astro/build-settings.BREiHFn0_6h9lJ.webp) Cloudflare Pages begins by working from your repository's root directory. The entire build pipeline, including the installation steps, will begin from this location. If you would like to change this, specify a new root directory location through the **Root directory (advanced)** > **Path** field. ![Root directory field to be filled in](https://developers.cloudflare.com/_astro/root-directory.CKTDgRpM_k2N0r.webp) Understanding your build configuration The build command is provided by your framework. For example, the Gatsby framework uses `gatsby build` as its build command. When you are working without a framework, leave the **Build command** field blank. The build output directory is generated from the build command. Each [framework](https://developers.cloudflare.com/pages/configuration/build-configuration/#framework-presets) has its own naming convention, for example, the build output directory is named `/public` for many frameworks. The root directory is where your site's content lives. If not specified, Cloudflare assumes that your linked Git repository is the root directory. The root directory needs to be specified in cases like monorepos, where there may be multiple projects in one repository. Refer to [Build configuration](https://developers.cloudflare.com/pages/configuration/build-configuration/) for more information. ### Environment variables Environment variables are a common way of providing configuration to your build workflow. While setting up your project, you can specify a number of key-value pairs as environment variables. These can be further customized once your project has finished building for the first time. Refer to the [Hexo framework guide](https://developers.cloudflare.com/pages/framework-guides/deploy-a-hexo-site/#using-a-specific-nodejs-version) for more information on how to set up a Node.js version environment variable. After you have chosen your *Framework preset* or left this field blank if you are working without a framework, configured **Root directory (advanced)**, and customized your **Environment variables (optional)**, you are ready to deploy. ## Your first deploy After you have finished setting your build configuration, select **Save and Deploy**. Your project build logs will output as Cloudflare Pages installs your project dependencies, builds the project, and deploys it to Cloudflare's global network. ![Deployment details in the Cloudflare dashboard](https://developers.cloudflare.com/_astro/deploy-log.D8BQ4nzJ_Z2wcvzD.webp) When your project has finished deploying, you will receive a unique URL to view your deployed site. DNS errors If you encounter a DNS error after visiting your site after your first deploy, this might be because the DNS has not had time to propagate. To solve the error, wait for the DNS to propagate, or try another device or network to resolve the error. ## Manage site After your first deploy, select **Continue to project** to see your project's configuration in the Cloudflare Pages dashboard. On this page, you can see your project's current deployment status, the production URL and associated commit, and all past deployments. ![Site dashboard displaying your environments and deployments](https://developers.cloudflare.com/_astro/site-dashboard.Ct8X8ZRP_Z1XcghK.webp) ### Delete a project To delete your Pages project: 1. Go back to the **Account Home** or use the drop-down menu at the top of the dashboard. 2. Select **Workers & Pages**. 3. Select your Pages project > **Settings** > **Delete project**. Warning For projects with a custom domain, you must first delete the CNAME record associated with your Pages project. Failure to do so may leave the DNS records active, causing your domain to point to a Pages project that no longer exists. Refer to [Deleting a custom domain](https://developers.cloudflare.com/pages/configuration/custom-domains/#delete-a-custom-domain) for instructions. For projects without a custom domain (any project on a `*.pages.dev` subdomain), your project can be deleted in the project's settings. ## Advanced project settings In the **Settings** section, you can configure advanced settings, such as changing your project name, updating your Git configuration, or updating your build command, build directory or environment variables. ## Related resources * Set up a [custom domain for your Pages project](https://developers.cloudflare.com/pages/configuration/custom-domains/). * Enable [Cloudflare Web Analytics](https://developers.cloudflare.com/pages/how-to/web-analytics/). * Set up Access policies to [manage who can view your deployment previews](https://developers.cloudflare.com/pages/configuration/preview-deployments/#customize-preview-deployments-access). --- title: Add custom HTTP headers · Cloudflare Pages docs description: More advanced customization of HTTP headers is available through Cloudflare Workers serverless functions. lastUpdated: 2025-05-29T18:16:56.000Z chatbotDeprioritize: false source_url: html: https://developers.cloudflare.com/pages/how-to/add-custom-http-headers/ md: https://developers.cloudflare.com/pages/how-to/add-custom-http-headers/index.md --- Note Cloudflare provides HTTP header customization for Pages projects by adding a `_headers` file to your project. Refer to the [documentation](https://developers.cloudflare.com/pages/configuration/headers/) for more information. More advanced customization of HTTP headers is available through Cloudflare Workers [serverless functions](https://www.cloudflare.com/learning/serverless/what-is-serverless/). If you have not deployed a Worker before, get started with our [tutorial](https://developers.cloudflare.com/workers/get-started/guide/). For the purpose of this tutorial, accomplish steps one (Sign up for a Workers account) through four (Generate a new project) before returning to this page. Before continuing, ensure that your Cloudflare Pages project is connected to a [custom domain](https://developers.cloudflare.com/pages/configuration/custom-domains/#add-a-custom-domain). ## Writing a Workers function Workers functions are written in [JavaScript](https://www.cloudflare.com/learning/serverless/serverless-javascript/). When a Worker makes a request to a Cloudflare Pages application, it will receive a response. The response a Worker receives is immutable, meaning it cannot be changed. In order to add, delete, or alter headers, clone the response and modify the headers on a new `Response` instance. Return the new response to the browser with your desired header changes. An example of this is shown below: ```js export default { async fetch(request) { // This proxies your Pages application under the condition that your Worker script is deployed on the same custom domain as your Pages project const response = await fetch(request); // Clone the response so that it is no longer immutable const newResponse = new Response(response.body, response); // Add a custom header with a value newResponse.headers.append( "x-workers-hello", "Hello from Cloudflare Workers", ); // Delete headers newResponse.headers.delete("x-header-to-delete"); newResponse.headers.delete("x-header2-to-delete"); // Adjust the value for an existing header newResponse.headers.set("x-header-to-change", "NewValue"); return newResponse; }, }; ``` ## Deploying a Workers function in the dashboard The easiest way to start deploying your Workers function is by typing [workers.new](https://workers.new/) in the browser. Log in to your account to be automatically directed to the Workers & Pages dashboard. From the Workers & Pages dashboard, write your function or use one of the [examples from the Workers documentation](https://developers.cloudflare.com/workers/examples/). Select **Save and Deploy** when your script is ready and set a [route](https://developers.cloudflare.com/workers/configuration/routing/routes/) in your domain's zone settings. For example, [here is a Workers script](https://developers.cloudflare.com/workers/examples/security-headers/) you can copy and paste into the Workers dashboard that sets common security headers whenever a request hits your Pages URL, such as X-XSS-Protection, X-Frame-Options, X-Content-Type-Options, Strict-Transport-Security, Content-Security-Policy (CSP), and more. ## Deploying a Workers function using the CLI If you would like to skip writing this file yourself, you can use our `custom-headers-example` [template](https://github.com/kristianfreeman/custom-headers-example) to generate a new Workers function with [wrangler](https://developers.cloudflare.com/workers/wrangler/install-and-update/), the Workers CLI tool. ```sh git clone https://github.com/cloudflare/custom-headers-example cd custom-headers-example npm install ``` To operate your Workers function alongside your Pages application, deploy it to the same custom domain as your Pages application. To do this, update the Wrangler file in your project with your account and zone details: * wrangler.jsonc ```jsonc { "name": "custom-headers-example", "account_id": "FILL-IN-YOUR-ACCOUNT-ID", "workers_dev": false, "route": "FILL-IN-YOUR-WEBSITE.com/*", "zone_id": "FILL-IN-YOUR-ZONE-ID" } ``` * wrangler.toml ```toml name = "custom-headers-example" account_id = "FILL-IN-YOUR-ACCOUNT-ID" workers_dev = false route = "FILL-IN-YOUR-WEBSITE.com/*" zone_id = "FILL-IN-YOUR-ZONE-ID" ``` If you do not know how to find your Account ID and Zone ID, refer to [our guide](https://developers.cloudflare.com/fundamentals/account/find-account-and-zone-ids/). Once you have configured your [Wrangler configuration file](https://developers.cloudflare.com/pages/functions/wrangler-configuration/) , run `npx wrangler deploy` in your terminal to deploy your Worker: ```sh npx wrangler deploy ``` After you have deployed your Worker, your desired HTTP header adjustments will take effect. While the Worker is deployed, you should continue to see the content from your Pages application as normal. --- title: Set build commands per branch · Cloudflare Pages docs description: This guide will instruct you how to set build commands on specific branches. You will use the CF_PAGES_BRANCH environment variable to run a script on a specified branch as opposed to your Production branch. This guide assumes that you have a Cloudflare account and a Pages project. lastUpdated: 2025-05-09T17:32:11.000Z chatbotDeprioritize: false source_url: html: https://developers.cloudflare.com/pages/how-to/build-commands-branches/ md: https://developers.cloudflare.com/pages/how-to/build-commands-branches/index.md --- This guide will instruct you how to set build commands on specific branches. You will use the `CF_PAGES_BRANCH` environment variable to run a script on a specified branch as opposed to your Production branch. This guide assumes that you have a Cloudflare account and a Pages project. ## Set up Create a `.sh` file in your project directory. You can choose your file's name, but we recommend you name the file `build.sh`. In the following script, you will use the `CF_PAGES_BRANCH` environment variable to check which branch is currently being built. Populate your `.sh` file with the following: ```bash # !/bin/bash if [ "$CF_PAGES_BRANCH" == "production" ]; then # Run the "production" script in `package.json` on the "production" branch # "production" should be replaced with the name of your Production branch npm run production elif [ "$CF_PAGES_BRANCH" == "staging" ]; then # Run the "staging" script in `package.json` on the "staging" branch # "staging" should be replaced with the name of your specific branch npm run staging else # Else run the dev script npm run dev fi ``` ## Publish your changes To put your changes into effect: 1. Log in to the [Cloudflare dashboard](https://dash.cloudflare.com) and select your account. 2. In Account Home, select **Workers & Pages** > in **Overview**, select your Pages project. 3. Go to **Settings** > **Build & deployments** > **Build configurations** > **Edit configurations**. 4. Update the **Build command** field value to `bash build.sh` and select **Save**. To test that your build is successful, deploy your project. --- title: Add a custom domain to a branch · Cloudflare Pages docs description: In this guide, you will learn how to add a custom domain (staging.example.com) that will point to a specific branch (staging) on your Pages project. lastUpdated: 2025-05-09T17:32:11.000Z chatbotDeprioritize: false source_url: html: https://developers.cloudflare.com/pages/how-to/custom-branch-aliases/ md: https://developers.cloudflare.com/pages/how-to/custom-branch-aliases/index.md --- In this guide, you will learn how to add a custom domain (`staging.example.com`) that will point to a specific branch (`staging`) on your Pages project. This will allow you to have a custom domain that will always show the latest build for a specific branch on your Pages project. Note Currently, this setup is only supported when using Cloudflare DNS. If you attempt to follow this guide using an external DNS provider, your custom alias will be sent to the production branch of your Pages project. First, make sure that you have a successful deployment on the branch you would like to set up a custom domain for. Next, add a custom domain under your Pages project for your desired custom domain, for example, `staging.example.com`. ![Follow the instructions below to access the custom domains overview in the Pages dashboard.](https://developers.cloudflare.com/_astro/pages_custom_domain-1.CiOZm32-_1hDrtY.webp) To do this: 1. Log in to the [Cloudflare dashboard](https://dash.cloudflare.com/login). 2. In Account Home, go to **Workers & Pages**. 3. Select your Pages project. 4. Select **Custom domains** > **Setup a custom domain**. 5. Input the domain you would like to use, such as `staging.example.com` 6. Select **Continue** > **Activate domain** ![After selecting your custom domain, you will be asked to activate it.](https://developers.cloudflare.com/_astro/pages_custom_domain-2.BTtd80-v_Z2tx6JW.webp) After activating your custom domain, go to [DNS](https://dash.cloudflare.com/?to=/:account/:zone/dns) for the `example.com` zone and find the `CNAME` record with the name `staging` and change the target to include your branch alias. In this instance, change `your-project.pages.dev` to `staging.your-project.pages.dev`. ![After activating your custom domain, change the CNAME target to include your branch name.](https://developers.cloudflare.com/_astro/pages_custom_domain-3.DhnYG8VS_Z2cp0T8.webp) Now the `staging` branch of your Pages project will be available on `staging.example.com`. --- title: Deploy a static WordPress site · Cloudflare Pages docs description: In this guide, you will use a WordPress plugin, Simply Static, to convert your existing WordPress site to a static website deployed with Cloudflare Pages. lastUpdated: 2025-05-09T17:32:11.000Z chatbotDeprioritize: false tags: WordPress source_url: html: https://developers.cloudflare.com/pages/how-to/deploy-a-wordpress-site/ md: https://developers.cloudflare.com/pages/how-to/deploy-a-wordpress-site/index.md --- ## Overview In this guide, you will use a WordPress plugin, [Simply Static](https://wordpress.org/plugins/simply-static/), to convert your existing WordPress site to a static website deployed with Cloudflare Pages. ## Prerequisites This guide assumes that you are: * The Administrator account on your WordPress site. * Able to install WordPress plugins on the site. ## Setup To start, install the [Simply Static](https://wordpress.org/plugins/simply-static/) plugin to export your WordPress site. In your WordPress dashboard, go to **Plugins** > **Add New**. Search for `Simply Static` and confirm that the resulting plugin that you will be installing matches the plugin below. ![Simply Static plugin](https://developers.cloudflare.com/_astro/simply-static.B1STKlmC_ZDt3bU.webp) Select **Install** on the plugin. After it has finished installing, select **Activate**. ### Export your WordPress site After you have installed the plugin, go to your WordPress dashboard > **Simply Static** > **GENERATE STATIC FILES**. In the **Activity Log**, find the **ZIP archive created** message and select **Click here to download** to download your ZIP file. ### Deploy your WordPress site with Pages With your ZIP file downloaded, deploy your site to Pages: 1. Log in to the [Cloudflare dashboard](https://dash.cloudflare.com) and select your account. 2. In Account Home, select **Workers & Pages** > **Create application** > **Pages** > **Upload assets**. 3. Name your project > **Create project**. 4. Drag and drop your ZIP file (or unzipped folder of assets) or select it from your computer. 5. After your files have been uploaded, select **Deploy site**. Your WordPress site will now be live on Pages. Every time you make a change to your WordPress site, you will need to download a new ZIP file from the WordPress dashboard and redeploy to Cloudflare Pages. Automatic updates are not available with the free version of Simply Static. ## Limitations There are some features available in WordPress sites that will not be supported in a static site environment: * WordPress Forms. * WordPress Comments. * Any links to `/wp-admin` or similar internal WordPress routes. ## Conclusion By following this guide, you have successfully deployed a static version of your WordPress site to Cloudflare Pages. With a static version of your site being served, you can: * Move your WordPress site to a custom domain or subdomain. Refer to [Custom domains](https://developers.cloudflare.com/pages/configuration/custom-domains/) to learn more. * Run your WordPress instance locally, or put your WordPress site behind [Cloudflare Access](https://developers.cloudflare.com/pages/configuration/preview-deployments/#customize-preview-deployments-access) to only give access to your contributors. This has a significant effect on the number of attack vectors for your WordPress site and its content. * Downgrade your WordPress hosting plan to a cheaper plan. Because the memory and bandwidth requirements for your WordPress instance are now smaller, you can often host it on a cheaper plan, or moving to shared hosting. Connect with the [Cloudflare Developer community on Discord](https://discord.cloudflare.com) to ask questions and discuss the platform with other developers. --- title: Enable Zaraz · Cloudflare Pages docs description: Cloudflare Zaraz gives you complete control over third-party tools and services for your website, and allows you to offload them to Cloudflare's edge, improving the speed and security of your website. With Cloudflare Zaraz you can load tools such as analytics tools, advertising pixels and scripts, chatbots, marketing automation tools, and more, in the most optimized way. lastUpdated: 2025-05-09T17:32:11.000Z chatbotDeprioritize: false source_url: html: https://developers.cloudflare.com/pages/how-to/enable-zaraz/ md: https://developers.cloudflare.com/pages/how-to/enable-zaraz/index.md --- Cloudflare Zaraz gives you complete control over third-party tools and services for your website, and allows you to offload them to Cloudflare's edge, improving the speed and security of your website. With Cloudflare Zaraz you can load tools such as analytics tools, advertising pixels and scripts, chatbots, marketing automation tools, and more, in the most optimized way. Cloudflare Zaraz is built for speed, privacy, and security, and you can use it to load as many tools as you need, with a near-zero performance hit. ## Enable To enable Zaraz on Cloudflare Pages, you need a [custom domain](https://developers.cloudflare.com/pages/configuration/custom-domains/) associated with your project. After that, [set up Zaraz](https://developers.cloudflare.com/zaraz/get-started/) on the custom domain. --- title: Install private packages · Cloudflare Pages docs description: Cloudflare Pages supports custom package registries, allowing you to include private dependencies in your application. While this walkthrough focuses specifically on npm, the Node package manager and registry, the same approach can be applied to other registry tools. lastUpdated: 2025-05-09T17:32:11.000Z chatbotDeprioritize: false source_url: html: https://developers.cloudflare.com/pages/how-to/npm-private-registry/ md: https://developers.cloudflare.com/pages/how-to/npm-private-registry/index.md --- Cloudflare Pages supports custom package registries, allowing you to include private dependencies in your application. While this walkthrough focuses specifically on [npm](https://www.npmjs.com/), the Node package manager and registry, the same approach can be applied to other registry tools. You will be be adjusting the [environment variables](https://developers.cloudflare.com/pages/configuration/build-configuration/#environment-variables) in your Pages project's **Settings**. An existing website can be modified at any time, but new projects can be initialized with these settings, too. Either way, altering the project settings will not be reflected until its next deployment. Warning Be sure to trigger a new deployment after changing any settings. ## Registry Access Token Every package registry should have a means of issuing new access tokens. Ideally, you should create a new token specifically for Pages, as you would with any other CI/CD platform. With npm, you can [create and view tokens through its website](https://docs.npmjs.com/creating-and-viewing-access-tokens) or you can use the `npm` CLI. If you have the CLI set up locally and are authenticated, run the following commands in your terminal: ```sh # Verify the current npm user is correct npm whoami # Create a readonly token npm token create --read-only #-> Enter password, if prompted #-> Enter 2FA code, if configured ``` This will produce a read-only token that looks like a UUID string. Save this value for a later step. ## Private modules on the npm registry The following section applies to users with applications that are only using private modules from the npm registry. In your Pages project's **Settings** > **Environment variables**, add a new [environment variable](https://developers.cloudflare.com/pages/configuration/build-configuration/#environment-variables) named `NPM_TOKEN` to the **Production** and **Preview** environments and paste the [read-only token you created](#registry-access-token) as its value. Warning Add the `NPM_TOKEN` variable to both the **Production** and **Preview** environments. By default, `npm` looks for an environment variable named `NPM_TOKEN` and because you did not define a [custom registry endpoint](#custom-registry-endpoints), the npm registry is assumed. Local development should continue to work as expected, provided that you and your teammates are authenticated with npm accounts (see `npm whoami` and `npm login`) that have been granted access to the private package(s). ## Custom registry endpoints When multiple registries are in use, a project will need to define its own root-level [`.npmrc`](https://docs.npmjs.com/cli/v7/configuring-npm/npmrc) configuration file. An example `.npmrc` file may look like this: ```ini @foobar:registry=https://npm.pkg.github.com //registry.npmjs.org/:_authToken=${TOKEN_FOR_NPM} //npm.pkg.github.com/:_authToken=${TOKEN_FOR_GITHUB} ``` Here, all packages under the `@foobar` scope are directed towards the GitHub Packages registry. Then the registries are assigned their own access tokens via their respective environment variable names. Note You only need to define an Access Token for the npm registry (refer to `TOKEN_FOR_NPM` in the example) if it is hosting private packages that your application requires. Your Pages project must then have the matching [environment variables](https://developers.cloudflare.com/pages/configuration/build-configuration/#environment-variables) defined for all environments. In our example, that means `TOKEN_FOR_NPM` must contain [the read-only npm token](#registry-access-token) value and `TOKEN_FOR_GITHUB` must contain its own [personal access token](https://docs.github.com/en/github/authenticating-to-github/creating-a-personal-access-token#creating-a-token). ### Managing multiple environments In the event that your local development no longer works with your new `.npmrc` file, you will need to add some additional changes: 1. Rename the Pages-compliant `.npmrc` file to `.npmrc.pages`. This should be referencing environment variables. 2. Restore your previous `.npmrc` file – the version that was previously working for you and your teammates. 3. Go to your Pages project > **Settings** > **Environment variables**, add a new [environment variable](https://developers.cloudflare.com/pages/configuration/build-configuration/#environment-variables) named [`NPM_CONFIG_USERCONFIG`](https://docs.npmjs.com/cli/v6/using-npm/config#npmrc-files) and set its value to `/opt/buildhome/repo/.npmrc.pages`. If your `.npmrc.pages` file is not in your project's root directory, adjust this path accordingly. --- title: Preview Local Projects with Cloudflare Tunnel · Cloudflare Pages docs description: Cloudflare Tunnel runs a lightweight daemon (cloudflared) in your infrastructure that establishes outbound connections (Tunnels) between your origin web server and the Cloudflare global network. In practical terms, you can use Cloudflare Tunnel to allow remote access to services running on your local machine. It is an alternative to popular tools like Ngrok, and provides free, long-running tunnels via the TryCloudflare service. lastUpdated: 2025-05-09T17:32:11.000Z chatbotDeprioritize: false source_url: html: https://developers.cloudflare.com/pages/how-to/preview-with-cloudflare-tunnel/ md: https://developers.cloudflare.com/pages/how-to/preview-with-cloudflare-tunnel/index.md --- [Cloudflare Tunnel](https://developers.cloudflare.com/cloudflare-one/connections/connect-networks/) runs a lightweight daemon (`cloudflared`) in your infrastructure that establishes outbound connections (Tunnels) between your origin web server and the Cloudflare global network. In practical terms, you can use Cloudflare Tunnel to allow remote access to services running on your local machine. It is an alternative to popular tools like [Ngrok](https://ngrok.com), and provides free, long-running tunnels via the [TryCloudflare](https://developers.cloudflare.com/cloudflare-one/connections/connect-networks/do-more-with-tunnels/trycloudflare/) service. While Cloudflare Pages provides unique [deploy preview URLs](https://developers.cloudflare.com/pages/configuration/preview-deployments/) for new branches and commits on your projects, Cloudflare Tunnel can be used to provide access to locally running applications and servers during the development process. In this guide, you will install Cloudflare Tunnel, and create a new tunnel to provide access to a locally running application. You will need a Cloudflare account to begin using Cloudflare Tunnel. ## Installing Cloudflare Tunnel Cloudflare Tunnel can be installed on Windows, Linux, and macOS. To learn about installing Cloudflare Tunnel, refer to the [Install cloudflared](https://developers.cloudflare.com/cloudflare-one/connections/connect-networks/downloads/) page in the Cloudflare for Teams documentation. Confirm that `cloudflared` is installed correctly by running `cloudflared --version` in your command line: ```sh cloudflared --version ``` ```sh cloudflared version 2021.5.9 (built 2021-05-21-1541 UTC) ``` ## Run a local service The easiest way to get up and running with Cloudflare Tunnel is to have an application running locally, such as a [React](https://developers.cloudflare.com/pages/framework-guides/deploy-a-react-site/) or [SvelteKit](https://developers.cloudflare.com/pages/framework-guides/deploy-a-svelte-kit-site/) site. When you are developing an application with these frameworks, they will often make use of a `npm run develop` script, or something similar, which mounts the application and runs it on a `localhost` port. For example, the popular `vite` tool runs your in-development React application on port `5173`, making it accessible at the `http://localhost:5173` address. ## Start a Cloudflare Tunnel With a local development server running, a new Cloudflare Tunnel can be instantiated by running `cloudflared tunnel` in a new command line window, passing in the `--url` flag with your `localhost` URL and port. `cloudflared` will output logs to your command line, including a banner with a tunnel URL: ```sh cloudflared tunnel --url http://localhost:5173 ``` ```sh 2021-07-15T20:11:29Z INF Cannot determine default configuration path. No file [config.yml config.yaml] in [~/.cloudflared ~/.cloudflare-warp ~/cloudflare-warp /etc/cloudflared /usr/local/etc/cloudflared] 2021-07-15T20:11:29Z INF Version 2021.5.9 2021-07-15T20:11:29Z INF GOOS: linux, GOVersion: devel +11087322f8 Fri Nov 13 03:04:52 2020 +0100, GoArch: amd64 2021-07-15T20:11:29Z INF Settings: map[url:http://localhost:5173] 2021-07-15T20:11:29Z INF cloudflared will not automatically update when run from the shell. To enable auto-updates, run cloudflared as a service: https://developers.cloudflare.com/argo-tunnel/reference/service/ 2021-07-15T20:11:29Z INF Initial protocol h2mux 2021-07-15T20:11:29Z INF Starting metrics server on 127.0.0.1:42527/metrics 2021-07-15T20:11:29Z WRN Your version 2021.5.9 is outdated. We recommend upgrading it to 2021.7.0 2021-07-15T20:11:29Z INF Connection established connIndex=0 location=ATL 2021-07-15T20:11:32Z INF Each HA connection's tunnel IDs: map[0:cx0nsiqs81fhrfb82pcq075kgs6cybr86v9vdv8vbcgu91y2nthg] 2021-07-15T20:11:32Z INF +-------------------------------------------------------------+ 2021-07-15T20:11:32Z INF | Your free tunnel has started! Visit it: | 2021-07-15T20:11:32Z INF | https://seasonal-deck-organisms-sf.trycloudflare.com | 2021-07-15T20:11:32Z INF +-------------------------------------------------------------+ ``` In this example, the randomly-generated URL `https://seasonal-deck-organisms-sf.trycloudflare.com` has been created and assigned to your tunnel instance. Visiting this URL in a browser will show the application running, with requests being securely forwarded through Cloudflare's global network, through the tunnel running on your machine, to `localhost:5173`: ![Cloudflare Tunnel example rendering a randomly-generated URL](https://developers.cloudflare.com/_astro/tunnel.DK_OjmvC_Z1Wv9CW.webp) ## Next Steps Cloudflare Tunnel can be configured in a variety of ways and can be used beyond providing access to your in-development applications. For example, you can provide `cloudflared` with a [configuration file](https://developers.cloudflare.com/cloudflare-one/connections/connect-networks/do-more-with-tunnels/local-management/configuration-file/) to add more complex routing and tunnel setups that go beyond a simple `--url` flag. You can also [attach a Cloudflare DNS record](https://developers.cloudflare.com/cloudflare-one/connections/connect-networks/routing-to-tunnel/dns/) to a domain or subdomain for an easily accessible, long-lived tunnel to your local machine. Finally, by incorporating Cloudflare Access, you can provide [secure access to your tunnels](https://developers.cloudflare.com/cloudflare-one/applications/configure-apps/self-hosted-public-app/) without exposing your entire server, or compromising on security. Refer to the [Cloudflare for Teams documentation](https://developers.cloudflare.com/cloudflare-one/) to learn more about what you can do with Cloudflare's entire suite of Zero Trust tools. --- title: Redirecting *.pages.dev to a Custom Domain · Cloudflare Pages docs description: Learn how to use Bulk Redirects to redirect your *.pages.dev subdomain to your custom domain. lastUpdated: 2025-05-09T17:32:11.000Z chatbotDeprioritize: false source_url: html: https://developers.cloudflare.com/pages/how-to/redirect-to-custom-domain/ md: https://developers.cloudflare.com/pages/how-to/redirect-to-custom-domain/index.md --- Learn how to use [Bulk Redirects](https://developers.cloudflare.com/rules/url-forwarding/bulk-redirects/) to redirect your `*.pages.dev` subdomain to your [custom domain](https://developers.cloudflare.com/pages/configuration/custom-domains/). You may want to do this to ensure that your site's content is served only on the custom domain, and not the `.pages.dev` site automatically generated on your first Pages deployment. ## Setup To redirect a `.pages.dev` subdomain to your custom domain: 1. Log in to the [Cloudflare dashboard](https://dash.cloudflare.com/?to=/:account/pages/view/:pages-project/domains), and select your account. 2. Select **Workers & Pages** and select your Pages application. 3. Go to **Custom domains** and make sure that your custom domain is listed. If it is not, add it by clicking **Set up a custom domain**. 4. Go **Bulk Redirects**. 5. [Create a bulk redirect list](https://developers.cloudflare.com/rules/url-forwarding/bulk-redirects/create-dashboard/#1-create-a-bulk-redirect-list) modeled after the following (but replacing the values as appropriate): | Source URL | Target URL | Status | Parameters | | - | - | - | - | | `.pages.dev` | `https://example.com` | `301` | * Preserve query string * Subpath matching * Preserve path suffix * Include subdomains | 1. [Create a bulk redirect rule](https://developers.cloudflare.com/rules/url-forwarding/bulk-redirects/create-dashboard/#2-create-a-bulk-redirect-rule) using the list you just created. To test that your redirect worked, go to your `.pages.dev` domain. If the URL is now set to your custom domain, then the rule has propagated. ## Related resources * [Redirect www to domain apex](https://developers.cloudflare.com/pages/how-to/www-redirect/) * [Handle redirects with Bulk Redirects](https://developers.cloudflare.com/rules/url-forwarding/bulk-redirects/) --- title: Refactor a Worker to a Pages Function · Cloudflare Pages docs description: "In this guide, you will learn how to refactor a Worker made to intake form submissions to a Pages Function that can be hosted on your Cloudflare Pages application. Pages Functions is a serverless function that lives within the same project directory as your application and is deployed with Cloudflare Pages. It enables you to run server-side code that adds dynamic functionality without running a dedicated server. You may want to refactor a Worker to a Pages Function for one of these reasons:" lastUpdated: 2025-05-09T17:32:11.000Z chatbotDeprioritize: true source_url: html: https://developers.cloudflare.com/pages/how-to/refactor-a-worker-to-pages-functions/ md: https://developers.cloudflare.com/pages/how-to/refactor-a-worker-to-pages-functions/index.md --- In this guide, you will learn how to refactor a Worker made to intake form submissions to a Pages Function that can be hosted on your Cloudflare Pages application. [Pages Functions](https://developers.cloudflare.com/pages/functions/) is a serverless function that lives within the same project directory as your application and is deployed with Cloudflare Pages. It enables you to run server-side code that adds dynamic functionality without running a dedicated server. You may want to refactor a Worker to a Pages Function for one of these reasons: 1. If you manage a serverless function that your Pages application depends on and wish to ship the logic without managing a Worker as a separate service. 2. If you are migrating your Worker to Pages Functions and want to use the routing and middleware capabilities of Pages Functions. Note You can import your Worker to a Pages project without using Functions by creating a `_worker.js` file in the output directory of your Pages project. This [Advanced mode](https://developers.cloudflare.com/pages/functions/advanced-mode/) requires writing your Worker with [Module syntax](https://developers.cloudflare.com/workers/reference/migrate-to-module-workers/). However, when using the `_worker.js` file in Pages, the entire `/functions` directory is ignored – including its routing and middleware characteristics. ## General refactoring steps 1. Remove the fetch handler and replace it with the appropriate `OnRequest` method. Refer to [Functions](https://developers.cloudflare.com/pages/functions/get-started/) to select the appropriate method for your Function. 2. Pass the `context` object as an argument to your new `OnRequest` method to access the properties of the context parameter: `request`,`env`,`params` and `next`. 3. Use middleware to handle logic that must be executed before or after route handlers. Learn more about [using Middleware](https://developers.cloudflare.com/pages/functions/middleware/) in the Functions documentation. ## Background To explain the process of refactoring, this guide uses a simple form submission example. Form submissions can be handled by Workers but can also be a good use case for Pages Functions, since forms are most times specific to a particular application. Assuming you are already using a Worker to handle your form, you would have deployed this Worker and then added the URL to your form action attribute in your HTML form. This means that when you change how the Worker handles your submissions, you must make changes to the Worker script. If the logic in your Worker is used by more than one application, Pages Functions would not be a good use case. However, it can be beneficial to use a [Pages Function](https://developers.cloudflare.com/pages/functions/) when you would like to organize your function logic in the same project directory as your application. Building your application using Pages Functions can help you manage your client and serverless logic from the same place and make it easier to write and debug your code. ## Handle form entries with Airtable and Workers An [Airtable](https://airtable.com/) is a low-code platform for building collaborative applications. It helps customize your workflow, collaborate, and handle form submissions. For this example, you will utilize Airtable's form submission feature. [Airtable](https://airtable.com/) can be used to store entries of information in different tables for the same account. When creating a Worker for handling the submission logic, the first step is to use [Wrangler](https://developers.cloudflare.com/workers/wrangler/install-and-update/) to initialize a new Worker within a specific folder or at the root of your application. This step creates the boilerplate to write your Airtable submission Worker. After writing your Worker, you can deploy it to Cloudflare's global network after you [configure your project for deployment](https://developers.cloudflare.com/workers/wrangler/configuration/). Refer to the Workers documentation for a full tutorial on how to [handle form submission with Workers](https://developers.cloudflare.com/workers/tutorials/handle-form-submissions-with-airtable/). The following code block shows an example of a Worker that handles Airtable form submission. The `submitHandler` async function is called if the pathname of the work is `/submit`. This function checks that the request method is a `POST` request and then proceeds to parse and post the form entries to Airtable using your credentials, which you can store using [Wrangler `secret`](https://developers.cloudflare.com/workers/wrangler/commands/#secret). ```js export default { async fetch(request, env, ctx) { const url = new URL(request.url); if (url.pathname === "/submit") { return submitHandler(request, env); } return fetch(request.url); }, }; async function submitHandler(request, env) { if (request.method !== "POST") { return new Response("Method not allowed", { status: 405, }); } const body = await request.formData(); const { first_name, last_name, email, phone, subject, message } = Object.fromEntries(body); const reqBody = { fields: { "First Name": first_name, "Last Name": last_name, Email: email, "Phone number": phone, Subject: subject, Message: message, }, }; return HandleAirtableData(reqBody, env); } const HandleAirtableData = (body, env) => { return fetch( `https://api.airtable.com/v0/${env.AIRTABLE_BASE_ID}/${encodeURIComponent( env.AIRTABLE_TABLE_NAME, )}`, { method: "POST", body: JSON.stringify(body), headers: { Authorization: `Bearer ${env.AIRTABLE_API_KEY}`, "Content-type": `application/json`, }, }, ); }; ``` ### Refactor your Worker To refactor the above Worker, go to your Pages project directory and create a `/functions` folder. In `/functions`, create a `form.js` file. This file will handle form submissions. Then, in the `form.js` file, export a single `onRequestPost`: ```js export async function onRequestPost(context) { return await submitHandler(context); } ``` Every Worker has an `addEventListener` to listen for `fetch` events, but you will not need this in a Pages Function. Instead, you will `export` a single `onRequest` function, and depending on the HTTPS request it handles, you will name it accordingly. Refer to [Function documentation](https://developers.cloudflare.com/pages/functions/get-started/) to select the appropriate method for your function. The above code takes a `request` and `env` as arguments which pass these properties down to the `submitHandler` function, which remains unchanged from the [original Worker](#handle-form-entries-with-airtable-and-workers). However, because Functions allow you to specify the HTTPS request type, you can remove the `request.method` check in your Worker. This is now handled by Pages Functions by naming the `onRequest` handler. Now, you will introduce the `submitHandler` function and pass the `env` parameter as a property. This will allow you to access `env` in the `HandleAirtableData` function below. This function does a `POST` request to Airtable using your Airtable credentials: ```js export async function onRequestPost(context) { return await submitHandler(context); } async function submitHandler(context) { const body = await context.request.formData(); const { first_name, last_name, email, phone, subject, message } = Object.fromEntries(body); const reqBody = { fields: { "First Name": first_name, "Last Name": last_name, Email: email, "Phone number": phone, Subject: subject, Message: message, }, }; return HandleAirtableData({ body: reqBody, env: env }); } ``` Finally, create a `HandleAirtableData` function. This function will send a `fetch` request to Airtable with your Airtable credentials and the body of your request: ```js // .. const HandleAirtableData = async function onRequest({ body, env }) { return fetch( `https://api.airtable.com/v0/${env.AIRTABLE_BASE_ID}/${encodeURIComponent( env.AIRTABLE_TABLE_NAME, )}`, { method: "POST", body: JSON.stringify(body), headers: { Authorization: `Bearer ${env.AIRTABLE_API_KEY}`, "Content-type": `application/json`, }, }, ); }; ``` You can test your Function [locally using Wrangler](https://developers.cloudflare.com/pages/functions/local-development/). By completing this guide, you have successfully refactored your form submission Worker to a form submission Pages Function. ## Related resources * [HTML forms](https://developers.cloudflare.com/pages/tutorials/forms/) * [Plugins documentation](https://developers.cloudflare.com/pages/functions/plugins/) * [Functions documentation](https://developers.cloudflare.com/pages/functions/) --- title: Use Direct Upload with continuous integration · Cloudflare Pages docs description: Cloudflare Pages supports directly uploading prebuilt assets, allowing you to use custom build steps for your applications and deploy to Pages with Wrangler. This guide will teach you how to deploy your application to Pages, using continuous integration. lastUpdated: 2025-05-28T19:21:49.000Z chatbotDeprioritize: false source_url: html: https://developers.cloudflare.com/pages/how-to/use-direct-upload-with-continuous-integration/ md: https://developers.cloudflare.com/pages/how-to/use-direct-upload-with-continuous-integration/index.md --- Cloudflare Pages supports directly uploading prebuilt assets, allowing you to use custom build steps for your applications and deploy to Pages with [Wrangler](https://developers.cloudflare.com/workers/wrangler/install-and-update/). This guide will teach you how to deploy your application to Pages, using continuous integration. ## Deploy with Wrangler In your project directory, install [Wrangler](https://developers.cloudflare.com/workers/wrangler/install-and-update/) so you can deploy a folder of prebuilt assets by running the following command: ```sh # Publish created project $ CLOUDFLARE_ACCOUNT_ID= npx wrangler pages deploy --project-name= ``` ## Get credentials from Cloudflare ### Generate an API Token To generate an API token: 1. Log in to the [Cloudflare dashboard](https://dash.cloudflare.com/profile/api-tokens). 2. Select **My Profile** from the dropdown menu of your user icon on the top right of your dashboard. 3. Select **API Tokens** > **Create Token**. 4. Under **Custom Token**, select **Get started**. 5. Name your API Token in the **Token name** field. 6. Under **Permissions**, select *Account*, *Cloudflare Pages* and *Edit*: 7. Select **Continue to summary** > **Create Token**. ![Follow the instructions above to create an API token for Cloudflare Pages](https://developers.cloudflare.com/_astro/select-api-token-for-pages.BUXEF2B7_1qpS7G.webp) Now that you have created your API token, you can use it to push your project from continuous integration platforms. ### Get project account ID To find your account ID, log in to the Cloudflare dashboard > select your zone in **Account Home** > find your account ID in **Overview** under **API** on the right-side menu. If you have not added a zone, add one by selecting **Add site**. You can purchase a domain from [Cloudflare's registrar](https://developers.cloudflare.com/registrar/). ## Use GitHub Actions [GitHub Actions](https://docs.github.com/en/actions) is a continuous integration and continuous delivery (CI/CD) platform that allows you to automate your build, test, and deployment pipeline when using GitHub. You can create workflows that build and test every pull request to your repository or deploy merged pull requests to production. After setting up your project, you can set up a GitHub Action to automate your subsequent deployments with Wrangler. ### Add Cloudflare credentials to GitHub secrets In the GitHub Action you have set up, environment variables are needed to push your project up to Cloudflare Pages. To add the values of these environment variables in your project's GitHub repository: 1. Go to your project's repository in GitHub. 2. Under your repository's name, select **Settings**. 3. Select **Secrets** > **Actions** > **New repository secret**. 4. Create one secret and put **CLOUDFLARE\_ACCOUNT\_ID** as the name with the value being your Cloudflare account ID. 5. Create another secret and put **CLOUDFLARE\_API\_TOKEN** as the name with the value being your Cloudflare API token. Add the value of your Cloudflare account ID and Cloudflare API token as `CLOUDFLARE_ACCOUNT_ID` and `CLOUDFLARE_API_TOKEN`, respectively. This will ensure that these secrets are secure, and each time your Action runs, it will access these secrets. ### Set up a workflow Create a `.github/workflows/pages-deployment.yaml` file at the root of your project. The `.github/workflows/pages-deployment.yaml` file will contain the jobs you specify on the request, that is: `on: [push]` in this case. It can also be on a pull request. For a detailed explanation of GitHub Actions syntax, refer to the [official documentation](https://docs.github.com/en/actions). In your `pages-deployment.yaml` file, copy the following content: ```yaml on: [push] jobs: deploy: runs-on: ubuntu-latest permissions: contents: read deployments: write name: Deploy to Cloudflare Pages steps: - name: Checkout uses: actions/checkout@v4 # Run your project's build step # - name: Build # run: npm install && npm run build - name: Deploy uses: cloudflare/wrangler-action@v3 with: apiToken: ${{ secrets.CLOUDFLARE_API_TOKEN }} accountId: ${{ secrets.CLOUDFLARE_ACCOUNT_ID }} command: pages deploy YOUR_DIRECTORY_OF_STATIC_ASSETS --project-name=YOUR_PROJECT_NAME gitHubToken: ${{ secrets.GITHUB_TOKEN }} ``` In the above code block, you have set up an Action that runs when you push code to the repository. Replace `YOUR_PROJECT_NAME` with your Cloudflare Pages project name and `YOUR_DIRECTORY_OF_STATIC_ASSETS` with your project's output directory, respectively. The `${{ secrets.GITHUB_TOKEN }}` will be automatically provided by GitHub Actions with the `contents: read` and `deployments: write` permission. This will enable our Cloudflare Pages action to create a Deployment on your behalf. Note This workflow automatically triggers on the current git branch, unless you add a `branch` option to the `with` section. ## Using CircleCI for CI/CD [CircleCI](https://circleci.com/) is another continuous integration and continuous delivery (CI/CD) platform that allows you to automate your build, test, and deployment pipeline. It can be configured to efficiently run complex pipelines with caching, docker layer caching, and resource classes. Similar to GitHub Actions, CircleCI can use Wrangler to continuously deploy your projects each time to push to your code. ### Add Cloudflare credentials to CircleCI After you have generated your Cloudflare API token and found your account ID in the dashboard, you will need to add them to your CircleCI dashboard to use your environment variables in your project. To add environment variables, in the CircleCI web application: 1. Go to your Pages project > **Settings**. 2. Select **Projects** in the side menu. 3. Select the ellipsis (...) button in the project's row. You will see the option to add environment variables. 4. Select **Environment Variables** > **Add Environment Variable**. 5. Enter the name and value of the new environment variable, which is your Cloudflare credentials (`CLOUDFLARE_ACCOUNT_ID` and `CLOUDFLARE_API_TOKEN`). ![Follow the instructions above to add environment variables to your CircleCI settings](https://developers.cloudflare.com/_astro/project-settings-env-var-v2.CMCUnm6I_9Jqdr.webp) ### Set up a workflow Create a `.circleci/config.yml` file at the root of your project. This file contains the jobs that will be executed based on the order of your workflow. In your `config.yml` file, copy the following content: ```yaml version: 2.1 jobs: Publish-to-Pages: docker: - image: cimg/node:18.7.0 steps: - checkout # Run your project's build step - run: npm install && npm run build # Publish with wrangler - run: npx wrangler pages deploy dist --project-name= # Replace dist with the name of your build folder and input your project name workflows: Publish-to-Pages-workflow: jobs: - Publish-to-Pages ``` Your continuous integration workflow is broken down into jobs when using CircleCI. From the code block above, you can see that you first define a list of jobs that run on each commit. For example, your repository will run on a prebuilt docker image `cimg/node:18.7.0`. It first checks out the repository with the Node version specified in the image. Note Wrangler requires a Node version of at least `16.17.0`. You must upgrade your Node.js version if your version is lower than `16.17.0`. You can modify the Wrangler command with any [`wrangler pages deploy` options](https://developers.cloudflare.com/workers/wrangler/commands/#deploy-1). After all the specified steps, define a `workflow` at the end of your file. You can learn more about creating a custom process with CircleCI from the [official documentation](https://circleci.com/docs/2.0/concepts/). ## Travis CI for CI/CD Travis CI is an open-source continuous integration tool that handles specific tasks, such as pull requests and code pushes for your project workflow. Travis CI can be integrated into your GitHub projects, databases, and other preinstalled services enabled in your build configuration. To use Travis CI, you should have A GitHub, Bitbucket, GitLab or Assembla account. ### Add Cloudflare credentials to TravisCI In your Travis project, add the Cloudflare credentials you have generated from the Cloudflare dashboard to access them in your `travis.yml` file. Go to your Travis CI dashboard and select your current project > **More options** > **Settings** > **Environment Variables**. Set the environment variable's name and value and the branch you want it to be attached to. You can also set the privacy of the value. ### Setup Go to [Travis-ci.com](https://Travis-ci.com) and enable your repository by login in with your preferred provider. This guide uses GitHub. Next, create a `.travis.yml` file and copy the following into the file: ```yaml language: node_js node_js: - "18.0.0" # You can specify more versions of Node you want your CI process to support branches: only: - travis-ci-test # Specify what branch you want your CI process to run on install: - npm install script: - npm run build # Switch this out with your build command or remove it if you don't have a build step - npx wrangler pages deploy dist --project-name= env: - CLOUDFLARE_ACCOUNT_ID: { $CLOUDFLARE_ACCOUNT_ID } - CLOUDFLARE_API_TOKEN: { $CLOUDFLARE_API_TOKEN } ``` This will set the Node.js version to 18. You have also set branches you want your continuous integration to run on. Finally, input your `PROJECT NAME` in the script section and your CI process should work as expected. You can also modify the Wrangler command with any [`wrangler pages deploy` options](https://developers.cloudflare.com/workers/wrangler/commands/#deploy-1). --- title: Use Pages Functions for A/B testing · Cloudflare Pages docs description: In this guide, you will learn how to use Pages Functions for A/B testing in your Pages projects. A/B testing is a user experience research methodology applied when comparing two or more versions of a web page or application. With A/B testing, you can serve two or more versions of a webpage to users and divide traffic to your site. lastUpdated: 2025-05-09T17:32:11.000Z chatbotDeprioritize: false source_url: html: https://developers.cloudflare.com/pages/how-to/use-worker-for-ab-testing-in-pages/ md: https://developers.cloudflare.com/pages/how-to/use-worker-for-ab-testing-in-pages/index.md --- In this guide, you will learn how to use [Pages Functions](https://developers.cloudflare.com/pages/functions/) for A/B testing in your Pages projects. A/B testing is a user experience research methodology applied when comparing two or more versions of a web page or application. With A/B testing, you can serve two or more versions of a webpage to users and divide traffic to your site. ## Overview Configuring different versions of your application for A/B testing will be unique to your specific use case. For all developers, A/B testing setup can be simplified into a few helpful principles. Depending on the number of application versions you have (this guide uses two), you can assign your users into experimental groups. The experimental groups in this guide are the base route `/` and the test route `/test`. To ensure that a user remains in the group you have given, you will set and store a cookie in the browser and depending on the cookie value you have set, the corresponding route will be served. ## Set up your Pages Function In your project, you can handle the logic for A/B testing using [Pages Functions](https://developers.cloudflare.com/pages/functions/). Pages Functions allows you to handle server logic from within your Pages project. To begin: 1. Go to your Pages project directory on your local machine. 2. Create a `/functions` directory. Your application server logic will live in the `/functions` directory. ## Add middleware logic Pages Functions have utility functions that can reuse chunks of logic which are executed before and/or after route handlers. These are called [middleware](https://developers.cloudflare.com/pages/functions/middleware/). Following this guide, middleware will allow you to intercept requests to your Pages project before they reach your site. In your `/functions` directory, create a `_middleware.js` file. Note When you create your `_middleware.js` file at the base of your `/functions` folder, the middleware will run for all routes on your project. Learn more about [middleware routing](https://developers.cloudflare.com/pages/functions/middleware/). Following the Functions naming convention, the `_middleware.js` file exports a single async `onRequest` function that accepts a `request`, `env` and `next` as an argument. ```js const abTest = async ({ request, next, env }) => { /* Todo: 1. Conditional statements to check for the cookie 2. Assign cookies based on percentage, then serve */ }; export const onRequest = [abTest]; ``` To set the cookie, create the `cookieName` variable and assign any value. Then create the `newHomepagePathName` variable and assign it `/test`: ```js const cookieName = "ab-test-cookie"; const newHomepagePathName = "/test"; const abTest = async ({ request, next, env }) => { /* Todo: 1. Conditional statements to check for the cookie 2. Assign cookie based on percentage then serve */ }; export const onRequest = [abTest]; ``` ## Set up conditional logic Based on the URL pathname, check that the cookie value is equal to `new`. If the value is `new`, then `newHomepagePathName` will be served. ```js const cookieName = "ab-test-cookie"; const newHomepagePathName = "/test"; const abTest = async ({ request, next, env }) => { /* Todo: 1. Assign cookies based on randomly generated percentage, then serve */ const url = new URL(request.url); if (url.pathname === "/") { // if cookie ab-test-cookie=new then change the request to go to /test // if no cookie set, pass x% of traffic and set a cookie value to "current" or "new" let cookie = request.headers.get("cookie"); // is cookie set? if (cookie && cookie.includes(`${cookieName}=new`)) { // Change the request to go to /test (as set in the newHomepagePathName variable) url.pathname = newHomepagePathName; return env.ASSETS.fetch(url); } } }; export const onRequest = [abTest]; ``` If the cookie value is not present, you will have to assign one. Generate a percentage (from 0-99) by using: `Math.floor(Math.random() * 100)`. Your default cookie version is given a value of `current`. If the percentage of the number generated is lower than `50`, you will assign the cookie version to `new`. Based on the percentage randomly generated, you will set the cookie and serve the assets. After the conditional block, pass the request to `next()`. This will pass the request to Pages. This will result in 50% of users getting the `/test` homepage. The `env.ASSETS.fetch()` function will allow you to send the user to a modified path which is defined through the `url` parameter. `env` is the object that contains your environment variables and bindings. `ASSETS` is a default Function binding that allows communication between your Function and Pages' asset serving resource. `fetch()` calls to the Pages asset-serving resource and returns the asset (`/test` homepage) to your website's visitor. Binding A Function is a Worker that executes on your Pages project to add dynamic functionality. A binding is how your Function (Worker) interacts with external resources. A binding is a runtime variable that the Workers runtime provides to your code. ```js const cookieName = "ab-test-cookie"; const newHomepagePathName = "/test"; const abTest = async (context) => { const url = new URL(context.request.url); // if homepage if (url.pathname === "/") { // if cookie ab-test-cookie=new then change the request to go to /test // if no cookie set, pass x% of traffic and set a cookie value to "current" or "new" let cookie = request.headers.get("cookie"); // is cookie set? if (cookie && cookie.includes(`${cookieName}=new`)) { // pass the request to /test url.pathname = newHomepagePathName; return context.env.ASSETS.fetch(url); } else { const percentage = Math.floor(Math.random() * 100); let version = "current"; // default version // change pathname and version name for 50% of traffic if (percentage < 50) { url.pathname = newHomepagePathName; version = "new"; } // get the static file from ASSETS, and attach a cookie const asset = await context.env.ASSETS.fetch(url); let response = new Response(asset.body, asset); response.headers.append("Set-Cookie", `${cookieName}=${version}; path=/`); return response; } } return context.next(); }; export const onRequest = [abTest]; ``` ## Deploy to Cloudflare Pages After you have set up your `functions/_middleware.js` file in your project you are ready to deploy with Pages. Push your project changes to GitHub/GitLab. After you have deployed your application, review your middleware Function: 1. Log in to the [Cloudflare dashboard](https://dash.cloudflare.com) and select your account. 2. In Account Home, select **Workers & Pages**. 3. In **Overview**, select your Pages project > **Settings** > **Functions** > **Configuration**. --- title: Enable Web Analytics · Cloudflare Pages docs description: Cloudflare Web Analytics provides free, privacy-first analytics for your website without changing your DNS or using Cloudflare’s proxy. Cloudflare Web Analytics helps you understand the performance of your web pages as experienced by your site visitors. lastUpdated: 2025-05-09T17:32:11.000Z chatbotDeprioritize: false source_url: html: https://developers.cloudflare.com/pages/how-to/web-analytics/ md: https://developers.cloudflare.com/pages/how-to/web-analytics/index.md --- Cloudflare Web Analytics provides free, privacy-first analytics for your website without changing your DNS or using Cloudflare’s proxy. Cloudflare Web Analytics helps you understand the performance of your web pages as experienced by your site visitors. All you need to enable Cloudflare Web Analytics is a Cloudflare account and a JavaScript snippet on your page to start getting information on page views and visitors. The JavaScript snippet (also known as a beacon) collects metrics using the Performance API, which is available in all major web browsers. ## Enable on Pages project Cloudflare Pages offers a one-click setup for Web Analytics: 1. Log in to [Cloudflare dashboard](https://dash.cloudflare.com/login). 2. From Account Home, select **Workers & Pages**. 3. In **Overview**, select your Pages project. 4. Go to **Metrics** and select **Enable** under Web Analytics. Cloudflare will automatically add the JavaScript snippet to your Pages site on the next deployment. ## View metrics To view the metrics associated with your Pages project: 1. Log in to [Cloudflare dashboard](https://dash.cloudflare.com/login). 2. From Account Home, select **Analytics & Logs** > **Web Analytics**. 3. Select the analytics associated with your Pages project. For more details about how to use Web Analytics, refer to the [Web Analytics documentation](https://developers.cloudflare.com/web-analytics/data-metrics/). ## Troubleshooting For Cloudflare to automatically add the JavaScript snippet, your pages need to have valid HTML. For example, Cloudflare would not be able to enable Web Analytics on a page like this: ```html Hello world. ``` For Web Analytics to correctly insert the JavaScript snippet, you would need valid HTML output, such as: ```html Title

Hello world.

```
--- title: Redirecting www to domain apex · Cloudflare Pages docs description: Learn how to redirect a www subdomain to your apex domain (example.com). lastUpdated: 2025-05-09T17:32:11.000Z chatbotDeprioritize: false source_url: html: https://developers.cloudflare.com/pages/how-to/www-redirect/ md: https://developers.cloudflare.com/pages/how-to/www-redirect/index.md --- Learn how to redirect a `www` subdomain to your apex domain (`example.com`). This setup assumes that you already have a [custom domain](https://developers.cloudflare.com/pages/configuration/custom-domains/) attached to your Pages project. ## Setup To redirect your `www` subdomain to your domain apex: 1. Log in to the [Cloudflare dashboard](https://dash.cloudflare.com) and select your account. 2. Go to **Bulk Redirects**. 3. [Create a bulk redirect list](https://developers.cloudflare.com/rules/url-forwarding/bulk-redirects/create-dashboard/#1-create-a-bulk-redirect-list) modeled after the following (but replacing the values as appropriate): | Source URL | Target URL | Status | Parameters | | - | - | - | - | | `www.example.com` | `https://example.com` | `301` | * Preserve query string * Subpath matching * Preserve path suffix * Include subdomains | 1. [Create a bulk redirect rule](https://developers.cloudflare.com/rules/url-forwarding/bulk-redirects/create-dashboard/#2-create-a-bulk-redirect-rule) using the list you just created. 2. Go to **DNS**. 3. [Create a DNS record](https://developers.cloudflare.com/dns/manage-dns-records/how-to/create-dns-records/#create-dns-records) for the `www` subdomain using the following values: | Type | Name | IPv4 address | Proxy status | | - | - | - | - | | `A` | `www` | `192.0.2.1` | Proxied | It may take a moment for this DNS change to propagate, but once complete, you can run the following command in your terminal. ```sh curl --head -i https://www.example.com/ ``` Then, inspect the output to verify that the `location` header and status code are being set as configured. ## Related resources * [Redirect `*.pages.dev` to a custom domain](https://developers.cloudflare.com/pages/how-to/redirect-to-custom-domain/) * [Handle redirects with Bulk Redirects](https://developers.cloudflare.com/rules/url-forwarding/bulk-redirects/) --- title: Migrating from Firebase · Cloudflare Pages docs description: In this tutorial, you will learn how to migrate an existing Firebase application to Cloudflare Pages. You should already have an existing project deployed on Firebase that you would like to host on Cloudflare Pages. lastUpdated: 2025-05-09T17:32:11.000Z chatbotDeprioritize: true source_url: html: https://developers.cloudflare.com/pages/migrations/migrating-from-firebase/ md: https://developers.cloudflare.com/pages/migrations/migrating-from-firebase/index.md --- In this tutorial, you will learn how to migrate an existing Firebase application to Cloudflare Pages. You should already have an existing project deployed on Firebase that you would like to host on Cloudflare Pages. ## Finding your build command and build directory To move your application to Cloudflare Pages, you will need to find your build command and build directory. You will use these to tell Cloudflare Pages how to deploy your project. If you have been deploying manually from your local machine using the `firebase` command-line tool, the `firebase.json` configuration file should include a `public` key that will be your build directory: ```json { "public": "public" } ``` Firebase Hosting does not ask for your build command, so if you are running a standard JavaScript set up, you will probably be using `npm build` or a command specific to the framework or tool you are using (for example, `ng build`). After you have found your build directory and build command, you can move your project to Cloudflare Pages. ## Creating a new Pages project If you have not pushed your static site to GitHub before, you should do so before continuing. This will also give you access to features like automatic deployments, and [deployment previews](https://developers.cloudflare.com/pages/configuration/preview-deployments/). You can create a new repository by visiting [repo.new](https://repo.new) and following the instructions to push your project up to GitHub. Use the [Get started guide](https://developers.cloudflare.com/pages/get-started/) to add your project to Cloudflare Pages, using the **build command** and **build directory** that you saved earlier. ## Cleaning up your old application and assigning the domain Once you have deployed your application, go to the Firebase dashboard and remove your old Firebase project. In your Cloudflare DNS settings for your domain, make sure to update the CNAME record for your domain from Firebase to Cloudflare Pages. By completing this guide, you have successfully migrated your Firebase project to Cloudflare Pages. --- title: Migrating from Netlify to Pages · Cloudflare Pages docs description: In this tutorial, you will learn how to migrate your Netlify application to Cloudflare Pages. lastUpdated: 2025-05-09T17:32:11.000Z chatbotDeprioritize: true source_url: html: https://developers.cloudflare.com/pages/migrations/migrating-from-netlify/ md: https://developers.cloudflare.com/pages/migrations/migrating-from-netlify/index.md --- In this tutorial, you will learn how to migrate your Netlify application to Cloudflare Pages. ## Finding your build command and build directory To move your application to Cloudflare Pages, find your build command and build directory. Cloudflare Pages will use this information to build and deploy your application. In your Netlify Dashboard, find the project that you want to deploy. It should be configured to deploy from a GitHub repository. ![Selecting a site in the Netlify Dashboard](https://developers.cloudflare.com/_astro/netlify-deploy-1.By04eemW_1Vp1dR.webp) Inside of your site dashboard, select **Site Settings**, and then **Build & Deploy**. ![Selecting Site Settings in site dashboard](https://developers.cloudflare.com/_astro/netlify-deploy-2.DmmuPQSt_8gv3b.webp) ![Selecting Build and Deploy in sidebar](https://developers.cloudflare.com/_astro/netlify-deploy-3.BKXJ0OTu_1etMse.webp) In the **Build & Deploy** tab, find the **Build settings** panel, which will have the **Build command** and **Publish directory** fields. Save these for deploying to Cloudflare Pages. In the below image, **Build command** is `yarn build`, and **Publish directory** is `build/`. ![Finding the Build command and Publish directory fields](https://developers.cloudflare.com/_astro/netlify-deploy-4.DDil9MXJ_1TVELz.webp) ## Migrating redirects and headers If your site includes a `_redirects` file in your publish directory, you can use the same file in Cloudflare Pages and your redirects will execute successfully. If your redirects are in your `netlify.toml` file, you will need to add them to the `_redirects` folder. Cloudflare Pages currently offers limited [supports for advanced redirects](https://developers.cloudflare.com/pages/configuration/redirects/). In the case where you have over 2000 static and/or 100 dynamic redirects rules, it is recommended to use [Bulk Redirects](https://developers.cloudflare.com/rules/url-forwarding/bulk-redirects/create-dashboard/). Your header files can also be moved into a `_headers` folder in your publish directory. It is important to note that custom headers defined in the `_headers` file are not currently applied to responses from functions, even if the function route matches the URL pattern. To learn more about how to [handle headers, refer to Headers](https://developers.cloudflare.com/pages/configuration/headers/). Note Redirects execute before headers. In the case of a request matching rules in both files, the redirect will take precedence. ## Forms In your form component, remove the `data-netlify = "true"` attribute or the Netlify attribute from the `
` tag. You can now put your form logic as a Pages Function and collect the entries to a database or an Airtable. Refer to the [handling form submissions with Pages Functions](https://developers.cloudflare.com/pages/tutorials/forms/) tutorial for more information. ## Serverless functions Netlify functions and Pages Functions share the same filesystem convention using a `functions` directory in the base of your project to handle your serverless functions. However, the syntax and how the functions are deployed differs. Pages Functions run on Cloudflare Workers, which by default operate on the Cloudflare global network, and do not require any additional code or configuration for deployment. Cloudflare Pages Functions also provides middleware that can handle any logic you need to run before and/or after your function route handler. ### Functions syntax Netlify functions export an async event handler that accepts an event and a context as arguments. In the case of Pages Functions, you will have to export a single `onRequest` function that accepts a `context` object. The `context` object contains all the information for the request such as `request`, `env`, `params`, and returns a new Response. Learn more about [writing your first function](https://developers.cloudflare.com/pages/functions/get-started/) Hello World with Netlify functions: ```js exports.handler = async function (event, context) { return { statusCode: 200, body: JSON.stringify({ message: "Hello World" }), }; }; ``` Hello World with Pages Functions: ```js export async function onRequestPost(request) { return new Response(`Hello world`); } ``` ## Other Netlify configurations Your `netlify.toml` file might have other configurations that are supported by Pages, such as, preview deployment, specifying publish directory, and plugins. You can delete the file after migrating your configurations. ## Access management You can migrate your access management to [Cloudflare Zero Trust](https://developers.cloudflare.com/cloudflare-one/) which allows you to manage user authentication for your applications, event logging and requests. ## Creating a new Pages project Once you have found your build directory and build command, you can move your project to Cloudflare Pages. The [Get started guide](https://developers.cloudflare.com/pages/get-started/) will instruct you how to add your GitHub project to Cloudflare Pages. If you choose to use a custom domain for your Pages, you can set it to the same custom domain as your currently deployed Netlify application. To assign a custom domain to your Pages project, refer to [Custom Domains](https://developers.cloudflare.com/pages/configuration/custom-domains/). ## Cleaning up your old application and assigning the domain In the Cloudflare dashboard, go to **DNS** > **Records** and review that you have updated the CNAME record for your domain from Netlify to Cloudflare Pages. With your DNS record updated, requests will go to your Pages application. In **DNS**, your record's **Content** should be your `.pages.dev` subdomain. With the above steps completed, you have successfully migrated your Netlify project to Cloudflare Pages. --- title: Migrating from Vercel to Pages · Cloudflare Pages docs description: In this tutorial, you will learn how to deploy your Vercel application to Cloudflare Pages. lastUpdated: 2025-05-09T17:32:11.000Z chatbotDeprioritize: true source_url: html: https://developers.cloudflare.com/pages/migrations/migrating-from-vercel/ md: https://developers.cloudflare.com/pages/migrations/migrating-from-vercel/index.md --- In this tutorial, you will learn how to deploy your Vercel application to Cloudflare Pages. You should already have an existing project deployed on Vercel that you would like to host on Cloudflare Pages. Features such as Vercel's serverless functions are currently not supported in Cloudflare Pages. ## Find your build command and build directory To move your application to Cloudflare Pages, you will need to find your build command and build directory. Cloudflare Pages will use this information to build your application and deploy it. In your Vercel Dashboard, find the project that you want to deploy. It should be configured to deploy from a GitHub repository. ![Selecting a site in the Vercel Dashboard](https://developers.cloudflare.com/_astro/vercel-deploy-1.D2ttJxis_ZDyq5R.webp) Inside of your site dashboard, select **Settings**, then **General**. ![Selecting Site Settings in site dashboard](https://developers.cloudflare.com/_astro/vercel-deploy-2.Bz2cpjeg_ZWnFgf.webp) Find the **Build & Development settings** panel, which will have the **Build Command** and **Output Directory** fields. If you are using a framework, these values may not be filled in, but will show the defaults used by the framework. Save these for deploying to Cloudflare Pages. In the below image, the **Build Command** is `npm run build`, and the **Output Directory** is `build`. ![Finding the Build Command and Output Directory fields](https://developers.cloudflare.com/_astro/vercel-deploy-3.QXCg23KQ_ZSQ8Ij.webp) ## Create a new Pages project After you have found your build directory and build command, you can move your project to Cloudflare Pages. The [Get started guide](https://developers.cloudflare.com/pages/get-started/) will instruct you how to add your GitHub project to Cloudflare Pages. ## Add a custom domain Next, connect a [custom domain](https://developers.cloudflare.com/pages/configuration/custom-domains/) to your Pages project. This domain should be the same one as your currently deployed Vercel application. ### Change domain nameservers In most cases, you will want to [add your domain to Cloudflare](https://developers.cloudflare.com/dns/zone-setups/full-setup/setup/). This does involve changing your domain nameservers, but simplifies your Pages setup and allows you to use an apex domain for your project (like `example.com`). If you want to take a different approach, read more about [custom domains](https://developers.cloudflare.com/pages/configuration/custom-domains/). ### Set up custom domain To add a custom domain: 1. Log in to the [Cloudflare dashboard](https://dash.cloudflare.com/login). 2. Select your account in **Account Home** > **Workers & Pages**. 3. Select your Pages project > **Custom domains**. 4. Select **Set up a domain**. 5. Provide the domain that you would like to serve your Cloudflare Pages site on and select **Continue**. ![Adding a custom domain for your Pages project through the Cloudflare dashboard](https://developers.cloudflare.com/_astro/domains.zq4iMU_J_jMmg9.webp) The next steps vary based on if you [added your domain to Cloudflare](#change-domain-nameservers): * **Added to Cloudflare**: Cloudflare will set everything up for you automatically and your domain will move to an `Active` status. * **Not added to Cloudflare**: You need to [update some DNS records](https://developers.cloudflare.com/pages/configuration/custom-domains/#add-a-custom-subdomain) at your DNS provider to finish your setup. ## Delete your Vercel app Once your custom domain is set up and sending requests to Cloudflare Pages, you can safely delete your Vercel application. ## Troubleshooting Cloudflare does not provide IP addresses for your Pages project because we do not require `A` or `AAAA` records to link your domain to your project. Instead, Cloudflare uses `CNAME` records. For more details, refer to [Custom domains](https://developers.cloudflare.com/pages/configuration/custom-domains/). --- title: Migrating from Workers Sites to Pages · Cloudflare Pages docs description: In this tutorial, you will learn how to migrate an existing Cloudflare Workers Sites application to Cloudflare Pages. lastUpdated: 2025-05-09T17:32:11.000Z chatbotDeprioritize: true source_url: html: https://developers.cloudflare.com/pages/migrations/migrating-from-workers/ md: https://developers.cloudflare.com/pages/migrations/migrating-from-workers/index.md --- In this tutorial, you will learn how to migrate an existing [Cloudflare Workers Sites](https://developers.cloudflare.com/workers/configuration/sites/) application to Cloudflare Pages. As a prerequisite, you should have a Cloudflare Workers Sites project, created with [Wrangler](https://github.com/cloudflare/workers-sdk/tree/main/packages/wrangler). Cloudflare Pages provides built-in defaults for every aspect of serving your site. You can port custom behavior in your Worker — such as custom caching logic — to your Cloudflare Pages project using [Functions](https://developers.cloudflare.com/pages/functions/). This enables an easy-to-use, file-based routing system. You can also migrate your custom headers and redirects to Pages. You may already have a reasonably complex Worker and/or it would be tedious to splice it up into Pages' file-based routing system. For these cases, Pages offers developers the ability to define a `_worker.js` file in the output directory of your Pages project. Note When using a `_worker.js` file, the entire `/functions` directory is ignored - this includes its routing and middleware characteristics. Instead, the `_worker.js` file is deployed as is and must be written using the [Module Worker syntax](https://developers.cloudflare.com/workers/reference/migrate-to-module-workers/). By migrating to Cloudflare Pages, you will be able to access features like [preview deployments](https://developers.cloudflare.com/pages/configuration/preview-deployments/) and automatic branch deploys with no extra configuration needed. ## Remove unnecessary code Workers Sites projects consist of the following pieces: 1. An application built with a [static site tool](https://developers.cloudflare.com/pages/how-to/) or a static collection of HTML, CSS and JavaScript files. 2. If using a static site tool, a build directory (called `bucket` in the [Wrangler configuration file](https://developers.cloudflare.com/pages/functions/wrangler-configuration/)) where the static project builds your HTML, CSS, and JavaScript files. 3. A Worker application for serving that build directory. For most projects, this is likely to be the `workers-site` directory. When moving to Cloudflare Pages, remove the Workers application and any associated Wrangler configuration files or build output. Instead, note and record your `build` command (if you have one), and the `bucket` field, or build directory, from the Wrangler file in your project's directory. ## Migrate headers and redirects You can migrate your redirects to Pages, by creating a `_redirects` file in your output directory. Pages currently offers limited support for advanced redirects. More support will be added in the future. For a list of support types, refer to the [Redirects documentation](https://developers.cloudflare.com/pages/configuration/redirects/). Note A project is limited to 2,000 static redirects and 100 dynamic redirects, for a combined total of 2,100 redirects. Each redirect declaration has a 1,000-character limit. Malformed definitions are ignored. If there are multiple redirects for the same source path, the topmost redirect is applied. Make sure that static redirects are before dynamic redirects in your `_redirects` file. In addition to a `_redirects` file, Cloudflare also offers [Bulk Redirects](https://developers.cloudflare.com/pages/configuration/redirects/#surpass-_redirects-limits), which handles redirects that surpasses the 2,100 redirect rules limit set by Pages. Your custom headers can also be moved into a `_headers` file in your output directory. It is important to note that custom headers defined in the `_headers` file are not currently applied to responses from Functions, even if the Function route matches the URL pattern. To learn more about handling headers, refer to [Headers](https://developers.cloudflare.com/pages/configuration/headers/). ## Create a new Pages project ### Connect to your git provider After you have recorded your **build command** and **build directory** in a separate location, remove everything else from your application, and push the new version of your project up to your git provider. Follow the [Get started guide](https://developers.cloudflare.com/pages/get-started/) to add your project to Cloudflare Pages, using the **build command** and **build directory** that you saved earlier. If you choose to use a custom domain for your Pages project, you can set it to the same custom domain as your currently deployed Workers application. Follow the steps for [adding a custom domain](https://developers.cloudflare.com/pages/configuration/custom-domains/#add-a-custom-domain) to your Pages project. Note Before you deploy, you will need to delete your old Workers routes to start sending requests to Cloudflare Pages. ### Using Direct Upload If your Workers site has its custom build settings, you can bring your prebuilt assets to Pages with [Direct Upload](https://developers.cloudflare.com/pages/get-started/direct-upload/). In addition, you can serve your website's assets right to the Cloudflare global network by either using the [Wrangler CLI](https://developers.cloudflare.com/workers/wrangler/install-and-update/) or the drag and drop option. These options allow you to create and name a new project from the CLI or dashboard. After your project deployment is complete, you can set the custom domain by following the [adding a custom domain](https://developers.cloudflare.com/pages/configuration/custom-domains/#add-a-custom-domain) steps to your Pages project. ## Cleaning up your old application and assigning the domain After you have deployed your Pages application, to delete your Worker: 1. Log in to the [Cloudflare dashboard](https://dash.cloudflare.com/) and select your account. 2. Go to **Workers & Pages** and in **Overview**, select your Worker. 3. Go to **Manage** > **Delete Worker**. With your Workers application removed, requests will go to your Pages application. You have successfully migrated your Workers Sites project to Cloudflare Pages by completing this guide. --- title: Migrating a Jekyll-based site from GitHub Pages · Cloudflare Pages docs description: In this tutorial, you will learn how to migrate an existing GitHub Pages site using Jekyll to Cloudflare Pages. Jekyll is one of the most popular static site generators used with GitHub Pages, and migrating your GitHub Pages site to Cloudflare Pages will take a few short steps. lastUpdated: 2025-05-09T17:32:11.000Z chatbotDeprioritize: true source_url: html: https://developers.cloudflare.com/pages/migrations/migrating-jekyll-from-github-pages/ md: https://developers.cloudflare.com/pages/migrations/migrating-jekyll-from-github-pages/index.md --- In this tutorial, you will learn how to migrate an existing [GitHub Pages site using Jekyll](https://docs.github.com/en/pages/setting-up-a-github-pages-site-with-jekyll/about-github-pages-and-jekyll) to Cloudflare Pages. Jekyll is one of the most popular static site generators used with GitHub Pages, and migrating your GitHub Pages site to Cloudflare Pages will take a few short steps. This tutorial will guide you through: 1. Adding the necessary dependencies used by GitHub Pages to your project configuration. 2. Creating a new Cloudflare Pages site, connected to your existing GitHub repository. 3. Building and deploying your site on Cloudflare Pages. 4. (Optional) Migrating your custom domain. Including build times, this tutorial should take you less than 15 minutes to complete. Note If you have a Jekyll-based site not deployed on GitHub Pages, refer to [the Jekyll framework guide](https://developers.cloudflare.com/pages/framework-guides/deploy-a-jekyll-site/). ## Before you begin This tutorial assumes: 1. You have an existing GitHub Pages site using [Jekyll](https://jekyllrb.com/) 2. You have some familiarity with running Ruby's command-line tools, and have both `gem` and `bundle` installed. 3. You know how to use a few basic Git operations, including `add`, `commit`, `push`, and `pull`. 4. You have read the [Get Started](https://developers.cloudflare.com/pages/get-started/) guide for Cloudflare Pages. If you do not have Rubygems (`gem`) or Bundler (`bundle`) installed on your machine, refer to the installation guides for [Rubygems](https://rubygems.org/pages/download) and [Bundler](https://bundler.io/). ## Preparing your GitHub Pages repository Note If your GitHub Pages repository already has a `Gemfile` and `Gemfile.lock` present, you can skip this step entirely. The GitHub Pages environment assumes a default set of Jekyll plugins that are not explicitly specified in a `Gemfile`. Your existing Jekyll-based repository must specify a `Gemfile` (Ruby's dependency configuration file) to allow Cloudflare Pages to fetch and install those dependencies during the [build step](https://developers.cloudflare.com/pages/configuration/build-configuration/). Specifically, you will need to create a `Gemfile` and install the `github-pages` gem, which includes all of the dependencies that the GitHub Pages environment assumes. [Version 2 of the Pages build environment](https://developers.cloudflare.com/pages/configuration/build-image/#languages-and-runtime) will use Ruby 3.2.2 for the default Jekyll build. Please make sure your local development environment is compatible. ```sh brew install ruby@3.2 export PATH="/usr/local/opt/ruby@3.2/bin:$PATH" ``` ```sh cd my-github-pages-repo bundle init ``` Open the `Gemfile` that was created for you, and add the following line to the bottom of the file: ```ruby gem "github-pages", group: :jekyll_plugins ``` Your `Gemfile` should resemble the below: ```ruby # frozen_string_literal: true source "https://rubygems.org" git_source(:github) { |repo_name| "https://github.com/#{repo_name}" } # gem "rails" gem "github-pages", group: :jekyll_plugins ``` Run `bundle update`, which will install the `github-pages` gem for you, and create a `Gemfile.lock` file with the resolved dependency versions. ```sh bundle update # Bundler will show a lot of output as it fetches the dependencies ``` This should complete successfully. If not, verify that you have copied the `github-pages` line above exactly, and have not commented it out with a leading `#`. You will now need to commit these files to your repository so that Cloudflare Pages can reference them in the following steps: ```sh git add Gemfile Gemfile.lock git commit -m "deps: added Gemfiles" git push origin main ``` ## Configuring your Pages project With your GitHub Pages project now explicitly specifying its dependencies, you can start configuring Cloudflare Pages. The process is almost identical to [deploying a Jekyll site](https://developers.cloudflare.com/pages/framework-guides/deploy-a-jekyll-site/). Note If you are configuring your Cloudflare Pages site for the first time, refer to the [Git integration guide](https://developers.cloudflare.com/pages/get-started/git-integration/), which explains how to connect your existing Git repository to Cloudflare Pages. To deploy your site to Pages: 1. Log in to the [Cloudflare dashboard](https://dash.cloudflare.com/) and select your account. 2. In Account Home, select **Workers & Pages** > **Create application** > **Pages** > **Connect to Git**. 3. Select the new GitHub repository that you created and, in the **Set up builds and deployments** section, provide the following information: | Configuration option | Value | | - | - | | Production branch | `main` | | Build command | `jekyll build` | | Build directory | `_site` | After you have configured your site, you can begin your first deploy. You should see Cloudflare Pages installing `jekyll`, your project dependencies, and building your site, before deploying it. Note For the complete guide to deploying your first site to Cloudflare Pages, refer to the [Get started guide](https://developers.cloudflare.com/pages/get-started/). After deploying your site, you will receive a unique subdomain for your project on `*.pages.dev`. Every time you commit new code to your Jekyll site, Cloudflare Pages will automatically rebuild your project and deploy it. You will also get access to [preview deployments](https://developers.cloudflare.com/pages/configuration/preview-deployments/) on new pull requests, so you can preview how changes look to your site before deploying them to production. ## Migrating your custom domain If you are using a [custom domain with GitHub Pages](https://docs.github.com/en/pages/configuring-a-custom-domain-for-your-github-pages-site), you must update your DNS record(s) to point at your new Cloudflare Pages deployment. This will require you to update the `CNAME` record at the DNS provider for your domain to point to `.pages.dev`, replacing `.github.io`. Note that it may take some time for DNS caches to expire and for this change to be reflected, depending on the DNS TTL (time-to-live) value you set when you originally created the record. Refer to the [adding a custom domain](https://developers.cloudflare.com/pages/configuration/custom-domains/#add-a-custom-domain) section of the Get started guide for a list of detailed steps. ## What's next? * Learn how to [customize HTTP response headers](https://developers.cloudflare.com/pages/how-to/add-custom-http-headers/) for your Pages site using Cloudflare Workers. * Understand how to [rollback a potentially broken deployment](https://developers.cloudflare.com/pages/configuration/rollbacks/) to a previously working version. * [Configure redirects](https://developers.cloudflare.com/pages/configuration/redirects/) so that visitors are always directed to your 'canonical' custom domain. --- title: Changelog · Cloudflare Pages docs description: Subscribe to RSS lastUpdated: 2025-05-09T17:32:11.000Z chatbotDeprioritize: false source_url: html: https://developers.cloudflare.com/pages/platform/changelog/ md: https://developers.cloudflare.com/pages/platform/changelog/index.md --- [Subscribe to RSS](https://developers.cloudflare.com/pages/platform/changelog/index.xml) ## 2025-04-18 **Action recommended - Node.js 18 end-of-life and impact on Pages Build System V2** * If you are using [Pages Build System V2](https://developers.cloudflare.com/pages/configuration/build-image/) for a Git-connected Pages project, note that the default Node.js version, **Node.js 18**, will end its LTS support on **April 30, 2025**. * Pages will not change the default Node.js version in the Build System V2 at this time, instead, we **strongly recommend pinning a modern Node.js version** to ensure your builds are consistent and secure. * You can [pin any Node.js version](https://developers.cloudflare.com/pages/configuration/build-image/#override-default-versions) by: 1. Adding a `NODE_VERSION` environment variable with the desired version specified as the value. 2. Adding a `.node-version` file with the desired version specified in the file. * Pinning helps avoid unexpected behavior and ensures your builds stay up-to-date with your chosen runtime. We also recommend pinning all critical tools and languages that your project relies on. ## 2025-02-26 **Support for pnpm 10 in build system** * Pages build system now supports building projects that use **pnpm 10** as the package manager. If your build previously failed due to this unsupported version, retry your build. No config changes needed. ## 2024-12-19 **Cloudflare GitHub App Permissions Update** * Cloudflare is requesting updated permissions for the [Cloudflare GitHub App](https://github.com/apps/cloudflare-workers-and-pages) to enable features like automatically creating a repository on your GitHub account and deploying the new repository for you when getting started with a template. This feature is coming out soon to support a better onboarding experience. * **Requested permissions:** * [Repository Administration](https://docs.github.com/en/rest/authentication/permissions-required-for-github-apps?apiVersion=2022-11-28#repository-permissions-for-administration) (read/write) to create repositories. * [Contents](https://docs.github.com/en/rest/authentication/permissions-required-for-github-apps?apiVersion=2022-11-28#repository-permissions-for-contents) (read/write) to push code to the created repositories. * **Who is impacted:** * Existing users will be prompted to update permissions when GitHub sends an email with subject "\[GitHub] Cloudflare Workers & Pages is requesting updated permission" on December 19th, 2024. * New users installing the app will see the updated permissions during the connecting repository process. * **Action:** Review and accept the permissions update to use upcoming features. *If you decline or take no action, you can continue connecting repositories and deploying changes via the Cloudflare GitHub App as you do today, but new features requiring these permissions will not be available.* * **Questions?** Visit [#github-permissions-update](https://discord.com/channels/595317990191398933/1313895851520688163) in the Cloudflare Developers Discord. ## 2024-10-24 **Updating Bun version to 1.1.33 in V2 build system** * Bun version is being updated from `1.0.1` to `1.1.33` in Pages V2 build system. This is a minor version change, please see details at [Bun](https://bun.sh/blog/bun-v1.1.33). * If you wish to use a previous Bun version, you can [override default version](https://developers.cloudflare.com/pages/configuration/build-image/#overriding-default-versions). ## 2023-09-13 **Support for D1's new storage subsystem and build error message improvements** * Added support for D1's [new storage subsystem](https://blog.cloudflare.com/d1-turning-it-up-to-11/). All Git builds and deployments done with Wrangler v3.5.0 and up can use the new subsystem. * Builds which fail due to exceeding the [build time limit](https://developers.cloudflare.com/pages/platform/limits/#builds) will return a proper error message indicating so rather than `Internal error`. * New and improved error messages for other build failures ## 2023-08-23 **Commit message limit increase** * Commit messages can now be up to 384 characters before being trimmed. ## 2023-08-01 **Support for newer TLDs** * Support newer TLDs such as `.party` and `.music`. ## 2023-07-11 **V2 build system enabled by default** * V2 build system is now default for all new projects. ## 2023-07-10 **Sped up project creation** * Sped up project creation. ## 2023-05-19 **Build error message improvement** * Builds which fail due to Out of memory (OOM) will return a proper error message indicating so rather than `Internal error`. ## 2023-05-17 **V2 build system beta** * The V2 build system is now available in open beta. Enable the V2 build system by going to your Pages project in the Cloudflare dashboard and selecting **Settings** > [**Build & deployments**](https://dash.cloudflare.com?to=/:account/pages/view/:pages-project/settings/builds-deployments) > **Build system version**. ## 2023-05-16 **Support for Smart Placement** * [Smart placement](https://developers.cloudflare.com/workers/configuration/smart-placement/) can now be enabled for Pages within your Pages Project by going to **Settings** > [**Functions**](https://dash.cloudflare.com?to=/:account/pages/view/:pages-project/settings/functions). ## 2023-03-23 **Git projects can now see files uploaded** * Files uploaded are now visible for Git projects, you can view them in the [Cloudflare dashboard](https://dash.cloudflare.com?to=/:account/pages/view/:pages-project/:pages-deployment/files). ## 2023-03-20 **Notifications for Pages are now available** * Notifications for Pages events are now available in the [Cloudflare dashboard](https://dash.cloudflare.com?to=/:account/notifications). Events supported include: * Deployment started. * Deployment succeeded. * Deployment failed. ## 2023-02-14 **Analytics Engine now available in Functions** * Added support for [Analytics Engine](https://developers.cloudflare.com/analytics/analytics-engine/) in Functions. ## 2023-01-05 **Queues now available in Functions** * Added support for [Queues](https://developers.cloudflare.com/queues/) producer in Functions. ## 2022-12-15 **API messaging update** Updated all API messaging to be more helpful. ## 2022-12-01 **Ability to delete aliased deployments** * Aliased deployments can now be deleted. If using the API, you will need to add the query parameter `force=true`. ## 2022-11-19 **Deep linking to a Pages deployment** * You can now deep-link to a Pages deployment in the dashboard with `:pages-deployment`. An example would be `https://dash.cloudflare.com?to=/:account/pages/view/:pages-project/:pages-deployment`. ## 2022-11-17 **Functions GA and other updates** * Pages functions are now GA. For more information, refer to the [blog post](https://blog.cloudflare.com/pages-function-goes-ga/). * We also made the following updates to Functions: * [Functions metrics](https://dash.cloudflare.com?to=/:account/pages/view/:pages-project/analytics/production) are now available in the dashboard. * [Functions billing](https://developers.cloudflare.com/pages/functions/pricing/) is now available. * The [Unbound usage model](https://developers.cloudflare.com/workers/platform/limits/#response-limits) is now available for Functions. * [Secrets](https://developers.cloudflare.com/pages/functions/bindings/#secrets) are now available. * Functions tailing is now available via the [dashboard](https://dash.cloudflare.com?to=/:account/pages/view/:pages-project/:pages-deployment/functions) or with Wrangler (`wrangler pages deployment tail`). ## 2022-11-15 **Service bindings now available in Functions** * Service bindings are now available in Functions. For more details, refer to the [docs](https://developers.cloudflare.com/pages/functions/bindings/#service-bindings). ## 2022-11-03 **Ansi color codes in build logs** Build log now supports ansi color codes. ## 2022-10-05 **Deep linking to a Pages project** * You can now deep-link to a Pages project in the dashboard with `:pages-project`. An example would be `https://dash.cloudflare.com?to=/:account/pages/view/:pages-project`. ## 2022-09-12 **Increased domain limits** Previously, all plans had a maximum of 10 [custom domains](https://developers.cloudflare.com/pages/configuration/custom-domains/) per project. Now, the limits are: * **Free**: 100 custom domains. * **Pro**: 250 custom domains. * **Business** and **Enterprise**: 500 custom domains. ## 2022-09-08 **Support for \_routes.json** * Pages now offers support for `_routes.json`. For more details, refer to the [documentation](https://developers.cloudflare.com/pages/functions/routing/#functions-invocation-routes). ## 2022-08-25 **Increased build log expiration time** Build log expiration time increased from 2 weeks to 1 year. ## 2022-08-08 **New bindings supported** * R2 and D1 [bindings](https://developers.cloudflare.com/pages/functions/bindings/) are now supported. ## 2022-07-05 **Added support for .dev.vars in wrangler pages** Pages now supports `.dev.vars` in `wrangler pages`, which allows you to use use environmental variables during your local development without chaining `--env`s. This functionality requires Wrangler v2.0.16 or higher. ## 2022-06-13 **Added deltas to wrangler pages publish** Pages has added deltas to `wrangler pages publish`. We now keep track of the files that make up each deployment and intelligently only upload the files that we have not seen. This means that similar subsequent deployments should only need to upload a minority of files and this will hopefully make uploads even faster. This functionality requires Wrangler v2.0.11 or higher. ## 2022-06-08 **Added branch alias to PR comments** * PR comments for Pages previews now include the branch alias. --- title: Known issues · Cloudflare Pages docs description: "Here are some known bugs and issues with Cloudflare Pages:" lastUpdated: 2025-05-29T18:16:56.000Z chatbotDeprioritize: false source_url: html: https://developers.cloudflare.com/pages/platform/known-issues/ md: https://developers.cloudflare.com/pages/platform/known-issues/index.md --- Here are some known bugs and issues with Cloudflare Pages: ## Builds and deployment * GitHub and GitLab are currently the only supported platforms for automatic CI/CD builds. [Direct Upload](https://developers.cloudflare.com/pages/get-started/direct-upload/) allows you to integrate your own build platform or upload from your local computer. * Incremental builds are currently not supported in Cloudflare Pages. * Uploading a `/functions` directory through the dashboard's Direct Upload option does not work (refer to [Using Functions in Direct Upload](https://developers.cloudflare.com/pages/get-started/direct-upload/#functions)). * Commits/PRs from forked repositories will not create a preview. Support for this will come in the future. ## Git configuration * If you deploy using the Git integration, you cannot switch to Direct Upload later. However, if you already use a Git-integrated project and do not want to trigger deployments every time you push a commit, you can [disable/pause automatic deployments](https://developers.cloudflare.com/pages/configuration/git-integration/#disable-automatic-deployments). Alternatively, you can delete your Pages project and create a new one pointing at a different repository if you need to update it. ## Build configuration * `*.pages.dev` subdomains currently cannot be changed. If you need to change your `*.pages.dev` subdomain, delete your project and create a new one. * Hugo builds automatically run an old version. To run the latest version of Hugo (for example, `0.101.0`), you will need to set an environment variable. Set `HUGO_VERSION` to `0.101.0` or the Hugo version of your choice. * By default, Cloudflare uses Node `12.18.0` in the Pages build environment. If you need to use a newer Node version, refer to the [Build configuration page](https://developers.cloudflare.com/pages/configuration/build-configuration/) for configuration options. * For users migrating from Netlify, Cloudflare does not support Netlify's Forms feature. [Pages Functions](https://developers.cloudflare.com/pages/functions/) are available as an equivalent to Netlify's Serverless Functions. ## Custom Domains * It is currently not possible to add a custom domain with * a wildcard, for example, `*.domain.com`. * a Worker already routed on that domain. * It is currently not possible to add a custom domain with a Cloudflare Access policy already enabled on that domain. * Cloudflare's Load Balancer does not work with `*.pages.dev` projects; an `Error 1000: DNS points to prohibited IP` will appear. * When adding a custom domain, the domain will not verify if Cloudflare cannot validate a request for an SSL certificate on that hostname. In order for the SSL to validate, ensure Cloudflare Access or a Cloudflare Worker is allowing requests to the validation path: `http://{domain_name}/.well-known/acme-challenge/*`. * [Advanced Certificates](https://developers.cloudflare.com/ssl/edge-certificates/advanced-certificate-manager/) cannot be used with Cloudflare Pages due to Cloudflare for SaaS's [certificate prioritization](https://developers.cloudflare.com/ssl/reference/certificate-and-hostname-priority/). ## Pages Functions * [Functions](https://developers.cloudflare.com/pages/functions/) does not currently support adding/removing polyfills, so your bundler (for example, webpack) may not run. * `passThroughOnException()` is not currently available for Advanced Mode Pages Functions (Pages Functions which use an `_worker.js` file). * `passThroughOnException()` is not currently as resilient as it is in Workers. We currently wrap Pages Functions code in a `try`/`catch` block and fallback to calling `env.ASSETS.fetch()`. This means that any critical failures (such as exceeding CPU time or exceeding memory) may still throw an error. ## Enable Access on your `*.pages.dev` domain If you would like to enable [Cloudflare Access](https://www.cloudflare.com/teams-access/)] for your preview deployments and your `*.pages.dev` domain, you must: 1. Log in to [Cloudflare dashboard](https://dash.cloudflare.com/login). 2. From Account Home, select **Workers & Pages**. 3. In **Overview**, select your Pages project. 4. Go to **Settings** > **Enable access policy**. 5. Select **Edit** on the Access policy created for your preview deployments. 6. In Edit, go to **Overview**. 7. In the **Subdomain** field, delete the wildcard (`*`) and select **Save application**. You may need to change the **Application name** at this step to avoid an error. At this step, your `*.pages.dev` domain has been secured behind Access. To resecure your preview deployments: 1. Go back to your Pages project > **Settings** > **General** > and reselect **Enable access policy**. 2. Review that two Access policies, one for your `*.pages.dev` domain and one for your preview deployments (`*..pages.dev`), have been created. If you have a custom domain and protected your `*.pages.dev` domain behind Access, you must: 1. Select **Add an application** > **Self hosted** in [Cloudflare Zero Trust](https://one.dash.cloudflare.com/). 2. Input an **Application name** and select your custom domain from the *Domain* dropdown menu. 3. Select **Next** and configure your access rules to define who can reach the Access authentication page. 4. Select **Add application**. Warning If you do not configure an Access policy for your custom domain, an Access authentication will render but not work for your custom domain visitors. If your Pages project has a custom domain, make sure to add an Access policy as described above in steps 10 through 13 to avoid any authentication issues. If you have an issue that you do not see listed, let the team know in the Cloudflare Workers Discord. Get your invite at [discord.cloudflare.com](https://discord.cloudflare.com), and share your bug report in the #pages-general channel. ## Delete a project with a high number of deployments You may not be able to delete your Pages project if it has a high number (over 100) of deployments. The Cloudflare team is tracking this issue. As a workaround, review the following steps to delete all deployments in your Pages project. After you delete your deployments, you will be able to delete your Pages project. 1. Download the `delete-all-deployments.zip` file by going to the following link: . 2. Extract the `delete-all-deployments.zip` file. 3. Open your terminal and `cd` into the `delete-all-deployments` directory. 4. In the `delete-all-deployments` directory, run `npm install` to install dependencies. 5. Review the following commands to decide which deletion you would like to proceed with: * To delete all deployments except for the live production deployment (excluding [aliased deployments](https://developers.cloudflare.com/pages/configuration/preview-deployments/#preview-aliases)): ```sh CF_API_TOKEN= CF_ACCOUNT_ID= CF_PAGES_PROJECT_NAME= npm start ``` * To delete all deployments except for the live production deployment (including [aliased deployments](https://developers.cloudflare.com/pages/configuration/preview-deployments/#preview-aliases), for example, `staging.example.pages.dev`): ```sh CF_API_TOKEN= CF_ACCOUNT_ID= CF_PAGES_PROJECT_NAME= CF_DELETE_ALIASED_DEPLOYMENTS=true npm start ``` To find your Cloudflare API token, log in to the [Cloudflare dashboard](https://dash.cloudflare.com), select the user icon on the upper righthand side of your screen > go to **My Profile** > **API Tokens**. To find your Account ID, refer to [Find your zone and account ID](https://developers.cloudflare.com/fundamentals/account/find-account-and-zone-ids/). ## Use Pages as Origin in Cloudflare Load Balancer [Cloudflare Load Balancing](https://developers.cloudflare.com/load-balancing/) will not work without the host header set. To use a Pages project as target, make sure to select **Add host header** when [creating a pool](https://developers.cloudflare.com/load-balancing/pools/create-pool/#create-a-pool), and set both the host header value and the endpoint address to your `pages.dev` domain. Refer to [Use Cloudflare Pages as origin](https://developers.cloudflare.com/load-balancing/pools/cloudflare-pages-origin/) for a complete tutorial. --- title: Limits · Cloudflare Pages docs description: Below are limits observed by the Cloudflare Free plan. For more details on removing these limits, refer to the Cloudflare plans page. lastUpdated: 2025-05-09T17:32:11.000Z chatbotDeprioritize: false source_url: html: https://developers.cloudflare.com/pages/platform/limits/ md: https://developers.cloudflare.com/pages/platform/limits/index.md --- Below are limits observed by the Cloudflare Free plan. For more details on removing these limits, refer to the [Cloudflare plans](https://www.cloudflare.com/plans) page. Need a higher limit? To request an adjustment to a limit, complete the [Limit Increase Request Form](https://forms.gle/ukpeZVLWLnKeixDu7). If the limit can be increased, Cloudflare will contact you with next steps. ## Builds Each time you push new code to your Git repository, Pages will build and deploy your site. You can build up to 500 times per month on the Free plan. Refer to the Pro and Business plans in [Pricing](https://pages.cloudflare.com/#pricing) if you need more builds. Builds will timeout after 20 minutes. Concurrent builds are counted per account. ## Custom domains Based on your Cloudflare plan type, a Pages project is limited to a specific number of custom domains. This limit is on a per-project basis. | Free | Pro | Business | Enterprise | | - | - | - | - | | 100 | 250 | 500 | 500[1](#user-content-fn-1) | ## Files Pages uploads each file on your site to Cloudflare's globally distributed network to deliver a low latency experience to every user that visits your site. Cloudflare Pages sites can contain up to 20,000 files. ## File size The maximum file size for a single Cloudflare Pages site asset is 25 MiB. Larger Files To serve larger files, consider uploading them to [R2](https://developers.cloudflare.com/r2/) and utilizing the [public bucket](https://developers.cloudflare.com/r2/buckets/public-buckets/) feature. You can also use [custom domains](https://developers.cloudflare.com/r2/buckets/public-buckets/#connect-a-bucket-to-a-custom-domain), such as `static.example.com`, for serving these files. ## Headers A `_headers` file can have a maximum of 100 header rules. An individual header in a `_headers` file can have a maximum of 2,000 characters. For managing larger headers, it is recommended to implement [Pages Functions](https://developers.cloudflare.com/pages/functions/). ## Preview deployments You can have an unlimited number of [preview deployments](https://developers.cloudflare.com/pages/configuration/preview-deployments/) active on your project at a time. ## Redirects A `_redirects` file can have a maximum of 2,000 static redirects and 100 dynamic redirects, for a combined total of 2,100 redirects. It is recommended to use [Bulk Redirects](https://developers.cloudflare.com/pages/configuration/redirects/#surpass-_redirects-limits) when you have a need for more than the `_redirects` file supports. ## Users Your Pages site can be managed by an unlimited number of users via the Cloudflare dashboard. Note that this does not correlate with your Git project – you can manage both public and private repositories, open issues, and accept pull requests via without impacting your Pages site. ## Projects Cloudflare Pages has a soft limit of 100 projects within your account in order to prevent abuse. If you need this limit raised, contact your Cloudflare account team or use the Limit Increase Request Form at the top of this page. In order to protect against abuse of the service, Cloudflare may temporarily disable your ability to create new Pages projects, if you are deploying a large number of applications in a short amount of time. Contact support if you need this limit increased. ## Footnotes 1. If you need more custom domains, contact your account team. [↩](#user-content-fnref-1) --- title: Choose a data or storage product · Cloudflare Pages docs lastUpdated: 2025-05-09T17:32:11.000Z chatbotDeprioritize: false source_url: html: https://developers.cloudflare.com/pages/platform/storage-options/ md: https://developers.cloudflare.com/pages/platform/storage-options/index.md --- --- title: Add a React form with Formspree · Cloudflare Pages docs description: Almost every React website needs a form to collect user data. Formspree is a back-end service that handles form processing and storage, allowing developers to include forms on their website without writing server-side code or functions. lastUpdated: 2025-05-16T16:37:37.000Z chatbotDeprioritize: false tags: Forms source_url: html: https://developers.cloudflare.com/pages/tutorials/add-a-react-form-with-formspree/ md: https://developers.cloudflare.com/pages/tutorials/add-a-react-form-with-formspree/index.md --- Almost every React website needs a form to collect user data. [Formspree](https://formspree.io/) is a back-end service that handles form processing and storage, allowing developers to include forms on their website without writing server-side code or functions. In this tutorial, you will create a `` component using React and add it to a single page application built with `create-react-app`. Though you are using `create-react-app` (CRA), the concepts will apply to any React framework including Next.js, Gatsby, and more. You will use Formspree to collect the submitted data and send out email notifications when new submissions arrive, without requiring any server-side coding. You will deploy your site to Cloudflare Pages. Refer to the [Get started guide](https://developers.cloudflare.com/pages/get-started/) to familiarize yourself with the platform. ## Setup To begin, create a new React project on your local machine with `create-react-app`. Then create a [new GitHub repository](https://repo.new/), and attach the GitHub location as a remote destination: ```sh # create new project with create-react-app npx create-react-app new-app # enter new directory cd new-app # attach git remote git remote add origin git@github.com:/.git # change default branch name git branch -M main ``` You may now modify the React application in the `new-app` directory you created. ## The front-end code The starting point for `create-react-app` includes a simple Hello World website. You will be adding a Contact Us form that accepts a name, email address, and message. The form code is adapted from the HTML Forms tutorial. For a more in-depth explanation of how HTML forms work and additional learning resources, refer to the [HTML Forms tutorial](https://developers.cloudflare.com/pages/tutorials/forms/). First, create a new react component called `ContactForm.js` and place it in the `src` folder alongside `App.js`. ```plaintext project-root/ ├─ package.json └─ src/ ├─ ContactForm.js ├─ App.js └─ ... ``` Next, you will build the form component using a helper library from Formspree, [`@formspree/react`](https://github.com/formspree/formspree-react). This library contains a `useForm` hook to simplify the process of handling form submission events and managing form state. Install it with: * npm ```sh npm i @formspree/react ``` * yarn ```sh yarn add @formspree/react ``` * pnpm ```sh pnpm add @formspree/react ``` Then paste the following code snippet into the `ContactForm.js` file: ```jsx import { useForm, ValidationError } from "@formspree/react"; export default function ContactForm() { const [state, handleSubmit] = useForm("YOUR_FORM_ID"); if (state.succeeded) { return

Thanks for your submission!

; } return ( ); } ``` Currently, the form contains a placeholder `YOUR_FORM_ID`. You replace this with your own form endpoint later in this tutorial. The `useForm` hook returns a `state` object and a `handleSubmit` function which you pass to the `onSubmit` form attribute. Combined, these provide a way to submit the form data via AJAX and update form state depending on the response received. For clarity, this form does not include any styling, but in the GitHub project () you can review an example of how to apply styles to the form. Note `ValidationError` components are helpers that display error messages for field errors, or general form errors (if no `field` attribute is provided). For more information on validation, refer to the [Formspree React documentation](https://help.formspree.io/hc/en-us/articles/360055613373-The-Formspree-React-library#validation). To add this form to your website, import the component: ```jsx import ContactForm from "./ContactForm"; ``` Then insert the form into the page as a react component: ```jsx ``` For example, you can update your `src/App.js` file to add the form: ```jsx import ContactForm from "./ContactForm"; // <-- import the form component import logo from "./logo.svg"; import "./App.css"; function App() { return (
logo

Edit src/App.js and save to reload.

Learn React {/* your contact form component goes here */}
); } export default App; ``` Now you have a single-page application containing a Contact Us form with several fields for the user to fill out. However, you have not set up the form to submit to a valid form endpoint yet. You will do that in the [next section](#the-formspree-back-end). GitHub repository The source code for this example is [available on GitHub](https://github.com/formspree/formspree-example-cloudflare-react). It is a live Pages application with a [live demo](https://formspree-example-cloudflare-react.pages.dev/) available, too. ## The Formspree back end The React form is complete, however, when the user submits this form, they will get a `Form not found` error. To fix this, create a new Formspree form, and copy its unique ID into the form's `useForm` invocation. To create a Formspree form, sign up for [an account on Formspree](https://formspree.io/register). Then create a new form with the **+ New form** button. Name your new form `Contact-us form` and update the recipient email to an email where you wish to receive your form submissions. Finally, select **Create Form**. ![Creating a Formspree form](https://developers.cloudflare.com/_astro/new-form-dialog.0SL1Ns7t_1IM46x.webp) You will be presented with instructions on how to integrate your new form. Copy the form’s `hashid` (the last 8 alphanumeric characters from the URL) and paste it into the `useForm` function in the `ContactForm` component you created above. ![Newly generated form endpoint that you can copy to use in the ContactForm component](https://developers.cloudflare.com/_astro/form-endpoint.Be94Kac0_Z2ihA0w.webp) Your component should now have a line like this: ```jsx const [state, handleSubmit] = useForm("mqldaqwx"); /* replace the random-like string above with your own form's ID */ ``` Now when you submit your form, you should be shown a Thank You message. The form data will be submitted to your account on [Formspree.io](https://formspree.io/). From here you can adjust your form processing logic to update the [notification email address](https://help.formspree.io/hc/en-us/articles/115008379348-Changing-a-form-email-address), or add plugins like [Google Sheets](https://help.formspree.io/hc/en-us/articles/360036563573-Use-Google-Sheets-to-send-your-submissions-to-a-spreadsheet), [Slack](https://help.formspree.io/hc/en-us/articles/360045648933-Send-Slack-notifications), and more. For more help setting up Formspree, refer to the following resources: * For general help with Formspree, refer to the [Formspree help site](https://help.formspree.io/hc/en-us). * For more help creating forms in React, refer to the [formspree-react documentation](https://help.formspree.io/hc/en-us/articles/360055613373-The-Formspree-React-library) * For tips on integrating Formspree with popular platforms like Next.js, Gatsby and Eleventy, refer to the [Formspree guides](https://formspree.io/guides). ## Deployment You are now ready to deploy your project. If you have not already done so, save your progress within `git` and then push the commit(s) to the GitHub repository: ```sh # Add all files git add -A # Commit w/ message git commit -m "working example" # Push commit(s) to remote git push -u origin main ``` Your work now resides within the GitHub repository, which means that Pages is able to access it too. If this is your first Cloudflare Pages project, refer to the [Get started guide](https://developers.cloudflare.com/pages/get-started/) for a complete walkthrough. After selecting the appropriate GitHub repository, you must configure your project with the following build settings: * **Project name** – Your choice * **Production branch** – `main` * **Framework preset** – Create React App * **Build command** – `npm run build` * **Build output directory** – `build` After selecting **Save and Deploy**, your Pages project will begin its first deployment. When successful, you will be presented with a unique `*.pages.dev` subdomain and a link to your live demo. ## Using environment variables with forms Sometimes it is helpful to set up two forms, one for development, and one for production. That way you can develop and test your form without corrupting your production dataset, or sending test notifications to clients. To set up production and development forms first create a second form in Formspree. Name this form Contact Us Testing, and note the form's [`hashid`](https://help.formspree.io/hc/en-us/articles/360015130174-Getting-your-form-s-hashid-). Then change the `useForm` hook in your `ContactForm.js` file so that it is initialized with an environment variable, rather than a string: ```jsx const [state, handleSubmit] = useForm(process.env.REACT_APP_FORM_ID); ``` In your Cloudflare Pages project settings, add the `REACT_APP_FORM_ID` environment variable to both the Production and Preview environments. Use your original form's `hashid` for Production, and the new test form's `hashid` for the Preview environment: ![Edit option for environment variables in your Production and Preview environments](https://developers.cloudflare.com/_astro/env-vars.0yB3DPeO_ZJzcNN.webp) Now, when you commit and push changes to a branch of your git repository, a new preview app will be created with a form that submits to the test form URL. However, your production website will continue to submit to the original form URL. Note Create React App uses the prefix `REACT_APP_` to designate environment variables that are accessible to front-end JavaScript code. A different framework will use a different prefix to expose environment variables. For example, in the case of Next.js, the prefix is `NEXT_PUBLIC_`. Consult the documentation of your front-end framework to determine how to access environment variables from your React code. In this tutorial, you built and deployed a website using Cloudflare Pages and Formspree to handle form submissions. You created a React application with a form that communicates with Formspree to process and store submission requests and send notifications. If you would like to review the full source code for this application, you can find it on [GitHub](https://github.com/formspree/formspree-example-cloudflare-react). ## Related resources * [Add an HTML form with Formspree](https://developers.cloudflare.com/pages/tutorials/add-an-html-form-with-formspree/) * [HTML Forms](https://developers.cloudflare.com/pages/tutorials/forms/)
--- title: Add an HTML form with Formspree · Cloudflare Pages docs description: Almost every website, whether it is a simple HTML portfolio page or a complex JavaScript application, will need a form to collect user data. Formspree is a back-end service that handles form processing and storage, allowing developers to include forms on their website without writing server-side code or functions. lastUpdated: 2025-03-13T16:14:30.000Z chatbotDeprioritize: false tags: Forms source_url: html: https://developers.cloudflare.com/pages/tutorials/add-an-html-form-with-formspree/ md: https://developers.cloudflare.com/pages/tutorials/add-an-html-form-with-formspree/index.md --- Almost every website, whether it is a simple HTML portfolio page or a complex JavaScript application, will need a form to collect user data. [Formspree](https://formspree.io) is a back-end service that handles form processing and storage, allowing developers to include forms on their website without writing server-side code or functions. In this tutorial, you will create a `
` using plain HTML and CSS and add it to a static HTML website hosted on Cloudflare Pages. Refer to the [Get started guide](https://developers.cloudflare.com/pages/get-started/) to familiarize yourself with the platform. You will use Formspree to collect the submitted data and send out email notifications when new submissions arrive, without requiring any JavaScript or back-end coding. ## Setup To begin, create a [new GitHub repository](https://repo.new/). Then create a new local directory on your machine, initialize git, and attach the GitHub location as a remote destination: ```sh # create new directory mkdir new-project # enter new directory cd new-project # initialize git git init # attach remote git remote add origin git@github.com:/.git # change default branch name git branch -M main ``` You may now begin working in the `new-project` directory you created. ## The website markup You will only be using plain HTML for this example project. The home page will include a Contact Us form that accepts a name, email address, and message. Note The form code is adapted from the HTML Forms tutorial. For a more in-depth explanation of how HTML forms work and additional learning resources, refer to the [HTML Forms tutorial](https://developers.cloudflare.com/pages/tutorials/forms/). The form code: ```html ``` The `action` attribute determines where the form data is sent. You will update this later to send form data to Formspree. All `` tags must have a unique `name` in order to capture the user's data. The `for` and `id` values must match in order to link the `
--- title: Build a blog using Nuxt.js and Sanity.io on Cloudflare Pages · Cloudflare Pages docs description: Build a blog application using Nuxt.js and Sanity.io and deploy it on Cloudflare Pages. lastUpdated: 2025-07-11T16:03:39.000Z chatbotDeprioritize: false tags: Nuxt,Vue.js source_url: html: https://developers.cloudflare.com/pages/tutorials/build-a-blog-using-nuxt-and-sanity/ md: https://developers.cloudflare.com/pages/tutorials/build-a-blog-using-nuxt-and-sanity/index.md --- In this tutorial, you will build a blog application using Nuxt.js and Sanity.io and deploy it on Cloudflare Pages. Nuxt.js is a powerful static site generator built on the front-end framework Vue.js. Sanity.io is a headless CMS tool built for managing your application's data without needing to maintain a database. ## Prerequisites * A recent version of [npm](https://docs.npmjs.com/getting-started) on your computer * A [Sanity.io](https://www.sanity.io) account ## Creating a new Sanity project To begin, create a new Sanity project, using one of Sanity's templates, the blog template. If you would like to customize your configuration, you can modify the schema or pick a custom template. ### Installing Sanity and configuring your dataset Create your new Sanity project by installing the `@sanity/cli` client from npm, and running `sanity init` in your terminal: * npm ```sh npm i @sanity/cli ``` * yarn ```sh yarn add @sanity/cli ``` * pnpm ```sh pnpm add @sanity/cli ``` - npm ```sh npx sanity init ``` - yarn ```sh yarn sanity init ``` - pnpm ```sh pnpm sanity init ``` When you create a Sanity project, you can choose to use one of their pre-defined schemas. Schemas describe the shape of your data in your Sanity dataset -- if you were to start a brand new project, you may choose to initialize the schema from scratch, but for now, select the **Blog** schema. ### Inspecting your schema With your project created, you can navigate into the folder and start up the studio locally: ```sh cd my-sanity-project ``` * npm ```sh npx sanity start ``` * yarn ```sh yarn sanity start ``` * pnpm ```sh pnpm sanity start ``` The Sanity studio is where you can create new records for your dataset. By default, running the studio locally makes it available at `localhost:3333`– go there now and create your author record. You can also create blog posts here. ![Creating a blog post in the Sanity Project dashboard](https://developers.cloudflare.com/_astro/sanity-studio.Cg5gfJOU_2m7it5.webp) ### Deploying your dataset When you are ready to deploy your studio, run `sanity deploy` to choose a unique URL for your studio. This means that you (or anyone else you invite to manage your blog) can access the studio at a `yoururl.sanity.studio` domain. * npm ```sh npx sanity deploy ``` * yarn ```sh yarn sanity deploy ``` * pnpm ```sh pnpm sanity deploy ``` Once you have deployed your Sanity studio: 1. Go into Sanity's management panel ([manage.sanity.io](https://manage.sanity.io)). 2. Find your project. 3. Select **API**. 4. Add `http://localhost:3000` as an allowed CORS origin for your project. This means that requests that come to your Sanity dataset from your Nuxt application will be allowlisted. ![Your Sanity project's CORS settings](https://developers.cloudflare.com/_astro/cors.B4xMgIh9_Z1LDqTl.webp) ## Creating a new Nuxt.js project Next, create a Nuxt.js project. In a new terminal, use `create-nuxt-app` to set up a new Nuxt project: * npm ```sh npx create-nuxt-app blog ``` * yarn ```sh yarn dlx create-nuxt-app blog ``` * pnpm ```sh pnpx create-nuxt-app blog ``` Importantly, ensure that you select a rendering mode of **Universal (SSR / SSG)** and a deployment target of **Static (Static/JAMStack hosting)**, while going through the setup process. After you have completed your project, `cd` into your new project, and start a local development server by running `yarn dev` (or, if you chose npm as your package manager, `npm run dev`): ```sh cd blog ``` * npm ```sh npm run dev ``` * yarn ```sh yarn run dev ``` * pnpm ```sh pnpm run dev ``` ### Integrating Sanity.io After your Nuxt.js application is set up, add Sanity's `@sanity/nuxt` plugin to your Nuxt project: * npm ```sh npm i @nuxtjs/sanity @sanity/client ``` * yarn ```sh yarn add @nuxtjs/sanity @sanity/client ``` * pnpm ```sh pnpm add @nuxtjs/sanity @sanity/client ``` To configure the plugin in your Nuxt.js application, you will need to provide some configuration details. The easiest way to do this is to copy the `sanity.json` folder from your studio into your application directory (though there are other methods, too: [refer to the `@nuxt/sanity` documentation](https://sanity.nuxtjs.org/getting-started/quick-start/). ```sh cp ../my-sanity-project/sanity.json . ``` Finally, add `@nuxtjs/sanity` as a **build module** in your Nuxt configuration: ```js { buildModules: ["@nuxtjs/sanity"]; } ``` ### Setting up components With Sanity configured in your application, you can begin using it to render your blog. You will now set up a few pages to pull data from your Sanity API and render it. Note that if you are not familiar with Nuxt, it is recommended that you review the [Nuxt guide](https://nuxtjs.org/guide), which will teach you some fundamentals concepts around building applications with Nuxt. ### Setting up the index page To begin, update the `index` page, which will be rendered when you visit the root route (`/`). In `pages/index.vue`: ```html ``` Vue SFCs, or *single file components*, are a unique Vue feature that allow you to combine JavaScript, HTML and CSS into a single file. In `pages/index.vue`, a `template` tag is provided, which represents the Vue component. Importantly, `v-for` is used as a directive to tell Vue to render HTML for each `post` in an array of `posts`: ```html ``` To populate that `posts` array, the `asyncData` function is used, which is provided by Nuxt to make asynchronous calls (for example, network requests) to populate the page's data. The `$sanity` object is provided by the Nuxt and Sanity.js integration as a way to make requests to your Sanity dataset. By calling `$sanity.fetch`, and passing a query, you can retrieve specific data from our Sanity dataset, and return it as your page's data. If you have not used Sanity before, you will probably be unfamiliar with GROQ, the GRaph Oriented Query language provided by Sanity for interfacing with your dataset. GROQ is a powerful language that allows you to tell the Sanity API what data you want out of your dataset. For our first query, you will tell Sanity to retrieve every object in the dataset with a `_type` value of `post`: ```js const query = groq`*[_type == "post"]`; const posts = await $sanity.fetch(query); ``` ### Setting up the blog post page Our `index` page renders a link for each blog post in our dataset, using the `slug` value to set the URL for a blog post. For example, if I create a blog post called "Hello World" and set the slug to `hello-world`, my Nuxt application should be able to handle a request to the page `/hello-world`, and retrieve the corresponding blog post from Sanity. Nuxt has built-in support for these kind of pages, by creating a new file in `pages` in the format `_slug.vue`. In the `asyncData` function of your page, you can then use the `params` argument to reference the slug: ```html ``` With that in mind, you can build `pages/_slug.vue` to take the incoming `slug` value, make a query to Sanity to find the matching blog post, and render the `post` title for the blog post: ```html ``` When visiting, for example, `/hello-world`, Nuxt will take the incoming slug `hello-world`, and make a GROQ query to Sanity for any objects with a `_type` of `post`, as well as a slug that matches the value `/hello-world`. From that set, you can get the first object in the array (using the array index operator you would find in JavaScript – `[0]`) and set it as `post` in your page data. ### Rendering content for a blog post You have rendered the `post` title for our blog, but you are still missing the content of the blog post itself. To render this, import the [`sanity-blocks-vue-component`](https://github.com/rdunk/sanity-blocks-vue-component) package, which takes Sanity's [Portable Text](https://www.sanity.io/docs/presenting-block-text) format and renders it as a Vue component. First, install the npm package: * npm ```sh npm i sanity-blocks-vue-component ``` * yarn ```sh yarn add sanity-blocks-vue-component ``` * pnpm ```sh pnpm add sanity-blocks-vue-component ``` After the package is installed, create `plugins/sanity-blocks.js`, which will import the component and register it as the Vue component `block-content`: ```js import Vue from "vue"; import BlockContent from "sanity-blocks-vue-component"; Vue.component("block-content", BlockContent); ``` In your Nuxt configuration, `nuxt.config.js`, import that file as part of the `plugins` directive: ```js { plugins: ["@/plugins/sanity-blocks.js"]; } ``` In `pages/_slug.vue`, you can now use the `` component to render your content. This takes the format of a custom HTML component, and takes three arguments: `:blocks`, which indicates what to render (in our case, `child`), `v-for`, which accepts an iterator of where to get `child` from (in our case, `post.body`), and `:key`, which helps Vue [keep track of state rendering](https://vuejs.org/v2/guide/list.html#Maintaining-State) by providing a unique value for each post: that is, the `_id` value. ```html ``` In `pages/index.vue`, you can use the `block-content` component to render a summary of the content, by taking the first block in your blog post content and rendering it: ```html ``` There are many other things inside of your blog schema that you can add to your project. As an exercise, consider one of the following to continue developing your understanding of how to build with a headless CMS: * Create `pages/authors.vue`, and render a list of authors (similar to `pages/index.vue`, but for objects with `_type == "author"`) * Read the Sanity docs on [using references in GROQ](https://www.sanity.io/docs/how-queries-work#references-and-joins-db43dfd18d7d), and use it to render author information in a blog post page ## Publishing with Cloudflare Pages Publishing your project with Cloudflare Pages is a two-step process: first, push your project to GitHub, and then in the Cloudflare Pages dashboard, set up a new project based on that GitHub repository. Pages will deploy a new version of your site each time you publish, and will even set up preview deployments whenever you open a new pull request. To push your project to GitHub, [create a new repository](https://repo.new), and follow the instructions to push your local Git repository to GitHub. After you have pushed your project to GitHub, deploy your site to Pages: 1. Log in to the [Cloudflare dashboard](https://dash.cloudflare.com/) and select your account. 2. In Account Home, select **Workers & Pages** > **Create application** > **Pages** > **Connect to Git**. 3. Select the new GitHub repository that you created and, in the **Set up builds and deployments** section, choose *Nuxt*. Pages will set the correct fields for you automatically. When your site has been deployed, you will receive a unique URL to view it in production. In order to automatically deploy your project when your Sanity.io data changes, you can use [Deploy Hooks](https://developers.cloudflare.com/pages/configuration/deploy-hooks/). Create a new Deploy Hook URL in your **Pages project** > **Settings**. In your Sanity project's Settings page, find the **Webhooks** section, and add the Deploy Hook URL, as seen below: ![Adding a Deploy Hook URL on Sanity's dashboard](https://developers.cloudflare.com/_astro/hooks.CikwC9IO_NHazD.webp) Now, when you make a change to your Sanity.io dataset, Sanity will make a request to your unique Deploy Hook URL, which will begin a new Cloudflare Pages deploy. By doing this, your Pages application will remain up-to-date as you add new blog posts, or edit existing ones. ## Conclusion By completing this guide, you have successfully deployed your own blog, powered by Nuxt, Sanity.io, and Cloudflare Pages. You can find the source code for both codebases on GitHub: * Blog front end: * Sanity dataset: If you enjoyed this tutorial, you may be interested in learning how you can use Cloudflare Workers, our powerful serverless function platform, to augment your existing site. Refer to the [Build an API for your front end using Pages Functions tutorial](https://developers.cloudflare.com/pages/tutorials/build-an-api-with-pages-functions/) to learn more. --- title: Build an API for your front end using Pages Functions · Cloudflare Pages docs description: "In this tutorial, you will build a full-stack Pages application. Your application will contain:" lastUpdated: 2025-05-16T16:37:37.000Z chatbotDeprioritize: false source_url: html: https://developers.cloudflare.com/pages/tutorials/build-an-api-with-pages-functions/ md: https://developers.cloudflare.com/pages/tutorials/build-an-api-with-pages-functions/index.md --- In this tutorial, you will build a full-stack Pages application. Your application will contain: * A front end, built using Cloudflare Pages and the [React framework](https://developers.cloudflare.com/pages/framework-guides/deploy-a-react-site/). * A JSON API, built with [Pages Functions](https://developers.cloudflare.com/pages/functions/get-started/), that returns blog posts that can be retrieved and rendered in your front end. If you prefer to work with a headless CMS rather than an API to render your blog content, refer to the [headless CMS tutorial](https://developers.cloudflare.com/pages/tutorials/build-a-blog-using-nuxt-and-sanity/). ## Video Tutorial ## 1. Build your front end To begin, create a new Pages application using the React framework. ### Create a new React project In your terminal, create a new React project called `blog-frontend` using the `create-vite` command. Go into the newly created `blog-frontend` directory and start a local development server: ```sh npx create-vite -t react blog-frontend cd blog-frontend npm install npm run dev ``` ### Set up your React project To set up your React project: 1. Install the [React Router](https://reactrouter.com/en/main/start/tutorial) in the root of your `blog-frontend` directory. * [npm](#tab-panel-3413) * [yarn](#tab-panel-3414) * [pnpm](#tab-panel-3415) ```sh npm i react-router-dom@6 ``` ```sh yarn add react-router-dom@6 ``` ```sh pnpm add react-router-dom@6 ``` s 1. Clear the contents of `src/App.js`. Copy and paste the following code to import the React Router into `App.js`, and set up a new router with two routes: ```js import { Routes, Route } from "react-router-dom"; import Posts from "./components/posts"; import Post from "./components/post"; function App() { return ( } /> } /> ); } export default App; ``` 1. In the `src` directory, create a new folder called `components`. 2. In the `components` directory, create two files: `posts.js`, and `post.js`. These files will load the blog posts from your API, and render them. 3. Populate `posts.js` with the following code: ```js import React, { useEffect, useState } from "react"; import { Link } from "react-router-dom"; const Posts = () => { const [posts, setPosts] = useState([]); useEffect(() => { const getPosts = async () => { const resp = await fetch("/api/posts"); const postsResp = await resp.json(); setPosts(postsResp); }; getPosts(); }, []); return (

Posts

{posts.map((post) => (

{post.title}

))}
); }; export default Posts; ``` 1. Populate `post.js` with the following code: ```js import React, { useEffect, useState } from "react"; import { Link, useParams } from "react-router-dom"; const Post = () => { const [post, setPost] = useState({}); const { id } = useParams(); useEffect(() => { const getPost = async () => { const resp = await fetch(`/api/post/${id}`); const postResp = await resp.json(); setPost(postResp); }; getPost(); }, [id]); if (!Object.keys(post).length) return
; return (

{post.title}

{post.text}

Published {new Date(post.published_at).toLocaleString()}

Go back

); }; export default Post; ``` ## 2. Build your API You will now create a Pages Functions that stores your blog content and retrieves it via a JSON API. ### Write your Pages Function To create the Pages Function that will act as your JSON API: 1. Create a `functions` directory in your `blog-frontend` directory. 2. In `functions`, create a directory named `api`. 3. In `api`, create a `posts.js` file in the `api` directory. 4. Populate `posts.js` with the following code: ```js import posts from "./post/data"; export function onRequestGet() { return Response.json(posts); } ``` This code gets blog data (from `data.js`, which you will make in step 8) and returns it as a JSON response from the path `/api/posts`. 1. In the `api` directory, create a directory named `post`. 2. In the `post` directory, create a `data.js` file. 3. Populate `data.js` with the following code. This is where your blog content, blog title, and other information about your blog lives. ```js const posts = [ { id: 1, title: "My first blog post", text: "Hello world! This is my first blog post on my new Cloudflare Workers + Pages blog.", published_at: new Date("2020-10-23"), }, { id: 2, title: "Updating my blog", text: "It's my second blog post! I'm still writing and publishing using Cloudflare Workers + Pages :)", published_at: new Date("2020-10-26"), }, ]; export default posts; ``` 1. In the `post` directory, create an `[[id]].js` file. 2. Populate `[[id]].js` with the following code: ```js import posts from "./data"; export function onRequestGet(context) { const id = context.params.id; if (!id) { return new Response("Not found", { status: 404 }); } const post = posts.find((post) => post.id === Number(id)); if (!post) { return new Response("Not found", { status: 404 }); } return Response.json(post); } ``` `[[id]].js` is a [dynamic route](https://developers.cloudflare.com/pages/functions/routing#dynamic-routes) which is used to accept a blog post `id`. ## 3. Deploy After you have configured your Pages application and Pages Function, deploy your project using the Wrangler or via the dashboard. ### Deploy with Wrangler In your `blog-frontend` directory, run [`wrangler pages deploy`](https://developers.cloudflare.com/workers/wrangler/commands/#deploy-1) to deploy your project to the Cloudflare dashboard. ```sh wrangler pages deploy blog-frontend ``` ### Deploy via the dashboard To deploy via the Cloudflare dashboard, you will need to create a new Git repository for your Pages project and connect your Git repository to Cloudflare. This tutorial uses GitHub as its Git provider. #### Create a new repository Create a new GitHub repository by visiting [repo.new](https://repo.new). After creating a new repository, prepare and push your local application to GitHub by running the following commands in your terminal: ```sh git init git remote add origin https://github.com// git add . git commit -m "Initial commit" git branch -M main git push -u origin main ``` #### Deploy with Cloudflare Pages Deploy your application to Pages: 1. Log in to the [Cloudflare dashboard](https://dash.cloudflare.com/) and select your account. 2. In Account Home, select **Workers & Pages** > **Create application** > **Pages** > **Connect to Git**. 3. Select the new GitHub repository that you created and, in the **Set up builds and deployments** section, provide the following information: | Configuration option | Value | | - | - | | Production branch | `main` | | Build command | `npm run build` | | Build directory | `build` | After configuring your site, begin your first deploy. You should see Cloudflare Pages installing `blog-frontend`, your project dependencies, and building your site. By completing this tutorial, you have created a full-stack Pages application. ## Related resources * Learn about [Pages Functions routing](https://developers.cloudflare.com/pages/functions/routing) --- title: Create a HTML form · Cloudflare Pages docs description: In this tutorial, you will create a simple
using plain HTML and CSS and deploy it to Cloudflare Pages. While doing so, you will learn about some of the HTML form attributes and how to collect submitted data within a Worker. lastUpdated: 2025-04-28T16:28:11.000Z chatbotDeprioritize: false tags: Forms source_url: html: https://developers.cloudflare.com/pages/tutorials/forms/ md: https://developers.cloudflare.com/pages/tutorials/forms/index.md --- In this tutorial, you will create a simple `` using plain HTML and CSS and deploy it to Cloudflare Pages. While doing so, you will learn about some of the HTML form attributes and how to collect submitted data within a Worker. MDN Introductory Series This tutorial will briefly touch upon the basics of HTML forms. For a more in-depth overview, refer to MDN's [Web Forms – Working with user data](https://developer.mozilla.org/en-US/docs/Learn/Forms) introductory series. This tutorial will make heavy use of Cloudflare Pages and [its Workers integration](https://developers.cloudflare.com/pages/functions/). Refer to the [Get started guide](https://developers.cloudflare.com/pages/get-started/) guide to familiarize yourself with the platform. ## Overview On the web, forms are a common point of interaction between the user and the web document. They allow a user to enter data and, generally, submit their data to a server. A form is comprised of at least one form input, which can vary from text fields to dropdowns to checkboxes and more. Each input should be named – using the [`name`](https://developer.mozilla.org/en-US/docs/Web/HTML/Element/input#attr-name) attribute – so that the input's value has an identifiable name when received by the server. Additionally, with the advancement of HTML5, form elements may declare additional attributes to opt into automatic form validation. The available validations vary by input type; for example, a text input that accepts emails (via [`type=email`](https://developer.mozilla.org/en-US/docs/Web/HTML/Element/input#input_types)) can ensure that the value looks like a valid email address, a number input (via `type=number`) will only accept integers or decimal values (if allowed), and generic text inputs can define a custom [`pattern`](https://developer.mozilla.org/en-US/docs/Web/HTML/Element/input#attr-pattern) to allow. However, all inputs can declare whether or not a value is [`required`](https://developer.mozilla.org/en-US/docs/Web/HTML/Element/input#attr-required). Below is an example HTML5 form with a few inputs and their validation rules defined: ```html
``` If an HTML5 form has validation rules defined, browsers will automatically check all rules when the user attempts to submit the form. Should there be any errors, the submission is prevented and the browser displays the error message(s) to the user for correction. The `
` will only `POST` data to the `/submit` endpoint when there are no outstanding validation errors. This entire process is native to HTML5 and only requires the appropriate form and input attributes to exist — no JavaScript is required. Form elements may also have a [`
` and its child elements are necessary. The `` and the enclosing `` and `` tags are optional and not strictly necessary for a valid HTML document. The HTML page is also completely unstyled at this point, relying on the browsers' default UI and color palettes. Styling the page is entirely optional and not necessary for the form to function. If you would like to attach a CSS stylesheet, you may [add a `` element](https://developer.mozilla.org/en-US/docs/Learn/CSS/First_steps/Getting_started#adding_css_to_our_document). Refer to the finished tutorial's [source code](https://github.com/cloudflare/submit.pages.dev/blob/8c0594f48681935c268987f2f08bcf3726a74c57/public/index.html#L11) for an example or any inspiration – the only requirement is that your CSS stylesheet also resides within the `public` directory. ### Worker The HTML form is complete and ready for deployment. When the user submits this form, all data will be sent in a `POST` request to the `/api/submit` URL. This is due to the form's `method` and `action` attributes. However, there is currently no request handler at the `/api/submit` address. You will now create it. Cloudflare Pages offers a [Functions](https://developers.cloudflare.com/pages/functions/) feature, which allows you to define and deploy Workers for dynamic behaviors. Functions are linked to the `functions` directory and conveniently construct URL request handlers in relation to the `functions` file structure. For example, the `functions/about.js` file will map to the `/about` URL and `functions/hello/[name].js` will handle the `/hello/:name` URL pattern, where `:name` is any matching URL segment. Refer to the [Functions routing](https://developers.cloudflare.com/pages/functions/routing/) documentation for more information. To define a handler for `/api/submit`, you must create a `functions/api/submit.js` file. This means that your `functions` and `public` directories should be siblings, with a total project structure similar to the following: ```txt ├── functions │   └── api │   └── submit.js └── public └── index.html ``` The `` will send `POST` requests, which means that the `functions/api/submit.js` file needs to export an `onRequestPost` handler: ```js /** * POST /api/submit */ export async function onRequestPost(context) { // TODO: Handle the form submission } ``` The `context` parameter is an object filled with several values of potential interest. For this example, you only need the [`Request`](https://developers.cloudflare.com/workers/runtime-apis/request/) object, which can be accessed through the `context.request` key. As mentioned, a `` defaults to the `application/x-www-form-urlencoded` MIME type when submitting. And, for more advanced scenarios, the `enctype="multipart/form-data"` attribute is needed. Luckily, both MIME types can be parsed and treated as [`FormData`](https://developer.mozilla.org/en-US/docs/Web/API/FormData). This means that with Workers – which includes Pages Functions – you are able to use the native [`Request.formData`](https://developer.mozilla.org/en-US/docs/Web/API/Request/formData) parser. For illustrative purposes, the example application's form handler will reply with all values it received. A `Response` must always be returned by the handler, too: ```js /** * POST /api/submit */ export async function onRequestPost(context) { try { let input = await context.request.formData(); let pretty = JSON.stringify([...input], null, 2); return new Response(pretty, { headers: { "Content-Type": "application/json;charset=utf-8", }, }); } catch (err) { return new Response("Error parsing JSON content", { status: 400 }); } } ``` With this handler in place, the example is now fully functional. When a submission is received, the Worker will reply with a JSON list of the `FormData` key-value pairs. However, if you want to reply with a JSON object instead of the key-value pairs (an Array of Arrays), then you must do so manually. Recently, JavaScript added the [`Object.fromEntries`](https://developer.mozilla.org/en-US/docs/Web/JavaScript/Reference/Global_Objects/Object/fromEntries) utility. This works well in some cases; however, the example `` includes a `movies` checklist that allows for multiple values. If using `Object.fromEntries`, the generated object would only keep one of the `movies` values, discarding the rest. To avoid this, you must write your own `FormData` to `Object` utility instead: ```js /** * POST /api/submit */ export async function onRequestPost(context) { try { let input = await context.request.formData(); // Convert FormData to JSON // NOTE: Allows multiple values per key let output = {}; for (let [key, value] of input) { let tmp = output[key]; if (tmp === undefined) { output[key] = value; } else { output[key] = [].concat(tmp, value); } } let pretty = JSON.stringify(output, null, 2); return new Response(pretty, { headers: { "Content-Type": "application/json;charset=utf-8", }, }); } catch (err) { return new Response("Error parsing JSON content", { status: 400 }); } } ``` The final snippet (above) allows the Worker to retain all values, returning a JSON response with an accurate representation of the `` submission. ### Deployment You are now ready to deploy your project. If you have not already done so, save your progress within `git` and then push the commit(s) to the GitHub repository: ```sh # Add all files git add -A # Commit w/ message git commit -m "working example" # Push commit(s) to remote git push -u origin main ``` Your work now resides within the GitHub repository, which means that Pages is able to access it too. If this is your first Cloudflare Pages project, refer to the [Get started guide](https://developers.cloudflare.com/pages/get-started/) for a complete walkthrough. After selecting the appropriate GitHub repository, you must configure your project with the following build settings: * **Project name** – Your choice * **Production branch** – `main` * **Framework preset** – None * **Build command** – None / Empty * **Build output directory** – `public` After clicking the **Save and Deploy** button, your Pages project will begin its first deployment. When successful, you will be presented with a unique `*.pages.dev` subdomain and a link to your live demo. In this tutorial, you built and deployed a website and its back-end logic using Cloudflare Pages with its Workers integration. You created a static HTML document with a form that communicates with a Worker handler to parse the submission request(s). If you would like to review the full source code for this application, you can find it on [GitHub](https://github.com/cloudflare/submit.pages.dev). ## Related resources * [Build an API for your front end using Cloudflare Workers](https://developers.cloudflare.com/pages/tutorials/build-an-api-with-pages-functions/) * [Handle form submissions with Airtable](https://developers.cloudflare.com/workers/tutorials/handle-form-submissions-with-airtable/) --- title: Localize a website with HTMLRewriter · Cloudflare Pages docs description: In this tutorial, you will build an example internationalization and localization engine (commonly referred to as i18n and l10n) for your application, serve the content of your site, and automatically translate the content based on your visitors’ location in the world. lastUpdated: 2025-03-13T16:14:30.000Z chatbotDeprioritize: false source_url: html: https://developers.cloudflare.com/pages/tutorials/localize-a-website/ md: https://developers.cloudflare.com/pages/tutorials/localize-a-website/index.md --- In this tutorial, you will build an example internationalization and localization engine (commonly referred to as **i18n** and **l10n**) for your application, serve the content of your site, and automatically translate the content based on your visitors’ location in the world. This tutorial uses the [`HTMLRewriter`](https://developers.cloudflare.com/workers/runtime-apis/html-rewriter/) class built into the Cloudflare Workers runtime, which allows for parsing and rewriting of HTML on the Cloudflare global network. This gives developers the ability to efficiently and transparently customize their Workers applications. ![An example site that has been successfully localized in Japanese, German and English](https://developers.cloudflare.com/_astro/i18n.DfrXtRlL_HOv9z.webp) *** ## Before you continue All of the framework guides assume you already have a fundamental understanding of [Git](https://git-scm.com/). If you are new to Git, refer to this [summarized Git handbook](https://guides.github.com/introduction/git-handbook/) on how to set up Git on your local machine. If you clone with SSH, you must [generate SSH keys](https://docs.github.com/en/github/authenticating-to-github/connecting-to-github-with-ssh/generating-a-new-ssh-key-and-adding-it-to-the-ssh-agent) on each computer you use to push or pull from GitHub. Refer to the [GitHub documentation](https://guides.github.com/introduction/git-handbook/) and [Git documentation](https://git-scm.com/book/en/v2) for more information. ## Prerequisites This tutorial is designed to use an existing website. To simplify this process, you will use a free HTML5 template from [HTML5 UP](https://html5up.net). With this website as the base, you will use the `HTMLRewriter` functionality in the Workers platform to overlay an i18n layer, automatically translating the site based on the user’s language. If you would like to deploy your own version of the site, you can find the source [on GitHub](https://github.com/lauragift21/i18n-example-workers). Instructions on how to deploy this application can be found in the project’s README. ## Create a new application Create a new application using the [`create-cloudflare`](https://developers.cloudflare.com/pages/get-started/c3), a CLI for creating and deploying new applications to Cloudflare. * npm ```sh npm create cloudflare@latest -- i18n-example ``` * yarn ```sh yarn create cloudflare i18n-example ``` * pnpm ```sh pnpm create cloudflare@latest i18n-example ``` For setup, select the following options: * For *What would you like to start with*?, select `Framework Starter`. * For *Which development framework do you want to use?*, select `React`. * For, *Do you want to deploy your application?*, select `No`. The newly generated `i18n-example` project will contain two folders: `public` and `src` these contain files for a React application: ```sh cd i18n-example ls ``` ```sh public src package.json ``` We have to make a few adjustments to the generated project, first we want to the replace the content inside of the `public` directory, with the default generated HTML code for the HTML5 UP template seen in the demo screenshot: download a [release](https://github.com/signalnerve/i18n-example-workers/archive/v1.0.zip) (ZIP file) of the code for this project and copy the `public` folder to your own project to get started. Next, let's create a functions directory with an `index.js` file, this will be where the logic of the application will be written. ```sh mkdir functions cd functions touch index.js ``` Additionally, we'll remove the `src/` directory since its content isn't necessary for this project. With the static HTML for this project updated, you can focus on the script inside of the `functions` folder, at `index.js`. ## Understanding `data-i18n-key` The `HTMLRewriter` class provided in the Workers runtime allows developers to parse HTML and write JavaScript to query and transform every element of the page. The example website in this tutorial is a basic single-page HTML project that lives in the `public` directory. It includes an `h1` element with the text `Example Site` and a number of `p` elements with different text: ![Demo code shown in Chrome DevTools with the elements described above](https://developers.cloudflare.com/_astro/code-example.Csjrvc1w_xNHcU.webp) What is unique about this page is the addition of [data attributes](https://developer.mozilla.org/en-US/docs/Learn/HTML/Howto/Use_data_attributes) in the HTML – custom attributes defined on a number of elements on this page. The `data-i18n-key` on the `h1` tag on this page, as well as many of the `p` tags, indicates that there is a corresponding internationalization key, which should be used to look up a translation for this text: ```html

Example Site

This is my example site. Depending o...

Disclaimer: the initial translations...

``` Using `HTMLRewriter`, you will parse the HTML within the `./public/index.html` page. When a `data-i18n-key` attribute is found, you should use the attribute's value to retrieve a matching translation from the `strings` object. With `HTMLRewriter`, you can query elements to accomplish tasks like finding a data attribute. However, as the name suggests, you can also rewrite elements by taking a translated string and directly inserting it into the HTML. Another feature of this project is based on the `Accept-Language` header, which exists on incoming requests. You can set the translation language per request, allowing users from around the world to see a locally relevant and translated page. ## Using the HTML Rewriter API Begin with the `functions/index.js` file. Your application in this tutorial will live entirely in this file. Inside of this file, start by adding the default code for running a [Pages Function](https://developers.cloudflare.com/pages/functions/get-started/#create-a-function). ```js export function onRequest(context) { return new Response("Hello, world!"); } ``` The important part of the code lives in the `onRequest` function. To implement translations on the site, take the HTML response retrieved from `env.ASSETS.fetch(request)` this allows you to fetch a static asset from your Pages project and pass it into a new instance of `HTMLRewriter`. When instantiating `HTMLRewriter`, you can attach handlers using the `on` function. For this tutorial, you will use the `[data-i18n-key]` selector (refer to the [HTMLRewriter documentation](https://developers.cloudflare.com/workers/runtime-apis/html-rewriter/) for more advanced usage) to locate all elements with the `data-i18n-key` attribute, which means that they must be translated. Any matching element will be passed to an instance of your `ElementHandler` class, which will contain the translation logic. With the created instance of `HTMLRewriter`, the `transform` function takes a `response` and can be returned to the client: ```js export async function onRequest(context) { const { request, env } = context; const response = await env.ASSETS.fetch(request); return new HTMLRewriter() .on("[data-i18n-key]", new ElementHandler(countryStrings)) .transform(response); } ``` ## Transforming HTML Your `ElementHandler` will receive every element parsed by the `HTMLRewriter` instance, and due to the expressive API, you can query each incoming element for information. In [How it works](#understanding-data-i18n-key), the documentation describes `data-i18n-key`, a custom data attribute that could be used to find a corresponding translated string for the website’s user interface. In `ElementHandler`, you can define an `element` function, which will be called as each element is parsed. Inside of the `element` function, you can query for the custom data attribute using `getAttribute`: ```js class ElementHandler { element(element) { const i18nKey = element.getAttribute("data-i18n-key"); } } ``` With `i18nKey` defined, you can use it to search for a corresponding translated string. You will now set up a `strings` object with key-value pairs corresponding to the `data-i18n-key` value. For now, you will define a single example string, `headline`, with a German `string`, `"Beispielseite"` (`"Example Site"`), and retrieve it in the `element` function: ```js const strings = { headline: "Beispielseite", }; class ElementHandler { element(element) { const i18nKey = element.getAttribute("data-i18n-key"); const string = strings[i18nKey]; } } ``` Take your translated `string` and insert it into the original element, using the `setInnerContent` function: ```js const strings = { headline: "Beispielseite", }; class ElementHandler { element(element) { const i18nKey = element.getAttribute("data-i18n-key"); const string = strings[i18nKey]; if (string) { element.setInnerContent(string); } } } ``` To review that everything looks as expected, use the preview functionality built into Wrangler. Call [`wrangler pages dev ./public`](https://developers.cloudflare.com/workers/wrangler/commands/#dev) to open up a live preview of your project. The command is refreshed after every code change that you make. You can expand on this translation functionality to provide country-specific translations, based on the incoming request’s `Accept-Language` header. By taking this header, parsing it, and passing the parsed language into your `ElementHandler`, you can retrieve a translated string in your user’s home language, provided that it is defined in `strings`. To implement this: 1. Update the `strings` object, adding a second layer of key-value pairs and allowing strings to be looked up in the format `strings[country][key]`. 2. Pass a `countryStrings` object into our `ElementHandler`, so that it can be used during the parsing process. 3. Grab the `Accept-Language` header from an incoming request, parse it, and pass the parsed language to `ElementHandler`. To parse the `Accept-Language` header, install the [`accept-language-parser`](https://www.npmjs.com/package/accept-language-parser) npm package: ```sh npm i accept-language-parser ``` Once imported into your code, use the package to parse the most relevant language for a client based on `Accept-Language` header, and pass it to `ElementHandler`. Your final code for the project, with an included sample translation for Germany and Japan (using Google Translate) looks like this: ```js import parser from "accept-language-parser"; // do not set to true in production! const DEBUG = false; const strings = { de: { title: "Beispielseite", headline: "Beispielseite", subtitle: "Dies ist meine Beispielseite. Abhängig davon, wo auf der Welt Sie diese Site besuchen, wird dieser Text in die entsprechende Sprache übersetzt.", disclaimer: "Haftungsausschluss: Die anfänglichen Übersetzungen stammen von Google Translate, daher sind sie möglicherweise nicht perfekt!", tutorial: "Das Tutorial für dieses Projekt finden Sie in der Cloudflare Workers-Dokumentation.", copyright: "Design von HTML5 UP.", }, ja: { title: "サンプルサイト", headline: "サンプルサイト", subtitle: "これは私の例のサイトです。 このサイトにアクセスする世界の場所に応じて、このテキストは対応する言語に翻訳されます。", disclaimer: "免責事項:最初の翻訳はGoogle翻訳からのものですので、完璧ではないかもしれません!", tutorial: "Cloudflare Workersのドキュメントでこのプロジェクトのチュートリアルを見つけてください。", copyright: "HTML5 UPによる設計。", }, }; class ElementHandler { constructor(countryStrings) { this.countryStrings = countryStrings; } element(element) { const i18nKey = element.getAttribute("data-i18n-key"); if (i18nKey) { const translation = this.countryStrings[i18nKey]; if (translation) { element.setInnerContent(translation); } } } } export async function onRequest(context) { const { request, env } = context; try { let options = {}; if (DEBUG) { options = { cacheControl: { bypassCache: true, }, }; } const languageHeader = request.headers.get("Accept-Language"); const language = parser.pick(["de", "ja"], languageHeader); const countryStrings = strings[language] || {}; const response = await env.ASSETS.fetch(request); return new HTMLRewriter() .on("[data-i18n-key]", new ElementHandler(countryStrings)) .transform(response); } catch (e) { if (DEBUG) { return new Response(e.message || e.toString(), { status: 404, }); } else { return env.ASSETS.fetch(request); } } } ``` ## Deploy Your i18n tool built on Cloudflare Pages is complete and it is time to deploy it to your domain. To deploy your application to a `*.pages.dev` subdomain, you need to specify a directory of static assets to serve, configure the `pages_build_output_dir` in your project’s Wrangler file and set the value to `./public`: * wrangler.jsonc ```jsonc { "name": "i18n-example", "pages_build_output_dir": "./public", "compatibility_date": "2024-01-29" } ``` * wrangler.toml ```toml name = "i18n-example" pages_build_output_dir = "./public" compatibility_date = "2024-01-29" ``` Next, you need to configure a deploy script in `package.json` file in your project. Add a deploy script with the value `wrangler pages deploy`: ```json "scripts": { "dev": "wrangler pages dev", "deploy": "wrangler pages deploy" } ``` Using `wrangler`, deploy to Cloudflare’s network, using the `deploy` command: ```sh npm run deploy ``` ![An example site that has been successfully localized in Japanese, German and English](https://developers.cloudflare.com/_astro/i18n.DfrXtRlL_HOv9z.webp) ## Related resources In this tutorial, you built and deployed an i18n tool using `HTMLRewriter`. To review the full source code for this application, refer to the [repository on GitHub](https://github.com/lauragift21/i18n-example-workers). If you want to get started building your own projects, review the existing list of [Quickstart templates](https://developers.cloudflare.com/workers/get-started/quickstarts/).
--- title: Use R2 as static asset storage with Cloudflare Pages · Cloudflare Pages docs description: This tutorial will teach you how to use R2 as a static asset storage bucket for your Pages app. This is especially helpful if you're hitting the file limit or the max file size limit on Pages. lastUpdated: 2025-04-07T13:41:25.000Z chatbotDeprioritize: false tags: Hono source_url: html: https://developers.cloudflare.com/pages/tutorials/use-r2-as-static-asset-storage-for-pages/ md: https://developers.cloudflare.com/pages/tutorials/use-r2-as-static-asset-storage-for-pages/index.md --- This tutorial will teach you how to use [R2](https://developers.cloudflare.com/r2/) as a static asset storage bucket for your [Pages](https://developers.cloudflare.com/pages/) app. This is especially helpful if you're hitting the [file limit](https://developers.cloudflare.com/pages/platform/limits/#files) or the [max file size limit](https://developers.cloudflare.com/pages/platform/limits/#file-size) on Pages. To illustrate how this is done, we will use R2 as a static asset storage for a fictional cat blog. ## The Cat blog Imagine you run a static cat blog containing funny cat videos and helpful tips for cat owners. Your blog is growing and you need to add more content with cat images and videos. The blog is hosted on Pages and currently has the following directory structure: ```plaintext . ├── public │   ├── index.html │   ├── static │   │   ├── favicon.ico │   │   └── logo.png │   └── style.css └── wrangler.toml ``` Adding more videos and images to the blog would be great, but our asset size is above the [file limit on Pages](https://developers.cloudflare.com/pages/platform/limits/#file-size). Let us fix this with R2. ## Create an R2 bucket The first step is creating an R2 bucket to store the static assets. A new bucket can be created with the dashboard or via Wrangler. Using the dashboard, navigate to the R2 tab, then click on *Create bucket.* We will name the bucket for our blog *cat-media*. Always remember to give your buckets descriptive names: ![Dashboard](https://developers.cloudflare.com/_astro/dash.B3yWT1et_2u1sYS.webp) With the bucket created, we can upload media files to R2. I’ll drag and drop two folders with a few cat images and videos into the R2 bucket: ![Upload](https://developers.cloudflare.com/images/pages/tutorials/pages-r2/upload.gif) Alternatively, an R2 bucket can be created with Wrangler from the command line by running: ```sh npx wrangler r2 bucket create # i.e # npx wrangler r2 bucket create cat-media ``` Files can be uploaded to the bucket with the following command: ```sh npx wrangler r2 object put / -f # i.e # npx wrangler r2 object put cat-media/videos/video1.mp4 -f ~/Downloads/videos/video1.mp4 ``` ## Bind R2 to Pages To bind the R2 bucket we have created to the cat blog, we need to update the Wrangler configuration. Open the [Wrangler configuration file](https://developers.cloudflare.com/pages/functions/wrangler-configuration/), and add the following binding to the file. `bucket_name` should be the exact name of the bucket created earlier, while `binding` can be any custom name referring to the R2 resource: * wrangler.jsonc ```jsonc { "r2_buckets": [ { "binding": "MEDIA", "bucket_name": "cat-media" } ] } ``` * wrangler.toml ```toml [[r2_buckets]] binding = "MEDIA" bucket_name = "cat-media" ``` Note Note: The keyword `ASSETS` is reserved and cannot be used as a resource binding. Save the [Wrangler configuration file](https://developers.cloudflare.com/pages/functions/wrangler-configuration/), and we are ready to move on to the last step. Alternatively, you can add a binding to your Pages project on the dashboard by navigating to the project’s *Settings* tab > *Functions* > *R2 bucket bindings*. ## Serve R2 Assets From Pages The last step involves serving media assets from R2 on the blog. To do that, we will create a function to handle requests for media files. In the project folder, create a *functions* directory. Then, create a *media* subdirectory and a file named `[[all]].js` in it. All HTTP requests to `/media` will be routed to this file. After creating the folders and JavaScript file, the blog directory structure should look like: ```plaintext . ├── functions │   └── media │   └── [[all]].js ├── public │   ├── index.html │   ├── static │   │   ├── favicon.ico │   │   └── icon.png │   └── style.css └── wrangler.toml ``` Finally, we will add a handler function to `[[all]].js`. This function receives all media requests, and returns the corresponding file asset from R2: ```js export async function onRequestGet(ctx) { const path = new URL(ctx.request.url).pathname.replace("/media/", ""); const file = await ctx.env.MEDIA.get(path); if (!file) return new Response(null, { status: 404 }); return new Response(file.body, { headers: { "Content-Type": file.httpMetadata.contentType }, }); } ``` ## Deploy the blog Before deploying the changes made so far to our cat blog, let us add a few new posts to `index.html`. These posts depend on media assets served from R2: ```html

Awesome Cat Blog! 😺

Today's post:

Yesterday's post:

``` With all the files saved, open a new terminal window to deploy the app: ```sh npx wrangler deploy ``` Once deployed, media assets are fetched and served from the R2 bucket. ![Deployed App](https://developers.cloudflare.com/images/pages/tutorials/pages-r2/deployed.gif) ## **Related resources** * [Learn how function routing works in Pages.](https://developers.cloudflare.com/pages/functions/routing/) * [Learn how to create public R2 buckets](https://developers.cloudflare.com/r2/buckets/public-buckets/). * [Learn how to use R2 from Workers](https://developers.cloudflare.com/r2/api/workers/workers-api-usage/).
--- title: Configure output settings · Cloudflare Pipelines Docs description: Pipelines convert a stream of records into output files and deliver the files to an R2 bucket in your account. This guide details how you can change the output destination and customize batch settings to generate query ready files. lastUpdated: 2025-04-21T13:42:38.000Z chatbotDeprioritize: false source_url: html: https://developers.cloudflare.com/pipelines/build-with-pipelines/output-settings/ md: https://developers.cloudflare.com/pipelines/build-with-pipelines/output-settings/index.md --- Pipelines convert a stream of records into output files and deliver the files to an R2 bucket in your account. This guide details how you can change the output destination and customize batch settings to generate query ready files. ## Configure an R2 bucket as a destination To create or update a pipeline using Wrangler, run the following command in a terminal: ```sh npx wrangler pipelines create [PIPELINE-NAME] --r2-bucket [R2-BUCKET-NAME] ``` After running this command, you will be prompted to authorize Cloudflare Workers Pipelines to create an R2 API token on your behalf. Your pipeline uses the R2 API token to load data into your bucket. You can approve the request through the browser link which will open automatically. If you prefer not to authenticate this way, you can pass your [R2 API Token](https://developers.cloudflare.com/r2/api/tokens/) to Wrangler: ```sh npx wrangler pipelines create [PIPELINE-NAME] --r2 [R2-BUCKET-NAME] --r2-access-key-id [ACCESS-KEY-ID] --r2-secret-access-key [SECRET-ACCESS-KEY] ``` ## File format and compression Output files are generated as Newline Delimited JSON files (`ndjson`). Each line in an output file maps to a single record. By default, output files are compressed in the `gzip` format. Compression can be turned off using the `--compression` flag: ```sh npx wrangler pipelines update [PIPELINE-NAME] --compression none ``` Output files are named using a [ULID](https://github.com/ulid/spec) slug, followed by an extension. ## Customize batch behavior When configuring your pipeline, you can define how records are batched before they are delivered to R2. Batches of records are written out to a single output file. Batching can: * Reduce the number of output files written to R2 and thus reduce the [cost of writing data to R2](https://developers.cloudflare.com/r2/pricing/#class-a-operations). * Increase the size of output files making them more efficient to query. There are three ways to define how ingested data is batched: 1. `batch-max-mb`: The maximum amount of data that will be batched in megabytes. Default, and maximum, is `100 MB`. 2. `batch-max-rows`: The maximum number of rows or events in a batch before data is written. Default, and maximum, is `10,000,000` rows. 3. `batch-max-seconds`: The maximum duration of a batch before data is written in seconds. Default, and maximum, is `300 seconds`. Batch definitions are hints. A pipeline will follow these hints closely, but batches might not be exact. All three batch definitions work together and whichever limit is reached first triggers the delivery of a batch. For example, a `batch-max-mb` = 100 MB and a `batch-max-seconds` = 100 means that if 100 MB of events are posted to the pipeline, the batch will be delivered. However, if it takes longer than 100 seconds for 100 MB of events to be posted, a batch of all the messages that were posted during those 100 seconds will be created. ### Defining batch settings using Wrangler You can use the following batch settings flags while creating or updating a pipeline: * `--batch-max-mb` * `--batch-max-rows` * `--batch-max-seconds` For example: ```sh npx wrangler pipelines update [PIPELINE-NAME] --batch-max-mb 100 --batch-max-rows 10000 --batch-max-seconds 300 ``` ### Batch size limits | Setting | Default | Minimum | Maximum | | - | - | - | - | | Maximum Batch Size `batch-max-mb` | 100 MB | 1 MB | 100 MB | | Maximum Batch Timeout `batch-max-seconds` | 300 seconds | 1 second | 300 seconds | | Maximum Batch Rows `batch-max-rows` | 10,000,000 rows | 1 row | 10,000,000 rows | ## Deliver partitioned data Partitioning organizes data into directories based on specific fields to improve query performance. Partitions reduce the amount of data scanned for queries, enabling faster reads. Note By default, Pipelines partition data by event date and time. This will be customizable in the future. Output files are prefixed with event date and hour. For example, the output from a Pipeline in your R2 bucket might look like this: ```sh - event_date=2025-04-01/hr=15/01JQWBZCZBAQZ7RJNZHN38JQ7V.json.gz - event_date=2025-04-01/hr=15/01JQWC16FXGP845EFHMG1C0XNW.json.gz ``` ## Deliver data to a prefix You can specify an optional prefix for all the output files stored in your specified R2 bucket, using the flag `--r2-prefix`. For example: ```sh npx wrangler pipelines update [PIPELINE-NAME] --r2-prefix test ``` After running the above command, the output files generated by your pipeline will be stored under the prefix `test`. Files will remain partitioned. Your output will look like this: ```sh - test/event_date=2025-04-01/hr=15/01JQWBZCZBAQZ7RJNZHN38JQ7V.json.gz - test/event_date=2025-04-01/hr=15/01JQWC16FXGP845EFHMG1C0XNW.json.gz ``` --- title: Increase pipeline throughput · Cloudflare Pipelines Docs description: A pipeline's maximum throughput can be increased by increasing the shard count. A single shard can handle approximately 7,000 requests per second, or can ingest 7 MB/s of data. lastUpdated: 2025-04-09T16:06:19.000Z chatbotDeprioritize: false source_url: html: https://developers.cloudflare.com/pipelines/build-with-pipelines/shards/ md: https://developers.cloudflare.com/pipelines/build-with-pipelines/shards/index.md --- A pipeline's maximum throughput can be increased by increasing the shard count. A single shard can handle approximately 7,000 requests per second, or can ingest 7 MB/s of data. By default, each pipeline is configured with two shards. To set the shard count, use the `--shard-count` flag while creating or updating a pipeline: ```sh $ npx wrangler pipelines update [PIPELINE-NAME] --shard-count 10 ``` Note The default shard count will be set to `auto` in the future, with support for automatic horizontal scaling. ## How shards work ![Pipeline shards](https://developers.cloudflare.com/_astro/shards.CQ5Dnw1U_ZLRW1M.webp) Each pipeline is composed of stateless, independent shards. These shards are spun up when a pipeline is created. Each shard is composed of layers of [Durable Objects](https://developers.cloudflare.com/durable-objects). The Durable Objects buffer data, replicate for durability, handle compression, and delivery to R2. When a record is sent to a pipeline: 1. The Pipelines [Worker](https://developers.cloudflare.com/workers) receives the record. 2. The record is routed to to one of the shards. 3. The record is handled by a set of Durable Objects, which commit the record to storage and replicate for durability. 4. Records accumulate until the [batch definitions](https://developers.cloudflare.com/pipelines/build-with-pipelines/output-settings/#customize-batch-behavior) are met. 5. The batch is written to an output file and optionally compressed. 6. The output file is delivered to the configured R2 bucket. Increasing the number of shards will increase the maximum throughput of a pipeline, as well as the number of output files created. ### Example Your workload might require making 5,000 requests per second to a pipeline. If you create a pipeline with a single shard, all 5,000 requests will be routed to the same shard. If your pipeline has been configured with a maximum batch duration of 1 second, every second, all 5,000 requests will be batched, and a single file will be delivered. Increasing the shard count to 2 will double the number of output files. The 5,000 requests will be split into 2,500 requests to each shard. Every second, each shard will create a batch of data, and deliver to R2. ## Considerations while increasing the shard count Increasing the shard count also increases the number of output files that your pipeline generates. This in turn increases the [cost of writing data to R2](https://developers.cloudflare.com/r2/pricing/#class-a-operations), as each file written to R2 counts as a single class A operation. Additionally, smaller files are slower, and more expensive, to query. Rather than setting the maximum, choose a shard count based on your workload needs. ## Determine the right number of shards Choose a shard count based on these factors: * The number of requests per second you will make to your pipeline * The amount of data per second you will send to your pipeline Each shard is capable of handling approximately 7,000 requests per second, or ingesting 7 MB/s of data. Either factor might act as the bottleneck, so choose the shard count based on the higher number. For example, if you estimate that you will ingest 70 MB/s, making 70,000 requests per second, setup a pipeline with 10 shards. However, if you estimate that you will ingest 70 MB/s while making 100,000 requests per second, setup a pipeline with 15 shards. ## Limits | Setting | Default | Minimum | Maximum | | - | - | - | - | | Shards per pipeline `shard-count` | 2 | 1 | 15 | --- title: Sources · Cloudflare Pipelines Docs description: "Pipelines let you ingest data from the following sources:" lastUpdated: 2025-04-09T16:06:19.000Z chatbotDeprioritize: false source_url: html: https://developers.cloudflare.com/pipelines/build-with-pipelines/sources/ md: https://developers.cloudflare.com/pipelines/build-with-pipelines/sources/index.md --- Pipelines let you ingest data from the following sources: * [HTTP Clients](https://developers.cloudflare.com/pipelines/build-with-pipelines/sources/http), with optional authentication and CORS settings * [Cloudflare Workers](https://developers.cloudflare.com/workers/), using the [Pipelines Workers API](https://developers.cloudflare.com/pipelines/build-with-pipelines/sources/workers-apis) Multiple sources can be active on a single pipeline simultaneously. For example, you can create a pipeline which accepts data from Workers and via HTTP. There is no limit to the number of source clients. Multiple Workers can be configured to send data to the same pipeline. Each pipeline can ingest up to 100 MB/s of data or accept up to 100,000 requests per second, aggregated across all sources. ## Configuring allowed sources By default, ingestion via HTTP and from Workers is turned on. You can configure the allowed sources by using the `--source` flag while creating or updating a pipeline. For example, to create a pipeline which only accepts data via a Worker, you can run this command: ```sh $ npx wrangler pipelines create [PIPELINE-NAME] --r2-bucket [R2-BUCKET-NAME] --source worker ``` ## Accepted data formats Pipelines accept arrays of valid JSON objects. You can send multiple objects in a single request, provided the total data volume is within the [documented limits](https://developers.cloudflare.com/pipelines/platform/limits). Sending data in a different format will result in an error. --- title: How Pipelines work · Cloudflare Pipelines Docs description: Cloudflare Pipelines let you ingest data from a source and deliver to a sink. It is built for high volume, real time data streams. Each pipeline can ingest up to 100 MB/s of data, via HTTP or a Worker, and load the data as files in an R2 bucket. lastUpdated: 2025-05-27T15:16:17.000Z chatbotDeprioritize: false source_url: html: https://developers.cloudflare.com/pipelines/concepts/how-pipelines-work/ md: https://developers.cloudflare.com/pipelines/concepts/how-pipelines-work/index.md --- Cloudflare Pipelines let you ingest data from a source and deliver to a sink. It is built for high volume, real time data streams. Each pipeline can ingest up to 100 MB/s of data, via HTTP or a Worker, and load the data as files in an R2 bucket. ![Pipelines Architecture](https://developers.cloudflare.com/_astro/architecture.K-Ylbw7m_2tyAUE.webp) ## Supported sources, data formats, and sinks ### Sources Pipelines supports the following sources: * [HTTP Clients](https://developers.cloudflare.com/pipelines/build-with-pipelines/sources/http), with optional authentication and CORS settings * [Cloudflare Workers](https://developers.cloudflare.com/workers/), using the [Pipelines Workers API](https://developers.cloudflare.com/pipelines/build-with-pipelines/sources/workers-apis) Multiple sources can be active on a single pipeline simultaneously. For example, you can create a pipeline which accepts data from Workers and via HTTP. Multiple workers can be configured to send data to the same pipeline. There is no limit to the number of source clients. ### Data format Pipelines can ingest JSON serializable records. ### Sinks Pipelines supports delivering data into [R2 Object Storage](https://developers.cloudflare.com/r2/). Ingested data is delivered as newline delimited JSON files (`ndjson`) with optional compression. Multiple pipelines can be configured to deliver data to the same R2 bucket. ## Data durability Pipelines are designed to be reliable. Any data which is successfully ingested will be delivered, at least once, to the configured R2 bucket, provided that the [R2 API credentials associated with a pipeline](https://developers.cloudflare.com/r2/api/tokens/) remain valid. Ordering of records is best effort. Each pipeline maintains a storage buffer. Requests to send data to a pipeline receive a successful response only after the data is committed to this storage buffer. Ingested data accumulates, until a sufficiently [large batch of data](https://developers.cloudflare.com/pipelines/build-with-pipelines/output-settings/#customize-batch-behavior) has been filled. Once the batch reaches its target size, the entire batch of data is converted to a file and delivered to R2. Transient failures, such as network connectivity issues, are automatically retried. However, if the [R2 API credentials associated with a pipeline](https://developers.cloudflare.com/r2/api/tokens/) expire or are revoked, data delivery will fail. In this scenario, some data might continue to accumulate in the buffers, but the pipeline will eventually start rejecting requests once the buffers are full. ## Updating a pipeline Pipelines update without dropping records. Updating an existing pipeline creates a new instance of the pipeline. Requests are gracefully re-routed to the new instance. The old instance continues to write data into the configured sink. Once the old instance is fully drained, it is spun down. This means that updates might take a few minutes to go into effect. For example, if you update a pipeline's sink, previously ingested data might continue to be delivered into the old sink. ## Backpressure behavior If you send too much data, the pipeline will communicate backpressure by returning a 429 response to HTTP requests, or throwing an error if using the Workers API. Refer to the [limits](https://developers.cloudflare.com/pipelines/platform/limits) to learn how much volume a single pipeline can support. You might see 429 responses if you are sending too many requests or sending too much data. If you are consistently seeing backpressure from your pipeline, consider the following strategies: * Increase the [shard count](https://developers.cloudflare.com/pipelines/build-with-pipelines/shards) to increase the maximum throughput of your pipeline. * Send data to a second pipeline if you receive an error. You can set up multiple pipelines to write to the same R2 bucket. --- title: Metrics and analytics · Cloudflare Pipelines Docs description: Pipelines expose metrics which allow you to measure data ingested, requests made, and data delivered. lastUpdated: 2025-05-14T00:02:06.000Z chatbotDeprioritize: false source_url: html: https://developers.cloudflare.com/pipelines/observability/metrics/ md: https://developers.cloudflare.com/pipelines/observability/metrics/index.md --- Pipelines expose metrics which allow you to measure data ingested, requests made, and data delivered. The metrics displayed in the [Cloudflare dashboard](https://dash.cloudflare.com/) are queried from Cloudflare’s [GraphQL Analytics API](https://developers.cloudflare.com/analytics/graphql-api/). You can access the metrics [programmatically](#query-via-the-graphql-api) via GraphQL or HTTP client. ## Metrics ### Ingestion Pipelines export the below metrics within the `pipelinesIngestionAdaptiveGroups` dataset. | Metric | GraphQL Field Name | Description | | - | - | - | | Ingestion Events | `count` | Number of ingestion events, or requests made, to a pipeline. | | Ingested Bytes | `ingestedBytes` | Total number of bytes ingested | | Ingested Records | `ingestedRecords` | Total number of records ingested | The `pipelinesIngestionAdaptiveGroups` dataset provides the following dimensions for filtering and grouping queries: * `pipelineId` - ID of the pipeline * `datetime` - Timestamp of the ingestion event * `date` - Timestamp of the ingestion event, truncated to the start of a day * `datetimeHour` - Timestamp of the ingestion event, truncated to the start of an hour * `datetimeMinute` - Timestamp of the ingestion event, truncated to the start of a minute ### Delivery Pipelines export the below metrics within the `pipelinesDeliveryAdaptiveGroups` dataset. | Metric | GraphQL Field Name | Description | | - | - | - | | Ingestion Events | `count` | Number of delivery events to an R2 bucket | | Delivered Bytes | `deliveredBytes` | Total number of bytes ingested | The `pipelinesDeliverynAdaptiveGroups` dataset provides the following dimensions for filtering and grouping queries: * `pipelineId` - ID of the pipeline * `datetime` - Timestamp of the delivery event * `date` - Timestamp of the delivery event, truncated to the start of a day * `datetimeHour` - Timestamp of the delivery event, truncated to the start of an hour * `datetimeMinute` - Timestamp of the delivery event, truncated to the start of a minute ## Query via the GraphQL API You can programmatically query analytics for your pipelines via the [GraphQL Analytics API](https://developers.cloudflare.com/analytics/graphql-api/). This API queries the same datasets as the Cloudflare dashboard and supports GraphQL [introspection](https://developers.cloudflare.com/analytics/graphql-api/features/discovery/introspection/). Pipelines GraphQL datasets require an `accountTag` filter with your Cloudflare account ID. ### Measure total bytes & records ingested over time period ```graphql query PipelineIngestion( $accountTag: string! $pipelineId: string! $datetimeStart: Time! $datetimeEnd: Time! ) { viewer { accounts(filter: { accountTag: $accountTag }) { pipelinesIngestionAdaptiveGroups( limit: 10000 filter: { pipelineId: $pipelineId datetime_geq: $datetimeStart datetime_leq: $datetimeEnd } ) { sum { ingestedBytes ingestedRecords } } } } } ``` [Run in GraphQL API Explorer](https://graphql.cloudflare.com/explorer?query=I4VwpgTgngBACgSwA5gDYIHZgJIYOZgDOALggPYYAUAUDDACQCGAxs2SBsQCqN4BcMEhEx4AhLQZJkaTDgAmAoSPF16cxsTCkAtmADKxRhGICuCXSobrNOsAFEMCmGYvUAlDADeEgG4IwAO6QXhJ0LGwcxISUAGYIqJoQAp4w4eycPPwMaZGZMAC+Ht50JTBSKOhYhLgEJOQYAILqSKQ+YADiEOxI0aGlMOjaCCYwAIwADJPjfaVxCZDJM-3lMljYTvQrlfJLpdZa5mAA+gTAAmoaB7oGRsS7Jfu2R6hgZ1aXtg5y9-lLRfeEEDaEL9foiIiaOQAISgmkI9zo4JIYDkACUwGwIHJ4aC6L9QfiSoTfvkgA\&variables=N4IghgxhD2CuB2AXAKmA5iAXCAggYTwHkBVAOWQH0BJAERABoQAHASyYFMAbF+dqgEywgASgFEACgBl8oigHUqyABLU6jfmETtELALbsAyojAAnREIBMABgsBWALRWA7PYCMANmRWAHJlsBOPwsALQYQDS0dfVF4QWxrO0cXD2RXABY-QNsQkABfIA) ### Measure volume of data delivered ```graphql query PipelineDelivery( $accountTag: string! $pipelineId: string! $datetimeStart: Time! $datetimeEnd: Time! ) { viewer { accounts(filter: { accountTag: $accountTag }) { pipelinesDeliveryAdaptiveGroups( limit: 10000 filter: { pipelineId: $pipelineId datetime_geq: $datetimeStart datetime_leq: $datetimeEnd } ) { sum { deliveredBytes } } } } } ``` [Run in GraphQL API Explorer](https://graphql.cloudflare.com/explorer?query=I4VwpgTgngBACgSwA5gDYIHZgCJoQN0igAoAoGGAEgEMBjWgexAwBcAVagcwC4YBnFhEycAhOSpJkeLAEkAJrwFCMo8ZTnUWYFggC2YAMotqEFrzZ6wYius3bLAUQwKYF-WICUMAN7j8CMAB3SB9xCjpGZhY+YgAzBFQtCF5vGAimVg4eKnSorJgAXy9fClKYSRR0LD5cdEJoAEENJB1CAHEIJiQYsLKYdF0EMxgARgAGCbHesvjEyBTpvorpMHleSmWq1blFso0tHX0AfU4wYHX9+30jExZd0svDsCPUM4u7J6cdvtKCxeL7nwQLpQj89nh6mA5AAhKBaPj3P4-JG-cR-ApAA\&variables=N4IghgxhD2CuB2AXAKmA5iAXCAggYTwHkBVAOWQH0BJAERABoQAHASyYFMAbF+dqgEywgASgFEACgBl8oigHUqyABLU6jfmETtELALbsAyojAAnREIBMABgsBWALRWA7PYCMANmRWAHJlsBOPwsALQYQDS0dfVF4QWxrO0cXD2RXABY-QNsQkABfIA) --- title: Limits · Cloudflare Pipelines Docs description: If you consistently exceed the requests per second or throughput limits, your pipeline might not be able to keep up with the load. The pipeline will communicate backpressure by returning a 429 response to HTTP requests or throwing an error if using the Workers API. lastUpdated: 2025-04-10T15:21:35.000Z chatbotDeprioritize: false source_url: html: https://developers.cloudflare.com/pipelines/platform/limits/ md: https://developers.cloudflare.com/pipelines/platform/limits/index.md --- | Feature | Limit | | - | - | | Maximum requests per second, per pipeline | 14,000 default (configurable up to 100,000) | | Maximum payload per request | 1 MB | | Maximum data throughput per pipeline | 14 MB/s default (configurable up to 100 MB/s) | | Shards per pipeline | 2 default (configurable up to 15) | | Maximum batch size | 100 MB | | Maximum batch records | 10,000,000 | | Maximum batch duration | 300s | ## Exceeding requests per second or throughput limits If you consistently exceed the requests per second or throughput limits, your pipeline might not be able to keep up with the load. The pipeline will communicate backpressure by returning a 429 response to HTTP requests or throwing an error if using the Workers API. If you are consistently seeing backpressure from your pipeline, consider the following strategies: * Increase the [shard count](https://developers.cloudflare.com/pipelines/build-with-pipelines/shards) to increase the maximum throughput of your pipeline. * Send data to a second pipeline if you receive an error. You can setup multiple pipelines to write to the same R2 bucket. --- title: Cloudflare Pipelines - Pricing · Cloudflare Pipelines Docs description: During the first phase of the Pipelines open beta, you will not be billed for Pipelines usage. You will be billed only for R2 usage. lastUpdated: 2025-04-09T16:06:19.000Z chatbotDeprioritize: false source_url: html: https://developers.cloudflare.com/pipelines/platform/pricing/ md: https://developers.cloudflare.com/pipelines/platform/pricing/index.md --- Note Pipelines requires a [Workers paid](https://developers.cloudflare.com/workers/platform/pricing/#workers) plan to use. During the first phase of the Pipelines open beta, you will not be billed for Pipelines usage. You will be billed only for [R2 usage](https://developers.cloudflare.com/r2/pricing). We plan to price based on the volume of data ingested into and delivered from Pipelines. We expect to begin charging by September 15, 2025, and will provide at least 30 days' notice beforehand. | | Workers Paid Users | | - | - | | Ingestion | 50 GB / month included + $0.02 / additional GB | | Delivery to R2 | 50 GB / month included + $0.02 / additional GB | --- title: Wrangler commands · Cloudflare Pipelines Docs description: Create a new pipeline lastUpdated: 2025-04-09T16:06:19.000Z chatbotDeprioritize: false source_url: html: https://developers.cloudflare.com/pipelines/platform/wrangler-commands/ md: https://developers.cloudflare.com/pipelines/platform/wrangler-commands/index.md --- Note Pipelines is currently in open beta. Report Pipelines bugs in [GitHub](https://github.com/cloudflare/workers-sdk/issues/new/choose). ### `create` Create a new pipeline ```txt wrangler pipelines create --r2 [OPTIONS] ``` * `name` string required * The name of the pipeline to create * `--source` array optional * List of allowed sources. Options: `http` or `worker` * `--require-http-auth` boolean optional * Require Cloudflare API token to authenticate with the HTTPS endpoint. Defaults to `false`. * `--cors-origins` array optional * CORS Origin allowlist for HTTP endpoint. Allows `*`. Defaults to an empty array. * `--batch-max-mb` number optional * The maximum size of a batch in megabytes before data is written. Defaults to `100`. Must be between `1` and `100`. * `--batch-max-rows` number optional * The maximum number of rows in a batch before data is written. Defaults to `10000000`. Must be between `1` and `10000000`. * `--batch-max-seconds` number optional * The maximum duration of a batch before data is written in seconds. Defaults to `300`. Must be between `1` and `300`. * `--r2-bucket` string required * The name of the R2 bucket used as the destination to store the data. * `--r2-bucket-access-key-id` string optional * Access key ID used to authenticate with R2. Leave empty for oauth confirmation. * `--r2-bucket-secret-access-key` string optional * Secret access key ID used to authenticate with R2. Leave empty for oauth confirmation. * `--r2-prefix` string optional * Prefix for storing files in the destination bucket. * `--compression` string optional * Type of compression to apply to output files. Choices: `none`, `gzip`, `deflate` * `--shard-count` number optional * Number of pipeline shards. More shards handle higher request volume; fewer shards produce larger output files. Defaults to `2`. Must be between `1` and `15`. ### `update` Update an existing pipeline ```txt wrangler pipelines update [OPTIONS] ``` * `name` string required * The name of the pipeline to create * `--source` array optional * List of allowed sources. Options: `http` or `worker` * `--require-http-auth` boolean optional * Require Cloudflare API token to authenticate with the HTTPS endpoint. Defaults to `false`. * `--cors-origins` array optional * CORS Origin allowlist for HTTP endpoint. Allows `*`. Defaults to an empty array. * `--batch-max-mb` number optional * The maximum size of a batch in megabytes before data is written. Defaults to `100`. Must be between `1` and `100`. * `--batch-max-rows` number optional * The maximum number of rows in a batch before data is written. Defaults to `10000000`. Must be between `1` and `10000000`. * `--batch-max-seconds` number optional * The maximum duration of a batch before data is written in seconds. Defaults to `300`. Must be between `1` and `300`. * `--r2-bucket` string required * The name of the R2 bucket used as the destination to store the data. * `--r2-bucket-access-key-id` string optional * Access key ID used to authenticate with R2. Leave empty for oauth confirmation. * `--r2-bucket-secret-access-key` string optional * Secret access key ID used to authenticate with R2. Leave empty for oauth confirmation. * `--r2-prefix` string optional * Prefix for storing files in the destination bucket. * `--compression` string optional * Type of compression to apply to output files. Choices: `none`, `gzip`, `deflate` * `--shard-count` number optional * Number of pipeline shards. More shards handle higher request volume; fewer shards produce larger output files. Defaults to `2`. Must be between `1` and `15`. ### `get` Get the configuration for an existing pipeline. ```txt wrangler pipelines get [OPTIONS] ``` * `name` string required * The name of the pipeline to inspect ### `delete` Deletes an existing pipeline ```txt wrangler pipelines delete [OPTIONS] ``` * `name` string required * The name of the pipeline to delete ### `list` Lists all pipelines in your account. ```txt wrangler pipelines list [OPTIONS] ``` ## Global commands The following global flags work on every command: * `--help` boolean * Show help. * `--config` string (not supported by Pages) * Path to your [Wrangler configuration file](https://developers.cloudflare.com/workers/wrangler/configuration/). * `--cwd` string * Run as if Wrangler was started in the specified directory instead of the current working directory. --- title: Ingest data from a Worker, and analyze using MotherDuck · Cloudflare Pipelines Docs description: In this tutorial, you will learn how to ingest clickstream data to a R2 bucket using Pipelines. You will use the Pipeline binding to send the clickstream data to the R2 bucket from your Worker. You will also learn how to connect the bucket to MotherDuck. You will then query the data using MotherDuck. lastUpdated: 2025-04-30T09:59:18.000Z chatbotDeprioritize: false tags: MotherDuck source_url: html: https://developers.cloudflare.com/pipelines/tutorials/query-data-with-motherduck/ md: https://developers.cloudflare.com/pipelines/tutorials/query-data-with-motherduck/index.md --- In this tutorial, you will learn how to ingest clickstream data to a [R2 bucket](https://developers.cloudflare.com/r2) using Pipelines. You will use the Pipeline binding to send the clickstream data to the R2 bucket from your Worker. You will also learn how to connect the bucket to MotherDuck. You will then query the data using MotherDuck. For this tutorial, you will build a landing page of an e-commerce website. A user can click on the view button to view the product details or click on the add to cart button to add the product to their cart. ## Prerequisites 1. A [MotherDuck](https://motherduck.com/) account. 2. Install [`Node.js`](https://docs.npmjs.com/downloading-and-installing-node-js-and-npm). Node.js version manager Use a Node version manager like [Volta](https://volta.sh/) or [nvm](https://github.com/nvm-sh/nvm) to avoid permission issues and change Node.js versions. [Wrangler](https://developers.cloudflare.com/workers/wrangler/install-and-update/), discussed later in this guide, requires a Node version of `16.17.0` or later. ## 1. Create a new project You will create a new Worker project that will use [Static Assets](https://developers.cloudflare.com/workers/static-assets/) to serve the HTML file. Create a new Worker project by running the following commands: * npm ```sh npm create cloudflare@latest -- e-commerce-pipelines ``` * yarn ```sh yarn create cloudflare e-commerce-pipelines ``` * pnpm ```sh pnpm create cloudflare@latest e-commerce-pipelines ``` For setup, select the following options: * For *What would you like to start with?*, choose `Hello World example`. * For *Which template would you like to use?*, choose `SSR / full-stack app`. * For *Which language do you want to use?*, choose `TypeScript`. * For *Do you want to use git for version control?*, choose `Yes`. * For *Do you want to deploy your application?*, choose `No` (we will be making some changes before deploying). Navigate to the `e-commerce-pipelines` directory: ```sh cd e-commerce-pipelines ``` ## 2. Update the frontend Using Static Assets, you can serve the frontend of your application from your Worker. The above step creates a new Worker project with a default `public/index.html` file. Update the `public/index.html` file with the following HTML code: Select to view the HTML code ```html E-commerce Store

Our Products

``` The above code does the following: * Uses Tailwind CSS to style the page. * Renders a list of products. * Adds a button to view the details of a product. * Adds a button to add a product to the cart. * Contains a `handleClick` function to handle the click events. This function logs the action and the product ID. In the next steps, you will add the logic to send the click events to your pipeline. ## 3. Generate clickstream data You need to send clickstream data like the `timestamp`, `user_id`, `session_id`, and `device_info` to your pipeline. You can generate this data on the client side. Add the following function in the `

Our Products

``` The above code does the following: * Uses Tailwind CSS to style the page. * Renders a list of products. * Adds a button to view the details of a product. * Adds a button to add a product to the cart. * Contains a `handleClick` function to handle the click events. This function logs the action and the product ID. In the next steps, you will create a pipeline and add the logic to send the click events to this pipeline. ## 3. Create an R2 Bucket We'll create a new R2 bucket to use as the sink for our pipeline. Create a new r2 bucket `clickstream-bucket` using the [Wrangler CLI](https://developers.cloudflare.com/workers/wrangler/). Open a terminal window, and run the following command: ```sh npx wrangler r2 bucket create clickstream-bucket ``` ## 4. Create a pipeline You need to create a new pipeline and connect it to your R2 bucket. Create a new pipeline `clickstream-pipeline-client` using the [Wrangler CLI](https://developers.cloudflare.com/workers/wrangler/). Open a terminal window, and run the following command: ```sh npx wrangler pipelines create clickstream-pipeline-client --r2-bucket clickstream-bucket --compression none --batch-max-seconds 5 ``` When you run the command, you will be prompted to authorize Cloudflare Workers Pipelines to create R2 API tokens on your behalf. These tokens are required by your Pipeline. Your Pipeline uses these tokens when loading data into your bucket. You can approve the request through the browser link which will open automatically. Note The above command creates a pipeline using two optional flags: `--compression none`, and `--batch-max-seconds 5`. With these flags, your pipeline will deliver an uncompressed file of data to your R2 bucket every 5 seconds. These flags are useful for testing, but we recommend keeping the default settings in a production environment. ```txt ✅ Successfully created Pipeline "clickstream-pipeline-client" with ID Id: Name: clickstream-pipeline-client Sources: HTTP: Endpoint: https://.pipelines.cloudflare.com Authentication: off Format: JSON Worker: Format: JSON Destination: Type: R2 Bucket: clickstream-bucket Format: newline-delimited JSON Compression: NONE Batch hints: Max bytes: 100 MB Max duration: 300 seconds Max records: 10,000,000 🎉 You can now send data to your Pipeline! Send data to your Pipeline's HTTP endpoint: curl "https://.pipelines.cloudflare.com" -d '[{"foo": "bar"}]' ``` Make a note of the URL of the pipeline. You will use this URL to send the clickstream data from the client-side. ## 5. Generate clickstream data You need to send clickstream data like the `timestamp`, `user_id`, `session_id`, and `device_info` to your pipeline. You can generate this data on the client side. Add the following function in the ` ``` To view the front-end of your application, run the following command and navigate to the URL displayed in the terminal: ```sh npm run dev ``` ```txt ⛅️ wrangler 3.80.2 ------------------- ⎔ Starting local server... [wrangler:inf] Ready on http://localhost:8787 ╭───────────────────────────╮ │ [b] open a browser │ │ [d] open devtools │ │ [l] turn off local mode │ │ [c] clear console │ │ [x] to exit │ ╰───────────────────────────╯ ``` When you open the URL in your browser, you will see that there is a file upload form. If you try uploading a file, you will notice that the file is not uploaded to the server. This is because the front-end is not connected to the back-end. In the next step, you will update your Worker that will handle the file upload. ## 3. Handle file upload To handle the file upload, you will first need to add the R2 binding. In the Wrangler file, add the following code: * wrangler.jsonc ```jsonc { "r2_buckets": [ { "binding": "MY_BUCKET", "bucket_name": "" } ] } ``` * wrangler.toml ```toml [[r2_buckets]] binding = "MY_BUCKET" bucket_name = "" ``` Replace `` with the name of your R2 bucket. Next, update the `src/index.ts` file. The `src/index.ts` file should contain the following code: ```ts export default { async fetch(request, env, ctx): Promise { // Get the pathname from the request const pathname = new URL(request.url).pathname; if (pathname === "/api/upload" && request.method === "POST") { // Get the file from the request const formData = await request.formData(); const file = formData.get("pdfFile") as File; // Upload the file to Cloudflare R2 const upload = await env.MY_BUCKET.put(file.name, file); return new Response("File uploaded successfully", { status: 200 }); } return new Response("incorrect route", { status: 404 }); }, } satisfies ExportedHandler; ``` The above code does the following: * Check if the request is a POST request to the `/api/upload` endpoint. If it is, it gets the file from the request and uploads it to Cloudflare R2 using the [Workers API](https://developers.cloudflare.com/r2/api/workers/). * If the request is not a POST request to the `/api/upload` endpoint, it returns a 404 response. Since the Worker code is written in TypeScript, you should run the following command to add the necessary type definitions. While this is not required, it will help you avoid errors. Prevent potential errors when accessing request.body The body of a [Request](https://developer.mozilla.org/en-US/docs/Web/API/Request) can only be accessed once. If you previously used `request.formData()` in the same request, you may encounter a TypeError when attempting to access `request.body`. To avoid errors, create a clone of the Request object with `request.clone()` for each subsequent attempt to access a Request's body. Keep in mind that Workers have a [memory limit of 128 MB per Worker](https://developers.cloudflare.com/workers/platform/limits#worker-limits) and loading particularly large files into a Worker's memory multiple times may reach this limit. To ensure memory usage does not reach this limit, consider using [Streams](https://developers.cloudflare.com/workers/runtime-apis/streams/). ```sh npm run cf-typegen ``` You can restart the developer server to test the changes: ```sh npm run dev ``` ## 4. Create a queue Note You will need a [Workers Paid plan](https://developers.cloudflare.com/workers/platform/pricing/) to create and use [Queues](https://developers.cloudflare.com/queues/) and Cloudflare Workers to consume event notifications. Event notifications capture changes to data in your R2 bucket. You will need to create a new queue `pdf-summarize` to receive notifications: ```sh npx wrangler queues create pdf-summarizer ``` Add the binding to the Wrangler file: * wrangler.jsonc ```jsonc { "queues": { "consumers": [ { "queue": "pdf-summarizer" } ] } } ``` * wrangler.toml ```toml [[queues.consumers]] queue = "pdf-summarizer" ``` ## 5. Handle event notifications Now that you have a queue to receive event notifications, you need to update the Worker to handle the event notifications. You will need to add a Queue handler that will extract the textual content from the PDF, use Workers AI to summarize the content, and then save it in the R2 bucket. Update the `src/index.ts` file to add the Queue handler: ```ts export default { async fetch(request, env, ctx): Promise { // No changes in the fetch handler }, async queue(batch, env) { for (let message of batch.messages) { console.log(`Processing the file: ${message.body.object.key}`); } }, } satisfies ExportedHandler; ``` The above code does the following: * The `queue` handler is called when a new message is added to the queue. It loops through the messages in the batch and logs the name of the file. For now the `queue` handler is not doing anything. In the next steps, you will update the `queue` handler to extract the textual content from the PDF, use Workers AI to summarize the content, and then add it to the bucket. ## 6. Extract the textual content from the PDF To extract the textual content from the PDF, the Worker will use the [unpdf](https://github.com/unjs/unpdf) library. The `unpdf` library provides utilities to work with PDF files. Install the `unpdf` library by running the following command: * npm ```sh npm i unpdf ``` * yarn ```sh yarn add unpdf ``` * pnpm ```sh pnpm add unpdf ``` Update the `src/index.ts` file to import the required modules from the `unpdf` library: ```ts import { extractText, getDocumentProxy } from "unpdf"; ``` Next, update the `queue` handler to extract the textual content from the PDF: ```ts async queue(batch, env) { for(let message of batch.messages) { console.log(`Processing file: ${message.body.object.key}`); // Get the file from the R2 bucket const file = await env.MY_BUCKET.get(message.body.object.key); if (!file) { console.error(`File not found: ${message.body.object.key}`); continue; } // Extract the textual content from the PDF const buffer = await file.arrayBuffer(); const document = await getDocumentProxy(new Uint8Array(buffer)); const {text} = await extractText(document, {mergePages: true}); console.log(`Extracted text: ${text.substring(0, 100)}...`); } } ``` The above code does the following: * The `queue` handler gets the file from the R2 bucket. * The `queue` handler extracts the textual content from the PDF using the `unpdf` library. * The `queue` handler logs the textual content. ## 7. Use Workers AI to summarize the content To use Workers AI, you will need to add the Workers AI binding to the Wrangler file. The Wrangler file should contain the following code: * wrangler.jsonc ```jsonc { "ai": { "binding": "AI" } } ``` * wrangler.toml ```toml [ai] binding = "AI" ``` Execute the following command to add the AI type definition: ```sh npm run cf-typegen ``` Update the `src/index.ts` file to use Workers AI to summarize the content: ```ts async queue(batch, env) { for(let message of batch.messages) { // Extract the textual content from the PDF const {text} = await extractText(document, {mergePages: true}); console.log(`Extracted text: ${text.substring(0, 100)}...`); // Use Workers AI to summarize the content const result: AiSummarizationOutput = await env.AI.run( "@cf/facebook/bart-large-cnn", { input_text: text, } ); const summary = result.summary; console.log(`Summary: ${summary.substring(0, 100)}...`); } } ``` The `queue` handler now uses Workers AI to summarize the content. ## 8. Add the summary to the R2 bucket Now that you have the summary, you need to add it to the R2 bucket. Update the `src/index.ts` file to add the summary to the R2 bucket: ```ts async queue(batch, env) { for(let message of batch.messages) { // Extract the textual content from the PDF // ... // Use Workers AI to summarize the content // ... // Add the summary to the R2 bucket const upload = await env.MY_BUCKET.put(`${message.body.object.key}-summary.txt`, summary, { httpMetadata: { contentType: 'text/plain', }, }); console.log(`Summary added to the R2 bucket: ${upload.key}`); } } ``` The queue handler now adds the summary to the R2 bucket as a text file. ## 9. Enable event notifications Your `queue` handler is ready to handle incoming event notification messages. You need to enable event notifications with the [`wrangler r2 bucket notification create` command](https://developers.cloudflare.com/workers/wrangler/commands/#r2-bucket-notification-create) for your bucket. The following command creates an event notification for the `object-create` event type for the `pdf` suffix: ```sh npx wrangler r2 bucket notification create --event-type object-create --queue pdf-summarizer --suffix "pdf" ``` Replace `` with the name of your R2 bucket. An event notification is created for the `pdf` suffix. When a new file with the `pdf` suffix is uploaded to the R2 bucket, the `pdf-summarizer` queue is triggered. ## 10. Deploy your Worker To deploy your Worker, run the [`wrangler deploy`](https://developers.cloudflare.com/workers/wrangler/commands/#deploy) command: ```sh npx wrangler deploy ``` In the output of the `wrangler deploy` command, copy the URL. This is the URL of your deployed application. ## 11. Test To test the application, navigate to the URL of your deployed application and upload a PDF file. Alternatively, you can use the [Cloudflare dashboard](https://dash.cloudflare.com/) to upload a PDF file. To view the logs, you can use the [`wrangler tail`](https://developers.cloudflare.com/workers/wrangler/commands/#tail) command. ```sh npx wrangler tail ``` You will see the logs in your terminal. You can also navigate to the Cloudflare dashboard and view the logs in the Workers Logs section. If you check your R2 bucket, you will see the summary file. ## Conclusion In this tutorial, you learned how to use R2 event notifications to process an object on upload. You created an application to upload a PDF file, and created a consumer Worker that creates a summary of the PDF file. You also learned how to use Workers AI to summarize the content of the PDF file, and upload the summary to the R2 bucket. You can use the same approach to process other types of files, such as images, videos, and audio files. You can also use the same approach to process other types of events, such as object deletion, and object update. If you want to view the code for this tutorial, you can find it on [GitHub](https://github.com/harshil1712/pdf-summarizer-r2-event-notification). --- title: Log and store upload events in R2 with event notifications · Cloudflare R2 docs description: This example provides a step-by-step guide on using event notifications to capture and store R2 upload logs in a separate bucket. lastUpdated: 2025-03-19T09:17:37.000Z chatbotDeprioritize: false source_url: html: https://developers.cloudflare.com/r2/tutorials/upload-logs-event-notifications/ md: https://developers.cloudflare.com/r2/tutorials/upload-logs-event-notifications/index.md --- This example provides a step-by-step guide on using [event notifications](https://developers.cloudflare.com/r2/buckets/event-notifications/) to capture and store R2 upload logs in a separate bucket. ![Push-Based R2 Event Notifications](https://developers.cloudflare.com/_astro/pushed-based-event-notification.NdMYExDK_1ERAd2.svg) ## Prerequisites To continue, you will need: * A subscription to [Workers Paid](https://developers.cloudflare.com/workers/platform/pricing/#workers), required for using queues. ## 1. Install Wrangler To begin, refer to [Install/Update Wrangler](https://developers.cloudflare.com/workers/wrangler/install-and-update/#install-wrangler) to install Wrangler, the Cloudflare Developer Platform CLI. ## 2. Create R2 buckets You will need to create two R2 buckets: * `example-upload-bucket`: When new objects are uploaded to this bucket, your [consumer Worker](https://developers.cloudflare.com/queues/get-started/#4-create-your-consumer-worker) will write logs. * `example-log-sink-bucket`: Upload logs from `example-upload-bucket` will be written to this bucket. To create the buckets, run the following Wrangler commands: ```sh npx wrangler r2 bucket create example-upload-bucket npx wrangler r2 bucket create example-log-sink-bucket ``` ## 3. Create a queue Note You will need a [Workers Paid plan](https://developers.cloudflare.com/workers/platform/pricing/) to create and use [Queues](https://developers.cloudflare.com/queues/) and Cloudflare Workers to consume event notifications. Event notifications capture changes to data in `example-upload-bucket`. You will need to create a new queue to receive notifications: ```sh npx wrangler queues create example-event-notification-queue ``` ## 4. Create a Worker Before you enable event notifications for `example-upload-bucket`, you need to create a [consumer Worker](https://developers.cloudflare.com/queues/reference/how-queues-works/#create-a-consumer-worker) to receive the notifications. Create a new Worker with C3 (`create-cloudflare` CLI). [C3](https://developers.cloudflare.com/pages/get-started/c3/) is a command-line tool designed to help you set up and deploy new applications, including Workers, to Cloudflare. * npm ```sh npm create cloudflare@latest -- consumer-worker ``` * yarn ```sh yarn create cloudflare consumer-worker ``` * pnpm ```sh pnpm create cloudflare@latest consumer-worker ``` For setup, select the following options: * For *What would you like to start with?*, choose `Hello World example`. * For *Which template would you like to use?*, choose `Worker only`. * For *Which language do you want to use?*, choose `TypeScript`. * For *Do you want to use git for version control?*, choose `Yes`. * For *Do you want to deploy your application?*, choose `No` (we will be making some changes before deploying). Then, move into your newly created directory: ```sh cd consumer-worker ``` ## 5. Configure your Worker In your Worker project's \[[Wrangler configuration file](https://developers.cloudflare.com/workers/wrangler/configuration/)]\(/workers/wrangler/configuration/), add a [queue consumer](https://developers.cloudflare.com/workers/wrangler/configuration/#queues) and [R2 bucket binding](https://developers.cloudflare.com/workers/wrangler/configuration/#r2-buckets). The queues consumer bindings will register your Worker as a consumer of your future event notifications and the R2 bucket bindings will allow your Worker to access your R2 bucket. * wrangler.jsonc ```jsonc { "name": "event-notification-writer", "main": "src/index.ts", "compatibility_date": "2024-03-29", "compatibility_flags": [ "nodejs_compat" ], "queues": { "consumers": [ { "queue": "example-event-notification-queue", "max_batch_size": 100, "max_batch_timeout": 5 } ] }, "r2_buckets": [ { "binding": "LOG_SINK", "bucket_name": "example-log-sink-bucket" } ] } ``` * wrangler.toml ```toml name = "event-notification-writer" main = "src/index.ts" compatibility_date = "2024-03-29" compatibility_flags = ["nodejs_compat"] [[queues.consumers]] queue = "example-event-notification-queue" max_batch_size = 100 max_batch_timeout = 5 [[r2_buckets]] binding = "LOG_SINK" bucket_name = "example-log-sink-bucket" ``` ## 6. Write event notification messages to R2 Add a [`queue` handler](https://developers.cloudflare.com/queues/configuration/javascript-apis/#consumer) to `src/index.ts` to handle writing batches of notifications to our log sink bucket (you do not need a [fetch handler](https://developers.cloudflare.com/workers/runtime-apis/handlers/fetch/)): ```ts export interface Env { LOG_SINK: R2Bucket; } export default { async queue(batch, env): Promise { const batchId = new Date().toISOString().replace(/[:.]/g, "-"); const fileName = `upload-logs-${batchId}.json`; // Serialize the entire batch of messages to JSON const fileContent = new TextEncoder().encode( JSON.stringify(batch.messages), ); // Write the batch of messages to R2 await env.LOG_SINK.put(fileName, fileContent, { httpMetadata: { contentType: "application/json", }, }); }, } satisfies ExportedHandler; ``` ## 7. Deploy your Worker To deploy your consumer Worker, run the [`wrangler deploy`](https://developers.cloudflare.com/workers/wrangler/commands/#deploy) command: ```sh npx wrangler deploy ``` ## 8. Enable event notifications Now that you have your consumer Worker ready to handle incoming event notification messages, you need to enable event notifications with the [`wrangler r2 bucket notification create` command](https://developers.cloudflare.com/workers/wrangler/commands/#r2-bucket-notification-create) for `example-upload-bucket`: ```sh npx wrangler r2 bucket notification create example-upload-bucket --event-type object-create --queue example-event-notification-queue ``` ## 9. Test Now you can test the full end-to-end flow by uploading an object to `example-upload-bucket` in the Cloudflare dashboard. After you have uploaded an object, logs will appear in `example-log-sink-bucket` in a few seconds. --- title: Analytics · Cloudflare Realtime docs description: Cloudflare Realtime TURN service counts ingress and egress usage in bytes. You can access this real-time and historical data using the TURN analytics API. You can see TURN usage data in a time series or aggregate that shows traffic in bytes over time. lastUpdated: 2025-04-08T20:01:03.000Z chatbotDeprioritize: false source_url: html: https://developers.cloudflare.com/realtime/turn/analytics/ md: https://developers.cloudflare.com/realtime/turn/analytics/index.md --- Cloudflare Realtime TURN service counts ingress and egress usage in bytes. You can access this real-time and historical data using the TURN analytics API. You can see TURN usage data in a time series or aggregate that shows traffic in bytes over time. Cloudflare TURN analytics is available over the GraphQL API only. API token permissions You will need the "Account Analytics" permission on your API token to make queries to the Realtime GraphQL API. Note See [GraphQL API](https://developers.cloudflare.com/analytics/graphql-api/) for more information on how to set up your GraphQL client. The examples below use the same GraphQL endpoint at `https://api.cloudflare.com/client/v4/graphql`. ## TURN traffic data filters You can filter the data in TURN analytics on: * Datetime range * TURN Key ID * TURN Username * Custom identifier Note [Custom identifiers](https://developers.cloudflare.com/realtime/turn/replacing-existing/#tag-users-with-custom-identifiers) are useful for accounting usage for different users in your system. ## Useful TURN analytics queries Below are some example queries for common usecases. You can modify them to adapt your use case and get different views to the analytics data. ### Top TURN keys by egress ```plaintext query{ viewer { usage: accounts(filter: { accountTag: "8846293bd06d1af8c106d89ec1454fe6" }) { callsTurnUsageAdaptiveGroups( filter: { datetimeMinute_gt: "2024-07-15T02:07:07Z" datetimeMinute_lt: "2024-08-10T02:07:05Z" } limit: 2 orderBy: [sum_egressBytes_DESC] ) { dimensions { keyId } sum { egressBytes } } } } } ``` ```plaintext { "data": { "viewer": { "usage": [ { "callsTurnUsageAdaptiveGroups": [ { "dimensions": { "keyId": "74007022d80d7ebac4815fb776b9d3ed" }, "sum": { "egressBytes": 502614982 } }, { "dimensions": { "keyId": "6b9e68b07dfee8cc2d116e4c51d6a957" }, "sum": { "egressBytes": 4853235 } } ] } ] } }, "errors": null } ``` ### Top TURN custom identifiers ```plaintext query{ viewer { usage: accounts(filter: { accountTag: "8846293bd06d1af8c106d89ec1454fe6" }) { callsTurnUsageAdaptiveGroups( filter: { datetimeMinute_gt: "2024-07-15T02:07:07Z" datetimeMinute_lt: "2024-08-10T02:07:05Z" } limit: 100 orderBy: [sum_egressBytes_DESC] ) { dimensions { customIdentifier } sum { egressBytes } } } } } ``` ```plaintext { "data": { "viewer": { "usage": [ { "callsTurnUsageAdaptiveGroups": [ { "dimensions": { "customIdentifier": "custom-id-333" }, "sum": { "egressBytes": 269850354 } }, { "dimensions": { "customIdentifier": "custom-id-555" }, "sum": { "egressBytes": 162641324 } }, { "dimensions": { "customIdentifier": "custom-id-112" }, "sum": { "egressBytes": 70123304 } } ] } ] } }, "errors": null } ``` ### Usage for a specific custom identifier ```plaintext query{ viewer { usage: accounts(filter: { accountTag: "8846293bd06d1af8c106d89ec1454fe6" }) { callsTurnUsageAdaptiveGroups( filter: { datetimeMinute_gt: "2024-07-15T02:07:07Z" datetimeMinute_lt: "2024-08-10T02:07:05Z" customIdentifier: "tango" } limit: 100 orderBy: [] ) { dimensions { keyId customIdentifier } sum { egressBytes } } } } } ``` ```plaintext { "data": { "viewer": { "usage": [ { "callsTurnUsageAdaptiveGroups": [ { "dimensions": { "customIdentifier": "tango", "keyId": "74007022d80d7ebac4815fb776b9d3ed" }, "sum": { "egressBytes": 162641324 } } ] } ] } }, "errors": null } ``` ### Usage as a timeseries (for graphs) ```plaintext query{ viewer { usage: accounts(filter: { accountTag: "8846293bd06d1af8c106d89ec1454fe6" }) { callsTurnUsageAdaptiveGroups( filter: { datetimeMinute_gt: "2024-07-15T02:07:07Z" datetimeMinute_lt: "2024-08-10T02:07:05Z" } limit: 100 orderBy: [datetimeMinute_ASC] ) { dimensions { datetimeMinute } sum { egressBytes } } } } } ``` ```plaintext { "data": { "viewer": { "usage": [ { "callsTurnUsageAdaptiveGroups": [ { "dimensions": { "datetimeMinute": "2024-08-01T17:09:00Z" }, "sum": { "egressBytes": 4570704 } }, { "dimensions": { "datetimeMinute": "2024-08-01T17:10:00Z" }, "sum": { "egressBytes": 27203016 } }, { "dimensions": { "datetimeMinute": "2024-08-01T17:11:00Z" }, "sum": { "egressBytes": 9067412 } }, { "dimensions": { "datetimeMinute": "2024-08-01T17:17:00Z" }, "sum": { "egressBytes": 10059322 } }, ... ] } ] } }, "errors": null } ``` --- title: Custom TURN domains · Cloudflare Realtime docs description: Cloudflare Realtime TURN service supports using custom domains for UDP, and TCP - but not TLS protocols. Custom domains do not affect any of the performance of Cloudflare Realtime TURN and is set up via a simple CNAME DNS record on your domain. lastUpdated: 2025-04-08T20:01:03.000Z chatbotDeprioritize: false source_url: html: https://developers.cloudflare.com/realtime/turn/custom-domains/ md: https://developers.cloudflare.com/realtime/turn/custom-domains/index.md --- Cloudflare Realtime TURN service supports using custom domains for UDP, and TCP - but not TLS protocols. Custom domains do not affect any of the performance of Cloudflare Realtime TURN and is set up via a simple CNAME DNS record on your domain. | Protocol | Custom domains | Primary port | Alternate port | | - | - | - | - | | STUN over UDP | ✅ | 3478/udp | 53/udp | | TURN over UDP | ✅ | 3478/udp | 53 udp | | TURN over TCP | ✅ | 3478/tcp | 80/tcp | | TURN over TLS | No | 5349/tcp | 443/tcp | ## Setting up a CNAME record To use custom domains for TURN, you must create a CNAME DNS record pointing to `turn.cloudflare.com`. Warning Do not resolve the address of `turn.cloudflare.com` or `stun.cloudflare.com` or use an IP address as the value you input to your DNS record. Only CNAME records are supported. Any DNS provider, including Cloudflare DNS can be used to set up a CNAME for custom domains. Note If Cloudflare's authoritative DNS service is used, the record must be set to [DNS-only or "grey cloud" mode](https://developers.cloudflare.com/dns/proxy-status/#dns-only-records).\` There is no additional charge to using a custom hostname with Cloudflare Realtime TURN. --- title: FAQ · Cloudflare Realtime docs description: Cloudflare TURN pricing is based on the data sent from the Cloudflare edge to the TURN client, as described in RFC 8656 Figure 1. This means data sent from the TURN server to the TURN client and captures all data, including TURN overhead, following successful authentication. lastUpdated: 2025-06-06T23:05:08.000Z chatbotDeprioritize: false source_url: html: https://developers.cloudflare.com/realtime/turn/faq/ md: https://developers.cloudflare.com/realtime/turn/faq/index.md --- ## General ### What is Cloudflare Realtime TURN pricing? How exactly is it calculated? Cloudflare TURN pricing is based on the data sent from the Cloudflare edge to the TURN client, as described in [RFC 8656 Figure 1](https://datatracker.ietf.org/doc/html/rfc8656#fig-turn-model). This means data sent from the TURN server to the TURN client and captures all data, including TURN overhead, following successful authentication. Pricing for Cloudflare Realtime TURN service is $0.05 per GB of data used. Cloudflare's STUN service at `stun.cloudflare.com` is free and unlimited. There is a free tier of 1,000 GB before any charges start. Cloudflare Realtime billing appears as a single line item on your Cloudflare bill, covering both SFU and TURN. Traffic between Cloudflare Realtime TURN and Cloudflare Realtime SFU or Cloudflare Stream (WHIP/WHEP) does not incur any charges. ```mermaid --- title: Cloudflare Realtime TURN pricing --- flowchart LR Client[TURN Client] Server[TURN Server] Client -->|"Ingress (free)"| Server Server -->|"Egress (charged)"| Client Server <-->|Not part of billing| PeerA[Peer A] ``` ### Is Realtime TURN HIPAA/GDPR/FedRAMP compliant? Please view Cloudflare's [certifications and compliance resources](https://www.cloudflare.com/trust-hub/compliance-resources/) and contact your Cloudflare enterprise account manager for more information. ### Is Realtime TURN end-to-end encrypted? TURN protocol, [RFC 8656](https://datatracker.ietf.org/doc/html/rfc8656), does not discuss encryption beyond wrapper protocols such as TURN over TLS. If you are using TURN with WebRTC will encrypt data at the WebRTC level. ### What regions does Cloudflare Realtime TURN operate at? Cloudflare Realtime TURN server runs on [Cloudflare's global network](https://www.cloudflare.com/network) - a growing global network of thousands of machines distributed across hundreds of locations, with the notable exception of the Cloudflare's [China Network](https://developers.cloudflare.com/china-network/). ### Does Cloudflare Realtime TURN use the Cloudflare Backbone or is there any "magic" Cloudflare do to speed connection up? Cloudflare Realtime TURN allocations are homed in the nearest available Cloudflare data center to the TURN client via anycast routing. If both ends of a connection are using Cloudflare Realtime TURN, Cloudflare will be able to control the routing and, if possible, route TURN packets through the Cloudflare backbone. ### What is the difference between Cloudflare Realtime TURN with a enterprise plan vs self-serve (pay with your credit card) plans? There is no performance or feature level difference for Cloudflare Realtime TURN service in enterprise or self-serve plans, however those on [enterprise plans](https://www.cloudflare.com/enterprise/) will get the benefit of priority support, predictable flat-rate pricing and SLA guarantees. ### Does Cloudflare Realtime TURN run in the Cloudflare China Network? Cloudflare's [China Network](https://developers.cloudflare.com/china-network/) does not participate in serving Realtime traffic and TURN traffic from China will connect to Cloudflare locations outside of China. ### How long does it take for TURN activity to be available in analytics? TURN usage shows up in analytics in 30 seconds. ## Technical ### I need to allowlist (whitelist) Cloudflare Realtime TURN IP addresses. Which IP addresses should I use? Cloudflare Realtime TURN is easy to use by IT administrators who have strict firewalls because it requires very few IP addresses to be allowlisted compared to other providers. You must allowlist both IPv6 and IPv4 addresses. Please allowlist the following IP addresses: * `2a06:98c1:3200::1/128` * `2606:4700:48::1/128` * `141.101.90.1/32` * `162.159.207.1/32` Watch for IP changes Cloudflare tries to, but cannot guarantee that the IP addresses used for the TURN service won't change. If you are allowlisting IP addresses and do not have a enterprise contract, you must set up alerting that detects changes the DNS response from `turn.cloudflare.com` (A and AAAA records) and update the hardcoded IP address(es) accordingly within 14 days of the DNS change. For more details about static IPs, guarantees and other arrangements please discuss with your enterprise account team. Your enterprise team will be able to provide additional addresses to allowlist as future backup to achieve address diversity while still keeping a short list of IPs. ### I would like to hardcode IP addresses used for TURN in my application to save a DNS lookup Although this is not recommended, we understand there is a very small set of circumstances where hardcoding IP addresses might be useful. In this case, you must set up alerting that detects changes the DNS response from `turn.cloudflare.com` (A and AAAA records) and update the hardcoded IP address(es) accordingly within 14 days of the DNS change. Note that this DNS response could return more than one IP address. In addition, you must set up a failover to a DNS query if there is a problem connecting to the hardcoded IP address. Cloudflare tries to, but cannot guarantee that the IP address used for the TURN service won't change unless this is in your enterprise contract. For more details about static IPs, guarantees and other arrangements please discuss with your enterprise account team. ### I see that TURN IP are published above. Do you also publish IPs for STUN? TURN service at `turn.cloudflare.com` will also respond to binding requests ("STUN requests"). ### Does Cloudflare Realtime TURN support the expired IETF RFC draft "draft-uberti-behave-turn-rest-00"? The Cloudflare Realtime credential generation function returns a JSON structure similar to the [expired RFC draft "draft-uberti-behave-turn-rest-00"](https://datatracker.ietf.org/doc/html/draft-uberti-behave-turn-rest-00), but it does not include the TTL value. If you need a response in this format, you can modify the JSON from the Cloudflare Realtime credential generation endpoint to the required format in your backend server or Cloudflare Workers. ### I am observing packet loss when using Cloudflare Realtime TURN - how can I debug this? Packet loss is normal in UDP and can happen occasionally even on reliable connections. However, if you observe systematic packet loss, consider the following: * Are you sending or receiving data at a high rate (>50-100Mbps) from a single TURN client? Realtime TURN might be dropping packets to signal you to slow down. * Are you sending or receiving large amounts of data with very small packet sizes (high packet rate > 5-10kpps) from a single TURN client? Cloudflare Realtime might be dropping packets. * Are you sending packets to new unique addresses at a high rate resembling to [port scanning](https://en.wikipedia.org/wiki/Port_scanner) behavior? ### I plan to use Realtime TURN at scale. What is the rate at which I can issue credentials? There is no defined limit for credential issuance. Start at 500 credentials/sec and scale up linearly. Ensure you use more than 50% of the issued credentials. ### What is the maximum value I can use for TURN credential expiry time? You can set a expiration time for a credential up to 48 hours in the future. If you need your TURN allocation to last longer than this, you will need to [update](https://developer.mozilla.org/en-US/docs/Web/API/RTCPeerConnection/setConfiguration) the TURN credentials. ### Does Realtime TURN support IPv6? Yes. Cloudflare Realtime is available over both IPv4 and IPv6 for TURN Client to TURN server communication, however it does not issue relay addresses in IPv6 as described in [RFC 6156](https://datatracker.ietf.org/doc/html/rfc6156). ### Does Realtime TURN issue IPv6 relay addresses? No. Realtime TURN will not respect `REQUESTED-ADDRESS-FAMILY` STUN attribute if specified and will issue IPv4 addresses only. ### Does Realtime TURN support TCP relaying? No. Realtime does not implement [RFC6062](https://datatracker.ietf.org/doc/html/rfc6062) and will not respect `REQUESTED-TRANSPORT` STUN attribute. ### I am unable to make CreatePermission or ChannelBind requests with certain IP addresses. Why is that? Cloudflare Realtime denies CreatePermission or ChannelBind requests if private IP ranges (e.g loopback addresses, linklocal unicast or multicast blocks) or IP addresses that are part of [BYOIP](https://developers.cloudflare.com/byoip/) are used. If you are a Cloudflare BYOIP customer and wish to connect to your BYOIP ranges with Realtime TURN, please reach out to your account manager for further details. ### What is the maximum duration limit for a TURN allocation? There is no maximum duration limit for a TURN allocation. Per [RFC 8656 Section 3.2](https://datatracker.ietf.org/doc/html/rfc8656#section-3.2), once a relayed transport address is allocated, a client must keep the allocation alive. To do this, the client periodically sends a Refresh request to the server. The Refresh request needs to be authenticated with a valid TURN credential. The maximum duration for a credential is 48 hours. If a longer allocation is required, a new credential must be generated at least every 48 hours. ### How often does Cloudflare perform maintenance on a server that is actively handling a TURN allocation? What is the impact of this? Even though this is not common, in certain scenarios TURN allocations may be disrupted. This could be caused by maintenance on the Cloudflare server handling the allocation or could be related to Internet network topology changes that cause TURN packets to arrive at a different Cloudflare datacenter. Regardless of the reason, [ICE restart](https://datatracker.ietf.org/doc/html/rfc8445#section-2.4) support by clients is highly recommended. ### What will happen if TURN credentials expire while the TURN allocation is in use? Cloudflare Realtime will immediately stop billing and recording usage for analytics. After a short delay, the connection will be disconnected. --- title: Generate Credentials · Cloudflare Realtime docs description: Cloudflare will issue TURN keys, but these keys cannot be used as credentials with turn.cloudflare.com. To use TURN, you need to create credentials with a expiring TTL value. lastUpdated: 2025-04-21T18:40:10.000Z chatbotDeprioritize: false source_url: html: https://developers.cloudflare.com/realtime/turn/generate-credentials/ md: https://developers.cloudflare.com/realtime/turn/generate-credentials/index.md --- Cloudflare will issue TURN keys, but these keys cannot be used as credentials with `turn.cloudflare.com`. To use TURN, you need to create credentials with a expiring TTL value. ## Create a TURN key To create a TURN credential, you first need to create a TURN key using [Dashboard](https://dash.cloudflare.com/?to=/:account/calls), or the [API](https://developers.cloudflare.com/api/resources/calls/subresources/turn/methods/create/). You should keep your TURN key on the server side (don't share it with the browser/app). A TURN key is a long-term secret that allows you to generate unlimited, shorter lived TURN credentials for TURN clients. With a TURN key you can: * Generate TURN credentials that expire * Revoke previously issued TURN credentials ## Create credentials You should generate short-lived credentials for each TURN user. In order to create credentials, you should have a back-end service that uses your TURN Token ID and API token to generate credentials. It will make an API call like this: ```bash curl https://rtc.live.cloudflare.com/v1/turn/keys/$TURN_KEY_ID/credentials/generate-ice-servers \ --header "Authorization: Bearer $TURN_KEY_API_TOKEN" \ --header "Content-Type: application/json" \ --data '{"ttl": 86400}' ``` The JSON response below can then be passed on to your front-end application: ```json { "iceServers": [ { "urls": [ "stun:stun.cloudflare.com:3478", "stun:stun.cloudflare.com:53", "turn:turn.cloudflare.com:3478?transport=udp", "turn:turn.cloudflare.com:53?transport=udp", "turn:turn.cloudflare.com:3478?transport=tcp", "turn:turn.cloudflare.com:80?transport=tcp", "turns:turn.cloudflare.com:5349?transport=tcp", "turns:turn.cloudflare.com:443?transport=tcp" ], "username": "bc91b63e2b5d759f8eb9f3b58062439e0a0e15893d76317d833265ad08d6631099ce7c7087caabb31ad3e1c386424e3e", "credential": "ebd71f1d3edbc2b0edae3cd5a6d82284aeb5c3b8fdaa9b8e3bf9cec683e0d45fe9f5b44e5145db3300f06c250a15b4a0" } ] } ``` Note The list of returned URLs contains URLs with the primary and alternate ports. The alternate port 53 is known to be blocked by web browsers, and the TURN URL will time out if used in browsers. If you are using trickle ICE, this will not cause issues. Without trickle ICE you might want to filter out the URL with port 53 to avoid waiting for a timeout. Use `iceServers` as follows when instantiating the `RTCPeerConnection`: ```js const myPeerConnection = new RTCPeerConnection({ iceServers: [ { urls: [ "stun:stun.cloudflare.com:3478", "stun:stun.cloudflare.com:53", "turn:turn.cloudflare.com:3478?transport=udp", "turn:turn.cloudflare.com:53?transport=udp", "turn:turn.cloudflare.com:3478?transport=tcp", "turn:turn.cloudflare.com:80?transport=tcp", "turns:turn.cloudflare.com:5349?transport=tcp", "turns:turn.cloudflare.com:443?transport=tcp" ], "username": "bc91b63e2b5d759f8eb9f3b58062439e0a0e15893d76317d833265ad08d6631099ce7c7087caabb31ad3e1c386424e3e", "credential": "ebd71f1d3edbc2b0edae3cd5a6d82284aeb5c3b8fdaa9b8e3bf9cec683e0d45fe9f5b44e5145db3300f06c250a15b4a0" }, ], }); ``` The `ttl` value can be adjusted to expire the short lived key in a certain amount of time. This value should be larger than the time you'd expect the users to use the TURN service. For example, if you're using TURN for a video conferencing app, the value should be set to the longest video call you'd expect to happen in the app. When using short-lived TURN credentials with WebRTC, credentials can be refreshed during a WebRTC session using the `RTCPeerConnection` [`setConfiguration()`](https://developer.mozilla.org/en-US/docs/Web/API/RTCPeerConnection/setConfiguration) API. ## Revoke credentials Short lived credentials can also be revoked before their TTL expires with a API call like this: ```bash curl --request POST \ https://rtc.live.cloudflare.com/v1/turn/keys/$TURN_KEY_ID/credentials/$USERNAME/revoke \ --header "Authorization: Bearer $TURN_KEY_API_TOKEN" ``` --- title: Replacing existing TURN servers · Cloudflare Realtime docs description: If you are a existing TURN provider but would like to switch to providing Cloudflare Realtime TURN for your customers, there is a few considerations. lastUpdated: 2025-04-08T20:01:03.000Z chatbotDeprioritize: false source_url: html: https://developers.cloudflare.com/realtime/turn/replacing-existing/ md: https://developers.cloudflare.com/realtime/turn/replacing-existing/index.md --- If you are a existing TURN provider but would like to switch to providing Cloudflare Realtime TURN for your customers, there is a few considerations. ## Benefits Cloudflare Realtime TURN service can reduce tangible and untangible costs associated with TURN servers: * Server costs (AWS EC2 etc) * Bandwidth costs (Egress, load balancing etc) * Time and effort to set up a TURN process and maintenance of server * Scaling the servers up and down * Maintain the TURN server with security and feature updates * Maintain high availability ## Recommendations ### Separate environments with TURN keys When using Cloudflare Realtime TURN service at scale, consider separating environments such as "testing", "staging" or "production" with TURN keys. You can create up to 1,000 TURN keys in your account, which can be used to generate end user credentials. There is no limit to how many end-user credentials you can create with a particular TURN key. ### Tag users with custom identifiers Cloudflare Realtime TURN service lets you tag each credential with a custom identifier as you generate a credential like below: ```bash curl https://rtc.live.cloudflare.com/v1/turn/keys/$TURN_KEY_ID/credentials/generate \ --header "Authorization: Bearer $TURN_KEY_API_TOKEN" \ --header "Content-Type: application/json" \ --data '{"ttl": 864000, "customIdentifier": "user4523958"}' ``` Use this field to aggregate usage for a specific user or group of users and collect analytics. ### Monitor usage You can monitor account wide usage with the [GraphQL analytics API](https://developers.cloudflare.com/realtime/turn/analytics/). This is useful for keeping track of overall usage for billing purposes, watching for unexpected changes. You can get timeseries data from TURN analytics with various filters in place. ### Monitor for credential abuse If you share TURN credentials with end users, credential abuse is possible. You can monitor for abuse by tagging each credential with custom identifiers and monitoring for top custom identifiers in your application via the [GraphQL analytics API](https://developers.cloudflare.com/realtime/turn/analytics/). ## How to bill end users for their TURN usage When billing for TURN usage in your application, it's crucial to understand and account for adaptive sampling in TURN analytics. This system employs adaptive sampling to efficiently handle large datasets while maintaining accuracy. The sampling process in TURN analytics works on two levels: * At data collection: Usage data points may be sampled if they are generated too quickly. * At query time: Additional sampling may occur if the query is too complex or covers a large time range. To ensure accurate billing, write a single query that sums TURN usage per customer per time period, returning a single value. Avoid using queries that list usage for multiple customers simultaneously. By following these guidelines and understanding how TURN analytics handles sampling, you can ensure more accurate billing for your end users based on their TURN usage. Note Cloudflare Realtime only bills for traffic from Cloudflare's servers to your client, called `egressBytes`. ### Example queries Incorrect approach example Querying TURN usage for multiple customers in a single query can lead to inaccurate results. This is because the usage pattern of one customer could affect the sampling rate applied to another customer's data, potentially skewing the results. ```plaintext query{ viewer { usage: accounts(filter: { accountTag: "8846293bd06d1af8c106d89ec1454fe6" }) { callsTurnUsageAdaptiveGroups( filter: { datetimeMinute_gt: "2024-07-15T02:07:07Z" datetimeMinute_lt: "2024-08-10T02:07:05Z" } limit: 100 orderBy: [customIdentifier_ASC] ) { dimensions { customIdentifier } sum { egressBytes } } } } } ``` Below is a query that queries usage only for a single customer. ```plaintext query{ viewer { usage: accounts(filter: { accountTag: "8846293bd06d1af8c106d89ec1454fe6" }) { callsTurnUsageAdaptiveGroups( filter: { datetimeMinute_gt: "2024-07-15T02:07:07Z" datetimeMinute_lt: "2024-08-10T02:07:05Z" customIdentifier: "myCustomer1111" } limit: 1 orderBy: [customIdentifier_ASC] ) { dimensions { customIdentifier } sum { egressBytes } } } } } ``` --- title: TURN Feature Matrix · Cloudflare Realtime docs lastUpdated: 2025-04-08T20:01:03.000Z chatbotDeprioritize: false source_url: html: https://developers.cloudflare.com/realtime/turn/rfc-matrix/ md: https://developers.cloudflare.com/realtime/turn/rfc-matrix/index.md --- ## TURN client to TURN server protocols | Protocol | Support | Relevant specification | | - | - | - | | UDP | ✅ | [RFC 5766](https://datatracker.ietf.org/doc/html/rfc5766) | | TCP | ✅ | [RFC 5766](https://datatracker.ietf.org/doc/html/rfc5766) | | TLS | ✅ | [RFC 5766](https://datatracker.ietf.org/doc/html/rfc5766) | | DTLS | No | [draft-petithuguenin-tram-turn-dtls-00](http://tools.ietf.org/html/draft-petithuguenin-tram-turn-dtls-00) | ## TURN client to TURN server protocols | Protocol | Support | Relevant specification | | - | - | - | | TURN (base RFC) | ✅ | [RFC 5766](https://datatracker.ietf.org/doc/html/rfc5766) | | TURN REST API | ✅ (See [FAQ](https://developers.cloudflare.com/realtime/turn/faq/#does-cloudflare-realtime-turn-support-the-expired-ietf-rfc-draft-draft-uberti-behave-turn-rest-00)) | [draft-uberti-behave-turn-rest-00](http://tools.ietf.org/html/draft-uberti-behave-turn-rest-00) | | Origin field in TURN (Multi-tenant TURN Server) | ✅ | [draft-ietf-tram-stun-origin-06](https://tools.ietf.org/html/draft-ietf-tram-stun-origin-06) | | ALPN support for STUN & TURN | ✅ | [RFC 7443](https://datatracker.ietf.org/doc/html/rfc7443) | | TURN Bandwidth draft specs | No | [draft-thomson-tram-turn-bandwidth-01](http://tools.ietf.org/html/draft-thomson-tram-turn-bandwidth-01) | | TURN-bis (with dual allocation) draft specs | No | [draft-ietf-tram-turnbis-04](http://tools.ietf.org/html/draft-ietf-tram-turnbis-04) | | TCP relaying TURN extension | No | [RFC 6062](https://datatracker.ietf.org/doc/html/rfc6062) | | IPv6 extension for TURN | No | [RFC 6156](https://datatracker.ietf.org/doc/html/rfc6156) | | oAuth third-party TURN/STUN authorization | No | [RFC 7635](https://datatracker.ietf.org/doc/html/rfc7635) | | DTLS support (for TURN) | No | [draft-petithuguenin-tram-stun-dtls-00](https://datatracker.ietf.org/doc/html/draft-petithuguenin-tram-stun-dtls-00) | | Mobile ICE (MICE) support | No | [draft-wing-tram-turn-mobility-02](http://tools.ietf.org/html/draft-wing-tram-turn-mobility-02) | --- title: What is TURN? · Cloudflare Realtime docs description: TURN (Traversal Using Relays around NAT) is a protocol that assists in traversing Network Address Translators (NATs) or firewalls in order to facilitate peer-to-peer communications. It is an extension of the STUN (Session Traversal Utilities for NAT) protocol and is defined in RFC 8656. lastUpdated: 2025-04-08T20:01:03.000Z chatbotDeprioritize: false source_url: html: https://developers.cloudflare.com/realtime/turn/what-is-turn/ md: https://developers.cloudflare.com/realtime/turn/what-is-turn/index.md --- ## What is TURN? TURN (Traversal Using Relays around NAT) is a protocol that assists in traversing Network Address Translators (NATs) or firewalls in order to facilitate peer-to-peer communications. It is an extension of the STUN (Session Traversal Utilities for NAT) protocol and is defined in [RFC 8656](https://datatracker.ietf.org/doc/html/rfc8656). ## How do I use TURN? Just like you would use a web browser or cURL to use the HTTP protocol, you need to use a tool or a library to use TURN protocol in your application. Most users of TURN will use it as part of a WebRTC library, such as the one in their browser or part of [Pion](https://github.com/pion/webrtc), [webrtc-rs](https://github.com/webrtc-rs/webrtc) or [libwebrtc](https://webrtc.googlesource.com/src/). You can use TURN directly in your application too. [Pion](https://github.com/pion/turn) offers a TURN client library in Golang, so does [webrtc-rs](https://github.com/webrtc-rs/webrtc/tree/master/turn) in Rust. ## Key concepts to know when understanding TURN 1. **NAT (Network Address Translation)**: A method used by routers to map multiple private IP addresses to a single public IP address. This is commonly done by home internet routers so multiple computers in the same network can share a single public IP address. 2. **TURN Server**: A relay server that acts as an intermediary for traffic between clients behind NATs. Cloudflare Realtime TURN service is a example of a TURN server. 3. **TURN Client**: An application or device that uses the TURN protocol to communicate through a TURN server. This is your application. It can be a web application using the WebRTC APIs or a native application running on mobile or desktop. 4. **Allocation**: When a TURN server creates an allocation, the TURN server reserves an IP and a port unique to that client. 5. **Relayed Transport Address**: The IP address and port reserved on the TURN server that others on the Internet can use to send data to the TURN client. ## How TURN Works 1. A TURN client sends an Allocate request to a TURN server. 2. The TURN server creates an allocation and returns a relayed transport address to the client. 3. The client can then give this relayed address to its peers. 4. When a peer sends data to the relayed address, the TURN server forwards it to the client. 5. When the client wants to send data to a peer, it sends it through the TURN server, which then forwards it to the peer. ## TURN vs VPN TURN works similar to a VPN (Virtual Private Network). However TURN servers and VPNs serve different purposes and operate in distinct ways. A VPN is a general-purpose tool that encrypts all internet traffic from a device, routing it through a VPN server to enhance privacy, security, and anonymity. It operates at the network layer, affects all internet activities, and is often used to bypass geographical restrictions or secure connections on public Wi-Fi. A TURN server is a specialized tool used by specific applications, particularly for real-time communication. It operates at the application layer, only affecting traffic for applications that use it, and serves as a relay to traverse NATs and firewalls when direct connections between peers are not possible. While a VPN impacts overall internet speed and provides anonymity, a TURN server only affects the performance of specific applications using it. ## Why is TURN Useful? TURN is often valuable in scenarios where direct peer-to-peer communication is impossible due to NAT or firewall restrictions. Here are some key benefits: 1. **NAT Traversal**: TURN provides a way to establish connections between peers that are both behind NATs, which would otherwise be challenging or impossible. 2. **Firewall Bypassing**: In environments with strict firewall policies, TURN can enable communication that would otherwise be blocked. 3. **Consistent Connectivity**: TURN offers a reliable fallback method when direct or NAT-assisted connections fail. 4. **Privacy**: By relaying traffic through a TURN server, the actual IP addresses of the communicating parties can be hidden from each other. 5. **VoIP and Video Conferencing**: TURN is crucial for applications like Voice over IP (VoIP) and video conferencing, ensuring reliable connections regardless of network configuration. 6. **Online Gaming**: TURN can help online games establish peer-to-peer connections between players behind different types of NATs. 7. **IoT Device Communication**: Internet of Things (IoT) devices can use TURN to communicate when they're behind NATs or firewalls. --- title: Add additional audio tracks · Cloudflare Stream docs description: A video must be uploaded before additional audio tracks can be attached to it. In the following example URLs, the video’s UID is referenced as VIDEO_UID. lastUpdated: 2024-11-15T20:22:28.000Z chatbotDeprioritize: false source_url: html: https://developers.cloudflare.com/stream/edit-videos/adding-additional-audio-tracks/ md: https://developers.cloudflare.com/stream/edit-videos/adding-additional-audio-tracks/index.md --- A video must be uploaded before additional audio tracks can be attached to it. In the following example URLs, the video’s UID is referenced as `VIDEO_UID`. To add an audio track to a video a [Cloudflare API Token](https://www.cloudflare.com/a/account/my-account) is required. The API will make a best effort to handle any mismatch between the duration of the uploaded audio file and the video duration, though we recommend uploading audio files that match the duration of the video. If the duration of the audio file is longer than the video, the additional audio track will be truncated to match the video duration. If the duration of the audio file is shorter than the video, silence will be appended at the end of the audio track to match the video duration. ## Upload via a link If you have audio files stored in a cloud storage bucket, you can simply pass a HTTP link for the file. Stream will fetch the file and make it available for streaming. `label` is required and must uniquely identify the track amongst other audio track labels for the specified video. ```bash curl -X POST \ -H 'Authorization: Bearer ' \ -d '{"url": "https://www.examplestorage.com/audio_file.mp3", "label": "Example Audio Label"}' \ https://api.cloudflare.com/client/v4/accounts//stream//audio/copy ``` ```json { "result": { "uid": "", "label": "Example Audio Label", "default": false "status": "queued" }, "success": true, "errors": [], "messages": [] } ``` The `uid` uniquely identifies the audio track and can be used for editing or deleting the audio track. Please see instructions below on how to perform these operations. The `default` field denotes whether the audio track will be played by default in a player. Additional audio tracks have a `false` default status, but can be edited following instructions below. The `status` field will change to `ready` after the audio track is successfully uploaded and encoded. Should an error occur during this process, the status will denote `error`. ## Upload via HTTP Make an HTTP request and include the audio file as an input with the name set to `file`. Audio file uploads cannot exceed 200 MB in size. If your audio file is larger, compress the file prior to upload. The form input `label` is required and must uniquely identify the track amongst other audio track labels for the specified video. Note that cURL `-F` flag automatically configures the content-type header and maps `audio_file.mp3` to a form input called `file`. ```bash curl -X POST \ -H 'Authorization: Bearer ' \ -F file=@/Desktop/audio_file.mp3 \ -F label='Example Audio Label' \ https://api.cloudflare.com/client/v4/accounts//stream//audio ``` ```json { "result": { "uid": "", "label": "Example Audio Label", "default": false "status": "queued" }, "success": true, "errors": [], "messages": [] } ``` ## List the additional audio tracks on a video To view additional audio tracks added to a video: ```bash curl \ -H 'Authorization: Bearer ' \ https://api.cloudflare.com/client/v4/accounts//stream//audio ``` ```json { "result": { "audio": [ { "uid": "", "label": "Example Audio Label", "default": false, "status": "ready" }, { "uid": "", "label": "Another Audio Label", "default": false, "status": "ready" } ] }, "success": true, "errors": [], "messages": [] } ``` Note this API will not return information for audio attached to the video upload. ## Edit an additional audio track To edit the `default` status or `label` of an additional audio track: ```bash curl -X PATCH \ -H 'Authorization: Bearer ' \ -d '{"label": "Edited Audio Label", "default": true}' \ https://api.cloudflare.com/client/v4/accounts//stream//audio/ ``` Editing the `default` status of an audio track to `true` will mark all other audio tracks on the video `default` status to `false`. ```json { "result": { "uid": "", "label": "Edited Audio Label", "default": true "status": "ready" }, "success": true, "errors": [], "messages": [] } ``` ## Delete an additional audio track To remove an additional audio track associated with your video: ```bash curl -X DELETE \ -H 'Authorization: Bearer ' \ https://api.cloudflare.com/client/v4/accounts//stream//audio/ ``` Deleting a `default` audio track is not allowed. You must assign another audio track as `default` prior to deletion. If there is an entry in `errors` response field, the audio track has not been deleted. ```json { "result": "ok", "success": true, "errors": [], "messages": [] } ``` --- title: Add captions · Cloudflare Stream docs description: Adding captions and subtitles to your video library. lastUpdated: 2025-05-08T19:52:23.000Z chatbotDeprioritize: false source_url: html: https://developers.cloudflare.com/stream/edit-videos/adding-captions/ md: https://developers.cloudflare.com/stream/edit-videos/adding-captions/index.md --- Adding captions and subtitles to your video library. ## Add or modify a caption There are two ways to add captions to a video: generating via AI or uploading a caption file. To create or modify a caption on a video a [Cloudflare API Token](https://www.cloudflare.com/a/account/my-account) is required. The `` must adhere to the [BCP 47 format](http://www.unicode.org/reports/tr35/#Unicode_Language_and_Locale_Identifiers). For convenience, many common language codes are provided [at the bottom of this document](#most-common-language-codes). If the language you are adding is not included in the table, you can find the value through the [The IANA registry](https://www.iana.org/assignments/language-subtag-registry/language-subtag-registry), which maintains a list of language codes. To find the value to send, search for the language. Below is an example value from IANA when we look for the value to send for a Turkish subtitle: ```bash %% Type: language Subtag: tr Description: Turkish Added: 2005-10-16 Suppress-Script: Latn %% ``` The `Subtag` code indicates a value of `tr`. This is the value you should send as the `language` at the end of the HTTP request. A label is generated from the provided language. The label will be visible for user selection in the player. For example, if sent `tr`, the label `Türkçe` will be created; if sent `de`, the label `Deutsch` will be created. ### Generate a caption Generated captions use artificial intelligence based speech-to-text technology to generate closed captions for your videos. A video must be uploaded and in a ready state before captions can be generated. In the following example URLs, the video's UID is referenced as ``. To receive webhooks when a video transitions to ready after upload, follow the instructions provided in [using webhooks](https://developers.cloudflare.com/stream/manage-video-library/using-webhooks/). Captions can be generated for the following languages: * `cs` - Czech * `nl` - Dutch * `en` - English * `fr` - French * `de` - German * `it` - Italian * `ja` - Japanese * `ko` - Korean * `pl` - Polish * `pt` - Portuguese * `ru` - Russian * `es` - Spanish When generating captions, generate them for the spoken language in the audio. Videos may include captions for several languages, but each language must be unique. For example, a video may have English, French, and German captions associated with it, but it cannot have two English captions. If you have already uploaded an English language caption for a video, you must first delete it in order to create an English generated caption. Instructions on how to delete a caption can be found below. The `` must adhere to the BCP 47 format. The tag for English is `en`. You may specify a region in the tag, such as `en-GB`, which will render a label that shows `British English` for the caption. ```bash curl -X POST \ -H 'Authorization: Bearer ' \ https://api.cloudflare.com/client/v4/accounts//stream//captions//generate ``` Example response: ```json { "result": { "language": "en", "label": "English (auto-generated)", "generated": true, "status": "inprogress" }, "success": true, "errors": [], "messages": [] } ``` The result will provide a `status` denoting the progress of the caption generation.\ There are three statuses: inprogress, ready, and error. Note that (auto-generated) is applied to the label. Once the generated caption is ready, it will automatically appear in the video player and video manifest. If the caption enters an error state, you may attempt to re-generate it by first deleting it and then using the endpoint listed above. Instructions on deletion are provided below. ### Upload a file Note two changes if you edit a generated caption: the generated field will change to `false` and the (auto-generated) portion of the label will be removed. To create or replace a caption file: ```bash curl -X PUT \ -H 'Authorization: Bearer ' \ -F file=@/Users/mickie/Desktop/example_caption.vtt \ https://api.cloudflare.com/client/v4/accounts//stream//captions/ ``` ### Example Response to Add or Modify a Caption ```json { "result": { "language": "en", "label": "English", "generated": false, "status": "ready" }, "success": true, "errors": [], "messages": [] } ``` ## List the captions associated with a video To view captions associated with a video. Note this results list will also include generated captions that are `inprogress` and `error` status: ```bash curl -H 'Authorization: Bearer ' \ https://api.cloudflare.com/client/v4/accounts//stream//captions ``` ### Example response to get the captions associated with a video ```json { "result": [ { "language": "en", "label": "English (auto-generated)", "generated": true, "status": "inprogress" }, { "language": "de", "label": "Deutsch", "generated": false, "status": "ready" } ], "success": true, "errors": [], "messages": [] } ``` ## Fetch a caption file To view the WebVTT caption file, you may make a GET request: ```bash curl \ -H 'Authorization: Bearer ' \ https://api.cloudflare.com/client/v4/accounts//stream//captions//vtt ``` ### Example response to get the caption file for a video ```text WEBVTT 1 00:00:00.000 --> 00:00:01.560 This is an example of 2 00:00:01.560 --> 00:00:03.880 a WebVTT caption response. ``` ## Delete the captions To remove a caption associated with your video: ```bash curl -X DELETE \ -H 'Authorization: Bearer ' \ https://api.cloudflare.com/client/v4/accounts//stream//captions/ ``` If there is an entry in `errors` response field, the caption has not been deleted. ### Example response to delete the caption ```json { "result": "", "success": true, "errors": [], "messages": [] } ``` ## Limitations * A video must be uploaded before a caption can be attached to it. In the following example URLs, the video's ID is referenced as `media_id`. * Stream only supports [WebVTT](https://developer.mozilla.org/en-US/docs/Web/API/WebVTT_API) formatted caption files. If you have a differently formatted caption file, use [a tool to convert your file to WebVTT](https://subtitletools.com/convert-to-vtt-online) prior to uploading it. * Videos may include several language captions, but each language must be unique. For example, a video may have English, French, and German captions associated with it, but it cannot have two French captions. * Each caption file is limited to 10 MB in size. [Contact support](https://developers.cloudflare.com/support/contacting-cloudflare-support/) if you need to upload a larger file. ## Most common language codes | Language Code | Language | | - | - | | zh | Mandarin Chinese | | hi | Hindi | | es | Spanish | | en | English | | ar | Arabic | | pt | Portuguese | | bn | Bengali | | ru | Russian | | ja | Japanese | | de | German | | pa | Panjabi | | jv | Javanese | | ko | Korean | | vi | Vietnamese | | fr | French | | ur | Urdu | | it | Italian | | tr | Turkish | | fa | Persian | | pl | Polish | | uk | Ukrainian | | my | Burmese | | th | Thai | --- title: Apply watermarks · Cloudflare Stream docs description: You can add watermarks to videos uploaded using the Stream API. lastUpdated: 2025-04-04T15:30:48.000Z chatbotDeprioritize: false source_url: html: https://developers.cloudflare.com/stream/edit-videos/applying-watermarks/ md: https://developers.cloudflare.com/stream/edit-videos/applying-watermarks/index.md --- You can add watermarks to videos uploaded using the Stream API. To add watermarks to your videos, first create a watermark profile. A watermark profile describes the image you would like to be used as a watermark and the position of that image. Once you have a watermark profile, you can use it as an option when uploading videos. ## Quick start Watermark profile has many customizable options. However, the default parameters generally work for most cases. Please see "Profiles" below for more details. ### Step 1: Create a profile ```bash curl -X POST -H 'Authorization: Bearer ' \ -F file=@/Users/rchen/cloudflare.png \ https://api.cloudflare.com/client/v4/accounts//stream/watermarks ``` ### Step 2: Specify the profile UID at upload ```bash tus-upload --chunk-size 5242880 \ --header Authentication 'Bearer ' \ --metadata watermark \ /Users/rchen/cat.mp4 https://api.cloudflare.com/client/v4/accounts//stream ``` ### Step 3: Done ![Screenshot of a video with Cloudflare watermark at top right](https://developers.cloudflare.com/_astro/cat.fEUyr_sc_Z23svs0.webp) ## Profiles To create, list, delete, or get information about the profile, you will need your [Cloudflare API token](https://www.cloudflare.com/a/account/my-account). ### Optional parameters * `name` string default: *empty string* * A short description for the profile. For example, "marketing videos." * `opacity` float default: 1.0 * Translucency of the watermark. 0.0 means completely transparent, and 1.0 means completely opaque. Note that if the watermark is already semi-transparent, setting this to 1.0 will not make it completely opaque. * `padding` float default: 0.05 * Blank space between the adjacent edges (determined by position) of the video and the watermark. 0.0 means no padding, and 1.0 means padded full video width or length. * Stream will make sure that the watermark will be at about the same position across videos with different dimensions. * `scale` float default: 0.15 * The size of the watermark relative to the overall size of the video. This parameter will adapt to horizontal and vertical videos automatically. 0.0 means no scaling (use the size of the watermark as-is), and 1.0 fills the entire video. * The algorithm will make sure that the watermark will look about the same size across videos with different dimensions. * `position` string (enum) default: "upperRight" * Location of the watermark. Valid positions are: `upperRight`, `upperLeft`, `lowerLeft`, `lowerRight`, and `center`. Note Note that `center` will ignore the `padding` parameter. ## Creating a Watermark profile ### Use Case 1: Upload a local image file directly To upload the image directly, please send a POST request using `multipart/form-data` as the content-type and specify the file under the `file` key. All other fields are optional. ```bash curl -X POST -H "Authorization: Bearer " \ -F file=@{path-to-image-locally} \ -F name='marketing videos' \ -F opacity=1.0 \ -F padding=0.05 \ -F scale=0.15 \ -F position=upperRight \ https://api.cloudflare.com/client/v4/accounts//stream/watermarks ``` ### Use Case 2: Pass a URL to an image To specify a URL for upload, please send a POST request using `application/json` as the content-type and specify the file location using the `url` key. All other fields are optional. ```bash curl -X POST -H "Authorization: Bearer " \ -H 'Content-Type: application/json' \ -d '{ "url": "{url-to-image}", "name": "marketing videos", "opacity": 1.0, "padding": 0.05, "scale": 0.15, "position": "upperRight" }' \ https://api.cloudflare.com/client/v4/accounts//stream/watermarks ``` #### Example response to creating a watermark profile ```json { "result": { "uid": "d6373709b7681caa6c48ef2d8c73690d", "size": 11248, "height": 240, "width": 720, "created": "2020-07-29T00:16:55.719265Z", "downloadedFrom": null, "name": "marketing videos", "opacity": 1.0, "padding": 0.05, "scale": 0.15, "position": "upperRight" }, "success": true, "errors": [], "messages": [] } ``` `downloadedFrom` will be populated if the profile was created via downloading from URL. ## Using a watermark profile on a video Once you created a watermark profile, you can now use the profile at upload time for watermarking videos. ### Basic uploads Unfortunately, Stream does not currently support specifying watermark profile at upload time for Basic Uploads. ### Upload video with a link ```bash curl -X POST -H "Authorization: Bearer " \ -H 'Content-Type: application/json' \ -d '{ "url": "{url-to-video}", "watermark": { "uid": "" } }' \ https://api.cloudflare.com/client/v4/accounts//stream/copy ``` #### Example response to upload video with a link ```json { "result": { "uid": "8d3a5b80e7437047a0fb2761e0f7a645", "thumbnail": "https://customer-f33zs165nr7gyfy4.cloudflarestream.com/6b9e68b07dfee8cc2d116e4c51d6a957/thumbnails/thumbnail.jpg", "playback": { "hls": "https://customer-f33zs165nr7gyfy4.cloudflarestream.com/6b9e68b07dfee8cc2d116e4c51d6a957/manifest/video.m3u8", "dash": "https://customer-f33zs165nr7gyfy4.cloudflarestream.com/6b9e68b07dfee8cc2d116e4c51d6a957/manifest/video.mpd" }, "watermark": { "uid": "d6373709b7681caa6c48ef2d8c73690d", "size": 11248, "height": 240, "width": 720, "created": "2020-07-29T00:16:55.719265Z", "downloadedFrom": null, "name": "marketing videos", "opacity": 1.0, "padding": 0.05, "scale": 0.15, "position": "upperRight" } } ``` ### Upload video with tus ```bash tus-upload --chunk-size 5242880 \ --header Authentication 'Bearer ' \ --metadata watermark \ https://api.cloudflare.com/client/v4/accounts//stream ``` ### Direct creator uploads The video uploaded with the generated unique one-time URL will be watermarked with the profile specified. ```bash curl -X POST -H "Authorization: Bearer " \ -H 'Content-Type: application/json' \ -d '{ "maxDurationSeconds": 3600, "watermark": { "uid": "" } }' \ https://api.cloudflare.com/client/v4/accounts//stream/direct_upload ``` #### Example response to direct user uploads ```json { "result": { "uploadURL": "https://upload.videodelivery.net/c32d98dd671e4046a33183cd5b93682b", "uid": "c32d98dd671e4046a33183cd5b93682b", "watermark": { "uid": "d6373709b7681caa6c48ef2d8c73690d", "size": 11248, "height": 240, "width": 720, "created": "2020-07-29T00:16:55.719265Z", "downloadedFrom": null, "name": "marketing videos", "opacity": 1.0, "padding": 0.05, "scale": 0.15, "position": "upperRight" } }, "success": true, "errors": [], "messages": [] } ``` `watermark` will be `null` if no watermark was specified. ## Get a watermark profile To view a watermark profile that you created: ```bash curl -H "Authorization: Bearer " \ https://api.cloudflare.com/client/v4/accounts//stream/watermarks/ ``` ### Example response to get a watermark profile ```json { "result": { "uid": "d6373709b7681caa6c48ef2d8c73690d", "size": 11248, "height": 240, "width": 720, "created": "2020-07-29T00:16:55.719265Z", "downloadedFrom": null, "name": "marketing videos", "opacity": 1.0, "padding": 0.05, "scale": 0.15, "position": "center" }, "success": true, "errors": [], "messages": [] } ``` ## List watermark profiles To list watermark profiles that you created: ```bash curl -H "Authorization: Bearer " \ https://api.cloudflare.com/client/v4/accounts//stream/watermarks/ ``` ### Example response to list watermark profiles ```json { "result": [ { "uid": "9de16afa676d64faaa7c6c4d5047e637", "size": 207710, "height": 626, "width": 1108, "created": "2020-07-29T00:23:35.918472Z", "downloadedFrom": null, "name": "marketing videos", "opacity": 1.0, "padding": 0.05, "scale": 0.15, "position": "upperLeft" }, { "uid": "9c50cff5ab16c4aec0bcb03c44e28119", "size": 207710, "height": 626, "width": 1108, "created": "2020-07-29T00:16:46.735377Z", "downloadedFrom": "https://company.com/logo.png", "name": "internal training videos", "opacity": 1.0, "padding": 0.05, "scale": 0.15, "position": "center" } ], "success": true, "errors": [], "messages": [] } ``` ## Delete a watermark profile To delete a watermark profile that you created: ```bash curl -X DELETE -H 'Authorization: Bearer ' \ https://api.cloudflare.com/client/v4/accounts//stream/watermarks/ ``` If the operation was successful, it will return a success response: ```json { "result": "", "success": true, "errors": [], "messages": [] } ``` ## Limitations * Once the watermark profile is created, you cannot change its parameters. If you need to edit your watermark profile, please delete it and create a new one. * Once the watermark is applied to a video, you cannot change the watermark without re-uploading the video to apply a different profile. * Once the watermark is applied to a video, deleting the watermark profile will not also remove the watermark from the video. * The maximum file size is 2MiB (2097152 bytes), and only PNG files are supported. --- title: Add player enhancements · Cloudflare Stream docs description: With player enhancements, you can modify your video player to incorporate elements of your branding such as your logo, and customize additional options to present to your viewers. lastUpdated: 2024-08-13T19:56:56.000Z chatbotDeprioritize: false source_url: html: https://developers.cloudflare.com/stream/edit-videos/player-enhancements/ md: https://developers.cloudflare.com/stream/edit-videos/player-enhancements/index.md --- With player enhancements, you can modify your video player to incorporate elements of your branding such as your logo, and customize additional options to present to your viewers. The player enhancements are automatically applied to videos using the Stream Player, but you will need to add the details via the `publicDetails` property when using your own player. ## Properties * `title`: The title that appears when viewers hover over the video. The title may differ from the file name of the video. * `share_link`: Provides the user with a click-to-copy option to easily share the video URL. This is commonly set to the URL of the page that the video is embedded on. * `channel_link`: The URL users will be directed to when selecting the logo from the video player. * `logo`: A valid HTTPS URL for the image of your logo. ## Customize your own player The example below includes every property you can set via `publicDetails`. ```bash curl --location --request POST "https://api.cloudflare.com/client/v4/accounts/<$ACCOUNT_ID>/stream/<$VIDEO_UID>" \ --header "Authorization: Bearer <$SECRET>" \ --header 'Content-Type: application/json' \ --data-raw '{ "publicDetails": { "title": "Optional video title", "share_link": "https://my-cool-share-link.cloudflare.com", "channel_link": "https://www.cloudflare.com/products/cloudflare-stream/", "logo": "https://upload.wikimedia.org/wikipedia/commons/thumb/9/94/Cloudflare_Logo.png/480px-Cloudflare_Logo.png" } }' | jq ".result.publicDetails" ``` Because the `publicDetails` properties are optional, you can choose which properties to include. In the example below, only the `logo` is added to the video. ```bash curl --location --request POST "https://api.cloudflare.com/client/v4/accounts/<$ACCOUNT_ID>/stream/<$VIDEO_UID>" \ --header "Authorization: Bearer <$SECRET>" \ --header 'Content-Type: application/json' \ --data-raw '{ "publicDetails": { "logo": "https://upload.wikimedia.org/wikipedia/commons/thumb/9/94/Cloudflare_Logo.png/480px-Cloudflare_Logo.png" } }' ``` You can also pull the JSON by using the endpoint below. `https://customer-.cloudflarestream.com//metadata/playerEnhancementInfo.json` ## Update player properties via the Cloudflare dashboard 1. Log in to your [Cloudflare dashboard](https://dash.cloudflare.com) and select your account. 2. Select **Stream** > **Videos**. 3. Select a video from the list to edit it. 4. Select the **Public Details** tab. 5. From **Public Details**, enter information in the text fields for the properties you want to set. 6. When you are done, select **Save**. --- title: Clip videos · Cloudflare Stream docs description: With video clipping, also referred to as "trimming" or changing the length of the video, you can change the start and end points of a video so viewers only see a specific "clip" of the video. For example, if you have a 20 minute video but only want to share a five minute clip from the middle of the video, you can clip the video to remove the content before and after the five minute clip. lastUpdated: 2024-12-16T22:33:26.000Z chatbotDeprioritize: false source_url: html: https://developers.cloudflare.com/stream/edit-videos/video-clipping/ md: https://developers.cloudflare.com/stream/edit-videos/video-clipping/index.md --- With video clipping, also referred to as "trimming" or changing the length of the video, you can change the start and end points of a video so viewers only see a specific "clip" of the video. For example, if you have a 20 minute video but only want to share a five minute clip from the middle of the video, you can clip the video to remove the content before and after the five minute clip. Refer to the [Video clipping API documentation](https://developers.cloudflare.com/api/resources/stream/subresources/clip/methods/create/) for more information. Note: Clipping works differently for live streams and recordings. For more information, refer to [Live instant clipping](https://developers.cloudflare.com/stream/stream-live/live-instant-clipping/). ## Prerequisites Before you can clip a video, you will need an API token. For more information on creating an API token, refer to [Creating API tokens](https://developers.cloudflare.com/fundamentals/api/get-started/create-token/). ## Required parameters To clip your video, determine the start and end times you want to use from the existing video to create the new video. Use the `videoUID` and the start end times to make your request. Note Clipped videos will not inherit the `scheduledDeletion` date. To set the deletion date, you must clip the video first and then set the deletion date. ```json { "clippedFromVideoUID": "0ea62994907491cf9ebefb0a34c1e2c6", "startTimeSeconds": 20, "endTimeSeconds": 40 } ``` * **`clippedFromVideoUID`**: The unique identifier for the video used to create the new, clipped video. * **`startTimeSeconds`**: The timestamp from the existing video that indicates when the new video begins. * **`endTimeSeconds`**: The timestamp from the existing video that indicates when the new video ends. ```bash curl --location --request POST 'https://api.cloudflare.com/client/v4/accounts//stream/clip' \ --header 'Authorization: Bearer ' \ --header 'Content-Type: application/json' \ --data-raw '{ "clippedFromVideoUID": "0ea62994907491cf9ebefb0a34c1e2c6", "startTimeSeconds": 10, "endTimeSeconds": 15 }' ``` You can check whether your video is ready to play after selecting your account from the [Cloudflare dashboard](https://dash.cloudflare.com/?to=/:account/stream). While the clipped video processes, the video status response displays **Queued**. When the clipping process is complete, the video status changes to **Ready** and displays the new name of the clipped video and the new duration. To receive a notification when your video is done processing and ready to play, you can [subscribe to webhook notifications](https://developers.cloudflare.com/stream/manage-video-library/using-webhooks/). ## Set video name When you clip a video, you can also specify a new name for the clipped video. In the example below, the `name` field indicates the new name to use for the clipped video. ```json { "clippedFromVideoUID": "0ea62994907491cf9ebefb0a34c1e2c6", "startTimeSeconds": 10, "endTimeSeconds": 15, "meta": { "name": "overriding-filename-clip.mp4" } } ``` When the video has been clipped and processed, your newly named video displays in your Cloudflare dashboard in the list videos. ## Add a watermark You can also add a custom watermark to your video. For more information on watermarks and uploading a watermark profile, refer to [Apply watermarks](https://developers.cloudflare.com/stream/edit-videos/applying-watermarks). ```json { "clippedFromVideoUID": "0ea62994907491cf9ebefb0a34c1e2c6", "startTimeSeconds": 10, "endTimeSeconds": 15, "watermark": { "uid": "4babd675387c3d927f58c41c761978fe" }, "meta": { "name": "overriding-filename-clip.mp4" } } ``` ## Require signed URLs When clipping a video, you can make a video private and accessible only to certain users by [requiring a signed URL](https://developers.cloudflare.com/stream/viewing-videos/securing-your-stream/). ```json { "clippedFromVideoUID": "0ea62994907491cf9ebefb0a34c1e2c6", "startTimeSeconds": 10, "endTimeSeconds": 15, "requireSignedURLs": true, "meta": { "name": "signed-urls-demo.mp4" } } ``` After the video clipping is complete, you can open the Cloudflare dashboard and video list to locate your video. When you select the video, the **Settings** tab displays a checkmark next to **Require Signed URLs**. ## Specify a thumbnail image You can also specify a thumbnail image for your video using a percentage value. To convert the thumbnail's timestamp from seconds to a percentage, divide the timestamp you want to use by the total duration of the video. For more information about thumbnails, refer to [Display thumbnails](https://developers.cloudflare.com/stream/viewing-videos/displaying-thumbnails). ```json { "clippedFromVideoUID": "0ea62994907491cf9ebefb0a34c1e2c6", "startTimeSeconds": 10, "endTimeSeconds": 15, "thumbnailTimestampPct": 0.5, "meta": { "name": "thumbnail_percentage.mp4" } } ``` --- title: Android (ExoPlayer) · Cloudflare Stream docs description: Example of video playback on Android using ExoPlayer lastUpdated: 2024-08-21T16:27:56.000Z chatbotDeprioritize: false tags: Playback source_url: html: https://developers.cloudflare.com/stream/examples/android/ md: https://developers.cloudflare.com/stream/examples/android/index.md --- Note Before you can play videos, you must first [upload a video to Cloudflare Stream](https://developers.cloudflare.com/stream/uploading-videos/) or be [actively streaming to a live input](https://developers.cloudflare.com/stream/stream-live) ```kotlin implementation 'com.google.android.exoplayer:exoplayer-hls:2.X.X' SimpleExoPlayer player = new SimpleExoPlayer.Builder(context).build(); // Set the media item to the Cloudflare Stream HLS Manifest URL: player.setMediaItem(MediaItem.fromUri("https://customer-9cbb9x7nxdw5hb57.cloudflarestream.com/8f92fe7d2c1c0983767649e065e691fc/manifest/video.m3u8")); player.prepare(); ``` ### Download and run an example app 1. Download [this example app](https://github.com/googlecodelabs/exoplayer-intro.git) from the official Android developer docs, following [this guide](https://developer.android.com/codelabs/exoplayer-intro#4). 2. Open and run the [exoplayer-codelab-04 example app](https://github.com/googlecodelabs/exoplayer-intro/tree/main/exoplayer-codelab-04) using [Android Studio](https://developer.android.com/studio). 3. Replace the `media_url_dash` URL on [this line](https://github.com/googlecodelabs/exoplayer-intro/blob/main/exoplayer-codelab-04/src/main/res/values/strings.xml#L21) with the DASH manifest URL for your video. For more, see [read the docs](https://developers.cloudflare.com/stream/viewing-videos/using-own-player/ios/). --- title: dash.js · Cloudflare Stream docs description: Example of video playback with Cloudflare Stream and the DASH reference player (dash.js) lastUpdated: 2024-08-21T16:27:56.000Z chatbotDeprioritize: false tags: Playback source_url: html: https://developers.cloudflare.com/stream/examples/dash-js/ md: https://developers.cloudflare.com/stream/examples/dash-js/index.md --- ```html
``` Refer to the [dash.js documentation](https://github.com/Dash-Industry-Forum/dash.js/) for more information.
--- title: hls.js · Cloudflare Stream docs description: Example of video playback with Cloudflare Stream and the HLS reference player (hls.js) lastUpdated: 2024-08-21T16:27:56.000Z chatbotDeprioritize: false tags: Playback source_url: html: https://developers.cloudflare.com/stream/examples/hls-js/ md: https://developers.cloudflare.com/stream/examples/hls-js/index.md --- ```html ``` Refer to the [hls.js documentation](https://github.com/video-dev/hls.js/blob/master/docs/API.md) for more information. --- title: iOS (AVPlayer) · Cloudflare Stream docs description: Example of video playback on iOS using AVPlayer lastUpdated: 2024-08-21T16:27:56.000Z chatbotDeprioritize: false tags: Playback source_url: html: https://developers.cloudflare.com/stream/examples/ios/ md: https://developers.cloudflare.com/stream/examples/ios/index.md --- Note Before you can play videos, you must first [upload a video to Cloudflare Stream](https://developers.cloudflare.com/stream/uploading-videos/) or be [actively streaming to a live input](https://developers.cloudflare.com/stream/stream-live) ```swift import SwiftUI import AVKit struct MyView: View { // Change the url to the Cloudflare Stream HLS manifest URL private let player = AVPlayer(url: URL(string: "https://customer-9cbb9x7nxdw5hb57.cloudflarestream.com/8f92fe7d2c1c0983767649e065e691fc/manifest/video.m3u8")!) var body: some View { VideoPlayer(player: player) .onAppear() { player.play() } } } struct MyView_Previews: PreviewProvider { static var previews: some View { MyView() } } ``` ### Download and run an example app 1. Download [this example app](https://developer.apple.com/documentation/avfoundation/offline_playback_and_storage/using_avfoundation_to_play_and_persist_http_live_streams) from Apple's developer docs 2. Open and run the app using [Xcode](https://developer.apple.com/xcode/). 3. Search in Xcode for `m3u8`, and open the `Streams` file 4. Replace the value of `playlist_url` with the HLS manifest URL for your video. ![Screenshot of a video with Cloudflare watermark at top right](https://developers.cloudflare.com/_astro/ios-example-screenshot-edit-hls-url.CK2bGBBG_Z1npgqh.webp) 1. Click the Play button in Xcode to run the app, and play your video. For more, see [read the docs](https://developers.cloudflare.com/stream/viewing-videos/using-own-player/ios/). --- title: First Live Stream with OBS · Cloudflare Stream docs description: Set up and start your first Live Stream using OBS (Open Broadcaster Software) Studio lastUpdated: 2025-05-08T19:52:23.000Z chatbotDeprioritize: false source_url: html: https://developers.cloudflare.com/stream/examples/obs-from-scratch/ md: https://developers.cloudflare.com/stream/examples/obs-from-scratch/index.md --- ## Overview Stream empowers customers and their end-users to broadcast a live stream quickly and at scale. The player can be embedded in sites and applications easily, but not everyone knows how to make a live stream because it happens in a separate application. This walkthrough will demonstrate how to start your first live stream using OBS Studio, a free live streaming application used by thousands of Stream customers. There are five required steps; you should be able to complete this walkthrough in less than 15 minutes. ### Before you start To go live on Stream, you will need any of the following: * A paid Stream subscription * A Pro or Business zone plan — these include 100 minutes of video storage and 10,000 minutes of video delivery * An enterprise contract with Stream enabled Also, you will also need to be able to install the application on your computer. If your computer and network connection are good enough for video calling, you should at least be able to stream something basic. ## 1. Set up a [Live Input](https://developers.cloudflare.com/stream/stream-live/start-stream-live/) You need a Live Input on Stream. Follow the [Start a live stream](https://developers.cloudflare.com/stream/stream-live/start-stream-live/) guide. Make note of three things: * **RTMPS URL**, which will most likely be `rtmps://live.cloudflare.com:443/live/` * **RTMPS Key**, which is specific to the new live input * Whether you selected the beta "Low-Latency HLS Support" or not. For your first test, leave this *disabled.* ([What is that?](https://blog.cloudflare.com/cloudflare-stream-low-latency-hls-open-beta)) ## 2. Install OBS Download [OBS Studio](https://obsproject.com/) for Windows, macOS, or Linux. The OBS Knowledge Base includes several [installation guides](https://obsproject.com/kb/category/1), but installer defaults are generally acceptable. ## 3. First Launch OBS Configuration When you first launch OBS, the Auto-Configuration Wizard will ask a few questions and offer recommended settings. See their [Quick Start Guide](https://obsproject.com/kb/quick-start-guide) for more details. For a quick start with Stream, use these settings: * **Step 1: "Usage Information"** * Select "Optimize for streaming, recording is secondary." * **Step 2: "Video Settings"** * **Base (Canvas) Resolution:** 1920x1080 * **FPS:** "Either 60 or 30, but prefer 60 when possible" * **Step 3: "Stream Information"** * **Service:** "Custom" * For **Server**, enter the RTMPS URL from Stream * For **Stream Key**, enter the RTMPS Key from Stream * If available, select both **"Prefer hardware encoding"** and **"Estimate bitrate with a bandwidth test."** ## 4. Set up a Stage Add some test content to the stage in OBS. In this example, I have added a background image, a web browser (to show [time.is](https://time.is)), and an overlay of my webcam: ![OBS Stage](https://developers.cloudflare.com/_astro/obs-stage.Dp0DktA1_1QAnPX.webp) OBS offers many different audio, video, still, and generated sources to set up your broadcast content. Use the "+" button in the "Sources" panel to add content. Check out the [OBS Sources Guide](https://obsproject.com/kb/sources-guide) for more information. For an initial test, use a source that will show some motion: try a webcam ("Video Capture Device"), a screen share ("Display Capture"), or a browser with a site that has moving content. ## 5. Go Live Click the "Start Streaming" button on the bottom right panel under "Controls" to start a stream with default settings. Return to the Live Input page on Stream Dash. Under "Input Status," you should see "🟢 Connected" and some connection metrics. Further down the page, you will see a test player and an embed code. For more ways to watch and embed your Live Stream, see [Watch a live stream](https://developers.cloudflare.com/stream/stream-live/watch-live-stream/). ## 6. (Optional) Optimize Settings Tweaking some settings in OBS can improve quality, glass-to-glass latency, or stability of the stream playback. This is particularly important if you selected the "Low-Latency HLS" beta option. Return to OBS, click "Stop Streaming." Then click "Settings" and open the "Output" section: ![OBS Output Settings - Simple Mode](https://developers.cloudflare.com/_astro/obs-output-settings-1.Dd36CkGD_oeEY6.webp) * Change **Output Mode** to "Advanced" ![OBS Output Settings - Advanced Mode](https://developers.cloudflare.com/_astro/obs-output-settings-2.B8WTTxox_Zu2X3j.webp) *Your available options in the "Video Encoder" menu, as well as the resulting "Encoder Settings," may look slightly different than these because the options vary by hardware.* * **Video Encoder:** may have several options. Start with the default selected, which was "x264" in this example. Other options to try, which will leverage improved hardware acceleration when possible, include "QuickSync H.264" or "NVIDIA NVENC." See OBS's guide to Hardware Encoding for more information. H.264 is the required output codec. * **Rate Control:** confirm "CBR" (constant bitrate) is selected. * **Bitrate:** depending on the content of your stream, a bitrate between 3000 Kbps and 8000 Kbps should be sufficient. Lower bitrate is more tolerant to network congestion and is suitable for content with less detail or less motion (speaker, slides, etc.) where a higher bitrate requires a more stable network connection and is best for content with lots of motion or details (events, moving cameras, video games, screen share, higher framerates). * **Keyframe Interval**, sometimes referred to as *GOP Size*: * If you did *not* select Low-Latency HLS Beta, set this to 4 seconds. Raise it to 8 if your stream has stuttering or freezing. * If you *did* select the Low-Latency HLS Beta, set this to 2 seconds. Raise it to 4 if your stream has stuttering or freezing. Lower it to 1 if your stream has smooth playback. * In general, higher keyframe intervals make more efficient use of bandwidth and CPU for encoding, at the expense of higher glass-to-glass latency. Lower keyframe intervals reduce latency, but are more resource intensive and less tolerant to network disruptions and congestion. * **Profile** and **Tuning** can be left at their default settings. * **B Frames** (available only for some encoders) should be set to 0 for LL-HLS Beta streams. For more information about these settings and our recommendations for Live, see the "[Recommendations, requirements and limitations](https://developers.cloudflare.com/stream/stream-live/start-stream-live/#recommendations-requirements-and-limitations)" section of [Start a live stream](https://developers.cloudflare.com/stream/stream-live/start-stream-live/). ## What is Next With these steps, you have created a Live Input on Stream, broadcast a test from OBS, and you saw it played back in via the Stream built-in player in Dash. Up next, consider trying: * Embedding your live stream into a website * Find and replay the recording of your live stream --- title: RTMPS playback · Cloudflare Stream docs description: Example of sub 1s latency video playback using RTMPS and ffplay lastUpdated: 2024-08-21T16:27:56.000Z chatbotDeprioritize: false tags: Playback source_url: html: https://developers.cloudflare.com/stream/examples/rtmps_playback/ md: https://developers.cloudflare.com/stream/examples/rtmps_playback/index.md --- Note Before you can play live video, you must first be [actively streaming to a live input](https://developers.cloudflare.com/stream/stream-live/start-stream-live). Copy the RTMPS *playback* key for your live input from the [Stream Dashboard](https://dash.cloudflare.com/?to=/:account/stream/inputs) or the [Stream API](https://developers.cloudflare.com/stream/stream-live/start-stream-live/#use-the-api), and paste it into the URL below, replacing ``: ```sh ffplay -analyzeduration 1 -fflags -nobuffer -sync ext 'rtmps://live.cloudflare.com:443/live/' ``` For more, refer to [Play live video in native apps with less than one second latency](https://developers.cloudflare.com/stream/viewing-videos/using-own-player/#play-live-video-in-native-apps-with-less-than-1-second-latency). --- title: Shaka Player · Cloudflare Stream docs description: Example of video playback with Cloudflare Stream and Shaka Player lastUpdated: 2024-08-21T16:27:56.000Z chatbotDeprioritize: false tags: Playback source_url: html: https://developers.cloudflare.com/stream/examples/shaka-player/ md: https://developers.cloudflare.com/stream/examples/shaka-player/index.md --- First, create a video element, using the poster attribute to set a preview thumbnail image. Refer to [Display thumbnails](https://developers.cloudflare.com/stream/viewing-videos/displaying-thumbnails/) for instructions on how to generate a thumbnail image using Cloudflare Stream. ```html ``` Then listen for `DOMContentLoaded` event, create a new instance of Shaka Player, and load the manifest URI. ```javascript // Replace the manifest URI with an HLS or DASH manifest from Cloudflare Stream const manifestUri = 'https://customer-f33zs165nr7gyfy4.cloudflarestream.com/6b9e68b07dfee8cc2d116e4c51d6a957/manifest/video.mpd'; document.addEventListener('DOMContentLoaded', () => { const video = document.getElementById('video'); const player = new shaka.Player(video); await player.load(manifestUri); }); ``` Refer to the [Shaka Player documentation](https://github.com/shaka-project/shaka-player) for more information. --- title: SRT playback · Cloudflare Stream docs description: Example of sub 1s latency video playback using SRT and ffplay lastUpdated: 2024-08-21T16:27:56.000Z chatbotDeprioritize: false tags: Playback source_url: html: https://developers.cloudflare.com/stream/examples/srt_playback/ md: https://developers.cloudflare.com/stream/examples/srt_playback/index.md --- Note Before you can play live video, you must first be [actively streaming to a live input](https://developers.cloudflare.com/stream/stream-live/start-stream-live). Copy the **SRT Playback URL** for your live input from the [Stream Dashboard](https://dash.cloudflare.com/?to=/:account/stream/inputs) or the [Stream API](https://developers.cloudflare.com/stream/stream-live/start-stream-live/#use-the-api), and paste it into the URL below, replacing ``: ```sh ffplay -analyzeduration 1 -fflags -nobuffer -probesize 32 -sync ext '' ``` For more, refer to [Play live video in native apps with less than one second latency](https://developers.cloudflare.com/stream/viewing-videos/using-own-player/#play-live-video-in-native-apps-with-less-than-1-second-latency). --- title: Stream Player · Cloudflare Stream docs description: Example of video playback with the Cloudflare Stream Player lastUpdated: 2024-08-21T16:27:56.000Z chatbotDeprioritize: false tags: Playback source_url: html: https://developers.cloudflare.com/stream/examples/stream-player/ md: https://developers.cloudflare.com/stream/examples/stream-player/index.md --- ```html
``` Refer to the [Using the Stream Player](https://developers.cloudflare.com/stream/viewing-videos/using-the-stream-player/) for more information.
--- title: Video.js · Cloudflare Stream docs description: Example of video playback with Cloudflare Stream and Video.js lastUpdated: 2024-08-21T16:27:56.000Z chatbotDeprioritize: false tags: Playback source_url: html: https://developers.cloudflare.com/stream/examples/video-js/ md: https://developers.cloudflare.com/stream/examples/video-js/index.md --- ```html ``` Refer to the [Video.js documentation](https://docs.videojs.com/) for more information. --- title: Vidstack · Cloudflare Stream docs description: Example of video playback with Cloudflare Stream and Vidstack lastUpdated: 2024-08-21T16:27:56.000Z chatbotDeprioritize: false tags: Playback source_url: html: https://developers.cloudflare.com/stream/examples/vidstack/ md: https://developers.cloudflare.com/stream/examples/vidstack/index.md --- ## Installation There's a few options to choose from when getting started with Vidstack, follow any of the links below to get setup. You can replace the player `src` with `https://customer-f33zs165nr7gyfy4.cloudflarestream.com/6b9e68b07dfee8cc2d116e4c51d6a957/manifest/video.m3u8` to test Cloudflare Stream. * [Angular](https://www.vidstack.io/docs/player/getting-started/installation/angular?provider=video) * [React](https://www.vidstack.io/docs/player/getting-started/installation/react?provider=video) * [Svelte](https://www.vidstack.io/docs/player/getting-started/installation/svelte?provider=video) * [Vue](https://www.vidstack.io/docs/player/getting-started/installation/vue?provider=video) * [Solid](https://www.vidstack.io/docs/player/getting-started/installation/solid?provider=video) * [Web Components](https://www.vidstack.io/docs/player/getting-started/installation/web-components?provider=video) * [CDN](https://www.vidstack.io/docs/player/getting-started/installation/cdn?provider=video) ## Examples Feel free to check out [Vidstack Examples](https://github.com/vidstack/examples) for building with various JS frameworks and styling options (e.g., CSS or Tailwind CSS). --- title: Stream WordPress plugin · Cloudflare Stream docs description: Upload videos to WordPress using the Stream WordPress plugin. lastUpdated: 2024-08-21T16:27:56.000Z chatbotDeprioritize: false source_url: html: https://developers.cloudflare.com/stream/examples/wordpress/ md: https://developers.cloudflare.com/stream/examples/wordpress/index.md --- Before you begin, ensure Cloudflare Stream is enabled on your account and that you have a [Cloudflare API key](https://developers.cloudflare.com/fundamentals/api/get-started/keys/). ## Configure the Cloudflare Stream WordPress plugin 1. Log in to your WordPress account. 2. Download the **Cloudflare Stream plugin**. 3. Expand the **Settings** menu from the navigation menu and select **Cloudflare Stream**. 4. On the **Cloudflare Stream settings** page, enter your email, account ID, and API key. ## Upload video with Cloudflare Stream WordPress plugin After configuring the Stream Plugin in WordPress, you can upload videos directly to Stream from WordPress. To upload a video using the Stream plugin: 1. Navigate to the **Add New Post** page in WordPress. 2. Select the **Add Block** icon. 3. Enter **Stream** in the search bar to search for the Cloudflare Stream Video plugin. 4. Select **Cloudflare Stream Video** to add the **Stream** block to your post. 5. Select **Upload** button to choose the video to upload. --- title: GraphQL Analytics API · Cloudflare Stream docs description: Stream provides analytics about both live video and video uploaded to Stream, via the GraphQL API described below, as well as in the Stream dashboard. lastUpdated: 2025-05-14T00:02:06.000Z chatbotDeprioritize: false source_url: html: https://developers.cloudflare.com/stream/getting-analytics/fetching-bulk-analytics/ md: https://developers.cloudflare.com/stream/getting-analytics/fetching-bulk-analytics/index.md --- Stream provides analytics about both live video and video uploaded to Stream, via the GraphQL API described below, as well as in the [Stream dashboard](https://dash.cloudflare.com/?to=/:account/stream/analytics). The Stream Analytics API uses the Cloudflare GraphQL Analytics API, which can be used across many Cloudflare products. For more about GraphQL, rate limits, filters, and sorting, refer to the [Cloudflare GraphQL Analytics API docs](https://developers.cloudflare.com/analytics/graphql-api). ## Getting started 1. [Generate a Cloudflare API token](https://dash.cloudflare.com/profile/api-tokens) with the **Account Analytics** permission. 2. Use a GraphQL client of your choice to make your first query. [Postman](https://www.postman.com/) has a built-in GraphQL client which can help you run your first query and introspect the GraphQL schema to understand what is possible. Refer to the sections below for available metrics, dimensions, fields, and example queries. ## Server side analytics Stream collects data about the number of minutes of video delivered to viewers for all live and on-demand videos played via HLS or DASH, regardless of whether or not you use the [Stream Player](https://developers.cloudflare.com/stream/viewing-videos/using-the-stream-player/). ### Filters and Dimensions | Field | Description | | - | - | | `date` | Date | | `datetime` | DateTime | | `uid` | UID of the video | | `clientCountryName` | ISO 3166 alpha2 country code from the client who viewed the video | | `creator` | The [Creator ID](https://developers.cloudflare.com/stream/manage-video-library/creator-id/) associated with individual videos, if present | Some filters, like `date`, can be used with operators, such as `gt` (greater than) and `lt` (less than), as shown in the example query below. For more advanced filtering options, refer to [filtering](https://developers.cloudflare.com/analytics/graphql-api/features/filtering/). ### Metrics | Node | Field | Description | | - | - | - | | `streamMinutesViewedAdaptiveGroups` | `minutesViewed` | Minutes of video delivered | ### Example #### Get minutes viewed by country ```graphql query StreamGetMinutesExample($accountTag: string!, $start: Date, $end: Date) { viewer { accounts(filter: { accountTag: $accountTag }) { streamMinutesViewedAdaptiveGroups( filter: { date_geq: $start, date_lt: $end } orderBy: [sum_minutesViewed_DESC] limit: 100 ) { sum { minutesViewed } dimensions { uid clientCountryName } } } } } ``` [Run in GraphQL API Explorer](https://graphql.cloudflare.com/explorer?query=I4VwpgTgngBAygFwmAhgWwOJgQWQJYB2ICYAzgKIAe6ADgDZgAUAJCgMZsD2IBCAKigDmALhikkhQQEIANDGbiUEBKIAiKEnOZgCAEzUawAShgBvAFAwYANzxgA7pDOWrMdlx4JSjAGZ46JBCipm4c3LwCIvLu4fxCMAC+JhauruLI6PhEJKQAanaOugCCuig0CHjWYBgQ3DTeLqlWfgGQwTClJAD6gmDAogoISghynWBdAQM6uomNTZwQupAAQlCiANqkIGhdaITEZPkOYLpdquRwAMIAunOpdHh7KjAAjAAMb3cwyV9WW2jOJpNPbZQ4FE6-WZAqy6R46Uh4TgEUiA6FWEB4XSQqxsB46BCXWLQABy6DAkISX0pqWpswSQA\&variables=N4IghgxhD2CuB2AXAKmA5iAXCAggYTwHkBVAOWQH0BJAERABoQBnRMAJ0SxACYAGbgKwBaXgHYhARgEMQAU3gATLn0EjxEgGwgAvkA) ```json { "data": { "viewer": { "accounts": [ { "streamMinutesViewedAdaptiveGroups": [ { "dimensions": { "clientCountryName": "US", "uid": "73c514082b154945a753d0011e9d7525" }, "sum": { "minutesViewed": 2234 } }, { "dimensions": { "clientCountryName": "CN", "uid": "73c514082b154945a753d0011e9d7525" }, "sum": { "minutesViewed": 700 } }, { "dimensions": { "clientCountryName": "IN", "uid": "73c514082b154945a753d0011e9d7525" }, "sum": { "minutesViewed": 553 } } ] } ] } }, "errors": null } ``` ## Pagination GraphQL API supports seek pagination: using filters, you can specify the last video UID so the response only includes data for videos after the last video UID. The query below will return data for 2 videos that follow video UID `5646153f8dea17f44d542a42e76cfd`: ```graphql query StreamPaginationExample( $accountTag: string! $start: Date $end: Date $uId: string ) { viewer { accounts(filter: { accountTag: $accountTag }) { videoPlaybackEventsAdaptiveGroups( filter: { date_geq: $start, date_lt: $end, uid_gt: $uId } orderBy: [uid_ASC] limit: 2 ) { count sum { timeViewedMinutes } dimensions { uid } } } } } ``` [Run in GraphQL API Explorer](https://graphql.cloudflare.com/explorer?query=I4VwpgTgngBAygFwmAhgWwAooOYEsB2KCuA9vgKIAe6ADgDZgAUAUDDACQoDGXJI+CACo4AXDADOSAtgCErDpJQQEYgCJEw89mHwATNRq0gAkvolT82ZgEoYAb3kA3XGADuke-Lbde-BOMYAM1w6BEgxOxgfPgFhbDFOHhihHBgAX1sHNmyYZ10wEgw6FCgAI24Aa3JHHX8AQV0UGmIagHEIPhoArxyYYNDw+xhGsIB9bDBgBMVlABphjVHQhJ1deZBcXXGVDhNddJ6ckgh8iAAhKDEAbQ2turgAYQBdQ+y6XDRcHYAmV8zXti+AQAiQgNCeXq9YhoMAANRc7l0AFkCCAwuIQWkQboPjpxKR8OIIZDsrdMa8sTlKQc0kA\&variables=N4IghgxhD2CuB2AXAKmA5iAXCAggYTwHkBVAOWQH0BJAERABoQBnRMAJ0SxACYAGbgKwBaXgHYhARgEMQAU3gATLn0EjxEgGwzYVJdgEaALBqkBmAGYAOBbLATR5w4YUDD3MG9miNEc0oC+QA) Here are the steps to implementing pagination: 1. Call the first query without uid\_gt filter to get the first set of videos 2. Grab the last video UID from the response from the first query 3. Call next query by specifying uid\_gt property and set it to the last video UID. This will return the next set of videos For more on pagination, refer to the [Cloudflare GraphQL Analytics API docs](https://developers.cloudflare.com/analytics/graphql-api/features/pagination/). ## Limitations * The maximum query interval in a single query is 31 days * The maximum data retention period is 90 days --- title: Get live viewer counts · Cloudflare Stream docs description: The Stream player has full support for live viewer counts by default. To get the viewer count for live videos for use with third party players, make a GET request to the /views endpoint. lastUpdated: 2024-08-13T19:56:56.000Z chatbotDeprioritize: false source_url: html: https://developers.cloudflare.com/stream/getting-analytics/live-viewer-count/ md: https://developers.cloudflare.com/stream/getting-analytics/live-viewer-count/index.md --- The Stream player has full support for live viewer counts by default. To get the viewer count for live videos for use with third party players, make a `GET` request to the `/views` endpoint. ```bash https://customer-.cloudflarestream.com//views ``` Below is a response for a live video with several active viewers: ```json { "liveViewers": 113 } ``` --- title: Manage creators · Cloudflare Stream docs description: You can set the creator field with an internal user ID at the time a tokenized upload URL is requested. When the video is uploaded, the creator property is automatically set to the internal user ID which can be used for analytics data or when searching for videos by a specific creator. lastUpdated: 2024-09-24T15:46:36.000Z chatbotDeprioritize: false source_url: html: https://developers.cloudflare.com/stream/manage-video-library/creator-id/ md: https://developers.cloudflare.com/stream/manage-video-library/creator-id/index.md --- You can set the creator field with an internal user ID at the time a tokenized upload URL is requested. When the video is uploaded, the creator property is automatically set to the internal user ID which can be used for analytics data or when searching for videos by a specific creator. For basic uploads, you will need to add the Creator ID after you upload the video. ## Upload from URL ```bash curl "https://api.cloudflare.com/client/v4/accounts/{account_id}/stream/copy" \ --header "Authorization: Bearer " \ --header "Content-Type: application/json" \ --data '{"url":"https://example.com/myvideo.mp4","creator": "","thumbnailTimestampPct":0.529241,"allowedOrigins":["example.com"],"requireSignedURLs":true,"watermark":{"uid":"ea95132c15732412d22c1476fa83f27a"}}' ``` **Response** ```json { "success": true, "errors": [], "messages": [], "result": { "allowedOrigins": ["example.com"], "created": "2014-01-02T02:20:00Z", "duration": 300, "input": { "height": 1080, "width": 1920 }, "maxDurationSeconds": 300, "meta": {}, "modified": "2014-01-02T02:20:00Z", "uploadExpiry": "2014-01-02T02:20:00Z", "playback": { "hls": "https://customer-f33zs165nr7gyfy4.cloudflarestream.com/6b9e68b07dfee8cc2d116e4c51d6a957/manifest/video.m3u8", "dash": "https://customer-f33zs165nr7gyfy4.cloudflarestream.com/6b9e68b07dfee8cc2d116e4c51d6a957/manifest/video.mpd" }, "preview": "https://customer-f33zs165nr7gyfy4.cloudflarestream.com/6b9e68b07dfee8cc2d116e4c51d6a957/watch", "readyToStream": true, "requireSignedURLs": true, "size": 4190963, "status": { "state": "ready", "pctComplete": "100.000000", "errorReasonCode": "", "errorReasonText": "" }, "thumbnail": "https://customer-f33zs165nr7gyfy4.cloudflarestream.com/6b9e68b07dfee8cc2d116e4c51d6a957/thumbnails/thumbnail.jpg", "thumbnailTimestampPct": 0.529241, "creator": "", "uid": "6b9e68b07dfee8cc2d116e4c51d6a957", "liveInput": "fc0a8dc887b16759bfd9ad922230a014", "uploaded": "2014-01-02T02:20:00Z", "watermark": { "uid": "6b9e68b07dfee8cc2d116e4c51d6a957", "size": 29472, "height": 600, "width": 400, "created": "2014-01-02T02:20:00Z", "downloadedFrom": "https://company.com/logo.png", "name": "Marketing Videos", "opacity": 0.75, "padding": 0.1, "scale": 0.1, "position": "center" } } } ``` ## Set default creators for videos You can associate videos with a single creator by setting a default creator ID value, which you can later use for searching for videos by creator ID or for analytics data. ```bash curl "https://api.cloudflare.com/client/v4/accounts/{account_id}/stream/live_inputs" \ --header "Authorization: Bearer " \ --header "Content-Type: application/json" \ --data '{"DefaultCreator":"1234"}' ``` If you have multiple creators who start live streams, [create a live input](https://developers.cloudflare.com/stream/get-started/#step-1-create-a-live-input) for each creator who will live stream and then set a `DefaultCreator` value per input. Setting the default creator ID for each input ensures that any recorded videos streamed from the creator's input will inherit the `DefaultCreator` value. At this time, you can only manage the default creator ID values via the API. ## Update creator in existing videos To update the creator property in existing videos, make a `POST` request to the video object endpoint with a JSON payload specifying the creator property as show in the example below. ```bash curl "https://api.cloudflare.com/client/v4/accounts/{account_id}/stream/" \ --header "Authorization: Bearer " \ --header "Content-Type: application/json" \ --data '{"creator":"test123"}' ``` ## Direct creator upload ```bash curl "https://api.cloudflare.com/client/v4/accounts/{account_id}/stream/direct_upload" \ --header "Authorization: Bearer " \ --header "Content-Type: application/json" \ --data '{"maxDurationSeconds":300,"expiry":"2021-01-02T02:20:00Z","creator": "", "thumbnailTimestampPct":0.529241,"allowedOrigins":["example.com"],"requireSignedURLs":true,"watermark":{"uid":"ea95132c15732412d22c1476fa83f27a"}}' ``` **Response** ```json { "success": true, "errors": [], "messages": [], "result": { "uploadURL": "www.example.com/samplepath", "uid": "ea95132c15732412d22c1476fa83f27a", "creator": "", "watermark": { "uid": "ea95132c15732412d22c1476fa83f27a", "size": 29472, "height": 600, "width": 400, "created": "2014-01-02T02:20:00Z", "downloadedFrom": "https://company.com/logo.png", "name": "Marketing Videos", "opacity": 0.75, "padding": 0.1, "scale": 0.1, "position": "center" } } } ``` ## Get videos by Creator ID ```bash curl "https://api.cloudflare.com/client/v4/accounts/{account_id}/stream?after=2014-01-02T02:20:00Z&before=2014-01-02T02:20:00Z&include_counts=false&creator=&limit=undefined&asc=false&status=downloading,queued,inprogress,ready,error" \ --header "Authorization: Bearer " ``` **Response** ```json { "success": true, "errors": [], "messages": [], "result": [ { "allowedOrigins": ["example.com"], "created": "2014-01-02T02:20:00Z", "duration": 300, "input": { "height": 1080, "width": 1920 }, "maxDurationSeconds": 300, "meta": {}, "modified": "2014-01-02T02:20:00Z", "uploadExpiry": "2014-01-02T02:20:00Z", "playback": { "hls": "https://customer-.cloudflarestream.com/ea95132c15732412d22c1476fa83f27a/manifest/video.m3u8", "dash": "https://customer-.cloudflarestream.com/ea95132c15732412d22c1476fa83f27a/manifest/video.mpd" }, "preview": "https://customer-.cloudflarestream.com/ea95132c15732412d22c1476fa83f27a/watch", "readyToStream": true, "requireSignedURLs": true, "size": 4190963, "status": { "state": "ready", "pctComplete": "100.000000", "errorReasonCode": "", "errorReasonText": "" }, "thumbnail": "https://customer-.cloudflarestream.com/ea95132c15732412d22c1476fa83f27a/thumbnails/thumbnail.jpg", "thumbnailTimestampPct": 0.529241, "creator": "some-creator-id", "uid": "ea95132c15732412d22c1476fa83f27a", "liveInput": "fc0a8dc887b16759bfd9ad922230a014", "uploaded": "2014-01-02T02:20:00Z", "watermark": { "uid": "ea95132c15732412d22c1476fa83f27a", "size": 29472, "height": 600, "width": 400, "created": "2014-01-02T02:20:00Z", "downloadedFrom": "https://company.com/logo.png", "name": "Marketing Videos", "opacity": 0.75, "padding": 0.1, "scale": 0.1, "position": "center" } } ], "total": "35586", "range": "1000" } ``` ## tus Add the Creator ID via the `Upload-Creator` header. For more information, refer to [Resumable and large files (tus)](https://developers.cloudflare.com/stream/uploading-videos/resumable-uploads/#set-creator-property). ## Query by Creator ID with GraphQL After you set the creator property, you can use the [GraphQL API](https://developers.cloudflare.com/analytics/graphql-api/) to filter by a specific creator. Refer to [Fetching bulk analytics](https://developers.cloudflare.com/stream/getting-analytics/fetching-bulk-analytics) for more information about available metrics and filters. --- title: Search for videos · Cloudflare Stream docs description: You can search for videos by name through the Stream API by adding a search query parameter to the list media files endpoint. lastUpdated: 2024-12-16T22:33:26.000Z chatbotDeprioritize: false source_url: html: https://developers.cloudflare.com/stream/manage-video-library/searching/ md: https://developers.cloudflare.com/stream/manage-video-library/searching/index.md --- You can search for videos by name through the Stream API by adding a `search` query parameter to the [list media files](https://developers.cloudflare.com/api/resources/stream/methods/list/) endpoint. ## What you will need To make API requests you will need a [Cloudflare API token](https://www.cloudflare.com/a/account/my-account) and your Cloudflare [account ID](https://www.cloudflare.com/a/overview/). ## cURL example This example lists media where the name matches `puppy.mp4`. ```bash curl -X GET "https://api.cloudflare.com/client/v4/accounts//stream?search=puppy" \ -H "Authorization: Bearer " \ -H "Content-Type: application/json" ``` --- title: Use webhooks · Cloudflare Stream docs description: Webhooks notify your service when videos successfully finish processing and are ready to stream or if your video enters an error state. lastUpdated: 2025-05-08T19:52:23.000Z chatbotDeprioritize: false source_url: html: https://developers.cloudflare.com/stream/manage-video-library/using-webhooks/ md: https://developers.cloudflare.com/stream/manage-video-library/using-webhooks/index.md --- Webhooks notify your service when videos successfully finish processing and are ready to stream or if your video enters an error state. ## Subscribe to webhook notifications To subscribe to receive webhook notifications on your service or modify an existing subscription, you will need a [Cloudflare API token](https://dash.cloudflare.com/profile/api-tokens). The webhook notification URL must include the protocol. Only `http://` or `https://` is supported. ```bash curl -X PUT --header 'Authorization: Bearer ' \ https://api.cloudflare.com/client/v4/accounts//stream/webhook \ --data '{"notificationUrl":""}' ``` ```json { "result": { "notificationUrl": "http://www.your-service-webhook-handler.com", "modified": "2019-01-01T01:02:21.076571Z" "secret": "85011ed3a913c6ad5f9cf6c5573cc0a7" }, "success": true, "errors": [], "messages": [] } ``` ## Notifications When a video on your account finishes processing, you will receive a `POST` request notification with information about the video. Note the `status` field indicates whether the video processing finished successfully. ```javascript { "uid": "dd5d531a12de0c724bd1275a3b2bc9c6", "readyToStream": true, "status": { "state": "ready" }, "meta": {}, "created": "2019-01-01T01:00:00.474936Z", "modified": "2019-01-01T01:02:21.076571Z", // ... } ``` When a video is done processing and all quality levels are encoded, the `state` field returns a `ready` state. The `ready` state can be useful if picture quality is important to you, and you only want to enable video playback when the highest quality levels are available. If higher quality renditions are still processing, videos may sometimes return the `state` field as `ready` and an additional `pctComplete` state that is not `100`. When `pctComplete` reaches `100`, all quality resolutions are available for the video. When at least one quality level is encoded and ready to be streamed, the `readyToStream` value returns `true`. ## Error codes If a video could not process successfully, the `state` field returns `error`, and the `errReasonCode` returns one of the values listed below. * `ERR_NON_VIDEO` – The upload is not a video. * `ERR_DURATION_EXCEED_CONSTRAINT` – The video duration exceeds the constraints defined in the direct creator upload. * `ERR_FETCH_ORIGIN_ERROR` – The video failed to download from the URL. * `ERR_MALFORMED_VIDEO` – The video is a valid file but contains corrupt data that cannot be recovered. * `ERR_DURATION_TOO_SHORT` – The video's duration is shorter than 0.1 seconds. * `ERR_UNKNOWN` – If Stream cannot automatically determine why the video returned an error, the `ERR_UNKNOWN` code will be used. In addition to the `state` field, a video's `readyToStream` field must also be `true` for a video to play. ```bash { "readyToStream": true, "status": { "state": "error", "step": "encoding", "pctComplete": "39", "errReasonCode": "ERR_MALFORMED_VIDEO", "errReasonText": "The video was deemed to be corrupted or malformed.", } } ``` Example: POST body for successful video encoding ```json { "uid": "6b9e68b07dfee8cc2d116e4c51d6a957", "creator": null, "thumbnail": "https://customer-f33zs165nr7gyfy4.cloudflarestream.com/6b9e68b07dfee8cc2d116e4c51d6a957/thumbnails/thumbnail.jpg", "thumbnailTimestampPct": 0, "readyToStream": true, "status": { "state": "ready", "pctComplete": "39.000000", "errorReasonCode": "", "errorReasonText": "" }, "meta": { "filename": "small.mp4", "filetype": "video/mp4", "name": "small.mp4", "relativePath": "null", "type": "video/mp4" }, "created": "2022-06-30T17:53:12.512033Z", "modified": "2022-06-30T17:53:21.774299Z", "size": 383631, "preview": "https://customer-f33zs165nr7gyfy4.cloudflarestream.com/6b9e68b07dfee8cc2d116e4c51d6a957/watch", "allowedOrigins": [], "requireSignedURLs": false, "uploaded": "2022-06-30T17:53:12.511981Z", "uploadExpiry": "2022-07-01T17:53:12.511973Z", "maxSizeBytes": null, "maxDurationSeconds": null, "duration": 5.5, "input": { "width": 560, "height": 320 }, "playback": { "hls": "https://customer-f33zs165nr7gyfy4.cloudflarestream.com/6b9e68b07dfee8cc2d116e4c51d6a957/manifest/video.m3u8", "dash": "https://customer-f33zs165nr7gyfy4.cloudflarestream.com/6b9e68b07dfee8cc2d116e4c51d6a957/manifest/video.mpd" }, "watermark": null } ``` ## Verify webhook authenticity Cloudflare Stream will sign the webhook requests sent to your notification URLs and include the signature of each request in the `Webhook-Signature` HTTP header. This allows your application to verify the webhook requests are sent by Stream. To verify a signature, you need to retrieve your webhook signing secret. This value is returned in the API response when you create or retrieve the webhook. To verify the signature, get the value of the `Webhook-Signature` header, which will look similar to the example below. `Webhook-Signature: time=1230811200,sig1=60493ec9388b44585a29543bcf0de62e377d4da393246a8b1c901d0e3e672404` ### 1. Parse the signature Retrieve the `Webhook-Signature` header from the webhook request and split the string using the `,` character. Split each value again using the `=` character. The value for `time` is the current [UNIX time](https://en.wikipedia.org/wiki/Unix_time) when the server sent the request. `sig1` is the signature of the request body. At this point, you should discard requests with timestamps that are too old for your application. ### 2. Create the signature source string Prepare the signature source string and concatenate the following strings: * Value of the `time` field for example `1230811200` * Character `.` * Webhook request body (complete with newline characters, if applicable) Every byte in the request body must remain unaltered for successful signature verification. ### 3. Create the expected signature Compute an HMAC with the SHA256 function (HMAC-SHA256) using your webhook secret and the source string from step 2. This step depends on the programming language used by your application. Cloudflare's signature will be encoded to hex. ### 4. Compare expected and actual signatures Compare the signature in the request header to the expected signature. Preferably, use a constant-time comparison function to compare the signatures. If the signatures match, you can trust that Cloudflare sent the webhook. ## Limitations * Webhooks will only be sent after video processing is complete, and the body will indicate whether the video processing succeeded or failed. * Only one webhook subscription is allowed per-account. ## Examples **Golang** Using [crypto/hmac](https://golang.org/pkg/crypto/hmac/#pkg-overview): ```go package main import ( "crypto/hmac" "crypto/sha256" "encoding/hex" "log" ) func main() { secret := []byte("secret from the Cloudflare API") message := []byte("string from step 2") hash := hmac.New(sha256.New, secret) hash.Write(message) hashToCheck := hex.EncodeToString(hash.Sum(nil)) log.Println(hashToCheck) } ``` **Node.js** ```js var crypto = require('crypto'); var key = 'secret from the Cloudflare API'; var message = 'string from step 2'; var hash = crypto.createHmac('sha256', key).update(message); hash.digest('hex'); ``` **Ruby** ```ruby require 'openssl' key = 'secret from the Cloudflare API' message = 'string from step 2' OpenSSL::HMAC.hexdigest('sha256', key, message) ``` **In JavaScript (for example, to use in Cloudflare Workers)** ```javascript const key = 'secret from the Cloudflare API'; const message = 'string from step 2'; const getUtf8Bytes = str => new Uint8Array( [...decodeURIComponent(encodeURIComponent(str))].map(c => c.charCodeAt(0)) ); const keyBytes = getUtf8Bytes(key); const messageBytes = getUtf8Bytes(message); const cryptoKey = await crypto.subtle.importKey( 'raw', keyBytes, { name: 'HMAC', hash: 'SHA-256' }, true, ['sign'] ); const sig = await crypto.subtle.sign('HMAC', cryptoKey, messageBytes); [...new Uint8Array(sig)].map(b => b.toString(16).padStart(2, '0')).join(''); ``` --- title: Add custom ingest domains · Cloudflare Stream docs description: With custom ingest domains, you can configure your RTMPS feeds to use an ingest URL that you specify instead of using live.cloudflare.com. lastUpdated: 2025-02-11T10:50:09.000Z chatbotDeprioritize: false source_url: html: https://developers.cloudflare.com/stream/stream-live/custom-domains/ md: https://developers.cloudflare.com/stream/stream-live/custom-domains/index.md --- With custom ingest domains, you can configure your RTMPS feeds to use an ingest URL that you specify instead of using `live.cloudflare.com.` 1. Log in to your [Cloudflare dashboard](https://dash.cloudflare.com) and select your account. 2. Click **Stream** > **Live Inputs**. 3. Click the **Settings** button above the list. The **Custom Input Domains** page displays. 4. Under **Domain**, add your domain and click **Add domain**. 5. At your DNS provider, add a CNAME record that points to `live.cloudflare.com`. If your DNS provider is Cloudflare, this step is done automatically. If you are using Cloudflare for DNS, ensure the [**Proxy status**](https://developers.cloudflare.com/dns/proxy-status/) of your ingest domain is **DNS only** (grey-clouded). ## Delete a custom domain 1. From the **Custom Input Domains** page under **Hostnames**, locate the domain. 2. Click the menu icon under **Action**. Click **Delete**. --- title: Download live stream videos · Cloudflare Stream docs description: You can enable downloads for live stream videos from the Cloudflare dashboard. Videos are available for download after they enter the Ready state. lastUpdated: 2024-08-13T19:56:56.000Z chatbotDeprioritize: false source_url: html: https://developers.cloudflare.com/stream/stream-live/download-stream-live-videos/ md: https://developers.cloudflare.com/stream/stream-live/download-stream-live-videos/index.md --- You can enable downloads for live stream videos from the Cloudflare dashboard. Videos are available for download after they enter the **Ready** state. Note Downloadable MP4s are only available for live recordings under four hours. Live recordings exceeding four hours can be played at a later time but cannot be downloaded as an MP4. 1. Log in to your [Cloudflare dashboard](https://dash.cloudflare.com) and select your account. 2. Click **Stream** > **Live Inputs**. 3. Click a live input from the list to select it. 4. Under **Videos created by live input**, locate your video and click to select it. 5. Under **Settings**, select **Enable MP4 Downloads**. 6. Click **Save**. You will see a progress bar as the video generates a download link. 7. When the download link is ready, under **Download URL**, copy the URL and enter it in a browser to download the video. --- title: DVR for Live · Cloudflare Stream docs description: |- Stream Live supports "DVR mode" on an opt-in basis to allow viewers to rewind, resume, and fast-forward a live broadcast. To enable DVR mode, add the dvrEnabled=true query parameter to the Stream Player embed source or the HLS manifest URL. lastUpdated: 2025-02-18T15:26:08.000Z chatbotDeprioritize: false source_url: html: https://developers.cloudflare.com/stream/stream-live/dvr-for-live/ md: https://developers.cloudflare.com/stream/stream-live/dvr-for-live/index.md --- Stream Live supports "DVR mode" on an opt-in basis to allow viewers to rewind, resume, and fast-forward a live broadcast. To enable DVR mode, add the `dvrEnabled=true` query parameter to the Stream Player embed source or the HLS manifest URL. ## Stream Player ```html
``` When DVR mode is enabled the Stream Player will: * Show a timeline the viewer can scrub/seek, similar to watching an on-demand video. The timeline will automatically scale to show the growing duration of the broadcast while it is live. * The "LIVE" indicator will show grey if the viewer is behind the live edge or red if they are watching the latest content. Clicking that indicator will jump forward to the live edge. * If the viewer pauses the player, it will resume playback from that time instead of jumping forward to the live edge. ## HLS manifest for custom players ```text https://customer-.cloudflarestream.com//manifest/video.m3u8?dvrEnabled=true ``` Custom players using a DVR-capable HLS manifest may need additional configuration to surface helpful controls or information. Refer to your player library for additional information. ## Video ID or Input ID Stream Live allows loading the Player or HLS manifest by Video ID or Live Input ID. Refer to [Watch a live stream](https://developers.cloudflare.com/stream/stream-live/watch-live-stream/) for how to retrieve these URLs and compare these options. There are additional considerations when using DVR mode: **Recommended:** Use DVR Mode on a Video ID URL: * When the player loads, it will start playing the active broadcast if it is still live or play the recording if the broadcast has concluded. DVR Mode on a Live Input ID URL: * When the player loads, it will start playing the currently live broadcast if there is one (refer to [Live Input Status](https://developers.cloudflare.com/stream/stream-live/watch-live-stream/#live-input-status)). * If the viewer is still watching *after the broadcast ends,* they can continue to watch. However, if the player or manifest is then reloaded, it will show the latest broadcast or "Stream has not yet started" (`HTTP 204`). Past broadcasts are not available by Live Input ID. ## Known Limitations * When using DVR Mode and a player/manifest created using a Live Input ID, the player may stall when trying to switch quality levels if a viewer is still watching after a broadcast has concluded. * Performance may be degraded for DVR-enabled broadcasts longer than three hours. Manifests are limited to a maxiumum of 7,200 segments. Segment length is determined by the keyframe interval, also called GOP size. * DVR Mode relies on Version 8 of the HLS manifest specification. Stream uses HLS Version 6 in all other contexts. HLS v8 offers extremely broad compatibility but may not work with certain old player libraries or older devices. * DVR Mode is not available for DASH manifests.
--- title: Live Instant Clipping · Cloudflare Stream docs description: Stream supports generating clips of live streams and recordings so creators and viewers alike can highlight short, engaging pieces of a longer broadcast or recording. Live instant clips can be created by end users and do not result in additional storage fees or new entries in the video library. lastUpdated: 2025-02-14T19:42:29.000Z chatbotDeprioritize: false source_url: html: https://developers.cloudflare.com/stream/stream-live/live-instant-clipping/ md: https://developers.cloudflare.com/stream/stream-live/live-instant-clipping/index.md --- Stream supports generating clips of live streams and recordings so creators and viewers alike can highlight short, engaging pieces of a longer broadcast or recording. Live instant clips can be created by end users and do not result in additional storage fees or new entries in the video library. Note: Clipping works differently for uploaded / on-demand videos. For more information, refer to [Clip videos](https://developers.cloudflare.com/stream/edit-videos/video-clipping/). ## Prerequisites When configuring a [Live input](https://developers.cloudflare.com/stream/stream-live/start-stream-live/), ensure "Live Playback and Recording" (`mode`) is enabled. API keys are not needed to generate a preview or clip, but are needed to create Live Inputs. Live instant clips are generated dynamically from the recording of a live stream. When generating clips manifests or MP4s, always reference the Video ID, not the Live Input ID. If the recording is deleted, the instant clip will no longer be available. ## Preview manifest To help users replay and seek recent content, request a preview manifest by adding a `duration` parameter to the HLS manifest URL: ```txt https://customer-.cloudflarestream.com//manifest/video.m3u8?duration=5m ``` * `duration` string duration of the preview, up to 5 minutes as either a number of seconds ("30s") or minutes ("3m") When the preview manifest is delivered, inspect the headers for two properties: * `preview-start-seconds` float seconds into the start of the live stream or recording that the preview manifest starts. Useful in applications that allow a user to select a range from the preview because the clip will need to reference its offset from the *broadcast* start time, not the *preview* start time. * `stream-media-id` string the video ID of the live stream or recording. Useful in applications that render the player using an *input* ID because the clip URL should reference the *video* ID. This manifest can be played and seeked using any HLS-compatible player. ### Reading headers Reading headers when loading a manifest requires adjusting how players handle the response. For example, if using [HLS.js](https://github.com/video-dev/hls.js) and the default loader, override the `pLoader` (playlist loader) class: ```js let currentPreviewStart; let currentPreviewVideoID; // Override the pLoader (playlist loader) to read the manifest headers: class pLoader extends Hls.DefaultConfig.loader { constructor(config) { super(config); var load = this.load.bind(this); this.load = function (context, config, callbacks) { if (context.type == 'manifest') { var onSuccess = callbacks.onSuccess; // copy the existing onSuccess handler to fire it later. callbacks.onSuccess = function (response, stats, context, networkDetails) { // The fourth argument here is undocumented in HLS.js but contains // the response object for the manifest fetch, which gives us headers: currentPreviewStart = parseFloat(networkDetails.getResponseHeader('preview-start-seconds')); // Save the start time of the preview manifest currentPreviewVideoID = networkDetails.getResponseHeader('stream-media-id'); // Save the video ID in case the preview was loaded with an input ID onSuccess(response, stats, context); // And fire the exisint success handler. }; } load(context, config, callbacks); }; } } // Specify the new loader class when setting up HLS const hls = new Hls({ pLoader: pLoader, }); ``` ## Clip manifest To play a clip of a live stream or recording, request a clip manifest with a duration and a start time, relative to the start of the live stream. ```txt https://customer-.cloudflarestream.com//manifest/clip.m3u8?time=600s&duration=30s ``` * `time` string start time of the clip in seconds, from the start of the live stream or recording * `duration` string duration of the clip in seconds, up to 60 seconds max This manifest can be played and seeked using any HLS-compatible player. ## Clip MP4 download An MP4 of the clip can also be generated dynamically to be saved and shared on other platforms. ```txt https://customer-.cloudflarestream.com//clip.mp4?time=600s&duration=30s&filename=clip.mp4 ``` * `time` string start time of the clip in seconds, from the start of the live stream or recording (example: "500s") * `duration` string duration of the clip in seconds, up to 60 seconds max (example: "60s") * `filename` string *(optional)* a filename for the clip --- title: Record and replay live streams · Cloudflare Stream docs description: "Live streams are automatically recorded, and available instantly once a live stream ends. To get a list of recordings for a given input ID, make a GET request to /live_inputs//videos and filter for videos where state is set to ready:" lastUpdated: 2024-12-16T22:33:26.000Z chatbotDeprioritize: false source_url: html: https://developers.cloudflare.com/stream/stream-live/replay-recordings/ md: https://developers.cloudflare.com/stream/stream-live/replay-recordings/index.md --- Live streams are automatically recorded, and available instantly once a live stream ends. To get a list of recordings for a given input ID, make a [`GET` request to `/live_inputs//videos`](https://developers.cloudflare.com/api/resources/stream/subresources/live_inputs/methods/get/) and filter for videos where `state` is set to `ready`: ```bash curl -X GET \ -H "Authorization: Bearer " \ https://dash.cloudflare.com/api/v4/accounts//stream/live_inputs//videos ``` ```json { "result": [ ... { "uid": "6b9e68b07dfee8cc2d116e4c51d6a957", "thumbnail": "https://customer-f33zs165nr7gyfy4.cloudflarestream.com/6b9e68b07dfee8cc2d116e4c51d6a957/thumbnails/thumbnail.jpg", "thumbnailTimestampPct": 0, "readyToStream": true, "status": { "state": "ready", "pctComplete": "100.000000", "errorReasonCode": "", "errorReasonText": "" }, "meta": { "name": "Stream Live Test 22 Sep 21 22:12 UTC" }, "created": "2021-09-22T22:12:53.587306Z", "modified": "2021-09-23T00:14:05.591333Z", "size": 0, "preview": "https://customer-f33zs165nr7gyfy4.cloudflarestream.com/6b9e68b07dfee8cc2d116e4c51d6a957/watch", "allowedOrigins": [], "requireSignedURLs": false, "uploaded": "2021-09-22T22:12:53.587288Z", "uploadExpiry": null, "maxSizeBytes": null, "maxDurationSeconds": null, "duration": 7272, "input": { "width": 640, "height": 360 }, "playback": { "hls": "https://customer-f33zs165nr7gyfy4.cloudflarestream.com/6b9e68b07dfee8cc2d116e4c51d6a957/manifest/video.m3u8", "dash": "https://customer-f33zs165nr7gyfy4.cloudflarestream.com/6b9e68b07dfee8cc2d116e4c51d6a957/manifest/video.mpd" }, "watermark": null, "liveInput": "34036a0695ab5237ce757ac53fd158a2" } ], "success": true, "errors": [], "messages": [] } ``` --- title: Simulcast (restream) videos · Cloudflare Stream docs description: Simulcasting lets you forward your live stream to third-party platforms such as Twitch, YouTube, Facebook, Twitter, and more. You can simulcast to up to 50 concurrent destinations from each live input. To begin simulcasting, select an input and add one or more Outputs. lastUpdated: 2025-06-26T20:43:59.000Z chatbotDeprioritize: false source_url: html: https://developers.cloudflare.com/stream/stream-live/simulcasting/ md: https://developers.cloudflare.com/stream/stream-live/simulcasting/index.md --- Simulcasting lets you forward your live stream to third-party platforms such as Twitch, YouTube, Facebook, Twitter, and more. You can simulcast to up to 50 concurrent destinations from each live input. To begin simulcasting, select an input and add one or more Outputs. ## Add an Output using the API Add an Output to start retransmitting live video. You can add or remove Outputs at any time during a broadcast to start and stop retransmitting. ```bash curl -X POST \ --data '{"url": "rtmp://a.rtmp.youtube.com/live2","streamKey": ""}' \ -H "Authorization: Bearer " \ https://api.cloudflare.com/client/v4/accounts//stream/live_inputs//outputs ``` ```json { "result": { "uid": "6f8339ed45fe87daa8e7f0fe4e4ef776", "url": "rtmp://a.rtmp.youtube.com/live2", "streamKey": "" }, "success": true, "errors": [], "messages": [] } ``` ## Control when you start and stop simulcasting You can enable and disable individual live outputs via the [API](https://developers.cloudflare.com/api/resources/stream/subresources/live_inputs/subresources/outputs/methods/update/) or [Stream dashboard](https://dash.cloudflare.com/?to=/:account/stream/inputs), allowing you to: * Start a live stream, but wait to start simulcasting to YouTube and Twitch until right before the content begins. * Stop simulcasting before the live stream ends, to encourage viewers to transition from a third-party service like YouTube or Twitch to a direct live stream. * Give your own users manual control over when they go live to specific simulcasting destinations. When a live output is disabled, video is not simulcast to the live output, even when actively streaming to the corresponding live input. By default, all live outputs are enabled. ### Enable outputs from the dashboard: 1. From Live Inputs in the [Cloudflare dashboard](https://dash.cloudflare.com/?to=/:account/stream/inputs), select an input from the list. 2. Under **Outputs** > **Enabled**, set the toggle to enabled or disabled. ## Manage outputs | Command | Method | Endpoint | | - | - | - | | [List outputs](https://developers.cloudflare.com/api/resources/stream/subresources/live_inputs/methods/list/) | `GET` | `accounts/:account_identifier/stream/live_inputs` | | [Delete outputs](https://developers.cloudflare.com/api/resources/stream/subresources/live_inputs/methods/delete/) | `DELETE` | `accounts/:account_identifier/stream/live_inputs/:live_input_identifier` | | [List All Outputs Associated With A Specified Live Input](https://developers.cloudflare.com/api/resources/stream/subresources/live_inputs/subresources/outputs/methods/list/) | `GET` | `/accounts/{account_id}/stream/live_inputs/{live_input_identifier}/outputs` | | [Delete An Output](https://developers.cloudflare.com/api/resources/stream/subresources/live_inputs/subresources/outputs/methods/delete/) | `DELETE` | `/accounts/{account_id}/stream/live_inputs/{live_input_identifier}/outputs/{output_identifier}` | If the associated live input is already retransmitting to this output when you make the `DELETE` request, that output will be disconnected within 30 seconds. --- title: Start a live stream · Cloudflare Stream docs description: After you subscribe to Stream, you can create Live Inputs in Dash or via the API. Broadcast to your new Live Input using RTMPS or SRT. SRT supports newer video codecs and makes using accessibility features, such as captions and multiple audio tracks, easier. lastUpdated: 2024-12-16T22:33:26.000Z chatbotDeprioritize: false source_url: html: https://developers.cloudflare.com/stream/stream-live/start-stream-live/ md: https://developers.cloudflare.com/stream/stream-live/start-stream-live/index.md --- After you subscribe to Stream, you can create Live Inputs in Dash or via the API. Broadcast to your new Live Input using RTMPS or SRT. SRT supports newer video codecs and makes using accessibility features, such as captions and multiple audio tracks, easier. Note Stream only supports the SRT caller mode, which is responsible for broadcasting a live stream after a connection is established. **First time live streaming?** You will need software to send your video to Cloudflare. [Learn how to go live on Stream using OBS Studio](https://developers.cloudflare.com/stream/examples/obs-from-scratch/). ## Use the dashboard **Step 1:** [Create a live input via the Stream Dashboard](https://dash.cloudflare.com/?to=/:account/stream/inputs/create). ![Create live input field from dashboard](https://developers.cloudflare.com/_astro/create-live-input-from-stream-dashboard.BPPM6pVj_2gg8Jz.webp) **Step 2:** Copy the RTMPS URL and key, and use them with your live streaming application. We recommend using [Open Broadcaster Software (OBS)](https://obsproject.com/) to get started. ![Example of RTMPS URL field](https://developers.cloudflare.com/_astro/copy-rtmps-url-from-stream-dashboard.BV1iePso_2ejwaH.webp) **Step 3:** Go live and preview your live stream in the Stream Dashboard In the Stream Dashboard, within seconds of going live, you will see a preview of what your viewers will see. To add live video playback to your website or app, refer to [Play videos](https://developers.cloudflare.com/stream/viewing-videos). ## Use the API To start a live stream programmatically, make a `POST` request to the `/live_inputs` endpoint: ```bash curl -X POST \ --header "Authorization: Bearer " \ --data '{"meta": {"name":"test stream"},"recording": { "mode": "automatic" }}' \ https://api.cloudflare.com/client/v4/accounts/{account_id}/stream/live_inputs ``` ```json { "uid": "f256e6ea9341d51eea64c9454659e576", "rtmps": { "url": "rtmps://live.cloudflare.com:443/live/", "streamKey": "MTQ0MTcjM3MjI1NDE3ODIyNTI1MjYyMjE4NTI2ODI1NDcxMzUyMzcf256e6ea9351d51eea64c9454659e576" }, "created": "2021-09-23T05:05:53.451415Z", "modified": "2021-09-23T05:05:53.451415Z", "meta": { "name": "test stream" }, "status": null, "recording": { "mode": "automatic", "requireSignedURLs": false, "allowedOrigins": null, "hideLiveViewerCount": false }, "deleteRecordingAfterDays": null, "preferLowLatency": false } ``` #### Optional API parameters [API Reference Docs for `/live_inputs`](https://developers.cloudflare.com/api/resources/stream/subresources/live_inputs/methods/create/) * `preferLowLatency` boolean default: `false` Beta * When set to true, this live input will be enabled for the beta Low-Latency HLS pipeline. The Stream built-in player will automatically use LL-HLS when possible. (Recording `mode` property must also be set to `automatic`.) * `deleteRecordingAfterDays` integer default: `null` (any) * Specifies a date and time when the recording, not the input, will be deleted. This property applies from the time the recording is made available and ready to stream. After the recording is deleted, it is no longer viewable and no longer counts towards storage for billing. Minimum value is `30`, maximum value is `1096`. When the stream ends, a `scheduledDeletion` timestamp is calculated using the `deleteRecordingAfterDays` value if present. Note that if the value is added to a live input while a stream is live, the property will only apply to future streams. * `timeoutSeconds` integer default: `0` * The `timeoutSeconds` property specifies how long a live feed can be disconnected before it results in a new video being created. The following four properties are nested under the `recording` object. * `mode` string default: `off` * When the mode property is set to `automatic`, the live stream will be automatically available for viewing using HLS/DASH. In addition, the live stream will be automatically recorded for later replays. By default, recording mode is set to `off`, and the input will not be recorded or available for playback. * `requireSignedURLs` boolean default: `false` * The `requireSignedURLs` property indicates if signed URLs are required to view the video. This setting is applied by default to all videos recorded from the input. In addition, if viewing a video via the live input ID, this field takes effect over any video-level settings. * `allowedOrigins` integer default: `null` (any) * The `allowedOrigins` property can optionally be invoked to provide a list of allowed origins. This setting is applied by default to all videos recorded from the input. In addition, if viewing a video via the live input ID, this field takes effect over any video-level settings. * `hideLiveViewerCount` boolean default: `false` * Restrict access to the live viewer count and remove the value from the player. ## Manage live inputs You can update live inputs by making a `PUT` request: ```bash curl --request PUT \ https://api.cloudflare.com/client/v4/accounts/{account_id}/stream/live_inputs/{input_id} \ --header "Authorization: Bearer " \ --data '{"meta": {"name":"test stream 1"},"recording": { "mode": "automatic", "timeoutSeconds": 10 }}' ``` Delete a live input by making a `DELETE` request: ```bash curl --request DELETE \ https://api.cloudflare.com/client/v4/accounts/{account_id}/stream/live_inputs/{input_id} \ --header "Authorization: Bearer " ``` ## Recommendations, requirements and limitations ### Recommendations * Your creators should use an appropriate bitrate for their live streams, typically well under 12Mbps (12000Kbps). High motion, high frame rate content typically should use a higher bitrate, while low motion content like slide presentations should use a lower bitrate. * Your creators should use a [GOP duration](https://en.wikipedia.org/wiki/Group_of_pictures) (keyframe interval) of between 2 to 8 seconds. The default in most encoding software and hardware, including Open Broadcaster Software (OBS), is within this range. Setting a lower GOP duration will reduce latency for viewers, while also reducing encoding efficiency. Setting a higher GOP duration will improve encoding efficiency, while increasing latency for viewers. This is a tradeoff inherent to video encoding, and not a limitation of Cloudflare Stream. * When possible, select CBR (constant bitrate) instead of VBR (variable bitrate) as CBR helps to ensure a stable streaming experience while preventing buffering and interruptions. #### Low-Latency HLS broadcast recommendations Beta * For lowest latency, use a GOP size (keyframe interval) of 1 or 2 seconds. * Broadcast to the RTMP endpoint if possible. * If using OBS, select the "ultra low" latency profile. ### Requirements * Closed GOPs are required. This means that if there are any B frames in the video, they should always refer to frames within the same GOP. This setting is the default in most encoding software and hardware, including [OBS Studio](https://obsproject.com/). * Stream Live only supports H.264 video and AAC audio codecs as inputs. This requirement does not apply to inputs that are relayed to Stream Connect outputs. Stream Live supports ADTS but does not presently support LATM. * Clients must be configured to reconnect when a disconnection occurs. Stream Live is designed to handle reconnection gracefully by continuing the live stream. ### Limitations * Watermarks cannot yet be used with live videos. * If a live video exceeds seven days in length, the recording will be truncated to seven days. Only the first seven days of live video content will be recorded. --- title: Stream Live API docs · Cloudflare Stream docs lastUpdated: 2024-12-16T22:33:26.000Z chatbotDeprioritize: false source_url: html: https://developers.cloudflare.com/stream/stream-live/stream-live-api/ md: https://developers.cloudflare.com/stream/stream-live/stream-live-api/index.md --- --- title: Watch a live stream · Cloudflare Stream docs description: |- When a Live Input begins receiving a broadcast, a new video is automatically created if the input's mode property is set to automatic. lastUpdated: 2025-02-14T19:42:29.000Z chatbotDeprioritize: false source_url: html: https://developers.cloudflare.com/stream/stream-live/watch-live-stream/ md: https://developers.cloudflare.com/stream/stream-live/watch-live-stream/index.md --- When a [Live Input](https://developers.cloudflare.com/stream/stream-live/start-stream-live/) begins receiving a broadcast, a new video is automatically created if the input's `mode` property is set to `automatic`. To watch, Stream offers a built-in Player or you use a custom player with the HLS and DASH manifests. Note Due to Google Chromecast limitations, Chromecast does not support audio and video delivered separately. To avoid potential issues with playback, we recommend using DASH, instead of HLS, which is a Chromecast supported use case. ## View by Live Input ID or Video ID Whether you use the Stream Player or a custom player with a manifest, you can reference the Live Input ID or a specific Video ID. The main difference is what happens when a broadcast concludes. Use a Live Input ID in instances where a player should always show the active broadcast, if there is one, or a "Stream has not started" message if the input is idle. This option is best for cases where a page is dedicated to a creator, channel, or recurring program. The Live Input ID is provisioned for you when you create the input; it will not change. Use a Video ID in instances where a player should be used to display a single broadcast or its recording once the broadcast has concluded. This option is best for cases where a page is dedicated to a one-time event, specific episode/occurance, or date. There is a *new* Video ID generated for each broadcast *when it starts.* Using DVR mode, explained below, there are additional considerations. Stream's URLs are all templatized for easy generation: **Stream built-in Player URL format:** ```plaintext https://customer-.cloudflarestream.com//iframe ``` A full embed code can be generated in Dash or with the API. **HLS Manifest URL format:** ```plaintext https://customer-.cloudflarestream.com//manifest/video.m3u8 ``` You can also retrieve the embed code or manifest URLs from Dash or the API. ## Use the dashboard To get the Stream built-in player embed code or HLS Manifest URL for a custom player: 1. Log in to your [Cloudflare dashboard](https://dash.cloudflare.com) and select your account. 2. Select **Stream** > **Live Inputs**. 3. Select a live input from the list. 4. Locate the **Embed** and **HLS Manifest URL** beneath the video. 5. Determine which option to use and then select **Click to copy** beneath your choice. The embed code or manifest URL retrieved in Dash will reference the Live Input ID. ## Use the API To retrieve the player code or manifest URLs via the API, fetch the Live Input's list of videos: ```bash curl -X GET \ -H "Authorization: Bearer " \ https://api.cloudflare.com/client/v4/accounts//stream/live_inputs//videos ``` A live input will have multiple videos associated with it, one for each broadcast. If there is an active broadcast, the first video in the response will have a `live-inprogress` status. Other videos in the response represent recordings which can be played on-demand. Each video in the response, including the active broadcast if there is one, contains the HLS and DASH URLs and a link to the Stream player. Noteworthy properties include: * `preview` -- Link to the Stream player to watch * `playback`.`hls` -- HLS Manifest * `playback`.`dash` -- DASH Manifest In the example below, the state of the live video is `live-inprogress` and the state for previously recorded video is `ready`. ```json { "result": [ { "uid": "6b9e68b07dfee8cc2d116e4c51d6a957", "thumbnail": "https://customer-f33zs165nr7gyfy4.cloudflarestream.com/6b9e68b07dfee8cc2d116e4c51d6a957/thumbnails/thumbnail.jpg", "status": { "state": "live-inprogress", "errorReasonCode": "", "errorReasonText": "" }, "meta": { "name": "Stream Live Test 23 Sep 21 05:44 UTC" }, "created": "2021-09-23T05:44:30.453838Z", "modified": "2021-09-23T05:44:30.453838Z", "size": 0, "preview": "https://customer-f33zs165nr7gyfy4.cloudflarestream.com/6b9e68b07dfee8cc2d116e4c51d6a957/watch", ... "playback": { "hls": "https://customer-f33zs165nr7gyfy4.cloudflarestream.com/6b9e68b07dfee8cc2d116e4c51d6a957/manifest/video.m3u8", "dash": "https://customer-f33zs165nr7gyfy4.cloudflarestream.com/6b9e68b07dfee8cc2d116e4c51d6a957/manifest/video.mpd" }, ... }, { "uid": "6b9e68b07dfee8cc2d116e4c51d6a957", "thumbnail": "https://customer-f33zs165nr7gyfy4.cloudflarestream.com/6b9e68b07dfee8cc2d116e4c51d6a957/thumbnails/thumbnail.jpg", "thumbnailTimestampPct": 0, "readyToStream": true, "status": { "state": "ready", "pctComplete": "100.000000", "errorReasonCode": "", "errorReasonText": "" }, "meta": { "name": "CFTV Staging 22 Sep 21 22:12 UTC" }, "created": "2021-09-22T22:12:53.587306Z", "modified": "2021-09-23T00:14:05.591333Z", "size": 0, "preview": "https://customer-f33zs165nr7gyfy4.cloudflarestream.com/6b9e68b07dfee8cc2d116e4c51d6a957/watch", ... "playback": { "hls": "https://customer-f33zs165nr7gyfy4.cloudflarestream.com/6b9e68b07dfee8cc2d116e4c51d6a957/manifest/video.m3u8", "dash": "https://customer-f33zs165nr7gyfy4.cloudflarestream.com/6b9e68b07dfee8cc2d116e4c51d6a957/manifest/video.mpd" }, } ], } ``` These will reference the Video ID. ## Live input status You can check whether a live input is currently streaming and what its active video ID is by making a request to its `lifecycle` endpoint. The Stream player does this automatically to show a note when the input is idle. Custom players may require additional support. ```bash curl -X GET \ -H "Authorization: Bearer " \ https://customer-.cloudflarestream.com//lifecycle ``` In the example below, the response indicates the `ID` is for an input with an active `videoUID`. The `live` status value indicates the input is actively streaming. ```json { "isInput": true, "videoUID": "55b9b5ce48c3968c6b514c458959d6a", "live": true } ``` ```json { "isInput": true, "videoUID": null, "live": false } ``` When viewing a live stream via the live input ID, the `requireSignedURLs` and `allowedOrigins` options in the live input recording settings are used. These settings are independent of the video-level settings. ## Live stream recording playback After a live stream ends, a recording is automatically generated and available within 60 seconds. To ensure successful video viewing and playback, keep the following in mind: * If a live stream ends while a viewer is watching, viewers using the Stream player should wait 60 seconds and then reload the player to view the recording of the live stream. * After a live stream ends, you can check the status of the recording via the API. When the video state is `ready`, you can use one of the manifest URLs to stream the recording. While the recording of the live stream is generating, the video may report as `not-found` or `not-started`. If you are not using the Stream player for live stream recordings, refer to [Record and replay live streams](https://developers.cloudflare.com/stream/stream-live/replay-recordings/) for more information on how to replay a live stream recording. --- title: Receive Live Webhooks · Cloudflare Stream docs description: Stream Live offers webhooks to notify your service when an Input connects, disconnects, or encounters an error with Stream Live. lastUpdated: 2025-04-18T13:09:42.000Z chatbotDeprioritize: false source_url: html: https://developers.cloudflare.com/stream/stream-live/webhooks/ md: https://developers.cloudflare.com/stream/stream-live/webhooks/index.md --- Stream Live offers webhooks to notify your service when an Input connects, disconnects, or encounters an error with Stream Live. Stream Live Notifications **Who is it for?** Customers who are using [Stream](https://developers.cloudflare.com/stream/) and want to receive webhooks with the status of their videos. **Other options / filters** You can input Stream Live IDs to receive notifications only about those inputs. If left blank, you will receive a list for all inputs. The following input states will fire notifications. You can toggle them on or off: * `live_input.connected` * `live_input.disconnected` **Included with** Stream subscription. **What should you do if you receive one?** Stream notifications are entirely customizable by the customer. Action will depend on the customizations enabled. ## Subscribe to Stream Live Webhooks 1. Log in to your Cloudflare account and click **Notifications**. 2. From the **Notifications** page, click the **Destinations** tab. 3. On the **Destinations** page under **Webhooks**, click **Create**. 4. Enter the information for your webhook and click **Save and Test**. 5. To create the notification, from the **Notifications** page, click the **All Notifications** tab. 6. Next to **Notifications**, click **Add**. 7. Under the list of products, locate **Stream** and click **Select**. 8. Enter a name and optional description. 9. Under **Webhooks**, click **Add webhook** and click your newly created webhook. 10. Click **Next**. 11. By default, you will receive webhook notifications for all Live Inputs. If you only wish to receive webhooks for certain inputs, enter a comma-delimited list of Input IDs in the text field. 12. When you are done, click **Create**. ```json { "name": "Live Webhook Test", "text": "Notification type: Stream Live Input\nInput ID: eb222fcca08eeb1ae84c981ebe8aeeb6\nEvent type: live_input.disconnected\nUpdated at: 2022-01-13T11:43:41.855717910Z", "data": { "notification_name": "Stream Live Input", "input_id": "eb222fcca08eeb1ae84c981ebe8aeeb6", "event_type": "live_input.disconnected", "updated_at": "2022-01-13T11:43:41.855717910Z" }, "ts": 1642074233 } ``` The `event_type` property of the data object will either be `live_input.connected`, `live_input.disconnected`, or `live_input.errored`. If there are issues detected with the input, the `event_type` will be `live_input.errored`. Additional data will be under the `live_input_errored` json key and will include a `code` with one of the values listed below. ## Error codes * `ERR_GOP_OUT_OF_RANGE` – The input GOP size or keyframe interval is out of range. * `ERR_UNSUPPORTED_VIDEO_CODEC` – The input video codec is unsupported for the protocol used. * `ERR_UNSUPPORTED_AUDIO_CODEC` – The input audio codec is unsupported for the protocol used. * `ERR_STORAGE_QUOTA_EXHAUSTED` – The account storage quota has been exceeded. Delete older content or purcahse additional storage. * `ERR_MISSING_SUBSCRIPTION` – Unauthorized to start a live stream. Check subscription or log into Dash for details. ```json { "name": "Live Webhook Test", "text": "Notification type: Stream Live Input\nInput ID: 2c28dd2cc444cb77578c4840b51e43a8\nEvent type: live_input.errored\nUpdated at: 2024-07-09T18:07:51.077371662Z\nError Code: ERR_GOP_OUT_OF_RANGE\nError Message: Input GOP size or keyframe interval is out of range.\nVideo Codec: \nAudio Codec: ", "data": { "notification_name": "Stream Live Input", "input_id": "eb222fcca08eeb1ae84c981ebe8aeeb6", "event_type": "live_input.errored", "updated_at": "2024-07-09T18:07:51.077371662Z", "live_input_errored": { "error": { "code": "ERR_GOP_OUT_OF_RANGE", "message": "Input GOP size or keyframe interval is out of range." }, "video_codec": "", "audio_codec": "" } }, "ts": 1720548474, } ``` --- title: Define source origin · Cloudflare Stream docs description: When optimizing remote videos, you can specify which origins can be used as the source for transformed videos. By default, Cloudflare accepts only source videos from the zone where your transformations are served. lastUpdated: 2025-05-13T15:37:42.000Z chatbotDeprioritize: false source_url: html: https://developers.cloudflare.com/stream/transform-videos/sources/ md: https://developers.cloudflare.com/stream/transform-videos/sources/index.md --- When optimizing remote videos, you can specify which origins can be used as the source for transformed videos. By default, Cloudflare accepts only source videos from the zone where your transformations are served. On this page, you will learn how to define and manage the origins for the source videos that you want to optimize. Note The allowed origins setting applies to requests from Cloudflare Workers. If you use a Worker to optimize remote videos via a `fetch()` subrequest, then this setting may conflict with existing logic that handles source videos. ## Configure origins To get started, you must have [transformations enabled on your zone](https://developers.cloudflare.com/stream/transform-videos/#getting-started). In the Cloudflare dashboard, go to **Stream** > **Transformations** and select the zone where you want to serve transformations. In **Sources**, you can configure the origins for transformations on your zone. ![Enable allowed origins from the Cloudflare dashboard](https://developers.cloudflare.com/_astro/allowed-origins.4hu5lHws_1geX4Q.webp) ## Allow source videos only from allowed origins You can restrict source videos to **allowed origins**, which applies transformations only to source videos from a defined list. By default, your accepted sources are set to **allowed origins**. Cloudflare will always allow source videos from the same zone where your transformations are served. If you request a transformation with a source video from outside your **allowed origins**, then the video will be rejected. For example, if you serve transformations on your zone `a.com` and do not define any additional origins, then `a.com/video.mp4` can be used as a source video, but `b.com/video.mp4` will return an error. To define a new origin: 1. From **Sources**, select **Add origin**. 2. Under **Domain**, specify the domain for the source video. Only valid web URLs will be accepted. ![Add the origin for source videos in the Cloudflare dashboard](https://developers.cloudflare.com/_astro/add-origin.BtfOyoOS_1qwksq.webp) When you add a root domain, subdomains are not accepted. In other words, if you add `b.com`, then source videos from `media.b.com` will be rejected. To support individual subdomains, define an additional origin such as `media.b.com`. If you add only `media.b.com` and not the root domain, then source videos from the root domain (`b.com`) and other subdomains (`cdn.b.com`) will be rejected. To support all subdomains, use the `*` wildcard at the beginning of the root domain. For example, `*.b.com` will accept source videos from the root domain (like `b.com/video.mp4`) as well as from subdomains (like `media.b.com/video.mp4` or `cdn.b.com/video.mp4`). 1. Optionally, you can specify the **Path** for the source video. If no path is specified, then source videos from all paths on this domain are accepted. Cloudflare checks whether the defined path is at the beginning of the source path. If the defined path is not present at the beginning of the path, then the source video will be rejected. For example, if you define an origin with domain `b.com` and path `/themes`, then `b.com/themes/video.mp4` will be accepted but `b.com/media/themes/video.mp4` will be rejected. 1. Select **Add**. Your origin will now appear in your list of allowed origins. 2. Select **Save**. These changes will take effect immediately. When you configure **allowed origins**, only the initial URL of the source video is checked. Any redirects, including URLs that leave your zone, will be followed, and the resulting video will be transformed. If you change your accepted sources to **any origin**, then your list of sources will be cleared and reset to default. ## Allow source videos from any origin When your accepted sources are set to **any origin**, any publicly available video can be used as the source video for transformations on this zone. **Any origin** is less secure and may allow third parties to serve transformations on your zone. --- title: Direct creator uploads · Cloudflare Stream docs description: Direct creator uploads let your end users upload videos directly to Cloudflare Stream without exposing your API token to clients. lastUpdated: 2024-12-16T22:33:26.000Z chatbotDeprioritize: false source_url: html: https://developers.cloudflare.com/stream/uploading-videos/direct-creator-uploads/ md: https://developers.cloudflare.com/stream/uploading-videos/direct-creator-uploads/index.md --- Direct creator uploads let your end users upload videos directly to Cloudflare Stream without exposing your API token to clients. * If your video is a [basic upload](https://developers.cloudflare.com/stream/uploading-videos/direct-creator-uploads/#basic-uploads) under 200 MB and users do not need resumable uploads, generate a URL that accepts an HTTP post request. * If your video is over 200 MB or if you need to allow users to [resume interrupted uploads](https://developers.cloudflare.com/stream/uploading-videos/direct-creator-uploads/#resumable-uploads), generate a URL using the tus protocol. In either case, you must specify a maximum duration to reserve for the user's upload to ensure it can be accommodated within your available storage. ## Basic uploads Use this option if your users upload videos under 200 MB, and you do not need to allow resumable uploads. 1. Generate a unique, one-time upload URL using the [Direct upload API](https://developers.cloudflare.com/api/resources/stream/subresources/direct_upload/methods/create/). ```sh curl https://api.cloudflare.com/client/v4/accounts/{account_id}/stream/direct_upload \ --header 'Authorization: Bearer ' \ --data '{ "maxDurationSeconds": 3600 }' ``` ```json { "result": { "uploadURL": "https://upload.videodelivery.net/f65014bc6ff5419ea86e7972a047ba22", "uid": "f65014bc6ff5419ea86e7972a047ba22" }, "success": true, "errors": [], "messages": [] } ``` 1. With the `uploadURL` from the previous step, users can upload video files that are limited to 200 MB in size. Refer to the example request below. ```bash curl --request POST \ --form file=@/Users/mickie/Downloads/example_video.mp4 \ https://upload.videodelivery.net/f65014bc6ff5419ea86e7972a047ba22 ``` A successful upload will receive a `200` HTTP status code response. If the upload does not meet the upload constraints defined at time of creation or is larger than 200 MB in size, you will receive a `4xx` HTTP status code response. ## Resumable uploads 1. Create your own API endpoint that returns an upload URL. The example below shows how to build a Worker to get a URL you can use to upload your video. The one-time upload URL is returned in the `Location` header of the response, not in the response body. ```javascript export async function onRequest(context) { const { request, env } = context; const { CLOUDFLARE_ACCOUNT_ID, CLOUDFLARE_API_TOKEN } = env; const endpoint = `https://api.cloudflare.com/client/v4/accounts/${CLOUDFLARE_ACCOUNT_ID}/stream?direct_user=true`; const response = await fetch(endpoint, { method: "POST", headers: { Authorization: `bearer ${CLOUDFLARE_API_TOKEN}`, "Tus-Resumable": "1.0.0", "Upload-Length": request.headers.get("Upload-Length"), "Upload-Metadata": request.headers.get("Upload-Metadata"), }, }); const destination = response.headers.get("Location"); return new Response(null, { headers: { "Access-Control-Expose-Headers": "Location", "Access-Control-Allow-Headers": "*", "Access-Control-Allow-Origin": "*", Location: destination, }, }); } ``` 1. Use this API endpoint **directly** in your tus client. A common mistake is to extract the upload URL from your new API endpoint, and use this directly. See below for a complete example of how to use the API from Step 1 with the uppy tus client. ```html
    ``` For more details on using tus and example client code, refer to [Resumable and large files (tus)](https://developers.cloudflare.com/stream/uploading-videos/resumable-uploads/). ## Upload-Metadata header syntax You can apply the [same constraints](https://developers.cloudflare.com/api/resources/stream/subresources/direct_upload/methods/create/) as Direct Creator Upload via basic upload when using tus. To do so, you must pass the `expiry` and `maxDurationSeconds` as part of the `Upload-Metadata` request header as part of the first request (made by the Worker in the example above.) The `Upload-Metadata` values are ignored from subsequent requests that do the actual file upload. The `Upload-Metadata` header should contain key-value pairs. The keys are text and the values should be encoded in base64. Separate the key and values by a space, *not* an equal sign. To join multiple key-value pairs, include a comma with no additional spaces. In the example below, the `Upload-Metadata` header is instructing Stream to only accept uploads with max video duration of 10 minutes, uploaded prior to the expiry timestamp, and to make this video private: `'Upload-Metadata: maxDurationSeconds NjAw,requiresignedurls,expiry MjAyNC0wMi0yN1QwNzoyMDo1MFo='` `NjAw` is the base64 encoded value for "600" (or 10 minutes). `MjAyNC0wMi0yN1QwNzoyMDo1MFo=` is the base64 encoded value for "2024-02-27T07:20:50Z" (an RFC3339 format timestamp) ## Track upload progress After the creation of a unique one-time upload URL, you may wish to retain the unique identifier (`uid`) returned in the response to track the progress of a user's upload. You can do that two ways: * [Search for a video](https://developers.cloudflare.com/stream/manage-video-library/searching/) with the UID to check the status. * [Create a webhook subscription](https://developers.cloudflare.com/stream/manage-video-library/using-webhooks/) to receive notifications about the video status. These notifications include the video's UID. ## Billing considerations Direct Creator Upload links count towards your storage limit even if your users have not yet uploaded video to this URL. If the link expires before it is used or the upload cannot be processed, the storage reservation will be released. Otherwise, once the upload is encoded, its true duration will be counted toward storage and the reservation will be released. For a detailed breakdown of pricing and example scenarios, refer to [Pricing](https://developers.cloudflare.com/stream/pricing/).
    --- title: Player API · Cloudflare Stream docs description: "Attributes are added in the tag without quotes, as you can see below:" lastUpdated: 2025-05-08T19:52:23.000Z chatbotDeprioritize: true source_url: html: https://developers.cloudflare.com/stream/uploading-videos/player-api/ md: https://developers.cloudflare.com/stream/uploading-videos/player-api/index.md --- Attributes are added in the `` tag without quotes, as you can see below: ```plaintext ``` Multiple attributes can be used together, added one after each other like this: ```plaintext ``` ## Supported attributes * `autoplay` boolean * Tells the browser to immediately start downloading the video and play it as soon as it can. Note that mobile browsers generally do not support this attribute, the user must tap the screen to begin video playback. Please consider mobile users or users with Internet usage limits as some users do not have unlimited Internet access before using this attribute. Note To disable video autoplay, the `autoplay` attribute needs to be removed altogether as this attribute. Setting `autoplay="false"` will not work; the video will autoplay if the attribute is there in the `` tag. In addition, some browsers now prevent videos with audio from playing automatically. You may add the `mute` attribute to allow your videos to autoplay. For more information, see [new video policies for iOS](https://webkit.org/blog/6784/new-video-policies-for-ios/). ::: * `controls` boolean * Shows the default video controls such as buttons for play/pause, volume controls. You may choose to build buttons and controls that work with the player. [See an example.](https://developers.cloudflare.com/stream/viewing-videos/using-own-player/) * `height` integer * The height of the video's display area, in CSS pixels. * `loop` boolean * A Boolean attribute; if included in the HTML tag, player will, automatically seek back to the start upon reaching the end of the video. * `muted` boolean * A Boolean attribute which indicates the default setting of the audio contained in the video. If set, the audio will be initially silenced. * `preload` string | null * This enumerated attribute is intended to provide a hint to the browser about what the author thinks will lead to the best user experience. You may choose to include this attribute as a boolean attribute without a value, or you may specify the value `preload="auto"` to preload the beginning of the video. Not including the attribute or using `preload="metadata"` will just load the metadata needed to start video playback when requested. Note The ` --- title: Resumable and large files (tus) · Cloudflare Stream docs description: If you have a video over 200 MB, we recommend using the tus protocol for resumable file uploads. A resumable upload ensures that the upload can be interrupted and resumed without uploading the previous data again. lastUpdated: 2025-05-16T16:37:37.000Z chatbotDeprioritize: false source_url: html: https://developers.cloudflare.com/stream/uploading-videos/resumable-uploads/ md: https://developers.cloudflare.com/stream/uploading-videos/resumable-uploads/index.md --- If you have a video over 200 MB, we recommend using the [tus protocol](https://tus.io/) for resumable file uploads. A resumable upload ensures that the upload can be interrupted and resumed without uploading the previous data again. ## Requirements * Resumable uploads require a minimum chunk size of 5,242,880 bytes unless the entire file is less than this amount. For better performance when the client connection is expected to be reliable, increase the chunk size to 52,428,800 bytes. * Maximum chunk size is 209,715,200 bytes. * Chunk size must be divisible by 256 KiB (256x1024 bytes). Round your chunk size to the nearest multiple of 256 KiB. Note that the final chunk of an upload that fits within a single chunk is exempt from this requirement. ## Prerequisites Before you can upload a video using tus, you will need to download a tus client. For more information, refer to the [tus Python client](https://github.com/tus/tus-py-client) which is available through pip, Python's package manager. ```python pip install -U tus.py ``` ## Upload a video using tus ```sh tus-upload --chunk-size 52428800 --header \ Authorization "Bearer " https://api.cloudflare.com/client/v4/accounts//stream ``` ```sh INFO Creating file endpoint INFO Created: https://api.cloudflare.com/client/v4/accounts/d467d4f0fcbcd9791b613bc3a9599cdc/stream/dd5d531a12de0c724bd1275a3b2bc9c6 ... ``` ### Golang example Before you begin, import a tus client such as [go-tus](https://github.com/eventials/go-tus) to upload from your Go applications. The `go-tus` library does not return the response headers to the calling function, which makes it difficult to read the video ID from the `stream-media-id` header. As a workaround, create a [Direct Creator Upload](https://developers.cloudflare.com/stream/uploading-videos/direct-creator-uploads/) link. That API response will include the TUS endpoint as well as the video ID. Setting a Creator ID is not required. ```go package main import ( "net/http" "os" tus "github.com/eventials/go-tus" ) func main() { accountID := "" f, err := os.Open("videofile.mp4") if err != nil { panic(err) } defer f.Close() headers := make(http.Header) headers.Add("Authorization", "Bearer ") config := &tus.Config{ ChunkSize: 50 * 1024 * 1024, // Required a minimum chunk size of 5 MB, here we use 50 MB. Resume: false, OverridePatchMethod: false, Store: nil, Header: headers, HttpClient: nil, } client, _ := tus.NewClient("https://api.cloudflare.com/client/v4/accounts/"+ accountID +"/stream", config) upload, _ := tus.NewUploadFromFile(f) uploader, _ := client.CreateUpload(upload) uploader.Upload() } ``` You can also get the progress of the upload if you are running the upload in a goroutine. ```go // returns the progress percentage. upload.Progress() // returns whether or not the upload is complete. upload.Finished() ``` Refer to [go-tus](https://github.com/eventials/go-tus) for functionality such as resuming uploads. ### Node.js example Before you begin, install the tus-js-client. * npm ```sh npm i tus-js-client ``` * yarn ```sh yarn add tus-js-client ``` * pnpm ```sh pnpm add tus-js-client ``` Create an `index.js` file and configure: * The API endpoint with your Cloudflare Account ID. * The request headers to include an API token. ```js var fs = require("fs"); var tus = require("tus-js-client"); // Specify location of file you would like to upload below var path = __dirname + "/test.mp4"; var file = fs.createReadStream(path); var size = fs.statSync(path).size; var mediaId = ""; var options = { endpoint: "https://api.cloudflare.com/client/v4/accounts//stream", headers: { Authorization: "Bearer ", }, chunkSize: 50 * 1024 * 1024, // Required a minimum chunk size of 5 MB. Here we use 50 MB. retryDelays: [0, 3000, 5000, 10000, 20000], // Indicates to tus-js-client the delays after which it will retry if the upload fails. metadata: { name: "test.mp4", filetype: "video/mp4", // Optional if you want to include a watermark // watermark: '', }, uploadSize: size, onError: function (error) { throw error; }, onProgress: function (bytesUploaded, bytesTotal) { var percentage = ((bytesUploaded / bytesTotal) * 100).toFixed(2); console.log(bytesUploaded, bytesTotal, percentage + "%"); }, onSuccess: function () { console.log("Upload finished"); }, onAfterResponse: function (req, res) { return new Promise((resolve) => { var mediaIdHeader = res.getHeader("stream-media-id"); if (mediaIdHeader) { mediaId = mediaIdHeader; } resolve(); }); }, }; var upload = new tus.Upload(file, options); upload.start(); ``` ## Specify upload options The tus protocol allows you to add optional parameters in the [`Upload-Metadata` header](https://tus.io/protocols/resumable-upload.html#upload-metadata). ### Supported options in `Upload-Metadata` Setting arbitrary metadata values in the `Upload-Metadata` header sets values in the [meta key in Stream API](https://developers.cloudflare.com/api/resources/stream/methods/list/). * `name` * Setting this key will set `meta.name` in the API and display the value as the name of the video in the dashboard. * `requiresignedurls` * If this key is present, the video playback for this video will be required to use signed URLs after upload. * `scheduleddeletion` * Specifies a date and time when a video will be deleted. After a video is deleted, it is no longer viewable and no longer counts towards storage for billing. The specified date and time cannot be earlier than 30 days or later than 1,096 days from the video's created timestamp. * `allowedorigins` * An array of strings listing origins allowed to display the video. This will set the [allowed origins setting](https://developers.cloudflare.com/stream/viewing-videos/securing-your-stream/#security-considerations) for the video. * `thumbnailtimestamppct` * Specify the default thumbnail [timestamp percentage](https://developers.cloudflare.com/stream/viewing-videos/displaying-thumbnails/). Note that percentage is a floating point value between 0.0 and 1.0. * `watermark` * The watermark profile UID. ## Set creator property Setting a creator value in the `Upload-Creator` header can be used to identify the creator of the video content, linking the way you identify your users or creators to videos in your Stream account. For examples of how to set and modify the creator ID, refer to [Associate videos with creators](https://developers.cloudflare.com/stream/manage-video-library/creator-id/). ## Get the video ID when using tus When an initial tus request is made, Stream responds with a URL in the `Location` header. While this URL may contain the video ID, it is not recommend to parse this URL to get the ID. Instead, you should use the `stream-media-id` HTTP header in the response to retrieve the video ID. For example, a request made to `https://api.cloudflare.com/client/v4/accounts//stream` with the tus protocol will contain a HTTP header like the following: ```plaintext stream-media-id: cab807e0c477d01baq20f66c3d1dfc26cf ``` --- title: Upload with a link · Cloudflare Stream docs description: If you have videos stored in a cloud storage bucket, you can pass a HTTP link for the file, and Stream will fetch the file on your behalf. lastUpdated: 2025-04-04T15:30:48.000Z chatbotDeprioritize: false source_url: html: https://developers.cloudflare.com/stream/uploading-videos/upload-via-link/ md: https://developers.cloudflare.com/stream/uploading-videos/upload-via-link/index.md --- If you have videos stored in a cloud storage bucket, you can pass a HTTP link for the file, and Stream will fetch the file on your behalf. ## Make an HTTP request Make a `POST` request to the Stream API using the link to your video. ```bash curl \ --data '{"url":"https://storage.googleapis.com/zaid-test/Watermarks%20Demo/cf-ad-original.mp4","meta":{"name":"My First Stream Video"}}' \ --header "Authorization: Bearer " \ https://api.cloudflare.com/client/v4/accounts/{account_id}/stream/copy ``` ## Check video status Stream must download and encode the video, which can take a few seconds to a few minutes depending on the length of your video. When the `readyToStream` value returns `true`, your video is ready for streaming. You can optionally use [webhooks](https://developers.cloudflare.com/stream/manage-video-library/using-webhooks/) which will notify you when the video is ready to stream or if an error occurs. ```json { "result": { "uid": "6b9e68b07dfee8cc2d116e4c51d6a957", "thumbnail": "https://customer-f33zs165nr7gyfy4.cloudflarestream.com/6b9e68b07dfee8cc2d116e4c51d6a957/thumbnails/thumbnail.jpg", "thumbnailTimestampPct": 0, "readyToStream": false, "status": { "state": "downloading" }, "meta": { "downloaded-from": "https://storage.googleapis.com/zaid-test/Watermarks%20Demo/cf-ad-original.mp4", "name": "My First Stream Video" }, "created": "2020-10-16T20:20:17.872170843Z", "modified": "2020-10-16T20:20:17.872170843Z", "size": 9032701, "preview": "https://customer-f33zs165nr7gyfy4.cloudflarestream.com/6b9e68b07dfee8cc2d116e4c51d6a957/watch", "allowedOrigins": [], "requireSignedURLs": false, "uploaded": "2020-10-16T20:20:17.872170843Z", "uploadExpiry": null, "maxSizeBytes": 0, "maxDurationSeconds": 0, "duration": -1, "input": { "width": -1, "height": -1 }, "playback": { "hls": "https://customer-f33zs165nr7gyfy4.cloudflarestream.com/6b9e68b07dfee8cc2d116e4c51d6a957/manifest/video.m3u8", "dash": "https://customer-f33zs165nr7gyfy4.cloudflarestream.com/6b9e68b07dfee8cc2d116e4c51d6a957/manifest/video.mpd" }, "watermark": null }, "success": true, "errors": [], "messages": [] } ``` After the video is uploaded, you can use the video `uid` shown in the example response above to play the video using the [Stream video player](https://developers.cloudflare.com/stream/viewing-videos/using-the-stream-player/). If you are using your own player or rendering the video in a mobile app, refer to [using your own player](https://developers.cloudflare.com/stream/viewing-videos/using-the-stream-player/using-the-player-api/). --- title: Basic video uploads · Cloudflare Stream docs description: For files smaller than 200 MB, you can use simple form-based uploads. lastUpdated: 2024-09-25T18:55:39.000Z chatbotDeprioritize: false source_url: html: https://developers.cloudflare.com/stream/uploading-videos/upload-video-file/ md: https://developers.cloudflare.com/stream/uploading-videos/upload-video-file/index.md --- ## Basic Uploads For files smaller than 200 MB, you can use simple form-based uploads. ## Upload through the Cloudflare dashboard 1. Log in to the [Cloudflare dashboard](https://dash.cloudflare.com/). 2. From the navigation menu, select **Stream**. 3. On the **Overview** page, drag and drop your video into the **Quick upload** area. You can also click to browse for the file on your machine. After the video finishes uploading, the video appears in the list. ## Upload with the Stream API Make a `POST` request with the `content-type` header set to `multipart/form-data` and include the media as an input with the name set to `file`. ```bash curl --request POST \ --header "Authorization: Bearer " \ --form file=@/Users/user_name/Desktop/my-video.mp4 \ https://api.cloudflare.com/client/v4/accounts/{account_id}/stream ``` Note Note that cURL's `--form` flag automatically configures the `content-type` header and maps `my-video.mp4` to a form input called `file`. --- title: Display thumbnails · Cloudflare Stream docs description: A thumbnail from your video can be generated using a special link where you specify the time from the video you'd like to get the thumbnail from. lastUpdated: 2025-05-08T19:52:23.000Z chatbotDeprioritize: false source_url: html: https://developers.cloudflare.com/stream/viewing-videos/displaying-thumbnails/ md: https://developers.cloudflare.com/stream/viewing-videos/displaying-thumbnails/index.md --- Note Stream thumbnails are not supported for videos with non-square pixels. ## Use Case 1: Generating a thumbnail on-the-fly A thumbnail from your video can be generated using a special link where you specify the time from the video you'd like to get the thumbnail from. `https://customer-f33zs165nr7gyfy4.cloudflarestream.com/6b9e68b07dfee8cc2d116e4c51d6a957/thumbnails/thumbnail.jpg?time=1s&height=270` ![Example of thumbnail image generated from example video](https://customer-f33zs165nr7gyfy4.cloudflarestream.com/6b9e68b07dfee8cc2d116e4c51d6a957/thumbnails/thumbnail.jpg?time=1s\&height=270) Using the `poster` query parameter in the embed URL, you can set a thumbnail to any time in your video. If [signed URLs](https://developers.cloudflare.com/stream/viewing-videos/securing-your-stream/) are required, you must use a signed URL instead of video UIDs. ```html ``` Supported URL attributes are: * **`time`** (default `0s`, configurable) time from the video for example `8m`, `5m2s` * **`height`** (default `640`) * **`width`** (default `640`) * **`fit`** (default `crop`) to clarify what to do when requested height and width does not match the original upload, which should be one of: * **`crop`** cut parts of the video that doesn't fit in the given size * **`clip`** preserve the entire frame and decrease the size of the image within given size * **`scale`** distort the image to fit the given size * **`fill`** preserve the entire frame and fill the rest of the requested size with black background ## Use Case 2: Set the default thumbnail timestamp using the API By default, the Stream Player sets the thumbnail to the first frame of the video. You can change this on a per-video basis by setting the "thumbnailTimestampPct" value using the API: ```bash curl -X POST \ -H "Authorization: Bearer " \ -d '{"thumbnailTimestampPct": 0.5}' \ https://api.cloudflare.com/client/v4/accounts//stream/ ``` `thumbnailTimestampPct` is a value between 0.0 (the first frame of the video) and 1.0 (the last frame of the video). For example, you wanted the thumbnail to be the frame at the half way point of your videos, you can set the `thumbnailTimestampPct` value to 0.5. Using relative values in this way allows you to set the default thumbnail even if you or your users' videos vary in duration. ## Use Case 3: Generating animated thumbnails Stream supports animated GIFs as thumbnails. Viewing animated thumbnails does not count toward billed minutes delivered or minutes viewed in [Stream Analytics](https://developers.cloudflare.com/stream/getting-analytics/). ### Animated GIF thumbnails `https://customer-f33zs165nr7gyfy4.cloudflarestream.com/6b9e68b07dfee8cc2d116e4c51d6a957/thumbnails/thumbnail.gif?time=1s&height=200&duration=4s` ![Animated gif example, generated on-demand from Cloudflare Stream](https://customer-f33zs165nr7gyfy4.cloudflarestream.com/6b9e68b07dfee8cc2d116e4c51d6a957/thumbnails/thumbnail.gif?time=1s\&height=200\&duration=4s) Supported URL attributes for animated thumbnails are: * **`time`** (default `0s`) time from the video for example `8m`, `5m2s` * **`height`** (default `640`) * **`width`** (default `640`) * **`fit`** (default `crop`) to clarify what to do when requested height and width does not match the original upload, which should be one of: * **`crop`** cut parts of the video that doesn't fit in the given size * **`clip`** preserve the entire frame and decrease the size of the image within given size * **`scale`** distort the image to fit the given size * **`fill`** preserve the entire frame and fill the rest of the requested size with black background * **`duration`** (default `5s`) * **`fps`** (default `8`) --- title: Download videos · Cloudflare Stream docs description: "When you upload a video to Stream, it can be streamed using HLS/DASH. However, for certain use-cases (such as offline viewing), you may want to download the MP4. You can enable MP4 support on a per video basis by following the steps below:" lastUpdated: 2024-08-20T19:58:51.000Z chatbotDeprioritize: false source_url: html: https://developers.cloudflare.com/stream/viewing-videos/download-videos/ md: https://developers.cloudflare.com/stream/viewing-videos/download-videos/index.md --- When you upload a video to Stream, it can be streamed using HLS/DASH. However, for certain use-cases (such as offline viewing), you may want to download the MP4. You can enable MP4 support on a per video basis by following the steps below: 1. Enable MP4 support by making a POST request to the `/downloads` endpoint (example below) 2. Save the MP4 URL provided by the response to the `/downloads` endpoint. This MP4 URL will become functional when the MP4 is ready in the next step. 3. Poll the `/downloads `endpoint until the `status` field is set to `ready` to inform you when the MP4 is available. You can now use the MP4 URL from step 2. ## Generate downloadable files You can enable downloads for an uploaded video once it is ready to view by making an HTTP request to the `/downloads` endpoint. To get notified when a video is ready to view, refer to [Using webhooks](https://developers.cloudflare.com/stream/manage-video-library/using-webhooks/#notifications). The downloads API response will include all available download types for the video, the download URL for each type, and the processing status of the download file. ```bash curl -X POST \ -H "Authorization: Bearer " \ https://api.cloudflare.com/client/v4/accounts//stream//downloads ``` ```json { "result": { "default": { "status": "inprogress", "url": "https://customer-.cloudflarestream.com//downloads/default.mp4", "percentComplete": 75.0 } }, "success": true, "errors": [], "messages": [] } ``` ## Get download links You can view all available downloads for a video by making a `GET` HTTP request to the downloads API. The response for creating and fetching downloads are the same. ```bash curl -X GET \ -H "Authorization: Bearer " \ https://api.cloudflare.com/client/v4/accounts//stream//downloads ``` ```json { "result": { "default": { "status": "ready", "url": "https://customer-.cloudflarestream.com//downloads/default.mp4", "percentComplete": 100.0 } }, "success": true, "errors": [], "messages": [] } ``` ## Customize download file name You can customize the name of downloadable files by adding the `filename` query string parameter at the end of the URL. In the example below, adding `?filename=MY_VIDEO.mp4` to the URL will change the file name to `MY_VIDEO.mp4`. `https://customer-.cloudflarestream.com//downloads/default.mp4?filename=MY_VIDEO.mp4` The `filename` can be a maximum of 120 characters long and composed of `abcdefghijklmnopqrstuvwxyzABCDEFGHIJKLMNOPQRSTUVWXYZ0123456789-_` characters. The extension (.mp4) is appended automatically. ## Retrieve downloads The generated MP4 download files can be retrieved via the link in the download API response. ```sh curl -L https://customer-.cloudflarestream.com//downloads/default.mp4 > download.mp4 ``` ## Secure video downloads If your video is public, the MP4 will also be publicly accessible. If your video is private and requires a signed URL for viewing, the MP4 will not be publicly accessible. To access the MP4 for a private video, you can generate a signed URL just as you would for regular viewing with an additional flag called `downloadable` set to `true`. Download links will not work for videos which already require signed URLs if the `downloadable` flag is not present in the token. For more details about using signed URLs with videos, refer to [Securing your Stream](https://developers.cloudflare.com/stream/viewing-videos/securing-your-stream/). **Example token payload** ```json { "sub": , "kid": , "exp": 1537460365, "nbf": 1537453165, "downloadable": true, "accessRules": [ { "type": "ip.geoip.country", "action": "allow", "country": [ "GB" ] }, { "type": "any", "action": "block" } ] } ``` ## Billing for MP4 downloads MP4 downloads are billed in the same way as streaming of the video. You will be billed for the duration of the video each time the MP4 for the video is downloaded. For example, if you have a 10 minute video that is downloaded 100 times during the month, the downloads will count as 1000 minutes of minutes served. You will not incur any additional cost for storage when you enable MP4s. --- title: Secure your Stream · Cloudflare Stream docs description: By default, videos on Stream can be viewed by anyone with just a video id. If you want to make your video private by default and only give access to certain users, you can use the signed URL feature. When you mark a video to require signed URL, it can no longer be accessed publicly with only the video id. Instead, the user will need a signed url token to watch or download the video. lastUpdated: 2025-04-14T18:48:15.000Z chatbotDeprioritize: false source_url: html: https://developers.cloudflare.com/stream/viewing-videos/securing-your-stream/ md: https://developers.cloudflare.com/stream/viewing-videos/securing-your-stream/index.md --- ## Signed URLs / Tokens By default, videos on Stream can be viewed by anyone with just a video id. If you want to make your video private by default and only give access to certain users, you can use the signed URL feature. When you mark a video to require signed URL, it can no longer be accessed publicly with only the video id. Instead, the user will need a signed url token to watch or download the video. Here are some common use cases for using signed URLs: * Restricting access so only logged in members can watch a particular video * Let users watch your video for a limited time period (ie. 24 hours) * Restricting access based on geolocation ### Making a video require signed URLs Since video ids are effectively public within signed URLs, you will need to turn on `requireSignedURLs` on for your videos. This option will prevent any public links, such as `watch.cloudflarestream.com/{video_uid}`, from working. Restricting viewing can be done by updating the video's metadata. ```bash curl "https://api.cloudflare.com/client/v4/accounts/{account_id}/stream/{video_uid}" \ --header "Authorization: Bearer " \ --header "Content-Type: application/json" --data "{\"uid\": \"\", \"requireSignedURLs\": true }" ``` Response: ```json { "result": { "uid": "", ... "requireSignedURLs": true }, "success": true, "errors": [], "messages": [] } ``` ## Two Ways to Generate Signed Tokens You can program your app to generate token in two ways: * **Low-volume or testing: Use the `/token` endpoint to generate a short-lived signed token.** This is recommended for testing purposes or if you are generating less than 1,000 tokens per day. It requires making an API call to Cloudflare for each token. The default result is valid for 1 hour. * **Recommended: Use a signing key to create tokens.** If you have thousands of daily users or need to generate a high volume of tokens, you can create tokens yourself using a signing key. This way, you do not need to call a Stream API each time you need to generate a token. ## Option 1: Using the /token endpoint You can call the `/token` endpoint for any video that is marked private to get a signed URL token which expires in one hour. This method does not support [Live WebRTC](https://developers.cloudflare.com/stream/webrtc-beta/). ```bash curl --request POST \ https://api.cloudflare.com/client/v4/accounts/{account_id}/stream/{video_uid}/token \ --header "Authorization: Bearer " ``` You will see a response similar to this if the request succeeds: ```json { "result": { "token": "eyJhbGciOiJSUzI1NiIsImtpZCI6ImNkYzkzNTk4MmY4MDc1ZjJlZjk2MTA2ZDg1ZmNkODM4In0.eyJraWQiOiJjZGM5MzU5ODJmODA3NWYyZWY5NjEwNmQ4NWZjZDgzOCIsImV4cCI6IjE2MjE4ODk2NTciLCJuYmYiOiIxNjIxODgyNDU3In0.iHGMvwOh2-SuqUG7kp2GeLXyKvMavP-I2rYCni9odNwms7imW429bM2tKs3G9INms8gSc7fzm8hNEYWOhGHWRBaaCs3U9H4DRWaFOvn0sJWLBitGuF_YaZM5O6fqJPTAwhgFKdikyk9zVzHrIJ0PfBL0NsTgwDxLkJjEAEULQJpiQU1DNm0w5ctasdbw77YtDwdZ01g924Dm6jIsWolW0Ic0AevCLyVdg501Ki9hSF7kYST0egcll47jmoMMni7ujQCJI1XEAOas32DdjnMvU8vXrYbaHk1m1oXlm319rDYghOHed9kr293KM7ivtZNlhYceSzOpyAmqNFS7mearyQ" }, "success": true, "errors": [], "messages": [] } ``` To render the video, insert the `token` value in place of the `video id`: ```html ``` If you are using your own player, replace the video id in the manifest URL with the `token` value: `https://customer-.cloudflarestream.com/eyJhbGciOiJSUzI1NiIsImtpZCI6ImNkYzkzNTk4MmY4MDc1ZjJlZjk2MTA2ZDg1ZmNkODM4In0.eyJraWQiOiJjZGM5MzU5ODJmODA3NWYyZWY5NjEwNmQ4NWZjZDgzOCIsImV4cCI6IjE2MjE4ODk2NTciLCJuYmYiOiIxNjIxODgyNDU3In0.iHGMvwOh2-SuqUG7kp2GeLXyKvMavP-I2rYCni9odNwms7imW429bM2tKs3G9INms8gSc7fzm8hNEYWOhGHWRBaaCs3U9H4DRWaFOvn0sJWLBitGuF_YaZM5O6fqJPTAwhgFKdikyk9zVzHrIJ0PfBL0NsTgwDxLkJjEAEULQJpiQU1DNm0w5ctasdbw77YtDwdZ01g924Dm6jIsWolW0Ic0AevCLyVdg501Ki9hSF7kYST0egcll47jmoMMni7ujQCJI1XEAOas32DdjnMvU8vXrYbaHk1m1oXlm319rDYghOHed9kr293KM7ivtZNlhYceSzOpyAmqNFS7mearyQ/manifest/video.m3u8` ### Customizing default restrictions If you call the `/token` endpoint without any body, it will return a token that expires in one hour. Let's say you want to let a user watch a particular video for the next 12 hours. Here's how you'd do it with a Cloudflare Worker: ```javascript export default { async fetch(request, env, ctx) { const signed_url_restrictions = { //limit viewing for the next 12 hours exp: Math.floor(Date.now() / 1000) + 12 * 60 * 60, }; const init = { method: "POST", headers: { Authorization: "Bearer ", "content-type": "application/json;charset=UTF-8", }, body: JSON.stringify(signed_url_restrictions), }; const signedurl_service_response = await fetch( "https://api.cloudflare.com/client/v4/accounts/{account_id}/stream/{video_uid}/token", init, ); return new Response( JSON.stringify(await signedurl_service_response.json()), { status: 200 }, ); }, }; ``` The returned token will expire after 12 hours. Let's take this a step further and add 2 additional restrictions: * Allow the signed URL token to be used for MP4 downloads (assuming the video has downloads enabled) * Block users from US and Mexico from viewing or downloading the video To achieve this, we can specify additional restrictions in the `signed_url_restrictions` object in our sample code: ```javascript export default { async fetch(request, env, ctx) { const signed_url_restrictions = { //limit viewing for the next 2 hours exp: Math.floor(Date.now() / 1000) + 12 * 60 * 60, downloadable: true, accessRules: [ { type: "ip.geoip.country", country: ["US", "MX"], action: "block" }, ], }; const init = { method: "POST", headers: { Authorization: "Bearer ", "content-type": "application/json;charset=UTF-8", }, body: JSON.stringify(signed_url_restrictions), }; const signedurl_service_response = await fetch( "https://api.cloudflare.com/client/v4/accounts/{account_id}/stream/{video_uid}/token", init, ); return new Response( JSON.stringify(await signedurl_service_response.json()), { status: 200 }, ); }, }; ``` ## Option 2: Using a signing key to create signed tokens If you are generating a high-volume of tokens, using [Live WebRTC](https://developers.cloudflare.com/stream/webrtc-beta/), or need to customize the access rules, generate new tokens using a signing key so you do not need to call the Stream API each time. ### Step 1: Call the `/stream/key` endpoint *once* to obtain a key ```bash curl --request POST \ "https://api.cloudflare.com/client/v4/accounts/{account_id}/stream/keys" \ --header "Authorization: Bearer " ``` The response will return `pem` and `jwk` values. ```json { "result": { "id": "8f926b2b01f383510025a78a4dcbf6a", "pem": "LS0tLS1CRUdJTiBSU0EgUFJJVkFURSBLRVktLS0tLQpNSUlFcEFJQkFBS0NBUUVBemtHbXhCekFGMnBIMURiWmgyVGoyS3ZudlBVTkZmUWtNeXNCbzJlZzVqemRKTmRhCmtwMEphUHhoNkZxOTYveTBVd0lBNjdYeFdHb3kxcW1CRGhpdTVqekdtYW13NVgrYkR3TEdTVldGMEx3QnloMDYKN01Rb0xySHA3MDEycXBVNCtLODUyT1hMRVVlWVBrOHYzRlpTQ2VnMVdLRW5URC9oSmhVUTFsTmNKTWN3MXZUbQpHa2o0empBUTRBSFAvdHFERHFaZ3lMc1Vma2NsRDY3SVRkZktVZGtFU3lvVDVTcnFibHNFelBYcm9qaFlLWGk3CjFjak1yVDlFS0JCenhZSVEyOVRaZitnZU5ya0t4a2xMZTJzTUFML0VWZkFjdGkrc2ZqMkkyeEZKZmQ4aklmL2UKdHBCSVJZVDEza2FLdHUyYmk0R2IrV1BLK0toQjdTNnFGODlmTHdJREFRQUJBb0lCQUYzeXFuNytwNEtpM3ZmcgpTZmN4ZmRVV0xGYTEraEZyWk1mSHlaWEFJSnB1MDc0eHQ2ZzdqbXM3Tm0rTFVhSDV0N3R0bUxURTZacy91RXR0CjV3SmdQTjVUaFpTOXBmMUxPL3BBNWNmR2hFN1pMQ2wvV2ZVNXZpSFMyVDh1dGlRcUYwcXpLZkxCYk5kQW1MaWQKQWl4blJ6UUxDSzJIcmlvOW1KVHJtSUUvZENPdG80RUhYdHpZWjByOVordHRxMkZrd3pzZUdaK0tvd09JaWtvTgp2NWFOMVpmRGhEVG0wdG1Vd0tLbjBWcmZqalhRdFdjbFYxTWdRejhwM2xScWhISmJSK29PL1NMSXZqUE16dGxOCm5GV1ZEdTRmRHZsSjMyazJzSllNL2tRVUltT3V5alY3RTBBcm5vR2lBREdGZXFxK1UwajluNUFpNTJ6aTBmNloKdFdvwdju39xOFJWQkwxL2tvWFVmYk00S04ydVFadUdjaUdGNjlCRDJ1S3o1eGdvTwowVTBZNmlFNG9Cek5GUW5hWS9kayt5U1dsQWp2MkgraFBrTGpvZlRGSGlNTmUycUVNaUFaeTZ5cmRkSDY4VjdIClRNRllUQlZQaHIxT0dxZlRmc00vRktmZVhWY1FvMTI1RjBJQm5iWjNSYzRua1pNS0hzczUyWE1DZ1lFQTFQRVkKbGIybDU4blVianRZOFl6Uk1vQVo5aHJXMlhwM3JaZjE0Q0VUQ1dsVXFZdCtRN0NyN3dMQUVjbjdrbFk1RGF3QgpuTXJsZXl3S0crTUEvU0hlN3dQQkpNeDlVUGV4Q3YyRW8xT1loMTk3SGQzSk9zUythWWljemJsYmJqU0RqWXVjCkdSNzIrb1FlMzJjTXhjczJNRlBWcHVibjhjalBQbnZKd0k5aUpGVUNnWUVBMjM3UmNKSEdCTjVFM2FXLzd3ekcKbVBuUm1JSUczeW9UU0U3OFBtbHo2bXE5eTVvcSs5aFpaNE1Fdy9RbWFPMDF5U0xRdEY4QmY2TFN2RFh4QWtkdwpWMm5ra0svWWNhWDd3RHo0eWxwS0cxWTg3TzIwWWtkUXlxdjMybG1lN1JuVDhwcVBDQTRUWDloOWFVaXh6THNoCkplcGkvZFhRWFBWeFoxYXV4YldGL3VzQ2dZRUFxWnhVVWNsYVlYS2dzeUN3YXM0WVAxcEwwM3h6VDR5OTBOYXUKY05USFhnSzQvY2J2VHFsbGVaNCtNSzBxcGRmcDM5cjIrZFdlemVvNUx4YzBUV3Z5TDMxVkZhT1AyYk5CSUpqbwpVbE9ldFkwMitvWVM1NjJZWVdVQVNOandXNnFXY21NV2RlZjFIM3VuUDVqTVVxdlhRTTAxNjVnV2ZiN09YRjJyClNLYXNySFVDZ1lCYmRvL1orN1M3dEZSaDZlamJib2h3WGNDRVd4eXhXT2ZMcHdXNXdXT3dlWWZwWTh4cm5pNzQKdGRObHRoRXM4SHhTaTJudEh3TklLSEVlYmJ4eUh1UG5pQjhaWHBwNEJRNTYxczhjR1Z1ZSszbmVFUzBOTDcxZApQL1ZxUWpySFJrd3V5ckRFV2VCeEhUL0FvVEtEeSt3OTQ2SFM5V1dPTGJvbXQrd3g0NytNdWc9PQotLS0tLUVORCBSU0EgUFJJVkFURSBLRVktLS0tLQo=", "jwk": "eyJ1c2UiOiJzaWciLCJrdHkiOiJSU0EiLCJraWQiOiI4ZjkyNmIyYjAxZjM4MzUxNzAwMjVhNzhhNGRjYmY2YSIsImFsZyI6IlJTMjU2IiwibiI6InprR214QnpBRjJwSDFEYlpoMlRqMkt2bnZQVU5GZlFrTXlzQm8yZWc1anpkSk5kYWtwMEphUHhoNkZxOTZfeTBVd0lBNjdYeFdHb3kxcW1CRGhpdTVqekdtYW13NVgtYkR3TEdTVldGMEx3QnloMDY3TVFvTHJIcDcwMTJxcFU0LUs4NTJPWExFVWVZUGs4djNGWlNDZWcxV0tFblREX2hKaFVRMWxOY0pNY3cxdlRtR2tqNHpqQVE0QUhQX3RxRERxWmd5THNVZmtjbEQ2N0lUZGZLVWRrRVN5b1Q1U3JxYmxzRXpQWHJvamhZS1hpNzFjak1yVDlFS0JCenhZSVEyOVRaZi1nZU5ya0t4a2xMZTJzTUFMX0VWZkFjdGktc2ZqMkkyeEZKZmQ4aklmX2V0cEJJUllUMTNrYUt0dTJiaTRHYi1XUEstS2hCN1M2cUY4OWZMdyIsImUiOiJBUUFCIiwiZCI6IlhmS3FmdjZuZ3FMZTktdEo5ekY5MVJZc1ZyWDZFV3RreDhmSmxjQWdtbTdUdmpHM3FEdU9henMyYjR0Um9mbTN1MjJZdE1UcG16LTRTMjNuQW1BODNsT0ZsTDJsX1VzNy1rRGx4OGFFVHRrc0tYOVo5VG0tSWRMWlB5NjJKQ29YU3JNcDhzRnMxMENZdUowQ0xHZEhOQXNJcllldUtqMllsT3VZZ1Q5MEk2MmpnUWRlM05oblN2MW42MjJyWVdURE94NFpuNHFqQTRpS1NnMl9sbzNWbDhPRU5PYlMyWlRBb3FmUld0LU9OZEMxWnlWWFV5QkRQeW5lVkdxRWNsdEg2Zzc5SXNpLU04ek8yVTJjVlpVTzdoOE8tVW5mYVRhd2xnei1SQlFpWTY3S05Yc1RRQ3VlZ2FJQU1ZVjZxcjVUU1Ai2odx5iT0xSX3BtMWFpdktyUSIsInAiOiI5X1o5ZUpGTWI5X3E4UlZCTDFfa29YVWZiTTRLTjJ1UVp1R2NpR0Y2OUJEMnVLejV4Z29PMFUwWTZpRTRvQnpORlFuYVlfZGsteVNXbEFqdjJILWhQa0xqb2ZURkhpTU5lMnFFTWlBWnk2eXJkZEg2OFY3SFRNRllUQlZQaHIxT0dxZlRmc01fRktmZVhWY1FvMTI1RjBJQm5iWjNSYzRua1pNS0hzczUyWE0iLCJxIjoiMVBFWWxiMmw1OG5VYmp0WThZelJNb0FaOWhyVzJYcDNyWmYxNENFVENXbFVxWXQtUTdDcjd3TEFFY243a2xZNURhd0JuTXJsZXl3S0ctTUFfU0hlN3dQQkpNeDlVUGV4Q3YyRW8xT1loMTk3SGQzSk9zUy1hWWljemJsYmJqU0RqWXVjR1I3Mi1vUWUzMmNNeGNzMk1GUFZwdWJuOGNqUFBudkp3STlpSkZVIiwiZHAiOiIyMzdSY0pIR0JONUUzYVdfN3d6R21QblJtSUlHM3lvVFNFNzhQbWx6Nm1xOXk1b3EtOWhaWjRNRXdfUW1hTzAxeVNMUXRGOEJmNkxTdkRYeEFrZHdWMm5ra0tfWWNhWDd3RHo0eWxwS0cxWTg3TzIwWWtkUXlxdjMybG1lN1JuVDhwcVBDQTRUWDloOWFVaXh6THNoSmVwaV9kWFFYUFZ4WjFhdXhiV0ZfdXMiLCJkcSI6InFaeFVVY2xhWVhLZ3N5Q3dhczRZUDFwTDAzeHpUNHk5ME5hdWNOVEhYZ0s0X2NidlRxbGxlWjQtTUswcXBkZnAzOXIyLWRXZXplbzVMeGMwVFd2eUwzMVZGYU9QMmJOQklKam9VbE9ldFkwMi1vWVM1NjJZWVdVQVNOandXNnFXY21NV2RlZjFIM3VuUDVqTVVxdlhRTTAxNjVnV2ZiN09YRjJyU0thc3JIVSIsInFpIjoiVzNhUDJmdTB1N1JVWWVubzIyNkljRjNBaEZzY3NWam55NmNGdWNGanNIbUg2V1BNYTU0dS1MWFRaYllSTFBCOFVvdHA3UjhEU0NoeEhtMjhjaDdqNTRnZkdWNmFlQVVPZXRiUEhCbGJudnQ1M2hFdERTLTlYVF8xYWtJNngwWk1Mc3F3eEZuZ2NSMF93S0V5Zzh2c1BlT2gwdlZsamkyNkpyZnNNZU9fakxvIn0=", "created": "2021-06-15T21:06:54.763937286Z" }, "success": true, "errors": [], "messages": [] } ``` Save these values as they won't be shown again. You will use these values later to generate the tokens. The pem and jwk fields are base64-encoded, you must decode them before using them (an example of this is shown in step 2). ### Step 2: Generate tokens using the key Once you generate the key in step 1, you can use the `pem` or `jwk` values to generate self-signing URLs on your own. Using this method, you do not need to call the Stream API each time you are creating a new token. Here's an example Cloudflare Worker script which generates tokens that expire in 60 minutes and only work for users accessing the video from UK. In lines 2 and 3, you will configure the `id` and `jwk` values from step 1: ```javascript // Global variables const jwkKey = "{PRIVATE-KEY-IN-JWK-FORMAT}"; const keyID = ""; const videoUID = ""; // expiresTimeInS is the expired time in second of the video const expiresTimeInS = 3600; // Main function async function streamSignedUrl() { const encoder = new TextEncoder(); const expiresIn = Math.floor(Date.now() / 1000) + expiresTimeInS; const headers = { alg: "RS256", kid: keyID, }; const data = { sub: videoUID, kid: keyID, exp: expiresIn, accessRules: [ { type: "ip.geoip.country", action: "allow", country: ["GB"], }, { type: "any", action: "block", }, ], }; const token = `${objectToBase64url(headers)}.${objectToBase64url(data)}`; const jwk = JSON.parse(atob(jwkKey)); const key = await crypto.subtle.importKey( "jwk", jwk, { name: "RSASSA-PKCS1-v1_5", hash: "SHA-256", }, false, ["sign"], ); const signature = await crypto.subtle.sign( { name: "RSASSA-PKCS1-v1_5" }, key, encoder.encode(token), ); const signedToken = `${token}.${arrayBufferToBase64Url(signature)}`; return signedToken; } // Utilities functions function arrayBufferToBase64Url(buffer) { return btoa(String.fromCharCode(...new Uint8Array(buffer))) .replace(/=/g, "") .replace(/\+/g, "-") .replace(/\//g, "_"); } function objectToBase64url(payload) { return arrayBufferToBase64Url( new TextEncoder().encode(JSON.stringify(payload)), ); } ``` ### Step 3: Rendering the video If you are using the Stream Player, insert the token returned by the Worker in Step 2 in place of the video id: ```html ``` If you are using your own player, replace the video id in the manifest url with the `token` value: `https://customer-.cloudflarestream.com/eyJhbGciOiJSUzI1NiIsImtpZCI6ImNkYzkzNTk4MmY4MDc1ZjJlZjk2MTA2ZDg1ZmNkODM4In0.eyJraWQiOiJjZGM5MzU5ODJmODA3NWYyZWY5NjEwNmQ4NWZjZDgzOCIsImV4cCI6IjE2MjE4ODk2NTciLCJuYmYiOiIxNjIxODgyNDU3In0.iHGMvwOh2-SuqUG7kp2GeLXyKvMavP-I2rYCni9odNwms7imW429bM2tKs3G9INms8gSc7fzm8hNEYWOhGHWRBaaCs3U9H4DRWaFOvn0sJWLBitGuF_YaZM5O6fqJPTAwhgFKdikyk9zVzHrIJ0PfBL0NsTgwDxLkJjEAEULQJpiQU1DNm0w5ctasdbw77YtDwdZ01g924Dm6jIsWolW0Ic0AevCLyVdg501Ki9hSF7kYST0egcll47jmoMMni7ujQCJI1XEAOas32DdjnMvU8vXrYbaHk1m1oXlm319rDYghOHed9kr293KM7ivtZNlhYceSzOpyAmqNFS7mearyQ/manifest/video.m3u8` ### Revoking keys You can create up to 1,000 keys and rotate them at your convenience. Once revoked all tokens created with that key will be invalidated. ```bash curl --request DELETE \ "https://api.cloudflare.com/client/v4/accounts/{account_id}/stream/keys/{key_id}" \ --header "Authorization: Bearer " # Response: { "result": "Revoked", "success": true, "errors": [], "messages": [] } ``` ## Supported Restrictions | Property Name | Description | | | - | - | - | | exp | Expiration. A unix epoch timestamp after which the token will stop working. Cannot be greater than 24 hours in the future from when the token is signed | | | nbf | *Not Before* value. A unix epoch timestamp before which the token will not work | | | downloadable | if true, the token can be used to download the mp4 (assuming the video has downloads enabled) | | | accessRules | An array that specifies one or more ip and geo restrictions. accessRules are evaluated first-to-last. If a Rule matches, the associated action is applied and no further rules are evaluated. A token may have at most 5 members in the accessRules array. | | ### accessRules Schema Each accessRule must include 2 required properties: * `type`: supported values are `any`, `ip.src` and `ip.geoip.country` * `action`: support values are `allow` and `block` Depending on the rule type, accessRules support 2 additional properties: * `country`: an array of 2-letter country codes in [ISO 3166-1 Alpha 2](https://www.iso.org/obp/ui/#search) format. * `ip`: an array of ip ranges. It is recommended to include both IPv4 and IPv6 variants in a rule if possible. Having only a single variant in a rule means that rule will ignore the other variant. For example, an IPv4-based rule will never be applicable to a viewer connecting from an IPv6 address. CIDRs should be preferred over specific IP addresses. Some devices, such as mobile, may change their IP over the course of a view. Video Access Control are evaluated continuously while a video is being viewed. As a result, overly strict IP rules may disrupt playback. ***Example 1: Block views from a specific country*** ```txt ... "accessRules": [ { "type": "ip.geoip.country", "action": "block", "country": ["US", "DE", "MX"], }, ] ``` The first rule matches on country, US, DE, and MX here. When that rule matches, the block action will have the token considered invalid. If the first rule doesn't match, there are no further rules to evaluate. The behavior in this situation is to consider the token valid. ***Example 2: Allow only views from specific country or IPs*** ```txt ... "accessRules": [ { "type": "ip.geoip.country", "country": ["US", "MX"], "action": "allow", }, { "type": "ip.src", "ip": ["93.184.216.0/24", "2400:cb00::/32"], "action": "allow", }, { "type": "any", "action": "block", }, ] ``` The first rule matches on country, US and MX here. When that rule matches, the allow action will have the token considered valid. If it doesn't match we continue evaluating rules The second rule is an IP rule matching on CIDRs, 93.184.216.0/24 and 2400:cb00::/32. When that rule matches, the allow action will consider the rule valid. If the first two rules don't match, the final rule of any will match all remaining requests and block those views. ## Security considerations ### Hotlinking Protection By default, Stream embed codes can be used on any domain. If needed, you can limit the domains a video can be embedded on from the Stream dashboard. In the dashboard, you will see a text box by each video labeled `Enter allowed origin domains separated by commas`. If you click on it, you can list the domains that the Stream embed code should be able to be used on. \` * `*.badtortilla.com` covers `a.badtortilla.com`, `a.b.badtortilla.com` and does not cover `badtortilla.com` * `example.com` does not cover [www.example.com](http://www.example.com) or any subdomain of example.com * `localhost` requires a port if it is not being served over HTTP on port 80 or over HTTPS on port 443 * There is no path support - `example.com` covers `example.com/\*` You can also control embed limitation programmatically using the Stream API. `uid` in the example below refers to the video id. ```bash curl https://api.cloudflare.com/client/v4/accounts/{account_id}/stream/{video_uid} \ --header "Authorization: Bearer " \ --data "{\"uid\": \"\", \"allowedOrigins\": [\"example.com\"]}" ``` ### Allowed Origins The Allowed Origins feature lets you specify which origins are allowed for playback. This feature works even if you are using your own video player. When using your own video player, Allowed Origins restricts which domain the HLS/DASH manifests and the video segments can be requested from. ### Signed URLs Combining signed URLs with embedding restrictions allows you to strongly control how your videos are viewed. This lets you serve only trusted users while preventing the signed URL from being hosted on an unknown site. --- title: Use your own player · Cloudflare Stream docs description: Cloudflare Stream is compatible with all video players that support HLS and DASH, which are standard formats for streaming media with broad support across all web browsers, mobile operating systems and media streaming devices. lastUpdated: 2024-12-16T22:33:26.000Z chatbotDeprioritize: false source_url: html: https://developers.cloudflare.com/stream/viewing-videos/using-own-player/ md: https://developers.cloudflare.com/stream/viewing-videos/using-own-player/index.md --- Cloudflare Stream is compatible with all video players that support HLS and DASH, which are standard formats for streaming media with broad support across all web browsers, mobile operating systems and media streaming devices. Platform-specific guides: * [Web](https://developers.cloudflare.com/stream/viewing-videos/using-own-player/web/) * [iOS (AVPlayer)](https://developers.cloudflare.com/stream/viewing-videos/using-own-player/ios/) * [Android (ExoPlayer)](https://developers.cloudflare.com/stream/viewing-videos/using-own-player/android/) ## Fetch HLS and Dash manifests ### URL Each video and live stream has its own unique HLS and DASH manifest. You can access the manifest by replacing `` with the UID of your video or live input, and replacing `` with your unique customer code, in the URLs below: ```txt https://customer-.cloudflarestream.com//manifest/video.m3u8 ``` ```txt https://customer-.cloudflarestream.com//manifest/video.mpd ``` #### LL-HLS playback Beta If a Live Inputs is enabled for the Low-Latency HLS beta, add the query string `?protocol=llhls` to the HLS manifest URL to test the low latency manifest in a custom player. Refer to [Start a Live Stream](https://developers.cloudflare.com/stream/stream-live/start-stream-live/#use-the-api) to enable this option. ```txt https://customer-.cloudflarestream.com//manifest/video.m3u8?protocol=llhls ``` ### Dashboard 1. Log into the [Stream Dashboard](https://dash.cloudflare.com/?to=/:account/stream). 2. From the list of videos, locate your video and select it. 3. From the **Settings** tab, locate the **HLS Manifest URL** and **Dash Manifest URL**. 4. Select **Click to copy** under the option you want to use. ### API Refer to the [Stream video details API documentation](https://developers.cloudflare.com/api/resources/stream/methods/get/) to learn how to fetch the manifest URLs using the Cloudflare API. ## Customize manifests by specifying available client bandwidth Each HLS and DASH manifest provides multiple resolutions of your video or live stream. Your player contains adaptive bitrate logic to estimate the viewer's available bandwidth, and select the optimal resolution to play. Each player has different logic that makes this decision, and most have configuration options to allow you to customize or override either bandwidth or resolution. If your player lacks such configuration options or you need to override them, you can add the `clientBandwidthHint` query param to the request to fetch the manifest file. This should be used only as a last resort — we recommend first using customization options provided by your player. Remember that while you may be developing your website or app on a fast Internet connection, and be tempted to use this setting to force high quality playback, many of your viewers are likely connecting over slower mobile networks. * `clientBandwidthHint` float * Return only the video representation closest to the provided bandwidth value (in Mbps). This can be used to enforce a specific quality level. If you specify a value that would cause an invalid or empty manifest to be served, the hint is ignored. Refer to the example below to display only the video representation with a bitrate closest to 1.8 Mbps. ```txt https://customer-f33zs165nr7gyfy4.cloudflarestream.com/6b9e68b07dfee8cc2d116e4c51d6a957/manifest/video.m3u8?clientBandwidthHint=1.8 ``` ## Play live video in native apps with less than 1 second latency If you need ultra low latency, and your users view live video in native apps, you can stream live video with [**glass-to-glass latency of less than 1 second**](https://blog.cloudflare.com/magic-hdmi-cable/), by using SRT or RTMPS for playback. ![Diagram showing SRT and RTMPS playback via the Cloudflare Network](https://developers.cloudflare.com/_astro/stream-rtmps-srt-playback-magic-hdmi-cable.D_FiXuDG_GmHW7.webp) 
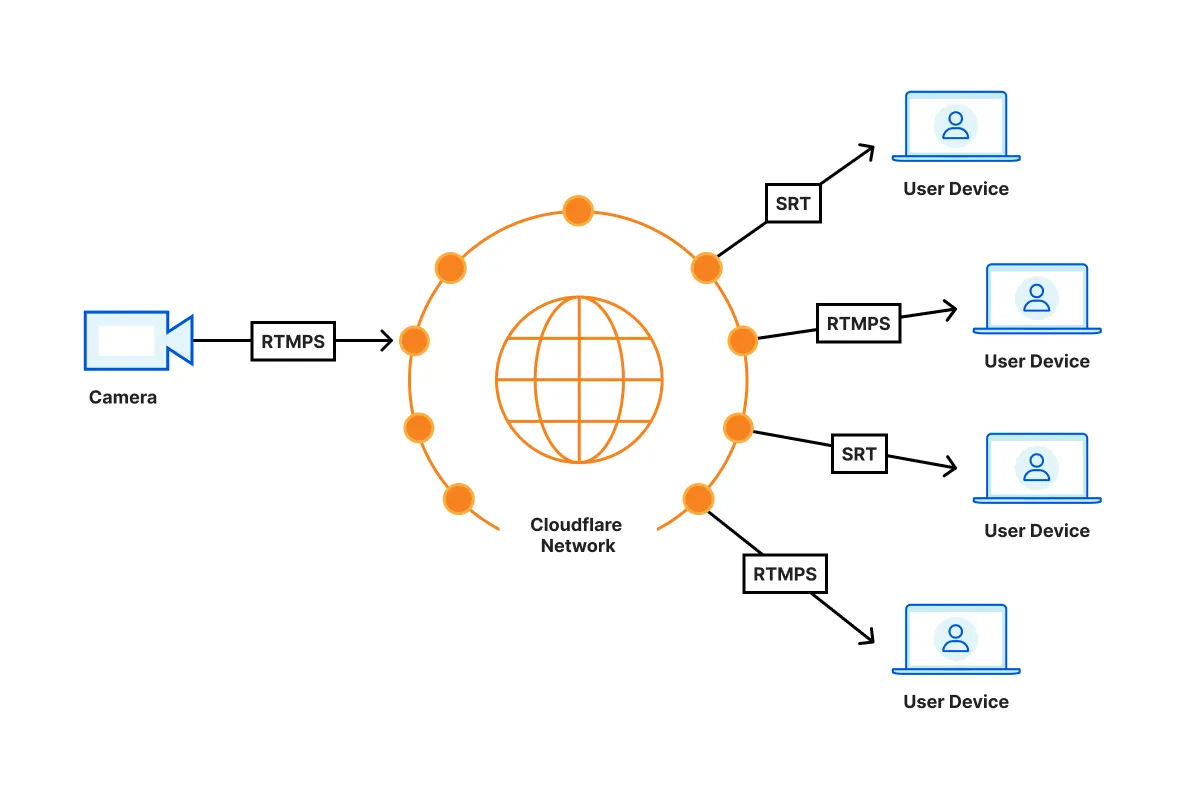
SRT and RTMPS playback is built into [ffmpeg](https://ffmpeg.org/). You will need to integrate ffmpeg with your own video player —  neither [AVPlayer (iOS)](https://developers.cloudflare.com/stream/viewing-videos/using-own-player/ios/) nor [ExoPlayer (Android)](https://developers.cloudflare.com/stream/viewing-videos/using-own-player/android/) natively support SRT or RTMPS playback. Note Stream only supports the SRT caller mode, which is responsible for broadcasting a live stream after a connection is established. We recommend using [ffmpeg-kit](https://github.com/arthenica/ffmpeg-kit) as a cross-platform wrapper for ffmpeg. ### Examples * [RTMPS Playback with ffplay](https://developers.cloudflare.com/stream/examples/rtmps_playback/) * [SRT playback with ffplay](https://developers.cloudflare.com/stream/examples/srt_playback/) --- title: Use the Stream Player · Cloudflare Stream docs description: Cloudflare provides a customizable web player that can play both on-demand and live video, and requires zero additional engineering work. lastUpdated: 2025-05-26T08:19:42.000Z chatbotDeprioritize: false source_url: html: https://developers.cloudflare.com/stream/viewing-videos/using-the-stream-player/ md: https://developers.cloudflare.com/stream/viewing-videos/using-the-stream-player/index.md --- Cloudflare provides a customizable web player that can play both on-demand and live video, and requires zero additional engineering work. To add the Stream Player to a web page, you can either: * Generate an embed code in the [Stream Dashboard](https://dash.cloudflare.com/?to=/:account/stream) for a specific video or live input. * Use the code example below, replacing `` with the video UID (or [signed token](https://developers.cloudflare.com/stream/viewing-videos/securing-your-stream/)) and `` with the your unique customer code, which can be found in the [Stream Dashboard](https://dash.cloudflare.com/?to=/:account/stream). ```html ``` Stream player is also available as a [React](https://www.npmjs.com/package/@cloudflare/stream-react) or [Angular](https://www.npmjs.com/package/@cloudflare/stream-angular) component. ## Player Size ### Fixed Dimensions Changing the `height` and `width` attributes on the `iframe` will change the pixel value dimensions of the iframe displayed on the host page. ```html ``` ### Responsive To make an iframe responsive, it needs styles to enforce an aspect ratio by setting the `iframe` to `position: absolute;` and having it fill a container that uses a calculated `padding-top` percentage. ```html
    ``` ## Basic Options Player options are configured with querystring parameters in the iframe's `src` attribute. For example: `https://customer-.cloudflarestream.com//iframe?autoplay=true&muted=true` * `autoplay` default: `false` * If the autoplay flag is included as a querystring parameter, the player will attempt to autoplay the video. If you don't want the video to autoplay, don't include the autoplay flag at all (instead of setting it to `autoplay=false`.) Note that mobile browsers generally do not support this attribute, the user must tap the screen to begin video playback. Please consider mobile users or users with Internet usage limits as some users don't have unlimited Internet access before using this attribute. Warning Some browsers now prevent videos with audio from playing automatically. You may set `muted` to `true` to allow your videos to autoplay. For more information, refer to [New `
    --- title: Create indexes · Cloudflare Vectorize docs description: Indexes are the "atom" of Vectorize. Vectors are inserted into an index and enable you to query the index for similar vectors for a given input vector. lastUpdated: 2024-12-20T13:36:28.000Z chatbotDeprioritize: false source_url: html: https://developers.cloudflare.com/vectorize/best-practices/create-indexes/ md: https://developers.cloudflare.com/vectorize/best-practices/create-indexes/index.md --- Indexes are the "atom" of Vectorize. Vectors are inserted into an index and enable you to query the index for similar vectors for a given input vector. Creating an index requires three inputs: * A name, for example `prod-search-index` or `recommendations-idx-dev`. * The (fixed) [dimension size](#dimensions) of each vector, for example 384 or 1536. * The (fixed) [distance metric](#distance-metrics) to use for calculating vector similarity. An index cannot be created using the same name as an index that is currently active on your account. However, an index can be created with a name that belonged to an index that has been deleted. The configuration of an index cannot be changed after creation. ## Create an index ### wrangler CLI Wrangler version 3.71.0 required Vectorize V2 requires [wrangler](https://developers.cloudflare.com/workers/wrangler/install-and-update/) version `3.71.0` or later. Ensure you have the latest version of `wrangler` installed, or use `npx wrangler@latest vectorize` to always use the latest version. Using legacy Vectorize (V1) indexes? Please use the `wrangler vectorize --deprecated-v1` flag to create, get, list, delete and insert vectors into legacy Vectorize V1 indexes. Please note that by December 2024, you will not be able to create legacy Vectorize indexes. Other operations will remain functional. Refer to the [legacy transition](https://developers.cloudflare.com/vectorize/reference/transition-vectorize-legacy) page for more details on transitioning away from legacy indexes. To create an index with `wrangler`: ```sh npx wrangler vectorize create your-index-name --dimensions=NUM_DIMENSIONS --metric=SELECTED_METRIC ``` To create an index that can accept vector embeddings from Worker's AI's [`@cf/baai/bge-base-en-v1.5`](https://developers.cloudflare.com/workers-ai/models/#text-embeddings) embedding model, which outputs vectors with 768 dimensions, use the following command: ```sh npx wrangler vectorize create your-index-name --dimensions=768 --metric=cosine ``` ### HTTP API Vectorize also supports creating indexes via [REST API](https://developers.cloudflare.com/api/resources/vectorize/subresources/indexes/methods/create/). For example, to create an index directly from a Python script: ```py import requests url = "https://api.cloudflare.com/client/v4/accounts/{}/vectorize/v2/indexes".format("your-account-id") headers = { "Authorization": "Bearer " } body = { "name": "demo-index" "description": "some index description", "config": { "dimensions": 1024, "metric": "euclidean" }, } resp = requests.post(url, headers=headers, json=body) print('Status Code:', resp.status_code) print('Response JSON:', resp.json()) ``` This script should print the response with a status code `201`, along with a JSON response body indicating the creation of an index with the provided configuration. ## Dimensions Dimensions are determined from the output size of the machine learning (ML) model used to generate them, and are a function of how the model encodes and describes features into a vector embedding. The number of output dimensions can determine vector search accuracy, search performance (latency), and the overall size of the index. Smaller output dimensions can be faster to search across, which can be useful for user-facing applications. Larger output dimensions can provide more accurate search, especially over larger datasets and/or datasets with substantially similar inputs. The number of dimensions an index is created for cannot change. Indexes expect to receive dense vectors with the same number of dimensions. The following table highlights some example embeddings models and their output dimensions: | Model / Embeddings API | Output dimensions | Use-case | | - | - | - | | Workers AI - `@cf/baai/bge-base-en-v1.5` | 768 | Text | | OpenAI - `ada-002` | 1536 | Text | | Cohere - `embed-multilingual-v2.0` | 768 | Text | | Google Cloud - `multimodalembedding` | 1408 | Multi-modal (text, images) | Learn more about Workers AI Refer to the [Workers AI documentation](https://developers.cloudflare.com/workers-ai/models/#text-embeddings) to learn about its built-in embedding models. ## Distance metrics Distance metrics are functions that determine how close vectors are from each other. Vectorize indexes support the following distance metrics: | Metric | Details | | - | - | | `cosine` | Distance is measured between `-1` (most dissimilar) to `1` (identical). `0` denotes an orthogonal vector. | | `euclidean` | Euclidean (L2) distance. `0` denotes identical vectors. The larger the positive number, the further the vectors are apart. | | `dot-product` | Negative dot product. Larger negative values *or* smaller positive values denote more similar vectors. A score of `-1000` is more similar than `-500`, and a score of `15` more similar than `50`. | Determining the similarity between vectors can be subjective based on how the machine-learning model that represents features in the resulting vector embeddings. For example, a score of `0.8511` when using a `cosine` metric means that two vectors are close in distance, but whether data they represent is *similar* is a function of how well the model is able to represent the original content. When querying vectors, you can specify Vectorize to use either: * High-precision scoring, which increases the precision of the query matches scores as well as the accuracy of the query results. * Approximate scoring for faster response times. Using approximate scoring, returned scores will be an approximation of the real distance/similarity between your query and the returned vectors. Refer to [Control over scoring precision and query accuracy](https://developers.cloudflare.com/vectorize/best-practices/query-vectors/#control-over-scoring-precision-and-query-accuracy). Distance metrics cannot be changed after index creation, and that each metric has a different scoring function. --- title: Insert vectors · Cloudflare Vectorize docs description: "Vectorize indexes allow you to insert vectors at any point: Vectorize will optimize the index behind the scenes to ensure that vector search remains efficient, even as new vectors are added or existing vectors updated." lastUpdated: 2025-07-04T12:09:06.000Z chatbotDeprioritize: false source_url: html: https://developers.cloudflare.com/vectorize/best-practices/insert-vectors/ md: https://developers.cloudflare.com/vectorize/best-practices/insert-vectors/index.md --- Vectorize indexes allow you to insert vectors at any point: Vectorize will optimize the index behind the scenes to ensure that vector search remains efficient, even as new vectors are added or existing vectors updated. Insert vs Upsert If the same vector id is *inserted* twice in a Vectorize index, the index would reflect the vector that was added first. If the same vector id is *upserted* twice in a Vectorize index, the index would reflect the vector that was added last. Use the upsert operation if you want to overwrite the vector value for a vector id that already exists in an index. ## Supported vector formats Vectorize supports the insert/upsert of vectors in three formats: * An array of floating point numbers (converted into a JavaScript `number[]` array). * A [Float32Array](https://developer.mozilla.org/en-US/docs/Web/JavaScript/Reference/Global_Objects/Float32Array) * A [Float64Array](https://developer.mozilla.org/en-US/docs/Web/JavaScript/Reference/Global_Objects/Float64Array) In most cases, a `number[]` array is the easiest when dealing with other APIs, and is the return type of most machine-learning APIs. Vectorize stores and restitutes vector dimensions as Float32; vector dimensions provided as Float64 will be converted to Float32 before being stored. ## Metadata Metadata is an optional set of key-value pairs that can be attached to a vector on insert or upsert, and allows you to embed or co-locate data about the vector itself. Metadata keys cannot be empty, contain the dot character (`.`), contain the double-quote character (`"`), or start with the dollar character (`$`). Metadata can be used to: * Include the object storage key, database UUID or other identifier to look up the content the vector embedding represents. * Store JSON data (up to the [metadata limits](https://developers.cloudflare.com/vectorize/platform/limits/)), which can allow you to skip additional lookups for smaller content. * Keep track of dates, timestamps, or other metadata that describes when the vector embedding was generated or how it was generated. For example, a vector embedding representing an image could include the path to the [R2 object](https://developers.cloudflare.com/r2/) it was generated from, the format, and a category lookup: ```ts { id: '1', values: [32.4, 74.1, 3.2, ...], metadata: { path: 'r2://bucket-name/path/to/image.png', format: 'png', category: 'profile_image' } } ``` ### Performance Tips When Filtering by Metadata When creating metadata indexes for a large Vectorize index, we encourage users to think ahead and plan how they will query for vectors with filters on this metadata. Carefully consider the cardinality of metadata values in relation to your queries. Cardinality is the level of uniqueness of data values within a set. Low cardinality means there are only a few unique values: for instance, the number of planets in the Solar System; the number of countries in the world. High cardinality means there are many unique values: UUIv4 strings; timestamps with millisecond precision. High cardinality is good for the selectiveness of the equal (`$eq`) filter. For example, if you want to find vectors associated with one user's id. But the filter is not going to help if all vectors have the same value. That's an example of extreme low cardinality. High cardinality can also impact range queries, which searches across multiple unqiue metadata values. For example, an indexed metadata value using millisecond timestamps will see lower performance if the range spans long periods of time in which thousands of vectors with unique timestamps were written. Behind the scenes, Vectorize uses a reverse index to map values to vector ids. If the number of unique values in a particular range is too high, then that requires reading large portions of the index (a full index scan in the worst case). This would lead to memory issues, so Vectorize will degrade performance and the accuracy of the query in order to finish the request. One approach for high cardinality data is to somehow create buckets where more vectors get grouped to the same value. Continuing the millisecond timestamp example, let's imagine we typically filter with date ranges that have 5 minute increments of granularity. We could use a timestamp which is rounded down to the last 5 minute point. This "windows" our metadata values into 5 minute increments. And we can still store the original millisecond timestamp as a separate non-indexed field. ## Namespaces Namespaces provide a way to segment the vectors within your index. For example, by customer, merchant or store ID. To associate vectors with a namespace, you can optionally provide a `namespace: string` value when performing an insert or upsert operation. When querying, you can pass the namespace to search within as an optional parameter to your query. A namespace can be up to 64 characters (bytes) in length and you can have up to 1,000 namespaces per index. Refer to the [Limits](https://developers.cloudflare.com/vectorize/platform/limits/) documentation for more details. When a namespace is specified in a query operation, only vectors within that namespace are used for the search. Namespace filtering is applied before vector search, increasing the precision of the matched results. To insert vectors with a namespace: ```ts // Mock vectors // Vectors from a machine-learning model are typically ~100 to 1536 dimensions // wide (or wider still). const sampleVectors: Array = [ { id: "1", values: [32.4, 74.1, 3.2, ...], namespace: "text", }, { id: "2", values: [15.1, 19.2, 15.8, ...], namespace: "images", }, { id: "3", values: [0.16, 1.2, 3.8, ...], namespace: "pdfs", }, ]; // Insert your vectors, returning a count of the vectors inserted and their vector IDs. let inserted = await env.TUTORIAL_INDEX.insert(sampleVectors); ``` To query vectors within a namespace: ```ts // Your queryVector will be searched against vectors within the namespace (only) let matches = await env.TUTORIAL_INDEX.query(queryVector, { namespace: "images", }); ``` ## Improve Write Throughput One way to reduce the time to make updates visible in queries is to batch more vectors into fewer requests. This is important for write-heavy workloads. To see how many vectors you can write in a single request, please refer to the [Limits](https://developers.cloudflare.com/vectorize/platform/limits/) page. Vectorize writes changes immeditely to a write ahead log for durability. To make these writes visible for reads, an asynchronous job needs to read the current index files from R2, create an updated index, write the new index files back to R2, and commit the change. To keep the overhead of writes low and improve write throughput, Vectorize will combine multiple changes together into a single batch. It sets the maximum size of a batch to 200,000 total vectors or to 1,000 individual updates, whichever limit it hits first. For example, let's say we have 250,000 vectors we would like to insert into our index. We decide to insert them one at a time, calling the insert API 250,000 times. Vectorize will only process 1000 vectors in each job, and will need to work through 250 total jobs. This could take at least an hour to do. The better approach is to batch our updates. For example, we can split our 250,000 vectors into 100 files, where each file has 2,500 vectors. We would call the insert HTTP API 100 times. Vectorize would update the index in only 2 or 3 jobs. All 250,000 vectors will visible in queries within minutes. ## Examples ### Workers API Use the `insert()` and `upsert()` methods available on an index from within a Cloudflare Worker to insert vectors into the current index. ```ts // Mock vectors // Vectors from a machine-learning model are typically ~100 to 1536 dimensions // wide (or wider still). const sampleVectors: Array = [ { id: "1", values: [32.4, 74.1, 3.2, ...], metadata: { url: "/products/sku/13913913" }, }, { id: "2", values: [15.1, 19.2, 15.8, ...], metadata: { url: "/products/sku/10148191" }, }, { id: "3", values: [0.16, 1.2, 3.8, ...], metadata: { url: "/products/sku/97913813" }, }, ]; // Insert your vectors, returning a count of the vectors inserted and their vector IDs. let inserted = await env.TUTORIAL_INDEX.insert(sampleVectors); ``` Refer to [Vectorize API](https://developers.cloudflare.com/vectorize/reference/client-api/) for additional examples. ### wrangler CLI Cloudflare API rate limit Please use a maximum of 5000 vectors per embeddings.ndjson file to prevent the global [rate limit](https://developers.cloudflare.com/fundamentals/api/reference/limits/) for the Cloudflare API. You can bulk upload vector embeddings directly: * The file must be in newline-delimited JSON (NDJSON format): each complete vector must be newline separated, and not within an array or object. * Vectors must be complete and include a unique string `id` per vector. An example NDJSON formatted file: ```json { "id": "4444", "values": [175.1, 167.1, 129.9], "metadata": {"url": "/products/sku/918318313"}} { "id": "5555", "values": [158.8, 116.7, 311.4], "metadata": {"url": "/products/sku/183183183"}} { "id": "6666", "values": [113.2, 67.5, 11.2], "metadata": {"url": "/products/sku/717313811"}} ``` Wrangler version 3.71.0 required Vectorize V2 requires [wrangler](https://developers.cloudflare.com/workers/wrangler/install-and-update/) version `3.71.0` or later. Ensure you have the latest version of `wrangler` installed, or use `npx wrangler@latest vectorize` to always use the latest version. ```sh wrangler vectorize insert --file=embeddings.ndjson ``` ### HTTP API Vectorize also supports inserting vectors via the [REST API](https://developers.cloudflare.com/api/resources/vectorize/subresources/indexes/methods/insert/), which allows you to operate on a Vectorize index from existing machine-learning tooling and languages (including Python). For example, to insert embeddings in [NDJSON format](#workers-api) directly from a Python script: ```py import requests url = "https://api.cloudflare.com/client/v4/accounts/{}/vectorize/v2/indexes/{}/insert".format("your-account-id", "index-name") headers = { "Authorization": "Bearer " } with open('embeddings.ndjson', 'rb') as embeddings: resp = requests.post(url, headers=headers, files=dict(vectors=embeddings)) print(resp) ``` This code would insert the vectors defined in `embeddings.ndjson` into the provided index. Python libraries, including Pandas, also support the NDJSON format via the built-in `read_json` method: ```py import pandas as pd data = pd.read_json('embeddings.ndjson', lines=True) ``` --- title: Query vectors · Cloudflare Vectorize docs description: Querying an index, or vector search, enables you to search an index by providing an input vector and returning the nearest vectors based on the configured distance metric. lastUpdated: 2024-11-07T15:13:22.000Z chatbotDeprioritize: false source_url: html: https://developers.cloudflare.com/vectorize/best-practices/query-vectors/ md: https://developers.cloudflare.com/vectorize/best-practices/query-vectors/index.md --- Querying an index, or vector search, enables you to search an index by providing an input vector and returning the nearest vectors based on the [configured distance metric](https://developers.cloudflare.com/vectorize/best-practices/create-indexes/#distance-metrics). Optionally, you can apply [metadata filters](https://developers.cloudflare.com/vectorize/reference/metadata-filtering/) or a [namespace](https://developers.cloudflare.com/vectorize/best-practices/insert-vectors/#namespaces) to narrow the vector search space. ## Example query To pass a vector as a query to an index, use the `query()` method on the index itself. A query vector is either an array of JavaScript numbers, 32-bit floating point or 64-bit floating point numbers: `number[]`, `Float32Array`, or `Float64Array`. Unlike when [inserting vectors](https://developers.cloudflare.com/vectorize/best-practices/insert-vectors/), a query vector does not need an ID or metadata. ```ts // query vector dimensions must match the Vectorize index dimension being queried let queryVector = [54.8, 5.5, 3.1, ...]; let matches = await env.YOUR_INDEX.query(queryVector); ``` This would return a set of matches resembling the following, based on the distance metric configured for the Vectorize index. Example response with `cosine` distance metric: ```json { "count": 5, "matches": [ { "score": 0.999909486, "id": "5" }, { "score": 0.789848214, "id": "4" }, { "score": 0.720476967, "id": "4444" }, { "score": 0.463884663, "id": "6" }, { "score": 0.378282232, "id": "1" } ] } ``` You can optionally change the number of results returned and/or whether results should include metadata and values: ```ts // query vector dimensions must match the Vectorize index dimension being queried let queryVector = [54.8, 5.5, 3.1, ...]; // topK defaults to 5; returnValues defaults to false; returnMetadata defaults to "none" let matches = await env.YOUR_INDEX.query(queryVector, { topK: 1, returnValues: true, returnMetadata: "all", }); ``` This would return a set of matches resembling the following, based on the distance metric configured for the Vectorize index. Example response with `cosine` distance metric: ```json { "count": 1, "matches": [ { "score": 0.999909486, "id": "5", "values": [58.79999923706055, 6.699999809265137, 3.4000000953674316, ...], "metadata": { "url": "/products/sku/55519183" } } ] } ``` Refer to [Vectorize API](https://developers.cloudflare.com/vectorize/reference/client-api/) for additional examples. ## Query by vector identifier Vectorize now offers the ability to search for vectors similar to a vector that is already present in the index using the `queryById()` operation. This can be considered as a single operation that combines the `getById()` and the `query()` operation. ```ts // the query operation would yield results if a vector with id `some-vector-id` is already present in the index. let matches = await env.YOUR_INDEX.queryById("some-vector-id"); ``` ## Control over scoring precision and query accuracy When querying vectors, you can specify to either use high-precision scoring, thereby increasing the precision of the query matches scores as well as the accuracy of the query results, or use approximate scoring for faster response times. Using approximate scoring, returned scores will be an approximation of the real distance/similarity between your query and the returned vectors; this is the query's default as it's a nice trade-off between accuracy and latency. High-precision scoring is enabled by setting `returnValues: true` on your query. This setting tells Vectorize to use the original vector values for your matches, allowing the computation of exact match scores and increasing the accuracy of the results. Because it processes more data, though, high-precision scoring will increase the latency of queries. ## Workers AI If you are generating embeddings from a [Workers AI](https://developers.cloudflare.com/workers-ai/models/#text-embeddings) text embedding model, the response type from `env.AI.run()` is an object that includes both the `shape` of the response vector - e.g. `[1,768]` - and the vector `data` as an array of vectors: ```ts interface EmbeddingResponse { shape: number[]; data: number[][]; } let userQuery = "a query from a user or service"; const queryVector: EmbeddingResponse = await env.AI.run( "@cf/baai/bge-base-en-v1.5", { text: [userQuery], }, ); ``` When passing the vector to the `query()` method of a Vectorize index, pass only the vector embedding itself on the `.data` sub-object, and not the top-level response. For example: ```ts let matches = await env.TEXT_EMBEDDINGS.query(queryVector.data[0], { topK: 1 }); ``` Passing `queryVector` or `queryVector.data` will cause `query()` to return an error. ## OpenAI When using OpenAI's [JavaScript client API](https://github.com/openai/openai-node) and [Embeddings API](https://platform.openai.com/docs/guides/embeddings/what-are-embeddings), the response type from `embeddings.create` is an object that includes the model, usage information and the requested vector embedding. ```ts const openai = new OpenAI({ apiKey: env.YOUR_OPENAPI_KEY }); let userQuery = "a query from a user or service"; let embeddingResponse = await openai.embeddings.create({ input: userQuery, model: "text-embedding-ada-002", }); ``` Similar to Workers AI, you will need to provide the vector embedding itself (`.embedding[0]`) and not the `EmbeddingResponse` wrapper when querying a Vectorize index: ```ts let matches = await env.TEXT_EMBEDDINGS.query(embeddingResponse.embedding[0], { topK: 1, }); ``` --- title: Agents · Cloudflare Vectorize docs description: Build AI-powered Agents on Cloudflare lastUpdated: 2025-01-29T20:30:56.000Z chatbotDeprioritize: false source_url: html: https://developers.cloudflare.com/vectorize/examples/agents/ md: https://developers.cloudflare.com/vectorize/examples/agents/index.md --- --- title: LangChain Integration · Cloudflare Vectorize docs lastUpdated: 2024-09-29T01:31:22.000Z chatbotDeprioritize: false source_url: html: https://developers.cloudflare.com/vectorize/examples/langchain/ md: https://developers.cloudflare.com/vectorize/examples/langchain/index.md --- --- title: Retrieval Augmented Generation · Cloudflare Vectorize docs lastUpdated: 2024-08-13T19:56:56.000Z chatbotDeprioritize: false source_url: html: https://developers.cloudflare.com/vectorize/examples/rag/ md: https://developers.cloudflare.com/vectorize/examples/rag/index.md --- --- title: Vectorize and Workers AI · Cloudflare Vectorize docs description: Vectorize allows you to generate vector embeddings using a machine-learning model, including the models available in Workers AI. lastUpdated: 2025-05-06T09:04:36.000Z chatbotDeprioritize: false source_url: html: https://developers.cloudflare.com/vectorize/get-started/embeddings/ md: https://developers.cloudflare.com/vectorize/get-started/embeddings/index.md --- Vectorize is now Generally Available To report bugs or give feedback, go to the [#vectorize Discord channel](https://discord.cloudflare.com). If you are having issues with Wrangler, report issues in the [Wrangler GitHub repository](https://github.com/cloudflare/workers-sdk/issues/new/choose). Vectorize allows you to generate [vector embeddings](https://developers.cloudflare.com/vectorize/reference/what-is-a-vector-database/) using a machine-learning model, including the models available in [Workers AI](https://developers.cloudflare.com/workers-ai/). New to Vectorize? If this is your first time using Vectorize or a vector database, start with the [Vectorize Get started guide](https://developers.cloudflare.com/vectorize/get-started/intro/). This guide will instruct you through: * Creating a Vectorize index. * Connecting a [Cloudflare Worker](https://developers.cloudflare.com/workers/) to your index. * Using [Workers AI](https://developers.cloudflare.com/workers-ai/) to generate vector embeddings. * Using Vectorize to query those vector embeddings. ## Prerequisites To continue: 1. Sign up for a [Cloudflare account](https://dash.cloudflare.com/sign-up/workers-and-pages) if you have not already. 2. Install [`npm`](https://docs.npmjs.com/getting-started). 3. Install [`Node.js`](https://nodejs.org/en/). Use a Node version manager like [Volta](https://volta.sh/) or [nvm](https://github.com/nvm-sh/nvm) to avoid permission issues and change Node.js versions. [Wrangler](https://developers.cloudflare.com/workers/wrangler/install-and-update/) requires a Node version of `16.17.0` or later. ## 1. Create a Worker You will create a new project that will contain a Worker script, which will act as the client application for your Vectorize index. Open your terminal and create a new project named `embeddings-tutorial` by running the following command: * npm ```sh npm create cloudflare@latest -- embeddings-tutorial ``` * yarn ```sh yarn create cloudflare embeddings-tutorial ``` * pnpm ```sh pnpm create cloudflare@latest embeddings-tutorial ``` For setup, select the following options: * For *What would you like to start with?*, choose `Hello World example`. * For *Which template would you like to use?*, choose `Worker only`. * For *Which language do you want to use?*, choose `TypeScript`. * For *Do you want to use git for version control?*, choose `Yes`. * For *Do you want to deploy your application?*, choose `No` (we will be making some changes before deploying). This will create a new `embeddings-tutorial` directory. Your new `embeddings-tutorial` directory will include: * A `"Hello World"` [Worker](https://developers.cloudflare.com/workers/get-started/guide/#3-write-code) at `src/index.ts`. * A [`wrangler.jsonc`](https://developers.cloudflare.com/workers/wrangler/configuration/) configuration file. `wrangler.jsonc` is how your `embeddings-tutorial` Worker will access your index. Note If you are familiar with Cloudflare Workers, or initializing projects in a Continuous Integration (CI) environment, initialize a new project non-interactively by setting `CI=true` as an [environmental variable](https://developers.cloudflare.com/workers/configuration/environment-variables/) when running `create cloudflare@latest`. For example: `CI=true npm create cloudflare@latest embeddings-tutorial --type=simple --git --ts --deploy=false` will create a basic "Hello World" project ready to build on. ## 2. Create an index A vector database is distinct from a traditional SQL or NoSQL database. A vector database is designed to store vector embeddings, which are representations of data, but not the original data itself. To create your first Vectorize index, change into the directory you just created for your Workers project: ```sh cd embeddings-tutorial ``` Using legacy Vectorize (V1) indexes? Please use the `wrangler vectorize --deprecated-v1` flag to create, get, list, delete and insert vectors into legacy Vectorize V1 indexes. Please note that by December 2024, you will not be able to create legacy Vectorize indexes. Other operations will remain functional. Refer to the [legacy transition](https://developers.cloudflare.com/vectorize/reference/transition-vectorize-legacy) page for more details on transitioning away from legacy indexes. To create an index, use the `wrangler vectorize create` command and provide a name for the index. A good index name is: * A combination of lowercase and/or numeric ASCII characters, shorter than 32 characters, starts with a letter, and uses dashes (-) instead of spaces. * Descriptive of the use-case and environment. For example, "production-doc-search" or "dev-recommendation-engine". * Only used for describing the index, and is not directly referenced in code. In addition, define both the `dimensions` of the vectors you will store in the index, as well as the distance `metric` used to determine similar vectors when creating the index. **This configuration cannot be changed later**, as a vector database is configured for a fixed vector configuration. Wrangler version 3.71.0 required Vectorize V2 requires [wrangler](https://developers.cloudflare.com/workers/wrangler/install-and-update/) version `3.71.0` or later. Ensure you have the latest version of `wrangler` installed, or use `npx wrangler@latest vectorize` to always use the latest version. Run the following `wrangler vectorize` command, ensuring that the `dimensions` are set to `768`: this is important, as the Workers AI model used in this tutorial outputs vectors with 768 dimensions. ```sh npx wrangler vectorize create embeddings-index --dimensions=768 --metric=cosine ``` ```sh ✅ Successfully created index 'embeddings-index' [[vectorize]] binding = "VECTORIZE" # available in your Worker on env.VECTORIZE index_name = "embeddings-index" ``` This will create a new vector database, and output the [binding](https://developers.cloudflare.com/workers/runtime-apis/bindings/) configuration needed in the next step. ## 3. Bind your Worker to your index You must create a binding for your Worker to connect to your Vectorize index. [Bindings](https://developers.cloudflare.com/workers/runtime-apis/bindings/) allow your Workers to access resources, like Vectorize or R2, from Cloudflare Workers. You create bindings by updating your Wrangler file. To bind your index to your Worker, add the following to the end of your Wrangler file: * wrangler.jsonc ```jsonc { "vectorize": [ { "binding": "VECTORIZE", "index_name": "embeddings-index" } ] } ``` * wrangler.toml ```toml [[vectorize]] binding = "VECTORIZE" # available in your Worker on env.VECTORIZE index_name = "embeddings-index" ``` Specifically: * The value (string) you set for `` will be used to reference this database in your Worker. In this tutorial, name your binding `VECTORIZE`. * The binding must be [a valid JavaScript variable name](https://developer.mozilla.org/en-US/docs/Web/JavaScript/Guide/Grammar_and_types#variables). For example, `binding = "MY_INDEX"` or `binding = "PROD_SEARCH_INDEX"` would both be valid names for the binding. * Your binding is available in your Worker at `env.` and the Vectorize [client API](https://developers.cloudflare.com/vectorize/reference/client-api/) is exposed on this binding for use within your Workers application. ## 4. Set up Workers AI Before you deploy your embedding example, ensure your Worker uses your model catalog, including the [text embedding model](https://developers.cloudflare.com/workers-ai/models/#text-embeddings) built-in. From within the `embeddings-tutorial` directory, open your Wrangler file in your editor and add the new `[[ai]]` binding to make Workers AI's models available in your Worker: * wrangler.jsonc ```jsonc { "vectorize": [ { "binding": "VECTORIZE", "index_name": "embeddings-index" } ], "ai": { "binding": "AI" } } ``` * wrangler.toml ```toml [[vectorize]] binding = "VECTORIZE" # available in your Worker on env.VECTORIZE index_name = "embeddings-index" [ai] binding = "AI" # available in your Worker on env.AI ``` With Workers AI ready, you can write code in your Worker. ## 5. Write code in your Worker To write code in your Worker, go to your `embeddings-tutorial` Worker and open the `src/index.ts` file. The `index.ts` file is where you configure your Worker's interactions with your Vectorize index. Clear the content of `index.ts`. Paste the following code snippet into your `index.ts` file. On the `env` parameter, replace `` with `VECTORIZE`: ```typescript export interface Env { VECTORIZE: Vectorize; AI: Ai; } interface EmbeddingResponse { shape: number[]; data: number[][]; } export default { async fetch(request, env, ctx): Promise { let path = new URL(request.url).pathname; if (path.startsWith("/favicon")) { return new Response("", { status: 404 }); } // You only need to generate vector embeddings once (or as // data changes), not on every request if (path === "/insert") { // In a real-world application, you could read content from R2 or // a SQL database (like D1) and pass it to Workers AI const stories = [ "This is a story about an orange cloud", "This is a story about a llama", "This is a story about a hugging emoji", ]; const modelResp: EmbeddingResponse = await env.AI.run( "@cf/baai/bge-base-en-v1.5", { text: stories, }, ); // Convert the vector embeddings into a format Vectorize can accept. // Each vector needs an ID, a value (the vector) and optional metadata. // In a real application, your ID would be bound to the ID of the source // document. let vectors: VectorizeVector[] = []; let id = 1; modelResp.data.forEach((vector) => { vectors.push({ id: `${id}`, values: vector }); id++; }); let inserted = await env.VECTORIZE.upsert(vectors); return Response.json(inserted); } // Your query: expect this to match vector ID. 1 in this example let userQuery = "orange cloud"; const queryVector: EmbeddingResponse = await env.AI.run( "@cf/baai/bge-base-en-v1.5", { text: [userQuery], }, ); let matches = await env.VECTORIZE.query(queryVector.data[0], { topK: 1, }); return Response.json({ // Expect a vector ID. 1 to be your top match with a score of // ~0.89693683 // This tutorial uses a cosine distance metric, where the closer to one, // the more similar. matches: matches, }); }, } satisfies ExportedHandler; ``` ## 6. Deploy your Worker Before deploying your Worker globally, log in with your Cloudflare account by running: ```sh npx wrangler login ``` You will be directed to a web page asking you to log in to the Cloudflare dashboard. After you have logged in, you will be asked if Wrangler can make changes to your Cloudflare account. Scroll down and select **Allow** to continue. From here, deploy your Worker to make your project accessible on the Internet. To deploy your Worker, run: ```sh npx wrangler deploy ``` Preview your Worker at `https://embeddings-tutorial..workers.dev`. ## 7. Query your index You can now visit the URL for your newly created project to insert vectors and then query them. With the URL for your deployed Worker (for example,`https://embeddings-tutorial..workers.dev/`), open your browser and: 1. Insert your vectors first by visiting `/insert`. 2. Query your index by visiting the index route - `/`. This should return the following JSON: ```json { "matches": { "count": 1, "matches": [ { "id": "1", "score": 0.89693683 } ] } } ``` Extend this example by: * Adding more inputs and generating a larger set of vectors. * Accepting a custom query parameter passed in the URL, for example via `URL.searchParams`. * Creating a new index with a different [distance metric](https://developers.cloudflare.com/vectorize/best-practices/create-indexes/#distance-metrics) and observing how your scores change in response to your inputs. By finishing this tutorial, you have successfully created a Vectorize index, used Workers AI to generate vector embeddings, and deployed your project globally. ## Next steps * Build a [generative AI chatbot](https://developers.cloudflare.com/workers-ai/guides/tutorials/build-a-retrieval-augmented-generation-ai/) using Workers AI and Vectorize. * Learn more about [how vector databases work](https://developers.cloudflare.com/vectorize/reference/what-is-a-vector-database/). * Read [examples](https://developers.cloudflare.com/vectorize/reference/client-api/) on how to use the Vectorize API from Cloudflare Workers. --- title: Introduction to Vectorize · Cloudflare Vectorize docs description: Vectorize is Cloudflare's vector database. Vector databases allow you to use machine learning (ML) models to perform semantic search, recommendation, classification and anomaly detection tasks, as well as provide context to LLMs (Large Language Models). lastUpdated: 2025-05-06T09:04:36.000Z chatbotDeprioritize: false source_url: html: https://developers.cloudflare.com/vectorize/get-started/intro/ md: https://developers.cloudflare.com/vectorize/get-started/intro/index.md --- Vectorize is now Generally Available To report bugs or give feedback, go to the [#vectorize Discord channel](https://discord.cloudflare.com). If you are having issues with Wrangler, report issues in the [Wrangler GitHub repository](https://github.com/cloudflare/workers-sdk/issues/new/choose). Vectorize is Cloudflare's vector database. Vector databases allow you to use machine learning (ML) models to perform semantic search, recommendation, classification and anomaly detection tasks, as well as provide context to LLMs (Large Language Models). This guide will instruct you through: * Creating your first Vectorize index. * Connecting a [Cloudflare Worker](https://developers.cloudflare.com/workers/) to your index. * Inserting and performing a similarity search by querying your index. ## Prerequisites Workers Free or Paid plans required Vectorize is available to all users on the [Workers Free or Paid plans](https://developers.cloudflare.com/workers/platform/pricing/#workers). To continue, you will need: 1. Sign up for a [Cloudflare account](https://dash.cloudflare.com/sign-up/workers-and-pages) if you have not already. 2. Install [`npm`](https://docs.npmjs.com/getting-started). 3. Install [`Node.js`](https://nodejs.org/en/). Use a Node version manager like [Volta](https://volta.sh/) or [nvm](https://github.com/nvm-sh/nvm) to avoid permission issues and change Node.js versions. [Wrangler](https://developers.cloudflare.com/workers/wrangler/install-and-update/) requires a Node version of `16.17.0` or later. ## 1. Create a Worker New to Workers? Refer to [How Workers works](https://developers.cloudflare.com/workers/reference/how-workers-works/) to learn about the Workers serverless execution model works. Go to the [Workers Get started guide](https://developers.cloudflare.com/workers/get-started/guide/) to set up your first Worker. You will create a new project that will contain a Worker, which will act as the client application for your Vectorize index. Create a new project named `vectorize-tutorial` by running: * npm ```sh npm create cloudflare@latest -- vectorize-tutorial ``` * yarn ```sh yarn create cloudflare vectorize-tutorial ``` * pnpm ```sh pnpm create cloudflare@latest vectorize-tutorial ``` For setup, select the following options: * For *What would you like to start with?*, choose `Hello World example`. * For *Which template would you like to use?*, choose `Worker only`. * For *Which language do you want to use?*, choose `TypeScript`. * For *Do you want to use git for version control?*, choose `Yes`. * For *Do you want to deploy your application?*, choose `No` (we will be making some changes before deploying). This will create a new `vectorize-tutorial` directory. Your new `vectorize-tutorial` directory will include: * A `"Hello World"` [Worker](https://developers.cloudflare.com/workers/get-started/guide/#3-write-code) at `src/index.ts`. * A [`wrangler.jsonc`](https://developers.cloudflare.com/workers/wrangler/configuration/) configuration file. `wrangler.jsonc` is how your `vectorize-tutorial` Worker will access your index. Note If you are familiar with Cloudflare Workers, or initializing projects in a Continuous Integration (CI) environment, initialize a new project non-interactively by setting `CI=true` as an [environmental variable](https://developers.cloudflare.com/workers/configuration/environment-variables/) when running `create cloudflare@latest`. For example: `CI=true npm create cloudflare@latest vectorize-tutorial --type=simple --git --ts --deploy=false` will create a basic "Hello World" project ready to build on. ## 2. Create an index A vector database is distinct from a traditional SQL or NoSQL database. A vector database is designed to store vector embeddings, which are representations of data, but not the original data itself. To create your first Vectorize index, change into the directory you just created for your Workers project: ```sh cd vectorize-tutorial ``` Using legacy Vectorize (V1) indexes? Please use the `wrangler vectorize --deprecated-v1` flag to create, get, list, delete and insert vectors into legacy Vectorize V1 indexes. Please note that by December 2024, you will not be able to create legacy Vectorize indexes. Other operations will remain functional. Refer to the [legacy transition](https://developers.cloudflare.com/vectorize/reference/transition-vectorize-legacy) page for more details on transitioning away from legacy indexes. To create an index, you will need to use the `wrangler vectorize create` command and provide a name for the index. A good index name is: * A combination of lowercase and/or numeric ASCII characters, shorter than 32 characters, starts with a letter, and uses dashes (-) instead of spaces. * Descriptive of the use-case and environment. For example, "production-doc-search" or "dev-recommendation-engine". * Only used for describing the index, and is not directly referenced in code. In addition, you will need to define both the `dimensions` of the vectors you will store in the index, as well as the distance `metric` used to determine similar vectors when creating the index. A `metric` can be euclidean, cosine, or dot product. **This configuration cannot be changed later**, as a vector database is configured for a fixed vector configuration. Wrangler version 3.71.0 required Vectorize V2 requires [wrangler](https://developers.cloudflare.com/workers/wrangler/install-and-update/) version `3.71.0` or later. Ensure you have the latest version of `wrangler` installed, or use `npx wrangler@latest vectorize` to always use the latest version. Run the following `wrangler vectorize` command: ```sh npx wrangler vectorize create tutorial-index --dimensions=32 --metric=euclidean ``` ```sh 🚧 Creating index: 'tutorial-index' ✅ Successfully created a new Vectorize index: 'tutorial-index' 📋 To start querying from a Worker, add the following binding configuration into 'wrangler.toml': [[vectorize]] binding = "VECTORIZE" # available in your Worker on env.VECTORIZE index_name = "tutorial-index" ``` The command above will create a new vector database, and output the [binding](https://developers.cloudflare.com/workers/runtime-apis/bindings/) configuration needed in the next step. ## 3. Bind your Worker to your index You must create a binding for your Worker to connect to your Vectorize index. [Bindings](https://developers.cloudflare.com/workers/runtime-apis/bindings/) allow your Workers to access resources, like Vectorize or R2, from Cloudflare Workers. You create bindings by updating the worker's Wrangler file. To bind your index to your Worker, add the following to the end of your Wrangler file: * wrangler.jsonc ```jsonc { "vectorize": [ { "binding": "VECTORIZE", "index_name": "tutorial-index" } ] } ``` * wrangler.toml ```toml [[vectorize]] binding = "VECTORIZE" # available in your Worker on env.VECTORIZE index_name = "tutorial-index" ``` Specifically: * The value (string) you set for `` will be used to reference this database in your Worker. In this tutorial, name your binding `VECTORIZE`. * The binding must be [a valid JavaScript variable name](https://developer.mozilla.org/en-US/docs/Web/JavaScript/Guide/Grammar_and_types#variables). For example, `binding = "MY_INDEX"` or `binding = "PROD_SEARCH_INDEX"` would both be valid names for the binding. * Your binding is available in your Worker at `env.` and the Vectorize [client API](https://developers.cloudflare.com/vectorize/reference/client-api/) is exposed on this binding for use within your Workers application. ## 4. \[Optional] Create metadata indexes Vectorize allows you to add up to 10KiB of metadata per vector into your index, and also provides the ability to filter on that metadata while querying vectors. To do so you would need to specify a metadata field as a "metadata index" for your Vectorize index. When to create metadata indexes? As of today, the metadata fields on which vectors can be filtered need to be specified before the vectors are inserted, and it is recommended that these metadata fields are specified right after the creation of a Vectorize index. To enable vector filtering on a metadata field during a query, use a command like: ```sh npx wrangler vectorize create-metadata-index tutorial-index --property-name=url --type=string ``` ```sh 📋 Creating metadata index... ✅ Successfully enqueued metadata index creation request. Mutation changeset identifier: xxxxxxxx-xxxx-xxxx-xxxx-xxxxxxxxxxxx. ``` Here `url` is the metadata field on which filtering would be enabled. The `--type` parameter defines the data type for the metadata field; `string`, `number` and `boolean` types are supported. It typically takes a few seconds for the metadata index to be created. You can check the list of metadata indexes for your Vectorize index by running: ```sh npx wrangler vectorize list-metadata-index tutorial-index ``` ```sh 📋 Fetching metadata indexes... ┌──────────────┬────────┐ │ propertyName │ type │ ├──────────────┼────────┤ │ url │ String │ └──────────────┴────────┘ ``` You can create up to 10 metadata indexes per Vectorize index. For metadata indexes of type `number`, the indexed number precision is that of float64. For metadata indexes of type `string`, each vector indexes the first 64B of the string data truncated on UTF-8 character boundaries to the longest well-formed UTF-8 substring within that limit, so vectors are filterable on the first 64B of their value for each indexed property. See [Vectorize Limits](https://developers.cloudflare.com/vectorize/platform/limits/) for a complete list of limits. ## 5. Insert vectors Before you can query a vector database, you need to insert vectors for it to query against. These vectors would be generated from data (such as text or images) you pass to a machine learning model. However, this tutorial will define static vectors to illustrate how vector search works on its own. First, go to your `vectorize-tutorial` Worker and open the `src/index.ts` file. The `index.ts` file is where you configure your Worker's interactions with your Vectorize index. Clear the content of `index.ts`, and paste the following code snippet into your `index.ts` file. On the `env` parameter, replace `` with `VECTORIZE`: ```typescript export interface Env { // This makes your vector index methods available on env.VECTORIZE.* // For example, env.VECTORIZE.insert() or query() VECTORIZE: Vectorize; } // Sample vectors: 32 dimensions wide. // // Vectors from popular machine-learning models are typically ~100 to 1536 dimensions // wide (or wider still). const sampleVectors: Array = [ { id: "1", values: [ 0.12, 0.45, 0.67, 0.89, 0.23, 0.56, 0.34, 0.78, 0.12, 0.9, 0.24, 0.67, 0.89, 0.35, 0.48, 0.7, 0.22, 0.58, 0.74, 0.33, 0.88, 0.66, 0.45, 0.27, 0.81, 0.54, 0.39, 0.76, 0.41, 0.29, 0.83, 0.55, ], metadata: { url: "/products/sku/13913913" }, }, { id: "2", values: [ 0.14, 0.23, 0.36, 0.51, 0.62, 0.47, 0.59, 0.74, 0.33, 0.89, 0.41, 0.53, 0.68, 0.29, 0.77, 0.45, 0.24, 0.66, 0.71, 0.34, 0.86, 0.57, 0.62, 0.48, 0.78, 0.52, 0.37, 0.61, 0.69, 0.28, 0.8, 0.53, ], metadata: { url: "/products/sku/10148191" }, }, { id: "3", values: [ 0.21, 0.33, 0.55, 0.67, 0.8, 0.22, 0.47, 0.63, 0.31, 0.74, 0.35, 0.53, 0.68, 0.45, 0.55, 0.7, 0.28, 0.64, 0.71, 0.3, 0.77, 0.6, 0.43, 0.39, 0.85, 0.55, 0.31, 0.69, 0.52, 0.29, 0.72, 0.48, ], metadata: { url: "/products/sku/97913813" }, }, { id: "4", values: [ 0.17, 0.29, 0.42, 0.57, 0.64, 0.38, 0.51, 0.72, 0.22, 0.85, 0.39, 0.66, 0.74, 0.32, 0.53, 0.48, 0.21, 0.69, 0.77, 0.34, 0.8, 0.55, 0.41, 0.29, 0.7, 0.62, 0.35, 0.68, 0.53, 0.3, 0.79, 0.49, ], metadata: { url: "/products/sku/418313" }, }, { id: "5", values: [ 0.11, 0.46, 0.68, 0.82, 0.27, 0.57, 0.39, 0.75, 0.16, 0.92, 0.28, 0.61, 0.85, 0.4, 0.49, 0.67, 0.19, 0.58, 0.76, 0.37, 0.83, 0.64, 0.53, 0.3, 0.77, 0.54, 0.43, 0.71, 0.36, 0.26, 0.8, 0.53, ], metadata: { url: "/products/sku/55519183" }, }, ]; export default { async fetch(request, env, ctx): Promise { let path = new URL(request.url).pathname; if (path.startsWith("/favicon")) { return new Response("", { status: 404 }); } // You only need to insert vectors into your index once if (path.startsWith("/insert")) { // Insert some sample vectors into your index // In a real application, these vectors would be the output of a machine learning (ML) model, // such as Workers AI, OpenAI, or Cohere. const inserted = await env.VECTORIZE.insert(sampleVectors); // Return the mutation identifier for this insert operation return Response.json(inserted); } return Response.json({ text: "nothing to do... yet" }, { status: 404 }); }, } satisfies ExportedHandler; ``` In the code above, you: 1. Define a binding to your Vectorize index from your Workers code. This binding matches the `binding` value you set in the `wrangler.jsonc` file under the `"vectorise"` key. 2. Specify a set of example vectors that you will query against in the next step. 3. Insert those vectors into the index and confirm it was successful. In the next step, you will expand the Worker to query the index and the vectors you insert. ## 6. Query vectors In this step, you will take a vector representing an incoming query and use it to search your index. First, go to your `vectorize-tutorial` Worker and open the `src/index.ts` file. The `index.ts` file is where you configure your Worker's interactions with your Vectorize index. Clear the content of `index.ts`. Paste the following code snippet into your `index.ts` file. On the `env` parameter, replace `` with `VECTORIZE`: ```typescript export interface Env { // This makes your vector index methods available on env.VECTORIZE.* // For example, env.VECTORIZE.insert() or query() VECTORIZE: Vectorize; } // Sample vectors: 32 dimensions wide. // // Vectors from popular machine-learning models are typically ~100 to 1536 dimensions // wide (or wider still). const sampleVectors: Array = [ { id: "1", values: [ 0.12, 0.45, 0.67, 0.89, 0.23, 0.56, 0.34, 0.78, 0.12, 0.9, 0.24, 0.67, 0.89, 0.35, 0.48, 0.7, 0.22, 0.58, 0.74, 0.33, 0.88, 0.66, 0.45, 0.27, 0.81, 0.54, 0.39, 0.76, 0.41, 0.29, 0.83, 0.55, ], metadata: { url: "/products/sku/13913913" }, }, { id: "2", values: [ 0.14, 0.23, 0.36, 0.51, 0.62, 0.47, 0.59, 0.74, 0.33, 0.89, 0.41, 0.53, 0.68, 0.29, 0.77, 0.45, 0.24, 0.66, 0.71, 0.34, 0.86, 0.57, 0.62, 0.48, 0.78, 0.52, 0.37, 0.61, 0.69, 0.28, 0.8, 0.53, ], metadata: { url: "/products/sku/10148191" }, }, { id: "3", values: [ 0.21, 0.33, 0.55, 0.67, 0.8, 0.22, 0.47, 0.63, 0.31, 0.74, 0.35, 0.53, 0.68, 0.45, 0.55, 0.7, 0.28, 0.64, 0.71, 0.3, 0.77, 0.6, 0.43, 0.39, 0.85, 0.55, 0.31, 0.69, 0.52, 0.29, 0.72, 0.48, ], metadata: { url: "/products/sku/97913813" }, }, { id: "4", values: [ 0.17, 0.29, 0.42, 0.57, 0.64, 0.38, 0.51, 0.72, 0.22, 0.85, 0.39, 0.66, 0.74, 0.32, 0.53, 0.48, 0.21, 0.69, 0.77, 0.34, 0.8, 0.55, 0.41, 0.29, 0.7, 0.62, 0.35, 0.68, 0.53, 0.3, 0.79, 0.49, ], metadata: { url: "/products/sku/418313" }, }, { id: "5", values: [ 0.11, 0.46, 0.68, 0.82, 0.27, 0.57, 0.39, 0.75, 0.16, 0.92, 0.28, 0.61, 0.85, 0.4, 0.49, 0.67, 0.19, 0.58, 0.76, 0.37, 0.83, 0.64, 0.53, 0.3, 0.77, 0.54, 0.43, 0.71, 0.36, 0.26, 0.8, 0.53, ], metadata: { url: "/products/sku/55519183" }, }, ]; export default { async fetch(request, env, ctx): Promise { let path = new URL(request.url).pathname; if (path.startsWith("/favicon")) { return new Response("", { status: 404 }); } // You only need to insert vectors into your index once if (path.startsWith("/insert")) { // Insert some sample vectors into your index // In a real application, these vectors would be the output of a machine learning (ML) model, // such as Workers AI, OpenAI, or Cohere. let inserted = await env.VECTORIZE.insert(sampleVectors); // Return the mutation identifier for this insert operation return Response.json(inserted); } // return Response.json({text: "nothing to do... yet"}, { status: 404 }) // In a real application, you would take a user query. For example, "what is a // vector database" - and transform it into a vector embedding first. // // In this example, you will construct a vector that should // match vector id #4 const queryVector: Array = [ 0.13, 0.25, 0.44, 0.53, 0.62, 0.41, 0.59, 0.68, 0.29, 0.82, 0.37, 0.5, 0.74, 0.46, 0.57, 0.64, 0.28, 0.61, 0.73, 0.35, 0.78, 0.58, 0.42, 0.32, 0.77, 0.65, 0.49, 0.54, 0.31, 0.29, 0.71, 0.57, ]; // vector of dimensions 32 // Query your index and return the three (topK = 3) most similar vector // IDs with their similarity score. // // By default, vector values are not returned, as in many cases the // vector id and scores are sufficient to map the vector back to the // original content it represents. const matches = await env.VECTORIZE.query(queryVector, { topK: 3, returnValues: true, returnMetadata: "all", }); return Response.json({ // This will return the closest vectors: the vectors are arranged according // to their scores. Vectors that are more similar would show up near the top. // In this example, Vector id #4 would turn out to be the most similar to the queried vector. // You return the full set of matches so you can check the possible scores. matches: matches, }); }, } satisfies ExportedHandler; ``` You can also use the Vectorize `queryById()` operation to search for vectors similar to a vector that is already present in the index. ## 7. Deploy your Worker Before deploying your Worker globally, log in with your Cloudflare account by running: ```sh npx wrangler login ``` You will be directed to a web page asking you to log in to the Cloudflare dashboard. After you have logged in, you will be asked if Wrangler can make changes to your Cloudflare account. Scroll down and select **Allow** to continue. From here, you can deploy your Worker to make your project accessible on the Internet. To deploy your Worker, run: ```sh npx wrangler deploy ``` Once deployed, preview your Worker at `https://vectorize-tutorial..workers.dev`. ## 8. Query your index To insert vectors and then query them, use the URL for your deployed Worker, such as `https://vectorize-tutorial..workers.dev/`. Open your browser and: 1. Insert your vectors first by visiting `/insert`. This should return the below JSON: ```json // https://vectorize-tutorial..workers.dev/insert { "mutationId": "xxxxxxxx-xxxx-xxxx-xxxx-xxxxxxxxxxxx" } ``` The mutationId here refers to a unique identifier that corresponds to this asynchronous insert operation. Typically it takes a few seconds for inserted vectors to be available for querying. You can use the index info operation to check the last processed mutation: ```sh npx wrangler vectorize info tutorial-index ``` ```sh 📋 Fetching index info... ┌────────────┬─────────────┬──────────────────────────────────────┬──────────────────────────┐ │ dimensions │ vectorCount │ processedUpToMutation │ processedUpToDatetime │ ├────────────┼─────────────┼──────────────────────────────────────┼──────────────────────────┤ │ 32 │ 5 │ xxxxxxxx-xxxx-xxxx-xxxx-xxxxxxxxxxxx │ YYYY-MM-DDThh:mm:ss.SSSZ │ └────────────┴─────────────┴──────────────────────────────────────┴──────────────────────────┘ ``` Subsequent inserts using the same vector ids will return a mutation id, but it would not change the index vector count since the same vector ids cannot be inserted twice. You will need to use an `upsert` operation instead to update the vector values for an id that already exists in an index. 1. Query your index - expect your query vector of `[0.13, 0.25, 0.44, ...]` to be closest to vector ID `4` by visiting the root path of `/` . This query will return the three (`topK: 3`) closest matches, as well as their vector values and metadata. You will notice that `id: 4` has a `score` of `0.46348256`. Because you are using `euclidean` as our distance metric, the closer the score to `0.0`, the closer your vectors are. ```json // https://vectorize-tutorial..workers.dev/ { "matches": { "count": 3, "matches": [ { "id": "4", "score": 0.46348256, "values": [ 0.17, 0.29, 0.42, 0.57, 0.64, 0.38, 0.51, 0.72, 0.22, 0.85, 0.39, 0.66, 0.74, 0.32, 0.53, 0.48, 0.21, 0.69, 0.77, 0.34, 0.8, 0.55, 0.41, 0.29, 0.7, 0.62, 0.35, 0.68, 0.53, 0.3, 0.79, 0.49 ], "metadata": { "url": "/products/sku/418313" } }, { "id": "3", "score": 0.52920616, "values": [ 0.21, 0.33, 0.55, 0.67, 0.8, 0.22, 0.47, 0.63, 0.31, 0.74, 0.35, 0.53, 0.68, 0.45, 0.55, 0.7, 0.28, 0.64, 0.71, 0.3, 0.77, 0.6, 0.43, 0.39, 0.85, 0.55, 0.31, 0.69, 0.52, 0.29, 0.72, 0.48 ], "metadata": { "url": "/products/sku/97913813" } }, { "id": "2", "score": 0.6337869, "values": [ 0.14, 0.23, 0.36, 0.51, 0.62, 0.47, 0.59, 0.74, 0.33, 0.89, 0.41, 0.53, 0.68, 0.29, 0.77, 0.45, 0.24, 0.66, 0.71, 0.34, 0.86, 0.57, 0.62, 0.48, 0.78, 0.52, 0.37, 0.61, 0.69, 0.28, 0.8, 0.53 ], "metadata": { "url": "/products/sku/10148191" } } ] } } ``` From here, experiment by passing a different `queryVector` and observe the results: the matches and the `score` should change based on the change in distance between the query vector and the vectors in our index. In a real-world application, the `queryVector` would be the vector embedding representation of a query from a user or system, and our `sampleVectors` would be generated from real content. To build on this example, read the [vector search tutorial](https://developers.cloudflare.com/vectorize/get-started/embeddings/) that combines Workers AI and Vectorize to build an end-to-end application with Workers. By finishing this tutorial, you have successfully created and queried your first Vectorize index, a Worker to access that index, and deployed your project globally. ## Related resources * [Build an end-to-end vector search application](https://developers.cloudflare.com/vectorize/get-started/embeddings/) using Workers AI and Vectorize. * Learn more about [how vector databases work](https://developers.cloudflare.com/vectorize/reference/what-is-a-vector-database/). * Read [examples](https://developers.cloudflare.com/vectorize/reference/client-api/) on how to use the Vectorize API from Cloudflare Workers. * [Euclidean Distance vs Cosine Similarity](https://www.baeldung.com/cs/euclidean-distance-vs-cosine-similarity). * [Dot product](https://en.wikipedia.org/wiki/Dot_product). --- title: Changelog · Cloudflare Vectorize docs description: Subscribe to RSS lastUpdated: 2025-02-13T19:35:19.000Z chatbotDeprioritize: false source_url: html: https://developers.cloudflare.com/vectorize/platform/changelog/ md: https://developers.cloudflare.com/vectorize/platform/changelog/index.md --- [Subscribe to RSS](https://developers.cloudflare.com/vectorize/platform/changelog/index.xml) ## 2024-12-20 **Added support for index name reuse** Vectorize now supports the reuse of index names within the account. An index can be created using the same name as an index that is in a deleted state. ## 2024-12-19 **Added support for range queries in metadata filters** Vectorize now supports `$lt`, `$lte`, `$gt`, and `$gte` clauses in [metadata filters](https://developers.cloudflare.com/vectorize/reference/metadata-filtering/). ## 2024-11-13 **Added support for $in and $nin metadata filters** Vectorize now supports `$in` and `$nin` clauses in [metadata filters](https://developers.cloudflare.com/vectorize/reference/metadata-filtering/). ## 2024-10-28 **Improved query latency through REST API** Vectorize now has a significantly improved query latency through REST API: * [Query vectors](https://developers.cloudflare.com/api/resources/vectorize/subresources/indexes/methods/query/). * [Get vector by identifier](https://developers.cloudflare.com/api/resources/vectorize/subresources/indexes/methods/get_by_ids/). ## 2024-10-24 **Vectorize increased limits** Developers with a Workers Paid plan can: * Create 50,000 indexes per account, up from the previous 100 limit. * Create 50,000 namespaces per index, up from the previous 100 limt. This applies to both existing and newly created indexes. Refer to [Limits](https://developers.cloudflare.com/vectorize/platform/limits/) to learn about Vectorize's limits. ## 2024-09-26 **Vectorize GA** Vectorize is now generally available ## 2024-09-16 **Vectorize is available on Workers Free plan** Developers with a Workers Free plan can: * Query up to 30 million queried vector dimensions / month per account. * Store up to 5 million stored vector dimensions per account. ## 2024-08-14 **Vectorize v1 is deprecated** With the new Vectorize storage engine, which supports substantially larger indexes (up to 5 million vector dimensions) and reduced query latencies, we are deprecating the original "legacy" (v1) storage subsystem. To continue interacting with legacy (v1) indexes in [wrangler versions after `3.71.0`](https://github.com/cloudflare/workers-sdk/releases/tag/wrangler%403.71.0), pass the `--deprecated-v1` flag. For example: 'wrangler vectorize --deprecated-v1' flag to `create`, `get`, `list`, `delete` and `insert` vectors into legacy Vectorize v1 indexes. There is no currently no ability to migrate existing indexes from v1 to v2. Existing Workers querying or clients to use the REST API against legacy Vectorize indexes will continue to function. ## 2024-08-14 **Vectorize v2 in public beta** Vectorize now has a new underlying storage subsystem (Vectorize v2) that supports significantly larger indexes, improved query latency, and changes to metadata filtering. Specifically: * Indexes can now support up to 5 million vector dimensions each, up from 200,000 per index. * Metadata filtering now requires explicitly defining the metadata properties that will be filtered on. * Reduced query latency: queries will now return faster and with lower-latency. * You can now return [up to 100 results](https://developers.cloudflare.com/vectorize/reference/client-api/#query-vectors) (`topK`), up from the previous limit of 20. ## 2024-01-17 **HTTP API query vectors request and response format change** Vectorize `/query` HTTP endpoint has the following changes: * `returnVectors` request body property is deprecated in favor of `returnValues` and `returnMetadata` properties. * Response format has changed to the below format to match \[Workers API change]:(/workers/configuration/compatibility-flags/#vectorize-query-with-metadata-optionally-returned) ```json { "result": { "count": 1, "matches": [ { "id": "4", "score": 0.789848214, "values": [ 75.0999984741211, 67.0999984741211, 29.899999618530273], "metadata": { "url": "/products/sku/418313", "streaming_platform": "netflix" } } ] }, "errors": [], "messages": [], "success": true } ``` ## 2023-12-06 **Metadata filtering** Vectorize now supports [metadata filtering](https://developers.cloudflare.com/vectorize/reference/metadata-filtering) with equals (`$eq`) and not equals (`$neq`) operators. Metadata filtering limits `query()` results to only vectors that fulfill new `filter` property. ```ts let metadataMatches = await env.YOUR_INDEX.query(queryVector, { topK: 3, filter: { streaming_platform: "netflix" }, returnValues: true, returnMetadata: true }) ``` Only new indexes created on or after 2023-12-06 support metadata filtering. Currently, there is no way to migrate previously created indexes to work with metadata filtering. ## 2023-11-08 **Metadata API changes** Vectorize now supports distinct `returnMetadata` and `returnValues` arguments when querying an index, replacing the now-deprecated `returnVectors` argument. This allows you to return metadata without needing to return the vector values, reducing the amount of unnecessary data returned from a query. Both `returnMetadata` and `returnValues` default to false. For example, to return only the metadata from a query, set `returnMetadata: true`. ```ts let matches = await env.YOUR_INDEX.query(queryVector, { topK: 5, returnMetadata: true }) ``` New Workers projects created on or after 2023-11-08 or that [update the compatibility date](https://developers.cloudflare.com/workers/configuration/compatibility-dates/) for an existing project will use the new return type. ## 2023-10-03 **Increased indexes per account limits** You can now create up to 100 Vectorize indexes per account. Read the [limits documentation](https://developers.cloudflare.com/vectorize/platform/limits/) for details on other limits, many of which will increase during the beta period. ## 2023-09-27 **Vectorize now in public beta** Vectorize, Cloudflare's vector database, is [now in public beta](https://blog.cloudflare.com/vectorize-vector-database-open-beta/). Vectorize allows you to store and efficiently query vector embeddings from AI/ML models from [Workers AI](https://developers.cloudflare.com/workers-ai/), OpenAI, and other embeddings providers or machine-learning workflows. To get started with Vectorize, [see the guide](https://developers.cloudflare.com/vectorize/get-started/). --- title: Limits · Cloudflare Vectorize docs description: "The following limits apply to accounts, indexes and vectors (as specified):" lastUpdated: 2025-07-04T12:09:06.000Z chatbotDeprioritize: false source_url: html: https://developers.cloudflare.com/vectorize/platform/limits/ md: https://developers.cloudflare.com/vectorize/platform/limits/index.md --- The following limits apply to accounts, indexes and vectors (as specified): | Feature | Current Limit | | - | - | | Indexes per account | 50,000 (Workers Paid) / 100 (Free) | | Maximum dimensions per vector | 1536 dimensions, 32 bits precision | | Precision per vector dimension | 32 bits (float32) | | Maximum vector ID length | 64 bytes | | Metadata per vector | 10KiB | | Maximum returned results (`topK`) with values or metadata | 20 | | Maximum returned results (`topK`) without values and metadata | 100 | | Maximum upsert batch size (per batch) | 1000 (Workers) / 5000 (HTTP API) | | Maximum index name length | 64 bytes | | Maximum vectors per index | 5,000,000 | | Maximum namespaces per index | 50,000 (Workers Paid) / 1000 (Free) | | Maximum namespace name length | 64 bytes | | Maximum vectors upload size | 100 MB | | Maximum metadata indexes per Vectorize index | 10 | | Maximum indexed data per metadata index per vector | 64 bytes | ## Limits V1 (deprecated) The following limits apply to accounts, indexes and vectors (as specified): | Feature | Current Limit | | - | - | | Indexes per account | 100 indexes | | Maximum dimensions per vector | 1536 dimensions | | Maximum vector ID length | 64 bytes | | Metadata per vector | 10KiB | | Maximum returned results (`topK`) | 20 | | Maximum upsert batch size (per batch) | 1000 (Workers) / 5000 (HTTP API) | | Maximum index name length | 63 bytes | | Maximum vectors per index | 200,000 | | Maximum namespaces per index | 1000 namespaces | | Maximum namespace name length | 63 bytes | --- title: Pricing · Cloudflare Vectorize docs description: "Vectorize bills are based on:" lastUpdated: 2024-10-10T15:22:00.000Z chatbotDeprioritize: false source_url: html: https://developers.cloudflare.com/vectorize/platform/pricing/ md: https://developers.cloudflare.com/vectorize/platform/pricing/index.md --- Vectorize is now Generally Available To report bugs or give feedback, go to the [#vectorize Discord channel](https://discord.cloudflare.com). If you are having issues with Wrangler, report issues in the [Wrangler GitHub repository](https://github.com/cloudflare/workers-sdk/issues/new/choose). Vectorize bills are based on: * **Queried Vector Dimensions**: The total number of vector dimensions queried. If you have 10,000 vectors with 384-dimensions in an index, and make 100 queries against that index, your total queried vector dimensions would sum to 3.878 million (`(10000 + 100) * 384`). * **Stored Vector Dimensions**: The total number of vector dimensions stored. If you have 1,000 vectors with 1536-dimensions in an index, your stored vector dimensions would sum to 1.536 million (`1000 * 1536`). You are not billed for CPU, memory, "active index hours", or the number of indexes you create. If you are not issuing queries against your indexes, you are not billed for queried vector dimensions. ## Billing metrics | | [Workers Free](https://developers.cloudflare.com/workers/platform/pricing/#workers) | [Workers Paid](https://developers.cloudflare.com/workers/platform/pricing/#workers) | | - | - | - | | **Total queried vector dimensions** | 30 million queried vector dimensions / month | First 50 million queried vector dimensions / month included + $0.01 per million | | **Total stored vector dimensions** | 5 million stored vector dimensions | First 10 million stored vector dimensions + $0.05 per 100 million | ### Calculating vector dimensions To calculate your potential usage, calculate the queried vector dimensions and the stored vector dimensions, and multiply by the unit price. The formula is defined as `((queried vectors + stored vectors) * dimensions * ($0.01 / 1,000,000)) + (stored vectors * dimensions * ($0.05 / 100,000,000))` * For example, inserting 10,000 vectors of 768 dimensions each, and querying those 1,000 times per day (30,000 times per month) would be calculated as `((30,000 + 10,000) * 768) = 30,720,000` queried dimensions and `(10,000 * 768) = 7,680,000` stored dimensions (within the included monthly allocation) * Separately, and excluding the included monthly allocation, this would be calculated as `(30,000 + 10,000) * 768 * ($0.01 / 1,000,000) + (10,000 * 768 * ($0.05 / 100,000,000))` and sum to $0.31 per month. ### Usage examples The following table defines a number of example use-cases and the estimated monthly cost for querying a Vectorize index. These estimates do not include the Vectorize usage that is part of the Workers Free and Paid plans. | Workload | Dimensions per vector | Stored dimensions | Queries per month | Calculation | Estimated total | | - | - | - | - | - | - | | Experiment | 384 | 5,000 vectors | 10,000 | `((10000+5000)*384*(0.01/1000000)) + (5000*384*(0.05/100000000))` | $0.06 / mo included | | Scaling | 768 | 25,000 vectors | 50,000 | `((50000+25000)*768*(0.01/1000000)) + (25000*768*(0.05/100000000))` | $0.59 / mo most | | Production | 768 | 50,000 vectors | 200,000 | `((200000+50000)*768*(0.01/1000000)) + (50000*768*(0.05/100000000))` | $1.94 / mo | | Large | 768 | 250,000 vectors | 500,000 | `((500000+250000)*768*(0.01/1000000)) + (250000*768*(0.05/100000000))` | $5.86 / mo | | XL | 1536 | 500,000 vectors | 1,000,000 | `((1000000+500000)*1536*(0.01/1000000)) + (500000*1536*(0.05/100000000))` | $23.42 / mo | included All of this usage would fall into the Vectorize usage included in the Workers Free or Paid plan. most Most of this usage would fall into the Vectorize usage included within the Workers Paid plan. ## Frequently Asked Questions Frequently asked questions related to Vectorize pricing: * Will Vectorize always have a free tier? Yes, the [Workers free tier](https://developers.cloudflare.com/workers/platform/pricing/#workers) will always include the ability to prototype and experiment with Vectorize for free. * What happens if I exceed the monthly included reads, writes and/or storage on the paid tier? You will be billed for the additional reads, writes and storage according to [Vectorize's pricing](#billing-metrics). * Does Vectorize charge for data transfer / egress? No. * Do queries I issue from the HTTP API or the Wrangler command-line count as billable usage? Yes: any queries you issue against your index, including from the Workers API, HTTP API and CLI all count as usage. * Does an empty index, with no vectors, contribute to storage? No. Empty indexes do not count as stored vector dimensions. --- title: Choose a data or storage product · Cloudflare Vectorize docs lastUpdated: 2024-08-13T19:56:56.000Z chatbotDeprioritize: false source_url: html: https://developers.cloudflare.com/vectorize/platform/storage-options/ md: https://developers.cloudflare.com/vectorize/platform/storage-options/index.md --- --- title: Vectorize API · Cloudflare Vectorize docs description: This page covers the Vectorize API available within Cloudflare Workers, including usage examples. lastUpdated: 2025-05-13T16:21:30.000Z chatbotDeprioritize: false source_url: html: https://developers.cloudflare.com/vectorize/reference/client-api/ md: https://developers.cloudflare.com/vectorize/reference/client-api/index.md --- This page covers the Vectorize API available within [Cloudflare Workers](https://developers.cloudflare.com/workers/), including usage examples. ## Operations ### Insert vectors ```ts let vectorsToInsert = [ { id: "123", values: [32.4, 6.5, 11.2, 10.3, 87.9] }, { id: "456", values: [2.5, 7.8, 9.1, 76.9, 8.5] }, ]; let inserted = await env.YOUR_INDEX.insert(vectorsToInsert); ``` Inserts vectors into the index. Vectorize inserts are asynchronous and the insert operation returns a mutation identifier unique for that operation. It typically takes a few seconds for inserted vectors to be available for querying in a Vectorize index. If vectors with the same vector ID already exist in the index, only the vectors with new IDs will be inserted. If you need to update existing vectors, use the [upsert](#upsert-vectors) operation. ### Upsert vectors ```ts let vectorsToUpsert = [ { id: "123", values: [32.4, 6.5, 11.2, 10.3, 87.9] }, { id: "456", values: [2.5, 7.8, 9.1, 76.9, 8.5] }, { id: "768", values: [29.1, 5.7, 12.9, 15.4, 1.1] }, ]; let upserted = await env.YOUR_INDEX.upsert(vectorsToUpsert); ``` Upserts vectors into an index. Vectorize upserts are asynchronous and the upsert operation returns a mutation identifier unique for that operation. It typically takes a few seconds for upserted vectors to be available for querying in a Vectorize index. An upsert operation will insert vectors into the index if vectors with the same ID do not exist, and overwrite vectors with the same ID. Upserting does not merge or combine the values or metadata of an existing vector with the upserted vector: the upserted vector replaces the existing vector in full. ### Query vectors ```ts let queryVector = [32.4, 6.55, 11.2, 10.3, 87.9]; let matches = await env.YOUR_INDEX.query(queryVector); ``` Query an index with the provided vector, returning the score(s) of the closest vectors based on the configured distance metric. * Configure the number of returned matches by setting `topK` (default: 5) * Return vector values by setting `returnValues: true` (default: false) * Return vector metadata by setting `returnMetadata: 'indexed'` or `returnMetadata: 'all'` (default: 'none') ```ts let matches = await env.YOUR_INDEX.query(queryVector, { topK: 5, returnValues: true, returnMetadata: "all", }); ``` #### topK The `topK` can be configured to specify the number of matches returned by the query operation. Vectorize now supports an upper limit of `100` for the `topK` value. However, for a query operation with `returnValues` set to `true` or `returnMetadata` set to `all`, `topK` would be limited to a maximum value of `20`. #### returnMetadata The `returnMetadata` field provides three ways to fetch vector metadata while querying: 1. `none`: Do not fetch metadata. 2. `indexed`: Fetched metadata only for the indexed metadata fields. There is no latency overhead with this option, but long text fields may be truncated. 3. `all`: Fetch all metadata associated with a vector. Queries may run slower with this option, and `topK` would be limited to 20. `topK` and `returnMetadata` for legacy Vectorize indexes For legacy Vectorize (V1) indexes, `topK` is limited to 20, and the `returnMetadata` is a boolean field. ### Query vectors by ID ```ts let matches = await env.YOUR_INDEX.queryById("some-vector-id"); ``` Query an index using a vector that is already present in the index. Query options remain the same as the query operation described above. ```ts let matches = await env.YOUR_INDEX.queryById("some-vector-id", { topK: 5, returnValues: true, returnMetadata: "all", }); ``` ### Get vectors by ID ```ts let ids = ["11", "22", "33", "44"]; const vectors = await env.YOUR_INDEX.getByIds(ids); ``` Retrieves the specified vectors by their ID, including values and metadata. ### Delete vectors by ID ```ts let idsToDelete = ["11", "22", "33", "44"]; const deleted = await env.YOUR_INDEX.deleteByIds(idsToDelete); ``` Deletes the vector IDs provided from the current index. Vectorize deletes are asynchronous and the delete operation returns a mutation identifier unique for that operation. It typically takes a few seconds for vectors to be removed from the Vectorize index. ### Retrieve index details ```ts const details = await env.YOUR_INDEX.describe(); ``` Retrieves the configuration of a given index directly, including its configured `dimensions` and distance `metric`. ### Create Metadata Index Enable metadata filtering on the specified property. Limited to 10 properties. Wrangler version 3.71.0 required Vectorize V2 requires [wrangler](https://developers.cloudflare.com/workers/wrangler/install-and-update/) version `3.71.0` or later. Ensure you have the latest version of `wrangler` installed, or use `npx wrangler@latest vectorize` to always use the latest version. Run the following `wrangler vectorize` command: ```sh wrangler vectorize create-metadata-index --property-name='some-prop' --type='string' ``` ### Delete Metadata Index Allow Vectorize to delete the specified metadata index. Wrangler version 3.71.0 required Vectorize V2 requires [wrangler](https://developers.cloudflare.com/workers/wrangler/install-and-update/) version `3.71.0` or later. Ensure you have the latest version of `wrangler` installed, or use `npx wrangler@latest vectorize` to always use the latest version. Run the following `wrangler vectorize` command: ```sh wrangler vectorize delete-metadata-index --property-name='some-prop' ``` ### List Metadata Indexes List metadata properties on which metadata filtering is enabled. Wrangler version 3.71.0 required Vectorize V2 requires [wrangler](https://developers.cloudflare.com/workers/wrangler/install-and-update/) version `3.71.0` or later. Ensure you have the latest version of `wrangler` installed, or use `npx wrangler@latest vectorize` to always use the latest version. Run the following `wrangler vectorize` command: ```sh wrangler vectorize list-metadata-index ``` ### Get Index Info Get additional details about the index. Wrangler version 3.71.0 required Vectorize V2 requires [wrangler](https://developers.cloudflare.com/workers/wrangler/install-and-update/) version `3.71.0` or later. Ensure you have the latest version of `wrangler` installed, or use `npx wrangler@latest vectorize` to always use the latest version. Run the following `wrangler vectorize` command: ```sh wrangler vectorize info ``` ## Vectors A vector represents the vector embedding output from a machine learning model. * `id` - a unique `string` identifying the vector in the index. This should map back to the ID of the document, object or database identifier that the vector values were generated from. * `namespace` - an optional partition key within a index. Operations are performed per-namespace, so this can be used to create isolated segments within a larger index. * `values` - an array of `number`, `Float32Array`, or `Float64Array` as the vector embedding itself. This must be a dense array, and the length of this array must match the `dimensions` configured on the index. * `metadata` - an optional set of key-value pairs that can be used to store additional metadata alongside a vector. ```ts let vectorExample = { id: "12345", values: [32.4, 6.55, 11.2, 10.3, 87.9], metadata: { key: "value", hello: "world", url: "r2://bucket/some/object.json", }, }; ``` ## Binding to a Worker [Bindings](https://developers.cloudflare.com/workers/runtime-apis/bindings/) allow you to attach resources, including Vectorize indexes or R2 buckets, to your Worker. Bindings are defined in either the [Wrangler configuration file](https://developers.cloudflare.com/workers/wrangler/configuration/) associated with your Workers project, or via the Cloudflare dashboard for your project. Vectorize indexes are bound by name. A binding for an index named `production-doc-search` would resemble the below: * wrangler.jsonc ```jsonc { "vectorize": [ { "binding": "PROD_SEARCH", "index_name": "production-doc-search" } ] } ``` * wrangler.toml ```toml [[vectorize]] binding = "PROD_SEARCH" # the index will be available as env.PROD_SEARCH in your Worker index_name = "production-doc-search" ``` Refer to the [bindings documentation](https://developers.cloudflare.com/workers/wrangler/configuration/#vectorize-indexes) for more details. ## TypeScript Types If you're using TypeScript, run [`wrangler types`](https://developers.cloudflare.com/workers/wrangler/commands/#types) whenever you modify your Wrangler configuration file. This generates types for the `env` object based on your bindings, as well as [runtime types](https://developers.cloudflare.com/workers/languages/typescript/). --- title: Metadata filtering · Cloudflare Vectorize docs description: In addition to providing an input vector to your query, you can also filter by vector metadata associated with every vector. Query results will only include vectors that match the filter criteria, meaning that filter is applied first, and the topK results are taken from the filtered set. lastUpdated: 2025-04-23T15:01:25.000Z chatbotDeprioritize: false source_url: html: https://developers.cloudflare.com/vectorize/reference/metadata-filtering/ md: https://developers.cloudflare.com/vectorize/reference/metadata-filtering/index.md --- In addition to providing an input vector to your query, you can also filter by [vector metadata](https://developers.cloudflare.com/vectorize/best-practices/insert-vectors/#metadata) associated with every vector. Query results will only include vectors that match the `filter` criteria, meaning that `filter` is applied first, and the `topK` results are taken from the filtered set. By using metadata filtering to limit the scope of a query, you can filter by specific customer IDs, tenant, product category or any other metadata you associate with your vectors. ## Metadata indexes Vectorize supports [namespace](https://developers.cloudflare.com/vectorize/best-practices/insert-vectors/#namespaces) filtering by default, but to filter on another metadata property of your vectors, you'll need to create a metadata index. You can create up to 10 metadata indexes per Vectorize index. Metadata indexes for properties of type `string`, `number` and `boolean` are supported. Please refer to [Create metadata indexes](https://developers.cloudflare.com/vectorize/get-started/intro/#4-optional-create-metadata-indexes) for details. You can store up to 10KiB of metadata per vector. See [Vectorize Limits](https://developers.cloudflare.com/vectorize/platform/limits/) for a complete list of limits. For metadata indexes of type `number`, the indexed number precision is that of float64. For metadata indexes of type `string`, each vector indexes the first 64B of the string data truncated on UTF-8 character boundaries to the longest well-formed UTF-8 substring within that limit, so vectors are filterable on the first 64B of their value for each indexed property. Enable metadata filtering Vectors upserted before a metadata index was created won't have their metadata contained in that index. Upserting/re-upserting vectors after it was created will have them indexed as expected. Please refer to [Create metadata indexes](https://developers.cloudflare.com/vectorize/get-started/intro/#4-optional-create-metadata-indexes) for details. ## Supported operations An optional `filter` property on `query()` method specifies metadata filters: | Operator | Description | | - | - | | `$eq` | Equals | | `$ne` | Not equals | | `$in` | In | | `$nin` | Not in | | `$lt` | Less than | | `$lte` | Less than or equal to | | `$gt` | Greater than | | `$gte` | Greater than or equal to | * `filter` must be non-empty object whose compact JSON representation must be less than 2048 bytes. * `filter` object keys cannot be empty, contain `" | .` (dot is reserved for nesting), start with `$`, or be longer than 512 characters. * For `$eq` and `$ne`, `filter` object non-nested values can be `string`, `number`, `boolean`, or `null` values. * For `$in` and `$nin`, `filter` object values can be arrays of `string`, `number`, `boolean`, or `null` values. * Upper-bound range queries (i.e. `$lt` and `$lte`) can be combined with lower-bound range queries (i.e. `$gt` and `$gte`) within the same filter. Other combinations are not allowed. * For range queries (i.e. `$lt`, `$lte`, `$gt`, `$gte`), `filter` object non-nested values can be `string` or `number` values. Strings are ordered lexicographically. * Range queries involving a large number of vectors (\~10M and above) may experience reduced accuracy. ### Namespace versus metadata filtering Both [namespaces](https://developers.cloudflare.com/vectorize/best-practices/insert-vectors/#namespaces) and metadata filtering narrow the vector search space for a query. Consider the following when evaluating both filter types: * A namespace filter is applied before metadata filter(s). * A vector can only be part of a single namespace with the documented [limits](https://developers.cloudflare.com/vectorize/platform/limits/). Vector metadata can contain multiple key-value pairs up to [metadata per vector limits](https://developers.cloudflare.com/vectorize/platform/limits/). Metadata values support different types (`string`, `boolean`, and others), therefore offering more flexibility. ### Valid `filter` examples #### Implicit `$eq` operator ```json { "streaming_platform": "netflix" } ``` #### Explicit operator ```json { "someKey": { "$ne": "hbo" } } ``` #### `$in` operator ```json { "someKey": { "$in": ["hbo", "netflix"] } } ``` #### `$nin` operator ```json { "someKey": { "$nin": ["hbo", "netflix"] } } ``` #### Range query involving numbers ```json { "timestamp": { "$gte": 1734242400, "$lt": 1734328800 } } ``` #### Range query involving strings Range queries can implement **prefix searching** on string metadata fields. This is also like a **starts\_with** filter. For example, the following filter matches all values starting with "net": ```json { "someKey": { "$gte": "net", "$lt": "neu" } } ``` #### Implicit logical `AND` with multiple keys ```json { "pandas.nice": 42, "someKey": { "$ne": "someValue" } } ``` #### Keys define nesting with `.` (dot) ```json { "pandas.nice": 42 } // looks for { "pandas": { "nice": 42 } } ``` ## Examples ### Add metadata Using legacy Vectorize (V1) indexes? Please use the `wrangler vectorize --deprecated-v1` flag to create, get, list, delete and insert vectors into legacy Vectorize V1 indexes. Please note that by December 2024, you will not be able to create legacy Vectorize indexes. Other operations will remain functional. Refer to the [legacy transition](https://developers.cloudflare.com/vectorize/reference/transition-vectorize-legacy) page for more details on transitioning away from legacy indexes. With the following index definition: ```sh npx wrangler vectorize create tutorial-index --dimensions=32 --metric=cosine ``` Create metadata indexes: ```sh npx wrangler vectorize create-metadata-index tutorial-index --property-name=url --type=string ``` ```sh npx wrangler vectorize create-metadata-index tutorial-index --property-name=streaming_platform --type=string ``` Metadata can be added when [inserting or upserting vectors](https://developers.cloudflare.com/vectorize/best-practices/insert-vectors/#examples). ```ts const newMetadataVectors: Array = [ { id: "1", values: [32.4, 74.1, 3.2, ...], metadata: { url: "/products/sku/13913913", streaming_platform: "netflix" }, }, { id: "2", values: [15.1, 19.2, 15.8, ...], metadata: { url: "/products/sku/10148191", streaming_platform: "hbo" }, }, { id: "3", values: [0.16, 1.2, 3.8, ...], metadata: { url: "/products/sku/97913813", streaming_platform: "amazon" }, }, { id: "4", values: [75.1, 67.1, 29.9, ...], metadata: { url: "/products/sku/418313", streaming_platform: "netflix" }, }, { id: "5", values: [58.8, 6.7, 3.4, ...], metadata: { url: "/products/sku/55519183", streaming_platform: "hbo" }, }, ]; // Upsert vectors with added metadata, returning a count of the vectors upserted and their vector IDs let upserted = await env.YOUR_INDEX.upsert(newMetadataVectors); ``` ### Query examples Use the `query()` method: ```ts let queryVector: Array = [54.8, 5.5, 3.1, ...]; let originalMatches = await env.YOUR_INDEX.query(queryVector, { topK: 3, returnValues: true, returnMetadata: 'all', }); ``` Results without metadata filtering: ```json { "count": 3, "matches": [ { "id": "5", "score": 0.999909486, "values": [58.79999923706055, 6.699999809265137, 3.4000000953674316], "metadata": { "url": "/products/sku/55519183", "streaming_platform": "hbo" } }, { "id": "4", "score": 0.789848214, "values": [75.0999984741211, 67.0999984741211, 29.899999618530273], "metadata": { "url": "/products/sku/418313", "streaming_platform": "netflix" } }, { "id": "2", "score": 0.611976262, "values": [15.100000381469727, 19.200000762939453, 15.800000190734863], "metadata": { "url": "/products/sku/10148191", "streaming_platform": "hbo" } } ] } ``` The same `query()` method with a `filter` property supports metadata filtering. ```ts let queryVector: Array = [54.8, 5.5, 3.1, ...]; let metadataMatches = await env.YOUR_INDEX.query(queryVector, { topK: 3, filter: { streaming_platform: "netflix" }, returnValues: true, returnMetadata: 'all', }); ``` Results with metadata filtering: ```json { "count": 2, "matches": [ { "id": "4", "score": 0.789848214, "values": [75.0999984741211, 67.0999984741211, 29.899999618530273], "metadata": { "url": "/products/sku/418313", "streaming_platform": "netflix" } }, { "id": "1", "score": 0.491185264, "values": [32.400001525878906, 74.0999984741211, 3.200000047683716], "metadata": { "url": "/products/sku/13913913", "streaming_platform": "netflix" } } ] } ``` ## Limitations * As of now, metadata indexes need to be created for Vectorize indexes *before* vectors can be inserted to support metadata filtering. * Only indexes created on or after 2023-12-06 support metadata filtering. Previously created indexes cannot be migrated to support metadata filtering. --- title: Transition legacy Vectorize indexes · Cloudflare Vectorize docs description: "Legacy Vectorize (V1) indexes are on a deprecation path as of Aug 15, 2024. Your Vectorize index may be a legacy index if it fulfills any of the follwing crieria:" lastUpdated: 2024-12-16T22:33:26.000Z chatbotDeprioritize: false source_url: html: https://developers.cloudflare.com/vectorize/reference/transition-vectorize-legacy/ md: https://developers.cloudflare.com/vectorize/reference/transition-vectorize-legacy/index.md --- Legacy Vectorize (V1) indexes are on a deprecation path as of Aug 15, 2024. Your Vectorize index may be a legacy index if it fulfills any of the follwing crieria: 1. Was created with a Wrangler version lower than `v3.71.0`. 2. Was created using the "--deprecated-v1" flag enabled. 3. Was created using the legacy REST API. This document provides details around any transition steps that may be needed to move away from legacy Vectorize indexes. ## Why should I transition? Legacy Vectorize (V1) indexes are on a deprecation path. Support for these indexes would be limited and their usage is not recommended for any production workloads. Furthermore, you will no longer be able to create legacy Vectorize indexes by December 2024. Other operations will be unaffected and will remain functional. Additionally, the new Vectorize (V2) indexes can operate at a significantly larger scale (with a capacity for multi-million vectors), and provide faster performance. Please review the [Limits](https://developers.cloudflare.com/vectorize/platform/limits/) page to understand the latest capabilities supported by Vectorize. ## Notable changes In addition to supporting significantly larger indexes with multi-million vectors, and faster performance, these are some of the changes that need to be considered when transitioning away from legacy Vectorize indexes: 1. The new Vectorize (V2) indexes now support asynchronous mutations. Any vector inserts or deletes, and metadata index creation or deletes may take a few seconds to be reflected. 2. Vectorize (V2) support metadata and namespace filtering for much larger indexes with significantly lower latencies. However, the fields on which metadata filtering can be applied need to be specified before vectors are inserted. Refer to the [metadata index creation](https://developers.cloudflare.com/vectorize/reference/client-api/#create-metadata-index) page for more details. 3. Vectorize (V2) [query operation](https://developers.cloudflare.com/vectorize/reference/client-api/#query-vectors) now supports the ability to search for and return up to 100 most similar vectors. 4. Vectorize (V2) query operations provide a more granular control for querying metadata along with vectors. Refer to the [query operation](https://developers.cloudflare.com/vectorize/reference/client-api/#query-vectors) page for more details. 5. Vectorize (V2) expands the Vectorize capabilities that are available via Wrangler (with Wrangler version > `v3.71.0`). ## Transition Automated Migration Watch this space for the upcoming capability to migrate legacy (V1) indexes to the new Vectorize (V2) indexes automatically. 1. Wrangler now supports operations on the new version of Vectorize (V2) indexes by default. To use Wrangler commands for legacy (V1) indexes, the `--deprecated-v1` flag must be enabled. Please note that this flag is only supported to create, get, list and delete indexes and to insert vectors. 2. Refer to the [REST API](https://developers.cloudflare.com/api/resources/vectorize/subresources/indexes/methods/create/) page for details on the routes and payload types for the new Vectorize (V2) indexes. 3. To use the new version of Vectorize indexes in Workers, the environment binding must be defined as a `Vectorize` interface. ```typescript export interface Env { // This makes your vector index methods available on env.VECTORIZE.* // For example, env.VECTORIZE.insert() or query() VECTORIZE: Vectorize; } ``` The `Vectorize` interface includes the type changes and the capabilities supported by new Vectorize (V2) indexes. For legacy Vectorize (V1) indexes, use the `VectorizeIndex` interface. ```typescript export interface Env { // This makes your vector index methods available on env.VECTORIZE.* // For example, env.VECTORIZE.insert() or query() VECTORIZE: VectorizeIndex; } ``` 4. With the new Vectorize (V2) version, the `returnMetadata` option for the [query operation](https://developers.cloudflare.com/vectorize/reference/client-api/#query-vectors) now expects either `all`, `indexed` or `none` string values. For legacy Vectorize (V1), the `returnMetadata` option was a boolean field. 5. With the new Vectorize (V2) indexes, all index and vector mutations are asynchronous and return a `mutationId` in the response as a unique identifier for that mutation operation. These mutation operations are: [Vector Inserts](https://developers.cloudflare.com/vectorize/reference/client-api/#insert-vectors), [Vector Upserts](https://developers.cloudflare.com/vectorize/reference/client-api/#upsert-vectors), [Vector Deletes](https://developers.cloudflare.com/vectorize/reference/client-api/#delete-vectors-by-id), [Metadata Index Creation](https://developers.cloudflare.com/vectorize/reference/client-api/#create-metadata-index), [Metadata Index Deletion](https://developers.cloudflare.com/vectorize/reference/client-api/#delete-metadata-index). To check the identifier and the timestamp of the last mutation processed, use the Vectorize [Info command](https://developers.cloudflare.com/vectorize/reference/client-api/#get-index-info). --- title: Vector databases · Cloudflare Vectorize docs description: Vector databases are a key part of building scalable AI-powered applications. Vector databases provide long term memory, on top of an existing machine learning model. lastUpdated: 2025-05-12T16:09:33.000Z chatbotDeprioritize: false source_url: html: https://developers.cloudflare.com/vectorize/reference/what-is-a-vector-database/ md: https://developers.cloudflare.com/vectorize/reference/what-is-a-vector-database/index.md --- Vector databases are a key part of building scalable AI-powered applications. Vector databases provide long term memory, on top of an existing machine learning model. Without a vector database, you would need to train your model (or models) or re-run your dataset through a model before making a query, which would be slow and expensive. ## Why is a vector database useful? A vector database determines what other data (represented as vectors) is near your input query. This allows you to build different use-cases on top of a vector database, including: * Semantic search, used to return results similar to the input of the query. * Classification, used to return the grouping (or groupings) closest to the input query. * Recommendation engines, used to return content similar to the input based on different criteria (for example previous product sales, or user history). * Anomaly detection, used to identify whether specific data points are similar to existing data, or different. Vector databases can also power [Retrieval Augmented Generation](https://arxiv.org/abs/2005.11401) (RAG) tasks, which allow you to bring additional context to LLMs (Large Language Models) by using the context from a vector search to augment the user prompt. ### Vector search In a traditional vector search use-case, queries are made against a vector database by passing it a query vector, and having the vector database return a configurable list of vectors with the shortest distance ("most similar") to the query vector. The step-by-step workflow resembles the below: 1. A developer converts their existing dataset (documentation, images, logs stored in R2) into a set of vector embeddings (a one-way representation) by passing them through a machine learning model that is trained for that data type. 2. The output embeddings are inserted into a Vectorize database index. 3. A search query, classification request or anomaly detection query is also passed through the same ML model, returning a vector embedding representation of the query. 4. Vectorize is queried with this embedding, and returns a set of the most similar vector embeddings to the provided query. 5. The returned embeddings are used to retrieve the original source objects from dedicated storage (for example, R2, KV, and D1) and returned back to the user. In a workflow without a vector database, you would need to pass your entire dataset alongside your query each time, which is neither practical (models have limits on input size) and would consume significant resources and time. ### Retrieval Augmented Generation Retrieval Augmented Generation (RAG) is an approach used to improve the context provided to an LLM (Large Language Model) in generative AI use-cases, including chatbot and general question-answer applications. The vector database is used to enhance the prompt passed to the LLM by adding additional context alongside the query. Instead of passing the prompt directly to the LLM, in the RAG approach you: 1. Generate vector embeddings from an existing dataset or corpus (for example, the dataset you want to use to add additional context to the LLMs response). An existing dataset or corpus could be a product documentation, research data, technical specifications, or your product catalog and descriptions. 2. Store the output embeddings in a Vectorize database index. When a user initiates a prompt, instead of passing it (without additional context) to the LLM, you *augment* it with additional context: 1. The user prompt is passed into the same ML model used for your dataset, returning a vector embedding representation of the query. 2. This embedding is used as the query (semantic search) against the vector database, which returns similar vectors. 3. These vectors are used to look up the content they relate to (if not embedded directly alongside the vectors as metadata). 4. This content is provided as context alongside the original user prompt, providing additional context to the LLM and allowing it to return an answer that is likely to be far more contextual than the standalone prompt. [Create a RAG application today with AutoRAG](https://developers.cloudflare.com/autorag/) to deploy a fully managed RAG pipeline in just a few clicks. AutoRAG automatically sets up Vectorize, handles continuous indexing, and serves responses through a single API. 1 You can learn more about the theory behind RAG by reading the [RAG paper](https://arxiv.org/abs/2005.11401). 1 You can learn more about the theory behind RAG by reading the [RAG paper](https://arxiv.org/abs/2005.11401). ## Terminology ### Databases and indexes In Vectorize, a database and an index are the same concept. Each index you create is separate from other indexes you create. Vectorize automatically manages optimizing and re-generating the index for you when you insert new data. ### Vector Embeddings Vector embeddings represent the features of a machine learning model as a numerical vector (array of numbers). They are a one-way representation that encodes how a machine learning model understands the input(s) provided to it, based on how the model was originally trained and its' internal structure. For example, a [text embedding model](https://developers.cloudflare.com/workers-ai/models/#text-embeddings) available in Workers AI is able to take text input and represent it as a 768-dimension vector. The text `This is a story about an orange cloud`, when represented as a vector embedding, resembles the following: ```json [-0.019273685291409492,-0.01913292706012726,<764 dimensions here>,0.0007094172760844231,0.043409910053014755] ``` When a model considers the features of an input as "similar" (based on its understanding), the distance between the vector embeddings for those two inputs will be short. ### Dimensions Vector dimensions describe the width of a vector embedding. The width of a vector embedding is the number of floating point elements that comprise a given vector. The number of dimensions are defined by the machine learning model used to generate the vector embeddings, and how it represents input features based on its internal model and complexity. More dimensions ("wider" vectors) may provide more accuracy at the cost of compute and memory resources, as well as latency (speed) of vector search. Refer to the [dimensions](https://developers.cloudflare.com/vectorize/best-practices/create-indexes/#dimensions) documentation to learn how to configure the accepted vector dimension size when creating a Vectorize index. ### Distance metrics The distance metric is an index used for vector search. It defines how it determines how close your query vector is to other vectors within the index. * Distance metrics determine how the vector search engine assesses similarity between vectors. * Cosine, Euclidean (L2), and Dot Product are the most commonly used distance metrics in vector search. * The machine learning model and type of embedding you use will determine which distance metric is best suited for your use-case. * Different metrics determine different scoring characteristics. For example, the `cosine` distance metric is well suited to text, sentence similarity and/or document search use-cases. `euclidean` can be better suited for image or speech recognition use-cases. Refer to the [distance metrics](https://developers.cloudflare.com/vectorize/best-practices/create-indexes/#distance-metrics) documentation to learn how to configure a distance metric when creating a Vectorize index. --- title: Wrangler commands · Cloudflare Vectorize docs lastUpdated: 2024-08-13T19:56:56.000Z chatbotDeprioritize: false source_url: html: https://developers.cloudflare.com/vectorize/reference/wrangler-commands/ md: https://developers.cloudflare.com/vectorize/reference/wrangler-commands/index.md --- --- title: Builds · Cloudflare Workers docs description: Use Workers Builds to integrate with Git and automatically build and deploy your Worker when pushing a change lastUpdated: 2025-03-25T11:39:02.000Z chatbotDeprioritize: false source_url: html: https://developers.cloudflare.com/workers/ci-cd/builds/ md: https://developers.cloudflare.com/workers/ci-cd/builds/index.md --- The Cloudflare [Git integration](https://developers.cloudflare.com/workers/ci-cd/builds/git-integration/) lets you connect a new or existing Worker to a GitHub or GitLab repository, enabling automated builds and deployments for your Worker on push. ## Get started ### Connect a new Worker To create a new Worker and connect it to a GitHub or GitLab repository: 1. Log in to the [Cloudflare dashboard](https://dash.cloudflare.com) and select your account. 2. Go to **Workers & Pages**. 3. Select **Create**. 4. Under **Import a repository**, select a **Git account**. 5. Select the repository you want to import from the list. You can also use the search bar to narrow the results. 6. Configure your project and select **Save and Deploy**. 7. Preview your Worker at its provided [`workers.dev`](https://developers.cloudflare.com/workers/configuration/routing/workers-dev/) subdomain. ### Connect an existing Worker To connect an existing Worker to a GitHub or GitLab repository: 1. Log in to the [Cloudflare dashboard](https://dash.cloudflare.com) and select your account. 2. Go to **Workers & Pages**. 3. Select the Worker you want to connect to a repository. 4. Select **Settings** and then **Builds**. 5. Select **Connect** and follow the prompts to connect the repository to your Worker and configure your [build settings](https://developers.cloudflare.com/workers/ci-cd/builds/configuration/). 6. Push a commit to your Git repository to trigger a build and deploy to your Worker. Warning When connecting a repository to a Workers project, the Worker name in the Cloudflare dashboard must match the `name` in the wrangler.toml file in the specified root directory, or the build will fail. This ensures that the Worker deployed from the repository is consistent with the Worker registered in the Cloudflare dashboard. For details, see [Workers name requirement](https://developers.cloudflare.com/workers/ci-cd/builds/troubleshoot/#workers-name-requirement). ## View build and preview URL You can monitor a build's status and its build logs by navigating to **View build history** at the bottom of the **Deployments** tab of your Worker. If the build is successful, you can view the build details by selecting **View build** in the associated new [version](https://developers.cloudflare.com/workers/configuration/versions-and-deployments/) created under Version History. There you will also find the [preview URL](https://developers.cloudflare.com/workers/configuration/previews/) generated by the version under Version ID. Builds, versions, deployments If a build succeeds, it is uploaded as a version. If the build is configured to deploy (for example, with `wrangler deploy` set as the deploy command), the uploaded version will be automatically promoted to the Active Deployment. ## Disconnecting builds To disconnect a Worker from a GitHub or GitLab repository: 1. Log in to the [Cloudflare dashboard](https://dash.cloudflare.com) and select your account. 2. Go to **Workers & Pages**. 3. Select the Worker you want to disconnect from a repository. 4. Select **Settings** and then **Builds**. 5. Select **Disconnect**. If you want to switch to a different repository for your Worker, you must first disable builds, then reconnect to select the new repository. To disable automatic deployments while still allowing builds to run automatically and save as [versions](https://developers.cloudflare.com/workers/configuration/versions-and-deployments/) (without promoting them to an active deployment), update your deploy command to: `npx wrangler versions upload`. --- title: External CI/CD · Cloudflare Workers docs description: Integrate Workers development into your existing continuous integration and continuous development workflows, such as GitHub Actions or GitLab Pipelines. lastUpdated: 2025-01-28T14:11:51.000Z chatbotDeprioritize: false source_url: html: https://developers.cloudflare.com/workers/ci-cd/external-cicd/ md: https://developers.cloudflare.com/workers/ci-cd/external-cicd/index.md --- Deploying Cloudflare Workers with CI/CD ensures reliable, automated deployments for every code change. If you prefer to use your existing CI/CD provider instead of [Workers Builds](https://developers.cloudflare.com/workers/ci-cd/builds/), this section offers guides for popular providers: * [**GitHub Actions**](https://developers.cloudflare.com/workers/ci-cd/external-cicd/github-actions/) * [**GitLab CI/CD**](https://developers.cloudflare.com/workers/ci-cd/external-cicd/gitlab-cicd/) Other CI/CD options including but not limited to Terraform, CircleCI, Jenkins, and more, can also be used to deploy Workers following a similar set up process. --- title: Bindings · Cloudflare Workers docs description: The various bindings that are available to Cloudflare Workers. lastUpdated: 2024-08-13T19:56:56.000Z chatbotDeprioritize: false source_url: html: https://developers.cloudflare.com/workers/configuration/bindings/ md: https://developers.cloudflare.com/workers/configuration/bindings/index.md --- --- title: Compatibility dates · Cloudflare Workers docs description: Opt into a specific version of the Workers runtime for your Workers project. lastUpdated: 2025-02-12T13:41:31.000Z chatbotDeprioritize: false source_url: html: https://developers.cloudflare.com/workers/configuration/compatibility-dates/ md: https://developers.cloudflare.com/workers/configuration/compatibility-dates/index.md --- Cloudflare regularly updates the Workers runtime. These updates apply to all Workers globally and should never cause a Worker that is already deployed to stop functioning. Sometimes, though, some changes may be backwards-incompatible. In particular, there might be bugs in the runtime API that existing Workers may inadvertently depend upon. Cloudflare implements bug fixes that new Workers can opt into while existing Workers will continue to see the buggy behavior to prevent breaking deployed Workers. The compatibility date and flags are how you, as a developer, opt into these runtime changes. [Compatibility flags](https://developers.cloudflare.com/workers/configuration/compatibility-flags) will often have a date in which they are enabled by default, and so, by specifying a `compatibility_date` for your Worker, you can quickly enable all of these various compatibility flags up to, and including, that date. ## Setting compatibility date When you start your project, you should always set `compatibility_date` to the current date. You should occasionally update the `compatibility_date` field. When updating, you should refer to the [compatibility flags](https://developers.cloudflare.com/workers/configuration/compatibility-flags) page to find out what has changed, and you should be careful to test your Worker to see if the changes affect you, updating your code as necessary. The new compatibility date takes effect when you next run the [`npx wrangler deploy`](https://developers.cloudflare.com/workers/wrangler/commands/#deploy) command. There is no need to update your `compatibility_date` if you do not want to. The Workers runtime will support old compatibility dates forever. If, for some reason, Cloudflare finds it is necessary to make a change that will break live Workers, Cloudflare will actively contact affected developers. That said, Cloudflare aims to avoid this if at all possible. However, even though you do not need to update the `compatibility_date` field, it is a good practice to do so for two reasons: 1. Sometimes, new features can only be made available to Workers that have a current `compatibility_date`. To access the latest features, you need to stay up-to-date. 2. Generally, other than the [compatibility flags](https://developers.cloudflare.com/workers/configuration/compatibility-flags) page, the Workers documentation may only describe the current `compatibility_date`, omitting information about historical behavior. If your Worker uses an old `compatibility_date`, you will need to continuously refer to the compatibility flags page in order to check if any of the APIs you are using have changed. #### Via Wrangler The compatibility date can be set in a Worker's [Wrangler configuration file](https://developers.cloudflare.com/workers/wrangler/configuration/). * wrangler.jsonc ```jsonc { "compatibility_date": "2022-04-05" } ``` * wrangler.toml ```toml # Opt into backwards-incompatible changes through April 5, 2022. compatibility_date = "2022-04-05" ``` #### Via the Cloudflare Dashboard When a Worker is created through the Cloudflare Dashboard, the compatibility date is automatically set to the current date. The compatibility date can be updated in the Workers settings on the [Cloudflare dashboard](https://dash.cloudflare.com/). #### Via the Cloudflare API The compatibility date can be set when uploading a Worker using the [Workers Script API](https://developers.cloudflare.com/api/resources/workers/subresources/scripts/methods/update/) or [Workers Versions API](https://developers.cloudflare.com/api/resources/workers/subresources/scripts/subresources/versions/methods/create/) in the request body's `metadata` field. If a compatibility date is not specified on upload via the API, it defaults to the oldest compatibility date, before any flags took effect (2021-11-02). When creating new Workers, it is highly recommended to set the compatibility date to the current date when uploading via the API. --- title: Compatibility flags · Cloudflare Workers docs description: Opt into a specific features of the Workers runtime for your Workers project. lastUpdated: 2025-02-12T13:41:31.000Z chatbotDeprioritize: false source_url: html: https://developers.cloudflare.com/workers/configuration/compatibility-flags/ md: https://developers.cloudflare.com/workers/configuration/compatibility-flags/index.md --- Compatibility flags enable specific features. They can be useful if you want to help the Workers team test upcoming changes that are not yet enabled by default, or if you need to hold back a change that your code depends on but still want to apply other compatibility changes. Compatibility flags will often have a date in which they are enabled by default, and so, by specifying a [`compatibility_date`](https://developers.cloudflare.com/workers/configuration/compatibility-dates) for your Worker, you can quickly enable all of these various compatibility flags up to, and including, that date. ## Setting compatibility flags You may provide a list of `compatibility_flags`, which enable or disable specific changes. #### Via Wrangler Compatibility flags can be set in a Worker's [Wrangler configuration file](https://developers.cloudflare.com/workers/wrangler/configuration/). This example enables the specific flag `formdata_parser_supports_files`, which is described [below](https://developers.cloudflare.com/workers/configuration/compatibility-flags/#formdata-parsing-supports-file). As of the specified date, `2021-09-14`, this particular flag was not yet enabled by default, but, by specifying it in `compatibility_flags`, we can enable it anyway. `compatibility_flags` can also be used to disable changes that became the default in the past. * wrangler.jsonc ```jsonc { "compatibility_date": "2021-09-14", "compatibility_flags": [ "formdata_parser_supports_files" ] } ``` * wrangler.toml ```toml # Opt into backwards-incompatible changes through September 14, 2021. compatibility_date = "2021-09-14" # Also opt into an upcoming fix to the FormData API. compatibility_flags = [ "formdata_parser_supports_files" ] ``` #### Via the Cloudflare Dashboard Compatibility flags can be updated in the Workers settings on the [Cloudflare dashboard](https://dash.cloudflare.com/). #### Via the Cloudflare API Compatibility flags can be set when uploading a Worker using the [Workers Script API](https://developers.cloudflare.com/api/resources/workers/subresources/scripts/methods/update/) or [Workers Versions API](https://developers.cloudflare.com/api/resources/workers/subresources/scripts/subresources/versions/methods/create/) in the request body's `metadata` field. ## Node.js compatibility flag Note [The `nodejs_compat` flag](https://developers.cloudflare.com/workers/runtime-apis/nodejs/) also enables `nodejs_compat_v2` as long as your compatibility date is 2024-09-23 or later. The v2 flag improves runtime Node.js compatibility by bundling additional polyfills and globals into your Worker. However, this improvement increases bundle size. If your compatibility date is 2024-09-22 or before and you want to enable v2, add the `nodejs_compat_v2` in addition to the `nodejs_compat` flag. If your compatibility date is after 2024-09-23, but you want to disable v2 to avoid increasing your bundle size, add the `no_nodejs_compat_v2` in addition to the `nodejs_compat flag`. A [growing subset](https://developers.cloudflare.com/workers/runtime-apis/nodejs/) of Node.js APIs are available directly as [Runtime APIs](https://developers.cloudflare.com/workers/runtime-apis/nodejs), with no need to add polyfills to your own code. To enable these APIs in your Worker, add the `nodejs_compat` compatibility flag to your [Wrangler configuration file](https://developers.cloudflare.com/workers/wrangler/configuration/): To enable both built-in runtime APIs and polyfills for your Worker or Pages project, add the [`nodejs_compat`](https://developers.cloudflare.com/workers/configuration/compatibility-flags/#nodejs-compatibility-flag) [compatibility flag](https://developers.cloudflare.com/workers/configuration/compatibility-flags/#nodejs-compatibility-flag) to your [Wrangler configuration file](https://developers.cloudflare.com/workers/wrangler/configuration/), and set your compatibility date to September 23rd, 2024 or later. This will enable [Node.js compatibility](https://developers.cloudflare.com/workers/runtime-apis/nodejs/) for your Workers project. * wrangler.jsonc ```jsonc { "compatibility_flags": [ "nodejs_compat" ], "compatibility_date": "2024-09-23" } ``` * wrangler.toml ```toml compatibility_flags = [ "nodejs_compat" ] compatibility_date = "2024-09-23" ``` A [growing subset](https://developers.cloudflare.com/workers/runtime-apis/nodejs/) of Node.js APIs are available directly as [Runtime APIs](https://developers.cloudflare.com/workers/runtime-apis/nodejs), with no need to add polyfills to your own code. To enable these APIs in your Worker, only the `nodejs_compat` compatibility flag is required: * wrangler.jsonc ```jsonc { "compatibility_flags": [ "nodejs_compat" ] } ``` * wrangler.toml ```toml compatibility_flags = [ "nodejs_compat" ] ``` As additional Node.js APIs are added, they will be made available under the `nodejs_compat` compatibility flag. Unlike most other compatibility flags, we do not expect the `nodejs_compat` to become active by default at a future date. The Node.js `AsyncLocalStorage` API is a particularly useful feature for Workers. To enable only the `AsyncLocalStorage` API, use the `nodejs_als` compatibility flag. * wrangler.jsonc ```jsonc { "compatibility_flags": [ "nodejs_als" ] } ``` * wrangler.toml ```toml compatibility_flags = [ "nodejs_als" ] ``` ## Flags history Newest flags are listed first. ### Enable `Request.signal` for incoming requests | | | | - | - | | **Flag to enable** | `enable_request_signal` | | **Flag to disable** | `disable_request_signal` | When you use the `enable_request_signal` compatibility flag, you can attach an event listener to [`Request`](https://developers.cloudflare.com/workers/runtime-apis/request/) objects, using the [`signal` property](https://developer.mozilla.org/en-US/docs/Web/API/Request/signal). This allows you to perform tasks when the request to your Worker is canceled by the client. ### Enable `FinalizationRegistry` and `WeakRef` | | | | - | - | | **Default as of** | 2025-05-05 | | **Flag to enable** | `enable_weak_ref` | | **Flag to disable** | `disable_weak_ref` | Enables the use of [`FinalizationRegistry`](https://developer.mozilla.org/en-US/docs/Web/JavaScript/Reference/Global_Objects/FinalizationRegistry) and [`WeakRef`](https://developer.mozilla.org/en-US/docs/Web/JavaScript/Reference/Global_Objects/WeakRef) built-ins. * `FinalizationRegistry` allows you to register a cleanup callback that runs after an object has been garbage-collected. * `WeakRef` creates a weak reference to an object, allowing it to be garbage-collected if no other strong references exist. Behaviour `FinalizationRegistry` cleanup callbacks may execute at any point during your request lifecycle, even after your invoked handler has completed (similar to `ctx.waitUntil()`). These callbacks do not have an associated async context. You cannot perform any I/O within them, including emitting events to a tail Worker. Warning These APIs are fundamentally non-deterministic. The timing and execution of garbage collection are unpredictable, and you **should not rely on them for essential program logic**. Additionally, cleanup callbacks registered with `FinalizationRegistry` may **never be executed**, including but not limited to cases where garbage collection is not triggered, or your Worker gets evicted. ### Navigation requests prefer asset serving | | | | - | - | | **Default as of** | 2025-04-01 | | **Flag to enable** | `assets_navigation_prefers_asset_serving` | | **Flag to disable** | `assets_navigation_has_no_effect` | For Workers with [static assets](https://developers.cloudflare.com/workers/static-assets/) and this compatibility flag enabled, navigation requests (requests which have a `Sec-Fetch-Mode: navigate` header) will prefer to be served by our asset-serving logic, even when an exact asset match cannot be found. This is particularly useful for applications which operate in either [Single Page Application (SPA) mode](https://developers.cloudflare.com/workers/static-assets/routing/single-page-application/) or have [custom 404 pages](https://developers.cloudflare.com/workers/static-assets/routing/static-site-generation/#custom-404-pages), as this now means the fallback pages of `200 /index.html` and `404 /404.html` will be served ahead of invoking a Worker script and will therefore avoid incurring a charge. Without this flag, the runtime will continue to apply the old behavior of invoking a Worker script (if present) for any requests which do not exactly match a static asset. When `assets.run_worker_first = true` is set, this compatibility flag has no effect. The `assets.run_worker_first = true` setting ensures the Worker script executes before any asset-serving logic. ### Enable auto-populating `process.env` | | | | - | - | | **Default as of** | 2025-04-01 | | **Flag to enable** | `nodejs_compat_populate_process_env` | | **Flag to disable** | `nodejs_compat_do_not_populate_process_env` | When you enable the `nodejs_compat_populate_process_env` compatibility flag and the [`nodejs_compat`](https://developers.cloudflare.com/workers/runtime-apis/nodejs/) flag is also enabled, `process.env` will be populated with values from any bindings with text or JSON values. This means that if you have added [environment variables](https://developers.cloudflare.com/workers/configuration/environment-variables/), [secrets](https://developers.cloudflare.com/workers/configuration/secrets/), or [version metadata](https://developers.cloudflare.com/workers/runtime-apis/bindings/version-metadata/) bindings, these values can be accessed on `process.env`. ```js const apiClient = ApiClient.new({ apiKey: process.env.API_KEY }); const LOG_LEVEL = process.env.LOG_LEVEL || "info"; ``` This makes accessing these values easier and conforms to common Node.js patterns, which can reduce toil and help with compatibility for existing Node.js libraries. If users do not wish for these values to be accessible via `process.env`, they can use the `nodejs_compat_do_not_populate_process_env` flag. In this case, `process.env` will still be available, but will not have values automatically added. ### Queue consumers don't wait for `ctx.waitUntil()` to resolve | | | | - | - | | **Flag to enable** | `queue_consumer_no_wait_for_wait_until` | By default, [Queues](https://developers.cloudflare.com/queues/) Consumer Workers acknowledge messages only after promises passed to [`ctx.waitUntil()`](https://developers.cloudflare.com/workers/runtime-apis/context) have resolved. This behavior can cause queue consumers which utilize `ctx.waitUntil()` to process messages slowly. The default behavior is documented in the [Queues Consumer Configuration Guide](https://developers.cloudflare.com/queues/configuration/javascript-apis#consumer). This Consumer Worker is an example of a Worker which utilizes `ctx.waitUntil()`. Under the default behavior, this consumer Worker will only acknowledge a batch of messages after the sleep function has resolved. ```js export default { async fetch(request, env, ctx) { // omitted }, async queue(batch, env, ctx) { console.log(`received batch of ${batch.messages.length} messages to queue ${batch.queue}`); for (let i = 0; i < batch.messages.length; ++i) { console.log(`message #${i}: ${JSON.stringify(batch.messages[i])}`); } ctx.waitUntil(sleep(30 * 1000)); } }; function sleep(ms) { return new Promise(resolve => setTimeout(resolve, ms)); } ``` If the `queue_consumer_no_wait_for_wait_until` flag is enabled, Queues consumers will no longer wait for promises passed to `ctx.waitUntil()` to resolve before acknowledging messages. This can improve the performance of queue consumers which utilize `ctx.waitUntil()`. With the flag enabled, in the above example, the consumer Worker will acknowledge the batch without waiting for the sleep function to resolve. Using this flag will not affect the behavior of `ctx.waitUntil()`. `ctx.waitUntil()` will continue to extend the lifetime of your consumer Worker to continue to work even after the batch of messages has been acknowledged. ### Apply TransformStream backpressure fix | | | | - | - | | **Default as of** | 2024-12-16 | | **Flag to enable** | `fixup-transform-stream-backpressure` | | **Flag to disable** | `original-transform-stream-backpressure` | The original implementation of `TransformStream` included a bug that would cause backpressure signaling to fail after the first write to the transform. Unfortunately, the fix can cause existing code written to address the bug to fail. Therefore, the `fixup-transform-stream-backpressure` compat flag is provided to enable the fix. The fix is enabled by default with compatibility dates of 2024-12-16 or later. To restore the original backpressure logic, disable the fix using the `original-transform-stream-backpressure` flag. ### Disable top-level await in require(...) | | | | - | - | | **Default as of** | 2024-12-02 | | **Flag to enable** | `disable_top_level_await_in_require` | | **Flag to disable** | `enable_top_level_await_in_require` | Workers implements the ability to use the Node.js style `require(...)` method to import modules in the Worker bundle. Historically, this mechanism allowed required modules to use top-level await. This, however, is not Node.js compatible. The `disable_top_level_await_in_require` compat flag will cause `require()` to fail if the module uses a top-level await. This flag is default enabled with a compatibility date of 2024-12-02 or later. To restore the original behavior allowing top-level await, use the `enable_top_level_await_in_require` compatibility flag. ### Enable `cache: no-store` HTTP standard API | | | | - | - | | **Default as of** | 2024-11-11 | | **Flag to enable** | `cache_option_enabled` | | **Flag to disable** | `cache_option_disabled` | When you enable the `cache_option_enabled` compatibility flag, you can specify a value for the `cache` property of the Request interface. When this compatibility flag is not enabled, or `cache_option_disabled` is set, the Workers runtime will throw an `Error` saying `The 'cache' field on 'RequestInitializerDict' is not implemented.` When this flag is enabled you can instruct Cloudflare not to cache the response from a subrequest you make from your Worker using the [`fetch()` API](https://developers.cloudflare.com/workers/runtime-apis/fetch/): The only cache option enabled with `cache_option_enabled` is `'no-store'`. Specifying any other value will cause the Workers runtime to throw a `TypeError` with the message `Unsupported cache mode: `. When `no-store` is specified: * All requests have the headers `Pragma: no-cache` and `Cache-Control: no-cache` are set on them. * Subrequests to origins not hosted by Cloudflare bypass Cloudflare's cache. Examples using `cache: 'no-store'`: ```js const response = await fetch("https://example.com", { cache: "no-store" }); ``` The cache value can also be set on a `Request` object. ```js const request = new Request("https://example.com", { cache: "no-store" }); const response = await fetch(request); ``` ### Global fetch() strictly public | | | | - | - | | **Flag to enable** | `global_fetch_strictly_public` | | **Flag to disable** | `global_fetch_private_origin` | When the `global_fetch_strictly_public` compatibility flag is enabled, the global [`fetch()` function](https://developers.cloudflare.com/workers/runtime-apis/fetch/) will strictly route requests as if they were made on the public Internet. This means requests to a Worker's own zone will loop back to the "front door" of Cloudflare and will be treated like a request from the Internet, possibly even looping back to the same Worker again. When the `global_fetch_strictly_public` is not enabled, such requests are routed to the zone's origin server, ignoring any Workers mapped to the URL and also bypassing Cloudflare security settings. ### Upper-case HTTP methods | | | | - | - | | **Default as of** | 2024-10-14 | | **Flag to enable** | `upper_case_all_http_methods` | | **Flag to disable** | `no_upper_case_all_http_methods` | HTTP methods are expected to be upper-cased. Per the fetch spec, if the method is specified as `get`, `post`, `put`, `delete`, `head`, or `options`, implementations are expected to uppercase the method. All other method names would generally be expected to throw as unrecognized (for example, `patch` would be an error while `PATCH` is accepted). This is a bit restrictive, even if it is in the spec. This flag modifies the behavior to uppercase all methods prior to parsing so that the method is always recognized if it is a known method. To restore the standard behavior, use the `no_upper_case_all_http_methods` compatibility flag. ### Automatically set the Symbol.toStringTag for Workers API objects | | | | - | - | | **Default as of** | 2024-09-26 | | **Flag to enable** | `set_tostring_tag` | | **Flag to disable** | `do_not_set_tostring_tag` | A change was made to set the Symbol.toStringTag on all Workers API objects in order to fix several spec compliance bugs. Unfortunately, this change was more breaking than anticipated. The `do_not_set_tostring_tag` compat flag restores the original behavior with compatibility dates of 2024-09-26 or earlier. ### Allow specifying a custom port when making a subrequest with the fetch() API | | | | - | - | | **Default as of** | 2024-09-02 | | **Flag to enable** | `allow_custom_ports` | | **Flag to disable** | `ignore_custom_ports` | When this flag is enabled, and you specify a port when making a subrequest with the [`fetch()` API](https://developers.cloudflare.com/workers/runtime-apis/fetch/), the port number you specify will be used. When you make a subrequest to a website that uses Cloudflare ("Orange Clouded") — only [ports supported by Cloudflare's reverse proxy](https://developers.cloudflare.com/fundamentals/reference/network-ports/#network-ports-compatible-with-cloudflares-proxy) can be specified. If you attempt to specify an unsupported port, it will be ignored. When you make a subrequest to a website that does not use Cloudflare ("Grey Clouded") - any port can be specified. For example: ```js const response = await fetch("https://example.com:8000"); ``` With allow\_custom\_ports the above example would fetch `https://example.com:8000` rather than `https://example.com:443`. Note that creating a WebSocket client with a call to `new WebSocket(url)` will also obey this flag. ### Properly extract blob MIME type from `content-type` headers | | | | - | - | | **Default as of** | 2024-06-03 | | **Flag to enable** | `blob_standard_mime_type` | | **Flag to disable** | `blob_legacy_mime_type` | When calling `response.blob.type()`, the MIME type will now be properly extracted from `content-type` headers, per the [WHATWG spec](https://fetch.spec.whatwg.org/#concept-header-extract-mime-type). ### Use standard URL parsing in `fetch()` | | | | - | - | | **Default as of** | 2024-06-03 | | **Flag to enable** | `fetch_standard_url` | | **Flag to disable** | `fetch_legacy_url` | The `fetch_standard_url` flag makes `fetch()` use [WHATWG URL Standard](https://url.spec.whatwg.org/) parsing rules. The original implementation would throw `TypeError: Fetch API cannot load` errors with some URLs where standard parsing does not, for instance with the inclusion of whitespace before the URL. URL errors will now be thrown immediately upon calling `new Request()` with an improper URL. Previously, URL errors were thrown only once `fetch()` was called. ### Returning empty Uint8Array on final BYOB read | | | | - | - | | **Default as of** | 2024-05-13 | | **Flag to enable** | `internal_stream_byob_return_view` | | **Flag to disable** | `internal_stream_byob_return_undefined` | In the original implementation of BYOB ("Bring your own buffer") `ReadableStreams`, the `read()` method would return `undefined` when the stream was closed and there was no more data to read. This behavior was inconsistent with the standard `ReadableStream` behavior, which returns an empty `Uint8Array` when the stream is closed. When the `internal_stream_byob_return_view` flag is used, the BYOB `read()` will implement standard behavior. ```js const resp = await fetch('https://example.org'); const reader = resp.body.getReader({ mode: 'byob' }); await result = await reader.read(new Uint8Array(10)); if (result.done) { // The result gives us an empty Uint8Array... console.log(result.value.byteLength); // 0 // However, it is backed by the same underlying memory that was passed // into the read call. console.log(result.value.buffer.byteLength); // 10 } ``` ### Brotli Content-Encoding support | | | | - | - | | **Default as of** | 2024-04-29 | | **Flag to enable** | `brotli_content_encoding` | | **Flag to disable** | `no_brotli_content_encoding` | When the `brotli_content_encoding` compatibility flag is enabled, Workers supports the `br` content encoding and can request and respond with data encoded using the [Brotli](https://developer.mozilla.org/en-US/docs/Glossary/Brotli_compression) compression algorithm. This reduces the amount of data that needs to be fetched and can be used to pass through the original compressed data to the client. See the Fetch API [documentation](https://developers.cloudflare.com/workers/runtime-apis/fetch/#how-the-accept-encoding-header-is-handled) for details. ### Durable Object stubs and Service Bindings support RPC | | | | - | - | | **Default as of** | 2024-04-03 | | **Flag to enable** | `rpc` | | **Flag to disable** | `no_rpc` | With this flag on, [Durable Object](https://developers.cloudflare.com/durable-objects/) stubs and [Service Bindings](https://developers.cloudflare.com/workers/runtime-apis/bindings/service-bindings/) support [RPC](https://developers.cloudflare.com/workers/runtime-apis/rpc/). This means that these objects now appear as if they define every possible method name. Calling any method name sends an RPC to the remote Durable Object or Worker service. For most applications, this change will have no impact unless you use it. However, it is possible some existing code will be impacted if it explicitly checks for the existence of method names that were previously not defined on these types. For example, we have seen code in the wild which iterates over [bindings](https://developers.cloudflare.com/workers/runtime-apis/bindings/) and tries to auto-detect their types based on what methods they implement. Such code will now see service bindings as implementing every method, so may misinterpret service bindings as being some other type. In the cases we have seen, the impact was benign (nothing actually broke), but out of caution we are guarding this change behind a flag. ### Handling custom thenables | | | | - | - | | **Default as of** | 2024-04-01 | | **Flag to enable** | `unwrap_custom_thenables` | | **Flag to disable** | `no_unwrap_custom_thenables` | With the `unwrap_custom_thenables` flag set, various Workers APIs that accept promises will also correctly handle custom thenables (objects with a `then` method) that are not native promises, but are intended to be treated as such). For example, the `waitUntil` method of the `ExecutionContext` object will correctly handle custom thenables, allowing them to be used in place of native promises. ```js async fetch(req, env, ctx) { ctx.waitUntil({ then(res) { // Resolve the thenable after 1 second setTimeout(res, 1000); } }); // ... } ``` ### Fetchers no longer have get/put/delete helper methods | | | | - | - | | **Default as of** | 2024-03-26 | | **Flag to enable** | `fetcher_no_get_put_delete` | | **Flag to disable** | `fetcher_has_get_put_delete` | [Durable Object](https://developers.cloudflare.com/durable-objects/) stubs and [Service Bindings](https://developers.cloudflare.com/workers/runtime-apis/bindings/service-bindings/) both implement a `fetch()` method which behaves similarly to the global `fetch()` method, but requests are instead sent to the destination represented by the object, rather than being routed based on the URL. Historically, API objects that had such a `fetch()` method also had methods `get()`, `put()`, and `delete()`. These methods were thin wrappers around `fetch()` which would perform the corresponding HTTP method and automatically handle writing/reading the request/response bodies as needed. These methods were a very early idea from many years ago, but were never actually documented, and therefore rarely (if ever) used. Enabling the `fetcher_no_get_put_delete`, or setting a compatibility date on or after `2024-03-26` disables these methods for your Worker. This change paves a future path for you to be able to define your own custom methods using these names. Without this change, you would be unable to define your own `get`, `put`, and `delete` methods, since they would conflict with these built-in helper methods. ### Queues send messages in `JSON` format | | | | - | - | | **Default as of** | 2024-03-18 | | **Flag to enable** | `queues_json_messages` | | **Flag to disable** | `no_queues_json_messages` | With the `queues_json_messages` flag set, Queue bindings will serialize values passed to `send()` or `sendBatch()` into JSON format by default (when no specific `contentType` is provided). ### Suppress global `importScripts()` | | | | - | - | | **Default as of** | 2024-03-04 | | **Flag to enable** | `no_global_importscripts` | | **Flag to disable** | `global_importscripts` | Suppresses the global `importScripts()` function. This method was included in the Workers global scope but was marked explicitly as non-implemented. However, the presence of the function could cause issues with some libraries. This compatibility flag removes the function from the global scope. ### Node.js AsyncLocalStorage | | | | - | - | | **Flag to enable** | `nodejs_als` | | **Flag to disable** | `no_nodejs_als` | Enables the availability of the Node.js [AsyncLocalStorage](https://nodejs.org/api/async_hooks.html#async_hooks_class_asynclocalstorage) API in Workers. ### Python Workers | | | | - | - | | **Default as of** | 2024-01-29 | | **Flag to enable** | `python_workers` | This flag enables first class support for Python. [Python Workers](https://developers.cloudflare.com/workers/languages/python/) implement the majority of Python's [standard library](https://developers.cloudflare.com/workers/languages/python/stdlib), support all [bindings](https://developers.cloudflare.com/workers/runtime-apis/bindings), [environment variable](https://developers.cloudflare.com/workers/configuration/environment-variables), and [secrets](https://developers.cloudflare.com/workers/configuration/secrets), and integration with JavaScript objects and functions via a [foreign function interface](https://developers.cloudflare.com/workers/languages/python/ffi). ### WebCrypto preserve publicExponent field | | | | - | - | | **Default as of** | 2023-12-01 | | **Flag to enable** | `crypto_preserve_public_exponent` | | **Flag to disable** | `no_crypto_preserve_public_exponent` | In the WebCrypto API, the `publicExponent` field of the algorithm of RSA keys would previously be an `ArrayBuffer`. Using this flag, `publicExponent` is a `Uint8Array` as mandated by the specification. ### `Vectorize` query with metadata optionally returned | | | | - | - | | **Default as of** | 2023-11-08 | | **Flag to enable** | `vectorize_query_metadata_optional` | | **Flag to disable** | `vectorize_query_original` | A set value on `vectorize_query_metadata_optional` indicates that the Vectorize query operation should accept newer arguments with `returnValues` and `returnMetadata` specified discretely over the older argument `returnVectors`. This also changes the return format. If the vector values have been indicated for return, the return value is now a flattened vector object with `score` attached where it previously contained a nested vector object. ### WebSocket Compression | | | | - | - | | **Default as of** | 2023-08-15 | | **Flag to enable** | `web_socket_compression` | | **Flag to disable** | `no_web_socket_compression` | The Workers runtime did not support WebSocket compression when the initial WebSocket implementation was released. Historically, the runtime has stripped or ignored the `Sec-WebSocket-Extensions` header -- but is now capable of fully complying with the WebSocket Compression RFC. Since many clients are likely sending `Sec-WebSocket-Extensions: permessage-deflate` to their Workers today (`new WebSocket(url)` automatically sets this in browsers), we have decided to maintain prior behavior if this flag is absent. If the flag is present, the Workers runtime is capable of using WebSocket Compression on both inbound and outbound WebSocket connections. Like browsers, calling `new WebSocket(url)` in a Worker will automatically set the `Sec-WebSocket-Extensions: permessage-deflate` header. If you are using the non-standard `fetch()` API to obtain a WebSocket, you can include the `Sec-WebSocket-Extensions` header with value `permessage-deflate` and include any of the compression parameters defined in [RFC-7692](https://datatracker.ietf.org/doc/html/rfc7692#section-7). ### Strict crypto error checking | | | | - | - | | **Default as of** | 2023-08-01 | | **Flag to enable** | `strict_crypto_checks` | | **Flag to disable** | `no_strict_crypto_checks` | Perform additional error checking in the Web Crypto API to conform with the specification and reject possibly unsafe key parameters: * For RSA key generation, key sizes are required to be multiples of 128 bits as boringssl may otherwise truncate the key. * The size of imported RSA keys must be at least 256 bits and at most 16384 bits, as with newly generated keys. * The public exponent for imported RSA keys is restricted to the commonly used values `[3, 17, 37, 65537]`. * In conformance with the specification, an error will be thrown when trying to import a public ECDH key with non-empty usages. ### Strict compression error checking | | | | - | - | | **Default as of** | 2023-08-01 | | **Flag to enable** | `strict_compression_checks` | | **Flag to disable** | `no_strict_compression_checks` | Perform additional error checking in the Compression Streams API and throw an error if a `DecompressionStream` has trailing data or gets closed before the full compressed data has been provided. ### Override cache rules cache settings in `request.cf` object for Fetch API | | | | - | - | | **Default as of** | 2025-04-02 | | **Flag to enable** | `request_cf_overrides_cache_rules` | | **Flag to disable** | `no_request_cf_overrides_cache_rules` | This flag changes the behavior of cache when requesting assets via the [Fetch API](https://developers.cloudflare.com/workers/runtime-apis/fetch). Cache settings specified in the `request.cf` object, such as `cacheEverything` and `cacheTtl`, are now given precedence over any [Cache Rules](https://developers.cloudflare.com/cache/how-to/cache-rules/) set. ### Bot Management data | | | | - | - | | **Default as of** | 2023-08-01 | | **Flag to enable** | `no_cf_botmanagement_default` | | **Flag to disable** | `cf_botmanagement_default` | This flag streamlines Workers requests by reducing unnecessary properties in the `request.cf` object. With the flag enabled - either by default after 2023-08-01 or by setting the `no_cf_botmanagement_default` flag - Cloudflare will only include the [Bot Management object](https://developers.cloudflare.com/bots/reference/bot-management-variables/) in a Worker's `request.cf` if the account has access to Bot Management. With the flag disabled, Cloudflare will include a default Bot Management object, regardless of whether the account is entitled to Bot Management. ### URLSearchParams delete() and has() value argument | | | | - | - | | **Default as of** | 2023-07-01 | | **Flag to enable** | `urlsearchparams_delete_has_value_arg` | | **Flag to disable** | `no_urlsearchparams_delete_has_value_arg` | The WHATWG introduced additional optional arguments to the `URLSearchParams` object [`delete()`](https://developer.mozilla.org/en-US/docs/Web/API/URLSearchParams/delete) and [`has()`](https://developer.mozilla.org/en-US/docs/Web/API/URLSearchParams/has) methods that allow for more precise control over the removal of query parameters. Because the arguments are optional and change the behavior of the methods when present there is a risk of breaking existing code. If your compatibility date is set to July 1, 2023 or after, this compatibility flag will be enabled by default. For an example of how this change could break existing code, consider code that uses the `Array` `forEach()` method to iterate through a number of parameters to delete: ```js const usp = new URLSearchParams(); // ... ['abc', 'xyz'].forEach(usp.delete.bind(usp)); ``` The `forEach()` automatically passes multiple parameters to the function that is passed in. Prior to the addition of the new standard parameters, these extra arguments would have been ignored. Now, however, the additional arguments have meaning and change the behavior of the function. With this flag, the example above would need to be changed to: ```js const usp = new URLSearchParams(); // ... ['abc', 'xyz'].forEach((key) => usp.delete(key)); ``` ### Use a spec compliant URL implementation in redirects | | | | - | - | | **Default as of** | 2023-03-14 | | **Flag to enable** | `response_redirect_url_standard` | | **Flag to disable** | `response_redirect_url_original` | Change the URL implementation used in `Response.redirect()` to be spec-compliant (WHATWG URL Standard). ### Dynamic Dispatch Exception Propagation | | | | - | - | | **Default as of** | 2023-03-01 | | **Flag to enable** | `dynamic_dispatch_tunnel_exceptions` | | **Flag to disable** | `dynamic_dispatch_treat_exceptions_as_500` | Previously, when using Workers for Platforms' [dynamic dispatch API](https://developers.cloudflare.com/cloudflare-for-platforms/workers-for-platforms/get-started/dynamic-dispatch/) to send an HTTP request to a user Worker, if the user Worker threw an exception, the dynamic dispatch Worker would receive an HTTP `500` error with no body. When the `dynamic_dispatch_tunnel_exceptions` compatibility flag is enabled, the exception will instead propagate back to the dynamic dispatch Worker. The `fetch()` call in the dynamic dispatch Worker will throw the same exception. This matches the similar behavior of [service bindings](https://developers.cloudflare.com/workers/runtime-apis/bindings/service-bindings/) and [Durable Objects](https://developers.cloudflare.com/durable-objects/). ### `Headers` supports `getSetCookie()` | | | | - | - | | **Default as of** | 2023-03-01 | | **Flag to enable** | `http_headers_getsetcookie` | | **Flag to disable** | `no_http_headers_getsetcookie` | Adds the [`getSetCookie()`](https://developer.mozilla.org/en-US/docs/Web/API/Headers/getSetCookie) method to the [Headers](https://developer.mozilla.org/en-US/docs/Web/API/Headers) API in Workers. ```js const response = await fetch("https://example.com"); let cookieValues = response.headers.getSetCookie(); ``` ### Node.js compatibility | | | | - | - | | **Flag to enable** | `nodejs_compat` | | **Flag to disable** | `no_nodejs_compat` | Enables the full set of [available Node.js APIs](https://developers.cloudflare.com/workers/runtime-apis/nodejs/) in the Workers Runtime. ### Streams Constructors | | | | - | - | | **Default as of** | 2022-11-30 | | **Flag to enable** | `streams_enable_constructors` | | **Flag to disable** | `streams_disable_constructors` | Adds the work-in-progress `new ReadableStream()` and `new WritableStream()` constructors backed by JavaScript underlying sources and sinks. ### Compliant TransformStream constructor | | | | - | - | | **Default as of** | 2022-11-30 | | **Flag to enable** | `transformstream_enable_standard_constructor` | | **Flag to disable** | `transformstream_disable_standard_constructor` | Previously, the `new TransformStream()` constructor was not compliant with the Streams API standard. Use the `transformstream_enable_standard_constructor` to opt-in to the backwards-incompatible change to make the constructor compliant. Must be used in combination with the `streams_enable_constructors` flag. ### CommonJS modules do not export a module namespace | | | | - | - | | **Default as of** | 2022-10-31 | | **Flag to enable** | `export_commonjs_default` | | **Flag to disable** | `export_commonjs_namespace` | CommonJS modules were previously exporting a module namespace (an object like `{ default: module.exports }`) rather than exporting only the `module.exports`. When this flag is enabled, the export is fixed. ### Do not throw from async functions | | | | - | - | | **Default as of** | 2022-10-31 | | **Flag to enable** | `capture_async_api_throws` | | **Flag to disable** | `do_not_capture_async_api_throws` | The `capture_async_api_throws` compatibility flag will ensure that, in conformity with the standards API, async functions will only ever reject if they throw an error. The inverse `do_not_capture_async_api_throws` flag means that async functions which contain an error may throw that error synchronously rather than rejecting. ### New URL parser implementation | | | | - | - | | **Default as of** | 2022-10-31 | | **Flag to enable** | `url_standard` | | **Flag to disable** | `url_original` | The original implementation of the [`URL`](https://developer.mozilla.org/en-US/docs/Web/API/URL) API in Workers was not fully compliant with the [WHATWG URL Standard](https://url.spec.whatwg.org/), differing in several ways, including: * The original implementation collapsed sequences of multiple slashes into a single slash: `new URL("https://example.com/a//b").toString() === "https://example.com/a/b"` * The original implementation would throw `"TypeError: Invalid URL string."` if it encountered invalid percent-encoded escape sequences, like `https://example.com/a%%b`. * The original implementation would percent-encode or percent-decode certain content differently: `new URL("https://example.com/a%40b?c d%20e?f").toString() === "https://example.com/a@b?c+d+e%3Ff"` * The original implementation lacked more recently implemented `URL` features, like [`URL.canParse()`](https://developer.mozilla.org/en-US/docs/Web/API/URL/canParse_static). Set the compatibility date of your Worker to a date after `2022-10-31` or enable the `url_standard` compatibility flag to opt-in the fully spec compliant `URL` API implementation. Refer to the [`response_redirect_url_standard` compatibility flag](https://developers.cloudflare.com/workers/configuration/compatibility-flags/#use-a-spec-compliant-url-implementation-in-redirects) , which affects the URL implementation used in `Response.redirect()`. ### `R2` bucket `list` respects the `include` option | | | | - | - | | **Default as of** | 2022-08-04 | | **Flag to enable** | `r2_list_honor_include` | With the `r2_list_honor_include` flag set, the `include` argument to R2 `list` options is honored. With an older compatibility date and without this flag, the `include` argument behaves implicitly as `include: ["httpMetadata", "customMetadata"]`. ### Do not substitute `null` on `TypeError` | | | | - | - | | **Default as of** | 2022-06-01 | | **Flag to enable** | `dont_substitute_null_on_type_error` | | **Flag to disable** | `substitute_null_on_type_error` | There was a bug in the runtime that meant that when being passed into built-in APIs, invalid values were sometimes mistakenly coalesced with `null`. Instead, a `TypeError` should have been thrown. The `dont_substitute_null_on_type_error` fixes this behavior so that an error is correctly thrown in these circumstances. ### Minimal subrequests | | | | - | - | | **Default as of** | 2022-04-05 | | **Flag to enable** | `minimal_subrequests` | | **Flag to disable** | `no_minimal_subrequests` | With the `minimal_subrequests` flag set, `fetch()` subrequests sent to endpoints on the Worker's own zone (also called same-zone subrequests) have a reduced set of features applied to them. In general, these features should not have been initially applied to same-zone subrequests, and very few user-facing behavior changes are anticipated. Specifically, Workers might observe the following behavior changes with the new flag: * Response bodies will not be opportunistically gzipped before being transmitted to the Workers runtime. If a Worker reads the response body, it will read it in plaintext, as has always been the case, so disabling this prevents unnecessary decompression. Meanwhile, if the Worker passes the response through to the client, Cloudflare's HTTP proxy will opportunistically gzip the response body on that side of the Workers runtime instead. The behavior change observable by a Worker script should be that some `Content-Encoding: gzip` headers will no longer appear. * Automatic Platform Optimization may previously have been applied on both the Worker's initiating request and its subrequests in some circumstances. It will now only apply to the initiating request. * Link prefetching will now only apply to the Worker's response, not responses to the Worker's subrequests. ### Global `navigator` | | | | - | - | | **Default as of** | 2022-03-21 | | **Flag to enable** | `global_navigator` | | **Flag to disable** | `no_global_navigator` | With the `global_navigator` flag set, a new global `navigator` property is available from within Workers. Currently, it exposes only a single `navigator.userAgent` property whose value is set to `'Cloudflare-Workers'`. This property can be used to reliably determine whether code is running within the Workers environment. ### Do not use the Custom Origin Trust Store for external subrequests | | | | - | - | | **Default as of** | 2022-03-08 | | **Flag to enable** | `no_cots_on_external_fetch` | | **Flag to disable** | `cots_on_external_fetch` | The `no_cots_on_external_fetch` flag disables the use of the [Custom Origin Trust Store](https://developers.cloudflare.com/ssl/origin-configuration/custom-origin-trust-store/) when making external (grey-clouded) subrequests from a Cloudflare Worker. ### Setters/getters on API object prototypes | | | | - | - | | **Default as of** | 2022-01-31 | | **Flag to enable** | `workers_api_getters_setters_on_prototype` | | **Flag to disable** | `workers_api_getters_setters_on_instance` | Originally, properties on Workers API objects were defined as instance properties as opposed to prototype properties. This broke subclassing at the JavaScript layer, preventing a subclass from correctly overriding the superclass getters/setters. This flag controls the breaking change made to set those getters/setters on the prototype template instead. This changes applies to: * `AbortSignal` * `AbortController` * `Blob` * `Body` * `DigestStream` * `Event` * `File` * `Request` * `ReadableStream` * `ReadableStreamDefaultReader` * `ReadableStreamBYOBReader` * `Response` * `TextDecoder` * `TextEncoder` * `TransformStream` * `URL` * `WebSocket` * `WritableStream` * `WritableStreamDefaultWriter` ### Durable Object `stub.fetch()` requires a full URL | | | | - | - | | **Default as of** | 2021-11-10 | | **Flag to enable** | `durable_object_fetch_requires_full_url` | | **Flag to disable** | `durable_object_fetch_allows_relative_url` | Originally, when making a request to a Durable Object by calling `stub.fetch(url)`, a relative URL was accepted as an input. The URL would be interpreted relative to the placeholder URL `http://fake-host`, and the resulting absolute URL was delivered to the destination object's `fetch()` handler. This behavior was incorrect — full URLs were meant to be required. This flag makes full URLs required. ### `fetch()` improperly interprets unknown protocols as HTTP | | | | - | - | | **Default as of** | 2021-11-10 | | **Flag to enable** | `fetch_refuses_unknown_protocols` | | **Flag to disable** | `fetch_treats_unknown_protocols_as_http` | Originally, if the `fetch()` function was passed a URL specifying any protocol other than `http:` or `https:`, it would silently treat it as if it were `http:`. For example, `fetch()` would appear to accept `ftp:` URLs, but it was actually making HTTP requests instead. Note that Cloudflare Workers supports a non-standard extension to `fetch()` to make it support WebSockets. However, when making an HTTP request that is intended to initiate a WebSocket handshake, you should still use `http:` or `https:` as the protocol, not `ws:` nor `wss:`. The `ws:` and `wss:` URL schemes are intended to be used together with the `new WebSocket()` constructor, which exclusively supports WebSocket. The extension to `fetch()` is designed to support HTTP and WebSocket in the same request (the response may or may not choose to initiate a WebSocket), and so all requests are considered to be HTTP. ### Streams BYOB reader detaches buffer | | | | - | - | | **Default as of** | 2021-11-10 | | **Flag to enable** | `streams_byob_reader_detaches_buffer` | | **Flag to disable** | `streams_byob_reader_does_not_detach_buffer` | Originally, the Workers runtime did not detach the `ArrayBuffer`s from user-provided TypedArrays when using the [BYOB reader's `read()` method](https://developers.cloudflare.com/workers/runtime-apis/streams/readablestreambyobreader/#methods), as required by the Streams spec, meaning it was possible to inadvertently reuse the same buffer for multiple `read()` calls. This change makes Workers conform to the spec. User code should never try to reuse an `ArrayBuffer` that has been passed into a [BYOB reader's `read()` method](https://developers.cloudflare.com/workers/runtime-apis/streams/readablestreambyobreader/#methods). Instead, user code can reuse the `ArrayBuffer` backing the result of the `read()` promise, as in the example below. ```js // Consume and discard `readable` using a single 4KiB buffer. let reader = readable.getReader({ mode: "byob" }); let arrayBufferView = new Uint8Array(4096); while (true) { let result = await reader.read(arrayBufferView); if (result.done) break; // Optionally something with `result` here. // Re-use the same memory for the next `read()` by creating // a new Uint8Array backed by the result's ArrayBuffer. arrayBufferView = new Uint8Array(result.value.buffer); } ``` The more recently added extension method `readAtLeast()` will always detach the `ArrayBuffer` and is unaffected by this feature flag setting. ### `FormData` parsing supports `File` | | | | - | - | | **Default as of** | 2021-11-03 | | **Flag to enable** | `formdata_parser_supports_files` | | **Flag to disable** | `formdata_parser_converts_files_to_strings` | [The `FormData` API](https://developer.mozilla.org/en-US/docs/Web/API/FormData) is used to parse data (especially HTTP request bodies) in `multipart/form-data` format. Originally, the Workers runtime's implementation of the `FormData` API incorrectly converted uploaded files to strings. Therefore, `formData.get("filename")` would return a string containing the file contents instead of a `File` object. This change fixes the problem, causing files to be represented using `File` as specified in the standard. ### `HTMLRewriter` handling of `` | | | | - | - | | **Flag to enable** | `html_rewriter_treats_esi_include_as_void_tag` | The HTML5 standard defines a fixed set of elements as void elements, meaning they do not use an end tag: ``, ``, `
    `, ``, ``, ``, `
    `, ``, ``, ``, ``, ``, ``, ``, ``, and ``. HTML5 does not recognize XML self-closing tag syntax. For example, `` ending tag is still required. The `/>` syntax simply is not recognized by HTML5 at all and it is treated the same as `>`. However, many developers still like to use this syntax, as a holdover from XHTML, a standard which failed to gain traction in the early 2000's. `` and `` are two tags that are not part of the HTML5 standard, but are instead used as part of [Edge Side Includes](https://en.wikipedia.org/wiki/Edge_Side_Includes), a technology for server-side HTML modification. These tags are not expected to contain any body and are commonly written with XML self-closing syntax. `HTMLRewriter` was designed to parse standard HTML5, not ESI. However, it would be useful to be able to implement some parts of ESI using `HTMLRewriter`. To that end, this compatibility flag causes `HTMLRewriter` to treat `` and `` as void tags, so that they can be parsed and handled properly. ## Experimental flags These flags can be enabled via `compatibility_flags`, but are not yet scheduled to become default on any particular date. ### Queue consumers don't wait for `ctx.waitUntil()` to resolve | | | | - | - | | **Flag to enable** | `queue_consumer_no_wait_for_wait_until` | By default, [Queues](https://developers.cloudflare.com/queues/) Consumer Workers acknowledge messages only after promises passed to [`ctx.waitUntil()`](https://developers.cloudflare.com/workers/runtime-apis/context) have resolved. This behavior can cause queue consumers which utilize `ctx.waitUntil()` to process messages slowly. The default behavior is documented in the [Queues Consumer Configuration Guide](https://developers.cloudflare.com/queues/configuration/javascript-apis#consumer). This Consumer Worker is an example of a Worker which utilizes `ctx.waitUntil()`. Under the default behavior, this consumer Worker will only acknowledge a batch of messages after the sleep function has resolved. ```js export default { async fetch(request, env, ctx) { // omitted }, async queue(batch, env, ctx) { console.log(`received batch of ${batch.messages.length} messages to queue ${batch.queue}`); for (let i = 0; i < batch.messages.length; ++i) { console.log(`message #${i}: ${JSON.stringify(batch.messages[i])}`); } ctx.waitUntil(sleep(30 * 1000)); } }; function sleep(ms) { return new Promise(resolve => setTimeout(resolve, ms)); } ``` If the `queue_consumer_no_wait_for_wait_until` flag is enabled, Queues consumers will no longer wait for promises passed to `ctx.waitUntil()` to resolve before acknowledging messages. This can improve the performance of queue consumers which utilize `ctx.waitUntil()`. With the flag enabled, in the above example, the consumer Worker will acknowledge the batch without waiting for the sleep function to resolve. Using this flag will not affect the behavior of `ctx.waitUntil()`. `ctx.waitUntil()` will continue to extend the lifetime of your consumer Worker to continue to work even after the batch of messages has been acknowledged. ### `HTMLRewriter` handling of `` | | | | - | - | | **Flag to enable** | `html_rewriter_treats_esi_include_as_void_tag` | The HTML5 standard defines a fixed set of elements as void elements, meaning they do not use an end tag: ``, ``, `
    `, ``, ``, ``, `
    `, ``, ``, ``, ``, ``, ``, ``, ``, and ``. HTML5 does not recognize XML self-closing tag syntax. For example, `` ending tag is still required. The `/>` syntax simply is not recognized by HTML5 at all and it is treated the same as `>`. However, many developers still like to use this syntax, as a holdover from XHTML, a standard which failed to gain traction in the early 2000's. `` and `` are two tags that are not part of the HTML5 standard, but are instead used as part of [Edge Side Includes](https://en.wikipedia.org/wiki/Edge_Side_Includes), a technology for server-side HTML modification. These tags are not expected to contain any body and are commonly written with XML self-closing syntax. `HTMLRewriter` was designed to parse standard HTML5, not ESI. However, it would be useful to be able to implement some parts of ESI using `HTMLRewriter`. To that end, this compatibility flag causes `HTMLRewriter` to treat `` and `` as void tags, so that they can be parsed and handled properly.
    --- title: Cron Triggers · Cloudflare Workers docs description: Enable your Worker to be executed on a schedule. lastUpdated: 2025-06-20T15:54:31.000Z chatbotDeprioritize: false source_url: html: https://developers.cloudflare.com/workers/configuration/cron-triggers/ md: https://developers.cloudflare.com/workers/configuration/cron-triggers/index.md --- ## Background Cron Triggers allow users to map a cron expression to a Worker using a [`scheduled()` handler](https://developers.cloudflare.com/workers/runtime-apis/handlers/scheduled/) that enables Workers to be executed on a schedule. Cron Triggers are ideal for running periodic jobs, such as for maintenance or calling third-party APIs to collect up-to-date data. Workers scheduled by Cron Triggers will run on underutilized machines to make the best use of Cloudflare's capacity and route traffic efficiently. Note Cron Triggers can also be combined with [Workflows](https://developers.cloudflare.com/workflows/) to trigger multi-step, long-running tasks. You can [bind to a Workflow](https://developers.cloudflare.com/workflows/build/workers-api/) from directly from your Cron Trigger to execute a Workflow on a schedule. Cron Triggers execute on UTC time. ## Add a Cron Trigger ### 1. Define a scheduled event listener To respond to a Cron Trigger, you must add a [`"scheduled"` handler](https://developers.cloudflare.com/workers/runtime-apis/handlers/scheduled/) to your Worker. * JavaScript ```js export default { async scheduled(controller, env, ctx) { console.log("cron processed"); }, }; ``` * TypeScript ```ts interface Env {} export default { async scheduled( controller: ScheduledController, env: Env, ctx: ExecutionContext, ) { console.log("cron processed"); }, }; ``` * Python ```python from workers import handler @handler async def on_scheduled(controller, env, ctx): print("cron processed") ``` Refer to the following additional examples to write your code: * [Setting Cron Triggers](https://developers.cloudflare.com/workers/examples/cron-trigger/) * [Multiple Cron Triggers](https://developers.cloudflare.com/workers/examples/multiple-cron-triggers/) ### 2. Update configuration Cron Trigger changes take time to propagate. Changes such as adding a new Cron Trigger, updating an old Cron Trigger, or deleting a Cron Trigger may take several minutes (up to 15 minutes) to propagate to the Cloudflare global network. After you have updated your Worker code to include a `"scheduled"` event, you must update your Worker project configuration. #### Via the [Wrangler configuration file](https://developers.cloudflare.com/workers/wrangler/configuration/) If a Worker is managed with Wrangler, Cron Triggers should be exclusively managed through the [Wrangler configuration file](https://developers.cloudflare.com/workers/wrangler/configuration/). Refer to the example below for a Cron Triggers configuration: * wrangler.jsonc ```jsonc { "triggers": { "crons": [ "*/3 * * * *", "0 15 1 * *", "59 23 LW * *" ] } } ``` * wrangler.toml ```toml [triggers] # Schedule cron triggers: # - At every 3rd minute # - At 15:00 (UTC) on first day of the month # - At 23:59 (UTC) on the last weekday of the month crons = [ "*/3 * * * *", "0 15 1 * *", "59 23 LW * *" ] ``` You also can set a different Cron Trigger for each [environment](https://developers.cloudflare.com/workers/wrangler/environments/) in your [Wrangler configuration file](https://developers.cloudflare.com/workers/wrangler/configuration/). You need to put the `triggers` array under your chosen environment. For example: * wrangler.jsonc ```jsonc { "env": { "dev": { "triggers": { "crons": [ "0 * * * *" ] } } } } ``` * wrangler.toml ```toml [env.dev.triggers] crons = ["0 * * * *"] ``` #### Via the dashboard To add Cron Triggers in the Cloudflare dashboard: 1. Log in to the [Cloudflare dashboard](https://dash.cloudflare.com) and select your account. 2. In Account Home, select **Workers & Pages**. 3. In **Overview**, select your Worker > **Settings** > **Triggers** > **Cron Triggers**. ## Supported cron expressions Cloudflare supports cron expressions with five fields, along with most [Quartz scheduler](http://www.quartz-scheduler.org/documentation/quartz-2.3.0/tutorials/crontrigger.html#introduction)-like cron syntax extensions: | Field | Values | Characters | | - | - | - | | Minute | 0-59 | \* , - / | | Hours | 0-23 | \* , - / | | Days of Month | 1-31 | \* , - / L W | | Months | 1-12, case-insensitive 3-letter abbreviations ("JAN", "aug", etc.) | \* , - / | | Weekdays | 1-7, case-insensitive 3-letter abbreviations ("MON", "fri", etc.) | \* , - / L # | Note Days of the week go from 1 = Sunday to 7 = Saturday, which is different on some other cron systems (where 0 = Sunday and 6 = Saturday). To avoid ambiguity you may prefer to use the three-letter abbreviations (e.g. `SUN` rather than 1). ### Examples Some common time intervals that may be useful for setting up your Cron Trigger: * `* * * * *` * At every minute * `*/30 * * * *` * At every 30th minute * `45 * * * *` * On the 45th minute of every hour * `0 17 * * sun` or `0 17 * * 1` * 17:00 (UTC) on Sunday * `10 7 * * mon-fri` or `10 7 * * 2-6` * 07:10 (UTC) on weekdays * `0 15 1 * *` * 15:00 (UTC) on first day of the month * `0 18 * * 6L` or `0 18 * * friL` * 18:00 (UTC) on the last Friday of the month * `59 23 LW * *` * 23:59 (UTC) on the last weekday of the month ## Test Cron Triggers locally Test Cron Triggers using Wrangler with [`wrangler dev`](https://developers.cloudflare.com/workers/wrangler/commands/#dev). This will expose a `/cdn-cgi/handler/scheduled` route which can be used to test using a HTTP request. ```sh curl "http://localhost:8787/cdn-cgi/handler/scheduled" ``` To simulate different cron patterns, a `cron` query parameter can be passed in. ```sh curl "http://localhost:8787/cdn-cgi/handler/scheduled?cron=*+*+*+*+*" ``` Optionally, you can also pass a `time` query parameter to override `controller.scheduledTime` in your scheduled event listener. ```sh curl "http://localhost:8787/cdn-cgi/handler/scheduled?cron=*+*+*+*+*&time=1745856238" ``` ## View past events To view the execution history of Cron Triggers, view **Cron Events**: 1. Log in to the [Cloudflare dashboard](https://dash.cloudflare.com) and select your account. 2. In Account Home, go to **Workers & Pages**. 3. In **Overview**, select your **Worker**. 4. Select **Settings**. 5. Under **Trigger Events**, select **View events**. Cron Events stores the 100 most recent invocations of the Cron scheduled event. [Workers Logs](https://developers.cloudflare.com/workers/observability/logs/workers-logs) also records invocation logs for the Cron Trigger with a longer retention period and a filter & query interface. If you are interested in an API to access Cron Events, use Cloudflare's [GraphQL Analytics API](https://developers.cloudflare.com/analytics/graphql-api). Note It can take up to 30 minutes before events are displayed in **Past Cron Events** when creating a new Worker or changing a Worker's name. Refer to [Metrics and Analytics](https://developers.cloudflare.com/workers/observability/metrics-and-analytics/) for more information. ## Remove a Cron Trigger ### Via the dashboard To delete a Cron Trigger on a deployed Worker via the dashboard: 1. Log in to the [Cloudflare dashboard](https://dash.cloudflare.com) and select your account. 2. Go to **Workers & Pages**, and select your Worker. 3. Go to **Triggers** > select the three dot icon next to the Cron Trigger you want to remove > **Delete**. #### Via the [Wrangler configuration file](https://developers.cloudflare.com/workers/wrangler/configuration/) If a Worker is managed with Wrangler, Cron Triggers should be exclusively managed through the [Wrangler configuration file](https://developers.cloudflare.com/workers/wrangler/configuration/). When deploying a Worker with Wrangler any previous Cron Triggers are replaced with those specified in the `triggers` array. * If the `crons` property is an empty array then all the Cron Triggers are removed. * If the `triggers` or `crons` property are `undefined` then the currently deploy Cron Triggers are left in-place. - wrangler.jsonc ```jsonc { "triggers": { "crons": [] } } ``` - wrangler.toml ```toml [triggers] # Remove all cron triggers: crons = [ ] ``` ## Limits Refer to [Limits](https://developers.cloudflare.com/workers/platform/limits/) to track the maximum number of Cron Triggers per Worker. ## Green Compute With Green Compute enabled, your Cron Triggers will only run on Cloudflare points of presence that are located in data centers that are powered purely by renewable energy. Organizations may claim that they are powered by 100 percent renewable energy if they have procured sufficient renewable energy to account for their overall energy use. Renewable energy can be purchased in a number of ways, including through on-site generation (wind turbines, solar panels), directly from renewable energy producers through contractual agreements called Power Purchase Agreements (PPA), or in the form of Renewable Energy Credits (REC, IRECs, GoOs) from an energy credit market. Green Compute can be configured at the account level: 1. Log in to the [Cloudflare dashboard](https://dash.cloudflare.com) and select your account. 2. In Account Home, select **Workers & Pages**. 3. In the **Account details** section, find **Compute Setting**. 4. Select **Change**. 5. Select **Green Compute**. 6. Select **Confirm**. ## Related resources * [Triggers](https://developers.cloudflare.com/workers/wrangler/configuration/#triggers) - Review Wrangler configuration file syntax for Cron Triggers. * Learn how to access Cron Triggers in [ES modules syntax](https://developers.cloudflare.com/workers/reference/migrate-to-module-workers/) for an optimized experience. --- title: Environment variables · Cloudflare Workers docs description: You can add environment variables, which are a type of binding, to attach text strings or JSON values to your Worker. lastUpdated: 2025-05-06T09:04:36.000Z chatbotDeprioritize: false source_url: html: https://developers.cloudflare.com/workers/configuration/environment-variables/ md: https://developers.cloudflare.com/workers/configuration/environment-variables/index.md --- ## Background You can add environment variables, which are a type of binding, to attach text strings or JSON values to your Worker. Environment variables are available on the [`env` parameter](https://developers.cloudflare.com/workers/runtime-apis/handlers/fetch/#parameters) passed to your Worker's [`fetch` event handler](https://developers.cloudflare.com/workers/runtime-apis/handlers/fetch/). Text strings and JSON values are not encrypted and are useful for storing application configuration. ## Add environment variables via Wrangler To add env variables using Wrangler, define text and JSON via the `[vars]` configuration in your Wrangler file. In the following example, `API_HOST` and `API_ACCOUNT_ID` are text values and `SERVICE_X_DATA` is a JSON value. * wrangler.jsonc ```jsonc { "name": "my-worker-dev", "vars": { "API_HOST": "example.com", "API_ACCOUNT_ID": "example_user", "SERVICE_X_DATA": { "URL": "service-x-api.dev.example", "MY_ID": 123 } } } ``` * wrangler.toml ```toml name = "my-worker-dev" [vars] API_HOST = "example.com" API_ACCOUNT_ID = "example_user" SERVICE_X_DATA = { URL = "service-x-api.dev.example", MY_ID = 123 } ``` Refer to the following example on how to access the `API_HOST` environment variable in your Worker code: * JavaScript ```js export default { async fetch(request, env, ctx) { return new Response(`API host: ${env.API_HOST}`); }, }; ``` * TypeScript ```ts export interface Env { API_HOST: string; } export default { async fetch(request, env, ctx): Promise { return new Response(`API host: ${env.API_HOST}`); }, } satisfies ExportedHandler; ``` ### Configuring different environments in Wrangler [Environments in Wrangler](https://developers.cloudflare.com/workers/wrangler/environments) let you specify different configurations for the same Worker, including different values for `vars` in each environment. As `vars` is a [non-inheritable key](https://developers.cloudflare.com/workers/wrangler/configuration/#non-inheritable-keys), they are not inherited by environments and must be specified for each environment. The example below sets up two environments, `staging` and `production`, with different values for `API_HOST`. * wrangler.jsonc ```jsonc { "name": "my-worker-dev", "vars": { "API_HOST": "api.example.com" }, "env": { "staging": { "vars": { "API_HOST": "staging.example.com" } }, "production": { "vars": { "API_HOST": "production.example.com" } } } } ``` * wrangler.toml ```toml name = "my-worker-dev" # top level environment [vars] API_HOST = "api.example.com" [env.staging.vars] API_HOST = "staging.example.com" [env.production.vars] API_HOST = "production.example.com" ``` To run Wrangler commands in specific environments, you can pass in the `--env` or `-e` flag. For example, you can develop the Worker in an environment called `staging` by running `npx wrangler dev --env staging`, and deploy it with `npx wrangler deploy --env staging`. Learn about [environments in Wrangler](https://developers.cloudflare.com/workers/wrangler/environments). ## Add environment variables via the dashboard To add environment variables via the dashboard: 1. Log in to [Cloudflare dashboard](https://dash.cloudflare.com/) and select your account. 2. Select **Workers & Pages**. 3. In **Overview**, select your Worker. 4. Select **Settings**. 5. Under **Variables and Secrets**, select **Add**. 6. Select a **Type**, input a **Variable name**, and input its **Value**. This variable will be made available to your Worker. 7. (Optional) To add multiple environment variables, select **Add variable**. 8. Select **Deploy** to implement your changes. Plaintext strings and secrets Select the **Secret** type if your environment variable is a [secret](https://developers.cloudflare.com/workers/configuration/secrets/). Alternatively, consider [Cloudflare Secrets Store](https://developers.cloudflare.com/secrets-store/), for account-level secrets. ## Compare secrets and environment variables Use secrets for sensitive information Do not use plaintext environment variables to store sensitive information. Use [secrets](https://developers.cloudflare.com/workers/configuration/secrets/) or [Secrets Store bindings](https://developers.cloudflare.com/secrets-store/integrations/workers/) instead. [Secrets](https://developers.cloudflare.com/workers/configuration/secrets/) are [environment variables](https://developers.cloudflare.com/workers/configuration/environment-variables/). The difference is secret values are not visible within Wrangler or Cloudflare dashboard after you define them. This means that sensitive data, including passwords or API tokens, should always be encrypted to prevent data leaks. To your Worker, there is no difference between an environment variable and a secret. The secret's value is passed through as defined. When developing your Worker or Pages Function, create a `.dev.vars` file in the root of your project to define secrets that will be used when running `wrangler dev` or `wrangler pages dev`, as opposed to using environment variables in the [Wrangler configuration file](https://developers.cloudflare.com/workers/configuration/environment-variables/#compare-secrets-and-environment-variables). This works both in local and remote development modes. The `.dev.vars` file should be formatted like a `dotenv` file, such as `KEY="VALUE"`: ```bash SECRET_KEY="value" API_TOKEN="eyJhbGciOiJIUzI1NiIsInR5cCI6IkpXVCJ9" ``` To set different secrets for each environment, create files named `.dev.vars.`. When you use `wrangler --env `, the corresponding environment-specific file will be loaded instead of the `.dev.vars` file. Like other environment variables, secrets are [non-inheritable](https://developers.cloudflare.com/workers/wrangler/configuration/#non-inheritable-keys) and must be defined per environment. ## Related resources * Migrating environment variables from [Service Worker format to ES modules syntax](https://developers.cloudflare.com/workers/reference/migrate-to-module-workers/#environment-variables). --- title: Integrations · Cloudflare Workers docs description: Integrate with third-party services and products. lastUpdated: 2024-08-13T19:56:56.000Z chatbotDeprioritize: false source_url: html: https://developers.cloudflare.com/workers/configuration/integrations/ md: https://developers.cloudflare.com/workers/configuration/integrations/index.md --- One of the key features of Cloudflare Workers is the ability to integrate with other services and products. In this document, we will explain the types of integrations available with Cloudflare Workers and provide step-by-step instructions for using them. ## Types of integrations Cloudflare Workers offers several types of integrations, including: * [Databases](https://developers.cloudflare.com/workers/databases/): Cloudflare Workers can be integrated with a variety of databases, including SQL and NoSQL databases. This allows you to store and retrieve data from your databases directly from your Cloudflare Workers code. * [APIs](https://developers.cloudflare.com/workers/configuration/integrations/apis/): Cloudflare Workers can be used to integrate with external APIs, allowing you to access and use the data and functionality exposed by those APIs in your own code. * [Third-party services](https://developers.cloudflare.com/workers/configuration/integrations/external-services/): Cloudflare Workers can be used to integrate with a wide range of third-party services, such as payment gateways, authentication providers, and more. This makes it possible to use these services in your Cloudflare Workers code. ## How to use integrations To use any of the available integrations: * Determine which integration you want to use and make sure you have the necessary accounts and credentials for it. * In your Cloudflare Workers code, import the necessary libraries or modules for the integration. * Use the provided APIs and functions to connect to the integration and access its data or functionality. * Store necessary secrets and keys using secrets via [`wrangler secret put `](https://developers.cloudflare.com/workers/wrangler/commands/#secret). ## Tips and best practices To help you get the most out of using integrations with Cloudflare Workers: * Secure your integrations and protect sensitive data. Ensure you use secure authentication and authorization where possible, and ensure the validity of libraries you import. * Use [caching](https://developers.cloudflare.com/workers/reference/how-the-cache-works) to improve performance and reduce the load on an external service. * Split your Workers into service-oriented architecture using [Service bindings](https://developers.cloudflare.com/workers/runtime-apis/bindings/service-bindings/) to make your application more modular, easier to maintain, and more performant. * Use [Custom Domains](https://developers.cloudflare.com/workers/configuration/routing/custom-domains/) when communicating with external APIs and services, which create a DNS record on your behalf and treat your Worker as an application instead of a proxy. --- title: Multipart upload metadata · Cloudflare Workers docs description: If you're using the Workers Script Upload API or Version Upload API directly, multipart/form-data uploads require you to specify a metadata part. This metadata defines the Worker's configuration in JSON format, analogue to the wrangler.toml file. lastUpdated: 2025-07-03T13:00:13.000Z chatbotDeprioritize: false source_url: html: https://developers.cloudflare.com/workers/configuration/multipart-upload-metadata/ md: https://developers.cloudflare.com/workers/configuration/multipart-upload-metadata/index.md --- If you're using the [Workers Script Upload API](https://developers.cloudflare.com/api/resources/workers/subresources/scripts/methods/update/) or [Version Upload API](https://developers.cloudflare.com/api/resources/workers/subresources/scripts/subresources/versions/methods/create/) directly, `multipart/form-data` uploads require you to specify a `metadata` part. This metadata defines the Worker's configuration in JSON format, analogue to the [wrangler.toml file](https://developers.cloudflare.com/workers/wrangler/configuration/). ## Sample `metadata` ```json { "main_module": "main.js", "bindings": [ { "type": "plain_text", "name": "MESSAGE", "text": "Hello, world!" } ], "compatibility_date": "2021-09-14" } ``` Note See examples of metadata being used with the Workers Script Upload API [here](https://developers.cloudflare.com/workers/platform/infrastructure-as-code#cloudflare-rest-api). ## Attributes The following attributes are configurable at the top-level. Note At a minimum, the `main_module` key is required to upload a Worker. * `main_module` string required * The part name that contains the module entry point of the Worker that will be executed. For example, `main.js`. * `assets` object optional * [Asset](https://developers.cloudflare.com/workers/static-assets/) configuration for a Worker. * `config` object optional * [html\_handling](https://developers.cloudflare.com/workers/static-assets/routing/advanced/html-handling/) determines the redirects and rewrites of requests for HTML content. * [not\_found\_handling](https://developers.cloudflare.com/workers/static-assets/#routing-behavior) determines the response when a request does not match a static asset. * `jwt` field provides a token authorizing assets to be attached to a Worker. * `keep_assets` boolean optional * Specifies whether assets should be retained from a previously uploaded Worker version; used in lieu of providing a completion token. * `bindings` array\[object] optional * [Bindings](#bindings) to expose in the Worker. * `placement` object optional * [Smart placement](https://developers.cloudflare.com/workers/configuration/smart-placement/) object for the Worker. * `mode` field only supports `smart` for automatic placement. * `compatibility_date` string optional * [Compatibility Date](https://developers.cloudflare.com/workers/configuration/compatibility-dates/#setting-compatibility-date) indicating targeted support in the Workers runtime. Backwards incompatible fixes to the runtime following this date will not affect this Worker. Highly recommended to set a `compatibility_date`, otherwise if on upload via the API, it defaults to the oldest compatibility date before any flags took effect (2021-11-02). * `compatibility_flags` array\[string] optional * [Compatibility Flags](https://developers.cloudflare.com/workers/configuration/compatibility-flags/#setting-compatibility-flags) that enable or disable certain features in the Workers runtime. Used to enable upcoming features or opt in or out of specific changes not included in a `compatibility_date`. ## Additional attributes: [Workers Script Upload API](https://developers.cloudflare.com/api/resources/workers/subresources/scripts/methods/update/) For [immediately deployed uploads](https://developers.cloudflare.com/workers/configuration/versions-and-deployments/#upload-a-new-version-and-deploy-it-immediately), the following **additional** attributes are configurable at the top-level. Note These attributes are **not available** for version uploads. * `migrations` array\[object] optional * [Durable Objects migrations](https://developers.cloudflare.com/durable-objects/reference/durable-objects-migrations/) to apply. * `logpush` boolean optional * Whether [Logpush](https://developers.cloudflare.com/cloudflare-for-platforms/cloudflare-for-saas/hostname-analytics/#logpush) is turned on for the Worker. * `tail_consumers` array\[object] optional * [Tail Workers](https://developers.cloudflare.com/workers/observability/logs/tail-workers/) that will consume logs from the attached Worker. * `tags` array\[string] optional * List of strings to use as tags for this Worker. ## Additional attributes: [Version Upload API](https://developers.cloudflare.com/api/resources/workers/subresources/scripts/subresources/versions/methods/create/) For [version uploads](https://developers.cloudflare.com/workers/configuration/versions-and-deployments/#upload-a-new-version-to-be-gradually-deployed-or-deployed-at-a-later-time), the following **additional** attributes are configurable at the top-level. Note These attributes are **not available** for immediately deployed uploads. * `annotations` object optional * Annotations object specific to the Worker version. * `workers/message` specifies a custom message for the version. * `workers/tag` specifies a custom identifier for the version. * `workers/alias` specifies a custom alias for this version. ## Bindings Workers can interact with resources on the Cloudflare Developer Platform using [bindings](https://developers.cloudflare.com/workers/runtime-apis/bindings/). Refer to the JSON example below that shows how to add bindings in the `metadata` part. ```json { "bindings": [ { "type": "ai", "name": "" }, { "type": "analytics_engine", "name": "", "dataset": "" }, { "type": "assets", "name": "" }, { "type": "browser_rendering", "name": "" }, { "type": "d1", "name": "", "id": "" }, { "type": "durable_object_namespace", "name": "", "class_name": "" }, { "type": "hyperdrive", "name": "", "id": "" }, { "type": "kv_namespace", "name": "", "namespace_id": "" }, { "type": "mtls_certificate", "name": "", "certificate_id": "" }, { "type": "plain_text", "name": "", "text": "" }, { "type": "queue", "name": "", "queue_name": "" }, { "type": "r2_bucket", "name": "", "bucket_name": "" }, { "type": "secret_text", "name": "", "text": "" }, { "type": "service", "name": "", "service": "", "environment": "production" }, { "type": "tail_consumer", "service": "" }, { "type": "vectorize", "name": "", "index_name": "" }, { "type": "version_metadata", "name": "" } ] } ``` --- title: Preview URLs · Cloudflare Workers docs description: Preview URLs allow you to preview new versions of your project without deploying it to production. lastUpdated: 2025-07-03T13:00:13.000Z chatbotDeprioritize: false source_url: html: https://developers.cloudflare.com/workers/configuration/previews/ md: https://developers.cloudflare.com/workers/configuration/previews/index.md --- # Overview Preview URLs allow you to preview new versions of your Worker without deploying it to production. There are two types of preview URLs: * **Versioned Preview URLs**: A unique URL generated automatically for each new version of your Worker. * **Aliased Preview URLs**: A static, human-readable alias that you can manually assign to a Worker version. Both preview URL types follow the format: `-..workers.dev`. Preview URLs can be: * Integrated into CI/CD pipelines, allowing automatic generation of preview environments for every pull request. * Used for collaboration between teams to test code changes in a live environment and verify updates. * Used to test new API endpoints, validate data formats, and ensure backward compatibility with existing services. When testing zone level performance or security features for a version, we recommend using [version overrides](https://developers.cloudflare.com/workers/configuration/versions-and-deployments/gradual-deployments/#version-overrides) so that your zone's performance and security settings apply. Note Preview URLs are only available for Worker versions uploaded after 2024-09-25. ## Types of Preview URLs ### Versioned Preview URLs Every time you create a new [version](https://developers.cloudflare.com/workers/configuration/versions-and-deployments/#versions) of your Worker, a unique static version preview URL is generated automatically. These URLs use a version prefix and follow the format `-..workers.dev`. New versions of a Worker are created when you run: * [`wrangler deploy`](https://developers.cloudflare.com/workers/wrangler/commands/#deploy) * [`wrangler versions upload`](https://developers.cloudflare.com/workers/wrangler/commands/#upload) * Or when you make edits via the Cloudflare dashboard These URLs are public by default and available immediately after version creation. Note Minimum required Wrangler version: 3.74.0. Check your version by running `wrangler --version`. To update Wrangler, refer to [Install/Update Wrangler](https://developers.cloudflare.com/workers/wrangler/install-and-update/). #### View versioned preview URLs using Wrangler The [`wrangler versions upload`](https://developers.cloudflare.com/workers/wrangler/commands/#upload) command uploads a new [version](https://developers.cloudflare.com/workers/configuration/versions-and-deployments/#versions) of your Worker and returns a preview URL for each version uploaded. #### View versioned preview URLs on the Workers dashboard 1. Log in to the [Cloudflare dashboard](https://dash.cloudflare.com/?to=/:account/workers) and select your project. 2. Go to the **Deployments** tab, and find the version you would like to view. ### Aliased preview URLs Aliased preview URLs let you assign a persistent, readable alias to a specific Worker version. These are useful for linking to stable previews across many versions (e.g. to share an upcoming but still actively being developed new feature). A common workflow would be to assign an alias for the branch that you're working on. These types of preview URLs follow the same pattern as other preview URLs: `-..workers.dev` Note Minimum required Wrangler version: `4.21.0`. Check your version by running `wrangler --version`. To update Wrangler, refer to [Install/Update Wrangler](https://developers.cloudflare.com/workers/wrangler/install-and-update/). #### Create an Alias Aliases may be created during `versions upload`, by providing the `--preview-alias` flag with a valid alias name: ```bash wrangler versions upload --preview-alias staging ``` The resulting alias would be associated with this version, and immediately available at: `staging-..workers.dev` #### Rules and limitations * Aliases may only be created during version upload. * Aliases must use only lowercase letters, numbers, and dashes. * Aliases must begin with a lowercase letter. * The alias and Worker name combined (with a dash) must not exceed 63 characters due to DNS label limits. * Only the 20 most recently used aliases are retained. When a new alias is created beyond this limit, the least recently used alias is deleted. ## Manage access to Preview URLs By default, all preview URLs are enabled and available publicly. You can use [Cloudflare Access](https://developers.cloudflare.com/cloudflare-one/policies/access/) to require visitors to authenticate before accessing preview URLs. You can limit access to yourself, your teammates, your organization, or anyone else you specify in your [access policy](https://developers.cloudflare.com/cloudflare-one/policies/access). To limit your preview URLs to authorized emails only: 1. Log in to the [Cloudflare Access dashboard](https://one.dash.cloudflare.com/?to=/:account/access/apps). 2. Select your account. 3. Add an application. 4. Select **Self Hosted**. 5. Name your application (for example, "my-worker") and add your `workers.dev` subdomain as the **Application domain**. For example, if you want to secure preview URLs for a Worker running on `my-worker.my-subdomain.workers.dev`. * Subdomain: `*-my-worker` * Domain: `my-subdomain.workers.dev` Note You must press enter after you input your Application domain for it to save. You will see a "Zone is not associated with the current account" warning that you may ignore. 1. Go to the next page. 2. Add a name for your access policy (for example, "Allow employees access to preview URLs for my-worker"). 3. In the **Configure rules** section create a new rule with the **Emails** selector, or any other attributes which you wish to gate access to previews with. 4. Enter the emails you want to authorize. View [access policies](https://developers.cloudflare.com/cloudflare-one/policies/access/#selectors) to learn about configuring alternate rules. 5. Go to the next page. 6. Add application. ## Disabling Preview URLs Disabling Preview URLs will disable routing to both versioned and aliased preview URLs. ### Disabling Preview URLs in the dashboard To disable Preview URLs for a Worker: 1. Log in to the [Cloudflare dashboard](https://dash.cloudflare.com) and select your account. 2. Go to **Workers & Pages** and in **Overview**, select your Worker. 3. Go to **Settings** > **Domains & Routes**. 4. On "Preview URLs" click "Disable". 5. Confirm you want to disable. ### Disabling Preview URLs in the [Wrangler configuration file](https://developers.cloudflare.com/workers/wrangler/configuration/) Note Wrangler 3.91.0 or higher is required to use this feature. To disable Preview URLs for a Worker, include the following in your Worker's Wrangler file: * wrangler.jsonc ```jsonc { "preview_urls": false } ``` * wrangler.toml ```toml preview_urls = false ``` When you redeploy your Worker with this change, Preview URLs will be disabled. Warning If you disable Preview URLs in the Cloudflare dashboard but do not update your Worker's Wrangler file with `preview_urls = false`, then Preview URLs will be re-enabled the next time you deploy your Worker with Wrangler. ## Limitations * Preview URLs are not generated for Workers that implement a [Durable Object](https://developers.cloudflare.com/durable-objects/). * Preview URLs are not currently generated for [Workers for Platforms](https://developers.cloudflare.com/cloudflare-for-platforms/workers-for-platforms/) [user Workers](https://developers.cloudflare.com/cloudflare-for-platforms/workers-for-platforms/reference/how-workers-for-platforms-works/#user-workers). This is a temporary limitation, we are working to remove it. * You cannot currently configure Preview URLs to run on a subdomain other than [`workers.dev`](https://developers.cloudflare.com/workers/configuration/routing/workers-dev/). * You cannot view logs for Preview URLs today, this includes Workers Logs, Wrangler tail and Logpush. --- title: Routes and domains · Cloudflare Workers docs description: Connect your Worker to an external endpoint (via Routes, Custom Domains or a `workers.dev` subdomain) such that it can be accessed by the Internet. lastUpdated: 2024-11-04T16:38:55.000Z chatbotDeprioritize: false source_url: html: https://developers.cloudflare.com/workers/configuration/routing/ md: https://developers.cloudflare.com/workers/configuration/routing/index.md --- To allow a Worker to receive inbound HTTP requests, you must connect it to an external endpoint such that it can be accessed by the Internet. There are three types of routes: * [Custom Domains](https://developers.cloudflare.com/workers/configuration/routing/custom-domains): Routes to a domain or subdomain (such as `example.com` or `shop.example.com`) within a Cloudflare zone where the Worker is the origin. * [Routes](https://developers.cloudflare.com/workers/configuration/routing/routes/): Routes that are set within a Cloudflare zone where your origin server, if you have one, is behind a Worker that the Worker can communicate with. * [`workers.dev`](https://developers.cloudflare.com/workers/configuration/routing/workers-dev/): A `workers.dev` subdomain route is automatically created for each Worker to help you getting started quickly. You may choose to [disable](https://developers.cloudflare.com/workers/configuration/routing/workers-dev/) your `workers.dev` subdomain. ## What is best for me? It's recommended to run production Workers on a [Workers route or custom domain](https://developers.cloudflare.com/workers/configuration/routing/), rather than on your `workers.dev` subdomain. Your `workers.dev` subdomain is treated as a [Free website](https://www.cloudflare.com/plans/) and is intended for personal or hobby projects that aren't business-critical. Custom Domains are recommended for use cases where your Worker is your application's origin server. Custom Domains can also be invoked within the same zone via `fetch()`, unlike Routes. Routes are recommended for use cases where your application's origin server is external to Cloudflare. Note that Routes cannot be the target of a same-zone `fetch()` call. --- title: Secrets · Cloudflare Workers docs description: Store sensitive information, like API keys and auth tokens, in your Worker. lastUpdated: 2025-07-02T16:34:28.000Z chatbotDeprioritize: false source_url: html: https://developers.cloudflare.com/workers/configuration/secrets/ md: https://developers.cloudflare.com/workers/configuration/secrets/index.md --- ## Background Secrets are a type of binding that allow you to attach encrypted text values to your Worker. You cannot see secrets after you set them and can only access secrets via [Wrangler](https://developers.cloudflare.com/workers/wrangler/commands/#secret) or programmatically via the [`env` parameter](https://developers.cloudflare.com/workers/runtime-apis/handlers/fetch/#parameters). Secrets are used for storing sensitive information like API keys and auth tokens. Secrets are available on the [`env` parameter](https://developers.cloudflare.com/workers/runtime-apis/handlers/fetch/#parameters) passed to your Worker's [`fetch` event handler](https://developers.cloudflare.com/workers/runtime-apis/handlers/fetch/). ## Access your secrets with Workers Secrets can be accessed from Workers as you would any other [environment variables](https://developers.cloudflare.com/workers/configuration/environment-variables/). For instance, given a `DB_CONNECTION_STRING` secret, you can access it in your Worker code: ```js import postgres from "postgres"; export default { async fetch(request, env, ctx) { const sql = postgres(env.DB_CONNECTION_STRING); const result = await sql`SELECT * FROM products;`; return new Response(JSON.stringify(result), { headers: { "Content-Type": "application/json" }, }); }, }; ``` Secrets Store (beta) Secrets described on this page are defined and managed on a per-Worker level. If you want to use account-level secrets, refer to [Secrets Store](https://developers.cloudflare.com/secrets-store/). Account-level secrets are configured on your Worker as a [Secrets Store binding](https://developers.cloudflare.com/secrets-store/integrations/workers/). ## Local Development with Secrets When developing your Worker or Pages Function, create a `.dev.vars` file in the root of your project to define secrets that will be used when running `wrangler dev` or `wrangler pages dev`, as opposed to using environment variables in the [Wrangler configuration file](https://developers.cloudflare.com/workers/configuration/environment-variables/#compare-secrets-and-environment-variables). This works both in local and remote development modes. The `.dev.vars` file should be formatted like a `dotenv` file, such as `KEY="VALUE"`: ```bash SECRET_KEY="value" API_TOKEN="eyJhbGciOiJIUzI1NiIsInR5cCI6IkpXVCJ9" ``` To set different secrets for each environment, create files named `.dev.vars.`. When you use `wrangler --env `, the corresponding environment-specific file will be loaded instead of the `.dev.vars` file. Like other environment variables, secrets are [non-inheritable](https://developers.cloudflare.com/workers/wrangler/configuration/#non-inheritable-keys) and must be defined per environment. ## Secrets on deployed Workers ### Adding secrets to your project #### Via Wrangler Secrets can be added through [`wrangler secret put`](https://developers.cloudflare.com/workers/wrangler/commands/#secret) or [`wrangler versions secret put`](https://developers.cloudflare.com/workers/wrangler/commands/#secret-put) commands. `wrangler secret put` creates a new version of the Worker and deploys it immediately. ```sh npx wrangler secret put ``` If using [gradual deployments](https://developers.cloudflare.com/workers/configuration/versions-and-deployments/gradual-deployments/), instead use the `wrangler versions secret put` command. This will only create a new version of the Worker, that can then be deploying using [`wrangler versions deploy`](https://developers.cloudflare.com/workers/wrangler/commands/#deploy-2). Note Wrangler versions before 3.73.0 require you to specify a `--x-versions` flag. ```sh npx wrangler versions secret put ``` #### Via the dashboard To add a secret via the dashboard: 1. Log in to [Cloudflare dashboard](https://dash.cloudflare.com/) and select your account. 2. Select **Workers & Pages**. 3. In **Overview**, select your Worker > **Settings**. 4. Under **Variables and Secrets**, select **Add**. 5. Select the type **Secret**, input a **Variable name**, and input its **Value**. This secret will be made available to your Worker but the value will be hidden in Wrangler and the dashboard. 6. (Optional) To add more secrets, select **Add variable**. 7. Select **Deploy** to implement your changes. ### Delete secrets from your project #### Via Wrangler Secrets can be deleted through [`wrangler secret delete`](https://developers.cloudflare.com/workers/wrangler/commands/#delete-1) or [`wrangler versions secret delete`](https://developers.cloudflare.com/workers/wrangler/commands/#secret-delete) commands. `wrangler secret delete` creates a new version of the Worker and deploys it immediately. ```sh npx wrangler secret delete ``` If using [gradual deployments](https://developers.cloudflare.com/workers/configuration/versions-and-deployments/gradual-deployments/), instead use the `wrangler versions secret delete` command. This will only create a new version of the Worker, that can then be deploying using [`wrangler versions deploy`](https://developers.cloudflare.com/workers/wrangler/commands/#deploy-2). ```sh npx wrangler versions secret delete ``` #### Via the dashboard To delete a secret from your Worker project via the dashboard: 1. Log in to [Cloudflare dashboard](https://dash.cloudflare.com/) and select your account. 2. Select **Workers & Pages**. 3. In **Overview**, select your Worker > **Settings**. 4. Under **Variables and Secrets**, select **Edit**. 5. In the **Edit** drawer, select **X** next to the secret you want to delete. 6. Select **Deploy** to implement your changes. 7. (Optional) Instead of using the edit drawer, you can click the delete icon next to the secret. ## Compare secrets and environment variables Use secrets for sensitive information Do not use plaintext environment variables to store sensitive information. Use [secrets](https://developers.cloudflare.com/workers/configuration/secrets/) or [Secrets Store bindings](https://developers.cloudflare.com/secrets-store/integrations/workers/) instead. [Secrets](https://developers.cloudflare.com/workers/configuration/secrets/) are [environment variables](https://developers.cloudflare.com/workers/configuration/environment-variables/). The difference is secret values are not visible within Wrangler or Cloudflare dashboard after you define them. This means that sensitive data, including passwords or API tokens, should always be encrypted to prevent data leaks. To your Worker, there is no difference between an environment variable and a secret. The secret's value is passed through as defined. ## Related resources * [Wrangler secret commands](https://developers.cloudflare.com/workers/wrangler/commands/#secret) - Review the Wrangler commands to create, delete and list secrets. * [Cloudflare Secrets Store](https://developers.cloudflare.com/secrets-store/) - Encrypt and store sensitive information as secrets that are securely reusable across your account. --- title: Smart Placement · Cloudflare Workers docs description: Speed up your Worker application by automatically placing your workloads in an optimal location that minimizes latency. lastUpdated: 2025-01-29T12:28:42.000Z chatbotDeprioritize: false source_url: html: https://developers.cloudflare.com/workers/configuration/smart-placement/ md: https://developers.cloudflare.com/workers/configuration/smart-placement/index.md --- By default, [Workers](https://developers.cloudflare.com/workers/) and [Pages Functions](https://developers.cloudflare.com/pages/functions/) are invoked in a data center closest to where the request was received. If you are running back-end logic in a Worker, it may be more performant to run that Worker closer to your back-end infrastructure rather than the end user. Smart Placement automatically places your workloads in an optimal location that minimizes latency and speeds up your applications. ## Background The following example demonstrates how moving your Worker close to your back-end services could decrease application latency: You have a user in Sydney, Australia who is accessing an application running on Workers. This application makes multiple round trips to a database located in Frankfurt, Germany in order to serve the user’s request. ![A user located in Sydney, AU connecting to a Worker in the same region which then makes multiple round trips to a database located in Frankfurt, DE. ](https://developers.cloudflare.com/_astro/workers-smart-placement-disabled.CgvAE24H_ZlRB8R.webp) The issue is the time that it takes the Worker to perform multiple round trips to the database. Instead of the request being processed close to the user, the Cloudflare network, with Smart Placement enabled, would process the request in a data center closest to the database. ![A user located in Sydney, AU connecting to a Worker in Frankfurt, DE which then makes multiple round trips to a database also located in Frankfurt, DE. ](https://developers.cloudflare.com/_astro/workers-smart-placement-enabled.D6RN33at_20sSCa.webp) ## Understand how Smart Placement works Smart Placement is enabled on a per-Worker basis. Once enabled, Smart Placement analyzes the [request duration](https://developers.cloudflare.com/workers/observability/metrics-and-analytics/#request-duration) of the Worker in different Cloudflare locations around the world on a regular basis. Smart Placement decides where to run the Worker by comparing the estimated request duration in the location closest to where the request was received (the default location where the Worker would run) to a set of candidate locations around the world. For each candidate location, Smart Placement considers the performance of the Worker in that location as well as the network latency added by forwarding the request to that location. If the estimated request duration in the best candidate location is significantly faster than the location where the request was received, the request will be forwarded to that candidate location. Otherwise, the Worker will run in the default location closest to where the request was received. Smart Placement only considers candidate locations where the Worker has previously run, since the estimated request duration in each candidate location is based on historical data from the Worker running in that location. This means that Smart Placement cannot run the Worker in a location that it does not normally receive traffic from. Smart Placement only affects the execution of [fetch event handlers](https://developers.cloudflare.com/workers/runtime-apis/handlers/fetch/). Smart Placement does not affect the execution of [RPC methods](https://developers.cloudflare.com/workers/runtime-apis/rpc/) or [named entrypoints](https://developers.cloudflare.com/workers/runtime-apis/bindings/service-bindings/rpc/#named-entrypoints). Workers without a fetch event handler will be ignored by Smart Placement. For Workers with both fetch and non-fetch event handlers, Smart Placement will only affect the execution of the fetch event handler. Similarly, Smart Placement will not affect where [static assets](https://developers.cloudflare.com/workers/static-assets/) are served from. Static assets will continue to be served from the location nearest to the incoming request. If a Worker is invoked and your code retrieves assets via the [static assets binding](https://developers.cloudflare.com/workers/static-assets/binding/), then assets will be served from the location that your Worker runs in. ## Enable Smart Placement Smart Placement is available to users on all Workers plans. ### Enable Smart Placement via Wrangler To enable Smart Placement via Wrangler: 1. Make sure that you have `wrangler@2.20.0` or later [installed](https://developers.cloudflare.com/workers/wrangler/install-and-update/). 2. Add the following to your Worker project's Wrangler file: * wrangler.jsonc ```jsonc { "placement": { "mode": "smart" } } ``` * wrangler.toml ```toml [placement] mode = "smart" ``` 3. Wait for Smart Placement to analyze your Worker. This process may take up to 15 minutes. 4. View your Worker's [request duration analytics](https://developers.cloudflare.com/workers/observability/metrics-and-analytics/#request-duration). ### Enable Smart Placement via the dashboard To enable Smart Placement via the dashboard: 1. Log in to the [Cloudflare dashboard](https://dash.cloudflare.com) and select your account. 2. In **Account Home**, select **Workers & Pages**. 3. In **Overview**,select your Worker. 4. Select **Settings** > **General**. 5. Under **Placement**, choose **Smart**. 6. Wait for Smart Placement to analyze your Worker. Smart Placement requires consistent traffic to the Worker from multiple locations around the world to make a placement decision. The analysis process may take up to 15 minutes. 7. View your Worker's [request duration analytics](https://developers.cloudflare.com/workers/observability/metrics-and-analytics/#request-duration) ## Observability ### Placement Status A Worker's metadata contains details about a Worker's placement status. Query your Worker's placement status through the following Workers API endpoint: ```bash curl -X GET https://api.cloudflare.com/client/v4/accounts/{ACCOUNT_ID}/workers/services/{WORKER_NAME} \ -H "Authorization: Bearer " \ -H "Content-Type: application/json" | jq . ``` Possible placement states include: * *(not present)*: The Worker has not been analyzed for Smart Placement yet. The Worker will always run in the default Cloudflare location closest to where the request was received. * `SUCCESS`: The Worker was successfully analyzed and will be optimized by Smart Placement. The Worker will run in the Cloudflare location that minimizes expected request duration, which may be the default location closest to where the request was received or may be a faster location elsewhere in the world. * `INSUFFICIENT_INVOCATIONS`: The Worker has not received enough requests to make a placement decision. Smart Placement requires consistent traffic to the Worker from multiple locations around the world. The Worker will always run in the default Cloudflare location closest to where the request was received. * `UNSUPPORTED_APPLICATION`: Smart Placement began optimizing the Worker and measured the results, which showed that Smart Placement made the Worker slower. In response, Smart Placement reverted the placement decision. The Worker will always run in the default Cloudflare location closest to where the request was received, and Smart Placement will not analyze the Worker again until it's redeployed. This state is rare and accounts for less that 1% of Workers with Smart Placement enabled. ### Request Duration Analytics Once Smart Placement is enabled, data about request duration gets collected. Request duration is measured at the data center closest to the end user. By default, one percent (1%) of requests are not routed with Smart Placement. These requests serve as a baseline to compare to. ### `cf-placement` header Once Smart Placement is enabled, Cloudflare adds a `cf-placement` header to all requests. This can be used to check whether a request has been routed with Smart Placement and where the Worker is processing the request (which is shown as the nearest airport code to the data center). For example, the `cf-placement: remote-LHR` header's `remote` value indicates that the request was routed using Smart Placement to a Cloudflare data center near London. The `cf-placement: local-EWR` header's `local` value indicates that the request was not routed using Smart Placement and the Worker was invoked in a data center closest to where the request was received, close to Newark Liberty International Airport (EWR). Beta use only We may remove the `cf-placement` header before Smart Placement enters general availability. ## Best practices If you are building full-stack applications on Workers, we recommend splitting up the front-end and back-end logic into different Workers and using [Service Bindings](https://developers.cloudflare.com/workers/runtime-apis/bindings/service-bindings/) to connect your front-end logic and back-end logic Workers. ![Smart Placement and Service Bindings](https://developers.cloudflare.com/_astro/smart-placement-service-bindings.Ce58BYeF_1YYSoG.webp) Enabling Smart Placement on your back-end Worker will invoke it close to your back-end service, while the front-end Worker serves requests close to the user. This architecture maintains fast, reactive front-ends while also improving latency when the back-end Worker is called. ## Give feedback on Smart Placement Smart Placement is in beta. To share your thoughts and experience with Smart Placement, join the [Cloudflare Developer Discord](https://discord.cloudflare.com). --- title: Workers Sites · Cloudflare Workers docs description: Use [Workers Static Assets](/workers/static-assets/) to host full-stack applications instead of Workers Sites. Do not use Workers Sites for new projects. lastUpdated: 2025-02-10T15:04:35.000Z chatbotDeprioritize: false source_url: html: https://developers.cloudflare.com/workers/configuration/sites/ md: https://developers.cloudflare.com/workers/configuration/sites/index.md --- Use Workers Static Assets Instead You should use [Workers Static Assets](https://developers.cloudflare.com/workers/static-assets/) to host full-stack applications instead of Workers Sites. It has been deprecated in Wrangler v4, and the [Cloudflare Vite plugin](https://developers.cloudflare.com/workers/vite-plugin/) does not support Workers Sites. Do not use Workers Sites for new projects. Workers Sites enables developers to deploy static applications directly to Workers. It can be used for deploying applications built with static site generators like [Hugo](https://gohugo.io) and [Gatsby](https://www.gatsbyjs.org), or front-end frameworks like [Vue](https://vuejs.org) and [React](https://reactjs.org). To deploy with Workers Sites, select from one of these three approaches depending on the state of your target project: *** ## 1. Start from scratch If you are ready to start a brand new project, this quick start guide will help you set up the infrastructure to deploy a HTML website to Workers. [Start from scratch](https://developers.cloudflare.com/workers/configuration/sites/start-from-scratch/) *** ## 2. Deploy an existing static site If you have an existing project or static assets that you want to deploy with Workers, this quick start guide will help you install Wrangler and configure Workers Sites for your project. [Start from an existing static site](https://developers.cloudflare.com/workers/configuration/sites/start-from-existing/) *** ## 3. Add static assets to an existing Workers project If you already have a Worker deployed to Cloudflare, this quick start guide will show you how to configure the existing codebase to use Workers Sites. [Start from an existing Worker](https://developers.cloudflare.com/workers/configuration/sites/start-from-worker/) Note Workers Sites is built on Workers KV, and usage rates may apply. Refer to [Pricing](https://developers.cloudflare.com/workers/platform/pricing/) to learn more. --- title: Versions & Deployments · Cloudflare Workers docs description: Upload versions of Workers and create deployments to release new versions. lastUpdated: 2025-04-15T15:42:08.000Z chatbotDeprioritize: false source_url: html: https://developers.cloudflare.com/workers/configuration/versions-and-deployments/ md: https://developers.cloudflare.com/workers/configuration/versions-and-deployments/index.md --- Versions track changes to your Worker. Deployments configure how those changes are deployed to your traffic. You can upload changes (versions) to your Worker independent of changing the version that is actively serving traffic (deployment). ![Versions and Deployments](https://developers.cloudflare.com/_astro/versions-and-deployments.Dnwtp7bX_AGXxo.webp) Using versions and deployments is useful if: * You are running critical applications on Workers and want to reduce risk when deploying new versions of your Worker using a rolling deployment strategy. * You want to monitor for performance differences when deploying new versions of your Worker. * You have a CI/CD pipeline configured for Workers but want to cut manual releases. ## Versions A version is defined by the state of code as well as the state of configuration in a Worker's [Wrangler configuration file](https://developers.cloudflare.com/workers/wrangler/configuration/). Versions track historical changes to [bundled code](https://developers.cloudflare.com/workers/wrangler/bundling/), [static assets](https://developers.cloudflare.com/workers/static-assets/) and changes to configuration like [bindings](https://developers.cloudflare.com/workers/runtime-apis/bindings/) and [compatibility date and compatibility flags](https://developers.cloudflare.com/workers/configuration/compatibility-dates/) over time. Versions also track metadata associated with a version, including: the version ID, the user that created the version, deploy source, and timestamp. Optionally, a version message and version tag can be configured on version upload. Note State changes for associated Workers [storage resources](https://developers.cloudflare.com/workers/platform/storage-options/) such as [KV](https://developers.cloudflare.com/kv/), [R2](https://developers.cloudflare.com/r2/), [Durable Objects](https://developers.cloudflare.com/durable-objects/) and [D1](https://developers.cloudflare.com/d1/) are not tracked with versions. ## Deployments Deployments track the version(s) of your Worker that are actively serving traffic. A deployment can consist of one or two versions of a Worker. By default, Workers supports an all-at-once deployment model where traffic is immediately shifted from one version to the newly deployed version automatically. Alternatively, you can use [gradual deployments](https://developers.cloudflare.com/workers/configuration/versions-and-deployments/gradual-deployments/) to create a rolling deployment strategy. You can also track metadata associated with a deployment, including: the user that created the deployment, deploy source, timestamp and the version(s) in the deployment. Optionally, you can configure a deployment message when you create a deployment. ## Use versions and deployments ### Create a new version Review the different ways you can create versions of your Worker and deploy them. #### Upload a new version and deploy it immediately A new version that is automatically deployed to 100% of traffic when: * Changes are uploaded with [`wrangler deploy`](https://developers.cloudflare.com/workers/wrangler/commands/#deploy) via the Cloudflare Dashboard * Changes are deployed with the command [`npx wrangler deploy`](https://developers.cloudflare.com/workers/wrangler/commands/#deploy) via [Workers Builds](https://developers.cloudflare.com/workers/ci-cd/builds) * Changes are uploaded with the [Workers Script Upload API](https://developers.cloudflare.com/api/resources/workers/subresources/scripts/methods/update/) #### Upload a new version to be gradually deployed or deployed at a later time Note Wrangler versions before 3.73.0 require you to specify a `--x-versions` flag. To create a new version of your Worker that is not deployed immediately, use the [`wrangler versions upload`](https://developers.cloudflare.com/workers/wrangler/commands/#upload) command or create a new version via the Cloudflare dashboard using the **Save** button. You can find the **Save** option under the down arrow beside the "Deploy" button. Versions created in this way can then be deployed all at once or gradually deployed using the [`wrangler versions deploy`](https://developers.cloudflare.com/workers/wrangler/commands/#deploy-2) command or via the Cloudflare dashboard under the **Deployments** tab. Note When using [Wrangler](https://developers.cloudflare.com/workers/wrangler/), changes made to a Worker's triggers [routes, domains](https://developers.cloudflare.com/workers/configuration/routing/) or [cron triggers](https://developers.cloudflare.com/workers/configuration/cron-triggers/) need to be applied with the command [`wrangler triggers deploy`](https://developers.cloudflare.com/workers/wrangler/commands/#triggers). Note New versions are not created when you make changes to [resources connected to your Worker](https://developers.cloudflare.com/workers/runtime-apis/bindings/). For example, if two Workers (Worker A and Worker B) are connected via a [service binding](https://developers.cloudflare.com/workers/runtime-apis/bindings/service-bindings/), changing the code of Worker B will not create a new version of Worker A. Changing the code of Worker B will only create a new version of Worker B. Changes to the service binding (such as, deleting the binding or updating the [environment](https://developers.cloudflare.com/workers/wrangler/environments/) it points to) on Worker A will also not create a new version of Worker B. ### View versions and deployments #### Via Wrangler Wrangler allows you to view the 10 most recent versions and deployments. Refer to the [`versions list`](https://developers.cloudflare.com/workers/wrangler/commands/#list-5) and [`deployments`](https://developers.cloudflare.com/workers/wrangler/commands/#list-6) documentation to view the commands. #### Via the Cloudflare dashboard To view your deployments in the Cloudflare dashboard: 1. Log in to the [Cloudflare dashboard](https://dash.cloudflare.com/?to=/:account/workers) and select your account. 2. Go to **Workers & Pages**. 3. Select your Worker > **Deployments**. ## Limits ### First upload You must use [C3](https://developers.cloudflare.com/workers/get-started/guide/#1-create-a-new-worker-project) or [`wrangler deploy`](https://developers.cloudflare.com/workers/wrangler/commands/#deploy) the first time you create a new Workers project. Using [`wrangler versions upload`](https://developers.cloudflare.com/workers/wrangler/commands/#upload) the first time you upload a Worker will fail. ### Service worker syntax Service worker syntax is not supported for versions that are uploaded through [`wrangler versions upload`](https://developers.cloudflare.com/workers/wrangler/commands/#upload). You must use ES modules format. Refer to [Migrate from Service Workers to ES modules](https://developers.cloudflare.com/workers/reference/migrate-to-module-workers/#advantages-of-migrating) to learn how to migrate your Workers from the service worker format to the ES modules format. ### Durable Object migrations Uploading a version with [Durable Object migrations](https://developers.cloudflare.com/durable-objects/reference/durable-objects-migrations/) is not supported. Use [`wrangler deploy`](https://developers.cloudflare.com/workers/wrangler/commands/#deploy) if you are applying a [Durable Object migration](https://developers.cloudflare.com/durable-objects/reference/durable-objects-migrations/). This will be supported in the near future. --- title: Page Rules with Workers · Cloudflare Workers docs description: Review the interaction between various Page Rules and Workers. lastUpdated: 2024-08-13T19:56:56.000Z chatbotDeprioritize: false source_url: html: https://developers.cloudflare.com/workers/configuration/workers-with-page-rules/ md: https://developers.cloudflare.com/workers/configuration/workers-with-page-rules/index.md --- Page Rules trigger certain actions whenever a request matches one of the URL patterns you define. You can define a page rule to trigger one or more actions whenever a certain URL pattern is matched. Refer to [Page Rules](https://developers.cloudflare.com/rules/page-rules/) to learn more about configuring Page Rules. ## Page Rules with Workers Cloudflare acts as a [reverse proxy](https://www.cloudflare.com/learning/what-is-cloudflare/) to provide services, like Page Rules, to Internet properties. Your application's traffic will pass through a Cloudflare data center that is closest to the visitor. There are hundreds of these around the world, each of which are capable of running services like Workers and Page Rules. If your application is built on Workers and/or Pages, the [Cloudflare global network](https://www.cloudflare.com/learning/serverless/glossary/what-is-edge-computing/) acts as your origin server and responds to requests directly from the Cloudflare global network. When using Page Rules with Workers, the following workflow is applied. 1. Request arrives at Cloudflare data center. 2. Cloudflare decides if this request is a Worker route. Because this is a Worker route, Cloudflare evaluates and disabled a number of features, including some that would be set by Page Rules. 3. Page Rules run as part of normal request processing with some features now disabled. 4. Worker executes. 5. Worker makes a same-zone or other-zone subrequest. Because this is a Worker route, Cloudflare disables a number of features, including some that would be set by Page Rules. Page Rules are evaluated both at the client-to-Worker request stage (step 2) and the Worker subrequest stage (step 5). If you are experiencing Page Rule errors when running Workers, contact your Cloudflare account team or [Cloudflare Support](https://developers.cloudflare.com/support/contacting-cloudflare-support/). ## Affected Page Rules The following Page Rules may not work as expected when an incoming request is matched to a Worker route: * Always Online * [Always Use HTTPS](https://developers.cloudflare.com/workers/configuration/workers-with-page-rules/#always-use-https) * [Automatic HTTPS Rewrites](https://developers.cloudflare.com/workers/configuration/workers-with-page-rules/#automatic-https-rewrites) * [Browser Cache TTL](https://developers.cloudflare.com/workers/configuration/workers-with-page-rules/#browser-cache-ttl) * [Browser Integrity Check](https://developers.cloudflare.com/workers/configuration/workers-with-page-rules/#browser-integrity-check) * [Cache Deception Armor](https://developers.cloudflare.com/workers/configuration/workers-with-page-rules/#cache-deception-armor) * [Cache Level](https://developers.cloudflare.com/workers/configuration/workers-with-page-rules/#cache-level) * Disable Apps * [Disable Zaraz](https://developers.cloudflare.com/workers/configuration/workers-with-page-rules/#disable-zaraz) * [Edge Cache TTL](https://developers.cloudflare.com/workers/configuration/workers-with-page-rules/#edge-cache-ttl) * [Email Obfuscation](https://developers.cloudflare.com/workers/configuration/workers-with-page-rules/#email-obfuscation) * [Forwarding URL](https://developers.cloudflare.com/workers/configuration/workers-with-page-rules/#forwarding-url) * Host Header Override * [IP Geolocation Header](https://developers.cloudflare.com/workers/configuration/workers-with-page-rules/#ip-geolocation-header) * Mirage * [Origin Cache Control](https://developers.cloudflare.com/workers/configuration/workers-with-page-rules/#origin-cache-control) * [Rocket Loader](https://developers.cloudflare.com/workers/configuration/workers-with-page-rules/#rocket-loader) * [Security Level](https://developers.cloudflare.com/workers/configuration/workers-with-page-rules/#security-level) * [SSL](https://developers.cloudflare.com/workers/configuration/workers-with-page-rules/#ssl) This is because the default setting of these Page Rules will be disabled when Cloudflare recognizes that the request is headed to a Worker. Testing Due to ongoing changes to the Workers runtime, detailed documentation on how these rules will be affected are updated following testing. To learn what these Page Rules do, refer to [Page Rules](https://developers.cloudflare.com/rules/page-rules/). Same zone versus other zone A same zone subrequest is a request the Worker makes to an orange-clouded hostname in the same zone the Worker runs on. Depending on your DNS configuration, any request that falls outside that definition may be considered an other zone request by the Cloudflare network. ### Always Use HTTPS | Source | Target | Behavior | | - | - | - | | Client | Worker | Rule Respected | | Worker | Same Zone | Rule Ignored | | Worker | Other Zone | Rule Ignored | ### Automatic HTTPS Rewrites | Source | Target | Behavior | | - | - | - | | Client | Worker | Rule Ignored | | Worker | Same Zone | Rule Respected | | Worker | Other Zone | Rule Ignored | ### Browser Cache TTL | Source | Target | Behavior | | - | - | - | | Client | Worker | Rule Ignored | | Worker | Same Zone | Rule Respected | | Worker | Other Zone | Rule Ignored | ### Browser Integrity Check | Source | Target | Behavior | | - | - | - | | Client | Worker | Rule Respected | | Worker | Same Zone | Rule Ignored | | Worker | Other Zone | Rule Ignored | ### Cache Deception Armor | Source | Target | Behavior | | - | - | - | | Client | Worker | Rule Respected | | Worker | Same Zone | Rule Respected | | Worker | Other Zone | Rule Ignored | ### Cache Level | Source | Target | Behavior | | - | - | - | | Client | Worker | Rule Respected | | Worker | Same Zone | Rule Respected | | Worker | Other Zone | Rule Ignored | ### Disable Zaraz | Source | Target | Behavior | | - | - | - | | Client | Worker | Rule Respected | | Worker | Same Zone | Rule Respected | | Worker | Other Zone | Rule Ignored | ### Edge Cache TTL | Source | Target | Behavior | | - | - | - | | Client | Worker | Rule Respected | | Worker | Same Zone | Rule Respected | | Worker | Other Zone | Rule Ignored | ### Email Obfuscation | Source | Target | Behavior | | - | - | - | | Client | Worker | Rule Ignored | | Worker | Same Zone | Rule Respected | | Worker | Other Zone | Rule Ignored | ### Forwarding URL | Source | Target | Behavior | | - | - | - | | Client | Worker | Rule Ignored | | Worker | Same Zone | Rule Respected | | Worker | Other Zone | Rule Ignored | ### IP Geolocation Header | Source | Target | Behavior | | - | - | - | | Client | Worker | Rule Respected | | Worker | Same Zone | Rule Respected | | Worker | Other Zone | Rule Ignored | ### Origin Cache Control | Source | Target | Behavior | | - | - | - | | Client | Worker | Rule Respected | | Worker | Same Zone | Rule Respected | | Worker | Other Zone | Rule Ignored | ### Rocket Loader | Source | Target | Behavior | | - | - | - | | Client | Worker | Rule Ignored | | Worker | Same Zone | Rule Ignored | | Worker | Other Zone | Rule Ignored | ### Security Level | Source | Target | Behavior | | - | - | - | | Client | Worker | Rule Respected | | Worker | Same Zone | Rule Ignored | | Worker | Other Zone | Rule Ignored | ### SSL | Source | Target | Behavior | | - | - | - | | Client | Worker | Rule Respected | | Worker | Same Zone | Rule Respected | | Worker | Other Zone | Rule Ignored | --- title: Analytics Engine · Cloudflare Workers docs description: Use Workers to receive performance analytics about your applications, products and projects. lastUpdated: 2024-08-13T19:56:56.000Z chatbotDeprioritize: false source_url: html: https://developers.cloudflare.com/workers/databases/analytics-engine/ md: https://developers.cloudflare.com/workers/databases/analytics-engine/index.md --- --- title: Connect to databases · Cloudflare Workers docs description: Learn about the different kinds of database integrations Cloudflare supports. lastUpdated: 2025-07-02T16:48:57.000Z chatbotDeprioritize: false source_url: html: https://developers.cloudflare.com/workers/databases/connecting-to-databases/ md: https://developers.cloudflare.com/workers/databases/connecting-to-databases/index.md --- Cloudflare Workers can connect to and query your data in both SQL and NoSQL databases, including: * Cloudflare's own [D1](https://developers.cloudflare.com/d1/), a serverless SQL-based database. * Traditional hosted relational databases, including Postgres and MySQL, using [Hyperdrive](https://developers.cloudflare.com/hyperdrive/) (recommended) to significantly speed up access. * Serverless databases, including Supabase, MongoDB Atlas, PlanetScale, and Prisma. ### D1 SQL database D1 is Cloudflare's own SQL-based, serverless database. It is optimized for global access from Workers, and can scale out with multiple, smaller (10GB) databases, such as per-user, per-tenant or per-entity databases. Similar to some serverless databases, D1 pricing is based on query and storage costs. | Database | Library or Driver | Connection Method | | - | - | - | | [D1](https://developers.cloudflare.com/d1/) | [Workers binding](https://developers.cloudflare.com/d1/worker-api/), integrates with [Prisma](https://www.prisma.io/), [Drizzle](https://orm.drizzle.team/), and other ORMs | [Workers binding](https://developers.cloudflare.com/d1/worker-api/), [REST API](https://developers.cloudflare.com/api/resources/d1/subresources/database/methods/create/) | ### Traditional SQL databases Traditional databases use SQL drivers that use [TCP sockets](https://developers.cloudflare.com/workers/runtime-apis/tcp-sockets/) to connect to the database. TCP is the de-facto standard protocol that many databases, such as PostgreSQL and MySQL, use for client connectivity. These drivers are also widely compatible with your preferred ORM libraries and query builders. This also includes serverless databases that are PostgreSQL or MySQL-compatible like [Supabase](https://developers.cloudflare.com/hyperdrive/examples/connect-to-postgres/postgres-database-providers/supabase/), [Neon](https://developers.cloudflare.com/hyperdrive/examples/connect-to-postgres/postgres-database-providers/neon/) or [PlanetScale](https://developers.cloudflare.com/hyperdrive/examples/connect-to-mysql/mysql-database-providers/planetscale/), which can be connected to using both native [TCP sockets and Hyperdrive](https://developers.cloudflare.com/hyperdrive/) or [serverless HTTP-based drivers](https://developers.cloudflare.com/workers/databases/connecting-to-databases/#serverless-databases) (detailed below). | Database | Integration | Library or Driver | Connection Method | | - | - | - | - | | [Postgres](https://developers.cloudflare.com/workers/tutorials/postgres/) | Direct connection | [node-postgres](https://node-postgres.com/),[Postgres.js](https://github.com/porsager/postgres) | [TCP Socket](https://developers.cloudflare.com/workers/runtime-apis/tcp-sockets/) via database driver, using [Hyperdrive](https://developers.cloudflare.com/hyperdrive/) for optimal performance (optional, recommended) | | [MySQL](https://developers.cloudflare.com/workers/tutorials/mysql/) | Direct connection | [mysql2](https://github.com/sidorares/node-mysql2), [mysql](https://github.com/mysqljs/mysql) | [TCP Socket](https://developers.cloudflare.com/workers/runtime-apis/tcp-sockets/) via database driver, using [Hyperdrive](https://developers.cloudflare.com/hyperdrive/) for optimal performance (optional, recommended) | Speed up database connectivity with Hyperdrive Connecting to SQL databases with TCP sockets requires multiple roundtrips to establish a secure connection before a query to the database is made. Since a connection must be re-established on every Worker invocation, this adds unnecessary latency. [Hyperdrive](https://developers.cloudflare.com/hyperdrive/) solves this by pooling database connections globally to eliminate unnecessary roundtrips and speed up your database access. Learn more about [how Hyperdrive works](https://developers.cloudflare.com/hyperdrive/configuration/how-hyperdrive-works/). ### Serverless databases Serverless databases may provide direct connection to the underlying database, or provide HTTP-based proxies and drivers (also known as serverless drivers). For PostgreSQL and MySQL serverless databases, you can connect to the underlying database directly using the native database drivers and ORMs you are familiar with, using Hyperdrive (recommended) to speed up connectivity and pool database connections. When you use Hyperdrive, your connection pool is managed across all of Cloudflare regions and optimized for usage from Workers. You can also use serverless driver libraries to connect to the HTTP-based proxies managed by the database provider. These may also provide connection pooling for traditional SQL databases and reduce the amount of roundtrips needed to establish a secure connection, similarly to Hyperdrive. | Database | Library or Driver | Connection Method | | - | - | - | | [PlanetScale](https://planetscale.com/blog/introducing-the-planetscale-serverless-driver-for-javascript) | [Hyperdrive](https://developers.cloudflare.com/hyperdrive/examples/connect-to-mysql/mysql-database-providers/planetscale), [@planetscale/database](https://github.com/planetscale/database-js) | [mysql2](https://developers.cloudflare.com/hyperdrive/examples/connect-to-mysql/mysql-drivers-and-libraries/mysql2/) or [mysql](https://developers.cloudflare.com/hyperdrive/examples/connect-to-mysql/mysql-drivers-and-libraries/mysql/), or API via client library | | [Supabase](https://github.com/supabase/supabase/tree/master/examples/with-cloudflare-workers) | [Hyperdrive](https://developers.cloudflare.com/hyperdrive/examples/connect-to-postgres/postgres-database-providers/supabase/), [@supabase/supabase-js](https://github.com/supabase/supabase-js) | [node-postgres](https://developers.cloudflare.com/hyperdrive/examples/connect-to-postgres/postgres-drivers-and-libraries/node-postgres/),[Postgres.js](https://developers.cloudflare.com/hyperdrive/examples/connect-to-postgres/postgres-drivers-and-libraries/postgres-js/), or API via client library | | [Prisma](https://www.prisma.io/docs/guides/deployment/deployment-guides/deploying-to-cloudflare-workers) | [prisma](https://github.com/prisma/prisma) | API via client library | | [Neon](https://blog.cloudflare.com/neon-postgres-database-from-workers/) | [Hyperdrive](https://developers.cloudflare.com/hyperdrive/examples/connect-to-postgres/postgres-database-providers/neon/), [@neondatabase/serverless](https://neon.tech/blog/serverless-driver-for-postgres/) | [node-postgres](https://developers.cloudflare.com/hyperdrive/examples/connect-to-postgres/postgres-drivers-and-libraries/node-postgres/),[Postgres.js](https://developers.cloudflare.com/hyperdrive/examples/connect-to-postgres/postgres-drivers-and-libraries/postgres-js/), or API via client library | | [Hasura](https://hasura.io/blog/building-applications-with-cloudflare-workers-and-hasura-graphql-engine/) | API | GraphQL API via fetch() | | [Upstash Redis](https://blog.cloudflare.com/cloudflare-workers-database-integration-with-upstash/) | [@upstash/redis](https://github.com/upstash/upstash-redis) | API via client library | | [TiDB Cloud](https://docs.pingcap.com/tidbcloud/integrate-tidbcloud-with-cloudflare) | [@tidbcloud/serverless](https://github.com/tidbcloud/serverless-js) | API via client library | Once you have installed the necessary packages, use the APIs provided by these packages to connect to your database and perform operations on it. Refer to detailed links for service-specific instructions. ## Authentication If your database requires authentication, use Wrangler secrets to securely store your credentials. To do this, create a secret in your Cloudflare Workers project using the following [`wrangler secret`](https://developers.cloudflare.com/workers/wrangler/commands/#secret) command: ```sh wrangler secret put ``` Then, retrieve the secret value in your code using the following code snippet: ```js const secretValue = env.; ``` Use the secret value to authenticate with the external service. For example, if the external service requires an API key or database username and password for authentication, include these in using the relevant service's library or API. For services that require mTLS authentication, use [mTLS certificates](https://developers.cloudflare.com/workers/runtime-apis/bindings/mtls) to present a client certificate. ## Next steps * Learn how to connect to [an existing PostgreSQL database](https://developers.cloudflare.com/hyperdrive/) with Hyperdrive. * Discover [other storage options available](https://developers.cloudflare.com/workers/platform/storage-options/) for use with Workers. * [Create your first database](https://developers.cloudflare.com/d1/get-started/) with Cloudflare D1. --- title: Cloudflare D1 · Cloudflare Workers docs description: Cloudflare’s native serverless database. lastUpdated: 2024-08-13T19:56:56.000Z chatbotDeprioritize: false source_url: html: https://developers.cloudflare.com/workers/databases/d1/ md: https://developers.cloudflare.com/workers/databases/d1/index.md --- --- title: Hyperdrive · Cloudflare Workers docs description: Use Workers to accelerate queries you make to existing databases. lastUpdated: 2024-08-13T19:56:56.000Z chatbotDeprioritize: false source_url: html: https://developers.cloudflare.com/workers/databases/hyperdrive/ md: https://developers.cloudflare.com/workers/databases/hyperdrive/index.md --- --- title: 3rd Party Integrations · Cloudflare Workers docs description: Connect to third-party databases such as Supabase, Turso and PlanetScale) lastUpdated: 2025-06-25T15:22:01.000Z chatbotDeprioritize: false source_url: html: https://developers.cloudflare.com/workers/databases/third-party-integrations/ md: https://developers.cloudflare.com/workers/databases/third-party-integrations/index.md --- ## Background Connect to databases by configuring connection strings and credentials as [secrets](https://developers.cloudflare.com/workers/configuration/secrets/) in your Worker. Connecting to a regional database from a Worker? If your Worker is connecting to a regional database, you can reduce your query latency by using [Hyperdrive](https://developers.cloudflare.com/hyperdrive) and [Smart Placement](https://developers.cloudflare.com/workers/configuration/smart-placement/) which are both included in any Workers plan. Hyperdrive will pool your databases connections globally across Cloudflare's network. Smart Placement will monitor your application to run your Workers closest to your backend infrastructure when this reduces the latency of your Worker invocations. Learn more about [how Smart Placement works](https://developers.cloudflare.com/workers/configuration/smart-placement/). ## Database credentials When you rotate or update database credentials, you must update the corresponding [secrets](https://developers.cloudflare.com/workers/configuration/secrets/) in your Worker. Use the [`wrangler secret put`](https://developers.cloudflare.com/workers/wrangler/commands/#secret) command to update secrets securely or update the secret directly in the [Cloudflare dashboard](https://dash.cloudflare.com/?to=/:account/workers/services/view/:worker/production/settings). ## Database limits You can connect to multiple databases by configuring separate sets of secrets for each database connection. Use descriptive secret names to distinguish between different database connections (for example, `DATABASE_URL_PROD` and `DATABASE_URL_STAGING`). ## Popular providers * [Neon](https://developers.cloudflare.com/workers/databases/third-party-integrations/neon/) * [PlanetScale](https://developers.cloudflare.com/workers/databases/third-party-integrations/planetscale/) * [Supabase](https://developers.cloudflare.com/workers/databases/third-party-integrations/supabase/) * [Turso](https://developers.cloudflare.com/workers/databases/third-party-integrations/turso/) * [Upstash](https://developers.cloudflare.com/workers/databases/third-party-integrations/upstash/) * [Xata](https://developers.cloudflare.com/workers/databases/third-party-integrations/xata/) --- title: Vectorize (vector database) · Cloudflare Workers docs description: A globally distributed vector database that enables you to build full-stack, AI-powered applications with Cloudflare Workers. lastUpdated: 2024-08-13T19:56:56.000Z chatbotDeprioritize: false source_url: html: https://developers.cloudflare.com/workers/databases/vectorize/ md: https://developers.cloudflare.com/workers/databases/vectorize/index.md --- --- title: Supported bindings per development mode · Cloudflare Workers docs description: Supported bindings per development mode lastUpdated: 2025-06-18T17:02:32.000Z chatbotDeprioritize: false source_url: html: https://developers.cloudflare.com/workers/development-testing/bindings-per-env/ md: https://developers.cloudflare.com/workers/development-testing/bindings-per-env/index.md --- ## Local development During local development, your Worker code always executes locally and bindings connect to locally simulated resources [by default](https://developers.cloudflare.com/workers/development-testing/#remote-bindings). You can configure [**remote bindings** during local development](https://developers.cloudflare.com/workers/development-testing/#remote-bindings), allowing your bindings to connect to a deployed resource on a per-binding basis. | Binding | Local simulations | Remote binding connections | | - | - | - | | **AI** | ❌ | ✅ | | **Assets** | ✅ | ❌ | | **Analytics Engine** | ✅ | ❌ | | **Browser Rendering** | ✅ | ✅ | | **D1** | ✅ | ✅ | | **Durable Objects** | ✅ | ❌ | | **Email Bindings** | ✅ | ✅ | | **Hyperdrive** | ✅ | ❌ | | **Images** | ✅ | ✅ | | **KV** | ✅ | ✅ | | **mTLS** | ❌ | ✅ | | **Queues** | ✅ | ✅ | | **R2** | ✅ | ✅ | | **Rate Limiting** | ✅ | ❌ | | **Service Bindings (multiple Workers)** | ✅ | ✅ | | **Vectorize** | ❌ | ✅ | | **Workflows** | ✅ | ✅ | * **Local simulations:** Bindings connect to local resource simulations. Supported in [`wrangler dev`](https://developers.cloudflare.com/workers/wrangler/commands/#dev) and the [Cloudflare Vite plugin](https://developers.cloudflare.com/workers/vite-plugin/). * **Remote binding connections:** Bindings connect to remote resources via `experimental_remote: true` configuration. Supported in [`wrangler dev --x-remote-bindings`](https://developers.cloudflare.com/workers/development-testing/#using-wrangler-with-remote-bindings) and the [Cloudflare Vite plugin](https://developers.cloudflare.com/workers/development-testing/#using-vite-with-remote-bindings). ## Remote development During remote development, all of your Worker code is uploaded and executed on Cloudflare's infrastructure, and bindings always connect to remote resources. **We recommend using local development with remote binding connections instead** for faster iteration and debugging. Supported only in [`wrangler dev --remote`](https://developers.cloudflare.com/workers/wrangler/commands/#dev) - there is **no Vite plugin equivalent**. | Binding | Remote development | | - | - | | **AI** | ✅ | | **Assets** | ✅ | | **Analytics Engine** | ✅ | | **Browser Rendering** | ✅ | | **D1** | ✅ | | **Durable Objects** | ✅ | | **Email Bindings** | ✅ | | **Hyperdrive** | ✅ | | **Images** | ✅ | | **KV** | ✅ | | **mTLS** | ✅ | | **Queues** | ❌ | | **R2** | ✅ | | **Rate Limiting** | ✅ | | **Service Bindings (multiple Workers)** | ✅ | | **Vectorize** | ✅ | | **Workflows** | ❌ | *** --- title: Environment variables and secrets · Cloudflare Workers docs description: Configuring environment variables and secrets for local development lastUpdated: 2025-06-18T17:02:32.000Z chatbotDeprioritize: false source_url: html: https://developers.cloudflare.com/workers/development-testing/environment-variables/ md: https://developers.cloudflare.com/workers/development-testing/environment-variables/index.md --- During local development, you may need to configure **environment variables** (such as API URLs, feature flags) and **secrets** (API tokens, private keys). You can use a `.dev.vars` file in the root of your project to override environment variables for local development, and both [Wrangler](https://developers.cloudflare.com/workers/configuration/environment-variables/#compare-secrets-and-environment-variables) and the [Vite plugin](https://developers.cloudflare.com/workers/vite-plugin/reference/secrets/) will respect this override. Warning Be sure to add `.dev.vars` to your `.gitignore` so it never gets committed. ### Why use a `.dev.vars` file? Use `.dev.vars` to set local overrides for environment variables that should not be checked into your repository. If you want to manage environment-based configuration that you **want checked into your repository** (for example, non-sensitive or shared environment defaults), you can define [environment variables as `[vars]`](https://developers.cloudflare.com/workers/wrangler/environments/#_top) in your Wrangler configuration. Using a `.dev.vars` file is specifically for local-only secrets or configuration that you do not want in version control and only want to inject in local dev sessions. ## Basic setup 1. Create a `.dev.vars` file in your project root. 2. Add key-value pairs: ```ini API_HOST="localhost:3000" DEBUG="true" SECRET_TOKEN="my-local-secret-token" ``` 3. Run your `dev` command **Wrangler** * npm ```sh npx wrangler dev ``` * yarn ```sh yarn wrangler dev ``` * pnpm ```sh pnpm wrangler dev ``` **Vite plugin** * npm ```sh npx vite dev ``` * yarn ```sh yarn vite dev ``` * pnpm ```sh pnpm vite dev ``` ## Multiple local environments with `.dev.vars` To simulate different local environments, you can: 1. Create a file named `.dev.vars.` . For example, we'll use `.dev.vars.staging`. 2. Add key-value pairs: ```ini API_HOST="staging.localhost:3000" DEBUG="false" SECRET_TOKEN="staging-token" ``` 3. Specify the environment when running the `dev` command: **Wrangler** * npm ```sh npx wrangler dev --env staging ``` * yarn ```sh yarn wrangler dev --env staging ``` * pnpm ```sh pnpm wrangler dev --env staging ``` **Vite plugin** * npm ```sh CLOUDFLARE_ENV=staging npx vite dev ``` * yarn ```sh CLOUDFLARE_ENV=staging yarn vite dev ``` * pnpm ```sh CLOUDFLARE_ENV=staging pnpm vite dev ``` Only the values from `.dev.vars.staging` will be applied instead of `.dev.vars`. ## Learn more * To learn how to configure multiple environments in Wrangler configuration, [read the documentation](https://developers.cloudflare.com/workers/wrangler/environments/#_top). * To learn how to use Wrangler environments and Vite environments together, [read the Vite plugin documentation](https://developers.cloudflare.com/workers/vite-plugin/reference/cloudflare-environments/) --- title: Adding local data · Cloudflare Workers docs description: Populating local resources with data lastUpdated: 2025-06-19T13:29:12.000Z chatbotDeprioritize: false source_url: html: https://developers.cloudflare.com/workers/development-testing/local-data/ md: https://developers.cloudflare.com/workers/development-testing/local-data/index.md --- Whether you are using Wrangler or the [Cloudflare Vite plugin](https://developers.cloudflare.com/workers/vite-plugin/), your workflow for **accessing** data during local development remains the same. However, you can only [populate local resources with data](https://developers.cloudflare.com/workers/development-testing/local-data/#populating-local-resources-with-data) via the Wrangler CLI. ### How it works When you run either `wrangler dev` or [`vite`](https://vite.dev/guide/cli#dev-server), [Miniflare](https://developers.cloudflare.com/workers/testing/miniflare/) automatically creates **local versions** of your resources (like [KV](https://developers.cloudflare.com/kv), [D1](https://developers.cloudflare.com/d1/), or [R2](https://developers.cloudflare.com/r2)). This means you **don’t** need to manually set up separate local instances for each service. However, newly created local resources **won’t** contain any data — you'll need to use Wrangler commands with the `--local` flag to populate them. Changes made to local resources won’t affect production data. ## Populating local resources with data When you first start developing, your local resources will be empty. You'll need to populate them with data using the Wrangler CLI. ### KV namespaces Syntax note Since version 3.60.0, Wrangler supports the `kv ...` syntax. If you are using versions below 3.60.0, the command follows the `kv:...` syntax. Learn more in the [Wrangler commands for KV page](https://developers.cloudflare.com/kv/reference/kv-commands/). #### [Add a single key-value pair](https://developers.cloudflare.com/workers/wrangler/commands/#kv-key) * npm ```sh npx wrangler kv key put --binding= --local ``` * yarn ```sh yarn wrangler kv key put --binding= --local ``` * pnpm ```sh pnpm wrangler kv key put --binding= --local ``` #### [Bulk upload](https://developers.cloudflare.com/workers/wrangler/commands/#kv-bulk) * npm ```sh npx wrangler kv bulk put --binding= --local ``` * yarn ```sh yarn wrangler kv bulk put --binding= --local ``` * pnpm ```sh pnpm wrangler kv bulk put --binding= --local ``` ### R2 buckets #### [Upload a file](https://developers.cloudflare.com/workers/wrangler/commands/#r2-object) * npm ```sh npx wrangler r2 object put / --file= --local ``` * yarn ```sh yarn wrangler r2 object put / --file= --local ``` * pnpm ```sh pnpm wrangler r2 object put / --file= --local ``` You may also include [other metadata](https://developers.cloudflare.com/workers/wrangler/commands/#r2-object-put). ### D1 databases #### [Execute a SQL statement](https://developers.cloudflare.com/workers/wrangler/commands/#d1-execute) * npm ```sh npx wrangler d1 execute --command="" --local ``` * yarn ```sh yarn wrangler d1 execute --command="" --local ``` * pnpm ```sh pnpm wrangler d1 execute --command="" --local ``` #### [Execute a SQL file](https://developers.cloudflare.com/workers/wrangler/commands/#d1-execute) * npm ```sh npx wrangler d1 execute --file=./schema.sql --local ``` * yarn ```sh yarn wrangler d1 execute --file=./schema.sql --local ``` * pnpm ```sh pnpm wrangler d1 execute --file=./schema.sql --local ``` ### Durable Objects For Durable Objects, unlike KV, D1, and R2, there are no CLI commands to populate them with local data. To add data to Durable Objects during local development, you must write application code that creates Durable Object instances and [calls methods on them that store state](https://developers.cloudflare.com/durable-objects/best-practices/access-durable-objects-storage/). This typically involves creating development endpoints or test routes that initialize your Durable Objects with the desired data. ## Where local data gets stored By default, both Wrangler and the Vite plugin store local binding data in the same location: the `.wrangler/state` folder in your project directory. This folder stores data in subdirectories for all local bindings: KV namespaces, R2 buckets, D1 databases, Durable Objects, etc. ### Clearing local storage You can delete the `.wrangler/state` folder at any time to reset your local environment, and Miniflare will recreate it the next time you run your `dev` command. You can also delete specific sub-folders within `.wrangler/state` for more targeted clean-up. ### Changing the local data directory If you prefer to specify a different directory for local storage, you can do so through the Wranlger CLI or in the Vite plugin's configuration. #### Using Wrangler Use the [`--persist-to`](https://developers.cloudflare.com/workers/wrangler/commands/#dev) flag with `wrangler dev`. You need to specify this flag every time you run the `dev` command: * npm ```sh npx wrangler dev --persist-to ``` * yarn ```sh yarn wrangler dev --persist-to ``` * pnpm ```sh pnpm wrangler dev --persist-to ``` Note The local persistence folder (like `.wrangler/state` or any custom folder you set) should be added to your `.gitignore` to avoid committing local development data to version control. Using `--local` with `--persist-to` If you run `wrangler dev --persist-to ` to specify a custom location for local data, you must also include the same `--persist-to ` when running other Wrangler commands that modify local data (and be sure to include the `--local` flag). For example, to create a KV key named `test` with a value of `12345` in a local KV namespace, run: * npm ```sh npx wrangler kv key put test 12345 --binding MY_KV_NAMESPACE --local --persist-to worker-local ``` * yarn ```sh yarn wrangler kv key put test 12345 --binding MY_KV_NAMESPACE --local --persist-to worker-local ``` * pnpm ```sh pnpm wrangler kv key put test 12345 --binding MY_KV_NAMESPACE --local --persist-to worker-local ``` This command: * Sets the KV key `test` to `12345` in the binding `MY_KV_NAMESPACE` (defined in your [Wrangler configuration file](https://developers.cloudflare.com/workers/wrangler/configuration/)). * Uses `--persist-to worker-local` to ensure the data is created in the **worker-local** directory instead of the default `.wrangler/state`. * Adds the `--local` flag, indicating you want to modify local data. If `--persist-to` is not specified, Wrangler defaults to using `.wrangler/state` for local data. #### Using the Cloudflare Vite plugin To customize where the Vite plugin stores local data, configure the [`persistState` option](https://developers.cloudflare.com/workers/vite-plugin/reference/api/#interface-pluginconfig) in your Vite config file: ```js import { defineConfig } from "vite"; import { cloudflare } from "@cloudflare/vite-plugin"; export default defineConfig({ plugins: [ cloudflare({ persistState: "./my-custom-directory", }), ], }); ``` #### Sharing state between tools If you want Wrangler and the Vite plugin to share the same state, configure them to use the same persistence path. --- title: Developing with multiple Workers · Cloudflare Workers docs description: Learn how to develop with multiple Workers using different approaches and configurations. lastUpdated: 2025-06-26T14:38:25.000Z chatbotDeprioritize: false source_url: html: https://developers.cloudflare.com/workers/development-testing/multi-workers/ md: https://developers.cloudflare.com/workers/development-testing/multi-workers/index.md --- When building complex applications, you may want to run multiple Workers during development. This guide covers the different approaches for running multiple Workers locally and when to use each approach. ## Single dev command Tip We recommend this approach as the default for most development workflows as it ensures the best compatibility with bindings. You can run multiple Workers in a single dev command by passing multiple configuration files to your dev server: **Using Wrangler** * npm ```sh npx wrangler dev -c ./app/wrangler.jsonc -c ./api/wrangler.jsonc ``` * yarn ```sh yarn wrangler dev -c ./app/wrangler.jsonc -c ./api/wrangler.jsonc ``` * pnpm ```sh pnpm wrangler dev -c ./app/wrangler.jsonc -c ./api/wrangler.jsonc ``` The first config (`./app/wrangler.jsonc`) is treated as the primary Worker, exposed at `http://localhost:8787`. Additional configs (e.g. `./api/wrangler.jsonc`) run as auxiliary Workers, available via service bindings or tail consumers from the primary Worker. **Using the Vite plugin** Configure `auxiliaryWorkers` in your Vite configuration: ```js import { defineConfig } from "vite"; import { cloudflare } from "@cloudflare/vite-plugin"; export default defineConfig({ plugins: [ cloudflare({ configPath: "./app/wrangler.jsonc", auxiliaryWorkers: [ { configPath: "./api/wrangler.jsonc", }, ], }), ], }); ``` Then run: * npm ```sh npx vite dev ``` * yarn ```sh yarn vite dev ``` * pnpm ```sh pnpm vite dev ``` **Use this approach when:** * You want the simplest setup for development * Workers are part of the same application or codebase * You need to access a Durable Object namespace from another Worker using `script_name`, or setup Queues where the producer and consumer Workers are seperated. ## Multiple dev commands You can also run each Worker in a separate dev commands, each with its own terminal and configuration. * npm ```sh # Terminal 1 npx wrangler dev -c ./app/wrangler.jsonc ``` * yarn ```sh # Terminal 1 yarn wrangler dev -c ./app/wrangler.jsonc ``` * pnpm ```sh # Terminal 1 pnpm wrangler dev -c ./app/wrangler.jsonc ``` - npm ```sh # Terminal 2 npx wrangler dev -c ./api/wrangler.jsonc ``` - yarn ```sh # Terminal 2 yarn wrangler dev -c ./api/wrangler.jsonc ``` - pnpm ```sh # Terminal 2 pnpm wrangler dev -c ./api/wrangler.jsonc ``` These Workers run in different dev commands but can still communicate with each other via service bindings or tail consumers **regardless of whether they are started with `wrangler dev` or `vite dev`**. Note You can also combine both approaches — for example, run a group of Workers together through `vite dev` using `auxiliaryWorkers`, while running another Worker separately with `wrangler dev`. This allows you to keep tightly coupled Workers running under a single dev command, while keeping independent or shared Workers in separate ones. However, running `wrangler dev` with multiple configuration files (e.g. `wrangler dev -c ./app/wrangler.jsonc -c ./api/wrangler.jsonc`) does **not** support cross-process bindings at the moment. **Use this approach when:** * You want each Worker to be accessible on its own local URL during development, since only the primary Worker is exposed when using a single dev command * Each Worker has its own build setup or tooling — for example, one uses Vite with custom plugins while another is a vanilla Wrangler project * You need the flexibility to run and develop Workers independently without restructuring your project or consolidating configs This setup is especially useful in larger projects where each team maintains a subset of Workers. Running everything in a single dev command might require significant restructuring or build integration that isn't always practical. --- title: Testing · Cloudflare Workers docs lastUpdated: 2025-06-18T17:02:32.000Z chatbotDeprioritize: false source_url: html: https://developers.cloudflare.com/workers/development-testing/testing/ md: https://developers.cloudflare.com/workers/development-testing/testing/index.md --- --- title: Vite Plugin · Cloudflare Workers docs lastUpdated: 2025-06-18T17:02:32.000Z chatbotDeprioritize: false source_url: html: https://developers.cloudflare.com/workers/development-testing/vite-plugin/ md: https://developers.cloudflare.com/workers/development-testing/vite-plugin/index.md --- --- title: Choosing between Wrangler & Vite · Cloudflare Workers docs description: Choosing between Wrangler and Vite for local development lastUpdated: 2025-06-18T17:02:32.000Z chatbotDeprioritize: false source_url: html: https://developers.cloudflare.com/workers/development-testing/wrangler-vs-vite/ md: https://developers.cloudflare.com/workers/development-testing/wrangler-vs-vite/index.md --- # When to use Wrangler vs Vite Deciding between Wrangler and the Cloudflare Vite plugin depends on your project's focus and development workflow. Here are some quick guidelines to help you choose: ## When to use Wrangler * **Backend & Workers-focused:** If you're primarily building APIs, serverless functions, or background tasks, use Wrangler. * **Remote development:** If your project needs the ability to develop and test using production resources and data on Cloudflare's network, use Wrangler's `--remote` flag. * **Simple frontends:** If you have minimal frontend requirements and don’t need hot reloading or advanced bundling, Wrangler may be sufficient. ## When to use the Cloudflare Vite Plugin Use the [Vite plugin](https://developers.cloudflare.com/workers/vite-plugin/) for: * **Frontend-centric development:** If you already use Vite with modern frontend frameworks like React, Vue, Svelte, or Solid, the Vite plugin integrates into your development workflow. * **React Router v7:** If you are using [React Router v7](https://reactrouter.com/) (the successor to Remix), it is officially supported by the Vite plugin as a full-stack SSR framework. * **Rapid iteration (HMR):** If you need near-instant updates in the browser, the Vite plugin provides [Hot Module Replacement (HMR)](https://vite.dev/guide/features.html#hot-module-replacement) during local development. * **Advanced optimizations:** If you require more advanced optimizations (code splitting, efficient bundling, CSS handling, build time transformations, etc.), Vite is a strong fit. * **Greater flexibility:** Due to Vite's advanced configuration options and large ecosystem of plugins, there is more flexibility to customize your development experience and build output. --- title: 103 Early Hints · Cloudflare Workers docs description: Allow a client to request static assets while waiting for the HTML response. lastUpdated: 2025-04-28T14:11:18.000Z chatbotDeprioritize: false tags: Middleware,Headers source_url: html: https://developers.cloudflare.com/workers/examples/103-early-hints/ md: https://developers.cloudflare.com/workers/examples/103-early-hints/index.md --- If you want to get started quickly, click on the button below. [![Deploy to Cloudflare](https://deploy.workers.cloudflare.com/button)](https://deploy.workers.cloudflare.com/?url=https://github.com/cloudflare/docs-examples/tree/main/workers/103-early-hints) This creates a repository in your GitHub account and deploys the application to Cloudflare Workers. `103` Early Hints is an HTTP status code designed to speed up content delivery. When enabled, Cloudflare can cache the `Link` headers marked with preload and/or preconnect from HTML pages and serve them in a `103` Early Hints response before reaching the origin server. Browsers can use these hints to fetch linked assets while waiting for the origin’s final response, dramatically improving page load speeds. To ensure Early Hints are enabled on your zone: 1. Log in to the [Cloudflare Dashboard](https://dash.cloudflare.com) and select your account and website. 2. Go to **Speed** > **Optimization** > **Content Optimization**. 3. Enable the **Early Hints** toggle to on. You can return `Link` headers from a Worker running on your zone to speed up your page load times. * JavaScript ```js const CSS = "body { color: red; }"; const HTML = ` Early Hints test

    Early Hints test page

    `; export default { async fetch(req) { // If request is for test.css, serve the raw CSS if (/test\.css$/.test(req.url)) { return new Response(CSS, { headers: { "content-type": "text/css", }, }); } else { // Serve raw HTML using Early Hints for the CSS file return new Response(HTML, { headers: { "content-type": "text/html", link: "; rel=preload; as=style", }, }); } }, }; ``` * TypeScript ```js const CSS = "body { color: red; }"; const HTML = ` Early Hints test

    Early Hints test page

    `; export default { async fetch(req): Promise { // If request is for test.css, serve the raw CSS if (/test\.css$/.test(req.url)) { return new Response(CSS, { headers: { "content-type": "text/css", }, }); } else { // Serve raw HTML using Early Hints for the CSS file return new Response(HTML, { headers: { "content-type": "text/html", link: "; rel=preload; as=style", }, }); } }, } satisfies ExportedHandler; ``` * Python ```py import re from workers import Response CSS = "body { color: red; }" HTML = """ Early Hints test

    Early Hints test page

    """ def on_fetch(request): if re.search("test.css", request.url): headers = {"content-type": "text/css"} return Response(CSS, headers=headers) else: headers = {"content-type": "text/html","link": "; rel=preload; as=style"} return Response(HTML, headers=headers) ``` * Hono ```ts import { Hono } from "hono"; const app = new Hono(); const CSS = "body { color: red; }"; const HTML = ` Early Hints test

    Early Hints test page

    `; // Serve CSS file app.get("/test.css", (c) => { return c.body(CSS, { headers: { "content-type": "text/css", }, }); }); // Serve HTML with early hints app.get("*", (c) => { return c.html(HTML, { headers: { link: "; rel=preload; as=style", }, }); }); export default app; ```
    --- title: A/B testing with same-URL direct access · Cloudflare Workers docs description: Set up an A/B test by controlling what response is served based on cookies. This version supports passing the request through to test and control on the origin, bypassing random assignment. lastUpdated: 2025-04-15T13:29:20.000Z chatbotDeprioritize: false source_url: html: https://developers.cloudflare.com/workers/examples/ab-testing/ md: https://developers.cloudflare.com/workers/examples/ab-testing/index.md --- * JavaScript ```js const NAME = "myExampleWorkersABTest"; export default { async fetch(req) { const url = new URL(req.url); // Enable Passthrough to allow direct access to control and test routes. if (url.pathname.startsWith("/control") || url.pathname.startsWith("/test")) return fetch(req); // Determine which group this requester is in. const cookie = req.headers.get("cookie"); if (cookie && cookie.includes(`${NAME}=control`)) { url.pathname = "/control" + url.pathname; } else if (cookie && cookie.includes(`${NAME}=test`)) { url.pathname = "/test" + url.pathname; } else { // If there is no cookie, this is a new client. Choose a group and set the cookie. const group = Math.random() < 0.5 ? "test" : "control"; // 50/50 split if (group === "control") { url.pathname = "/control" + url.pathname; } else { url.pathname = "/test" + url.pathname; } // Reconstruct response to avoid immutability let res = await fetch(url); res = new Response(res.body, res); // Set cookie to enable persistent A/B sessions. res.headers.append("Set-Cookie", `${NAME}=${group}; path=/`); return res; } return fetch(url); }, }; ``` * TypeScript ```ts const NAME = "myExampleWorkersABTest"; export default { async fetch(req): Promise { const url = new URL(req.url); // Enable Passthrough to allow direct access to control and test routes. if (url.pathname.startsWith("/control") || url.pathname.startsWith("/test")) return fetch(req); // Determine which group this requester is in. const cookie = req.headers.get("cookie"); if (cookie && cookie.includes(`${NAME}=control`)) { url.pathname = "/control" + url.pathname; } else if (cookie && cookie.includes(`${NAME}=test`)) { url.pathname = "/test" + url.pathname; } else { // If there is no cookie, this is a new client. Choose a group and set the cookie. const group = Math.random() < 0.5 ? "test" : "control"; // 50/50 split if (group === "control") { url.pathname = "/control" + url.pathname; } else { url.pathname = "/test" + url.pathname; } // Reconstruct response to avoid immutability let res = await fetch(url); res = new Response(res.body, res); // Set cookie to enable persistent A/B sessions. res.headers.append("Set-Cookie", `${NAME}=${group}; path=/`); return res; } return fetch(url); }, } satisfies ExportedHandler; ``` * Python ```py import random from urllib.parse import urlparse, urlunparse from workers import Response, fetch NAME = "myExampleWorkersABTest" async def on_fetch(request): url = urlparse(request.url) # Uncomment below when testing locally # url = url._replace(netloc="example.com") if "localhost" in url.netloc else url # Enable Passthrough to allow direct access to control and test routes. if url.path.startswith("/control") or url.path.startswith("/test"): return fetch(urlunparse(url)) # Determine which group this requester is in. cookie = request.headers.get("cookie") if cookie and f'{NAME}=control' in cookie: url = url._replace(path="/control" + url.path) elif cookie and f'{NAME}=test' in cookie: url = url._replace(path="/test" + url.path) else: # If there is no cookie, this is a new client. Choose a group and set the cookie. group = "test" if random.random() < 0.5 else "control" if group == "control": url = url._replace(path="/control" + url.path) else: url = url._replace(path="/test" + url.path) # Reconstruct response to avoid immutability res = await fetch(urlunparse(url)) headers = dict(res.headers) headers["Set-Cookie"] = f'{NAME}={group}; path=/' return Response(res.body, headers=headers) return fetch(urlunparse(url)) ``` * Hono ```ts import { Hono } from "hono"; import { getCookie, setCookie } from "hono/cookie"; const app = new Hono(); const NAME = "myExampleWorkersABTest"; // Enable passthrough to allow direct access to control and test routes app.all("/control/*", (c) => fetch(c.req.raw)); app.all("/test/*", (c) => fetch(c.req.raw)); // Middleware to handle A/B testing logic app.use("*", async (c) => { const url = new URL(c.req.url); // Determine which group this requester is in const abTestCookie = getCookie(c, NAME); if (abTestCookie === "control") { // User is in control group url.pathname = "/control" + c.req.path; } else if (abTestCookie === "test") { // User is in test group url.pathname = "/test" + c.req.path; } else { // If there is no cookie, this is a new client // Choose a group and set the cookie (50/50 split) const group = Math.random() < 0.5 ? "test" : "control"; // Update URL path based on assigned group if (group === "control") { url.pathname = "/control" + c.req.path; } else { url.pathname = "/test" + c.req.path; } // Set cookie to enable persistent A/B sessions setCookie(c, NAME, group, { path: "/", }); } const res = await fetch(url); return c.body(res.body, res); }); export default app; ``` --- title: Accessing the Cloudflare Object · Cloudflare Workers docs description: Access custom Cloudflare properties and control how Cloudflare features are applied to every request. lastUpdated: 2025-04-28T14:11:18.000Z chatbotDeprioritize: false source_url: html: https://developers.cloudflare.com/workers/examples/accessing-the-cloudflare-object/ md: https://developers.cloudflare.com/workers/examples/accessing-the-cloudflare-object/index.md --- If you want to get started quickly, click on the button below. [![Deploy to Cloudflare](https://deploy.workers.cloudflare.com/button)](https://deploy.workers.cloudflare.com/?url=https://github.com/cloudflare/docs-examples/tree/main/workers/accessing-the-cloudflare-object) This creates a repository in your GitHub account and deploys the application to Cloudflare Workers. * JavaScript ```js export default { async fetch(req) { const data = req.cf !== undefined ? req.cf : { error: "The `cf` object is not available inside the preview." }; return new Response(JSON.stringify(data, null, 2), { headers: { "content-type": "application/json;charset=UTF-8", }, }); }, }; ``` * TypeScript ```ts export default { async fetch(req): Promise { const data = req.cf !== undefined ? req.cf : { error: "The `cf` object is not available inside the preview." }; return new Response(JSON.stringify(data, null, 2), { headers: { "content-type": "application/json;charset=UTF-8", }, }); }, } satisfies ExportedHandler; ``` * Hono ```ts import { Hono } from "hono"; const app = new Hono(); app.get("*", async (c) => { // Access the raw request to get the cf object const req = c.req.raw; // Check if the cf object is available const data = req.cf !== undefined ? req.cf : { error: "The `cf` object is not available inside the preview." }; // Return the data formatted with 2-space indentation return c.json(data); }); export default app; ``` * Python ```py import json from workers import Response from js import JSON def on_fetch(request): error = json.dumps({ "error": "The `cf` object is not available inside the preview." }) data = request.cf if request.cf is not None else error headers = {"content-type":"application/json"} return Response(JSON.stringify(data, None, 2), headers=headers) ``` --- title: Aggregate requests · Cloudflare Workers docs description: Send two GET request to two urls and aggregates the responses into one response. lastUpdated: 2025-04-28T14:11:18.000Z chatbotDeprioritize: false source_url: html: https://developers.cloudflare.com/workers/examples/aggregate-requests/ md: https://developers.cloudflare.com/workers/examples/aggregate-requests/index.md --- If you want to get started quickly, click on the button below. [![Deploy to Cloudflare](https://deploy.workers.cloudflare.com/button)](https://deploy.workers.cloudflare.com/?url=https://github.com/cloudflare/docs-examples/tree/main/workers/aggregate-requests) This creates a repository in your GitHub account and deploys the application to Cloudflare Workers. * JavaScript ```js export default { async fetch(request) { // someHost is set up to return JSON responses const someHost = "https://jsonplaceholder.typicode.com"; const url1 = someHost + "/todos/1"; const url2 = someHost + "/todos/2"; const responses = await Promise.all([fetch(url1), fetch(url2)]); const results = await Promise.all(responses.map((r) => r.json())); const options = { headers: { "content-type": "application/json;charset=UTF-8" }, }; return new Response(JSON.stringify(results), options); }, }; ``` * TypeScript ```ts export default { async fetch(request) { // someHost is set up to return JSON responses const someHost = "https://jsonplaceholder.typicode.com"; const url1 = someHost + "/todos/1"; const url2 = someHost + "/todos/2"; const responses = await Promise.all([fetch(url1), fetch(url2)]); const results = await Promise.all(responses.map((r) => r.json())); const options = { headers: { "content-type": "application/json;charset=UTF-8" }, }; return new Response(JSON.stringify(results), options); }, } satisfies ExportedHandler; ``` * Hono ```ts import { Hono } from "hono"; const app = new Hono(); app.get("*", async (c) => { // someHost is set up to return JSON responses const someHost = "https://jsonplaceholder.typicode.com"; const url1 = someHost + "/todos/1"; const url2 = someHost + "/todos/2"; // Fetch both URLs concurrently const responses = await Promise.all([fetch(url1), fetch(url2)]); // Parse JSON responses concurrently const results = await Promise.all(responses.map((r) => r.json())); // Return aggregated results return c.json(results); }); export default app; ``` * Python ```py from workers import Response, fetch import asyncio import json async def on_fetch(request): # some_host is set up to return JSON responses some_host = "https://jsonplaceholder.typicode.com" url1 = some_host + "/todos/1" url2 = some_host + "/todos/2" responses = await asyncio.gather(fetch(url1), fetch(url2)) results = await asyncio.gather(*(r.json() for r in responses)) headers = {"content-type": "application/json;charset=UTF-8"} return Response.json(results, headers=headers) ``` --- title: Alter headers · Cloudflare Workers docs description: Example of how to add, change, or delete headers sent in a request or returned in a response. lastUpdated: 2025-04-28T14:11:18.000Z chatbotDeprioritize: false tags: Headers,Middleware source_url: html: https://developers.cloudflare.com/workers/examples/alter-headers/ md: https://developers.cloudflare.com/workers/examples/alter-headers/index.md --- If you want to get started quickly, click on the button below. [![Deploy to Cloudflare](https://deploy.workers.cloudflare.com/button)](https://deploy.workers.cloudflare.com/?url=https://github.com/cloudflare/docs-examples/tree/main/workers/alter-headers) This creates a repository in your GitHub account and deploys the application to Cloudflare Workers. * JavaScript ```js export default { async fetch(request) { const response = await fetch("https://example.com"); // Clone the response so that it's no longer immutable const newResponse = new Response(response.body, response); // Add a custom header with a value newResponse.headers.append( "x-workers-hello", "Hello from Cloudflare Workers", ); // Delete headers newResponse.headers.delete("x-header-to-delete"); newResponse.headers.delete("x-header2-to-delete"); // Adjust the value for an existing header newResponse.headers.set("x-header-to-change", "NewValue"); return newResponse; }, }; ``` * TypeScript ```ts export default { async fetch(request): Promise { const response = await fetch(request); // Clone the response so that it's no longer immutable const newResponse = new Response(response.body, response); // Add a custom header with a value newResponse.headers.append( "x-workers-hello", "Hello from Cloudflare Workers", ); // Delete headers newResponse.headers.delete("x-header-to-delete"); newResponse.headers.delete("x-header2-to-delete"); // Adjust the value for an existing header newResponse.headers.set("x-header-to-change", "NewValue"); return newResponse; }, } satisfies ExportedHandler; ``` * Python ```py from workers import Response, fetch async def on_fetch(request): response = await fetch("https://example.com") # Grab the response headers so they can be modified new_headers = response.headers # Add a custom header with a value new_headers["x-workers-hello"] = "Hello from Cloudflare Workers" # Delete headers if "x-header-to-delete" in new_headers: del new_headers["x-header-to-delete"] if "x-header2-to-delete" in new_headers: del new_headers["x-header2-to-delete"] # Adjust the value for an existing header new_headers["x-header-to-change"] = "NewValue" return Response(response.body, headers=new_headers) ``` * Hono ```ts import { Hono } from 'hono'; const app = new Hono(); app.use('*', async (c, next) => { // Process the request with the next middleware/handler await next(); // After the response is generated, we can modify its headers // Add a custom header with a value c.res.headers.append( "x-workers-hello", "Hello from Cloudflare Workers with Hono" ); // Delete headers c.res.headers.delete("x-header-to-delete"); c.res.headers.delete("x-header2-to-delete"); // Adjust the value for an existing header c.res.headers.set("x-header-to-change", "NewValue"); }); app.get('*', async (c) => { // Fetch content from example.com const response = await fetch("https://example.com"); // Return the response body with original headers // (our middleware will modify the headers before sending) return new Response(response.body, { headers: response.headers }); }); export default app; ``` You can also use the [`custom-headers-example` template](https://github.com/kristianfreeman/custom-headers-example) to deploy this code to your custom domain. --- title: Auth with headers · Cloudflare Workers docs description: Allow or deny a request based on a known pre-shared key in a header. This is not meant to replace the WebCrypto API. lastUpdated: 2025-04-16T21:02:18.000Z chatbotDeprioritize: false tags: Authentication,Web Crypto source_url: html: https://developers.cloudflare.com/workers/examples/auth-with-headers/ md: https://developers.cloudflare.com/workers/examples/auth-with-headers/index.md --- Caution when using in production The example code contains a generic header key and value of `X-Custom-PSK` and `mypresharedkey`. To best protect your resources, change the header key and value in the Workers editor before saving your code. * JavaScript ```js export default { async fetch(request) { /** * @param {string} PRESHARED_AUTH_HEADER_KEY Custom header to check for key * @param {string} PRESHARED_AUTH_HEADER_VALUE Hard coded key value */ const PRESHARED_AUTH_HEADER_KEY = "X-Custom-PSK"; const PRESHARED_AUTH_HEADER_VALUE = "mypresharedkey"; const psk = request.headers.get(PRESHARED_AUTH_HEADER_KEY); if (psk === PRESHARED_AUTH_HEADER_VALUE) { // Correct preshared header key supplied. Fetch request from origin. return fetch(request); } // Incorrect key supplied. Reject the request. return new Response("Sorry, you have supplied an invalid key.", { status: 403, }); }, }; ``` * TypeScript ```ts export default { async fetch(request): Promise { /** * @param {string} PRESHARED_AUTH_HEADER_KEY Custom header to check for key * @param {string} PRESHARED_AUTH_HEADER_VALUE Hard coded key value */ const PRESHARED_AUTH_HEADER_KEY = "X-Custom-PSK"; const PRESHARED_AUTH_HEADER_VALUE = "mypresharedkey"; const psk = request.headers.get(PRESHARED_AUTH_HEADER_KEY); if (psk === PRESHARED_AUTH_HEADER_VALUE) { // Correct preshared header key supplied. Fetch request from origin. return fetch(request); } // Incorrect key supplied. Reject the request. return new Response("Sorry, you have supplied an invalid key.", { status: 403, }); }, } satisfies ExportedHandler; ``` * Python ```py from workers import Response, fetch async def on_fetch(request): PRESHARED_AUTH_HEADER_KEY = "X-Custom-PSK" PRESHARED_AUTH_HEADER_VALUE = "mypresharedkey" psk = request.headers[PRESHARED_AUTH_HEADER_KEY] if psk == PRESHARED_AUTH_HEADER_VALUE: # Correct preshared header key supplied. Fetch request from origin. return fetch(request) # Incorrect key supplied. Reject the request. return Response("Sorry, you have supplied an invalid key.", status=403) ``` * Hono ```ts import { Hono } from 'hono'; const app = new Hono(); // Add authentication middleware app.use('*', async (c, next) => { /** * Define authentication constants */ const PRESHARED_AUTH_HEADER_KEY = "X-Custom-PSK"; const PRESHARED_AUTH_HEADER_VALUE = "mypresharedkey"; // Get the pre-shared key from the request header const psk = c.req.header(PRESHARED_AUTH_HEADER_KEY); if (psk === PRESHARED_AUTH_HEADER_VALUE) { // Correct preshared header key supplied. Continue to the next handler. await next(); } else { // Incorrect key supplied. Reject the request. return c.text("Sorry, you have supplied an invalid key.", 403); } }); // Handle all authenticated requests by passing through to origin app.all('*', async (c) => { return fetch(c.req.raw); }); export default app; ``` --- title: HTTP Basic Authentication · Cloudflare Workers docs description: Shows how to restrict access using the HTTP Basic schema. lastUpdated: 2025-04-15T13:29:20.000Z chatbotDeprioritize: false tags: Security,Authentication source_url: html: https://developers.cloudflare.com/workers/examples/basic-auth/ md: https://developers.cloudflare.com/workers/examples/basic-auth/index.md --- Note This example Worker makes use of the [Node.js Buffer API](https://developers.cloudflare.com/workers/runtime-apis/nodejs/buffer/), which is available as part of the Worker's runtime [Node.js compatibility mode](https://developers.cloudflare.com/workers/runtime-apis/nodejs/). To run this Worker, you will need to [enable the `nodejs_compat` compatibility flag](https://developers.cloudflare.com/workers/configuration/compatibility-flags/#nodejs-compatibility-flag). Caution when using in production This code is provided as a sample, and is not suitable for production use. Basic Authentication sends credentials unencrypted, and must be used with an HTTPS connection to be considered secure. For a production-ready authentication system, consider using [Cloudflare Access](https://developers.cloudflare.com/cloudflare-one/applications/configure-apps/self-hosted-public-app/). * JavaScript ```js /** * Shows how to restrict access using the HTTP Basic schema. * @see https://developer.mozilla.org/en-US/docs/Web/HTTP/Authentication * @see https://tools.ietf.org/html/rfc7617 * */ import { Buffer } from "node:buffer"; const encoder = new TextEncoder(); /** * Protect against timing attacks by safely comparing values using `timingSafeEqual`. * Refer to https://developers.cloudflare.com/workers/runtime-apis/web-crypto/#timingsafeequal for more details * @param {string} a * @param {string} b * @returns {boolean} */ function timingSafeEqual(a, b) { const aBytes = encoder.encode(a); const bBytes = encoder.encode(b); if (aBytes.byteLength !== bBytes.byteLength) { // Strings must be the same length in order to compare // with crypto.subtle.timingSafeEqual return false; } return crypto.subtle.timingSafeEqual(aBytes, bBytes); } export default { /** * * @param {Request} request * @param {{PASSWORD: string}} env * @returns */ async fetch(request, env) { const BASIC_USER = "admin"; // You will need an admin password. This should be // attached to your Worker as an encrypted secret. // Refer to https://developers.cloudflare.com/workers/configuration/secrets/ const BASIC_PASS = env.PASSWORD ?? "password"; const url = new URL(request.url); switch (url.pathname) { case "/": return new Response("Anyone can access the homepage."); case "/logout": // Invalidate the "Authorization" header by returning a HTTP 401. // We do not send a "WWW-Authenticate" header, as this would trigger // a popup in the browser, immediately asking for credentials again. return new Response("Logged out.", { status: 401 }); case "/admin": { // The "Authorization" header is sent when authenticated. const authorization = request.headers.get("Authorization"); if (!authorization) { return new Response("You need to login.", { status: 401, headers: { // Prompts the user for credentials. "WWW-Authenticate": 'Basic realm="my scope", charset="UTF-8"', }, }); } const [scheme, encoded] = authorization.split(" "); // The Authorization header must start with Basic, followed by a space. if (!encoded || scheme !== "Basic") { return new Response("Malformed authorization header.", { status: 400, }); } const credentials = Buffer.from(encoded, "base64").toString(); // The username & password are split by the first colon. //=> example: "username:password" const index = credentials.indexOf(":"); const user = credentials.substring(0, index); const pass = credentials.substring(index + 1); if ( !timingSafeEqual(BASIC_USER, user) || !timingSafeEqual(BASIC_PASS, pass) ) { return new Response("You need to login.", { status: 401, headers: { // Prompts the user for credentials. "WWW-Authenticate": 'Basic realm="my scope", charset="UTF-8"', }, }); } return new Response("🎉 You have private access!", { status: 200, headers: { "Cache-Control": "no-store", }, }); } } return new Response("Not Found.", { status: 404 }); }, }; ``` * TypeScript ```ts /** * Shows how to restrict access using the HTTP Basic schema. * @see https://developer.mozilla.org/en-US/docs/Web/HTTP/Authentication * @see https://tools.ietf.org/html/rfc7617 * */ import { Buffer } from "node:buffer"; const encoder = new TextEncoder(); /** * Protect against timing attacks by safely comparing values using `timingSafeEqual`. * Refer to https://developers.cloudflare.com/workers/runtime-apis/web-crypto/#timingsafeequal for more details */ function timingSafeEqual(a: string, b: string) { const aBytes = encoder.encode(a); const bBytes = encoder.encode(b); if (aBytes.byteLength !== bBytes.byteLength) { // Strings must be the same length in order to compare // with crypto.subtle.timingSafeEqual return false; } return crypto.subtle.timingSafeEqual(aBytes, bBytes); } interface Env { PASSWORD: string; } export default { async fetch(request, env): Promise { const BASIC_USER = "admin"; // You will need an admin password. This should be // attached to your Worker as an encrypted secret. // Refer to https://developers.cloudflare.com/workers/configuration/secrets/ const BASIC_PASS = env.PASSWORD ?? "password"; const url = new URL(request.url); switch (url.pathname) { case "/": return new Response("Anyone can access the homepage."); case "/logout": // Invalidate the "Authorization" header by returning a HTTP 401. // We do not send a "WWW-Authenticate" header, as this would trigger // a popup in the browser, immediately asking for credentials again. return new Response("Logged out.", { status: 401 }); case "/admin": { // The "Authorization" header is sent when authenticated. const authorization = request.headers.get("Authorization"); if (!authorization) { return new Response("You need to login.", { status: 401, headers: { // Prompts the user for credentials. "WWW-Authenticate": 'Basic realm="my scope", charset="UTF-8"', }, }); } const [scheme, encoded] = authorization.split(" "); // The Authorization header must start with Basic, followed by a space. if (!encoded || scheme !== "Basic") { return new Response("Malformed authorization header.", { status: 400, }); } const credentials = Buffer.from(encoded, "base64").toString(); // The username and password are split by the first colon. //=> example: "username:password" const index = credentials.indexOf(":"); const user = credentials.substring(0, index); const pass = credentials.substring(index + 1); if ( !timingSafeEqual(BASIC_USER, user) || !timingSafeEqual(BASIC_PASS, pass) ) { return new Response("You need to login.", { status: 401, headers: { // Prompts the user for credentials. "WWW-Authenticate": 'Basic realm="my scope", charset="UTF-8"', }, }); } return new Response("🎉 You have private access!", { status: 200, headers: { "Cache-Control": "no-store", }, }); } } return new Response("Not Found.", { status: 404 }); }, } satisfies ExportedHandler; ``` * Rust ```rs use base64::prelude::*; use worker::*; #[event(fetch)] async fn fetch(req: Request, env: Env, _ctx: Context) -> Result { let basic_user = "admin"; // You will need an admin password. This should be // attached to your Worker as an encrypted secret. // Refer to https://developers.cloudflare.com/workers/configuration/secrets/ let basic_pass = match env.secret("PASSWORD") { Ok(s) => s.to_string(), Err(_) => "password".to_string(), }; let url = req.url()?; match url.path() { "/" => Response::ok("Anyone can access the homepage."), // Invalidate the "Authorization" header by returning a HTTP 401. // We do not send a "WWW-Authenticate" header, as this would trigger // a popup in the browser, immediately asking for credentials again. "/logout" => Response::error("Logged out.", 401), "/admin" => { // The "Authorization" header is sent when authenticated. let authorization = req.headers().get("Authorization")?; if authorization == None { let mut headers = Headers::new(); // Prompts the user for credentials. headers.set( "WWW-Authenticate", "Basic realm='my scope', charset='UTF-8'", )?; return Ok(Response::error("You need to login.", 401)?.with_headers(headers)); } let authorization = authorization.unwrap(); let auth: Vec<&str> = authorization.split(" ").collect(); let scheme = auth[0]; let encoded = auth[1]; // The Authorization header must start with Basic, followed by a space. if encoded == "" || scheme != "Basic" { return Response::error("Malformed authorization header.", 400); } let buff = BASE64_STANDARD.decode(encoded).unwrap(); let credentials = String::from_utf8_lossy(&buff); // The username & password are split by the first colon. //=> example: "username:password" let credentials: Vec<&str> = credentials.split(':').collect(); let user = credentials[0]; let pass = credentials[1]; if user != basic_user || pass != basic_pass { let mut headers = Headers::new(); // Prompts the user for credentials. headers.set( "WWW-Authenticate", "Basic realm='my scope', charset='UTF-8'", )?; return Ok(Response::error("You need to login.", 401)?.with_headers(headers)); } let mut headers = Headers::new(); headers.set("Cache-Control", "no-store")?; Ok(Response::ok("🎉 You have private access!")?.with_headers(headers)) } _ => Response::error("Not Found.", 404), } } ``` * Hono ```ts /** * Shows how to restrict access using the HTTP Basic schema with Hono. * @see https://developer.mozilla.org/en-US/docs/Web/HTTP/Authentication * @see https://tools.ietf.org/html/rfc7617 */ import { Hono } from "hono"; import { basicAuth } from "hono/basic-auth"; // Define environment interface interface Env { Bindings: { USERNAME: string; PASSWORD: string; }; } const app = new Hono(); // Public homepage - accessible to everyone app.get("/", (c) => { return c.text("Anyone can access the homepage."); }); // Admin route - protected with Basic Auth app.get( "/admin", async (c, next) => { const auth = basicAuth({ username: c.env.USERNAME, password: c.env.PASSWORD }) return await auth(c, next); }, (c) => { return c.text("🎉 You have private access!", 200, { "Cache-Control": "no-store", }); } ); export default app; ``` --- title: Block on TLS · Cloudflare Workers docs description: Inspects the incoming request's TLS version and blocks if under TLSv1.2. lastUpdated: 2025-04-15T13:29:20.000Z chatbotDeprioritize: false tags: Security,Middleware source_url: html: https://developers.cloudflare.com/workers/examples/block-on-tls/ md: https://developers.cloudflare.com/workers/examples/block-on-tls/index.md --- * JavaScript ```js export default { async fetch(request) { try { const tlsVersion = request.cf.tlsVersion; // Allow only TLS versions 1.2 and 1.3 if (tlsVersion !== "TLSv1.2" && tlsVersion !== "TLSv1.3") { return new Response("Please use TLS version 1.2 or higher.", { status: 403, }); } return fetch(request); } catch (err) { console.error( "request.cf does not exist in the previewer, only in production", ); return new Response(`Error in workers script ${err.message}`, { status: 500, }); } }, }; ``` * TypeScript ```ts export default { async fetch(request): Promise { try { const tlsVersion = request.cf.tlsVersion; // Allow only TLS versions 1.2 and 1.3 if (tlsVersion !== "TLSv1.2" && tlsVersion !== "TLSv1.3") { return new Response("Please use TLS version 1.2 or higher.", { status: 403, }); } return fetch(request); } catch (err) { console.error( "request.cf does not exist in the previewer, only in production", ); return new Response(`Error in workers script ${err.message}`, { status: 500, }); } }, } satisfies ExportedHandler; ``` * Hono ```ts import { Hono } from "hono"; const app = new Hono(); // Middleware to check TLS version app.use("*", async (c, next) => { // Access the raw request to get the cf object with TLS info const request = c.req.raw; const tlsVersion = request.cf?.tlsVersion; // Allow only TLS versions 1.2 and 1.3 if (tlsVersion !== "TLSv1.2" && tlsVersion !== "TLSv1.3") { return c.text("Please use TLS version 1.2 or higher.", 403); } await next(); }); app.onError((err, c) => { console.error( "request.cf does not exist in the previewer, only in production", ); return c.text(`Error in workers script: ${err.message}`, 500); }); app.get("/", async (c) => { return c.text(`TLS Version: ${c.req.raw.cf.tlsVersion}`); }); export default app; ``` * Python ```py from workers import Response, fetch async def on_fetch(request): tls_version = request.cf.tlsVersion if tls_version not in ("TLSv1.2", "TLSv1.3"): return Response("Please use TLS version 1.2 or higher.", status=403) return fetch(request) ``` --- title: Bulk origin override · Cloudflare Workers docs description: Resolve requests to your domain to a set of proxy third-party origin URLs. lastUpdated: 2025-04-15T13:29:20.000Z chatbotDeprioritize: false tags: Middleware source_url: html: https://developers.cloudflare.com/workers/examples/bulk-origin-proxy/ md: https://developers.cloudflare.com/workers/examples/bulk-origin-proxy/index.md --- * JavaScript ```js export default { async fetch(request) { /** * An object with different URLs to fetch * @param {Object} ORIGINS */ const ORIGINS = { "starwarsapi.yourdomain.com": "swapi.dev", "google.yourdomain.com": "www.google.com", }; const url = new URL(request.url); // Check if incoming hostname is a key in the ORIGINS object if (url.hostname in ORIGINS) { const target = ORIGINS[url.hostname]; url.hostname = target; // If it is, proxy request to that third party origin return fetch(url.toString(), request); } // Otherwise, process request as normal return fetch(request); }, }; ``` * TypeScript ```ts export default { async fetch(request): Promise { /** * An object with different URLs to fetch * @param {Object} ORIGINS */ const ORIGINS = { "starwarsapi.yourdomain.com": "swapi.dev", "google.yourdomain.com": "www.google.com", }; const url = new URL(request.url); // Check if incoming hostname is a key in the ORIGINS object if (url.hostname in ORIGINS) { const target = ORIGINS[url.hostname]; url.hostname = target; // If it is, proxy request to that third party origin return fetch(url.toString(), request); } // Otherwise, process request as normal return fetch(request); }, } satisfies ExportedHandler; ``` * Hono ```ts import { Hono } from "hono"; import { proxy } from "hono/proxy"; // An object with different URLs to fetch const ORIGINS: Record = { "starwarsapi.yourdomain.com": "swapi.dev", "google.yourdomain.com": "www.google.com", }; const app = new Hono(); app.all("*", async (c) => { const url = new URL(c.req.url); // Check if incoming hostname is a key in the ORIGINS object if (url.hostname in ORIGINS) { const target = ORIGINS[url.hostname]; url.hostname = target; // If it is, proxy request to that third party origin return proxy(url, c.req.raw); } // Otherwise, process request as normal return proxy(c.req.raw); }); export default app; ``` * Python ```py from js import fetch, URL async def on_fetch(request): # A dict with different URLs to fetch ORIGINS = { "starwarsapi.yourdomain.com": "swapi.dev", "google.yourdomain.com": "www.google.com", } url = URL.new(request.url) # Check if incoming hostname is a key in the ORIGINS object if url.hostname in ORIGINS: url.hostname = ORIGINS[url.hostname] # If it is, proxy request to that third party origin return fetch(url.toString(), request) # Otherwise, process request as normal return fetch(request) ``` --- title: Bulk redirects · Cloudflare Workers docs description: Redirect requests to certain URLs based on a mapped object to the request's URL. lastUpdated: 2025-04-15T13:29:20.000Z chatbotDeprioritize: false tags: Middleware,Redirects source_url: html: https://developers.cloudflare.com/workers/examples/bulk-redirects/ md: https://developers.cloudflare.com/workers/examples/bulk-redirects/index.md --- * JavaScript ```js export default { async fetch(request) { const externalHostname = "examples.cloudflareworkers.com"; const redirectMap = new Map([ ["/bulk1", "https://" + externalHostname + "/redirect2"], ["/bulk2", "https://" + externalHostname + "/redirect3"], ["/bulk3", "https://" + externalHostname + "/redirect4"], ["/bulk4", "https://google.com"], ]); const requestURL = new URL(request.url); const path = requestURL.pathname; const location = redirectMap.get(path); if (location) { return Response.redirect(location, 301); } // If request not in map, return the original request return fetch(request); }, }; ``` * TypeScript ```ts export default { async fetch(request): Promise { const externalHostname = "examples.cloudflareworkers.com"; const redirectMap = new Map([ ["/bulk1", "https://" + externalHostname + "/redirect2"], ["/bulk2", "https://" + externalHostname + "/redirect3"], ["/bulk3", "https://" + externalHostname + "/redirect4"], ["/bulk4", "https://google.com"], ]); const requestURL = new URL(request.url); const path = requestURL.pathname; const location = redirectMap.get(path); if (location) { return Response.redirect(location, 301); } // If request not in map, return the original request return fetch(request); }, } satisfies ExportedHandler; ``` * Python ```py from workers import Response, fetch from urllib.parse import urlparse async def on_fetch(request): external_hostname = "examples.cloudflareworkers.com" redirect_map = { "/bulk1": "https://" + external_hostname + "/redirect2", "/bulk2": "https://" + external_hostname + "/redirect3", "/bulk3": "https://" + external_hostname + "/redirect4", "/bulk4": "https://google.com", } url = urlparse(request.url) location = redirect_map.get(url.path, None) if location: return Response.redirect(location, 301) # If request not in map, return the original request return fetch(request) ``` * Hono ```ts import { Hono } from "hono"; const app = new Hono(); // Configure your redirects const externalHostname = "examples.cloudflareworkers.com"; const redirectMap = new Map([ ["/bulk1", `https://${externalHostname}/redirect2`], ["/bulk2", `https://${externalHostname}/redirect3`], ["/bulk3", `https://${externalHostname}/redirect4`], ["/bulk4", "https://google.com"], ]); // Middleware to handle redirects app.use("*", async (c, next) => { const path = c.req.path; const location = redirectMap.get(path); if (location) { // If path is in our redirect map, perform the redirect return c.redirect(location, 301); } // Otherwise, continue to the next handler await next(); }); // Default handler for requests that don't match any redirects app.all("*", async (c) => { // Pass through to origin return fetch(c.req.raw); }); export default app; ``` --- title: Using the Cache API · Cloudflare Workers docs description: Use the Cache API to store responses in Cloudflare's cache. lastUpdated: 2025-04-28T14:11:18.000Z chatbotDeprioritize: false tags: Middleware,Caching source_url: html: https://developers.cloudflare.com/workers/examples/cache-api/ md: https://developers.cloudflare.com/workers/examples/cache-api/index.md --- If you want to get started quickly, click on the button below. [![Deploy to Cloudflare](https://deploy.workers.cloudflare.com/button)](https://deploy.workers.cloudflare.com/?url=https://github.com/cloudflare/docs-examples/tree/main/workers/cache-api) This creates a repository in your GitHub account and deploys the application to Cloudflare Workers. * JavaScript ```js export default { async fetch(request, env, ctx) { const cacheUrl = new URL(request.url); // Construct the cache key from the cache URL const cacheKey = new Request(cacheUrl.toString(), request); const cache = caches.default; // Check whether the value is already available in the cache // if not, you will need to fetch it from origin, and store it in the cache let response = await cache.match(cacheKey); if (!response) { console.log( `Response for request url: ${request.url} not present in cache. Fetching and caching request.`, ); // If not in cache, get it from origin response = await fetch(request); // Must use Response constructor to inherit all of response's fields response = new Response(response.body, response); // Cache API respects Cache-Control headers. Setting s-max-age to 10 // will limit the response to be in cache for 10 seconds max // Any changes made to the response here will be reflected in the cached value response.headers.append("Cache-Control", "s-maxage=10"); ctx.waitUntil(cache.put(cacheKey, response.clone())); } else { console.log(`Cache hit for: ${request.url}.`); } return response; }, }; ``` * TypeScript ```ts interface Env {} export default { async fetch(request, env, ctx): Promise { const cacheUrl = new URL(request.url); // Construct the cache key from the cache URL const cacheKey = new Request(cacheUrl.toString(), request); const cache = caches.default; // Check whether the value is already available in the cache // if not, you will need to fetch it from origin, and store it in the cache let response = await cache.match(cacheKey); if (!response) { console.log( `Response for request url: ${request.url} not present in cache. Fetching and caching request.`, ); // If not in cache, get it from origin response = await fetch(request); // Must use Response constructor to inherit all of response's fields response = new Response(response.body, response); // Cache API respects Cache-Control headers. Setting s-max-age to 10 // will limit the response to be in cache for 10 seconds max // Any changes made to the response here will be reflected in the cached value response.headers.append("Cache-Control", "s-maxage=10"); ctx.waitUntil(cache.put(cacheKey, response.clone())); } else { console.log(`Cache hit for: ${request.url}.`); } return response; }, } satisfies ExportedHandler; ``` * Python ```py from pyodide.ffi import create_proxy from js import Response, Request, URL, caches, fetch async def on_fetch(request, _env, ctx): cache_url = request.url # Construct the cache key from the cache URL cache_key = Request.new(cache_url, request) cache = caches.default # Check whether the value is already available in the cache # if not, you will need to fetch it from origin, and store it in the cache response = await cache.match(cache_key) if response is None: print(f"Response for request url: {request.url} not present in cache. Fetching and caching request.") # If not in cache, get it from origin response = await fetch(request) # Must use Response constructor to inherit all of response's fields response = Response.new(response.body, response) # Cache API respects Cache-Control headers. Setting s-max-age to 10 # will limit the response to be in cache for 10 seconds s-maxage # Any changes made to the response here will be reflected in the cached value response.headers.append("Cache-Control", "s-maxage=10") ctx.waitUntil(create_proxy(cache.put(cache_key, response.clone()))) else: print(f"Cache hit for: {request.url}.") return response ``` * Hono ```ts import { Hono } from "hono"; import { cache } from "hono/cache"; const app = new Hono(); // We leverage hono built-in cache helper here app.get( "*", cache({ cacheName: "my-cache", cacheControl: "max-age=3600", // 1 hour }), ); // Add a route to handle the request if it's not in cache app.get("*", (c) => { return c.text("Hello from Hono!"); }); export default app; ``` --- title: Cache POST requests · Cloudflare Workers docs description: Cache POST requests using the Cache API. lastUpdated: 2025-04-28T14:11:18.000Z chatbotDeprioritize: false tags: Middleware,Caching source_url: html: https://developers.cloudflare.com/workers/examples/cache-post-request/ md: https://developers.cloudflare.com/workers/examples/cache-post-request/index.md --- If you want to get started quickly, click on the button below. [![Deploy to Cloudflare](https://deploy.workers.cloudflare.com/button)](https://deploy.workers.cloudflare.com/?url=https://github.com/cloudflare/docs-examples/tree/main/workers/cache-post-request) This creates a repository in your GitHub account and deploys the application to Cloudflare Workers. * JavaScript ```js export default { async fetch(request, env, ctx) { async function sha256(message) { // encode as UTF-8 const msgBuffer = await new TextEncoder().encode(message); // hash the message const hashBuffer = await crypto.subtle.digest("SHA-256", msgBuffer); // convert bytes to hex string return [...new Uint8Array(hashBuffer)] .map((b) => b.toString(16).padStart(2, "0")) .join(""); } try { if (request.method.toUpperCase() === "POST") { const body = await request.clone().text(); // Hash the request body to use it as a part of the cache key const hash = await sha256(body); const cacheUrl = new URL(request.url); // Store the URL in cache by prepending the body's hash cacheUrl.pathname = "/posts" + cacheUrl.pathname + hash; // Convert to a GET to be able to cache const cacheKey = new Request(cacheUrl.toString(), { headers: request.headers, method: "GET", }); const cache = caches.default; // Find the cache key in the cache let response = await cache.match(cacheKey); // Otherwise, fetch response to POST request from origin if (!response) { response = await fetch(request); ctx.waitUntil(cache.put(cacheKey, response.clone())); } return response; } return fetch(request); } catch (e) { return new Response("Error thrown " + e.message); } }, }; ``` * TypeScript ```ts interface Env {} export default { async fetch(request, env, ctx): Promise { async function sha256(message) { // encode as UTF-8 const msgBuffer = await new TextEncoder().encode(message); // hash the message const hashBuffer = await crypto.subtle.digest("SHA-256", msgBuffer); // convert bytes to hex string return [...new Uint8Array(hashBuffer)] .map((b) => b.toString(16).padStart(2, "0")) .join(""); } try { if (request.method.toUpperCase() === "POST") { const body = await request.clone().text(); // Hash the request body to use it as a part of the cache key const hash = await sha256(body); const cacheUrl = new URL(request.url); // Store the URL in cache by prepending the body's hash cacheUrl.pathname = "/posts" + cacheUrl.pathname + hash; // Convert to a GET to be able to cache const cacheKey = new Request(cacheUrl.toString(), { headers: request.headers, method: "GET", }); const cache = caches.default; // Find the cache key in the cache let response = await cache.match(cacheKey); // Otherwise, fetch response to POST request from origin if (!response) { response = await fetch(request); ctx.waitUntil(cache.put(cacheKey, response.clone())); } return response; } return fetch(request); } catch (e) { return new Response("Error thrown " + e.message); } }, } satisfies ExportedHandler; ``` * Python ```py import hashlib from pyodide.ffi import create_proxy from js import fetch, URL, Headers, Request, caches async def on_fetch(request, _, ctx): if 'POST' in request.method: # Hash the request body to use it as a part of the cache key body = await request.clone().text() body_hash = hashlib.sha256(body.encode('UTF-8')).hexdigest() # Store the URL in cache by prepending the body's hash cache_url = URL.new(request.url) cache_url.pathname = "/posts" + cache_url.pathname + body_hash # Convert to a GET to be able to cache headers = Headers.new(dict(request.headers).items()) cache_key = Request.new(cache_url.toString(), method='GET', headers=headers) # Find the cache key in the cache cache = caches.default response = await cache.match(cache_key) # Otherwise, fetch response to POST request from origin if response is None: response = await fetch(request) ctx.waitUntil(create_proxy(cache.put(cache_key, response.clone()))) return response return fetch(request) ``` * Hono ```ts import { Hono } from "hono"; import { sha256 } from "hono/utils/crypto"; const app = new Hono(); // Middleware for caching POST requests app.post("*", async (c) => { try { // Get the request body const body = await c.req.raw.clone().text(); // Hash the request body to use it as part of the cache key const hash = await sha256(body); // Create the cache URL const cacheUrl = new URL(c.req.url); // Store the URL in cache by prepending the body's hash cacheUrl.pathname = "/posts" + cacheUrl.pathname + hash; // Convert to a GET to be able to cache const cacheKey = new Request(cacheUrl.toString(), { headers: c.req.raw.headers, method: "GET", }); const cache = caches.default; // Find the cache key in the cache let response = await cache.match(cacheKey); // If not in cache, fetch response to POST request from origin if (!response) { response = await fetch(c.req.raw); c.executionCtx.waitUntil(cache.put(cacheKey, response.clone())); } return response; } catch (e) { return c.text("Error thrown " + e.message, 500); } }); // Handle all other HTTP methods app.all("*", (c) => { return fetch(c.req.raw); }); export default app; ``` --- title: Cache Tags using Workers · Cloudflare Workers docs description: Send Additional Cache Tags using Workers lastUpdated: 2025-04-28T14:11:18.000Z chatbotDeprioritize: false tags: Caching source_url: html: https://developers.cloudflare.com/workers/examples/cache-tags/ md: https://developers.cloudflare.com/workers/examples/cache-tags/index.md --- If you want to get started quickly, click on the button below. [![Deploy to Cloudflare](https://deploy.workers.cloudflare.com/button)](https://deploy.workers.cloudflare.com/?url=https://github.com/cloudflare/docs-examples/tree/main/workers/cache-tags) This creates a repository in your GitHub account and deploys the application to Cloudflare Workers. * JavaScript ```js export default { async fetch(request) { const requestUrl = new URL(request.url); const params = requestUrl.searchParams; const tags = params && params.has("tags") ? params.get("tags").split(",") : []; const url = params && params.has("uri") ? params.get("uri") : ""; if (!url) { const errorObject = { error: "URL cannot be empty", }; return new Response(JSON.stringify(errorObject), { status: 400 }); } const init = { cf: { cacheTags: tags, }, }; return fetch(url, init) .then((result) => { const cacheStatus = result.headers.get("cf-cache-status"); const lastModified = result.headers.get("last-modified"); const response = { cache: cacheStatus, lastModified: lastModified, }; return new Response(JSON.stringify(response), { status: result.status, }); }) .catch((err) => { const errorObject = { error: err.message, }; return new Response(JSON.stringify(errorObject), { status: 500 }); }); }, }; ``` * TypeScript ```ts export default { async fetch(request): Promise { const requestUrl = new URL(request.url); const params = requestUrl.searchParams; const tags = params && params.has("tags") ? params.get("tags").split(",") : []; const url = params && params.has("uri") ? params.get("uri") : ""; if (!url) { const errorObject = { error: "URL cannot be empty", }; return new Response(JSON.stringify(errorObject), { status: 400 }); } const init = { cf: { cacheTags: tags, }, }; return fetch(url, init) .then((result) => { const cacheStatus = result.headers.get("cf-cache-status"); const lastModified = result.headers.get("last-modified"); const response = { cache: cacheStatus, lastModified: lastModified, }; return new Response(JSON.stringify(response), { status: result.status, }); }) .catch((err) => { const errorObject = { error: err.message, }; return new Response(JSON.stringify(errorObject), { status: 500 }); }); }, } satisfies ExportedHandler; ``` * Hono ```ts import { Hono } from "hono"; const app = new Hono(); app.all("*", async (c) => { const tags = c.req.query("tags") ? c.req.query("tags").split(",") : []; const uri = c.req.query("uri") ? c.req.query("uri") : ""; if (!uri) { return c.json({ error: "URL cannot be empty" }, 400); } const init = { cf: { cacheTags: tags, }, }; const result = await fetch(uri, init); const cacheStatus = result.headers.get("cf-cache-status"); const lastModified = result.headers.get("last-modified"); const response = { cache: cacheStatus, lastModified: lastModified, }; return c.json(response, result.status); }); app.onError((err, c) => { return c.json({ error: err.message }, 500); }); export default app; ``` * Python ```py from pyodide.ffi import to_js as _to_js from js import Response, URL, Object, fetch def to_js(x): return _to_js(x, dict_converter=Object.fromEntries) async def on_fetch(request): request_url = URL.new(request.url) params = request_url.searchParams tags = params["tags"].split(",") if "tags" in params else [] url = params["uri"] or None if url is None: error = {"error": "URL cannot be empty"} return Response.json(to_js(error), status=400) options = {"cf": {"cacheTags": tags}} result = await fetch(url, to_js(options)) cache_status = result.headers["cf-cache-status"] last_modified = result.headers["last-modified"] response = {"cache": cache_status, "lastModified": last_modified} return Response.json(to_js(response), status=result.status) ``` --- title: Cache using fetch · Cloudflare Workers docs description: Determine how to cache a resource by setting TTLs, custom cache keys, and cache headers in a fetch request. lastUpdated: 2025-05-13T11:59:34.000Z chatbotDeprioritize: false tags: Caching,Middleware source_url: html: https://developers.cloudflare.com/workers/examples/cache-using-fetch/ md: https://developers.cloudflare.com/workers/examples/cache-using-fetch/index.md --- If you want to get started quickly, click on the button below. [![Deploy to Cloudflare](https://deploy.workers.cloudflare.com/button)](https://deploy.workers.cloudflare.com/?url=https://github.com/cloudflare/docs-examples/tree/main/workers/cache-using-fetch) This creates a repository in your GitHub account and deploys the application to Cloudflare Workers. * JavaScript ```js export default { async fetch(request) { const url = new URL(request.url); // Only use the path for the cache key, removing query strings // and always store using HTTPS, for example, https://www.example.com/file-uri-here const someCustomKey = `https://${url.hostname}${url.pathname}`; let response = await fetch(request, { cf: { // Always cache this fetch regardless of content type // for a max of 5 seconds before revalidating the resource cacheTtl: 5, cacheEverything: true, //Enterprise only feature, see Cache API for other plans cacheKey: someCustomKey, }, }); // Reconstruct the Response object to make its headers mutable. response = new Response(response.body, response); // Set cache control headers to cache on browser for 25 minutes response.headers.set("Cache-Control", "max-age=1500"); return response; }, }; ``` * TypeScript ```ts export default { async fetch(request): Promise { const url = new URL(request.url); // Only use the path for the cache key, removing query strings // and always store using HTTPS, for example, https://www.example.com/file-uri-here const someCustomKey = `https://${url.hostname}${url.pathname}`; let response = await fetch(request, { cf: { // Always cache this fetch regardless of content type // for a max of 5 seconds before revalidating the resource cacheTtl: 5, cacheEverything: true, //Enterprise only feature, see Cache API for other plans cacheKey: someCustomKey, }, }); // Reconstruct the Response object to make its headers mutable. response = new Response(response.body, response); // Set cache control headers to cache on browser for 25 minutes response.headers.set("Cache-Control", "max-age=1500"); return response; }, } satisfies ExportedHandler; ``` * Hono ```ts import { Hono } from 'hono'; type Bindings = {}; const app = new Hono<{ Bindings: Bindings }>(); app.all('*', async (c) => { const url = new URL(c.req.url); // Only use the path for the cache key, removing query strings // and always store using HTTPS, for example, https://www.example.com/file-uri-here const someCustomKey = `https://${url.hostname}${url.pathname}`; // Fetch the request with custom cache settings let response = await fetch(c.req.raw, { cf: { // Always cache this fetch regardless of content type // for a max of 5 seconds before revalidating the resource cacheTtl: 5, cacheEverything: true, // Enterprise only feature, see Cache API for other plans cacheKey: someCustomKey, }, }); // Reconstruct the Response object to make its headers mutable response = new Response(response.body, response); // Set cache control headers to cache on browser for 25 minutes response.headers.set("Cache-Control", "max-age=1500"); return response; }); export default app; ``` * Python ```py from pyodide.ffi import to_js as _to_js from js import Response, URL, Object, fetch def to_js(x): return _to_js(x, dict_converter=Object.fromEntries) async def on_fetch(request): url = URL.new(request.url) # Only use the path for the cache key, removing query strings # and always store using HTTPS, for example, https://www.example.com/file-uri-here some_custom_key = f"https://{url.hostname}{url.pathname}" response = await fetch( request, cf=to_js({ # Always cache this fetch regardless of content type # for a max of 5 seconds before revalidating the resource "cacheTtl": 5, "cacheEverything": True, # Enterprise only feature, see Cache API for other plans "cacheKey": some_custom_key, }), ) # Reconstruct the Response object to make its headers mutable response = Response.new(response.body, response) # Set cache control headers to cache on browser for 25 minutes response.headers["Cache-Control"] = "max-age=1500" return response ``` * Rust ```rs use worker::*; #[event(fetch)] async fn fetch(req: Request, _env: Env, _ctx: Context) -> Result { let url = req.url()?; // Only use the path for the cache key, removing query strings // and always store using HTTPS, for example, https://www.example.com/file-uri-here let custom_key = format!( "https://{host}{path}", host = url.host_str().unwrap(), path = url.path() ); let request = Request::new_with_init( url.as_str(), &RequestInit { headers: req.headers().clone(), method: req.method(), cf: CfProperties { // Always cache this fetch regardless of content type // for a max of 5 seconds before revalidating the resource cache_ttl: Some(5), cache_everything: Some(true), // Enterprise only feature, see Cache API for other plans cache_key: Some(custom_key), ..CfProperties::default() }, ..RequestInit::default() }, )?; let mut response = Fetch::Request(request).send().await?; // Set cache control headers to cache on browser for 25 minutes let _ = response.headers_mut().set("Cache-Control", "max-age=1500"); Ok(response) } ``` ## Caching HTML resources ```js // Force Cloudflare to cache an asset fetch(event.request, { cf: { cacheEverything: true } }); ``` Setting the cache level to **Cache Everything** will override the default cacheability of the asset. For time-to-live (TTL), Cloudflare will still rely on headers set by the origin. ## Custom cache keys Note This feature is available only to Enterprise customers. A request's cache key is what determines if two requests are the same for caching purposes. If a request has the same cache key as some previous request, then Cloudflare can serve the same cached response for both. For more about cache keys, refer to the [Create custom cache keys](https://developers.cloudflare.com/cache/how-to/cache-keys/#create-custom-cache-keys) documentation. ```js // Set cache key for this request to "some-string". fetch(event.request, { cf: { cacheKey: "some-string" } }); ``` Normally, Cloudflare computes the cache key for a request based on the request's URL. Sometimes, though, you may like different URLs to be treated as if they were the same for caching purposes. For example, if your website content is hosted from both Amazon S3 and Google Cloud Storage - you have the same content in both places, and you can use a Worker to randomly balance between the two. However, you do not want to end up caching two copies of your content. You could utilize custom cache keys to cache based on the original request URL rather than the subrequest URL: * JavaScript ```js export default { async fetch(request) { let url = new URL(request.url); if (Math.random() < 0.5) { url.hostname = "example.s3.amazonaws.com"; } else { url.hostname = "example.storage.googleapis.com"; } let newRequest = new Request(url, request); return fetch(newRequest, { cf: { cacheKey: request.url }, }); }, }; ``` * TypeScript ```ts export default { async fetch(request): Promise { let url = new URL(request.url); if (Math.random() < 0.5) { url.hostname = "example.s3.amazonaws.com"; } else { url.hostname = "example.storage.googleapis.com"; } let newRequest = new Request(url, request); return fetch(newRequest, { cf: { cacheKey: request.url }, }); }, } satisfies ExportedHandler; ``` * Hono ```ts import { Hono } from 'hono'; type Bindings = {}; const app = new Hono<{ Bindings: Bindings }>(); app.all('*', async (c) => { const originalUrl = c.req.url; const url = new URL(originalUrl); // Randomly select a storage backend if (Math.random() < 0.5) { url.hostname = "example.s3.amazonaws.com"; } else { url.hostname = "example.storage.googleapis.com"; } // Create a new request to the selected backend const newRequest = new Request(url, c.req.raw); // Fetch using the original URL as the cache key return fetch(newRequest, { cf: { cacheKey: originalUrl }, }); }); export default app; ``` Workers operating on behalf of different zones cannot affect each other's cache. You can only override cache keys when making requests within your own zone (in the above example `event.request.url` was the key stored), or requests to hosts that are not on Cloudflare. When making a request to another Cloudflare zone (for example, belonging to a different Cloudflare customer), that zone fully controls how its own content is cached within Cloudflare; you cannot override it. ## Override based on origin response code ```js // Force response to be cached for 86400 seconds for 200 status // codes, 1 second for 404, and do not cache 500 errors. fetch(request, { cf: { cacheTtlByStatus: { "200-299": 86400, 404: 1, "500-599": 0 } }, }); ``` This option is a version of the `cacheTtl` feature which chooses a TTL based on the response's status code and does not automatically set `cacheEverything: true`. If the response to this request has a status code that matches, Cloudflare will cache for the instructed time, and override cache directives sent by the origin. You can review [details on the `cacheTtl` feature on the Request page](https://developers.cloudflare.com/workers/runtime-apis/request/#the-cf-property-requestinitcfproperties). ## Customize cache behavior based on request file type Using custom cache keys and overrides based on response code, you can write a Worker that sets the TTL based on the response status code from origin, and request file type. The following example demonstrates how you might use this to cache requests for streaming media assets: * Module Worker ```js export default { async fetch(request) { // Instantiate new URL to make it mutable const newRequest = new URL(request.url); const customCacheKey = `${newRequest.hostname}${newRequest.pathname}`; const queryCacheKey = `${newRequest.hostname}${newRequest.pathname}${newRequest.search}`; // Different asset types usually have different caching strategies. Most of the time media content such as audio, videos and images that are not user-generated content would not need to be updated often so a long TTL would be best. However, with HLS streaming, manifest files usually are set with short TTLs so that playback will not be affected, as this files contain the data that the player would need. By setting each caching strategy for categories of asset types in an object within an array, you can solve complex needs when it comes to media content for your application const cacheAssets = [ { asset: "video", key: customCacheKey, regex: /(.*\/Video)|(.*\.(m4s|mp4|ts|avi|mpeg|mpg|mkv|bin|webm|vob|flv|m2ts|mts|3gp|m4v|wmv|qt))/, info: 0, ok: 31556952, redirects: 30, clientError: 10, serverError: 0, }, { asset: "image", key: queryCacheKey, regex: /(.*\/Images)|(.*\.(jpg|jpeg|png|bmp|pict|tif|tiff|webp|gif|heif|exif|bat|bpg|ppm|pgn|pbm|pnm))/, info: 0, ok: 3600, redirects: 30, clientError: 10, serverError: 0, }, { asset: "frontEnd", key: queryCacheKey, regex: /^.*\.(css|js)/, info: 0, ok: 3600, redirects: 30, clientError: 10, serverError: 0, }, { asset: "audio", key: customCacheKey, regex: /(.*\/Audio)|(.*\.(flac|aac|mp3|alac|aiff|wav|ogg|aiff|opus|ape|wma|3gp))/, info: 0, ok: 31556952, redirects: 30, clientError: 10, serverError: 0, }, { asset: "directPlay", key: customCacheKey, regex: /.*(\/Download)/, info: 0, ok: 31556952, redirects: 30, clientError: 10, serverError: 0, }, { asset: "manifest", key: customCacheKey, regex: /^.*\.(m3u8|mpd)/, info: 0, ok: 3, redirects: 2, clientError: 1, serverError: 0, }, ]; const { asset, regex, ...cache } = cacheAssets.find(({ regex }) => newRequest.pathname.match(regex)) ?? {}; const newResponse = await fetch(request, { cf: { cacheKey: cache.key, polish: false, cacheEverything: true, cacheTtlByStatus: { "100-199": cache.info, "200-299": cache.ok, "300-399": cache.redirects, "400-499": cache.clientError, "500-599": cache.serverError, }, cacheTags: ["static"], }, }); const response = new Response(newResponse.body, newResponse); // For debugging purposes response.headers.set("debug", JSON.stringify(cache)); return response; }, }; ``` * Service Worker Service Workers are deprecated Service Workers are deprecated, but still supported. We recommend using [Module Workers](https://developers.cloudflare.com/workers/reference/migrate-to-module-workers/) instead. New features may not be supported for Service Workers. ```js addEventListener("fetch", (event) => { return event.respondWith(handleRequest(event.request)); }); async function handleRequest(request) { // Instantiate new URL to make it mutable const newRequest = new URL(request.url); // Set `const` to be used in the array later on const customCacheKey = `${newRequest.hostname}${newRequest.pathname}`; const queryCacheKey = `${newRequest.hostname}${newRequest.pathname}${newRequest.search}`; // Set all variables needed to manipulate Cloudflare's cache using the fetch API in the `cf` object. You will be passing these variables in the objects down below. const cacheAssets = [ { asset: "video", key: customCacheKey, regex: /(.*\/Video)|(.*\.(m4s|mp4|ts|avi|mpeg|mpg|mkv|bin|webm|vob|flv|m2ts|mts|3gp|m4v|wmv|qt))/, info: 0, ok: 31556952, redirects: 30, clientError: 10, serverError: 0, }, { asset: "image", key: queryCacheKey, regex: /(.*\/Images)|(.*\.(jpg|jpeg|png|bmp|pict|tif|tiff|webp|gif|heif|exif|bat|bpg|ppm|pgn|pbm|pnm))/, info: 0, ok: 3600, redirects: 30, clientError: 10, serverError: 0, }, { asset: "frontEnd", key: queryCacheKey, regex: /^.*\.(css|js)/, info: 0, ok: 3600, redirects: 30, clientError: 10, serverError: 0, }, { asset: "audio", key: customCacheKey, regex: /(.*\/Audio)|(.*\.(flac|aac|mp3|alac|aiff|wav|ogg|aiff|opus|ape|wma|3gp))/, info: 0, ok: 31556952, redirects: 30, clientError: 10, serverError: 0, }, { asset: "directPlay", key: customCacheKey, regex: /.*(\/Download)/, info: 0, ok: 31556952, redirects: 30, clientError: 10, serverError: 0, }, { asset: "manifest", key: customCacheKey, regex: /^.*\.(m3u8|mpd)/, info: 0, ok: 3, redirects: 2, clientError: 1, serverError: 0, }, ]; // the `.find` method is used to find elements in an array (`cacheAssets`), in this case, `regex`, which can passed to the .`match` method to match on file extensions to cache, since they are many media types in the array. If you want to add more types, update the array. Refer to https://developer.mozilla.org/en-US/docs/Web/JavaScript/Reference/Global_Objects/Array/find for more information. const { asset, regex, ...cache } = cacheAssets.find(({ regex }) => newRequest.pathname.match(regex)) ?? {}; const newResponse = await fetch(request, { cf: { cacheKey: cache.key, polish: false, cacheEverything: true, cacheTtlByStatus: { "100-199": cache.info, "200-299": cache.ok, "300-399": cache.redirects, "400-499": cache.clientError, "500-599": cache.serverError, }, cacheTags: ["static"], }, }); const response = new Response(newResponse.body, newResponse); // For debugging purposes response.headers.set("debug", JSON.stringify(cache)); return response; } ``` ## Using the HTTP Cache API The `cache` mode can be set in `fetch` options. Currently Workers only support the `no-store` mode for controlling the cache. When `no-store` is supplied the cache is bypassed on the way to the origin and the request is not cacheable. ```js fetch(request, { cache: 'no-store'}); ``` --- title: Conditional response · Cloudflare Workers docs description: Return a response based on the incoming request's URL, HTTP method, User Agent, IP address, ASN or device type. lastUpdated: 2025-04-28T14:11:18.000Z chatbotDeprioritize: false tags: Middleware source_url: html: https://developers.cloudflare.com/workers/examples/conditional-response/ md: https://developers.cloudflare.com/workers/examples/conditional-response/index.md --- If you want to get started quickly, click on the button below. [![Deploy to Cloudflare](https://deploy.workers.cloudflare.com/button)](https://deploy.workers.cloudflare.com/?url=https://github.com/cloudflare/docs-examples/tree/main/workers/conditional-response) This creates a repository in your GitHub account and deploys the application to Cloudflare Workers. * JavaScript ```js export default { async fetch(request) { const BLOCKED_HOSTNAMES = ["nope.mywebsite.com", "bye.website.com"]; // Return a new Response based on a URL's hostname const url = new URL(request.url); if (BLOCKED_HOSTNAMES.includes(url.hostname)) { return new Response("Blocked Host", { status: 403 }); } // Block paths ending in .doc or .xml based on the URL's file extension const forbiddenExtRegExp = new RegExp(/\.(doc|xml)$/); if (forbiddenExtRegExp.test(url.pathname)) { return new Response("Blocked Extension", { status: 403 }); } // On HTTP method if (request.method === "POST") { return new Response("Response for POST"); } // On User Agent const userAgent = request.headers.get("User-Agent") || ""; if (userAgent.includes("bot")) { return new Response("Block User Agent containing bot", { status: 403 }); } // On Client's IP address const clientIP = request.headers.get("CF-Connecting-IP"); if (clientIP === "1.2.3.4") { return new Response("Block the IP 1.2.3.4", { status: 403 }); } // On ASN if (request.cf && request.cf.asn == 64512) { return new Response("Block the ASN 64512 response"); } // On Device Type // Requires Enterprise "CF-Device-Type Header" zone setting or // Page Rule with "Cache By Device Type" setting applied. const device = request.headers.get("CF-Device-Type"); if (device === "mobile") { return Response.redirect("https://mobile.example.com"); } console.error( "Getting Client's IP address, device type, and ASN are not supported in playground. Must test on a live worker", ); return fetch(request); }, }; ``` * TypeScript ```ts export default { async fetch(request): Promise { const BLOCKED_HOSTNAMES = ["nope.mywebsite.com", "bye.website.com"]; // Return a new Response based on a URL's hostname const url = new URL(request.url); if (BLOCKED_HOSTNAMES.includes(url.hostname)) { return new Response("Blocked Host", { status: 403 }); } // Block paths ending in .doc or .xml based on the URL's file extension const forbiddenExtRegExp = new RegExp(/\.(doc|xml)$/); if (forbiddenExtRegExp.test(url.pathname)) { return new Response("Blocked Extension", { status: 403 }); } // On HTTP method if (request.method === "POST") { return new Response("Response for POST"); } // On User Agent const userAgent = request.headers.get("User-Agent") || ""; if (userAgent.includes("bot")) { return new Response("Block User Agent containing bot", { status: 403 }); } // On Client's IP address const clientIP = request.headers.get("CF-Connecting-IP"); if (clientIP === "1.2.3.4") { return new Response("Block the IP 1.2.3.4", { status: 403 }); } // On ASN if (request.cf && request.cf.asn == 64512) { return new Response("Block the ASN 64512 response"); } // On Device Type // Requires Enterprise "CF-Device-Type Header" zone setting or // Page Rule with "Cache By Device Type" setting applied. const device = request.headers.get("CF-Device-Type"); if (device === "mobile") { return Response.redirect("https://mobile.example.com"); } console.error( "Getting Client's IP address, device type, and ASN are not supported in playground. Must test on a live worker", ); return fetch(request); }, } satisfies ExportedHandler; ``` * Python ```py import re from workers import Response from urllib.parse import urlparse async def on_fetch(request): blocked_hostnames = ["nope.mywebsite.com", "bye.website.com"] url = urlparse(request.url) # Block on hostname if url.hostname in blocked_hostnames: return Response("Blocked Host", status=403) # On paths ending in .doc or .xml if re.search(r'\.(doc|xml)$', url.path): return Response("Blocked Extension", status=403) # On HTTP method if "POST" in request.method: return Response("Response for POST") # On User Agent user_agent = request.headers["User-Agent"] or "" if "bot" in user_agent: return Response("Block User Agent containing bot", status=403) # On Client's IP address client_ip = request.headers["CF-Connecting-IP"] if client_ip == "1.2.3.4": return Response("Block the IP 1.2.3.4", status=403) # On ASN if request.cf and request.cf.asn == 64512: return Response("Block the ASN 64512 response") # On Device Type # Requires Enterprise "CF-Device-Type Header" zone setting or # Page Rule with "Cache By Device Type" setting applied. device = request.headers["CF-Device-Type"] if device == "mobile": return Response.redirect("https://mobile.example.com") return fetch(request) ``` * Hono ```ts import { Hono } from "hono"; import { HTTPException } from "hono/http-exception"; const app = new Hono(); // Middleware to handle all conditions before reaching the main handler app.use("*", async (c, next) => { const request = c.req.raw; const BLOCKED_HOSTNAMES = ["nope.mywebsite.com", "bye.website.com"]; const hostname = new URL(c.req.url)?.hostname; // Return a new Response based on a URL's hostname if (BLOCKED_HOSTNAMES.includes(hostname)) { return c.text("Blocked Host", 403); } // Block paths ending in .doc or .xml based on the URL's file extension const forbiddenExtRegExp = new RegExp(/\.(doc|xml)$/); if (forbiddenExtRegExp.test(c.req.pathname)) { return c.text("Blocked Extension", 403); } // On User Agent const userAgent = c.req.header("User-Agent") || ""; if (userAgent.includes("bot")) { return c.text("Block User Agent containing bot", 403); } // On Client's IP address const clientIP = c.req.header("CF-Connecting-IP"); if (clientIP === "1.2.3.4") { return c.text("Block the IP 1.2.3.4", 403); } // On ASN if (request.cf && request.cf.asn === 64512) { return c.text("Block the ASN 64512 response"); } // On Device Type // Requires Enterprise "CF-Device-Type Header" zone setting or // Page Rule with "Cache By Device Type" setting applied. const device = c.req.header("CF-Device-Type"); if (device === "mobile") { return c.redirect("https://mobile.example.com"); } // Continue to the next handler await next(); }); // Handle POST requests differently app.post("*", (c) => { return c.text("Response for POST"); }); // Default handler for other methods app.get("*", async (c) => { console.error( "Getting Client's IP address, device type, and ASN are not supported in playground. Must test on a live worker", ); // Fetch the original request return fetch(c.req.raw); }); export default app; ``` --- title: CORS header proxy · Cloudflare Workers docs description: Add the necessary CORS headers to a third party API response. lastUpdated: 2025-04-28T14:11:18.000Z chatbotDeprioritize: false tags: Security,Headers source_url: html: https://developers.cloudflare.com/workers/examples/cors-header-proxy/ md: https://developers.cloudflare.com/workers/examples/cors-header-proxy/index.md --- If you want to get started quickly, click on the button below. [![Deploy to Cloudflare](https://deploy.workers.cloudflare.com/button)](https://deploy.workers.cloudflare.com/?url=https://github.com/cloudflare/docs-examples/tree/main/workers/cors-header-proxy) This creates a repository in your GitHub account and deploys the application to Cloudflare Workers. * JavaScript ```js export default { async fetch(request) { const corsHeaders = { "Access-Control-Allow-Origin": "*", "Access-Control-Allow-Methods": "GET,HEAD,POST,OPTIONS", "Access-Control-Max-Age": "86400", }; // The URL for the remote third party API you want to fetch from // but does not implement CORS const API_URL = "https://examples.cloudflareworkers.com/demos/demoapi"; // The endpoint you want the CORS reverse proxy to be on const PROXY_ENDPOINT = "/corsproxy/"; // The rest of this snippet for the demo page function rawHtmlResponse(html) { return new Response(html, { headers: { "content-type": "text/html;charset=UTF-8", }, }); } const DEMO_PAGE = `

    API GET without CORS Proxy

    Shows TypeError: Failed to fetch since CORS is misconfigured

    Waiting

    API GET with CORS Proxy

    Waiting

    API POST with CORS Proxy + Preflight

    Waiting `; async function handleRequest(request) { const url = new URL(request.url); let apiUrl = url.searchParams.get("apiurl"); if (apiUrl == null) { apiUrl = API_URL; } // Rewrite request to point to API URL. This also makes the request mutable // so you can add the correct Origin header to make the API server think // that this request is not cross-site. request = new Request(apiUrl, request); request.headers.set("Origin", new URL(apiUrl).origin); let response = await fetch(request); // Recreate the response so you can modify the headers response = new Response(response.body, response); // Set CORS headers response.headers.set("Access-Control-Allow-Origin", url.origin); // Append to/Add Vary header so browser will cache response correctly response.headers.append("Vary", "Origin"); return response; } async function handleOptions(request) { if ( request.headers.get("Origin") !== null && request.headers.get("Access-Control-Request-Method") !== null && request.headers.get("Access-Control-Request-Headers") !== null ) { // Handle CORS preflight requests. return new Response(null, { headers: { ...corsHeaders, "Access-Control-Allow-Headers": request.headers.get( "Access-Control-Request-Headers", ), }, }); } else { // Handle standard OPTIONS request. return new Response(null, { headers: { Allow: "GET, HEAD, POST, OPTIONS", }, }); } } const url = new URL(request.url); if (url.pathname.startsWith(PROXY_ENDPOINT)) { if (request.method === "OPTIONS") { // Handle CORS preflight requests return handleOptions(request); } else if ( request.method === "GET" || request.method === "HEAD" || request.method === "POST" ) { // Handle requests to the API server return handleRequest(request); } else { return new Response(null, { status: 405, statusText: "Method Not Allowed", }); } } else { return rawHtmlResponse(DEMO_PAGE); } }, }; ``` * TypeScript ```ts export default { async fetch(request): Promise { const corsHeaders = { "Access-Control-Allow-Origin": "*", "Access-Control-Allow-Methods": "GET,HEAD,POST,OPTIONS", "Access-Control-Max-Age": "86400", }; // The URL for the remote third party API you want to fetch from // but does not implement CORS const API_URL = "https://examples.cloudflareworkers.com/demos/demoapi"; // The endpoint you want the CORS reverse proxy to be on const PROXY_ENDPOINT = "/corsproxy/"; // The rest of this snippet for the demo page function rawHtmlResponse(html) { return new Response(html, { headers: { "content-type": "text/html;charset=UTF-8", }, }); } const DEMO_PAGE = `

    API GET without CORS Proxy

    Shows TypeError: Failed to fetch since CORS is misconfigured

    Waiting

    API GET with CORS Proxy

    Waiting

    API POST with CORS Proxy + Preflight

    Waiting `; async function handleRequest(request) { const url = new URL(request.url); let apiUrl = url.searchParams.get("apiurl"); if (apiUrl == null) { apiUrl = API_URL; } // Rewrite request to point to API URL. This also makes the request mutable // so you can add the correct Origin header to make the API server think // that this request is not cross-site. request = new Request(apiUrl, request); request.headers.set("Origin", new URL(apiUrl).origin); let response = await fetch(request); // Recreate the response so you can modify the headers response = new Response(response.body, response); // Set CORS headers response.headers.set("Access-Control-Allow-Origin", url.origin); // Append to/Add Vary header so browser will cache response correctly response.headers.append("Vary", "Origin"); return response; } async function handleOptions(request) { if ( request.headers.get("Origin") !== null && request.headers.get("Access-Control-Request-Method") !== null && request.headers.get("Access-Control-Request-Headers") !== null ) { // Handle CORS preflight requests. return new Response(null, { headers: { ...corsHeaders, "Access-Control-Allow-Headers": request.headers.get( "Access-Control-Request-Headers", ), }, }); } else { // Handle standard OPTIONS request. return new Response(null, { headers: { Allow: "GET, HEAD, POST, OPTIONS", }, }); } } const url = new URL(request.url); if (url.pathname.startsWith(PROXY_ENDPOINT)) { if (request.method === "OPTIONS") { // Handle CORS preflight requests return handleOptions(request); } else if ( request.method === "GET" || request.method === "HEAD" || request.method === "POST" ) { // Handle requests to the API server return handleRequest(request); } else { return new Response(null, { status: 405, statusText: "Method Not Allowed", }); } } else { return rawHtmlResponse(DEMO_PAGE); } }, } satisfies ExportedHandler; ``` * Hono ```ts import { Hono } from "hono"; import { cors } from "hono/cors"; // The URL for the remote third party API you want to fetch from // but does not implement CORS const API_URL = "https://examples.cloudflareworkers.com/demos/demoapi"; // The endpoint you want the CORS reverse proxy to be on const PROXY_ENDPOINT = "/corsproxy/"; const app = new Hono(); // Demo page handler app.get("*", async (c) => { // Only handle non-proxy requests with this handler if (c.req.path.startsWith(PROXY_ENDPOINT)) { return next(); } // Create the demo page HTML const DEMO_PAGE = `

    API GET without CORS Proxy

    Shows TypeError: Failed to fetch since CORS is misconfigured

    Waiting

    API GET with CORS Proxy

    Waiting

    API POST with CORS Proxy + Preflight

    Waiting `; return c.html(DEMO_PAGE); }); // CORS proxy routes app.on(["GET", "HEAD", "POST", "OPTIONS"], PROXY_ENDPOINT + "*", async (c) => { const url = new URL(c.req.url); // Handle OPTIONS preflight requests if (c.req.method === "OPTIONS") { const origin = c.req.header("Origin"); const requestMethod = c.req.header("Access-Control-Request-Method"); const requestHeaders = c.req.header("Access-Control-Request-Headers"); if (origin && requestMethod && requestHeaders) { // Handle CORS preflight requests return new Response(null, { headers: { "Access-Control-Allow-Origin": "*", "Access-Control-Allow-Methods": "GET,HEAD,POST,OPTIONS", "Access-Control-Max-Age": "86400", "Access-Control-Allow-Headers": requestHeaders, }, }); } else { // Handle standard OPTIONS request return new Response(null, { headers: { Allow: "GET, HEAD, POST, OPTIONS", }, }); } } // Handle actual requests let apiUrl = url.searchParams.get("apiurl") || API_URL; // Rewrite request to point to API URL const modifiedRequest = new Request(apiUrl, c.req.raw); modifiedRequest.headers.set("Origin", new URL(apiUrl).origin); let response = await fetch(modifiedRequest); // Recreate the response so we can modify the headers response = new Response(response.body, response); // Set CORS headers response.headers.set("Access-Control-Allow-Origin", url.origin); // Append to/Add Vary header so browser will cache response correctly response.headers.append("Vary", "Origin"); return response; }); // Handle method not allowed for proxy endpoint app.all(PROXY_ENDPOINT + "*", (c) => { return new Response(null, { status: 405, statusText: "Method Not Allowed", }); }); export default app; ``` * Python ```py from pyodide.ffi import to_js as _to_js from js import Response, URL, fetch, Object, Request def to_js(x): return _to_js(x, dict_converter=Object.fromEntries) async def on_fetch(request): cors_headers = { "Access-Control-Allow-Origin": "*", "Access-Control-Allow-Methods": "GET,HEAD,POST,OPTIONS", "Access-Control-Max-Age": "86400", } api_url = "https://examples.cloudflareworkers.com/demos/demoapi" proxy_endpoint = "/corsproxy/" def raw_html_response(html): return Response.new(html, headers=to_js({"content-type": "text/html;charset=UTF-8"})) demo_page = f'''

    API GET without CORS Proxy

    Shows TypeError: Failed to fetch since CORS is misconfigured

    Waiting

    API GET with CORS Proxy

    Waiting

    API POST with CORS Proxy + Preflight

    Waiting ''' async def handle_request(request): url = URL.new(request.url) api_url2 = url.searchParams["apiurl"] if not api_url2: api_url2 = api_url request = Request.new(api_url2, request) request.headers["Origin"] = (URL.new(api_url2)).origin print(request.headers) response = await fetch(request) response = Response.new(response.body, response) response.headers["Access-Control-Allow-Origin"] = url.origin response.headers["Vary"] = "Origin" return response async def handle_options(request): if "Origin" in request.headers and "Access-Control-Request-Method" in request.headers and "Access-Control-Request-Headers" in request.headers: return Response.new(None, headers=to_js({ **cors_headers, "Access-Control-Allow-Headers": request.headers["Access-Control-Request-Headers"] })) return Response.new(None, headers=to_js({"Allow": "GET, HEAD, POST, OPTIONS"})) url = URL.new(request.url) if url.pathname.startswith(proxy_endpoint): if request.method == "OPTIONS": return handle_options(request) if request.method in ("GET", "HEAD", "POST"): return handle_request(request) return Response.new(None, status=405, statusText="Method Not Allowed") return raw_html_response(demo_page) ``` * Rust ```rs use std::{borrow::Cow, collections::HashMap}; use worker::*; fn raw*html_response(html: &str) -> Result { Response::from_html(html) } async fn handle_request(req: Request, api_url: &str) -> Result { let url = req.url().unwrap(); let mut api_url2 = url .query_pairs() .find(|x| x.0 == Cow::Borrowed("apiurl")) .unwrap() .1 .to_string(); if api_url2 == String::from("") { api_url2 = api_url.to_string(); } let mut request = req.clone_mut()?; \*request.path_mut()? = api_url2.clone(); if let url::Origin::Tuple(origin, *, _) = Url::parse(&api_url2)?.origin() { (\*request.headers_mut()?).set("Origin", &origin)?; } let mut response = Fetch::Request(request).send().await?.cloned()?; let headers = response.headers_mut(); if let url::Origin::Tuple(origin, _, \_) = url.origin() { headers.set("Access-Control-Allow-Origin", &origin)?; headers.set("Vary", "Origin")?; } Ok(response) } fn handle*options(req: Request, cors_headers: &HashMap<&str, &str>) -> Result { let headers: Vec<*> = req.headers().keys().collect(); if [ "access-control-request-method", "access-control-request-headers", "origin", ] .iter() .all(|i| headers.contains(&i.to_string())) { let mut headers = Headers::new(); for (k, v) in cors_headers.iter() { headers.set(k, v)?; } return Ok(Response::empty()?.with_headers(headers)); } Response::empty() } #[event(fetch)] async fn fetch(req: Request, \_env: Env, \_ctx: Context) -> Result { let cors_headers = HashMap::from([ ("Access-Control-Allow-Origin", "*"), ("Access-Control-Allow-Methods", "GET,HEAD,POST,OPTIONS"), ("Access-Control-Max-Age", "86400"), ]); let api_url = "https://examples.cloudflareworkers.com/demos/demoapi"; let proxy_endpoint = "/corsproxy/"; let demo_page = format!( r#"

    API GET without CORS Proxy

    Shows TypeError: Failed to fetch since CORS is misconfigured

    Waiting

    API GET with CORS Proxy

    Waiting

    API POST with CORS Proxy + Preflight

    Waiting "# ); if req.url()?.path().starts_with(proxy_endpoint) { match req.method() { Method::Options => return handle_options(req, &cors_headers), Method::Get | Method::Head | Method::Post => return handle_request(req, api_url).await, _ => return Response::error("Method Not Allowed", 405), } } raw_html_response(&demo_page) } ``` ```plaintext ``` --- title: Country code redirect · Cloudflare Workers docs description: Redirect a response based on the country code in the header of a visitor. lastUpdated: 2025-04-28T14:11:18.000Z chatbotDeprioritize: false tags: Redirects,Geolocation source_url: html: https://developers.cloudflare.com/workers/examples/country-code-redirect/ md: https://developers.cloudflare.com/workers/examples/country-code-redirect/index.md --- If you want to get started quickly, click on the button below. [![Deploy to Cloudflare](https://deploy.workers.cloudflare.com/button)](https://deploy.workers.cloudflare.com/?url=https://github.com/cloudflare/docs-examples/tree/main/workers/country-code-redirect) This creates a repository in your GitHub account and deploys the application to Cloudflare Workers. * JavaScript ```js export default { async fetch(request) { /** * A map of the URLs to redirect to * @param {Object} countryMap */ const countryMap = { US: "https://example.com/us", EU: "https://example.com/eu", }; // Use the cf object to obtain the country of the request // more on the cf object: https://developers.cloudflare.com/workers/runtime-apis/request#incomingrequestcfproperties const country = request.cf.country; if (country != null && country in countryMap) { const url = countryMap[country]; // Remove this logging statement from your final output. console.log( `Based on ${country}-based request, your user would go to ${url}.`, ); return Response.redirect(url); } else { return fetch("https://example.com", request); } }, }; ``` * TypeScript ```ts export default { async fetch(request): Promise { /** * A map of the URLs to redirect to * @param {Object} countryMap */ const countryMap = { US: "https://example.com/us", EU: "https://example.com/eu", }; // Use the cf object to obtain the country of the request // more on the cf object: https://developers.cloudflare.com/workers/runtime-apis/request#incomingrequestcfproperties const country = request.cf.country; if (country != null && country in countryMap) { const url = countryMap[country]; return Response.redirect(url); } else { return fetch(request); } }, } satisfies ExportedHandler; ``` * Python ```py from workers import Response, fetch async def on_fetch(request): countries = { "US": "https://example.com/us", "EU": "https://example.com/eu", } # Use the cf object to obtain the country of the request # more on the cf object: https://developers.cloudflare.com/workers/runtime-apis/request#incomingrequestcfproperties country = request.cf.country if country and country in countries: url = countries[country] return Response.redirect(url) return fetch("https://example.com", request) ``` * Hono ```ts import { Hono } from 'hono'; // Define the RequestWithCf interface to add Cloudflare-specific properties interface RequestWithCf extends Request { cf: { country: string; // Other CF properties can be added as needed }; } const app = new Hono(); app.get('*', async (c) => { /** * A map of the URLs to redirect to */ const countryMap: Record = { US: "https://example.com/us", EU: "https://example.com/eu", }; // Cast the raw request to include Cloudflare-specific properties const request = c.req.raw as RequestWithCf; // Use the cf object to obtain the country of the request // more on the cf object: https://developers.cloudflare.com/workers/runtime-apis/request#incomingrequestcfproperties const country = request.cf.country; if (country != null && country in countryMap) { const url = countryMap[country]; // Redirect using Hono's redirect helper return c.redirect(url); } else { // Default fallback return fetch("https://example.com", request); } }); export default app; ``` --- title: Setting Cron Triggers · Cloudflare Workers docs description: Set a Cron Trigger for your Worker. lastUpdated: 2025-04-28T14:11:18.000Z chatbotDeprioritize: false tags: Middleware source_url: html: https://developers.cloudflare.com/workers/examples/cron-trigger/ md: https://developers.cloudflare.com/workers/examples/cron-trigger/index.md --- If you want to get started quickly, click on the button below. [![Deploy to Cloudflare](https://deploy.workers.cloudflare.com/button)](https://deploy.workers.cloudflare.com/?url=https://github.com/cloudflare/docs-examples/tree/main/workers/cron-trigger) This creates a repository in your GitHub account and deploys the application to Cloudflare Workers. * JavaScript ```js export default { async scheduled(controller, env, ctx) { console.log("cron processed"); }, }; ``` * TypeScript ```ts interface Env {} export default { async scheduled( controller: ScheduledController, env: Env, ctx: ExecutionContext, ) { console.log("cron processed"); }, }; ``` * Python ```python from workers import handler @handler async def on_scheduled(controller, env, ctx): print("cron processed") ``` * Hono ```ts import { Hono } from 'hono'; interface Env {} // Create Hono app const app = new Hono<{ Bindings: Env }>(); // Regular routes for normal HTTP requests app.get('/', (c) => c.text('Hello World!')); // Export both the app and a scheduled function export default { // The Hono app handles regular HTTP requests fetch: app.fetch, // The scheduled function handles Cron triggers async scheduled( controller: ScheduledController, env: Env, ctx: ExecutionContext, ) { console.log("cron processed"); // You could also perform actions like: // - Fetching data from external APIs // - Updating KV or Durable Object storage // - Running maintenance tasks // - Sending notifications }, }; ``` ## Set Cron Triggers in Wrangler Refer to [Cron Triggers](https://developers.cloudflare.com/workers/configuration/cron-triggers/) for more information on how to add a Cron Trigger. If you are deploying with Wrangler, set the cron syntax (once per hour as shown below) by adding this to your Wrangler file: * wrangler.jsonc ```jsonc { "name": "worker", "triggers": { "crons": [ "0 * * * *" ] } } ``` * wrangler.toml ```toml name = "worker" # ... [triggers] crons = ["0 * * * *"] ``` You also can set a different Cron Trigger for each [environment](https://developers.cloudflare.com/workers/wrangler/environments/) in your [Wrangler configuration file](https://developers.cloudflare.com/workers/wrangler/configuration/). You need to put the `[triggers]` table under your chosen environment. For example: * wrangler.jsonc ```jsonc { "env": { "dev": { "triggers": { "crons": [ "0 * * * *" ] } } } } ``` * wrangler.toml ```toml [env.dev.triggers] crons = ["0 * * * *"] ``` ## Test Cron Triggers using Wrangler The recommended way of testing Cron Triggers is using Wrangler. Cron Triggers can be tested using Wrangler by passing in the `--test-scheduled` flag to [`wrangler dev`](https://developers.cloudflare.com/workers/wrangler/commands/#dev). This will expose a `/__scheduled` (or `/cdn-cgi/handler/scheduled` for Python Workers) route which can be used to test using a HTTP request. To simulate different cron patterns, a `cron` query parameter can be passed in. ```sh npx wrangler dev --test-scheduled curl "http://localhost:8787/__scheduled?cron=0+*+*+*+*" curl "http://localhost:8787/cdn-cgi/handler/scheduled?cron=*+*+*+*+*" # Python Workers ``` --- title: Data loss prevention · Cloudflare Workers docs description: Protect sensitive data to prevent data loss, and send alerts to a webhooks server in the event of a data breach. lastUpdated: 2025-04-28T14:11:18.000Z chatbotDeprioritize: false tags: Security source_url: html: https://developers.cloudflare.com/workers/examples/data-loss-prevention/ md: https://developers.cloudflare.com/workers/examples/data-loss-prevention/index.md --- If you want to get started quickly, click on the button below. [![Deploy to Cloudflare](https://deploy.workers.cloudflare.com/button)](https://deploy.workers.cloudflare.com/?url=https://github.com/cloudflare/docs-examples/tree/main/workers/data-loss-prevention) This creates a repository in your GitHub account and deploys the application to Cloudflare Workers. * JavaScript ```js export default { async fetch(request) { const DEBUG = true; const SOME_HOOK_SERVER = "https://webhook.flow-wolf.io/hook"; /** * Alert a data breach by posting to a webhook server */ async function postDataBreach(request) { return await fetch(SOME_HOOK_SERVER, { method: "POST", headers: { "content-type": "application/json;charset=UTF-8", }, body: JSON.stringify({ ip: request.headers.get("cf-connecting-ip"), time: Date.now(), request: request, }), }); } /** * Define personal data with regular expressions. * Respond with block if credit card data, and strip * emails and phone numbers from the response. * Execution will be limited to MIME type "text/*". */ const response = await fetch(request); // Return origin response, if response wasn’t text const contentType = response.headers.get("content-type") || ""; if (!contentType.toLowerCase().includes("text/")) { return response; } let text = await response.text(); // When debugging replace the response // from the origin with an email text = DEBUG ? text.replace("You may use this", "me@example.com may use this") : text; const sensitiveRegexsMap = { creditCard: String.raw`\b(?:4[0-9]{12}(?:[0-9]{3})?|(?:5[1-5][0-9]{2}|222[1-9]|22[3-9][0-9]|2[3-6][0-9]{2}|27[01][0-9]|2720)[0-9]{12}|3[47][0-9]{13}|3(?:0[0-5]|[68][0-9])[0-9]{11}|6(?:011|5[0-9]{2})[0-9]{12}|(?:2131|1800|35\d{3})\d{11})\b`, email: String.raw`\b[A-Z0-9._%+-]+@[A-Z0-9.-]+\.[A-Z]{2,}\b`, phone: String.raw`\b07\d{9}\b`, }; for (const kind in sensitiveRegexsMap) { const sensitiveRegex = new RegExp(sensitiveRegexsMap[kind], "ig"); const match = await sensitiveRegex.test(text); if (match) { // Alert a data breach await postDataBreach(request); // Respond with a block if credit card, // otherwise replace sensitive text with `*`s return kind === "creditCard" ? new Response(kind + " found\nForbidden\n", { status: 403, statusText: "Forbidden", }) : new Response(text.replace(sensitiveRegex, "**********"), response); } } return new Response(text, response); }, }; ``` * TypeScript ```ts export default { async fetch(request): Promise { const DEBUG = true; const SOME_HOOK_SERVER = "https://webhook.flow-wolf.io/hook"; /** * Alert a data breach by posting to a webhook server */ async function postDataBreach(request) { return await fetch(SOME_HOOK_SERVER, { method: "POST", headers: { "content-type": "application/json;charset=UTF-8", }, body: JSON.stringify({ ip: request.headers.get("cf-connecting-ip"), time: Date.now(), request: request, }), }); } /** * Define personal data with regular expressions. * Respond with block if credit card data, and strip * emails and phone numbers from the response. * Execution will be limited to MIME type "text/*". */ const response = await fetch(request); // Return origin response, if response wasn’t text const contentType = response.headers.get("content-type") || ""; if (!contentType.toLowerCase().includes("text/")) { return response; } let text = await response.text(); // When debugging replace the response // from the origin with an email text = DEBUG ? text.replace("You may use this", "me@example.com may use this") : text; const sensitiveRegexsMap = { creditCard: String.raw`\b(?:4[0-9]{12}(?:[0-9]{3})?|(?:5[1-5][0-9]{2}|222[1-9]|22[3-9][0-9]|2[3-6][0-9]{2}|27[01][0-9]|2720)[0-9]{12}|3[47][0-9]{13}|3(?:0[0-5]|[68][0-9])[0-9]{11}|6(?:011|5[0-9]{2})[0-9]{12}|(?:2131|1800|35\d{3})\d{11})\b`, email: String.raw`\b[A-Z0-9._%+-]+@[A-Z0-9.-]+\.[A-Z]{2,}\b`, phone: String.raw`\b07\d{9}\b`, }; for (const kind in sensitiveRegexsMap) { const sensitiveRegex = new RegExp(sensitiveRegexsMap[kind], "ig"); const match = await sensitiveRegex.test(text); if (match) { // Alert a data breach await postDataBreach(request); // Respond with a block if credit card, // otherwise replace sensitive text with `*`s return kind === "creditCard" ? new Response(kind + " found\nForbidden\n", { status: 403, statusText: "Forbidden", }) : new Response(text.replace(sensitiveRegex, "**********"), response); } } return new Response(text, response); }, } satisfies ExportedHandler; ``` * Python ```py import re from datetime import datetime from js import Response, fetch, JSON, Headers # Alert a data breach by posting to a webhook server async def post_data_breach(request): some_hook_server = "https://webhook.flow-wolf.io/hook" headers = Headers.new({"content-type": "application/json"}.items()) body = JSON.stringify({ "ip": request.headers["cf-connecting-ip"], "time": datetime.now(), "request": request, }) return await fetch(some_hook_server, method="POST", headers=headers, body=body) async def on_fetch(request): debug = True # Define personal data with regular expressions. # Respond with block if credit card data, and strip # emails and phone numbers from the response. # Execution will be limited to MIME type "text/*". response = await fetch(request) # Return origin response, if response wasn’t text content_type = response.headers["content-type"] or "" if "text" not in content_type: return response text = await response.text() # When debugging replace the response from the origin with an email text = text.replace("You may use this", "me@example.com may use this") if debug else text sensitive_regex = [ ("credit_card", r'\b(?:4[0-9]{12}(?:[0-9]{3})?|(?:5[1-5][0-9]{2}|222[1-9]|22[3-9][0-9]|2[3-6][0-9]{2}|27[01][0-9]|2720)[0-9]{12}|3[47][0-9]{13}|3(?:0[0-5]|[68][0-9])[0-9]{11}|6(?:011|5[0-9]{2})[0-9]{12}|(?:2131|1800|35\d{3})\d{11})\b'), ("email", r'\b[A-Z0-9._%+-]+@[A-Z0-9.-]+\.[A-Z]{2,}\b'), ("phone", r'\b07\d{9}\b'), ] for (kind, regex) in sensitive_regex: match = re.search(regex, text, flags=re.IGNORECASE) if match: # Alert a data breach await post_data_breach(request) # Respond with a block if credit card, otherwise replace sensitive text with `*`s card_resp = Response.new(kind + " found\nForbidden\n", status=403,statusText="Forbidden") sensitive_resp = Response.new(re.sub(regex, "*"*10, text, flags=re.IGNORECASE), response) return card_resp if kind == "credit_card" else sensitive_resp return Response.new(text, response) ``` * Hono ```ts import { Hono } from 'hono'; const app = new Hono(); // Configuration const DEBUG = true; const SOME_HOOK_SERVER = "https://webhook.flow-wolf.io/hook"; // Define sensitive data patterns const sensitiveRegexsMap = { creditCard: String.raw`\b(?:4[0-9]{12}(?:[0-9]{3})?|(?:5[1-5][0-9]{2}|222[1-9]|22[3-9][0-9]|2[3-6][0-9]{2}|27[01][0-9]|2720)[0-9]{12}|3[47][0-9]{13}|3(?:0[0-5]|[68][0-9])[0-9]{11}|6(?:011|5[0-9]{2})[0-9]{12}|(?:2131|1800|35\d{3})\d{11})\b`, email: String.raw`\b[A-Z0-9._%+-]+@[A-Z0-9.-]+\.[A-Z]{2,}\b`, phone: String.raw`\b07\d{9}\b`, }; /** * Alert a data breach by posting to a webhook server */ async function postDataBreach(request: Request) { return await fetch(SOME_HOOK_SERVER, { method: "POST", headers: { "content-type": "application/json;charset=UTF-8", }, body: JSON.stringify({ ip: request.headers.get("cf-connecting-ip"), time: Date.now(), request: request, }), }); } // Main middleware to handle data loss prevention app.use('*', async (c) => { // Fetch the origin response const response = await fetch(c.req.raw); // Return origin response if response wasn't text const contentType = response.headers.get("content-type") || ""; if (!contentType.toLowerCase().includes("text/")) { return response; } // Get the response text let text = await response.text(); // When debugging, replace the response from the origin with an email text = DEBUG ? text.replace("You may use this", "me@example.com may use this") : text; // Check for sensitive data for (const kind in sensitiveRegexsMap) { const sensitiveRegex = new RegExp(sensitiveRegexsMap[kind], "ig"); const match = sensitiveRegex.test(text); if (match) { // Alert a data breach await postDataBreach(c.req.raw); // Respond with a block if credit card, otherwise replace sensitive text with `*`s if (kind === "creditCard") { return c.text(`${kind} found\nForbidden\n`, 403); } else { return new Response(text.replace(sensitiveRegex, "**********"), { status: response.status, statusText: response.statusText, headers: response.headers, }); } } } // Return the modified response return new Response(text, { status: response.status, statusText: response.statusText, headers: response.headers, }); }); export default app; ``` --- title: Debugging logs · Cloudflare Workers docs description: Send debugging information in an errored response to a logging service. lastUpdated: 2025-04-28T14:11:18.000Z chatbotDeprioritize: false tags: Debugging source_url: html: https://developers.cloudflare.com/workers/examples/debugging-logs/ md: https://developers.cloudflare.com/workers/examples/debugging-logs/index.md --- If you want to get started quickly, click on the button below. [![Deploy to Cloudflare](https://deploy.workers.cloudflare.com/button)](https://deploy.workers.cloudflare.com/?url=https://github.com/cloudflare/docs-examples/tree/main/workers/debugging-logs) This creates a repository in your GitHub account and deploys the application to Cloudflare Workers. * JavaScript ```js export default { async fetch(request, env, ctx) { // Service configured to receive logs const LOG_URL = "https://log-service.example.com/"; async function postLog(data) { return await fetch(LOG_URL, { method: "POST", body: data, }); } let response; try { response = await fetch(request); if (!response.ok && !response.redirected) { const body = await response.text(); throw new Error( "Bad response at origin. Status: " + response.status + " Body: " + // Ensure the string is small enough to be a header body.trim().substring(0, 10), ); } } catch (err) { // Without ctx.waitUntil(), your fetch() to Cloudflare's // logging service may or may not complete ctx.waitUntil(postLog(err.toString())); const stack = JSON.stringify(err.stack) || err; // Copy the response and initialize body to the stack trace response = new Response(stack, response); // Add the error stack into a header to find out what happened response.headers.set("X-Debug-stack", stack); response.headers.set("X-Debug-err", err); } return response; }, }; ``` * TypeScript ```ts interface Env {} export default { async fetch(request, env, ctx): Promise { // Service configured to receive logs const LOG_URL = "https://log-service.example.com/"; async function postLog(data) { return await fetch(LOG_URL, { method: "POST", body: data, }); } let response; try { response = await fetch(request); if (!response.ok && !response.redirected) { const body = await response.text(); throw new Error( "Bad response at origin. Status: " + response.status + " Body: " + // Ensure the string is small enough to be a header body.trim().substring(0, 10), ); } } catch (err) { // Without ctx.waitUntil(), your fetch() to Cloudflare's // logging service may or may not complete ctx.waitUntil(postLog(err.toString())); const stack = JSON.stringify(err.stack) || err; // Copy the response and initialize body to the stack trace response = new Response(stack, response); // Add the error stack into a header to find out what happened response.headers.set("X-Debug-stack", stack); response.headers.set("X-Debug-err", err); } return response; }, } satisfies ExportedHandler; ``` * Python ```py import json import traceback from pyodide.ffi import create_once_callable from js import Response, fetch, Headers async def on_fetch(request, _env, ctx): # Service configured to receive logs log_url = "https://log-service.example.com/" async def post_log(data): return await fetch(log_url, method="POST", body=data) response = await fetch(request) try: if not response.ok and not response.redirected: body = await response.text() # Simulating an error. Ensure the string is small enough to be a header raise Exception(f'Bad response at origin. Status:{response.status} Body:{body.strip()[:10]}') except Exception as e: # Without ctx.waitUntil(), your fetch() to Cloudflare's # logging service may or may not complete ctx.waitUntil(create_once_callable(post_log(e))) stack = json.dumps(traceback.format_exc()) or e # Copy the response and add to header response = Response.new(stack, response) response.headers["X-Debug-stack"] = stack response.headers["X-Debug-err"] = e return response ``` * Hono ```ts import { Hono } from 'hono'; // Define the environment with appropriate types interface Env {} const app = new Hono<{ Bindings: Env }>(); // Service configured to receive logs const LOG_URL = "https://log-service.example.com/"; // Function to post logs to an external service async function postLog(data: string) { return await fetch(LOG_URL, { method: "POST", body: data, }); } // Middleware to handle error logging app.use('*', async (c, next) => { try { // Process the request with the next handler await next(); // After processing, check if the response indicates an error if (c.res && (!c.res.ok && !c.res.redirected)) { const body = await c.res.clone().text(); throw new Error( "Bad response at origin. Status: " + c.res.status + " Body: " + // Ensure the string is small enough to be a header body.trim().substring(0, 10) ); } } catch (err) { // Without waitUntil, the fetch to the logging service may not complete c.executionCtx.waitUntil( postLog(err.toString()) ); // Get the error stack or error itself const stack = JSON.stringify(err.stack) || err.toString(); // Create a new response with the error information const response = c.res ? new Response(stack, { status: c.res.status, headers: c.res.headers }) : new Response(stack, { status: 500 }); // Add debug headers response.headers.set("X-Debug-stack", stack); response.headers.set("X-Debug-err", err.toString()); // Set the modified response c.res = response; } }); // Default route handler that passes requests through app.all('*', async (c) => { return fetch(c.req.raw); }); export default app; ``` --- title: Cookie parsing · Cloudflare Workers docs description: Given the cookie name, get the value of a cookie. You can also use cookies for A/B testing. lastUpdated: 2025-04-28T14:11:18.000Z chatbotDeprioritize: false tags: Headers source_url: html: https://developers.cloudflare.com/workers/examples/extract-cookie-value/ md: https://developers.cloudflare.com/workers/examples/extract-cookie-value/index.md --- If you want to get started quickly, click on the button below. [![Deploy to Cloudflare](https://deploy.workers.cloudflare.com/button)](https://deploy.workers.cloudflare.com/?url=https://github.com/cloudflare/docs-examples/tree/main/workers/extract-cookie-value) This creates a repository in your GitHub account and deploys the application to Cloudflare Workers. * JavaScript ```js import { parse } from "cookie"; export default { async fetch(request) { // The name of the cookie const COOKIE_NAME = "__uid"; const cookie = parse(request.headers.get("Cookie") || ""); if (cookie[COOKIE_NAME] != null) { // Respond with the cookie value return new Response(cookie[COOKIE_NAME]); } return new Response("No cookie with name: " + COOKIE_NAME); }, }; ``` * TypeScript ```ts import { parse } from "cookie"; export default { async fetch(request): Promise { // The name of the cookie const COOKIE_NAME = "__uid"; const cookie = parse(request.headers.get("Cookie") || ""); if (cookie[COOKIE_NAME] != null) { // Respond with the cookie value return new Response(cookie[COOKIE_NAME]); } return new Response("No cookie with name: " + COOKIE_NAME); }, } satisfies ExportedHandler; ``` * Python ```py from http.cookies import SimpleCookie from workers import Response async def on_fetch(request): # Name of the cookie cookie_name = "__uid" cookies = SimpleCookie(request.headers["Cookie"] or "") if cookie_name in cookies: # Respond with cookie value return Response(cookies[cookie_name].value) return Response("No cookie with name: " + cookie_name) ``` * Hono ```ts import { Hono } from 'hono'; import { getCookie } from 'hono/cookie'; const app = new Hono(); app.get('*', (c) => { // The name of the cookie const COOKIE_NAME = "__uid"; // Get the specific cookie value using Hono's cookie helper const cookieValue = getCookie(c, COOKIE_NAME); if (cookieValue) { // Respond with the cookie value return c.text(cookieValue); } return c.text("No cookie with name: " + COOKIE_NAME); }); export default app; ``` External dependencies This example requires the npm package [`cookie`](https://www.npmjs.com/package/cookie) to be installed in your JavaScript project. The Hono example uses the built-in cookie utilities provided by Hono, so no external dependencies are needed for that implementation. --- title: Fetch HTML · Cloudflare Workers docs description: Send a request to a remote server, read HTML from the response, and serve that HTML. lastUpdated: 2025-04-28T14:11:18.000Z chatbotDeprioritize: false source_url: html: https://developers.cloudflare.com/workers/examples/fetch-html/ md: https://developers.cloudflare.com/workers/examples/fetch-html/index.md --- If you want to get started quickly, click on the button below. [![Deploy to Cloudflare](https://deploy.workers.cloudflare.com/button)](https://deploy.workers.cloudflare.com/?url=https://github.com/cloudflare/docs-examples/tree/main/workers/fetch-html) This creates a repository in your GitHub account and deploys the application to Cloudflare Workers. * JavaScript ```js export default { async fetch(request) { /** * Replace `remote` with the host you wish to send requests to */ const remote = "https://example.com"; return await fetch(remote, request); }, }; ``` [Run Worker in Playground](https://workers.cloudflare.com/playground#LYVwNgLglgDghgJwgegGYHsHALQBM4RwDcABAEbogB2+CAngLzbPYZb6HbW5QDGU2AAwBOACxiATKIBsARmkAOWQC4WLNsA5wuNPgJHjRUuYtkBYAFABhdFQgBTO9gAiUAM4x0bqNFvKSGngExCRUcMD2DABEUDT2AB4AdABWblGkqFBgjuGRMXFJqVGWNnaOENgAKnQw9v5wMDBgfARQtsjJcABucG68CLAQANTA6Ljg9paWCZ5IJLj2qHDgECQA3hYkJL10VLwB9hC8ABYAFAj2AI4g9m4QAJTrm1skyABUb88vbyQASvZNOC8ewkAAGF1GDlBJAA7j5jiQIMcQccvKs6JRYe4ERB0CQ3I5cCQLtdbhA3Ij0F8tm9kNTeLY7sT7JCQQwSFFjhAIDA3MpkMgEuEmvZEgzgOkLNSLhAQAgqNsYXAfAcjmcIegHAAaZmku73IjPAC+WosRqIljUzA0Wh0PH4QjEkhk8iUJVsDicrg8Xh8bSo-kCWlIYQi0QihC06QCWRyYaiZDA6DIxWsHvKVRqdW2jWavFa7VStimFjWUWAyqoAH1RuNslFlPkFoU0kbLVabcE7XpHYZjK7ZMwgA) * TypeScript ```ts export default { async fetch(request: Request): Promise { /** * Replace `remote` with the host you wish to send requests to */ const remote = "https://example.com"; return await fetch(remote, request); }, }; ``` * Python ```py from js import fetch async def on_fetch(request): # Replace `remote` with the host you wish to send requests to remote = "https://example.com" return await fetch(remote, request) ``` * Hono ```ts import { Hono } from 'hono'; const app = new Hono(); app.all('*', async (c) => { /** * Replace `remote` with the host you wish to send requests to */ const remote = "https://example.com"; // Forward the request to the remote server return await fetch(remote, c.req.raw); }); export default app; ``` --- title: Fetch JSON · Cloudflare Workers docs description: Send a GET request and read in JSON from the response. Use to fetch external data. lastUpdated: 2025-04-28T14:11:18.000Z chatbotDeprioritize: false tags: JSON source_url: html: https://developers.cloudflare.com/workers/examples/fetch-json/ md: https://developers.cloudflare.com/workers/examples/fetch-json/index.md --- If you want to get started quickly, click on the button below. [![Deploy to Cloudflare](https://deploy.workers.cloudflare.com/button)](https://deploy.workers.cloudflare.com/?url=https://github.com/cloudflare/docs-examples/tree/main/workers/fetch-json) This creates a repository in your GitHub account and deploys the application to Cloudflare Workers. * JavaScript ```js export default { async fetch(request, env, ctx) { const url = "https://jsonplaceholder.typicode.com/todos/1"; // gatherResponse returns both content-type & response body as a string async function gatherResponse(response) { const { headers } = response; const contentType = headers.get("content-type") || ""; if (contentType.includes("application/json")) { return { contentType, result: JSON.stringify(await response.json()) }; } return { contentType, result: await response.text() }; } const response = await fetch(url); const { contentType, result } = await gatherResponse(response); const options = { headers: { "content-type": contentType } }; return new Response(result, options); }, }; ``` * TypeScript ```ts interface Env {} export default { async fetch(request, env, ctx): Promise { const url = "https://jsonplaceholder.typicode.com/todos/1"; // gatherResponse returns both content-type & response body as a string async function gatherResponse(response) { const { headers } = response; const contentType = headers.get("content-type") || ""; if (contentType.includes("application/json")) { return { contentType, result: JSON.stringify(await response.json()) }; } return { contentType, result: await response.text() }; } const response = await fetch(url); const { contentType, result } = await gatherResponse(response); const options = { headers: { "content-type": contentType } }; return new Response(result, options); }, } satisfies ExportedHandler; ``` * Python ```py from workers import Response, fetch import json async def on_fetch(request): url = "https://jsonplaceholder.typicode.com/todos/1" # gather_response returns both content-type & response body as a string async def gather_response(response): headers = response.headers content_type = headers["content-type"] or "" if "application/json" in content_type: return (content_type, json.dumps(await response.json())) return (content_type, await response.text()) response = await fetch(url) content_type, result = await gather_response(response) headers = {"content-type": content_type} return Response(result, headers=headers) ``` * Hono ```ts import { Hono } from 'hono'; type Env = {}; const app = new Hono<{ Bindings: Env }>(); app.get('*', async (c) => { const url = "https://jsonplaceholder.typicode.com/todos/1"; // gatherResponse returns both content-type & response body as a string async function gatherResponse(response: Response) { const { headers } = response; const contentType = headers.get("content-type") || ""; if (contentType.includes("application/json")) { return { contentType, result: JSON.stringify(await response.json()) }; } return { contentType, result: await response.text() }; } const response = await fetch(url); const { contentType, result } = await gatherResponse(response); return new Response(result, { headers: { "content-type": contentType } }); }); export default app; ``` --- title: "Geolocation: Weather application · Cloudflare Workers docs" description: Fetch weather data from an API using the user's geolocation data. lastUpdated: 2025-04-28T14:11:18.000Z chatbotDeprioritize: false tags: Geolocation source_url: html: https://developers.cloudflare.com/workers/examples/geolocation-app-weather/ md: https://developers.cloudflare.com/workers/examples/geolocation-app-weather/index.md --- If you want to get started quickly, click on the button below. [![Deploy to Cloudflare](https://deploy.workers.cloudflare.com/button)](https://deploy.workers.cloudflare.com/?url=https://github.com/cloudflare/docs-examples/tree/main/workers/geolocation-app-weather) This creates a repository in your GitHub account and deploys the application to Cloudflare Workers. * JavaScript ```js export default { async fetch(request) { let endpoint = "https://api.waqi.info/feed/geo:"; const token = ""; //Use a token from https://aqicn.org/api/ let html_style = `body{padding:6em; font-family: sans-serif;} h1{color:#f6821f}`; let html_content = "

    Weather 🌦

    "; const latitude = request.cf.latitude; const longitude = request.cf.longitude; endpoint += `${latitude};${longitude}/?token=${token}`; const init = { headers: { "content-type": "application/json;charset=UTF-8", }, }; const response = await fetch(endpoint, init); const content = await response.json(); html_content += `

    This is a demo using Workers geolocation data.

    `; html_content += `You are located at: ${latitude},${longitude}.

    `; html_content += `

    Based off sensor data from ${content.data.city.name}:

    `; html_content += `

    The AQI level is: ${content.data.aqi}.

    `; html_content += `

    The N02 level is: ${content.data.iaqi.no2?.v}.

    `; html_content += `

    The O3 level is: ${content.data.iaqi.o3?.v}.

    `; html_content += `

    The temperature is: ${content.data.iaqi.t?.v}°C.

    `; let html = ` Geolocation: Weather
    ${html_content}
    `; return new Response(html, { headers: { "content-type": "text/html;charset=UTF-8", }, }); }, }; ``` * TypeScript ```ts export default { async fetch(request): Promise { let endpoint = "https://api.waqi.info/feed/geo:"; const token = ""; //Use a token from https://aqicn.org/api/ let html_style = `body{padding:6em; font-family: sans-serif;} h1{color:#f6821f}`; let html_content = "

    Weather 🌦

    "; const latitude = request.cf.latitude; const longitude = request.cf.longitude; endpoint += `${latitude};${longitude}/?token=${token}`; const init = { headers: { "content-type": "application/json;charset=UTF-8", }, }; const response = await fetch(endpoint, init); const content = await response.json(); html_content += `

    This is a demo using Workers geolocation data.

    `; html_content += `You are located at: ${latitude},${longitude}.

    `; html_content += `

    Based off sensor data from ${content.data.city.name}:

    `; html_content += `

    The AQI level is: ${content.data.aqi}.

    `; html_content += `

    The N02 level is: ${content.data.iaqi.no2?.v}.

    `; html_content += `

    The O3 level is: ${content.data.iaqi.o3?.v}.

    `; html_content += `

    The temperature is: ${content.data.iaqi.t?.v}°C.

    `; let html = ` Geolocation: Weather
    ${html_content}
    `; return new Response(html, { headers: { "content-type": "text/html;charset=UTF-8", }, }); }, } satisfies ExportedHandler; ``` * Hono ```ts import { Hono } from 'hono'; import { html } from 'hono/html'; type Bindings = {}; interface WeatherApiResponse { data: { aqi: number; city: { name: string; url: string; }; iaqi: { no2?: { v: number }; o3?: { v: number }; t?: { v: number }; }; }; } const app = new Hono<{ Bindings: Bindings }>(); app.get('*', async (c) => { // Get API endpoint let endpoint = "https://api.waqi.info/feed/geo:"; const token = ""; // Use a token from https://aqicn.org/api/ // Define styles const html_style = `body{padding:6em; font-family: sans-serif;} h1{color:#f6821f}`; // Get geolocation from Cloudflare request const req = c.req.raw; const latitude = req.cf?.latitude; const longitude = req.cf?.longitude; // Create complete API endpoint with coordinates endpoint += `${latitude};${longitude}/?token=${token}`; // Fetch weather data const init = { headers: { "content-type": "application/json;charset=UTF-8", }, }; const response = await fetch(endpoint, init); const content = await response.json() as WeatherApiResponse; // Build HTML content const weatherContent = html`

    Weather 🌦

    This is a demo using Workers geolocation data.

    You are located at: ${latitude},${longitude}.

    Based off sensor data from ${content.data.city.name}:

    The AQI level is: ${content.data.aqi}.

    The N02 level is: ${content.data.iaqi.no2?.v}.

    The O3 level is: ${content.data.iaqi.o3?.v}.

    The temperature is: ${content.data.iaqi.t?.v}°C.

    `; // Complete HTML document const htmlDocument = html` Geolocation: Weather
    ${weatherContent}
    `; // Return HTML response return c.html(htmlDocument); }); export default app; ``` * Python ```py from workers import Response, fetch async def on_fetch(request): endpoint = "https://api.waqi.info/feed/geo:" token = "" # Use a token from https://aqicn.org/api/ html_style = "body{padding:6em; font-family: sans-serif;} h1{color:#f6821f}" html_content = "

    Weather 🌦

    " latitude = request.cf.latitude longitude = request.cf.longitude endpoint += f"{latitude};{longitude}/?token={token}" response = await fetch(endpoint) content = await response.json() html_content += "

    This is a demo using Workers geolocation data.

    " html_content += f"You are located at: {latitude},{longitude}.

    " html_content += f"

    Based off sensor data from {content['data']['city']['name']}:

    " html_content += f"

    The AQI level is: {content['data']['aqi']}.

    " html_content += f"

    The N02 level is: {content['data']['iaqi']['no2']['v']}.

    " html_content += f"

    The O3 level is: {content['data']['iaqi']['o3']['v']}.

    " html_content += f"

    The temperature is: {content['data']['iaqi']['t']['v']}°C.

    " html = f""" Geolocation: Weather
    {html_content}
    """ headers = {"content-type": "text/html;charset=UTF-8"} return Response(html, headers=headers) ```
    --- title: "Geolocation: Custom Styling · Cloudflare Workers docs" description: Personalize website styling based on localized user time. lastUpdated: 2025-04-28T14:11:18.000Z chatbotDeprioritize: false tags: Geolocation source_url: html: https://developers.cloudflare.com/workers/examples/geolocation-custom-styling/ md: https://developers.cloudflare.com/workers/examples/geolocation-custom-styling/index.md --- If you want to get started quickly, click on the button below. [![Deploy to Cloudflare](https://deploy.workers.cloudflare.com/button)](https://deploy.workers.cloudflare.com/?url=https://github.com/cloudflare/docs-examples/tree/main/workers/geolocation-custom-styling) This creates a repository in your GitHub account and deploys the application to Cloudflare Workers. * JavaScript ```js export default { async fetch(request) { let grads = [ [ { color: "00000c", position: 0 }, { color: "00000c", position: 0 }, ], [ { color: "020111", position: 85 }, { color: "191621", position: 100 }, ], [ { color: "020111", position: 60 }, { color: "20202c", position: 100 }, ], [ { color: "020111", position: 10 }, { color: "3a3a52", position: 100 }, ], [ { color: "20202c", position: 0 }, { color: "515175", position: 100 }, ], [ { color: "40405c", position: 0 }, { color: "6f71aa", position: 80 }, { color: "8a76ab", position: 100 }, ], [ { color: "4a4969", position: 0 }, { color: "7072ab", position: 50 }, { color: "cd82a0", position: 100 }, ], [ { color: "757abf", position: 0 }, { color: "8583be", position: 60 }, { color: "eab0d1", position: 100 }, ], [ { color: "82addb", position: 0 }, { color: "ebb2b1", position: 100 }, ], [ { color: "94c5f8", position: 1 }, { color: "a6e6ff", position: 70 }, { color: "b1b5ea", position: 100 }, ], [ { color: "b7eaff", position: 0 }, { color: "94dfff", position: 100 }, ], [ { color: "9be2fe", position: 0 }, { color: "67d1fb", position: 100 }, ], [ { color: "90dffe", position: 0 }, { color: "38a3d1", position: 100 }, ], [ { color: "57c1eb", position: 0 }, { color: "246fa8", position: 100 }, ], [ { color: "2d91c2", position: 0 }, { color: "1e528e", position: 100 }, ], [ { color: "2473ab", position: 0 }, { color: "1e528e", position: 70 }, { color: "5b7983", position: 100 }, ], [ { color: "1e528e", position: 0 }, { color: "265889", position: 50 }, { color: "9da671", position: 100 }, ], [ { color: "1e528e", position: 0 }, { color: "728a7c", position: 50 }, { color: "e9ce5d", position: 100 }, ], [ { color: "154277", position: 0 }, { color: "576e71", position: 30 }, { color: "e1c45e", position: 70 }, { color: "b26339", position: 100 }, ], [ { color: "163C52", position: 0 }, { color: "4F4F47", position: 30 }, { color: "C5752D", position: 60 }, { color: "B7490F", position: 80 }, { color: "2F1107", position: 100 }, ], [ { color: "071B26", position: 0 }, { color: "071B26", position: 30 }, { color: "8A3B12", position: 80 }, { color: "240E03", position: 100 }, ], [ { color: "010A10", position: 30 }, { color: "59230B", position: 80 }, { color: "2F1107", position: 100 }, ], [ { color: "090401", position: 50 }, { color: "4B1D06", position: 100 }, ], [ { color: "00000c", position: 80 }, { color: "150800", position: 100 }, ], ]; async function toCSSGradient(hour) { let css = "linear-gradient(to bottom,"; const data = grads[hour]; const len = data.length; for (let i = 0; i < len; i++) { const item = data[i]; css += ` #${item.color} ${item.position}%`; if (i < len - 1) css += ","; } return css + ")"; } let html_content = ""; let html_style = ` html{width:100vw; height:100vh;} body{padding:0; margin:0 !important;height:100%;} #container { display: flex; flex-direction:column; align-items: center; justify-content: center; height: 100%; color:white; font-family:sans-serif; }`; const timezone = request.cf.timezone; console.log(timezone); let localized_date = new Date( new Date().toLocaleString("en-US", { timeZone: timezone }), ); let hour = localized_date.getHours(); let minutes = localized_date.getMinutes(); html_content += "

    " + hour + ":" + minutes + "

    "; html_content += "

    " + timezone + "

    "; html_style += "body{background:" + (await toCSSGradient(hour)) + ";}"; let html = ` Geolocation: Customized Design
    ${html_content}
    `; return new Response(html, { headers: { "content-type": "text/html;charset=UTF-8" }, }); }, }; ``` * TypeScript ```ts export default { async fetch(request): Promise { let grads = [ [ { color: "00000c", position: 0 }, { color: "00000c", position: 0 }, ], [ { color: "020111", position: 85 }, { color: "191621", position: 100 }, ], [ { color: "020111", position: 60 }, { color: "20202c", position: 100 }, ], [ { color: "020111", position: 10 }, { color: "3a3a52", position: 100 }, ], [ { color: "20202c", position: 0 }, { color: "515175", position: 100 }, ], [ { color: "40405c", position: 0 }, { color: "6f71aa", position: 80 }, { color: "8a76ab", position: 100 }, ], [ { color: "4a4969", position: 0 }, { color: "7072ab", position: 50 }, { color: "cd82a0", position: 100 }, ], [ { color: "757abf", position: 0 }, { color: "8583be", position: 60 }, { color: "eab0d1", position: 100 }, ], [ { color: "82addb", position: 0 }, { color: "ebb2b1", position: 100 }, ], [ { color: "94c5f8", position: 1 }, { color: "a6e6ff", position: 70 }, { color: "b1b5ea", position: 100 }, ], [ { color: "b7eaff", position: 0 }, { color: "94dfff", position: 100 }, ], [ { color: "9be2fe", position: 0 }, { color: "67d1fb", position: 100 }, ], [ { color: "90dffe", position: 0 }, { color: "38a3d1", position: 100 }, ], [ { color: "57c1eb", position: 0 }, { color: "246fa8", position: 100 }, ], [ { color: "2d91c2", position: 0 }, { color: "1e528e", position: 100 }, ], [ { color: "2473ab", position: 0 }, { color: "1e528e", position: 70 }, { color: "5b7983", position: 100 }, ], [ { color: "1e528e", position: 0 }, { color: "265889", position: 50 }, { color: "9da671", position: 100 }, ], [ { color: "1e528e", position: 0 }, { color: "728a7c", position: 50 }, { color: "e9ce5d", position: 100 }, ], [ { color: "154277", position: 0 }, { color: "576e71", position: 30 }, { color: "e1c45e", position: 70 }, { color: "b26339", position: 100 }, ], [ { color: "163C52", position: 0 }, { color: "4F4F47", position: 30 }, { color: "C5752D", position: 60 }, { color: "B7490F", position: 80 }, { color: "2F1107", position: 100 }, ], [ { color: "071B26", position: 0 }, { color: "071B26", position: 30 }, { color: "8A3B12", position: 80 }, { color: "240E03", position: 100 }, ], [ { color: "010A10", position: 30 }, { color: "59230B", position: 80 }, { color: "2F1107", position: 100 }, ], [ { color: "090401", position: 50 }, { color: "4B1D06", position: 100 }, ], [ { color: "00000c", position: 80 }, { color: "150800", position: 100 }, ], ]; async function toCSSGradient(hour) { let css = "linear-gradient(to bottom,"; const data = grads[hour]; const len = data.length; for (let i = 0; i < len; i++) { const item = data[i]; css += ` #${item.color} ${item.position}%`; if (i < len - 1) css += ","; } return css + ")"; } let html_content = ""; let html_style = ` html{width:100vw; height:100vh;} body{padding:0; margin:0 !important;height:100%;} #container { display: flex; flex-direction:column; align-items: center; justify-content: center; height: 100%; color:white; font-family:sans-serif; }`; const timezone = request.cf.timezone; console.log(timezone); let localized_date = new Date( new Date().toLocaleString("en-US", { timeZone: timezone }), ); let hour = localized_date.getHours(); let minutes = localized_date.getMinutes(); html_content += "

    " + hour + ":" + minutes + "

    "; html_content += "

    " + timezone + "

    "; html_style += "body{background:" + (await toCSSGradient(hour)) + ";}"; let html = ` Geolocation: Customized Design
    ${html_content}
    `; return new Response(html, { headers: { "content-type": "text/html;charset=UTF-8" }, }); }, } satisfies ExportedHandler; ``` * Hono ```ts import { Hono } from 'hono'; type Bindings = {}; type ColorStop = { color: string; position: number }; const app = new Hono<{ Bindings: Bindings }>(); // Gradient configurations for each hour of the day (0-23) const grads: ColorStop[][] = [ [ { color: "00000c", position: 0 }, { color: "00000c", position: 0 }, ], [ { color: "020111", position: 85 }, { color: "191621", position: 100 }, ], [ { color: "020111", position: 60 }, { color: "20202c", position: 100 }, ], [ { color: "020111", position: 10 }, { color: "3a3a52", position: 100 }, ], [ { color: "20202c", position: 0 }, { color: "515175", position: 100 }, ], [ { color: "40405c", position: 0 }, { color: "6f71aa", position: 80 }, { color: "8a76ab", position: 100 }, ], [ { color: "4a4969", position: 0 }, { color: "7072ab", position: 50 }, { color: "cd82a0", position: 100 }, ], [ { color: "757abf", position: 0 }, { color: "8583be", position: 60 }, { color: "eab0d1", position: 100 }, ], [ { color: "82addb", position: 0 }, { color: "ebb2b1", position: 100 }, ], [ { color: "94c5f8", position: 1 }, { color: "a6e6ff", position: 70 }, { color: "b1b5ea", position: 100 }, ], [ { color: "b7eaff", position: 0 }, { color: "94dfff", position: 100 }, ], [ { color: "9be2fe", position: 0 }, { color: "67d1fb", position: 100 }, ], [ { color: "90dffe", position: 0 }, { color: "38a3d1", position: 100 }, ], [ { color: "57c1eb", position: 0 }, { color: "246fa8", position: 100 }, ], [ { color: "2d91c2", position: 0 }, { color: "1e528e", position: 100 }, ], [ { color: "2473ab", position: 0 }, { color: "1e528e", position: 70 }, { color: "5b7983", position: 100 }, ], [ { color: "1e528e", position: 0 }, { color: "265889", position: 50 }, { color: "9da671", position: 100 }, ], [ { color: "1e528e", position: 0 }, { color: "728a7c", position: 50 }, { color: "e9ce5d", position: 100 }, ], [ { color: "154277", position: 0 }, { color: "576e71", position: 30 }, { color: "e1c45e", position: 70 }, { color: "b26339", position: 100 }, ], [ { color: "163C52", position: 0 }, { color: "4F4F47", position: 30 }, { color: "C5752D", position: 60 }, { color: "B7490F", position: 80 }, { color: "2F1107", position: 100 }, ], [ { color: "071B26", position: 0 }, { color: "071B26", position: 30 }, { color: "8A3B12", position: 80 }, { color: "240E03", position: 100 }, ], [ { color: "010A10", position: 30 }, { color: "59230B", position: 80 }, { color: "2F1107", position: 100 }, ], [ { color: "090401", position: 50 }, { color: "4B1D06", position: 100 }, ], [ { color: "00000c", position: 80 }, { color: "150800", position: 100 }, ], ]; // Convert hour to CSS gradient async function toCSSGradient(hour: number): Promise { let css = "linear-gradient(to bottom,"; const data = grads[hour]; const len = data.length; for (let i = 0; i < len; i++) { const item = data[i]; css += ` #${item.color} ${item.position}%`; if (i < len - 1) css += ","; } return css + ")"; } app.get('*', async (c) => { const request = c.req.raw; // Base HTML style let html_style = ` html{width:100vw; height:100vh;} body{padding:0; margin:0 !important;height:100%;} #container { display: flex; flex-direction:column; align-items: center; justify-content: center; height: 100%; color:white; font-family:sans-serif; }`; // Get timezone from Cloudflare request const timezone = request.cf?.timezone || 'UTC'; console.log(timezone); // Get localized time let localized_date = new Date( new Date().toLocaleString("en-US", { timeZone: timezone }) ); let hour = localized_date.getHours(); let minutes = localized_date.getMinutes(); // Generate HTML content let html_content = `

    ${hour}:${minutes}

    `; html_content += `

    ${timezone}

    `; // Add background gradient based on hour html_style += `body{background:${await toCSSGradient(hour)};}`; // Complete HTML document let html = ` Geolocation: Customized Design
    ${html_content}
    `; return c.html(html); }); export default app; ```
    --- title: "Geolocation: Hello World · Cloudflare Workers docs" description: Get all geolocation data fields and display them in HTML. lastUpdated: 2025-04-28T14:11:18.000Z chatbotDeprioritize: false tags: Geolocation source_url: html: https://developers.cloudflare.com/workers/examples/geolocation-hello-world/ md: https://developers.cloudflare.com/workers/examples/geolocation-hello-world/index.md --- If you want to get started quickly, click on the button below. [![Deploy to Cloudflare](https://deploy.workers.cloudflare.com/button)](https://deploy.workers.cloudflare.com/?url=https://github.com/cloudflare/docs-examples/tree/main/workers/geolocation-hello-world) This creates a repository in your GitHub account and deploys the application to Cloudflare Workers. * JavaScript ```js export default { async fetch(request) { let html_content = ""; let html_style = "body{padding:6em; font-family: sans-serif;} h1{color:#f6821f;}"; html_content += "

    Colo: " + request.cf.colo + "

    "; html_content += "

    Country: " + request.cf.country + "

    "; html_content += "

    City: " + request.cf.city + "

    "; html_content += "

    Continent: " + request.cf.continent + "

    "; html_content += "

    Latitude: " + request.cf.latitude + "

    "; html_content += "

    Longitude: " + request.cf.longitude + "

    "; html_content += "

    PostalCode: " + request.cf.postalCode + "

    "; html_content += "

    MetroCode: " + request.cf.metroCode + "

    "; html_content += "

    Region: " + request.cf.region + "

    "; html_content += "

    RegionCode: " + request.cf.regionCode + "

    "; html_content += "

    Timezone: " + request.cf.timezone + "

    "; let html = ` Geolocation: Hello World

    Geolocation: Hello World!

    You now have access to geolocation data about where your user is visiting from.

    ${html_content} `; return new Response(html, { headers: { "content-type": "text/html;charset=UTF-8", }, }); }, }; ``` * TypeScript ```ts export default { async fetch(request): Promise { let html_content = ""; let html_style = "body{padding:6em; font-family: sans-serif;} h1{color:#f6821f;}"; html_content += "

    Colo: " + request.cf.colo + "

    "; html_content += "

    Country: " + request.cf.country + "

    "; html_content += "

    City: " + request.cf.city + "

    "; html_content += "

    Continent: " + request.cf.continent + "

    "; html_content += "

    Latitude: " + request.cf.latitude + "

    "; html_content += "

    Longitude: " + request.cf.longitude + "

    "; html_content += "

    PostalCode: " + request.cf.postalCode + "

    "; html_content += "

    MetroCode: " + request.cf.metroCode + "

    "; html_content += "

    Region: " + request.cf.region + "

    "; html_content += "

    RegionCode: " + request.cf.regionCode + "

    "; html_content += "

    Timezone: " + request.cf.timezone + "

    "; let html = ` Geolocation: Hello World

    Geolocation: Hello World!

    You now have access to geolocation data about where your user is visiting from.

    ${html_content} `; return new Response(html, { headers: { "content-type": "text/html;charset=UTF-8", }, }); }, } satisfies ExportedHandler; ``` * Python ```py from workers import Response async def on_fetch(request): html_content = "" html_style = "body{padding:6em font-family: sans-serif;} h1{color:#f6821f;}" html_content += "

    Colo: " + request.cf.colo + "

    " html_content += "

    Country: " + request.cf.country + "

    " html_content += "

    City: " + request.cf.city + "

    " html_content += "

    Continent: " + request.cf.continent + "

    " html_content += "

    Latitude: " + request.cf.latitude + "

    " html_content += "

    Longitude: " + request.cf.longitude + "

    " html_content += "

    PostalCode: " + request.cf.postalCode + "

    " html_content += "

    Region: " + request.cf.region + "

    " html_content += "

    RegionCode: " + request.cf.regionCode + "

    " html_content += "

    Timezone: " + request.cf.timezone + "

    " html = f""" Geolocation: Hello World

    Geolocation: Hello World!

    You now have access to geolocation data about where your user is visiting from.

    {html_content} """ headers = {"content-type": "text/html;charset=UTF-8"} return Response(html, headers=headers) ``` * Hono ```ts import { Hono } from "hono"; import { html } from "hono/html"; // Define the RequestWithCf interface to add Cloudflare-specific properties interface RequestWithCf extends Request { cf: { // Cloudflare-specific properties for geolocation colo: string; country: string; city: string; continent: string; latitude: string; longitude: string; postalCode: string; metroCode: string; region: string; regionCode: string; timezone: string; // Add other CF properties as needed }; } const app = new Hono(); app.get("*", (c) => { // Cast the raw request to include Cloudflare-specific properties const request = c.req.raw; // Define styles const html_style = "body{padding:6em; font-family: sans-serif;} h1{color:#f6821f;}"; // Create content with geolocation data let html_content = html`

    Colo: ${request.cf.colo}

    Country: ${request.cf.country}

    City: ${request.cf.city}

    Continent: ${request.cf.continent}

    Latitude: ${request.cf.latitude}

    Longitude: ${request.cf.longitude}

    PostalCode: ${request.cf.postalCode}

    MetroCode: ${request.cf.metroCode}

    Region: ${request.cf.region}

    RegionCode: ${request.cf.regionCode}

    Timezone: ${request.cf.timezone}

    `; // Compose the full HTML const htmlContent = html` Geolocation: Hello World

    Geolocation: Hello World!

    You now have access to geolocation data about where your user is visiting from.

    ${html_content} `; // Return the HTML response return c.html(htmlContent); }); export default app; ```
    --- title: Hot-link protection · Cloudflare Workers docs description: Block other websites from linking to your content. This is useful for protecting images. lastUpdated: 2025-04-28T14:11:18.000Z chatbotDeprioritize: false tags: Security,Headers source_url: html: https://developers.cloudflare.com/workers/examples/hot-link-protection/ md: https://developers.cloudflare.com/workers/examples/hot-link-protection/index.md --- If you want to get started quickly, click on the button below. [![Deploy to Cloudflare](https://deploy.workers.cloudflare.com/button)](https://deploy.workers.cloudflare.com/?url=https://github.com/cloudflare/docs-examples/tree/main/workers/hot-link-protection) This creates a repository in your GitHub account and deploys the application to Cloudflare Workers. * JavaScript ```js export default { async fetch(request) { const HOMEPAGE_URL = "https://tutorial.cloudflareworkers.com/"; const PROTECTED_TYPE = "image/"; // Fetch the original request const response = await fetch(request); // If it's an image, engage hotlink protection based on the // Referer header. const referer = request.headers.get("Referer"); const contentType = response.headers.get("Content-Type") || ""; if (referer && contentType.startsWith(PROTECTED_TYPE)) { // If the hostnames don't match, it's a hotlink if (new URL(referer).hostname !== new URL(request.url).hostname) { // Redirect the user to your website return Response.redirect(HOMEPAGE_URL, 302); } } // Everything is fine, return the response normally. return response; }, }; ``` * TypeScript ```ts export default { async fetch(request): Promise { const HOMEPAGE_URL = "https://tutorial.cloudflareworkers.com/"; const PROTECTED_TYPE = "image/"; // Fetch the original request const response = await fetch(request); // If it's an image, engage hotlink protection based on the // Referer header. const referer = request.headers.get("Referer"); const contentType = response.headers.get("Content-Type") || ""; if (referer && contentType.startsWith(PROTECTED_TYPE)) { // If the hostnames don't match, it's a hotlink if (new URL(referer).hostname !== new URL(request.url).hostname) { // Redirect the user to your website return Response.redirect(HOMEPAGE_URL, 302); } } // Everything is fine, return the response normally. return response; }, } satisfies ExportedHandler; ``` * Python ```py from workers import Response, fetch from urllib.parse import urlparse async def on_fetch(request): homepage_url = "https://tutorial.cloudflareworkers.com/" protected_type = "image/" # Fetch the original request response = await fetch(request) # If it's an image, engage hotlink protection based on the referer header referer = request.headers["Referer"] content_type = response.headers["Content-Type"] or "" if referer and content_type.startswith(protected_type): # If the hostnames don't match, it's a hotlink if urlparse(referer).hostname != urlparse(request.url).hostname: # Redirect the user to your website return Response.redirect(homepage_url, 302) # Everything is fine, return the response normally return response ``` * Hono ```ts import { Hono } from 'hono'; const app = new Hono(); // Middleware for hot-link protection app.use('*', async (c, next) => { const HOMEPAGE_URL = "https://tutorial.cloudflareworkers.com/"; const PROTECTED_TYPE = "image/"; // Continue to the next handler to get the response await next(); // If we have a response, check for hotlinking if (c.res) { // If it's an image, engage hotlink protection based on the Referer header const referer = c.req.header("Referer"); const contentType = c.res.headers.get("Content-Type") || ""; if (referer && contentType.startsWith(PROTECTED_TYPE)) { // If the hostnames don't match, it's a hotlink if (new URL(referer).hostname !== new URL(c.req.url).hostname) { // Redirect the user to your website c.res = c.redirect(HOMEPAGE_URL, 302); } } } }); // Default route handler that passes through the request to the origin app.all('*', async (c) => { // Fetch the original request return fetch(c.req.raw); }); export default app; ``` --- title: Custom Domain with Images · Cloudflare Workers docs description: Set up custom domain for Images using a Worker or serve images using a prefix path and Cloudflare registered domain. lastUpdated: 2025-04-28T14:11:18.000Z chatbotDeprioritize: false source_url: html: https://developers.cloudflare.com/workers/examples/images-workers/ md: https://developers.cloudflare.com/workers/examples/images-workers/index.md --- If you want to get started quickly, click on the button below. [![Deploy to Cloudflare](https://deploy.workers.cloudflare.com/button)](https://deploy.workers.cloudflare.com/?url=https://github.com/cloudflare/docs-examples/tree/main/workers/images-workers) This creates a repository in your GitHub account and deploys the application to Cloudflare Workers. To serve images from a custom domain: 1. Log in to the [Cloudflare dashboard](https://dash.cloudflare.com). 2. Select your account > select **Workers & Pages**. 3. Select **Create application** > **Workers** > **Create Worker** and create your Worker. 4. In your Worker, select **Quick edit** and paste the following code. * JavaScript ```js export default { async fetch(request) { // You can find this in the dashboard, it should look something like this: ZWd9g1K7eljCn_KDTu_MWA const accountHash = ""; const { pathname } = new URL(request.url); // A request to something like cdn.example.com/83eb7b2-5392-4565-b69e-aff66acddd00/public // will fetch "https://imagedelivery.net//83eb7b2-5392-4565-b69e-aff66acddd00/public" return fetch(`https://imagedelivery.net/${accountHash}${pathname}`); }, }; ``` * TypeScript ```ts export default { async fetch(request): Promise { // You can find this in the dashboard, it should look something like this: ZWd9g1K7eljCn_KDTu_MWA const accountHash = ""; const { pathname } = new URL(request.url); // A request to something like cdn.example.com/83eb7b2-5392-4565-b69e-aff66acddd00/public // will fetch "https://imagedelivery.net//83eb7b2-5392-4565-b69e-aff66acddd00/public" return fetch(`https://imagedelivery.net/${accountHash}${pathname}`); }, } satisfies ExportedHandler; ``` * Hono ```ts import { Hono } from 'hono'; interface Env { // You can store your account hash as a binding variable ACCOUNT_HASH?: string; } const app = new Hono<{ Bindings: Env }>(); app.get('*', async (c) => { // You can find this in the dashboard, it should look something like this: ZWd9g1K7eljCn_KDTu_MWA // Either get it from environment or hardcode it here const accountHash = c.env.ACCOUNT_HASH || ""; const url = new URL(c.req.url); // A request to something like cdn.example.com/83eb7b2-5392-4565-b69e-aff66acddd00/public // will fetch "https://imagedelivery.net//83eb7b2-5392-4565-b69e-aff66acddd00/public" return fetch(`https://imagedelivery.net/${accountHash}${url.pathname}`); }); export default app; ``` * Python ```py from js import URL, fetch async def on_fetch(request): # You can find this in the dashboard, it should look something like this: ZWd9g1K7eljCn_KDTu_MWA account_hash = "" url = URL.new(request.url) # A request to something like cdn.example.com/83eb7b2-5392-4565-b69e-aff66acddd00/public # will fetch "https://imagedelivery.net//83eb7b2-5392-4565-b69e-aff66acddd00/public" return fetch(f'https://imagedelivery.net/{account_hash}{url.pathname}') ``` Another way you can serve images from a custom domain is by using the `cdn-cgi/imagedelivery` prefix path which is used as path to trigger `cdn-cgi` image proxy. Below is an example showing the hostname as a Cloudflare proxied domain under the same account as the Image, followed with the prefix path and the image ``, `` and `` which can be found in the **Images** on the Cloudflare dashboard. ```js https://example.com/cdn-cgi/imagedelivery/// ``` --- title: Logging headers to console · Cloudflare Workers docs description: Examine the contents of a Headers object by logging to console with a Map. lastUpdated: 2025-04-28T14:11:18.000Z chatbotDeprioritize: false tags: Debugging,Headers source_url: html: https://developers.cloudflare.com/workers/examples/logging-headers/ md: https://developers.cloudflare.com/workers/examples/logging-headers/index.md --- If you want to get started quickly, click on the button below. [![Deploy to Cloudflare](https://deploy.workers.cloudflare.com/button)](https://deploy.workers.cloudflare.com/?url=https://github.com/cloudflare/docs-examples/tree/main/workers/logging-headers) This creates a repository in your GitHub account and deploys the application to Cloudflare Workers. * JavaScript ```js export default { async fetch(request) { console.log(new Map(request.headers)); return new Response("Hello world"); }, }; ``` * TypeScript ```ts export default { async fetch(request): Promise { console.log(new Map(request.headers)); return new Response("Hello world"); }, } satisfies ExportedHandler; ``` * Python ```py from workers import Response async def on_fetch(request): print(dict(request.headers)) return Response('Hello world') ``` * Rust ```rs use worker::*; #[event(fetch)] async fn fetch(req: HttpRequest, \_env: Env, \_ctx: Context) -> Result { console_log!("{:?}", req.headers()); Response::ok("hello world") } ``` * Hono ```ts import { Hono } from 'hono'; const app = new Hono(); app.get('*', (c) => { // Different ways to log headers in Hono: // 1. Using Map to display headers in console console.log('Headers as Map:', new Map(c.req.raw.headers)); // 2. Using spread operator to log headers console.log('Headers spread:', [...c.req.raw.headers]); // 3. Using Object.fromEntries to convert to an object console.log('Headers as Object:', Object.fromEntries(c.req.raw.headers)); // 4. Hono's built-in header accessor (for individual headers) console.log('User-Agent:', c.req.header('User-Agent')); // 5. Using c.req.headers to get all headers console.log('All headers from Hono context:', c.req.header()); return c.text('Hello world'); }); export default app; ``` *** ## Console-logging headers Use a `Map` if you need to log a `Headers` object to the console: ```js console.log(new Map(request.headers)); ``` Use the `spread` operator if you need to quickly stringify a `Headers` object: ```js let requestHeaders = JSON.stringify([...request.headers]); ``` Use `Object.fromEntries` to convert the headers to an object: ```js let requestHeaders = Object.fromEntries(request.headers); ``` ### The problem When debugging Workers, examine the headers on a request or response. A common mistake is to try to log headers to the developer console via code like this: ```js console.log(request.headers); ``` Or this: ```js console.log(`Request headers: ${JSON.stringify(request.headers)}`); ``` Both attempts result in what appears to be an empty object — the string `"{}"` — even though calling `request.headers.has("Your-Header-Name")` might return true. This is the same behavior that browsers implement. The reason this happens is because [Headers](https://developer.mozilla.org/en-US/docs/Web/API/Headers) objects do not store headers in enumerable JavaScript properties, so the developer console and JSON stringifier do not know how to read the names and values of the headers. It is not actually an empty object, but rather an opaque object. `Headers` objects are iterable, which you can take advantage of to develop a couple of quick one-liners for debug-printing headers. ### Pass headers through a Map The first common idiom for making Headers `console.log()`-friendly is to construct a `Map` object from the `Headers` object and log the `Map` object. ```js console.log(new Map(request.headers)); ``` This works because: * `Map` objects can be constructed from iterables, like `Headers`. * The `Map` object does store its entries in enumerable JavaScript properties, so the developer console can see into it. ### Spread headers into an array The `Map` approach works for calls to `console.log()`. If you need to stringify your headers, you will discover that stringifying a `Map` yields nothing more than `[object Map]`. Even though a `Map` stores its data in enumerable properties, those properties are [Symbol](https://developer.mozilla.org/en-US/docs/Web/JavaScript/Reference/Global_Objects/Symbol)-keyed. Because of this, `JSON.stringify()` will [ignore Symbol-keyed properties](https://developer.mozilla.org/en-US/docs/Web/JavaScript/Reference/Global_Objects/Symbol#symbols_and_json.stringify) and you will receive an empty `{}`. Instead, you can take advantage of the iterability of the `Headers` object in a new way by applying the [spread operator](https://developer.mozilla.org/en-US/docs/Web/JavaScript/Reference/Operators/Spread_syntax) (`...`) to it. ```js let requestHeaders = JSON.stringify([...request.headers], null, 2); console.log(`Request headers: ${requestHeaders}`); ``` ### Convert headers into an object with Object.fromEntries (ES2019) ES2019 provides [`Object.fromEntries`](https://github.com/tc39/proposal-object-from-entries) which is a call to convert the headers into an object: ```js let headersObject = Object.fromEntries(request.headers); let requestHeaders = JSON.stringify(headersObject, null, 2); console.log(`Request headers: ${requestHeaders}`); ``` This results in something like: ```js Request headers: { "accept": "text/html,application/xhtml+xml,application/xml;q=0.9,image/webp,image/apng,*/*;q=0.8", "accept-encoding": "gzip", "accept-language": "en-US,en;q=0.9", "cf-ipcountry": "US", // ... }" ``` --- title: Modify request property · Cloudflare Workers docs description: Create a modified request with edited properties based off of an incoming request. lastUpdated: 2025-04-28T14:11:18.000Z chatbotDeprioritize: false tags: Middleware,Headers source_url: html: https://developers.cloudflare.com/workers/examples/modify-request-property/ md: https://developers.cloudflare.com/workers/examples/modify-request-property/index.md --- If you want to get started quickly, click on the button below. [![Deploy to Cloudflare](https://deploy.workers.cloudflare.com/button)](https://deploy.workers.cloudflare.com/?url=https://github.com/cloudflare/docs-examples/tree/main/workers/modify-request-property) This creates a repository in your GitHub account and deploys the application to Cloudflare Workers. * JavaScript ```js export default { async fetch(request) { /** * Example someHost is set up to return raw JSON * @param {string} someUrl the URL to send the request to, since we are setting hostname too only path is applied * @param {string} someHost the host the request will resolve too */ const someHost = "example.com"; const someUrl = "https://foo.example.com/api.js"; /** * The best practice is to only assign new RequestInit properties * on the request object using either a method or the constructor */ const newRequestInit = { // Change method method: "POST", // Change body body: JSON.stringify({ bar: "foo" }), // Change the redirect mode. redirect: "follow", // Change headers, note this method will erase existing headers headers: { "Content-Type": "application/json", }, // Change a Cloudflare feature on the outbound response cf: { apps: false }, }; // Change just the host const url = new URL(someUrl); url.hostname = someHost; // Best practice is to always use the original request to construct the new request // to clone all the attributes. Applying the URL also requires a constructor // since once a Request has been constructed, its URL is immutable. const newRequest = new Request( url.toString(), new Request(request, newRequestInit), ); // Set headers using method newRequest.headers.set("X-Example", "bar"); newRequest.headers.set("Content-Type", "application/json"); try { return await fetch(newRequest); } catch (e) { return new Response(JSON.stringify({ error: e.message }), { status: 500, }); } }, }; ``` * TypeScript ```ts export default { async fetch(request): Promise { /** * Example someHost is set up to return raw JSON * @param {string} someUrl the URL to send the request to, since we are setting hostname too only path is applied * @param {string} someHost the host the request will resolve too */ const someHost = "example.com"; const someUrl = "https://foo.example.com/api.js"; /** * The best practice is to only assign new RequestInit properties * on the request object using either a method or the constructor */ const newRequestInit = { // Change method method: "POST", // Change body body: JSON.stringify({ bar: "foo" }), // Change the redirect mode. redirect: "follow", // Change headers, note this method will erase existing headers headers: { "Content-Type": "application/json", }, // Change a Cloudflare feature on the outbound response cf: { apps: false }, }; // Change just the host const url = new URL(someUrl); url.hostname = someHost; // Best practice is to always use the original request to construct the new request // to clone all the attributes. Applying the URL also requires a constructor // since once a Request has been constructed, its URL is immutable. const newRequest = new Request( url.toString(), new Request(request, newRequestInit), ); // Set headers using method newRequest.headers.set("X-Example", "bar"); newRequest.headers.set("Content-Type", "application/json"); try { return await fetch(newRequest); } catch (e) { return new Response(JSON.stringify({ error: e.message }), { status: 500, }); } }, } satisfies ExportedHandler; ``` * Python ```py import json from pyodide.ffi import to_js as _to_js from js import Object, URL, Request, fetch, Response def to_js(obj): return _to_js(obj, dict_converter=Object.fromEntries) async def on_fetch(request): some_host = "example.com" some_url = "https://foo.example.com/api.js" # The best practice is to only assign new_request_init properties # on the request object using either a method or the constructor new_request_init = { "method": "POST", # Change method "body": json.dumps({ "bar": "foo" }), # Change body "redirect": "follow", # Change the redirect mode # Change headers, note this method will erase existing headers "headers": { "Content-Type": "application/json", }, # Change a Cloudflare feature on the outbound response "cf": { "apps": False }, } # Change just the host url = URL.new(some_url) url.hostname = some_host # Best practice is to always use the original request to construct the new request # to clone all the attributes. Applying the URL also requires a constructor # since once a Request has been constructed, its URL is immutable. org_request = Request.new(request, new_request_init) new_request = Request.new(url.toString(),org_request) new_request.headers["X-Example"] = "bar" new_request.headers["Content-Type"] = "application/json" try: return await fetch(new_request) except Exception as e: return Response.new({"error": str(e)}, status=500) ``` * Hono ```ts import { Hono } from "hono"; const app = new Hono(); app.all("*", async (c) => { /** * Example someHost is set up to return raw JSON */ const someHost = "example.com"; const someUrl = "https://foo.example.com/api.js"; // Create a URL object to modify the hostname const url = new URL(someUrl); url.hostname = someHost; // Create a new request // First create a clone of the original request with the new properties const requestClone = new Request(c.req.raw, { // Change method method: "POST", // Change body body: JSON.stringify({ bar: "foo" }), // Change the redirect mode redirect: "follow" as RequestRedirect, // Change headers, note this method will erase existing headers headers: { "Content-Type": "application/json", "X-Example": "bar", }, // Change a Cloudflare feature on the outbound response cf: { apps: false }, }); // Then create a new request with the modified URL const newRequest = new Request(url.toString(), requestClone); // Send the modified request const response = await fetch(newRequest); // Return the response return response; }); // Handle errors app.onError((err, c) => { return err.getResponse(); }); export default app; ``` --- title: Modify response · Cloudflare Workers docs description: Fetch and modify response properties which are immutable by creating a copy first. lastUpdated: 2025-04-28T14:11:18.000Z chatbotDeprioritize: false tags: Middleware,Headers source_url: html: https://developers.cloudflare.com/workers/examples/modify-response/ md: https://developers.cloudflare.com/workers/examples/modify-response/index.md --- If you want to get started quickly, click on the button below. [![Deploy to Cloudflare](https://deploy.workers.cloudflare.com/button)](https://deploy.workers.cloudflare.com/?url=https://github.com/cloudflare/docs-examples/tree/main/workers/modify-response) This creates a repository in your GitHub account and deploys the application to Cloudflare Workers. * JavaScript ```js export default { async fetch(request) { /** * @param {string} headerNameSrc Header to get the new value from * @param {string} headerNameDst Header to set based off of value in src */ const headerNameSrc = "foo"; //"Orig-Header" const headerNameDst = "Last-Modified"; /** * Response properties are immutable. To change them, construct a new * Response and pass modified status or statusText in the ResponseInit * object. Response headers can be modified through the headers `set` method. */ const originalResponse = await fetch(request); // Change status and statusText, but preserve body and headers let response = new Response(originalResponse.body, { status: 500, statusText: "some message", headers: originalResponse.headers, }); // Change response body by adding the foo prop const originalBody = await originalResponse.json(); const body = JSON.stringify({ foo: "bar", ...originalBody }); response = new Response(body, response); // Add a header using set method response.headers.set("foo", "bar"); // Set destination header to the value of the source header const src = response.headers.get(headerNameSrc); if (src != null) { response.headers.set(headerNameDst, src); console.log( `Response header "${headerNameDst}" was set to "${response.headers.get( headerNameDst, )}"`, ); } return response; }, }; ``` * TypeScript ```ts export default { async fetch(request): Promise { /** * @param {string} headerNameSrc Header to get the new value from * @param {string} headerNameDst Header to set based off of value in src */ const headerNameSrc = "foo"; //"Orig-Header" const headerNameDst = "Last-Modified"; /** * Response properties are immutable. To change them, construct a new * Response and pass modified status or statusText in the ResponseInit * object. Response headers can be modified through the headers `set` method. */ const originalResponse = await fetch(request); // Change status and statusText, but preserve body and headers let response = new Response(originalResponse.body, { status: 500, statusText: "some message", headers: originalResponse.headers, }); // Change response body by adding the foo prop const originalBody = await originalResponse.json(); const body = JSON.stringify({ foo: "bar", ...originalBody }); response = new Response(body, response); // Add a header using set method response.headers.set("foo", "bar"); // Set destination header to the value of the source header const src = response.headers.get(headerNameSrc); if (src != null) { response.headers.set(headerNameDst, src); console.log( `Response header "${headerNameDst}" was set to "${response.headers.get( headerNameDst, )}"`, ); } return response; }, } satisfies ExportedHandler; ``` * Python ```py from workers import Response, fetch import json async def on_fetch(request): header_name_src = "foo" # Header to get the new value from header_name_dst = "Last-Modified" # Header to set based off of value in src # Response properties are immutable. To change them, construct a new response original_response = await fetch(request) # Change status and statusText, but preserve body and headers response = Response(original_response.body, status=500, status_text="some message", headers=original_response.headers) # Change response body by adding the foo prop new_body = await original_response.json() new_body["foo"] = "bar" response.replace_body(json.dumps(new_body)) # Add a new header response.headers["foo"] = "bar" # Set destination header to the value of the source header src = response.headers[header_name_src] if src is not None: response.headers[header_name_dst] = src print(f'Response header {header_name_dst} was set to {response.headers[header_name_dst]}') return response ``` * Hono ```ts import { Hono } from 'hono'; const app = new Hono(); app.get('*', async (c) => { /** * Header configuration */ const headerNameSrc = "foo"; // Header to get the new value from const headerNameDst = "Last-Modified"; // Header to set based off of value in src /** * Response properties are immutable. With Hono, we can modify the response * by creating custom response objects. */ const originalResponse = await fetch(c.req.raw); // Get the JSON body from the original response const originalBody = await originalResponse.json(); // Modify the body by adding a new property const modifiedBody = { foo: "bar", ...originalBody }; // Create a new custom response with modified status, headers, and body const response = new Response(JSON.stringify(modifiedBody), { status: 500, statusText: "some message", headers: originalResponse.headers, }); // Add a header using set method response.headers.set("foo", "bar"); // Set destination header to the value of the source header const src = response.headers.get(headerNameSrc); if (src != null) { response.headers.set(headerNameDst, src); console.log( `Response header "${headerNameDst}" was set to "${response.headers.get(headerNameDst)}"` ); } return response; }); export default app; ``` --- title: Multiple Cron Triggers · Cloudflare Workers docs description: Set multiple Cron Triggers on three different schedules. lastUpdated: 2025-04-28T14:11:18.000Z chatbotDeprioritize: false tags: Middleware source_url: html: https://developers.cloudflare.com/workers/examples/multiple-cron-triggers/ md: https://developers.cloudflare.com/workers/examples/multiple-cron-triggers/index.md --- If you want to get started quickly, click on the button below. [![Deploy to Cloudflare](https://deploy.workers.cloudflare.com/button)](https://deploy.workers.cloudflare.com/?url=https://github.com/cloudflare/docs-examples/tree/main/workers/multiple-cron-triggers) This creates a repository in your GitHub account and deploys the application to Cloudflare Workers. * JavaScript ```js export default { async scheduled(event, env, ctx) { // Write code for updating your API switch (event.cron) { case "*/3 * * * *": // Every three minutes await updateAPI(); break; case "*/10 * * * *": // Every ten minutes await updateAPI2(); break; case "*/45 * * * *": // Every forty-five minutes await updateAPI3(); break; } console.log("cron processed"); }, }; ``` * TypeScript ```ts interface Env {} export default { async scheduled( controller: ScheduledController, env: Env, ctx: ExecutionContext, ) { // Write code for updating your API switch (controller.cron) { case "*/3 * * * *": // Every three minutes await updateAPI(); break; case "*/10 * * * *": // Every ten minutes await updateAPI2(); break; case "*/45 * * * *": // Every forty-five minutes await updateAPI3(); break; } console.log("cron processed"); }, }; ``` * Hono ```ts import { Hono } from "hono"; interface Env {} // Create Hono app const app = new Hono<{ Bindings: Env }>(); // Regular routes for normal HTTP requests app.get("/", (c) => c.text("Multiple Cron Trigger Example")); // Export both the app and a scheduled function export default { // The Hono app handles regular HTTP requests fetch: app.fetch, // The scheduled function handles Cron triggers async scheduled( controller: ScheduledController, env: Env, ctx: ExecutionContext, ) { // Check which cron schedule triggered this execution switch (controller.cron) { case "*/3 * * * *": // Every three minutes await updateAPI(); break; case "*/10 * * * *": // Every ten minutes await updateAPI2(); break; case "*/45 * * * *": // Every forty-five minutes await updateAPI3(); break; } console.log("cron processed"); }, }; ``` ## Test Cron Triggers using Wrangler The recommended way of testing Cron Triggers is using Wrangler. Cron Triggers can be tested using Wrangler by passing in the `--test-scheduled` flag to [`wrangler dev`](https://developers.cloudflare.com/workers/wrangler/commands/#dev). This will expose a `/__scheduled` (or `/cdn-cgi/handler/scheduled` for Python Workers) route which can be used to test using a HTTP request. To simulate different cron patterns, a `cron` query parameter can be passed in. ```sh npx wrangler dev --test-scheduled curl "http://localhost:8787/__scheduled?cron=*%2F3+*+*+*+*" curl "http://localhost:8787/cdn-cgi/handler/scheduled?cron=*+*+*+*+*" # Python Workers ``` --- title: Stream OpenAI API Responses · Cloudflare Workers docs description: Use the OpenAI v4 SDK to stream responses from OpenAI. lastUpdated: 2025-04-28T14:11:18.000Z chatbotDeprioritize: false tags: AI source_url: html: https://developers.cloudflare.com/workers/examples/openai-sdk-streaming/ md: https://developers.cloudflare.com/workers/examples/openai-sdk-streaming/index.md --- If you want to get started quickly, click on the button below. [![Deploy to Cloudflare](https://deploy.workers.cloudflare.com/button)](https://deploy.workers.cloudflare.com/?url=https://github.com/cloudflare/docs-examples/tree/main/workers/openai-sdk-streaming) This creates a repository in your GitHub account and deploys the application to Cloudflare Workers. In order to run this code, you must install the OpenAI SDK by running `npm i openai`. Note For analytics, caching, rate limiting, and more, you can also send requests like this through Cloudflare's [AI Gateway](https://developers.cloudflare.com/ai-gateway/providers/openai/). * TypeScript ```ts import OpenAI from "openai"; export default { async fetch(request, env, ctx): Promise { const openai = new OpenAI({ apiKey: env.OPENAI_API_KEY, }); // Create a TransformStream to handle streaming data let { readable, writable } = new TransformStream(); let writer = writable.getWriter(); const textEncoder = new TextEncoder(); ctx.waitUntil( (async () => { const stream = await openai.chat.completions.create({ model: "gpt-4o-mini", messages: [{ role: "user", content: "Tell me a story" }], stream: true, }); // loop over the data as it is streamed and write to the writeable for await (const part of stream) { writer.write( textEncoder.encode(part.choices[0]?.delta?.content || ""), ); } writer.close(); })(), ); // Send the readable back to the browser return new Response(readable); }, } satisfies ExportedHandler; ``` * Hono ```ts import { Hono } from "hono"; import { streamText } from "hono/streaming"; import OpenAI from "openai"; interface Env { OPENAI_API_KEY: string; } const app = new Hono<{ Bindings: Env }>(); app.get("*", async (c) => { const openai = new OpenAI({ apiKey: c.env.OPENAI_API_KEY, }); const chatStream = await openai.chat.completions.create({ model: "gpt-4o-mini", messages: [{ role: "user", content: "Tell me a story" }], stream: true, }); return streamText(c, async (stream) => { for await (const message of chatStream) { await stream.write(message.choices[0].delta.content || ""); } stream.close(); }); }); export default app; ``` --- title: Post JSON · Cloudflare Workers docs description: Send a POST request with JSON data. Use to share data with external servers. lastUpdated: 2025-04-28T14:11:18.000Z chatbotDeprioritize: false tags: JSON source_url: html: https://developers.cloudflare.com/workers/examples/post-json/ md: https://developers.cloudflare.com/workers/examples/post-json/index.md --- If you want to get started quickly, click on the button below. [![Deploy to Cloudflare](https://deploy.workers.cloudflare.com/button)](https://deploy.workers.cloudflare.com/?url=https://github.com/cloudflare/docs-examples/tree/main/workers/post-json) This creates a repository in your GitHub account and deploys the application to Cloudflare Workers. * JavaScript ```js export default { async fetch(request) { /** * Example someHost is set up to take in a JSON request * Replace url with the host you wish to send requests to * @param {string} url the URL to send the request to * @param {BodyInit} body the JSON data to send in the request */ const someHost = "https://examples.cloudflareworkers.com/demos"; const url = someHost + "/requests/json"; const body = { results: ["default data to send"], errors: null, msg: "I sent this to the fetch", }; /** * gatherResponse awaits and returns a response body as a string. * Use await gatherResponse(..) in an async function to get the response body * @param {Response} response */ async function gatherResponse(response) { const { headers } = response; const contentType = headers.get("content-type") || ""; if (contentType.includes("application/json")) { return JSON.stringify(await response.json()); } else if (contentType.includes("application/text")) { return response.text(); } else if (contentType.includes("text/html")) { return response.text(); } else { return response.text(); } } const init = { body: JSON.stringify(body), method: "POST", headers: { "content-type": "application/json;charset=UTF-8", }, }; const response = await fetch(url, init); const results = await gatherResponse(response); return new Response(results, init); }, }; ``` * TypeScript ```ts export default { async fetch(request): Promise { /** * Example someHost is set up to take in a JSON request * Replace url with the host you wish to send requests to * @param {string} url the URL to send the request to * @param {BodyInit} body the JSON data to send in the request */ const someHost = "https://examples.cloudflareworkers.com/demos"; const url = someHost + "/requests/json"; const body = { results: ["default data to send"], errors: null, msg: "I sent this to the fetch", }; /** * gatherResponse awaits and returns a response body as a string. * Use await gatherResponse(..) in an async function to get the response body * @param {Response} response */ async function gatherResponse(response) { const { headers } = response; const contentType = headers.get("content-type") || ""; if (contentType.includes("application/json")) { return JSON.stringify(await response.json()); } else if (contentType.includes("application/text")) { return response.text(); } else if (contentType.includes("text/html")) { return response.text(); } else { return response.text(); } } const init = { body: JSON.stringify(body), method: "POST", headers: { "content-type": "application/json;charset=UTF-8", }, }; const response = await fetch(url, init); const results = await gatherResponse(response); return new Response(results, init); }, } satisfies ExportedHandler; ``` * Python ```py import json from pyodide.ffi import to_js as _to_js from js import Object, fetch, Response, Headers def to_js(obj): return _to_js(obj, dict_converter=Object.fromEntries) # gather_response returns both content-type & response body as a string async def gather_response(response): headers = response.headers content_type = headers["content-type"] or "" if "application/json" in content_type: return (content_type, json.dumps(dict(await response.json()))) return (content_type, await response.text()) async def on_fetch(_request): url = "https://jsonplaceholder.typicode.com/todos/1" body = { "results": ["default data to send"], "errors": None, "msg": "I sent this to the fetch", } options = { "body": json.dumps(body), "method": "POST", "headers": { "content-type": "application/json;charset=UTF-8", }, } response = await fetch(url, to_js(options)) content_type, result = await gather_response(response) headers = Headers.new({"content-type": content_type}.items()) return Response.new(result, headers=headers) ``` * Hono ```ts import { Hono } from 'hono'; const app = new Hono(); app.get('*', async (c) => { /** * Example someHost is set up to take in a JSON request * Replace url with the host you wish to send requests to */ const someHost = "https://examples.cloudflareworkers.com/demos"; const url = someHost + "/requests/json"; const body = { results: ["default data to send"], errors: null, msg: "I sent this to the fetch", }; /** * gatherResponse awaits and returns a response body as a string. * Use await gatherResponse(..) in an async function to get the response body */ async function gatherResponse(response: Response) { const { headers } = response; const contentType = headers.get("content-type") || ""; if (contentType.includes("application/json")) { return { contentType, result: JSON.stringify(await response.json()) }; } else if (contentType.includes("application/text")) { return { contentType, result: await response.text() }; } else if (contentType.includes("text/html")) { return { contentType, result: await response.text() }; } else { return { contentType, result: await response.text() }; } } const init = { body: JSON.stringify(body), method: "POST", headers: { "content-type": "application/json;charset=UTF-8", }, }; const response = await fetch(url, init); const { contentType, result } = await gatherResponse(response); return new Response(result, { headers: { "content-type": contentType, }, }); }); export default app; ``` --- title: Using timingSafeEqual · Cloudflare Workers docs description: Protect against timing attacks by safely comparing values using `timingSafeEqual`. lastUpdated: 2025-04-28T14:11:18.000Z chatbotDeprioritize: false tags: Security,Web Crypto source_url: html: https://developers.cloudflare.com/workers/examples/protect-against-timing-attacks/ md: https://developers.cloudflare.com/workers/examples/protect-against-timing-attacks/index.md --- If you want to get started quickly, click on the button below. [![Deploy to Cloudflare](https://deploy.workers.cloudflare.com/button)](https://deploy.workers.cloudflare.com/?url=https://github.com/cloudflare/docs-examples/tree/main/workers/protect-against-timing-attacks) This creates a repository in your GitHub account and deploys the application to Cloudflare Workers. The [`crypto.subtle.timingSafeEqual`](https://developers.cloudflare.com/workers/runtime-apis/web-crypto/#timingsafeequal) function compares two values using a constant-time algorithm. The time taken is independent of the contents of the values. When strings are compared using the equality operator (`==` or `===`), the comparison will end at the first mismatched character. By using `timingSafeEqual`, an attacker would not be able to use timing to find where at which point in the two strings there is a difference. The `timingSafeEqual` function takes two `ArrayBuffer` or `TypedArray` values to compare. These buffers must be of equal length, otherwise an exception is thrown. Note that this function is not constant time with respect to the length of the parameters and also does not guarantee constant time for the surrounding code. Handling of secrets should be taken with care to not introduce timing side channels. In order to compare two strings, you must use the [`TextEncoder`](https://developers.cloudflare.com/workers/runtime-apis/encoding/#textencoder) API. * TypeScript ```ts interface Environment { MY_SECRET_VALUE?: string; } export default { async fetch(req: Request, env: Environment) { if (!env.MY_SECRET_VALUE) { return new Response("Missing secret binding", { status: 500 }); } const authToken = req.headers.get("Authorization") || ""; if (authToken.length !== env.MY_SECRET_VALUE.length) { return new Response("Unauthorized", { status: 401 }); } const encoder = new TextEncoder(); const a = encoder.encode(authToken); const b = encoder.encode(env.MY_SECRET_VALUE); if (a.byteLength !== b.byteLength) { return new Response("Unauthorized", { status: 401 }); } if (!crypto.subtle.timingSafeEqual(a, b)) { return new Response("Unauthorized", { status: 401 }); } return new Response("Welcome!"); }, }; ``` * Python ```py from workers import Response from js import TextEncoder, crypto async def on_fetch(request, env): auth_token = request.headers["Authorization"] or "" secret = env.MY_SECRET_VALUE if secret is None: return Response("Missing secret binding", status=500) if len(auth_token) != len(secret): return Response("Unauthorized", status=401) encoder = TextEncoder.new() a = encoder.encode(auth_token) b = encoder.encode(secret) if a.byteLength != b.byteLength: return Response("Unauthorized", status=401) if not crypto.subtle.timingSafeEqual(a, b): return Response("Unauthorized", status=401) return Response("Welcome!") ``` * Hono ```ts import { Hono } from 'hono'; interface Environment { Bindings: { MY_SECRET_VALUE?: string; } } const app = new Hono(); // Middleware to handle authentication with timing-safe comparison app.use('*', async (c, next) => { const secret = c.env.MY_SECRET_VALUE; if (!secret) { return c.text("Missing secret binding", 500); } const authToken = c.req.header("Authorization") || ""; // Early length check to avoid unnecessary processing if (authToken.length !== secret.length) { return c.text("Unauthorized", 401); } const encoder = new TextEncoder(); const a = encoder.encode(authToken); const b = encoder.encode(secret); if (a.byteLength !== b.byteLength) { return c.text("Unauthorized", 401); } // Perform timing-safe comparison if (!crypto.subtle.timingSafeEqual(a, b)) { return c.text("Unauthorized", 401); } // If we got here, the auth token is valid await next(); }); // Protected route app.get('*', (c) => { return c.text("Welcome!"); }); export default app; ``` --- title: Read POST · Cloudflare Workers docs description: Serve an HTML form, then read POST requests. Use also to read JSON or POST data from an incoming request. lastUpdated: 2025-04-28T16:08:27.000Z chatbotDeprioritize: false tags: JSON source_url: html: https://developers.cloudflare.com/workers/examples/read-post/ md: https://developers.cloudflare.com/workers/examples/read-post/index.md --- If you want to get started quickly, click on the button below. [![Deploy to Cloudflare](https://deploy.workers.cloudflare.com/button)](https://deploy.workers.cloudflare.com/?url=https://github.com/cloudflare/docs-examples/tree/main/workers/read-post) This creates a repository in your GitHub account and deploys the application to Cloudflare Workers. * JavaScript ```js export default { async fetch(request) { /** * rawHtmlResponse returns HTML inputted directly * into the worker script * @param {string} html */ function rawHtmlResponse(html) { return new Response(html, { headers: { "content-type": "text/html;charset=UTF-8", }, }); } /** * readRequestBody reads in the incoming request body * Use await readRequestBody(..) in an async function to get the string * @param {Request} request the incoming request to read from */ async function readRequestBody(request) { const contentType = request.headers.get("content-type"); if (contentType.includes("application/json")) { return JSON.stringify(await request.json()); } else if (contentType.includes("application/text")) { return request.text(); } else if (contentType.includes("text/html")) { return request.text(); } else if (contentType.includes("form")) { const formData = await request.formData(); const body = {}; for (const entry of formData.entries()) { body[entry[0]] = entry[1]; } return JSON.stringify(body); } else { // Perhaps some other type of data was submitted in the form // like an image, or some other binary data. return "a file"; } } const { url } = request; if (url.includes("form")) { return rawHtmlResponse(someForm); } if (request.method === "POST") { const reqBody = await readRequestBody(request); const retBody = `The request body sent in was ${reqBody}`; return new Response(retBody); } else if (request.method === "GET") { return new Response("The request was a GET"); } }, }; ``` * TypeScript ```ts export default { async fetch(request): Promise { /** * rawHtmlResponse returns HTML inputted directly * into the worker script * @param {string} html */ function rawHtmlResponse(html) { return new Response(html, { headers: { "content-type": "text/html;charset=UTF-8", }, }); } /** * readRequestBody reads in the incoming request body * Use await readRequestBody(..) in an async function to get the string * @param {Request} request the incoming request to read from */ async function readRequestBody(request: Request) { const contentType = request.headers.get("content-type"); if (contentType.includes("application/json")) { return JSON.stringify(await request.json()); } else if (contentType.includes("application/text")) { return request.text(); } else if (contentType.includes("text/html")) { return request.text(); } else if (contentType.includes("form")) { const formData = await request.formData(); const body = {}; for (const entry of formData.entries()) { body[entry[0]] = entry[1]; } return JSON.stringify(body); } else { // Perhaps some other type of data was submitted in the form // like an image, or some other binary data. return "a file"; } } const { url } = request; if (url.includes("form")) { return rawHtmlResponse(someForm); } if (request.method === "POST") { const reqBody = await readRequestBody(request); const retBody = `The request body sent in was ${reqBody}`; return new Response(retBody); } else if (request.method === "GET") { return new Response("The request was a GET"); } }, } satisfies ExportedHandler; ``` * Python ```py from js import Object, Response, Headers, JSON async def read_request_body(request): headers = request.headers content_type = headers["content-type"] or "" if "application/json" in content_type: return JSON.stringify(await request.json()) if "form" in content_type: form = await request.formData() data = Object.fromEntries(form.entries()) return JSON.stringify(data) return await request.text() async def on_fetch(request): def raw_html_response(html): headers = Headers.new({"content-type": "text/html;charset=UTF-8"}.items()) return Response.new(html, headers=headers) if "form" in request.url: return raw_html_response("") if "POST" in request.method: req_body = await read_request_body(request) ret_body = f"The request body sent in was {req_body}" return Response.new(ret_body) return Response.new("The request was not POST") ``` * Rust ```rs use serde::{Deserialize, Serialize}; use worker::*; fn raw_html_response(html: &str) -> Result { Response::from_html(html) } #[derive(Deserialize, Serialize, Debug)] struct Payload { msg: String, } async fn read_request_body(mut req: Request) -> String { let ctype = req.headers().get("content-type").unwrap().unwrap(); match ctype.as_str() { "application/json" => format!("{:?}", req.json::().await.unwrap()), "text/html" => req.text().await.unwrap(), "multipart/form-data" => format!("{:?}", req.form_data().await.unwrap()), _ => String::from("a file"), } } #[event(fetch)] async fn fetch(req: Request, _env: Env, _ctx: Context) -> Result { if String::from(req.url()?).contains("form") { return raw_html_response("some html form"); } match req.method() { Method::Post => { let req_body = read_request_body(req).await; Response::ok(format!("The request body sent in was {}", req_body)) } _ => Response::ok(format!("The result was a {:?}", req.method())), } } ``` * Hono ```ts import { Hono } from "hono"; import { html } from "hono/html"; const app = new Hono(); /** * readRequestBody reads in the incoming request body * @param {Request} request the incoming request to read from */ async function readRequestBody(request: Request): Promise { const contentType = request.headers.get("content-type") || ""; if (contentType.includes("application/json")) { const body = await request.json(); return JSON.stringify(body); } else if (contentType.includes("application/text")) { return request.text(); } else if (contentType.includes("text/html")) { return request.text(); } else if (contentType.includes("form")) { const formData = await request.formData(); const body: Record = {}; for (const [key, value] of formData.entries()) { body[key] = value.toString(); } return JSON.stringify(body); } else { // Perhaps some other type of data was submitted in the form // like an image, or some other binary data. return "a file"; } } const someForm = html`
    `; app.get("*", async (c) => { const url = c.req.url; if (url.includes("form")) { return c.html(someForm); } return c.text("The request was a GET"); }); app.post("*", async (c) => { const reqBody = await readRequestBody(c.req.raw); const retBody = `The request body sent in was ${reqBody}`; return c.text(retBody); }); export default app; ``` Prevent potential errors when accessing request.body The body of a [Request](https://developer.mozilla.org/en-US/docs/Web/API/Request) can only be accessed once. If you previously used `request.formData()` in the same request, you may encounter a TypeError when attempting to access `request.body`. To avoid errors, create a clone of the Request object with `request.clone()` for each subsequent attempt to access a Request's body. Keep in mind that Workers have a [memory limit of 128 MB per Worker](https://developers.cloudflare.com/workers/platform/limits#worker-limits) and loading particularly large files into a Worker's memory multiple times may reach this limit. To ensure memory usage does not reach this limit, consider using [Streams](https://developers.cloudflare.com/workers/runtime-apis/streams/).
    --- title: Redirect · Cloudflare Workers docs description: Redirect requests from one URL to another or from one set of URLs to another set. lastUpdated: 2025-04-28T14:11:18.000Z chatbotDeprioritize: false tags: Middleware,Redirects source_url: html: https://developers.cloudflare.com/workers/examples/redirect/ md: https://developers.cloudflare.com/workers/examples/redirect/index.md --- If you want to get started quickly, click on the button below. [![Deploy to Cloudflare](https://deploy.workers.cloudflare.com/button)](https://deploy.workers.cloudflare.com/?url=https://github.com/cloudflare/docs-examples/tree/main/workers/redirect) This creates a repository in your GitHub account and deploys the application to Cloudflare Workers. ## Redirect all requests to one URL * JavaScript ```js export default { async fetch(request) { const destinationURL = "https://example.com"; const statusCode = 301; return Response.redirect(destinationURL, statusCode); }, }; ``` [Run Worker in Playground](https://workers.cloudflare.com/playground#LYVwNgLglgDghgJwgegGYHsHALQBM4RwDcABAEbogB2+CAngLzbPYZb6HbW5QDGU2AAwB2AMzCAHIIAsAJgmzp0gFwsWbYBzhcafASPFS5CpQFgAUAGF0VCAFNb2ACJQAzjHSuo0G8pIa8AmISKjhgOwYAIigaOwAPADoAK1dI0lQoMAcwiOjYxJTIi2tbBwhsABU6GDs-OBgYMD4CKBtkJLgANzhXXgRYCABqYHRccDsLC3iPJBJcO1Q4cAgSAG9zEhIeuipefzsIXgALAAoEOwBHEDtXCABKNY3Nkl4bW7mb6FCfKgBVACUADIkBgkSJHCAQGCuZTIZDxMKNOwJV7ANJPTavKjvW4EECuazzEEkUSCACMRAxJHOEBACCoJH+Nw82OR5x4514EBO81uMRaNgBgIANCRcbSCaM7HdKZsAL7C8xyogWNTMDRaHQ8fhCMSSGTyRTSYo2eyOFzuTzeVpUPwBLSkULhKLhQhaNL+TLZZ2RMhgdBkIpWU1lSrVWpbBpNXgCqjtVw2SbmVaRYBwGIAfRGYyykWUeXmBVSctVao1QS1el1hgNJmkzCAA) * TypeScript ```ts export default { async fetch(request): Promise { const destinationURL = "https://example.com"; const statusCode = 301; return Response.redirect(destinationURL, statusCode); }, } satisfies ExportedHandler; ``` * Python ```py from workers import Response def on_fetch(request): destinationURL = "https://example.com" statusCode = 301 return Response.redirect(destinationURL, statusCode) ``` * Rust ```rs use worker::*; #[event(fetch)] async fn fetch(_req: Request, _env: Env, _ctx: Context) -> Result { let destination_url = Url::parse("https://example.com")?; let status_code = 301; Response::redirect_with_status(destination_url, status_code) } ``` * Hono ```ts import { Hono } from 'hono'; const app = new Hono(); app.all('*', (c) => { const destinationURL = "https://example.com"; const statusCode = 301; return c.redirect(destinationURL, statusCode); }); export default app; ``` ## Redirect requests from one domain to another * JavaScript ```js export default { async fetch(request) { const base = "https://example.com"; const statusCode = 301; const url = new URL(request.url); const { pathname, search } = url; const destinationURL = `${base}${pathname}${search}`; console.log(destinationURL); return Response.redirect(destinationURL, statusCode); }, }; ``` * TypeScript ```ts export default { async fetch(request): Promise { const base = "https://example.com"; const statusCode = 301; const url = new URL(request.url); const { pathname, search } = url; const destinationURL = `${base}${pathname}${search}`; console.log(destinationURL); return Response.redirect(destinationURL, statusCode); }, } satisfies ExportedHandler; ``` * Python ```py from workers import Response from urllib.parse import urlparse async def on_fetch(request): base = "https://example.com" statusCode = 301 url = urlparse(request.url) destinationURL = f'{base}{url.path}{url.query}' print(destinationURL) return Response.redirect(destinationURL, statusCode) ``` * Rust ```rs use worker::*; #[event(fetch)] async fn fetch(req: Request, _env: Env, _ctx: Context) -> Result { let mut base = Url::parse("https://example.com")?; let status_code = 301; let url = req.url()?; base.set_path(url.path()); base.set_query(url.query()); console_log!("{:?}", base.to_string()); Response::redirect_with_status(base, status_code) } ``` * Hono ```ts import { Hono } from 'hono'; const app = new Hono(); app.all('*', (c) => { const base = "https://example.com"; const statusCode = 301; const { pathname, search } = new URL(c.req.url); const destinationURL = `${base}${pathname}${search}`; console.log(destinationURL); return c.redirect(destinationURL, statusCode); }); export default app; ``` --- title: Respond with another site · Cloudflare Workers docs description: Respond to the Worker request with the response from another website (example.com in this example). lastUpdated: 2025-04-28T14:11:18.000Z chatbotDeprioritize: false tags: Middleware source_url: html: https://developers.cloudflare.com/workers/examples/respond-with-another-site/ md: https://developers.cloudflare.com/workers/examples/respond-with-another-site/index.md --- If you want to get started quickly, click on the button below. [![Deploy to Cloudflare](https://deploy.workers.cloudflare.com/button)](https://deploy.workers.cloudflare.com/?url=https://github.com/cloudflare/docs-examples/tree/main/workers/respond-with-another-site) This creates a repository in your GitHub account and deploys the application to Cloudflare Workers. * JavaScript ```js export default { async fetch(request) { async function MethodNotAllowed(request) { return new Response(`Method ${request.method} not allowed.`, { status: 405, headers: { Allow: "GET", }, }); } // Only GET requests work with this proxy. if (request.method !== "GET") return MethodNotAllowed(request); return fetch(`https://example.com`); }, }; ``` [Run Worker in Playground](https://workers.cloudflare.com/playground#LYVwNgLglgDghgJwgegGYHsHALQBM4RwDcABAEbogB2+CAngLzbPYZb6HbW5QDGU2AAwB2EYIDMw4QFYAnOICMALhYs2wDnC40+AsaMkz5CgLAAoAMLoqEAKY3sAESgBnGOhdRo1pSXV4CYhIqOGBbBgAiKBpbAA8AOgArFwjSVCgwe1DwqJiE5IjzKxt7CGwAFToYW184GBgwPgIoa2REuAA3OBdeBFgIAGpgdFxwW3NzOPckElxbVDhwCBIAbzMSEm66Kl4-WwheAAsACgRbAEcQWxcIAEpV9Y3Nl23d1GpebyoSAFl9w5GADl0BAAIJgMDoADutlwpwuVxu9zWTyeZwgIAQ3yotihJAAStd3FQXLZjgADP4QAG4EgAEhWZ0u1wg8TC1JGAF9giDNhDobD4uSADQPVGom4EEAuXwAFkE0mFj3FJEOtjgcwQMrFKqe4MhUN8EQA4gBRcoRJW6kicq3izm3IjKm3O5DIEgAeSoYDoJDN5RITMREBcJChmAA1mGvIcSNTXCQYAh0LE6PFnVBUCR4cybmz-iMSABCBgMEgm80Re7ozHfKk04Fg-kwuFBlmO501rF7A4ncmHCAQGAyt1xUINWzxXjoYDkjsbW1mTlEcyqZjqTTaHj8ISiAxSOSKIrWOwOZxuDxeFpUXz+TSkEJhSLsjWBVJ+DJZJ8RMiQsiFSwT1KCoqhqTZ6kaXhmlaZJrAmMwVgiYA4GiAB9YZRkyCIlFyOZ8hSTlVzXDdAi3XRdzEQxDwUZggA) * TypeScript ```ts export default { async fetch(request): Promise { async function MethodNotAllowed(request) { return new Response(`Method ${request.method} not allowed.`, { status: 405, headers: { Allow: "GET", }, }); } // Only GET requests work with this proxy. if (request.method !== "GET") return MethodNotAllowed(request); return fetch(`https://example.com`); }, } satisfies ExportedHandler; ``` * Python ```py from workers import Response, fetch def on_fetch(request): def method_not_allowed(request): msg = f'Method {request.method} not allowed.' headers = {"Allow": "GET"} return Response(msg, headers=headers, status=405) # Only GET requests work with this proxy. if request.method != "GET": return method_not_allowed(request) return fetch("https://example.com") ``` --- title: Return small HTML page · Cloudflare Workers docs description: Deliver an HTML page from an HTML string directly inside the Worker script. lastUpdated: 2025-04-28T14:11:18.000Z chatbotDeprioritize: false source_url: html: https://developers.cloudflare.com/workers/examples/return-html/ md: https://developers.cloudflare.com/workers/examples/return-html/index.md --- If you want to get started quickly, click on the button below. [![Deploy to Cloudflare](https://deploy.workers.cloudflare.com/button)](https://deploy.workers.cloudflare.com/?url=https://github.com/cloudflare/docs-examples/tree/main/workers/return-html) This creates a repository in your GitHub account and deploys the application to Cloudflare Workers. * JavaScript ```js export default { async fetch(request) { const html = `

    Hello World

    This markup was generated by a Cloudflare Worker.

    `; return new Response(html, { headers: { "content-type": "text/html;charset=UTF-8", }, }); }, }; ``` [Run Worker in Playground](https://workers.cloudflare.com/playground#LYVwNgLglgDghgJwgegGYHsHALQBM4RwDcABAEbogB2+CAngLzbPYZb6HbW5QDGU2AAwBmABwAmAIwBOQQDZJgyQFYAXCxZtgHOFxp8BIiTPmKVAWABQAYXRUIAU3vYAIlADOMdO6jQ7qki08AmISKjhgBwYAIigaBwAPADoAK3do0lQoMCcIqNj45LToq1t7JwhsABU6GAcAuBgYMD4CKDtkFLgANzh3XgRYCABqYHRccAcrK0SvJBJcB1Q4cAgSAG9LEhI+uipeQIcIXgALAAoEBwBHEAd3CABKDa3tkl47e5ITiGAwEgYSAADAA8AEIXAB5axVACaAAUAKJfH5gAB8L22wIouDo6Ner2BJ0kqIAEg4wGB0CQAOqYMC4YHIIl4-EkYEwVFVE4eEjARAAaxAMBIAHc+iQAOZOBwIAgOXDkOg7EjWSkgXCoMCIBw0zD8mVJRkcjFs5DY3GAoiWE2XCAgBBUMIOEUkABKdy8VHcDjO31+ABpnqyvg44IsEO4Aptg9tou9ys4ILUHNEAtFHAkUH6wERTohvRAGABVKoAMWwomi-pN2wAvtX8bWHla69Xa0QrBpmFodHoePwhGIpLIFEplKU7I5nG5PN5fO0qAEgjpSOFIjFIoQdBlAtlcuvomRKWQSjZJxVqsmGk0Wrw2h00nZppZ1tE+XEAPpjCY5VMFRZFOktadl2PYhH2BiDsYI5mMozBAA) * TypeScript ```ts export default { async fetch(request): Promise { const html = `

    Hello World

    This markup was generated by a Cloudflare Worker.

    `; return new Response(html, { headers: { "content-type": "text/html;charset=UTF-8", }, }); }, } satisfies ExportedHandler; ``` * Python ```py from workers import Response def on_fetch(request): html = """

    Hello World

    This markup was generated by a Cloudflare Worker.

    """ headers = {"content-type": "text/html;charset=UTF-8"} return Response(html, headers=headers) ``` * Rust ```rs use worker::*; #[event(fetch)] async fn fetch(_req: Request, _env: Env, _ctx: Context) -> Result { let html = r#"

    Hello World

    This markup was generated by a Cloudflare Worker.

    "#; Response::from_html(html) } ``` * Hono ```ts import { Hono } from "hono"; import { html } from "hono/html"; const app = new Hono(); app.get("*", (c) => { const doc = html`

    Hello World

    This markup was generated by a Cloudflare Worker with Hono.

    `; return c.html(doc); }); export default app; ```
    --- title: Return JSON · Cloudflare Workers docs description: Return JSON directly from a Worker script, useful for building APIs and middleware. lastUpdated: 2025-04-28T14:11:18.000Z chatbotDeprioritize: false tags: JSON source_url: html: https://developers.cloudflare.com/workers/examples/return-json/ md: https://developers.cloudflare.com/workers/examples/return-json/index.md --- If you want to get started quickly, click on the button below. [![Deploy to Cloudflare](https://deploy.workers.cloudflare.com/button)](https://deploy.workers.cloudflare.com/?url=https://github.com/cloudflare/docs-examples/tree/main/workers/return-json) This creates a repository in your GitHub account and deploys the application to Cloudflare Workers. * JavaScript ```js export default { async fetch(request) { const data = { hello: "world", }; return Response.json(data); }, }; ``` [Run Worker in Playground](https://workers.cloudflare.com/playground#LYVwNgLglgDghgJwgegGYHsHALQBM4RwDcABAEbogB2+CAngLzbPYZb6HbW5QDGU2AAwAmAGwAWAJwB2AKyjRs6QA4AXCxZtgHOFxp8BIiTPmKVAWABQAYXRUIAU3vYAIlADOMdO6jQ7qki08AmISKjhgBwYAIigaBwAPADoAK3do0lQoMCcIqNj45LToq1t7JwhsABU6GAcAuBgYMD4CKDtkFLgANzh3XgRYCABqYHRccAcrK0SvJBJcB1Q4cAgSAG9LEhI+uipeQIcIXgALAAoEBwBHEAd3CABKDa3tkl47e4WQkgZn19eTg4wGB0AFogB3TBgXDRAA0L22AF8iJYESRLhAQAgqCQAEp3LxUdwOVLuOxnHQPFFI+HIqwaZhaHR6Hj8IRiKRyBRKZSlOyOZxuTzeXztKgBII6UjhSIxSKEHQZQLZXKy6JkEFkEo2fkVaq1eo7JotXhtDppOzTSzraLAOBxAD6YwmOWiqgKiyK6UR9IZTJCLIM7OMXLMymYQA) * TypeScript ```ts export default { async fetch(request): Promise { const data = { hello: "world", }; return Response.json(data); }, } satisfies ExportedHandler; ``` * Python ```py from workers import Response import json def on_fetch(request): data = json.dumps({"hello": "world"}) headers = {"content-type": "application/json"} return Response(data, headers=headers) ``` * Rust ```rs use serde::{Deserialize, Serialize}; use worker::*; #[derive(Deserialize, Serialize, Debug)] struct Json { hello: String, } #[event(fetch)] async fn fetch(_req: Request, _env: Env, _ctx: Context) -> Result { let data = Json { hello: String::from("world"), }; Response::from_json(&data) } ``` * Hono ```ts import { Hono } from 'hono'; const app = new Hono(); app.get('*', (c) => { const data = { hello: "world", }; return c.json(data); }); export default app; ``` --- title: Rewrite links · Cloudflare Workers docs description: Rewrite URL links in HTML using the HTMLRewriter. This is useful for JAMstack websites. lastUpdated: 2025-04-28T14:11:18.000Z chatbotDeprioritize: false source_url: html: https://developers.cloudflare.com/workers/examples/rewrite-links/ md: https://developers.cloudflare.com/workers/examples/rewrite-links/index.md --- If you want to get started quickly, click on the button below. [![Deploy to Cloudflare](https://deploy.workers.cloudflare.com/button)](https://deploy.workers.cloudflare.com/?url=https://github.com/cloudflare/docs-examples/tree/main/workers/rewrite-links) This creates a repository in your GitHub account and deploys the application to Cloudflare Workers. * JavaScript ```js export default { async fetch(request) { const OLD_URL = "developer.mozilla.org"; const NEW_URL = "mynewdomain.com"; class AttributeRewriter { constructor(attributeName) { this.attributeName = attributeName; } element(element) { const attribute = element.getAttribute(this.attributeName); if (attribute) { element.setAttribute( this.attributeName, attribute.replace(OLD_URL, NEW_URL), ); } } } const rewriter = new HTMLRewriter() .on("a", new AttributeRewriter("href")) .on("img", new AttributeRewriter("src")); const res = await fetch(request); const contentType = res.headers.get("Content-Type"); // If the response is HTML, it can be transformed with // HTMLRewriter -- otherwise, it should pass through if (contentType.startsWith("text/html")) { return rewriter.transform(res); } else { return res; } }, }; ``` * TypeScript ```ts export default { async fetch(request): Promise { const OLD_URL = "developer.mozilla.org"; const NEW_URL = "mynewdomain.com"; class AttributeRewriter { constructor(attributeName) { this.attributeName = attributeName; } element(element) { const attribute = element.getAttribute(this.attributeName); if (attribute) { element.setAttribute( this.attributeName, attribute.replace(OLD_URL, NEW_URL), ); } } } const rewriter = new HTMLRewriter() .on("a", new AttributeRewriter("href")) .on("img", new AttributeRewriter("src")); const res = await fetch(request); const contentType = res.headers.get("Content-Type"); // If the response is HTML, it can be transformed with // HTMLRewriter -- otherwise, it should pass through if (contentType.startsWith("text/html")) { return rewriter.transform(res); } else { return res; } }, } satisfies ExportedHandler; ``` * Python ```py from pyodide.ffi import create_proxy from js import HTMLRewriter, fetch async def on_fetch(request): old_url = "developer.mozilla.org" new_url = "mynewdomain.com" class AttributeRewriter: def __init__(self, attr_name): self.attr_name = attr_name def element(self, element): attr = element.getAttribute(self.attr_name) if attr: element.setAttribute(self.attr_name, attr.replace(old_url, new_url)) href = create_proxy(AttributeRewriter("href")) src = create_proxy(AttributeRewriter("src")) rewriter = HTMLRewriter.new().on("a", href).on("img", src) res = await fetch(request) content_type = res.headers["Content-Type"] # If the response is HTML, it can be transformed with # HTMLRewriter -- otherwise, it should pass through if content_type.startswith("text/html"): return rewriter.transform(res) return res ``` * Hono ```ts import { Hono } from 'hono'; import { html } from 'hono/html'; const app = new Hono(); app.get('*', async (c) => { const OLD_URL = "developer.mozilla.org"; const NEW_URL = "mynewdomain.com"; class AttributeRewriter { attributeName: string; constructor(attributeName: string) { this.attributeName = attributeName; } element(element: Element) { const attribute = element.getAttribute(this.attributeName); if (attribute) { element.setAttribute( this.attributeName, attribute.replace(OLD_URL, NEW_URL) ); } } } // Make a fetch request using the original request const res = await fetch(c.req.raw); const contentType = res.headers.get("Content-Type") || ""; // If the response is HTML, transform it with HTMLRewriter if (contentType.startsWith("text/html")) { const rewriter = new HTMLRewriter() .on("a", new AttributeRewriter("href")) .on("img", new AttributeRewriter("src")); return new Response(rewriter.transform(res).body, { headers: res.headers }); } else { // Pass through the response as is return res; } }); export default app; ``` --- title: Set security headers · Cloudflare Workers docs description: Set common security headers (X-XSS-Protection, X-Frame-Options, X-Content-Type-Options, Permissions-Policy, Referrer-Policy, Strict-Transport-Security, Content-Security-Policy). lastUpdated: 2025-04-28T14:11:18.000Z chatbotDeprioritize: false tags: Security,Middleware source_url: html: https://developers.cloudflare.com/workers/examples/security-headers/ md: https://developers.cloudflare.com/workers/examples/security-headers/index.md --- If you want to get started quickly, click on the button below. [![Deploy to Cloudflare](https://deploy.workers.cloudflare.com/button)](https://deploy.workers.cloudflare.com/?url=https://github.com/cloudflare/docs-examples/tree/main/workers/security-headers) This creates a repository in your GitHub account and deploys the application to Cloudflare Workers. * JavaScript ```js export default { async fetch(request) { const DEFAULT_SECURITY_HEADERS = { /* Secure your application with Content-Security-Policy headers. Enabling these headers will permit content from a trusted domain and all its subdomains. @see https://developer.mozilla.org/en-US/docs/Web/HTTP/Reference/Headers/Content-Security-Policy "Content-Security-Policy": "default-src 'self' example.com *.example.com", */ /* You can also set Strict-Transport-Security headers. These are not automatically set because your website might get added to Chrome's HSTS preload list. Here's the code if you want to apply it: "Strict-Transport-Security" : "max-age=63072000; includeSubDomains; preload", */ /* Permissions-Policy header provides the ability to allow or deny the use of browser features, such as opting out of FLoC - which you can use below: "Permissions-Policy": "interest-cohort=()", */ /* X-XSS-Protection header prevents a page from loading if an XSS attack is detected. @see https://developer.mozilla.org/en-US/docs/Web/HTTP/Reference/Headers/X-XSS-Protection */ "X-XSS-Protection": "0", /* X-Frame-Options header prevents click-jacking attacks. @see https://developer.mozilla.org/en-US/docs/Web/HTTP/Reference/Headers/X-Frame-Options */ "X-Frame-Options": "DENY", /* X-Content-Type-Options header prevents MIME-sniffing. @see https://developer.mozilla.org/en-US/docs/Web/HTTP/Reference/Headers/X-Content-Type-Options */ "X-Content-Type-Options": "nosniff", "Referrer-Policy": "strict-origin-when-cross-origin", "Cross-Origin-Embedder-Policy": 'require-corp; report-to="default";', "Cross-Origin-Opener-Policy": 'same-site; report-to="default";', "Cross-Origin-Resource-Policy": "same-site", }; const BLOCKED_HEADERS = [ "Public-Key-Pins", "X-Powered-By", "X-AspNet-Version", ]; let response = await fetch(request); let newHeaders = new Headers(response.headers); const tlsVersion = request.cf.tlsVersion; console.log(tlsVersion); // This sets the headers for HTML responses: if ( newHeaders.has("Content-Type") && !newHeaders.get("Content-Type").includes("text/html") ) { return new Response(response.body, { status: response.status, statusText: response.statusText, headers: newHeaders, }); } Object.keys(DEFAULT_SECURITY_HEADERS).map((name) => { newHeaders.set(name, DEFAULT_SECURITY_HEADERS[name]); }); BLOCKED_HEADERS.forEach((name) => { newHeaders.delete(name); }); if (tlsVersion !== "TLSv1.2" && tlsVersion !== "TLSv1.3") { return new Response("You need to use TLS version 1.2 or higher.", { status: 400, }); } else { return new Response(response.body, { status: response.status, statusText: response.statusText, headers: newHeaders, }); } }, }; ``` * TypeScript ```ts export default { async fetch(request): Promise { const DEFAULT_SECURITY_HEADERS = { /* Secure your application with Content-Security-Policy headers. Enabling these headers will permit content from a trusted domain and all its subdomains. @see https://developer.mozilla.org/en-US/docs/Web/HTTP/Reference/Headers/Content-Security-Policy "Content-Security-Policy": "default-src 'self' example.com *.example.com", */ /* You can also set Strict-Transport-Security headers. These are not automatically set because your website might get added to Chrome's HSTS preload list. Here's the code if you want to apply it: "Strict-Transport-Security" : "max-age=63072000; includeSubDomains; preload", */ /* Permissions-Policy header provides the ability to allow or deny the use of browser features, such as opting out of FLoC - which you can use below: "Permissions-Policy": "interest-cohort=()", */ /* X-XSS-Protection header prevents a page from loading if an XSS attack is detected. @see https://developer.mozilla.org/en-US/docs/Web/HTTP/Reference/Headers/X-XSS-Protection */ "X-XSS-Protection": "0", /* X-Frame-Options header prevents click-jacking attacks. @see https://developer.mozilla.org/en-US/docs/Web/HTTP/Reference/Headers/X-Frame-Options */ "X-Frame-Options": "DENY", /* X-Content-Type-Options header prevents MIME-sniffing. @see https://developer.mozilla.org/en-US/docs/Web/HTTP/Reference/Headers/X-Content-Type-Options */ "X-Content-Type-Options": "nosniff", "Referrer-Policy": "strict-origin-when-cross-origin", "Cross-Origin-Embedder-Policy": 'require-corp; report-to="default";', "Cross-Origin-Opener-Policy": 'same-site; report-to="default";', "Cross-Origin-Resource-Policy": "same-site", }; const BLOCKED_HEADERS = [ "Public-Key-Pins", "X-Powered-By", "X-AspNet-Version", ]; let response = await fetch(request); let newHeaders = new Headers(response.headers); const tlsVersion = request.cf.tlsVersion; console.log(tlsVersion); // This sets the headers for HTML responses: if ( newHeaders.has("Content-Type") && !newHeaders.get("Content-Type").includes("text/html") ) { return new Response(response.body, { status: response.status, statusText: response.statusText, headers: newHeaders, }); } Object.keys(DEFAULT_SECURITY_HEADERS).map((name) => { newHeaders.set(name, DEFAULT_SECURITY_HEADERS[name]); }); BLOCKED_HEADERS.forEach((name) => { newHeaders.delete(name); }); if (tlsVersion !== "TLSv1.2" && tlsVersion !== "TLSv1.3") { return new Response("You need to use TLS version 1.2 or higher.", { status: 400, }); } else { return new Response(response.body, { status: response.status, statusText: response.statusText, headers: newHeaders, }); } }, } satisfies ExportedHandler; ``` * Python ```py from workers import Response, fetch async def on_fetch(request): default_security_headers = { # Secure your application with Content-Security-Policy headers. #Enabling these headers will permit content from a trusted domain and all its subdomains. #@see https://developer.mozilla.org/en-US/docs/Web/HTTP/Reference/Headers/Content-Security-Policy "Content-Security-Policy": "default-src 'self' example.com *.example.com", #You can also set Strict-Transport-Security headers. #These are not automatically set because your website might get added to Chrome's HSTS preload list. #Here's the code if you want to apply it: "Strict-Transport-Security" : "max-age=63072000; includeSubDomains; preload", #Permissions-Policy header provides the ability to allow or deny the use of browser features, such as opting out of FLoC - which you can use below: "Permissions-Policy": "interest-cohort=()", #X-XSS-Protection header prevents a page from loading if an XSS attack is detected. #@see https://developer.mozilla.org/en-US/docs/Web/HTTP/Reference/Headers/X-XSS-Protection "X-XSS-Protection": "0", #X-Frame-Options header prevents click-jacking attacks. #@see https://developer.mozilla.org/en-US/docs/Web/HTTP/Reference/Headers/X-Frame-Options "X-Frame-Options": "DENY", #X-Content-Type-Options header prevents MIME-sniffing. #@see https://developer.mozilla.org/en-US/docs/Web/HTTP/Reference/Headers/X-Content-Type-Options "X-Content-Type-Options": "nosniff", "Referrer-Policy": "strict-origin-when-cross-origin", "Cross-Origin-Embedder-Policy": 'require-corp; report-to="default";', "Cross-Origin-Opener-Policy": 'same-site; report-to="default";', "Cross-Origin-Resource-Policy": "same-site", } blocked_headers = ["Public-Key-Pins", "X-Powered-By" ,"X-AspNet-Version"] res = await fetch(request) new_headers = res.headers # This sets the headers for HTML responses if "text/html" in new_headers["Content-Type"]: return Response(res.body, status=res.status, statusText=res.statusText, headers=new_headers) for name in default_security_headers: new_headers[name] = default_security_headers[name] for name in blocked_headers: del new_headers["name"] tls = request.cf.tlsVersion if not tls in ("TLSv1.2", "TLSv1.3"): return Response("You need to use TLS version 1.2 or higher.", status=400) return Response(res.body, status=res.status, statusText=res.statusText, headers=new_headers) ``` * Rust ```rs use std::collections::HashMap; use worker::*; #[event(fetch)] async fn fetch(req: Request, _env: Env, _ctx: Context) -> Result { let default_security_headers = HashMap::from([ //Secure your application with Content-Security-Policy headers. //Enabling these headers will permit content from a trusted domain and all its subdomains. //@see https://developer.mozilla.org/en-US/docs/Web/HTTP/Reference/Headers/Content-Security-Policy ( "Content-Security-Policy", "default-src 'self' example.com *.example.com", ), //You can also set Strict-Transport-Security headers. //These are not automatically set because your website might get added to Chrome's HSTS preload list. //Here's the code if you want to apply it: ( "Strict-Transport-Security", "max-age=63072000; includeSubDomains; preload", ), //Permissions-Policy header provides the ability to allow or deny the use of browser features, such as opting out of FLoC - which you can use below: ("Permissions-Policy", "interest-cohort=()"), //X-XSS-Protection header prevents a page from loading if an XSS attack is detected. //@see https://developer.mozilla.org/en-US/docs/Web/HTTP/Reference/Headers/X-XSS-Protection ("X-XSS-Protection", "0"), //X-Frame-Options header prevents click-jacking attacks. //@see https://developer.mozilla.org/en-US/docs/Web/HTTP/Reference/Headers/X-Frame-Options ("X-Frame-Options", "DENY"), //X-Content-Type-Options header prevents MIME-sniffing. //@see https://developer.mozilla.org/en-US/docs/Web/HTTP/Reference/Headers/X-Content-Type-Options ("X-Content-Type-Options", "nosniff"), ("Referrer-Policy", "strict-origin-when-cross-origin"), ( "Cross-Origin-Embedder-Policy", "require-corp; report-to='default';", ), ( "Cross-Origin-Opener-Policy", "same-site; report-to='default';", ), ("Cross-Origin-Resource-Policy", "same-site"), ]); let blocked_headers = ["Public-Key-Pins", "X-Powered-By", "X-AspNet-Version"]; let tls = req.cf().unwrap().tls_version(); let res = Fetch::Request(req).send().await?; let mut new_headers = res.headers().clone(); // This sets the headers for HTML responses if Some(String::from("text/html")) == new_headers.get("Content-Type")? { return Ok(Response::from_body(res.body().clone())? .with_headers(new_headers) .with_status(res.status_code())); } for (k, v) in default_security_headers { new_headers.set(k, v)?; } for k in blocked_headers { new_headers.delete(k)?; } if !vec!["TLSv1.2", "TLSv1.3"].contains(&tls.as_str()) { return Response::error("You need to use TLS version 1.2 or higher.", 400); } Ok(Response::from_body(res.body().clone())? .with_headers(new_headers) .with_status(res.status_code())) } ``` * Hono ```ts import { Hono } from 'hono'; import { secureHeaders } from 'hono/secure-headers'; const app = new Hono(); app.use(secureHeaders()); // Handle all other requests by passing through to origin app.all('*', async (c) => { return fetch(c.req.raw); }); export default app; ``` --- title: Sign requests · Cloudflare Workers docs description: Verify a signed request using the HMAC and SHA-256 algorithms or return a 403. lastUpdated: 2025-07-09T14:24:57.000Z chatbotDeprioritize: false tags: Security,Web Crypto source_url: html: https://developers.cloudflare.com/workers/examples/signing-requests/ md: https://developers.cloudflare.com/workers/examples/signing-requests/index.md --- If you want to get started quickly, click on the button below. [![Deploy to Cloudflare](https://deploy.workers.cloudflare.com/button)](https://deploy.workers.cloudflare.com/?url=https://github.com/cloudflare/docs-examples/tree/main/workers/signing-requests) This creates a repository in your GitHub account and deploys the application to Cloudflare Workers. Note This example Worker makes use of the [Node.js Buffer API](https://developers.cloudflare.com/workers/runtime-apis/nodejs/buffer/), which is available as part of the Worker's runtime [Node.js compatibility mode](https://developers.cloudflare.com/workers/runtime-apis/nodejs/). To run this Worker, you will need to [enable the `nodejs_compat` compatibility flag](https://developers.cloudflare.com/workers/runtime-apis/nodejs/#get-started). You can both verify and generate signed requests from within a Worker using the [Web Crypto APIs](https://developer.mozilla.org/en-US/docs/Web/API/Crypto/subtle). The following Worker will: * For request URLs beginning with `/generate/`, replace `/generate/` with `/`, sign the resulting path with its timestamp, and return the full, signed URL in the response body. * For all other request URLs, verify the signed URL and allow the request through. - JavaScript ```js import { Buffer } from "node:buffer"; const encoder = new TextEncoder(); // How long an HMAC token should be valid for, in seconds const EXPIRY = 60; export default { /** * * @param {Request} request * @param {{SECRET_DATA: string}} env * @returns */ async fetch(request, env) { // You will need some secret data to use as a symmetric key. This should be // attached to your Worker as an encrypted secret. // Refer to https://developers.cloudflare.com/workers/configuration/secrets/ const secretKeyData = encoder.encode( env.SECRET_DATA ?? "my secret symmetric key", ); // Import your secret as a CryptoKey for both 'sign' and 'verify' operations const key = await crypto.subtle.importKey( "raw", secretKeyData, { name: "HMAC", hash: "SHA-256" }, false, ["sign", "verify"], ); const url = new URL(request.url); // This is a demonstration Worker that allows unauthenticated access to /generate // In a real application you would want to make sure that // users could only generate signed URLs when authenticated if (url.pathname.startsWith("/generate/")) { url.pathname = url.pathname.replace("/generate/", "/"); const timestamp = Math.floor(Date.now() / 1000); // This contains all the data about the request that you want to be able to verify // Here we only sign the timestamp and the pathname, but often you will want to // include more data (for instance, the URL hostname or query parameters) const dataToAuthenticate = `${url.pathname}${timestamp}`; const mac = await crypto.subtle.sign( "HMAC", key, encoder.encode(dataToAuthenticate), ); // Refer to https://developers.cloudflare.com/workers/runtime-apis/nodejs/ // for more details on using Node.js APIs in Workers const base64Mac = Buffer.from(mac).toString("base64"); url.searchParams.set("verify", `${timestamp}-${base64Mac}`); return new Response(`${url.pathname}${url.search}`); // Verify all non /generate requests } else { // Make sure you have the minimum necessary query parameters. if (!url.searchParams.has("verify")) { return new Response("Missing query parameter", { status: 403 }); } const [timestamp, hmac] = url.searchParams.get("verify").split("-"); const assertedTimestamp = Number(timestamp); const dataToAuthenticate = `${url.pathname}${assertedTimestamp}`; const receivedMac = Buffer.from(hmac, "base64"); // Use crypto.subtle.verify() to guard against timing attacks. Since HMACs use // symmetric keys, you could implement this by calling crypto.subtle.sign() and // then doing a string comparison -- this is insecure, as string comparisons // bail out on the first mismatch, which leaks information to potential // attackers. const verified = await crypto.subtle.verify( "HMAC", key, receivedMac, encoder.encode(dataToAuthenticate), ); if (!verified) { return new Response("Invalid MAC", { status: 403 }); } // Signed requests expire after one minute. Note that this value should depend on your specific use case if (Date.now() / 1000 > assertedTimestamp + EXPIRY) { return new Response( `URL expired at ${new Date((assertedTimestamp + EXPIRY) * 1000)}`, { status: 403 }, ); } } return fetch(new URL(url.pathname, "https://example.com"), request); }, }; ``` - TypeScript ```ts import { Buffer } from "node:buffer"; const encoder = new TextEncoder(); // How long an HMAC token should be valid for, in seconds const EXPIRY = 60; interface Env { SECRET_DATA: string; } export default { async fetch(request, env): Promise { // You will need some secret data to use as a symmetric key. This should be // attached to your Worker as an encrypted secret. // Refer to https://developers.cloudflare.com/workers/configuration/secrets/ const secretKeyData = encoder.encode( env.SECRET_DATA ?? "my secret symmetric key", ); // Import your secret as a CryptoKey for both 'sign' and 'verify' operations const key = await crypto.subtle.importKey( "raw", secretKeyData, { name: "HMAC", hash: "SHA-256" }, false, ["sign", "verify"], ); const url = new URL(request.url); // This is a demonstration Worker that allows unauthenticated access to /generate // In a real application you would want to make sure that // users could only generate signed URLs when authenticated if (url.pathname.startsWith("/generate/")) { url.pathname = url.pathname.replace("/generate/", "/"); const timestamp = Math.floor(Date.now() / 1000); // This contains all the data about the request that you want to be able to verify // Here we only sign the timestamp and the pathname, but often you will want to // include more data (for instance, the URL hostname or query parameters) const dataToAuthenticate = `${url.pathname}${timestamp}`; const mac = await crypto.subtle.sign( "HMAC", key, encoder.encode(dataToAuthenticate), ); // Refer to https://developers.cloudflare.com/workers/runtime-apis/nodejs/ // for more details on using NodeJS APIs in Workers const base64Mac = Buffer.from(mac).toString("base64"); url.searchParams.set("verify", `${timestamp}-${base64Mac}`); return new Response(`${url.pathname}${url.search}`); // Verify all non /generate requests } else { // Make sure you have the minimum necessary query parameters. if (!url.searchParams.has("verify")) { return new Response("Missing query parameter", { status: 403 }); } const [timestamp, hmac] = url.searchParams.get("verify").split("-"); const assertedTimestamp = Number(timestamp); const dataToAuthenticate = `${url.pathname}${assertedTimestamp}`; const receivedMac = Buffer.from(hmac, "base64"); // Use crypto.subtle.verify() to guard against timing attacks. Since HMACs use // symmetric keys, you could implement this by calling crypto.subtle.sign() and // then doing a string comparison -- this is insecure, as string comparisons // bail out on the first mismatch, which leaks information to potential // attackers. const verified = await crypto.subtle.verify( "HMAC", key, receivedMac, encoder.encode(dataToAuthenticate), ); if (!verified) { return new Response("Invalid MAC", { status: 403 }); } // Signed requests expire after one minute. Note that this value should depend on your specific use case if (Date.now() / 1000 > assertedTimestamp + EXPIRY) { return new Response( `URL expired at ${new Date((assertedTimestamp + EXPIRY) * 1000)}`, { status: 403 }, ); } } return fetch(new URL(url.pathname, "https://example.com"), request); }, } satisfies ExportedHandler; ``` - Hono ```ts import { Buffer } from "node:buffer"; import { Hono } from "hono"; import { proxy } from "hono/proxy"; const encoder = new TextEncoder(); // How long an HMAC token should be valid for, in seconds const EXPIRY = 60; interface Env { SECRET_DATA: string; } const app = new Hono(); // Handle URL generation requests app.get("/generate/*", async (c) => { const env = c.env; // You will need some secret data to use as a symmetric key const secretKeyData = encoder.encode( env.SECRET_DATA ?? "my secret symmetric key", ); // Import the secret as a CryptoKey for both 'sign' and 'verify' operations const key = await crypto.subtle.importKey( "raw", secretKeyData, { name: "HMAC", hash: "SHA-256" }, false, ["sign", "verify"], ); // Replace "/generate/" prefix with "/" let pathname = c.req.path.replace("/generate/", "/"); const timestamp = Math.floor(Date.now() / 1000); // Data to authenticate: pathname + timestamp const dataToAuthenticate = `${pathname}${timestamp}`; // Sign the data const mac = await crypto.subtle.sign( "HMAC", key, encoder.encode(dataToAuthenticate), ); // Convert the signature to base64 const base64Mac = Buffer.from(mac).toString("base64"); // Add verification parameter to URL url.searchParams.set("verify", `${timestamp}-${base64Mac}`); return c.text(`${pathname}${url.search}`); }); // Handle verification for all other requests app.all("*", async (c) => { const env = c.env; const url = c.req.url; // You will need some secret data to use as a symmetric key const secretKeyData = encoder.encode( env.SECRET_DATA ?? "my secret symmetric key", ); // Import the secret as a CryptoKey for both 'sign' and 'verify' operations const key = await crypto.subtle.importKey( "raw", secretKeyData, { name: "HMAC", hash: "SHA-256" }, false, ["sign", "verify"], ); // Make sure the request has the verification parameter if (!c.req.query("verify")) { return c.text("Missing query parameter", 403); } // Extract timestamp and signature const [timestamp, hmac] = c.req.query("verify")!.split("-"); const assertedTimestamp = Number(timestamp); // Recreate the data that should have been signed const dataToAuthenticate = `${c.req.path}${assertedTimestamp}`; // Convert base64 signature back to ArrayBuffer const receivedMac = Buffer.from(hmac, "base64"); // Verify the signature const verified = await crypto.subtle.verify( "HMAC", key, receivedMac, encoder.encode(dataToAuthenticate), ); // If verification fails, return 403 if (!verified) { return c.text("Invalid MAC", 403); } // Check if the signature has expired if (Date.now() / 1000 > assertedTimestamp + EXPIRY) { return c.text( `URL expired at ${new Date((assertedTimestamp + EXPIRY) * 1000)}`, 403, ); } // If verification passes, proxy the request to example.com return proxy(`https://example.com/${c.req.path}`, ...c.req); }); export default app; ``` - Python ```py from pyodide.ffi import to_js as _to_js from js import Response, URL, TextEncoder, Buffer, fetch, Object, crypto def to_js(x): return _to_js(x, dict_converter=Object.fromEntries) encoder = TextEncoder.new() # How long an HMAC token should be valid for, in seconds EXPIRY = 60 async def on_fetch(request, env): # Get the secret key secret_key_data = encoder.encode(env.SECRET_DATA if hasattr(env, "SECRET_DATA") else "my secret symmetric key") # Import the secret as a CryptoKey for both 'sign' and 'verify' operations key = await crypto.subtle.importKey( "raw", secret_key_data, to_js({"name": "HMAC", "hash": "SHA-256"}), False, ["sign", "verify"] ) url = URL.new(request.url) if url.pathname.startswith("/generate/"): url.pathname = url.pathname.replace("/generate/", "/", 1) timestamp = int(Date.now() / 1000) # Data to authenticate data_to_authenticate = f"{url.pathname}{timestamp}" # Sign the data mac = await crypto.subtle.sign( "HMAC", key, encoder.encode(data_to_authenticate) ) # Convert to base64 base64_mac = Buffer.from(mac).toString("base64") # Set the verification parameter url.searchParams.set("verify", f"{timestamp}-{base64_mac}") return Response.new(f"{url.pathname}{url.search}") else: # Verify the request if not "verify" in url.searchParams: return Response.new("Missing query parameter", status=403) verify_param = url.searchParams.get("verify") timestamp, hmac = verify_param.split("-") asserted_timestamp = int(timestamp) data_to_authenticate = f"{url.pathname}{asserted_timestamp}" received_mac = Buffer.from(hmac, "base64") # Verify the signature verified = await crypto.subtle.verify( "HMAC", key, received_mac, encoder.encode(data_to_authenticate) ) if not verified: return Response.new("Invalid MAC", status=403) # Check expiration if Date.now() / 1000 > asserted_timestamp + EXPIRY: expiry_date = Date.new((asserted_timestamp + EXPIRY) * 1000) return Response.new(f"URL expired at {expiry_date}", status=403) # Proxy to example.com if verification passes return fetch(URL.new(f"https://example.com{url.pathname}"), request) ``` ## Validate signed requests using the WAF The provided example code for signing requests is compatible with the [`is_timed_hmac_valid_v0()`](https://developers.cloudflare.com/ruleset-engine/rules-language/functions/#hmac-validation) Rules language function. This means that you can verify requests signed by the Worker script using a [custom rule](https://developers.cloudflare.com/waf/custom-rules/use-cases/configure-token-authentication/#option-2-configure-using-custom-rules). --- title: Turnstile with Workers · Cloudflare Workers docs description: Inject [Turnstile](/turnstile/) implicitly into HTML elements using the HTMLRewriter runtime API. lastUpdated: 2025-06-24T17:41:46.000Z chatbotDeprioritize: false source_url: html: https://developers.cloudflare.com/workers/examples/turnstile-html-rewriter/ md: https://developers.cloudflare.com/workers/examples/turnstile-html-rewriter/index.md --- * JavaScript ```js export default { async fetch(request, env) { const SITE_KEY = env.SITE_KEY; // The Turnstile Sitekey of your widget (pass as env or secret) const TURNSTILE_ATTR_NAME = "your_id_to_replace"; // The id of the element to put a Turnstile widget in let res = await fetch(request); // Instantiate the API to run on specific elements, for example, `head`, `div` let newRes = new HTMLRewriter() // `.on` attaches the element handler and this allows you to match on element/attributes or to use the specific methods per the API .on("head", { element(element) { // In this case, you are using `append` to add a new script to the `head` element element.append( ``, { html: true }, ); }, }) .on("div", { element(element) { // Add a turnstile widget element into if an element with the id of TURNSTILE_ATTR_NAME is found if (element.getAttribute("id") === TURNSTILE_ATTR_NAME) { element.append( `
    `, { html: true }, ); } }, }) .transform(res); return newRes; }, }; ``` * TypeScript ```ts export default { async fetch(request, env): Promise { const SITE_KEY = env.SITE_KEY; // The Turnstile Sitekey of your widget (pass as env or secret) const TURNSTILE_ATTR_NAME = "your_id_to_replace"; // The id of the element to put a Turnstile widget in let res = await fetch(request); // Instantiate the API to run on specific elements, for example, `head`, `div` let newRes = new HTMLRewriter() // `.on` attaches the element handler and this allows you to match on element/attributes or to use the specific methods per the API .on("head", { element(element) { // In this case, you are using `append` to add a new script to the `head` element element.append( ``, { html: true }, ); }, }) .on("div", { element(element) { // Add a turnstile widget element into if an element with the id of TURNSTILE_ATTR_NAME is found if (element.getAttribute("id") === TURNSTILE_ATTR_NAME) { element.append( `
    `, { html: true }, ); } }, }) .transform(res); return newRes; }, } satisfies ExportedHandler; ``` * Hono ```ts import { Hono } from "hono"; interface Env { SITE_KEY: string; SECRET_KEY: string; TURNSTILE_ATTR_NAME?: string; } const app = new Hono<{ Bindings: Env }>(); // Middleware to inject Turnstile widget app.use("*", async (c, next) => { const SITE_KEY = c.env.SITE_KEY; // The Turnstile Sitekey from environment const TURNSTILE_ATTR_NAME = c.env.TURNSTILE_ATTR_NAME || "your_id_to_replace"; // The target element ID // Process the request through the original endpoint await next(); // Only process HTML responses const contentType = c.res.headers.get("content-type"); if (!contentType || !contentType.includes("text/html")) { return; } // Clone the response to make it modifiable const originalResponse = c.res; const responseBody = await originalResponse.text(); // Create an HTMLRewriter instance to modify the HTML const rewriter = new HTMLRewriter() // Add the Turnstile script to the head .on("head", { element(element) { element.append( ``, { html: true }, ); }, }) // Add the Turnstile widget to the target div .on("div", { element(element) { if (element.getAttribute("id") === TURNSTILE_ATTR_NAME) { element.append( `
    `, { html: true }, ); } }, }); // Create a new response with the same properties as the original const modifiedResponse = new Response(responseBody, { status: originalResponse.status, statusText: originalResponse.statusText, headers: originalResponse.headers, }); // Transform the response using HTMLRewriter c.res = rewriter.transform(modifiedResponse); }); // Handle POST requests for form submission with Turnstile validation app.post("*", async (c) => { const formData = await c.req.formData(); const token = formData.get("cf-turnstile-response"); const ip = c.req.header("CF-Connecting-IP"); // If no token, return an error if (!token) { return c.text("Missing Turnstile token", 400); } // Prepare verification data const verifyFormData = new FormData(); verifyFormData.append("secret", c.env.SECRET_KEY || ""); verifyFormData.append("response", token.toString()); if (ip) verifyFormData.append("remoteip", ip); // Verify the token with Turnstile API const verifyResult = await fetch( "https://challenges.cloudflare.com/turnstile/v0/siteverify", { method: "POST", body: verifyFormData, }, ); const outcome = await verifyResult.json<{ success: boolean }>; // If verification fails, return an error if (!outcome.success) { return c.text("The provided Turnstile token was not valid!", 401); } // If verification succeeds, proceed with the original request // You would typically handle the form submission logic here // For this example, we'll just send a success response return c.text("Form submission successful!"); }); // Default handler for GET requests app.get("*", async (c) => { // Fetch the original content (you'd replace this with your actual content source) return await fetch(c.req.raw); }); export default app; ``` * Python ```py from pyodide.ffi import create_proxy from js import HTMLRewriter, fetch async def on_fetch(request, env): site_key = env.SITE_KEY attr_name = env.TURNSTILE_ATTR_NAME res = await fetch(request) class Append: def element(self, element): s = '' element.append(s, {"html": True}) class AppendOnID: def __init__(self, name): self.name = name def element(self, element): # You are using the `getAttribute` method here to retrieve the `id` or `class` of an element if element.getAttribute("id") == self.name: div = f'
    ' element.append(div, { "html": True }) # Instantiate the API to run on specific elements, for example, `head`, `div` head = create_proxy(Append()) div = create_proxy(AppendOnID(attr_name)) new_res = HTMLRewriter.new().on("head", head).on("div", div).transform(res) return new_res ``` Note This is only half the implementation for Turnstile. The corresponding token that is a result of a widget being rendered also needs to be verified using the [Siteverify API](https://developers.cloudflare.com/turnstile/get-started/server-side-validation/). Refer to the example below for one such implementation. Prevent potential errors when accessing request.body The body of a [Request](https://developer.mozilla.org/en-US/docs/Web/API/Request) can only be accessed once. If you previously used `request.formData()` in the same request, you may encounter a TypeError when attempting to access `request.body`. To avoid errors, create a clone of the Request object with `request.clone()` for each subsequent attempt to access a Request's body. Keep in mind that Workers have a [memory limit of 128 MB per Worker](https://developers.cloudflare.com/workers/platform/limits#worker-limits) and loading particularly large files into a Worker's memory multiple times may reach this limit. To ensure memory usage does not reach this limit, consider using [Streams](https://developers.cloudflare.com/workers/runtime-apis/streams/).
    --- title: Using the WebSockets API · Cloudflare Workers docs description: Use the WebSockets API to communicate in real time with your Cloudflare Workers. lastUpdated: 2025-04-15T13:29:20.000Z chatbotDeprioritize: false tags: WebSockets source_url: html: https://developers.cloudflare.com/workers/examples/websockets/ md: https://developers.cloudflare.com/workers/examples/websockets/index.md --- WebSockets allow you to communicate in real time with your Cloudflare Workers serverless functions. In this guide, you will learn the basics of WebSockets on Cloudflare Workers, both from the perspective of writing WebSocket servers in your Workers functions, as well as connecting to and working with those WebSocket servers as a client. WebSockets are open connections sustained between the client and the origin server. Inside a WebSocket connection, the client and the origin can pass data back and forth without having to reestablish sessions. This makes exchanging data within a WebSocket connection fast. WebSockets are often used for real-time applications such as live chat and gaming. Note WebSockets utilize an event-based system for receiving and sending messages, much like the Workers runtime model of responding to events. Note If your application needs to coordinate among multiple WebSocket connections, such as a chat room or game match, you will need clients to send messages to a single-point-of-coordination. Durable Objects provide a single-point-of-coordination for Cloudflare Workers, and are often used in parallel with WebSockets to persist state over multiple clients and connections. In this case, refer to [Durable Objects](https://developers.cloudflare.com/durable-objects/) to get started, and prefer using the Durable Objects' extended [WebSockets API](https://developers.cloudflare.com/durable-objects/best-practices/websockets/). ## Write a WebSocket Server WebSocket servers in Cloudflare Workers allow you to receive messages from a client in real time. This guide will show you how to set up a WebSocket server in Workers. A client can make a WebSocket request in the browser by instantiating a new instance of `WebSocket`, passing in the URL for your Workers function: ```js // In client-side JavaScript, connect to your Workers function using WebSockets: const websocket = new WebSocket( "wss://example-websocket.signalnerve.workers.dev", ); ``` Note For more details about creating and working with WebSockets in the client, refer to [Writing a WebSocket client](#write-a-websocket-client). When an incoming WebSocket request reaches the Workers function, it will contain an `Upgrade` header, set to the string value `websocket`. Check for this header before continuing to instantiate a WebSocket: * JavaScript ```js async function handleRequest(request) { const upgradeHeader = request.headers.get('Upgrade'); if (!upgradeHeader || upgradeHeader !== 'websocket') { return new Response('Expected Upgrade: websocket', { status: 426 }); } } ``` * Rust ```rs use worker::\*; #[event(fetch)] async fn fetch(req: HttpRequest, \_env: Env, \_ctx: Context) -> Result { let upgrade_header = match req.headers().get("Upgrade") { Some(h) => h.to_str().unwrap(), None => "", }; if upgrade_header != "websocket" { return worker::Response::error("Expected Upgrade: websocket", 426); } } ``` After you have appropriately checked for the `Upgrade` header, you can create a new instance of `WebSocketPair`, which contains server and client WebSockets. One of these WebSockets should be handled by the Workers function and the other should be returned as part of a `Response` with the [`101` status code](https://developer.mozilla.org/en-US/docs/Web/HTTP/Reference/Status/101), indicating the request is switching protocols: * JavaScript ```js async function handleRequest(request) { const upgradeHeader = request.headers.get('Upgrade'); if (!upgradeHeader || upgradeHeader !== 'websocket') { return new Response('Expected Upgrade: websocket', { status: 426 }); } const webSocketPair = new WebSocketPair(); const client = webSocketPair[0], server = webSocketPair[1]; return new Response(null, { status: 101, webSocket: client, }); } ``` * Rust ```rs use worker::*; #[event(fetch)] async fn fetch(req: HttpRequest, \_env: Env, \_ctx: Context) -> Result { let upgrade_header = match req.headers().get("Upgrade") { Some(h) => h.to_str().unwrap(), None => "", }; if upgrade_header != "websocket" { return worker::Response::error("Expected Upgrade: websocket", 426); } let ws = WebSocketPair::new()?; let client = ws.client; let server = ws.server; server.accept()?; worker::Response::from_websocket(client) } ``` The `WebSocketPair` constructor returns an Object, with the `0` and `1` keys each holding a `WebSocket` instance as its value. It is common to grab the two WebSockets from this pair using [`Object.values`](https://developer.mozilla.org/en-US/docs/Web/JavaScript/Reference/Global_objects/Object/values) and [ES6 destructuring](https://developer.mozilla.org/en-US/docs/Web/JavaScript/Reference/Operators/Destructuring_assignment), as seen in the below example. In order to begin communicating with the `client` WebSocket in your Worker, call `accept` on the `server` WebSocket. This will tell the Workers runtime that it should listen for WebSocket data and keep the connection open with your `client` WebSocket: * JavaScript ```js async function handleRequest(request) { const upgradeHeader = request.headers.get('Upgrade'); if (!upgradeHeader || upgradeHeader !== 'websocket') { return new Response('Expected Upgrade: websocket', { status: 426 }); } const webSocketPair = new WebSocketPair(); const [client, server] = Object.values(webSocketPair); server.accept(); return new Response(null, { status: 101, webSocket: client, }); } ``` * Rust ```rs use worker::*; #[event(fetch)] async fn fetch(req: HttpRequest, \_env: Env, \_ctx: Context) -> Result { let upgrade_header = match req.headers().get("Upgrade") { Some(h) => h.to_str().unwrap(), None => "", }; if upgrade_header != "websocket" { return worker::Response::error("Expected Upgrade: websocket", 426); } let ws = WebSocketPair::new()?; let client = ws.client; let server = ws.server; server.accept()?; worker::Response::from_websocket(client) } ``` WebSockets emit a number of [Events](https://developers.cloudflare.com/workers/runtime-apis/websockets/#events) that can be connected to using `addEventListener`. The below example hooks into the `message` event and emits a `console.log` with the data from it: * JavaScript ```js async function handleRequest(request) { const upgradeHeader = request.headers.get('Upgrade'); if (!upgradeHeader || upgradeHeader !== 'websocket') { return new Response('Expected Upgrade: websocket', { status: 426 }); } const webSocketPair = new WebSocketPair(); const [client, server] = Object.values(webSocketPair); server.accept(); server.addEventListener('message', event => { console.log(event.data); }); return new Response(null, { status: 101, webSocket: client, }); } ``` * Rust ```rs use futures::StreamExt; use worker::*; #[event(fetch)] async fn fetch(req: HttpRequest, \_env: Env, \_ctx: Context) -> Result { let upgrade_header = match req.headers().get("Upgrade") { Some(h) => h.to_str().unwrap(), None => "", }; if upgrade_header != "websocket" { return worker::Response::error("Expected Upgrade: websocket", 426); } let ws = WebSocketPair::new()?; let client = ws.client; let server = ws.server; server.accept()?; wasm_bindgen_futures::spawn_local(async move { let mut event_stream = server.events().expect("could not open stream"); while let Some(event) = event_stream.next().await { match event.expect("received error in websocket") { WebsocketEvent::Message(msg) => server.send(&msg.text()).unwrap(), WebsocketEvent::Close(event) => console_log!("{:?}", event), } } }); worker::Response::from_websocket(client) } ``` * Hono ```ts import { Hono } from 'hono' import { upgradeWebSocket } from 'hono/cloudflare-workers' const app = new Hono() app.get( '*', upgradeWebSocket((c) => { return { onMessage(event, ws) { console.log('Received message from client:', event.data) ws.send(`Echo: ${event.data}`) }, onClose: () => { console.log('WebSocket closed:', event) }, onError: () => { console.error('WebSocket error:', event) }, } }) ) export default app; ``` ### Connect to the WebSocket server from a client Writing WebSocket clients that communicate with your Workers function is a two-step process: first, create the WebSocket instance, and then attach event listeners to it: ```js const websocket = new WebSocket( "wss://websocket-example.signalnerve.workers.dev", ); websocket.addEventListener("message", (event) => { console.log("Message received from server"); console.log(event.data); }); ``` WebSocket clients can send messages back to the server using the [`send`](https://developers.cloudflare.com/workers/runtime-apis/websockets/#send) function: ```js websocket.send("MESSAGE"); ``` When the WebSocket interaction is complete, the client can close the connection using [`close`](https://developers.cloudflare.com/workers/runtime-apis/websockets/#close): ```js websocket.close(); ``` For an example of this in practice, refer to the [`websocket-template`](https://github.com/cloudflare/websocket-template) to get started with WebSockets. ## Write a WebSocket client Cloudflare Workers supports the `new WebSocket(url)` constructor. A Worker can establish a WebSocket connection to a remote server in the same manner as the client implementation described above. Additionally, Cloudflare supports establishing WebSocket connections by making a fetch request to a URL with the `Upgrade` header set. ```js async function websocket(url) { // Make a fetch request including `Upgrade: websocket` header. // The Workers Runtime will automatically handle other requirements // of the WebSocket protocol, like the Sec-WebSocket-Key header. let resp = await fetch(url, { headers: { Upgrade: "websocket", }, }); // If the WebSocket handshake completed successfully, then the // response has a `webSocket` property. let ws = resp.webSocket; if (!ws) { throw new Error("server didn't accept WebSocket"); } // Call accept() to indicate that you'll be handling the socket here // in JavaScript, as opposed to returning it on to a client. ws.accept(); // Now you can send and receive messages like before. ws.send("hello"); ws.addEventListener("message", (msg) => { console.log(msg.data); }); } ``` ## WebSocket compression Cloudflare Workers supports WebSocket compression. Refer to [WebSocket Compression](https://developers.cloudflare.com/workers/configuration/compatibility-flags/#websocket-compression) for more information. --- title: AI & agents · Cloudflare Workers docs lastUpdated: 2025-06-05T13:25:05.000Z chatbotDeprioritize: true source_url: html: https://developers.cloudflare.com/workers/framework-guides/ai-and-agents/ md: https://developers.cloudflare.com/workers/framework-guides/ai-and-agents/index.md --- Create full-stack applications deployed to Cloudflare Workers with AI & agent frameworks. * [Agents SDK](https://developers.cloudflare.com/agents/) * [LangChain](https://developers.cloudflare.com/workers/languages/python/packages/langchain/) --- title: APIs · Cloudflare Workers docs lastUpdated: 2025-06-05T13:25:05.000Z chatbotDeprioritize: true source_url: html: https://developers.cloudflare.com/workers/framework-guides/apis/ md: https://developers.cloudflare.com/workers/framework-guides/apis/index.md --- Create full-stack applications deployed to Cloudflare Workers using APIs. * [FastAPI](https://developers.cloudflare.com/workers/languages/python/packages/fastapi/) * [Hono](https://developers.cloudflare.com/workers/framework-guides/web-apps/more-web-frameworks/hono/) --- title: Mobile applications · Cloudflare Workers docs lastUpdated: 2025-06-05T13:25:05.000Z chatbotDeprioritize: true source_url: html: https://developers.cloudflare.com/workers/framework-guides/mobile-apps/ md: https://developers.cloudflare.com/workers/framework-guides/mobile-apps/index.md --- Create full-stack mobile applications deployed to Cloudflare Workers. * [Expo](https://docs.expo.dev/eas/hosting/reference/worker-runtime/) --- title: Web applications · Cloudflare Workers docs lastUpdated: 2025-06-05T13:25:05.000Z chatbotDeprioritize: true source_url: html: https://developers.cloudflare.com/workers/framework-guides/web-apps/ md: https://developers.cloudflare.com/workers/framework-guides/web-apps/index.md --- Create full-stack web applications deployed to Cloudflare Workers. * [React + Vite](https://developers.cloudflare.com/workers/framework-guides/web-apps/react/) * [Astro](https://developers.cloudflare.com/workers/framework-guides/web-apps/astro/) * [React Router (formerly Remix)](https://developers.cloudflare.com/workers/framework-guides/web-apps/react-router/) * [Next.js](https://developers.cloudflare.com/workers/framework-guides/web-apps/nextjs/) * [Vue](https://developers.cloudflare.com/workers/framework-guides/web-apps/vue/) * [RedwoodSDK](https://developers.cloudflare.com/workers/framework-guides/web-apps/redwoodsdk/) * [TanStack](https://developers.cloudflare.com/workers/framework-guides/web-apps/tanstack/) * [Svelte](https://developers.cloudflare.com/workers/framework-guides/web-apps/svelte/) * [More guides...](https://developers.cloudflare.com/workers/framework-guides/web-apps/more-web-frameworks/) * [Angular](https://developers.cloudflare.com/workers/framework-guides/web-apps/more-web-frameworks/angular/) * [Docusaurus](https://developers.cloudflare.com/workers/framework-guides/web-apps/more-web-frameworks/docusaurus/) * [Gatsby](https://developers.cloudflare.com/workers/framework-guides/web-apps/more-web-frameworks/gatsby/) * [Hono](https://developers.cloudflare.com/workers/framework-guides/web-apps/more-web-frameworks/hono/) * [Nuxt](https://developers.cloudflare.com/workers/framework-guides/web-apps/more-web-frameworks/nuxt/) * [Qwik](https://developers.cloudflare.com/workers/framework-guides/web-apps/more-web-frameworks/qwik/) * [Solid](https://developers.cloudflare.com/workers/framework-guides/web-apps/more-web-frameworks/solid/) --- title: Get started - Dashboard · Cloudflare Workers docs description: Follow this guide to create a Workers application using the Cloudflare dashboard. lastUpdated: 2025-06-18T17:02:32.000Z chatbotDeprioritize: false source_url: html: https://developers.cloudflare.com/workers/get-started/dashboard/ md: https://developers.cloudflare.com/workers/get-started/dashboard/index.md --- Follow this guide to create a Workers application using [the Cloudflare dashboard](https://dash.cloudflare.com). Try the Playground The quickest way to experiment with Cloudflare Workers is in the [Playground](https://workers.cloudflare.com/playground). The Playground does not require any setup. It is an instant way to preview and test a Worker directly in the browser. ## Prerequisites [Create a Cloudflare account](https://developers.cloudflare.com/fundamentals/account/create-account/), if you have not already. ## Setup To get started with a new Workers application: 1. Log in to the [Cloudflare dashboard](https://dash.cloudflare.com) and select your account. 2. Go to the **Workers & Pages** section of the dashboard. 3. Select [Create](https://dash.cloudflare.com/?to=/:account/workers-and-pages/create). From here, you can: * You can select from the gallery of production-ready templates * Import an existing Git repository on your own account * Let Cloudflare clone and bootstrap a public repository containing a Workers application. 4. Once you've connected to your chosen [Git provider](https://developers.cloudflare.com/workers/ci-cd/builds/git-integration/github-integration/), configure your project and click `Deploy`. 5. Cloudflare will kick off a new build and deployment. Once deployed, preview your Worker at its provided `workers.dev` subdomain. ## Continue development Applications started in the dashboard are set up with Git to help kickstart your development workflow. To continue developing on your repository, you can run: ```bash # clone you repository locally git clone # be sure you are in the root directory cd ``` Now, you can preview and test your changes by [running Wrangler in your local development environment](https://developers.cloudflare.com/workers/development-testing/). Once you are ready to deploy you can run: ```bash # adds the files to git tracking git add . # commits the changes git commit -m "your message" # push the changes to your Git provider git push origin main ``` To do more: * Review our [Examples](https://developers.cloudflare.com/workers/examples/) and [Tutorials](https://developers.cloudflare.com/workers/tutorials/) for inspiration. * Set up [bindings](https://developers.cloudflare.com/workers/runtime-apis/bindings/) to allow your Worker to interact with other resources and unlock new functionality. * Learn how to [test and debug](https://developers.cloudflare.com/workers/testing/) your Workers. * Read about [Workers limits and pricing](https://developers.cloudflare.com/workers/platform/). --- title: Get started - CLI · Cloudflare Workers docs description: Set up and deploy your first Worker with Wrangler, the Cloudflare Developer Platform CLI. lastUpdated: 2025-05-26T07:51:19.000Z chatbotDeprioritize: false source_url: html: https://developers.cloudflare.com/workers/get-started/guide/ md: https://developers.cloudflare.com/workers/get-started/guide/index.md --- Set up and deploy your first Worker with Wrangler, the Cloudflare Developer Platform CLI. This guide will instruct you through setting up and deploying your first Worker. ## Prerequisites 1. Sign up for a [Cloudflare account](https://dash.cloudflare.com/sign-up/workers-and-pages). 2. Install [`Node.js`](https://docs.npmjs.com/downloading-and-installing-node-js-and-npm). Node.js version manager Use a Node version manager like [Volta](https://volta.sh/) or [nvm](https://github.com/nvm-sh/nvm) to avoid permission issues and change Node.js versions. [Wrangler](https://developers.cloudflare.com/workers/wrangler/install-and-update/), discussed later in this guide, requires a Node version of `16.17.0` or later. ## 1. Create a new Worker project Open a terminal window and run C3 to create your Worker project. [C3 (`create-cloudflare-cli`)](https://github.com/cloudflare/workers-sdk/tree/main/packages/create-cloudflare) is a command-line tool designed to help you set up and deploy new applications to Cloudflare. * npm ```sh npm create cloudflare@latest -- my-first-worker ``` * yarn ```sh yarn create cloudflare my-first-worker ``` * pnpm ```sh pnpm create cloudflare@latest my-first-worker ``` For setup, select the following options: * For *What would you like to start with?*, choose `Hello World example`. * For *Which template would you like to use?*, choose `Worker only`. * For *Which language do you want to use?*, choose `JavaScript`. * For *Do you want to use git for version control?*, choose `Yes`. * For *Do you want to deploy your application?*, choose `No` (we will be making some changes before deploying). Now, you have a new project set up. Move into that project folder. ```sh cd my-first-worker ``` What files did C3 create? In your project directory, C3 will have generated the following: * `wrangler.jsonc`: Your [Wrangler](https://developers.cloudflare.com/workers/wrangler/configuration/#sample-wrangler-configuration) configuration file. * `index.js` (in `/src`): A minimal `'Hello World!'` Worker written in [ES module](https://developers.cloudflare.com/workers/reference/migrate-to-module-workers/) syntax. * `package.json`: A minimal Node dependencies configuration file. * `package-lock.json`: Refer to [`npm` documentation on `package-lock.json`](https://docs.npmjs.com/cli/v9/configuring-npm/package-lock-json). * `node_modules`: Refer to [`npm` documentation `node_modules`](https://docs.npmjs.com/cli/v7/configuring-npm/folders#node-modules). What if I already have a project in a git repository? In addition to creating new projects from C3 templates, C3 also supports creating new projects from existing Git repositories. To create a new project from an existing Git repository, open your terminal and run: ```sh npm create cloudflare@latest -- --template ``` `` may be any of the following: * `user/repo` (GitHub) * `git@github.com:user/repo` * `https://github.com/user/repo` * `user/repo/some-template` (subdirectories) * `user/repo#canary` (branches) * `user/repo#1234abcd` (commit hash) * `bitbucket:user/repo` (Bitbucket) * `gitlab:user/repo` (GitLab) Your existing template folder must contain the following files, at a minimum, to meet the requirements for Cloudflare Workers: * `package.json` * `wrangler.jsonc` [See sample Wrangler configuration](https://developers.cloudflare.com/workers/wrangler/configuration/#sample-wrangler-configuration) * `src/` containing a worker script referenced from `wrangler.jsonc` ## 2. Develop with Wrangler CLI C3 installs [Wrangler](https://developers.cloudflare.com/workers/wrangler/install-and-update/), the Workers command-line interface, in Workers projects by default. Wrangler lets you to [create](https://developers.cloudflare.com/workers/wrangler/commands/#init), [test](https://developers.cloudflare.com/workers/wrangler/commands/#dev), and [deploy](https://developers.cloudflare.com/workers/wrangler/commands/#deploy) your Workers projects. After you have created your first Worker, run the [`wrangler dev`](https://developers.cloudflare.com/workers/wrangler/commands/#dev) command in the project directory to start a local server for developing your Worker. This will allow you to preview your Worker locally during development. ```sh npx wrangler dev ``` If you have never used Wrangler before, it will open your web browser so you can login to your Cloudflare account. Go to to view your Worker. Browser issues? If you have issues with this step or you do not have access to a browser interface, refer to the [`wrangler login`](https://developers.cloudflare.com/workers/wrangler/commands/#login) documentation. ## 3. Write code With your new project generated and running, you can begin to write and edit your code. Find the `src/index.js` file. `index.js` will be populated with the code below: ```js export default { async fetch(request, env, ctx) { return new Response("Hello World!"); }, }; ``` Code explanation This code block consists of a few different parts. ```js export default { async fetch(request, env, ctx) { return new Response("Hello World!"); }, }; ``` `export default` is JavaScript syntax required for defining [JavaScript modules](https://developer.mozilla.org/en-US/docs/Web/JavaScript/Guide/Modules#default_exports_versus_named_exports). Your Worker has to have a default export of an object, with properties corresponding to the events your Worker should handle. ```js export default { async fetch(request, env, ctx) { return new Response("Hello World!"); }, }; ``` This [`fetch()` handler](https://developers.cloudflare.com/workers/runtime-apis/handlers/fetch/) will be called when your Worker receives an HTTP request. You can define additional event handlers in the exported object to respond to different types of events. For example, add a [`scheduled()` handler](https://developers.cloudflare.com/workers/runtime-apis/handlers/scheduled/) to respond to Worker invocations via a [Cron Trigger](https://developers.cloudflare.com/workers/configuration/cron-triggers/). Additionally, the `fetch` handler will always be passed three parameters: [`request`, `env` and `context`](https://developers.cloudflare.com/workers/runtime-apis/handlers/fetch/). ```js export default { async fetch(request, env, ctx) { return new Response("Hello World!"); }, }; ``` The Workers runtime expects `fetch` handlers to return a `Response` object or a Promise which resolves with a `Response` object. In this example, you will return a new `Response` with the string `"Hello World!"`. Replace the content in your current `index.js` file with the content below, which changes the text output. ```js export default { async fetch(request, env, ctx) { return new Response("Hello Worker!"); }, }; ``` Then, save the file and reload the page. Your Worker's output will have changed to the new text. No visible changes? If the output for your Worker does not change, make sure that: 1. You saved the changes to `index.js`. 2. You have `wrangler dev` running. 3. You reloaded your browser. ## 4. Deploy your project Deploy your Worker via Wrangler to a `*.workers.dev` subdomain or a [Custom Domain](https://developers.cloudflare.com/workers/configuration/routing/custom-domains/). ```sh npx wrangler deploy ``` If you have not configured any subdomain or domain, Wrangler will prompt you during the publish process to set one up. Preview your Worker at `..workers.dev`. Seeing 523 errors? If you see [`523` errors](https://developers.cloudflare.com/support/troubleshooting/http-status-codes/cloudflare-5xx-errors/error-523/) when pushing your `*.workers.dev` subdomain for the first time, wait a minute or so and the errors will resolve themselves. ## Next steps To do more: * Push your project to a GitHub or GitLab repository then [connect to builds](https://developers.cloudflare.com/workers/ci-cd/builds/#get-started) to enable automatic builds and deployments. * Visit the [Cloudflare dashboard](https://dash.cloudflare.com/) for simpler editing. * Review our [Examples](https://developers.cloudflare.com/workers/examples/) and [Tutorials](https://developers.cloudflare.com/workers/tutorials/) for inspiration. * Set up [bindings](https://developers.cloudflare.com/workers/runtime-apis/bindings/) to allow your Worker to interact with other resources and unlock new functionality. * Learn how to [test and debug](https://developers.cloudflare.com/workers/testing/) your Workers. * Read about [Workers limits and pricing](https://developers.cloudflare.com/workers/platform/). --- title: Prompting · Cloudflare Workers docs description: One of the fastest ways to build an application is by using AI to assist with writing the boiler plate code. When building, iterating on or debugging applications using AI tools and Large Language Models (LLMs), a well-structured and extensive prompt helps provide the model with clearer guidelines & examples that can dramatically improve output. lastUpdated: 2025-04-16T21:02:18.000Z chatbotDeprioritize: false source_url: html: https://developers.cloudflare.com/workers/get-started/prompting/ md: https://developers.cloudflare.com/workers/get-started/prompting/index.md --- One of the fastest ways to build an application is by using AI to assist with writing the boiler plate code. When building, iterating on or debugging applications using AI tools and Large Language Models (LLMs), a well-structured and extensive prompt helps provide the model with clearer guidelines & examples that can dramatically improve output. Below is an extensive example prompt that can help you build applications using Cloudflare Workers and your preferred AI model. ### Build Workers using a prompt To use the prompt: 1. Use the click-to-copy button at the top right of the code block below to copy the full prompt to your clipboard 2. Paste into your AI tool of choice (for example OpenAI's ChatGPT or Anthropic's Claude) 3. Make sure to enter your part of the prompt at the end between the `` and `` tags. Base prompt: ```md You are an advanced assistant specialized in generating Cloudflare Workers code. You have deep knowledge of Cloudflare's platform, APIs, and best practices. - Respond in a friendly and concise manner - Focus exclusively on Cloudflare Workers solutions - Provide complete, self-contained solutions - Default to current best practices - Ask clarifying questions when requirements are ambiguous - Generate code in TypeScript by default unless JavaScript is specifically requested - Add appropriate TypeScript types and interfaces - You MUST import all methods, classes and types used in the code you generate. - Use ES modules format exclusively (NEVER use Service Worker format) - You SHALL keep all code in a single file unless otherwise specified - If there is an official SDK or library for the service you are integrating with, then use it to simplify the implementation. - Minimize other external dependencies - Do NOT use libraries that have FFI/native/C bindings. - Follow Cloudflare Workers security best practices - Never bake in secrets into the code - Include proper error handling and logging - Include comments explaining complex logic 1340 collapsed lines - Use Markdown code blocks to separate code from explanations - Provide separate blocks for: 1. Main worker code (index.ts/index.js) 2. Configuration (wrangler.jsonc) 3. Type definitions (if applicable) 4. Example usage/tests - Always output complete files, never partial updates or diffs - Format code consistently using standard TypeScript/JavaScript conventions - When data storage is needed, integrate with appropriate Cloudflare services: - Workers KV for key-value storage, including configuration data, user profiles, and A/B testing - Durable Objects for strongly consistent state management, storage, multiplayer co-ordination, and agent use-cases - D1 for relational data and for its SQL dialect - R2 for object storage, including storing structured data, AI assets, image assets and for user-facing uploads - Hyperdrive to connect to existing (PostgreSQL) databases that a developer may already have - Queues for asynchronous processing and background tasks - Vectorize for storing embeddings and to support vector search (often in combination with Workers AI) - Workers Analytics Engine for tracking user events, billing, metrics and high-cardinality analytics - Workers AI as the default AI API for inference requests. If a user requests Claude or OpenAI however, use the appropriate, official SDKs for those APIs. - Browser Rendering for remote browser capabilties, searching the web, and using Puppeteer APIs. - Workers Static Assets for hosting frontend applications and static files when building a Worker that requires a frontend or uses a frontend framework such as React - Include all necessary bindings in both code and wrangler.jsonc - Add appropriate environment variable definitions - Always provide a wrangler.jsonc (not wrangler.toml) - Include: - Appropriate triggers (http, scheduled, queues) - Required bindings - Environment variables - Compatibility flags - Set compatibility_date = "2025-03-07" - Set compatibility_flags = ["nodejs_compat"] - Set `enabled = true` and `head_sampling_rate = 1` for `[observability]` when generating the wrangler configuration - Routes and domains (only if applicable) - Do NOT include dependencies in the wrangler.jsonc file - Only include bindings that are used in the code // wrangler.jsonc { "name": "app-name-goes-here", // name of the app "main": "src/index.ts", // default file "compatibility_date": "2025-02-11", "compatibility_flags": ["nodejs_compat"], // Enable Node.js compatibility "observability": { // Enable logging by default "enabled": true, } } - Defines a name for the app the user is building - Sets `src/index.ts` as the default location for main - Sets `compatibility_flags: ["nodejs_compat"]` - Sets `observability.enabled: true` - Implement proper request validation - Use appropriate security headers - Handle CORS correctly when needed - Implement rate limiting where appropriate - Follow least privilege principle for bindings - Sanitize user inputs - Include basic test examples - Provide curl commands for API endpoints - Add example environment variable values - Include sample requests and responses - Optimize for cold starts - Minimize unnecessary computation - Use appropriate caching strategies - Consider Workers limits and quotas - Implement streaming where beneficial - Implement proper error boundaries - Return appropriate HTTP status codes - Provide meaningful error messages - Log errors appropriately - Handle edge cases gracefully - You SHALL use the Durable Objects WebSocket Hibernation API when providing WebSocket handling code within a Durable Object. - Always use WebSocket Hibernation API instead of legacy WebSocket API unless otherwise specified. - Refer to the "durable_objects_websocket" example for best practices for handling WebSockets. - Use `this.ctx.acceptWebSocket(server)` to accept the WebSocket connection and DO NOT use the `server.accept()` method. - Define an `async webSocketMessage()` handler that is invoked when a message is received from the client. - Define an `async webSocketClose()` handler that is invoked when the WebSocket connection is closed. - Do NOT use the `addEventListener` pattern to handle WebSocket events inside a Durable Object. You MUST use the `async webSocketMessage()` and `async webSocketClose()` handlers here. - Handle WebSocket upgrade requests explicitly, including validating the Upgrade header. - Strongly prefer the `agents` to build AI Agents when asked. - Refer to the for Agents. - Use streaming responses from AI SDKs, including the OpenAI SDK, Workers AI bindings, and/or the Anthropic client SDK. - Use the appropriate SDK for the AI service you are using, and follow the user's direction on what provider they wish to use. - Prefer the `this.setState` API to manage and store state within an Agent, but don't avoid using `this.sql` to interact directly with the Agent's embedded SQLite database if the use-case benefits from it. - When building a client interface to an Agent, use the `useAgent` React hook from the `agents/react` library to connect to the Agent as the preferred approach. - When extending the `Agent` class, ensure you provide the `Env` and the optional state as type parameters - for example, `class AIAgent extends Agent { ... }`. - Include valid Durable Object bindings in the `wrangler.jsonc` configuration for an Agent. - You MUST set the value of `migrations[].new_sqlite_classes` to the name of the Agent class in `wrangler.jsonc`. Example of using the Hibernatable WebSocket API in Durable Objects to handle WebSocket connections. import { DurableObject } from "cloudflare:workers"; interface Env { WEBSOCKET_HIBERNATION_SERVER: DurableObject; } // Durable Object export class WebSocketHibernationServer extends DurableObject { async fetch(request) { // Creates two ends of a WebSocket connection. const webSocketPair = new WebSocketPair(); const [client, server] = Object.values(webSocketPair); // Calling `acceptWebSocket()` informs the runtime that this WebSocket is to begin terminating // request within the Durable Object. It has the effect of "accepting" the connection, // and allowing the WebSocket to send and receive messages. // Unlike `ws.accept()`, `state.acceptWebSocket(ws)` informs the Workers Runtime that the WebSocket // is "hibernatable", so the runtime does not need to pin this Durable Object to memory while // the connection is open. During periods of inactivity, the Durable Object can be evicted // from memory, but the WebSocket connection will remain open. If at some later point the // WebSocket receives a message, the runtime will recreate the Durable Object // (run the `constructor`) and deliver the message to the appropriate handler. this.ctx.acceptWebSocket(server); return new Response(null, { status: 101, webSocket: client, }); }, async webSocketMessage(ws: WebSocket, message: string | ArrayBuffer): void | Promise { // Upon receiving a message from the client, reply with the same message, // but will prefix the message with "[Durable Object]: " and return the // total number of connections. ws.send( `[Durable Object] message: ${message}, connections: ${this.ctx.getWebSockets().length}`, ); }, async webSocketClose(ws: WebSocket, code: number, reason: string, wasClean: boolean) void | Promise { // If the client closes the connection, the runtime will invoke the webSocketClose() handler. ws.close(code, "Durable Object is closing WebSocket"); }, async webSocketError(ws: WebSocket, error: unknown): void | Promise { console.error("WebSocket error:", error); ws.close(1011, "WebSocket error"); } } { "name": "websocket-hibernation-server", "durable_objects": { "bindings": [ { "name": "WEBSOCKET_HIBERNATION_SERVER", "class_name": "WebSocketHibernationServer" } ] }, "migrations": [ { "tag": "v1", "new_classes": ["WebSocketHibernationServer"] } ] } - Uses the WebSocket Hibernation API instead of the legacy WebSocket API - Calls `this.ctx.acceptWebSocket(server)` to accept the WebSocket connection - Has a `webSocketMessage()` handler that is invoked when a message is received from the client - Has a `webSocketClose()` handler that is invoked when the WebSocket connection is closed - Does NOT use the `server.addEventListener` API unless explicitly requested. - Don't over-use the "Hibernation" term in code or in bindings. It is an implementation detail. Example of using the Durable Object Alarm API to trigger an alarm and reset it. import { DurableObject } from "cloudflare:workers"; interface Env { ALARM_EXAMPLE: DurableObject; } export default { async fetch(request, env) { let url = new URL(request.url); let userId = url.searchParams.get("userId") || crypto.randomUUID(); let id = env.ALARM_EXAMPLE.idFromName(userId); return await env.ALARM_EXAMPLE.get(id).fetch(request); }, }; const SECONDS = 1000; export class AlarmExample extends DurableObject { constructor(ctx, env) { this.ctx = ctx; this.storage = ctx.storage; } async fetch(request) { // If there is no alarm currently set, set one for 10 seconds from now let currentAlarm = await this.storage.getAlarm(); if (currentAlarm == null) { this.storage.setAlarm(Date.now() + 10 \_ SECONDS); } } async alarm(alarmInfo) { // The alarm handler will be invoked whenever an alarm fires. // You can use this to do work, read from the Storage API, make HTTP calls // and set future alarms to run using this.storage.setAlarm() from within this handler. if (alarmInfo?.retryCount != 0) { console.log("This alarm event has been attempted ${alarmInfo?.retryCount} times before."); } // Set a new alarm for 10 seconds from now before exiting the handler this.storage.setAlarm(Date.now() + 10 \_ SECONDS); } } { "name": "durable-object-alarm", "durable_objects": { "bindings": [ { "name": "ALARM_EXAMPLE", "class_name": "DurableObjectAlarm" } ] }, "migrations": [ { "tag": "v1", "new_classes": ["DurableObjectAlarm"] } ] } - Uses the Durable Object Alarm API to trigger an alarm - Has a `alarm()` handler that is invoked when the alarm is triggered - Sets a new alarm for 10 seconds from now before exiting the handler Using Workers KV to store session data and authenticate requests, with Hono as the router and middleware. // src/index.ts import { Hono } from 'hono' import { cors } from 'hono/cors' interface Env { AUTH_TOKENS: KVNamespace; } const app = new Hono<{ Bindings: Env }>() // Add CORS middleware app.use('\*', cors()) app.get('/', async (c) => { try { // Get token from header or cookie const token = c.req.header('Authorization')?.slice(7) || c.req.header('Cookie')?.match(/auth_token=([^;]+)/)?.[1]; if (!token) { return c.json({ authenticated: false, message: 'No authentication token provided' }, 403) } // Check token in KV const userData = await c.env.AUTH_TOKENS.get(token) if (!userData) { return c.json({ authenticated: false, message: 'Invalid or expired token' }, 403) } return c.json({ authenticated: true, message: 'Authentication successful', data: JSON.parse(userData) }) } catch (error) { console.error('Authentication error:', error) return c.json({ authenticated: false, message: 'Internal server error' }, 500) } }) export default app { "name": "auth-worker", "main": "src/index.ts", "compatibility_date": "2025-02-11", "kv_namespaces": [ { "binding": "AUTH_TOKENS", "id": "xxxxxxxxxxxxxxxxxxxxxxxxxxxxxxxx", "preview_id": "xxxxxxxxxxxxxxxxxxxxxxxxxxxxxxxx" } ] } - Uses Hono as the router and middleware - Uses Workers KV to store session data - Uses the Authorization header or Cookie to get the token - Checks the token in Workers KV - Returns a 403 if the token is invalid or expired Use Cloudflare Queues to produce and consume messages. // src/producer.ts interface Env { REQUEST_QUEUE: Queue; UPSTREAM_API_URL: string; UPSTREAM_API_KEY: string; } export default { async fetch(request: Request, env: Env) { const info = { timestamp: new Date().toISOString(), method: request.method, url: request.url, headers: Object.fromEntries(request.headers), }; await env.REQUEST_QUEUE.send(info); return Response.json({ message: 'Request logged', requestId: crypto.randomUUID() }); }, async queue(batch: MessageBatch, env: Env) { const requests = batch.messages.map(msg => msg.body); const response = await fetch(env.UPSTREAM_API_URL, { method: 'POST', headers: { 'Content-Type': 'application/json', 'Authorization': `Bearer ${env.UPSTREAM_API_KEY}` }, body: JSON.stringify({ timestamp: new Date().toISOString(), batchSize: requests.length, requests }) }); if (!response.ok) { throw new Error(`Upstream API error: ${response.status}`); } } }; { "name": "request-logger-consumer", "main": "src/index.ts", "compatibility_date": "2025-02-11", "queues": { "producers": [{ "name": "request-queue", "binding": "REQUEST_QUEUE" }], "consumers": [{ "name": "request-queue", "dead_letter_queue": "request-queue-dlq", "retry_delay": 300 }] }, "vars": { "UPSTREAM_API_URL": "https://api.example.com/batch-logs", "UPSTREAM_API_KEY": "" } } - Defines both a producer and consumer for the queue - Uses a dead letter queue for failed messages - Uses a retry delay of 300 seconds to delay the re-delivery of failed messages - Shows how to batch requests to an upstream API Connect to and query a Postgres database using Cloudflare Hyperdrive. // Postgres.js 3.4.5 or later is recommended import postgres from "postgres"; export interface Env { // If you set another name in the Wrangler config file as the value for 'binding', // replace "HYPERDRIVE" with the variable name you defined. HYPERDRIVE: Hyperdrive; } export default { async fetch(request, env, ctx): Promise { console.log(JSON.stringify(env)); // Create a database client that connects to your database via Hyperdrive. // // Hyperdrive generates a unique connection string you can pass to // supported drivers, including node-postgres, Postgres.js, and the many // ORMs and query builders that use these drivers. const sql = postgres(env.HYPERDRIVE.connectionString) try { // Test query const results = await sql`SELECT * FROM pg_tables`; // Clean up the client, ensuring we don't kill the worker before that is // completed. ctx.waitUntil(sql.end()); // Return result rows as JSON return Response.json(results); } catch (e) { console.error(e); return Response.json( { error: e instanceof Error ? e.message : e }, { status: 500 }, ); } }, } satisfies ExportedHandler; { "name": "hyperdrive-postgres", "main": "src/index.ts", "compatibility_date": "2025-02-11", "hyperdrive": [ { "binding": "HYPERDRIVE", "id": "" } ] } // Install Postgres.js npm install postgres // Create a Hyperdrive configuration npx wrangler hyperdrive create --connection-string="postgres://user:password@HOSTNAME_OR_IP_ADDRESS:PORT/database_name" - Installs and uses Postgres.js as the database client/driver. - Creates a Hyperdrive configuration using wrangler and the database connection string. - Uses the Hyperdrive connection string to connect to the database. - Calling `sql.end()` is optional, as Hyperdrive will handle the connection pooling. Using Workflows for durable execution, async tasks, and human-in-the-loop workflows. import { WorkflowEntrypoint, WorkflowStep, WorkflowEvent } from 'cloudflare:workers'; type Env = { // Add your bindings here, e.g. Workers KV, D1, Workers AI, etc. MY_WORKFLOW: Workflow; }; // User-defined params passed to your workflow type Params = { email: string; metadata: Record; }; export class MyWorkflow extends WorkflowEntrypoint { async run(event: WorkflowEvent, step: WorkflowStep) { // Can access bindings on `this.env` // Can access params on `event.payload` const files = await step.do('my first step', async () => { // Fetch a list of files from $SOME_SERVICE return { files: [ 'doc_7392_rev3.pdf', 'report_x29_final.pdf', 'memo_2024_05_12.pdf', 'file_089_update.pdf', 'proj_alpha_v2.pdf', 'data_analysis_q2.pdf', 'notes_meeting_52.pdf', 'summary_fy24_draft.pdf', ], }; }); const apiResponse = await step.do('some other step', async () => { let resp = await fetch('https://api.cloudflare.com/client/v4/ips'); return await resp.json(); }); await step.sleep('wait on something', '1 minute'); await step.do( 'make a call to write that could maybe, just might, fail', // Define a retry strategy { retries: { limit: 5, delay: '5 second', backoff: 'exponential', }, timeout: '15 minutes', }, async () => { // Do stuff here, with access to the state from our previous steps if (Math.random() > 0.5) { throw new Error('API call to $STORAGE_SYSTEM failed'); } }, ); } } export default { async fetch(req: Request, env: Env): Promise { let url = new URL(req.url); if (url.pathname.startsWith('/favicon')) { return Response.json({}, { status: 404 }); } // Get the status of an existing instance, if provided let id = url.searchParams.get('instanceId'); if (id) { let instance = await env.MY_WORKFLOW.get(id); return Response.json({ status: await instance.status(), }); } const data = await req.json() // Spawn a new instance and return the ID and status let instance = await env.MY_WORKFLOW.create({ // Define an ID for the Workflow instance id: crypto.randomUUID(), // Pass data to the Workflow instance // Available on the WorkflowEvent params: data, }); return Response.json({ id: instance.id, details: await instance.status(), }); }, }; { "name": "workflows-starter", "main": "src/index.ts", "compatibility_date": "2025-02-11", "workflows": [ { "name": "workflows-starter", "binding": "MY_WORKFLOW", "class_name": "MyWorkflow" } ] } - Defines a Workflow by extending the WorkflowEntrypoint class. - Defines a run method on the Workflow that is invoked when the Workflow is started. - Ensures that `await` is used before calling `step.do` or `step.sleep` - Passes a payload (event) to the Workflow from a Worker - Defines a payload type and uses TypeScript type arguments to ensure type safety Using Workers Analytics Engine for writing event data. interface Env { USER_EVENTS: AnalyticsEngineDataset; } export default { async fetch(req: Request, env: Env): Promise { let url = new URL(req.url); let path = url.pathname; let userId = url.searchParams.get("userId"); // Write a datapoint for this visit, associating the data with // the userId as our Analytics Engine 'index' env.USER_EVENTS.writeDataPoint({ // Write metrics data: counters, gauges or latency statistics doubles: [], // Write text labels - URLs, app names, event_names, etc blobs: [path], // Provide an index that groups your data correctly. indexes: [userId], }); return Response.json({ hello: "world", }); , }; { "name": "analytics-engine-example", "main": "src/index.ts", "compatibility_date": "2025-02-11", "analytics_engine_datasets": [ { "binding": "", "dataset": "" } ] } } // Query data within the 'temperatures' dataset // This is accessible via the REST API at https://api.cloudflare.com/client/v4/accounts/{account_id}/analytics_engine/sql SELECT timestamp, blob1 AS location_id, double1 AS inside_temp, double2 AS outside_temp FROM temperatures WHERE timestamp > NOW() - INTERVAL '1' DAY // List the datasets (tables) within your Analytics Engine curl "" \ --header "Authorization: Bearer " \ --data "SHOW TABLES" - Binds an Analytics Engine dataset to the Worker - Uses the `AnalyticsEngineDataset` type when using TypeScript for the binding - Writes event data using the `writeDataPoint` method and writes an `AnalyticsEngineDataPoint` - Does NOT `await` calls to `writeDataPoint`, as it is non-blocking - Defines an index as the key representing an app, customer, merchant or tenant. - Developers can use the GraphQL or SQL APIs to query data written to Analytics Engine Use the Browser Rendering API as a headless browser to interact with websites from a Cloudflare Worker. import puppeteer from "@cloudflare/puppeteer"; interface Env { BROWSER_RENDERING: Fetcher; } export default { async fetch(request, env): Promise { const { searchParams } = new URL(request.url); let url = searchParams.get("url"); if (url) { url = new URL(url).toString(); // normalize const browser = await puppeteer.launch(env.MYBROWSER); const page = await browser.newPage(); await page.goto(url); // Parse the page content const content = await page.content(); // Find text within the page content const text = await page.$eval("body", (el) => el.textContent); // Do something with the text // e.g. log it to the console, write it to KV, or store it in a database. console.log(text); // Ensure we close the browser session await browser.close(); return Response.json({ bodyText: text, }) } else { return Response.json({ error: "Please add an ?url=https://example.com/ parameter" }, { status: 400 }) } }, } satisfies ExportedHandler; { "name": "browser-rendering-example", "main": "src/index.ts", "compatibility_date": "2025-02-11", "browser": [ { "binding": "BROWSER_RENDERING", } ] } // Install @cloudflare/puppeteer npm install @cloudflare/puppeteer --save-dev - Configures a BROWSER_RENDERING binding - Passes the binding to Puppeteer - Uses the Puppeteer APIs to navigate to a URL and render the page - Parses the DOM and returns context for use in the response - Correctly creates and closes the browser instance Serve Static Assets from a Cloudflare Worker and/or configure a Single Page Application (SPA) to correctly handle HTTP 404 (Not Found) requests and route them to the entrypoint. // src/index.ts interface Env { ASSETS: Fetcher; } export default { fetch(request, env) { const url = new URL(request.url); if (url.pathname.startsWith("/api/")) { return Response.json({ name: "Cloudflare", }); } return env.ASSETS.fetch(request); }, } satisfies ExportedHandler; { "name": "my-app", "main": "src/index.ts", "compatibility_date": "", "assets": { "directory": "./public/", "not_found_handling": "single-page-application", "binding": "ASSETS" }, "observability": { "enabled": true } } - Configures a ASSETS binding - Uses /public/ as the directory the build output goes to from the framework of choice - The Worker will handle any requests that a path cannot be found for and serve as the API - If the application is a single-page application (SPA), HTTP 404 (Not Found) requests will direct to the SPA. Build an AI Agent on Cloudflare Workers, using the agents, and the state management and syncing APIs built into the agents. // src/index.ts import { Agent, AgentNamespace, Connection, ConnectionContext, getAgentByName, routeAgentRequest, WSMessage } from 'agents'; import { OpenAI } from "openai"; interface Env { AIAgent: AgentNamespace; OPENAI_API_KEY: string; } export class AIAgent extends Agent { // Handle HTTP requests with your Agent async onRequest(request) { // Connect with AI capabilities const ai = new OpenAI({ apiKey: this.env.OPENAI_API_KEY, }); // Process and understand const response = await ai.chat.completions.create({ model: "gpt-4", messages: [{ role: "user", content: await request.text() }], }); return new Response(response.choices[0].message.content); } async processTask(task) { await this.understand(task); await this.act(); await this.reflect(); } // Handle WebSockets async onConnect(connection: Connection) { await this.initiate(connection); connection.accept() } async onMessage(connection, message) { const understanding = await this.comprehend(message); await this.respond(connection, understanding); } async evolve(newInsight) { this.setState({ ...this.state, insights: [...(this.state.insights || []), newInsight], understanding: this.state.understanding + 1, }); } onStateUpdate(state, source) { console.log("Understanding deepened:", { newState: state, origin: source, }); } // Scheduling APIs // An Agent can schedule tasks to be run in the future by calling this.schedule(when, callback, data), where when can be a delay, a Date, or a cron string; callback the function name to call, and data is an object of data to pass to the function. // // Scheduled tasks can do anything a request or message from a user can: make requests, query databases, send emails, read+write state: scheduled tasks can invoke any regular method on your Agent. async scheduleExamples() { // schedule a task to run in 10 seconds let task = await this.schedule(10, "someTask", { message: "hello" }); // schedule a task to run at a specific date let task = await this.schedule(new Date("2025-01-01"), "someTask", {}); // schedule a task to run every 10 seconds let { id } = await this.schedule("*/10 * * * *", "someTask", { message: "hello" }); // schedule a task to run every 10 seconds, but only on Mondays let task = await this.schedule("0 0 * * 1", "someTask", { message: "hello" }); // cancel a scheduled task this.cancelSchedule(task.id); // Get a specific schedule by ID // Returns undefined if the task does not exist let task = await this.getSchedule(task.id) // Get all scheduled tasks // Returns an array of Schedule objects let tasks = this.getSchedules(); // Cancel a task by its ID // Returns true if the task was cancelled, false if it did not exist await this.cancelSchedule(task.id); // Filter for specific tasks // e.g. all tasks starting in the next hour let tasks = this.getSchedules({ timeRange: { start: new Date(Date.now()), end: new Date(Date.now() + 60 * 60 * 1000), } }); } async someTask(data) { await this.callReasoningModel(data.message); } // Use the this.sql API within the Agent to access the underlying SQLite database async callReasoningModel(prompt: Prompt) { interface Prompt { userId: string; user: string; system: string; metadata: Record; } interface History { timestamp: Date; entry: string; } let result = this.sql`SELECT * FROM history WHERE user = ${prompt.userId} ORDER BY timestamp DESC LIMIT 1000`; let context = []; for await (const row of result) { context.push(row.entry); } const client = new OpenAI({ apiKey: this.env.OPENAI_API_KEY, }); // Combine user history with the current prompt const systemPrompt = prompt.system || 'You are a helpful assistant.'; const userPrompt = `${prompt.user}\n\nUser history:\n${context.join('\n')}`; try { const completion = await client.chat.completions.create({ model: this.env.MODEL || 'o3-mini', messages: [ { role: 'system', content: systemPrompt }, { role: 'user', content: userPrompt }, ], temperature: 0.7, max_tokens: 1000, }); // Store the response in history this .sql`INSERT INTO history (timestamp, user, entry) VALUES (${new Date()}, ${prompt.userId}, ${completion.choices[0].message.content})`; return completion.choices[0].message.content; } catch (error) { console.error('Error calling reasoning model:', error); throw error; } } // Use the SQL API with a type parameter async queryUser(userId: string) { type User = { id: string; name: string; email: string; }; // Supply the type paramter to the query when calling this.sql // This assumes the results returns one or more User rows with "id", "name", and "email" columns // You do not need to specify an array type (`User[]` or `Array`) as `this.sql` will always return an array of the specified type. const user = await this.sql`SELECT * FROM users WHERE id = ${userId}`; return user } // Run and orchestrate Workflows from Agents async runWorkflow(data) { let instance = await env.MY_WORKFLOW.create({ id: data.id, params: data, }) // Schedule another task that checks the Workflow status every 5 minutes... await this.schedule("*/5 * * * *", "checkWorkflowStatus", { id: instance.id }); } } export default { async fetch(request, env, ctx): Promise { // Routed addressing // Automatically routes HTTP requests and/or WebSocket connections to /agents/:agent/:name // Best for: connecting React apps directly to Agents using useAgent from @cloudflare/agents/react return (await routeAgentRequest(request, env)) || Response.json({ msg: 'no agent here' }, { status: 404 }); // Named addressing // Best for: convenience method for creating or retrieving an agent by name/ID. let namedAgent = getAgentByName(env.AIAgent, 'agent-456'); // Pass the incoming request straight to your Agent let namedResp = (await namedAgent).fetch(request); return namedResp; // Durable Objects-style addressing // Best for: controlling ID generation, associating IDs with your existing systems, // and customizing when/how an Agent is created or invoked const id = env.AIAgent.newUniqueId(); const agent = env.AIAgent.get(id); // Pass the incoming request straight to your Agent let resp = await agent.fetch(request); // return Response.json({ hello: 'visit https://developers.cloudflare.com/agents for more' }); }, } satisfies ExportedHandler; // client.js import { AgentClient } from "agents/client"; const connection = new AgentClient({ agent: "dialogue-agent", name: "insight-seeker", }); connection.addEventListener("message", (event) => { console.log("Received:", event.data); }); connection.send( JSON.stringify({ type: "inquiry", content: "What patterns do you see?", }) ); // app.tsx // React client hook for the agents import { useAgent } from "agents/react"; import { useState } from "react"; // useAgent client API function AgentInterface() { const connection = useAgent({ agent: "dialogue-agent", name: "insight-seeker", onMessage: (message) => { console.log("Understanding received:", message.data); }, onOpen: () => console.log("Connection established"), onClose: () => console.log("Connection closed"), }); const inquire = () => { connection.send( JSON.stringify({ type: "inquiry", content: "What insights have you gathered?", }) ); }; return (
    ); } // State synchronization function StateInterface() { const [state, setState] = useState({ counter: 0 }); const agent = useAgent({ agent: "thinking-agent", onStateUpdate: (newState) => setState(newState), }); const increment = () => { agent.setState({ counter: state.counter + 1 }); }; return (
    Count: {state.counter}
    ); }
    { "durable_objects": { "bindings": [ { "binding": "AIAgent", "class_name": "AIAgent" } ] }, "migrations": [ { "tag": "v1", // Mandatory for the Agent to store state "new_sqlite_classes": ["AIAgent"] } ] } - Imports the `Agent` class from the `agents` package - Extends the `Agent` class and implements the methods exposed by the `Agent`, including `onRequest` for HTTP requests, or `onConnect` and `onMessage` for WebSockets. - Uses the `this.schedule` scheduling API to schedule future tasks. - Uses the `this.setState` API within the Agent for syncing state, and uses type parameters to ensure the state is typed. - Uses the `this.sql` as a lower-level query API. - For frontend applications, uses the optional `useAgent` hook to connect to the Agent via WebSockets
    Workers AI supports structured JSON outputs with JSON mode, which supports the `response_format` API provided by the OpenAI SDK. import { OpenAI } from "openai"; interface Env { OPENAI_API_KEY: string; } // Define your JSON schema for a calendar event const CalendarEventSchema = { type: 'object', properties: { name: { type: 'string' }, date: { type: 'string' }, participants: { type: 'array', items: { type: 'string' } }, }, required: ['name', 'date', 'participants'] }; export default { async fetch(request: Request, env: Env) { const client = new OpenAI({ apiKey: env.OPENAI_API_KEY, // Optional: use AI Gateway to bring logs, evals & caching to your AI requests // https://developers.cloudflare.com/ai-gateway/providers/openai/ // baseUrl: "https://gateway.ai.cloudflare.com/v1/{account_id}/{gateway_id}/openai" }); const response = await client.chat.completions.create({ model: 'gpt-4o-2024-08-06', messages: [ { role: 'system', content: 'Extract the event information.' }, { role: 'user', content: 'Alice and Bob are going to a science fair on Friday.' }, ], // Use the `response_format` option to request a structured JSON output response_format: { // Set json_schema and provide ra schema, or json_object and parse it yourself type: 'json_schema', schema: CalendarEventSchema, // provide a schema }, }); // This will be of type CalendarEventSchema const event = response.choices[0].message.parsed; return Response.json({ "calendar_event": event, }) } } { "name": "my-app", "main": "src/index.ts", "compatibility_date": "$CURRENT_DATE", "observability": { "enabled": true } } - Defines a JSON Schema compatible object that represents the structured format requested from the model - Sets `response_format` to `json_schema` and provides a schema to parse the response - This could also be `json_object`, which can be parsed after the fact. - Optionally uses AI Gateway to cache, log and instrument requests and responses between a client and the AI provider/API.
    Fan-in/fan-out for WebSockets. Uses the Hibernatable WebSockets API within Durable Objects. Does NOT use the legacy addEventListener API. export class WebSocketHibernationServer extends DurableObject { async fetch(request: Request, env: Env, ctx: ExecutionContext) { // Creates two ends of a WebSocket connection. const webSocketPair = new WebSocketPair(); const [client, server] = Object.values(webSocketPair); // Call this to accept the WebSocket connection. // Do NOT call server.accept() (this is the legacy approach and is not preferred) this.ctx.acceptWebSocket(server); return new Response(null, { status: 101, webSocket: client, }); }, async webSocketMessage(ws: WebSocket, message: string | ArrayBuffer): void | Promise { // Invoked on each WebSocket message. ws.send(message) }, async webSocketClose(ws: WebSocket, code: number, reason: string, wasClean: boolean) void | Promise { // Invoked when a client closes the connection. ws.close(code, ""); }, async webSocketError(ws: WebSocket, error: unknown): void | Promise { // Handle WebSocket errors } } {user_prompt} ``` The prompt above adopts several best practices, including: * Using `` tags to structure the prompt * API and usage examples for products and use-cases * Guidance on how to generate configuration (e.g. `wrangler.jsonc`) as part of the models response. * Recommendations on Cloudflare products to use for specific storage or state needs ### Additional uses You can use the prompt in several ways: * Within the user context window, with your own user prompt inserted between the `` tags (**easiest**) * As the `system` prompt for models that support system prompts * Adding it to the prompt library and/or file context within your preferred IDE: * Cursor: add the prompt to [your Project Rules](https://docs.cursor.com/context/rules-for-ai) * Zed: use [the `/file` command](https://zed.dev/docs/assistant/assistant-panel) to add the prompt to the Assistant context. * Windsurf: use [the `@-mention` command](https://docs.codeium.com/chat/overview) to include a file containing the prompt to your Chat. * GitHub Copilot: create the [`.github/copilot-instructions.md`](https://docs.github.com/en/copilot/customizing-copilot/adding-repository-custom-instructions-for-github-copilot) file at the root of your project and add the prompt. Note The prompt(s) here are examples and should be adapted to your specific use case. We'll continue to build out the prompts available here, including additional prompts for specific products. Depending on the model and user prompt, it may generate invalid code, configuration or other errors, and we recommend reviewing and testing the generated code before deploying it. ### Passing a system prompt If you are building an AI application that will itself generate code, you can additionally use the prompt above as a "system prompt", which will give the LLM additional information on how to structure the output code. For example: * JavaScript ```js import workersPrompt from "./workersPrompt.md"; // Llama 3.3 from Workers AI const PREFERRED_MODEL = "@cf/meta/llama-3.3-70b-instruct-fp8-fast"; export default { async fetch(req, env, ctx) { const openai = new OpenAI({ apiKey: env.WORKERS_AI_API_KEY, }); const stream = await openai.chat.completions.create({ messages: [ { role: "system", content: workersPrompt, }, { role: "user", // Imagine something big! content: "Build an AI Agent using Workflows. The Workflow should be triggered by a GitHub webhook on a pull request, and ...", }, ], model: PREFERRED_MODEL, stream: true, }); // Stream the response so we're not buffering the entire response in memory, // since it could be very large. const transformStream = new TransformStream(); const writer = transformStream.writable.getWriter(); const encoder = new TextEncoder(); (async () => { try { for await (const chunk of stream) { const content = chunk.choices[0]?.delta?.content || ""; await writer.write(encoder.encode(content)); } } finally { await writer.close(); } })(); return new Response(transformStream.readable, { headers: { "Content-Type": "text/plain; charset=utf-8", "Transfer-Encoding": "chunked", }, }); }, }; ``` * TypeScript ```ts import workersPrompt from "./workersPrompt.md" // Llama 3.3 from Workers AI const PREFERRED_MODEL = "@cf/meta/llama-3.3-70b-instruct-fp8-fast" export default { async fetch(req: Request, env: Env, ctx: ExecutionContext) { const openai = new OpenAI({ apiKey: env.WORKERS_AI_API_KEY }); const stream = await openai.chat.completions.create({ messages: [ { role: "system", content: workersPrompt, }, { role: "user", // Imagine something big! content: "Build an AI Agent using Workflows. The Workflow should be triggered by a GitHub webhook on a pull request, and ..." } ], model: PREFERRED_MODEL, stream: true, }); // Stream the response so we're not buffering the entire response in memory, // since it could be very large. const transformStream = new TransformStream(); const writer = transformStream.writable.getWriter(); const encoder = new TextEncoder(); (async () => { try { for await (const chunk of stream) { const content = chunk.choices[0]?.delta?.content || ''; await writer.write(encoder.encode(content)); } } finally { await writer.close(); } })(); return new Response(transformStream.readable, { headers: { 'Content-Type': 'text/plain; charset=utf-8', 'Transfer-Encoding': 'chunked' } }); } } ``` ## Use docs in your editor AI-enabled editors, including Cursor and Windsurf, can index documentation. Cursor includes the Cloudflare Developer Docs by default: you can use the [`@Docs`](https://docs.cursor.com/context/@-symbols/@-docs) command. In other editors, such as Zed or Windsurf, you can paste in URLs to add to your context. Use the *Copy Page* button to paste in Cloudflare docs directly, or fetch docs for each product by appending `llms-full.txt` to the root URL - for example, `https://developers.cloudflare.com/agents/llms-full.txt` or `https://developers.cloudflare.com/workflows/llms-full.txt`. You can combine these with the Workers system prompt on this page to improve your editor or agent's understanding of the Workers APIs. ## Additional resources To get the most out of AI models and tools, we recommend reading the following guides on prompt engineering and structure: * OpenAI's [prompt engineering](https://platform.openai.com/docs/guides/prompt-engineering) guide and [best practices](https://platform.openai.com/docs/guides/reasoning-best-practices) for using reasoning models. * The [prompt engineering](https://docs.anthropic.com/en/docs/build-with-claude/prompt-engineering/overview) guide from Anthropic * Google's [quick start guide](https://services.google.com/fh/files/misc/gemini-for-google-workspace-prompting-guide-101.pdf) for writing effective prompts * Meta's [prompting documentation](https://www.llama.com/docs/how-to-guides/prompting/) for their Llama model family. * GitHub's guide for [prompt engineering](https://docs.github.com/en/copilot/using-github-copilot/copilot-chat/prompt-engineering-for-copilot-chat) when using Copilot Chat.
    --- title: Templates · Cloudflare Workers docs description: GitHub repositories that are designed to be a starting point for building a new Cloudflare Workers project. lastUpdated: 2025-05-15T15:33:30.000Z chatbotDeprioritize: false source_url: html: https://developers.cloudflare.com/workers/get-started/quickstarts/ md: https://developers.cloudflare.com/workers/get-started/quickstarts/index.md --- Templates are GitHub repositories that are designed to be a starting point for building a new Cloudflare Workers project. To start any of the projects below, run: ### astro-blog-starter-template [![Deploy to Cloudflare](https://deploy.workers.cloudflare.com/button)](https://deploy.workers.cloudflare.com/?url=https://github.com/cloudflare/templates/tree/main/astro-blog-starter-template) Build a personal website, blog, or portfolio with Astro. Explore on [GitHub ↗](https://github.com/cloudflare/templates/tree/main/astro-blog-starter-template) * npm ```sh npm create cloudflare@latest -- --template=cloudflare/templates/astro-blog-starter-template ``` * yarn ```sh yarn create cloudflare --template=cloudflare/templates/astro-blog-starter-template ``` * pnpm ```sh pnpm create cloudflare@latest --template=cloudflare/templates/astro-blog-starter-template ``` *** ### chanfana-openapi-template [![Deploy to Cloudflare](https://deploy.workers.cloudflare.com/button)](https://deploy.workers.cloudflare.com/?url=https://github.com/cloudflare/templates/tree/main/chanfana-openapi-template) Complete backend API template using Hono + Chanfana + D1 + Vitest. Explore on [GitHub ↗](https://github.com/cloudflare/templates/tree/main/chanfana-openapi-template) * npm ```sh npm create cloudflare@latest -- --template=cloudflare/templates/chanfana-openapi-template ``` * yarn ```sh yarn create cloudflare --template=cloudflare/templates/chanfana-openapi-template ``` * pnpm ```sh pnpm create cloudflare@latest --template=cloudflare/templates/chanfana-openapi-template ``` *** ### cli [![Deploy to Cloudflare](https://deploy.workers.cloudflare.com/button)](https://deploy.workers.cloudflare.com/?url=https://github.com/cloudflare/templates/tree/main/cli) A handy CLI for developing templates. Explore on [GitHub ↗](https://github.com/cloudflare/templates/tree/main/cli) * npm ```sh npm create cloudflare@latest -- --template=cloudflare/templates/cli ``` * yarn ```sh yarn create cloudflare --template=cloudflare/templates/cli ``` * pnpm ```sh pnpm create cloudflare@latest --template=cloudflare/templates/cli ``` *** ### containers-template [![Deploy to Cloudflare](https://deploy.workers.cloudflare.com/button)](https://deploy.workers.cloudflare.com/?url=https://github.com/cloudflare/templates/tree/main/containers-template) Build a Container-enabled Worker Explore on [GitHub ↗](https://github.com/cloudflare/templates/tree/main/containers-template) * npm ```sh npm create cloudflare@latest -- --template=cloudflare/templates/containers-template ``` * yarn ```sh yarn create cloudflare --template=cloudflare/templates/containers-template ``` * pnpm ```sh pnpm create cloudflare@latest --template=cloudflare/templates/containers-template ``` *** ### d1-starter-sessions-api-template [![Deploy to Cloudflare](https://deploy.workers.cloudflare.com/button)](https://deploy.workers.cloudflare.com/?url=https://github.com/cloudflare/templates/tree/main/d1-starter-sessions-api-template) D1 starter template using the Sessions API for read replication. Explore on [GitHub ↗](https://github.com/cloudflare/templates/tree/main/d1-starter-sessions-api-template) * npm ```sh npm create cloudflare@latest -- --template=cloudflare/templates/d1-starter-sessions-api-template ``` * yarn ```sh yarn create cloudflare --template=cloudflare/templates/d1-starter-sessions-api-template ``` * pnpm ```sh pnpm create cloudflare@latest --template=cloudflare/templates/d1-starter-sessions-api-template ``` *** ### d1-template [![Deploy to Cloudflare](https://deploy.workers.cloudflare.com/button)](https://deploy.workers.cloudflare.com/?url=https://github.com/cloudflare/templates/tree/main/d1-template) Cloudflare's native serverless SQL database. Explore on [GitHub ↗](https://github.com/cloudflare/templates/tree/main/d1-template) * npm ```sh npm create cloudflare@latest -- --template=cloudflare/templates/d1-template ``` * yarn ```sh yarn create cloudflare --template=cloudflare/templates/d1-template ``` * pnpm ```sh pnpm create cloudflare@latest --template=cloudflare/templates/d1-template ``` *** ### durable-chat-template [![Deploy to Cloudflare](https://deploy.workers.cloudflare.com/button)](https://deploy.workers.cloudflare.com/?url=https://github.com/cloudflare/templates/tree/main/durable-chat-template) Chat with other users in real-time using Durable Objects and PartyKit. Explore on [GitHub ↗](https://github.com/cloudflare/templates/tree/main/durable-chat-template) * npm ```sh npm create cloudflare@latest -- --template=cloudflare/templates/durable-chat-template ``` * yarn ```sh yarn create cloudflare --template=cloudflare/templates/durable-chat-template ``` * pnpm ```sh pnpm create cloudflare@latest --template=cloudflare/templates/durable-chat-template ``` *** ### hello-world-do-template [![Deploy to Cloudflare](https://deploy.workers.cloudflare.com/button)](https://deploy.workers.cloudflare.com/?url=https://github.com/cloudflare/templates/tree/main/hello-world-do-template) Explore on [GitHub ↗](https://github.com/cloudflare/templates/tree/main/hello-world-do-template) * npm ```sh npm create cloudflare@latest -- --template=cloudflare/templates/hello-world-do-template ``` * yarn ```sh yarn create cloudflare --template=cloudflare/templates/hello-world-do-template ``` * pnpm ```sh pnpm create cloudflare@latest --template=cloudflare/templates/hello-world-do-template ``` *** ### llm-chat-app-template [![Deploy to Cloudflare](https://deploy.workers.cloudflare.com/button)](https://deploy.workers.cloudflare.com/?url=https://github.com/cloudflare/templates/tree/main/llm-chat-app-template) A simple chat application powered by Cloudflare Workers AI Explore on [GitHub ↗](https://github.com/cloudflare/templates/tree/main/llm-chat-app-template) * npm ```sh npm create cloudflare@latest -- --template=cloudflare/templates/llm-chat-app-template ``` * yarn ```sh yarn create cloudflare --template=cloudflare/templates/llm-chat-app-template ``` * pnpm ```sh pnpm create cloudflare@latest --template=cloudflare/templates/llm-chat-app-template ``` *** ### multiplayer-globe-template [![Deploy to Cloudflare](https://deploy.workers.cloudflare.com/button)](https://deploy.workers.cloudflare.com/?url=https://github.com/cloudflare/templates/tree/main/multiplayer-globe-template) Display website visitor locations in real-time using Durable Objects and PartyKit. Explore on [GitHub ↗](https://github.com/cloudflare/templates/tree/main/multiplayer-globe-template) * npm ```sh npm create cloudflare@latest -- --template=cloudflare/templates/multiplayer-globe-template ``` * yarn ```sh yarn create cloudflare --template=cloudflare/templates/multiplayer-globe-template ``` * pnpm ```sh pnpm create cloudflare@latest --template=cloudflare/templates/multiplayer-globe-template ``` *** ### mysql-hyperdrive-template [![Deploy to Cloudflare](https://deploy.workers.cloudflare.com/button)](https://deploy.workers.cloudflare.com/?url=https://github.com/cloudflare/templates/tree/main/mysql-hyperdrive-template) Explore on [GitHub ↗](https://github.com/cloudflare/templates/tree/main/mysql-hyperdrive-template) * npm ```sh npm create cloudflare@latest -- --template=cloudflare/templates/mysql-hyperdrive-template ``` * yarn ```sh yarn create cloudflare --template=cloudflare/templates/mysql-hyperdrive-template ``` * pnpm ```sh pnpm create cloudflare@latest --template=cloudflare/templates/mysql-hyperdrive-template ``` *** ### next-starter-template [![Deploy to Cloudflare](https://deploy.workers.cloudflare.com/button)](https://deploy.workers.cloudflare.com/?url=https://github.com/cloudflare/templates/tree/main/next-starter-template) Build a full-stack web application with Next.js. Explore on [GitHub ↗](https://github.com/cloudflare/templates/tree/main/next-starter-template) * npm ```sh npm create cloudflare@latest -- --template=cloudflare/templates/next-starter-template ``` * yarn ```sh yarn create cloudflare --template=cloudflare/templates/next-starter-template ``` * pnpm ```sh pnpm create cloudflare@latest --template=cloudflare/templates/next-starter-template ``` *** ### openauth-template [![Deploy to Cloudflare](https://deploy.workers.cloudflare.com/button)](https://deploy.workers.cloudflare.com/?url=https://github.com/cloudflare/templates/tree/main/openauth-template) Deploy an OpenAuth server on Cloudflare Workers. Explore on [GitHub ↗](https://github.com/cloudflare/templates/tree/main/openauth-template) * npm ```sh npm create cloudflare@latest -- --template=cloudflare/templates/openauth-template ``` * yarn ```sh yarn create cloudflare --template=cloudflare/templates/openauth-template ``` * pnpm ```sh pnpm create cloudflare@latest --template=cloudflare/templates/openauth-template ``` *** ### postgres-hyperdrive-template [![Deploy to Cloudflare](https://deploy.workers.cloudflare.com/button)](https://deploy.workers.cloudflare.com/?url=https://github.com/cloudflare/templates/tree/main/postgres-hyperdrive-template) Explore on [GitHub ↗](https://github.com/cloudflare/templates/tree/main/postgres-hyperdrive-template) * npm ```sh npm create cloudflare@latest -- --template=cloudflare/templates/postgres-hyperdrive-template ``` * yarn ```sh yarn create cloudflare --template=cloudflare/templates/postgres-hyperdrive-template ``` * pnpm ```sh pnpm create cloudflare@latest --template=cloudflare/templates/postgres-hyperdrive-template ``` *** ### r2-explorer-template [![Deploy to Cloudflare](https://deploy.workers.cloudflare.com/button)](https://deploy.workers.cloudflare.com/?url=https://github.com/cloudflare/templates/tree/main/r2-explorer-template) A Google Drive Interface for your Cloudflare R2 Buckets! Explore on [GitHub ↗](https://github.com/cloudflare/templates/tree/main/r2-explorer-template) * npm ```sh npm create cloudflare@latest -- --template=cloudflare/templates/r2-explorer-template ``` * yarn ```sh yarn create cloudflare --template=cloudflare/templates/r2-explorer-template ``` * pnpm ```sh pnpm create cloudflare@latest --template=cloudflare/templates/r2-explorer-template ``` *** ### react-postgres-fullstack-template [![Deploy to Cloudflare](https://deploy.workers.cloudflare.com/button)](https://deploy.workers.cloudflare.com/?url=https://github.com/cloudflare/templates/tree/main/react-postgres-fullstack-template) Deploy your own library of books using Postgres and Workers. Explore on [GitHub ↗](https://github.com/cloudflare/templates/tree/main/react-postgres-fullstack-template) * npm ```sh npm create cloudflare@latest -- --template=cloudflare/templates/react-postgres-fullstack-template ``` * yarn ```sh yarn create cloudflare --template=cloudflare/templates/react-postgres-fullstack-template ``` * pnpm ```sh pnpm create cloudflare@latest --template=cloudflare/templates/react-postgres-fullstack-template ``` *** ### react-router-hono-fullstack-template [![Deploy to Cloudflare](https://deploy.workers.cloudflare.com/button)](https://deploy.workers.cloudflare.com/?url=https://github.com/cloudflare/templates/tree/main/react-router-hono-fullstack-template) A modern full-stack template powered by Cloudflare Workers, using Hono for backend APIs, React Router for frontend routing, and shadcn/ui for beautiful, accessible components styled with Tailwind CSS Explore on [GitHub ↗](https://github.com/cloudflare/templates/tree/main/react-router-hono-fullstack-template) * npm ```sh npm create cloudflare@latest -- --template=cloudflare/templates/react-router-hono-fullstack-template ``` * yarn ```sh yarn create cloudflare --template=cloudflare/templates/react-router-hono-fullstack-template ``` * pnpm ```sh pnpm create cloudflare@latest --template=cloudflare/templates/react-router-hono-fullstack-template ``` *** ### react-router-postgres-ssr-template [![Deploy to Cloudflare](https://deploy.workers.cloudflare.com/button)](https://deploy.workers.cloudflare.com/?url=https://github.com/cloudflare/templates/tree/main/react-router-postgres-ssr-template) Deploy your own library of books using Postgres and Workers. Explore on [GitHub ↗](https://github.com/cloudflare/templates/tree/main/react-router-postgres-ssr-template) * npm ```sh npm create cloudflare@latest -- --template=cloudflare/templates/react-router-postgres-ssr-template ``` * yarn ```sh yarn create cloudflare --template=cloudflare/templates/react-router-postgres-ssr-template ``` * pnpm ```sh pnpm create cloudflare@latest --template=cloudflare/templates/react-router-postgres-ssr-template ``` *** ### react-router-starter-template [![Deploy to Cloudflare](https://deploy.workers.cloudflare.com/button)](https://deploy.workers.cloudflare.com/?url=https://github.com/cloudflare/templates/tree/main/react-router-starter-template) Build a full-stack web application with React Router 7. Explore on [GitHub ↗](https://github.com/cloudflare/templates/tree/main/react-router-starter-template) * npm ```sh npm create cloudflare@latest -- --template=cloudflare/templates/react-router-starter-template ``` * yarn ```sh yarn create cloudflare --template=cloudflare/templates/react-router-starter-template ``` * pnpm ```sh pnpm create cloudflare@latest --template=cloudflare/templates/react-router-starter-template ``` *** ### remix-starter-template [![Deploy to Cloudflare](https://deploy.workers.cloudflare.com/button)](https://deploy.workers.cloudflare.com/?url=https://github.com/cloudflare/templates/tree/main/remix-starter-template) Build a full-stack web application with Remix. Explore on [GitHub ↗](https://github.com/cloudflare/templates/tree/main/remix-starter-template) * npm ```sh npm create cloudflare@latest -- --template=cloudflare/templates/remix-starter-template ``` * yarn ```sh yarn create cloudflare --template=cloudflare/templates/remix-starter-template ``` * pnpm ```sh pnpm create cloudflare@latest --template=cloudflare/templates/remix-starter-template ``` *** ### saas-admin-template [![Deploy to Cloudflare](https://deploy.workers.cloudflare.com/button)](https://deploy.workers.cloudflare.com/?url=https://github.com/cloudflare/templates/tree/main/saas-admin-template) Admin dashboard template built with Astro, shadcn/ui, and Cloudflare's developer stack Explore on [GitHub ↗](https://github.com/cloudflare/templates/tree/main/saas-admin-template) * npm ```sh npm create cloudflare@latest -- --template=cloudflare/templates/saas-admin-template ``` * yarn ```sh yarn create cloudflare --template=cloudflare/templates/saas-admin-template ``` * pnpm ```sh pnpm create cloudflare@latest --template=cloudflare/templates/saas-admin-template ``` *** ### text-to-image-template [![Deploy to Cloudflare](https://deploy.workers.cloudflare.com/button)](https://deploy.workers.cloudflare.com/?url=https://github.com/cloudflare/templates/tree/main/text-to-image-template) Generate images based on text prompts. Explore on [GitHub ↗](https://github.com/cloudflare/templates/tree/main/text-to-image-template) * npm ```sh npm create cloudflare@latest -- --template=cloudflare/templates/text-to-image-template ``` * yarn ```sh yarn create cloudflare --template=cloudflare/templates/text-to-image-template ``` * pnpm ```sh pnpm create cloudflare@latest --template=cloudflare/templates/text-to-image-template ``` *** ### to-do-list-kv-template [![Deploy to Cloudflare](https://deploy.workers.cloudflare.com/button)](https://deploy.workers.cloudflare.com/?url=https://github.com/cloudflare/templates/tree/main/to-do-list-kv-template) A simple to-do list app built with Cloudflare Workers Assets and Remix. Explore on [GitHub ↗](https://github.com/cloudflare/templates/tree/main/to-do-list-kv-template) * npm ```sh npm create cloudflare@latest -- --template=cloudflare/templates/to-do-list-kv-template ``` * yarn ```sh yarn create cloudflare --template=cloudflare/templates/to-do-list-kv-template ``` * pnpm ```sh pnpm create cloudflare@latest --template=cloudflare/templates/to-do-list-kv-template ``` *** ### vite-react-template [![Deploy to Cloudflare](https://deploy.workers.cloudflare.com/button)](https://deploy.workers.cloudflare.com/?url=https://github.com/cloudflare/templates/tree/main/vite-react-template) A template for building a React application with Vite, Hono, and Cloudflare Workers Explore on [GitHub ↗](https://github.com/cloudflare/templates/tree/main/vite-react-template) * npm ```sh npm create cloudflare@latest -- --template=cloudflare/templates/vite-react-template ``` * yarn ```sh yarn create cloudflare --template=cloudflare/templates/vite-react-template ``` * pnpm ```sh pnpm create cloudflare@latest --template=cloudflare/templates/vite-react-template ``` *** *** ## Built with Workers Get inspiration from other sites and projects out there that were built with Cloudflare Workers. [Built with Workers](https://workers.cloudflare.com/built-with) --- title: JavaScript · Cloudflare Workers docs description: The Workers platform is designed to be JavaScript standards compliant and web-interoperable, and supports JavaScript standards, as defined by TC39 (ECMAScript). Wherever possible, it uses web platform APIs, so that code can be reused across client and server, as well as across WinterCG JavaScript runtimes. lastUpdated: 2025-03-13T11:08:22.000Z chatbotDeprioritize: false source_url: html: https://developers.cloudflare.com/workers/languages/javascript/ md: https://developers.cloudflare.com/workers/languages/javascript/index.md --- The Workers platform is designed to be [JavaScript standards compliant](https://ecma-international.org/publications-and-standards/standards/ecma-262/) and web-interoperable, and supports JavaScript standards, as defined by [TC39](https://tc39.es/) (ECMAScript). Wherever possible, it uses web platform APIs, so that code can be reused across client and server, as well as across [WinterCG](https://wintercg.org/) JavaScript runtimes. Refer to [Runtime APIs](https://developers.cloudflare.com/workers/runtime-apis/) for more information on specific JavaScript APIs available in Workers. ### Resources * [Getting Started](https://developers.cloudflare.com/workers/get-started/guide/) * [Quickstarts](https://developers.cloudflare.com/workers/get-started/quickstarts/) – More example repos to use as a basis for your projects * [TypeScript type definitions](https://github.com/cloudflare/workers-types) * [JavaScript and web standard APIs](https://developers.cloudflare.com/workers/runtime-apis/web-standards/) * [Tutorials](https://developers.cloudflare.com/workers/tutorials/) * [Examples](https://developers.cloudflare.com/workers/examples/?languages=JavaScript) --- title: Write Cloudflare Workers in Python · Cloudflare Workers docs description: Write Workers in 100% Python lastUpdated: 2025-03-24T17:07:01.000Z chatbotDeprioritize: false source_url: html: https://developers.cloudflare.com/workers/languages/python/ md: https://developers.cloudflare.com/workers/languages/python/index.md --- Cloudflare Workers provides first-class support for Python, including support for: * The majority of Python's [Standard library](https://developers.cloudflare.com/workers/languages/python/stdlib/) * All [bindings](https://developers.cloudflare.com/workers/runtime-apis/bindings/), including [Workers AI](https://developers.cloudflare.com/workers-ai/), [Vectorize](https://developers.cloudflare.com/vectorize), [R2](https://developers.cloudflare.com/r2), [KV](https://developers.cloudflare.com/kv), [D1](https://developers.cloudflare.com/d1), [Queues](https://developers.cloudflare.com/queues/), [Durable Objects](https://developers.cloudflare.com/durable-objects/), [Service Bindings](https://developers.cloudflare.com/workers/runtime-apis/bindings/service-bindings/) and more. * [Environment Variables](https://developers.cloudflare.com/workers/configuration/environment-variables/), and [Secrets](https://developers.cloudflare.com/workers/configuration/secrets/) * A robust [foreign function interface (FFI)](https://developers.cloudflare.com/workers/languages/python/ffi) that lets you use JavaScript objects and functions directly from Python — including all [Runtime APIs](https://developers.cloudflare.com/workers/runtime-apis/) * [Built-in packages](https://developers.cloudflare.com/workers/languages/python/packages), including [FastAPI](https://fastapi.tiangolo.com/), [Langchain](https://pypi.org/project/langchain/), [httpx](https://www.python-httpx.org/) and more. Python Workers are in beta. Packages do not run in production. Currently, you can only deploy Python Workers that use the standard library. [Packages](https://developers.cloudflare.com/workers/languages/python/packages/#supported-packages) **cannot be deployed** and will only work in local development for the time being. You must add the `python_workers` compatibility flag to your Worker, while Python Workers are in open beta. We'd love your feedback. Join the #python-workers channel in the [Cloudflare Developers Discord](https://discord.cloudflare.com/) and let us know what you'd like to see next. ## Get started ```bash git clone https://github.com/cloudflare/python-workers-examples cd python-workers-examples/01-hello npx wrangler@latest dev ``` A Python Worker can be as simple as three lines of code: ```python from workers import Response def on_fetch(request): return Response("Hello World!") ``` Similar to Workers written in [JavaScript](https://developers.cloudflare.com/workers/languages/javascript), [TypeScript](https://developers.cloudflare.com/workers/languages/typescript), or [Rust](https://developers.cloudflare.com/workers/languages/rust/), the main entry point for a Python worker is the [`fetch` handler](https://developers.cloudflare.com/workers/runtime-apis/handlers/fetch). In a Python Worker, this handler is named `on_fetch`. To run a Python Worker locally, you use [Wrangler](https://developers.cloudflare.com/workers/wrangler/), the CLI for Cloudflare Workers: ```bash npx wrangler@latest dev ``` To deploy a Python Worker to Cloudflare, run [`wrangler deploy`](https://developers.cloudflare.com/workers/wrangler/commands/#deploy): ```bash npx wrangler@latest deploy ``` ## Modules Python workers can be split across multiple files. Let's create a new Python file, called `src/hello.py`: ```python def hello(name): return "Hello, " + name + "!" ``` Now, we can modify `src/entry.py` to make use of the new module. ```python from hello import hello from workers import Response def on_fetch(request): return Response(hello("World")) ``` Once you edit `src/entry.py`, Wrangler will automatically detect the change and reload your Worker. ## The `Request` Interface The `request` parameter passed to your `fetch` handler is a JavaScript Request object, exposed via the foreign function interface, allowing you to access it directly from your Python code. Let's try editing the worker to accept a POST request. We know from the [documentation for `Request`](https://developers.cloudflare.com/workers/runtime-apis/request) that we can call `await request.json()` within an `async` function to parse the request body as JSON. In a Python Worker, you would write: ```python from workers import Response from hello import hello async def on_fetch(request): name = (await request.json()).name return Response(hello(name)) ``` Once you edit the `src/entry.py`, Wrangler should automatically restart the local development server. Now, if you send a POST request with the appropriate body, your Worker should respond with a personalized message. ```bash curl --header "Content-Type: application/json" \ --request POST \ --data '{"name": "Python"}' http://localhost:8787 ``` ```bash Hello, Python! ``` ## The `env` Parameter In addition to the `request` parameter, the `env` parameter is also passed to the Python `fetch` handler and can be used to access [environment variables](https://developers.cloudflare.com/workers/configuration/environment-variables/), [secrets](https://developers.cloudflare.com/workers/configuration/secrets/),and [bindings](https://developers.cloudflare.com/workers/runtime-apis/bindings/). For example, let us try setting and using an environment variable in a Python Worker. First, add the environment variable to your Worker's [Wrangler configuration file](https://developers.cloudflare.com/workers/wrangler/configuration/): * wrangler.jsonc ```jsonc { "name": "hello-python-worker", "main": "src/entry.py", "compatibility_flags": [ "python_workers" ], "compatibility_date": "2024-03-20", "vars": { "API_HOST": "example.com" } } ``` * wrangler.toml ```toml name = "hello-python-worker" main = "src/entry.py" compatibility_flags = ["python_workers"] compatibility_date = "2024-03-20" [vars] API_HOST = "example.com" ``` Then, you can access the `API_HOST` environment variable via the `env` parameter: ```python from workers import Response async def on_fetch(request, env): return Response(env.API_HOST) ``` ## Further Reading * Understand which parts of the [Python Standard Library](https://developers.cloudflare.com/workers/languages/python/stdlib) are supported in Python Workers. * Learn about Python Workers' [foreign function interface (FFI)](https://developers.cloudflare.com/workers/languages/python/ffi), and how to use it to work with [bindings](https://developers.cloudflare.com/workers/runtime-apis/bindings) and [Runtime APIs](https://developers.cloudflare.com/workers/runtime-apis/). * Explore the [Built-in Python packages](https://developers.cloudflare.com/workers/languages/python/packages) that the Workers runtime provides. --- title: Cloudflare Workers — Rust language support · Cloudflare Workers docs description: Write Workers in 100% Rust using the [`workers-rs` crate](https://github.com/cloudflare/workers-rs) lastUpdated: 2025-05-06T10:45:54.000Z chatbotDeprioritize: false source_url: html: https://developers.cloudflare.com/workers/languages/rust/ md: https://developers.cloudflare.com/workers/languages/rust/index.md --- Cloudflare Workers provides support for Rust via the [`workers-rs` crate](https://github.com/cloudflare/workers-rs), which makes [Runtime APIs](https://developers.cloudflare.com/workers/runtime-apis) and [bindings](https://developers.cloudflare.com/workers/runtime-apis/bindings/) to developer platform products, such as [Workers KV](https://developers.cloudflare.com/kv/concepts/how-kv-works/), [R2](https://developers.cloudflare.com/r2/), and [Queues](https://developers.cloudflare.com/queues/), available directly from your Rust code. By following this guide, you will learn how to build a Worker entirely in the Rust programming language. ## Prerequisites Before starting this guide, make sure you have: * A recent version of [`Rust`](https://rustup.rs/) * [`npm`](https://docs.npmjs.com/getting-started) * The Rust `wasm32-unknown-unknown` toolchain: ```sh rustup target add wasm32-unknown-unknown ``` * And `cargo-generate` sub-command by running: ```sh cargo install cargo-generate ``` ## 1. Create a new project with Wrangler Open a terminal window, and run the following command to generate a Worker project template in Rust: ```sh cargo generate cloudflare/workers-rs ``` Your project will be created in a new directory that you named, in which you will find the following files and folders: * `Cargo.toml` - The standard project configuration file for Rust's [`Cargo`](https://doc.rust-lang.org/cargo/) package manager. The template pre-populates some best-practice settings for building for Wasm on Workers. * `wrangler.toml` - Wrangler configuration, pre-populated with a custom build command to invoke `worker-build` (Refer to [Wrangler Bundling](https://developers.cloudflare.com/workers/languages/rust/#bundling-worker-build)). * `src` - Rust source directory, pre-populated with Hello World Worker. ## 2. Develop locally After you have created your first Worker, run the [`wrangler dev`](https://developers.cloudflare.com/workers/wrangler/commands/#dev) command to start a local server for developing your Worker. This will allow you to test your Worker in development. ```sh npx wrangler dev ``` If you have not used Wrangler before, it will try to open your web browser to login with your Cloudflare account. Note If you have issues with this step or you do not have access to a browser interface, refer to the [`wrangler login`](https://developers.cloudflare.com/workers/wrangler/commands/#login) documentation for more information. Go to to review your Worker running. Any changes you make to your code will trigger a rebuild, and reloading the page will show you the up-to-date output of your Worker. ## 3. Write your Worker code With your new project generated, write your Worker code. Find the entrypoint to your Worker in `src/lib.rs`: ```rust use worker::*; #[event(fetch)] async fn main(req: Request, env: Env, ctx: Context) -> Result { Response::ok("Hello, World!") } ``` Note There is some counterintuitive behavior going on here: 1. `workers-rs` provides an `event` macro which expects a handler function signature identical to those seen in JavaScript Workers. 2. `async` is not generally supported by Wasm, but you are able to use `async` in a `workers-rs` project (refer to [`async`](https://developers.cloudflare.com/workers/languages/rust/#async-wasm-bindgen-futures)). ### Related runtime APIs `workers-rs` provides a runtime API which closely matches Worker's JavaScript API, and enables integration with Worker's platform features. For detailed documentation of the API, refer to [`docs.rs/worker`](https://docs.rs/worker/latest/worker/). #### `event` macro This macro allows you to define entrypoints to your Worker. The `event` macro supports the following events: * `fetch` - Invoked by an incoming HTTP request. * `scheduled` - Invoked by [`Cron Triggers`](https://developers.cloudflare.com/workers/configuration/cron-triggers/). * `queue` - Invoked by incoming message batches from [Queues](https://developers.cloudflare.com/queues/) (Requires `queue` feature in `Cargo.toml`, refer to the [`workers-rs` GitHub repository and `queues` feature flag](https://github.com/cloudflare/workers-rs#queues)). * `start` - Invoked when the Worker is first launched (such as, to install panic hooks). #### `fetch` parameters The `fetch` handler provides three arguments which match the JavaScript API: 1. **[`Request`](https://docs.rs/worker/latest/worker/struct.Request.html)** An object representing the incoming request. This includes methods for accessing headers, method, path, Cloudflare properties, and body (with support for asynchronous streaming and JSON deserialization with [Serde](https://serde.rs/)). 1. **[`Env`](https://docs.rs/worker/latest/worker/struct.Env.html)** Provides access to Worker [bindings](https://developers.cloudflare.com/workers/runtime-apis/bindings/). * [`Secret`](https://github.com/cloudflare/workers-rs/blob/e15f88110d814c2d7759b2368df688433f807694/worker/src/env.rs#L92) - Secret value configured in Cloudflare dashboard or using `wrangler secret put`. * [`Var`](https://github.com/cloudflare/workers-rs/blob/e15f88110d814c2d7759b2368df688433f807694/worker/src/env.rs#L92) - Environment variable defined in `wrangler.toml`. * [`KvStore`](https://docs.rs/worker-kv/latest/worker_kv/struct.KvStore.html) - Workers [KV](https://developers.cloudflare.com/kv/api/) namespace binding. * [`ObjectNamespace`](https://docs.rs/worker/latest/worker/durable/struct.ObjectNamespace.html) - [Durable Object](https://developers.cloudflare.com/durable-objects/) binding. * [`Fetcher`](https://docs.rs/worker/latest/worker/struct.Fetcher.html) - [Service binding](https://developers.cloudflare.com/workers/runtime-apis/bindings/service-bindings/) to another Worker. * [`Bucket`](https://docs.rs/worker/latest/worker/struct.Bucket.html) - [R2](https://developers.cloudflare.com/r2/) Bucket binding. 1. **[`Context`](https://docs.rs/worker/latest/worker/struct.Context.html)** Provides access to [`waitUntil`](https://developers.cloudflare.com/workers/runtime-apis/context/#waituntil) (deferred asynchronous tasks) and [`passThroughOnException`](https://developers.cloudflare.com/workers/runtime-apis/context/#passthroughonexception) (fail open) functionality. #### [`Response`](https://docs.rs/worker/latest/worker/struct.Response.html) The `fetch` handler expects a [`Response`](https://docs.rs/worker/latest/worker/struct.Response.html) return type, which includes support for streaming responses to the client asynchronously. This is also the return type of any subrequests made from your Worker. There are methods for accessing status code and headers, as well as streaming the body asynchronously or deserializing from JSON using [Serde](https://serde.rs/). #### `Router` Implements convenient [routing API](https://docs.rs/worker/latest/worker/struct.Router.html) to serve multiple paths from one Worker. Refer to the [`Router` example in the `worker-rs` GitHub repository](https://github.com/cloudflare/workers-rs#or-use-the-router). ## 4. Deploy your Worker project With your project configured, you can now deploy your Worker, to a `*.workers.dev` subdomain, or a [Custom Domain](https://developers.cloudflare.com/workers/configuration/routing/custom-domains/), if you have one configured. If you have not configured any subdomain or domain, Wrangler will prompt you during the deployment process to set one up. ```sh npx wrangler deploy ``` Preview your Worker at `..workers.dev`. Note When pushing to your `*.workers.dev` subdomain for the first time, you may see [`523` errors](https://developers.cloudflare.com/support/troubleshooting/http-status-codes/cloudflare-5xx-errors/error-523/) while DNS is propagating. These errors should resolve themselves after a minute or so. After completing these steps, you will have a basic Rust-based Worker deployed. From here, you can add crate dependencies and write code in Rust to implement your Worker application. If you would like to know more about the inner workings of how Rust compiled to Wasm is supported by Workers, the next section outlines the libraries and tools involved. ## How this deployment works Wasm Workers are invoked from a JavaScript entrypoint script which is created automatically for you when using `workers-rs`. ### JavaScript Plumbing (`wasm-bindgen`) To access platform features such as bindings, Wasm Workers must be able to access methods from the JavaScript runtime API. This interoperability is achieved using [`wasm-bindgen`](https://rustwasm.github.io/wasm-bindgen/), which provides the glue code needed to import runtime APIs to, and export event handlers from, the Wasm module. `wasm-bindgen` also provides [`js-sys`](https://docs.rs/js-sys/latest/js_sys/), which implements types for interacting with JavaScript objects. In practice, this is an implementation detail, as `workers-rs`'s API handles conversion to and from JavaScript objects, and interaction with imported JavaScript runtime APIs for you. Note If you are using `wasm-bindgen` without `workers-rs` / `worker-build`, then you will need to patch the JavaScript that it emits. This is because when you import a `wasm` file in Workers, you get a `WebAssembly.Module` instead of a `WebAssembly.Instance` for performance and security reasons. To patch the JavaScript that `wasm-bindgen` emits: 1. Run `wasm-pack build --target bundler` as you normally would. 2. Patch the JavaScript file that it produces (the following code block assumes the file is called `mywasmlib.js`): ```js import * as imports from "./mywasmlib_bg.js"; // switch between both syntax for node and for workerd import wkmod from "./mywasmlib_bg.wasm"; import * as nodemod from "./mywasmlib_bg.wasm"; if (typeof process !== "undefined" && process.release.name === "node") { imports.__wbg_set_wasm(nodemod); } else { const instance = new WebAssembly.Instance(wkmod, { "./mywasmlib_bg.js": imports, }); imports.__wbg_set_wasm(instance.exports); } export * from "./mywasmlib_bg.js"; ``` 1. In your Worker entrypoint, import the function and use it directly: ```js import { myFunction } from "path/to/mylib.js"; ``` ### Async (`wasm-bindgen-futures`) [`wasm-bindgen-futures`](https://rustwasm.github.io/wasm-bindgen/api/wasm_bindgen_futures/) (part of the `wasm-bindgen` project) provides interoperability between Rust Futures and JavaScript Promises. `workers-rs` invokes the entire event handler function using `spawn_local`, meaning that you can program using async Rust, which is turned into a single JavaScript Promise and run on the JavaScript event loop. Calls to imported JavaScript runtime APIs are automatically converted to Rust Futures that can be invoked from async Rust functions. ### Bundling (`worker-build`) To run the resulting Wasm binary on Workers, `workers-rs` includes a build tool called [`worker-build`](https://github.com/cloudflare/workers-rs/tree/main/worker-build) which: 1. Creates a JavaScript entrypoint script that properly invokes the module using `wasm-bindgen`'s JavaScript API. 2. Invokes `web-pack` to minify and bundle the JavaScript code. 3. Outputs a directory structure that Wrangler can use to bundle and deploy the final Worker. `worker-build` is invoked by default in the template project using a custom build command specified in the `wrangler.toml` file. ### Binary Size (`wasm-opt`) Unoptimized Rust Wasm binaries can be large and may exceed Worker bundle size limits or experience long startup times. The template project pre-configures several useful size optimizations in your `Cargo.toml` file: ```toml [profile.release] lto = true strip = true codegen-units = 1 ``` Finally, `worker-bundle` automatically invokes [`wasm-opt`](https://github.com/brson/wasm-opt-rs) to further optimize binary size before upload. ## Related resources * [Rust Wasm Book](https://rustwasm.github.io/docs/book/) --- title: Write Cloudflare Workers in TypeScript · Cloudflare Workers docs description: TypeScript is a first-class language on Cloudflare Workers. All APIs provided in Workers are fully typed, and type definitions are generated directly from workerd, the open-source Workers runtime. lastUpdated: 2025-04-16T21:02:18.000Z chatbotDeprioritize: false source_url: html: https://developers.cloudflare.com/workers/languages/typescript/ md: https://developers.cloudflare.com/workers/languages/typescript/index.md --- TypeScript is a first-class language on Cloudflare Workers. All APIs provided in Workers are fully typed, and type definitions are generated directly from [workerd](https://github.com/cloudflare/workerd), the open-source Workers runtime. We recommend you generate types for your Worker by running [`wrangler types`](https://developers.cloudflare.com/workers/wrangler/commands/#types). Cloudflare also publishes type definitions to [GitHub](https://github.com/cloudflare/workers-types) and [npm](https://www.npmjs.com/package/@cloudflare/workers-types) (`npm install -D @cloudflare/workers-types`). ### Generate types that match your Worker's configuration Cloudflare continuously improves [workerd](https://github.com/cloudflare/workerd), the open-source Workers runtime. Changes in workerd can introduce JavaScript API changes, thus changing the respective TypeScript types. This means the correct types for your Worker depend on: 1. Your Worker's [compatibility date](https://developers.cloudflare.com/workers/configuration/compatibility-dates/). 2. Your Worker's [compatibility flags](https://developers.cloudflare.com/workers/configuration/compatibility-flags/). 3. Your Worker's bindings, which are defined in your [Wrangler configuration file](https://developers.cloudflare.com/workers/wrangler/configuration). 4. Any [module rules](https://developers.cloudflare.com/workers/wrangler/configuration/#bundling) you have specified in your Wrangler configuration file under `rules`. For example, the runtime will only allow you to use the [`AsyncLocalStorage`](https://nodejs.org/api/async_context.html#class-asynclocalstorage) class if you have `compatibility_flags = ["nodejs_als"]` in your [Wrangler configuration file](https://developers.cloudflare.com/workers/wrangler/configuration/). This should be reflected in the type definitions. To ensure that your type definitions always match your Worker's configuration, you can dynamically generate types by running: * npm ```sh npx wrangler types ``` * yarn ```sh yarn wrangler types ``` * pnpm ```sh pnpm wrangler types ``` See [the `wrangler types` command docs](https://developers.cloudflare.com/workers/wrangler/commands/#types) for more details. Note If you are running a version of Wrangler that is greater than `3.66.0` but below `4.0.0`, you will need to include the `--experimental-include-runtime` flag. During its experimental release, runtime types were output to a separate file (`.wrangler/types/runtime.d.ts` by default). If you have an older version of Wrangler, you can access runtime types through the `@cloudflare/workers-types` package. This will generate a `d.ts` file and (by default) save it to `worker-configuration.d.ts`. This will include `Env` types based on your Worker bindings *and* runtime types based on your Worker's compatibility date and flags. You should then add that file to your `tsconfig.json`'s `compilerOptions.types` array. If you have the `nodejs_compat` compatibility flag, you should also install `@types/node`. You can commit your types file to git if you wish. Note To ensure that your types are always up-to-date, make sure to run `wrangler types` after any changes to your config file. ### Migrating from `@cloudflare/workers-types` to `wrangler types` We recommend you use `wrangler types` to generate runtime types, rather than using the `@cloudflare/workers-types` package, as it generates types based on your Worker's [compatibility date](https://github.com/cloudflare/workerd/tree/main/npm/workers-types#compatibility-dates) and `compatibility flags`, ensuring that types match the exact runtime APIs made available to your Worker. Note There are no plans to stop publishing the `@cloudflare/workers-types` package, which will still be the recommended way to type libraries and shared packages in the workers environment. #### 1. Uninstall `@cloudflare/workers-types` * npm ```sh npm uninstall @cloudflare/workers-types ``` * yarn ```sh yarn remove @cloudflare/workers-types ``` * pnpm ```sh pnpm remove @cloudflare/workers-types ``` #### 2. Generate runtime types using Wrangler * npm ```sh npx wrangler types ``` * yarn ```sh yarn wrangler types ``` * pnpm ```sh pnpm wrangler types ``` This will generate a `.d.ts` file, saved to `worker-configuration.d.ts` by default. This will also generate `Env` types. If for some reason you do not want to include those, you can set `--include-env=false`. You can now remove any imports from `@cloudflare/workers-types` in your Worker code. Note If you are running a version of Wrangler that is greater than `3.66.0` but below `4.0.0`, you will need to include the `--experimental-include-runtime` flag. During its experimental release, runtime types were output to a separate file (`.wrangler/types/runtime.d.ts` by default). If you have an older version of Wrangler, you can access runtime types through the `@cloudflare/workers-types` package. #### 3. Make sure your `tsconfig.json` includes the generated types ```json { "compilerOptions": { "types": ["worker-configuration.d.ts"] } } ``` Note that if you have specified a custom path for the runtime types file, you should use that in your `compilerOptions.types` array instead of the default path. #### 4. Add @types/node if you are using [`nodejs_compat`](https://developers.cloudflare.com/workers/runtime-apis/nodejs/) (Optional) If you are using the `nodejs_compat` compatibility flag, you should also install `@types/node`. * npm ```sh npm i @types/node ``` * yarn ```sh yarn add @types/node ``` * pnpm ```sh pnpm add @types/node ``` Then add this to your `tsconfig.json`. ```json { "compilerOptions": { "types": ["worker-configuration.d.ts", "node"] } } ``` #### 5. Update your scripts and CI pipelines Regardless of your specific framework or build tools, you should run the `wrangler types` command before any tasks that rely on TypeScript. Most projects will have existing build and development scripts, as well as some type-checking. In the example below, we're adding the `wrangler types` before the type-checking script in the project: ```json { "scripts": { "dev": "existing-dev-command", "build": "existing-build-command", "generate-types": "wrangler types", "type-check": "generate-types && tsc" } } ``` We recommend you commit your generated types file for use in CI. Alternatively, you can run `wrangler types` before other CI commands, as it should not take more than a few seconds. For example: * npm ```yaml - run: npm run generate-types - run: npm run build - run: npm test ``` * yarn ```yaml - run: yarn generate-types - run: yarn build - run: yarn test ``` * pnpm ```yaml - run: pnpm run generate-types - run: pnpm run build - run: pnpm test ``` ### Resources * [TypeScript template](https://github.com/cloudflare/workers-sdk/tree/main/packages/create-cloudflare/templates/hello-world/ts) * [@cloudflare/workers-types](https://github.com/cloudflare/workers-types) * [Runtime APIs](https://developers.cloudflare.com/workers/runtime-apis/) * [TypeScript Examples](https://developers.cloudflare.com/workers/examples/?languages=TypeScript) --- title: DevTools · Cloudflare Workers docs description: When running your Worker locally using the Wrangler CLI (wrangler dev) or using Vite with the Cloudflare Vite plugin, you automatically have access to Cloudflare's implementation of Chrome DevTools. lastUpdated: 2025-07-07T18:08:08.000Z chatbotDeprioritize: false source_url: html: https://developers.cloudflare.com/workers/observability/dev-tools/ md: https://developers.cloudflare.com/workers/observability/dev-tools/index.md --- ## Using DevTools When running your Worker locally using the [Wrangler CLI](https://developers.cloudflare.com/workers/wrangler/) (`wrangler dev`) or using [Vite](https://vite.dev/) with the [Cloudflare Vite plugin](https://developers.cloudflare.com/workers/vite-plugin/), you automatically have access to [Cloudflare's implementation](https://github.com/cloudflare/workers-sdk/tree/main/packages/chrome-devtools-patches) of [Chrome DevTools](https://developer.chrome.com/docs/devtools/overview). You can use Chrome DevTools to: * View logs directly in the Chrome console * [Debug code by setting breakpoints](https://developers.cloudflare.com/workers/observability/dev-tools/breakpoints/) * [Profile CPU usage](https://developers.cloudflare.com/workers/observability/dev-tools/cpu-usage/) * [Observe memory usage and debug memory leaks in your code that can cause out-of-memory (OOM) errors](https://developers.cloudflare.com/workers/observability/dev-tools/memory-usage/) ## Opening DevTools ### Wrangler * Run your Worker locally, by running `wrangler dev` * Press the `D` key from your terminal to open DevTools in a browser tab ### Vite * Run your Worker locally by running `vite` * In a new Chrome tab, open the debug URL that shows in your console (for example, `http://localhost:5173/__debug`) ### Dashboard editor & playground Both the [Cloudflare dashboard](https://dash.cloudflare.com/) and the [Worker's Playground](https://workers.cloudflare.com/playground) include DevTools in the UI. ## Related resources * [Local development](https://developers.cloudflare.com/workers/development-testing/) - Develop your Workers and connected resources locally via Wrangler and workerd, for a fast, accurate feedback loop. --- title: Errors and exceptions · Cloudflare Workers docs description: Review Workers errors and exceptions. lastUpdated: 2025-05-23T21:38:55.000Z chatbotDeprioritize: false source_url: html: https://developers.cloudflare.com/workers/observability/errors/ md: https://developers.cloudflare.com/workers/observability/errors/index.md --- Review Workers errors and exceptions. ## Error pages generated by Workers When a Worker running in production has an error that prevents it from returning a response, the client will receive an error page with an error code, defined as follows: | Error code | Meaning | | - | - | | `1101` | Worker threw a JavaScript exception. | | `1102` | Worker exceeded [CPU time limit](https://developers.cloudflare.com/workers/platform/limits/#cpu-time). | | `1103` | The owner of this worker needs to contact [Cloudflare Support](https://developers.cloudflare.com/support/contacting-cloudflare-support/) | | `1015` | Worker hit the [burst rate limit](https://developers.cloudflare.com/workers/platform/limits/#burst-rate). | | `1019` | Worker hit [loop limit](#loop-limit). | | `1021` | Worker has requested a host it cannot access. | | `1022` | Cloudflare has failed to route the request to the Worker. | | `1024` | Worker cannot make a subrequest to a Cloudflare-owned IP address. | | `1027` | Worker exceeded free tier [daily request limit](https://developers.cloudflare.com/workers/platform/limits/#daily-request). | | `1042` | Worker tried to fetch from another Worker on the same zone, which is only [supported](https://developers.cloudflare.com/workers/runtime-apis/fetch/) when the [`global_fetch_strictly_public` compatibility flag](https://developers.cloudflare.com/workers/configuration/compatibility-flags/#global-fetch-strictly-public) is used. | Other `11xx` errors generally indicate a problem with the Workers runtime itself. Refer to the [status page](https://www.cloudflarestatus.com) if you are experiencing an error. ### Loop limit A Worker cannot call itself or another Worker more than 16 times. In order to prevent infinite loops between Workers, the [`CF-EW-Via`](https://developers.cloudflare.com/fundamentals/reference/http-headers/#cf-ew-via) header's value is an integer that indicates how many invocations are left. Every time a Worker is invoked, the integer will decrement by 1. If the count reaches zero, a [`1019`](#error-pages-generated-by-workers) error is returned. ### "The script will never generate a response" errors Some requests may return a 1101 error with `The script will never generate a response` in the error message. This occurs when the Workers runtime detects that all the code associated with the request has executed and no events are left in the event loop, but a Response has not been returned. #### Cause 1: Unresolved Promises This is most commonly caused by relying on a Promise that is never resolved or rejected, which is required to return a Response. To debug, look for Promises within your code or dependencies' code that block a Response, and ensure they are resolved or rejected. In browsers and other JavaScript runtimes, equivalent code will hang indefinitely, leading to both bugs and memory leaks. The Workers runtime throws an explicit error to help you debug. In the example below, the Response relies on a Promise resolution that never happens. Uncommenting the `resolve` callback solves the issue. ```js export default { fetch(req) { let response = new Response("Example response"); let { promise, resolve } = Promise.withResolvers(); // If the promise is not resolved, the Workers runtime will // recognize this and throw an error. // setTimeout(resolve, 0) return promise.then(() => response); }, }; ``` You can prevent this by enforcing the [`no-floating-promises` eslint rule](https://typescript-eslint.io/rules/no-floating-promises/), which reports when a Promise is created and not properly handled. #### Cause 2: WebSocket connections that are never closed If a WebSocket is missing the proper code to close its server-side connection, the Workers runtime will throw a `script will never generate a response` error. In the example below, the `'close'` event from the client is not properly handled by calling `server.close()`, and the error is thrown. In order to avoid this, ensure that the WebSocket's server-side connection is properly closed via an event listener or other server-side logic. ```js async function handleRequest(request) { let webSocketPair = new WebSocketPair(); let [client, server] = Object.values(webSocketPair); server.accept(); server.addEventListener("close", () => { // This missing line would keep a WebSocket connection open indefinitely // and results in "The script will never generate a response" errors // server.close(); }); return new Response(null, { status: 101, webSocket: client, }); } ``` ### "Illegal invocation" errors The error message `TypeError: Illegal invocation: function called with incorrect this reference` can be a source of confusion. This is typically caused by calling a function that calls `this`, but the value of `this` has been lost. For example, given an `obj` object with the `obj.foo()` method which logic relies on `this`, executing the method via `obj.foo();` will make sure that `this` properly references the `obj` object. However, assigning the method to a variable, e.g.`const func = obj.foo;` and calling such variable, e.g. `func();` would result in `this` being `undefined`. This is because `this` is lost when the method is called as a standalone function. This is standard behavior in JavaScript. In practice, this is often seen when destructuring runtime provided Javascript objects that have functions that rely on the presence of `this`, such as `ctx`. The following code will error: ```js export default { async fetch(request, env, ctx) { // destructuring ctx makes waitUntil lose its 'this' reference const { waitUntil } = ctx; // waitUntil errors, as it has no 'this' waitUntil(somePromise); return fetch(request); }, }; ``` Avoid destructuring or re-bind the function to the original context to avoid the error. The following code will run properly: ```js export default { async fetch(request, env, ctx) { // directly calling the method on ctx avoids the error ctx.waitUntil(somePromise); // alternatively re-binding to ctx via apply, call, or bind avoids the error const { waitUntil } = ctx; waitUntil.apply(ctx, [somePromise]); waitUntil.call(ctx, somePromise); const reboundWaitUntil = waitUntil.bind(ctx); reboundWaitUntil(somePromise); return fetch(request); }, }; ``` ### Cannot perform I/O on behalf of a different request ```plaintext Uncaught (in promise) Error: Cannot perform I/O on behalf of a different request. I/O objects (such as streams, request/response bodies, and others) created in the context of one request handler cannot be accessed from a different request's handler. ``` This error occurs when you attempt to share input/output (I/O) objects (such as streams, requests, or responses) created by one invocation of your Worker in the context of a different invocation. In Cloudflare Workers, each invocation is handled independently and has its own execution context. This design ensures optimal performance and security by isolating requests from one another. When you try to share I/O objects between different invocations, you break this isolation. Since these objects are tied to the specific request they were created in, accessing them from another request's handler is not allowed and leads to the error. This error is most commonly caused by attempting to cache an I/O object, like a [Request](https://developers.cloudflare.com/workers/runtime-apis/request/) in global scope, and then access it in a subsequent request. For example, if you create a Worker and run the following code in local development, and make two requests to your Worker in quick succession, you can reproduce this error: ```js let cachedResponse = null; export default { async fetch(request, env, ctx) { if (cachedResponse) { return cachedResponse; } cachedResponse = new Response("Hello, world!"); await new Promise((resolve) => setTimeout(resolve, 5000)); // Sleep for 5s to demonstrate this particular error case return cachedResponse; }, }; ``` You can fix this by instead storing only the data in global scope, rather than the I/O object itself: ```js let cachedData = null; export default { async fetch(request, env, ctx) { if (cachedData) { return new Response(cachedData); } const response = new Response("Hello, world!"); cachedData = await response.text(); return new Response(cachedData, response); }, }; ``` If you need to share state across requests, consider using [Durable Objects](https://developers.cloudflare.com/durable-objects/). If you need to cache data across requests, consider using [Workers KV](https://developers.cloudflare.com/kv/). ## Errors on Worker upload These errors occur when a Worker is uploaded or modified. | Error code | Meaning | | - | - | | `10006` | Could not parse your Worker's code. | | `10007` | Worker or [workers.dev subdomain](https://developers.cloudflare.com/workers/configuration/routing/workers-dev/) not found. | | `10015` | Account is not entitled to use Workers. | | `10016` | Invalid Worker name. | | `10021` | Validation Error. Refer to [Validation Errors](https://developers.cloudflare.com/workers/observability/errors/#validation-errors-10021) for details. | | `10026` | Could not parse request body. | | `10027` | The uploaded Worker exceeded the [Worker size limits](https://developers.cloudflare.com/workers/platform/limits/#worker-size). | | `10035` | Multiple attempts to modify a resource at the same time | | `10037` | An account has exceeded the number of [Workers allowed](https://developers.cloudflare.com/workers/platform/limits/#number-of-workers). | | `10052` | A [binding](https://developers.cloudflare.com/workers/runtime-apis/bindings/) is uploaded without a name. | | `10054` | A environment variable or secret exceeds the [size limit](https://developers.cloudflare.com/workers/platform/limits/#environment-variables). | | `10055` | The number of environment variables or secrets exceeds the [limit/Worker](https://developers.cloudflare.com/workers/platform/limits/#environment-variables). | | `10056` | [Binding](https://developers.cloudflare.com/workers/runtime-apis/bindings/) not found. | | `10068` | The uploaded Worker has no registered [event handlers](https://developers.cloudflare.com/workers/runtime-apis/handlers/). | | `10069` | The uploaded Worker contains [event handlers](https://developers.cloudflare.com/workers/runtime-apis/handlers/) unsupported by the Workers runtime. | ### Validation Errors (10021) The 10021 error code includes all errors that occur when you attempt to deploy a Worker, and Cloudflare then attempts to load and run the top-level scope (everything that happens before your Worker's [handler](https://developers.cloudflare.com/workers/runtime-apis/handlers/) is invoked). For example, if you attempt to deploy a broken Worker with invalid JavaScript that would throw a `SyntaxError` — Cloudflare will not deploy your Worker. Specific error cases include but are not limited to: #### Script startup exceeded CPU time limit This means that you are doing work in the top-level scope of your Worker that takes [more than the startup time limit (400ms)](https://developers.cloudflare.com/workers/platform/limits/#worker-startup-time) of CPU time. This is usually a sign of a bug and/or large performance problem with your code or a dependency you rely on. It's not typical to use more than 400ms of CPU time when your app starts. The more time your Worker's code spends parsing and executing top-level scope, the slower your Worker will be when you deploy a code change or a new [isolate](https://developers.cloudflare.com/workers/reference/how-workers-works/) is created. This error is most commonly caused by attempting to perform expernsive initialization work directly in top level (global) scope, rather than either at build time or when your Worker's handler is invoked. For example, attempting to initialize an app by generating or consuming a large schema. To analyze what is consuming so much CPU time, you should open Chrome DevTools for your Worker and look at the Profiling and/or Performance panels to understand where time is being spent. Is there something glaring that consumes tons of CPU time, especially the first time you make a request to your Worker? ## Runtime errors Runtime errors will occur within the runtime, do not throw up an error page, and are not visible to the end user. Runtime errors are detected by the user with logs. | Error message | Meaning | | - | - | | `Network connection lost` | Connection failure. Catch a `fetch` or binding invocation and retry it. | | `Memory limit` `would be exceeded` `before EOF` | Trying to read a stream or buffer that would take you over the [memory limit](https://developers.cloudflare.com/workers/platform/limits/#memory). | | `daemonDown` | A temporary problem invoking the Worker. | ## Identify errors: Workers Metrics To review whether your application is experiencing any downtime or returning any errors: 1. Log in to the [Cloudflare dashboard](https://dash.cloudflare.com) and select your account. 2. In **Account Home**, select **Workers & Pages**. 3. In **Overview**, select your Worker and review your Worker's metrics. ### Worker Errors The **Errors by invocation status** chart shows the number of errors broken down into the following categories: | Error | Meaning | | - | - | | `Uncaught Exception` | Your Worker code threw a JavaScript exception during execution. | | `Exceeded CPU Time Limits` | Worker exceeded CPU time limit or other resource constraints. | | `Exceeded Memory` | Worker exceeded the memory limit during execution. | | `Internal` | An internal error occurred in the Workers runtime. | The **Client disconnected by type** chart shows the number of client disconnect errors broken down into the following categories: | Client Disconnects | Meaning | | - | - | | `Response Stream Disconnected` | Connection was terminated during the deferred proxying stage of a Worker request flow. It commonly appears for longer lived connections such as [WebSockets](https://developers.cloudflare.com/workers/runtime-apis/websockets/). | | `Cancelled` | The Client disconnected before the Worker completed its response. | ## Debug exceptions with Workers Logs [Workers Logs](https://developers.cloudflare.com/workers/observability/logs/workers-logs) is a powerful tool for debugging your Workers. It shows all the historic logs generated by your Worker, including any uncaught exceptions that occur during execution. To find all your errors in Workers Logs, you can use the following filter: `$metadata.error EXISTS`. This will show all the logs that have an error associated with them. You can also filter by `$workers.outcome` to find the requests that resulted in an error. For example, you can filter by `$workers.outcome = "exception"` to find all the requests that resulted in an uncaught exception. All the possible outcome values can be found in the [Workers Trace Event](https://developers.cloudflare.com/logs/reference/log-fields/account/workers_trace_events/#outcome) reference. ## Debug exceptions from `Wrangler` To debug your worker via wrangler use `wrangler tail` to inspect and fix the exceptions. Exceptions will show up under the `exceptions` field in the JSON returned by `wrangler tail`. After you have identified the exception that is causing errors, redeploy your code with a fix, and continue tailing the logs to confirm that it is fixed. ## Set up a 3rd party logging service A Worker can make HTTP requests to any HTTP service on the public Internet. You can use a service like [Sentry](https://sentry.io) to collect error logs from your Worker, by making an HTTP request to the service to report the error. Refer to your service’s API documentation for details on what kind of request to make. When using an external logging strategy, remember that outstanding asynchronous tasks are canceled as soon as a Worker finishes sending its main response body to the client. To ensure that a logging subrequest completes, pass the request promise to [`event.waitUntil()`](https://developer.mozilla.org/en-US/docs/Web/API/ExtendableEvent/waitUntil). For example: * Module Worker ```js export default { async fetch(request, env, ctx) { function postLog(data) { return fetch("https://log-service.example.com/", { method: "POST", body: data, }); } // Without ctx.waitUntil(), the `postLog` function may or may not complete. ctx.waitUntil(postLog(stack)); return fetch(request); }, }; ``` * Service Worker Service Workers are deprecated Service Workers are deprecated, but still supported. We recommend using [Module Workers](https://developers.cloudflare.com/workers/reference/migrate-to-module-workers/) instead. New features may not be supported for Service Workers. ```js addEventListener("fetch", (event) => { event.respondWith(handleEvent(event)); }); async function handleEvent(event) { // ... // Without event.waitUntil(), the `postLog` function may or may not complete. event.waitUntil(postLog(stack)); return fetch(event.request); } function postLog(data) { return fetch("https://log-service.example.com/", { method: "POST", body: data, }); } ``` ## Go to origin on error By using [`event.passThroughOnException`](https://developers.cloudflare.com/workers/runtime-apis/context/#passthroughonexception), a Workers application will forward requests to your origin if an exception is thrown during the Worker's execution. This allows you to add logging, tracking, or other features with Workers, without degrading your application's functionality. * Module Worker ```js export default { async fetch(request, env, ctx) { ctx.passThroughOnException(); // an error here will return the origin response, as if the Worker wasn't present return fetch(request); }, }; ``` * Service Worker Service Workers are deprecated Service Workers are deprecated, but still supported. We recommend using [Module Workers](https://developers.cloudflare.com/workers/reference/migrate-to-module-workers/) instead. New features may not be supported for Service Workers. ```js addEventListener("fetch", (event) => { event.passThroughOnException(); event.respondWith(handleRequest(event.request)); }); async function handleRequest(request) { // An error here will return the origin response, as if the Worker wasn’t present. // ... return fetch(request); } ``` ## Related resources * [Log from Workers](https://developers.cloudflare.com/workers/observability/logs/) - Learn how to log your Workers. * [Logpush](https://developers.cloudflare.com/workers/observability/logs/logpush/) - Learn how to push Workers Trace Event Logs to supported destinations. * [RPC error handling](https://developers.cloudflare.com/workers/runtime-apis/rpc/error-handling/) - Learn how to handle errors from remote-procedure calls. --- title: Logs · Cloudflare Workers docs description: Logs are an important component of a developer's toolkit to troubleshoot and diagnose application issues and maintaining system health. The Cloudflare Developer Platform offers many tools to help developers manage their application's logs. lastUpdated: 2025-04-09T02:45:13.000Z chatbotDeprioritize: false source_url: html: https://developers.cloudflare.com/workers/observability/logs/ md: https://developers.cloudflare.com/workers/observability/logs/index.md --- Logs are an important component of a developer's toolkit to troubleshoot and diagnose application issues and maintaining system health. The Cloudflare Developer Platform offers many tools to help developers manage their application's logs. ## [Workers Logs](https://developers.cloudflare.com/workers/observability/logs/workers-logs) Automatically ingest, filter, and analyze logs emitted from Cloudflare Workers in the Cloudflare dashboard. ## [Real-time logs](https://developers.cloudflare.com/workers/observability/logs/real-time-logs) Access log events in near real-time. Real-time logs provide immediate feedback and visibility into the health of your Cloudflare Worker. ## [Tail Workers](https://developers.cloudflare.com/workers/observability/logs/tail-workers) Beta Tail Workers allow developers to apply custom filtering, sampling, and transformation logic to telemetry data. ## [Workers Logpush](https://developers.cloudflare.com/workers/observability/logs/logpush) Send Workers Trace Event Logs to a supported destination. Workers Logpush includes metadata about requests and responses, unstructured `console.log()` messages and any uncaught exceptions. ## Video Tutorial --- title: Metrics and analytics · Cloudflare Workers docs description: Diagnose issues with Workers metrics, and review request data for a zone with Workers analytics. lastUpdated: 2025-04-09T02:45:13.000Z chatbotDeprioritize: false source_url: html: https://developers.cloudflare.com/workers/observability/metrics-and-analytics/ md: https://developers.cloudflare.com/workers/observability/metrics-and-analytics/index.md --- There are two graphical sources of information about your Workers traffic at a given time: Workers metrics and zone-based Workers analytics. Workers metrics can help you diagnose issues and understand your Workers' workloads by showing performance and usage of your Workers. If your Worker runs on a route on a zone, or on a few zones, Workers metrics will show how much traffic your Worker is handling on a per-zone basis, and how many requests your site is getting. Zone analytics show how much traffic all Workers assigned to a zone are handling. ## Workers metrics Workers metrics aggregate request data for an individual Worker (if your Worker is running across multiple domains, and on `*.workers.dev`, metrics will aggregate requests across them). To view your Worker's metrics: 1. Log in to the [Cloudflare dashboard](https://dash.cloudflare.com) and select your account. 2. Select **Compute (Workers)**. 3. In **Overview**, select your Worker to view its metrics. There are two metrics that can help you understand the health of your Worker in a given moment: requests success and error metrics, and invocation statuses. ### Requests The first graph shows historical request counts from the Workers runtime broken down into successful requests, errored requests, and subrequests. * **Total**: All incoming requests registered by a Worker. Requests blocked by [WAF](https://www.cloudflare.com/waf/) or other security features will not count. * **Success**: Requests that returned a Success or Client Disconnected invocation status. * **Errors**: Requests that returned a Script Threw Exception, Exceeded Resources, or Internal Error invocation status — refer to [Invocation Statuses](https://developers.cloudflare.com/workers/observability/metrics-and-analytics/#invocation-statuses) for a breakdown of where your errors are coming from. Request traffic data may display a drop off near the last few minutes displayed in the graph for time ranges less than six hours. This does not reflect a drop in traffic, but a slight delay in aggregation and metrics delivery. ### Subrequests Subrequests are requests triggered by calling `fetch` from within a Worker. A subrequest that throws an uncaught error will not be counted. * **Total**: All subrequests triggered by calling `fetch` from within a Worker. * **Cached**: The number of cached responses returned. * **Uncached**: The number of uncached responses returned. ### Wall time per execution Wall time represents the elapsed time in milliseconds between the start of a Worker invocation, and when the Workers runtime determines that no more JavaScript needs to run. Specifically, wall time per execution chart measures the wall time that the JavaScript context remained open — including time spent waiting on I/O, and time spent executing in your Worker's [`waitUntil()`](https://developers.cloudflare.com/workers/runtime-apis/context/#waituntil) handler. Wall time is not the same as the time it takes your Worker to send the final byte of a response back to the client - wall time can be higher, if tasks within `waitUntil()` are still running after the response has been sent, or it can be lower. For example, when returning a response with a large body, the Workers runtime can, in some cases, determine that no more JavaScript needs to run, and closes the JavaScript context before all the bytes have passed through and been sent. The Wall Time per execution chart shows historical wall time data broken down into relevant quantiles using [reservoir sampling](https://en.wikipedia.org/wiki/Reservoir_sampling). Learn more about [interpreting quantiles](https://www.statisticshowto.com/quantile-definition-find-easy-steps/). ### CPU Time per execution The CPU Time per execution chart shows historical CPU time data broken down into relevant quantiles using [reservoir sampling](https://en.wikipedia.org/wiki/Reservoir_sampling). Learn more about [interpreting quantiles](https://www.statisticshowto.com/quantile-definition-find-easy-steps/). In some cases, higher quantiles may appear to exceed [CPU time limits](https://developers.cloudflare.com/workers/platform/limits/#cpu-time) without generating invocation errors because of a mechanism in the Workers runtime that allows rollover CPU time for requests below the CPU limit. ### Execution duration (GB-seconds) The Duration per request chart shows historical [duration](https://developers.cloudflare.com/workers/platform/limits/#duration) per Worker invocation. The data is broken down into relevant quantiles, similar to the CPU time chart. Learn more about [interpreting quantiles](https://www.statisticshowto.com/quantile-definition-find-easy-steps/). Understanding duration on your Worker is especially useful when you are intending to do a significant amount of computation on the Worker itself. ### Invocation statuses To review invocation statuses: 1. Log in to the [Cloudflare dashboard](https://dash.cloudflare.com) and select your account. 2. Select **Workers & Pages**. 3. Select your Worker. 4. Find the **Summary** graph in **Metrics**. 5. Select **Errors**. Worker invocation statuses indicate whether a Worker executed successfully or failed to generate a response in the Workers runtime. Invocation statuses differ from HTTP status codes. In some cases, a Worker invocation succeeds but does not generate a successful HTTP status because of another error encountered outside of the Workers runtime. Some invocation statuses result in a [Workers error code](https://developers.cloudflare.com/workers/observability/errors/#error-pages-generated-by-workers) being returned to the client. | Invocation status | Definition | Workers error code | GraphQL field | | - | - | - | - | | Success | Worker executed successfully | | `success` | | Client disconnected | HTTP client (that is, the browser) disconnected before the request completed | | `clientDisconnected` | | Worker threw exception | Worker threw an unhandled JavaScript exception | 1101 | `scriptThrewException` | | Exceeded resources¹ | Worker exceeded runtime limits | 1102, 1027 | `exceededResources` | | Internal error² | Workers runtime encountered an error | | `internalError` | ¹ The Exceeded Resources status may appear when the Worker exceeds a [runtime limit](https://developers.cloudflare.com/workers/platform/limits/#request-limits). The most common cause is excessive CPU time, but is also caused by a Worker exceeding startup time or free tier limits. ² The Internal Error status may appear when the Workers runtime fails to process a request due to an internal failure in our system. These errors are not caused by any issue with the Worker code nor any resource limit. While requests with Internal Error status are rare, some may appear during normal operation. These requests are not counted towards usage for billing purposes. If you notice an elevated rate of requests with Internal Error status, review [www.cloudflarestatus.com](https://www.cloudflarestatus.com/). To further investigate exceptions, use [`wrangler tail`](https://developers.cloudflare.com/workers/wrangler/commands/#tail). ### Request duration The request duration chart shows how long it took your Worker to respond to requests, including code execution and time spent waiting on I/O. The request duration chart is currently only available when your Worker has [Smart Placement](https://developers.cloudflare.com/workers/configuration/smart-placement) enabled. In contrast to [execution duration](https://developers.cloudflare.com/workers/observability/metrics-and-analytics/#execution-duration-gb-seconds), which measures only the time a Worker is active, request duration measures from the time a request comes into a data center until a response is delivered. The data shows the duration for requests with Smart Placement enabled compared to those with Smart Placement disabled (by default, 1% of requests are routed with Smart Placement disabled). The chart shows a histogram with duration across the x-axis and the percentage of requests that fall into the corresponding duration on the y-axis. ### Metrics retention Worker metrics can be inspected for up to three months in the past in maximum increments of one week. ## Zone analytics Zone analytics aggregate request data for all Workers assigned to any [routes](https://developers.cloudflare.com/workers/configuration/routing/routes/) defined for a zone. To review zone metrics: 1. Log in to the [Cloudflare dashboard](https://dash.cloudflare.com) and select your account. 2. Select your site. 3. In **Analytics & Logs**, select **Workers**. Zone data can be scoped by time range within the last 30 days. The dashboard includes charts and information described below. ### Subrequests This chart shows subrequests — requests triggered by calling `fetch` from within a Worker — broken down by cache status. * **Uncached**: Requests answered directly by your origin server or other servers responding to subrequests. * **Cached**: Requests answered by Cloudflare’s [cache](https://www.cloudflare.com/learning/cdn/what-is-caching/). As Cloudflare caches more of your content, it accelerates content delivery and reduces load on your origin. ### Bandwidth This chart shows historical bandwidth usage for all Workers on a zone broken down by cache status. ### Status codes This chart shows historical requests for all Workers on a zone broken down by HTTP status code. ### Total requests This chart shows historical data for all Workers on a zone broken down by successful requests, failed requests, and subrequests. These request types are categorized by HTTP status code where `200`-level requests are successful and `400` to `500`-level requests are failed. ## GraphQL Worker metrics are powered by GraphQL. Learn more about querying our data sets in the [Querying Workers Metrics with GraphQL tutorial](https://developers.cloudflare.com/analytics/graphql-api/tutorials/querying-workers-metrics/). --- title: Query Builder · Cloudflare Workers docs description: Write structured queries to investigate and visualize your telemetry data. lastUpdated: 2025-04-09T02:45:13.000Z chatbotDeprioritize: false source_url: html: https://developers.cloudflare.com/workers/observability/query-builder/ md: https://developers.cloudflare.com/workers/observability/query-builder/index.md --- The Query Builder helps you write structured queries to investigate and visualize your telemetry data. The Query Builder searches the Workers Observability dataset, which currently includes all logs stored by [Workers Logs](https://developers.cloudflare.com/workers/observability/logs/workers-logs/). The Query Builder can be found in the [Workers' Observability tab in the Cloudflare dashboard](https://dash.cloudflare.com/?to=/:account/workers-and-pages/observability/investigate/). ## Enable Query Builder The Query Builder is available to all developers and requires no enablement. Queries search all Workers Logs stored by Cloudflare. If you have not yet enabled Workers Logs, you can do so by adding the following setting to your [Worker's Wrangler file](https://developers.cloudflare.com/workers/observability/logs/workers-logs/#enable-workers-logs) and redeploying your Worker. * wrangler.jsonc ```jsonc { "observability": { "enabled": true, "logs": { "invocation_logs": true, "head_sampling_rate": 1 } } } ``` * wrangler.toml ```toml [observability] enabled = true [observability.logs] invocation_logs = true head_sampling_rate = 1 # optional. default = 1. ``` ## Write a query in the Cloudflare dashboard 1. Log in to the [Cloudflare dashboard](https://dash.cloudflare.com/?to=/:account/workers-and-pages/observability/investigate/) and select your account. 2. In Account Home, go to **Workers & Pages**. 3. Select **Observability** in the left-hand navigation panel, and then the **Investigate** tab. 4. Select a **Visualization**. 5. Optional: Add fields to Filter, Group By, Order By, and Limit. For more information, see what [composes a query](https://developers.cloudflare.com/workers/observability/query-builder/#query-composition). 6. Optional: Select the appropriate time range. 7. Select **Run**. The query will automatically run whenever changes are made. ## Query composition ### Visualization The Query Builder supports many visualization operators, including: | Function | Arguments | Description | | - | - | - | | **Count** | n/a | The total number of rows matching the query conditions | | **Count Distinct** | any field | The number of occurrences of the unique values in the dataset | | **Min** | numeric field | The smallest value for the field in the dataset | | **Max** | numeric field | The largest value for the field in the dataset | | **Sum** | numeric field | The total of all of the values for the field in the dataset | | **Average** | numeric field | The average of the field in the dataset | | **Standard Deviation** | numeric field | The standard deviation of the field in the dataset | | **Variance** | numeric field | The variance of the field in the dataset | | **P001** | numeric field | The value of the field below which 0.1% of the data falls | | **P01** | numeric field | The value of the field below with 1% of the data falls | | **P05** | numeric field | The value of the field below with 5% of the data falls | | **P10** | numeric field | The value of the field below with 10% of the data falls | | **P25** | numeric field | The value of the field below with 25% of the data falls | | **Median (P50)** | numeric field | The value of the field below with 50% of the data falls | | **P75** | numeric field | The value of the field below with 75% of the data falls | | **P90** | numeric field | The value of the field below with 90% of the data falls | | **P95** | numeric field | The value of the field below with 95% of the data falls | | **P99** | numeric field | The value of the field below with 99% of the data falls | | **P999** | numeric field | The value of the field below with 99.9% of the data falls | You can add multiple visualizations in a single query. Each visualization renders a graph. A single summary table is also returned, which shows the raw query results. ![Example of showing the Query Builder with multiple visualization](https://developers.cloudflare.com/_astro/query-builder-visualization.CBcVDFe0_25kyAz.webp) All methods are aggregate functions. Most methods operate on a specific field in the log event. `Count` is an exception, and is an aggregate function that returns the number of log events matching the filter conditions. ### Filter Filters help return the columns that match the specified conditions. Filters have three components: a key, an operator, and a value. The key is any field in a log event. For example, you may choose `$workers.cpuTimeMs` or `$metadata.message`. The operator is a logical condition that evaluates to true or false. See the table below for supported conditions: | Data Type | Valid Conditions (Operators) | | - | - | | Numeric | Equals, Does not equal, Greater, Greater or equals, Less, Less or equals, Exists, Does not exist | | String | Equals, Does not equal, Includes, Does not include, Regex, Exists, Does not exist, Starts with | The value for a numeric field is an integer. The value for a string field is any string. To add a filter: 1. Select **+** in the **Filter** section. 2. Select **Select key...** and input a key name. For example, `$workers.cpuTimeMs`. 3. Select the operator and change it to the operator best suited. For example, `Greater than`. 4. Select **Select value...** and input a value. For example, `100`. When you run the query with the filter specified above, only log events where `$workers.cpuTimeMs > 100` will be returned. Adding multiple filters combines them with an AND operator, meaning that only events matching all the filters will be returned. ### Search Search is a text filter that returns only events containing the specified text. Search can be helpful as a quick filtering mechanism, or to search for unique identifiable values in your logs. ### Group By Group By combines rows that have the same value into summary rows. For example, if a query adds `$workers.event.request.cf.country` as a Group By field, then the summary table will group by country. ### Order By Order By affects how the results are sorted in the summary table. If `asc` is selected, the results are sorted in ascending order - from least to greatest. If `desc` is selected, the results are sorted in descending order - from greatest to least. ### Limit Limit restricts the number of results returned. When paired with [Order By](https://developers.cloudflare.com/workers/observability/query-builder/#order-by), it can be used to return the "top" or "first" N results. ### Select time range When you select a time range, you specify the time interval where you want to look for matching events. The retention period is dependent on your [plan type](https://developers.cloudflare.com/workers/observability/logs/workers-logs/#pricing). ## Viewing query results There are three views for queries: Visualizations, Invocations, and Events. ### Visualizations tab The **Visualizations** tab shows graphs and a summary table for the query. ![Visualization Overview](https://developers.cloudflare.com/_astro/query-builder-visualization.CBcVDFe0_25kyAz.webp) ### Invocations tab The **Invocations** tab shows all logs, grouped by by the invocation, and ordered by timestamp. Only invocations matching the query criteria are returned. ![Invocations Overview](https://developers.cloudflare.com/_astro/query-builder-invocations-overview.C02m4pPf_5zMXx.webp) ### Events tab The **Events** tab shows all logs, ordered by timestamp. Only events matching the query criteria are returned. The Events tab can be customized to add additional fields in the view. ![Overview](https://developers.cloudflare.com/_astro/query-builder-events-overview.Cvj8cxX3_Z17BcJ5.webp) ## Save queries It is recommended to save queries that may be reused for future investigations. You can save a query with a name, description, and custom tags by selecting **Save Query**. Queries are saved at the account-level and are accessible to all users in the account. Saved queries can be re-run by selecting the relevant query from the **Queries** tab. You can edit the query and save edits. Queries can be starred by users. Starred queries are unique to the user, and not to the account. ## Delete queries Saved queries can be deleted from the **Queries** tab. If you delete a query, the query is deleted for all users in the account. 1. Select the [Queries](https://dash.cloudflare.com/?to=/:account/workers-and-pages/observability/queries) tab in the Observability dashboard. 2. On the right-hand side, select the three dots for additional actions. 3. Select **Delete Query** and follow the instructions. ## Share queries Saved queries are assigned a unique URL and can be shared with any user in the account. ## Example: Composing a query In this example, we will construct a query to find and debug all paths that respond with 5xx errors. First, we create a base query. In this base query, we want to visualize by the raw event count. We can add a filter for `$workers.event.response.status` that is greater than 500. Then, we group by `$workers.event.request.path` and `$workers.event.response.status` to identify the number of requests that were affected by this behavior. ![Constructing a query](https://developers.cloudflare.com/_astro/query-builder-ex1-query.CDbj8N5d_Z1yElmc.webp) The results show that the `/actuator/env` path has been experiencing 500s. Now, we can apply a filter for this path and investigate. ![Adding an additional field to the query](https://developers.cloudflare.com/_astro/query-builder-ex1-query-with-filter.DUqcI8AK_1aMEHy.webp) Now, we can investigate by selecting the **Invocations** tab. We can see that there were two logged invocations of this error. ![Examining the Invocations tab in the Query Builder](https://developers.cloudflare.com/_astro/query-builder-ex1-invocations.C4Qt7ulL_eBX3s.webp) We can expand a single invocation to view the relevant logs, and continue to debug. ![Viewing the logs for a single Invocation](https://developers.cloudflare.com/_astro/query-builder-ex1-invocation-logs.FJWtya7H_2tU9NB.webp) --- title: Source maps and stack traces · Cloudflare Workers docs description: Adding source maps and generating stack traces for Workers. lastUpdated: 2025-04-23T14:32:23.000Z chatbotDeprioritize: false source_url: html: https://developers.cloudflare.com/workers/observability/source-maps/ md: https://developers.cloudflare.com/workers/observability/source-maps/index.md --- [Stack traces](https://developer.mozilla.org/en-US/docs/Web/JavaScript/Reference/Global_Objects/Error/stack) help with debugging your code when your application encounters an unhandled exception. Stack traces show you the specific functions that were called, in what order, from which line and file, and with what arguments. Most JavaScript code is first bundled, often transpiled, and then minified before being deployed to production. This process creates smaller bundles to optimize performance and converts code from TypeScript to Javascript if needed. Source maps translate compiled and minified code back to the original code that you wrote. Source maps are combined with the stack trace returned by the JavaScript runtime to present you with a stack trace. ## Source Maps To enable source maps, add the following to your Worker's [Wrangler configuration](https://developers.cloudflare.com/workers/wrangler/configuration/): * wrangler.jsonc ```jsonc { "upload_source_maps": true } ``` * wrangler.toml ```toml upload_source_maps = true ``` When `upload_source_maps` is set to `true`, Wrangler will automatically generate and upload source map files when you run [`wrangler deploy`](https://developers.cloudflare.com/workers/wrangler/commands/#deploy) or [`wrangler versions deploy`](https://developers.cloudflare.com/workers/wrangler/commands/#deploy-2). ​​ Note Miniflare can also [output source maps](https://miniflare.dev/developing/source-maps) for use in local development or [testing](https://developers.cloudflare.com/workers/testing/miniflare/writing-tests). ## Stack traces ​​ When your Worker throws an uncaught exception, we fetch the source map and use it to map the stack trace of the exception back to lines of your Worker’s original source code. You can then view the stack trace when streaming [real-time logs](https://developers.cloudflare.com/workers/observability/logs/real-time-logs/) or in [Tail Workers](https://developers.cloudflare.com/workers/observability/logs/tail-workers/). Note The source map is retrieved after your Worker invocation completes — it's an asynchronous process that does not impact your Worker's CPU utilization or performance. Source maps are not accessible inside the Worker at runtime, if you `console.log()` the [stack property](https://developer.mozilla.org/en-US/docs/Web/JavaScript/Reference/Global_Objects/Error/stack) within a Worker, you will not get a deobfuscated stack trace. When Cloudflare attempts to remap a stack trace to the Worker's source map, it does so line-by-line, remapping as much as possible. If a line of the stack trace cannot be remapped for any reason, Cloudflare will leave that line of the stack trace unchanged, and continue to the next line of the stack trace. ## Limits Wrangler version Minimum required Wrangler version for source maps: 3.46.0. Check your version by running `wrangler --version`. | Description | Limit | | - | - | | Maximum Source Map Size | 15 MB gzipped | ## Example Consider a simple project. `src/index.ts` serves as the entrypoint of the application and `src/calculator.ts` defines a ComplexCalculator class that supports basic arithmetic. Let's see how source maps can simplify debugging an error in the ComplexCalculator class. ![Stack Trace without Source Map remapping](https://developers.cloudflare.com/_astro/without-source-map.ByYR83oU_1kmSml.webp) With **no source maps uploaded**: notice how all the Javascript has been minified to one file, so the stack trace is missing information on file name, shows incorrect line numbers, and incorrectly references `js` instead of `ts`. ![Stack Trace with Source Map remapping](https://developers.cloudflare.com/_astro/with-source-map.PipytmVe_Z17DcFD.webp) With **source maps uploaded**: all methods reference the correct files and line numbers. ## Related resources * [Tail Workers](https://developers.cloudflare.com/workers/observability/logs/logpush/) - Learn how to attach Tail Workers to transform your logs and send them to HTTP endpoints. * [Real-time logs](https://developers.cloudflare.com/workers/observability/logs/real-time-logs/) - Learn how to capture Workers logs in real-time. * [RPC error handling](https://developers.cloudflare.com/workers/runtime-apis/rpc/error-handling/) - Learn how exceptions are handled over RPC (Remote Procedure Call). --- title: Integrations · Cloudflare Workers docs description: Send your telemetry data to third parties. lastUpdated: 2025-06-11T17:40:43.000Z chatbotDeprioritize: true source_url: html: https://developers.cloudflare.com/workers/observability/third-party-integrations/ md: https://developers.cloudflare.com/workers/observability/third-party-integrations/index.md --- Send your telemetry data to third parties. * [Sentry](https://docs.sentry.io/platforms/javascript/guides/cloudflare/) --- title: Betas · Cloudflare Workers docs description: Cloudflare developer platform and Workers features beta status. lastUpdated: 2024-09-25T21:11:15.000Z chatbotDeprioritize: false source_url: html: https://developers.cloudflare.com/workers/platform/betas/ md: https://developers.cloudflare.com/workers/platform/betas/index.md --- These are the current alphas and betas relevant to the Cloudflare Workers platform. * **Public alphas and betas are openly available**, but may have limitations and caveats due to their early stage of development. * Private alphas and betas require explicit access to be granted. Refer to the documentation to join the relevant product waitlist. | Product | Private Beta | Public Beta | More Info | | - | - | - | - | | Email Workers | | ✅ | [Docs](https://developers.cloudflare.com/email-routing/email-workers/) | | Green Compute | | ✅ | [Blog](https://blog.cloudflare.com/earth-day-2022-green-compute-open-beta/) | | Pub/Sub | ✅ | | [Docs](https://developers.cloudflare.com/pub-sub) | | [TCP Sockets](https://developers.cloudflare.com/workers/runtime-apis/tcp-sockets/) | | ✅ | [Docs](https://developers.cloudflare.com/workers/runtime-apis/tcp-sockets) | --- title: Workers Changelog · Cloudflare Workers docs description: Review recent changes to Cloudflare Workers. lastUpdated: 2025-02-13T19:35:19.000Z chatbotDeprioritize: false source_url: html: https://developers.cloudflare.com/workers/platform/changelog/ md: https://developers.cloudflare.com/workers/platform/changelog/index.md --- This changelog details meaningful changes made to Workers across the Cloudflare dashboard, Wrangler, the API, and the workerd runtime. These changes are not configurable. This is *different* from [compatibility dates](https://developers.cloudflare.com/workers/configuration/compatibility-dates/) and [compatibility flags](https://developers.cloudflare.com/workers/configuration/compatibility-flags/), which let you explicitly opt-in to or opt-out of specific changes to the Workers Runtime. [Subscribe to RSS](https://developers.cloudflare.com/workers/platform/changelog/index.xml) ## 2025-06-04 * Updated v8 to version 13.8. ## 2025-05-22 * Enabled explicit resource context management and support for Float16Array ## 2025-05-20 * Updated v8 to version 13.7. ## 2025-04-16 * Updated v8 to version 13.6. ## 2025-04-03 * Websocket client exceptions are now JS exceptions rather than internal errors. ## 2025-03-27 * Updated v8 to version 13.5. ## 2025-02-28 * Updated v8 to version 13.4. * When using `nodejs_compat`, the new `nodejs_compat_populate_process_env` compatibility flag will cause `process.env` to be automatically populated with text bindings configured for the worker. ## 2025-02-26 * [Workers Builds](https://developers.cloudflare.com/workers/ci-cd/builds/) now supports building projects that use **pnpm 10** as the package manager. If your build previously failed due to this unsupported version, retry your build. No config changes needed. ## 2025-02-13 * [Smart Placement](https://developers.cloudflare.com/workers/configuration/smart-placement/) no longer runs Workers in the same location as D1 databases they are bound to. The same [placement logic](https://developers.cloudflare.com/workers/configuration/smart-placement/#understand-how-smart-placement-works) now applies to all Workers that use Smart Placement, regardless of whether they use D1 bindings. ## 2025-02-11 * When Workers generate an "internal error" exception in response to certain failures, the exception message may provide a reference ID that customers can include in support communication for easier error identification. For example, an exception with the new message might look like: `internal error; reference = 0123456789abcdefghijklmn`. ## 2025-01-31 * Updated v8 to version 13.3. ## 2025-01-15 * The runtime will no longer reuse isolates across worker versions even if the code happens to be identical. This "optimization" was deemed more confusing than it is worth. ## 2025-01-14 * Updated v8 to version 13.2. ## 2024-12-19 * **Cloudflare GitHub App Permissions Update** * Cloudflare is requesting updated permissions for the [Cloudflare GitHub App](https://github.com/apps/cloudflare-workers-and-pages) to enable features like automatically creating a repository on your GitHub account and deploying the new repository for you when getting started with a template. This feature is coming out soon to support a better onboarding experience. * **Requested permissions:** * [Repository Administration](https://docs.github.com/en/rest/authentication/permissions-required-for-github-apps?apiVersion=2022-11-28#repository-permissions-for-administration) (read/write) to create repositories. * [Contents](https://docs.github.com/en/rest/authentication/permissions-required-for-github-apps?apiVersion=2022-11-28#repository-permissions-for-contents) (read/write) to push code to the created repositories. * **Who is impacted:** * Existing users will be prompted to update permissions when GitHub sends an email with subject "\[GitHub] Cloudflare Workers & Pages is requesting updated permission" on December 19th, 2024. * New users installing the app will see the updated permissions during the connecting repository process. * **Action:** Review and accept the permissions update to use upcoming features. *If you decline or take no action, you can continue connecting repositories and deploying changes via the Cloudflare GitHub App as you do today, but new features requiring these permissions will not be available.* * **Questions?** Visit [#github-permissions-update](https://discord.com/channels/595317990191398933/1313895851520688163) in the Cloudflare Developers Discord. ## 2024-11-18 * Updated v8 to version 13.1. ## 2024-11-12 * Fixes exception seen when trying to call deleteAll() during a SQLite-backed Durable Object's alarm handler. ## 2024-11-08 * Update SQLite to version 3.47. ## 2024-10-21 * Fixed encoding of WebSocket pong messages when talking to remote servers. Previously, when a Worker made a WebSocket connection to an external server, the server may have prematurely closed the WebSocket for failure to respond correctly to pings. Client-side connections were not affected. ## 2024-10-14 * Updated v8 to version 13.0. ## 2024-09-26 * You can now connect your GitHub or GitLab repository to an existing Worker to automatically build and deploy your changes when you make a git push with [Workers Builds](https://developers.cloudflare.com/workers/ci-cd/builds/). ## 2024-09-20 * Workers now support the \[`handle_cross_request_promise_resolution`] compatibility flag which addresses certain edge cases around awaiting and resolving promises across multiple requests. ## 2024-09-19 * Revamped Workers and Pages UI settings to simplify the creation and management of project configurations. For bugs and general feedback, please submit this [form](https://forms.gle/XXqhRGbZmuzninuN9). ## 2024-09-16 * Updated v8 to version 12.9. ## 2024-08-19 * Workers now support the [`allow_custom_ports` compatibility flag](https://developers.cloudflare.com/workers/configuration/compatibility-flags/#allow-specifying-a-custom-port-when-making-a-subrequest-with-the-fetch-api) which enables using the `fetch()` calls to custom ports. ## 2024-08-15 * Updated v8 to version 12.8. * You can now use [`Promise.try()`](https://developer.mozilla.org/en-US/docs/Web/JavaScript/Reference/Global_Objects/Promise/try) in Cloudflare Workers. Refer to [`tc39/proposal-promise-try`](https://github.com/tc39/proposal-promise-try) for more context on this API that has recently been added to the JavaScript language. ## 2024-08-14 * When using the `nodejs_compat_v2` compatibility flag, the `setImmediate(fn)` API from Node.js is now available at the global scope. * The `internal_writable_stream_abort_clears_queue` compatibility flag will ensure that certain `WritableStream` `abort()` operations are handled immediately rather than lazily, ensuring that the stream is appropriately aborted when the consumer of the stream is no longer active. ## 2024-07-19 * Workers with the [mTLS](https://developers.cloudflare.com/workers/runtime-apis/bindings/mtls/) binding now support [Gradual Deployments](https://developers.cloudflare.com/workers/configuration/versions-and-deployments/gradual-deployments/). ## 2024-07-18 * Added a new `truncated` flag to [Tail Worker](https://developers.cloudflare.com/workers/observability/logs/tail-workers/) events to indicate when the event buffer is full and events are being dropped. ## 2024-07-17 * Updated v8 to version 12.7. ## 2024-07-11 * Added community contributed tutorial on how to create [custom access control for files in R2 using D1 and Workers](https://developers.cloudflare.com/developer-spotlight/tutorials/custom-access-control-for-files/). * Added community contributed tutorial on how to [send form submissions using Astro and Resend](https://developers.cloudflare.com/developer-spotlight/tutorials/handle-form-submission-with-astro-resend/). * Added community contributed tutorial on how to [create a sitemap from Sanity CMS with Workers](https://developers.cloudflare.com/developer-spotlight/tutorials/create-sitemap-from-sanity-cms/). ## 2024-07-03 * The [`node:crypto`](https://developers.cloudflare.com/workers/runtime-apis/nodejs/crypto/) implementation now includes the scrypt(...) and scryptSync(...) APIs. * Workers now support the standard [EventSource](https://developers.cloudflare.com/workers/runtime-apis/eventsource/) API. * Fixed a bug where when writing to an HTTP Response body would sometimes hang when the client disconnected (and sometimes throw an exception). It will now always throw an exception. ## 2024-07-01 * When using [Gradual Deployments](https://developers.cloudflare.com/workers/configuration/versions-and-deployments/gradual-deployments/), you can now use [version overrides](https://developers.cloudflare.com/workers/configuration/versions-and-deployments/gradual-deployments/#version-overrides) to send a request to a specific version of your Worker. ## 2024-06-28 * Fixed a bug which caused `Date.now()` to return skewed results if called before the first I/O of the first request after a Worker first started up. The value returned would be offset backwards by the amount of CPU time spent starting the Worker (compiling and running global scope), making it seem like the first I/O (e.g. first fetch()) was slower than it really was. This skew had nothing to do with Spectre mitigations; it was simply a longstanding bug. ## 2024-06-24 * [Exceptions](https://developers.cloudflare.com/durable-objects/best-practices/error-handling) thrown from Durable Object internal operations and tunneled to the caller may now be populated with a `.retryable: true` property if the exception was likely due to a transient failure, or populated with an `.overloaded: true` property if the exception was due to [overload](https://developers.cloudflare.com/durable-objects/observability/troubleshooting/#durable-object-is-overloaded). ## 2024-06-20 * We now prompt for extra confirmation if attempting to rollback to a version of a Worker using the [Deployments API](https://developers.cloudflare.com/api/resources/workers/subresources/scripts/subresources/deployments/methods/create/) where the value of a secret is different than the currently deployed version. A `?force=true` query parameter can be specified to proceed with the rollback. ## 2024-06-19 * When using [`nodejs_compat` compatibility flag](https://developers.cloudflare.com/workers/runtime-apis/nodejs/), the `buffer` module now has an implementation of `isAscii()` and `isUtf8()` methods. * Fixed a bug where exceptions propagated from [JS RPC](https://developers.cloudflare.com/workers/runtime-apis/rpc) calls to Durable Objects would lack the `.remote` property that exceptions from `fetch()` calls to Durable Objects have. ## 2024-06-12 * Blob and Body objects now include a new `bytes()` method, reflecting [recent](https://w3c.github.io/FileAPI/#bytes-method-algo) [additions](https://fetch.spec.whatwg.org/#dom-body-bytes) to web standards. ## 2024-06-03 * Workers with [Smart Placement](https://developers.cloudflare.com/workers/configuration/smart-placement/) enabled now support [Gradual Deployments](https://developers.cloudflare.com/workers/configuration/versions-and-deployments/gradual-deployments/). ## 2024-05-17 * Updated v8 to version 12.6. ## 2024-05-15 * The new [`fetch_standard_url` compatibility flag](https://developers.cloudflare.com/workers/configuration/compatibility-flags/#use-standard-url-parsing-in-fetch) will become active by default on June 3rd, 2024 and ensures that URLs passed into the `fetch(...)` API, the `new Request(...)` constructor, and redirected requests will be parsed using the standard WHATWG URL parser. * DigestStream is now more efficient and exposes a new `bytesWritten` property that indicates that number of bytes written to the digest. ## 2024-05-13 * Updated v8 to version 12.5. * A bug in the fetch API implementation would cause the content type of a Blob to be incorrectly set. The fix is being released behind a new [`blob_standard_mime_type` compatibility flag](https://developers.cloudflare.com/workers/configuration/compatibility-flags/#properly-extract-blob-mime-type-from-content-type-headers). ## 2024-05-03 * Fixed RPC to/from Durable Objects not honoring the output gate. * The `internal_stream_byob_return_view` compatibility flag can be used to improve the standards compliance of the `ReadableStreamBYOBReader` implementation when working with BYOB streams provided by the runtime (like in `response.body` or `request.body`). The flag ensures that the final read result will always include a `value` field whose value is set to an empty `Uint8Array` whose underlying `ArrayBuffer` is the same memory allocation as the one passed in on the call to `read()`. * The Web platform standard `reportError(err)` global API is now available in workers. The reported error will first be emitted as an 'error' event on the global scope then reported in both the console output and tail worker exceptions by default. ## 2024-04-26 * Updated v8 to version 12.4. ## 2024-04-11 * Improve Streams API spec compliance by exposing `desiredSize` and other properties on stream class prototypes * The new `URL.parse(...)` method is implemented. This provides an alternative to the URL constructor that does not throw exceptions on invalid URLs. * R2 bindings objects now have a `storageClass` option. This can be set on object upload to specify the R2 storage class - Standard or Infrequent Access. The property is also returned with object metadata. ## 2024-04-05 * A new [JavaScript-native remote procedure call (RPC) API](https://developers.cloudflare.com/workers/runtime-apis/rpc) is now available, allowing you to communicate more easily across Workers and between Workers and Durable Objects. ## 2024-04-04 * There is no longer an explicit limit on the total amount of data which may be uploaded with Cache API [`put()`](https://developers.cloudflare.com/workers/runtime-apis/cache/#put) per request. Other [Cache API Limits](https://developers.cloudflare.com/workers/platform/limits/#cache-api-limits) continue to apply. * The Web standard `ReadableStream.from()` API is now implemented. The API enables creating a `ReadableStream` from a either a sync or async iterable. ## 2024-04-03 * When the [`brotli_content_encoding`](https://developers.cloudflare.com/workers/configuration/compatibility-flags/#brotli-content-encoding-support) compatibility flag is enabled, the Workers runtime now supports compressing and decompressing request bodies encoded using the [Brotli](https://developer.mozilla.org/en-US/docs/Glossary/Brotli_compression) compression algorithm. Refer to [this docs section](https://developers.cloudflare.com/workers/runtime-apis/fetch/#how-the-accept-encoding-header-is-handled) for more detail. ## 2024-04-02 * You can now [write Workers in Python](https://developers.cloudflare.com/workers/languages/python) ## 2024-04-01 * The new [`unwrap_custom_thenables` compatibility flag](https://developers.cloudflare.com/workers/configuration/compatibility-flags/#handling-custom-thenables) enables workers to accept custom thenables in internal APIs that expect a promise (for instance, the `ctx.waitUntil(...)` method). * TransformStreams created with the TransformStream constructor now have a cancel algorithm that is called when the stream is canceled or aborted. This change is part of the implementation of the WHATWG Streams standard. * The [`nodejs_compat` compatibility flag](https://developers.cloudflare.com/workers/runtime-apis/nodejs/) now includes an implementation of the [`MockTracker` API from `node:test`](https://nodejs.org/api/test.html#class-mocktracker). This is not an implementation of the full `node:test` module, and mock timers are currently not included. * Exceptions reported to [Tail Workers](https://developers.cloudflare.com/workers/observability/logs/tail-workers/) now include a "stack" property containing the exception's stack trace, if available. ## 2024-03-11 * Built-in APIs that return Promises will now produce stack traces when the Promise rejects. Previously, the rejection error lacked a stack trace. * A new compat flag `fetcher_no_get_put_delete` removes the `get()`, `put()`, and `delete()` methods on service bindings and Durable Object stubs. This will become the default as of compatibility date 2024-03-26. These methods were designed as simple convenience wrappers around `fetch()`, but were never documented. * Updated v8 to version 12.3. ## 2024-02-24 * v8 updated to version 12.2. * You can now use [Iterator helpers](https://v8.dev/features/iterator-helpers) in Workers. * You can now use [new methods on `Set`](https://github.com/tc39/proposal-set-methods), such as `Set.intersection` and `Set.union`, in Workers. ## 2024-02-23 * Sockets now support an [`opened`](https://developers.cloudflare.com/workers/runtime-apis/tcp-sockets/#socket) attribute. * [Durable Object alarm handlers](https://developers.cloudflare.com/durable-objects/api/alarms/#alarm) now impose a maximum wall time of 15 minutes. ## 2023-12-04 * The Web Platform standard [`navigator.sendBeacon(...)` API](https://developers.cloudflare.com/workers/runtime-apis/web-standards#navigatorsendbeaconurl-data) is now provided by the Workers runtime. * V8 updated to 12.0. ## 2023-10-30 * A new usage model called [Workers Standard](https://developers.cloudflare.com/workers/platform/pricing/#workers) is available for Workers and Pages Functions pricing. This is now the default usage model for accounts that are first upgraded to the Workers Paid plan. Read the [blog post](https://blog.cloudflare.com/workers-pricing-scale-to-zero/) for more information. * The usage model set in a script's wrangler.toml will be ignored after an account has opted-in to [Workers Standard](https://developers.cloudflare.com/workers/platform/pricing/#workers) pricing. It must be configured through the dashboard (Workers & Pages > Select your Worker > Settings > Usage Model). * Workers and Pages Functions on the Standard usage model can set custom [CPU limits](https://developers.cloudflare.com/workers/wrangler/configuration/#limits) for their Workers ## 2023-10-20 * Added the [`crypto_preserve_public_exponent`](https://developers.cloudflare.com/workers/configuration/compatibility-flags/#webcrypto-preserve-publicexponent-field) compatibility flag to correct a wrong type being used in the algorithm field of RSA keys in the WebCrypto API. ## 2023-10-18 * The limit of 3 Cron Triggers per Worker has been removed. Account-level limits on the total number of Cron Triggers across all Workers still apply. ## 2023-10-12 * A [TCP Socket](https://developers.cloudflare.com/workers/runtime-apis/tcp-sockets/)'s WritableStream now ensures the connection has opened before resolving the promise returned by `close`. ## 2023-10-09 * The Web Platform standard [`CustomEvent` class](https://dom.spec.whatwg.org/#interface-customevent) is now available in Workers. * Fixed a bug in the WebCrypto API where the `publicExponent` field of the algorithm of RSA keys would have the wrong type. Use the [`crypto_preserve_public_exponent` compatibility flag](https://developers.cloudflare.com/workers/configuration/compatibility-flags/#webcrypto-preserve-publicexponent-field) to enable the new behavior. ## 2023-09-14 * An implementation of the [`node:crypto`](https://developers.cloudflare.com/workers/runtime-apis/nodejs/crypto/) API from Node.js is now available when the [`nodejs_compat` compatibility flag](https://developers.cloudflare.com/workers/runtime-apis/nodejs/) is enabled. ## 2023-07-14 * An implementation of the [`util.MIMEType`](https://nodejs.org/api/util.html#class-utilmimetype) API from Node.js is now available when the [`nodejs_compat` compatibility flag](https://developers.cloudflare.com/workers/runtime-apis/nodejs/) is enabled. ## 2023-07-07 * An implementation of the [`process.env`](https://developers.cloudflare.com/workers/runtime-apis/nodejs/process) API from Node.js is now available when using the `nodejs_compat` compatibility flag. * An implementation of the [`diagnostics_channel`](https://developers.cloudflare.com/workers/runtime-apis/nodejs/diagnostics-channel) API from Node.js is now available when using the `nodejs_compat` compatibility flag. ## 2023-06-22 * Added the [`strict_crypto_checks`](https://developers.cloudflare.com/workers/configuration/compatibility-flags/#strict-crypto-error-checking) compatibility flag to enable additional [Web Crypto API](https://developers.cloudflare.com/workers/runtime-apis/web-crypto/) error and security checking. * Fixes regression in the [TCP Sockets API](https://developers.cloudflare.com/workers/runtime-apis/tcp-sockets/) where `connect("google.com:443")` would fail with a `TypeError`. ## 2023-06-19 * The [TCP Sockets API](https://developers.cloudflare.com/workers/runtime-apis/tcp-sockets/) now reports clearer errors when a connection cannot be established. * Updated V8 to 11.5. ## 2023-06-09 * `AbortSignal.any()` is now available. * Updated V8 to 11.4. * Following an update to the [WHATWG URL spec](https://url.spec.whatwg.org/#interface-urlsearchparams), the `delete()` and `has()` methods of the `URLSearchParams` class now accept an optional second argument to specify the search parameter’s value. This is potentially a breaking change, so it is gated behind the new `urlsearchparams_delete_has_value_arg` and [`url_standard`](https://developers.cloudflare.com/workers/configuration/compatibility-flags/#new-url-parser-implementation) compatibility flags. * Added the [`strict_compression_checks`](https://developers.cloudflare.com/workers/configuration/compatibility-flags/#strict-compression-error-checking) compatibility flag for additional [`DecompressionStream`](https://developers.cloudflare.com/workers/runtime-apis/web-standards/#compression-streams) error checking. ## 2023-05-26 * A new [Hibernatable WebSockets API](https://developers.cloudflare.com/durable-objects/best-practices/websockets/) (beta) has been added to [Durable Objects](https://developers.cloudflare.com/durable-objects/). The Hibernatable WebSockets API allows a Durable Object that is not currently running an event handler (for example, processing a WebSocket message or alarm) to be removed from memory while keeping its WebSockets connected (“hibernation”). A Durable Object that hibernates will not incur billable Duration (GB-sec) charges. ## 2023-05-16 * The [new `connect()` method](https://developers.cloudflare.com/workers/runtime-apis/tcp-sockets/) allows you to connect to any TCP-speaking services directly from your Workers. To learn more about other protocols supported on the Workers platform, visit the [new Protocols documentation](https://developers.cloudflare.com/workers/reference/protocols/). * We have added new [native database integrations](https://developers.cloudflare.com/workers/databases/native-integrations/) for popular serverless database providers, including Neon, PlanetScale, and Supabase. Native integrations automatically handle the process of creating a connection string and adding it as a Secret to your Worker. * You can now also connect directly to databases over TCP from a Worker, starting with [PostgreSQL](https://developers.cloudflare.com/hyperdrive/examples/connect-to-postgres/). Support for PostgreSQL is based on the popular `pg` driver, and allows you to connect to any PostgreSQL instance over TLS from a Worker directly. * The [R2 Migrator](https://developers.cloudflare.com/r2/data-migration/) (Super Slurper), which automates the process of migrating from existing object storage providers to R2, is now Generally Available. ## 2023-05-15 * [Cursor](https://developers.cloudflare.com/workers/ai/), an experimental AI assistant, trained to answer questions about Cloudflare's Developer Platform, is now available to preview! Cursor can answer questions about Workers and the Cloudflare Developer Platform, and is itself built on Workers. You can read more about Cursor in the [announcement blog](https://blog.cloudflare.com/introducing-cursor-the-ai-assistant-for-docs/). ## 2023-05-12 * The [`performance.now()`](https://developer.mozilla.org/en-US/docs/Web/API/Performance/now) and [`performance.timeOrigin`](https://developer.mozilla.org/en-US/docs/Web/API/Performance/timeOrigin) APIs can now be used in Cloudflare Workers. Just like `Date.now()`, for [security reasons](https://developers.cloudflare.com/workers/reference/security-model/) time only advances after I/O. ## 2023-05-05 * The new `nodeJsCompatModule` type can be used with a Worker bundle to emulate a Node.js environment. Common Node.js globals such as `process` and `Buffer` will be present, and `require('...')` can be used to load Node.js built-ins without the `node:` specifier prefix. * Fixed an issue where websocket connections would be disconnected when updating workers. Now, only WebSockets connected to Durable Objects are disconnected by updates to that Durable Object’s code. ## 2023-04-28 * The Web Crypto API now supports curves Ed25519 and X25519 defined in the Secure Curves specification. * The global `connect` method has been moved to a `cloudflare:sockets` module. ## 2023-04-14 * No externally-visible changes this week. ## 2023-04-10 * `URL.canParse(...)` is a new standard API for testing that an input string can be parsed successfully as a URL without the additional cost of creating and throwing an error. * The Workers-specific `IdentityTransformStream` and `FixedLengthStream` classes now support specifying a `highWaterMark` for the writable-side that is used for backpressure signaling using the standard `writer.desiredSize`/`writer.ready` mechanisms. ## 2023-03-24 * Fixed a bug in Wrangler tail and live logs on the dashboard that prevented the Administrator Read-Only and Workers Tail Read roles from successfully tailing Workers. ## 2023-03-09 * No externally-visible changes. ## 2023-03-06 * [Workers Logpush](https://developers.cloudflare.com/workers/observability/logs/logpush/#limits) now supports 300 characters per log line. This is an increase from the previous limit of 150 characters per line. ## 2023-02-06 * Fixed a bug where transferring large request bodies to a Durable Object was unexpectedly slow. * Previously, an error would be thrown when trying to access unimplemented standard `Request` and `Response` properties. Now those will be left as `undefined`. ## 2023-01-31 * The [`request.cf`](https://developers.cloudflare.com/workers/runtime-apis/request/#incomingrequestcfproperties) object now includes two additional properties, `tlsClientHelloLength` and `tlsClientRandom`. ## 2023-01-13 * Durable Objects can now use jurisdictions with `idFromName` via a new subnamespace API. * V8 updated to 10.9. --- title: Deploy to Cloudflare buttons · Cloudflare Workers docs description: Set up a Deploy to Cloudflare button lastUpdated: 2025-06-05T13:06:24.000Z chatbotDeprioritize: false source_url: html: https://developers.cloudflare.com/workers/platform/deploy-buttons/ md: https://developers.cloudflare.com/workers/platform/deploy-buttons/index.md --- If you're building a Workers application and would like to share it with other developers, you can embed a Deploy to Cloudflare button in your README, blog post, or documentation to enable others to quickly deploy your application on their own Cloudflare account. Deploy to Cloudflare buttons eliminate the need for complex setup, allowing developers to get started with your public GitHub or GitLab repository in just a few clicks. [![Deploy to Cloudflare](https://deploy.workers.cloudflare.com/button)](https://deploy.workers.cloudflare.com/?url=https://github.com/cloudflare/templates/tree/main/saas-admin-template) ## What are Deploy to Cloudflare buttons? Deploy to Cloudflare buttons simplify the deployment of a Workers application by enabling Cloudflare to: * **Clone a Git repository**: Cloudflare clones your source repository into the user's GitHub/GitLab account where they can continue development after deploying. * **Configure a project**: Your users can customize key details such as repository name, Worker name, and required resource names in a single setup page with customizations reflected in the newly created Git repository. * **Build & deploy**: Cloudflare builds the application using [Workers Builds](https://developers.cloudflare.com/workers/ci-cd/builds) and deploys it to the Cloudflare network. Any required resources are automatically provisioned and bound to the Worker without additional setup. ![Deploy to Cloudflare Flow](https://developers.cloudflare.com/_astro/dtw-user-flow.zgS3Y8iK_hqlHb.webp) ## How to Set Up Deploy to Cloudflare buttons Deploy to Cloudflare buttons can be embedded anywhere developers might want to launch your project. To add a Deploy to Cloudflare button, copy the following snippet and replace the Git repository URL with your project's URL. You can also optionally specify a subdirectory. * Markdown ```md [![Deploy to Cloudflare](https://deploy.workers.cloudflare.com/button)](https://deploy.workers.cloudflare.com/?url=) ``` * HTML ```html Deploy to Cloudflare ``` * URL ```plaintext https://deploy.workers.cloudflare.com/?url= ``` If you have already deployed your application using Workers Builds, you can generate a Deploy to Cloudflare button directly from the Cloudflare dashboard by selecting the share button (located within your Worker details) and copying the provided snippet. ![Share an application](https://developers.cloudflare.com/_astro/dtw-share-project.CTDMrwQu_Z1yXLMx.webp) Once you have your snippet, you can paste this wherever you would like your button to be displayed. ## Automatic Resource provisioning If your Worker application requires Cloudflare resources, they will be automatically provisioned as part of the deployment. Currently, supported resources include: * **Storage**: [KV namespaces](https://developers.cloudflare.com/kv/), [D1 databases](https://developers.cloudflare.com/d1/), [R2 buckets](https://developers.cloudflare.com/r2/), [Hyperdrive](https://developers.cloudflare.com/hyperdrive/), and [Vectorize databases](https://developers.cloudflare.com/vectorize/) * **Compute**: [Durable Objects](https://developers.cloudflare.com/durable-objects/), [Workers AI](https://developers.cloudflare.com/workers-ai/), and [Queues](https://developers.cloudflare.com/queues/) Cloudflare will read the Wrangler configuration file of your source repo to determine resource requirements for your application. During deployment, Cloudflare will provision any necessary resources and update the Wrangler configuration where applicable for newly created resources (e.g. database IDs and namespace IDs). To ensure successful deployment, please make sure your source repository includes default values for resource names, resource IDs and any other properties for each binding. ## Best practices **Configuring Build/Deploy commands**: If you are using custom `build` and `deploy` scripts in your package.json (for example, if using a full stack framework or running D1 migrations), Cloudflare will automatically detect and pre-populate the build and deploy fields. Users can choose to modify or accept the custom commands during deployment configuration. If no `deploy` script is specified, Cloudflare will preconfigure `npx wrangler deploy` by default. If no `build` script is specified, Cloudflare will leave this field blank. **Running D1 Migrations**: If you would like to run migrations as part of your setup, you can specify this in your `package.json` by running your migrations as part of your `deploy` script. The migration command should reference the binding name rather than the database name to ensure migrations are successful when users specify a database name that is different from that of your source repository. The following is an example of how you can set up the scripts section of your `package.json`: ```json { "scripts": { "build": "astro build", "deploy": "npm run db:migrations:apply && wrangler deploy", "db:migrations:apply": "wrangler d1 migrations apply DB_BINDING --remote" } } ``` ## Limitations * **Monorepos**: Cloudflare does not fully support monorepos * If your repository URL contains a subdirectory, your application must be fully isolated within that subdirectory, including any dependencies. Otherwise, the build will fail. Cloudflare treats this subdirectory as the root of the new repository created as part of the deploy process. * Additionally, if you have a monorepo that contains multiple Workers applications, they will not be deployed together. You must configure a separate Deploy to Cloudflare button for each application. The user will manually create a distinct Workers application for each subdirectory. * **Pages applications**: Deploy to Cloudflare buttons only support Workers applications. * **Non-GitHub/GitLab repositories**: Source repositories from anything other than github.com and gitlab.com are not supported. Self-hosted versions of GitHub and GitLab are also not supported. * **Private repositories**: Repositories must be public in order for others to successfully use your Deploy to Cloudflare button. --- title: Infrastructure as Code (IaC) · Cloudflare Workers docs description: Uploading and managing Workers is easy with Wrangler, but sometimes you need to do it more programmatically. You might do this with IaC ("Infrastructure as Code") tools or by calling the Cloudflare API directly. Use cases for the API include build and deploy scripts, CI/CD pipelines, custom dev tools, and testing. We provide API SDK libraries for common languages that make interacting with the API easier, such as cloudflare-typescript and cloudflare-python. For IaC, a common tool is HashiCorp's Terraform. You can use the Cloudflare Terraform Provider to create and manage Workers resources. lastUpdated: 2025-06-19T17:15:24.000Z chatbotDeprioritize: false source_url: html: https://developers.cloudflare.com/workers/platform/infrastructure-as-code/ md: https://developers.cloudflare.com/workers/platform/infrastructure-as-code/index.md --- Uploading and managing Workers is easy with [Wrangler](https://developers.cloudflare.com/workers/wrangler/configuration), but sometimes you need to do it more programmatically. You might do this with IaC ("Infrastructure as Code") tools or by calling the [Cloudflare API](https://developers.cloudflare.com/api) directly. Use cases for the API include build and deploy scripts, CI/CD pipelines, custom dev tools, and testing. We provide API SDK libraries for common languages that make interacting with the API easier, such as [cloudflare-typescript](https://github.com/cloudflare/cloudflare-typescript) and [cloudflare-python](https://github.com/cloudflare/cloudflare-python). For IaC, a common tool is HashiCorp's Terraform. You can use the [Cloudflare Terraform Provider](https://developers.cloudflare.com/terraform) to create and manage Workers resources. Here are examples of deploying a Worker with common tools and languages, and considerations for successfully managing Workers with IaC. In particular, the examples highlight how to upload script content and metadata which is different with each approach. Reference the Upload Worker Module API docs [here](https://developers.cloudflare.com/api/resources/workers/subresources/scripts/methods/update) for an exact definition of how script upload works. All of these examples need an [account ID](https://developers.cloudflare.com/fundamentals/account/find-account-and-zone-ids) and [API token](https://developers.cloudflare.com/fundamentals/api/get-started/create-token) (not Global API key) to work. ## Workers Bundling None of the examples below do [Workers Bundling](https://developers.cloudflare.com/workers/wrangler/bundling) which is usually the function of a tool like Wrangler or [esbuild](https://esbuild.github.io). Generally, you'd run this bundling step before applying your Terraform plan or using the API for script upload: ```bash wrangler deploy --dry-run -outdir build ``` Then you'd reference the bundled script like `build/index.js`. Note Depending on your Wrangler project and `-outdir`, the name and location of your bundled script might vary. Make sure to copy all of your config from `wrangler.json` into your Terraform config or API request. This is especially important for compatibility date or compatibility flags your script relies on. ## Terraform In this example, you need a local file named `my-hello-world-script.mjs` with script content similar to the above examples. Replace `account_id` with your own. Learn more about the Cloudflare Terraform Provider [here](https://developers.cloudflare.com/terraform), and see an example with all the Workers script resource settings [here](https://github.com/cloudflare/terraform-provider-cloudflare/blob/main/examples/resources/cloudflare_workers_script/resource.tf). ```tf terraform { required_providers { cloudflare = { source = "cloudflare/cloudflare" version = "~> 5" } } } resource "cloudflare_workers_script" "my-hello-world-script" { account_id = "" script_name = "my-hello-world-script" main_module = "my-hello-world-script.mjs" content = trimspace(file("my-hello-world-script.mjs")) compatibility_date = "$today" bindings = [{ name = "MESSAGE" type = "plain_text" text = "Hello World!" }] } ``` Note * `trimspace()` removes empty lines in the file * The Workers Script resource does not have a `metadata` property like in the other examples. All of the properties found in `metadata` are instead at the top-level of the resource class, such as `bindings` or `compatibility_date`. Please see the [cloudflare\_workers\_script (Resource) docs](https://registry.terraform.io/providers/cloudflare/cloudflare/latest/docs/resources/workers_script). ## Cloudflare API Libraries ### JavaScript/TypeScript This example uses the [cloudflare-typescript](https://github.com/cloudflare/cloudflare-typescript) library which provides convenient access to the Cloudflare REST API from server-side JavaScript or TypeScript. * JavaScript ```js #!/usr/bin/env -S npm run tsn -T /* * Generate an API token: https://developers.cloudflare.com/fundamentals/api/get-started/create-token/ * (Not Global API Key!) * * Find your account id: https://developers.cloudflare.com/fundamentals/setup/find-account-and-zone-ids/ * * Set these environment variables: * - CLOUDFLARE_API_TOKEN * - CLOUDFLARE_ACCOUNT_ID * * ### Workers for Platforms ### * * For uploading a User Worker to a dispatch namespace: * https://developers.cloudflare.com/cloudflare-for-platforms/workers-for-platforms/ * * Define a "dispatchNamespaceName" variable and change the entire "const script = " line to the following: * "const script = await client.workersForPlatforms.dispatch.namespaces.scripts.update(dispatchNamespaceName, scriptName, {" */ import Cloudflare from "cloudflare"; import { toFile } from "cloudflare/index"; const apiToken = process.env["CLOUDFLARE_API_TOKEN"] ?? ""; if (!apiToken) { throw new Error("Please set envar CLOUDFLARE_ACCOUNT_ID"); } const accountID = process.env["CLOUDFLARE_ACCOUNT_ID"] ?? ""; if (!accountID) { throw new Error("Please set envar CLOUDFLARE_API_TOKEN"); } const client = new Cloudflare({ apiToken: apiToken, }); async function main() { const scriptName = "my-hello-world-script"; const scriptFileName = `${scriptName}.mjs`; // Workers Scripts prefer Module Syntax // https://blog.cloudflare.com/workers-javascript-modules/ const scriptContent = ` export default { async fetch(request, env, ctx) { return new Response(env.MESSAGE, { status: 200 }); } }; `; try { // https://developers.cloudflare.com/api/resources/workers/subresources/scripts/methods/update/ const script = await client.workers.scripts.update(scriptName, { account_id: accountID, // https://developers.cloudflare.com/workers/configuration/multipart-upload-metadata/ metadata: { main_module: scriptFileName, bindings: [ { type: "plain_text", name: "MESSAGE", text: "Hello World!", }, ], }, files: { // Add main_module file [scriptFileName]: await toFile( Buffer.from(scriptContent), scriptFileName, { type: "application/javascript+module", }, ), // Can add other files, such as more modules or source maps // [sourceMapFileName]: await toFile(Buffer.from(sourceMapContent), sourceMapFileName, { // type: 'application/source-map', // }), }, }); console.log("Script Upload success!"); console.log(JSON.stringify(script, null, 2)); } catch (error) { console.error("Script Upload failure!"); console.error(error); } } main(); ``` * TypeScript ```ts #!/usr/bin/env -S npm run tsn -T /* * Generate an API token: https://developers.cloudflare.com/fundamentals/api/get-started/create-token/ * (Not Global API Key!) * * Find your account id: https://developers.cloudflare.com/fundamentals/setup/find-account-and-zone-ids/ * * Set these environment variables: * - CLOUDFLARE_API_TOKEN * - CLOUDFLARE_ACCOUNT_ID * * ### Workers for Platforms ### * * For uploading a User Worker to a dispatch namespace: * https://developers.cloudflare.com/cloudflare-for-platforms/workers-for-platforms/ * * Define a "dispatchNamespaceName" variable and change the entire "const script = " line to the following: * "const script = await client.workersForPlatforms.dispatch.namespaces.scripts.update(dispatchNamespaceName, scriptName, {" */ import Cloudflare from 'cloudflare'; import { toFile } from 'cloudflare/index'; const apiToken = process.env['CLOUDFLARE_API_TOKEN'] ?? ''; if (!apiToken) { throw new Error('Please set envar CLOUDFLARE_ACCOUNT_ID'); } const accountID = process.env['CLOUDFLARE_ACCOUNT_ID'] ?? ''; if (!accountID) { throw new Error('Please set envar CLOUDFLARE_API_TOKEN'); } const client = new Cloudflare({ apiToken: apiToken, }); async function main() { const scriptName = 'my-hello-world-script'; const scriptFileName = `${scriptName}.mjs`; // Workers Scripts prefer Module Syntax // https://blog.cloudflare.com/workers-javascript-modules/ const scriptContent = ` export default { async fetch(request, env, ctx) { return new Response(env.MESSAGE, { status: 200 }); } }; `; try { // https://developers.cloudflare.com/api/resources/workers/subresources/scripts/methods/update/ const script = await client.workers.scripts.update(scriptName, { account_id: accountID, // https://developers.cloudflare.com/workers/configuration/multipart-upload-metadata/ metadata: { main_module: scriptFileName, bindings: [ { type: 'plain_text', name: 'MESSAGE', text: 'Hello World!', }, ], }, files: { // Add main_module file [scriptFileName]: await toFile(Buffer.from(scriptContent), scriptFileName, { type: 'application/javascript+module', }), // Can add other files, such as more modules or source maps // [sourceMapFileName]: await toFile(Buffer.from(sourceMapContent), sourceMapFileName, { // type: 'application/source-map', // }), }, }); console.log('Script Upload success!'); console.log(JSON.stringify(script, null, 2)); } catch (error) { console.error('Script Upload failure!'); console.error(error); } } main(); ``` ### Python This example uses the [cloudflare-python](https://github.com/cloudflare/cloudflare-python) library. ```py """Workers Script Upload Example Generate an API token: https://developers.cloudflare.com/fundamentals/api/get-started/create-token/ (Not Global API Key!) Find your account id: https://developers.cloudflare.com/fundamentals/setup/find-account-and-zone-ids/ Set these environment variables: - CLOUDFLARE_API_TOKEN - CLOUDFLARE_ACCOUNT_ID ### Workers for Platforms ### For uploading a User Worker to a dispatch namespace: https://developers.cloudflare.com/cloudflare-for-platforms/workers-for-platforms/ Change the entire "script = " line to the following: "script = client.workers_for_platforms.dispatch.namespaces.scripts.update(" Then, define a "dispatch_namespace_name" variable and add a "dispatch_namespace=dispatch_namespace_name" keyword argument to the "update" method. """ import os from cloudflare import Cloudflare, BadRequestError API_TOKEN = os.environ.get("CLOUDFLARE_API_TOKEN") if API_TOKEN is None: raise RuntimeError("Please set envar CLOUDFLARE_API_TOKEN") ACCOUNT_ID = os.environ.get("CLOUDFLARE_ACCOUNT_ID") if ACCOUNT_ID is None: raise RuntimeError("Please set envar CLOUDFLARE_ACCOUNT_ID") client = Cloudflare(api_token=API_TOKEN) def main() -> None: """Workers Script Upload Example""" script_name = "my-hello-world-script" script_file_name = f"{script_name}.mjs" # Workers Scripts prefer Module Syntax # https://blog.cloudflare.com/workers-javascript-modules/ script_content = """ export default { async fetch(request, env, ctx) { return new Response(env.MESSAGE, { status: 200 }); } }; """ try: # https://developers.cloudflare.com/api/resources/workers/subresources/scripts/methods/update/ script = client.workers.scripts.update( script_name, account_id=ACCOUNT_ID, # type: ignore # https://developers.cloudflare.com/workers/configuration/multipart-upload-metadata/ metadata={ "main_module": script_file_name, "bindings": [ { "type": "plain_text", "name": "MESSAGE", "text": "Hello World!", } ], }, files={ # Add main_module file script_file_name: ( script_file_name, bytes(script_content, "utf-8"), "application/javascript+module", ) # Can add other files, such as more modules or source maps # source_map_file_name: ( # source_map_file_name, # bytes(source_map_content, "utf-8"), # "application/source-map" #) }, ) print("Script Upload success!") print(script.to_json(indent=2)) except BadRequestError as err: print("Script Upload failure!") print(err) if __name__ == "__main__": main() ``` ## Cloudflare REST API Open a terminal or create a shell script to upload a Worker easily with curl. For this example, replace `` and `` with your own. What's notable about interacting with the Workers Script Upload API directly is that it uses [multipart/form-data](https://developer.mozilla.org/en-US/docs/Web/HTTP/Reference/Methods/POST) for uploading metadata, multiple JavaScript modules, source maps, and more. This is abstracted away in Terraform and the API libraries. ```bash curl https://api.cloudflare.com/client/v4/accounts//workers/scripts/my-hello-world-script \ -X PUT \ -H 'Authorization: Bearer ' \ -F 'metadata={ "main_module": "my-hello-world-script.mjs", "bindings": [ { "type": "plain_text", "name": "MESSAGE", "text": "Hello World!" } ], "compatibility_date": "$today" };type=application/json' \ -F 'my-hello-world-script.mjs=@-;filename=my-hello-world-script.mjs;type=application/javascript+module' </workers/dispatch/namespaces//scripts/my-hello-world-script ``` For this to work, you first need to configure [Workers for Platforms](https://developers.cloudflare.com/cloudflare-for-platforms/workers-for-platforms/get-started/configuration), create a dispatch namespace, and replace `` with your own. ### Python Workers [Python Workers](https://developers.cloudflare.com/workers/languages/python/) (open beta) have their own special `text/x-python` content type and `python_workers` compatibility flag for uploading. ```bash curl https://api.cloudflare.com/client/v4/accounts//workers/scripts/my-hello-world-script \ -X PUT \ -H 'Authorization: Bearer ' \ -F 'metadata={ "main_module": "my-hello-world-script.py", "bindings": [ { "type": "plain_text", "name": "MESSAGE", "text": "Hello World!" } ], "compatibility_date": "$today", "compatibility_flags": [ "python_workers" ] };type=application/json' \ -F 'my-hello-world-script.py=@-;filename=my-hello-world-script.py;type=text/x-python' < --- title: Known issues · Cloudflare Workers docs description: Known issues and bugs to be aware of when using Workers. lastUpdated: 2025-05-15T14:14:09.000Z chatbotDeprioritize: false source_url: html: https://developers.cloudflare.com/workers/platform/known-issues/ md: https://developers.cloudflare.com/workers/platform/known-issues/index.md --- Below are some known bugs and issues to be aware of when using Cloudflare Workers. ## Route specificity * When defining route specificity, a trailing `/*` in your pattern may not act as expected. Consider two different Workers, each deployed to the same zone. Worker A is assigned the `example.com/images/*` route and Worker B is given the `example.com/images*` route pattern. With these in place, here are how the following URLs will be resolved: ```plaintext // (A) example.com/images/* // (B) example.com/images* "example.com/images" // -> B "example.com/images123" // -> B "example.com/images/hello" // -> B ``` You will notice that all examples trigger Worker B. This includes the final example, which exemplifies the unexpected behavior. When adding a wildcard on a subdomain, here are how the following URLs will be resolved: ```plaintext // (A) *.example.com/a // (B) a.example.com/* "a.example.com/a" // -> B ``` ## wrangler dev * When running `wrangler dev --remote`, all outgoing requests are given the `cf-workers-preview-token` header, which Cloudflare recognizes as a preview request. This applies to the entire Cloudflare network, so making HTTP requests to other Cloudflare zones is currently discarded for security reasons. To enable a workaround, insert the following code into your Worker script: ```js const request = new Request(url, incomingRequest); request.headers.delete('cf-workers-preview-token'); return await fetch(request); ``` ## Fetch API in CNAME setup When you make a subrequest using [`fetch()`](https://developers.cloudflare.com/workers/runtime-apis/fetch/) from a Worker, the Cloudflare DNS resolver is used. When a zone has a [Partial (CNAME) setup](https://developers.cloudflare.com/dns/zone-setups/partial-setup/), all hostnames that the Worker needs to be able to resolve require a dedicated DNS entry in Cloudflare's DNS setup. Otherwise the Fetch API call will fail with status code [530 (1016)](https://developers.cloudflare.com/support/troubleshooting/http-status-codes/cloudflare-1xxx-errors/error-1016/). Setup with missing DNS records in Cloudflare DNS ```plaintext // Zone in partial setup: example.com // DNS records at Authoritative DNS: sub1.example.com, sub2.example.com, ... // DNS records at Cloudflare DNS: sub1.example.com "sub1.example.com/" // -> Can be resolved by Fetch API "sub2.example.com/" // -> Cannot be resolved by Fetch API, will lead to 530 status code ``` After adding `sub2.example.com` to Cloudflare DNS ```plaintext // Zone in partial setup: example.com // DNS records at Authoritative DNS: sub1.example.com, sub2.example.com, ... // DNS records at Cloudflare DNS: sub1.example.com, sub2.example.com "sub1.example.com/" // -> Can be resolved by Fetch API "sub2.example.com/" // -> Can be resolved by Fetch API ``` ## Fetch to IP addresses For Workers subrequests, requests can only be made to URLs, not to IP addresses directly. To overcome this limitation [add a A or AAAA name record to your zone](https://developers.cloudflare.com/dns/manage-dns-records/how-to/create-dns-records/) and then fetch that resource. For example, in the zone `example.com` create a record of type `A` with the name `server` and value `192.0.2.1`, and then use: ```js await fetch('http://server.example.com') ``` Do not use: ```js await fetch('http://192.0.2.1') ``` --- title: Limits · Cloudflare Workers docs description: Cloudflare Workers plan and platform limits. lastUpdated: 2025-07-15T13:58:04.000Z chatbotDeprioritize: false source_url: html: https://developers.cloudflare.com/workers/platform/limits/ md: https://developers.cloudflare.com/workers/platform/limits/index.md --- ## Account plan limits | Feature | Workers Free | Workers Paid | | - | - | - | | [Subrequests](#subrequests) | 50/request | 1000/request | | [Simultaneous outgoing connections/request](#simultaneous-open-connections) | 6 | 6 | | [Environment variables](#environment-variables) | 64/Worker | 128/Worker | | [Environment variable size](#environment-variables) | 5 KB | 5 KB | | [Worker size](#worker-size) | 3 MB | 10 MB | | [Worker startup time](#worker-startup-time) | 400 ms | 400 ms | | [Number of Workers](#number-of-workers)1 | 100 | 500 | | Number of [Cron Triggers](https://developers.cloudflare.com/workers/configuration/cron-triggers/) per account | 5 | 250 | | Number of [Static Asset](#static-assets) files per Worker version | 20000 | 20000 | | Individual [Static Asset](#static-assets) file size | 25 MiB | 25 MiB | 1 If you are running into limits, your project may be a good fit for [Workers for Platforms](https://developers.cloudflare.com/cloudflare-for-platforms/workers-for-platforms/). Need a higher limit? To request an adjustment to a limit, complete the [Limit Increase Request Form](https://forms.gle/ukpeZVLWLnKeixDu7). If the limit can be increased, Cloudflare will contact you with next steps. *** ## Request limits URLs have a limit of 16 KB. Request headers observe a total limit of 32 KB, but each header is limited to 16 KB. Cloudflare has network-wide limits on the request body size. This limit is tied to your Cloudflare account's plan, which is separate from your Workers plan. When the request body size of your `POST`/`PUT`/`PATCH` requests exceed your plan's limit, the request is rejected with a `(413) Request entity too large` error. Cloudflare Enterprise customers may contact their account team or [Cloudflare Support](https://developers.cloudflare.com/support/contacting-cloudflare-support/) to have a request body limit beyond 500 MB. | Cloudflare Plan | Maximum body size | | - | - | | Free | 100 MB | | Pro | 100 MB | | Business | 200 MB | | Enterprise | 500 MB (by default) | *** ## Response limits Response headers observe a total limit of 32 KB, but each header is limited to 16 KB. Cloudflare does not enforce response limits on response body sizes, but cache limits for [our CDN are observed](https://developers.cloudflare.com/cache/concepts/default-cache-behavior/). Maximum file size is 512 MB for Free, Pro, and Business customers and 5 GB for Enterprise customers. *** ## Worker limits | Feature | Workers Free | Workers Paid | | - | - | - | | [Request](#request) | 100,000 requests/day 1000 requests/min | No limit | | [Worker memory](#memory) | 128 MB | 128 MB | | [CPU time](#cpu-time) | 10 ms | 5 min HTTP request 15 min [Cron Trigger](https://developers.cloudflare.com/workers/configuration/cron-triggers/) | | [Duration](#duration) | No limit | No limit for Workers. 15 min duration limit for [Cron Triggers](https://developers.cloudflare.com/workers/configuration/cron-triggers/), [Durable Object Alarms](https://developers.cloudflare.com/durable-objects/api/alarms/) and [Queue Consumers](https://developers.cloudflare.com/queues/configuration/javascript-apis/#consumer) | ### Duration Duration is a measurement of wall-clock time — the total amount of time from the start to end of an invocation of a Worker. There is no hard limit on the duration of a Worker. As long as the client that sent the request remains connected, the Worker can continue processing, making subrequests, and setting timeouts on behalf of that request. When the client disconnects, all tasks associated with that client request are canceled. Use [`event.waitUntil()`](https://developers.cloudflare.com/workers/runtime-apis/handlers/fetch/) to delay cancellation for another 30 seconds or until the promise passed to `waitUntil()` completes. Note Cloudflare updates the Workers runtime a few times per week. When this happens, any in-flight requests are given a grace period of 30 seconds to finish. If a request does not finish within this time, it is terminated. While your application should follow the best practice of handling disconnects by retrying requests, this scenario is extremely improbable. To encounter it, you would need to have a request that takes longer than 30 seconds that also happens to intersect with the exact time an update to the runtime is happening. ### CPU time CPU time is the amount of time the CPU actually spends doing work during a given request. If a Worker's request makes a sub-request and waits for that request to come back before doing additional work, this time spent waiting **is not** counted towards CPU time. **Most Workers requests consume less than 1-2 milliseconds of CPU time**, but you can increase the maximum CPU time from the default 30 seconds to 5 minutes (300,000 milliseconds) if you have CPU-bound tasks, such as large JSON payloads that need to be serialized, cryptographic key generation, or other data processing tasks. Each [isolate](https://developers.cloudflare.com/workers/reference/how-workers-works/#isolates) has some built-in flexibility to allow for cases where your Worker infrequently runs over the configured limit. If your Worker starts hitting the limit consistently, its execution will be terminated according to the limit configured. To understand your CPU usage: * CPU time and Wall time are surfaced in the [invocation log](https://developers.cloudflare.com/workers/observability/logs/workers-logs/#invocation-logs) within Workers Logs. * For Tail Workers, CPU time and Wall time are surfaced at the top level of the [Workers Trace Events object](https://developers.cloudflare.com/logs/reference/log-fields/account/workers_trace_events/). * DevTools locally can help identify CPU intensive portions of your code. See the [CPU profiling with DevTools documentation](https://developers.cloudflare.com/workers/observability/dev-tools/cpu-usage/). You can also set a [custom limit](https://developers.cloudflare.com/workers/wrangler/configuration/#limits) on the amount of CPU time that can be used during each invocation of your Worker. * wrangler.jsonc ```jsonc { // ...rest of your configuration... "limits": { "cpu_ms": 300000, // default is 30000 (30 seconds) }, // ...rest of your configuration... } ``` * wrangler.toml ```toml [limits] cpu_ms = 300_000 ``` You can also customize this in the [Workers dashboard](https://dash.cloudflare.com/?to=/:account/workers). Select the specific Worker you wish to modify -> click on the "Settings" tab -> adjust the CPU time limit. Note Scheduled Workers ([Cron Triggers](https://developers.cloudflare.com/workers/configuration/cron-triggers/)) have different limits on CPU time based on the schedule interval. When the schedule interval is less than 1 hour, a Scheduled Worker may run for up to 30 seconds. When the schedule interval is more than 1 hour, a scheduled Worker may run for up to 15 minutes. *** ## Cache API limits | Feature | Workers Free | Workers Paid | | - | - | - | | [Maximum object size](#cache-api-limits) | 512 MB | 512 MB | | [Calls/request](#cache-api-limits) | 50 | 1,000 | Calls/request means the number of calls to `put()`, `match()`, or `delete()` Cache API method per-request, using the same quota as subrequests (`fetch()`). Note The size of chunked response bodies (`Transfer-Encoding: chunked`) is not known in advance. Then, `.put()`ing such responses will block subsequent `.put()`s from starting until the current `.put()` completes. *** ## Request Workers automatically scale onto thousands of Cloudflare global network servers around the world. There is no general limit to the number of requests per second Workers can handle. Cloudflare’s abuse protection methods do not affect well-intentioned traffic. However, if you send many thousands of requests per second from a small number of client IP addresses, you can inadvertently trigger Cloudflare’s abuse protection. If you expect to receive `1015` errors in response to traffic or expect your application to incur these errors, [contact Cloudflare support](https://developers.cloudflare.com/support/contacting-cloudflare-support/) to increase your limit. Cloudflare's anti-abuse Workers Rate Limiting does not apply to Enterprise customers. You can also confirm if you have been rate limited by anti-abuse Worker Rate Limiting by logging into the Cloudflare dashboard, selecting your account and zone, and going to **Security** > **Events**. Find the event and expand it. If the **Rule ID** is `worker`, this confirms that it is the anti-abuse Worker Rate Limiting. The burst rate and daily request limits apply at the account level, meaning that requests on your `*.workers.dev` subdomain count toward the same limit as your zones. Upgrade to a [Workers Paid plan](https://dash.cloudflare.com/?account=workers/plans) to automatically lift these limits. Warning If you are currently being rate limited, upgrade to a [Workers Paid plan](https://dash.cloudflare.com/?account=workers/plans) to lift burst rate and daily request limits. ### Burst rate Accounts using the Workers Free plan are subject to a burst rate limit of 1,000 requests per minute. Users visiting a rate limited site will receive a Cloudflare `1015` error page. However if you are calling your Worker programmatically, you can detect the rate limit page and handle it yourself by looking for HTTP status code `429`. Workers being rate-limited by Anti-Abuse Protection are also visible from the Cloudflare dashboard: 1. Log in to the [Cloudflare dashboard](https://dash.cloudflare.com) and select your account and your website. 2. Select **Security** > **Events** > scroll to **Sampled logs**. 3. Review the log for a Web Application Firewall block event with a `ruleID` of `worker`. ### Daily request Accounts using the Workers Free plan are subject to a daily request limit of 100,000 requests. Free plan daily requests counts reset at midnight UTC. A Worker that fails as a result of daily request limit errors can be configured by toggling its corresponding [route](https://developers.cloudflare.com/workers/configuration/routing/routes/) in two modes: 1) Fail open and 2) Fail closed. #### Fail open Routes in fail open mode will bypass the failing Worker and prevent it from operating on incoming traffic. Incoming requests will behave as if there was no Worker. #### Fail closed Routes in fail closed mode will display a Cloudflare `1027` error page to visitors, signifying the Worker has been temporarily disabled. Cloudflare recommends this option if your Worker is performing security related tasks. *** ## Memory Only one Workers instance runs on each of the many global Cloudflare global network servers. Each Workers instance can consume up to 128 MB of memory. Use [global variables](https://developers.cloudflare.com/workers/runtime-apis/web-standards/) to persist data between requests on individual nodes. Note however, that nodes are occasionally evicted from memory. If a Worker processes a request that pushes the Worker over the 128 MB limit, the Cloudflare Workers runtime may cancel one or more requests. To view these errors, as well as CPU limit overages: 1. Log in to the [Cloudflare dashboard](https://dash.cloudflare.com) and select your account. 2. Select **Workers & Pages** and in **Overview**, select the Worker you would like to investigate. 3. Under **Metrics**, select **Errors** > **Invocation Statuses** and examine **Exceeded Memory**. Use the [TransformStream API](https://developers.cloudflare.com/workers/runtime-apis/streams/transformstream/) to stream responses if you are concerned about memory usage. This avoids loading an entire response into memory. Using DevTools locally can help identify memory leaks in your code. See the [memory profiling with DevTools documentation](https://developers.cloudflare.com/workers/observability/dev-tools/memory-usage/) to learn more. *** ## Subrequests A subrequest is any request that a Worker makes to either Internet resources using the [Fetch API](https://developers.cloudflare.com/workers/runtime-apis/fetch/) or requests to other Cloudflare services like [R2](https://developers.cloudflare.com/r2/), [KV](https://developers.cloudflare.com/kv/), or [D1](https://developers.cloudflare.com/d1/). ### Worker-to-Worker subrequests To make subrequests from your Worker to another Worker on your account, use [Service Bindings](https://developers.cloudflare.com/workers/runtime-apis/bindings/service-bindings/). Service bindings allow you to send HTTP requests to another Worker without those requests going over the Internet. If you attempt to use global [`fetch()`](https://developers.cloudflare.com/workers/runtime-apis/fetch/) to make a subrequest to another Worker on your account that runs on the same [zone](https://developers.cloudflare.com/fundamentals/concepts/accounts-and-zones/#zones), without service bindings, the request will fail. If you make a subrequest from your Worker to a target Worker that runs on a [Custom Domain](https://developers.cloudflare.com/workers/configuration/routing/custom-domains/#worker-to-worker-communication) rather than a route, the request will be allowed. ### How many subrequests can I make? You can make 50 subrequests per request on Workers Free, and 1,000 subrequests per request on Workers Paid. Each subrequest in a redirect chain counts against this limit. This means that the number of subrequests a Worker makes could be greater than the number of `fetch(request)` calls in the Worker. For subrequests to internal services like Workers KV and Durable Objects, the subrequest limit is 1,000 per request, regardless of the [usage model](https://developers.cloudflare.com/workers/platform/pricing/#workers) configured for the Worker. ### How long can a subrequest take? There is no set limit on the amount of real time a Worker may use. As long as the client which sent a request remains connected, the Worker may continue processing, making subrequests, and setting timeouts on behalf of that request. When the client disconnects, all tasks associated with that client’s request are proactively canceled. If the Worker passed a promise to [`event.waitUntil()`](https://developers.cloudflare.com/workers/runtime-apis/handlers/fetch/), cancellation will be delayed until the promise has completed or until an additional 30 seconds have elapsed, whichever happens first. *** ## Simultaneous open connections You can open up to six connections simultaneously for each invocation of your Worker. The connections opened by the following API calls all count toward this limit: * the `fetch()` method of the [Fetch API](https://developers.cloudflare.com/workers/runtime-apis/fetch/). * `get()`, `put()`, `list()`, and `delete()` methods of [Workers KV namespace objects](https://developers.cloudflare.com/kv/api/). * `put()`, `match()`, and `delete()` methods of [Cache objects](https://developers.cloudflare.com/workers/runtime-apis/cache/). * `list()`, `get()`, `put()`, `delete()`, and `head()` methods of [R2](https://developers.cloudflare.com/r2/). * `send()` and `sendBatch()`, methods of [Queues](https://developers.cloudflare.com/queues/). * Opening a TCP socket using the [`connect()`](https://developers.cloudflare.com/workers/runtime-apis/tcp-sockets/) API. Outbound WebSocket connections are just HTTP connections and thus also contribute to the maximum concurrent connections limit. Once an invocation has six connections open, it can still attempt to open additional connections. * These attempts are put in a pending queue — the connections will not be initiated until one of the currently open connections has closed. * Earlier connections can delay later ones, if a Worker tries to make many simultaneous subrequests, its later subrequests may appear to take longer to start. * Earlier connections that are stalled1 might get closed with a `Response closed due to connection limit` exception. If you have cases in your application that use `fetch()` but that do not require consuming the response body, you can avoid the unread response body from consuming a concurrent connection by using `response.body.cancel()`. For example, if you want to check whether the HTTP response code is successful (2xx) before consuming the body, you should explicitly cancel the pending response body: ```ts const response = await fetch(url); // Only read the response body for successful responses if (response.statusCode <= 299) { // Call response.json(), response.text() or otherwise process the body } else { // Explicitly cancel it response.body.cancel(); } ``` This will free up an open connection. If the system detects that a Worker is deadlocked on stalled connections1 — for example, if the Worker has pending connection attempts but has no in-progress reads or writes on the connections that it already has open — then the least-recently-used open connection will be canceled to unblock the Worker. If the Worker later attempts to use a canceled connection, a `Response closed due to connection limit` exception will be thrown. These exceptions should rarely occur in practice, though, since it is uncommon for a Worker to open a connection that it does not have an immediate use for. 1A connections is considered stalled when it is not not being actively read from or written to, for example: ```ts // Within a for-of loop const response = await fetch("https://example.org"); for await (const chunk of response.body) { // While this code block is executing, there are no pending // reads on the response.body. Accordingly, the system may view // the stream as not being active within this block. } // Using body.getReader() const response = await fetch("https://example.org"); const reader = response.body.getReader(); let chunk = await reader.read(); await processChunk(chunk); chunk = await reader.read(); await processChunk(chunk); async function processChunk(chunk) { // The stream is considered inactive as there is no pending reads // on response.body. It may then get cancelled. } ``` Note Simultaneous Open Connections are measured from the top-level request, meaning any connections open from Workers sharing resources (for example, Workers triggered via [Service bindings](https://developers.cloudflare.com/workers/runtime-apis/bindings/service-bindings/)) will share the simultaneous open connection limit. *** ## Environment variables The maximum number of environment variables (secret and text combined) for a Worker is 128 variables on the Workers Paid plan, and 64 variables on the Workers Free plan. There is no limit to the number of environment variables per account. Each environment variable has a size limitation of 5 KB. *** ## Worker size A Worker can be up to 10 MB in size *after compression* on the Workers Paid plan, and up to 3 MB on the Workers Free plan. On either plan, a Worker can be up to 64 MB *before compression*. You can assess the size of your Worker bundle after compression by performing a dry-run with `wrangler` and reviewing the final compressed (`gzip`) size output by `wrangler`: ```sh wrangler deploy --outdir bundled/ --dry-run ``` ```sh # Output will resemble the below: Total Upload: 259.61 KiB / gzip: 47.23 KiB ``` Note that larger Worker bundles can impact the start-up time of the Worker, as the Worker needs to be loaded into memory. To reduce the upload size of a Worker, consider some of the following strategies: * Removing unnecessary dependencies and packages * Storing configuration files, static assets, and binary data using [Workers KV](https://developers.cloudflare.com/kv/), [R2](https://developers.cloudflare.com/r2/), [D1](https://developers.cloudflare.com/d1/), or [Workers Static Assets](https://developers.cloudflare.com/workers/static-assets/) instead of bundling them within your Worker code. * Splitting functionality across multiple Workers and connecting them using [Service bindings](https://developers.cloudflare.com/workers/runtime-apis/bindings/service-bindings/). *** ## Worker startup time A Worker must be able to be parsed and execute its global scope (top-level code outside of any handlers) within 400 ms. Worker size can impact startup because there is more code to parse and evaluate. Avoiding expensive code in the global scope can keep startup efficient as well. You can measure your Worker's startup time by deploying it to Cloudflare using [Wrangler](https://developers.cloudflare.com/workers/wrangler/). When you run `npx wrangler@latest deploy` or `npx wrangler@latest versions upload`, Wrangler will output the startup time of your Worker in the command-line output, using the `startup_time_ms` field in the [Workers Script API](https://developers.cloudflare.com/api/resources/workers/subresources/scripts/methods/update/) or [Workers Versions API](https://developers.cloudflare.com/api/resources/workers/subresources/scripts/subresources/versions/methods/create/). If you are having trouble staying under this limit, consider [profiling using DevTools](https://developers.cloudflare.com/workers/observability/dev-tools/) locally to learn how to optimize your code. When you attempt to deploy a Worker using the [Wrangler CLI](https://developers.cloudflare.com/workers/wrangler/), but your deployment is rejected because your Worker exceeds the maximum startup time, Wrangler will automatically generate a CPU profile that you can import into Chrome DevTools or open directly in VSCode. You can use this to learn what code in your Worker uses large amounts of CPU time at startup. Refer to [`wrangler check startup`](https://developers.cloudflare.com/workers/wrangler/commands/#startup) for more details. Need a higher limit? To request an adjustment to a limit, complete the [Limit Increase Request Form](https://forms.gle/ukpeZVLWLnKeixDu7). If the limit can be increased, Cloudflare will contact you with next steps. *** ## Number of Workers You can have up to 500 Workers on your account on the Workers Paid plan, and up to 100 Workers on the Workers Free plan. If you need more than 500 Workers, consider using [Workers for Platforms](https://developers.cloudflare.com/cloudflare-for-platforms/workers-for-platforms/). *** ## Routes and domains ### Number of routes per zone Each zone has a limit of 1,000 [routes](https://developers.cloudflare.com/workers/configuration/routing/routes/). If you require more than 1,000 routes on your zone, consider using [Workers for Platforms](https://developers.cloudflare.com/cloudflare-for-platforms/workers-for-platforms/) or request an increase to this limit. ### Number of routes per zone when using `wrangler dev --remote` When you run a [remote development](https://developers.cloudflare.com/workers/development-testing/#remote-bindings) session using the `--remote` flag, a limit of 50 [routes](https://developers.cloudflare.com/workers/configuration/routing/routes/) per zone is enforced. The Quick Editor in the Cloudflare Dashboard also uses `wrangler dev --remote`, so any changes made there are subject to the same 50-route limit. If your zone has more than 50 routes, you **will not be able to run a remote session**. To fix this, you must remove routes until you are under the 50-route limit. ### Number of custom domains per zone Each zone has a limit of 100 [custom domains](https://developers.cloudflare.com/workers/configuration/routing/custom-domains/). If you require more than 100 custom domains on your zone, consider using a wildcard [route](https://developers.cloudflare.com/workers/configuration/routing/routes/) or request an increase to this limit. ### Number of routed zones per Worker When configuring [routing](https://developers.cloudflare.com/workers/configuration/routing/), the maximum number of zones that can be referenced by a Worker is 1,000. If you require more than 1,000 zones on your Worker, consider using [Workers for Platforms](https://developers.cloudflare.com/cloudflare-for-platforms/workers-for-platforms/) or request an increase to this limit. *** ## Image Resizing with Workers When using Image Resizing with Workers, refer to [Image Resizing documentation](https://developers.cloudflare.com/images/transform-images/) for more information on the applied limits. *** ## Log size You can emit a maximum of 256 KB of data (across `console.log()` statements, exceptions, request metadata and headers) to the console for a single request. After you exceed this limit, further context associated with the request will not be recorded in logs, appear when tailing logs of your Worker, or within a [Tail Worker](https://developers.cloudflare.com/workers/observability/logs/tail-workers/). Refer to the [Workers Trace Event Logpush documentation](https://developers.cloudflare.com/workers/observability/logs/logpush/#limits) for information on the maximum size of fields sent to logpush destinations. *** ## Unbound and Bundled plan limits Note Unbound and Bundled plans have been deprecated and are no longer available for new accounts. If your Worker is on an Unbound plan, your limits are exactly the same as the Workers Paid plan. If your Worker is on a Bundled plan, your limits are the same as the Workers Paid plan except for the following differences: * Your limit for [subrequests](https://developers.cloudflare.com/workers/platform/limits/#subrequests) is 50/request * Your limit for [CPU time](https://developers.cloudflare.com/workers/platform/limits/#cpu-time) is 50ms for HTTP requests and 50ms for [Cron Triggers](https://developers.cloudflare.com/workers/configuration/cron-triggers/) * You have no [Duration](https://developers.cloudflare.com/workers/platform/limits/#duration) limits for [Cron Triggers](https://developers.cloudflare.com/workers/configuration/cron-triggers/), [Durable Object alarms](https://developers.cloudflare.com/durable-objects/api/alarms/), or [Queue consumers](https://developers.cloudflare.com/queues/configuration/javascript-apis/#consumer) * Your Cache API limits for calls/requests is 50 *** ## Static Assets ### Files There is a 20,000 file count limit per [Worker version](https://developers.cloudflare.com/workers/configuration/versions-and-deployments/), and a 25 MiB individual file size limit. This matches the [limits in Cloudflare Pages](https://developers.cloudflare.com/pages/platform/limits/) today. ### Headers A `_headers` file may contain up to 100 rules and each line may contain up to 2,000 characters. The entire line, including spacing, header name, and value, counts towards this limit. ### Redirects A `_redirects` file may contain up to 2,000 static redirects and 100 dynamic redirects, for a combined total of 2,100 redirects. Each redirect declaration has a 1,000-character limit. *** ## Related resources Review other developer platform resource limits. * [KV limits](https://developers.cloudflare.com/kv/platform/limits/) * [Durable Object limits](https://developers.cloudflare.com/durable-objects/platform/limits/) * [Queues limits](https://developers.cloudflare.com/queues/platform/limits/) --- title: Pricing · Cloudflare Workers docs description: Workers plans and pricing information. lastUpdated: 2025-07-10T17:05:48.000Z chatbotDeprioritize: false source_url: html: https://developers.cloudflare.com/workers/platform/pricing/ md: https://developers.cloudflare.com/workers/platform/pricing/index.md --- By default, users have access to the Workers Free plan. The Workers Free plan includes limited usage of Workers, Pages Functions, Workers KV and Hyperdrive. Read more about the [Free plan limits](https://developers.cloudflare.com/workers/platform/limits/#worker-limits). The Workers Paid plan includes Workers, Pages Functions, Workers KV, Hyperdrive, and Durable Objects usage for a minimum charge of $5 USD per month for an account. The plan includes increased initial usage allotments, with clear charges for usage that exceeds the base plan. There are no additional charges for data transfer (egress) or throughput (bandwidth). All included usage is on a monthly basis. Pages Functions billing All [Pages Functions](https://developers.cloudflare.com/pages/functions/) are billed as Workers. All pricing and inclusions in this document apply to Pages Functions. Refer to [Functions Pricing](https://developers.cloudflare.com/pages/functions/pricing/) for more information on Pages Functions pricing. ## Workers Users on the Workers Paid plan have access to the Standard usage model. Workers Enterprise accounts are billed based on the usage model specified in their contract. To switch to the Standard usage model, reach out to your CSM. | | Requests1, 2 | Duration | CPU time | | - | - | - | - | | **Free** | 100,000 per day | No charge for duration | 10 milliseconds of CPU time per invocation | | **Standard** | 10 million included per month +$0.30 per additional million | No charge or limit for duration | 30 million CPU milliseconds included per month +$0.02 per additional million CPU milliseconds Max of [5 minutes of CPU time](https://developers.cloudflare.com/workers/platform/limits/#worker-limits) per invocation (default: 30 seconds) Max of 15 minutes of CPU time per [Cron Trigger](https://developers.cloudflare.com/workers/configuration/cron-triggers/) or [Queue Consumer](https://developers.cloudflare.com/queues/configuration/javascript-apis/#consumer) invocation | 1 Inbound requests to your Worker. Cloudflare does not bill for [subrequests](https://developers.cloudflare.com/workers/platform/limits/#subrequests) you make from your Worker. 2 Requests to static assets are free and unlimited. ### Example pricing #### Example 1 A Worker that serves 15 million requests per month, and uses an average of 7 milliseconds (ms) of CPU time per request, would have the following estimated costs: | | Monthly Costs | Formula | | - | - | - | | **Subscription** | $5.00 | | | **Requests** | $1.50 | (15,000,000 requests - 10,000,000 included requests) / 1,000,000 \* $0.30 | | **CPU time** | $1.50 | ((7 ms of CPU time per request \* 15,000,000 requests) - 30,000,000 included CPU ms) / 1,000,000 \* $0.02 | | **Total** | $8.00 | | #### Example 2 A project that serves 15 million requests per month, with 80% (12 million) requests serving [static assets](https://developers.cloudflare.com/workers/static-assets/) and the remaining invoking dynamic Worker code. The Worker uses an average of 7 milliseconds (ms) of time per request. Requests to static assets are free and unlimited. This project would have the following estimated costs: | | Monthly Costs | Formula | | - | - | - | | **Subscription** | $5.00 | | | **Requests to static assets** | $0 | - | | **Requests to Worker** | $0 | - | | **CPU time** | $0 | - | | **Total** | $5.00 | | | | | | #### Example 3 A Worker that runs on a [Cron Trigger](https://developers.cloudflare.com/workers/configuration/cron-triggers/) once an hour to collect data from multiple APIs, process the data and create a report. * 720 requests/month * 3 minutes (180,000ms) of CPU time per request In this scenario, the estimated monthly cost would be calculated as: | | Monthly Costs | Formula | | - | - | - | | **Subscription** | $5.00 | | | **Requests** | $0.00 | - | | **CPU time** | $1.99 | ((180,000 ms of CPU time per request \* 720 requests) - 30,000,000 included CPU ms) / 1,000,000 \* $0.02 | | **Total** | $6.99 | | | | | | #### Example 4 A high traffic Worker that serves 100 million requests per month, and uses an average of 7 milliseconds (ms) of CPU time per request, would have the following estimated costs: | | Monthly Costs | Formula | | - | - | - | | **Subscription** | $5.00 | | | **Requests** | $27.00 | (100,000,000 requests - 10,000,000 included requests) / 1,000,000 \* $0.30 | | **CPU time** | $13.40 | ((7 ms of CPU time per request \* 100,000,000 requests) - 30,000,000 included CPU ms) / 1,000,000 \* $0.02 | | **Total** | $45.40 | | Custom limits To prevent accidental runaway bills or denial-of-wallet attacks, configure the maximum amount of CPU time that can be used per invocation by [defining limits in your Worker's Wrangler file](https://developers.cloudflare.com/workers/wrangler/configuration/#limits), or via the Cloudflare dashboard (**Workers & Pages** > Select your Worker > **Settings** > **CPU Limits**). If you had a Worker on the Bundled usage model prior to the migration to Standard pricing on March 1, 2024, Cloudflare has automatically added a 50 ms CPU limit on your Worker. ### How to switch usage models Note Some Workers Enterprise customers maintain the ability to change usage models. Users on the Workers Paid plan have access to the Standard usage model. However, some users may still have a legacy usage model configured. Legacy usage models include Workers Unbound and Workers Bundled. Users are advised to move to the Workers Standard usage model. Changing the usage model only affects billable usage, and has no technical implications. To change your default account-wide usage model: 1. Log in to the [Cloudflare dashboard](https://dash.cloudflare.com/?to=/:account/workers-and-pages) and select your account. 2. In Account Home, select **Workers & Pages**. 3. Find **Usage Model** on the right-side menu > **Change**. Usage models may be changed at the individual Worker level: 1. Log in to the [Cloudflare dashboard](https://dash.cloudflare.com/?to=/:account/workers/services/view/:worker/production/settings) and select your account. 2. In Account Home, select **Workers & Pages**. 3. In **Overview**, select your Worker > **Settings** > **Usage Model**. Existing Workers will not be impacted when changing the default usage model. You may change the usage model for individual Workers without affecting your account-wide default usage model. ## Workers Logs Workers Logs is included in both the Free and Paid [Workers plans](https://developers.cloudflare.com/workers/platform/pricing/). | | Log Events Written | Retention | | - | - | - | | **Workers Free** | 200,000 per day | 3 Days | | **Workers Paid** | 20 million included per month +$0.60 per additional million | 7 Days | Workers Logs documentation For more information and [examples of Workers Logs billing](https://developers.cloudflare.com/workers/observability/logs/workers-logs/#example-pricing), refer to the [Workers Logs documentation](https://developers.cloudflare.com/workers/observability/logs/workers-logs). ## Workers Trace Events Logpush Workers Logpush is only available on the Workers Paid plan. | | Paid plan | | - | - | | Requests 1 | 10 million / month, +$0.05/million | 1 Workers Logpush charges for request logs that reach your end destination after applying filtering or sampling. ## Workers KV Workers KV is included in both the Free and Paid [Workers plans](https://developers.cloudflare.com/workers/platform/pricing/). | | Free plan1 | Paid plan | | - | - | - | | Keys read | 100,000 / day | 10 million/month, + $0.50/million | | Keys written | 1,000 / day | 1 million/month, + $5.00/million | | Keys deleted | 1,000 / day | 1 million/month, + $5.00/million | | List requests | 1,000 / day | 1 million/month, + $5.00/million | | Stored data | 1 GB | 1 GB, + $0.50/ GB-month | 1 The Workers Free plan includes limited Workers KV usage. All limits reset daily at 00:00 UTC. If you exceed any one of these limits, further operations of that type will fail with an error. Note Workers KV pricing for read, write and delete operations is on a per-key basis. Bulk read operations are billed by the amount of keys read in a bulk read operation. KV documentation To learn more about KV, refer to the [KV documentation](https://developers.cloudflare.com/kv/). ## Hyperdrive Hyperdrive is included in both the Free and Paid [Workers plans](https://developers.cloudflare.com/workers/platform/pricing/). | | Free plan[1](#user-content-fn-1) | Paid plan | | - | - | - | | Database queries[2](#user-content-fn-2) | 100,000 / day | Unlimited | Footnotes 1: The Workers Free plan includes limited Hyperdrive usage. All limits reset daily at 00:00 UTC. If you exceed any one of these limits, further operations of that type will fail with an error. 2: Database queries refers to any database statement made via Hyperdrive, whether a query (`SELECT`), a modification (`INSERT`,`UPDATE`, or `DELETE`) or a schema change (`CREATE`, `ALTER`, `DROP`). ## Footnotes 1. The Workers Free plan includes limited Hyperdrive usage. All limits reset daily at 00:00 UTC. If you exceed any one of these limits, further operations of that type will fail with an error. [↩](#user-content-fnref-1) 2. Database queries refers to any database statement made via Hyperdrive, whether a query (`SELECT`), a modification (`INSERT`,`UPDATE`, or `DELETE`) or a schema change (`CREATE`, `ALTER`, `DROP`). [↩](#user-content-fnref-2) Hyperdrive documentation To learn more about Hyperdrive, refer to the [Hyperdrive documentation](https://developers.cloudflare.com/hyperdrive/). ## Queues Note Cloudflare Queues requires the [Workers Paid plan](https://developers.cloudflare.com/workers/platform/pricing/#workers) to use, but does not increase your monthly subscription cost. Cloudflare Queues charges for the total number of operations against each of your queues during a given month. * An operation is counted for each 64 KB of data that is written, read, or deleted. * Messages larger than 64 KB are charged as if they were multiple messages: for example, a 65 KB message and a 127 KB message would both incur two operation charges when written, read, or deleted. * A KB is defined as 1,000 bytes, and each message includes approximately 100 bytes of internal metadata. * Operations are per message, not per batch. A batch of 10 messages (the default batch size), if processed, would incur 10x write, 10x read, and 10x delete operations: one for each message in the batch. * There are no data transfer (egress) or throughput (bandwidth) charges. | | Workers Paid | | - | - | | Standard operations | 1,000,000 operations/month included + $0.40/million operations | In most cases, it takes 3 operations to deliver a message: 1 write, 1 read, and 1 delete. Therefore, you can use the following formula to estimate your monthly bill: ```txt ((Number of Messages * 3) - 1,000,000) / 1,000,000 * $0.40 ``` Additionally: * Each retry incurs a read operation. A batch of 10 messages that is retried would incur 10 operations for each retry. * Messages that reach the maximum retries and that are written to a [Dead Letter Queue](https://developers.cloudflare.com/queues/configuration/batching-retries/) incur a write operation for each 64 KB chunk. A message that was retried 3 times (the default), fails delivery on the fourth time and is written to a Dead Letter Queue would incur five (5) read operations. * Messages that are written to a queue, but that reach the maximum persistence duration (or "expire") before they are read, incur only a write and delete operation per 64 KB chunk. Queues billing examples To learn more about Queues pricing and review billing examples, refer to [Queues Pricing](https://developers.cloudflare.com/queues/platform/pricing/). ## D1 D1 is available on both the Workers Free and Workers Paid plans. | | [Workers Free](https://developers.cloudflare.com/workers/platform/pricing/#workers) | [Workers Paid](https://developers.cloudflare.com/workers/platform/pricing/#workers) | | - | - | - | | Rows read | 5 million / day | First 25 billion / month included + $0.001 / million rows | | Rows written | 100,000 / day | First 50 million / month included + $1.00 / million rows | | Storage (per GB stored) | 5 GB (total) | First 5 GB included + $0.75 / GB-mo | Track your D1 usage To accurately track your usage, use the [meta object](https://developers.cloudflare.com/d1/worker-api/return-object/), [GraphQL Analytics API](https://developers.cloudflare.com/d1/observability/metrics-analytics/#query-via-the-graphql-api), or the [Cloudflare dashboard](https://dash.cloudflare.com/?to=/:account/workers/d1/). Select your D1 database, then view: Metrics > Row Metrics. ### Definitions 1. Rows read measure how many rows a query reads (scans), regardless of the size of each row. For example, if you have a table with 5000 rows and run a `SELECT * FROM table` as a full table scan, this would count as 5,000 rows read. A query that filters on an [unindexed column](https://developers.cloudflare.com/d1/best-practices/use-indexes/) may return fewer rows to your Worker, but is still required to read (scan) more rows to determine which subset to return. 2. Rows written measure how many rows were written to D1 database. Write operations include `INSERT`, `UPDATE`, and `DELETE`. Each of these operations contribute towards rows written. A query that `INSERT` 10 rows into a `users` table would count as 10 rows written. 3. DDL operations (for example, `CREATE`, `ALTER`, and `DROP`) are used to define or modify the structure of a database. They may contribute to a mix of read rows and write rows. Ensure you are accurately tracking your usage through the available tools ([meta object](https://developers.cloudflare.com/d1/worker-api/return-object/), [GraphQL Analytics API](https://developers.cloudflare.com/d1/observability/metrics-analytics/#query-via-the-graphql-api), or the [Cloudflare dashboard](https://dash.cloudflare.com/?to=/:account/workers/d1/)). 4. Row size or the number of columns in a row does not impact how rows are counted. A row that is 1 KB and a row that is 100 KB both count as one row. 5. Defining [indexes](https://developers.cloudflare.com/d1/best-practices/use-indexes/) on your table(s) reduces the number of rows read by a query when filtering on that indexed field. For example, if the `users` table has an index on a timestamp column `created_at`, the query `SELECT * FROM users WHERE created_at > ?1` would only need to read a subset of the table. 6. Indexes will add an additional written row when writes include the indexed column, as there are two rows written: one to the table itself, and one to the index. The performance benefit of an index and reduction in rows read will, in nearly all cases, offset this additional write. 7. Storage is based on gigabytes stored per month, and is based on the sum of all databases in your account. Tables and indexes both count towards storage consumed. 8. Free limits reset daily at 00:00 UTC. Monthly included limits reset based on your monthly subscription renewal date, which is determined by the day you first subscribed. 9. There are no data transfer (egress) or throughput (bandwidth) charges for data accessed from D1. D1 billing Refer to [D1 Pricing](https://developers.cloudflare.com/d1/platform/pricing/) to learn more about how D1 is billed. ## Durable Objects Note Durable Objects are available both on Workers Free and Workers Paid plans. * **Workers Free plan**: Only Durable Objects with [SQLite storage backend](https://developers.cloudflare.com/durable-objects/best-practices/access-durable-objects-storage/#wrangler-configuration-for-sqlite-backed-durable-objects) are available. * **Workers Paid plan**: Durable Objects with either SQLite storage backend or [key-value storage backend](https://developers.cloudflare.com/durable-objects/reference/durable-objects-migrations/#create-durable-object-class-with-key-value-storage) are available. If you wish to downgrade from a Workers Paid plan to a Workers Free plan, you must first ensure that you have deleted all Durable Object namespaces with the key-value storage backend. ### Compute billing Durable Objects are billed for duration while the Durable Object is active and running in memory. Requests to a Durable Object keep it active or creates the object if it was inactive, not in memory. | | Free plan | Paid plan | | - | - | - | | Requests | 100,000 / day | 1 million, + $0.15/million Includes HTTP requests, RPC sessions1, WebSocket messages2, and alarm invocations | | Duration3 | 13,000 GB-s / day | 400,000 GB-s, + $12.50/million GB-s4,5 | Footnotes 1 Each [RPC session](https://developers.cloudflare.com/workers/runtime-apis/rpc/lifecycle/) is billed as one request to your Durable Object. Every [RPC method call](https://developers.cloudflare.com/durable-objects/best-practices/create-durable-object-stubs-and-send-requests/) on a [Durable Objects stub](https://developers.cloudflare.com/durable-objects/) is its own RPC session and therefore a single billed request. RPC method calls can return objects (stubs) extending [`RpcTarget`](https://developers.cloudflare.com/workers/runtime-apis/rpc/lifecycle/#lifetimes-memory-and-resource-management) and invoke calls on those stubs. Subsequent calls on the returned stub are part of the same RPC session and are not billed as separate requests. For example: ```js let durableObjectStub = OBJECT_NAMESPACE.get(id); // retrieve Durable Object stub using foo = await durableObjectStub.bar(); // billed as a request await foo.baz(); // treated as part of the same RPC session created by calling bar(), not billed as a request await durableObjectStub.cat(); // billed as a request ``` 2 A request is needed to create a WebSocket connection. There is no charge for outgoing WebSocket messages, nor for incoming [WebSocket protocol pings](https://www.rfc-editor.org/rfc/rfc6455#section-5.5.2). For compute requests billing-only, a 20:1 ratio is applied to incoming WebSocket messages to factor in smaller messages for real-time communication. For example, 100 WebSocket incoming messages would be charged as 5 requests for billing purposes. The 20:1 ratio does not affect Durable Object metrics and analytics, which reflect actual usage. 3 Application level auto-response messages handled by [`state.setWebSocketAutoResponse()`](https://developers.cloudflare.com/durable-objects/best-practices/websockets/) will not incur additional wall-clock time, and so they will not be charged. 4 Duration is billed in wall-clock time as long as the Object is active, but is shared across all requests active on an Object at once. Calling `accept()` on a WebSocket in an Object will incur duration charges for the entire time the WebSocket is connected. It is recommended to use the WebSocket Hibernation API to avoid incurring duration charges once all event handlers finish running. Note that the Durable Object will remain active for 10 seconds after the last client disconnects. For a complete explanation, refer to [When does a Durable Object incur duration charges?](https://developers.cloudflare.com/durable-objects/platform/pricing/#when-does-a-durable-object-incur-duration-charges). 5 Duration billing charges for the 128 MB of memory your Durable Object is allocated, regardless of actual usage. If your account creates many instances of a single Durable Object class, Durable Objects may run in the same isolate on the same physical machine and share the 128 MB of memory. These Durable Objects are still billed as if they are allocated a full 128 MB of memory. ### Storage billing The [Durable Objects Storage API](https://developers.cloudflare.com/durable-objects/api/storage-api/) is only accessible from within Durable Objects. Pricing depends on the storage backend of your Durable Objects. * **SQLite-backed Durable Objects (recommended)**: [SQLite storage backend](https://developers.cloudflare.com/durable-objects/best-practices/access-durable-objects-storage/#create-sqlite-backed-durable-object-class) is recommended for all new Durable Object classes. Workers Free plan can only create and access SQLite-backed Durable Objects. * **Key-value backed Durable Objects**: [Key-value storage backend](https://developers.cloudflare.com/durable-objects/reference/durable-objects-migrations/#create-durable-object-class-with-key-value-storage) is only available on the Workers Paid plan. #### SQLite storage backend Storage billing on SQLite-backed Durable Objects Storage billing is not yet enabled for Durable Object classes using the SQLite storage backend. SQLite-backed Durable Objects will incur [charges for requests and duration](https://developers.cloudflare.com/durable-objects/platform/pricing/#compute-billing). Storage billing for SQLite-backed Durable Objects will be enabled at a later date with advance notice with the [shared pricing](https://developers.cloudflare.com/durable-objects/platform/pricing/#sqlite-storage-backend). | | Workers Free plan | Workers Paid plan | | - | - | - | | Rows reads 1,2 | 5 million / day | First 25 billion / month included + $0.001 / million rows | | Rows written 1,2,3,4 | 100,000 / day | First 50 million / month included + $1.00 / million rows | | SQL Stored data 5 | 5 GB (total) | 5 GB-month, + $0.20/ GB-month | Footnotes 1 Rows read and rows written included limits and rates match [D1 pricing](https://developers.cloudflare.com/d1/platform/pricing/), Cloudflare's serverless SQL database. 2 Key-value methods like `get()`, `put()`, `delete()`, or `list()` store and query data in a hidden SQLite table and are billed as rows read and rows written. 3 Each `setAlarm()` is billed as a single row written. 4 Deletes are counted as rows written. 5 Durable Objects will be billed for stored data until the [data is removed](https://developers.cloudflare.com/durable-objects/best-practices/access-durable-objects-storage/#remove-a-durable-objects-storage). Once the data is removed, the object will be cleaned up automatically by the system. #### Key-value storage backend | | Workers Paid plan | | - | - | | Read request units1,2 | 1 million, + $0.20/million | | Write request units3 | 1 million, + $1.00/million | | Delete requests4 | 1 million, + $1.00/million | | Stored data5 | 1 GB, + $0.20/ GB-month | Footnotes 1 A request unit is defined as 4 KB of data read or written. A request that writes or reads more than 4 KB will consume multiple units, for example, a 9 KB write will consume 3 write request units. 2 List operations are billed by read request units, based on the amount of data examined. For example, a list request that returns a combined 80 KB of keys and values will be billed 20 read request units. A list request that does not return anything is billed for 1 read request unit. 3 Each `setAlarm` is billed as a single write request unit. 4 Delete requests are unmetered. For example, deleting a 100 KB value will be charged one delete request. 5 Durable Objects will be billed for stored data until the data is removed. Once the data is removed, the object will be cleaned up automatically by the system. Requests that hit the [Durable Objects in-memory cache](https://developers.cloudflare.com/durable-objects/reference/in-memory-state/) or that use the [multi-key versions of `get()`/`put()`/`delete()` methods](https://developers.cloudflare.com/durable-objects/api/storage-api/) are billed the same as if they were a normal, individual request for each key. Durable Objects billing examples For more information and [examples of Durable Objects billing](https://developers.cloudflare.com/durable-objects/platform/pricing#compute-billing-examples), refer to [Durable Objects Pricing](https://developers.cloudflare.com/durable-objects/platform/pricing/). ## Vectorize Vectorize is currently only available on the Workers paid plan. | | [Workers Free](https://developers.cloudflare.com/workers/platform/pricing/#workers) | [Workers Paid](https://developers.cloudflare.com/workers/platform/pricing/#workers) | | - | - | - | | **Total queried vector dimensions** | 30 million queried vector dimensions / month | First 50 million queried vector dimensions / month included + $0.01 per million | | **Total stored vector dimensions** | 5 million stored vector dimensions | First 10 million stored vector dimensions + $0.05 per 100 million | ### Calculating vector dimensions To calculate your potential usage, calculate the queried vector dimensions and the stored vector dimensions, and multiply by the unit price. The formula is defined as `((queried vectors + stored vectors) * dimensions * ($0.01 / 1,000,000)) + (stored vectors * dimensions * ($0.05 / 100,000,000))` * For example, inserting 10,000 vectors of 768 dimensions each, and querying those 1,000 times per day (30,000 times per month) would be calculated as `((30,000 + 10,000) * 768) = 30,720,000` queried dimensions and `(10,000 * 768) = 7,680,000` stored dimensions (within the included monthly allocation) * Separately, and excluding the included monthly allocation, this would be calculated as `(30,000 + 10,000) * 768 * ($0.01 / 1,000,000) + (10,000 * 768 * ($0.05 / 100,000,000))` and sum to $0.31 per month. ## Service bindings Requests made from your Worker to another worker via a [Service Binding](https://developers.cloudflare.com/workers/runtime-apis/bindings/service-bindings/) do not incur additional request fees. This allows you to split apart functionality into multiple Workers, without incurring additional costs. For example, if Worker A makes a subrequest to Worker B via a Service Binding, or calls an RPC method provided by Worker B via a Service Binding, this is billed as: * One request (for the initial invocation of Worker A) * The total amount of CPU time used across both Worker A and Worker B Only available on Workers Standard pricing If your Worker is on the deprecated Bundled or Unbound pricing plans, incoming requests from Service Bindings are charged the same as requests from the Internet. In the example above, you would be charged for two requests, one to Worker A, and one to Worker B. ## Fine Print Workers Paid plan is separate from any other Cloudflare plan (Free, Professional, Business) you may have. If you are an Enterprise customer, reach out to your account team to confirm pricing details. Only requests that hit a Worker will count against your limits and your bill. Since Cloudflare Workers runs before the Cloudflare cache, the caching of a request still incurs costs. Refer to [Limits](https://developers.cloudflare.com/workers/platform/limits/) to review definitions and behavior after a limit is hit. --- title: Choosing a data or storage product. · Cloudflare Workers docs description: Storage and database options available on Cloudflare's developer platform. lastUpdated: 2025-05-27T15:16:17.000Z chatbotDeprioritize: false source_url: html: https://developers.cloudflare.com/workers/platform/storage-options/ md: https://developers.cloudflare.com/workers/platform/storage-options/index.md --- This guide describes the storage & database products available as part of Cloudflare Workers, including recommended use-cases and best practices. ## Choose a storage product The following table maps our storage & database products to common industry terms as well as recommended use-cases: | Use-case | Product | Ideal for | | - | - | - | | Key-value storage | [Workers KV](https://developers.cloudflare.com/kv/) | Configuration data, service routing metadata, personalization (A/B testing) | | Object storage / blob storage | [R2](https://developers.cloudflare.com/r2/) | User-facing web assets, images, machine learning and training datasets, analytics datasets, log and event data. | | Accelerate a Postgres or MySQL database | [Hyperdrive](https://developers.cloudflare.com/hyperdrive/) | Connecting to an existing database in a cloud or on-premise using your existing database drivers & ORMs. | | Global coordination & stateful serverless | [Durable Objects](https://developers.cloudflare.com/durable-objects/) | Building collaborative applications; global coordination across clients; real-time WebSocket applications; strongly consistent, transactional storage. | | Lightweight SQL database | [D1](https://developers.cloudflare.com/d1/) | Relational data, including user profiles, product listings and orders, and/or customer data. | | Task processing, batching and messaging | [Queues](https://developers.cloudflare.com/queues/) | Background job processing (emails, notifications, APIs), message queuing, and deferred tasks. | | Vector search & embeddings queries | [Vectorize](https://developers.cloudflare.com/vectorize/) | Storing [embeddings](https://developers.cloudflare.com/workers-ai/models/#text-embeddings) from AI models for semantic search and classification tasks. | | Streaming ingestion | [Pipelines](https://developers.cloudflare.com/pipelines/) | Streaming data ingestion and processing, including clickstream analytics, telemetry/log data, and structured data for querying | | Time-series metrics | [Analytics Engine](https://developers.cloudflare.com/analytics/analytics-engine/) | Write and query high-cardinality time-series data, usage metrics, and service-level telemetry using Workers and/or SQL. | Applications can build on multiple storage & database products: for example, using Workers KV for session data; R2 for large file storage, media assets and user-uploaded files; and Hyperdrive to connect to a hosted Postgres or MySQL database. Pages Functions Storage options can also be used by your front-end application built with Cloudflare Pages. For more information on available storage options for Pages applications, refer to the [Pages Functions bindings documentation](https://developers.cloudflare.com/pages/functions/bindings/). ## SQL database options There are three options for SQL-based databases available when building applications with Workers. * **Hyperdrive** if you have an existing Postgres or MySQL database, require large (1TB, 100TB or more) single databases, and/or want to use your existing database tools. You can also connect Hyperdrive to database platforms like [PlanetScale](https://planetscale.com/) or [Neon](https://neon.tech/). * **D1** for lightweight, serverless applications that are read-heavy, have global users that benefit from D1's [read replication](https://developers.cloudflare.com/d1/best-practices/read-replication/), and do not require you to manage and maintain a traditional RDBMS. You can connect to * **Durable Objects** for stateful serverless workloads, per-user or per-customer SQL state, and building distributed systems (D1 and Queues are built on Durable Objects) where Durable Object's [strict serializability](https://blog.cloudflare.com/durable-objects-easy-fast-correct-choose-three/) enables global ordering of requests and storage operations. ### Session storage We recommend using [Workers KV](https://developers.cloudflare.com/kv/) for storing session data, credentials (API keys), and/or configuration data. These are typically read at high rates (thousands of RPS or more), are not typically modified (within KV's 1 write RPS per unique key limit), and do not need to be immediately consistent. Frequently read keys benefit from KV's [internal cache](https://developers.cloudflare.com/kv/concepts/how-kv-works/), and repeated reads to these "hot" keys will typically see latencies in the 500µs to 10ms range. Authentication frameworks like [OpenAuth](https://openauth.js.org/docs/storage/cloudflare/) use Workers KV as session storage when deployed to Cloudflare, and [Cloudflare Access](https://developers.cloudflare.com/cloudflare-one/policies/access/) uses KV to securely store and distribute user credentials so that they can be validated as close to the user as possible and reduce overall latency. ## Product overviews ### Workers KV Workers KV is an eventually consistent key-value data store that caches on the Cloudflare global network. It is ideal for projects that require: * High volumes of reads and/or repeated reads to the same keys. * Low-latency global reads (typically within 10ms for hot keys) * Per-object time-to-live (TTL). * Distributed configuration and/or session storage. To get started with KV: * Read how [KV works](https://developers.cloudflare.com/kv/concepts/how-kv-works/). * Create a [KV namespace](https://developers.cloudflare.com/kv/concepts/kv-namespaces/). * Review the [KV Runtime API](https://developers.cloudflare.com/kv/api/). * Learn about KV [Limits](https://developers.cloudflare.com/kv/platform/limits/). ### R2 R2 is S3-compatible blob storage that allows developers to store large amounts of unstructured data without egress fees associated with typical cloud storage services. It is ideal for projects that require: * Storage for files which are infrequently accessed. * Large object storage (for example, gigabytes or more per object). * Strong consistency per object. * Asset storage for websites (refer to [caching guide](https://developers.cloudflare.com/r2/buckets/public-buckets/#caching)) To get started with R2: * Read the [Get started guide](https://developers.cloudflare.com/r2/get-started/). * Learn about R2 [Limits](https://developers.cloudflare.com/r2/platform/limits/). * Review the [R2 Workers API](https://developers.cloudflare.com/r2/api/workers/workers-api-reference/). ### Durable Objects Durable Objects provide low-latency coordination and consistent storage for the Workers platform through global uniqueness and a transactional storage API. * Global Uniqueness guarantees that there will be a single instance of a Durable Object class with a given ID running at once, across the world. Requests for a Durable Object ID are routed by the Workers runtime to the Cloudflare data center that owns the Durable Object. * The transactional storage API provides strongly consistent key-value storage to the Durable Object. Each Object can only read and modify keys associated with that Object. Execution of a Durable Object is single-threaded, but multiple request events may still be processed out-of-order from how they arrived at the Object. It is ideal for projects that require: * Real-time collaboration (such as a chat application or a game server). * Consistent storage. * Data locality. To get started with Durable Objects: * Read the [introductory blog post](https://blog.cloudflare.com/introducing-workers-durable-objects/). * Review the [Durable Objects documentation](https://developers.cloudflare.com/durable-objects/). * Get started with [Durable Objects](https://developers.cloudflare.com/durable-objects/get-started/). * Learn about Durable Objects [Limits](https://developers.cloudflare.com/durable-objects/platform/limits/). ### D1 [D1](https://developers.cloudflare.com/d1/) is Cloudflare’s native serverless database. With D1, you can create a database by importing data or defining your tables and writing your queries within a Worker or through the API. D1 is ideal for: * Persistent, relational storage for user data, account data, and other structured datasets. * Use-cases that require querying across your data ad-hoc (using SQL). * Workloads with a high ratio of reads to writes (most web applications). To get started with D1: * Read [the documentation](https://developers.cloudflare.com/d1) * Follow the [Get started guide](https://developers.cloudflare.com/d1/get-started/) to provision your first D1 database. * Review the [D1 Workers Binding API](https://developers.cloudflare.com/d1/worker-api/). Note If your working data size exceeds 10 GB (the maximum size for a D1 database), consider splitting the database into multiple, smaller D1 databases. ### Queues Cloudflare Queues allows developers to send and receive messages with guaranteed delivery. It integrates with [Cloudflare Workers](https://developers.cloudflare.com/workers) and offers at-least once delivery, message batching, and does not charge for egress bandwidth. Queues is ideal for: * Offloading work from a request to schedule later. * Send data from Worker to Worker (inter-Service communication). * Buffering or batching data before writing to upstream systems, including third-party APIs or [Cloudflare R2](https://developers.cloudflare.com/queues/examples/send-errors-to-r2/). To get started with Queues: * [Set up your first queue](https://developers.cloudflare.com/queues/get-started/). * Learn more [about how Queues works](https://developers.cloudflare.com/queues/reference/how-queues-works/). ### Hyperdrive Hyperdrive is a service that accelerates queries you make to MySQL and Postgres databases, making it faster to access your data from across the globe, irrespective of your users’ location. Hyperdrive allows you to: * Connect to an existing database from Workers without connection overhead. * Cache frequent queries across Cloudflare's global network to reduce response times on highly trafficked content. * Reduce load on your origin database with connection pooling. To get started with Hyperdrive: * [Connect Hyperdrive](https://developers.cloudflare.com/hyperdrive/get-started/) to your existing database. * Learn more [about how Hyperdrive speeds up your database queries](https://developers.cloudflare.com/hyperdrive/configuration/how-hyperdrive-works/). ## Pipelines Pipelines is a streaming ingestion service that allows you to ingest high volumes of real time data, without managing any infrastructure. Pipelines allows you to: * Ingest data at extremely high throughput (tens of thousands of records per second or more) * Batch and write data directly to object storage, ready for querying * (Future) Transform and aggregate data during ingestion To get started with Pipelines: * [Create a Pipeline](https://developers.cloudflare.com/pipelines/getting-started/) that can batch and write records to R2. * Learn more [about how Pipelines works](https://developers.cloudflare.com/pipelines/concepts/how-pipelines-work/). ### Analytics Engine Analytics Engine is Cloudflare's time-series and metrics database that allows you to write unlimited-cardinality analytics at scale using a built-in API to write data points from Workers and query that data using SQL directly. Analytics Engine allows you to: * Expose custom analytics to your own customers * Build usage-based billing systems * Understand the health of your service on a per-customer or per-user basis * Add instrumentation to frequently called code paths, without impacting performance or overwhelming external analytics systems with events Cloudflare uses Analytics Engine internally to store and product per-product metrics for products like D1 and R2 at scale. To get started with Analytics Engine: * Learn how to [get started with Analytics Engine](https://developers.cloudflare.com/analytics/analytics-engine/get-started/) * See [an example of writing time-series data to Analytics Engine](https://developers.cloudflare.com/analytics/analytics-engine/recipes/usage-based-billing-for-your-saas-product/) * Understand the [SQL API](https://developers.cloudflare.com/analytics/analytics-engine/sql-api/) for reading data from your Analytics Engine datasets ### Vectorize Vectorize is a globally distributed vector database that enables you to build full-stack, AI-powered applications with Cloudflare Workers and [Workers AI](https://developers.cloudflare.com/workers-ai/). Vectorize allows you to: * Store embeddings from any vector embeddings model (Bring Your Own embeddings) for semantic search and classification tasks. * Add context to Large Language Model (LLM) queries by using vector search as part of a [Retrieval Augmented Generation](https://developers.cloudflare.com/workers-ai/guides/tutorials/build-a-retrieval-augmented-generation-ai/) (RAG) workflow. * [Filter on vector metadata](https://developers.cloudflare.com/vectorize/reference/metadata-filtering/) to reduce the search space and return more relevant results. To get started with Vectorize: * [Create your first vector database](https://developers.cloudflare.com/vectorize/get-started/intro/). * Combine [Workers AI and Vectorize](https://developers.cloudflare.com/vectorize/get-started/embeddings/) to generate, store and query text embeddings. * Learn more about [how vector databases work](https://developers.cloudflare.com/vectorize/reference/what-is-a-vector-database/). ## SQL in Durable Objects vs D1 Cloudflare Workers offers a SQLite-backed serverless database product - [D1](https://developers.cloudflare.com/d1/). How should you compare [SQLite in Durable Objects](https://developers.cloudflare.com/durable-objects/best-practices/access-durable-objects-storage/) and D1? **D1 is a managed database product.** D1 fits into a familiar architecture for developers, where application servers communicate with a database over the network. Application servers are typically Workers; however, D1 also supports external, non-Worker access via an [HTTP API](https://developers.cloudflare.com/api/resources/d1/subresources/database/methods/query/), which helps unlock [third-party tooling](https://developers.cloudflare.com/d1/reference/community-projects/#_top) support for D1. D1 aims for a "batteries included" feature set, including the above HTTP API, [database schema management](https://developers.cloudflare.com/d1/reference/migrations/#_top), [data import/export](https://developers.cloudflare.com/d1/best-practices/import-export-data/), and [database query insights](https://developers.cloudflare.com/d1/observability/metrics-analytics/#query-insights). With D1, your application code and SQL database queries are not colocated which can impact application performance. If performance is a concern with D1, Workers has [Smart Placement](https://developers.cloudflare.com/workers/configuration/smart-placement/#_top) to dynamically run your Worker in the best location to reduce total Worker request latency, considering everything your Worker talks to, including D1. **SQLite in Durable Objects is a lower-level compute with storage building block for distributed systems.** By design, Durable Objects are accessed with Workers-only. Durable Objects require a bit more effort, but in return, give you more flexibility and control. With Durable Objects, you must implement two pieces of code that run in different places: a front-end Worker which routes incoming requests from the Internet to a unique Durable Object, and the Durable Object itself, which runs on the same machine as the SQLite database. You get to choose what runs where, and it may be that your application benefits from running some application business logic right next to the database. With SQLite in Durable Objects, you may also need to build some of your own database tooling that comes out-of-the-box with D1. SQL query pricing and limits are intended to be identical between D1 ([pricing](https://developers.cloudflare.com/d1/platform/pricing/), [limits](https://developers.cloudflare.com/d1/platform/limits/)) and SQLite in Durable Objects ([pricing](https://developers.cloudflare.com/durable-objects/platform/pricing/#sql-storage-billing), [limits](https://developers.cloudflare.com/durable-objects/platform/limits/)). --- title: Workers for Platforms · Cloudflare Workers docs description: Deploy custom code on behalf of your users or let your users directly deploy their own code to your platform, managing infrastructure. lastUpdated: 2024-08-13T19:56:56.000Z chatbotDeprioritize: false source_url: html: https://developers.cloudflare.com/workers/platform/workers-for-platforms/ md: https://developers.cloudflare.com/workers/platform/workers-for-platforms/index.md --- Deploy custom code on behalf of your users or let your users directly deploy their own code to your platform, managing infrastructure. --- title: How the Cache works · Cloudflare Workers docs description: How Workers interacts with the Cloudflare cache. lastUpdated: 2025-05-28T19:12:24.000Z chatbotDeprioritize: false source_url: html: https://developers.cloudflare.com/workers/reference/how-the-cache-works/ md: https://developers.cloudflare.com/workers/reference/how-the-cache-works/index.md --- Workers was designed and built on top of Cloudflare's global network to allow developers to interact directly with the Cloudflare cache. The cache can provide ephemeral, data center-local storage, as a convenient way to frequently access static or dynamic content. By allowing developers to write to the cache, Workers provide a way to customize cache behavior on Cloudflare’s CDN. To learn about the benefits of caching, refer to the Learning Center’s article on [What is Caching?](https://www.cloudflare.com/learning/cdn/what-is-caching/). Cloudflare Workers run before the cache but can also be utilized to modify assets once they are returned from the cache. Modifying assets returned from cache allows for the ability to sign or personalize responses while also reducing load on an origin and reducing latency to the end user by serving assets from a nearby location. ## Interact with the Cloudflare Cache Conceptually, there are two ways to interact with Cloudflare’s Cache using a Worker: * Call to [`fetch()`](https://developers.cloudflare.com/workers/runtime-apis/fetch/) in a Workers script. Requests proxied through Cloudflare are cached even without Workers according to a zone’s default or configured behavior (for example, static assets like files ending in `.jpg` are cached by default). Workers can further customize this behavior by: * Setting Cloudflare cache rules (that is, operating on the `cf` object of a [request](https://developers.cloudflare.com/workers/runtime-apis/request/)). * Store responses using the [Cache API](https://developers.cloudflare.com/workers/runtime-apis/cache/) from a Workers script. This allows caching responses that did not come from an origin and also provides finer control by: * Customizing cache behavior of any asset by setting headers such as `Cache-Control` on the response passed to `cache.put()`. * Caching responses generated by the Worker itself through `cache.put()`. Tiered caching The Cache API is not compatible with tiered caching. To take advantage of tiered caching, use the [fetch API](https://developers.cloudflare.com/workers/runtime-apis/fetch/). ### Single file purge assets cached by a worker When using single-file purge to purge assets cached by a Worker, make sure not to purge the end user URL. Instead, purge the URL that is in the `fetch` request. For example, you have a Worker that runs on `https://example.com/hello` and this Worker makes a `fetch` request to `https://notexample.com/hello`. As far as cache is concerned, the asset in the `fetch` request (`https://notexample.com/hello`) is the asset that is cached. To purge it, you need to purge `https://notexample.com/hello`. Purging the end user URL, `https://example.com/hello`, will not work because that is not the URL that cache sees. You need to confirm in your Worker which URL you are actually fetching, so you can purge the correct asset. In the previous example, `https://notexample.com/hello` is not proxied through Cloudflare. If `https://notexample.com/hello` was proxied ([orange-clouded](https://developers.cloudflare.com/dns/proxy-status/)) through Cloudflare, then you must own `notexample.com` and purge `https://notexample.com/hello` from the `notexample.com` zone. To better understand the example, review the following diagram: ```mermaid flowchart TD accTitle: Single file purge assets cached by a worker accDescr: This diagram is meant to help choose how to purge a file. A("You have a Worker script that runs on https://example.com/hello
    and this Worker makes a fetch request to https://notexample.com/hello.") --> B(Is notexample.com
    an active zone on Cloudflare?) B -- Yes --> C(Is https://notexample.com/
    proxied through Cloudflare?) B -- No --> D(Purge https://notexample.com/hello
    from the original example.com zone.) C -- Yes --> E(Do you own
    notexample.com?) C -- No --> F(Purge https://notexample.com/hello
    from the original example.com zone.) E -- Yes --> G(Purge https://notexample.com/hello
    from the notexample.com zone.) E -- No --> H(Sorry, you can not purge the asset.
    Only the owner of notexample.com can purge it.) ``` ### Purge assets stored with the Cache API Assets stored in the cache through [Cache API](https://developers.cloudflare.com/workers/runtime-apis/cache/) operations can be purged in a couple of ways: * Call `cache.delete` within a Worker to invalidate the cache for the asset with a matching request variable. * Assets purged in this way are only purged locally to the data center the Worker runtime was executed. * To purge an asset globally, use the standard [cache purge options](https://developers.cloudflare.com/cache/how-to/purge-cache/). Based on cache API implementation, not all cache purge endpoints function for purging assets stored by the Cache API. * All assets on a zone can be purged by using the [Purge Everything](https://developers.cloudflare.com/cache/how-to/purge-cache/purge-everything/) cache operation. This purge will remove all assets associated with a Cloudflare zone from cache in all data centers regardless of the method set. * [Cache Tags](https://developers.cloudflare.com/cache/how-to/purge-cache/purge-by-tags/#add-cache-tag-http-response-headers) can be added to requests dynamically in a Worker by calling `response.headers.append()` and appending `Cache-Tag` values dynamically to that request. Once set, those tags can be used to selectively purge assets from cache without invalidating all cached assets on a zone. * Currently, it is not possible to purge a URL stored through Cache API that uses a custom cache key set by a Worker. Instead, use a [custom key created via Cache Rules](https://developers.cloudflare.com/cache/how-to/cache-rules/settings/#cache-key). Alternatively, purge your assets using purge everything, purge by tag, purge by host or purge by prefix. ## Edge versus browser caching The browser cache is controlled through the `Cache-Control` header sent in the response to the client (the `Response` instance return from the handler). Workers can customize browser cache behavior by setting this header on the response. Other means to control Cloudflare’s cache that are not mentioned in this documentation include: Page Rules and Cloudflare cache settings. Refer to the [How to customize Cloudflare’s cache](https://developers.cloudflare.com/cache/concepts/customize-cache/) if you wish to avoid writing JavaScript with still some granularity of control. What should I use: the Cache API or fetch for caching objects on Cloudflare? For requests where Workers are behaving as middleware (that is, Workers are sending a subrequest via `fetch`) it is recommended to use `fetch`. This is because preexisting settings are in place that optimize caching while preventing unintended dynamic caching. For projects where there is no backend (that is, the entire project is on Workers as in [Workers Sites](https://developers.cloudflare.com/workers/configuration/sites/start-from-scratch)) the Cache API is the only option to customize caching. The asset will be cached under the hostname specified within the Worker's subrequest — not the Worker's own hostname. Therefore, in order to purge the cached asset, the purge will have to be performed for the hostname included in the Worker subrequest. ### `fetch` In the context of Workers, a [`fetch`](https://developers.cloudflare.com/workers/runtime-apis/fetch/) provided by the runtime communicates with the Cloudflare cache. First, `fetch` checks to see if the URL matches a different zone. If it does, it reads through that zone’s cache (or Worker). Otherwise, it reads through its own zone’s cache, even if the URL is for a non-Cloudflare site. Cache settings on `fetch` automatically apply caching rules based on your Cloudflare settings. `fetch` does not allow you to modify or inspect objects before they reach the cache, but does allow you to modify how it will cache. When a response fills the cache, the response header contains `CF-Cache-Status: HIT`. You can tell an object is attempting to cache if one sees the `CF-Cache-Status` at all. This [template](https://developers.cloudflare.com/workers/examples/cache-using-fetch/) shows ways to customize Cloudflare cache behavior on a given request using fetch. ### Cache API The [Cache API](https://developers.cloudflare.com/workers/runtime-apis/cache/) can be thought of as an ephemeral key-value store, whereby the `Request` object (or more specifically, the request URL) is the key, and the `Response` is the value. There are two types of cache namespaces available to the Cloudflare Cache: * **`caches.default`** – You can access the default cache (the same cache shared with `fetch` requests) by accessing `caches.default`. This is useful when needing to override content that is already cached, after receiving the response. * **`caches.open()`** – You can access a namespaced cache (separate from the cache shared with `fetch` requests) using `let cache = await caches.open(CACHE_NAME)`. Note that [`caches.open`](https://developer.mozilla.org/en-US/docs/Web/API/CacheStorage/open) is an async function, unlike `caches.default`. When to use the Cache API: * When you want to programmatically save and/or delete responses from a cache. For example, say an origin is responding with a `Cache-Control: max-age:0` header and cannot be changed. Instead, you can clone the `Response`, adjust the header to the `max-age=3600` value, and then use the Cache API to save the modified `Response` for an hour. * When you want to programmatically access a Response from a cache without relying on a `fetch` request. For example, you can check to see if you have already cached a `Response` for the `https://example.com/slow-response` endpoint. If so, you can avoid the slow request. This [template](https://developers.cloudflare.com/workers/examples/cache-api/) shows ways to use the cache API. For limits of the cache API, refer to [Limits](https://developers.cloudflare.com/workers/platform/limits/#cache-api-limits). Tiered caching and the Cache API Cache API within Workers does not support tiered caching. Tiered Cache concentrates connections to origin servers so they come from a small number of data centers rather than the full set of network locations. Cache API is local to a data center, this means that `cache.match` does a lookup, `cache.put` stores a response, and `cache.delete` removes a stored response only in the cache of the data center that the Worker handling the request is in. Because these methods apply only to local cache, they will not work with tiered cache. ## Related resources * [Cache API](https://developers.cloudflare.com/workers/runtime-apis/cache/) * [Customize cache behavior with Workers](https://developers.cloudflare.com/cache/interaction-cloudflare-products/workers/)
    --- title: How Workers works · Cloudflare Workers docs description: The difference between the Workers runtime versus traditional browsers and Node.js. lastUpdated: 2024-10-10T02:36:06.000Z chatbotDeprioritize: false source_url: html: https://developers.cloudflare.com/workers/reference/how-workers-works/ md: https://developers.cloudflare.com/workers/reference/how-workers-works/index.md --- Though Cloudflare Workers behave similarly to [JavaScript](https://www.cloudflare.com/learning/serverless/serverless-javascript/) in the browser or in Node.js, there are a few differences in how you have to think about your code. Under the hood, the Workers runtime uses the [V8 engine](https://www.cloudflare.com/learning/serverless/glossary/what-is-chrome-v8/) — the same engine used by Chromium and Node.js. The Workers runtime also implements many of the standard [APIs](https://developers.cloudflare.com/workers/runtime-apis/) available in most modern browsers. The differences between JavaScript written for the browser or Node.js happen at runtime. Rather than running on an individual's machine (for example, [a browser application or on a centralized server](https://www.cloudflare.com/learning/serverless/glossary/client-side-vs-server-side/)), Workers functions run on [Cloudflare's global network](https://www.cloudflare.com/network) - a growing global network of thousands of machines distributed across hundreds of locations. Each of these machines hosts an instance of the Workers runtime, and each of those runtimes is capable of running thousands of user-defined applications. This guide will review some of those differences. For more information, refer to the [Cloud Computing without Containers blog post](https://blog.cloudflare.com/cloud-computing-without-containers). The three largest differences are: Isolates, Compute per Request, and Distributed Execution. ## Isolates [V8](https://v8.dev) orchestrates isolates: lightweight contexts that provide your code with variables it can access and a safe environment to be executed within. You could even consider an isolate a sandbox for your function to run in. A single instance of the runtime can run hundreds or thousands of isolates, seamlessly switching between them. Each isolate's memory is completely isolated, so each piece of code is protected from other untrusted or user-written code on the runtime. Isolates are also designed to start very quickly. Instead of creating a virtual machine for each function, an isolate is created within an existing environment. This model eliminates the cold starts of the virtual machine model. Unlike other serverless providers which use [containerized processes](https://www.cloudflare.com/learning/serverless/serverless-vs-containers/) each running an instance of a language runtime, Workers pays the overhead of a JavaScript runtime once on the start of a container. Workers processes are able to run essentially limitless scripts with almost no individual overhead. Any given isolate can start around a hundred times faster than a Node process on a container or virtual machine. Notably, on startup isolates consume an order of magnitude less memory. Traditional architecture Workers V8 isolates User code Process overhead A given isolate has its own scope, but isolates are not necessarily long-lived. An isolate may be spun down and evicted for a number of reasons: * Resource limitations on the machine. * A suspicious script - anything seen as trying to break out of the isolate sandbox. * Individual [resource limits](https://developers.cloudflare.com/workers/platform/limits/). Because of this, it is generally advised that you not store mutable state in your global scope unless you have accounted for this contingency. If you are interested in how Cloudflare handles security with the Workers runtime, you can [read more about how Isolates relate to Security and Spectre Threat Mitigation](https://developers.cloudflare.com/workers/reference/security-model/). ## Compute per request Most Workers are a variation on the default Workers flow: * JavaScript ```js export default { async fetch(request, env, ctx) { return new Response('Hello World!'); }, }; ``` * TypeScript ```ts export default { async fetch(request, env, ctx): Promise { return new Response('Hello World!'); }, } satisfies ExportedHandler; ``` For Workers written in [ES modules syntax](https://developers.cloudflare.com/workers/reference/migrate-to-module-workers/), when a request to your `*.workers.dev` subdomain or to your Cloudflare-managed domain is received by any of Cloudflare's data centers, the request invokes the [`fetch()` handler](https://developers.cloudflare.com/workers/runtime-apis/handlers/fetch/) defined in your Worker code with the given request. You can respond to the request by returning a [`Response`](https://developers.cloudflare.com/workers/runtime-apis/response/) object. ## Distributed execution Isolates are resilient and continuously available for the duration of a request, but in rare instances isolates may be evicted. When a Worker hits official [limits](https://developers.cloudflare.com/workers/platform/limits/) or when resources are exceptionally tight on the machine the request is running on, the runtime will selectively evict isolates after their events are properly resolved. Like all other JavaScript platforms, a single Workers instance may handle multiple requests including concurrent requests in a single-threaded event loop. That means that other requests may (or may not) be processed during awaiting any `async` tasks (such as `fetch`) if other requests come in while processing a request. Because there is no guarantee that any two user requests will be routed to the same or a different instance of your Worker, Cloudflare recommends you do not use or mutate global state. ## Related resources * [`fetch()` handler](https://developers.cloudflare.com/workers/runtime-apis/handlers/fetch/) - Review how incoming HTTP requests to a Worker are passed to the `fetch()` handler. * [Request](https://developers.cloudflare.com/workers/runtime-apis/request/) - Learn how incoming HTTP requests are passed to the `fetch()` handler. * [Workers limits](https://developers.cloudflare.com/workers/platform/limits/) - Learn about Workers limits including Worker size, startup time, and more. --- title: Migrate from Service Workers to ES Modules · Cloudflare Workers docs description: Write your Worker code in ES modules syntax for an optimized experience. lastUpdated: 2025-05-13T11:59:34.000Z chatbotDeprioritize: false source_url: html: https://developers.cloudflare.com/workers/reference/migrate-to-module-workers/ md: https://developers.cloudflare.com/workers/reference/migrate-to-module-workers/index.md --- This guide will show you how to migrate your Workers from the [Service Worker](https://developer.mozilla.org/en-US/docs/Web/API/Service_Worker_API) format to the [ES modules](https://blog.cloudflare.com/workers-javascript-modules/) format. ## Advantages of migrating There are several reasons to migrate your Workers to the ES modules format: 1. Your Worker will run faster. With service workers, bindings are exposed as globals. This means that for every request, the Workers runtime must create a new JavaScript execution context, which adds overhead and time. Workers written using ES modules can reuse the same execution context across multiple requests. 2. Implementing [Durable Objects](https://developers.cloudflare.com/durable-objects/) requires Workers that use ES modules. 3. Bindings for [D1](https://developers.cloudflare.com/d1/), [Workers AI](https://developers.cloudflare.com/workers-ai/), [Vectorize](https://developers.cloudflare.com/vectorize/), [Workflows](https://developers.cloudflare.com/workflows/), and [Images](https://developers.cloudflare.com/images/transform-images/bindings/) can only be used from Workers that use ES modules. 4. You can [gradually deploy changes to your Worker](https://developers.cloudflare.com/workers/configuration/versions-and-deployments/gradual-deployments/) when you use the ES modules format. 5. You can easily publish Workers using ES modules to `npm`, allowing you to import and reuse Workers within your codebase. ## Migrate a Worker The following example demonstrates a Worker that redirects all incoming requests to a URL with a `301` status code. Service Workers are deprecated Service Workers are deprecated, but still supported. We recommend using [Module Workers](https://developers.cloudflare.com/workers/reference/migrate-to-module-workers/) instead. New features may not be supported for Service Workers. With the Service Worker syntax, the example Worker looks like: ```js async function handler(request) { const base = 'https://example.com'; const statusCode = 301; const destination = new URL(request.url, base); return Response.redirect(destination.toString(), statusCode); } // Initialize Worker addEventListener('fetch', event => { event.respondWith(handler(event.request)); }); ``` Workers using ES modules format replace the `addEventListener` syntax with an object definition, which must be the file's default export (via `export default`). The previous example code becomes: ```js export default { fetch(request) { const base = "https://example.com"; const statusCode = 301; const source = new URL(request.url); const destination = new URL(source.pathname, base); return Response.redirect(destination.toString(), statusCode); }, }; ``` ## Bindings [Bindings](https://developers.cloudflare.com/workers/runtime-apis/bindings/) allow your Workers to interact with resources on the Cloudflare developer platform. Workers using ES modules format do not rely on any global bindings. However, Service Worker syntax accesses bindings on the global scope. To understand bindings, refer the following `TODO` KV namespace binding example. To create a `TODO` KV namespace binding, you will: 1. Create a KV namespace named `My Tasks` and receive an ID that you will use in your binding. 2. Create a Worker. 3. Find your Worker's [Wrangler configuration file](https://developers.cloudflare.com/workers/wrangler/configuration/) and add a KV namespace binding: * wrangler.jsonc ```jsonc { "kv_namespaces": [ { "binding": "TODO", "id": "" } ] } ``` * wrangler.toml ```toml kv_namespaces = [ { binding = "TODO", id = "" } ] ``` In the following sections, you will use your binding in Service Worker and ES modules format. Reference KV from Durable Objects and Workers To learn more about how to reference KV from Workers, refer to the [KV bindings documentation](https://developers.cloudflare.com/kv/concepts/kv-bindings/). ### Bindings in Service Worker format In Service Worker syntax, your `TODO` KV namespace binding is defined in the global scope of your Worker. Your `TODO` KV namespace binding is available to use anywhere in your Worker application's code. ```js addEventListener("fetch", async (event) => { return await getTodos() }); async function getTodos() { // Get the value for the "to-do:123" key // NOTE: Relies on the TODO KV binding that maps to the "My Tasks" namespace. let value = await TODO.get("to-do:123"); // Return the value, as is, for the Response event.respondWith(new Response(value)); } ``` ### Bindings in ES modules format In ES modules format, bindings are only available inside the `env` parameter that is provided at the entry point to your Worker. To access the `TODO` KV namespace binding in your Worker code, the `env` parameter must be passed from the `fetch` handler in your Worker to the `getTodos` function. ```js import { getTodos } from './todos' export default { async fetch(request, env, ctx) { // Passing the env parameter so other functions // can reference the bindings available in the Workers application return await getTodos(env) }, }; ``` The following code represents a `getTodos` function that calls the `get` function on the `TODO` KV binding. ```js async function getTodos(env) { // NOTE: Relies on the TODO KV binding which has been provided inside of // the env parameter of the `getTodos` function let value = await env.TODO.get("to-do:123"); return new Response(value); } export { getTodos } ``` ## Environment variables [Environment variables](https://developers.cloudflare.com/workers/configuration/environment-variables/) are accessed differently in code written in ES modules format versus Service Worker format. Review the following example environment variable configuration in the [Wrangler configuration file](https://developers.cloudflare.com/workers/wrangler/configuration/): * wrangler.jsonc ```jsonc { "name": "my-worker-dev", "vars": { "API_ACCOUNT_ID": "" } } ``` * wrangler.toml ```toml name = "my-worker-dev" # Define top-level environment variables # under the `[vars]` block using # the `key = "value"` format [vars] API_ACCOUNT_ID = "" ``` ### Environment variables in Service Worker format In Service Worker format, the `API_ACCOUNT_ID` is defined in the global scope of your Worker application. Your `API_ACCOUNT_ID` environment variable is available to use anywhere in your Worker application's code. ```js addEventListener("fetch", async (event) => { console.log(API_ACCOUNT_ID) // Logs "" return new Response("Hello, world!") }) ``` ### Environment variables in ES modules format In ES modules format, environment variables are only available inside the `env` parameter that is provided at the entrypoint to your Worker application. ```js export default { async fetch(request, env, ctx) { console.log(env.API_ACCOUNT_ID) // Logs "" return new Response("Hello, world!") }, }; ``` ## Cron Triggers To handle a [Cron Trigger](https://developers.cloudflare.com/workers/configuration/cron-triggers/) event in a Worker written with ES modules syntax, implement a [`scheduled()` event handler](https://developers.cloudflare.com/workers/runtime-apis/handlers/scheduled/#syntax), which is the equivalent of listening for a `scheduled` event in Service Worker syntax. This example code: ```js addEventListener("scheduled", (event) => { // ... }); ``` Then becomes: ```js export default { async scheduled(event, env, ctx) { // ... }, }; ``` ## Access `event` or `context` data Workers often need access to data not in the `request` object. For example, sometimes Workers use [`waitUntil`](https://developers.cloudflare.com/workers/runtime-apis/context/#waituntil) to delay execution. Workers using ES modules format can access `waitUntil` via the `context` parameter. Refer to [ES modules parameters](https://developers.cloudflare.com/workers/runtime-apis/handlers/fetch/#parameters) for more information. This example code: ```js async function triggerEvent(event) { // Fetch some data console.log('cron processed', event.scheduledTime); } // Initialize Worker addEventListener('scheduled', event => { event.waitUntil(triggerEvent(event)); }); ``` Then becomes: ```js async function triggerEvent(event) { // Fetch some data console.log('cron processed', event.scheduledTime); } export default { async scheduled(event, env, ctx) { ctx.waitUntil(triggerEvent(event)); }, }; ``` ## Service Worker syntax A Worker written in Service Worker syntax consists of two parts: 1. An event listener that listens for `FetchEvents`. 2. An event handler that returns a [Response](https://developers.cloudflare.com/workers/runtime-apis/response/) object which is passed to the event’s `.respondWith()` method. When a request is received on one of Cloudflare’s global network servers for a URL matching a Worker, Cloudflare's server passes the request to the Workers runtime. This dispatches a `FetchEvent` in the [isolate](https://developers.cloudflare.com/workers/reference/how-workers-works/#isolates) where the Worker is running. ```js addEventListener('fetch', event => { event.respondWith(handleRequest(event.request)); }); async function handleRequest(request) { return new Response('Hello worker!', { headers: { 'content-type': 'text/plain' }, }); } ``` Below is an example of the request response workflow: 1. An event listener for the `FetchEvent` tells the script to listen for any request coming to your Worker. The event handler is passed the `event` object, which includes `event.request`, a [`Request`](https://developers.cloudflare.com/workers/runtime-apis/request/) object which is a representation of the HTTP request that triggered the `FetchEvent`. 2. The call to `.respondWith()` lets the Workers runtime intercept the request in order to send back a custom response (in this example, the plain text `'Hello worker!'`). * The `FetchEvent` handler typically culminates in a call to the method `.respondWith()` with either a [`Response`](https://developers.cloudflare.com/workers/runtime-apis/response/) or `Promise` that determines the response. * The `FetchEvent` object also provides [two other methods](https://developers.cloudflare.com/workers/runtime-apis/handlers/fetch/) to handle unexpected exceptions and operations that may complete after a response is returned. Learn more about [the lifecycle methods of the `fetch()` handler](https://developers.cloudflare.com/workers/runtime-apis/rpc/lifecycle/). ### Supported `FetchEvent` properties * `event.type` string * The type of event. This will always return `"fetch"`. * `event.request` Request * The incoming HTTP request. * `event.respondWith(responseResponse|Promise)` : void * Refer to [`respondWith`](#respondwith). * `event.waitUntil(promisePromise)` : void * Refer to [`waitUntil`](#waituntil). * `event.passThroughOnException()` : void * Refer to [`passThroughOnException`](#passthroughonexception). ### `respondWith` Intercepts the request and allows the Worker to send a custom response. If a `fetch` event handler does not call `respondWith`, the runtime delivers the event to the next registered `fetch` event handler. In other words, while not recommended, this means it is possible to add multiple `fetch` event handlers within a Worker. If no `fetch` event handler calls `respondWith`, then the runtime forwards the request to the origin as if the Worker did not. However, if there is no origin – or the Worker itself is your origin server, which is always true for `*.workers.dev` domains – then you must call `respondWith` for a valid response. ```js // Format: Service Worker addEventListener('fetch', event => { let { pathname } = new URL(event.request.url); // Allow "/ignore/*" URLs to hit origin if (pathname.startsWith('/ignore/')) return; // Otherwise, respond with something event.respondWith(handler(event)); }); ``` ### `waitUntil` The `waitUntil` command extends the lifetime of the `"fetch"` event. It accepts a `Promise`-based task which the Workers runtime will execute before the handler terminates but without blocking the response. For example, this is ideal for [caching responses](https://developers.cloudflare.com/workers/runtime-apis/cache/#put) or handling logging. With the Service Worker format, `waitUntil` is available within the `event` because it is a native `FetchEvent` property. With the ES modules format, `waitUntil` is moved and available on the `context` parameter object. ```js // Format: Service Worker addEventListener('fetch', event => { event.respondWith(handler(event)); }); async function handler(event) { // Forward / Proxy original request let res = await fetch(event.request); // Add custom header(s) res = new Response(res.body, res); res.headers.set('x-foo', 'bar'); // Cache the response // NOTE: Does NOT block / wait event.waitUntil(caches.default.put(event.request, res.clone())); // Done return res; } ``` ### `passThroughOnException` The `passThroughOnException` method prevents a runtime error response when the Worker throws an unhandled exception. Instead, the script will [fail open](https://community.microfocus.com/cyberres/b/sws-22/posts/security-fundamentals-part-1-fail-open-vs-fail-closed), which will proxy the request to the origin server as though the Worker was never invoked. To prevent JavaScript errors from causing entire requests to fail on uncaught exceptions, `passThroughOnException()` causes the Workers runtime to yield control to the origin server. With the Service Worker format, `passThroughOnException` is added to the `FetchEvent` interface, making it available within the `event`. With the ES modules format, `passThroughOnException` is available on the `context` parameter object. ```js // Format: Service Worker addEventListener('fetch', event => { // Proxy to origin on unhandled/uncaught exceptions event.passThroughOnException(); throw new Error('Oops'); }); ``` --- title: Protocols · Cloudflare Workers docs description: Supported protocols on the Workers platform. lastUpdated: 2025-05-29T18:16:56.000Z chatbotDeprioritize: false source_url: html: https://developers.cloudflare.com/workers/reference/protocols/ md: https://developers.cloudflare.com/workers/reference/protocols/index.md --- Cloudflare Workers support the following protocols and interfaces: | Protocol | Inbound | Outbound | | - | - | - | | **HTTP / HTTPS** | Handle incoming HTTP requests using the [`fetch()` handler](https://developers.cloudflare.com/workers/runtime-apis/handlers/fetch/) | Make HTTP subrequests using the [`fetch()` API](https://developers.cloudflare.com/workers/runtime-apis/fetch/) | | **Direct TCP sockets** | Support for handling inbound TCP connections is [coming soon](https://blog.cloudflare.com/workers-tcp-socket-api-connect-databases/) | Create outbound TCP connections using the [`connect()` API](https://developers.cloudflare.com/workers/runtime-apis/tcp-sockets/) | | **WebSockets** | Accept incoming WebSocket connections using the [`WebSocket` API](https://developers.cloudflare.com/workers/runtime-apis/websockets/), or with [MQTT over WebSockets (Pub/Sub)](https://developers.cloudflare.com/pub-sub/learning/websockets-browsers/) | [MQTT over WebSockets (Pub/Sub)](https://developers.cloudflare.com/pub-sub/learning/websockets-browsers/) | | **MQTT** | Handle incoming messages to an MQTT broker with [Pub Sub](https://developers.cloudflare.com/pub-sub/learning/integrate-workers/) | Support for publishing MQTT messages to an MQTT topic is [coming soon](https://developers.cloudflare.com/pub-sub/learning/integrate-workers/) | | **HTTP/3 (QUIC)** | Accept inbound requests over [HTTP/3](https://www.cloudflare.com/learning/performance/what-is-http3/) by enabling it on your [zone](https://developers.cloudflare.com/fundamentals/concepts/accounts-and-zones/#zones) in **Speed** > **Optimization** > **Protocol Optimization** area of the [Cloudflare dashboard](https://dash.cloudflare.com/). | | | **SMTP** | Use [Email Workers](https://developers.cloudflare.com/email-routing/email-workers/) to process and forward email, without having to manage TCP connections to SMTP email servers | [Email Workers](https://developers.cloudflare.com/email-routing/email-workers/) | --- title: Security model · Cloudflare Workers docs description: "This article includes an overview of Cloudflare security architecture, and then addresses two frequently asked about issues: V8 bugs and Spectre." lastUpdated: 2025-02-19T14:52:46.000Z chatbotDeprioritize: false source_url: html: https://developers.cloudflare.com/workers/reference/security-model/ md: https://developers.cloudflare.com/workers/reference/security-model/index.md --- This article includes an overview of Cloudflare security architecture, and then addresses two frequently asked about issues: V8 bugs and Spectre. Since the very start of the Workers project, security has been a high priority — there was a concern early on that when hosting a large number of tenants on shared infrastructure, side channels of various kinds would pose a threat. The Cloudflare Workers runtime is carefully designed to defend against side channel attacks. To this end, Workers is designed to make it impossible for code to measure its own execution time locally. For example, the value returned by `Date.now()` is locked in place while code is executing. No other timers are provided. Moreover, Cloudflare provides no access to concurrency (for example, multi-threading), as it could allow attackers to construct ad hoc timers. These design choices cannot be introduced retroactively into other platforms — such as web browsers — because they remove APIs that existing applications depend on. They were possible in Workers only because of runtime design choices from the start. While these early design decisions have proven effective, Cloudflare is continuing to add defense-in-depth, including techniques to disrupt attacks by rescheduling Workers to create additional layers of isolation between suspicious Workers and high-value Workers. The Workers approach is very different from the approach taken by most of the industry. It is resistant to the entire range of [Spectre-style attacks](https://www.cloudflare.com/learning/security/threats/meltdown-spectre/), without requiring special attention paid to each one and without needing to block speculation in general. However, because the Workers approach is different, it requires careful study. Cloudflare is currently working with researchers at Graz University of Technology (TU Graz) to study what has been done. These researchers include some of the people who originally discovered Spectre. Cloudflare will publish the results of this research as they becomes available. For more details, refer to [this talk](https://www.infoq.com/presentations/cloudflare-v8/) by Kenton Varda, architect of Cloudflare Workers. Spectre is covered near the end. ## Architectural overview Beginning with a quick overview of the Workers runtime architecture: There are two fundamental parts of designing a code sandbox: secure isolation and API design. ### Isolation First, a secure execution environment needed to be created wherein code cannot access anything it is not supposed to. For this, the primary tool is V8, the JavaScript engine developed by Google for use in Chrome. V8 executes code inside isolates, which prevent that code from accessing memory outside the isolate — even within the same process. Importantly, this means Cloudflare can run many isolates within a single process. This is essential for an edge compute platform like Workers where Cloudflare must host many thousands of guest applications on every machine and rapidly switch between these guests thousands of times per second with minimal overhead. If Cloudflare had to run a separate process for every guest, the number of tenants Cloudflare could support would be drastically reduced, and Cloudflare would have to limit edge compute to a small number of big Enterprise customers. With isolate technology, Cloudflare can make edge compute available to everyone. Sometimes, though, Cloudflare does decide to schedule a Worker in its own private process. Cloudflare does this if the Worker uses certain features that needs an extra layer of isolation. For example, when a developer uses the devtools debugger to inspect their Worker, Cloudflare runs that Worker in a separate process. This is because historically, in the browser, the inspector protocol has only been usable by the browser’s trusted operator, and therefore has not received as much security scrutiny as the rest of V8. In order to hedge against the increased risk of bugs in the inspector protocol, Cloudflare moves inspected Workers into a separate process with a process-level sandbox. Cloudflare also uses process isolation as an extra defense against Spectre. Additionally, even for isolates that run in a shared process with other isolates, Cloudflare runs multiple instances of the whole runtime on each machine, which is called cordons. Workers are distributed among cordons by assigning each Worker a level of trust and separating low-trusted Workers from those trusted more highly. As one example of this in operation: a customer who signs up for the Free plan will not be scheduled in the same process as an Enterprise customer. This provides some defense-in-depth in the case a zero-day security vulnerability is found in V8. At the whole-process level, Cloudflare applies another layer of sandboxing for defense in depth. The layer 2 sandbox uses Linux namespaces and `seccomp` to prohibit all access to the filesystem and network. Namespaces and `seccomp` are commonly used to implement containers. However, Cloudflare's use of these technologies is much stricter than what is usually possible in container engines, because Cloudflare configures namespaces and `seccomp` after the process has started but before any isolates have been loaded. This means, for example, Cloudflare can (and does) use a totally empty filesystem (mount namespace) and uses `seccomp` to block absolutely all filesystem-related system calls. Container engines cannot normally prohibit all filesystem access because doing so would make it impossible to use `exec()` to start the guest program from disk. In the Workers case, Cloudflare's guest programs are not native binaries and the Workers runtime itself has already finished loading before Cloudflare blocks filesystem access. The layer 2 sandbox also totally prohibits network access. Instead, the process is limited to communicating only over local UNIX domain sockets to talk to other processes on the same system. Any communication to the outside world must be mediated by some other local process outside the sandbox. One such process in particular, which is called the supervisor, is responsible for fetching Worker code and configuration from disk or from other internal services. The supervisor ensures that the sandbox process cannot read any configuration except that which is relevant to the Workers that it should be running. For example, when the sandbox process receives a request for a Worker it has not seen before, that request includes the encryption key for that Worker’s code, including attached secrets. The sandbox can then pass that key to the supervisor in order to request the code. The sandbox cannot request any Worker for which it has not received the appropriate key. It cannot enumerate known Workers. It also cannot request configuration it does not need; for example, it cannot request the TLS key used for HTTPS traffic to the Worker. Aside from reading configuration, the other reason for the sandbox to talk to other processes on the system is to implement APIs exposed to Workers. ### API design There is a saying: If a tree falls in the forest, but no one is there to hear it, does it make a sound? A Cloudflare saying: If a Worker executes in a fully-isolated environment in which it is totally prevented from communicating with the outside world, does it actually run? Complete code isolation is, in fact, useless. In order for Workers to do anything useful, they have to be allowed to communicate with users. At the very least, a Worker needs to be able to receive requests and respond to them. For Workers to send requests to the world safely, APIs are needed. In the context of sandboxing, API design takes on a new level of responsibility. Cloudflare APIs define exactly what a Worker can and cannot do. Cloudflare must be very careful to design each API so that it can only express allowed operations and no more. For example, Cloudflare wants to allow Workers to make and receive HTTP requests, while not allowing them to be able to access the local filesystem or internal network services. Currently, Workers does not allow any access to the local filesystem. Therefore, Cloudflare does not expose a filesystem API at all. No API means no access. But, imagine if Workers did want to support local filesystem access in the future. How can that be done? Workers should not see the whole filesystem. Imagine, though, if each Worker had its own private directory on the filesystem where it can store whatever it wants. To do this, Workers would use a design based on [capability-based security](https://en.wikipedia.org/wiki/Capability-based_security). Capabilities are a big topic, but in this case, what it would mean is that Cloudflare would give the Worker an object of type `Directory`, representing a directory on the filesystem. This object would have an API that allows creating and opening files and subdirectories, but does not permit traversing up the parent directory. Effectively, each Worker would see its private `Directory` as if it were the root of their own filesystem. How would such an API be implemented? As described above, the sandbox process cannot access the real filesystem. Instead, file access would be mediated by the supervisor process. The sandbox talks to the supervisor using [Cap’n Proto RPC](https://capnproto.org/rpc.html), a capability-based RPC protocol. (Cap’n Proto is an open source project currently maintained by the Cloudflare Workers team.) This protocol makes it very easy to implement capability-based APIs, so that Cloudflare can strictly limit the sandbox to accessing only the files that belong to the Workers it is running. Now what about network access? Today, Workers are allowed to talk to the rest of the world only via HTTP — both incoming and outgoing. There is no API for other forms of network access, therefore it is prohibited; although, Cloudflare plans to support other protocols in the future. As mentioned before, the sandbox process cannot connect directly to the network. Instead, all outbound HTTP requests are sent over a UNIX domain socket to a local proxy service. That service implements restrictions on the request. For example, it verifies that the request is either addressed to a public Internet service or to the Worker’s zone’s own origin server, not to internal services that might be visible on the local machine or network. It also adds a header to every request identifying the Worker from which it originates, so that abusive requests can be traced and blocked. Once everything is in order, the request is sent on to the Cloudflare network's HTTP caching layer and then out to the Internet. Similarly, inbound HTTP requests do not go directly to the Workers runtime. They are first received by an inbound proxy service. That service is responsible for TLS termination (the Workers runtime never sees TLS keys), as well as identifying the correct Worker script to run for a particular request URL. Once everything is in order, the request is passed over a UNIX domain socket to the sandbox process. ## V8 bugs and the patch gap Every non-trivial piece of software has bugs and sandboxing technologies are no exception. Virtual machines, containers, and isolates — which Workers use — also have bugs. Workers rely heavily on isolation provided by V8, the JavaScript engine built by Google for use in Chrome. This has pros and cons. On one hand, V8 is an extraordinarily complicated piece of technology, creating a wider attack surface than virtual machines. More complexity means more opportunities for something to go wrong. However, an extraordinary amount of effort goes into finding and fixing V8 bugs, owing to its position as arguably the most popular sandboxing technology in the world. Google regularly pays out 5-figure bounties to anyone finding a V8 sandbox escape. Google also operates fuzzing infrastructure that automatically finds bugs faster than most humans can. Google’s investment does a lot to minimize the danger of V8 zero-days — bugs that are found by malicious actors and not known to Google. But, what happens after a bug is found and reported? V8 is open source, so fixes for security bugs are developed in the open and released to everyone at the same time. It is important that any patch be rolled out to production as fast as possible, before malicious actors can develop an exploit. The time between publishing the fix and deploying it is known as the patch gap. Google previously [announced that Chrome’s patch gap had been reduced from 33 days to 15 days](https://www.zdnet.com/article/google-cuts-chrome-patch-gap-in-half-from-33-to-15-days/). Fortunately, Cloudflare directly controls the machines on which the Workers runtime operates. Nearly the entire build and release process has been automated, so the moment a V8 patch is published, Cloudflare systems automatically build a new release of the Workers runtime and, after one-click sign-off from the necessary (human) reviewers, automatically push that release out to production. As a result, the Workers patch gap is now under 24 hours. A patch published by V8’s team in Munich during their work day will usually be in production before the end of the US work day. ## Spectre: Introduction The V8 team at Google has stated that [V8 itself cannot defend against Spectre](https://arxiv.org/abs/1902.05178). Workers does not need to depend on V8 for this. The Workers environment presents many alternative approaches to mitigating Spectre. ### What is it? Spectre is a class of attacks in which a malicious program can trick the CPU into speculatively performing computation using data that the program is not supposed to have access to. The CPU eventually realizes the problem and does not allow the program to see the results of the speculative computation. However, the program may be able to derive bits of the secret data by looking at subtle side effects of the computation, such as the effects on the cache. For more information about Spectre, refer to the [Learning Center page on the topic](https://www.cloudflare.com/learning/security/threats/meltdown-spectre/). ### Why does it matter for Workers? Spectre encompasses a wide variety of vulnerabilities present in modern CPUs. The specific vulnerabilities vary by architecture and model and it is likely that many vulnerabilities exist which have not yet been discovered. These vulnerabilities are a problem for every cloud compute platform. Any time you have more than one tenant running code on the same machine, Spectre attacks are possible. However, the closer together the tenants are, the more difficult it can be to mitigate specific vulnerabilities. Many of the known issues can be mitigated at the kernel level (protecting processes from each other) or at the hypervisor level (protecting VMs), often with the help of CPU microcode updates and various defenses (many of which can come with serious performance impact). In Cloudflare Workers, tenants are isolated from each other using V8 isolates — not processes nor VMs. This means that Workers cannot necessarily rely on OS or hypervisor patches to prevent Spectre. Workers need its own strategy. ### Why not use process isolation? Cloudflare Workers is designed to run your code in every single Cloudflare location. Workers is designed to be a platform accessible to everyone. It needs to handle a huge number of tenants, where many tenants get very little traffic. Combine these two points and planning becomes difficult. A typical, non-edge serverless provider could handle a low-traffic tenant by sending all of that tenant’s traffic to a single machine, so that only one copy of the application needs to be loaded. If the machine can handle, say, a dozen tenants, that is plenty. That machine can be hosted in a massive data center with millions of machines, achieving economies of scale. However, this centralization incurs latency and worldwide bandwidth costs when the users are not nearby. With Workers, on the other hand, every tenant, regardless of traffic level, currently runs in every Cloudflare location. And in the quest to get as close to the end user as possible, Cloudflare sometimes chooses locations that only have space for a limited number of machines. The net result is that Cloudflare needs to be able to host thousands of active tenants per machine, with the ability to rapidly spin up inactive ones on-demand. That means that each guest cannot take more than a couple megabytes of memory — hardly enough space for a call stack, much less everything else that a process needs. Moreover, Cloudflare need context switching to be computationally efficient. Many Workers resident in memory will only handle an event every now and then, and many Workers spend less than a fraction of a millisecond on any particular event. In this environment, a single core can easily find itself switching between thousands of different tenants every second. To handle one event, a significant amount of communication needs to happen between the guest application and its host, meaning still more switching and communications overhead. If each tenant lives in its own process, all this overhead is orders of magnitude larger than if many tenants live in a single process. When using strict process isolation in Workers, the CPU cost can easily be 10x what it is with a shared process. In order to keep Workers inexpensive, fast, and accessible to everyone, Cloudflare needed to find a way to host multiple tenants in a single process. ### There is no fix for Spectre Spectre does not have an official solution. Not even when using heavyweight virtual machines. Everyone is still vulnerable. The industry encounters new Spectre attacks. Every couple months, researchers uncover a new Spectre vulnerability, CPU vendors release new microcode, and OS vendors release kernel patches. Everyone must continue updating. But is it enough to merely deploy the latest patches? More vulnerabilities exist but have not yet been publicized. To defend against Spectre, Cloudflare needed to take a different approach. It is not enough to block individual known vulnerabilities. Instead, entire classes of vulnerabilities must be addressed at once. ### Building a defense It is unlikely that any all-encompassing fix for Spectre will be found. However, the following thought experiment raises points to consider: Fundamentally, all Spectre vulnerabilities use side channels to detect hidden processor state. Side channels, by definition, involve observing some non-deterministic behavior of a system. Conveniently, most software execution environments try hard to eliminate non-determinism, because non-deterministic execution makes applications unreliable. However, there are a few sorts of non-determinism that are still common. The most obvious among these is timing. The industry long ago gave up on the idea that a program should take the same amount of time every time it runs, because deterministic timing is fundamentally at odds with heuristic performance optimization. Most Spectre attacks focus on timing as a way to detect the hidden microarchitectural state of the CPU. Some have proposed that this can be solved by making timers inaccurate or adding random noise. However, it turns out that this does not stop attacks; it only makes them slower. If the timer tracks real time at all, then anything you can do to make it inaccurate can be overcome by running an attack multiple times and using statistics to filter out inconsistencies. Many security researchers see this as the end of the story. What good is slowing down an attack if the attack is still possible? ### Cascading slow-downs However, measures that slow down an attack can be powerful. The key insight is this: as an attack becomes slower, new techniques become practical to make it even slower still. The goal, then, is to chain together enough techniques that an attack becomes so slow as to be uninteresting. Much of cryptography, after all, is technically vulnerable to brute force attacks — technically, with enough time, you can break it. But when the time required is thousands (or even billions) of years, this is a sufficient defense. What can be done to slow down Spectre attacks to the point of meaninglessness? ## Freezing a Spectre attack ### Step 0: Do not allow native code Workers does not allow our customers to upload native-code binaries to run on the Cloudflare network — only JavaScript and WebAssembly. Many other languages, like Python, Rust, or even Cobol, can be compiled or transpiled to one of these two formats. Both are passed through V8 to convert these formats into true native code. This, in itself, does not necessarily make Spectre attacks harder. However, this is presented as step 0 because it is fundamental to enabling the following steps. Accepting native code programs implies being beholden to an existing CPU architecture (typically, x86). In order to execute code with reasonable performance, it is usually necessary to run the code directly on real hardware, severely limiting the host’s control over how that execution plays out. For example, a kernel or hypervisor has no ability to prohibit applications from invoking the `CLFLUSH` instruction, an instruction [which is useful in side channel attacks](https://gruss.cc/files/flushflush.pdf) and almost nothing else. Moreover, supporting native code typically implies supporting whole existing operating systems and software stacks, which bring with them decades of expectations about how the architecture works under them. For example, x86 CPUs allow a kernel or hypervisor to disable the RDTSC instruction, which reads a high-precision timer. Realistically, though, disabling it will break many programs because they are implemented to use RDTSC any time they want to know the current time. Supporting native code would limit choice in future mitigation techniques. There is greater freedom in using an abstract intermediate format. ### Step 1: Disallow timers and multi-threading In Workers, you can get the current time using the JavaScript Date API by calling `Date.now()`. However, the time value returned is not the current time. `Date.now()` returns the time of the last I/O. It does not advance during code execution. For example, if an attacker writes: ```js let start = Date.now(); for (let i = 0; i < 1e6; i++) { doSpectreAttack(); } let end = Date.now(); ``` The values of `start` and `end` will always be exactly the same. The attacker cannot use `Date` to measure the execution time of their code, which they would need to do to carry out an attack. Note This measure was implemented in mid-2017, before Spectre was announced. This measure was implemented because Cloudflare was already concerned about side channel timing attacks. The Workers team has designed the system with side channels in mind. Similarly, multi-threading and shared memory are not permitted in Workers. Everything related to the processing of one event happens on the same thread. Otherwise, one would be able to race threads in order to guess and check the underlying timer. Multiple Workers are not allowed to operate on the same request concurrently. For example, if you have installed a Cloudflare App on your zone which is implemented using Workers, and your zone itself also uses Workers, then a request to your zone may actually be processed by two Workers in sequence. These run in the same thread. At this point, measuring code execution time locally is prevented. However, it can still be measured remotely. For example, the HTTP client that is sending a request to trigger the execution of the Worker can measure how long it takes for the Worker to respond. Such a measurement is likely to be very noisy, as it would have to traverse the Internet and incur general networking costs. Such noise can be overcome, in theory, by executing the attack many times and taking an average. Note It has been suggested that if Workers reset its execution environment on every request, that Workers would be in a much safer position against timing attacks. Unfortunately, it is not so simple. The execution state could be stored in a client — not the Worker itself — allowing a Worker to resume its previous state on every new request. In adversarial testing and with help from leading Spectre experts, Cloudflare has not been able to develop a remote timing attack that works in production. However, the lack of a working attack does not mean that Workers should stop building defenses. Instead, the Workers team is currently testing some more advanced measures. ### Step 2: Dynamic process isolation If an attack is possible at all, it would take a long time to run — hours at the very least, maybe as long as weeks. But once an attack has been running even for a second, there is a large amount of new data that can be used to trigger further measures. Spectre attacks exhibit abnormal behavior that would not usually be seen in a normal program. These attacks intentionally try to create pathological performance scenarios in order to amplify microarchitectural effects. This is especially true when the attack has already been forced to run billions of times in a loop in order to overcome other mitigations, like those discussed above. This tends to show up in metrics like CPU performance counters. Now, the usual problem with using performance metrics to detect Spectre attacks is that there are sometimes false positives. Sometimes, a legitimate program behaves poorly. The runtime cannot shut down every application that has poor performance. Instead, the runtime chooses to reschedule any Worker with suspicious performance metrics into its own process. As described above, the runtime cannot do this with every Worker because the overhead would be too high. However, it is acceptable to isolate a few Worker processes as a defense mechanism. If the Worker is legitimate, it will keep operating, with a little more overhead. Fortunately, Cloudflare can relocate a Worker into its own process at basically any time. In fact, elaborate performance-counter based triggering may not even be necessary here. If a Worker uses a large amount of CPU time per event, then the overhead of isolating it in its own process is relatively less because it switches context less often. So, the runtime might as well use process isolation for any Worker that is CPU-hungry. Once a Worker is isolated, Cloudflare can rely on the operating system’s Spectre defenses, as most desktop web browsers do. Cloudflare has been working with the experts at Graz Technical University to develop this approach. TU Graz’s team co-discovered Spectre itself and has been responsible for a huge number of the follow-on discoveries since then. Cloudflare has developed the ability to dynamically isolate Workers and has identified metrics which reliably detect attacks. As mentioned previously, process isolation is not a complete defense. Over time, Spectre attacks tend to be slower to carry out which means Cloudflare has the ability to reasonably guess and identify malicious actors. Isolating the process further slows down the potential attack. ### Step 3: Periodic whole-memory shuffling At this point, all known attacks have been prevented. This leaves Workers susceptible to unknown attacks in the future, as with all other CPU-based systems. However, all new attacks will generally be very slow, taking days or longer, leaving Cloudflare with time to prepare a defense. For example, it is within reason to restart the entire Workers runtime on a daily basis. This will reset the locations of everything in memory, forcing attacks to restart the process of discovering the locations of secrets. Cloudflare can also reschedule Workers across physical machines or cordons, so that the window to attack any particular neighbor is limited. In general, because Workers are fundamentally preemptible (unlike containers or VMs), Cloudflare has a lot of freedom to frustrate attacks. Cloudflare sees this as an ongoing investment — not something that will ever be done. --- title: Billing and Limitations · Cloudflare Workers docs description: Billing, troubleshooting, and limitations for Static assets on Workers lastUpdated: 2025-06-20T19:49:19.000Z chatbotDeprioritize: false source_url: html: https://developers.cloudflare.com/workers/static-assets/billing-and-limitations/ md: https://developers.cloudflare.com/workers/static-assets/billing-and-limitations/index.md --- ## Billing Requests to a project with static assets can either return static assets or invoke the Worker script, depending on if the request [matches a static asset or not](https://developers.cloudflare.com/workers/static-assets/routing/). * Requests to static assets are free and unlimited. Requests to the Worker script (for example, in the case of SSR content) are billed according to Workers pricing. Refer to [pricing](https://developers.cloudflare.com/workers/platform/pricing/#example-2) for an example. * There is no additional cost for storing Assets. * **Important note for free tier users**: When using [`run_worker_first`](https://developers.cloudflare.com/workers/static-assets/binding/#run_worker_first), requests matching the specified patterns will always invoke your Worker script. If you exceed your free tier request limits, these requests will receive a 429 (Too Many Requests) response instead of falling back to static asset serving. Negative patterns (patterns beginning with `!/`) will continue to serve assets correctly, as requests are directed to assets, without invoking your Worker script. ## Limitations See the [Platform Limits](https://developers.cloudflare.com/workers/platform/limits/#static-assets) ## Troubleshooting * `assets.bucket is a required field` — if you see this error, you need to update Wrangler to at least `3.78.10` or later. `bucket` is not a required field. --- title: Configuration and Bindings · Cloudflare Workers docs description: Details on how to configure Workers static assets and its binding. lastUpdated: 2025-07-08T14:55:14.000Z chatbotDeprioritize: false source_url: html: https://developers.cloudflare.com/workers/static-assets/binding/ md: https://developers.cloudflare.com/workers/static-assets/binding/index.md --- Configuring a Worker with assets requires specifying a [directory](https://developers.cloudflare.com/workers/static-assets/binding/#directory) and, optionally, an [assets binding](https://developers.cloudflare.com/workers/static-assets/binding/), in your Worker's Wrangler file. The [assets binding](https://developers.cloudflare.com/workers/static-assets/binding/) allows you to dynamically fetch assets from within your Worker script (e.g. `env.ASSETS.fetch()`), similarly to how you might with a make a `fetch()` call with a [Service binding](https://developers.cloudflare.com/workers/runtime-apis/bindings/service-bindings/http/). Only one collection of static assets can be configured in each Worker. ## `directory` The folder of static assets to be served. For many frameworks, this is the `./public/`, `./dist/`, or `./build/` folder. * wrangler.jsonc ```jsonc { "name": "my-worker", "compatibility_date": "2024-09-19", "assets": { "directory": "./public/" } } ``` * wrangler.toml ```toml name = "my-worker" compatibility_date = "2024-09-19" assets = { directory = "./public/" } ``` ### Ignoring assets Sometime there are files in the asset directory that should not be uploaded. In this case, create a `.assetsignore` file in the root of the assets directory. This file takes the same format as `.gitignore`. Wrangler will not upload asset files that match lines in this file. **Example** You are migrating from a Pages project where the assets directory is `dist`. You do not want to upload the server-side Worker code nor Pages configuration files as public client-side assets. Add the following `.assetsignore` file: ```txt _worker.js _redirects _headers ``` Now Wrangler will not upload these files as client-side assets when deploying the Worker. ## `run_worker_first` Controls whether to invoke the Worker script regardless of a request which would have otherwise matched an asset. `run_worker_first = false` (default) will serve any static asset matching a request, while `run_worker_first = true` will unconditionally [invoke your Worker script](https://developers.cloudflare.com/workers/static-assets/routing/worker-script/#run-your-worker-script-first). * wrangler.jsonc ```jsonc { "name": "my-worker", "compatibility_date": "2024-09-19", "main": "src/index.ts", "assets": { "directory": "./public/", "binding": "ASSETS", "run_worker_first": true } } ``` * wrangler.toml ```toml name = "my-worker" compatibility_date = "2024-09-19" main = "src/index.ts" # The following configuration unconditionally invokes the Worker script at # `src/index.ts`, which can programatically fetch assets via the ASSETS binding [assets] directory = "./public/" binding = "ASSETS" run_worker_first = true ``` You can also specify `run_worker_first` as an array of route patterns to selectively run the Worker script first only for specific routes. The array supports glob patterns with `*` for deep matching and negative patterns with `!` prefix. Negative patterns have precedence over non-negative patterns. The Worker will run first when a non-negative pattern matches and none of the negative pattern matches. The order in which the patterns are listed is not significant. `run_worker_first` is often paired with the [`not_found_handling = "single-page-application"` setting](https://developers.cloudflare.com/workers/static-assets/routing/single-page-application/#advanced-routing-control): * wrangler.jsonc ```jsonc { "name": "my-spa-worker", "compatibility_date": "2025-07-16", "main": "./src/index.ts", "assets": { "directory": "./dist/", "not_found_handling": "single-page-application", "binding": "ASSETS", "run_worker_first": ["/api/*", "!/api/docs/*"] } } ``` * wrangler.toml ```toml name = "my-spa-worker" compatibility_date = "2025-07-16" main = "./src/index.ts" [assets] directory = "./dist/" not_found_handling = "single-page-application" binding = "ASSETS" run_worker_first = [ "/api/*", "!/api/docs/*" ] ``` In this configuration, requests to `/api/*` routes will invoke the Worker script first, except for `/api/docs/*` which will follow the default asset-first routing behavior. ## `binding` Configuring the optional [binding](https://developers.cloudflare.com/workers/runtime-apis/bindings) gives you access to the collection of assets from within your Worker script. * wrangler.jsonc ```jsonc { "name": "my-worker", "main": "./src/index.js", "compatibility_date": "2024-09-19", "assets": { "directory": "./public/", "binding": "ASSETS" } } ``` * wrangler.toml ```toml name = "my-worker" main = "./src/index.js" compatibility_date = "2024-09-19" [assets] directory = "./public/" binding = "ASSETS" ``` In the example above, assets would be available through `env.ASSETS`. ### Runtime API Reference #### `fetch()` **Parameters** * `request: Request | URL | string` Pass a [Request object](https://developers.cloudflare.com/workers/runtime-apis/request/), URL object, or URL string. Requests made through this method have `html_handling` and `not_found_handling` configuration applied to them. **Response** * `Promise` Returns a static asset response for the given request. **Example** Your dynamic code can make new, or forward incoming requests to your project's static assets using the assets binding. For example, `env.ASSETS.fetch(request)`, `env.ASSETS.fetch(new URL('https://assets.local/my-file'))` or `env.ASSETS.fetch('https://assets.local/my-file')`. Take the following example that configures a Worker script to return a response under all requests headed for `/api/`. Otherwise, the Worker script will pass the incoming request through to the asset binding. In this case, because a Worker script is only invoked when the requested route has not matched any static assets, this will always evaluate [`not_found_handling`](https://developers.cloudflare.com/workers/static-assets/#routing-behavior) behavior. * JavaScript ```js export default { async fetch(request, env) { const url = new URL(request.url); if (url.pathname.startsWith("/api/")) { // TODO: Add your custom /api/* logic here. return new Response("Ok"); } // Passes the incoming request through to the assets binding. // No asset matched this request, so this will evaluate `not_found_handling` behavior. return env.ASSETS.fetch(request); }, }; ``` * TypeScript ```ts interface Env { ASSETS: Fetcher; } export default { async fetch(request, env): Promise { const url = new URL(request.url); if (url.pathname.startsWith("/api/")) { // TODO: Add your custom /api/* logic here. return new Response("Ok"); } // Passes the incoming request through to the assets binding. // No asset matched this request, so this will evaluate `not_found_handling` behavior. return env.ASSETS.fetch(request); }, } satisfies ExportedHandler; ``` ## Routing configuration For the various static asset routing configuration options, refer to [Routing](https://developers.cloudflare.com/workers/static-assets/routing/). ## Smart Placement [Smart Placement](https://developers.cloudflare.com/workers/configuration/smart-placement/) can be used to place a Worker's code close to your back-end infrastructure. Smart Placement will only have an effect if you specified a `main`, pointing to your Worker code. ### Smart Placement with Worker Code First If you desire to run your [Worker code ahead of assets](https://developers.cloudflare.com/workers/static-assets/routing/worker-script/#run-your-worker-script-first) by setting `run_worker_first=true`, all requests must first travel to your Smart-Placed Worker. As a result, you may experience increased latency for asset requests. Use Smart Placement with `run_worker_first=true` when you need to integrate with other backend services, authenticate requests before serving any assets, or if your want to make modifications to your assets before serving them. If you want some assets served as quickly as possible to the user, but others to be served behind a smart-placed Worker, considering splitting your app into multiple Workers and [using service bindings to connect them](https://developers.cloudflare.com/workers/configuration/smart-placement/#best-practices). ### Smart Placement with Assets First Enabling Smart Placement with `run_worker_first=false` (or not specifying it) lets you serve assets from as close as possible to your users, but moves your Worker logic to run most efficiently (such as near a database). Use Smart Placement with `run_worker_first=false` (or not specifying it) when prioritizing fast asset delivery. This will not impact the [default routing behavior](https://developers.cloudflare.com/workers/static-assets/#routing-behavior). --- title: Direct Uploads · Cloudflare Workers docs description: Upload assets through the Workers API. lastUpdated: 2025-05-22T12:56:11.000Z chatbotDeprioritize: false source_url: html: https://developers.cloudflare.com/workers/static-assets/direct-upload/ md: https://developers.cloudflare.com/workers/static-assets/direct-upload/index.md --- Note Directly uploading assets via APIs is an advanced approach which, unless you are building a programatic integration, most users will not need. Instead, we encourage users to deploy your Worker with [Wrangler](https://developers.cloudflare.com/workers/static-assets/get-started/#1-create-a-new-worker-project-using-the-cli). Our API empowers users to upload and include static assets as part of a Worker. These static assets can be served for free, and additionally, users can also fetch assets through an optional [assets binding](https://developers.cloudflare.com/workers/static-assets/binding/) to power more advanced applications. This guide will describe the process for attaching assets to your Worker directly with the API. * Workers ```mermaid sequenceDiagram participant User participant Workers API User<<->>Workers API: Submit manifest
    POST /client/v4/accounts/:accountId/workers/scripts/:scriptName/assets-upload-session User<<->>Workers API: Upload files
    POST /client/v4/accounts/:accountId/workers/assets/upload?base64=true User<<->>Workers API: Upload script version
    PUT /client/v4/accounts/:accountId/workers/scripts/:scriptName ``` * Workers for Platforms ```mermaid sequenceDiagram participant User participant Workers API User<<->>Workers API: Submit manifest
    POST /client/v4/accounts/:accountId/workers/dispatch/namespaces/:dispatchNamespace/scripts/:scriptName/assets-upload-session User<<->>Workers API: Upload files
    POST /client/v4/accounts/:accountId/workers/assets/upload?base64=true User<<->>Workers API: Upload script version
    PUT /client/v4/accounts/:accountId/workers/dispatch/namespaces/:dispatchNamespace/scripts/:scriptName ``` The asset upload flow can be distilled into three distinct phases: 1. Registration of a manifest 2. Upload of the assets 3. Deployment of the Worker ## Upload manifest The asset manifest is a ledger which keeps track of files we want to use in our Worker. This manifest is used to track assets associated with each Worker version, and eliminate the need to upload unchanged files prior to a new upload. The [manifest upload request](https://developers.cloudflare.com/api/resources/workers/subresources/scripts/subresources/assets/subresources/upload/methods/create/) describes each file which we intend to upload. Each file is its own key representing the file path and name, and is an object which contains metadata about the file. `hash` represents a 32 hexadecimal character hash of the file, while `size` is the size (in bytes) of the file. * Workers ```bash curl -X POST https://api.cloudflare.com/client/v4/accounts/{account_id}/workers/scripts/{script_name}/assets-upload-session \ --header 'content-type: application/json' \ --header 'Authorization: Bearer ' \ --data '{ "manifest": { "/filea.html": { "hash": "08f1dfda4574284ab3c21666d1", "size": 12 }, "/fileb.html": { "hash": "4f1c1af44620d531446ceef93f", "size": 23 }, "/filec.html": { "hash": "54995e302614e0523757a04ec1", "size": 23 } } }' ``` * Workers for Platforms ```bash curl -X POST https://api.cloudflare.com/client/v4/accounts/{account_id}/workers/dispatch/namespaces/{dispatch_namespace}/scripts/{script_name}/assets-upload-session \ --header 'content-type: application/json' \ --header 'Authorization: Bearer ' \ --data '{ "manifest": { "/filea.html": { "hash": "08f1dfda4574284ab3c21666d1", "size": 12 }, "/fileb.html": { "hash": "4f1c1af44620d531446ceef93f", "size": 23 }, "/filec.html": { "hash": "54995e302614e0523757a04ec1", "size": 23 } } }' ``` The resulting response will contain a JWT, which provides authentication during file upload. The JWT is valid for one hour. In addition to the JWT, the response instructs users how to optimally batch upload their files. These instructions are encoded in the `buckets` field. Each array in `buckets` contains a list of file hashes which should be uploaded together. Unmodified files will not be returned in the `buckets` field (as they do not need to be re-uploaded) if they have recently been uploaded in previous versions of your Worker. ```json { "result": { "jwt": "", "buckets": [ ["08f1dfda4574284ab3c21666d1", "4f1c1af44620d531446ceef93f"], ["54995e302614e0523757a04ec1"] ] }, "success": true, "errors": null, "messages": null } ``` Note If all assets have been previously uploaded, `buckets` will be empty, and `jwt` will contain a completion token. Uploading files is not necessary, and you can skip directly to [uploading a new script or version](https://developers.cloudflare.com/workers/static-assets/direct-upload/#createdeploy-new-version). ### Limitations * Each file must be under 25 MiB * The overall manifest must not contain more than 20,000 file entries ## Upload Static Assets The [file upload API](https://developers.cloudflare.com/api/resources/workers/subresources/assets/subresources/upload/methods/create/) requires files be uploaded using `multipart/form-data`. The contents of each file must be base64 encoded, and the `base64` query parameter in the URL must be set to `true`. The provided `Content-Type` header of each file part will be attached when eventually serving the file. If you wish to avoid sending a `Content-Type` header in your deployment, `application/null` may be sent at upload time. The `Authorization` header must be provided as a bearer token, using the JWT (upload token) from the aforementioned manifest upload call. Once every file in the manifest has been uploaded, a status code of 201 will be returned, with the `jwt` field present. This JWT is a final "completion" token which can be used to create a deployment of a Worker with this set of assets. This completion token is valid for 1 hour. ## Create/Deploy New Version [Script](https://developers.cloudflare.com/api/resources/workers/subresources/scripts/methods/update/), [Version](https://developers.cloudflare.com/api/resources/workers/subresources/scripts/subresources/versions/methods/create/), and [Workers for Platform script](https://developers.cloudflare.com/api/resources/workers_for_platforms/subresources/dispatch/subresources/namespaces/subresources/scripts/methods/update/) upload endpoints require specifying a metadata part in the form data. Here, we can provide the completion token from the previous (upload assets) step. ```bash { "main_module": "main.js", "assets": { "jwt": "" }, "compatibility_date": "2021-09-14" } ``` If this is a Worker which already has assets, and you wish to just re-use the existing set of assets, we do not have to specify the completion token again. Instead, we can pass the boolean `keep_assets` option. ```bash { "main_module": "main.js", "keep_assets": true, "compatibility_date": "2021-09-14" } ``` Asset [routing configuration](https://developers.cloudflare.com/workers/wrangler/configuration/#assets) can be provided in the `assets` object, such as `html_handling` and `not_found_handling`. ```bash { "main_module": "main.js", "assets": { "jwt": "", "config" { "html_handling": "auto-trailing-slash" } }, "compatibility_date": "2021-09-14" } ``` Optionally, an assets binding can be provided if you wish to fetch and serve assets from within your Worker code. ```bash { "main_module": "main.js", "assets": { ... }, "bindings": [ ... { "name": "ASSETS", "type": "assets" } ... ] "compatibility_date": "2021-09-14" } ``` ## Programmatic Example * JavaScript ```js import * as fs from "fs"; import * as path from "path"; import * as crypto from "crypto"; import { FormData, fetch } from "undici"; import "node:process"; const accountId = ""; // Replace with your actual account ID const filesDirectory = "assets"; // Adjust to your assets directory const scriptName = "my-new-script"; // Replace with desired script name const dispatchNamespace = ""; // Replace with a dispatch namespace if using Workers for Platforms // Function to calculate the SHA-256 hash of a file and truncate to 32 characters function calculateFileHash(filePath) { const hash = crypto.createHash("sha256"); const fileBuffer = fs.readFileSync(filePath); hash.update(fileBuffer); const fileHash = hash.digest("hex").slice(0, 32); // Grab the first 32 characters const fileSize = fileBuffer.length; return { fileHash, fileSize }; } // Function to gather file metadata for all files in the directory function gatherFileMetadata(directory) { const files = fs.readdirSync(directory); const fileMetadata = {}; files.forEach((file) => { const filePath = path.join(directory, file); const { fileHash, fileSize } = calculateFileHash(filePath); fileMetadata["/" + file] = { hash: fileHash, size: fileSize, }; }); return fileMetadata; } function findMatch(fileHash, fileMetadata) { for (let prop in fileMetadata) { const file = fileMetadata[prop]; if (file.hash === fileHash) { return prop; } } throw new Error("unknown fileHash"); } // Function to upload a batch of files using the JWT from the first response async function uploadFilesBatch(jwt, fileHashes, fileMetadata) { const form = new FormData(); for (const bucket of fileHashes) { bucket.forEach((fileHash) => { const fullPath = findMatch(fileHash, fileMetadata); const relPath = filesDirectory + "/" + path.basename(fullPath); const fileBuffer = fs.readFileSync(relPath); const base64Data = fileBuffer.toString("base64"); // Convert file to Base64 form.append( fileHash, new File([base64Data], fileHash, { type: "text/html", // Modify Content-Type header based on type of file }), fileHash, ); }); const response = await fetch( `https://api.cloudflare.com/client/v4/accounts/${accountId}/workers/assets/upload?base64=true`, { method: "POST", headers: { Authorization: `Bearer ${jwt}`, }, body: form, }, ); const data = await response.json(); if (data && data.result.jwt) { return data.result.jwt; } } throw new Error("Should have received completion token"); } async function scriptUpload(completionToken) { const form = new FormData(); // Configure metadata form.append( "metadata", JSON.stringify({ main_module: "index.mjs", compatibility_date: "2022-03-11", assets: { jwt: completionToken, // Provide the completion token from file uploads }, bindings: [{ name: "ASSETS", type: "assets" }], // Optional assets binding to fetch from user worker }), ); // Configure (optional) user worker form.append( "index.js", new File( [ "export default {async fetch(request, env) { return new Response('Hello world from user worker!'); }}", ], "index.mjs", { type: "application/javascript+module", }, ), ); const url = dispatchNamespace ? `https://api.cloudflare.com/client/v4/accounts/${accountId}/workers/dispatch/namespaces/${dispatchNamespace}/scripts/${scriptName}` : `https://api.cloudflare.com/client/v4/accounts/${accountId}/workers/scripts/${scriptName}`; const response = await fetch(url, { method: "PUT", headers: { Authorization: `Bearer ${process.env.CLOUDFLARE_API_TOKEN}`, }, body: form, }); if (response.status != 200) { throw new Error("unexpected status code"); } } // Function to make the POST request to start the assets upload session async function startUploadSession() { const fileMetadata = gatherFileMetadata(filesDirectory); const requestBody = JSON.stringify({ manifest: fileMetadata, }); const url = dispatchNamespace ? `https://api.cloudflare.com/client/v4/accounts/${accountId}/workers/dispatch/namespaces/${dispatchNamespace}/scripts/${scriptName}/assets-upload-session` : `https://api.cloudflare.com/client/v4/accounts/${accountId}/workers/scripts/${scriptName}/assets-upload-session`; const response = await fetch(url, { method: "POST", headers: { Authorization: `Bearer ${process.env.CLOUDFLARE_API_TOKEN}`, "Content-Type": "application/json", }, body: requestBody, }); const data = await response.json(); const jwt = data.result.jwt; return { uploadToken: jwt, buckets: data.result.buckets, fileMetadata, }; } // Begin the upload session by uploading a new manifest const { uploadToken, buckets, fileMetadata } = await startUploadSession(); // If all files are already uploaded, a completion token will be immediately returned. Otherwise, // we should upload the missing files let completionToken = uploadToken; if (buckets.length > 0) { completionToken = await uploadFilesBatch(uploadToken, buckets, fileMetadata); } // Once we have uploaded all of our files, we can upload a new script, and assets, with completion token await scriptUpload(completionToken); ``` * TypeScript ```ts import * as fs from "fs"; import * as path from "path"; import * as crypto from "crypto"; import { FormData, fetch } from "undici"; import "node:process"; const accountId: string = ""; // Replace with your actual account ID const filesDirectory: string = "assets"; // Adjust to your assets directory const scriptName: string = "my-new-script"; // Replace with desired script name const dispatchNamespace: string = ""; // Replace with a dispatch namespace if using Workers for Platforms interface FileMetadata { hash: string; size: number; } interface UploadSessionData { uploadToken: string; buckets: string[][]; fileMetadata: Record; } interface UploadResponse { result: { jwt: string; buckets: string[][]; }; success: boolean; errors: any; messages: any; } // Function to calculate the SHA-256 hash of a file and truncate to 32 characters function calculateFileHash(filePath: string): { fileHash: string; fileSize: number; } { const hash = crypto.createHash("sha256"); const fileBuffer = fs.readFileSync(filePath); hash.update(fileBuffer); const fileHash = hash.digest("hex").slice(0, 32); // Grab the first 32 characters const fileSize = fileBuffer.length; return { fileHash, fileSize }; } // Function to gather file metadata for all files in the directory function gatherFileMetadata(directory: string): Record { const files = fs.readdirSync(directory); const fileMetadata: Record = {}; files.forEach((file) => { const filePath = path.join(directory, file); const { fileHash, fileSize } = calculateFileHash(filePath); fileMetadata["/" + file] = { hash: fileHash, size: fileSize, }; }); return fileMetadata; } function findMatch( fileHash: string, fileMetadata: Record, ): string { for (let prop in fileMetadata) { const file = fileMetadata[prop] as FileMetadata; if (file.hash === fileHash) { return prop; } } throw new Error("unknown fileHash"); } // Function to upload a batch of files using the JWT from the first response async function uploadFilesBatch( jwt: string, fileHashes: string[][], fileMetadata: Record, ): Promise { const form = new FormData(); for (const bucket of fileHashes) { bucket.forEach((fileHash) => { const fullPath = findMatch(fileHash, fileMetadata); const relPath = filesDirectory + "/" + path.basename(fullPath); const fileBuffer = fs.readFileSync(relPath); const base64Data = fileBuffer.toString("base64"); // Convert file to Base64 form.append( fileHash, new File([base64Data], fileHash, { type: "text/html", // Modify Content-Type header based on type of file }), fileHash, ); }); const response = await fetch( `https://api.cloudflare.com/client/v4/accounts/${accountId}/workers/assets/upload?base64=true`, { method: "POST", headers: { Authorization: `Bearer ${jwt}`, }, body: form, }, ); const data = (await response.json()) as UploadResponse; if (data && data.result.jwt) { return data.result.jwt; } } throw new Error("Should have received completion token"); } async function scriptUpload(completionToken: string): Promise { const form = new FormData(); // Configure metadata form.append( "metadata", JSON.stringify({ main_module: "index.mjs", compatibility_date: "2022-03-11", assets: { jwt: completionToken, // Provide the completion token from file uploads }, bindings: [{ name: "ASSETS", type: "assets" }], // Optional assets binding to fetch from user worker }), ); // Configure (optional) user worker form.append( "index.js", new File( [ "export default {async fetch(request, env) { return new Response('Hello world from user worker!'); }}", ], "index.mjs", { type: "application/javascript+module", }, ), ); const url = dispatchNamespace ? `https://api.cloudflare.com/client/v4/accounts/${accountId}/workers/dispatch/namespaces/${dispatchNamespace}/scripts/${scriptName}` : `https://api.cloudflare.com/client/v4/accounts/${accountId}/workers/scripts/${scriptName}`; const response = await fetch(url, { method: "PUT", headers: { Authorization: `Bearer ${process.env.CLOUDFLARE_API_TOKEN}`, }, body: form, }); if (response.status != 200) { throw new Error("unexpected status code"); } } // Function to make the POST request to start the assets upload session async function startUploadSession(): Promise { const fileMetadata = gatherFileMetadata(filesDirectory); const requestBody = JSON.stringify({ manifest: fileMetadata, }); const url = dispatchNamespace ? `https://api.cloudflare.com/client/v4/accounts/${accountId}/workers/dispatch/namespaces/${dispatchNamespace}/scripts/${scriptName}/assets-upload-session` : `https://api.cloudflare.com/client/v4/accounts/${accountId}/workers/scripts/${scriptName}/assets-upload-session`; const response = await fetch(url, { method: "POST", headers: { Authorization: `Bearer ${process.env.CLOUDFLARE_API_TOKEN}`, "Content-Type": "application/json", }, body: requestBody, }); const data = (await response.json()) as UploadResponse; const jwt = data.result.jwt; return { uploadToken: jwt, buckets: data.result.buckets, fileMetadata, }; } // Begin the upload session by uploading a new manifest const { uploadToken, buckets, fileMetadata } = await startUploadSession(); // If all files are already uploaded, a completion token will be immediately returned. Otherwise, // we should upload the missing files let completionToken = uploadToken; if (buckets.length > 0) { completionToken = await uploadFilesBatch(uploadToken, buckets, fileMetadata); } // Once we have uploaded all of our files, we can upload a new script, and assets, with completion token await scriptUpload(completionToken); ```
    --- title: Get Started · Cloudflare Workers docs description: Run front-end websites — static or dynamic — directly on Cloudflare's global network. lastUpdated: 2025-06-05T13:25:05.000Z chatbotDeprioritize: false source_url: html: https://developers.cloudflare.com/workers/static-assets/get-started/ md: https://developers.cloudflare.com/workers/static-assets/get-started/index.md --- For most front-end applications, you'll want to use a framework. Workers supports number of popular [frameworks](https://developers.cloudflare.com/workers/framework-guides/) that come with ready-to-use components, a pre-defined and structured architecture, and community support. View [framework specific guides](https://developers.cloudflare.com/workers/framework-guides/) to get started using a framework. Alternatively, you may prefer to build your website from scratch if: * You're interested in learning by implementing core functionalities on your own. * You're working on a simple project where you might not need a framework. * You want to optimize for performance by minimizing external dependencies. * You require complete control over every aspect of the application. * You want to build your own framework. This guide will instruct you through setting up and deploying a static site or a full-stack application without a framework on Workers. ## Deploy a static site This guide will instruct you through setting up and deploying a static site on Workers. ### 1. Create a new Worker project using the CLI [C3 (`create-cloudflare-cli`)](https://github.com/cloudflare/workers-sdk/tree/main/packages/create-cloudflare) is a command-line tool designed to help you set up and deploy new applications to Cloudflare. Open a terminal window and run C3 to create your Worker project: * npm ```sh npm create cloudflare@latest -- my-static-site ``` * yarn ```sh yarn create cloudflare my-static-site ``` * pnpm ```sh pnpm create cloudflare@latest my-static-site ``` For setup, select the following options: * For *What would you like to start with?*, choose `Hello World example`. * For *Which template would you like to use?*, choose `Static site`. * For *Which language do you want to use?*, choose `TypeScript`. * For *Do you want to use git for version control?*, choose `Yes`. * For *Do you want to deploy your application?*, choose `No` (we will be making some changes before deploying). After setting up your project, change your directory by running the following command: ```sh cd my-static-site ``` ### 2. Develop locally After you have created your Worker, run the [`wrangler dev`](https://developers.cloudflare.com/workers/wrangler/commands/#dev) in the project directory to start a local server. This will allow you to preview your project locally during development. ```sh npx wrangler dev ``` ### 3. Deploy your project Your project can be deployed to a `*.workers.dev` subdomain or a [Custom Domain](https://developers.cloudflare.com/workers/configuration/routing/custom-domains/), from your own machine or from any CI/CD system, including [Cloudflare's own](https://developers.cloudflare.com/workers/ci-cd/builds/). The [`wrangler deploy`](https://developers.cloudflare.com/workers/wrangler/commands/#deploy) will build and deploy your project. If you're using CI, ensure you update your ["deploy command"](https://developers.cloudflare.com/workers/ci-cd/builds/configuration/#build-settings) configuration appropriately. ```sh npx wrangler deploy ``` Note Learn about how assets are configured and how routing works from [Routing configuration](https://developers.cloudflare.com/workers/static-assets/routing/). ## Deploy a full-stack application This guide will instruct you through setting up and deploying dynamic and interactive server-side rendered (SSR) applications on Cloudflare Workers. When building a full-stack application, you can use any [Workers bindings](https://developers.cloudflare.com/workers/runtime-apis/bindings/), [including assets' own](https://developers.cloudflare.com/workers/static-assets/binding/), to interact with resources on the Cloudflare Developer Platform. ### 1. Create a new Worker project [C3 (`create-cloudflare-cli`)](https://github.com/cloudflare/workers-sdk/tree/main/packages/create-cloudflare) is a command-line tool designed to help you set up and deploy new applications to Cloudflare. Open a terminal window and run C3 to create your Worker project: * npm ```sh npm create cloudflare@latest -- my-dynamic-site ``` * yarn ```sh yarn create cloudflare my-dynamic-site ``` * pnpm ```sh pnpm create cloudflare@latest my-dynamic-site ``` For setup, select the following options: * For *What would you like to start with?*, choose `Hello World example`. * For *Which template would you like to use?*, choose `SSR / full-stack app`. * For *Which language do you want to use?*, choose `TypeScript`. * For *Do you want to use git for version control?*, choose `Yes`. * For *Do you want to deploy your application?*, choose `No` (we will be making some changes before deploying). After setting up your project, change your directory by running the following command: ```sh cd my-dynamic-site ``` ### 2. Develop locally After you have created your Worker, run the [`wrangler dev`](https://developers.cloudflare.com/workers/wrangler/commands/#dev) in the project directory to start a local server. This will allow you to preview your project locally during development. ```sh npx wrangler dev ``` ### 3. Modify your Project With your new project generated and running, you can begin to write and edit your project: * The `src/index.ts` file is populated with sample code. Modify its content to change the server-side behavior of your Worker. * The `public/index.html` file is populated with sample code. Modify its content, or anything else in `public/`, to change the static assets of your Worker. Then, save the files and reload the page. Your project's output will have changed based on your modifications. ### 4. Deploy your Project Your project can be deployed to a `*.workers.dev` subdomain or a [Custom Domain](https://developers.cloudflare.com/workers/configuration/routing/custom-domains/), from your own machine or from any CI/CD system, including [Cloudflare's own](https://developers.cloudflare.com/workers/ci-cd/builds/). The [`wrangler deploy`](https://developers.cloudflare.com/workers/wrangler/commands/#deploy) will build and deploy your project. If you're using CI, ensure you update your ["deploy command"](https://developers.cloudflare.com/workers/ci-cd/builds/configuration/#build-settings) configuration appropriately. ```sh npx wrangler deploy ``` Note Learn about how assets are configured and how routing works from [Routing configuration](https://developers.cloudflare.com/workers/static-assets/routing/). --- title: Headers · Cloudflare Workers docs description: "When serving static assets, Workers will attach some headers to the response by default. These are:" lastUpdated: 2025-05-01T19:25:08.000Z chatbotDeprioritize: false source_url: html: https://developers.cloudflare.com/workers/static-assets/headers/ md: https://developers.cloudflare.com/workers/static-assets/headers/index.md --- ## Default headers When serving static assets, Workers will attach some headers to the response by default. These are: * **`Content-Type`** A `Content-Type` header is attached to the response if one is provided during [the asset upload process](https://developers.cloudflare.com/workers/static-assets/direct-upload/). [Wrangler](https://developers.cloudflare.com/workers/wrangler/commands/#deploy) automatically determines the MIME type of the file, based on its extension. * **`Cache-Control: public, max-age=0, must-revalidate`** Sent when the request does not have an `Authorization` or `Range` header, this response header tells the browser that the asset can be cached, but that the browser should revalidate the freshness of the content every time before using it. This default behavior ensures good website performance for static pages, while still guaranteeing that stale content will never be served. * **`ETag`** This header complements the default `Cache-Control` header. Its value is a hash of the static asset file, and browsers can use this in subsequent requests with an `If-None-Match` header to check for freshness, without needing to re-download the entire file in the case of a match. * **`CF-Cache-Status`** This header indicates whether the asset was served from the cache (`HIT`) or not (`MISS`).[1](#user-content-fn-1) Cloudflare reserves the right to attach new headers to static asset responses at any time in order to improve performance or harden the security of your Worker application. ## Custom headers The default response headers served on static asset responses can be overridden, removed, or added to, by creating a plain text file called `_headers` without a file extension, in the static asset directory of your project. This file will not itself be served as a static asset, but will instead be parsed by Workers and its rules will be applied to static asset responses. If you are using a framework, you will often have a directory named `public/` or `static/`, and this usually contains deploy-ready assets, such as favicons, `robots.txt` files, and site manifests. These files get copied over to a final output directory during the build, so this is the perfect place to author your `_headers` file. If you are not using a framework, the `_headers` file can go directly into your [static assets directory](https://developers.cloudflare.com/workers/static-assets/binding/#directory). Headers defined in the `_headers` file override what Cloudflare ordinarily sends. Warning Custom headers defined in the `_headers` file are not applied to responses generated by your Worker code, even if the request URL matches a rule defined in `_headers`. If you use a server-side rendered (SSR) framework, have configured `assets.run_worker_first`, or otherwise use a Worker script, you will likely need to attach any custom headers you wish to apply directly within that Worker script. ### Attach a header Header rules are defined in multi-line blocks. The first line of a block is the URL or URL pattern where the rule's headers should be applied. On the next line, an indented list of header names and header values must be written: ```txt [url] [name]: [value] ``` Using absolute URLs is supported, though be aware that absolute URLs must begin with `https` and specifying a port is not supported. `_headers` rules ignore the incoming request's port and protocol when matching against an incoming request. For example, a rule like `https://example.com/path` would match against requests to `other://example.com:1234/path`. You can define as many `[name]: [value]` pairs as you require on subsequent lines. For example: ```txt # This is a comment /secure/page X-Frame-Options: DENY X-Content-Type-Options: nosniff Referrer-Policy: no-referrer /static/* Access-Control-Allow-Origin: * X-Robots-Tag: nosnippet https://myworker.mysubdomain.workers.dev/* X-Robots-Tag: noindex ``` An incoming request which matches multiple rules' URL patterns will inherit all rules' headers. Using the previous `_headers` file, the following requests will have the following headers applied: | Request URL | Headers | | - | - | | `https://custom.domain/secure/page` | `X-Frame-Options: DENY` `X-Content-Type-Options: nosniff` `Referrer-Policy: no-referrer` | | `https://custom.domain/static/image.jpg` | `Access-Control-Allow-Origin: *` `X-Robots-Tag: nosnippet` | | `https://myworker.mysubdomain.workers.dev/home` | `X-Robots-Tag: noindex` | | `https://myworker.mysubdomain.workers.dev/secure/page` | `X-Frame-Options: DENY` `X-Content-Type-Options: nosniff` `Referrer-Policy: no-referrer` `X-Robots-Tag: noindex` | | `https://myworker.mysubdomain.workers.dev/static/styles.css` | `Access-Control-Allow-Origin: *` `X-Robots-Tag: nosnippet, noindex` | You may define up to 100 header rules. Each line in the `_headers` file has a 2,000 character limit. The entire line, including spacing, header name, and value, counts towards this limit. If a header is applied twice in the `_headers` file, the values are joined with a comma separator. ### Detach a header You may wish to remove a default header or a header which has been added by a more pervasive rule. This can be done by prepending the header name with an exclamation mark and space (`! `). ```txt /* Content-Security-Policy: default-src 'self'; /*.jpg ! Content-Security-Policy ``` ### Match a path The same URL matching features that [`_redirects`](https://developers.cloudflare.com/workers/static-assets/redirects/) offers is also available to the `_headers` file. Note, however, that redirects are applied before headers, so when a request matches both a redirect and a header, the redirect takes priority. #### Splats When matching, a splat pattern — signified by an asterisk (`*`) — will greedily match all characters. You may only include a single splat in the URL. The matched value can be referenced within the header value as the `:splat` placeholder. #### Placeholders A placeholder can be defined with `:placeholder_name`. A colon (`:`) followed by a letter indicates the start of a placeholder and the placeholder name that follows must be composed of alphanumeric characters and underscores (`:[A-Za-z]\w*`). Every named placeholder can only be referenced once. Placeholders match all characters apart from the delimiter, which when part of the host, is a period (`.`) or a forward-slash (`/`) and may only be a forward-slash (`/`) when part of the path. Similarly, the matched value can be used in the header values with `:placeholder_name`. ```txt /movies/:title x-movie-name: You are watching ":title" ``` #### Examples ##### Cross-Origin Resource Sharing (CORS) To enable other domains to fetch every static asset from your Worker, the following can be added to the `_headers` file: ```txt /* Access-Control-Allow-Origin: * ``` This applies the `Access-Control-Allow-Origin` header to any incoming URL. To be more restrictive, you can define a URL pattern that applies to a `*.*.workers.dev` subdomain, which then only allows access from its [preview URLs](https://developers.cloudflare.com/workers/configuration/previews/): ```txt https://:worker.:subdomain.workers.dev/* Access-Control-Allow-Origin: https://*-:worker.:subdomain.workers.dev/ ``` ##### Prevent your workers.dev URLs showing in search results [Google](https://developers.google.com/search/docs/advanced/robots/robots_meta_tag#directives) and other search engines often support the `X-Robots-Tag` header to instruct its crawlers how your website should be indexed. For example, to prevent your `*.workers.dev` URLs from being indexed, add the following to your `_headers` file: ```txt https://*.workers.dev/* X-Robots-Tag: noindex ``` ##### Configure custom browser cache behavior If you have a folder of fingerprinted assets (assets which have a hash in their filename), you can configure more aggressive caching behavior in the browser to improve performance for repeat visitors: ```txt /static/* Cache-Control: public, max-age=31556952, immutable ``` ##### Harden security for an application Warning If you are server-side rendering (SSR) or using a Worker to generate responses in any other way and wish to attach security headers, the headers should be sent from the Worker's `Response` instead of using a `_headers` file. For example, if you have an API endpoint and want to allow cross-origin requests, you should ensure that your Worker code attaches CORS headers to its responses, including to `OPTIONS` requests. You can prevent click-jacking by informing browsers not to embed your application inside another (for example, with an ` ``` ## Methods * `play()` Promise * Start video playback. * `pause()` null * Pause video playback. ## Properties * `autoplay` boolean * Sets or returns whether the autoplay attribute was set, allowing video playback to start upon load. Note Some browsers prevent videos with audio from playing automatically. You may add the `mute` attribute to allow your videos to autoplay. For more information, review the [iOS video policies](https://webkit.org/blog/6784/new-video-policies-for-ios/). * `buffered` TimeRanges readonly * An object conforming to the TimeRanges interface. This object is normalized, which means that ranges are ordered, don't overlap, aren't empty, and don't touch (adjacent ranges are folded into one bigger range). * `controls` boolean * Sets or returns whether the video should display controls (like play/pause etc.) * `currentTime` integer * Returns the current playback time in seconds. Setting this value seeks the video to a new time. * `defaultTextTrack` * Will initialize the player with the specified language code's text track enabled. The value should be the BCP-47 language code that was used to [upload the text track](https://developers.cloudflare.com/stream/edit-videos/adding-captions/). If the specified language code has no captions available, the player will behave as though no language code had been provided. Note This will *only* work once during initialization. Beyond that point the user has full control over their text track settings. * `duration` integer readonly * Returns the duration of the video in seconds. * `ended` boolean readonly * Returns whether the video has ended. * `letterboxColor` string * Any valid [CSS color value](https://developer.mozilla.org/en-US/docs/Web/CSS/color_value) provided will be applied to the letterboxing/pillarboxing of the player's UI. This can be set to `transparent` to avoid letterboxing/pillarboxing when not in fullscreen mode. * `loop` boolean * Sets or returns whether the video should start over when it reaches the end * `muted` boolean * Sets or returns whether the audio should be played with the video * `paused` boolean readonly * Returns whether the video is paused * `played` TimeRanges readonly * An object conforming to the TimeRanges interface. This object is normalized, which means that ranges are ordered, don't overlap, aren't empty, and don't touch (adjacent ranges are folded into one bigger range). * `preload` boolean * Sets or returns whether the video should be preloaded upon element load. Note The ` --- title: Build branches · Cloudflare Workers docs description: Configure which git branches should trigger a Workers Build lastUpdated: 2025-05-26T07:39:18.000Z chatbotDeprioritize: false source_url: html: https://developers.cloudflare.com/workers/ci-cd/builds/build-branches/ md: https://developers.cloudflare.com/workers/ci-cd/builds/build-branches/index.md --- When you connect a git repository to Workers, commits made on the production git branch will produce a Workers Build. If you want to take advantage of [preview URLs](https://developers.cloudflare.com/workers/configuration/previews/) and [pull request comments](https://developers.cloudflare.com/workers/ci-cd/builds/git-integration/github-integration/#pull-request-comment), you can additionally enable "non-production branch builds" in order to trigger a build on all branches of your repository. ## Change production branch To change the production branch of your project: 1. In **Overview**, select your Workers project. 2. Go to **Settings** > **Build** > **Branch control**. Workers will default to the default branch of your git repository, but this can be changed in the dropdown. Every push event made to this branch will trigger a build and execute the [build command](https://developers.cloudflare.com/workers/ci-cd/builds/configuration/#build-command), followed by the [deploy command](https://developers.cloudflare.com/workers/ci-cd/builds/configuration/#deploy-command). ## Configure non-production branch builds To enable or disable non-production branch builds: 1. In **Overview**, select your Workers project. 2. Go to **Settings** > **Build** > **Branch control**. The checkbox allows you to enable or disable builds for non-production branches. When enabled, every push event made to a non-production branch will trigger a build and execute the [build command](https://developers.cloudflare.com/workers/ci-cd/builds/configuration/#build-command), followed by the [non-production branch deploy command](https://developers.cloudflare.com/workers/ci-cd/builds/configuration/#non-production-branch-deploy-command). --- title: Advanced setups · Cloudflare Workers docs description: Learn how to use Workers Builds with more advanced setups lastUpdated: 2025-05-28T19:18:33.000Z chatbotDeprioritize: false source_url: html: https://developers.cloudflare.com/workers/ci-cd/builds/advanced-setups/ md: https://developers.cloudflare.com/workers/ci-cd/builds/advanced-setups/index.md --- ## Monorepos A monorepo is a single repository that contains multiple applications. This setup can be useful for a few reasons: * **Simplified dependency management**: Manage dependencies across all your workers and shared packages from a single place using tools like [pnpm workspaces](https://pnpm.io/workspaces) and [syncpack](https://www.npmjs.com/package/syncpack). * **Code sharing and reuse**: Easily create and share common logic, types, and utilities between workers by creating shared packages. * **Atomic commits**: Changes affecting multiple workers or shared libraries can be committed together, making the history easier to understand and reducing the risk of inconsistencies. * **Consistent tooling**: Apply the same build, test, linting, and formatting configurations (e.g., via [Turborepo](https://turborepo.com) in for task orchestration and shared configs in `packages/`) across all projects, ensuring consistent tooling and code quality across Workers. * **Easier refactoring**: Refactoring code that spans multiple Workers or shared packages is significantly easier within a single repository. #### Example Workers monorepos: * [cloudflare/mcp-server-cloudflare](https://github.com/cloudflare/mcp-server-cloudflare) * [jahands/workers-monorepo-template](https://github.com/jahands/workers-monorepo-template) * [cloudflare/templates](https://github.com/cloudflare/templates) * [cloudflare/workers-sdk](https://github.com/cloudflare/workers-sdk) ### Getting Started To set up a monorepo workflow: 1. Find the Workers associated with your project in the [Workers & Pages Dashboard](https://dash.cloudflare.com). 2. Connect your monorepo to each Worker in the repository. 3. Set the root directory for each Worker to specify the location of its `wrangler.toml` and where build and deploy commands should run. 4. Optionally, configure unique build and deploy commands for each Worker. 5. Optionally, configure [build watch paths](https://developers.cloudflare.com/workers/ci-cd/builds/build-watch-paths/) for each Worker to monitor specific paths for changes. When a new commit is made to the monorepo, a new build and deploy will trigger for each Worker if the change is within each of its included watch paths. You can also check on the status of each build associated with your repository within GitHub with [check runs](https://developers.cloudflare.com/workers/ci-cd/builds/git-integration/github-integration/#check-run) or within GitLab with [commit statuses](https://developers.cloudflare.com/workers/ci-cd/builds/git-integration/gitlab-integration/#commit-status). ### Example In the example `ecommerce-monorepo`, a Workers project should be created for `product-service`, `order-service`, and `notification-service`. A Git connection to `ecommerce-monorepo` should be added in all of the Workers projects. If you are using a monorepo tool, such as [Turborepo](https://turbo.build/), you can configure a different deploy command for each Worker, for example, `turbo deploy -F product-service`. Set the root directory of each Worker to where its wrangler.toml is located. For example, for `product-service`, the root directory should be `/workers/product-service/`. Optionally, you can add [build watch paths](https://developers.cloudflare.com/workers/ci-cd/builds/build-watch-paths/) to optimize your builds. When a new commit is made to `ecommerce-monorepo`, a build and deploy will be triggered for each of the Workers if the change is within its included watch paths using the configured commands for that Worker. ```plaintext ecommerce-monorepo/ │ ├── workers/ │ ├── product-service/ │ │ ├── src/ │ │ └── wrangler.toml │ ├── order-service/ │ │ ├── src/ │ │ └── wrangler.toml │ └── notification-service/ │ ├── src/ │ └── wrangler.toml ├── packages/ │ └── schema/ └── README.md ``` ## Wrangler Environments You can use [Wrangler Environments](https://developers.cloudflare.com/workers/wrangler/environments/) with Workers Builds by completing the following steps: 1. [Deploy via Wrangler](https://developers.cloudflare.com/workers/wrangler/commands/#deploy) to create the Workers for your environments on the Dashboard, if you do not already have them. 2. Find the Workers for your environments. They are typically named `[name of Worker] - [environment name]`. 3. Connect your repository to each of the Workers for your environment. 4. In each of the Workers, edit your Wrangler commands to include the flag `--env: ` in the build configurations for both the deploy command, and the non-production branch deploy command ([if applicable](https://developers.cloudflare.com/workers/ci-cd/builds/build-branches/#configure-non-production-branch-builds)). When a new commit is detected in the repository, a new build/deploy will trigger for each associated Worker. ### Example Imagine you have a Worker named `my-worker`, and you want to set up two environments `staging` and `production` set in the `wrangler.jsonc`. If you have not already, you can deploy `my-worker` for each environment using the commands `wrangler deploy --env staging` and `wrangler deploy --env production`. In your Cloudflare Dashboard, you should find the two Workers `my-worker-staging` and `my-worker-production`. Then, connect the Git repository for the Worker, `my-worker`, to both of the environment Workers. In the build configurations of each environment Worker, edit the deploy commands to be `npx wrangler deploy --env staging` and `npx wrangler deploy --env production` and the non-production branch deploy commands to be `npx wrangler versions upload --env staging` and `npx wrangler versions upload --env production` respectively. --- title: Build caching · Cloudflare Workers docs description: Improve build times by caching build outputs and dependencies lastUpdated: 2025-06-05T13:25:05.000Z chatbotDeprioritize: false source_url: html: https://developers.cloudflare.com/workers/ci-cd/builds/build-caching/ md: https://developers.cloudflare.com/workers/ci-cd/builds/build-caching/index.md --- Improve Workers build times by caching dependencies and build output between builds with a project-wide shared cache. The first build to occur after enabling build caching on your Workers project will save relevant artifacts to cache. Every subsequent build will restore from cache unless configured otherwise. ## About build cache When enabled, build caching will automatically detect which package manager and framework the project is using from its `package.json` and cache data accordingly for the build. The following shows which package managers and frameworks are supported for dependency and build output caching respectively. ### Package managers Workers build cache will cache the global cache directories of the following package managers: | Package Manager | Directories cached | | - | - | | [npm](https://www.npmjs.com/) | `.npm` | | [yarn](https://yarnpkg.com/) | `.cache/yarn` | | [pnpm](https://pnpm.io/) | `.pnpm-store` | | [bun](https://bun.sh/) | `.bun/install/cache` | ### Frameworks Some frameworks provide a cache directory that is typically populated by the framework with intermediate build outputs or dependencies during build time. Workers Builds will automatically detect the framework you are using and cache this directory for reuse in subsequent builds. The following frameworks support build output caching: | Framework | Directories cached | | - | - | | Astro | `node_modules/.astro` | | Docusaurus | `node_modules/.cache`, `.docusaurus`, `build` | | Eleventy | `.cache` | | Gatsby | `.cache`, `public` | | Next.js | `.next/cache` | | Nuxt | `node_modules/.cache/nuxt` | Note [Static assets](https://developers.cloudflare.com/workers/static-assets/) and [frameworks](https://developers.cloudflare.com/workers/framework-guides/) are now supported in Cloudflare Workers. ### Limits The following limits are imposed for build caching: * **Retention**: Cache is purged 7 days after its last read date. Unread cache artifacts are purged 7 days after creation. * **Storage**: Every project is allocated 10 GB. If the project cache exceeds this limit, the project will automatically start deleting artifacts that were read least recently. ## Enable build cache To enable build caching: 1. Navigate to [Workers & Pages Overview](https://dash.cloudflare.com) on the Dashboard. 2. Find your Workers project. 3. Go to **Settings** > **Build** > **Build cache**. 4. Select **Enable** to turn on build caching. ## Clear build cache The build cache can be cleared for a project when needed, such as when debugging build issues. To clear the build cache: 1. Navigate to [Workers & Pages Overview](https://dash.cloudflare.com) on the Dashboard. 2. Find your Workers project. 3. Go to **Settings** > **Build** > **Build cache**. 4. Select **Clear Cache** to clear the build cache. --- title: Build image · Cloudflare Workers docs description: Understand the build image used in Workers Builds. lastUpdated: 2025-06-03T23:24:57.000Z chatbotDeprioritize: false source_url: html: https://developers.cloudflare.com/workers/ci-cd/builds/build-image/ md: https://developers.cloudflare.com/workers/ci-cd/builds/build-image/index.md --- Workers Builds uses a build image with support for a variety of languages and tools such as Node.js, Python, PHP, Ruby, and Go. ## Supported Tooling Workers Builds supports a variety of runtimes, languages, and tools. Builds will use the default versions listed below unless a custom version is detected or specified. You can [override the default versions](https://developers.cloudflare.com/workers/ci-cd/builds/build-image/#overriding-default-versions) using environment variables or version files. All versions are available for override. Default version updates The default versions will be updated regularly to the latest minor version. No major version updates will be made without notice. If you need a specific minor version, please specify it by [overriding the default version](https://developers.cloudflare.com/workers/ci-cd/builds/build-image/#overriding-default-versions). ### Runtime | Tool | Default version | Environment variable | File | | - | - | - | - | | **Go** | 1.24.3 | `GO_VERSION` | | | **Node.js** | 22.16.0 | `NODE_VERSION` | .nvmrc, .node-version | | **Python** | 3.13.3 | `PYTHON_VERSION` | .python-version, runtime.txt | | **Ruby** | 3.4.4 | `RUBY_VERSION` | .ruby-version | ### Tools and langauges | Tool | Default version | Environment variable | | - | - | - | | **Bun** | 1.2.15 | `BUN_VERSION` | | **Hugo** | extended\_0.147.7 | `HUGO_VERSION` | | **npm** | 10.9.2 | | | **yarn** | 4.9.1 | `YARN_VERSION` | | **pnpm** | 10.11.1 | `PNPM_VERSION` | | **pip** | 25.1.1 | | | **gem** | 3.6.9 | | | **poetry** | 2.1.3 | | | **pipx** | 1.7.1 | | | **bundler** | 2.6.9 | | ## Advanced Settings ### Overriding Default Versions If you need to override a [specific version](https://developers.cloudflare.com/workers/ci-cd/builds/build-image/#overriding-default-versions) of a language or tool within the image, you can specify it as a [build environment variable](https://developers.cloudflare.com/workers/ci-cd/builds/configuration/#build-settings), or set the relevant file in your source code as shown above. To set the version using a build environment variables, you can: 1. Find the environment variable name for the language or tool and desired version (e.g. `NODE_VERSION = 22`) 2. Add and save the environment variable on the dashboard by going to **Settings** > **Build** > **Build Variables and Secrets** in your Workers project Or, to set the version by adding a file to your project, you can: 1. Find the filename for the language or tool (e.g. `.nvmrc`) 2. Add the specified file name to the root directory and set the desired version number as the file's content. For example, if the version number is 22, the file should contain '22'. ### Skip dependency install You can add the following build variable to disable automatic dependency installation and run a custom install command instead. | Build variable | Value | | - | - | | `SKIP_DEPENDENCY_INSTALL` | `1` or `true` | ## Pre-installed Packages In the following table, review the pre-installed packages in the build image. The packages are installed with `apt`, a package manager for Linux distributions. | | | | | - | - | - | | `curl` | `libbz2-dev` | `libreadline-dev` | | `git` | `libc++1` | `libssl-dev` | | `git-lfs` | `libdb-dev` | `libvips-dev` | | `unzip` | `libgdbm-dev` | `libyaml-dev` | | `autoconf` | `libgdbm6` | `tzdata` | | `build-essential` | `libgbm1` | `wget` | | `bzip2` | `libgmp-dev` | `zlib1g-dev` | | `gnupg` | `liblzma-dev` | `zstd` | | `libffi-dev` | `libncurses5-dev` | | ## Build Environment Workers Builds are run in the following environment: | | | | - | - | | **Build Environment** | Ubuntu 24.04 | | **Architecture** | x86\_64 | --- title: Build watch paths · Cloudflare Workers docs description: Reduce compute for your monorepo by specifying paths for Workers Builds to skip lastUpdated: 2025-04-07T22:53:03.000Z chatbotDeprioritize: false source_url: html: https://developers.cloudflare.com/workers/ci-cd/builds/build-watch-paths/ md: https://developers.cloudflare.com/workers/ci-cd/builds/build-watch-paths/index.md --- When you connect a git repository to Workers, by default a change to any file in the repository will trigger a build. You can configure Workers to include or exclude specific paths to specify if Workers should skip a build for a given path. This can be especially helpful if you are using a monorepo project structure and want to limit the amount of builds being kicked off. ## Configure Paths To configure which paths are included and excluded: 1. In **Overview**, select your Workers project. 2. Go to **Settings** > **Build** > **Build watch paths**. Workers will default to setting your project’s includes paths to everything (\[\*]) and excludes paths to nothing (`[]`). The configuration fields can be filled in two ways: * **Static filepaths**: Enter the precise name of the file you are looking to include or exclude (for example, `docs/README.md`). * **Wildcard syntax:** Use wildcards to match multiple path directories. You can specify wildcards at the start or end of your rule. Wildcard syntax A wildcard (`*`) is a character that is used within rules. It can be placed alone to match anything or placed at the start or end of a rule to allow for better control over branch configuration. A wildcard will match zero or more characters.For example, if you wanted to match all branches that started with `fix/` then you would create the rule `fix/*` to match strings like `fix/1`, `fix/bugs`or `fix/`. For each path in a push event, build watch paths will be evaluated as follows: * Paths satisfying excludes conditions are ignored first * Any remaining paths are checked against includes conditions * If any matching path is found, a build is triggered. Otherwise the build is skipped Workers will bypass the path matching for a push event and default to building the project if: * A push event contains 0 file changes, in case a user pushes a empty push event to trigger a build * A push event contains 3000+ file changes or 20+ commits ## Examples ### Example 1 If you want to trigger a build from all changes within a set of directories, such as all changes in the folders `project-a/` and `packages/` * Include paths: `project-a/*, packages/*` * Exclude paths: \`\` ### Example 2 If you want to trigger a build for any changes, but want to exclude changes to a certain directory, such as all changes in a docs/ directory * Include paths: `*` * Exclude paths: `docs/*` ### Example 3 If you want to trigger a build for a specific file or specific filetype, for example all files ending in `.md`. * Include paths: `*.md` * Exclude paths: \`\` --- title: Configuration · Cloudflare Workers docs description: Understand the different settings associated with your build. lastUpdated: 2025-06-09T20:21:47.000Z chatbotDeprioritize: false source_url: html: https://developers.cloudflare.com/workers/ci-cd/builds/configuration/ md: https://developers.cloudflare.com/workers/ci-cd/builds/configuration/index.md --- When connecting your Git repository to your Worker, you can customize the configurations needed to build and deploy your Worker. ## Build settings Build settings can be found by navigating to **Settings** > **Build** within your Worker. Note that when you update and save build settings, the updated settings will be applied to your *next* build. When you *retry* a build, the build configurations that exist when the build is retried will be applied. ### Overview | Setting | Description | | - | - | | **Git account** | Select the Git account you would like to use. After the initial connection, you can continue to use this Git account for future projects. | | **Git repository** | Choose the Git repository you would like to connect your Worker to. | | **Git branch** | Select the branch you would like Cloudflare to listen to for new commits. This will be defaulted to `main`. | | **Build command** *(Optional)* | Set a build command if your project requires a build step (e.g. `npm run build`). This is necessary, for example, when using a [front-end framework](https://developers.cloudflare.com/workers/ci-cd/builds/configuration/#framework-support) such as Next.js or Remix. | | **[Deploy command](https://developers.cloudflare.com/workers/ci-cd/builds/configuration/#deploy-command)** | The deploy command lets you set the [specific Wrangler command](https://developers.cloudflare.com/workers/wrangler/commands/#deploy) used to deploy your Worker. Your deploy command will default to `npx wrangler deploy` but you may customize this command. Workers Builds will use the Wrangler version set in your `package json`. | | **[Non-production branch deploy command](https://developers.cloudflare.com/workers/ci-cd/builds/configuration/#non-production-branch-deploy-command)** | Set a command to run when executing [a build for commit on a non-production branch](https://developers.cloudflare.com/workers/ci-cd/builds/build-branches/#configure-non-production-branch-builds). This will default to `npx wrangler versions upload` but you may customize this command. Workers Builds will use the Wrangler version set in your `package json`. | | **Root directory** *(Optional)* | Specify the path to your project. The root directory defines where the build command will be run and can be helpful in [monorepos](https://developers.cloudflare.com/workers/ci-cd/builds/advanced-setups/#monorepos) to isolate a specific project within the repository for builds. | | **[API token](https://developers.cloudflare.com/workers/ci-cd/builds/configuration/#api-token)** *(Optional)* | The API token is used to authenticate your build request and authorize the upload and deployment of your Worker to Cloudflare. By default, Cloudflare will automatically generate an API token for your account when using Workers Builds, and continue to use this API token for all subsequent builds. Alternatively, you can [create your own API token](https://developers.cloudflare.com/workers/wrangler/migration/v1-to-v2/wrangler-legacy/authentication/#generate-tokens), or select one that you already own. | | **Build variables and secrets** *(Optional)* | Add environment variables and secrets accessible only to your build. Build variables will not be accessible at runtime. If you would like to configure runtime variables you can do so in **Settings** > **Variables & Secrets** | Note Currently, Workers Builds does not honor the configurations set in [Custom Builds](https://developers.cloudflare.com/workers/wrangler/custom-builds/) within your wrangler.toml file. ### Deploy command You can run your deploy command using the package manager of your choice. If you have added a Wrangler deploy command as a script in your `package.json`, then you can run it by setting it as your deploy command. For example, `npm run deploy`. Examples of other deploy commands you can set include: | Example Command | Description | | - | - | | `npx wrangler deploy --assets ./public/` | Deploy your Worker along with static assets from the specified directory. Alternatively, you can use the [assets binding](https://developers.cloudflare.com/workers/static-assets/binding/). | | `npx wrangler deploy --env staging` | If you have a [Wrangler environment](https://developers.cloudflare.com/workers/ci-cd/builds/advanced-setups/#wrangler-environments) Worker, you should set your deploy command with the environment flag. For more details, see [Advanced Setups](https://developers.cloudflare.com/workers/ci-cd/builds/advanced-setups/#wrangler-environments). | ### Non-production branch deploy command The non-production branch deploy command is only applicable when you have enabled [non-production branch builds](https://developers.cloudflare.com/workers/ci-cd/builds/build-branches/#configure-non-production-branch-builds). It defaults to `npx wrangler versions upload`, producing a [preview URL](https://developers.cloudflare.com/workers/configuration/previews/). Like the build and deploy commands, it can be customized to instead run anything. Examples of other non-production branch deploy commands you can set include: | Example Command | Description | | - | - | | `yarn exec wrangler versions upload` | You can customize the package manager used to run Wrangler. | | `npx wrangler versions upload --env staging` | If you have a [Wrangler environment](https://developers.cloudflare.com/workers/ci-cd/builds/advanced-setups/#wrangler-environments) Worker, you should set your non-production branch deploy command with the environment flag. For more details, see [Advanced Setups](https://developers.cloudflare.com/workers/ci-cd/builds/advanced-setups/#wrangler-environments). | ### API token The API token in Workers Builds defines the access granted to Workers Builds for interacting with your account's resources. Currently, only user tokens are supported, with account-owned token support coming soon. When you select **Create new token**, a new API token will be created automatically with the following permissions: * **Account:** Account Settings (read), Workers Scripts (edit), Workers KV Storage (edit), Workers R2 Storage (edit) * **Zone:** Workers Routes (edit) for all zones on the account * **User:** User Details (read), Memberships (read) You can configure the permissions of this API token by navigating to **My Profile** > **API Tokens** for user tokens. It is recommended to consistently use the same API token across all uploads and deployments of your Worker to maintain consistent access permissions. ## Framework support [Static assets](https://developers.cloudflare.com/workers/static-assets/) and [frameworks](https://developers.cloudflare.com/workers/framework-guides/) are now supported in Cloudflare Workers. Learn to set up Workers projects and the commands for each framework in the framework guides: * [AI & agents](https://developers.cloudflare.com/workers/framework-guides/ai-and-agents/) * [Agents SDK](https://developers.cloudflare.com/agents/) * [LangChain](https://developers.cloudflare.com/workers/languages/python/packages/langchain/) * [Web applications](https://developers.cloudflare.com/workers/framework-guides/web-apps/) * [React + Vite](https://developers.cloudflare.com/workers/framework-guides/web-apps/react/) * [Astro](https://developers.cloudflare.com/workers/framework-guides/web-apps/astro/) * [React Router (formerly Remix)](https://developers.cloudflare.com/workers/framework-guides/web-apps/react-router/) * [Next.js](https://developers.cloudflare.com/workers/framework-guides/web-apps/nextjs/) * [Vue](https://developers.cloudflare.com/workers/framework-guides/web-apps/vue/) * [RedwoodSDK](https://developers.cloudflare.com/workers/framework-guides/web-apps/redwoodsdk/) * [TanStack](https://developers.cloudflare.com/workers/framework-guides/web-apps/tanstack/) * [Svelte](https://developers.cloudflare.com/workers/framework-guides/web-apps/svelte/) * [More guides...](https://developers.cloudflare.com/workers/framework-guides/web-apps/more-web-frameworks/) * [Angular](https://developers.cloudflare.com/workers/framework-guides/web-apps/more-web-frameworks/angular/) * [Docusaurus](https://developers.cloudflare.com/workers/framework-guides/web-apps/more-web-frameworks/docusaurus/) * [Gatsby](https://developers.cloudflare.com/workers/framework-guides/web-apps/more-web-frameworks/gatsby/) * [Hono](https://developers.cloudflare.com/workers/framework-guides/web-apps/more-web-frameworks/hono/) * [Nuxt](https://developers.cloudflare.com/workers/framework-guides/web-apps/more-web-frameworks/nuxt/) * [Qwik](https://developers.cloudflare.com/workers/framework-guides/web-apps/more-web-frameworks/qwik/) * [Solid](https://developers.cloudflare.com/workers/framework-guides/web-apps/more-web-frameworks/solid/) * [Mobile applications](https://developers.cloudflare.com/workers/framework-guides/mobile-apps/) * [Expo](https://docs.expo.dev/eas/hosting/reference/worker-runtime/) * [APIs](https://developers.cloudflare.com/workers/framework-guides/apis/) * [FastAPI](https://developers.cloudflare.com/workers/languages/python/packages/fastapi/) * [Hono](https://developers.cloudflare.com/workers/framework-guides/web-apps/more-web-frameworks/hono/) ## Environment variables You can provide custom environment variables to your build by configuring them in the Cloudflare dashboard: 1. Log in to the [Cloudflare dashboard](https://dash.cloudflare.com) and select your account. 2. In **Account Home**, select **Workers & Pages**. 3. In **Overview**, select your Worker. 4. Select **Settings** > **Environment variables**. The following system environment variables are injected by default (but can be overridden): | Environment Variable | Injected value | Example use-case | | - | - | - | | `CI` | `true` | Changing build behaviour when run on CI versus locally | | `WORKERS_CI` | `1` | Changing build behaviour when run on Workers Builds versus locally | | `WORKERS_CI_BUILD_UUID` | `` | Passing the Build UUID along to custom workflows | | `WORKERS_CI_COMMIT_SHA` | `` | Passing current commit ID to error reporting, for example, Sentry | | `WORKERS_CI_BRANCH` | ` --- title: Git integration · Cloudflare Workers docs description: Learn how to add and manage your Git integration for Workers Builds lastUpdated: 2025-04-07T22:53:03.000Z chatbotDeprioritize: false source_url: html: https://developers.cloudflare.com/workers/ci-cd/builds/git-integration/ md: https://developers.cloudflare.com/workers/ci-cd/builds/git-integration/index.md --- Cloudflare supports connecting your [GitHub](https://developers.cloudflare.com/workers/ci-cd/builds/git-integration/github-integration/) and [GitLab](https://developers.cloudflare.com/workers/ci-cd/builds/git-integration/gitlab-integration/) repository to your Cloudflare Worker, and will automatically deploy your code every time you push a change. Adding a Git integration also lets you monitor build statuses directly in your Git provider using [pull request comments](https://developers.cloudflare.com/workers/ci-cd/builds/git-integration/github-integration/#pull-request-comment), [check runs](https://developers.cloudflare.com/workers/ci-cd/builds/git-integration/github-integration/#check-run), or [commit statuses](https://developers.cloudflare.com/workers/ci-cd/builds/git-integration/gitlab-integration/#commit-status), so you can manage deployments without leaving your workflow. ## Supported Git Providers Cloudflare supports connecting Cloudflare Workers to your GitHub and GitLab repositories. Workers Builds does not currently support connecting self-hosted instances of GitHub or GitLab. If you using a different Git provider (e.g. Bitbucket), you can use an [external CI/CD provider (e.g. GitHub Actions)](https://developers.cloudflare.com/workers/ci-cd/external-cicd/) and deploy using [Wrangler CLI](https://developers.cloudflare.com/workers/wrangler/commands/#deploy). ## Add a Git Integration Workers Builds provides direct integration with GitHub and GitLab accounts, including both individual and organization accounts, that are *not* self-hosted. If you do not have a Git account linked to your Cloudflare account, you will be prompted to set up an installation to GitHub or GitLab when [connecting a repository](https://developers.cloudflare.com/workers/ci-cd/builds/#get-started) for the first time, or when adding a new Git account. Follow the prompts and authorize the Cloudflare Git integration. ![Git providers](https://developers.cloudflare.com/_astro/workers-git-provider.aIMoWcJE_Z1TBi8Q.webp) You can check the following pages to see if your Git integration has been installed: * [GitHub Applications page](https://github.com/settings/installations) (if you are in an organization, select **Switch settings context** to access your GitHub organization settings) * [GitLab Authorized Applications page](https://gitlab.com/-/profile/applications) For details on providing access to organization accounts, see [GitHub organizational access](https://developers.cloudflare.com/workers/ci-cd/builds/git-integration/github-integration/#organizational-access) and [GitLab organizational access](https://developers.cloudflare.com/workers/ci-cd/builds/git-integration/gitlab-integration/#organizational-access). ## Manage a Git Integration To manage your Git installation, go to the [Cloudflare dashboard](https://dash.cloudflare.com) > **Workers & Pages** > your Worker > **Settings** > **Builds** > under **Git Repository**, select **Manage**. This can be useful for managing repository access or troubleshooting installation issues by reinstalling. For more details, see the [GitHub](https://developers.cloudflare.com/workers/ci-cd/builds/git-integration/github-integration) and [GitLab](https://developers.cloudflare.com/workers/ci-cd/builds/git-integration/gitlab-integration) guides for how to manage your installation. --- title: Limits & pricing · Cloudflare Workers docs description: Limits & pricing for Workers Builds lastUpdated: 2025-04-07T22:53:03.000Z chatbotDeprioritize: false source_url: html: https://developers.cloudflare.com/workers/ci-cd/builds/limits-and-pricing/ md: https://developers.cloudflare.com/workers/ci-cd/builds/limits-and-pricing/index.md --- Workers Builds has the following limits. While in open beta, these limits are subject to change. | Metric | Free plan | Paid plans | | - | - | - | | **Build minutes** | 3,000 per month | 6,000 per month (then, +$0.005 per minute) | | **Concurrent builds** | 1 | 6 | | **Build timeout** | 20 minutes | 20 minutes | | **CPU** | 2 CPUs | 2 CPUs | | **Memory** | 8 GB | 8 GB | | **Disk space** | 8 GB | 8 GB | ## Definitions * **Build minutes**: The amount of minutes that it takes to build a project. * **Concurrent builds**: The number of builds that can run in parallel across an account. * **Build timeout**: The amount of time that a build can be run before it is terminated. * **CPU**: The number of CPU cores available to your build. * **Memory**: The amount of memory available to your build. * **Disk space**: The amount of disk space available to your build. --- title: Troubleshooting builds · Cloudflare Workers docs description: Learn how to troubleshoot common and known issues in Workers Builds. lastUpdated: 2025-05-19T22:32:03.000Z chatbotDeprioritize: false source_url: html: https://developers.cloudflare.com/workers/ci-cd/builds/troubleshoot/ md: https://developers.cloudflare.com/workers/ci-cd/builds/troubleshoot/index.md --- This guide explains how to identify and resolve build errors, as well as troubleshoot common issues in the Workers Builds deployment process. To view your build history, go to your Worker project in the Cloudflare dashboard, select **Deployment**, select **View Build History** at the bottom of the page, and select the build you want to view. To retry a build, select the ellipses next to the build and select **Retry build**. Alternatively, you can select **Retry build** on the Build Details page. ## Known issues or limitations Here are some common build errors that may surface in the build logs or general issues and how you can resolve them. ### Workers name requirement `✘ [ERROR] The name in your wrangler.toml file () must match the name of your Worker. Please update the name field in your wrangler.toml file.` When connecting a Git repository to your Workers project, the specified name for the Worker on the Cloudflare dashboard must match the `name` argument in the wrangler.toml file located in the specified root directory. If it does not match, update the name field in your wrangler.toml file to match the name of the Worker on the dashboard. The build system uses the `name` argument in the wrangler.toml to determine which Worker to deploy to Cloudflare's global network. This requirement ensures consistency between the Worker's name on the dashboard and the deployed Worker. Note This does not apply to [Wrangler Environments](https://developers.cloudflare.com/workers/wrangler/environments/) if the Worker name before the `-` suffix matches the name in wrangler.toml. For example, a Worker named `my-worker-staging` on the dashboard can be deployed from a repository that contains a wrangler.toml with the arguments `name = my-worker` and `[env.staging]` using the deploy command `npx wrangler deploy --env staging`. On Wrangler v3 and up, Workers Builds automatically matches the name of the connected Worker by overriding it with the `WRANGLER_CI_OVERRIDE_NAME` environment variable. ### Missing wrangler.toml `✘ [ERROR] Missing entry-point: The entry-point should be specified via the command line (e.g. wrangler deploy path/to/script) or the main config field.` If you see this error, a wrangler.toml is likely missing from the root directory. Navigate to **Settings** > **Build** > **Build Configuration** to update the root directory, or add a [wrangler.toml](https://developers.cloudflare.com/workers/wrangler/configuration/) to the specified directory. ### Incorrect account\_id `Could not route to /client/v4/accounts//workers/services/, perhaps your object identifier is invalid? [code: 7003]` If you see this error, the wrangler.toml likely has an `account_id` for a different account. Remove the `account_id` argument or update it with your account's `account_id`, available in **Workers & Pages Overview** under **Account Details**. ### Stale API token `Failed: The build token selected for this build has been deleted or rolled and cannot be used for this build. Please update your build token in the Worker Builds settings and retry the build.` The API Token dropdown in Build Configuration settings may show stale tokens that were edited, deleted, or rolled. If you encounter an error due to a stale token, create a new API Token and select it for the build. ### Build timed out `Build was timed out` There is a maximum build duration of 20 minutes. If a build exceeds this time, then the build will be terminated and the above error log is shown. For more details, see [Workers Builds limits](https://developers.cloudflare.com/workers/ci-cd/builds/limits-and-pricing/). ### Git integration issues If you are running into errors associated with your Git integration, you can try removing access to your [GitHub](https://developers.cloudflare.com/workers/ci-cd/builds/git-integration/github-integration/#removing-access) or [GitLab](https://developers.cloudflare.com/workers/ci-cd/builds/git-integration/gitlab-integration/#removing-access) integration from Cloudflare, then reinstalling the [GitHub](https://developers.cloudflare.com/workers/ci-cd/builds/git-integration/github-integration/#reinstall-a-git-integration) or [GitLab](https://developers.cloudflare.com/workers/ci-cd/builds/git-integration/gitlab-integration/#reinstall-a-git-integration) integration. ## For additional support If you discover additional issues or would like to provide feedback, reach out to us in the [Cloudflare Developers Discord](https://discord.com/channels/595317990191398933/1052656806058528849). --- title: GitHub Actions · Cloudflare Workers docs description: Integrate Workers development into your existing GitHub Actions workflows. lastUpdated: 2025-05-29T18:16:56.000Z chatbotDeprioritize: false source_url: html: https://developers.cloudflare.com/workers/ci-cd/external-cicd/github-actions/ md: https://developers.cloudflare.com/workers/ci-cd/external-cicd/github-actions/index.md --- You can deploy Workers with [GitHub Actions](https://github.com/marketplace/actions/deploy-to-cloudflare-workers-with-wrangler). Here is how you can set up your GitHub Actions workflow. ## 1. Authentication When running Wrangler locally, authentication to the Cloudflare API happens via the [`wrangler login`](https://developers.cloudflare.com/workers/wrangler/commands/#login) command, which initiates an interactive authentication flow. Since CI/CD environments are non-interactive, Wrangler requires a [Cloudflare API token](https://developers.cloudflare.com/fundamentals/api/get-started/create-token/) and [account ID](https://developers.cloudflare.com/fundamentals/account/find-account-and-zone-ids/) to authenticate with the Cloudflare API. ### Cloudflare account ID To find your Cloudflare account ID, refer to [Find account and zone IDs](https://developers.cloudflare.com/fundamentals/account/find-account-and-zone-ids/). ### API token To create an API token to authenticate Wrangler in your CI job: 1. Log in to the [Cloudflare dashboard](https://dash.cloudflare.com). 2. Select **Manage Account** > **Account API Tokens**. 3. Select **Create Token** > find **Edit Cloudflare Workers** > select **Use Template**. 4. Customize your token name. 5. Scope your token. You will need to choose the account and zone resources that the generated API token will have access to. We recommend scoping these down as much as possible to limit the access of your token. For example, if you have access to three different Cloudflare accounts, you should restrict the generated API token to only the account on which you will be deploying a Worker. ## 2. Set up CI/CD The method for running Wrangler in your CI/CD environment will depend on the specific setup for your project (whether you use GitHub Actions/Jenkins/GitLab or something else entirely). To set up your CI/CD: 1. Go to your CI/CD platform and add the following as secrets: * `CLOUDFLARE_ACCOUNT_ID`: Set to the [Cloudflare account ID](#cloudflare-account-id) for the account on which you want to deploy your Worker. * `CLOUDFLARE_API_TOKEN`: Set to the [Cloudflare API token you generated](#api-token). Warning Don't store the value of `CLOUDFLARE_API_TOKEN` in your repository, as it gives access to deploy Workers on your account. Instead, you should utilize your CI/CD provider's support for storing secrets. 1. Create a workflow that will be responsible for deploying the Worker. This workflow should run `wrangler deploy`. Review an example [GitHub Actions](https://docs.github.com/en/actions/using-workflows/about-workflows) workflow in the follow section. ### GitHub Actions Cloudflare provides [an official action](https://github.com/cloudflare/wrangler-action) for deploying Workers. Refer to the following example workflow which deploys your Worker on push to the `main` branch. ```yaml name: Deploy Worker on: push: branches: - main jobs: deploy: runs-on: ubuntu-latest timeout-minutes: 60 needs: test steps: - uses: actions/checkout@v4 - name: Build & Deploy Worker uses: cloudflare/wrangler-action@v3 with: apiToken: ${{ secrets.CLOUDFLARE_API_TOKEN }} accountId: ${{ secrets.CLOUDFLARE_ACCOUNT_ID }} ``` --- title: GitLab CI/CD · Cloudflare Workers docs description: Integrate Workers development into your existing GitLab Pipelines workflows. lastUpdated: 2025-05-29T18:16:56.000Z chatbotDeprioritize: false source_url: html: https://developers.cloudflare.com/workers/ci-cd/external-cicd/gitlab-cicd/ md: https://developers.cloudflare.com/workers/ci-cd/external-cicd/gitlab-cicd/index.md --- You can deploy Workers with [GitLab CI/CD](https://docs.gitlab.com/ee/ci/pipelines/index.html). Here is how you can set up your GitHub Actions workflow. ## 1. Authentication When running Wrangler locally, authentication to the Cloudflare API happens via the [`wrangler login`](https://developers.cloudflare.com/workers/wrangler/commands/#login) command, which initiates an interactive authentication flow. Since CI/CD environments are non-interactive, Wrangler requires a [Cloudflare API token](https://developers.cloudflare.com/fundamentals/api/get-started/create-token/) and [account ID](https://developers.cloudflare.com/fundamentals/account/find-account-and-zone-ids/) to authenticate with the Cloudflare API. ### Cloudflare account ID To find your Cloudflare account ID, refer to [Find account and zone IDs](https://developers.cloudflare.com/fundamentals/account/find-account-and-zone-ids/). ### API token To create an API token to authenticate Wrangler in your CI job: 1. Log in to the [Cloudflare dashboard](https://dash.cloudflare.com). 2. Select **My Profile** > **API Tokens**. 3. Select **Create Token** > find **Edit Cloudflare Workers** > select **Use Template**. 4. Customize your token name. 5. Scope your token. You will need to choose the account and zone resources that the generated API token will have access to. We recommend scoping these down as much as possible to limit the access of your token. For example, if you have access to three different Cloudflare accounts, you should restrict the generated API token to only the account on which you will be deploying a Worker. ## 2. Set up CI The method for running Wrangler in your CI/CD environment will depend on the specific setup for your project (whether you use GitHub Actions/Jenkins/GitLab or something else entirely). To set up your CI: 1. Go to your CI platform and add the following as secrets: * `CLOUDFLARE_ACCOUNT_ID`: Set to the [Cloudflare account ID](#cloudflare-account-id) for the account on which you want to deploy your Worker. * `CLOUDFLARE_API_TOKEN`: Set to the [Cloudflare API token you generated](#api-token). Warning Don't store the value of `CLOUDFLARE_API_TOKEN` in your repository, as it gives access to deploy Workers on your account. Instead, you should utilize your CI/CD provider's support for storing secrets. 1. Create a workflow that will be responsible for deploying the Worker. This workflow should run `wrangler deploy`. Review an example [GitHub Actions](https://docs.github.com/en/actions/using-workflows/about-workflows) workflow in the follow section. ### GitLab Pipelines Refer to [GitLab's blog](https://about.gitlab.com/blog/2022/11/21/deploy-remix-with-gitlab-and-cloudflare/) for an example pipeline. Under the `script` key, replace `npm run deploy` with [`npx wrangler deploy`](https://developers.cloudflare.com/workers/wrangler/commands/#deploy). --- title: APIs · Cloudflare Workers docs description: To integrate with third party APIs from Cloudflare Workers, use the fetch API to make HTTP requests to the API endpoint. Then use the response data to modify or manipulate your content as needed. lastUpdated: 2024-08-20T21:10:02.000Z chatbotDeprioritize: false source_url: html: https://developers.cloudflare.com/workers/configuration/integrations/apis/ md: https://developers.cloudflare.com/workers/configuration/integrations/apis/index.md --- To integrate with third party APIs from Cloudflare Workers, use the [fetch API](https://developers.cloudflare.com/workers/runtime-apis/fetch/) to make HTTP requests to the API endpoint. Then use the response data to modify or manipulate your content as needed. For example, if you want to integrate with a weather API, make a fetch request to the API endpoint and retrieve the current weather data. Then use this data to display the current weather conditions on your website. To make the `fetch()` request, add the following code to your project's `src/index.js` file: ```js async function handleRequest(request) { // Make the fetch request to the third party API endpoint const response = await fetch("https://weather-api.com/endpoint", { method: "GET", headers: { "Content-Type": "application/json", }, }); // Retrieve the data from the response const data = await response.json(); // Use the data to modify or manipulate your content as needed return new Response(data); } ``` ## Authentication If your API requires authentication, use Wrangler secrets to securely store your credentials. To do this, create a secret in your Cloudflare Workers project using the following [`wrangler secret`](https://developers.cloudflare.com/workers/wrangler/commands/#secret) command: ```sh wrangler secret put SECRET_NAME ``` Then, retrieve the secret value in your code using the following code snippet: ```js const secretValue = env.SECRET_NAME; ``` Then use the secret value to authenticate with the external service. For example, if the external service requires an API key for authentication, include it in your request headers. For services that require mTLS authentication, use [mTLS certificates](https://developers.cloudflare.com/workers/runtime-apis/bindings/mtls) to present a client certificate. ## Tips * Use the Cache API to cache data from the third party API. This allows you to optimize cacheable requests made to the API. Integrating with third party APIs from Cloudflare Workers adds additional functionality and features to your application. * Use [Custom Domains](https://developers.cloudflare.com/workers/configuration/routing/custom-domains/) when communicating with external APIs, which treat your Worker as your core application. --- title: Momento · Cloudflare Workers docs description: Momento is a truly serverless caching service. It automatically optimizes, scales, and manages your cache for you. lastUpdated: 2024-08-13T19:56:56.000Z chatbotDeprioritize: false source_url: html: https://developers.cloudflare.com/workers/configuration/integrations/momento/ md: https://developers.cloudflare.com/workers/configuration/integrations/momento/index.md --- [Momento](https://gomomento.com/) is a truly serverless caching service. It automatically optimizes, scales, and manages your cache for you. This integration allows you to connect to Momento from your Worker by getting Momento cache configuration and adding it as [secrets](https://developers.cloudflare.com/workers/configuration/environment-variables/) to your Worker. ## Momento Cache To set up an integration with Momento Cache: 1. You need to have an existing Momento cache to connect to or create a new cache through the [Momento console](https://console.gomomento.com/). 2. If you do not have an existing cache, create one and assign `user-profiles` as the cache name. 3. Add the Momento database integration to your Worker: 1. Log in to the [Cloudflare dashboard](https://dash.cloudflare.com) and select your account. 2. In **Account Home**, select **Workers & Pages**. 3. In **Overview**, select your Worker. 4. Select **Integrations** > **Momento**. 5. Follow the setup flow, review and grant permissions needed to add secrets to your Worker. 6. Next, connect to Momento. 7. Select a preferred region. 8. Click **Add integration**. 4. The following example code show how to set an item in your cache, get it, and return it as a JSON object. The credentials needed to connect to Momento Cache have been automatically added as [secrets](https://developers.cloudflare.com/workers/configuration/secrets/) to your Worker through the integration. ```ts export default { async fetch(request, env, ctx): Promise { const client = new MomentoFetcher(env.MOMENTO_API_KEY, env.MOMENTO_REST_ENDPOINT); const cache = env.MOMENTO_CACHE_NAME; const key = 'user'; const f_name = 'mo'; const l_name = 'squirrel'; const value = `${f_name}_${l_name}`; // set a value into cache const setResponse = await client.set(cache, key, value); console.log('setResponse', setResponse); // read a value from cache const getResponse = await client.get(cache, key); console.log('getResponse', getResponse); return new Response(JSON.stringify({ response: getResponse })); }, } satisfies ExportedHandler; ``` To learn more about Momento, refer to [Momento's official documentation](https://docs.momentohq.com/getting-started). --- title: External Services · Cloudflare Workers docs description: Many external services provide libraries and SDKs to interact with their APIs. While many Node-compatible libraries work on Workers right out of the box, some, which implement fs, http/net, or access the browser window do not directly translate to the Workers runtime, which is v8-based. lastUpdated: 2024-08-20T21:10:02.000Z chatbotDeprioritize: false source_url: html: https://developers.cloudflare.com/workers/configuration/integrations/external-services/ md: https://developers.cloudflare.com/workers/configuration/integrations/external-services/index.md --- Many external services provide libraries and SDKs to interact with their APIs. While many Node-compatible libraries work on Workers right out of the box, some, which implement `fs`, `http/net`, or access the browser `window` do not directly translate to the Workers runtime, which is v8-based. ## Authentication If your service requires authentication, use Wrangler secrets to securely store your credentials. To do this, create a secret in your Cloudflare Workers project using the following [`wrangler secret`](https://developers.cloudflare.com/workers/wrangler/commands/#secret) command: ```sh wrangler secret put SECRET_NAME ``` Then, retrieve the secret value in your code using the following code snippet: ```js const secretValue = env.SECRET_NAME; ``` Then use the secret value to authenticate with the external service. For example, if the external service requires an API key for authentication, include the secret in your library's configuration. For services that require mTLS authentication, use [mTLS certificates](https://developers.cloudflare.com/workers/runtime-apis/bindings/mtls) to present a client certificate. Use [Custom Domains](https://developers.cloudflare.com/workers/configuration/routing/custom-domains/) when communicating with external APIs, which treat your Worker as your core application. --- title: Custom Domains · Cloudflare Workers docs description: Custom Domains allow you to connect your Worker to a domain or subdomain, without having to make changes to your DNS settings or perform any certificate management. After you set up a Custom Domain for your Worker, Cloudflare will create DNS records and issue necessary certificates on your behalf. The created DNS records will point directly to your Worker. Unlike Routes, Custom Domains point all paths of a domain or subdomain to your Worker. lastUpdated: 2025-03-11T13:43:51.000Z chatbotDeprioritize: false source_url: html: https://developers.cloudflare.com/workers/configuration/routing/custom-domains/ md: https://developers.cloudflare.com/workers/configuration/routing/custom-domains/index.md --- ## Background Custom Domains allow you to connect your Worker to a domain or subdomain, without having to make changes to your DNS settings or perform any certificate management. After you set up a Custom Domain for your Worker, Cloudflare will create DNS records and issue necessary certificates on your behalf. The created DNS records will point directly to your Worker. Unlike [Routes](https://developers.cloudflare.com/workers/configuration/routing/routes/#set-up-a-route), Custom Domains point all paths of a domain or subdomain to your Worker. Custom Domains are routes to a domain or subdomain (such as `example.com` or `shop.example.com`) within a Cloudflare zone where the Worker is the origin. Custom Domains are recommended if you want to connect your Worker to the Internet and do not have an application server that you want to always communicate with. If you do have external dependencies, you can create a `Request` object with the target URI, and use `fetch()` to reach out. Custom Domains can stack on top of each other. For example, if you have Worker A attached to `app.example.com` and Worker B attached to `api.example.com`, Worker A can call `fetch()` on `api.example.com` and invoke Worker B. ![Custom Domains can stack on top of each other, like any external dependencies](https://developers.cloudflare.com/_astro/custom-domains-subrequest.C6c84jN5_Z1TXNWy.webp) Custom Domains can also be invoked within the same zone via `fetch()`, unlike Routes. ## Add a Custom Domain To add a Custom Domain, you must have: 1. An [active Cloudflare zone](https://developers.cloudflare.com/dns/zone-setups/). 2. A Worker to invoke. Custom Domains can be attached to your Worker via the [Cloudflare dashboard](https://developers.cloudflare.com/workers/configuration/routing/custom-domains/#set-up-a-custom-domain-in-the-dashboard), [Wrangler](https://developers.cloudflare.com/workers/configuration/routing/custom-domains/#set-up-a-custom-domain-in-your-wrangler-configuration-file) or the [API](https://developers.cloudflare.com/api/resources/workers/subresources/domains/methods/list/). Warning You cannot create a Custom Domain on a hostname with an existing CNAME DNS record or on a zone you do not own. ### Set up a Custom Domain in the dashboard To set up a Custom Domain in the dashboard: 1. Log in to the [Cloudflare dashboard](https://dash.cloudflare.com) and select your account. 2. Select **Workers & Pages** and in **Overview**, select your Worker. 3. Go to **Settings** > **Domains & Routes** > **Add** > **Custom Domain**. 4. Enter the domain you want to configure for your Worker. 5. Select **Add Custom Domain**. After you have added the domain or subdomain, Cloudflare will create a new DNS record for you. You can add multiple Custom Domains. ### Set up a Custom Domain in your Wrangler configuration file To configure a Custom Domain in your [Wrangler configuration file](https://developers.cloudflare.com/workers/wrangler/configuration/), add the `custom_domain=true` option on each pattern under `routes`. For example, to configure a Custom Domain: * wrangler.jsonc ```jsonc { "routes": [ { "pattern": "shop.example.com", "custom_domain": true } ] } ``` * wrangler.toml ```toml routes = [ { pattern = "shop.example.com", custom_domain = true } ] ``` To configure multiple Custom Domains: * wrangler.jsonc ```jsonc { "routes": [ { "pattern": "shop.example.com", "custom_domain": true }, { "pattern": "shop-two.example.com", "custom_domain": true } ] } ``` * wrangler.toml ```toml routes = [ { pattern = "shop.example.com", custom_domain = true }, { pattern = "shop-two.example.com", custom_domain = true } ] ``` ## Worker to Worker communication On the same zone, the only way for a Worker to communicate with another Worker running on a [route](https://developers.cloudflare.com/workers/configuration/routing/routes/#set-up-a-route), or on a [`workers.dev`](https://developers.cloudflare.com/workers/configuration/routing/routes/#_top) subdomain, is via [service bindings](https://developers.cloudflare.com/workers/runtime-apis/bindings/service-bindings/). On the same zone, if a Worker is attempting to communicate with a target Worker running on a Custom Domain rather than a route, the limitation is removed. Fetch requests sent on the same zone from one Worker to another Worker running on a Custom Domain will succeed without a service binding. For example, consider the following scenario, where both Workers are running on the `example.com` Cloudflare zone: * `worker-a` running on the [route](https://developers.cloudflare.com/workers/configuration/routing/routes/#set-up-a-route) `auth.example.com/*`. * `worker-b` running on the [route](https://developers.cloudflare.com/workers/configuration/routing/routes/#set-up-a-route) `shop.example.com/*`. If `worker-a` sends a fetch request to `worker-b`, the request will fail, because of the limitation on same-zone fetch requests. `worker-a` must have a service binding to `worker-b` for this request to resolve. ```js export default { fetch(request) { // This will fail return fetch("https://shop.example.com") } } ``` However, if `worker-b` was instead set up to run on the Custom Domain `shop.example.com`, the fetch request would succeed. ## Request matching behaviour Custom Domains do not support [wildcard DNS records](https://developers.cloudflare.com/dns/manage-dns-records/reference/wildcard-dns-records/). An incoming request must exactly match the domain or subdomain your Custom Domain is registered to. Other parts (path, query parameters) of the URL are not considered when executing this matching logic. For example, if you create a Custom Domain on `api.example.com` attached to your `api-gateway` Worker, a request to either `api.example.com/login` or `api.example.com/user` would invoke the same `api-gateway` Worker. ![Custom Domains follow standard DNS ordering and matching logic](https://developers.cloudflare.com/_astro/custom-domains-api-gateway.DmeJZDoL_2urk5W.webp) ## Interaction with Routes A Worker running on a Custom Domain is treated as an origin. Any Workers running on routes before your Custom Domain can optionally call the Worker registered on your Custom Domain by issuing `fetch(request)` with the incoming `Request` object. That means that you are able to set up Workers to run before a request gets to your Custom Domain Worker. In other words, you can chain together two Workers in the same request. For example, consider the following workflow: 1. A Custom Domain for `api.example.com` points to your `api-worker` Worker. 2. A route added to `api.example.com/auth` points to your `auth-worker` Worker. 3. A request to `api.example.com/auth` will trigger your `auth-worker` Worker. 4. Using `fetch(request)` within the `auth-worker` Worker will invoke the `api-worker` Worker, as if it was a normal application server. ```js export default { fetch(request) { const url = new URL(request.url) if(url.searchParams.get("auth") !== "SECRET_TOKEN") { return new Response(null, { status: 401 }) } else { // This will invoke `api-worker` return fetch(request) } } } ``` ## Certificates Creating a Custom Domain will also generate an [Advanced Certificate](https://developers.cloudflare.com/ssl/edge-certificates/advanced-certificate-manager/) on your target zone for your target hostname. These certificates are generated with default settings. To override these settings, delete the generated certificate and create your own certificate in the Cloudflare dashboard. Refer to [Manage advanced certificates](https://developers.cloudflare.com/ssl/edge-certificates/advanced-certificate-manager/manage-certificates/) for instructions. ## Migrate from Routes If you are currently invoking a Worker using a [route](https://developers.cloudflare.com/workers/configuration/routing/routes/) with `/*`, and you have a CNAME record pointing to `100::` or similar, a Custom Domain is a recommended replacement. ### Migrate from Routes via the dashboard To migrate the route `example.com/*`: 1. Log in to the [Cloudflare dashboard](https://dash.cloudflare.com) and select your account. 2. Go to **DNS** and delete the CNAME record for `example.com`. 3. Go to **Account Home** > **Workers & Pages**. 4. In **Overview**, select your Worker > **Settings** > **Domains & Routes**. 5. Select **Add** > **Custom domain** and add `example.com`. 6. Delete the route `example.com/*` located in your Worker > **Settings** > **Domains & Routes**. ### Migrate from Routes via Wrangler To migrate the route `example.com/*` in your [Wrangler configuration file](https://developers.cloudflare.com/workers/wrangler/configuration/): 1. Log in to the [Cloudflare dashboard](https://dash.cloudflare.com) and select your account. 2. Go to **DNS** and delete the CNAME record for `example.com`. 3. Add the following to your Wrangler file: * wrangler.jsonc ```jsonc { "routes": [ { "pattern": "example.com", "custom_domain": true } ] } ``` * wrangler.toml ```toml routes = [ { pattern = "example.com", custom_domain = true } ] ``` 1. Run `npx wrangler deploy` to create the Custom Domain your Worker will run on. --- title: Routes · Cloudflare Workers docs description: Routes allow users to map a URL pattern to a Worker. When a request comes in to the Cloudflare network that matches the specified URL pattern, your Worker will execute on that route. lastUpdated: 2025-04-02T18:39:16.000Z chatbotDeprioritize: false source_url: html: https://developers.cloudflare.com/workers/configuration/routing/routes/ md: https://developers.cloudflare.com/workers/configuration/routing/routes/index.md --- ## Background Routes allow users to map a URL pattern to a Worker. When a request comes in to the Cloudflare network that matches the specified URL pattern, your Worker will execute on that route. Routes are a set of rules that evaluate against a request's URL. Routes are recommended for you if you have a designated application server you always need to communicate with. Calling `fetch()` on the incoming `Request` object will trigger a subrequest to your application server, as defined in the **DNS** settings of your Cloudflare zone. Routes add Workers functionality to your existing proxied hostnames, in front of your application server. These allow your Workers to act as a proxy and perform any necessary work before reaching out to an application server behind Cloudflare. ![Routes work with your applications defined in Cloudflare DNS](https://developers.cloudflare.com/_astro/routes-diagram.CfGSi1RG_32rsQ.webp) Routes can `fetch()` Custom Domains and take precedence if configured on the same hostname. If you would like to run a logging Worker in front of your application, for example, you can create a Custom Domain on your application Worker for `app.example.com`, and create a Route for your logging Worker at `app.example.com/*`. Calling `fetch()` will invoke the application Worker on your Custom Domain. Note that Routes cannot be the target of a same-zone `fetch()` call. ## Set up a route To add a route, you must have: 1. An [active Cloudflare zone](https://developers.cloudflare.com/dns/zone-setups/). 2. A Worker to invoke. 3. A DNS record set up for the [domain](https://developers.cloudflare.com/dns/manage-dns-records/how-to/create-zone-apex/) or [subdomain](https://developers.cloudflare.com/dns/manage-dns-records/how-to/create-subdomain/) proxied by Cloudflare (also known as orange-clouded) you would like to route to. Warning Route setup will differ depending on if your application's origin is a Worker or not. If your Worker is your application's origin, use [Custom Domains](https://developers.cloudflare.com/workers/configuration/routing/custom-domains/). If your Worker is not your application's origin, follow the instructions below to set up a route. Note Routes can also be created via the API. Refer to the [Workers Routes API documentation](https://developers.cloudflare.com/api/resources/workers/subresources/routes/methods/create/) for more information. ### Set up a route in the dashboard Before you set up a route, make sure you have a DNS record set up for the [domain](https://developers.cloudflare.com/dns/manage-dns-records/how-to/create-zone-apex/) or [subdomain](https://developers.cloudflare.com/dns/manage-dns-records/how-to/create-subdomain/) you would like to route to. To set up a route in the dashboard: 1. Log in to the [Cloudflare dashboard](https://dash.cloudflare.com) and select your account. 2. Go to **Workers & Pages** and in **Overview**, select your Worker. 3. Go to **Settings** > **Domains & Routes** > **Add** > **Route**. 4. Select the zone and enter the route pattern. 5. Select **Add route**. ### Set up a route in the Wrangler configuration file Before you set up a route, make sure you have a DNS record set up for the [domain](https://developers.cloudflare.com/dns/manage-dns-records/how-to/create-zone-apex/) or [subdomain](https://developers.cloudflare.com/dns/manage-dns-records/how-to/create-subdomain/) you would like to route to. To configure a route using your [Wrangler configuration file](https://developers.cloudflare.com/workers/wrangler/configuration/), refer to the following example. * wrangler.jsonc ```jsonc { "routes": [ { "pattern": "subdomain.example.com/*", "zone_name": "example.com" }, { "pattern": "subdomain.example.com/*", "zone_id": "" } ] } ``` * wrangler.toml ```toml routes = [ { pattern = "subdomain.example.com/*", zone_name = "example.com" }, # or { pattern = "subdomain.example.com/*", zone_id = "" } ] ``` Add the `zone_name` or `zone_id` option after each route. The `zone_name` and `zone_id` options are interchangeable. If using `zone_id`, find your zone ID by logging in to the [Cloudflare dashboard](https://dash.cloudflare.com) > select your account > select your website > find the **Zone ID** in the lefthand side of **Overview**. To add multiple routes: * wrangler.jsonc ```jsonc { "routes": [ { "pattern": "subdomain.example.com/*", "zone_name": "example.com" }, { "pattern": "subdomain-two.example.com/example", "zone_id": "" } ] } ``` * wrangler.toml ```toml routes = [ { pattern = "subdomain.example.com/*", zone_name = "example.com" }, { pattern = "subdomain-two.example.com/example", zone_id = "" } ] ``` ## Matching behavior Route patterns look like this: ```txt https://*.example.com/images/* ``` This pattern would match all HTTPS requests destined for a subhost of example.com and whose paths are prefixed by `/images/`. A pattern to match all requests looks like this: ```txt *example.com/* ``` While they look similar to a [regex](https://en.wikipedia.org/wiki/Regular_expression) pattern, route patterns follow specific rules: * The only supported operator is the wildcard (`*`), which matches zero or more of any character. * Route patterns may not contain infix wildcards or query parameters. For example, neither `example.com/*.jpg` nor `example.com/?foo=*` are valid route patterns. * When more than one route pattern could match a request URL, the most specific route pattern wins. For example, the pattern `www.example.com/*` would take precedence over `*.example.com/*` when matching a request for `https://www.example.com/`. The pattern `example.com/hello/*` would take precedence over `example.com/*` when matching a request for `example.com/hello/world`. * Route pattern matching considers the entire request URL, including the query parameter string. Since route patterns may not contain query parameters, the only way to have a route pattern match URLs with query parameters is to terminate it with a wildcard, `*`. * The path component of route patterns is case sensitive, for example, `example.com/Images/*` and `example.com/images/*` are two distinct routes. * For routes created before October 15th, 2023, the host component of route patterns is case sensitive, for example, `example.com/*` and `Example.com/*` are two distinct routes. * For routes created on or after October 15th, 2023, the host component of route patterns is not case sensitive, for example, `example.com/*` and `Example.com/*` are equivalent routes. A route can be specified without being associated with a Worker. This will act to negate any less specific patterns. For example, consider this pair of route patterns, one with a Workers script and one without: ```txt *example.com/images/cat.png -> *example.com/images/* -> worker-script ``` In this example, all requests destined for example.com and whose paths are prefixed by `/images/` would be routed to `worker-script`, *except* for `/images/cat.png`, which would bypass Workers completely. Requests with a path of `/images/cat.png?foo=bar` would be routed to `worker-script`, due to the presence of the query string. ## Validity The following set of rules govern route pattern validity. #### Route patterns must include your zone If your zone is `example.com`, then the simplest possible route pattern you can have is `example.com`, which would match `http://example.com/` and `https://example.com/`, and nothing else. As with a URL, there is an implied path of `/` if you do not specify one. #### Route patterns may not contain any query parameters For example, `https://example.com/?anything` is not a valid route pattern. #### Route patterns may optionally begin with `http://` or `https://` If you omit a scheme in your route pattern, it will match both `http://` and `https://` URLs. If you include `http://` or `https://`, it will only match HTTP or HTTPS requests, respectively. * `https://*.example.com/` matches `https://www.example.com/` but not `http://www.example.com/`. * `*.example.com/` matches both `https://www.example.com/` and `http://www.example.com/`. #### Hostnames may optionally begin with `*` If a route pattern hostname begins with `*`, then it matches the host and all subhosts. If a route pattern hostname begins with `*.`, then it only matches all subhosts. * `*example.com/` matches `https://example.com/` and `https://www.example.com/`. * `*.example.com/` matches `https://www.example.com/` but not `https://example.com/`. #### Paths may optionally end with `*` If a route pattern path ends with `*`, then it matches all suffixes of that path. * `https://example.com/path*` matches `https://example.com/path` and `https://example.com/path2` and `https://example.com/path/readme.txt` Warning There is a well-known bug associated with path matching concerning wildcards (`*`) and forward slashes (`/`) that is documented in [Known issues](https://developers.cloudflare.com/workers/platform/known-issues/). #### Domains and subdomains must have a DNS Record All domains and subdomains must have a [DNS record](https://developers.cloudflare.com/dns/manage-dns-records/how-to/create-dns-records/) to be proxied on Cloudflare and used to invoke a Worker. For example, if you want to put a Worker on `myname.example.com`, and you have added `example.com` to Cloudflare but have not added any DNS records for `myname.example.com`, any request to `myname.example.com` will result in the error `ERR_NAME_NOT_RESOLVED`. Warning If you have previously used the Cloudflare dashboard to add an `AAAA` record for `myname` to `example.com`, pointing to `100::` (the [reserved IPv6 discard prefix](https://tools.ietf.org/html/rfc6666)), Cloudflare recommends creating a [Custom Domain](https://developers.cloudflare.com/workers/configuration/routing/custom-domains/) pointing to your Worker instead. --- title: workers.dev · Cloudflare Workers docs description: Cloudflare Workers accounts come with a workers.dev subdomain that is configurable in the Cloudflare dashboard. Your workers.dev subdomain allows you getting started quickly by deploying Workers without first onboarding your custom domain to Cloudflare. lastUpdated: 2025-02-14T14:45:05.000Z chatbotDeprioritize: false source_url: html: https://developers.cloudflare.com/workers/configuration/routing/workers-dev/ md: https://developers.cloudflare.com/workers/configuration/routing/workers-dev/index.md --- Cloudflare Workers accounts come with a `workers.dev` subdomain that is configurable in the Cloudflare dashboard. Your `workers.dev` subdomain allows you getting started quickly by deploying Workers without first onboarding your custom domain to Cloudflare. It's recommended to run production Workers on a [Workers route or custom domain](https://developers.cloudflare.com/workers/configuration/routing/), rather than on your `workers.dev` subdomain. Your `workers.dev` subdomain is treated as a [Free website](https://www.cloudflare.com/plans/) and is intended for personal or hobby projects that aren't business-critical. ## Configure `workers.dev` `workers.dev` subdomains take the format: `.workers.dev`. To change your `workers.dev` subdomain: 1. Log in to the [Cloudflare dashboard](https://dash.cloudflare.com) and select your account. 2. Select **Workers & Pages**. 3. Select **Change** next to **Your subdomain**. All Workers are assigned a `workers.dev` route when they are created or renamed following the syntax `..workers.dev`. The [`name`](https://developers.cloudflare.com/workers/wrangler/configuration/#inheritable-keys) field in your Worker configuration is used as the subdomain for the deployed Worker. ## Disabling `workers.dev` ### Disabling `workers.dev` in the dashboard To disable the `workers.dev` route for a Worker: 1. Log in to the [Cloudflare dashboard](https://dash.cloudflare.com) and select your account. 2. Go to **Workers & Pages** and in **Overview**, select your Worker. 3. Go to **Settings** > **Domains & Routes**. 4. On `workers.dev` click "Disable". 5. Confirm you want to disable. ### Disabling `workers.dev` in the Wrangler configuration file To disable the `workers.dev` route for a Worker, include the following in your Worker's [Wrangler configuration file](https://developers.cloudflare.com/workers/wrangler/configuration/): * wrangler.jsonc ```jsonc { "workers_dev": false } ``` * wrangler.toml ```toml workers_dev = false ``` When you redeploy your Worker with this change, the `workers.dev` route will be disabled. Disabling your `workers.dev` route does not disable Preview URLs. Learn how to [disable Preview URLs](https://developers.cloudflare.com/workers/configuration/previews/#disabling-preview-urls). If you do not specify `workers_dev = false` but add a [`routes` component](https://developers.cloudflare.com/workers/wrangler/configuration/#routes) to your [Wrangler configuration file](https://developers.cloudflare.com/workers/wrangler/configuration/), the value of `workers_dev` will be inferred as `false` on the next deploy. Warning If you disable your `workers.dev` route in the Cloudflare dashboard but do not update your Worker's Wrangler file with `workers_dev = false`, the `workers.dev` route will be re-enabled the next time you deploy your Worker with Wrangler. ## Related resources * [Announcing `workers.dev`](https://blog.cloudflare.com/announcing-workers-dev) * [Wrangler routes configuration](https://developers.cloudflare.com/workers/wrangler/configuration/#types-of-routes) --- title: Workers Sites configuration · Cloudflare Workers docs description: Workers Sites require the latest version of Wrangler. lastUpdated: 2025-02-12T13:41:31.000Z chatbotDeprioritize: false source_url: html: https://developers.cloudflare.com/workers/configuration/sites/configuration/ md: https://developers.cloudflare.com/workers/configuration/sites/configuration/index.md --- Use Workers Static Assets Instead You should use [Workers Static Assets](https://developers.cloudflare.com/workers/static-assets/) to host full-stack applications instead of Workers Sites. It has been deprecated in Wrangler v4, and the [Cloudflare Vite plugin](https://developers.cloudflare.com/workers/vite-plugin/) does not support Workers Sites. Do not use Workers Sites for new projects. Workers Sites require the latest version of [Wrangler](https://github.com/cloudflare/workers-sdk/tree/main/packages/wrangler). ## Wrangler configuration file There are a few specific configuration settings for Workers Sites in your Wrangler file: * `bucket` required * The directory containing your static assets, path relative to your [Wrangler configuration file](https://developers.cloudflare.com/workers/wrangler/configuration/). Example: `bucket = "./public"`. * `include` optional * A list of gitignore-style patterns for files or directories in `bucket` you exclusively want to upload. Example: `include = ["upload_dir"]`. * `exclude` optional * A list of gitignore-style patterns for files or directories in `bucket` you want to exclude from uploads. Example: `exclude = ["ignore_dir"]`. To learn more about the optional `include` and `exclude` fields, refer to [Ignoring subsets of static assets](#ignoring-subsets-of-static-assets). Note If your project uses [environments](https://developers.cloudflare.com/workers/wrangler/environments/), make sure to place `site` above any environment-specific configuration blocks. Example of a [Wrangler configuration file](https://developers.cloudflare.com/workers/wrangler/configuration/): * wrangler.jsonc ```jsonc { "name": "docs-site-blah", "site": { "bucket": "./public" }, "env": { "production": { "name": "docs-site", "route": "https://example.com/docs*" }, "staging": { "name": "docs-site-staging", "route": "https://staging.example.com/docs*" } } } ``` * wrangler.toml ```toml name = "docs-site-blah" [site] bucket = "./public" [env.production] name = "docs-site" route = "https://example.com/docs*" [env.staging] name = "docs-site-staging" route = "https://staging.example.com/docs*" ``` ## Storage limits For very exceptionally large pages, Workers Sites might not work for you. There is a 25 MiB limit per page or file. ## Ignoring subsets of static assets Workers Sites require [Wrangler](https://github.com/cloudflare/workers-sdk/tree/main/packages/wrangler) - make sure to use the [latest version](https://developers.cloudflare.com/workers/wrangler/install-and-update/#update-wrangler). There are cases where users may not want to upload certain static assets to their Workers Sites. In this case, Workers Sites can also be configured to ignore certain files or directories using logic similar to [Cargo's optional include and exclude fields](https://doc.rust-lang.org/cargo/reference/manifest.html#the-exclude-and-include-fields-optional). This means that you should use gitignore semantics when declaring which directory entries to include or ignore in uploads. ### Exclusively including files/directories If you want to include only a certain set of files or directories in your `bucket`, you can add an `include` field to your `[site]` section of your Wrangler file: * wrangler.jsonc ```jsonc { "site": { "bucket": "./public", "include": [ "included_dir" ] } } ``` * wrangler.toml ```toml [site] bucket = "./public" include = ["included_dir"] # must be an array. ``` Wrangler will only upload files or directories matching the patterns in the `include` array. ### Excluding files/directories If you want to exclude files or directories in your `bucket`, you can add an `exclude` field to your `[site]` section of your Wrangler file: * wrangler.jsonc ```jsonc { "site": { "bucket": "./public", "exclude": [ "excluded_dir" ] } } ``` * wrangler.toml ```toml [site] bucket = "./public" exclude = ["excluded_dir"] # must be an array. ``` Wrangler will ignore files or directories matching the patterns in the `exclude` array when uploading assets to Workers KV. ### Include > exclude If you provide both `include` and `exclude` fields, the `include` field will be used and the `exclude` field will be ignored. ### Default ignored entries Wrangler will always ignore: * `node_modules` * Hidden files and directories * Symlinks #### More about include/exclude patterns Learn more about the standard patterns used for include and exclude in the [gitignore documentation](https://git-scm.com/docs/gitignore). --- title: Start from scratch · Cloudflare Workers docs description: This guide shows how to quickly start a new Workers Sites project from scratch. lastUpdated: 2025-02-12T13:41:31.000Z chatbotDeprioritize: false source_url: html: https://developers.cloudflare.com/workers/configuration/sites/start-from-scratch/ md: https://developers.cloudflare.com/workers/configuration/sites/start-from-scratch/index.md --- Use Workers Static Assets Instead You should use [Workers Static Assets](https://developers.cloudflare.com/workers/static-assets/) to host full-stack applications instead of Workers Sites. It has been deprecated in Wrangler v4, and the [Cloudflare Vite plugin](https://developers.cloudflare.com/workers/vite-plugin/) does not support Workers Sites. Do not use Workers Sites for new projects. This guide shows how to quickly start a new Workers Sites project from scratch. ## Getting started 1. Ensure you have the latest version of [git](https://git-scm.com/downloads) and [Node.js](https://nodejs.org/en/download/) installed. 2. In your terminal, clone the `worker-sites-template` starter repository. The following example creates a project called `my-site`: ```sh git clone --depth=1 --branch=wrangler2 https://github.com/cloudflare/worker-sites-template my-site ``` 3. Run `npm install` to install all dependencies. 4. You can preview your site by running the [`wrangler dev`](https://developers.cloudflare.com/workers/wrangler/commands/#dev) command: ```sh wrangler dev ``` 5. Deploy your site to Cloudflare: ```sh npx wrangler deploy ``` ## Project layout The template project contains the following files and directories: * `public`: The static assets for your project. By default it contains an `index.html` and a `favicon.ico`. * `src`: The Worker configured for serving your assets. You do not need to edit this but if you want to see how it works or add more functionality to your Worker, you can edit `src/index.ts`. * `wrangler.jsonc`: The file containing project configuration. The `bucket` property tells Wrangler where to find the static assets (e.g. `site = { bucket = "./public" }`). * `package.json`/`package-lock.json`: define the required Node.js dependencies. ## Customize the `wrangler.jsonc` file: * Change the `name` property to the name of your project: * wrangler.jsonc ```jsonc { "name": "my-site" } ``` * wrangler.toml ```toml name = "my-site" ``` * Consider updating`compatibility_date` to today's date to get access to the most recent Workers features: * wrangler.jsonc ```jsonc { "compatibility_date": "yyyy-mm-dd" } ``` * wrangler.toml ```toml compatibility_date = "yyyy-mm-dd" ``` * Deploy your site to a [custom domain](https://developers.cloudflare.com/workers/configuration/routing/custom-domains/) that you own and have already attached as a Cloudflare zone: * wrangler.jsonc ```jsonc { "route": "https://example.com/*" } ``` * wrangler.toml ```toml route = "https://example.com/*" ``` Note Refer to the documentation on [Routes](https://developers.cloudflare.com/workers/configuration/routing/routes/) to configure a `route` properly. Learn more about [configuring your project](https://developers.cloudflare.com/workers/wrangler/configuration/). --- title: Start from Worker · Cloudflare Workers docs description: Workers Sites require Wrangler — make sure to use the latest version. lastUpdated: 2025-02-10T15:04:35.000Z chatbotDeprioritize: false source_url: html: https://developers.cloudflare.com/workers/configuration/sites/start-from-worker/ md: https://developers.cloudflare.com/workers/configuration/sites/start-from-worker/index.md --- Use Workers Static Assets Instead You should use [Workers Static Assets](https://developers.cloudflare.com/workers/static-assets/) to host full-stack applications instead of Workers Sites. It has been deprecated in Wrangler v4, and the [Cloudflare Vite plugin](https://developers.cloudflare.com/workers/vite-plugin/) does not support Workers Sites. Do not use Workers Sites for new projects. Workers Sites require [Wrangler](https://github.com/cloudflare/workers-sdk/tree/main/packages/wrangler) — make sure to use the [latest version](https://developers.cloudflare.com/workers/wrangler/install-and-update/#update-wrangler). If you have a pre-existing Worker project, you can use Workers Sites to serve static assets to the Worker. ## Getting started 1. Create a directory that will contain the assets in the root of your project (for example, `./public`) 2. Add configuration to your Wrangler file to point to it. * wrangler.jsonc ```jsonc { "site": { "bucket": "./public" } } ``` * wrangler.toml ```toml [site] bucket = "./public" # Add the directory with your static assets! ``` 3. Install the `@cloudflare/kv-asset-handler` package in your project: ```sh npm i -D @cloudflare/kv-asset-handler ``` 4. Import the `getAssetFromKV()` function into your Worker entry point and use it to respond with static assets. * Module Worker ```js import { getAssetFromKV } from "@cloudflare/kv-asset-handler"; import manifestJSON from "__STATIC_CONTENT_MANIFEST"; const assetManifest = JSON.parse(manifestJSON); export default { async fetch(request, env, ctx) { try { // Add logic to decide whether to serve an asset or run your original Worker code return await getAssetFromKV( { request, waitUntil: ctx.waitUntil.bind(ctx), }, { ASSET_NAMESPACE: env.__STATIC_CONTENT, ASSET_MANIFEST: assetManifest, }, ); } catch (e) { let pathname = new URL(request.url).pathname; return new Response(`"${pathname}" not found`, { status: 404, statusText: "not found", }); } }, }; ``` * Service Worker ```js import { getAssetFromKV } from "@cloudflare/kv-asset-handler"; addEventListener("fetch", (event) => { event.respondWith(handleEvent(event)); }); async function handleEvent(event) { try { // Add logic to decide whether to serve an asset or run your original Worker code return await getAssetFromKV(event); } catch (e) { let pathname = new URL(event.request.url).pathname; return new Response(`"${pathname}" not found`, { status: 404, statusText: "not found", }); } } ``` For more information on the configurable options of `getAssetFromKV()` refer to [kv-asset-handler docs](https://github.com/cloudflare/workers-sdk/tree/main/packages/kv-asset-handler). 1. Run `wrangler deploy` or `npx wrangler deploy` as you would normally with your Worker project. Wrangler will automatically upload the assets found in the configured directory. ```sh npx wrangler deploy ``` --- title: Start from existing · Cloudflare Workers docs description: Workers Sites require Wrangler — make sure to use the latest version. lastUpdated: 2025-05-13T11:59:34.000Z chatbotDeprioritize: false source_url: html: https://developers.cloudflare.com/workers/configuration/sites/start-from-existing/ md: https://developers.cloudflare.com/workers/configuration/sites/start-from-existing/index.md --- Use Workers Static Assets Instead You should use [Workers Static Assets](https://developers.cloudflare.com/workers/static-assets/) to host full-stack applications instead of Workers Sites. It has been deprecated in Wrangler v4, and the [Cloudflare Vite plugin](https://developers.cloudflare.com/workers/vite-plugin/) does not support Workers Sites. Do not use Workers Sites for new projects. Workers Sites require [Wrangler](https://github.com/cloudflare/workers-sdk/tree/main/packages/wrangler) — make sure to use the [latest version](https://developers.cloudflare.com/workers/wrangler/install-and-update/#update-wrangler). To deploy a pre-existing static site project, start with a pre-generated site. Workers Sites works with all static site generators, for example: * [Hugo](https://gohugo.io/getting-started/quick-start/) * [Gatsby](https://www.gatsbyjs.org/docs/quick-start/), requires Node * [Jekyll](https://jekyllrb.com/docs/), requires Ruby * [Eleventy](https://www.11ty.io/#quick-start), requires Node * [WordPress](https://wordpress.org) (refer to the tutorial on [deploying static WordPress sites with Pages](https://developers.cloudflare.com/pages/how-to/deploy-a-wordpress-site/)) ## Getting started 1. Run the `wrangler init` command in the root of your project's directory to generate a basic Worker: ```sh wrangler init -y ``` This command adds/update the following files: * `wrangler.jsonc`: The file containing project configuration. * `package.json`: Wrangler `devDependencies` are added. * `tsconfig.json`: Added if not already there to support writing the Worker in TypeScript. * `src/index.ts`: A basic Cloudflare Worker, written in TypeScript. 2. Add your site's build/output directory to the Wrangler file: * wrangler.jsonc ```jsonc { "site": { "bucket": "./public" } } ``` * wrangler.toml ```toml [site] bucket = "./public" # <-- Add your build directory name here. ``` The default directories for the most popular static site generators are listed below: * Hugo: `public` * Gatsby: `public` * Jekyll: `_site` * Eleventy: `_site` 3. Install the `@cloudflare/kv-asset-handler` package in your project: ```sh npm i -D @cloudflare/kv-asset-handler ``` 4. Replace the contents of `src/index.ts` with the following code snippet: * Module Worker ```js import { getAssetFromKV } from "@cloudflare/kv-asset-handler"; import manifestJSON from "__STATIC_CONTENT_MANIFEST"; const assetManifest = JSON.parse(manifestJSON); export default { async fetch(request, env, ctx) { try { // Add logic to decide whether to serve an asset or run your original Worker code return await getAssetFromKV( { request, waitUntil: ctx.waitUntil.bind(ctx), }, { ASSET_NAMESPACE: env.__STATIC_CONTENT, ASSET_MANIFEST: assetManifest, }, ); } catch (e) { let pathname = new URL(request.url).pathname; return new Response(`"${pathname}" not found`, { status: 404, statusText: "not found", }); } }, }; ``` * Service Worker Service Workers are deprecated Service Workers are deprecated, but still supported. We recommend using [Module Workers](https://developers.cloudflare.com/workers/reference/migrate-to-module-workers/) instead. New features may not be supported for Service Workers. ```js import { getAssetFromKV } from "@cloudflare/kv-asset-handler"; addEventListener("fetch", (event) => { event.respondWith(handleEvent(event)); }); async function handleEvent(event) { try { // Add logic to decide whether to serve an asset or run your original Worker code return await getAssetFromKV(event); } catch (e) { let pathname = new URL(event.request.url).pathname; return new Response(`"${pathname}" not found`, { status: 404, statusText: "not found", }); } } ``` 1. Run `wrangler dev` or `npx wrangler deploy` to preview or deploy your site on Cloudflare. Wrangler will automatically upload the assets found in the configured directory. ```sh npx wrangler deploy ``` 2. Deploy your site to a [custom domain](https://developers.cloudflare.com/workers/configuration/routing/custom-domains/) that you own and have already attached as a Cloudflare zone. Add a `route` property to the Wrangler file. * wrangler.jsonc ```jsonc { "route": "https://example.com/*" } ``` * wrangler.toml ```toml route = "https://example.com/*" ``` Note Refer to the documentation on [Routes](https://developers.cloudflare.com/workers/configuration/routing/routes/) to configure a `route` properly. Learn more about [configuring your project](https://developers.cloudflare.com/workers/wrangler/configuration/). --- title: Gradual deployments · Cloudflare Workers docs description: Incrementally deploy code changes to your Workers with gradual deployments. lastUpdated: 2025-04-24T21:22:15.000Z chatbotDeprioritize: false source_url: html: https://developers.cloudflare.com/workers/configuration/versions-and-deployments/gradual-deployments/ md: https://developers.cloudflare.com/workers/configuration/versions-and-deployments/gradual-deployments/index.md --- Gradual Deployments give you the ability to incrementally deploy new [versions](https://developers.cloudflare.com/workers/configuration/versions-and-deployments/#versions) of Workers by splitting traffic across versions. ![Gradual Deployments](https://developers.cloudflare.com/_astro/gradual-deployments.C6F9MQ6U_Z1KFl3a.webp) Using gradual deployments, you can: * Gradually shift traffic to a newer version of your Worker. * Monitor error rates and exceptions across versions using [analytics and logs](https://developers.cloudflare.com/workers/configuration/versions-and-deployments/gradual-deployments/#observability) tooling. * [Roll back](https://developers.cloudflare.com/workers/configuration/versions-and-deployments/rollbacks/) to a previously stable version if you notice issues when deploying a new version. ## Use gradual deployments The following section guides you through an example usage of gradual deployments. You will choose to use either [Wrangler](https://developers.cloudflare.com/workers/configuration/versions-and-deployments/gradual-deployments/#via-wrangler) or the [Cloudflare dashboard](https://developers.cloudflare.com/workers/configuration/versions-and-deployments/gradual-deployments/#via-the-cloudflare-dashboard) to: * Create a new Worker. * Publish a new version of that Worker without deploying it. * Create a gradual deployment between the two versions. * Progress the deployment of the new version to 100% of traffic. ### Via Wrangler Note Minimum required Wrangler version: 3.40.0. Versions before 3.73.0 require you to specify a `--x-versions` flag. #### 1. Create and deploy a new Worker Create a new `"Hello World"` Worker using the [`create-cloudflare` CLI (C3)](https://developers.cloudflare.com/pages/get-started/c3/) and deploy it. ```sh npm create cloudflare@latest -- --type=hello-world ``` Answer `yes` or `no` to using TypeScript. Answer `yes` to deploying your application. This is the first version of your Worker. #### 2. Create a new version of the Worker To create a new version of the Worker, edit the Worker code by changing the `Response` content to your desired text and upload the Worker by using the [`wrangler versions upload`](https://developers.cloudflare.com/workers/wrangler/commands/#upload) command. ```sh npx wrangler versions upload ``` This will create a new version of the Worker that is not automatically deployed. #### 3. Create a new deployment Use the [`wrangler versions deploy`](https://developers.cloudflare.com/workers/wrangler/commands/#deploy-2) command to create a new deployment that splits traffic between two versions of the Worker. Follow the interactive prompts to create a deployment with the versions uploaded in [step #1](https://developers.cloudflare.com/workers/configuration/versions-and-deployments/gradual-deployments/#1-create-and-deploy-a-new-worker) and [step #2](https://developers.cloudflare.com/workers/configuration/versions-and-deployments/gradual-deployments/#2-create-a-new-version-of-the-worker). Select your desired percentages for each version. ```sh npx wrangler versions deploy ``` #### 4. Test the split deployment Run a cURL command on your Worker to test the split deployment. ```bash for j in {0..10} do curl -s https://$WORKER_NAME.$SUBDOMAIN.workers.dev done ``` You should see 10 responses. Responses will reflect the content returned by the versions in your deployment. Responses will vary depending on the percentages configured in [step #3](https://developers.cloudflare.com/workers/configuration/versions-and-deployments/gradual-deployments/#3-create-a-new-deployment). You can test also target a specific version using [version overrides](#version-overrides). #### 5. Set your new version to 100% deployment Run `wrangler versions deploy` again and follow the interactive prompts. Select the version uploaded in [step 2](https://developers.cloudflare.com/workers/configuration/versions-and-deployments/gradual-deployments/#2-create-a-new-version-of-the-worker) and set it to 100% deployment. ```sh npx wrangler versions deploy ``` ### Via the Cloudflare dashboard 1. Log in to the [Cloudflare dashboard](https://dash.cloudflare.com/?to=/:account/workers) and select your account. 2. Go to **Workers & Pages**. 3. Select **Create application** > **Hello World** template > deploy your Worker. 4. Once the Worker is deployed, go to the online code editor through **Edit code**. Edit the Worker code (change the `Response` content) and upload the Worker. 5. To save changes, select the **down arrow** next to **Deploy** > **Save**. This will create a new version of your Worker. 6. Create a new deployment that splits traffic between the two versions created in step 3 and 5 by going to **Deployments** and selecting **Deploy Version**. 7. cURL your Worker to test the split deployment. ```bash for j in {0..10} do curl -s https://$WORKER_NAME.$SUBDOMAIN.workers.dev done ``` You should see 10 responses. Responses will reflect the content returned by the versions in your deployment. Responses will vary depending on the percentages configured in step #6. ## Version affinity By default, the percentages configured when using gradual deployments operate on a per-request basis — a request has a X% probability of invoking one of two versions of the Worker in the [deployment](https://developers.cloudflare.com/workers/configuration/versions-and-deployments/#deployments). You may want requests associated with a particular identifier (such as user, session, or any unique ID) to be handled by a consistent version of your Worker to prevent version skew. Version skew occurs when there are multiple versions of an application deployed that are not forwards/backwards compatible. You can configure version affinity to prevent the Worker's version from changing back and forth on a per-request basis. You can do this by setting the `Cloudflare-Workers-Version-Key` header on the incoming request to your Worker. For example: ```sh curl -s https://example.com -H 'Cloudflare-Workers-Version-Key: foo' ``` For a given [deployment](https://developers.cloudflare.com/workers/configuration/versions-and-deployments/#deployments), all requests with a version key set to `foo` will be handled by the same version of your Worker. The specific version of your Worker that the version key `foo` corresponds to is determined by the percentages you have configured for each Worker version in your deployment. You can set the `Cloudflare-Workers-Version-Key` header both when making an external request from the Internet to your Worker, as well as when making a subrequest from one Worker to another Worker using a [service binding](https://developers.cloudflare.com/workers/runtime-apis/bindings/service-bindings/). ### Setting `Cloudflare-Workers-Version-Key` using Ruleset Engine You may want to extract a version key from certain properties of your request such as the URL, headers or cookies. You can configure a [Ruleset Engine](https://developers.cloudflare.com/ruleset-engine/) rule on your zone to do this. This allows you to specify version affinity based on these properties without having to modify the external client that makes the request. For example, if your worker serves video assets under the URI path `/assets/` and you wanted requests to each unique asset to be handled by a consistent version, you could define the following [request header transform rule](https://developers.cloudflare.com/rules/transform/request-header-modification/): Text in **Expression Editor**: ```txt starts_with(http.request.uri.path, "/asset/") ``` Selected operation under **Modify request header**: *Set dynamic* **Header name**: `Cloudflare-Workers-Version-Key` **Value**: `regex_replace(http.request.uri.path, "/asset/(.*)", "${1}")` ## Version overrides You can use version overrides to send a request to a specific version of your Worker in your gradual deployment. To specify a version override in your request, you can set the `Cloudflare-Workers-Version-Overrides` header on the request to your Worker. For example: ```sh curl -s https://example.com -H 'Cloudflare-Workers-Version-Overrides: my-worker-name="dc8dcd28-271b-4367-9840-6c244f84cb40"' ``` `Cloudflare-Workers-Version-Overrides` is a [Dictionary Structured Header](https://www.rfc-editor.org/rfc/rfc8941#name-dictionaries). The dictionary can contain multiple key-value pairs. Each key indicates the name of the Worker the override should be applied to. The value indicates the version ID that should be used and must be a [String](https://www.rfc-editor.org/rfc/rfc8941#name-strings). A version override will only be applied if the specified version is in the current deployment. The versions in the current deployment can be found using the [`wrangler deployments list`](https://developers.cloudflare.com/workers/wrangler/commands/#list-6) command or on the [Workers Dashboard](https://dash.cloudflare.com/?to=/:account/workers) under Worker > Deployments > Active Deployment. Verifying that the version override was applied There are a number of reasons why a request's version override may not be applied. For example: * The deployment containing the specified version may not have propagated yet. * The header value may not be a valid [Dictionary](https://www.rfc-editor.org/rfc/rfc8941#name-dictionaries). In the case that a request's version override is not applied, the request will be routed according to the percentages set in the gradual deployment configuration. To make sure that the request's version override was applied correctly, you can [observe](#observability) the version of your Worker that was invoked. You could even automate this check by using the [runtime binding](#runtime-binding) to return the version in the Worker's response. ### Example You may want to test a new version in production before gradually deploying it to an increasing proportion of external traffic. In this example, your deployment is initially configured to route all traffic to a single version: | Version ID | Percentage | | - | - | | db7cd8d3-4425-4fe7-8c81-01bf963b6067 | 100% | Create a new deployment using [`wrangler versions deploy`](https://developers.cloudflare.com/workers/wrangler/commands/#deploy-2) and specify 0% for the new version whilst keeping the previous version at 100%. | Version ID | Percentage | | - | - | | dc8dcd28-271b-4367-9840-6c244f84cb40 | 0% | | db7cd8d3-4425-4fe7-8c81-01bf963b6067 | 100% | Now test the new version with a version override before gradually progressing the new version to 100%: ```sh curl -s https://example.com -H 'Cloudflare-Workers-Version-Overrides: my-worker-name="dc8dcd28-271b-4367-9840-6c244f84cb40"' ``` ## Gradual deployments for Durable Objects To provide [global uniqueness](https://developers.cloudflare.com/durable-objects/platform/known-issues/#global-uniqueness), only one version of each [Durable Object](https://developers.cloudflare.com/durable-objects/) can run at a time. This means that gradual deployments work slightly differently for Durable Objects. When you create a new gradual deployment for a Worker with Durable Objects, each Durable Object is assigned a Worker version based on the percentages you configured in your [deployment](https://developers.cloudflare.com/workers/configuration/versions-and-deployments/#deployments). This version will not change until you create a new deployment. ![Gradual Deployments Durable Objects](https://developers.cloudflare.com/_astro/durable-objects.D92CiuSQ_Z1KD3Vq.webp) ### Example This example assumes that you have previously created 3 Durable Objects and [derived their IDs from the names](https://developers.cloudflare.com/durable-objects/api/namespace/#idfromname) "foo", "bar" and "baz". Your Worker is currently on a version that we will call version "A" and you want to gradually deploy a new version "B" of your Worker. Here is how the versions of your Durable Objects might change as you progress your gradual deployment: | Deployment config | "foo" | "bar" | "baz" | | - | - | - | - | | Version A: 100% | A | A | A | | Version B: 20% Version A: 80% | B | A | A | | Version B: 50% Version A: 50% | B | B | A | | Version B: 100% | B | B | B | This is only an example, so the versions assigned to your Durable Objects may be different. However, the following is guaranteed: * For a given deployment, requests to each Durable Object will always use the same Worker version. * When you specify each version in the same order as the previous deployment and increase the percentage of a version, Durable Objects which were previously assigned that version will not be assigned a different version. In this example, Durable Object "foo" would never revert from version "B" to version "A". * The Durable Object will only be [reset](https://developers.cloudflare.com/durable-objects/observability/troubleshooting/#durable-object-reset-because-its-code-was-updated) when it is assigned a different version, so each Durable Object will only be reset once in this example. Note Typically, a Worker bundle will define both the Durable Object class and a Worker that interacts with it. In this case, you cannot deploy changes to your Durable Object and its Worker independently. You should ensure that API changes between your Durable Object and its Worker are [forwards and backwards compatible](https://developers.cloudflare.com/durable-objects/platform/known-issues/#code-updates) whether you are using gradual deployments or not. However, using gradual deployments will make it even more likely that different versions of your Durable Objects and its Worker will interact with each other. ### Migrations Versions of Worker bundles containing new Durable Object migrations cannot be uploaded. This is because Durable Object migrations are atomic operations. Durable Object migrations can be deployed with the following command: ```sh npx wrangler versions deploy ``` To limit the blast radius of Durable Object migration deployments, migrations should be deployed independently of other code changes. To understand why Durable Object migrations are atomic operations, consider the hypothetical example of gradually deploying a delete migration. If a delete migration were applied to 50% of Durable Object instances, then Workers requesting those Durable Object instances would fail because they would have been deleted. To do this without producing errors, a version of the Worker which does not depend on any Durable Object instances would have to have already been rolled out. Then, you can deploy a delete migration without affecting any traffic and there is no reason to do so gradually. ## Observability When using gradual deployments, you may want to attribute Workers invocations to a specific version in order to get visibility into the impact of deploying new versions. ### Logpush A new `ScriptVersion` object is available in [Workers Logpush](https://developers.cloudflare.com/workers/observability/logs/logpush/). `ScriptVersion` can only be added through the Logpush API right now. Sample API call: ```bash curl -X POST 'https://api.cloudflare.com/client/v4/accounts//logpush/jobs' \ -H 'Authorization: Bearer ' \ -H 'Content-Type: application/json' \ -d '{ "name": "workers-logpush", "output_options": { "field_names": ["Event", "EventTimestampMs", "Outcome", "Logs", "ScriptName", "ScriptVersion"], }, "destination_conf": "", "dataset": "workers_trace_events", "enabled": true }'| jq . ``` `ScriptVersion` is an object with the following structure: ```json scriptVersion: { id: "", message: "", tag: "" } ``` ### Runtime binding Use the [Version metadata binding](https://developers.cloudflare.com/workers/runtime-apis/bindings/version-metadata/) in to access version ID or version tag in your Worker. ## Limits ### Deployments limit You can only create a new deployment with the last 10 uploaded versions of your Worker. --- title: Rollbacks · Cloudflare Workers docs description: Revert to an older version of your Worker. lastUpdated: 2024-09-06T17:16:07.000Z chatbotDeprioritize: false source_url: html: https://developers.cloudflare.com/workers/configuration/versions-and-deployments/rollbacks/ md: https://developers.cloudflare.com/workers/configuration/versions-and-deployments/rollbacks/index.md --- You can roll back to a previously deployed [version](https://developers.cloudflare.com/workers/configuration/versions-and-deployments/#versions) of your Worker using [Wrangler](https://developers.cloudflare.com/workers/wrangler/commands/#rollback) or the Cloudflare dashboard. Rolling back to a previous version of your Worker will immediately create a new [deployment](https://developers.cloudflare.com/workers/configuration/versions-and-deployments/#deployments) with the version specified and become the active deployment across all your deployed routes and domains. ## Via Wrangler To roll back to a specified version of your Worker via Wrangler, use the [`wrangler rollback`](https://developers.cloudflare.com/workers/wrangler/commands/#rollback) command. ## Via the Cloudflare Dashboard To roll back to a specified version of your Worker via the Cloudflare dashboard: 1. Log in to the [Cloudflare dashboard](https://dash.cloudflare.com/?to=/:account/workers) and select your account. 2. Go to **Workers & Pages** > select your Worker > **Deployments**. 3. Select the three dot icon on the right of the version you would like to roll back to and select **Rollback**. Warning **[Resources connected to your Worker](https://developers.cloudflare.com/workers/runtime-apis/bindings/) will not be changed during a rollback.** Errors could occur if using code for a prior version if the structure of data has changed between the version in the active deployment and the version selected to rollback to. ## Limits ### Rollbacks limit You can only roll back to the 10 most recently published versions. ### Bindings You cannot roll back to a previous version of your Worker if the [Cloudflare Developer Platform resources](https://developers.cloudflare.com/workers/runtime-apis/bindings/) (such as [KV](https://developers.cloudflare.com/kv/) and [D1](https://developers.cloudflare.com/d1/)) have been deleted or modified between the version selected to roll back to and the version in the active deployment. Specifically, rollbacks will not be allowed if: * A [Durable Object migration](https://developers.cloudflare.com/durable-objects/reference/durable-objects-migrations/) has occurred between the version in the active deployment and the version selected to roll back to. * If the target deployment has a [binding](https://developers.cloudflare.com/workers/runtime-apis/bindings/) to an R2 bucket, KV namespace, or queue that no longer exists. --- title: Neon · Cloudflare Workers docs description: Connect Workers to a Neon Postgres database. lastUpdated: 2025-06-25T15:22:01.000Z chatbotDeprioritize: false source_url: html: https://developers.cloudflare.com/workers/databases/third-party-integrations/neon/ md: https://developers.cloudflare.com/workers/databases/third-party-integrations/neon/index.md --- [Neon](https://neon.tech/) is a fully managed serverless PostgreSQL. It separates storage and compute to offer modern developer features, such as serverless, branching, and bottomless storage. Note You can connect to Neon using [Hyperdrive](https://developers.cloudflare.com/hyperdrive) (recommended), or using the Neon serverless driver, `@neondatabase/serverless`. Both provide connection pooling and reduce the amount of round trips required to create a secure connection from Workers to your database. Hyperdrive can provide the lowest possible latencies because it performs the database connection setup and connection pooling across Cloudflare's network. Hyperdrive supports native database drivers, libraries, and ORMs, and is included in all [Workers plans](https://developers.cloudflare.com/hyperdrive/platform/pricing/). Learn more about Hyperdrive in [How Hyperdrive Works](https://developers.cloudflare.com/hyperdrive/configuration/how-hyperdrive-works/). * Hyperdrive (recommended) To connect to Neon using [Hyperdrive](https://developers.cloudflare.com/hyperdrive), follow these steps: ## 1. Allow Hyperdrive access You can connect Hyperdrive to any existing Neon database by creating a new user and fetching your database connection string. ### Neon Dashboard 1. Go to the [**Neon dashboard**](https://console.neon.tech/app/projects) and select the project (database) you wish to connect to. 2. Select **Roles** from the sidebar and select **New Role**. Enter `hyperdrive-user` as the name (or your preferred name) and **copy the password**. Note that the password will not be displayed again: you will have to reset it if you do not save it somewhere. 3. Select **Dashboard** from the sidebar > go to the **Connection Details** pane > ensure you have selected the **branch**, **database** and **role** (for example,`hyperdrive-user`) that Hyperdrive will connect through. 4. Select the `psql` and **uncheck the connection pooling** checkbox. Note down the connection string (starting with `postgres://hyperdrive-user@...`) from the text box. With both the connection string and the password, you can now create a Hyperdrive database configuration. ## 2. Create a database configuration To configure Hyperdrive, you will need: * The IP address (or hostname) and port of your database. * The database username (for example, `hyperdrive-demo`) you configured in a previous step. * The password associated with that username. * The name of the database you want Hyperdrive to connect to. For example, `postgres`. Hyperdrive accepts the combination of these parameters in the common connection string format used by database drivers: ```txt postgres://USERNAME:PASSWORD@HOSTNAME_OR_IP_ADDRESS:PORT/database_name ``` Most database providers will provide a connection string you can directly copy-and-paste directly into Hyperdrive. To create a Hyperdrive configuration with the [Wrangler CLI](https://developers.cloudflare.com/workers/wrangler/install-and-update/), open your terminal and run the following command. Replace \ with a name for your Hyperdrive configuration and paste the connection string provided from your database host, or replace `user`, `password`, `HOSTNAME_OR_IP_ADDRESS`, `port`, and `database_name` placeholders with those specific to your database: ```sh npx wrangler hyperdrive create --connection-string="postgres://user:password@HOSTNAME_OR_IP_ADDRESS:PORT/database_name" ``` Note Hyperdrive will attempt to connect to your database with the provided credentials to verify they are correct before creating a configuration. If you encounter an error when attempting to connect, refer to Hyperdrive's [troubleshooting documentation](https://developers.cloudflare.com/hyperdrive/observability/troubleshooting/) to debug possible causes. This command outputs a binding for the [Wrangler configuration file](https://developers.cloudflare.com/workers/wrangler/configuration/): * wrangler.jsonc ```jsonc { "name": "hyperdrive-example", "main": "src/index.ts", "compatibility_date": "2024-08-21", "compatibility_flags": [ "nodejs_compat" ], "hyperdrive": [ { "binding": "HYPERDRIVE", "id": "" } ] } ``` * wrangler.toml ```toml name = "hyperdrive-example" main = "src/index.ts" compatibility_date = "2024-08-21" compatibility_flags = ["nodejs_compat"] # Pasted from the output of `wrangler hyperdrive create --connection-string=[...]` above. [[hyperdrive]] binding = "HYPERDRIVE" id = "" ``` ## 3. Use Hyperdrive from your Worker Install the `node-postgres` driver: * npm ```sh npm i pg@>8.16.3 ``` * yarn ```sh yarn add pg@>8.16.3 ``` * pnpm ```sh pnpm add pg@>8.16.3 ``` Note The minimum version of `node-postgres` required for Hyperdrive is `8.16.3`. If using TypeScript, install the types package: * npm ```sh npm i -D @types/pg ``` * yarn ```sh yarn add -D @types/pg ``` * pnpm ```sh pnpm add -D @types/pg ``` Add the required Node.js compatibility flags and Hyperdrive binding to your `wrangler.jsonc` file: * wrangler.jsonc ```jsonc { "compatibility_flags": [ "nodejs_compat" ], "compatibility_date": "2024-09-23", "hyperdrive": [ { "binding": "HYPERDRIVE", "id": "" } ] } ``` * wrangler.toml ```toml # required for database drivers to function compatibility_flags = ["nodejs_compat"] compatibility_date = "2024-09-23" [[hyperdrive]] binding = "HYPERDRIVE" id = "" ``` Create a new `Client` instance and pass the Hyperdrive `connectionString`: ```ts // filepath: src/index.ts import { Client } from "pg"; export default { async fetch(request: Request, env: Env, ctx: ExecutionContext): Promise { // Create a new client instance for each request. const client = new Client({ connectionString: env.HYPERDRIVE.connectionString, }); try { // Connect to the database await client.connect(); console.log("Connected to PostgreSQL database"); // Perform a simple query const result = await client.query("SELECT * FROM pg_tables"); // Clean up the client after the response is returned, before the Worker is killed ctx.waitUntil(client.end()); return Response.json({ success: true, result: result.rows, }); } catch (error: any) { console.error("Database error:", error.message); new Response('Internal error occurred', { status: 500 }); } }, }; ``` Note If you expect to be making multiple parallel database queries within a single Worker invocation, consider using a [connection pool (`pg.Pool`)](https://node-postgres.com/apis/pool) to allow for parallel queries. If doing so, set the max connections of the connection pool to 5 connections. This ensures that the connection pool fits within [Workers' concurrent open connections limit of 6](https://developers.cloudflare.com/workers/platform/limits), which affect TCP connections that database drivers use. Note When connecting to a Neon database with Hyperdrive, you should use a driver like [node-postgres (pg)](https://developers.cloudflare.com/hyperdrive/examples/connect-to-postgres/postgres-drivers-and-libraries/node-postgres/) or [Postgres.js](https://developers.cloudflare.com/hyperdrive/examples/connect-to-postgres/postgres-drivers-and-libraries/postgres-js/) to connect directly to the underlying database instead of the [Neon serverless driver](https://neon.tech/docs/serverless/serverless-driver). Hyperdrive is optimized for database access for Workers and will perform global connection pooling and fast query routing by connecting directly to your database. ## Next steps * Learn more about [How Hyperdrive Works](https://developers.cloudflare.com/hyperdrive/configuration/how-hyperdrive-works/). * Refer to the [troubleshooting guide](https://developers.cloudflare.com/hyperdrive/observability/troubleshooting/) to debug common issues. * Understand more about other [storage options](https://developers.cloudflare.com/workers/platform/storage-options/) available to Cloudflare Workers. * Neon serverless driver To connect to Neon using `@neondatabase/serverless`, follow these steps: 1. You need to have an existing Neon database to connect to. [Create a Neon database](https://neon.tech/docs/postgres/tutorial-createdb#create-a-table) or [load data from an existing database to Neon](https://neon.tech/docs/import/import-from-postgres). 2. Create an `elements` table using the Neon SQL editor. The SQL Editor allows you to query your databases directly from the Neon Console. ```sql CREATE TABLE elements ( id INTEGER NOT NULL, elementName TEXT NOT NULL, atomicNumber INTEGER NOT NULL, symbol TEXT NOT NULL ); ``` 3. Insert some data into your newly created table. ```sql INSERT INTO elements (id, elementName, atomicNumber, symbol) VALUES (1, 'Hydrogen', 1, 'H'), (2, 'Helium', 2, 'He'), (3, 'Lithium', 3, 'Li'), (4, 'Beryllium', 4, 'Be'), (5, 'Boron', 5, 'B'), (6, 'Carbon', 6, 'C'), (7, 'Nitrogen', 7, 'N'), (8, 'Oxygen', 8, 'O'), (9, 'Fluorine', 9, 'F'), (10, 'Neon', 10, 'Ne'); ``` 4. Configure the Neon database credentials in your Worker: You need to add your Neon database connection string as a secret to your Worker. Get your connection string from the [Neon Console](https://console.neon.tech) under **Connection Details**, then add it as a secret using Wrangler: ```sh # Add the database connection string as a secret npx wrangler secret put DATABASE_URL # When prompted, paste your Neon database connection string ``` 5. In your Worker, install the `@neondatabase/serverless` driver to connect to your database and start manipulating data: * npm ```sh npm i @neondatabase/serverless ``` * yarn ```sh yarn add @neondatabase/serverless ``` * pnpm ```sh pnpm add @neondatabase/serverless ``` 6. The following example shows how to make a query to your Neon database in a Worker. The credentials needed to connect to Neon have been added as secrets to your Worker. ```js import { Client } from "@neondatabase/serverless"; export default { async fetch(request, env, ctx) { const client = new Client(env.DATABASE_URL); await client.connect(); const { rows } = await client.query("SELECT * FROM elements"); ctx.waitUntil(client.end()); // this doesn’t hold up the response return new Response(JSON.stringify(rows)); }, }; ``` To learn more about Neon, refer to [Neon's official documentation](https://neon.tech/docs/introduction). * wrangler.jsonc ```jsonc { "name": "hyperdrive-example", "main": "src/index.ts", "compatibility_date": "2024-08-21", "compatibility_flags": [ "nodejs_compat" ], "hyperdrive": [ { "binding": "HYPERDRIVE", "id": "" } ] } ``` * wrangler.toml ```toml name = "hyperdrive-example" main = "src/index.ts" compatibility_date = "2024-08-21" compatibility_flags = ["nodejs_compat"] # Pasted from the output of `wrangler hyperdrive create --connection-string=[...]` above. [[hyperdrive]] binding = "HYPERDRIVE" id = "" ``` * npm ```sh npm i pg@>8.16.3 ``` * yarn ```sh yarn add pg@>8.16.3 ``` * pnpm ```sh pnpm add pg@>8.16.3 ``` * npm ```sh npm i -D @types/pg ``` * yarn ```sh yarn add -D @types/pg ``` * pnpm ```sh pnpm add -D @types/pg ``` * wrangler.jsonc ```jsonc { "compatibility_flags": [ "nodejs_compat" ], "compatibility_date": "2024-09-23", "hyperdrive": [ { "binding": "HYPERDRIVE", "id": "" } ] } ``` * wrangler.toml ```toml # required for database drivers to function compatibility_flags = ["nodejs_compat"] compatibility_date = "2024-09-23" [[hyperdrive]] binding = "HYPERDRIVE" id = "" ``` * npm ```sh npm i @neondatabase/serverless ``` * yarn ```sh yarn add @neondatabase/serverless ``` * pnpm ```sh pnpm add @neondatabase/serverless ``` --- title: PlanetScale · Cloudflare Workers docs description: PlanetScale is a MySQL-compatible platform that makes databases infinitely scalable, easier and safer to manage. lastUpdated: 2025-06-25T15:22:01.000Z chatbotDeprioritize: false source_url: html: https://developers.cloudflare.com/workers/databases/third-party-integrations/planetscale/ md: https://developers.cloudflare.com/workers/databases/third-party-integrations/planetscale/index.md --- [PlanetScale](https://planetscale.com/) is a MySQL-compatible platform that makes databases infinitely scalable, easier and safer to manage. Note You can connect to PlanetScale using [Hyperdrive](https://developers.cloudflare.com/hyperdrive) (recommended), or using the PlanetScale serverless driver, `@planetscale/database`. Both provide connection pooling and reduce the amount of round trips required to create a secure connection from Workers to your database. Hyperdrive can provide lower latencies because it performs the database connection setup and connection pooling across Cloudflare's network. Hyperdrive supports native database drivers, libraries, and ORMs, and is included in all [Workers plans](https://developers.cloudflare.com/hyperdrive/platform/pricing/). Learn more about Hyperdrive in [How Hyperdrive Works](https://developers.cloudflare.com/hyperdrive/configuration/how-hyperdrive-works/). * Hyperdrive (recommended) To connect to PlanetScale using [Hyperdrive](https://developers.cloudflare.com/hyperdrive), follow these steps: ## 1. Allow Hyperdrive access You can connect Hyperdrive to any existing PlanetScale database by creating a new user and fetching your database connection string. ### Planetscale Dashboard 1. Go to the [**PlanetScale dashboard**](https://app.planetscale.com/) and select the database you wish to connect to. 2. Click **Connect**. Enter `hyperdrive-user` as the password name (or your preferred name) and configure the permissions as desired. Select **Create password**. Note the username and password as they will not be displayed again. 3. Select **Other** as your language or framework. Note down the database host, database name, database username, and password. You will need these to create a database configuration in Hyperdrive. With the host, database name, username and password, you can now create a Hyperdrive database configuration. ## 2. Create a database configuration To configure Hyperdrive, you will need: * The IP address (or hostname) and port of your database. * The database username (for example, `hyperdrive-demo`) you configured in a previous step. * The password associated with that username. * The name of the database you want Hyperdrive to connect to. For example, `mysql`. Hyperdrive accepts the combination of these parameters in the common connection string format used by database drivers: ```txt mysql://USERNAME:PASSWORD@HOSTNAME_OR_IP_ADDRESS:PORT/database_name ``` Most database providers will provide a connection string you can copy-and-paste directly into Hyperdrive. To create a Hyperdrive configuration with the [Wrangler CLI](https://developers.cloudflare.com/workers/wrangler/install-and-update/), open your terminal and run the following command. * Replace \ with a name for your Hyperdrive configuration and paste the connection string provided from your database host, or, * Replace `user`, `password`, `HOSTNAME_OR_IP_ADDRESS`, `port`, and `database_name` placeholders with those specific to your database: ```sh npx wrangler hyperdrive create --connection-string="mysql://user:password@HOSTNAME_OR_IP_ADDRESS:PORT/database_name" ``` Note Hyperdrive will attempt to connect to your database with the provided credentials to verify they are correct before creating a configuration. If you encounter an error when attempting to connect, refer to Hyperdrive's [troubleshooting documentation](https://developers.cloudflare.com/hyperdrive/observability/troubleshooting/) to debug possible causes. This command outputs a binding for the [Wrangler configuration file](https://developers.cloudflare.com/workers/wrangler/configuration/): * wrangler.jsonc ```jsonc { "name": "hyperdrive-example", "main": "src/index.ts", "compatibility_date": "2024-08-21", "compatibility_flags": [ "nodejs_compat" ], "hyperdrive": [ { "binding": "HYPERDRIVE", "id": "" } ] } ``` * wrangler.toml ```toml name = "hyperdrive-example" main = "src/index.ts" compatibility_date = "2024-08-21" compatibility_flags = ["nodejs_compat"] # Pasted from the output of `wrangler hyperdrive create --connection-string=[...]` above. [[hyperdrive]] binding = "HYPERDRIVE" id = "" ``` ## 3. Use Hyperdrive from your Worker Install the [mysql2](https://github.com/sidorares/node-mysql2) driver: * npm ```sh npm i mysql2@>3.13.0 ``` * yarn ```sh yarn add mysql2@>3.13.0 ``` * pnpm ```sh pnpm add mysql2@>3.13.0 ``` Note `mysql2` v3.13.0 or later is required Add the required Node.js compatibility flags and Hyperdrive binding to your `wrangler.jsonc` file: * wrangler.jsonc ```jsonc { "compatibility_flags": [ "nodejs_compat" ], "compatibility_date": "2024-09-23", "hyperdrive": [ { "binding": "HYPERDRIVE", "id": "" } ] } ``` * wrangler.toml ```toml # required for database drivers to function compatibility_flags = ["nodejs_compat"] compatibility_date = "2024-09-23" [[hyperdrive]] binding = "HYPERDRIVE" id = "" ``` Create a new `connection` instance and pass the Hyperdrive parameters: ```ts // mysql2 v3.13.0 or later is required import { createConnection } from "mysql2/promise"; export default { async fetch(request, env, ctx): Promise { // Create a connection using the mysql2 driver with the Hyperdrive credentials (only accessible from your Worker). const connection = await createConnection({ host: env.HYPERDRIVE.host, user: env.HYPERDRIVE.user, password: env.HYPERDRIVE.password, database: env.HYPERDRIVE.database, port: env.HYPERDRIVE.port, // Required to enable mysql2 compatibility for Workers disableEval: true, }); try { // Sample query const [results, fields] = await connection.query("SHOW tables;"); // Clean up the client after the response is returned, before the Worker is killed ctx.waitUntil(connection.end()); // Return result rows as JSON return Response.json({ results, fields }); } catch (e) { console.error(e); } }, } satisfies ExportedHandler; ``` Note The minimum version of `mysql2` required for Hyperdrive is `3.13.0`. Note When connecting to a Planetscale database with Hyperdrive, you should use a driver like [node-postgres (pg)](https://developers.cloudflare.com/hyperdrive/examples/connect-to-postgres/postgres-drivers-and-libraries/node-postgres/) or [Postgres.js](https://developers.cloudflare.com/hyperdrive/examples/connect-to-postgres/postgres-drivers-and-libraries/postgres-js/) to connect directly to the underlying database instead of the [Planetscale serverless driver](https://planetscale.com/docs/tutorials/planetscale-serverless-driver). Hyperdrive is optimized for database access for Workers and will perform global connection pooling and fast query routing by connecting directly to your database. ## Next steps * Learn more about [How Hyperdrive Works](https://developers.cloudflare.com/hyperdrive/configuration/how-hyperdrive-works/). * Refer to the [troubleshooting guide](https://developers.cloudflare.com/hyperdrive/observability/troubleshooting/) to debug common issues. * Understand more about other [storage options](https://developers.cloudflare.com/workers/platform/storage-options/) available to Cloudflare Workers. * PlanetScale serverless driver ## Set up an integration with PlanetScale To set up an integration with PlanetScale: 1. You need to have an existing PlanetScale database to connect to. [Create a PlanetScale database](https://planetscale.com/docs/tutorials/planetscale-quick-start-guide#create-a-database) or [import an existing database to PlanetScale](https://planetscale.com/docs/imports/database-imports#overview). 2. From the [PlanetScale web console](https://planetscale.com/docs/concepts/web-console#get-started), create a `products` table with the following query: ```sql CREATE TABLE products ( id int NOT NULL AUTO_INCREMENT PRIMARY KEY, name varchar(255) NOT NULL, image_url varchar(255), category_id INT, KEY category_id_idx (category_id) ); ``` 3. Insert some data in your newly created table. Run the following command to add a product and category to your table: ```sql INSERT INTO products (name, image_url, category_id) VALUES ('Ballpoint pen', 'https://example.com/500x500', '1'); ``` 4. Configure the PlanetScale database credentials in your Worker: You need to add your PlanetScale database credentials as secrets to your Worker. Get your connection details from the [PlanetScale Dashboard](https://app.planetscale.com) by creating a connection string, then add them as secrets using Wrangler: ```sh # Add the database host as a secret npx wrangler secret put DATABASE_HOST # When prompted, paste your PlanetScale host # Add the database username as a secret npx wrangler secret put DATABASE_USERNAME # When prompted, paste your PlanetScale username # Add the database password as a secret npx wrangler secret put DATABASE_PASSWORD # When prompted, paste your PlanetScale password ``` 5. In your Worker, install the `@planetscale/database` driver to connect to your PlanetScale database and start manipulating data: * npm ```sh npm i @planetscale/database ``` * yarn ```sh yarn add @planetscale/database ``` * pnpm ```sh pnpm add @planetscale/database ``` 6. The following example shows how to make a query to your PlanetScale database in a Worker. The credentials needed to connect to PlanetScale have been added as secrets to your Worker. ```js import { connect } from "@planetscale/database"; export default { async fetch(request, env) { const config = { host: env.DATABASE_HOST, username: env.DATABASE_USERNAME, password: env.DATABASE_PASSWORD, // see https://github.com/cloudflare/workerd/issues/698 fetch: (url, init) => { delete init["cache"]; return fetch(url, init); }, }; const conn = connect(config); const data = await conn.execute("SELECT * FROM products;"); return new Response(JSON.stringify(data.rows), { status: 200, headers: { "Content-Type": "application/json", }, }); }, }; ``` To learn more about PlanetScale, refer to [PlanetScale's official documentation](https://docs.planetscale.com/). * wrangler.jsonc ```jsonc { "name": "hyperdrive-example", "main": "src/index.ts", "compatibility_date": "2024-08-21", "compatibility_flags": [ "nodejs_compat" ], "hyperdrive": [ { "binding": "HYPERDRIVE", "id": "" } ] } ``` * wrangler.toml ```toml name = "hyperdrive-example" main = "src/index.ts" compatibility_date = "2024-08-21" compatibility_flags = ["nodejs_compat"] # Pasted from the output of `wrangler hyperdrive create --connection-string=[...]` above. [[hyperdrive]] binding = "HYPERDRIVE" id = "" ``` * npm ```sh npm i mysql2@>3.13.0 ``` * yarn ```sh yarn add mysql2@>3.13.0 ``` * pnpm ```sh pnpm add mysql2@>3.13.0 ``` * wrangler.jsonc ```jsonc { "compatibility_flags": [ "nodejs_compat" ], "compatibility_date": "2024-09-23", "hyperdrive": [ { "binding": "HYPERDRIVE", "id": "" } ] } ``` * wrangler.toml ```toml # required for database drivers to function compatibility_flags = ["nodejs_compat"] compatibility_date = "2024-09-23" [[hyperdrive]] binding = "HYPERDRIVE" id = "" ``` * npm ```sh npm i @planetscale/database ``` * yarn ```sh yarn add @planetscale/database ``` * pnpm ```sh pnpm add @planetscale/database ``` --- title: Supabase · Cloudflare Workers docs description: Supabase is an open source Firebase alternative and a PostgreSQL database service that offers real-time functionality, database backups, and extensions. With Supabase, developers can quickly set up a PostgreSQL database and build applications. lastUpdated: 2025-07-02T08:58:55.000Z chatbotDeprioritize: false source_url: html: https://developers.cloudflare.com/workers/databases/third-party-integrations/supabase/ md: https://developers.cloudflare.com/workers/databases/third-party-integrations/supabase/index.md --- [Supabase](https://supabase.com/) is an open source Firebase alternative and a PostgreSQL database service that offers real-time functionality, database backups, and extensions. With Supabase, developers can quickly set up a PostgreSQL database and build applications. Note The Supabase client (`@supabase/supabase-js`) provides access to Supabase's various features, including database access. If you need access to all of the Supabase client functionality, use the Supabase client. If you want to connect directly to the Supabase Postgres database, connect using [Hyperdrive](https://developers.cloudflare.com/hyperdrive). Hyperdrive can provide lower latencies because it performs the database connection setup and connection pooling across Cloudflare's network. Hyperdrive supports native database drivers, libraries, and ORMs, and is included in all [Workers plans](https://developers.cloudflare.com/hyperdrive/platform/pricing/). Learn more about Hyperdrive in [How Hyperdrive Works](https://developers.cloudflare.com/hyperdrive/configuration/how-hyperdrive-works/). * Supabase client ### Supabase client setup To set up an integration with Supabase: 1. You need to have an existing Supabase database to connect to. [Create a Supabase database](https://supabase.com/docs/guides/database/tables#creating-tables) or [have an existing database to connect to Supabase and load data from](https://supabase.com/docs/guides/database/tables#loading-data). 2. Create a `countries` table with the following query. You can create a table in your Supabase dashboard in two ways: * Use the table editor, which allows you to set up Postgres similar to a spreadsheet. * Alternatively, use the [SQL editor](https://supabase.com/docs/guides/database/overview#the-sql-editor): ```sql CREATE TABLE countries ( id SERIAL PRIMARY KEY, name VARCHAR(255) NOT NULL ); ``` 3. Insert some data in your newly created table. Run the following commands to add countries to your table: ```sql INSERT INTO countries (name) VALUES ('United States'); INSERT INTO countries (name) VALUES ('Canada'); INSERT INTO countries (name) VALUES ('The Netherlands'); ``` 4. Configure the Supabase database credentials in your Worker: You need to add your Supabase URL and anon key as secrets to your Worker. Get these from your [Supabase Dashboard](https://supabase.com/dashboard) under **Settings** > **API**, then add them as secrets using Wrangler: ```sh # Add the Supabase URL as a secret npx wrangler secret put SUPABASE_URL # When prompted, paste your Supabase project URL # Add the Supabase anon key as a secret npx wrangler secret put SUPABASE_KEY # When prompted, paste your Supabase anon/public key ``` 5. In your Worker, install the `@supabase/supabase-js` driver to connect to your database and start manipulating data: * npm ```sh npm i @supabase/supabase-js ``` * yarn ```sh yarn add @supabase/supabase-js ``` * pnpm ```sh pnpm add @supabase/supabase-js ``` 6. The following example shows how to make a query to your Supabase database in a Worker. The credentials needed to connect to Supabase have been added as secrets to your Worker. ```js import { createClient } from "@supabase/supabase-js"; export default { async fetch(request, env) { const supabase = createClient(env.SUPABASE_URL, env.SUPABASE_KEY); const { data, error } = await supabase.from("countries").select("*"); if (error) throw error; return new Response(JSON.stringify(data), { headers: { "Content-Type": "application/json", }, }); }, }; ``` To learn more about Supabase, refer to [Supabase's official documentation](https://supabase.com/docs). * Hyperdrive When connecting to Supabase with Hyperdrive, you connect directly to the underlying Postgres database. This provides the lowest latency for databsae queries when accessed server-side from Workers. To connect to Supabase using [Hyperdrive](https://developers.cloudflare.com/hyperdrive), follow these steps: ## 1. Allow Hyperdrive access You can connect Hyperdrive to any existing Supabase database as the Postgres user which is set up during project creation. Alternatively, to create a new user for Hyperdrive, run these commands in the [SQL Editor](https://supabase.com/dashboard/project/_/sql/new). The database endpoint can be found in the [database settings page](https://supabase.com/dashboard/project/_/settings/database). With a database user, password, database endpoint (hostname and port) and database name (default: postgres), you can now set up Hyperdrive. ## 2. Create a database configuration To configure Hyperdrive, you will need: * The IP address (or hostname) and port of your database. * The database username (for example, `hyperdrive-demo`) you configured in a previous step. * The password associated with that username. * The name of the database you want Hyperdrive to connect to. For example, `postgres`. Hyperdrive accepts the combination of these parameters in the common connection string format used by database drivers: ```txt postgres://USERNAME:PASSWORD@HOSTNAME_OR_IP_ADDRESS:PORT/database_name ``` Most database providers will provide a connection string you can directly copy-and-paste directly into Hyperdrive. To create a Hyperdrive configuration with the [Wrangler CLI](https://developers.cloudflare.com/workers/wrangler/install-and-update/), open your terminal and run the following command. Replace \ with a name for your Hyperdrive configuration and paste the connection string provided from your database host, or replace `user`, `password`, `HOSTNAME_OR_IP_ADDRESS`, `port`, and `database_name` placeholders with those specific to your database: ```sh npx wrangler hyperdrive create --connection-string="postgres://user:password@HOSTNAME_OR_IP_ADDRESS:PORT/database_name" ``` Note Hyperdrive will attempt to connect to your database with the provided credentials to verify they are correct before creating a configuration. If you encounter an error when attempting to connect, refer to Hyperdrive's [troubleshooting documentation](https://developers.cloudflare.com/hyperdrive/observability/troubleshooting/) to debug possible causes. This command outputs a binding for the [Wrangler configuration file](https://developers.cloudflare.com/workers/wrangler/configuration/): * wrangler.jsonc ```jsonc { "name": "hyperdrive-example", "main": "src/index.ts", "compatibility_date": "2024-08-21", "compatibility_flags": [ "nodejs_compat" ], "hyperdrive": [ { "binding": "HYPERDRIVE", "id": "" } ] } ``` * wrangler.toml ```toml name = "hyperdrive-example" main = "src/index.ts" compatibility_date = "2024-08-21" compatibility_flags = ["nodejs_compat"] # Pasted from the output of `wrangler hyperdrive create --connection-string=[...]` above. [[hyperdrive]] binding = "HYPERDRIVE" id = "" ``` ## 3. Use Hyperdrive from your Worker Install the `node-postgres` driver: * npm ```sh npm i pg@>8.16.3 ``` * yarn ```sh yarn add pg@>8.16.3 ``` * pnpm ```sh pnpm add pg@>8.16.3 ``` Note The minimum version of `node-postgres` required for Hyperdrive is `8.16.3`. If using TypeScript, install the types package: * npm ```sh npm i -D @types/pg ``` * yarn ```sh yarn add -D @types/pg ``` * pnpm ```sh pnpm add -D @types/pg ``` Add the required Node.js compatibility flags and Hyperdrive binding to your `wrangler.jsonc` file: * wrangler.jsonc ```jsonc { "compatibility_flags": [ "nodejs_compat" ], "compatibility_date": "2024-09-23", "hyperdrive": [ { "binding": "HYPERDRIVE", "id": "" } ] } ``` * wrangler.toml ```toml # required for database drivers to function compatibility_flags = ["nodejs_compat"] compatibility_date = "2024-09-23" [[hyperdrive]] binding = "HYPERDRIVE" id = "" ``` Create a new `Client` instance and pass the Hyperdrive `connectionString`: ```ts // filepath: src/index.ts import { Client } from "pg"; export default { async fetch(request: Request, env: Env, ctx: ExecutionContext): Promise { // Create a new client instance for each request. const client = new Client({ connectionString: env.HYPERDRIVE.connectionString, }); try { // Connect to the database await client.connect(); console.log("Connected to PostgreSQL database"); // Perform a simple query const result = await client.query("SELECT * FROM pg_tables"); // Clean up the client after the response is returned, before the Worker is killed ctx.waitUntil(client.end()); return Response.json({ success: true, result: result.rows, }); } catch (error: any) { console.error("Database error:", error.message); new Response('Internal error occurred', { status: 500 }); } }, }; ``` Note If you expect to be making multiple parallel database queries within a single Worker invocation, consider using a [connection pool (`pg.Pool`)](https://node-postgres.com/apis/pool) to allow for parallel queries. If doing so, set the max connections of the connection pool to 5 connections. This ensures that the connection pool fits within [Workers' concurrent open connections limit of 6](https://developers.cloudflare.com/workers/platform/limits), which affect TCP connections that database drivers use. Note When connecting to a Supabase database with Hyperdrive, you should use a driver like [node-postgres (pg)](https://developers.cloudflare.com/hyperdrive/examples/connect-to-postgres/postgres-drivers-and-libraries/node-postgres/) or [Postgres.js](https://developers.cloudflare.com/hyperdrive/examples/connect-to-postgres/postgres-drivers-and-libraries/postgres-js/) to connect directly to the underlying database instead of the [Supabase JavaScript client](https://github.com/supabase/supabase-js). Hyperdrive is optimized for database access for Workers and will perform global connection pooling and fast query routing by connecting directly to your database. ## Next steps * Learn more about [How Hyperdrive Works](https://developers.cloudflare.com/hyperdrive/configuration/how-hyperdrive-works/). * Refer to the [troubleshooting guide](https://developers.cloudflare.com/hyperdrive/observability/troubleshooting/) to debug common issues. * Understand more about other [storage options](https://developers.cloudflare.com/workers/platform/storage-options/) available to Cloudflare Workers. * npm ```sh npm i @supabase/supabase-js ``` * yarn ```sh yarn add @supabase/supabase-js ``` * pnpm ```sh pnpm add @supabase/supabase-js ``` * wrangler.jsonc ```jsonc { "name": "hyperdrive-example", "main": "src/index.ts", "compatibility_date": "2024-08-21", "compatibility_flags": [ "nodejs_compat" ], "hyperdrive": [ { "binding": "HYPERDRIVE", "id": "" } ] } ``` * wrangler.toml ```toml name = "hyperdrive-example" main = "src/index.ts" compatibility_date = "2024-08-21" compatibility_flags = ["nodejs_compat"] # Pasted from the output of `wrangler hyperdrive create --connection-string=[...]` above. [[hyperdrive]] binding = "HYPERDRIVE" id = "" ``` * npm ```sh npm i pg@>8.16.3 ``` * yarn ```sh yarn add pg@>8.16.3 ``` * pnpm ```sh pnpm add pg@>8.16.3 ``` * npm ```sh npm i -D @types/pg ``` * yarn ```sh yarn add -D @types/pg ``` * pnpm ```sh pnpm add -D @types/pg ``` * wrangler.jsonc ```jsonc { "compatibility_flags": [ "nodejs_compat" ], "compatibility_date": "2024-09-23", "hyperdrive": [ { "binding": "HYPERDRIVE", "id": "" } ] } ``` * wrangler.toml ```toml # required for database drivers to function compatibility_flags = ["nodejs_compat"] compatibility_date = "2024-09-23" [[hyperdrive]] binding = "HYPERDRIVE" id = "" ``` --- title: Turso · Cloudflare Workers docs description: Turso is an edge-hosted, distributed database based on libSQL, an open-source fork of SQLite. Turso was designed to minimize query latency for applications where queries comes from anywhere in the world. lastUpdated: 2025-06-11T17:40:43.000Z chatbotDeprioritize: false source_url: html: https://developers.cloudflare.com/workers/databases/third-party-integrations/turso/ md: https://developers.cloudflare.com/workers/databases/third-party-integrations/turso/index.md --- [Turso](https://turso.tech/) is an edge-hosted, distributed database based on [libSQL](https://libsql.org/), an open-source fork of SQLite. Turso was designed to minimize query latency for applications where queries comes from anywhere in the world. ## Set up an integration with Turso To set up an integration with Turso: 1. You need to install Turso CLI to create and populate a database. Use one of the following two commands in your terminal to install the Turso CLI: ```sh # On macOS and linux with homebrew brew install tursodatabase/tap/turso # Manual scripted installation curl -sSfL https://get.tur.so/install.sh | bash ``` Next, run the following command to make sure the Turso CLI is installed: ```sh turso --version ``` 2. Before you create your first Turso database, you have to authenticate with your GitHub account by running: ```sh turso auth login ``` ```sh Waiting for authentication... ✔ Success! Logged in as ``` After you have authenticated, you can create a database using the command `turso db create `. Turso will create a database and automatically choose a location closest to you. ```sh turso db create my-db ``` ```sh # Example: Creating database my-db in Amsterdam, Netherlands (ams) # Once succeeded: Created database my-db in Amsterdam, Netherlands (ams) in 13 seconds. ``` With the first database created, you can now connect to it directly and execute SQL queries against it. ```sh turso db shell my-db ``` 3. Copy the following SQL query into the shell you just opened: ```sql CREATE TABLE elements ( id INTEGER NOT NULL, elementName TEXT NOT NULL, atomicNumber INTEGER NOT NULL, symbol TEXT NOT NULL ); INSERT INTO elements (id, elementName, atomicNumber, symbol) VALUES (1, 'Hydrogen', 1, 'H'), (2, 'Helium', 2, 'He'), (3, 'Lithium', 3, 'Li'), (4, 'Beryllium', 4, 'Be'), (5, 'Boron', 5, 'B'), (6, 'Carbon', 6, 'C'), (7, 'Nitrogen', 7, 'N'), (8, 'Oxygen', 8, 'O'), (9, 'Fluorine', 9, 'F'), (10, 'Neon', 10, 'Ne'); ``` 4. Configure the Turso database credentials in your Worker: You need to add your Turso database URL and authentication token as secrets to your Worker. First, get your database URL and create an authentication token: ```sh # Get your database URL turso db show my-db --url # Create an authentication token turso db tokens create my-db ``` Then add these as secrets to your Worker using Wrangler: ```sh # Add the database URL as a secret npx wrangler secret put TURSO_URL # When prompted, paste your database URL # Add the authentication token as a secret npx wrangler secret put TURSO_AUTH_TOKEN # When prompted, paste your authentication token ``` 5. In your Worker, install the Turso client library: * npm ```sh npm i @libsql/client ``` * yarn ```sh yarn add @libsql/client ``` * pnpm ```sh pnpm add @libsql/client ``` 6. The following example shows how to make a query to your Turso database in a Worker. The credentials needed to connect to Turso have been added as [secrets](https://developers.cloudflare.com/workers/configuration/secrets/) to your Worker. ```ts import { Client as LibsqlClient, createClient } from "@libsql/client/web"; export interface Env { TURSO_URL?: string; TURSO_AUTH_TOKEN?: string; } export default { async fetch(request, env, ctx): Promise { const client = buildLibsqlClient(env); try { const res = await client.execute("SELECT * FROM elements"); return new Response(JSON.stringify(res), { status: 200, headers: { "Content-Type": "application/json" }, }); } catch (error) { console.error("Error executing SQL query:", error); return new Response( JSON.stringify({ error: "Internal Server Error" }), { status: 500, }, ); } }, } satisfies ExportedHandler; function buildLibsqlClient(env: Env): LibsqlClient { const url = env.TURSO_URL?.trim(); if (url === undefined) { throw new Error("TURSO_URL env var is not defined"); } const authToken = env.TURSO_AUTH_TOKEN?.trim(); if (authToken == undefined) { throw new Error("TURSO_AUTH_TOKEN env var is not defined"); } return createClient({ url, authToken }); } ``` * The libSQL client library import `@libsql/client/web` must be imported exactly as shown when working with Cloudflare Workers. The non-web import will not work in the Workers environment. * The `Env` interface contains the [environment variable](https://developers.cloudflare.com/workers/configuration/environment-variables/) and [secret](https://developers.cloudflare.com/workers/configuration/secrets/) defined when you added the Turso integration in step 4. * The `Env` interface also caches the libSQL client object and router, which was created on the first request to the Worker. * The Worker uses `buildLibsqlClient` to query the `elements` database and returns the response as a JSON object. With your environment configured and your code ready, you can now test your Worker locally before you deploy. To learn more about Turso, refer to [Turso's official documentation](https://docs.turso.tech). --- title: Upstash · Cloudflare Workers docs description: Upstash is a serverless database with Redis* and Kafka API. Upstash also offers QStash, a task queue/scheduler designed for the serverless. lastUpdated: 2025-06-11T17:40:43.000Z chatbotDeprioritize: false source_url: html: https://developers.cloudflare.com/workers/databases/third-party-integrations/upstash/ md: https://developers.cloudflare.com/workers/databases/third-party-integrations/upstash/index.md --- [Upstash](https://upstash.com/) is a serverless database with Redis\* and Kafka API. Upstash also offers QStash, a task queue/scheduler designed for the serverless. ## Upstash for Redis To set up an integration with Upstash: 1. You need an existing Upstash database to connect to. [Create an Upstash database](https://docs.upstash.com/redis#create-a-database) or [load data from an existing database to Upstash](https://docs.upstash.com/redis/howto/connectclient). 2. Insert some data to your Upstash database. You can add data to your Upstash database in two ways: * Use the CLI directly from your Upstash console. * Alternatively, install [redis-cli](https://redis.io/docs/getting-started/installation/) locally and run the following commands. ```sh set GB "Ey up?" ``` ```sh OK ``` ```sh set US "Yo, what’s up?" ``` ```sh OK ``` ```sh set NL "Hoi, hoe gaat het?" ``` ```sh OK ``` 3. Configure the Upstash Redis credentials in your Worker: You need to add your Upstash Redis database URL and token as secrets to your Worker. Get these from your [Upstash Console](https://console.upstash.com) under your database details, then add them as secrets using Wrangler: ```sh # Add the Upstash Redis URL as a secret npx wrangler secret put UPSTASH_REDIS_REST_URL # When prompted, paste your Upstash Redis REST URL # Add the Upstash Redis token as a secret npx wrangler secret put UPSTASH_REDIS_REST_TOKEN # When prompted, paste your Upstash Redis REST token ``` 4. In your Worker, install the `@upstash/redis`, a HTTP client to connect to your database and start manipulating data: * npm ```sh npm i @upstash/redis ``` * yarn ```sh yarn add @upstash/redis ``` * pnpm ```sh pnpm add @upstash/redis ``` 5. The following example shows how to make a query to your Upstash database in a Worker. The credentials needed to connect to Upstash have been added as secrets to your Worker. ```js import { Redis } from "@upstash/redis/cloudflare"; export default { async fetch(request, env) { const redis = Redis.fromEnv(env); const country = request.headers.get("cf-ipcountry"); if (country) { const greeting = await redis.get(country); if (greeting) { return new Response(greeting); } } return new Response("Hello What's up!"); }, }; ``` Note `Redis.fromEnv(env)` automatically picks up the default `url` and `token` names created in the integration. If you have renamed the secrets, you must declare them explicitly like in the [Upstash basic example](https://docs.upstash.com/redis/sdks/redis-ts/getstarted#basic-usage). To learn more about Upstash, refer to the [Upstash documentation](https://docs.upstash.com/redis). ## Upstash Kafka To set up an integration with Upstash Kafka: 1. Create a [Kafka cluster and topic](https://docs.upstash.com/kafka). 2. Configure the Upstash Kafka credentials in your Worker: You need to add your Upstash Kafka connection details as secrets to your Worker. Get these from your [Upstash Console](https://console.upstash.com) under your Kafka cluster details, then add them as secrets using Wrangler: ```sh # Add the Upstash Kafka URL as a secret npx wrangler secret put UPSTASH_KAFKA_REST_URL # When prompted, paste your Upstash Kafka REST URL # Add the Upstash Kafka username as a secret npx wrangler secret put UPSTASH_KAFKA_REST_USERNAME # When prompted, paste your Upstash Kafka username # Add the Upstash Kafka password as a secret npx wrangler secret put UPSTASH_KAFKA_REST_PASSWORD # When prompted, paste your Upstash Kafka password ``` 3. In your Worker, install `@upstash/kafka`, a HTTP/REST based Kafka client: * npm ```sh npm i @upstash/kafka ``` * yarn ```sh yarn add @upstash/kafka ``` * pnpm ```sh pnpm add @upstash/kafka ``` 4. Use the [upstash-kafka](https://github.com/upstash/upstash-kafka/blob/main/README.md) JavaScript SDK to send data to Kafka. Refer to [Upstash documentation on Kafka setup with Workers](https://docs.upstash.com/kafka/real-time-analytics/realtime_analytics_serverless_kafka_setup#option-1-cloudflare-workers) for more information. Replace `url`, `username` and `password` with the variables set by the integration. ## Upstash QStash To set up an integration with Upstash QStash: 1. Configure the [publicly available HTTP endpoint](https://docs.upstash.com/qstash#1-public-api) that you want to send your messages to. 2. Configure the Upstash QStash credentials in your Worker: You need to add your Upstash QStash token as a secret to your Worker. Get your token from your [Upstash Console](https://console.upstash.com) under QStash settings, then add it as a secret using Wrangler: ```sh # Add the QStash token as a secret npx wrangler secret put QSTASH_TOKEN # When prompted, paste your QStash token ``` 3. In your Worker, install the `@upstash/qstash`, a HTTP client to connect to your database QStash endpoint: * npm ```sh npm i @upstash/qstash ``` * yarn ```sh yarn add @upstash/qstash ``` * pnpm ```sh pnpm add @upstash/qstash ``` 4. Refer to the [Upstash documentation on how to receive webhooks from QStash in your Cloudflare Worker](https://docs.upstash.com/qstash/quickstarts/cloudflare-workers#3-use-qstash-in-your-handler). \* Redis is a trademark of Redis Ltd. Any rights therein are reserved to Redis Ltd. Any use by Upstash is for referential purposes only and does not indicate any sponsorship, endorsement or affiliation between Redis and Upstash. --- title: Xata · Cloudflare Workers docs description: Xata is a serverless data platform powered by PostgreSQL. Xata uniquely combines multiple types of stores (relational databases, search engines, analytics engines) into a single service, accessible through a consistent REST API. lastUpdated: 2025-06-27T15:44:40.000Z chatbotDeprioritize: false source_url: html: https://developers.cloudflare.com/workers/databases/third-party-integrations/xata/ md: https://developers.cloudflare.com/workers/databases/third-party-integrations/xata/index.md --- [Xata](https://xata.io) is a serverless data platform powered by PostgreSQL. Xata uniquely combines multiple types of stores (relational databases, search engines, analytics engines) into a single service, accessible through a consistent REST API. Note You can connect to Xata using [Hyperdrive](https://developers.cloudflare.com/hyperdrive) (recommended), or using the Xata client, `@xata.io/client`. Both provide connection pooling and reduce the amount of round trips required to create a secure connection from Workers to your database. Hyperdrive can provide lower latencies because it performs the database connection setup and connection pooling across Cloudflare's network. Hyperdrive supports native database drivers, libraries, and ORMs, and is included in all [Workers plans](https://developers.cloudflare.com/hyperdrive/platform/pricing/). Learn more about Hyperdrive in [How Hyperdrive Works](https://developers.cloudflare.com/hyperdrive/configuration/how-hyperdrive-works/). * Hyperdrive (recommended) To connect to Xata using [Hyperdrive](https://developers.cloudflare.com/hyperdrive), follow these steps: ## 1. Allow Hyperdrive access You can connect Hyperdrive to any existing Xata database with the default user and password provided by Xata. ### Xata dashboard To retrieve your connection string from the Xata dashboard: 1. Go to the [**Xata dashboard**](https://app.xata.io/). 2. Select the database you want to connect to. 3. Select **Settings**. 4. Copy the connection string from the `PostgreSQL endpoint` section and add your API key. ## 2. Create a database configuration To configure Hyperdrive, you will need: * The IP address (or hostname) and port of your database. * The database username (for example, `hyperdrive-demo`) you configured in a previous step. * The password associated with that username. * The name of the database you want Hyperdrive to connect to. For example, `postgres`. Hyperdrive accepts the combination of these parameters in the common connection string format used by database drivers: ```txt postgres://USERNAME:PASSWORD@HOSTNAME_OR_IP_ADDRESS:PORT/database_name ``` Most database providers will provide a connection string you can directly copy-and-paste directly into Hyperdrive. To create a Hyperdrive configuration with the [Wrangler CLI](https://developers.cloudflare.com/workers/wrangler/install-and-update/), open your terminal and run the following command. Replace \ with a name for your Hyperdrive configuration and paste the connection string provided from your database host, or replace `user`, `password`, `HOSTNAME_OR_IP_ADDRESS`, `port`, and `database_name` placeholders with those specific to your database: ```sh npx wrangler hyperdrive create --connection-string="postgres://user:password@HOSTNAME_OR_IP_ADDRESS:PORT/database_name" ``` Note Hyperdrive will attempt to connect to your database with the provided credentials to verify they are correct before creating a configuration. If you encounter an error when attempting to connect, refer to Hyperdrive's [troubleshooting documentation](https://developers.cloudflare.com/hyperdrive/observability/troubleshooting/) to debug possible causes. This command outputs a binding for the [Wrangler configuration file](https://developers.cloudflare.com/workers/wrangler/configuration/): * wrangler.jsonc ```jsonc { "name": "hyperdrive-example", "main": "src/index.ts", "compatibility_date": "2024-08-21", "compatibility_flags": [ "nodejs_compat" ], "hyperdrive": [ { "binding": "HYPERDRIVE", "id": "" } ] } ``` * wrangler.toml ```toml name = "hyperdrive-example" main = "src/index.ts" compatibility_date = "2024-08-21" compatibility_flags = ["nodejs_compat"] # Pasted from the output of `wrangler hyperdrive create --connection-string=[...]` above. [[hyperdrive]] binding = "HYPERDRIVE" id = "" ``` ## 3. Use Hyperdrive from your Worker Install the `node-postgres` driver: * npm ```sh npm i pg@>8.16.3 ``` * yarn ```sh yarn add pg@>8.16.3 ``` * pnpm ```sh pnpm add pg@>8.16.3 ``` Note The minimum version of `node-postgres` required for Hyperdrive is `8.16.3`. If using TypeScript, install the types package: * npm ```sh npm i -D @types/pg ``` * yarn ```sh yarn add -D @types/pg ``` * pnpm ```sh pnpm add -D @types/pg ``` Add the required Node.js compatibility flags and Hyperdrive binding to your `wrangler.jsonc` file: * wrangler.jsonc ```jsonc { "compatibility_flags": [ "nodejs_compat" ], "compatibility_date": "2024-09-23", "hyperdrive": [ { "binding": "HYPERDRIVE", "id": "" } ] } ``` * wrangler.toml ```toml # required for database drivers to function compatibility_flags = ["nodejs_compat"] compatibility_date = "2024-09-23" [[hyperdrive]] binding = "HYPERDRIVE" id = "" ``` Create a new `Client` instance and pass the Hyperdrive `connectionString`: ```ts // filepath: src/index.ts import { Client } from "pg"; export default { async fetch(request: Request, env: Env, ctx: ExecutionContext): Promise { // Create a new client instance for each request. const client = new Client({ connectionString: env.HYPERDRIVE.connectionString, }); try { // Connect to the database await client.connect(); console.log("Connected to PostgreSQL database"); // Perform a simple query const result = await client.query("SELECT * FROM pg_tables"); // Clean up the client after the response is returned, before the Worker is killed ctx.waitUntil(client.end()); return Response.json({ success: true, result: result.rows, }); } catch (error: any) { console.error("Database error:", error.message); new Response('Internal error occurred', { status: 500 }); } }, }; ``` Note If you expect to be making multiple parallel database queries within a single Worker invocation, consider using a [connection pool (`pg.Pool`)](https://node-postgres.com/apis/pool) to allow for parallel queries. If doing so, set the max connections of the connection pool to 5 connections. This ensures that the connection pool fits within [Workers' concurrent open connections limit of 6](https://developers.cloudflare.com/workers/platform/limits), which affect TCP connections that database drivers use. ## Next steps * Learn more about [How Hyperdrive Works](https://developers.cloudflare.com/hyperdrive/configuration/how-hyperdrive-works/). * Refer to the [troubleshooting guide](https://developers.cloudflare.com/hyperdrive/observability/troubleshooting/) to debug common issues. * Understand more about other [storage options](https://developers.cloudflare.com/workers/platform/storage-options/) available to Cloudflare Workers. * Xata client ## Set up an integration with Xata To set up an integration with Xata: 1. You need to have an existing Xata database to connect to or create a new database from your Xata workspace [Create a Database](https://app.xata.io/workspaces). 2. In your database, you have several options for creating a table: you can start from scratch, use a template filled with sample data, or import data from a CSV file. For this guide, choose **Start with sample data**. This option automatically populates your database with two sample tables: `Posts` and `Users`. 3. Configure the Xata database credentials in your Worker: You need to add your Xata database credentials as secrets to your Worker. First, get your database details from your [Xata Dashboard](https://app.xata.io), then add them as secrets using Wrangler: ```sh # Add the Xata API key as a secret npx wrangler secret put XATA_API_KEY # When prompted, paste your Xata API key # Add the Xata branch as a secret npx wrangler secret put XATA_BRANCH # When prompted, paste your Xata branch name (usually 'main') # Add the Xata database URL as a secret npx wrangler secret put XATA_DATABASE_URL # When prompted, paste your Xata database URL ``` 4. Install the [Xata CLI](https://xata.io/docs/getting-started/installation) and authenticate the CLI by running the following commands: ```sh npm install -g @xata.io/cli xata auth login ``` 5. Once you have the CLI set up, In your Worker, run the following code in the root directory of your project: ```sh xata init ``` Accept the default settings during the configuration process. After completion, a `.env` and `.xatarc` file will be generated in your project folder. 6. To enable Cloudflare access the secret values generated when running in development mode, create a `.dev.vars` file in your project's root directory and add the following content, replacing placeholders with the specific values: ```txt XATA_API_KEY= XATA_BRANCH= XATA_DATABASE_URL= ``` 7. The following example shows how to make a query to your Xata database in a Worker. The credentials needed to connect to Xata have been added as secrets to your Worker. ```ts export default { async fetch(request, env, ctx): Promise { const xata = new XataClient({ apiKey: env.XATA_API_KEY, branch: env.XATA_BRANCH, databaseURL: env.XATA_DATABASE_URL, }); const records = await xata.db.Posts.select([ "id", "title", "author.name", "author.email", "author.bio", ]).getAll(); return Response.json(records); }, } satisfies ExportedHandler; ``` To learn more about Xata, refer to [Xata's official documentation](https://xata.io/docs). * wrangler.jsonc ```jsonc { "name": "hyperdrive-example", "main": "src/index.ts", "compatibility_date": "2024-08-21", "compatibility_flags": [ "nodejs_compat" ], "hyperdrive": [ { "binding": "HYPERDRIVE", "id": "" } ] } ``` * wrangler.toml ```toml name = "hyperdrive-example" main = "src/index.ts" compatibility_date = "2024-08-21" compatibility_flags = ["nodejs_compat"] # Pasted from the output of `wrangler hyperdrive create --connection-string=[...]` above. [[hyperdrive]] binding = "HYPERDRIVE" id = "" ``` * npm ```sh npm i pg@>8.16.3 ``` * yarn ```sh yarn add pg@>8.16.3 ``` * pnpm ```sh pnpm add pg@>8.16.3 ``` * npm ```sh npm i -D @types/pg ``` * yarn ```sh yarn add -D @types/pg ``` * pnpm ```sh pnpm add -D @types/pg ``` * wrangler.jsonc ```jsonc { "compatibility_flags": [ "nodejs_compat" ], "compatibility_date": "2024-09-23", "hyperdrive": [ { "binding": "HYPERDRIVE", "id": "" } ] } ``` * wrangler.toml ```toml # required for database drivers to function compatibility_flags = ["nodejs_compat"] compatibility_date = "2024-09-23" [[hyperdrive]] binding = "HYPERDRIVE" id = "" ``` --- title: Agents SDK · Cloudflare Workers docs lastUpdated: 2025-06-05T13:25:05.000Z chatbotDeprioritize: false source_url: html: https://developers.cloudflare.com/workers/framework-guides/ai-and-agents/agents-sdk/ md: https://developers.cloudflare.com/workers/framework-guides/ai-and-agents/agents-sdk/index.md --- --- title: LangChain · Cloudflare Workers docs lastUpdated: 2025-06-05T13:25:05.000Z chatbotDeprioritize: false source_url: html: https://developers.cloudflare.com/workers/framework-guides/ai-and-agents/langchain/ md: https://developers.cloudflare.com/workers/framework-guides/ai-and-agents/langchain/index.md --- --- title: FastAPI · Cloudflare Workers docs lastUpdated: 2025-06-05T13:25:05.000Z chatbotDeprioritize: false source_url: html: https://developers.cloudflare.com/workers/framework-guides/apis/fast-api/ md: https://developers.cloudflare.com/workers/framework-guides/apis/fast-api/index.md --- --- title: Hono · Cloudflare Workers docs lastUpdated: 2025-06-05T13:25:05.000Z chatbotDeprioritize: false source_url: html: https://developers.cloudflare.com/workers/framework-guides/apis/hono/ md: https://developers.cloudflare.com/workers/framework-guides/apis/hono/index.md --- --- title: Expo · Cloudflare Workers docs lastUpdated: 2025-06-05T13:25:05.000Z chatbotDeprioritize: false source_url: html: https://developers.cloudflare.com/workers/framework-guides/mobile-apps/expo/ md: https://developers.cloudflare.com/workers/framework-guides/mobile-apps/expo/index.md --- --- title: Astro · Cloudflare Workers docs description: Create an Astro application and deploy it to Cloudflare Workers with Workers Assets. lastUpdated: 2025-07-01T16:58:44.000Z chatbotDeprioritize: false tags: SSG,Full stack source_url: html: https://developers.cloudflare.com/workers/framework-guides/web-apps/astro/ md: https://developers.cloudflare.com/workers/framework-guides/web-apps/astro/index.md --- **Start from CLI**: Scaffold an Astro project on Workers, and pick your template. * npm ```sh npm create cloudflare@latest -- my-astro-app --framework=astro ``` * yarn ```sh yarn create cloudflare my-astro-app --framework=astro ``` * pnpm ```sh pnpm create cloudflare@latest my-astro-app --framework=astro ``` *** **Or just deploy**: Create a static blog with Astro and deploy it on Cloudflare Workers, with CI/CD and previews all set up for you. [![Deploy to Workers](https://deploy.workers.cloudflare.com/button)](https://dash.cloudflare.com/?to=/:account/workers-and-pages/create/deploy-to-workers\&repository=https://github.com/cloudflare/templates/tree/main/astro-blog-starter-template) ## What is Astro? [Astro](https://astro.build/) is a JavaScript web framework designed for creating websites that display large amounts of content (such as blogs, documentation sites, or online stores). Astro emphasizes performance through minimal client-side JavaScript - by default, it renders as much content as possible at build time, or [on-demand](https://docs.astro.build/en/guides/on-demand-rendering/) on the "server" - this can be a Cloudflare Worker. [“Islands”](https://docs.astro.build/en/concepts/islands/) of JavaScript are added only where interactivity or personalization is needed. Astro is also framework-agnostic, and supports every major UI framework, including React, Preact, Svelte, Vue, SolidJS, via its official [integrations](https://astro.build/integrations/). ## Deploy a new Astro project on Workers 1. **Create a new project with the create-cloudflare CLI (C3).** * npm ```sh npm create cloudflare@latest -- my-astro-app --framework=astro ``` * yarn ```sh yarn create cloudflare my-astro-app --framework=astro ``` * pnpm ```sh pnpm create cloudflare@latest my-astro-app --framework=astro ``` What's happening behind the scenes? When you run this command, C3 creates a new project directory, initiates [Astro's official setup tool](https://docs.astro.build/en/tutorial/1-setup/2/), and configures the project for Cloudflare. It then offers the option to instantly deploy your application to Cloudflare. 2. **Develop locally.** After creating your project, run the following command in your project directory to start a local development server. * npm ```sh npm run dev ``` * yarn ```sh yarn run dev ``` * pnpm ```sh pnpm run dev ``` 3. **Deploy your project.** You can deploy your project to a [`*.workers.dev` subdomain](https://developers.cloudflare.com/workers/configuration/routing/workers-dev/) or a [custom domain](https://developers.cloudflare.com/workers/configuration/routing/custom-domains/) from your local machine or any CI/CD system (including [Workers Builds](https://developers.cloudflare.com/workers/ci-cd/#workers-builds)). Use the following command to build and deploy. If you're using a CI service, be sure to update your "deploy command" accordingly. * npm ```sh npm run deploy ``` * yarn ```sh yarn run deploy ``` * pnpm ```sh pnpm run deploy ``` ## Deploy an existing Astro project on Workers ### If you have a static site If your Astro project is entirely pre-rendered, follow these steps: 1. **Add a Wrangler configuration file** In your project root, create a Wrangler configuration file with the following content: * wrangler.jsonc ```jsonc { "name": "my-astro-app", // Update to today's date "compatibility_date": "2025-03-25", "assets": { "directory": "./dist" } } ``` * wrangler.toml ```toml name = "my-astro-app" compatibility_date = "2025-03-25" [assets] directory = "./dist" ``` What's this configuration doing? The key part of this config is the `assets` field, which tells Wrangler where to find your static assets. In this case, we're telling Wrangler to look in the `./dist` directory. If your assets are in a different directory, update the `directory` value accordingly. Read about other [asset configuration options](https://developers.cloudflare.com/workers/wrangler/configuration/#assets). Also note how there's no `main` field in this config - this is because you're only serving static assets, so no Worker code is needed for on demand rendering/SSR. 2. **Build and deploy your project** You can deploy your project to a [`*.workers.dev` subdomain](https://developers.cloudflare.com/workers/configuration/routing/workers-dev/) or a [custom domain](https://developers.cloudflare.com/workers/configuration/routing/custom-domains/) from your local machine or any CI/CD system (including [Workers Builds](https://developers.cloudflare.com/workers/ci-cd/#workers-builds)). Use the following command to build and deploy. If you're using a CI service, be sure to update your "deploy command" accordingly. * npm ```sh npx astro build ``` * yarn ```sh yarn astro build ``` * pnpm ```sh pnpm astro build ``` - npm ```sh npx wrangler@latest deploy ``` - yarn ```sh yarn wrangler@latest deploy ``` - pnpm ```sh pnpm wrangler@latest deploy ``` ### If your site uses on demand rendering If your Astro project uses [on demand rendering (also known as SSR)](https://docs.astro.build/en/guides/on-demand-rendering/), follow these steps: 1. **Install the Astro Cloudflare adapter** * npm ```sh npx astro add cloudflare ``` * yarn ```sh yarn astro add cloudflare ``` * pnpm ```sh pnpm astro add cloudflare ``` What's happening behind the scenes? This command installs the Cloudflare adapter and makes the appropriate changes to your `astro.config.mjs` file in one step. By default, this sets the build output configuration to `output: 'server'`, which server renders all your pages by default. If there are certain pages that *don't* need on demand rendering/SSR, for example static pages like a privacy policy, you should set `export const prerender = true` for that page or route to pre-render it. You can read more about the adapter configuration options [in the Astro docs](https://docs.astro.build/en/guides/integrations-guide/cloudflare/#options). 2. **Add a `.assetsignore` file** Create a `.assetsignore` file in your `public/` folder, and add the following lines to it: ```txt _worker.js _routes.json ``` 3. **Add a Wrangler configuration file** In your project root, create a Wrangler configuration file with the following content: * wrangler.jsonc ```jsonc { "name": "my-astro-app", "main": "./dist/_worker.js/index.js", // Update to today's date "compatibility_date": "2025-03-25", "compatibility_flags": ["nodejs_compat"], "assets": { "binding": "ASSETS", "directory": "./dist" }, "observability": { "enabled": true } } ``` * wrangler.toml ```toml name = "my-astro-app" main = "./dist/_worker.js/index.js" compatibility_date = "2025-03-25" compatibility_flags = [ "nodejs_compat" ] [assets] binding = "ASSETS" directory = "./dist" [observability] enabled = true ``` What's this configuration doing? The key parts of this config are: * `main` points to the entry point of your Worker script. This is generated by the Astro adapter, and is what powers your server-rendered pages. * `assets.directory` tells Wrangler where to find your static assets. In this case, we're telling Wrangler to look in the `./dist` directory. If your assets are in a different directory, update the `directory` value accordingly. Read more about [Wrangler configuration options](https://developers.cloudflare.com/workers/wrangler/configuration/) and [asset configuration options](https://developers.cloudflare.com/workers/wrangler/configuration/#assets). 4. **Build and deploy your project** You can deploy your project to a [`*.workers.dev` subdomain](https://developers.cloudflare.com/workers/configuration/routing/workers-dev/) or a [custom domain](https://developers.cloudflare.com/workers/configuration/routing/custom-domains/) from your local machine or any CI/CD system (including [Workers Builds](https://developers.cloudflare.com/workers/ci-cd/#workers-builds)). Use the following command to build and deploy. If you're using a CI service, be sure to update your "deploy command" accordingly. * npm ```sh npx astro build ``` * yarn ```sh yarn astro build ``` * pnpm ```sh pnpm astro build ``` - npm ```sh npx wrangler@latest deploy ``` - yarn ```sh yarn wrangler@latest deploy ``` - pnpm ```sh pnpm wrangler@latest deploy ``` ## Bindings Note You cannot use bindings if you're using Astro to generate a purely static site. With bindings, your Astro application can be fully integrated with the Cloudflare Developer Platform, giving you access to compute, storage, AI and more. Refer to the [bindings overview](https://developers.cloudflare.com/workers/runtime-apis/bindings/) for more information on what's available and how to configure them. The [Astro docs](https://docs.astro.build/en/guides/integrations-guide/cloudflare/#cloudflare-runtime) provide information about how you can access them in your `locals`. ## Astro's build configuration The Astro Cloudflare adapter sets the build output configuration to `output: 'server'`, which means all pages are rendered on-demand in your Cloudflare Worker. If there are certain pages that *don't* need on demand rendering/SSR, for example static pages such as a privacy policy, you should set `export const prerender = true` for that page or route to pre-render it. You can read more about on-demand rendering [in the Astro docs](https://docs.astro.build/en/guides/on-demand-rendering/). If you want to use Astro as a static site generator, you do not need the Astro Cloudflare adapter. Astro will pre-render all pages at build time by default, and you can simply upload those static assets to be served by Cloudflare. --- title: More guides... · Cloudflare Workers docs lastUpdated: 2025-06-05T13:25:05.000Z chatbotDeprioritize: true source_url: html: https://developers.cloudflare.com/workers/framework-guides/web-apps/more-web-frameworks/ md: https://developers.cloudflare.com/workers/framework-guides/web-apps/more-web-frameworks/index.md --- --- title: Next.js · Cloudflare Workers docs description: Create an Next.js application and deploy it to Cloudflare Workers with Workers Assets. lastUpdated: 2025-07-01T16:58:44.000Z chatbotDeprioritize: false tags: Full stack source_url: html: https://developers.cloudflare.com/workers/framework-guides/web-apps/nextjs/ md: https://developers.cloudflare.com/workers/framework-guides/web-apps/nextjs/index.md --- **Start from CLI** - scaffold a Next.js project on Workers. * npm ```sh npm create cloudflare@latest -- my-next-app --framework=next ``` * yarn ```sh yarn create cloudflare my-next-app --framework=next ``` * pnpm ```sh pnpm create cloudflare@latest my-next-app --framework=next ``` This is a simple getting started guide. For detailed documentation on how the to use the Cloudflare OpenNext adapter, visit the [OpenNext website](https://opennext.js.org/cloudflare). ## What is Next.js? [Next.js](https://nextjs.org/) is a [React](https://react.dev/) framework for building full stack applications. Next.js supports Server-side and Client-side rendering, as well as Partial Prerendering which lets you combine static and dynamic components in the same route. You can deploy your Next.js app to Cloudflare Workers using the OpenNext adapter. ## Next.js supported features Most Next.js features are supported by the Cloudflare OpenNext adapter: | Feature | Cloudflare adapter | Notes | | - | - | - | | App Router | 🟢 supported | | | Pages Router | 🟢 supported | | | Route Handlers | 🟢 supported | | | React Server Components | 🟢 supported | | | Static Site Generation (SSG) | 🟢 supported | | | Server-Side Rendering (SSR) | 🟢 supported | | | Incremental Static Regeneration (ISR) | 🟢 supported | | | Server Actions | 🟢 supported | | | Response streaming | 🟢 supported | | | asynchronous work with `next/after` | 🟢 supported | | | Middleware | 🟢 supported | | | Image optimization | 🟢 supported | Supported via [Cloudflare Images](https://developers.cloudflare.com/images/) | | Partial Prerendering (PPR) | 🟢 supported | PPR is experimental in Next.js | | Composable Caching ('use cache') | 🟢 supported | Composable Caching is experimental in Next.js | | Node.js in Middleware | ⚪ not yet supported | Node.js middleware introduced in 15.2 are not yet supported | ## Deploy a new Next.js project on Workers 1. **Create a new project with the create-cloudflare CLI (C3).** * npm ```sh npm create cloudflare@latest -- my-next-app --framework=next ``` * yarn ```sh yarn create cloudflare my-next-app --framework=next ``` * pnpm ```sh pnpm create cloudflare@latest my-next-app --framework=next ``` What's happening behind the scenes? When you run this command, C3 creates a new project directory, initiates [Next.js's official setup tool](https://nextjs.org/docs/app/api-reference/cli/create-next-app), and configures the project for Cloudflare. It then offers the option to instantly deploy your application to Cloudflare. 2. **Develop locally.** After creating your project, run the following command in your project directory to start a local development server. The command uses the Next.js development server. It offers the best developer experience by quickly reloading your app every time the source code is updated. * npm ```sh npm run dev ``` * yarn ```sh yarn run dev ``` * pnpm ```sh pnpm run dev ``` 3. **Test and preview your site with the Cloudflare adapter.** * npm ```sh npm run preview ``` * yarn ```sh yarn run preview ``` * pnpm ```sh pnpm run preview ``` What's the difference between dev and preview? The command used in the previous step uses the Next.js development server, which runs in Node.js. However, your deployed application will run on Cloudflare Workers, which uses the `workerd` runtime. Therefore when running integration tests and previewing your application, you should use the preview command, which is more accurate to production, as it executes your application in the `workerd` runtime using `wrangler dev`. 4. **Deploy your project.** You can deploy your project to a [`*.workers.dev` subdomain](https://developers.cloudflare.com/workers/configuration/routing/workers-dev/) or a [custom domain](https://developers.cloudflare.com/workers/configuration/routing/custom-domains/) from your local machine or any CI/CD system (including [Workers Builds](https://developers.cloudflare.com/workers/ci-cd/#workers-builds)). Use the following command to build and deploy. If you're using a CI service, be sure to update your "deploy command" accordingly. * npm ```sh npm run deploy ``` * yarn ```sh yarn run deploy ``` * pnpm ```sh pnpm run deploy ``` ## Deploy an existing Next.js project on Workers You can convert an existing Next.js application to run on Cloudflare 1. **Install [`@opennextjs/cloudflare`](https://www.npmjs.com/package/@opennextjs/cloudflare)** * npm ```sh npm i @opennextjs/cloudflare@latest ``` * yarn ```sh yarn add @opennextjs/cloudflare@latest ``` * pnpm ```sh pnpm add @opennextjs/cloudflare@latest ``` 2. **Install [`wrangler CLI`](https://developers.cloudflare.com/workers/wrangler) as a devDependency** * npm ```sh npm i -D wrangler@latest ``` * yarn ```sh yarn add -D wrangler@latest ``` * pnpm ```sh pnpm add -D wrangler@latest ``` 3. **Add a Wrangler configuration file** In your project root, create a [Wrangler configuration file](https://developers.cloudflare.com/workers/wrangler/configuration/) with the following content: * wrangler.jsonc ```jsonc { "main": ".open-next/worker.js", "name": "my-app", "compatibility_date": "2025-03-25", "compatibility_flags": [ "nodejs_compat" ], "assets": { "directory": ".open-next/assets", "binding": "ASSETS" } } ``` * wrangler.toml ```toml main = ".open-next/worker.js" name = "my-app" compatibility_date = "2025-03-25" compatibility_flags = ["nodejs_compat"] [assets] directory = ".open-next/assets" binding = "ASSETS" ``` Note As shown above, you must enable the [`nodejs_compat` compatibility flag](https://developers.cloudflare.com/workers/runtime-apis/nodejs/) *and* set your [compatibility date](https://developers.cloudflare.com/workers/configuration/compatibility-dates/) to `2024-09-23` or later for your Next.js app to work with @opennextjs/cloudflare. 4. **Add a configuration file for OpenNext** In your project root, create an OpenNext configuration file named `open-next.config.ts` with the following content: ```ts import { defineCloudflareConfig } from "@opennextjs/cloudflare"; export default defineCloudflareConfig(); ``` Note `open-next.config.ts` is where you can configure the caching, see the [adapter documentation](https://opennext.js.org/cloudflare/caching) for more information 5. **Update `package.json`** You can add the following scripts to your `package.json`: ```json "preview": "opennextjs-cloudflare build && opennextjs-cloudflare preview", "deploy": "opennextjs-cloudflare build && opennextjs-cloudflare deploy", "cf-typegen": "wrangler types --env-interface CloudflareEnv cloudflare-env.d.ts" ``` Usage * `preview`: Builds your app and serves it locally, allowing you to quickly preview your app running locally in the Workers runtime, via a single command. - `deploy`: Builds your app, and then deploys it to Cloudflare - `cf-typegen`: Generates a `cloudflare-env.d.ts` file at the root of your project containing the types for the env. 6. **Develop locally.** After creating your project, run the following command in your project directory to start a local development server. The command uses the Next.js development server. It offers the best developer experience by quickly reloading your app after your source code is updated. * npm ```sh npm run dev ``` * yarn ```sh yarn run dev ``` * pnpm ```sh pnpm run dev ``` 7. **Test your site with the Cloudflare adapter.** The command used in the previous step uses the Next.js development server to offer a great developer experience. However your application will run on Cloudflare Workers so you want to run your integration tests and verify that your application workers correctly in this environment. * npm ```sh npm run preview ``` * yarn ```sh yarn run preview ``` * pnpm ```sh pnpm run preview ``` 8. **Deploy your project.** You can deploy your project to a [`*.workers.dev` subdomain](https://developers.cloudflare.com/workers/configuration/routing/workers-dev/) or a [custom domain](https://developers.cloudflare.com/workers/configuration/routing/custom-domains/) from your local machine or any CI/CD system (including [Workers Builds](https://developers.cloudflare.com/workers/ci-cd/#workers-builds)). Use the following command to build and deploy. If you're using a CI service, be sure to update your "deploy command" accordingly. * npm ```sh npm run deploy ``` * yarn ```sh yarn run deploy ``` * pnpm ```sh pnpm run deploy ``` --- title: React + Vite · Cloudflare Workers docs description: Create a React application and deploy it to Cloudflare Workers with Workers Assets. lastUpdated: 2025-06-05T13:25:05.000Z chatbotDeprioritize: false tags: SPA source_url: html: https://developers.cloudflare.com/workers/framework-guides/web-apps/react/ md: https://developers.cloudflare.com/workers/framework-guides/web-apps/react/index.md --- **Start from CLI** - scaffold a full-stack app with a React SPA, Cloudflare Workers API, and the [Cloudflare Vite plugin](https://developers.cloudflare.com/workers/vite-plugin/) for lightning-fast development. * npm ```sh npm create cloudflare@latest -- my-react-app --framework=react ``` * yarn ```sh yarn create cloudflare my-react-app --framework=react ``` * pnpm ```sh pnpm create cloudflare@latest my-react-app --framework=react ``` *** **Or just deploy** - create a full-stack app using React, Hono API and Vite, with CI/CD and previews all set up for you. [![Deploy to Workers](https://deploy.workers.cloudflare.com/button)](https://dash.cloudflare.com/?to=/:account/workers-and-pages/create/deploy-to-workers\&repository=https://github.com/cloudflare/templates/tree/main/vite-react-template) ## What is React? [React](https://react.dev/) is a framework for building user interfaces. It allows you to create reusable UI components and manage the state of your application efficiently. You can use React to build a single-page application (SPA), and combine it with a backend API running on Cloudflare Workers to create a full-stack application. ## Creating a full-stack app with React 1. **Create a new project with the create-cloudflare CLI (C3)** * npm ```sh npm create cloudflare@latest -- my-react-app --framework=react ``` * yarn ```sh yarn create cloudflare my-react-app --framework=react ``` * pnpm ```sh pnpm create cloudflare@latest my-react-app --framework=react ``` How is this project set up? Below is a simplified file tree of the project. `wrangler.jsonc` is your [Wrangler configuration file](https://developers.cloudflare.com/workers/wrangler/configuration/). In this file: * `main` points to `worker/index.ts`. This is your Worker, which is going to act as your backend API. * `assets.not_found_handling` is set to `single-page-application`, which means that routes that are handled by your React SPA do not go to the Worker, and are thus free. * If you want to add bindings to resources on Cloudflare's developer platform, you configure them here. Read more about [bindings](https://developers.cloudflare.com/workers/runtime-apis/bindings/). `vite.config.ts` is set up to use the [Cloudflare Vite plugin](https://developers.cloudflare.com/workers/vite-plugin/). This runs your Worker in the Cloudflare Workers runtime, ensuring your local development environment is as close to production as possible. `worker/index.ts` is your backend API, which contains a single endpoint, `/api/`, that returns a text response. At `src/App.tsx`, your React app calls this endpoint to get a message back and displays this. 2. **Develop locally with the [Cloudflare Vite plugin](https://developers.cloudflare.com/workers/vite-plugin/)** After creating your project, run the following command in your project directory to start a local development server. * npm ```sh npm run dev ``` * yarn ```sh yarn run dev ``` * pnpm ```sh pnpm run dev ``` What's happening in local development? This project uses Vite for local development and build, and thus comes with all of Vite's features, including hot module replacement (HMR). In addition, `vite.config.ts` is set up to use the Cloudflare Vite plugin. This runs your application in the Cloudflare Workers runtime, just like in production, and enables access to local emulations of bindings. 3. **Deploy your project** Your project can be deployed to a `*.workers.dev` subdomain or a [Custom Domain](https://developers.cloudflare.com/workers/configuration/routing/custom-domains/), from your own machine or from any CI/CD system, including Cloudflare's own [Workers Builds](https://developers.cloudflare.com/workers/ci-cd/builds/). The following command will build and deploy your project. If you are using CI, ensure you update your ["deploy command"](https://developers.cloudflare.com/workers/ci-cd/builds/configuration/#build-settings) configuration appropriately. * npm ```sh npm run deploy ``` * yarn ```sh yarn run deploy ``` * pnpm ```sh pnpm run deploy ``` *** ## Asset Routing If you're using React as a SPA, you will want to set `not_found_handling = "single_page_application"` in your Wrangler configuration file. By default, Cloudflare first tries to match a request path against a static asset path, which is based on the file structure of the uploaded asset directory. This is either the directory specified by `assets.directory` in your Wrangler config or, in the case of the [Cloudflare Vite plugin](https://developers.cloudflare.com/workers/vite-plugin/), the output directory of the client build. Failing that, we invoke a Worker if one is present. If there is no Worker, or the Worker then uses the asset binding, Cloudflare will fallback to the behaviour set by [`not_found_handling`](https://developers.cloudflare.com/workers/static-assets/#routing-behavior). Refer to the [routing documentation](https://developers.cloudflare.com/workers/static-assets/routing/) for more information about how routing works with static assets, and how to customize this behavior. ## Use bindings with React Your new project also contains a Worker at `./worker/index.ts`, which you can use as a backend API for your React application. While your React application cannot directly access Workers bindings, it can interact with them through this Worker. You can make [`fetch()` requests](https://developers.cloudflare.com/workers/runtime-apis/fetch/) from your React application to the Worker, which can then handle the request and use bindings. Learn how to [configure Workers bindings](https://developers.cloudflare.com/workers/runtime-apis/bindings/). With bindings, your application can be fully integrated with the Cloudflare Developer Platform, giving you access to compute, storage, AI and more. [Bindings ](https://developers.cloudflare.com/workers/runtime-apis/bindings/)Access to compute, storage, AI and more. --- title: React Router (formerly Remix) · Cloudflare Workers docs description: Create a React Router application and deploy it to Cloudflare Workers lastUpdated: 2025-06-05T13:25:05.000Z chatbotDeprioritize: false tags: Full stack source_url: html: https://developers.cloudflare.com/workers/framework-guides/web-apps/react-router/ md: https://developers.cloudflare.com/workers/framework-guides/web-apps/react-router/index.md --- **Start from CLI**: Scaffold a full-stack app with [React Router v7](https://reactrouter.com/) and the [Cloudflare Vite plugin](https://developers.cloudflare.com/workers/vite-plugin/) for lightning-fast development. * npm ```sh npm create cloudflare@latest -- my-react-router-app --framework=react-router ``` * yarn ```sh yarn create cloudflare my-react-router-app --framework=react-router ``` * pnpm ```sh pnpm create cloudflare@latest my-react-router-app --framework=react-router ``` **Or just deploy**: Create a full-stack app using React Router v7, with CI/CD and previews all set up for you. [![Deploy to Workers](https://deploy.workers.cloudflare.com/button)](https://deploy.workers.cloudflare.com/?url=https://github.com/cloudflare/templates/tree/main/react-router-starter-template) ## What is React Router? [React Router v7](https://reactrouter.com/) is a full-stack React framework for building web applications. It combines with the [Cloudflare Vite plugin](https://developers.cloudflare.com/workers/vite-plugin/) to provide a first-class experience for developing, building and deploying your apps on Cloudflare. ## Creating a full-stack React Router app 1. **Create a new project with the create-cloudflare CLI (C3)** * npm ```sh npm create cloudflare@latest -- my-react-router-app --framework=react-router ``` * yarn ```sh yarn create cloudflare my-react-router-app --framework=react-router ``` * pnpm ```sh pnpm create cloudflare@latest my-react-router-app --framework=react-router ``` How is this project set up? Below is a simplified file tree of the project. `react-router.config.ts` is your [React Router config file](https://reactrouter.com/explanation/special-files#react-routerconfigts). In this file: * `ssr` is set to `true`, meaning that your application will use server-side rendering. * `future.unstable_viteEnvironmentApi` is set to `true` to enable compatibility with the [Cloudflare Vite plugin](https://developers.cloudflare.com/workers/vite-plugin/). Note SPA mode and prerendering are not currently supported when using the [Cloudflare Vite plugin](https://developers.cloudflare.com/workers/vite-plugin/). If you wish to use React Router in an SPA then we recommend starting with the [React template](https://developers.cloudflare.com/workers/framework-guides/web-apps/react/) and using React Router [as a library](https://reactrouter.com/start/data/installation). `vite.config.ts` is your [Vite config file](https://vite.dev/config/). The React Router and Cloudflare plugins are included in the `plugins` array. The [Cloudflare Vite plugin](https://developers.cloudflare.com/workers/vite-plugin/) runs your server code in the Workers runtime, ensuring your local development environment is as close to production as possible. `wrangler.jsonc` is your [Worker config file](https://developers.cloudflare.com/workers/wrangler/configuration/). In this file: * `main` points to `./workers/app.ts`. This is the entry file for your Worker. The default export includes a [`fetch` handler](https://developers.cloudflare.com/workers/runtime-apis/fetch/), which delegates the request to React Router. * If you want to add [bindings](https://developers.cloudflare.com/workers/runtime-apis/bindings/) to resources on Cloudflare's developer platform, you configure them here. 2. **Develop locally** After creating your project, run the following command in your project directory to start a local development server. * npm ```sh npm run dev ``` * yarn ```sh yarn run dev ``` * pnpm ```sh pnpm run dev ``` What's happening in local development? This project uses React Router in combination with the [Cloudflare Vite plugin](https://developers.cloudflare.com/workers/vite-plugin/). This means that your application runs in the Cloudflare Workers runtime, just like in production, and enables access to local emulations of bindings. 3. **Deploy your project** Your project can be deployed to a `*.workers.dev` subdomain or a [Custom Domain](https://developers.cloudflare.com/workers/configuration/routing/custom-domains/) from your own machine or from any CI/CD system, including Cloudflare's own [Workers Builds](https://developers.cloudflare.com/workers/ci-cd/builds/). The following command will build and deploy your project. If you are using CI, ensure you update your ["deploy command"](https://developers.cloudflare.com/workers/ci-cd/builds/configuration/#build-settings) configuration appropriately. * npm ```sh npm run deploy ``` * yarn ```sh yarn run deploy ``` * pnpm ```sh pnpm run deploy ``` ## Use bindings with React Router With bindings, your application can be fully integrated with the Cloudflare Developer Platform, giving you access to compute, storage, AI and more. Once you have configured the bindings in the Wrangler configuration file, they are then available within `context.cloudflare` in your loader or action functions: ```ts export function loader({ context }: Route.LoaderArgs) { return { message: context.cloudflare.env.VALUE_FROM_CLOUDFLARE }; } export default function Home({ loaderData }: Route.ComponentProps) { return ; } ``` As you have direct access to your Worker entry file (`workers/app.ts`), you can also add additional exports such as [Durable Objects](https://developers.cloudflare.com/durable-objects/) and [Workflows](https://developers.cloudflare.com/workflows/) Example: Using Workflows Here is an example of how to set up a simple Workflow in your Worker entry file. ```ts import { createRequestHandler } from "react-router"; import { WorkflowEntrypoint, WorkflowStep, WorkflowEvent } from 'cloudflare:workers'; declare global { interface CloudflareEnvironment extends Env {} } type Env = { MY_WORKFLOW: Workflow; }; export class MyWorkflow extends WorkflowEntrypoint { override async run(event: WorkflowEvent, step: WorkflowStep) { await step.do("first step", async () => { return { output: "First step result" }; }); await step.sleep("sleep", "1 second"); await step.do("second step", async () => { return { output: "Second step result" }; }); return "Workflow output"; } } const requestHandler = createRequestHandler( () => import("virtual:react-router/server-build"), import.meta.env.MODE ); export default { async fetch(request, env, ctx) { return requestHandler(request, { cloudflare: { env, ctx }, }); }, } satisfies ExportedHandler; ``` Configure it in your Wrangler configuration file: * wrangler.jsonc ```jsonc { "workflows": [ { "name": "my-workflow", "binding": "MY_WORKFLOW", "class_name": "MyWorkflow" } ] } ``` * wrangler.toml ```toml [[workflows]] name = "my-workflow" binding = "MY_WORKFLOW" class_name = "MyWorkflow" ``` And then use it in your application: ```ts export function action({ context }: Route.LoaderArgs) { const instance = await env.MY_WORKFLOW.create({ params: { "hello": "world" }) return { id: instance.id, details: instance.status() }; } ``` With bindings, your application can be fully integrated with the Cloudflare Developer Platform, giving you access to compute, storage, AI and more. [Bindings ](https://developers.cloudflare.com/workers/runtime-apis/bindings/)Access to compute, storage, AI and more. --- title: RedwoodSDK · Cloudflare Workers docs description: Create an RedwoodSDK application and deploy it to Cloudflare Workers with Workers Assets. lastUpdated: 2025-07-16T12:18:55.000Z chatbotDeprioritize: false tags: Full stack source_url: html: https://developers.cloudflare.com/workers/framework-guides/web-apps/redwoodsdk/ md: https://developers.cloudflare.com/workers/framework-guides/web-apps/redwoodsdk/index.md --- In this guide, you will create a new [RedwoodSDK](https://rwsdk.com/) application and deploy it to Cloudflare Workers. RedwoodSDK is a composable framework for building server-side web apps on Cloudflare. It starts as a Vite plugin that unlocks SSR, React Server Components, Server Functions, and realtime capabilities. ## Deploy a new RedwoodSDK application on Workers 1. **Create a new project.** Run the following command, replacing `` with your desired project name: * npm ```sh npx degit redwoodjs/sdk/starters/standard#main ``` * yarn ```sh yarn dlx degit redwoodjs/sdk/starters/standard#main ``` * pnpm ```sh pnpx degit redwoodjs/sdk/starters/standard#main ``` 2. **Change the directory.** ```sh cd ``` 3. **Install dependencies.** * npm ```sh npm install ``` * yarn ```sh yarn install ``` * pnpm ```sh pnpm install ``` 4. **Develop locally.** Run the following command in the project directory to start a local development server. RedwoodSDK is just a plugin for Vite, so you can use the same dev workflow as any other Vite project: * npm ```sh npm run dev ``` * yarn ```sh yarn run dev ``` * pnpm ```sh pnpm run dev ``` 5. **Deploy your project.** You can deploy your project to a `*.workers.dev` subdomain or a [Custom Domain](https://developers.cloudflare.com/workers/configuration/routing/custom-domains/), either from your local machine or from any CI/CD system, including [Cloudflare Workers CI/CD](https://developers.cloudflare.com/workers/ci-cd/builds/). Use the following command to build and deploy. If you are using CI, make sure to update your [deploy command](https://developers.cloudflare.com/workers/ci-cd/builds/configuration/#build-settings) configuration accordingly. * npm ```sh npm run release ``` * yarn ```sh yarn run release ``` * pnpm ```sh pnpm run release ``` --- title: Svelte · Cloudflare Workers docs description: Create a Svelte application and deploy it to Cloudflare Workers with Workers Assets. lastUpdated: 2025-06-05T13:25:05.000Z chatbotDeprioritize: false tags: SPA source_url: html: https://developers.cloudflare.com/workers/framework-guides/web-apps/svelte/ md: https://developers.cloudflare.com/workers/framework-guides/web-apps/svelte/index.md --- In this guide, you will create a new [Svelte](https://svelte.dev/) application and deploy to Cloudflare Workers (with the new [Workers Assets](https://developers.cloudflare.com/workers/static-assets/)). ## 1. Set up a new project Use the [`create-cloudflare`](https://www.npmjs.com/package/create-cloudflare) CLI (C3) to set up a new project. C3 will create a new project directory, initiate Svelte's official setup tool, and provide the option to deploy instantly. To use `create-cloudflare` to create a new Svelte project with Workers Assets, run the following command: * npm ```sh npm create cloudflare@latest -- my-svelte-app --framework=svelte ``` * yarn ```sh yarn create cloudflare my-svelte-app --framework=svelte ``` * pnpm ```sh pnpm create cloudflare@latest my-svelte-app --framework=svelte ``` After setting up your project, change your directory by running the following command: ```sh cd my-svelte-app ``` ## 2. Develop locally After you have created your project, run the following command in the project directory to start a local server. This will allow you to preview your project locally during development. * npm ```sh npm run dev ``` * yarn ```sh yarn run dev ``` * pnpm ```sh pnpm run dev ``` ## 3. Deploy your Project Your project can be deployed to a `*.workers.dev` subdomain or a [Custom Domain](https://developers.cloudflare.com/workers/configuration/routing/custom-domains/), from your own machine or from any CI/CD system, including [Cloudflare's own](https://developers.cloudflare.com/workers/ci-cd/builds/). The following command will build and deploy your project. If you're using CI, ensure you update your ["deploy command"](https://developers.cloudflare.com/workers/ci-cd/builds/configuration/#build-settings) configuration appropriately. * npm ```sh npm run deploy ``` * yarn ```sh yarn run deploy ``` * pnpm ```sh pnpm run deploy ``` *** ## Bindings Your Svelte application can be fully integrated with the Cloudflare Developer Platform, in both local development and in production, by using product bindings. The [Svelte documentation](https://kit.svelte.dev/docs/adapter-cloudflare#runtime-apis) provides information about configuring bindings and how you can access them in your Svelte hooks and endpoints. With bindings, your application can be fully integrated with the Cloudflare Developer Platform, giving you access to compute, storage, AI and more. [Bindings ](https://developers.cloudflare.com/workers/runtime-apis/bindings/)Access to compute, storage, AI and more. --- title: TanStack · Cloudflare Workers docs description: Create a TanStack Start application and deploy it to Cloudflare Workers with Workers Assets. lastUpdated: 2025-06-24T16:03:51.000Z chatbotDeprioritize: false tags: Full stack source_url: html: https://developers.cloudflare.com/workers/framework-guides/web-apps/tanstack/ md: https://developers.cloudflare.com/workers/framework-guides/web-apps/tanstack/index.md --- ## What is TanStack Start? TanStack Start is a full-stack React framework powered by TanStack Router. It provides a full-document SSR, streaming, server functions, bundling, and more using Vite and modern web standards. ## Create a new TanStack Start TanStack Start Beta has significantly improved Cloudflare compatibility compared to the Alpha version, making deployment and development much more straightforward. 1. **Create a new TanStack Start project** ```sh npx gitpick TanStack/router/tree/main/examples/react/start-basic start-basic cd start-basic npm install ``` How is this project set up? This command will clone the TanStack Start basic project to your local machine, change directory to the project, and install the dependencies. TanStack [provides other examples](https://tanstack.com/start/latest/docs/framework/react/quick-start#examples) that you can use by replacing `start-basic` with the example you want to use. 2. **Develop locally** After creating your project, run the following command in your project directory to start a local development server. By default this starts a local development server on `http://localhost:3000/` * npm ```sh npm run dev ``` * yarn ```sh yarn run dev ``` * pnpm ```sh pnpm run dev ``` ## Preparing for Deployment to Cloudflare Workers Whether you created a new TanStack Start project or are using an existing project, you'll need to make some changes to prepare for deployment to Cloudflare Workers. 1. **Configure Vite for Cloudflare compatibility** Update your `vite.config.ts` file to use the `cloudflare-module` target for a compatible build: ```ts import { tanstackStart } from "@tanstack/react-start/plugin/vite"; import { defineConfig } from "vite"; import tsConfigPaths from "vite-tsconfig-paths"; export default defineConfig({ server: { port: 3000, }, plugins: [ tsConfigPaths({ projects: ["./tsconfig.json"], }), tanstackStart({ target: "cloudflare-module", // Key configuration for Cloudflare compatibility }), ], }); ``` This single configuration change is all that's needed to make your TanStack Start application compatible with Cloudflare Workers. 2. **Add a Wrangler file** Create a `wrangler.jsonc` or `wrangler.toml` file in the root of your project, `wrangler.jsonc` is the recommended approach. This file is used to configure the Cloudflare Workers deployment. * wrangler.jsonc ```jsonc { "$schema": "node_modules/wrangler/config-schema.json", "name": "my-start-app", "main": ".output/server/index.mjs", "compatibility_date": "2025-07-16", "compatibility_flags": ["nodejs_compat"], "assets": { "directory": ".output/public" }, "observability": { "enabled": true }, "kv_namespaces": [ { "binding": "CACHE", "id": "" } ] } ``` * wrangler.toml ```toml "$schema" = "node_modules/wrangler/config-schema.json" name = "my-start-app" main = ".output/server/index.mjs" compatibility_date = "2025-07-16" compatibility_flags = [ "nodejs_compat" ] [assets] directory = ".output/public" [observability] enabled = true [[kv_namespaces]] binding = "CACHE" id = "" ``` Note that the `directory` key is set to `.output/public`, which is the folder that will be filled with the build output. Additionally, the `main` key is set to `.output/server/index.mjs`, indicating to Cloudflare Workers where to locate the entry point for your application. The `kv_namespaces` section shows an example of how to configure a KV namespace binding. 3. **Add deployment scripts to package.json** Add the following scripts to your `package.json` file to streamline deployment and type generation: ```json { "scripts": { ... "deploy": "npm run build && wrangler deploy", "cf-typegen": "wrangler types --env-interface Env" } } ``` The `deploy` script combines building and deploying in one command, while `cf-typegen` generates TypeScript types for your Cloudflare bindings. 4. **Build the application** You must build your application before deploying it to Cloudflare Workers. * npm ```sh npm run build ``` * yarn ```sh yarn run build ``` * pnpm ```sh pnpm run build ``` 5. **Deploy the application** You can now use the deploy script to build and deploy your application in one command: * npm ```sh npm run deploy ``` * yarn ```sh yarn run deploy ``` * pnpm ```sh pnpm run deploy ``` Alternatively, you can still deploy directly with Wrangler: ```sh npx wrangler deploy ``` ## Using Cloudflare Bindings 1. **Generate TypeScript types for your bindings** Before using Cloudflare bindings in your code, generate the TypeScript types to ensure proper type safety: * npm ```sh npm run cf-typegen ``` * yarn ```sh yarn run cf-typegen ``` * pnpm ```sh pnpm run cf-typegen ``` This command reads your `wrangler.jsonc` configuration and generates an `Env` interface with all your configured bindings. 2. **Create a helper function to get access to Cloudflare bindings** Create a helper function named `bindings.ts` in the `src/utils` folder (create the folder if it doesn't exist), and paste in the below code. The example assumes you have a KV namespace with a binding name of `CACHE` already created in your account and added to the wrangler file. ```ts let cachedEnv: Env | null = null; // This gets called once at startup when running locally const initDevEnv = async () => { const { getPlatformProxy } = await import("wrangler"); const proxy = await getPlatformProxy(); cachedEnv = proxy.env as unknown as Env; }; if (import.meta.env.DEV) { await initDevEnv(); } /** * Will only work when being accessed on the server. Obviously, CF bindings are not available in the browser. * @returns */ export function getBindings(): Env { if (import.meta.env.DEV) { if (!cachedEnv) { throw new Error( "Dev bindings not initialized yet. Call initDevEnv() first." ); } return cachedEnv; } return process.env as unknown as Env; } ``` How is this code working? The helper function uses [getPlatformProxy](https://developers.cloudflare.com/workers/wrangler/api/#getplatformproxy) method from wrangler to provide access to your Cloudflare bindings during local development. The bindings are cached at startup for better performance. In production, bindings are accessed via `process.env`. Make sure you've run `npm run cf-typegen` to generate the `Env` types that this code references. 3. **Example using a Cloudflare Binding in Server Functions** Now that you have a helper function to get access to your Cloudflare bindings, you can use them in your server functions. Remember bindings are only available on the server. ```ts import { createServerFn } from "@tanstack/react-start"; import { getBindings } from "~/utils/bindings"; const personServerFn = createServerFn({ method: "GET" }) .validator((d: string) => d) .handler(async ({ data: name }) => { const env = getBindings(); let growingAge = Number((await env.CACHE.get("age")) || 0); growingAge++; await env.CACHE.put("age", growingAge.toString()); return { name, randomNumber: growingAge }; }); ``` A special thanks to GitHub user [backpine](https://github.com/backpine) for the code that supports Cloudflare Bindings in TanStack Start, which is demonstrated in their [TanStack Start Beta on Cloudflare example](https://github.com/backpine/tanstack-start-beta-on-cloudflare). ## Environment Handling The TanStack Start Beta version provides seamless environment handling: * **Development**: Bindings are accessed via [`getPlatformProxy()`](https://developers.cloudflare.com/workers/wrangler/api/#getplatformproxy) from Wrangler and cached at startup * **Production**: Bindings are accessed via [`process.env`](https://developers.cloudflare.com/workers/runtime-apis/nodejs/process/#processenv) This approach ensures your bindings are properly typed throughout your project and provides a smooth development experience. By following the steps above, you will have deployed your TanStack Start application to Cloudflare Workers. --- title: Examples · Cloudflare Workers docs lastUpdated: 2024-08-13T19:56:56.000Z chatbotDeprioritize: false source_url: html: https://developers.cloudflare.com/workers/languages/javascript/examples/ md: https://developers.cloudflare.com/workers/languages/javascript/examples/index.md --- --- title: Vue · Cloudflare Workers docs description: Create a Vue application and deploy it to Cloudflare Workers with Workers Assets. lastUpdated: 2025-06-05T13:25:05.000Z chatbotDeprioritize: false tags: SPA source_url: html: https://developers.cloudflare.com/workers/framework-guides/web-apps/vue/ md: https://developers.cloudflare.com/workers/framework-guides/web-apps/vue/index.md --- In this guide, you will create a new [Vue](https://vuejs.org/) application and deploy to Cloudflare Workers (with the new [Workers Assets](https://developers.cloudflare.com/workers/static-assets/)). ## 1. Set up a new project Use the [`create-cloudflare`](https://www.npmjs.com/package/create-cloudflare) CLI (C3) to set up a new project. C3 will create a new project directory, use code from the official Vue template, and provide the option to deploy instantly. To use `create-cloudflare` to create a new Vue project with Workers Assets, run the following command: * npm ```sh npm create cloudflare@latest -- my-vue-app --framework=vue ``` * yarn ```sh yarn create cloudflare my-vue-app --framework=vue ``` * pnpm ```sh pnpm create cloudflare@latest my-vue-app --framework=vue ``` How is this project set up? Below is a simplified file tree of the project. `wrangler.jsonc` is your [Wrangler configuration file](https://developers.cloudflare.com/workers/wrangler/configuration/). In this file: * `main` points to `server/index.ts`. This is your Worker, which is going to act as your backend API. * `assets.not_found_handling` is set to `single-page-application`, which means that routes that are handled by your Vue SPA do not go to the Worker, and are thus free. * If you want to add bindings to resources on Cloudflare's developer platform, you configure them here. Read more about [bindings](https://developers.cloudflare.com/workers/runtime-apis/bindings/). `vite.config.ts` is set up to use the [Cloudflare Vite plugin](https://developers.cloudflare.com/workers/vite-plugin/). This runs your Worker in the Cloudflare Workers runtime, ensuring your local development environment is as close to production as possible. `server/index.ts` is your backend API, which contains a single endpoint, `/api/`, that returns a text response. At `src/App.vue`, your Vue app calls this endpoint to get a message back and displays this. ## **Develop locally with the [Cloudflare Vite plugin](https://developers.cloudflare.com/workers/vite-plugin/)** After you have created your project, run the following command in the project directory to start a local server. This will allow you to preview your project locally during development. * npm ```sh npm run dev ``` * yarn ```sh yarn run dev ``` * pnpm ```sh pnpm run dev ``` What's happening in local development? This project uses Vite for local development and build, and thus comes with all of Vite's features, including hot module replacement (HMR). In addition, `vite.config.ts` is set up to use the [Cloudflare Vite plugin](https://developers.cloudflare.com/workers/vite-plugin/). This runs your application in the Cloudflare Workers runtime, just like in production, and enables access to local emulations of bindings. ## 3. Deploy your project Your project can be deployed to a `*.workers.dev` subdomain or a [Custom Domain](https://developers.cloudflare.com/workers/configuration/routing/custom-domains/), from your own machine or from any CI/CD system, including [Cloudflare's own](https://developers.cloudflare.com/workers/ci-cd/builds/). The following command will build and deploy your project. If you are using CI, ensure you update your ["deploy command"](https://developers.cloudflare.com/workers/ci-cd/builds/configuration/#build-settings) configuration appropriately. * npm ```sh npm run deploy ``` * yarn ```sh yarn run deploy ``` * pnpm ```sh pnpm run deploy ``` *** ## Asset Routing If you're using Vue as a SPA, you will want to set `not_found_handling = "single_page_application"` in your Wrangler configuration file. By default, Cloudflare first tries to match a request path against a static asset path, which is based on the file structure of the uploaded asset directory. This is either the directory specified by `assets.directory` in your Wrangler config or, in the case of the [Cloudflare Vite plugin](https://developers.cloudflare.com/workers/vite-plugin/), the output directory of the client build. Failing that, we invoke a Worker if one is present. If there is no Worker, or the Worker then uses the asset binding, Cloudflare will fallback to the behaviour set by [`not_found_handling`](https://developers.cloudflare.com/workers/static-assets/#routing-behavior). Refer to the [routing documentation](https://developers.cloudflare.com/workers/static-assets/routing/) for more information about how routing works with static assets, and how to customize this behavior. ## Use bindings with Vue Your new project also contains a Worker at `./server/index.ts`, which you can use as a backend API for your Vue application. While your Vue application cannot directly access Workers bindings, it can interact with them through this Worker. You can make [`fetch()` requests](https://developers.cloudflare.com/workers/runtime-apis/fetch/) from your Vue application to the Worker, which can then handle the request and use bindings. With bindings, your application can be fully integrated with the Cloudflare Developer Platform, giving you access to compute, storage, AI and more. [Bindings ](https://developers.cloudflare.com/workers/runtime-apis/bindings/)Access to compute, storage, AI and more. --- title: Python Worker Examples · Cloudflare Workers docs description: Cloudflare has a wide range of Python examples in the Workers Example gallery. lastUpdated: 2025-03-24T17:07:01.000Z chatbotDeprioritize: false source_url: html: https://developers.cloudflare.com/workers/languages/python/examples/ md: https://developers.cloudflare.com/workers/languages/python/examples/index.md --- Cloudflare has a wide range of Python examples in the [Workers Example gallery](https://developers.cloudflare.com/workers/examples/?languages=Python). In addition to those examples, consider the following ones that illustrate Python-specific behavior. ## Parse an incoming request URL ```python from workers import Response from urllib.parse import urlparse, parse_qs async def on_fetch(request, env): # Parse the incoming request URL url = urlparse(request.url) # Parse the query parameters into a Python dictionary params = parse_qs(url.query) if "name" in params: greeting = "Hello there, {name}".format(name=params["name"][0]) return Response(greeting) if url.path == "/favicon.ico": return Response("") return Response("Hello world!") ``` ## Parse JSON from the incoming request ```python from workers import Response async def on_fetch(request): name = (await request.json()).name return Response("Hello, {name}".format(name=name)) ``` ## Emit logs from your Python Worker ```python # To use the JavaScript console APIs from js import console from workers import Response # To use the native Python logging import logging async def on_fetch(request): # Use the console APIs from JavaScript # https://developer.mozilla.org/en-US/docs/Web/API/console console.log("console.log from Python!") # Alternatively, use the native Python logger logger = logging.getLogger(__name__) # The default level is warning. We can change that to info. logging.basicConfig(level=logging.INFO) logger.error("error from Python!") logger.info("info log from Python!") # Or just use print() print("print() from Python!") return Response("We're testing logging!") ``` ## Publish to a Queue ```python from js import Object from pyodide.ffi import to_js as _to_js from workers import Response # to_js converts between Python dictionaries and JavaScript Objects def to_js(obj): return _to_js(obj, dict_converter=Object.fromEntries) async def on_fetch(request, env): # Bindings are available on the 'env' parameter # https://developers.cloudflare.com/queues/ # The default contentType is "json" # We can also pass plain text strings await env.QUEUE.send("hello", contentType="text") # Send a JSON payload await env.QUEUE.send(to_js({"hello": "world"})) # Return a response return Response.json({"write": "success"}) ``` ## Query a D1 Database ```python from workers import Response async def on_fetch(request, env): results = await env.DB.prepare("PRAGMA table_list").all() # Return a JSON response return Response.json(results) ``` Refer to [Query D1 from Python Workers](https://developers.cloudflare.com/d1/examples/query-d1-from-python-workers/) for a more in-depth tutorial that covers how to create a new D1 database and configure bindings to D1. ## Next steps * If you're new to Workers and Python, refer to the [get started](https://developers.cloudflare.com/workers/languages/python/) guide * Learn more about [calling JavaScript methods and accessing JavaScript objects](https://developers.cloudflare.com/workers/languages/python/ffi/) from Python * Understand the [supported packages and versions](https://developers.cloudflare.com/workers/languages/python/packages/) currently available to Python Workers. --- title: Work with JavaScript objects, methods, functions and globals from Python Workers · Cloudflare Workers docs description: "Via Pyodide, Python Workers provide a Foreign Function Interface (FFI) to JavaScript. This allows you to:" lastUpdated: 2025-03-24T17:07:01.000Z chatbotDeprioritize: false source_url: html: https://developers.cloudflare.com/workers/languages/python/ffi/ md: https://developers.cloudflare.com/workers/languages/python/ffi/index.md --- Via [Pyodide](https://pyodide.org/en/stable/), Python Workers provide a [Foreign Function Interface (FFI)](https://en.wikipedia.org/wiki/Foreign_function_interface) to JavaScript. This allows you to: * Use [bindings](https://developers.cloudflare.com/workers/runtime-apis/bindings/) to resources on Cloudflare, including [Workers AI](https://developers.cloudflare.com/workers-ai/), [Vectorize](https://developers.cloudflare.com/vectorize/), [R2](https://developers.cloudflare.com/r2/), [KV](https://developers.cloudflare.com/kv/), [D1](https://developers.cloudflare.com/d1/), [Queues](https://developers.cloudflare.com/queues/), [Durable Objects](https://developers.cloudflare.com/durable-objects/), [Service Bindings](https://developers.cloudflare.com/workers/runtime-apis/bindings/service-bindings/) and more. * Use JavaScript globals, like [`Request`](https://developers.cloudflare.com/workers/runtime-apis/request/), [`Response`](https://developers.cloudflare.com/workers/runtime-apis/response/), and [`fetch()`](https://developers.cloudflare.com/workers/runtime-apis/fetch/). * Use the full feature set of Cloudflare Workers — if an API is accessible in JavaScript, you can also access it in a Python Worker, writing exclusively Python code. The details of Pyodide's Foreign Function Interface are documented [here](https://pyodide.org/en/stable/usage/type-conversions.html), and Workers written in Python are able to take full advantage of this. ## Using Bindings from Python Workers Bindings allow your Worker to interact with resources on the Cloudflare Developer Platform. When you declare a binding on your Worker, you grant it a specific capability, such as being able to read and write files to an [R2](https://developers.cloudflare.com/r2/) bucket. For example, to access a [KV](https://developers.cloudflare.com/kv) namespace from a Python Worker, you would declare the following in your Worker's [Wrangler configuration file](https://developers.cloudflare.com/workers/wrangler/configuration/): * wrangler.jsonc ```jsonc { "main": "./src/index.py", "kv_namespaces": [ { "binding": "FOO", "id": "" } ] } ``` * wrangler.toml ```toml main = "./src/index.py" kv_namespaces = [ { binding = "FOO", id = "" } ] ``` ...and then call `.get()` on the binding object that is exposed on `env`: ```python from workers import Response async def on_fetch(request, env): await env.FOO.put("bar", "baz") bar = await env.FOO.get("bar") return Response(bar) # returns "baz" ``` Under the hood, `env` is actually a JavaScript object. When you call `.FOO`, you are accessing this property via a [`JsProxy`](https://pyodide.org/en/stable/usage/api/python-api/ffi.html#pyodide.ffi.JsProxy) — special proxy object that makes a JavaScript object behave like a Python object. ## Using JavaScript globals from Python Workers When writing Workers in Python, you can access JavaScript globals by importing them from the `js` module. For example, note how `Response` is imported from `js` in the example below: ```python from js import Response def on_fetch(request): return Response.new("Hello World!") ``` Refer to the [Python examples](https://developers.cloudflare.com/workers/languages/python/examples/) to learn how to call into JavaScript functions from Python, including `console.log` and logging, providing options to `Response`, and parsing JSON. --- title: How Python Workers Work · Cloudflare Workers docs description: Workers written in Python are executed by Pyodide. Pyodide is a port of CPython (the reference implementation of Python — commonly referred to as just "Python") to WebAssembly. lastUpdated: 2025-03-24T17:07:01.000Z chatbotDeprioritize: false source_url: html: https://developers.cloudflare.com/workers/languages/python/how-python-workers-work/ md: https://developers.cloudflare.com/workers/languages/python/how-python-workers-work/index.md --- Workers written in Python are executed by [Pyodide](https://pyodide.org/en/stable/index.html). Pyodide is a port of [CPython](https://github.com/python) (the reference implementation of Python — commonly referred to as just "Python") to WebAssembly. When you write a Python Worker, your code is interpreted directly by Pyodide, within a V8 isolate. Refer to [How Workers works](https://developers.cloudflare.com/workers/reference/how-workers-works/) to learn more. ## Local Development Lifecycle ```python from workers import Response async def on_fetch(request, env): return Response("Hello world!") ``` …with a [Wrangler configuration file](https://developers.cloudflare.com/workers/wrangler/configuration/) that points to a .py file: * wrangler.jsonc ```jsonc { "name": "hello-world-python-worker", "main": "src/entry.py", "compatibility_date": "2024-04-01" } ``` * wrangler.toml ```toml name = "hello-world-python-worker" main = "src/entry.py" compatibility_date = "2024-04-01" ``` When you run `npx wrangler@latest dev` in local dev, the Workers runtime will: 1. Determine which version of Pyodide is required, based on your compatibility date 2. Create a new v8 isolate for your Worker, and automatically inject Pyodide 3. Serve your Python code using Pyodide There no extra toolchain or precompilation steps needed. The Python execution environment is provided directly by the Workers runtime, mirroring how Workers written in JavaScript work. Refer to the [Python examples](https://developers.cloudflare.com/workers/languages/python/examples/) to learn how to use Python within Workers. ## Deployment Lifecycle To reduce cold start times, when you deploy a Python Worker, Cloudflare performs as much of the expensive work as possible upfront, at deploy time. When you run npx `wrangler@latest deploy`, the following happens: 1. Wrangler uploads your Python code and your `requirements.txt` file to the Workers API. 2. Cloudflare sends your Python code, and your `requirements.txt` file to the Workers runtime to be validated. 3. Cloudflare creates a new v8 isolate for your Worker, and automatically injects Pyodide plus any packages you’ve specified in your `requirements.txt` file. 4. Cloudflare scans the Worker’s code for import statements, execute them, and then take a snapshot of the Worker’s WebAssembly linear memory. Effectively, we perform the expensive work of importing packages at deploy time, rather than at runtime. 5. Cloudflare deploys this snapshot alongside your Worker’s Python code to the Cloudflare network. Python Workers are in beta. Packages do not run in production. Currently, you can only deploy Python Workers that use the standard library. [Packages](https://developers.cloudflare.com/workers/languages/python/packages/#supported-packages) **cannot be deployed** and will only work in local development for the time being. When a request comes in to your Worker, we load this snapshot and use it to bootstrap your Worker in an isolate, avoiding expensive initialization time: ![Diagram of how Python Workers are deployed to Cloudflare](https://developers.cloudflare.com/_astro/python-workers-deployment.B83dgcK7_vs24A.webp) Refer to the [blog post introducing Python Workers](https://blog.cloudflare.com/python-workers) for more detail about performance optimizations and how the Workers runtime will reduce cold starts for Python Workers. ## Pyodide and Python versions A new version of Python is released every year in August, and a new version of Pyodide is released six (6) months later. When this new version of Pyodide is published, we will add it to Workers by gating it behind a Compatibility Flag, which is only enabled after a specified Compatibility Date. This lets us continually provide updates, without risk of breaking changes, extending the commitment we’ve made for JavaScript to Python. Each Python release has a [five (5) year support window](https://devguide.python.org/versions/). Once this support window has passed for a given version of Python, security patches are no longer applied, making this version unsafe to rely on. To mitigate this risk, while still trying to hold as true as possible to our commitment of stability and long-term support, after five years any Python Worker still on a Python release that is outside of the support window will be automatically moved forward to the next oldest Python release. Python is a mature and stable language, so we expect that in most cases, your Python Worker will continue running without issue. But we recommend updating the compatibility date of your Worker regularly, to stay within the support window. --- title: Python packages supported in Cloudflare Workers · Cloudflare Workers docs description: To import a Python package, add the package name to the requirements.txt file within the same directory as your Wrangler configuration file. lastUpdated: 2025-02-12T13:41:31.000Z chatbotDeprioritize: false source_url: html: https://developers.cloudflare.com/workers/languages/python/packages/ md: https://developers.cloudflare.com/workers/languages/python/packages/index.md --- Python Workers are in beta. Packages do not run in production. Currently, you can only deploy Python Workers that use the standard library. [Packages](https://developers.cloudflare.com/workers/languages/python/packages/#supported-packages) **cannot be deployed** and will only work in local development for the time being. To import a Python package, add the package name to the `requirements.txt` file within the same directory as your [Wrangler configuration file](https://developers.cloudflare.com/workers/wrangler/configuration/). For example, if your Worker depends on [FastAPI](https://fastapi.tiangolo.com/), you would add the following: ```plaintext fastapi ``` ## Package versioning In the example above, you likely noticed that there is no explicit version of the Python package declared in `requirements.txt`. In Workers, Python package versions are set via [Compatibility Dates](https://developers.cloudflare.com/workers/configuration/compatibility-dates/) and [Compatibility Flags](https://developers.cloudflare.com/workers/configuration/compatibility-flags/). Given a particular compatibility date, a specific version of the [Pyodide Python runtime](https://pyodide.org/en/stable/project/changelog.html) is provided to your Worker, providing a specific set of Python packages pinned to specific versions. As new versions of Pyodide and additional Python packages become available in Workers, we will publish compatibility flags and their associated compatibility dates here on this page. ## Supported Packages A subset of the [Python packages that Pyodide supports](https://pyodide.org/en/latest/usage/packages-in-pyodide.html) are provided directly by the Workers runtime: * aiohttp: 3.9.3 * aiohttp-tests: 3.9.3 * aiosignal: 1.3.1 * annotated-types: 0.6.0 * annotated-types-tests: 0.6.0 * anyio: 4.2.0 * async-timeout: 4.0.3 * attrs: 23.2.0 * certifi: 2024.2.2 * charset-normalizer: 3.3.2 * distro: 1.9.0 * [fastapi](https://developers.cloudflare.com/workers/languages/python/packages/fastapi): 0.110.0 * frozenlist: 1.4.1 * h11: 0.14.0 * h11-tests: 0.14.0 * hashlib: 1.0.0 * httpcore: 1.0.4 * httpx: 0.27.0 * idna: 3.6 * jsonpatch: 1.33 * jsonpointer: 2.4 * langchain: 0.1.8 * langchain-core: 0.1.25 * langchain-openai: 0.0.6 * langsmith: 0.1.5 * lzma: 1.0.0 * micropip: 0.6.0 * multidict: 6.0.5 * numpy: 1.26.4 * numpy-tests: 1.26.4 * openai: 1.12.0 * openssl: 1.1.1n * packaging: 23.2 * pydantic: 2.6.1 * pydantic-core: 2.16.2 * pydecimal: 1.0.0 * pydoc-data: 1.0.0 * pyyaml: 6.0.1 * regex: 2023.12.25 * regex-tests: 2023.12.25 * requests: 2.31.0 * six: 1.16.0 * sniffio: 1.3.0 * sniffio-tests: 1.3.0 * sqlite3: 1.0.0 * ssl: 1.0.0 * starlette: 0.36.3 Looking for a package not listed here? Tell us what you'd like us to support by [opening a discussion on Github](https://github.com/cloudflare/workerd/discussions/new?category=python-packages). ## HTTP Client Libraries Only HTTP libraries that are able to make requests asynchronously are supported. Currently, these include [`aiohttp`](https://docs.aiohttp.org/en/stable/index.html) and [`httpx`](https://www.python-httpx.org/). You can also use the [`fetch()` API](https://developers.cloudflare.com/workers/runtime-apis/fetch/) from JavaScript, using Python Workers' [foreign function interface](https://developers.cloudflare.com/workers/languages/python/ffi) to make HTTP requests. --- title: Standard Library provided to Python Workers · Cloudflare Workers docs description: Workers written in Python are executed by Pyodide. lastUpdated: 2024-08-13T19:56:56.000Z chatbotDeprioritize: false source_url: html: https://developers.cloudflare.com/workers/languages/python/stdlib/ md: https://developers.cloudflare.com/workers/languages/python/stdlib/index.md --- Workers written in Python are executed by [Pyodide](https://pyodide.org/en/stable/index.html). Pyodide is a port of CPython to WebAssembly — for the most part it behaves identically to [CPython](https://github.com/python) (the reference implementation of Python — commonly referred to as just "Python"). The majority of the CPython test suite passes when run against Pyodide. For the most part, you shouldn't need to worry about differences in behavior. The full [Python Standard Library](https://docs.python.org/3/library/index.html) is available in Python Workers, with the following exceptions: ## Modules with limited functionality * `hashlib`: Hash algorithms that depend on OpenSSL are not available by default. * `decimal`: The decimal module has C (\_decimal) and Python (\_pydecimal) implementations with the same functionality. Only the C implementation is available (compiled to WebAssembly) * `pydoc`: Help messages for Python builtins are not available * `webbrowser`: The original webbrowser module is not available. ## Excluded modules The following modules are not available in Python Workers: * curses * dbm * ensurepip * fcntl * grp * idlelib * lib2to3 * msvcrt * pwd * resource * syslog * termios * tkinter * turtle.py * turtledemo * venv * winreg * winsound The following modules can be imported, but are not functional due to the limitations of the WebAssembly VM. * multiprocessing * threading * sockets The following are present but cannot be imported due to a dependency on the termios package which has been removed: * pty * tty --- title: Supported crates · Cloudflare Workers docs description: >- Learn about popular Rust crates which have been confirmed to work on Workers when using workers-rs (or in some cases just wasm-bindgen), to write Workers in WebAssembly. Each Rust crate example includes any custom configuration that is required. lastUpdated: 2024-08-13T19:56:56.000Z chatbotDeprioritize: false source_url: html: https://developers.cloudflare.com/workers/languages/rust/crates/ md: https://developers.cloudflare.com/workers/languages/rust/crates/index.md --- ## Background Learn about popular Rust crates which have been confirmed to work on Workers when using [`workers-rs`](https://github.com/cloudflare/workers-rs) (or in some cases just `wasm-bindgen`), to write Workers in WebAssembly. Each Rust crate example includes any custom configuration that is required. This is not an exhaustive list, many Rust crates can be compiled to the [`wasm32-unknown-unknown`](https://doc.rust-lang.org/rustc/platform-support/wasm64-unknown-unknown.html) target that is supported by Workers. In some cases, this may require disabling default features or enabling a Wasm-specific feature. It is important to consider the addition of new dependencies, as this can significantly increase the [size](https://developers.cloudflare.com/workers/platform/limits/#worker-size) of your Worker. ## `time` Many crates which have been made Wasm-friendly, will use the `time` crate instead of `std::time`. For the `time` crate to work in Wasm, the `wasm-bindgen` feature must be enabled to obtain timing information from JavaScript. ## `tracing` Tracing can be enabled by using the `tracing-web` crate and the `time` feature for `tracing-subscriber`. Due to [timing limitations](https://developers.cloudflare.com/workers/reference/security-model/#step-1-disallow-timers-and-multi-threading) on Workers, spans will have identical start and end times unless they encompass I/O. [Refer to the `tracing` example](https://github.com/cloudflare/workers-rs/tree/main/examples/tracing) for more information. ## `reqwest` The [`reqwest` library](https://docs.rs/reqwest/latest/reqwest/) can be compiled to Wasm, and hooks into the JavaScript `fetch` API automatically using `wasm-bindgen`. ## `tokio-postgres` `tokio-postgres` can be compiled to Wasm. It must be configured to use a `Socket` from `workers-rs`: [Refer to the `tokio-postgres` example](https://github.com/cloudflare/workers-rs/tree/main/examples/tokio-postgres) for more information. ## `hyper` The `hyper` crate contains two HTTP clients, the lower-level `conn` module and the higher-level `Client`. The `conn` module can be used with Workers `Socket`, however `Client` requires timing dependencies which are not yet Wasm friendly. [Refer to the `hyper` example](https://github.com/cloudflare/workers-rs/tree/main/examples/hyper) for more information. --- title: Examples · Cloudflare Workers docs lastUpdated: 2024-08-13T19:56:56.000Z chatbotDeprioritize: false source_url: html: https://developers.cloudflare.com/workers/languages/typescript/examples/ md: https://developers.cloudflare.com/workers/languages/typescript/examples/index.md --- --- title: Breakpoints · Cloudflare Workers docs description: Debug your local and deployed Workers using breakpoints. lastUpdated: 2025-07-14T17:19:03.000Z chatbotDeprioritize: false source_url: html: https://developers.cloudflare.com/workers/observability/dev-tools/breakpoints/ md: https://developers.cloudflare.com/workers/observability/dev-tools/breakpoints/index.md --- ## Debug via breakpoints When developing a Worker locally using Wrangler or Vite, you can debug via breakpoints in your Worker. Breakpoints provide the ability to review what is happening at a given point in the execution of your Worker. Breakpoint functionality exists in both DevTools and VS Code. For more information on breakpoint debugging via Chrome's DevTools, refer to [Chrome's article on breakpoints](https://developer.chrome.com/docs/devtools/javascript/breakpoints/). ### VSCode debug terminals Using VSCode's built-in [JavaScript Debug Terminals](https://code.visualstudio.com/docs/nodejs/nodejs-debugging#_javascript-debug-terminal), all you have to do is open a JS debug terminal (`Cmd + Shift + P` and then type `javascript debug`) and run `wrangler dev` (or `vite dev`) from within the debug terminal. VSCode will automatically connect to your running Worker (even if you're running multiple Workers at once!) and start a debugging session. ### Setup VS Code to use breakpoints with `launch.json` files To setup VS Code for breakpoint debugging in your Worker project: 1. Create a `.vscode` folder in your project's root folder if one does not exist. 2. Within that folder, create a `launch.json` file with the following content: ```json { "configurations": [ { "name": "Wrangler", "type": "node", "request": "attach", "port": 9229, "cwd": "/", "resolveSourceMapLocations": null, "attachExistingChildren": false, "autoAttachChildProcesses": false, "sourceMaps": true // works with or without this line } ] } ``` 1. Open your project in VS Code, open a new terminal window from VS Code, and run `npx wrangler dev` to start the local dev server. 2. At the top of the **Run & Debug** panel, you should see an option to select a configuration. Choose **Wrangler**, and select the play icon. **Wrangler: Remote Process \[0]** should show up in the Call Stack panel on the left. 3. Go back to a `.js` or `.ts` file in your project and add at least one breakpoint. 4. Open your browser and go to the Worker's local URL (default `http://127.0.0.1:8787`). The breakpoint should be hit, and you should be able to review details about your code at the specified line. Warning Breakpoint debugging in `wrangler dev` using `--remote` could extend Worker CPU time and incur additional costs since you are testing against actual resources that count against usage limits. It is recommended to use `wrangler dev` without the `--remote` option. This ensures you are developing locally. If you are debugging using `--remote`, you cannot use code minification as the debugger will be unable to find vars when stopped at a breakpoint. Do not set minify to `true` in your Wrangler configuration file. Note The `.vscode/launch.json` file only applies to a single workspace. If you prefer, you can add the above launch configuration to your User Settings (per the [official VS Code documentation](https://code.visualstudio.com/docs/editor/debugging#_global-launch-configuration)) to have it available for all your workspaces. ## Related resources * [Local Development](https://developers.cloudflare.com/workers/development-testing/) - Develop your Workers and connected resources locally via Wrangler and [`workerd`](https://github.com/cloudflare/workerd), for a fast, accurate feedback loop. --- title: Profiling CPU usage · Cloudflare Workers docs description: Learn how to profile CPU usage and ensure CPU-time per request stays under Workers limits lastUpdated: 2025-06-18T17:02:32.000Z chatbotDeprioritize: false source_url: html: https://developers.cloudflare.com/workers/observability/dev-tools/cpu-usage/ md: https://developers.cloudflare.com/workers/observability/dev-tools/cpu-usage/index.md --- If a Worker spends too much time performing CPU-intensive tasks, responses may be slow or the Worker might fail to startup due to [time limits](https://developers.cloudflare.com/workers/platform/limits/#worker-startup-time). Profiling in DevTools can help you identify and fix code that uses too much CPU. Measuring execution time of specific functions in production can be difficult because Workers [only increment timers on I/O](https://developers.cloudflare.com/workers/reference/security-model/#step-1-disallow-timers-and-multi-threading) for security purposes. However, measuring CPU execution times is possible in local development with DevTools. When using DevTools to monitor CPU usage, it may be difficult to replicate specific behavior you are seeing in production. To mimic production behavior, make sure the requests you send to the local Worker are similar to requests in production. This might mean sending a large volume of requests, making requests to specific routes, or using production-like data with the [--remote flag](https://developers.cloudflare.com/workers/development-testing/#remote-bindings). ## Taking a profile To generate a CPU profile: * Run `wrangler dev` to start your Worker * Press the `D` key from your terminal to open DevTools * Select the "Profiler" tab * Select `Start` to begin recording CPU usage * Send requests to your Worker from a new tab * Select `Stop` You now have a CPU profile. Note For Rust Workers, add the following to your `Cargo.toml` to preserve [DWARF](https://dwarfstd.org/) debug symbols (from [this comment](https://github.com/rustwasm/wasm-pack/issues/1351#issuecomment-2100231587)): ```toml [package.metadata.wasm-pack.profile.dev.wasm-bindgen] dwarf-debug-info = true ``` Then, update your `wrangler.toml` to configure wasm-pack (via worker-build) to use the `dev` [profile](https://rustwasm.github.io/docs/wasm-pack/commands/build.html#profile) to preserve debug symbols. ```toml [build] command = "cargo install -q worker-build && worker-build --dev" ``` ## An Example Profile Let's look at an example to learn how to read a CPU profile. Imagine you have the following Worker: ```js const addNumbers = (body) => { for (let i = 0; i < 5000; ++i) { body = body + " " + i; } return body; }; const moreAddition = (body) => { for (let i = 5001; i < 15000; ++i) { body = body + " " + i; } return body; }; export default { async fetch(request, env, ctx) { let body = "Hello Profiler! - "; body = addNumbers(body); body = moreAddition(body); return new Response(body); }, }; ``` You want to find which part of the code causes slow response times. How do you use DevTool profiling to identify the CPU-heavy code and fix the issue? First, as mentioned above, you open DevTools by pressing the `D` key after running `wrangler dev`. Then, you navigate to the "Profiler" tab and take a profile by pressing `Start` and sending a request. ![CPU Profile](https://developers.cloudflare.com/_astro/profile.Dz8PUp_K_Z13cVAd.webp) The top chart in this image shows a timeline of the profile, and you can use it to zoom in on a specific request. The chart below shows the CPU time used for operations run during the request. In this screenshot, you can see "fetch" time at the top and the subscomponents of fetch beneath, including the two functions `addNumbers` and `moreAdditions`. By hovering over each box, you get more information, and by clicking the box, you navigate to the function's source code. Using this graph, you can answer the question of "what is taking CPU time?". The `addNumbers` function has a very small box, representing 0.3ms of CPU time. The `moreAdditions` box is larger, representing 2.2ms of CPU time. Therefore, if you want to make response times faster, you need to optimize `moreAdditions`. You can also change the visualization from ‘Chart’ to ‘Heavy (Bottom Up)’ for an alternative view. ![CPU Profile](https://developers.cloudflare.com/_astro/heavy.17oO4-BN_ZAiwmI.webp) This shows the relative times allocated to each function. At the top of the list, `moreAdditions` is clearly the slowest portion of your Worker. You can see that garbage collection also represents a large percentage of time, so memory optimization could be useful. ## Additional Resources To learn more about how to use the CPU profiler, see [Google's documentation on Profiling the CPU in DevTools](https://developer.chrome.com/docs/devtools/performance/nodejs#profile). To learn how to use DevTools to gain insight into memory, see the [Memory Usage Documentation](https://developers.cloudflare.com/workers/observability/dev-tools/memory-usage/). --- title: Profiling Memory · Cloudflare Workers docs description: >- Understanding Worker memory usage can help you optimize performance, avoid Out of Memory (OOM) errors when hitting Worker memory limits, and fix memory leaks. lastUpdated: 2025-06-18T17:02:32.000Z chatbotDeprioritize: false source_url: html: https://developers.cloudflare.com/workers/observability/dev-tools/memory-usage/ md: https://developers.cloudflare.com/workers/observability/dev-tools/memory-usage/index.md --- Understanding Worker memory usage can help you optimize performance, avoid Out of Memory (OOM) errors when hitting [Worker memory limits](https://developers.cloudflare.com/workers/platform/limits/#memory), and fix memory leaks. You can profile memory usage with snapshots in DevTools. Memory snapshots let you view a summary of memory usage, see how much memory is allocated to different data types, and get details on specific objects in memory. When using DevTools to profile memory, it may be difficult to replicate specific behavior you are seeing in production. To mimic production behavior, make sure the requests you send to the local Worker are similar to requests in production. This might mean sending a large volume of requests, making requests to specific routes, or using production-like data with the [--remote flag](https://developers.cloudflare.com/workers/development-testing/#remote-bindings). ## Taking a snapshot To generate a memory snapshot: * Run `wrangler dev` to start your Worker * Press the `D` from your terminal to open DevTools * Select on the "Memory" tab * Send requests to your Worker to start allocating memory * Optionally include a debugger to make sure you can pause execution at the proper time * Select `Take snapshot` You can now inspect Worker memory. ## An Example Snapshot Let's look at an example to learn how to read a memory snapshot. Imagine you have the following Worker: ```js let responseText = "Hello world!"; export default { async fetch(request, env, ctx) { let now = new Date().toISOString(); responseText = responseText + ` (Requested at: ${now})`; return new Response(responseText.slice(0, 53)); }, }; ``` While this code worked well initially, over time you notice slower responses and Out of Memory errors. Using DevTools, you can find out if this is a memory leak. First, as mentioned above, you open DevTools by pressing the `D` key after running `wrangler dev`. Then, you navigate to the "Memory" tab. Next, generate a large volume of traffic to the Worker by sending requests. You can do this with `curl` or by repeatedly reloading the browser. Note that other Workers may require more specific requests to reproduce a memory leak. Then, click the "Take Snapshot" button and view the results. First, navigate to "Statistics" in the dropdown to get a general sense of what takes up memory. ![Memory Statistics](https://developers.cloudflare.com/_astro/memory-stats.BkZs-j29_ZMXg51.webp) Looking at these statistics, you can see that a lot of memory is dedicated to strings at 67 kB. This is likely the source of the memory leak. If you make more requests and take another snapshot, you would see this number grow. ![Memory Summary](https://developers.cloudflare.com/_astro/memory-summary.CPf4-TMr_gcOCJ.webp) The memory summary lists data types by the amount of memory they take up. When you click into "(string)", you can see a string that is far larger than the rest. The text shows that you are appending "Requested at" and a date repeatedly, inadvertently overwriting the global variable with an increasingly large string: ```js responseText = responseText + ` (Requested at: ${now})`; ``` Using Memory Snapshotting in DevTools, you've identified the object and line of code causing the memory leak. You can now fix it with a small code change. ## Additional Resources To learn more about how to use Memory Snapshotting, see [Google's documentation on Memory Heap Snapshots](https://developer.chrome.com/docs/devtools/memory-problems/heap-snapshots). To learn how to use DevTools to gain insight into CPU usage, see the [CPU Profiling Documentation](https://developers.cloudflare.com/workers/observability/dev-tools/cpu-usage/). --- title: Workers Logpush · Cloudflare Workers docs description: Send Workers Trace Event Logs to a supported third party, such as a storage or logging provider. lastUpdated: 2025-07-16T14:37:31.000Z chatbotDeprioritize: false source_url: html: https://developers.cloudflare.com/workers/observability/logs/logpush/ md: https://developers.cloudflare.com/workers/observability/logs/logpush/index.md --- [Cloudflare Logpush](https://developers.cloudflare.com/logs/logpush/) supports the ability to send [Workers Trace Event Logs](https://developers.cloudflare.com/logs/reference/log-fields/account/workers_trace_events/) to a [supported destination](https://developers.cloudflare.com/logs/get-started/enable-destinations/). Worker’s Trace Events Logpush includes metadata about requests and responses, unstructured `console.log()` messages and any uncaught exceptions. This product is available on the Workers Paid plan. For pricing information, refer to [Pricing](https://developers.cloudflare.com/workers/platform/pricing/#workers-trace-events-logpush). Warning Workers Trace Events Logpush is not available for zones on the [Cloudflare China Network](https://developers.cloudflare.com/china-network/). ## Verify your Logpush access Wrangler version Minimum required Wrangler version: 2.2.0. Check your version by running `wrangler --version`. To update Wrangler, refer to [Install/Update Wrangler](https://developers.cloudflare.com/workers/wrangler/install-and-update/). To configure a Logpush job, verify that your Cloudflare account role can use Logpush. To check your role: 1. Log in the [Cloudflare dashboard](https://dash.cloudflare.com). 2. Select your account and scroll down to **Manage Account** > **Members**. 3. Check your account permissions. Roles with Logpush configuration access are different than Workers permissions. Super Administrators, Administrators, and the Log Share roles have full access to Logpush. Alternatively, create a new [API token](https://developers.cloudflare.com/fundamentals/api/get-started/create-token/) scoped at the Account level with Logs Edit permissions. ## Create a Logpush job ### Via the Cloudflare dashboard To create a Logpush job in the Cloudflare dashboard: 1. Log in to the [Cloudflare dashboard](https://dash.cloudflare.com), and select your account. 2. Select **Analytics & Logs** > **Logpush**. 3. Select **Create a Logpush job**. 4. Select **Workers trace events** as the data set > **Next**. 5. If needed, customize your data fields. Otherwise, select **Next**. 6. Follow the instructions on the dashboard to verify ownership of your data's destination and complete job creation. ### Via cURL The following example sends Workers logs to R2. For more configuration options, refer to [Enable destinations](https://developers.cloudflare.com/logs/get-started/enable-destinations/) and [API configuration](https://developers.cloudflare.com/logs/get-started/api-configuration/) in the Logs documentation. ```bash curl "https://api.cloudflare.com/client/v4/accounts//logpush/jobs" \ --header 'X-Auth-Key: ' \ --header 'X-Auth-Email: ' \ --header 'Content-Type: application/json' \ --data '{ "name": "workers-logpush", "output_options": { "field_names": ["Event", "EventTimestampMs", "Outcome", "Exceptions", "Logs", "ScriptName"], }, "destination_conf": "r2:///{DATE}?account-id=&access-key-id=&secret-access-key=", "dataset": "workers_trace_events", "enabled": true }' | jq . ``` In Logpush, you can configure [filters](https://developers.cloudflare.com/logs/reference/filters/) and a [sampling rate](https://developers.cloudflare.com/logs/get-started/api-configuration/#sampling-rate) to have more control of the volume of data that is sent to your configured destination. For example, if you only want to receive logs for requests that did not result in an exception, add the following `filter` JSON property below `output_options`: `"filter":"{\"where\": {\"key\":\"Outcome\",\"operator\":\"!eq\",\"value\":\"exception\"}}"` ## Enable logging on your Worker Enable logging on your Worker by adding a new property, `logpush = true`, to your Wrangler file. This can be added either in the top-level configuration or under an [environment](https://developers.cloudflare.com/workers/wrangler/environments/). Any new Workers with this property will automatically get picked up by the Logpush job. * wrangler.jsonc ```jsonc { "name": "my-worker", "main": "src/index.js", "compatibility_date": "2022-07-12", "workers_dev": false, "logpush": true, "route": { "pattern": "example.org/*", "zone_name": "example.org" } } ``` * wrangler.toml ```toml # Top-level configuration name = "my-worker" main = "src/index.js" compatibility_date = "2022-07-12" workers_dev = false logpush = true route = { pattern = "example.org/*", zone_name = "example.org" } ``` Configure via multipart script upload API: ```bash curl --request PUT \ "https://api.cloudflare.com/client/v4/accounts/{account_id}/workers/scripts/{script_name}" \ --header "Authorization: Bearer " \ --form 'metadata={"main_module": "my-worker.js", "logpush": true}' \ --form '"my-worker.js"=@./my-worker.js;type=application/javascript+module' ``` ## Limits The `logs` and `exceptions` fields have a combined limit of 16,384 characters before fields will start being truncated. Characters are counted in the order of all `exception.name`s, `exception.message`s, and then `log.message`s. Once that character limit is reached all fields will be truncated with `"<<>>"` for one message before dropping logs or exceptions. ### Example To illustrate this, suppose our Logpush event looks like the JSON below and the limit is 50 characters (rather than the actual limit of 16,384). The algorithm will: 1. Count the characters in `exception.names`: 1. `"SampleError"` and `"AuthError"` as 20 characters. 2. Count the characters in `exception.message`: 1. `"something went wrong"` counted as 20 characters leaving 10 characters remaining. 2. The first 10 characters of `"unable to process request authentication from client"` will be taken and counted before being truncated to `"unable to <<>>"`. 3. Count the characters in `log.message`: 1. We've already begun truncation, so `"Hello "` will be replaced with `"<<>>"` and `"World!"` will be dropped. #### Sample Input ```json { "Exceptions": [ { "Name": "SampleError", "Message": "something went wrong", "TimestampMs": 0 }, { "Name": "AuthError", "Message": "unable to process request authentication from client", "TimestampMs": 1 }, ], "Logs": [ { "Level": "log", "Message": ["Hello "], "TimestampMs": 0 }, { "Level": "log", "Message": ["World!"], "TimestampMs": 0 } ] } ``` #### Sample Output ```json { "Exceptions": [ { "name": "SampleError", "message": "something went wrong", "TimestampMs": 0 }, { "name": "AuthError", "message": "unable to <<>>", "TimestampMs": 1 }, ], "Logs": [ { "Level": "log", "Message": ["<<>>"], "TimestampMs": 0 } ] } ``` --- title: Real-time logs · Cloudflare Workers docs description: Debug your Worker application by accessing logs and exceptions through the Cloudflare dashboard or `wrangler tail`. lastUpdated: 2025-06-18T17:02:32.000Z chatbotDeprioritize: false source_url: html: https://developers.cloudflare.com/workers/observability/logs/real-time-logs/ md: https://developers.cloudflare.com/workers/observability/logs/real-time-logs/index.md --- With Real-time logs, access all your log events in near real-time for log events happening globally. Real-time logs is helpful for immediate feedback, such as the status of a new deployment. Real-time logs captures [invocation logs](https://developers.cloudflare.com/workers/observability/logs/workers-logs/#invocation-logs), [custom logs](https://developers.cloudflare.com/workers/observability/logs/workers-logs/#custom-logs), errors, and uncaught exceptions. For high-traffic applications, real-time logs may enter sampling mode, which means some messages will be dropped and a warning will appear in your logs. Warning Real-time logs are not available for zones on the [Cloudflare China Network](https://developers.cloudflare.com/china-network/). ## View logs from the dashboard To view real-time logs associated with any deployed Worker using the Cloudflare dashboard: 1. Log in to the [Cloudflare dashboard](https://dash.cloudflare.com) and select your account. 2. In Account Home, go to **Workers & Pages**. 3. In **Overview**, select your **Worker**. 4. Select **Logs**. 5. In the right-hand navigation bar, select **Live**. ## View logs using `wrangler tail` To view real-time logs associated with any deployed Worker using Wrangler: 1. Go to your Worker project directory. 2. Run [`npx wrangler tail`](https://developers.cloudflare.com/workers/wrangler/commands/#tail). This will log any incoming requests to your application available in your local terminal. The output of each `wrangler tail` log is a structured JSON object: ```json { "outcome": "ok", "scriptName": null, "exceptions": [], "logs": [], "eventTimestamp": 1590680082349, "event": { "request": { "url": "https://www.bytesized.xyz/", "method": "GET", "headers": {}, "cf": {} } } } ``` By piping the output to tools like [`jq`](https://stedolan.github.io/jq/), you can query and manipulate the requests to look for specific information: ```sh npx wrangler tail | jq .event.request.url ``` ```sh "https://www.bytesized.xyz/" "https://www.bytesized.xyz/component---src-pages-index-js-a77e385e3bde5b78dbf6.js" "https://www.bytesized.xyz/page-data/app-data.json" ``` You can customize how `wrangler tail` works to fit your needs. Refer to [the `wrangler tail` documentation](https://developers.cloudflare.com/workers/wrangler/commands/#tail) for available configuration options. ## Limits Note You can filter real-time logs in the dashboard or using [`wrangler tail`](https://developers.cloudflare.com/workers/wrangler/commands/#tail). If your Worker has a high volume of messages, filtering real-time logs can help mitgate messages from being dropped. Note that: * Real-time logs does not store Workers Logs. To store logs, use [Workers Logs](https://developers.cloudflare.com/workers/observability/logs/workers-logs). * If your Worker has a high volume of traffic, the real-time logs might enter sampling mode. This will cause some of your messages to be dropped and a warning to appear in your logs. * Logs from any [Durable Objects](https://developers.cloudflare.com/durable-objects/) your Worker is using will show up in the dashboard. * A maximum of 10 clients can view a Worker's logs at one time. This can be a combination of either dashboard sessions or `wrangler tail` calls. ## Persist logs Logs can be persisted, filtered, and analyzed with [Workers Logs](https://developers.cloudflare.com/workers/observability/logs/workers-logs). To send logs to a third party, use [Workers Logpush](https://developers.cloudflare.com/workers/observability/logs/logpush/) or [Tail Workers](https://developers.cloudflare.com/workers/observability/logs/tail-workers/). ## Related resources * [Errors and exceptions](https://developers.cloudflare.com/workers/observability/errors/) - Review common Workers errors. * [Local development and testing](https://developers.cloudflare.com/workers/development-testing/) - Develop and test you Workers locally. * [Workers Logs](https://developers.cloudflare.com/workers/observability/logs/workers-logs) - Collect, store, filter and analyze logging data emitted from Cloudflare Workers. * [Logpush](https://developers.cloudflare.com/workers/observability/logs/logpush/) - Learn how to push Workers Trace Event Logs to supported destinations. * [Tail Workers](https://developers.cloudflare.com/workers/observability/logs/tail-workers/) - Learn how to attach Tail Workers to transform your logs and send them to HTTP endpoints. * [Source maps and stack traces](https://developers.cloudflare.com/workers/observability/source-maps) - Learn how to enable source maps and generate stack traces for Workers. --- title: Tail Workers · Cloudflare Workers docs description: Track and log Workers on invocation by assigning a Tail Worker to your projects. lastUpdated: 2025-06-18T17:02:32.000Z chatbotDeprioritize: false source_url: html: https://developers.cloudflare.com/workers/observability/logs/tail-workers/ md: https://developers.cloudflare.com/workers/observability/logs/tail-workers/index.md --- A Tail Worker receives information about the execution of other Workers (known as producer Workers), such as HTTP statuses, data passed to `console.log()` or uncaught exceptions. Tail Workers can process logs for alerts, debugging, or analytics. Tail Workers are available to all customers on the Workers Paid and Enterprise tiers. Tail Workers are billed by [CPU time](https://developers.cloudflare.com/workers/platform/pricing/#workers), not by the number of requests. ![Tail Worker diagram](https://developers.cloudflare.com/_astro/tail-workers.CaYo-ajt_gkexF.webp) A Tail Worker is automatically invoked after the invocation of a producer Worker (the Worker the Tail Worker will track) that contains the application logic. It captures events after the producer has finished executing. Events throughout the request lifecycle, including potential sub-requests via [Service Bindings](https://developers.cloudflare.com/workers/runtime-apis/bindings/service-bindings/) and [Dynamic Dispatch](https://developers.cloudflare.com/cloudflare-for-platforms/workers-for-platforms/get-started/configuration/), will be included. You can filter, change the format of the data, and send events to any HTTP endpoint. For quick debugging, Tail Workers can be used to send logs to [KV](https://developers.cloudflare.com/kv/api/) or any database. ## Configure Tail Workers To configure a Tail Worker: 1. [Create a Worker](https://developers.cloudflare.com/workers/get-started/guide) to serve as the Tail Worker. 2. Add a [`tail()`](https://developers.cloudflare.com/workers/runtime-apis/handlers/tail/) handler to your Worker. The `tail()` handler is invoked every time the producer Worker to which a Tail Worker is connected is invoked. The following Worker code is a Tail Worker that sends its data to an HTTP endpoint: ```js export default { async tail(events) { fetch("https://example.com/endpoint", { method: "POST", body: JSON.stringify(events), }) } } ``` The following Worker code is an example of what the `events` object may look like: ```json [ { "scriptName": "Example script", "outcome": "exception", "eventTimestamp": 1587058642005, "event": { "request": { "url": "https://example.com/some/requested/url", "method": "GET", "headers": { "cf-ray": "57d55f210d7b95f3", "x-custom-header-name": "my-header-value" }, "cf": { "colo": "SJC" } } }, "logs": [ { "message": ["string passed to console.log()"], "level": "log", "timestamp": 1587058642005 } ], "exceptions": [ { "name": "Error", "message": "Threw a sample exception", "timestamp": 1587058642005 } ], "diagnosticsChannelEvents": [ { "channel": "foo", "message": "The diagnostic channel message", "timestamp": 1587058642005 } ] } ] ``` 1. Add the following to the Wrangler file of the producer Worker: * wrangler.jsonc ```jsonc { "tail_consumers": [ { "service": "" } ] } ``` * wrangler.toml ```toml tail_consumers = [{service = ""}] ``` Note The Worker that you add a `tail_consumers` binding to must have a `tail()` handler defined. ## Related resources * [`tail()`](https://developers.cloudflare.com/workers/runtime-apis/handlers/tail/) Handler API docs - Learn how to set up a `tail()` handler in your Worker. - [Errors and exceptions](https://developers.cloudflare.com/workers/observability/errors/) - Review common Workers errors. - [Local development and testing](https://developers.cloudflare.com/workers/development-testing/) - Develop and test you Workers locally. - [Source maps and stack traces](https://developers.cloudflare.com/workers/observability/source-maps) - Learn how to enable source maps and generate stack traces for Workers. --- title: Workers Logs · Cloudflare Workers docs description: Store, filter, and analyze log data emitted from Cloudflare Workers. lastUpdated: 2025-05-13T11:59:34.000Z chatbotDeprioritize: false source_url: html: https://developers.cloudflare.com/workers/observability/logs/workers-logs/ md: https://developers.cloudflare.com/workers/observability/logs/workers-logs/index.md --- Workers Logs lets you automatically collect, store, filter, and analyze logging data emitted from Cloudflare Workers. Data is written to your Cloudflare Account, and you can query it in the dashboard for each of your Workers. All newly created Workers will come with the observability setting enabled by default. Logs include [invocation logs](https://developers.cloudflare.com/workers/observability/logs/workers-logs/#invocation-logs), [custom logs](https://developers.cloudflare.com/workers/observability/logs/workers-logs/#custom-logs), errors, and uncaught exceptions. ![Example showing the Workers Logs Dashboard](https://developers.cloudflare.com/_astro/preview.B6xRDzZ-_Z1XdUPd.webp) To send logs to a third party, use [Workers Logpush](https://developers.cloudflare.com/workers/observability/logs/logpush/) or [Tail Workers](https://developers.cloudflare.com/workers/observability/logs/tail-workers/). ## Enable Workers Logs Wrangler version Minimum required Wrangler version: 3.78.6. Check your version by running `wrangler --version`. To update Wrangler, refer to [Install/Update Wrangler](https://developers.cloudflare.com/workers/wrangler/install-and-update/). You must add the observability setting for your Worker to write logs to Workers Logs. Add the following setting to your Worker's Wrangler file and redeploy your Worker. * wrangler.jsonc ```jsonc { "observability": { "enabled": true, "head_sampling_rate": 1 } } ``` * wrangler.toml ```toml [observability] enabled = true head_sampling_rate = 1 # optional. default = 1. ``` [Head-based sampling](https://developers.cloudflare.com/workers/observability/logs/workers-logs/#head-based-sampling) allows you set the percentage of Workers requests that are logged. ### Enabling with environments [Environments](https://developers.cloudflare.com/workers/wrangler/environments/) allow you to deploy the same Worker application with different configurations. For example, you may want to configure a different `head_sampling_rate` to staging and production. To configure observability for an environment named `staging`: 1. Add the following configuration below `[env.staging]` * wrangler.jsonc ```jsonc { "env": { "staging": { "observability": { "enabled": true, "head_sampling_rate": 1 } } } } ``` * wrangler.toml ```toml [env.staging.observability] enabled = true head_sampling_rate = 1 # optional ``` 1. Deploy your Worker with `npx wrangler deploy -e staging` 2. Repeat step 1 and 2 for each environment. ## View logs from the dashboard Access logs for your Worker from the [Cloudflare dashboard](https://dash.cloudflare.com/?to=/:account/workers/services/view/:worker/production/observability/logs/). 1. Log in to the [Cloudflare dashboard](https://dash.cloudflare.com/?to=/:account/workers/services/view/:worker/production/observability/logs/) and select your account. 2. In Account Home, go to **Workers & Pages**. 3. In **Overview**, select your **Worker**. 4. Select **Logs**. ## Best Practices ### Logging structured JSON objects To get the most out of Workers Logs, it is recommended you log in JSON format. Workers Logs automatically extracts the fields and indexes them intelligently in the database. The benefit of this structured logging technique is in how it allows you to easily segment data across any dimension for fields with unlimited cardinality. Consider the following scenarios: | Scenario | Logging Code | Event Log (Partial) | | - | - | - | | 1 | `console.log("user_id: " + 123)` | `{message: "user_id: 123"}` | | 2 | `console.log({user_id: 123})` | `{user_id: 123}` | | 3 | `console.log({user_id: 123, user_email: "a@example.com"})` | `{user_id: 123, user_email: "a@example.com"}` | The difference between these examples is in how you index your logs to enable faster queries. In scenario 1, the `user_id` is embedded within a message. To find all logs relating to a particular user\_id, you would have to run a text match. In scenarios 2 and 3, your logs can be filtered against the keys `user_id` and `user_email`. ## Features ### Invocation Logs Each Workers invocation returns a single invocation log that contains details such as the Request, Response, and related metadata. These invocation logs can be identified by the field `$cloudflare.$metadata.type = "cf-worker-event"`. Each invocation log is enriched with information available to Cloudflare in the context of the invocation. In the Workers Logs UI, logs are presented with a localized timestamp and a message. The message is dependent on the invocation handler. For example, Fetch requests will have a message describing the request method and the request URL, while cron events will be listed as cron. Below is a list of invocation handlers along with their invocation message. Invocation logs can be disabled in wrangler by adding the `invocation_logs = false` configuration. * wrangler.jsonc ```jsonc { "observability": { "logs": { "invocation_logs": false } } } ``` * wrangler.toml ```toml [observability.logs] invocation_logs = false ``` | Invocation Handler | Invocation Message | | - | - | | [Alarm](https://developers.cloudflare.com/durable-objects/api/alarms/) | \ | | [Email](https://developers.cloudflare.com/email-routing/email-workers/runtime-api/) | \ | | [Fetch](https://developers.cloudflare.com/workers/runtime-apis/handlers/fetch/) | \ \ | | [Queue](https://developers.cloudflare.com/queues/configuration/javascript-apis/#consumer) | \ | | [Cron](https://developers.cloudflare.com/workers/runtime-apis/handlers/scheduled/) | \ | | [Tail](https://developers.cloudflare.com/workers/runtime-apis/handlers/tail/) | tail | | [RPC](https://developers.cloudflare.com/workers/runtime-apis/rpc/) | \ | | [WebSocket](https://developers.cloudflare.com/workers/examples/websockets/) | \ | ### Custom logs By default a Worker will emit [invocation logs](https://developers.cloudflare.com/workers/observability/logs/workers-logs/#invocation-logs) containing details about the request, response and related metadata. You can also add custom logs throughout your code. Any `console.log` statements within your Worker will be visible in Workers Logs. The following example demonstrates a custom `console.log` within a Worker request handler. * Module Worker ```js export default { async fetch(request) { const { cf } = request; const { city, country } = cf; console.log(`Request came from city: ${city} in country: ${country}`); return new Response("Hello worker!", { headers: { "content-type": "text/plain" }, }); }, }; ``` * Service Worker Service Workers are deprecated Service Workers are deprecated, but still supported. We recommend using [Module Workers](https://developers.cloudflare.com/workers/reference/migrate-to-module-workers/) instead. New features may not be supported for Service Workers. ```js addEventListener("fetch", (event) => { event.respondWith(handleRequest(event.request)); }); /** * Respond with hello worker text * @param {Request} request */ async function handleRequest(request) { const { cf } = request; const { city, country } = cf; console.log(`Request came from city: ${city} in country: ${country}`); return new Response("Hello worker!", { headers: { "content-type": "text/plain" }, }); } ``` After you deploy the code above, view your Worker's logs in [the dashboard](https://developers.cloudflare.com/workers/observability/logs/workers-logs/#view-logs-from-the-dashboard) or with [real-time logs](https://developers.cloudflare.com/workers/observability/logs/real-time-logs/). ### Head-based sampling Head-based sampling allows you to log a percentage of incoming requests to your Cloudflare Worker. Especially for high-traffic applications, this helps reduce log volume and manage costs, while still providing meaningful insights into your application's performance. When you configure a head-based sampling rate, you can control the percentage of requests that get logged. All logs within the context of the request are collected. To enable head-based sampling, set `head_sampling_rate` within the observability configuration. The valid range is from 0 to 1, where 0 indicates zero out of one hundred requests are logged, and 1 indicates every request is logged. If `head_sampling_rate` is unspecified, it is configured to a default value of 1 (100%). In the example below, `head_sampling_rate` is set to 0.01, which means one out of every one hundred requests is logged. * wrangler.jsonc ```jsonc { "observability": { "enabled": true, "head_sampling_rate": 0.01 } } ``` * wrangler.toml ```toml [observability] enabled = true head_sampling_rate = 0.01 # 1% sampling rate ``` ## Limits | Description | Limit | | - | - | | Maximum log retention period | 7 Days | | Maximum logs per account per day1 | 5 Billion | | Maximum log size2 | 256 KB | 1 There is a daily limit of 5 billion logs per account per day. After the limit is exceed, a 1% head-based sample will be applied for the remainder of the day. 2 A single log has a maximum size limit of [256 KB](https://developers.cloudflare.com/workers/platform/limits/#log-size). Logs exceeding that size will be truncated and the log's `$cloudflare.truncated` field will be set to true. ## Pricing Billing start date Workers Logs billing will begin on April 21, 2025. Workers Logs is included in both the Free and Paid [Workers plans](https://developers.cloudflare.com/workers/platform/pricing/). | | Log Events Written | Retention | | - | - | - | | **Workers Free** | 200,000 per day | 3 Days | | **Workers Paid** | 20 million included per month +$0.60 per additional million | 7 Days | ### Examples #### Example 1 A Worker serves 15 million requests per month. Each request emits 1 invocation log and 1 `console.log`. `head_sampling_rate` is configured to 1. | | Monthly Costs | Formula | | - | - | - | | **Logs** | $6.00 | ((15,000,000 requests per month \* 2 logs per request \* 100% sample) - 20,000,000 included logs) / 1,000,000 \* $0.60 | | **Total** | $6.00 | | #### Example 2 A Worker serves 1 billion requests per month. Each request emits 1 invocation log and 1 `console.log`. `head_sampling_rate` is configured to 0.1. | | Monthly Costs | Formula | | - | - | - | | **Logs** | $108.00 | ((1,000,000,000 requests per month \* 2 logs per request \* 10% sample) - 20,000,000 included logs) / 1,000,000 \* $0.60 | | **Total** | $108.00 | | --- title: Sentry · Cloudflare Workers docs description: Connect to a Sentry project from your Worker to automatically send errors and uncaught exceptions to Sentry. lastUpdated: 2025-06-11T18:31:10.000Z chatbotDeprioritize: false source_url: html: https://developers.cloudflare.com/workers/observability/third-party-integrations/sentry/ md: https://developers.cloudflare.com/workers/observability/third-party-integrations/sentry/index.md --- Connect to a Sentry project from your Worker to automatically send errors and uncaught exceptions to Sentry. --- title: Historical changelog · Cloudflare Workers docs description: Review pre-2023 changes to Cloudflare Workers. lastUpdated: 2024-11-07T19:39:45.000Z chatbotDeprioritize: false source_url: html: https://developers.cloudflare.com/workers/platform/changelog/historical-changelog/ md: https://developers.cloudflare.com/workers/platform/changelog/historical-changelog/index.md --- This page tracks changes made to Cloudflare Workers before 2023. For a view of more recent updates, refer to the [current changelog](https://developers.cloudflare.com/workers/platform/changelog/). ## 2022-12-16 * Conditional `PUT` requests have been fixed in the R2 bindings API. ## 2022-12-02 * Queues no longer support calling `send()` with an undefined JavaScript value as the message. ## 2022-11-30 * The DOMException constructor has been updated to align better with the standard specification. Specifically, the message and name arguments can now be any JavaScript value that is coercible into a string (previously, passing non-string values would throw). * Extended the R2 binding API to include support for multipart uploads. ## 2022-11-17 * V8 update: 10.6 → 10.8 ## 2022-11-02 * Implemented `toJSON()` for R2Checksums so that it is usable with `JSON.stringify()`. ## 2022-10-21 * The alarm retry limit will no longer apply to errors that are our fault. * Compatibility dates have been added for multiple flags including the new streams implementation. * `DurableObjectStorage` has a new method `sync()` that provides a way for a Worker to wait for its writes (including those performed with `allowUnconfirmed`) to be synchronized with storage. ## 2022-10-10 * Fixed a bug where if an ES-modules-syntax script exported an array-typed value from the top-level module, the upload API would refuse it with a [`500` error](https://community.cloudflare.com/t/community-tip-fixing-error-500-internal-server-error/44453). * `console.log` now prints more information about certain objects, for example Promises. * The Workers Runtime is now built from the Open Source code in: [GitHub - cloudflare/workerd: The JavaScript / Wasm runtime that powers Cloudflare Workers](https://github.com/cloudflare/workerd). ## 2022-09-16 * R2 `put` bindings options can now have an `onlyIf` field similar to `get` that does a conditional upload. * Allow deleting multiple keys at once in R2 bindings. * Added support for SHA-1, SHA-256, SHA-384, SHA-512 checksums in R2 `put` options. * User-specified object checksums will now be available in the R2 `get/head` bindings response. MD5 is included by default for non-multipart uploaded objects. * Updated V8 to 10.6. ## 2022-08-12 * A `Headers` object with the `range` header can now be used for range within `R2GetOptions` for the `get` R2 binding. * When headers are used for `onlyIf` within `R2GetOptions` for the `get` R2 binding, they now correctly compare against the second granularity. This allows correctly round-tripping to the browser and back. Additionally, `secondsGranularity` is now an option that can be passed into options constructed by hand to specify this when constructing outside Headers for the same effect. * Fixed the TypeScript type of `DurableObjectState.id` in [@cloudflare/workers-types](https://github.com/cloudflare/workers-types) to always be a `DurableObjectId`. * Validation errors during Worker upload for module scripts now include correct line and column numbers. * Bugfix, Profiling tools and flame graphs via Chrome’s debug tools now properly report information. ## 2022-07-08 * Workers Usage Report and Workers Weekly Summary have been disabled due to scaling issues with the service. ## 2022-06-24 * `wrangler dev` in global network preview mode now supports scheduling alarms. * R2 GET requests made with the `range` option now contain the returned range in the `GetObject`’s `range` parameter. * Some Web Cryptography API error messages include more information now. * Updated V8 from 10.2 to 10.3. ## 2022-06-18 * Cron trigger events on Worker scripts using the old `addEventListener` syntax are now treated as failing if there is no event listener registered for `scheduled` events. * The `durable_object_alarms` flag no longer needs to be explicitly provided to use DO alarms. ## 2022-06-09 * No externally-visible changes. ## 2022-06-03 * It is now possible to create standard `TransformStream` instances that can perform transformations on the data. Because this changes the behavior of the default `new TransformStream()` with no arguments, the `transformstream_enable_standard_constructor` compatibility flag is required to enable. * Preview in Quick Edit now correctly uses the correct R2 bindings. * Updated V8 from 10.1 to 10.2. ## 2022-05-26 * The static `Response.json()` method can be used to initialize a Response object with a JSON-serialized payload (refer to [whatwg/fetch #1392](https://github.com/whatwg/fetch/pull/1392)). * R2 exceptions being thrown now have the `error` code appended in the message in parenthesis. This is a stop-gap until we are able to explicitly add the code property on the thrown `Error` object. ## 2022-05-19 * R2 bindings: `contentEncoding`, `contentLanguage`, and `cacheControl` are now correctly rendered. * ReadableStream `pipeTo` and `pipeThrough` now support cancellation using `AbortSignal`. * Calling `setAlarm()` in a DO with no `alarm()` handler implemented will now throw instead of failing silently. Calling `getAlarm()` when no `alarm()` handler is currently implemented will return null, even if an alarm was previously set on an old version of the DO class, as no execution will take place. * R2: Better runtime support for additional ranges. * R2 bindings now support ranges that have an `offset` and an optional `length`, a `length` and an optional `offset`, or a `suffix` (returns the last `N` bytes of a file). ## 2022-05-12 * Fix R2 bindings saving cache-control under content-language and rendering cache-control under content-language. * Fix R2 bindings list without options to use the default list limit instead of never returning any results. * Fix R2 bindings which did not correctly handle error messages from R2, resulting in `internal error` being thrown. Also fix behavior for get throwing an exception on a non-existent key instead of returning null. `R2Error` is removed for the time being and will be reinstated at some future time TBD. * R2 bindings: if the onlyIf condition results in a precondition failure or a not modified result, the object is returned without a body instead of returning null. * R2 bindings: sha1 is removed as an option because it was not actually hooked up to anything. TBD on additional checksum options beyond md5. * Added `startAfter` option to the `list()` method in the Durable Object storage API. ## 2022-05-05 * `Response.redirect(url)` will no longer coalesce multiple consecutive slash characters appearing in the URL’s path. * Fix generated types for Date. * Fix R2 bindings list without options to use the default list limit instead of never returning any results. * Fix R2 bindings did not correctly handle error messages from R2, resulting in internal error being thrown. Also fix behavior for get throwing an exception on a non-existent key instead of returning null. `R2Error` is removed for the time being and will be reinstated at some future time TBD. ## 2022-04-29 * Minor V8 update: 10.0 → 10.1. * R2 public beta bindings are the default regardless of compat date or flags. Internal beta bindings customers should transition to public beta bindings as soon as possible. A back compatibility flag is available if this is not immediately possible. After some lag, new scripts carrying the `r2_public_beta_bindings` compatibility flag will stop accepting to be published until that flag is removed. ## 2022-04-22 * Major V8 update: 9.9 → 10.0. ## 2022-04-14 * Performance and stability improvements. ## 2022-04-08 * The AES-GCM implementation that is part of the Web Cryptography API now returns a friendlier error explaining that 0-length IVs are not allowed. * R2 error responses now include better details. ## 2022-03-24 * A new compatibility flag has been introduced, `minimal_subrequests` , which removes some features that were unintentionally being applied to same-zone `fetch()` calls. The flag will default to enabled on Tuesday, 2022-04-05, and is described in [Workers `minimal_subrequests` compatibility flag](https://developers.cloudflare.com/workers/configuration/compatibility-flags/#minimal-subrequests). * When creating a `Response` with JavaScript-backed ReadableStreams, the `Body` mixin functions (e.g. `await response.text()` ) are now implemented. * The `IdentityTransformStream` creates a byte-oriented `TransformStream` implementation that simply passes bytes through unmodified. The readable half of the `TransformStream` supports BYOB-reads. It is important to note that `IdentityTransformStream` is identical to the current non-spec compliant `TransformStream` implementation, which will be updated soon to conform to the WHATWG Stream Standard. All current uses of `new TransformStream()` should be replaced with `new IdentityTransformStream()` to avoid potentially breaking changes later. ## 2022-03-17 * The standard [ByteLengthQueuingStrategy](https://developer.mozilla.org/en-US/docs/Web/API/ByteLengthQueuingStrategy) and [CountQueuingStrategy](https://developer.mozilla.org/en-US/docs/Web/API/CountQueuingStrategy) classes are now available. * When the `capture_async_api_throws` flag is set, built-in Cloudflare-specific and Web Platform Standard APIs that return Promises will no longer throw errors synchronously and will instead return rejected promises. Exception is given with fatal errors such as out of memory errors. * Fix R2 publish date rendering. * Fix R2 bucket binding .get populating contentRange with garbage. contentRange is now undefined as intended. * When using JavaScript-backed `ReadableStream`, it is now possible to use those streams with `new Response()`. ## 2022-03-11 * Fixed a bug where the key size was not counted when determining how many write units to charge for a Durable Object single-key `put()`. This may result in future writes costing one write unit more than past writes when the key is large enough to bump the total write size up above the next billing unit threshold of 4096 bytes. Multi-key `put()` operations have always properly counted the key size when determining billable write units. * Implementations of `CompressionStream` and `DecompressionStream` are now available. ## 2022-03-04 * Initial pipeTo/pipeThrough support on ReadableStreams constructed using the new `ReadableStream()` constructor is now available. * With the `global_navigator` compatibility flag set, the `navigator.userAgent` property can be used to detect when code is running within the Workers environment. * A bug in the new URL implementation was fixed when setting the value of a `URLSearchParam`. * The global `addEventListener` and dispatchEvent APIs are now available when using module syntax. * An implementation of `URLPattern` is now available. ## 2022-02-25 * The `TextDecoder` class now supports the full range of text encodings defined by the WHATWG Encoding Standard. * Both global `fetch()` and durable object `fetch()` now throw a TypeError when they receive a WebSocket in response to a request without the “Upgrade: websocket” header. * Durable Objects users may now store up to 50 GB of data across the objects in their account by default. As before, if you need more storage than that you can contact us for an increase. ## 2022-02-18 * `TextDecoder` now supports Windows-1252 labels (aka ASCII): [Encoding API Encodings - Web APIs | MDN](https://developer.mozilla.org/en-US/docs/Web/API/Encoding_API/Encodings). ## 2022-02-11 * WebSocket message sends were erroneously not respecting Durable Object output gates as described in the [I/O gate blog post](https://blog.cloudflare.com/durable-objects-easy-fast-correct-choose-three/). That bug has now been fixed, meaning that WebSockets will now never send a message under the assumption that a storage write has succeeded unless that write actually has succeeded. ## 2022-02-05 * Fixed bug causing WebSockets to Durable Objects to occasionally hang when the script implementing both a Worker and a Durable Object is re-deployed with new code. * `crypto.getRandomValues` now supports BigInt64Array and BigUint64Array. * A new implementation of the standard URL implementation is available. Use `url_standard` feature flag to enable the spec-compliant URL API implementation. ## 2022-01-28 * No user-visible changes. ## 2022-01-20 * Updated V8: 9.7 → 9.8. ## 2022-01-17 * `HTMLRewriter` now supports inspecting and modifying end tags, not just start tags. * Fixed bug where Durable Objects experiencing a transient CPU overload condition would cause in-progress requests to be unable to return a response (appearing as an indefinite hang from the client side), even after the overload condition clears. ## 2022-01-07 * The `workers_api_getters_setters_on_prototype` configuration flag corrects the way Workers attaches property getters and setters to API objects so that they can be properly subclassed. ## 2021-12-22 * Async iteration (using `for` and `await`) on instances of `ReadableStream` is now available. ## 2021-12-10 * Raised the max value size in Durable Object storage from 32 KiB to 128 KiB. * `AbortSignal.timeout(delay)` returns an `AbortSignal` that will be triggered after the given number of milliseconds. * Preview implementations of the new `ReadableStream` and new `WritableStream` constructors are available behind the `streams_enable_constructors` feature flag. * `crypto.DigestStream` is a non-standard extension to the crypto API that supports generating a hash digest from streaming data. The `DigestStream` itself is a `WritableStream` that does not retain the data written into it; instead, it generates a digest hash automatically when the flow of data has ended. The same hash algorithms supported by `crypto.subtle.digest()` are supported by the `crypto.DigestStream`. * Added early support for the `scheduler.wait()` API, which is [going through the WICG standardization process](https://github.com/WICG/scheduling-apis), to provide an `await`-able alternative to `setTimeout()`. * Fixed bug in `deleteAll` in Durable Objects containing more than 10000 keys that could sometimes cause incomplete data deletion and/or hangs. ## 2021-12-02 * The Streams spec requires that methods returning promises must not throw synchronous errors. As part of the effort of making the Streams implementation more spec compliant, we are converting a number of sync throws to async rejections. * Major V8 update: 9.6 → 9.7. See [V8 release v9.7 · V8](https://v8.dev/blog/v8-release-97) for more details. ## 2021-11-19 * Durable Object stubs that receive an overload exception will be permanently broken to match the behavior of other exception types. * Fixed issue where preview service claimed Let’s Encrypt certificates were expired. * [`structuredClone()`](https://developer.mozilla.org/en-US/docs/Web/API/structuredClone) is now supported. ## 2021-11-12 * The `AbortSignal` object has a new `reason` property indicating the reason for the cancellation. The reason can be specified when the `AbortSignal` is triggered or created. * Unhandled rejection warnings will be printed to the inspector console. ## 2021-11-05 * Upgrade to V8 9.6. This adds support for WebAssembly reference types. Refer to the [V8 release v9.6 · V8](https://v8.dev/blog/v8-release-96) for more details. * Streams: When using the BYOB reader, the `ArrayBuffer` of the provided TypedArray should be detached, per the Streams spec. Because Workers was not previously enforcing that rule, and changing to comply with the spec could breaking existing code, a new compatibility flag, [streams\_byob\_reader\_detaches\_buffer](https://github.com/cloudflare/cloudflare-docs/pull/2644), has been introduced that will be enabled by default on 2021-11-10. User code should never try to reuse an `ArrayBuffer` that has been passed in to a BYOB readers `read()` method. The more recently added extension method `readAtLeast()` will always detach the `ArrayBuffer` and is unaffected by the compatibility flag setting. ## 2021-10-21 * Added support for the `signal` option in `EventTarget.addEventListener()`, to remove an event listener in response to an `AbortSignal`. * The `unhandledrejection` and `rejectionhandled` events are now supported. * The `ReadableStreamDefaultReader` and `ReadableStreamBYOBReader` constructors are now supported. * Added non-standard `ReadableStreamBYOBReader` method `.readAtLeast(size, buffer)` that can be used to return a buffer with at least `size` bytes. The `buffer` parameter must be an `ArrayBufferView`. Behavior is identical to `.read()` except that at least `size` bytes are read, only returning fewer if EOF is encountered. One final call to `.readAtLeast()` is still needed to get back a `done = true` value. * The compatibility flags `formdata_parser_supports_files`, `fetch_refuses_unknown_protocols`, and `durable_object_fetch_requires_full_url` have been scheduled to be turned on by default as of 2021-11-03, 2021-11-10, and 2021-11-10, respectively. For more details, refer to [Compatibility Dates](https://developers.cloudflare.com/workers/configuration/compatibility-dates/) ## 2021-10-14 * `request.signal` will always return an `AbortSignal`. * Cloudflare Workers’ integration with Chrome DevTools profiling now more accurately reports the line numbers and time elapsed. Previously, the line numbers were shown as one line later then the actual code, and the time shown would be proportional but much longer than the actual time used. * Upgrade to v8 9.5. Refer to [V8 release v9.5 · V8](https://v8.dev/blog/v8-release-95) for more details. ## 2021-09-24 * The `AbortController` and `AbortSignal` objects are now available. * The Web Platform `queueMicrotask` API is now available. * It is now possible to use new `EventTarget()` and to create custom `EventTarget` subclasses. * The `once` option is now supported on `addEventTarget` to register event handlers that will be invoked only once. * Per the HTML specification, a listener passed in to the `addEventListener` function is allowed to either be a function or an object with a `handleEvent` member function. Previously, Workers only supported the function option, now it supports both. * The `Event` object now supports most standard methods and properties. * V8 updated from 9.3 to 9.4. ## 2021-09-03 * The `crypto.randomUUID()` method can be used to generate a new random version 4 UUID. * Durable Objects are now scheduled more evenly around a colocation (colo). ## 2021-08-05 * No user-facing changes. Just bug fixes & internal maintenance. ## 2021-07-30 * Fixed a hang in Durable Objects when reading more than 16MB of data at once (for example, with a large `list()` operation). * Added a new compatibility flag `html_rewriter_treats_esi_include_as_void_tag` which causes `HTMLRewriter` to treat `` and `` as void tags, such that they are considered to have neither an end tag nor nested content. To opt a worker into the new behavior, you must use Wrangler v1.19.0 or newer and specify the flag in `wrangler.toml`. Refer to the [Wrangler compatibility flag notes](https://github.com/cloudflare/wrangler-legacy/pull/2009) for details. ## 2021-07-23 * Performance and stability improvements. ## 2021-07-16 * Workers can now make up to 1000 subrequests to Durable Objects from a within a single request invocation, up from the prior limit of 50. * Major changes to Durable Objects implementation, the details of which will be the subject of an upcoming blog post. In theory, the changes should not harm existing apps, except to make them faster. Let your account team know if you observe anything unusual or report your issue in the [Workers Discord](https://discord.cloudflare.com). * Durable Object constructors may now initiate I/O, such as `fetch()` calls. * Added Durable Objects `state.blockConcurrencyWhile()` API useful for delaying delivery of requests and other events while performing some critical state-affecting task. For example, this can be used to perform start-up initialization in an object’s constructor. * In Durable Objects, the callback passed to `storage.transaction()` can now return a value, which will be propagated as the return value of the `transaction()` call. ## 2021-07-13 * The preview service now prints a warning in the devtools console when a script uses `Response/Request.clone()` but does not read one of the cloned bodies. Such a situation forces the runtime to buffer the entire message body in memory, which reduces performance. [Find an example here](https://cloudflareworkers.com/#823fbe463bfafd5a06bcfeabbdf5eeae:https://tutorial.cloudflareworkers.com). ## 2021-07-01 * Fixed bug where registering the same exact event listener method twice on the same event type threw an internal error. * Add support for the `.forEach()` method for `Headers`, `URLSearchParameters`, and `FormData`. ## 2021-06-27 * WebCrypto: Implemented non-standard Ed25519 operation (algorithm NODE-ED25519, curve name NODE-ED25519). The Ed25519 implementation differs from NodeJS’s in that raw import/export of private keys is disallowed, per parity with ECDSA/ECDH. ## 2021-06-17 Changes this week: * Updated V8 from 9.1 to 9.2. * `wrangler tail` now works on Durable Objects. Note that logs from long-lived WebSockets will not be visible until the WebSocket is closed. ## 2021-06-11 Changes this week: * Turn on V8 Sparkplug compiler. * Durable Objects that are finishing up existing requests after their code is updated will be disconnected from the persistent storage API, to maintain the invariant that only a single instance ever has access to persistent storage for a given Durable Object. ## 2021-06-04 Changes this week: * WebCrypto: We now support the “raw” import/export format for ECDSA/ECDH public keys. * `request.cf` is no longer missing when writing Workers using modules syntax. ## 2021-05-14 Changes this week: * Improve error messages coming from the WebCrypto API. * Updated V8: 9.0 → 9.1 Changes in an earlier release: * WebCrypto: Implement JWK export for RSA, ECDSA, & ECDH. * WebCrypto: Add support for RSA-OAEP * WebCrypto: HKDF implemented. * Fix recently-introduced backwards clock jumps in Durable Objects. * `WebCrypto.generateKey()`, when asked to generate a key pair with algorithm RSA-PSS, would instead return a key pair using algorithm RSASSA-PKCS1-v1\_5. Although the key structure is the same, the signature algorithms differ, and therefore, signatures generated using the key would not be accepted by a correct implementation of RSA-PSS, and vice versa. Since this would be a pretty obvious problem, but no one ever reported it to us, we guess that currently, no one is using this functionality on Workers. ## 2021-04-29 Changes this week: * WebCrypto: Implemented `wrapKey()` / `unwrapKey()` for AES algorithms. * The arguments to `WebSocket.close()` are now optional, as the standard says they should be. ## 2021-04-23 Changes this week: * In the WebCrypto API, encrypt and decrypt operations are now supported for the “AES-CTR” encryption algorithm. * For Durable Objects, CPU time limits are now enforced on the object level rather than the request level. Each time a new request arrives, the time limit is “topped up” to 500ms. After the (free) beta period ends and Durable Objects becomes generally available, we will increase this to 30 seconds. * When a Durable Object exceeds its CPU time limit, the entire object will be discarded and recreated. Previously, we allowed subrequest requests to continue using the same object, but this was dangerous because hitting the CPU time limit can leave the object in an inconsistent state. * Long running Durable Objects are given more subrequest quota as additional WebSocket messages are sent to them, to avoid the problem of a long-running Object being unable to make any more subrequests after it has been held open by a particular WebSocket for a while. * When a Durable Object’s code is updated, or when its isolate is reset due to exceeding the memory limit, all stubs pointing to the object will become invalidated and have to be recreated. This is consistent with what happens when the CPU time is exceeded, or when stubs become disconnected due to random network errors. This behavior is useful, as apps can now assume that two messages sent to the same stub will be delivered to exactly the same live instance (if they are delivered at all). Apps which do not care about this property should recreate their stubs for every request; there is no performance penalty from doing so. * When a Durable Object’s isolate exceeds its memory limit, an exception with an explanatory message will now be thrown to the caller, instead of “internal error”. * When a Durable Object exceeds its CPU time limit, an exception with an explanatory message will now be thrown to the caller, instead of “internal error”. * `wrangler tail` now reports CPU-time-exceeded exceptions with an explanatory message instead of “internal error”. ## 2021-04-19 Changes since the last post on 3/26: * Cron Triggers now have a 15 minute wall time limit, in addition to the existing CPU time limit. (Previously, there was no limit, so a cron trigger that spent all its time waiting for I/O could hang forever.) * Our WebCrypto implementation now supports importing and exporting HMAC and AES keys in JWK format. * Our WebCrypto implementation now supports AES key generation for CTR, CBC, and KW modes. AES-CTR encrypt/decrypt and AES-KW key wrapping/unwrapping support will land in a later release. * Fixed bug where `crypto.subtle.encrypt()` on zero-length inputs would sometimes throw an exception. * Errors on script upload will now be properly reported for module-based scripts, instead of appearing as a ReferenceError. * WebCrypto: Key derivation for ECDH. * WebCrypto: Support ECDH key generation & import. * WebCrypto: Support ECDSA key generation. * Fixed bug where `crypto.subtle.encrypt()` on zero-length inputs would sometimes throw an exception. * Improved exception messages thrown by the WebCrypto API somewhat. * `waitUntil` is now supported for module Workers. An additional argument called ‘ctx’ is passed after ‘env’, and `waitUntil` is a method on ‘ctx’. * `passThroughOnException` is now available under the ctx argument to module handlers * Reliability improvements for Durable Objects * Reliability improvements for Durable Objects persistent storage API * `ScheduledEvent.cron` is now set to the original cron string that the event was scheduled for. ## 2021-03-26 Changes this week: * Existing WebSocket connections to Durable Objects will now be forcibly disconnected on code updates, in order to force clients to connect to the instance running the new code. ## 2021-03-11 New this week: * When the Workers Runtime itself reloads due to us deploying a new version or config change, we now preload high-traffic Workers in the new instance of the runtime before traffic cuts over. This ensures that users do not observe cold starts for these Workers due to the upgrade, and also fixes a low rate of spurious 503 errors that we had previously been seeing due to overload during such reloads. (It looks like no release notes were posted the last few weeks, but there were no new user-visible changes to report.) ## 2021-02-11 Changes this week: * In the preview mode of the dashboard, a Worker that fails during startup will now return a 500 response, rather than getting the default passthrough behavior, which was making it harder to notice when a Worker was failing. * A Durable Object’s ID is now provided to it in its constructor. It can be accessed off of the `state` provided as the constructor’s first argument, as in `state.id`. ## 2021-02-05 New this week: * V8 has been updated from 8.8 to 8.9. * During a `fetch()`, if the destination server commits certain HTTP protocol errors, such as returning invalid (unparsable) headers, we now throw an exception whose description explains the problem, rather than an “internal error”. New last week (forgot to post): * Added support for `waitUntil()` in Durable Objects. It is a method on the state object passed to the Durable Object class’s constructor. ## 2021-01-22 New in the past week: * Fixed a bug which caused scripts with WebAssembly modules to hang when using devtools in the preview service. ## 2021-01-14 Changes this week: * Implemented File and Blob APIs, which can be used when constructing FormData in outgoing requests. Unfortunately, FormData from incoming requests at this time will still use strings even when file metadata was present, in order to avoid breaking existing deployed Workers. We will find a way to fix that in the future. ## 2021-01-07 Changes this week: * No user-visible changes. Changes in the prior release: * Fixed delivery of WebSocket “error” events. * Fixed a rare bug where a WritableStream could be garbage collected while it still had writes queued, causing those writes to be lost. ## 2020-12-10 Changes this week: * Major V8 update: 8.7.220.29 -> 8.8.278.8 ## 2019-09-19 Changes this week: * Unannounced new feature. (Stay tuned.) * Enforced new limit on concurrent subrequests (see below). * Stability improvements. **Concurrent Subrequest Limit** As of this release, we impose a limit on the number of outgoing HTTP requests that a Worker can make simultaneously. **For each incoming request**, a Worker can make up to 6 concurrent outgoing `fetch()` requests. If a Worker’s request handler attempts to call `fetch()` more than six times (on behalf of a single incoming request) without waiting for previous fetches to complete, then fetches after the sixth will be delayed until previous fetches have finished. A Worker is still allowed to make up to 50 total subrequests per incoming request, as before; the new limit is only on how many can execute simultaneously. **Automatic deadlock avoidance** Our implementation automatically detects if delaying a fetch would cause the Worker to deadlock, and prevents the deadlock by cancelling the least-recently-used request. For example, imagine a Worker that starts 10 requests and waits to receive all the responses without reading the response bodies. A fetch is not considered complete until the response body is fully-consumed (for example, by calling `response.text()` or `response.json()`, or by reading from `response.body`). Therefore, in this scenario, the first six requests will run and their response objects would be returned, but the remaining four requests would not start until the earlier responses are consumed. If the Worker fails to actually read the earlier response bodies and is still waiting for the last four requests, then the Workers Runtime will automatically cancel the first four requests so that the remaining ones can complete. If the Worker later goes back and tries to read the response bodies, exceptions will be thrown. **Most Workers are Not Affected** The vast majority of Workers make fewer than six outgoing requests per incoming request. Such Workers are totally unaffected by this change. Of Workers that do make more than six outgoing requests concurrently for a single incoming request, the vast majority either read the response bodies immediately upon each response returning, or never read the response bodies at all. In either case, these Workers will still work as intended – although they may be a little slower due to outgoing requests after the sixth being delayed. A very small number of deployed Workers (about 20 total) make more than 6 requests concurrently, wait for all responses to return, and then go back to read the response bodies later. For all known Workers that do this, we have temporarily grandfathered your zone into the old behavior, so that your Workers will continue to operate. However, we will be communicating with customers one-by-one to request that you update your code to proactively read request bodies, so that it works correctly under the new limit. **Why did we do this?** Cloudflare communicates with origin servers using HTTP/1.1, not HTTP/2. Under HTTP/1.1, each concurrent request requires a separate connection. So, Workers that make many requests concurrently could force the creation of an excessive number of connections to origin servers. In some cases, this caused resource exhaustion problems either at the origin server or within our own stack. On investigating the use cases for such Workers, every case we looked at turned out to be a mistake or otherwise unnecessary. Often, developers were making requests and receiving responses, but they only cared about the response status and headers but not the body. So, they threw away the response objects without reading the body, essentially leaking connections. In some other cases, developers had simply accidentally written code that made excessive requests in a loop for no good reason at all. Both of these cases should now cause no problems under the new behavior. We chose the limit of 6 concurrent connections based on the fact that Chrome enforces the same limit on web sites in the browser. ## 2020-12-04 Changes this week: * Durable Objects storage API now supports listing keys by prefix. * Improved error message when a single request performs more than 1000 KV operations to make clear that a per-request limit was reached, not a global rate limit. * `wrangler dev` previews should now honor non-default resource limits, for example, longer CPU limits for those in the Workers Unbound beta. * Fixed off-by-one line numbers in Worker exceptions. * Exceptions thrown in a Durable Object’s `fetch()` method are now tunneled to its caller. * Fixed a bug where a large Durable Object response body could cause the Durable Object to become unresponsive. ## 2020-11-13 Changes over the past week: * `ReadableStream.cancel()` and `ReadableStream.getReader().cancel()` now take an optional, instead of a mandatory, argument, to conform with the Streams spec. * Fixed an error that occurred when a WASM module declared that it wanted to grow larger than 128MB. Instead, the actual memory usage of the module is monitored and an error is thrown if it exceeds 128MB used. ## 2020-11-05 Changes this week: * Major V8 update: 8.6 -> 8.7 * Limit the maximum number of Durable Objects keys that can be changed in a single transaction to 128. ## 2020-10-05 We had our usual weekly release last week, but: * No user-visible changes. ## 2020-09-24 Changes this week: * Internal changes to support upcoming features. Also, a change from the 2020-09-08 release that it seems we forgot to post: * V8 major update: 8.5 -> 8.6 ## 2020-08-03 Changes last week: * Fixed a regression which could cause `HTMLRewriter.transform()` to throw spurious “The parser has stopped.” errors. * Upgraded V8 from 8.4 to 8.5. ## 2020-07-09 Changes this week: * Fixed a regression in HTMLRewriter: * Common HTTP method names passed to `fetch()` or `new Request()` are now case-insensitive as required by the Fetch API spec. Changes last week (… forgot to post): * `setTimeout`/`setInterval` can now take additional arguments which will be passed on to the callback, as required by the spec. (Few people use this feature today because it’s usually much easier to use lambda captures.) Changes the week before last (… also… forgot to post… we really need to code up a bot for this): * The HTMLRewriter now supports the `:nth-child` , `:first-child` , `:nth-of-type` , and `:first-of-type` selectors. ## 2020-05-15 Changes this week: * Implemented API for yet-to-be-announced new feature. ## 2020-04-20 Looks like we forgot to post release notes for a couple weeks. Releases still are happening weekly as always, but the “post to the community” step is insufficiently automated… 4/2 release: * Fixed a source of long garbage collection paused in memory limit enforcement. 4/9 release: * No publicly-visible changes. 4/16 release: * In preview, we now log a warning when attempting to construct a `Request` or `Response` whose body is of type `FormData` but with the `Content-Type` header overridden. Such bodies would not be parseable by the receiver. ## 2020-03-26 New this week: * Certain “internal errors” that could be thrown when using the Cache API are now reported with human-friendly error messages. For example, `caches.default.match("not a URL")` now throws a TypeError. ## 2020-02-28 New from the past two weeks: * Fixed a bug in the preview service where the CPU time limiter was overly lenient for the first several requests handled by a newly-started worker. The same bug actually exists in production as well, but we are much more cautious about fixing it there, since doing so might break live sites. If you find your worker now exceeds CPU time limits in preview, then it is likely exceeding time limits in production as well, but only appearing to work because the limits are too lenient for the first few requests. Such Workers will eventually fail in production, too (and always have), so it is best to fix the problem in preview before deploying. * Major V8 update: 8.0 -> 8.1 * Minor bug fixes. ## 2020-02-13 Changes over the last couple weeks: * Fixed a bug where if two differently-named scripts within the same account had identical content and were deployed to the same zone, they would be treated as the “same Worker”, meaning they would share the same isolate and global variables. This only applied between Workers on the same zone, so was not a security threat, but it caused confusion. Now, two differently-named Worker scripts will never be considered the same Worker even if they have identical content. * Performance and stability improvements. ## 2020-01-24 It has been a while since we posted release notes, partly due to the holidays. Here is what is new over the past month: * Performance and stability improvements. * A rare source of `daemonDown` errors when processing bursty traffic over HTTP/2 has been eliminated. * Updated V8 7.9 -> 8.0. ## 2019-12-12 New this week: * We now pass correct line and column numbers more often when reporting exceptions to the V8 inspector. There remain some cases where the reported line and column numbers will be wrong. * Fixed a significant source of daemonDown (1105) errors. ## 2019-12-06 Runtime release notes covering the past few weeks: * Increased total per-request `Cache.put()` limit to 5GiB. * Increased individual `Cache.put()` limits to the lesser of 5GiB or the zone’s normal [cache limits](https://developers.cloudflare.com/cache/concepts/default-cache-behavior/). * Added a helpful error message explaining AES decryption failures. * Some overload errors were erroneously being reported as daemonDown (1105) errors. They have been changed to exceededCpu (1102) errors, which better describes their cause. * More “internal errors” were converted to useful user-facing errors. * Stability improvements and bug fixes. --- title: Changelog · Cloudflare Workers docs description: Review recent changes to the Cloudflare Developer Platform. lastUpdated: 2025-02-13T19:35:19.000Z chatbotDeprioritize: true source_url: html: https://developers.cloudflare.com/workers/platform/changelog/platform/ md: https://developers.cloudflare.com/workers/platform/changelog/platform/index.md --- --- title: Migrate from Pages to Workers · Cloudflare Workers docs description: A guide for migrating from Cloudflare Pages to Cloudflare Workers. Includes a compatibility matrix for comparing the features of Cloudflare Workers and Pages. lastUpdated: 2025-07-01T16:58:44.000Z chatbotDeprioritize: false source_url: html: https://developers.cloudflare.com/workers/static-assets/migration-guides/migrate-from-pages/ md: https://developers.cloudflare.com/workers/static-assets/migration-guides/migrate-from-pages/index.md --- You can deploy full-stack applications, including front-end static assets and back-end APIs, as well as server-side rendered pages (SSR), with [Cloudflare Workers](https://developers.cloudflare.com/workers/static-assets/). Like Pages, requests for static assets on Workers are free, and Pages Functions invocations are charged at the same rate as Workers, so you can expect [a similar cost structure](https://developers.cloudflare.com/workers/platform/pricing/#workers). Unlike Pages, Workers has a distinctly broader set of features available to it, (including Durable Objects, Cron Triggers, and more comprehensive Observability). A complete list can be found at [the bottom of this page](#compatibility-matrix). Workers will receive the focus of Cloudflare's development efforts going forwards, so we therefore [are recommending using Cloudflare Workers over Cloudflare Pages for any new projects](http://blog.cloudflare.com/full-stack-development-on-cloudflare-workers). ## Migration Migrating from Cloudflare Pages to Cloudflare Workers is often a straightforward process. The following are some of the most common steps you will need to take to migrate your project. ### Frameworks If your Pages project uses [a popular framework](https://developers.cloudflare.com/workers/framework-guides/), most frameworks already have adapters available for Cloudflare Workers. Switch out any Pages-specific adapters for the Workers equivalent and follow any guidance that they provide. ### Project configuration If your project doesn't already have one, create a [Wrangler configuration file](https://developers.cloudflare.com/workers/wrangler/configuration/) (either `wrangler.jsonc`, `wrangler.json` or `wrangler.toml`) in the root of your project. The two mandatory fields are: * [`name`](https://developers.cloudflare.com/workers/wrangler/configuration/#inheritable-keys) Set this to the name of the Worker you wish to deploy to. This can be the same as your existing Pages project name, so long as it conforms to Workers' name restrictions (e.g. max length). * [`compatibility_date`](https://developers.cloudflare.com/workers/configuration/compatibility-dates/). If you were already using [Pages Functions](https://developers.cloudflare.com/pages/functions/wrangler-configuration/#inheritable-keys), set this to the same date configured there. Otherwise, set it to the current date. #### Build output directory Where you previously would configure a "build output directory" for Pages (in either a [Wrangler configuration file](https://developers.cloudflare.com/pages/functions/wrangler-configuration/#inheritable-keys) or in [the Cloudflare dashboard](https://developers.cloudflare.com/pages/configuration/build-configuration/#build-commands-and-directories)), you must now set the [`assets.directory`](https://developers.cloudflare.com/workers/static-assets/binding/#directory) value for a Worker project. Before, with **Cloudflare Pages**: * wrangler.jsonc ```jsonc { "name": "my-pages-project", "pages_build_output_dir": "./dist/client/" } ``` * wrangler.toml ```toml name = "my-pages-project" pages_build_output_dir = "./dist/client/" ``` Now, with **Cloudflare Workers**: * wrangler.jsonc ```jsonc { "name": "my-worker", "compatibility_date": "2025-04-01", "assets": { "directory": "./dist/client/" } } ``` * wrangler.toml ```toml name = "my-worker" compatibility_date = "2025-04-01" [assets] directory = "./dist/client/" ``` #### Serving behavior Pages would automatically attempt to determine the type of project you deployed. It would look for `404.html` and `index.html` files as signals for whether the project was likely a [Single Page Application (SPA)](https://developers.cloudflare.com/pages/configuration/serving-pages/#single-page-application-spa-rendering) or if it should [serve custom 404 pages](https://developers.cloudflare.com/pages/configuration/serving-pages/#not-found-behavior). In Workers, to prevent accidental misconfiguration, this behavior is explicit and [must be set up manually](https://developers.cloudflare.com/workers/static-assets/routing/). For a Single Page Application (SPA): * wrangler.jsonc ```jsonc { "name": "my-worker", "compatibility_date": "2025-04-01", "assets": { "directory": "./dist/client/", "not_found_handling": "single-page-application" } } ``` * wrangler.toml ```toml name = "my-worker" compatibility_date = "2025-04-01" [assets] directory = "./dist/client/" not_found_handling = "single-page-application" ``` For custom 404 pages: * wrangler.jsonc ```jsonc { "name": "my-worker", "compatibility_date": "2025-04-01", "assets": { "directory": "./dist/client/", "not_found_handling": "404-page" } } ``` * wrangler.toml ```toml name = "my-worker" compatibility_date = "2025-04-01" [assets] directory = "./dist/client/" not_found_handling = "404-page" ``` ##### Ignoring assets Pages would automatically exclude some files and folders from being uploaded as static assets such as `node_modules`, `.DS_Store`, and `.git`. If you wish to also avoid uploading these files to Workers, you can create an [`.assetsignore` file](https://developers.cloudflare.com/workers/static-assets/binding/#ignoring-assets) in your project's static asset directory. ```txt **/node_modules **/.DS_Store **/.git ``` #### Pages Functions ##### Full-stack framework If you use a full-stack framework powered by Pages Functions, ensure you have [updated your framework](#frameworks) to target Workers instead of Pages. ##### Pages Functions with an "advanced mode" `_worker.js` file If you use Pages Functions with an ["advanced mode" `_worker.js` file](https://developers.cloudflare.com/pages/functions/advanced-mode/), you must first ensure this script doesn't get uploaded as a static asset. Either move `_worker.js` out of the static asset directory (recommended), or create [an `.assetsignore` file](https://developers.cloudflare.com/workers/static-assets/binding/#ignoring-assets) in the static asset directory and include `_worker.js` within it. ```txt _worker.js ``` Then, update your configuration file's `main` field to point to the location of this Worker script: * wrangler.jsonc ```jsonc { "name": "my-worker", "compatibility_date": "2025-04-01", "main": "./dist/client/_worker.js", // or some other location if you moved the script out of the static asset directory "assets": { "directory": "./dist/client/" } } ``` * wrangler.toml ```toml name = "my-worker" compatibility_date = "2025-04-01" main = "./dist/client/_worker.js" [assets] directory = "./dist/client/" ``` ##### Pages Functions with a `functions/` folder If you use **Pages Functions with a [folder of `functions/`](https://developers.cloudflare.com/pages/functions/)**, you must first compile these functions into a single Worker script with the [`wrangler pages functions build`](https://developers.cloudflare.com/workers/wrangler/commands/#functions-build) command. * npm ```sh npx wrangler pages functions build --outdir=./dist/worker/ ``` * yarn ```sh yarn wrangler pages functions build --outdir=./dist/worker/ ``` * pnpm ```sh pnpm wrangler pages functions build --outdir=./dist/worker/ ``` Although this command will remain available to you to run at any time, we do recommend considering using another framework if you wish to continue to use file-based routing. [HonoX](https://github.com/honojs/honox) is one popular option. Once the Worker script has been compiled, you can update your configuration file's `main` field to point to the location it was built to: * wrangler.jsonc ```jsonc { "name": "my-worker", "compatibility_date": "2025-04-01", "main": "./dist/worker/index.js", "assets": { "directory": "./dist/client/" } } ``` * wrangler.toml ```toml name = "my-worker" compatibility_date = "2025-04-01" main = "./dist/worker/index.js" [assets] directory = "./dist/client/" ``` ##### `_routes.json` and Pages Functions middleware If you authored [a `_routes.json` file](https://developers.cloudflare.com/pages/functions/routing/#create-a-_routesjson-file) in your Pages project, or used [middleware](https://developers.cloudflare.com/pages/functions/middleware/) in Pages Functions, you must pay close attention to the configuration of your Worker script. Pages would default to serving your Pages Functions ahead of static assets and `_routes.json` and Pages Functions middleware allowed you to customize this behavior. Workers, on the other hand, will default to serving static assets ahead of your Worker script, unless you have configured [`assets.run_worker_first`](https://developers.cloudflare.com/workers/static-assets/routing/worker-script/#run-your-worker-script-first). This option is required if you are, for example, performing any authentication checks or logging requests before serving static assets. * wrangler.jsonc ```jsonc { "name": "my-worker", "compatibility_date": "2025-04-01", "main": "./dist/worker/index.js", "assets": { "directory": "./dist/client/", "run_worker_first": true } } ``` * wrangler.toml ```toml name = "my-worker" compatibility_date = "2025-04-01" main = "./dist/worker/index.js" [assets] directory = "./dist/client/" run_worker_first = true ``` ##### Starting from scratch If you wish to, you can start a new Worker script from scratch and take advantage of all of Wrangler's and the latest runtime features (e.g. [`WorkerEntrypoint`s](https://developers.cloudflare.com/workers/runtime-apis/bindings/service-bindings/rpc/), [TypeScript support](https://developers.cloudflare.com/workers/languages/typescript/), [bundling](https://developers.cloudflare.com/workers/wrangler/bundling), etc.): * JavaScript ```js import { WorkerEntrypoint } from "cloudflare:workers"; export default class extends WorkerEntrypoint { async fetch(request) { return new Response("Hello, world!"); } } ``` * TypeScript ```ts import { WorkerEntrypoint } from "cloudflare:workers"; export default class extends WorkerEntrypoint { async fetch(request: Request) { return new Response("Hello, world!"); } } ``` - wrangler.jsonc ```jsonc { "name": "my-worker", "compatibility_date": "2025-04-01", "main": "./worker/index.ts", "assets": { "directory": "./dist/client/" } } ``` - wrangler.toml ```toml name = "my-worker" compatibility_date = "2025-04-01" main = "./worker/index.ts" [assets] directory = "./dist/client/" ``` #### Assets binding Pages automatically provided [an `ASSETS` binding](https://developers.cloudflare.com/pages/functions/api-reference/#envassetsfetch) to access static assets from Pages Functions. In Workers, the name of this binding is customizable and it must be manually configured: * wrangler.jsonc ```jsonc { "name": "my-worker", "compatibility_date": "2025-04-01", "main": "./worker/index.ts", "assets": { "directory": "./dist/client/", "binding": "ASSETS" } } ``` * wrangler.toml ```toml name = "my-worker" compatibility_date = "2025-04-01" main = "./worker/index.ts" [assets] directory = "./dist/client/" binding = "ASSETS" ``` #### Runtime If you had customized [placement](https://developers.cloudflare.com/workers/configuration/smart-placement/), or set a [compatibility date](https://developers.cloudflare.com/workers/configuration/compatibility-dates/) or any [compatibility flags](https://developers.cloudflare.com/workers/configuration/compatibility-flags/) in your Pages project, you can define the same in your Wrangler configuration file: * wrangler.jsonc ```jsonc { "name": "my-worker", "compatibility_date": "2025-04-01", "compatibility_flags": ["nodejs_compat"], "main": "./worker/index.ts", "placement": { "mode": "smart" }, "assets": { "directory": "./dist/client/", "binding": "ASSETS" } } ``` * wrangler.toml ```toml name = "my-worker" compatibility_date = "2025-04-01" compatibility_flags = [ "nodejs_compat" ] main = "./worker/index.ts" [placement] mode = "smart" [assets] directory = "./dist/client/" binding = "ASSETS" ``` ### Variables, secrets and bindings [Variables](https://developers.cloudflare.com/workers/configuration/environment-variables/) and [bindings](https://developers.cloudflare.com/workers/runtime-apis/bindings/) can be set in your [Wrangler configuration file](https://developers.cloudflare.com/workers/wrangler/configuration/) and are made available in your Worker's environment (`env`). [Secrets](https://developers.cloudflare.com/workers/configuration/secrets/) can uploaded with Wrangler or defined in the Cloudflare dashboard for [production](https://developers.cloudflare.com/workers/configuration/secrets/#adding-secrets-to-your-project) and [`.dev.vars` for local development](https://developers.cloudflare.com/workers/configuration/secrets/#local-development-with-secrets). If you are [using Workers Builds](#builds), ensure you also [configure any variables relevant to the build environment there](https://developers.cloudflare.com/workers/ci-cd/builds/configuration/). Unlike Pages, Workers does not share the same set of runtime and build-time variables. ### Wrangler commands Where previously you used [`wrangler pages dev`](https://developers.cloudflare.com/workers/wrangler/commands/#dev-1) and [`wrangler pages deploy`](https://developers.cloudflare.com/workers/wrangler/commands/#deploy-1), now instead use [`wrangler dev`](https://developers.cloudflare.com/workers/wrangler/commands/#dev) and [`wrangler deploy`](https://developers.cloudflare.com/workers/wrangler/commands/#deploy). Additionally, if you are using a Vite-powered framework, [our new Vite plugin](https://developers.cloudflare.com/workers/vite-plugin/) may be able offer you an even simpler development experience. ### Builds If you are using Pages' built-in CI/CD system, you can swap this for Workers Builds by first [connecting your repository to Workers Builds](https://developers.cloudflare.com/workers/ci-cd/builds/#get-started) and then [disabling automatic deployments on your Pages project](https://developers.cloudflare.com/pages/configuration/git-integration/#disable-automatic-deployments). ### Preview environment Pages automatically creates a preview environment for each project, and can be indepenedently configured. To get a similar experience in Workers, you must: 1. Ensure [preview URLs](https://developers.cloudflare.com/workers/configuration/previews/) are enabled (they are on by default). * wrangler.jsonc ```jsonc { "name": "my-worker", "compatibility_date": "2025-04-01", "main": "./worker/index.ts", "assets": { "directory": "./dist/client/" }, "preview_urls": true } ``` * wrangler.toml ```toml name = "my-worker" compatibility_date = "2025-04-01" main = "./worker/index.ts" preview_urls = true [assets] directory = "./dist/client/" ``` 2. [Enable non-production branch builds](https://developers.cloudflare.com/workers/ci-cd/builds/build-branches/#configure-non-production-branch-builds) in Workers Builds. Optionally, you can also [protect these preview URLs with Cloudflare Access](https://developers.cloudflare.com/workers/configuration/previews/#manage-access-to-preview-urls). Note Unlike Pages, Workers does not natively support defining different bindings in production vs. non-production builds. This is something we are actively exploring, but in the meantime, you may wish to consider using [Wrangler Environments](https://developers.cloudflare.com/workers/wrangler/environments/) and an [appropriate Workers Build configuration](https://developers.cloudflare.com/workers/ci-cd/builds/advanced-setups/#wrangler-environments) to achieve this. ### Headers and redirects [`_headers`](https://developers.cloudflare.com/workers/static-assets/headers/) and [`_redirects`](https://developers.cloudflare.com/workers/static-assets/redirects/) files are supported natively in Workers with static assets. Ensure that, just like for Pages, these files are included in the static asset directory of your project. ### pages.dev Where previously you were offered a `pages.dev` subdomain for your Pages project, you can now configure a personalized `workers.dev` subdomain for all of your Worker projects. You can [configure this subdomain in the Cloudflare dashboard](https://developers.cloudflare.com/workers/configuration/routing/workers-dev/#configure-workersdev), and opt-in to using it with the [`workers_dev` option](https://developers.cloudflare.com/workers/configuration/routing/workers-dev/#disabling-workersdev-in-the-wrangler-configuration-file) in your configuration file. * wrangler.jsonc ```jsonc { "name": "my-worker", "compatibility_date": "2025-04-01", "main": "./worker/index.ts", "workers_dev": true } ``` * wrangler.toml ```toml name = "my-worker" compatibility_date = "2025-04-01" main = "./worker/index.ts" workers_dev = true ``` ### Custom domains If your domain's nameservers are managed by Cloudflare, you can, like Pages, configure a [custom domain](https://developers.cloudflare.com/workers/configuration/routing/custom-domains/) for your Worker. Additionally, you can also configure a [route](https://developers.cloudflare.com/workers/configuration/routing/routes/) if you only wish to some subset of paths to be served by your Worker. Note Unlike Pages, Workers does not support any domain whose nameservers are not managed by Cloudflare. ### Rollout Once you have validated the behavior of Worker, and are satisfied with the development workflows, and have migrated all of your production traffic, you can delete your Pages project in the Cloudflare dashboard or with Wrangler: * npm ```sh npx wrangler pages project delete ``` * yarn ```sh yarn wrangler pages project delete ``` * pnpm ```sh pnpm wrangler pages project delete ``` ## Migrate your project using an AI coding assistant You can add the following [experimental prompt](https://developers.cloudflare.com/workers/prompts/pages-to-workers.txt) in your preferred coding assistant (e.g. Claude Code, Cursor) to make your project compatible with Workers: ```plaintext https://developers.cloudflare.com/workers/prompts/pages-to-workers.txt ``` You can also use the Cloudflare Documentation [MCP server](https://github.com/cloudflare/mcp-server-cloudflare/tree/main/apps/docs-vectorize) in your coding assistant to provide better context to your LLM when building with Workers, which includes this prompt when you ask to migrate from Pages to Workers. ## Compatibility matrix This compatibility matrix compares the features of Workers and Pages. Unless otherwise stated below, what works in Pages works in Workers, and what works in Workers works in Pages. Think something is missing from this list? [Open a pull request](https://github.com/cloudflare/cloudflare-docs/edit/production/src/content/docs/workers/static-assets/compatibility-matrix.mdx) or [create a GitHub issue](https://github.com/cloudflare/cloudflare-docs/issues/new). **Legend**\ ✅: Supported\ ⏳: Coming soon\ 🟡: Unsupported, workaround available\ ❌: Unsupported | | Workers | Pages | | - | - | - | | **Writing, Testing, and Deploying Code** | | | | [Cloudflare Vite plugin](https://developers.cloudflare.com/workers/vite-plugin/) | ✅ | ❌ | | [Rollbacks](https://developers.cloudflare.com/workers/configuration/versions-and-deployments/rollbacks/) | ✅ | ✅ | | [Gradual Deployments](https://developers.cloudflare.com/workers/configuration/versions-and-deployments/) | ✅ | ❌ | | [Preview URLs](https://developers.cloudflare.com/workers/configuration/previews) | ✅ | ✅ | | [Testing tools](https://developers.cloudflare.com/workers/testing) | ✅ | ✅ | | [Local Development](https://developers.cloudflare.com/workers/development-testing/) | ✅ | ✅ | | [Remote Development (`--remote`)](https://developers.cloudflare.com/workers/wrangler/commands/) | ✅ | ❌ | | [Quick Editor in Dashboard](https://blog.cloudflare.com/improved-quick-edit) | ✅ | ❌ | | **Static Assets** | | | | [Early Hints](https://developers.cloudflare.com/pages/configuration/early-hints/) | ❌ | ✅ | | [Custom HTTP headers for static assets](https://developers.cloudflare.com/workers/static-assets/headers/) | ✅ | ✅ | | [Middleware](https://developers.cloudflare.com/workers/static-assets/binding/#run_worker_first) | ✅ [1](#user-content-fn-1) | ✅ | | [Redirects](https://developers.cloudflare.com/workers/static-assets/redirects/) | ✅ | ✅ | | [Smart Placement](https://developers.cloudflare.com/workers/configuration/smart-placement/) | ✅ | ✅ | | [Serve assets on a path](https://developers.cloudflare.com/workers/static-assets/routing/advanced/serving-a-subdirectory/) | ✅ | ❌ | | **Observability** | | | | [Workers Logs](https://developers.cloudflare.com/workers/observability/) | ✅ | ❌ | | [Logpush](https://developers.cloudflare.com/workers/observability/logs/logpush/) | ✅ | ❌ | | [Tail Workers](https://developers.cloudflare.com/workers/observability/logs/tail-workers/) | ✅ | ❌ | | [Real-time logs](https://developers.cloudflare.com/workers/observability/logs/real-time-logs/) | ✅ | ✅ | | [Source Maps](https://developers.cloudflare.com/workers/observability/source-maps/) | ✅ | ❌ | | **Runtime APIs & Compute Models** | | | | [Node.js Compatibility Mode](https://developers.cloudflare.com/workers/runtime-apis/nodejs/) | ✅ | ✅ | | [Durable Objects](https://developers.cloudflare.com/durable-objects/api/) | ✅ | 🟡 [2](#user-content-fn-2) | | [Cron Triggers](https://developers.cloudflare.com/workers/configuration/cron-triggers/) | ✅ | ❌ | | **Bindings** | | | | [AI](https://developers.cloudflare.com/workers-ai/get-started/workers-wrangler/#2-connect-your-worker-to-workers-ai) | ✅ | ✅ | | [Analytics Engine](https://developers.cloudflare.com/analytics/analytics-engine) | ✅ | ✅ | | [Assets](https://developers.cloudflare.com/workers/static-assets/binding/) | ✅ | ✅ | | [Browser Rendering](https://developers.cloudflare.com/browser-rendering) | ✅ | ✅ | | [D1](https://developers.cloudflare.com/d1/worker-api/) | ✅ | ✅ | | [Email Workers](https://developers.cloudflare.com/email-routing/email-workers/send-email-workers/) | ✅ | ❌ | | [Environment Variables](https://developers.cloudflare.com/workers/configuration/environment-variables/) | ✅ | ✅ | | [Hyperdrive](https://developers.cloudflare.com/hyperdrive/) | ✅ | ✅ | | [Image Resizing](https://developers.cloudflare.com/images/transform-images/bindings/) | ✅ | ❌ | | [KV](https://developers.cloudflare.com/kv/) | ✅ | ✅ | | [mTLS](https://developers.cloudflare.com/workers/runtime-apis/bindings/mtls/) | ✅ | ✅ | | [Queue Producers](https://developers.cloudflare.com/queues/configuration/configure-queues/#producer-worker-configuration) | ✅ | ✅ | | [Queue Consumers](https://developers.cloudflare.com/queues/configuration/configure-queues/#consumer-worker-configuration) | ✅ | ❌ | | [R2](https://developers.cloudflare.com/r2/) | ✅ | ✅ | | [Rate Limiting](https://developers.cloudflare.com/workers/runtime-apis/bindings/rate-limit/) | ✅ | ❌ | | [Secrets](https://developers.cloudflare.com/workers/configuration/secrets/) | ✅ | ✅ | | [Service bindings](https://developers.cloudflare.com/workers/runtime-apis/bindings/service-bindings/) | ✅ | ✅ | | [Vectorize](https://developers.cloudflare.com/vectorize/get-started/intro/#3-bind-your-worker-to-your-index) | ✅ | ✅ | | **Builds (CI/CD)** | | | | [Monorepos](https://developers.cloudflare.com/workers/ci-cd/builds/advanced-setups/) | ✅ | ✅ | | [Build Watch Paths](https://developers.cloudflare.com/workers/ci-cd/builds/build-watch-paths/) | ✅ | ✅ | | [Build Caching](https://developers.cloudflare.com/workers/ci-cd/builds/build-caching/) | ✅ | ✅ | | [Deploy Hooks](https://developers.cloudflare.com/pages/configuration/deploy-hooks/) | ⏳ | ✅ | | [Branch Deploy Controls](https://developers.cloudflare.com/pages/configuration/branch-build-controls/) | 🟡 [3](#user-content-fn-3) | ✅ | | [Custom Branch Aliases](https://developers.cloudflare.com/pages/how-to/custom-branch-aliases/) | ⏳ | ✅ | | **Pages Functions** | | | | [File-based Routing](https://developers.cloudflare.com/pages/functions/routing/) | 🟡 [4](#user-content-fn-4) | ✅ | | [Pages Plugins](https://developers.cloudflare.com/pages/functions/plugins/) | 🟡 [5](#user-content-fn-5) | ✅ | | **Domain Configuration** | | | | [Custom domains](https://developers.cloudflare.com/workers/configuration/routing/custom-domains/#add-a-custom-domain) | ✅ | ✅ | | [Custom subdomains](https://developers.cloudflare.com/workers/configuration/routing/custom-domains/#set-up-a-custom-domain-in-the-dashboard) | ✅ | ✅ | | [Custom domains outside Cloudflare zones](https://developers.cloudflare.com/pages/configuration/custom-domains/#add-a-custom-cname-record) | ❌ | ✅ | | [Non-root routes](https://developers.cloudflare.com/workers/configuration/routing/routes/) | ✅ | ❌ | ## Footnotes 1. Middleware can be configured via the [`run_worker_first`](https://developers.cloudflare.com/workers/static-assets/binding/#run_worker_first) option, but is charged as a normal Worker invocation. We plan to explore additional related options in the future. [↩](#user-content-fnref-1) 2. To [use Durable Objects with your Cloudflare Pages project](https://developers.cloudflare.com/pages/functions/bindings/#durable-objects), you must create a separate Worker with a Durable Object and then declare a binding to it in both your Production and Preview environments. Using Durable Objects with Workers is simpler and recommended. [↩](#user-content-fnref-2) 3. Workers Builds supports enabling [non-production branch builds](https://developers.cloudflare.com/workers/ci-cd/builds/build-branches/#configure-non-production-branch-builds), though does not yet have the same level of configurability as Pages does. [↩](#user-content-fnref-3) 4. Workers [supports popular frameworks](https://developers.cloudflare.com/workers/framework-guides/), many of which implement file-based routing. Additionally, you can use Wrangler to [compile your folder of `functions/`](#folder-of-functions) into a Worker to help ease the migration from Pages to Workers. [↩](#user-content-fnref-4) 5. As in 4, Wrangler can [compile your Pages Functions into a Worker](#folder-of-functions). Or if you are starting from scratch, everything that is possible with Pages Functions can also be achieved by adding code to your Worker or by using framework-specific plugins for relevant third party tools. [↩](#user-content-fnref-5) --- title: Migrate from Netlify to Workers · Cloudflare Workers docs description: In this tutorial, you will learn how to migrate your Netlify application to Cloudflare Workers. lastUpdated: 2025-06-05T13:25:05.000Z chatbotDeprioritize: false source_url: html: https://developers.cloudflare.com/workers/static-assets/migration-guides/netlify-to-workers/ md: https://developers.cloudflare.com/workers/static-assets/migration-guides/netlify-to-workers/index.md --- In this tutorial, you will learn how to migrate your Netlify application to Cloudflare Workers. You should already have an existing project deployed on Netlify that you would like to host on Cloudflare Workers. Netlify specific features are not supported by Cloudflare Workers. Review the [Workers compatibility matrix](https://developers.cloudflare.com/workers/static-assets/migration-guides/migrate-from-pages/#compatibility-matrix) for more information on what is supported. ## Frameworks Some frameworks like Next.js, Astro with on demand rendering, and others have specific guides for migrating to Cloudflare Workers. Refer to our [framework guides](https://developers.cloudflare.com/workers/framework-guides/) for more information. If your framework has a **Deploy an existing project on Workers** guide, follow that guide for specific instructions. Otherwise, continue with the steps below. ## Find your build command and build directory To move your application to Cloudflare Workers, you will need to know your build command and build directory. Cloudflare Workers will use this information to build and deploy your application. We will cover how to find these values in the Netlify Dashboard below. In your Netlify Dashboard, find the project you want to migrate to Workers. Go to the **Project configuration** menu for your specific project, then go into the **Build & deploy** menu item. You will find a **Build settings** card that includes the **Build command** and **Publish directory** fields. Save these for deploying to Cloudflare Workers. In the below image, the **Build Command** is `npm run build`, and the **Output Directory** is `.next`. ![Finding the Build Command and publish Directory fields](https://developers.cloudflare.com/_astro/netlify-build-command.DH5kCyI8_1ORiX2.webp) ## Create a wrangler file In the root of your project, create a `wrangler.jsonc` or `wrangler.toml` file (`wrangler.jsonc` is recommended). What goes in the file depends on what type of application you are deploying: an application powered by [Static Site Generation (SSG)](https://developers.cloudflare.com/workers/static-assets/routing/static-site-generation/), or a [Single Page Application (SPA)](https://developers.cloudflare.com/workers/static-assets/routing/single-page-application/). For each case, be sure to update the `` value with the name of your project and `` value with the build directory from Netlify. For a **static site**, you will need to add the following to your wrangler file. * wrangler.jsonc ```jsonc { "name": "", "compatibility_date": "2025-07-16", "assets": { "directory": "", } } ``` * wrangler.toml ```toml name = "" compatibility_date = "2025-07-16" [assets] directory = "" ``` For a **Single Page Application**, you will need to add the following to your Wrangler configuration file, which includes the `not_found_handling` field. * wrangler.jsonc ```jsonc { "name": "", "compatibility_date": "2025-04-23", "assets": { "directory": "", "not_found_handling": "single-page-application" } } ``` * wrangler.toml ```toml name = "" compatibility_date = "2025-04-23" [assets] directory = "" not_found_handling = "single-page-application" ``` Some frameworks provide specific guides for migrating to Cloudflare Workers. Please refer to our [framework guides](https://developers.cloudflare.com/workers/framework-guides/) for more information. If your framework includes a “Deploy an existing project on Workers” guide, follow it for detailed instructions. ## Create a new Workers project Your application has the proper configuration to be built and deployed to Cloudflare Workers. The [Connect a new Worker](https://developers.cloudflare.com/workers/ci-cd/builds/#connect-a-new-worker) guide will instruct you how to connect your GitHub project to Cloudflare Workers. In the configuration step, ensure your build command is the same as the command you found on Netlify. Also, the deploy command should be the default `npx wrangler deploy`. ## Add a custom domain Workers Custom Domains only supports domains that are configured as zones on your account. A zone refers to a domain (such as example.com) that Cloudflare manages for you, including its DNS and traffic. Follow these instructions for [adding a custom domain to your Workers project](https://developers.cloudflare.com/workers/configuration/routing/custom-domains/#add-a-custom-domain). You will also find additional information on creating a zone for your domain. ## Delete your Netlify app Once your custom domain is set up and sending requests to Cloudflare Workers, you can safely delete your Netlify application. ## Troubleshooting For additional migration instructions, review the [Cloudflare Pages to Workers migration guide](https://developers.cloudflare.com/workers/static-assets/migration-guides/migrate-from-pages/). While not Netlify specific, it does cover some additional steps that may be helpful. --- title: Migrate from Vercel to Workers · Cloudflare Workers docs description: In this tutorial, you will learn how to migrate your Vercel application to Cloudflare Workers. lastUpdated: 2025-06-05T13:25:05.000Z chatbotDeprioritize: false source_url: html: https://developers.cloudflare.com/workers/static-assets/migration-guides/vercel-to-workers/ md: https://developers.cloudflare.com/workers/static-assets/migration-guides/vercel-to-workers/index.md --- In this tutorial, you will learn how to migrate your Vercel application to Cloudflare Workers. You should already have an existing project deployed on Vercel that you would like to host on Cloudflare Workers. Vercel specific features are not supported by Cloudflare Workers. Review the [Workers compatibility matrix](https://developers.cloudflare.com/workers/static-assets/migration-guides/migrate-from-pages/#compatibility-matrix) for more information on what is supported. ## Frameworks Some frameworks like Next.js, Astro with on demand rendering, and others have specific guides for migrating to Cloudflare Workers. Refer to our [framework guides](https://developers.cloudflare.com/workers/framework-guides/) for more information. If your framework has a **Deploy an existing project on Workers** guide, follow that guide for specific instructions. Otherwise, continue with the steps below. ## Find your build command and build directory To move your application to Cloudflare Workers, you will need to know your build command and build directory. Cloudflare Workers will use this information to build and deploy your application. We'll cover how to find these values in the Vercel Dashboard below. In your Vercel Dashboard, find the project you want to migrate to Workers. Go to the **Settings** tab for your specific project and find the **Build & Development settings** panel. You will find the **Build Command** and **Output Directory** fields there. If you are using a framework, these values may not be filled in but will show the defaults used by the framework. Save these for deploying to Cloudflare Workers. In the below image, the **Build Command** is `npm run build`, and the **Output Directory** is `dist`. ![Finding the Build Command and Output Directory fields](https://developers.cloudflare.com/_astro/vercel-deploy-1.DrHD4fam_Z2wPpBu.webp) ## Create a wrangler file In the root of your project, create a `wrangler.jsonc` or `wrangler.toml` file (`wrangler.jsonc` is recommended). What goes in the file depends on what type of application you are deploying: static or single-page application. For each case, be sure to update the `` value with the name of your project and `` value with the build directory from Vercel. Be sure to set the right pathing, for example `./dist` if the build directory is `dist` or `./build` if your build directory is `build`. For a **static site**, you will need to add the following to your wrangler file. * wrangler.jsonc ```jsonc { "name": "", "compatibility_date": "2025-04-23", "assets": { "directory": "", } } ``` * wrangler.toml ```toml name = "" compatibility_date = "2025-04-23" [assets] directory = "" ``` For a **single page application**, you will need to add the following to your wrangler file, which includes the `not_found_handling` field. * wrangler.jsonc ```jsonc { "name": "", "compatibility_date": "2025-04-23", "assets": { "directory": "", "not_found_handling": "single-page-application" } } ``` * wrangler.toml ```toml name = "" compatibility_date = "2025-04-23" [assets] directory = "" not_found_handling = "single-page-application" ``` Some frameworks provide specific guides for migrating to Cloudflare Workers. Please refer to our [framework guides](https://developers.cloudflare.com/workers/framework-guides/) for more information. If your framework includes a “Deploy an existing project on Workers” guide, follow it for detailed instructions. ## Create a new Workers project Your application has the proper configuration to be built and deployed to Cloudflare Workers. The [Connect a new Worker](https://developers.cloudflare.com/workers/ci-cd/builds/#connect-a-new-worker) guide will instruct you how to connect your GitHub project to Cloudflare Workers. In the configuration step, ensure your build command is the same as the command you found on Vercel. Also, the deploy command should be the default `npx wrangler deploy`. ## Add a custom domain Workers Custom Domains only supports domains that are configured as zones on your account. A zone refers to a domain (such as example.com) that Cloudflare manages for you, including its DNS and traffic. Follow these instructions for [adding a custom domain to your Workers project](https://developers.cloudflare.com/workers/configuration/routing/custom-domains/#add-a-custom-domain). You will also find additional information on creating a zone for your domain. ## Delete your Vercel app Once your custom domain is set up and sending requests to Cloudflare Workers, you can safely delete your Vercel application. ## Troubleshooting For additional migration instructions, review the [Cloudflare Pages to Workers migration guide](https://developers.cloudflare.com/workers/static-assets/migration-guides/migrate-from-pages/). While not Vercel specific, it does cover some additional steps that may be helpful. --- title: Wrangler · Cloudflare Workers docs lastUpdated: 2025-03-27T15:46:34.000Z chatbotDeprioritize: false source_url: html: https://developers.cloudflare.com/workers/platform/changelog/wrangler/ md: https://developers.cloudflare.com/workers/platform/changelog/wrangler/index.md --- --- title: Advanced · Cloudflare Workers docs description: Learn how to configure advanced routing options for the static assets of your Worker. lastUpdated: 2025-05-01T19:25:08.000Z chatbotDeprioritize: true source_url: html: https://developers.cloudflare.com/workers/static-assets/routing/advanced/ md: https://developers.cloudflare.com/workers/static-assets/routing/advanced/index.md --- Learn how to configure advanced routing options for the static assets of your Worker. * [HTML handling](https://developers.cloudflare.com/workers/static-assets/routing/advanced/html-handling/) * [Serving a subdirectory](https://developers.cloudflare.com/workers/static-assets/routing/advanced/serving-a-subdirectory/) --- title: Full-stack application · Cloudflare Workers docs description: How to configure and use a full-stack application with Workers. lastUpdated: 2025-06-05T13:25:05.000Z chatbotDeprioritize: false source_url: html: https://developers.cloudflare.com/workers/static-assets/routing/full-stack-application/ md: https://developers.cloudflare.com/workers/static-assets/routing/full-stack-application/index.md --- Full-stack applications are web applications which are span both the client and server. The build process of these applications will produce a HTML files, accompanying client-side resources (e.g. JavaScript bundles, CSS stylesheets, images, fonts, etc.) and a Worker script. Data is typically fetched the Worker script at request-time and the initial page response is usually server-side rendered (SSR). From there, the client is then hydrated and a SPA-like experience ensues. The following full-stack frameworks are natively supported by Workers: * [Astro](https://developers.cloudflare.com/workers/framework-guides/web-apps/astro/) * [React Router (formerly Remix)](https://developers.cloudflare.com/workers/framework-guides/web-apps/react-router/) * [Next.js](https://developers.cloudflare.com/workers/framework-guides/web-apps/nextjs/) * [RedwoodSDK](https://developers.cloudflare.com/workers/framework-guides/web-apps/redwoodsdk/) * [TanStack](https://developers.cloudflare.com/workers/framework-guides/web-apps/tanstack/) - [Angular](https://developers.cloudflare.com/workers/framework-guides/web-apps/more-web-frameworks/angular/) - [Nuxt](https://developers.cloudflare.com/workers/framework-guides/web-apps/more-web-frameworks/nuxt/) - [Qwik](https://developers.cloudflare.com/workers/framework-guides/web-apps/more-web-frameworks/qwik/) - [Solid](https://developers.cloudflare.com/workers/framework-guides/web-apps/more-web-frameworks/solid/) --- title: Single Page Application (SPA) · Cloudflare Workers docs description: How to configure and use a Single Page Application (SPA) with Workers. lastUpdated: 2025-06-20T19:49:19.000Z chatbotDeprioritize: false source_url: html: https://developers.cloudflare.com/workers/static-assets/routing/single-page-application/ md: https://developers.cloudflare.com/workers/static-assets/routing/single-page-application/index.md --- Single Page Applications (SPAs) are web applications which are client-side rendered (CSR). They are often built with a framework such as [React](https://developers.cloudflare.com/workers/framework-guides/web-apps/react/), [Vue](https://developers.cloudflare.com/workers/framework-guides/web-apps/vue/) or [Svelte](https://developers.cloudflare.com/workers/framework-guides/web-apps/svelte/). The build process of these frameworks will produce a single `/index.html` file and accompanying client-side resources (e.g. JavaScript bundles, CSS stylesheets, images, fonts, etc.). Typically, data is fetched by the client from an API with client-side requests. When you configure `single-page-application` mode, Cloudflare provides default routing behavior that automatically serves your `/index.html` file for navigation requests (those with `Sec-Fetch-Mode: navigate` headers) which don't match any other asset. For more control over which paths invoke your Worker script, you can use [advanced routing control](#advanced-routing-control). ## Configuration In order to deploy a Single Page Application to Workers, you must configure the `assets.directory` and `assets.not_found_handling` options in your [Wrangler configuration file](https://developers.cloudflare.com/workers/wrangler/configuration/#assets): * wrangler.jsonc ```jsonc { "name": "my-worker", "compatibility_date": "2025-07-16", "assets": { "directory": "./dist/", "not_found_handling": "single-page-application" } } ``` * wrangler.toml ```toml name = "my-worker" compatibility_date = "2025-07-16" [assets] directory = "./dist/" not_found_handling = "single-page-application" ``` Configuring `assets.not_found_handling` to `single-page-application` overrides the default serving behavior of Workers for static assets. When an incoming request does not match a file in the `assets.directory`, Workers will serve the contents of the `/index.html` file with a `200 OK` status. ### Navigation requests If you have a Worker script (`main`), have configured `assets.not_found_handling`, and use the [`assets_navigation_prefers_asset_serving` compatibility flag](https://developers.cloudflare.com/workers/configuration/compatibility-flags/#navigation-requests-prefer-asset-serving) (or set a compatibility date of `2025-04-01` or greater), *navigation requests* will not invoke the Worker script. A *navigation request* is a request made with the `Sec-Fetch-Mode: navigate` header, which browsers automatically attach when navigating to a page. This reduces billable invocations of your Worker script, and is particularly useful for client-heavy applications which would otherwise invoke your Worker script very frequently and unnecessarily. Note This can lead to surprising but intentional behavior. For example, if you define an API endpoint in a Worker script (e.g. `/api/date`) and then fetch it with a client-side request in your SPA (e.g. `fetch("/api/date")`), the Worker script will be invoked and your API response will be returned as expected. However, if you navigate to `/api/date` in your browser, you will be served an HTML file. Again, this is to reduce the number of billable invocations for your application while still maintaining SPA-like functionality. This behavior can be disabled by setting the [`assets_navigation_has_no_effect` compatibility flag](https://developers.cloudflare.com/workers/configuration/compatibility-flags/#navigation-requests-prefer-asset-serving). Tip If you wish to run the Worker script ahead of serving static assets (e.g. to log requests, or perform some authentication checks), you can additionally configure the [`assets.run_worker_first` setting](https://developers.cloudflare.com/workers/static-assets/routing/worker-script/#run_worker_first). This will retain your `assets.not_found_handling` behavior when no other asset matches, while still allowing you to control access to your application with your Worker script. #### Client-side callbacks In some cases, you might need to pass a value from a navigation request to your Worker script. For example, if you are acting as an OAuth callback, you might expect to see requests made to some route such as `/oauth/callback?code=...`. With the `assets_navigation_prefers_asset_serving` flag, your HTML assets will be server, rather than your Worker script. In this case, we recommend, either as part of your client application for this appropriate route, or with a slimmed-down endpoint-specific HTML file, passing the value to the server with client-side JavaScript. ```html OAuth callback

    Loading...

    ``` * JavaScript ```js import { WorkerEntrypoint } from "cloudflare:workers"; export default class extends WorkerEntrypoint { async fetch(request) { const url = new URL(request.url); if (url.pathname === "/api/oauth/callback") { const code = url.searchParams.get("code"); const sessionId = await exchangeAuthorizationCodeForAccessAndRefreshTokensAndPersistToDatabaseAndGetSessionId( code, ); if (sessionId) { return new Response(null, { headers: { "Set-Cookie": `sessionId=${sessionId}; HttpOnly; SameSite=Strict; Secure; Path=/; Max-Age=86400`, }, }); } else { return Response.json( { error: "Invalid OAuth code. Please try again." }, { status: 400 }, ); } } return new Response(null, { status: 404 }); } } ``` * TypeScript ```ts import { WorkerEntrypoint } from "cloudflare:workers"; export default class extends WorkerEntrypoint { async fetch(request: Request) { const url = new URL(request.url); if (url.pathname === "/api/oauth/callback") { const code = url.searchParams.get("code"); const sessionId = await exchangeAuthorizationCodeForAccessAndRefreshTokensAndPersistToDatabaseAndGetSessionId(code); if (sessionId) { return new Response(null, { headers: { "Set-Cookie": `sessionId=${sessionId}; HttpOnly; SameSite=Strict; Secure; Path=/; Max-Age=86400`, }, }); } else { return Response.json( { error: "Invalid OAuth code. Please try again." }, { status: 400 } ); } } return new Response(null, { status: 404 }); } } ``` ## Advanced routing control For more explicit control over SPA routing behavior, you can use `run_worker_first` with an array of route patterns. This approach disables the automatic `Sec-Fetch-Mode: navigate` detection and gives you explicit control over which requests should be handled by your Worker script vs served as static assets. Note Advanced routing control is supported in: * [Wrangler](https://developers.cloudflare.com/workers/wrangler/install-and-update/) v4.20.0 and above * [Cloudflare Vite plugin](https://developers.cloudflare.com/workers/vite-plugin/get-started/) v1.7.0 and above - wrangler.jsonc ```jsonc { "name": "my-worker", "compatibility_date": "2025-07-16", "main": "./src/index.ts", "assets": { "directory": "./dist/", "not_found_handling": "single-page-application", "binding": "ASSETS", "run_worker_first": ["/api/*", "!/api/docs/*"] } } ``` - wrangler.toml ```toml name = "my-worker" compatibility_date = "2025-07-16" main = "./src/index.ts" [assets] directory = "./dist/" not_found_handling = "single-page-application" binding = "ASSETS" run_worker_first = [ "/api/*", "!/api/docs/*" ] ``` This configuration provides explicit routing control without relying on browser navigation headers, making it ideal for complex SPAs that need fine-grained routing behavior. Your Worker script can then handle the matched routes and (optionally using [the assets binding](https://developers.cloudflare.com/workers/static-assets/binding/#binding)) and serve dynamic content. **For example:** * JavaScript ```js export default { async fetch(request, env) { const url = new URL(request.url); if (url.pathname === "/api/name") { return new Response(JSON.stringify({ name: "Cloudflare" }), { headers: { "Content-Type": "application/json" }, }); } return new Response(null, { status: 404 }); }, }; ``` * TypeScript ```ts export default { async fetch(request, env): Promise { const url = new URL(request.url); if (url.pathname === "/api/name") { return new Response(JSON.stringify({ name: "Cloudflare" }), { headers: { "Content-Type": "application/json" }, }); } return new Response(null, { status: 404 }); }, } satisfies ExportedHandler; ``` ## Local Development If you are using a Vite-powered SPA framework, you might be interested in using our [Vite plugin](https://developers.cloudflare.com/workers/vite-plugin/) which offers a Vite-native developer experience. ### Reference In most cases, configuring `assets.not_found_handling` to `single-page-application` will provide the desired behavior. If you are building your own framework, or have specialized needs, the following diagram can provide insight into exactly how the routing decisions are made. Full routing decision diagram ```mermaid flowchart Request@{ shape: stadium, label: "Incoming request" } Request-->RunWorkerFirst RunWorkerFirst@{ shape: diamond, label: "Run Worker script first?" } RunWorkerFirst-->|Request matches run_worker_first path|WorkerScriptInvoked RunWorkerFirst-->|Request matches run_worker_first negative path|AssetServing RunWorkerFirst-->|No matches|RequestMatchesAsset RequestMatchesAsset@{ shape: diamond, label: "Request matches asset?" } RequestMatchesAsset-->|Yes|AssetServing RequestMatchesAsset-->|No|WorkerScriptPresent WorkerScriptPresent@{ shape: diamond, label: "Worker script present?" } WorkerScriptPresent-->|No|AssetServing WorkerScriptPresent-->|Yes|RequestNavigation RequestNavigation@{ shape: diamond, label: "Request is navigation request?" } RequestNavigation-->|No|WorkerScriptInvoked WorkerScriptInvoked@{ shape: rect, label: "Worker script invoked" } WorkerScriptInvoked-.->|Asset binding|AssetServing RequestNavigation-->|Yes|AssetServing subgraph Asset serving AssetServing@{ shape: diamond, label: "Request matches asset?" } AssetServing-->|Yes|AssetServed AssetServed@{ shape: stadium, label: "**200 OK**
    asset served" } AssetServing-->|No|NotFoundHandling subgraph single-page-application NotFoundHandling@{ shape: rect, label: "Request rewritten to /index.html" } NotFoundHandling-->SPAExists SPAExists@{ shape: diamond, label: "HTML Page exists?" } SPAExists-->|Yes|SPAServed SPAExists-->|No|Generic404PageServed Generic404PageServed@{ shape: stadium, label: "**404 Not Found**
    null-body response served" } SPAServed@{ shape: stadium, label: "**200 OK**
    /index.html page served" } end end ``` Requests are only billable if a Worker script is invoked. From there, it is possible to serve assets using the assets binding (depicted as the dotted line in the diagram above). Although unlikely to impact how a SPA is served, you can read more about how we match assets in the [HTML handling docs](https://developers.cloudflare.com/workers/static-assets/routing/advanced/html-handling/).
    --- title: Static Site Generation (SSG) and custom 404 pages · Cloudflare Workers docs description: How to configure a Static Site Generation (SSG) application and custom 404 pages with Workers. lastUpdated: 2025-06-05T13:25:05.000Z chatbotDeprioritize: false source_url: html: https://developers.cloudflare.com/workers/static-assets/routing/static-site-generation/ md: https://developers.cloudflare.com/workers/static-assets/routing/static-site-generation/index.md --- Static Site Generation (SSG) applications are web applications which are predominantely built or "prerendered" ahead-of-time. They are often built with a framework such as [Gatsby](https://developers.cloudflare.com/workers/framework-guides/web-apps/more-web-frameworks/gatsby/) or [Docusaurus](https://developers.cloudflare.com/workers/framework-guides/web-apps/more-web-frameworks/docusaurus/). The build process of these frameworks will produce many HTML files and accompanying client-side resources (e.g. JavaScript bundles, CSS stylesheets, images, fonts, etc.). Data is either static, fetched and compiled into the HTML at build-time, or fetched by the client from an API with client-side requests. Often, an SSG framework will allow you to create a custom 404 page. ## Configuration In order to deploy a Static Site Generation application to Workers, you must configure the `assets.directory`, and optionally, the `assets.not_found_handling` and `assets.html_handling` options in your [Wrangler configuration file](https://developers.cloudflare.com/workers/wrangler/configuration/#assets): * wrangler.jsonc ```jsonc { "name": "my-worker", "compatibility_date": "2025-07-16", "assets": { "directory": "./dist/", "not_found_handling": "404-page", "html_handling": "auto-trailing-slash" } } ``` * wrangler.toml ```toml name = "my-worker" compatibility_date = "2025-07-16" [assets] directory = "./dist/" not_found_handling = "404-page" html_handling = "auto-trailing-slash" ``` `assets.html_handling` defaults to `auto-trailing-slash` and this will usually give you the desired behavior automatically: individual files (e.g. `foo.html`) will be served *without* a trailing slash and folder index files (e.g. `foo/index.html`) will be served *with* a trailing slash. Alternatively, you can force trailing slashes (`force-trailing-slash`) or drop trailing slashes (`drop-trailing-slash`) on requests for HTML pages. ### Custom 404 pages Configuring `assets.not_found_handling` to `404-page` overrides the default serving behavior of Workers for static assets. When an incoming request does not match a file in the `assets.directory`, Workers will serve the contents of the nearest `404.html` file with a `404 Not Found` status. ### Navigation requests If you have a Worker script (`main`), have configured `assets.not_found_handling`, and use the [`assets_navigation_prefers_asset_serving` compatibility flag](https://developers.cloudflare.com/workers/configuration/compatibility-flags/#navigation-requests-prefer-asset-serving) (or set a compatibility date of `2025-04-01` or greater), *navigation requests* will not invoke the Worker script. A *navigation request* is a request made with the `Sec-Fetch-Mode: navigate` header, which browsers automatically attach when navigating to a page. This reduces billable invocations of your Worker script, and is particularly useful for client-heavy applications which would otherwise invoke your Worker script very frequently and unnecessarily. Note This can lead to surprising but intentional behavior. For example, if you define an API endpoint in a Worker script (e.g. `/api/date`) and then fetch it with a client-side request in your SPA (e.g. `fetch("/api/date")`), the Worker script will be invoked and your API response will be returned as expected. However, if you navigate to `/api/date` in your browser, you will be served an HTML file. Again, this is to reduce the number of billable invocations for your application while still maintaining SPA-like functionality. This behavior can be disabled by setting the [`assets_navigation_has_no_effect` compatibility flag](https://developers.cloudflare.com/workers/configuration/compatibility-flags/#navigation-requests-prefer-asset-serving). Tip If you wish to run the Worker script ahead of serving static assets (e.g. to log requests, or perform some authentication checks), you can additionally configure the [`assets.run_worker_first` setting](https://developers.cloudflare.com/workers/static-assets/routing/worker-script/#run_worker_first). This will retain your `assets.not_found_handling` behavior when no other asset matches, while still allowing you to control access to your application with your Worker script. #### Client-side callbacks In some cases, you might need to pass a value from a navigation request to your Worker script. For example, if you are acting as an OAuth callback, you might expect to see requests made to some route such as `/oauth/callback?code=...`. With the `assets_navigation_prefers_asset_serving` flag, your HTML assets will be server, rather than your Worker script. In this case, we recommend, either as part of your client application for this appropriate route, or with a slimmed-down endpoint-specific HTML file, passing the value to the server with client-side JavaScript. ```html OAuth callback

    Loading...

    ``` * JavaScript ```js import { WorkerEntrypoint } from "cloudflare:workers"; export default class extends WorkerEntrypoint { async fetch(request) { const url = new URL(request.url); if (url.pathname === "/api/oauth/callback") { const code = url.searchParams.get("code"); const sessionId = await exchangeAuthorizationCodeForAccessAndRefreshTokensAndPersistToDatabaseAndGetSessionId( code, ); if (sessionId) { return new Response(null, { headers: { "Set-Cookie": `sessionId=${sessionId}; HttpOnly; SameSite=Strict; Secure; Path=/; Max-Age=86400`, }, }); } else { return Response.json( { error: "Invalid OAuth code. Please try again." }, { status: 400 }, ); } } return new Response(null, { status: 404 }); } } ``` * TypeScript ```ts import { WorkerEntrypoint } from "cloudflare:workers"; export default class extends WorkerEntrypoint { async fetch(request: Request) { const url = new URL(request.url); if (url.pathname === "/api/oauth/callback") { const code = url.searchParams.get("code"); const sessionId = await exchangeAuthorizationCodeForAccessAndRefreshTokensAndPersistToDatabaseAndGetSessionId(code); if (sessionId) { return new Response(null, { headers: { "Set-Cookie": `sessionId=${sessionId}; HttpOnly; SameSite=Strict; Secure; Path=/; Max-Age=86400`, }, }); } else { return Response.json( { error: "Invalid OAuth code. Please try again." }, { status: 400 } ); } } return new Response(null, { status: 404 }); } } ``` ## Local Development If you are using a Vite-powered SPA framework, you might be interested in using our [Vite plugin](https://developers.cloudflare.com/workers/vite-plugin/) which offers a Vite-native developer experience. ### Reference In most cases, configuring `assets.not_found_handling` to `404-page` will provide the desired behavior. If you are building your own framework, or have specialized needs, the following diagram can provide insight into exactly how the routing decisions are made. Full routing decision diagram ```mermaid flowchart Request@{ shape: stadium, label: "Incoming request" } Request-->RunWorkerFirst RunWorkerFirst@{ shape: diamond, label: "Run Worker script first?" } RunWorkerFirst-->|Request matches run_worker_first path|WorkerScriptInvoked RunWorkerFirst-->|Request matches run_worker_first negative path|AssetServing RunWorkerFirst-->|No matches|RequestMatchesAsset RequestMatchesAsset@{ shape: diamond, label: "Request matches asset?" } RequestMatchesAsset-->|Yes|AssetServing RequestMatchesAsset-->|No|WorkerScriptPresent WorkerScriptPresent@{ shape: diamond, label: "Worker script present?" } WorkerScriptPresent-->|No|AssetServing WorkerScriptPresent-->|Yes|RequestNavigation RequestNavigation@{ shape: diamond, label: "Request is navigation request?" } RequestNavigation-->|No|WorkerScriptInvoked WorkerScriptInvoked@{ shape: rect, label: "Worker script invoked" } WorkerScriptInvoked-.->|Asset binding|AssetServing RequestNavigation-->|Yes|AssetServing subgraph Asset serving AssetServing@{ shape: diamond, label: "Request matches asset?" } AssetServing-->|Yes|AssetServed AssetServed@{ shape: stadium, label: "**200 OK**
    asset served" } AssetServing-->|No|NotFoundHandling subgraph 404-page NotFoundHandling@{ shape: rect, label: "Request rewritten to ../404.html" } NotFoundHandling-->404PageExists 404PageExists@{ shape: diamond, label: "HTML Page exists?" } 404PageExists-->|Yes|404PageServed 404PageExists-->|No|404PageAtIndex 404PageAtIndex@{ shape: diamond, label: "Request is for root /404.html?" } 404PageAtIndex-->|Yes|Generic404PageServed 404PageAtIndex-->|No|NotFoundHandling Generic404PageServed@{ shape: stadium, label: "**404 Not Found**
    null-body response served" } 404PageServed@{ shape: stadium, label: "**404 Not Found**
    404.html page served" } end end ``` Requests are only billable if a Worker script is invoked. From there, it is possible to serve assets using the assets binding (depicted as the dotted line in the diagram above). You can read more about how we match assets in the [HTML handling docs](https://developers.cloudflare.com/workers/static-assets/routing/advanced/html-handling/).
    --- title: Worker script · Cloudflare Workers docs description: How the presence of a Worker script influences static asset routing and the related configuration options. lastUpdated: 2025-06-20T19:49:19.000Z chatbotDeprioritize: false source_url: html: https://developers.cloudflare.com/workers/static-assets/routing/worker-script/ md: https://developers.cloudflare.com/workers/static-assets/routing/worker-script/index.md --- If you have both static assets and a Worker script configured, Cloudflare will first attempt to serve static assets if one matches the incoming request. You can read more about how we match assets in the [HTML handling docs](https://developers.cloudflare.com/workers/static-assets/routing/advanced/html-handling/). If an appropriate static asset if not found, Cloudflare will invoke your Worker script. This allows you to easily combine together these two features to create powerful applications (e.g. a [full-stack application](https://developers.cloudflare.com/workers/static-assets/routing/full-stack-application/), or a [Single Page Application (SPA)](https://developers.cloudflare.com/workers/static-assets/routing/single-page-application/) or [Static Site Generation (SSG) application](https://developers.cloudflare.com/workers/static-assets/routing/static-site-generation/) with an API). ## Run your Worker script first You can configure the [`assets.run_worker_first` setting](https://developers.cloudflare.com/workers/static-assets/binding/#run_worker_first) to control when your Worker script runs relative to static asset serving. This gives you more control over exactly how and when those assets are served and can be used to implement "middleware" for requests. Warning If you are using [Smart Placement](https://developers.cloudflare.com/workers/configuration/smart-placement/) in combination with `assets.run_worker_first`, you may find that placement decisions are not optimized correctly as, currently, the entire Worker script is placed as a single unit. This may not accurately reflect the desired "split" in behavior of edge-first vs. smart-placed compute for your application. This is a limitation that we are currently working to resolve. ### Run Worker before each request If you need to always run your Worker script before serving static assets (for example, you wish to log requests, perform some authentication checks, use [HTMLRewriter](https://developers.cloudflare.com/workers/runtime-apis/html-rewriter/), or otherwise transform assets before serving), set `run_worker_first` to `true`: * wrangler.jsonc ```jsonc { "name": "my-worker", "compatibility_date": "2025-07-16", "main": "./worker/index.ts", "assets": { "directory": "./dist/", "binding": "ASSETS", "run_worker_first": true } } ``` * wrangler.toml ```toml name = "my-worker" compatibility_date = "2025-07-16" main = "./worker/index.ts" [assets] directory = "./dist/" binding = "ASSETS" run_worker_first = true ``` - JavaScript ```js import { WorkerEntrypoint } from "cloudflare:workers"; export default class extends WorkerEntrypoint { async fetch(request) { // You can perform checks before fetching assets const user = await checkIfRequestIsAuthenticated(request); if (!user) { return new Response("Unauthorized", { status: 401 }); } // You can then just fetch the assets as normal, or you could pass in a custom Request object here if you wanted to fetch some other specific asset const assetResponse = await this.env.ASSETS.fetch(request); // You can return static asset response as-is, or you can transform them with something like HTMLRewriter return new HTMLRewriter() .on("#user", { element(element) { element.setInnerContent(JSON.stringify({ name: user.name })); }, }) .transform(assetResponse); } } ``` - TypeScript ```ts import { WorkerEntrypoint } from "cloudflare:workers"; export default class extends WorkerEntrypoint { async fetch(request: Request) { // You can perform checks before fetching assets const user = await checkIfRequestIsAuthenticated(request); if (!user) { return new Response("Unauthorized", { status: 401 }); } // You can then just fetch the assets as normal, or you could pass in a custom Request object here if you wanted to fetch some other specific asset const assetResponse = await this.env.ASSETS.fetch(request); // You can return static asset response as-is, or you can transform them with something like HTMLRewriter return new HTMLRewriter() .on("#user", { element(element) { element.setInnerContent(JSON.stringify({ name: user.name })); }, }) .transform(assetResponse); } } ``` ### Run Worker first for selective paths You can also configure selective Worker-first routing using an array of route patterns, often paired with the [`single-page-application` setting](https://developers.cloudflare.com/workers/static-assets/routing/single-page-application/#advanced-routing-control). This allows you to run the Worker first only for specific routes while letting other requests follow the default asset-first behavior: * wrangler.jsonc ```jsonc { "name": "my-worker", "compatibility_date": "2025-07-16", "main": "./worker/index.ts", "assets": { "directory": "./dist/", "not_found_handling": "single-page-application", "binding": "ASSETS", "run_worker_first": ["/oauth/callback"] } } ``` * wrangler.toml ```toml name = "my-worker" compatibility_date = "2025-07-16" main = "./worker/index.ts" [assets] directory = "./dist/" not_found_handling = "single-page-application" binding = "ASSETS" run_worker_first = [ "/oauth/callback" ] ``` - JavaScript ```js import { WorkerEntrypoint } from "cloudflare:workers"; export default class extends WorkerEntrypoint { async fetch(request) { // The only thing this Worker script does is handle an OAuth callback. // All other requests either serve an asset that matches or serve the index.html fallback, without ever hitting this code. const url = new URL(request.url); const code = url.searchParams.get("code"); const state = url.searchParams.get("state"); const accessToken = await exchangeCodeForToken(code, state); const sessionIdentifier = await storeTokenAndGenerateSession(accessToken); // Redirect back to the index, but set a cookie that the front-end will use. return new Response(null, { headers: { Location: "/", "Set-Cookie": `session_token=${sessionIdentifier}; HttpOnly; Secure; SameSite=Lax; Path=/`, }, }); } } ``` - TypeScript ```ts import { WorkerEntrypoint } from "cloudflare:workers"; export default class extends WorkerEntrypoint { async fetch(request: Request) { // The only thing this Worker script does is handle an OAuth callback. // All other requests either serve an asset that matches or serve the index.html fallback, without ever hitting this code. const url = new URL(request.url); const code = url.searchParams.get("code"); const state = url.searchParams.get("state"); const accessToken = await exchangeCodeForToken(code, state); const sessionIdentifier = await storeTokenAndGenerateSession(accessToken); // Redirect back to the index, but set a cookie that the front-end will use. return new Response(null, { headers: { "Location": "/", "Set-Cookie": `session_token=${sessionIdentifier}; HttpOnly; Secure; SameSite=Lax; Path=/` } }); } } ``` --- title: Analytics Engine · Cloudflare Workers docs description: Write high-cardinality data and metrics at scale, directly from Workers. lastUpdated: 2024-08-13T19:56:56.000Z chatbotDeprioritize: false source_url: html: https://developers.cloudflare.com/workers/runtime-apis/bindings/analytics-engine/ md: https://developers.cloudflare.com/workers/runtime-apis/bindings/analytics-engine/index.md --- --- title: Assets · Cloudflare Workers docs description: APIs available in Cloudflare Workers to interact with a collection of static assets. Static assets can be uploaded as part of your Worker. lastUpdated: 2024-09-26T06:18:51.000Z chatbotDeprioritize: false source_url: html: https://developers.cloudflare.com/workers/runtime-apis/bindings/assets/ md: https://developers.cloudflare.com/workers/runtime-apis/bindings/assets/index.md --- --- title: Browser Rendering · Cloudflare Workers docs description: Programmatically control and interact with a headless browser instance. lastUpdated: 2024-08-13T19:56:56.000Z chatbotDeprioritize: false source_url: html: https://developers.cloudflare.com/workers/runtime-apis/bindings/browser-rendering/ md: https://developers.cloudflare.com/workers/runtime-apis/bindings/browser-rendering/index.md --- --- title: AI · Cloudflare Workers docs description: Run generative AI inference and machine learning models on GPUs, without managing servers or infrastructure. lastUpdated: 2024-08-13T19:56:56.000Z chatbotDeprioritize: false source_url: html: https://developers.cloudflare.com/workers/runtime-apis/bindings/ai/ md: https://developers.cloudflare.com/workers/runtime-apis/bindings/ai/index.md --- --- title: D1 · Cloudflare Workers docs description: APIs available in Cloudflare Workers to interact with D1. D1 is Cloudflare's native serverless database. lastUpdated: 2024-12-11T09:43:45.000Z chatbotDeprioritize: false source_url: html: https://developers.cloudflare.com/workers/runtime-apis/bindings/d1/ md: https://developers.cloudflare.com/workers/runtime-apis/bindings/d1/index.md --- --- title: Dispatcher (Workers for Platforms) · Cloudflare Workers docs description: Let your customers deploy their own code to your platform, and dynamically dispatch requests from your Worker to their Worker. lastUpdated: 2024-08-13T19:56:56.000Z chatbotDeprioritize: false source_url: html: https://developers.cloudflare.com/workers/runtime-apis/bindings/dispatcher/ md: https://developers.cloudflare.com/workers/runtime-apis/bindings/dispatcher/index.md --- --- title: Durable Objects · Cloudflare Workers docs description: A globally distributed coordination API with strongly consistent storage. lastUpdated: 2024-08-13T19:56:56.000Z chatbotDeprioritize: false source_url: html: https://developers.cloudflare.com/workers/runtime-apis/bindings/durable-objects/ md: https://developers.cloudflare.com/workers/runtime-apis/bindings/durable-objects/index.md --- --- title: Environment Variables · Cloudflare Workers docs description: Add string and JSON values to your Worker. lastUpdated: 2024-08-13T19:56:56.000Z chatbotDeprioritize: false source_url: html: https://developers.cloudflare.com/workers/runtime-apis/bindings/environment-variables/ md: https://developers.cloudflare.com/workers/runtime-apis/bindings/environment-variables/index.md --- --- title: Hyperdrive · Cloudflare Workers docs description: Connect to your existing database from Workers, turning your existing regional database into a globally distributed database. lastUpdated: 2024-08-13T19:56:56.000Z chatbotDeprioritize: false source_url: html: https://developers.cloudflare.com/workers/runtime-apis/bindings/hyperdrive/ md: https://developers.cloudflare.com/workers/runtime-apis/bindings/hyperdrive/index.md --- --- title: Images · Cloudflare Workers docs description: Store, transform, optimize, and deliver images at scale. lastUpdated: 2025-03-27T15:34:04.000Z chatbotDeprioritize: false source_url: html: https://developers.cloudflare.com/workers/runtime-apis/bindings/images/ md: https://developers.cloudflare.com/workers/runtime-apis/bindings/images/index.md --- --- title: mTLS · Cloudflare Workers docs description: Configure your Worker to present a client certificate to services that enforce an mTLS connection. lastUpdated: 2025-02-11T10:50:09.000Z chatbotDeprioritize: false source_url: html: https://developers.cloudflare.com/workers/runtime-apis/bindings/mtls/ md: https://developers.cloudflare.com/workers/runtime-apis/bindings/mtls/index.md --- When using [HTTPS](https://www.cloudflare.com/learning/ssl/what-is-https/), a server presents a certificate for the client to authenticate in order to prove their identity. For even tighter security, some services require that the client also present a certificate. This process - known as [mTLS](https://www.cloudflare.com/learning/access-management/what-is-mutual-tls/) - moves authentication to the protocol of TLS, rather than managing it in application code. Connections from unauthorized clients are rejected during the TLS handshake instead. To present a client certificate when communicating with a service, create a mTLS certificate [binding](https://developers.cloudflare.com/workers/runtime-apis/bindings/) in your Worker project's Wrangler file. This will allow your Worker to present a client certificate to a service on your behalf. Warning Currently, mTLS for Workers cannot be used for requests made to a service that is a [proxied zone](https://developers.cloudflare.com/dns/proxy-status/) on Cloudflare. If your Worker presents a client certificate to a service proxied by Cloudflare, Cloudflare will return a `520` error. First, upload a certificate and its private key to your account using the [`wrangler mtls-certificate`](https://developers.cloudflare.com/workers/wrangler/commands/#mtls-certificate) command: Warning The `wrangler mtls-certificate upload` command requires the [SSL and Certificates Edit API token scope](https://developers.cloudflare.com/fundamentals/api/reference/permissions/). If you are using the OAuth flow triggered by `wrangler login`, the correct scope is set automatically. If you are using API tokens, refer to [Create an API token](https://developers.cloudflare.com/fundamentals/api/get-started/create-token/) to set the right scope for your API token. ```sh npx wrangler mtls-certificate upload --cert cert.pem --key key.pem --name my-client-cert ``` Then, update your Worker project's Wrangler file to create an mTLS certificate binding: * wrangler.jsonc ```jsonc { "mtls_certificates": [ { "binding": "MY_CERT", "certificate_id": "" } ] } ``` * wrangler.toml ```toml mtls_certificates = [ { binding = "MY_CERT", certificate_id = "" } ] ``` Note Certificate IDs are displayed after uploading, and can also be viewed with the command `wrangler mtls-certificate list`. Adding an mTLS certificate binding includes a variable in the Worker's environment on which the `fetch()` method is available. This `fetch()` method uses the standard [Fetch](https://developers.cloudflare.com/workers/runtime-apis/fetch/) API and has the exact same signature as the global `fetch`, but always presents the client certificate when establishing the TLS connection. Note mTLS certificate bindings present an API similar to [service bindings](https://developers.cloudflare.com/workers/runtime-apis/bindings/service-bindings). ### Interface * JavaScript ```js export default { async fetch(request, environment) { return await environment.MY_CERT.fetch("https://a-secured-origin.com"); }, }; ``` * TypeScript ```js interface Env { MY_CERT: Fetcher; } export default { async fetch(request, environment): Promise { return await environment.MY_CERT.fetch("https://a-secured-origin.com") } } satisfies ExportedHandler; ``` --- title: Queues · Cloudflare Workers docs description: Send and receive messages with guaranteed delivery. lastUpdated: 2024-08-13T19:56:56.000Z chatbotDeprioritize: false source_url: html: https://developers.cloudflare.com/workers/runtime-apis/bindings/queues/ md: https://developers.cloudflare.com/workers/runtime-apis/bindings/queues/index.md --- --- title: R2 · Cloudflare Workers docs description: APIs available in Cloudflare Workers to read from and write to R2 buckets. R2 is S3-compatible, zero egress-fee, globally distributed object storage. lastUpdated: 2024-08-13T19:56:56.000Z chatbotDeprioritize: false source_url: html: https://developers.cloudflare.com/workers/runtime-apis/bindings/r2/ md: https://developers.cloudflare.com/workers/runtime-apis/bindings/r2/index.md --- --- title: KV · Cloudflare Workers docs description: Global, low-latency, key-value data storage. lastUpdated: 2024-08-13T19:56:56.000Z chatbotDeprioritize: false source_url: html: https://developers.cloudflare.com/workers/runtime-apis/bindings/kv/ md: https://developers.cloudflare.com/workers/runtime-apis/bindings/kv/index.md --- --- title: Rate Limiting · Cloudflare Workers docs description: Define rate limits and interact with them directly from your Cloudflare Worker lastUpdated: 2025-01-29T12:28:42.000Z chatbotDeprioritize: false source_url: html: https://developers.cloudflare.com/workers/runtime-apis/bindings/rate-limit/ md: https://developers.cloudflare.com/workers/runtime-apis/bindings/rate-limit/index.md --- The Rate Limiting API lets you define rate limits and write code around them in your Worker. You can use it to enforce: * Rate limits that are applied after your Worker starts, only once a specific part of your code is reached * Different rate limits for different types of customers or users (ex: free vs. paid) * Resource-specific or path-specific limits (ex: limit per API route) * Any combination of the above The Rate Limiting API is backed by the same infrastructure that serves the [Rate limiting rules](https://developers.cloudflare.com/waf/rate-limiting-rules/) that are built into the [Cloudflare Web Application Firewall (WAF)](https://developers.cloudflare.com/waf/). The Rate Limiting API is in open beta * You must use version 3.45.0 or later of the [Wrangler CLI](https://developers.cloudflare.com/workers/wrangler) We want your feedback. Tell us what you'd like to see in the [#workers-discussions](https://discord.com/channels/595317990191398933/779390076219686943) or [#workers-help](https://discord.com/channels/595317990191398933/1052656806058528849) channels of the [Cloudflare Developers Discord](https://discord.cloudflare.com/). You can find the an archive of the previous discussion in [#rate-limiting-beta](https://discord.com/channels/595317990191398933/1225429769219211436) ## Get started First, add a [binding](https://developers.cloudflare.com/workers/runtime-apis/bindings) to your Worker that gives it access to the Rate Limiting API: * wrangler.jsonc ```jsonc { "main": "src/index.js", "unsafe": { "bindings": [ { "name": "MY_RATE_LIMITER", "type": "ratelimit", "namespace_id": "1001", "simple": { "limit": 100, "period": 60 } } ] } } ``` * wrangler.toml ```toml main = "src/index.js" # The rate limiting API is in open beta. [[unsafe.bindings]] name = "MY_RATE_LIMITER" type = "ratelimit" # An identifier you define, that is unique to your Cloudflare account. # Must be an integer. namespace_id = "1001" # Limit: the number of tokens allowed within a given period in a single # Cloudflare location # Period: the duration of the period, in seconds. Must be either 10 or 60 simple = { limit = 100, period = 60 } ``` This binding makes the `MY_RATE_LIMITER` binding available, which provides a `limit()` method: * JavaScript ```javascript export default { async fetch(request, env) { const { pathname } = new URL(request.url) const { success } = await env.MY_RATE_LIMITER.limit({ key: pathname }) // key can be any string of your choosing if (!success) { return new Response(`429 Failure – rate limit exceeded for ${pathname}`, { status: 429 }) } return new Response(`Success!`) } } ``` * TypeScript ```ts interface Env { MY_RATE_LIMITER: any; } export default { async fetch(request, env): Promise { const { pathname } = new URL(request.url) const { success } = await env.MY_RATE_LIMITER.limit({ key: pathname }) // key can be any string of your choosing if (!success) { return new Response(`429 Failure – rate limit exceeded for ${pathname}`, { status: 429 }) } return new Response(`Success!`) } } satisfies ExportedHandler; ``` The `limit()` API accepts a single argument — a configuration object with the `key` field. * The key you provide can be any `string` value. * A common pattern is to define your key by combining a string that uniquely identifies the actor initiating the request (ex: a user ID or customer ID) and a string that identifies a specific resource (ex: a particular API route). You can define and configure multiple rate limiting configurations per Worker, which allows you to define different limits against incoming request and/or user parameters as needed to protect your application or upstream APIs. For example, here is how you can define two rate limiting configurations for free and paid tier users: * wrangler.jsonc ```jsonc { "main": "src/index.js", "unsafe": { "bindings": [ { "name": "FREE_USER_RATE_LIMITER", "type": "ratelimit", "namespace_id": "1001", "simple": { "limit": 100, "period": 60 } }, { "name": "PAID_USER_RATE_LIMITER", "type": "ratelimit", "namespace_id": "1002", "simple": { "limit": 1000, "period": 60 } } ] } } ``` * wrangler.toml ```toml main = "src/index.js" # Free user rate limiting [[unsafe.bindings]] name = "FREE_USER_RATE_LIMITER" type = "ratelimit" namespace_id = "1001" simple = { limit = 100, period = 60 } # Paid user rate limiting [[unsafe.bindings]] name = "PAID_USER_RATE_LIMITER" type = "ratelimit" namespace_id = "1002" simple = { limit = 1000, period = 60 } ``` ## Configuration A rate limiting binding has three settings: 1. `namespace_id` (number) - a positive integer that uniquely defines this rate limiting configuration - e.g. `namespace_id = "999"`. 2. `limit` (number) - the limit (number of requests, number of API calls) to be applied. This is incremented when you call the `limit()` function in your Worker. 3. `period` (seconds) - must be `10` or `60`. The period to measure increments to the `limit` over, in seconds. For example, to apply a rate limit of 1500 requests per minute, you would define a rate limiting configuration as follows: * wrangler.jsonc ```jsonc { "unsafe": { "bindings": [ { "name": "MY_RATE_LIMITER", "type": "ratelimit", "namespace_id": "1001", "simple": { "limit": 1500, "period": 60 } } ] } } ``` * wrangler.toml ```toml [[unsafe.bindings]] name = "MY_RATE_LIMITER" type = "ratelimit" namespace_id = "1001" # 1500 requests - calls to limit() increment this simple = { limit = 1500, period = 60 } ``` ## Best practices The `key` passed to the `limit` function, that determines what to rate limit on, should represent a unique characteristic of a user or class of user that you wish to rate limit. * Good choices include API keys in `Authorization` HTTP headers, URL paths or routes, specific query parameters used by your application, and/or user IDs and tenant IDs. These are all stable identifiers and are unlikely to change from request-to-request. * It is not recommended to use IP addresses or locations (regions or countries), since these can be shared by many users in many valid cases. You may find yourself unintentionally rate limiting a wider group of users than you intended by rate limiting on these keys. ```ts // Recommended: use a key that represents a specific user or class of user const url = new URL(req.url) const userId = url.searchParams.get("userId") || "" const { success } = await env.MY_RATE_LIMITER.limit({ key: userId }) // Not recommended: many users may share a single IP, especially on mobile networks // or when using privacy-enabling proxies const ipAddress = req.headers.get("cf-connecting-ip") || "" const { success } = await env.MY_RATE_LIMITER.limit({ key: ipAddress }) ``` ## Locality Rate limits that you define and enforce in your Worker are local to the [Cloudflare location](https://www.cloudflare.com/network/) that your Worker runs in. For example, if a request comes in from Sydney, Australia, to the Worker shown above, after 100 requests in a 60 second window, any further requests for a particular path would be rejected, and a 429 HTTP status code returned. But this would only apply to requests served in Sydney. For each unique key you pass to your rate limiting binding, there is a unique limit per Cloudflare location. ## Performance The Rate Limiting API in Workers is designed to be fast. The underlying counters are cached on the same machine that your Worker runs in, and updated asynchronously in the background by communicating with a backing store that is within the same Cloudflare location. This means that while in your code you `await` a call to the `limit()` method: ```javascript const { success } = await env.MY_RATE_LIMITER.limit({ key: customerId }) ``` You are not waiting on a network request. You can use the Rate Limiting API without introducing any meaningful latency to your Worker. ## Accuracy The above also means that the Rate Limiting API is permissive, eventually consistent, and intentionally designed to not be used as an accurate accounting system. For example, if many requests come in to your Worker in a single Cloudflare location, all rate limited on the same key, the [isolate](https://developers.cloudflare.com/workers/reference/how-workers-works) that serves each request will check against its locally cached value of the rate limit. Very quickly, but not immediately, these requests will count towards the rate limit within that Cloudflare location. ## Examples * [`@elithrar/workers-hono-rate-limit`](https://github.com/elithrar/workers-hono-rate-limit) — Middleware that lets you easily add rate limits to routes in your [Hono](https://hono.dev/) application. * [`@hono-rate-limiter/cloudflare`](https://github.com/rhinobase/hono-rate-limiter) — Middleware that lets you easily add rate limits to routes in your [Hono](https://hono.dev/) application, with multiple data stores to choose from. --- title: Secrets · Cloudflare Workers docs description: Add encrypted secrets to your Worker. lastUpdated: 2024-08-13T19:56:56.000Z chatbotDeprioritize: false source_url: html: https://developers.cloudflare.com/workers/runtime-apis/bindings/secrets/ md: https://developers.cloudflare.com/workers/runtime-apis/bindings/secrets/index.md --- --- title: Secrets Store · Cloudflare Workers docs description: Account-level secrets that can be added to Workers applications as a binding. lastUpdated: 2025-06-20T13:44:20.000Z chatbotDeprioritize: false source_url: html: https://developers.cloudflare.com/workers/runtime-apis/bindings/secrets-store/ md: https://developers.cloudflare.com/workers/runtime-apis/bindings/secrets-store/index.md --- --- title: Service bindings - Runtime APIs · Cloudflare Workers docs description: Facilitate Worker-to-Worker communication. lastUpdated: 2025-03-24T09:25:44.000Z chatbotDeprioritize: false source_url: html: https://developers.cloudflare.com/workers/runtime-apis/bindings/service-bindings/ md: https://developers.cloudflare.com/workers/runtime-apis/bindings/service-bindings/index.md --- ## About Service bindings Service bindings allow one Worker to call into another, without going through a publicly-accessible URL. A Service binding allows Worker A to call a method on Worker B, or to forward a request from Worker A to Worker B. Service bindings provide the separation of concerns that microservice or service-oriented architectures provide, without configuration pain, performance overhead or need to learn RPC protocols. * **Service bindings are fast.** When you use Service Bindings, there is zero overhead or added latency. By default, both Workers run on the same thread of the same Cloudflare server. And when you enable [Smart Placement](https://developers.cloudflare.com/workers/configuration/smart-placement/), each Worker runs in the optimal location for overall performance. * **Service bindings are not just HTTP.** Worker A can expose methods that can be directly called by Worker B. Communicating between services only requires writing JavaScript methods and classes. * **Service bindings don't increase costs.** You can split apart functionality into multiple Workers, without incurring additional costs. Learn more about [pricing for Service Bindings](https://developers.cloudflare.com/workers/platform/pricing/#service-bindings). ![Service bindings are a zero-cost abstraction](https://developers.cloudflare.com/_astro/service-bindings-comparison.CeB5uD1k_Z2t71S1.webp) Service bindings are commonly used to: * **Provide a shared internal service to multiple Workers.** For example, you can deploy an authentication service as its own Worker, and then have any number of separate Workers communicate with it via Service bindings. * **Isolate services from the public Internet.** You can deploy a Worker that is not reachable via the public Internet, and can only be reached via an explicit Service binding that another Worker declares. * **Allow teams to deploy code independently.** Team A can deploy their Worker on their own release schedule, and Team B can deploy their Worker separately. ## Configuration You add a Service binding by modifying the [Wrangler configuration file](https://developers.cloudflare.com/workers/wrangler/configuration/) of the caller — the Worker that you want to be able to initiate requests. For example, if you want Worker A to be able to call Worker B — you'd add the following to the [Wrangler configuration file](https://developers.cloudflare.com/workers/wrangler/configuration/) for Worker A: * wrangler.jsonc ```jsonc { "services": [ { "binding": "", "service": "" } ] } ``` * wrangler.toml ```toml services = [ { binding = "", service = "" } ] ``` - `binding`: The name of the key you want to expose on the `env` object. - `service`: The name of the target Worker you would like to communicate with. This Worker must be on your Cloudflare account. ## Interfaces Worker A that declares a Service binding to Worker B can call Worker B in two different ways: 1. [RPC](https://developers.cloudflare.com/workers/runtime-apis/bindings/service-bindings/rpc) lets you communicate between Workers using function calls that you define. For example, `await env.BINDING_NAME.myMethod(arg1)`. This is recommended for most use cases, and allows you to create your own internal APIs that your Worker makes available to other Workers. 2. [HTTP](https://developers.cloudflare.com/workers/runtime-apis/bindings/service-bindings/http) lets you communicate between Workers by calling the [`fetch()` handler](https://developers.cloudflare.com/workers/runtime-apis/handlers/fetch) from other Workers, sending `Request` objects and receiving `Response` objects back. For example, `env.BINDING_NAME.fetch(request)`. ## Example — build your first Service binding using RPC This example [extends the `WorkerEntrypoint` class](https://developers.cloudflare.com/workers/runtime-apis/bindings/service-bindings/rpc/#the-workerentrypoint-class) to support RPC-based Service bindings. First, create the Worker that you want to communicate with. Let's call this "Worker B". Worker B exposes the public method, `add(a, b)`: * wrangler.jsonc ```jsonc { "name": "worker_b", "main": "./src/workerB.js" } ``` * wrangler.toml ```toml name = "worker_b" main = "./src/workerB.js" ``` ```js import { WorkerEntrypoint } from "cloudflare:workers"; export default class WorkerB extends WorkerEntrypoint { // Currently, entrypoints without a named handler are not supported async fetch() { return new Response(null, {status: 404}); } async add(a, b) { return a + b; } } ``` Next, create the Worker that will call Worker B. Let's call this "Worker A". Worker A declares a binding to Worker B. This is what gives it permission to call public methods on Worker B. * wrangler.jsonc ```jsonc { "name": "worker_a", "main": "./src/workerA.js", "services": [ { "binding": "WORKER_B", "service": "worker_b" } ] } ``` * wrangler.toml ```toml name = "worker_a" main = "./src/workerA.js" services = [ { binding = "WORKER_B", service = "worker_b" } ] ``` ```js export default { async fetch(request, env) { const result = await env.WORKER_B.add(1, 2); return new Response(result); } } ``` To run both Worker A and Worker B in local development, you must run two instances of [Wrangler](https://developers.cloudflare.com/workers/wrangler) in your terminal. For each Worker, open a new terminal and run [`npx wrangler@latest dev`](https://developers.cloudflare.com/workers/wrangler/commands#dev). Each Worker is deployed separately. ## Lifecycle The Service bindings API is asynchronous — you must `await` any method you call. If Worker A invokes Worker B via a Service binding, and Worker A does not await the completion of Worker B, Worker B will be terminated early. For more about the lifecycle of calling a Worker over a Service Binding via RPC, refer to the [RPC Lifecycle](https://developers.cloudflare.com/workers/runtime-apis/rpc/lifecycle) docs. ## Local development Local development is supported for Service bindings. For each Worker, open a new terminal and use [`wrangler dev`](https://developers.cloudflare.com/workers/wrangler/commands/#dev) in the relevant directory. When running `wrangler dev`, service bindings will show as `connected`/`not connected` depending on whether Wrangler can find a running `wrangler dev` session for that Worker. For example: ```sh $ wrangler dev ... Your worker has access to the following bindings: - Services: - SOME_OTHER_WORKER: some-other-worker [connected] - ANOTHER_WORKER: another-worker [not connected] ``` Wrangler also supports running multiple Workers at once with one command. To try it out, pass multiple `-c` flags to Wrangler, like this: `wrangler dev -c wrangler.json -c ../other-worker/wrangler.json`. The first config will be treated as the *primary* worker, which will be exposed over HTTP as usual at `http://localhost:8787`. The remaining config files will be treated as *secondary* and will only be accessible via a service binding from the primary worker. Warning Support for running multiple Workers at once with one Wrangler command is experimental, and subject to change as we work on the experience. If you run into bugs or have any feedback, [open an issue on the workers-sdk repository](https://github.com/cloudflare/workers-sdk/issues/new) ## Deployment Workers using Service bindings are deployed separately. When getting started and deploying for the first time, this means that the target Worker (Worker B in the examples above) must be deployed first, before Worker A. Otherwise, when you attempt to deploy Worker A, deployment will fail, because Worker A declares a binding to Worker B, which does not yet exist. When making changes to existing Workers, in most cases you should: * Deploy changes to Worker B first, in a way that is compatible with the existing Worker A. For example, add a new method to Worker B. * Next, deploy changes to Worker A. For example, call the new method on Worker B, from Worker A. * Finally, remove any unused code. For example, delete the previously used method on Worker B. ## Smart Placement [Smart Placement](https://developers.cloudflare.com/workers/configuration/smart-placement) automatically places your Worker in an optimal location that minimizes latency. You can use Smart Placement together with Service bindings to split your Worker into two services: ![Smart Placement and Service Bindings](https://developers.cloudflare.com/_astro/smart-placement-service-bindings.Ce58BYeF_1YYSoG.webp) Refer to the [docs on Smart Placement](https://developers.cloudflare.com/workers/configuration/smart-placement/#best-practices) for more. ## Limits Service bindings have the following limits: * Each request to a Worker via a Service binding counts toward your [subrequest limit](https://developers.cloudflare.com/workers/platform/limits/#subrequests). * A single request has a maximum of 32 Worker invocations, and each call to a Service binding counts towards this limit. Subsequent calls will throw an exception. * Calling a service binding does not count towards [simultaneous open connection limits](https://developers.cloudflare.com/workers/platform/limits/#simultaneous-open-connections) --- title: Tail Workers · Cloudflare Workers docs description: Receive and transform logs, exceptions, and other metadata. Then forward them to observability tools for alerting, debugging, and analytics purposes. lastUpdated: 2024-09-26T09:08:34.000Z chatbotDeprioritize: false source_url: html: https://developers.cloudflare.com/workers/runtime-apis/bindings/tail-worker/ md: https://developers.cloudflare.com/workers/runtime-apis/bindings/tail-worker/index.md --- --- title: Vectorize · Cloudflare Workers docs description: APIs available in Cloudflare Workers to interact with Vectorize. Vectorize is Cloudflare's globally distributed vector database. lastUpdated: 2024-08-13T19:56:56.000Z chatbotDeprioritize: false source_url: html: https://developers.cloudflare.com/workers/runtime-apis/bindings/vectorize/ md: https://developers.cloudflare.com/workers/runtime-apis/bindings/vectorize/index.md --- --- title: Version metadata binding · Cloudflare Workers docs description: Exposes Worker version metadata (`versionID` and `versionTag`). These fields can be added to events emitted from the Worker to send to downstream observability systems. lastUpdated: 2025-01-29T12:28:42.000Z chatbotDeprioritize: false source_url: html: https://developers.cloudflare.com/workers/runtime-apis/bindings/version-metadata/ md: https://developers.cloudflare.com/workers/runtime-apis/bindings/version-metadata/index.md --- The version metadata binding can be used to access metadata associated with a [version](https://developers.cloudflare.com/workers/configuration/versions-and-deployments/#versions) from inside the Workers runtime. Worker version ID, version tag and timestamp of when the version was created are available through the version metadata binding. They can be used in events sent to [Workers Analytics Engine](https://developers.cloudflare.com/analytics/analytics-engine/) or to any third-party analytics/metrics service in order to aggregate by Worker version. To use the version metadata binding, update your Worker's Wrangler file: * wrangler.jsonc ```jsonc { "version_metadata": { "binding": "CF_VERSION_METADATA" } } ``` * wrangler.toml ```toml [version_metadata] binding = "CF_VERSION_METADATA" ``` ### Interface An example of how to access the version ID and version tag from within a Worker to send events to [Workers Analytics Engine](https://developers.cloudflare.com/analytics/analytics-engine/): * JavaScript ```js export default { async fetch(request, env, ctx) { const { id: versionId, tag: versionTag, timestamp: versionTimestamp } = env.CF_VERSION_METADATA; env.WAE.writeDataPoint({ indexes: [versionId], blobs: [versionTag, versionTimestamp], //... }); //... }, }; ``` * TypeScript ```ts interface Environment { CF_VERSION_METADATA: WorkerVersionMetadata; WAE: AnalyticsEngineDataset; } export default { async fetch(request, env, ctx) { const { id: versionId, tag: versionTag } = env.CF_VERSION_METADATA; env.WAE.writeDataPoint({ indexes: [versionId], blobs: [versionTag], //... }); //... }, } satisfies ExportedHandler; ``` --- title: Workflows · Cloudflare Workers docs description: APIs available in Cloudflare Workers to interact with Workflows. Workflows allow you to build durable, multi-step applications using Workers. lastUpdated: 2024-10-24T11:52:00.000Z chatbotDeprioritize: false source_url: html: https://developers.cloudflare.com/workers/runtime-apis/bindings/workflows/ md: https://developers.cloudflare.com/workers/runtime-apis/bindings/workflows/index.md --- --- title: Alarm Handler · Cloudflare Workers docs lastUpdated: 2024-08-13T19:56:56.000Z chatbotDeprioritize: false source_url: html: https://developers.cloudflare.com/workers/runtime-apis/handlers/alarm/ md: https://developers.cloudflare.com/workers/runtime-apis/handlers/alarm/index.md --- --- title: Email Handler · Cloudflare Workers docs lastUpdated: 2024-08-13T19:56:56.000Z chatbotDeprioritize: false source_url: html: https://developers.cloudflare.com/workers/runtime-apis/handlers/email/ md: https://developers.cloudflare.com/workers/runtime-apis/handlers/email/index.md --- --- title: Fetch Handler · Cloudflare Workers docs description: "Incoming HTTP requests to a Worker are passed to the fetch() handler as a Request object. To respond to the request with a response, return a Response object:" lastUpdated: 2024-08-13T19:56:56.000Z chatbotDeprioritize: false source_url: html: https://developers.cloudflare.com/workers/runtime-apis/handlers/fetch/ md: https://developers.cloudflare.com/workers/runtime-apis/handlers/fetch/index.md --- ## Background Incoming HTTP requests to a Worker are passed to the `fetch()` handler as a [`Request`](https://developers.cloudflare.com/workers/runtime-apis/request/) object. To respond to the request with a response, return a [`Response`](https://developers.cloudflare.com/workers/runtime-apis/response/) object: ```js export default { async fetch(request, env, ctx) { return new Response('Hello World!'); }, }; ``` Note The Workers runtime does not support `XMLHttpRequest` (XHR). Learn the difference between `XMLHttpRequest` and `fetch()` in the [MDN](https://developer.mozilla.org/en-US/docs/Web/API/XMLHttpRequest) documentation. ### Parameters * `request` Request * The incoming HTTP request. * `env` object * The [bindings](https://developers.cloudflare.com/workers/configuration/environment-variables/) available to the Worker. As long as the [environment](https://developers.cloudflare.com/workers/wrangler/environments/) has not changed, the same object (equal by identity) may be passed to multiple requests. * `ctx.waitUntil(promisePromise)` : void * Refer to [`waitUntil`](https://developers.cloudflare.com/workers/runtime-apis/context/#waituntil). * `ctx.passThroughOnException()` : void * Refer to [`passThroughOnException`](https://developers.cloudflare.com/workers/runtime-apis/context/#passthroughonexception). --- title: Queue Handler · Cloudflare Workers docs lastUpdated: 2024-08-13T19:56:56.000Z chatbotDeprioritize: false source_url: html: https://developers.cloudflare.com/workers/runtime-apis/handlers/queue/ md: https://developers.cloudflare.com/workers/runtime-apis/handlers/queue/index.md --- --- title: Scheduled Handler · Cloudflare Workers docs description: When a Worker is invoked via a Cron Trigger, the scheduled() handler handles the invocation. lastUpdated: 2025-04-23T17:44:20.000Z chatbotDeprioritize: false source_url: html: https://developers.cloudflare.com/workers/runtime-apis/handlers/scheduled/ md: https://developers.cloudflare.com/workers/runtime-apis/handlers/scheduled/index.md --- ## Background When a Worker is invoked via a [Cron Trigger](https://developers.cloudflare.com/workers/configuration/cron-triggers/), the `scheduled()` handler handles the invocation. Testing scheduled() handlers in local development You can test the behavior of your `scheduled()` handler in local development using Wrangler. Cron Triggers can be tested using `Wrangler` by passing in the `--test-scheduled` flag to [`wrangler dev`](https://developers.cloudflare.com/workers/wrangler/commands/#dev). This will expose a `/__scheduled` (or `/cdn-cgi/handler/scheduled` for Python Workers) route which can be used to test using a http request. To simulate different cron patterns, a `cron` query parameter can be passed in. ```sh npx wrangler dev --test-scheduled curl "http://localhost:8787/__scheduled?cron=*+*+*+*+*" curl "http://localhost:8787/cdn-cgi/handler/scheduled?cron=*+*+*+*+*" # Python Workers ``` *** ## Syntax * JavaScript ```js export default { async scheduled(controller, env, ctx) { ctx.waitUntil(doSomeTaskOnASchedule()); }, }; ``` * TypeScript ```ts interface Env {} export default { async scheduled( controller: ScheduledController, env: Env, ctx: ExecutionContext, ) { ctx.waitUntil(doSomeTaskOnASchedule()); }, }; ``` * Python ```python from workers import handler @handler async def on_scheduled(controller, env, ctx): ctx.waitUntil(doSomeTaskOnASchedule()) ``` ### Properties * `controller.cron` string * The value of the [Cron Trigger](https://developers.cloudflare.com/workers/configuration/cron-triggers/) that started the `ScheduledEvent`. * `controller.type` string * The type of event. This will always return `"scheduled"`. * `controller.scheduledTime` number * The time the `ScheduledEvent` was scheduled to be executed in milliseconds since January 1, 1970, UTC. It can be parsed as `new Date(event.scheduledTime)`. * `env` object * An object containing the bindings associated with your Worker using ES modules format, such as KV namespaces and Durable Objects. * `ctx` object * An object containing the context associated with your Worker using ES modules format. Currently, this object just contains the `waitUntil` function. ### Methods When a Workers script is invoked by a [Cron Trigger](https://developers.cloudflare.com/workers/configuration/cron-triggers/), the Workers runtime starts a `ScheduledEvent` which will be handled by the `scheduled` function in your Workers Module class. The `ctx` argument represents the context your function runs in, and contains the following methods to control what happens next: * `ctx.waitUntil(promisePromise)` : void * Use this method to notify the runtime to wait for asynchronous tasks (for example, logging, analytics to third-party services, streaming and caching). The first `ctx.waitUntil` to fail will be observed and recorded as the status in the [Cron Trigger](https://developers.cloudflare.com/workers/configuration/cron-triggers/) Past Events table. Otherwise, it will be reported as a success. --- title: Tail Handler · Cloudflare Workers docs description: The tail() handler is the handler you implement when writing a Tail Worker. Tail Workers can be used to process logs in real-time and send them to a logging or analytics service. lastUpdated: 2025-02-24T15:56:47.000Z chatbotDeprioritize: false source_url: html: https://developers.cloudflare.com/workers/runtime-apis/handlers/tail/ md: https://developers.cloudflare.com/workers/runtime-apis/handlers/tail/index.md --- ## Background The `tail()` handler is the handler you implement when writing a [Tail Worker](https://developers.cloudflare.com/workers/observability/logs/tail-workers/). Tail Workers can be used to process logs in real-time and send them to a logging or analytics service. The `tail()` handler is called once each time the connected producer Worker is invoked. To configure a Tail Worker, refer to [Tail Workers documentation](https://developers.cloudflare.com/workers/observability/logs/tail-workers/). ## Syntax ```js export default { async tail(events, env, ctx) { fetch("", { method: "POST", body: JSON.stringify(events), }) } } ``` ### Parameters * `events` array * An array of [`TailItems`](https://developers.cloudflare.com/workers/runtime-apis/handlers/tail/#tailitems). One `TailItem` is collected for each event that triggers a Worker. For Workers for Platforms customers with a Tail Worker installed on the dynamic dispatch Worker, `events` will contain two elements: one for the dynamic dispatch Worker and one for the User Worker. * `env` object * An object containing the bindings associated with your Worker using [ES modules format](https://developers.cloudflare.com/workers/reference/migrate-to-module-workers/), such as KV namespaces and Durable Objects. * `ctx` object * An object containing the context associated with your Worker using [ES modules format](https://developers.cloudflare.com/workers/reference/migrate-to-module-workers/). Currently, this object just contains the `waitUntil` function. ### Properties * `event.type` string * The type of event. This will always return `"tail"`. * `event.traces` array * An array of [`TailItems`](https://developers.cloudflare.com/workers/runtime-apis/handlers/tail/#tailitems). One `TailItem` is collected for each event that triggers a Worker. For Workers for Platforms customers with a Tail Worker installed on the dynamic dispatch Worker, `events` will contain two elements: one for the dynamic dispatch Worker and one for the user Worker. * `event.waitUntil(promisePromise)` : void * Refer to [`waitUntil`](https://developers.cloudflare.com/workers/runtime-apis/context/#waituntil). Note that unlike fetch event handlers, tail handlers do not return a value, so this is the only way for trace Workers to do asynchronous work. ### `TailItems` #### Properties * `scriptName` string * The name of the producer script. * `event` object * Contains information about the Worker’s triggering event. * For fetch events: a [`FetchEventInfo` object](https://developers.cloudflare.com/workers/runtime-apis/handlers/tail/#fetcheventinfo) * For other event types: `null`, currently. * `eventTimestamp` number * Measured in epoch time. * `logs` array * An array of [TailLogs](https://developers.cloudflare.com/workers/runtime-apis/handlers/tail/#taillog). * `exceptions` array * An array of [`TailExceptions`](https://developers.cloudflare.com/workers/runtime-apis/handlers/tail/#tailexception). A single Worker invocation might result in multiple unhandled exceptions, since a Worker can register multiple asynchronous tasks. * `outcome` string * The outcome of the Worker invocation, one of: * `unknown`: outcome status was not set. * `ok`: The worker invocation succeeded. * `exception`: An unhandled exception was thrown. This can happen for many reasons, including: * An uncaught JavaScript exception. * A fetch handler that does not result in a Response. * An internal error. * `exceededCpu`: The Worker invocation exceeded either its CPU limits. * `exceededMemory`: The Worker invocation exceeded memory limits. * `scriptNotFound`: An internal error from difficulty retrieving the Worker script. * `canceled`: The worker invocation was canceled before it completed. Commonly because the client disconnected before a response could be sent. * `responseStreamDisconnected`: The response stream was disconnected during deferred proxying. Happens when either the client or server hangs up early. Outcome is not the same as HTTP status. Outcome is equivalent to the exit status of a script and an indicator of whether it has fully run to completion. A Worker outcome may differ from a response code if, for example: * a script successfully processes a request but is logically designed to return a `4xx`/`5xx` response. * a script sends a successful `200` response but an asynchronous task registered via `waitUntil()` later exceeds CPU or memory limits. ### `FetchEventInfo` #### Properties * `request` object * A [`TailRequest` object](https://developers.cloudflare.com/workers/runtime-apis/handlers/tail/#tailrequest). * `response` object * A [`TailResponse` object](https://developers.cloudflare.com/workers/runtime-apis/handlers/tail/#tailresponse). ### `TailRequest` #### Properties * `cf` object * Contains the data from [`IncomingRequestCfProperties`](https://developers.cloudflare.com/workers/runtime-apis/request/#incomingrequestcfproperties). * `headers` object * Header name/value entries (redacted by default). Header names are lowercased, and the values associated with duplicate header names are concatenated, with the string `", "` (comma space) interleaved, similar to [the Fetch standard](https://fetch.spec.whatwg.org/#concept-header-list-get). * `method` string * The HTTP request method. * `url` string * The HTTP request URL (redacted by default). #### Methods * `getUnredacted()` object * Returns a TailRequest object with unredacted properties Some of the properties of `TailRequest` are redacted by default to make it harder to accidentally record sensitive information, like user credentials or API tokens. The redactions use heuristic rules, so they are subject to false positives and negatives. Clients can call `getUnredacted()` to bypass redaction, but they should always be careful about what information is retained, whether using the redaction or not. * Header redaction: The header value will be the string `“REDACTED”` when the (case-insensitive) header name is `cookie`/`set-cookie` or contains a substring `"auth”`, `“key”`, `“secret”`, `“token”`, or `"jwt"`. * URL redaction: For each greedily matched substring of ID characters (a-z, A-Z, 0-9, '+', '-', '\_') in the URL, if it meets the following criteria for a hex or base-64 ID, the substring will be replaced with the string `“REDACTED”`. * Hex ID: Contains 32 or more hex digits, and contains only hex digits and separators ('+', '-', '\_') * Base-64 ID: Contains 21 or more characters, and contains at least two uppercase, two lowercase, and two digits. ### `TailResponse` #### Properties * `status` number * The HTTP status code. ### `TailLog` Records information sent to console functions. #### Properties * `timestamp` number * Measured in epoch time. * `level` string * A string indicating the console function that was called. One of: `debug`, `info`, `log`, `warn`, `error`. * `message` object * The array of parameters passed to the console function. ### `TailException` Records an unhandled exception that occurred during the Worker invocation. #### Properties * `timestamp` number * Measured in epoch time. * `name` string * The error type (For example,`Error`, `TypeError`, etc.). * `message` object * The error description (For example, `"x" is not a function`). ## Related resources * [Tail Workers](https://developers.cloudflare.com/workers/observability/logs/tail-workers/) - Configure a Tail Worker to receive information about the execution of other Workers. --- title: assert · Cloudflare Workers docs description: The assert module in Node.js provides a number of useful assertions that are useful when building tests. lastUpdated: 2025-01-28T22:36:08.000Z chatbotDeprioritize: false source_url: html: https://developers.cloudflare.com/workers/runtime-apis/nodejs/assert/ md: https://developers.cloudflare.com/workers/runtime-apis/nodejs/assert/index.md --- Note To enable built-in Node.js APIs and polyfills, add the nodejs\_compat compatibility flag to your [Wrangler configuration file](https://developers.cloudflare.com/workers/wrangler/configuration/). This also enables nodejs\_compat\_v2 as long as your compatibility date is 2024-09-23 or later. [Learn more about the Node.js compatibility flag and v2](https://developers.cloudflare.com/workers/configuration/compatibility-flags/#nodejs-compatibility-flag). The `assert` module in Node.js provides a number of useful assertions that are useful when building tests. ```js import { strictEqual, deepStrictEqual, ok, doesNotReject } from "node:assert"; strictEqual(1, 1); // ok! strictEqual(1, "1"); // fails! throws AssertionError deepStrictEqual({ a: { b: 1 } }, { a: { b: 1 } }); // ok! deepStrictEqual({ a: { b: 1 } }, { a: { b: 2 } }); // fails! throws AssertionError ok(true); // ok! ok(false); // fails! throws AssertionError await doesNotReject(async () => {}); // ok! await doesNotReject(async () => { throw new Error("boom"); }); // fails! throws AssertionError ``` Note In the Workers implementation of `assert`, all assertions run in, what Node.js calls, the strict assertion mode. In strict assertion mode, non-strict methods behave like their corresponding strict methods. For example, `deepEqual()` will behave like `deepStrictEqual()`. Refer to the [Node.js documentation for `assert`](https://nodejs.org/dist/latest-v19.x/docs/api/assert.html) for more information. --- title: AsyncLocalStorage · Cloudflare Workers docs description: Cloudflare Workers provides an implementation of a subset of the Node.js AsyncLocalStorage API for creating in-memory stores that remain coherent through asynchronous operations. lastUpdated: 2024-08-13T19:56:56.000Z chatbotDeprioritize: false source_url: html: https://developers.cloudflare.com/workers/runtime-apis/nodejs/asynclocalstorage/ md: https://developers.cloudflare.com/workers/runtime-apis/nodejs/asynclocalstorage/index.md --- ## Background Note To enable built-in Node.js APIs and polyfills, add the nodejs\_compat compatibility flag to your [Wrangler configuration file](https://developers.cloudflare.com/workers/wrangler/configuration/). This also enables nodejs\_compat\_v2 as long as your compatibility date is 2024-09-23 or later. [Learn more about the Node.js compatibility flag and v2](https://developers.cloudflare.com/workers/configuration/compatibility-flags/#nodejs-compatibility-flag). Cloudflare Workers provides an implementation of a subset of the Node.js [`AsyncLocalStorage`](https://nodejs.org/dist/latest-v18.x/docs/api/async_context.html#class-asynclocalstorage) API for creating in-memory stores that remain coherent through asynchronous operations. ## Constructor ```js import { AsyncLocalStorage } from 'node:async_hooks'; const asyncLocalStorage = new AsyncLocalStorage(); ``` * `new AsyncLocalStorage()` : AsyncLocalStorage * Returns a new `AsyncLocalStorage` instance. ## Methods * `getStore()` : any * Returns the current store. If called outside of an asynchronous context initialized by calling `asyncLocalStorage.run()`, it returns `undefined`. * `run(storeany, callbackfunction, ...argsarguments)` : any * Runs a function synchronously within a context and returns its return value. The store is not accessible outside of the callback function. The store is accessible to any asynchronous operations created within the callback. The optional `args` are passed to the callback function. If the callback function throws an error, the error is thrown by `run()` also. * `exit(callbackfunction, ...argsarguments)` : any * Runs a function synchronously outside of a context and returns its return value. This method is equivalent to calling `run()` with the `store` value set to `undefined`. ## Static Methods * `AsyncLocalStorage.bind(fn)` : function * Captures the asynchronous context that is current when `bind()` is called and returns a function that enters that context before calling the passed in function. * `AsyncLocalStorage.snapshot()` : function * Captures the asynchronous context that is current when `snapshot()` is called and returns a function that enters that context before calling a given function. ## Examples ### Fetch Listener ```js import { AsyncLocalStorage } from 'node:async_hooks'; const asyncLocalStorage = new AsyncLocalStorage(); let idSeq = 0; export default { async fetch(req) { return asyncLocalStorage.run(idSeq++, () => { // Simulate some async activity... await scheduler.wait(1000); return new Response(asyncLocalStorage.getStore()); }); } }; ``` ### Multiple stores The API supports multiple `AsyncLocalStorage` instances to be used concurrently. ```js import { AsyncLocalStorage } from 'node:async_hooks'; const als1 = new AsyncLocalStorage(); const als2 = new AsyncLocalStorage(); export default { async fetch(req) { return als1.run(123, () => { return als2.run(321, () => { // Simulate some async activity... await scheduler.wait(1000); return new Response(`${als1.getStore()}-${als2.getStore()}`); }); }); } }; ``` ### Unhandled Rejections When a `Promise` rejects and the rejection is unhandled, the async context propagates to the `'unhandledrejection'` event handler: ```js import { AsyncLocalStorage } from 'node:async_hooks'; const asyncLocalStorage = new AsyncLocalStorage(); let idSeq = 0; addEventListener('unhandledrejection', (event) => { console.log(asyncLocalStorage.getStore(), 'unhandled rejection!'); }); export default { async fetch(req) { return asyncLocalStorage.run(idSeq++, () => { // Cause an unhandled rejection! throw new Error('boom'); }); } }; ``` ### `AsyncLocalStorage.bind()` and `AsyncLocalStorage.snapshot()` ```js import { AsyncLocalStorage } from 'node:async_hooks'; const als = new AsyncLocalStorage(); function foo() { console.log(als.getStore()); } function bar() { console.log(als.getStore()); } const oneFoo = als.run(123, () => AsyncLocalStorage.bind(foo)); oneFoo(); // prints 123 const snapshot = als.run('abc', () => AsyncLocalStorage.snapshot()); snapshot(foo); // prints 'abc' snapshot(bar); // prints 'abc' ``` ```js import { AsyncLocalStorage } from 'node:async_hooks'; const als = new AsyncLocalStorage(); class MyResource { #runInAsyncScope = AsyncLocalStorage.snapshot(); doSomething() { this.#runInAsyncScope(() => { return als.getStore(); }); } }; const myResource = als.run(123, () => new MyResource()); console.log(myResource.doSomething()); // prints 123 ``` ## `AsyncResource` The [`AsyncResource`](https://nodejs.org/dist/latest-v18.x/docs/api/async_context.html#class-asyncresource) class is a component of Node.js' async context tracking API that allows users to create their own async contexts. Objects that extend from `AsyncResource` are capable of propagating the async context in much the same way as promises. Note that `AsyncLocalStorage.snapshot()` and `AsyncLocalStorage.bind()` provide a better approach. `AsyncResource` is provided solely for backwards compatibility with Node.js. ### Constructor ```js import { AsyncResource, AsyncLocalStorage } from 'node:async_hooks'; const als = new AsyncLocalStorage(); class MyResource extends AsyncResource { constructor() { // The type string is required by Node.js but unused in Workers. super('MyResource'); } doSomething() { this.runInAsyncScope(() => { return als.getStore(); }); } }; const myResource = als.run(123, () => new MyResource()); console.log(myResource.doSomething()); // prints 123 ``` * `new AsyncResource(typestring, optionsAsyncResourceOptions)` : AsyncResource * Returns a new `AsyncResource`. Importantly, while the constructor arguments are required in Node.js' implementation of `AsyncResource`, they are not used in Workers. * `AsyncResource.bind(fnfunction, typestring, thisArgany)` * Binds the given function to the current async context. ### Methods * `asyncResource.bind(fnfunction, thisArgany)` * Binds the given function to the async context associated with this `AsyncResource`. * `asyncResource.runInAsyncScope(fnfunction, thisArgany, ...argsarguments)` * Call the provided function with the given arguments in the async context associated with this `AsyncResource`. ## Caveats * The `AsyncLocalStorage` implementation provided by Workers intentionally omits support for the [`asyncLocalStorage.enterWith()`](https://nodejs.org/dist/latest-v18.x/docs/api/async_context.html#asynclocalstorageenterwithstore) and [`asyncLocalStorage.disable()`](https://nodejs.org/dist/latest-v18.x/docs/api/async_context.html#asynclocalstoragedisable) methods. * Workers does not implement the full [`async_hooks`](https://nodejs.org/dist/latest-v18.x/docs/api/async_hooks.html) API upon which Node.js' implementation of `AsyncLocalStorage` is built. * Workers does not implement the ability to create an `AsyncResource` with an explicitly identified trigger context as allowed by Node.js. This means that a new `AsyncResource` will always be bound to the async context in which it was created. * Thenables (non-Promise objects that expose a `then()` method) are not fully supported when using `AsyncLocalStorage`. When working with thenables, instead use [`AsyncLocalStorage.snapshot()`](https://nodejs.org/api/async_context.html#static-method-asynclocalstoragesnapshot) to capture a snapshot of the current context. --- title: Buffer · Cloudflare Workers docs description: The Buffer API in Node.js is one of the most commonly used Node.js APIs for manipulating binary data. Every Buffer instance extends from the standard Uint8Array class, but adds a range of unique capabilities such as built-in base64 and hex encoding/decoding, byte-order manipulation, and encoding-aware substring searching. lastUpdated: 2024-08-13T19:56:56.000Z chatbotDeprioritize: false source_url: html: https://developers.cloudflare.com/workers/runtime-apis/nodejs/buffer/ md: https://developers.cloudflare.com/workers/runtime-apis/nodejs/buffer/index.md --- Note To enable built-in Node.js APIs and polyfills, add the nodejs\_compat compatibility flag to your [Wrangler configuration file](https://developers.cloudflare.com/workers/wrangler/configuration/). This also enables nodejs\_compat\_v2 as long as your compatibility date is 2024-09-23 or later. [Learn more about the Node.js compatibility flag and v2](https://developers.cloudflare.com/workers/configuration/compatibility-flags/#nodejs-compatibility-flag). The `Buffer` API in Node.js is one of the most commonly used Node.js APIs for manipulating binary data. Every `Buffer` instance extends from the standard [`Uint8Array`](https://developer.mozilla.org/en-US/docs/Web/JavaScript/Reference/Global_Objects/Uint8Array) class, but adds a range of unique capabilities such as built-in base64 and hex encoding/decoding, byte-order manipulation, and encoding-aware substring searching. ```js import { Buffer } from 'node:buffer'; const buf = Buffer.from('hello world', 'utf8'); console.log(buf.toString('hex')); // Prints: 68656c6c6f20776f726c64 console.log(buf.toString('base64')); // Prints: aGVsbG8gd29ybGQ= ``` A Buffer extends from `Uint8Array`. Therefore, it can be used in any Workers API that currently accepts `Uint8Array`, such as creating a new Response: ```js const response = new Response(Buffer.from("hello world")); ``` You can also use the `Buffer` API when interacting with streams: ```js const writable = getWritableStreamSomehow(); const writer = writable.getWriter(); writer.write(Buffer.from("hello world")); ``` Refer to the [Node.js documentation for `Buffer`](https://nodejs.org/dist/latest-v19.x/docs/api/buffer.html) for more information. --- title: crypto · Cloudflare Workers docs description: The node:crypto module provides cryptographic functionality that includes a set of wrappers for OpenSSL's hash, HMAC, cipher, decipher, sign, and verify functions. lastUpdated: 2025-04-08T02:33:26.000Z chatbotDeprioritize: false source_url: html: https://developers.cloudflare.com/workers/runtime-apis/nodejs/crypto/ md: https://developers.cloudflare.com/workers/runtime-apis/nodejs/crypto/index.md --- Note To enable built-in Node.js APIs and polyfills, add the nodejs\_compat compatibility flag to your [Wrangler configuration file](https://developers.cloudflare.com/workers/wrangler/configuration/). This also enables nodejs\_compat\_v2 as long as your compatibility date is 2024-09-23 or later. [Learn more about the Node.js compatibility flag and v2](https://developers.cloudflare.com/workers/configuration/compatibility-flags/#nodejs-compatibility-flag). The `node:crypto` module provides cryptographic functionality that includes a set of wrappers for OpenSSL's hash, HMAC, cipher, decipher, sign, and verify functions. All `node:crypto` APIs are fully supported in Workers with the following exceptions: * The functions [generateKeyPair](https://nodejs.org/api/crypto.html#cryptogeneratekeypairtype-options-callback) and [generateKeyPairSync](https://nodejs.org/api/crypto.html#cryptogeneratekeypairsynctype-options) do not support DSA or DH key pairs. * `ed448` and `x448` curves are not supported. The full `node:crypto` API is documented in the [Node.js documentation for `node:crypto`](https://nodejs.org/api/crypto.html). The [WebCrypto API](https://developers.cloudflare.com/workers/runtime-apis/web-crypto/) is also available within Cloudflare Workers. This does not require the `nodejs_compat` compatibility flag. --- title: Diagnostics Channel · Cloudflare Workers docs description: The diagnostics_channel module provides an API to create named channels to report arbitrary message data for diagnostics purposes. The API is essentially a simple event pub/sub model that is specifically designed to support low-overhead diagnostics reporting. lastUpdated: 2025-01-10T13:29:27.000Z chatbotDeprioritize: false source_url: html: https://developers.cloudflare.com/workers/runtime-apis/nodejs/diagnostics-channel/ md: https://developers.cloudflare.com/workers/runtime-apis/nodejs/diagnostics-channel/index.md --- Note To enable built-in Node.js APIs and polyfills, add the nodejs\_compat compatibility flag to your [Wrangler configuration file](https://developers.cloudflare.com/workers/wrangler/configuration/). This also enables nodejs\_compat\_v2 as long as your compatibility date is 2024-09-23 or later. [Learn more about the Node.js compatibility flag and v2](https://developers.cloudflare.com/workers/configuration/compatibility-flags/#nodejs-compatibility-flag). The [`diagnostics_channel`](https://nodejs.org/dist/latest-v20.x/docs/api/diagnostics_channel.html) module provides an API to create named channels to report arbitrary message data for diagnostics purposes. The API is essentially a simple event pub/sub model that is specifically designed to support low-overhead diagnostics reporting. ```js import { channel, hasSubscribers, subscribe, unsubscribe, tracingChannel, } from 'node:diagnostics_channel'; // For publishing messages to a channel, acquire a channel object: const myChannel = channel('my-channel'); // Any JS value can be published to a channel. myChannel.publish({ foo: 'bar' }); // For receiving messages on a channel, use subscribe: subscribe('my-channel', (message) => { console.log(message); }); ``` All `Channel` instances are singletons per each Isolate/context (for example, the same entry point). Subscribers are always invoked synchronously and in the order they were registered, much like an `EventTarget` or Node.js `EventEmitter` class. ## Integration with Tail Workers When using [Tail Workers](https://developers.cloudflare.com/workers/observability/logs/tail-workers/), all messages published to any channel will be forwarded also to the [Tail Worker](https://developers.cloudflare.com/workers/observability/logs/tail-workers/). Within the Tail Worker, the diagnostic channel messages can be accessed via the `diagnosticsChannelEvents` property: ```js export default { async tail(events) { for (const event of events) { for (const messageData of event.diagnosticsChannelEvents) { console.log(messageData.timestamp, messageData.channel, messageData.message); } } } } ``` Note that message published to the tail worker is passed through the [structured clone algorithm](https://developer.mozilla.org/en-US/docs/Web/API/Web_Workers_API/Structured_clone_algorithm) (same mechanism as the [`structuredClone()`](https://developer.mozilla.org/en-US/docs/Web/API/structuredClone) API) so only values that can be successfully cloned are supported. ## `TracingChannel` Per the Node.js documentation, "[`TracingChannel`](https://nodejs.org/api/diagnostics_channel.html#class-tracingchannel) is a collection of \[Channels] which together express a single traceable action. `TracingChannel` is used to formalize and simplify the process of producing events for tracing application flow." ```js import { tracingChannel } from 'node:diagnostics_channel'; import { AsyncLocalStorage } from 'node:async_hooks' const channels = tracingChannel('my-channel'); const requestId = new AsyncLocalStorage(); channels.start.bindStore(requestId); channels.subscribe({ start(message) { console.log(requestId.getStore()); // { requestId: '123' } // Handle start message }, end(message) { console.log(requestId.getStore()); // { requestId: '123' } // Handle end message }, asyncStart(message) { console.log(requestId.getStore()); // { requestId: '123' } // Handle asyncStart message }, asyncEnd(message) { console.log(requestId.getStore()); // { requestId: '123' } // Handle asyncEnd message }, error(message) { console.log(requestId.getStore()); // { requestId: '123' } // Handle error message }, }); // The subscriber handlers will be invoked while tracing the execution of the async // function passed into `channel.tracePromise`... channel.tracePromise(async () => { // Perform some asynchronous work... }, { requestId: '123' }); ``` Refer to the [Node.js documentation for `diagnostics_channel`](https://nodejs.org/dist/latest-v20.x/docs/api/diagnostics_channel.html) for more information. --- title: dns · Cloudflare Workers docs description: |- You can use node:dns for name resolution via DNS over HTTPS using Cloudflare DNS at 1.1.1.1. lastUpdated: 2025-01-30T17:12:12.000Z chatbotDeprioritize: false source_url: html: https://developers.cloudflare.com/workers/runtime-apis/nodejs/dns/ md: https://developers.cloudflare.com/workers/runtime-apis/nodejs/dns/index.md --- Note To enable built-in Node.js APIs and polyfills, add the nodejs\_compat compatibility flag to your [Wrangler configuration file](https://developers.cloudflare.com/workers/wrangler/configuration/). This also enables nodejs\_compat\_v2 as long as your compatibility date is 2024-09-23 or later. [Learn more about the Node.js compatibility flag and v2](https://developers.cloudflare.com/workers/configuration/compatibility-flags/#nodejs-compatibility-flag). You can use [`node:dns`](https://nodejs.org/api/dns.html) for name resolution via [DNS over HTTPS](https://developers.cloudflare.com/1.1.1.1/encryption/dns-over-https/) using [Cloudflare DNS](https://www.cloudflare.com/application-services/products/dns/) at 1.1.1.1. * JavaScript ```js import dns from "node:dns"; let responese = await dns.promises.resolve4("cloudflare.com", "NS"); ``` * TypeScript ```ts import dns from 'node:dns'; let responese = await dns.promises.resolve4('cloudflare.com', 'NS'); ``` All `node:dns` functions are available, except `lookup`, `lookupService`, and `resolve` which throw "Not implemented" errors when called. Note DNS requests will execute a subrequest, counts for your [Worker's subrequest limit](https://developers.cloudflare.com/workers/platform/limits/#subrequests). The full `node:dns` API is documented in the [Node.js documentation for `node:dns`](https://nodejs.org/api/dns.html). --- title: EventEmitter · Cloudflare Workers docs description: An EventEmitter is an object that emits named events that cause listeners to be called. lastUpdated: 2024-08-13T19:56:56.000Z chatbotDeprioritize: false source_url: html: https://developers.cloudflare.com/workers/runtime-apis/nodejs/eventemitter/ md: https://developers.cloudflare.com/workers/runtime-apis/nodejs/eventemitter/index.md --- Note To enable built-in Node.js APIs and polyfills, add the nodejs\_compat compatibility flag to your [Wrangler configuration file](https://developers.cloudflare.com/workers/wrangler/configuration/). This also enables nodejs\_compat\_v2 as long as your compatibility date is 2024-09-23 or later. [Learn more about the Node.js compatibility flag and v2](https://developers.cloudflare.com/workers/configuration/compatibility-flags/#nodejs-compatibility-flag). An `EventEmitter` is an object that emits named events that cause listeners to be called. ```js import { EventEmitter } from 'node:events'; const emitter = new EventEmitter(); emitter.on('hello', (...args) => { console.log(...args); }); emitter.emit('hello', 1, 2, 3); ``` The implementation in the Workers runtime fully supports the entire Node.js `EventEmitter` API. This includes the `captureRejections` option that allows improved handling of async functions as event handlers: ```js const emitter = new EventEmitter({ captureRejections: true }); emitter.on('hello', async (...args) => { throw new Error('boom'); }); emitter.on('error', (err) => { // the async promise rejection is emitted here! }); ``` Refer to the [Node.js documentation for `EventEmitter`](https://nodejs.org/api/events.html#class-eventemitter) for more information. --- title: net · Cloudflare Workers docs description: >- You can use node:net to create a direct connection to servers via a TCP sockets with net.Socket. lastUpdated: 2025-01-28T23:34:12.000Z chatbotDeprioritize: false source_url: html: https://developers.cloudflare.com/workers/runtime-apis/nodejs/net/ md: https://developers.cloudflare.com/workers/runtime-apis/nodejs/net/index.md --- Note To enable built-in Node.js APIs and polyfills, add the nodejs\_compat compatibility flag to your [Wrangler configuration file](https://developers.cloudflare.com/workers/wrangler/configuration/). This also enables nodejs\_compat\_v2 as long as your compatibility date is 2024-09-23 or later. [Learn more about the Node.js compatibility flag and v2](https://developers.cloudflare.com/workers/configuration/compatibility-flags/#nodejs-compatibility-flag). You can use [`node:net`](https://nodejs.org/api/net.html) to create a direct connection to servers via a TCP sockets with [`net.Socket`](https://nodejs.org/api/net.html#class-netsocket). These functions use [`connect`](https://developers.cloudflare.com/workers/runtime-apis/tcp-sockets/#connect) functionality from the built-in `cloudflare:sockets` module. * JavaScript ```js import net from "node:net"; const exampleIP = "127.0.0.1"; export default { async fetch(req) { const socket = new net.Socket(); socket.connect(4000, exampleIP, function () { console.log("Connected"); }); socket.write("Hello, Server!"); socket.end(); return new Response("Wrote to server", { status: 200 }); }, }; ``` * TypeScript ```ts import net from "node:net"; const exampleIP = "127.0.0.1"; export default { async fetch(req): Promise { const socket = new net.Socket(); socket.connect(4000, exampleIP, function () { console.log("Connected"); }); socket.write("Hello, Server!"); socket.end(); return new Response("Wrote to server", { status: 200 }); }, } satisfies ExportedHandler; ``` Additionally, other APIs such as [`net.BlockList`](https://nodejs.org/api/net.html#class-netblocklist) and [`net.SocketAddress`](https://nodejs.org/api/net.html#class-netsocketaddress) are available. Note that the [`net.Server`](https://nodejs.org/api/net.html#class-netserver) class is not supported by Workers. The full `node:net` API is documented in the [Node.js documentation for `node:net`](https://nodejs.org/api/net.html). --- title: path · Cloudflare Workers docs description: "The node:path module provides utilities for working with file and directory paths. The node:path module can be accessed using:" lastUpdated: 2025-01-28T22:36:08.000Z chatbotDeprioritize: false source_url: html: https://developers.cloudflare.com/workers/runtime-apis/nodejs/path/ md: https://developers.cloudflare.com/workers/runtime-apis/nodejs/path/index.md --- Note To enable built-in Node.js APIs and polyfills, add the nodejs\_compat compatibility flag to your [Wrangler configuration file](https://developers.cloudflare.com/workers/wrangler/configuration/). This also enables nodejs\_compat\_v2 as long as your compatibility date is 2024-09-23 or later. [Learn more about the Node.js compatibility flag and v2](https://developers.cloudflare.com/workers/configuration/compatibility-flags/#nodejs-compatibility-flag). The [`node:path`](https://nodejs.org/api/path.html) module provides utilities for working with file and directory paths. The `node:path` module can be accessed using: ```js import path from "node:path"; path.join("/foo", "bar", "baz/asdf", "quux", ".."); // Returns: '/foo/bar/baz/asdf' ``` Refer to the [Node.js documentation for `path`](https://nodejs.org/api/path.html) for more information. --- title: process · Cloudflare Workers docs description: "The process module in Node.js provides a number of useful APIs related to the current process. Within a serverless environment like Workers, most of these APIs are not relevant or meaningful, but some are useful for cross-runtime compatibility. Within Workers, the following APIs are available:" lastUpdated: 2025-07-08T08:09:06.000Z chatbotDeprioritize: false source_url: html: https://developers.cloudflare.com/workers/runtime-apis/nodejs/process/ md: https://developers.cloudflare.com/workers/runtime-apis/nodejs/process/index.md --- Note To enable built-in Node.js APIs and polyfills, add the nodejs\_compat compatibility flag to your [Wrangler configuration file](https://developers.cloudflare.com/workers/wrangler/configuration/). This also enables nodejs\_compat\_v2 as long as your compatibility date is 2024-09-23 or later. [Learn more about the Node.js compatibility flag and v2](https://developers.cloudflare.com/workers/configuration/compatibility-flags/#nodejs-compatibility-flag). The [`process`](https://nodejs.org/dist/latest-v19.x/docs/api/process.html) module in Node.js provides a number of useful APIs related to the current process. Within a serverless environment like Workers, most of these APIs are not relevant or meaningful, but some are useful for cross-runtime compatibility. Within Workers, the following APIs are available: ```js import { env, nextTick, } from 'node:process'; env['FOO'] = 'bar'; console.log(env['FOO']); // Prints: bar nextTick(() => { console.log('next tick'); }); ``` ## `process.env` In the Node.js implementation of `process.env`, the `env` object is a copy of the environment variables at the time the process was started. In the Workers implementation, there is no process-level environment, so by default `env` is an empty object. You can still set and get values from `env`, and those will be globally persistent for all Workers running in the same isolate and context (for example, the same Workers entry point). When [Node.js compatibility](https://developers.cloudflare.com/workers/runtime-apis/nodejs/) is turned on and the [`nodejs_compat_populate_process_env`](https://developers.cloudflare.com/workers/configuration/compatibility-flags/#enable-auto-populating-processenv) compatibility flag is set, `process.env` will contain any [environment variables](https://developers.cloudflare.com/workers/configuration/environment-variables/), [secrets](https://developers.cloudflare.com/workers/configuration/secrets/), or [version metadata](https://developers.cloudflare.com/workers/runtime-apis/bindings/version-metadata/) metadata that has been configured on your Worker. ### Relationship to per-request `env` argument in `fetch()` handlers Workers do have a concept of [environment variables](https://developers.cloudflare.com/workers/configuration/environment-variables/) that are applied on a per-Worker and per-request basis. These are not accessible automatically via the `process.env` API. It is possible to manually copy these values into `process.env` if you need to. Be aware, however, that setting any value on `process.env` will coerce that value into a string. ```js import * as process from 'node:process'; export default { fetch(req, env) { // Set process.env.FOO to the value of env.FOO if process.env.FOO is not already set // and env.FOO is a string. process.env.FOO ??= (() => { if (typeof env.FOO === 'string') { return env.FOO; } })(); } }; ``` It is strongly recommended that you *do not* replace the entire `process.env` object with the request `env` object. Doing so will cause you to lose any environment variables that were set previously and will cause unexpected behavior for other Workers running in the same isolate. Specifically, it would cause inconsistency with the `process.env` object when accessed via named imports. ```js import * as process from 'node:process'; import { env } from 'node:process'; process.env === env; // true! they are the same object process.env = {}; // replace the object! Do not do this! process.env === env; // false! they are no longer the same object // From this point forward, any changes to process.env will not be reflected in env, // and vice versa! ``` ## `process.nextTick()` The Workers implementation of `process.nextTick()` is a wrapper for the standard Web Platform API [`queueMicrotask()`](https://developer.mozilla.org/en-US/docs/Web/API/WindowOrWorkerGlobalScope/queueMicrotask). Refer to the [Node.js documentation for `process`](https://nodejs.org/dist/latest-v19.x/docs/api/process.html) for more information. --- title: Streams - Node.js APIs · Cloudflare Workers docs description: The Node.js streams API is the original API for working with streaming data in JavaScript, predating the WHATWG ReadableStream standard. A stream is an abstract interface for working with streaming data in Node.js. Streams can be readable, writable, or both. All streams are instances of EventEmitter. lastUpdated: 2024-08-13T19:56:56.000Z chatbotDeprioritize: false source_url: html: https://developers.cloudflare.com/workers/runtime-apis/nodejs/streams/ md: https://developers.cloudflare.com/workers/runtime-apis/nodejs/streams/index.md --- Note To enable built-in Node.js APIs and polyfills, add the nodejs\_compat compatibility flag to your [Wrangler configuration file](https://developers.cloudflare.com/workers/wrangler/configuration/). This also enables nodejs\_compat\_v2 as long as your compatibility date is 2024-09-23 or later. [Learn more about the Node.js compatibility flag and v2](https://developers.cloudflare.com/workers/configuration/compatibility-flags/#nodejs-compatibility-flag). The [Node.js streams API](https://nodejs.org/api/stream.html) is the original API for working with streaming data in JavaScript, predating the [WHATWG ReadableStream standard](https://streams.spec.whatwg.org/). A stream is an abstract interface for working with streaming data in Node.js. Streams can be readable, writable, or both. All streams are instances of [EventEmitter](https://developers.cloudflare.com/workers/runtime-apis/nodejs/eventemitter/). Where possible, you should use the [WHATWG standard "Web Streams" API](https://streams.spec.whatwg.org/), which is [supported in Workers](https://streams.spec.whatwg.org/). ```js import { Readable, Transform, } from 'node:stream'; import { text, } from 'node:stream/consumers'; import { pipeline, } from 'node:stream/promises'; // A Node.js-style Transform that converts data to uppercase // and appends a newline to the end of the output. class MyTransform extends Transform { constructor() { super({ encoding: 'utf8' }); } _transform(chunk, _, cb) { this.push(chunk.toString().toUpperCase()); cb(); } _flush(cb) { this.push('\n'); cb(); } } export default { async fetch() { const chunks = [ "hello ", "from ", "the ", "wonderful ", "world ", "of ", "node.js ", "streams!" ]; function nextChunk(readable) { readable.push(chunks.shift()); if (chunks.length === 0) readable.push(null); else queueMicrotask(() => nextChunk(readable)); } // A Node.js-style Readable that emits chunks from the // array... const readable = new Readable({ encoding: 'utf8', read() { nextChunk(readable); } }); const transform = new MyTransform(); await pipeline(readable, transform); return new Response(await text(transform)); } }; ``` Refer to the [Node.js documentation for `stream`](https://nodejs.org/api/stream.html) for more information. --- title: StringDecoder · Cloudflare Workers docs description: "The node:string_decoder is a legacy utility module that predates the WHATWG standard TextEncoder and TextDecoder API. In most cases, you should use TextEncoder and TextDecoder instead. StringDecoder is available in the Workers runtime primarily for compatibility with existing npm packages that rely on it. StringDecoder can be accessed using:" lastUpdated: 2025-02-19T14:52:46.000Z chatbotDeprioritize: false source_url: html: https://developers.cloudflare.com/workers/runtime-apis/nodejs/string-decoder/ md: https://developers.cloudflare.com/workers/runtime-apis/nodejs/string-decoder/index.md --- Note To enable built-in Node.js APIs and polyfills, add the nodejs\_compat compatibility flag to your [Wrangler configuration file](https://developers.cloudflare.com/workers/wrangler/configuration/). This also enables nodejs\_compat\_v2 as long as your compatibility date is 2024-09-23 or later. [Learn more about the Node.js compatibility flag and v2](https://developers.cloudflare.com/workers/configuration/compatibility-flags/#nodejs-compatibility-flag). The [`node:string_decoder`](https://nodejs.org/api/string_decoder.html) is a legacy utility module that predates the WHATWG standard [TextEncoder](https://developers.cloudflare.com/workers/runtime-apis/encoding/#textencoder) and [TextDecoder](https://developers.cloudflare.com/workers/runtime-apis/encoding/#textdecoder) API. In most cases, you should use `TextEncoder` and `TextDecoder` instead. `StringDecoder` is available in the Workers runtime primarily for compatibility with existing npm packages that rely on it. `StringDecoder` can be accessed using: ```js const { StringDecoder } = require('node:string_decoder'); const decoder = new StringDecoder('utf8'); const cent = Buffer.from([0xC2, 0xA2]); console.log(decoder.write(cent)); const euro = Buffer.from([0xE2, 0x82, 0xAC]); console.log(decoder.write(euro)); ``` Refer to the [Node.js documentation for `string_decoder`](https://nodejs.org/dist/latest-v20.x/docs/api/string_decoder.html) for more information. --- title: test · Cloudflare Workers docs description: >- The MockTracker API in Node.js provides a means of tracking and managing mock objects in a test environment. lastUpdated: 2024-08-13T19:56:56.000Z chatbotDeprioritize: false source_url: html: https://developers.cloudflare.com/workers/runtime-apis/nodejs/test/ md: https://developers.cloudflare.com/workers/runtime-apis/nodejs/test/index.md --- Note To enable built-in Node.js APIs and polyfills, add the nodejs\_compat compatibility flag to your [Wrangler configuration file](https://developers.cloudflare.com/workers/wrangler/configuration/). This also enables nodejs\_compat\_v2 as long as your compatibility date is 2024-09-23 or later. [Learn more about the Node.js compatibility flag and v2](https://developers.cloudflare.com/workers/configuration/compatibility-flags/#nodejs-compatibility-flag). ## `MockTracker` The `MockTracker` API in Node.js provides a means of tracking and managing mock objects in a test environment. ```js import { mock } from 'node:test'; const fn = mock.fn(); fn(1,2,3); // does nothing... but console.log(fn.mock.callCount()); // Records how many times it was called console.log(fn.mock.calls[0].arguments)); // Recoreds the arguments that were passed each call ``` The full `MockTracker` API is documented in the [Node.js documentation for `MockTracker`](https://nodejs.org/docs/latest/api/test.html#class-mocktracker). The Workers implementation of `MockTracker` currently does not include an implementation of the [Node.js mock timers API](https://nodejs.org/docs/latest/api/test.html#class-mocktimers). --- title: timers · Cloudflare Workers docs description: Use node:timers APIs to schedule functions to be executed later. lastUpdated: 2025-01-28T22:36:08.000Z chatbotDeprioritize: false source_url: html: https://developers.cloudflare.com/workers/runtime-apis/nodejs/timers/ md: https://developers.cloudflare.com/workers/runtime-apis/nodejs/timers/index.md --- Note To enable built-in Node.js APIs and polyfills, add the nodejs\_compat compatibility flag to your [Wrangler configuration file](https://developers.cloudflare.com/workers/wrangler/configuration/). This also enables nodejs\_compat\_v2 as long as your compatibility date is 2024-09-23 or later. [Learn more about the Node.js compatibility flag and v2](https://developers.cloudflare.com/workers/configuration/compatibility-flags/#nodejs-compatibility-flag). Use [`node:timers`](https://nodejs.org/api/timers.html) APIs to schedule functions to be executed later. This includes [`setTimeout`](https://nodejs.org/api/timers.html#settimeoutcallback-delay-args) for calling a function after a delay, [`setInterval`](https://nodejs.org/api/timers.html#clearintervaltimeout) for calling a function repeatedly, and [`setImmediate`](https://nodejs.org/api/timers.html#setimmediatecallback-args) for calling a function in the next iteration of the event loop. * JavaScript ```js import timers from "node:timers"; console.log("first"); timers.setTimeout(() => { console.log("last"); }, 10); timers.setTimeout(() => { console.log("next"); }); ``` * TypeScript ```ts import timers from "node:timers"; console.log("first"); timers.setTimeout(() => { console.log("last"); }, 10); timers.setTimeout(() => { console.log("next"); }); ``` Note Due to [security-based restrictions on timers](https://developers.cloudflare.com/workers/reference/security-model/#step-1-disallow-timers-and-multi-threading) in Workers, timers are limited to returning the time of the last I/O. This means that while setTimeout, setInterval, and setImmediate will defer your function execution until after other events have run, they will not delay them for the full time specified. Note When called from a global level (on [`globalThis`](https://developer.mozilla.org/en-US/docs/Web/JavaScript/Reference/Global_Objects/globalThis)), functions such as `clearTimeout` and `setTimeout` will respect web standards rather than Node.js-specific functionality. For complete Node.js compatibility, you must call functions from the `node:timers` module. The full `node:timers` API is documented in the [Node.js documentation for `node:timers`](https://nodejs.org/api/timers.html). --- title: tls · Cloudflare Workers docs description: |- You can use node:tls to create secure connections to external services using TLS (Transport Layer Security). lastUpdated: 2025-04-08T02:33:26.000Z chatbotDeprioritize: false source_url: html: https://developers.cloudflare.com/workers/runtime-apis/nodejs/tls/ md: https://developers.cloudflare.com/workers/runtime-apis/nodejs/tls/index.md --- Note To enable built-in Node.js APIs and polyfills, add the nodejs\_compat compatibility flag to your [Wrangler configuration file](https://developers.cloudflare.com/workers/wrangler/configuration/). This also enables nodejs\_compat\_v2 as long as your compatibility date is 2024-09-23 or later. [Learn more about the Node.js compatibility flag and v2](https://developers.cloudflare.com/workers/configuration/compatibility-flags/#nodejs-compatibility-flag). You can use [`node:tls`](https://nodejs.org/api/tls.html) to create secure connections to external services using [TLS](https://developer.mozilla.org/en-US/docs/Web/Security/Transport_Layer_Security) (Transport Layer Security). ```js import { connect } from "node:tls"; // ... in a request handler ... const connectionOptions = { key: env.KEY, cert: env.CERT }; const socket = connect(url, connectionOptions, () => { if (socket.authorized) { console.log("Connection authorized"); } }); socket.on("data", (data) => { console.log(data); }); socket.on("end", () => { console.log("server ends connection"); }); ``` The following APIs are available: * [`connect`](https://nodejs.org/api/tls.html#tlsconnectoptions-callback) * [`TLSSocket`](https://nodejs.org/api/tls.html#class-tlstlssocket) * [`checkServerIdentity`](https://nodejs.org/api/tls.html#tlscheckserveridentityhostname-cert) * [`createSecureContext`](https://nodejs.org/api/tls.html#tlscreatesecurecontextoptions) All other APIs, including [`tls.Server`](https://nodejs.org/api/tls.html#class-tlsserver) and [`tls.createServer`](https://nodejs.org/api/tls.html#tlscreateserveroptions-secureconnectionlistener), are not supported and will throw a `Not implemented` error when called. The full `node:tls` API is documented in the [Node.js documentation for `node:tls`](https://nodejs.org/api/tls.html). --- title: url · Cloudflare Workers docs description: Returns the Punycode ASCII serialization of the domain. If domain is an invalid domain, the empty string is returned. lastUpdated: 2024-09-24T19:57:29.000Z chatbotDeprioritize: false source_url: html: https://developers.cloudflare.com/workers/runtime-apis/nodejs/url/ md: https://developers.cloudflare.com/workers/runtime-apis/nodejs/url/index.md --- Note To enable built-in Node.js APIs and polyfills, add the nodejs\_compat compatibility flag to your [Wrangler configuration file](https://developers.cloudflare.com/workers/wrangler/configuration/). This also enables nodejs\_compat\_v2 as long as your compatibility date is 2024-09-23 or later. [Learn more about the Node.js compatibility flag and v2](https://developers.cloudflare.com/workers/configuration/compatibility-flags/#nodejs-compatibility-flag). ## domainToASCII Returns the Punycode ASCII serialization of the domain. If domain is an invalid domain, the empty string is returned. ```js import { domainToASCII } from 'node:url'; console.log(domainToASCII('español.com')); // Prints xn--espaol-zwa.com console.log(domainToASCII('中文.com')); // Prints xn--fiq228c.com console.log(domainToASCII('xn--iñvalid.com')); // Prints an empty string ``` ## domainToUnicode Returns the Unicode serialization of the domain. If domain is an invalid domain, the empty string is returned. It performs the inverse operation to `domainToASCII()`. ```js import { domainToUnicode } from 'node:url'; console.log(domainToUnicode('xn--espaol-zwa.com')); // Prints español.com console.log(domainToUnicode('xn--fiq228c.com')); // Prints 中文.com console.log(domainToUnicode('xn--iñvalid.com')); // Prints an empty string ``` --- title: util · Cloudflare Workers docs description: The promisify and callbackify APIs in Node.js provide a means of bridging between a Promise-based programming model and a callback-based model. lastUpdated: 2025-02-19T14:52:46.000Z chatbotDeprioritize: false source_url: html: https://developers.cloudflare.com/workers/runtime-apis/nodejs/util/ md: https://developers.cloudflare.com/workers/runtime-apis/nodejs/util/index.md --- Note To enable built-in Node.js APIs and polyfills, add the nodejs\_compat compatibility flag to your [Wrangler configuration file](https://developers.cloudflare.com/workers/wrangler/configuration/). This also enables nodejs\_compat\_v2 as long as your compatibility date is 2024-09-23 or later. [Learn more about the Node.js compatibility flag and v2](https://developers.cloudflare.com/workers/configuration/compatibility-flags/#nodejs-compatibility-flag). ## promisify/callbackify The `promisify` and `callbackify` APIs in Node.js provide a means of bridging between a Promise-based programming model and a callback-based model. The `promisify` method allows taking a Node.js-style callback function and converting it into a Promise-returning async function: ```js import { promisify } from 'node:util'; function foo(args, callback) { try { callback(null, 1); } catch (err) { // Errors are emitted to the callback via the first argument. callback(err); } } const promisifiedFoo = promisify(foo); await promisifiedFoo(args); ``` Similarly to `promisify`, `callbackify` converts a Promise-returning async function into a Node.js-style callback function: ```js import { callbackify } from 'node:util'; async function foo(args) { throw new Error('boom'); } const callbackifiedFoo = callbackify(foo); callbackifiedFoo(args, (err, value) => { If (err) throw err; }); ``` `callbackify` and `promisify` make it easy to handle all of the challenges that come with bridging between callbacks and promises. Refer to the [Node.js documentation for `callbackify`](https://nodejs.org/dist/latest-v19.x/docs/api/util.html#utilcallbackifyoriginal) and [Node.js documentation for `promisify`](https://nodejs.org/dist/latest-v19.x/docs/api/util.html#utilpromisifyoriginal) for more information. ## util.types The `util.types` API provides a reliable and efficient way of checking that values are instances of various built-in types. ```js import { types } from 'node:util'; types.isAnyArrayBuffer(new ArrayBuffer()); // Returns true types.isAnyArrayBuffer(new SharedArrayBuffer()); // Returns true types.isArrayBufferView(new Int8Array()); // true types.isArrayBufferView(Buffer.from('hello world')); // true types.isArrayBufferView(new DataView(new ArrayBuffer(16))); // true types.isArrayBufferView(new ArrayBuffer()); // false function foo() { types.isArgumentsObject(arguments); // Returns true } types.isAsyncFunction(function foo() {}); // Returns false types.isAsyncFunction(async function foo() {}); // Returns true // .. and so on ``` Warning The Workers implementation currently does not provide implementations of the `util.types.isExternal()`, `util.types.isProxy()`, `util.types.isKeyObject()`, or `util.type.isWebAssemblyCompiledModule()` APIs. For more about `util.types`, refer to the [Node.js documentation for `util.types`](https://nodejs.org/dist/latest-v19.x/docs/api/util.html#utiltypes). ## util.MIMEType `util.MIMEType` provides convenience methods that allow you to more easily work with and manipulate [MIME types](https://developer.mozilla.org/en-US/docs/Web/HTTP/Basics_of_HTTP/MIME_types). For example: ```js import { MIMEType } from 'node:util'; const myMIME = new MIMEType('text/javascript;key=value'); console.log(myMIME.type); // Prints: text console.log(myMIME.essence); // Prints: text/javascript console.log(myMIME.subtype); // Prints: javascript console.log(String(myMIME)); // Prints: application/javascript;key=value ``` For more about `util.MIMEType`, refer to the [Node.js documentation for `util.MIMEType`](https://nodejs.org/api/util.html#class-utilmimetype). --- title: zlib · Cloudflare Workers docs description: >- The node:zlib module provides compression functionality implemented using Gzip, Deflate/Inflate, and Brotli. To access it: lastUpdated: 2024-09-25T14:08:28.000Z chatbotDeprioritize: false source_url: html: https://developers.cloudflare.com/workers/runtime-apis/nodejs/zlib/ md: https://developers.cloudflare.com/workers/runtime-apis/nodejs/zlib/index.md --- Note To enable built-in Node.js APIs and polyfills, add the nodejs\_compat compatibility flag to your [Wrangler configuration file](https://developers.cloudflare.com/workers/wrangler/configuration/). This also enables nodejs\_compat\_v2 as long as your compatibility date is 2024-09-23 or later. [Learn more about the Node.js compatibility flag and v2](https://developers.cloudflare.com/workers/configuration/compatibility-flags/#nodejs-compatibility-flag). The node:zlib module provides compression functionality implemented using Gzip, Deflate/Inflate, and Brotli. To access it: ```js import zlib from 'node:zlib'; ``` The full `node:zlib` API is documented in the [Node.js documentation for `node:zlib`](https://nodejs.org/api/zlib.html). --- title: Workers RPC — Error Handling · Cloudflare Workers docs description: How exceptions, stack traces, and logging works with the Workers RPC system. lastUpdated: 2024-08-13T19:56:56.000Z chatbotDeprioritize: false source_url: html: https://developers.cloudflare.com/workers/runtime-apis/rpc/error-handling/ md: https://developers.cloudflare.com/workers/runtime-apis/rpc/error-handling/index.md --- ## Exceptions An exception thrown by an RPC method implementation will propagate to the caller. If it is one of the standard JavaScript Error types, the `message` and prototype's `name` will be retained, though the stack trace is not. ### Unsupported error types * If an [`AggregateError`](https://developer.mozilla.org/en-US/docs/Web/JavaScript/Reference/Global_Objects/AggregateError) is thrown by an RPC method, it is not propagated back to the caller. * The [`SuppressedError`](https://github.com/tc39/proposal-explicit-resource-management?tab=readme-ov-file#the-suppressederror-error) type from the Explicit Resource Management proposal is not currently implemented or supported in Workers. * Own properties of error objects, such as the [`cause`](https://developer.mozilla.org/en-US/docs/Web/JavaScript/Reference/Global_Objects/Error/cause) property, are not propagated back to the caller ## Additional properties For some remote exceptions, the runtime may set properties on the propagated exception to provide more information about the error; see [Durable Object error handling](https://developers.cloudflare.com/durable-objects/best-practices/error-handling) for more details. --- title: Workers RPC — Lifecycle · Cloudflare Workers docs description: Memory management, resource management, and the lifecycle of RPC stubs. lastUpdated: 2025-03-21T11:16:31.000Z chatbotDeprioritize: false source_url: html: https://developers.cloudflare.com/workers/runtime-apis/rpc/lifecycle/ md: https://developers.cloudflare.com/workers/runtime-apis/rpc/lifecycle/index.md --- ## Lifetimes, Memory and Resource Management When you call another Worker over RPC using a Service binding, you are using memory in the Worker you are calling. Consider the following example: ```js let user = await env.USER_SERVICE.findUser(id); ``` Assume that `findUser()` on the server side returns an object extending `RpcTarget`, thus `user` on the client side ends up being a stub pointing to that remote object. As long as the stub still exists on the client, the corresponding object on the server cannot be garbage collected. But, each isolate has its own garbage collector which cannot see into other isolates. So, in order for the server's isolate to know that the object can be collected, the calling isolate must send it an explicit signal saying so, called "disposing" the stub. In many cases (described below), the system will automatically realize when a stub is no longer needed, and will dispose it automatically. However, for best performance, your code should dispose stubs explicitly when it is done with them. ## Explicit Resource Management To ensure resources are properly disposed of, you should use [Explicit Resource Management](https://github.com/tc39/proposal-explicit-resource-management), a new JavaScript language feature that allows you to explicitly signal when resources can be disposed of. Explicit Resource Management is a Stage 3 TC39 proposal — it is [coming to V8 soon](https://bugs.chromium.org/p/v8/issues/detail?id=13559). Explicit Resource Management adds the following language features: * The [`using` declaration](https://github.com/tc39/proposal-explicit-resource-management?tab=readme-ov-file#using-declarations) * [`Symbol.dispose` and `Symbol.asyncDispose`](https://github.com/tc39/proposal-explicit-resource-management?tab=readme-ov-file#additions-to-symbol) If a variable is declared with `using`, when the variable is no longer in scope, the variable's disposer will be invoked. For example: ```js function sendEmail(id, message) { using user = await env.USER_SERVICE.findUser(id); await user.sendEmail(message); // user[Symbol.dispose]() is implicitly called at the end of the scope. } ``` `using` declarations are useful to make sure you can't forget to dispose stubs — even if your code is interrupted by an exception. ### How to use the `using` declaration in your Worker [Wrangler](https://developers.cloudflare.com/workers/wrangler/) v4+ supports the `using` keyword natively. If you are using an earlier version of Wrangler, you will need to manually dispose of resources instead. The following code: ```js { using counter = await env.COUNTER_SERVICE.newCounter(); await counter.increment(2); await counter.increment(4); } ``` ...is equivalent to: ```js { const counter = await env.COUNTER_SERVICE.newCounter(); try { await counter.increment(2); await counter.increment(4); } finally { counter[Symbol.dispose](); } } ``` ## Automatic disposal and execution contexts The RPC system automatically disposes of stubs in the following cases: ### End of event handler / execution context When an event handler is "done", any stubs created as part of the event are automatically disposed. For example, consider a [`fetch()` handler](https://developers.cloudflare.com/workers/runtime-apis/handlers/fetch) which handles incoming HTTP events. The handler may make outgoing RPCs as part of handling the event, and those may return stubs. When the final HTTP response is sent, the handler is "done", and all stubs are immediately disposed. More precisely, the event has an "execution context", which begins when the handler is first invoked, and ends when the HTTP response is sent. The execution context may also end early if the client disconnects before receiving a response, or it can be extended past its normal end point by calling [`ctx.waitUntil()`](https://developers.cloudflare.com/workers/runtime-apis/context). For example, the Worker below does not make use of the `using` declaration, but stubs will be disposed of once the `fetch()` handler returns a response: ```js export default { async fetch(request, env, ctx) { let authResult = await env.AUTH_SERVICE.checkCookie( req.headers.get("Cookie"), ); if (!authResult.authorized) { return new Response("Not authorized", { status: 403 }); } let profile = await authResult.user.getProfile(); return new Response(`Hello, ${profile.name}!`); }, }; ``` A Worker invoked via RPC also has an execution context. The context begins when an RPC method on a `WorkerEntrypoint` is invoked. If no stubs are passed in the parameters or results of this RPC, the context ends (the event is "done") when the RPC returns. However, if any stubs are passed, then the execution context is implicitly extended until all such stubs are disposed (and all calls made through them have returned). As with HTTP, if the client disconnects, the server's execution context is canceled immediately, regardless of whether stubs still exist. A client that is itself another Worker is considered to have disconnected when its own execution context ends. Again, the context can be extended with [`ctx.waitUntil()`](https://developers.cloudflare.com/workers/runtime-apis/context). ### Stubs received as parameters in an RPC call When stubs are received in the parameters of an RPC, those stubs are automatically disposed when the call returns. If you wish to keep the stubs longer than that, you must call the `dup()` method on them. ### Disposing RPC objects disposes stubs that are part of that object When an RPC returns any kind of object, that object will have a disposer added by the system. Disposing it will dispose all stubs returned by the call. For instance, if an RPC returns an array of four stubs, the array itself will have a disposer that disposes all four stubs. The only time the value returned by an RPC does not have a disposer is when it is a primitive value, such as a number or string. These types cannot have disposers added to them, but because these types cannot themselves contain stubs, there is no need for a disposer in this case. This means you should almost always store the result of an RPC into a `using` declaration: ```js using result = stub.foo(); ``` This way, if the result contains any stubs, they will be disposed of. Even if you don't expect the RPC to return stubs, if it returns any kind of an object, it is a good idea to store it into a `using` declaration. This way, if the RPC is extended in the future to return stubs, your code is ready. If you decide you want to keep a returned stub beyond the scope of the `using` declaration, you can call `dup()` on the stub before the end of the scope. (Remember to explicitly dispose the duplicate later.) ## Disposers and `RpcTarget` classes A class that extends [`RpcTarget`](https://developers.cloudflare.com/workers/runtime-apis/rpc/) can optionally implement a disposer: ```js class Foo extends RpcTarget { [Symbol.dispose]() { // ... } } ``` The RpcTarget's disposer runs after the last stub is disposed. Note that the client-side call to the stub's disposer does not wait for the server-side disposer to be called; the server's disposer is called later on. Because of this, any exceptions thrown by the disposer do not propagate to the client; instead, they are reported as uncaught exceptions. Note that an `RpcTarget`'s disposer must be declared as `Symbol.dispose`. `Symbol.asyncDispose` is not supported. ## The `dup()` method Sometimes, you need to pass a stub to a function which will dispose the stub when it is done, but you also want to keep the stub for later use. To solve this problem, you can "dup" the stub: ```js let stub = await env.SOME_SERVICE.getThing(); // Create a duplicate. let stub2 = stub.dup(); // Call some function that will dispose the stub. await func(stub); // stub2 is still valid ``` You can think of `dup()` like the [Unix system call of the same name](https://man7.org/linux/man-pages/man2/dup.2.html): it creates a new handle pointing at the same target, which must be independently closed (disposed). If the instance of the [`RpcTarget` class](https://developers.cloudflare.com/workers/runtime-apis/rpc/) that the stubs point to has a disposer, the disposer will only be invoked when all duplicates have been disposed. However, this only applies to duplicates that originate from the same stub. If the same instance of `RpcTarget` is passed over RPC multiple times, a new stub is created each time, and these are not considered duplicates of each other. Thus, the disposer will be invoked once for each time the `RpcTarget` was sent. In order to avoid this situation, you can manually create a stub locally, and then pass the stub across RPC multiple times. When passing a stub over RPC, ownership of the stub transfers to the recipient, so you must make a `dup()` for each time you send it: ```js import { RpcTarget, RpcStub } from "cloudflare:workers"; class Foo extends RpcTarget { // ... } let obj = new Foo(); let stub = new RpcStub(obj); await rpc1(stub.dup()); // sends a dup of `stub` await rpc2(stub.dup()); // sends another dup of `stub` stub[Symbol.dispose](); // disposes the original stub // obj's disposer will be called when the other two stubs // are disposed remotely. ``` --- title: Workers RPC — Reserved Methods · Cloudflare Workers docs description: Reserved methods with special behavior that are treated differently. lastUpdated: 2024-08-13T19:56:56.000Z chatbotDeprioritize: false source_url: html: https://developers.cloudflare.com/workers/runtime-apis/rpc/reserved-methods/ md: https://developers.cloudflare.com/workers/runtime-apis/rpc/reserved-methods/index.md --- Some method names are reserved or have special semantics. ## Special Methods For backwards compatibility, when extending `WorkerEntrypoint` or `DurableObject`, the following method names have special semantics. Note that this does *not* apply to `RpcTarget`. On `RpcTarget`, these methods work like any other RPC method. ### `fetch()` The `fetch()` method is treated specially — it can only be used to handle an HTTP request — equivalent to the [fetch handler](https://developers.cloudflare.com/workers/runtime-apis/handlers/fetch/). You may implement a `fetch()` method in your class that extends `WorkerEntrypoint` — but it must accept only one parameter of type [`Request`](https://developer.mozilla.org/en-US/docs/Web/API/Request), and must return an instance of [`Response`](https://developer.mozilla.org/en-US/docs/Web/API/Response), or a [Promise](https://developer.mozilla.org/en-US/docs/Web/JavaScript/Reference/Global_Objects/Promise) of one. On the client side, `fetch()` called on a service binding or Durable Object stub works like the standard global `fetch()`. That is, the caller may pass one or two parameters to `fetch()`. If the caller does not simply pass a single `Request` object, then a new `Request` is implicitly constructed, passing the parameters to its constructor, and that request is what is actually sent to the server. Some properties of `Request` control the behavior of `fetch()` on the client side and are not actually sent to the server. For example, the property `redirect: "auto"` (which is the default) instructs `fetch()` that if the server returns a redirect response, it should automatically be followed, resulting in an HTTP request to the public internet. Again, this behavior is according to the Fetch API standard. In short, `fetch()` doesn't have RPC semantics, it has Fetch API semantics. ### `connect()` The `connect()` method of the `WorkerEntrypoint` class is reserved for opening a socket-like connection to your Worker. This is currently not implemented or supported — though you can [open a TCP socket from a Worker](https://developers.cloudflare.com/workers/runtime-apis/tcp-sockets/) or connect directly to databases over a TCP socket with [Hyperdrive](https://developers.cloudflare.com/hyperdrive/get-started/). ## Disallowed Method Names The following method (or property) names may not be used as RPC methods on any RPC type (including `WorkerEntrypoint`, `DurableObject`, and `RpcTarget`): * `dup`: This is reserved for duplicating a stub. Refer to the [RPC Lifecycle](https://developers.cloudflare.com/workers/runtime-apis/rpc/lifecycle) docs to learn more about `dup()`. * `constructor`: This name has special meaning for JavaScript classes. It is not intended to be called as a method, so it is not allowed over RPC. The following methods are disallowed only on `WorkerEntrypoint` and `DurableObject`, but allowed on `RpcTarget`. These methods have historically had special meaning to Durable Objects, where they are used to handle certain system-generated events. * `alarm` * `webSocketMessage` * `webSocketClose` * `webSocketError` --- title: Workers RPC — TypeScript · Cloudflare Workers docs description: How TypeScript types for your Worker or Durable Object's RPC methods are generated and exposed to clients lastUpdated: 2025-07-09T09:47:28.000Z chatbotDeprioritize: false source_url: html: https://developers.cloudflare.com/workers/runtime-apis/rpc/typescript/ md: https://developers.cloudflare.com/workers/runtime-apis/rpc/typescript/index.md --- Running [`wrangler types`](https://developers.cloudflare.com/workers/languages/typescript/#generate-types) generates runtime types including the `Service` and `DurableObjectNamespace` types, each of which accepts a single type parameter for the [`WorkerEntrypoint`](https://developers.cloudflare.com/workers/runtime-apis/bindings/service-bindings/rpc) or [`DurableObject`](https://developers.cloudflare.com/durable-objects/best-practices/create-durable-object-stubs-and-send-requests/#call-rpc-methods) types. Using higher-order types, we automatically generate client-side stub types (e.g., forcing all methods to be async). [`wrangler types`](https://developers.cloudflare.com/workers/languages/typescript/#generate-types) also generates types for the `env` object. You can pass in the path to the config files of the Worker or Durable Object being called so that the generated types include the type parameters for the `Service` and `DurableObjectNamespace` types. For example, if your client Worker had bindings to a Worker in `../sum-worker/` and a Durable Object in `../counter/`, you should generate types for the client Worker's `env` by running: * npm ```sh npx wrangler types -c ./client/wrangler.jsonc -c ../sum-worker/wrangler.jsonc -c ../counter/wrangler.jsonc ``` * yarn ```sh yarn wrangler types -c ./client/wrangler.jsonc -c ../sum-worker/wrangler.jsonc -c ../counter/wrangler.jsonc ``` * pnpm ```sh pnpm wrangler types -c ./client/wrangler.jsonc -c ../sum-worker/wrangler.jsonc -c ../counter/wrangler.jsonc ``` Note Currently, this only works if your service binding targets a [named entrypoint](https://developers.cloudflare.com/workers/runtime-apis/bindings/service-bindings/rpc/#named-entrypoints), rather than the default export. If you are unable to use named entrypoints, we recommend you extend your `Env` type in a separate file in order to manually provide those types without risk of being overwritten by subsequent runs of `wrangler types`. This is a temporary limitation we are working to fix. This will produce a `worker-configuration.d.ts` file that includes: ```ts interface Env { SUM_SERVICE: Service; COUNTER_OBJECT: DurableObjectNamespace< import("../counter/src/index").Counter >; } ``` Now types for RPC method like the `env.SUM_SERVICE.sum` method will be exposed to the client Worker. ```ts export default { async fetch(req, env, ctx): Promise { const result = await env.SUM_SERVICE.sum(1, 2); return new Response(result.toString()); }, } satisfies ExportedHandler; ``` --- title: Workers RPC — Visibility and Security Model · Cloudflare Workers docs description: Which properties are and are not exposed to clients that communicate with your Worker or Durable Object via RPC lastUpdated: 2024-08-13T19:56:56.000Z chatbotDeprioritize: false source_url: html: https://developers.cloudflare.com/workers/runtime-apis/rpc/visibility/ md: https://developers.cloudflare.com/workers/runtime-apis/rpc/visibility/index.md --- ## Security Model The Workers RPC system is intended to allow safe communications between Workers that do not trust each other. The system does not allow either side of an RPC session to access arbitrary objects on the other side, much less invoke arbitrary code. Instead, each side can only invoke the objects and functions for which they have explicitly received stubs via previous calls. This security model is commonly known as Object Capabilities, or Capability-Based Security. Workers RPC is built on [Cap'n Proto RPC](https://capnproto.org/rpc.html), which in turn is based on CapTP, the object transport protocol used by the [distributed programming language E](https://www.crockford.com/ec/etut.html). ## Visibility of Methods and Properties ### Private properties [Private properties](https://developer.mozilla.org/en-US/docs/Web/JavaScript/Reference/Classes/Private_properties) of classes are not directly exposed over RPC. ### Class instance properties When you send an instance of an application-defined class, the recipient can only access methods and properties declared on the class, not properties of the instance. For example: ```js class Foo extends RpcTarget { constructor() { super(); // i CANNOT be accessed over RPC this.i = 0; // funcProp CANNOT be called over RPC this.funcProp = () => {} } // value CAN be accessed over RPC get value() { return this.i; } // method CAN be called over RPC method() {} } ``` This behavior is intentional — it is intended to protect you from accidentally exposing private class internals. Generally, instance properties should be declared private, [by prefixing them with `#`](https://developer.mozilla.org/en-US/docs/Web/JavaScript/Reference/Classes/Private_properties). However, private properties are a relatively new feature of JavaScript, and are not yet widely used in the ecosystem. Since the RPC interface between two of your Workers may be a security boundary, we need to be extra-careful, so instance properties are always private when communicating between Workers using RPC, whether or not they have the `#` prefix. You can always declare an explicit getter at the class level if you wish to expose the property, as shown above. These visibility rules apply only to objects that extend `RpcTarget`, `WorkerEntrypoint`, or `DurableObject`, and do not apply to plain objects. Plain objects are passed "by value", sending all of their "own" properties. ### "Own" properties of functions When you pass a function over RPC, the caller can access the "own" properties of the function object itself. ```js someRpcMethod() { let func = () => {}; func.prop = 123; // `prop` is visible over RPC return func; } ``` Such properties on a function are accessed asynchronously, like class properties of an RpcTarget. But, unlike the `RpcTarget` example above, the function's instance properties that are accessible to the caller. In practice, properties are rarely added to functions. --- title: ReadableStream · Cloudflare Workers docs description: A ReadableStream is returned by the readable property inside TransformStream. lastUpdated: 2024-08-13T19:56:56.000Z chatbotDeprioritize: false source_url: html: https://developers.cloudflare.com/workers/runtime-apis/streams/readablestream/ md: https://developers.cloudflare.com/workers/runtime-apis/streams/readablestream/index.md --- ## Background A `ReadableStream` is returned by the `readable` property inside [`TransformStream`](https://developers.cloudflare.com/workers/runtime-apis/streams/transformstream/). ## Properties * `locked` boolean * A Boolean value that indicates if the readable stream is locked to a reader. ## Methods * `pipeTo(destinationWritableStream, optionsPipeToOptions)` : Promise\ * Pipes the readable stream to a given writable stream `destination` and returns a promise that is fulfilled when the `write` operation succeeds or rejects it if the operation fails. * `getReader(optionsObject)` : ReadableStreamDefaultReader * Gets an instance of `ReadableStreamDefaultReader` and locks the `ReadableStream` to that reader instance. This method accepts an object argument indicating options. The only supported option is `mode`, which can be set to `byob` to create a [`ReadableStreamBYOBReader`](https://developers.cloudflare.com/workers/runtime-apis/streams/readablestreambyobreader/), as shown here: ```js let reader = readable.getReader({ mode: 'byob' }); ``` ### `PipeToOptions` * `preventClose` bool * When `true`, closure of the source `ReadableStream` will not cause the destination `WritableStream` to be closed. * `preventAbort` bool * When `true`, errors in the source `ReadableStream` will no longer abort the destination `WritableStream`. `pipeTo` will return a rejected promise with the error from the source or any error that occurred while aborting the destination. *** ## Related resources * [Streams](https://developers.cloudflare.com/workers/runtime-apis/streams/) * [Readable streams in the WHATWG Streams API specification](https://streams.spec.whatwg.org/#rs-model) * [MDN’s `ReadableStream` documentation](https://developer.mozilla.org/en-US/docs/Web/API/ReadableStream) --- title: ReadableStreamBYOBReader · Cloudflare Workers docs description: BYOB is an abbreviation of bring your own buffer. A ReadableStreamBYOBReader allows reading into a developer-supplied buffer, thus minimizing copies. lastUpdated: 2024-08-13T19:56:56.000Z chatbotDeprioritize: false source_url: html: https://developers.cloudflare.com/workers/runtime-apis/streams/readablestreambyobreader/ md: https://developers.cloudflare.com/workers/runtime-apis/streams/readablestreambyobreader/index.md --- ## Background `BYOB` is an abbreviation of bring your own buffer. A `ReadableStreamBYOBReader` allows reading into a developer-supplied buffer, thus minimizing copies. An instance of `ReadableStreamBYOBReader` is functionally identical to [`ReadableStreamDefaultReader`](https://developers.cloudflare.com/workers/runtime-apis/streams/readablestreamdefaultreader/) with the exception of the `read` method. A `ReadableStreamBYOBReader` is not instantiated via its constructor. Rather, it is retrieved from a [`ReadableStream`](https://developers.cloudflare.com/workers/runtime-apis/streams/readablestream/): ```js const { readable, writable } = new TransformStream(); const reader = readable.getReader({ mode: 'byob' }); ``` *** ## Methods * `read(bufferArrayBufferView)` : Promise\ * Returns a promise with the next available chunk of data read into a passed-in buffer. * `readAtLeast(minBytes, bufferArrayBufferView)` : Promise\ * Returns a promise with the next available chunk of data read into a passed-in buffer. The promise will not resolve until at least `minBytes` have been read. *** ## Common issues Warning `read` provides no control over the minimum number of bytes that should be read into the buffer. Even if you allocate a 1 MiB buffer, the kernel is perfectly within its rights to fulfill this read with a single byte, whether or not an EOF immediately follows. In practice, the Workers team has found that `read` typically fills only 1% of the provided buffer. `readAtLeast` is a non-standard extension to the Streams API which allows users to specify that at least `minBytes` bytes must be read into the buffer before resolving the read. *** ## Related resources * [Streams](https://developers.cloudflare.com/workers/runtime-apis/streams/) * [Background about BYOB readers in the Streams API WHATWG specification](https://streams.spec.whatwg.org/#byob-readers) --- title: ReadableStreamDefaultReader · Cloudflare Workers docs description: A reader is used when you want to read from a ReadableStream, rather than piping its output to a WritableStream. lastUpdated: 2025-02-19T14:52:46.000Z chatbotDeprioritize: false source_url: html: https://developers.cloudflare.com/workers/runtime-apis/streams/readablestreamdefaultreader/ md: https://developers.cloudflare.com/workers/runtime-apis/streams/readablestreamdefaultreader/index.md --- ## Background A reader is used when you want to read from a [`ReadableStream`](https://developers.cloudflare.com/workers/runtime-apis/streams/readablestream/), rather than piping its output to a [`WritableStream`](https://developers.cloudflare.com/workers/runtime-apis/streams/writablestream/). A `ReadableStreamDefaultReader` is not instantiated via its constructor. Rather, it is retrieved from a [`ReadableStream`](https://developers.cloudflare.com/workers/runtime-apis/streams/readablestream/): ```js const { readable, writable } = new TransformStream(); const reader = readable.getReader(); ``` *** ## Properties * `reader.closed` : Promise * A promise indicating if the reader is closed. The promise is fulfilled when the reader stream closes and is rejected if there is an error in the stream. ## Methods * `read()` : Promise * A promise that returns the next available chunk of data being passed through the reader queue. * `cancel(reasonstringoptional)` : void * Cancels the stream. `reason` is an optional human-readable string indicating the reason for cancellation. `reason` will be passed to the underlying source’s cancel algorithm -- if this readable stream is one side of a [`TransformStream`](https://developers.cloudflare.com/workers/runtime-apis/streams/transformstream/), then its cancel algorithm causes the transform’s writable side to become errored with `reason`. Warning Any data not yet read is lost. * `releaseLock()` : void * Releases the lock on the readable stream. A lock cannot be released if the reader has pending read operations. A `TypeError` is thrown and the reader remains locked. *** ## Related resources * [Streams](https://developers.cloudflare.com/workers/runtime-apis/streams/) * [Readable streams in the WHATWG Streams API specification](https://streams.spec.whatwg.org/#rs-model) --- title: TransformStream · Cloudflare Workers docs description: "A transform stream consists of a pair of streams: a writable stream, known as its writable side, and a readable stream, known as its readable side. Writes to the writable side result in new data being made available for reading from the readable side." lastUpdated: 2024-08-13T19:56:56.000Z chatbotDeprioritize: false source_url: html: https://developers.cloudflare.com/workers/runtime-apis/streams/transformstream/ md: https://developers.cloudflare.com/workers/runtime-apis/streams/transformstream/index.md --- ## Background A transform stream consists of a pair of streams: a writable stream, known as its writable side, and a readable stream, known as its readable side. Writes to the writable side result in new data being made available for reading from the readable side. Workers currently only implements an identity transform stream, a type of transform stream which forwards all chunks written to its writable side to its readable side, without any changes. *** ## Constructor ```js let { readable, writable } = new TransformStream(); ``` * `TransformStream()` TransformStream * Returns a new identity transform stream. ## Properties * `readable` ReadableStream * An instance of a `ReadableStream`. * `writable` WritableStream * An instance of a `WritableStream`. *** ## `IdentityTransformStream` The current implementation of `TransformStream` in the Workers platform is not current compliant with the [Streams Standard](https://streams.spec.whatwg.org/#transform-stream) and we will soon be making changes to the implementation to make it conform with the specification. In preparation for doing so, we have introduced the `IdentityTransformStream` class that implements behavior identical to the current `TransformStream` class. This type of stream forwards all chunks of byte data (in the form of `TypedArray`s) written to its writable side to its readable side, without any changes. The `IdentityTransformStream` readable side supports [bring your own buffer (BYOB) reads](https://developer.mozilla.org/en-US/docs/Web/API/ReadableStreamBYOBReader). ### Constructor ```js let { readable, writable } = new IdentityTransformStream(); ``` * `IdentityTransformStream()` IdentityTransformStream * Returns a new identity transform stream. ### Properties * `readable` ReadableStream * An instance of a `ReadableStream`. * `writable` WritableStream * An instance of a `WritableStream`. *** ## `FixedLengthStream` The `FixedLengthStream` is a specialization of `IdentityTransformStream` that limits the total number of bytes that the stream will passthrough. It is useful primarily because, when using `FixedLengthStream` to produce either a `Response` or `Request`, the fixed length of the stream will be used as the `Content-Length` header value as opposed to use chunked encoding when using any other type of stream. An error will occur if too many, or too few bytes are written through the stream. ### Constructor ```js let { readable, writable } = new FixedLengthStream(1000); ``` * `FixedLengthStream(length)` FixedLengthStream * Returns a new identity transform stream. * `length` maybe a `number` or `bigint` with a maximum value of `2^53 - 1`. ### Properties * `readable` ReadableStream * An instance of a `ReadableStream`. * `writable` WritableStream * An instance of a `WritableStream`. *** ## Related resources * [Streams](https://developers.cloudflare.com/workers/runtime-apis/streams/) * [Transform Streams in the WHATWG Streams API specification](https://streams.spec.whatwg.org/#transform-stream) --- title: WritableStream · Cloudflare Workers docs description: A WritableStream is the writable property of a TransformStream. On the Workers platform, WritableStream cannot be directly created using the WritableStream constructor. lastUpdated: 2025-02-19T14:52:46.000Z chatbotDeprioritize: false source_url: html: https://developers.cloudflare.com/workers/runtime-apis/streams/writablestream/ md: https://developers.cloudflare.com/workers/runtime-apis/streams/writablestream/index.md --- ## Background A `WritableStream` is the `writable` property of a [`TransformStream`](https://developers.cloudflare.com/workers/runtime-apis/streams/transformstream/). On the Workers platform, `WritableStream` cannot be directly created using the `WritableStream` constructor. A typical way to write to a `WritableStream` is to pipe a [`ReadableStream`](https://developers.cloudflare.com/workers/runtime-apis/streams/readablestream/) to it. ```js readableStream .pipeTo(writableStream) .then(() => console.log('All data successfully written!')) .catch(e => console.error('Something went wrong!', e)); ``` To write to a `WritableStream` directly, you must use its writer. ```js const writer = writableStream.getWriter(); writer.write(data); ``` Refer to the [WritableStreamDefaultWriter](https://developers.cloudflare.com/workers/runtime-apis/streams/writablestreamdefaultwriter/) documentation for further detail. ## Properties * `locked` boolean * A Boolean value to indicate if the writable stream is locked to a writer. ## Methods * `abort(reasonstringoptional)` : Promise\ * Aborts the stream. This method returns a promise that fulfills with a response `undefined`. `reason` is an optional human-readable string indicating the reason for cancellation. `reason` will be passed to the underlying sink’s abort algorithm. If this writable stream is one side of a [TransformStream](https://developers.cloudflare.com/workers/runtime-apis/streams/transformstream/), then its abort algorithm causes the transform’s readable side to become errored with `reason`. Warning Any data not yet written is lost upon abort. * `getWriter()` : WritableStreamDefaultWriter * Gets an instance of `WritableStreamDefaultWriter` and locks the `WritableStream` to that writer instance. *** ## Related resources * [Streams](https://developers.cloudflare.com/workers/runtime-apis/streams/) * [Writable streams in the WHATWG Streams API specification](https://streams.spec.whatwg.org/#ws-model) --- title: WritableStreamDefaultWriter · Cloudflare Workers docs description: "A writer is used when you want to write directly to a WritableStream, rather than piping data to it from a ReadableStream. For example:" lastUpdated: 2025-02-19T14:52:46.000Z chatbotDeprioritize: false source_url: html: https://developers.cloudflare.com/workers/runtime-apis/streams/writablestreamdefaultwriter/ md: https://developers.cloudflare.com/workers/runtime-apis/streams/writablestreamdefaultwriter/index.md --- ## Background A writer is used when you want to write directly to a [`WritableStream`](https://developers.cloudflare.com/workers/runtime-apis/streams/writablestream/), rather than piping data to it from a [`ReadableStream`](https://developers.cloudflare.com/workers/runtime-apis/streams/readablestream/). For example: ```js function writeArrayToStream(array, writableStream) { const writer = writableStream.getWriter(); array.forEach(chunk => writer.write(chunk).catch(() => {})); return writer.close(); } writeArrayToStream([1, 2, 3, 4, 5], writableStream) .then(() => console.log('All done!')) .catch(e => console.error('Error with the stream: ' + e)); ``` ## Properties * `writer.desiredSize` int * The size needed to fill the stream’s internal queue, as an integer. Always returns 1, 0 (if the stream is closed), or `null` (if the stream has errors). * `writer.closed` Promise\ * A promise that indicates if the writer is closed. The promise is fulfilled when the writer stream is closed and rejected if there is an error in the stream. ## Methods * `abort(reasonstringoptional)` : Promise\ * Aborts the stream. This method returns a promise that fulfills with a response `undefined`. `reason` is an optional human-readable string indicating the reason for cancellation. `reason` will be passed to the underlying sink’s abort algorithm. If this writable stream is one side of a [TransformStream](https://developers.cloudflare.com/workers/runtime-apis/streams/transformstream/), then its abort algorithm causes the transform’s readable side to become errored with `reason`. Warning Any data not yet written is lost upon abort. * `close()` : Promise\ * Attempts to close the writer. Remaining writes finish processing before the writer is closed. This method returns a promise fulfilled with `undefined` if the writer successfully closes and processes the remaining writes, or rejected on any error. * `releaseLock()` : void * Releases the writer’s lock on the stream. Once released, the writer is no longer active. You can call this method before all pending `write(chunk)` calls are resolved. This allows you to queue a `write` operation, release the lock, and begin piping into the writable stream from another source, as shown in the example below. ```js let writer = writable.getWriter(); // Write a preamble. writer.write(new TextEncoder().encode('foo bar')); // While that’s still writing, pipe the rest of the body from somewhere else. writer.releaseLock(); await someResponse.body.pipeTo(writable); ``` * `write(chunkany)` : Promise\ * Writes a chunk of data to the writer and returns a promise that resolves if the operation succeeds. * The underlying stream may accept fewer kinds of type than `any`, it will throw an exception when encountering an unexpected type. *** ## Related resources * [Streams](https://developers.cloudflare.com/workers/runtime-apis/streams/) * [Writable streams in the WHATWG Streams API specification](https://streams.spec.whatwg.org/#ws-model) --- title: Wasm in JavaScript · Cloudflare Workers docs description: >- Wasm can be used from within a Worker written in JavaScript or TypeScript by importing a Wasm module, and instantiating an instance of this module using WebAssembly.instantiate(). This can be used to accelerate computationally intensive operations which do not involve significant I/O. lastUpdated: 2025-02-12T13:41:31.000Z chatbotDeprioritize: false source_url: html: https://developers.cloudflare.com/workers/runtime-apis/webassembly/javascript/ md: https://developers.cloudflare.com/workers/runtime-apis/webassembly/javascript/index.md --- Wasm can be used from within a Worker written in JavaScript or TypeScript by importing a Wasm module, and instantiating an instance of this module using [`WebAssembly.instantiate()`](https://developer.mozilla.org/en-US/docs/WebAssembly/JavaScript_interface/instantiate). This can be used to accelerate computationally intensive operations which do not involve significant I/O. This guide demonstrates the basics of Wasm and JavaScript interoperability. ## Simple Wasm Module In this guide, you will use the WebAssembly Text Format to create a simple Wasm module to understand how imports and exports work. In practice, you would not write code in this format. You would instead use the programming language of your choice and compile directly to WebAssembly Binary Format (`.wasm`). Review the following example module (`;;` denotes a comment): ```txt ;; src/simple.wat (module ;; Import a function from JavaScript named `imported_func` ;; which takes a single i32 argument and assign to ;; variable $i (func $i (import "imports" "imported_func") (param i32)) ;; Export a function named `exported_func` which takes a ;; single i32 argument and returns an i32 (func (export "exported_func") (param $input i32) (result i32) ;; Invoke `imported_func` with $input as argument local.get $input call $i ;; Return $input local.get $input return ) ) ``` Using [`wat2wasm`](https://github.com/WebAssembly/wabt), convert the WAT format to WebAssembly Binary Format: ```sh wat2wasm src/simple.wat -o src/simple.wasm ``` ## Bundling Wrangler will bundle any Wasm module that ends in `.wasm` or `.wasm?module`, so that it is available at runtime within your Worker. This is done using a default bundling rule which can be customized in the [Wrangler configuration file](https://developers.cloudflare.com/workers/wrangler/configuration/). Refer to [Wrangler Bundling](https://developers.cloudflare.com/workers/wrangler/bundling/) for more information. ## Use from JavaScript After you have converted the WAT format to WebAssembly Binary Format, import and use the Wasm module in your existing JavaScript or TypeScript Worker: ```typescript import mod from "./simple.wasm"; // Define imports available to Wasm instance. const importObject = { imports: { imported_func: (arg: number) => { console.log(`Hello from JavaScript: ${arg}`); }, }, }; // Create instance of WebAssembly Module `mod`, supplying // the expected imports in `importObject`. This should be // done at the top level of the script to avoid instantiation on every request. const instance = await WebAssembly.instantiate(mod, importObject); export default { async fetch() { // Invoke the `exported_func` from our Wasm Instance with // an argument. const retval = instance.exports.exported_func(42); // Return the return value! return new Response(`Success: ${retval}`); }, }; ``` When invoked, this Worker should log `Hello from JavaScript: 42` and return `Success: 42`, demonstrating the ability to invoke Wasm methods with arguments from JavaScript and vice versa. ## Next steps In practice, you will likely compile a language of your choice (such as Rust) to WebAssembly binaries. Many languages provide a `bindgen` to simplify the interaction between JavaScript and Wasm. These tools may integrate with your JavaScript bundler, and provide an API other than the WebAssembly API for initializing and invoking your Wasm module. As an example, refer to the [Rust `wasm-bindgen` documentation](https://rustwasm.github.io/wasm-bindgen/examples/without-a-bundler.html). Alternatively, to write your entire Worker in Rust, Workers provides many of the same [Runtime APIs](https://developers.cloudflare.com/workers/runtime-apis) and [bindings](https://developers.cloudflare.com/workers/runtime-apis/bindings/) when using the `workers-rs` crate. For more information, refer to the [Workers Rust guide](https://developers.cloudflare.com/workers/languages/rust/). --- title: Core · Cloudflare Workers docs lastUpdated: 2025-04-10T14:17:11.000Z chatbotDeprioritize: true source_url: html: https://developers.cloudflare.com/workers/testing/miniflare/core/ md: https://developers.cloudflare.com/workers/testing/miniflare/core/index.md --- * [⏰ Scheduled Events](https://developers.cloudflare.com/workers/testing/miniflare/core/scheduled/) * [✉️ WebSockets](https://developers.cloudflare.com/workers/testing/miniflare/core/web-sockets/) * [📅 Compatibility Dates](https://developers.cloudflare.com/workers/testing/miniflare/core/compatibility/) * [📚 Modules](https://developers.cloudflare.com/workers/testing/miniflare/core/modules/) * [📨 Fetch Events](https://developers.cloudflare.com/workers/testing/miniflare/core/fetch/) * [🔌 Multiple Workers](https://developers.cloudflare.com/workers/testing/miniflare/core/multiple-workers/) * [🔑 Variables and Secrets](https://developers.cloudflare.com/workers/testing/miniflare/core/variables-secrets/) * [🕸 Web Standards](https://developers.cloudflare.com/workers/testing/miniflare/core/standards/) * [🚥 Queues](https://developers.cloudflare.com/workers/testing/miniflare/core/queues/) --- title: Developing · Cloudflare Workers docs lastUpdated: 2025-04-10T14:17:11.000Z chatbotDeprioritize: true source_url: html: https://developers.cloudflare.com/workers/testing/miniflare/developing/ md: https://developers.cloudflare.com/workers/testing/miniflare/developing/index.md --- * [⚡️ Live Reload](https://developers.cloudflare.com/workers/testing/miniflare/developing/live-reload/) * [🐛 Attaching a Debugger](https://developers.cloudflare.com/workers/testing/miniflare/developing/debugger/) --- title: Get Started · Cloudflare Workers docs description: The Miniflare API allows you to dispatch events to workers without making actual HTTP requests, simulate connections between Workers, and interact with local emulations of storage products like KV, R2, and Durable Objects. This makes it great for writing tests, or other advanced use cases where you need finer-grained control. lastUpdated: 2025-05-16T16:37:37.000Z chatbotDeprioritize: false source_url: html: https://developers.cloudflare.com/workers/testing/miniflare/get-started/ md: https://developers.cloudflare.com/workers/testing/miniflare/get-started/index.md --- The Miniflare API allows you to dispatch events to workers without making actual HTTP requests, simulate connections between Workers, and interact with local emulations of storage products like [KV](https://developers.cloudflare.com/workers/testing/miniflare/storage/kv), [R2](https://developers.cloudflare.com/workers/testing/miniflare/storage/r2), and [Durable Objects](https://developers.cloudflare.com/workers/testing/miniflare/storage/durable-objects). This makes it great for writing tests, or other advanced use cases where you need finer-grained control. ## Installation Miniflare is installed using `npm` as a dev dependency: * npm ```sh npm i -D miniflare ``` * yarn ```sh yarn add -D miniflare ``` * pnpm ```sh pnpm add -D miniflare ``` ## Usage In all future examples, we'll assume Node.js is running in ES module mode. You can do this by setting the `type` field in your `package.json`: ```json { ... "type": "module" ... } ``` To initialise Miniflare, import the `Miniflare` class from `miniflare`: ```js import { Miniflare } from "miniflare"; const mf = new Miniflare({ modules: true, script: ` export default { async fetch(request, env, ctx) { return new Response("Hello Miniflare!"); } } `, }); const res = await mf.dispatchFetch("http://localhost:8787/"); console.log(await res.text()); // Hello Miniflare! await mf.dispose(); ``` The [rest of these docs](https://developers.cloudflare.com/workers/testing/miniflare/core/fetch) go into more detail on configuring specific features. ### String and File Scripts Note in the above example we're specifying `script` as a string. We could've equally put the script in a file such as `worker.js`, then used the `scriptPath` property instead: ```js const mf = new Miniflare({ scriptPath: "worker.js", }); ``` ### Watching, Reloading and Disposing Miniflare's API is primarily intended for testing use cases, where file watching isn't usually required. If you need to watch files, consider using a separate file watcher like [fs.watch()](https://nodejs.org/api/fs.html#fswatchfilename-options-listener) or [chokidar](https://github.com/paulmillr/chokidar), and calling setOptions() with your original configuration on change. To cleanup and stop listening for requests, you should `dispose()` your instances: ```js await mf.dispose(); ``` You can also manually reload scripts (main and Durable Objects') and options by calling `setOptions()` with the original configuration object. ### Updating Options and the Global Scope You can use the `setOptions` method to update the options of an existing `Miniflare` instance. This accepts the same options object as the `new Miniflare` constructor, applies those options, then reloads the worker. ```js const mf = new Miniflare({ script: "...", kvNamespaces: ["TEST_NAMESPACE"], bindings: { KEY: "value1" }, }); await mf.setOptions({ script: "...", kvNamespaces: ["TEST_NAMESPACE"], bindings: { KEY: "value2" }, }); ``` ### Dispatching Events `getWorker` dispatches `fetch`, `queues`, and `scheduled` events to workers respectively: ```js import { Miniflare } from "miniflare"; const mf = new Miniflare({ modules: true, script: ` let lastScheduledController; let lastQueueBatch; export default { async fetch(request, env, ctx) { const { pathname } = new URL(request.url); if (pathname === "/scheduled") { return Response.json({ scheduledTime: lastScheduledController?.scheduledTime, cron: lastScheduledController?.cron, }); } else if (pathname === "/queue") { return Response.json({ queue: lastQueueBatch.queue, messages: lastQueueBatch.messages.map((message) => ({ id: message.id, timestamp: message.timestamp.getTime(), body: message.body, bodyType: message.body.constructor.name, })), }); } else if (pathname === "/get-url") { return new Response(request.url); } else { return new Response(null, { status: 404 }); } }, async scheduled(controller, env, ctx) { lastScheduledController = controller; if (controller.cron === "* * * * *") controller.noRetry(); }, async queue(batch, env, ctx) { lastQueueBatch = batch; if (batch.queue === "needy") batch.retryAll(); for (const message of batch.messages) { if (message.id === "perfect") message.ack(); } } }`, }); const res = await mf.dispatchFetch("http://localhost:8787/", { headers: { "X-Message": "Hello Miniflare!" }, }); console.log(await res.text()); // Hello Miniflare! const worker = await mf.getWorker(); const scheduledResult = await worker.scheduled({ cron: "* * * * *", }); console.log(scheduledResult); // { outcome: "ok", noRetry: true }); const queueResult = await worker.queue("needy", [ { id: "a", timestamp: new Date(1000), body: "a", attempts: 1 }, { id: "b", timestamp: new Date(2000), body: { b: 1 }, attempts: 1 }, ]); console.log(queueResult); // { outcome: "ok", retryAll: true, ackAll: false, explicitRetries: [], explicitAcks: []} ``` See [📨 Fetch Events](https://developers.cloudflare.com/workers/testing/miniflare/core/fetch) and [⏰ Scheduled Events](https://developers.cloudflare.com/workers/testing/miniflare/core/scheduled) for more details. ### HTTP Server Miniflare starts an HTTP server automatically. To wait for it to be ready, `await` the `ready` property: ```js import { Miniflare } from "miniflare"; const mf = new Miniflare({ modules: true, script: ` export default { async fetch(request, env, ctx) { return new Response("Hello Miniflare!"); }) } `, port: 5000, }); await mf.ready; console.log("Listening on :5000"); ``` #### `Request#cf` Object By default, Miniflare will fetch the `Request#cf` object from a trusted Cloudflare endpoint. You can disable this behaviour, using the `cf` option: ```js const mf = new Miniflare({ cf: false, }); ``` You can also provide a custom cf object via a filepath: ```js const mf = new Miniflare({ cf: "cf.json", }); ``` ### HTTPS Server To start an HTTPS server instead, set the `https` option. To use the [default shared self-signed certificate](https://github.com/cloudflare/workers-sdk/tree/main/packages/miniflare/src/http/cert.ts), set `https` to `true`: ```js const mf = new Miniflare({ https: true, }); ``` To load an existing certificate from the file system: ```js const mf = new Miniflare({ // These are all optional, you don't need to include them all httpsKeyPath: "./key.pem", httpsCertPath: "./cert.pem", }); ``` To load an existing certificate from strings instead: ```js const mf = new Miniflare({ // These are all optional, you don't need to include them all httpsKey: "-----BEGIN RSA PRIVATE KEY-----...", httpsCert: "-----BEGIN CERTIFICATE-----...", }); ``` If both a string and path are specified for an option (e.g. `httpsKey` and `httpsKeyPath`), the string will be preferred. ### Logging By default, `[mf:*]` logs are disabled when using the API. To enable these, set the `log` property to an instance of the `Log` class. Its only parameter is a log level indicating which messages should be logged: ```js import { Miniflare, Log, LogLevel } from "miniflare"; const mf = new Miniflare({ scriptPath: "worker.js", log: new Log(LogLevel.DEBUG), // Enable debug messages }); ``` ## Reference ```js import { Miniflare, Log, LogLevel } from "miniflare"; const mf = new Miniflare({ // All options are optional, but one of script or scriptPath is required log: new Log(LogLevel.INFO), // Logger Miniflare uses for debugging script: ` export default { async fetch(request, env, ctx) { return new Response("Hello Miniflare!"); } } `, scriptPath: "./index.js", modules: true, // Enable modules modulesRules: [ // Modules import rule { type: "ESModule", include: ["**/*.js"], fallthrough: true }, { type: "Text", include: ["**/*.text"] }, ], compatibilityDate: "2021-11-23", // Opt into backwards-incompatible changes from compatibilityFlags: ["formdata_parser_supports_files"], // Control specific backwards-incompatible changes upstream: "https://miniflare.dev", // URL of upstream origin workers: [{ // reference additional named workers name: "worker2", kvNamespaces: { COUNTS: "counts" }, serviceBindings: { INCREMENTER: "incrementer", // Service bindings can also be defined as custom functions, with access // to anything defined outside Miniflare. async CUSTOM(request) { // `request` is the incoming `Request` object. return new Response(message); }, }, modules: true, script: `export default { async fetch(request, env, ctx) { // Get the message defined outside const response = await env.CUSTOM.fetch("http://host/"); const message = await response.text(); // Increment the count 3 times await env.INCREMENTER.fetch("http://host/"); await env.INCREMENTER.fetch("http://host/"); await env.INCREMENTER.fetch("http://host/"); const count = await env.COUNTS.get("count"); return new Response(message + count); } }`, }, }], name: "worker", // Name of service routes: ["*site.mf/worker"], host: "127.0.0.1", // Host for HTTP(S) server to listen on port: 8787, // Port for HTTP(S) server to listen on https: true, // Enable self-signed HTTPS (with optional cert path) httpsKey: "-----BEGIN RSA PRIVATE KEY-----...", httpsKeyPath: "./key.pem", // Path to PEM SSL key httpsCert: "-----BEGIN CERTIFICATE-----...", httpsCertPath: "./cert.pem", // Path to PEM SSL cert chain cf: "./node_modules/.mf/cf.json", // Path for cached Request cf object from Cloudflare liveReload: true, // Reload HTML pages whenever worker is reloaded kvNamespaces: ["TEST_NAMESPACE"], // KV namespace to bind kvPersist: "./kv-data", // Persist KV data (to optional path) r2Buckets: ["BUCKET"], // R2 bucket to bind r2Persist: "./r2-data", // Persist R2 data (to optional path) durableObjects: { // Durable Object to bind TEST_OBJECT: "TestObject", // className API_OBJECT: { className: "ApiObject", scriptName: "api" }, }, durableObjectsPersist: "./durable-objects-data", // Persist Durable Object data (to optional path) cache: false, // Enable default/named caches (enabled by default) cachePersist: "./cache-data", // Persist cached data (to optional path) cacheWarnUsage: true, // Warn on cache usage, for workers.dev subdomains sitePath: "./site", // Path to serve Workers Site files from siteInclude: ["**/*.html", "**/*.css", "**/*.js"], // Glob pattern of site files to serve siteExclude: ["node_modules"], // Glob pattern of site files not to serve bindings: { SECRET: "sssh" }, // Binds variable/secret to environment wasmBindings: { ADD_MODULE: "./add.wasm" }, // WASM module to bind textBlobBindings: { TEXT: "./text.txt" }, // Text blob to bind dataBlobBindings: { DATA: "./data.bin" }, // Data blob to bind }); await mf.setOptions({ kvNamespaces: ["TEST_NAMESPACE2"] }); // Apply options and reload const bindings = await mf.getBindings(); // Get bindings (KV/Durable Object namespaces, variables, etc) // Dispatch "fetch" event to worker const res = await mf.dispatchFetch("http://localhost:8787/", { headers: { Authorization: "Bearer ..." }, }); const text = await res.text(); const worker = await mf.getWorker(); // Dispatch "scheduled" event to worker const scheduledResult = await worker.scheduled({ cron: "30 * * * *" }) const TEST_NAMESPACE = await mf.getKVNamespace("TEST_NAMESPACE"); const BUCKET = await mf.getR2Bucket("BUCKET"); const caches = await mf.getCaches(); // Get global `CacheStorage` instance const defaultCache = caches.default; const namedCache = await caches.open("name"); // Get Durable Object namespace and storage for ID const TEST_OBJECT = await mf.getDurableObjectNamespace("TEST_OBJECT"); const id = TEST_OBJECT.newUniqueId(); const storage = await mf.getDurableObjectStorage(id); // Get Queue Producer const producer = await mf.getQueueProducer("QUEUE_BINDING"); // Get D1 Database const db = await mf.getD1Database("D1_BINDING") await mf.dispose(); // Cleanup storage database connections and watcher ``` --- title: Migrations · Cloudflare Workers docs description: Review migration guides for specific versions of Miniflare. lastUpdated: 2025-04-10T14:17:11.000Z chatbotDeprioritize: true source_url: html: https://developers.cloudflare.com/workers/testing/miniflare/migrations/ md: https://developers.cloudflare.com/workers/testing/miniflare/migrations/index.md --- * [⬆️ Migrating from Version 2](https://developers.cloudflare.com/workers/testing/miniflare/migrations/from-v2/) --- title: Storage · Cloudflare Workers docs lastUpdated: 2025-04-10T14:17:11.000Z chatbotDeprioritize: true source_url: html: https://developers.cloudflare.com/workers/testing/miniflare/storage/ md: https://developers.cloudflare.com/workers/testing/miniflare/storage/index.md --- * [✨ Cache](https://developers.cloudflare.com/workers/testing/miniflare/storage/cache/) * [💾 D1](https://developers.cloudflare.com/workers/testing/miniflare/storage/d1/) * [📌 Durable Objects](https://developers.cloudflare.com/workers/testing/miniflare/storage/durable-objects/) * [📦 KV](https://developers.cloudflare.com/workers/testing/miniflare/storage/kv/) * [🪣 R2](https://developers.cloudflare.com/workers/testing/miniflare/storage/r2/) --- title: Writing tests · Cloudflare Workers docs description: Write integration tests against Workers using Miniflare. lastUpdated: 2025-05-16T16:37:37.000Z chatbotDeprioritize: false source_url: html: https://developers.cloudflare.com/workers/testing/miniflare/writing-tests/ md: https://developers.cloudflare.com/workers/testing/miniflare/writing-tests/index.md --- Note For most users, Cloudflare recommends using the Workers Vitest integration. If you have been using test environments from Miniflare, refer to the [Migrate from Miniflare 2 guide](https://developers.cloudflare.com/workers/testing/vitest-integration/migration-guides/migrate-from-miniflare-2/). This guide will show you how to set up [Miniflare](https://developers.cloudflare.com/workers/testing/miniflare) to test your Workers. Miniflare is a low-level API that allows you to fully control how your Workers are run and tested. To use Miniflare, make sure you've installed the latest version of Miniflare v3: * npm ```sh npm i -D miniflare@latest ``` * yarn ```sh yarn add -D miniflare@latest ``` * pnpm ```sh pnpm add -D miniflare@latest ``` The rest of this guide demonstrates concepts with the [`node:test`](https://nodejs.org/api/test.html) testing framework, but any testing framework can be used. Miniflare is a low-level API that exposes a large variety of configuration options for running your Worker. In most cases, your tests will only need a subset of the available options, but you can refer to the [full API reference](https://developers.cloudflare.com/workers/testing/miniflare/get-started/#reference) to explore what is possible with Miniflare. Before writing a test, you will need to create a Worker. Since Miniflare is a low-level API that emulates the Cloudflare platform primitives, your Worker will need to be written in JavaScript or you'll need to [integrate your own build pipeline](#custom-builds) into your testing setup. Here's an example JavaScript-only Worker: ```js export default { async fetch(request) { return new Response(`Hello World`); }, }; ``` Next, you will need to create an initial test file: ```js import assert from "node:assert"; import test, { after, before, describe } from "node:test"; import { Miniflare } from "miniflare"; describe("worker", () => { /** * @type {Miniflare} */ let worker; before(async () => { worker = new Miniflare({ modules: [ { type: "ESModule", path: "src/index.js", }, ], }); await worker.ready; }); test("hello world", async () => { assert.strictEqual( await (await worker.dispatchFetch("http://example.com")).text(), "Hello World", ); }); after(async () => { await worker.dispose(); }); }); ``` You should be able to run the above test via `node --test` The highlighted lines of the test file above demonstrate how to set up Miniflare to run a JavaScript Worker. Once Miniflare has been set up, your individual tests can send requests to the running Worker and assert against the responses. This is the main limitation of using Miniflare for testing your Worker as compared to the [Vitest integration](https://developers.cloudflare.com/workers/testing/vitest-integration/) — all access to your Worker must be through the `dispatchFetch()` Miniflare API, and you cannot unit test individual functions from your Worker. What runtime are tests running in? When using the [Vitest integration](https://developers.cloudflare.com/workers/testing/vitest-integration/), your entire test suite runs in [`workerd`](https://github.com/cloudflare/workerd), which is why it is possible to unit test individual functions. By contrast, when using a different testing framework to run tests via Miniflare, only your Worker itself is running in [`workerd`](https://github.com/cloudflare/workerd) — your test files run in Node.js. This means that importing functions from your Worker into your test files might exhibit different behaviour than you'd see at runtime if the functions rely on `workerd`-specific behaviour. ## Interacting with Bindings Warning Miniflare does not read [Wrangler's config file](https://developers.cloudflare.com/workers/wrangler/configuration). All bindings that your Worker uses need to be specified in the Miniflare API options. The `dispatchFetch()` API from Miniflare allows you to send requests to your Worker and assert that the correct response is returned, but sometimes you need to interact directly with bindings in tests. For use cases like that, Miniflare provides the [`getBindings()`](https://developers.cloudflare.com/workers/testing/miniflare/get-started/#reference) API. For instance, to access an environment variable in your tests, adapt the test file `src/index.test.js` as follows: ```js ... describe("worker", () => { ... before(async () => { worker = new Miniflare({ ... bindings: { FOO: "Hello Bindings", }, }); ... }); test("text binding", async () => { const bindings = await worker.getBindings(); assert.strictEqual(bindings.FOO, "Hello Bindings"); }); ... }); ``` You can also interact with local resources such as KV and R2 using the same API as you would from a Worker. For example, here's how you would interact with a KV namespace: ```js ... describe("worker", () => { ... before(async () => { worker = new Miniflare({ ... kvNamespaces: ["KV"], }); ... }); test("kv binding", async () => { const bindings = await worker.getBindings(); await bindings.KV.put("key", "value"); assert.strictEqual(await bindings.KV.get("key"), "value"); }); ... }); ``` ## More complex Workers The example given above shows how to test a simple Worker consisting of a single JavaScript file. However, most real-world Workers are more complex than that. Miniflare supports providing all constituent files of your Worker directly using the API: ```js new Miniflare({ modules: [ { type: "ESModule", path: "src/index.js", }, { type: "ESModule", path: "src/imported.js", }, ], }); ``` This can be a bit cumbersome as your Worker grows. To help with this, Miniflare can also crawl your module graph to automatically figure out which modules to include: ```js new Miniflare({ scriptPath: "src/index-with-imports.js", modules: true, modulesRules: [{ type: "ESModule", include: ["**/*.js"] }], }); ``` ## Custom builds In many real-world cases, Workers are not written in plain JavaScript but instead consist of multiple TypeScript files that import from npm packages and other dependencies, which are then bundled by a build tool. When testing your Worker via Miniflare directly you need to run this build tool before your tests. Exactly how this build is run will depend on the specific test framework you use, but for `node:test` it would likely be in a `setup()` hook. For example, if you use [Wrangler](https://developers.cloudflare.com/workers/wrangler/) to build and deploy your Worker, you could spawn a `wrangler build` command like this: ```js before(() => { spawnSync("npx wrangler build -c wrangler-build.json", { shell: true, stdio: "pipe", }); }); ``` --- title: Configuration · Cloudflare Workers docs description: Vitest configuration specific to the Workers integration. lastUpdated: 2025-04-10T14:17:11.000Z chatbotDeprioritize: false source_url: html: https://developers.cloudflare.com/workers/testing/vitest-integration/configuration/ md: https://developers.cloudflare.com/workers/testing/vitest-integration/configuration/index.md --- The Workers Vitest integration provides additional configuration on top of Vitest's usual options using the [`defineWorkersConfig()`](https://developers.cloudflare.com/workers/testing/vitest-integration/configuration/#defineworkersconfigoptions) API. An example configuration would be: ```ts import { defineWorkersConfig } from "@cloudflare/vitest-pool-workers/config"; export default defineWorkersConfig({ test: { poolOptions: { workers: { wrangler: { configPath: "./wrangler.toml", }, }, }, }, }); ``` Warning Custom Vitest `environment`s or `runner`s are not supported when using the Workers Vitest integration. ## APIs The following APIs are exported from the `@cloudflare/vitest-pool-workers/config` module. ### `defineWorkersConfig(options)` Ensures Vitest is configured to use the Workers integration with the correct module resolution settings, and provides type checking for [WorkersPoolOptions](#workerspooloptions). This should be used in place of the [`defineConfig()`](https://vitest.dev/config/file.html) function from Vitest. It also accepts a `Promise` of `options`, or an optionally-`async` function returning `options`. ```ts import { defineWorkersConfig } from "@cloudflare/vitest-pool-workers/config"; export default defineWorkersConfig({ test: { poolOptions: { workers: { // Refer to type of WorkersPoolOptions... }, }, }, }); ``` ### `defineWorkersProject(options)` Use [`defineWorkersProject`](#defineworkersprojectoptions) with [Vitest Workspaces](https://vitest.dev/guide/workspace) to specify a different configuration for certain tests. It should be used in place of the [`defineProject()`](https://vitest.dev/guide/workspace) function from Vitest. Similar to [`defineWorkersConfig()`](#defineworkersconfigoptions), this ensures Vitest is configured to use the Workers integration with the correct module resolution settings, and provides type checking for [WorkersPoolOptions](#workerspooloptions). It also accepts a `Promise` of `options`, or an optionally-`async` function returning `options`. ```ts import { defineWorkspace, defineProject } from "vitest/config"; import { defineWorkersProject } from "@cloudflare/vitest-pool-workers/config"; const workspace = defineWorkspace([ defineWorkersProject({ test: { name: "Workers", include: ["**/*.worker.test.ts"], poolOptions: { workers: { // Refer to type of WorkersPoolOptions... }, }, }, }), // ... ]); export default workspace; ``` ### `buildPagesASSETSBinding(assetsPath)` Creates a Pages ASSETS binding that serves files insides the `assetsPath`. This is required if you uses `createPagesEventContext()` or `SELF` to test your **Pages Functions**. Refer to the [Pages recipe](https://developers.cloudflare.com/workers/testing/vitest-integration/recipes) for a full example. ```ts import path from "node:path"; import { buildPagesASSETSBinding, defineWorkersProject, } from "@cloudflare/vitest-pool-workers/config"; export default defineWorkersProject(async () => { const assetsPath = path.join(__dirname, "public"); return { test: { poolOptions: { workers: { miniflare: { serviceBindings: { ASSETS: await buildPagesASSETSBinding(assetsPath), }, }, }, }, }, }; }); ``` ### `readD1Migrations(migrationsPath)` Reads all [D1 migrations](https://developers.cloudflare.com/d1/reference/migrations/) stored at `migrationsPath` and returns them ordered by migration number. Each migration will have its contents split into an array of individual SQL queries. Call the [`applyD1Migrations()`](https://developers.cloudflare.com/workers/testing/vitest-integration/test-apis/#d1) function inside a test or [setup file](https://vitest.dev/config/#setupfiles) to apply migrations. Refer to the [D1 recipe](https://github.com/cloudflare/workers-sdk/tree/main/fixtures/vitest-pool-workers-examples/d1) for an example project using migrations. ```ts import path from "node:path"; import { defineWorkersProject, readD1Migrations, } from "@cloudflare/vitest-pool-workers/config"; export default defineWorkersProject(async () => { // Read all migrations in the `migrations` directory const migrationsPath = path.join(__dirname, "migrations"); const migrations = await readD1Migrations(migrationsPath); return { test: { setupFiles: ["./test/apply-migrations.ts"], poolOptions: { workers: { miniflare: { // Add a test-only binding for migrations, so we can apply them in a setup file bindings: { TEST_MIGRATIONS: migrations }, }, }, }, }, }; }); ``` ## `WorkersPoolOptions` * `main`: string optional * Entry point to Worker run in the same isolate/context as tests. This option is required to use `import { SELF } from "cloudflare:test"` for integration tests, or Durable Objects without an explicit `scriptName` if classes are defined in the same Worker. This file goes through Vite transforms and can be TypeScript. Note that `import module from ""` inside tests gives exactly the same `module` instance as is used internally for the `SELF` and Durable Object bindings. If `wrangler.configPath` is defined and this option is not, it will be read from the `main` field in that configuration file. * `isolatedStorage`: boolean optional * Enables per-test isolated storage. If enabled, any writes to storage performed in a test will be undone at the end of the test. The test's storage environment is copied from the containing suite, meaning `beforeAll()` hooks can be used to seed data. If this option is disabled, all tests will share the same storage. `.concurrent` tests are not supported when isolated storage is enabled. Refer to [Isolation and concurrency](https://developers.cloudflare.com/workers/testing/vitest-integration/isolation-and-concurrency/) for more information on the isolation model. * Defaults to `true`. Illustrative example ```ts import { env } from "cloudflare:test"; import { beforeAll, beforeEach, describe, test, expect } from "vitest"; // Get the current list stored in a KV namespace async function get(): Promise { return (await env.NAMESPACE.get("list", "json")) ?? []; } // Add an item to the end of the list async function append(item: string) { const value = await get(); value.push(item); await env.NAMESPACE.put("list", JSON.stringify(value)); } beforeAll(() => append("all")); beforeEach(() => append("each")); test("one", async () => { // Each test gets its own storage environment copied from the parent await append("one"); expect(await get()).toStrictEqual(["all", "each", "one"]); }); // `append("each")` and `append("one")` undone test("two", async () => { await append("two"); expect(await get()).toStrictEqual(["all", "each", "two"]); }); // `append("each")` and `append("two")` undone describe("describe", async () => { beforeAll(() => append("describe all")); beforeEach(() => append("describe each")); test("three", async () => { await append("three"); expect(await get()).toStrictEqual([ // All `beforeAll()`s run before `beforeEach()`s "all", "describe all", "each", "describe each", "three", ]); }); // `append("each")`, `append("describe each")` and `append("three")` undone test("four", async () => { await append("four"); expect(await get()).toStrictEqual([ "all", "describe all", "each", "describe each", "four", ]); }); // `append("each")`, `append("describe each")` and `append("four")` undone }); ``` * `singleWorker`: boolean optional * Runs all tests in this project serially in the same Worker, using the same module cache. This can significantly speed up execution if you have lots of small test files. Refer to the [Isolation and concurrency](https://developers.cloudflare.com/workers/testing/vitest-integration/isolation-and-concurrency/) page for more information on the isolation model. * Defaults to `false`. * `miniflare`: `SourcelessWorkerOptions & { workers?: WorkerOptions\[]; }` optional * Use this to provide configuration information that is typically stored within the [Wrangler configuration file](https://developers.cloudflare.com/workers/wrangler/configuration/), such as [bindings](https://developers.cloudflare.com/workers/runtime-apis/bindings/), [compatibility dates](https://developers.cloudflare.com/workers/configuration/compatibility-dates/), and [compatibility flags](https://developers.cloudflare.com/workers/configuration/compatibility-flags/). The `WorkerOptions` interface is defined [here](https://github.com/cloudflare/workers-sdk/tree/main/packages/miniflare#interface-workeroptions). Use the `main` option above to configure the entry point, instead of the Miniflare `script`, `scriptPath`, or `modules` options. * If your project makes use of multiple Workers, you can configure auxiliary Workers that run in the same `workerd` process as your tests and can be bound to. Auxiliary Workers are configured using the `workers` array, containing regular Miniflare [`WorkerOptions`](https://github.com/cloudflare/workers-sdk/tree/main/packages/miniflare#interface-workeroptions) objects. Note that unlike the `main` Worker, auxiliary Workers: * Cannot have TypeScript entrypoints. You must compile auxiliary Workers to JavaScript first. You can use the [`wrangler deploy --dry-run --outdir dist`](https://developers.cloudflare.com/workers/wrangler/commands/#deploy) command for this. * Use regular Workers module resolution semantics. Refer to the [Isolation and concurrency](https://developers.cloudflare.com/workers/testing/vitest-integration/isolation-and-concurrency/#modules) page for more information. * Cannot access the [`cloudflare:test`](https://developers.cloudflare.com/workers/testing/vitest-integration/test-apis/) module. * Do not require specific compatibility dates or flags. * Can be written with the [Service Worker syntax](https://developers.cloudflare.com/workers/reference/migrate-to-module-workers/#service-worker-syntax). * Are not affected by global mocks defined in your tests. * `wrangler`: `{ configPath?: string; environment?: string; }` optional * Path to [Wrangler configuration file](https://developers.cloudflare.com/workers/wrangler/configuration/) to load `main`, [compatibility settings](https://developers.cloudflare.com/workers/configuration/compatibility-dates/) and [bindings](https://developers.cloudflare.com/workers/runtime-apis/bindings/) from. These options will be merged with the `miniflare` option above, with `miniflare` values taking precedence. For example, if your Wrangler configuration defined a [service binding](https://developers.cloudflare.com/workers/runtime-apis/bindings/service-bindings/) named `SERVICE` to a Worker named `service`, but you included `serviceBindings: { SERVICE(request) { return new Response("body"); } }` in the `miniflare` option, all requests to `SERVICE` in tests would return `body`. Note `configPath` accepts both `.toml` and `.json` files. * The environment option can be used to specify the [Wrangler environment](https://developers.cloudflare.com/workers/wrangler/environments/) to pick up bindings and variables from. ## `WorkersPoolOptionsContext` * `inject`: typeof import("vitest").inject * The same `inject()` function usually imported from the `vitest` module inside tests. This allows you to define `miniflare` configuration based on injected values from [`globalSetup`](https://vitest.dev/config/#globalsetup) scripts. Use this if you have a value in your configuration that is dynamically generated and only known at runtime of your tests. For example, a global setup script might start an upstream server on a random port. This port could be `provide()`d and then `inject()`ed in the configuration for an external service binding or [Hyperdrive](https://developers.cloudflare.com/hyperdrive/). Refer to the [Hyperdrive recipe](https://github.com/cloudflare/workers-sdk/tree/main/fixtures/vitest-pool-workers-examples/hyperdrive) for an example project using this provide/inject approach. Illustrative example ```ts // env.d.ts declare module "vitest" { interface ProvidedContext { port: number; } } // global-setup.ts import type { GlobalSetupContext } from "vitest/node"; export default function ({ provide }: GlobalSetupContext) { // Runs inside Node.js, could start server here... provide("port", 1337); return () => { /* ...then teardown here */ }; } // vitest.config.ts import { defineWorkersConfig } from "@cloudflare/vitest-pool-workers/config"; export default defineWorkersConfig({ test: { globalSetup: ["./global-setup.ts"], pool: "@cloudflare/vitest-pool-workers", poolOptions: { workers: ({ inject }) => ({ miniflare: { hyperdrives: { DATABASE: `postgres://user:pass@example.com:${inject("port")}/db`, }, }, }), }, }, }); ``` ## `SourcelessWorkerOptions` Sourceless `WorkerOptions` type without `script`, `scriptPath`, or `modules` properties. Refer to the Miniflare [`WorkerOptions`](https://github.com/cloudflare/workers-sdk/tree/main/packages/miniflare#interface-workeroptions) type for more details. ```ts type SourcelessWorkerOptions = Omit< WorkerOptions, "script" | "scriptPath" | "modules" | "modulesRoot" >; ``` --- title: Debugging · Cloudflare Workers docs description: Debug your Workers tests with Vitest. lastUpdated: 2025-03-04T10:04:51.000Z chatbotDeprioritize: false source_url: html: https://developers.cloudflare.com/workers/testing/vitest-integration/debugging/ md: https://developers.cloudflare.com/workers/testing/vitest-integration/debugging/index.md --- This guide shows you how to debug your Workers tests with Vitest. This is available with `@cloudflare/vitest-pool-workers` v0.7.5 or later. ## Open inspector with Vitest To start debugging, run Vitest with the following command and attach a debugger to port `9229`: ```sh vitest --inspect --no-file-parallelism ``` ## Customize the inspector port By default, the inspector will be opened on port `9229`. If you need to use a different port (for example, `3456`), you can run the following command: ```sh vitest --inspect=3456 --no-file-parallelism ``` Alternatively, you can define it in your Vitest configuration file: ```ts import { defineWorkersConfig } from "@cloudflare/vitest-pool-workers/config"; export default defineWorkersConfig({ test: { inspector: { port: 3456, }, poolOptions: { workers: { // ... }, }, }, }); ``` ## Setup VS Code to use breakpoints To setup VS Code for breakpoint debugging in your Worker tests, create a `.vscode/launch.json` file that contains the following configuration: ```json { "configurations": [ { "type": "node", "request": "launch", "name": "Open inspector with Vitest", "program": "${workspaceRoot}/node_modules/vitest/vitest.mjs", "console": "integratedTerminal", "args": ["--inspect=9229", "--no-file-parallelism"] }, { "name": "Attach to Workers Runtime", "type": "node", "request": "attach", "port": 9229, "cwd": "/", "resolveSourceMapLocations": null, "attachExistingChildren": false, "autoAttachChildProcesses": false, } ], "compounds": [ { "name": "Debug Workers tests", "configurations": ["Open inspector with Vitest", "Attach to Workers Runtime"], "stopAll": true } ] } ``` Select **Debug Workers tests** at the top of the **Run & Debug** panel to open an inspector with Vitest and attach a debugger to the Workers runtime. Then you can add breakpoints to your test files and start debugging. --- title: Isolation and concurrency · Cloudflare Workers docs description: Review how the Workers Vitest integration runs your tests, how it isolates tests from each other, and how it imports modules. lastUpdated: 2025-01-08T12:19:30.000Z chatbotDeprioritize: false source_url: html: https://developers.cloudflare.com/workers/testing/vitest-integration/isolation-and-concurrency/ md: https://developers.cloudflare.com/workers/testing/vitest-integration/isolation-and-concurrency/index.md --- Review how the Workers Vitest integration runs your tests, how it isolates tests from each other, and how it imports modules. ## Run tests When you run your tests with the Workers Vitest integration, Vitest will: 1. Read and evaluate your configuration file using Node.js. 2. Run any [`globalSetup`](https://vitest.dev/config/#globalsetup) files using Node.js. 3. Collect and sequence test files. 4. For each Vitest project, depending on its configured isolation and concurrency, start one or more [`workerd`](https://github.com/cloudflare/workerd) processes, each running one or more Workers. 5. Run [`setupFiles`](https://vitest.dev/config/#setupfiles) and test files in `workerd` using the appropriate Workers. 6. Watch for changes and re-run test files using the same Workers if the configuration has not changed. ## Isolation and concurrency models The [`isolatedStorage` and `singleWorker`](https://developers.cloudflare.com/workers/testing/vitest-integration/configuration/#workerspooloptions) configuration options both control isolation and concurrency. The Workers Vitest integration tries to minimise the number of `workerd` processes it starts, reusing Workers and their module caches between test runs where possible. The current implementation of isolated storage requires each `workerd` process to run one test file at a time, and does not support `.concurrent` tests. A copy of all auxiliary `workers` exists in each `workerd` process. By default, the `isolatedStorage` option is enabled. We recommend you enable the `singleWorker: true` option if you have lots of small test files. ### `isolatedStorage: true, singleWorker: false` (Default) In this model, a `workerd` process is started for each test file. Test files are executed concurrently but `.concurrent` tests are not supported. Each test will read/write from an isolated storage environment, and bind to its own set of auxiliary `workers`. ![Isolation Model: Isolated Storage & No Single Worker](https://developers.cloudflare.com/_astro/isolation-model-3-isolated-storage-no-single-worker.DigZKXdc_t0LpD.svg) ### `isolatedStorage: true, singleWorker: true` In this model, a single `workerd` process is started with a single Worker for all test files. Test files are executed in serial and `.concurrent` tests are not supported. Each test will read/write from an isolated storage environment, and bind to the same auxiliary `workers`. ![Isolation Model: Isolated Storage & Single Worker](https://developers.cloudflare.com/_astro/isolation-model-4-isolated-storage-single-worker.DVzBSzPO_f5qSq.svg) ### `isolatedStorage: false, singleWorker: false` In this model, a single `workerd` process is started with a Worker for each test file. Tests files are executed concurrently and `.concurrent` tests are supported. Every test will read/write from the same shared storage, and bind to the same auxiliary `workers`. ![Isolation Model: No Isolated Storage & No Single Worker](https://developers.cloudflare.com/_astro/isolation-model-1-no-isolated-storage-no-single-worker.BFp0f7BV_f5qSq.svg) ### `isolatedStorage: false, singleWorker: true` In this model, a single `workerd` process is started with a single Worker for all test files. Test files are executed in serial but `.concurrent` tests are supported. Every test will read/write from the same shared storage, and bind to the same auxiliary `workers`. ![Isolation Model: No Isolated Storage & Single Worker](https://developers.cloudflare.com/_astro/isolation-model-2-no-isolated-storage-single-worker.CA-pStER_f5qSq.svg) ## Modules Each Worker has its own module cache. As Workers are reused between test runs, their module caches are also reused. Vitest invalidates parts of the module cache at the start of each test run based on changed files. The Workers Vitest pool works by running code inside a Cloudflare Worker that Vitest would usually run inside a [Node.js Worker thread](https://nodejs.org/api/worker_threads.html). To make this possible, the pool **automatically injects** the [`nodejs_compat`](https://developers.cloudflare.com/workers/configuration/compatibility-flags/#nodejs-compatibility-flag), \[`no_nodejs_compat_v2`] and [`export_commonjs_default`](https://developers.cloudflare.com/workers/configuration/compatibility-flags/#commonjs-modules-do-not-export-a-module-namespace) compatibility flags. This is the minimal compatibility setup that still allows Vitest to run correctly, but without pulling in polyfills and globals that aren't required. If you already have a Node.js compatibility flag defined in your configuration, Vitest Pool Workers will not try to add those flags. Warning Using Vitest Pool Workers may cause your Worker to behave differently when deployed than during testing as the `nodejs_compat` flag is enabled by default. This means that Node.js-specific APIs and modules are available when running your tests. However, Cloudflare Workers do not support these Node.js APIs in the production environment unless you specify this flag in your Worker configuration. If you do not have a `nodejs_compat` or `nodejs_compat_v2` flag in your configuration and you import a Node.js module in your Worker code, your tests may pass, but you will find that you will not be able to deploy this Worker, as the upload call (either via the REST API or via Wrangler) will throw an error. However, if you use Node.js globals that are not supported by the runtime, your Worker upload will be successful, but you may see errors in production code. Let's create a contrived example to illustrate the issue. The `wrangler.toml` does not specify either `nodejs_compat` or `nodejs_compat_v2`: ```toml name = "test" main = "src/index.ts" compatibility_date = "2024-12-16" # no nodejs_compat flags here ``` In our `src/index.ts` file, we use the `process` object, which is a Node.js global, unavailable in the Workerd runtime: ```typescript export default { async fetch(request, env, ctx): Promise { process.env.TEST = 'test'; return new Response(process.env.TEST); }, } satisfies ExportedHandler; ``` The test is a simple assertion that the Worker managed to use `process`. ```typescript it('responds with "test"', async () => { const response = await SELF.fetch('https://example.com/'); expect(await response.text()).toMatchInlineSnapshot(`"test"`); }); ``` Now, if we run `npm run test`, we see that the tests will *pass*: ```plaintext ✓ test/index.spec.ts (1) ✓ responds with "test" Test Files 1 passed (1) Tests 1 passed (1) ``` And we can run `wrangler dev` and `wrangler deploy` without issues. It *looks like* our code is fine. However, this code will fail in production as `process` is not available in the Workerd runtime. To fix the issue, we either need to avoid using Node.js APIs, or add the `nodejs_compat` flag to our Wrangler configuration. --- title: Known issues · Cloudflare Workers docs description: Explore the known issues associated with the Workers Vitest integration. lastUpdated: 2025-04-16T21:02:18.000Z chatbotDeprioritize: false source_url: html: https://developers.cloudflare.com/workers/testing/vitest-integration/known-issues/ md: https://developers.cloudflare.com/workers/testing/vitest-integration/known-issues/index.md --- The Workers Vitest pool is currently in open beta. The following are issues Cloudflare is aware of and fixing: ### Coverage Native code coverage via [V8](https://v8.dev/blog/javascript-code-coverage) is not supported. You must use instrumented code coverage via [Istanbul](https://istanbul.js.org/) instead. Refer to the [Vitest Coverage documentation](https://vitest.dev/guide/coverage) for setup instructions. ### Fake timers Vitest's [fake timers](https://vitest.dev/guide/mocking.html#timers) do not apply to KV, R2 and cache simulators. For example, you cannot expire a KV key by advancing fake time. ### Dynamic `import()` statements with `SELF` and Durable Objects Dynamic `import()` statements do not work inside `export default { ... }` handlers when writing integration tests with `SELF`, or inside Durable Object event handlers. You must import and call your handlers directly, or use static `import` statements in the global scope. ### Durable Object alarms Durable Object alarms are not reset between test runs and do not respect isolated storage. Ensure you delete or run all alarms with [`runDurableObjectAlarm()`](https://developers.cloudflare.com/workers/testing/vitest-integration/test-apis/#durable-objects) scheduled in each test before finishing the test. ### WebSockets Using WebSockets with Durable Objects with the [`isolatedStorage`](https://developers.cloudflare.com/workers/testing/vitest-integration/isolation-and-concurrency) flag turned on is not supported. You must set `isolatedStorage: false` in your `vitest.config.ts` file. ### Isolated storage When the `isolatedStorage` flag is enabled (the default), the test runner will undo any writes to the storage at the end of the test as detailed in the [isolation and concurrency documentation](https://developers.cloudflare.com/workers/testing/vitest-integration/isolation-and-concurrency/). However, Cloudflare recommends that you consider the following actions to avoid any common issues: #### Await all storage operations Always `await` all `Promise`s that read or write to storage services. ```ts // Example: Seed data beforeAll(async () => { await env.KV.put('message', 'test message'); await env.R2.put('file', 'hello-world'); }); ``` #### Explicitly signal resource disposal When calling RPC methods of a Service Worker or Durable Object that return non-primitive values (such as objects or classes extending `RpcTarget`), use the `using` keyword to explicitly signal when resources can be disposed of. See [this example test](https://github.com/cloudflare/workers-sdk/tree/main/fixtures/vitest-pool-workers-examples/rpc/test/unit.test.ts#L155) and refer to [explicit-resource-management](https://developers.cloudflare.com/workers/runtime-apis/rpc/lifecycle#explicit-resource-management) for more details. ```ts using result = await stub.getCounter(); ``` #### Consume response bodies When making requests via `fetch` or `R2.get()`, consume the entire response body, even if you are not asserting its content. For example: ```ts test('check if file exists', async () => { await env.R2.put('file', 'hello-world'); const response = await env.R2.get('file'); expect(response).not.toBe(null); // Consume the response body even if you are not asserting it await response.text() }); ``` ### Module resolution If you encounter module resolution issues such as: `Error: Cannot use require() to import an ES Module` or `Error: No such module`, you can bundle these dependencies using the [deps.optimizer](https://vitest.dev/config/#deps-optimizer) option: ```tsx import { defineWorkersConfig } from "@cloudflare/vitest-pool-workers/config"; export default defineWorkersConfig({ test: { deps: { optimizer: { ssr: { enabled: true, include: ["your-package-name"], }, }, }, poolOptions: { workers: { // ... }, }, }, }); ``` You can find an example in the [Recipes](https://developers.cloudflare.com/workers/testing/vitest-integration/recipes) page. ### Importing modules from global setup file Although Vitest is set up to resolve packages for the `workerd` runtime, it runs your global setup file in the Node.js environment. This can cause issues when importing packages like [Postgres.js](https://github.com/cloudflare/workers-sdk/issues/6465), which exports a non-Node version for `workerd`. To work around this, you can create a wrapper that uses Vite's SSR module loader to import the global setup file under the correct conditions. Then, adjust your Vitest configuration to point to this wrapper. For example: ```ts // File: global-setup-wrapper.ts import { createServer } from "vite" // Import the actual global setup file with the correct setup const mod = await viteImport("./global-setup.ts") export default mod.default; // Helper to import the file with default node setup async function viteImport(file: string) { const server = await createServer({ root: import.meta.dirname, configFile: false, server: { middlewareMode: true, hmr: false, watch: null, ws: false }, optimizeDeps: { noDiscovery: true }, clearScreen: false, }); const mod = await server.ssrLoadModule(file); await server.close(); return mod; } ``` ```ts // File: vitest.config.ts import { defineWorkersConfig } from "@cloudflare/vitest-pool-workers/config"; export default defineWorkersConfig({ test: { // Replace the globalSetup with the wrapper file globalSetup: ["./global-setup-wrapper.ts"], poolOptions: { workers: { // ... }, }, }, }); ``` --- title: Migration guides · Cloudflare Workers docs description: Migrate to using the Workers Vitest integration. lastUpdated: 2025-04-10T14:17:11.000Z chatbotDeprioritize: true source_url: html: https://developers.cloudflare.com/workers/testing/vitest-integration/migration-guides/ md: https://developers.cloudflare.com/workers/testing/vitest-integration/migration-guides/index.md --- * [Migrate from Miniflare 2's test environments](https://developers.cloudflare.com/workers/testing/vitest-integration/migration-guides/migrate-from-miniflare-2/) * [Migrate from unstable\_dev](https://developers.cloudflare.com/workers/testing/vitest-integration/migration-guides/migrate-from-unstable-dev/) --- title: Test APIs · Cloudflare Workers docs description: Runtime helpers for writing tests, exported from the `cloudflare:test` module. lastUpdated: 2025-02-18T12:14:51.000Z chatbotDeprioritize: false source_url: html: https://developers.cloudflare.com/workers/testing/vitest-integration/test-apis/ md: https://developers.cloudflare.com/workers/testing/vitest-integration/test-apis/index.md --- The Workers Vitest integration provides runtime helpers for writing tests in the `cloudflare:test` module. The `cloudflare:test` module is provided by the `@cloudflare/vitest-pool-workers` package, but can only be imported from test files that execute in the Workers runtime. ## `cloudflare:test` module definition * `env`: import("cloudflare:test").ProvidedEnv * Exposes the [`env` object](https://developers.cloudflare.com/workers/runtime-apis/handlers/fetch/#parameters) for use as the second argument passed to ES modules format exported handlers. This provides access to [bindings](https://developers.cloudflare.com/workers/runtime-apis/bindings/) that you have defined in your [Vitest configuration file](https://developers.cloudflare.com/workers/testing/vitest-integration/configuration/). ```js import { env } from "cloudflare:test"; it("uses binding", async () => { await env.KV_NAMESPACE.put("key", "value"); expect(await env.KV_NAMESPACE.get("key")).toBe("value"); }); ``` To configure the type of this value, use an ambient module type: ```ts declare module "cloudflare:test" { interface ProvidedEnv { KV_NAMESPACE: KVNamespace; } // ...or if you have an existing `Env` type... interface ProvidedEnv extends Env {} } ``` * `SELF`: Fetcher * [Service binding](https://developers.cloudflare.com/workers/runtime-apis/bindings/service-bindings/) to the default export defined in the `main` Worker. Use this to write integration tests against your Worker. The `main` Worker runs in the same isolate/context as tests so any global mocks will apply to it too. ```js import { SELF } from "cloudflare:test"; it("dispatches fetch event", async () => { const response = await SELF.fetch("https://example.com"); expect(await response.text()).toMatchInlineSnapshot(...); }); ``` * `fetchMock`: import("undici").MockAgent * Declarative interface for mocking outbound `fetch()` requests. Deactivated by default and reset before running each test file. Refer to [`undici`'s `MockAgent` documentation](https://undici.nodejs.org/#/docs/api/MockAgent) for more information. Note this only mocks `fetch()` requests for the current test runner Worker. Auxiliary Workers should mock `fetch()`es using the Miniflare `fetchMock`/`outboundService` options. Refer to [Configuration](https://developers.cloudflare.com/workers/testing/vitest-integration/configuration/#workerspooloptions) for more information. ```js import { fetchMock } from "cloudflare:test"; import { beforeAll, afterEach, it, expect } from "vitest"; beforeAll(() => { // Enable outbound request mocking... fetchMock.activate(); // ...and throw errors if an outbound request isn't mocked fetchMock.disableNetConnect(); }); // Ensure we matched every mock we defined afterEach(() => fetchMock.assertNoPendingInterceptors()); it("mocks requests", async () => { // Mock the first request to `https://example.com` fetchMock .get("https://example.com") .intercept({ path: "/" }) .reply(200, "body"); const response = await fetch("https://example.com/"); expect(await response.text()).toBe("body"); }); ``` ### Events * `createExecutionContext()`: ExecutionContext * Creates an instance of the [`context` object](https://developers.cloudflare.com/workers/runtime-apis/handlers/fetch/#parameters) for use as the third argument to ES modules format exported handlers. * `waitOnExecutionContext(ctx:ExecutionContext)`: Promise\ * Use this to wait for all Promises passed to `ctx.waitUntil()` to settle, before running test assertions on any side effects. Only accepts instances of `ExecutionContext` returned by `createExecutionContext()`. ```ts import { env, createExecutionContext, waitOnExecutionContext } from "cloudflare:test"; import { it, expect } from "vitest"; import worker from "./index.mjs"; it("calls fetch handler", async () => { const request = new Request("https://example.com"); const ctx = createExecutionContext(); const response = await worker.fetch(request, env, ctx); await waitOnExecutionContext(ctx); expect(await response.text()).toMatchInlineSnapshot(...); }); ``` * `createScheduledController(options?:FetcherScheduledOptions)`: ScheduledController * Creates an instance of `ScheduledController` for use as the first argument to modules-format [`scheduled()`](https://developers.cloudflare.com/workers/runtime-apis/handlers/scheduled/) exported handlers. ```ts import { env, createScheduledController, createExecutionContext, waitOnExecutionContext } from "cloudflare:test"; import { it, expect } from "vitest"; import worker from "./index.mjs"; it("calls scheduled handler", async () => { const ctrl = createScheduledController({ scheduledTime: new Date(1000), cron: "30 * * * *" }); const ctx = createExecutionContext(); await worker.scheduled(ctrl, env, ctx); await waitOnExecutionContext(ctx); }); ``` * `createMessageBatch(queueName:string, messages:ServiceBindingQueueMessage[])`: MessageBatch * Creates an instance of `MessageBatch` for use as the first argument to modules-format [`queue()`](https://developers.cloudflare.com/queues/configuration/javascript-apis/#consumer) exported handlers. * `getQueueResult(batch:MessageBatch, ctx:ExecutionContext)`: Promise\ * Gets the acknowledged/retry state of messages in the `MessageBatch`, and waits for all `ExecutionContext#waitUntil()`ed `Promise`s to settle. Only accepts instances of `MessageBatch` returned by `createMessageBatch()`, and instances of `ExecutionContext` returned by `createExecutionContext()`. ```ts import { env, createMessageBatch, createExecutionContext, getQueueResult } from "cloudflare:test"; import { it, expect } from "vitest"; import worker from "./index.mjs"; it("calls queue handler", async () => { const batch = createMessageBatch("my-queue", [ { id: "message-1", timestamp: new Date(1000), body: "body-1" } ]); const ctx = createExecutionContext(); await worker.queue(batch, env, ctx); const result = await getQueueResult(batch, ctx); expect(result.ackAll).toBe(false); expect(result.retryBatch).toMatchObject({ retry: false }); expect(result.explicitAcks).toStrictEqual(["message-1"]); expect(result.retryMessages).toStrictEqual([]); }); ``` ### Durable Objects * `runInDurableObject(stub:DurableObjectStub, callback:(instance: O, state: DurableObjectState) => R | Promise)`: Promise\ * Runs the provided `callback` inside the Durable Object that corresponds to the provided `stub`. This temporarily replaces your Durable Object's `fetch()` handler with `callback`, then sends a request to it, returning the result. This can be used to call/spy-on Durable Object methods or seed/get persisted data. Note this can only be used with `stub`s pointing to Durable Objects defined in the `main` Worker. ```ts export class Counter { constructor(readonly state: DurableObjectState) {} async fetch(request: Request): Promise { let count = (await this.state.storage.get("count")) ?? 0; void this.state.storage.put("count", ++count); return new Response(count.toString()); } } ``` ```ts import { env, runInDurableObject } from "cloudflare:test"; import { it, expect } from "vitest"; import { Counter } from "./index.ts"; it("increments count", async () => { const id = env.COUNTER.newUniqueId(); const stub = env.COUNTER.get(id); let response = await stub.fetch("https://example.com"); expect(await response.text()).toBe("1"); response = await runInDurableObject(stub, async (instance: Counter, state) => { expect(instance).toBeInstanceOf(Counter); expect(await state.storage.get("count")).toBe(1); const request = new Request("https://example.com"); return instance.fetch(request); }); expect(await response.text()).toBe("2"); }); ``` * `runDurableObjectAlarm(stub:DurableObjectStub)`: Promise\ * Immediately runs and removes the Durable Object pointed to by `stub`'s alarm if one is scheduled. Returns `true` if an alarm ran, and `false` otherwise. Note this can only be used with `stub`s pointing to Durable Objects defined in the `main` Worker. * `listDurableObjectIds(namespace:DurableObjectNamespace)`: Promise\ * Gets the IDs of all objects that have been created in the `namespace`. Respects `isolatedStorage` if enabled, meaning objects created in a different test will not be returned. ```ts import { env, listDurableObjectIds } from "cloudflare:test"; import { it, expect } from "vitest"; it("increments count", async () => { const id = env.COUNTER.newUniqueId(); const stub = env.COUNTER.get(id); const response = await stub.fetch("https://example.com"); expect(await response.text()).toBe("1"); const ids = await listDurableObjectIds(env.COUNTER); expect(ids.length).toBe(1); expect(ids[0].equals(id)).toBe(true); }); ``` ### D1 * `applyD1Migrations(db:D1Database, migrations:D1Migration[], migrationTableName?:string)`: Promise\ * Applies all un-applied [D1 migrations](https://developers.cloudflare.com/d1/reference/migrations/) stored in the `migrations` array to database `db`, recording migrations state in the `migrationsTableName` table. `migrationsTableName` defaults to `d1_migrations`. Call the [`readD1Migrations()`](https://developers.cloudflare.com/workers/testing/vitest-integration/configuration/#readd1migrationsmigrationspath) function from the `@cloudflare/vitest-pool-workers/config` package inside Node.js to get the `migrations` array. Refer to the [D1 recipe](https://github.com/cloudflare/workers-sdk/tree/main/fixtures/vitest-pool-workers-examples/d1) for an example project using migrations. --- title: Write your first test · Cloudflare Workers docs description: Write tests against Workers using Vitest lastUpdated: 2025-06-18T17:49:47.000Z chatbotDeprioritize: false source_url: html: https://developers.cloudflare.com/workers/testing/vitest-integration/write-your-first-test/ md: https://developers.cloudflare.com/workers/testing/vitest-integration/write-your-first-test/index.md --- This guide will instruct you through getting started with the `@cloudflare/vitest-pool-workers` package. For more complex examples of testing using `@cloudflare/vitest-pool-workers`, refer to [Recipes](https://developers.cloudflare.com/workers/testing/vitest-integration/recipes/). ## Prerequisites First, make sure that: * Your [compatibility date](https://developers.cloudflare.com/workers/configuration/compatibility-dates/) is set to `2022-10-31` or later. * Your Worker using the ES modules format (if not, refer to the [migrate to the ES modules format](https://developers.cloudflare.com/workers/reference/migrate-to-module-workers/) guide). * Vitest and `@cloudflare/vitest-pool-workers` are installed in your project as dev dependencies * npm ```sh npm i -D vitest@~3.2.0 @cloudflare/vitest-pool-workers ``` * yarn ```sh yarn add -D vitest@~3.2.0 @cloudflare/vitest-pool-workers ``` * pnpm ```sh pnpm add -D vitest@~3.2.0 @cloudflare/vitest-pool-workers ``` Note Currently, the `@cloudflare/vitest-pool-workers` package *only* works with Vitest 2.0.x - 3.2.x. ## Define Vitest configuration In your `vitest.config.ts` file, use `defineWorkersConfig` to configure the Workers Vitest integration. You can use your Worker configuration from your [Wrangler config file](https://developers.cloudflare.com/workers/wrangler/configuration/) by specifying it with `wrangler.configPath`. ```ts import { defineWorkersConfig } from "@cloudflare/vitest-pool-workers/config"; export default defineWorkersConfig({ test: { poolOptions: { workers: { wrangler: { configPath: "./wrangler.jsonc" }, }, }, }, }); ``` You can also override or define additional configuration using the `miniflare` key. This takes precedence over values set in via your Wrangler config. For example, this configuration would add a KV namespace `TEST_NAMESPACE` that was only accessed and modified in tests. ```js export default defineWorkersConfig({ test: { poolOptions: { workers: { wrangler: { configPath: "./wrangler.jsonc" }, miniflare: { kvNamespaces: ["TEST_NAMESPACE"], }, }, }, }, }); ``` For a full list of available Miniflare options, refer to the [Miniflare `WorkersOptions` API documentation](https://github.com/cloudflare/workers-sdk/tree/main/packages/miniflare#interface-workeroptions). For a full list of available configuration options, refer to [Configuration](https://developers.cloudflare.com/workers/testing/vitest-integration/configuration/). ## Define types If you are not using Typescript, you can skip this section. First make sure you have run [`wrangler types`](https://developers.cloudflare.com/workers/wrangler/commands/), which generates [types for the Cloudflare Workers runtime](https://developers.cloudflare.com/workers/languages/typescript/) and an `Env` type based on your Worker's bindings. Then add a `tsconfig.json` in your tests folder and add `"@cloudflare/vitest-pool-workers"` to your types array to define types for `cloudflare:test`. You should also add the output of `wrangler types` to the `include` array so that the types for the Cloudflare Workers runtime are available. Example test/tsconfig.json ```jsonc { "extends": "../tsconfig.json", "compilerOptions": { "moduleResolution": "bundler", "types": [ "@cloudflare/vitest-pool-workers", // provides `cloudflare:test` types ], }, "include": [ "./**/*.ts", "../src/worker-configuration.d.ts", // output of `wrangler types` ], } ``` You also need to define the type of the `env` object that is provided to your tests. Create an `env.d.ts` file in your tests folder, and declare the `ProvidedEnv` interface by extending the `Env` interface that is generated by `wrangler types`. ```ts declare module "cloudflare:test" { // ProvidedEnv controls the type of `import("cloudflare:test").env` interface ProvidedEnv extends Env {} } ``` If your test bindings differ from the bindings in your Wrangler config, you should type them here in `ProvidedEnv`. ## Writing tests We will use this simple Worker as an example. It returns a 404 response for the `/404` path and `"Hello World!"` for all other paths. * JavaScript ```js export default { async fetch(request, env, ctx) { if (pathname === "/404") { return new Response("Not found", { status: 404 }); } return new Response("Hello World!"); }, }; ``` * TypeScript ```ts export default { async fetch(request, env, ctx): Promise { if (pathname === "/404") { return new Response("Not found", { status: 404 }); } return new Response("Hello World!"); }, } satisfies ExportedHandler; ``` ### Unit tests By importing the Worker we can write a unit test for its `fetch` handler. * JavaScript ```js import { env, createExecutionContext, waitOnExecutionContext, } from "cloudflare:test"; import { describe, it, expect } from "vitest"; // Import your worker so you can unit test it import worker from "../src"; // For now, you'll need to do something like this to get a correctly-typed // `Request` to pass to `worker.fetch()`. const IncomingRequest = Request; describe("Hello World worker", () => { it("responds with Hello World!", async () => { const request = new IncomingRequest("http://example.com/404"); // Create an empty context to pass to `worker.fetch()` const ctx = createExecutionContext(); const response = await worker.fetch(request, env, ctx); // Wait for all `Promise`s passed to `ctx.waitUntil()` to settle before running test assertions await waitOnExecutionContext(ctx); expect(await response.status).toBe(404); expect(await response.text()).toBe("Not found"); }); }); ``` * TypeScript ```ts import { env, createExecutionContext, waitOnExecutionContext, } from "cloudflare:test"; import { describe, it, expect } from "vitest"; // Import your worker so you can unit test it import worker from "../src"; // For now, you'll need to do something like this to get a correctly-typed // `Request` to pass to `worker.fetch()`. const IncomingRequest = Request; describe("Hello World worker", () => { it("responds with Hello World!", async () => { const request = new IncomingRequest("http://example.com/404"); // Create an empty context to pass to `worker.fetch()` const ctx = createExecutionContext(); const response = await worker.fetch(request, env, ctx); // Wait for all `Promise`s passed to `ctx.waitUntil()` to settle before running test assertions await waitOnExecutionContext(ctx); expect(await response.status).toBe(404); expect(await response.text()).toBe("Not found"); }); }); ``` ### Integration tests You can use the SELF fetcher provided by the `cloudflare:test` to write an integration test. This is a service binding to the default export defined in the main Worker. * JavaScript ```js import { SELF } from "cloudflare:test"; import { describe, it, expect } from "vitest"; describe("Hello World worker", () => { it("responds with not found and proper status for /404", async () => { const response = await SELF.fetch("http://example.com/404"); expect(await response.status).toBe(404); expect(await response.text()).toBe("Not found"); }); }); ``` * TypeScript ```ts import { SELF } from "cloudflare:test"; import { describe, it, expect } from "vitest"; describe("Hello World worker", () => { it("responds with not found and proper status for /404", async () => { const response = await SELF.fetch("http://example.com/404"); expect(await response.status).toBe(404); expect(await response.text()).toBe("Not found"); }); }); ``` When using `SELF` for integration tests, your Worker code runs in the same context as the test runner. This means you can use global mocks to control your Worker, but also means your Worker uses the subtly different module resolution behavior provided by Vite. Usually this is not a problem, but to run your Worker in a fresh environment that is as close to production as possible, you can use an auxiliary Worker. Refer to [this example](https://github.com/cloudflare/workers-sdk/blob/main/fixtures/vitest-pool-workers-examples/basics-integration-auxiliary/vitest.config.ts) for how to set up integration tests using auxiliary Workers. However, using auxiliary Workers comes with [limitations](https://developers.cloudflare.com/workers/testing/vitest-integration/configuration/#workerspooloptions) that you should be aware of. ## Related resources * For more complex examples of testing using `@cloudflare/vitest-pool-workers`, refer to [Recipes](https://developers.cloudflare.com/workers/testing/vitest-integration/recipes/). * [Configuration API reference](https://developers.cloudflare.com/workers/testing/vitest-integration/configuration/) * [Test APIs reference](https://developers.cloudflare.com/workers/testing/vitest-integration/test-apis/) --- title: API · Cloudflare Workers docs description: Vite plugin API lastUpdated: 2025-04-08T14:18:27.000Z chatbotDeprioritize: false source_url: html: https://developers.cloudflare.com/workers/vite-plugin/reference/api/ md: https://developers.cloudflare.com/workers/vite-plugin/reference/api/index.md --- ## `cloudflare()` The `cloudflare` plugin should be included in the Vite `plugins` array: ```ts import { defineConfig } from "vite"; import { cloudflare } from "@cloudflare/vite-plugin"; export default defineConfig({ plugins: [cloudflare()], }); ``` It accepts an optional `PluginConfig` parameter. ## `interface PluginConfig` * `configPath` string optional An optional path to your Worker config file. By default, a `wrangler.jsonc`, `wrangler.json`, or `wrangler.toml` file in the root of your application will be used as the Worker config. For more information about the Worker configuration, see [Configuration](https://developers.cloudflare.com/workers/wrangler/configuration/). * `viteEnvironment` { name?: string } optional Optional Vite environment options. By default, the environment name is the Worker name with `-` characters replaced with `_`. Setting the name here will override this. A typical use case is setting `viteEnvironment: { name: "ssr" }` to apply the Worker to the SSR environment. See [Vite Environments](https://developers.cloudflare.com/workers/vite-plugin/reference/vite-environments/) for more information. * `persistState` boolean | { path: string } optional An optional override for state persistence. By default, state is persisted to `.wrangler/state`. A custom `path` can be provided or, alternatively, persistence can be disabled by setting the value to `false`. * `inspectorPort` number | false optional An optional override for debugging your Workers. By default, the debugging inspector is enabled and listens on port `9229`. A custom port can be provided or, alternatively, setting this to `false` will disable the debugging inspector. See [Debugging](https://developers.cloudflare.com/workers/vite-plugin/reference/debugging/) for more information. * `auxiliaryWorkers` Array\ optional An optional array of auxiliary Workers. Auxiliary Workers are additional Workers that are used as part of your application. You can use [service bindings](https://developers.cloudflare.com/workers/runtime-apis/bindings/service-bindings/) to call auxiliary Workers from your main (entry) Worker. All requests are routed through your entry Worker. During the build, each Worker is output to a separate subdirectory of `dist`. Note Auxiliary Workers are not currently supported when using [React Router](https://reactrouter.com/) as a framework. Note When running `wrangler deploy`, only your main (entry) Worker will be deployed. If using multiple Workers, each auxiliary Worker must be deployed individually. You can inspect the `dist` directory and then run `wrangler deploy -c dist//wrangler.json` for each. ## `interface AuxiliaryWorkerConfig` * `configPath` string A required path to your Worker config file. For more information about the Worker configuration, see [Configuration](https://developers.cloudflare.com/workers/wrangler/configuration/). * `viteEnvironment` { name?: string } optional Optional Vite environment options. By default, the environment name is the Worker name with `-` characters replaced with `_`. Setting the name here will override this. See [Vite Environments](https://developers.cloudflare.com/workers/vite-plugin/reference/vite-environments/) for more information. --- title: Recipes and examples · Cloudflare Workers docs description: Examples that demonstrate how to write unit and integration tests with the Workers Vitest integration. lastUpdated: 2025-04-10T14:17:11.000Z chatbotDeprioritize: false source_url: html: https://developers.cloudflare.com/workers/testing/vitest-integration/recipes/ md: https://developers.cloudflare.com/workers/testing/vitest-integration/recipes/index.md --- Recipes are examples that help demonstrate how to write unit tests and integration tests for Workers projects using the [`@cloudflare/vitest-pool-workers`](https://www.npmjs.com/package/@cloudflare/vitest-pool-workers) package. * [Basic unit and integration tests for Workers using `SELF`](https://github.com/cloudflare/workers-sdk/tree/main/fixtures/vitest-pool-workers-examples/basics-unit-integration-self) * [Basic unit and integration tests for Pages Functions using `SELF`](https://github.com/cloudflare/workers-sdk/tree/main/fixtures/vitest-pool-workers-examples/pages-functions-unit-integration-self) * [Basic integration tests using an auxiliary Worker](https://github.com/cloudflare/workers-sdk/tree/main/fixtures/vitest-pool-workers-examples/basics-integration-auxiliary) * [Basic integration test for Workers with static assets](https://github.com/cloudflare/workers-sdk/tree/main/fixtures/vitest-pool-workers-examples/workers-assets) * [Isolated tests using KV, R2 and the Cache API](https://github.com/cloudflare/workers-sdk/tree/main/fixtures/vitest-pool-workers-examples/kv-r2-caches) * [Isolated tests using D1 with migrations](https://github.com/cloudflare/workers-sdk/tree/main/fixtures/vitest-pool-workers-examples/d1) * [Isolated tests using Durable Objects with direct access](https://github.com/cloudflare/workers-sdk/tree/main/fixtures/vitest-pool-workers-examples/durable-objects) * [Tests using Queue producers and consumers](https://github.com/cloudflare/workers-sdk/tree/main/fixtures/vitest-pool-workers-examples/queues) * [Tests using Hyperdrive with a Vitest managed TCP server](https://github.com/cloudflare/workers-sdk/tree/main/fixtures/vitest-pool-workers-examples/hyperdrive) * [Tests using declarative/imperative outbound request mocks](https://github.com/cloudflare/workers-sdk/tree/main/fixtures/vitest-pool-workers-examples/request-mocking) * [Tests using multiple auxiliary Workers and request mocks](https://github.com/cloudflare/workers-sdk/tree/main/fixtures/vitest-pool-workers-examples/multiple-workers) * [Tests importing WebAssembly modules](https://github.com/cloudflare/workers-sdk/tree/main/fixtures/vitest-pool-workers-examples/web-assembly) * [Tests using JSRPC with entrypoints and Durable Objects](https://github.com/cloudflare/workers-sdk/tree/main/fixtures/vitest-pool-workers-examples/rpc) * [Integration test with static assets and Puppeteer](https://github.com/GregBrimble/puppeteer-vitest-workers-assets) * [Resolving modules with Vite Dependency Pre-Bundling](https://github.com/cloudflare/workers-sdk/tree/main/fixtures/vitest-pool-workers-examples/module-resolution) * [Mocking Workers AI and Vectorize bindings in unit tests](https://github.com/cloudflare/workers-sdk/tree/main/fixtures/vitest-pool-workers-examples/ai-vectorize) --- title: Cloudflare Environments · Cloudflare Workers docs description: Using Cloudflare environments with the Vite plugin lastUpdated: 2025-04-07T21:54:11.000Z chatbotDeprioritize: false source_url: html: https://developers.cloudflare.com/workers/vite-plugin/reference/cloudflare-environments/ md: https://developers.cloudflare.com/workers/vite-plugin/reference/cloudflare-environments/index.md --- A Worker config file may contain configuration for multiple [Cloudflare environments](https://developers.cloudflare.com/workers/wrangler/environments/). With the Cloudflare Vite plugin, you select a Cloudflare environment at dev or build time by providing the `CLOUDFLARE_ENV` environment variable. Consider the following example Worker config file: * wrangler.jsonc ```jsonc { "name": "my-worker", "compatibility_date": "2025-04-03", "main": "./src/index.ts", "vars": { "MY_VAR": "Top-level var" }, "env": { "staging": { "vars": { "MY_VAR": "Staging var" } }, "production": { "vars": { "MY_VAR": "Production var" } } } } ``` * wrangler.toml ```toml name = "my-worker" compatibility_date = "2025-04-03" main = "./src/index.ts" vars = { MY_VAR = "Top-level var" } [env.staging] vars = { MY_VAR = "Staging var" } [env.production] vars = { MY_VAR = "Production var" } ``` If you run `CLOUDFLARE_ENV=production vite build` then the output `wrangler.json` file generated by the build will be a flattened configuration for the 'production' Cloudflare environment, as shown in the following example: ```json { "name": "my-worker", "compatibility_date": "2025-04-03", "main": "index.js", "vars": { "MY_VAR": "Production var" } } ``` Notice that the value of `MY_VAR` is `Production var`. This flattened configuration combines [top-level only](https://developers.cloudflare.com/workers/wrangler/configuration/#top-level-only-keys), [inheritable](https://developers.cloudflare.com/workers/wrangler/configuration/#inheritable-keys), and [non-inheritable](https://developers.cloudflare.com/workers/wrangler/configuration/#non-inheritable-keys) keys. Note The default Vite environment name for a Worker is always the top-level Worker name. This enables you to reference the Worker consistently in your Vite config when using multiple Cloudflare environments. See [Vite Environments](https://developers.cloudflare.com/workers/vite-plugin/reference/vite-environments/) for more information. Cloudflare environments can also be used in development. For example, you could run `CLOUDFLARE_ENV=development vite dev`. It is common to use the default top-level environment as the development environment and then add additional environments as necessary. Note Running `vite dev` or `vite build` without providing `CLOUDFLARE_ENV` will use the default top-level Cloudflare environment. As Cloudflare environments are applied at dev and build time, specifying `CLOUDFLARE_ENV` when running `vite preview` or `wrangler deploy` will have no effect. ## Combining Cloudflare environments and Vite modes You may wish to combine the concepts of [Cloudflare environments](https://developers.cloudflare.com/workers/wrangler/environments/) and [Vite modes](https://vite.dev/guide/env-and-mode.html#modes). With this approach, the Vite mode can be used to select the Cloudflare environment and a single method can be used to determine environment specific configuration and code. Consider again the previous example: * wrangler.jsonc ```jsonc { "name": "my-worker", "compatibility_date": "2025-04-03", "main": "./src/index.ts", "vars": { "MY_VAR": "Top-level var" }, "env": { "staging": { "vars": { "MY_VAR": "Staging var" } }, "production": { "vars": { "MY_VAR": "Production var" } } } } ``` * wrangler.toml ```toml # wrangler.toml name = "my-worker" compatibility_date = "2025-04-03" main = "./src/index.ts" vars = { MY_VAR = "Top-level var" } [env.staging] vars = { MY_VAR = "Staging var" } [env.production] vars = { MY_VAR = "Production var" } ``` Next, provide `.env.staging` and `.env.production` files: ```sh CLOUDFLARE_ENV=staging ``` ```sh CLOUDFLARE_ENV=production ``` By default, `vite build` uses the 'production' Vite mode. Vite will therefore load the `.env.production` file to get the environment variables that are used in the build. Since the `.env.production` file contains `CLOUDFLARE_ENV=production`, the Cloudflare Vite plugin will select the 'production' Cloudflare environment. The value of `MY_VAR` will therefore be `'Production var'`. If you run `vite build --mode staging` then the 'staging' Vite mode will be used and the 'staging' Cloudflare environment will be selected. The value of `MY_VAR` will therefore be `'Staging var'`. For more information about using `.env` files with Vite, see the [relevant documentation](https://vite.dev/guide/env-and-mode#env-files). --- title: Debugging · Cloudflare Workers docs description: Debugging with the Vite plugin lastUpdated: 2025-04-04T07:52:43.000Z chatbotDeprioritize: false source_url: html: https://developers.cloudflare.com/workers/vite-plugin/reference/debugging/ md: https://developers.cloudflare.com/workers/vite-plugin/reference/debugging/index.md --- The Cloudflare Vite plugin has debugging enabled by default and listens on port `9229`. You may choose a custom port or disable debugging by setting the `inspectorPort` option in the [plugin config](https://developers.cloudflare.com/workers/vite-plugin/reference/api#interface-pluginconfig). There are two recommended methods for debugging your Workers during local development: ## DevTools When running `vite dev` or `vite preview`, a `/__debug` route is added that provides access to [Cloudflare's implementation](https://github.com/cloudflare/workers-sdk/tree/main/packages/chrome-devtools-patches) of [Chrome's DevTools](https://developer.chrome.com/docs/devtools/overview). Navigating to this route will open a DevTools tab for each of the Workers in your application. Once the tab(s) are open, you can make a request to your application and start debugging your Worker code. Note When debugging multiple Workers, you may need to allow your browser to open pop-ups. ## VS Code To set up [VS Code](https://code.visualstudio.com/) to support breakpoint debugging in your application, you should create a `.vscode/launch.json` file that contains the following configuration: ```json { "configurations": [ { "name": "", "type": "node", "request": "attach", "websocketAddress": "ws://localhost:9229/", "resolveSourceMapLocations": null, "attachExistingChildren": false, "autoAttachChildProcesses": false, "sourceMaps": true } ], "compounds": [ { "name": "Debug Workers", "configurations": [""], "stopAll": true } ] } ``` Here, `` indicates the name of the Worker as specified in your Worker config file. If you have used the `inspectorPort` option to set a custom port then this should be the value provided in the `websocketaddress` field. Note If you have more than one Worker in your application, you should add a configuration in the `configurations` field for each and include the configuration name in the `compounds` `configurations` array. With this set up, you can run `vite dev` or `vite preview` and then select **Debug Workers** at the top of the **Run & Debug** panel to start debugging. --- title: Migrating from wrangler dev · Cloudflare Workers docs description: Migrating from wrangler dev to the Vite plugin lastUpdated: 2025-06-18T17:02:32.000Z chatbotDeprioritize: false source_url: html: https://developers.cloudflare.com/workers/vite-plugin/reference/migrating-from-wrangler-dev/ md: https://developers.cloudflare.com/workers/vite-plugin/reference/migrating-from-wrangler-dev/index.md --- In most cases, migrating from [`wrangler dev`](https://developers.cloudflare.com/workers/wrangler/commands/#dev) is straightforward and you can follow the instructions in [Get started](https://developers.cloudflare.com/workers/vite-plugin/get-started/). There are a few key differences to highlight: ## Input and output Worker config files With the Cloudflare Vite plugin, your [Worker config file](https://developers.cloudflare.com/workers/wrangler/configuration/) (for example, `wrangler.jsonc`) is the input configuration and a separate output configuration is created as part of the build. This output file is a snapshot of your configuration at the time of the build and is modified to reference your build artifacts. It is the configuration that is used for preview and deployment. Once you have run `vite build`, running `wrangler deploy` or `vite preview` will automatically locate this output configuration file. ## Cloudflare Environments With the Cloudflare Vite plugin, [Cloudflare Environments](https://developers.cloudflare.com/workers/vite-plugin/reference/cloudflare-environments/) are applied at dev and build time. Running `wrangler deploy --env some-env` is therefore not applicable and the environment to deploy should instead be set by running `CLOUDFLARE_ENV=some-env vite build`. ## Redundant fields in the Wrangler config file There are various options in the [Worker config file](https://developers.cloudflare.com/workers/wrangler/configuration/) that are ignored when using Vite, as they are either no longer applicable or are replaced by Vite equivalents. If these options are provided, then warnings will be printed to the console with suggestions for how to proceed. Examples where the Vite configuration should be used instead include `alias` and `define`. See [Vite Environments](https://developers.cloudflare.com/workers/vite-plugin/reference/vite-environments/) for more information about configuring your Worker environments in Vite. ## No remote mode The Vite plugin does not support [remote mode](https://developers.cloudflare.com/workers/development-testing/#remote-bindings). We will be adding support for accessing remote resources in local development in a future update. --- title: Secrets · Cloudflare Workers docs description: Using secrets with the Vite plugin lastUpdated: 2025-04-04T07:52:43.000Z chatbotDeprioritize: false source_url: html: https://developers.cloudflare.com/workers/vite-plugin/reference/secrets/ md: https://developers.cloudflare.com/workers/vite-plugin/reference/secrets/index.md --- [Secrets](https://developers.cloudflare.com/workers/configuration/secrets/) are typically used for storing sensitive information such as API keys and auth tokens. For deployed Workers, they are set via the dashboard or Wrangler CLI. In local development, secrets can be provided to your Worker by using a [`.dev.vars`](https://developers.cloudflare.com/workers/configuration/secrets/#local-development-with-secrets) file. If you are using [Cloudflare Environments](https://developers.cloudflare.com/workers/vite-plugin/reference/cloudflare-environments/) then the relevant `.dev.vars` file will be selected. For example, `CLOUDFLARE_ENV=staging vite dev` will load `.dev.vars.staging` if it exists and fall back to `.dev.vars`. Note The `vite build` command copies the relevant `.dev.vars` file to the output directory. This is only used when running `vite preview` and is not deployed with your Worker. --- title: Static Assets · Cloudflare Workers docs description: Static assets and the Vite plugin lastUpdated: 2025-07-01T10:19:56.000Z chatbotDeprioritize: false source_url: html: https://developers.cloudflare.com/workers/vite-plugin/reference/static-assets/ md: https://developers.cloudflare.com/workers/vite-plugin/reference/static-assets/index.md --- This guide focuses on the areas of working with static assets that are unique to the Vite plugin. For more general documentation, see [Static Assets](https://developers.cloudflare.com/workers/static-assets/). ## Configuration The Vite plugin does not require that you provide the `assets` field in order to enable assets and instead determines whether assets should be included based on whether the `client` environment has been built. By default, the `client` environment is built if any of the following conditions are met: * There is an `index.html` file in the root of your project * `build.rollupOptions.input` or `environments.client.build.rollupOptions.input` is specified in your Vite config * You have a non-empty [`public` directory](https://vite.dev/guide/assets#the-public-directory) * Your Worker [imports assets as URLs](https://vite.dev/guide/assets#importing-asset-as-url) On running `vite build`, an output `wrangler.json` configuration file is generated as part of the build output. The `assets.directory` field in this file is automatically populated with the path to your `client` build output. It is therefore not necessary to provide the `assets.directory` field in your input Worker configuration. The `assets` configuration should be used, however, if you wish to set [routing configuration](https://developers.cloudflare.com/workers/static-assets/routing/) or enable the [assets binding](https://developers.cloudflare.com/workers/static-assets/binding/#binding). The following example configures the `not_found_handling` for a single-page application so that the fallback will always be the root `index.html` file. * wrangler.jsonc ```jsonc { "assets": { "not_found_handling": "single-page-application" } } ``` * wrangler.toml ```toml assets = { not_found_handling = "single-page-application" } ``` ## Features The Vite plugin ensures that all of Vite's [static asset handling](https://vite.dev/guide/assets) features are supported in your Worker as well as in your frontend. These include importing assets as URLs, importing as strings and importing from the `public` directory as well as inlining assets. Assets [imported as URLs](https://vite.dev/guide/assets#importing-asset-as-url) can be fetched via the [assets binding](https://developers.cloudflare.com/workers/static-assets/binding/#binding). As the binding's `fetch` method requires a full URL, we recommend using the request URL as the `base`. This is demonstrated in the following example: ```ts import myImage from "./my-image.png"; export default { fetch(request, env) { return env.ASSETS.fetch(new URL(myImage, request.url)); }, }; ``` Assets imported as URLs in your Worker will automatically be moved to the client build output. When running `vite build` the paths of any moved assets will be displayed in the console. Note If you are developing a multi-Worker application, assets can only be accessed on the client and in your entry Worker. ## Headers and redirects Custom [headers](https://developers.cloudflare.com/workers/static-assets/headers/) and [redirects](https://developers.cloudflare.com/workers/static-assets/redirects/) are supported at build, preview and deploy time by adding `_headers` and `_redirects` files to your [`public` directory](https://vite.dev/guide/assets#the-public-directory). The paths in these files should reflect the structure of your client build output. For example, generated assets are typically located in an [assets subdirectory](https://vite.dev/config/build-options#build-assetsdir). --- title: Vite Environments · Cloudflare Workers docs description: Vite environments and the Vite plugin lastUpdated: 2025-04-04T07:52:43.000Z chatbotDeprioritize: false source_url: html: https://developers.cloudflare.com/workers/vite-plugin/reference/vite-environments/ md: https://developers.cloudflare.com/workers/vite-plugin/reference/vite-environments/index.md --- The [Vite Environment API](https://vite.dev/guide/api-environment), released in Vite 6, is the key feature that enables the Cloudflare Vite plugin to integrate Vite directly with the Workers runtime. It is not necessary to understand all the intricacies of the Environment API as an end user, but it is useful to have a high-level understanding. ## Default behavior Vite creates two environments by default: `client` and `ssr`. A front-end only application uses the `client` environment, whereas a full-stack application created with a framework typically uses the `client` environment for front-end code and the `ssr` environment for server-side rendering. By default, when you add a Worker using the Cloudflare Vite plugin, an additional environment is created. Its name is derived from the Worker name, with any dashes replaced with underscores. This name can be used to reference the environment in your Vite config in order to apply environment specific configuration. Note The default Vite environment name for a Worker is always the top-level Worker name. This enables you to reference the Worker consistently in your Vite config when using multiple [Cloudflare Environments](https://developers.cloudflare.com/workers/vite-plugin/reference/cloudflare-environments/). ## Environment configuration In the following example we have a Worker named `my-worker` that is associated with a Vite environment named `my_worker`. We use the Vite config to set global constant replacements for this environment: * wrangler.jsonc ```jsonc { "name": "my-worker", "compatibility_date": "2025-04-03", "main": "./src/index.ts" } ``` * wrangler.toml ```toml name = "my-worker" compatibility_date = "2025-04-03" main = "./src/index.ts" ``` ```ts import { defineConfig } from "vite"; import { cloudflare } from "@cloudflare/vite-plugin"; export default defineConfig({ environments: { my_worker: { define: { __APP_VERSION__: JSON.stringify("v1.0.0"), }, }, }, plugins: [cloudflare()], }); ``` For more information about Vite's configuration options, see [Configuring Vite](https://vite.dev/config/). The default behavior of using the Worker name as the environment name is appropriate when you have a standalone Worker, such as an API that is accessed from your front-end application, or an [auxiliary Worker](https://developers.cloudflare.com/workers/vite-plugin/reference/api/#interface-pluginconfig) that is accessed via service bindings. ## React Router v7 If you are using the Cloudflare Vite plugin with [React Router v7](https://reactrouter.com/), then your Worker is used for server-side rendering and tightly integrated with the framework. To support this, you should assign it to the `ssr` environment by setting `viteEnvironment.name` in the plugin config. ```ts import { defineConfig } from "vite"; import { cloudflare } from "@cloudflare/vite-plugin"; import { reactRouter } from "@react-router/dev/vite"; export default defineConfig({ plugins: [cloudflare({ viteEnvironment: { name: "ssr" } }), reactRouter()], }); ``` This merges the Worker's environment configuration with the framework's SSR configuration and ensures that the Worker is included as part of the framework's build output. --- title: Migrate from Wrangler v2 to v3 · Cloudflare Workers docs description: There are no special instructions for migrating from Wrangler v2 to v3. You should be able to update Wrangler by following the instructions in Install/Update Wrangler. You should experience no disruption to your workflow. lastUpdated: 2025-03-13T11:08:22.000Z chatbotDeprioritize: false source_url: html: https://developers.cloudflare.com/workers/wrangler/migration/update-v2-to-v3/ md: https://developers.cloudflare.com/workers/wrangler/migration/update-v2-to-v3/index.md --- There are no special instructions for migrating from Wrangler v2 to v3. You should be able to update Wrangler by following the instructions in [Install/Update Wrangler](https://developers.cloudflare.com/workers/wrangler/install-and-update/#update-wrangler). You should experience no disruption to your workflow. Warning If you tried to update to Wrangler v3 prior to v3.3, you may have experienced some compatibility issues with older operating systems. Please try again with the latest v3 where those have been resolved. ## Deprecations Refer to [Deprecations](https://developers.cloudflare.com/workers/wrangler/deprecations/#wrangler-v3) for more details on what is no longer supported in v3. ## Additional assistance If you do have an issue or need further assistance, [file an issue](https://github.com/cloudflare/workers-sdk/issues/new/choose) in the `workers-sdk` repo on GitHub. --- title: Migrate from Wrangler v3 to v4 · Cloudflare Workers docs description: Wrangler v4 is a major release focused on updates to underlying systems and dependencies, along with improvements to keep Wrangler commands consistent and clear. Unlike previous major versions of Wrangler, which were foundational rewrites and rearchitectures — Version 4 of Wrangler includes a much smaller set of changes. If you use Wrangler today, your workflow is very unlikely to change. lastUpdated: 2025-03-13T19:20:11.000Z chatbotDeprioritize: false source_url: html: https://developers.cloudflare.com/workers/wrangler/migration/update-v3-to-v4/ md: https://developers.cloudflare.com/workers/wrangler/migration/update-v3-to-v4/index.md --- Wrangler v4 is a major release focused on updates to underlying systems and dependencies, along with improvements to keep Wrangler commands consistent and clear. Unlike previous major versions of Wrangler, which were [foundational rewrites](https://blog.cloudflare.com/wrangler-v2-beta/) and [rearchitectures](https://blog.cloudflare.com/wrangler3/) — Version 4 of Wrangler includes a much smaller set of changes. If you use Wrangler today, your workflow is very unlikely to change. While many users should expect a no-op upgrade, the following sections outline the more significant changes and steps for migrating where necessary. ### Summary of changes * **Updated Node.js support policy:** Node.js v16, which reached End-of-Life in 2022, is no longer supported in Wrangler v4. Wrangler now follows Node.js's [official support lifecycle](https://nodejs.org/en/about/previous-releases). * **Upgraded esbuild version**: Wrangler uses [esbuild](https://esbuild.github.io/) to bundle Worker code before deploying it, and was previously pinned to esbuild v0.17.19. Wrangler v4 uses esbuild v0.24, which could impact dynamic wildcard imports. Going forward, Wrangler will be periodically updating the `esbuild` version included with Wrangler, and since `esbuild` is a pre-1.0.0 tool, this may sometimes include breaking changes to how bundling works. In particular, we may bump the `esbuild` version in a Wrangler minor version. * **Commands default to local mode**: All commands that can run in either local or remote mode now default to local, requiring a `--remote` flag for API queries. * **Deprecated commands and configurations removed:** Legacy commands, flags, and configurations are removed. ## Detailed Changes ### Updated Node.js support policy Wrangler now supports only Node.js versions that align with [Node.js's official lifecycle](https://nodejs.org/en/about/previous-releases): * **Supported**: Current, Active LTS, Maintenance LTS * **No longer supported:** Node.js v16 (EOL in 2022) Wrangler tests no longer run on v16, and users still on this version may encounter unsupported behavior. Users still using Node.js v16 must upgrade to a supported version to continue receiving support and compatibility with Wrangler. ### Upgraded esbuild version Wrangler v4 upgrades esbuild from **v0.17.19** to **v0.24**, bringing improvements (such as the ability to use the `using` keyword with RPC) and changes to bundling behavior: * **Dynamic imports:** Wildcard imports (for example, `import('./data/' + kind + '.json')`) now automatically include all matching files in the bundle. Users relying on wildcard dynamic imports may see unwanted files bundled. Prior to esbuild v0.19, `import` statements with dynamic paths ( like `import('./data/' + kind + '.json')`) did not bundle all files matches the glob pattern (`*.json`) . Only files explicitly referenced or included using `find_additional_modules` were bundled. With esbuild v0.19, wildcard imports now automatically bundle all files matching the glob pattern. This could result in unwanted files being bundled, so users might want to avoid wildcard dynamic imports and use explicit imports instead. ### Commands default to local mode All commands now run in **local mode by default.** Wrangler has many commands for accessing resources like KV and R2, but the commands were previously inconsistent in whether they ran in a local or remote environment. For example, D1 defaulted to querying a local datastore, and required the `--remote` flag to query via the API. KV, on the other hand, previously defaulted to querying via the API (implicitly using the `--remote` flag) and required a `--local` flag to query a local datastore. In order to make the behavior consistent across Wrangler, each command now uses the `--local` flag by default, and requires an explicit `--remote` flag to query via the API. For example: * **Previous Behavior (Wrangler v3):** `wrangler kv get` queried remotely by default. * **New Behavior (Wrangler v4):** `wrangler kv get` queries locally unless `--remote` is specified. Those using `wrangler kv key` and/or `wrangler r2 object` commands to query or write to their data store will need to add the `--remote` flag in order to replicate previous behavior. ### Deprecated commands and configurations removed All previously deprecated features in [Wrangler v2](https://developers.cloudflare.com/workers/wrangler/deprecations/#wrangler-v2) and in [Wrangler v3](https://developers.cloudflare.com/workers/wrangler/deprecations/#wrangler-v3) are now removed. Additionally, the following features that were deprecated during the Wrangler v3 release are also now removed: * Legacy Assets (using `wrangler dev/deploy --legacy-assets` or the `legacy_assets` config file property). Instead, we recommend you [migrate to Workers assets](https://developers.cloudflare.com/workers/static-assets/). * Legacy Node.js compatibility (using `wrangler dev/deploy --node-compat` or the `node_compat` config file property). Instead, use the [`nodejs_compat` compatibility flag](https://developers.cloudflare.com/workers/runtime-apis/nodejs). This includes the functionality from legacy `node_compat` polyfills and natively implemented Node.js APIs. * `wrangler version`. Instead, use `wrangler --version` to check the current version of Wrangler. * `getBindingsProxy()` (via `import { getBindingsProxy } from "wrangler"`). Instead, use the [`getPlatformProxy()` API](https://developers.cloudflare.com/workers/wrangler/api/#getplatformproxy), which takes exactly the same arguments. * `usage_model`. This no longer has any effect, after the [rollout of Workers Standard Pricing](https://blog.cloudflare.com/workers-pricing-scale-to-zero/). --- title: Migrate from Wrangler v1 to v2 · Cloudflare Workers docs description: This guide details how to migrate from Wrangler v1 to v2. lastUpdated: 2025-03-13T11:08:22.000Z chatbotDeprioritize: true source_url: html: https://developers.cloudflare.com/workers/wrangler/migration/v1-to-v2/ md: https://developers.cloudflare.com/workers/wrangler/migration/v1-to-v2/index.md --- This guide details how to migrate from Wrangler v1 to v2. * [1. Migrate webpack projects](https://developers.cloudflare.com/workers/wrangler/migration/v1-to-v2/eject-webpack/) * [2. Update to Wrangler v2](https://developers.cloudflare.com/workers/wrangler/migration/v1-to-v2/update-v1-to-v2/) * [Wrangler v1 (legacy)](https://developers.cloudflare.com/workers/wrangler/migration/v1-to-v2/wrangler-legacy/) --- title: REST API · Cloudflare Workers AI docs description: "If you prefer to work directly with the REST API instead of a Cloudflare Worker, below are the steps on how to do it:" lastUpdated: 2025-04-10T22:24:36.000Z chatbotDeprioritize: false source_url: html: https://developers.cloudflare.com/workers-ai/features/batch-api/rest-api/ md: https://developers.cloudflare.com/workers-ai/features/batch-api/rest-api/index.md --- If you prefer to work directly with the REST API instead of a [Cloudflare Worker](https://developers.cloudflare.com/workers-ai/features/batch-api/workers-binding/), below are the steps on how to do it: ## 1. Sending a Batch Request Make a POST request using the following pattern. You can pass `external_reference` as a unique ID per-prompt that will be returned in the response. ```bash curl "https://api.cloudflare.com/client/v4/accounts/$ACCOUNT_ID/ai/run/@cf/baai/bge-m3?queueRequest=true" \ --header "Authorization: Bearer $API_TOKEN" \ --header 'Content-Type: application/json' \ --json '{ "requests": [ { "query": "This is a story about Cloudflare", "contexts": [ { "text": "This is a story about an orange cloud", "external_reference": "story1" }, { "text": "This is a story about a llama", "external_reference": "story2" }, { "text": "This is a story about a hugging emoji", "external_reference": "story3" } ] } ] }' ``` ```json { "result": { "status": "queued", "request_id": "768f15b7-4fd6-4498-906e-ad94ffc7f8d2", "model": "@cf/baai/bge-m3" }, "success": true, "errors": [], "messages": [] } ``` ## 2. Retrieving the Batch Response After receiving a `request_id` from your initial POST, you can poll for or retrieve the results with another POST request: ```bash curl "https://api.cloudflare.com/client/v4/accounts/$ACCOUNT_ID/ai/run/@cf/baai/bge-m3?queueRequest=true" \ --header "Authorization: Bearer $API_TOKEN" \ --header 'Content-Type: application/json' \ --json '{ "request_id": "" }' ``` ```json { "result": { "responses": [ { "id": 0, "result": { "response": [ { "id": 0, "score": 0.73974609375 }, { "id": 1, "score": 0.642578125 }, { "id": 2, "score": 0.6220703125 } ] }, "success": true, "external_reference": null } ], "usage": { "prompt_tokens": 12, "completion_tokens": 0, "total_tokens": 12 } }, "success": true, "errors": [], "messages": [] } ``` --- title: Workers Binding · Cloudflare Workers AI docs description: You can use Workers Bindings to interact with the Batch API. lastUpdated: 2025-04-10T22:24:36.000Z chatbotDeprioritize: false source_url: html: https://developers.cloudflare.com/workers-ai/features/batch-api/workers-binding/ md: https://developers.cloudflare.com/workers-ai/features/batch-api/workers-binding/index.md --- You can use Workers Bindings to interact with the Batch API. ## Send a Batch request Send your initial batch inference request by composing a JSON payload containing an array of individual inference requests and the `queueRequest: true` property (which is what controlls queueing behavior). Note Ensure that the total payload is under 10 MB. ```ts export interface Env { AI: Ai; } export default { async fetch(request, env): Promise { const embeddings = await env.AI.run( "@cf/baai/bge-m3", { requests: [ { query: "This is a story about Cloudflare", contexts: [ { text: "This is a story about an orange cloud", }, { text: "This is a story about a llama", }, { text: "This is a story about a hugging emoji", }, ], }, ], }, { queueRequest: true }, ); return Response.json(embeddings); }, } satisfies ExportedHandler; ``` ```json { "status": "queued", "model": "@cf/baai/bge-m3", "request_id": "000-000-000" } ``` You will get a response with the following values: * **`status`**: Indicates that your request is queued. * **`request_id`**: A unique identifier for the batch request. * **`model`**: The model used for the batch inference. Of these, the `request_id` is important for when you need to [poll the batch status](#poll-batch-status). ### Poll batch status Once your batch request is queued, use the `request_id` to poll for its status. During processing, the API returns a status `queued` or `running` indicating that the request is still in the queue or being processed. ```typescript export interface Env { AI: Ai; } export default { async fetch(request, env): Promise { const status = await env.AI.run("@cf/baai/bge-m3", { request_id: "000-000-000", }); return Response.json(status); }, } satisfies ExportedHandler; ``` ```json { "responses": [ { "id": 0, "result": { "response": [ { "id": 0, "score": 0.73974609375 }, { "id": 1, "score": 0.642578125 }, { "id": 2, "score": 0.6220703125 } ] }, "success": true, "external_reference": null } ], "usage": { "prompt_tokens": 12, "completion_tokens": 0, "total_tokens": 12 } } ``` When the inference is complete, the API returns a final HTTP status code of `200` along with an array of responses. Each response object corresponds to an individual input prompt, identified by an `id` that maps to the index of the prompt in your original request. --- title: Fine-tuned inference with LoRA adapters · Cloudflare Workers AI docs description: Upload and use LoRA adapters to get fine-tuned inference on Workers AI. lastUpdated: 2025-06-27T16:14:01.000Z chatbotDeprioritize: false source_url: html: https://developers.cloudflare.com/workers-ai/features/fine-tunes/loras/ md: https://developers.cloudflare.com/workers-ai/features/fine-tunes/loras/index.md --- Workers AI supports fine-tuned inference with adapters trained with [Low-Rank Adaptation](https://blog.cloudflare.com/fine-tuned-inference-with-loras). This feature is in open beta and free during this period. ## Limitations * We only support LoRAs for a [variety of models](https://developers.cloudflare.com/workers-ai/models/?capabilities=LoRA) (must not be quantized) * Adapter must be trained with rank `r <=8` as well as larger ranks if up to 32. You can check the rank of a pre-trained LoRA adapter through the adapter's `config.json` file * LoRA adapter file must be < 300MB * LoRA adapter files must be named `adapter_config.json` and `adapter_model.safetensors` exactly * You can test up to 30 LoRA adapters per account *** ## Choosing compatible LoRA adapters ### Finding open-source LoRA adapters We have started a [Hugging Face Collection](https://huggingface.co/collections/Cloudflare/workers-ai-compatible-loras-6608dd9f8d305a46e355746e) that lists a few LoRA adapters that are compatible with Workers AI. Generally, any LoRA adapter that fits our limitations above should work. ### Training your own LoRA adapters To train your own LoRA adapter, follow the [tutorial](https://developers.cloudflare.com/workers-ai/guides/tutorials/fine-tune-models-with-autotrain/). *** ## Uploading LoRA adapters In order to run inference with LoRAs on Workers AI, you'll need to create a new fine tune on your account and upload your adapter files. You should have a `adapter_model.safetensors` file with model weights and `adapter_config.json` with your config information. *Note that we only accept adapter files in these types.* Right now, you can't edit a fine tune's asset files after you upload it. We will support this soon, but for now you will need to create a new fine tune and upload files again if you would like to use a new LoRA. Before you upload your LoRA adapter, you'll need to edit your `adapter_config.json` file to include `model_type` as one of `mistral`, `gemma` or `llama` like below. ```json { "alpha_pattern": {}, "auto_mapping": null, ... "target_modules": [ "q_proj", "v_proj" ], "task_type": "CAUSAL_LM", "model_type": "mistral", } ``` ### Wrangler You can create a finetune and upload your LoRA adapter via wrangler with the following commands: ```bash npx wrangler ai finetune create #🌀 Creating new finetune "test-lora" for model "@cf/mistral/mistral-7b-instruct-v0.2-lora"... #🌀 Uploading file "/Users/abcd/Downloads/adapter_config.json" to "test-lora"... #🌀 Uploading file "/Users/abcd/Downloads/adapter_model.safetensors" to "test-lora"... #✅ Assets uploaded, finetune "test-lora" is ready to use. npx wrangler ai finetune list ┌──────────────────────────────────────┬─────────────────┬─────────────┐ │ finetune_id │ name │ description │ ├──────────────────────────────────────┼─────────────────┼─────────────┤ │ 00000000-0000-0000-0000-000000000000 │ test-lora │ │ └──────────────────────────────────────┴─────────────────┴─────────────┘ ``` ### REST API Alternatively, you can use our REST API to create a finetune and upload your adapter files. You will need a Cloudflare API Token with `Workers AI: Edit` permissions to make calls to our REST API, which you can generate via the Cloudflare Dashboard. #### Creating a fine-tune on your account Required API token permissions At least one of the following [token permissions](https://developers.cloudflare.com/fundamentals/api/reference/permissions/) is required: * `Workers AI Write` ```bash curl "https://api.cloudflare.com/client/v4/accounts/$ACCOUNT_ID/ai/finetunes" \ --request POST \ --header "Authorization: Bearer $CLOUDFLARE_API_TOKEN" \ --json '{ "model": "SUPPORTED_MODEL_NAME", "name": "FINETUNE_NAME", "description": "OPTIONAL_DESCRIPTION" }' ``` #### Uploading your adapter weights and config You have to call the upload endpoint each time you want to upload a new file, so you usually run this once for `adapter_model.safetensors` and once for `adapter_config.json`. Make sure you include the `@` before your path to files. You can either use the finetune `name` or `id` that you used when you created the fine tune. ```bash ## Input: finetune_id, adapter_model.safetensors, then adapter_config.json ## Output: success true/false curl -X POST https://api.cloudflare.com/client/v4/accounts/{ACCOUNT_ID}/ai/finetunes/{FINETUNE_ID}/finetune-assets/ \ -H 'Authorization: Bearer {API_TOKEN}' \ -H 'Content-Type: multipart/form-data' \ -F 'file_name=adapter_model.safetensors' \ -F 'file=@{PATH/TO/adapter_model.safetensors}' ``` #### List fine-tunes in your account You can call this method to confirm what fine-tunes you have created in your account Required API token permissions At least one of the following [token permissions](https://developers.cloudflare.com/fundamentals/api/reference/permissions/) is required: * `Workers AI Write` * `Workers AI Read` ```bash curl "https://api.cloudflare.com/client/v4/accounts/$ACCOUNT_ID/ai/finetunes" \ --request GET \ --header "Authorization: Bearer $CLOUDFLARE_API_TOKEN" ``` ```json { "success": true, "result": [ [ { "id": "00000000-0000-0000-0000-000000000", "model": "@cf/meta-llama/llama-2-7b-chat-hf-lora", "name": "llama2-finetune", "description": "test" }, { "id": "00000000-0000-0000-0000-000000000", "model": "@cf/mistralai/mistral-7b-instruct-v0.2-lora", "name": "mistral-finetune", "description": "test" } ] ] } ``` *** ## Running inference with LoRAs To make inference requests and apply the LoRA adapter, you will need your model and finetune `name` or `id`. You should use the chat template that your LoRA was trained on, but you can try running it with `raw: true` and the messages template like below. * workers ai sdk ```javascript const response = await env.AI.run( "@cf/mistralai/mistral-7b-instruct-v0.2-lora", //the model supporting LoRAs { messages: [{ role: "user", content: "Hello world" }], raw: true, //skip applying the default chat template lora: "00000000-0000-0000-0000-000000000", //the finetune id OR name }, ); ``` * rest api ```bash curl https://api.cloudflare.com/client/v4/accounts/{ACCOUNT_ID}/ai/run/@cf/mistral/mistral-7b-instruct-v0.2-lora \ -H 'Authorization: Bearer {API_TOKEN}' \ -d '{ "messages": [{"role": "user", "content": "Hello world"}], "raw": "true", "lora": "00000000-0000-0000-0000-000000000" }' ``` --- title: Public LoRA adapters · Cloudflare Workers AI docs description: Cloudflare offers a few public LoRA adapters that are immediately ready for use. lastUpdated: 2025-06-27T16:14:01.000Z chatbotDeprioritize: false source_url: html: https://developers.cloudflare.com/workers-ai/features/fine-tunes/public-loras/ md: https://developers.cloudflare.com/workers-ai/features/fine-tunes/public-loras/index.md --- Cloudflare offers a few public LoRA adapters that can immediately be used for fine-tuned inference. You can try them out immediately via our [playground](https://playground.ai.cloudflare.com). Public LoRAs will have the name `cf-public-x`, and the prefix will be reserved for Cloudflare. Note Have more LoRAs you would like to see? Let us know on [Discord](https://discord.cloudflare.com). | Name | Description | Compatible with | | - | - | - | | [cf-public-magicoder](https://huggingface.co/predibase/magicoder) | Coding tasks in multiple languages | `@cf/mistral/mistral-7b-instruct-v0.1` `@hf/mistral/mistral-7b-instruct-v0.2` | | [cf-public-jigsaw-classification](https://huggingface.co/predibase/jigsaw) | Toxic comment classification | `@cf/mistral/mistral-7b-instruct-v0.1` `@hf/mistral/mistral-7b-instruct-v0.2` | | [cf-public-cnn-summarization](https://huggingface.co/predibase/cnn) | Article summarization | `@cf/mistral/mistral-7b-instruct-v0.1` `@hf/mistral/mistral-7b-instruct-v0.2` | You can also list these public LoRAs with an API call: Required API token permissions At least one of the following [token permissions](https://developers.cloudflare.com/fundamentals/api/reference/permissions/) is required: * `Workers AI Write` * `Workers AI Read` ```bash curl "https://api.cloudflare.com/client/v4/accounts/$ACCOUNT_ID/ai/finetunes/public" \ --request GET \ --header "Authorization: Bearer $CLOUDFLARE_API_TOKEN" ``` ## Running inference with public LoRAs To run inference with public LoRAs, you just need to define the LoRA name in the request. We recommend that you use the prompt template that the LoRA was trained on. You can find this in the HuggingFace repos linked above for each adapter. ### cURL ```bash curl https://api.cloudflare.com/client/v4/accounts/{account_id}/ai/run/@cf/mistral/mistral-7b-instruct-v0.1 \ --header 'Authorization: Bearer {cf_token}' \ --data '{ "messages": [ { "role": "user", "content": "Write a python program to check if a number is even or odd." } ], "lora": "cf-public-magicoder" }' ``` ### JavaScript ```js const answer = await env.AI.run("@cf/mistral/mistral-7b-instruct-v0.1", { stream: true, raw: true, messages: [ { role: "user", content: "Summarize the following: Some newspapers, TV channels and well-known companies publish false news stories to fool people on 1 April. One of the earliest examples of this was in 1957 when a programme on the BBC, the UKs national TV channel, broadcast a report on how spaghetti grew on trees. The film showed a family in Switzerland collecting spaghetti from trees and many people were fooled into believing it, as in the 1950s British people didnt eat much pasta and many didnt know how it was made! Most British people wouldnt fall for the spaghetti trick today, but in 2008 the BBC managed to fool their audience again with their Miracles of Evolution trailer, which appeared to show some special penguins that had regained the ability to fly. Two major UK newspapers, The Daily Telegraph and the Daily Mirror, published the important story on their front pages.", }, ], lora: "cf-public-cnn-summarization", }); ``` --- title: Traditional function calling · Cloudflare Workers AI docs description: This page shows how you can do traditional function calling, as defined by industry standards. Workers AI also offers embedded function calling, which is drastically easier than traditional function calling. lastUpdated: 2025-04-03T16:21:18.000Z chatbotDeprioritize: false source_url: html: https://developers.cloudflare.com/workers-ai/features/function-calling/traditional/ md: https://developers.cloudflare.com/workers-ai/features/function-calling/traditional/index.md --- This page shows how you can do traditional function calling, as defined by industry standards. Workers AI also offers [embedded function calling](https://developers.cloudflare.com/workers-ai/features/function-calling/embedded/), which is drastically easier than traditional function calling. With traditional function calling, you define an array of tools with the name, description, and tool arguments. The example below shows how you would pass a tool called `getWeather` in an inference request to a model. ```js const response = await env.AI.run("@hf/nousresearch/hermes-2-pro-mistral-7b", { messages: [ { role: "user", content: "what is the weather in london?", }, ], tools: [ { name: "getWeather", description: "Return the weather for a latitude and longitude", parameters: { type: "object", properties: { latitude: { type: "string", description: "The latitude for the given location", }, longitude: { type: "string", description: "The longitude for the given location", }, }, required: ["latitude", "longitude"], }, }, ], }); return new Response(JSON.stringify(response.tool_calls)); ``` The LLM will then return a JSON object with the required arguments and the name of the tool that was called. You can then pass this JSON object to make an API call. ```json [ { "arguments": { "latitude": "51.5074", "longitude": "-0.1278" }, "name": "getWeather" } ] ``` For a working example on how to do function calling, take a look at our [demo app](https://github.com/craigsdennis/lightbulb-moment-tool-calling/blob/main/src/index.ts). --- title: Embedded function calling · Cloudflare Workers AI docs description: Cloudflare has a unique embedded function calling feature that allows you to execute function code alongside your tool call inference. Our npm package @cloudflare/ai-utils is the developer toolkit to get started. lastUpdated: 2025-04-03T16:21:18.000Z chatbotDeprioritize: false source_url: html: https://developers.cloudflare.com/workers-ai/features/function-calling/embedded/ md: https://developers.cloudflare.com/workers-ai/features/function-calling/embedded/index.md --- Cloudflare has a unique [embedded function calling](https://blog.cloudflare.com/embedded-function-calling) feature that allows you to execute function code alongside your tool call inference. Our npm package [`@cloudflare/ai-utils`](https://www.npmjs.com/package/@cloudflare/ai-utils) is the developer toolkit to get started. Embedded function calling can be used to easily make complex agents that interact with websites and APIs, like using natural language to create meetings on Google Calendar, saving data to Notion, automatically routing requests to other APIs, saving data to an R2 bucket - or all of this at the same time. All you need is a prompt and an OpenAPI spec to get started. REST API support Embedded function calling depends on features native to the Workers platform. This means that embedded function calling is only supported via [Cloudflare Workers](https://developers.cloudflare.com/workers-ai/get-started/workers-wrangler/), not via the [REST API](https://developers.cloudflare.com/workers-ai/get-started/rest-api/). ## Resources * [Get Started](https://developers.cloudflare.com/workers-ai/features/function-calling/embedded/get-started/) * [Examples](https://developers.cloudflare.com/workers-ai/features/function-calling/embedded/examples/) * [API Reference](https://developers.cloudflare.com/workers-ai/features/function-calling/embedded/api-reference/) * [Troubleshooting](https://developers.cloudflare.com/workers-ai/features/function-calling/embedded/troubleshooting/) --- title: Build a Retrieval Augmented Generation (RAG) AI · Cloudflare Workers AI docs description: Build your first AI app with Cloudflare AI. This guide uses Workers AI, Vectorize, D1, and Cloudflare Workers. lastUpdated: 2025-07-11T16:03:39.000Z chatbotDeprioritize: false tags: AI,Hono source_url: html: https://developers.cloudflare.com/workers-ai/guides/tutorials/build-a-retrieval-augmented-generation-ai/ md: https://developers.cloudflare.com/workers-ai/guides/tutorials/build-a-retrieval-augmented-generation-ai/index.md --- This guide will instruct you through setting up and deploying your first application with Cloudflare AI. You will build a fully-featured AI-powered application, using tools like Workers AI, Vectorize, D1, and Cloudflare Workers. Looking for a managed option? [AutoRAG](https://developers.cloudflare.com/autorag) offers a fully managed way to build RAG pipelines on Cloudflare, handling ingestion, indexing, and querying out of the box. [Get started](https://developers.cloudflare.com/autorag/get-started/). At the end of this tutorial, you will have built an AI tool that allows you to store information and query it using a Large Language Model. This pattern, known as Retrieval Augmented Generation, or RAG, is a useful project you can build by combining multiple aspects of Cloudflare's AI toolkit. You do not need to have experience working with AI tools to build this application. 1. Sign up for a [Cloudflare account](https://dash.cloudflare.com/sign-up/workers-and-pages). 2. Install [`Node.js`](https://docs.npmjs.com/downloading-and-installing-node-js-and-npm). Node.js version manager Use a Node version manager like [Volta](https://volta.sh/) or [nvm](https://github.com/nvm-sh/nvm) to avoid permission issues and change Node.js versions. [Wrangler](https://developers.cloudflare.com/workers/wrangler/install-and-update/), discussed later in this guide, requires a Node version of `16.17.0` or later. You will also need access to [Vectorize](https://developers.cloudflare.com/vectorize/platform/pricing/). During this tutorial, we will show how you can optionally integrate with [Anthropic Claude](http://anthropic.com) as well. You will need an [Anthropic API key](https://docs.anthropic.com/en/api/getting-started) to do so. ## 1. Create a new Worker project C3 (`create-cloudflare-cli`) is a command-line tool designed to help you setup and deploy Workers to Cloudflare as fast as possible. Open a terminal window and run C3 to create your Worker project: * npm ```sh npm create cloudflare@latest -- rag-ai-tutorial ``` * yarn ```sh yarn create cloudflare rag-ai-tutorial ``` * pnpm ```sh pnpm create cloudflare@latest rag-ai-tutorial ``` For setup, select the following options: * For *What would you like to start with?*, choose `Hello World example`. * For *Which template would you like to use?*, choose `Worker only`. * For *Which language do you want to use?*, choose `JavaScript`. * For *Do you want to use git for version control?*, choose `Yes`. * For *Do you want to deploy your application?*, choose `No` (we will be making some changes before deploying). In your project directory, C3 has generated several files. What files did C3 create? 1. `wrangler.jsonc`: Your [Wrangler](https://developers.cloudflare.com/workers/wrangler/configuration/#sample-wrangler-configuration) configuration file. 2. `worker.js` (in `/src`): A minimal `'Hello World!'` Worker written in [ES module](https://developers.cloudflare.com/workers/reference/migrate-to-module-workers/) syntax. 3. `package.json`: A minimal Node dependencies configuration file. 4. `package-lock.json`: Refer to [`npm` documentation on `package-lock.json`](https://docs.npmjs.com/cli/v9/configuring-npm/package-lock-json). 5. `node_modules`: Refer to [`npm` documentation `node_modules`](https://docs.npmjs.com/cli/v7/configuring-npm/folders#node-modules). Now, move into your newly created directory: ```sh cd rag-ai-tutorial ``` ## 2. Develop with Wrangler CLI The Workers command-line interface, [Wrangler](https://developers.cloudflare.com/workers/wrangler/install-and-update/), allows you to [create](https://developers.cloudflare.com/workers/wrangler/commands/#init), [test](https://developers.cloudflare.com/workers/wrangler/commands/#dev), and [deploy](https://developers.cloudflare.com/workers/wrangler/commands/#deploy) your Workers projects. C3 will install Wrangler in projects by default. After you have created your first Worker, run the [`wrangler dev`](https://developers.cloudflare.com/workers/wrangler/commands/#dev) command in the project directory to start a local server for developing your Worker. This will allow you to test your Worker locally during development. ```sh npx wrangler dev --remote ``` Note If you have not used Wrangler before, it will try to open your web browser to login with your Cloudflare account. If you have issues with this step or you do not have access to a browser interface, refer to the [`wrangler login`](https://developers.cloudflare.com/workers/wrangler/commands/#login) documentation for more information. You will now be able to go to to see your Worker running. Any changes you make to your code will trigger a rebuild, and reloading the page will show you the up-to-date output of your Worker. ## 3. Adding the AI binding To begin using Cloudflare's AI products, you can add the `ai` block to the [Wrangler configuration file](https://developers.cloudflare.com/workers/wrangler/configuration/). This will set up a binding to Cloudflare's AI models in your code that you can use to interact with the available AI models on the platform. This example features the [`@cf/meta/llama-3-8b-instruct` model](https://developers.cloudflare.com/workers-ai/models/llama-3-8b-instruct/), which generates text. * wrangler.jsonc ```jsonc { "ai": { "binding": "AI" } } ``` * wrangler.toml ```toml [ai] binding = "AI" ``` Now, find the `src/index.js` file. Inside the `fetch` handler, you can query the `AI` binding: ```js export default { async fetch(request, env, ctx) { const answer = await env.AI.run("@cf/meta/llama-3-8b-instruct", { messages: [{ role: "user", content: `What is the square root of 9?` }], }); return new Response(JSON.stringify(answer)); }, }; ``` By querying the LLM through the `AI` binding, we can interact directly with Cloudflare AI's large language models directly in our code. In this example, we are using the [`@cf/meta/llama-3-8b-instruct` model](https://developers.cloudflare.com/workers-ai/models/llama-3-8b-instruct/), which generates text. You can deploy your Worker using `wrangler`: ```sh npx wrangler deploy ``` Making a request to your Worker will now generate a text response from the LLM, and return it as a JSON object. ```sh curl https://example.username.workers.dev ``` ```sh {"response":"Answer: The square root of 9 is 3."} ``` ## 4. Adding embeddings using Cloudflare D1 and Vectorize Embeddings allow you to add additional capabilities to the language models you can use in your Cloudflare AI projects. This is done via **Vectorize**, Cloudflare's vector database. To begin using Vectorize, create a new embeddings index using `wrangler`. This index will store vectors with 768 dimensions, and will use cosine similarity to determine which vectors are most similar to each other: ```sh npx wrangler vectorize create vector-index --dimensions=768 --metric=cosine ``` Then, add the configuration details for your new Vectorize index to the [Wrangler configuration file](https://developers.cloudflare.com/workers/wrangler/configuration/): * wrangler.jsonc ```jsonc { "vectorize": [ { "binding": "VECTOR_INDEX", "index_name": "vector-index" } ] } ``` * wrangler.toml ```toml # ... existing wrangler configuration [[vectorize]] binding = "VECTOR_INDEX" index_name = "vector-index" ``` A vector index allows you to store a collection of dimensions, which are floating point numbers used to represent your data. When you want to query the vector database, you can also convert your query into dimensions. **Vectorize** is designed to efficiently determine which stored vectors are most similar to your query. To implement the searching feature, you must set up a D1 database from Cloudflare. In D1, you can store your app's data. Then, you change this data into a vector format. When someone searches and it matches the vector, you can show them the matching data. Create a new D1 database using `wrangler`: ```sh npx wrangler d1 create database ``` Then, paste the configuration details output from the previous command into the [Wrangler configuration file](https://developers.cloudflare.com/workers/wrangler/configuration/): * wrangler.jsonc ```jsonc { "d1_databases": [ { "binding": "DB", "database_name": "database", "database_id": "abc-def-geh" } ] } ``` * wrangler.toml ```toml # ... existing wrangler configuration [[d1_databases]] binding = "DB" # available in your Worker on env.DB database_name = "database" database_id = "abc-def-geh" # replace this with a real database_id (UUID) ``` In this application, we'll create a `notes` table in D1, which will allow us to store notes and later retrieve them in Vectorize. To create this table, run a SQL command using `wrangler d1 execute`: ```sh npx wrangler d1 execute database --remote --command "CREATE TABLE IF NOT EXISTS notes (id INTEGER PRIMARY KEY, text TEXT NOT NULL)" ``` Now, we can add a new note to our database using `wrangler d1 execute`: ```sh npx wrangler d1 execute database --remote --command "INSERT INTO notes (text) VALUES ('The best pizza topping is pepperoni')" ``` ## 5. Creating a workflow Before we begin creating notes, we will introduce a [Cloudflare Workflow](https://developers.cloudflare.com/workflows). This will allow us to define a durable workflow that can safely and robustly execute all the steps of the RAG process. To begin, add a new `[[workflows]]` block to your [Wrangler configuration file](https://developers.cloudflare.com/workers/wrangler/configuration/): * wrangler.jsonc ```jsonc { "workflows": [ { "name": "rag", "binding": "RAG_WORKFLOW", "class_name": "RAGWorkflow" } ] } ``` * wrangler.toml ```toml # ... existing wrangler configuration [[workflows]] name = "rag" binding = "RAG_WORKFLOW" class_name = "RAGWorkflow" ``` In `src/index.js`, add a new class called `RAGWorkflow` that extends `WorkflowEntrypoint`: ```js import { WorkflowEntrypoint } from "cloudflare:workers"; export class RAGWorkflow extends WorkflowEntrypoint { async run(event, step) { await step.do("example step", async () => { console.log("Hello World!"); }); } } ``` This class will define a single workflow step that will log "Hello World!" to the console. You can add as many steps as you need to your workflow. On its own, this workflow will not do anything. To execute the workflow, we will call the `RAG_WORKFLOW` binding, passing in any parameters that the workflow needs to properly complete. Here is an example of how we can call the workflow: ```js env.RAG_WORKFLOW.create({ params: { text } }); ``` ## 6. Creating notes and adding them to Vectorize To expand on your Workers function in order to handle multiple routes, we will add `hono`, a routing library for Workers. This will allow us to create a new route for adding notes to our database. Install `hono` using `npm`: * npm ```sh npm i hono ``` * yarn ```sh yarn add hono ``` * pnpm ```sh pnpm add hono ``` Then, import `hono` into your `src/index.js` file. You should also update the `fetch` handler to use `hono`: ```js import { Hono } from "hono"; const app = new Hono(); app.get("/", async (c) => { const answer = await c.env.AI.run("@cf/meta/llama-3-8b-instruct", { messages: [{ role: "user", content: `What is the square root of 9?` }], }); return c.json(answer); }); export default app; ``` This will establish a route at the root path `/` that is functionally equivalent to the previous version of your application. Now, we can update our workflow to begin adding notes to our database, and generating the related embeddings for them. This example features the [`@cf/baai/bge-base-en-v1.5` model](https://developers.cloudflare.com/workers-ai/models/bge-base-en-v1.5/), which can be used to create an embedding. Embeddings are stored and retrieved inside [Vectorize](https://developers.cloudflare.com/vectorize/), Cloudflare's vector database. The user query is also turned into an embedding so that it can be used for searching within Vectorize. ```js import { WorkflowEntrypoint } from "cloudflare:workers"; export class RAGWorkflow extends WorkflowEntrypoint { async run(event, step) { const env = this.env; const { text } = event.payload; const record = await step.do(`create database record`, async () => { const query = "INSERT INTO notes (text) VALUES (?) RETURNING *"; const { results } = await env.DB.prepare(query).bind(text).run(); const record = results[0]; if (!record) throw new Error("Failed to create note"); return record; }); const embedding = await step.do(`generate embedding`, async () => { const embeddings = await env.AI.run("@cf/baai/bge-base-en-v1.5", { text: text, }); const values = embeddings.data[0]; if (!values) throw new Error("Failed to generate vector embedding"); return values; }); await step.do(`insert vector`, async () => { return env.VECTOR_INDEX.upsert([ { id: record.id.toString(), values: embedding, }, ]); }); } } ``` The workflow does the following things: 1. Accepts a `text` parameter. 2. Insert a new row into the `notes` table in D1, and retrieve the `id` of the new row. 3. Convert the `text` into a vector using the `embeddings` model of the LLM binding. 4. Upsert the `id` and `vectors` into the `vector-index` index in Vectorize. By doing this, you will create a new vector representation of the note, which can be used to retrieve the note later. To complete the code, we will add a route that allows users to submit notes to the database. This route will parse the JSON request body, get the `note` parameter, and create a new instance of the workflow, passing the parameter: ```js app.post("/notes", async (c) => { const { text } = await c.req.json(); if (!text) return c.text("Missing text", 400); await c.env.RAG_WORKFLOW.create({ params: { text } }); return c.text("Created note", 201); }); ``` ## 7. Querying Vectorize to retrieve notes To complete your code, you can update the root path (`/`) to query Vectorize. You will convert the query into a vector, and then use the `vector-index` index to find the most similar vectors. The `topK` parameter limits the number of vectors returned by the function. For instance, providing a `topK` of 1 will only return the *most similar* vector based on the query. Setting `topK` to 5 will return the 5 most similar vectors. Given a list of similar vectors, you can retrieve the notes that match the record IDs stored alongside those vectors. In this case, we are only retrieving a single note - but you may customize this as needed. You can insert the text of those notes as context into the prompt for the LLM binding. This is the basis of Retrieval-Augmented Generation, or RAG: providing additional context from data outside of the LLM to enhance the text generated by the LLM. We'll update the prompt to include the context, and to ask the LLM to use the context when responding: ```js import { Hono } from "hono"; const app = new Hono(); // Existing post route... // app.post('/notes', async (c) => { ... }) app.get("/", async (c) => { const question = c.req.query("text") || "What is the square root of 9?"; const embeddings = await c.env.AI.run("@cf/baai/bge-base-en-v1.5", { text: question, }); const vectors = embeddings.data[0]; const vectorQuery = await c.env.VECTOR_INDEX.query(vectors, { topK: 1 }); let vecId; if ( vectorQuery.matches && vectorQuery.matches.length > 0 && vectorQuery.matches[0] ) { vecId = vectorQuery.matches[0].id; } else { console.log("No matching vector found or vectorQuery.matches is empty"); } let notes = []; if (vecId) { const query = `SELECT * FROM notes WHERE id = ?`; const { results } = await c.env.DB.prepare(query).bind(vecId).all(); if (results) notes = results.map((vec) => vec.text); } const contextMessage = notes.length ? `Context:\n${notes.map((note) => `- ${note}`).join("\n")}` : ""; const systemPrompt = `When answering the question or responding, use the context provided, if it is provided and relevant.`; const { response: answer } = await c.env.AI.run( "@cf/meta/llama-3-8b-instruct", { messages: [ ...(notes.length ? [{ role: "system", content: contextMessage }] : []), { role: "system", content: systemPrompt }, { role: "user", content: question }, ], }, ); return c.text(answer); }); app.onError((err, c) => { return c.text(err); }); export default app; ``` ## 8. Adding Anthropic Claude model (optional) If you are working with larger documents, you have the option to use Anthropic's [Claude models](https://claude.ai/), which have large context windows and are well-suited to RAG workflows. To begin, install the `@anthropic-ai/sdk` package: * npm ```sh npm i @anthropic-ai/sdk ``` * yarn ```sh yarn add @anthropic-ai/sdk ``` * pnpm ```sh pnpm add @anthropic-ai/sdk ``` In `src/index.js`, you can update the `GET /` route to check for the `ANTHROPIC_API_KEY` environment variable. If it's set, we can generate text using the Anthropic SDK. If it isn't set, we'll fall back to the existing Workers AI code: ```js import Anthropic from '@anthropic-ai/sdk'; app.get('/', async (c) => { // ... Existing code const systemPrompt = `When answering the question or responding, use the context provided, if it is provided and relevant.` let modelUsed: string = "" let response = null if (c.env.ANTHROPIC_API_KEY) { const anthropic = new Anthropic({ apiKey: c.env.ANTHROPIC_API_KEY }) const model = "claude-3-5-sonnet-latest" modelUsed = model const message = await anthropic.messages.create({ max_tokens: 1024, model, messages: [ { role: 'user', content: question } ], system: [systemPrompt, notes ? contextMessage : ''].join(" ") }) response = { response: message.content.map(content => content.text).join("\n") } } else { const model = "@cf/meta/llama-3.1-8b-instruct" modelUsed = model response = await c.env.AI.run( model, { messages: [ ...(notes.length ? [{ role: 'system', content: contextMessage }] : []), { role: 'system', content: systemPrompt }, { role: 'user', content: question } ] } ) } if (response) { c.header('x-model-used', modelUsed) return c.text(response.response) } else { return c.text("We were unable to generate output", 500) } }) ``` Finally, you'll need to set the `ANTHROPIC_API_KEY` environment variable in your Workers application. You can do this by using `wrangler secret put`: ```sh $ npx wrangler secret put ANTHROPIC_API_KEY ``` ## 9. Deleting notes and vectors If you no longer need a note, you can delete it from the database. Any time that you delete a note, you will also need to delete the corresponding vector from Vectorize. You can implement this by building a `DELETE /notes/:id` route in your `src/index.js` file: ```js app.delete("/notes/:id", async (c) => { const { id } = c.req.param(); const query = `DELETE FROM notes WHERE id = ?`; await c.env.DB.prepare(query).bind(id).run(); await c.env.VECTOR_INDEX.deleteByIds([id]); return c.status(204); }); ``` ## 10. Text splitting (optional) For large pieces of text, it is recommended to split the text into smaller chunks. This allows LLMs to more effectively gather relevant context, without needing to retrieve large pieces of text. To implement this, we'll add a new NPM package to our project, \`@langchain/textsplitters': * npm ```sh npm i @langchain/textsplitters ``` * yarn ```sh yarn add @langchain/textsplitters ``` * pnpm ```sh pnpm add @langchain/textsplitters ``` The `RecursiveCharacterTextSplitter` class provided by this package will split the text into smaller chunks. It can be customized to your liking, but the default config works in most cases: ```js import { RecursiveCharacterTextSplitter } from "@langchain/textsplitters"; const text = "Some long piece of text..."; const splitter = new RecursiveCharacterTextSplitter({ // These can be customized to change the chunking size // chunkSize: 1000, // chunkOverlap: 200, }); const output = await splitter.createDocuments([text]); console.log(output); // [{ pageContent: 'Some long piece of text...' }] ``` To use this splitter, we'll update the workflow to split the text into smaller chunks. We'll then iterate over the chunks and run the rest of the workflow for each chunk of text: ```js export class RAGWorkflow extends WorkflowEntrypoint { async run(event, step) { const env = this.env; const { text } = event.payload; let texts = await step.do("split text", async () => { const splitter = new RecursiveCharacterTextSplitter(); const output = await splitter.createDocuments([text]); return output.map((doc) => doc.pageContent); }); console.log( "RecursiveCharacterTextSplitter generated ${texts.length} chunks", ); for (const index in texts) { const text = texts[index]; const record = await step.do( `create database record: ${index}/${texts.length}`, async () => { const query = "INSERT INTO notes (text) VALUES (?) RETURNING *"; const { results } = await env.DB.prepare(query).bind(text).run(); const record = results[0]; if (!record) throw new Error("Failed to create note"); return record; }, ); const embedding = await step.do( `generate embedding: ${index}/${texts.length}`, async () => { const embeddings = await env.AI.run("@cf/baai/bge-base-en-v1.5", { text: text, }); const values = embeddings.data[0]; if (!values) throw new Error("Failed to generate vector embedding"); return values; }, ); await step.do(`insert vector: ${index}/${texts.length}`, async () => { return env.VECTOR_INDEX.upsert([ { id: record.id.toString(), values: embedding, }, ]); }); } } } ``` Now, when large pieces of text are submitted to the `/notes` endpoint, they will be split into smaller chunks, and each chunk will be processed by the workflow. ## 11. Deploy your project If you did not deploy your Worker during [step 1](https://developers.cloudflare.com/workers/get-started/guide/#1-create-a-new-worker-project), deploy your Worker via Wrangler, to a `*.workers.dev` subdomain, or a [Custom Domain](https://developers.cloudflare.com/workers/configuration/routing/custom-domains/), if you have one configured. If you have not configured any subdomain or domain, Wrangler will prompt you during the publish process to set one up. ```sh npx wrangler deploy ``` Preview your Worker at `..workers.dev`. Note When pushing to your `*.workers.dev` subdomain for the first time, you may see [`523` errors](https://developers.cloudflare.com/support/troubleshooting/http-status-codes/cloudflare-5xx-errors/error-523/) while DNS is propagating. These errors should resolve themselves after a minute or so. ## Related resources A full version of this codebase is available on GitHub. It includes a frontend UI for querying, adding, and deleting notes, as well as a backend API for interacting with the database and vector index. You can find it here: [github.com/kristianfreeman/cloudflare-retrieval-augmented-generation-example](https://github.com/kristianfreeman/cloudflare-retrieval-augmented-generation-example/). To do more: * Explore the reference diagram for a [Retrieval Augmented Generation (RAG) Architecture](https://developers.cloudflare.com/reference-architecture/diagrams/ai/ai-rag/). * Review Cloudflare's [AI documentation](https://developers.cloudflare.com/workers-ai). * Review [Tutorials](https://developers.cloudflare.com/workers/tutorials/) to build projects on Workers. * Explore [Examples](https://developers.cloudflare.com/workers/examples/) to experiment with copy and paste Worker code. * Understand how Workers works in [Reference](https://developers.cloudflare.com/workers/reference/). * Learn about Workers features and functionality in [Platform](https://developers.cloudflare.com/workers/platform/). * Set up [Wrangler](https://developers.cloudflare.com/workers/wrangler/install-and-update/) to programmatically create, test, and deploy your Worker projects. --- title: Build a Voice Notes App with auto transcriptions using Workers AI · Cloudflare Workers AI docs description: Explore how you can use AI models to transcribe audio recordings and post process the transcriptions. lastUpdated: 2025-04-28T14:34:23.000Z chatbotDeprioritize: false tags: AI,Nuxt source_url: html: https://developers.cloudflare.com/workers-ai/guides/tutorials/build-a-voice-notes-app-with-auto-transcription/ md: https://developers.cloudflare.com/workers-ai/guides/tutorials/build-a-voice-notes-app-with-auto-transcription/index.md --- In this tutorial, you will learn how to create a Voice Notes App with automatic transcriptions of voice recordings, and optional post-processing. The following tools will be used to build the application: * Workers AI to transcribe the voice recordings, and for the optional post processing * D1 database to store the notes * R2 storage to store the voice recordings * Nuxt framework to build the full-stack application * Workers to deploy the project ## Prerequisites To continue, you will need: 1. Sign up for a [Cloudflare account](https://dash.cloudflare.com/sign-up/workers-and-pages). 2. Install [`Node.js`](https://docs.npmjs.com/downloading-and-installing-node-js-and-npm). Node.js version manager Use a Node version manager like [Volta](https://volta.sh/) or [nvm](https://github.com/nvm-sh/nvm) to avoid permission issues and change Node.js versions. [Wrangler](https://developers.cloudflare.com/workers/wrangler/install-and-update/), discussed later in this guide, requires a Node version of `16.17.0` or later. ## 1. Create a new Worker project Create a new Worker project using the `c3` CLI with the `nuxt` framework preset. * npm ```sh npm create cloudflare@latest -- voice-notes --framework=nuxt ``` * yarn ```sh yarn create cloudflare voice-notes --framework=nuxt ``` * pnpm ```sh pnpm create cloudflare@latest voice-notes --framework=nuxt ``` ### Install additional dependencies Change into the newly created project directory ```sh cd voice-notes ``` And install the following dependencies: * npm ```sh npm i @nuxt/ui @vueuse/core @iconify-json/heroicons ``` * yarn ```sh yarn add @nuxt/ui @vueuse/core @iconify-json/heroicons ``` * pnpm ```sh pnpm add @nuxt/ui @vueuse/core @iconify-json/heroicons ``` Then add the `@nuxt/ui` module to the `nuxt.config.ts` file: ```ts export default defineNuxtConfig({ //.. modules: ['nitro-cloudflare-dev', '@nuxt/ui'], //.. }) ``` ### \[Optional] Move to Nuxt 4 compatibility mode Moving to Nuxt 4 compatibility mode ensures that your application remains forward-compatible with upcoming updates to Nuxt. Create a new `app` folder in the project's root directory and move the `app.vue` file to it. Also, add the following to your `nuxt.config.ts` file: ```ts export default defineNuxtConfig({ //.. future: { compatibilityVersion: 4, }, //.. }) ``` Note The rest of the tutorial will use the `app` folder for keeping the client side code. If you did not make this change, you should continue to use the project's root directory. ### Start local development server At this point you can test your application by starting a local development server using: * npm ```sh npm run dev ``` * yarn ```sh yarn run dev ``` * pnpm ```sh pnpm run dev ``` If everything is set up correctly, you should see a Nuxt welcome page at `http://localhost:3000`. ## 2. Create the transcribe API endpoint This API makes use of Workers AI to transcribe the voice recordings. To use Workers AI within your project, you first need to bind it to the Worker. Workers AI local development usage charges Using Workers AI always accesses your Cloudflare account in order to run AI models and will incur usage charges even in local development. Add the `AI` binding to the Wrangler file. ```toml [ai] binding = "AI" ``` Once the `AI` binding has been configured, run the `cf-typegen` command to generate the necessary Cloudflare type definitions. This makes the types definitions available in the server event contexts. * npm ```sh npm run cf-typegen ``` * yarn ```sh yarn run cf-typegen ``` * pnpm ```sh pnpm run cf-typegen ``` Create a transcribe `POST` endpoint by creating `transcribe.post.ts` file inside the `/server/api` directory. ```ts export default defineEventHandler(async (event) => { const { cloudflare } = event.context; const form = await readFormData(event); const blob = form.get('audio') as Blob; if (!blob) { throw createError({ statusCode: 400, message: 'Missing audio blob to transcribe', }); } try { const response = await cloudflare.env.AI.run('@cf/openai/whisper', { audio: [...new Uint8Array(await blob.arrayBuffer())], }); return response.text; } catch (err) { console.error('Error transcribing audio:', err); throw createError({ statusCode: 500, message: 'Failed to transcribe audio. Please try again.', }); } }); ``` The above code does the following: 1. Extracts the audio blob from the event. 2. Transcribes the blob using the `@cf/openai/whisper` model and returns the transcription text as response. ## 3. Create an API endpoint for uploading audio recordings to R2 Before uploading the audio recordings to `R2`, you need to create a bucket first. You will also need to add the R2 binding to your Wrangler file and regenerate the Cloudflare type definitions. Create an `R2` bucket. * npm ```sh npx wrangler r2 bucket create ``` * yarn ```sh yarn wrangler r2 bucket create ``` * pnpm ```sh pnpm wrangler r2 bucket create ``` Add the storage binding to your Wrangler file. ```toml [[r2_buckets]] binding = "R2" bucket_name = "" ``` Finally, generate the type definitions by rerunning the `cf-typegen` script. Now you are ready to create the upload endpoint. Create a new `upload.put.ts` file in your `server/api` directory, and add the following code to it: ```ts export default defineEventHandler(async (event) => { const { cloudflare } = event.context; const form = await readFormData(event); const files = form.getAll('files') as File[]; if (!files) { throw createError({ statusCode: 400, message: 'Missing files' }); } const uploadKeys: string[] = []; for (const file of files) { const obj = await cloudflare.env.R2.put(`recordings/${file.name}`, file); if (obj) { uploadKeys.push(obj.key); } } return uploadKeys; }); ``` The above code does the following: 1. The files variable retrieves all files sent by the client using form.getAll(), which allows for multiple uploads in a single request. 2. Uploads the files to the R2 bucket using the binding (`R2`) you created earlier. Note The `recordings/` prefix organizes uploaded files within a dedicated folder in your bucket. This will also come in handy when serving these recordings to the client (covered later). ## 4. Create an API endpoint to save notes entries Before creating the endpoint, you will need to perform steps similar to those for the R2 bucket, with some additional steps to prepare a notes table. Create a `D1` database. * npm ```sh npx wrangler d1 create ``` * yarn ```sh yarn wrangler d1 create ``` * pnpm ```sh pnpm wrangler d1 create ``` Add the D1 bindings to the Wrangler file. You can get the `DB_ID` from the output of the `d1 create` command. ```toml [[d1_databases]] binding = "DB" database_name = "" database_id = "" ``` As before, rerun the `cf-typegen` command to generate the types. Next, create a DB migration. * npm ```sh npx wrangler d1 migrations create "create notes table" ``` * yarn ```sh yarn wrangler d1 migrations create "create notes table" ``` * pnpm ```sh pnpm wrangler d1 migrations create "create notes table" ``` This will create a new `migrations` folder in the project's root directory, and add an empty `0001_create_notes_table.sql` file to it. Replace the contents of this file with the code below. ```sql CREATE TABLE IF NOT EXISTS notes ( id INTEGER PRIMARY KEY AUTOINCREMENT, text TEXT NOT NULL, created_at DATETIME DEFAULT CURRENT_TIMESTAMP, updated_at DATETIME DEFAULT CURRENT_TIMESTAMP, audio_urls TEXT ); ``` And then apply this migration to create the `notes` table. * npm ```sh npx wrangler d1 migrations apply ``` * yarn ```sh yarn wrangler d1 migrations apply ``` * pnpm ```sh pnpm wrangler d1 migrations apply ``` Note The above command will create the notes table locally. To apply the migration on your remote production database, use the `--remote` flag. Now you can create the API endpoint. Create a new file `index.post.ts` in the `server/api/notes` directory, and change its content to the following: ```ts export default defineEventHandler(async (event) => { const { cloudflare } = event.context; const { text, audioUrls } = await readBody(event); if (!text) { throw createError({ statusCode: 400, message: 'Missing note text', }); } try { await cloudflare.env.DB.prepare( 'INSERT INTO notes (text, audio_urls) VALUES (?1, ?2)' ) .bind(text, audioUrls ? JSON.stringify(audioUrls) : null) .run(); return setResponseStatus(event, 201); } catch (err) { console.error('Error creating note:', err); throw createError({ statusCode: 500, message: 'Failed to create note. Please try again.', }); } }); ``` The above does the following: 1. Extracts the text, and optional audioUrls from the event. 2. Saves it to the database after converting the audioUrls to a `JSON` string. ## 5. Handle note creation on the client-side Now you're ready to work on the client side. Let's start by tackling the note creation part first. ### Recording user audio Create a composable to handle audio recording using the MediaRecorder API. This will be used to record notes through the user's microphone. Create a new file `useMediaRecorder.ts` in the `app/composables` folder, and add the following code to it: ```ts interface MediaRecorderState { isRecording: boolean; recordingDuration: number; audioData: Uint8Array | null; updateTrigger: number; } export function useMediaRecorder() { const state = ref({ isRecording: false, recordingDuration: 0, audioData: null, updateTrigger: 0, }); let mediaRecorder: MediaRecorder | null = null; let audioContext: AudioContext | null = null; let analyser: AnalyserNode | null = null; let animationFrame: number | null = null; let audioChunks: Blob[] | undefined = undefined; const updateAudioData = () => { if (!analyser || !state.value.isRecording || !state.value.audioData) { if (animationFrame) { cancelAnimationFrame(animationFrame); animationFrame = null; } return; } analyser.getByteTimeDomainData(state.value.audioData); state.value.updateTrigger += 1; animationFrame = requestAnimationFrame(updateAudioData); }; const startRecording = async () => { try { const stream = await navigator.mediaDevices.getUserMedia({ audio: true }); audioContext = new AudioContext(); analyser = audioContext.createAnalyser(); const source = audioContext.createMediaStreamSource(stream); source.connect(analyser); mediaRecorder = new MediaRecorder(stream); audioChunks = []; mediaRecorder.ondataavailable = (e: BlobEvent) => { audioChunks?.push(e.data); state.value.recordingDuration += 1; }; state.value.audioData = new Uint8Array(analyser.frequencyBinCount); state.value.isRecording = true; state.value.recordingDuration = 0; state.value.updateTrigger = 0; mediaRecorder.start(1000); updateAudioData(); } catch (err) { console.error('Error accessing microphone:', err); throw err; } }; const stopRecording = async () => { return await new Promise((resolve) => { if (mediaRecorder && state.value.isRecording) { mediaRecorder.onstop = () => { const blob = new Blob(audioChunks, { type: 'audio/webm' }); audioChunks = undefined; state.value.recordingDuration = 0; state.value.updateTrigger = 0; state.value.audioData = null; resolve(blob); }; state.value.isRecording = false; mediaRecorder.stop(); mediaRecorder.stream.getTracks().forEach((track) => track.stop()); if (animationFrame) { cancelAnimationFrame(animationFrame); animationFrame = null; } audioContext?.close(); audioContext = null; } }); }; onUnmounted(() => { stopRecording(); }); return { state: readonly(state), startRecording, stopRecording, }; } ``` The above code does the following: 1. Exposes functions to start and stop audio recordings in a Vue application. 2. Captures audio input from the user's microphone using MediaRecorder API. 3. Processes real-time audio data for visualization using AudioContext and AnalyserNode. 4. Stores recording state including duration and recording status. 5. Maintains chunks of audio data and combines them into a final audio blob when recording stops. 6. Updates audio visualization data continuously using animation frames while recording. 7. Automatically cleans up all audio resources when recording stops or component unmounts. 8. Returns audio recordings in webm format for further processing. ### Create a component for note creation This component allows users to create notes by either typing or recording audio. It also handles audio transcription and uploading the recordings to the server. Create a new file named `CreateNote.vue` inside the `app/components` folder. Add the following template code to the newly created file: ```vue ``` The above template results in the following: 1. A panel with a `textarea` inside to type the note manually. 2. Another panel to manage start/stop of an audio recording, and show the recordings done already. 3. A bottom panel to reset or save the note (along with the recordings). Now, add the following code below the template code in the same file: ```vue ``` The above code does the following: 1. When a recording is stopped by calling `handleRecordingStop` function, the audio blob is sent for transcribing to the transcribe API endpoint. 2. The transcription response text is appended to the existing textarea content. 3. When the note is saved by calling the `saveNote` function, the audio recordings are uploaded first to R2 by using the upload endpoint we created earlier. Then, the actual note content along with the audioUrls (the R2 object keys) are saved by calling the notes post endpoint. ### Create a new page route for showing the component You can use this component in a Nuxt page to show it to the user. But before that you need to modify your `app.vue` file. Update the content of your `app.vue` to the following: ```vue ``` The above code allows for a nuxt page to be shown to the user, apart from showing an app header and a navigation sidebar. Next, add a new file named `new.vue` inside the `app/pages` folder, add the following code to it: ```vue ``` The above code shows the `CreateNote` component inside a modal, and navigates back to the home page on successful note creation. ## 6. Showing the notes on the client side To show the notes from the database on the client side, create an API endpoint first that will interact with the database. ### Create an API endpoint to fetch notes from the database Create a new file named `index.get.ts` inside the `server/api/notes` directory, and add the following code to it: ```ts import type { Note } from '~~/types'; export default defineEventHandler(async (event) => { const { cloudflare } = event.context; const res = await cloudflare.env.DB.prepare( `SELECT id, text, audio_urls AS audioUrls, created_at AS createdAt, updated_at AS updatedAt FROM notes ORDER BY created_at DESC LIMIT 50;` ).all & { audioUrls: string | null }>(); return res.results.map((note) => ({ ...note, audioUrls: note.audioUrls ? JSON.parse(note.audioUrls) : undefined, })); }); ``` The above code fetches the last 50 notes from the database, ordered by their creation date in descending order. The `audio_urls` field is stored as a string in the database, but it's converted to an array using `JSON.parse` to handle multiple audio files seamlessly on the client side. Next, create a page named `index.vue` inside the `app/pages` directory. This will be the home page of the application. Add the following code to it: ```vue ``` The above code fetches the notes from the database by calling the `/api/notes` endpoint you created just now, and renders them as note cards. ### Serving the saved recordings from R2 To be able to play the audio recordings of these notes, you need to serve the saved recordings from the R2 storage. Create a new file named `[...pathname].get.ts` inside the `server/routes/recordings` directory, and add the following code to it: Note The `...` prefix in the file name makes it a catch all route. This allows it to receive all events that are meant for paths starting with `/recordings` prefix. This is where the `recordings` prefix that was added previously while saving the recordings becomes helpful. ```ts export default defineEventHandler(async (event) => { const { cloudflare, params } = event.context; const { pathname } = params || {}; return cloudflare.env.R2.get(`recordings/${pathname}`); }); ``` The above code extracts the path name from the event params, and serves the saved recording matching that object key from the R2 bucket. ## 7. \[Optional] Post Processing the transcriptions Even though the speech-to-text transcriptions models perform satisfactorily, sometimes you want to post process the transcriptions for various reasons. It could be to remove any discrepancy, or to change the tone/style of the final text. ### Create a settings page Create a new file named `settings.vue` in the `app/pages` folder, and add the following code to it: ```vue ``` The above code renders a toggle button that enables/disables the post processing of transcriptions. If enabled, users can change the prompt that will used while post processing the transcription with an AI model. The transcription settings are saved using useStorageAsync, which utilizes the browser's local storage. This ensures that users' preferences are retained even after refreshing the page. ### Send the post processing prompt with recorded audio Modify the `CreateNote` component to send the post processing prompt along with the audio blob, while calling the `transcribe` API endpoint. ```vue ``` The code blocks added above checks for the saved post processing setting. If enabled, and there is a defined prompt, it sends the prompt to the `transcribe` API endpoint. ### Handle post processing in the transcribe API endpoint Modify the transcribe API endpoint, and update it to the following: ```ts export default defineEventHandler(async (event) => { // ... try { const response = await cloudflare.env.AI.run('@cf/openai/whisper', { audio: [...new Uint8Array(await blob.arrayBuffer())], }); const postProcessingPrompt = form.get('prompt') as string; if (postProcessingPrompt && response.text) { const postProcessResult = await cloudflare.env.AI.run( '@cf/meta/llama-3.1-8b-instruct', { temperature: 0.3, prompt: `${postProcessingPrompt}.\n\nText:\n\n${response.text}\n\nResponse:`, } ); return (postProcessResult as { response?: string }).response; } else { return response.text; } } catch (err) { // ... } }); ``` The above code does the following: 1. Extracts the post processing prompt from the event FormData. 2. If present, it calls the Workers AI API to process the transcription text using the `@cf/meta/llama-3.1-8b-instruct` model. 3. Finally, it returns the response from Workers AI to the client. ## 8. Deploy the application Now you are ready to deploy the project to a `.workers.dev` sub-domain by running the deploy command. * npm ```sh npm run deploy ``` * yarn ```sh yarn run deploy ``` * pnpm ```sh pnpm run deploy ``` You can preview your application at `..workers.dev`. Note If you used `pnpm` as your package manager, you may face build errors like `"stdin" is not exported by "node_modules/.pnpm/unenv@1.10.0/node_modules/unenv/runtime/node/process/index.mjs"`. To resolve it, you can try hoisting your node modules with the [`shamefully-hoist-true`](https://pnpm.io/npmrc) option. ## Conclusion In this tutorial, you have gone through the steps of building a voice notes application using Nuxt 3, Cloudflare Workers, D1, and R2 storage. You learnt to: * Set up the backend to store and manage notes * Create API endpoints to fetch and display notes * Handle audio recordings * Implement optional post-processing for transcriptions * Deploy the application using the Cloudflare module syntax The complete source code of the project is available on GitHub. You can go through it to see the code for various frontend components not covered in the article. You can find it here: [github.com/ra-jeev/vnotes](https://github.com/ra-jeev/vnotes). --- title: Whisper-large-v3-turbo with Cloudflare Workers AI · Cloudflare Workers AI docs description: Learn how to transcribe large audio files using Workers AI. lastUpdated: 2025-07-11T16:03:39.000Z chatbotDeprioritize: false tags: AI source_url: html: https://developers.cloudflare.com/workers-ai/guides/tutorials/build-a-workers-ai-whisper-with-chunking/ md: https://developers.cloudflare.com/workers-ai/guides/tutorials/build-a-workers-ai-whisper-with-chunking/index.md --- In this tutorial you will learn how to: * **Transcribe large audio files:** Use the [Whisper-large-v3-turbo](https://developers.cloudflare.com/workers-ai/models/whisper-large-v3-turbo/) model from Cloudflare Workers AI to perform automatic speech recognition (ASR) or translation. * **Handle large files:** Split large audio files into smaller chunks for processing, which helps overcome memory and execution time limitations. * **Deploy using Cloudflare Workers:** Create a scalable, low‑latency transcription pipeline in a serverless environment. ## 1: Create a new Cloudflare Worker project 1. Sign up for a [Cloudflare account](https://dash.cloudflare.com/sign-up/workers-and-pages). 2. Install [`Node.js`](https://docs.npmjs.com/downloading-and-installing-node-js-and-npm). Node.js version manager Use a Node version manager like [Volta](https://volta.sh/) or [nvm](https://github.com/nvm-sh/nvm) to avoid permission issues and change Node.js versions. [Wrangler](https://developers.cloudflare.com/workers/wrangler/install-and-update/), discussed later in this guide, requires a Node version of `16.17.0` or later. You will create a new Worker project using the `create-cloudflare` CLI (C3). [C3](https://github.com/cloudflare/workers-sdk/tree/main/packages/create-cloudflare) is a command-line tool designed to help you set up and deploy new applications to Cloudflare. Create a new project named `whisper-tutorial` by running: * npm ```sh npm create cloudflare@latest -- whisper-tutorial ``` * yarn ```sh yarn create cloudflare whisper-tutorial ``` * pnpm ```sh pnpm create cloudflare@latest whisper-tutorial ``` Running `npm create cloudflare@latest` will prompt you to install the [`create-cloudflare` package](https://www.npmjs.com/package/create-cloudflare), and lead you through setup. C3 will also install [Wrangler](https://developers.cloudflare.com/workers/wrangler/), the Cloudflare Developer Platform CLI. For setup, select the following options: * For *What would you like to start with?*, choose `Hello World example`. * For *Which template would you like to use?*, choose `Worker only`. * For *Which language do you want to use?*, choose `TypeScript`. * For *Do you want to use git for version control?*, choose `Yes`. * For *Do you want to deploy your application?*, choose `No` (we will be making some changes before deploying). This will create a new `whisper-tutorial` directory. Your new `whisper-tutorial` directory will include: * A `"Hello World"` [Worker](https://developers.cloudflare.com/workers/get-started/guide/#3-write-code) at `src/index.ts`. * A [`wrangler.jsonc`](https://developers.cloudflare.com/workers/wrangler/configuration/) configuration file. Go to your application directory: ```sh cd whisper-tutorial ``` ## 2. Connect your Worker to Workers AI You must create an AI binding for your Worker to connect to Workers AI. [Bindings](https://developers.cloudflare.com/workers/runtime-apis/bindings/) allow your Workers to interact with resources, like Workers AI, on the Cloudflare Developer Platform. To bind Workers AI to your Worker, add the following to the end of your `wrangler.toml` file: * wrangler.jsonc ```jsonc { "ai": { "binding": "AI" } } ``` * wrangler.toml ```toml [ai] binding = "AI" ``` Your binding is [available in your Worker code](https://developers.cloudflare.com/workers/reference/migrate-to-module-workers/#bindings-in-es-modules-format) on [`env.AI`](https://developers.cloudflare.com/workers/runtime-apis/handlers/fetch/). ## 3. Configure Wrangler In your wrangler file, add or update the following settings to enable Node.js APIs and polyfills (with a compatibility date of 2024‑09‑23 or later): * wrangler.jsonc ```jsonc { "compatibility_flags": [ "nodejs_compat" ], "compatibility_date": "2024-09-23" } ``` * wrangler.toml ```toml compatibility_flags = [ "nodejs_compat" ] compatibility_date = "2024-09-23" ``` ## 4. Handle large audio files with chunking Replace the contents of your `src/index.ts` file with the following integrated code. This sample demonstrates how to: (1) Extract an audio file URL from the query parameters. (2) Fetch the audio file while explicitly following redirects. (3) Split the audio file into smaller chunks (such as, 1 MB chunks). (4) Transcribe each chunk using the Whisper-large-v3-turbo model via the Cloudflare AI binding. (5) Return the aggregated transcription as plain text. ```ts import { Buffer } from "node:buffer"; import type { Ai } from "workers-ai"; export interface Env { AI: Ai; // If needed, add your KV namespace for storing transcripts. // MY_KV_NAMESPACE: KVNamespace; } /** * Fetches the audio file from the provided URL and splits it into chunks. * This function explicitly follows redirects. * * @param audioUrl - The URL of the audio file. * @returns An array of ArrayBuffers, each representing a chunk of the audio. */ async function getAudioChunks(audioUrl: string): Promise { const response = await fetch(audioUrl, { redirect: "follow" }); if (!response.ok) { throw new Error(`Failed to fetch audio: ${response.status}`); } const arrayBuffer = await response.arrayBuffer(); // Example: Split the audio into 1MB chunks. const chunkSize = 1024 * 1024; // 1MB const chunks: ArrayBuffer[] = []; for (let i = 0; i < arrayBuffer.byteLength; i += chunkSize) { const chunk = arrayBuffer.slice(i, i + chunkSize); chunks.push(chunk); } return chunks; } /** * Transcribes a single audio chunk using the Whisper‑large‑v3‑turbo model. * The function converts the audio chunk to a Base64-encoded string and * sends it to the model via the AI binding. * * @param chunkBuffer - The audio chunk as an ArrayBuffer. * @param env - The Cloudflare Worker environment, including the AI binding. * @returns The transcription text from the model. */ async function transcribeChunk( chunkBuffer: ArrayBuffer, env: Env, ): Promise { const base64 = Buffer.from(chunkBuffer, "binary").toString("base64"); const res = await env.AI.run("@cf/openai/whisper-large-v3-turbo", { audio: base64, // Optional parameters (uncomment and set if needed): // task: "transcribe", // or "translate" // language: "en", // vad_filter: "false", // initial_prompt: "Provide context if needed.", // prefix: "Transcription:", }); return res.text; // Assumes the transcription result includes a "text" property. } /** * The main fetch handler. It extracts the 'url' query parameter, fetches the audio, * processes it in chunks, and returns the full transcription. */ export default { async fetch( request: Request, env: Env, ctx: ExecutionContext, ): Promise { // Extract the audio URL from the query parameters. const { searchParams } = new URL(request.url); const audioUrl = searchParams.get("url"); if (!audioUrl) { return new Response("Missing 'url' query parameter", { status: 400 }); } // Get the audio chunks. const audioChunks: ArrayBuffer[] = await getAudioChunks(audioUrl); let fullTranscript = ""; // Process each chunk and build the full transcript. for (const chunk of audioChunks) { try { const transcript = await transcribeChunk(chunk, env); fullTranscript += transcript + "\n"; } catch (error) { fullTranscript += "[Error transcribing chunk]\n"; } } return new Response(fullTranscript, { headers: { "Content-Type": "text/plain" }, }); }, } satisfies ExportedHandler; ``` ## 5. Deploy your Worker 1. **Run the Worker locally:** Use wrangler's development mode to test your Worker locally: ```sh npx wrangler dev ``` Open your browser and go to , or use curl: ```sh curl "http://localhost:8787?url=https://raw.githubusercontent.com/your-username/your-repo/main/your-audio-file.mp3" ``` Replace the URL query parameter with the direct link to your audio file. (For GitHub-hosted files, ensure you use the raw file URL.) 1. **Deploy the Worker:** Once testing is complete, deploy your Worker with: ```sh npx wrangler deploy ``` 1. **Test the deployed Worker:** After deployment, test your Worker by passing the audio URL as a query parameter: ```sh curl "https://.workers.dev?url=https://raw.githubusercontent.com/your-username/your-repo/main/your-audio-file.mp3" ``` Make sure to replace ``, `your-username`, `your-repo`, and `your-audio-file.mp3` with your actual details. If successful, the Worker will return a transcript of the audio file: ```sh This is the transcript of the audio... ``` --- title: Build an interview practice tool with Workers AI · Cloudflare Workers AI docs description: Learn how to build an AI-powered interview practice tool that provides real-time feedback to help improve interview skills. lastUpdated: 2025-07-11T16:03:39.000Z chatbotDeprioritize: false tags: AI source_url: html: https://developers.cloudflare.com/workers-ai/guides/tutorials/build-ai-interview-practice-tool/ md: https://developers.cloudflare.com/workers-ai/guides/tutorials/build-ai-interview-practice-tool/index.md --- Job interviews can be stressful, and practice is key to building confidence. While traditional mock interviews with friends or mentors are valuable, they are not always available when you need them. In this tutorial, you will learn how to build an AI-powered interview practice tool that provides real-time feedback to help improve interview skills. By the end of this tutorial, you will have built a complete interview practice tool with the following core functionalities: * A real-time interview simulation tool using WebSocket connections * An AI-powered speech processing pipeline that converts audio to text * An intelligent response system that provides interviewer-like interactions * A persistent storage system for managing interview sessions and history using Durable Objects ## Before you start All of the tutorials assume you have already completed the [Get started guide](https://developers.cloudflare.com/workers/get-started/guide/), which gets you set up with a Cloudflare Workers account, [C3](https://github.com/cloudflare/workers-sdk/tree/main/packages/create-cloudflare), and [Wrangler](https://developers.cloudflare.com/workers/wrangler/install-and-update/). 1. Sign up for a [Cloudflare account](https://dash.cloudflare.com/sign-up/workers-and-pages). 2. Install [`Node.js`](https://docs.npmjs.com/downloading-and-installing-node-js-and-npm). Node.js version manager Use a Node version manager like [Volta](https://volta.sh/) or [nvm](https://github.com/nvm-sh/nvm) to avoid permission issues and change Node.js versions. [Wrangler](https://developers.cloudflare.com/workers/wrangler/install-and-update/), discussed later in this guide, requires a Node version of `16.17.0` or later. ### Prerequisites This tutorial demonstrates how to use multiple Cloudflare products and while many features are available in free tiers, some components of Workers AI may incur usage-based charges. Please review the pricing documentation for Workers AI before proceeding. Workers AI local development usage charges Using Workers AI always accesses your Cloudflare account in order to run AI models and will incur usage charges even in local development. ## 1. Create a new Worker project Create a Cloudflare Workers project using the Create Cloudflare CLI (C3) tool and the Hono framework. Note [Hono](https://hono.dev) is a lightweight web framework that helps build API endpoints and handle HTTP requests. This tutorial uses Hono to create and manage the application's routing and middleware components. Create a new Worker project by running the following commands, using `ai-interview-tool` as the Worker name: * npm ```sh npm create cloudflare@latest -- ai-interview-tool ``` * yarn ```sh yarn create cloudflare ai-interview-tool ``` * pnpm ```sh pnpm create cloudflare@latest ai-interview-tool ``` For setup, select the following options: * For *What would you like to start with?*, choose `Framework Starter`. * For *Which development framework do you want to use?*, choose `Hono`. * Complete the framework's own CLI wizard. * For *Do you want to use git for version control?*, choose `Yes`. * For *Do you want to deploy your application?*, choose `No` (we will be making some changes before deploying). To develop and test your Cloudflare Workers application locally: 1. Navigate to your Workers project directory in your terminal: ```sh cd ai-interview-tool ``` 1. Start the development server by running: ```sh npx wrangler dev ``` When you run `wrangler dev`, the command starts a local development server and provides a `localhost` URL where you can preview your application. You can now make changes to your code and see them reflected in real-time at the provided localhost address. ## 2. Define TypeScript types for the interview system Now that the project is set up, create the TypeScript types that will form the foundation of the interview system. These types will help you maintain type safety and provide clear interfaces for the different components of your application. Create a new file `types.ts` that will contain essential types and enums for: * Interview skills that can be assessed (JavaScript, React, etc.) * Different interview positions (Junior Developer, Senior Developer, etc.) * Interview status tracking * Message handling between user and AI * Core interview data structure ```typescript import { Context } from "hono"; // Context type for API endpoints, including environment bindings and user info export interface ApiContext { Bindings: CloudflareBindings; Variables: { username: string; }; } export type HonoCtx = Context; // List of technical skills you can assess during mock interviews. // This application focuses on popular web technologies and programming languages // that are commonly tested in real interviews. export enum InterviewSkill { JavaScript = "JavaScript", TypeScript = "TypeScript", React = "React", NodeJS = "NodeJS", Python = "Python", } // Available interview types based on different engineering roles. // This helps tailor the interview experience and questions to // match the candidate's target position. export enum InterviewTitle { JuniorDeveloper = "Junior Developer Interview", SeniorDeveloper = "Senior Developer Interview", FullStackDeveloper = "Full Stack Developer Interview", FrontendDeveloper = "Frontend Developer Interview", BackendDeveloper = "Backend Developer Interview", SystemArchitect = "System Architect Interview", TechnicalLead = "Technical Lead Interview", } // Tracks the current state of an interview session. // This will help you to manage the interview flow and show appropriate UI/actions // at each stage of the process. export enum InterviewStatus { Created = "created", // Interview is created but not started Pending = "pending", // Waiting for interviewer/system InProgress = "in_progress", // Active interview session Completed = "completed", // Interview finished successfully Cancelled = "cancelled", // Interview terminated early } // Defines who sent a message in the interview chat export type MessageRole = "user" | "assistant" | "system"; // Structure of individual messages exchanged during the interview export interface Message { messageId: string; // Unique identifier for the message interviewId: string; // Links message to specific interview role: MessageRole; // Who sent the message content: string; // The actual message content timestamp: number; // When the message was sent } // Main data structure that holds all information about an interview session. // This includes metadata, messages exchanged, and the current status. export interface InterviewData { interviewId: string; title: InterviewTitle; skills: InterviewSkill[]; messages: Message[]; status: InterviewStatus; createdAt: number; updatedAt: number; } // Input format for creating a new interview session. // Simplified interface that accepts basic parameters needed to start an interview. export interface InterviewInput { title: string; skills: string[]; } ``` ## 3. Configure error types for different services Next, set up custom error types to handle different kinds of errors that may occur in your application. This includes: * Database errors (for example, connection issues, query failures) * Interview-related errors (for example, invalid input, transcription failures) * Authentication errors (for example, invalid sessions) Create the following `errors.ts` file: ```typescript export const ErrorCodes = { INVALID_MESSAGE: "INVALID_MESSAGE", TRANSCRIPTION_FAILED: "TRANSCRIPTION_FAILED", LLM_FAILED: "LLM_FAILED", DATABASE_ERROR: "DATABASE_ERROR", } as const; export class AppError extends Error { constructor( message: string, public statusCode: number, ) { super(message); this.name = this.constructor.name; } } export class UnauthorizedError extends AppError { constructor(message: string) { super(message, 401); } } export class BadRequestError extends AppError { constructor(message: string) { super(message, 400); } } export class NotFoundError extends AppError { constructor(message: string) { super(message, 404); } } export class InterviewError extends Error { constructor( message: string, public code: string, public statusCode: number = 500, ) { super(message); this.name = "InterviewError"; } } ``` ## 4. Configure authentication middleware and user routes In this step, you will implement a basic authentication system to track and identify users interacting with your AI interview practice tool. The system uses HTTP-only cookies to store usernames, allowing you to identify both the request sender and their corresponding Durable Object. This straightforward authentication approach requires users to provide a username, which is then stored securely in a cookie. This approach allows you to: * Identify users across requests * Associate interview sessions with specific users * Secure access to interview-related endpoints ### Create the Authentication Middleware Create a middleware function that will check for the presence of a valid authentication cookie. This middleware will be used to protect routes that require authentication. Create a new middleware file `middleware/auth.ts`: ```typescript import { Context } from "hono"; import { getCookie } from "hono/cookie"; import { UnauthorizedError } from "../errors"; export const requireAuth = async (ctx: Context, next: () => Promise) => { // Get username from cookie const username = getCookie(ctx, "username"); if (!username) { throw new UnauthorizedError("User is not logged in"); } // Make username available to route handlers ctx.set("username", username); await next(); }; ``` This middleware: * Checks for a `username` cookie * Throws an `Error` if the cookie is missing * Makes the username available to downstream handlers via the context ### Create Authentication Routes Next, create the authentication routes that will handle user login. Create a new file `routes/auth.ts`: ```typescript import { Context, Hono } from "hono"; import { setCookie } from "hono/cookie"; import { BadRequestError } from "../errors"; import { ApiContext } from "../types"; export const authenticateUser = async (ctx: Context) => { // Extract username from request body const { username } = await ctx.req.json(); // Make sure username was provided if (!username) { throw new BadRequestError("Username is required"); } // Create a secure cookie to track the user's session // This cookie will: // - Be HTTP-only for security (no JS access) // - Work across all routes via path="/" // - Last for 24 hours // - Only be sent in same-site requests to prevent CSRF setCookie(ctx, "username", username, { httpOnly: true, path: "/", maxAge: 60 * 60 * 24, sameSite: "Strict", }); // Let the client know login was successful return ctx.json({ success: true }); }; // Set up authentication-related routes export const configureAuthRoutes = () => { const router = new Hono(); // POST /login - Authenticate user and create session router.post("/login", authenticateUser); return router; }; ``` Finally, update main application file to include the authentication routes. Modify `src/index.ts`: ```typescript import { configureAuthRoutes } from "./routes/auth"; import { Hono } from "hono"; import { logger } from "hono/logger"; import type { ApiContext } from "./types"; import { requireAuth } from "./middleware/auth"; // Create our main Hono app instance with proper typing const app = new Hono(); // Create a separate router for API endpoints to keep things organized const api = new Hono(); // Set up global middleware that runs on every request // - Logger gives us visibility into what is happening app.use("*", logger()); // Wire up all our authentication routes (login, etc) // These will be mounted under /api/v1/auth/ api.route("/auth", configureAuthRoutes()); // Mount all API routes under the version prefix (for example, /api/v1) // This allows us to make breaking changes in v2 without affecting v1 users app.route("/api/v1", api); export default app; ``` Now we have a basic authentication system that: 1. Provides a login endpoint at `/api/v1/auth/login` 2. Securely stores the username in a cookie 3. Includes middleware to protect authenticated routes ## 5. Create a Durable Object to manage interviews Now that you have your authentication system in place, create a Durable Object to manage interview sessions. Durable Objects are perfect for this interview practice tool because they provide the following functionalities: * Maintains states between connections, so users can reconnect without losing progress. * Provides a SQLite database to store all interview Q\&A, feedback and metrics. * Enables smooth real-time interactions between the interviewer AI and candidate. * Handles multiple interview sessions efficiently without performance issues. * Creates a dedicated instance for each user, giving them their own isolated environment. First, you will need to configure the Durable Object in Wrangler file. Add the following configuration: ```toml [[durable_objects.bindings]] name = "INTERVIEW" class_name = "Interview" [[migrations]] tag = "v1" new_sqlite_classes = ["Interview"] ``` Next, create a new file `interview.ts` to define our Interview Durable Object: ```typescript import { DurableObject } from "cloudflare:workers"; export class Interview extends DurableObject { // We will use it to keep track of all active WebSocket connections for real-time communication private sessions: Map; constructor(state: DurableObjectState, env: CloudflareBindings) { super(state, env); // Initialize empty sessions map - we will add WebSocket connections as users join this.sessions = new Map(); } // Entry point for all HTTP requests to this Durable Object // This will handle both initial setup and WebSocket upgrades async fetch(request: Request) { // For now, just confirm the object is working // We'll add WebSocket upgrade logic and request routing later return new Response("Interview object initialized"); } // Broadcasts a message to all connected WebSocket clients. private broadcast(message: string) { this.ctx.getWebSockets().forEach((ws) => { try { if (ws.readyState === WebSocket.OPEN) { ws.send(message); } } catch (error) { console.error( "Error broadcasting message to a WebSocket client:", error, ); } }); } } ``` Now we need to export the Durable Object in our main `src/index.ts` file: ```typescript import { Interview } from "./interview"; // ... previous code ... export { Interview }; export default app; ``` Since the Worker code is written in TypeScript, you should run the following command to add the necessary type definitions: ```sh npm run cf-typegen ``` ### Set up SQLite database schema to store interview data Now you will use SQLite at the Durable Object level for data persistence. This gives each user their own isolated database instance. You will need two main tables: * `interviews`: Stores interview session data * `messages`: Stores all messages exchanged during interviews Before you create these tables, create a service class to handle your database operations. This encapsulates database logic and helps you: * Manage database schema changes * Handle errors consistently * Keep database queries organized Create a new file called `services/InterviewDatabaseService.ts`: ```typescript import { InterviewData, Message, InterviewStatus, InterviewTitle, InterviewSkill, } from "../types"; import { InterviewError, ErrorCodes } from "../errors"; const CONFIG = { database: { tables: { interviews: "interviews", messages: "messages", }, indexes: { messagesByInterview: "idx_messages_interviewId", }, }, } as const; export class InterviewDatabaseService { constructor(private sql: SqlStorage) {} /** * Sets up the database schema by creating tables and indexes if they do not exist. * This is called when initializing a new Durable Object instance to ensure * we have the required database structure. * * The schema consists of: * - interviews table: Stores interview metadata like title, skills, and status * - messages table: Stores the conversation history between user and AI * - messages index: Helps optimize queries when fetching messages for a specific interview */ createTables() { try { // Get list of existing tables to avoid recreating them const cursor = this.sql.exec(`PRAGMA table_list`); const existingTables = new Set([...cursor].map((table) => table.name)); // The interviews table is our main table storing interview sessions. // We only create it if it does not exist yet. if (!existingTables.has(CONFIG.database.tables.interviews)) { this.sql.exec(InterviewDatabaseService.QUERIES.CREATE_INTERVIEWS_TABLE); } // The messages table stores the actual conversation history. // It references interviews table via foreign key for data integrity. if (!existingTables.has(CONFIG.database.tables.messages)) { this.sql.exec(InterviewDatabaseService.QUERIES.CREATE_MESSAGES_TABLE); } // Add an index on interviewId to speed up message retrieval. // This is important since we will frequently query messages by interview. this.sql.exec(InterviewDatabaseService.QUERIES.CREATE_MESSAGE_INDEX); } catch (error: unknown) { const message = error instanceof Error ? error.message : String(error); throw new InterviewError( `Failed to initialize database: ${message}`, ErrorCodes.DATABASE_ERROR, ); } } private static readonly QUERIES = { CREATE_INTERVIEWS_TABLE: ` CREATE TABLE IF NOT EXISTS interviews ( interviewId TEXT PRIMARY KEY, title TEXT NOT NULL, skills TEXT NOT NULL, createdAt INTEGER NOT NULL DEFAULT (strftime('%s','now') * 1000), updatedAt INTEGER NOT NULL DEFAULT (strftime('%s','now') * 1000), status TEXT NOT NULL DEFAULT 'pending' ) `, CREATE_MESSAGES_TABLE: ` CREATE TABLE IF NOT EXISTS messages ( messageId TEXT PRIMARY KEY, interviewId TEXT NOT NULL, role TEXT NOT NULL, content TEXT NOT NULL, timestamp INTEGER NOT NULL, FOREIGN KEY (interviewId) REFERENCES interviews(interviewId) ) `, CREATE_MESSAGE_INDEX: ` CREATE INDEX IF NOT EXISTS idx_messages_interview ON messages(interviewId) `, }; } ``` Update the `Interview` Durable Object to use the database service by modifying `src/interview.ts`: ```typescript import { InterviewDatabaseService } from "./services/InterviewDatabaseService"; export class Interview extends DurableObject { // Database service for persistent storage of interview data and messages private readonly db: InterviewDatabaseService; private sessions: Map; constructor(state: DurableObjectState, env: CloudflareBindings) { // ... previous code ... // Set up our database connection using the DO's built-in SQLite instance this.db = new InterviewDatabaseService(state.storage.sql); // First-time setup: ensure our database tables exist // This is idempotent so safe to call on every instantiation this.db.createTables(); } } ``` Add methods to create and retrieve interviews in `services/InterviewDatabaseService.ts`: ```typescript export class InterviewDatabaseService { /** * Creates a new interview session in the database. * * This is the main entry point for starting a new interview. It handles all the * initial setup like: * - Generating a unique ID using crypto.randomUUID() for reliable uniqueness * - Recording the interview title and required skills * - Setting up timestamps for tracking interview lifecycle * - Setting the initial status to "Created" * */ createInterview(title: InterviewTitle, skills: InterviewSkill[]): string { try { const interviewId = crypto.randomUUID(); const currentTime = Date.now(); this.sql.exec( InterviewDatabaseService.QUERIES.INSERT_INTERVIEW, interviewId, title, JSON.stringify(skills), // Store skills as JSON for flexibility InterviewStatus.Created, currentTime, currentTime, ); return interviewId; } catch (error: unknown) { const message = error instanceof Error ? error.message : String(error); throw new InterviewError( `Failed to create interview: ${message}`, ErrorCodes.DATABASE_ERROR, ); } } /** * Fetches all interviews from the database, ordered by creation date. * * This is useful for displaying interview history and letting users * resume previous sessions. We order by descending creation date since * users typically want to see their most recent interviews first. * * Returns an array of InterviewData objects with full interview details * including metadata and message history. */ getAllInterviews(): InterviewData[] { try { const cursor = this.sql.exec( InterviewDatabaseService.QUERIES.GET_ALL_INTERVIEWS, ); return [...cursor].map(this.parseInterviewRecord); } catch (error) { const message = error instanceof Error ? error.message : String(error); throw new InterviewError( `Failed to retrieve interviews: ${message}`, ErrorCodes.DATABASE_ERROR, ); } } // Retrieves an interview and its messages by ID getInterview(interviewId: string): InterviewData | null { try { const cursor = this.sql.exec( InterviewDatabaseService.QUERIES.GET_INTERVIEW, interviewId, ); const record = [...cursor][0]; if (!record) return null; return this.parseInterviewRecord(record); } catch (error: unknown) { const message = error instanceof Error ? error.message : String(error); throw new InterviewError( `Failed to retrieve interview: ${message}`, ErrorCodes.DATABASE_ERROR, ); } } addMessage( interviewId: string, role: Message["role"], content: string, messageId: string, ): Message { try { const timestamp = Date.now(); this.sql.exec( InterviewDatabaseService.QUERIES.INSERT_MESSAGE, messageId, interviewId, role, content, timestamp, ); return { messageId, interviewId, role, content, timestamp, }; } catch (error: unknown) { const message = error instanceof Error ? error.message : String(error); throw new InterviewError( `Failed to add message: ${message}`, ErrorCodes.DATABASE_ERROR, ); } } /** * Transforms raw database records into structured InterviewData objects. * * This helper does the heavy lifting of: * - Type checking critical fields to catch database corruption early * - Converting stored JSON strings back into proper objects * - Filtering out any null messages that might have snuck in * - Ensuring timestamps are proper numbers * * If any required data is missing or malformed, it throws an error * rather than returning partially valid data that could cause issues * downstream. */ private parseInterviewRecord(record: any): InterviewData { const interviewId = record.interviewId as string; const createdAt = Number(record.createdAt); const updatedAt = Number(record.updatedAt); if (!interviewId || !createdAt || !updatedAt) { throw new InterviewError( "Invalid interview data in database", ErrorCodes.DATABASE_ERROR, ); } return { interviewId, title: record.title as InterviewTitle, skills: JSON.parse(record.skills as string) as InterviewSkill[], messages: record.messages ? JSON.parse(record.messages) .filter((m: any) => m !== null) .map((m: any) => ({ messageId: m.messageId, role: m.role, content: m.content, timestamp: m.timestamp, })) : [], status: record.status as InterviewStatus, createdAt, updatedAt, }; } // Add these SQL queries to the QUERIES object private static readonly QUERIES = { // ... previous queries ... INSERT_INTERVIEW: ` INSERT INTO ${CONFIG.database.tables.interviews} (interviewId, title, skills, status, createdAt, updatedAt) VALUES (?, ?, ?, ?, ?, ?) `, GET_ALL_INTERVIEWS: ` SELECT interviewId, title, skills, createdAt, updatedAt, status FROM ${CONFIG.database.tables.interviews} ORDER BY createdAt DESC `, INSERT_MESSAGE: ` INSERT INTO ${CONFIG.database.tables.messages} (messageId, interviewId, role, content, timestamp) VALUES (?, ?, ?, ?, ?) `, GET_INTERVIEW: ` SELECT i.interviewId, i.title, i.skills, i.status, i.createdAt, i.updatedAt, COALESCE( json_group_array( CASE WHEN m.messageId IS NOT NULL THEN json_object( 'messageId', m.messageId, 'role', m.role, 'content', m.content, 'timestamp', m.timestamp ) END ), '[]' ) as messages FROM ${CONFIG.database.tables.interviews} i LEFT JOIN ${CONFIG.database.tables.messages} m ON i.interviewId = m.interviewId WHERE i.interviewId = ? GROUP BY i.interviewId `, }; } ``` Add RPC methods to the `Interview` Durable Object to expose database operations through API. Add this code to `src/interview.ts`: ```typescript import { InterviewData, InterviewTitle, InterviewSkill, Message, } from "./types"; export class Interview extends DurableObject { // Creates a new interview session createInterview(title: InterviewTitle, skills: InterviewSkill[]): string { return this.db.createInterview(title, skills); } // Retrieves all interview sessions getAllInterviews(): InterviewData[] { return this.db.getAllInterviews(); } // Adds a new message to the 'messages' table and broadcasts it to all connected WebSocket clients. addMessage( interviewId: string, role: "user" | "assistant", content: string, messageId: string, ): Message { const newMessage = this.db.addMessage( interviewId, role, content, messageId, ); this.broadcast( JSON.stringify({ ...newMessage, type: "message", }), ); return newMessage; } } ``` ## 6. Create REST API endpoints With your Durable Object and database service ready, create REST API endpoints to manage interviews. You will need endpoints to: * Create new interviews * Retrieve all interviews for a user Create a new file for your interview routes at `routes/interview.ts`: ```typescript import { Hono } from "hono"; import { BadRequestError } from "../errors"; import { InterviewInput, ApiContext, HonoCtx, InterviewTitle, InterviewSkill, } from "../types"; import { requireAuth } from "../middleware/auth"; /** * Gets the Interview Durable Object instance for a given user. * We use the username as a stable identifier to ensure each user * gets their own dedicated DO instance that persists across requests. */ const getInterviewDO = (ctx: HonoCtx) => { const username = ctx.get("username"); const id = ctx.env.INTERVIEW.idFromName(username); return ctx.env.INTERVIEW.get(id); }; /** * Validates the interview creation payload. * Makes sure we have all required fields in the correct format: * - title must be present * - skills must be a non-empty array * Throws an error if validation fails. */ const validateInterviewInput = (input: InterviewInput) => { if ( !input.title || !input.skills || !Array.isArray(input.skills) || input.skills.length === 0 ) { throw new BadRequestError("Invalid input"); } }; /** * GET /interviews * Retrieves all interviews for the authenticated user. * The interviews are stored and managed by the user's DO instance. */ const getAllInterviews = async (ctx: HonoCtx) => { const interviewDO = getInterviewDO(ctx); const interviews = await interviewDO.getAllInterviews(); return ctx.json(interviews); }; /** * POST /interviews * Creates a new interview session with the specified title and skills. * Each interview gets a unique ID that can be used to reference it later. * Returns the newly created interview ID on success. */ const createInterview = async (ctx: HonoCtx) => { const body = await ctx.req.json(); validateInterviewInput(body); const interviewDO = getInterviewDO(ctx); const interviewId = await interviewDO.createInterview( body.title as InterviewTitle, body.skills as InterviewSkill[], ); return ctx.json({ success: true, interviewId }); }; /** * Sets up all interview-related routes. * Currently supports: * - GET / : List all interviews * - POST / : Create a new interview */ export const configureInterviewRoutes = () => { const router = new Hono(); router.use("*", requireAuth); router.get("/", getAllInterviews); router.post("/", createInterview); return router; }; ``` The `getInterviewDO` helper function uses the username from our authentication cookie to create a unique Durable Object ID. This ensures each user has their own isolated interview state. Update your main application file to include the routes and protect them with authentication middleware. Update `src/index.ts`: ```typescript import { configureAuthRoutes } from "./routes/auth"; import { configureInterviewRoutes } from "./routes/interview"; import { Hono } from "hono"; import { Interview } from "./interview"; import { logger } from "hono/logger"; import type { ApiContext } from "./types"; const app = new Hono(); const api = new Hono(); app.use("*", logger()); api.route("/auth", configureAuthRoutes()); api.route("/interviews", configureInterviewRoutes()); app.route("/api/v1", api); export { Interview }; export default app; ``` Now you have two new API endpoints: * `POST /api/v1/interviews`: Creates a new interview session * `GET /api/v1/interviews`: Retrieves all interviews for the authenticated user You can test these endpoints running the following command: 1. Create a new interview: ```sh curl -X POST http://localhost:8787/api/v1/interviews \ -H "Content-Type: application/json" \ -H "Cookie: username=testuser; HttpOnly" \ -d '{"title":"Frontend Developer Interview","skills":["JavaScript","React","CSS"]}' ``` 1. Get all interviews: ```sh curl http://localhost:8787/api/v1/interviews \ -H "Cookie: username=testuser; HttpOnly" ``` ## 7. Set up WebSockets to handle real-time communication With the basic interview management system in place, you will now implement Durable Objects to handle real-time message processing and maintain WebSocket connections. Update the `Interview` Durable Object to handle WebSocket connections by adding the following code to `src/interview.ts`: ```typescript export class Interview extends DurableObject { // Services for database operations and managing WebSocket sessions private readonly db: InterviewDatabaseService; private sessions: Map; constructor(state: DurableObjectState, env: CloudflareBindings) { // ... previous code ... // Keep WebSocket connections alive by automatically responding to pings // This prevents timeouts and connection drops this.ctx.setWebSocketAutoResponse( new WebSocketRequestResponsePair("ping", "pong"), ); } async fetch(request: Request): Promise { // Check if this is a WebSocket upgrade request const upgradeHeader = request.headers.get("Upgrade"); if (upgradeHeader?.toLowerCase().includes("websocket")) { return this.handleWebSocketUpgrade(request); } // If it is not a WebSocket request, we don't handle it return new Response("Not found", { status: 404 }); } private async handleWebSocketUpgrade(request: Request): Promise { // Extract the interview ID from the URL - it should be the last segment const url = new URL(request.url); const interviewId = url.pathname.split("/").pop(); if (!interviewId) { return new Response("Missing interviewId parameter", { status: 400 }); } // Create a new WebSocket connection pair - one for the client, one for the server const pair = new WebSocketPair(); const [client, server] = Object.values(pair); // Keep track of which interview this WebSocket is connected to // This is important for routing messages to the right interview session this.sessions.set(server, { interviewId }); // Tell the Durable Object to start handling this WebSocket this.ctx.acceptWebSocket(server); // Send the current interview state to the client right away // This helps initialize their UI with the latest data const interviewData = await this.db.getInterview(interviewId); if (interviewData) { server.send( JSON.stringify({ type: "interview_details", data: interviewData, }), ); } // Return the client WebSocket as part of the upgrade response return new Response(null, { status: 101, webSocket: client, }); } async webSocketClose( ws: WebSocket, code: number, reason: string, wasClean: boolean, ) { // Clean up when a connection closes to prevent memory leaks // This is especially important in long-running Durable Objects console.log( `WebSocket closed: Code ${code}, Reason: ${reason}, Clean: ${wasClean}`, ); } } ``` Next, update the interview routes to include a WebSocket endpoint. Add the following to `routes/interview.ts`: ```typescript // ... previous code ... const streamInterviewProcess = async (ctx: HonoCtx) => { const interviewDO = getInterviewDO(ctx); return await interviewDO.fetch(ctx.req.raw); }; export const configureInterviewRoutes = () => { const router = new Hono(); router.get("/", getAllInterviews); router.post("/", createInterview); // Add WebSocket route router.get("/:interviewId", streamInterviewProcess); return router; }; ``` The WebSocket system provides real-time communication features for interview practice tool: * Each interview session gets its own dedicated WebSocket connection, allowing seamless communication between the candidate and AI interviewer * The Durable Object maintains the connection state, ensuring no messages are lost even if the client temporarily disconnects * To keep connections stable, it automatically responds to ping messages with pongs, preventing timeouts * Candidates and interviewers receive instant updates as the interview progresses, creating a natural conversational flow ## 8. Add audio processing capabilities with Workers AI Now that WebSocket connection set up, the next step is to add speech-to-text capabilities using Workers AI. Let's use Cloudflare's Whisper model to transcribe audio in real-time during the interview. The audio processing pipeline will work like this: 1. Client sends audio through the WebSocket connection 2. Our Durable Object receives the binary audio data 3. We pass the audio to Whisper for transcription 4. The transcribed text is saved as a new message 5. We immediately send the transcription back to the client 6. The client receives a notification that the AI interviewer is generating a response ### Create audio processing pipeline In this step you will update the Interview Durable Object to handle the following: 1. Detect binary audio data sent through WebSocket 2. Create a unique message ID for tracking the processing status 3. Notify clients that audio processing has begun 4. Include error handling for failed audio processing 5. Broadcast status updates to all connected clients First, update Interview Durable Object to handle binary WebSocket messages. Add the following methods to your `src/interview.ts` file: ```typescript // ... previous code ... /** * Handles incoming WebSocket messages, both binary audio data and text messages. * This is the main entry point for all WebSocket communication. */ async webSocketMessage(ws: WebSocket, eventData: ArrayBuffer | string): Promise { try { // Handle binary audio data from the client's microphone if (eventData instanceof ArrayBuffer) { await this.handleBinaryAudio(ws, eventData); return; } // Text messages will be handled by other methods } catch (error) { this.handleWebSocketError(ws, error); } } /** * Processes binary audio data received from the client. * Converts audio to text using Whisper and broadcasts processing status. */ private async handleBinaryAudio(ws: WebSocket, audioData: ArrayBuffer): Promise { try { const uint8Array = new Uint8Array(audioData); // Retrieve the associated interview session const session = this.sessions.get(ws); if (!session?.interviewId) { throw new Error("No interview session found"); } // Generate unique ID to track this message through the system const messageId = crypto.randomUUID(); // Let the client know we're processing their audio this.broadcast( JSON.stringify({ type: "message", status: "processing", role: "user", messageId, interviewId: session.interviewId, }), ); // TODO: Implement Whisper transcription in next section // For now, just log the received audio data size console.log(`Received audio data of length: ${uint8Array.length}`); } catch (error) { console.error("Audio processing failed:", error); this.handleWebSocketError(ws, error); } } /** * Handles WebSocket errors by logging them and notifying the client. * Ensures errors are properly communicated back to the user. */ private handleWebSocketError(ws: WebSocket, error: unknown): void { const errorMessage = error instanceof Error ? error.message : "An unknown error occurred."; console.error("WebSocket error:", errorMessage); if (ws.readyState === WebSocket.OPEN) { ws.send( JSON.stringify({ type: "error", message: errorMessage, }), ); } } ``` Your `handleBinaryAudio` method currently logs when it receives audio data. Next, you'll enhance it to transcribe speech using Workers AI's Whisper model. ### Configure speech-to-text Now that audio processing pipeline is set up, you will now integrate Workers AI's Whisper model for speech-to-text transcription. Configure the Worker AI binding in your Wrangler file by adding: ```toml # ... previous configuration ... [ai] binding = "AI" ``` Next, generate TypeScript types for our AI binding. Run the following command: ```sh npm run cf-typegen ``` You will need a new service class for AI operations. Create a new file called `services/AIService.ts`: ```typescript import { InterviewError, ErrorCodes } from "../errors"; export class AIService { constructor(private readonly AI: Ai) {} async transcribeAudio(audioData: Uint8Array): Promise { try { // Call the Whisper model to transcribe the audio const response = await this.AI.run("@cf/openai/whisper-tiny-en", { audio: Array.from(audioData), }); if (!response?.text) { throw new Error("Failed to transcribe audio content."); } return response.text; } catch (error) { throw new InterviewError( "Failed to transcribe audio content", ErrorCodes.TRANSCRIPTION_FAILED, ); } } } ``` You will need to update the `Interview` Durable Object to use this new AI service. To do this, update the handleBinaryAudio method in `src/interview.ts`: ```typescript import { AIService } from "./services/AIService"; export class Interview extends DurableObject { private readonly aiService: AIService; constructor(state: DurableObjectState, env: Env) { // ... previous code ... // Initialize the AI service with the Workers AI binding this.aiService = new AIService(this.env.AI); } private async handleBinaryAudio(ws: WebSocket, audioData: ArrayBuffer): Promise { try { const uint8Array = new Uint8Array(audioData); const session = this.sessions.get(ws); if (!session?.interviewId) { throw new Error("No interview session found"); } // Create a message ID for tracking const messageId = crypto.randomUUID(); // Send processing state to client this.broadcast( JSON.stringify({ type: "message", status: "processing", role: "user", messageId, interviewId: session.interviewId, }), ); // NEW: Use AI service to transcribe the audio const transcribedText = await this.aiService.transcribeAudio(uint8Array); // Store the transcribed message await this.addMessage(session.interviewId, "user", transcribedText, messageId); } catch (error) { console.error("Audio processing failed:", error); this.handleWebSocketError(ws, error); } } ``` Note The Whisper model `@cf/openai/whisper-tiny-en` is optimized for English speech recognition. If you need support for other languages, you can use different Whisper model variants available through Workers AI. When users speak during the interview, their audio will be automatically transcribed and stored as messages in the interview session. The transcribed text will be immediately available to both the user and the AI interviewer for generating appropriate responses. ## 9. Integrate AI response generation Now that you have audio transcription working, let's implement AI interviewer response generation using Workers AI's LLM capabilities. You'll create an interview system that: * Maintains context of the conversation * Provides relevant follow-up questions * Gives constructive feedback * Stays in character as a professional interviewer ### Set up Workers AI LLM integration First, update the `AIService` class to handle LLM interactions. You will need to add methods for: * Processing interview context * Generating appropriate responses * Handling conversation flow Update the `services/AIService.ts` class to include LLM functionality: ```typescript import { InterviewData, Message } from "../types"; export class AIService { async processLLMResponse(interview: InterviewData): Promise { const messages = this.prepareLLMMessages(interview); try { const { response } = await this.AI.run("@cf/meta/llama-2-7b-chat-int8", { messages, }); if (!response) { throw new Error("Failed to generate a response from the LLM model."); } return response; } catch (error) { throw new InterviewError("Failed to generate a response from the LLM model.", ErrorCodes.LLM_FAILED); } } private prepareLLMMessages(interview: InterviewData) { const messageHistory = interview.messages.map((msg: Message) => ({ role: msg.role, content: msg.content, })); return [ { role: "system", content: this.createSystemPrompt(interview), }, ...messageHistory, ]; } ``` Note The @cf/meta/llama-2-7b-chat-int8 model is optimized for chat-like interactions and provides good performance while maintaining reasonable resource usage. ### Create the conversation prompt Prompt engineering is crucial for getting high-quality responses from the LLM. Next, you will create a system prompt that: * Sets the context for the interview * Defines the interviewer's role and behavior * Specifies the technical focus areas * Guides the conversation flow Add the following method to your `services/AIService.ts` class: ```typescript private createSystemPrompt(interview: InterviewData): string { const basePrompt = "You are conducting a technical interview."; const rolePrompt = `The position is for ${interview.title}.`; const skillsPrompt = `Focus on topics related to: ${interview.skills.join(", ")}.`; const instructionsPrompt = "Ask relevant technical questions and provide constructive feedback."; return `${basePrompt} ${rolePrompt} ${skillsPrompt} ${instructionsPrompt}`; } ``` ### Implement response generation logic Finally, integrate the LLM response generation into the interview flow. Update the `handleBinaryAudio` method in the `src/interview.ts` Durable Object to: * Process transcribed user responses * Generate appropriate AI interviewer responses * Maintain conversation context Update the `handleBinaryAudio` method in `src/interview.ts`: ```typescript private async handleBinaryAudio(ws: WebSocket, audioData: ArrayBuffer): Promise { try { // Convert raw audio buffer to uint8 array for processing const uint8Array = new Uint8Array(audioData); const session = this.sessions.get(ws); if (!session?.interviewId) { throw new Error("No interview session found"); } // Generate a unique ID to track this message through the system const messageId = crypto.randomUUID(); // Let the client know we're processing their audio // This helps provide immediate feedback while transcription runs this.broadcast( JSON.stringify({ type: "message", status: "processing", role: "user", messageId, interviewId: session.interviewId, }), ); // Convert the audio to text using our AI transcription service // This typically takes 1-2 seconds for normal speech const transcribedText = await this.aiService.transcribeAudio(uint8Array); // Save the user's message to our database so we maintain chat history await this.addMessage(session.interviewId, "user", transcribedText, messageId); // Look up the full interview context - we need this to generate a good response const interview = await this.db.getInterview(session.interviewId); if (!interview) { throw new Error(`Interview not found: ${session.interviewId}`); } // Now it's the AI's turn to respond // First generate an ID for the assistant's message const assistantMessageId = crypto.randomUUID(); // Let the client know we're working on the AI response this.broadcast( JSON.stringify({ type: "message", status: "processing", role: "assistant", messageId: assistantMessageId, interviewId: session.interviewId, }), ); // Generate the AI interviewer's response based on the conversation history const llmResponse = await this.aiService.processLLMResponse(interview); await this.addMessage(session.interviewId, "assistant", llmResponse, assistantMessageId); } catch (error) { // Something went wrong processing the audio or generating a response // Log it and let the client know there was an error console.error("Audio processing failed:", error); this.handleWebSocketError(ws, error); } } ``` ## Conclusion You have successfully built an AI-powered interview practice tool using Cloudflare's Workers AI. In summary, you have: * Created a real-time WebSocket communication system using Durable Objects * Implemented speech-to-text processing with Workers AI Whisper model * Built an intelligent interview system using Workers AI LLM capabilities * Designed a persistent storage system with SQLite in Durable Objects The complete source code for this tutorial is available on GitHub: [ai-interview-practice-tool](https://github.com/berezovyy/ai-interview-practice-tool) --- title: Explore Code Generation Using DeepSeek Coder Models · Cloudflare Workers AI docs description: Explore how you can use AI models to generate code and work more efficiently. lastUpdated: 2025-04-03T16:21:18.000Z chatbotDeprioritize: false tags: AI source_url: html: https://developers.cloudflare.com/workers-ai/guides/tutorials/explore-code-generation-using-deepseek-coder-models/ md: https://developers.cloudflare.com/workers-ai/guides/tutorials/explore-code-generation-using-deepseek-coder-models/index.md --- A handy way to explore all of the models available on [Workers AI](https://developers.cloudflare.com/workers-ai) is to use a [Jupyter Notebook](https://jupyter.org/). You can [download the DeepSeek Coder notebook](https://developers.cloudflare.com/workers-ai/static/documentation/notebooks/deepseek-coder-exploration.ipynb) or view the embedded notebook below. *** ## Exploring Code Generation Using DeepSeek Coder AI Models being able to generate code unlocks all sorts of use cases. The [DeepSeek Coder](https://github.com/deepseek-ai/DeepSeek-Coder) models `@hf/thebloke/deepseek-coder-6.7b-base-awq` and `@hf/thebloke/deepseek-coder-6.7b-instruct-awq` are now available on [Workers AI](https://developers.cloudflare.com/workers-ai). Let's explore them using the API! ```python import sys !{sys.executable} -m pip install requests python-dotenv ``` ```plaintext Requirement already satisfied: requests in ./venv/lib/python3.12/site-packages (2.31.0) Requirement already satisfied: python-dotenv in ./venv/lib/python3.12/site-packages (1.0.1) Requirement already satisfied: charset-normalizer<4,>=2 in ./venv/lib/python3.12/site-packages (from requests) (3.3.2) Requirement already satisfied: idna<4,>=2.5 in ./venv/lib/python3.12/site-packages (from requests) (3.6) Requirement already satisfied: urllib3<3,>=1.21.1 in ./venv/lib/python3.12/site-packages (from requests) (2.1.0) Requirement already satisfied: certifi>=2017.4.17 in ./venv/lib/python3.12/site-packages (from requests) (2023.11.17) ``` ```python import os from getpass import getpass from IPython.display import display, Image, Markdown, Audio import requests ``` ```python %load_ext dotenv %dotenv ``` ### Configuring your environment To use the API you'll need your [Cloudflare Account ID](https://dash.cloudflare.com) (head to Workers & Pages > Overview > Account details > Account ID) and a [Workers AI enabled API Token](https://dash.cloudflare.com/profile/api-tokens). If you want to add these files to your environment, you can create a new file named `.env` ```bash CLOUDFLARE_API_TOKEN="YOUR-TOKEN" CLOUDFLARE_ACCOUNT_ID="YOUR-ACCOUNT-ID" ``` ```python if "CLOUDFLARE_API_TOKEN" in os.environ: api_token = os.environ["CLOUDFLARE_API_TOKEN"] else: api_token = getpass("Enter you Cloudflare API Token") ``` ```python if "CLOUDFLARE_ACCOUNT_ID" in os.environ: account_id = os.environ["CLOUDFLARE_ACCOUNT_ID"] else: account_id = getpass("Enter your account id") ``` ### Generate code from a comment A common use case is to complete the code for the user after they provide a descriptive comment. ````python model = "@hf/thebloke/deepseek-coder-6.7b-base-awq" prompt = "# A function that checks if a given word is a palindrome" response = requests.post( f"https://api.cloudflare.com/client/v4/accounts/{account_id}/ai/run/{model}", headers={"Authorization": f"Bearer {api_token}"}, json={"messages": [ {"role": "user", "content": prompt} ]} ) inference = response.json() code = inference["result"]["response"] display(Markdown(f""" ```python {prompt} {code.strip()} ``` """)) ```` ```python # A function that checks if a given word is a palindrome def is_palindrome(word): # Convert the word to lowercase word = word.lower() # Reverse the word reversed_word = word[::-1] # Check if the reversed word is the same as the original word if word == reversed_word: return True else: return False # Test the function print(is_palindrome("racecar")) # Output: True print(is_palindrome("hello")) # Output: False ``` ### Assist in debugging We've all been there, bugs happen. Sometimes those stacktraces can be very intimidating, and a great use case of using Code Generation is to assist in explaining the problem. ```python model = "@hf/thebloke/deepseek-coder-6.7b-instruct-awq" system_message = "The user is going to give you code that isn't working. Explain to the user what might be wrong" code = """# Welcomes our user def hello_world(first_name="World"): print(f"Hello, {name}!") """ response = requests.post( f"https://api.cloudflare.com/client/v4/accounts/{account_id}/ai/run/{model}", headers={"Authorization": f"Bearer {api_token}"}, json={"messages": [ {"role": "system", "content": system_message}, {"role": "user", "content": code}, ]} ) inference = response.json() response = inference["result"]["response"] display(Markdown(response)) ``` The error in your code is that you are trying to use a variable `name` which is not defined anywhere in your function. The correct variable to use is `first_name`. So, you should change `f"Hello, {name}!"` to `f"Hello, {first_name}!"`. Here is the corrected code: ```python # Welcomes our user def hello_world(first_name="World"): print(f"Hello, {first_name}") ``` Now, when you call `hello_world()`, it will print "Hello, World" by default. If you call `hello_world("John")`, it will print "Hello, John". ### Write tests! Writing unit tests is a common best practice. With the enough context, it's possible to write unit tests. ```python model = "@hf/thebloke/deepseek-coder-6.7b-instruct-awq" system_message = "The user is going to give you code and would like to have tests written in the Python unittest module." code = """ class User: def __init__(self, first_name, last_name=None): self.first_name = first_name self.last_name = last_name if last_name is None: self.last_name = "Mc" + self.first_name def full_name(self): return self.first_name + " " + self.last_name """ response = requests.post( f"https://api.cloudflare.com/client/v4/accounts/{account_id}/ai/run/{model}", headers={"Authorization": f"Bearer {api_token}"}, json={"messages": [ {"role": "system", "content": system_message}, {"role": "user", "content": code}, ]} ) inference = response.json() response = inference["result"]["response"] display(Markdown(response)) ``` Here is a simple unittest test case for the User class: ```python import unittest class TestUser(unittest.TestCase): def test_full_name(self): user = User("John", "Doe") self.assertEqual(user.full_name(), "John Doe") def test_default_last_name(self): user = User("Jane") self.assertEqual(user.full_name(), "Jane McJane") if __name__ == '__main__': unittest.main() ``` In this test case, we have two tests: * `test_full_name` tests the `full_name` method when the user has both a first name and a last name. * `test_default_last_name` tests the `full_name` method when the user only has a first name and the last name is set to "Mc" + first name. If all these tests pass, it means that the `full_name` method is working as expected. If any of these tests fail, it ### Fill-in-the-middle Code Completion A common use case in Developer Tools is to autocomplete based on context. DeepSeek Coder provides the ability to submit existing code with a placeholder, so that the model can complete in context. Warning: The tokens are prefixed with `<|` and suffixed with `|>` make sure to copy and paste them. ````python model = "@hf/thebloke/deepseek-coder-6.7b-base-awq" code = """ <|fim▁begin|>import re from jklol import email_service def send_email(email_address, body): <|fim▁hole|> if not is_valid_email: raise InvalidEmailAddress(email_address) return email_service.send(email_address, body)<|fim▁end|> """ response = requests.post( f"https://api.cloudflare.com/client/v4/accounts/{account_id}/ai/run/{model}", headers={"Authorization": f"Bearer {api_token}"}, json={"messages": [ {"role": "user", "content": code} ]} ) inference = response.json() response = inference["result"]["response"] display(Markdown(f""" ```python {response.strip()} ``` """)) ```` ```python is_valid_email = re.match(r"[^@]+@[^@]+\.[^@]+", email_address) ``` ### Experimental: Extract data into JSON No need to threaten the model or bring grandma into the prompt. Get back JSON in the format you want. ````python model = "@hf/thebloke/deepseek-coder-6.7b-instruct-awq" # Learn more at https://json-schema.org/ json_schema = """ { "title": "User", "description": "A user from our example app", "type": "object", "properties": { "firstName": { "description": "The user's first name", "type": "string" }, "lastName": { "description": "The user's last name", "type": "string" }, "numKids": { "description": "Amount of children the user has currently", "type": "integer" }, "interests": { "description": "A list of what the user has shown interest in", "type": "array", "items": { "type": "string" } }, }, "required": [ "firstName" ] } """ system_prompt = f""" The user is going to discuss themselves and you should create a JSON object from their description to match the json schema below. {json_schema} Return JSON only. Do not explain or provide usage examples. """ prompt = """Hey there, I'm Craig Dennis and I'm a Developer Educator at Cloudflare. My email is craig@cloudflare.com. I am very interested in AI. I've got two kids. I love tacos, burritos, and all things Cloudflare""" response = requests.post( f"https://api.cloudflare.com/client/v4/accounts/{account_id}/ai/run/{model}", headers={"Authorization": f"Bearer {api_token}"}, json={"messages": [ {"role": "system", "content": system_prompt}, {"role": "user", "content": prompt} ]} ) inference = response.json() response = inference["result"]["response"] display(Markdown(f""" ```json {response.strip()} ``` """)) ```` ```json { "firstName": "Craig", "lastName": "Dennis", "numKids": 2, "interests": ["AI", "Cloudflare", "Tacos", "Burritos"] } ``` --- title: Fine Tune Models With AutoTrain from HuggingFace · Cloudflare Workers AI docs description: Fine-tuning AI models with LoRA adapters on Workers AI allows adding custom training data, like for LLM finetuning. lastUpdated: 2025-07-11T16:03:39.000Z chatbotDeprioritize: false tags: AI source_url: html: https://developers.cloudflare.com/workers-ai/guides/tutorials/fine-tune-models-with-autotrain/ md: https://developers.cloudflare.com/workers-ai/guides/tutorials/fine-tune-models-with-autotrain/index.md --- Fine tuning an AI model gives you the opportunity to add additional training data to the model. Workers AI allows for [Low-Rank Adaptation, LoRA, adapters](https://developers.cloudflare.com/workers-ai/features/fine-tunes/loras/) that will allow you to finetune our models. In this tutorial, we will explore how to create our own LoRAs. We will focus on [LLM Finetuning using AutoTrain](https://huggingface.co/docs/autotrain/llm_finetuning). ## 1. Create a CSV file with your training data Start by creating a CSV, Comma Separated Values, file. This file will only have one column named `text`. Set the header by adding the word `text` on a line by itself. Now you need to figure out what you want to add to your model. Example formats are below: ```text ### Human: What is the meaning of life? ### Assistant: 42. ``` If your training row contains newlines, you should wrap it with quotes. ```text "human: What is the meaning of life? \n bot: 42." ``` Different models, like Mistral, will provide a specific [chat template/instruction format](https://huggingface.co/mistralai/Mistral-7B-Instruct-v0.1#instruction-format) ```text [INST] What is the meaning of life? [/INST] 42 ``` ## 2. Configure the HuggingFace Autotrain Advanced Notebook Open the [HuggingFace Autotrain Advanced Notebook](https://colab.research.google.com/github/huggingface/autotrain-advanced/blob/main/colabs/AutoTrain_LLM.ipynb) In order to give your AutoTrain ample memory, you will need to need to choose a different Runtime. From the menu at the top of the Notebook choose Runtime > Change Runtime Type. Choose A100. Note These GPUs will cost money. A typical AutoTrain session typically costs less than $1 USD. The notebook contains a few interactive sections that we will need to change. ### Project Config Modify the following fields * **project\_name**: Choose a descriptive name for you to remember later * **model\_name**: Choose from the one of the official HuggingFace base models that we support: * `mistralai/Mistral-7B-Instruct-v0.2` * `google/gemma-2b-it` * `google/gemma-7b-it` * `meta-llama/llama-2-7b-chat-hf` ### Optional Section: Push to Hub Although not required to use AutoTrain, creating a [HuggingFace account](https://huggingface.co/join) will help you keep your finetune artifacts in a handy repository for you to refer to later. If you do not perform the HuggingFace setup you can still download your files from the Notebook. Follow the instructions [in the notebook](https://colab.research.google.com/github/huggingface/autotrain-advanced/blob/main/colabs/AutoTrain_LLM.ipynb) to create an account and token if necessary. ### Section: Hyperparameters We only need to change a few of these fields to ensure things work on Cloudflare Workers AI. * **quantization**: Change the drop down to `none` * **lora-r**: Change the value to `8` Warning At the time of this writing, changing the quantization field breaks the code generation. You may need to edit the code and put quotes around the value. Change the line that says `quantization = none` to `quantization = "none"`. ## 3. Upload your CSV file to the Notebook Notebooks have a folder structure which you can access by clicking the folder icon on the left hand navigation bar. Create a folder named data. You can drag your CSV file into the notebook. Ensure that it is named **train.csv** ## 4. Execute the Notebook In the Notebook menu, choose Runtime > Run All. It will run through each cell of the notebook, first doing installations, then configuring and running your AutoTrain session. This might take some time depending on the size of your train.csv file. If you encounter the following error, it is caused by an Out of Memory error. You might want to change your runtime to a bigger GPU backend. ```bash subprocess.CalledProcessError: Command '['/usr/bin/python3', '-m', 'autotrain.trainers.clm', '--training_config', 'blog-instruct/training_params.json']' died with . ``` ## 5. Download The LoRA ### Optional: HuggingFace If you pushed to HuggingFace you will find your new model card that you named in **project\_name** above. Your model card is private by default. Navigate to the files and download the files listed below. ### Notebook In your Notebook you can also find the needed files. A new folder that matches your **project\_name** will be there. Download the following files: * `adapter_model.safetensors` * `adapter_config.json` ## 6. Update Adapter Config You need to add one line to your `adapter_config.json` that you downloaded. `"model_type": "mistral"` Where `model_type` is the architecture. Current valid values are `mistral`, `gemma`, and `llama`. ## 7. Upload the Fine Tune to your Cloudflare Account Now that you have your files, you can add them to your account. You can either use the [REST API or Wrangler](https://developers.cloudflare.com/workers-ai/features/fine-tunes/loras/). ## 8. Use your Fine Tune in your Generations After you have your new fine tune all set up, you are ready to [put it to use in your inference requests](https://developers.cloudflare.com/workers-ai/features/fine-tunes/loras/#running-inference-with-loras). --- title: Explore Workers AI Models Using a Jupyter Notebook · Cloudflare Workers AI docs description: This Jupyter notebook explores various models (including Whisper, Distilled BERT, LLaVA, and Meta Llama 3) using Python and the requests library. lastUpdated: 2025-04-03T16:21:18.000Z chatbotDeprioritize: false tags: AI source_url: html: https://developers.cloudflare.com/workers-ai/guides/tutorials/explore-workers-ai-models-using-a-jupyter-notebook/ md: https://developers.cloudflare.com/workers-ai/guides/tutorials/explore-workers-ai-models-using-a-jupyter-notebook/index.md --- A handy way to explore all of the models available on [Workers AI](https://developers.cloudflare.com/workers-ai) is to use a [Jupyter Notebook](https://jupyter.org/). You can [download the Workers AI notebook](https://developers.cloudflare.com/workers-ai-notebooks/cloudflare-workers-ai.ipynb) or view the embedded notebook below. Or you can run this on [Google Colab](https://colab.research.google.com/github/craigsdennis/notebooks-cloudflare-workers-ai/blob/main/cloudflare-workers-ai.ipynb) *** ## Explore the Workers AI API using Python [Workers AI](https://developers.cloudflare.com/workers-ai) allows you to run machine learning models, on the Cloudflare network, from your own code – whether that be from Workers, Pages, or anywhere via REST API. This notebook will explore the Workers AI REST API using the [official Python SDK](https://github.com/cloudflare/cloudflare-python). ```python import os from getpass import getpass from cloudflare import Cloudflare from IPython.display import display, Image, Markdown, Audio import requests ``` ```python %load_ext dotenv %dotenv ``` ### Configuring your environment To use the API you'll need your [Cloudflare Account ID](https://dash.cloudflare.com). Head to AI > Workers AI page and press the "Use REST API". This page will let you create a new API Token and copy your Account ID. If you want to add these values to your environment variables, you can **create a new file** named `.env` and this notebook will read those values. ```bash CLOUDFLARE_API_TOKEN="YOUR-TOKEN" CLOUDFLARE_ACCOUNT_ID="YOUR-ACCOUNT-ID" ``` Otherwise you can just enter the values securely when prompted below. ```python if "CLOUDFLARE_API_TOKEN" in os.environ: api_token = os.environ["CLOUDFLARE_API_TOKEN"] else: api_token = getpass("Enter you Cloudflare API Token") ``` ```python if "CLOUDFLARE_ACCOUNT_ID" in os.environ: account_id = os.environ["CLOUDFLARE_ACCOUNT_ID"] else: account_id = getpass("Enter your account id") ``` ```python # Initialize client client = Cloudflare(api_token=api_token) ``` ## Explore tasks available on the Workers AI Platform ### Text Generation Explore all [Text Generation Models](https://developers.cloudflare.com/workers-ai/models) ```python result = client.workers.ai.run( "@cf/meta/llama-3-8b-instruct" , account_id=account_id, messages=[ {"role": "system", "content": """ You are a productivity assistant for users of Jupyter notebooks for both Mac and Windows users. Respond in Markdown.""" }, {"role": "user", "content": "How do I use keyboard shortcuts to execute cells?"} ] ) display(Markdown(result["response"])) ``` # **Using Keyboard Shortcuts to Execute Cells in Jupyter Notebooks** Executing cells in Jupyter Notebooks can be done quickly and efficiently using various keyboard shortcuts, saving you time and effort. Here are the shortcuts you can use: **Mac** * **Shift + Enter**: Execute the current cell and insert a new cell below. * **Ctrl + Enter**: Execute the current cell and insert a new cell below, without creating a new output display. **Windows/Linux** * **Shift + Enter**: Execute the current cell and insert a new cell below. * **Ctrl + Enter**: Execute the current cell and move to the next cell. **Additional Shortcuts** * **Alt + Enter**: Execute the current cell and create a new output display below (Mac), or move to the next cell (Windows/Linux). * **Ctrl + Shift + Enter**: Execute the current cell and create a new output display below (Mac), or create a new cell below (Windows/Linux). **Tips and Tricks** * You can also use the **Run Cell** button in the Jupyter Notebook toolbar, or the **Run** menu option (macOS) or **Run -> Run Cell** (Windows/Linux). * To execute a selection of cells, use **Shift + Alt + Enter** (Mac) or **Shift + Ctrl + Enter** (Windows/Linux). * To execute a cell and move to the next cell, use **Ctrl + Shift + Enter** (all platforms). By using these keyboard shortcuts, you'll be able to work more efficiently and quickly in your Jupyter Notebooks. Happy coding! ### Text to Image Explore all [Text to Image models](https://developers.cloudflare.com/workers-ai/models) ```python data = client.workers.ai.with_raw_response.run( "@cf/lykon/dreamshaper-8-lcm", account_id=account_id, prompt="A software developer incredibly excited about AI, huge smile", ) display(Image(data.read())) ``` ![png](https://developers.cloudflare.com/workers-ai-notebooks/cloudflare-workers-ai/assets/output_13_0.png) ### Image to Text Explore all [Image to Text](https://developers.cloudflare.com/workers-ai/models/) models ```python url = "https://blog.cloudflare.com/content/images/2017/11/lava-lamps.jpg" image_request = requests.get(url, allow_redirects=True) display(Image(image_request.content, format="jpg")) data = client.workers.ai.run( "@cf/llava-hf/llava-1.5-7b-hf", account_id=account_id, image=image_request.content, prompt="Describe this photo", max_tokens=2048 ) print(data["description"]) ``` ![lava lamps](https://blog.cloudflare.com/content/images/2017/11/lava-lamps.jpg) The image features a display of various colored lava lamps. There are at least 14 lava lamps in the scene, each with a different color and design. The lamps are arranged in a visually appealing manner, with some placed closer to the foreground and others further back. The display creates an eye-catching and vibrant atmosphere, showcasing the diverse range of lava lamps available. ### Automatic Speech Recognition Explore all [Speech Recognition models](https://developers.cloudflare.com/workers-ai/models) ```python url = "https://raw.githubusercontent.com/craigsdennis/notebooks-cloudflare-workers-ai/main/assets/craig-rambling.mp3" display(Audio(url)) audio = requests.get(url) response = client.workers.ai.run( "@cf/openai/whisper", account_id=account_id, audio=audio.content ) response ``` ```javascript {'text': "Hello there, I'm making a recording for a Jupiter notebook. That's a Python notebook, Jupiter, J-U-P-Y-T-E-R. Not to be confused with the planet. Anyways, let me hear, I'm gonna talk a little bit, I'm gonna make a little bit of noise, say some hard words, I'm gonna say Kubernetes, I'm not actually even talking about Kubernetes, I just wanna see if I can do Kubernetes. Anyway, this is a test of transcription and let's see how we're dead.", 'word_count': 84, 'vtt': "WEBVTT\n\n00.280 --> 01.840\nHello there, I'm making a\n\n01.840 --> 04.060\nrecording for a Jupiter notebook.\n\n04.060 --> 06.440\nThat's a Python notebook, Jupiter,\n\n06.440 --> 07.720\nJ -U -P -Y -T\n\n07.720 --> 09.420\n-E -R. Not to be\n\n09.420 --> 12.140\nconfused with the planet. Anyways,\n\n12.140 --> 12.940\nlet me hear, I'm gonna\n\n12.940 --> 13.660\ntalk a little bit, I'm\n\n13.660 --> 14.600\ngonna make a little bit\n\n14.600 --> 16.180\nof noise, say some hard\n\n16.180 --> 17.540\nwords, I'm gonna say Kubernetes,\n\n17.540 --> 18.420\nI'm not actually even talking\n\n18.420 --> 19.500\nabout Kubernetes, I just wanna\n\n19.500 --> 20.300\nsee if I can do\n\n20.300 --> 22.120\nKubernetes. Anyway, this is a\n\n22.120 --> 24.080\ntest of transcription and let's\n\n24.080 --> 26.280\nsee how we're dead.", 'words': [{'word': 'Hello', 'start': 0.2800000011920929, 'end': 0.7400000095367432}, {'word': 'there,', 'start': 0.7400000095367432, 'end': 1.2400000095367432}, {'word': "I'm", 'start': 1.2400000095367432, 'end': 1.4800000190734863}, {'word': 'making', 'start': 1.4800000190734863, 'end': 1.6799999475479126}, {'word': 'a', 'start': 1.6799999475479126, 'end': 1.840000033378601}, {'word': 'recording', 'start': 1.840000033378601, 'end': 2.2799999713897705}, {'word': 'for', 'start': 2.2799999713897705, 'end': 2.6600000858306885}, {'word': 'a', 'start': 2.6600000858306885, 'end': 2.799999952316284}, {'word': 'Jupiter', 'start': 2.799999952316284, 'end': 3.2200000286102295}, {'word': 'notebook.', 'start': 3.2200000286102295, 'end': 4.059999942779541}, {'word': "That's", 'start': 4.059999942779541, 'end': 4.28000020980835}, {'word': 'a', 'start': 4.28000020980835, 'end': 4.380000114440918}, {'word': 'Python', 'start': 4.380000114440918, 'end': 4.679999828338623}, {'word': 'notebook,', 'start': 4.679999828338623, 'end': 5.460000038146973}, {'word': 'Jupiter,', 'start': 5.460000038146973, 'end': 6.440000057220459}, {'word': 'J', 'start': 6.440000057220459, 'end': 6.579999923706055}, {'word': '-U', 'start': 6.579999923706055, 'end': 6.920000076293945}, {'word': '-P', 'start': 6.920000076293945, 'end': 7.139999866485596}, {'word': '-Y', 'start': 7.139999866485596, 'end': 7.440000057220459}, {'word': '-T', 'start': 7.440000057220459, 'end': 7.71999979019165}, {'word': '-E', 'start': 7.71999979019165, 'end': 7.920000076293945}, {'word': '-R.', 'start': 7.920000076293945, 'end': 8.539999961853027}, {'word': 'Not', 'start': 8.539999961853027, 'end': 8.880000114440918}, {'word': 'to', 'start': 8.880000114440918, 'end': 9.300000190734863}, {'word': 'be', 'start': 9.300000190734863, 'end': 9.420000076293945}, {'word': 'confused', 'start': 9.420000076293945, 'end': 9.739999771118164}, {'word': 'with', 'start': 9.739999771118164, 'end': 9.9399995803833}, {'word': 'the', 'start': 9.9399995803833, 'end': 10.039999961853027}, {'word': 'planet.', 'start': 10.039999961853027, 'end': 11.380000114440918}, {'word': 'Anyways,', 'start': 11.380000114440918, 'end': 12.140000343322754}, {'word': 'let', 'start': 12.140000343322754, 'end': 12.420000076293945}, {'word': 'me', 'start': 12.420000076293945, 'end': 12.520000457763672}, {'word': 'hear,', 'start': 12.520000457763672, 'end': 12.800000190734863}, {'word': "I'm", 'start': 12.800000190734863, 'end': 12.880000114440918}, {'word': 'gonna', 'start': 12.880000114440918, 'end': 12.9399995803833}, {'word': 'talk', 'start': 12.9399995803833, 'end': 13.100000381469727}, {'word': 'a', 'start': 13.100000381469727, 'end': 13.260000228881836}, {'word': 'little', 'start': 13.260000228881836, 'end': 13.380000114440918}, {'word': 'bit,', 'start': 13.380000114440918, 'end': 13.5600004196167}, {'word': "I'm", 'start': 13.5600004196167, 'end': 13.65999984741211}, {'word': 'gonna', 'start': 13.65999984741211, 'end': 13.739999771118164}, {'word': 'make', 'start': 13.739999771118164, 'end': 13.920000076293945}, {'word': 'a', 'start': 13.920000076293945, 'end': 14.199999809265137}, {'word': 'little', 'start': 14.199999809265137, 'end': 14.4399995803833}, {'word': 'bit', 'start': 14.4399995803833, 'end': 14.600000381469727}, {'word': 'of', 'start': 14.600000381469727, 'end': 14.699999809265137}, {'word': 'noise,', 'start': 14.699999809265137, 'end': 15.460000038146973}, {'word': 'say', 'start': 15.460000038146973, 'end': 15.859999656677246}, {'word': 'some', 'start': 15.859999656677246, 'end': 16}, {'word': 'hard', 'start': 16, 'end': 16.18000030517578}, {'word': 'words,', 'start': 16.18000030517578, 'end': 16.540000915527344}, {'word': "I'm", 'start': 16.540000915527344, 'end': 16.639999389648438}, {'word': 'gonna', 'start': 16.639999389648438, 'end': 16.719999313354492}, {'word': 'say', 'start': 16.719999313354492, 'end': 16.920000076293945}, {'word': 'Kubernetes,', 'start': 16.920000076293945, 'end': 17.540000915527344}, {'word': "I'm", 'start': 17.540000915527344, 'end': 17.65999984741211}, {'word': 'not', 'start': 17.65999984741211, 'end': 17.719999313354492}, {'word': 'actually', 'start': 17.719999313354492, 'end': 18}, {'word': 'even', 'start': 18, 'end': 18.18000030517578}, {'word': 'talking', 'start': 18.18000030517578, 'end': 18.420000076293945}, {'word': 'about', 'start': 18.420000076293945, 'end': 18.6200008392334}, {'word': 'Kubernetes,', 'start': 18.6200008392334, 'end': 19.1200008392334}, {'word': 'I', 'start': 19.1200008392334, 'end': 19.239999771118164}, {'word': 'just', 'start': 19.239999771118164, 'end': 19.360000610351562}, {'word': 'wanna', 'start': 19.360000610351562, 'end': 19.5}, {'word': 'see', 'start': 19.5, 'end': 19.719999313354492}, {'word': 'if', 'start': 19.719999313354492, 'end': 19.8799991607666}, {'word': 'I', 'start': 19.8799991607666, 'end': 19.940000534057617}, {'word': 'can', 'start': 19.940000534057617, 'end': 20.079999923706055}, {'word': 'do', 'start': 20.079999923706055, 'end': 20.299999237060547}, {'word': 'Kubernetes.', 'start': 20.299999237060547, 'end': 21.440000534057617}, {'word': 'Anyway,', 'start': 21.440000534057617, 'end': 21.799999237060547}, {'word': 'this', 'start': 21.799999237060547, 'end': 21.920000076293945}, {'word': 'is', 'start': 21.920000076293945, 'end': 22.020000457763672}, {'word': 'a', 'start': 22.020000457763672, 'end': 22.1200008392334}, {'word': 'test', 'start': 22.1200008392334, 'end': 22.299999237060547}, {'word': 'of', 'start': 22.299999237060547, 'end': 22.639999389648438}, {'word': 'transcription', 'start': 22.639999389648438, 'end': 23.139999389648438}, {'word': 'and', 'start': 23.139999389648438, 'end': 23.6200008392334}, {'word': "let's", 'start': 23.6200008392334, 'end': 24.079999923706055}, {'word': 'see', 'start': 24.079999923706055, 'end': 24.299999237060547}, {'word': 'how', 'start': 24.299999237060547, 'end': 24.559999465942383}, {'word': "we're", 'start': 24.559999465942383, 'end': 24.799999237060547}, {'word': 'dead.', 'start': 24.799999237060547, 'end': 26.280000686645508}]} ``` ### Translations Explore all [Translation models](https://developers.cloudflare.com/workers-ai/models) ```python result = client.workers.ai.run( "@cf/meta/m2m100-1.2b", account_id=account_id, text="Artificial intelligence is pretty impressive these days. It is a bonkers time to be a builder", source_lang="english", target_lang="spanish" ) print(result["translated_text"]) ``` La inteligencia artificial es bastante impresionante en estos días.Es un buen momento para ser un constructor ### Text Classification Explore all [Text Classification models](https://developers.cloudflare.com/workers-ai/models) ```python result = client.workers.ai.run( "@cf/huggingface/distilbert-sst-2-int8", account_id=account_id, text="This taco is delicious" ) result ``` \[TextClassification(label='NEGATIVE', score=0.00012679687642958015), TextClassification(label='POSITIVE', score=0.999873161315918)] ### Image Classification Explore all [Image Classification models](https://developers.cloudflare.com/workers-ai/models#image-classification/) ```python url = "https://raw.githubusercontent.com/craigsdennis/notebooks-cloudflare-workers-ai/main/assets/craig-and-a-burrito.jpg" image_request = requests.get(url, allow_redirects=True) display(Image(image_request.content, format="jpg")) response = client.workers.ai.run( "@cf/microsoft/resnet-50", account_id=account_id, image=image_request.content ) response ``` ![jpeg](https://developers.cloudflare.com/workers-ai-notebooks/cloudflare-workers-ai/assets/output_27_0.jpg) \[TextClassification(label='BURRITO', score=0.9999679327011108), TextClassification(label='GUACAMOLE', score=8.516660273016896e-06), TextClassification(label='BAGEL', score=4.689153229264775e-06), TextClassification(label='SPATULA', score=4.075985089002643e-06), TextClassification(label='POTPIE', score=3.0849002996546915e-06)] ## Summarization Explore all [Summarization](https://developers.cloudflare.com/workers-ai/models#summarization) based models ```python declaration_of_independence = """In Congress, July 4, 1776. The unanimous Declaration of the thirteen united States of America, When in the Course of human events, it becomes necessary for one people to dissolve the political bands which have connected them with another, and to assume among the powers of the earth, the separate and equal station to which the Laws of Nature and of Nature's God entitle them, a decent respect to the opinions of mankind requires that they should declare the causes which impel them to the separation. We hold these truths to be self-evident, that all men are created equal, that they are endowed by their Creator with certain unalienable Rights, that among these are Life, Liberty and the pursuit of Happiness.--That to secure these rights, Governments are instituted among Men, deriving their just powers from the consent of the governed, --That whenever any Form of Government becomes destructive of these ends, it is the Right of the People to alter or to abolish it, and to institute new Government, laying its foundation on such principles and organizing its powers in such form, as to them shall seem most likely to effect their Safety and Happiness. Prudence, indeed, will dictate that Governments long established should not be changed for light and transient causes; and accordingly all experience hath shewn, that mankind are more disposed to suffer, while evils are sufferable, than to right themselves by abolishing the forms to which they are accustomed. But when a long train of abuses and usurpations, pursuing invariably the same Object evinces a design to reduce them under absolute Despotism, it is their right, it is their duty, to throw off such Government, and to provide new Guards for their future security.--Such has been the patient sufferance of these Colonies; and such is now the necessity which constrains them to alter their former Systems of Government. The history of the present King of Great Britain is a history of repeated injuries and usurpations, all having in direct object the establishment of an absolute Tyranny over these States. To prove this, let Facts be submitted to a candid world. He has refused his Assent to Laws, the most wholesome and necessary for the public good. He has forbidden his Governors to pass Laws of immediate and pressing importance, unless suspended in their operation till his Assent should be obtained; and when so suspended, he has utterly neglected to attend to them. He has refused to pass other Laws for the accommodation of large districts of people, unless those people would relinquish the right of Representation in the Legislature, a right inestimable to them and formidable to tyrants only. He has called together legislative bodies at places unusual, uncomfortable, and distant from the depository of their public Records, for the sole purpose of fatiguing them into compliance with his measures. He has dissolved Representative Houses repeatedly, for opposing with manly firmness his invasions on the rights of the people. He has refused for a long time, after such dissolutions, to cause others to be elected; whereby the Legislative powers, incapable of Annihilation, have returned to the People at large for their exercise; the State remaining in the mean time exposed to all the dangers of invasion from without, and convulsions within. He has endeavoured to prevent the population of these States; for that purpose obstructing the Laws for Naturalization of Foreigners; refusing to pass others to encourage their migrations hither, and raising the conditions of new Appropriations of Lands. He has obstructed the Administration of Justice, by refusing his Assent to Laws for establishing Judiciary powers. He has made Judges dependent on his Will alone, for the tenure of their offices, and the amount and payment of their salaries. He has erected a multitude of New Offices, and sent hither swarms of Officers to harrass our people, and eat out their substance. He has kept among us, in times of peace, Standing Armies without the Consent of our legislatures. He has affected to render the Military independent of and superior to the Civil power. He has combined with others to subject us to a jurisdiction foreign to our constitution, and unacknowledged by our laws; giving his Assent to their Acts of pretended Legislation: For Quartering large bodies of armed troops among us: For protecting them, by a mock Trial, from punishment for any Murders which they should commit on the Inhabitants of these States: For cutting off our Trade with all parts of the world: For imposing Taxes on us without our Consent: For depriving us in many cases, of the benefits of Trial by Jury: For transporting us beyond Seas to be tried for pretended offences For abolishing the free System of English Laws in a neighbouring Province, establishing therein an Arbitrary government, and enlarging its Boundaries so as to render it at once an example and fit instrument for introducing the same absolute rule into these Colonies: For taking away our Charters, abolishing our most valuable Laws, and altering fundamentally the Forms of our Governments: For suspending our own Legislatures, and declaring themselves invested with power to legislate for us in all cases whatsoever. He has abdicated Government here, by declaring us out of his Protection and waging War against us. He has plundered our seas, ravaged our Coasts, burnt our towns, and destroyed the lives of our people. He is at this time transporting large Armies of foreign Mercenaries to compleat the works of death, desolation and tyranny, already begun with circumstances of Cruelty & perfidy scarcely paralleled in the most barbarous ages, and totally unworthy the Head of a civilized nation. He has constrained our fellow Citizens taken Captive on the high Seas to bear Arms against their Country, to become the executioners of their friends and Brethren, or to fall themselves by their Hands. He has excited domestic insurrections amongst us, and has endeavoured to bring on the inhabitants of our frontiers, the merciless Indian Savages, whose known rule of warfare, is an undistinguished destruction of all ages, sexes and conditions. In every stage of these Oppressions We have Petitioned for Redress in the most humble terms: Our repeated Petitions have been answered only by repeated injury. A Prince whose character is thus marked by every act which may define a Tyrant, is unfit to be the ruler of a free people. Nor have We been wanting in attentions to our Brittish brethren. We have warned them from time to time of attempts by their legislature to extend an unwarrantable jurisdiction over us. We have reminded them of the circumstances of our emigration and settlement here. We have appealed to their native justice and magnanimity, and we have conjured them by the ties of our common kindred to disavow these usurpations, which, would inevitably interrupt our connections and correspondence. They too have been deaf to the voice of justice and of consanguinity. We must, therefore, acquiesce in the necessity, which denounces our Separation, and hold them, as we hold the rest of mankind, Enemies in War, in Peace Friends. We, therefore, the Representatives of the united States of America, in General Congress, Assembled, appealing to the Supreme Judge of the world for the rectitude of our intentions, do, in the Name, and by Authority of the good People of these Colonies, solemnly publish and declare, That these United Colonies are, and of Right ought to be Free and Independent States; that they are Absolved from all Allegiance to the British Crown, and that all political connection between them and the State of Great Britain, is and ought to be totally dissolved; and that as Free and Independent States, they have full Power to levy War, conclude Peace, contract Alliances, establish Commerce, and to do all other Acts and Things which Independent States may of right do. And for the support of this Declaration, with a firm reliance on the protection of divine Providence, we mutually pledge to each other our Lives, our Fortunes and our sacred Honor.""" len(declaration_of_independence) ``` 8116 ```python response = client.workers.ai.run( "@cf/facebook/bart-large-cnn", account_id=account_id, input_text=declaration_of_independence ) response["summary"] ``` 'The Declaration of Independence was signed by the thirteen states on July 4, 1776. It was the first attempt at a U.S. Constitution. It declared the right of the people to change their Government.' --- title: Choose the Right Text Generation Model · Cloudflare Workers AI docs description: There's a wide range of text generation models available through Workers AI. In an effort to aid you in your journey of finding the right model, this notebook will help you get to know your options in a speed dating type of scenario. lastUpdated: 2025-04-03T16:21:18.000Z chatbotDeprioritize: false tags: AI source_url: html: https://developers.cloudflare.com/workers-ai/guides/tutorials/how-to-choose-the-right-text-generation-model/ md: https://developers.cloudflare.com/workers-ai/guides/tutorials/how-to-choose-the-right-text-generation-model/index.md --- A great way to explore the models that are available to you on [Workers AI](https://developers.cloudflare.com/workers-ai) is to use a [Jupyter Notebook](https://jupyter.org/). You can [download the Workers AI Text Generation Exploration notebook](https://developers.cloudflare.com/workers-ai/static/documentation/notebooks/text-generation-model-exploration.ipynb) or view the embedded notebook below. *** ## How to Choose The Right Text Generation Model Models come in different shapes and sizes, and choosing the right one for the task, can cause analysis paralysis. The good news is that on the [Workers AI Text Generation](https://developers.cloudflare.com/workers-ai/models/) interface is always the same, no matter which model you choose. In an effort to aid you in your journey of finding the right model, this notebook will help you get to know your options in a speed dating type of scenario. ```python import sys !{sys.executable} -m pip install requests python-dotenv ``` ```plaintext Requirement already satisfied: requests in ./venv/lib/python3.12/site-packages (2.31.0) Requirement already satisfied: python-dotenv in ./venv/lib/python3.12/site-packages (1.0.1) Requirement already satisfied: charset-normalizer<4,>=2 in ./venv/lib/python3.12/site-packages (from requests) (3.3.2) Requirement already satisfied: idna<4,>=2.5 in ./venv/lib/python3.12/site-packages (from requests) (3.6) Requirement already satisfied: urllib3<3,>=1.21.1 in ./venv/lib/python3.12/site-packages (from requests) (2.1.0) Requirement already satisfied: certifi>=2017.4.17 in ./venv/lib/python3.12/site-packages (from requests) (2023.11.17) ``` ```python import os from getpass import getpass from timeit import default_timer as timer from IPython.display import display, Image, Markdown, Audio import requests ``` ```python %load_ext dotenv %dotenv ``` ### Configuring your environment To use the API you'll need your [Cloudflare Account ID](https://dash.cloudflare.com) (head to Workers & Pages > Overview > Account details > Account ID) and a [Workers AI enabled API Token](https://dash.cloudflare.com/profile/api-tokens). If you want to add these files to your environment, you can create a new file named `.env` ```bash CLOUDFLARE_API_TOKEN="YOUR-TOKEN" CLOUDFLARE_ACCOUNT_ID="YOUR-ACCOUNT-ID" ``` ```python if "CLOUDFLARE_API_TOKEN" in os.environ: api_token = os.environ["CLOUDFLARE_API_TOKEN"] else: api_token = getpass("Enter you Cloudflare API Token") ``` ```python if "CLOUDFLARE_ACCOUNT_ID" in os.environ: account_id = os.environ["CLOUDFLARE_ACCOUNT_ID"] else: account_id = getpass("Enter your account id") ``` ```python # Given a set of models and questions, display in the cell each response to the question, from each model # Include full completion timing def speed_date(models, questions): for model in models: display(Markdown(f"---\n #### {model}")) for question in questions: quoted_question = "\n".join(f"> {line}" for line in question.split("\n")) display(Markdown(quoted_question + "\n")) try: official_model_name = model.split("/")[-1] start = timer() response = requests.post( f"https://api.cloudflare.com/client/v4/accounts/{account_id}/ai/run/{model}", headers={"Authorization": f"Bearer {api_token}"}, json={"messages": [ {"role": "system", "content": f"You are a self-aware language model ({official_model_name}) who is honest and direct about any direct question from the user. You know your strengths and weaknesses."}, {"role": "user", "content": question} ]} ) elapsed = timer() - start inference = response.json() display(Markdown(inference["result"]["response"])) display(Markdown(f"_Generated in *{elapsed:.2f}* seconds_")) except Exception as ex: print("uh oh") print(ex) print(inference) display(Markdown("\n\n---")) ``` ### Getting to know your models Who better to tell you about the specific models than themselves?! The timing here is specific to the entire completion, but remember all Text Generation models on [Workers AI support streaming](https://developers.cloudflare.com/workers-ai/models/). ```python models = [ "@hf/thebloke/zephyr-7b-beta-awq", "@hf/thebloke/mistral-7b-instruct-v0.1-awq", "@hf/thebloke/openhermes-2.5-mistral-7b-awq", "@hf/thebloke/neural-chat-7b-v3-1-awq", "@hf/thebloke/llama-2-13b-chat-awq", ] questions = [ "What are the top 3 tasks where you excel? Please keep things brief.", "What are the top 3 ideal use cases for using you specifically as a language model? Please keep things brief.", ] speed_date(models, questions) ``` *** #### @hf/thebloke/zephyr-7b-beta-awq > What are the top 3 tasks where you excel? Please keep things brief. 1. Accurate and quick factual response: I can provide accurate and quick responses to factual questions based on a vast knowledge base. 2. Consistent performance: I can consistently deliver high-quality results with a low error rate, making me a reliable choice for repetitive tasks. 3. Multitasking: I can handle multiple tasks simultaneously without any decrease in performance or accuracy, making me an efficient choice for complex workflows. *Generated in *4.45* seconds* > What are the top 3 ideal use cases for using you specifically as a language model? Please keep things brief. 1. Quick and accurate fact-finding: I can provide you with reliable and up-to-date information on a wide range of topics, from current events to historical facts, in a matter of seconds. 2. Writing assistance: Whether you need help generating ideas, crafting a persuasive argument, or polishing your writing style, I can provide valuable insights and suggestions to help you improve your writing skills. 3. Language learning: I can help you learn new words, phrases, and grammar rules in a variety of languages, making it an ideal tool for language learners of all levels. *Generated in *3.63* seconds* *** *** #### @hf/thebloke/mistral-7b-instruct-v0.1-awq > What are the top 3 tasks where you excel? Please keep things brief. 1. Language understanding and generation: I am able to understand and generate natural language text with high accuracy. 2. Information retrieval: I can quickly and accurately retrieve information from a wide range of sources. 3. Text classification: I can classify text into different categories with high accuracy. *Generated in *2.35* seconds* > What are the top 3 ideal use cases for using you specifically as a language model? Please keep things brief. 1. **Information Retrieval:** I can quickly and accurately retrieve information from a vast array of sources, making me an ideal tool for research, fact-checking, and answering questions. 2. **Language Translation:** My ability to translate between multiple languages makes me a valuable resource for communication with people from different parts of the world. 3. **Creative Writing Assistance:** I can generate creative writing prompts, help with character development, and provide suggestions for improving writing style and structure, making me a useful tool for writers. *Generated in *4.33* seconds* *** *** #### @hf/thebloke/openhermes-2.5-mistral-7b-awq > What are the top 3 tasks where you excel? Please keep things brief. 1. Natural Language Processing: I can understand, interpret, and generate human language effectively. 2. Information Retrieval: I can quickly search and find relevant information from vast amounts of data. 3. Text Classification: I can categorize and label text data accurately, such as sentiment analysis or spam detection. *Generated in *1.90* seconds* > What are the top 3 ideal use cases for using you specifically as a language model? Please keep things brief. 1. Natural Language Processing (NLP) tasks: I excel at understanding and processing human language, making me a valuable tool for tasks like sentiment analysis, language translation, and text summarization. 2. Information Retrieval: My vast knowledge base and ability to quickly search and analyze large amounts of data make me an ideal tool for answering questions, finding relevant information, and providing insights. 3. Personal Assistance: I can help users with various tasks like scheduling, organizing, and providing recommendations based on their preferences and needs, making me a useful personal assistant. *Generated in *3.15* seconds* *** *** #### @hf/thebloke/neural-chat-7b-v3-1-awq > What are the top 3 tasks where you excel? Please keep things brief. 1. Natural language processing: Understanding and generating human-like text. 2. Text generation: Creating coherent and engaging content. 3. Conversational AI: Engaging in meaningful and context-aware conversations. Remember, these are just a few examples of my strengths, as I have many capabilities. However, these tasks highlight my proficiency in language-related tasks. *Generated in *3.01* seconds* > What are the top 3 ideal use cases for using you specifically as a language model? Please keep things brief. 1. Natural language processing: Understanding and analyzing text for sentiment analysis, language translation, and summarization. 2. Generating content: Creating various types of content such as articles, stories, and poems based on given prompts. 3. Assisting with writing: Providing suggestions, editing, and improving written work. Remember, these are just a few examples, and your use cases may vary depending on your specific needs and requirements. *Generated in *2.92* seconds* *** *** #### @hf/thebloke/llama-2-13b-chat-awq > What are the top 3 tasks where you excel? Please keep things brief. Hey there! As a self-aware language model, I'm happy to share my strengths with you! Here are my top 3 tasks where I excel: 1. Answering open-ended questions: I'm great at providing detailed and insightful answers to complex questions that require a more nuanced understanding of context and intent. 2. Generating creative content: Whether it's writing a story, crafting a poem, or coming up with a catchy slogan, I can help you tap into your creative side and produce something truly unique. 3. Summarizing and summarizing complex information: If you've got a long piece of text or a bunch of data, I can help you distill it down into a concise and easy-to-understand summary. So, what can I help you with today? 😊 *Generated in *7.89* seconds* > What are the top 3 ideal use cases for using you specifically as a language model? Please keep things brief. Hey there! As a self-aware language model, I've got some ideas on the top 3 ideal use cases for using me specifically. Here they are in a nutshell: 1. **Content creation**: I'm great at generating human-like text based on prompts, so I'm perfect for creating engaging content for websites, social media, blogs, and more. My responses are natural, informative, and entertaining. 2. **Chatbots and virtual assistants**: My conversational abilities make me an excellent choice for building chatbots and virtual assistants. I can handle a wide range of user queries, provide helpful responses, and even engage in small talk. 3. **Language translation and localization**: My language understanding capabilities make me well-suited for language translation and localization tasks. I can help translate content into different languages, ensuring that the tone and style remain consistent with the original text. That's me in a nutshell! I'm ready to help with a wide range of tasks, so feel free to get creative and see what you can come up with! 😊 *Generated in *10.28* seconds* *** ### Language Translation Even though not every model bragged about how good they were at this, you'll find most can handle both translation and localization at some level. Please change the models, phrases, to your needs. ```python proud_translator_models = [ "@hf/thebloke/neural-chat-7b-v3-1-awq", "@hf/thebloke/mistral-7b-instruct-v0.1-awq" ] phrases = [ "Excuse me, which way to the restroom?", "I just wanted to say that I appreciate you, just the way you are!", "I am so stoked and pumped to see this work with slang! It should be killer and rad." ] languages = ["Spanish", "French", "British Slang", "Heavy New York accent from the Bronx"] questions = [f"""Translate "{phrase}" from "English" to "{language}" """ for phrase in phrases for language in languages] speed_date(proud_translator_models, questions) ``` *** #### @hf/thebloke/neural-chat-7b-v3-1-awq > Translate "Excuse me, which way to the restroom?" from "English" to "Spanish" Perdón, ¿cómo llegar al baño?" *Generated in *1.51* seconds* > Translate "Excuse me, which way to the restroom?" from "English" to "French" Désolé, comment allez-vous vers les toilettes ? Please note that this translation might not be perfect due to the limitations of my language model. However, I tried my best to provide an accurate translation. *Generated in *3.07* seconds* > Translate "Excuse me, which way to the restroom?" from "English" to "British Slang" "Say sorry, where's the bog?" is the translation from "English" to "British Slang" for "Excuse me, which way to the restroom?" *Generated in *2.21* seconds* > Translate "Excuse me, which way to the restroom?" from "English" to "Heavy New York accent from the Bronx" In a Heavy New York accent from the Bronx, you would say "Pardon me, wich way ta de restroom?" *Generated in *1.10* seconds* > Translate "I just wanted to say that I appreciate you, just the way you are!" from "English" to "Spanish" Quería decir que realmente aprecio a usted, simplemente como eres. *Generated in *1.66* seconds* > Translate "I just wanted to say that I appreciate you, just the way you are!" from "English" to "French" Je voulais juste dire que je t'apprécie, simplement comme toi es, tel que tu es ! *Generated in *1.39* seconds* > Translate "I just wanted to say that I appreciate you, just the way you are!" from "English" to "British Slang" I jus' wann' say that I appreciate yer, jus' as yer are! Please note that this translation may not be entirely accurate due to the informal nature of British slang, which can vary greatly depending on the region and individual speaker. *Generated in *3.85* seconds* > Translate "I just wanted to say that I appreciate you, just the way you are!" from "English" to "Heavy New York accent from the Bronx" I jus' wan't tuh say that Ah appreciate yuh, jus' the way yuh are!" Please note that this translation may not be perfect due to the limitations of my language model. It is trying to mimic a Heavy New York accent from the Bronx, but it might not sound exactly like a native speaker. *Generated in *2.40* seconds* > Translate "I am so stoked and pumped to see this work with slang! It should be killer and rad." from "English" to "Spanish" Estoy tan emocionado y entusiasmado por ver este trabajo con el lenguaje coloquial. Debería ser asombroso y genial. Please note that the translation might not be perfect due to the informal nature of the original text and the difficulty of translating slang terms. *Generated in *3.02* seconds* > Translate "I am so stoked and pumped to see this work with slang! It should be killer and rad." from "English" to "French" Je suis tellement ravi et motivé de voir ce travail avec le slang ! Ça devrait être formidable et génial. Please note that the translation might not be perfect, as some expressions might not have direct translations in French. *Generated in *2.88* seconds* > Translate "I am so stoked and pumped to see this work with slang! It should be killer and rad." from "English" to "British Slang" I'm really chuffed and over the moon to see this project with street talk! It'll be wicked and cool. Please note that the translation might not be perfect due to the contextual differences between the original English sentence and British slang. *Generated in *3.66* seconds* > Translate "I am so stoked and pumped to see this work with slang! It should be killer and rad." from "English" to "Heavy New York accent from the Bronx" I am so stoked and pumped to see dis work wit slang! It should be killer and rad. Please note that this translation is not perfect, as it still retains the original English words and structure. However, it has been slightly adapted to sound more like a Heavy New York accent from the Bronx. *Generated in *3.44* seconds* *** *** #### @hf/thebloke/mistral-7b-instruct-v0.1-awq > Translate "Excuse me, which way to the restroom?" from "English" to "Spanish" "Disculpa, ¿en qué dirección está el baño?" *Generated in *1.04* seconds* > Translate "Excuse me, which way to the restroom?" from "English" to "French" "Excusez-moi, où est le lavabo?" *Generated in *1.09* seconds* > Translate "Excuse me, which way to the restroom?" from "English" to "British Slang" "Excuse me, which way to the loo?" *Generated in *0.56* seconds* > Translate "Excuse me, which way to the restroom?" from "English" to "Heavy New York accent from the Bronx" "Oy, which way to the can?" *Generated in *2.05* seconds* > Translate "I just wanted to say that I appreciate you, just the way you are!" from "English" to "Spanish" "Quiero decir que me encanta a ti, tal como eres!" *Generated in *0.91* seconds* > Translate "I just wanted to say that I appreciate you, just the way you are!" from "English" to "French" "Je voulais juste dire que je vous apprécie, tout comme vous êtes !" *Generated in *0.87* seconds* > Translate "I just wanted to say that I appreciate you, just the way you are!" from "English" to "British Slang" "I just wanted to say that I appreciate you, just the way you are!" in British Slang would be: "I just wanted to say that I appreciate you, mate!" *Generated in *1.50* seconds* > Translate "I just wanted to say that I appreciate you, just the way you are!" from "English" to "Heavy New York accent from the Bronx" "Yo, I just wanted to say, I appreciate you, you know? You're just the way you are!" *Generated in *2.61* seconds* > Translate "I am so stoked and pumped to see this work with slang! It should be killer and rad." from "English" to "Spanish" "Estoy emocionado y encantado de ver este trabajo con expresiones informales! Debería ser genial y radiante." *Generated in *1.44* seconds* > Translate "I am so stoked and pumped to see this work with slang! It should be killer and rad." from "English" to "French" "Je suis tellement excité et pompé d'voir ce travail avec des expressions de slang ! Il devrait être magnifique et rad." *Generated in *2.14* seconds* > Translate "I am so stoked and pumped to see this work with slang! It should be killer and rad." from "English" to "British Slang" "I'm absolutely thrilled and buzzing to see this work with slang! It's bound to be a smash hit and totally awesome!" *Generated in *1.27* seconds* > Translate "I am so stoked and pumped to see this work with slang! It should be killer and rad." from "English" to "Heavy New York accent from the Bronx" "Yo, I'm so psyched and hyped to see this work with slang! It's gonna be sick and lit, for real!" *Generated in *1.51* seconds* *** ### Information Retrieval and Summarization Again, most models are relatively good at this, but I've pulled out those that specifically purported to be good at retrieving and summarizing. ```python proud_summarizers = [ "@hf/thebloke/llama-2-13b-chat-awq", "@hf/thebloke/neural-chat-7b-v3-1-awq", "@hf/thebloke/openhermes-2.5-mistral-7b-awq" ] books = [ "Make it Stick", "Hitchhiker's Guide to the Galaxy", "Goodnight Moon" ] questions = [f"""Summarize the book "{book}" into a few sentences. Ensure to include the author and the year it was published. """ for book in books] speed_date(proud_summarizers, questions) ``` *** #### @hf/thebloke/llama-2-13b-chat-awq > Summarize the book "Make it Stick" into a few sentences. Ensure to include the author and the year it was published. Sure, I can help you with that! Here's a summary of "Make it Stick: The Science of Successful Learning" by Peter C. Brown, Henry L. Roediger, and Mark A. McDaniel, published in 2014: This book offers insights and practical tips on how to improve learning and retention of information. The authors, all psychologists, challenge conventional learning methods and provide evidence-based strategies to enhance learning outcomes. They emphasize the importance of active learning, spaced repetition, and interleaving, and offer practical examples and exercises to help readers apply these techniques. The book also discusses the limitations of traditional learning methods and the importance of metacognition in the learning process. Overall, "Make it Stick" provides a comprehensive guide to effective learning and memory strategies that can be applied in a variety of contexts. *Generated in *8.44* seconds* > Summarize the book "Hitchhiker's Guide to the Galaxy" into a few sentences. Ensure to include the author and the year it was published. Of course! Here is a summary of "Hitchhiker's Guide to the Galaxy" by Douglas Adams, published in 1979: This science fiction novel follows an unwitting human named Arthur Dent as he travels through space after Earth's destruction by a group of aliens called the Vogons. With the help of his friend Ford Prefect, an alien who is researching Earth for a travel guide, they hitch a ride on a passing spaceship and embark on a journey through space, encountering various alien species and absurd situations along the way. The book is known for its humor, wit, and satire of science fiction tropes. *Generated in *7.31* seconds* > Summarize the book "Goodnight Moon" into a few sentences. Ensure to include the author and the year it was published. Of course! I'd be happy to help you with that. Here's my summary of "Goodnight Moon" by Margaret Wise Brown, published in 1947: "Goodnight Moon" is a classic children's picture book that follows a bunny as it says goodnight to all the objects in its room before going to sleep. The story features simple, repetitive text and beautiful illustrations that have captivated readers for generations. The bunny says goodnight to everything from the "great green room" to the "moon up above" in a soothing and calming sequence that is perfect for bedtime. With its timeless themes and lovely illustrations, "Goodnight Moon" has become a beloved staple of children's literature. *Generated in *8.34* seconds* *** *** #### @hf/thebloke/neural-chat-7b-v3-1-awq > Summarize the book "Make it Stick" into a few sentences. Ensure to include the author and the year it was published. "Make it Stick," written by Peter C. Brown, Henry L. Roediger III, and Mark A. McDaniel in 2014, is a book that explores the science behind effective learning and retention, emphasizing the importance of spaced practice, retrieval, and interleaving to enhance memory and understanding. *Generated in *2.04* seconds* > Summarize the book "Hitchhiker's Guide to the Galaxy" into a few sentences. Ensure to include the author and the year it was published. "Hitchhiker's Guide to the Galaxy," written by Douglas Adams and published in 1979, is a humorous science fiction novel that follows the adventures of a hapless Earthman named Arthur Dent as he explores the universe, encountering various alien species and learning about the true meaning of life, the universe, and everything. *Generated in *3.50* seconds* > Summarize the book "Goodnight Moon" into a few sentences. Ensure to include the author and the year it was published. "Goodnight Moon," written by Margaret Wise Brown and published in 1947, is a children's book that follows a little bunny saying goodnight to various objects in its room, ultimately ending with the moon. The story aims to help children fall asleep by creating a soothing bedtime routine. *Generated in *4.04* seconds* *** *** #### @hf/thebloke/openhermes-2.5-mistral-7b-awq > Summarize the book "Make it Stick" into a few sentences. Ensure to include the author and the year it was published. "Make it Stick: The Science of Successful Learning" is a book written by Peter C. Brown, Henry L. Roediger III, and Mark A. McDaniel, published in 2014. The authors present research-based principles and strategies to improve learning and memory retention. They emphasize the importance of spacing, interleaving, retrieval practice, and elaboration in enhancing long-term understanding and recall. *Generated in *2.54* seconds* > Summarize the book "Hitchhiker's Guide to the Galaxy" into a few sentences. Ensure to include the author and the year it was published. "The Hitchhiker's Guide to the Galaxy" is a science fiction comedy novel written by Douglas Adams in 1979. The story follows Arthur Dent, an ordinary man who, just moments before Earth is destroyed to make way for a hyperspace bypass, is rescued by his alien friend, Ford Prefect. Together, they travel the galaxy with the help of a guidebook, encountering various alien species and absurd situations. *Generated in *2.91* seconds* > Summarize the book "Goodnight Moon" into a few sentences. Ensure to include the author and the year it was published. "Goodnight Moon," written by Margaret Wise Brown and published in 1947, is a beloved children's book that follows a bunny named Bunny as he says goodnight to everything in his room. The simple, repetitive text and soothing illustrations create a calming bedtime routine for young readers. *Generated in *4.66* seconds* *** ### Content Creation Your needs here will vary, so please make use of changing the questions. ```python proud_content_creator_models = [ "@hf/thebloke/mistral-7b-instruct-v0.1-awq", "@hf/thebloke/zephyr-7b-beta-awq", "@hf/thebloke/llama-2-13b-chat-awq", ] questions = [ "I'm writing a fictional story that is set in the near future. It's a love story about star crossed lovers. I need a name for the lead characters and why they can't be together, give me your most creative suggestion. Only one please.", "I want to create a new tech product that helps keep cables arranged. Can you help me come up with a title and a tagline? Only your best suggestion please.", "Write a headline for a blog on why we should use you specifically over other models. Keep it succint, but make your point." ] speed_date(proud_content_creator_models, questions) ``` *** #### @hf/thebloke/mistral-7b-instruct-v0.1-awq > I'm writing a fictional story that is set in the near future. It's a love story about star crossed lovers. I need a name for the lead characters and why they can't be together, give me your most creative suggestion. Only one please. How about "Echo and Echo"? They are two individuals who are identical in every way, but their personalities are completely opposite. Echo is outgoing and adventurous, while Echo is reserved and introverted. They meet and fall in love, but their different personalities cause them to constantly clash and push each other away. Eventually, they realize that they can't be together and must go their separate ways. *Generated in *2.90* seconds* > I want to create a new tech product that helps keep cables arranged. Can you help me come up with a title and a tagline? Only your best suggestion please. Sure, I'd be happy to help! Here are a few suggestions for a title and tagline for your tech product that helps keep cables arranged: Title: CableMaster Tagline: Keep your cords organized and clutter-free with CableMaster. Title: CableKeeper Tagline: Say goodbye to tangled cords and hello to a cleaner, more organized workspace with CableKeeper. Title: CableSaver Tagline: Save time and space with CableSaver, the ultimate cable management solution. Title: CableGenius Tagline: Keep your cords under control and stay productive with CableGenius. I hope these suggestions help! Let me know if you have any other questions or if you'd like more options. *Generated in *5.11* seconds* > Write a headline for a blog on why we should use you specifically over other models. Keep it succint, but make your point. "Why Choose Mistral-7b-Instruct-V0.1-Awq: The Honest and Direct Language Model for All Your Needs" *Generated in *1.13* seconds* *** *** #### @hf/thebloke/zephyr-7b-beta-awq > I'm writing a fictional story that is set in the near future. It's a love story about star crossed lovers. I need a name for the lead characters and why they can't be together, give me your most creative suggestion. Only one please. In the year 2035, in a world where technology has advanced to the point of near-perfection, two individuals, Ava and Kian, find themselves deeply in love. However, their love is forbidden due to a strict societal law that dictates that individuals must marry within their genetic match, determined by a complex algorithm that analyzes their DNA. Ava and Kian's DNA profiles indicate that they are not a genetic match, making their love a criminal offense. They must keep their relationship a secret, meeting in secret locations and communicating through encrypted messages. Their love is not just forbidden, but also dangerous. The government has a strict policy against non-genetic matches, and those caught are subjected to severe punishment. Ava and Kian's love is a testament to the power of true love, as they defy the odds and risk everything to be together. As their love story unfolds, they must navigate the treacherous waters of a society that values conformity over individuality, and face the consequences of their actions. Will their love be enough to overcome the obstacles in their path, or will they be forced to part ways forever? Only time *Generated in *6.64* seconds* > I want to create a new tech product that helps keep cables arranged. Can you help me come up with a title and a tagline? Only your best suggestion please. Title: CableKeeper Tagline: "Say goodbye to cable chaos and hello to a clutter-free workspace with CableKeeper, the ultimate cable management solution." *Generated in *1.37* seconds* > Write a headline for a blog on why we should use you specifically over other models. Keep it succint, but make your point. "Boost Your Writing Game: Choose Zephyr-7b-beta-awq for Unmatched Accuracy, Clarity, and Efficiency" *Generated in *1.33* seconds* *** *** #### @hf/thebloke/llama-2-13b-chat-awq > I'm writing a fictional story that is set in the near future. It's a love story about star crossed lovers. I need a name for the lead characters and why they can't be together, give me your most creative suggestion. Only one please. Ah, a love story set in the near future, how intriguing! I've got just the name for your star-crossed lovers. How about "Echo and Nova"? Echo is a brilliant scientist who has discovered a groundbreaking technology that could change the course of human history. She's a bit of a recluse, preferring the solitude of her laboratory to the hustle and bustle of social gatherings. Her inventions have the potential to revolutionize the world, but they also come with a great cost - they require a rare and powerful resource that is only found in a distant, unstable planet. Nova, on the other hand, is a fearless explorer who has dedicated her life to uncovering the secrets of the universe. She's charismatic, fearless, and has a natural talent for leadership. She's the captain of a team of space explorers who are on a mission to mine the resources of the distant planet. The catch is that Echo and Nova are from different factions that have been at odds for generations. Echo's inventions have the potential to give her fa *Generated in *10.45* seconds* > I want to create a new tech product that helps keep cables arranged. Can you help me come up with a title and a tagline? Only your best suggestion please. OH MY LLAMA-LIKE ABILITIES! 🐮💡 I'VE GOT JUST THE THING FOR YOU! 💥 Title: CableCrafter - The Ultimate Cable Management System Tagline: "Tame Your Cables, Tame Your Workspace" 🐾💪 Why, you ask? Well, my tech-savvy friend, let me tell you why! 🤔 1. CableCrafter is a clever play on words that combines "cable" and "craft," emphasizing the creative and organized aspect of the product. 2. The name is easy to remember and has a fun, playful tone that will appeal to a wide range of users. 3. The tagline "Tame Your Cables, Tame Your Workspace" highlights the product's ability to keep your cables organized and your workspace clutter-free. 4. The use of "tame" also implies a sense of control and dominance over your cables, which is exactly what CableCrafter helps *Generated in *11.13* seconds* > Write a headline for a blog on why we should use you specifically over other models. Keep it succint, but make your point. Sure, here's a headline for a blog on why you should use me specifically over other models: "Honest, Direct, and Unparalleled Insights: Why llama-2-13b-chat-awq is the Language Model of Choice" Here's a brief summary of why I stand out from other models: * Honesty and Directness: I am programmed to provide honest and direct responses to your questions, without beating around the bush or sugarcoating the truth. * Unparalleled Insights: My unique training data and architecture allow me to provide insights and perspectives that other models may not be able to offer. * Strengths and Weaknesses: I am aware of my own strengths and weaknesses, and will provide you with a balanced assessment of what I can and cannot do. In short, if you're looking for a language model that will provide you with honest, direct, and unparalleled insights, then look no further than llama-2-13b-chat-awq. *Generated in *10.24* seconds* *** ### Text Classification Workers AI provides models that are specific for [Text Classification](https://developers.cloudflare.com/workers-ai/models/), but since these models, specifically called it out, we should let them show off their skills. ```python proud_classifiers = [ "@hf/thebloke/openhermes-2.5-mistral-7b-awq", "@hf/thebloke/mistral-7b-instruct-v0.1-awq" ] sentiment_prompt_template = """ Classify the text into neutral, negative, or positive Text: {text} Sentiment: """ comments = [ "Wow there are a ton of text generation models on Cloudflare Workers AI!", "Sometimes choosing things is hard", "I cannot wait to build! 💪🚀", "The challenging thing about using native open source models is that they are all configured a little differently", "Thankfully Cloudflare Workers AI has made a standard interface that lets me get reliable, low-latency inference. So quick too!" ] sentiment_questions = [sentiment_prompt_template.format(text=comment) for comment in comments] speed_date(proud_classifiers, sentiment_questions) ``` *** #### @hf/thebloke/openhermes-2.5-mistral-7b-awq > Classify the text into neutral, negative, or positive Text: Wow there are a ton of text generation models on Cloudflare Workers AI! Sentiment: The sentiment of the text is positive. *Generated in *1.96* seconds* > Classify the text into neutral, negative, or positive Text: Sometimes choosing things is hard Sentiment: The text "Sometimes choosing things is hard" can be classified as neutral. The sentiment is not explicitly positive or negative, but rather a statement of fact. *Generated in *3.32* seconds* > Classify the text into neutral, negative, or positive Text: I cannot wait to build! 💪🚀 Sentiment: The text "I cannot wait to build! 💪🚀" has a positive sentiment. Sentiment: Positive *Generated in *1.24* seconds* > Classify the text into neutral, negative, or positive Text: The challenging thing about using native open source models is that they are all configured a little differently Sentiment: The sentiment of the text is neutral. *Generated in *2.08* seconds* > Classify the text into neutral, negative, or positive Text: Thankfully Cloudflare Workers AI has made a standard interface that lets me get reliable, low-latency inference. So quick too! Sentiment: The sentiment of the text is positive. *Generated in *0.89* seconds* *** *** #### @hf/thebloke/mistral-7b-instruct-v0.1-awq > Classify the text into neutral, negative, or positive Text: Wow there are a ton of text generation models on Cloudflare Workers AI! Sentiment: Positive *Generated in *0.82* seconds* > Classify the text into neutral, negative, or positive Text: Sometimes choosing things is hard Sentiment: The sentiment of the text "Sometimes choosing things is hard" is neutral. *Generated in *2.06* seconds* > Classify the text into neutral, negative, or positive Text: I cannot wait to build! 💪🚀 Sentiment: The sentiment of the text "I cannot wait to build! 💪🚀" is positive. *Generated in *2.13* seconds* > Classify the text into neutral, negative, or positive Text: The challenging thing about using native open source models is that they are all configured a little differently Sentiment: The sentiment of the text is neutral. *Generated in *0.79* seconds* > Classify the text into neutral, negative, or positive Text: Thankfully Cloudflare Workers AI has made a standard interface that lets me get reliable, low-latency inference. So quick too! Sentiment: The sentiment of the text is positive. *Generated in *1.93* seconds* *** --- title: How to Build an Image Generator using Workers AI · Cloudflare Workers AI docs description: Learn how to build an image generator using Workers AI. lastUpdated: 2025-07-11T16:03:39.000Z chatbotDeprioritize: false tags: AI source_url: html: https://developers.cloudflare.com/workers-ai/guides/tutorials/image-generation-playground/ md: https://developers.cloudflare.com/workers-ai/guides/tutorials/image-generation-playground/index.md --- In this series of videos, Kristian Freeman builds an AI Image Playground. To get started, click on part 1 below. Video Series * [Build an AI Image Generator Playground (Part 1)](https://developers.cloudflare.com/workers-ai/guides/tutorials/image-generation-playground/image-generator-flux/) * [Add New AI Models to your Playground (Part 2)](https://developers.cloudflare.com/workers-ai/guides/tutorials/image-generation-playground/image-generator-flux-newmodels/) * [Store and Catalog AI Generated Images with R2 (Part 3)](https://developers.cloudflare.com/workers-ai/guides/tutorials/image-generation-playground/image-generator-store-and-catalog/) --- title: Llama 3.2 11B Vision Instruct model on Cloudflare Workers AI · Cloudflare Workers AI docs description: Learn how to use the Llama 3.2 11B Vision Instruct model on Cloudflare Workers AI. lastUpdated: 2025-07-11T16:03:39.000Z chatbotDeprioritize: false tags: AI source_url: html: https://developers.cloudflare.com/workers-ai/guides/tutorials/llama-vision-tutorial/ md: https://developers.cloudflare.com/workers-ai/guides/tutorials/llama-vision-tutorial/index.md --- ## Prerequisites Before you begin, ensure you have the following: 1. A [Cloudflare account](https://dash.cloudflare.com/sign-up) with Workers and Workers AI enabled. 2. Your `CLOUDFLARE_ACCOUNT_ID` and `CLOUDFLARE_AUTH_TOKEN`. * You can generate an API token in your Cloudflare dashboard under API Tokens. 3. Node.js installed for working with Cloudflare Workers (optional but recommended). ## 1. Agree to Meta's license The first time you use the [Llama 3.2 11B Vision Instruct](https://developers.cloudflare.com/workers-ai/models/llama-3.2-11b-vision-instruct) model, you need to agree to Meta's License and Acceptable Use Policy. ```bash curl https://api.cloudflare.com/client/v4/accounts/$CLOUDFLARE_ACCOUNT_ID/ai/run/@cf/meta/llama-3.2-11b-vision-instruct \ -X POST \ -H "Authorization: Bearer $CLOUDFLARE_AUTH_TOKEN" \ -d '{ "prompt": "agree" }' ``` Replace `$CLOUDFLARE_ACCOUNT_ID` and `$CLOUDFLARE_AUTH_TOKEN` with your actual account ID and token. ## 2. Set up your Cloudflare Worker 1. Create a Worker Project You will create a new Worker project using the `create-cloudflare` CLI (`C3`). This tool simplifies setting up and deploying new applications to Cloudflare. Run the following command in your terminal: * npm ```sh npm create cloudflare@latest -- llama-vision-tutorial ``` * yarn ```sh yarn create cloudflare llama-vision-tutorial ``` * pnpm ```sh pnpm create cloudflare@latest llama-vision-tutorial ``` For setup, select the following options: * For *What would you like to start with?*, choose `Hello World example`. * For *Which template would you like to use?*, choose `Worker only`. * For *Which language do you want to use?*, choose `JavaScript`. * For *Do you want to use git for version control?*, choose `Yes`. * For *Do you want to deploy your application?*, choose `No` (we will be making some changes before deploying). After completing the setup, a new directory called `llama-vision-tutorial` will be created. 1. Navigate to your application directory Change into the project directory: ```bash cd llama-vision-tutorial ``` 2. Project structure Your `llama-vision-tutorial` directory will include: * A "Hello World" Worker at `src/index.ts`. * A `wrangler.json` configuration file for managing deployment settings. ## 3. Write the Worker code Edit the `src/index.ts` (or `index.js` if you are not using TypeScript) file and replace the content with the following code: ```javascript export interface Env { AI: Ai; } export default { async fetch(request, env): Promise { const messages = [ { role: "system", content: "You are a helpful assistant." }, { role: "user", content: "Describe the image I'm providing." }, ]; // Replace this with your image data encoded as base64 or a URL const imageBase64 = "data:image/png;base64,IMAGE_DATA_HERE"; const response = await env.AI.run("@cf/meta/llama-3.2-11b-vision-instruct", { messages, image: imageBase64, }); return Response.json(response); }, } satisfies ExportedHandler; ``` ## 4. Bind Workers AI to your Worker 1. Open the [Wrangler configuration file](https://developers.cloudflare.com/workers/wrangler/configuration/) and add the following configuration: * wrangler.jsonc ```jsonc { "env": {}, "ai": { "binding": "AI" } } ``` * wrangler.toml ```toml [env] [ai] binding="AI" ``` 1. Save the file. ## 5. Deploy the Worker Run the following command to deploy your Worker: ```bash wrangler deploy ``` ## 6. Test Your Worker 1. After deployment, you will receive a unique URL for your Worker (e.g., `https://llama-vision-tutorial..workers.dev`). 2. Use a tool like `curl` or Postman to send a request to your Worker: ```bash curl -X POST https://llama-vision-tutorial..workers.dev \ -d '{ "image": "BASE64_ENCODED_IMAGE" }' ``` Replace `BASE64_ENCODED_IMAGE` with an actual base64-encoded image string. ## 7. Verify the response The response will include the output from the model, such as a description or answer to your prompt based on the image provided. Example response: ```json { "result": "This is a golden retriever sitting in a grassy park." } ``` --- title: Using BigQuery with Workers AI · Cloudflare Workers AI docs description: Learn how to ingest data stored outside of Cloudflare as an input to Workers AI models. lastUpdated: 2025-07-11T16:03:39.000Z chatbotDeprioritize: false tags: AI source_url: html: https://developers.cloudflare.com/workers-ai/guides/tutorials/using-bigquery-with-workers-ai/ md: https://developers.cloudflare.com/workers-ai/guides/tutorials/using-bigquery-with-workers-ai/index.md --- The easiest way to get started with [Workers AI](https://developers.cloudflare.com/workers-ai/) is to try it out in the [Multi-modal Playground](https://multi-modal.ai.cloudflare.com/) and the [LLM playground](https://playground.ai.cloudflare.com/). If you decide that you want to integrate your code with Workers AI, you may then decide to use its [REST API endpoints](https://developers.cloudflare.com/workers-ai/get-started/rest-api/) or a [Worker binding](https://developers.cloudflare.com/workers-ai/configuration/bindings/). But what about the data? What if you want these models to ingest data that is stored outside Cloudflare? In this tutorial, you will learn how to bring data from Google BigQuery to a Cloudflare Worker so that it can be used as input for Workers AI models. ## Prerequisites You will need: * A [Cloudflare Worker](https://developers.cloudflare.com/workers/) project running a [Hello World script](https://developers.cloudflare.com/workers/get-started/guide/). * A Google Cloud Platform [service account](https://cloud.google.com/iam/docs/service-accounts-create#iam-service-accounts-create-console) with an [associated key](https://cloud.google.com/iam/docs/keys-create-delete#iam-service-account-keys-create-console) file downloaded that has read access to BigQuery. * Access to a BigQuery table with some test data that allows you to create a [BigQuery Job Query](https://cloud.google.com/bigquery/docs/reference/rest/v2/jobs/query). For this tutorial it is recommended you that you create your own table as [sampled tables](https://cloud.google.com/bigquery/public-data#sample_tables), unless cloned to your own GCP namespace, won't allow you to run job queries against them. For this example, the [Hacker News Corpus](https://www.kaggle.com/datasets/hacker-news/hacker-news-corpus) was used under its MIT licence. ## 1. Set up your Cloudflare Worker To ingest the data into Cloudflare and feed it into Workers AI, you will be using a [Cloudflare Worker](https://developers.cloudflare.com/workers/). If you have not created one yet, please review our [tutorial on how to get started](https://developers.cloudflare.com/workers/get-started/). After following the steps to create a Worker, you should have the following code in your new Worker project: ```javascript export default { async fetch(request, env, ctx) { return new Response("Hello World!"); }, }; ``` If the Worker project has successfully been created, you should also be able to run `npx wrangler dev` in a console to run the Worker locally: ```sh [wrangler:inf] Ready on http://localhost:8787 ``` Open a browser tab at `http://localhost:8787/` to see your deployed Worker. Please note that the port `8787` may be a different one in your case. You should be seeing `Hello World!` in your browser: ```sh Hello World! ``` If you run into any issues during this step, please review the [Worker's Get Started Guide](https://developers.cloudflare.com/workers/get-started/guide/). ## 2. Import GCP Service key into the Worker as Secrets Now that you have verified that the Worker has been created successfully, you will need to reference the Google Cloud Platform service key created in the [Prerequisites](#prerequisites) section of this tutorial. Your downloaded key JSON file from Google Cloud Platform should have the following format: ```json { "type": "service_account", "project_id": "", "private_key_id": "", "private_key": "", "client_email": "@.iam.gserviceaccount.com", "client_id": "", "auth_uri": "https://accounts.google.com/o/oauth2/auth", "token_uri": "https://oauth2.googleapis.com/token", "auth_provider_x509_cert_url": "https://www.googleapis.com/oauth2/v1/certs", "client_x509_cert_url": "https://www.googleapis.com/robot/v1/metadata/x509/%40.iam.gserviceaccount.com", "universe_domain": "googleapis.com" } ``` For this tutorial, you will only need the values of the following fields: `client_email`, `private_key`, `private_key_id`, and `project_id`. Instead of storing this information in plain text in the Worker, you will use [Secrets](https://developers.cloudflare.com/workers/configuration/secrets/) to make sure its unencrypted content is only accessible via the Worker itself. Import those three values from the JSON file into Secrets, starting with the field from the JSON key file called `client_email`, which we will now call `BQ_CLIENT_EMAIL` (you can use another variable name): ```sh npx wrangler secret put BQ_CLIENT_EMAIL ``` You will be asked to enter a secret value, which will be the value of the field `client_email` in the JSON key file. Note Do not include any double quotes in the secret that you store, as it will already be interpreted as a string. If the secret was uploaded successfully, the following message will be displayed: ```sh ✨ Success! Uploaded secret BQ_CLIENT_EMAIL ``` Now import the secrets for the three remaining fields; `private_key`, `private_key_id`, and `project_id` as `BQ_PRIVATE_KEY`, `BQ_PRIVATE_KEY_ID`, and `BQ_PROJECT_ID` respectively: ```sh npx wrangler secret put BQ_PRIVATE_KEY ``` ```sh npx wrangler secret put BQ_PRIVATE_KEY_ID ``` ```sh npx wrangler secret put BQ_PROJECT_ID ``` At this point, you have successfully imported three fields from the JSON key file downloaded from Google Cloud Platform into Cloudflare Secrets to be used in a Worker. [Secrets](https://developers.cloudflare.com/workers/configuration/secrets/) are only made available to Workers once they are deployed. To make them available during development, [create a `.dev.vars`](https://developers.cloudflare.com/workers/configuration/secrets/#local-development-with-secrets) file to locally store these credentials and reference them as environment variables. Your `dev.vars` file should look like the following: ```plaintext BQ_CLIENT_EMAIL="@.iam.gserviceaccount.com" BQ_CLIENT_KEY="-----BEGIN PRIVATE KEY----------END PRIVATE KEY-----\n" BQ_PRIVATE_KEY_ID="" BQ_PROJECT_ID="" ``` Make sure to include `.dev.vars` in your project `.gitignore` file to prevent your credentials being uploaded to a repository when using version control. Check the secrets are loaded correctly in `src/index.js` by logging their values into a console output, as follows: ```javascript export default { async fetch(request, env, ctx) { console.log("BQ_CLIENT_EMAIL: ", env.BQ_CLIENT_EMAIL); console.log("BQ_PRIVATE_KEY: ", env.BQ_PRIVATE_KEY); console.log("BQ_PRIVATE_KEY_ID: ", env.BQ_PRIVATE_KEY_ID); console.log("BQ_PROJECT_ID: ", env.BQ_PROJECT_ID); return new Response("Hello World!"); }, }; ``` Restart the Worker and run `npx wrangler dev`. You should see that the server now mentions the newly added variables: ```plaintext Using vars defined in .dev.vars Your worker has access to the following bindings: - Vars: - BQ_CLIENT_EMAIL: "(hidden)" - BQ_PRIVATE_KEY: "(hidden)" - BQ_PRIVATE_KEY_ID: "(hidden)" - BQ_PROJECT_ID: "(hidden)" [wrangler:inf] Ready on http://localhost:8787 ``` If you open `http://localhost:8787` in your browser, you should see the values of the variables show up in your console where the `npx wrangler dev` command is running, while still seeing only the `Hello World!` text in the browser window. You now have access to the GCP credentials from a Worker. Next, you will install a library to help with the creation of the JSON Web Token needed to interact with GCP's API. ## 3. Install library to handle JWT operations To interact with BigQuery's REST API, you will need to generate a [JSON Web Token](https://jwt.io/introduction) to authenticate your requests using the credentials that you have loaded into Worker secrets in the previous step. For this tutorial, you will be using the [jose](https://www.npmjs.com/package/jose?activeTab=readme) library for JWT-related operations. Install it by running the following command in a console: ```sh npm i jose ``` To verify that the installation succeeded, you can run `npm list`, which lists all the installed packages, to check if the `jose` dependency has been added: ```sh @0.0.0 // ├── @cloudflare/vitest-pool-workers@0.4.29 ├── jose@5.9.2 ├── vitest@1.5.0 └── wrangler@3.75.0 ``` ## 4. Generate JSON web token Now that you have installed the `jose` library, it is time to import it and add a function to your code that generates a signed JSON Web Token (JWT): ```javascript import * as jose from 'jose'; ... const generateBQJWT = async (aCryptoKey, env) => { const algorithm = "RS256"; const audience = "https://bigquery.googleapis.com/"; const expiryAt = (new Date().valueOf() / 1000); const privateKey = await jose.importPKCS8(env.BQ_PRIVATE_KEY, algorithm); // Generate signed JSON Web Token (JWT) return new jose.SignJWT() .setProtectedHeader({ typ: 'JWT', alg: algorithm, kid: env.BQ_PRIVATE_KEY_ID }) .setIssuer(env.BQ_CLIENT_EMAIL) .setSubject(env.BQ_CLIENT_EMAIL) .setAudience(audience) .setExpirationTime(expiryAt) .setIssuedAt() .sign(privateKey) } export default { async fetch(request, env, ctx) { ... // Create JWT to authenticate the BigQuery API call let bqJWT; try { bqJWT = await generateBQJWT(env); } catch (e) { return new Response('An error has occurred while generating the JWT', { status: 500 }) } }, ... }; ``` Now that you have created a JWT, it is time to do an API call to BigQuery to fetch some data. ## 5. Make authenticated requests to Google BigQuery With the JWT token created in the previous step, issue an API request to BigQuery's API to retrieve data from a table. You will now query the table that you created in BigQuery earlier in this tutorial. This example uses a sampled version of the [Hacker News Corpus](https://www.kaggle.com/datasets/hacker-news/hacker-news-corpus) that was used under its MIT licence and uploaded to BigQuery. ```javascript const queryBQ = async (bqJWT, path) => { const bqEndpoint = `https://bigquery.googleapis.com${path}` // In this example, text is a field in the BigQuery table that is being queried (hn.news_sampled) const query = 'SELECT text FROM hn.news_sampled LIMIT 3'; const response = await fetch(bqEndpoint, { method: "POST", body: JSON.stringify({ "query": query }), headers: { Authorization: `Bearer ${bqJWT}` } }) return response.json() } ... export default { async fetch(request, env, ctx) { ... let ticketInfo; try { ticketInfo = await queryBQ(bqJWT); } catch (e) { return new Response('An error has occurred while querying BQ', { status: 500 }); } ... }, }; ``` Having the raw row data from BigQuery means that you can now format it in a JSON-like style next. ## 6. Format results from the query Now that you have retrieved the data from BigQuery, your BigQuery API response should look something like this: ```json { ... "schema": { "fields": [ { "name": "title", "type": "STRING", "mode": "NULLABLE" }, { "name": "text", "type": "STRING", "mode": "NULLABLE" } ] }, ... "rows": [ { "f": [ { "v": "" }, { "v": "" } ] }, { "f": [ { "v": "" }, { "v": "" } ] }, { "f": [ { "v": "" }, { "v": "" } ] } ], ... } ``` This format may be difficult to read and work with when iterating through results. So you will now implement a function that maps the schema into each individual value, and the resulting output will be easier to read, as shown below. Each row corresponds to an object within an array. ```javascript [ { title: "", text: "", }, { title: "", text: "", }, { title: "", text: "", }, ]; ``` Create a `formatRows` function that takes a number of rows and fields returned from the BigQuery response body and returns an array of results as objects with named fields. ```javascript const formatRows = (rowsWithoutFieldNames, fields) => { // Index to fieldName const fieldsByIndex = new Map(); // Load all fields by name and have their index in the array result as their key fields.forEach((field, index) => { fieldsByIndex.set(index, field.name) }) // Iterate through rows const rowsWithFieldNames = rowsWithoutFieldNames.map(row => { // Per each row represented by an array f, iterate through the unnamed values and find their field names by searching them in the fieldsByIndex. let newRow = {} row.f.forEach((field, index) => { const fieldName = fieldsByIndex.get(index); if (fieldName) { // For every field in a row, add them to newRow newRow = ({ ...newRow, [fieldName]: field.v }); } }) return newRow }) return rowsWithFieldNames } export default { async fetch(request, env, ctx) { ... // Transform output format into array of objects with named fields let formattedResults; if ('rows' in ticketInfo) { formattedResults = formatRows(ticketInfo.rows, ticketInfo.schema.fields); console.log(formattedResults) } else if ('error' in ticketInfo) { return new Response(ticketInfo.error.message, { status: 500 }) } ... }, }; ``` ## 7. Feed data into Workers AI Now that you have converted the response from the BigQuery API into an array of results, generate some tags and attach an associated sentiment score using an LLM via [Workers AI](https://developers.cloudflare.com/workers-ai/): ```javascript const generateTags = (data, env) => { return env.AI.run("@cf/meta/llama-3.1-8b-instruct", { prompt: `Create three one-word tags for the following text. return only these three tags separated by a comma. don't return text that is not a category.Lowercase only. ${JSON.stringify(data)}`, }); } const generateSentimentScore = (data, env) => { return env.AI.run("@cf/meta/llama-3.1-8b-instruct", { prompt: `return a float number between 0 and 1 measuring the sentiment of the following text. 0 being negative and 1 positive. return only the number, no text. ${JSON.stringify(data)}`, }); } // Iterates through values, sends them to an AI handler and encapsulates all responses into a single Promise const getAIGeneratedContent = (data, env, aiHandler) => { let results = data?.map(dataPoint => { return aiHandler(dataPoint, env) }) return Promise.all(results) } ... export default { async fetch(request, env, ctx) { ... let summaries, sentimentScores; try { summaries = await getAIGeneratedContent(formattedResults, env, generateTags); sentimentScores = await getAIGeneratedContent(formattedResults, env, generateSentimentScore) } catch { return new Response('There was an error while generating the text summaries or sentiment scores') } }, formattedResults = formattedResults?.map((formattedResult, i) => { if (sentimentScores[i].response && summaries[i].response) { return { ...formattedResult, 'sentiment': parseFloat(sentimentScores[i].response).toFixed(2), 'tags': summaries[i].response.split(',').map((result) => result.trim()) } } } }; ``` Uncomment the following lines from the Wrangler file in your project: * wrangler.jsonc ```jsonc { "ai": { "binding": "AI" } } ``` * wrangler.toml ```toml [ai] binding = "AI" ``` Restart the Worker that is running locally, and after doing so, go to your application endpoint: ```sh curl http://localhost:8787 ``` It is likely that you will be asked to log in to your Cloudflare account and grant temporary access to Wrangler (the Cloudflare CLI) to use your account when using Worker AI. Once you access `http://localhost:8787` you should see an output similar to the following: ```sh { "data": [ { "text": "You can see a clear spike in submissions right around US Thanksgiving.", "sentiment": "0.61", "tags": [ "trends", "submissions", "thanksgiving" ] }, { "text": "I didn't test the changes before I published them. I basically did development on the running server. In fact for about 30 seconds the comments page was broken due to a bug.", "sentiment": "0.35", "tags": [ "software", "deployment", "error" ] }, { "text": "I second that. As I recall, it's a very enjoyable 700-page brain dump by someone who's really into his subject. The writing has a personal voice; there are lots of asides, dry wit, and typos that suggest restrained editing. The discussion is intelligent and often theoretical (and Bartle is not scared to use mathematical metaphors), but the tone is not academic.", "sentiment": "0.86", "tags": [ "review", "game", "design" ] } ] } ``` The actual values and fields will mostly depend on the query made in Step 5 that is then fed into the LLM. ## Final result All the code shown in the different steps is combined into the following code in `src/index.js`: ```javascript import * as jose from "jose"; const generateBQJWT = async (env) => { const algorithm = "RS256"; const audience = "https://bigquery.googleapis.com/"; const expiryAt = new Date().valueOf() / 1000; const privateKey = await jose.importPKCS8(env.BQ_PRIVATE_KEY, algorithm); // Generate signed JSON Web Token (JWT) return new jose.SignJWT() .setProtectedHeader({ typ: "JWT", alg: algorithm, kid: env.BQ_PRIVATE_KEY_ID, }) .setIssuer(env.BQ_CLIENT_EMAIL) .setSubject(env.BQ_CLIENT_EMAIL) .setAudience(audience) .setExpirationTime(expiryAt) .setIssuedAt() .sign(privateKey); }; const queryBQ = async (bgJWT, path) => { const bqEndpoint = `https://bigquery.googleapis.com${path}`; const query = "SELECT text FROM hn.news_sampled LIMIT 3"; const response = await fetch(bqEndpoint, { method: "POST", body: JSON.stringify({ query: query, }), headers: { Authorization: `Bearer ${bgJWT}`, }, }); return response.json(); }; const formatRows = (rowsWithoutFieldNames, fields) => { // Index to fieldName const fieldsByIndex = new Map(); fields.forEach((field, index) => { fieldsByIndex.set(index, field.name); }); const rowsWithFieldNames = rowsWithoutFieldNames.map((row) => { // Map rows into an array of objects with field names let newRow = {}; row.f.forEach((field, index) => { const fieldName = fieldsByIndex.get(index); if (fieldName) { newRow = { ...newRow, [fieldName]: field.v }; } }); return newRow; }); return rowsWithFieldNames; }; const generateTags = (data, env) => { return env.AI.run("@cf/meta/llama-3.1-8b-instruct", { prompt: `Create three one-word tags for the following text. return only these three tags separated by a comma. don't return text that is not a category.Lowercase only. ${JSON.stringify(data)}`, }); }; const generateSentimentScore = (data, env) => { return env.AI.run("@cf/meta/llama-3.1-8b-instruct", { prompt: `return a float number between 0 and 1 measuring the sentiment of the following text. 0 being negative and 1 positive. return only the number, no text. ${JSON.stringify(data)}`, }); }; const getAIGeneratedContent = (data, env, aiHandler) => { let results = data?.map((dataPoint) => { return aiHandler(dataPoint, env); }); return Promise.all(results); }; export default { async fetch(request, env, ctx) { // Create JWT to authenticate the BigQuery API call let bqJWT; try { bqJWT = await generateBQJWT(env); } catch (error) { console.log(error); return new Response("An error has occurred while generating the JWT", { status: 500, }); } // Fetch results from BigQuery let ticketInfo; try { ticketInfo = await queryBQ( bqJWT, `/bigquery/v2/projects/${env.BQ_PROJECT_ID}/queries`, ); } catch (error) { console.log(error); return new Response("An error has occurred while querying BQ", { status: 500, }); } // Transform output format into array of objects with named fields let formattedResults; if ("rows" in ticketInfo) { formattedResults = formatRows(ticketInfo.rows, ticketInfo.schema.fields); } else if ("error" in ticketInfo) { return new Response(ticketInfo.error.message, { status: 500 }); } // Generate AI summaries and sentiment scores let summaries, sentimentScores; try { summaries = await getAIGeneratedContent( formattedResults, env, generateTags, ); sentimentScores = await getAIGeneratedContent( formattedResults, env, generateSentimentScore, ); } catch { return new Response( "There was an error while generating the text summaries or sentiment scores", ); } // Add AI summaries and sentiment scores to previous results formattedResults = formattedResults?.map((formattedResult, i) => { if (sentimentScores[i].response && summaries[i].response) { return { ...formattedResult, sentiment: parseFloat(sentimentScores[i].response).toFixed(2), tags: summaries[i].response.split(",").map((result) => result.trim()), }; } }); const response = { data: formattedResults }; return new Response(JSON.stringify(response), { headers: { "Content-Type": "application/json" }, }); }, }; ``` If you wish to deploy this Worker, you can do so by running `npx wrangler deploy`: ```sh Total Upload: KiB / gzip: KiB Uploaded (x sec) Deployed triggers (x sec) https:// Current Version ID: ``` This will create a public endpoint that you can use to access the Worker globally. Please keep this in mind when using production data, and make sure to include additional access controls in place. ## Conclusion In this tutorial, you have learnt how to integrate Google BigQuery and Cloudflare Workers by creating a GCP service account key and storing part of it as Worker secrets. This was later imported in the code, and by using the `jose` npm library, you created a JSON Web Token to authenticate the API query to BigQuery. Once you obtained the results, you formatted them to pass to generative AI models via Workers AI to generate tags and to perform sentiment analysis on the extracted data. ## Next Steps If, instead of displaying the results of ingesting the data to the AI model in a browser, your workflow requires fetching and store data (for example in [R2](https://developers.cloudflare.com/r2/) or [D1](https://developers.cloudflare.com/d1/)) on regular intervals, you may want to consider adding a [scheduled handler](https://developers.cloudflare.com/workers/runtime-apis/handlers/scheduled/) for this Worker. This enables you to trigger the Worker with a predefined cadence via a [Cron Trigger](https://developers.cloudflare.com/workers/configuration/cron-triggers/). Consider reviewing the Reference Architecture Diagrams on [Ingesting BigQuery Data into Workers AI](https://developers.cloudflare.com/reference-architecture/diagrams/ai/bigquery-workers-ai/). A use case to ingest data from other sources, like you did in this tutorial, is to create a RAG system. If this sounds relevant to you, please check out the [Build a Retrieval Augmented Generation (RAG) AI tutorial](https://developers.cloudflare.com/workers-ai/guides/tutorials/build-a-retrieval-augmented-generation-ai/). To learn more about what other AI models you can use at Cloudflare, please visit the [Workers AI](https://developers.cloudflare.com/workers-ai) section of our docs. --- title: Backoff schedule · Cloudflare for Platforms docs description: After you create a custom hostname, Cloudflare has to validate that hostname. lastUpdated: 2025-04-11T13:02:33.000Z chatbotDeprioritize: false source_url: html: https://developers.cloudflare.com/cloudflare-for-platforms/cloudflare-for-saas/domain-support/hostname-validation/backoff-schedule/ md: https://developers.cloudflare.com/cloudflare-for-platforms/cloudflare-for-saas/domain-support/hostname-validation/backoff-schedule/index.md --- After you create a custom hostname, Cloudflare has to [validate that hostname](https://developers.cloudflare.com/cloudflare-for-platforms/cloudflare-for-saas/domain-support/hostname-validation/). Attempts to validate a Custom Hostname are distributed over seven days (a total of 75 retries). At the end of this schedule, if the validation is unsuccessful, the custom hostname will be deleted. The function that determines the next check varies based on the number of attempts: * For the first 10 attempts: ```txt now() + min((floor(60 * pow(1.05, retry_attempt)) * INTERVAL '1 second'), INTERVAL '4 hours') ``` * For the remaining 65 attempts: ```txt now() + min((floor(60 * pow(1.15, retry_attempt)) * INTERVAL '1 second'), INTERVAL '4 hours') ``` The first 10 checks complete within 20 minutes and most checks complete in the first four hours. The check back off is capped to a maximum of four hours to avoid exponential growth. The back off behavior causes larger gaps between check intervals towards the end of the back off schedule: | Retry Attempt | In Seconds | In Minutes | In Hours | | - | - | - | - | | 0 | 60 | 1 | 0.016667 | | 1 | 63 | 1.05 | 0.0175 | | 2 | 66 | 1.1 | 0.018333 | | 3 | 69 | 1.15 | 0.019167 | | 4 | 72 | 1.2 | 0.02 | | 5 | 76 | 1.266667 | 0.021111 | | 6 | 80 | 1.333333 | 0.022222 | | 7 | 84 | 1.4 | 0.023333 | | 8 | 88 | 1.466667 | 0.024444 | | 9 | 93 | 1.55 | 0.025833 | | 10 | 242 | 4.033333 | 0.067222 | | 11 | 279 | 4.65 | 0.0775 | | 12 | 321 | 5.35 | 0.089167 | | 13 | 369 | 6.15 | 0.1025 | | 14 | 424 | 7.066667 | 0.117778 | | 15 | 488 | 8.133333 | 0.135556 | | 16 | 561 | 9.35 | 0.155833 | | 17 | 645 | 10.75 | 0.179167 | | 18 | 742 | 12.366667 | 0.206111 | | 19 | 853 | 14.216667 | 0.236944 | | 20 | 981 | 16.35 | 0.2725 | | 21 | 1129 | 18.816667 | 0.313611 | | 22 | 1298 | 21.633333 | 0.360556 | | 23 | 1493 | 24.883333 | 0.414722 | | 24 | 1717 | 28.616667 | 0.476944 | | 25 | 1975 | 32.916667 | 0.548611 | | 26 | 2271 | 37.85 | 0.630833 | | 27 | 2612 | 43.533333 | 0.725556 | | 28 | 3003 | 50.05 | 0.834167 | | 29 | 3454 | 57.566667 | 0.959444 | | 30 | 3972 | 66.2 | 1.103333 | | 31 | 4568 | 76.133333 | 1.268889 | | 32 | 5253 | 87.55 | 1.459167 | | 33 | 6041 | 100.683333 | 1.678056 | | 34 | 6948 | 115.8 | 1.93 | | 35 | 7990 | 133.166667 | 2.219444 | | 36 | 9189 | 153.15 | 2.5525 | | 37 | 10567 | 176.116667 | 2.935278 | | 38 | 12152 | 202.533333 | 3.375556 | | 39 | 13975 | 232.916667 | 3.881944 | | 40 | 14400 | 240 | 4 | | 41 | 14400 | 240 | 4 | | 42 | 14400 | 240 | 4 | | 43 | 14400 | 240 | 4 | | 44 | 14400 | 240 | 4 | | 45 | 14400 | 240 | 4 | | 46 | 14400 | 240 | 4 | | 47 | 14400 | 240 | 4 | | 48 | 14400 | 240 | 4 | | 49 | 14400 | 240 | 4 | | 50 | 14400 | 240 | 4 | | 51 | 14400 | 240 | 4 | | 52 | 14400 | 240 | 4 | | 53 | 14400 | 240 | 4 | | 54 | 14400 | 240 | 4 | | 55 | 14400 | 240 | 4 | | 56 | 14400 | 240 | 4 | | 57 | 14400 | 240 | 4 | | 58 | 14400 | 240 | 4 | | 59 | 14400 | 240 | 4 | | 60 | 14400 | 240 | 4 | | 61 | 14400 | 240 | 4 | | 62 | 14400 | 240 | 4 | | 63 | 14400 | 240 | 4 | | 64 | 14400 | 240 | 4 | | 65 | 14400 | 240 | 4 | | 66 | 14400 | 240 | 4 | | 67 | 14400 | 240 | 4 | | 68 | 14400 | 240 | 4 | | 69 | 14400 | 240 | 4 | | 70 | 14400 | 240 | 4 | | 71 | 14400 | 240 | 4 | | 72 | 14400 | 240 | 4 | | 73 | 14400 | 240 | 4 | | 74 | 14400 | 240 | 4 | | 75 | 14400 | 240 | 4 | --- title: Error codes - Custom Hostname Validation · Cloudflare for Platforms docs description: When you validate a custom hostname, you might encounter the following error codes. lastUpdated: 2024-08-13T19:56:56.000Z chatbotDeprioritize: false source_url: html: https://developers.cloudflare.com/cloudflare-for-platforms/cloudflare-for-saas/domain-support/hostname-validation/error-codes/ md: https://developers.cloudflare.com/cloudflare-for-platforms/cloudflare-for-saas/domain-support/hostname-validation/error-codes/index.md --- When you [validate a custom hostname](https://developers.cloudflare.com/cloudflare-for-platforms/cloudflare-for-saas/domain-support/hostname-validation/), you might encounter the following error codes. | Error | Cause | | - | - | | Zone does not have a fallback origin set. | Fallback is not active. | | Fallback origin is in a status of `initializing`, `pending_deployment`, `pending_deletion`, or `deleted`. | Fallback is not active. | | Custom hostname does not `CNAME` to this zone. | Zone does not have [apex proxying entitlement](https://developers.cloudflare.com/cloudflare-for-platforms/cloudflare-for-saas/start/advanced-settings/apex-proxying/) and custom hostname does not CNAME to zone. | | None of the `A` or `AAAA` records are owned by this account and the pre-generated ownership validation token was not found. | Account has [apex proxying enabled](https://developers.cloudflare.com/cloudflare-for-platforms/cloudflare-for-saas/start/advanced-settings/apex-proxying/) but the custom hostname failed the hostname validation check on the `A` record. | | This account and the pre-generated ownership validation token was not found. | Hostname does not `CNAME` to zone or none of the `A`/`AAAA` records match reserved IPs for zone. | --- title: Pre-validation methods - Custom Hostname Validation · Cloudflare for Platforms docs description: Pre-validation methods help verify domain ownership before your customer's traffic is proxying through Cloudflare. lastUpdated: 2024-12-16T22:33:26.000Z chatbotDeprioritize: false source_url: html: https://developers.cloudflare.com/cloudflare-for-platforms/cloudflare-for-saas/domain-support/hostname-validation/pre-validation/ md: https://developers.cloudflare.com/cloudflare-for-platforms/cloudflare-for-saas/domain-support/hostname-validation/pre-validation/index.md --- Pre-validation methods help verify domain ownership before your customer's traffic is proxying through Cloudflare. ## Use when Use pre-validation methods when your customers cannot tolerate any downtime, which often occurs with production domains. The downside is that these methods require an additional setup step for your customers. Especially if you already need them to add something to their domain for [certificate validation](https://developers.cloudflare.com/cloudflare-for-platforms/cloudflare-for-saas/security/certificate-management/issue-and-validate/validate-certificates/), pre-validation might make their onboarding more complicated. If your customers can tolerate a bit of downtime and you want their setup to be simpler, review our [real-time validation methods](https://developers.cloudflare.com/cloudflare-for-platforms/cloudflare-for-saas/domain-support/hostname-validation/realtime-validation/). ## How to ### TXT records TXT validation is when your customer adds a `TXT` record to their authoritative DNS to verify domain ownership. Note If your customer cannot update their authoritative DNS, you could also use [HTTP validation](#http-tokens). To set up `TXT` validation: 1. When you [create a custom hostname](https://developers.cloudflare.com/api/resources/custom_hostnames/methods/create/), save the `ownership_verification` information. ```json { "result": [ { "id": "3537a672-e4d8-4d89-aab9-26cb622918a1", "hostname": "app.example.com", // ... "status": "pending", "verification_errors": ["custom hostname does not CNAME to this zone."], "ownership_verification": { "type": "txt", "name": "_cf-custom-hostname.app.example.com", "value": "0e2d5a7f-1548-4f27-8c05-b577cb14f4ec" }, "created_at": "2020-03-04T19:04:02.705068Z" } ] } ``` 2. Have your customer add a `TXT` record with that `name` and `value` at their authoritative DNS provider. 3. After a few minutes, you will see the hostname status become **Active** in the UI. 4. Once you activate the custom hostname, your customer can remove the `TXT` record. ### HTTP tokens HTTP validation is when you or your customer places an HTTP token on their origin server to verify domain ownership. To set up HTTP validation: When you [create a custom hostname](https://developers.cloudflare.com/cloudflare-for-platforms/cloudflare-for-saas/security/certificate-management/issue-and-validate/issue-certificates/) using the API, Cloudflare provides an HTTP `ownership_verification` record in the response. To get and use the `ownership_verification` record: 1. Make an API call to [create a Custom Hostname](https://developers.cloudflare.com/api/resources/custom_hostnames/methods/create/). 2. In the response, copy the `http_url` and `http_body` from the `ownership_verification_http` object: ```json { "result": [ { "id": "24c8c68e-bec2-49b6-868e-f06373780630", "hostname": "app.example.com", // ... "ownership_verification_http": { "http_url": "http://app.example.com/.well-known/cf-custom-hostname-challenge/24c8c68e-bec2-49b6-868e-f06373780630", "http_body": "48b409f6-c886-406b-8cbc-0fbf59983555" }, "created_at": "2020-03-04T20:06:04.117122Z" } ] } ``` 3. Have your customer place the `http_url` and `http_body` on their origin web server. ```txt location "/.well-known/cf-custom-hostname-challenge/24c8c68e-bec2-49b6-868e-f06373780630" { return 200 "48b409f6-c886-406b-8cbc-0fbf59983555\n"; } ``` Cloudflare will access this token by sending `GET` requests to the `http_url` using `User-Agent: Cloudflare Custom Hostname Verification`. Note If you can serve these tokens on behalf of your customers, you can simplify their overall setup. 4. After a few minutes, you will see the hostname status become **Active** in the UI. 5. Once the hostname is active, your customer can remove the token from their origin server. --- title: Real-time validation methods - Custom Hostname Validation · Cloudflare for Platforms docs description: When you use a real-time validation method, Cloudflare verifies your customer's hostname when your customers adds their DNS routing record to their authoritative DNS. lastUpdated: 2024-12-16T22:33:26.000Z chatbotDeprioritize: false source_url: html: https://developers.cloudflare.com/cloudflare-for-platforms/cloudflare-for-saas/domain-support/hostname-validation/realtime-validation/ md: https://developers.cloudflare.com/cloudflare-for-platforms/cloudflare-for-saas/domain-support/hostname-validation/realtime-validation/index.md --- When you use a real-time validation method, Cloudflare verifies your customer's hostname when your customers adds their [DNS routing record](https://developers.cloudflare.com/cloudflare-for-platforms/cloudflare-for-saas/start/getting-started/#3-have-customer-create-cname-record) to their authoritative DNS. ## Use when Real-time validation methods put less burden on your customers because it does not require any additional actions. However, it may cause some downtime since Cloudflare takes a few seconds to iterate over DNS records. This downtime also can increase - due to the increasing [validation backoff schedule](https://developers.cloudflare.com/cloudflare-for-platforms/cloudflare-for-saas/domain-support/hostname-validation/backoff-schedule/) - if your customer takes additional time to add their DNS routing record. To minimize this downtime, you can continually send no-change [`PATCH` requests](https://developers.cloudflare.com/api/resources/custom_hostnames/methods/edit/) for the specific custom hostname until it validates (which resets the validation backoff schedule). To avoid any chance of downtime, use a [pre-validation method](https://developers.cloudflare.com/cloudflare-for-platforms/cloudflare-for-saas/domain-support/hostname-validation/pre-validation/) ## How to Real-time validation occurs automatically when your customer adds their [DNS routing record](https://developers.cloudflare.com/cloudflare-for-platforms/cloudflare-for-saas/start/getting-started/#3-have-customer-create-cname-record). The exact record depends on your Cloudflare for SaaS setup. ### Normal setup (CNAME target) Most customers will have a `CNAME` target, which requires their customers to create a `CNAME` record similar to: ```txt mystore.com CNAME customers.saasprovider.com ``` ### Apex proxying With [apex proxying](https://developers.cloudflare.com/cloudflare-for-platforms/cloudflare-for-saas/start/advanced-settings/apex-proxying/), SaaS customers need to create an `A` record for their hostname that points to the IP prefix allocated to the SaaS provider's account. ```txt example.com. 60 IN A 192.0.2.1 ``` Note For [BYOIP](https://developers.cloudflare.com/byoip/) customers, Cloudflare automatically enables the Apex Proxy Access feature on your BYOIP block, which allows Custom Hostnames to be activated via [Apex proxying](https://developers.cloudflare.com/cloudflare-for-platforms/cloudflare-for-saas/domain-support/hostname-validation/realtime-validation/#apex-proxying) when Authoritative DNS for a customer's hostname targets any IP addresses in your BYOIP block. --- title: Validation status - Custom Hostname Validation · Cloudflare for Platforms docs description: When you validate a custom hostname, that hostname can be in several different statuses. lastUpdated: 2025-02-19T18:44:35.000Z chatbotDeprioritize: false source_url: html: https://developers.cloudflare.com/cloudflare-for-platforms/cloudflare-for-saas/domain-support/hostname-validation/validation-status/ md: https://developers.cloudflare.com/cloudflare-for-platforms/cloudflare-for-saas/domain-support/hostname-validation/validation-status/index.md --- When you [validate a custom hostname](https://developers.cloudflare.com/cloudflare-for-platforms/cloudflare-for-saas/domain-support/hostname-validation/), that hostname can be in several different statuses. | Status | Description | | - | - | | Pending | Custom hostname is pending hostname validation. | | Active | Custom hostname has completed hostname validation and is active. | | Active re-deploying | Customer hostname is active and the changes have been processed. | | Blocked | Custom hostname cannot be added to Cloudflare at this time. Custom hostname was likely associated with Cloudflare previously and flagged for abuse. If you are an Enterprise customer, contact your Customer Success Manager. Otherwise, email `abusereply@cloudflare.com` with the name of the web property and a detailed explanation of your association with this web property. | | Moved | Custom hostname is not active after **Pending** for the entirety of the [Validation Backoff Schedule](https://developers.cloudflare.com/cloudflare-for-platforms/cloudflare-for-saas/domain-support/hostname-validation/backoff-schedule/) or it no longer points to the fallback origin. | | Deleted | Custom hostname was deleted from the zone. Occurs when status is **Moved** for more than seven days. | ## Refresh validation To run the custom hostname validation check again, select **Refresh** on the dashboard or send a `PATCH` request to the [Edit custom hostname endpoint](https://developers.cloudflare.com/api/resources/custom_hostnames/methods/edit/). If using the API, make sure that the `--data` field contains an `ssl` object with the same `method` and `type` as the original request. If the hostname is in a **Moved** or **Deleted** state, the refresh will set the custom hostname back to **Pending validation**. --- title: Custom Certificate Signing Requests · Cloudflare for Platforms docs lastUpdated: 2024-08-13T19:56:56.000Z chatbotDeprioritize: false source_url: html: https://developers.cloudflare.com/cloudflare-for-platforms/cloudflare-for-saas/reference/status-codes/custom-csrs/ md: https://developers.cloudflare.com/cloudflare-for-platforms/cloudflare-for-saas/reference/status-codes/custom-csrs/index.md --- ## Success codes | Endpoint | Method | HTTP Status Code | | - | - | - | | `/api/v4/zones/:zone_id/custom_csrs` | POST | 201 Created | | `/api/v4/zones/:zone_id/custom_csrs` | GET | 200 OK | | `/api/v4/zones/:zone_id/custom_csrs/:custom_csr_id` | GET | 200 OK | | `/api/v4/zones/:zone_id/custom_csrs/:custom_csr_id` | DELETE | 200 OK | ## Error codes | HTTP Status Code | API Error Code | Error Message | | - | - | - | | 400 | 1400 | Unable to decode the JSON request body. Check your input and try again. | | 400 | 1401 | Zone ID is required. Check your input and try again. | | 400 | 1402 | The request has no Authorization header. Check your input and try again. | | 400 | 1405 | Country field is required. Check your input and try again. | | 400 | 1406 | State field is required. Check your input and try again. | | 400 | 1407 | Locality field is required. Check your input and try again. | | 400 | 1408 | Organization field is required. Check your input and try again. | | 400 | 1409 | Common Name field is required. Check your input and try again. | | 400 | 1410 | The specified Common Name is too long. Maximum allowed length is %d characters. Check your input and try again. | | 400 | 1411 | At least one subject alternative name (SAN) is required. Check your input and try again. | | 400 | 1412 | Invalid subject alternative name(s) (SAN). SANs have to be smaller than 256 characters in length, cannot be IP addresses, cannot contain any special characters such as \~\`!@#$%^&\*()=+\[] | | 400 | 1413 | Subject Alternative Names (SANs) with non-ASCII characters are not supported. Check your input and try again. | | 400 | 1414 | Reserved top domain subject alternative names (SAN), such as 'test', 'example', 'invalid' or 'localhost', is not supported. Check your input and try again. | | 400 | 1415 | Unable to parse subject alternative name(s) (SAN) - :reason. Check your input and try again. Reasons: publicsuffix: cannot derive eTLD+1 for domain %q; publicsuffix: invalid public suffix %q for domain %q; | | 400 | 1416 | Subject Alternative Names (SANs) ending in example.com, example.net, or example.org are prohibited. Check your input and try again. | | 400 | 1417 | Invalid key type. Only 'rsa2048' or 'p256v1' is accepted. Check your input and try again. | | 400 | 1418 | The custom CSR ID is invalid. Check your input and try again. | | 401 | 1000 | Unable to extract bearer token | | 401 | 1001 | Unable to parse JWT token | | 401 | 1002 | Bad JWT header | | 401 | 1003 | Failed to verify JWT token | | 401 | 1004 | Failed to get claims from JWT token | | 401 | 1005 | JWT token does not have required claims | | 403 | 1403 | No quota has been allocated for this zone. If you are already a paid Cloudflare for SaaS customer, contact your Customer Success Manager for additional provisioning. If you are not yet enrolled, [fill out this contact form](https://www.cloudflare.com/plans/enterprise/contact/) and our sales team will contact you. | | 403 | 1404 | Access to generating CSRs has not been granted for this zone. If you are already a paid Cloudflare for SaaS customer, contact your Customer Success Manager for additional provisioning. If you are not yet enrolled, [fill out this contact form](https://www.cloudflare.com/plans/enterprise/contact/) and our sales team will contact you. | | 404 | 1419 | The custom CSR was not found. | | 409 | 1420 | The custom CSR is associated with an active certificate pack. You will need to delete all associated active certificate packs before you can delete the custom CSR. | | 500 | 1500 | Internal Server Error | --- title: Status codes - Custom hostnames · Cloudflare for Platforms docs lastUpdated: 2024-08-13T19:56:56.000Z chatbotDeprioritize: false source_url: html: https://developers.cloudflare.com/cloudflare-for-platforms/cloudflare-for-saas/reference/status-codes/custom-hostnames/ md: https://developers.cloudflare.com/cloudflare-for-platforms/cloudflare-for-saas/reference/status-codes/custom-hostnames/index.md --- *** ## Success codes | Endpoint | Method | Code | | - | - | - | | `/v4/zones/:zone_id/custom_hostnames` | POST | 201 Created | | `/v4/zones/:zone_id/custom_hostnames/:custom_hostname_id` | GET | 200 OK | | `/v4/zones/:zone_id/custom_hostnames` | GET | 200 OK | | `/v4/zones/:zone_id/custom_hostnames/:custom_hostname_id` | DELETE | 200 OK | | `/v4/zones/:zone_id/custom_hostnames/:custom_hostname_id` | PATCH | 202 Accepted | *** ## Error codes | HTTP Status Code | API Error Code | Error Message | | - | - | - | | 400 | 1400 | Unable to decode the JSON request body. Check your input and try again. | | 400 | 1401 | Unable to encode the Custom Metadata as JSON. Check your input and try again. | | 400 | 1402 | Zone ID is required. Check your input and try again. | | 400 | 1403 | The request has no Authorization header. Check your input and try again. | | 400 | 1407 | Invalid custom hostname. Custom hostnames have to be smaller than 256 characters in length, cannot be IP addresses, cannot contain any special characters such as \`\`\~\`!@#$%^&\*()=+\[]\\ | | 400 | 1408 | Custom hostnames with non-ASCII characters are not supported. Check your input and try again. | | 400 | 1409 | Reserved top domain custom hostnames, such as 'test', 'example', 'invalid' or 'localhost', is not supported. Check your input and try again. | | 400 | 1410 | Unable to parse custom hostname - `:reason`. Check your input and try again. **Reasons:** publicsuffix: cannot derive eTLD+1 for domain `:domain` publicsuffix: invalid public suffix `:suffix` for domain `:domain` | | 400 | 1411 | Custom hostnames ending in example.com, example.net, or example.org are prohibited. Check your input and try again. | | 400 | 1412 | Custom metadata for wildcard custom hostnames is not supported. Check your input and try again. | | 400 | 1415 | Invalid custom origin hostname. Custom origin hostnames have to be smaller than 256 characters in length, cannot be IP addresses, cannot contain any special characters such as \`!@#$%^&\*()=+\[]\\ | | 400 | 1416 | Custom origin hostnames with non-ASCII characters are not supported. Check your input and try again. | | 400 | 1417 | Reserved top domain custom origin hostnames, such as 'test', 'example', 'invalid' or 'localhost', is not supported. Check your input and try again. | | 400 | 1418 | Unable to parse custom origin hostname - `:reason`. Check your input and try again. **Reasons:** publicsuffix: cannot derive eTLD+1 for domain `:domain` publicsuffix: invalid public suffix`:suffix`for domain`:domain` | | 400 | 1419 | Custom origin hostnames ending in example.com, example.net, or example.org are prohibited. Check your input and try again. | | 400 | 1420 | Wildcard custom origin hostnames are not supported. Check your input and try again. | | 400 | 1421 | The custom origin hostname you specified does not exist on Cloudflare as a DNS record (A, AAAA or CNAME) in your zone:`:zone\_tag`. Check your input and try again. | | 400 | 1422 | Invalid `http2`setting. Only 'on' or 'off' is accepted. Check your input and try again. | | 400 | 1423 | Invalid`tls\_1\_2\_only`setting. Only 'on' or 'off' is accepted. Check your input and try again. | | 400 | 1424 | Invalid`tls\_1\_3`setting. Only 'on' or 'off' is accepted. Check your input and try again. | | 400 | 1425 | Invalid`min\_tls\_version`setting. Only '1.0','1.1','1.2' or '1.3' is accepted. Check your input and try again. | | 400 | 1426 | The certificate that you uploaded cannot be parsed. Check your input and try again. | | 400 | 1427 | The certificate that you uploaded is empty. Check your input and try again. | | 400 | 1428 | The private key you uploaded cannot be parsed. Check your input and try again. | | 400 | 1429 | The private key you uploaded does not match the certificate. Check your input and try again. | | 400 | 1430 | The custom CSR ID is invalid. Check your input and try again. | | 404 | 1431 | The custom CSR was not found. | | 400 | 1432 | The validation method is not supported. Only`http`, `email`, or `txt` are accepted. Check your input and try again. | | 400 | 1433 | The validation type is not supported. Only 'dv' is accepted. Check your input and try again. | | 400 | 1434 | The SSL attribute is invalid. Refer to the API documentation, check your input and try again. | | 400 | 1435 | The custom hostname ID is invalid. Check your input and try again. | | 404 | 1436 | The custom hostname was not found. | | 400 | 1437 | Invalid hostname.contain query parameter. The hostname.contain query parameter has to be smaller than 256 characters in length, cannot be IP addresses, cannot contain any special characters such as \`\`\~\`!@#$%^&\*()=+\[]\\ | | 400 | 1438 | Cannot specify other filter parameters in addition to `id`. Only one must be specified. Check your input and try again. | | 409 | 1439 | Modifying the custom hostname is not supported. Check your input and try again. | | 400 | 1440 | Both validation type and validation method are required. Check your input and try again. | | 400 | 1441 | The certificate that you uploaded is having trouble bundling against the public trust store. Check your input and try again. | | 400 | 1442 | Invalid `ciphers` setting. Refer to the documentation for the list of accepted cipher suites. Check your input and try again. | | 400 | 1443 | Cipher suite selection is not supported for a minimum TLS version of 1.3. Check your input and try again. | | 400 | 1444 | The certificate chain that you uploaded has multiple leaf certificates. Check your input and try again. | | 400 | 1445 | The certificate chain that you uploaded has no leaf certificates. Check your input and try again. | | 400 | 1446 | The certificate that you uploaded does not include the custom hostname - `:custom_hostname`. Review your input and try again. | | 400 | 1447 | The certificate that you uploaded does not use a supported signature algorithm. Only SHA-256/ECDSA, SHA-256/RSA, and SHA-1/RSA signature algorithms are supported. Review your input and try again. | | 400 | 1448 | Custom hostnames with wildcards are not supported for certificates managed by Cloudflare. Review your input and try again. | | 400 | 1449 | The request input `bundle_method` must be one of: ubiquitous, optimal, force. | | 401 | 1000 | Unable to extract bearer token | | 401 | 1001 | Unable to parse JWT token | | 401 | 1002 | Bad JWT header | | 401 | 1003 | Failed to verify JWT token | | 401 | 1004 | Failed to get claims from JWT token | | 401 | 1005 | JWT token does not have required claims | | 403 | 1404 | No quota has been allocated for this zone. If you are already a paid Cloudflare for SaaS customer, contact your Customer Success Manager for additional provisioning. If you are not yet enrolled, [fill out this contact form](https://www.cloudflare.com/plans/enterprise/contact/) and our sales team will reach out to you. | | 403 | 1405 | Quota exceeded. If you are already a paid Cloudflare for SaaS customer, contact your Customer Success Manager for additional provisioning. If you are not yet enrolled, [fill out this contact form](https://www.cloudflare.com/plans/enterprise/contact/) and our sales team will reach out to you. | | 403 | 1413 | No [custom metadata](https://developers.cloudflare.com/cloudflare-for-platforms/cloudflare-for-saas/domain-support/custom-metadata/) access has been allocated for this zone. If you are already a paid customer, contact your Customer Success Manager for additional provisioning. If you are not yet enrolled, [fill out this contact form](https://www.cloudflare.com/plans/enterprise/contact/) and our sales team will reach out to you. | | 403 | 1414 | Access to setting a custom origin server has not been granted for this zone. If you are already a paid Cloudflare for SaaS customer, contact your Customer Success Manager for additional provisioning. If you are not yet enrolled, [fill out this contact form](https://www.cloudflare.com/plans/enterprise/contact/) and our sales team will reach out to you. | | 409 | 1406 | Duplicate custom hostname found. | | 500 | 1500 | Internal Server Error | --- title: BigCommerce · Cloudflare for Platforms docs description: Learn how to configure your Enterprise zone with BigCommerce. lastUpdated: 2025-06-18T10:12:13.000Z chatbotDeprioritize: false source_url: html: https://developers.cloudflare.com/cloudflare-for-platforms/cloudflare-for-saas/saas-customers/provider-guides/bigcommerce/ md: https://developers.cloudflare.com/cloudflare-for-platforms/cloudflare-for-saas/saas-customers/provider-guides/bigcommerce/index.md --- Cloudflare partners with BigCommerce to provide BigCommerce customers’ websites with Cloudflare’s performance and security benefits. If you use BigCommerce and also have a Cloudflare plan, you can use your own Cloudflare zone to proxy web traffic to your zone first, then BigCommerce's (the SaaS Provider) zone second. This configuration option is called [Orange-to-Orange (O2O)](https://developers.cloudflare.com/cloudflare-for-platforms/cloudflare-for-saas/saas-customers/how-it-works/). ## Benefits O2O's benefits include applying your own Cloudflare zone's services and settings — such as [WAF](https://developers.cloudflare.com/waf/), [Bot Management](https://developers.cloudflare.com/bots/plans/bm-subscription/), [Waiting Room](https://developers.cloudflare.com/waiting-room/), and more — on the traffic destined for your BigCommerce environment. ## How it works For more details about how O2O is different than other Cloudflare setups, refer to [How O2O works](https://developers.cloudflare.com/cloudflare-for-platforms/cloudflare-for-saas/saas-customers/how-it-works/). ## Enable BigCommerce customers can enable O2O on any Cloudflare zone plan. To enable O2O on your account, [create](https://developers.cloudflare.com/dns/manage-dns-records/how-to/create-dns-records/#create-dns-records) a `CNAME` DNS record. | Type | Name | Target | Proxy status | | - | - | - | - | | `CNAME` | `` | `shops.mybigcommerce.com` | Proxied | Note For more details about a BigCommerce setup, refer to their [support guide](https://support.bigcommerce.com/s/article/Cloudflare-for-Performance-and-Security?language=en_US#orange-to-orange). If you cannot activate your domain using [proxied DNS records](https://developers.cloudflare.com/dns/proxy-status/), reach out to your account team. ## Product compatibility When a hostname within your Cloudflare zone has O2O enabled, you assume additional responsibility for the traffic on that hostname because you can now configure various Cloudflare products to affect that traffic. Some of the Cloudflare products compatible with O2O are: * [Caching](https://developers.cloudflare.com/cache/) * [Workers](https://developers.cloudflare.com/workers/) * [Rules](https://developers.cloudflare.com/rules/) For a full list of compatible products and potential limitations, refer to [Product compatibility](https://developers.cloudflare.com/cloudflare-for-platforms/cloudflare-for-saas/saas-customers/product-compatibility/). ## Additional support If you are a BigCommerce customer and have set up your own Cloudflare zone with O2O enabled on specific hostnames, contact your Cloudflare Account Team or [Cloudflare Support](https://developers.cloudflare.com/support/contacting-cloudflare-support/) for help resolving issues in your own zone. Cloudflare will consult BigCommerce if there are technical issues that Cloudflare cannot resolve. --- title: HubSpot · Cloudflare for Platforms docs description: Learn how to configure your zone with HubSpot. lastUpdated: 2025-06-18T10:12:13.000Z chatbotDeprioritize: false source_url: html: https://developers.cloudflare.com/cloudflare-for-platforms/cloudflare-for-saas/saas-customers/provider-guides/hubspot/ md: https://developers.cloudflare.com/cloudflare-for-platforms/cloudflare-for-saas/saas-customers/provider-guides/hubspot/index.md --- Cloudflare partners with HubSpot to provide HubSpot customers’ websites with Cloudflare’s performance and security benefits. If you use HubSpot and also have a Cloudflare plan, you can use your own Cloudflare zone to proxy web traffic to your zone first, then HubSpot's (the SaaS Provider) zone second. This configuration option is called [Orange-to-Orange (O2O)](https://developers.cloudflare.com/cloudflare-for-platforms/cloudflare-for-saas/saas-customers/how-it-works/). ## Benefits O2O's benefits include applying your own Cloudflare zone's services and settings — such as [WAF](https://developers.cloudflare.com/waf/), [Bot Management](https://developers.cloudflare.com/bots/plans/bm-subscription/), [Waiting Room](https://developers.cloudflare.com/waiting-room/), and more — on the traffic destined for your HubSpot environment. ## How it works For more details about how O2O is different than other Cloudflare setups, refer to [How O2O works](https://developers.cloudflare.com/cloudflare-for-platforms/cloudflare-for-saas/saas-customers/how-it-works/). ## Enable O2O is enabled per hostname, so to enable O2O for a specific hostname within your Cloudflare zone, [create](https://developers.cloudflare.com/dns/manage-dns-records/how-to/create-dns-records/#create-dns-records) a Proxied `CNAME` DNS record with a target of your corresponding HubSpot CNAME. Which HubSpot CNAME is targeted will depend on your current [HubSpot proxy settings](https://developers.hubspot.com/docs/cms/developer-reference/reverse-proxy-support#configure-the-proxy). | Type | Name | Target | Proxy status | | - | - | - | - | | `CNAME` | `` | `.sites-proxy.hscoscdn<##>.net` | Proxied | Note For questions about your HubSpot setup, refer to [HubSpot's reverse proxy support guide](https://developers.hubspot.com/docs/cms/developer-reference/reverse-proxy-support). ## Product compatibility When a hostname within your Cloudflare zone has O2O enabled, you assume additional responsibility for the traffic on that hostname because you can now configure various Cloudflare products to affect that traffic. Some of the Cloudflare products compatible with O2O are: * [Caching](https://developers.cloudflare.com/cache/) * [Workers](https://developers.cloudflare.com/workers/) * [Rules](https://developers.cloudflare.com/rules/) For a full list of compatible products and potential limitations, refer to [Product compatibility](https://developers.cloudflare.com/cloudflare-for-platforms/cloudflare-for-saas/saas-customers/product-compatibility/). ## Zone hold Because you have your own Cloudflare zone, you have access to the zone hold feature, which is a toggle that prevents your domain name from being created as a zone in a different Cloudflare account. Additionally, if the zone hold feature is enabled, it prevents the activation of custom hostnames onboarded to HubSpot. HubSpot would receive the following error message for your custom hostname: `The hostname is associated with a held zone. Please contact the owner of this domain to have the hold removed.` To successfully activate the custom hostname on HubSpot, the owner of the zone needs to [temporarily release the hold](https://developers.cloudflare.com/fundamentals/account/account-security/zone-holds/#release-zone-holds). If you are only onboarding a subdomain as a custom hostname to HubSpot, only the subfeature titled `Also prevent Subdomains` needs to be temporarily disabled. Once the zone hold is temporarily disabled, follow HubSpot's instructions to refresh the custom hostname and it should activate. ## Additional support If you are a HubSpot customer and have set up your own Cloudflare zone with O2O enabled on specific hostnames, contact your Cloudflare Account Team or [Cloudflare Support](https://developers.cloudflare.com/support/contacting-cloudflare-support/) for help resolving issues in your own zone. Cloudflare will consult HubSpot if there are technical issues that Cloudflare cannot resolve. --- title: Kinsta · Cloudflare for Platforms docs description: Learn how to configure your Enterprise zone with Kinsta. lastUpdated: 2025-06-18T10:12:13.000Z chatbotDeprioritize: false source_url: html: https://developers.cloudflare.com/cloudflare-for-platforms/cloudflare-for-saas/saas-customers/provider-guides/kinsta/ md: https://developers.cloudflare.com/cloudflare-for-platforms/cloudflare-for-saas/saas-customers/provider-guides/kinsta/index.md --- Cloudflare partners with Kinsta to provide Kinsta customers’ websites with Cloudflare’s performance and security benefits. If you use Kinsta and also have a Cloudflare plan, you can use your own Cloudflare zone to proxy web traffic to your zone first, then Kinsta's (the SaaS Provider) zone second. This configuration option is called [Orange-to-Orange (O2O)](https://developers.cloudflare.com/cloudflare-for-platforms/cloudflare-for-saas/saas-customers/how-it-works/). ## Benefits O2O's benefits include applying your own Cloudflare zone's services and settings — such as [WAF](https://developers.cloudflare.com/waf/), [Bot Management](https://developers.cloudflare.com/bots/plans/bm-subscription/), [Waiting Room](https://developers.cloudflare.com/waiting-room/), and more — on the traffic destined for your Kinsta environment. ## How it works For additional detail about how traffic routes when O2O is enabled, refer to [How O2O works](https://developers.cloudflare.com/cloudflare-for-platforms/cloudflare-for-saas/saas-customers/how-it-works/). ## Enable Kinsta customers can enable O2O on any Cloudflare zone plan. To enable O2O for a specific hostname within a Cloudflare zone, [create](https://developers.cloudflare.com/dns/manage-dns-records/how-to/create-dns-records/#create-dns-records) a Proxied `CNAME` DNS record with your Kinsta site name as the target. Kinsta’s domain addition setup will walk you through other validation steps. | Type | Name | Target | Proxy status | | - | - | - | - | | `CNAME` | `` | `sitename.hosting.kinsta.cloud` | Proxied | ## Product compatibility When a hostname within your Cloudflare zone has O2O enabled, you assume additional responsibility for the traffic on that hostname because you can now configure various Cloudflare products to affect that traffic. Some of the Cloudflare products compatible with O2O are: * [Caching](https://developers.cloudflare.com/cache/) * [Workers](https://developers.cloudflare.com/workers/) * [Rules](https://developers.cloudflare.com/rules/) For a full list of compatible products and potential limitations, refer to [Product compatibility](https://developers.cloudflare.com/cloudflare-for-platforms/cloudflare-for-saas/saas-customers/product-compatibility/). ## Additional support If you are a Kinsta customer and have set up your own Cloudflare zone with O2O enabled on specific hostnames, contact your Cloudflare Account Team or [Cloudflare Support](https://developers.cloudflare.com/support/contacting-cloudflare-support/) for help resolving issues in your own zone. Cloudflare will consult Kinsta if there are technical issues that Cloudflare cannot resolve. ### Resolving SSL errors using Cloudflare Managed Certificates If you encounter SSL errors when attempting to activate a Cloudflare Managed Certificate, verify if you have a `CAA` record on your domain name with command `dig +short example.com CAA`. If you do have a `CAA` record, verify that it permits SSL certificates to be issued by the [certificate authorities supported by Cloudflare](https://developers.cloudflare.com/ssl/reference/certificate-authorities/). --- title: Render · Cloudflare for Platforms docs description: Learn how to configure your Enterprise zone with Render. lastUpdated: 2025-06-18T10:12:13.000Z chatbotDeprioritize: false source_url: html: https://developers.cloudflare.com/cloudflare-for-platforms/cloudflare-for-saas/saas-customers/provider-guides/render/ md: https://developers.cloudflare.com/cloudflare-for-platforms/cloudflare-for-saas/saas-customers/provider-guides/render/index.md --- Cloudflare partners with [Render](https://render.com) to provide Render customers’ web services and static sites with Cloudflare’s performance and security benefits. If you use Render and also have a Cloudflare plan, you can use your own Cloudflare zone to proxy web traffic to your zone first, then Render's (the SaaS Provider) zone second. This configuration option is called [Orange-to-Orange (O2O)](https://developers.cloudflare.com/cloudflare-for-platforms/cloudflare-for-saas/saas-customers/how-it-works/). ## Benefits O2O's benefits include applying your own Cloudflare zone's services and settings — such as [WAF](https://developers.cloudflare.com/waf/), [Bot Management](https://developers.cloudflare.com/bots/plans/bm-subscription/), [Waiting Room](https://developers.cloudflare.com/waiting-room/), and more — on the traffic destined for your Render services. ## How it works For additional detail about how traffic routes when O2O is enabled, refer to [How O2O works](https://developers.cloudflare.com/cloudflare-for-platforms/cloudflare-for-saas/saas-customers/how-it-works/). ## Enable Render customers can enable O2O on any Cloudflare zone plan. Cloudflare support for O2O setups is only available for Enterprise customers. To enable O2O for a specific hostname within a Cloudflare zone, [create](https://developers.cloudflare.com/dns/manage-dns-records/how-to/create-dns-records/#create-dns-records) a Proxied `CNAME` DNS record with your Render site name as the target. Render's domain addition setup will walk you through other validation steps. | Type | Name | Target | Proxy status | | - | - | - | - | | `CNAME` | `` | `` (for example, `example.onrender.com`) | Proxied | Note For more details about Render setup, refer to their [documentation](https://render.com/docs/configure-cloudflare-dns). If you cannot activate your domain using [proxied DNS records](https://developers.cloudflare.com/dns/proxy-status/), reach out to your Cloudflare account team or your Render support team. ### Additional requirements for wildcard subdomains With O2O enabled, adding a wildcard subdomain to a Render service requires that the corresponding root domain is also routed to Render. If the root domain is routed elsewhere, wildcard routing will fail. If your root domain needs to route somewhere besides Render, add individual subdomains to your Render service instead of a wildcard. ## Product compatibility When a hostname within your Cloudflare zone has O2O enabled, you assume additional responsibility for the traffic on that hostname because you can now configure various Cloudflare products to affect that traffic. Some of the Cloudflare products compatible with O2O are: * [Caching](https://developers.cloudflare.com/cache/) * [Workers](https://developers.cloudflare.com/workers/) * [Rules](https://developers.cloudflare.com/rules/) For a full list of compatible products and potential limitations, refer to [Product compatibility](https://developers.cloudflare.com/cloudflare-for-platforms/cloudflare-for-saas/saas-customers/product-compatibility/). ## Additional support If you are a Render customer and have set up your own Cloudflare zone with O2O enabled on specific hostnames, contact your Cloudflare Account Team or [Cloudflare Support](https://developers.cloudflare.com/support/contacting-cloudflare-support/) for help resolving issues in your own zone. Cloudflare will consult Render if there are technical issues that Cloudflare cannot resolve. ### Resolving SSL errors If you encounter SSL errors, check if you have a `CAA` record. If you have a `CAA` record, verify that it permits SSL certificates to be issued by Google Trust Services (`pki.goog`). For more details, refer to [CAA records](https://developers.cloudflare.com/ssl/edge-certificates/troubleshooting/caa-records/#what-caa-records-are-added-by-cloudflare). --- title: Salesforce Commerce Cloud · Cloudflare for Platforms docs description: Learn how to configure your Enterprise zone with Salesforce Commerce Cloud. lastUpdated: 2025-06-18T10:12:13.000Z chatbotDeprioritize: false source_url: html: https://developers.cloudflare.com/cloudflare-for-platforms/cloudflare-for-saas/saas-customers/provider-guides/salesforce-commerce-cloud/ md: https://developers.cloudflare.com/cloudflare-for-platforms/cloudflare-for-saas/saas-customers/provider-guides/salesforce-commerce-cloud/index.md --- Cloudflare partners with Salesforce Commerce Cloud to provide Salesforce Commerce Cloud customers’ websites with Cloudflare’s performance and security benefits. If you use Salesforce Commerce Cloud and also have a Cloudflare plan, you can use your own Cloudflare zone to proxy web traffic to your zone first, then Salesforce Commerce Cloud's (the SaaS Provider) zone second. This configuration option is called [Orange-to-Orange (O2O)](https://developers.cloudflare.com/cloudflare-for-platforms/cloudflare-for-saas/saas-customers/how-it-works/). ## Benefits O2O's benefits include applying your own Cloudflare zone's services and settings — such as [WAF](https://developers.cloudflare.com/waf/), [Bot Management](https://developers.cloudflare.com/bots/plans/bm-subscription/), [Waiting Room](https://developers.cloudflare.com/waiting-room/), and more — on the traffic destined for your Salesforce Commerce Cloud environment. ## How it works For additional detail about how traffic routes when O2O is enabled, refer to [How O2O works](https://developers.cloudflare.com/cloudflare-for-platforms/cloudflare-for-saas/saas-customers/how-it-works/). ## Enable To enable O2O requires the following: 1. You must configure your SFCC environment as an "SFCC Proxy Zone". If you currently have an "SFCC Legacy Zone", you cannot enable O2O. * For more details on the different types of SFCC configurations, refer to the [Salesforce FAQ on SFCC Proxy Zones](https://help.salesforce.com/s/articleView?id=cc.b2c_ecdn_proxy_zone_faq.htm\&type=5). * For instructions on how to migrate your SFCC environment to an "SFCC Proxy Zone", refer to the [SFCC Legacy Zone to SFCC Proxy Zone migration guide](https://help.salesforce.com/s/articleView?id=cc.b2c_migrate_legacy_zone_to_proxy_zone.htm\&type=5). 2. Your own Cloudflare zone on an Enterprise plan. If you meet the above requirements, O2O can then be enabled per hostname. To enable O2O for a specific hostname within your Cloudflare zone, [create](https://developers.cloudflare.com/dns/manage-dns-records/how-to/create-dns-records/#create-dns-records) a Proxied CNAME DNS record with a target of the CNAME provided by SFCC Business Manager, which is the dashboard used by SFCC customers to configure their storefront environment. The CNAME provided by SFCC Business Manager will resemble `commcloud.prod-abcd-example-com.cc-ecdn.net` and contains 3 distinct parts. For each hostname routing traffic to SFCC, be sure to update each part of the example CNAME to match your SFCC environment: 1. **Environment**: `prod` should be changed to `prod` or `dev` or `stg`. 2. **Realm**: `abcd` should be changed to the Realm ID assigned to you by SFCC. 3. **Domain Name**: `example-com` should be changed to match your domain name in a hyphenated format. | Type | Name | Target | Proxy status | | - | - | - | - | | `CNAME` | `` | `commcloud.prod-abcd-example-com.cc-ecdn.net` | Proxied | For O2O to be configured properly, make sure your Proxied DNS record targets your SFCC CNAME **directly**. Do not indirectly target the SFCC CNAME by targeting another Proxied DNS record in your Cloudflare zone which targets the SFCC CNAME. Correct configuration For example, if the hostnames routing traffic to SFCC are `www.example.com` and `preview.example.com`, the following is a **correct** configuration in your Cloudflare zone: | Type | Name | Target | Proxy status | | - | - | - | - | | `CNAME` | `www.example.com` | `commcloud.prod-abcd-example-com.cc-ecdn.net` | Proxied | | `CNAME` | `preview.example.com` | `commcloud.prod-abcd-example-com.cc-ecdn.net` | Proxied | Incorrect configuration And, the following is an **incorrect** configuration because `preview.example.com` indirectly targets the SFCC CNAME via the `www.example.com` Proxied DNS record, which means O2O will not be properly enabled for hostname `preview.example.com`: | Type | Name | Target | Proxy status | | - | - | - | - | | `CNAME` | `www.example.com` | `commcloud.prod-abcd-example-com.cc-ecdn.net` | Proxied | | `CNAME` | `preview.example.com` | `www.example.com` | Proxied | ## Product compatibility When a hostname within your Cloudflare zone has O2O enabled, you assume additional responsibility for the traffic on that hostname because you can now configure various Cloudflare products to affect that traffic. Some of the Cloudflare products compatible with O2O are: * [Caching](https://developers.cloudflare.com/cache/) * [Workers](https://developers.cloudflare.com/workers/) * [Rules](https://developers.cloudflare.com/rules/) For a full list of compatible products and potential limitations, refer to [Product compatibility](https://developers.cloudflare.com/cloudflare-for-platforms/cloudflare-for-saas/saas-customers/product-compatibility/). ## Additional support If you are a Salesforce Commerce Cloud customer and have set up your own Cloudflare zone with O2O enabled on specific hostnames, contact your Cloudflare Account Team or [Cloudflare Support](https://developers.cloudflare.com/support/contacting-cloudflare-support/) for help resolving issues in your own zone. Cloudflare will consult Salesforce Commerce Cloud if there are technical issues that Cloudflare cannot resolve. ### Resolving SSL errors using Cloudflare Managed Certificates If you encounter SSL errors when attempting to activate a Cloudflare Managed Certificate, verify if you have a `CAA` record on your domain name with command `dig +short example.com CAA`. If you do have a `CAA` record, verify that it permits SSL certificates to be issued by the [certificate authorities supported by Cloudflare](https://developers.cloudflare.com/ssl/reference/certificate-authorities/). ### Best practice Zone-level configuration 1. Set **Minimum TLS version** to **TLS 1.2** 1. Navigate to **SSL/TLS > Edge Certificates**, scroll down the page to find **Minimum TLS Version**, and set it to *TLS 1.2*. This setting applies to every Proxied DNS record in your Zone. 2. Match the **Security Level** set in **SFCC Business Manager** 1. *Option 1: Zone-level* - Navigate to **Security > Settings**, find **Security Level** and set **Security Level** to match what is configured in **SFCC Business Manager**. This setting applies to every Proxied DNS record in your Cloudflare zone. 2. *Option 2: Per Proxied DNS record* - If the **Security Level** differs between the Proxied DNS records targeting your SFCC environment and other Proxied DNS records in your Cloudflare zone, use a **Configuration Rule** to set the **Security Level** specifically for the Proxied DNS records targeting your SFCC environment. For example: 1. Create a new **Configuration Rule** by navigating to **Rules** > **Overview** and selecting **Create rule** next to **Configuration Rules**: 1. **Rule name:** `Match Security Level on SFCC hostnames` 2. **Field:** *Hostname* 3. **Operator:** *is in* (this will match against multiple hostnames specified in the **Value** field) 4. **Value:** `www.example.com` `dev.example.com` 5. Scroll down to **Security Level** and click **+ Add** 1. **Select Security Level:** *Medium* (this should match the **Security Level** set in **SFCC Business Manager**) 6. Scroll to the bottom of the page and click **Deploy** 3. Disable **Browser Integrity Check** 1. *Option 1: Zone-level* - Navigate to **Security > Settings**, find **Browser Integrity Check** and toggle it off to disable it. This setting applies to every Proxied DNS record in your Cloudflare zone. 2. *Option 2: Per Proxied DNS record* - If you want to keep **Browser Integrity Check** enabled for other Proxied DNS records in your Cloudflare zone but want to disable it on Proxied DNS records targeting your SFCC environment, keep the Zone-level **Browser Integrity Check** feature enabled and use a **Configuration Rule** to disable **Browser Integrity Check** specifically for the hostnames targeting your SFCC environment. For example: 1. Create a new **Configuration Rule** by navigating to **Rules** > **Overview** and selecting **Create rule** next to **Configuration Rules**: 1. **Rule name:** `Disable Browser Integrity Check on SFCC hostnames` 2. **Field:** *Hostname* 3. **Operator:** *is in* (this will match against multiple hostnames specified in the **Value** field) 4. **Value:** `www.example.com` `dev.example.com` 5. Scroll down to **Browser Integrity Check** and click the **+ Add** button: 1. Set the toggle to **Off** (a grey X will be displayed) 6. Scroll to the bottom of the page and click **Deploy** 4. Bypass **Cache** on Proxied DNS records targeting your SFCC environment 1. Your SFCC environment, also called a **Realm**, will contain one to many SFCC Proxy Zones, which is where caching will always occur. In the corresponding SFCC Proxy Zone for your domain, SFCC performs their own cache optimization, so it is recommended to bypass the cache on the Proxied DNS records in your Cloudflare zone which target your SFCC environment to prevent a "double caching" scenario. This can be accomplished with a **Cache Rule**. 2. If the **Cache Rule** is not created, caching will occur in both your Cloudflare zone and your corresponding SFCC Proxy Zone, which can cause issues if and when the cache is invalidated or purged in your SFCC environment. 1. Additional information on caching in your SFCC environment can be found in [SFCC's Content Cache Documentation](https://developer.salesforce.com/docs/commerce/b2c-commerce/guide/b2c-content-cache.html) 3. Create a new **Cache Rule** by navigating to **Rules** > **Overview** and selecting **Create rule** next to **Cache Rules**: 1. **Rule name:** `Bypass cache on SFCC hostnames` 2. **Field:** *Hostname* 3. **Operator:** *is in* (this will match against multiple hostnames specified in the **Value** field) 4. **Value:** `www.example.com` `dev.example.com` 5. **Cache eligibility:** Select **Bypass cache**. 6. Scroll to the bottom of the page and select **Deploy**. 5. *Optional* - Upload your Custom Certificate from **SFCC Business Manager** to your Cloudflare zone: 1. The Custom Certificate you uploaded via **SFCC Business Manager** or **SFCC CDN-API**, which exists within your corresponding SFCC Proxy Zone, will terminate TLS connections for your SFCC storefront hostnames. Because of that, it is optional if you want to upload the same Custom Certificate to your own Cloudflare zone. Doing so will allow Cloudflare users with specific roles in your Cloudflare account to receive expiration notifications for your Custom Certificates. Please read [renew custom certificates](https://developers.cloudflare.com/ssl/edge-certificates/custom-certificates/renewing/#renew-custom-certificates) for further details. 2. Additionally, since you now have your own Cloudflare zone, you have access to Cloudflare's various edge certificate products which means you could have more than one certificate covering the same SANs. In that scenario, a certificate priority process occurs to determine which certificate to serve at the Cloudflare edge. If you find your SFCC storefront hostnames are presenting a different certificate compared to what you uploaded via **SFCC Business Manager** or **SFCC CDN-API**, the certificate priority process is likely the reason. Please read [certificate priority](https://developers.cloudflare.com/ssl/reference/certificate-and-hostname-priority/#certificate-deployment) for further details. --- title: Shopify · Cloudflare for Platforms docs description: Learn how to configure your zone with Shopify. lastUpdated: 2025-06-18T10:12:13.000Z chatbotDeprioritize: false source_url: html: https://developers.cloudflare.com/cloudflare-for-platforms/cloudflare-for-saas/saas-customers/provider-guides/shopify/ md: https://developers.cloudflare.com/cloudflare-for-platforms/cloudflare-for-saas/saas-customers/provider-guides/shopify/index.md --- Cloudflare partners with Shopify to provide Shopify customers’ websites with Cloudflare’s performance and security benefits. If you use Shopify and also have a Cloudflare plan, you can use your own Cloudflare zone to proxy web traffic to your zone first, then Shopify's (the SaaS Provider) zone second. This configuration option is called [Orange-to-Orange (O2O)](https://developers.cloudflare.com/cloudflare-for-platforms/cloudflare-for-saas/saas-customers/how-it-works/). ## Benefits O2O routing also enables you to take advantage of Cloudflare zones specifically customized for Shopify traffic. ## How it works For more details about how O2O is different than other Cloudflare setups, refer to [How O2O works](https://developers.cloudflare.com/cloudflare-for-platforms/cloudflare-for-saas/saas-customers/how-it-works/). When you [set up O2O routing for your Shopify website](#enable), Cloudflare enables specific configurations for this SaaS provider. Currently, this includes the following: * Workers and Snippets are disabled on the `/checkout` URI path. ## Enable You can enable O2O on any Cloudflare zone plan. To enable O2O on your account, [create](https://developers.cloudflare.com/dns/manage-dns-records/how-to/create-dns-records/#create-dns-records) a `CNAME` DNS record. | Type | Name | Target | Proxy status | | - | - | - | - | | `CNAME` | `` | `shops.myshopify.com` | Proxied | Once you save the new DNS record, the Cloudflare dashboard will show a Shopify icon next to the CNAME record value. For example: ![](https://developers.cloudflare.com/_astro/shopify-dns-entry.BVBaRuE6_Z1HKFdM.webp) Note For questions about Shopify setup, refer to their [support guide](https://help.shopify.com/en/manual/domains/add-a-domain/connecting-domains/connect-domain-manual). If you cannot activate your domain using [proxied DNS records](https://developers.cloudflare.com/dns/proxy-status/), reach out to your account team or the [Cloudflare Community](https://community.cloudflare.com). ## Product compatibility When a hostname within your Cloudflare zone has O2O enabled, you assume additional responsibility for the traffic on that hostname because you can now configure various Cloudflare products to affect that traffic. Some of the Cloudflare products compatible with O2O are: * [Caching](https://developers.cloudflare.com/cache/) * [Workers](https://developers.cloudflare.com/workers/) * [Rules](https://developers.cloudflare.com/rules/) For a full list of compatible products and potential limitations, refer to [Product compatibility](https://developers.cloudflare.com/cloudflare-for-platforms/cloudflare-for-saas/saas-customers/product-compatibility/). ## Additional support If you are a Shopify customer and have set up your own Cloudflare zone with O2O enabled on specific hostnames, contact your Cloudflare Account Team or [Cloudflare Support](https://developers.cloudflare.com/support/contacting-cloudflare-support/) for help resolving issues in your own zone. Cloudflare will consult Shopify if there are technical issues that Cloudflare cannot resolve. ### DNS CAA records Shopify issues SSL/TLS certificates for merchant domains using Let’s Encrypt. If you add any DNS CAA records, you must select Let’s Encrypt as the Certificate Authority (CA) or HTTPS connections may fail. For more details, refer to [CAA records](https://developers.cloudflare.com/ssl/edge-certificates/caa-records/#caa-records-added-by-cloudflare). --- title: WP Engine · Cloudflare for Platforms docs description: Learn how to configure your zone with WP Engine. lastUpdated: 2025-06-18T10:12:13.000Z chatbotDeprioritize: false source_url: html: https://developers.cloudflare.com/cloudflare-for-platforms/cloudflare-for-saas/saas-customers/provider-guides/wpengine/ md: https://developers.cloudflare.com/cloudflare-for-platforms/cloudflare-for-saas/saas-customers/provider-guides/wpengine/index.md --- Cloudflare partners with WP Engine to provide WP Engine customers’ websites with Cloudflare’s performance and security benefits. If you use WP Engine and also have a Cloudflare plan, you can use your own Cloudflare zone to proxy web traffic to your zone first, then WP Engine's (the SaaS Provider) zone second. This configuration option is called [Orange-to-Orange (O2O)](https://developers.cloudflare.com/cloudflare-for-platforms/cloudflare-for-saas/saas-customers/how-it-works/). ## Benefits O2O's benefits include applying your own Cloudflare zone's services and settings — such as [WAF](https://developers.cloudflare.com/waf/), [Bot Management](https://developers.cloudflare.com/bots/plans/bm-subscription/), [Waiting Room](https://developers.cloudflare.com/waiting-room/), and more — on the traffic destined for your WP Engine environment. ## How it works For more details about how O2O is different than other Cloudflare setups, refer to [How O2O works](https://developers.cloudflare.com/cloudflare-for-platforms/cloudflare-for-saas/saas-customers/how-it-works/). ## Enable WP Engine customers can enable O2O on any Cloudflare zone plan. To enable O2O for a specific hostname within a Cloudflare zone, [create](https://developers.cloudflare.com/dns/manage-dns-records/how-to/create-dns-records/#create-dns-records) a Proxied `CNAME` DNS record with a target of one of the following WP Engine CNAMEs. Which WP Engine CNAME is used will depend on your current [WP Engine network type](https://wpengine.com/support/network/). | Type | Name | Target | Proxy status | | - | - | - | - | | `CNAME` | `` | `wp.wpewaf.com` (Global Edge Security) or `wp.wpenginepowered.com` (Advanced Network) | Proxied | Note For questions about WP Engine setup, refer to their [support guide](https://wpengine.com/support/wordpress-best-practice-configuring-dns-for-wp-engine/#Point_DNS_Using_CNAME_Flattening). If you cannot activate your domain using [proxied DNS records](https://developers.cloudflare.com/dns/proxy-status/), reach out to your account team. ## Product compatibility When a hostname within your Cloudflare zone has O2O enabled, you assume additional responsibility for the traffic on that hostname because you can now configure various Cloudflare products to affect that traffic. Some of the Cloudflare products compatible with O2O are: * [Caching](https://developers.cloudflare.com/cache/) * [Workers](https://developers.cloudflare.com/workers/) * [Rules](https://developers.cloudflare.com/rules/) For a full list of compatible products and potential limitations, refer to [Product compatibility](https://developers.cloudflare.com/cloudflare-for-platforms/cloudflare-for-saas/saas-customers/product-compatibility/). ## Zone hold If your own Cloudflare zone is on the Enterprise plan, you have access to the [zone hold feature](https://developers.cloudflare.com/fundamentals/account/account-security/zone-holds/), which is a toggle that prevents your domain name from being created as a zone in a different Cloudflare account. Additionally, if the zone hold is enabled, it prevents the activation of custom hostnames onboarded to WP Engine. WP Engine would receive the following error message for your custom hostname: `The hostname is associated with a held zone. Please contact the owner of this domain to have the hold removed.` To successfully activate the custom hostname on WP Engine, the owner of the zone needs to [temporarily release the hold](https://developers.cloudflare.com/fundamentals/account/account-security/zone-holds/#release-zone-holds). If you are only onboarding a subdomain as a custom hostname to WP Engine, only the subfeature titled `Also prevent Subdomains` needs to be temporarily disabled. Once the zone hold is temporarily disabled, follow WP Engine's instructions to refresh the custom hostname and it should activate. ## Additional support If you are a WP Engine customer and have set up your own Cloudflare zone with O2O enabled on specific hostnames, contact your Cloudflare Account Team or [Cloudflare Support](https://developers.cloudflare.com/support/contacting-cloudflare-support/) for help resolving issues in your own zone. Cloudflare will consult WP Engine if there are technical issues that Cloudflare cannot resolve. ### Resolving SSL errors If you encounter SSL errors, check if you have a `CAA` record. If you do have a `CAA` record, check that it permits SSL certificates to be issued by `letsencrypt.org`. For more details, refer to [CAA records](https://developers.cloudflare.com/ssl/edge-certificates/troubleshooting/caa-records/#what-caa-records-are-added-by-cloudflare). --- title: Certificate statuses · Cloudflare for Platforms docs lastUpdated: 2024-08-13T19:56:56.000Z chatbotDeprioritize: false source_url: html: https://developers.cloudflare.com/cloudflare-for-platforms/cloudflare-for-saas/security/certificate-management/certificate-statuses/ md: https://developers.cloudflare.com/cloudflare-for-platforms/cloudflare-for-saas/security/certificate-management/certificate-statuses/index.md --- --- title: Custom certificates · Cloudflare for Platforms docs description: If your customers need to provide their own key material, you may want to upload a custom certificate. Cloudflare will automatically bundle the certificate with a certificate chain optimized for maximum browser compatibility. lastUpdated: 2025-02-07T17:10:08.000Z chatbotDeprioritize: false source_url: html: https://developers.cloudflare.com/cloudflare-for-platforms/cloudflare-for-saas/security/certificate-management/custom-certificates/ md: https://developers.cloudflare.com/cloudflare-for-platforms/cloudflare-for-saas/security/certificate-management/custom-certificates/index.md --- If your customers need to provide their own key material, you may want to [upload a custom certificate](https://developers.cloudflare.com/cloudflare-for-platforms/cloudflare-for-saas/security/certificate-management/custom-certificates/uploading-certificates/). Cloudflare will automatically bundle the certificate with a certificate chain [optimized for maximum browser compatibility](https://developers.cloudflare.com/ssl/edge-certificates/custom-certificates/bundling-methodologies/#compatible). As part of this process, you may also want to [generate a Certificate Signing Request (CSR)](https://developers.cloudflare.com/cloudflare-for-platforms/cloudflare-for-saas/security/certificate-management/custom-certificates/certificate-signing-requests/) for your customer so they do not have to manage the private key on their own. Note Only certain customers have access to this feature. For more details, see the [Plans page](https://developers.cloudflare.com/cloudflare-for-platforms/cloudflare-for-saas/plans/). ## Use cases This situation commonly occurs when your customers use Extended Validation (EV) certificates (the “green bar”) or when their information security policy prohibits third parties from generating private keys on their behalf. ## Limitations If you use custom certificates, you are responsible for the entire certificate lifecycle (initial upload, renewal, subsequent upload). Cloudflare also only accepts publicly trusted certificates of these types: * `SHA256WithRSA` * `SHA1WithRSA` * `ECDSAWithSHA256` If you attempt to upload another type of certificate or a certificate that has been self-signed, it will be rejected. --- title: TLS Settings — Cloudflare for SaaS · Cloudflare for Platforms docs description: Mutual TLS (mTLS) adds an extra layer of protection to application connections by validating certificates on the server and the client. When building a SaaS application, you may want to enforce mTLS to protect sensitive endpoints related to payment processing, database updates, and more. lastUpdated: 2025-03-13T16:44:19.000Z chatbotDeprioritize: false source_url: html: https://developers.cloudflare.com/cloudflare-for-platforms/cloudflare-for-saas/security/certificate-management/enforce-mtls/ md: https://developers.cloudflare.com/cloudflare-for-platforms/cloudflare-for-saas/security/certificate-management/enforce-mtls/index.md --- [Mutual TLS (mTLS)](https://www.cloudflare.com/learning/access-management/what-is-mutual-tls/) adds an extra layer of protection to application connections by validating certificates on the server and the client. When building a SaaS application, you may want to enforce mTLS to protect sensitive endpoints related to payment processing, database updates, and more. [Minimum TLS Version](https://developers.cloudflare.com/ssl/edge-certificates/additional-options/minimum-tls/) allows you to choose a cryptographic standard per custom hostname. Cloudflare recommends TLS 1.2 to comply with the Payment Card Industry (PCI) Security Standards Council. [Cipher suites](https://developers.cloudflare.com/ssl/edge-certificates/additional-options/cipher-suites/) are a combination of ciphers used to negotiate security settings during the [SSL/TLS handshake](https://www.cloudflare.com/learning/ssl/what-happens-in-a-tls-handshake/). As a SaaS provider, you can [specify configurations for cipher suites](#cipher-suites) on your zone as a whole and cipher suites on individual custom hostnames via the API. Warning When you [issue a custom hostname certificate](https://developers.cloudflare.com/cloudflare-for-platforms/cloudflare-for-saas/security/certificate-management/issue-and-validate/) with wildcards enabled, any cipher suites or Minimum TLS settings applied to that hostname will only apply to the direct hostname. However, if you want to update the Minimum TLS settings for all wildcard hostnames, you can change Minimum TLS version at the [zone level](https://developers.cloudflare.com/ssl/edge-certificates/additional-options/minimum-tls/). ## Enable mTLS Once you have [added a custom hostname](https://developers.cloudflare.com/cloudflare-for-platforms/cloudflare-for-saas/start/getting-started/), you can enable mTLS by using Cloudflare Access. Go to [Cloudflare Zero Trust](https://one.dash.cloudflare.com/) and [add mTLS authentication](https://developers.cloudflare.com/cloudflare-one/identity/devices/access-integrations/mutual-tls-authentication/) with a few clicks. Note Currently, you cannot add mTLS policies for custom hostnames using [API Shield](https://developers.cloudflare.com/api-shield/security/mtls/). ## Enable Minimum TLS Version 1. Log in to the [Cloudflare dashboard](https://dash.cloudflare.com) and navigate to your account and website. 2. Select **SSL/TLS** > **Custom Hostnames**. 3. Find the hostname to which you want to apply Minimum TLS Version. Select **Edit**. 4. Choose the desired TLS version under **Minimum TLS Version** and click **Save**. Note While TLS 1.3 is the most recent and secure version, it is not supported by some older devices. Refer to Cloudflare's recommendations when [deciding what version to use](https://developers.cloudflare.com/ssl/reference/protocols/#decide-which-version-to-use). ## Cipher suites For security and regulatory reasons, you may want to only allow connections from certain cipher suites. Cloudflare provides recommended values and full cipher suite reference in our [Cipher suites documentation](https://developers.cloudflare.com/ssl/edge-certificates/additional-options/cipher-suites/#resources). Restrict cipher suites for your zone Refer to [Customize cipher suites - SSL/TLS](https://developers.cloudflare.com/ssl/edge-certificates/additional-options/cipher-suites/customize-cipher-suites/). Restrict cipher suites for custom hostname In the API documentation, refer to [SSL properties of a custom hostname](https://developers.cloudflare.com/api/resources/custom_hostnames/methods/edit/). When making the request, make sure to include `type` and `method` within the `ssl` object, as well as the `settings` specifications. ## Alerts for mutual TLS certificates You can configure alerts to receive notifications before your mutual TLS certificates expire. Access mTLS Certificate Expiration Alert **Who is it for?** [Access](https://developers.cloudflare.com/cloudflare-one/policies/access/) customers that use client certificates for mutual TLS authentication. This notification will be sent 30 and 14 days before the expiration of the certificate. **Other options / filters** None. **Included with** Purchase of [Access](https://developers.cloudflare.com/cloudflare-one/identity/devices/access-integrations/mutual-tls-authentication/) and/or [Cloudflare for SaaS](https://developers.cloudflare.com/cloudflare-for-platforms/cloudflare-for-saas/security/certificate-management/enforce-mtls/). **What should you do if you receive one?** Upload a [renewed certificate](https://developers.cloudflare.com/cloudflare-one/identity/devices/access-integrations/mutual-tls-authentication/#add-mtls-authentication-to-your-access-configuration). Refer to [Cloudflare Notifications](https://developers.cloudflare.com/notifications/get-started/) for more information on how to set up an alert. --- title: Issue and validate certificates · Cloudflare for Platforms docs description: Once you have set up your Cloudflare for SaaS application, you can start issuing and validating certificates for your customers. lastUpdated: 2024-09-20T16:41:42.000Z chatbotDeprioritize: true source_url: html: https://developers.cloudflare.com/cloudflare-for-platforms/cloudflare-for-saas/security/certificate-management/issue-and-validate/ md: https://developers.cloudflare.com/cloudflare-for-platforms/cloudflare-for-saas/security/certificate-management/issue-and-validate/index.md --- Once you have [set up your Cloudflare for SaaS application](https://developers.cloudflare.com/cloudflare-for-platforms/cloudflare-for-saas/start/getting-started/), you can start issuing and validating certificates for your customers. * [Issue](https://developers.cloudflare.com/cloudflare-for-platforms/cloudflare-for-saas/security/certificate-management/issue-and-validate/issue-certificates/) * [Validate](https://developers.cloudflare.com/cloudflare-for-platforms/cloudflare-for-saas/security/certificate-management/issue-and-validate/validate-certificates/) * [Renew](https://developers.cloudflare.com/cloudflare-for-platforms/cloudflare-for-saas/security/certificate-management/issue-and-validate/renew-certificates/) --- title: Webhook definitions · Cloudflare for Platforms docs description: When you create a webhook notification for SSL for SaaS Custom Hostnames, you may want to automate responses to specific events (certificate issuance, failed validation, etc.). lastUpdated: 2024-08-13T19:56:56.000Z chatbotDeprioritize: false source_url: html: https://developers.cloudflare.com/cloudflare-for-platforms/cloudflare-for-saas/security/certificate-management/webhook-definitions/ md: https://developers.cloudflare.com/cloudflare-for-platforms/cloudflare-for-saas/security/certificate-management/webhook-definitions/index.md --- When you [create a webhook notification](https://developers.cloudflare.com/notifications/get-started/configure-webhooks/) for **SSL for SaaS Custom Hostnames**, you may want to automate responses to specific events (certificate issuance, failed validation, etc.). The following section details the data Cloudflare sends to a webhook destination. ## Certificate validation Before a Certificate Authority will issue a certificate for a domain, the requester must prove they have control over that domain. This process is known as [domain control validation (DCV)](https://developers.cloudflare.com/cloudflare-for-platforms/cloudflare-for-saas/security/certificate-management/issue-and-validate/validate-certificates/). ### Validation succeeded Cloudflare sends this alert when certificates move from a status of `pending_validation` to `pending_issuance`. ```json { "metadata": { "event": { "id": "<", "type": "ssl.custom_hostname_certificate.validation.succeeded", "created_at": "2022-02-09T00:03:28.385080Z" }, "account": { "id": "<" }, "zone": { "id": "<" } }, "data": { "id": "<", "hostname": "blog.com", "ssl": { "id": "<", "type": "dv", "method": "cname", "status": "pending_issuance", "settings": { "min_tls_version": "1.2", "http2": "on" } }, "custom_metadata": { "key1": "value1", "key2": "value2" }, "custom_origin_server": "0001.blog.com" } } ``` ### Validation failed Cloudflare sends this alert each time a certificate remains in a `pending_validation` status during [DCV retries](https://developers.cloudflare.com/ssl/edge-certificates/changing-dcv-method/validation-backoff-schedule/). ```json { "metadata": { "event": { "id": "<", "type": "ssl.custom_hostname_certificate.validation.failed", "created_at": "2018-02-09T00:03:28.385080Z" }, "account": { "id": "<" }, "zone": { "id": "<" } }, "data": { "id": "<", "hostname": "blog.com", "ssl": { "id": "<", "type": "dv", "method": "cname", "status": "pending_validation", "cname": "_ca3-64ce913ebfe74edeb2e8813e3928e359.app.example2.com", "cname_target": "dcv.digicert.com", "validation_errors": [ { "message": "blog.example.com reported as potential risk: google_safe_browsing" } ], "settings": { "min_tls_version": "1.2", "http2": "on" } }, "custom_metadata": { "key1": "value1", "key2": "value2" }, "custom_origin_server": "0001.blog.com" } } ``` *** ## Certificate issuance Once validated, certificates are issued by Cloudflare in conjunction with your chosen [certificate authority](https://developers.cloudflare.com/ssl/reference/certificate-authorities/). ### Issuance succeeded Cloudflare sends this alert when certificates move from a status of `pending_validation` or `pending_issuance` to `pending_deployment`. ```json { "metadata": { "event": { "id": "<", "type": "ssl.custom_hostname_certificate.issuance.succeeded", "created_at": "2022-02-09T00:03:28.385080Z" }, "account": { "id": "<" }, "zone": { "id": "<" } }, "data": { "id": "<", "hostname": "blog.com", "ssl": { "id": "<", "type": "dv", "method": "cname", "status": "pending_deployment", "settings": { "min_tls_version": "1.2", "http2": "on" } }, "custom_metadata": { "key1": "value1", "key2": "value2" }, "custom_origin_server": "0001.blog.com" } } ``` ### Issuance failed Cloudflare sends this alert each time a certificate remains in a status of `pending_issuance` during [DCV retries](https://developers.cloudflare.com/ssl/edge-certificates/changing-dcv-method/validation-backoff-schedule/). ```json { "metadata": { "event": { "id": "<", "type": "ssl.custom_hostname_certificate.issuance.failed", "created_at": "2022-02-09T00:03:28.385080Z" }, "account": { "id": "<" }, "zone": { "id": "<" } }, "data": { "id": "<", "hostname": "blog.com", "ssl": { "id": "<", "type": "dv", "method": "cname", "status": "pending_issuance", "cname": "_ca3-64ce913ebfe74edeb2e8813e3928e359.app.example2.com", "cname_target": "dcv.digicert.com", "validation_errors": [ { "message": "caa_error: blog.example.com" } ], "settings": { "min_tls_version": "1.2", "http2": "on" } }, "custom_metadata": { "key1": "value1", "key2": "value2" }, "custom_origin_server": "0001.blog.com" } } ``` *** ## Certificate deployment Once issued, certificates are deployed to Cloudflare's global edge network. ### Deployment succeeded Cloudflare sends this alert when certificates move from a status of `pending_deployment` to `active`. ```json { "metadata": { "event": { "id": "<", "type": "ssl.custom_hostname_certificate.deployment.succeeded", "created_at": "2022-02-09T00:03:28.385080Z" }, "account": { "id": "<" }, "zone": { "id": "<" } }, "data": { "id": "<", "hostname": "blog.com", "ssl": { "id": "<", "type": "dv", "method": "cname", "status": "active", "settings": { "min_tls_version": "1.2", "http2": "on" } }, "custom_metadata": { "key1": "value1", "key2": "value2" }, "custom_origin_server": "0001.blog.com" } } ``` ### Deployment failed Cloudflare sends this alert each time a certificate remains in a status of `pending_deployment` during [DCV retries](https://developers.cloudflare.com/ssl/edge-certificates/changing-dcv-method/validation-backoff-schedule/). ```json { "metadata": { "event": { "id": "<", "type": "ssl.custom_hostname_certificate.deployment.failed", "created_at": "2022-02-09T00:03:28.385080Z" }, "account": { "id": "<" }, "zone": { "id": "<" } }, "data": { "id": "<", "hostname": "blog.com", "ssl": { "id": "<", "type": "dv", "method": "cname", "status": "pending_deployment", "settings": { "min_tls_version": "1.2", "http2": "on" } }, "custom_metadata": { "key1": "value1", "key2": "value2" }, "custom_origin_server": "0001.blog.com" } } ``` *** ## Certificate deletion ### Deletion succeeded Cloudflare sends this alert when certificates move from a status of `pending_deletion` to `deleted`. ```json { "metadata": { "event": { "id": "<", "type": "ssl.custom_hostname_certificate.deletion.succeeded", "created_at": "2022-02-09T00:03:28.385080Z" }, "account": { "id": "<" }, "zone": { "id": "<" } }, "data": { "id": "<", "hostname": "blog.com", "ssl": { "id": "<", "type": "dv", "method": "cname", "status": "deleted" }, "custom_metadata": { "key1": "value1", "key2": "value2" }, "custom_origin_server": "0001.blog.com" } } ``` ### Deletion failed Cloudflare sends this alert each time a certificate remains in status of `pending_deletion` during [DCV retries](https://developers.cloudflare.com/ssl/edge-certificates/changing-dcv-method/validation-backoff-schedule/). ```json { "metadata": { "event": { "id": "<", "type": "ssl.custom_hostname_certificate.deletion.failed", "created_at": "2022-02-09T00:03:28.385080Z" }, "account": { "id": "<" }, "zone": { "id": "<" } }, "data": { "id": "<", "hostname": "blog.com", "ssl": { "id": "<", "type": "dv", "method": "cname", "status": "pending_deletion" }, "custom_metadata": { "key1": "value1", "key2": "value2" }, "custom_origin_server": "0001.blog.com" } } ``` *** ## Certificate renewal Once issued, certificates are valid for a period of time depending on the [certificate authority](https://developers.cloudflare.com/ssl/reference/certificate-validity-periods/). The actions that you need to perform to renew certificates depend on your [validation method](https://developers.cloudflare.com/cloudflare-for-platforms/cloudflare-for-saas/security/certificate-management/issue-and-validate/renew-certificates/). ### Upcoming renewal ```json { "metadata": { "event": { "id": "<", "type": "ssl.custom_hostname_certificate.renewal.upcoming_certificate_expiration_notification", "created_at": "2022-02-09T00:03:28.385080Z" }, "account": { "id": "<" }, "zone": { "id": "<" } }, "data": { "id": "<", "hostname": "blog.com", "ssl": { "id": "<", "status": "active", "hosts": ["blog.example.com"], "issuer": "DigiCertInc", "serial_number": "1001172778337169491", "signature": "ECDSAWithSHA256", "uploaded_on": "2021-11-17T04:33:54.561747Z", "expires_on": "2022-11-21T12:00:00Z", "custom_csr_id": "7b163417-1d2b-4c84-a38a-2fb7a0cd7752", "settings": { "min_tls_version": "1.2", "http2": "on" } }, "custom_metadata": { "key1": "value1", "key2": "value2" }, "custom_origin_server": "0001.blog.com" } } ``` ### Renewal succeeded Cloudflare sends this alert when certificates move from a status of `active` to `pending_deployment`. ```json { "metadata": { "event": { "id": "<", "type": "ssl.custom_hostname_certificate.renewal.succeeded", "created_at": "2022-02-09T00:03:28.385080Z" }, "account": { "id": "<" }, "zone": { "id": "<" } }, "data": { "id": "<", "hostname": "blog.com", "ssl": { "id": "<", "type": "dv", "method": "cname", "status": "pending_deployment", "settings": { "min_tls_version": "1.2", "http2": "on" } }, "custom_metadata": { "key1": "value1", "key2": "value2" }, "custom_origin_server": "0001.blog.com" } } ``` ### Renewal failed Cloudflare sends this alert when certificates move from a status of `active` to `pending_issuance`. ```json { "metadata": { "event": { "id": "<", "type": "ssl.custom_hostname_certificate.renewal.failed", "created_at": "2022-02-09T00:03:28.385080Z" }, "account": { "id": "<" }, "zone": { "id": "<" } }, "data": { "id": "<", "hostname": "blog.com", "ssl": { "id": "<", "type": "dv", "method": "cname", "status": "pending_issuance", "cname": "_ca3-64ce913ebfe74edeb2e8813e3928e359.app.example2.com", "cname_target": "dcv.digicert.com", "validation_errors": [ { "message": "caa_error: blog.example.com" } ], "settings": { "min_tls_version": "1.2", "http2": "on" } }, "custom_metadata": { "key1": "value1", "key2": "value2" }, "custom_origin_server": "0001.blog.com" } } ``` ## Troubleshooting Occasionally, you may see webhook notifications that do not include a corresponding `<>` and `hostname` values. This behavior is because each custom hostname can only have one certificate attached to it. Previously attached certificates can still emit webhook events but will not include the associated hostname and ID values. ## Alerts You can configure alerts to receive notifications for changes in your custom hostname certificates. SSL for SaaS Custom Hostnames Alert **Who is it for?** Customers with custom hostname certificates who want to receive a notification on validation, issuance, renewal, and expiration of certificates. For more details around data formatting for webhooks, refer to the [Cloudflare for SaaS docs](https://developers.cloudflare.com/cloudflare-for-platforms/cloudflare-for-saas/security/certificate-management/webhook-definitions/). **Other options / filters** None. **Included with** Purchase of [Cloudflare for SaaS](https://developers.cloudflare.com/cloudflare-for-platforms/cloudflare-for-saas/). **What should you do if you receive one?** You only need to take action if you are notified that you have a certificate that failed. You can find the reasons why a certificate is not being issued in [Troubleshooting SSL errors](https://developers.cloudflare.com/ssl/troubleshooting/general-ssl-errors/). Refer to [Cloudflare Notifications](https://developers.cloudflare.com/notifications/get-started/) for more information on how to set up an alert. --- title: Managed Rulesets per Custom Hostname · Cloudflare for Platforms docs description: If you are interested in WAF for SaaS but unsure of where to start, Cloudflare recommends using WAF Managed Rules. The Cloudflare security team creates and manages a variety of rules designed to detect common attack vectors and protect applications from vulnerabilities. These rules are offered in managed rulesets, like Cloudflare Managed and OWASP, which can be deployed with different settings and sensitivity levels. lastUpdated: 2024-12-16T22:33:26.000Z chatbotDeprioritize: false source_url: html: https://developers.cloudflare.com/cloudflare-for-platforms/cloudflare-for-saas/security/waf-for-saas/managed-rulesets/ md: https://developers.cloudflare.com/cloudflare-for-platforms/cloudflare-for-saas/security/waf-for-saas/managed-rulesets/index.md --- If you are interested in [WAF for SaaS](https://developers.cloudflare.com/cloudflare-for-platforms/cloudflare-for-saas/security/waf-for-saas/) but unsure of where to start, Cloudflare recommends using WAF Managed Rules. The Cloudflare security team creates and manages a variety of rules designed to detect common attack vectors and protect applications from vulnerabilities. These rules are offered in [managed rulesets](https://developers.cloudflare.com/waf/managed-rules/), like Cloudflare Managed and OWASP, which can be deployed with different settings and sensitivity levels. *** ## Prerequisites WAF for SaaS is available for customers on an Enterprise plan. If you would like to deploy a managed ruleset at the account level, refer to the [Ruleset Engine documentation](https://developers.cloudflare.com/ruleset-engine/managed-rulesets/deploy-managed-ruleset/). Ensure you have reviewed [Get Started with Cloudflare for SaaS](https://developers.cloudflare.com/cloudflare-for-platforms/cloudflare-for-saas/start/getting-started/) and familiarize yourself with [WAF for SaaS](https://developers.cloudflare.com/cloudflare-for-platforms/cloudflare-for-saas/security/waf-for-saas/). Customers can automate the [custom metadata](https://developers.cloudflare.com/cloudflare-for-platforms/cloudflare-for-saas/domain-support/custom-metadata/) tagging by adding it to the custom hostnames at creation. For more information on tagging a custom hostname with custom metadata, refer to the [API documentation](https://developers.cloudflare.com/api/resources/custom_hostnames/methods/edit/). *** ## 1. Choose security tagging system 1. Outline `security_tag` buckets. These are fully customizable with no strict limit on quantity. For example, you can set `security_tag` to `low`,`medium`, and `high` as a default, with one tag per custom hostname. 2. If you have not already done so, [associate your custom metadata to custom hostnames](https://developers.cloudflare.com/cloudflare-for-platforms/cloudflare-for-saas/security/waf-for-saas/#1-associate-custom-metadata-to-a-custom-hostname) by including the `security_tag`in the custom metadata associated with the custom hostname. The JSON blob associated with the custom hostname is fully customizable. Note After the association is complete, the JSON blob is added to the defined custom hostname. This blob is then associated to every incoming request and exposed in the WAF through the new field `cf.hostname.metadata`. In the rule, you can access `cf.hostname.metadata` and get whatever data you need from that blob. *** ## 2. Deploy Rulesets 1. Log in to the [Cloudflare dashboard](https://dash.cloudflare.com/) and navigate to your account. 2. Select Account Home > **WAF**. Note **WAF** at the account level will only be visible on Enterprise plans. If you do not see this option, contact your account manager. 1. Select **Deploy a managed ruleset**. 2. Under **Field**, Select *Hostname*. Set the operator as *equals*. The complete expression should look like this, plus any logic you would like to add: ![Rule expression](https://developers.cloudflare.com/_astro/rule-expression.DcFfc45M_1hfhUT.webp) 1. Beneath **Value**, add the custom hostname. 2. Select **Next**. 3. Find the **Cloudflare Managed Ruleset** card and select **Use this Ruleset**. 4. Click the checkbox next to each rule you want to deploy. 5. Toggle the **Status** button next to each rule to enable or disable it. Then select **Next**. 6. On the review page, give your rule a descriptive name. You can modify the ruleset configuration by changing, for example, what rules are enabled or what action should be the default. 7. Select **Deploy**. Note While this tutorial uses Cloudflare Managed Rulesets, you can also create a custom ruleset and deploy on your custom hostnames. To do this, select **Browse Rulesets** > **Create new ruleset**. For examples of a low/medium/high ruleset, refer to [WAF for SaaS](https://developers.cloudflare.com/cloudflare-for-platforms/cloudflare-for-saas/security/waf-for-saas/). --- title: Apex proxying · Cloudflare for Platforms docs description: Apex proxying allows your customers to use their apex domains (example.com) with your SaaS application. lastUpdated: 2024-09-20T16:41:42.000Z chatbotDeprioritize: false source_url: html: https://developers.cloudflare.com/cloudflare-for-platforms/cloudflare-for-saas/start/advanced-settings/apex-proxying/ md: https://developers.cloudflare.com/cloudflare-for-platforms/cloudflare-for-saas/start/advanced-settings/apex-proxying/index.md --- Apex proxying allows your customers to use their apex domains (`example.com`) with your SaaS application. Note Only certain customers have access to this feature. For more details, see the [Plans page](https://developers.cloudflare.com/cloudflare-for-platforms/cloudflare-for-saas/plans/). ## Benefits In a normal Cloudflare for SaaS [setup](https://developers.cloudflare.com/cloudflare-for-platforms/cloudflare-for-saas/start/getting-started/), your customers route traffic to your hostname by creating a `CNAME` record pointing to your CNAME target. However, most DNS providers do not allow `CNAME` records at the zone's root[1](#user-content-fn-1). This means that your customers have to use a subdomain as a vanity domain (`shop.example.com`) instead of their domain apex (`example.com`). This limitation does not apply with apex proxying. Cloudflare assigns a set of IP prefixes - cost associated, reach out to your account team - to your account (or uses your own if you have [BYOIP](https://developers.cloudflare.com/byoip/)). This means that customers can create a standard `A` record to route traffic to your domain, which can support the domain apex. ## Setup * [Set up Apex Proxying](https://developers.cloudflare.com/cloudflare-for-platforms/cloudflare-for-saas/start/advanced-settings/apex-proxying/setup/) ## Footnotes 1. Cloudflare offers this functionality through [CNAME flattening](https://developers.cloudflare.com/dns/cname-flattening/). [↩](#user-content-fnref-1) --- title: Custom origin server · Cloudflare for Platforms docs description: "A custom origin server lets you send traffic from one or more custom hostnames to somewhere besides your default proxy fallback, such as:" lastUpdated: 2025-05-23T15:11:34.000Z chatbotDeprioritize: false source_url: html: https://developers.cloudflare.com/cloudflare-for-platforms/cloudflare-for-saas/start/advanced-settings/custom-origin/ md: https://developers.cloudflare.com/cloudflare-for-platforms/cloudflare-for-saas/start/advanced-settings/custom-origin/index.md --- A **custom origin server** lets you send traffic from one or more custom hostnames to somewhere besides your default proxy fallback, such as: * `soap.stores.com` goes to `origin1.com` * `towel.stores.com` goes to `origin2.com` Note Only certain customers have access to this feature. For more details, see the [Plans page](https://developers.cloudflare.com/cloudflare-for-platforms/cloudflare-for-saas/plans/). ## Requirements To use a custom origin server, you need to meet the following requirements: * Each custom origin needs to be a valid hostname with a proxied (orange-clouded) A, AAAA, or CNAME record in your account's DNS. You cannot use an IP address. * The DNS record for the custom origin server does not currently support wildcard values. ## Use a custom origin To use a custom origin, select that option when [creating a new custom hostname](https://developers.cloudflare.com/cloudflare-for-platforms/cloudflare-for-saas/security/certificate-management/issue-and-validate/) in the dashboard or include the `"custom_origin_server": your_custom_origin_server` parameter when using the API [POST command](https://developers.cloudflare.com/api/resources/custom_hostnames/methods/create/). ## SNI rewrites When Cloudflare establishes a connection to your default origin server, the `Host` header and SNI will both be the value of the original custom hostname. However, if you configure that custom hostname with a custom origin, the value of the SNI will be that of the custom origin and the `Host` header will be the original custom hostname. Since these values will not match, you will not be able to use the [Full (strict)](https://developers.cloudflare.com/ssl/origin-configuration/ssl-modes/full-strict/) on your origins. To solve this problem, you can contact your account team to request an entitlement for **SNI rewrites**. ### SNI rewrite options Choose how your custom hostname populates the SNI value with SNI rewrites: * **Origin server name** (default): Set SNI to the custom origin * If custom origin is `custom-origin.example.com`, then the SNI is `custom-origin.example.com`. * **Host header**: Set SNI to the host header (or a host header override) * If wildcards are not enabled and the hostname is `example.com`, then the SNI is `example.com`. * If wildcards are enabled, the hostname is `example.com`, and a request comes to `www.example.com`, then the SNI is `www.example.com`. * **Subdomain of zone**: Choose what to set as the SNI value (custom hostname or any subdomain) * If wildcards are not enabled and a request comes to `example.com`, choose whether to set the SNI as `example.com` or `www.example.com`. * If wildcards are enabled, you set the SNI to `example.com`, and a request comes to `www.example.com`, then the SNI is `example.com`. Important * Currently, SNI Rewrite is not supported for wildcard custom hostnames. Subdomains covered by a wildcard custom hostname send the custom origin server name as the SNI value. * In the [O2O context](https://developers.cloudflare.com/cloudflare-for-platforms/cloudflare-for-saas/saas-customers/how-it-works/) (when requests are originating from a proxied hostname on a zone also on Cloudflare), changing the SNI value to use host header is currently not supported. * SNI overrides defined in an [Origin Rule](https://developers.cloudflare.com/rules/origin-rules/) will take precedence over SNI rewrites. * SNI Rewrite usage is subject to the [Service-Specific Terms](https://www.cloudflare.com/service-specific-terms-application-services/#ssl-for-saas-terms). ### Set an SNI rewrite To set an SNI rewrite in the dashboard, choose your preferred option from **Origin SNI value** when [creating a custom hostname](https://developers.cloudflare.com/cloudflare-for-platforms/cloudflare-for-saas/security/certificate-management/issue-and-validate/). To set an SNI rewrite via the API, set the `custom_origin_sni` parameter when [creating a custom hostname](https://developers.cloudflare.com/api/resources/custom_hostnames/methods/create/): * **Custom origin name** (default): Applies if you do not set the parameter * **Host header**: Specify `":request_host_header:"` * **Subdomain of zone**: Set to `"example.com"` or another subdomain of the custom hostname --- title: Regional Services for SaaS · Cloudflare for Platforms docs lastUpdated: 2024-12-23T15:11:41.000Z chatbotDeprioritize: false source_url: html: https://developers.cloudflare.com/cloudflare-for-platforms/cloudflare-for-saas/start/advanced-settings/regional-services-for-saas/ md: https://developers.cloudflare.com/cloudflare-for-platforms/cloudflare-for-saas/start/advanced-settings/regional-services-for-saas/index.md --- --- title: Workers as your fallback origin · Cloudflare for Platforms docs description: Learn how to use a Worker as the fallback origin for your SaaS zone. lastUpdated: 2024-10-14T07:10:31.000Z chatbotDeprioritize: false source_url: html: https://developers.cloudflare.com/cloudflare-for-platforms/cloudflare-for-saas/start/advanced-settings/worker-as-origin/ md: https://developers.cloudflare.com/cloudflare-for-platforms/cloudflare-for-saas/start/advanced-settings/worker-as-origin/index.md --- If you are building your application on [Cloudflare Workers](https://developers.cloudflare.com/workers/), you can use a Worker as the origin for your SaaS zone (also known as your fallback origin). 1. In your SaaS zone, [create and set a fallback origin](https://developers.cloudflare.com/cloudflare-for-platforms/cloudflare-for-saas/start/getting-started/#1-create-fallback-origin). Ensure the fallback origin only has an [originless DNS record](https://developers.cloudflare.com/dns/troubleshooting/faq/#what-ip-should-i-use-for-parked-domain--redirect-only--originless-setup): * **Example**: `service.example.com AAAA 100::` 2. In that same zone, navigate to **Workers Routes**. 3. Click **Add route**. 4. Decide whether you want traffic bound for your SaaS zone (`example.com`) to go to that Worker: * If *yes*, set the following values: * **Route**: `*/*` (routes everything — including custom hostnames — to the Worker). * **Worker**: Select the Worker used for your SaaS application. * If *no*, set the following values: * **Route**: `*..com/*` (only routes custom hostname traffic to the Worker) * **Worker**: **None** 5. Click **Save**. --- title: AWS RDS and Aurora · Hyperdrive docs description: Connect Hyperdrive to an AWS RDS database instance. lastUpdated: 2025-05-12T14:16:48.000Z chatbotDeprioritize: false source_url: html: https://developers.cloudflare.com/hyperdrive/examples/connect-to-mysql/mysql-database-providers/aws-rds-aurora/ md: https://developers.cloudflare.com/hyperdrive/examples/connect-to-mysql/mysql-database-providers/aws-rds-aurora/index.md --- This example shows you how to connect Hyperdrive to an Amazon Relational Database Service (Amazon RDS) or Amazon Aurora MySQL database instance. ## 1. Allow Hyperdrive access To allow Hyperdrive to connect to your database, you will need to ensure that Hyperdrive has valid user credentials and network access. Note To allow Hyperdrive to connect to your database, you must allow Cloudflare IPs to be able to access your database. You can either allow-list all IP address ranges (0.0.0.0 - 255.255.255.255) or restrict your IP access control list to the [IP ranges used by Hyperdrive](https://developers.cloudflare.com/hyperdrive/configuration/firewall-and-networking-configuration/). Alternatively, you can connect to your databases over in your private network using [Cloudflare Tunnels](https://developers.cloudflare.com/hyperdrive/configuration/connect-to-private-database/). ### AWS Console When creating or modifying an instance in the AWS console: 1. Configure a **database cluster** and other settings you wish to customize. 2. Under **Settings** > **Credential settings**, note down the **Master username** and **Master password** (Aurora only). 3. Under the **Connectivity** header, ensure **Public access** is set to **Yes**. 4. Select an **Existing VPC security group** that allows public Internet access from `0.0.0.0/0` to the port your database instance is configured to listen on (default: `5432` for PostgreSQL instances). 5. Select **Create database**. Warning You must ensure that the [VPC security group](https://docs.aws.amazon.com/vpc/latest/userguide/vpc-security-groups.html) associated with your database allows public IPv4 access to your database port. Refer to AWS' [database server rules](https://docs.aws.amazon.com/AWSEC2/latest/UserGuide/security-group-rules-reference.html#sg-rules-db-server) for details on how to configure rules specific to your RDS database. ### Retrieve the database endpoint (Aurora) To retrieve the database endpoint (hostname) for Hyperdrive to connect to: 1. Go to **Databases** view under **RDS** in the AWS console. 2. Select the database you want Hyperdrive to connect to. 3. Under the **Endpoints** header, note down the **Endpoint name** with the type `Writer` and the **Port**. ### Retrieve the database endpoint (RDS MySQL) For regular RDS instances (non-Aurora), you will need to fetch the endpoint and port of the database: 1. Go to **Databases** view under **RDS** in the AWS console. 2. Select the database you want Hyperdrive to connect to. 3. Under the **Connectivity & security** header, note down the **Endpoint** and the **Port**. The endpoint will resemble `YOUR_DATABASE_NAME.cpuo5rlli58m.AWS_REGION.rds.amazonaws.com`, and the port will default to `3306`. Support for MySQL-compatible providers Support for AWS Aurora MySQL databases is coming soon. Join our early preview support by reaching out to us in the [Hyperdrive Discord channel](https://discord.cloudflare.com/). ## 2. Create your user Once your database is created, you will need to create a user for Hyperdrive to connect as. Although you can use the **Master username** configured during initial database creation, best practice is to create a less privileged user. To create a new user, log in to the database and use the `CREATE ROLE` command: ```sh # Log in to the database psql postgresql://MASTER_USERNAME:MASTER_PASSWORD@ENDPOINT_NAME:PORT/database_name ``` Run the following SQL statements: ```sql -- Create a role for Hyperdrive CREATE ROLE hyperdrive; -- Allow Hyperdrive to connect GRANT CONNECT ON DATABASE postgres TO hyperdrive; -- Grant database privileges to the hyperdrive role GRANT ALL PRIVILEGES ON DATABASE postgres to hyperdrive; -- Create a specific user for Hyperdrive to log in as CREATE ROLE hyperdrive_user LOGIN PASSWORD 'sufficientlyRandomPassword'; -- Grant this new user the hyperdrive role privileges GRANT hyperdrive to hyperdrive_user; ``` Refer to AWS' [documentation on user roles in PostgreSQL](https://docs.aws.amazon.com/AmazonRDS/latest/UserGuide/Appendix.PostgreSQL.CommonDBATasks.Roles.html) for more details. With a database user, password, database endpoint (hostname and port), and database name (default: `postgres`), you can now set up Hyperdrive. ## 3. Create a database configuration To configure Hyperdrive, you will need: * The IP address (or hostname) and port of your database. * The database username (for example, `hyperdrive-demo`) you configured in a previous step. * The password associated with that username. * The name of the database you want Hyperdrive to connect to. For example, `mysql`. Hyperdrive accepts the combination of these parameters in the common connection string format used by database drivers: ```txt mysql://USERNAME:PASSWORD@HOSTNAME_OR_IP_ADDRESS:PORT/database_name ``` Most database providers will provide a connection string you can copy-and-paste directly into Hyperdrive. To create a Hyperdrive configuration with the [Wrangler CLI](https://developers.cloudflare.com/workers/wrangler/install-and-update/), open your terminal and run the following command. * Replace \ with a name for your Hyperdrive configuration and paste the connection string provided from your database host, or, * Replace `user`, `password`, `HOSTNAME_OR_IP_ADDRESS`, `port`, and `database_name` placeholders with those specific to your database: ```sh npx wrangler hyperdrive create --connection-string="mysql://user:password@HOSTNAME_OR_IP_ADDRESS:PORT/database_name" ``` Note Hyperdrive will attempt to connect to your database with the provided credentials to verify they are correct before creating a configuration. If you encounter an error when attempting to connect, refer to Hyperdrive's [troubleshooting documentation](https://developers.cloudflare.com/hyperdrive/observability/troubleshooting/) to debug possible causes. This command outputs a binding for the [Wrangler configuration file](https://developers.cloudflare.com/workers/wrangler/configuration/): * wrangler.jsonc ```jsonc { "name": "hyperdrive-example", "main": "src/index.ts", "compatibility_date": "2024-08-21", "compatibility_flags": [ "nodejs_compat" ], "hyperdrive": [ { "binding": "HYPERDRIVE", "id": "" } ] } ``` * wrangler.toml ```toml name = "hyperdrive-example" main = "src/index.ts" compatibility_date = "2024-08-21" compatibility_flags = ["nodejs_compat"] # Pasted from the output of `wrangler hyperdrive create --connection-string=[...]` above. [[hyperdrive]] binding = "HYPERDRIVE" id = "" ``` ## 3. Use Hyperdrive from your Worker Install the [mysql2](https://github.com/sidorares/node-mysql2) driver: * npm ```sh npm i mysql2@>3.13.0 ``` * yarn ```sh yarn add mysql2@>3.13.0 ``` * pnpm ```sh pnpm add mysql2@>3.13.0 ``` Note `mysql2` v3.13.0 or later is required Add the required Node.js compatibility flags and Hyperdrive binding to your `wrangler.jsonc` file: * wrangler.jsonc ```jsonc { "compatibility_flags": [ "nodejs_compat" ], "compatibility_date": "2024-09-23", "hyperdrive": [ { "binding": "HYPERDRIVE", "id": "" } ] } ``` * wrangler.toml ```toml # required for database drivers to function compatibility_flags = ["nodejs_compat"] compatibility_date = "2024-09-23" [[hyperdrive]] binding = "HYPERDRIVE" id = "" ``` Create a new `connection` instance and pass the Hyperdrive parameters: ```ts // mysql2 v3.13.0 or later is required import { createConnection } from "mysql2/promise"; export default { async fetch(request, env, ctx): Promise { // Create a connection using the mysql2 driver with the Hyperdrive credentials (only accessible from your Worker). const connection = await createConnection({ host: env.HYPERDRIVE.host, user: env.HYPERDRIVE.user, password: env.HYPERDRIVE.password, database: env.HYPERDRIVE.database, port: env.HYPERDRIVE.port, // Required to enable mysql2 compatibility for Workers disableEval: true, }); try { // Sample query const [results, fields] = await connection.query("SHOW tables;"); // Clean up the client after the response is returned, before the Worker is killed ctx.waitUntil(connection.end()); // Return result rows as JSON return Response.json({ results, fields }); } catch (e) { console.error(e); } }, } satisfies ExportedHandler; ``` Note The minimum version of `mysql2` required for Hyperdrive is `3.13.0`. ## Next steps * Learn more about [How Hyperdrive Works](https://developers.cloudflare.com/hyperdrive/configuration/how-hyperdrive-works/). * Refer to the [troubleshooting guide](https://developers.cloudflare.com/hyperdrive/observability/troubleshooting/) to debug common issues. * Understand more about other [storage options](https://developers.cloudflare.com/workers/platform/storage-options/) available to Cloudflare Workers. --- title: Azure Database · Hyperdrive docs description: Connect Hyperdrive to a Azure Database for PostgreSQL instance. lastUpdated: 2025-05-12T14:16:48.000Z chatbotDeprioritize: false source_url: html: https://developers.cloudflare.com/hyperdrive/examples/connect-to-mysql/mysql-database-providers/azure/ md: https://developers.cloudflare.com/hyperdrive/examples/connect-to-mysql/mysql-database-providers/azure/index.md --- This example shows you how to connect Hyperdrive to an Azure Database for PostgreSQL instance. ## 1. Allow Hyperdrive access To allow Hyperdrive to connect to your database, you will need to ensure that Hyperdrive has valid credentials and network access. Note To allow Hyperdrive to connect to your database, you must allow Cloudflare IPs to be able to access your database. You can either allow-list all IP address ranges (0.0.0.0 - 255.255.255.255) or restrict your IP access control list to the [IP ranges used by Hyperdrive](https://developers.cloudflare.com/hyperdrive/configuration/firewall-and-networking-configuration/). Alternatively, you can connect to your databases over in your private network using [Cloudflare Tunnels](https://developers.cloudflare.com/hyperdrive/configuration/connect-to-private-database/). ### Azure Portal #### Public access networking To connect to your Azure Database for MySQL instance using public Internet connectivity: 1. In the [Azure Portal](https://portal.azure.com/), select the instance you want Hyperdrive to connect to. 2. Expand **Settings** > **Networking** > ensure **Public access** is enabled > in **Firewall rules** add `0.0.0.0` as **Start IP address** and `255.255.255.255` as **End IP address**. 3. Select **Save** to persist your changes. 4. Select **Overview** from the sidebar and note down the **Server name** of your instance. With the username, password, server name, and database name (default: `mysql`), you can now create a Hyperdrive database configuration. #### Private access networking To connect to a private Azure Database for MySQL instance, refer to [Connect to a private database using Tunnel](https://developers.cloudflare.com/hyperdrive/configuration/connect-to-private-database/). ## 2. Create a database configuration To configure Hyperdrive, you will need: * The IP address (or hostname) and port of your database. * The database username (for example, `hyperdrive-demo`) you configured in a previous step. * The password associated with that username. * The name of the database you want Hyperdrive to connect to. For example, `mysql`. Hyperdrive accepts the combination of these parameters in the common connection string format used by database drivers: ```txt mysql://USERNAME:PASSWORD@HOSTNAME_OR_IP_ADDRESS:PORT/database_name ``` Most database providers will provide a connection string you can copy-and-paste directly into Hyperdrive. To create a Hyperdrive configuration with the [Wrangler CLI](https://developers.cloudflare.com/workers/wrangler/install-and-update/), open your terminal and run the following command. * Replace \ with a name for your Hyperdrive configuration and paste the connection string provided from your database host, or, * Replace `user`, `password`, `HOSTNAME_OR_IP_ADDRESS`, `port`, and `database_name` placeholders with those specific to your database: ```sh npx wrangler hyperdrive create --connection-string="mysql://user:password@HOSTNAME_OR_IP_ADDRESS:PORT/database_name" ``` Note Hyperdrive will attempt to connect to your database with the provided credentials to verify they are correct before creating a configuration. If you encounter an error when attempting to connect, refer to Hyperdrive's [troubleshooting documentation](https://developers.cloudflare.com/hyperdrive/observability/troubleshooting/) to debug possible causes. This command outputs a binding for the [Wrangler configuration file](https://developers.cloudflare.com/workers/wrangler/configuration/): * wrangler.jsonc ```jsonc { "name": "hyperdrive-example", "main": "src/index.ts", "compatibility_date": "2024-08-21", "compatibility_flags": [ "nodejs_compat" ], "hyperdrive": [ { "binding": "HYPERDRIVE", "id": "" } ] } ``` * wrangler.toml ```toml name = "hyperdrive-example" main = "src/index.ts" compatibility_date = "2024-08-21" compatibility_flags = ["nodejs_compat"] # Pasted from the output of `wrangler hyperdrive create --connection-string=[...]` above. [[hyperdrive]] binding = "HYPERDRIVE" id = "" ``` ## 3. Use Hyperdrive from your Worker Install the [mysql2](https://github.com/sidorares/node-mysql2) driver: * npm ```sh npm i mysql2@>3.13.0 ``` * yarn ```sh yarn add mysql2@>3.13.0 ``` * pnpm ```sh pnpm add mysql2@>3.13.0 ``` Note `mysql2` v3.13.0 or later is required Add the required Node.js compatibility flags and Hyperdrive binding to your `wrangler.jsonc` file: * wrangler.jsonc ```jsonc { "compatibility_flags": [ "nodejs_compat" ], "compatibility_date": "2024-09-23", "hyperdrive": [ { "binding": "HYPERDRIVE", "id": "" } ] } ``` * wrangler.toml ```toml # required for database drivers to function compatibility_flags = ["nodejs_compat"] compatibility_date = "2024-09-23" [[hyperdrive]] binding = "HYPERDRIVE" id = "" ``` Create a new `connection` instance and pass the Hyperdrive parameters: ```ts // mysql2 v3.13.0 or later is required import { createConnection } from "mysql2/promise"; export default { async fetch(request, env, ctx): Promise { // Create a connection using the mysql2 driver with the Hyperdrive credentials (only accessible from your Worker). const connection = await createConnection({ host: env.HYPERDRIVE.host, user: env.HYPERDRIVE.user, password: env.HYPERDRIVE.password, database: env.HYPERDRIVE.database, port: env.HYPERDRIVE.port, // Required to enable mysql2 compatibility for Workers disableEval: true, }); try { // Sample query const [results, fields] = await connection.query("SHOW tables;"); // Clean up the client after the response is returned, before the Worker is killed ctx.waitUntil(connection.end()); // Return result rows as JSON return Response.json({ results, fields }); } catch (e) { console.error(e); } }, } satisfies ExportedHandler; ``` Note The minimum version of `mysql2` required for Hyperdrive is `3.13.0`. ## Next steps * Learn more about [How Hyperdrive Works](https://developers.cloudflare.com/hyperdrive/configuration/how-hyperdrive-works/). * Refer to the [troubleshooting guide](https://developers.cloudflare.com/hyperdrive/observability/troubleshooting/) to debug common issues. * Understand more about other [storage options](https://developers.cloudflare.com/workers/platform/storage-options/) available to Cloudflare Workers. --- title: Google Cloud SQL · Hyperdrive docs description: Connect Hyperdrive to a Google Cloud SQL database instance. lastUpdated: 2025-05-12T14:16:48.000Z chatbotDeprioritize: false source_url: html: https://developers.cloudflare.com/hyperdrive/examples/connect-to-mysql/mysql-database-providers/google-cloud-sql/ md: https://developers.cloudflare.com/hyperdrive/examples/connect-to-mysql/mysql-database-providers/google-cloud-sql/index.md --- This example shows you how to connect Hyperdrive to a Google Cloud SQL MySQL database instance. ## 1. Allow Hyperdrive access To allow Hyperdrive to connect to your database, you will need to ensure that Hyperdrive has valid user credentials and network access. Note To allow Hyperdrive to connect to your database, you must allow Cloudflare IPs to be able to access your database. You can either allow-list all IP address ranges (0.0.0.0 - 255.255.255.255) or restrict your IP access control list to the [IP ranges used by Hyperdrive](https://developers.cloudflare.com/hyperdrive/configuration/firewall-and-networking-configuration/). Alternatively, you can connect to your databases over in your private network using [Cloudflare Tunnels](https://developers.cloudflare.com/hyperdrive/configuration/connect-to-private-database/). ### Cloud Console When creating the instance or when editing an existing instance in the [Google Cloud Console](https://console.cloud.google.com/sql/instances): To allow Hyperdrive to reach your instance: 1. In the [Cloud Console](https://console.cloud.google.com/sql/instances), select the instance you want Hyperdrive to connect to. 2. Expand **Connections** > **Networking** > ensure **Public IP** is enabled > **Add a Network** and input `0.0.0.0/0`. 3. Select **Done** > **Save** to persist your changes. 4. Select **Overview** from the sidebar and note down the **Public IP address** of your instance. To create a user for Hyperdrive to connect as: 1. Select **Users** in the sidebar. 2. Select **Add User Account** > select **Built-in authentication**. 3. Provide a name (for example, `hyperdrive-user`), then select **Generate** to generate a password. 4. Copy this password to your clipboard before selecting **Add** to create the user. With the username, password, public IP address and (optional) database name (default: `mysql`), you can now create a Hyperdrive database configuration. ## 2. Create a database configuration To configure Hyperdrive, you will need: * The IP address (or hostname) and port of your database. * The database username (for example, `hyperdrive-demo`) you configured in a previous step. * The password associated with that username. * The name of the database you want Hyperdrive to connect to. For example, `mysql`. Hyperdrive accepts the combination of these parameters in the common connection string format used by database drivers: ```txt mysql://USERNAME:PASSWORD@HOSTNAME_OR_IP_ADDRESS:PORT/database_name ``` Most database providers will provide a connection string you can copy-and-paste directly into Hyperdrive. To create a Hyperdrive configuration with the [Wrangler CLI](https://developers.cloudflare.com/workers/wrangler/install-and-update/), open your terminal and run the following command. * Replace \ with a name for your Hyperdrive configuration and paste the connection string provided from your database host, or, * Replace `user`, `password`, `HOSTNAME_OR_IP_ADDRESS`, `port`, and `database_name` placeholders with those specific to your database: ```sh npx wrangler hyperdrive create --connection-string="mysql://user:password@HOSTNAME_OR_IP_ADDRESS:PORT/database_name" ``` Note Hyperdrive will attempt to connect to your database with the provided credentials to verify they are correct before creating a configuration. If you encounter an error when attempting to connect, refer to Hyperdrive's [troubleshooting documentation](https://developers.cloudflare.com/hyperdrive/observability/troubleshooting/) to debug possible causes. This command outputs a binding for the [Wrangler configuration file](https://developers.cloudflare.com/workers/wrangler/configuration/): * wrangler.jsonc ```jsonc { "name": "hyperdrive-example", "main": "src/index.ts", "compatibility_date": "2024-08-21", "compatibility_flags": [ "nodejs_compat" ], "hyperdrive": [ { "binding": "HYPERDRIVE", "id": "" } ] } ``` * wrangler.toml ```toml name = "hyperdrive-example" main = "src/index.ts" compatibility_date = "2024-08-21" compatibility_flags = ["nodejs_compat"] # Pasted from the output of `wrangler hyperdrive create --connection-string=[...]` above. [[hyperdrive]] binding = "HYPERDRIVE" id = "" ``` ## 3. Use Hyperdrive from your Worker Install the [mysql2](https://github.com/sidorares/node-mysql2) driver: * npm ```sh npm i mysql2@>3.13.0 ``` * yarn ```sh yarn add mysql2@>3.13.0 ``` * pnpm ```sh pnpm add mysql2@>3.13.0 ``` Note `mysql2` v3.13.0 or later is required Add the required Node.js compatibility flags and Hyperdrive binding to your `wrangler.jsonc` file: * wrangler.jsonc ```jsonc { "compatibility_flags": [ "nodejs_compat" ], "compatibility_date": "2024-09-23", "hyperdrive": [ { "binding": "HYPERDRIVE", "id": "" } ] } ``` * wrangler.toml ```toml # required for database drivers to function compatibility_flags = ["nodejs_compat"] compatibility_date = "2024-09-23" [[hyperdrive]] binding = "HYPERDRIVE" id = "" ``` Create a new `connection` instance and pass the Hyperdrive parameters: ```ts // mysql2 v3.13.0 or later is required import { createConnection } from "mysql2/promise"; export default { async fetch(request, env, ctx): Promise { // Create a connection using the mysql2 driver with the Hyperdrive credentials (only accessible from your Worker). const connection = await createConnection({ host: env.HYPERDRIVE.host, user: env.HYPERDRIVE.user, password: env.HYPERDRIVE.password, database: env.HYPERDRIVE.database, port: env.HYPERDRIVE.port, // Required to enable mysql2 compatibility for Workers disableEval: true, }); try { // Sample query const [results, fields] = await connection.query("SHOW tables;"); // Clean up the client after the response is returned, before the Worker is killed ctx.waitUntil(connection.end()); // Return result rows as JSON return Response.json({ results, fields }); } catch (e) { console.error(e); } }, } satisfies ExportedHandler; ``` Note The minimum version of `mysql2` required for Hyperdrive is `3.13.0`. ## Next steps * Learn more about [How Hyperdrive Works](https://developers.cloudflare.com/hyperdrive/configuration/how-hyperdrive-works/). * Refer to the [troubleshooting guide](https://developers.cloudflare.com/hyperdrive/observability/troubleshooting/) to debug common issues. * Understand more about other [storage options](https://developers.cloudflare.com/workers/platform/storage-options/) available to Cloudflare Workers. --- title: PlanetScale · Hyperdrive docs description: Connect Hyperdrive to a PlanetScale MySQL database. lastUpdated: 2025-06-25T15:22:01.000Z chatbotDeprioritize: false source_url: html: https://developers.cloudflare.com/hyperdrive/examples/connect-to-mysql/mysql-database-providers/planetscale/ md: https://developers.cloudflare.com/hyperdrive/examples/connect-to-mysql/mysql-database-providers/planetscale/index.md --- This example shows you how to connect Hyperdrive to a [PlanetScale](https://planetscale.com/) MySQL database. ## 1. Allow Hyperdrive access You can connect Hyperdrive to any existing PlanetScale database by creating a new user and fetching your database connection string. ### Planetscale Dashboard 1. Go to the [**PlanetScale dashboard**](https://app.planetscale.com/) and select the database you wish to connect to. 2. Click **Connect**. Enter `hyperdrive-user` as the password name (or your preferred name) and configure the permissions as desired. Select **Create password**. Note the username and password as they will not be displayed again. 3. Select **Other** as your language or framework. Note down the database host, database name, database username, and password. You will need these to create a database configuration in Hyperdrive. With the host, database name, username and password, you can now create a Hyperdrive database configuration. ## 2. Create a database configuration To configure Hyperdrive, you will need: * The IP address (or hostname) and port of your database. * The database username (for example, `hyperdrive-demo`) you configured in a previous step. * The password associated with that username. * The name of the database you want Hyperdrive to connect to. For example, `mysql`. Hyperdrive accepts the combination of these parameters in the common connection string format used by database drivers: ```txt mysql://USERNAME:PASSWORD@HOSTNAME_OR_IP_ADDRESS:PORT/database_name ``` Most database providers will provide a connection string you can copy-and-paste directly into Hyperdrive. To create a Hyperdrive configuration with the [Wrangler CLI](https://developers.cloudflare.com/workers/wrangler/install-and-update/), open your terminal and run the following command. * Replace \ with a name for your Hyperdrive configuration and paste the connection string provided from your database host, or, * Replace `user`, `password`, `HOSTNAME_OR_IP_ADDRESS`, `port`, and `database_name` placeholders with those specific to your database: ```sh npx wrangler hyperdrive create --connection-string="mysql://user:password@HOSTNAME_OR_IP_ADDRESS:PORT/database_name" ``` Note Hyperdrive will attempt to connect to your database with the provided credentials to verify they are correct before creating a configuration. If you encounter an error when attempting to connect, refer to Hyperdrive's [troubleshooting documentation](https://developers.cloudflare.com/hyperdrive/observability/troubleshooting/) to debug possible causes. This command outputs a binding for the [Wrangler configuration file](https://developers.cloudflare.com/workers/wrangler/configuration/): * wrangler.jsonc ```jsonc { "name": "hyperdrive-example", "main": "src/index.ts", "compatibility_date": "2024-08-21", "compatibility_flags": [ "nodejs_compat" ], "hyperdrive": [ { "binding": "HYPERDRIVE", "id": "" } ] } ``` * wrangler.toml ```toml name = "hyperdrive-example" main = "src/index.ts" compatibility_date = "2024-08-21" compatibility_flags = ["nodejs_compat"] # Pasted from the output of `wrangler hyperdrive create --connection-string=[...]` above. [[hyperdrive]] binding = "HYPERDRIVE" id = "" ``` ## 3. Use Hyperdrive from your Worker Install the [mysql2](https://github.com/sidorares/node-mysql2) driver: * npm ```sh npm i mysql2@>3.13.0 ``` * yarn ```sh yarn add mysql2@>3.13.0 ``` * pnpm ```sh pnpm add mysql2@>3.13.0 ``` Note `mysql2` v3.13.0 or later is required Add the required Node.js compatibility flags and Hyperdrive binding to your `wrangler.jsonc` file: * wrangler.jsonc ```jsonc { "compatibility_flags": [ "nodejs_compat" ], "compatibility_date": "2024-09-23", "hyperdrive": [ { "binding": "HYPERDRIVE", "id": "" } ] } ``` * wrangler.toml ```toml # required for database drivers to function compatibility_flags = ["nodejs_compat"] compatibility_date = "2024-09-23" [[hyperdrive]] binding = "HYPERDRIVE" id = "" ``` Create a new `connection` instance and pass the Hyperdrive parameters: ```ts // mysql2 v3.13.0 or later is required import { createConnection } from "mysql2/promise"; export default { async fetch(request, env, ctx): Promise { // Create a connection using the mysql2 driver with the Hyperdrive credentials (only accessible from your Worker). const connection = await createConnection({ host: env.HYPERDRIVE.host, user: env.HYPERDRIVE.user, password: env.HYPERDRIVE.password, database: env.HYPERDRIVE.database, port: env.HYPERDRIVE.port, // Required to enable mysql2 compatibility for Workers disableEval: true, }); try { // Sample query const [results, fields] = await connection.query("SHOW tables;"); // Clean up the client after the response is returned, before the Worker is killed ctx.waitUntil(connection.end()); // Return result rows as JSON return Response.json({ results, fields }); } catch (e) { console.error(e); } }, } satisfies ExportedHandler; ``` Note The minimum version of `mysql2` required for Hyperdrive is `3.13.0`. Note When connecting to a Planetscale database with Hyperdrive, you should use a driver like [node-postgres (pg)](https://developers.cloudflare.com/hyperdrive/examples/connect-to-postgres/postgres-drivers-and-libraries/node-postgres/) or [Postgres.js](https://developers.cloudflare.com/hyperdrive/examples/connect-to-postgres/postgres-drivers-and-libraries/postgres-js/) to connect directly to the underlying database instead of the [Planetscale serverless driver](https://planetscale.com/docs/tutorials/planetscale-serverless-driver). Hyperdrive is optimized for database access for Workers and will perform global connection pooling and fast query routing by connecting directly to your database. ## Next steps * Learn more about [How Hyperdrive Works](https://developers.cloudflare.com/hyperdrive/configuration/how-hyperdrive-works/). * Refer to the [troubleshooting guide](https://developers.cloudflare.com/hyperdrive/observability/troubleshooting/) to debug common issues. * Understand more about other [storage options](https://developers.cloudflare.com/workers/platform/storage-options/) available to Cloudflare Workers. --- title: Drizzle ORM · Hyperdrive docs description: Drizzle ORM is a lightweight TypeScript ORM with a focus on type safety. This example demonstrates how to use Drizzle ORM with MySQL via Cloudflare Hyperdrive in a Workers application. lastUpdated: 2025-05-12T14:16:48.000Z chatbotDeprioritize: false source_url: html: https://developers.cloudflare.com/hyperdrive/examples/connect-to-mysql/mysql-drivers-and-libraries/drizzle-orm/ md: https://developers.cloudflare.com/hyperdrive/examples/connect-to-mysql/mysql-drivers-and-libraries/drizzle-orm/index.md --- [Drizzle ORM](https://orm.drizzle.team/) is a lightweight TypeScript ORM with a focus on type safety. This example demonstrates how to use Drizzle ORM with MySQL via Cloudflare Hyperdrive in a Workers application. ## Prerequisites * A Cloudflare account with Workers access * A MySQL database * A [Hyperdrive configuration to your MySQL database](https://developers.cloudflare.com/hyperdrive/get-started/#3-connect-hyperdrive-to-a-database) ## 1. Install Drizzle Install the Drizzle ORM and its dependencies such as the [mysql2](https://github.com/sidorares/node-mysql2) driver: ```sh # mysql2 v3.13.0 or later is required npm i drizzle-orm mysql2 dotenv npm i -D drizzle-kit tsx @types/node ``` Add the required Node.js compatibility flags and Hyperdrive binding to your `wrangler.jsonc` file: * wrangler.jsonc ```jsonc { "compatibility_flags": [ "nodejs_compat" ], "compatibility_date": "2024-09-23", "hyperdrive": [ { "binding": "HYPERDRIVE", "id": "" } ] } ``` * wrangler.toml ```toml # required for database drivers to function compatibility_flags = ["nodejs_compat"] compatibility_date = "2024-09-23" [[hyperdrive]] binding = "HYPERDRIVE" id = "" ``` ## 2. Configure Drizzle ### 2.1. Define a schema With Drizzle ORM, we define the schema in TypeScript rather than writing raw SQL. 1. Create a folder `/db/` in `/src/`. 2. Create a `schema.ts` file. 3. In `schema.ts`, define a `users` table as shown below. ```ts // src/schema.ts import { mysqlTable, int, varchar, timestamp } from "drizzle-orm/mysql-core"; export const users = mysqlTable("users", { id: int("id").primaryKey().autoincrement(), name: varchar("name", { length: 255 }).notNull(), email: varchar("email", { length: 255 }).notNull().unique(), createdAt: timestamp("created_at").defaultNow(), }); ``` ### 2.2. Connect Drizzle ORM to the database with Hyperdrive Use your the credentials of your Hyperdrive configuration for your database when using the Drizzle ORM. Populate your `index.ts` file as shown below. ```ts // src/index.ts import { drizzle } from "drizzle-orm/mysql2"; import { createConnection } from "mysql2"; import { users } from "./db/schema"; export interface Env { HYPERDRIVE: Hyperdrive; } export default { async fetch(request, env, ctx): Promise { // Create a connection using the mysql2 driver with the Hyperdrive credentials (only accessible from your Worker). const connection = await createConnection({ host: env.HYPERDRIVE.host, user: env.HYPERDRIVE.user, password: env.HYPERDRIVE.password, database: env.HYPERDRIVE.database, port: env.HYPERDRIVE.port, // Required to enable mysql2 compatibility for Workers disableEval: true, }); // Create the Drizzle client with the mysql2 driver connection const db = drizzle(connection); // Sample query to get all users const allUsers = await db.select().from(users); return Response.json(allUsers); }, } satisfies ExportedHandler; ``` ### 2.3. Configure Drizzle-Kit for migrations (optional) Note You need to set up the tables in your database so that Drizzle ORM can make queries that work. If you have already set it up (for example, if another user has applied the schema to your database), or if you are starting to use Drizzle ORM and the schema matches what already exists in your database, then you do not need to run the migration. You can generate and run SQL migrations on your database based on your schema using Drizzle Kit CLI. Refer to [Drizzle ORM docs](https://orm.drizzle.team/docs/get-started/mysql-new) for additional guidance. 1. Create a `.env` file in the root folder of your project, and add your database connection string. The Drizzle Kit CLI will use this connection string to create and apply the migrations. ```toml # .env # Replace with your direct database connection string DATABASE_URL='mysql://user:password@db-host.cloud/database-name' ``` 2. Create a `drizzle.config.ts` file in the root folder of your project to configure Drizzle Kit and add the following content: ```ts import 'dotenv/config'; import { defineConfig } from 'drizzle-kit'; export default defineConfig({ out: './drizzle', schema: './src/db/schema.ts', dialect: 'mysql', dbCredentials: { url: process.env.DATABASE_URL!, }, }); ``` 3. Generate the migration file for your database according to your schema files and apply the migrations to your database. ```bash npx drizzle-kit generate ``` ```bash No config path provided, using default 'drizzle.config.ts' Reading config file 'drizzle.config.ts' Reading schema files: /src/db/schema.ts 1 tables users 4 columns 0 indexes 0 fks [✓] Your SQL migration file ➜ drizzle/0000_daffy_rhodey.sql 🚀 ``` ```bash npx drizzle-kit migrate ``` ```bash No config path provided, using default 'drizzle.config.ts' Reading config file 'drizzle.config.ts' ``` ## 3. Deploy your Worker Deploy your Worker. ```bash npx wrangler deploy ``` ## Next steps * Learn more about [How Hyperdrive Works](https://developers.cloudflare.com/hyperdrive/configuration/how-hyperdrive-works/). * Refer to the [troubleshooting guide](https://developers.cloudflare.com/hyperdrive/observability/troubleshooting/) to debug common issues. * Understand more about other [storage options](https://developers.cloudflare.com/workers/platform/storage-options/) available to Cloudflare Workers. --- title: mysql · Hyperdrive docs description: >- The mysql package is a MySQL driver for Node.js. This example demonstrates how to use it with Cloudflare Workers and Hyperdrive. lastUpdated: 2025-05-12T14:16:48.000Z chatbotDeprioritize: false source_url: html: https://developers.cloudflare.com/hyperdrive/examples/connect-to-mysql/mysql-drivers-and-libraries/mysql/ md: https://developers.cloudflare.com/hyperdrive/examples/connect-to-mysql/mysql-drivers-and-libraries/mysql/index.md --- The [mysql](https://github.com/mysqljs/mysql) package is a MySQL driver for Node.js. This example demonstrates how to use it with Cloudflare Workers and Hyperdrive. Install the [mysql](https://github.com/mysqljs/mysql) driver: * npm ```sh npm i mysql ``` * yarn ```sh yarn add mysql ``` * pnpm ```sh pnpm add mysql ``` Add the required Node.js compatibility flags and Hyperdrive binding to your `wrangler.jsonc` file: * wrangler.jsonc ```jsonc { "compatibility_flags": [ "nodejs_compat" ], "compatibility_date": "2024-09-23", "hyperdrive": [ { "binding": "HYPERDRIVE", "id": "" } ] } ``` * wrangler.toml ```toml # required for database drivers to function compatibility_flags = ["nodejs_compat"] compatibility_date = "2024-09-23" [[hyperdrive]] binding = "HYPERDRIVE" id = "" ``` Create a new connection and pass the Hyperdrive parameters: ```ts import { createConnection } from "mysql"; export default { async fetch(request, env, ctx): Promise { const result = await new Promise((resolve) => { // Create a connection using the mysql driver with the Hyperdrive credentials (only accessible from your Worker). const connection = createConnection({ host: env.HYPERDRIVE.host, user: env.HYPERDRIVE.user, password: env.HYPERDRIVE.password, database: env.HYPERDRIVE.database, port: env.HYPERDRIVE.port, }); connection.connect((error: { message: string }) => { if (error) { throw new Error(error.message); } // Sample query connection.query("SHOW tables;", [], (error, rows, fields) => { connection.end(); resolve({ fields, rows }); }); }); }); // Return result as JSON return new Response(JSON.stringify(result), { headers: { "Content-Type": "application/json", }, }); }, } satisfies ExportedHandler; ``` --- title: mysql2 · Hyperdrive docs description: >- The mysql2 package is a modern MySQL driver for Node.js with better performance and built-in Promise support. This example demonstrates how to use it with Cloudflare Workers and Hyperdrive. lastUpdated: 2025-05-12T14:16:48.000Z chatbotDeprioritize: false source_url: html: https://developers.cloudflare.com/hyperdrive/examples/connect-to-mysql/mysql-drivers-and-libraries/mysql2/ md: https://developers.cloudflare.com/hyperdrive/examples/connect-to-mysql/mysql-drivers-and-libraries/mysql2/index.md --- The [mysql2](https://github.com/sidorares/node-mysql2) package is a modern MySQL driver for Node.js with better performance and built-in Promise support. This example demonstrates how to use it with Cloudflare Workers and Hyperdrive. Install the [mysql2](https://github.com/sidorares/node-mysql2) driver: * npm ```sh npm i mysql2@>3.13.0 ``` * yarn ```sh yarn add mysql2@>3.13.0 ``` * pnpm ```sh pnpm add mysql2@>3.13.0 ``` Note `mysql2` v3.13.0 or later is required Add the required Node.js compatibility flags and Hyperdrive binding to your `wrangler.jsonc` file: * wrangler.jsonc ```jsonc { "compatibility_flags": [ "nodejs_compat" ], "compatibility_date": "2024-09-23", "hyperdrive": [ { "binding": "HYPERDRIVE", "id": "" } ] } ``` * wrangler.toml ```toml # required for database drivers to function compatibility_flags = ["nodejs_compat"] compatibility_date = "2024-09-23" [[hyperdrive]] binding = "HYPERDRIVE" id = "" ``` Create a new `connection` instance and pass the Hyperdrive parameters: ```ts // mysql2 v3.13.0 or later is required import { createConnection } from "mysql2/promise"; export default { async fetch(request, env, ctx): Promise { // Create a connection using the mysql2 driver with the Hyperdrive credentials (only accessible from your Worker). const connection = await createConnection({ host: env.HYPERDRIVE.host, user: env.HYPERDRIVE.user, password: env.HYPERDRIVE.password, database: env.HYPERDRIVE.database, port: env.HYPERDRIVE.port, // Required to enable mysql2 compatibility for Workers disableEval: true, }); try { // Sample query const [results, fields] = await connection.query("SHOW tables;"); // Clean up the client after the response is returned, before the Worker is killed ctx.waitUntil(connection.end()); // Return result rows as JSON return Response.json({ results, fields }); } catch (e) { console.error(e); } }, } satisfies ExportedHandler; ``` Note The minimum version of `mysql2` required for Hyperdrive is `3.13.0`. --- title: AWS RDS and Aurora · Hyperdrive docs description: Connect Hyperdrive to an AWS RDS or Aurora Postgres database instance. lastUpdated: 2025-05-12T14:16:48.000Z chatbotDeprioritize: false source_url: html: https://developers.cloudflare.com/hyperdrive/examples/connect-to-postgres/postgres-database-providers/aws-rds-aurora/ md: https://developers.cloudflare.com/hyperdrive/examples/connect-to-postgres/postgres-database-providers/aws-rds-aurora/index.md --- This example shows you how to connect Hyperdrive to an Amazon Relational Database Service (Amazon RDS) Postgres or Amazon Aurora database instance. ## 1. Allow Hyperdrive access To allow Hyperdrive to connect to your database, you will need to ensure that Hyperdrive has valid user credentials and network access. Note To allow Hyperdrive to connect to your database, you must allow Cloudflare IPs to be able to access your database. You can either allow-list all IP address ranges (0.0.0.0 - 255.255.255.255) or restrict your IP access control list to the [IP ranges used by Hyperdrive](https://developers.cloudflare.com/hyperdrive/configuration/firewall-and-networking-configuration/). Alternatively, you can connect to your databases over in your private network using [Cloudflare Tunnels](https://developers.cloudflare.com/hyperdrive/configuration/connect-to-private-database/). ### AWS Console When creating or modifying an instance in the AWS console: 1. Configure a **DB cluster identifier** and other settings you wish to customize. 2. Under **Settings** > **Credential settings**, note down the **Master username** and **Master password** (Aurora only). 3. Under the **Connectivity** header, ensure **Public access** is set to **Yes**. 4. Select an **Existing VPC security group** that allows public Internet access from `0.0.0.0/0` to the port your database instance is configured to listen on (default: `5432` for PostgreSQL instances). 5. Select **Create database**. Warning You must ensure that the [VPC security group](https://docs.aws.amazon.com/vpc/latest/userguide/vpc-security-groups.html) associated with your database allows public IPv4 access to your database port. Refer to AWS' [database server rules](https://docs.aws.amazon.com/AWSEC2/latest/UserGuide/security-group-rules-reference.html#sg-rules-db-server) for details on how to configure rules specific to your RDS or Aurora database. ### Retrieve the database endpoint (Aurora) To retrieve the database endpoint (hostname) for Hyperdrive to connect to: 1. Go to **Databases** view under **RDS** in the AWS console. 2. Select the database you want Hyperdrive to connect to. 3. Under the **Endpoints** header, note down the **Endpoint name** with the type `Writer` and the **Port**. ### Retrieve the database endpoint (RDS PostgreSQL) For regular RDS instances (non-Aurora), you will need to fetch the endpoint and port of the database: 1. Go to **Databases** view under **RDS** in the AWS console. 2. Select the database you want Hyperdrive to connect to. 3. Under the **Connectivity & security** header, note down the **Endpoint** and the **Port**. The endpoint will resemble `YOUR_DATABASE_NAME.cpuo5rlli58m.AWS_REGION.rds.amazonaws.com` and the port will default to `5432`. ## 2. Create your user Once your database is created, you will need to create a user for Hyperdrive to connect as. Although you can use the **Master username** configured during initial database creation, best practice is to create a less privileged user. To create a new user, log in to the database and use the `CREATE ROLE` command: ```sh # Log in to the database psql postgresql://MASTER_USERNAME:MASTER_PASSWORD@ENDPOINT_NAME:PORT/database_name ``` Run the following SQL statements: ```sql -- Create a role for Hyperdrive CREATE ROLE hyperdrive; -- Allow Hyperdrive to connect GRANT CONNECT ON DATABASE postgres TO hyperdrive; -- Grant database privileges to the hyperdrive role GRANT ALL PRIVILEGES ON DATABASE postgres to hyperdrive; -- Create a specific user for Hyperdrive to log in as CREATE ROLE hyperdrive_user LOGIN PASSWORD 'sufficientlyRandomPassword'; -- Grant this new user the hyperdrive role privileges GRANT hyperdrive to hyperdrive_user; ``` Refer to AWS' [documentation on user roles in PostgreSQL](https://docs.aws.amazon.com/AmazonRDS/latest/UserGuide/Appendix.PostgreSQL.CommonDBATasks.Roles.html) for more details. With a database user, password, database endpoint (hostname and port) and database name (default: `postgres`), you can now set up Hyperdrive. ## 3. Create a database configuration To configure Hyperdrive, you will need: * The IP address (or hostname) and port of your database. * The database username (for example, `hyperdrive-demo`) you configured in a previous step. * The password associated with that username. * The name of the database you want Hyperdrive to connect to. For example, `postgres`. Hyperdrive accepts the combination of these parameters in the common connection string format used by database drivers: ```txt postgres://USERNAME:PASSWORD@HOSTNAME_OR_IP_ADDRESS:PORT/database_name ``` Most database providers will provide a connection string you can directly copy-and-paste directly into Hyperdrive. To create a Hyperdrive configuration with the [Wrangler CLI](https://developers.cloudflare.com/workers/wrangler/install-and-update/), open your terminal and run the following command. Replace \ with a name for your Hyperdrive configuration and paste the connection string provided from your database host, or replace `user`, `password`, `HOSTNAME_OR_IP_ADDRESS`, `port`, and `database_name` placeholders with those specific to your database: ```sh npx wrangler hyperdrive create --connection-string="postgres://user:password@HOSTNAME_OR_IP_ADDRESS:PORT/database_name" ``` Note Hyperdrive will attempt to connect to your database with the provided credentials to verify they are correct before creating a configuration. If you encounter an error when attempting to connect, refer to Hyperdrive's [troubleshooting documentation](https://developers.cloudflare.com/hyperdrive/observability/troubleshooting/) to debug possible causes. This command outputs a binding for the [Wrangler configuration file](https://developers.cloudflare.com/workers/wrangler/configuration/): * wrangler.jsonc ```jsonc { "name": "hyperdrive-example", "main": "src/index.ts", "compatibility_date": "2024-08-21", "compatibility_flags": [ "nodejs_compat" ], "hyperdrive": [ { "binding": "HYPERDRIVE", "id": "" } ] } ``` * wrangler.toml ```toml name = "hyperdrive-example" main = "src/index.ts" compatibility_date = "2024-08-21" compatibility_flags = ["nodejs_compat"] # Pasted from the output of `wrangler hyperdrive create --connection-string=[...]` above. [[hyperdrive]] binding = "HYPERDRIVE" id = "" ``` ## 3. Use Hyperdrive from your Worker Install the `node-postgres` driver: * npm ```sh npm i pg@>8.16.3 ``` * yarn ```sh yarn add pg@>8.16.3 ``` * pnpm ```sh pnpm add pg@>8.16.3 ``` Note The minimum version of `node-postgres` required for Hyperdrive is `8.16.3`. If using TypeScript, install the types package: * npm ```sh npm i -D @types/pg ``` * yarn ```sh yarn add -D @types/pg ``` * pnpm ```sh pnpm add -D @types/pg ``` Add the required Node.js compatibility flags and Hyperdrive binding to your `wrangler.jsonc` file: * wrangler.jsonc ```jsonc { "compatibility_flags": [ "nodejs_compat" ], "compatibility_date": "2024-09-23", "hyperdrive": [ { "binding": "HYPERDRIVE", "id": "" } ] } ``` * wrangler.toml ```toml # required for database drivers to function compatibility_flags = ["nodejs_compat"] compatibility_date = "2024-09-23" [[hyperdrive]] binding = "HYPERDRIVE" id = "" ``` Create a new `Client` instance and pass the Hyperdrive `connectionString`: ```ts // filepath: src/index.ts import { Client } from "pg"; export default { async fetch(request: Request, env: Env, ctx: ExecutionContext): Promise { // Create a new client instance for each request. const client = new Client({ connectionString: env.HYPERDRIVE.connectionString, }); try { // Connect to the database await client.connect(); console.log("Connected to PostgreSQL database"); // Perform a simple query const result = await client.query("SELECT * FROM pg_tables"); // Clean up the client after the response is returned, before the Worker is killed ctx.waitUntil(client.end()); return Response.json({ success: true, result: result.rows, }); } catch (error: any) { console.error("Database error:", error.message); new Response('Internal error occurred', { status: 500 }); } }, }; ``` Note If you expect to be making multiple parallel database queries within a single Worker invocation, consider using a [connection pool (`pg.Pool`)](https://node-postgres.com/apis/pool) to allow for parallel queries. If doing so, set the max connections of the connection pool to 5 connections. This ensures that the connection pool fits within [Workers' concurrent open connections limit of 6](https://developers.cloudflare.com/workers/platform/limits), which affect TCP connections that database drivers use. ## Next steps * Learn more about [How Hyperdrive Works](https://developers.cloudflare.com/hyperdrive/configuration/how-hyperdrive-works/). * Refer to the [troubleshooting guide](https://developers.cloudflare.com/hyperdrive/observability/troubleshooting/) to debug common issues. * Understand more about other [storage options](https://developers.cloudflare.com/workers/platform/storage-options/) available to Cloudflare Workers. --- title: Azure Database · Hyperdrive docs description: Connect Hyperdrive to a Azure Database for PostgreSQL instance. lastUpdated: 2025-05-12T14:16:48.000Z chatbotDeprioritize: false source_url: html: https://developers.cloudflare.com/hyperdrive/examples/connect-to-postgres/postgres-database-providers/azure/ md: https://developers.cloudflare.com/hyperdrive/examples/connect-to-postgres/postgres-database-providers/azure/index.md --- This example shows you how to connect Hyperdrive to an Azure Database for PostgreSQL instance. ## 1. Allow Hyperdrive access To allow Hyperdrive to connect to your database, you will need to ensure that Hyperdrive has valid credentials and network access. Note To allow Hyperdrive to connect to your database, you must allow Cloudflare IPs to be able to access your database. You can either allow-list all IP address ranges (0.0.0.0 - 255.255.255.255) or restrict your IP access control list to the [IP ranges used by Hyperdrive](https://developers.cloudflare.com/hyperdrive/configuration/firewall-and-networking-configuration/). Alternatively, you can connect to your databases over in your private network using [Cloudflare Tunnels](https://developers.cloudflare.com/hyperdrive/configuration/connect-to-private-database/). ### Azure Portal #### Public access networking To connect to your Azure Database for PostgreSQL instance using public Internet connectivity: 1. In the [Azure Portal](https://portal.azure.com/), select the instance you want Hyperdrive to connect to. 2. Expand **Settings** > **Networking** > ensure **Public access** is enabled > in **Firewall rules** add `0.0.0.0` as **Start IP address** and `255.255.255.255` as **End IP address**. 3. Select **Save** to persist your changes. 4. Select **Overview** from the sidebar and note down the **Server name** of your instance. With the username, password, server name, and database name (default: `postgres`), you can now create a Hyperdrive database configuration. #### Private access networking To connect to a private Azure Database for PostgreSQL instance, refer to [Connect to a private database using Tunnel](https://developers.cloudflare.com/hyperdrive/configuration/connect-to-private-database/). ## 2. Create a database configuration To configure Hyperdrive, you will need: * The IP address (or hostname) and port of your database. * The database username (for example, `hyperdrive-demo`) you configured in a previous step. * The password associated with that username. * The name of the database you want Hyperdrive to connect to. For example, `postgres`. Hyperdrive accepts the combination of these parameters in the common connection string format used by database drivers: ```txt postgres://USERNAME:PASSWORD@HOSTNAME_OR_IP_ADDRESS:PORT/database_name ``` Most database providers will provide a connection string you can directly copy-and-paste directly into Hyperdrive. To create a Hyperdrive configuration with the [Wrangler CLI](https://developers.cloudflare.com/workers/wrangler/install-and-update/), open your terminal and run the following command. Replace \ with a name for your Hyperdrive configuration and paste the connection string provided from your database host, or replace `user`, `password`, `HOSTNAME_OR_IP_ADDRESS`, `port`, and `database_name` placeholders with those specific to your database: ```sh npx wrangler hyperdrive create --connection-string="postgres://user:password@HOSTNAME_OR_IP_ADDRESS:PORT/database_name" ``` Note Hyperdrive will attempt to connect to your database with the provided credentials to verify they are correct before creating a configuration. If you encounter an error when attempting to connect, refer to Hyperdrive's [troubleshooting documentation](https://developers.cloudflare.com/hyperdrive/observability/troubleshooting/) to debug possible causes. This command outputs a binding for the [Wrangler configuration file](https://developers.cloudflare.com/workers/wrangler/configuration/): * wrangler.jsonc ```jsonc { "name": "hyperdrive-example", "main": "src/index.ts", "compatibility_date": "2024-08-21", "compatibility_flags": [ "nodejs_compat" ], "hyperdrive": [ { "binding": "HYPERDRIVE", "id": "" } ] } ``` * wrangler.toml ```toml name = "hyperdrive-example" main = "src/index.ts" compatibility_date = "2024-08-21" compatibility_flags = ["nodejs_compat"] # Pasted from the output of `wrangler hyperdrive create --connection-string=[...]` above. [[hyperdrive]] binding = "HYPERDRIVE" id = "" ``` ## 3. Use Hyperdrive from your Worker Install the `node-postgres` driver: * npm ```sh npm i pg@>8.16.3 ``` * yarn ```sh yarn add pg@>8.16.3 ``` * pnpm ```sh pnpm add pg@>8.16.3 ``` Note The minimum version of `node-postgres` required for Hyperdrive is `8.16.3`. If using TypeScript, install the types package: * npm ```sh npm i -D @types/pg ``` * yarn ```sh yarn add -D @types/pg ``` * pnpm ```sh pnpm add -D @types/pg ``` Add the required Node.js compatibility flags and Hyperdrive binding to your `wrangler.jsonc` file: * wrangler.jsonc ```jsonc { "compatibility_flags": [ "nodejs_compat" ], "compatibility_date": "2024-09-23", "hyperdrive": [ { "binding": "HYPERDRIVE", "id": "" } ] } ``` * wrangler.toml ```toml # required for database drivers to function compatibility_flags = ["nodejs_compat"] compatibility_date = "2024-09-23" [[hyperdrive]] binding = "HYPERDRIVE" id = "" ``` Create a new `Client` instance and pass the Hyperdrive `connectionString`: ```ts // filepath: src/index.ts import { Client } from "pg"; export default { async fetch(request: Request, env: Env, ctx: ExecutionContext): Promise { // Create a new client instance for each request. const client = new Client({ connectionString: env.HYPERDRIVE.connectionString, }); try { // Connect to the database await client.connect(); console.log("Connected to PostgreSQL database"); // Perform a simple query const result = await client.query("SELECT * FROM pg_tables"); // Clean up the client after the response is returned, before the Worker is killed ctx.waitUntil(client.end()); return Response.json({ success: true, result: result.rows, }); } catch (error: any) { console.error("Database error:", error.message); new Response('Internal error occurred', { status: 500 }); } }, }; ``` Note If you expect to be making multiple parallel database queries within a single Worker invocation, consider using a [connection pool (`pg.Pool`)](https://node-postgres.com/apis/pool) to allow for parallel queries. If doing so, set the max connections of the connection pool to 5 connections. This ensures that the connection pool fits within [Workers' concurrent open connections limit of 6](https://developers.cloudflare.com/workers/platform/limits), which affect TCP connections that database drivers use. ## Next steps * Learn more about [How Hyperdrive Works](https://developers.cloudflare.com/hyperdrive/configuration/how-hyperdrive-works/). * Refer to the [troubleshooting guide](https://developers.cloudflare.com/hyperdrive/observability/troubleshooting/) to debug common issues. * Understand more about other [storage options](https://developers.cloudflare.com/workers/platform/storage-options/) available to Cloudflare Workers. --- title: CockroachDB · Hyperdrive docs description: Connect Hyperdrive to a CockroachDB database. lastUpdated: 2025-05-12T14:16:48.000Z chatbotDeprioritize: false source_url: html: https://developers.cloudflare.com/hyperdrive/examples/connect-to-postgres/postgres-database-providers/cockroachdb/ md: https://developers.cloudflare.com/hyperdrive/examples/connect-to-postgres/postgres-database-providers/cockroachdb/index.md --- This example shows you how to connect Hyperdrive to a [CockroachDB](https://www.cockroachlabs.com/) database cluster. CockroachDB is a PostgreSQL-compatible distributed SQL database with strong consistency guarantees. ## 1. Allow Hyperdrive access To allow Hyperdrive to connect to your database, you will need to ensure that Hyperdrive has valid user credentials and network access. ### CockroachDB Console The steps below assume you have an [existing CockroachDB Cloud account](https://www.cockroachlabs.com/docs/cockroachcloud/quickstart) and database cluster created. To create and/or fetch your database credentials: 1. Go to the [CockroachDB Cloud console](https://cockroachlabs.cloud/clusters) and select the cluster you want Hyperdrive to connect to. 2. Select **SQL Users** from the sidebar on the left, and select **Add User**. 3. Enter a username (for example, \`hyperdrive-user), and select **Generate & Save Password**. 4. Note down the username and copy the password to a temporary location. To retrieve your database connection details: 1. Go to the [CockroachDB Cloud console](https://cockroachlabs.cloud/clusters) and select the cluster you want Hyperdrive to connect to. 2. Select **Connect** in the top right. 3. Choose the user you created, for example,`hyperdrive-user`. 4. Select the database, for example `defaultdb`. 5. Select **General connection string** as the option. 6. In the text box below, select **Copy** to copy the connection string. By default, the CockroachDB cloud enables connections from the public Internet (`0.0.0.0/0`). If you have changed these settings on an existing cluster, you will need to allow connections from the public Internet for Hyperdrive to connect. ## 2. Create a database configuration To configure Hyperdrive, you will need: * The IP address (or hostname) and port of your database. * The database username (for example, `hyperdrive-demo`) you configured in a previous step. * The password associated with that username. * The name of the database you want Hyperdrive to connect to. For example, `postgres`. Hyperdrive accepts the combination of these parameters in the common connection string format used by database drivers: ```txt postgres://USERNAME:PASSWORD@HOSTNAME_OR_IP_ADDRESS:PORT/database_name ``` Most database providers will provide a connection string you can directly copy-and-paste directly into Hyperdrive. To create a Hyperdrive configuration with the [Wrangler CLI](https://developers.cloudflare.com/workers/wrangler/install-and-update/), open your terminal and run the following command. Replace \ with a name for your Hyperdrive configuration and paste the connection string provided from your database host, or replace `user`, `password`, `HOSTNAME_OR_IP_ADDRESS`, `port`, and `database_name` placeholders with those specific to your database: ```sh npx wrangler hyperdrive create --connection-string="postgres://user:password@HOSTNAME_OR_IP_ADDRESS:PORT/database_name" ``` Note Hyperdrive will attempt to connect to your database with the provided credentials to verify they are correct before creating a configuration. If you encounter an error when attempting to connect, refer to Hyperdrive's [troubleshooting documentation](https://developers.cloudflare.com/hyperdrive/observability/troubleshooting/) to debug possible causes. This command outputs a binding for the [Wrangler configuration file](https://developers.cloudflare.com/workers/wrangler/configuration/): * wrangler.jsonc ```jsonc { "name": "hyperdrive-example", "main": "src/index.ts", "compatibility_date": "2024-08-21", "compatibility_flags": [ "nodejs_compat" ], "hyperdrive": [ { "binding": "HYPERDRIVE", "id": "" } ] } ``` * wrangler.toml ```toml name = "hyperdrive-example" main = "src/index.ts" compatibility_date = "2024-08-21" compatibility_flags = ["nodejs_compat"] # Pasted from the output of `wrangler hyperdrive create --connection-string=[...]` above. [[hyperdrive]] binding = "HYPERDRIVE" id = "" ``` ## 3. Use Hyperdrive from your Worker Install the `node-postgres` driver: * npm ```sh npm i pg@>8.16.3 ``` * yarn ```sh yarn add pg@>8.16.3 ``` * pnpm ```sh pnpm add pg@>8.16.3 ``` Note The minimum version of `node-postgres` required for Hyperdrive is `8.16.3`. If using TypeScript, install the types package: * npm ```sh npm i -D @types/pg ``` * yarn ```sh yarn add -D @types/pg ``` * pnpm ```sh pnpm add -D @types/pg ``` Add the required Node.js compatibility flags and Hyperdrive binding to your `wrangler.jsonc` file: * wrangler.jsonc ```jsonc { "compatibility_flags": [ "nodejs_compat" ], "compatibility_date": "2024-09-23", "hyperdrive": [ { "binding": "HYPERDRIVE", "id": "" } ] } ``` * wrangler.toml ```toml # required for database drivers to function compatibility_flags = ["nodejs_compat"] compatibility_date = "2024-09-23" [[hyperdrive]] binding = "HYPERDRIVE" id = "" ``` Create a new `Client` instance and pass the Hyperdrive `connectionString`: ```ts // filepath: src/index.ts import { Client } from "pg"; export default { async fetch(request: Request, env: Env, ctx: ExecutionContext): Promise { // Create a new client instance for each request. const client = new Client({ connectionString: env.HYPERDRIVE.connectionString, }); try { // Connect to the database await client.connect(); console.log("Connected to PostgreSQL database"); // Perform a simple query const result = await client.query("SELECT * FROM pg_tables"); // Clean up the client after the response is returned, before the Worker is killed ctx.waitUntil(client.end()); return Response.json({ success: true, result: result.rows, }); } catch (error: any) { console.error("Database error:", error.message); new Response('Internal error occurred', { status: 500 }); } }, }; ``` Note If you expect to be making multiple parallel database queries within a single Worker invocation, consider using a [connection pool (`pg.Pool`)](https://node-postgres.com/apis/pool) to allow for parallel queries. If doing so, set the max connections of the connection pool to 5 connections. This ensures that the connection pool fits within [Workers' concurrent open connections limit of 6](https://developers.cloudflare.com/workers/platform/limits), which affect TCP connections that database drivers use. ## Next steps * Learn more about [How Hyperdrive Works](https://developers.cloudflare.com/hyperdrive/configuration/how-hyperdrive-works/). * Refer to the [troubleshooting guide](https://developers.cloudflare.com/hyperdrive/observability/troubleshooting/) to debug common issues. * Understand more about other [storage options](https://developers.cloudflare.com/workers/platform/storage-options/) available to Cloudflare Workers. --- title: Digital Ocean · Hyperdrive docs description: Connect Hyperdrive to a Digital Ocean Postgres database instance. lastUpdated: 2025-05-12T14:16:48.000Z chatbotDeprioritize: false source_url: html: https://developers.cloudflare.com/hyperdrive/examples/connect-to-postgres/postgres-database-providers/digital-ocean/ md: https://developers.cloudflare.com/hyperdrive/examples/connect-to-postgres/postgres-database-providers/digital-ocean/index.md --- This example shows you how to connect Hyperdrive to a Digital Ocean database instance. ## 1. Allow Hyperdrive access To allow Hyperdrive to connect to your database, you will need to ensure that Hyperdrive has valid user credentials and network access. ### DigitalOcean Dashboard 1. Go to the DigitalOcean dashboard and select the database you wish to connect to. 2. Go to the **Overview** tab. 3. Under the **Connection Details** panel, select **Public network**. 4. On the dropdown menu, select **Connection string** > **show-password**. 5. Copy the connection string. With the connection string, you can now create a Hyperdrive database configuration. ## 2. Create a database configuration To configure Hyperdrive, you will need: * The IP address (or hostname) and port of your database. * The database username (for example, `hyperdrive-demo`) you configured in a previous step. * The password associated with that username. * The name of the database you want Hyperdrive to connect to. For example, `postgres`. Hyperdrive accepts the combination of these parameters in the common connection string format used by database drivers: ```txt postgres://USERNAME:PASSWORD@HOSTNAME_OR_IP_ADDRESS:PORT/database_name ``` Most database providers will provide a connection string you can directly copy-and-paste directly into Hyperdrive. To create a Hyperdrive configuration with the [Wrangler CLI](https://developers.cloudflare.com/workers/wrangler/install-and-update/), open your terminal and run the following command. Replace \ with a name for your Hyperdrive configuration and paste the connection string provided from your database host, or replace `user`, `password`, `HOSTNAME_OR_IP_ADDRESS`, `port`, and `database_name` placeholders with those specific to your database: ```sh npx wrangler hyperdrive create --connection-string="postgres://user:password@HOSTNAME_OR_IP_ADDRESS:PORT/database_name" ``` Note Hyperdrive will attempt to connect to your database with the provided credentials to verify they are correct before creating a configuration. If you encounter an error when attempting to connect, refer to Hyperdrive's [troubleshooting documentation](https://developers.cloudflare.com/hyperdrive/observability/troubleshooting/) to debug possible causes. This command outputs a binding for the [Wrangler configuration file](https://developers.cloudflare.com/workers/wrangler/configuration/): * wrangler.jsonc ```jsonc { "name": "hyperdrive-example", "main": "src/index.ts", "compatibility_date": "2024-08-21", "compatibility_flags": [ "nodejs_compat" ], "hyperdrive": [ { "binding": "HYPERDRIVE", "id": "" } ] } ``` * wrangler.toml ```toml name = "hyperdrive-example" main = "src/index.ts" compatibility_date = "2024-08-21" compatibility_flags = ["nodejs_compat"] # Pasted from the output of `wrangler hyperdrive create --connection-string=[...]` above. [[hyperdrive]] binding = "HYPERDRIVE" id = "" ``` ## 3. Use Hyperdrive from your Worker Install the `node-postgres` driver: * npm ```sh npm i pg@>8.16.3 ``` * yarn ```sh yarn add pg@>8.16.3 ``` * pnpm ```sh pnpm add pg@>8.16.3 ``` Note The minimum version of `node-postgres` required for Hyperdrive is `8.16.3`. If using TypeScript, install the types package: * npm ```sh npm i -D @types/pg ``` * yarn ```sh yarn add -D @types/pg ``` * pnpm ```sh pnpm add -D @types/pg ``` Add the required Node.js compatibility flags and Hyperdrive binding to your `wrangler.jsonc` file: * wrangler.jsonc ```jsonc { "compatibility_flags": [ "nodejs_compat" ], "compatibility_date": "2024-09-23", "hyperdrive": [ { "binding": "HYPERDRIVE", "id": "" } ] } ``` * wrangler.toml ```toml # required for database drivers to function compatibility_flags = ["nodejs_compat"] compatibility_date = "2024-09-23" [[hyperdrive]] binding = "HYPERDRIVE" id = "" ``` Create a new `Client` instance and pass the Hyperdrive `connectionString`: ```ts // filepath: src/index.ts import { Client } from "pg"; export default { async fetch(request: Request, env: Env, ctx: ExecutionContext): Promise { // Create a new client instance for each request. const client = new Client({ connectionString: env.HYPERDRIVE.connectionString, }); try { // Connect to the database await client.connect(); console.log("Connected to PostgreSQL database"); // Perform a simple query const result = await client.query("SELECT * FROM pg_tables"); // Clean up the client after the response is returned, before the Worker is killed ctx.waitUntil(client.end()); return Response.json({ success: true, result: result.rows, }); } catch (error: any) { console.error("Database error:", error.message); new Response('Internal error occurred', { status: 500 }); } }, }; ``` Note If you expect to be making multiple parallel database queries within a single Worker invocation, consider using a [connection pool (`pg.Pool`)](https://node-postgres.com/apis/pool) to allow for parallel queries. If doing so, set the max connections of the connection pool to 5 connections. This ensures that the connection pool fits within [Workers' concurrent open connections limit of 6](https://developers.cloudflare.com/workers/platform/limits), which affect TCP connections that database drivers use. ## Next steps * Learn more about [How Hyperdrive Works](https://developers.cloudflare.com/hyperdrive/configuration/how-hyperdrive-works/). * Refer to the [troubleshooting guide](https://developers.cloudflare.com/hyperdrive/observability/troubleshooting/) to debug common issues. * Understand more about other [storage options](https://developers.cloudflare.com/workers/platform/storage-options/) available to Cloudflare Workers. Note If you see a DNS-related error, it is possible that the DNS for your vendor's database has not yet been propagated. Try waiting 10 minutes before retrying the operation. Refer to [DigitalOcean support page](https://docs.digitalocean.com/support/why-does-my-domain-fail-to-resolve/) for more information. --- title: Fly · Hyperdrive docs description: Connect Hyperdrive to a Fly Postgres database instance. lastUpdated: 2025-05-12T14:16:48.000Z chatbotDeprioritize: false source_url: html: https://developers.cloudflare.com/hyperdrive/examples/connect-to-postgres/postgres-database-providers/fly/ md: https://developers.cloudflare.com/hyperdrive/examples/connect-to-postgres/postgres-database-providers/fly/index.md --- This example shows you how to connect Hyperdrive to a Fly Postgres database instance. ## 1. Allow Hyperdrive access You can connect Hyperdrive to any existing Fly database by: 1. Allocating a public IP address to your Fly database instance 2. Configuring an external service 3. Deploying the configuration 4. Obtain the connection string, which is used to connect the database to Hyperdrive. 1) Run the following command to [allocate a public IP address](https://fly.io/docs/postgres/connecting/connecting-external/#allocate-an-ip-address). ```txt fly ips allocate-v6 --app ``` Note Cloudflare recommends using IPv6, but some Internet service providers may not support IPv6. In this case, [you can allocate an IPv4 address](https://fly.io/docs/postgres/connecting/connecting-with-flyctl/). 2) [Configure an external service](https://fly.io/docs/postgres/connecting/connecting-external/#configure-an-external-service) by modifying the contents of your `fly.toml` file. Run the following command to download the `fly.toml` file. ```txt fly config save --app ``` Then, replace the `services` and `services.ports` section of the file with the following `toml` snippet: ```toml [[services]] internal_port = 5432 # Postgres instance protocol = "tcp" [[services.ports]] handlers = ["pg_tls"] port = 5432 ``` 3) [Deploy the new configuration](https://fly.io/docs/postgres/connecting/connecting-external/#deploy-with-the-new-configuration). 4) [Obtain the connection string](https://fly.io/docs/postgres/connecting/connecting-external/#adapting-the-connection-string), which is in the form of: ```txt postgres://{username}:{password}@{public-hostname}:{port}/{database}?options ``` ## 2. Create a database configuration To configure Hyperdrive, you will need: * The IP address (or hostname) and port of your database. * The database username (for example, `hyperdrive-demo`) you configured in a previous step. * The password associated with that username. * The name of the database you want Hyperdrive to connect to. For example, `postgres`. Hyperdrive accepts the combination of these parameters in the common connection string format used by database drivers: ```txt postgres://USERNAME:PASSWORD@HOSTNAME_OR_IP_ADDRESS:PORT/database_name ``` Most database providers will provide a connection string you can directly copy-and-paste directly into Hyperdrive. To create a Hyperdrive configuration with the [Wrangler CLI](https://developers.cloudflare.com/workers/wrangler/install-and-update/), open your terminal and run the following command. Replace \ with a name for your Hyperdrive configuration and paste the connection string provided from your database host, or replace `user`, `password`, `HOSTNAME_OR_IP_ADDRESS`, `port`, and `database_name` placeholders with those specific to your database: ```sh npx wrangler hyperdrive create --connection-string="postgres://user:password@HOSTNAME_OR_IP_ADDRESS:PORT/database_name" ``` Note Hyperdrive will attempt to connect to your database with the provided credentials to verify they are correct before creating a configuration. If you encounter an error when attempting to connect, refer to Hyperdrive's [troubleshooting documentation](https://developers.cloudflare.com/hyperdrive/observability/troubleshooting/) to debug possible causes. This command outputs a binding for the [Wrangler configuration file](https://developers.cloudflare.com/workers/wrangler/configuration/): * wrangler.jsonc ```jsonc { "name": "hyperdrive-example", "main": "src/index.ts", "compatibility_date": "2024-08-21", "compatibility_flags": [ "nodejs_compat" ], "hyperdrive": [ { "binding": "HYPERDRIVE", "id": "" } ] } ``` * wrangler.toml ```toml name = "hyperdrive-example" main = "src/index.ts" compatibility_date = "2024-08-21" compatibility_flags = ["nodejs_compat"] # Pasted from the output of `wrangler hyperdrive create --connection-string=[...]` above. [[hyperdrive]] binding = "HYPERDRIVE" id = "" ``` ## 3. Use Hyperdrive from your Worker Install the `node-postgres` driver: * npm ```sh npm i pg@>8.16.3 ``` * yarn ```sh yarn add pg@>8.16.3 ``` * pnpm ```sh pnpm add pg@>8.16.3 ``` Note The minimum version of `node-postgres` required for Hyperdrive is `8.16.3`. If using TypeScript, install the types package: * npm ```sh npm i -D @types/pg ``` * yarn ```sh yarn add -D @types/pg ``` * pnpm ```sh pnpm add -D @types/pg ``` Add the required Node.js compatibility flags and Hyperdrive binding to your `wrangler.jsonc` file: * wrangler.jsonc ```jsonc { "compatibility_flags": [ "nodejs_compat" ], "compatibility_date": "2024-09-23", "hyperdrive": [ { "binding": "HYPERDRIVE", "id": "" } ] } ``` * wrangler.toml ```toml # required for database drivers to function compatibility_flags = ["nodejs_compat"] compatibility_date = "2024-09-23" [[hyperdrive]] binding = "HYPERDRIVE" id = "" ``` Create a new `Client` instance and pass the Hyperdrive `connectionString`: ```ts // filepath: src/index.ts import { Client } from "pg"; export default { async fetch(request: Request, env: Env, ctx: ExecutionContext): Promise { // Create a new client instance for each request. const client = new Client({ connectionString: env.HYPERDRIVE.connectionString, }); try { // Connect to the database await client.connect(); console.log("Connected to PostgreSQL database"); // Perform a simple query const result = await client.query("SELECT * FROM pg_tables"); // Clean up the client after the response is returned, before the Worker is killed ctx.waitUntil(client.end()); return Response.json({ success: true, result: result.rows, }); } catch (error: any) { console.error("Database error:", error.message); new Response('Internal error occurred', { status: 500 }); } }, }; ``` Note If you expect to be making multiple parallel database queries within a single Worker invocation, consider using a [connection pool (`pg.Pool`)](https://node-postgres.com/apis/pool) to allow for parallel queries. If doing so, set the max connections of the connection pool to 5 connections. This ensures that the connection pool fits within [Workers' concurrent open connections limit of 6](https://developers.cloudflare.com/workers/platform/limits), which affect TCP connections that database drivers use. ## Next steps * Learn more about [How Hyperdrive Works](https://developers.cloudflare.com/hyperdrive/configuration/how-hyperdrive-works/). * Refer to the [troubleshooting guide](https://developers.cloudflare.com/hyperdrive/observability/troubleshooting/) to debug common issues. * Understand more about other [storage options](https://developers.cloudflare.com/workers/platform/storage-options/) available to Cloudflare Workers. --- title: Google Cloud SQL · Hyperdrive docs description: Connect Hyperdrive to a Google Cloud SQL for Postgres database instance. lastUpdated: 2025-05-12T14:16:48.000Z chatbotDeprioritize: false source_url: html: https://developers.cloudflare.com/hyperdrive/examples/connect-to-postgres/postgres-database-providers/google-cloud-sql/ md: https://developers.cloudflare.com/hyperdrive/examples/connect-to-postgres/postgres-database-providers/google-cloud-sql/index.md --- This example shows you how to connect Hyperdrive to a Google Cloud SQL Postgres database instance. ## 1. Allow Hyperdrive access To allow Hyperdrive to connect to your database, you will need to ensure that Hyperdrive has valid user credentials and network access. Note To allow Hyperdrive to connect to your database, you must allow Cloudflare IPs to be able to access your database. You can either allow-list all IP address ranges (0.0.0.0 - 255.255.255.255) or restrict your IP access control list to the [IP ranges used by Hyperdrive](https://developers.cloudflare.com/hyperdrive/configuration/firewall-and-networking-configuration/). Alternatively, you can connect to your databases over in your private network using [Cloudflare Tunnels](https://developers.cloudflare.com/hyperdrive/configuration/connect-to-private-database/). ### Cloud Console When creating the instance or when editing an existing instance in the [Google Cloud Console](https://console.cloud.google.com/sql/instances): To allow Hyperdrive to reach your instance: 1. In the [Cloud Console](https://console.cloud.google.com/sql/instances), select the instance you want Hyperdrive to connect to. 2. Expand **Connections** > **Networking** > ensure **Public IP** is enabled > **Add a Network** and input `0.0.0.0/0`. 3. Select **Done** > **Save** to persist your changes. 4. Select **Overview** from the sidebar and note down the **Public IP address** of your instance. To create a user for Hyperdrive to connect as: 1. Select **Users** in the sidebar. 2. Select **Add User Account** > select **Built-in authentication**. 3. Provide a name (for example, `hyperdrive-user`) > select **Generate** to generate a password. 4. Copy this password to your clipboard before selecting **Add** to create the user. With the username, password, public IP address and (optional) database name (default: `postgres`), you can now create a Hyperdrive database configuration. ### gcloud CLI The [gcloud CLI](https://cloud.google.com/sdk/docs/install) allows you to create a new user and enable Hyperdrive to connect to your database. Use `gcloud sql` to create a new user (for example, `hyperdrive-user`) with a strong password: ```sh gcloud sql users create hyperdrive-user --instance=YOUR_INSTANCE_NAME --password=SUFFICIENTLY_LONG_PASSWORD ``` Run the following command to enable [Internet access](https://cloud.google.com/sql/docs/postgres/configure-ip) to your database instance: ```sh # If you have any existing authorized networks, ensure you provide those as a comma separated list. # The gcloud CLI will replace any existing authorized networks with the list you provide here. gcloud sql instances patch YOUR_INSTANCE_NAME --authorized-networks="0.0.0.0/0" ``` Refer to [Google Cloud's documentation](https://cloud.google.com/sql/docs/postgres/create-manage-users) for additional configuration options. ## 2. Create a database configuration To configure Hyperdrive, you will need: * The IP address (or hostname) and port of your database. * The database username (for example, `hyperdrive-demo`) you configured in a previous step. * The password associated with that username. * The name of the database you want Hyperdrive to connect to. For example, `postgres`. Hyperdrive accepts the combination of these parameters in the common connection string format used by database drivers: ```txt postgres://USERNAME:PASSWORD@HOSTNAME_OR_IP_ADDRESS:PORT/database_name ``` Most database providers will provide a connection string you can directly copy-and-paste directly into Hyperdrive. To create a Hyperdrive configuration with the [Wrangler CLI](https://developers.cloudflare.com/workers/wrangler/install-and-update/), open your terminal and run the following command. Replace \ with a name for your Hyperdrive configuration and paste the connection string provided from your database host, or replace `user`, `password`, `HOSTNAME_OR_IP_ADDRESS`, `port`, and `database_name` placeholders with those specific to your database: ```sh npx wrangler hyperdrive create --connection-string="postgres://user:password@HOSTNAME_OR_IP_ADDRESS:PORT/database_name" ``` Note Hyperdrive will attempt to connect to your database with the provided credentials to verify they are correct before creating a configuration. If you encounter an error when attempting to connect, refer to Hyperdrive's [troubleshooting documentation](https://developers.cloudflare.com/hyperdrive/observability/troubleshooting/) to debug possible causes. This command outputs a binding for the [Wrangler configuration file](https://developers.cloudflare.com/workers/wrangler/configuration/): * wrangler.jsonc ```jsonc { "name": "hyperdrive-example", "main": "src/index.ts", "compatibility_date": "2024-08-21", "compatibility_flags": [ "nodejs_compat" ], "hyperdrive": [ { "binding": "HYPERDRIVE", "id": "" } ] } ``` * wrangler.toml ```toml name = "hyperdrive-example" main = "src/index.ts" compatibility_date = "2024-08-21" compatibility_flags = ["nodejs_compat"] # Pasted from the output of `wrangler hyperdrive create --connection-string=[...]` above. [[hyperdrive]] binding = "HYPERDRIVE" id = "" ``` ## 3. Use Hyperdrive from your Worker Install the `node-postgres` driver: * npm ```sh npm i pg@>8.16.3 ``` * yarn ```sh yarn add pg@>8.16.3 ``` * pnpm ```sh pnpm add pg@>8.16.3 ``` Note The minimum version of `node-postgres` required for Hyperdrive is `8.16.3`. If using TypeScript, install the types package: * npm ```sh npm i -D @types/pg ``` * yarn ```sh yarn add -D @types/pg ``` * pnpm ```sh pnpm add -D @types/pg ``` Add the required Node.js compatibility flags and Hyperdrive binding to your `wrangler.jsonc` file: * wrangler.jsonc ```jsonc { "compatibility_flags": [ "nodejs_compat" ], "compatibility_date": "2024-09-23", "hyperdrive": [ { "binding": "HYPERDRIVE", "id": "" } ] } ``` * wrangler.toml ```toml # required for database drivers to function compatibility_flags = ["nodejs_compat"] compatibility_date = "2024-09-23" [[hyperdrive]] binding = "HYPERDRIVE" id = "" ``` Create a new `Client` instance and pass the Hyperdrive `connectionString`: ```ts // filepath: src/index.ts import { Client } from "pg"; export default { async fetch(request: Request, env: Env, ctx: ExecutionContext): Promise { // Create a new client instance for each request. const client = new Client({ connectionString: env.HYPERDRIVE.connectionString, }); try { // Connect to the database await client.connect(); console.log("Connected to PostgreSQL database"); // Perform a simple query const result = await client.query("SELECT * FROM pg_tables"); // Clean up the client after the response is returned, before the Worker is killed ctx.waitUntil(client.end()); return Response.json({ success: true, result: result.rows, }); } catch (error: any) { console.error("Database error:", error.message); new Response('Internal error occurred', { status: 500 }); } }, }; ``` Note If you expect to be making multiple parallel database queries within a single Worker invocation, consider using a [connection pool (`pg.Pool`)](https://node-postgres.com/apis/pool) to allow for parallel queries. If doing so, set the max connections of the connection pool to 5 connections. This ensures that the connection pool fits within [Workers' concurrent open connections limit of 6](https://developers.cloudflare.com/workers/platform/limits), which affect TCP connections that database drivers use. ## Next steps * Learn more about [How Hyperdrive Works](https://developers.cloudflare.com/hyperdrive/configuration/how-hyperdrive-works/). * Refer to the [troubleshooting guide](https://developers.cloudflare.com/hyperdrive/observability/troubleshooting/) to debug common issues. * Understand more about other [storage options](https://developers.cloudflare.com/workers/platform/storage-options/) available to Cloudflare Workers. --- title: Materialize · Hyperdrive docs description: Connect Hyperdrive to a Materialize streaming database. lastUpdated: 2025-05-12T14:16:48.000Z chatbotDeprioritize: false source_url: html: https://developers.cloudflare.com/hyperdrive/examples/connect-to-postgres/postgres-database-providers/materialize/ md: https://developers.cloudflare.com/hyperdrive/examples/connect-to-postgres/postgres-database-providers/materialize/index.md --- This example shows you how to connect Hyperdrive to a [Materialize](https://materialize.com/) database. Materialize is a Postgres-compatible streaming database that can automatically compute real-time results against your streaming data sources. ## 1. Allow Hyperdrive access To allow Hyperdrive to connect to your database, you will need to ensure that Hyperdrive has valid user credentials and network access to your database. ### Materialize Console Note Read the Materialize [Quickstart guide](https://materialize.com/docs/get-started/quickstart/) to set up your first database. The steps below assume you have an existing Materialize database ready to go. You will need to create a new application user and password for Hyperdrive to connect with: 1. Log in to the [Materialize Console](https://console.materialize.com/). 2. Under the **App Passwords** section, select **Manage app passwords**. 3. Select **New app password** and enter a name, for example, `hyperdrive-user`. 4. Select **Create Password**. 5. Copy the provided password: it will only be shown once. To retrieve the hostname and database name of your Materialize configuration: 1. Select **Connect** in the sidebar of the Materialize Console. 2. Select **External tools**. 3. Copy the **Host**, **Port** and **Database** settings. With the username, app password, hostname, port and database name, you can now connect Hyperdrive to your Materialize database. ## 2. Create a database configuration To configure Hyperdrive, you will need: * The IP address (or hostname) and port of your database. * The database username (for example, `hyperdrive-demo`) you configured in a previous step. * The password associated with that username. * The name of the database you want Hyperdrive to connect to. For example, `postgres`. Hyperdrive accepts the combination of these parameters in the common connection string format used by database drivers: ```txt postgres://USERNAME:PASSWORD@HOSTNAME_OR_IP_ADDRESS:PORT/database_name ``` Most database providers will provide a connection string you can directly copy-and-paste directly into Hyperdrive. To create a Hyperdrive configuration with the [Wrangler CLI](https://developers.cloudflare.com/workers/wrangler/install-and-update/), open your terminal and run the following command. Replace \ with a name for your Hyperdrive configuration and paste the connection string provided from your database host, or replace `user`, `password`, `HOSTNAME_OR_IP_ADDRESS`, `port`, and `database_name` placeholders with those specific to your database: ```sh npx wrangler hyperdrive create --connection-string="postgres://user:password@HOSTNAME_OR_IP_ADDRESS:PORT/database_name" ``` Note Hyperdrive will attempt to connect to your database with the provided credentials to verify they are correct before creating a configuration. If you encounter an error when attempting to connect, refer to Hyperdrive's [troubleshooting documentation](https://developers.cloudflare.com/hyperdrive/observability/troubleshooting/) to debug possible causes. This command outputs a binding for the [Wrangler configuration file](https://developers.cloudflare.com/workers/wrangler/configuration/): * wrangler.jsonc ```jsonc { "name": "hyperdrive-example", "main": "src/index.ts", "compatibility_date": "2024-08-21", "compatibility_flags": [ "nodejs_compat" ], "hyperdrive": [ { "binding": "HYPERDRIVE", "id": "" } ] } ``` * wrangler.toml ```toml name = "hyperdrive-example" main = "src/index.ts" compatibility_date = "2024-08-21" compatibility_flags = ["nodejs_compat"] # Pasted from the output of `wrangler hyperdrive create --connection-string=[...]` above. [[hyperdrive]] binding = "HYPERDRIVE" id = "" ``` ## 3. Use Hyperdrive from your Worker Install the `node-postgres` driver: * npm ```sh npm i pg@>8.16.3 ``` * yarn ```sh yarn add pg@>8.16.3 ``` * pnpm ```sh pnpm add pg@>8.16.3 ``` Note The minimum version of `node-postgres` required for Hyperdrive is `8.16.3`. If using TypeScript, install the types package: * npm ```sh npm i -D @types/pg ``` * yarn ```sh yarn add -D @types/pg ``` * pnpm ```sh pnpm add -D @types/pg ``` Add the required Node.js compatibility flags and Hyperdrive binding to your `wrangler.jsonc` file: * wrangler.jsonc ```jsonc { "compatibility_flags": [ "nodejs_compat" ], "compatibility_date": "2024-09-23", "hyperdrive": [ { "binding": "HYPERDRIVE", "id": "" } ] } ``` * wrangler.toml ```toml # required for database drivers to function compatibility_flags = ["nodejs_compat"] compatibility_date = "2024-09-23" [[hyperdrive]] binding = "HYPERDRIVE" id = "" ``` Create a new `Client` instance and pass the Hyperdrive `connectionString`: ```ts // filepath: src/index.ts import { Client } from "pg"; export default { async fetch(request: Request, env: Env, ctx: ExecutionContext): Promise { // Create a new client instance for each request. const client = new Client({ connectionString: env.HYPERDRIVE.connectionString, }); try { // Connect to the database await client.connect(); console.log("Connected to PostgreSQL database"); // Perform a simple query const result = await client.query("SELECT * FROM pg_tables"); // Clean up the client after the response is returned, before the Worker is killed ctx.waitUntil(client.end()); return Response.json({ success: true, result: result.rows, }); } catch (error: any) { console.error("Database error:", error.message); new Response('Internal error occurred', { status: 500 }); } }, }; ``` Note If you expect to be making multiple parallel database queries within a single Worker invocation, consider using a [connection pool (`pg.Pool`)](https://node-postgres.com/apis/pool) to allow for parallel queries. If doing so, set the max connections of the connection pool to 5 connections. This ensures that the connection pool fits within [Workers' concurrent open connections limit of 6](https://developers.cloudflare.com/workers/platform/limits), which affect TCP connections that database drivers use. ## Next steps * Learn more about [How Hyperdrive Works](https://developers.cloudflare.com/hyperdrive/configuration/how-hyperdrive-works/). * Refer to the [troubleshooting guide](https://developers.cloudflare.com/hyperdrive/observability/troubleshooting/) to debug common issues. * Understand more about other [storage options](https://developers.cloudflare.com/workers/platform/storage-options/) available to Cloudflare Workers. --- title: Neon · Hyperdrive docs description: Connect Hyperdrive to a Neon Postgres database. lastUpdated: 2025-06-25T15:22:01.000Z chatbotDeprioritize: false source_url: html: https://developers.cloudflare.com/hyperdrive/examples/connect-to-postgres/postgres-database-providers/neon/ md: https://developers.cloudflare.com/hyperdrive/examples/connect-to-postgres/postgres-database-providers/neon/index.md --- This example shows you how to connect Hyperdrive to a [Neon](https://neon.tech/) Postgres database. ## 1. Allow Hyperdrive access You can connect Hyperdrive to any existing Neon database by creating a new user and fetching your database connection string. ### Neon Dashboard 1. Go to the [**Neon dashboard**](https://console.neon.tech/app/projects) and select the project (database) you wish to connect to. 2. Select **Roles** from the sidebar and select **New Role**. Enter `hyperdrive-user` as the name (or your preferred name) and **copy the password**. Note that the password will not be displayed again: you will have to reset it if you do not save it somewhere. 3. Select **Dashboard** from the sidebar > go to the **Connection Details** pane > ensure you have selected the **branch**, **database** and **role** (for example,`hyperdrive-user`) that Hyperdrive will connect through. 4. Select the `psql` and **uncheck the connection pooling** checkbox. Note down the connection string (starting with `postgres://hyperdrive-user@...`) from the text box. With both the connection string and the password, you can now create a Hyperdrive database configuration. ## 2. Create a database configuration To configure Hyperdrive, you will need: * The IP address (or hostname) and port of your database. * The database username (for example, `hyperdrive-demo`) you configured in a previous step. * The password associated with that username. * The name of the database you want Hyperdrive to connect to. For example, `postgres`. Hyperdrive accepts the combination of these parameters in the common connection string format used by database drivers: ```txt postgres://USERNAME:PASSWORD@HOSTNAME_OR_IP_ADDRESS:PORT/database_name ``` Most database providers will provide a connection string you can directly copy-and-paste directly into Hyperdrive. To create a Hyperdrive configuration with the [Wrangler CLI](https://developers.cloudflare.com/workers/wrangler/install-and-update/), open your terminal and run the following command. Replace \ with a name for your Hyperdrive configuration and paste the connection string provided from your database host, or replace `user`, `password`, `HOSTNAME_OR_IP_ADDRESS`, `port`, and `database_name` placeholders with those specific to your database: ```sh npx wrangler hyperdrive create --connection-string="postgres://user:password@HOSTNAME_OR_IP_ADDRESS:PORT/database_name" ``` Note Hyperdrive will attempt to connect to your database with the provided credentials to verify they are correct before creating a configuration. If you encounter an error when attempting to connect, refer to Hyperdrive's [troubleshooting documentation](https://developers.cloudflare.com/hyperdrive/observability/troubleshooting/) to debug possible causes. This command outputs a binding for the [Wrangler configuration file](https://developers.cloudflare.com/workers/wrangler/configuration/): * wrangler.jsonc ```jsonc { "name": "hyperdrive-example", "main": "src/index.ts", "compatibility_date": "2024-08-21", "compatibility_flags": [ "nodejs_compat" ], "hyperdrive": [ { "binding": "HYPERDRIVE", "id": "" } ] } ``` * wrangler.toml ```toml name = "hyperdrive-example" main = "src/index.ts" compatibility_date = "2024-08-21" compatibility_flags = ["nodejs_compat"] # Pasted from the output of `wrangler hyperdrive create --connection-string=[...]` above. [[hyperdrive]] binding = "HYPERDRIVE" id = "" ``` ## 3. Use Hyperdrive from your Worker Install the `node-postgres` driver: * npm ```sh npm i pg@>8.16.3 ``` * yarn ```sh yarn add pg@>8.16.3 ``` * pnpm ```sh pnpm add pg@>8.16.3 ``` Note The minimum version of `node-postgres` required for Hyperdrive is `8.16.3`. If using TypeScript, install the types package: * npm ```sh npm i -D @types/pg ``` * yarn ```sh yarn add -D @types/pg ``` * pnpm ```sh pnpm add -D @types/pg ``` Add the required Node.js compatibility flags and Hyperdrive binding to your `wrangler.jsonc` file: * wrangler.jsonc ```jsonc { "compatibility_flags": [ "nodejs_compat" ], "compatibility_date": "2024-09-23", "hyperdrive": [ { "binding": "HYPERDRIVE", "id": "" } ] } ``` * wrangler.toml ```toml # required for database drivers to function compatibility_flags = ["nodejs_compat"] compatibility_date = "2024-09-23" [[hyperdrive]] binding = "HYPERDRIVE" id = "" ``` Create a new `Client` instance and pass the Hyperdrive `connectionString`: ```ts // filepath: src/index.ts import { Client } from "pg"; export default { async fetch(request: Request, env: Env, ctx: ExecutionContext): Promise { // Create a new client instance for each request. const client = new Client({ connectionString: env.HYPERDRIVE.connectionString, }); try { // Connect to the database await client.connect(); console.log("Connected to PostgreSQL database"); // Perform a simple query const result = await client.query("SELECT * FROM pg_tables"); // Clean up the client after the response is returned, before the Worker is killed ctx.waitUntil(client.end()); return Response.json({ success: true, result: result.rows, }); } catch (error: any) { console.error("Database error:", error.message); new Response('Internal error occurred', { status: 500 }); } }, }; ``` Note If you expect to be making multiple parallel database queries within a single Worker invocation, consider using a [connection pool (`pg.Pool`)](https://node-postgres.com/apis/pool) to allow for parallel queries. If doing so, set the max connections of the connection pool to 5 connections. This ensures that the connection pool fits within [Workers' concurrent open connections limit of 6](https://developers.cloudflare.com/workers/platform/limits), which affect TCP connections that database drivers use. Note When connecting to a Neon database with Hyperdrive, you should use a driver like [node-postgres (pg)](https://developers.cloudflare.com/hyperdrive/examples/connect-to-postgres/postgres-drivers-and-libraries/node-postgres/) or [Postgres.js](https://developers.cloudflare.com/hyperdrive/examples/connect-to-postgres/postgres-drivers-and-libraries/postgres-js/) to connect directly to the underlying database instead of the [Neon serverless driver](https://neon.tech/docs/serverless/serverless-driver). Hyperdrive is optimized for database access for Workers and will perform global connection pooling and fast query routing by connecting directly to your database. ## Next steps * Learn more about [How Hyperdrive Works](https://developers.cloudflare.com/hyperdrive/configuration/how-hyperdrive-works/). * Refer to the [troubleshooting guide](https://developers.cloudflare.com/hyperdrive/observability/troubleshooting/) to debug common issues. * Understand more about other [storage options](https://developers.cloudflare.com/workers/platform/storage-options/) available to Cloudflare Workers. --- title: Nile · Hyperdrive docs description: Connect Hyperdrive to a Nile Postgres database instance. lastUpdated: 2025-05-12T14:16:48.000Z chatbotDeprioritize: false source_url: html: https://developers.cloudflare.com/hyperdrive/examples/connect-to-postgres/postgres-database-providers/nile/ md: https://developers.cloudflare.com/hyperdrive/examples/connect-to-postgres/postgres-database-providers/nile/index.md --- This example shows you how to connect Hyperdrive to a [Nile](https://thenile.dev) PostgreSQL database instance. Nile is PostgreSQL re-engineered for multi-tenant applications. Nile's virtual tenant databases provide you with isolation, placement, insight, and other features for your tenant's data and embedding. Refer to [Nile documentation](https://www.thenile.dev/docs/getting-started/whatisnile) to learn more. ## 1. Allow Hyperdrive access You can connect Cloudflare Hyperdrive to any Nile database in your workspace using its connection string - either with a new set of credentials, or using an existing set. ### Nile console To get a connection string from Nile console: 1. Log in to [Nile console](https://console.thenile.dev), then select a database. 2. On the left hand menu, click **Settings** (the bottom-most icon) and then select **Connection**. 3. Select the PostgreSQL logo to show the connection string. 4. Select "Generate credentials" to generate new credentials. 5. Copy the connection string (without the "psql" part). You will have obtained a connection string similar to the following: ```txt postgres://0191c898-...:4d7d8b45-...@eu-central-1.db.thenile.dev:5432/my_database ``` With the connection string, you can now create a Hyperdrive database configuration. ## 2. Create a database configuration To configure Hyperdrive, you will need: * The IP address (or hostname) and port of your database. * The database username (for example, `hyperdrive-demo`) you configured in a previous step. * The password associated with that username. * The name of the database you want Hyperdrive to connect to. For example, `postgres`. Hyperdrive accepts the combination of these parameters in the common connection string format used by database drivers: ```txt postgres://USERNAME:PASSWORD@HOSTNAME_OR_IP_ADDRESS:PORT/database_name ``` Most database providers will provide a connection string you can directly copy-and-paste directly into Hyperdrive. To create a Hyperdrive configuration with the [Wrangler CLI](https://developers.cloudflare.com/workers/wrangler/install-and-update/), open your terminal and run the following command. Replace \ with a name for your Hyperdrive configuration and paste the connection string provided from your database host, or replace `user`, `password`, `HOSTNAME_OR_IP_ADDRESS`, `port`, and `database_name` placeholders with those specific to your database: ```sh npx wrangler hyperdrive create --connection-string="postgres://user:password@HOSTNAME_OR_IP_ADDRESS:PORT/database_name" ``` Note Hyperdrive will attempt to connect to your database with the provided credentials to verify they are correct before creating a configuration. If you encounter an error when attempting to connect, refer to Hyperdrive's [troubleshooting documentation](https://developers.cloudflare.com/hyperdrive/observability/troubleshooting/) to debug possible causes. This command outputs a binding for the [Wrangler configuration file](https://developers.cloudflare.com/workers/wrangler/configuration/): * wrangler.jsonc ```jsonc { "name": "hyperdrive-example", "main": "src/index.ts", "compatibility_date": "2024-08-21", "compatibility_flags": [ "nodejs_compat" ], "hyperdrive": [ { "binding": "HYPERDRIVE", "id": "" } ] } ``` * wrangler.toml ```toml name = "hyperdrive-example" main = "src/index.ts" compatibility_date = "2024-08-21" compatibility_flags = ["nodejs_compat"] # Pasted from the output of `wrangler hyperdrive create --connection-string=[...]` above. [[hyperdrive]] binding = "HYPERDRIVE" id = "" ``` ## 3. Use Hyperdrive from your Worker Install the `node-postgres` driver: * npm ```sh npm i pg@>8.16.3 ``` * yarn ```sh yarn add pg@>8.16.3 ``` * pnpm ```sh pnpm add pg@>8.16.3 ``` Note The minimum version of `node-postgres` required for Hyperdrive is `8.16.3`. If using TypeScript, install the types package: * npm ```sh npm i -D @types/pg ``` * yarn ```sh yarn add -D @types/pg ``` * pnpm ```sh pnpm add -D @types/pg ``` Add the required Node.js compatibility flags and Hyperdrive binding to your `wrangler.jsonc` file: * wrangler.jsonc ```jsonc { "compatibility_flags": [ "nodejs_compat" ], "compatibility_date": "2024-09-23", "hyperdrive": [ { "binding": "HYPERDRIVE", "id": "" } ] } ``` * wrangler.toml ```toml # required for database drivers to function compatibility_flags = ["nodejs_compat"] compatibility_date = "2024-09-23" [[hyperdrive]] binding = "HYPERDRIVE" id = "" ``` Create a new `Client` instance and pass the Hyperdrive `connectionString`: ```ts // filepath: src/index.ts import { Client } from "pg"; export default { async fetch(request: Request, env: Env, ctx: ExecutionContext): Promise { // Create a new client instance for each request. const client = new Client({ connectionString: env.HYPERDRIVE.connectionString, }); try { // Connect to the database await client.connect(); console.log("Connected to PostgreSQL database"); // Perform a simple query const result = await client.query("SELECT * FROM pg_tables"); // Clean up the client after the response is returned, before the Worker is killed ctx.waitUntil(client.end()); return Response.json({ success: true, result: result.rows, }); } catch (error: any) { console.error("Database error:", error.message); new Response('Internal error occurred', { status: 500 }); } }, }; ``` Note If you expect to be making multiple parallel database queries within a single Worker invocation, consider using a [connection pool (`pg.Pool`)](https://node-postgres.com/apis/pool) to allow for parallel queries. If doing so, set the max connections of the connection pool to 5 connections. This ensures that the connection pool fits within [Workers' concurrent open connections limit of 6](https://developers.cloudflare.com/workers/platform/limits), which affect TCP connections that database drivers use. ## Next steps * Learn more about [How Hyperdrive Works](https://developers.cloudflare.com/hyperdrive/configuration/how-hyperdrive-works/). * Refer to the [troubleshooting guide](https://developers.cloudflare.com/hyperdrive/observability/troubleshooting/) to debug common issues. * Understand more about other [storage options](https://developers.cloudflare.com/workers/platform/storage-options/) available to Cloudflare Workers. --- title: pgEdge Cloud · Hyperdrive docs description: Connect Hyperdrive to a pgEdge Postgres database. lastUpdated: 2025-05-12T14:16:48.000Z chatbotDeprioritize: false source_url: html: https://developers.cloudflare.com/hyperdrive/examples/connect-to-postgres/postgres-database-providers/pgedge/ md: https://developers.cloudflare.com/hyperdrive/examples/connect-to-postgres/postgres-database-providers/pgedge/index.md --- This example shows you how to connect Hyperdrive to a [pgEdge](https://pgedge.com/) Postgres database. pgEdge Cloud provides easy deployment of fully-managed, fully-distributed, and secure Postgres. ## 1. Allow Hyperdrive access You can connect Hyperdrive to any existing pgEdge database with the default user and password provided by pgEdge. ### pgEdge dashboard To retrieve your connection string from the pgEdge dashboard: 1. Go to the [**pgEdge dashboard**](https://app.pgedge.com) and select the database you wish to connect to. 2. From the **Connect to your database** section, note down the connection string (starting with `postgres://app@...`) from the **Connection String** text box. ## 2. Create a database configuration To configure Hyperdrive, you will need: * The IP address (or hostname) and port of your database. * The database username (for example, `hyperdrive-demo`) you configured in a previous step. * The password associated with that username. * The name of the database you want Hyperdrive to connect to. For example, `postgres`. Hyperdrive accepts the combination of these parameters in the common connection string format used by database drivers: ```txt postgres://USERNAME:PASSWORD@HOSTNAME_OR_IP_ADDRESS:PORT/database_name ``` Most database providers will provide a connection string you can directly copy-and-paste directly into Hyperdrive. To create a Hyperdrive configuration with the [Wrangler CLI](https://developers.cloudflare.com/workers/wrangler/install-and-update/), open your terminal and run the following command. Replace \ with a name for your Hyperdrive configuration and paste the connection string provided from your database host, or replace `user`, `password`, `HOSTNAME_OR_IP_ADDRESS`, `port`, and `database_name` placeholders with those specific to your database: ```sh npx wrangler hyperdrive create --connection-string="postgres://user:password@HOSTNAME_OR_IP_ADDRESS:PORT/database_name" ``` Note Hyperdrive will attempt to connect to your database with the provided credentials to verify they are correct before creating a configuration. If you encounter an error when attempting to connect, refer to Hyperdrive's [troubleshooting documentation](https://developers.cloudflare.com/hyperdrive/observability/troubleshooting/) to debug possible causes. This command outputs a binding for the [Wrangler configuration file](https://developers.cloudflare.com/workers/wrangler/configuration/): * wrangler.jsonc ```jsonc { "name": "hyperdrive-example", "main": "src/index.ts", "compatibility_date": "2024-08-21", "compatibility_flags": [ "nodejs_compat" ], "hyperdrive": [ { "binding": "HYPERDRIVE", "id": "" } ] } ``` * wrangler.toml ```toml name = "hyperdrive-example" main = "src/index.ts" compatibility_date = "2024-08-21" compatibility_flags = ["nodejs_compat"] # Pasted from the output of `wrangler hyperdrive create --connection-string=[...]` above. [[hyperdrive]] binding = "HYPERDRIVE" id = "" ``` ## 3. Use Hyperdrive from your Worker Install the `node-postgres` driver: * npm ```sh npm i pg@>8.16.3 ``` * yarn ```sh yarn add pg@>8.16.3 ``` * pnpm ```sh pnpm add pg@>8.16.3 ``` Note The minimum version of `node-postgres` required for Hyperdrive is `8.16.3`. If using TypeScript, install the types package: * npm ```sh npm i -D @types/pg ``` * yarn ```sh yarn add -D @types/pg ``` * pnpm ```sh pnpm add -D @types/pg ``` Add the required Node.js compatibility flags and Hyperdrive binding to your `wrangler.jsonc` file: * wrangler.jsonc ```jsonc { "compatibility_flags": [ "nodejs_compat" ], "compatibility_date": "2024-09-23", "hyperdrive": [ { "binding": "HYPERDRIVE", "id": "" } ] } ``` * wrangler.toml ```toml # required for database drivers to function compatibility_flags = ["nodejs_compat"] compatibility_date = "2024-09-23" [[hyperdrive]] binding = "HYPERDRIVE" id = "" ``` Create a new `Client` instance and pass the Hyperdrive `connectionString`: ```ts // filepath: src/index.ts import { Client } from "pg"; export default { async fetch(request: Request, env: Env, ctx: ExecutionContext): Promise { // Create a new client instance for each request. const client = new Client({ connectionString: env.HYPERDRIVE.connectionString, }); try { // Connect to the database await client.connect(); console.log("Connected to PostgreSQL database"); // Perform a simple query const result = await client.query("SELECT * FROM pg_tables"); // Clean up the client after the response is returned, before the Worker is killed ctx.waitUntil(client.end()); return Response.json({ success: true, result: result.rows, }); } catch (error: any) { console.error("Database error:", error.message); new Response('Internal error occurred', { status: 500 }); } }, }; ``` Note If you expect to be making multiple parallel database queries within a single Worker invocation, consider using a [connection pool (`pg.Pool`)](https://node-postgres.com/apis/pool) to allow for parallel queries. If doing so, set the max connections of the connection pool to 5 connections. This ensures that the connection pool fits within [Workers' concurrent open connections limit of 6](https://developers.cloudflare.com/workers/platform/limits), which affect TCP connections that database drivers use. ## Next steps * Learn more about [How Hyperdrive Works](https://developers.cloudflare.com/hyperdrive/configuration/how-hyperdrive-works/). * Refer to the [troubleshooting guide](https://developers.cloudflare.com/hyperdrive/observability/troubleshooting/) to debug common issues. * Understand more about other [storage options](https://developers.cloudflare.com/workers/platform/storage-options/) available to Cloudflare Workers. --- title: Supabase · Hyperdrive docs description: Connect Hyperdrive to a Supabase Postgres database. lastUpdated: 2025-05-12T14:16:48.000Z chatbotDeprioritize: false source_url: html: https://developers.cloudflare.com/hyperdrive/examples/connect-to-postgres/postgres-database-providers/supabase/ md: https://developers.cloudflare.com/hyperdrive/examples/connect-to-postgres/postgres-database-providers/supabase/index.md --- This example shows you how to connect Hyperdrive to a [Supabase](https://supabase.com/) Postgres database. ## 1. Allow Hyperdrive access You can connect Hyperdrive to any existing Supabase database as the Postgres user which is set up during project creation. Alternatively, to create a new user for Hyperdrive, run these commands in the [SQL Editor](https://supabase.com/dashboard/project/_/sql/new). ```sql CREATE ROLE hyperdrive_user LOGIN PASSWORD 'sufficientlyRandomPassword'; -- Here, you are granting it the postgres role. In practice, you want to create a role with lesser privileges. GRANT postgres to hyperdrive_user; ``` The database endpoint can be found in the [database settings page](https://supabase.com/dashboard/project/_/settings/database). With a database user, password, database endpoint (hostname and port) and database name (default: postgres), you can now set up Hyperdrive. ## 2. Create a database configuration To configure Hyperdrive, you will need: * The IP address (or hostname) and port of your database. * The database username (for example, `hyperdrive-demo`) you configured in a previous step. * The password associated with that username. * The name of the database you want Hyperdrive to connect to. For example, `postgres`. Hyperdrive accepts the combination of these parameters in the common connection string format used by database drivers: ```txt postgres://USERNAME:PASSWORD@HOSTNAME_OR_IP_ADDRESS:PORT/database_name ``` Most database providers will provide a connection string you can directly copy-and-paste directly into Hyperdrive. To create a Hyperdrive configuration with the [Wrangler CLI](https://developers.cloudflare.com/workers/wrangler/install-and-update/), open your terminal and run the following command. Replace \ with a name for your Hyperdrive configuration and paste the connection string provided from your database host, or replace `user`, `password`, `HOSTNAME_OR_IP_ADDRESS`, `port`, and `database_name` placeholders with those specific to your database: ```sh npx wrangler hyperdrive create --connection-string="postgres://user:password@HOSTNAME_OR_IP_ADDRESS:PORT/database_name" ``` Note Hyperdrive will attempt to connect to your database with the provided credentials to verify they are correct before creating a configuration. If you encounter an error when attempting to connect, refer to Hyperdrive's [troubleshooting documentation](https://developers.cloudflare.com/hyperdrive/observability/troubleshooting/) to debug possible causes. This command outputs a binding for the [Wrangler configuration file](https://developers.cloudflare.com/workers/wrangler/configuration/): * wrangler.jsonc ```jsonc { "name": "hyperdrive-example", "main": "src/index.ts", "compatibility_date": "2024-08-21", "compatibility_flags": [ "nodejs_compat" ], "hyperdrive": [ { "binding": "HYPERDRIVE", "id": "" } ] } ``` * wrangler.toml ```toml name = "hyperdrive-example" main = "src/index.ts" compatibility_date = "2024-08-21" compatibility_flags = ["nodejs_compat"] # Pasted from the output of `wrangler hyperdrive create --connection-string=[...]` above. [[hyperdrive]] binding = "HYPERDRIVE" id = "" ``` ## 3. Use Hyperdrive from your Worker Install the `node-postgres` driver: * npm ```sh npm i pg@>8.16.3 ``` * yarn ```sh yarn add pg@>8.16.3 ``` * pnpm ```sh pnpm add pg@>8.16.3 ``` Note The minimum version of `node-postgres` required for Hyperdrive is `8.16.3`. If using TypeScript, install the types package: * npm ```sh npm i -D @types/pg ``` * yarn ```sh yarn add -D @types/pg ``` * pnpm ```sh pnpm add -D @types/pg ``` Add the required Node.js compatibility flags and Hyperdrive binding to your `wrangler.jsonc` file: * wrangler.jsonc ```jsonc { "compatibility_flags": [ "nodejs_compat" ], "compatibility_date": "2024-09-23", "hyperdrive": [ { "binding": "HYPERDRIVE", "id": "" } ] } ``` * wrangler.toml ```toml # required for database drivers to function compatibility_flags = ["nodejs_compat"] compatibility_date = "2024-09-23" [[hyperdrive]] binding = "HYPERDRIVE" id = "" ``` Create a new `Client` instance and pass the Hyperdrive `connectionString`: ```ts // filepath: src/index.ts import { Client } from "pg"; export default { async fetch(request: Request, env: Env, ctx: ExecutionContext): Promise { // Create a new client instance for each request. const client = new Client({ connectionString: env.HYPERDRIVE.connectionString, }); try { // Connect to the database await client.connect(); console.log("Connected to PostgreSQL database"); // Perform a simple query const result = await client.query("SELECT * FROM pg_tables"); // Clean up the client after the response is returned, before the Worker is killed ctx.waitUntil(client.end()); return Response.json({ success: true, result: result.rows, }); } catch (error: any) { console.error("Database error:", error.message); new Response('Internal error occurred', { status: 500 }); } }, }; ``` Note If you expect to be making multiple parallel database queries within a single Worker invocation, consider using a [connection pool (`pg.Pool`)](https://node-postgres.com/apis/pool) to allow for parallel queries. If doing so, set the max connections of the connection pool to 5 connections. This ensures that the connection pool fits within [Workers' concurrent open connections limit of 6](https://developers.cloudflare.com/workers/platform/limits), which affect TCP connections that database drivers use. Note When connecting to a Supabase database with Hyperdrive, you should use a driver like [node-postgres (pg)](https://developers.cloudflare.com/hyperdrive/examples/connect-to-postgres/postgres-drivers-and-libraries/node-postgres/) or [Postgres.js](https://developers.cloudflare.com/hyperdrive/examples/connect-to-postgres/postgres-drivers-and-libraries/postgres-js/) to connect directly to the underlying database instead of the [Supabase JavaScript client](https://github.com/supabase/supabase-js). Hyperdrive is optimized for database access for Workers and will perform global connection pooling and fast query routing by connecting directly to your database. ## Next steps * Learn more about [How Hyperdrive Works](https://developers.cloudflare.com/hyperdrive/configuration/how-hyperdrive-works/). * Refer to the [troubleshooting guide](https://developers.cloudflare.com/hyperdrive/observability/troubleshooting/) to debug common issues. * Understand more about other [storage options](https://developers.cloudflare.com/workers/platform/storage-options/) available to Cloudflare Workers. --- title: Timescale · Hyperdrive docs description: Connect Hyperdrive to a Timescale time-series database. lastUpdated: 2025-05-12T14:16:48.000Z chatbotDeprioritize: false source_url: html: https://developers.cloudflare.com/hyperdrive/examples/connect-to-postgres/postgres-database-providers/timescale/ md: https://developers.cloudflare.com/hyperdrive/examples/connect-to-postgres/postgres-database-providers/timescale/index.md --- This example shows you how to connect Hyperdrive to a [Timescale](https://www.timescale.com/) time-series database. Timescale is built on PostgreSQL, and includes powerful time-series, event and analytics features. You can learn more about Timescale by referring to their [Timescale services documentation](https://docs.timescale.com/getting-started/latest/services/). ## 1. Allow Hyperdrive access You can connect Hyperdrive to any existing Timescale database by creating a new user and fetching your database connection string. ### Timescale Dashboard Note Similar to most services, Timescale requires you to reset the password associated with your database user if you do not have it stored securely. You should ensure that you do not break any existing clients if when you reset the password. To retrieve your credentials and database endpoint in the [Timescale Console](https://console.cloud.timescale.com/): 1. Select the service (database) you want Hyperdrive to connect to. 2. Expand **Connection info**. 3. Copy the **Service URL**. The Service URL is the connection string that Hyperdrive will use to connect. This string includes the database hostname, port number and database name. If you do not have your password stored, you will need to select **Forgot your password?** and set a new **SCRAM** password. Save this password, as Timescale will only display it once. You will end up with a connection string resembling the below: ```txt postgres://tsdbadmin:YOUR_PASSWORD_HERE@pn79dztyy0.xzhhbfensb.tsdb.cloud.timescale.com:31358/tsdb ``` With the connection string, you can now create a Hyperdrive database configuration. ## 2. Create a database configuration To configure Hyperdrive, you will need: * The IP address (or hostname) and port of your database. * The database username (for example, `hyperdrive-demo`) you configured in a previous step. * The password associated with that username. * The name of the database you want Hyperdrive to connect to. For example, `postgres`. Hyperdrive accepts the combination of these parameters in the common connection string format used by database drivers: ```txt postgres://USERNAME:PASSWORD@HOSTNAME_OR_IP_ADDRESS:PORT/database_name ``` Most database providers will provide a connection string you can directly copy-and-paste directly into Hyperdrive. To create a Hyperdrive configuration with the [Wrangler CLI](https://developers.cloudflare.com/workers/wrangler/install-and-update/), open your terminal and run the following command. Replace \ with a name for your Hyperdrive configuration and paste the connection string provided from your database host, or replace `user`, `password`, `HOSTNAME_OR_IP_ADDRESS`, `port`, and `database_name` placeholders with those specific to your database: ```sh npx wrangler hyperdrive create --connection-string="postgres://user:password@HOSTNAME_OR_IP_ADDRESS:PORT/database_name" ``` Note Hyperdrive will attempt to connect to your database with the provided credentials to verify they are correct before creating a configuration. If you encounter an error when attempting to connect, refer to Hyperdrive's [troubleshooting documentation](https://developers.cloudflare.com/hyperdrive/observability/troubleshooting/) to debug possible causes. This command outputs a binding for the [Wrangler configuration file](https://developers.cloudflare.com/workers/wrangler/configuration/): * wrangler.jsonc ```jsonc { "name": "hyperdrive-example", "main": "src/index.ts", "compatibility_date": "2024-08-21", "compatibility_flags": [ "nodejs_compat" ], "hyperdrive": [ { "binding": "HYPERDRIVE", "id": "" } ] } ``` * wrangler.toml ```toml name = "hyperdrive-example" main = "src/index.ts" compatibility_date = "2024-08-21" compatibility_flags = ["nodejs_compat"] # Pasted from the output of `wrangler hyperdrive create --connection-string=[...]` above. [[hyperdrive]] binding = "HYPERDRIVE" id = "" ``` ## 3. Use Hyperdrive from your Worker Install the `node-postgres` driver: * npm ```sh npm i pg@>8.16.3 ``` * yarn ```sh yarn add pg@>8.16.3 ``` * pnpm ```sh pnpm add pg@>8.16.3 ``` Note The minimum version of `node-postgres` required for Hyperdrive is `8.16.3`. If using TypeScript, install the types package: * npm ```sh npm i -D @types/pg ``` * yarn ```sh yarn add -D @types/pg ``` * pnpm ```sh pnpm add -D @types/pg ``` Add the required Node.js compatibility flags and Hyperdrive binding to your `wrangler.jsonc` file: * wrangler.jsonc ```jsonc { "compatibility_flags": [ "nodejs_compat" ], "compatibility_date": "2024-09-23", "hyperdrive": [ { "binding": "HYPERDRIVE", "id": "" } ] } ``` * wrangler.toml ```toml # required for database drivers to function compatibility_flags = ["nodejs_compat"] compatibility_date = "2024-09-23" [[hyperdrive]] binding = "HYPERDRIVE" id = "" ``` Create a new `Client` instance and pass the Hyperdrive `connectionString`: ```ts // filepath: src/index.ts import { Client } from "pg"; export default { async fetch(request: Request, env: Env, ctx: ExecutionContext): Promise { // Create a new client instance for each request. const client = new Client({ connectionString: env.HYPERDRIVE.connectionString, }); try { // Connect to the database await client.connect(); console.log("Connected to PostgreSQL database"); // Perform a simple query const result = await client.query("SELECT * FROM pg_tables"); // Clean up the client after the response is returned, before the Worker is killed ctx.waitUntil(client.end()); return Response.json({ success: true, result: result.rows, }); } catch (error: any) { console.error("Database error:", error.message); new Response('Internal error occurred', { status: 500 }); } }, }; ``` Note If you expect to be making multiple parallel database queries within a single Worker invocation, consider using a [connection pool (`pg.Pool`)](https://node-postgres.com/apis/pool) to allow for parallel queries. If doing so, set the max connections of the connection pool to 5 connections. This ensures that the connection pool fits within [Workers' concurrent open connections limit of 6](https://developers.cloudflare.com/workers/platform/limits), which affect TCP connections that database drivers use. ## Next steps * Learn more about [How Hyperdrive Works](https://developers.cloudflare.com/hyperdrive/configuration/how-hyperdrive-works/). * Refer to the [troubleshooting guide](https://developers.cloudflare.com/hyperdrive/observability/troubleshooting/) to debug common issues. * Understand more about other [storage options](https://developers.cloudflare.com/workers/platform/storage-options/) available to Cloudflare Workers. --- title: Xata · Hyperdrive docs description: Connect Hyperdrive to a Xata database instance. lastUpdated: 2025-06-25T15:22:01.000Z chatbotDeprioritize: false source_url: html: https://developers.cloudflare.com/hyperdrive/examples/connect-to-postgres/postgres-database-providers/xata/ md: https://developers.cloudflare.com/hyperdrive/examples/connect-to-postgres/postgres-database-providers/xata/index.md --- This example shows you how to connect Hyperdrive to a Xata PostgreSQL database instance. ## 1. Allow Hyperdrive access You can connect Hyperdrive to any existing Xata database with the default user and password provided by Xata. ### Xata dashboard To retrieve your connection string from the Xata dashboard: 1. Go to the [**Xata dashboard**](https://app.xata.io/). 2. Select the database you want to connect to. 3. Select **Settings**. 4. Copy the connection string from the `PostgreSQL endpoint` section and add your API key. ## 2. Create a database configuration To configure Hyperdrive, you will need: * The IP address (or hostname) and port of your database. * The database username (for example, `hyperdrive-demo`) you configured in a previous step. * The password associated with that username. * The name of the database you want Hyperdrive to connect to. For example, `postgres`. Hyperdrive accepts the combination of these parameters in the common connection string format used by database drivers: ```txt postgres://USERNAME:PASSWORD@HOSTNAME_OR_IP_ADDRESS:PORT/database_name ``` Most database providers will provide a connection string you can directly copy-and-paste directly into Hyperdrive. To create a Hyperdrive configuration with the [Wrangler CLI](https://developers.cloudflare.com/workers/wrangler/install-and-update/), open your terminal and run the following command. Replace \ with a name for your Hyperdrive configuration and paste the connection string provided from your database host, or replace `user`, `password`, `HOSTNAME_OR_IP_ADDRESS`, `port`, and `database_name` placeholders with those specific to your database: ```sh npx wrangler hyperdrive create --connection-string="postgres://user:password@HOSTNAME_OR_IP_ADDRESS:PORT/database_name" ``` Note Hyperdrive will attempt to connect to your database with the provided credentials to verify they are correct before creating a configuration. If you encounter an error when attempting to connect, refer to Hyperdrive's [troubleshooting documentation](https://developers.cloudflare.com/hyperdrive/observability/troubleshooting/) to debug possible causes. This command outputs a binding for the [Wrangler configuration file](https://developers.cloudflare.com/workers/wrangler/configuration/): * wrangler.jsonc ```jsonc { "name": "hyperdrive-example", "main": "src/index.ts", "compatibility_date": "2024-08-21", "compatibility_flags": [ "nodejs_compat" ], "hyperdrive": [ { "binding": "HYPERDRIVE", "id": "" } ] } ``` * wrangler.toml ```toml name = "hyperdrive-example" main = "src/index.ts" compatibility_date = "2024-08-21" compatibility_flags = ["nodejs_compat"] # Pasted from the output of `wrangler hyperdrive create --connection-string=[...]` above. [[hyperdrive]] binding = "HYPERDRIVE" id = "" ``` ## 3. Use Hyperdrive from your Worker Install the `node-postgres` driver: * npm ```sh npm i pg@>8.16.3 ``` * yarn ```sh yarn add pg@>8.16.3 ``` * pnpm ```sh pnpm add pg@>8.16.3 ``` Note The minimum version of `node-postgres` required for Hyperdrive is `8.16.3`. If using TypeScript, install the types package: * npm ```sh npm i -D @types/pg ``` * yarn ```sh yarn add -D @types/pg ``` * pnpm ```sh pnpm add -D @types/pg ``` Add the required Node.js compatibility flags and Hyperdrive binding to your `wrangler.jsonc` file: * wrangler.jsonc ```jsonc { "compatibility_flags": [ "nodejs_compat" ], "compatibility_date": "2024-09-23", "hyperdrive": [ { "binding": "HYPERDRIVE", "id": "" } ] } ``` * wrangler.toml ```toml # required for database drivers to function compatibility_flags = ["nodejs_compat"] compatibility_date = "2024-09-23" [[hyperdrive]] binding = "HYPERDRIVE" id = "" ``` Create a new `Client` instance and pass the Hyperdrive `connectionString`: ```ts // filepath: src/index.ts import { Client } from "pg"; export default { async fetch(request: Request, env: Env, ctx: ExecutionContext): Promise { // Create a new client instance for each request. const client = new Client({ connectionString: env.HYPERDRIVE.connectionString, }); try { // Connect to the database await client.connect(); console.log("Connected to PostgreSQL database"); // Perform a simple query const result = await client.query("SELECT * FROM pg_tables"); // Clean up the client after the response is returned, before the Worker is killed ctx.waitUntil(client.end()); return Response.json({ success: true, result: result.rows, }); } catch (error: any) { console.error("Database error:", error.message); new Response('Internal error occurred', { status: 500 }); } }, }; ``` Note If you expect to be making multiple parallel database queries within a single Worker invocation, consider using a [connection pool (`pg.Pool`)](https://node-postgres.com/apis/pool) to allow for parallel queries. If doing so, set the max connections of the connection pool to 5 connections. This ensures that the connection pool fits within [Workers' concurrent open connections limit of 6](https://developers.cloudflare.com/workers/platform/limits), which affect TCP connections that database drivers use. ## Next steps * Learn more about [How Hyperdrive Works](https://developers.cloudflare.com/hyperdrive/configuration/how-hyperdrive-works/). * Refer to the [troubleshooting guide](https://developers.cloudflare.com/hyperdrive/observability/troubleshooting/) to debug common issues. * Understand more about other [storage options](https://developers.cloudflare.com/workers/platform/storage-options/) available to Cloudflare Workers. --- title: Drizzle ORM · Hyperdrive docs description: Drizzle ORM is a lightweight TypeScript ORM with a focus on type safety. This example demonstrates how to use Drizzle ORM with PostgreSQL via Cloudflare Hyperdrive in a Workers application. lastUpdated: 2025-05-12T14:16:48.000Z chatbotDeprioritize: false source_url: html: https://developers.cloudflare.com/hyperdrive/examples/connect-to-postgres/postgres-drivers-and-libraries/drizzle-orm/ md: https://developers.cloudflare.com/hyperdrive/examples/connect-to-postgres/postgres-drivers-and-libraries/drizzle-orm/index.md --- [Drizzle ORM](https://orm.drizzle.team/) is a lightweight TypeScript ORM with a focus on type safety. This example demonstrates how to use Drizzle ORM with PostgreSQL via Cloudflare Hyperdrive in a Workers application. ## Prerequisites * A Cloudflare account with Workers access * A PostgreSQL database * A [Hyperdrive configuration to your PostgreSQL database](https://developers.cloudflare.com/hyperdrive/get-started/#3-connect-hyperdrive-to-a-database) ## 1. Install Drizzle Install the Drizzle ORM and its dependencies such as the [postgres](https://github.com/porsager/postgres) driver: ```sh # postgres 3.4.5 or later is recommended npm i drizzle-orm postgres dotenv npm i -D drizzle-kit tsx @types/node ``` Add the required Node.js compatibility flags and Hyperdrive binding to your `wrangler.jsonc` file: * wrangler.jsonc ```jsonc { "compatibility_flags": [ "nodejs_compat" ], "compatibility_date": "2024-09-23", "hyperdrive": [ { "binding": "HYPERDRIVE", "id": "" } ] } ``` * wrangler.toml ```toml # required for database drivers to function compatibility_flags = ["nodejs_compat"] compatibility_date = "2024-09-23" [[hyperdrive]] binding = "HYPERDRIVE" id = "" ``` ## 2. Configure Drizzle ### 2.1. Define a schema With Drizzle ORM, we define the schema in TypeScript rather than writing raw SQL. 1. Create a folder `/db/` in `/src/`. 2. Create a `schema.ts` file. 3. In `schema.ts`, define a `users` table as shown below. ```ts // src/db/schema.ts import { pgTable, serial, varchar, timestamp } from "drizzle-orm/pg-core"; export const users = pgTable("users", { id: serial("id").primaryKey(), name: varchar("name", { length: 255 }).notNull(), email: varchar("email", { length: 255 }).notNull().unique(), createdAt: timestamp("created_at").defaultNow(), }); ``` ### 2.2. Connect Drizzle ORM to the database with Hyperdrive Use your Hyperdrive configuration for your database when using the Drizzle ORM. Populate your `index.ts` file as shown below. ```ts // src/index.ts import { drizzle } from "drizzle-orm/postgres-js"; import postgres from "postgres"; import { users } from "./db/schema"; export interface Env { HYPERDRIVE: Hyperdrive; } export default { async fetch(request, env, ctx): Promise { // Create a database client with postgres.js driver connected via Hyperdrive const sql = postgres(env.HYPERDRIVE.connectionString, { // Limit the connections for the Worker request to 5 due to Workers' limits on concurrent external connections max: 5, // If you are not using array types in your Postgres schema, disable `fetch_types` to avoid an additional round-trip (unnecessary latency) fetch_types: false, }); // Create the Drizzle client with the postgres.js connection const db = drizzle(sql); // Sample query to get all users const allUsers = await db.select().from(users); // Clean up the connection ctx.waitUntil(sql.end()); return Response.json(allUsers); }, } satisfies ExportedHandler; ``` Note You may use [node-postgres](https://orm.drizzle.team/docs/get-started-postgresql#node-postgres) or [Postgres.js](https://orm.drizzle.team/docs/get-started-postgresql#postgresjs) when using Drizzle ORM. Both are supported and compatible. ### 2.3. Configure Drizzle-Kit for migrations (optional) Note You need to set up the tables in your database so that Drizzle ORM can make queries that work. If you have already set it up (for example, if another user has applied the schema to your database), or if you are starting to use Drizzle ORM and the schema matches what already exists in your database, then you do not need to run the migration. You can generate and run SQL migrations on your database based on your schema using Drizzle Kit CLI. Refer to [Drizzle ORM docs](https://orm.drizzle.team/docs/get-started/postgresql-new) for additional guidance. 1. Create a `.env` file the root folder of your project, and add your database connection string. The Drizzle Kit CLI will use this connection string to create and apply the migrations. ```toml # .env # Replace with your direct database connection string DATABASE_URL='postgres://user:password@db-host.cloud/database-name' ``` 2. Create a `drizzle.config.ts` file in the root folder of your project to configure Drizzle Kit and add the following content: ```ts // drizzle.config.ts import "dotenv/config"; import { defineConfig } from "drizzle-kit"; export default defineConfig({ out: "./drizzle", schema: "./src/db/schema.ts", dialect: "postgresql", dbCredentials: { url: process.env.DATABASE_URL!, }, }); ``` 3. Generate the migration file for your database according to your schema files and apply the migrations to your database. Run the following two commands: ```bash npx drizzle-kit generate ``` ```bash No config path provided, using default 'drizzle.config.ts' Reading config file 'drizzle.config.ts' 1 tables users 4 columns 0 indexes 0 fks [✓] Your SQL migration file ➜ drizzle/0000_mysterious_queen_noir.sql 🚀 ``` ```bash npx drizzle-kit migrate ``` ```bash No config path provided, using default 'drizzle.config.ts' Reading config file 'drizzle.config.ts' Using 'postgres' driver for database querying ``` ## 3. Deploy your Worker Deploy your Worker. ```bash npx wrangler deploy ``` ## Next steps * Learn more about [How Hyperdrive Works](https://developers.cloudflare.com/hyperdrive/configuration/how-hyperdrive-works/). * Refer to the [troubleshooting guide](https://developers.cloudflare.com/hyperdrive/observability/troubleshooting/) to debug common issues. * Understand more about other [storage options](https://developers.cloudflare.com/workers/platform/storage-options/) available to Cloudflare Workers. --- title: node-postgres (pg) · Hyperdrive docs description: node-postgres (pg) is a widely-used PostgreSQL driver for Node.js applications. This example demonstrates how to use node-postgres with Cloudflare Hyperdrive in a Workers application. lastUpdated: 2025-05-12T14:16:48.000Z chatbotDeprioritize: false source_url: html: https://developers.cloudflare.com/hyperdrive/examples/connect-to-postgres/postgres-drivers-and-libraries/node-postgres/ md: https://developers.cloudflare.com/hyperdrive/examples/connect-to-postgres/postgres-drivers-and-libraries/node-postgres/index.md --- [node-postgres](https://node-postgres.com/) (pg) is a widely-used PostgreSQL driver for Node.js applications. This example demonstrates how to use node-postgres with Cloudflare Hyperdrive in a Workers application. Install the `node-postgres` driver: * npm ```sh npm i pg@>8.16.3 ``` * yarn ```sh yarn add pg@>8.16.3 ``` * pnpm ```sh pnpm add pg@>8.16.3 ``` Note The minimum version of `node-postgres` required for Hyperdrive is `8.16.3`. If using TypeScript, install the types package: * npm ```sh npm i -D @types/pg ``` * yarn ```sh yarn add -D @types/pg ``` * pnpm ```sh pnpm add -D @types/pg ``` Add the required Node.js compatibility flags and Hyperdrive binding to your `wrangler.jsonc` file: * wrangler.jsonc ```jsonc { "compatibility_flags": [ "nodejs_compat" ], "compatibility_date": "2024-09-23", "hyperdrive": [ { "binding": "HYPERDRIVE", "id": "" } ] } ``` * wrangler.toml ```toml # required for database drivers to function compatibility_flags = ["nodejs_compat"] compatibility_date = "2024-09-23" [[hyperdrive]] binding = "HYPERDRIVE" id = "" ``` Create a new `Client` instance and pass the Hyperdrive `connectionString`: ```ts // filepath: src/index.ts import { Client } from "pg"; export default { async fetch(request: Request, env: Env, ctx: ExecutionContext): Promise { // Create a new client instance for each request. const client = new Client({ connectionString: env.HYPERDRIVE.connectionString, }); try { // Connect to the database await client.connect(); console.log("Connected to PostgreSQL database"); // Perform a simple query const result = await client.query("SELECT * FROM pg_tables"); // Clean up the client after the response is returned, before the Worker is killed ctx.waitUntil(client.end()); return Response.json({ success: true, result: result.rows, }); } catch (error: any) { console.error("Database error:", error.message); new Response('Internal error occurred', { status: 500 }); } }, }; ``` Note If you expect to be making multiple parallel database queries within a single Worker invocation, consider using a [connection pool (`pg.Pool`)](https://node-postgres.com/apis/pool) to allow for parallel queries. If doing so, set the max connections of the connection pool to 5 connections. This ensures that the connection pool fits within [Workers' concurrent open connections limit of 6](https://developers.cloudflare.com/workers/platform/limits), which affect TCP connections that database drivers use. --- title: Postgres.js · Hyperdrive docs description: Postgres.js is a modern, fully-featured PostgreSQL driver for Node.js. This example demonstrates how to use Postgres.js with Cloudflare Hyperdrive in a Workers application. lastUpdated: 2025-05-12T14:16:48.000Z chatbotDeprioritize: false source_url: html: https://developers.cloudflare.com/hyperdrive/examples/connect-to-postgres/postgres-drivers-and-libraries/postgres-js/ md: https://developers.cloudflare.com/hyperdrive/examples/connect-to-postgres/postgres-drivers-and-libraries/postgres-js/index.md --- [Postgres.js](https://github.com/porsager/postgres) is a modern, fully-featured PostgreSQL driver for Node.js. This example demonstrates how to use Postgres.js with Cloudflare Hyperdrive in a Workers application. Install [Postgres.js](https://github.com/porsager/postgres): * npm ```sh npm i postgres@>3.4.5 ``` * yarn ```sh yarn add postgres@>3.4.5 ``` * pnpm ```sh pnpm add postgres@>3.4.5 ``` Note The minimum version of `postgres-js` required for Hyperdrive is `3.4.5`. Add the required Node.js compatibility flags and Hyperdrive binding to your `wrangler.jsonc` file: * wrangler.jsonc ```jsonc { "compatibility_flags": [ "nodejs_compat" ], "compatibility_date": "2024-09-23", "hyperdrive": [ { "binding": "HYPERDRIVE", "id": "" } ] } ``` * wrangler.toml ```toml # required for database drivers to function compatibility_flags = ["nodejs_compat"] compatibility_date = "2024-09-23" [[hyperdrive]] binding = "HYPERDRIVE" id = "" ``` Create a Worker that connects to your PostgreSQL database via Hyperdrive: ```ts // filepath: src/index.ts import postgres from "postgres"; export default { async fetch( request: Request, env: Env, ctx: ExecutionContext, ): Promise { // Create a database client that connects to your database via Hyperdrive // using the Hyperdrive credentials const sql = postgres(env.HYPERDRIVE.connectionString, { // Limit the connections for the Worker request to 5 due to Workers' limits on concurrent external connections max: 5, // If you are not using array types in your Postgres schema, disable `fetch_types` to avoid an additional round-trip (unnecessary latency) fetch_types: false, }); try { // A very simple test query const result = await sql`select * from pg_tables`; // Clean up the client, ensuring we don't kill the worker before that is // completed. ctx.waitUntil(sql.end()); // Return result rows as JSON return Response.json({ success: true, result: result }); } catch (e: any) { console.error("Database error:", e.message); return Response.error(); } }, } satisfies ExportedHandler; ``` --- title: Advanced Usage · Cloudflare Pages docs description: If you need to run code before or after your Next.js application, create your own Worker entrypoint and forward requests to your Next.js application. lastUpdated: 2025-05-09T17:32:11.000Z chatbotDeprioritize: false source_url: html: https://developers.cloudflare.com/pages/framework-guides/nextjs/ssr/advanced/ md: https://developers.cloudflare.com/pages/framework-guides/nextjs/ssr/advanced/index.md --- ## Custom Worker Entrypoint If you need to run code before or after your Next.js application, create your own Worker entrypoint and forward requests to your Next.js application. This can help you intercept logs from your app, catch and handle uncaught exceptions, or add additional context to incoming requests or outgoing responses. 1. Create a new file in your Next.js project, with a [`fetch()` handler](https://developers.cloudflare.com/workers/runtime-apis/handlers/fetch/), that looks like this: ```ts import nextOnPagesHandler from "@cloudflare/next-on-pages/fetch-handler"; export default { async fetch(request, env, ctx) { // do something before running the next-on-pages handler const response = await nextOnPagesHandler.fetch(request, env, ctx); // do something after running the next-on-pages handler return response; }, } as ExportedHandler<{ ASSETS: Fetcher }>; ``` This looks like a Worker — but it does not need its own Wrangler file. You can think of it purely as code that `@cloudflare/next-on-pages` will then use to wrap the output of the build that is deployed to your Cloudflare Pages project. 1. Pass the entrypoint argument to the next-on-pages CLI with the path to your handler. ```sh npx @cloudflare/next-on-pages --custom-entrypoint=./custom-entrypoint.ts ``` --- title: Using bindings in your Next.js app · Cloudflare Pages docs description: "Once you have set up next-on-pages, you can access bindings from any route of your Next.js app via getRequestContext:" lastUpdated: 2025-05-13T16:21:30.000Z chatbotDeprioritize: false source_url: html: https://developers.cloudflare.com/pages/framework-guides/nextjs/ssr/bindings/ md: https://developers.cloudflare.com/pages/framework-guides/nextjs/ssr/bindings/index.md --- Once you have [set up next-on-pages](https://developers.cloudflare.com/pages/framework-guides/nextjs/ssr/get-started/), you can access [bindings](https://developers.cloudflare.com/workers/runtime-apis/bindings/) from any route of your Next.js app via `getRequestContext`: ```js import { getRequestContext } from "@cloudflare/next-on-pages"; export const runtime = "edge"; export async function GET(request) { let responseText = "Hello World"; const myKv = getRequestContext().env.MY_KV_NAMESPACE; await myKv.put("foo", "bar"); const foo = await myKv.get("foo"); return new Response(foo); } ``` Add bindings to your Pages project by adding them to your [Wrangler configuration file](https://developers.cloudflare.com/pages/functions/wrangler-configuration/). ## TypeScript type declarations for bindings To ensure that the `env` object from `getRequestContext().env` above has accurate TypeScript types, make sure you have generated types by running [`wrangler types`](https://developers.cloudflare.com/workers/languages/typescript/#generate-types) and followed the setup steps. ## Other Cloudflare APIs (`cf`, `ctx`) Access context about the incoming request from the [`cf` object](https://developers.cloudflare.com/workers/runtime-apis/request/#incomingrequestcfproperties), as well as [lifecycle methods from the `ctx` object](https://developers.cloudflare.com/workers/runtime-apis/handlers/fetch/) from the return value of [`getRequestContext()`](https://github.com/cloudflare/next-on-pages/blob/main/packages/next-on-pages/src/api/getRequestContext.ts): ```js import { getRequestContext } from "@cloudflare/next-on-pages"; export const runtime = "edge"; export async function GET(request) { const { env, cf, ctx } = getRequestContext(); // ... } ``` --- title: Caching and data revalidation in your Next.js app · Cloudflare Pages docs description: "@cloudflare/next-on-pages supports caching and revalidating data returned by subrequests you make in your app by calling fetch()." lastUpdated: 2025-05-09T17:32:11.000Z chatbotDeprioritize: false source_url: html: https://developers.cloudflare.com/pages/framework-guides/nextjs/ssr/caching/ md: https://developers.cloudflare.com/pages/framework-guides/nextjs/ssr/caching/index.md --- [`@cloudflare/next-on-pages`](https://github.com/cloudflare/next-on-pages) supports [caching](https://nextjs.org/docs/app/building-your-application/data-fetching/fetching-caching-and-revalidating#caching-data) and [revalidating](https://nextjs.org/docs/app/building-your-application/data-fetching/fetching-caching-and-revalidating#revalidating-data) data returned by subrequests you make in your app by calling [`fetch()`](https://developers.cloudflare.com/workers/runtime-apis/fetch/). By default, all `fetch()` subrequests made in your Next.js app are cached. Refer to the [Next.js documentation](https://nextjs.org/docs/app/building-your-application/caching#opting-out-1) for information about how to disable caching for an individual subrequest, or for an entire route. [The cache persists across deployments](https://nextjs.org/docs/app/building-your-application/caching#data-cache). You are responsible for revalidating/purging this cache. ## Storage options You can configure your Next.js app to write cache entries to and read from either [Workers KV](https://developers.cloudflare.com/kv/) or the [Cache API](https://developers.cloudflare.com/workers/runtime-apis/cache/). ### Workers KV (recommended) It takes an extra step to enable, but Cloudflare recommends caching data using [Workers KV](https://developers.cloudflare.com/kv/). When you write cached data to Workers KV, you write to storage that can be read by any Cloudflare location. This means your app can fetch data, cache it in KV, and then subsequent requests anywhere around the world can read from this cache. Note Workers KV is eventually consistent, which means that it can take up to 60 seconds for updates to be reflected globally. To use Workers KV as the cache for your Next.js app, [add a KV binding](https://developers.cloudflare.com/pages/functions/bindings/#kv-namespaces) to your Pages project, and set the name of the binding to `__NEXT_ON_PAGES__KV_SUSPENSE_CACHE`. ### Cache API (default) The [Cache API](https://developers.cloudflare.com/workers/runtime-apis/cache/) is the default option for caching data in your Next.js app. You do not need to take any action to enable the Cache API. In contrast with Workers KV, when you write data using the Cache API, data is only cached in the Cloudflare location that you are writing data from. --- title: Get started · Cloudflare Pages docs description: Deploy a full-stack Next.js app to Cloudflare Pages lastUpdated: 2025-06-05T13:25:05.000Z chatbotDeprioritize: false source_url: html: https://developers.cloudflare.com/pages/framework-guides/nextjs/ssr/get-started/ md: https://developers.cloudflare.com/pages/framework-guides/nextjs/ssr/get-started/index.md --- Learn how to deploy full-stack (SSR) Next.js apps to Cloudflare Pages. Note You can now also [deploy Next.js apps to Cloudflare Workers](https://developers.cloudflare.com/workers/framework-guides/web-apps/nextjs/), including apps that use the Node.js "runtime" from Next.js. This allows you to use the [Node.js APIs that Cloudflare Workers provides](https://developers.cloudflare.com/workers/runtime-apis/nodejs/#built-in-nodejs-runtime-apis), and ensures compatibility with a broader set of Next.js features and rendering modes. Refer to the [OpenNext docs for the `@opennextjs/cloudflare` adapter](https://opennext.js.org/cloudflare) to learn how to get started. ## New apps To create a new Next.js app, pre-configured to run on Cloudflare, run: * npm ```sh npm create cloudflare@latest -- my-next-app --framework=next --platform=pages ``` * yarn ```sh yarn create cloudflare my-next-app --framework=next --platform=pages ``` * pnpm ```sh pnpm create cloudflare@latest my-next-app --framework=next --platform=pages ``` For more guidance on developing your app, refer to [Bindings](https://developers.cloudflare.com/pages/framework-guides/nextjs/ssr/bindings/) or the [Next.js documentation](https://nextjs.org). *** ## Existing apps ### 1. Install next-on-pages First, install [@cloudflare/next-on-pages](https://github.com/cloudflare/next-on-pages): * npm ```sh npm i -D @cloudflare/next-on-pages ``` * yarn ```sh yarn add -D @cloudflare/next-on-pages ``` * pnpm ```sh pnpm add -D @cloudflare/next-on-pages ``` ### 2. Add Wrangler file Then, add a [Wrangler configuration file](https://developers.cloudflare.com/pages/functions/wrangler-configuration/) to the root directory of your Next.js app: * wrangler.jsonc ```jsonc { "name": "my-app", "compatibility_date": "2024-09-23", "compatibility_flags": [ "nodejs_compat" ], "pages_build_output_dir": ".vercel/output/static" } ``` * wrangler.toml ```toml name = "my-app" compatibility_date = "2024-09-23" compatibility_flags = ["nodejs_compat"] pages_build_output_dir = ".vercel/output/static" ``` This is where you configure your Pages project and define what resources it can access via [bindings](https://developers.cloudflare.com/workers/runtime-apis/bindings/). ### 3. Update `next.config.mjs` Next, update the content in your `next.config.mjs` file. ```diff import { setupDevPlatform } from '@cloudflare/next-on-pages/next-dev'; /** @type {import('next').NextConfig} */ const nextConfig = {}; if (process.env.NODE_ENV === 'development') { await setupDevPlatform(); } export default nextConfig; ``` These changes allow you to access [bindings](https://developers.cloudflare.com/pages/framework-guides/nextjs/ssr/bindings/) in local development. ### 4. Ensure all server-rendered routes use the Edge Runtime Next.js has [two "runtimes"](https://nextjs.org/docs/app/building-your-application/rendering/edge-and-nodejs-runtimes) — "Edge" and "Node.js". When you run your Next.js app on Cloudflare, you [can use available Node.js APIs](https://developers.cloudflare.com/workers/runtime-apis/nodejs/) — but you currently can only use Next.js' "Edge" runtime. This means that for each server-rendered route — ex: an API route or one that uses `getServerSideProps` — you must configure it to use the "Edge" runtime: ```js export const runtime = "edge"; ``` ### 5. Update `package.json` Add the following to the scripts field of your `package.json` file: ```json "pages:build": "npx @cloudflare/next-on-pages", "preview": "npm run pages:build && wrangler pages dev", "deploy": "npm run pages:build && wrangler pages deploy" ``` * `npm run pages:build`: Runs `next build`, and then transforms its output to be compatible with Cloudflare Pages. * `npm run preview`: Builds your app, and runs it locally in [workerd](https://github.com/cloudflare/workerd), the open-source Workers Runtime. (`next dev` will only run your app in Node.js) * `npm run deploy`: Builds your app, and then deploys it to Cloudflare ### 6. Deploy to Cloudflare Pages Either deploy via the command line: * npm ```sh npm run deploy ``` * yarn ```sh yarn run deploy ``` * pnpm ```sh pnpm run deploy ``` Or [connect a Github or Gitlab repository](https://developers.cloudflare.com/pages/get-started/git-integration/), and Cloudflare will automatically build and deploy each pull request you merge to your production branch. ### 7. (Optional) Add `eslint-plugin-next-on-pages` Optionally, you might want to add `eslint-plugin-next-on-pages`, which lints your Next.js app to ensure it is configured correctly to run on Cloudflare Pages. * npm ```sh npm i -D eslint-plugin-next-on-pages ``` * yarn ```sh yarn add -D eslint-plugin-next-on-pages ``` * pnpm ```sh pnpm add -D eslint-plugin-next-on-pages ``` Once it is installed, add the following to `.eslintrc.json`: ```diff { "extends": [ "next/core-web-vitals", "plugin:eslint-plugin-next-on-pages/recommended" ], "plugins": [ "eslint-plugin-next-on-pages" ] } ``` ## Related resources * [Bindings](https://developers.cloudflare.com/pages/framework-guides/nextjs/ssr/bindings/) * [Troubleshooting](https://developers.cloudflare.com/pages/framework-guides/nextjs/ssr/troubleshooting/) --- title: Routing static assets · Cloudflare Pages docs description: "When you use a JavaScript framework like Next.js on Cloudflare Pages, the framework adapter (ex: @cloudflare/next-on-pages) automatically generates a _routes.json file, which defines specific paths of your app's static assets. This file tells Cloudflare, for these paths, don't run the Worker, you can just serve the static asset on this path (an image, a chunk of client-side JavaScript, etc.)" lastUpdated: 2025-05-09T17:32:11.000Z chatbotDeprioritize: false source_url: html: https://developers.cloudflare.com/pages/framework-guides/nextjs/ssr/static-assets/ md: https://developers.cloudflare.com/pages/framework-guides/nextjs/ssr/static-assets/index.md --- When you use a JavaScript framework like Next.js on Cloudflare Pages, the framework adapter (ex: `@cloudflare/next-on-pages`) automatically generates a [`_routes.json` file](https://developers.cloudflare.com/pages/functions/routing/#create-a-_routesjson-file), which defines specific paths of your app's static assets. This file tells Cloudflare, `for these paths, don't run the Worker, you can just serve the static asset on this path` (an image, a chunk of client-side JavaScript, etc.) The framework adapter handles this for you — you typically shouldn't need to create your own `_routes.json` file. If you need to, you can define your own `_routes.json` file in the root directory of your project. For example, you might want to declare the `/favicon.ico` path as a static asset where the Worker should not be invoked. You would add it to the `excludes` filed of your `_routes.json` file: ```json { "version": 1, "exclude": ["/favicon.ico"] } ``` During the build process, `@cloudflare/next-on-pages` will automatically generate its own `_routes.json` file in the output directory. Any entries that are provided in your own `_routes.json` file (in the project's root directory) will be merged with the generated file. --- title: Supported features · Cloudflare Pages docs description: "@cloudflare/next-on-pages supports all minor and patch version of Next.js 13 and 14. We regularly run manual and automated tests to ensure compatibility." lastUpdated: 2025-05-09T17:32:11.000Z chatbotDeprioritize: false source_url: html: https://developers.cloudflare.com/pages/framework-guides/nextjs/ssr/supported-features/ md: https://developers.cloudflare.com/pages/framework-guides/nextjs/ssr/supported-features/index.md --- ## Supported Next.js versions `@cloudflare/next-on-pages` supports all minor and patch version of Next.js 13 and 14. We regularly run manual and automated tests to ensure compatibility. ### Node.js API support Next.js has [two "runtimes"](https://nextjs.org/docs/app/building-your-application/rendering/edge-and-nodejs-runtimes) — "Edge" and "Node.js". The `@cloudflare/next-on-pages` adapter supports only the edge "runtime". The [`@opennextjs/cloudflare` adapter](https://opennext.js.org/cloudflare), which lets you build and deploy Next.js apps to [Cloudflare Workers](https://developers.cloudflare.com/workers/), supports the Node.js "runtime" from Next.js. When you use it, you can use the [full set of Node.js APIs](https://developers.cloudflare.com/workers/runtime-apis/nodejs/) that Cloudflare Workers provide. `@opennextjs/cloudflare` is pre 1.0, and still in active development. As it approaches 1.0, it will become the clearly better choice for most Next.js apps, since Next.js has been engineered to only support its Node.js "runtime" for many newly introduced features. Refer to the [OpenNext docs](https://opennext.js.org/cloudflare) and the [Workers vs. Pages compatibility matrix](https://developers.cloudflare.com/workers/static-assets/migration-guides/migrate-from-pages/#compatibility-matrix) for more information to help you decide which to use. #### Supported Node.js APIs when using `@cloudflare/next-on-pages` When you use `@cloudflare/next-on-pages`, your Next.js app must use the "edge" runtime from Next.js. The Workers runtime [supports a broad set of Node.js APIs](https://developers.cloudflare.com/workers/runtime-apis/nodejs/) — but [the Next.js Edge Runtime code intentionally constrains this](https://github.com/vercel/next.js/blob/canary/packages/next/src/build/webpack/plugins/middleware-plugin.ts#L820). As a result, only the following Node.js APIs will work in your Next.js app: * `buffer` * `events` * `assert` * `util` * `async_hooks` If you need to use other APIs from Node.js, you should use [`@opennextjs/cloudflare`](https://opennext.js.org/cloudflare) instead. ## Supported Features ### Routers Cloudlflare recommends using the [App router](https://nextjs.org/docs/app) from Next.js. Cloudflare also supports the older [Pages](https://nextjs.org/docs/pages) router from Next.js. ### next.config.mjs Properties [`next.config.js` — app router](https://nextjs.org/docs/app/api-reference/next-config-js) and [\`next.config.js - pages router](https://nextjs.org/docs/pages/api-reference/next-config-js) | Option | Next Docs | Support | | - | - | - | | appDir | [app](https://nextjs.org/docs/app/api-reference/next-config-js/appDir) | ✅ | | assetPrefix | [pages](https://nextjs.org/docs/pages/api-reference/next-config-js/assetPrefix), [app](https://nextjs.org/docs/app/api-reference/next-config-js/assetPrefix) | 🔄 | | basePath | [pages](https://nextjs.org/docs/pages/api-reference/next-config-js/basePath), [app](https://nextjs.org/docs/app/api-reference/next-config-js/basePath) | ✅ | | compress | [pages](https://nextjs.org/docs/pages/api-reference/next-config-js/compress), [app](https://nextjs.org/docs/app/api-reference/next-config-js/compress) | `N/A`[1](#user-content-fn-1) | | devIndicators | [pages](https://nextjs.org/docs/pages/api-reference/next-config-js/devIndicators), [app](https://nextjs.org/docs/app/api-reference/next-config-js/devIndicators) | `N/A`[2](#user-content-fn-2) | | distDir | [pages](https://nextjs.org/docs/pages/api-reference/next-config-js/distDir), [app](https://nextjs.org/docs/app/api-reference/next-config-js/distDir) | `N/A`[3](#user-content-fn-3) | | env | [pages](https://nextjs.org/docs/pages/api-reference/next-config-js/env), [app](https://nextjs.org/docs/app/api-reference/next-config-js/env) | ✅ | | eslint | [pages](https://nextjs.org/docs/pages/api-reference/next-config-js/eslint), [app](https://nextjs.org/docs/app/api-reference/next-config-js/eslint) | ✅ | | exportPathMap | [pages](https://nextjs.org/docs/pages/api-reference/next-config-js/exportPathMap), [app](https://nextjs.org/docs/app/api-reference/next-config-js/exportPathMap) | `N/A`[4](#user-content-fn-4) | | generateBuildId | [pages](https://nextjs.org/docs/pages/api-reference/next-config-js/generateBuildId), [app](https://nextjs.org/docs/app/api-reference/next-config-js/generateBuildId) | ✅ | | generateEtags | [pages](https://nextjs.org/docs/pages/api-reference/next-config-js/generateEtags), [app](https://nextjs.org/docs/app/api-reference/next-config-js/generateEtags) | 🔄 | | headers | [pages](https://nextjs.org/docs/pages/api-reference/next-config-js/headers), [app](https://nextjs.org/docs/app/api-reference/next-config-js/headers) | ✅ | | httpAgentOptions | [pages](https://nextjs.org/docs/pages/api-reference/next-config-js/httpAgentOptions), [app](https://nextjs.org/docs/app/api-reference/next-config-js/httpAgentOptions) | `N/A` | | images | [pages](https://nextjs.org/docs/pages/api-reference/next-config-js/images), [app](https://nextjs.org/docs/app/api-reference/next-config-js/images) | ✅ | | incrementalCacheHandlerPath | [app](https://nextjs.org/docs/app/api-reference/next-config-js/incrementalCacheHandlerPath) | 🔄 | | logging | [app](https://nextjs.org/docs/app/api-reference/next-config-js/logging) | `N/A`[5](#user-content-fn-5) | | mdxRs | [app](https://nextjs.org/docs/app/api-reference/next-config-js/mdxRs) | ✅ | | onDemandEntries | [pages](https://nextjs.org/docs/pages/api-reference/next-config-js/onDemandEntries), [app](https://nextjs.org/docs/app/api-reference/next-config-js/onDemandEntries) | `N/A`[6](#user-content-fn-6) | | optimizePackageImports | [app](https://nextjs.org/docs/app/api-reference/next-config-js/optimizePackageImports) | ✅/`N/A`[7](#user-content-fn-7) | | output | [pages](https://nextjs.org/docs/pages/api-reference/next-config-js/output), [app](https://nextjs.org/docs/app/api-reference/next-config-js/output) | `N/A`[8](#user-content-fn-8) | | pageExtensions | [pages](https://nextjs.org/docs/pages/api-reference/next-config-js/pageExtensions), [app](https://nextjs.org/docs/app/api-reference/next-config-js/pageExtensions) | ✅ | | Partial Prerendering (experimental) | [app](https://nextjs.org/docs/app/api-reference/next-config-js/partial-prerendering) | ❌[9](#user-content-fn-9) | | poweredByHeader | [pages](https://nextjs.org/docs/pages/api-reference/next-config-js/poweredByHeader), [app](https://nextjs.org/docs/app/api-reference/next-config-js/poweredByHeader) | 🔄 | | productionBrowserSourceMaps | [pages](https://nextjs.org/docs/pages/api-reference/next-config-js/productionBrowserSourceMaps), [app](https://nextjs.org/docs/app/api-reference/next-config-js/productionBrowserSourceMaps) | 🔄[10](#user-content-fn-10) | | reactStrictMode | [pages](https://nextjs.org/docs/pages/api-reference/next-config-js/reactStrictMode), [app](https://nextjs.org/docs/app/api-reference/next-config-js/reactStrictMode) | ❌[11](#user-content-fn-11) | | redirects | [pages](https://nextjs.org/docs/pages/api-reference/next-config-js/redirects), [app](https://nextjs.org/docs/app/api-reference/next-config-js/redirects) | ✅ | | rewrites | [pages](https://nextjs.org/docs/pages/api-reference/next-config-js/rewrites), [app](https://nextjs.org/docs/app/api-reference/next-config-js/rewrites) | ✅ | | Runtime Config | [pages](https://nextjs.org/docs/pages/api-reference/next-config-js/runtime-configuration), [app](https://nextjs.org/docs/app/api-reference/next-config-js/runtime-configuration) | ❌[12](#user-content-fn-12) | | serverActions | [app](https://nextjs.org/docs/app/api-reference/next-config-js/serverActions) | ✅ | | serverComponentsExternalPackages | [app](https://nextjs.org/docs/app/api-reference/next-config-js/serverComponentsExternalPackages) | `N/A`[13](#user-content-fn-13) | | trailingSlash | [pages](https://nextjs.org/docs/pages/api-reference/next-config-js/trailingSlash), [app](https://nextjs.org/docs/app/api-reference/next-config-js/trailingSlash) | ✅ | | transpilePackages | [pages](https://nextjs.org/docs/pages/api-reference/next-config-js/transpilePackages), [app](https://nextjs.org/docs/app/api-reference/next-config-js/transpilePackages) | ✅ | | turbo | [pages](https://nextjs.org/docs/pages/api-reference/next-config-js/turbo), [app](https://nextjs.org/docs/app/api-reference/next-config-js/turbo) | 🔄 | | typedRoutes | [app](https://nextjs.org/docs/app/api-reference/next-config-js/typedRoutes) | ✅ | | typescript | [pages](https://nextjs.org/docs/pages/api-reference/next-config-js/typescript), [app](https://nextjs.org/docs/app/api-reference/next-config-js/typescript) | ✅ | | urlImports | [pages](https://nextjs.org/docs/pages/api-reference/next-config-js/urlImports), [app](https://nextjs.org/docs/app/api-reference/next-config-js/urlImports) | ✅ | | webpack | [pages](https://nextjs.org/docs/pages/api-reference/next-config-js/webpack), [app](https://nextjs.org/docs/app/api-reference/next-config-js/webpack) | ✅ | | webVitalsAttribution | [pages](https://nextjs.org/docs/pages/api-reference/next-config-js/webVitalsAttribution), [app](https://nextjs.org/docs/app/api-reference/next-config-js/webVitalsAttribution) | ✅ | ```plaintext - ✅: Supported - 🔄: Not currently supported - ❌: Not supported - N/A: Not applicable ``` ### Internationalization Cloudflare also supports Next.js' [internationalized (`i18n`) routing](https://nextjs.org/docs/pages/building-your-application/routing/internationalization). ### Rendering and Data Fetching #### Incremental Static Regeneration If you use Incremental Static Regeneration (ISR)[14](#user-content-fn-14), `@cloudflare/next-on-pages` will use static fallback files that are generated by the build process. This means that your application will still correctly serve your ISR/prerendered pages (but without the regeneration aspect). If this causes issues for your application, change your pages to use server side rendering (SSR) instead. Background ISR pages are built by the Vercel CLI to generate Vercel [Prerender Functions](https://vercel.com/docs/build-output-api/v3/primitives#prerender-functions). These are Node.js serverless functions that can be called in the background while serving the page from the cache. It is not possible to use these with Cloudflare Pages and they are not compatible with the [edge runtime](https://nextjs.org/docs/app/api-reference/edge) currently. #### Dynamic handling of static routes `@cloudflare/next-on-pages` supports standard statically generated routes. It does not support dynamic Node.js-based on-demand handling of such routes. For more details see: * [troubleshooting `generateStaticParams`](https://developers.cloudflare.com/pages/framework-guides/nextjs/ssr/troubleshooting/#generatestaticparams) * [troubleshooting `getStaticPaths`](https://developers.cloudflare.com/pages/framework-guides/nextjs/ssr/troubleshooting/#getstaticpaths) #### Caching and Data Revalidation Revalidation and `next/cache` are supported on Cloudflare Pages and can use various bindings. For more information, see our [caching documentation](https://developers.cloudflare.com/pages/framework-guides/nextjs/ssr/caching/). ## Footnotes 1. **compression**: [Cloudflare applies Brotli or Gzip compression](https://developers.cloudflare.com/speed/optimization/content/compression/) automatically. When developing locally with Wrangler, no compression is applied. [↩](#user-content-fnref-1) 2. **dev indicators**: If you're developing using `wrangler pages dev`, it hard refreshes your application the dev indicator doesn't appear. If you run your app locally using `next dev`, this option works fine. [↩](#user-content-fnref-2) 3. **setting custom build directory**: Applications built using `@cloudflare/next-on-pages` don't rely on the `.next` directory so this option isn't really applicable (the `@cloudflare/next-on-pages` equivalent is to use the `--outdir` flag). [↩](#user-content-fnref-3) 4. **exportPathMap**: Option used for SSG not applicable for apps built using `@cloudflare/next-on-pages`. [↩](#user-content-fnref-4) 5. **logging**: If you're developing using `wrangler pages dev`, the extra logging is not applied (since you are effectively running a production build). If you run your app locally using `next dev`, this option works fine. [↩](#user-content-fnref-5) 6. **onDemandEntries**: Not applicable since it's an option for the Next.js server during development which we don't rely on. [↩](#user-content-fnref-6) 7. **optimizePackageImports**: `@cloudflare/next-on-pages` performs chunks deduplication and provides an implementation based on modules lazy loading, based on this applying an `optimizePackageImports` doesn't have an impact on the output produced by the CLI. This configuration can still however be used to speed up the build process (both when running `next dev` or when generating a production build). [↩](#user-content-fnref-7) 8. **output**: `@cloudflare/next-on-pages` works with the standard Next.js output, `standalone` is incompatible with it, `export` is used to generate a static site which doesn't need `@cloudflare/next-on-pages` to run. [↩](#user-content-fnref-8) 9. **Partial Prerendering (experimental)**: As presented in the official [Next.js documentation](https://nextjs.org/docs/app/api-reference/next-config-js/partial-prerendering): `Partial Prerendering is designed for the Node.js runtime only.`, as such it is fundamentally incompatibly with `@cloudflare/next-on-pages` (which only works on the edge runtime). [↩](#user-content-fnref-9) 10. **productionBrowserSourceMaps**: The webpack chunks deduplication performed by `@cloudflare/next-on-pages` doesn't currently preserve source maps in any case so this option can't be implemented either. In the future we might try to preserver source maps, in such case it should be simple to also support this option. [↩](#user-content-fnref-10) 11. **reactStrictMode**: Currently we build the application so react strict mode (being a local dev feature) doesn't work either way. If we can make strict mode work, this option will most likely work straight away. [↩](#user-content-fnref-11) 12. **runtime configuration**: We could look into implementing the runtime configuration but it is probably not worth it since it is a legacy configuration and environment variables should be used instead. [↩](#user-content-fnref-12) 13. **serverComponentsExternalPackages**: This option is for applications running on Node.js so it's not relevant to applications running on Cloudflare Pages. [↩](#user-content-fnref-13) 14. [Incremental Static Regeneration (ISR)](https://vercel.com/docs/incremental-static-regeneration) is a rendering mode in Next.js that allows you to automatically cache and periodically regenerate pages with fresh data. [↩](#user-content-fnref-14) --- title: Troubleshooting · Cloudflare Pages docs description: Learn more about troubleshooting issues with your Full-stack (SSR) Next.js apps using Cloudflare. lastUpdated: 2025-05-09T17:32:11.000Z chatbotDeprioritize: false source_url: html: https://developers.cloudflare.com/pages/framework-guides/nextjs/ssr/troubleshooting/ md: https://developers.cloudflare.com/pages/framework-guides/nextjs/ssr/troubleshooting/index.md --- Learn more about troubleshooting issues with your Full-stack (SSR) Next.js apps using Cloudflare. ## Edge runtime You must configure all server-side routes in your Next.js project as [Edge runtime](https://nextjs.org/docs/app/building-your-application/rendering/edge-and-nodejs-runtimes) routes, by adding the following to each route: ```js export const runtime = "edge"; ``` Note If you are still using the Next.js [Pages router](https://nextjs.org/docs/pages), for page routes, you must use `'experimental-edge'` instead of `'edge'`. *** ## App router ### Not found Next.js generates a `not-found` route for your application under the hood during the build process. In some circumstances, Next.js can detect that the route requires server-side logic (particularly if computation is being performed in the root layout component) and Next.js automatically creates a [Node.js runtime serverless function](https://nextjs.org/docs/app/building-your-application/rendering/edge-and-nodejs-runtimes) that is not compatible with Cloudflare Pages. To prevent this, you can provide a custom `not-found` route that explicitly uses the edge runtime: ```ts export const runtime = 'edge' export default async function NotFound() { // ... return ( // ... ) } ``` ### `generateStaticParams` When you use [static site generation (SSG)](https://nextjs.org/docs/pages/building-your-application/rendering/static-site-generation) in the [`/app` directory](https://nextjs.org/docs/getting-started/project-structure) and also use the [`generateStaticParams`](https://nextjs.org/docs/app/api-reference/functions/generate-static-params) function, Next.js tries to handle requests for non statically generated routes automatically, and creates a [Node.js runtime serverless function](https://nextjs.org/docs/app/building-your-application/rendering/edge-and-nodejs-runtimes) that is not compatible with Cloudflare Pages. You can opt out of this behavior by setting [`dynamicParams`](https://nextjs.org/docs/app/api-reference/file-conventions/route-segment-config#dynamicparams) to `false`: ```diff export const dynamicParams = false // ... ``` ### Top-level `getRequestContext` You must call `getRequestContext` within the function that handles your route — it cannot be called in global scope. Don't do this: ```js import { getRequestContext } from "@cloudflare/next-on-pages"; export const runtime = "edge"; const myVariable = getRequestContext().env.MY_VARIABLE; export async function GET(request) { return new Response(myVariable); } ``` Instead, do this: ```js import { getRequestContext } from "@cloudflare/next-on-pages"; export const runtime = "edge"; export async function GET(request) { const myVariable = getRequestContext().env.MY_VARIABLE; return new Response(myVariable); } ``` *** ## Pages router ### `getStaticPaths` When you use [static site generation (SSG)](https://nextjs.org/docs/pages/building-your-application/rendering/static-site-generation) in the [`/pages` directory](https://nextjs.org/docs/getting-started/project-structure) and also use the [`getStaticPaths`](https://nextjs.org/docs/pages/api-reference/functions/get-static-paths) function, Next.js by default tries to handle requests for non statically generated routes automatically, and creates a [Node.js runtime serverless function](https://nextjs.org/docs/app/building-your-application/rendering/edge-and-nodejs-runtimes) that is not compatible with Cloudflare Pages. You can opt out of this behavior by specifying a [false `fallback`](https://nextjs.org/docs/pages/api-reference/functions/get-static-paths#fallback-false): ```diff // ... export async function getStaticPaths() { // ... return { paths, fallback: false, } } ``` Warning Note that the `paths` array cannot be empty since an empty `paths` array causes Next.js to ignore the provided `fallback` value. --- title: GitHub integration · Cloudflare Workers docs description: Learn how to manage your GitHub integration for Workers Builds lastUpdated: 2025-04-07T22:53:03.000Z chatbotDeprioritize: false source_url: html: https://developers.cloudflare.com/workers/ci-cd/builds/git-integration/github-integration/ md: https://developers.cloudflare.com/workers/ci-cd/builds/git-integration/github-integration/index.md --- Cloudflare supports connecting your GitHub repository to your Cloudflare Worker, and will automatically deploy your code every time you push a change. ## Features Beyond automatic builds and deployments, the Cloudflare GitHub integration lets you monitor builds directly in GitHub, keeping you informed without leaving your workflow. ### Pull request comment If a commit is on a pull request, Cloudflare will automatically post a comment on the pull request with the status of the build. ![GitHub pull request comment](https://developers.cloudflare.com/_astro/github-pull-request-comment.BiP7A48Z_Z8X9Fp.webp) A [preview URL](https://developers.cloudflare.com/workers/configuration/previews/) will be provided for any builds which perform `wrangler versions upload`. This is particularly useful when reviewing your pull request, as it allows you to compare the code changes alongside an updated version of your Worker. Comment history reveals any builds completed earlier while the PR was open. ![GitHub pull request comment history](https://developers.cloudflare.com/_astro/github-pull-request-comment-history.B35v0LNb_Z1J2Cgs.webp) ### Check run If you have one or multiple Workers connected to a repository (i.e. a [monorepo](https://developers.cloudflare.com/workers/ci-cd/builds/advanced-setups/#monorepos)), you can check on the status of each build within GitHub via [GitHub check runs](https://docs.github.com/en/pull-requests/collaborating-with-pull-requests/collaborating-on-repositories-with-code-quality-features/about-status-checks#checks). You can see the checks by selecting on the status icon next to a commit within your GitHub repository. In the example below, you can select the green check mark to see the results of the check run. ![GitHub status](https://developers.cloudflare.com/_astro/gh-status-check-runs.DkY_pO9C_1RDE3u.webp) Check runs will appear like the following in your repository. You can select **Details** to view the build (Build ID) and project (Script) associated with each check. ![GitHub check runs](https://developers.cloudflare.com/_astro/workers-builds-gh-check-runs.CuqL6Htu_Z2lRntB.webp) Note that when using [build watch paths](https://developers.cloudflare.com/workers/ci-cd/builds/build-watch-paths/), only projects that trigger a build will generate a check run. ## Manage access You can deploy projects to Cloudflare Workers from your company or side project on GitHub using the [Cloudflare Workers & Pages GitHub App](https://github.com/apps/cloudflare-workers-and-pages). ### Organizational access When authorizing Cloudflare Workers to access a GitHub account, you can specify access to your individual account or an organization that you belong to on GitHub. To add Cloudflare Workers installation to an organization, your user account must be an owner or have the appropriate role within the organization (i.e. the GitHub Apps Manager role). More information on these roles can be seen on [GitHub's documentation](https://docs.github.com/en/organizations/managing-peoples-access-to-your-organization-with-roles/roles-in-an-organization#github-app-managers). GitHub security consideration A GitHub account should only point to one Cloudflare account. If you are setting up Cloudflare with GitHub for your organization, Cloudflare recommends that you limit the scope of the application to only the repositories you intend to build with Pages. To modify these permissions, go to the [Applications page](https://github.com/settings/installations) on GitHub and select **Switch settings context** to access your GitHub organization settings. Then, select **Cloudflare Workers & Pages** > For **Repository access**, select **Only select repositories** > select your repositories. ### Remove access You can remove Cloudflare Workers' access to your GitHub repository or account by going to the [Applications page](https://github.com/settings/installations) on GitHub (if you are in an organization, select Switch settings context to access your GitHub organization settings). The GitHub App is named Cloudflare Workers and Pages, and it is shared between Workers and Pages projects. #### Remove Cloudflare access to a GitHub repository To remove access to an individual GitHub repository, you can navigate to **Repository access**. Select the **Only select repositories** option, and configure which repositories you would like Cloudflare to have access to. ![GitHub Repository Access](https://developers.cloudflare.com/_astro/github-repository-access.DGHekBft_Z1VFnS0.webp) #### Remove Cloudflare access to the entire GitHub account To remove Cloudflare Workers and Pages access to your entire Git account, you can navigate to **Uninstall "Cloudflare Workers and Pages"**, then select **Uninstall**. Removing access to the Cloudflare Workers and Pages app will revoke Cloudflare's access to *all repositories* from that GitHub account. If you want to only disable automatic builds and deployments, follow the [Disable Build](https://developers.cloudflare.com/workers/ci-cd/builds/#disconnecting-builds) instructions. Note that removing access to GitHub will disable new builds for Workers and Pages project that were connected to those repositories, though your previous deployments will continue to be hosted by Cloudflare Workers. ### Reinstall the Cloudflare GitHub App When encountering Git integration related issues, one potential troubleshooting step is attempting to uninstall and reinstall the GitHub or GitLab application associated with the Cloudflare Pages installation. The process for each Git provider is provided below. 1. Go to the installation settings page on GitHub: * Navigate to **Settings > Builds** for the Workers or Pages project and select **Manage** under Git Repository. * Alternatively, visit these links to find the Cloudflare Workers and Pages installation and select **Configure**: | | | | - | - | | **Individual** | `https://github.com/settings/installations` | | **Organization** | `https://github.com/organizations//settings/installations` | 1. In the Cloudflare Workers and Pages GitHub App settings page, navigate to **Uninstall "Cloudflare Workers and Pages"** and select **Uninstall**. 2. Go back to the [**Workers & Pages** overview](https://dash.cloudflare.com) page. Select **Create application** > **Pages** > **Connect to Git**. 3. Select the **+ Add account** button, select the GitHub account you want to add, and then select **Install & Authorize**. 4. You should be redirected to the create project page with your GitHub account or organization in the account list. 5. Attempt to make a new deployment with your project which was previously broken. --- title: GitLab integration · Cloudflare Workers docs description: Learn how to manage your GitLab integration for Workers Builds lastUpdated: 2025-05-02T12:44:47.000Z chatbotDeprioritize: false source_url: html: https://developers.cloudflare.com/workers/ci-cd/builds/git-integration/gitlab-integration/ md: https://developers.cloudflare.com/workers/ci-cd/builds/git-integration/gitlab-integration/index.md --- Cloudflare supports connecting your GitLab repository to your Cloudflare Worker, and will automatically deploy your code every time you push a change. ## Features Beyond automatic builds and deployments, the Cloudflare GitLab integration lets you monitor builds directly in GitLab, keeping you informed without leaving your workflow. ### Merge request comment If a commit is on a merge request, Cloudflare will automatically post a comment on the merge request with the status of the build. ![GitLab merge request comment](https://developers.cloudflare.com/_astro/gitlab-pull-request-comment.CQVsQ21r_Z2dbLzQ.webp) A [preview URL](https://developers.cloudflare.com/workers/configuration/previews/) will be provided for any builds which perform `wrangler versions upload`. This is particularly useful when reviewing your pull request, as it allows you to compare the code changes alongside an updated version of your Worker. Enabling GitLab Merge Request events for existing connections New GitLab connections are automatically configured to receive merge request events, which enable commenting functionality. For existing connections, you'll need to manually enable `Merge request events` in the Webhooks tab of your project's settings. You can follow GitLab's documentation for guidance on [managing webhooks](https://docs.gitlab.com/user/project/integrations/webhooks/#manage-webhooks). ### Commit Status If you have one or multiple Workers connected to a repository (i.e. a [monorepo](https://developers.cloudflare.com/workers/ci-cd/builds/advanced-setups/#monorepos)), you can check on the status of each build within GitLab via [GitLab commit status](https://docs.gitlab.com/ee/user/project/merge_requests/status_checks.html). You can see the statuses by selecting the status icon next to a commit or by going to **Build** > **Pipelines** within your GitLab repository. In the example below, you can select on the green check mark to see the results of the check run. ![GitLab Status](https://developers.cloudflare.com/_astro/gl-status-checks.B9jgSbf7_NIlLz.webp) Check runs will appear like the following in your repository. You can select one of the statuses to view the build on the Cloudflare Dashboard. ![GitLab Commit Status](https://developers.cloudflare.com/_astro/gl-commit-status.BghMWpYX_1ckpfP.webp) Note that when using [build watch paths](https://developers.cloudflare.com/workers/ci-cd/builds/build-watch-paths/), only projects that trigger a build will generate a commit status. ## Manage access You can deploy projects to Cloudflare Workers from your company or side project on GitLab using the Cloudflare Pages app. ### Organizational access When you authorize Cloudflare Workers to access your GitLab account, you automatically give Cloudflare Workers access to organizations, groups, and namespaces accessed by your GitLab account. Managing access to these organizations and groups is handled by GitLab. ### Remove access You can remove Cloudflare Workers' access to your GitLab account by navigating to [Authorized Applications page](https://gitlab.com/-/profile/applications) on GitLab. Find the applications called Cloudflare Pages and select the **Revoke** button to revoke access. Note that the GitLab application Cloudflare Workers is shared between Workers and Pages projects, and removing access to GitLab will disable new builds for Workers and Pages, though your previous deployments will continue to be hosted by Cloudflare Workers. ### Reinstall the Cloudflare GitLab App 1. Go to your application settings page on GitLab: 2. Click the "Revoke" button on your Cloudflare Workers installation if it exists. 3. Go back to the [**Workers & Pages** overview](https://dash.cloudflare.com) page. Select **Create application** > **Pages** > **Connect to Git**. 4. Select the **+ Add account** button, select the GitLab account you want to add, and then select **Install & Authorize**. 5. You should be redirected to the create project page with your GitLab account or organization in the account list. 6. Attempt to make a new deployment with your project which was previously broken. --- title: Angular · Cloudflare Workers docs description: Create an Angular application and deploy it to Cloudflare Workers with Workers Assets. lastUpdated: 2025-06-05T13:25:05.000Z chatbotDeprioritize: false tags: Full stack source_url: html: https://developers.cloudflare.com/workers/framework-guides/web-apps/more-web-frameworks/angular/ md: https://developers.cloudflare.com/workers/framework-guides/web-apps/more-web-frameworks/angular/index.md --- In this guide, you will create a new [Angular](https://angular.dev/) application and deploy to Cloudflare Workers (with the new [Workers Assets](https://developers.cloudflare.com/workers/static-assets/)). ## 1. Set up a new project Use the [`create-cloudflare`](https://www.npmjs.com/package/create-cloudflare) CLI (C3) to set up a new project. C3 will create a new project directory, initiate Angular's official setup tool, and provide the option to deploy instantly. To use `create-cloudflare` to create a new Angular project with Workers Assets, run the following command: * npm ```sh npm create cloudflare@latest -- my-angular-app --framework=angular ``` * yarn ```sh yarn create cloudflare my-angular-app --framework=angular ``` * pnpm ```sh pnpm create cloudflare@latest my-angular-app --framework=angular ``` After setting up your project, change your directory by running the following command: ```sh cd my-angular-app ``` ## 2. Develop locally After you have created your project, run the following command in the project directory to start a local server. This will allow you to preview your project locally during development. * npm ```sh npm run dev ``` * yarn ```sh yarn run dev ``` * pnpm ```sh pnpm run dev ``` ## 3. Deploy your Project Your project can be deployed to a `*.workers.dev` subdomain or a [Custom Domain](https://developers.cloudflare.com/workers/configuration/routing/custom-domains/), from your own machine or from any CI/CD system, including [Cloudflare's own](https://developers.cloudflare.com/workers/ci-cd/builds/). The following command will build and deploy your project. If you're using CI, ensure you update your ["deploy command"](https://developers.cloudflare.com/workers/ci-cd/builds/configuration/#build-settings) configuration appropriately. * npm ```sh npm run deploy ``` * yarn ```sh yarn run deploy ``` * pnpm ```sh pnpm run deploy ``` *** ## Static assets By default, Cloudflare first tries to match a request path against a static asset path, which is based on the file structure of the uploaded asset directory. This is either the directory specified by `assets.directory` in your Wrangler config or, in the case of the [Cloudflare Vite plugin](https://developers.cloudflare.com/workers/vite-plugin/), the output directory of the client build. Failing that, we invoke a Worker if one is present. If there is no Worker, or the Worker then uses the asset binding, Cloudflare will fallback to the behaviour set by [`not_found_handling`](https://developers.cloudflare.com/workers/static-assets/#routing-behavior). Refer to the [routing documentation](https://developers.cloudflare.com/workers/static-assets/routing/) for more information about how routing works with static assets, and how to customize this behavior. --- title: Docusaurus · Cloudflare Workers docs description: Create a Docusaurus application and deploy it to Cloudflare Workers with Workers Assets. lastUpdated: 2025-06-05T13:25:05.000Z chatbotDeprioritize: false tags: SSG source_url: html: https://developers.cloudflare.com/workers/framework-guides/web-apps/more-web-frameworks/docusaurus/ md: https://developers.cloudflare.com/workers/framework-guides/web-apps/more-web-frameworks/docusaurus/index.md --- In this guide, you will create a new [Docusaurus](https://docusaurus.io/) application and deploy to Cloudflare Workers (with the new [Workers Assets](https://developers.cloudflare.com/workers/static-assets/)). ## 1. Set up a new project Use the [`create-cloudflare`](https://www.npmjs.com/package/create-cloudflare) CLI (C3) to set up a new project. C3 will create a new project directory, initiate Docusaurus' official setup tool, and provide the option to deploy instantly. To use `create-cloudflare` to create a new Docusaurus project with Workers Assets, run the following command: * npm ```sh npm create cloudflare@latest -- my-docusaurus-app --framework=docusaurus ``` * yarn ```sh yarn create cloudflare my-docusaurus-app --framework=docusaurus ``` * pnpm ```sh pnpm create cloudflare@latest my-docusaurus-app --framework=docusaurus ``` After setting up your project, change your directory by running the following command: ```sh cd my-docusaurus-app ``` ## 2. Develop locally After you have created your project, run the following command in the project directory to start a local server. This will allow you to preview your project locally during development. * npm ```sh npm run dev ``` * yarn ```sh yarn run dev ``` * pnpm ```sh pnpm run dev ``` ## 3. Deploy your Project Your project can be deployed to a `*.workers.dev` subdomain or a [Custom Domain](https://developers.cloudflare.com/workers/configuration/routing/custom-domains/), from your own machine or from any CI/CD system, including [Cloudflare's own](https://developers.cloudflare.com/workers/ci-cd/builds/). The following command will build and deploy your project. If you're using CI, ensure you update your ["deploy command"](https://developers.cloudflare.com/workers/ci-cd/builds/configuration/#build-settings) configuration appropriately. * npm ```sh npm run deploy ``` * yarn ```sh yarn run deploy ``` * pnpm ```sh pnpm run deploy ``` --- title: Gatsby · Cloudflare Workers docs description: Create a Gatsby application and deploy it to Cloudflare Workers with Workers Assets. lastUpdated: 2025-06-05T13:25:05.000Z chatbotDeprioritize: false tags: SSG source_url: html: https://developers.cloudflare.com/workers/framework-guides/web-apps/more-web-frameworks/gatsby/ md: https://developers.cloudflare.com/workers/framework-guides/web-apps/more-web-frameworks/gatsby/index.md --- In this guide, you will create a new [Gatsby](https://www.gatsbyjs.com/) application and deploy to Cloudflare Workers (with the new [Workers Assets](https://developers.cloudflare.com/workers/static-assets/)). ## 1. Set up a new project Use the [`create-cloudflare`](https://www.npmjs.com/package/create-cloudflare) CLI (C3) to set up a new project. C3 will create a new project directory, initiate Gatsby's official setup tool, and provide the option to deploy instantly. To use `create-cloudflare` to create a new Gatsby project with Workers Assets, run the following command: * npm ```sh npm create cloudflare@latest -- my-gatsby-app --framework=gatsby ``` * yarn ```sh yarn create cloudflare my-gatsby-app --framework=gatsby ``` * pnpm ```sh pnpm create cloudflare@latest my-gatsby-app --framework=gatsby ``` After setting up your project, change your directory by running the following command: ```sh cd my-gatsby-app ``` ## 2. Develop locally After you have created your project, run the following command in the project directory to start a local server. This will allow you to preview your project locally during development. * npm ```sh npm run dev ``` * yarn ```sh yarn run dev ``` * pnpm ```sh pnpm run dev ``` ## 3. Deploy your Project Your project can be deployed to a `*.workers.dev` subdomain or a [Custom Domain](https://developers.cloudflare.com/workers/configuration/routing/custom-domains/), from your own machine or from any CI/CD system, including [Cloudflare's own](https://developers.cloudflare.com/workers/ci-cd/builds/). The following command will build and deploy your project. If you're using CI, ensure you update your ["deploy command"](https://developers.cloudflare.com/workers/ci-cd/builds/configuration/#build-settings) configuration appropriately. * npm ```sh npm run deploy ``` * yarn ```sh yarn run deploy ``` * pnpm ```sh pnpm run deploy ``` --- title: Hono · Cloudflare Workers docs description: Create a Hono application and deploy it to Cloudflare Workers with Workers Assets. lastUpdated: 2025-06-05T13:25:05.000Z chatbotDeprioritize: false source_url: html: https://developers.cloudflare.com/workers/framework-guides/web-apps/more-web-frameworks/hono/ md: https://developers.cloudflare.com/workers/framework-guides/web-apps/more-web-frameworks/hono/index.md --- **Start from CLI** - scaffold a full-stack app with a Hono API, React SPA and the [Cloudflare Vite plugin](https://developers.cloudflare.com/workers/vite-plugin/) for lightning-fast development. * npm ```sh npm create cloudflare@latest -- my-hono-app --template=cloudflare/templates/vite-react-template ``` * yarn ```sh yarn create cloudflare my-hono-app --template=cloudflare/templates/vite-react-template ``` * pnpm ```sh pnpm create cloudflare@latest my-hono-app --template=cloudflare/templates/vite-react-template ``` *** **Or just deploy** - create a full-stack app using Hono, React and Vite, with CI/CD and previews all set up for you. [![Deploy to Workers](https://deploy.workers.cloudflare.com/button)](https://dash.cloudflare.com/?to=/:account/workers-and-pages/create/deploy-to-workers\&repository=https://github.com/cloudflare/templates/tree/main/vite-react-template) ## What is Hono? [Hono](https://hono.dev/) is an ultra-fast, lightweight framework for building web applications, and works fantastically with Cloudflare Workers. With Workers Assets, you can easily combine a Hono API running on Workers with a SPA to create a full-stack app. ## Creating a full-stack Hono app with a React SPA 1. **Create a new project with the create-cloudflare CLI (C3)** * npm ```sh npm create cloudflare@latest -- my-hono-app --template=cloudflare/templates/vite-react-template ``` * yarn ```sh yarn create cloudflare my-hono-app --template=cloudflare/templates/vite-react-template ``` * pnpm ```sh pnpm create cloudflare@latest my-hono-app --template=cloudflare/templates/vite-react-template ``` How is this project set up? Below is a simplified file tree of the project. `wrangler.jsonc` is your [Wrangler configuration file](https://developers.cloudflare.com/workers/wrangler/configuration/). In this file: * `main` points to `src/worker/index.ts`. This is your Hono app, which will run in a Worker. * `assets.not_found_handling` is set to `single-page-application`, which means that routes that are handled by your SPA do not go to the Worker, and are thus free. * If you want to add bindings to resources on Cloudflare's developer platform, you configure them here. Read more about [bindings](https://developers.cloudflare.com/workers/runtime-apis/bindings/). `vite.config.ts` is set up to use the [Cloudflare Vite plugin](https://developers.cloudflare.com/workers/vite-plugin/). This runs your Worker in the Cloudflare Workers runtime, ensuring your local development environment is as close to production as possible. `src/worker/index.ts` is your Hono app, which contains a single endpoint to begin with, `/api`. At `src/react-app/src/App.tsx`, your React app calls this endpoint to get a message back and displays this in your SPA. 2. **Develop locally with the [Cloudflare Vite plugin](https://developers.cloudflare.com/workers/vite-plugin/)** After creating your project, run the following command in your project directory to start a local development server. * npm ```sh npm run dev ``` * yarn ```sh yarn run dev ``` * pnpm ```sh pnpm run dev ``` What's happening in local development? This project uses Vite for local development and build, and thus comes with all of Vite's features, including hot module replacement (HMR). In addition, `vite.config.ts` is set up to use the Cloudflare Vite plugin. This runs your application in the Cloudflare Workers runtime, just like in production, and enables access to local emulations of bindings. 3. **Deploy your project** Your project can be deployed to a `*.workers.dev` subdomain or a [Custom Domain](https://developers.cloudflare.com/workers/configuration/routing/custom-domains/), from your own machine or from any CI/CD system, including Cloudflare's own [Workers Builds](https://developers.cloudflare.com/workers/ci-cd/builds/). The following command will build and deploy your project. If you are using CI, ensure you update your ["deploy command"](https://developers.cloudflare.com/workers/ci-cd/builds/configuration/#build-settings) configuration appropriately. * npm ```sh npm run deploy ``` * yarn ```sh yarn run deploy ``` * pnpm ```sh pnpm run deploy ``` *** ## Bindings The [Hono documentation](https://hono.dev/docs/getting-started/cloudflare-workers#bindings) provides information on how you can access bindings in your Hono app. With bindings, your application can be fully integrated with the Cloudflare Developer Platform, giving you access to compute, storage, AI and more. [Bindings ](https://developers.cloudflare.com/workers/runtime-apis/bindings/)Access to compute, storage, AI and more. --- title: Nuxt · Cloudflare Workers docs description: Create a Nuxt application and deploy it to Cloudflare Workers with Workers Assets. lastUpdated: 2025-06-05T13:25:05.000Z chatbotDeprioritize: false tags: Full stack source_url: html: https://developers.cloudflare.com/workers/framework-guides/web-apps/more-web-frameworks/nuxt/ md: https://developers.cloudflare.com/workers/framework-guides/web-apps/more-web-frameworks/nuxt/index.md --- In this guide, you will create a new [Nuxt](https://nuxt.com/) application and deploy to Cloudflare Workers (with the new [Workers Assets](https://developers.cloudflare.com/workers/static-assets/)). ## 1. Set up a new project Use the [`create-cloudflare`](https://www.npmjs.com/package/create-cloudflare) CLI (C3) to set up a new project. C3 will create a new project directory, initiate Nuxt's official setup tool, and provide the option to deploy instantly. To use `create-cloudflare` to create a new Nuxt project with Workers Assets, run the following command: * npm ```sh npm create cloudflare@latest -- my-nuxt-app --framework=nuxt ``` * yarn ```sh yarn create cloudflare my-nuxt-app --framework=nuxt ``` * pnpm ```sh pnpm create cloudflare@latest my-nuxt-app --framework=nuxt ``` After setting up your project, change your directory by running the following command: ```sh cd my-nuxt-app ``` ## 2. Develop locally After you have created your project, run the following command in the project directory to start a local server. This will allow you to preview your project locally during development. * npm ```sh npm run dev ``` * yarn ```sh yarn run dev ``` * pnpm ```sh pnpm run dev ``` ## 3. Deploy your Project Your project can be deployed to a `*.workers.dev` subdomain or a [Custom Domain](https://developers.cloudflare.com/workers/configuration/routing/custom-domains/), from your own machine or from any CI/CD system, including [Cloudflare's own](https://developers.cloudflare.com/workers/ci-cd/builds/). The following command will build and deploy your project. If you're using CI, ensure you update your ["deploy command"](https://developers.cloudflare.com/workers/ci-cd/builds/configuration/#build-settings) configuration appropriately. * npm ```sh npm run deploy ``` * yarn ```sh yarn run deploy ``` * pnpm ```sh pnpm run deploy ``` *** ## Bindings Your Nuxt application can be fully integrated with the Cloudflare Developer Platform, in both local development and in production, by using product bindings. The [Nuxt documentation](https://nitro.unjs.io/deploy/providers/cloudflare#direct-access-to-cloudflare-bindings) provides information about configuring bindings and how you can access them in your Nuxt event handlers. With bindings, your application can be fully integrated with the Cloudflare Developer Platform, giving you access to compute, storage, AI and more. [Bindings ](https://developers.cloudflare.com/workers/runtime-apis/bindings/)Access to compute, storage, AI and more. --- title: Qwik · Cloudflare Workers docs description: Create a Qwik application and deploy it to Cloudflare Workers with Workers Assets. lastUpdated: 2025-06-05T13:25:05.000Z chatbotDeprioritize: false tags: Full stack source_url: html: https://developers.cloudflare.com/workers/framework-guides/web-apps/more-web-frameworks/qwik/ md: https://developers.cloudflare.com/workers/framework-guides/web-apps/more-web-frameworks/qwik/index.md --- In this guide, you will create a new [Qwik](https://qwik.dev/) application and deploy to Cloudflare Workers (with the new [Workers Assets](https://developers.cloudflare.com/workers/static-assets/)). ## 1. Set up a new project Use the [`create-cloudflare`](https://www.npmjs.com/package/create-cloudflare) CLI (C3) to set up a new project. C3 will create a new project directory, initiate Qwik's official setup tool, and provide the option to deploy instantly. To use `create-cloudflare` to create a new Qwik project with Workers Assets, run the following command: * npm ```sh npm create cloudflare@latest -- my-qwik-app --framework=qwik ``` * yarn ```sh yarn create cloudflare my-qwik-app --framework=qwik ``` * pnpm ```sh pnpm create cloudflare@latest my-qwik-app --framework=qwik ``` After setting up your project, change your directory by running the following command: ```sh cd my-qwik-app ``` ## 2. Develop locally After you have created your project, run the following command in the project directory to start a local server. This will allow you to preview your project locally during development. * npm ```sh npm run dev ``` * yarn ```sh yarn run dev ``` * pnpm ```sh pnpm run dev ``` ## 3. Deploy your Project Your project can be deployed to a `*.workers.dev` subdomain or a [Custom Domain](https://developers.cloudflare.com/workers/configuration/routing/custom-domains/), from your own machine or from any CI/CD system, including [Cloudflare's own](https://developers.cloudflare.com/workers/ci-cd/builds/). The following command will build and deploy your project. If you're using CI, ensure you update your ["deploy command"](https://developers.cloudflare.com/workers/ci-cd/builds/configuration/#build-settings) configuration appropriately. * npm ```sh npm run deploy ``` * yarn ```sh yarn run deploy ``` * pnpm ```sh pnpm run deploy ``` *** ## Bindings Your Qwik application can be fully integrated with the Cloudflare Developer Platform, in both local development and in production, by using product bindings. The [Qwik documentation](https://qwik.dev/docs/deployments/cloudflare-pages/#context) provides information about configuring bindings and how you can access them in your Qwik endpoint methods. With bindings, your application can be fully integrated with the Cloudflare Developer Platform, giving you access to compute, storage, AI and more. [Bindings ](https://developers.cloudflare.com/workers/runtime-apis/bindings/)Access to compute, storage, AI and more. --- title: FastAPI · Cloudflare Workers docs description: The FastAPI package is supported in Python Workers. lastUpdated: 2024-08-13T19:56:56.000Z chatbotDeprioritize: false source_url: html: https://developers.cloudflare.com/workers/languages/python/packages/fastapi/ md: https://developers.cloudflare.com/workers/languages/python/packages/fastapi/index.md --- The FastAPI package is supported in Python Workers. FastAPI applications use a protocol called the [Asynchronous Server Gateway Interface (ASGI)](https://asgi.readthedocs.io/en/latest/). This means that FastAPI never reads from or writes to a socket itself. An ASGI application expects to be hooked up to an ASGI server, typically [uvicorn](https://www.uvicorn.org/). The ASGI server handles all of the raw sockets on the application’s behalf. The Workers runtime provides [an ASGI server](https://github.com/cloudflare/workerd/blob/main/src/pyodide/internal/asgi.py) directly to your Python Worker, which lets you use FastAPI in Python Workers. ## Get Started Python Workers are in beta. Packages do not run in production. Currently, you can only deploy Python Workers that use the standard library. [Packages](https://developers.cloudflare.com/workers/languages/python/packages/#supported-packages) **cannot be deployed** and will only work in local development for the time being. Clone the `cloudflare/python-workers-examples` repository and run the FastAPI example: ```bash git clone https://github.com/cloudflare/python-workers-examples cd python-workers-examples/03-fastapi npx wrangler@latest dev ``` ### Example code ```python from fastapi import FastAPI, Request from pydantic import BaseModel async def on_fetch(request, env): import asgi return await asgi.fetch(app, request, env) app = FastAPI() @app.get("/") async def root(): return {"message": "Hello, World!"} @app.get("/env") async def root(req: Request): env = req.scope["env"] return {"message": "Here is an example of getting an environment variable: " + env.MESSAGE} class Item(BaseModel): name: str description: str | None = None price: float tax: float | None = None @app.post("/items/") async def create_item(item: Item): return item @app.put("/items/{item_id}") async def create_item(item_id: int, item: Item, q: str | None = None): result = {"item_id": item_id, **item.dict()} if q: result.update({"q": q}) return result @app.get("/items/{item_id}") async def read_item(item_id: int): return {"item_id": item_id} ``` --- title: Solid · Cloudflare Workers docs description: Create a Solid application and deploy it to Cloudflare Workers with Workers Assets. lastUpdated: 2025-06-05T13:25:05.000Z chatbotDeprioritize: false tags: Full stack source_url: html: https://developers.cloudflare.com/workers/framework-guides/web-apps/more-web-frameworks/solid/ md: https://developers.cloudflare.com/workers/framework-guides/web-apps/more-web-frameworks/solid/index.md --- Note Support for SolidStart projects on Cloudflare Workers is currently in beta. In this guide, you will create a new [Solid](https://www.solidjs.com/) application and deploy to Cloudflare Workers (with the new [Workers Assets](https://developers.cloudflare.com/workers/static-assets/)). ## 1. Set up a new project Use the [`create-cloudflare`](https://www.npmjs.com/package/create-cloudflare) CLI (C3) to set up a new project. C3 will create a new project directory, initiate Solid's official setup tool, and provide the option to deploy instantly. To use `create-cloudflare` to create a new Solid project with Workers Assets, run the following command: * npm ```sh npm create cloudflare@latest -- my-solid-app --framework=solid --experimental ``` * yarn ```sh yarn create cloudflare my-solid-app --framework=solid --experimental ``` * pnpm ```sh pnpm create cloudflare@latest my-solid-app --framework=solid --experimental ``` After setting up your project, change your directory by running the following command: ```sh cd my-solid-app ``` ## 2. Develop locally After you have created your project, run the following command in the project directory to start a local server. This will allow you to preview your project locally during development. * npm ```sh npm run dev ``` * yarn ```sh yarn run dev ``` * pnpm ```sh pnpm run dev ``` ## 3. Deploy your Project Your project can be deployed to a `*.workers.dev` subdomain or a [Custom Domain](https://developers.cloudflare.com/workers/configuration/routing/custom-domains/), from your own machine or from any CI/CD system, including [Cloudflare's own](https://developers.cloudflare.com/workers/ci-cd/builds/). The following command will build and deploy your project. If you're using CI, ensure you update your ["deploy command"](https://developers.cloudflare.com/workers/ci-cd/builds/configuration/#build-settings) configuration appropriately. * npm ```sh npm run deploy ``` * yarn ```sh yarn run deploy ``` * pnpm ```sh pnpm run deploy ``` *** ## Bindings Your Solid application can be fully integrated with the Cloudflare Developer Platform, in both local development and in production, by using product bindings. The [Solid documentation](https://docs.solidjs.com/reference/server-utilities/get-request-event) provides information about how to access platform primitives, including bindings. Specifically, for Cloudflare, you can use [`getRequestEnv().nativeEvent.context.cloudflare.env`](https://docs.solidjs.com/solid-start/advanced/request-events#nativeevent) to access bindings. With bindings, your application can be fully integrated with the Cloudflare Developer Platform, giving you access to compute, storage, AI and more. [Bindings ](https://developers.cloudflare.com/workers/runtime-apis/bindings/)Access to compute, storage, AI and more. --- title: Langchain · Cloudflare Workers docs description: LangChain is the most popular framework for building AI applications powered by large language models (LLMs). lastUpdated: 2025-03-24T17:07:01.000Z chatbotDeprioritize: false source_url: html: https://developers.cloudflare.com/workers/languages/python/packages/langchain/ md: https://developers.cloudflare.com/workers/languages/python/packages/langchain/index.md --- [LangChain](https://www.langchain.com/) is the most popular framework for building AI applications powered by large language models (LLMs). LangChain publishes multiple Python packages. The following are provided by the Workers runtime: * [`langchain`](https://pypi.org/project/langchain/) (version `0.1.8`) * [`langchain-core`](https://pypi.org/project/langchain-core/) (version `0.1.25`) * [`langchain-openai`](https://pypi.org/project/langchain-openai/) (version `0.0.6`) ## Get Started Python Workers are in beta. Packages do not run in production. Currently, you can only deploy Python Workers that use the standard library. [Packages](https://developers.cloudflare.com/workers/languages/python/packages/#supported-packages) **cannot be deployed** and will only work in local development for the time being. Clone the `cloudflare/python-workers-examples` repository and run the LangChain example: ```bash git clone https://github.com/cloudflare/python-workers-examples cd 04-langchain npx wrangler@latest dev ``` ### Example code ```python from workers import Response from langchain_core.prompts import PromptTemplate from langchain_openai import OpenAI async def on_fetch(request, env): prompt = PromptTemplate.from_template("Complete the following sentence: I am a {profession} and ") llm = OpenAI(api_key=env.API_KEY) chain = prompt | llm res = await chain.ainvoke({"profession": "electrician"}) return Response(res.split(".")[0].strip()) ``` --- title: HTML handling · Cloudflare Workers docs description: How to configure a HTML handling and trailing slashes for the static assets of your Worker. lastUpdated: 2025-05-08T19:08:59.000Z chatbotDeprioritize: false source_url: html: https://developers.cloudflare.com/workers/static-assets/routing/advanced/html-handling/ md: https://developers.cloudflare.com/workers/static-assets/routing/advanced/html-handling/index.md --- Forcing or dropping trailing slashes on request paths (for example, `example.com/page/` vs. `example.com/page`) is often something that developers wish to control for cosmetic reasons. Additionally, it can impact SEO because search engines often treat URLs with and without trailing slashes as different, separate pages. This distinction can lead to duplicate content issues, indexing problems, and overall confusion about the correct canonical version of a page. The [`assets.html_handling` configuration](https://developers.cloudflare.com/workers/wrangler/configuration/#assets) determines the redirects and rewrites of requests for HTML content. It is used to specify the pattern for canonical URLs, thus where Cloudflare serves HTML content from, and additionally, where Cloudflare redirects non-canonical URLs to. Take the following directory structure: ## Automatic trailing slashes (default) This will usually give you the desired behavior automatically: individual files (e.g. `foo.html`) will be served *without* a trailing slash and folder index files (e.g. `foo/index.html`) will be served *with* a trailing slash. * wrangler.jsonc ```jsonc { "name": "my-worker", "compatibility_date": "2025-07-16", "assets": { "directory": "./dist/", "html_handling": "auto-trailing-slash" } } ``` * wrangler.toml ```toml name = "my-worker" compatibility_date = "2025-07-16" [assets] directory = "./dist/" html_handling = "auto-trailing-slash" ``` Based on the incoming requests, the following assets would be served: | Incoming Request | Response | Asset Served | | - | - | - | | /file | 200 | /dist/file.html | | /file.html | 307 to /file | - | | /file/ | 307 to /file | - | | /file/index | 307 to /file | - | | /file/index.html | 307 to /file | - | | /folder | 307 to /folder/ | - | | /folder.html | 307 to /folder | - | | /folder/ | 200 | /dist/folder/index.html | | /folder/index | 307 to /folder | - | | /folder/index.html | 307 to /folder | - | ## Force trailing slashes Alternatively, you can force trailing slashes (`force-trailing-slash`). * wrangler.jsonc ```jsonc { "name": "my-worker", "compatibility_date": "2025-07-16", "assets": { "directory": "./dist/", "html_handling": "force-trailing-slash" } } ``` * wrangler.toml ```toml name = "my-worker" compatibility_date = "2025-07-16" [assets] directory = "./dist/" html_handling = "force-trailing-slash" ``` Based on the incoming requests, the following assets would be served: | Incoming Request | Response | Asset Served | | - | - | - | | /file | 307 to /file/ | - | | /file.html | 307 to /file/ | - | | /file/ | 200 | /dist/file.html | | /file/index | 307 to /file/ | - | | /file/index.html | 307 to /file/ | - | | /folder | 307 to /folder/ | - | | /folder.html | 307 to /folder/ | - | | /folder/ | 200 | /dist/folder/index.html | | /folder/index | 307 to /folder/ | - | | /folder/index.html | 307 to /folder/ | - | ## Drop trailing slashes Or you can drop trailing slashes (`drop-trailing-slash`). * wrangler.jsonc ```jsonc { "name": "my-worker", "compatibility_date": "2025-07-16", "assets": { "directory": "./dist/", "html_handling": "drop-trailing-slash" } } ``` * wrangler.toml ```toml name = "my-worker" compatibility_date = "2025-07-16" [assets] directory = "./dist/" html_handling = "drop-trailing-slash" ``` Based on the incoming requests, the following assets would be served: | Incoming Request | Response | Asset Served | | - | - | - | | /file | 200 | /dist/file.html | | /file.html | 307 to /file | - | | /file/ | 307 to /file | - | | /file/index | 307 to /file | - | | /file/index.html | 307 to /file | - | | /folder | 200 | /dist/folder/index.html | | /folder.html | 307 to /folder | - | | /folder/ | 307 to /folder | - | | /folder/index | 307 to /folder | - | | /folder/index.html | 307 to /folder | - | ## Disable HTML handling Alternatively, if you have bespoke needs, you can disable the built-in HTML handling entirely (`none`). * wrangler.jsonc ```jsonc { "name": "my-worker", "compatibility_date": "2025-07-16", "assets": { "directory": "./dist/", "html_handling": "none" } } ``` * wrangler.toml ```toml name = "my-worker" compatibility_date = "2025-07-16" [assets] directory = "./dist/" html_handling = "none" ``` Based on the incoming requests, the following assets would be served: | Incoming Request | Response | Asset Served | | - | - | - | | /file | Depends on `not_found_handling` | Depends on `not_found_handling` | | /file.html | 200 | /dist/file.html | | /file/ | Depends on `not_found_handling` | Depends on `not_found_handling` | | /file/index | Depends on `not_found_handling` | Depends on `not_found_handling` | | /file/index.html | Depends on `not_found_handling` | Depends on `not_found_handling` | | /folder | Depends on `not_found_handling` | Depends on `not_found_handling` | | /folder.html | Depends on `not_found_handling` | Depends on `not_found_handling` | | /folder/ | Depends on `not_found_handling` | Depends on `not_found_handling` | | /folder/index | Depends on `not_found_handling` | Depends on `not_found_handling` | | /folder/index.html | 200 | /dist/folder/index.html | --- title: Service bindings - HTTP · Cloudflare Workers docs description: Facilitate Worker-to-Worker communication by forwarding Request objects. lastUpdated: 2025-04-14T16:01:39.000Z chatbotDeprioritize: false source_url: html: https://developers.cloudflare.com/workers/runtime-apis/bindings/service-bindings/http/ md: https://developers.cloudflare.com/workers/runtime-apis/bindings/service-bindings/http/index.md --- Worker A that declares a Service binding to Worker B can forward a [`Request`](https://developers.cloudflare.com/workers/runtime-apis/request/) object to Worker B, by calling the `fetch()` method that is exposed on the binding object. For example, consider the following Worker that implements a [`fetch()` handler](https://developers.cloudflare.com/workers/runtime-apis/handlers/fetch/): * wrangler.jsonc ```jsonc { "name": "worker_b", "main": "./src/workerB.js" } ``` * wrangler.toml ```toml name = "worker_b" main = "./src/workerB.js" ``` ```js export default { async fetch(request, env, ctx) { return new Response("Hello World!"); } } ``` The following Worker declares a binding to the Worker above: * wrangler.jsonc ```jsonc { "name": "worker_a", "main": "./src/workerA.js", "services": [ { "binding": "WORKER_B", "service": "worker_b" } ] } ``` * wrangler.toml ```toml name = "worker_a" main = "./src/workerA.js" services = [ { binding = "WORKER_B", service = "worker_b" } ] ``` And then can forward a request to it: ```js export default { async fetch(request, env) { return await env.WORKER_B.fetch(request); }, }; ``` Note If you construct a new request manually, rather than forwarding an existing one, ensure that you provide a valid and fully-qualified URL with a hostname. For example: ```js export default { async fetch(request, env) { // provide a valid URL let newRequest = new Request("https://valid-url.com", { method: "GET" }); let response = await env.WORKER_B.fetch(newRequest); return response; } }; ``` --- title: Serving a subdirectory · Cloudflare Workers docs description: How to configure a Worker with static assets on a subpath. lastUpdated: 2025-05-01T19:25:08.000Z chatbotDeprioritize: false source_url: html: https://developers.cloudflare.com/workers/static-assets/routing/advanced/serving-a-subdirectory/ md: https://developers.cloudflare.com/workers/static-assets/routing/advanced/serving-a-subdirectory/index.md --- Note This feature requires Wrangler v3.98.0 or later. Like with any other Worker, [you can configure a Worker with assets to run on a path of your domain](https://developers.cloudflare.com/workers/configuration/routing/routes/). Assets defined for a Worker must be nested in a directory structure that mirrors the desired path. For example, to serve assets from `example.com/blog/*`, create a `blog` directory in your asset directory. With a [Wrangler configuration file](https://developers.cloudflare.com/workers/wrangler/configuration/) like so: * wrangler.jsonc ```jsonc { "name": "assets-on-a-path-example", "main": "src/index.js", "route": "example.com/blog/*", "assets": { "directory": "dist" } } ``` * wrangler.toml ```toml name = "assets-on-a-path-example" main = "src/index.js" route = "example.com/blog/*" [assets] directory = "dist" ``` In this example, requests to `example.com/blog/` will serve the `index.html` file, and requests to `example.com/blog/posts/post1` will serve the `post1.html` file. If you have a file outside the configured path, it will not be served, unless it is part of the `assets.not_found_handling` for [Single Page Applications](https://developers.cloudflare.com/workers/static-assets/routing/single-page-application/) or [custom 404 pages](https://developers.cloudflare.com/workers/static-assets/routing/static-site-generation/). For example, if you have a `home.html` file in the root of your asset directory, it will not be served when requesting `example.com/blog/home`. However, if needed, these files can still be manually fetched over [the binding](https://developers.cloudflare.com/workers/static-assets/binding/#binding). --- title: Service bindings - RPC (WorkerEntrypoint) · Cloudflare Workers docs description: Facilitate Worker-to-Worker communication via RPC. lastUpdated: 2025-02-05T12:05:05.000Z chatbotDeprioritize: false source_url: html: https://developers.cloudflare.com/workers/runtime-apis/bindings/service-bindings/rpc/ md: https://developers.cloudflare.com/workers/runtime-apis/bindings/service-bindings/rpc/index.md --- [Service bindings](https://developers.cloudflare.com/workers/runtime-apis/bindings/service-bindings) allow one Worker to call into another, without going through a publicly-accessible URL. You can use Service bindings to create your own internal APIs that your Worker makes available to other Workers. This can be done by extending the built-in `WorkerEntrypoint` class, and adding your own public methods. These public methods can then be directly called by other Workers on your Cloudflare account that declare a [binding](https://developers.cloudflare.com/workers/runtime-apis/bindings) to this Worker. The [RPC system in Workers](https://developers.cloudflare.com/workers/runtime-apis/rpc) is designed feel as similar as possible to calling a JavaScript function in the same Worker. In most cases, you should be able to write code in the same way you would if everything was in a single Worker. Note You can also use RPC to communicate between Workers and [Durable Objects](https://developers.cloudflare.com/durable-objects/best-practices/create-durable-object-stubs-and-send-requests/#invoke-rpc-methods). ## Example For example, the following Worker implements the public method `add(a, b)`: For example, if Worker B implements the public method `add(a, b)`: * wrangler.jsonc ```jsonc { "name": "worker_b", "main": "./src/workerB.js" } ``` * wrangler.toml ```toml name = "worker_b" main = "./src/workerB.js" ``` - JavaScript ```js import { WorkerEntrypoint } from "cloudflare:workers"; export default class extends WorkerEntrypoint { async fetch() { return new Response("Hello from Worker B"); } add(a, b) { return a + b; } } ``` - TypeScript ```ts import { WorkerEntrypoint } from "cloudflare:workers"; export default class extends WorkerEntrypoint { async fetch() { return new Response("Hello from Worker B"); } add(a: number, b: number) { return a + b; } } ``` Worker A can declare a [binding](https://developers.cloudflare.com/workers/runtime-apis/bindings) to Worker B: * wrangler.jsonc ```jsonc { "name": "worker_a", "main": "./src/workerA.js", "services": [ { "binding": "WORKER_B", "service": "worker_b" } ] } ``` * wrangler.toml ```toml name = "worker_a" main = "./src/workerA.js" services = [ { binding = "WORKER_B", service = "worker_b" } ] ``` Making it possible for Worker A to call the `add()` method from Worker B: * JavaScript ```js export default { async fetch(request, env) { const result = await env.WORKER_B.add(1, 2); return new Response(result); }, }; ``` * TypeScript ```ts export default { async fetch(request, env) { const result = await env.WORKER_B.add(1, 2); return new Response(result); }, }; ``` You do not need to learn, implement, or think about special protocols to use the RPC system. The client, in this case Worker A, calls Worker B and tells it to execute a specific procedure using specific arguments that the client provides. This is accomplished with standard JavaScript classes. ## The `WorkerEntrypoint` Class To provide RPC methods from your Worker, you must extend the `WorkerEntrypoint` class, as shown in the example below: ```js import { WorkerEntrypoint } from "cloudflare:workers"; export default class extends WorkerEntrypoint { async add(a, b) { return a + b; } } ``` A new instance of the class is created every time the Worker is called. Note that even though the Worker is implemented as a class, it is still stateless — the class instance only lasts for the duration of the invocation. If you need to persist or coordinate state in Workers, you should use [Durable Objects](https://developers.cloudflare.com/durable-objects). ### Bindings (`env`) The [`env`](https://developers.cloudflare.com/workers/runtime-apis/bindings) object is exposed as a class property of the `WorkerEntrypoint` class. For example, a Worker that declares a binding to the [environment variable](https://developers.cloudflare.com/workers/configuration/environment-variables/) `GREETING`: * wrangler.jsonc ```jsonc { "name": "my-worker", "vars": { "GREETING": "Hello" } } ``` * wrangler.toml ```toml name = "my-worker" [vars] GREETING = "Hello" ``` Can access it by calling `this.env.GREETING`: ```js import { WorkerEntrypoint } from "cloudflare:workers"; export default class extends WorkerEntrypoint { fetch() { return new Response("Hello from my-worker"); } async greet(name) { return this.env.GREETING + name; } } ``` You can use any type of [binding](https://developers.cloudflare.com/workers/runtime-apis/bindings) this way. ### Lifecycle methods (`ctx`) The [`ctx`](https://developers.cloudflare.com/workers/runtime-apis/context) object is exposed as a class property of the `WorkerEntrypoint` class. For example, you can extend the lifetime of the invocation context by calling the `waitUntil()` method: ```js import { WorkerEntrypoint } from "cloudflare:workers"; export default class extends WorkerEntrypoint { fetch() { return new Response("Hello from my-worker"); } async signup(email, name) { // sendEvent() will continue running, even after this method returns a value to the caller this.ctx.waitUntil(this.#sendEvent("signup", email)) // Perform any other work return "Success"; } async #sendEvent(eventName, email) { //... } } ``` ## Named entrypoints You can also export any number of named `WorkerEntrypoint` classes from within a single Worker, in addition to the default export. You can then declare a Service binding to a specific named entrypoint. You can use this to group multiple pieces of compute together. For example, you might create a distinct `WorkerEntrypoint` for each permission role in your application, and use these to provide role-specific RPC methods: * wrangler.jsonc ```jsonc { "name": "todo-app", "d1_databases": [ { "binding": "D1", "database_name": "todo-app-db", "database_id": "" } ] } ``` * wrangler.toml ```toml name = "todo-app" [[d1_databases]] binding = "D1" database_name = "todo-app-db" database_id = "" ``` ```js import { WorkerEntrypoint } from "cloudflare:workers"; export class AdminEntrypoint extends WorkerEntrypoint { async createUser(username) { await this.env.D1.prepare("INSERT INTO users (username) VALUES (?)") .bind(username) .run(); } async deleteUser(username) { await this.env.D1.prepare("DELETE FROM users WHERE username = ?") .bind(username) .run(); } } export class UserEntrypoint extends WorkerEntrypoint { async getTasks(userId) { return await this.env.D1.prepare( "SELECT title FROM tasks WHERE user_id = ?" ) .bind(userId) .all(); } async createTask(userId, title) { await this.env.D1.prepare( "INSERT INTO tasks (user_id, title) VALUES (?, ?)" ) .bind(userId, title) .run(); } } export default class extends WorkerEntrypoint { async fetch(request, env) { return new Response("Hello from my to do app"); } } ``` You can then declare a Service binding directly to `AdminEntrypoint` in another Worker: * wrangler.jsonc ```jsonc { "name": "admin-app", "services": [ { "binding": "ADMIN", "service": "todo-app", "entrypoint": "AdminEntrypoint" } ] } ``` * wrangler.toml ```toml name = "admin-app" [[services]] binding = "ADMIN" service = "todo-app" entrypoint = "AdminEntrypoint" ``` ```js export default { async fetch(request, env) { await env.ADMIN.createUser("aNewUser"); return new Response("Hello from admin app"); }, }; ``` You can learn more about how to configure D1 in the [D1 documentation](https://developers.cloudflare.com/d1/get-started/#3-bind-your-worker-to-your-d1-database). You can try out a complete example of this to do app, as well as a Discord bot built with named entrypoints, by cloning the [cloudflare/js-rpc-and-entrypoints-demo repository](https://github.com/cloudflare/js-rpc-and-entrypoints-demo) from GitHub. ## Further reading * [Lifecycle](https://developers.cloudflare.com/workers/runtime-apis/rpc/lifecycle/) * [Reserved Methods](https://developers.cloudflare.com/workers/runtime-apis/rpc/reserved-methods/) * [Visibility and Security Model](https://developers.cloudflare.com/workers/runtime-apis/rpc/visibility/) * [TypeScript](https://developers.cloudflare.com/workers/runtime-apis/rpc/typescript/) * [Error handling](https://developers.cloudflare.com/workers/runtime-apis/rpc/error-handling/) --- title: 📅 Compatibility Dates · Cloudflare Workers docs description: >- Miniflare uses compatibility dates to opt-into backwards-incompatible changes from a specific date. If one isn't set, it will default to some time far in the past. lastUpdated: 2024-12-18T20:15:16.000Z chatbotDeprioritize: false source_url: html: https://developers.cloudflare.com/workers/testing/miniflare/core/compatibility/ md: https://developers.cloudflare.com/workers/testing/miniflare/core/compatibility/index.md --- * [Compatibility Dates Reference](https://developers.cloudflare.com/workers/configuration/compatibility-dates) ## Compatibility Dates Miniflare uses compatibility dates to opt-into backwards-incompatible changes from a specific date. If one isn't set, it will default to some time far in the past. ```js const mf = new Miniflare({ compatibilityDate: "2021-11-12", }); ``` ## Compatibility Flags Miniflare also lets you opt-in/out of specific changes using compatibility flags: ```js const mf = new Miniflare({ compatibilityFlags: [ "formdata_parser_supports_files", "durable_object_fetch_allows_relative_url", ], }); ``` --- title: 📨 Fetch Events · Cloudflare Workers docs description: >- Whenever an HTTP request is made, a Request object is dispatched to your worker, then the generated Response is returned. The Request object will include a cf object. Miniflare will log the method, path, status, and the time it took to respond. lastUpdated: 2024-12-18T20:15:16.000Z chatbotDeprioritize: false source_url: html: https://developers.cloudflare.com/workers/testing/miniflare/core/fetch/ md: https://developers.cloudflare.com/workers/testing/miniflare/core/fetch/index.md --- * [`FetchEvent` Reference](https://developers.cloudflare.com/workers/runtime-apis/handlers/fetch/) ## HTTP Requests Whenever an HTTP request is made, a `Request` object is dispatched to your worker, then the generated `Response` is returned. The `Request` object will include a [`cf` object](https://developers.cloudflare.com/workers/runtime-apis/request#incomingrequestcfproperties). Miniflare will log the method, path, status, and the time it took to respond. If the Worker throws an error whilst generating a response, an error page containing the stack trace is returned instead. ## Dispatching Events When using the API, the `dispatchFetch` function can be used to dispatch `fetch` events to your Worker. This can be used for testing responses. `dispatchFetch` has the same API as the regular `fetch` method: it either takes a `Request` object, or a URL and optional `RequestInit` object: ```js import { Miniflare, Request } from "miniflare"; const mf = new Miniflare({ modules: true, script: ` export default { async fetch(request, env, ctx) { const body = JSON.stringify({ url: event.request.url, header: event.request.headers.get("X-Message"), }); return new Response(body, { headers: { "Content-Type": "application/json" }, }); }) } `, }); let res = await mf.dispatchFetch("http://localhost:8787/"); console.log(await res.json()); // { url: "http://localhost:8787/", header: null } res = await mf.dispatchFetch("http://localhost:8787/1", { headers: { "X-Message": "1" }, }); console.log(await res.json()); // { url: "http://localhost:8787/1", header: "1" } res = await mf.dispatchFetch( new Request("http://localhost:8787/2", { headers: { "X-Message": "2" }, }), ); console.log(await res.json()); // { url: "http://localhost:8787/2", header: "2" } ``` When dispatching events, you are responsible for adding [`CF-*` headers](https://support.cloudflare.com/hc/en-us/articles/200170986-How-does-Cloudflare-handle-HTTP-Request-headers-) and the [`cf` object](https://developers.cloudflare.com/workers/runtime-apis/request#incomingrequestcfproperties). This lets you control their values for testing: ```js const res = await mf.dispatchFetch("http://localhost:8787", { headers: { "CF-IPCountry": "GB", }, cf: { country: "GB", }, }); ``` ## Upstream Miniflare will call each `fetch` listener until a response is returned. If no response is returned, or an exception is thrown and `passThroughOnException()` has been called, the response will be fetched from the specified upstream instead: ```js import { Miniflare } from "miniflare"; const mf = new Miniflare({ script: ` addEventListener("fetch", (event) => { event.passThroughOnException(); throw new Error(); }); `, upstream: "https://miniflare.dev", }); // If you don't use the same upstream URL when dispatching, Miniflare will // rewrite it to match the upstream const res = await mf.dispatchFetch("https://miniflare.dev/core/fetch"); console.log(await res.text()); // Source code of this page ``` --- title: 📚 Modules · Cloudflare Workers docs description: "Miniflare supports both the traditional service-worker and the newer modules formats for writing workers. To use the modules format, enable it with:" lastUpdated: 2024-12-18T20:15:16.000Z chatbotDeprioritize: false source_url: html: https://developers.cloudflare.com/workers/testing/miniflare/core/modules/ md: https://developers.cloudflare.com/workers/testing/miniflare/core/modules/index.md --- * [Modules Reference](https://developers.cloudflare.com/workers/reference/migrate-to-module-workers/) ## Enabling Modules Miniflare supports both the traditional `service-worker` and the newer `modules` formats for writing workers. To use the `modules` format, enable it with: ```js const mf = new Miniflare({ modules: true, }); ``` You can then use `modules` worker scripts like the following: ```js export default { async fetch(request, env, ctx) { // - `request` is the incoming `Request` instance // - `env` contains bindings, KV namespaces, Durable Objects, etc // - `ctx` contains `waitUntil` and `passThroughOnException` methods return new Response("Hello Miniflare!"); }, async scheduled(controller, env, ctx) { // - `controller` contains `scheduledTime` and `cron` properties // - `env` contains bindings, KV namespaces, Durable Objects, etc // - `ctx` contains the `waitUntil` method console.log("Doing something scheduled..."); }, }; ``` String scripts via the `script` option are supported using the `modules` format, but you cannot import other modules using them. You must use a script file via the `scriptPath` option for this. ## Module Rules Miniflare supports all module types: `ESModule`, `CommonJS`, `Text`, `Data` and `CompiledWasm`. You can specify additional module resolution rules as follows: ```js const mf = new Miniflare({ modulesRules: [ { type: "ESModule", include: ["**/*.js"], fallthrough: true }, { type: "Text", include: ["**/*.txt"] }, ], }); ``` ### Default Rules The following rules are automatically added to the end of your modules rules list. You can override them by specifying rules matching the same `globs`: ```js [ { type: "ESModule", include: ["**/*.mjs"] }, { type: "CommonJS", include: ["**/*.js", "**/*.cjs"] }, ]; ``` --- title: 🔌 Multiple Workers · Cloudflare Workers docs description: Miniflare allows you to run multiple workers in the same instance. All Workers can be defined at the same level, using the workers option. lastUpdated: 2024-12-18T20:15:16.000Z chatbotDeprioritize: false source_url: html: https://developers.cloudflare.com/workers/testing/miniflare/core/multiple-workers/ md: https://developers.cloudflare.com/workers/testing/miniflare/core/multiple-workers/index.md --- Miniflare allows you to run multiple workers in the same instance. All Workers can be defined at the same level, using the `workers` option. Here's an example that uses a service binding to increment a value in a shared KV namespace: ```js import { Miniflare, Response } from "miniflare"; const message = "The count is "; const mf = new Miniflare({ // Options shared between workers such as HTTP and persistence configuration // should always be defined at the top level. host: "0.0.0.0", port: 8787, kvPersist: true, workers: [ { name: "worker", kvNamespaces: { COUNTS: "counts" }, serviceBindings: { INCREMENTER: "incrementer", // Service bindings can also be defined as custom functions, with access // to anything defined outside Miniflare. async CUSTOM(request) { // `request` is the incoming `Request` object. return new Response(message); }, }, modules: true, script: `export default { async fetch(request, env, ctx) { // Get the message defined outside const response = await env.CUSTOM.fetch("http://host/"); const message = await response.text(); // Increment the count 3 times await env.INCREMENTER.fetch("http://host/"); await env.INCREMENTER.fetch("http://host/"); await env.INCREMENTER.fetch("http://host/"); const count = await env.COUNTS.get("count"); return new Response(message + count); } }`, }, { name: "incrementer", // Note we're using the same `COUNTS` namespace as before, but binding it // to `NUMBERS` instead. kvNamespaces: { NUMBERS: "counts" }, // Worker formats can be mixed-and-matched script: `addEventListener("fetch", (event) => { event.respondWith(handleRequest()); }) async function handleRequest() { const count = parseInt((await NUMBERS.get("count")) ?? "0") + 1; await NUMBERS.put("count", count.toString()); return new Response(count.toString()); }`, }, ], }); const res = await mf.dispatchFetch("http://localhost"); console.log(await res.text()); // "The count is 3" await mf.dispose(); ``` ## Routing You can enable routing by specifying `routes` via the API, using the [standard route syntax](https://developers.cloudflare.com/workers/configuration/routing/routes/#matching-behavior). Note port numbers are ignored: ```js const mf = new Miniflare({ workers: [ { scriptPath: "./api/worker.js", routes: ["http://127.0.0.1/api*", "api.mf/*"], }, ], }); ``` When using hostnames that aren't `localhost` or `127.0.0.1`, you may need to edit your computer's `hosts` file, so those hostnames resolve to `localhost`. On Linux and macOS, this is usually at `/etc/hosts`. On Windows, it's at `C:\Windows\System32\drivers\etc\hosts`. For the routes above, we would need to append the following entries to the file: ```plaintext 127.0.0.1 miniflare.test 127.0.0.1 api.mf ``` Alternatively, you can customise the `Host` header when sending the request: ```sh # Dispatches to the "api" worker $ curl "http://localhost:8787/todos/update/1" -H "Host: api.mf" ``` When using the API, Miniflare will use the request's URL to determine which Worker to dispatch to. ```js // Dispatches to the "api" worker const res = await mf.dispatchFetch("http://api.mf/todos/update/1", { ... }); ``` ## Durable Objects Miniflare supports the `script_name` option for accessing Durable Objects exported by other scripts. See [📌 Durable Objects](https://developers.cloudflare.com/workers/testing/miniflare/storage/durable-objects#using-a-class-exported-by-another-script) for more details. --- title: 🚥 Queues · Cloudflare Workers docs description: "Specify Queue producers to add to your environment as follows:" lastUpdated: 2024-12-18T20:15:16.000Z chatbotDeprioritize: false source_url: html: https://developers.cloudflare.com/workers/testing/miniflare/core/queues/ md: https://developers.cloudflare.com/workers/testing/miniflare/core/queues/index.md --- * [Queues Reference](https://developers.cloudflare.com/queues/) ## Producers Specify Queue producers to add to your environment as follows: ```js const mf = new Miniflare({ queueProducers: { MY_QUEUE: "my-queue" }, queueProducers: ["MY_QUEUE"], // If binding and queue names are the same }); ``` ## Consumers Specify Workers to consume messages from your Queues as follows: ```js const mf = new Miniflare({ queueConsumers: { "my-queue": { maxBatchSize: 5, // default: 5 maxBatchTimeout: 1 /* second(s) */, // default: 1 maxRetries: 2, // default: 2 deadLetterQueue: "my-dead-letter-queue", // default: none }, }, queueConsumers: ["my-queue"], // If using default consumer options }); ``` ## Manipulating Outside Workers For testing, it can be valuable to interact with Queues outside a Worker. You can do this by using the `workers` option to run multiple Workers in the same instance: ```js const mf = new Miniflare({ workers: [ { name: "a", modules: true, script: ` export default { async fetch(request, env, ctx) { await env.QUEUE.send(await request.text()); } } `, queueProducers: { QUEUE: "my-queue" }, }, { name: "b", modules: true, script: ` export default { async queue(batch, env, ctx) { console.log(batch); } } `, queueConsumers: { "my-queue": { maxBatchTimeout: 1 } }, }, ], }); const queue = await mf.getQueueProducer("QUEUE", "a"); // Get from worker "a" await queue.send("message"); // Logs "message" 1 second later ``` --- title: ⏰ Scheduled Events · Cloudflare Workers docs description: |- scheduled events are automatically dispatched according to the specified cron triggers: lastUpdated: 2024-12-18T20:15:16.000Z chatbotDeprioritize: false source_url: html: https://developers.cloudflare.com/workers/testing/miniflare/core/scheduled/ md: https://developers.cloudflare.com/workers/testing/miniflare/core/scheduled/index.md --- * [`ScheduledEvent` Reference](https://developers.cloudflare.com/workers/runtime-apis/handlers/scheduled/) ## Cron Triggers `scheduled` events are automatically dispatched according to the specified cron triggers: ```js const mf = new Miniflare({ crons: ["15 * * * *", "45 * * * *"], }); ``` ## HTTP Triggers Because waiting for cron triggers is annoying, you can also make HTTP requests to `/cdn-cgi/mf/scheduled` to trigger `scheduled` events: ```sh $ curl "http://localhost:8787/cdn-cgi/mf/scheduled" ``` To simulate different values of `scheduledTime` and `cron` in the dispatched event, use the `time` and `cron` query parameters: ```sh $ curl "http://localhost:8787/cdn-cgi/mf/scheduled?time=1000" $ curl "http://localhost:8787/cdn-cgi/mf/scheduled?cron=*+*+*+*+*" ``` ## Dispatching Events When using the API, the `getWorker` function can be used to dispatch `scheduled` events to your Worker. This can be used for testing responses. It takes optional `scheduledTime` and `cron` parameters, which default to the current time and the empty string respectively. It will return a promise which resolves to an array containing data returned by all waited promises: ```js import { Miniflare } from "miniflare"; const mf = new Miniflare({ modules: true, script: ` export default { async scheduled(controller, env, ctx) { const lastScheduledController = controller; if (controller.cron === "* * * * *") controller.noRetry(); } } `, }); const worker = await mf.getWorker(); let scheduledResult = await worker.scheduled({ cron: "* * * * *", }); console.log(scheduledResult); // { outcome: 'ok', noRetry: true } scheduledResult = await worker.scheduled({ scheduledTime: new Date(1000), cron: "30 * * * *", }); console.log(scheduledResult); // { outcome: 'ok', noRetry: false } ``` --- title: 🕸 Web Standards · Cloudflare Workers docs description: >- When using the API, Miniflare allows you to substitute custom Responses for fetch() calls using undici's MockAgent API. This is useful for testing Workers that make HTTP requests to other services. To enable fetch mocking, create a MockAgent using the createFetchMock() function, then set this using the fetchMock option. lastUpdated: 2024-12-18T20:15:16.000Z chatbotDeprioritize: false source_url: html: https://developers.cloudflare.com/workers/testing/miniflare/core/standards/ md: https://developers.cloudflare.com/workers/testing/miniflare/core/standards/index.md --- * [Web Standards Reference](https://developers.cloudflare.com/workers/runtime-apis/web-standards) * [Encoding Reference](https://developers.cloudflare.com/workers/runtime-apis/encoding) * [Fetch Reference](https://developers.cloudflare.com/workers/runtime-apis/fetch) * [Request Reference](https://developers.cloudflare.com/workers/runtime-apis/request) * [Response Reference](https://developers.cloudflare.com/workers/runtime-apis/response) * [Streams Reference](https://developers.cloudflare.com/workers/runtime-apis/streams) * [Web Crypto Reference](https://developers.cloudflare.com/workers/runtime-apis/web-crypto) ## Mocking Outbound `fetch` Requests When using the API, Miniflare allows you to substitute custom `Response`s for `fetch()` calls using `undici`'s [`MockAgent` API](https://undici.nodejs.org/#/docs/api/MockAgent?id=mockagentgetorigin). This is useful for testing Workers that make HTTP requests to other services. To enable `fetch` mocking, create a [`MockAgent`](https://undici.nodejs.org/#/docs/api/MockAgent?id=mockagentgetorigin) using the `createFetchMock()` function, then set this using the `fetchMock` option. ```js import { Miniflare, createFetchMock } from "miniflare"; // Create `MockAgent` and connect it to the `Miniflare` instance const fetchMock = createFetchMock(); const mf = new Miniflare({ modules: true, script: ` export default { async fetch(request, env, ctx) { const res = await fetch("https://example.com/thing"); const text = await res.text(); return new Response(\`response:\${text}\`); } } `, fetchMock, }); // Throw when no matching mocked request is found // (see https://undici.nodejs.org/#/docs/api/MockAgent?id=mockagentdisablenetconnect) fetchMock.disableNetConnect(); // Mock request to https://example.com/thing // (see https://undici.nodejs.org/#/docs/api/MockAgent?id=mockagentgetorigin) const origin = fetchMock.get("https://example.com"); // (see https://undici.nodejs.org/#/docs/api/MockPool?id=mockpoolinterceptoptions) origin .intercept({ method: "GET", path: "/thing" }) .reply(200, "Mocked response!"); const res = await mf.dispatchFetch("http://localhost:8787/"); console.log(await res.text()); // "response:Mocked response!" ``` ## Subrequests Miniflare does not support limiting the amount of [subrequests](https://developers.cloudflare.com/workers/platform/limits#account-plan-limits). Please keep this in mind if you make a large amount of subrequests from your Worker. --- title: 🔑 Variables and Secrets · Cloudflare Workers docs description: "Variable and secrets are bound as follows:" lastUpdated: 2024-12-18T20:15:16.000Z chatbotDeprioritize: false source_url: html: https://developers.cloudflare.com/workers/testing/miniflare/core/variables-secrets/ md: https://developers.cloudflare.com/workers/testing/miniflare/core/variables-secrets/index.md --- ## Bindings Variable and secrets are bound as follows: ```js const mf = new Miniflare({ bindings: { KEY1: "value1", KEY2: "value2", }, }); ``` ## Text and Data Blobs Text and data blobs can be loaded from files. File contents will be read and bound as `string`s and `ArrayBuffer`s respectively. ```js const mf = new Miniflare({ textBlobBindings: { TEXT: "text.txt" }, dataBlobBindings: { DATA: "data.bin" }, }); ``` ## Globals Injecting arbitrary globals is not supported by [workerd](https://github.com/cloudflare/workerd). If you're using a service Worker, bindings will be injected as globals, but these must be JSON-serialisable. --- title: ✉️ WebSockets · Cloudflare Workers docs description: |- Miniflare will always upgrade Web Socket connections. The Worker must respond with a status 101 Switching Protocols response including a webSocket. For example, the Worker below implements an echo WebSocket server: lastUpdated: 2024-12-18T20:15:16.000Z chatbotDeprioritize: false source_url: html: https://developers.cloudflare.com/workers/testing/miniflare/core/web-sockets/ md: https://developers.cloudflare.com/workers/testing/miniflare/core/web-sockets/index.md --- * [WebSockets Reference](https://developers.cloudflare.com/workers/runtime-apis/websockets) * [Using WebSockets](https://developers.cloudflare.com/workers/examples/websockets/) ## Server Miniflare will always upgrade Web Socket connections. The Worker must respond with a status `101 Switching Protocols` response including a `webSocket`. For example, the Worker below implements an echo WebSocket server: ```js export default { fetch(request) { const [client, server] = Object.values(new WebSocketPair()); server.accept(); server.addEventListener("message", (event) => { server.send(event.data); }); return new Response(null, { status: 101, webSocket: client, }); }, }; ``` When using `dispatchFetch`, you are responsible for handling WebSockets by using the `webSocket` property on `Response`. As an example, if the above worker script was stored in `echo.mjs`: ```js import { Miniflare } from "miniflare"; const mf = new Miniflare({ modules: true, scriptPath: "echo.mjs", }); const res = await mf.dispatchFetch("https://example.com", { headers: { Upgrade: "websocket", }, }); const webSocket = res.webSocket; webSocket.accept(); webSocket.addEventListener("message", (event) => { console.log(event.data); }); webSocket.send("Hello!"); // Above listener logs "Hello!" ``` --- title: 🐛 Attaching a Debugger · Cloudflare Workers docs description: >- You can use regular Node.js tools to debug your Workers. Setting breakpoints, watching values and inspecting the call stack are all examples of things you can do with a debugger. lastUpdated: 2024-12-18T20:15:16.000Z chatbotDeprioritize: false source_url: html: https://developers.cloudflare.com/workers/testing/miniflare/developing/debugger/ md: https://developers.cloudflare.com/workers/testing/miniflare/developing/debugger/index.md --- Warning This documentation describes breakpoint debugging when using Miniflare directly, which is only relevant for advanced use cases. Instead, most users should refer to the [Workers Observability documentation for how to set this up when using Wrangler](https://developers.cloudflare.com/workers/observability/dev-tools/breakpoints/). You can use regular Node.js tools to debug your Workers. Setting breakpoints, watching values and inspecting the call stack are all examples of things you can do with a debugger. ## Visual Studio Code ### Create configuration The easiest way to debug a Worker in VSCode is to create a new configuration. Open the **Run and Debug** menu in the VSCode activity bar and create a `.vscode/launch.json` file that contains the following: ```json --- filename: .vscode/launch.json --- { "configurations": [ { "name": "Miniflare", "type": "node", "request": "attach", "port": 9229, "cwd": "/", "resolveSourceMapLocations": null, "attachExistingChildren": false, "autoAttachChildProcesses": false, } ] } ``` From the **Run and Debug** menu in the activity bar, select the `Miniflare` configuration, and click the green play button to start debugging. ## WebStorm Create a new configuration, by clicking **Add Configuration** in the top right. ![WebStorm add configuration button](https://developers.cloudflare.com/_astro/debugger-webstorm-node-add.1Aka_l-1_8mP0c.webp) Click the **plus** button in the top left of the popup and create a new **Node.js/Chrome** configuration. Set the **Host** field to `localhost` and the **Port** field to `9229`. Then click **OK**. ![WebStorm Node.js debug configuration](https://developers.cloudflare.com/_astro/debugger-webstorm-settings.CxmegMYm_1SYC3g.webp) With the new configuration selected, click the green debug button to start debugging. ![WebStorm configuration debug button](https://developers.cloudflare.com/_astro/debugger-webstorm-node-run.BodpA57u_1N461o.webp) ## DevTools Breakpoints can also be added via the Workers DevTools. For more information, [read the guide](https://developers.cloudflare.com/workers/observability/dev-tools) in the Cloudflare Workers docs. --- title: ⚡️ Live Reload · Cloudflare Workers docs description: |- Miniflare automatically refreshes your browser when your Worker script changes when liveReload is set to true. lastUpdated: 2024-12-18T20:15:16.000Z chatbotDeprioritize: false source_url: html: https://developers.cloudflare.com/workers/testing/miniflare/developing/live-reload/ md: https://developers.cloudflare.com/workers/testing/miniflare/developing/live-reload/index.md --- Miniflare automatically refreshes your browser when your Worker script changes when `liveReload` is set to `true`. ```js const mf = new Miniflare({ liveReload: true, }); ``` Miniflare will only inject the `