Tutorial: Work with agents in VS Code
This tutorial walks you through using different types of agents in Visual Studio Code. You build a todo app from scratch, add a theme toggle, and redesign the layout by delegating work across local, plan, background, and cloud agents.
If you don't yet have a Copilot subscription, you can use Copilot for free by signing up for the Copilot Free plan and get a monthly limit of inline suggestions and chat interactions.
Prerequisites
To complete this tutorial, you need:
- Visual Studio Code installed on your computer
- A GitHub account (for cloud agent workflow)
- A GitHub Copilot subscription
Step 1: Use a local agent to scaffold an app
In this step, you use a local agent to create the initial todo app structure. Local agents are ideal for interactive tasks where you want immediate feedback and results, such as scaffolding a new project or iterating on a new feature.
-
Create a new project folder and ensure it's under Git version control.
mkdir todo-app cd todo-app git init -
Open the project folder in VS Code.
-
Open the Chat view (⌃⌘I (Windows, Linux Ctrl+Alt+I)) and select Agent from the Agents dropdown.
Optionally, choose a specific language model if you have a preference.
ImportantIf you don't see the agent option, make sure agents are enabled in your VS Code settings ( chat.agent.enabled This setting is managed at the organization level. Contact your administrator to change it.). Your organization might also have disabled agents - contact your admin to enable this functionality.
-
Enter the following prompt in the chat input field to scaffold the todo app and select Send.
Create a simple todo app with HTML, CSS, and JavaScript. Include an input field to add todos, a list to display them, and a delete button for each item. -
Review as the agent generates the different files for the app. Use Keep or Undo to accept or reject changes as needed.
-
You can preview the changes in the integrated browser.
-
Enable the integrated browser for
localhostURLs by configuring workbench.browser.openLocalhostLinks -
Open the
index.htmlfile and select the Preview button.
-
-
Send additional prompts to enhance the app further. Notice that the preview updates live as you make changes.
For example, you can ask:
Mark todos as completed with a strikethrough effect.
You now have a working todo app that you can extend with additional features. By using a local agent, you can interactively generate and refine your code in real-time.
Step 2: Use Copilot CLI to implement a feature plan
In this step, you use the plan agent to create an implementation plan for a theme toggle and then hand off the implementation to Copilot CLI in the background. Copilot CLI is ideal for delegating tasks that don't require immediate interaction. They can use Git worktrees to isolate file changes from your main workspace and prevent conflicts.
-
First, commit your current changes in the Source Control view to have a clean state.
-
In the Chat view, select New Chat (+) > New Chat to start a new local agent session. Notice that your previous chat session is preserved in the sessions list.
-
Select Plan from the Agents dropdown to switch to the plan agent and enter the following prompt:
Create a plan to add a dark/light theme toggle to the app. The toggle should switch between themes and persist the user's preference. -
The plan agent might ask clarifying questions to refine the plan. Respond as needed.
-
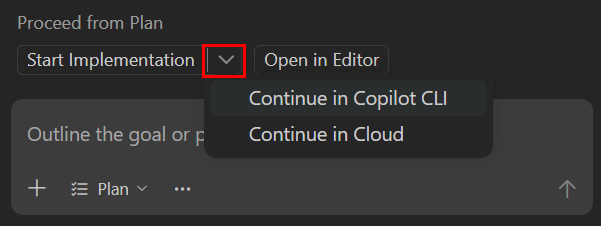
When you're ready, select Start Implementation > Continue in Copilot CLI to hand off the plan to Copilot CLI.
-
Copilot CLI creates a Git worktree where it starts implementing the feature. When asked, select Copy Changes to make sure all current changes are available to Copilot CLI.
-
You can track the Copilot CLI session in the Sessions view. Select the session to see details about its progress.
TipWhile Copilot CLI works in the background, you can continue editing your main workspace without conflicts.
-
Once the agent finishes, select any of the changed files to review its changes, or select View All Changes to open a multi-file diff editor with all the changes.
TipYou can send follow-up prompts to Copilot CLI to make adjustments or improvements to the feature.
-
In the Chat view, select Apply to apply the changes to your main workspace.
You've successfully used Copilot CLI to perform a task autonomously in the background. You can start multiple Copilot CLI sessions for different tasks without interrupting your main workflow.
Step 3: Use a cloud agent to collaborate on a feature
In this step, you use a cloud agent (Copilot coding agent) to redesign the app layout and use pull requests and collaboration features in GitHub. Copilot coding agent runs on remote infrastructure and are ideal for tasks that don't require immediate feedback, don't need to run locally, or involve collaboration through GitHub.
-
First, publish the project to a GitHub repository and add it as a remote to use Copilot coding agent on your project.
-
Run the Publish to GitHub command from the Command Palette (⇧⌘P (Windows, Linux Ctrl+Shift+P)) and follow the prompts to create a new repository.
-
Run the Git: Add Remote command from the Command Palette and follow the prompts to add your GitHub repository as a remote.
-
-
In the Chat view, select New Chat (+) > New Chat.
-
Select Cloud from the session type dropdown to switch to a cloud agent and enter the following prompt:
Redesign the todo app layout to improve user experience. Update colors, spacing, typography, and add animations to give it a modern look. -
The cloud agent starts a new session to work on your request. It creates a branch and pull request in your GitHub repository.
-
You can track the cloud agent in the Sessions view in the Chat view or select the link to view the pull request details.
TipIf you have the GitHub Pull Requests extension installed, you can also track the pull request progress in the Copilot on my Behalf view in the GitHub Pull Requests view.
-
Once completed, the cloud agent assigns the pull request to you for review.

-
Right-click the cloud agent session in the Sessions view to view additional options or select the session and choose Checkout or Apply.
You've successfully used a cloud agent to collaborate on a feature using GitHub. Cloud agents enable you to use remote resources and collaborate on changes through GitHub issues and pull requests.
Next steps
You've successfully used different types of agents to build, enhance, and redesign a todo app. Continue exploring agents: