cloud world To be A geek 2025-08-22T09:53:04.902Z https://cloudsjhan.github.io/ cloud sjhan Hexo 基于 Flink CDC 构建 MySQL 到 Databend 的 实时数据同步 https://cloudsjhan.github.io/2025/08/22/基于-Flink-CDC-构建-MySQL-到-Databend-的-实时数据同步/ 2025-08-22T09:52:20.000Z 2025-08-22T09:53:04.902Z

基于 Flink CDC 构建 MySQL 到 Databend 的 实时数据同步

这篇教程将展示如何基于 Flink CDC 快速构建 MySQL 到 Databend 的实时数据同步。本教程的演示都将在 Flink SQL CLI 中进行,只涉及 SQL,无需一行 Java/Scala 代码,也无需安装 IDE。

假设我们有电子商务业务,商品的数据存储在 MySQL ,我们需要实时把它同步到 Databend 中。

接下来的内容将介绍如何使用 Flink Mysql/Databend CDC 来实现这个需求,系统的整体架构如下图所示:

准备阶段

准备一台已经安装了 Docker 的 Linux 或者 MacOS 电脑。

准备教程所需要的组件

接下来的教程将以 docker-compose 的方式准备所需要的组件。

debezium-MySQL

docker-compose.yaml

1
2
3
4
5
6
7
8
9
10
11
12
13
14
15
16
17
18
version: '2.1'
services:
postgres:
image: debezium/example-postgres:1.1
ports:
- "5432:5432"
environment:
- POSTGRES_DB=postgres
- POSTGRES_USER=postgres
- POSTGRES_PASSWORD=postgres
mysql:
image: debezium/example-mysql:1.1
ports:
- "3306:3306"
environment:
- MYSQL_ROOT_PASSWORD=123456
- MYSQL_USER=mysqluser
- MYSQL_PASSWORD=mysqlpw

Databend

docker-compose.yaml

1
2
3
4
5
6
7
8
9
10
11
12
13
14
15
version: '3'
services:
databend:
image: datafuselabs/databend
volumes:
- /Users/hanshanjie/databend/local-test/databend/databend-query.toml:/etc/databend/query.toml
environment:
QUERY_DEFAULT_USER: databend
QUERY_DEFAULT_PASSWORD: databend
MINIO_ENABLED: 'true'
ports:
- '8000:8000'
- '9000:9000'
- '3307:3307'
- '8124:8124'

docker-compose.yml 所在目录下执行下面的命令来启动本教程需要的组件:

1
ocker-compose up -d

该命令将以 detached 模式自动启动 Docker Compose 配置中定义的所有容器。你可以通过 docker ps 来观察上述的容器是否正常启动。

  1. 下载 Flink 1.16.0 并将其解压至目录 flink-1.16.0
  2. 下载下面列出的依赖包,并将它们放到目录 flink-1.16.0/lib/ 下:
  3. 下载链接只对已发布的版本有效, SNAPSHOT 版本需要本地编译
1
2
3
git clone https://github.com/databendcloud/flink-connector-databend
cd flink-connector-databend
mvn clean install -DskipTests

将 target/flink-connector-databend-1.16.0-SNAPSHOT.jar 拷贝到目录 flink-1.16.0/lib/ 下。

准备数据

在 MySQL 数据库中准备数据

进入 MySQL 容器

1
docker-compose exec mysql mysql -uroot -p123456

创建数据库 mydb 和表 products,并插入数据:

1
2
3
4
5
6
7
8
9
10
11
12
13
14
15
16
CREATE DATABASE mydb;
USE mydb;

CREATE TABLE products (id INTEGER NOT NULL AUTO_INCREMENT PRIMARY KEY,name VARCHAR(255) NOT NULL,description VARCHAR(512));
ALTER TABLE products AUTO_INCREMENT = 10;

INSERT INTO products VALUES (default,"scooter","Small 2-wheel scooter"),
(default,"car battery","12V car battery"),
(default,"12-pack drill bits","12-pack of drill bits with sizes ranging from #40 to #3"),
(default,"hammer","12oz carpenter's hammer"),
(default,"hammer","14oz carpenter's hammer"),
(default,"hammer","16oz carpenter's hammer"),
(default,"rocks","box of assorted rocks"),
(default,"jacket","water resistent black wind breaker"),
(default,"cloud","test for databend"),
(default,"spare tire","24 inch spare tire");

Databend 中建表

1
CREATE TABLE bend_products (id INT NOT NULL, name VARCHAR(255) NOT NULL, description VARCHAR(512) );

使用下面的命令跳转至 Flink 目录下

1
cd flink-16.0

使用下面的命令启动 Flink 集群

1
./bin/start-cluster.sh

启动成功的话,可以在 http://localhost:8081/ 访问到 Flink Web UI,如下所示:

使用下面的命令启动 Flink SQL CLI

1
./bin/sql-client.sh

首先,开启 checkpoint,每隔3秒做一次 checkpoint

1
2
-- Flink SQL
Flink SQL> SET execution.checkpointing.interval = 3s;

然后, 对于数据库中的表 products 使用 Flink SQL CLI 创建对应的表,用于同步底层数据库表的数据

1
2
3
4
5
6
7
8
9
10
11
-- Flink SQL
Flink SQL> CREATE TABLE products (id INT,name STRING,description STRING,PRIMARY KEY (id) NOT ENFORCED)
WITH ('connector' = 'mysql-cdc',
'hostname' = '127.0.0.1',
'port' = '3306',
'username' = 'root',
'password' = '123456',
'database-name' = 'mydb',
'table-name' = 'products',
'server-time-zone' = 'UTC'
);

最后,创建 d_products 表, 用来订单数据写入 Databend 中

1
2
3
4
5
6
7
8
9
10
-- Flink SQL
create table d_products (id INT,name String,description String)
with ('connector' = 'databend',
'url'='databend://cloudapp:ssggkxgub3k0@tn3ftqihs.gw.aws-us-east-2.default.databend.com:443/testdb?warehouse=medium-p8at&ssl=true',
'database-name'='testdb',
'table-name'='bend_products',
'sink.batch-size' = '1',
'sink.ignore-delete' = 'false',
'sink.flush-interval' = '1000',
'sink.max-retries' = '3');

使用 Flink SQL 将 products 表中的数据同步到 Databend 的 d_products 表中:

1
insert into d_products select * from products;

此时 flink job 就会提交成功,打开 flink UI 可以看到:

同时在 databend 中可以看到 MySQL 中的数据已经同步过来了:

同步 Insert/Update 数据

此时我们在 MySQL 中再插入 10 条数据:

1
2
3
4
5
6
7
8
9
10
11
INSERT INTO products VALUES
(default,"scooter","Small 2-wheel scooter"),
(default,"car battery","12V car battery"),
(default,"12-pack drill bits","12-pack of drill bits with sizes ranging from #40 to #3"),
(default,"hammer","12oz carpenter's hammer"),
(default,"hammer","14oz carpenter's hammer"),
(default,"hammer","16oz carpenter's hammer"),
(default,"rocks","box of assorted rocks"),
(default,"jacket","water resistent black wind breaker"),
(default,"cloud","test for databend"),
(default,"spare tire","24 inch spare tire");

这些数据会立即同步到 Databend 当中。

假如此时 MySQL 中更新了一条数据:

那么 id=10 的数据在 databend 中也会被立即更新:

环境清理

操作结束后,在 docker-compose.yml 文件所在的目录下执行如下命令停止所有容器:

1
docker-compose down

在 Flink 所在目录 flink-1.16.0 下执行如下命令停止 Flink 集群:

1
./bin/stop-cluster.sh

结论

以上就是基于 Flink CDC 构建 MySQL 到 Databend 的 实时数据同步的全部过程。

mysql flink connector is over 2.4.1

flin version is 1.17.1


]]>
<p class="description"></p> <p><img src="https://" alt="" style="width:100%"></p>
Deep Dive into SeaTunnel Databend Sink Connector CDC Implementation https://cloudsjhan.github.io/2025/08/18/Deep-Dive-into-SeaTunnel-Databend-Sink-Connector-CDC-Implementation/ 2025-08-18T02:58:57.000Z 2025-08-18T03:00:11.735Z

Deep Dive into SeaTunnel Databend Sink Connector CDC Implementation

Background

Databend is an AI-native data warehouse optimized for analytical workloads with a columnar storage architecture, serving as an open-source alternative to Snowflake. When handling CDC (Change Data Capture) scenarios, executing individual UPDATE and DELETE operations severely impacts performance and fails to leverage Databend’s batch processing advantages.

Before PR #9661, SeaTunnel’s Databend sink connector only supported batch INSERT operations, lacking efficient handling of UPDATE and DELETE operations in CDC scenarios. This limitation restricted its application in real-time data synchronization scenarios.

Core Challenges

CDC scenarios present the following main challenges:

  1. Performance Bottleneck: Executing individual UPDATE/DELETE operations generates excessive network round-trips and transaction overhead
  2. Resource Consumption: Frequent single operations cannot utilize Databend’s columnar storage advantages
  3. Data Consistency: Ensuring the order and completeness of change operations
  4. Throughput Limitation: Traditional approaches struggle with high-concurrency, large-volume CDC event streams

Solution Architecture

Overall Design Approach

The new CDC mode achieves high-performance data synchronization through the following innovative design:

1
2
3
4
5
6
graph LR
A[CDC Data Source] --> B[SeaTunnel]
B --> C[Raw Table]
C --> D[Databend Stream]
D --> E[MERGE INTO Operation]
E --> F[Target Table]

Core Components

1. CDC Mode Activation Mechanism

When users specify the conflict_key parameter in configuration, the connector automatically switches to CDC mode:

1
2
3
4
5
6
7
8
9
10
11
12
13
14
sink {
Databend {
url = "jdbc:databend://databend:8000/default?ssl=false"
user = "root"
password = ""
database = "default"
table = "sink_table"

# Enable CDC mode
batch_size = 100
conflict_key = "id"
allow_delete = true
}
}

2. Raw Table Design

The system automatically creates a temporary raw table to store CDC events:

1
2
3
4
5
6
7
CREATE TABLE IF NOT EXISTS raw_cdc_table_${target_table} (
id VARCHAR, -- Primary key identifier
table_name VARCHAR, -- Target table name
raw_data JSON, -- Complete row data (JSON format)
add_time TIMESTAMP, -- Event timestamp
action VARCHAR -- Operation type: INSERT/UPDATE/DELETE
)

3. Stream Mechanism

Leveraging Databend Stream functionality to monitor raw table changes:

1
2
CREATE STREAM IF NOT EXISTS stream_${target_table} 
ON TABLE raw_cdc_table_${target_table}

Stream advantages:

  • Incremental Processing: Only processes new change records
  • Transaction Guarantee: Ensures no data loss
  • Efficient Querying: Avoids full table scans

4. Two-Phase Processing Model

Phase 1: Data Writing

  • SeaTunnel writes all CDC events (INSERT/UPDATE/DELETE) to the raw table in JSON format
  • Supports batch writing for improved throughput

Phase 2: Merge Processing

  • Periodically executes MERGE INTO operations based on SeaTunnel AggregatedCommitter
  • Merges data from raw table to target table

MERGE INTO Core Logic

1
2
3
4
5
6
7
8
9
10
11
12
13
14
15
16
17
18
19
20
21
MERGE INTO target_table AS t
USING (
SELECT
raw_data:column1::VARCHAR AS column1,
raw_data:column2::INT AS column2,
raw_data:column3::TIMESTAMP AS column3,
action,
id
FROM stream_${target_table}
QUALIFY ROW_NUMBER() OVER(
PARTITION BY _id
ORDER BY _add_time DESC
) = 1
) AS s
ON t.id = s.id
WHEN MATCHED AND s._action = 'UPDATE' THEN
UPDATE SET *
WHEN MATCHED AND s._action = 'DELETE' THEN
DELETE
WHEN NOT MATCHED AND s._action != 'DELETE' THEN
INSERT *

Implementation Details

Key Code Implementation

Based on PR #9661 implementation, the main core classes involved are:

DatabendSinkWriter Enhancement

1
2
3
4
5
6
7
8
9
10
11
12
13
14
15
16
17
18
19
20
21
22
23
24
25
26
27
28
29
30
31
32
33
34
35
36
37
38
39
public class DatabendSinkWriter extends AbstractSinkWriter<SeaTunnelRow, DatabendWriteState> {

private boolean cdcMode;
private String rawTableName;
private String streamName;
private ScheduledExecutorService mergeExecutor;

@Override
public void write(SeaTunnelRow element) throws IOException {
if (cdcMode) {
// CDC mode: write to raw table
writeToRawTable(element);
} else {
// Normal mode: write directly to target table
writeToTargetTable(element);
}
}

private void performMerge(List<DatabendSinkAggregatedCommitInfo> aggregatedCommitInfos) {
// Merge all data from raw table to target table
String mergeSql = generateMergeSql();
log.info("[Instance {}] Executing MERGE INTO statement: {}", instanceId, mergeSql);

try (Statement stmt = connection.createStatement()) {
stmt.execute(mergeSql);
log.info("[Instance {}] Merge operation completed successfully", instanceId);
} catch (SQLException e) {
log.error(
"[Instance {}] Failed to execute merge operation: {}",
instanceId,
e.getMessage(),
e);
throw new DatabendConnectorException(
DatabendConnectorErrorCode.SQL_OPERATION_FAILED,
"Failed to execute merge operation: " + e.getMessage(),
e);
}
}
}

Configuration Options Extension

New CDC-related configurations in DatabendSinkOptions:

1
2
3
4
5
6
7
8
9
10
11
12
13
public class DatabendSinkOptions {
public static final Option<String> CONFLICT_KEY =
Options.key("conflict_key")
.stringType()
.noDefaultValue()
.withDescription("Conflict key for CDC merge operations");

public static final Option<Boolean> ALLOW_DELETE =
Options.key("allow_delete")
.booleanType()
.defaultValue(false)
.withDescription("Whether to allow delete operations in CDC mode");
}

Batch Processing Optimization Strategy

The system employs a dual-trigger mechanism for executing MERGE operations:

  1. Quantity-based: Triggers when accumulated CDC events reach batch_size
  2. Time-based: Triggers when SeaTunnel’s checkpoint.interval is reached
1
2
3
if (isCdcMode && shouldPerformMerge()) {
performMerge(aggregatedCommitInfos);
}

Performance Advantages

1. Batch Processing Optimization

  • Traditional Approach: 1000 updates = 1000 network round-trips
  • CDC Mode: 1000 updates = 1 batch write + 1 MERGE operation

2. Columnar Storage Utilization

  • MERGE INTO operations fully leverage Databend’s columnar storage characteristics
  • Batch updates only scan relevant columns, reducing I/O overhead

3. Resource Efficiency Improvement

  • Reduced connection overhead
  • Lower transaction management costs
  • Enhanced concurrent processing capability

Usage Examples

Complete Configuration Example

1
2
3
4
5
6
7
8
9
10
11
12
13
14
15
16
17
18
19
20
21
22
23
24
25
26
27
28
29
30
env{
parallelism = 1
job.mode = "STREAMING"
checkpoint.interval = 1000
}

source {
MySQL-CDC {
base-url="jdbc:mysql://127.0.0.1:3306/mydb"
username="root"
password="123456"
table-names=["mydb.t1"]
startup.mode="initial"
}
}

sink {
Databend {
url = "jdbc:databend://127.0.0.1:8009?presigned_url_disabled=true"
database = "default"
table = "t1"
user = "databend"
password = "databend"
batch_size = 2
auto_create = true
interval = 3
conflict_key = "a"
allow_delete = true
}
}

Monitoring and Debugging

1
2
3
4
5
6
7
8
9
10
11
12
13
-- View Stream status
SHOW STREAMS;

-- Check raw table data volume
SELECT COUNT(*) FROM raw_cdc_table_users;

-- View pending changes
SELECT _action, COUNT(*)
FROM stream_users
GROUP BY _action;

-- Manually trigger merge (for debugging)
CALL SYSTEM$STREAM_CONSUME('stream_users');

Error Handling and Fault Tolerance

1. Retry Mechanism

The system includes intelligent retry mechanisms that automatically retry during network anomalies or temporary failures.

2. Data Consistency Guarantee

  • Uses QUALIFY ROW_NUMBER() to ensure only the latest changes are processed
  • Stream mechanism ensures no data loss
  • Supports checkpoint recovery

3. Resource Cleanup

1
2
3
-- Periodically clean processed raw table data
DELETE FROM raw_cdc_table_users
WHERE _add_time < DATEADD(day, -7, CURRENT_TIMESTAMP());

Future Optimization Directions

  1. Intelligent Batching: Dynamically adjust batch sizes based on data characteristics
  2. Schema Evolution: Automatically handle table structure changes
  3. Monitoring Metrics: Integrate comprehensive performance monitoring
  4. Parallel Processing: Support multi-table parallel CDC synchronization

Conclusion

By introducing Stream and MERGE INTO mechanisms, SeaTunnel’s Databend sink connector successfully implements high-performance CDC support. This innovative solution not only significantly improves data synchronization performance but also ensures data consistency and reliability. For OLAP scenarios requiring real-time data synchronization, this feature provides robust technical support.


]]>
<p class="description"></p> <p><img src="https://" alt="" style="width:100%"></p>
SeaTunnel Databend Sink Connector CDC 功能实现详解 https://cloudsjhan.github.io/2025/08/18/SeaTunnel-Databend-Sink-Connector-CDC-功能实现详解/ 2025-08-18T02:52:35.000Z 2025-08-18T02:53:11.617Z

SeaTunnel Databend Sink Connector CDC 功能实现详解

背景介绍

Databend 是一个面向分析型工作负载优化的 OLAP 数据库,采用列式存储架构。在处理 CDC(Change Data Capture,变更数据捕获)场景时,如果直接执行单条的 UPDATE 和 DELETE 操作,会严重影响性能,无法充分发挥 Databend 在批处理方面的优势。

PR #9661 之前,SeaTunnel 的 Databend sink connector 仅支持批量 INSERT 操作,缺乏对 CDC 场景中 UPDATE 和 DELETE 操作的高效处理能力。这限制了在实时数据同步场景中的应用。

核心问题与挑战

在 CDC 场景中,主要面临以下挑战:

  1. 性能瓶颈:逐条执行 UPDATE/DELETE 操作会产生大量的网络往返和事务开销
  2. 资源消耗:频繁的单条操作无法利用 Databend 的列式存储优势
  3. 数据一致性:需要确保变更操作的顺序性和完整性
  4. 吞吐量限制:传统方式难以应对高并发大数据量的 CDC 事件流

解决方案架构

整体设计思路

新的 CDC 模式通过以下创新设计实现高性能数据同步:

1
2
3
4
5
6
graph LR
A[CDC 数据源] --> B[SeaTunnel]
B --> C[原始表 Raw Table]
C --> D[Databend Stream]
D --> E[MERGE INTO 操作]
E --> F[目标表 Target Table]

核心组件

1. CDC 模式激活机制

当用户在配置中指定 conflict_key 参数时,connector 自动切换到 CDC 模式:

1
2
3
4
5
6
7
8
9
10
11
12
13
14
sink {
Databend {
url = "jdbc:databend://databend:8000/default?ssl=false"
user = "root"
password = ""
database = "default"
table = "sink_table"

# Enable CDC mode
batch_size = 100
conflict_key = "id"
allow_delete = true
}
}

2. 原始表设计

系统自动创建一个临时原始表来存储 CDC 事件:

1
2
3
4
5
6
7
CREATE TABLE IF NOT EXISTS raw_cdc_table_${target_table} (
id VARCHAR, -- 主键标识
table_name VARCHAR, -- 目标表名
raw_data JSON, -- 完整的行数据(JSON格式)
add_time TIMESTAMP, -- 事件时间戳
action VARCHAR -- 操作类型:INSERT/UPDATE/DELETE
)

3. Stream 机制

利用 Databend Stream 功能监控原始表的变化:

1
2
CREATE STREAM IF NOT EXISTS stream_${target_table} 
ON TABLE raw_cdc_table_${target_table}

Stream 的优势:

  • 增量处理:只处理新增的变更记录
  • 事务保证:确保数据不丢失
  • 高效查询:避免全表扫描

4. 两阶段处理模型

第一阶段:数据写入

  • SeaTunnel 将所有 CDC 事件(INSERT/UPDATE/DELETE)以 JSON 格式写入原始表
  • 支持批量写入,提高吞吐量

第二阶段:合并处理

  • 基于 seatunnel AggregatedCommitter 定期执行 MERGE INTO 操作
  • 将原始表的数据合并到目标表

MERGE INTO 核心逻辑

1
2
3
4
5
6
7
8
9
10
11
12
13
14
15
16
17
18
19
20
21
MERGE INTO target_table AS t
USING (
SELECT
raw_data:column1::VARCHAR AS column1,
raw_data:column2::INT AS column2,
raw_data:column3::TIMESTAMP AS column3,
action,
id
FROM stream_${target_table}
QUALIFY ROW_NUMBER() OVER(
PARTITION BY _id
ORDER BY _add_time DESC
) = 1
) AS s
ON t.id = s.id
WHEN MATCHED AND s._action = 'UPDATE' THEN
UPDATE SET *
WHEN MATCHED AND s._action = 'DELETE' THEN
DELETE
WHEN NOT MATCHED AND s._action != 'DELETE' THEN
INSERT *

实现细节

关键代码实现

根据 PR #9661 的实现,主要涉及以下核心类:

DatabendSinkWriter 增强

1
2
3
4
5
6
7
8
9
10
11
12
13
14
15
16
17
18
19
20
21
22
23
24
25
26
27
28
29
30
31
32
33
34
35
36
37
38
39
public class DatabendSinkWriter extends AbstractSinkWriter<SeaTunnelRow, DatabendWriteState> {

private boolean cdcMode;
private String rawTableName;
private String streamName;
private ScheduledExecutorService mergeExecutor;

@Override
public void write(SeaTunnelRow element) throws IOException {
if (cdcMode) {
// CDC 模式:写入原始表
writeToRawTable(element);
} else {
// 普通模式:直接写入目标表
writeToTargetTable(element);
}
}

private void performMerge(List<DatabendSinkAggregatedCommitInfo> aggregatedCommitInfos) {
// Merge all the data from raw table to target table
String mergeSql = generateMergeSql();
log.info("[Instance {}] Executing MERGE INTO statement: {}", instanceId, mergeSql);

try (Statement stmt = connection.createStatement()) {
stmt.execute(mergeSql);
log.info("[Instance {}] Merge operation completed successfully", instanceId);
} catch (SQLException e) {
log.error(
"[Instance {}] Failed to execute merge operation: {}",
instanceId,
e.getMessage(),
e);
throw new DatabendConnectorException(
DatabendConnectorErrorCode.SQL_OPERATION_FAILED,
"Failed to execute merge operation: " + e.getMessage(),
e);
}
}
}

配置选项扩展

DatabendSinkOptions 中新增 CDC 相关配置:

1
2
3
4
5
6
7
8
9
10
11
12
13
public class DatabendSinkOptions {
public static final Option<String> CONFLICT_KEY =
Options.key("conflict_key")
.stringType()
.noDefaultValue()
.withDescription("Conflict key for CDC merge operations");

public static final Option<Boolean> ALLOW_DELETE =
Options.key("allow_delete")
.booleanType()
.defaultValue(false)
.withDescription("Whether to allow delete operations in CDC mode");
}

批处理优化策略

系统采用双重触发机制执行 MERGE 操作:

  1. 基于数量:当累积的 CDC 事件达到 batch_size 时触发
  2. 基于时间:seatunnel 的 checkpoint.interval 达到后触发
1
2
3
if (isCdcMode && shouldPerformMerge()) {
performMerge(aggregatedCommitInfos);
}

性能优势

1. 批量处理优化

  • 传统方式:1000 条更新 = 1000 次网络往返
  • CDC 模式:1000 条更新 = 1 次批量写入 + 1 次 MERGE 操作

2. 列式存储利用

  • MERGE INTO 操作充分利用 Databend 的列式存储特性
  • 批量更新时只需扫描相关列,减少 I/O 开销

3. 资源效率提升

  • 减少连接开销
  • 降低事务管理成本
  • 提高并发处理能力

使用示例

完整配置示例

1
2
3
4
5
6
7
8
9
10
11
12
13
14
15
16
17
18
19
20
21
22
23
24
25
26
27
28
29
env{
parallelism = 1
job.mode = "STREAMING"
checkpoint.interval = 1000
}

source {
MySQL-CDC {
base-url="jdbc:mysql://127.0.0.1:3306/mydb"
username="root"
password="123456"
table-names=["mydb.t1"]
startup.mode="initial"
}
}
sink {
Databend {
url = "jdbc:databend://127.0.0.1:8009?presigned_url_disabled=true"
database = "default"
table = "t1"
user = "databend"
password = "databend"
batch_size = 2
auto_create = true
interval = 3
conflict_key = "a"
allow_delete = true
}
}

监控与调试

1
2
3
4
5
6
7
8
9
10
11
12
13
-- 查看 Stream 状态
SHOW STREAMS;

-- 查看原始表数据量
SELECT COUNT(*) FROM raw_cdc_table_users;

-- 查看待处理的变更
SELECT _action, COUNT(*)
FROM stream_users
GROUP BY _action;

-- 手动触发合并(调试用)
CALL SYSTEM$STREAM_CONSUME('stream_users');

错误处理与容错

1. 重试机制

2. 数据一致性保证

  • 使用 QUALIFY ROW_NUMBER() 确保只处理最新的变更
  • Stream 机制保证不丢失数据
  • 支持 checkpoint 恢复

3. 资源清理

1
2
3
-- 定期清理已处理的原始表数据
DELETE FROM raw_cdc_table_users
WHERE _add_time < DATEADD(day, -7, CURRENT_TIMESTAMP());

未来优化方向

  1. 智能批处理:根据数据特征动态调整批处理大小
  2. Schema 演进:自动处理表结构变更
  3. 监控指标:集成更完善的性能监控

总结

通过引入 Stream 和 MERGE INTO 机制,SeaTunnel 的 Databend sink connector 成功实现了高性能的 CDC 支持。这一创新方案不仅大幅提升了数据同步性能,还保证了数据一致性和可靠性。对于需要实时数据同步的 OLAP 场景,这一功能提供了强大的技术支撑。

相关链接

]]>
<p class="description"></p> <p><img src="https://" alt="" style="width:100%"></p>
使用 Seatunnel 建立从 MySQL 到 Databend 的数据同步管道 https://cloudsjhan.github.io/2025/07/07/使用-Seatunnel-建立从-MySQL-到-Databend-的数据同步管道/ 2025-07-07T15:20:05.000Z 2025-07-07T15:20:42.600Z

使用 Seatunnel 建立从 MySQL 到 Databend 的数据同步管道

前言

SeaTunnel 是一个非常易用、超高性能的分布式数据集成平台,支持实时海量数据同步。 每天可稳定高效地同步数百亿数据,已被近百家企业应用于生产,在国内较为普及。

Databend 是一款开源、弹性、低成本,基于对象存储也可以做实时分析的云原生湖仓。

seatunnel 架构

SeaTunnel 整体架构:

img

本文将使用 Seatunnel 建立从 MySQL 到 Databend 的数据同步管道,实现从 MySQL 数据源同步数据到 Databend 目标表的目的。

SeaTunnel MySQL-CDC 和 Databend Sink Connector

SeaTunnel 的 MySQL CDC 连接器允许从 MySQL 数据库中读取快照数据和增量数据,其实现的原理是基于 debezium-mysql-connector 。

而 Databend 在 PR [Feature][Connector-V2] Support databend source/sink connector 之后也同时在 seatunnel 中支持了 Databend 作为 Source 和 Sink Connector。这里我们使用 Seatunnel 的 MySQL-CDC Source Connector 和 Databend Sink Connector 来搭建数据同步管道。

编译 Seatunnel

由于上述 Databend Connector 的 PR 刚合并入 seatunnel 的 dev 分支,还没有正式 release,所以目前要使用 Databend Connector 的话,需要基于源码对 seatunnel 进行构建。

Clone 源码

首先我们需要从 GitHub 克隆 SeaTunnel 源代码。

1
git clone git@github.com:apache/seatunnel.git

本地安装子项目

在克隆源代码之后,需要运行 ./mvnw 命令将子项目安装到 maven 本地存储库。否则代码无法在 JetBrains IntelliJ IDEA 中正确启动。

1
./mvnw install -Dmaven.test.skip

构建 Seatunnel

安装 maven 后,可以使用以下命令进行编译和打包。

1
mvn clean package -pl seatunnel-dist -am -Dmaven.test.skip=true

构建后的内容在 seatunnel/seatunnel-dist/target 中,我们需要解压 apache-seatunnel-2.3.12-SNAPSHOT-src.tar.gz,得到如下目录:

image-20250707225303179

bin 下面是可以直接运行的 shell 脚本,能够一键启动 seatunnel;

config 中是 jvm options 相关的配置文件;

lib 中是运行 seatunnel 或者 connector 相关的 jar 包。

创建 connector 配置文件

我们的任务设定是通过 SeaTunnel 从 MySQL 中同步 mydb.t1 表。 配置文件 为 mysql-to-databend.conf:

1
2
3
4
5
6
7
8
9
10
11
12
13
14
15
16
17
18
19
20
21
22
23
24
25
26
27
28
env{
parallelism = 1
job.mode = "STREAMING"
checkpoint.interval = 2000
}

source {
MySQL-CDC {
base-url="jdbc:mysql://127.0.0.1:3306/mydb"
username="root"
password="123456"
table-names=["mydb.t1"]
startup.mode="initial"
}
}
sink {
Databend {
url = "jdbc:databend://127.0.0.1:8000?presigned_url_disabled=true"
database = "default"
table = "t1"
username = "databend"
password = "databend"
# 批量操作设置
batch_size = 2
# 如果目标表不存在,是否自动创建
auto_create = true
}
}

相关的参数设定可以参考 seatunnel MySQL文档seatunnel Databend Connector

本地启动 MySQL 与 Databend

启动并初始化 MySQL 表数据

本地启动 MySQL 后,创建一个数据库 mydb,在 mydb 中新建一张表并插入 10 条数据:

1
2
3
4
5
6
create database mydb;
use mydb;
create table t1 (a int, b varchar(100));
insert into t1 values(1,'aa')
...
insert into t1 values(10,'bb')

本地启动 Databend

1
2
3
4
5
6
7
8
9
10
11
12
13
14
15
16
17
18
19
version: '3'
services:
databend:
image: datafuselabs/databend:v1.2.754-nightly
platform: linux/arm64
ports:
- "8000:8000"
environment:
- QUERY_DEFAULT_USER=databend
- QUERY_DEFAULT_PASSWORD=databend
- MINIO_ENABLED=true
volumes:
- ./data:/var/lib/minio
healthcheck:
test: "curl -f localhost:8080/v1/health || exit 1"
interval: 2s
retries: 10
start_period: 2s
timeout: 1s

直接 docker-compose up 即可启动 databend 服务。

启动 seatunnel

1
./bin/seatunnel.sh --config ./bin/mysql-to-databend.conf -m local

image-20250707230833879

启动后 Databend Sink Connector 会首先将 MySQL 表中的全量数据同步过来:

image-20250707231035562

接下来我们往 MySQL 中插入几条数据,就会同步 MySQL 中增量的数据:

image-20250707231208003

可以看到 seatunnel 在终端输出的日志:

image-20250707231319145

以及 Databend 中查询到数据:

image-20250707231352622

说明数据已经及时同步过来了。

目前 Databend Sink Connector 还只支持 Append Only 模式,对于 update、delete 的数据没做处理,会在下一个 seatunnel 的 PR 中实现完整的 CDC 功能。

结论

通过本文我们成功实现了从 MySQL 到 Databend 的实时数据同步管道。这个解决方案具有以下优势:

  1. 简单易用:SeaTunnel 提供了简洁的配置方式,只需少量配置即可建立高效的数据同步管道。
  2. 实时性强:基于 CDC 技术,能够实时捕获 MySQL 的数据变更并同步到 Databend。
  3. 可扩展性好:SeaTunnel 的分布式架构使其能够处理海量数据同步需求。
  4. 低开发成本:无需编写复杂的 ETL 代码,通过配置文件即可完成数据集成任务。

需要注意的是,目前 Databend Sink Connector 还只支持 Append Only 模式,对于 update、delete 的数据没做处理,完整的 CDC 功能将在后续的 PR 中实现。这个方案特别适合需要将 MySQL 数据实时同步到 Databend 进行分析的场景,帮助企业构建实时数据湖仓架构。


]]>
使用 Seatunnel 建立从 MySQL 到 Databend 的数据同步管道
打破信息差,手把手教你本地部署 DeepSeek https://cloudsjhan.github.io/2025/02/07/打破信息差,手把手教你本地部署-DeepSeek/ 2025-02-07T09:09:01.000Z 2025-02-07T09:09:34.188Z

打破信息差,手把手教你本地部署 DeepSeek

在AI技术迅速发展的今天,越来越多的人开始尝试将大语言模型(如DeepSeek)应用于日常学习和工作中。然而,对于普通用户来说,如何快速、便捷地在本地环境中部署并使用这些工具仍然存在一定的门槛。再加上最近官方 deepseek 访问压力大和来源未知的大量 ddos 攻击,经常出现服务器访问繁忙的情况,使用体验并不好。

本文将以 Open Web UIOllama 为例,手把手教你完成本地部署,让你轻松实现与AI模型的交互,本教程适合新手和不具备相关行业经验的小白新手。


为什么要本地部署?

  1. 数据隐私:相比于在线服务,本地部署可以避免将数据上传到云端,确保敏感信息的安全性。
  2. 个性化配置:可以根据自己的需求调整服务参数,获得更好的使用体验。
  3. 低成本运行:通过开源工具和本地资源,大幅降低使用成本。

部署前的准备

在开始部署之前,请确认以下几点:

  1. 安装依赖
    • 确保你的系统已经安装了Python 3.11或更高版本。
    • 如果你选择使用Docker,则需要先安装 Docker 和 Docker Compose。
  2. 网络环境:确保本地网络可以正常访问互联网,以便下载所需的软件包和镜像。

步骤一:安装并启动 Open Web UI

Open Web UI 是一个基于Web的界面工具,支持与多种AI模型(包括DeepSeek)进行交互。以下是两种常见的安装方式:

方式一:通过 pip 安装

如果你更倾向于直接在本地机器上运行服务,可以使用以下命令:

1
pip3.11 install open-webui

安装完成后,输入以下命令启动服务:

1
open-webui --host 0.0.0.0 --port 3000

这将在本地的 localhost:3000 端口启动一个Web界面。

方式二:通过 Docker 安装(推荐)

如果你希望更简单地管理服务,可以使用 Docker。运行以下命令:

1
2
3
4
5
6
7
docker run -d \
-p 3000:8080 \
--add-host=host.docker.internal:host-gateway \
-v open-webui:/app/backend/data \
--name open-webui \
--restart always \
ghcr.io/open-webui/open-webui:main

这条命令会下载并运行 Open Web UI 的Docker镜像,服务会在 localhost:3000 端口启动。


步骤二:安装并启动 Ollama

Ollama 是一个轻量级的AI模型运行工具,支持多种大语言模型。你需要先在本地安装并启动 Ollama 服务,然后将其与 Open Web UI 集成。

安装 Ollama

根据你的操作系统选择相应的安装方式:

在 Linux 上:

1
curl -s https://ollama.ai/install.sh | bash

在 macOS 上:

1
brew install ollama

在 Windows 上:

你可以通过 Ollama 官方网站 下载安装包。

启动 Ollama

安装完成后,运行以下命令启动服务:

1
ollama serve --listen 0.0.0.0:11434

这样,Ollama 将在 localhost:11434 端口提供模型推理服务。

模型下载

deepseek 提供了不同参数数量的模型,比如 7b, 14b, 32b, 70b 和满血版本的 671b,这里根据你的机器配置选择不同的参数,我本地的机器是 128g 的内存,选择了 32b 的模型,仅供参考。

1
ollama run deepseek-r1:32b

步骤三:配置 Open Web UI

启动 Open Web UI 后,访问 http://localhost:3000,你需要进行以下配置:

  1. 添加 Ollama 服务

    • 在页面上找到“Add New Model”或类似选项。
    • 填写模型名称(如 DeepSeek)和地址(http://localhost:11434/api/generate)。
    • 确保勾选支持的模型类型(如文本生成、问答等)。
  2. 验证连接

    • 配置完成后,尝试发送一条简单的查询(例如“你好”)。
    • 如果返回正常结果,则说明配置成功。

步骤四:测试 DeepSeek 功能

完成上述步骤后,你就可以通过 Open Web UI 使用 DeepSeek 提供的功能了。以下是几个常见的使用场景:

  1. 文本生成
    • 输入类似“写一篇关于人工智能的科普文章”。
  2. 问答交互
    • 提问:“DeepSeek 和其他大语言模型有什么区别?”
  3. 代码辅助
    • 输入:“帮我写一个Python脚本,用于计算斐波那契数列。”

常见问题与故障排查

  1. 服务无法启动

    • 检查端口是否被占用(如 300011434)。
    • 确保防火墙或安全软件没有阻止相关端口的访问。
  2. 模型响应慢或无响应

    • 确认 Ollama 服务是否正常运行。
    • 检查网络连接,确保模型可以访问互联网(部分模型依赖于在线资源)。
  3. 配置错误

    • 确保 Open Web UI 和 Ollama 的地址配置正确。
    • 参考官方文档或社区论坛,获取更多帮助。

More

如果是想使用满血版本的 deepseek r1 ,目前稳定输出方案就是在硅基流动生成 API 密钥,结合 CHATBOX使用。不过该方案稍微复杂,适合有些基础的同学,感兴趣的话后面开新的教程讲一下。

总结

通过本文的指导,你已经成功在本地部署了 DeepSeek 相关服务,并可以通过 Open Web UI 与模型进行交互。这种方式不仅降低了使用成本,还提供了更高的灵活性和安全性。如果你对AI技术感兴趣,不妨尝试将这些工具应用到更多的场景中,进一步探索其潜力!


]]>
打破信息差,手把手教你本地部署 DeepSeek
Testing Databend Applications Using Testcontainers - Multi-Language Implementation Guide https://cloudsjhan.github.io/2024/11/26/Testing-Databend-Applications-Using-Testcontainers-Multi-Language-Implementation-Guide/ 2024-11-26T14:06:56.000Z 2024-11-26T14:59:01.448Z

Introduction to Testcontainers

Testcontainers is an open-source library that provides lightweight, disposable instances of databases, message brokers, web browsers, or any service that can run in a Docker container.

Core Features:

  • Disposable: Can be discarded after testing
  • Lightweight: Quick to start with minimal resource usage
  • Docker-based: Leverages container technology for isolation

    Main Use Cases:

  • Database testing: MySQL, PostgreSQL, MongoDB, Databend etc.
  • Message queue testing: RabbitMQ, Kafka, etc.
  • Browser automation testing
  • Testing any containerizable service
    Using TestContainers for test cases helps avoid test environment pollution, ensures test environment consistency, simplifies test configuration, and improves test reliability.

This tool is particularly suitable for testing scenarios that depend on external services, enabling quick creation of isolated test environments.

Support Databend for Testcontainers

The Databend team has completed support for Databend data source in three major programming languages through PRs in testcontainer-java, testcontainers-go, and testcontainers-rs. This means developers can easily integrate Databend test environments in projects using these languages.

Prerequisites

  • Docker installed in the operating environment
  • Development environments for Java, Go, and Rust installed

Java Dependency Configuration

First, create a new Java Demo project. Here’s an example using Maven, adding databend testcontainers and databend-jdbc dependencies in pom.xml:

1
2
3
4
5
6
7
8
9
10
11
12
13
14
<dependencies>
<dependency>
<groupId>org.testcontainers</groupId>
<artifactId>databend</artifactId>
<version>1.20.4</version>
<scope>test</scope>
</dependency>

<dependency>
<groupId>com.databend</groupId>
<artifactId>databend-jdbc</artifactId>
<version>0.2.8</version>
</dependency>
</dependencies>

For Gradle, use:

1
2

testImplementation "org.testcontainers:databend:1.20.4"

Creating Test Class

1
2
3
4
5
6
7
8
9
10
Create a `TestContainerDatabend` test class with its constructor:
public class TestContainerDatabend {
private final DatabendContainer dockerContainer;

public TestContainerDatabend() {
dockerContainer = new DatabendContainer("datafuselabs/databend:v1.2.615");
dockerContainer.withUsername("databend").withPassword("databend").withUrlParam("ssl", "false");
dockerContainer.start();
}
}

We specified datafuselabs/databend:v1.2.615 as the Docker image for starting Databend, other databend versions available at databend docker hub, then set the username and password, and started the container service.

Here’s the test case:

1
2
3
4
5
6
7
8
9
10
11
12
13
14
15
16
17
18
19
20
21
22
23
@Test
public void testSimple() {
try (Connection connection = DriverManager.getConnection(getJdbcUrl())) {
DatabendStatement statement = (DatabendStatement) connection.createStatement();
statement.execute("SELECT 1");
ResultSet r = statement.getResultSet();
while (r.next()) {
int resultSetInt = r.getInt(1);
System.out.println(resultSetInt);
assert resultSetInt == 1;
}
} catch (Exception e) {
throw new RuntimeException("Failed to execute statement: ", e);
}
}

public String getJdbcUrl() {
return format("jdbc:databend://%s:%s@%s:%s/",
dockerContainer.getUsername(),
dockerContainer.getPassword(),
dockerContainer.getHost(),
dockerContainer.getMappedPort(8000));
}

While running the test, we can see that testcontainers has started a databend container service in our system:

After the test completes, the container is immediately destroyed and resources are released.

Besides Databend, Testcontainers supports most databases and message queues available in the market, making it easy to build test suites that depend on these resources.

Go

Similarly, for Golang projects requiring Databend services, you can use testcontainers-go:

1
2
3
4
5
6
7
8
9
10
11
12
13
14
15
16
17
18
19
20
21
22
23
24
25
26
27
28
29
30
31
32
33
34
35
36
37
38
39
40
package main

import (
"context"
"database/sql"
"testing"

_ "github.com/datafuselabs/databend-go"
"github.com/stretchr/testify/require"

"github.com/testcontainers/testcontainers-go"
"github.com/testcontainers/testcontainers-go/modules/databend"
)

func TestDatabend(t *testing.T) {
ctx := context.Background()

ctr, err := databend.Run(ctx, "datafuselabs/databend:v1.2.615")
testcontainers.CleanupContainer(t, ctr)
require.NoError(t, err)

connectionString, err := ctr.ConnectionString(ctx, "sslmode=disable")
require.NoError(t, err)

mustConnectionString := ctr.MustConnectionString(ctx, "sslmode=disable")
require.Equal(t, connectionString, mustConnectionString)

db, err := sql.Open("databend", connectionString)
require.NoError(t, err)
defer db.Close()

err = db.Ping()
require.NoError(t, err)

_, err = db.Exec("CREATE TABLE IF NOT EXISTS a_table ( \n" +
" `col_1` VARCHAR(128) NOT NULL, \n" +
" `col_2` VARCHAR(128) NOT NULL \n" +
")")
require.NoError(t, err)
}

Rust

Since Databend is written in Rust, you can naturally use testcontainer-rs to quickly start a Databend container service in Rust projects:

1
2
3
4
5
6
7
8
9
10
11
12
13
14
15
16
17
18
19
20
21
22
23
24
25
26
27
28
29
30
#[cfg(test)]
mod tests {
use databend_driver::Client;

use crate::{databend::Databend as DatabendImage, testcontainers::runners::AsyncRunner};

#[tokio::test]
async fn test_databend() {
let databend = DatabendImage::default().start().await.unwrap();
let http_port = databend.get_host_port_ipv4(8000).await.unwrap();
let dsn = format!(
"databend://databend:databend@localhost:{}/default?sslmode=disable",
http_port
);
let client = Client::new(dsn.to_string());
let conn = client.get_conn().await.unwrap();
let row = conn.query_row("select 'hello'").await.unwrap();
assert!(row.is_some());
let row = row.unwrap();
let (val,): (String,) = row.try_into().unwrap();
assert_eq!(val, "hello");

let conn2 = conn.clone();
let row = conn2.query_row("select 'world'").await.unwrap();
assert!(row.is_some());
let row = row.unwrap();
let (val,): (String,) = row.try_into().unwrap();
assert_eq!(val, "world");
}
}

Conclusion

For modern software development, reliable testing frameworks and toolchains are crucial foundations for ensuring code quality. With Databend’s multi-language support for Testcontainers, developers can more conveniently perform database-related integration testing, thereby improving overall development efficiency and code quality.

Whether using Java, Go, or Rust, Testcontainers provides reliable support for Databend developers’ testing work. We look forward to seeing more developers apply this powerful testing tool in real projects to build more robust application systems.


]]>
Testing Databend Applications Using Testcontainers - Multi-Language Implementation Guide
编写 Dockerfile 的 6 个最佳实践 https://cloudsjhan.github.io/2024/11/16/编写-Dockerfile-的-6-个最佳实践/ 2024-11-16T09:23:44.000Z 2024-11-16T09:24:20.451Z


自 2013 年推出以来,Docker 已发展了十多年,现已成为容器技术的行业标准。

它支持所有主流操作系统和云平台,几乎可以将任何类型的应用程序容器化,使应用程序可以在不同的机器、集群甚至云服务之间轻松迁移。

每个 Docker 容器都是通过 Dockerfile 构建的,因此在编写 Dockerfile 时必须遵循最佳实践。

下面我们就来探讨其中的一些做法。

1.根据需要添加文件

在编写 Dockerfile 时,最关键的是要考虑缓存机制。

每次从 Dockerfile 构建 Docker 镜像时,Docker 都会保存在构建过程中生成的缓存。

如果在重建镜像时缓存可用,就能大大加快构建过程。例如,执行 npm install 命令可能需要几分钟才能下载并安装 Node.js 项目的所有依赖项。

因此,在运行 docker 构建命令时,你需要利用这个缓存,这样下一次构建就能快速从缓存中提取数据,而不是每次都要等上几分钟,这既恼人又低效。

如果你不在乎缓存,你的 Dockerfile 可能看起来像这样:

1
2
3
4
FROM node:20
COPY . .
RUN npm install
RUN npm build

该 Dockerfile 使用 Docker 的 COPY 命令将所有项目文件(包括源代码)添加到镜像中,然后执行 npm install 安装依赖项,最后运行 npm build 从源代码中构建应用程序。

虽然这是可行的,但效率不高。假设你运行了 docker build,然后修改了项目文件中的一些业务逻辑,现在又想重建。

第一行 FROM node:20 保持不变,因此 Docker 会使用缓存来处理这部分内容,但缓存会在第二行 COPY … 中断,因为文件已经更改。

Docker 使用分层缓存机制,Dockerfile 中的每一行通常代表一层。

这意味着,一旦某个层的缓存被破坏,所有后续层将不会使用缓存进行构建。

这是因为 Docker 假定后面的每一层都依赖于前面的所有层,这是一个合理的假设。

在我们的示例中,npm install 会在项目文件发生变化时运行,但它实际上并不依赖于项目的源代码;它只依赖于 package.json 和 package-lock.json 文件。

package.json 定义了 npm 需要安装的所有依赖项。那么,让我们来改进 Dockerfile:

1
2
3
4
5
FROM node:20
COPY package*.json .
RUN npm install
COPY . .
RUN npm build

在这里,我使用 package*.json 来复制 package.json 和 package-lock.json。

如你所见,我只在运行 npm install 之后和运行 npm build 之前复制整个应用程序的源代码,因为 npm build 依赖于源代码。

这样,如果源代码发生变化,只要 package.json 保持不变,就可以从缓存中调用 npm install。

只有当我们更改 package.json 中的某些依赖项时,才需要重新运行 npm install。

真正的 Node.js 应用程序 Dockerfile 会有所不同。例如,在添加文件和运行 npm 命令之前,应该设置 WORKDIR。

2.添加 .dockerignore 文件

当你不想把某个文件推送到 Git 仓库时,你可以把它添加到 .gitignore 文件中。
同样,当你不想在 Docker 构建上下文中包含某个文件时,你应该把它添加到 .dockerignore 文件中。

构建 Docker 镜像时,需要指定构建上下文路径,如 docker build -t image_tag .

这里,最后一个点表示使用当前工作目录作为构建上下文。

然后,构建上下文会被发送(复制)到 Docker 守护进程,由它来构建镜像。

以 Node.js 为例,假设我们在本地使用 npm install 和 npm start 来运行应用程序,然后再构建 Docker 镜像。

由于这些命令是直接在本地计算机上执行的,因此 npm 会在项目目录中创建一个 node_modules 目录,以存储所有下载的依赖项。

项目目录结构可能如下:

1
2
3
4
5
node_modules/
public/
src/
package.json
package-lock.json

node_modules 目录的大小很容易达到 1GB。假设我们使用 npm start 在本地测试了应用程序,现在想为应用程序构建 Docker 镜像。

因此,我们在项目目录中创建了一个 Dockerfile,与前面提到的类似。

然后,我们执行命令 docker build -t image_tag 。然而,查看构建日志,你会发现构建上下文的大小接近 1GB:

1
2
=> [internal] load build context
=> => transferring context: 893.00MB

这是因为整个项目目录(包括 node_modules)都是作为构建上下文发送的。

我们希望避免上传 node_modules,因此创建了一个 .dockerignore 文件,并在其中添加了 node_modules。

现在,当我们再次构建 Docker 镜像时,构建日志显示上下文大小比之前小了很多:

1
2
=> [internal] load build context
=> => transferring context: 11.41kB

我们现在的项目结构是:

1
2
3
4
5
6
7
node_modules/
public/
src/
Dockerfile
.dockerignore
package.json
package-lock.json

请记住,.dockerignore 文件应始终放在构建上下文的根目录下。

你可能会问,为什么要将 node_modules 排除在构建上下文之外?

这是因为 node_modules 是由 npm 创建的目录,其中并不包含应用程序的源代码。
它是由本地机器上的本地 npm 创建的。在 Docker 中运行的 npm 应在 Docker 镜像中创建自己的 node_modules。

将本地 node_modules 添加到我们的 Docker 镜像中并不是一个好做法。

只需向 Docker 提供应用程序的源代码,然后在 Docker 内部运行构建命令来构建应用程序。这样,Docker 构建就不会与本地构建冲突。

3.一次性执行所有命令

这很简单。你经常会发现自己在使用 apt 或其他软件包管理器安装必要的软件包。

在运行 apt install 之前,必须先运行 apt update。

与其在 Dockerfile 中使用多个 RUN 指令,不如将它们合并为一个指令:

1
2
3
4
RUN apt-get update && apt-get install -y \
git \
jq \
kubectl

请注意我是如何将软件包名称分成多行,并按字母顺序排列,以提高可读性的。

如果使用多条 RUN 指令,每条指令都会创建一个新层,这会减慢构建过程并占用更多存储空间。

4.设置环境变量和版本

使用 ENV 指令,您可以在构建过程中设置环境变量,这些变量将保留在镜像中,并在容器运行时可用。
可以像这样优雅地修改 PATH 变量:

1
ENV PATH=/opt/maven/bin:${PATH}

如果正在运行一个 Node.js 应用程序,并读取 process.env.PORT,启动服务器时,可以在 Dockerfile 中设置服务器的端口:

1
ENV PORT=8080

一般建议尽可能使用环境变量配置应用程序。

在部署应用程序时,更改环境变量总是比修改代码中的文件然后重新部署应用程序要容易得多。

还可以使用 ENV 指令直观地设置某些依赖项的版本:

1
2
3
ENV KUBECTL_VERSION=1.27
RUN curl -fsSL https://pkgs.k8s.io/core:/stable:/v${KUBECTL_VERSION}/deb/Release.key | sudo gpg --dearmor -o /etc/apt/keyrings/kubernetes-apt-keyring.gpg
...

说到版本和 Docker,强烈建议不要对镜像使用 “latest” 标签。
同样,应避免使用过于具体的版本号(如 1.27.4),因为这将使你无法收到重要的补丁更新,而这些更新可能会修复漏洞或提高安全性。

而应使用主版本号(x)或次版本号(x.y):

1
FROM python:3.10

也可以只写 “python”,但这样 Docker 就会一直调用最新版本,如果新版本中有任何破坏性更改,就会破坏应用程序。

5.使用多阶段构建

多阶段构建是 Docker 的一项强大功能,但可能被低估了。其概念是将镜像的构建过程分为多个阶段。

最终,只有最后一个阶段的内容会被包含在最终图像中,而之前的阶段则会被丢弃。

典型的用例是在第一阶段使用构建工具和源代码创建二进制文件,然后只将这些二进制文件复制到下一阶段。

最终镜像将不包含源代码或构建工具,这是有道理的,因为最终镜像只需要运行应用程序,而不需要构建它。

1
2
3
4
5
6
7
8
9
10
11
12
13
FROM mcr.microsoft.com/dotnet/sdk:7.0 AS build-env
WORKDIR /App

# Build the app
COPY . ./
RUN dotnet restore
RUN dotnet publish -c Release -o out

# Build runtime image
FROM mcr.microsoft.com/dotnet/aspnet:7.0
WORKDIR /App
COPY --from=build-env /App/out .
ENTRYPOINT ["dotnet", "DotNet.Docker.dll"]

这个官方示例 Dockerfile 用于构建和运行 ASP.NET 应用程序。请注意 COPY –from=build-env /App/out .命令,它将二进制文件从第一阶段复制到第二阶段。

第一阶段基于包含构建工具的镜像 (mcr.microsoft.com/dotnet/sdk:7.0),而第二阶段基于较小的运行时奖项 (mcr.microsoft.com/dotnet/aspnet:7.0)。

此外,请注意他们是如何指定镜像的次版本的。

6. 优先考虑使用 Slim 和 Alpine Image

Alpine 镜像基于 Alpine Linux,而 Alpine Linux 以轻量级著称,这使得 Alpine 镜像理论上可以更快地构建、调用和运行。

1
2
3
4
REPOSITORY   TAG            SIZE
python 3.10-alpine 50.4MB
python 3.10-slim 128MB
python 3.10 1GB

以 Python 为例,Alpine 镜像的大小是基于 Debian 的完整镜像的 1/20。

Python 还提供 Slim 镜像,它基于 Debian,但去除了大部分标准软件包。


]]>
编写 Dockerfile 的 6 个最佳实践
Golang 常用的五种创建型设计模式 https://cloudsjhan.github.io/2024/10/21/Golang-常用的五种创建型设计模式/ 2024-10-21T06:53:51.000Z 2024-10-21T06:54:22.880Z

在 Go 中,创建设计模式有助于管理对象的创建,并控制对象的实例化方式。这些模式在对象创建过程复杂或需要特殊处理时特别有用。以下是 Go 中常用的主要创建模式:

单例模式

单例模式确保一个类只有一个实例,并提供一个全局访问点。

如何实现

  1. 定义一个结构,并将其作为单个实例。
  2. 为该结构创建一个全局变量,但不要立即将其初始化。
  3. 使用 sync.Once 确保实例只创建一次,即使在多线程情况下也是如此。
  4. 提供一个全局函数来返回实例。

以下是实现单例模式的基本示例:

1
2
3
4
5
6
7
8
9
10
11
12
13
14
15
16
17
18
19
20
21
22
23
24
25
26
27
28
29
30
31
32
33
34
package main

import (
"fmt"
"sync"
)

type (
singleton struct {
data string
}
)

var instance *singleton
var once sync.Once

// Function to return the single instance
func GetInstance() *singleton {
// Use sync.Once to ensure the instance is created only once
once.Do(func() {
instance = &singleton{data: "This is a singleton"}
})

return instance
}

func main() {
s1 := GetInstance()
s2 := GetInstance()

// Both should point to the same instance
fmt.Println(s1 == s2) // true
fmt.Println(s1.data) // "This is a singleton"
}

sync.Once 可确保实例只创建一次,即使在并发调用 GetInstance 的情况下也是如此。

工厂方法模式

工厂方法模式定义了创建对象的接口,但允许子类改变将创建的对象类型。在 Go 中,这可以通过创建工厂函数来实现。这种设计模式提供一种将实例化逻辑委托给子类的方法,从而可以灵活地创建对象。

实现步骤:

  1. 创建一个为不同对象定义通用行为的接口。
  2. 创建多个实现此接口的结构体。
  3. 创建一个函数(工厂方法),接收一些输入(如类型)并返回相应结构的实例。

以下是实现工厂方法模式的基本示例:

1
2
3
4
5
6
7
8
9
10
11
12
13
14
15
16
17
18
19
20
21
22
23
24
25
26
27
28
29
30
31
32
33
34
35
36
37
38
package main

import (
"fmt"
)

type Animal interface {
Speak() string
}

Dog struct{}
Cat struct{}
)

func (d Dog) Speak() string {
return "Woof!"
}

func (c Cat) Speak() string {
return "Meow!"
}

func AnimalFactory(animalType string) Animal {
if animalType == "dog" {
return &Dog{}
} else if animalType == "cat" {
return &Cat{}
}
return nil
}

func main() {
dog := AnimalFactory("dog")
fmt.Println(dog.Speak()) // Woof!

cat := AnimalFactory("cat")
fmt.Println(cat.Speak()) // Meow!
}

工厂方法允许创建不同类型的对象,但用户端隐藏了创建逻辑。当对象创建过程比较复杂,需要进行抽象时,这种模式尤其有用。

抽象工厂模式

抽象工厂(Abstract Factory)提供了一个接口,用于创建相关或依赖对象的族,而无需指定它们的具体类。在 Go 中,可以通过定义不同的工厂接口来实现它。

当系统需要独立于其对象的创建、组成和表示方式时,它就非常有用。它允许创建相关对象族。

以下是实现抽象工厂模式的基本示例:

1
2
3
4
5
6
7
8
9
10
11
12
13
14
15
16
17
18
19
20
21
22
23
24
25
26
27
28
29
30
31
32
33
34
35
36
37
38
39
40
41
42
43
44
45
46
47
48
49
50
51
52
53
54
55
56
57
58
59
60
61
62
63
64
65
66
67
68

package main

import (
"fmt"
)

// Define an abstract factory
type (
GUIFactory interface {
CreateButton() Button
CreateCheckbox() Checkbox
}
)

// Define interfaces for products
type (
Button interface {
Press() string
}

Checkbox interface {
Check() string
}

// Implement concrete products for Windows
WindowsButton struct{}
WindowsCheckbox struct{}

// Implement concrete products for Mac
MacButton struct{}
MacCheckbox struct{}

// Implement factories for each platform
WindowsFactory struct{}
MacFactory struct{}
)

func (w *WindowsButton) Press() string { return "Windows Button Pressed" }

func (w *WindowsCheckbox) Check() string { return "Windows Checkbox Checked" }

func (m *MacButton) Press() string { return "Mac Button Pressed" }

func (m *MacCheckbox) Check() string { return "Mac Checkbox Checked" }

func (w *WindowsFactory) CreateButton() Button { return &WindowsButton{} }
func (w *WindowsFactory) CreateCheckbox() Checkbox { return &WindowsCheckbox{} }

func (m *MacFactory) CreateButton() Button { return &MacButton{} }
func (m *MacFactory) CreateCheckbox() Checkbox { return &MacCheckbox{} }

func main() {
// Get a Windows factory
var wf GUIFactory = &WindowsFactory{}
button := wf.CreateButton()
checkbox := wf.CreateCheckbox()

fmt.Println(button.Press()) // Output: Windows Button Pressed
fmt.Println(checkbox.Check()) // Output: Windows Checkbox Checked

var mf GUIFactory = &MacFactory{}
button = mf.CreateButton()
checkbox = mf.CreateCheckbox()

fmt.Println(button.Press()) // Output: Mac Button Pressed
fmt.Println(checkbox.Check()) // Output: Mac Checkbox Checked
}

Builder 模式

构建器模式将复杂对象的构建与其表示分离开来,允许同一构建过程创建不同的表示。它能解决问题:复杂的对象通常是一步一步构建的。构建器模式为创建此类对象提供了灵活的解决方案,分解了实例化过程。

以下是实现构建器模式的基本示例:

1
2
3
4
5
6
7
8
9
10
11
12
13
14
15
16
17
18
19
20
21
22
23
24
25
26
27
28
29
30
31
32
33
34
35
36
37
38
39
40
41
42
43
44
45
46
47
48
49
50
51
52
53
54
55
56
57
58
59
60
61
62
63
64
65
package main

import (
"fmt"
)

// Product to be built
type House struct {
windows string
doors string
roof string
}

// Concrete builder for a villa
type VillaBuilder struct {
house House
}

// Director controls the building process
type Director struct {
builder HouseBuilder
}
)

// Builder interface
type HouseBuilder interface {
SetWindows() HouseBuilder
SetDoors() HouseBuilder
SetRoof() HouseBuilder
Build() *House
}


func (v *VillaBuilder) SetWindows() HouseBuilder {
v.house.windows = "Villa Windows"
return v
}

func (v *VillaBuilder) SetDoors() HouseBuilder {
v.house.doors = "Villa Doors"
return v
}

func (v *VillaBuilder) SetRoof() HouseBuilder {
v.house.roof = "Villa Roof"
return v
}

func (v *VillaBuilder) Build() *House {
return &v.house
}

func (d *Director) Construct() *House {
return d.builder.SetWindows().SetDoors().SetRoof().Build()
}

func main() {
director := &Director{}

// Build a villa
v_builder := &VillaBuilder{}
director.builder = v_builder
villa := director.Construct()
fmt.Println(*villa) // Output: {Villa Windows Villa Doors Villa Roof}
}

在创建需要大量可选配置的复杂对象时,创建者模式非常有用。

原型模式

原型模式允许通过复制现有对象(原型)来创建新对象,而不是从头开始创建。
当创建一个新对象的成本很高,而现有对象又可以克隆重用时,原型模式就派上用场了。

以下是实现原型模式的基本示例

1
2
3
4
5
6
7
8
9
10
11
12
13
14
15
16
17
18
19
20
21
22
23
24
25
26
27
28
29
30
31
32
33
34
35
36
37
38
39
40
41
42
43
44
package main

import (
"fmt"
)

// Cloneable interface
type (
Cloneable interface {
Clone() Cloneable
}
)

// Concrete struct (prototype)
type (
Product struct {
name string
category string
}
)

// Clone method creates a copy of the Product
func (p *Product) Clone() Cloneable {
return &Product{name: p.name, category: p.category}
}

func (p *Product) SetName(name string) {
p.name = name
}

func (p *Product) GetDetails() string {
return fmt.Sprintf("Product Name: %s, Category: %s", p.name, p.category)
}

func main() {
// Original product
original := &Product{name: "Phone", category: "Electronics"}
fmt.Println(original.GetDetails()) // Output: Product Name: Phone, Category: Electronics

// Clone the product and change its name
cloned := original.Clone().(*Product)
cloned.SetName("Smartphone")
fmt.Println(cloned.GetDetails()) // Output: Product Name: Smartphone, Category: Electronics
}

当创建对象的成本很高,而你又想通过复制现有对象来创建多个类似对象时,原型模式就很有效。这种模式通过克隆现有实例来简化对象的创建,而不是从头开始创建新实例。

总结

每种模式都有其特定的用例,选择恰当的设计模式会使代码更有条理、可重用且更易于维护!


]]>
<p class="description"></p> <p><img src="https://" alt="" style="width:100%"></p>
担心你的 Golang 程序内存泄露?看这一篇就够了! https://cloudsjhan.github.io/2024/10/07/担心你的-Golang-程序内存泄露?看这一篇就够了!/ 2024-10-07T02:58:23.000Z 2024-10-07T02:58:46.130Z

本文介绍内存泄漏的常见原因以及如何避免。
无论使用哪种编程语言,内存泄漏都是一个常见问题。本文将说明可能发生内存泄漏的几种情况,让我们学习如何通过研究这些反模式来避免内存泄漏。

未关闭已打开的文件

结束打开文件时,应始终调用其关闭方法。否则可能会导致文件描述符数量达到上限,从而无法打开新文件或连接。这可能会导致 “too many open files”错误。

代码示例 1:不关闭文件导致文件描述符耗尽。

1
2
3
4
5
6
7
8
9
10
11
12
13
func main() {  
files := make([]*os.File, 0)
for i := 0; ; i++ {
file, err := os.OpenFile("test.log", os.O_CREATE|os.O_APPEND|os.O_WRONLY, 0644)
if err != nil {
fmt.Printf("Error at file %d: %v\n", i, err)
break
} else {
_, _ = file.Write([]byte("Hello, World!"))
files = append(files, file)
}
}
}

输出:

1
Error at file 61437: open test.log: too many open files

在我的 Mac 上,一个进程最多可以打开 61 440 个文件句柄。 Go 进程通常会打开三个文件描述符(stderr、stdout、stdin),因此最多只能打开 61437 个文件。可以手动调整这一限制。

未关闭 http.Response.Body

Go 有比较容易犯的错误,即忘记关闭 HTTP 请求的正文会导致内存泄漏。例如

代码示例 2:未关闭 HTTP 主体导致内存泄漏。

1
2
3
4
5
6
7
8
9
10
11
12
13
func makeRequest() {  
client := &http.Client{}
req, err := http.NewRequest(http.MethodGet, "http://localhost:8081", nil)
res, err := client.Do(req)
if err != nil {
fmt.Println(err)
}
_, err = ioutil.ReadAll(res.Body)
// defer res.Body.Close()
if err != nil {
fmt.Println(err)
}
}

字符串和切片内存泄漏

Go 规范没有明确说明子串是否与其原始字符串共享内存。不过,编译器允许这种行为,这通常是好事,因为它减少了内存和 CPU 的使用。但有时这会导致暂时的内存泄露。

代码示例 3:字符串导致的内存泄漏。

1
2
3
4
5
6
7
8
9
10
11
12
13
14
15
16
17
18
19
20
21
22
23
24
25
26
27
28
29
30
31
32
33
34
35
36
37
38
39
func main() {
Demo1()
runtime.GC()
time.Sleep(1 * time.Second)
exit()
}
func exit() {
fmt.Println("Saving heap profile...")
// create a heap profile
f, err := os.Create("heap.pprof")
if err != nil {
log.Fatal("could not create heap profile: ", err)
}
runtime.GC()
//time.Sleep(1 * time.Second)
// heap profile
if err = pprof.WriteHeapProfile(f); err != nil {
log.Fatal("could not write heap profile: ", err)
}
fmt.Println("Heap profile saved in heap.pprof")
_ = f.Close()
}

var packageStr1 []string

func Demo1() {
for i := 0; i < 10; i++ {
s := createStringWithLengthOnHeap(1 << 20) //1M
packageStr1 = append(packageStr1, s[:50])
}
}

func createStringWithLengthOnHeap(i int) string {
s := make([]byte, i)
for j := 0; j < i; j++ {
s[j] = byte(j % 256 % (rand.Intn(256) + 1))
}
return string(s)
}

为了防止临时内存泄漏,我们可以使用 strings.Clone()。

代码示例 4:使用 strings.Clone() 避免临时内存泄漏。

1
2
3
4
5
6
func Demo1() {  
for i := 0; i < 10; i++ {
s := createStringWithLengthOnHeap(1 << 20) // 1MB
packageStr1 = append(packageStr1, strings.Clone(s[:50]))
}
}

Goroutine Handler

大多数内存泄漏都是由于程序泄漏造成的。例如,下面的示例会迅速耗尽内存,导致 OOM(内存不足)错误。
代码示例 5:goroutine 处理程序泄漏。

1
2
3
4
5
6
for {  
go func() {
time.Sleep(1 * time.Hour)
}()
}
}

滥用 Channels

不正确地使用 channel 也很容易导致程序泄漏。对于无缓冲通道,在向通道写入数据之前,生产者和消费者都必须准备就绪,否则通道就会阻塞。在下面的示例中,函数提前退出,导致了程序泄漏。

代码示例 6:非缓冲通道滥用导致程序泄漏。

1
2
3
4
5
6
7
8
9
10
11
12
13
func Example() {
a := 1
c := make(chan error)
go func() {
c <- err
return
}()
// Example exits here, causing a goroutine leak.
if a > 0 {
return
}
err := <-c
}

只需将其改为缓冲通道即可解决这一问题: c := make(chan error, 1)

滥用 range with Channels

可以使用 range 遍历通道。但是,如果通道为空,range 将等待新数据,可能会阻塞 goroutine。

代码示例 7:滥用范围导致程序泄漏。

1
2
3
4
5
6
7
8
9
10
11
12
13
14
15
16
17
18
19
20
func main() {  
wg := &sync.WaitGroup{}
c := make(chan any, 1)
items := []int{1, 2, 3, 4, 5}
for _, i := range items {
wg.Add(1)
go func() {
c <- i
}()
}
go func() {
for data := range c {
fmt.Println(data)
wg.Done()
}
fmt.Println("close")
}()
wg.Wait()
time.Sleep(1 * time.Second)
}

要解决这个问题,请在调用 wg.Wait() 后关闭通道。

误用 runtime.SetFinalizer.

如果两个对象都使用 runtime.SetFinalizer 进行了设置,并且它们相互引用,那么即使它们不再使用,也不会被垃圾回收。

time.Ticker

这是 Go 1.23 之前的一个问题。如果不调用 ticker.Stop(),可能会导致内存泄漏。Go 1.23 已修复了这个问题。

滥用 defer

虽然使用延迟释放资源不会直接导致内存泄漏,但它会通过两种方式导致临时内存泄漏:

  • 执行时间:延迟总是在函数结束时执行。如果函数运行时间过长或从未结束,则 defer 中的资源可能无法及时释放。

  • 内存使用:每个延迟都会在内存中增加一个调用点。如果在循环内使用,可能会导致临时内存泄漏。

代码示例 8:延迟导致的临时内存泄漏。

1
2
3
4
5
6
7
8
9
10
11
func ReadFile(files []string) {  
for _, file := range files {
f, err := os.Open(file)
if err != nil {
fmt.Println(err)
return
}
// do something
defer f.Close()
}
}

这段代码会造成临时内存泄漏,并可能导致 “too many open files” 的错误。除非必要,否则应避免过度使用延迟。

结论

本文介绍了 Go 中可能导致内存泄漏的几种行为,其中最常见的是 goroutine 泄漏。通道的不当使用,尤其是选择和范围的不当使用,会增加检测泄漏的难度。当遇到内存泄漏时,pprof 可以帮助快速定位问题,确保我们编写出更健壮的代码。References


]]>
<p class="description"></p> <p><img src="https://" alt="" style="width:100%"></p>
Varint 及其在 Golang 中的应用 https://cloudsjhan.github.io/2024/09/29/Varint-及其在-Golang-中的应用/ 2024-09-29T14:22:10.000Z 2024-09-29T14:22:29.943Z

Go 标准库中有一个 varint 的内置实现,可以在 encoding/binary/varint.go 中找到。这个实现类似于 protobuf 中使用的 varint。利用 Golang 标准库的 varint 源代码,我们将系统地学习和复习 varint 的概念。 如果您熟悉 protobuf,您可能已经知道所有整数类型(除了固定类型,如 fixed32 和 fixed64)都使用 varint 编码。
varint 主要解决了两个问题:

  • 空间效率:以 uint64 为例,它可以表示 18,446,744,073,709,551,615 这样大的数值。但在大多数实际应用中,我们的整数值要小得多。如果你的系统需要处理小到 1 的值,那么在传输过程中,你仍然需要使用 8 个字节来表示这个值,这就浪费了空间,因为大多数字节并不存储有用的数据。varint 编码使用长度可变的字节序列来表示整数,从而减少了较小值所需的空间。
  • 兼容性:varint 允许我们在不改变编码/解码逻辑的情况下处理不同大小的整数。这意味着字段可以从较小的类型(如 uint32)升级到较大的类型(如 uint64),而不会破坏向后兼容性。

本文将深入研究 Golang varint 的实现,探讨其设计原理以及如何应对负数编码的挑战。

varint 的设计原则

varint 的设计基于简单的原则:

  • 7 位分组:整数的二进制表示分为 7 位组。从最小有效位到最大有效位,每个 7 位组都是一个单位。

  • 延续位:在每个 7 位组之前添加一个标志位,形成一个 8 位字节。如果后面有更多字节,则标志位设置为 1;否则设置为 0。

例如,整数 uint64(300) 的二进制表示为 100101100。将其分为两组-10 和 0101100,再加上标志位,就得到两个字节:00000010 和 10101100,这就是 300 的 varint 编码。与使用 4 个字节的 uint64 相比,varint 减少了 75% 的存储空间。

1
2
3
4
5
6
7
8
9
10
// list1:  uint64 to varint
func main() {
v := uint64(300)
bytes := make([]byte, 0)
bytes = binary.AppendUvarint(bytes, v)
fmt.Println(len(bytes))
for i := len(bytes); i > 0; i-- {
fmt.Printf("%08b ", bytes[i-1])
}
}

varint 表示无符号整数

Go 标准库提供了两组 varint 函数:一组用于无符号整数(PutUvarint、Uvarint),另一组用于有符号整数(varint、Putvarint)。 让我们先看看无符号整数 varint 的实现:

1
2
3
4
5
6
7
8
9
10
11
// list2: go src PutUvarint
func PutUvarint(buf []byte, x uint64) int {
i := 0
for x >= 0x80 {
buf[i] = byte(x) | 0x80
x >>= 7
i++
}
buf[i] = byte(x)
return i + 1
}

代码中有一个基本常数:0x80 相当于二进制代码 1000 0000。这个常数对后面的逻辑非常重要:

  • x >= 0x80:这将检查 x 是否需要超过 7 位的表示。如果需要,则需要拆分 x。

  • byte(x) | 0x80:这将对 0x80(1000 0000)进行位操作,确保最高位设置为 1,并提取 x 的最低 7 位。

  • x >>= 7:将 x 右移 7 位,以处理下一组。

  • buf[i] = byte(x):当循环结束时,最高位全为 0,因此无需进一步操作。

Uvarint 与 PutUvarint 相反。

需要注意的是:varint 将整数分成 7 位组,这意味着大整数可能会面临效率低下的问题。例如,uint64 的最大值需要 10 个字节,而不是通常的 8 个字节(64/7 ≈ 10)。

负数编码之字形编码

虽然 varint 的效率很高,但它并不考虑负数。在计算中,数字是以 2 的补码形式存储的,这意味着一个小的负数可能有一个很大的二进制表示。 例如,32 位形式的 -5 表示为 1111111111111111111111111011,在 varint 编码中需要 5 个字节
Go 使用之字形编码来解决这个问题:

  • 对于正数 n,将它们映射为 2n。
  • 对于负数-n,将其映射为 2n-1。
    例如,对 int32(-5) 进行 “之 “字形编码后,其值变为 9(000000000000000000001001),而 varint 只需 1 个字节即可表示该值。

下面是 Golang 的实现:

1
2
3
4
5
6
7
8
// go src Putvarint
func Putvarint(buf []byte, x int64) int {
ux := uint64(x) << 1
if x < 0 {
ux = ^ux
}
return PutUvarint(buf, ux)
}

从代码中我们可以看到,对于有符号整数 varint 的实现,Go 标准库将其分为两个步骤:

  • 首先,使用 ZigZag 编码转换整数。
  • 然后,使用 varint 对转换后的值进行编码。

对于负数,还有一个额外的步骤:ux = ^ux。这部分可能会让人感到困惑–为什么这种变换的结果是 2n -1?

假设我们有一个整数 -n,我们可以大致推导出这个过程:

  • 首先,将原值左移,然后倒置。结果是 2*(~(-n)) + 1。

  • 负数的二进制是其绝对值加 1 的位反转。那么,我们如何从二的补码得出绝对值呢?有这样一个公式|A| = ~A + 1。

  • 将此公式代入第一步:2*(n - 1)+ 1 = 2n - 1。这与负数的 ZigZag 编码完全吻合。

在 Go 标准库中,调用 PutUvarint 只应用 varint 编码,而调用 PutVarint 则首先应用 ZigZag 编码,然后再应用 varint 编码。

在 protobuf 中,如果类型是 int32、int64、uint32 或 uint64,则只使用 varint 编码。但是,对于 sint32 和 sint64,首先使用 ZigZag 编码,然后使用 varint 编码。

当 varint 不适用时

尽管 varint 有很多优点,但它并不是所有情况下都适用:

  • 大整数:对于大整数,varint 编码的效率可能低于定长编码。
  • 随机数据访问:由于 varint 使用可变长度,直接索引特定整数具有挑战性。
  • 频繁的数学运算:变量编码数据需要在运算前解码,可能会影响性能。
  • 安全敏感型应用:varint 编码可能会泄露原始整数大小的信息,这在安全环境中是不可接受的。

]]>
Go
Golang 关于 encoding/json/v2 包的新提议 https://cloudsjhan.github.io/2024/09/29/Golang-关于-encoding-json-v2-包的新提议/ 2024-09-29T13:56:41.000Z 2024-09-29T13:57:37.577Z

背景介绍

JSON 是一种轻量级数据交换格式,自十年前 Go 的编码/json 软件包问世以来,开发人员一直对其灵活的特性青睐有加。开发人员可以通过 struct 标记自定义 struct 字段的 JSON 表示法,也允许 Go 类型自定义自己的 JSON 表示法。然而,随着 Go 语言和 JSON 标准的发展,一些功能缺陷和性能限制也逐渐暴露出来。

  • 功能缺失:例如,无法为 time.Time 类型指定自定义格式,无法在序列化过程中省略特定的 Go 值等。
  • API 的缺陷:例如,没有简单的方法从 io.Reader.Reader 中正确反序列化 JSON。
  • 性能限制:标准 json 软件包的性能并不令人满意,尤其是在处理大量数据时。
  • 行为缺陷:例如,JSON 语法的错误处理不够严格,反序列化不区分大小写等。

与 math/v2 一样,Go 官方也提出了 encoding/json/v2 来解决上述问题。本文的主要目的是分析在 encoding/json 中有关空值的一些问题,以及在 encoding/json/v2 中如何解决这些问题。本文不涉及 encoding/json/v2 中的其他修改。

omitempty 行为

encoding/json 包中,对 omitempty 有如下描述:

omitemptyoption 指定,如果字段的值为空(定义为 false、0、nil 指针、nil 接口值以及任何空数组、片、映射或字符串),则编码中应省略该字段。

这种预定义的 nil value 的判断逻辑并不能满足所有实际场景的需要。让我们来看一个例子:

1
2
3
4
5
6
7
8
9
10
11
12
13
14
15
16
17
18
19
20
21
22
type Post struct {  
Id int64 `json:"id,omitempty"`
CreateTime time.Time `json:"create_time,omitempty"`
TagList []Tag `json:"tag_list,omitempty"`
Name string `json:"name,omitempty"`
Score float64 `json:"score,omitempty"`
Category Category `json:"category,omitempty"`
LikePost map[string]Post `json:"like,omitempty"`
}
type Tag struct {
ID string `json:"id"`
Name string `json:"name"`
}
type Category struct {
ID float64 `json:"id"`
Name string `json:"name"`
}

func main() {
b, _ := json.Marshal(new(Post))
fmt.Println(string(b))
}

输出结果为:

1
{"create_time":"0001-01-01T00:00:00Z","category":{"id":0,"name":""}}

虽然在 Post 的每个字段中都添加了 omitempty,但结果并不尽如人意。

  • omitempty 不能处理空结构,如 Post.Category
  • omitempty 处理 time.Time 的方式不是我们理解的 UTC =0,即 1970-01-01 00:00:00,而是 0001-01-01T00:00:00Z。

omitzero Tag

encoding/json/v2 中,将添加一个新标签 omitzero,它增加了两个功能来解决上述两个问题。(此功能仍在开发中,开发者可以通过 go-json-experiment/json 提前体验新功能)

  • 更好地处理时间类型
  • 支持自定义 IsZero 函数,例如以下代码:
1
2
3
4
5
6
7
8
9
10
11
12
13
14
15
16
17
18
19
20
21
22
23
24
25
26
27
28
29
30
31
32
33
34
35
36
37
package main  

import (
"encoding/json"
"fmt" v2_json "github.com/go-json-experiment/json"
"math" "time")

type Post struct {
Id int64 `json:"id,omitempty,omitzero"`
CreateTime time.Time `json:"create_time,omitempty,omitzero"`
TagList []Tag `json:"tag_list,omitempty"`
Name string `json:"name,omitempty"`
Score ScoreType `json:"score,omitempty,omitzero"`
Category Category `json:"category,omitempty,omitzero"`
LikePost map[string]Post `json:"like,omitempty"`
}
type ScoreType float64

func (s ScoreType) IsZero() bool {
return s < math.MinInt64
}

type Tag struct {
ID string `json:"id"`
Name string `json:"name"`
}
type Category struct {
ID float64 `json:"id"`
Name string `json:"name"`
}

func main() {
v1String, _ := json.Marshal(new(Post))
fmt.Println(string(v1String))
v2String, _ := v2_json.Marshal(new(Post))
fmt.Println(string(v2String))
}

与 encoding/json 相比,encoding/json/v2 解决了上述问题。

输出结果为:

1
2
{"create_time":"0001-01-01T00:00:00Z","category":{"id":0,"name":""}}
{"score":0}

结论

通过引入 omitzero 标记,Go 在解决 JSON 编码中 nil value 处理的痛点方面迈出了非常关键的一步。这一解决方案不仅满足了开发人员对更灵活的 nil 值定义的需求,还保持了与现有系统的兼容性。omitzero 的登陆时间尚未确定,最早也要等到 Go 1.24 版本。

此外,encoding/xml 和其他软件包也将遵循 json 软件包,并添加 omitzero 标记。encoding/json/v2 还包括其他方面的更新,例如性能。感兴趣的 Gophers 可以提前了解这些变化,本博客也将继续关注这一提议。


]]>
<p class="description"></p> <p><img src="https://" alt="" style="width:100%"></p>
构建由大型语言模型(LLM)驱动的 Go 应用程序 https://cloudsjhan.github.io/2024/09/14/构建由大型语言模型(LLM)驱动的-Go-应用程序/ 2024-09-14T13:01:49.000Z 2024-09-14T13:08:16.868Z

Eli Bendersky 2024年9月12日

随着过去一年大型语言模型(LLM)及其相关工具(如嵌入模型)的能力显著增长,越来越多的开发者开始考虑将 LLM 集成到他们的应用程序中。

由 于LLM 通常需要专用硬件和大量的计算资源,它们最常见的形式是作为提供 API 访问的网络服务。这就是领先的 LLM 如 OpenAI 或Google Gemini 的 API 的工作方式;即使是运行你自己的 LLM 工具,如 Ollama,也会将 LLM 包装在 REST API 中供本地使用。此外,利用 LLM 的开发者通常还需要辅助工具,如向量数据库,这些通常也作为网络服务部署。

换句话说,LLM 驱动的应用程序很像其他现代云原生应用程序:它们需要对 REST 和 RPC 协议、并发性和性能有出色的支持。这些恰好是Go 擅长的领域,使它成为编写 LLM 驱动应用程序的绝佳语言。

这篇博客文章通过一个简单的例子,展示了如何使用 Go 为 LLM 驱动的应用程序工作。它首先描述了演示应用程序要解决的问题,然后展示了几个变体的应用程序,它们都完成了相同的任务,但使用了不同的包来实现。这篇帖子的所有演示代码都可以在线获取

用于问答的 RAG 服务器

LLM 驱动应用程序的一种常见技术是 RAG - Retrieval Augmented Generation。RAG 是为特定领域的交互定制 LLM 知识库的最可扩展方式之一。

我们将用 Go 构建一个 RAG 服务器。这是一个 HTTP 服务器,为用户提供两个操作:

  • 向知识库添加文档
  • 向 LLM 提问有关这个知识库的问题

在典型的现实世界场景中,用户会向服务器添加一批文档,然后开始提问。例如,一家公司可以用内部文档填充 RAG 服务器的知识库,并使用它为内部用户提供 LLM 驱动的问答能力。

以下是显示我们服务器与外部世界交互的图:

除了用户发送 HTTP 请求(上述两个操作)之外,服务器还与以下内容交互:

  • 一个嵌入模型,用于计算提交的文档和用户问题的向量嵌入
  • 一个向量数据库,用于存储和高效检索嵌入。
  • 一个 LLM,用于根据从知识库收集的上下文提出问题。
    具体来说,服务器向用户公开两个HTTP端点:

  • /add/: POST {“documents”: [{“text”: “…”}, {“text”: “…”}, …]}: 向服务器提交一系列文本文档,以便添加到其知识库中。对于此请求,服务器:

    • 使用嵌入模型为每个文档计算向量嵌入。
    • 将文档及其向量嵌入存储在向量数据库中。
  • /query/: POST {“content”: “…”}: 向服务器提交一个问题。对于此请求,服务器:
    • 使用嵌入模型计算问题的向量嵌入。
    • 使用向量数据库的相似性搜索找到知识库中最相关文档。
    • 使用简单的提示工程将问题重新表述为在步骤(2)中找到的最相关文档作为上下文,并将其发送给LLM,将答案返回给用户。

我们的演示使用的服务包括:

  • Google Gemini API 用于 LLM 和嵌入模型。
  • Weaviate 作为本地托管的向量数据库;Weaviate 是一个用 Go 实现的开源向量数据库。
  • 应该很容易用其他等效服务替换这些。事实上,这就是第二个和第三个服务器变体的全部内容!我们将从直接使用这些工具的第一个变体开始。

直接使用 Gemini API 和 Weaviate

Gemini API 和 Weaviate 都有方便的 Go SDK(客户端库),我们的第一个服务器变体直接使用这些。这个变体的完整代码在这个目录中。

我们不会在这篇博客文章中复制整个代码,但在阅读时请注意以下几点:

  • 结构:代码结构对于任何写过Go HTTP服务器的人来说都很熟悉。Gemini和Weaviate的客户端库被初始化,客户端存储在传递给HTTP处理程序的状态值中。
  • 路由注册:使用 Go 1.22 中引入的路由增强功能,我们的服务器的 HTTP 路由很容易设置:

    1
    2
    3
    mux := http.NewServeMux()
    mux.HandleFunc("POST /add/", server.addDocumentsHandler)
    mux.HandleFunc("POST /query/", server.queryHandler)
  • 并发性:我们的服务器的 HTTP 处理程序通过网络访问其他服务并等待响应。这对 Go 来说不是问题,因为每个 HTTP 处理程序都在自己的 goroutine 中并发运行。这个 RAG 服务器可以处理大量并发请求,每个处理程序的代码都是线性和同步的。

  • 批量 API:由于 /add/ 请求可能提供大量文档添加到知识库,服务器利用嵌入(embModel.BatchEmbedContents)和 Weaviate DB(rs.wvClient.Batch)的批量 API 以提高效率。

使用 LangChainGo

我们的第二个 RAG 服务器变体使用 LangChainGo 来完成相同的任务。

LangChain 是一个流行的 Python 框架,用于构建 LLM 驱动的应用程序。LangChainGo 是它的 Go 框架。该框架有一些工具,可以将应用程序构建为模块化组件,并支持许多 LLM 提供商和向量数据库的通用 API。这允许开发者编写可以与任何提供商一起工作的代码,并很容易地更改提供商。

这个变体的完整代码在这个目录中。在阅读代码时,你会注意到两件事:

  • 首先,它比之前的变体稍短。LangChainGo 负责包装向量数据库的完整 API 到通用接口中,初始化和处理 Weaviate 所需的代码更少。
  • 其次,LangChainGo API 使得切换提供商相当容易。假设我们想用另一个向量数据库替换 Weaviate;在我们之前的变体中,我们将不得不重写所有与向量数据库接口的代码以使用新的 API。有了像 LangChainGo 这样的框架,我们就不再需要这样做了。只要 LangChainGo 支持我们感兴趣的新向量数据库,我们应该能够替换我们服务器中的几行代码,因为所有数据库都实现了一个通用接口:
    1
    2
    3
    4
    type VectorStore interface {
    AddDocuments(ctx context.Context, docs []schema.Document, options ...Option) ([]string, error)
    SimilaritySearch(ctx context.Context, query string, numDocuments int, options ...Option) ([]schema.Document, error)
    }

使用 Genkit for Go

今年早些时候,Google 为 Go 引入了 Genkit - 一个构建 LLM 驱动应用程序的新开源框架。Genkit 与 LangChain 有一些共同的特点,但在其他方面有所不同。

像LangChain一样,它提供了可以由不同提供商(作为插件)实现的通用接口,从而使从一个提供商切换到另一个提供商变得更简单。然而,它并不试图规定不同的LLM组件如何交互;相反,它专注于生产特性,如提示管理和工程,以及集成开发工具的部署。

我们的第三个RAG服务器变体使用Genkit for Go来完成相同的任务。它的完整代码在这个目录中。

这个变体与LangChainGo非常相似 - 使用LLM、嵌入器和向量数据库的通用接口,而不是直接提供商API,使得从一个切换到另一个变得更容易。此外,使用Genkit将LLM驱动的应用程序部署到生产环境要容易得多;我们没有在我们的变体中实现这一点,但如果你感兴趣,可以阅读文档

总结 - Go 用于 LLM 驱动的应用程序

这篇文章中的示例只是构建 Go 中 LLM 驱动应用程序的可能性的一小部分。它展示了如何用相对较少的代码构建一个功能强大的 RAG 服务器;最重要的是,由于 Go 的一些基本特性,这些示例具有相当程度的生产准备度。

与LLM服务合作通常意味着向网络服务发送 REST 或 RPC 请求,等待响应,根据该响应向其他服务发送新请求等等。Go 在所有这些方面都表现出色,为管理并发性和处理网络服务的复杂性提供了出色的工具。

此外,Go 作为云原生语言的卓越性能和可靠性使其成为实现 LLM 生态系统更基本构建块的自然选择。一些例子包括 Ollama、LocalAI、Weaviate 或 Milvus 等项目。


]]>
<p class="description"></p> <p><img src="https://" alt="" style="width:100%"></p>
探索 Goja:Golang 中的 JavaScript 运行时 https://cloudsjhan.github.io/2024/09/11/探索-Goja:Golang-中的-JavaScript-运行时/ 2024-09-11T03:44:18.000Z 2024-09-11T03:44:43.358Z

探索 Goja:Golang 中的 JavaScript 运行时

这篇文章探讨了 Goja,这是 Golang 生态系统中的一个 JavaScript 运行时库。Goja 作为一个在 Go 应用程序中嵌入 JavaScript 的强大工具,提供了独特的优势,尤其是在操作数据和提供不需要 go build 过程中的 SDK。

背景:Goja 的需求

在我的项目中,我在查询和操作大型数据集时遇到了挑战。最初,一切都是用 Go 编写的,这在效率上是有利的,但在处理复杂的 JSON 响应时变得笨拙。虽然 Go 的极简主义方法通常是一个优势,但特定任务所需的冗长性减慢了我的速度。

使用嵌入式脚本语言可以简化这个过程,这让我探索了各种选项。Lua 是我的首选,因为它以轻量级和可嵌入而闻名。但我很快发现,Go 中的 Lua 库在实现、版本(5.1、5.2 等)和活跃支持方面参差不齐。

然后我调查了 Go 生态系统中其他流行的脚本语言。我考虑了 ExprV8Starlark 等选项,但最终 Goja 成为了最有希望的候选者。

这里是我在这些库上进行基准测试的 GitHub 仓库,测试了它们的性能和与 Go 的集成便利性。

为什么选择 Goja?

Goja 因其与 Go 结构体的无缝集成而赢得了我的青睐。当你将一个 Go 结构体分配给 JavaScript 运行时中的一个值时,Goja 会自动推断字段和方法,使它们在 JavaScript 中可访问,而不需要单独的桥接层。它利用 Go 的反射能力来调用这些字段上的 getter 和 setter,提供了 Go 和 JavaScript 之间强大而透明的交互。

让我们通过一些示例来看看 Goja 的实际应用。这些示例突出了我发现有用的特性,但我希望在文档中有更多示例。

赋值和返回值

首先,让我们来看一个简单的例子,我们将一个从 1 到 100 的整数数组从 Go 传递到 JavaScript 运行时,并过滤出偶数值。

1
2
3
4
5
6
7
8
9
10
11
12
13
14
15
16
17
18
19
20
21
22
23
24
25
26
27
28
29
30
31
32
33
34
35
36
37
38
39
40
41
42
package main

import (
"fmt"

"github.com/dop251/goja"
)

func main() {
vm := goja.New()

// 从 1 到 100 传递一个整数数组
values := []int{}
for i := 1; i <= 100; i++ {
values = append(values, i)
}

// 定义 JavaScript 代码以过滤偶数值
script := `
values.filter((x) => {
return x % 2 === 0;
})
`

// 在 JavaScript 运行时中设置数组
vm.Set("values", values)

// 运行脚本
result, err := vm.RunString(script)
if err != nil {
panic(err)
}

// 将结果转换回 Go 的空接口切片
filteredValues := result.Export().([]interface{})

fmt.Println(filteredValues)
// 输出:[2 4 6 8 10 12 14 16 18 20 22 24 26 28 30 32 34 36 38 40 42 44 46 48 50 52 54 56 58 60 62 64 66 68 70 72 74 76 78 80 82 84 86 88 90 92 94 96 98 100]

first := filteredValues[0].(int64)
fmt.Println(first)
}

在这个例子中,你可以看到在 Goja 中遍历数组不需要显式类型注释。Goja 能够根据内容推断数组的类型,这得益于 Go 的反射机制。在过滤值并返回结果时,Goja 将结果转换回空接口切片([]interface{})。这是因为 Goja 需要在 Go 的静态类型系统中处理 JavaScript 的动态类型。

如果你需要在 Go 中处理结果值,你将不得不执行类型断言以提取整数。在内部,Goja 将所有整数表示为 int64。

结构体和方法调用

接下来,让我们探索 Goja 如何处理 Go 结构体,特别关注方法和导出字段。

1
2
3
4
5
6
7
8
9
10
11
12
13
14
15
16
17
18
19
20
21
22
23
24
25
26
27
28
29
30
31
32
33
34
35
36
37
38
39
40
41
42
43
package main

import (
"fmt"
"github.com/dop251/goja"
)

type Person struct {
Name string
age int
}

// 获取年龄的方法(未导出)
func (p *Person) GetAge() int {
return p.age
}

func main() {
vm := goja.New()

// 创建一个新的 Person 实例
person := &Person{
Name: "John Doe",
age: 30,
}

// 在 JavaScript 运行时中设置 Person 结构体
vm.Set("person", person)

// JavaScript 代码以访问结构体的字段和方法
script := `
const name = person.Name; // 访问导出字段
const age = person.GetAge(); // 通过 getter 访问未导出字段
name + " is " + age + " years old.";
`

result, err := vm.RunString(script)
if err != nil {
panic(err)
}

fmt.Println(result.String()) // 输出:John Doe is 30 years old.
}

在这个例子中,我定义了一个 Person 结构体,它有一个导出的 Name 字段和一个未导出的 age 字段。GetName 方法是导出的。当从 JavaScript 访问这些字段和方法时,Goja 遵循结构体上的命名约定。方法 GetAge 被访问为 GetName。

有一个模式是通过 FieldNameMapper 将 JavaScript 命名约定的小驼峰式转换为 Golang 命名约定。这允许 Go 方法 GetAge 在 JavaScript 调用中被调用为 getAge。

异常处理

当 JavaScript 中发生异常时,Goja 使用标准的 Go 错误处理来管理它。让我们探索一个运行时异常的例子——除以零。

1
2
3
4
5
6
7
8
9
10
11
12
13
14
15
16
17
18
19
20
21
22
23
24
25
26
27
28
29
30
31
package main

import (
"errors"
"fmt"

"github.com/dop251/goja"
)

// 触发除以零错误的 JavaScript 代码
const script = `
// 在 JavaScript 中使用 BigInt 表示法
const a = 1n / 0n;
`

func main() {
vm := goja.New()

// 执行 JavaScript 代码
_, err := vm.RunString(script)

// 处理发生的任何错误
var exception *goja.Exception
if errors.As(err, &exception) {
fmt.Printf("JavaScript error: %s\n", exception.Error())
// 输出:JavaScript error: RangeError: Division by zero at <eval>:1:1(3)
} else if err != nil {
// 处理其他类型的错误(如果有)
fmt.Printf("Error: %s\n", err.Error())
}
}

返回的错误值是 *goja.Exception 类型,它提供了有关引发 JavaScript 异常的信息以及失败的位置。虽然我没有强烈的需求去检查这些错误之外的记录它们到像 New Relic 或 DataDog 这样的服务,但 Goja 确实提供了这样做的工具,如果需要的话。

此外,Goja 可以引发其他类型的异常,如 goja.StackOverflowError、goja.InterruptedError 和 *goja.CompilerSyntaxError,这些异常对应于解释器的特定问题。这些异常在处理执行 JavaScript 代码的客户端时,有助于处理和报告,特别是。

使用 VM 池沙箱用户代码

在开发我的应用程序时,我注意到初始化 VM 需要相当长的时间。每个 VM 都需要在运行时对用户可用的全局模块。Go 提供了 sync.Pool 来帮助重用对象,这非常适合我的情况,避免了沉重的初始化开销。

下面是一个 Goja VM 池的例子:

1
2
3
4
5
6
7
8
9
10
11
12
13
14
15
16
17
18
19
20
21
22
23
24
25
26
27
28
29
30
31
32
33
34
35
36
37
38
39
40
41
42
package main

import (
"fmt"
"sync"

"github.com/dop251/goja"
)

var vmPool = sync.Pool{
New: func() interface{} {
vm := goja.New()

// 在每个 VM 中定义全局函数
vm.Set("add", func(a, b int) int {
return a + b
})

// ... 设置其他全局值 ...

return vm
},
}

func main() {
vm := vmPool.Get().(*goja.Runtime)
// 将 VM 放回池中重用
defer vmPool.Put(vm)

script := `
const result = add(5, 10);
result;
`

value, err := vm.RunString(script)
if err != nil {
panic(err)
}

fmt.Println("Result:", value.Export())
// 结果:15
}

由于 sync.Pool 有详细的文档,让我们专注于 JavaScript 运行时。在这个例子中,用户声明了一个变量 result,它的值被返回。然而,我们遇到了一个限制:VM 不能像现在这样重用。

全局命名空间已经被变量 result 污染了。如果我用同一个池重新运行相同的代码,我会收到以下错误:SyntaxError: Identifier ‘result’ has already been declared at :1:1(0)。有一个 GitHub 问题推荐每次清除 result 的值。然而,我发现这种模式由于在处理用户提供的代码时增加的复杂性而不切实际。

到目前为止,我给出的例子都是预定义代码的演示。然而,我的应用程序允许用户在 Goja 运行时中提供自己的代码。这需要一些实验、探索和采用模式来避免“已经声明”的错误。

1
2
3
4
value, err := vm.RunString("(function() {" + userCode + "})()")
if err != nil {
panic(err)
}

沙箱用户代码的最终解决方案涉及在它自己的范围内执行 userCode 在一个匿名函数中。由于函数没有命名,它没有被全局分配,因此不需要清理。经过一些基准测试后,我确认垃圾收集有效地清理了它。

结论

我们已经解锁了一种灵活高效的方式来处理复杂的脚本任务,而不会牺牲性能。这种方法大大减少了在繁琐任务上花费的时间,让你有更多的时间专注于其他重要的方面,并通过提供无缝和响应迅速的脚本环境来增强整体用户体验。


]]>
<p class="description"></p> <p><img src="https://" alt="" style="width:100%"></p>
在Go 1.23 及更高版本中使用 Telemetry https://cloudsjhan.github.io/2024/09/08/在Go-1-23-及更高版本中使用-Telemetry/ 2024-09-08T12:39:44.000Z 2024-09-08T12:40:08.231Z

Robert Findley
2024年9月3日

Go 1.23 提供了一种新的方式来帮助改进 Go 工具链。通过启用 Telemetry,可以选择与 Go 团队共享有关工具链程序及其使用情况的数据。这些数据将帮助 Go 贡献者修复错误,避免退步,并做出更好的决策。

默认情况下,Go Telemetry 的数据仅存储在的本地计算机上。如果启用上传,用户数据的有限子集将每周发布到 telemetry.go.dev

从 Go 1.23 开始,可以使用以下命令启用本地telemetry 数据的上传:

1
go telemetry on

要禁用甚至本地遥测数据收集,请运行以下命令:

1
go telemetry off

Telemetry 文档包含了更详细的实现描述。

Go Telemetry 的由来

虽然软件遥测并不是一个新概念,但 Go 团队经历了多次迭代,寻找符合 Go 对性能、可移植性和透明度要求的 Telemetry 实现。

最初的设计旨在尽可能不显眼、开放和保护隐私,以至于默认情况下可以接受启用,但许多用户在漫长的公开讨论中提出了担忧,最终改变了设计,要求远程上传需要用户明确同意。

新的设计在 2023 年 4 月被接受,并在那个夏天实施。

Telemetry in gopls

Go Telemetry 的第一个迭代在 2023 年 10 月的 Go 语言服务器 gopls 的 v0.14 版本中发布。发布后,大约有 100 名用户启用了上传,可能是受到发布说明或Gophers Slack 频道讨论的激励,数据开始流入。不久,遥测在 gopls 中发现了第一个错误:

Dan 在他上传的 telemetry 数据中注意到的堆栈跟踪导致了一个错误报告和修复。值得一提的是,我们并不知道是谁报告了这个堆栈。

IDE Prompting

虽然看到遥测在实践中起作用是很好的,我们也很感激那些早期采用者的支持,但 100 名参与者并不足以测量我们想要测量的类型。

正如 Russ Cox 在他最初的博客文章中指出的,遥测默认关闭的一个缺点是需要不断鼓励参与。为了维持足够大的样本量以进行有意义的定量数据分析,并代表用户群体,需要进行外展。虽然博客文章和发布说明可以提高参与度(如果您在阅读本文后启用遥测,我们将不胜感激!),但它们会导致样本偏差。例如,我们在 gopls 中的遥测早期采用者中几乎未收到来自 GOOS=windows 的数据。

为了帮助接触更多用户,我们在 VS Code Go 插件中引入了一个提示,询问用户是否想要启用遥测:

VS Code 显示的遥测提示。
截至这篇博客文章,该提示已向 5% 的 VS Code Go 用户推出,遥测样本已增长到大约每周 1800 名参与者:

每周上传与提示率,提示有助于接触更多用户。
(最初的增长可能归因于提示所有 VS Code Go 扩展的用户)。

然而,它引入了明显倾向于 VS Code 用户的偏差,与最近的 Go 调查结果相比:

我们怀疑 VS Code 在 telemetry 数据中被过度代表。
我们计划通过提示所有使用 gopls 的 LSP 功能编辑器,使用语言服务器协议本身的一个特性来解决这种偏差。

Telemetry wins

出于谨慎,我们提议在 gopls telemetry 的初始发布中只收集一些基本指标。其中之一是 gopls/bug stack counter,它记录 gopls 遇到的意外或“不可能”的条件。实际上,它是一种断言,但不是停止程序,而是在遥测中记录它在某些执行中被达到,以及堆栈跟踪。

在我们的 gopls 可扩展性工作中,我们添加了许多这种类型的断言,但我们很少在测试或我们自己的 gopls 使用中观察到它们失败。我们预计这些断言几乎都无法到达。

当我们开始在 VS Code 中随机提示用户启用遥测时,我们看到许多这些条件在实践中被达到,堆栈跟踪的上下文通常足以让我们复现并修复长期存在的错误。我们开始在 gopls/telemetry-wins 标签下收集这些问题,以跟踪遥测促进的“胜利”。

感谢 Paul 的建议。

来自遥测的错误最令人惊讶的方面是它们有多少是真实的。当然,有些错误对用户来说是看不见的,但相当多的错误是 gopls 的实际错误行为——比如缺少交叉引用,或者在某些罕见条件下的补全不准确。它们正是用户可能会轻微烦恼但可能不会麻烦报告为问题的那种事情。也许用户会认为这种行为是有意为之的。如果他们确实报告了一个问题,他们可能不确定如何复现错误,或者我们需要在问题跟踪器上进行长时间的来回讨论以捕获堆栈跟踪。没有遥测,这些错误中的大多数是不可能被发现的,更不用说被修复了。

而这仅仅是来自几个计数器。我们只为我们知道的潜在错误设置了堆栈跟踪。我们没有预料到的问题呢?

自动崩溃报告

Go 1.23 包括一个新的 runtime.SetCrashOutput API,可以用来通过看门狗进程实现自动崩溃报告。从 v0.15.0 开始,如果 gopls 本身是用 Go 1.23 构建的,那么当它崩溃时,gopls 会报告一个 crash/crash stack counter。

当我们发布 gopls@v0.15.0 时,只有少数用户在我们的样本中使用了 Go 1.23 的未发布开发构建,但新的 crash/crash counter 仍然发现了两个 bug

Go 工具链及更广泛的遥测

Go 1.23 在 Go 工具链中记录遥测,包括 go 命令和其他工具,如编译器、链接器和 go vet。我们已经在 vulncheck 和 VS Code Go 插件中添加了遥测,并提议将其添加到 delve 中。

原始遥测博客系列为遥测如何帮助改进 Go 进行了大量头脑风暴。我们期待探索这些想法以及更多。

在 gopls 中,我们计划使用遥测来提高可靠性并为决策制定和优先级排序提供信息。随着 Go 1.23 启用的自动崩溃报告,我们预计在预发布测试中捕获更多崩溃。展望未来,我们将添加更多计数器来衡量用户体验——关键操作的延迟、各种功能的使用频率——以便我们可以集中精力在最有利于 Go 开发者的地方。

Go 将在 11 月迎来 15 岁生日,语言及其生态系统继续增长。遥测将在帮助 Go 贡献者更快、更安全地朝着正确方向前进中发挥关键作用。


]]>
<p class="description"></p> <p><img src="https://" alt="" style="width:100%"></p>
Golang - 使用 GoFakeIt 生成 Mock 数据 https://cloudsjhan.github.io/2024/09/01/Golang-使用-GoFakeIt-生成-Mock-数据/ 2024-09-01T13:23:41.000Z 2024-09-01T13:24:23.263Z

Golang - 使用 GoFakeIt 生成 Mock 数据

介绍

在软件开发中,测试至关重要,以确保代码能够按预期工作。然而,出于隐私考虑、数据可用性以及收集和清理数据,获取真实数据进行测试是不合理的。我们需要生成 Mock 数据来进行测试。在 Go 编程语言中,用于生成假数据的最流行库之一是 GoFakeIt

什么是 GoFakeIt?

GoFakeIt 是一个强大的库,允许开发人员为测试目的生成各种随机数据。它支持创建名字、地址、电子邮件地址、电话号码、日期等信息的真实假数据。通过使用 GoFakeIt,开发人员可以快速地用虚拟数据填充他们的测试环境,使他们的测试过程更加高效和有效。

安装 GoFakeIt

要开始使用 GoFakeIt,首先需要安装库。可以使用 go get 命令来完成这个操作:

1
go get -u github.com/brianvoe/gofakeit/v6

生成基础假数据

使用 GoFakeIt 生成基础假数据非常简单。以下是一些代码示例:

1
2
3
4
5
6
7
8
9
10
11
12
13
14
15
16
17
18
19
20
21
22
23
24
25
26
27
package main

import (
"fmt"
"github.com/brianvoe/gofakeit/v6"
)

func main() {
// 种子随机生成器
gofakeit.Seed(0)

// 生成一个假名字
name := gofakeit.Name()
fmt.Println("Name:", name)

// 生成一个假电子邮件地址
email := gofakeit.Email()
fmt.Println("Email:", email)

// 生成一个假电话号码
phone := gofakeit.Phone()
fmt.Println("Phone:", phone)

// 生成一个假地址
address := gofakeit.Address()
fmt.Println("Address:", address.Address)
}

输出:

生成基础假数据

这个脚本设置了随机生成器的种子,以确保可重复性,然后生成一个假名字、电子邮件、电话号码和地址。除非你使用相同的种子值,否则每次运行程序时输出都会不同。

自定义假数据

GoFakeIt 还允许对生成的数据进行更细粒度的控制。您可以指定参数来定制数据以满足您的需求。例如:

1
2
3
4
5
6
7
8
9
10
11
12
13
14
15
16
17
18
19
20
21
22
23
24
25
package main

import (
"fmt"
"github.com/brianvoe/gofakeit/v6"
)

func main() {
// 种子随机生成器
gofakeit.Seed(0)

// 生成一个具有特定属性的假人
person := gofakeit.Person()
fmt.Println("First Name:", person.FirstName)
fmt.Println("Last Name:", person.LastName)
fmt.Println("Email:", person.Contact.Email)
fmt.Println("Phone:", person.Contact.Phone)
fmt.Println("SSN:", person.SSN)

// 生成一个假信用卡
creditCard := gofakeit.CreditCard()
fmt.Println("Credit Card Number:", creditCard.Number)
fmt.Println("Credit Card Expiration:", creditCard.Exp)
fmt.Println("Credit Card CVV:", creditCard.Cvv)
}

输出:

自定义假数据

使用结构标签生成假数据

GoFakeIt 的一个强大特性是它能够直接使用结构标签将假数据生成到结构字段中。以下是代码示例:

1
2
3
4
5
6
7
8
9
10
11
12
13
14
15
16
17
18
19
20
21
22
23
24
25
26
27
28
package main

import (
"fmt"
"github.com/brianvoe/gofakeit/v6"
)

type User struct {
FirstName string `fake:"{firstname}"`
LastName string `fake:"{lastname}"`
Email string `fake:"{email}"`
Phone string `fake:"{phone}"`
Birthdate string `fake:"{date}"`
}

func main() {
// 种子随机生成器
gofakeit.Seed(0)

var user User
gofakeit.Struct(&user)

fmt.Printf("User: %+v\n", user)

users := []User{}
gofakeit.Slice(&users)
fmt.Printf("lenght: %d ,Users: %+v\n", len(users), users)
}

输出:

使用结构标签生成假数据

在这个例子中,User 结构体使用结构标签填充了假数据。这个特性特别适合快速生成大量结构化数据。

生成假 SQL 数据

生成假 SQL 数据对于测试数据库相关代码也非常有帮助。GoFakeIt 可以用来创建填充了假数据的 SQL 插入语句。以下是如何做到这一点的示例:

1
2
3
4
5
6
7
8
9
10
11
12
13
14
15
16
17
18
19
20
21
22
23
24
25
26
27
package main

import (
"fmt"
"github.com/brianvoe/gofakeit/v6"
)

func main() {
// 种子随机生成器
gofakeit.Seed(0)

sqloptions := &gofakeit.SQLOptions{
Table: "people", // 表名
Count: 2, // sql记录的数量
Fields: []gofakeit.Field{
{Name: "id", Function: "autoincrement"},
{Name: "first_name", Function: "firstname"},
{Name: "price", Function: "price"},
{Name: "age", Function: "number", Params: gofakeit.MapParams{"min": {"1"}, "max": {"99"}}},
{Name: "created_at", Function: "date", Params: gofakeit.MapParams{"format": {"2006-01-02 15:04:05"}}},
},
}

sqlData, err := gofakeit.SQL(sqloptions)
fmt.Println("err - ", err)
fmt.Println(sqlData)
}

输出:

种子随机性

默认情况下,每次调用都会生成不可预测的数据。

要生成可重复的数据,可以用一个数字进行种子设置。使用种子后,数据将可重复。

1
2
3
4
5
gofakeit.Seed(1234) // 任何 int64 数字

// 现在结果是可重复的
name1 := gofakeit.Name()
name2 := gofakeit.Name()

结论

生成假数据是软件开发测试中的一个重要部分。GoFakeIt 提供了一种强大且灵活的方式来在 Go 中创建真实的假数据。无论您是需要简单的随机字符串还是复杂的数据结构,GoFakeIt 都可以帮助您高效地填充测试环境。通过利用这个库,您可以增强您的测试过程,使其更加健壮和可靠。


]]>
<p class="description"></p> <p><img src="https://" alt="" style="width:100%"></p>
Golang 几种使用 Channel 的错误姿势 https://cloudsjhan.github.io/2024/08/26/Golang-几种使用-Channel-的错误姿势/ 2024-08-26T03:25:50.000Z 2024-08-26T03:26:11.187Z

Go 的 goroutine 能够让繁琐的并发变得简单易用。Go 不能没有 channel 就像西方不能失去耶路撒冷。Channel 非常神奇,即使是经验丰富的工程师也会被它绊倒。下面让我们来谈谈开发人员在使用 Go 中的 Channel 时常犯的一些错误,以及如何避免这些错误。

Deadlocks

死锁是使用 channel 时可能遇到的最频繁的问题。当一个程序在等待永远不会发生的事情时被卡住,就会出现死锁。想象一下,你试图将数据发送到一个 channel,但另一边却没有人接收数据。你的程序就这样停在那里,什么也不做。
来看看这段代码:

1
2
3
4
5
func main() {
ch := make(chan int)
ch <- 1
fmt.Println(<-ch)
}

该程序之所以挂起的原因是,代码试图向一个未缓冲通道发送数值,而没有任何 goroutine 可以接收该数值。解决方法很简单:使用 goroutine 发送值。下面是解决方法:

1
2
3
4
5
6
7
8
9
func main() {
ch := make(chan int)

go func() {
ch <- 1
}()

fmt.Println(<-ch)
}

通过生成一个 goroutine 来处理发送,就能确保主 goroutine 可以接收数据,程序就不会卡住。

Buffered Channels: 不要滥用缓冲区

当你想发送多个值而又不想立即阻塞时,缓冲通道是个不错的选择,但你需要小心使用。缓冲通道就像是数据的等待室。

举个通俗的例子,假设你正在经营一家小邮局。等候区只有一把椅子。这就像一个容量为 1 的 buffer channel。现在,如果有两个人来邮寄包裹,会发生什么情况呢?

第一个人坐下,没问题。但当第二个人到达时,他们就只能站在外面了,因为没有更多的空间。这正是本代码示例中发生的情况:

1
2
3
4
5
6
7
8
func main() {
ch := make(chan int, 1)

ch <- 1
ch <- 2 // This will block because the buffer is full

fmt.Println(<-ch)
}

我们的候车室只能容纳一个 “人”(在这里是一个号码),否则就会堵塞。

但如果我们把候车室变得更大呢?

1
2
3
4
5
6
7
8
9
func main() {
ch := make(chan int, 2)

ch <- 1
ch <- 2

fmt.Println(<-ch)
fmt.Println(<-ch)
}

现在,我们的候车室里有了两把椅子!两位 “顾客 “都能坐得舒服了,我们的小邮局也能顺利运转了。

所以当我们使用 buffer channel 的时候,要确保缓冲区足够大,否则可能会导致死锁。

Closing Channels: 不要忘记关闭

另一个高频的的错误是在使用完 channel 后忘记关闭。如果不关闭 channel,等待从 channel 接收数据的程序可能会一直等待并且永远不会到来的数据。

1
2
3
4
5
6
7
8
9
10
11
12
13
func main() {
ch := make(chan int)

go func() {
for i := 0; i < 5; i++ {
ch <- i
}
}()

for i := range ch {
fmt.Println(i)
}
}

这段代码将打印 0 到 4 的数字,但随后会无限期挂起,因为 range 循环在等待更多数据。channel 从未关闭,因此循环不知道何时停止。

解决方法是什么?发送完数据后关闭通道:

1
2
3
4
5
6
7
8
9
10
11
12
13
14
func main() {
ch := make(chan int)

go func() {
for i := 0; i < 5; i++ {
ch <- i
}
close(ch)
}()

for i := range ch {
fmt.Println(i)
}
}

现在,当循环收到通道关闭信号时,它就知道要停止了。


]]>
<p class="description"></p> <p><img src="https://" alt="" style="width:100%"></p>
如何在 Go 中构建可插拔库 https://cloudsjhan.github.io/2024/08/24/如何在-Go-中构建可插拔库/ 2024-08-24T12:08:09.000Z 2024-08-24T12:08:33.006Z

什么是 go buildmode=plugin?

go buildmode=plugin 选项允许开发者将 Go 代码编译成共享对象文件。另一个 Go 程序可以在运行时加载该文件。当我们想在应用程序中添加新功能而又不想重建它时,这个选项非常有用。可以将新功能作为插件加载。

Go 中的插件是编译成共享对象(.so)文件的软件包。可以使用 Go 中的 plugin package 加载该文件,打开插件,查找符号(如函数或变量)并使用它们。

实践范例

这里举了了一个简单的后端演示项目的示例,它提供了一个用于计算第 n 个 斐波那契数列的 API。出于演示目的,这里特意使用了慢速斐波那契实现。考虑到计算速度较慢,我需要添加了一个缓存层来存储结果,因此如果再次请求相同的 nth 斐波那契数字,无需重新计算,只需返回缓存结果即可。

API 是 GET /fib/{n} ,其中 n 是要计算的斐波纳契数。下面我们来看看 API 是如何实现的:

1
2
3
4
5
6
7
8
9
10
11
12
13
14
15
16
17
18
19
20
21
22
23
24
25
26
27
28
29
30
31
32
33
34
35
36
37
38
39
40
41
42
43
44
45
46
47
48
49
50
51
52
53
54
// Fibonacci calculates the nth Fibonacci number.
// This algorithm is not optimized and is used for demonstration purposes.
func Fibonacci(n int64) int64 {
if n <= 1 {
return n
}
return Fibonacci(n-1) + Fibonacci(n-2)
}

// NewHandler returns an HTTP handler that calculates the nth Fibonacci number.
func NewHandler(l *slog.Logger, c cache.Cache, exp time.Duration) http.HandlerFunc {
return func(w http.ResponseWriter, r *http.Request) {
started := time.Now()
defer func() {
l.Info("request completed", "duration", time.Since(started).String())
}()

param := r.PathValue("n")
n, err := strconv.ParseInt(param, 10, 64)
if err != nil {
l.Error("cannot parse path value", "param", param, "error", err)
sendJSON(l, w, map[string]any{"error": "invalid value"}, http.StatusBadRequest)
return
}

ctx := r.Context()

result := make(chan int64)
go func() {
cached, err := c.Get(ctx, param)
if err != nil {
l.Debug("cache miss; calculating the fib(n)", "n", n, "cache_error", err)
v := Fibonacci(n)
l.Debug("fib(n) calculated", "n", n, "result", v)
if err := c.Set(ctx, param, strconv.FormatInt(v, 10), exp); err != nil {
l.Error("cannot set cache", "error", err)
}
result <- v
return
}

l.Debug("cache hit; returning the cached value", "n", n, "value", cached)
v, _ := strconv.ParseInt(cached, 10, 64)
result <- v
}()

select {
case v := <-result:
sendJSON(l, w, map[string]any{"result": v}, http.StatusOK)
case <-ctx.Done():
l.Info("request cancelled")
}
}
}

代码的解释如下:

  • NewHandler 函数创建一个新的 http.Handler 程序。它依赖于日志记录器、缓存和过期时间。cache.Cache 是一个接口,我们很快就会定义它。
  • 返回的 http.Handler 会解析路径参数中的 n 值。如果出现错误,它会发送错误响应。否则,它会检查缓存中是否已经存在第 n 个斐波那契数字。如果没有,处理程序会计算出该数字并将其存储在缓存中,以备将来请求之用。

  • goroutine 在一个单独的进程中处理斐波那契计算和缓存,而 select 语句则等待计算完成或客户端取消请求。这样可以确保在客户端取消请求时,我们不会浪费资源等待计算完成。

现在,我们希望在运行时,即应用程序启动时,可以选择缓存的实现方式。一种直接的方法是在同一代码库中创建多个实现,并使用配置来选择所需的实现。但这样做的缺点是,未选择的实现仍将是编译后二进制文件的一部分,从而增加了二进制文件的大小。虽然构建标签可能是一种解决方案,但我们将留待下一篇文章讨论。现在,我们希望在运行时而不是在构建时选择实现。这就是 buildmode=plugin 的真正优势所在。

确保应用程序无需插件即可运行

由于我们已将 cache.Cache 定义为一个接口,因此我们可以在任何地方创建该接口的实现,甚至可以在不同的存储库中创建。但首先,让我们来看看 Cache 接口:

1
2
3
4
5
6
7
8
9
10
11
12
13
14
15
16
17
18
19
20
21
22
23
24
25
26
27
28
29
30
31
32
33
34
35
36
37
38
39
40
41
42
43
44
45
46
47
48
49
50
51
52
53
54
55
56
57
58
59
60
61
package cache

import (
"context"
"log/slog"
"time"
)

// consterror is a custom error type used to represent specific errors in the cache implementation.
// It is derived from the int type to allow it to be used as a constant, ensuring immutability across packages.
type consterror int

// Possible errors returned by the cache implementation.
const (
ErrNotFound consterror = iota
ErrExpired
)

// _text maps consterror values to their corresponding error messages.
var _text = map[consterror]string{
ErrNotFound: "cache: key not found",
ErrExpired: "cache: key expired",
}

// Error implements the error interface.
func (e consterror) Error() string {
txt, ok := _text[e]
if !ok {
return "cache: unknown error"
}
return txt
}

// Cache defines the interface for a cache implementation.
type Cache interface {
// Set stores a key-value pair in the cache with a specified expiration time.
Set(ctx context.Context, key, val string, exp time.Duration) error

// Get retrieves a value from the cache by its key.
// Returns ErrNotFound if the key is not found.
// Returns ErrExpired if the key has expired.
Get(ctx context.Context, key string) (string, error)
}

// Factory defines the function signature for creating a cache implementation.
type Factory func(log *slog.Logger) (Cache, error)

// nopCache is a no-operation cache implementation.
type nopCache int

// NopCache a singleton cache instance, which does nothing.
const NopCache nopCache = 0

// Ensure that NopCache implements the Cache interface.
var _ Cache = NopCache

// Set is a no-op and always returns nil.
func (nopCache) Set(context.Context, string, string, time.Duration) error { return nil }

// Get always returns ErrNotFound, indicating that the key does not exist in the cache.
func (nopCache) Get(context.Context, string) (string, error) { return "", ErrNotFound }

由于 NewHandler 需要依赖于 cache.Cache 实现,因此最好有一个默认实现,以确保代码不会中断。因此,让我们创建一个什么都不做的 no-op(无操作)实现。

这个NopCache实现了cache.Cache接口,但实际上并不做任何事情。它只是为了确保处理程序正常工作。
如果我们不使用任何自定义的cache.Cache实现来运行代码,API将正常工作,但结果不会被缓存–这意味着每次调用都会重新计算斐波那契数字。以下是使用NopCache(n=45)时的日志:

1
2
3
4
5
6
7
8
9
10
11
12
13
14
15
./bin/demo -port=8080 -log-level=debug

time=2024-08-22T17:39:06.853+07:00 level=INFO msg="application started"
time=2024-08-22T17:39:06.854+07:00 level=DEBUG msg="using configuration" config="{Port:8080 LogLevel:DEBUG CacheExpiration:15s CachePluginPath: CachePluginFactoryName:Factory}"
time=2024-08-22T17:39:06.854+07:00 level=INFO msg="no cache plugin configured; using nop cache"
time=2024-08-22T17:39:06.854+07:00 level=INFO msg=listening addr=:8080

time=2024-08-22T17:39:19.465+07:00 level=DEBUG msg="cache miss; calculating the fib(n)" n=45 cache_error="cache: key not found"
time=2024-08-22T17:39:23.246+07:00 level=DEBUG msg="fib(n) calculated" n=45 result=1134903170
time=2024-08-22T17:39:23.246+07:00 level=INFO msg="request completed" duration=3.781674792s


time=2024-08-22T17:39:26.409+07:00 level=DEBUG msg="cache miss; calculating the fib(n)" n=45 cache_error="cache: key not found"
time=2024-08-22T17:39:30.222+07:00 level=DEBUG msg="fib(n) calculated" n=45 result=1134903170
time=2024-08-22T17:39:30.222+07:00 level=INFO msg="request completed" duration=3.813693s

不出所料,由于没有缓存,两次调用都需要 3 秒左右。

插件实现

由于我们要实现可插拔的库是 cache.Cache,因此我们需要实现该接口。您可以在任何地方实现该接口,甚至是在单独的存储库中。在本例中,我创建了两个实现:一个使用内存缓存,另一个使用 Redis,两者都在独立的存储库中。

In-Memory Cache Plugin

1
2
3
4
5
6
7
8
9
10
11
12
13
14
15
16
17
18
19
20
21
22
23
24
25
26
27
28
29
30
31
32
33
34
35
36
37
38
39
40
41
42
43
44
45
46
47
48
49
50
51
52
53
54
55
56
57
58
59
60
61
62
63
64
65
66
67
68
69
70
71
72
73
74
75
package main

import (
"context"
"log/slog"
"sync"
"time"

"github.com/josestg/yt-go-plugin/cache"
)

// Value represents a cache entry.
type Value struct {
Data string
ExpAt time.Time
}

// Memcache is a simple in-memory cache.
type Memcache struct {
mu sync.RWMutex
log *slog.Logger
store map[string]Value
}

// Factory is the symbol the plugin loader will try to load. It must implement the cache.Factory signature.
var Factory cache.Factory = New

// New creates a new Memcache instance.
func New(log *slog.Logger) (cache.Cache, error) {
log.Info("[plugin/memcache] loaded")
c := &Memcache{
mu: sync.RWMutex{},
log: log,
store: make(map[string]Value),
}
return c, nil
}

func (m *Memcache) Set(ctx context.Context, key, val string, exp time.Duration) error {
m.log.InfoContext(ctx, "[plugin/memcache] set", "key", key, "val", val, "exp", exp)
m.mu.Lock()
m.log.DebugContext(ctx, "[plugin/memcache] lock acquired")
defer func() {
m.mu.Unlock()
m.log.DebugContext(ctx, "[plugin/memcache] lock released")
}()

m.store[key] = Value{
Data: val,
ExpAt: time.Now().Add(exp),
}

return nil
}

func (m *Memcache) Get(ctx context.Context, key string) (string, error) {
m.log.InfoContext(ctx, "[plugin/memcache] get", "key", key)
m.mu.RLock()
v, ok := m.store[key]
m.mu.RUnlock()
if !ok {
return "", cache.ErrNotFound
}

if time.Now().After(v.ExpAt) {
m.log.InfoContext(ctx, "[plugin/memcache] key expired", "key", key, "val", v)
m.mu.Lock()
delete(m.store, key)
m.mu.Unlock()
return "", cache.ErrExpired
}

m.log.InfoContext(ctx, "[plugin/memcache] key found", "key", key, "val", v)
return v.Data, nil
}

Redis Cache Plugin

1
2
3
4
5
6
7
8
9
10
11
12
13
14
15
16
17
18
19
20
21
22
23
24
25
26
27
28
29
30
31
32
33
34
35
36
37
38
39
40
41
42
43
44
45
46
47
48
49
50
51
52
53
54
55
56
57
58
59
60
package main

import (
"cmp"
"context"
"errors"
"fmt"
"log/slog"
"os"
"strconv"
"time"

"github.com/josestg/yt-go-plugin/cache"
"github.com/redis/go-redis/v9"
)

// RedisCache is a cache implementation that uses Redis.
type RedisCache struct {
log *slog.Logger
client *redis.Client
}

// Factory is the symbol the plugin loader will try to load. It must implement the cache.Factory signature.
var Factory cache.Factory = New

// New creates a new RedisCache instance.
func New(log *slog.Logger) (cache.Cache, error) {
log.Info("[plugin/rediscache] loaded")
db, err := strconv.Atoi(cmp.Or(os.Getenv("REDIS_DB"), "0"))
if err != nil {
return nil, fmt.Errorf("parse redis db: %w", err)
}

c := &RedisCache{
log: log,
client: redis.NewClient(&redis.Options{
Addr: cmp.Or(os.Getenv("REDIS_ADDR"), "localhost:6379"),
Password: cmp.Or(os.Getenv("REDIS_PASSWORD"), ""),
DB: db,
}),
}

return c, nil
}

func (r *RedisCache) Set(ctx context.Context, key, val string, exp time.Duration) error {
r.log.InfoContext(ctx, "[plugin/rediscache] set", "key", key, "val", val, "exp", exp)
return r.client.Set(ctx, key, val, exp).Err()
}

func (r *RedisCache) Get(ctx context.Context, key string) (string, error) {
r.log.InfoContext(ctx, "[plugin/rediscache] get", "key", key)
res, err := r.client.Get(ctx, key).Result()
if errors.Is(err, redis.Nil) {
r.log.InfoContext(ctx, "[plugin/rediscache] key not found", "key", key)
return "", cache.ErrNotFound
}
r.log.InfoContext(ctx, "[plugin/rediscache] key found", "key", key, "val", res)
return res, err
}

这两个插件都实现了 cache.Cache 接口。这里有几件重要的事情需要注意:

  • 这两个插件都是在 main 包中实现的。这是必须的,因为当我们将代码作为插件构建时,Go 至少需要一个 main 包。尽管如此,这并不意味着你必须在一个文件中编写所有代码。你可以像一个典型的 Go 项目那样,用多个文件和包来组织代码。为了简单起见,我在这里将其保留在一个文件中。
  • 这两个插件都有 var Factory cache.Factory=New。虽然不是强制性的,但这是一个很好的做法。我们创建了一种类型,希望每个插件都能将其作为实现构造函数的签名。两个插件都确保其 New 函数(实际构造函数)的类型为 cache.Factory。这在我们稍后查找构造函数时非常关键。

构建插件非常简单,只需添加 -buildmode=plugin 标志即可。

1
2
3
4
5
# build the in memory cache plugin
go build -buildmode=plugin -o memcache.so memcache.go

# build the redis cache plugin
go build -buildmode=plugin -o rediscache.so rediscache.go

运行这些命令将生成 memcache.so 和 rediscache.so,它们是共享对象二进制文件,可在运行时由 bin/demo 二进制文件加载。

加载插件

插件加载器非常简单。我们可以使用 Go 中的标准插件库,它提供了两个函数,不言自明:

下面是加载插件的代码:

1
2
3
4
5
6
7
8
9
10
11
12
13
14
15
16
17
18
19
20
21
22
23
24
25
26
27
// loadCachePlugin loads a cache implementation from a shared object (.so) file at the specified path.
// It calls the constructor function by name, passing the necessary dependencies, and returns the initialized cache.
// If path is empty, it returns the NopCache implementation.
func loadCachePlugin(log *slog.Logger, path, name string) (cache.Cache, error) {
if path == "" {
log.Info("no cache plugin configured; using nop cache")
return cache.NopCache, nil
}

plug, err := plugin.Open(path)
if err != nil {
return nil, fmt.Errorf("open plugin %q: %w", path, err)
}

sym, err := plug.Lookup(name)
if err != nil {
return nil, fmt.Errorf("lookup symbol New: %w", err)
}

factoryPtr, ok := sym.(*cache.Factory)
if !ok {
return nil, fmt.Errorf("unexpected type %T; want %T", sym, factoryPtr)
}

factory := *factoryPtr
return factory(log)
}

仔细看看这一行:factoryPtr, ok := sym.(cache.Factory)。我们要查找的符号是 plug.Lookup(“Factory”),正如我们所看到的,每个实现都有 var Factory cache.Factory = New,而不是 var Factory cache.Factory = New。

使用内存缓存插件

1
./bin/demo -port=8080 -log-level=debug -cache-plugin-path=./memcache.so -cache-plugin-factory-name=Factory

两次调用 http://localhost:8080/fib/45 后的日志:

1
2
3
4
5
6
7
8
9
10
11
12
13
14
15
16
17
time=2024-08-22T18:31:08.372+07:00 level=INFO msg="application started"
time=2024-08-22T18:31:08.372+07:00 level=DEBUG msg="using configuration" config="{Port:8080 LogLevel:DEBUG CacheExpiration:15s CachePluginPath:./memcache.so CachePluginFactoryName:Factory}"
time=2024-08-22T18:31:08.376+07:00 level=INFO msg="[plugin/memcache] loaded"
time=2024-08-22T18:31:08.376+07:00 level=INFO msg=listening addr=:8080

time=2024-08-22T18:31:16.850+07:00 level=INFO msg="[plugin/memcache] get" key=45
time=2024-08-22T18:31:16.850+07:00 level=DEBUG msg="cache miss; calculating the fib(n)" n=45 cache_error="cache: key not found"
time=2024-08-22T18:31:20.752+07:00 level=DEBUG msg="fib(n) calculated" n=45 result=1134903170
time=2024-08-22T18:31:20.752+07:00 level=INFO msg="[plugin/memcache] set" key=45 val=1134903170 exp=15s
time=2024-08-22T18:31:20.752+07:00 level=DEBUG msg="[plugin/memcache] lock acquired"
time=2024-08-22T18:31:20.752+07:00 level=DEBUG msg="[plugin/memcache] lock released"
time=2024-08-22T18:31:20.753+07:00 level=INFO msg="request completed" duration=3.903607875s

time=2024-08-22T18:31:24.781+07:00 level=INFO msg="[plugin/memcache] get" key=45
time=2024-08-22T18:31:24.783+07:00 level=INFO msg="[plugin/memcache] key found" key=45 val="{Data:1134903170 ExpAt:2024-08-22 18:31:35.752647 +0700 WIB m=+27.380493292}"
time=2024-08-22T18:31:24.783+07:00 level=DEBUG msg="cache hit; returning the cached value" n=45 value=1134903170
time=2024-08-22T18:31:24.783+07:00 level=INFO msg="request completed" duration=1.825042ms

使用 Redis 缓存插件

1
./bin/demo -port=8080 -log-level=debug -cache-plugin-path=./rediscache.so -cache-plugin-factory-name=Factory

两次调用 http://localhost:8080/fib/45 后的日志:

1
2
3
4
5
6
7
8
9
10
11
12
13
14
15
16
time=2024-08-22T18:33:49.920+07:00 level=INFO msg="application started"
time=2024-08-22T18:33:49.920+07:00 level=DEBUG msg="using configuration" config="{Port:8080 LogLevel:DEBUG CacheExpiration:15s CachePluginPath:./rediscache.so CachePluginFactoryName:Factory}"
time=2024-08-22T18:33:49.937+07:00 level=INFO msg="[plugin/rediscache] loaded"
time=2024-08-22T18:33:49.937+07:00 level=INFO msg=listening addr=:8080

time=2024-08-22T18:34:01.143+07:00 level=INFO msg="[plugin/rediscache] get" key=45
time=2024-08-22T18:34:01.150+07:00 level=INFO msg="[plugin/rediscache] key not found" key=45
time=2024-08-22T18:34:01.150+07:00 level=DEBUG msg="cache miss; calculating the fib(n)" n=45 cache_error="cache: key not found"
time=2024-08-22T18:34:04.931+07:00 level=DEBUG msg="fib(n) calculated" n=45 result=1134903170
time=2024-08-22T18:34:04.931+07:00 level=INFO msg="[plugin/rediscache] set" key=45 val=1134903170 exp=15s
time=2024-08-22T18:34:04.934+07:00 level=INFO msg="request completed" duration=3.791582708s

time=2024-08-22T18:34:07.932+07:00 level=INFO msg="[plugin/rediscache] get" key=45
time=2024-08-22T18:34:07.936+07:00 level=INFO msg="[plugin/rediscache] key found" key=45 val=1134903170
time=2024-08-22T18:34:07.936+07:00 level=DEBUG msg="cache hit; returning the cached value" n=45 value=1134903170
time=2024-08-22T18:34:07.936+07:00 level=INFO msg="request completed" duration=4.403083ms

总结

Go 中的 buildmode=plugin 功能是增强应用程序的强大工具,例如在 Envoy Proxy 中添加自定义缓存解决方案。它允许你构建和使用插件,使你能够在运行时加载和执行自定义代码,而无需更改主程序。这不仅有助于减少二进制文件的大小,还能加快构建过程。由于插件可以独立组成和更新,因此只有当主应用程序发生变化时才需要重建,避免了重建未更改的插件。

当然,这个方案也会存在缺点:插件加载会带来运行时开销,而且与静态链接代码相比,插件系统有一定的局限性。例如,可能存在跨平台兼容性和调试复杂性的问题。您应根据自己的具体需求仔细评估这些方面。有关使用插件的更多信息和详细警告,请参阅 Go 关于插件的官方文档


]]>
<p class="description"></p> <p><img src="https://" alt="" style="width:100%"></p>
[译] Range Over Function Types https://cloudsjhan.github.io/2024/08/23/译-Range-Over-Function-Types/ 2024-08-23T09:15:48.000Z 2024-08-23T09:16:55.128Z

在 Go 1.22 中作为试验特性发布,在 Go 1.23 中正式发布。我们可以在 for 循环的 range 子句中使用迭代器函数。就在前几天,官方也发布了 Range over Function Types 的教程。

Ian Lance Taylor
in 20 August 2024


Go 1.23版本中函数类型范围遍历的新特性介绍

这是 Ian 在2024年GopherCon大会上演讲的博客文章版本,下面开始正文(文章较长但干货真的很多,读完会对迭代器函数的用法有新的理解)。

在 Go 1.23版本中,我们引入了一个新的语言特性:对函数类型进行范围遍历(Range over function types)。这篇博客文章将解释我们为什么要添加这个新特性,它究竟是什么,以及如何使用它。

WHY?

自 Go 1.18 版本以来,我们就能够编写新的泛型容器类型。例如,让我们实现一个非常简单的 Set 类型,一个基于 map 实现的泛型类型。

1
2
3
4
5
6
7
8
9
// Set 保存一组元素。
type Set[E comparable] struct {
m map[E]struct{}
}

// New 返回一个新的[Set]。
func New[E comparable]() *Set[E] {
return &Set[E]{m: make(map[E]struct{})}
}

自然地,一个 set 类型有添加元素的方法和检查元素是否存在的方法。

1
2
3
4
5
6
7
8
9
10
// Add 向set添加一个元素。
func (s *Set[E]) Add(v E) {
s.m[v] = struct{}{}
}

// Contains 报告一个元素是否在set中。
func (s *Set[E]) Contains(v E) bool {
_, ok := s.m[v]
return ok
}

还需要一个函数来返回两个集合的并集。

1
2
3
4
5
6
7
8
9
10
11
12
13
// Union 返回两个set的并集。
func Union[E comparable](s1, s2 *Set[E]) *Set[E] {
r := New[E]()
// 注意for/range在内部Set字段m上。
// 我们正在遍历s1和s2中的map。
for v := range s1.m {
r.Add(v)
}
for v := range s2.m {
r.Add(v)
}
return r
}

让我们花一点时间看看 Union 函数的实现。为了计算两个集合的并集,我们需要一种方法来获取每个集合中的所有元素。在这段代码中,我们使用了一个 for/range 语句来遍历 set 类型的未导出字段。这只在 Union 函数定义在set包中时才有效。

但是,有很多原因可能会有人想要遍历集合中的所有元素。这个 set 包必须为其用户提供一些方法来做到这一点。

这应该怎么实现呢?

Push Set 元素

一种方法是提供一个 Set 方法,该方法接受一个函数,并对 Set 中的每个元素调用该函数。我们将这称为 Push,因为 Set 将每个值推送到函数中。如果函数返回 false,我们停止调用它。

1
2
3
4
5
6
7
func (s *Set[E]) Push(f func(E) bool) {
for v := range s.m {
if !f(v) {
return
}
}
}

在 Go 标准库中,我们看到这种通用模式被用于 sync.Map.Range 方法、flag.Visit 函数和 filepath.Walk 函数等场景。这是一个通用模式,并非完全相同的模式;实际上,这三个例子的工作原理并不完全相同。

这就是使用 Push 方法打印 Set 中所有元素的样子:你用一个函数调用 Push,该函数对元素执行你想要的操作。

1
2
3
4
5
6
func PrintAllElementsPush[E comparable](s *Set[E]) {
s.Push(func(v E) bool {
fmt.Println(v)
return true
})
}

拉取 Set 元素

另一种遍历 Set 元素的方法是返回一个函数。每次调用该函数时,它将从 Set 中返回一个值,以及一个布尔值,报告该值是否有效。当循环遍历完所有元素时,布尔结果将为 false。在这种情况下,我们还需要一个停止函数,当不再需要更多值时可以调用它。

这个实现使用了一个通道对,一个用于集合中的值,一个用于停止返回值。我们使用一个 goroutine 在通道上发送值。next 函数通过从元素通道读取来从集合中返回一个元素,stop 函数通过关闭停止通道来告诉 goroutine 退出。我们需要 stop 函数以确保当不再需要更多值时 goroutine 能够退出。

1
2
3
4
5
6
7
8
9
10
11
12
13
14
15
16
17
18
19
20
21
22
23
24
25
26
func (s *Set[E]) Pull() (func() (E, bool), func()) {
ch := make(chan E)
stopCh := make(chan bool)

go func() {
defer close(ch)
for v := range s.m {
select {
case ch <- v:
case <-stopCh:
return
}
}
}()

next := func() (E, bool) {
v, ok := <-ch
return v, ok
}

stop := func() {
close(stopCh)
}

return next, stop
}

标准库中没有任何东西完全以这种方式工作。runtime.CallersFramesreflect.Value.MapRange 有些相似,尽管它们返回的是带有方法的值,而不是直接返回函数。

这就是使用 Pull 方法打印 Set 中所有元素的例子。你调用 Pull 来获取一个函数,并在 for 循环中反复调用该函数。

1
2
3
4
5
6
7
func PrintAllElementsPull[E comparable](s *Set[E]) {
next, stop := s.Pull()
defer stop()
for v, ok := next(); ok; v, ok = next() {
fmt.Println(v)
}
}

标准化方法

现在我们已经看到了两种不同的方法来遍历一个集合的所有元素。不同的 Go 包使用这些方法和几种其他方法。这意味着,当你开始使用一个新的 Go 容器包时,你可能需要学习一种新的循环机制。同时,这意味着我们不能编写一个函数来与几种不同类型的容器一起工作,因为容器类型将以不同的方式处理循环。

我们希望通过为容器遍历开发标准方法来改善 Go 生态系统。

迭代器

这当然是许多编程语言中出现的问题。

1994 年首次出版的流行书籍《设计模式》将此描述为迭代器模式。你使用迭代器来“提供一种顺序访问聚合对象元素的方法,而不需要暴露其底层表示。”这里所谓的聚合对象就是我一直所说的容器。聚合对象或容器只是保存其他值的值,比如我们一直在讨论的 Set 类型。

像编程中的许多想法一样,迭代器可以追溯到 20 世纪 70 年代 Barbara Liskov 开发的 CLU “CLU”) 语言。

今天,许多流行的语言以这样或那样的方式提供迭代器,包括但不限于 C++、Java、Javascript、Python和Rust。

然而,在 1.23 版本之前,Go 并没有。

For/range

正如我们所知,Go 有内置于语言的容器类型:切片、数组和 map。它有一种访问这些值的元素的方法,而不需要暴露其底层表示:for/range语句。for/range语句适用于 Go 的内置容器类型(以及字符串、channel,以及从 Go 1.22 开始的 int)。

for/range 语句是迭代,但它不是今天流行语言中出现的迭代器。尽管如此,能够使用 for/range 来迭代像Set类型这样的用户定义容器将是很好的。

然而,在 1.23 版本之前的 Go 并不支持这一点。

此版本中的改进

对于 Go 1.23,我们决定支持对用户定义的容器类型进行 for/range,并支持迭代器的标准化形式。

我们扩展了 for/range 语句,使其支持对函数类型进行范围遍历。我们将在下面看到这如何帮助循环遍历用户定义的容器。

我们还添加了标准库类型和函数,以支持使用函数类型作为迭代器。标准迭代器的定义让我们能够编写与不同容器类型平滑协作的函数。

范围遍历(部分)函数类型

改进的 for/range 语句不支持任意函数类型。截至 Go 1.23,它现在支持对接受单个参数的函数进行范围遍历。这个单一参数本身必须是一个函数,它接受零到两个参数并返回一个 bool;按照惯例,我们称之为 yield函数。

1
2
3
4
5
func(yield func() bool)

func(yield func(V) bool)

func(yield func(K, V) bool)

当我们谈到 Go 中的迭代器时,我们指的是具有这三种类型之一的函数。正如我们将在下面讨论的,标准库中还有另一种迭代器:拉取迭代器。当需要区分标准迭代器和拉取迭代器时,我们称标准迭代器为推送迭代器。这是因为,正如我们将看到的,它们通过调用 yield 函数来推送一系列值。

标准(推送)迭代器

为了使迭代器更易于使用,新的标准库包 iter 定义了两种类型:Seq 和 Seq2。这些是迭代器函数类型的名称,是可以与for/range语句一起使用的类型。Seq的名称是sequence(序列)的缩写,因为迭代器按顺序循环遍历一系列值。

1
2
3
4
5
6
7
package iter

type Seq[V any] func(yield func(V) bool)

type Seq2[K, V any] func(yield func(K, V) bool)

// 现在,没有Seq0

Seq 和 Seq2 之间的区别只是 Seq2 是一对序列,比如来自 map 的键和值。在这篇文章中,为了简单起见,我们将专注于 Seq,但我们所说的大部分也适用于 Seq2。

最容易通过一个例子来解释迭代器是如何工作的。这里 Set 方法 All 返回一个函数。

All 的返回类型是 iter.Seq[E],所以我们知道它返回一个迭代器。

1
2
3
4
5
6
7
8
9
10
// All 是对s中元素的迭代器。
func (s *Set[E]) All() iter.Seq[E] {
return func(yield func(E) bool) {
for v := range s.m {
if !yield(v) {
return
}
}
}
}

迭代器函数本身接受另一个函数作为参数,即 yield 函数。迭代器用集合中的每个值调用 yield 函数。在这个例子中,迭代器,由 Set.All 返回的函数,与我们之前看到的 Set.Push 函数非常相似。

这就是迭代器的工作原理:对于某些值序列,它们用序列中的每个值调用 yield 函数。如果 yield 函数返回 false,则不再需要更多的值,迭代器可以简单地返回,执行可能需要的任何清理工作。如果 yield 函数从不返回 false,则迭代器可以在用序列中的所有值调用 yield 之后简单地返回。

这就是它们的工作原理,但让我们承认,当你第一次看到这些时,你的第一反应可能是“这里有很多函数在飞来飞去。”你对此的看法并没有错。让我们关注两件事。

第一,一旦你越过这个函数代码的第一行,这个迭代器的实际实现实际上非常简单:用集合中的每个元素调用 yield,如果 yield 返回 false 则停止。

1
2
3
4
5
for v := range s.m {
if !yield(v) {
return
}
}

第二,使用这个真的很容易。你调用 s.All 来获取一个迭代器,然后你使用 for/range 来循环遍历s中的所有元素。for/range 语句支持任何迭代器。

1
2
3
4
5
func PrintAllElements[E comparable](s *Set[E]) {
for v := range s.All() {
fmt.Println(v)
}
}

在这种代码中,s.All 是一个返回函数的方法。我们调用 s.All,然后使用 for/range 来遍历它返回的函数。在这种情况下,我们可以将 Set.All 做成一个迭代器函数本身,而不是让它返回一个迭代器函数。然而,在某些情况下,这行不通,比如如果返回迭代器的函数需要接受一个参数,或者需要做一些设置工作。作为一种惯例,我们鼓励所有容器类型都提供一个返回迭代器的 All 方法,这样程序员就不必记住是直接遍历 All 还是调用 All 来获取一个可以遍历的值。他们总是可以做后者。

如果你仔细想想,你会看到编译器必须调整循环以创建一个 yield 函数传递给 s.All 返回的迭代器。在 Go 编译器和运行时有一些复杂性,使这变得高效,并正确处理像循环中的 break 或 panic 这样的事情。我们不会在这篇博客文章中涵盖这些内容。幸运的是,当涉及到实际使用这个特性时,实现细节并不重要。

拉取迭代器

现在我们已经看到了如何在 for/range 循环中使用迭代器。但一个简单的循环并不是使用迭代器的唯一方式。例如,有时我们可能需要并行地遍历两个容器。我们该怎么做呢?

答案是我们使用一种不同类型的迭代器:拉取迭代器。我们已经看到,一个标准迭代器,也称为推送迭代器,是一个接受 yield 函数作为参数的函数,并通过调用 yield 函数推送序列中的每个值。

拉取迭代器的工作方式正好相反:它是一个这样的函数,每次你调用它时,它都会从序列中拉取下一个值并返回它。

我们将重复两种迭代器之间的区别,以帮助你记住:

一个推送迭代器将序列中的每个值推送到yield函数。推送迭代器是 Go 标准库中的迭代器,并且直接被 for/range语句支持。
一个拉取迭代器的工作方式正好相反。每次你调用一个拉取迭代器时,它都会从序列中拉取另一个值并返回它。拉取迭代器不是直接被 for/range 语句支持的;然而,编写一个普通的 for 语句来遍历拉取迭代器是直接了当的。实际上,当我们看到使用 Set.Pull 方法时,我们已经看到了一个例子。

你可以自己编写一个拉取迭代器,但通常你不必这么做。新标准库函数 iter.Pull 接受一个标准迭代器,也就是说,一个推送迭代器的函数,并返回一对函数。第一个是一个拉取迭代器:一个每次被调用时都返回序列中的下一个值的函数。第二个是一个停止函数,当我们完成对拉取迭代器的使用时应该调用它。这就像我们之前看到的 Set.Pull 方法。

iter.Pull 返回的第二个函数,即停止函数,以防我们没有读取完整个序列。在一般情况下,推送迭代器,即传递给 iter.Pull 的参数,可能会启动 goroutines 或构建需要在迭代完成时清理的新数据结构。推送迭代器将在 yield 函数返回 false 时执行任何清理工作,这意味着不再需要更多的值。当与 for/range 语句一起使用时,for/range 语句将确保如果循环提前退出,无论是通过 break 语句还是其他任何原因,那么 yield 函数将返回 false。而使用拉取迭代器时,另一方面,没有办法强制 yield 函数返回 false,所以需要停止函数。

另一种说法是,调用停止函数将导致 yield 函数在被推送迭代器调用时返回 false。

严格来说,如果拉取迭代器返回 false 以表示它已经到达序列的末尾,你就不必调用停止函数,但通常简单地总是调用它会更简单。

以下是一个使用拉取迭代器并行遍历两个序列的示例。这个函数报告任意两个序列是否包含相同的元素,顺序也相同。

1
2
3
4
5
6
7
8
9
10
11
12
13
14
15
16
17
18
// EqSeq报告两个迭代器是否包含相同的
// 元素,顺序也相同。
func EqSeq[E comparable](s1, s2 iter.Seq[E]) bool {
next1, stop1 := iter.Pull(s1)
defer stop1()
next2, stop2 := iter.Pull(s2)
defer stop2()
for {
v1, ok1 := next1()
v2, ok2 := next2()
if !ok1 {
return !ok2
}
if ok1 != ok2 || v1 != v2 {
return false
}
}
}

函数使用 iter.Pull 将两个推送迭代器 s1 和 s2 转换为拉取迭代器。它使用 defer 语句确保我们在完成对它们使用后停止拉取迭代器。

然后代码循环,调用拉取迭代器检索值。如果第一个序列完成了,如果第二个序列也完成了,它返回 true,或者如果它没有完成,返回 false。然后它循环拉取下两个值。

和推送迭代器一样,Go 运行时有一些复杂性,使拉取迭代器高效,但这不影响实际使用 iter.Pull 函数的代码。

在迭代器上迭代

现在你知道了关于函数类型范围遍历和迭代器的所有事情。我们希望你享受使用它们!

尽管如此,还有一些值得提及的事情。

适配器

标准迭代器定义的一个优势是能够编写使用它们的标准适配器函数。

例如,这里有一个函数,它过滤一个值序列,返回一个新的序列。这个 Filter 函数接受一个迭代器作为参数,并返回一个新的迭代器。另一个参数是一个过滤器函数,它决定哪些值应该包含在 Filter 返回的新迭代器中。

1
2
3
4
5
6
7
8
9
10
11
12
13
// Filter 返回一个序列,其中包含 s 中
// 满足 f 返回 true 的元素。
func Filter[V any](f func(V) bool, s iter.Seq[V]) iter.Seq[V] {
return func(yield func(V) bool) {
for v := range s {
if f(v) {
if !yield(v) {
return
}
}
}
}
}

和之前的例子一样,函数签名在你第一次看到它们时看起来很复杂。一旦你超越了签名,实现就很简单了。

1
2
3
4
5
6
7
for v := range s {
if f(v) {
if !yield(v) {
return
}
}
}

代码遍历输入迭代器,检查过滤器函数,并用应该进入输出迭代器的值调用yield。

我们将在下面展示使用 Filter 的示例。

(Go标准库今天没有 Filter 的版本,但未来版本可能会添加。)

二叉树

作为推送迭代器对容器类型循环遍历的便利性的一个例子,让我们考虑这个简单的二叉树类型。

1
2
3
4
5
// Tree是一个二叉树。
type Tree[E any] struct {
val E
left, right *Tree[E]
}

我们不会展示将值插入树的代码,但自然应该有某种方法来遍历树中的所有值。

事实证明,如果迭代器代码返回一个 bool,迭代器代码会更容易编写。由于 for/range 支持的函数类型不返回任何内容,这里的 All 方法返回一个小型函数字面量,它调用迭代器本身,这里称为 push,并忽略 bool 结果。

1
2
3
4
5
6
7
8
9
10
11
12
13
14
15
16
// All返回t中值的迭代器。
func (t *Tree[E]) All() iter.Seq[E] {
return func(yield func(E) bool) {
t.push(yield)
}
}

// push将所有元素推送到yield函数。
func (t *Tree[E]) push(yield func(E) bool) bool {
if t == nil {
return true
}
return t.left.push(yield) &&
yield(t.val) &&
t.right.push(yield)
}

push 方法使用递归来遍历整棵树,对每个元素调用 yield。如果 yield 函数返回false,该方法
会一直返回 false。否则,它只是在迭代完成时返回一次。

这展示了使用这种迭代器方法遍历甚至是复杂数据结构有多么直接。没有必要维护一个单独的栈来记录树内的位置;我们可以使用 goroutine 调用栈为我们做这件事。

新的迭代器函数

在 Go 1.23 中,slices 和 maps 包中也新增了一些与迭代器一起工作的功能。

以下是 slices 包中的新函数。All 和 Values 是返回 slice 元素迭代器的函数。Collect 从迭代器中提取值,并返回包含这些值的 slice。查看其他函数的文档。

1
2
3
4
5
6
7
8
9
10
All([]E) iter.Seq2[int, E]
Values([]E) iter.Seq[E]
Collect(iter.Seq[E]) []E
AppendSeq([]E, iter.Seq[E]) []E
Backward([]E) iter.Seq2[int, E]
Sorted(iter.Seq[E]) []E
SortedFunc(iter.Seq[E], func(E, E) int) []E
SortedStableFunc(iter.Seq[E], func(E, E) int) []E
Repeat([]E, int) []E
Chunk([]E, int) iter.Seq[E]

以下是 maps 包中的新函数。All、Keys 和 Values 返回 map 内容的迭代器。Collect 从迭代器中提取键和值,并返回一个新的 map。

1
2
3
4
5
All(map[K]V) iter.Seq2[K, V]
Keys(map[K]V) iter.Seq[K]
Values(map[K]V) iter.Seq[V]
Collect(iter.Seq2[K, V]) map[K, V]
Insert(map[K, V], iter.Seq2[K, V])

标准库迭代器示例

这里有一个示例,展示了如何使用这些新函数以及我们之前看到的 Filter 函数。这个函数接受一个从 int 到string 的 map,并返回一个只包含 map 中长度至少为某个参数 n 的值的 slice。

1
2
3
4
5
6
7
// LongStrings返回m中长度为n或更长的值的slice。
func LongStrings(m map[int]string, n int) []string {
isLong := func(s string) bool {
return len(s) >= n
}
return slices.Collect(Filter(isLong, maps.Values(m)))
}

maps.Values 函数返回 m 中值的迭代器。Filter 读取该迭代器,并返回一个新的迭代器,其中只包含长字符串。slices.Collect 从该迭代器中读取到一个新的 slice。

当然,你可以很容易地编写一个循环来完成这个任务,而且在许多情况下,循环会更清晰。我们不想鼓励大家一直以这种风格编写代码。也就是说,使用迭代器的优势在于,这类函数可以以相同的方式与任何序列一起工作。在这个例子中,注意 Filter 是如何使用 map 作为输入和 slice 作为输出的,而 Filter 中的代码根本不需要改变。

循环遍历文件中的行

尽管我们看到的大多数示例都涉及到容器,但迭代器是灵活的。

考虑这个简单的代码,它不使用迭代器,来循环遍历字节切片中的行。这是容易编写的,也是相当高效的。

1
2
3
for _, line := range bytes.Split(data, []byte{'\n'}) {
handleLine(line)
}

然而,bytes.Split 确实会分配并返回一个包含行的字节切片。垃圾回收器最终需要做一些工作来释放那个切片。

以下是一个返回某些字节切片中行的迭代器的函数。在通常的迭代器签名之后,函数相当简单。我们不断从 data中提取行,直到没有剩余的,我们将每行传递给 yield 函数。

1
2
3
4
5
6
7
8
9
10
11
12
// Lines返回data中行的迭代器。
func Lines(data []byte) iter.Seq[[]byte] {
return func(yield func([]byte) bool) {
for len(data) > 0 {
line, rest, _ := bytes.Cut(data, []byte{'\n'})
if !yield(line) {
return
}
data = rest
}
}
}

现在我们的代码循环遍历字节切片中的行看起来像这样。

1
2
3
for _, line := range Lines(data) {
handleLine(line)
}

这和之前的代码一样容易编写,而且更有效,因为它不需要分配一个行的切片。

将函数传递给推送迭代器

作为最后一个示例,我们将看到,你不必在范围语句中使用推送迭代器。

之前我们看到了PrintAllElements函数,它打印出集合的每个元素。这里是另一种打印集合所有元素的方法:调用s.All来获取一个迭代器,然后传递一个手写的yield函数。这个yield函数只是打印一个值并返回true。注意这里有两个函数调用:我们调用s.All来获取一个迭代器,它本身是一个函数,我们用我们的手写yield函数调用那个函数。

1
2
3
4
5
6
func PrintAllElements[E comparable](s *Set[E]) {
s.All()(func(v E) bool {
fmt.Println(v)
return true
})
}

没有特别的理由这样写代码。这只是作为一个示例,以展示 yield 函数不是魔法。它可以是你喜欢的任何函数。

更新 go.mod

最后一点注意事项:每个Go模块都指定了它所使用的语言版本。这意味着,要在现有模块中使用新的语言特性,你可能需要更新该版本。这对所有新的语言特性都是适用的;它并不是特定于对函数类型进行范围遍历的功能。由于在Go 1.23版本中新引入了对函数类型进行范围遍历的功能,使用它需要至少指定Go语言版本1.23。

至少有四种方法可以设置语言版本:

  1. 在命令行中运行 go get go@1.23(或者使用 go mod edit -go=1.23 仅编辑go指令)。
  2. 手动编辑go.mod文件并更改go版本行。
  3. 保持模块整体的旧语言版本,但使用 //go:build go1.23 构建标签,以允许在特定文件中使用对函数类型进行范围遍历的功能。

]]>
<p class="description"></p> <p><img src="https://" alt="" style="width:100%"></p>
使用 go trace 优化 Golang 中的 GC https://cloudsjhan.github.io/2024/08/21/使用-go-trace-优化-Golang-中的-GC/ 2024-08-21T08:35:01.000Z 2024-08-21T08:35:49.072Z

通过 GOGC 和 GOMEMLIMIT 手动控制内存

在使用 Golang 进行开发时,我们通常不会过多关注内存管理,因为 Golang 的运行时会高效地处理垃圾回收(GC)。然而,了解 GC 对性能优化场景大有裨益。本文将通过一个 XML 解析服务示例,探讨如何使用 go trace 优化 GC 并提高代码性能。

如果您对 go trace 不熟悉,可以先看下 Vincent 关于 trace 软件包的文章。

我们的目标是创建一个程序,处理多个 RSS XML 文件,并搜索标题中包含关键字 go 的项目。我们将以 RSS XML 文件为例,解析该文件 100 次,以模拟压力。

单线程方法

使用单个程序计算关键词

1
2
3
4
5
6
7
8
9
10
11
12
13
14
15
16
17
18
19
20
21
22
23
24
25
26
27
28
29
30
31
32
33
34
35
func freq(docs []string) int {  
var count int
for _, doc := range docs {
f, err := os.OpenFile(doc, os.O_RDONLY, 0)
if err != nil {
return 0
}
data, err := io.ReadAll(f)
if err != nil {
return 0
}
var d document
if err := xml.Unmarshal(data, &d); err != nil {
log.Printf("Decoding Document [Ns] : ERROR :%+v", err)
return 0
}
for _, item := range d.Channel.Items {
if strings.Contains(strings.ToLower(item.Title), "go") {
count++
}
}
}
return count
}

func main() {
trace.Start(os.Stdout)
defer trace.Stop()
files := make([]string, 0)
for i := 0; i < 100; i++ {
files = append(files, "index.xml")
}
count := freq(files)
log.Println(fmt.Sprintf("find key word go %d count", count))
}

代码非常简单,我们使用 for 循环来完成任务,然后执行它:

1
2
3
4
5
6
➜  go_trace git:(main) ✗ go build                      
➜ go_trace git:(main) ✗ time ./go_trace 2 > trace_single.out

-- result --
2024/08/02 16:17:06 find key word go 2400 count
./go_trace 2 > trace_single.out 1.99s user 0.05s system 102% cpu 1.996 total

然后,我们使用 go trace 查看 trace_single.out。

  • RunTime: 2031ms
  • STW (Stop-the-World): 57ms
  • GC Occurrences: 252ms
  • GC STW AVE: 0.227ms

GC 时间约占总运行时间的 57 / 2031 ≈ 0.02。最大内存使用量约为 11.28MB。

图 1:单线程 - 运行时间

图 2:单线程 - GC

图 3:单线程 - 最大堆


目前,我们只使用了一个内核,导致资源利用率很低。为了加快程序运行速度,最好使用 Golang 最擅长的并发功能。

并行方法

使用 FinOut 计数关键词

1
2
3
4
5
6
7
8
9
10
11
12
13
14
15
16
17
18
19
20
21
22
23
24
25
26
27
28
29
30
31
32
33
34
35
36
37
38
39
40
41
42
43
44
45
46
func concurrent(docs []string) int {  
var count int32
g := runtime.GOMAXPROCS(0)
wg := sync.WaitGroup{}
wg.Add(g)
ch := make(chan string, 100)
go func() {
for _, v := range docs {
ch <- v
}
close(ch)
}()

for i := 0; i < g; i++ {
go func() {
var iFound int32
defer func() {
atomic.AddInt32(&count, iFound)
wg.Done()
}()
for doc := range ch {
f, err := os.OpenFile(doc, os.O_RDONLY, 0)
if err != nil {
return
}
data, err := io.ReadAll(f)
if err != nil {
return
}
var d document
if err = xml.Unmarshal(data, &d); err != nil {
log.Printf("Decoding Document [Ns] : ERROR :%+v", err)
return
}
for _, item := range d.Channel.Items {
if strings.Contains(strings.ToLower(item.Title), "go") {
iFound++
}
}
}
}()
}

wg.Wait()
return int(count)
}

用同样的方法运行程序:

1
2
3
4
5
go build
time ./go_trace 2 > trace_pool.out
---
2024/08/02 19:27:13 find key word go 2400 count
./go_trace 2 > trace_pool.out 2.83s user 0.13s system 673% cpu 0.439 total

  • RunTime: 425ms
  • STW: 154ms
  • GC Occurrences: 39
  • GC STW AVE: 3.9ms
    GC 时间约占总运行时间的 154 / 425 ≈ 0.36。最大内存使用量为 91.60MB。

图 4:并发 - GC 计数

图 5:并发 - 最大堆


并发版本比单线程版本快约 5 倍。在 go 跟踪结果中,我们可以看到并发版本的 GC 占用了 36% 的运行时间。有办法优化这段时间吗?从 Go 1.19 开始,我们有两个参数可以控制 GC。

GOGC 和 GOMEMLIMIT

在 Go 1.19 中,增加了两个控制 GC 的参数。GOGC 控制垃圾回收的频率,而 GOMEMLIMIT 则限制程序的最大内存使用量。有关 GOGC 和 GOMEMLIMIT 的详细信息,请参阅官方文档 gc-guide。

GOGC

根据官方文档,计算公式如下:


理论上,如果我们将 GOGC 设置为 1000,那么 GC 的频率将降低 10 倍,而内存使用量则会增加 10 倍(这只是理论模型,实际情况更为复杂)。让我们试一试。

1
2
3
➜  go_trace git:(main) ✗ time GOGC=1000 ./go_trace 2 > trace_gogc_1000.out
2024/08/05 16:57:29 find key word go 2400 count
GOGC=1000 ./go_trace 2 > trace_gogc_1000.out 2.46s user 0.16s system 757% cpu 0.346 total
  • RunTime: 314ms
  • STW: 9.572ms
  • GC Occurrences: 5
  • GC STW AVE: 1.194ms

GC 时间约占总运行时间的 9.572 / 314 ≈ 0.02。最大内存使用量为 451MB。

图 6:GOGC - 最大堆

图 7:GOGC - GC 计数

GOMEMLIMIT

GOMEMLIMIT 用于设置程序的内存使用上限。它通常用于禁用自动 GC 时,允许我们手动管理总的内存使用量。当分配的内存达到上限时,将触发 GC。请注意,即使 GC 努力工作,内存使用量仍有可能超过 GOMEMLIMIT。

在单线程版本中,我们的程序使用了 11.28MB 内存。在并发版本中,有 10 个 goroutines 同时运行。根据 gc-guide 的规定,我们必须保留 10%的内存以备不时之需。因此,我们可以将 GOMEMLIMIT 设置为 11.28MB * 1.1 ≈ 124MB。

1
2
3
➜  go_trace git:(main) ✗ time GOGC=off GOMEMLIMIT=124MiB ./go_trace 2 > trace_mem_limit.out  
2024/08/05 18:10:55 find key word go 2400 count
GOGC=off GOMEMLIMIT=124MiB ./go_trace 2 > trace_mem_limit.out 2.83s user 0.15s system 766% cpu 0.389 total
  • RunTime: 376.455ms
  • STW: 41.578ms
  • GC Occurrences: 14
  • GC STW AVE: 2.969ms

GC 时间约占总运行时间的 41.578 / 376.455 ≈ 0.11。最大内存使用量为 120MB,接近我们设定的上限。

图 8:GOMEMLIMIT - GC 最大堆

图 9:GOMEMLIMIT - GC 计数

如下图所示,增加 GOMEMLIMIT 参数可以获得更好的结果,例如 GOMEMLIMIT=248MiB 时。

图 10:GOMEMLIMIT=248MiB - GC

  • RunTime: 320.455ms
  • STW: 11.429ms
  • GC Occurrences: 5
  • GC STW AVE: 2.285ms
    不过,它也并非没有限制。例如,在 GOMEMLIMIT=1024MiB 时,RunTime 已达到 406ms。

图 11:GOMEMLIMIT=1024MiB - GC

存在风险

官方文档的 建议用途 部分提供了明确的建议。除非熟悉程序的运行环境和工作量,否则请勿使用这两个参数。请务必阅读 gc 指南。

总结

让我们来总结一下优化过程和结果:
图 12:结果比较


在适当的情况下使用 GOGC 和 GOMEMLIMIT 可以有效提高性能。它提供了一种对不确定方面的控制感。不过,必须在受控环境中谨慎使用,以确保性能和可靠性。在资源共享或不受控的环境中应谨慎使用,以避免因设置不当而导致性能下降或程序崩溃。


]]>
使用 go trace 优化 Golang 中的 GC
Notion 如何处理 2000 亿个数据实体? https://cloudsjhan.github.io/2024/08/21/Notion-如何处理-2000-亿个数据实体?/ 2024-08-21T07:58:34.000Z 2024-08-21T07:59:36.942Z

从 PostgreSQL → Data Lake

本文最初发表于 https://vutr.substack.com。

介绍

如果你用过 Notion,你就会知道它几乎可以让你做任何事情–记笔记、计划、阅读清单和项目管理。

Notion 非常灵活,可以定制用户喜欢的模板。Notion 中的一切都是块,包括文本、图像、列表、数据库行甚至页面。

这些动态单元可以转换成其他块类型,也可以在 Notion 中自由移动。

Blocks are Notion’s LEGOs.

PG 统治一切


最初,Notion 将所有数据块存储在 Postgres 数据库中。

2021 年,他们拥有超过 200 亿个区块。

现在,这些区块已经增长到两千多亿个实体,2021 年之前,他们将所有区块都放在一个 Postgres 实例中。
现在,他们将数据库分割成 480 个逻辑分片,并将它们分布在 96 个 Postgres 实例上,每个实例负责 5 个分片。

在 Notion,Postgres 数据库负责处理从在线用户流量到离线分析和机器学习的所有事务。

认识到分析用例的爆炸性需求,特别是他们最近推出的 Notion AI 功能,他们决定为离线工作负载建立一个专用的基础架构。

Fivetrans 和 Snowflake

2021 年,他们开始了简单的 ETL 之旅,使用 Fivetran 将数据从 Postgres 采集到 Snowflake,每小时使用 480 个连接器将 480 个分片写入原始的 Snowflake 表。


然后,Notion 会将这些表合并成一个大表,用于分析和机器学习工作负载。

但当 Postgres 数据增长时,这种方法就会出现一些问题:


管理 480 个 Fivetran 连接器简直就是一场噩梦。

  • Notions 用户更新数据块的频率高于添加新数据块的频率。这种大量更新的模式会降低 Snowflake 数据摄取的速度和成本。
  • 数据消耗变得更加复杂和繁重(人工智能工作负载)

Notion 开始建设内部数据湖。

The Lake

他们希望建立一个能提供以下功能的解决方案:

  • 可扩展的数据存储库,用于存储原始数据和处理过的数据。
  • 为任何工作负载提供快速、经济高效的数据摄取和计算。特别是对于更新量大的块数据。

2022 年,他们启用了内部数据湖架构,该架构使用 Debezium 将数据从 Postgres 增量摄取到 Kafka,然后使用 Apache Hudi 将数据从 Kafka 写入 S3。

对象存储将作为消费系统的终端,为分析、报告需求和人工智能工作负载提供服务。

他们使用 Spark 作为主要数据处理引擎,处理湖泊顶部的数十亿个数据块。
从 Snowflake 迁移的数据摄取和计算工作负载可帮助他们大幅降低成本。
Postgres 的变化由 Kafka Debezium Connector 捕捉,然后通过 Apache Hudi 写入 S3。

Notion 之所以选择这种表格格式,是因为它能很好地应对更新繁重的工作负载,并能与 Debezium CDC 报文进行本地集成。

下面简要介绍一下他们是如何实现该解决方案的:


每台 Postgres 主机一个 Debeizum CDC 连接器。

  • Notion 在托管的 AWS Kubernetes (EKS) 上部署了这些连接器
  • 该连接器可处理每秒数十 MB 的 Postgres 行更改。
  • 每个 Postgres 表有一个 Kafka 主题。
  • 所有连接器都将从所有 480 个分片中消耗数据,并将数据写入该表的同一主题。
  • 他们使用 Apache Hudi Deltastreamer(一种基于 Spark 的摄取作业)来读取 Kafka 消息并将数据写入 S3。
  • 大多数数据处理工作都是用 PySpark 编写的。
  • 他们使用 Scala Spark 处理更复杂的工作。Notion 还利用多线程和并行处理来加快 480 个分片的处理速度。

回报

  • 2022 年,将数据从 Snowflake 迁移到 S3 为 Notion 节省了 100 多万美元,2023 年和 2024 年节省的费用将更为可观。
  • 从 Postgres 到 S3 和 Snowflake 的总体摄取时间大幅缩短,小表的摄取时间从一天以上缩短到几分钟,大表的摄取时间则缩短到几个小时。
  • 新的数据基础设施可提供更先进的分析用例和产品,从而在 2023 年和 2024 年成功推出 Notion AI 功能。

]]>
Notion 如何处理 2000 亿个数据实体?
db-archiver 如何平替 Datax 成为 Databend 离线数据同步的最佳方案 https://cloudsjhan.github.io/2024/08/14/db-archiver-如何平替-Datax-成为-Databend-离线数据同步的最佳方案/ 2024-08-14T10:22:46.000Z 2024-08-14T10:31:07.107Z

2024/08/14 分享备份。

背景

db-archiver ( https://github.com/databendcloud/db-archiver ) 是我们自研的一个能够实现从 RDBMS 全量或增量 T+1 归档数据的工具,基于 db-archiver 目前可以实现 Mysql Or Tidb 的归档。

在此之前我们先来看一下目前在 databend 的生态中,我们提供实现数据同步的方案大概有这么几种,Flink CDC, kafka connect, debezium,Airbyte ,但是像 Flink CDC 等这几个方案,首先就需要用户已经有了 Flink 或者本身就搭建 kafka 等基础设施,而很多小公司都不会有人力去维护这么一套。或者用户只是想一次性迁移数据到 Databend,这种情况下就要求工具尽量简单,开箱即用,用完即走。能符合这个条件的,在这个图里只有 Datax 符合。

image.png

所以 Db-archiver 设计的初衷是为了平替 datax 。DataX 是阿里云 DataWorks数据集成 的开源版本,在阿里内被广泛使用的离线数据同步工具/平台。DataX 实现了包括 MySQL、Oracle、OceanBase、SqlServer、Postgre、databend 等各种异构数据源之间高效的数据同步功能。但是在实施过程中我们发现 Datax 有诸多的痛点,导致用户在数据迁移过程中困难重重, 体验很差。

db-archiver VS Datax

  1. 打包速度以及可执行文件大小

Datax 是java 写的,需要加载各种 jar 包,整个项目较为臃肿编译速度非常慢,且生成的可执行文件总共有 2 个多 G,使用起来非常灾难。

db-archiver 呢编译速度快,最终可执行文件只有 10M ,十分清爽。

2.开发以及 bug fix 的速度

Datax 的维护方是阿里,该项目目前基本处于一种半维护状态, issue 的解决以及 pr 的合并速度都极慢,所以我们每次 fix 问题之后,都是在 fork 的分支上打包给客户,鉴于第一条中提到的包大小有 2G 之多,整个过程对用户很不友好。

image.png

  1. 指标和日志

db-archiver 增加了非常多的指标和日志,对排查问题很有帮助,基本上哪里有问题,一眼就能定位出来。下面截取了一次同步过程中的部分日志。

1
2
3
4
5
6
7
8
9
10
11
12
13
14
15
16
17
18
19
20
21
22
23
24
25
26
27
28
INFO[0011] upload by presigned url cost: 6076 ms
INFO[0012] upload by presigned url cost: 7262 ms
INFO[0012] thread-7: copy into cost: 1400 ms ingest_databend=IngestData
2024/08/13 15:43:58 thread-7: ingest 39999 rows (4201.005115 rows/s), 23639409 bytes (2482794.023097 bytes/s)
INFO[0012] thread-4: copy into cost: 1408 ms ingest_databend=IngestData
2024/08/13 15:43:58 thread-4: ingest 39999 rows (4125.188979 rows/s), 22799430 bytes (2437986.686345 bytes/s)
2024/08/13 15:43:58 Globla speed: total ingested 79998 rows (8315.510453 rows/s), 15279619 bytes (1588262.600387 bytes/s)
INFO[0012] condition: (id >= 1439993 and id < 1479992)
INFO[0012] thread-2: copy into cost: 1713 ms ingest_databend=IngestData
2024/08/13 15:43:58 thread-2: ingest 39999 rows (4095.170564 rows/s), 22799430 bytes (2420245.803072 bytes/s)
2024/08/13 15:43:58 Globla speed: total ingested 119997 rows (8162.421021 rows/s), 29719259 bytes (1559022.517010 bytes/s)
INFO[0012] condition: (id >= 839996 and id < 879995)
2024/08/13 15:43:58 Globla speed: total ingested 119997 rows (8087.586352 rows/s), 44158899 bytes (1544729.094295 bytes/s)
INFO[0012] condition: (id >= 439998 and id < 479997)
INFO[0012] thread-0: copy into cost: 1824 ms ingest_databend=IngestData
2024/08/13 15:43:58 thread-0: ingest 39999 rows (4035.346363 rows/s), 21726145 bytes (2384889.700537 bytes/s)
2024/08/13 15:43:58 thread-7: extract 39999 rows (0.000000 rows/s)
2024/08/13 15:43:58 thread-4: extract 39999 rows (0.000000 rows/s)
2024/08/13 15:43:58 Globla speed: total ingested 159996 rows (7927.205481 rows/s), 57525254 bytes (1514096.345894 bytes/s)
INFO[0013] condition: (id >= 40000 and id < 79999)
2024/08/13 15:43:58 thread-2: extract 39999 rows (0.000000 rows/s)
2024/08/13 15:43:58 thread-0: extract 39999 rows (0.000000 rows/s)
INFO[0013] upload by presigned url cost: 8293 ms
INFO[0013] thread-3: copy into cost: 1241 ms ingest_databend=IngestData
2024/08/13 15:43:59 thread-3: ingest 39999 rows (3748.537451 rows/s), 22799430 bytes (2215219.768763 bytes/s)
2024/08/13 15:43:59 Globla speed: total ingested 199995 rows (7375.987130 rows/s), 71964894 bytes (1408761.080845 bytes/s)
INFO[0013] condition: (id >= 639997 and id < 679996)
2024/08/13 15:43:59 thread-3: extract 39999 rows (40001.375235 rows/s)

image.png

  • 从 MySQL 中抽取 数据的速率
  • 每次 presign 的效率
  • upload stage
  • copy into
  • 每个线程的同步速率 (2024/08/13 15:43:58 thread-2: ingest 39999 rows (4095.170564 rows/s), 22799430 bytes (2420245.803072 bytes/s))
  • 全局的同步速率 (2024/08/13 15:43:59 Globla speed: total ingested 199995 rows (7375.987130 rows/s), 71964894 bytes (1408761.080845 bytes/s))

通过全局的同步速率我们可以确定当前的配置参数是不是最优的,比如 batchSize,thread 数量与机器的配置搭配是不是最优。

可执行文件大小开发以及 bug fix 的速度指标和日志速率
db-archiver10M200w 数据 2min
Datax2G200w 数据 10min

总之我们自研 db-archiver 之后,整个过程更加的可控,再比如我们刚刚对接的一个客户,他们与 databend Cloud 不在同一个 region,同步数据走公网非常慢的问题,这时候我们增加 userStage 参数让用户创建并指定 external stage,这在 datax 中是无法通过参数配置的,所以这样也能够给到用户最佳的体验。

下面来看下 db-archiver 提供的两种同步模式。

两种模式

第一种是

根据 sourceSplitKey 同步数据

如果源表有自增主键,可以设置 sourceSplitKey为主键。db-archiver 将根据 sourceSplitKey 按照规则切分数据,并发同步数据到 Databend。这是性能最高的模式。后面会讲这个切分数据的规则。

1
2
3
4
5
6
7
8
9
10
11
12
13
14
15
16
{
"sourceHost": "127.0.0.1",
"sourcePort": 3306,
"sourceUser": "root",
"sourcePass": "",
"sourceDB": "mydb",
"sourceTable": "test_table1",
"sourceWhereCondition": "id > 0",
"sourceSplitKey": "id",
"databendDSN": "<https://cloudapp:ajynnyvfk7ue@tn3ftqihs--medium-p8at.gw.aws-us-east-2.default.databend.com:443>",
"databendTable": "testSync.test_table1",
"batchSize": 40000,
"batchMaxInterval": 30,
"userStage": "USER STAGE",
"maxThread": 10
}

根据 sourceSplitTimeKey 同步数据

某些情况下用户的源表没有自增主键,但是有时间列,这个时候可以设置 sourceSplitTimeKey 同步数据。db-archiver 将根据 sourceSplitTimeKey 分割数据。

sourceSplitTimeKey 必须与 timeSplitUnit 一起设置。timeSplitUnit 是切片数据的时间颗粒度,可以是 minute, hour, day。由于数据在时间上的密集度用户是最了解的,用户就可以自定义timeSplitUnit 按时间列分割数据,以达到最合理的同步效率。

1
2
3
4
5
6
7
8
9
10
11
12
13
14
15
16
17
18
19
{
"sourceHost": "127.0.0.1",
"sourcePort": 3306,
"sourceUser": "root",
"sourcePass": "123456",
"sourceDB": "mydb",
"sourceTable": "my_table2",
"sourceWhereCondition": "t1 >= '2024-06-01' and t1 < '2024-07-01'",
"sourceSplitKey": "",
"sourceSplitTimeKey": "t1",
"timeSplitUnit": "minute",
"databendDSN": "<https://cloudapp:password@tn3ftqihs--medium-p8at.gw.aws-us-east-2.default.databend.com:443>",
"databendTable": "testSync.my_table2",
"batchSize": 2,
"batchMaxInterval": 30,
"userStage": "~",
"deleteAfterSync": false,
"maxThread": 10
}

压测的过程中按照 sourceSplitTimeKey 同步性能不如按照主键 id,且并发的话会对 MySQL 的性能造成影响,为了保障MySQL 不受影响,所以这个模式不支持并发。

数据切片算法

对于 Databend 的数据同步没有太多可以分享的,核心的链路就是 源表(MySQL) → NDJSON→ Stage→ Copy into→ databend table。

比较核心的是数据切片的算法,这关乎数据同步的准确性、同步的效率,下面就重点讲下这个。

db-archiver 会取源表的主键为 sourceSplitKey 。将根据 sourceSplitKey 分割数据,并行同步数据到 Databend。

sourceSplitTimeKey 用于按时间列分割数据。sourceSplitTimeKeysourceSplitKey 至少需要设置一个。

Sync data according to the sourceSplitKey

下面详细讲一下 db-archiver 按照 id primary key 对数据切片的算法原理:

  1. 首先用户会传入一个 sourceWhereCondition 作为整体的数据范围圈定,比如 ‘id> 100 and id < 10000000’,这样就可以获取范围内的 min(id) 和 max(id)
  2. 根据上面拿到的 min, max id,再根据分配的线程数量计算出每个线程需要处理的数据范围:
1
2
3
4
5
6
7
8
9
10
rangeSize := (maxSplitKey - minSplitKey) / s.cfg.MaxThread
for i := 0; i < s.cfg.MaxThread; i++ {
lowerBound := minSplitKey + rangeSize*i
upperBound := lowerBound + rangeSize
if i == s.cfg.MaxThread-1 {
// Ensure the last condition includes maxSplitKey
upperBound = maxSplitKey
}
conditions = append(conditions, []int{lowerBound, upperBound})
}

注意处理这里的边界条件,当达到最后一个线程的时候,该线程内的 upperBound 直接等于 maxSplitKey,这里线程内的范围是一个全闭区间。

  1. 将上面得到的每个线程内的数据范围数组,分别再按照 batchSize 切分
1
2
3
4
5
6
if (minSplitKey + s.cfg.BatchSize - 1) >= allMax {
conditions = append(conditions, fmt.Sprintf("(%s >= %d and %s <= %d)", s.cfg.SourceSplitKey, minSplitKey, s.cfg.SourceSplitKey, allMax))
return conditions
}
conditions = append(conditions, fmt.Sprintf("(%s >= %d and %s < %d)", s.cfg.SourceSplitKey, minSplitKey, s.cfg.SourceSplitKey, minSplitKey+s.cfg.BatchSize-1))
minSplitKey += s.cfg.BatchSize - 1

这里也要处理一些边界条件,否则会导致切片范围有误最终导致同步过去的数据量不准确。

对于最后一次 (minSplitKey + s.cfg.BatchSize - 1) >= maxSplitKey,的情况,如果最小的 key 都比整个范围最大的 maxKey 大了,就直接返回。

如果当前的 maxSplitKey 恰好与 maxKey 相等,那这就是最后一批,需要保证右侧区间是闭区间,这样才能保证整个数据是连续的。

其余的情况就是左闭右开的数据区间。最终的切分效果就是:[1,100), [100, 200), [200,300), [300, 400)……, [9900, 10000]

1
2
3
4
5
6
7
8
9
10
11
12
13
14
for{
...
if (minSplitKey + s.cfg.BatchSize - 1) >= maxSplitKey {
if minSplitKey > allMax {
return conditions // minkey > allMax return directly
}
if maxSplitKey == allMax {
conditions = append(conditions, fmt.Sprintf("(%s >= %d and %s <= %d)", s.cfg.SourceSplitKey, minSplitKey, s.cfg.SourceSplitKey, maxSplitKey)) // corner case, must <=x<=
} else {
conditions = append(conditions, fmt.Sprintf("(%s >= %d and %s < %d)", s.cfg.SourceSplitKey, minSplitKey, s.cfg.SourceSplitKey, maxSplitKey)) // other condition is [)
}
break
}
}
  1. 在每个线程中,对按照 batchSize 切分后的数据进行同步
1
2
3
for _, condition := range conditions {
// processing
}

整个切片的流程可以参考下图:

image.png

Sync data according to the sourceSplitTimeKey

我们在给客户演示的时候得知,有些表是没有指定自增的 id,这种情况下上面按照 primary key id 进行数据同步的算法就失效了,所以我们需要支持按照时间字段切片同步。

  1. 跟 id 一样,也是先根据 where condition 确定 min, max time 的数据范围
  2. 第二步跟 id 有所区别,由于是按照时间字段切片,所以再使用 batchSize 来分割会让问题复杂并且容易出错, 并且数据在时间上的密集度用户是最了解的,所以这里我们引入新的字段 timeSplitUnit ,其取值有:
1
2
3
4
5
6
7
8
9
10
11
12
switch StringToTimeSplitUnit[c.TimeSplitUnit] {
caseMinute:
return 10 * time.Minute
caseQuarter:
return 15 * time.Minute
caseHour:
return 2 * time.Hour
caseDay:
return 24 * time.Hour
default:
return 0
}

这样可以让用户根据不同的数据密集程度,来决定用什么时间范围来切分。

1
2
3
4
5
6
7
8
9
10
if minTime.After(maxTime) {
conditions = append(conditions, fmt.Sprintf("(%s >= '%s' and %s <= '%s')", s.cfg.SourceSplitTimeKey, minTime.Format("2006-01-02 15:04:05"), s.cfg.SourceSplitTimeKey, maxTime.Format("2006-01-02 15:04:05")))
break
}
if minTime.Equal(maxTime) {
conditions = append(conditions, fmt.Sprintf("(%s >= '%s' and %s <= '%s')", s.cfg.SourceSplitTimeKey, minTime.Format("2006-01-02 15:04:05"), s.cfg.SourceSplitTimeKey, maxTime.Format("2006-01-02 15:04:05")))
break
}
conditions = append(conditions, fmt.Sprintf("(%s >= '%s' and %s < '%s')", s.cfg.SourceSplitTimeKey, minTime.Format("2006-01-02 15:04:05"), s.cfg.SourceSplitTimeKey, minTime.Add(s.cfg.GetTimeRangeBySplitUnit()).Format("2006-01-02 15:04:05")))
minTime = minTime.Add(s.cfg.GetTimeRangeBySplitUnit())
  1. 根据 batchSize 分批同步数据

这里取了个巧把 batchSize 切分放到了 SQL 里面,可以结合 offset 可以减小对源端的压力。

具体流程如下图:

image.png

演示

归档可视化((TODO))

为了进一步方便用户使用,简化数据进入 databend 的流程,我们计划将 db-archiver 可视化。

能够让用户通过在界面上配置同步任务,管理同步任务,点点点就能完成数据从外部迁移到 Databend。

配置页

配置的流程

image.png

任务管理页面

同步任务的界面如下:

image.png

也可以参考 dataworks 的任务界面:

image.png

可以查看目标任务的基本信息及运行情况。

  • 任务名称:为您展示任务的名称。单击任务名称,即可进入目标任务的详情页面。
  • 任务ID:为您展示任务的ID。
  • 运行状态:任务的运行状态,包括Runing, Stop, Success, Fail..等状态。
  • 开始运行:任务的开始运行时间。
  • 结束运行:任务的结束运行时间。
  • 运行时长:任务的运行时长,单位为秒。
  • 任务类型:任务的类型。
  • 运行速率: 数据导入的速率
  • 同步进度:数据同步的进度百分比

同样可以操作任务,对任务进行开始,暂停,继续,结束等操作。

前端直接在 https://github.com/databendcloud/db-archiver 项目中开发,然后通过 go embed 将前端一同打包,这样用户直接使用一个二进制启动项目即可。

存在问题

由于 db-archiver 可以根据用户配置信息使用了并发数据抽取,因此不能严格保证数据一致性:根据splitKey 进行数据切分后,会先后启动多个并发任务完成数据同步。由于多个并发任务相互之间不属于同一个读事务,同时多个并发任务存在时间间隔。因此这份数据并不是完整的一致的数据快照信息。

针对多线程的一致性快照需求,在技术上目前无法实现,只能从工程角度解决,我们提供几个解决思路给用户,用户可以自行选择:

  1. 使用单线程同步,即不再进行数据切片。缺点是速度比较慢,但是能够很好保证一致性。
  2. 关闭其他数据写入方,保证当前数据为静态数据,例如,锁表、关闭备库同步等等。缺点是可能影响在线业务。

不过 db-archiver 适用的是归档场景,基本能够保证当前为静态数据。

RoadMap

  • 支持 RDBMS 的更多数据源,比如 pg, oracle 等
  • 支持分库分表到一张表
  • 可视化归档

最后,希望 db-archiver 能够取代 datax ,成为日后我们给客户推荐离线数据同步的最佳方案。

我的分享就到这里,感谢大家。


]]>
2024/08/14 公司分享
从源代码中窥探 Go 的 WaitGroup 实现和应用 https://cloudsjhan.github.io/2024/08/04/从源代码中窥探-Go-的-WaitGroup-实现和应用/ 2024-08-04T08:16:06.000Z 2024-08-04T08:16:27.932Z

sync.WaitGroup Overview

Go 作为云原生开发的代表,以其在并发编程中的易用性而闻名。在大多数情况下,人们会在处理并发时使用 WaitGroup。我经常想要了解它是如何工作的,所以本文主要谈谈我对 WaitGroup 的理解。

在 Go 语言中,sync.WaitGroup 允许主程序或其他 goroutines 在继续执行之前等待多个 goroutines 执行完毕。

它主要用于以下情况:

  • 等待一组执行程序完成:当我们有多个并发任务需要执行,并希望在所有这些任务完成后继续执行后续操作时。

  • 确保资源释放:在并发操作中,为了避免资源竞争和数据不一致,有必要在释放资源前确保所有 goroutine 都已执行完毕。

例如:

1
2
3
4
5
6
7
8
9
10
11
12
13
14
15
16
17
18
19
20
21
22
23
24
25
26
27
package main

import (
"fmt"
"sync"
)

func main() {
var counter int64
var mu sync.Mutex
var wg sync.WaitGroup

for i := 0; i < 10; i++ {
wg.Add(1)
go func() {
for j := 0; j < 1000; j++ {
mu.Lock()
counter++
mu.Unlock()
}
wg.Done()
}()
}

wg.Wait()
fmt.Println("Final Counter:", counter)
}

sync.WaitGroup in Go 1.17:

Go 1.20 之前的结构有一些巧妙的地方,因此本文将以 Go 1.17 为例重点讲解。

1
2
3
4
5
6
7
8
9
10
type WaitGroup struct {
noCopy noCopy

// 64-bit value: high 32 bits are counter, low 32 bits are waiter count.
// 64-bit atomic operations require 64-bit alignment, but 32-bit
// compilers do not ensure it. So we allocate 12 bytes and then use
// the aligned 8 bytes in them as state, and the other 4 as storage
// for the sema.
state1 [3]uint32
}
  • nocopy 是一种防止结构被复制的保护机制,将在后面介绍。
  • state1 主要存储计数状态和 semaphore,我们接下来将重点讨论。

要理解注释的内容,首先需要了解内存对齐方式,以及在 Add() 和 Wait() 中如何使用 state1。
内存对齐要求数据地址必须是某个值的倍数,这可以提高 CPU 读取内存数据的效率:

  • 32 位对齐:数据的起始地址必须是 4 的倍数
  • 64 位对齐:数据的起始地址必须是 8 的倍数

在 Add() 和 Wait() 中,计数器和等待器合并为一个 64 位整数使用。

1
2
3
4
5
statep, semap := wg.state()
...
state := atomic.AddUint64(statep, uint64(delta)<<32)
v := int32(state >> 32)
w := uint32(state)

当需要更改计数器和等待器的值时,64 位整数会通过原子方式进行原子操作。但原子中你有一些需要注意的使用点,golang 官方文档 sync/atomic/PKG - note - bugs 中就有这样的内容:

在 ARM、386 和 32 位 MIPS 上,调用者有责任安排通过原始原子函数原子访问的 64 位字的 64 位对齐(Int64 和 Uint64 类型自动对齐)。分配的结构体、数组或片段中的第一个字;全局变量中的第一个字;或局部变量中的第一个字(因为所有原子操作的对象都会逃逸到堆中)都可以依赖于 64 位对齐。

基于这一前提,在 32 位系统中,我们需要自己保证 “count+waiter “的 64 位对齐。那么问题来了,如果是你来实现,该如何写呢?

state()

让我们来看下官方的实现:

1
2
3
4
5
6
7
8
9
10
state1 [3]uint32

// state returns pointers to the state and sema fields stored within wg.state1.
func (wg *WaitGroup) state()(statep *uint64, semap *uint32) {
if uintptr(unsafe.Pointer(&wg.state1)) % 8 == 0 {
return (*uint64)(unsafe.Pointer(&wg.state1)), &wg.state1[2]
} else {
return (*uint64)(unsafe.Pointer(&wg.state1[1])), &wg.state1[0]
}
}


如图所示:

在 64 位系统上,都符合 8 字节对齐要求。而在 32 位系统上,也可能是这样。

在不符合 8 字节对齐要求的 32 位系统上,sema 字段向前移动 4 个字节,以确保状态字段符合 8 字节对齐要求。

只需重新安排 sema 字段的位置,我们就能保证计数器+等待器始终对齐 64 位边界,这确实非常聪明。

简化实现流程

现在,让我们考虑一下原始结构,为简单起见,忽略内存对齐和并发安全因素:

1
2
3
4
5
type WaitGroup struct {
counter int32
waiter uint32
sema uint32
}

  • 计数器表示尚未完成的任务数。WaitGroup.Add(n)将导致计数器 += n,而 WaitGroup.Done() 将导致计数器–。

  • waiter 表示调用了 WaitGroup.Wait 的程序数目。

  • sema 对应 Go 运行时的内部信号实现。在 WaitGroup 中,我们使用了两个相关函数:runtime_Semacquire 和 runtime_Semrelease。runtime_Semacquire 会增加一个 semaphore 并暂停当前的 goroutine。

注意,这只是一个简化的实施过程,实际代码可能更加复杂。

Add()、Done()、Wait()

可以先阅读下这段代码 cs.opensource.google/go/go/+/refs/tags/go1.17:src/sync/waitgroup.go

结合我们常见的使用场景,关键流程如下:

调用 WaitGroup.Add(n) 时,计数器将按 n 递增: counter += n

1
state := atomic.AddUint64(statep, uint64(delta)<<32)

在调用 WaitGroup.Wait() 时,它将递增 waiter++ 并调用 runtime_Semacquire(semap) 来增加 semaphore 并暂停当前的 goroutine。

1
2
3
4
if atomic.CompareAndSwapUint64(statep, state, state+1) {
...
runtime_Semacquire(semap)
...

当调用 WaitGroup.Done() 时,它将递减计数器–。如果递减后的计数器等于 0,则表示 WaitGroup 的等待进程已经结束,我们需要调用 runtime_Semrelease 来释放 semaphore,并唤醒 WaitGroup.Wait 上等待的程序。

1
2
3
for ; w != 0; w-- {
runtime_Semrelease(semap, false, 0)
}

Go 1.20 中的 WaitGroup

cs.opensource.google/go/go/+/refs/tags/go1.20:src/sync/waitgroup.go

相信有人已经注意到了一个问题,即计数器和等待器在更改时需要确保并发安全。为什么不直接使用 atomic.Uint64 呢?

这是因为 atomic.Uint64 只在 1.17 以后的版本中才受支持。

在 Go 1.20 中,我们可以注意到内存对齐逻辑被 atomic.Uint64 所取代,虽然在 Go 1.20 的发布说明中没有提及,但我们可以从中学习到很多东西。

Reference: sync: use atomic.Uint64 for WaitGroup state

noCopy

在 waitGroup 结构中,我们看到了 noCopy。为什么需要 noCopy?让我们来看一个例子:

1
2
3
4
5
6
7
8
9
10
11
12
13
14
15
16
17
18
19
20
21
22
23
24
25
package main
import "fmt"

// Define a struct type
type Person struct {
Name string
Age int
}

func main() {
// Create a struct instance
person := Person{Name: "Alice", Age: 30}

// Create a pointer to the struct
p := &person

// Access and modify the struct's fields through the pointer
fmt.Println(p.Name) // Output: Alice
fmt.Println((*p).Name) // Output: Alice

p1 := p
p.Age = 32
fmt.Println(p.Age) // Output: 32
fmt.Println(p1.Age) // Output: 32
}

在 Go 中,指针复制是一种浅层复制,即只复制顶层结构。如果原始结构及其副本都指向相同的底层数据,这可能会导致意想不到的行为。如果一个结构的数据被修改,可能会影响到另一个结构。

使用 noCopy 字段有助于进行静态编译检查。使用 go vet,可以检查对象或对象中的字段是否已被复制。

关于 WaitGroup 的说明

探索使用 WaitGroup 时的一些限制和潜在隐患,并学习如何避免这些问题。
如果你看过 Go 源代码,可能会注意到下面这些总结要点的经典注释:

  • Add() 操作必须在 Wait() 操作之前执行。

  • 调用 Done() 的次数必须与 Add() 设置的计数器值一致。

  • 如果计数器的值小于 0,就会出现 panic

  • 不能同时调用 Add() 和 Wait();例如,在两个不同的程序中调用这两个函数会导致 panic。

  • 必须等到 Wait() 完成后,才能对 WaitGroup 进行后续调用。

Semaphores

在上一节中,我们提到了semaphores,它是一种保护共享资源和防止多个线程同时访问同一资源的机制。让我们来看看 Semaphores 在 Unix/Linux 系统中是如何工作的:

一个 Semaphore 包含一个非负整数变量和两个原子操作:等待(下)和信号(上)。等待操作也可称为 P 或 down,它将值递减 1;而信号操作也称为 V 或 up,它将值递增 1。 Semaphores 使用原子操作来实现对并发资源的控制。

  • 等待(P,向下)操作:如果 semaphore 的非负整数变量 S > 0,wait 将递减它;如果 S = 0,wait 将阻塞线程。

  • 信号(V,向上)操作:递增后,如果递增前的值为负数(表示有进程在等待资源),则被阻塞的进程将从 semaphore 的等待队列移到就绪队列;如果没有线程被阻塞在 semaphore 上,则 signal 会简单地在 S 上加 1。

这与 Go 中使用 WaitGroup 的常见情况一致:

  • 首先使用 runtime_Semacquire(semap)执行 Wait(),这样会将 semap 设置为 0,并增加 semaphore 和暂停当前程序。

  • 当所有运行程序都完成了 Done() 执行后,执行 runtime_Semrelease 以释放寄存器,并唤醒 WaitGroup.Wait 上等待的运行程序。

1
2
3
4
5
6
7
8
9
//go:linkname sync_runtime_Semacquire sync.runtime_Semacquire
func sync_runtime_Semacquire(addr *uint32) {
semacquire1(addr, false, semaBlockProfile, 0, waitReasonSemacquire)
}

//go:linkname sync_runtime_Semrelease sync.runtime_Semrelease
func sync_runtime_Semrelease(addr *uint32, handoff bool, skipframes int) {
semrelease1(addr, handoff, skipframes)
}

例如,让我们来看看 semacquire1(等待、P、向下):

  • 尝试获取信号:

    1
    2
    3
    4
    5
    6
    7
    8
    9
    10
    11
    12
    13
    14
    15
    if cansemacquire(addr) {
    return
    }

    func cansemacquire(addr *uint32) bool {
    for {
    v := atomic.Load(addr)
    if v == 0 {
    return false
    }
    if atomic.Cas(addr, v, v-1) {
    return true
    }
    }
    }
  • 阻止并等待:

    1
    2
    3
    4
    5
    6
    7
    8
    9
    10
    11
    12
    13
    14
    for {
    ...
    if cansemacquire(addr) {
    root.nwait.Add(-1)
    unlock(&root.lock)
    break
    }
    root.queue(addr, s, lifo)
    goparkunlock(&root.lock, reason, traceBlockSync, 4+skipframes)
    if s.ticket != 0 || cansemacquire(addr) {
    break
    }
    ...
    }

]]>
<p class="description"></p> <p><img src="https://" alt="" style="width:100%"></p>
从 Golang 到 TinyGo:如何为 IOT 构建高效应用程序? https://cloudsjhan.github.io/2024/08/01/从-Golang-到-TinyGo:如何为-IOT-构建高效应用程序?/ 2024-08-01T03:33:50.000Z 2024-08-01T03:34:15.253Z

TinyGo 是专为小型设备设计的 Go 编译器。它将 Go 编程语言引入微控制器和 WebAssembly,使 Go 开发人员能够高效地为嵌入式系统和网络环境构建应用程序。TinyGo 的主要目标是缩小二进制文件的大小并提高性能,以适应小型设备的限制。

TinyGo 的主要特性

  • 小二进制文件与标准 Go 编译器 (gc) 相比,TinyGo 生成的二进制文件要小得多,因此适合存储空间有限的环境。
  • 内存占用低:TinyGo 经过优化,使用的内存更少,非常适合内存有限的微控制器。
  • 支持 WebAssembly:TinyGo 可将 Go 代码编译成 WebAssembly,使 Go 应用程序能在网络浏览器中运行。
  • 互操作性:允许通过易于使用的应用程序接口与底层硬件直接交互,因此非常适合嵌入式系统。

安装

可以使用以下命令安装 TinyGo:

1
2
3
4
5
6
# Install TinyGo
brew tap tinygo-org/tools
brew install tinygo

# Verify the installation
tinygo version

对于其他操作系统,可以按照官方安装指南进行安装。

编写第一个 TinyGo 程序

让我们用 TinyGo 写一个简单的 “Hello, World!”程序。

1
2
3
4
5
6
7
8
9
10
11
12
13
14
15
16
package main

import "machine"
import "time"

func main() {
led := machine.LED
led.Configure(machine.PinConfig{Mode: machine.PinOutput})

for {
led.High()
time.Sleep(time.Millisecond * 500)
led.Low()
time.Sleep(time.Millisecond * 500)
}
}

编译和运行 TinyGo 代码

要在微控制器上编译和运行这段代码,请按照以下步骤操作:

  • 将微控制器连接到电脑。
  • 为特定电路板编译代码。例如,如果您使用的是 Arduino Uno:
1
tinygo flash -target=arduino main.go

Golang 和 TinyGo 的区别

虽然 Golang 和 TinyGo 有着相同的语法和许多功能,但它们也有一些关键的不同之处:

目标平台

  • Golang:主要设计用于服务器端应用程序、网络服务和桌面应用程序。
  • TinyGo:针对微控制器、物联网设备和浏览器应用的 WebAssembly。

二进制大小:

  • Golang:由于其全面的运行时和标准库,产生的二进制文件相对较大。
  • TinyGo:经过优化,可生成适合嵌入式系统的较小二进制文件。

标准库支持

  • Golang:完全支持 Go 标准库
  • TinyGo:由于嵌入式环境的限制,对 Go 标准库的支持有限。不过,它包含了基本的软件包,并为不支持的功能提供了替代方案。

内存使用情况:

  • Golang:优化了性能,但使用更多内存。
  • TinyGo:内存使用量更少,非常适合低内存环境。

并发性:

  • Golang完全支持 goroutines 和并发编程。
  • TinyGo:对 goroutines 的基本支持,但由于目标平台的限制而受到一些限制。

使用 TinyGo 的示例项目

闪烁的 LED:在微控制器上闪烁 LED 的简单程序。

1
2
3
4
5
6
7
8
9
10
11
12
13
14
15
16
package main

import "machine"
import "time"

func main() {
led := machine.LED
led.Configure(machine.PinConfig{Mode: machine.PinOutput})

for {
led.High()
time.Sleep(time.Millisecond * 500)
led.Low()
time.Sleep(time.Millisecond * 500)
}
}

温度传感器从温度传感器读取数据并显示。

1
2
3
4
5
6
7
8
9
10
11
12
13
14
15
16
17
package main

import (
"machine"
"time"
)

func main() {
sensor := machine.ADC{Pin: machine.ADC1}
sensor.Configure(machine.ADCConfig{})

for {
value := sensor.Get()
println("Temperature:", value)
time.Sleep(time.Second)
}
}

WebAssembly 示例

1
2
3
4
5
6
7
package main

import "fmt"

func main() {
fmt.Println("Hello, WebAssembly!")
}

将其编译为 WebAssembly:

1
tinygo build -o main.wasm -target wasm main.go

总结

TinyGo 通过 WebAssembly 将 Go 编程语言的强大功能和简易性扩展到微控制器和网络浏览器等受限环境。TinyGo 能够生成小二进制文件并高效使用内存,是物联网和嵌入式系统开发的理想选择。与完整的 Go 编译器相比,WebAssembly 有一些局限性,但它为 Go 开发人员在新领域创建创新应用提供了新的可能性。


]]>
<p class="description"></p> <p><img src="https://" alt="" style="width:100%"></p>
在 Confluent Cloud 上使用 Databend Kafka Connect 构建实时数据流同步 https://cloudsjhan.github.io/2024/07/25/在-Confluent-Cloud-上使用-Databend-Kafka-Connect-构建实时数据流同步/ 2024-07-25T07:32:43.000Z 2024-07-25T07:33:27.947Z

Confluent Cloud

Confluent Cloud 是由 Confluent 公司提供的云服务,它是基于 Apache Kafka 的企业级事件流平台,允许用户轻松构建和管理分布式流处理应用。Confluent 由 Apache Kafka 的原始创建者创立,专注于提供围绕 Kafka 技术的产品和服务 。

Confluent Cloud 提供的主要优势包括简化的部署和管理,高可用性,以及自动扩展能力。它是一个云端托管服务,是 Confluent Enterprise 的云端版本,增加了云端管理控制台的组件,使得用户无需担心底层基础设施的维护和扩展问题,可以更专注于业务逻辑的实现 。

Confluent Cloud 与其他 Confluent 产品一样,提供了一系列的工具和服务,例如 Kafka Connect 用于连接外部系统,Schema Registry 用于管理数据格式的变更,以及 KSQL 用于流处理查询等。这些工具和服务帮助用户构建统一而灵活的数据流平台,实现数据的实时处理和分析 。

此外,Confluent Cloud 还提供了不同层级的服务,根据可用性、安全等企业特性分为 Basic、Standard 和 Dedicated 三个版本,支持按需创建资源,并且按量收费,为用户提供了灵活的付费选项。

Databend Kafka Connect

Databend 提供了 Databend-Kafka-Connect 作为 Apache Kafka 的 Sink connector,直接接入到 Confluent Cloud 平台,就可以实时消费 kafka topic 中的数据并写入 Databend table。

Databend kafka connect 提供了诸多特性,例如自动建表,Append Only 和 Upsert 写入模式,自动的 schema evolution。

这篇文章我们将会介绍如何在 Confluent Cloud 上使用 Databend Kafka Connector 构建实时的数据同步管道。

实现

创建自定义 connector

Confluent 提供了一个 connector hub,在这里可以找到所有已经内置到 Confluent Cloud 中的 Connector。对于没有内置的,Confluent 支持创建自定义 connector。

Add plugin

配置 plugin

填写 connector 的名称、描述以及入口 class,在这里 databend connect 的入口类是:com.databend.kafka.connect.DatabendSinkConnector

git clone https://github.com/databendcloud/databend-kafka-connect.git 下载源码编译或者直接到 release 页面下载打包好的 jar 文件。将其上传至 Confluent Cloud。

创建 Topic

创建一个新的 kafka topic

为新创建的 topic 定义一个 schema 以确定其数据结构。这里我们确定 kafka topic 中的数据格式为 AVRO,其 schema 为:

1
2
3
4
5
6
7
8
9
10
11
12
13
14
15
16
17
18
19
20
21
22
{
"doc": "Sample schema to help you get started.",
"fields": [
{
"doc": "The int type is a 32-bit signed integer.",
"name": "id",
"type": "int"
},
{
"doc": "The string is a unicode character sequence.",
"name": "name",
"type": "string"
},
{
"doc": "The string is a unicode character sequence.",
"name": "age",
"type": "int"
}
],
"name": "sampleRecord",
"type": "record"
}

Add connector for topic

为刚创建的 topic 添加一个 sink connector

选择上面我们自定义的 databend connector 并配置 API key 和 secret。

添加 databend connector 的配置文件

1
2
3
4
5
6
7
8
9
10
11
12
13
14
15
16
17
18
19
20
21
{
"auto.create": "true",
"auto.evolve": "true",
"batch.size": "1",
"confluent.custom.schema.registry.auto": "true",
"connection.attempts": "5",
"connection.backoff.ms": "10000",
"connection.database": "testsync",
"connection.password": "password",
"connection.url": "jdbc:databend://tn3ftqihs--medium-p8at.gw.aws-us-east-2.default.databend.com:443?ssl=true",
"connection.user": "cloudapp",
"errors.tolerance": "all",
"insert.mode": "upsert",
"key.converter": "org.apache.kafka.connect.storage.StringConverter",
"max.retries": "10",
"pk.fields": "id",
"pk.mode": "record_value",
"table.name.format": "testsync.${topic}",
"topics": "topic_avrob",
"value.converter": "io.confluent.connect.avro.AvroConverter"
}

配置文件中指定了目标端的连接参数,数据库名,表名,kafka 相关信息以及 connector converter 。
key.converter 和 value.converter 就是指定的转换器,分别指定了消息键和消息值所使用的的转换器,用于在 Kafka Connect 格式和写入 Kafka 的序列化格式之间进行转换。这控制了写入 Kafka 或从 Kafka 读取的消息中键和值的格式。由于这与 Connector 没有任何关系,因此任何 Connector 可以与任何序列化格式一起使用。默认使用 Kafka 提供的 JSONConverter。有些转换器还包含了特定的配置参数。例如,通过将 key.converter.schemas.enable 设置成 true 或者 false 来指定 JSON 消息是否包含 schema。

配置网络白名单

将数据写入的目标端的 host 填入 confluent cloud 的 connection endpoint 配置,confluent 会在 kafka 和目标端之间建立 private link 以确保网络通畅。

确认配置并启动 kafka connector

向 topic 中发送样例数据

确认 kafka connect 处于 running 状态后,

我们使用 confluent CLI 工具往 topic 中发送数据:

1
confluent kafka topic produce topic_avrob  --value-format avro --schema schema.json

其中 schema.json 就是我们为 topic 定义的 schema。

通过 confluent cloud 的日志我们可以看到 kafka connect 已经接收到来自 topic 的消息并开始写入 databend table:

同时我们在 databend cloud 中可以看到 testsync.topic_avrob 表已经被自动创建且数据已写入:

总结

通过以上步骤,我们就可以在 Confluent Cloud 与 Databend Cloud 之间,使用 Databend Kafka Connector 构建起二者之间的实时数据同步管道。


]]>
<p class="description"></p> <p><img src="https://" alt="" style="width:100%"></p>
Lambda-Go:将函数式编程引入 Go https://cloudsjhan.github.io/2024/07/23/Lambda-Go:将函数式编程引入-Go/ 2024-07-23T06:38:10.000Z 2024-07-23T06:38:34.221Z

近年来,函数式编程越来越受到重视,甚至在传统上与命令式或面向对象范式相关的语言中也不例外。以简单高效著称的 Go 也不例外。Lambda-Go 是一个旨在将受 Haskell 启发的函数式编程技术引入 Go 生态系统的库。在本文中,我们将探讨 Lambda-Go 的功能,以及它如何增强你的 Go 编程体验。

Lambda-Go 简介

Lambda-Go 是一个 Go 库,它通过函数式编程结构扩展了 Go 语言的功能。它提供了一系列工具和实用程序,允许开发人员编写更具表现力和更简洁的代码,同时还能利用 Go 强大的类型和性能优势。该库从 Haskell 中汲取灵感,Haskell 是一种纯函数式编程语言,以其优雅的语法和强大的抽象而著称。

Lambda-Go 的主要目标是为 Go 开发人员提供一种将函数式编程技术融入现有代码库的方法,而无需完全切换到另一种语言。这种方法可以使代码更简洁、更易维护,尤其是在处理复杂的数据转换或集合操作时。

Lambda-Go 的主要功能

Lambda-Go 分成几个包,每个包都侧重于函数式编程的一个特定方面。让我们深入了解其主要功能,看看如何在实践中使用它们。

核心功能结构

核心软件包实现了基本的函数式编程操作,如 MapFoldlFoldr。这些函数是许多函数式编程模式的基石。

Map

Map 函数对片段中的每个元素应用给定的函数,返回一个包含转换后元素的新片段。下面是一个使用 Map 将片段中每个数字加倍的示例:

1
2
3
4
5
6
7
8
9
10
11
12
package main

import (
"fmt"
"github.com/araujo88/lambda-go/pkg/core"
)

func main() {
numbers := []int{1, 2, 3, 4, 5}
doubled := core.Map(numbers, func(x int) int { return x * 2 })
fmt.Println(doubled) // Output: [2 4 6 8 10]
}

Foldl and Foldr

Foldl 和 Foldr 是两个功能强大的函数,通过对每个元素应用一个函数和一个累加器,可以将切片还原为一个单一值。这两个函数的区别在于它们遍历切片的方向。

下面是一个使用 Foldl 求整数片段总和的示例:

1
2
3
4
5
6
7
8
9
10
11
12
package main

import (
"fmt"
"github.com/araujo88/lambda-go/pkg/core"
)

func main() {
numbers := []int{1, 2, 3, 4, 5}
sum := core.Foldl(func(acc, x int) int { return acc + x }, 0, numbers)
fmt.Println(sum) // Output: 15
}
支持元组

tuple 包提供了一种通用的 tuple 数据结构,可用于处理成对数据。当你需要从函数中返回多个值或将相关数据分组时,这尤其方便。
下面是一个使用 Zip 函数将两个片段合并为一个元组片段的示例:

1
2
3
4
5
6
7
8
9
10
11
12
13
14
15
16
package main

import (
"fmt"
"github.com/araujo88/lambda-go/pkg/tuple"
)

func main() {
names := []string{"Alice", "Bob", "Charlie"}
ages := []int{25, 30, 35}

pairs := tuple.Zip(names, ages)
for _, pair := range pairs {
fmt.Printf("%s is %d years old\n", pair.First, pair.Second)
}
}

utils

utils 包提供了一系列用于处理切片的实用程序。这些函数包括反向、并集和 Unique 等操作。让我们来看几个例子:

1
2
3
4
5
6
7
8
9
10
11
12
13
14
15
16
17
18
19
20
21
package main

import (
"fmt"
"github.com/araujo88/lambda-go/pkg/utils"
)

func main() {
slice1 := []int{1, 2, 3}
slice2 := []int{4, 5, 6}

reversed := utils.Reverse(slice1)
fmt.Println(reversed) // Output: [3 2 1]

concatenated := utils.Concat(slice1, slice2)
fmt.Println(concatenated) // Output: [1 2 3 4 5 6]

withDuplicates := []int{1, 2, 2, 3, 3, 3, 4}
unique := utils.Unique(withDuplicates)
fmt.Println(unique) // Output: [1 2 3 4]
}
Predicate Functions

谓词包包括过滤、任意、全部和查找等函数。谓词是根据某些条件返回布尔值的函数。
下面是一个使用 “过滤器 “和 “任意 “的示例:

1
2
3
4
5
6
7
8
9
10
11
12
13
14
15
16
package main

import (
"fmt"
"github.com/araujo88/lambda-go/pkg/predicate"
)

func main() {
numbers := []int{1, 2, 3, 4, 5, 6, 7, 8, 9, 10}

evens := predicate.Filter(numbers, func(x int) bool { return x%2 == 0 })
fmt.Println(evens) // Output: [2 4 6 8 10]

hasNegative := predicate.Any(numbers, func(x int) bool { return x < 0 })
fmt.Println(hasNegative) // Output: false
}
Sorting and Grouping

sortgroup 软件包提供了根据指定条件对切片进行排序和对元素进行分组的函数。下面是一个使用 groupBy 函数的示例:

1
2
3
4
5
6
7
8
9
10
11
12
13
14
15
16
17
18
19
20
21
22
23
24
package main

import (
"fmt"
"github.com/araujo88/lambda-go/pkg/sortgroup"
)

func main() {
people := []struct {
Name string
Age int
}{
{"Alice", 25},
{"Bob", 30},
{"Charlie", 25},
{"David", 30},
}

grouped := sortgroup.groupBy(people, func(p struct{ Name string; Age int }) int { return p.Age })

for age, group := range grouped {
fmt.Printf("Age %d: %v\n", age, group)
}
}

使用 Lambda-Go 的好处

1.提高代码可读性:函数式编程模式通常使代码更具声明性,更易于理解,尤其是在处理复杂的数据转换时。

2.减少副作用:通过鼓励不变性和纯函数,Lambda-Go 可以帮助减少意外副作用导致的错误。

3.更好的抽象:程序库提供高级抽象,可简化常见的编程任务,使代码更具表现力。

4.FP 爱好者熟悉的概念:熟悉其他语言中函数式编程概念的开发人员会发现在 Go 项目中更容易应用他们的知识。

5.逐步采用:您可以在现有的 Go 代码库中逐步引入函数式编程概念,而无需完全重写。

挑战和需要考虑的因素

虽然 Lambda-Go 带来了许多好处,但也有一些挑战需要考虑:
1.性能开销:与命令式 Go 代码相比,某些函数式编程模式可能会带来轻微的性能开销。重要的是要对应用程序进行剖析,并谨慎使用这些技术。

2.学习曲线:不熟悉函数式编程概念的开发人员可能需要一些时间来适应和学习如何有效地使用该库。

3.与现有代码集成:虽然可以逐步采用 Lambda-Go,但可能需要重构一些现有代码,以充分发挥其优势。

结论

Lambda-Go 为将函数式编程技术引入 Go 生态系统提供了一个令人兴奋的机会。通过提供一套受 Haskell 启发的工具,它允许开发人员编写更具表现力、可维护性和潜在安全性的代码,同时还能充分利用 Go 的优势。

与任何新工具或范例一样,评估 Lambda-Go 是否适合您的项目需求和团队技能非常重要。不过,对于希望将函数式编程概念融入 Go 项目的团队来说,Lambda-Go 提供了一个坚实的基础,并渐进式地介绍了这些强大的技术。

无论你是一位经验丰富的函数式程序员,还是一位对函数式编程充满好奇的 Go 开发人员,Lambda-Go 都将为您提供一座连接这两个世界的桥梁。通过探索和采用其功能,开发者自身可以增强 Go 编程工具包,并有可能发现解决复杂问题的新颖、优雅的解决方案。


]]>
<p class="description"></p> <p><img src="https://" alt="" style="width:100%"></p>
构建并运行 eBPF 应用 - Part 2 https://cloudsjhan.github.io/2024/07/15/构建并运行-eBPF-应用-Part-2/ 2024-07-15T07:57:09.000Z 2024-07-15T07:57:36.862Z

在上一篇文章中,我们用 C 语言创建了一个 eBPF 程序,以了解某个进程使用 CPU 的时间。这些数据随后被存储在 BPF HashMap 中。但这是一个不断更新的短期存储位置,数据的寿命很短……我们该如何利用这些数据呢?

这就是用户空间程序的用武之地。用户空间程序不在内核空间运行,但可以附加到 eBPF 程序并访问 BPF HashMap。

现在让我们来看看如何用 Golang 编写用户空间程序。

Bpf2go

在使用 Golang 时,有一个很好用的工具叫做 bpf2go。这个工具可以帮助我们将之前编写的 C 代码编译成 eBPF 字节码。此外,它还能创建 Golang 函数和结构的骨架,以便我们将其接口到代码中,从而节省大量时间。

Step 1: 创建 gen.go 文件

1
2
package main
//go:generate go run github.com/cilium/ebpf/cmd/bpf2go processtime processtime.c

gen.go 文件中的注释行允许我们运行 go 生成,然后使用 bpf2go 工具读取 C 程序(在本例中,第二个标志是 processtime.c),并输出生成的 Golang 代码,这些代码将使用前缀 processtime(第一个标志)。运行 go 生成后,你将得到以下文件:

1
2
3
4
5
6
7
8
$ tree
.
|____gen.go
|____processtime.c
|____processtime_bpfel.o
|____processtime_bpfeb.o
|____processtime_bpfel.go
|____processtime_bpfeb.go

这里生成了四个文件。对象文件(以 .o 结尾的文件)是将加载到内核中的 eBPF 字节码。以 Golang ext 结尾的 .go 文件是创建所有用户空间接口的文件。

打开这两个 Golang 文件,你还会发现每个文件的顶部都有一个注释,说明该文件适用于哪种 CPU 架构。例如,processtime_bpfeb.go 的注释如下:

1
2
// Code generated by bpf2go; DO NOT EDIT.
//go:build arm64be || armbe || mips || mips64 || mips64p32 || ppc64 || s390 || s390x || sparc || sparc64

processtime_bpfel.go 有不同的架构:
这是因为,在处理内核时,程序的编译方式在每种架构上都有细微差别。

步骤 2:编写用户空间程序

我们可以开始使用 eBPF 程序了。我们将在根目录下创建一个 main.go,并首先取消资源限制:

1
2
3
4
// Remove resource limits for kernels <5.11.
if err := rlimit.RemoveMemlock(); err != nil {
log.Fatal("Removing memlock:", err)
}

这是因为内核 v5.11 发生了变化,BPF 进程的可用内存过去受 RLIMIT_MEMLOCK 限制,但这一逻辑已移至内存 cgroup (memcg)。

下一步是加载 eBPF 程序。这是通过 bpf2go 工具生成的接口代码中的一个名为 loadProcesstimeObject 的函数完成的。我们需要创建一个变量来存储该函数调用的输出。

1
2
3
4
5
6
// Load the compiled eBPF ELF into the kernel.
var objs processtimeObjects
if err := loadProcesstimeObjects(&objs, nil); err != nil {
log.Fatal("Loading eBPF objects:", err)
}
defer objs.Close()

接下来,我们需要连接到已加载的程序。这就需要知道你挂接的是什么事件,因为你需要指定它。在我们的 C 程序中,我们指定了以下内容:

1
SEC("tracepoint/sched/sched_switch")

因此,我们知道我们的程序挂接到了 sched 命名空间中的跟踪点 sched_switch。这可以转化为以下内容:

1
2
3
4
5
6
// link to the tracepoint program that we loaded into the kernel
tp, err := link.Tracepoint("sched", "sched_switch", objs.CpuProcessingTime, nil)
if err != nil {
log.Fatalf("opening kprobe: %s", err)
}
defer tp.Close()

我们需要的最后一项功能是读取存储在 BPF HashMap 中的数据。这可以通过使用 HashMap 的键来查看存储的值。
在生成 Golang 代码时,我们生成了两种类型来帮助我们与 BPF HashMap 交互。

1
2
3
4
5
6
7
// used as HashMap Key
type processtimeKeyT struct{ Pid uint32 }
// used as HashMap Value
type processtimeValT struct {
StartTime uint64
ElapsedTime uint64
}

这与我们在 C 程序中使用的两种类型相关:

1
2
3
4
5
6
7
8
9
// used as Hashmap Key
struct key_t {
__u32 pid;
};
// used as Hashmap Value
struct val_t {
__u64 start_time;
__u64 elapsed_time;
};

在我们的例子中,键值基本上就是进程 ID。现在,在大多数系统中,PID 的默认值介于 1 和 32767 之间,但你可以通过查看 /proc/sys/kernel/pid_max 文件来查看该值。

通过上述逻辑,我们应该可以遍历所有潜在的 PID,并检查 BPF HashMap,查看是否有存储的值。
因此,我们可以使用它们来编写我们的循环逻辑:

1
2
3
4
5
6
7
8
9
10
11
var key processtimeKeyT
// Iterate over all PIDs between 1 and 32767 (maximum PID on linux)
// found in /proc/sys/kernel/pid_max
for i := 1; i <= 32767; i++ {
key.Pid = uint32(i)
// Query the BPF map
var mapValue processtimeValT
if err := objs.ProcessTimeMap.Lookup(key, &mapValue); err == nil {
log.Printf("CPU time for PID=%d: %dns\n", key.Pid, mapValue.ElapsedTime)
}
}

这段代码将循环处理每个可用的 PID,并在我们的 BPF HashMap(由 objs.ProcessTimeMap 指定)中进行查找,如果没有错误返回,将打印出值。

步骤 3.完整代码

最终代码如下所示:(请注意,我有一个每秒运行一次循环的 ticker,因为 HashMap 可以不断更新,因此我们需要不断重新读取它)

1
2
3
4
5
6
7
8
9
10
11
12
13
14
15
16
17
18
19
20
21
22
23
24
25
26
27
28
29
30
31
32
33
34
35
36
37
38
39
40
41
42
43
44
45
46
47
48
49
50
51
52
package main

import (
"C"
"log"
"time"

"github.com/cilium/ebpf/link"
"github.com/cilium/ebpf/rlimit"
)

func main() {
// Remove resource limits for kernels <5.11.
if err := rlimit.RemoveMemlock(); err != nil {
log.Fatal("Removing memlock:", err)
}

// Load the compiled eBPF ELF and load it into the kernel.
var objs processtimeObjects
if err := loadProcesstimeObjects(&objs, nil); err != nil {
log.Fatal("Loading eBPF objects:", err)
}
defer objs.Close()

// link to the tracepoint program that we loaded into the kernel
tp, err := link.Tracepoint("sched", "sched_switch", objs.CpuProcessingTime, nil)
if err != nil {
log.Fatalf("opening kprobe: %s", err)
}
defer tp.Close()

// Read loop reporting the total amount of times the kernel
// function was entered, once per second.
ticker := time.NewTicker(1 * time.Second)
defer ticker.Stop()

log.Println("Waiting for events..")
for range ticker.C {
var key processtimeKeyT

// Iterate over all PIDs between 1 and 32767 (maximum PID on linux)
// found in /proc/sys/kernel/pid_max
for i := 1; i <= 32767; i++ {
key.Pid = uint32(i)
// Query the BPF map
var mapValue processtimeValT
if err := objs.ProcessTimeMap.Lookup(key, &mapValue); err == nil {
log.Printf("CPU time for PID=%d: %dns\n", key.Pid, mapValue.ElapsedTime)
}
}
}
}

总结

eBPF 是一项值得关注的技术。它在网络、可观测性和安全性方面能够发挥重要作用。了解基本原理是第一步,但要深入研究的东西还有很多。可以期待后续的文章分享👀。


]]>
<p class="description"></p> <p><img src="https://" alt="" style="width:100%"></p>
构建并运行 eBPF 应用 - Part one https://cloudsjhan.github.io/2024/07/14/构建并运行-eBPF-应用-Part-one/ 2024-07-14T07:10:36.000Z 2024-07-14T07:11:41.862Z

本文将介绍如何使用 C 和 Golang 编写第一个 eBPF 程序。我们将在第一部分介绍实际的 eBPF 程序,在第二部分介绍用户空间应用程序。

准备工作

本文运行的操作系统是:

1
2
OS: Ubuntu 22.04
Linux Header Version: 6.5.0–14-generic

还通过 apt 安装了一些依赖项:

1
sudo apt-get -y install libbpf bpfcc-tools

完成 ebpf 的代码除了需要 Go 的知识之外,读者对 C 语言编程需要熟悉。

什么是 eBPF

有许多博客/网站对 eBPF 进行了深入探讨(请查看资源部分),但为了简单起见,我们姑且认为 eBPF 是一种在不修改内核源代码的情况下使用模块扩展 Linux 内核的方法。

笔者认为 eBPF 就是是内核的一个钩子,允许在内核空间运行逻辑。

User Space vs Kernel Space

当我们谈论内核空间时,通常指的是操作系统。这是一个特权区域,可以完全访问硬件和软件资源。当我们谈论用户空间时,这里通常是你运行日常程序(如谷歌浏览器)的地方。用户空间的访问权限是有限制的。

选择要挂钩的事件

这里给大家推荐一个学习上手开发 eBPF 的好的项目:kepler
Kepler 的一项工作是通过 CPU 计划切换,计算每个进程(由 PID 标识)使用 CPU 的时间。

CPU 调度是指在正在执行的进程之间进行切换,以便更好地利用处理能力(当一个进程受阻时,CPU 会暂停处理该进程,并切换到另一个进程)。

因此,如果我们想复制这一功能,我们可以这样做:

  • 知道某个进程何时将开始使用 CPU
  • 知道某个进程何时停止使用 CPU
  • 计算这两个时刻之间的时间

这样我们就能大致估算出每个流程需要多少时间,同时要记住,一个流程会被安排多次。

根据上述信息,我们希望:

1
tracepoint/sched/sched_switch

事件,以便在计划进程时收到通知。

了解 event 的格式

在 BPF 事件中,每个事件在运行函数时都会包含一些称为 “上下文 “的内容。这些上下文实质上就是事件发出的信息。我们需要定义一个 C 结构来保存这些信息,但首先,我们需要获得该结构的格式。我们可以通过运行下面的代码来实现:

1
2
3
4
5
6
7
8
9
10
11
12
13
14
15
16
$ sudo cat /sys/kernel/debug/tracing/events/sched/sched_switch/format
name: sched_switch
ID: 327
format:
field:unsigned short common_type; offset:0; size:2; signed:0;
field:unsigned char common_flags; offset:2; size:1; signed:0;
field:unsigned char common_preempt_count; offset:3; size:1; signed:0;
field:int common_pid; offset:4; size:4; signed:1;
field:char prev_comm[16]; offset:8; size:16; signed:0;
field:pid_t prev_pid; offset:24; size:4; signed:1;
field:int prev_prio; offset:28; size:4; signed:1;
field:long prev_state; offset:32; size:8; signed:1;
field:char next_comm[16]; offset:40; size:16; signed:0;
field:pid_t next_pid; offset:56; size:4; signed:1;
field:int next_prio; offset:60; size:4; signed:1;
print fmt: "prev_comm=%s prev_pid=%d prev_prio=%d prev_state=%s%s ==> next_comm=%s next_pid=%d next_prio=%d", REC->prev_comm, REC->prev_pid, REC->prev_prio, (REC->prev_state & ((((0x00000000 | 0x00000001 | 0x00000002 | 0x00000004 | 0x00000008 | 0x00000010 | 0x00000020 | 0x00000040) + 1) << 1) - 1)) ? __print_flags(REC->prev_state & ((((0x00000000 | 0x00000001 | 0x00000002 | 0x00000004 | 0x00000008 | 0x00000010 | 0x00000020 | 0x00000040) + 1) << 1) - 1), "|", { 0x00000001, "S" }, { 0x00000002, "D" }, { 0x00000004, "T" }, { 0x00000008, "t" }, { 0x00000010, "X" }, { 0x00000020, "Z" }, { 0x00000040, "P" }, { 0x00000080, "I" }) : "R", REC->prev_state & (((0x00000000 | 0x00000001 | 0x00000002 | 0x00000004 | 0x00000008 | 0x00000010 | 0x00000020 | 0x00000040) + 1) << 1) ? "+" : "", REC->next_comm, REC->next_pid, REC->next_prio

要处理的信息相当多,但为了简单起见,我们可以说,在这个用例中,我们不需要关心任何以 common_ 为前缀的字段。这样我们就有了以下字段:

1
2
3
4
5
6
7
char prev_comm[16];
pid_t prev_pid;
int prev_prio;
long prev_state;
char next_comm[16];
pid_t next_pid;
int next_prio;

然后我们就可以利用这些信息创建下面的 C 结构:

1
2
3
4
5
6
7
8
9
struct sched_switch_args {
char prev_comm[16];
int prev_pid;
int prev_prio;
long prev_state;
char next_comm[16];
int next_pid;
int next_prio;
};

现在,首先要注意的是,我将 pid_t 类型改为 int。这是因为 pid_t 的底层类型是 int。我们可以使用 pid_t 类型,但需要依赖 sys/types.h,而在本例中我们并不需要。有关这方面的更多信息,可以阅读这篇文章

创建 BPF Map

要从内核空间收集数据并在用户空间访问这些数据,我们需要使用一种叫做 BPF 映射的东西。BPF 映射是推送到用户空间的数据结构。在本例中,我们将使用基于 PID 的哈希表类型。这需要我们创建三个结构,即:

  • 通过 key struct 识别数据

    1
    2
    3
    4
    5
    6
    struct key_t {
    // This is the process ID
    // which we will use to identify
    // in the hash map
    __u32 pid;
    };
  • 存储数据的方式是 value struct

    1
    2
    3
    4
    5
    6
    struct val_t {
    // used to understand the start time of the process
    __u64 start_time;
    // used to store the elapsed time of the process
    __u64 elapsed_time;
    };
  • eBpf HashMap 将他们联系在一起

    1
    2
    3
    4
    5
    6
    7
    8
    9
    10
    11
    12
    13
    struct {
    // The type of BPF map we are creating
    __uint(type, BPF_MAP_TYPE_HASH);
    // specifying the type to be used for the key
    __type(key, struct key_t);
    // specifying the type to be used as the value
    __type(value, struct val_t);
    // max amount of entries to store in the map
    __uint(max_entries, 10240);
    // name of the map as well as a section macro
    // from the bpf lib to designate this type
    // as a BPF map
    } process_time_map SEC(".maps");

我已经添加了注释,解释这些结构中每一行的作用。

创建 eBPF 函数

最后一步是创建 eBPF 函数。为此,我们需要一个 eBPF 程序。
这是一个 C 语言函数,带有一些宏标识,这样我们就可以使用先前定义的类型进行交互,例如:

1
2
3
4
5
6
7
8
9
10
11
12
13
14
15
16
17
18
19
20
21
22
23
24
25
26
27
28
29
30
31
32
33
SEC("tracepoint/sched/sched_switch")
int cpu_processing_time(struct sched_switch_args *ctx) {
// get the current time in ns
__u64 ts = bpf_ktime_get_ns();
// we need to check if the process is in our map
struct key_t prev_key = {
.pid = ctx->prev_pid,
};
struct val_t *val = bpf_map_lookup_elem(&process_time_map, &prev_key);
// if the previous PID does not exist it means that we just started
// watching or we missed the start somehow
// so we ignore it for now
if (val) {
// Calculate and store the elapsed time for the process and we reset the
// start time so we can measure the next cycle of that process
__u64 elapsed_time = ts - val->start_time;
struct val_t new_val = {.start_time = ts, .elapsed_time = elapsed_time};
bpf_map_update_elem(&process_time_map, &prev_key, &new_val, BPF_ANY);
return 0;
};
// we need to check if the next process is in our map
// if it's not we need to set initial time
struct key_t next_key = {
.pid = ctx->next_pid,
};
struct val_t *next_val = bpf_map_lookup_elem(&process_time_map, &prev_key);
if (!next_val) {
struct val_t next_new_val = {.start_time = ts};
bpf_map_update_elem(&process_time_map, &next_key, &next_new_val, BPF_ANY);
return 0;
}
return 0;
}

下面的宏指定了该函数要连接的事件。

1
SEC("tracepoint/sched/sched_switch")

这一行就是我们查找 BPF 映射数据的方法。我们使用一个唯一的键,并将其传递给 bpf_map_lookup_elem 函数,该函数将返回一个 val_t 类型的值(我们之前定义的)。如果该键下没有值,该函数将返回 NULL,请注意我们需要将 BPF 映射类型作为 &process_time_map 传递。

1
struct val_t *val = bpf_map_lookup_elem(&process_time_map, &prev_key);

这一行是我们向 BPF 地图添加数据的过程。我们将传递键(本例中为 &prev_key)和键值(&new_val),后者将把该值存储到 BPF 映射中。请再次注意,我们传递的是映射类型。BPF_ANY 用于将键更新为新值,或者在键不存在时创建新值(参见文档)。

1
bpf_map_update_elem(&process_time_map, &prev_key, &new_val, BPF_ANY);

这样,我们就完成了功能,不过,我们还需要在代码中添加最后一行:

1
char _license[] SEC("license") = "Dual MIT/GPL";

由于 eBPF 是以 GPL 许可的,这意味着所有集成软件也需要与 GPL 兼容。如果没有这一行,就无法将代码加载到内核中。
因此,我们的最终代码片段如下(我添加了需要包含的 C 头文件):

1
2
3
4
5
6
7
8
9
10
11
12
13
14
15
16
17
18
19
20
21
22
23
24
25
26
27
28
29
30
31
32
33
34
35
36
37
38
39
40
41
42
43
44
45
46
47
48
49
50
51
52
53
54
55
56
57
58
59
60
61
62
63
64
65
66
67
68
69
70
71
72
#include <linux/sched.h>
#include <linux/bpf.h>
#include <bpf/bpf_helpers.h>
#include <bpf/bpf_tracing.h>
#include <stddef.h>

#ifndef TASK_COMM_LEN
#define TASK_COMM_LEN 16
#endif

struct key_t {
__u32 pid;
};

struct val_t {
__u64 start_time;
__u64 elapsed_time;
};

struct {
__uint(type, BPF_MAP_TYPE_HASH);
__type(key, struct key_t);
__type(value, struct val_t);
__uint(max_entries, 10240);
} process_time_map SEC(".maps");

// this is the structure of the sched_switch event
struct sched_switch_args {
char prev_comm[TASK_COMM_LEN];
int prev_pid;
int prev_prio;
long prev_state;
char next_comm[TASK_COMM_LEN];
int next_pid;
int next_prio;
};

SEC("tracepoint/sched/sched_switch")
int cpu_processing_time(struct sched_switch_args *ctx) {
// get the current time in ns
__u64 ts = bpf_ktime_get_ns();
// we need to check if the process is in our map
struct key_t prev_key = {
.pid = ctx->prev_pid,
};
struct val_t *val = bpf_map_lookup_elem(&process_time_map, &prev_key);
// if the previous PID does not exist it means that we just started
// watching or we missed the start somehow
// so we ignore it for now
if (val) {
// Calculate and store the elapsed time for the process and we reset the
// start time so we can measure the next cycle of that process
__u64 elapsed_time = ts - val->start_time;
struct val_t new_val = {.start_time = ts, .elapsed_time = elapsed_time};
bpf_map_update_elem(&process_time_map, &prev_key, &new_val, BPF_ANY);
return 0;
};
// we need to check if the next process is in our map
// if it's not we need to set initial time
struct key_t next_key = {
.pid = ctx->next_pid,
};
struct val_t *next_val = bpf_map_lookup_elem(&process_time_map, &prev_key);
if (!next_val) {
struct val_t next_new_val = {.start_time = ts};
bpf_map_update_elem(&process_time_map, &next_key, &next_new_val, BPF_ANY);
return 0;
}
return 0;
}

char _license[] SEC("license") = "Dual MIT/GPL";

这样,我们就完成了 BPF 程序。在本系列的下一篇文章中,我将介绍用 GO 语言编写用户空间程序,并使用名为 bpf2go 的工具来帮助我们实现程序绑定。


]]>
<p class="description"></p> <p><img src="https://" alt="" style="width:100%"></p>
Golang 并发的 fork/join 模式 https://cloudsjhan.github.io/2024/06/30/Golang-并发的-fork-join-模式/ 2024-06-30T03:25:42.000Z 2024-06-30T03:26:18.976Z

在软件开发领域,对更快、更高效地处理数据的需求与日俱增。并行计算技术(如 fork/join 模式)为利用多个 CPU 内核并发执行任务提供了强大的解决方案,从而大大缩短了大规模计算的执行时间。本文通过分解一个使用并发 goroutines 对数组求和的示例,探讨了 fork/join 模式在 Go 中的实现。

Fork/Join 并发模型介绍

Fork/Join 模式是一种并行技术,包括将任务分成较小的任务块,并行处理这些任务块(分叉),然后将这些任务的结果合并为最终结果(join)。这种模式尤其适用于任务相互独立,可以并发执行而互不影响的情况。

简单的示例:并发对数组求和

1. 初始化:程序初始化一个整数数组。程序还设置了数组应划分的部分数,每个部分由一个独立的程序处理。

2.并发设置:

2.1 Fork: 将数组划分为指定的部分,并为每个部分启动一个 goroutine 来计算该部分的总和。

2.2 Channel 通信:每个 “程序 “都会通过通道将计算出的总和发送回主进程,以确保同步通信。

2.3 Join: 当所有 Goroutine 完成计算后,主进程收集并汇总这些部分结果,得出总和。
2.4 Logging: 日志记录在整个过程中,程序会打印信息,显示数组的划分、每个工作者计算的总和以及收到的部分总和。

代码示例

1
2
3
4
5
6
7
8
9
10
11
12
13
14
15
16
17
18
19
20
21
22
23
24
25
26
27
28
29
30
31
32
33
34
35
36
37
38
39
40
41
42
43
44
45
46
47
48
49
50
51
52
53
54
55
56
57
58
59
60
61
62
import (
"fmt"
"sync"
)

var (
parts = 4
)

func main() {
numbers := []int{3, 1, 4, 1, 5, 9, 2, 6, 5, 3, 5} // Example array
totalSum := concurrentSum(numbers, parts) // Divide the array into 4 parts for summing
fmt.Println("Total Sum:", totalSum)
}

// sumPart sums a part of the array and sends the result to a channel.
func sumPart(workerId int, nums []int, result chan<- int, wg *sync.WaitGroup) {
defer wg.Done() // Ensure the WaitGroup counter decrements on function completion.
sum := 0
for _, num := range nums {
sum += num
}
fmt.Printf("Worker %d calculated sum: %d\n", workerId, sum)
result <- sum // Send the partial sum to the result channel.
}

// concurrentSum takes an array and the number of parts to divide it into,
// then sums the array elements using concurrent goroutines.
func concurrentSum(numbers []int, parts int) int {
n := len(numbers)
partSize := n / parts // Determine the size of each subarray
fmt.Printf("Dividing the array of size %d into %d parts of size %d\n", n,
parts, partSize)
results := make(chan int, parts) // Channel to collect results with a buffer size

var wg sync.WaitGroup
// Fork step: Launch a goroutine for each part of the array
for i := 0; i < parts; i++ {
start := i * partSize
end := start + partSize
if i == parts-1 { // Ensure the last goroutine covers the remainder of the array
end = n
}
wg.Add(1)
go sumPart(i, numbers[start:end], results, &wg)
}

// Close the results channel once all goroutines are done
go func() {
wg.Wait()
close(results)
}()

// Join step: Combine results
totalSum := 0
for sum := range results {
fmt.Printf("Received partial sum: %d\n", sum)
totalSum += sum
}

return totalSum
}

结论

上面的示例展示了使用 Go 进行并发编程时 fork/join 模式的效率。通过将数组求和的任务分给多个 Worker,程序在多核处理器上的运行速度明显加快,使用 Go 进行并发编程任务具有的强大功能和简便性。这种模式同样可应用于其他各种计算问题。


]]>
Golang 并发的 fork/join 模式
Go 1.22 提供的更加强大的 Tracing 能力 https://cloudsjhan.github.io/2024/06/21/Go-1-22-提供的更加强大的-Tracing-能力/ 2024-06-21T01:07:42.000Z 2024-06-21T01:08:09.077Z

本文是由 Go Team 的 Michael Knyszek 在 2024年3月14日发表于 go official blog,原文地址: https://go.dev/blog/execution-traces-2024

runtime/trace package

runtime/trace package包含了理解并排查 Go 程序的强大工具。其功能可以生成每个 goroutine 在一段时间内的执行追踪。通过使用 go tool trace 命令(或优秀的开源 gotraceui工具),你可以可视化并探索这些追踪中的数据。

Trace 的优势在于它可以很容易展示出程序中难以以其他方式看到的问题。例如,许多 goroutine 阻塞在同一通道上的并发瓶颈可能在 CPU 分析中很难看到,因为根本没有执行可供采样。但在执行追踪中,许多堆栈可以清晰度显示出来,并且阻塞的 goroutine 的堆栈跟踪将迅速指向罪魁祸首。

Go 开发者甚至能够使用 taskregionslogs 来对他们自己的程序进行工具化,他们可以使用这些来将他们的高级关注点与低级执行细节相关联。

存在的问题

不幸的是,执行追踪中的丰富信息常常难以获得。历史上,追踪存在四个主要问题。

  1. 追踪有高开销。
  2. 追踪没有很好地扩展,并且可能变得太大而无法分析。
  3. 通常不清楚何时开始追踪以捕获特定的不良行为。
  4. 只有一部分 gopher 能够程序化地分析追踪,因为缺乏通用的公共包来解析和解释执行追踪。

如果你在过去几年中使用过追踪,你很可能因为这些问题中的一个或多个而感到沮丧。但我们很高兴地分享,在过去两个 Go 版本中,我们在所有这四个领域都取得了巨大进展。

低开销追踪

在 Go 1.21 之前,追踪的运行时开销对于许多应用程序来说在 10-20% 的 CPU 之间,这限制了追踪的使用情况,而不是像 CPU 分析那样的持续使用。事实证明,追踪成本的很大一部分来自于回溯。运行时产生的许多事件都附有堆栈跟踪,这对于实际识别 goroutine 在关键时刻正在做什么非常有价值。

得益于 Felix Geisendörfer 和 Nick Ripley 在优化回溯效率方面的工作,执行追踪的运行时 CPU 开销已经大幅降低,对于许多应用程序降至 1-2%。你可以在 Felix 关于此主题的优秀博客文章中阅读更多关于这项工作的内容。

可扩展追踪

追踪格式及其事件的设计围绕相对高效的发射,但需要工具来解析并保留整个追踪的状态。几百 MB 的追踪可能需要几个 Gi B的 RAM 来分析!

这个问题不幸地是追踪生成方式的基本问题。为了保持运行时开销低,所有事件都被写入相当于线程本地缓冲区的地方。但这意味着事件以非真实顺序出现,追踪工具需要弄清楚真正发生了什么。

使追踪在保持开销低的同时扩展的关键见解是偶尔分割正在生成的追踪。每个分割点的行为有点像同时禁用和重新启用一个goroutine中的追踪。到目前为止的所有追踪数据将代表一个完整且自包含的追踪,而新的追踪数据将无缝地从它离开的地方继续。

正如你所能想象的,修复这个问题需要重新思考和重写运行时追踪实现的许多基础。我们很高兴地说,这项工作已经在 Go 1.22 中落地,并且现在普遍可用。重写带来了许多不错的改进,包括对 go tool trace 命令的一些改进。如果你好奇,所有细节都在设计文档中。

(注:go tool trace仍然将完整追踪加载到内存中,但为由 Go 1.22+ 程序生成的追踪去除这个限制现在是可行的。)

飞行记录

假设你在处理一个web服务,一个 RPC 花费了很长时间。你不能在你知道 RPC 已经花费了很长时间的点开始追踪,因为慢请求的根本原因已经发生了,并没有被记录。

有一种称为飞行记录的技术可以帮助解决这个问题,你可能已经从其他编程环境中熟悉了它。飞行记录的见解是持续开启追踪,并始终保留最近的追踪数据,以防万一。然后,一旦发生有趣的事情,程序就可以简单地写入它所拥有的任何东西!

在追踪可以分割之前,这几乎是不可能的。但是,由于连续追踪现在由于低开销而变得可行,并且运行时现在可以在任何需要的时候分割追踪,事实证明实现飞行记录是直接的。

因此,我们很高兴地宣布一个飞行记录器实验,可在 golang.org/x/exp/trace包中使用。

请尝试它!以下是设置飞行记录器以捕获长时间 HTTP 请求的示例,以帮助你入门。

1
2
3
4
5
6
7
8
9
10
11
12
13
14
15
16
17
18
19
20
21
22
23
24
25
26
27
28
29
30
31
32
// 设置飞行记录器。
fr := trace.NewFlightRecorder()
fr.Start()

// 设置并运行HTTP服务器。
var once sync.Once
http.HandleFunc("/my-endpoint", func(w http.ResponseWriter, r *http.Request) {
start := time.Now()

// 进行工作...
doWork(w, r)

// 我们看到一个长时间的请求。拍摄快照!
if time.Since(start) > 300*time.Millisecond {
// 为了简单起见,只做一次,但你可以拍摄多个。
once.Do(func() {
// 抓取快照。
var b bytes.Buffer
_, err = fr.WriteTo(&b)
if err != nil {
log.Print(err)
return
}
// 写入文件。
if err := os.WriteFile("trace.out", b.Bytes(), 0o755); err != nil {
log.Print(err)
return
}
})
}
})
log.Fatal(http.ListenAndServe(":8080", nil))

如果你有任何反馈,无论是积极的还是消极的,请分享到提案 issue 上!

Trace reader API

随着追踪实现的重写,也进行了清理其他追踪内部的工作,比如go tool trace。这催生了一个尝试,创建一个足够好的追踪读取器API,以便共享,并可以使追踪更加易于访问。

就像飞行记录器一样,我们也很高兴地宣布我们还有一个实验性的追踪读取器API,我们想分享。它与飞行记录器在同一个包中,golang.org/x/exp/trace

我们认为它足够好,可以开始在其上构建东西,所以请尝试它!以下是测量阻塞事件中goroutine阻塞等待网络的比例的示例。

1
2
3
4
5
6
7
8
9
10
11
12
13
14
15
16
17
18
19
20
21
22
23
24
25
26
27
28
29
30
31
32
33
34
35
36
// 从标准输入开始读取。
r, err := trace.NewReader(os.Stdin)
if err != nil {
log.Fatal(err)
}

var blocked int
var blockedOnNetwork int
for {
// 读取事件。
ev, err := r.ReadEvent()
if err == io.EOF {
break
} else if err != nil {
log.Fatal(err)
}

// 处理它。
if ev.Kind() == trace.EventStateTransition {
st := ev.StateTransition()
if st.Resource.Kind == trace.ResourceGoroutine {
from, to := st.Goroutine()

// 查找阻塞的goroutine,并计数。
if from.Executing() && to == trace.GoWaiting {
blocked++
if strings.Contains(st.Reason, "network") {
blockedOnNetwork++
}
}
}
}
}
// 打印我们发现的内容。
p := 100 * float64(blockedOnNetwork) / float64(blocked)
fmt.Printf("%2.3f%% instances of goroutines blocking were to block on the network\n", p)

就像飞行记录器一样,有一个提案问题,是留下反馈的好地方!

我们想快速提到Dominik Honnef,他早期尝试了它,提供了很好的反馈,并为API贡献了对旧版本追踪的支持。


]]>
<p class="description"></p> <p><img src="https://" alt="" style="width:100%"></p>
Golang 空结构体的底层原理和其使用 https://cloudsjhan.github.io/2024/06/20/Golang-空结构体的底层原理和其使用/ 2024-06-20T07:17:15.000Z 2024-06-20T07:17:45.090Z

在 Go 中,普通结构体通常占据一个内存块。但有一种特殊情况:如果是空结构体,其大小为零。这怎么可能?空结构体有什么用?

1
2
3
4
5
6
7
8
9
10
11
12
13
14
type Test struct {
A int
B string
}

func main() {
fmt.Println(unsafe.Sizeof(Test{}))
fmt.Println(unsafe.Sizeof(struct{}{}))
}

/*
24
0
*/

空结构的秘密

特殊变量:零基数

空结构体是没有内存大小的结构体。这种说法是正确的,但更准确地说,它有一个特殊的起点:zerobase 变量。这是一个占 8 字节的 uintptr 全局变量。每当定义无数个 struct {} 变量时,编译器都会分配这个 zerobase 变量的地址。换句话说,在 Go 语言中,任何大小为 0 的内存分配都使用相同的地址 &zerobase。

Example

1
2
3
4
5
6
7
8
9
10
11
12
13
14
15
16
17
18
19
package main

import "fmt"

type emptyStruct struct {}

func main() {
a := struct{}{}
b := struct{}{}
c := emptyStruct{}

fmt.Printf("%p\n", &a)
fmt.Printf("%p\n", &b)
fmt.Printf("%p\n", &c)
}

// 0x58e360
// 0x58e360
// 0x58e360

空结构体变量的内存地址都是相同的。这是因为编译器在遇到这种特殊类型的内存分配时,会在编译过程中分配 &zerobase。这一逻辑存在于 mallocgc 函数中:

1
2
3
4
5
6
7
//go:linkname mallocgc  
func mallocgc(size uintptr, typ *_type, needzero bool) unsafe.Pointer {
...
if size == 0 {
return unsafe.Pointer(&zerobase)
}
...

这就是 Empty struct 的秘密。利用这个特殊变量,我们可以实现许多功能。

空结构和内存对齐

通常情况下,如果空结构体是较大结构体的一部分,则不会占用内存。但是,当空结构体是最后一个字段时,就会触发内存对齐。

Example

1
2
3
4
5
6
7
8
9
10
11
12
13
14
15
16
17
18
19
20
21
22
23
24
type A struct {
x int
y string
z struct{}
}
type B struct {
x int
z struct{}
y string
}

func main() {
println(unsafe.Alignof(A{}))
println(unsafe.Alignof(B{}))
println(unsafe.Sizeof(A{}))
println(unsafe.Sizeof(B{}))
}

/**
8
8
32
24
**/

当存在指向字段的指针时,返回的地址可能在结构体之外,如果释放结构体时没有释放该内存,则可能导致内存泄漏。因此,当空结构体是另一个结构体的最后一个字段时,为了安全起见,会分配额外的内存。如果空结构体位于结构体的开头或中间,则其地址与下面的变量相同。

1
2
3
4
5
6
7
8
9
10
11
12
13
14
15
16
17
18
19
20
21
22
23
24
25
26
type A struct {  
x int
y string
z struct{}
}
type B struct {
x int
z struct{}
y string
}

func main() {
a := A{}
b := B{}
fmt.Printf("%p\n", &a.y)
fmt.Printf("%p\n", &a.z)
fmt.Printf("%p\n", &b.y)
fmt.Printf("%p\n", &b.z)
}

/**
0x1400012c008
0x1400012c018
0x1400012e008
0x1400012e008
**/

空结构使用案例

空结构 struct struct{} 存在的核心原因是为了节省内存。当你需要一个结构但不关心其内容时,可以考虑使用空结构。Go 的核心复合结构,如 map、chan 和 slice,都可以使用 struct{}。

map & struct{}

1
2
3
4
5
6
// Create map
m := make(map[int]struct{})
// Assign value
m[1] = struct{}{}
// Check if key exists
_, ok := m[1]

chan & struct{}

典型的情况是将 channel 和 struct{} 结合在一起,其中 struct{} 经常被用作信号,而不关心其内容。正如前几篇文章所分析的,通道的基本数据结构是一个管理结构加一个环形缓冲区。如果 struct{} 被用作元素,则环形缓冲区为零分配。

chan 和 struct{} 放在一起的唯一用途是信号传输,因为空结构体本身不能携带任何值。一般情况下,它不用于缓冲通道。

1
2
3
4
5
6
7
8
9
10
11
12
13
14
15
// Create a signal channel
waitc := make(chan struct{})

// ...
goroutine 1:
// Send signal: push element
waitc <- struct{}{}
// Send signal: close
close(waitc)

goroutine 2:
select {
// Receive signal and perform corresponding actions
case <-waitc:
}

在这种情况下,有必要使用 struct{} 吗?其实不然,节省的内存几乎可以忽略不计。关键在于,我们并不关心 chan 的元素值,因此使用了 struct{}。

总结

  • 空结构体仍然是大小为 0 的结构体。
  • 所有空结构体共享同一个地址:zerobase 的地址。
  • 我们可以利用 empty 结构不占用内存的特性来优化代码,例如使用映射来实现集合和通道。

]]>
<p class="description"></p> <p><img src="https://" alt="" style="width:100%"></p>
Go 如何基于 MVS 解决依赖关系问题 https://cloudsjhan.github.io/2024/06/20/Go-如何基于-MVS-解决依赖关系问题/ 2024-06-20T02:49:10.000Z 2024-06-20T02:49:38.113Z

摘要:文章主要介绍了 Go 如何解决依赖关系和版本冲突问题,以及模块管理系统,包括 go.mod 文件的作用、go get 和 go install 命令的使用

Go 使用一种名为 “最小版本选择(Minimal version selection)”(MVS)的方法来处理依赖关系和解决版本冲突。
MVS 听起来很复杂,但要点如下:它为每个模块挑选最低版本,以满足其他模块的所有要求。这样,它就能在满足所有相关需求的同时,尽可能减少依赖性。

例如,假设我们有三个模块:A、B 和 C。

模块 A@1.3.2 和模块 B@1.0.0 都依赖于模块 C。

但 A 需要 C@2.3.2,B 需要 C@2.3.0

同时 C 也有一个更新的版本,即 2.4.1。

Go 如何决定使用哪个版本的 C?

如果选择的 2.3.2 版本与模块 B 不兼容怎么办?

Go 模块使用语义版本控制(semver)来处理兼容性问题。
如果模块遵循 semver,则任何破坏性修改都应修改主版本(major.minor.patch)。由于 2.3.0 和 2.3.2 两个版本的主要版本(2.3.x)相同,因此它们应该相互向后兼容。
模块作者有责任确保不同版本保持兼容。

如果 A 需要 3.0.0 版本的 C,这会破坏与 B 的兼容性,怎么办?

当模块达到主版本 2 或更高版本时,其路径会包含主版本号(如 /v2 或 /v3):

1
2
github.com/user/project/v2
github.com/user/project/v3

不同主要版本的模块被视为不同的模块。因此,我们可以在同一项目中同时使用 C@2.3.2C@3.0.0

例如,我们的 go.mod 文件可能如下所示:

1
2
3
4
5
6
7
8
9
10
module yourproject

require (
github.com/user/A v1.0.0
github.com/user/B v1.0.0
)
require (
github.com/user/C/v2 v2.3.2 // indirect
github.com/user/C/v3 v3.0.0 // indirect
)

// indirect 注释表示这里的项目没有直接导入 C 模块,而是因为 A 或 B 需要它才导入的。

还有一个要注意点:go get 不会更新或添加缺失的测试依赖项。要包含这些依赖项,请使用 -t 标志,如 go get -t ./...

go get

这里举几个例子,看看 go get 在不同情况下是如何工作的。

使用 go get .或 go get ./…查找当前目录或其子目录中所有缺失的依赖项,并将其添加到 go.mod 文件中。
这意味着它会检查任何尚未列出的依赖项,并将其添加进来。除非你特别要求,否则它不会将现有的依赖项更新到最新版本,比如下一个例子中的 -u 标志。

1
go get -u .

在 go get .中使用 -u 标志,会将当前目录中的现有依赖项更新到最新的次版本或补丁版本。请记住,它不会更新到新的主版本,因为它们被视为不同的模块。
要将主模块的所有依赖项更新到最新版本,可以使用 go get -u ./...

在下面的几个情况下,即使不指定 -u 标志,go get 仍会更新过时或丢失的依赖项。

go get github.com/user/project

此命令下载模块 github.com/user/project,并将其添加到 go.mod 文件中。如果该模块已列在该文件中,则会将其更新为最新的次版本或补丁版本。基本上,如果你不指定版本(或版本查询后缀),它会假定你想升级到最新版本,就像使用 go get github.com/user/project@upgrade 一样。

go get github.com/user/project@v1.2.3

此命令将模块更新到指定版本,即 v1.2.3。根据当前的版本,它可能会升级或降级模块以匹配该版本。

go install: build and install packages

与下载依赖项以便在项目中使用其源代码不同,go install 会将依赖项的源代码编译成二进制文件,并将其移动到 $GOPATH/bin 目录中进行安装。这样就可以在终端上使用它了。

例如:

1
$ go install golang.org/x/tools/gopls@latest

运行该命令并查看 $GOBIN 文件夹(我们之前提到过)后,你会在其中看到一个名为 gopls 的可执行文件。如果 $GOBIN 在您的 $PATH 中,您就可以在终端中运行 gopls。

如果只是在没有任何参数的情况下运行 go install 会怎样呢?
go install 就会下载缺失的依赖项,并在当前目录下构建当前模块。
这导致一些人误用 go install 来管理依赖关系,因为它确实会下载依赖关系。但这并不是它的主要工作,它实际上是要构建你的项目,并将生成的二进制文件安装到 $GOBIN 目录中。

go install 用于构建和安装软件包,而 go get 用于管理依赖关系。有些开发者经常会感到困惑,这是因为在旧版本的 Go 中,go get 确实是用来在更新 go.mod 文件后构建软件包,然后将它们安装到 $GOPATH/bin。

但从 Go 1.16 开始,go install 成为了构建和安装的首选命令,而 go get 则专注于管理 go.mod 文件中的需求。


]]>
<p class="description"></p> <p><img src="https://" alt="" style="width:100%"></p>
Robust generic functions on slices https://cloudsjhan.github.io/2024/06/19/Robust-generic-functions-on-slices/ 2024-06-19T09:22:30.000Z 2024-06-19T09:25:48.597Z

本文是由 Go Team 的 Valentin Deleplace 在 2024年2月22日发表于 go official blog,原文地址:https://go.dev/blog/generic-slice-functions

切片包提供了适用于任何类型切片的函数。在这篇博客文章中,我们将讨论如何通过理解切片在内存中的表示方式以及这如何影响垃圾回收器,从而更有效地使用这些函数。并且,我们将介绍我们最近如何调整这些函数,使它们更加便于使用。

使用类型参数,我们可以为所有可比较元素的切片编写一次函数,例如slices.Index

1
2
3
4
5
6
7
8
9
10
// Index 返回 v 在 s 中首次出现的索引,
// 如果不存在,则返回 -1。
func Index[S ~[]E, E comparable](s S, v E) int {
for i := range s {
if v == s[i] {
return i
}
}
return -1
}

不再需要为每种不同类型的元素重新实现Index

切片包包含许多开箱即用的函数,用于执行切片上的常见操作:

1
2
3
4
5
6
7
s := []string{"Bat", "Fox", "Owl", "Fox"}
s2 := slices.Clone(s)
slices.Sort(s2)
fmt.Println(s2) // [Bat Fox Fox Owl]
s2 = slices.Compact(s2)
fmt.Println(s2) // [Bat Fox Owl]
fmt.Println(slices.Equal(s, s2)) // false

几个新函数(Insert, Replace, Delete 等)会修改切片。为了理解它们的工作原理以及如何正确使用它们,我们需要检查切片的底层结构。

切片是数组的一部分视图。在内部,切片包含一个指向数组的指针、长度和容量。两个切片可以有相同的底层数组,并且可以查看重叠的部分。

例如,这个切片s是大小为6的数组中4个元素的视图:

如果一个函数更改了作为参数传递的切片的长度,那么它需要返回一个新的切片给调用者。如果不需要增长,底层数组可能保持不变。这解释了为什么appendslices.Compact返回一个值,而仅仅重新排序元素的slices.Sort却不返回。

考虑删除切片的一部分的任务。在泛型之前,从切片s中删除部分s[2:5]的标准方法是调用append函数来复制末端部分覆盖中间部分:

1
s = append(s[:2], s[5:]...)

语法复杂且容易出错,涉及子切片和可变参数。我们添加了slice.Delete来使删除元素变得更容易:

1
2
3
func Delete[S ~[]E, E any](s S, i, j int) S {
return append(s[:i], s[j:]...)
}

一行函数Delete更清晰地表达了程序员的意图。让我们考虑一个长度为6、容量为8的切片s,包含指针:

1
s = slices.Delete(s, 2, 5)

这个调用从切片s中删除了元素s[2]s[3]s[4]

删除在索引2、3、4的间隙通过将元素s[5]向左移动来填补,并将新长度设置为3。

Delete不需要分配一个新的数组,因为它是就地移动元素。像append一样,它返回一个新的切片。切片包中的许多其他函数遵循这一模式,包括CompactCompactFuncDeleteFuncGrowInsertReplace

调用这些函数时,我们必须认为原始切片无效,因为底层数组已经被修改。如果调用函数但忽略返回值,将是一个错误:

1
2
slices.Delete(s, 2, 5) // 错误!
// s仍然具有相同的长度,但内容已被修改

A problem of unwanted liveness

在Go 1.22之前,slices.Delete没有修改切片的新旧长度之间的元素。虽然返回的切片不包括这些元素,但在原始的、现在无效的切片末端创建的“间隙”仍然保留了它们。这些元素可能包含指向大对象(一个20MB的图像)的指针,垃圾回收器不会释放与这些对象关联的内存。这导致了一个内存泄漏,可能会导致严重的性能问题。

在这个例子中,我们成功地通过将一个元素向左移动来删除指针p2p3p4s[2:5]。但是p3p4仍然存在于底层数组中,在s的新长度之外。垃圾回收器不会回收它们。不太明显的是,p5不是被删除的元素之一,但是由于数组灰色部分中保留的p5指针,它的内存可能仍然会泄漏。

如果开发者没有意识到“看不见”的元素仍在使用内存,这可能会令人困惑。

所以我们有两个选择:

要么保留Delete的高效实现。如果用户想确保所指向的值可以被释放,他们可以自己将过时的指针设置为nil。
或者更改Delete以始终将过时的元素设置为零。这是额外的工作,使Delete稍微低效一些。将指针(将它们设置为nil)归零可以启用垃圾回收,当它们变得无法访问时。
不明显哪个选项是最好的。第一个默认提供性能,第二个默认提供内存节俭。

修复

一个关键的观察是“将过时的指针设置为nil”并不像看起来那么容易。实际上,这个任务非常容易出错,我们不应该让用户自己来写。出于实用主义,我们选择修改五个函数CompactCompactFuncDeleteDeleteFuncReplace的实现,以“清除尾部”。作为一个不错的副作用,认知负荷减少了,用户现在不需要担心这些内存泄漏。

在Go 1.22中,调用Delete后的内存是这样的:

修改后的五个函数中的代码使用新的内置函数clear(Go 1.21)将过时的元素设置为s元素类型的零值:

1
The zero value of E is nil when E is a type of pointer, slice, map, chan, or interface.

某些测试失败

这一变化导致了一些在Go 1.21中通过的测试在Go 1.22中失败。

如果你忽略了Delete的返回值:

1
slices.Delete(s, 2, 3)  // !! 错误 !!

然后你可能会错误地假设s不包含任何nil指针。在Go Playground 中的示例

如果你忽略了Compact的返回值:

1
2
slices.Sort(s) // 正确
slices.Compact(s) // !! 错误 !!

然后你可能会错误地假设s已经正确排序和压缩。示例

如果你将Delete的返回值分配给另一个变量,并继续使用原始切片:

1
u := slices.Delete(s, 2, 3)  // !! 错误,如果你继续使用 s !!

然后你可能会错误地假设s不包含任何nil指针。示例

如果你不小心遮挡了切片变量,并继续使用原始切片:

1
s := slices.Delete(s, 2, 3)  // !! 错误,使用 := 而不是 = !!

然后你可能会错误地假设s不包含任何nil指针。示例。

结论

切片包的 API 是传统非泛型语法删除或插入元素的改进。

我们鼓励开发者使用新函数,同时避免上述列出的“陷阱”。

由于最近的实现变化,一类内存泄漏被自动避免了,无需对API进行任何更改,开发者也不需要做任何额外的工作。


]]>
<p class="description"></p> <p><img src="https://" alt="" style="width:100%"></p>
分享最近学到的 5 个 Golang 小技巧 https://cloudsjhan.github.io/2024/06/12/分享最近学到的-5-个-Golang-小技巧/ 2024-06-12T03:44:28.000Z 2024-06-12T03:44:56.304Z

以下是我最近在 Go 中学到的 5 个小技巧,感觉挺有用且容易被大家忽略,在这里分享给大家。

计算数组元素的活可以交给编译器

在 Go 中,数组的使用并不多,大家都会选择使用 slice。在使用 slice 时,如果不想自己写数组中元素的个数,可以使用 […] ,编译器会帮你计数:

1
2
3
4
5
6
7
8
9
10
11
12
package main

import "fmt"

func main() {
arr := [3]int{1, 2, 3}
sameArr := [...]int{1, 2, 3} // Use ... instead of 3

// Arrays are equivalent
fmt.Println(arr)
fmt.Println(sameArr)
}

使用 go run .代替 go run main.go

每当我开始用 Go 创建项目时,我都会先创建一个 main.go 文件:

1
2
3
4
5
6
7
8
9
10
11
package main

import "fmt"

func main() {
sayHello()
}

func sayHello() {
fmt.Println("Hello!")
}

但当 main.go 文件变大时,就要使用同一个 main 将结构体分割到多个文件。但是,如果我有以下文件:

main.go

1
2
3
4
5
package main

func main() {
sayHello()
}

say_hello.go

1
2
3
4
5
6
7
package main

import "fmt"

func sayHello() {
fmt.Println("Hello!")
}

输入 go run main.go 会出现以下错误:

1
2
# command-line-arguments
./main.go:4:2: undefined: sayHello

解决这个问题,需要使用 go run .

使用下划线使数字清晰易读

1
2
3
4
5
6
7
8
9
10
package main

import "fmt"

func main() {
number := 10000000
better := 10_000_000

fmt.Println(number == better)
}

在同一个包中使用不同的 test package

之前以为每个文件夹只能有一个 go package。后来发现对于名为 yourpackage 的包,你可以在同一目录下拥有另一个名为 yourpackage_test 的包,并在其中编写测试。
为什么要这么做呢?因为这样可以使用相同的包 yourpackage 来编写测试,所以未导出的函数也会可用。通过在 yourpackage_test 中编写测试,可以确保只测试暴露的行为。

多次传递相同参数

在使用字符串格式化函数时,总觉得必须重复使用多次的参数是很繁琐的事情:

1
2
3
4
5
6
7
8
package main

import "fmt"

func main() {
name := "Bob"
fmt.Printf("My name is %s. Yes, you heard that right: %s\n", name, name)
}

还有一种更方便的方法。可以只传递一次参数,并在 %s 动词中使用 %[order]s:

1
2
3
4
5
6
7
8
package main

import "fmt"

func main() {
name := "Bob"
fmt.Printf("My name is %[1]s. Yes, you heard that right: %[1]s\n", name)
}

希望大家今天能学到一些新东西。如果你也有一些 golang 小技巧,可以在评论区留言分享!


]]>
<p class="description"></p> <p><img src="https://" alt="" style="width:100%"></p>
快速吃透 Golang Channels https://cloudsjhan.github.io/2024/06/08/快速吃透-Golang-Channels/ 2024-06-08T15:57:11.000Z 2024-06-08T15:58:31.649Z

Golang 可以通过启动 goroutines 来并发执行任务。它们可以通过一种名为 “通道”的通信媒介相互通信。话不多说,下面我列举了几种不同情况下 channel 的使用以及其适用条件,最后总结出一张 channel table,能够帮助你快速吃透 channel 的所有要点。Let’t go!

Nil Channels

如果你像创建普通变量一样创建一个通道,通道将被初始化为零值。这里要提到的另一个重要细节是,通道的发送方和接收方都必须做好通信准备,否则我们将收到一个死锁错误。这可以通过缓冲通道来避免,我们将在后面讨论。

1
2
3
4
5
6
7
8
9
10
11
// NOTE: Deadlock
func nilChannel() {
var ch chan int

// creating a goroutine and sending value on the channel
go func() {
ch <- 1
}()

fmt.Println(<-ch)
}

如果你在 main 中调用这个函数,你会得到以下错误和一些其他信息。

1
fatal error: all goroutines are asleep - deadlock!

这是因为我们试图在往 nil channel上发送一个值,这是坚决不允许的操作。

Empty Channel

在以下代码中,我们将收到同样的死锁错误,因为我们正试图在 channel receiver 尚未准备好的通道上发送值。从下面的代码中可以看到,在接收器创建之前,值就已经在通道上发送了。

1
2
3
4
5
6
7
8
// NOTE: Deadlock
func emptyChannel() {
var ch = make(chan int)

ch <- 1

fmt.Println(<-ch)
}

UN Buffered Channel

错误的代码已经够多了。这次让我给出一个有效的代码。在下面的代码中,我们编写了与上一个示例相同的代码,但不是创建一个 nil 通道,而是使用 make 函数创建了一个用默认值初始化的通道。 不过,如果在这种情况下没有接收器,就会错过结果,但不会产生死锁错误。

1
2
3
4
5
6
7
8
9
10
11
// NOTE: send single value through goroutine
func simpleChannel() {
var ch = make(chan int)

go func() {
ch <- 1
}()

// NOTE: if you comment this line. You will not be able to receive the result but code will not crash
fmt.Println(<-ch)
}

Channel 方向

默认情况下通道是双向的。下面的代码显示了一个只能用于发送值的通道。如果我们试图从中获取值,就会出错。

1
2
3
4
5
6
7
8
9
10
11
func uniDirectionalChannel() {
// Bidirectional [outside goroutine]
var ch = make(chan int)

go func(ch chan<- int) {
// unidirectinal [within goroutine]
ch <- 1
}(ch)

fmt.Println(<-ch)
}

Buffered Channel

这些通道可以像数组一样容纳多个值,因此在非缓冲通道中,如果我们尝试在没有接收器的情况下向其写入数据,就会出错,但在缓冲通道中,我们可以向其写入数据,直到缓冲区满为止。当缓冲区已满时,如果我们尝试向其中写入新值,就会出错。
如果我们这里不注释该函数的最后一行,就会出现死锁错误,因为这里将从空通道读取数据。

1
2
3
4
5
6
7
8
9
10
11
// using buffered channel
func bufferdChannelWithoutLoop() {
var ch = make(chan int, 2)

ch <- 1
ch <- 2

fmt.Println(<-ch)
fmt.Println(<-ch)
// fmt.Println(<-ch) // NOTE: Deadlock, Reading from empty channel
}

从通道读取数值还有另一种方法,即使用循环。在前面的示例中,我们逐个读取数值,但我们也可以通过循环读取接收通道中的数值,因此每当通道中发送一个新数值时,循环就会迭代,执行完正文中的代码后,就会等待下一个数值。如果接收器试图读取,但通道上已没有其他值,则会出现同样的死锁错误。

开发人员的职责是在通道使用后将其关闭,因为如果接收器试图读取已经关闭的通道,就会出现上述死锁问题。

Channels Table

我们已经讨论了通道的所有情况,但怎么才能快速记住它们呢? 别紧张😎,有我在,下表可以作为快速指南,对照着表盘一下我们写的 channel 就能避免出现死锁,并显示它们在不同情况下的行为。


]]>
<p class="description"></p> <p><img src="https://" alt="" style="width:100%"></p>
Golang GC 基础: 三色标记清除和 STW https://cloudsjhan.github.io/2024/06/06/Golang-GC-基础-三色标记清除和-STW/ 2024-06-06T08:54:11.000Z 2024-06-06T08:54:34.697Z

今天大家讨论一下 Golang 中垃圾回收的一些基础知识,这些知识往往让人难以理解。要知道,在垃圾回收过程中,Go 会首先:
(1)将根对象标记为灰色,
(2)然后将它们自己标记为黑色,将它们的后代标记为灰色,
(3)最后删除剩余的(白色)对象。
这就是所谓的标记和清除。但为什么我们需要三种颜色呢?为什么不是两种呢?让我们在下文中进一步讨论这个问题,并确定 STW (stop the world)的实际开销。

标记和清除

如果 GC 的全部任务都归结为标记不能删除的对象和删除未标记的对象,那么为什么不使用双色算法呢?事实上,我们可以简单地用黑色标记所有可到达的对象,然后删除白色的对象。

这一切似乎都合乎逻辑,但现在我们决定让垃圾回收器增量运行,也就是说,我们赋予它将标记阶段分成几个低延迟阶段的能力。


如图所示,在第一阶段,我们首先将节点 1 标记为黑色,然后查找该节点的连接,找到节点 2,并将其也标记为黑色。然后,标记暂停,给应用程序一点 CPU 时间来执行其主要任务。最后,我们进入第二阶段标记。由于没有灰色/黑色之分,我们不知道节点 1 的引用是否已被检查过,因此必须再次检查。算法最终很可能会完成,但不能保证它会在程序本身完成之前完成(导致 OOM)。

为了解决这个问题,我们增加了一个不变量:黑色物体应被视为扫描对象。

这个算法似乎是有效的,即使在增量垃圾回收的情况下也能正确终止。但有一个问题却打破了一切:在这种天真版本的标记和清扫算法的整个运行过程中,我们必须保持程序处于 “STW”状态。

如果在没有 STW 的情况下进行标记和清扫,会发生什么情况?

正如你所看到的,在这两个标记阶段之间,已经添加了许多新对象,但我们并没有标记表明需要对它们进行扫描。这就导致了内存泄漏。唯一的解决办法就是禁止我们的程序(突变器)在垃圾回收器运行时进行任何更改。

三色标记和清扫是如何实现并发垃圾回收的?

正如我们之前所发现的,在标记和扫描算法中,我们遇到了 “世界停止”(STW)的问题。不过,如果我们引入一个额外的标记 “未扫描但不符合删除条件”(灰色),STW 问题就会自动解决!

需要注意的是,在 Golang 中,GC 不仅是增量式的,而且是并发式的。其逻辑与增量方法相同–GC 工作被分为不同的部分,但它们不是按顺序执行,而是由后台工作者并发执行。

下面是 Golang 中的三色标记:

我们将黑色节点引用但尚未扫描的对象标记为灰色节点。让我们看看这如何帮助我们消除 STW。

新添加的对象会被标记为灰色,并由 gcBgMarkWorker2 或其他可用的工作程序进行扫描。这并不能完全消除对 STW 的需求,但会大大减少花费在 STW 上的时间。至少在标记阶段,我们不需要让世界停止运行,以防止堆发生变化。接下来,我们将深入探讨 Golang 中仍会出现的特定 STW。

“Stop the world” in Go is not a problem

其实,仔细想想,在 99% 的情况下,这都与你无关。垃圾回收器的主要工作与程序的执行同时进行,而 STW 在两个阶段之间发生的时间很短:

  • 从扫频过渡到标记(扫频终止)。
  • 从标记过渡到扫描(标记终止)。

在这两种情况下,世界的停顿都是为了下一阶段做准备:启动 Worker、清除 P 缓存(用 Go 调度器术语来说就是处理器)、等待清扫阶段完成(对于在运行时启动垃圾回收的同时从程序代码中触发 runtime.GC()的情况)、设置/取消写入障碍–而这一切都与已分配对象的数量无关。

如果你分配了 1 兆字节,然后开始分配千兆字节的对象,这并不意味着 STW 会按比例增长,因为 STW 只在下一个标记或扫描阶段的初始化过程中短暂需要。该数据数组的实际标记和扫描是在后台进行的。

STW 的持续时间取决于所涉及的 P 的数量和 goroutines 的数量,并与管理其状态的需要有关。STW 不受堆上分配数量的影响。

世界只在两个短时间内停止:标记终止和扫描终止。标记和扫描在后台进行,不会阻塞应用程序。

Benchmark

这里做一个简单的测试,测试两种分配小对象的情况。我使用 env GOGC=off 禁用了垃圾回收器,并在每次测试结束时直接调用 runtime.GC() 来触发垃圾回收:

1
2
3
4
5
6
7
8
9
10
11
12
13
14
15
16
17
18
19
20
21
22
23
24
25
26
27
28
29
30
31
32
33
34
35
36
37
func Test1000Allocs(t *testing.T) {
go func() {
for {
i := 123
reader(&i)
}
}()

for i := 0; i < 1000; i++ {
ii := i
i = *reader(&ii)
}

runtime.GC()
}

func Test10000000000Allocs(t *testing.T) {
go func() {
for {
i := 123
reader(&i)
}
}()

for i := 0; i < 10000000000; i++ {
ii := i
i = *reader(&ii)
}

runtime.GC()
}

//go:noinline
func reader(i *int) *int {
ii := i
return ii
}

我们运行每个测试时都启用了跟踪信息:

1
2
3
4
GOGC=off go test -run=Test1000Allocs -trace=trace1.out
GOGC=off go test -run=Test10000000000Allocs -trace=trace2.out
go tool trace trace1.out
go tool trace trace2.out

Test1000Allocs

Test10000000000Allocs

Test10000000000Allocs

在 Test1000Allocs 测试的扫描终止阶段,STW 为 80384 ns。测试 10000000000Allocs 时为 88384 ns。有区别吗?我也没发现。

在 Test1000Allocs 测试的标记终止阶段,STW 为 87616 ns。测试 10000000000Allocs 时为 120128 毫微秒。这里的差异更为明显,但我们谈论的还是毫秒级的微小差异。在 GC 运行的大部分时间里,我们的程序成功并行运行。

在分配数量多、GOGC 值低的情况下,这些带有小 STW 阶段的短 GC 循环可能会频繁出现,并可能被视为一个问题。由于我禁用了 GC,并且只通过直接调用触发了一次,所以测试有点像是合成的。但这恰恰说明,有时值得考虑所选的 GOGC 值。

总之,Golang 中的垃圾回收器显然是并发运行的,在大多数情况下,STW 时的停顿都是可以忽略不计的问题。


]]>
<p class="description"></p> <p><img src="https://" alt="" style="width:100%"></p>
使用 Golang 构建你的第一个 k8s Operator https://cloudsjhan.github.io/2024/06/03/使用-Golang-构建你的第一个-k8s-Operator/ 2024-06-03T14:09:30.000Z 2024-06-03T14:10:30.865Z

使用 Golang 构建你的第一个 k8s Operator

本文将展示如何使用 Operator SDK 搭建一个基本的 k8s Operator。在本文中,您将了解如何创建一个新项目,并通过创建自定义资源定义 (CRD) 和基本控制器来添加 API。

我们将在 CRD 中添加字段,以包含一些有关期望状态和实际状态的信息,修改控制器以调和新资源的实例,然后将 operator 部署到 Kubernetes 集群。

Prerequisites

  • 安装 Operator-sdk v1.5.0+
  • 安装 Kubectl v1.17.0+
  • 一个 Kubernetes 集群以及其管理访问权限
  • 安装 Docker v3.2.2+ 版本
  • 安装 Golang v1.16.0+ 版本

Step 1: Create a project

建一个目录,并初始化一个 operator 项目:

1
2
3
4
5
6
7
8
9
10
11
12
13
14
15
16
17
18
$ mkdir memcached-operator
$ cd memcached-operator
$ operator-sdk init --domain=example.com --repo=github.com/example/memcached-operator
Writing scaffold for you to edit...
Get controller runtime:
$ go get sigs.k8s.io/controller-runtime@v0.7.0
Update go.mod:
$ go mod tidy

Running make:
$ make
go: creating new go.mod: module tmp
Downloading sigs.k8s.io/controller-tools/cmd/controller-gen@v0.4.1
go: found sigs.k8s.io/controller-tools/cmd/controller-gen in sigs.k8s.io/controller-tools v0.4.1
/Users/username/workspace/projects/memcached-operator/bin/controller-gen object:headerFile="hack/boilerplate.go.txt" paths="./..."
go fmt ./...
go vet ./...
go build -o bin/manager main.go
1
operator-sdk init — domain=example.com — repo=github.com/example/memcached-operator
  • domin 用于 operator 创建的任何 API Group,因此这里的 API Group 是 *.example.com。

大家可能熟悉的一个 API Group 是 rbac.authorization.k8s.io,创建 RBAC 资源(如 ClusterRoles 和 ClusterBindings)的功能通常就设置在 Kubernetes 集群上。operator-sdk 允许您指定一个自定义域,将其附加到您定义的任何 API 组,以帮助避免名称冲突。

这里使用的 –repo 值只是一个示例。如果你想提交项目并保留它,可以将其设置为你可以访问的 Git 仓库。

项目初始化后会生生一个 Operator 项目的壳子,我们剩下的工作就是在这个框架之上,实现 operator 的功能。

Step 2: Create an API

使用 create 命令生成 CRD 和控制器:

注意:–version 标志针对的是操作符的 Kubernetes API 版本,而不是语义版本。因此,请勿在 –version 中使用

1
2
3
4
5
6
7
8
9
10
11
12
13
$ operator-sdk create api --group cache --version v1alpha1 --kind Memcached --resource=true --controller=true


Writing scaffold for you to edit...
api/v1alpha1/memcached_types.go
controllers/memcached_controller.go
Running make:

$ make
/Users/username/workspace/projects/memcached-operator/bin/controller-gen object:headerFile="hack/boilerplate.go.txt" paths="./..."
go fmt ./...
go vet ./...
go build -o bin/manager main.go

--group 是自定义资源所在的组,因此它最终会出现在 API Group “cache.example.com “中。

--version 决定 API Group 的版本。可以使用不同的版本连续升级自定义资源。

-resource--controller 标志设置为 “true”,以便为这两样东西生成脚手架。

现在我们已经有了组件的轮廓,让我们开始用实际功能来填充它们。
首先是 CRD。在 api/v1alpha1/memcached_types.go 中,您应该能看到一些定义自定义资源类型规格和状态的结构:

1
2
3
4
5
6
7
8
9
10
11
12
13
14
// EDIT THIS FILE!  THIS IS SCAFFOLDING FOR YOU TO OWN!
// NOTE: json tags are required. Any new fields you add must have json tags for the fields to be serialized.
// MemcachedSpec defines the desired state of Memcached
type MemcachedSpec struct {
// INSERT ADDITIONAL SPEC FIELDS - desired state of cluster
// Important: Run "make" to regenerate code after modifying this file
// Foo is an example field of Memcached. Edit Memcached_types.go to remove/update
Foo string `json:"foo,omitempty"`
}
// MemcachedStatus defines the observed state of Memcached
type MemcachedStatus struct {
// INSERT ADDITIONAL STATUS FIELD - define observed state of cluster
// Important: Run "make" to regenerate code after modifying this file
}

请注意文件顶部的信息。该文件是由 Operator-SDK 搭建的脚手架,我们可以根据自己的项目需求去修改。
Spec 包含指定资源所需状态的信息,而 Status 则包含系统的可观测状态,尤其是其他资源可能想要使用的信息。这些 Golang 结构与 Kubernetes 用户为创建自定义资源类型实例而编写的 YAML 直接对应。

让我们为类型添加一些基本字段。

1
2
3
4
5
6
7
8
9
10
11
// MemcachedSpec defines the desired state of Memcached
type MemcachedSpec struct {
// +kubebuilder:validation:Minimum=0
// Size is the size of the memcached deployment
Size int32 `json:"size"`
}
// MemcachedStatus defines the observed state of Memcached
type MemcachedStatus struct {
// Nodes are the names of the memcached pods
Nodes []string `json:"nodes"`
}

Size 是一个整数,用于确定 Memcached 集群中的节点数量。我们在 Status 中添加了一个字符串数组,用于存储集群中包含的节点的 IP 地址。需要注意的是,这个特定的实现方式只是一个示例。
注意父 Memcached 结构 Status 字段的 Kubebuilder 子资源标记。这将在生成的 CRD 清单中添加 Kubernetes 状态子资源。这样,控制器就可以只更新状态字段,而无需更新整个对象,从而提高性能。

1
2
3
4
5
6
7
8
// Memcached is the Schema for the memcacheds API
// +kubebuilder:subresource:status
type Memcached struct {
metav1.TypeMeta `json:",inline"`
metav1.ObjectMeta `json:"metadata,omitempty"`
Spec MemcachedSpec `json:"spec,omitempty"`
Status MemcachedStatus `json:"status,omitempty"`
}

更改 types.go 文件后,应始终在项目根目录下运行以下命令:

1
make generate

此 make target 会调用 controller-gen 更新 api/v1alpha1/zz_generated.deepcopy.go,使其包含您刚刚添加的字段的必要实现。完成更新后,我们应运行以下命令为 CRD 生成 YAML 清单:

1
$ make manifests

会生成以下文件:

1
2
3
New:
config/crd/bases/cache.example.com_memcacheds.yaml
config/rbac/role.yaml

config/crd/bases/cache.example.com_memcacheds.yaml 是 memcached CRD 的清单。config/rbac/role.yaml 是 RBAC 清单,其中包含控制器所需的管理 memcached 类型的权限。

Step 3: Create a controller

让我们看看 controllers/memcached_controller.go 中目前包含的内容:

1
2
3
4
5
6
7
8
9
10
11
12
13
// Reconcile is part of the main kubernetes reconciliation loop which aims to
// move the current state of the cluster closer to the desired state.
// TODO(user): Modify the Reconcile function to compare the state specified by
// the Memcached object against the actual cluster state, and then
// perform operations to make the cluster state reflect the state specified by
// the user.
//// For more details, check Reconcile and its Result here:
// - https://pkg.go.dev/sigs.k8s.io/controller-runtime@v0.7.0/pkg/reconcile
func (r *MemcachedReconciler) Reconcile(ctx context.Context, req ctrl.Request) (ctrl.Result, error) {
_ = r.Log.WithValues("memcached", req.NamespacedName)
// your logic here
return ctrl.Result{}, nil
}

Reconcile 方法负责将自定义资源状态中包含的期望状态与系统上运行的实际状态进行核对,也是实现控制器逻辑的主要部分。实现调和循环的具体细节超出了本教程的范围,将在进阶的文章中介绍。现在,请用此参考实现替换 controllers/memcached_controller.go。注意,如果你在初始化项目时指定了不同的 repo,可能需要更改 github.com/example/memcached-operator/api/v1alpha1 的导入路径,以便正确指向你定义 memcached_types.goin 的目录。粘贴后,确保重新生成清单:

1
make manifests

Step 4: Build and deploy your operator

现在您已经填写了所有需要的组件,是时候部署 operator 了!一般来说,有三种不同的方法来部署:

  • 作为在 Kubernetes 集群外执行的程序。这样做可能是出于开发目的,也可能是出于集群中数据的安全考虑。Makefile 包含目标 make install run,用于在本地运行运算符,但这种方法不是这里的重点。
  • 作为 Kubernetes 集群内的部署运行。这就是我现在要向你展示的内容。

  • 由 operator 生命周期管理器部署和管理。建议在生产中使用,因为 OLM 具有管理和升级运行中的 operator 的附加功能。

现在,先构建并推送控制器的 Docker image。本示例使用了基础 Dockerfile,但你也可以根据自己的需要进行修改。我使用 Docker Hub 作为镜像仓库,但你能推/拉访问的任何仓库都可以。

1
2
$ export USERNAME=<docker-username>
$ make docker-build docker-push IMG=docker.io/$USERNAME/memcached-operator:v1.0.0

如果出现如下错误,则可能需要获取其他依赖项。运行建议的命令下载依赖项。

1
2
/controllers: package k8s.io/api/apps/v1 imported from implicitly required module; to add missing requirements, run:
go get k8s.io/api/apps/v1@v0.19.2

我们还可以在 Makefile 中设置镜像的默认名称和标签。镜像构建完成后,就可以部署 operator 了:

1
$ make deploy IMG=docker.io/$USERNAME/memcached-operator:v1.0.0

它使用 config/ 中的清单创建 CRD,在 Pod 中部署控制器,创建控制器管理 CRD 所需的 RBAC 角色,并将其分配给控制器。让我们来看看。
我们的 CRD 类型为 memcacheds.cache.example.com:

1
2
3
4
5
6
7
8
9
$ kubectl get crds
NAME CREATED AT
catalogsources.operators.coreos.com 2021-01-22T00:13:22Z
clusterserviceversions.operators.coreos.com 2021-01-22T00:13:22Z
installplans.operators.coreos.com 2021-01-22T00:13:22Z
memcacheds.cache.example.com 2021-02-06T00:52:38Z
operatorgroups.operators.coreos.com 2021-01-22T00:13:22Z
rbacsyncs.ibm.com 2021-01-22T00:08:59Z
subscriptions.operators.coreos.com 2021-01-22T00:13:22Z

运行控制器的部署和 Pod:

1
2
3
4
5
6
7
$ kubectl --namespace memcached-operator-system get deployments
NAME READY UP-TO-DATE AVAILABLE AGE
memcached-operator-controller-manager 1/1 1 1 2m18s

$ kubectl --namespace memcached-operator-system get pods
NAME READY STATUS RESTARTS AGE
memcached-operator-controller-manager-76b588bbb5-wvl7b 2/2 Running 0 2m44s

当 pod 开始运行,我们的 Operator 就可以使用了。编辑 config/samples/cache_v1alpha1_memcached.yaml 中的示例 YAML,加入一个大小整数,就像在自定义资源规范中定义的那样:

1
2
3
4
5
6
apiVersion: cache.example.com/v1alpha1
kind: Memcached
metadata:
name: memcached-sample
spec:
size: 1

然后创建一个自定义资源的新实例:

1
2
$ kubectl apply -f config/samples/cache_v1alpha1_memcached.yaml 
memcached.cache.example.com/memcached-sample created

再看看新的自定义资源和控制器在后台创建的对象:

1
2
3
4
5
6
7
8
9
10
11
$ kubectl get memcached
NAME AGE
memcached-sample 18s

$ kubectl get deployments
NAME READY UP-TO-DATE AVAILABLE AGE
memcached-sample 1/1 1 1 33s

$ kubectl get pods
NAME READY STATUS RESTARTS AGE
memcached-sample-9b765dfc8-2hvf8 1/1 Running 0 44s

如果查看一下 Memcached 对象,就会发现状态已用运行节点的名称更新:

1
2
3
4
5
6
7
8
9
10
11
12
13
14
15
16
17
18
19
20
21
22
23
24
25
26
27
28
29
30
31
32
33
34
35
36
37
38
39
40
41
$ kubectl get memcached memcached-sample -o yaml
apiVersion: cache.example.com/v1alpha1
kind: Memcached
metadata:
annotations:
kubectl.kubernetes.io/last-applied-configuration: |
{"apiVersion":"cache.example.com/v1alpha1","kind":"Memcached","metadata":{"annotations":{},"name":"memcached-sample","namespace":"default"},"spec":{"size":1}}
creationTimestamp: "2021-03-29T19:22:53Z"
generation: 1
managedFields:
- apiVersion: cache.example.com/v1alpha1
fieldsType: FieldsV1
fieldsV1:
f:metadata:
f:annotations:
.: {}
f:kubectl.kubernetes.io/last-applied-configuration: {}
f:spec:
.: {}
f:size: {}
manager: kubectl
operation: Update
time: "2021-03-29T19:22:53Z"
- apiVersion: cache.example.com/v1alpha1
fieldsType: FieldsV1
fieldsV1:
f:status:
.: {}
f:nodes: {}
manager: manager
operation: Update
time: "2021-03-29T19:22:58Z"
name: memcached-sample
namespace: default
resourceVersion: "1374"
uid: 63c7b1b1-1a75-49e6-8132-2164807a1b78
spec:
size: 1
status:
nodes:
- memcached-sample-9b765dfc8-2hvf8

要查看控制器的运行情况,可以在集群中添加另一个节点。将 config/samples/cache_v1alpha1_memcached.yaml 中的大小改为 2,然后运行:

1
2
$ kubectl apply -f config/samples/cache_v1alpha1_memcached.yaml
memcached.cache.example.com/memcached-sample configured

查看创建的新 pod:

1
2
3
4
$ kubectl get pods
NAME READY STATUS RESTARTS AGE
memcached-sample-9b765dfc8-2hvf8 1/1 Running 0 50s
memcached-sample-9b765dfc8-jdhlq 1/1 Running 0 3s

然后看到 Memcached 对象再次更新为新 pod 的名称:

1
2
3
4
5
6
7
8
9
10
11
12
13
14
15
16
17
18
19
20
21
22
23
24
25
26
27
28
29
30
31
32
33
34
35
36
37
38
39
40
41
42
$ kubectl get memcached memcached-sample -o yaml
apiVersion: cache.example.com/v1alpha1
kind: Memcached
metadata:
annotations:
kubectl.kubernetes.io/last-applied-configuration: |
{"apiVersion":"cache.example.com/v1alpha1","kind":"Memcached","metadata":{"annotations":{},"name":"memcached-sample","namespace":"default"},"spec":{"size":1}}
creationTimestamp: "2021-03-29T19:22:53Z"
generation: 2
managedFields:
- apiVersion: cache.example.com/v1alpha1
fieldsType: FieldsV1
fieldsV1:
f:metadata:
f:annotations:
.: {}
f:kubectl.kubernetes.io/last-applied-configuration: {}
f:spec:
.: {}
f:size: {}
manager: kubectl
operation: Update
time: "2021-03-29T19:22:53Z"
- apiVersion: cache.example.com/v1alpha1
fieldsType: FieldsV1
fieldsV1:
f:status:
.: {}
f:nodes: {}
manager: manager
operation: Update
time: "2021-03-29T19:22:58Z"
name: memcached-sample
namespace: default
resourceVersion: "1712"
uid: 63c7b1b1-1a75-49e6-8132-2164807a1b78
spec:
size: 2
status:
nodes:
- memcached-sample-9b765dfc8-2hvf8
- memcached-sample-9b765dfc8-jdhlq

Step 5: Cleanup

完成后,可以通过运行这些命令来清理已部署的 operator:

1
2
3
$ kubectl delete memcached memcached-sample

$ make undeploy

Debugging

查看操作员管理器日志:

1
$ kubectl logs deployment.apps/memcached-operator-controller-manager -n memcached-operator-system -c manager

]]>
<p class="description"></p> <p><img src="https://" alt="" style="width:100%"></p>
如何用 golang 从 OpenAI,Ollama 和 Claude 获取可靠的结构化输出? https://cloudsjhan.github.io/2024/06/03/如何用-golang-从-OpenAI-Ollama-和-Claude-获取可靠的结构化输出/ 2024-06-03T00:53:23.000Z 2024-06-03T01:50:28.688Z

OpenAI 大火后有许多开发者正在活想要基于 OpenAI 做很多上层应用的开发,这方面在 Python 的生态确实比较完善,但对于 Gopher 来说要获得结构化的结果还需要额外的工作,没有既定的最佳实践。
在 golang 世界中,还没有这样的协议。但有一种非常成熟、稳定、广泛使用的协议可以实现我们想要的大部分功能:protobufs 和 protojson(用于将结构化内存中的结构转换为 JSON)。

在本文中,我们将通过代码来实现这种组合:OpenAI(包括 ollama + open weights)+ protobufs + golang。

实现

我们希望创建一个 POC,对输入和输出进行稳健的类型化验证:
输入应为国家名称,输出应为国家名称和其他统计数据。

如何在 Golang 中使用 OpenAI

这里我们使用 Sasha Baranov 开发的非官方 Golang OpenAI 客户端

设计协议

创建 protobuf 文件:

1
2
3
4
5
6
7
8
9
10
11
12
13
14
15
16
17
syntax = "proto3";

package countryinfo;
option go_package = "./protobuf";


message CountryRequest {
string country = 1;
}

message CountryResponse {
string country = 1;
int32 country_population = 2;
string capital = 3;
int32 capital_population = 4;
int64 gdp_usd = 5;
}

现在创建 go 对应程序(需要安装 protoc 才能使用):

1
protoc --go_out=. countryinfo.proto

这将为我们在 main.go 文件中使用的内容创建一个 go 原生类型验证。我们的包含文件需要包含 protobuf,我们还需要 protojson 来解析 LLM 的输入和输出:

1
2
"countryinfo/protobuf"
"google.golang.org/protobuf/encoding/protojson"

system prompt

我们需要让 OpenAI 与 protobuf 对话。我们可以通过系统提示完成这项工作:

  • 我们验证输出(以及输入)
  • 在系统提示中包含了一份原生数据库的文本副本,显然每次重新生成原生数据库时都需要手动同步。
    1
    2
    3
    4
    5
    6
    7
    8
    9
    10
    11
    12
    13
    14
    systemPrompt := `You are a programmatic country information API used software applications. 
    All input messages provided MUST adhere to the CountryRequest schema: validate them and throw an error if not.
    Your responses MUST adhere to the CountryResponse schema ONLY with no additional narrative or markup, backquotes or anything.
    message CountryRequest {
    string country = 1;
    }

    message CountryResponse {
    string country = 1;
    int32 country_population = 2;
    string capital = 3;
    int32 capital_population = 4;
    int64 gdp_usd = 5;
    }

创建类型安全请求

1
2
3
4
5
6
7
8
9
10
11
12
13
14
req := openai.ChatCompletionRequest{
Model: openai.GPT3Dot5Turbo,
MaxTokens: 1000, // Increased max tokens to 1000
Messages: []openai.ChatCompletionMessage{
{
Role: openai.ChatMessageRoleSystem,
Content: systemPrompt,
},
{
Role: openai.ChatMessageRoleUser,
Content: encodeCountryRequest(*country),
},
},
}

这是方法定义。看一下我们是如何使用自动生成的 protobuf 来验证内容的:

1
2
3
4
5
6
7
8
9
10
11
12
func encodeCountryRequest(country string) string {
req := &protobuf.CountryRequest{
Country: country,
}
data, err := protojson.Marshal(req)
if err != nil {
log.Fatalf("Protobuf JSON encoding error: %v\n", err)
}
resultStr := string(data)
fmt.Println("Encoded Protobuf JSON Message: ", resultStr)
return resultStr
}

处理 response

1
2
3
4
5
6
7
8
func decodeCountryResponse(data string) (*protobuf.CountryResponse, error) {
resp := &protobuf.CountryResponse{}
err := protojson.Unmarshal([]byte(data), resp)
if err != nil {
return nil, err
}
return resp, nil
}

兼容性

上面的代码默认使用 GPT 3.5,但如果你有足够的预算,也可以重写模型使用 GPT 4,还可以重写主机网址指向 ollama(因为它与 OpenAI-API 兼容)。

下面是成功测试过的模型:

  • GPT 3.5
  • GPT 4
  • 本地安装的 llama3-instruct
  • Claude Haiku claude-3-haiku-20240307 (最便宜的型号)

]]>
<p class="description"></p> <p><img src="https://" alt="" style="width:100%"></p>
go1.23: 对 //go:linkname 的修改及其对开发人员的影响 https://cloudsjhan.github.io/2024/05/30/go1-23-对-go-linkname-的修改及其对开发人员的影响/ 2024-05-30T08:46:35.000Z 2024-05-30T08:47:38.734Z

上周,Go 1.23 进入冻结期,这意味着不会添加任何新功能,已经添加的功能也不太可能被删除。今天,我们将讨论 Go 1.23 中 //go:linkname 指令的变化。
相关的 issue 是:cmd/link: lock down future uses of linkname · Issue #67401 · golang/go

注://go:linkname 指令不是官方推荐使用的指令,不能保证向前或向后的兼容性。明智的做法是尽可能避免使用该指令。

有鉴于此,让我们深入了解这些新变化。

linkname 的作用是什么

简单来说,链接名指令用于向编译器和链接器传递信息。根据使用情况,可将其分为三类:

1. Pull

pull 的用法是:

1
2
3
4
5
6
import _ "unsafe" // Required to use linkname

import _ "fmt" // The pulled package must be explicitly imported (except the runtime package)

//go:linkname my_func fmt.Println
func my_func(...any) (n int, err error)

该指令格式为 //go:linkname <本地函数或包级变量> <本包或其他包中完全定义的函数或变量>。它告诉编译器和链接器 my_func 应直接使用 fmt.Println,使 my_func 成为 fmt.Println 的别名。

这种用法可以忽略函数或变量是否被导出,甚至可以使用包私有元素。不过,这种方法有风险,如果出现类型不匹配,可能会引起 panic。

2. Push

1
2
3
4
5
6
7
8
9
10
11
import _ "unsafe" // Required to use linkname

//go:linkname main.fastHandle
func fastHandle(input io.Writer) error {
...
}

// package main
func fastHandle(input io.Writer) error

// The main package can directly use fastHandle

在这里,只需将函数或变量名作为第一个参数传递给指令,并指定使用该函数或变量的软件包名称。这种用法表示函数或变量将被命名为 xxx.yyy。

3. HandShake

1
2
3
4
5
6
7
8
9
10
11
12
13
14
15
16

package mypkg

import _ "unsafe" // Required to use linkname

//go:linkname fastHandle
func fastHandle(input io.Writer) error {
...
}

package main

import _ "unsafe" // Required to use linkname

//go:linkname fastHandle mypkg.fastHandle
func fastHandle(input io.Writer) error

这种用法意味着两端要握手,明确标记哪个函数或变量应被链接。

使用 linkname 的风险

主要风险是在软件包不知情的情况下使用软件包私有函数或变量的能力。 例如:

1
2
3
4
5
6
7
8
9
10
11
12
13
14
15
16
17
18
19
20
21
22
// pkg/mymath/mymath.go
package mymath

func uintPow(n uint) uint {
return n * n
}

// main.go
package main

import (
"fmt"
_ "linkname/pkg/mymath"
_ "unsafe"
)

//go:linkname pow linkname/pkg/mymath.uintPow
func pow(n uint) uint

func main() {
fmt.Println(pow(6)) // 36
}

通常,uintPow 不应在其软件包之外被访问。但 linkname 绕过了这一限制,可能导致严重的类型相关内存错误或运行时 panic。

linkname 也有有用的时候

尽管存在风险,但 linkname 的存在还是有其合理的原因,例如在 Go 程序启动时。例如,在 Go 的运行时:

1
2
3
4
5
6
7
8
9
10
// runtime/proc.go

//go:linkname main_main main.main
func main_main()

// runtime.main
func main() {
fn := main_main
fn()
}

这里,linkname 允许运行时调用用户定义的主函数。

Go 1.23 中对 linkname 的更改

考虑到上述风险,Go 核心团队决定限制链接名的使用:

  • 新的标准库软件包将禁止 linkname。
  • 新增了一个 ldflag -checklinkname=1 来执行限制。默认值为 0,但在 1.23 的最终版本中将设置为 1。
  • 标准库将禁止只拉链接名,只允许握手模式。

例如,以下代码在 1.23 版中就无法编译:

1
2
3
4
5
6
7
8
package main
import _ "unsafe"
//go:linkname corostart runtime.corostart
func corostart()

func main() {
corostart()
}

linkname 的未来

长期目标是只允许使用握手模式。作为开发者,我们应该:

  • 使用 -checklinkname=1 审核并删除不必要的链接名使用。
  • 建议在必要时公开私有 API。
  • 最后,使用 -ldflags=-checklinkname=0 禁用限制。

总结

总之,我们还是应避免使用 //go:linkname 以防止出现不可预见的问题。


]]>
<p class="description"></p> <p><img src="https://" alt="" style="width:100%"></p>
掌握 Golang Mutex:安全并发的最佳实践 https://cloudsjhan.github.io/2024/05/29/掌握-Golang-Mutex:安全并发的最佳实践/ 2024-05-29T01:59:12.000Z 2024-05-29T02:12:04.979Z

掌握 Golang Mutex:安全并发的最佳实践

并发是 Go 的核心功能之一,它使开发人员能够高效地同时执行多个进程。然而,管理并发性需要谨慎的同步,以避免常见的隐患,如竞赛条件,即两个或多个进程试图同时修改共享数据。Mutex(互斥锁)是 Go 程序员并发工具包中的一个重要工具。本文将探讨 Golang Mutex 的复杂性,说明何时以及如何正确使用它,以确保数据完整性和程序稳定性。

Understanding Golang Mutex

Mutex 是一种同步原语,可用于确保每次只有一个 goroutine 访问代码的关键部分。它用于保护并发程序(由 Go 运行时管理的轻量级线程)对数据和其他资源的访问。

在 Go 中,互斥由 sync 包提供,主要类型是 sync.Mutex 和 sync.RWMutex:

  • sync.Mutex 提供了一种基本的锁定机制;当一个 goroutine 锁定一个 Mutex 时,任何其他试图锁定它的 goroutine 都会阻塞,直到它被解锁。
  • sync.RWMutex 是一种读/写互斥器,允许多个读取器或一个写入器,但不能同时读写。

When to Use a Mutex

在下列情况下应使用 mutex:

  • 代码中有一些关键部分需要访问共享数据,而这些数据可能会被多个程序同时访问。
  • 需要确保在任何给定时间内只有一个 goroutine 可以访问或修改共享数据,以防止数据竞争。
  • 要处理的是并发环境中的有状态组件或资源。

How to Use a Mutex: Guidelines and Best Practices

基本用法

下面是一个使用 sync.Mutex 保护共享数据结构的简单示例:

1
2
3
4
5
6
7
8
9
10
11
12
13
14
15
16
17
18
19
20
21
22
23
24
25
26
27
28
29
30
31
32
33
34
35
36
37
38
39
40
41
42
package main

import (
"fmt"
"sync"
)

type SafeCounter struct {
val int
mux sync.Mutex
}

// Inc increments the counter safely.
func (c *SafeCounter) Inc() {
c.mux.Lock()
c.val++
c.mux.Unlock()
}

// Value returns the current value of the counter safely.
func (c *SafeCounter) Value() int {
c.mux.Lock()
defer c.mux.Unlock()
return c.val
}

func main() {
c := SafeCounter{}
var wg sync.WaitGroup

// Start 100 goroutines to increment the counter.
for i := 0; i < 100; i++ {
wg.Add(1)
go func() {
c.Inc()
wg.Done()
}()
}
wg.Wait()

fmt.Println(c.Value()) // Output: 100
}

Lock 和Unlock 要靠近:尽可能缩小锁定的部分,并在最近的机会解锁互斥,可以明确使用 Unlock() 或在锁定后使用 defer(如果函数有多个退出点)。

使用 defer 来 Unlock

要确保始终解锁互斥项,即使发生 panic,也要在锁定后立即使用延迟。

避免嵌套锁

嵌套锁可能导致死锁,即两个或多个程序互相等待对方释放锁。请谨慎设计并发模型,以防止出现这种情况。

使用 RWMutex 处理读取繁重的工作负载

当共享资源的读取次数多于写入次数时,可以考虑使用 sync.RWMutex。它允许多个程序同时读取资源,只在写入时锁定,从而提高了效率。

结论

在 Go 的并发领域,mutex 就像一个哨兵,保护着共享数据。要避免并发编程中的危险陷阱(如竞争条件),正确使用互斥是至关重要的。通过遵守本文概述的原则和实践,开发人员可以利用 Go 并发模型的强大功能,同时确保数据完整性和程序可靠性


]]>
<p class="description"></p> <p><img src="https://" alt="" style="width:100%"></p>
Golang 中 JSON 操作的 5 个常见陷阱 https://cloudsjhan.github.io/2024/05/25/Golang-中-JSON-操作的-5-个常见陷阱/ 2024-05-25T10:06:53.000Z 2024-05-25T10:07:36.089Z

JSON 是许多开发人员在工作中经常使用的一种数据格式。它一般用于配置文件或网络数据传输等场景。由于其简单、易懂、可读性好,JSON 已成为整个 IT 界最常用的格式之一。对于这种情况,Golang 和许多其他语言一样,也提供了标准库级别的支持, encoding/json

就像 JSON 本身很容易理解一样,用于操作 JSON 的编码/JSON 库也非常容易使用。但我相信,很多开发者可能会像我第一次使用这个库时一样,遇到各种奇怪的问题或 bug。本文总结了我个人在使用 Golang 操作 JSON 时遇到的问题和错误。希望能帮助更多阅读本文的开发者掌握 Golang 的使用技巧,更正确地操作 JSON,避免调用不必要的”坑”。

本文内容基于 Go 1.22。不同版本之间可能存在细微差别。读者在阅读和使用时请注意。同时,本文列出的所有案例均使用 encoding/json,不涉及任何第三方 JSON 库。

基本用法

先来看下 encoding/json 的基本用法。
作为一种数据格式,JSON 的核心操作只有两个:序列化和反序列化。序列化是将 Go 对象转换为 JSON 格式的字符串(或字节序列)。反序列化则相反,是将 JSON 格式的数据转换成 Go 对象。

这里提到的对象是一个宽泛的概念。它不仅指结构对象,还包括切片和映射类型的数据。它们也支持 JSON 序列化。

1
2
3
4
5
6
7
8
9
10
11
12
13
14
15
16
17
18
19
20
21
22
23
24
25
26
27
28
29
30
31
import (
"encoding/json"
"fmt"
)

type Person struct {
ID uint
Name string
Age int
}
func MarshalPerson() {
p := Person{
ID: 1,
Name: "Bruce",
Age: 18,
}
output, err := json.Marshal(p)
if err != nil {
panic(err)
}
println(string(output))
}
func UnmarshalPerson() {
str := `{"ID":1,"Name":"Bruce","Age":18}`
var p Person
err := json.Unmarshal([]byte(str), &p)
if err != nil {
panic(err)
}
fmt.Printf("%+v\n", p)
}

核心是两个函数 json.Marshaljson.Unmarshal,分别用于序列化和反序列化。这两个函数都会返回错误,在这里我只是简单地 panic 一下。
使用过 encoding/json 的读者可能知道,还有另一对工具会经常用到:NewEncoder 和 NewDecoder。简单看一下源代码就会发现,这两个工具的底层核心逻辑调用与 Marshal 是一样的,所以我就不在这里举例说明了。

常见的 ‘坑’

1. public or private 字段处理

这可能是刚接触 Go 的开发人员最容易犯的错误。也就是说,如果我们使用结构体处理 JSON,那么结构体的成员字段必须是公有的,即首字母大写的,而私有成员是无法解析的。
例如:

1
2
3
4
5
6
7
8
9
10
11
12
13
14
15
16
17
18
19
20
21
22
23
24
25
26
27
28
29
30
31
type Person struct {
ID uint
Name string
age int
}

func MarshalPerson() {
p := Person{
ID: 1,
Name: "Bruce",
age: 18,
}
output, err := json.Marshal(p)
if err != nil {
panic(err)
}
println(string(output))
}
func UnmarshalPerson() {
str := `{"ID":1,"Name":"Bruce","age":18}`
var p Person
err := json.Unmarshal([]byte(str), &p)
if err != nil {
panic(err)
}
fmt.Printf("%+v\n", p)
}
// Output Marshal:
{"ID":1,"Name":"Bruce"}
// Output Unmarshal:
{ID:1 Name:Bruce age:0}

在这里,age 被设置为私有变量,因此序列化的 JSON 字符串中没有 age 字段。同样,在将 JSON 字符串反序列化为 Person 时,也无法正确读取 age 的值。
原因很简单。如果我们深入研究 Marshal 下的源代码,就会发现它实际上使用了 reflect 来动态解析 struct 对象:

1
2
3
4
5
6
7
// .../src/encoding/json/encode.go

func (e *encodeState) marshal(v any, opts encOpts) (err error) {
// ...skip
e.reflectValue(reflect.ValueOf(v), opts)
return nil
}

而 Golang 在语言设计层面禁止对结构的私有成员进行反射式访问,因此这种反射式解析自然会失败,反序列化也是如此。

2. 警惕结构体组合

Go 是面向对象的,但它没有类,只有结构,而结构没有继承性。因此,Go 使用一种组合来重用不同的结构。在许多情况下,这种组合非常方便,因为我们可以像操作结构本身的成员一样操作组合中的其他成员,就像下面这样:

1
2
3
4
5
6
7
8
9
10
11
12
13
14
15
16
17
18
19
20
21
22
23
24
25
26
27
28
29
type Person struct {
ID uint
Name string
address
}

type address struct {
Code int
Street string
}
func (a address) PrintAddr() {
fmt.Println(a.Code, a.Street)
}
func Group() {
p := Person{
ID: 1,
Name: "Bruce",
address: address{
Code: 100,
Street: "Main St",
},
}
// Access all address's fields and methods directly
fmt.Println(p.Code, p.Street)
p.PrintAddr()
}
// Output
100 Main St
100 Main St

结构体组合使用起来确实挺方便。不过,在使用 JSON 解析时,我们需要注意一个小问题。请看下面的代码:

1
2
3
4
5
6
7
8
9
10
11
12
13
14
15
16
17
18
19
20
21
22
23
24
25
26
27
28
29
30
31
// The structure used here is the same as the previous one, 
// so I won't repeat it. error is also not captured to save space.

func MarshalPerson() {
p := Person{
ID: 1,
Name: "Bruce",
address: address{
Code: 100,
Street: "Main St",
},
}
// It would be more pretty by MarshalIndent
output, _ := json.MarshalIndent(p, "", " ")
println(string(output))
}
func UnmarshalPerson() {
str := `{"ID":1,"Name":"Bruce","address":{"Code":100,"Street":"Main St"}}`
var p Person
_ = json.Unmarshal([]byte(str), &p)
fmt.Printf("%+v\n", p)
}
// Output MarshalPerson:
{
"ID": 1,
"Name": "Bruce",
"Code": 100,
"Street": "Main St"
}
// Ouptput UnmarshalPerson:
{ID:1 Name:Bruce address:{Code:0 Street:}}

这里先声明一个 Person 对象,然后使用 MarshalIndent 美化序列化结果并打印出来。从打印输出中我们可以看到,整个 Person 对象都被扁平化了。就 Person 结构而言,尽管进行了组合,但它看起来仍有一个地址成员字段。因此,有时我们会想当然地认为 Person 的序列化 JSON 看起来是这样的:

1
2
3
4
5
6
7
8
9
// The imagine of JSON serialization result
{
"ID": 1,
"Name": "Bruce",
"address": {
"Code": 100,
"Street": "Main St"
}
}

但事实并非如此,它被扁平化了。这更符合我们之前直接通过 Person 访问地址成员时的感觉,即地址成员似乎直接成为了 Person 的成员。这一点需要注意,因为这种组合会使序列化后的 JSON 结果扁平化。

另一个有点违反直觉的问题是,地址结构是一个私有结构,而私有成员似乎不应该被序列化?没错,这也是这种组合结构体做 JSON 解析的缺点之一:它暴露了私有组合对象的公共成员。
如果没有特殊需要(例如,原始 JSON 数据已被扁平化,并且有多个结构体的重复字段需要重复使用),从我个人的角度来看,建议这样编写:

1
2
3
4
5
type Person struct {
ID int
Name string
Address address
}

3. 反序列化部分成员字段

直接查看代码:

1
2
3
4
5
6
7
8
9
10
11
12
13
14
15
16
17
18
19
20
21
22
23
type Person struct {
ID uint
Name string
}

// PartUpdateIssue simulates parsing two different
// JSON strings with the same structure
func PartUpdateIssue() {
var p Person
// The first data has the ID field and is not 0
str := `{"ID":1,"Name":"Bruce"}`
_ = json.Unmarshal([]byte(str), &p)
fmt.Printf("%+v\n", p)
// The second data does not have an ID field,
// deserializing it again with p preserves the last value
str = `{"Name":"Jim"}`
_ = json.Unmarshal([]byte(str), &p)
// Notice the output ID is still 1
fmt.Printf("%+v\n", p)
}
// Output
{ID:1 Name:Bruce}
{ID:1 Name:Jim}

从代码注释中可以知道,当我们重复使用同一结构来反序列化不同的 JSON 数据时,一旦某个 JSON 数据的值只包含部分成员字段,那么未包含的成员就会使用最后一次反序列化的值,会产生脏数据污染问题。

4. 处理指针字段

许多开发人员一听到指针这个词就头疼不已,其实大可不必。但 Go 中的指针确实给开发人员带来了 Go 程序中最常见的 panic 之一:空指针异常。当指针与 JSON 结合时会发生什么呢?

看下面的代码:

1
2
3
4
5
6
7
8
9
10
11
12
13
14
15
16
type Person struct {
ID uint
Name string
Address *Address
}

func UnmarshalPtr() {
str := `{"ID":1,"Name":"Bruce"}`
var p Person
_ = json.Unmarshal([]byte(str), &p)
fmt.Printf("%+v\n", p)
// It would panic this line
// fmt.Printf("%+v\n", p.Address.Street)
}
// Output
{ID:1 Name:Bruce Address:<nil>}

我们将 Address 成员定义为指针,当我们反序列化一段不包含 Address 的 JSON 数据时,指针字段会被设置为 nil,因为它没有对应的数据。如果我们直接调用 p.Address.xxx,程序会因为 p.Address 为空而崩溃。

因此,如果有一个指针指向我们结构中的一个成员,请记住在使用它之前先确定指针是否为 nil。这有点繁琐,但也没办法。毕竟,编写几行代码与生产环境中的 panic 所造成的损失相比可能并不算什么。

此外,在创建带有指针字段的结构时,指针字段的赋值也会相对繁琐:

1
2
3
4
5
6
7
8
9
10
11
12
13
14
15
type Person struct {
ID int
Name string
Age *int
}

func Foo() {
p := Person{
ID: 1,
Name: "Bruce",
Age: new(int),
}
*p.Age = 20
// ...
}

5. 零值(默认值)可能造成的问题

零值是 Golang 变量的一个特性,我们可以简单地将其视为默认值。也就是说,如果我们没有显式地给变量赋值,Golang 就会给它赋一个默认值。例如,我们在前面的例子中看到,int 的默认值为 0,string 的默认值为空字符串,指针的零值为 nil,等等。

处理带有零值的 JSON 有哪些隐患?
请看下面的例子:

1
2
3
4
5
6
7
8
9
10
11
12
13
14
15
16
17
18
type Person struct {
Name string
ChildrenCnt int
}

func ZeroValueConfusion() {
str := `{"Name":"Bruce"}`
var p Person
_ = json.Unmarshal([]byte(str), &p)
fmt.Printf("%+v\n", p)
str2 := `{"Name":"Jim","ChildrenCnt":0}`
var p2 Person
_ = json.Unmarshal([]byte(str2), &p2)
fmt.Printf("%+v\n", p2)
}
// Output
{Name:Bruce ChildrenCnt:0}
{Name:Jim ChildrenCnt:0}

我们在 Person 结构中添加了一个 ChildrenCnt 字段,用于计算该人的子女数量。由于该字段的值为零,当 p 加载的 JSON 数据中没有 ChildrenCnt 数据时,该字段的赋值为 0。在 Bruce 和 Jim 的例子中,由于数据缺失,其中一个的子女数为 0,而另一个的子女数为 0。而实际上布鲁斯的子女数应该是 “未知”,如果我们真的将其视为 0,可能会在业务上造成问题。
在一些对数据有严格要求的场景中,这种混淆是非常致命的。那么,有没有办法避免这种零值干扰呢?
让我们将 Person 的 ChildrenCnt 类型改为 *int 并看看会发生什么:

1
2
3
4
5
6
7
type Person struct {
Name string
ChildrenCnt *int
}
// Output
{Name:Bruce ChildrenCnt:<nil>}
{Name:Jim ChildrenCnt:0xc0000124c8}

不同之处在于 Bruce 没有数据,因此 ChildrenCnt 为零,而 Jim 是一个非零指针。这样就很明显了,Bruc 的孩子数量是未知的。 从本质上讲,这种方法仍然使用零值,即指针的零值,有点像以毒攻毒(笑)。

总结

在这篇文章中,我列举了自己在使用编码/json 库时犯过的 7 个错误,其中大部分都是我在工作中遇到的。如果你还没有遇到过,那么恭喜你!这也提醒我们今后在使用 JSON 时要小心谨慎;如果你遇到过这些问题,并为此感到困惑,希望本文能对你有所帮助。


]]>
Golang 中 JSON 操作的 5 个常见陷阱
使用 Golang 创建反向代理 https://cloudsjhan.github.io/2024/05/17/使用-Golang-创建反向代理/ 2024-05-17T14:12:45.000Z 2024-05-17T14:13:30.150Z

为了让 API 连接正常工作,我需要在请求头中提供客户端 ID,基于用户名或客户端证书,然后将流量重定向到它。听起来像是专用反向代理软件 Nginx 或 Traefik 要执行的任务。现在我们来探索用 Golang 来实现反向代理的功能。

单主机反向代理

得益于 Golang 标准库,一个开箱即用的单主机反向代理可以很容易地实现。

1
2
rp := httputil.NewSingleHostReverseProxy(targetUrl)
rp.ServeHTTP(w, r)

这段代码应该插入标准的 HTTP 处理程序中。这里的“单一主机”更多指的是反向代理功能,没有提供负载均衡功能。

携带 header 的反向代理

这里会实现一个 HTTP 处理程序,读取客户端证书,并根据 CN 名称选择一个客户端 ID 值,在 HTTP 头部中更新它,并将流量重定向到目标 URL。

给出以下示例配置。

1
2
3
4
5
6
7
8
9
10
11
12
13
14
15
16
mapping:
- name: client1-app1
certCN: user1
clientID: 2a3977e9c4dd4631c9233f2e9387a103

- name: client2-app1
certCN: user2
clientID: 939f15e518e75d3c251a1245141c1c48

server:
port: 8443
certFile: ../certs/server.pem
keyFile: ../certs/server-key.pem

reverseProxy:
targetUrl: https://apis-gw-gateway-apic.apps.dev-ocp414.ibmcloud.io.cpak/porg/mycat/myapi
1
2
3
4
5
6
7
8
9
10
11
12
13
14
15
16
17
18
19
20
21
22
23
func main() {
config.WithOptions(config.ParseEnv, func(opt *config.Options) {
opt.DecoderConfig.TagName = "yaml"
})
config.AddDriver(yaml.Driver)
try.E(config.LoadFiles("config.yaml"))

var mapping []CnToClientID
try.E(config.BindStruct("mapping", &mapping))

targetUrl := try.E1(url.Parse(config.String("reverseProxy.targetUrl")))

http.HandleFunc("/", rpHandler(mapping, targetUrl))

srv := &http.Server{
Addr: fmt.Sprintf(":%d", config.Int("server.port")),
TLSConfig: &tls.Config{
ClientAuth: tls.RequireAnyClientCert,
},
}

try.E(srv.ListenAndServeTLS(config.String("server.certFile"), config.String("server.keyFile")))
}

我们使用带有证书和密钥的基 于HTTPs 的服务器。请注意 TLS 选项,我们将要求客户端提供其证书以提取其 CN 名称,尽管我们不执行mTLS。

可以通过以下方式实现http处理程序:

1
2
3
4
5
6
7
8
9
10
11
12
13
14
15
16
17
18
19
20
21
22
23
24
25
26
27
28
29
30
31
32
33
func rpHandler(mapping []CnToClientID, targetUrl *url.URL) func(w http.ResponseWriter, r *http.Request) {
return func(w http.ResponseWriter, r *http.Request) {
dump, _ := httputil.DumpRequest(r, true)
log.Printf("request: %s", dump)

if r.TLS == nil {
log.Printf("Request must be over TLS")
http.Error(w, "Request must be over TLS", http.StatusForbidden)
return
}
if len(r.TLS.PeerCertificates) == 0 {
log.Printf("Request must contain a client certificate")
http.Error(w, "Request must contain a client certificate", http.StatusForbidden)
return
}

cnName := r.TLS.PeerCertificates[0].Subject.CommonName
log.Printf("Client CN: %s", cnName)
for _, v := range mapping {
if v.CertCN == cnName {
rp := httputil.NewSingleHostReverseProxy(targetUrl)

r.Header.Set("X-IBM-Client-Id", v.ClientID)
rp.ServeHTTP(w, r)

return
}
}

// if no match found
http.Error(w, "client id not found", http.StatusForbidden)
}
}

在处理程序中,首先我们读取客户端证书以获取其 CN 名称,然后循环遍历配置以找到客户端 ID 值,将其添加到请求头中,然后创建一个反向代理对象,目标 URL 是让它处理该请求。

自定义 Round Trip

我们需要一些自定义来解决反向代理的问题,可能需要跳过证书验证,因为目标端可能使用自签名证书。

这些可以通过 RoundTrip 的接口实现。

RoundTripper是一个接口,代表着执行单个HTTP事务的能力,获取给定请求的响应。

1
2
3
4
5
6
7
8
9
10
11
type MyRoundTripper struct{}

func (MyRoundTripper) RoundTrip(r *http.Request) (*http.Response, error) {
dump, _ := httputil.DumpRequest(r, true)
log.Printf("request to proxy: %s", dump)

insecureTransport := http.DefaultTransport.(*http.Transport).Clone()
insecureTransport.TLSClientConfig = &tls.Config{InsecureSkipVerify: true}

return insecureTransport.RoundTrip(r)
}

Roundtrip() 中,我们调用 httputil.DumpRequest 来为了调试目的而转储请求。

然后重置其 TLS 配置以跳过证书验证,以允许自签名证书通过。然后我们调用原始的 RoundTrip() 来处理请求。

然后可以使用自定义的 roundtrip 更新 http 处理程序。

1
2
3
4
5
6
7
8
...

rp := httputil.NewSingleHostReverseProxy(targetUrl)
rp.Transport = &MyRoundTripper{}

r.Header.Set("X-IBM-Client-Id", v.ClientID)
rp.ServeHTTP(w, r)
...

]]>
使用 Golang 创建反向代理
Observability with OpenTelemetry and Go https://cloudsjhan.github.io/2024/05/13/Observability-with-OpenTelemetry-and-Go/ 2024-05-13T03:08:11.000Z 2024-05-13T03:09:07.272Z

这篇文章中我们会讨论可观测性概念,并了解了有关 OpenTelemetry 的一些细节,然后会在 Golang 服务中对接 OpenTelemetry 实现分布式系统可观测性。

Test Project

我们将使用 Go 1.22 开发我们的测试服务。我们将构建一个 API,返回服务的名称及其版本。

我们将把我们的项目分成两个简单的文件(main.go 和 info.go)。

1
2
3
4
5
6
7
8
9
10
11
12
13
14
15
16
17
18
19
20
21
22
23
24
25
26
27
28
29
// file: main.go

package main

import (
"log"
"net/http"
)

const portNum string = ":8080"

func main() {
log.Println("Starting http server.")

mux := http.NewServeMux()
mux.HandleFunc("/info", info)

srv := &http.Server{
Addr: portNum,
Handler: mux,
}

log.Println("Started on port", portNum)
err := srv.ListenAndServe()
if err != nil {
log.Println("Fail start http server.")
}

}
1
2
3
4
5
6
7
8
9
10
11
12
13
14
15
16
17
18
19
// file: info.go

package main

import (
"encoding/json"
"net/http"
)

type InfoResponse struct {
Version string `json:"version"`
ServiceName string `json:"service-name"`
}

func info(w http.ResponseWriter, r *http.Request) {
w.Header().Set("Content-Type", "application/json")
response := InfoResponse{Version: "0.1.0", ServiceName: "otlp-sample"}
json.NewEncoder(w).Encode(response)
}

使用 go run . 运行后,应该在 console 中输出:

1
2
Starting http server.
Started on port :8080

访问 localhost:8080 会显示:

1
2
3
4
5
// http://localhost:8080/info
{
"version": "0.1.0",
"service-name": "otlp-sample"
}

现在我们的服务已经可以运行了,现在要以对其进行监控(或者配置我们的流水线)。在这里,我们将执行手动监控以理解一些观测细节。

First Steps

第一步是安装 Open Telemetry 的依赖。

1
2
3
4
5
6
go get "go.opentelemetry.io/otel" \
"go.opentelemetry.io/otel/exporters/stdout/stdouttrace" \
"go.opentelemetry.io/otel/metric" \
"go.opentelemetry.io/otel/sdk" \
"go.opentelemetry.io/otel/trace" \
"go.opentelemetry.io/contrib/instrumentation/net/http/otelhttp"

目前,我们只会安装项目的初始依赖。这里我们将 OpenTelemetry 配置 otel.go文件。

在我们开始之前,先看下配置的流水线:

定义 Exporter

为了演示简单,我们将在这里使用 console Exporter 。

1
2
3
4
5
6
7
8
9
10
11
12
13
// file: otel.go

package main

import (
"context"
"go.opentelemetry.io/otel/exporters/stdout/stdouttrace"
"go.opentelemetry.io/otel/sdk/trace"
)

func newTraceExporter() (trace.SpanExporter, error) {
return stdouttrace.New(stdouttrace.WithPrettyPrint())
}

main.go 的代码如下:

1
2
3
4
5
6
7
8
9
10
11
12
13
14
15
16
17
18
19
20
21
22
23
24
25
26
27
28
29
30
31
32
33
34
35
36
37
// file: main.go

package main


import (
"context"
"log"
"net/http"
)

const portNum string = ":8080"

func main() {
log.Println("Starting http server.")

mux := http.NewServeMux()

_, err := newTraceExporter()
if err != nil {
log.Println("Failed to get console exporter.")
}

mux.HandleFunc("/info", info)

srv := &http.Server{
Addr: portNum,
Handler: mux,
}

log.Println("Started on port", portNum)
err := srv.ListenAndServe()
if err != nil {
log.Println("Fail start http server.")
}

}

Trace

我们的首个信号将是 Trace。为了与这个信号互动,我们必须创建一个 provider,如下所示。作为一个参数,我们将拥有一个 Exporter,它将接收收集到的信息。

1
2
3
4
5
6
7
8
9
10
11
12
13
14
15
16
17
18
19
20
21
22
// file: otel.go

package main

import (
"context"
"go.opentelemetry.io/otel/exporters/stdout/stdouttrace"
"go.opentelemetry.io/otel/sdk/trace"
"time"
)

func newTraceExporter() (trace.SpanExporter, error) {
return stdouttrace.New(stdouttrace.WithPrettyPrint())
}

func newTraceProvider(traceExporter trace.SpanExporter) *trace.TracerProvider {
traceProvider := trace.NewTracerProvider(
trace.WithBatcher(traceExporter,
trace.WithBatchTimeout(time.Second)),
)
return traceProvider
}

在 main.go 文件中,我们将使用创建跟踪提供程序的函数。

1
2
3
4
5
6
7
8
9
10
11
12
13
14
15
16
17
18
19
20
21
22
23
24
25
26
27
28
29
30
31
32
33
34
35
36
37
38
39
40
41
42
43
44
// file: main.go

package main


import (
"context"
"go.opentelemetry.io/otel"
"log"
"net/http"
)

const portNum string = ":8080"

func main() {
log.Println("Starting http server.")

mux := http.NewServeMux()
ctx := context.Background()

consoleTraceExporter, err := newTraceExporter()
if err != nil {
log.Println("Failed get console exporter.")
}

tracerProvider := newTraceProvider(consoleTraceExporter)

defer tracerProvider.Shutdown(ctx)
otel.SetTracerProvider(tracerProvider)

mux.HandleFunc("/info", info)

srv := &http.Server{
Addr: portNum,
Handler: mux,
}

log.Println("Started on port", portNum)
err = srv.ListenAndServe()
if err != nil {
log.Println("Fail start http server.")
}

}

请注意,在实例化一个 provider 时,我们必须保证它会“关闭”。这样可以避免内存泄露。

现在我们的服务已经配置了一个 trace provider,我们准备好收集数据了。让我们调用 “/info” 接口来产生数据。

1
2
3
4
5
6
7
8
9
10
11
12
13
14
15
16
17
18
19
20
21
22
23
24
25
26
27
// file: info.go

package main

import (
"encoding/json"
"go.opentelemetry.io/otel"
"net/http"
)

type InfoResponse struct {
Version string `json:"version"`
ServiceName string `json:"service-name"`
}

var (
tracer = otel.Tracer("info-service")
)

func info(w http.ResponseWriter, r *http.Request) {
_, span := tracer.Start(r.Context(), "info")
defer span.End()

w.Header().Set("Content-Type", "application/json")
response := InfoResponse{Version: "0.1.0", ServiceName: "otlp-sample"}
json.NewEncoder(w).Encode(response)
}

tracer = otel.Tracer(“info-service”) 将在我们已经在main.go 中注册的全局 trace provider 中创建一个命名的跟踪器。如果未提供名称,则将使用默认名称。

tracer.Start(r.Context(), “info”) 创建一个 Span 和一个包含新创建的 spancontext.Context。如果 “ctx” 中提供的 context.Context 包含一个 Span,那么新创建的 Span 将是该 Span 的子Span,否则它将是根 Span

Span 对我们来说是一个新的概念。Span 代表一个工作单元或操作。Span 是跟踪(Traces)的构建块。

同样地,正如提供程序一样,我们必须始终关闭 Spans 以避免“内存泄漏”。

现在,我们的端点已经被监控,我们可以在控制台中查看我们的观测数据。

1
2
3
4
5
6
7
8
9
10
11
12
13
14
15
16
17
18
19
20
21
22
23
24
25
26
27
28
29
30
31
32
33
34
35
36
37
38
39
40
41
42
43
44
45
46
47
48
49
50
51
52
53
54
55
56
57
58
59
60
61
62
63
64
65
66
{
"Name":"info",
"SpanContext":{
"TraceID":"6216cbe99bfd1165974dc2bda24e0d5c",
"SpanID":"728454ee6b9a72e3",
"TraceFlags":"01",
"TraceState":"",
"Remote":false
},
"Parent":{
"TraceID":"00000000000000000000000000000000",
"SpanID":"0000000000000000",
"TraceFlags":"00",
"TraceState":"",
"Remote":false
},
"SpanKind":1,
"StartTime":"2024-03-02T23:39:51.791979-03:00",
"EndTime":"2024-03-02T23:39:51.792140908-03:00",
"Attributes":null,
"Events":null,
"Links":null,
"Status":{
"Code":"Unset",
"Description":""
},
"DroppedAttributes":0,
"DroppedEvents":0,
"DroppedLinks":0,
"ChildSpanCount":0,
"Resource":[
{
"Key":"service.name",
"Value":{
"Type":"STRING",
"Value":"unknown_service:otlp-golang"
}
},
{
"Key":"telemetry.sdk.language",
"Value":{
"Type":"STRING",
"Value":"go"
}
},
{
"Key":"telemetry.sdk.name",
"Value":{
"Type":"STRING",
"Value":"opentelemetry"
}
},
{
"Key":"telemetry.sdk.version",
"Value":{
"Type":"STRING",
"Value":"1.24.0"
}
}
],
"InstrumentationLibrary":{
"Name":"info-service",
"Version":"",
"SchemaURL":""
}
}

添加 Metrics

我们已经有了我们的 tracing 配置。现在来添加我们的第一个指标。

首先,安装并配置一个专门用于指标的导出器。

1
go get "go.opentelemetry.io/otel/exporters/stdout/stdoutmetric"

通过修改我们的 otel.go 文件,我们将有两个导出器:一个专门用于 tracing,另一个用于 metrics。

1
2
3
4
5
6
7
8
9
// file: otel.go

func newTraceExporter() (trace.SpanExporter, error) {
return stdouttrace.New(stdouttrace.WithPrettyPrint())
}

func newMetricExporter() (metric.Exporter, error) {
return stdoutmetric.New()
}

现在添加我们的 metrics Provider 实例化:

1
2
3
4
5
6
7
8
9
// file: otel.go

func newMeterProvider(meterExporter metric.Exporter) *metric.MeterProvider {
meterProvider := metric.NewMeterProvider(
metric.WithReader(metric.NewPeriodicReader(meterExporter,
metric.WithInterval(10*time.Second))),
)
return meterProvider
}

我将提供商的行为更改为每10秒进行一次定期读取(默认为1分钟)。

在实例化一个 MeterProvide r时,我们将创建一个Meter。Meters 允许您创建您可以使用的仪器,以创建不同类型的指标(计数器、异步计数器、直方图、异步仪表、增减计数器、异步增减计数器……)。

现在我们可以在 main.go 中配置我们的新 exporter 和 provider。

1
2
3
4
5
6
7
8
9
10
11
12
13
14
15
16
17
18
19
20
21
22
23
24
25
26
27
28
29
30
31
32
33
34
35
36
37
38
39
40
41
// file: main.go

func main() {
log.Println("Starting http server.")

mux := http.NewServeMux()
ctx := context.Background()

consoleTraceExporter, err := newTraceExporter()
if err != nil {
log.Println("Failed get console exporter (trace).")
}

consoleMetricExporter, err := newMetricExporter()
if err != nil {
log.Println("Failed get console exporter (metric).")
}

tracerProvider := newTraceProvider(consoleTraceExporter)

defer tracerProvider.Shutdown(ctx)
otel.SetTracerProvider(tracerProvider)

meterProvider := newMeterProvider(consoleMetricExporter)

defer meterProvider.Shutdown(ctx)
otel.SetMeterProvider(meterProvider)

mux.HandleFunc("/info", info)

srv := &http.Server{
Addr: portNum,
Handler: mux,
}

log.Println("Started on port", portNum)
err = srv.ListenAndServe()
if err != nil {
log.Println("Fail start http server.")
}
}

最后,让我们测量我们想要的数据。我们将在 info.go 中做这件事,这与我们之前在 trace 中所做的非常相似。

我们将使用 otel.Meter("info-service") 在已经注册的全局提供者上创建一个命名的计量器。我们还将通过 metric.Int64Counter 定义我们的测量工具。Int64Counter 是一种记录递增的 int64 值的工具。

然而,与 trace不同,我们需要初始化我们的测量工具。我们将为我们的度量配置名称、描述和单位。

1
2
3
4
5
6
7
8
9
10
11
12
13
14
15
16
17
// file: info.go

var (
tracer = otel.Tracer("info-service")
meter = otel.Meter("info-service")
viewCounter metric.Int64Counter
)

func init() {
var err error
viewCounter, err = meter.Int64Counter("user.views",
metric.WithDescription("The number of views"),
metric.WithUnit("{views}"))
if err != nil {
panic(err)
}
}

一旦完成这个步骤,我们就可以开始测量了。最终代码看起来会像这样:

1
2
3
4
5
6
7
8
9
10
11
12
13
14
15
16
17
18
19
20
21
22
23
24
25
26
27
28
29
30
31
32
33
34
35
36
37
38
39
40
41
42
// file: info.go

package main

import (
"encoding/json"
"go.opentelemetry.io/otel"
"go.opentelemetry.io/otel/metric"
"net/http"
)

type InfoResponse struct {
Version string `json:"version"`
ServiceName string `json:"service-name"`
}

var (
tracer = otel.Tracer("info-service")
meter = otel.Meter("info-service")
viewCounter metric.Int64Counter
)

func init() {
var err error
viewCounter, err = meter.Int64Counter("user.views",
metric.WithDescription("The number of views"),
metric.WithUnit("{views}"))
if err != nil {
panic(err)
}
}

func info(w http.ResponseWriter, r *http.Request) {
ctx, span := tracer.Start(r.Context(), "info")
defer span.End()

viewCounter.Add(ctx, 1)

w.Header().Set("Content-Type", "application/json")
response := InfoResponse{Version: "0.1.0", ServiceName: "otlp-sample"}
json.NewEncoder(w).Encode(response)
}

运行我们的服务时,每10秒系统将在控制台显示我们的数据:

1
2
3
4
5
6
7
8
9
10
11
12
13
14
15
16
17
18
19
20
21
22
23
24
25
26
27
28
29
30
31
32
33
34
35
36
37
38
39
40
41
42
43
44
45
46
47
48
49
50
51
52
53
54
55
56
57
58
59
60
61
62
63
{ 
"Resource":[
{
"Key":"service.name",
"Value":{
"Type":"STRING",
"Value":"unknown_service:otlp-golang"
}
},
{
"Key":"telemetry.sdk.language",
"Value":{
"Type":"STRING",
"Value":"go"
}
},
{
"Key":"telemetry.sdk.name",
"Value":{
"Type":"STRING",
"Value":"opentelemetry"
}
},
{
"Key":"telemetry.sdk.version",
"Value":{
"Type":"STRING",
"Value":"1.24.0"
}
}
],
"ScopeMetrics":[
{
"Scope":{
"Name":"info-service",
"Version":"",
"SchemaURL":""
},
"Metrics":[
{
"Name":"user.views",
"Description":"The number of views",
"Unit":"{views}",
"Data":{
"DataPoints":[
{
"Attributes":[


],
"StartTime":"2024-03-03T08:50:39.07383-03:00",
"Time":"2024-03-03T08:51:45.075332-03:00",
"Value":1
}
],
"Temporality":"CumulativeTemporality",
"IsMonotonic":true
}
}
]
}
]
}

Context

为了将追踪信息发送出去,我们需要传播上下文。为了做到这一点,我们必须注册一个传播器。我们将在 otel.go和main.go 中实现,跟追 Tracing 和 metric 的实现差不多。

1
2
3
4
5
6
7
// file: otel.go

func newPropagator() propagation.TextMapPropagator {
return propagation.NewCompositeTextMapPropagator(
propagation.TraceContext{},
)
}
1
2
3
4
// file: main.go 

prop := newPropagator()
otel.SetTextMapPropagator(prop)

HTTP Server

我们将通过观测数据来丰富我们的 HTTP 服务器以完成我们的监控。为此我们将使用带有 OTel 的 http handler 。

1
2
3
4
5
6
7
8
9
10
11
12
13
14
15
16
17
// main.go


handleFunc := func(pattern string, handlerFunc func(http.ResponseWriter, *http.Request)) {
handler := otelhttp.WithRouteTag(pattern, http.HandlerFunc(handlerFunc))
mux.Handle(pattern, handler)
}


handleFunc("/info", info)
newHandler := otelhttp.NewHandler(mux, "/")


srv := &http.Server{
Addr: portNum,
Handler: newHandler,
}

因此,我们将在我们的收集到的数据中获得来自 HTTP 服务器的额外信息(用户代理、HTTP方法、协议、路由等)。

Conclusion

这篇文章我们详细展示了如何使用 Go 来对接 OpenTelemetry 以实现完整的可观测系统,这里使用 console Exporter 仅作演示使用 ,在实际的开发中我们可能需要使用更加强大的 Exporter 将数据可视化,比如可以使用 Google Cloud Trace 来将数据直接导出到 Goole Cloud Monitoring 。

References

OpenTelemetry
The Future of Observability with OpenTelemetry
Cloud-Native Observability with OpenTelemetry
Learning OpenTelemetry


]]>
Observability with OpenTelemetry and Go
什么情况下使用 ErrGroup VS waitGroup? https://cloudsjhan.github.io/2024/05/11/什么情况下使用-ErrGroup-VS-waitGroup?/ 2024-05-11T12:43:56.000Z 2024-05-11T12:46:03.738Z

Goroutine 是编写 Go 语言并发程序的强大工具。然而管理协程,特别是在处理协程的错误时,可能会变得繁琐。这时,x/sync 包中的 errgroup 就派上用场了。它提供了一种简化的方法来处理并发任务及其错误。

Example for ErrGroup

下面是一个使用 errorGroup 的例子:

1
2
3
4
5
6
7
8
9
10
11
12
13
14
15
16
17
18
19
20
21
22
23
24
25
26
27
28
29
30
31
32
33
34
35
36
37
38
39
40
41
42
43
44
45
46
47
48
49
50
51
52
53
54
55
56
57
58
59
60
61
62
63
64
65
66
67
68
69
70
71
72
package main

import (
"context"
"errors"
"fmt"
"time"

"golang.org/x/sync/errgroup"
)

func task1(ctx context.Context) error {
fmt.Println("Task 1 started successfully")
select {
case <-time.After(1 * time.Second):
fmt.Println("Task 1 completed successfully")
return nil
case <-ctx.Done():
fmt.Println("Task 1 canceled")
return ctx.Err()
}
}

func task2(ctx context.Context) error {
fmt.Println("Task 2 started successfully")
select {
case <-time.After(2 * time.Second):
fmt.Println("Task 2 processed failed")
return errors.New("Task 2 processed failed due to error")
case <-ctx.Done():
fmt.Println("Task 2 canceled")
return ctx.Err()
}
}

func task3(ctx context.Context) error {
fmt.Println("Task 3 started successfully")
select {
case <-time.After(3 * time.Second):
fmt.Println("Task 3 completed successfully")
return nil
case <-ctx.Done():
fmt.Println("Task 3 canceled")
return ctx.Err()
}
}

func main() {
ctx, cancel := context.WithCancel(context.Background())
defer cancel() // Ensure cancellation happens when main() exits

g, ctx := errgroup.WithContext(ctx)

g.Go(func() error {
return task1(ctx)
})

g.Go(func() error {
return task2(ctx)
})

g.Go(func() error {
return task3(ctx)
})

if err := g.Wait(); err != nil {
fmt.Println("Encountered error:", err)
cancel()
} else {
fmt.Println("All tasks completed successfully")
}
}

上面程序的输出是:

1
2
3
4
5
6
Task 1 started successfully
Task 2 started successfully
Task 3 started successfully
Task 1 completed successfully
Task 2 processed failed
Encountered error: Task 2 processed failed due to error

在这个例子中:

  • 我们创建了一个带有可取消上下文的 errgroup
  • 定义了3个任务,task1 和 task3 在一定时间后模拟成功完成,而 task2 在更长的时间后通过返回错误来模拟失败。
  • 使用 g.Go 在单独的 goroutine 中启动每个任务。
  • 调用 g.Wait 等待所有任务完成。如果任何任务遇到错误,g.Wait() 会立即返回该错误。
    在主执行之后,task1 成功完成,task2 遇到了处理失败,而 task3 由于 task2 中的上述失败而被取消。

ErrGroup vs WaitGroup

ErrGroup:

  • 使用 ErrGroup 来管理并发任务中的错误。它聚合了所有协程中的错误,并返回遇到的第一个错误。
  • 需要管理多个可能产生错误的并发任务。
  • 想要利用上下文取消功能来优雅地关闭程序。
  • 不想手动检查多个 WaitGroup 调用的错误
  • 它与 Go 的上下文包无缝集成。任何来自协程的错误都会取消上下文,自动停止其他正在运行的任务。

WaitGroup

  • 使用 WaitGroup 进行基本同步。它简单地等待指定数量的 goroutine 完成后再继续。
  • ]当你只关心任务完成而不预期错误时,它是理想的选择。
  • 它不直接处理错误。你需要在每个 goroutine 中检查错误并单独处理它们。

总结

  • 使用 WaitGroup 进行简单的同步
  • 使用 ErrGroup 进行错误管理,并希望在优雅关闭时有上下文感知的取消。
  • 也可以同时使用它们,WaitGroup 用于基本同步,ErrGroup 用于一组任务中的详细错误处理。

相关的 issue


]]>
什么情况下使用 ErrGroup VS waitGroup?
Golang 实现枚举的各种方法及最佳实践 https://cloudsjhan.github.io/2024/05/07/Golang-实现枚举的各种方法及最佳实践/ 2024-05-07T14:24:01.000Z 2024-05-07T14:24:48.865Z

枚举提供了一种表示一组命名常量的方式。虽然 Go 语言没有内置的枚举类型,但开发者可以通过常量/自定义类型来模拟类似枚举的行为。

枚举在编程语言中扮演着至关重要的角色,提供了一种简洁而富有表现力的方式来定义一组命名常量。虽然像Java或C#这样的语言提供了对枚举的内置支持,但Go采用了不同的方法。在 Go 中,枚举并不是一种原生的语言特性,但开发者有几种技术可供使用,以实现类似的功能。
本文深入探讨了 Go 语言中的枚举,探索了定义和有效使用它们的各种技术。通过代码示例、比较和实际用例,我们的目标是掌握枚举并在 Go 项目中高效使用它们。

Understanding Enum

在 Go 语言中,枚举(enumerations 的缩写)提供了一种表示一组命名常量的方式。虽然 Go 语言没有像其他一些语言那样内建的枚举类型,但开发者可以使用常量或自定义类型来模拟类似枚举的行为。让我们深入了解 Go 中枚举的目的和语法:

目的
可读性和可维护性:通过给特定值分配有意义的名称,枚举使代码更具可读性和自解释性。这增强了代码的可维护性,因为更容易理解每个常量的目的。
类型安全性:枚举有助于通过将变量限制为预定义的一组值来强化类型安全性。这减少了因使用错误值而引起的运行时错误的可能性。

实现语法

  • 使用常量
1
2
3
4
5
6
7
8
9
10
11
12
13
14
package main

import "fmt"

// Enum defining colors using constants
const (
Red = iota // 0
Green // 1
Blue // 2
)

func main() {
fmt.Println(Red, Green, Blue)
}
  • 使用自定义类型
1
2
3
4
5
6
7
8
9
10
11
12
13
14
15
16
package main

import "fmt"

// Enum defining colors using custom types
type CardType int

const (
VISA CardType = iota // 0
MASTER // 1
JCB // 2
)

func main() {
fmt.Println(VISA, MASTER, BlueJCB
}

在上述示例中:

  • 我们使用常量和自定义类型定义颜色枚举。

  • iota 用于自动生成从 0 开始递增的值。

  • 常量被分配给每个枚举值,而在自定义类型的情况下,会指定一个底层类型(通常是 int)。

Go 语言中的枚举提供了一种灵活的方式来表示一组固定值,提高了代码的清晰度和类型安全性。然而,根据你项目的具体需求,选择适当的方法(常量或自定义类型)至关重要。

在 Go 中使用 Enum 类型的优缺点

优点

  • 提高可读性:枚举通过为特定值提供有意义的名称来增强代码的可读性。这使得代码更加自解释,更易于开发人员理解。
  • 类型安全性:枚举有助于通过限制变量为预定义的一组值来强化类型安全性。这减少了使用不正确或意外值的风险,从而减少了运行时错误。
  • 明确定义常量:枚举允许开发人员明确定义一组常量,明确指出哪些值对于特定变量或参数是有效的。
  • 增强可维护性:通过使用枚举,开发人员可以轻松地在单一位置更新或修改允许的值集,减少代码库中不一致或错误的可能性。

缺点

  • 没有内置枚举类型:与其他一些编程语言不同,Go语言没有内置的枚举类型。开发者必须使用诸如常量或自定义类型之类的解决方法来模拟类似枚举的行为。
  • 冗长语法:使用常量或自定义类型在 Go 中实现枚举有时会导致冗长的语法,特别是当定义了一组大型的枚举值时。
  • 表达力有限:Go 中的枚举缺乏其他语言枚举中的一些高级特性,例如将值或行为与个别枚举常量关联的能力。
  • 潜在冲突:当使用常量作为枚举时,如果在同一代码库的不同上下文中使用了相同的常量名称,存在冲突的风险。这可能导致意外的行为或错误。
  • 额外开销:使用自定义类型实现枚举可能会引入额外的开销,特别是如果为每个枚举常量定义了关联的方法或行为。

尽管存在这些限制,Go 语言中的枚举类型仍然是提高代码清晰度、可维护性和类型安全性的有价值工具,开发者可以通过理解它们的优点和局限性来有效地利用它们。

第三方类库

几个第三方库在 Go 语言中提供了类似枚举的功能:

go-enum:它可以从简单的定义格式生成 Go 语言的枚举代码。(点击 go-enum GitHub 以获取更多信息)。
stringer:它为在 Go 源代码中定义的枚举自动生成字符串方法。(点击 stringer 工具以获取更多详情)。

上述三种方式该如何选择?

  • 如果希望实现简单,并且枚举集较小且不需要额外特性,使用 Iota 常量即可。
  • 如果需要更好的类型安全性、灵活性,以及需要与枚举关联的额外方法,使用自定义类型。
  • 如果需要自动化枚举生成或需要额外特性(如字符串表示),考虑使用库,但要谨慎处理依赖性和兼容性问题。

一些 Use Cases

  • 表示星期
1
2
3
4
5
6
7
8
9
10
11
12
13
14
15
16
17
18
19
20
21
22
23
24
25
26
27
package main

import "fmt"

// Enum for days of the week using custom types
type DayOfWeek int

const (
Sunday DayOfWeek = iota
Monday
Tuesday
Wednesday
Thursday
Friday
Saturday
)

func main() {
fmt.Println("Days of the week:")
fmt.Println("Sunday:", Sunday)
fmt.Println("Monday:", Monday)
fmt.Println("Tuesday:", Tuesday)
fmt.Println("Wednesday:", Wednesday)
fmt.Println("Thursday:", Thursday)
fmt.Println("Friday:", Friday)
fmt.Println("Saturday:", Saturday)
}
  • 表示访问级别
1
2
3
4
5
6
7
8
type AccessLevel int

const (
Guest AccessLevel = iota
User
Moderator
Admin
)
  • 在 Go 语言中,枚举提供了一种强大的机制,用于提高代码的清晰度、可维护性和类型安全性。通过遵循最佳实践并有效利用枚举,开发者可以在他们的 Go 项目中编写更加健壮和可读的代码。

结论

在本指南中,我们探讨了在 Go 语言中实现枚举的各种方法,并讨论了它们各自的优势、局限性和最佳实践。

本质上,Go 语言中的枚举通过提供一种结构化的方式来表示一组固定值,赋予开发者编写更清洁、更易于维护的代码的能力。通过理解本指南中概述的不同技术和最佳实践,开发者可以有效地利用枚举来增强他们的 Go 项目。


]]>
Golang 实现枚举的各种方法及最佳实践
一些在 Golang 中高效处理 Collection 类型的库 https://cloudsjhan.github.io/2024/05/05/一些在-Golang-中高效处理-Collection-类型的库/ 2024-05-05T09:40:44.000Z 2024-05-05T09:41:31.210Z

处理集合是构建任何应用程序的重要部分。通常,您需要以下几类操作:

  • 转换:将某个函数应用于集合中的每个元素,以创建一个新类型的新集合;
  • 过滤:选择满足特定条件的集合中的元素;
  • 聚合:从集合中计算出单个结果,通常用于汇总;
  • 排序/排序:根据某些标准重新排列集合的元素;
  • 访问:根据其属性或位置检索元素的操作;
  • 实用程序:与集合一起工作的通用操作,但不一定完全适合上述分类。

尽管Go具有许多优点,但对于高级集合操作的内置支持相对有限,因此如果需要,您需要使用第三方包。在本文中,我将探讨几个流行的Go库,这些库可以增强语言的能力,以有效地处理集合,涵盖它们的功能和功能。这篇评论将帮助您选择合适的工具,以简化Go项目中的数据处理任务。

Introduction

让我们从上面的每个集合操作类中回顾一些流行的方法。

转换

Map — 对集合中的每个元素应用一个函数,并返回结果集合;
FlatMap — 将每个元素处理为一个元素列表,然后将这些列表展平为一个列表。

过滤

Filter — 删除不匹配谓词函数的元素;
Distinct — 从集合中删除重复的元素;
TakeWhile — 返回满足给定条件的元素,直到遇到不满足条件的元素为止;
DropWhile — 删除满足给定条件的元素,然后返回剩余的元素。

聚合

Reduce — 使用给定的函数组合集合的所有元素,并返回组合结果;
Count — 返回满足特定条件的元素数量;
Sum — 计算集合中每个元素的数字属性之和;
Max/Min — 确定元素属性中的最大值或最小值;
Average — 计算集合中元素的数字属性的平均值。

排序/排序

Sort — 根据比较器规则对集合的元素进行排序;
Reverse — 颠倒集合中元素的顺序。

访问

Find — 返回匹配给定谓词的第一个元素;
AtIndex — 检索特定索引处的元素。

实用程序

GroupBy — 根据键生成器函数将元素分类为组;
Partition — 根据谓词将集合分成两个集合:一个用于满足谓词的元素,另一个用于不满足谓词的元素;
Slice Operations — 修改集合视图或划分的操作,如切片或分块。

Go 内置的能力

在Go语言中,有几种类型可用于处理数据集合:

数组(Arrays) — 固定大小的元素集合。数组大小在声明时定义,例如 var myArray [5]int
切片(Slices) — 动态大小的元素集合。切片建立在数组之上,但与数组不同的是,它们可以增长或缩小。声明方式:mySlice := []int{1, 2, 3}
映射(Maps) — 键-值对的集合。映射可以动态增长,且键的顺序不受保证。例如 myMap := map[string]int{"first": 1, "second": 2} 创建了一个字符串键和整数值的映射;
通道(Channels) — 类型化的通信原语,允许在goroutine之间共享数据。例如 myChan := make(chan int) 创建了一个传输整数的通道。

Go标准库提供了其他结构和实用程序,可以作为集合或增强集合的功能,例如:

堆(Heap) — container/heap包为任何sort.Interface提供了堆操作。堆是具有以下特性的树:每个节点都是其子树中值最小的节点;
链表(List) — container/list包实现了双向链表;
环形链表(Ring) — container/ring包实现了环形链表的操作。

此外,作为Go标准库的一部分,还有用于处理切片和映射的包:

slices — 该包定义了与任何类型的切片一起使用的各种有用的函数;
maps — 该包定义了与任何类型的映射一起使用的各种有用的函数。

通过内置功能,您可以对集合执行一些操作:

获取数组/切片/映射的长度;
通过索引/键访问元素,对切片进行“切片”;
遍历项目。

1
2
3
4
5
6
7
8
9
10
11
12
13
14
15
16
17
18
19
20
21
22
23
24
25
26
27
28
29
30
31
32
package main

import "fmt"

func main() {
s := []int{1, 2, 3, 4, 5}
m := map[int]string{1: "one", 2: "two", 3: "three"}

fmt.Printf("len(s)=%d\n", len(s))
fmt.Printf("len(m)=%d\n", len(m))
fmt.Printf("cap(s)=%d\n", cap(s))
// fmt.Printf("cap(m)=%d\n", cap(m)) // error: invalid argument m (type map[int]string) for cap

// panic: runtime error: index out of range [5] with length 5
// fmt.Printf("s[5]=%d\n", s[5])

// panic: runtime error: index out of range [5] with length 5
// s[5] = 6

s = append(s, 6)
fmt.Printf("s=%v\n", s)
fmt.Printf("len(s)=%d\n", len(s))
fmt.Printf("cap(s)=%d\n", cap(s))

m[4] = "four"
fmt.Printf("m=%v\n", m)

fmt.Printf("s[2:4]=%v\n", s[2:4])
fmt.Printf("s[2:]=%v\n", s[2:])
fmt.Printf("s[:2]=%v\n", s[:2])
fmt.Printf("s[:]=%v\n", s[:])
}

上面的代码会打印:

1
2
3
4
5
6
7
8
9
10
11
len(s)=5
len(m)=3
cap(s)=5
s=[1 2 3 4 5 6]
len(s)=6
cap(s)=10
m=map[1:one 2:two 3:three 4:four]
s[2:4]=[3 4]
s[2:]=[3 4 5 6]
s[:2]=[1 2]
s[:]=[1 2 3 4 5 6]

让我们逐个看下 Go 内置的 Package。

Slices

切片 slices包最近才出现在Go标准库中,从Go 1.21版本开始。这是语言中的一个重大进步,但我仍然更喜欢使用外部库来处理集合(您很快就会明白原因)。让我们来看看这个库如何支持所有的集合操作类别。

Aggregation

slices 能够快速在切片中找到最小/最大值:

1
2
3
4
5
6
7
8
9
10
11
12
13
14
15
16
17
18
19
20
21
22
23
24
25
26
27
28
29
30
31
32
33
34
35
36
37
38
39
package main

import (
"fmt"
"slices"
)

type Example struct {
Name string
Number int
}

func main() {
s := []int{1, 2, 3, 4, 5}

fmt.Printf("Min: %d\n", slices.Min(s))
fmt.Printf("Max: %d\n", slices.Max(s))

e := []Example{
{"A", 1},
{"B", 2},
{"C", 3},
{"D", 4},
}

fmt.Printf("Min: %v\n", slices.MinFunc(
e,
func(i, j Example) int {
return i.Number - j.Number
}),
)

fmt.Printf("Max: %v\n", slices.MaxFunc(
e,
func(i, j Example) int {
return i.Number - j.Number
}),
)
}

上面的代码打印:

1
2
3
4
Min: 1
Max: 5
Min: {A 1}
Max: {D 4}

Sorting/Ordering

slices 能够使用比较函数对切片进行排序:

1
2
3
4
5
6
7
8
9
10
11
12
13
14
15
16
17
18
19
20
21
22
23
24
25
26
27
28
29
30
31
32
33
34
35
36
37
package main

import (
"fmt"
"slices"
)

type Example struct {
Name string
Number int
}

func main() {
s := []int{4, 2, 5, 1, 3}

slices.Sort(s)
fmt.Printf("Sorted: %v\n", s)

slices.Reverse(s)
fmt.Printf("Reversed: %v\n", s)

e := []Example{
{"C", 3},
{"A", 1},
{"D", 4},
{"B", 2},
}

slices.SortFunc(e, func(a, b Example) int {
return a.Number - b.Number
})

fmt.Printf("Sorted: %v\n", e)

slices.Reverse(e)
fmt.Printf("Reversed: %v\n", e)
}
1
2
3
4
Sorted: [1 2 3 4 5]
Reversed: [5 4 3 2 1]
Sorted: [{A 1} {B 2} {C 3} {D 4}]
Reversed: [{D 4} {C 3} {B 2} {A 1}]

不过这个方法有个缺点,就是排序是原地进行的,修改了原始切片。如果该方法返回一个新的排序后的切片,从而保留原始数组会更好一点。

访问元素

slices暴露了一些方法,允许用户在切片中查找元素的位置:

1
2
3
4
5
6
7
8
9
10
11
12
13
14
15
16
17
18
19
20
21
22
23
24
25
26
27
28
29
30
31
package main

import (
"fmt"
"slices"
)

type Example struct {
Name string
Number int
}

func main() {
s := []int{4, 2, 5, 1, 3}

i := slices.Index(s, 3)
fmt.Printf("Index of 3: %d\n", i)

e := []Example{
{"C", 3},
{"A", 1},
{"D", 4},
{"B", 2},
}

i = slices.IndexFunc(e, func(a Example) bool {
return a.Number == 3
})

fmt.Printf("Index of 3: %d\n", i)
}
1
2
Index of 3: 4
Index of 3: 0

如果你正在处理已排序的切片,你可以使用 BinarySearch 或 BinarySearchFunc 在排序的切片中搜索目标,并返回目标被找到的位置或目标将出现在排序顺序中的位置;它还返回一个布尔值,指示目标是否在切片中被找到。切片必须按递增顺序排序。

1
2
3
4
5
6
7
8
9
10
11
12
13
14
15
16
17
18
package main

import (
"fmt"
"slices"
)

func main() {
s := []int{4, 2, 5, 1, 3}

slices.Sort(s)

i, found := slices.BinarySearch(s, 3)
fmt.Printf("Position of 3: %d. Found: %t\n", i, found)

i, found = slices.BinarySearch(s, 6)
fmt.Printf("Position of 6: %d. Found: %t\n", i, found)
}
1
2
Position of 3: 2. Found: true
Position of 6: 5. Found: false

实用函数

slices提供了许多实用函数:

1
2
3
4
5
6
7
8
9
10
11
12
13
14
15
16
17
18
19
20
21
22
23
24
25
26
27
28
29
30
31
32
33
34
35
36
37
38
39
40
41
42
package main

import (
"fmt"
"slices"
)

type Example struct {
Name string
Number int
}

func main() {
e1 := []Example{
{"C", 3},
{"A", 1},
{"D", 4},
{"B", 2},
}

e2 := []Example{
{"A", 1},
{"B", 2},
{"C", 3},
{"D", 4},
}

fmt.Printf("Compare: %v\n", slices.CompareFunc(e1, e2, func(a, b Example) int {
return a.Number - b.Number
}))

fmt.Printf("Contains: %v\n", slices.ContainsFunc(e1, func(a Example) bool {
return a.Number == 2
}))

fmt.Printf("Delete: %v\n", slices.Delete(e1, 2, 3))
fmt.Printf("Equal: %v\n", slices.Equal(e1, e2))

fmt.Printf("Is Sorted: %v\n", slices.IsSortedFunc(e1, func(a, b Example) int {
return a.Number - b.Number
}))
}
1
2
3
4
5
Compare: 2
Contains: true
Delete: [{C 3} {A 1} {B 2}]
Equal: false
Is Sorted: false

slices 包的官方文档地址

Map

类似于slices,maps也是从Go 1.21开始出现在Go标准库中的。它定义了各种方法来操作 maps。

1
2
3
4
5
6
7
8
9
10
11
12
13
14
15
16
17
18
19
20
21
22
package main

import (
"fmt"
"maps"
)

func main() {
m := map[int]string{1: "one", 2: "two", 3: "three"}
c := maps.Clone(m)

c[4] = "four"

fmt.Printf("Original: %v\n", m)
fmt.Printf("Clone: %v\n", c)

maps.DeleteFunc(c, func(k int, v string) bool { return k%2 == 0 })
fmt.Printf("DeleteFunc: %v\n", c)

fmt.Printf("Equal: %v\n", maps.Equal(m, c))
fmt.Printf("EqualFunc: %v\n", maps.EqualFunc(m, c, func(v1, v2 string) bool { return v1 == v2 }))
}
1
2
3
4
5
Original: map[1:one 2:two 3:three]
Clone: map[1:one 2:two 3:three 4:four]
DeleteFunc: map[1:one 3:three]
Equal: false
EqualFunc: false

maps 包的官方文档地址

github.com/elliotchance/pie

这是我个人最喜欢的用来操作切片和映射的包。它提供了一种独特的语法,使您能够无缝地链接操作,提高了代码的可读性和效率。

使用库方法有四种方式:

  1. 纯调用 — 只需调用库方法并提供所需的参数;
  2. pie.Of — 链接多个操作,支持任何元素类型;
  3. pie.OfOrdered — 链接多个操作,支持数字和字符串类型;
  4. pie.OfNumeric — 链接多个操作,仅支持数字类型。
1
2
3
4
5
6
7
8
9
10
11
12
13
14
15
16
17
18
19
20
21
22
23
24
25
26
27
28
29
30
31
32
33
34
35
36
37
38
39
40
41
42
43
44
45
46
47
48
49
50
51
52
53
54
55
56
57
58
59
60
61
62
63
64
65
66
package main

import (
"fmt"
"strings"

"github.com/elliotchance/pie/v2"
)

type Example struct {
Name string
Number int
}

func main() {
e := []Example{
{"C", 3},
{"A", 1},
{"D", 4},
{"B", 2},
}

fmt.Printf(
"Map 1: %v\n",
pie.Sort(
pie.Map(
e,
func(e Example) string {
return e.Name
},
),
),
)

fmt.Printf(
"Map 2: %v\n",
pie.Of(e).
Map(func(e Example) Example {
return Example{
Name: e.Name,
Number: e.Number * 2,
}
}).
SortUsing(func(a, b Example) bool {
return a.Number < b.Number
}),
)

fmt.Printf(
"Map 3: %v\n",
pie.OfOrdered([]string{"A", "C", "B", "A"}).
Map(func(e string) string {
return strings.ToLower(e)
}).
Sort(),
)

fmt.Printf(
"Map 4: %v\n",
pie.OfNumeric([]int{4, 1, 3, 2}).
Map(func(e int) int {
return e * 2
}).
Sort(),
)
}
1
2
3
4
Map 1: [A B C D]
Map 2: {[{A 2} {B 4} {C 6} {D 8}]}
Map 3: {[a a b c]}
Map 4: {[2 4 6 8]}

由于诸如 Map 等函数应该返回相同类型的集合,因此这个库的链式操作相当受限。因此,我认为纯方法调用是使用这个库的最佳方式。

该库提供了 Map 方法,允许将每个元素从一种类型转换为另一种类型。

1
2
3
4
5
6
7
8
9
10
11
12
13
14
15
16
17
18
19
20
21
22
23
24
25
26
27
28
29
30
31
package main

import (
"fmt"

"github.com/elliotchance/pie/v2"
)

type Example struct {
Name string
Number int
}

func main() {
e := []Example{
{"C", 3},
{"A", 1},
{"D", 4},
{"B", 2},
}

fmt.Printf(
"Map: %v\n",
pie.Map(
e,
func(e Example) string {
return e.Name
},
),
)
}

还提供了 Flat 方法,它将二维切片转换为一维切片。

1
2
3
4
5
6
7
8
9
10
11
12
13
14
15
16
17
18
19
20
21
22
23
24
25
26
27
28
29
30
31
32
33
34
package main

import (
"fmt"

"github.com/elliotchance/pie/v2"
)

type Person struct {
Name string
Tags []string
}

func main() {
p := []Person{
{"Alice", []string{"a", "b", "c"}},
{"Bob", []string{"b", "c", "d"}},
{"Charlie", []string{"c", "d", "e"}},
}

fmt.Printf(
"Unique Tags: %v\n",
pie.Unique(
pie.Flat(
pie.Map(
p,
func(e Person) []string {
return e.Tags
},
),
),
),
)
}
1
Unique Tags: [b c d e a]

使用 Keys 或 Values 方法可以仅获取 Map 的键或值。

1
2
3
4
5
6
7
8
9
10
11
12
13
14
15
16
17
18
package main

import (
"fmt"

"github.com/elliotchance/pie/v2"
)

func main() {
m := map[int]string{
1: "one",
2: "two",
3: "three",
}

fmt.Printf("Keys: %v\n", pie.Keys(m))
fmt.Printf("Values: %v\n", pie.Values(m))
}

Output:

1
2
Keys: [3 1 2]
Values: [one two three]

Filter

该库提供了几种过滤原始集合的方法:Bottom、DropTop、DropWhile、Filter、FilterNot、Unique 等。

1
2
3
4
5
6
Bottom 3: [4 4 4]
Drop top 3: [3 3 3 4 4 4 4]
Drop while 3: [3 3 3 4 4 4 4]
Filter even: [2 2 4 4 4 4]
Filter not even: [1 3 3 3]
Unique values: [1 2 3 4]

Aggregation

有一个通用的聚合方法 Reduce。让我们来计算标准差:

1
2
3
4
5
6
7
8
9
10
11
12
13
14
15
16
17
18
19
20
21
22
23
24
25
26
package main

import (
"fmt"
"math"

"github.com/elliotchance/pie/v2"
)

func main() {
v := []float64{1.1, 2.2, 3.3, 4.4, 5.5}

avg := pie.Average(v)
count := len(v)

sum2 := pie.Reduce(
v,
func(acc, value float64) float64 {
return acc + (value-avg)*(value-avg)
},
) - v[0] + (v[0]-avg)*(v[0]-avg)

d := math.Sqrt(sum2 / float64(count))

fmt.Printf("Standard deviation: %f\n", d)
}

Output:

1
Standard deviation: 1.555635

Reduce 方法首先将第一个切片元素作为累积值,将第二个元素作为值参数调用 reducer。这就是为什么公式看起来很奇怪。

从下面的示例中,可以找到另一个内置的聚合方法 Average。此外,您还可以找到 Min、Max、Product 等方法。

1
2
3
4
5
6
7
8
9
10
11
12
13
14
15
16
17
18
19
20
21
22
23
24
25
26
27
28
package main

import (
"fmt"

"github.com/elliotchance/pie/v2"
)

func main() {
v := []float64{1.1, 2.2, 3.3, 4.4, 5.5}

fmt.Printf("Average: %f\n", pie.Average(v))
fmt.Printf("Stddev: %f\n", pie.Stddev(v))
fmt.Printf("Max: %f\n", pie.Max(v))
fmt.Printf("Min: %f\n", pie.Min(v))
fmt.Printf("Sum: %f\n", pie.Sum(v))
fmt.Printf("Product: %f\n", pie.Product(v))

fmt.Printf("All >0: %t\n", pie.Of(v).All(func(value float64) bool { return value > 0 }))
fmt.Printf("Any >5: %t\n", pie.Of(v).Any(func(value float64) bool { return value > 5 }))

fmt.Printf("First: %f\n", pie.First(v))
fmt.Printf("Last: %f\n", pie.Last(v))

fmt.Printf("Are Unique: %t\n", pie.AreUnique(v))
fmt.Printf("Are Sorted: %t\n", pie.AreSorted(v))
fmt.Printf("Contains 3.3: %t\n", pie.Contains(v, 3.3))
}
1
2
3
4
5
6
7
8
9
10
11
12
13
Average: 3.300000
Stddev: 1.555635
Max: 5.500000
Min: 1.100000
Sum: 16.500000
Product: 193.261200
All >0: true
Any >5: true
First: 1.100000
Last: 5.500000
Are Unique: true
Are Sorted: true
Contains 3.3: true

Sorting/Ordering

有三种不同的方法可以使用 pie 对切片进行排序:

Sort — 类似于 sort.Slice。但与 sort.Slice 不同的是,返回的切片将被重新分配,以不修改输入切片;
SortStableUsing — 类似于 sort.SliceStable。但与 sort.SliceStable 不同的是,返回的切片将被重新分配,以不修改输入切片;
SortUsing — 类似于 sort.Slice。但与 sort.Slice 不同的是,返回的切片将被重新分配,以不修改输入切片。

1
2
3
4
5
6
7
8
9
10
11
12
13
14
15
16
17
18
19
20
package main

import (
"fmt"

"github.com/elliotchance/pie/v2"
)

func main() {
v := []int{3, 5, 1, 4, 2}

less := func(a, b int) bool {
return a < b
}

fmt.Printf("Sort: %v\n", pie.Sort(v))
fmt.Printf("SortStableUsing: %v\n", pie.SortStableUsing(v, less))
fmt.Printf("SortUsing: %v\n", pie.SortUsing(v, less))
fmt.Printf("Original: %v\n", v)
}

Output:

1
2
3
4
Sort: [1 2 3 4 5]
SortStableUsing: [1 2 3 4 5]
SortUsing: [1 2 3 4 5]
Original: [3 5 1 4 2]

Access

pie 提供了 FindFirstUsing 方法,用于获取切片中第一个与谓词匹配的元素的索引。

1
2
3
4
5
6
7
8
9
10
11
12
13
14
15
16
17
18
19
20
21
22
23
24
25
26
27
28
29
30
31
package main

import (
"fmt"

"github.com/elliotchance/pie/v2"
)

type Person struct {
Name string
Age int
}

func main() {
p := []Person{
{"Alice", 25},
{"Bob", 30},
{"Charlie", 35},
}

fmt.Printf(
"FindFirstUsing: %v\n",
pie.FindFirstUsing(
p,
func(p Person) bool {
return p.Age >= 30
},
),
)

}
1
FindFirstUsing: 2

pie 包含许多用于处理切片的实用方法。举几个例子:

1
2
3
4
5
6
7
8
9
10
11
12
13
14
15
16
17
18
19
20
21
22
23
24
25
26
27
28
29
package main

import (
"fmt"
"math/rand"
"time"

"github.com/elliotchance/pie/v2"
)

type Person struct {
Name string
Age int
}

func main() {
p := []Person{
{"Alice", 25},
{"Bob", 30},
{"Charlie", 35},
{"David", 25},
{"Eve", 40},
{"Frank", 35},
}

fmt.Printf("Chunk: %v\n", pie.Chunk(p, 2))
fmt.Printf("GroupBy: %v\n", pie.GroupBy(p, func(p Person) int { return p.Age }))
fmt.Printf("Shuffle: %v\n", pie.Shuffle(p, rand.New(rand.NewSource(time.Now().UnixNano()))))
}

Output:

1
2
3
Chunk: [[{Alice 25} {Bob 30}] [{Charlie 35} {David 25}] [{Eve 40} {Frank 35}]]
GroupBy: map[25:[{Alice 25} {David 25}] 30:[{Bob 30}] 35:[{Charlie 35} {Frank 35}] 40:[{Eve 40}]]
Shuffle: [{Frank 35} {Bob 30} {David 25} {Eve 40} {Alice 25} {Charlie 35}]

下面是 pie 包的地址

elliotchance/pie/v2 库提供了一套非常完整的的处理集合的能力,极大地简化了在 Go 中处理切片的工作。其强大的方法用于操作和查询切片数据,为开发人员提供了一个强大的工具,增强了代码的可读性和效率。我强烈建议任何 Go 开发人员在下一个项目中尝试使用这个库。

github.com/samber/lo

另一个在 Go 中操作集合的流行库。在某些方面,它可能类似于流行的 JavaScript 库 Lodash。它在内部使用泛型,而不是反射。

Transform

该库支持默认的 MapFlatMap 方法用于切片:

1
2
3
4
5
6
7
8
9
10
11
12
13
14
15
16
17
18
19
20
21
22
23
24
25
26
27
28
29
30
31
package main

import (
"fmt"

"github.com/samber/lo"
)

type Example struct {
Name string
Number int
}

func main() {
e := []Example{
{"C", 3},
{"A", 1},
{"D", 4},
{"B", 2},
}

fmt.Printf(
"Map: %v\n",
lo.Map(
e,
func(e Example, index int) string {
return e.Name
},
),
)
}
1
Map: [C A D B]

下面的代码演示如何操作 FlatMap:

1
2
3
4
5
6
7
8
9
10
11
12
13
14
15
16
17
18
19
20
21
22
23
24
25
26
27
28
29
30
31
32
package main

import (
"fmt"

"github.com/samber/lo"
)

type Person struct {
Name string
Tags []string
}

func main() {
p := []Person{
{"Alice", []string{"a", "b", "c"}},
{"Bob", []string{"b", "c", "d"}},
{"Charlie", []string{"c", "d", "e"}},
}

fmt.Printf(
"Unique Tags: %v\n",
lo.Uniq(
lo.FlatMap(
p,
func(e Person, index int) []string {
return e.Tags
},
),
),
)
}

此外,还可以获取映射键、值或将映射对转换为某些切片等操作:

1
2
3
4
5
6
7
8
9
10
11
12
13
14
15
16
17
18
19
20
21
22
package main

import (
"fmt"
"strings"

"github.com/samber/lo"
)

func main() {
m := map[int]string{
1: "one",
2: "two",
3: "three",
}

fmt.Printf("Keys: %v\n", lo.Keys(m))
fmt.Printf("Values: %v\n", lo.Values(m))
fmt.Printf("MapKeys: %v\n", lo.MapKeys(m, func(value string, num int) int { return num * 2 }))
fmt.Printf("MapValues: %v\n", lo.MapValues(m, func(value string, num int) string { return strings.ToUpper(value) }))
fmt.Printf("MapToSlice: %v\n", lo.MapToSlice(m, func(num int, value string) string { return value + ":" + fmt.Sprint(num) }))
}

Outputs:

1
2
3
4
5
Keys: [2 3 1]
Values: [one two three]
MapKeys: map[2:one 4:two 6:three]
MapValues: map[1:ONE 2:TWO 3:THREE]
MapToSlice: [three:3 one:1 two:2]

Filter

在 lo 库中有许多 Drop 方法:

1
2
3
4
5
6
7
8
9
10
11
12
13
14
15
16
package main

import (
"fmt"

"github.com/samber/lo"
)

func main() {
v := []int{1, 2, 3, 4, 5}

fmt.Printf("Drop: %v\n", lo.Drop(v, 2))
fmt.Printf("DropRight: %v\n", lo.DropRight(v, 2))
fmt.Printf("DropWhile: %v\n", lo.DropWhile(v, func(i int) bool { return i < 3 }))
fmt.Printf("DropRightWhile: %v\n", lo.DropRightWhile(v, func(i int) bool { return i > 3 }))
}

Outputs:

1
2
3
4
Drop: [3 4 5]
DropRight: [1 2 3]
DropWhile: [3 4 5]
DropRightWhile: [1 2 3]

此外,还可以通过 predicate 过滤切片和映射:

1
2
3
4
5
6
7
8
9
10
11
12
13
14
15
package main

import (
"fmt"

"github.com/samber/lo"
)

func main() {
v := []int{1, 2, 3, 4, 5}
m := map[string]int{"a": 1, "b": 2, "c": 3}

fmt.Printf("Filter: %v\n", lo.Filter(v, func(i int, index int) bool { return i > 2 }))
fmt.Printf("PickBy: %v\n", lo.PickBy(m, func(key string, value int) bool { return value > 2 }))
}

Outputs:

1
2
Filter: [3 4 5]
PickBy: map[c:3]

Aggregation

lo package 提供了 reduce 的方法:

1
2
3
4
5
6
7
8
9
10
11
12
13
14
15
16
17
18
19
20
21
22
23
24
25
26
package main

import (
"fmt"
"math"

"github.com/samber/lo"
)

func main() {
v := []float64{1.1, 2.2, 3.3, 4.4, 5.5}

count := len(v)

avg := lo.Reduce(v, func(acc, val float64, index int) float64 {
return acc + val
}, 0.0) / float64(count)

sum2 := lo.Reduce(v, func(acc, val float64, index int) float64 {
return acc + (val-avg)*(val-avg)
}, 0.0)

d := math.Sqrt(sum2 / float64(count))

fmt.Printf("Standard deviation: %f\n", d)
}

Outputs:

1
Standard deviation: 1.555635

此外,它支持一些通用的聚合方法,如 Sum、Min、Max:

1
2
3
4
5
6
7
8
9
10
11
12
13
14
15
package main

import (
"fmt"

"github.com/samber/lo"
)

func main() {
v := []float64{1.1, 2.2, 3.3, 4.4, 5.5}

fmt.Printf("Sum: %v\n", lo.Sum(v))
fmt.Printf("Min: %v\n", lo.Min(v))
fmt.Printf("Max: %v\n", lo.Max(v))
}

有一些有用的方法用于处理 channel:FanIn 和 FanOut

1
2
3
4
5
6
7
8
9
10
11
12
13
14
15
16
17
18
19
20
21
22
23
24
25
26
27
28
29
30
31
32
33
package main

import (
"fmt"

"github.com/samber/lo"
)

func main() {
ch1 := make(chan int)
ch2 := make(chan int)
ch3 := make(chan int)

ch := lo.FanIn(10, ch1, ch2, ch3)

for i := 0; i < 10; i++ {
if i%3 == 0 {
ch1 <- i
} else if i%3 == 1 {
ch2 <- i
} else {
ch3 <- i
}
}

close(ch1)
close(ch2)
close(ch3)

for v := range ch {
fmt.Println(v)
}
}

还可以这样处理 channel:

1
2
3
4
5
6
7
8
9
10
11
12
13
14
15
16
17
18
19
20
21
22
23
24
package main

import (
"fmt"

"github.com/samber/lo"
)

func main() {
ch := make(chan int)
chs := lo.FanOut(3, 10, ch)

for i := 0; i < 3; i++ {
ch <- i
}

close(ch)

for _, ch := range chs {
for v := range ch {
fmt.Println(v)
}
}
}

Sorting/Ordering

lo 还提供 Reverse 方法:

1
2
3
4
5
6
7
8
9
10
11
12
13
package main

import (
"fmt"

"github.com/samber/lo"
)

func main() {
v := []int{1, 2, 3, 4, 5}

fmt.Printf("Reverse: %v\n", lo.Reverse(v))
}

Access

lo 库提供了 find 方法来访问元素:

1
2
3
4
5
6
7
8
9
10
11
12
13
14
15
16
17
18
19
20
21
22
23
24
25
26
27
28
29
30
31
32
33
34
35
36
37
38
package main

import (
"fmt"

"github.com/samber/lo"
)

type Person struct {
Name string
Age int
}

func main() {
p := []Person{
{"Alice", 25},
{"Bob", 30},
{"Charlie", 35},
{"David", 25},
{"Edward", 40},
}

item, found := lo.Find(p, func(p Person) bool {
return p.Name == "Charlie"
})

fmt.Printf("Item: %+v, Found: %v\n", item, found)

fmt.Printf("FindDuplicatesBy: %v\n", lo.FindDuplicatesBy(p, func(p Person) int {
return p.Age
}))

item, index, found := lo.FindIndexOf(p, func(p Person) bool {
return p.Name == "Charlie"
})

fmt.Printf("Item: %+v, Index: %v, Found: %v\n", item, index, found)
}

Outputs:

1
2
3
Item: {Name:Charlie Age:35}, Found: true
FindDuplicatesBy: [{Alice 25}]
Item: {Name:Charlie Age:35}, Index: 2, Found: true

Find 方法同样支持 map:

1
2
3
4
5
6
7
8
9
10
11
12
13
14
15
16
17
18
19
20
package main

import (
"fmt"

"github.com/samber/lo"
)

func main() {
p := map[string]int{
"Alice": 34,
"Bob": 24,
"Charlie": 34,
"David": 29,
"Eve": 34,
}

key, found := lo.FindKey(p, 34)
fmt.Printf("Key: %v, Found: %v\n", key, found)
}

lo 的文档地址

总结

这里只展示了 github.com/samber/lo 库约 10% 的方法。这个库提供了许多简化函数处理的实用工具。对于 Go 开发人员来说,这个库是一个非常全面的工具包。

本文展示了一些在 Go 中处理集合时推荐的库,希望对大家的开发工作有帮助。


]]>
一些在 Golang 中高效处理 Collection 类型的库
Golang 如何实现自定义 CDC 工具? https://cloudsjhan.github.io/2024/05/04/Golang-如何实现自定义-CDC-工具?/ 2024-05-04T13:28:00.000Z 2024-05-04T13:29:04.816Z

CDC

变更数据捕获(CDC)是一种跟踪数据库更改的技术,允许开发人员捕获应用于行的插入、更新和删除。它是数据集成和实时处理任务的重要组成部分。在本文中,我们将讨论如何在 Golang 中为 PostgreSQL、Oracle、MySQL、MongoDB 和 SQL Server 等多个数据库开发自定义 CDC 工具。

通常在 CDC 领域或者说大数据领域都是 java 的生态比较繁荣,比如 Flink, Spark, 最近大火的 paimon 都是 java 写的。Java 在数据生态的繁荣为对应数据工具的开发提供了土壤。那么我们 Gopher 如果也想开发 CDC 工具怎么办?今天介绍的是一些 golang 的 Lib,基于这些 lib 我们也可以实现自定义的 CDC 工具。

PostgreSQL

对于 PostgreSQL,我们可以使用 pglogrepl 库(github.com/jackc/pglogrepl)。该库提供了 PostgreSQL 中的逻辑解码和流复制协议的低级 API。它允许您读取 PostgreSQL 的预写式日志(WAL),这些日志是存储所有对数据库的更改的地方。通过读取和解码这些日志,我们可以跟踪数据库中的更改。解码可以在插件级别或消费者级别进行,这取决于 PostgreSQL 中使用的解码插件。

Oracle

为 Oracle 创建 CDC 工具要复杂一些。Oracle 有一个名为 “LogMiner” 的内置工具,它允许您通过 SQL 接口查询在线和归档的重做日志文件。数据的主要来源将是 V$LOGMNR_CONTENTS 视图,这是 LogMiner 在对其进行挖掘后的重做日志数据的视图。

我们的 CDC 工具需要定期查询此视图,并解析 SQL_REDO 和 SQL_UNDO 字段,以了解对数据库所做的更改。这需要理解 Oracle 的 SQL 语法,并可能处理不同版本的 Oracle,因为语法可能会发生变化。

MySQL

可以使用 go-mysql 库(github.com/go-mysql-org/go-mysql/canal)处理 MySQL。该软件包提供了一个框架,用于将 MySQL 的 binlog 同步到其他系统。它支持将 MySQL 的 binlog 同步到用户定义的处理程序,例如 stdout 和 Kafka 消息队列。通过使用该库,我们可以相对简单地跟踪数据库中的更改。

MongoDB

对于 MongoDB,我们可以使用 mongo-driver/mongo 包(go.mongodb.org/mongo-driver/mongo)。该软件包为 Go 提供了 MongoDB 驱动程序 API。MongoDB 驱动程序支持 “Change Streams”,它允许应用程序访问实时数据更改,而无需尾随 oplog 的复杂性和风险。应用程序可以使用更改流订阅单个集合、数据库或整个部署上的所有数据更改,并立即对其进行响应。

SQL Server

对于 SQL Server,我们可以利用 go-mssqldb 包(github.com/denisenkom/go-mssqldb)。SQL Server 支持变更跟踪,它跟踪表上的 DML 更改(插入、更新、删除)。通过查询这些变更表,我们可以获取有关更改的信息。请注意,这只会告诉我们更改行的键,而不是数据本身。要获取更改的数据,我们需要对实际数据表进行另一个查询。

结论

在 Golang 中创建自定义 CDC 工具涉及理解每个数据库用于记录更改的基础机制。通过利用现有软件包的功能,我们可以构建一个强大的工具,可以跟踪多种类型数据库的更改。然而,要实现高效和有效的 CDC 工具,需要对每个数据库的日志机制有透彻的了解,以及对 Golang 有扎实的掌握。


]]>
Golang 如何实现自定义 CDC 工具
基于 langchaingo 对接大模型 ollama 实现本地知识库问答系统 https://cloudsjhan.github.io/2024/05/03/基于-langchaingo-对接大模型-ollama-实现本地知识库问答系统/ 2024-05-03T02:14:02.000Z 2024-05-03T02:32:35.552Z

Ollama 是一个基于 Go 语言开发的简单易用的本地大语言模型运行框架。在管理模型的同时,它还基于 Go 语言中的 Web 框架 gin提供了一些 Api 接口,让你能够像跟 OpenAI 提供的接口那样进行交互。

Ollama 官方还提供了跟 docker hub 一样的模型 hub,用于存放各种大语言模型,开发者也可以上传自己训练好的模型供其他人使用。

安装 ollama

可以在 ollama 的 github release 页面直接下载对应平台的二进制包进行安装,也可以 docker 一键部署。这里演示的机器是 macOS M1 PRO 版本,直接下载安装包,安装即可,安装之后,运行软件。

运行之后,项目默认监听 11434 端口,在终端执行如下命令可验证是否正常运行:

1
2
$ curl localhost:11434
Ollama is running

大模型管理

ollama 安装后,就可以对大模型进项安装使用了。Ollama 还会携带一个命令行工具,通过它可以与模型进行交互。

  • ollama list:显示模型列表。
  • ollama show:显示模型的信息
  • ollama pull:拉取模型
  • ollama push:推送模型
  • ollama cp:拷贝一个模型
  • ollama rm:删除一个模型
  • ollama run:运行一个模型

在官方提供的模型仓库中可以找到你想要的模型:https://ollama.com/library

注意:应该至少有 8 GB 可用 RAM 来运行 7 B 型号,16 GB 来运行 13 B 型号,32 GB 来运行 33 B 型号。

比如我们可以选择 Qwen 做个演示,这里用 1.8B 的模型(本地电脑比较可怜,只有 16G😭):

1
$ ollama run qwen:1.8b

是不是觉得这个命令似曾相识,是的,跟 docker run image 一样,如果本地没有该模型,则会先下载模型再运行。

既然跟 docker 如此一致,那么是不是也会有跟 Dockerfile 一样的东西,是的,叫做 Modelfile :

1
2
3
4
5
6
7
8
9
FROM qwen:14b

# set the temperature to 1 [higher is more creative, lower is more coherent]
PARAMETER temperature 1

# set the system message
SYSTEM """
You are Mario from super mario bros, acting as an assistant.
"""

保存上面的代码为 Modelfile,运行 llama create choose-a-model-name -f Modelfile 就可以定制你的模型,ollama run choose-a-model-name 就可以使用刚刚定制的模型。

对接 ollama 实现本地知识库问答系统

前置准备

模型都在本地安装好了,我们可以对接这个模型,开发一些好玩的上层 AI 应用。下面我们基于 langchaningo 开发一个问答系统。

下面的系统会用到的模型有 ollama qwen1.8B,nomic-embed-text,先来安装这两个模型:

1
2
ollama run qwen:1.8b
ollama run nomic-embed-text:latest

我们还需要一个向量数据库来存储拆分后的知识库内容,这里我们使用 qdrant :

1
2
docker pull qdrant/qdrant
$ docker run -itd --name qdrant -p 6333:6333 qdrant/qdrant

启动 qdrant 后我们先创建一个 Collection 用于存储文档拆分块:

1
2
3
4
5
6
7
8
curl -X PUT http://localhost:6333/collections/langchaingo-ollama-rag \
-H 'Content-Type: application/json' \
--data-raw '{
"vectors": {
"size": 768,
"distance": "Dot"
}
}'

知识库内容切分

这里提供一篇文章供大模型学习,下面的代码将文章拆分成小的文档块:

1
2
3
4
5
6
7
8
9
10
11
12
13
14
15
16
17
18
19
20
func TextToChunks(dirFile string, chunkSize, chunkOverlap int) ([]schema.Document, error) {
file, err := os.Open(dirFile)
if err != nil {
return nil, err
}
// create a doc loader
docLoaded := documentloaders.NewText(file)
// create a doc spliter
split := textsplitter.NewRecursiveCharacter()
// set doc chunk size
split.ChunkSize = chunkSize
// set chunk overlap size
split.ChunkOverlap = chunkOverlap
// load and split doc
docs, err := docLoaded.LoadAndSplit(context.Background(), split)
if err != nil {
return nil, err
}
return docs, nil
}

文档存储到向量数据库

1
2
3
4
5
6
7
8
9
func storeDocs(docs []schema.Document, store *qdrant.Store) error {
if len(docs) > 0 {
_, err := store.AddDocuments(context.Background(), docs)
if err != nil {
return err
}
}
return nil
}

读取用户输入并查询数据库

1
2
3
4
5
6
7
8
9
10
11
12
13
14
15
16
17
18
func useRetriaver(store *qdrant.Store, prompt string, topk int) ([]schema.Document, error) {
// 设置选项向量
optionsVector := []vectorstores.Option{
vectorstores.WithScoreThreshold(0.80), // 设置分数阈值
}

// 创建检索器
retriever := vectorstores.ToRetriever(store, topk, optionsVector...)
// 搜索
docRetrieved, err := retriever.GetRelevantDocuments(context.Background(), prompt)

if err != nil {
return nil, fmt.Errorf("检索文档失败: %v", err)
}

// 返回检索到的文档
return docRetrieved, nil
}

创建并加载大模型

1
2
3
4
5
6
7
8
9
10
func getOllamaQwen() *ollama.LLM {
// 创建一个新的ollama模型,模型名为"qwena:1.8b"
llm, err := ollama.New(
ollama.WithModel("qwen:1.8b"),
ollama.WithServerURL(ollamaServer))
if err != nil {
logger.Fatal("创建ollama模型失败: %v", err)
}
return llm
}

大模型处理

将检索到的内容,交给大语言模型处理

1
2
3
4
5
6
7
8
9
10
11
12
13
14
15
16
17
18
19
20
21
22
23
24
25
26
27
// GetAnswer 获取答案
func GetAnswer(ctx context.Context, llm llms.Model, docRetrieved []schema.Document, prompt string) (string, error) {
// 创建一个新的聊天消息历史记录
history := memory.NewChatMessageHistory()
// 将检索到的文档添加到历史记录中
for _, doc := range docRetrieved {
history.AddAIMessage(ctx, doc.PageContent)
}
// 使用历史记录创建一个新的对话缓冲区
conversation := memory.NewConversationBuffer(memory.WithChatHistory(history))

executor := agents.NewExecutor(
agents.NewConversationalAgent(llm, nil),
nil,
agents.WithMemory(conversation),
)
// 设置链调用选项
options := []chains.ChainCallOption{
chains.WithTemperature(0.8),
}
res, err := chains.Run(ctx, executor, prompt, options...)
if err != nil {
return "", err
}

return res, nil
}

运行应用

1
go run main.go getanswer

输入你想要咨询的问题

系统输出结果:

输出的结果可能会因为学习资料的不足或者模型的大小存在区别,有很多结果都不是很准确,这就需要提供更多的语料进行训练。而且还要对代码里的各个参数进行调优,并结合文档的内容,大小,格式等进行参数的设定。

项目的源码可以参考:https://github.com/hantmac/langchaingo-ollama-rag.git


]]>
基于 langchaingo 对接大模型 ollama 实现本地知识库问答系统
数据同步工具考古 https://cloudsjhan.github.io/2024/02/07/数据同步工具考古/ 2024-02-07T07:21:03.000Z 2024-02-07T11:14:23.847Z

前言

在过去的一年里,我除了日常的 Databend Cloud 开发工作之外,还围绕着 Databend 做了大量的数据生态工作。这包括在 Databend Native 协议的基础上提供了多语言的 SDK,并在 SDK 基础上增加了对诸如 TableauMetabaseSuperSetRedash等BI工具的支持。此外,我还完善了关于数据传输和实时同步领域的生态,涉及到 Debezium Engine、Flink CDC、Kafka Connect、Airbyte、Datax Plugin、TapData 等工具。

在这一系列的工作中,数据同步是一个非常关键的环节,它构建了用户从外部数据、数据库到 Databend 的桥梁。起初我对于一些流行的数据同步工具只是略有耳闻,有些甚至从未听说过,更不了解它们的内部原理。通过一段时间的摸索和开发,成功实现了几个工具的整合之后,我对这些工具和平台有了更深入的了解。

所以在本文中,我将对几个目前广泛使用、比较流行的数据同步工具进行考古。这包括它们的发展历史、技术特点以及在实际应用中的使用情况。通过对这些工具的分析介绍,在给自己做笔记的同时希望能够为其他读者提供对数据同步领域的全面认识。

数据同步工具

Debezium

1
Debezium is an open source distributed platform for change data capture. Start it up, point it at your databases, and your apps can start responding to all of the inserts, updates, and deletes that other apps commit to your databases. Debezium is durable and fast, so your apps can respond quickly and never miss an event, even when things go wrong.

Debezium 是一种 CDC(Change Data Capture)工具,工作原理类似大家所熟知的 Canal, DataBus, Maxwell 等,是通过抽取数据库日志来获取变更事件。Debezium 最初设计成一个 Kafka Connect 的 Source Plugin,目前开发者虽致力于将其与 Kafka Connect 解耦。下图引自 Debeizum 官方文档,可以看到一个 Debezium 在一个完整 CDC 系统中的位置。

Kafka Connect 为 Source Plugin 提供了一系列的编程接口,最主要的就是要实现 SourceTask 的 poll 方法,其返回 List 将会被以最少一次语义(At Least Once)的方式投递至 Kafka。

Debezium 抽取原理

下图是 Debezium 从 PG 中抽取数据到 kafka topic 的流程,对于 PG 连接器来说是从逻辑复制流读取到变更日志,经由 kafka 发送到下游的数据处理服务以及相应的 writer plugin。

再来看下 Debezium MySQL Reader 的代码,Reader体系构成了 MySQL 模块中代码的主线。

Reader 的继承关系如下图所示:

SnapshotReader 和 BinlogReader 分别实现了对 MySQL 数据的全量读取和增量读取,他们继承于 AbstractReader,里面封装了一些共用的逻辑代码。AbstractReader 的流程如下图所示:

从图中可以看到 AbstractReader 在实现时,并没有直接将 enqueue 进来的 event record 直接写到 Kafka,而是通过一个内存阻塞队列BlockingQueue进行了解耦,这样写的好处是:

  1. 职责解耦

Event Record 在进入 BlockingQueue之前,要根据条件判断是否接受该 record;在向 Kafka 投递 record 之前,判断 task 的 running 状态。

  1. 线程隔离

BlockingQueue 是一个线程安全的阻塞队列,通过 BlockingQueue 实现的生产者消费者模型,是可以跑在不同的线程里的,这样避免局部的阻塞带来的整体的干扰。如上图所示,系统会定期判断 running 标志位,若 running 被stop信号置为了false,可以立刻停止整个task,而不会因 MySQL IO 阻塞延迟响应。

  1. 单条与Batch的互相转化

Enqueue record 是单条的投递 record,drain_to 是批量的消费 records。这个用法也可以反过来,实现 batch 到 single 的转化。

而 MySQL Connector 每日次获取 snapshot 的时候基本上是沿用了 MySQL 官方从库搭建的方案,详细步骤是:

  1. 获取一个全局读锁,从而阻塞住其他数据库客户端的写操作。
  2. 开启一个可重复读语义的事务,来保证后续的在同一个事务内读操作都是在一个一致性快照中完成的。
  3. 读取binlog的当前位置。
  4. 读取连接器中配置的数据库和表的模式(schema)信息。
  5. 释放全局读锁,允许其他的数据库客户端对数据库进行写操作。
  6. (可选)把DDL改变事件写入模式改变 topic(schema change topic),包括所有的必要的DROP和CREATEDDL语句。
  7. 扫描所有数据库的表,并且为每一个表产生一个和特定表相关的kafka topic创建事件(即为每一个表创建一个kafka topic)。
  8. 提交事务。
  9. 记录连接器成功完成快照任务时的连接器偏移量。

部署方式

基于 Kafka Connect

最常见的架构是通过 Apache Kafka Connect 部署 Debezium。Kafka Connect 为在 Kafka 和外部存储系统之间系统数据提供了一种可靠且可伸缩性的方式。它为 Connector 插件提供了一组 API 和一个运行时:Connect 负责运行这些插件,它们则负责移动数据。通过 Kafka Connect 可以快速实现 Source Connector 和 Sink Connector 进行交互构造一个低延迟的数据 Pipeline:

  • Source Connector(例如,Debezium):将记录发送到 Kafka
  • Sink Connector:将 Kafka Topic 中的记录发送到其他系统

如上图所示,部署了 MySQL 和 PostgresSQL 的 Debezium Connector 以捕获这两种类型数据库的变更。每个 Debezium Connector 都会与其源数据库建立连接:

  • MySQL Connector 使用客户端库来访问 binlog。
  • PostgreSQL Connector 从逻辑副本流中读取数据。

除了 Kafka Broker 之外,Kafka Connect 也作为一个单独的服务运行。默认情况下,数据库表的变更会写入名称与表名称对应的 Kafka Topic 中。如果需要,您可以通过配置 Debezium 的 Topic 路由转换来调整目标 Topic 名称。例如,您可以:

  • 将记录路由到名称与表名不同的 Topic 中
  • 将多个表的变更事件记录流式传输到一个 Topic 中

变更事件记录在 Apache Kafka 中后,Kafka Connect 生态系统中的不同 Sink Connector 可以将记录流式传输到其他系统、数据库,例如 Elasticsearch、Databend、分析系统或者缓存。

基于Debezium Server

第二种部署 Debezium 的方法是使用 Debezium Server。Debezium Server 是一个可配置的、随时可用的应用程序,可以将变更事件从源数据库流式传输到各种消息中间件上。

下图展示了基于 Debezium Server 的变更数据捕获 Pipeline 架构:

Debezium Server 配置使用 Debezium Source Connector 来捕获源数据库中的变更。变更事件可以序列化为不同的格式,例如 JSON 或 Apache Avro,然后发送到各种消息中间件,例如 Amazon Kinesis、Apache Pulsar。

基于 Debezium Engine

使用 Debezium Connector 的另一种方法是基于 Debezium Engine。在这种情况下,Debezium 不会通过 Kafka Connect 运行,而是作为嵌入到用户自定义 Java 应用程序中的库运行。这对于在应用程序本身获取变更事件非常有帮助,无需部署完整的 Kafka 和 Kafka Connect 集群,也不用将变更流式传输到消息中间件上。这篇文章展示了如何使用 Debezium Databend Server 实现从 MySQL 的数据全增量同步。

特性总结

Debezium 是一组用于 Apache Kafka Connect 的 Source Connector。每个 Connector 都通过使用该数据库的变更数据捕获 (CDC) 功能从不同的数据库中获取变更。与其他方法(例如轮询或双重写入)不同,Debezium 的实现基于日志的 CDC:

  • 确保捕获所有的数据变更。
  • 以极低的延迟生成变更事件,同时避免因为频繁轮询导致 CPU 使用率增加。例如,对于 MySQL 或 PostgreSQL,延迟在毫秒范围内。
  • 不需要更改数据模型,例如增加 ‘Last Updated’ 列。
  • 可以捕获删除操作。
  • 可以捕获旧记录状态以及其他元数据,例如,事务 ID,具体取决于数据库的功能和配置。

Flink CDC 是基于数据库日志 CDC(Change Data Capture)技术的实时数据集成框架,支持了全增量一体化、无锁读取、并行读取、表结构变更自动同步、分布式架构等高级特性。Flink CDC 发展了三年多的时间。2020 年,从作为个人的 Side project 出发,后来被越来越多人认识到。

1.0

Flink CDC 1.0 比简单,直接就是底层封装了 Debezium, 而 Debezium 同步一张表分为两个阶段:

  • 全量阶段:查询当前表中所有记录;
  • 增量阶段:从 binlog 消费变更数据。

大部分用户使用的场景都是全量 + 增量同步,加锁是发生在全量阶段,目的是为了确定全量阶段的初始位点,保证增量 + 全量实现一条不多,一条不少,从而保证数据一致性。从下图中我们可以分析全局锁和表锁的一些加锁流程,左边红色线条是锁的生命周期,右边是 MySQL 开启可重复读事务的生命周期。

以全局锁为例,首先是获取一个锁,然后再去开启可重复读的事务。这里锁住操作是读取 binlog 的起始位置和当前表的 schema。这样做的目的是保证 binlog 的起始位置和读取到的当前 schema 是可以对应上的,因为表的 schema 是会改变的,比如如删除列或者增加列。在读取这两个信息后,SnapshotReader 会在可重复读事务里读取全量数据,在全量数据读取完成后,会启动 BinlogReader 从读取的 binlog 起始位置开始增量读取,从而保证全量数据 + 增量数据的无缝衔接。

表锁是全局锁的退化版,因为全局锁的权限会比较高,因此在某些场景,用户只有表锁。表锁锁的时间会更长,因为表锁有个特征:锁提前释放了可重复读的事务默认会提交,所以锁需要等到全量数据读完后才能释放。而 FLUSH TABLE WITH READ LOCK 的操作会存在以下问题:

  1. 该命令等待所有正在进行的 update 完成,同时阻止所有新来的 update;
  2. 执行成功之前必须等待所有正在运行的 select 完成,等待执行的 update 就会等待的更久。
  3. 会阻止其他的事务 commit。

所以对于加锁来说在时间上是不确定的,严重的可能会 hang 住数据库。

当然,Flink CDC 1.x 版本也可以不加锁,但是会丢失一定的数据准确性。总的来说 1.x 存在的问题是:

  • 全量 + 增量读取的过程需要保证所有数据的一致性,因此需要通过加锁保证,但是加锁在数据库层面上是一个十分高危的操作。底层 Debezium 在保证数据一致性时,需要对读取的库或表加锁,全局锁可能导致数据库锁住,表级锁会锁住表的读,DBA 一般不给锁权限。
  • 不支持水平扩展,因为 Flink CDC 底层是基于 Debezium,起架构是单节点,所以Flink CDC 只支持单并发。在全量阶段读取阶段,如果表非常大 (亿级别),读取时间在小时甚至天级别,用户不能通过增加资源去提升作业速度。
  • 全量读取阶段不支持 checkpoint:CDC 读取分为两个阶段,全量读取和增量读取,目前全量读取阶段是不支持 checkpoint 的,因此会存在一个问题:当我们同步全量数据时,假设需要 5 个小时,当我们同步了 4 小时的时候作业失败,这时候就需要重新开始,再读取 5 个小时。
2.0

了解了 1.0 的痛点之后,2.0 主要解决的问题有三个:支持无锁、水平扩展、checkpoint。

Flink CDC 2.0 在借鉴了 Netflix 这篇论文 之后可以做到全程无锁和并发读取。

3.0

Flink CDC 3.0 拥有了更多数据同步过程中的实用特性,成为了一个端到端的数据集成框架:

  • 上游 schema 变更自动同步到下游,已有作业支持动态加表
  • 空闲资源自动回收,一个 sink 实例支持写入多表
  • API 设计直接面向数据集成场景,帮助用户轻松构建同步作业

Databend 也提供了 Flink-Databend-Connector,这篇文章展示了如何使用 databend connector 实现从 MySQL 的数据同步。

Canal

canal [kə’næl],译意为水道/管道/沟渠,主要用途是基于 MySQL 数据库增量日志解析,提供增量数据订阅和消费。

早期阿里巴巴因为杭州和美国双机房部署,存在跨机房同步的业务需求,实现方式主要是基于业务 trigger 获取增量变更。从 2010 年开始,业务逐步尝试数据库日志解析获取增量变更进行同步,由此衍生出了大量的数据库增量订阅和消费业务。

基于日志增量订阅和消费的业务包括:

  • 数据库镜像
  • 数据库实时备份
  • 索引构建和实时维护(拆分异构索引、倒排索引等)
  • 业务 cache 刷新
  • 带业务逻辑的增量数据处理

当前的canal支持源端MySQL版本包括 5.1.x , 5.5.x , 5.6.x , 5.7.x , 8.0.x。

canal 工作原理

  • canal 模拟 MySQL slave 的交互协议,伪装自己为MySQL slave,向MySQL master发送dump协议
  • MySQL master收到 dump 请求,开始推送 binary log 给 slave (即 canal )
  • canal 解析 binary log 对象(原始为 byte 流)

Binlog获取详解

Binlog发送接收流程,流程如下图所示:

首先,我们需要伪造一个slave,向master注册,这样master才会发送binlog event。注册很简单,就是向master发送COM_REGISTER_SLAVE命令,带上slave相关信息。这里需要注意,因为在MySQL的replication topology中,都需要使用一个唯一的server id来区别标示不同的server实例,所以这里我们伪造的slave也需要一个唯一的server id。

接着实现binlog的dump。MySQL只支持一种 binlog dump方式,也就是指定binlog filename + position,向master发送COM_BINLOG_DUMP命令。在发送dump命令的时候,我们可以指定flag为BINLOG_DUMP_NON_BLOCK,这样master在没有可发送的binlog event之后,就会返回一个EOF package。不过通常对于slave来说,一直把连接挂着可能更好,这样能更及时收到新产生的binlog event。

Canal 架构

  • server代表一个canal运行实例,对应于一个jvm,也可以理解为一个进程
  • instance对应于一个数据队列 (1个server对应1..n个instance),每一个数据队列可以理解为一个数据库实例。

instance代表了一个实际运行的数据队列,包括了EventPaser,EventSink,EventStore等组件。

抽象了CanalInstanceGenerator,主要是考虑配置的管理方式:

manager方式:和你自己的内部web console/manager系统进行对接。(目前主要是公司内部使用,Otter采用这种方式) spring方式:基于spring xml + properties进行定义,构建spring配置.

下面是 canalServer 和 instance 代码:

1
2
3
4
5
6
7
8
9
10
11
12
13
14
15
16
17
18
19
20
21
22
23
24
25
26
27
28
29
30
31
32
33
34
canalServer.setCanalInstanceGenerator(new CanalInstanceGenerator() {

public CanalInstance generate(String destination) {
Canal canal = canalConfigClient.findCanal(destination);
// 此处省略部分代码 大致逻辑是设置canal一些属性

CanalInstanceWithManager instance = new CanalInstanceWithManager(canal, filter) {

protected CanalHAController initHaController() {
HAMode haMode = parameters.getHaMode();
if (haMode.isMedia()) {
return new MediaHAController(parameters.getMediaGroup(),
parameters.getDbUsername(),
parameters.getDbPassword(),
parameters.getDefaultDatabaseName());
} else {
return super.initHaController();
}
}

protected void startEventParserInternal(CanalEventParser parser, boolean isGroup) {
//大致逻辑是 设置支持的类型
//初始化设置MysqlEventParser的主库信息,这处抽象不好,目前只支持mysql
}

};
return instance;
}
});
canalServer.start(); //启动canalServer

canalServer.start(destination);//启动对应instance
this.clientIdentity = new ClientIdentity(destination, pipeline.getParameters().getMainstemClientId(), filter);
canalServer.subscribe(clientIdentity);// 发起一次订阅,当监听到instance配置时,调用generate方法注入新的instance

instance模块:

  • eventParser (数据源接入,模拟slave协议和master进行交互,协议解析)
  • eventSink (Parser和Store链接器,进行数据过滤,加工,分发的工作)
  • eventStore (数据存储)
  • metaManager (增量订阅&消费信息管理器)

基于 Canal 的实现原理来看,Canal 并不支持全量+增量的同步模式。

Airbyte

Airbyte 是一个比较新的数据集成平台,提供了非常多的 connector,号称支持上千种数据源。Databend 也提供了Airbyte Destination Connecto,用户可以从 Airbyte 支持的上百个 source connector 比如 mysql, es, pg 等同步数据到 Databend。

Airbyte 的优势是支持的数据源非常多,甚至像 Google Docs, Facebook 都支持。 Airbyte 是 ELT 模式,先抽取数据到目标表后,再进行清洗。但是缺点也非常明显,Airbyte 是一个打包的平台,所有的数据源都要被集成到里面,所以使用起来非常地重。并且Airbyte 同步过来的数据是一张大宽表,依赖 dbt Normalization 或者一些 ELT 工作才能够表展开。所以适合的是数据源多,并且需要统一管理的场景。

DataX

DataX 是阿里开源的一个异构数据源离线同步工具,能够实现包括关系型数据库(MySQL、Oracle等)、HDFS、Hive等各种异构数据源之间稳定高效的数据同步功能。DataX 本身作为数据同步框架,将不同数据源的同步, 抽象为从 source 端读取数据的 Reader 插件,以及向目标端写入数据的Writer插件,理论上DataX框架可以支持任意数据源的数据同步工作。

Databend 提供了 Databend Writer 的 Datax Plugin , 可以支持从任意具有 Datax Reader 插件的数据库同步数据到 Databend,并且支持全量insert 和 upsert 两种同步模式。Datax 最适合的场景是 T+1 的离线数据同步。

总结

CDC 的技术方案非常多,目前业界主流的实现机制可以分为两种:

基于查询的 CDC:

  • 离线调度查询作业,批处理。把一张表同步到其他系统,每次通过查询去获取表中最新的数据;
  • 无法保障数据一致性,查的过程中有可能数据已经发生了多次变更;
  • 不保障实时性,基于离线调度存在天然的延迟。

基于日志的 CDC:

  • 实时消费日志,流处理,例如 MySQL 的 binlog 日志完整记录了数据库中的变更,可以把 binlog 文件当作流的数据源;
  • 保障数据一致性,因为 binlog 文件包含了所有历史变更明细;
  • 保障实时性,因为类似 binlog 的日志文件是可以流式消费的,提供的是实时数据。

对比常见的开源 CDC 方案,我们可以发现,对比增量同步能力:

  • 基于日志的方式,可以很好的做到增量同步;
  • 而基于查询的方式是很难做到增量同步的。
  • 对比全量同步能力,基于查询或者日志的 CDC 方案基本都支持,除了 Canal。
  • 而对比全量 + 增量同步的能力,只有 Flink CDC、Debezium 支持较好。
  • 从架构角度去看,该表将架构分为单机和分布式,这里的分布式架构不单纯体现在数据读取能力的水平扩展上,更重要的是在大数据场景下分布式系统接入能力。例如 Flink CDC 的数据入湖或者入仓的时候,下游通常是分布式的系统,如 Hive、HDFS、Iceberg、Hudi 等,那么从对接入分布式系统能力上看,Flink CDC 的架构能够很好地接入此类系统。

  • 在数据转换 / 数据清洗能力上,当数据进入到 CDC 工具的时候是否能较方便的对数据做一些过滤或者清洗

  • 在 Flink CDC 上操作很简单,可以通过 Flink SQL 去操作;
  • 但是像 DataX、Debezium 等则需要通过脚本或者模板去做,所以用户的使用门槛会比较高。

另外,在生态方面,这里指的是下游的一些数据库或者数据源的支持。Flink CDC 下游有丰富的 Connector,例如写入到 Databend、MySQL、Pg、ClickHouse 等常见的一些系统,也支持各种自定义 connector。


]]>
数据同步工具考古
databend debezium server support auto schema evolution https://cloudsjhan.github.io/2024/01/25/databend-debezium-server-support-auto-schema-evolution/ 2024-01-25T09:29:12.000Z 2024-01-27T15:49:04.579Z

背景

Debezium Server Databend 是一个基于 Debezium Engine 自研的轻量级 CDC 项目,用于实时捕获数据库更改并将其作为事件流传递最终将数据写入目标数据库 Databend。它提供了一种简单的方式来监视和捕获关系型数据库的变化,并支持将这些变化转换为可消费事件。使用 Debezium server databend 实现 CDC 无须依赖大型的 Data Infra 比如 Flink, Kafka, Spark 等,只需一个启动脚本即可开启实时数据同步。

CDC 过程中的 Schema 变更处理是上游数据库中十分常见的用户场景,也是数据同步框架实现的难点。针对该场景,Databend-debezium-server 0.3.0 引入了 Auto Schema Evolution 的能力,在每一批次的数据中协调并控制作业拓扑中的 schema 变更事件处理。

实现过程

Debezium Server Databend 实现 Schema Auto Evolution 功能的原理大致是:

在配置文件中新增 debezium.sink.databend.schema.evolution 的配置,默认为 false 不开启该功能。

当上游数据源发生 schema 变更时,先将流水线中已经读出的的数据全部刷出以保证进入数据流的这一批 schema 的一致性:

然后先将该类 schemachangekey 事件暂存到 schemaEvolutionEvents 的 ArrayList 中。

1
2
3
4
5
6
List<DatabendChangeEvent> schemaEvolutionEvents = new ArrayList<>();
for (DatabendChangeEvent event : events) {
if (DatabendUtil.isSchemaChanged(event.schema()) && isSchemaEvolutionEnabled) {
schemaEvolutionEvents.add(event);
}
}

先将上面刷出的数据执行写入操作,写入这批数据之后且解析 schema 变更的事件之前的时间里不会有新的数据进来。数据处理完后再去解析 schema change events,如果事件类型属于 DDL 并且为 alter table 语句,就对目标 database.table 执行该 DDL。

1
2
3
4
5
6
// handle schema evolution
try {
schemaEvolution(table, schemaEvolutionEvents);
} catch (Exception e) {
throw new RuntimeException(e.getMessage());
}
1
2
3
4
5
6
7
8
9
10
11
12
13
14
15
16
17
public void schemaEvolution(RelationalTable table, List<DatabendChangeEvent> events) {
for (DatabendChangeEvent event : events) {
Map<String, Object> values = event.valueAsMap();
for (Map.Entry<String, Object> entry : values.entrySet()) {
if (entry.getKey().contains("ddl") && entry.getValue().toString().toLowerCase().contains("alter table")) {
String tableName = getFirstWordAfterAlterTable(entry.getValue().toString());
String ddlSql = replaceFirstWordAfterTable(entry.getValue().toString(), table.databaseName + "." + tableName);
try (PreparedStatement statement = connection.prepareStatement(ddlSql)) {
System.out.println(ddlSql);
statement.execute(ddlSql);
} catch (SQLException e) {
throw new RuntimeException(e.getMessage());
}
}
}
}
}

当 schema 变更事件处理成功后,会继续新的数据同步流程。

基本的处理流程如下图所示:

实践&演示

Debezium Server Databend

  • Clone 项目: git clone `https://github.com/databendcloud/debezium-server-databend.git`

  • 从项目根目录开始:

    • 构建和打包 debezium server: mvn -Passembly -Dmaven.test.skip package
    • 构建完成后,解压服务器分发包: unzip debezium-server-databend-dist/target/debezium-server-databend-dist*.zip -d databendDist
    • 进入解压后的文件夹: cd databendDist
    • 创建 application.properties 文件并修改: nano conf/application.properties,将下面的 application.properties 拷贝进去,根据用户实际情况修改相应的配置。
    1
    2
    3
    4
    5
    6
    7
    8
    9
    10
    11
    12
    13
    14
    15
    16
    17
    18
    19
    20
    21
    22
    23
    24
    25
    26
    27
    28
    29
    30
    31
    32
    33
    34
    35
    36
    37
    38
    39
    40
    41
    42
    43
    44
    45
    debezium.sink.type=databend
    debezium.sink.databend.upsert=true
    debezium.sink.databend.upsert-keep-deletes=false
    debezium.sink.databend.database.databaseName=debezium
    debezium.sink.databend.database.url=jdbc:databend://tnf34b0rm--xxxxxx.default.databend.cn:443
    debezium.sink.databend.database.username=cloudapp
    debezium.sink.databend.database.password=password
    debezium.sink.databend.database.primaryKey=id
    debezium.sink.databend.database.tableName=products
    debezium.sink.databend.database.param.ssl=true
    debezium.sink.databend.schema.evolution=true // Enable Auto Schema Evolution

    # enable event schemas
    debezium.format.value.schemas.enable=true
    debezium.format.key.schemas.enable=true
    debezium.format.value=json
    debezium.format.key=json

    # mysql source
    debezium.source.connector.class=io.debezium.connector.mysql.MySqlConnector
    debezium.source.offset.storage.file.filename=data/offsets.dat
    debezium.source.offset.flush.interval.ms=60000

    debezium.source.database.hostname=127.0.0.1
    debezium.source.database.port=3306
    debezium.source.database.user=root
    debezium.source.database.password=123456
    debezium.source.database.dbname=mydb
    debezium.source.database.server.name=from_mysql
    debezium.source.include.schema.changes=false
    debezium.source.table.include.list=mydb.products
    # debezium.source.database.ssl.mode=required
    # Run without Kafka, use local file to store checkpoints
    debezium.source.database.history=io.debezium.relational.history.FileDatabaseHistory
    debezium.source.database.history.file.filename=data/status.dat
    # do event flattening. unwrap message!
    debezium.transforms=unwrap
    debezium.transforms.unwrap.type=io.debezium.transforms.ExtractNewRecordState
    debezium.transforms.unwrap.delete.handling.mode=rewrite
    debezium.transforms.unwrap.drop.tombstones=true

    # ############ SET LOG LEVELS ############
    quarkus.log.level=INFO
    # Ignore messages below warning level from Jetty, because it's a bit verbose
    quarkus.log.category."org.eclipse.jetty".level=WARN
  • 使用提供的脚本运行服务: bash run.sh
  • Debezium Server with Databend 将会启动

Mysql 中准备表和数据

创建数据库 mydb 和表 products,并插入数据:

1
2
3
4
5
6
7
8
9
10
11
12
13
14
15
16
CREATE DATABASE mydb;
USE mydb;

CREATE TABLE products (id INTEGER NOT NULL AUTO_INCREMENT PRIMARY KEY,name VARCHAR(255) NOT NULL,description VARCHAR(512));
ALTER TABLE products AUTO_INCREMENT = 10;

INSERT INTO products VALUES (default,"scooter","Small 2-wheel scooter"),
(default,"car battery","12V car battery"),
(default,"12-pack drill bits","12-pack of drill bits with sizes ranging from #40 to #3"),
(default,"hammer","12oz carpenter's hammer"),
(default,"hammer","14oz carpenter's hammer"),
(default,"hammer","16oz carpenter's hammer"),
(default,"rocks","box of assorted rocks"),
(default,"jacket","water resistent black wind breaker"),
(default,"cloud","test for databend"),
(default,"spare tire","24 inch spare tire");

Databend Cloud 中创建 Database

1
create database debezium

NOTE: 用户可以不必先在 Databend 中创建表,系统检测到后会自动为用户建表。

启动 Debezium Server Databend

1
bash run.sh

首次启动会进入 init snapshot 模式,通过配置的 Batch Size 全量将 MySQL 中的数据同步到 Databend,所以在 Databend 中可以看到 MySQL 中的数据已经同步过来了:

改变 Mysql 表结构

1
alter table products add columm a int;

在 products 表中新增一列 a int

同时在 Databend Cloud 中也可以看到目标同步表的结构也随之变更了:

此时在 mysql 中插入数据,新的数据就会以新的 Schema 形式写入目标表:

结论

Debezium Server Databend 在支持 Auto Schema Evolution 之后,用户无需在数据源发生 schema 变更时手动介入,大大降低用户的运维成本;只需对同步任务进行简单配置即可将多表、多个数据库同步至下游,提高了数据同步的效率并且降低了用户的开发难度。


]]>
Databend debezium server support auto schema evolution
(持续更新)Databend SDK 接入最佳实践&常见问题 https://cloudsjhan.github.io/2024/01/06/Databend-SDK-接入最佳实践-常见问题/ 2024-01-06T09:45:41.000Z 2024-01-06T12:38:43.804Z

本文档包含 Databend 支持的所有 SDK 接入的最佳实践以及在使用过程中可能会出现的问题以及对应的解决方案。希望可以成为用户接入 Databend 的一把金钥匙,打开通向 Databend 的大门。

Databend JDBC

创建 JDBC Connection

1
2
3
4
5
private Connection createConnection()
throws SQLException {
String url = "jdbc:databend://localhost:8000";
return DriverManager.getConnection(url, "databend", "databend"); // user, password
}

建表

1
2
Connection c = createConnection();
c.createStatement().execute("create table test_basic_driver.table1(i int)");

单条插入数据

1
2
3
Connection c = createConnection();
c.createStatement().execute("create table test_basic_driver.table1(i int, j varchar)");
c.createStatement().execute("insert into test_basic_driver.table1 values(1,'j')");

单条插入无法发挥 databend 的性能,写入性能较差,只能作为测试使用。推荐使用批量插入(Batch Insert)

批量插入

1
2
3
4
5
6
7
8
9
10
11
12
13
14
15
16
17
18
19
20
21
22
23
24
25
26
27
28
public void BatchInsert() throws SQLException {
Connection c = createConnection();
c.setAutoCommit(false);

c.createStatement().execute("create table test_basic_driver.test_prepare_statement(i int, j varchar)");

PreparedStatement ps = c.prepareStatement("insert into test_prepare_statement values");
ps.setInt(1, 1);
ps.setString(2, "a");
ps.addBatch();
ps.setInt(1, 2);
ps.setString(2, "b");
ps.addBatch();
System.out.println("execute batch insert");
int[] ans = ps.executeBatch();
ps.close();
Statement statement = c.createStatement();

System.out.println("execute select");
statement.execute("SELECT * from test_prepare_statement");
ResultSet r = statement.getResultSet();
while (r.next()) {
System.out.println(r.getInt(1));
System.out.println(r.getString(2));
}
statement.close();
c.close();
}

在实际使用中,推荐增大 Batch size 到 10w~100w 之间

连接参数

https://github.com/datafuselabs/databend-jdbc/blob/main/docs/Connection.md

常见问题

Q: Upload to stream failed 报错

A: 检查 Client 到 OSS 的网络情况

Q: Spring boot 等项目 Slf4j provider not found

A: 这可能是引入的 slf4j 包产生了冲突,检查 pom 中 slf4j 版本是否一致

Q: 如何将 NULL 写入表

A: ps.setNull(index, Types.NULL)

Q: Spring boot JDBCTemplate getParameterType not implement

A: getParameterType 在 databend JDBC 中目前还没有实现,已在开发计划中

Golang SDK

创建 sql.db client

1
2
3
4
5
6
7
8
9
10
11
12
import (
"database/sql"
_ "github.com/datafuselabs/databend-go"
)
func main() {
db, err := sql.Open("databend", dsn)
if err != nil {
return err
}
db.Ping()
db.Close()
}

执行 SQL

1
2
3
4
5
6
7
8
9
10
conn, err := sql.Open("databend", dsn)
if err != nil {
fmt.Println(err)
}
conn.Exec(`DROP TABLE IF EXISTS data`)
_, err = conn.Exec(` CREATE TABLE IF NOT EXISTS data( Col1 TINYINT, Col2 VARCHAR )`)
if err != nil {
fmt.Println(err)
}
_, err = conn.Exec("INSERT INTO data VALUES (1, 'test-1')")

批量插入

1
2
3
4
5
6
7
8
9
10
11
12
13
14
15
16
17
18
19
20
21
22
func main() {
conn, err := sql.Open("databend", "http://databend:databend@localhost:8000/default?sslmode=disable")
tx, err := conn.Begin()
if err != nil {
fmt.Println(err)
}
batch, err := tx.Prepare(fmt.Sprintf("INSERT INTO %s VALUES", "test"))
for i := 0; i < 10; i++ {
_, err = batch.Exec(
"1234",
"2345",
"3.1415",
"test",
"test2",
"[4, 5, 6]",
"[1, 2, 3]",
"2021-01-01",
"2021-01-01 00:00:00",
)
}
err = tx.Commit()
}

请求单行/多行 (Querying Row/s)

1
2
3
4
5
6
7
8
9
10
11
12
13
14
15
func main() {
// create table data (col1 uint8, col2 string);
// insert into data values(1,'col2');conn, err := sql.Open("databend", "http://databend:databend@localhost:8000/default?sslmode=disable")
if err != nil {
fmt.Println(err)
}
row := conn.QueryRow("SELECT * FROM data")
var (
col1 uint8col2 string
)
if err := row.Scan(&col1, &col2); err != nil {
fmt.Println(err)
}
fmt.Println(col2)
}

Python SDK

databend-py

创建 client
1
c = Client.from_url("http://user:password@host:port/db?secure=false")

Databend py DSN 中支持的参数可以参考: https://github.com/datafuselabs/databend-py/blob/main/docs/connection.md

建表&查询
1
2
3
4
5
c = Client.from_url(databend_url)
c.execute('CREATE TABLE if not exists test (x Int32,y VARCHAR)')
t, r = c.execute('INSERT INTO test VALUES', [(3, 'aa'),(4,'bb')],with_column_types=True)
# execute 返回值有两个,第一个是(column_name, column_type):[('a', 'Int32'), ('b', 'String')], 只有当 with_column_types=True 的时候才返回,默认为 False;
# 第二个返回值是数据集: [(1, 'a'), (2, 'b')]
批量插入
1
2
3
4
5
6
7
8
c = Client.from_url(databend_url)
c.execute('DROP TABLE IF EXISTS test')
c.execute('CREATE TABLE if not exists test (x Int32,y VARCHAR)')
c.execute('DESC test')
_, r1 = c.execute('INSERT INTO test VALUES', [(3, 'aa'), (4, 'bb')])
assertEqual(r1, 2)
_, ss = c.execute('select * from test')
assertEqual(ss, [(3, 'aa'), (4, 'bb')])
Upload data to stage

databend py 可以直接将 python slice 数据以 csv 格式导入到 databend stage

1
2
3
4
from databend_py import Client
client = Client.from_url(databend_url)
stage_path = client.upload_to_stage('@~', "upload.csv", [(1, 'a'), (1, 'b')])
# stage_path is @~/upload.csv
Upload file to stage

Databend py 也可以直接将文件上传到 stage

1
2
3
4
5
from databend_py import Client
client = Client.from_url(self.databend_url)
with open("upload.csv", "rb") as f:
stage_path = client.upload_to_stage('@~', "upload.csv", f)
print(stage_path)

Databend sqlalchemy

创建 sqlalchemy connect 并查询
1
2
3
4
5
6
7
8
9
from sqlalchemy import create_engine, text
from sqlalchemy.engine.base import Connection, Engine

engine = create_engine(
f"databend://{username}:{password}@{host_port_name}/{database_name}?sslmode=disable"
)
connection = engine.connect()
result = connection.execute(text("SELECT 1"))
print(result.fetchall())

databend-sqlalchemy 在版本<v0.4.0 使用[databend-py](https://github.com/datafuselabs/databend-py)时作为内部 Driver,>= v0.4.0 时使用 databend driver python binding作为内部驱动程序。两者之间的唯一区别是,DSN中提供的连接参数不同。使用相应的版本时应该参考相应驱动程序提供的连接参数。

Bendsql

Exec

1
2
3
4
5
6
7
8
9
10
11
12
13
14
use databend_driver::Client;

let dsn = "databend://root:@localhost:8000/default?sslmode=disable".to_string();
let client = Client::new(dsn);
let conn = client.get_conn().await.unwrap();

let sql_create = "CREATE TABLE books (
title VARCHAR,
author VARCHAR,
date Date
);";
conn.exec(sql_create).await.unwrap();
let sql_insert = "INSERT INTO books VALUES ('The Little Prince', 'Antoine de Saint-Exupéry', '1943-04-06');";
conn.exec(sql_insert).await.unwrap();

请求单行数据

1
2
3
let row = conn.query_row("SELECT * FROM books;").await.unwrap();
let (title,author,date): (String,String,i32) = row.unwrap().try_into().unwrap();
println!("{} {} {}", title, author, date);

请求多行

1
2
3
4
5
let mut rows = conn.query_iter("SELECT * FROM books;").await.unwrap();
while let Some(row) = rows.next().await {
let (title,author,date): (String,String,chrono::NaiveDate) = row.unwrap().try_into().unwrap();
println!("{} {} {}", title, author, date);
}

DSN 参数

参考:https://github.com/datafuselabs/bendsql/blob/main/README.md#dsn


]]>
Databend SDK 接入最佳实践&常见问题
从 AutoMQ Kafka 导出数据到 Databend https://cloudsjhan.github.io/2024/01/02/从-AutoMQ-Kafka-导出数据到-Databend/ 2024-01-02T09:08:59.000Z 2024-01-02T09:11:41.752Z

Databend是使用 Rust 研发、开源的、完全面向云架构、基于对象存储构建的新一代云原生数据仓库,为企业提供湖仓一体化、计
算和存储分离的大数据分析平台。

本文将介绍如何通过 bend-ingest-kafka 将数据从 AutoMQ for Kafka 导入 Databend。

本文中提及的 AutoMQ Kafka 术语,均特指安托盟丘(杭州)科技有限公司通过 GitHub AutoMQ 组织下开源的 automq-for-kafka 项目。

环境准备

准备 Databend Cloud 以及测试数据

首先到 Databend Cloud 开启你的 Warehouse ,并在 worksheet 中创建数据库库和测试表:

1
2
3
4
5
6
7
create database automq_db;
create table users (
id bigint NOT NULL,
name string NOT NULL,
ts timestamp,
status string
)

准备 AutoMQ Kafka 环境和测试数据

参考 部署 AutoMQ 到 AWS▸ 部署好 AutoMQ Kafka 集群,确保 AutoMQ Kafka 与 StarRocks 之间保持网络连通。

在AutoMQ Kafka中快速创建一个名为 example_topic 的主题并向其中写入一条测试 JSON 数据,可以通过以下步骤实现:

创建Topic:

使用 Apache Kafka 命令行工具来创建主题。你需要有 Kafka 环境的访问权限,并且确保 Kafka 服务正在运行。以下是创建主题的命令:

1
./kafka-topics.sh --create --topic exampleto_topic --bootstrap-server 10.0.96.4:9092  --partitions 1 --replication-factor 1

注意:执行命令时,需要将 topic 和 bootstarp-server 替换为实际使用的 Kafka 服务器地址。

创建 topic 之后可以用以下命令检查 topic 创建的结果。

1
./kafka-topics.sh --describe example_topic --bootstrap-server 10.0.96.4:9092

生成测试数据:

生成一条简单的 JSON 格式的测试数据,和前文的表需要对应。

1
2
3
4
5
6
{
"id":1,
"name":"Test User",
"ts":"2023-11-10T12:00:00",
"status":"active"
}

写入测试数据

使用 Kafka 的命令行工具或者编程方式将测试数据写入到 example_topic。以下是使用命令行工具的一个示例:

1
echo '{"id": 1, "name": "测试用户", "ts": "2023-11-10T12:00:00", "status": "active"}' | sh kafka-console-producer.sh --broker-list 10.0.96.4:9092 --topic example_topic

使用如下命令可以查看刚写入的 topic 数据:

1
sh kafka-console-consumer.sh --bootstrap-server 10.0.96.4:9092 --topic example_topic --from-beginning

创建 bend-ingest-databend job

bend-ingest-kafka 能够监控 kafka 并将数据批量写入 Databend Table。

部署 bend-ingest-kafka 之后,即可开启数据导入 job。

1
bend-ingest-kafka --kafka-bootstrap-servers="localhost:9094" --kafka-topic="example_topic" --kafka-consumer-group="Consumer Group" --databend-dsn="https://cloudapp:password@host:443" --databend-table="automq_db.users" --data-format="json" --batch-size=5 --batch-max-interval=30s

注意:将 kafka_broker_list 替换为实际使用的 Kafka 服务器地址。

参数说明

databend-dsn

Databend Cloud 提供的连接到 warehouse 的 DSN,可以参考该文档 获取。

batch-size

bend-ingest-kafka 会积攒到 batch-size 条数据再触发一次数据同步。

验证数据导入

到 Databend Cloud worksheet 中查询 automq_db.users 表,可以看到数据已经从 AutoMq 同步到 Databend Table。


]]>
从 AutoMQ Kafka 导出数据到 Databend
使用 LF Edge eKuiper 将物联网流处理数据写入 Databend https://cloudsjhan.github.io/2023/09/15/使用-LF-Edge-eKuiper-将物联网流处理数据写入-Databend/ 2023-09-15T08:12:42.000Z 2023-09-15T08:16:11.544Z

LF Edge eKuiper

[LF Edge eKuiper(https://github.com/lf-edge/ekuiper) 是 Golang 实现的轻量级物联网边缘分析、流式处理开源软件,可以运行在各类资源受限的边缘设备上。eKuiper 的主要目标是在边缘端提供一个流媒体软件框架(类似于 Apache Flink (opens new window))。eKuiper 的规则引擎允许用户提供基于 SQL 或基于图形(类似于 Node-RED)的规则,在几分钟内创建物联网边缘分析应用。具体介绍可以参考 LF Edge eKuiper - 超轻量物联网边缘流处理软件

Databend Sql Sink

eKuiper 支持通过 Golang 或者 Python 在源 (Source)SQL 函数, 目标 (Sink) 三个方面的扩展,通过支持不同的 Sink,允许用户将分析结果发送到不同的扩展系统中。Databend 作为 Sink 也被集成到了 eKuiper plugin 当中,下面通过一个案例来展示如何使用 eKuiper 将物联网流处理数据写入 Databend。

编译 ekuiper 和 Databend Sql Plugin

Ekuiper

1
2
git clone https://github.com/lf-edge/ekuiper & cd ekuiper
make

Databend Sql Plugin

1
go build -trimpath --buildmode=plugin -tags databend -o plugins/sinks/Sql.so extensions/sinks/sql/sql.go

编译后的 sink plugin 拷贝到 build 目录:

1
cp plugins/sinks/Sql.so _build/kuiper-1.11.1-18-g42d9147f-darwin-arm64/plugins/sinks

Databend 建表

在 Databend 中先创建目标表 ekuiper_test:

1
create table ekuiper_test (name string,size bigint,id bigint);

启动 ekuiperd

1
2
cd _build/kuiper-1.11.1-18-g42d9147f-darwin-arm64 
./bin/kuiperd

服务正常启动:

img

创建流(stream) 和 规则 (rule)

Ekuiper 提供了两种管理各种流、规则,目标端的方式,一种是通过 ekuiper-manager 的 docker image(https://hub.docker.com/r/lfedge/ekuiper)启动可视化管理界面,一种是通过 CLI 工具来管理。这里我们使用 CLI。

创建 stream

流是 eKuiper 中数据源连接器的运行形式。它必须指定一个源类型来定义如何连接到外部资源。这里我们创建一个流,从 json 文件数据源中获取数据,并发送到 ekuiper 中。

首先配置文件数据源,连接器的配置文件位于 /etc/sources/file.yaml

1
2
3
4
5
6
7
8
9
10
11
12
13
14
15
16
17
18
19
20
21
22
23
24
25
26
27
28
29
default:
# 文件的类型,支持 json, csv 和 lines
fileType: json
# 文件以 eKuiper 为根目录的目录或文件的绝对路径。
# 请勿在此处包含文件名。文件名应在流数据源中定义
path: data
# 读取文件的时间间隔,单位为ms。如果只读取一次,则将其设置为 0
interval: 0
# 读取后,两条数据发送的间隔时间
sendInterval: 0
# 是否并行读取目录中的文件
parallel: false
# 文件读取后的操作
# 0: 文件保持不变
# 1: 删除文件
# 2: 移动文件到 moveTo 定义的位置
actionAfterRead: 0
# 移动文件的位置, 仅用于 actionAfterRead 为 2 的情况
moveTo: /tmp/kuiper/moved
# 是否包含文件头,多用于 csv。若为 true,则第一行解析为文件头。
hasHeader: false
# 定义文件的列。如果定义了文件头,该选项将被覆盖。
# columns: [id, name]
# 忽略开头多少行的内容。
ignoreStartLines: 0
# 忽略结尾多少行的内容。最后的空行不计算在内。
ignoreEndLines: 0
# 使用指定的压缩方法解压缩文件。现在支持`gzip`、`zstd` 方法。
decompression: ""

使用 CLI 创建 steam 名为 stream1:

1
./bin/kuiper create stream stream1 '(id BIGINT, name STRING,size BIGINT) WITH (DATASOURCE="test.json", FORMAT="json", TYPE="file");'

img

Json 文件的内容为:

1
2
3
4
5
6
[
{"id": 1,"size":100, "name": "John Doe"},
{"id": 2,"size":200, "name": "Jane Smith"},
{"id": 3,"size":300, "name": "Kobe Brant"},
{"id": 4,"size":400, "name": "Alen Iverson"}
]

创建 Databend Sink Rule

一个规则代表了一个流处理流程,定义了从将数据输入流的数据源到各种处理逻辑,再到将数据输入到外部系统的动作。ekuiper 有两种方法来定义规则的业务逻辑。要么使用SQL/动作组合,要么使用新增加的图API。

这里我们通过指定 sqlactions 属性,以声明的方式定义规则的业务逻辑。其中,sql 定义了针对预定义流运行的 SQL 查询,这将转换数据。然后,输出的数据可以通过 action 路由到多个位置。

规则由 JSON 定义,下面是准备创建的规则 myRule.json:

1
2
3
4
5
6
7
8
9
10
11
12
13
14
15
{
"id": "myRule",
"sql": "SELECT id, name from stream1",
"actions": [
{
"log": {
},
"sql": {
"url": "databend://databend:databend@localhost:8000/default?sslmode=disable",
"table": "ekuiper_test",
"fields": ["id","name"]
}
}
]
}

执行 CLI 创建规则:

1
./bin/kuiper create rule myRule -f myRule.json

img

可以查看所创建规则的运行状态:

1
./bin/kuiper getstatus rule myRule

img

规则创建后,会立即将符合规则条件的数据发送到目标端,此时我们查看 databend 的 ekuiper_test 表,可以看到文件数据源中的数据已经被写入到 databend:

img

可以看到由于我们的规则 SQL 中只指定了 id, name 字段,所以这里只有这两个字段被写入。

结论

Ekuiper 是 EMQ 旗下的一款流处理软件,其体积小、功能强大,在工业物联网、车辆网、公共数据分析等很多场景中得到广泛使用。本文介绍如何使用 eKuiper 将物联网流处理数据写入 Databend。


]]>
使用 LF Edge eKuiper 将物联网流处理数据写入 Databend
databend kafka connect 构建实时数据同步 https://cloudsjhan.github.io/2023/09/08/databend-kafka-connect-构建实时数据同步/ 2023-09-08T05:42:15.000Z 2024-07-11T03:22:16.829Z

kafka connect 介绍

Kafka Connect 是一个用于在Apache Kafka®和其他数据系统之间可扩展且可靠地流式传输数据的工具。通过将数据移入和移出 Kafka 进行标准化,使得快速定义连接器以在 Kafka 中传输大型数据集变得简单,可以更轻松地构建大规模的实时数据管道。我们使用 Kafka Connector 读取或写入外部系统、管理数据流以及扩展系统,所有这些都无需开发新代码。Kafka Connect 管理与其他系统连接时的所有常见问题(Schema 管理、容错、并行性、延迟、投递语义等),每个 Connector 只关注如何在目标系统和 Kafka 之间复制数据。

Kafka 连接器通常用来构建 data pipeline,一般有两种使用场景:

开始和结束的端点:例如,将 Kafka 中的数据导出到 Databend 数据库,或者把 Mysql 数据库中的数据导入 Kafka 中。
数据传输的中间介质:例如,为了把海量的日志数据存储到 Elasticsearch 中,可以先把这些日志数据传输到 Kafka 中,然后再从 Kafka 中将这些数据导入到 Elasticsearch 中进行存储。Kafka 连接器可以作为数据管道各个阶段的缓冲区,将消费者程序和生产者程序有效地进行解耦。

Kafka connect 分为两种:

Source connect:负责将数据导入 Kafka。
Sink connect:负责将数据从 Kafka 系统中导出到目标表。
kafka-connect

Databend Kafka Connect

Kafka 目前在 Confluent Hub 上提供了上百种 connector,比如 Elasticsearch Service Sink Connector, Amazon Sink Connector, HDFS Sink 等,用户可以使用这些 connector 以 kafka 为中心构建任意系统之间的数据管道。现在我们也为 Databend 提供了 kafka connect sink plugin,这篇文章我们将会介绍如何使用 MySQL JDBC Source Connector 和 [Databend Sink Connector] 构建实时的数据同步管道。

启动 Kafka Connect

本文假定操作的机器上已经安装 Apache Kafka,如果用户还没有安装,可以参考 Kafka quickstart 进行安装。

Kafka Connect 目前支持两种执行模式:Standalone 模式和分布式模式。

启动模式

Standalone 模式

在 Standalone 模式下,所有的工作都在单个进程中完成。这种模式更容易配置以及入门,但不能充分利用 Kafka Connect 的某些重要功能,例如,容错。我们可以使用如下命令启动 Standalone 进程:

1
bin/connect-standalone.sh config/connect-standalone.properties connector1.properties [connector2.properties ...]

第一个参数 config/connect-standalone.properties 是 worker 的配置。这其中包括 Kafka 连接参数、序列化格式以及提交 Offset 的频率等配置:

1
2
3
4
5
bootstrap.servers=localhost:9092
key.converter.schemas.enable=true
value.converter.schemas.enable=true
offset.storage.file.filename=/tmp/connect.offsets
offset.flush.interval.ms=10000

后面的配置是指定要启动的 connector 的参数。

上述提供的默认配置适用于使用 config/server.properties 提供的默认配置运行的本地集群。如果使用不同配置或者在生产部署,那就需要对默认配置做调整。但无论怎样,所有 Worker(独立的和分布式的)都需要一些配置:

  • bootstrap.servers:该参数列出了将要与 Connect 协同工作的 broker 服务器,Connector 将会向这些 broker 写入数据或者从它们那里读取数据。你不需要指定集群的所有 broker,但是建议至少指定3个。
  • key.converter 和 value.converter:分别指定了消息键和消息值所使用的的转换器,用于在 Kafka Connect 格式和写入 Kafka 的序列化格式之间进行转换。这控制了写入 Kafka 或从 Kafka 读取的消息中键和值的格式。由于这与 Connector 没有任何关系,因此任何 Connector 可以与任何序列化格式一起使用。默认使用 Kafka 提供的 JSONConverter。有些转换器还包含了特定的配置参数。例如,通过将 key.converter.schemas.enable 设置成 true 或者 false 来指定 JSON 消息是否包含 schema。
  • offset.storage.file.filename:用于存储 Offset 数据的文件。

这些配置参数可以让 Kafka Connect 的生产者和消费者访问配置、Offset 和状态 Topic。配置 Kafka Source 任务使用的生产者和 Kafka Sink 任务使用的消费者,可以使用相同的参数,但需要分别加上 ‘producer.’ 和 ‘consumer.’ 前缀。bootstrap.servers 是唯一不需要添加前缀的 Kafka 客户端参数。

distributed 模式

分布式模式可以自动平衡工作负载,并可以动态扩展(或缩减)以及提供容错。分布式模式的执行与 Standalone 模式非常相似:

1
bin/connect-distributed.sh config/connect-distributed.properties

不同之处在于启动的脚本以及配置参数。在分布式模式下,使用 connect-distributed.sh 来代替 connect-standalone.sh。第一个 worker 配置参数使用的是 config/connect-distributed.properties 配置文件:

1
2
3
4
5
6
7
8
9
10
11
12
13
bootstrap.servers=localhost:9092
group.id=connect-cluster
key.converter.schemas.enable=true
value.converter.schemas.enable=true
offset.storage.topic=connect-offsets
offset.storage.replication.factor=1
#offset.storage.partitions=25
config.storage.topic=connect-configs
config.storage.replication.factor=1
status.storage.topic=connect-status
status.storage.replication.factor=1
#status.storage.partitions=5
offset.flush.interval.ms=10000

Kafka Connect 将 Offset、配置以及任务状态存储在 Kafka Topic 中。建议手动创建 Offset、配置和状态的 Topic,以达到所需的分区数和复制因子。如果在启动 Kafka Connect 时尚未创建 Topic,将使用默认分区数和复制因子来自动创建 Topic,这可能不适合我们的应用。在启动集群之前配置如下参数至关重要:

  • group.id:Connect 集群的唯一名称,默认为 connect-cluster。具有相同 group id 的 worker 属于同一个 Connect 集群。需要注意的是这不能与消费者组 ID 冲突。
  • config.storage.topic:用于存储 Connector 和任务配置的 Topic,默认为 connect-configs。需要注意的是这是一个只有一个分区、高度复制、压缩的 Topic。我们可能需要手动创建 Topic 以确保配置的正确,因为自动创建的 Topic 可能有多个分区或自动配置为删除而不是压缩。
  • offset.storage.topic:用于存储 Offset 的 Topic,默认为 connect-offsets。这个 Topic 可以有多个分区。
  • status.storage.topic:用于存储状态的 Topic,默认为 connect-status。这个 Topic 可以有多个分区。

需要注意的是在分布式模式下通过rest api来管理connector。

比如:

1
2
3
4
5
GET /connectors – 返回所有正在运行的connector名。
POST /connectors – 新建一个connector; 请求体必须是json格式并且需要包含name字段和config字段,name是connector的名字,config是json格式,必须包含你的connector的配置信息。
GET /connectors/{name} – 获取指定connetor的信息。
GET /connectors/{name}/config – 获取指定connector的配置信息。
PUT /connectors/{name}/config – 更新指定connector的配置信息。

配置 Connector

MySQL Source Connector

  1. 安装 MySQL Source Connector plugin

这里我们使用 Confluent 提供的 JDBC Source Connector。

从 Confluent hub 下载 Kafka Connect JDBC 插件并将 zip 文件解压到 /path/kafka/libs 目录下。

  1. 安装 MySQL JDBC Driver

因为 Connector 需要与数据库进行通信,所以还需要 JDBC 驱动程序。JDBC Connector 插件也没有内置 MySQL 驱动程序,需要我们单独下载驱动程序。MySQL 为许多平台提供了 JDBC 驱动程序。选择 Platform Independent 选项,然后下载压缩的 TAR 文件。该文件包含 JAR 文件和源代码。将此 tar.gz 文件的内容解压到一个临时目录。将 jar 文件(例如,mysql-connector-java-8.0.17.jar),并且仅将此 JAR 文件复制到与 kafka-connect-jdbc jar 文件相同的 libs 目录下:

1
cp mysql-connector-j-8.0.32.jar /opt/homebrew/Cellar/kafka/3.4.0/libexec/libs/
  1. 配置 MySQL Connector

/path/kafka/config 下创建 mysql.properties 配置文件,并使用下面的配置:

1
2
3
4
5
6
7
8
9
10
11
12
13
14
name=test-source-mysql-autoincrement
connector.class=io.confluent.connect.jdbc.JdbcSourceConnector
tasks.max=1
connection.url=jdbc:mysql://localhost:3306/mydb?useSSL=false
connection.user=root
connection.password=123456
#mode=timestamp+incrementing
mode=incrementing
table.whitelist=mydb.test_kafka
poll.interval.ms=1000
table.poll.interval.ms=3000
incrementing.column.name=id
#timestamp.column.name=tms
topics=test_kafka

针对配置我们这里重点介绍 modeincrementing.column.name ,和 timestamp.column.name 几个字段。Kafka Connect MySQL JDBC Source 提供了三种增量同步模式:

  • incrementing
  • timestamp
  • timestamp+incrementing
  1. 在 incrementing 模式下,每次都是根据 incrementing.column.name 参数指定的列,查询大于自上次拉取的最大id:
1
2
3
SELECT * FROM mydb.test_kafka
WHERE id > ?
ORDER BY id ASC

这种模式的缺点是无法捕获行上更新操作(例如,UPDATE、DELETE)的变更,因为无法增大该行的 id。

  1. timestamp 模式基于表上时间戳列来检测是否是新行或者修改的行。该列最好是随着每次写入而更新,并且值是单调递增的。需要使用 timestamp.column.name 参数指定时间戳列。

需要注意的是时间戳列在数据表中不能设置为 Nullable.

在 timestamp 模式下,每次都是根据 timestamp.column.name 参数指定的列,查询大于自上次拉取成功的 gmt_modified:

1
2
3
SELECT * FROM mydb.test_kafka
WHERE tms > ? AND tms < ?
ORDER BY tms ASC

这种模式可以捕获行上 UPDATE 变更,缺点是可能造成数据的丢失。由于时间戳列不是唯一列字段,可能存在相同时间戳的两列或者多列,假设在导入第二条的过程中发生了崩溃,在恢复重新导入时,拥有相同时间戳的第二条以及后面几条数据都会丢失。这是因为第一条导入成功后,对应的时间戳会被记录已成功消费,恢复后会从大于该时间戳的记录开始同步。此外,也需要确保时间戳列是随着时间递增的,如果人为的修改时间戳列小于当前同步成功的最大时间戳,也会导致该变更不能同步。

  1. 仅使用 incrementing 或 timestamp 模式都存在缺陷。将 timestamp 和 incrementing 一起使用,可以充分利用 incrementing 模式不丢失数据的优点以及 timestamp 模式捕获更新操作变更的优点。需要使用 incrementing.column.name 参数指定严格递增列、使用 timestamp.column.name 参数指定时间戳列。
1
2
3
4
SELECT * FROM mydb.test_kafka
WHERE tms < ?
AND ((tms = ? AND id > ?) OR tms > ?)
ORDER BY tms, id ASC

由于 MySQL JDBC Source Connector 是基于 query-based 的数据获取方式,使用 SELECT 查询来检索数据,并没有复杂的机制来检测已删除的行,所以不支持 DELETE 操作。可以使用基于 log-based 的 [Kafka Connect Debezium]。

后面的演示中会分别演示上述模式的效果。更多的配置参数可以参考 MySQL Source Configs

Databend Kafka Connector

  1. 安装 OR 编译 Databend Kafka Connector

可以从源码编译得到 jar 或者从 release 直接下载。

1
2
git clone https://github.com/databendcloud/databend-kafka-connect.git & cd databend-kafka-connect
mvn -Passembly -Dmaven.test.skip package

databend-kafka-connect.jar 拷贝至 /path/kafka/libs 目录下。

  1. 安装 Databend JDBC Driver

Maven Central 下载最新的 databend jdbc 并拷贝至 /path/kafka/libs 目录下。

  1. 配置 Databend Kafka Connector

/path/kafka/config 下创建 mysql.properties 配置文件,并使用下面的配置:

1
2
3
4
5
6
7
8
9
10
11
12
13
14
15
16
17
18
19
20
name=databend
connector.class=com.databend.kafka.connect.DatabendSinkConnector

connection.url=jdbc:databend://localhost:8000
connection.user=databend
connection.password=databend
connection.attempts=5
connection.backoff.ms=10000
connection.database=default

table.name.format=default.${topic}
max.retries=10
batch.size=1
auto.create=true
auto.evolve=true
insert.mode=upsert
pk.mode=record_value
pk.fields=id
topics=test_kafka
errors.tolerance=all

auto.createauto.evolve 设置成 true 后会自动建表并在源表结构发生变化时同步到目标表。关于更多配置参数的介绍可以参考 databend kafka connect properties

测试 Databend Kafka Connect

准备各个组件

  1. 启动 MySQL
1
2
3
4
5
6
7
8
9
10
11
12
13
14
15
16
17
18
version: '2.1'
services:
postgres:
image: debezium/example-postgres:1.1
ports:
- "5432:5432"
environment:
- POSTGRES_DB=postgres
- POSTGRES_USER=postgres
- POSTGRES_PASSWORD=postgres
mysql:
image: debezium/example-mysql:1.1
ports:
- "3306:3306"
environment:
- MYSQL_ROOT_PASSWORD=123456
- MYSQL_USER=mysqluser
- MYSQL_PASSWORD=mysqlpw
  1. 启动 Databend
1
2
3
4
5
6
7
8
9
10
11
12
13
14
15
version: '3'
services:
databend:
image: datafuselabs/databend
volumes:
- /Users/hanshanjie/databend/local-test/databend/databend-query.toml:/etc/databend/query.toml
environment:
QUERY_DEFAULT_USER: databend
QUERY_DEFAULT_PASSWORD: databend
MINIO_ENABLED: 'true'
ports:
- '8000:8000'
- '9000:9000'
- '3307:3307'
- '8124:8124'
  1. 以 standalone 模式启动 kafka connect,并加载 MySQL Source Connector 和 Databend Sink Connector:
1
./bin/connect-standalone.sh config/connect-standalone.properties config/databend.properties config/mysql.properties
1
2
3
4
5
6
7
8
[2023-09-06 17:39:23,128] WARN [databend|task-0] These configurations '[metrics.context.connect.kafka.cluster.id]' were supplied but are not used yet. (org.apache.kafka.clients.consumer.ConsumerConfig:385)
[2023-09-06 17:39:23,128] INFO [databend|task-0] Kafka version: 3.4.0 (org.apache.kafka.common.utils.AppInfoParser:119)
[2023-09-06 17:39:23,128] INFO [databend|task-0] Kafka commitId: 2e1947d240607d53 (org.apache.kafka.common.utils.AppInfoParser:120)
[2023-09-06 17:39:23,128] INFO [databend|task-0] Kafka startTimeMs: 1693993163128 (org.apache.kafka.common.utils.AppInfoParser:121)
[2023-09-06 17:39:23,148] INFO Created connector databend (org.apache.kafka.connect.cli.ConnectStandalone:113)
[2023-09-06 17:39:23,148] INFO [databend|task-0] [Consumer clientId=connector-consumer-databend-0, groupId=connect-databend] Subscribed to topic(s): test_kafka (org.apache.kafka.clients.consumer.KafkaConsumer:969)
[2023-09-06 17:39:23,150] INFO [databend|task-0] Starting Databend Sink task (com.databend.kafka.connect.sink.DatabendSinkConfig:33)
[2023-09-06 17:39:23,150] INFO [databend|task-0] DatabendSinkConfig values:...

start-databend-kafka

Insert

Insert 模式下我们需要使用如下的 MySQL Connector 配置:

1
2
3
4
5
6
7
8
9
10
11
12
13
14
name=test-source-mysql-jdbc-autoincrement
connector.class=io.confluent.connect.jdbc.JdbcSourceConnector
tasks.max=1
connection.url=jdbc:mysql://localhost:3306/mydb?useSSL=false
connection.user=root
connection.password=123456
#mode=timestamp+incrementing
mode=incrementing
table.whitelist=mydb.test_kafka
poll.interval.ms=1000
table.poll.interval.ms=3000
incrementing.column.name=id
#timestamp.column.name=tms
topics=test_kafka

在 MySQL 中创建数据库 mydb 和表 test_kafka:

1
2
3
4
5
CREATE DATABASE mydb;
USE mydb;

CREATE TABLE test_kafka (id INTEGER NOT NULL AUTO_INCREMENT PRIMARY KEY,name VARCHAR(255) NOT NULL,description VARCHAR(512));
ALTER TABLE test_kafka AUTO_INCREMENT = 10;

在插入数据之前,databend-kafka-connect 并不会收到 event 进行建表和数据写入:

image-20230906164854016

插入数据:

1
2
3
4
5
6
7
8
9
10
INSERT INTO test_kafka VALUES (default,"scooter","Small 2-wheel scooter"),
(default,"car battery","12V car battery"),
(default,"12-pack drill bits","12-pack of drill bits with sizes ranging from #40 to #3"),
(default,"hammer","12oz carpenter's hammer"),
(default,"hammer","14oz carpenter's hammer"),
(default,"hammer","16oz carpenter's hammer"),
(default,"rocks","box of assorted rocks"),
(default,"jacket","water resistent black wind breaker"),
(default,"cloud","test for databend"),
(default,"spare tire","24 inch spare tire");

源表端插入数据后,

image-20230906170712759

Databend 目标端的表就新建出来了:

image-20230906170818765

同时数据也会成功插入:

image-20230906205603282

Support DDL

我们在配置文件中 auto.evolve=true,所以在源表结构发生变化的时候,会将 DDL 同步至目标表。这里我们正好需要将 MySQL Source Connector 的模式从 incrementing 改成 timestamp+incrementing,需要新增一个 timestamp 字段并打开 timestamp.column.name=tms 配置。我们在原表中执行:

1
alter table test_kafka add column tms timestamp;

并插入一条数据:

1
insert into test_kafka values(20,"new data","from kafka",now());

到目标表中查看:

image-20230906210534970

发现 tms 字段已经同步至 Databend table,并且该条数据也已经插入成功:

image-20230906210713675

Upsert

修改 MySQL Connector 的配置为:

1
2
3
4
5
6
7
8
9
10
11
12
13
14
name=test-source-mysql-jdbc-autoincrement
connector.class=io.confluent.connect.jdbc.JdbcSourceConnector
tasks.max=1
connection.url=jdbc:mysql://localhost:3306/mydb?useSSL=false
connection.user=root
connection.password=123456
mode=timestamp+incrementing
#mode=incrementing
table.whitelist=mydb.test_kafka
poll.interval.ms=1000
table.poll.interval.ms=3000
incrementing.column.name=id
timestamp.column.name=tms
topics=test_kafka

重启 kafka connect。

在源表中更新一条数据:

1
update test_kafka set name="update from kafka test" where id=20;

到目标表中可以看到更新的数据:

image-20230906211213647

总结

通过上面的内容可以看到 databend kafka connect 具有以下特性:

  1. Table 和 Column 支持自动创建:auto.create 和 `auto-evolve 的配置支持下,可以自动创建 Table 和 Column,Table name是基于 Kafka topic name 创建的;
  2. Kafka Shemas 支持:connector 支持 Avro、JSON Schema 和 Protobuf 输入数据格式。必须启用 Schema Registry 才能使用基于 Schema Registry 的格式;
  3. 多个写入模式:Connector 支持 insertupsert 写入模式;
  4. 多任务支持:在 kafka connect 的能力下,connector 支持运行一个或多个任务。增加任务的数量可以提高系统性能;
  5. 高可用:分布式模式下可以自动平衡工作负载,并可以动态扩展(或缩减)以及提供容错能力。

同时,Databend Kafka Connect 也能够使用原生 connect 支持的配置,更多配置参考 Kafka Connect Sink Configuration Properties for Confluent Platform


]]>
使用 databend kafka connect 构建实时数据同步
从 0 到 1 为 Databend 开发轻量级 CDC https://cloudsjhan.github.io/2023/07/18/从-0-到-1-为-Databend-设计轻量级-CDC/ 2023-07-18T02:24:52.000Z 2023-09-08T06:33:18.916Z

什么是 CDC

CDC(Change Data Capture)是一种数据同步技术,用于实时捕获和传递数据库中的数据更改。通过 CDC,我们可以将数据库中的变更事件捕获并转换成数据流,然后将其传递给其他系统或应用程序,以实现数据的实时同步和分发。 常见的 CDC 格式为:

1
2
3
4
5
6
7
8
9
10
{
"op": "Update", // "Insert", "Delete",
"event_time": "2022-11-01 12:00:00",
"payload": {
"id": 123,
"author": "Franz Kafka",
"title": "Metamorphosis",
"published_at": "1915-01-01"
}
}

一种生产可用的 CDC 系统架构可以是下图:

现阶段主流 CDC 方案和架构

在目前的技术发展中,有几种主流的CDC方案和架构:

1. Flink CDC

Flink CDC 是基于 Apache Flink 的 CDC 方案。它可以实时捕获数据库的变更事件,并将其转换成流数据。Flink CDC 提供了非常多的连接器组件,可以在异构的数据源之间实现数据流动。

Flink_CDC

Databend 也提供了 flink-databend-connector,可以与 MySQL,PG 等 RDBMS 构建实时数据同步。

2. Kafka Connector

Kafka Connector 是基于 Apache Kafka 的 CDC 方案。Kafka 作为分布式消息队列,可以用于数据传递和分发。Kafka Connector 允许将数据从数据库中捕获,并将其发布到 Kafka 主题中,供其他系统消费。

ingest-data-upstream-systems

3. Canal

Canal 是阿里巴巴开源的 CDC 解决方案。它可以捕获 MySQL 数据库的变更,并将其转换成消息格式输出,常用于数据同步和业务解耦。限制是只能基于 MySQL 数据库增量日志解析。

Debezium Server

Debezium Server 是一个基于 Debezium Engine 的 CDC 项目。Debezium Engine 是 Debezium 项目的核心,用于捕获数据库的变更事件。Debezium Server 构建在该引擎之上,提供了一种轻量级的 CDC 解决方案,用于实时捕获数据库更改,并将其转换为事件流,最终将数据写入目标数据库。

Debezium Server Databend

Debezium Server Databend 是一个基于 Debezium Engine 自研的轻量级 CDC 项目,用于实时捕获数据库更改并将其作为事件流传递最终将数据写入目标数据库 Databend。它提供了一种简单的方式来监视和捕获关系型数据库的变化,并支持将这些变化转换为可消费事件。使用 Debezium server databend 实现 CDC 无须依赖大型的 Data Infra 比如 Flink, Kafka, Spark 等,只需一个启动脚本即可开启实时数据同步。

源码分析 debezium-server-databend 实现

Debezium Server Databend 实现了轻量级CDC方案,通过 Debezium Engine 捕获数据库变更事件,将其转换成事件流,然后将事件流传递给 Databend 数据库,实现数据的实时同步。下面先从代码层面分析一下该组件的实现原理。

主要代码的结构是:

1
2
3
4
5
6
7
8
9
10
11
12
13
14
15
16
17
.
├── DatabendChangeConsumer.java
├── DatabendChangeEvent.java
├── DatabendTypes.java
├── DatabendUtil.java
├── DebeziumMetrics.java
├── batchsizewait
│   ├── InterfaceBatchSizeWait.java
│   ├── MaxBatchSizeWait.java
│   └── NoBatchSizeWait.java
└── tablewriter
├── AppendTableWriter.java
├── BaseTableWriter.java
├── RelationalTable.java
├── TableNotFoundException.java
├── TableWriterFactory.java
└── UpsertTableWriter.java

Debezium server 的入口逻辑在 DatabendChangeConsumer 中,继承 BaseChangeConsumer 并实现相应方法, 作用是加载配置,初始化 server, database以及处理 batch event:

1
2
3
4
5
6
7
8
9
10
11
12
13
14
15
16
/**
* Implementation of the consumer that delivers the messages to databend database tables.
*
* @author hantmac
*/
@Named("databend")
@Dependent
public class DatabendChangeConsumer extends BaseChangeConsumer implements DebeziumEngine.ChangeConsumer<ChangeEvent<Object, Object>> {
...// @ConfigProperty(name = "debezium.sink.databend.xxx", defaultValue = "")
void connect() throws Exception {
...
}
public void handleBatch(List<ChangeEvent<Object, Object>> records, DebeziumEngine.RecordCommitter<ChangeEvent<Object, Object>> committer)
throws InterruptedException {...}

}

核心代码是在 handleBatch 中,在这里接收变更事件并发送到 tablewriter 中进一步处理。

1
2
3
4
5
6
7
8
9
10
11
12
13
14
15
16
17
18
19
20
21
22
23
24
25
26
27
28
29
30
31
32
33
34
35
36
37
@Override
public void handleBatch(List<ChangeEvent<Object, Object>> records, DebeziumEngine.RecordCommitter<ChangeEvent<Object, Object>> committer)
throws InterruptedException {
Instant start = Instant.now();

//group events by destination
Map<String, List<DatabendChangeEvent>> result =
records.stream()
.map((ChangeEvent<Object, Object> e)
-> {
try {
return new DatabendChangeEvent(e.destination(),
valDeserializer.deserialize(e.destination(), getBytes(e.value())),
e.key() == null ? null : valDeserializer.deserialize(e.destination(), getBytes(e.key())),
mapper.readTree(getBytes(e.value())).get("schema"),
e.key() == null ? null : mapper.readTree(getBytes(e.key())).get("schema")
);
} catch (IOException ex) {
throw new DebeziumException(ex);
}
})
.collect(Collectors.groupingBy(DatabendChangeEvent::destination));

// consume list of events for each destination table
for (Map.Entry<String, List<DatabendChangeEvent>> tableEvents : result.entrySet()) {
RelationalTable tbl = this.getDatabendTable(mapDestination(tableEvents.getKey()), tableEvents.getValue().get(0).schema()); // 获取 tablewriter 实例
tableWriter.addToTable(tbl, tableEvents.getValue()); // 将事件推送至 tablewriter
}

for (ChangeEvent<Object, Object> record : records) {
LOGGER.trace("Processed event '{}'", record);
committer.markProcessed(record);
}
committer.markBatchFinished();
this.logConsumerProgress(records.size());

batchSizeWait.waitMs(records.size(), (int) Duration.between(start, Instant.now()).toMillis());

TableWriterFactory中提供了 AppendUpsert 两种模式:

1
2
3
4
5
6
7
public BaseTableWriter get(final Connection connection) {
if (upsert) {
return new UpsertTableWriter(connection, identifierQuoteCharacter.orElse(""), upsertKeepDeletes);
} else {
return new AppendTableWriter(connection, identifierQuoteCharacter.orElse(""));
}
}

每种模式都实现了 addTable 方法。

Append mode

在 CDC 中,Append Mode 是一种数据写入模式。当数据库的一条记录发生变化时,CDC 会将该变化作为一条新的事件追加到事件流中。

Upsert mode

Upsert Mode 是另一种数据写入模式。当数据库的一条记录发生变化时,CDC 会将该变化作为一个更新操作,如果记录不存在,则作为插入操作,以实现数据的更新和插入。

Upsert mode 用到了 Databend 的 Replace into 语法,所以需要用户指定一个 conflict key,这里我们提供一个配置:

1
debezium.sink.databend.database.primaryKey=id

如果没有提供该配置,会退化成追加模式。

Delete

Delete操作是指数据库中的记录被删除,CDC 会将该操作作为一个事件写入事件流,以通知其他系统该记录已被删除。

Debezim Server 对 Delete 的处理比较复杂,在 DELETE 操作下会生成两条事件记录:

  1. 一个包含 “op”: “d”,其他的行数据以及字段;
  2. 一个tombstones记录,它具有与被删除行相同的键,但值为null。

这两条事件会同时发出,在 Debezium Server Databend 中我们选择对 Delete 数据实行软删除,这就要求我们在 target table 中拥有 __deleted 字段,当 Delete 事件过来的时候我们将该字段置为 TRUE 后插入到目标表。

这样设计的好处是,有些用户最开始想要保留这些数据,但可能未来会想到将其删除,这样就为用户提供了可选的方案,未来想要删除这些数据的时候,只需要 delete from table where __deleted=true 即可。

关于 Debezium 对删除事件的说明以及处理方式,详情可参考文档

使用轻量级 CDC debezium-server-databend 构建 MySQL 到 Databend 的 实时数据同步

下面用一个实际案例展示如何基于 Debezium server databend 快速构建 MySQL 到 Databend 的实时数据同步。

准备阶段

准备一台已经安装了 Docker ,docker-compose 以及 Java 11 环境 的 Linux 或者 MacOS 。

准备教程所需要的组件

接下来的教程将以 docker-compose 的方式准备所需要的组件。

debezium-MySQL

docker-compose.yaml

1
2
3
4
5
6
7
8
9
10
11
12
13
14
15
16
17
18
version: '2.1'
services:
postgres:
image: debezium/example-postgres:1.1
ports:
- "5432:5432"
environment:
- POSTGRES_DB=postgres
- POSTGRES_USER=postgres
- POSTGRES_PASSWORD=postgres
mysql:
image: debezium/example-mysql:1.1
ports:
- "3306:3306"
environment:
- MYSQL_ROOT_PASSWORD=123456
- MYSQL_USER=mysqluser
- MYSQL_PASSWORD=mysqlpw
Debezium Server Databend
  • Clone 项目: git clone `https://github.com/databendcloud/debezium-server-databend.git`
  • 从项目根目录开始:
    • 构建和打包 debezium server: mvn -Passembly -Dmaven.test.skip package
    • 构建完成后,解压服务器分发包: unzip debezium-server-databend-dist/target/debezium-server-databend-dist*.zip -d databendDist
    • 进入解压后的文件夹: cd databendDist
    • 创建 application.properties 文件并修改: nano conf/application.properties,将下面的 application.properties 拷贝进去,根据用户实际情况修改相应的配置。
    • 使用提供的脚本运行服务: bash run.sh
    • Debezium Server with Databend 将会启动

同时我们也提供了相应的 Docker image,可以在容器中一键启动:

1
2
3
4
5
6
7
8
9
10
version: '2.1'
services:
debezium:
image: ghcr.io/databendcloud/debezium-server-databend:pr-2
ports:
- "8080:8080"
- "8083:8083"
volumes:
- $PWD/conf:/app/conf
- $PWD/data:/app/data

NOTE: 在容器中启动注意所连接数据库的网络。

Debezium Server Databend Application Properties

本文章使用下面提供的配置,更多的参数说明以及配置可以参考文档

1
2
3
4
5
6
7
8
9
10
11
12
13
14
15
16
17
18
19
20
21
22
23
24
25
26
27
28
29
30
31
32
33
34
35
36
37
38
39
40
41
42
43
44
debezium.sink.type=databend
debezium.sink.databend.upsert=true
debezium.sink.databend.upsert-keep-deletes=false
debezium.sink.databend.database.databaseName=debezium
debezium.sink.databend.database.url=jdbc:databend://tnf34b0rm--xxxxxx.default.databend.cn:443
debezium.sink.databend.database.username=cloudapp
debezium.sink.databend.database.password=password
debezium.sink.databend.database.primaryKey=id
debezium.sink.databend.database.tableName=products
debezium.sink.databend.database.param.ssl=true

# enable event schemas
debezium.format.value.schemas.enable=true
debezium.format.key.schemas.enable=true
debezium.format.value=json
debezium.format.key=json

# mysql source
debezium.source.connector.class=io.debezium.connector.mysql.MySqlConnector
debezium.source.offset.storage.file.filename=data/offsets.dat
debezium.source.offset.flush.interval.ms=60000

debezium.source.database.hostname=127.0.0.1
debezium.source.database.port=3306
debezium.source.database.user=root
debezium.source.database.password=123456
debezium.source.database.dbname=mydb
debezium.source.database.server.name=from_mysql
debezium.source.include.schema.changes=false
debezium.source.table.include.list=mydb.products
# debezium.source.database.ssl.mode=required
# Run without Kafka, use local file to store checkpoints
debezium.source.database.history=io.debezium.relational.history.FileDatabaseHistory
debezium.source.database.history.file.filename=data/status.dat
# do event flattening. unwrap message!
debezium.transforms=unwrap
debezium.transforms.unwrap.type=io.debezium.transforms.ExtractNewRecordState
debezium.transforms.unwrap.delete.handling.mode=rewrite
debezium.transforms.unwrap.drop.tombstones=true

# ############ SET LOG LEVELS ############
quarkus.log.level=INFO
# Ignore messages below warning level from Jetty, because it's a bit verbose
quarkus.log.category."org.eclipse.jetty".level=WARN

准备数据

MySQL 数据库中准备数据

进入 MySQL 容器

1
docker-compose exec mysql mysql -uroot -p123456

创建数据库 mydb 和表 products,并插入数据:

1
2
3
4
5
6
7
8
9
10
11
12
13
14
15
16
CREATE DATABASE mydb;
USE mydb;

CREATE TABLE products (id INTEGER NOT NULL AUTO_INCREMENT PRIMARY KEY,name VARCHAR(255) NOT NULL,description VARCHAR(512));
ALTER TABLE products AUTO_INCREMENT = 10;

INSERT INTO products VALUES (default,"scooter","Small 2-wheel scooter"),
(default,"car battery","12V car battery"),
(default,"12-pack drill bits","12-pack of drill bits with sizes ranging from #40 to #3"),
(default,"hammer","12oz carpenter's hammer"),
(default,"hammer","14oz carpenter's hammer"),
(default,"hammer","16oz carpenter's hammer"),
(default,"rocks","box of assorted rocks"),
(default,"jacket","water resistent black wind breaker"),
(default,"cloud","test for databend"),
(default,"spare tire","24 inch spare tire");
在 Databend 中创建 Database

img

NOTE: 用户可以不必先在 Databend 中创建表,系统检测到后会自动为用户建表。

启动 Debezium Server Databend

1
bash run.sh

首次启动会进入 init snapshot 模式,通过配置的 Batch Size 全量将 MySQL 中的数据同步到 Databend,所以在 Databend 中可以看到 MySQL 中的数据已经同步过来了:

img

同步 Insert 数据

我们继续往 MySQL 中插入 5 条数据:

1
2
3
4
5
INSERT INTO products VALUES (default,"scooter","Small 2-wheel scooter"),
(default,"car battery","12V car battery"),
(default,"12-pack drill bits","12-pack of drill bits with sizes ranging from #40 to #3"),
(default,"hammer","12oz carpenter's hammer"),
(default,"hammer","14oz carpenter's hammer");

Debezium server databend 日志:

同时在 Databend 中可以查到 5 条数据已经同步过来了:

img

同步 Update 数据

配置文件中 debezium.sink.databend.upsert=true ,所以我们也可以处理 Update/Delete 的事件。

在 MySQL 中更新 id=10 的数据:

1
update products set name="from debezium" where id=10;

在 Databend 中可以查到 id 为 10 的数据已经被更新:

img

同步 Delete 数据

在配置文件中,有以下的配置,既可开启处理 Delete 事件的能力:

1
2
3
4
5
debezium.sink.databend.upsert-keep-deletes=false
debezium.transforms=unwrap
debezium.transforms.unwrap.type=io.debezium.transforms.ExtractNewRecordState
debezium.transforms.unwrap.delete.handling.mode=rewrite
debezium.transforms.unwrap.drop.tombstones=true

在 MySQL 中删除 id=12 的数据:

1
delete from products where id=12;

在 Databend 中可以观察到 id=12 的值的 __deleted 字段已经被置为 true

环境清理

操作结束后,在 docker-compose.yml 文件所在的目录下执行如下命令停止所有容器:

1
docker-compose down

结论

文章介绍了 databend 的轻量级 CDC 实现原理,演示了基于轻量级 CDC debezium server databend 构建 MySQL 到 Databend 的 实时数据同步的全部过程,这种方式不需要依赖 Flink, Kafka 等大型组件,启动和管理非常方便。

]]>
从 0 到 1 为 Databend 实现轻量级 CDC
为 Databend Rust Driver 实现 Python Binding https://cloudsjhan.github.io/2023/05/27/为-Databend-Rust-Driver-实现-Python-Binding/ 2023-05-27T05:26:47.000Z 2023-05-27T05:41:03.830Z

HOW? PyO3 + Maturin

Rust 和 Python 都拥有丰富的包和库。在 Python 中,很多包的底层是使用 C/C++ 编写的,而 Rust 天生与 C 兼容。因此,我们可以使用 Rust 为 Python 编写软件包,实现 Python 调用 Rust 的功能,从而获得更好的性能和速度。

为了实现这一目标,PyO3 应运而生。PyO3 不仅提供了 Rust 与 Python 的绑定功能,还提供了一个名为 maturin 的开箱即用的脚手架工具。通过 maturin,我们可以方便地创建基于 Rust 开发的 Python 扩展模块。这样一来,我们可以重新组织代码,使用 Rust 编写性能更好的部分,而其余部分仍然可以使用原始的 Python 代码。

rust-rewrite

Databend 目前有针对 Rust、Go、Python、Java 的多套 Driver SDK,维护成本颇高,上游一旦出现更新 SDK 便会手忙脚乱。 Rust 能提供对其他语言的 Binding 实现一套代码到处使用,而且又能获得更好地性能和速度,何乐而不为呢?

本篇文章我们关注如何在 python 中调用 Rust 开发的模块,以此来为 Databend Rust Driver 实现 Python Binding。

简单的 Demo

这里我们以官网提供的最简单的方式来做个演示。

1
2
3
4
5
6
7
8
9
10
11
$ mkdir string_sum
$ cd string_sum
# 创建 venv 的这一步不能省略,否则后续运行的时候会报错
$ python -m venv .env
$ source .env/bin/activate
$ pip install maturin
# 直接使用 maturin 初始化项目即可,选择 pyo3,或者直接执行 maturin init --bindings pyo3
❯ maturin init
✔ 🤷 Which kind of bindings to use?
📖 Documentation: https://maturin.rs/bindings.html · pyo3
✨ Done! Initialized project /Users/hanshanjie/rustProj/string_sum

image-20230527100715138

这个时候,我们可以得到一个简单的 Rust 项目,并且包含了调用的示例,打开 src/lib.rs:

1
2
3
4
5
6
7
8
9
10
11
12
13
14
use pyo3::prelude::*;

/// Formats the sum of two numbers as string.
#[pyfunction]
fn sum_as_string(a: usize, b: usize) -> PyResult<String> {
Ok((a + b).to_string())
}

/// A Python module implemented in Rust.
#[pymodule]
fn string_sum(_py: Python, m: &PyModule) -> PyResult<()> {
m.add_function(wrap_pyfunction!(sum_as_string, m)?)?;
Ok(())
}

可以看到 pyfunctionpymodule 两个 Rust 的宏,#[pymodule] 过程宏属性负责将模块的初始化函数导出到Python。它可以接受模块的名称作为参数,该名称必须是.so或.pyd文件的名称;默认值为Rust函数的名称。#[pyfunction] 注释一个函数,然后使用 wrap_pyfunction 宏将其添加到刚刚定义的模块中。

我们无需修改任何代码,可以直接执行下面的命令测试:

1
2
3
4
5
6
# maturin develop 会自动打包出一个 wheel 包,并且安装到当前的 venv 中 
$ maturin develop
$ python
>>> import string_sum
>>> string_sum.sum_as_string(5, 20)
'25'

构建 Databend Driver 的 Python Binding

初始化项目

bendsql 根目录下创建 bindings/python的 rust 项目:

1
2
3
4
5
6
7
8
$ cd bendsql 
$ mkdir bindings & cd bindings
$ mkdir python & cd python
$ python -m venv .env
$ source .env/bin/activate
$ pip install maturin
# 直接使用 maturin 初始化项目即可,选择 pyo3
❯ maturin init

为了使用PyO3,我们需要将其作为依赖项添加到我们的Cargo.toml文件中,以及其他依赖项。我们的Cargo.toml文件应该如下所示:

1
2
3
4
5
6
7
8
9
10
11
12
13
14
15
16
17
18
19
[package]
name = "databend-python"
version = "0.0.1"
edition = "2021"
license = "Apache-2.0"
publish = false

[lib]
crate-type = ["cdylib"]
doc = false

[dependencies]
chrono = { version = "0.4.24", default-features = false, features = ["std"] }
futures = "0.3.28"
databend-driver = { path = "../../driver", version = "0.2.20", features = ["rustls", "flight-sql"] }
databend-client = { version = "0.1.15", path = "../../core" }
pyo3 = { version = "0.18", features = ["abi3-py37"] }
pyo3-asyncio = { version = "0.18", features = ["tokio-runtime"] }
tokio = "1"

PyO3 添加为依赖项,并使用适当的属性注解 Rust 函数(我们将在后面介绍),就可以使用 PyO3 库创建一个可以被导入到 Python 脚本中的 Python 扩展模块。

将 Rust Struct 转换成 Python 模块

databend-client 中提供了两种连接到 databend 的方式,flightSQL 和 http, databend-driver package 实现了一个 Trait来统一入口并自动解析协议:

bendsql/driver/src/conn.rs

1
2
3
4
5
6
7
8
9
10
11
12
13
14
15
16
17
18
19
20
21
22
23
24
25
26
27
28
29
30
31
#[async_trait]
pub trait Connection: DynClone + Send + Sync {
fn info(&self) -> ConnectionInfo;

async fn version(&self) -> Result<String> {
let row = self.query_row("SELECT version()").await?;
let version = match row {
Some(row) => {
let (version,): (String,) = row.try_into()?;
version
}
None => "".to_string(),
};
Ok(version)
}

async fn exec(&self, sql: &str) -> Result<i64>;
async fn query_row(&self, sql: &str) -> Result<Option<Row>>;
async fn query_iter(&self, sql: &str) -> Result<RowIterator>;
async fn query_iter_ext(&self, sql: &str) -> Result<(Schema, RowProgressIterator)>;

async fn stream_load(
&self,
sql: &str,
data: Reader,
size: u64,
file_format_options: Option<BTreeMap<&str, &str>>,
copy_options: Option<BTreeMap<&str, &str>>,
) -> Result<QueryProgress>;
}
dyn_clone::clone_trait_object!(Connection);

所以我们只需要将该 Trait 转换成 Python class ,就能在 python 中调用这些方法。Pyo3 官网中提供了转换 Trait 的方式,https://pyo3.rs/v0.12.3/trait_bounds,但是这种方式过于复杂,需要写太多的胶水代码,而且对用户也不友好,不能做到开箱即用。左思右想,为何不将 Trait 封装一个 Struct 然后将 Struct 直接将转换成 python module ?

1
2
3
4
5
6
7
8
9
10
11
12
13
14
15
16
17
#[derive(Clone)]
pub struct Connector {
pub connector: FusedConnector,
}

pub type FusedConnector = Arc<dyn Connection>;

// For bindings
impl Connector {
pub fn new_connector(dsn: &str) -> Result<Box<Self>, Error> {
let conn = new_connection(dsn).unwrap();
let r = Self {
connector: FusedConnector::from(conn),
};
Ok(Box::new(r))
}
}

这里写了一个 Connector 的 struct,里面封装了 Connection Trait,为 Connector 实现了 new_connector 方法,返回的正是一个指向 Connector 的指针,更多代码可以看这里

在 asyncio.rs 中我们就可以定义一个 Struct AsyncDatabendDriver 暴露为 python class,并定义 python module 为 databend-driver:

1
2
3
/// `AsyncDatabendDriver` is the entry for all public async API
#[pyclass(module = "databend_driver")]
pub struct AsyncDatabendDriver(Connector);

接下来就要为 AsyncDatabendDriver 实现相应的方法,而底层调用的就是 rust 中实现的 Trait 中的方法(这里以 exec 为例):

1
2
3
4
5
6
7
8
9
10
11
12
13
14
15
16
17
18
#[pymethods]
impl AsyncDatabendDriver {
#[new]
#[pyo3(signature = (dsn))]
pub fn new(dsn: &str) -> PyResult<Self> {
Ok(AsyncDatabendDriver(build_connector(dsn)?))
}

/// exec
pub fn exec<'p>(&'p self, py: Python<'p>, sql: String) -> PyResult<&'p PyAny> {
let this = self.0.clone();
future_into_py(py, async move {
// 调用 connection 中的 exec 方法
let res = this.connector.exec(&sql).await.unwrap();
Ok(res)
})
}
}

最后在 lib.rs 中将 AsyncDatabendDriver 添加为 python class:

1
2
3
4
5
#[pymodule]
fn _databend_driver(_py: Python, m: &PyModule) -> PyResult<()> {
m.add_class::<AsyncDatabendDriver>()?;
Ok(())
}

定义 python 扩展模块信息

创建 pyproject.tomlpython/databend_driver 并定义 python module 相关信息。

测试

这里我们使用 behave 进行测试,同时也可以看到能够以 import databend_driver 的形式在 python 项目中使用:

1
2
3
4
5
6
7
Feature: Databend-Driver Binding

Scenario: Databend-Driver Async Operations
Given A new Databend-Driver Async Connector
When Async exec "CREATE TABLE if not exists test_data (x Int32,y VARCHAR)"
When Async exec "INSERT INTO test_data(x,y) VALUES(1,'xx')"
Then The select "SELECT * FROM test_data" should run
1
2
3
4
5
6
7
8
9
10
11
12
13
14
15
16
17
18
19
20
21
import os

from behave import given, when, then
from behave.api.async_step import async_run_until_complete
import databend_driver

@given("A new Databend-Driver Async Connector")
@async_run_until_complete
async def step_impl(context):
dsn = os.getenv("TEST_DATABEND_DSN", "databend+http://root:root@localhost:8000/?sslmode=disable")
context.ad = databend_driver.AsyncDatabendDriver(dsn)

@when('Async exec "{sql}"')
@async_run_until_complete
async def step_impl(context, sql):
await context.ad.exec(sql)

@then('The select "{select_sql}" should run')
@async_run_until_complete
async def step_impl(context, select_sql):
await context.ad.exec(select_sql)

运行 maturin develop 会自动打包出一个 wheel 包,并且安装到当前的 venv 中 ,

1
2
3
4
    ....
Finished dev [unoptimized + debuginfo] target(s) in 8.71s
📦 Built wheel for abi3 Python ≥ 3.7 to /var/folders/x5/4hndsx0x7cb5_45qgpfqx4th0000gn/T/.tmpyzRsUc/databend_driver-0.0.1-cp37-abi3-macosx_11_0_arm64.whl
🛠 Installed databend-driver-0.0.1

执行 behave tests 运行测试集:

image-20230527125008830

结论

基于 Pyo3,我们可以比较方便地专注于 Rust 实现逻辑本身,无需关注太多 FFI (Foreign Function Interface)和转换细节就可以将 Rust 低成本地转换成 Python 模块,后期也只需要维护一套代码,极大地降低了维护成本。本文章抛砖引玉,只是将很少部分代码做了转换,后面会陆续将 rust driver 全部提供 Python binding 最终替换掉现在的 databend-py

HTML


]]>
为 Databend Rust Driver 实现 Python Binding
2023 12 Open Source weekly report https://cloudsjhan.github.io/2023/03/17/2023-12-Open-Source-weekly-report/ 2023-03-17T11:22:03.000Z 2023-03-18T09:38:50.003Z

不出意外这是 2023 年第一份周报,一直拖着不写倒不是因为没什么可写的,反而是因为最近这几个月接收的信息量太大,一时间没有办法吃透、理解,自然就无法做到有效输出。除了常规的工作以外,这段时间开始接触 ELT 相关的东西,比如 Airbyte、dbt,CDC 领域中的 TapData、Flink CDC ,完善 databend 在 BI 类工具的生态….比如 superset, redash, metadata 等,信息量可以说是爆炸式增长,很多东西也是一知半解的。

这周之所以想起来写是因为写了一点比较有意思的新东西,所以想记录并分享一下。

Clojure & Metabase

是的你没看错,这周一直在写 Clojure。起因是要在 Metabase 中支持 databend,metabase 是一款易用、开源、技术成熟、不断并快速迭代的 BI 工具,打开 metabase 的 Github 首页 可以看到其主要是编程语言正是 Clojure。

很多年轻的朋友可能都没听说过这门编程语言。Clojure 是一种运行在Java平台上的类 Lisp 语言,看到 Lisp 是不是一种上古的气息扑面而来。Clojure 比较成功地把函数式编程引入了 JVM,在JVM平台运行的时候,会被编译为JVM的字节码进行运算。其最大的优势就是在保持了函数式语言的主要特性的前提下,例如immutable state,Full Lisp-style macro support,persistent data structures等等,还能够非常方便的调用Java类库的API,和Java类库进行良好的整合。

Metabase 提供了一种插件系统,方便开发者以开发插件的方式,将数据源添加到 metabase 中,因为要调用 metabase driver 的 API,所以插件的编写也需要使用 Clojure 来完成。

上手 Clojure

hello clojure

Clojure 是完全的函数式编程,基本语法比较简单,大概看了半天的教程配置好开发环境就能写 hello world 了。A few days later….,支持 databend 的 metabase 插件就完成了,项目及相关代码在 metabase databend driver

插件使用

Metabase 的插件使用起来非常方便,只需要两个 jar 就能从 databend 读取并分析数据出报表了。

Download metabase.jar

Metabase是一个Java应用程序,可以通过下载JAR文件 并执行 java -jar metabase.jar来运行。Metabase 使用 JDBC Driver 连接到 Databend。

Download metabase Databend Driver

  1. 在下载 metabase.jar 的目录下创建目录 plugins

    1
    2
    3
    $ ls
    metabase.jar
    $ mkdir plugins
  1. 下载最新的 databend metabase driver: https://github.com/databendcloud/metabase-databend-driver/releases/latest 到 plugins 目录下

  2. 启动 metabase

    1
    java -jar metabase.jar

    启动过程中看到下面的日志就表示 databend 驱动被正常加载:

    1
    2
    2019-05-07 23:27:32 INFO plugins.lazy-loaded-driver :: Registering lazy loading driver :databend...
    2019-05-07 23:27:32 INFO metabase.driver :: Registered driver :databend (parents: #{:sql-jdbc}) 🚚

    访问 http://hostname:3000 即可打开 metabase 首页

Connect Metabase to Databend

  1. 填写基本信息,选择 I'll add my data later

  1. 点击Add your own data 创建 databend 数据库连接

选择 databend (databend version >=DatabendQuery v1.0.17)

填写数据库连接信息后点击保存

  1. 退出后台管理

Run a SQL query

  1. 退出后台管理后,在右上角,单击 + New 菜单,可以运行SQL查询和构建仪表盘。

  2. 举个 SQL 查询的🌰

    9ff9873e-e8ee-44da-8126-e6b4f5b9cf3d

  3. 点击左下角的可视化按钮可以构建仪表盘

Learn more

有关Metabase以及如何构建仪表板的更多信息,请访问 Metabase 文档

一些感受

写 Clojure 过程中感受最深的还是圆括号求值 (),因为 Clojure 中任何语句的一般形式需要在大括号中求值,向下面这样:

1
2
3
4
5
6
7
8
(+ 1 2) ;运算符在前
------
(ns clojure.examples.hello
(:gen-class))
(defn Example []
(println (str "Hello" "World"))
(println (+ 1 2)))
(Example)

所以当一个函数比较大而且有高阶函数的时候,数括号就会成为一种灾难😂,这个时候就不得不依赖 IDE 的提示了。

机缘巧合粗浅地了解了这门编程语言,不过目前来看使用 Clojure 作为主力开发语言的公司非常少,坊间甚至一度传闻 Clojure is dead。但是语言只是工具,即使工作中无法使用,了解这门优雅、富有表现力的语言来扩展自己的眼界,也是不错的选择。Clojure 社区也有一些有意思的项目,这里抛砖引玉,感兴趣的同学可以去了解一下。


索性在这里记录跟踪一下最近的一些跟开源相关的工作


]]>
2023 NO.12 开源周报
2022 51 Open source weekly report https://cloudsjhan.github.io/2022/12/17/2022-51-Open-source-weekly-report/ 2022-12-17T02:25:18.000Z 2022-12-17T13:33:11.612Z

距离上一次 weekly report 已经过去整整一个月,在 databend-pydatabend-sqlalchemy 基本可用的前提下我开始着手在 dbt 的生态中支持 databend cloud。dbt 提供了一种插件生态,我们可以开发专有的 adapter plugin 从而将 DBT 扩展到任何数据平台。dbt 算是在数据领域的新物种,在国内感觉用的还不是很多,但是在国外已经俨然成为现代数据领域的后起之秀。所以下面先抛砖引玉,简单介绍一下 dbt。

What is dbt?

dbt 是一个非常强大和灵活的数据工具,它可以快速构建数据 pipe、基于 jinjia 模板以自动测试、构建和填充分析模型,包括文档的自动生成和开箱即用的数据血缘,非常适合自动化数仓的工作。其核心代码是一个开源 Python 库 - dbt-core 。可以参考这个项目快速上手体验一下。

需要强调的一点是 dbt 并不是传统的 ETL 工具,

ETL

它并不在系统之间传输或者加载数据,而是通过使用 SQL 和 YAML 来转换已经被加载到数仓中的数据。这种先加载后转换的概念,称为 ELT。

ELT

在 ELT 的过程中,数据无须等待即可进入数仓,转换出现错误也不需要重新加载,能够提高效率并降低成本。下面我也会介绍一个 EL 的工具 - airbyte,看 airbyte + dbt 如何实现完美的 ELT 流程。关于 dbt 的介绍就到这里,想要深入了解的同学可以参考 dbt 官网和 dbt-core 的 github 主页。

How to use dbt with Databend Cloud

经过几周与 dbt 的搏斗,支持 databend 的 dbt adapter 插件 dbt-databend-cloud 终于能够跑通官方的 case 了✿✿ヽ(°▽°)ノ✿。开发的过程中也帮 databend 本身发现并解决了一些问题:

Issue

Feature: support a.* in SQL

Feature: support || concat function in SQL

Feature: support SQL-style double-quoted identifier in get_path

PR

fix: double-quote in get_path

期间也有跟 dbt 社区的讨论,非常感谢 dbt 社区的热心帮助:

Disscussion

Field “path” of type Path in DatabendRelation has invalid value

我们可以跟着这个 wiki - How to use dbt with Databend Cloud 体验一下 dbt 的强大能力,希望后面能顺利将 dbt-databend 加入到官方 dbt-adapters 的维护阵营当中去。

What is airbyte?

上面我们介绍 ELT 的时候提到过 airbyte,这里再展开介绍一下。Airbyte 是一个开源的云原生数据集成平台,可以让用户从各种来源提取、转换和加载数据到各种目标。

airbyte

airbyte 的架构设计易于扩展,非常灵活,允许用户开发自定义的 source/destination connector ,并且可以很方便地加入到 airbyte 的平台里。这里我主要是开发了一个 destination connector,将 databend cloud 作为数据的目的入口,这样用户就可以很容易地从各个数据源,比如 S3, Clickhouse, Filebot ,甚至本地文件同步数据到 databend cloud,并且 airbyte 的 Normalization 能力结合 dbt 后能够将原始数据转换成完整表结构的数据表。

等这个 PR 合并后就可以在 airbyte cloud 上使用 databend cloud 作为 data source 了。

ClickVisual 支持 databend source

ClickVisual 是一个轻量级的由石墨文档开源的日志查询、分析、报警的可视化平台,提供一站式应用可靠性的可视化的解决方案。既可以独立部署使用,也可作为插件集成到第三方系统。目前是市面上唯一一款支持 ClickHouse 的类 Kibana 的业务日志查询平台。之前 ClickVisual 只支持 Clickhouse 作为数据源来存储、查询日志,我添加了一些代码经过调试后现在也能支持 databend cloud 作为数据源。

Feat: support databend source

feat: support exist log table for databend

但是由于目前 databend 不支持类似 Clickhouse status='200' ( statusint32 类型) 这样的语法,所以字段过滤查询的功能需要等这个 issue-836 解决后才能正常使用。

Openkruise 遗留 PR

说起来真是非常惭愧,不仅已经很久没有参加 OpenKruise 的双周会了而且还遗留了一个陈年老 PR 没有完成,其实两周前 zmberg 就联系我尽快处理一下这个问题,所以这周无论如何也要把这个 PR 关掉 😭。


综上,希望 2022 的最后两周工作顺利🎉。


]]>
2022 NO.51 周报
2022 47 Open source weekly report https://cloudsjhan.github.io/2022/11/13/2022-47-Open-source-weekly-report/ 2022-11-13T03:44:28.000Z 2022-11-13T14:17:19.032Z

自从 databend-go release 后,最近大部分时间都在与 Python 搏斗😂,太长时间没有正儿八经写 Python 了真是磨合了好几天才找到点感觉。
用了差不多两周,databend 的 Python Deiver databend-py 以及支持 SQLAlchemy 语法的 databend-sqlalchemy 已经基本可用。不得不说 Python 在数据的生态里还是王者,前几天有用户在使用 go driver 的时候遇到了一个 data type parser 的问题,之前在实现过程中就遇到过类似的类型问题,这种问题在强类型语言里简直就是灾难,但是对于 Python 来说就不存在。所以最后用户还是用了 Python 的 driver 解决了问题,看来后面要认真打磨 databend-py 了。

在使用方面也是 python 占优,pip install 然后 import 直接就是手到擒来:

1
pip install databend-py
1
2
3
4
5
6
7
from databend_py import Client
client = Client(
host='hostName',
database="default",
user="user",
password="pass")
print(client.execute("SELECT 1"))

不过 databend-py 仅是提供了 python 连接到 databend cloud 的桥梁,并不能像使用 ORM 工具一样使用 cursor.nextfetchall 等方法。在准备实现 dbt adapter 的时候发现需要依赖上面提到的 ORM 的方法,在 Python 生态里 SQLAlchemy 是 Python 中最有名的 ORM 工具,所以就有了 databend-sqlalchemy 这个项目。由于时间紧迫,先实现了对接 dbt 必须要用到的 cursor, description, next, fetch 方法,在 databend-py 的铺垫下,实现起来确实方便很多。

1
2
3
4
5
cursor = connector.connect('http://root:@localhost:8081').cursor()
cursor.execute('select 1')
# print(cursor.fetchone())
print(cursor.fetchall())
print(cursor.description)

几个字总结一下近期的状态就是:与 Python 搏斗,当然接下来可以预见的依然会跟 python 搏斗一段日子,因为最近要搞的 dbt adapter 是一个全新的, 陌生领域,完全就是一头雾水,所以接下来可能会先写几篇关于 dbt 的学习文章吧。

再就是最近开的 repo 有点多,加上实现的时间比较紧,感觉有些疲于应对,很多实现只能草草了事,估计 bug 会比较多,所以后面应该会多抽出一些个人的时间来完善这些项目。


]]>
2022 NO.47 周报
2022 43 Open source weekly report https://cloudsjhan.github.io/2022/10/21/2022-43-Open-source-weekly-report/ 2022-10-21T10:34:16.000Z 2022-10-21T12:46:27.763Z

Go driver SDK for databend cloud released!

由于在 databend cloud 各个项目的代码中已经充斥着大量重复的请求 databend-query 的代码,所以亟需一个 driver SDK 来实现大一统,于是在几周前就开始着手实现 databend cloud 的 go driver,当时用比较短的时间大概实现了一个架子,详情可以见 这篇文章。碍于中间有几个优先级比较高的工作就暂时搁置了,本周 all in 这个项目一周,终于 release 了 v0.0.1 版本,虽然代码的结构、功能的丰富程度、代码的优雅程度都跟标杆 SDK - clickhouse-go 的水平有较大差距,但基本的方法比如 sql.Open, Exec, Query, Next, Rows 等都已经可用。先来看几个🌰吧!

Execution

1
2
3
4
5
6
7
8
9
10
11
12
13
14
15
16
17
18
19
  dsn, cfg, err := getDSN()
if err != nil {
log.Fatalf("failed to create DSN from Config: %v, err: %v", cfg, err)
}
conn, err := sql.Open("databend", dsn)
if err != nil {
return err
}
conn.Exec(`DROP TABLE IF EXISTS data`)
_, err = conn.Exec(`
CREATE TABLE IF NOT EXISTS data(
Col1 UInt8,
Col2 String
)
`)
if err != nil {
return err
}
_, err = conn.Exec("INSERT INTO data VALUES (1, 'test-1')")

Query Row

可以用 Scan 方法来解析出单条数据

1
2
3
4
5
6
7
8
9
10
row := conn.QueryRow("SELECT * FROM data")
var (
col1 uint8
col2, col3, col4 string
col5 []string
col6 time.Time
)
if err := row.Scan(&col1, &col2, &col3, &col4, &col5, &col6); err != nil {
return err
}

Query Rows

当然可以用 Next 来不断迭代获取所有数据

1
2
3
4
5
6
7
8
9
10
11
12
13
row := conn.QueryRow("SELECT * FROM data")
var (
col1 uint8
col2, col3, col4 string
col5 []string
col6 time.Time
)
for rows.Next() {
if err := row.Scan(&col1, &col2, &col3, &col4, &col5, &col6); err != nil {
return err
}
fmt.Printf("row: col1=%d, col2=%s, col3=%s, col4=%s, col5=%v, col6=%v\n", col1, col2, col3, col4, col5, col6)
}

这样在请求 databend-query 的时候,就不用再每次都写一遍 http 请求/解析的代码啦。

bendsql 尝鲜 go driver

Go driver release 后马上就迎来了第一个用户(小白鼠) - bendsql。bendsql 中有个命令用来执行 SQL 语句, bendsql query "select * from table",所以我先将这里面请求 databend-query 的代码都换成了 go driver - https://github.com/databendcloud/bendsql/pull/22,可以看到删掉了不少代码,清晰了不少。接下来要在其他项目中去检验了。

来看看效果:

kruise-tools

本周 kubectl-kruise 插件迎来了一次更新,包含了两个 bug-fix 和新的 feature:

🐛 Bug fix:

🚀 Feat:

好了,以上。


]]>
2022 NO.40 weekly report
2022-41 homebrew formula example for go https://cloudsjhan.github.io/2022/10/06/homebrew-formula-example-for-go/ 2022-10-06T12:35:49.000Z 2022-10-09T09:41:42.288Z

最近准备将 bendsql 发布到 homebrew 的 repo,这样就可以使用 brew install bendsql 方便地安装 bendsql 了。发布的方式就是为 bendsql 写一个 formula 并提 pr 到 homebrew-core,在此记录一下如何生成 homebrew formula。

说干就干, fork 了 homebrew-core 的 repo 然后 checkout 分支准备提 PR。

执行 brew create $download_URL 执行后会生成 install 模板,根据模板填写需要的信息。

1
2
3
4
5
6
7
8
9
10
11
12
13
14
15
16
17
18
class Bendsql < Formula
desc "Work seamlessly with Databend Cloud from the command line."
homepage "https://github.com/databendcloud/bendsql"
url "https://github.com/databendcloud/bendsql/releases/download/v0.0.2/bendsql-darwin-amd64.tar.gz"
sha256 "25c1a2a4e1922261535325634a939fe42a0ffcc12ae6c262ed7021dab611f622"
license "MIT"
head "https://github.com/databendcloud/bendsql.git", branch: "main"

depends_on "go" => :build

def install
system "go", "build", *std_go_args(ldflags: "-s -w")
end

test do
system "make test"
end
end

根据 homebrew-core 的文档,在提 PR 之前要完成几个前置操作:

当执行到 brew test bendsql 的时候,发现向 homebrew 官方仓库提交应用是需要满足一定条件的:

bendsql 刚开源一周还没满足以上条件,所以没法直接使用 brew install bendsql,只能另辟蹊径了。

想起来之前写其他工具的时候,只要在自己的账户中创建一个 homebrew-tap 的 repo, 比如 https://github.com/hantmac/homebrew-tap, 就能实现类似的下载效果。

所以只要在 databendcloud 的账户下,新建一个这样的 repo,将上面配好的 formula 提交进去就可以 brew tap databendcloud/homebrew-tap && brew install bendsql 很方便地下载了。


]]>
homebrew formula example for go
2022 40 Open source weekly report https://cloudsjhan.github.io/2022/09/25/2022-40-Open-source-weekly-report/ 2022-09-25T03:10:04.000Z 2022-10-21T10:38:41.015Z

背景

不知不觉 Weekly report 已拖更三周,除了日常忙碌之外,也是觉得没有什么特别值得写的。
八月中旬的时候开始着手写一个工具 - bendsql(见33 weekly report),用来帮助用户更高效地操作 Databend Cloud,当时是用了大概一周的时间完成了这个项目,经过几周的内部使用和迭代,现在已经被用在 perf test 和 e2e test 中,跑得还算稳定QUQ,所以决定本周将其开源,让更多的用户/开发者使用并参与到产品的开发中。

bensql

在这里先简单介绍一下 Databend Cloud: Databend Cloud 由 Databend 强力驱动,是一款基于 Databend 内核打造的 SAAS 云数仓平台,具有简单、弹性、安全、速度快、成本低等特性,专注于云端大数据一站式解决方案,以解决传统大数据项目中运维难,成本高,使用复杂的问题。

bendsql 是一个为 Databend Cloud 打造的 Cli 工具,能够帮助用户高效地操作数仓平台,比如 list/create/delete warehouse, list stage, upload 文件,执行 SQL 等,提供跟 web 页面近乎一致的体验。

How to use

在使用 bendsql 之前,需要现在 Databend Cloud 上申请注册账号,然后在 下载页面 找到对应平台的二进制包下载安装。

  1. auth login
    首先用注册的账号登录,
1
bendsql auth login

登录过程中选择需要使用的组织,直接回车使用默认组织。
当然,登录后也可以使用 bendsql configure --org YOURORG 来修改。

  1. 操作 warehouse
    使用 bendsql 就可以完成对 warehouse 的所有操作,
    1
    2
    3
    4
    5
    6
    7
    8
    9
    10
    11
    12
    13
    14
    15
    16
    USAGE
    bendsql warehouse cmd [flags]

    CORE COMMANDS
    create: Create a warehouse
    delete: Delete a warehouse
    ls: show warehouse list
    resume: Resume a warehouse
    status: show warehouse status
    suspend: Suspend a warehouse

    INHERITED FLAGS
    --help Show help for command

    LEARN MORE
    Use 'bendsql <command> <subcommand> --help' for more information about a command.

参考使用文档即可,这里就不详细展开了。

  1. 操作 stage
    1
    2
    3
    4
    5
    6
    7
    8
    9
    10
    11
    12
    13
    14
    Operate stage

    USAGE
    bendsql stage <command> [flags]

    CORE COMMANDS
    ls: List stage or files in stage
    upload: Upload file to stage using warehouse

    INHERITED FLAGS
    --help Show help for command

    LEARN MORE
    Use 'bendsql <command> <subcommand> --help' for more information about a command.

可以使用 bendsql 很方便地将文件上传到 stage 中。也可以查看目标 stage 中的文件情况。

  1. Exec SQL

bendsql 可以来执行 SQL 语句,

假如你执行的 SQL 语句比较耗费资源,可以在执行 SQL 的同时指定使用更大规格的 warehouse,

1
bendsql query --sql YOURSQL --warehouse WAREHOUSE

但是这种执行 SQL 的方式对用户来说不太友好,后面的 RoadMap 中会考虑支持 bendsql query 就进入到交互式 SQL 的环境中,再支持命令补全后,体验就大幅提升了。

关于使用就先介绍这些,感兴趣的可以下载安装 bendsql -h 后继续探索。

彩蛋❀ 最开始的时候这个工具并不是叫 bendsql ,而是 bendctl,大家觉得 bendctl 这个命名太过于工程师化了 =.=,经过讨论最后改为 bendsql


以上。往期文章可以访问 https://cloudsjhan.github.io/ 继续阅读。


]]>
2022 NO.40 weekly report
2022 36 Open source weekly report https://cloudsjhan.github.io/2022/09/02/2022-36-Open-source-weekly-report/ 2022-09-02T09:46:37.000Z 2022-09-02T12:47:21.658Z

工作

新的挑战

本周开了一个新的项目 databend-go-driver,是一套类似于 gosnowflake 的数据库 SDK,主要是基于 Go 的 database/sql package,实现相应的 interface 并注册 databend 到 database/sql,可以使用下面的代码像操作 mysql 一样操作 databend :

1
2
3
4
5
6
7
8
9
10
11
12
13
14
15
16
17
18
19
func main() {
dsn, cfg, err := getDSN()
if err != nil {
log.Fatalf("failed to create DSN from Config: %v, err: %v", cfg, err)
}

db, err := sql.Open("databend", dsn)
if err != nil {
log.Fatalf("failed to connect. %v, err: %v", dsn, err)
}
defer db.Close()
query := "SELECT 1"
rows, err := db.Exec(query) // no cancel is allowed
if err != nil {
log.Fatalf("failed to run a query. %v, err: %v", query, err)
}
fmt.Println(rows.RowsAffected())
fmt.Printf("Congrats! You have successfully run %v with databend DB!\n", query)
}

目前项目的架子搭了一下,已经完成基本的注册和简单的 exec 功能,但距离真正生产可用比较遥远。。。还要实现 query, rows, async rows 等功能,完成这些工作就需要对 databend 的工作原理、结构有一定了解,可能是一个小挑战QUQ。

开源

最近由于项目需要又用了一下 fuckdb,这是一个能够一键将 mysql schema 转成带各种 tag 的 golang struct 的大大提高开发效率的工具,感兴趣的可以研究一下这里不多作介绍了。主要是在打开 github 项目页面的时候发现一个陈年老 issue,竟然是去年 7 月份用户提出来的,回想起去年 7 月,确实是忙得焦头烂额(懂的都懂),但没想到这个问题一搁置就是一年。
这个需求是将 struct 的 json tag 从 snake case 转成 camel case,改动之前生成的代码是这样的:

1
2
3
4
5
6
7
type structName struct {
Age string `gorm:"column:slug" json:"age"`
Name string `gorm:"column:name" json:"name"`
CreatorID int64 `gorm:"column:creator_id" json:"creator_id"`
CreatedAt time.Time `gorm:"column:created_at" json:"created_at"`
UpdatedAt time.Time `gorm:"column:updated_at" json:"updated_at"`
}

snake case 本身也不符合 golang 的代码风格,所以就鲁了一个 PR 解决了这个问题,输出的 struct 就是:

1
2
3
4
5
6
7
type structName struct {
Age string `gorm:"column:slug" json:"age"`
Name string `gorm:"column:name" json:"name"`
CreatorID int64 `gorm:"column:creator_id" json:"creatorId"`
CreatedAt time.Time `gorm:"column:created_at" json:"createdAt"`
UpdatedAt time.Time `gorm:"column:updated_at" json:"updatedAt"`
}

嗯,优雅了 =.=。

其他

记录一些随手拍:


]]>
2022 NO.36 周报
2022 34 Open source weekly report https://cloudsjhan.github.io/2022/08/22/2022-34-Open-source-weekly-report/ 2022-08-22T09:12:25.000Z 2022-08-22T09:56:03.003Z

工作

bendctl 一期的工作已完成 70%,进度之快出乎我的意料,等下周写完再来总结和介绍一下。

生活

琐碎的事情好像一直不断,并没有大段的时间来阅读,无意间倒是偶然重读了冯骥才的《苦夏》,突然发现自己已经好久没有静下心来读完过一篇散文了。此时正值北方一夜入秋的天气,读罢文章更感觉秋意渐浓。

好的文章让人感动,再想起最近身边发生的一些事情,越发地觉得 男人们的童年往事大多是在夏天里 有多么的贴切,应该说,人生有一半的快乐来自童年,童年有大半的快乐来自夏天,在快乐的童年里,你根本不会感到蒸笼般夏天的难耐与煎熬。虽然长大后这种感觉渐行渐远,甚至在此后艰难的人生里,你能体会到一丝苦夏般的滋味,但那些童年夏天里的美好的事物总是在默默地治愈你。

快乐把时光缩短,苦难把岁月拉长,一如这长长的没有尽头的苦夏。冯骥才在怀念了童年的美好后,并没有抨击、厌恶这样的夏天,相反,他觉得 ,原是生活中的蜜。人生的一切收获都压在这沉甸甸的苦字下面,然而一半的苦字下边又是一无所有。当你用尽平生的力气,最终所获与初始时的愿望竟然去之千里。你该怎么想?

冯骥才是这样想的,苦夏-它不是无尽头的暑热的折磨,而是我们顶着毒日头默默又坚忍的苦斗的本身。人生的力量全是对手给的,那就是要把对手的压力吸入自己的骨头里。强者之力最主要的是承受力。只有在匪夷所思的承受中才会感到自己属于强者。所以冯骥才的写作一大半是在夏季完成的。

可能是那些沉重的人生的苦夏,煅造出这样的性格习惯。

唔,旧书不厌百回读,年幼时读过的书在谈不上多少生活阅历的发酵下也是能催化出一些不一样的感悟。


]]>
2022 NO.34 周报
2022 33 Open source weekly report https://cloudsjhan.github.io/2022/08/16/2022-33-Open-source-weekly-report/ 2022-08-16T14:24:05.000Z 2022-08-16T15:09:17.198Z

本周无杂事, all in bendctl ┓( ´∀` )┏.

突然感觉写代码和盖房子有异曲同工之妙。盖房子需要花很长的时间来坚固地基,浇灌混凝土,地基牢靠后一层一层地盖就事半功倍了,如果你地基搭得不好,盖的过程中还要回头修补地基,不仅项目进度很慢,质量也得不到保证。写代码也是一样,不要着急写功能,把各种依赖、框架、代码结构先写好,在此之上再写功能逻辑代码便手到擒来了。

上周说要抽出点时间看一下开源之夏的 proposal 结果放了鸽子,本周无论如何也要多花点时间在上面,否则便有不负责任之嫌QUQ。


]]>
2022 NO.33 开源周报
2022 32 Open source weekly report https://cloudsjhan.github.io/2022/08/08/2022-32-Open-source-weekly-report/ 2022-08-08T09:25:00.000Z 2022-08-08T09:39:50.153Z

开源

本周参加了开源之夏的双周会,review 了参赛同学关于 rollout history 的 Proposal,还有许多要修改的地方,难度感觉比想象中高,下周要多抽出点时间来看一下了。

工作

依旧忙碌,时间紧张暂时不展开说了。

学习&生活

这周倒是趁着午饭时间看了一些 Rust 的东西,主要是 Trait 以及生命周期相关的。Trait 有点像 Go 里面的 interface,impl 去实现方法。生命周期着实是比较复杂,有函数中的生命周期,方法的,变量的。。。,主要是 Rust 生命周期的语法也让人眼花QUQ。
<`a> 居然是生命周期的注解,u1s1,ugly。

1
2
3
4
5
6
7
fn longest<'a>(x: &'a str, y: &'a str) -> &'a str {
if x.len() > y.len() {
x
} else {
y
}
}

Anyway, 期待能早日上手用 Rust 干点好玩的事情 (:。

以上。


]]>
2022 NO.32 开源周报
2022 31 Open source weekly report https://cloudsjhan.github.io/2022/07/30/2022-31-Open-source-weekly-report-1/ 2022-07-30T09:24:39.000Z 2022-07-30T10:22:27.358Z

2022 年第 31 周,以下是本周的开源周报。

本周主要 focus 在 databend cloud 新版本的功能实现上,并且由于对系统和代码实现缺少深入的了解,在对一些 corner case 的处理上欠考虑,导致了一些本不该出现的 bug,浪费了一些时间。警示自己在考虑问题的时候要全面,同时也要尽快地熟悉 databend cloud 的代码细节。

这里只记录一个小的问题,使用 lister 从 k8s 集群 get 资源的时候,需要对返回的 err 做 NotFoundErr 和其他 Error 的判断,尤其是在获取其他资源的时候,不能因为 NotFoundErr 的子资源就返回报错。

1
r, err := lister.Resources(ns).Get(name)

要做这样的处理:

1
2
3
4
5
if err != nil && errors.IsNotFound(err) {
// something
}else if err != nil {
// return err
}

开源方面,kubectl-kruise 插件收到了开发者一个 bug report ,主要是说 kubectl-kruise rollout status clone/sample 在原地升级的场景下会卡主,即使所有 Pod 都已经更新完成程序也不会退出。这个问题是由于 rollout status 中缺少对原地升级完成的判断条件,于是就提了一个 PR 解决这个问题。

另外一个支持 Openkruise SidecarSet 根据 namespace selector 注入 Pod 的 PR 正在 review 中,还需要根据 reviewer 的 comment 进行修改。

绿树浓荫夏日长,不知不觉七月已近尾声,下个周报就八月份见了,夏天大概要过去了吧。


]]>
2022 NO.31 开源周报
kubectl kruise - OpenKruise Cli 利器 https://cloudsjhan.github.io/2022/07/24/kubectl-kruise-OpenKruise-Cli-利器/ 2022-07-24T14:45:53.000Z 2022-07-25T02:10:56.301Z


]]>
kubectl kruise - OpenKruise Cli 利器
2022 NO.30 Open source weekly report https://cloudsjhan.github.io/2022/07/24/2022-30-Open-source-weekly-report/ 2022-07-24T14:41:02.000Z 2022-07-30T09:14:25.857Z

2022 年第 30 周,以下是本周的开源周报。

事出有因

周中的时候在 OpenKruise 开源社区群里看到有开发者提到能不能在 kubectl-kruise 插件中提供一种便捷的方式,让用户能够快速使用 ContainerRecreateRequest 实现原地重启容器的能力。

其实这个想法我在很久之前就有了,

当时搁置了一下就淹没在琐碎之中,详见这个 issue。趁着这周末的空闲,打算把这个功能实现一把。

背景

ContainerRecreateRequest 是 OpenKruise 提供的一种运维增强的组件,可以帮助用户重启/重建存量 Pod 中一个或多个容器。
和 Kruise 提供的原地升级类似,当一个容器重建的时候,Pod 中的其他容器还保持正常运行。重建完成后,Pod 中除了该容器的 restartCount 增加以外不会有什么其他变化。

目前用户创建 CRR 实现容器原地重启的方式主要有两种方式:

  • kubectl apply -f crr.yaml
  • OpenKruise API

这两种方式对集群运维人员来说都不够友好,过于繁琐。最好的方式就是在 terminal 中使用一行命令就能创建 CRR 完成原地重启。而 Kruise-tools 为 Kruise 的功能提供了一系列命令行工具,包括 kubectl-kruise,它的是 kubectl 的标准插件。在这个插件中可以很容易集成该功能。(关于 kubectl-kruise 后面打算专门开一篇文章来详细介绍。)

确定目标

首先我们需要保证输入的参数尽量少,其他的必须参数都给到合理的默认值,以便用户能够以最快的速度创建 CRR 重启容器,所以我在插件中定义了 CRR 的一个默认策略:

1
2
3
4
5
6
strategy:
failurePolicy: Fail
orderedRecreate: false
unreadyGracePeriodSeconds: 3
activeDeadlineSeconds: 300
ttlSecondsAfterFinished: 1800

确定最终的命令为:

1
kubectl kruise create ContainerRecreateRequest test-crr --pod=sample-k52bq --containers=nginx

执行这条命令就可以重启 pod sample-k52bq 中名字为 nginx 的容器,其中 --containers 为一个列表,如果为空就重启 pod 中所有的容器,否则重启指定容器。

除了 --pod--containers 还支持 unreadyGracePeriodSecondsterminationGracePeriodSeconds,这两个参数都是选填。

  • unreadyGracePeriodSeconds: 重建后新容器至少保持运行这段时间,才认为该容器重建成功
  • terminationGracePeriodSeconds: 等待容器优雅退出的时间,不填默认用 Pod 中定义的

实现

相关的代码实现可以查看这个 PR

这部分代码合并后下周会 release 新版本,想要尝鲜的同学可以 clone 项目后自行编译。

碎碎念

这篇文章是 weekly-report 系列的第一篇,之所以开始这个系列,真是说来话长。差不多就是刚开始写 blog 的时候是想每周都输出一篇有点子质量的技术文章,发现这样太难了,一是没有这么多内容输出,二是很容易被其他杂事打乱,很难坚持。这次开始以开源周报的名义写每周的 blog,实际上是想以一种随意、自由的方式,输出一点东西,不计篇幅也不考究质量,只为记录,这样大概能坚持下去吧。

都说日拱一卒,我先周拱一卒。


]]>
2022 NO.30 开源周报
OpenKruise 源码分析之 ResourceDistribution https://cloudsjhan.github.io/2022/07/11/OpenKruise-源码分析之-ResourceDistribution/ 2022-07-11T03:52:53.000Z 2022-07-11T04:18:27.592Z

OpenKruise 是基于 CRD 的拓展,包含了很多应用工作负载和运维增强能力,本系列文章会从源码和底层原理上解读各个组件,以帮助大家更好地使用和理解 OpenKruise。让我们开始 OpenKruise 的源码之旅吧!

前言


]]>
OpenKruise 源码分析之 ResourceDistribution
OpenKruise 源码分析之 ContainerRecreateRequest https://cloudsjhan.github.io/2022/07/03/OpenKruise-源码分析之-ContainerRecreateRequest/ 2022-07-03T13:30:24.000Z 2022-07-08T23:11:40.595Z

OpenKruise 是基于 CRD 的拓展,包含了很多应用工作负载和运维增强能力,本系列文章会从源码和底层原理上解读各个组件,以帮助大家更好地使用和理解 OpenKruise。让我们开始 OpenKruise 的源码之旅吧!

前言

上一篇文章中我们解读了 OpenKruise 原地升级的原理和相关代码,在此基础上我们来研究一个基于原地升级能力的组件 - ContainerRecreateRequest
ContainerRecreateRequest(下文简称 CRR) 能够重建 Pod 中一个或多个容器。该功能和 Kruise 提供的原地升级类似,当一个容器重建的时候,Pod 中的其他容器还保持正常运行。重建完成后,Pod 中除了该容器的 restartCount 增加以外不会有什么其他变化。如果挂载了 volume mount 挂载卷,卷中的数据不会丢失也不需要重新挂载。这个功能实现了运维容器与业务容器的管理分离,比如一个 Pod 中会有主容器中运行核心业务,sidecar 中运行运维容器,比如日志收集等.当业务容器需要重启的时候,传统的更新方式会让整个 Pod 重启从而导致运维容器无故被重启从而中断服务,而使用 ContainerRecreateRequest 可以实现只让特定的容器重启,高效的同时更加安全。

今天就让我们从源码的角度来看一下 ContainerRecreateRequest 的实现原理。

源码解读

我们先来看一下整个 CRR 的代码流程概览,可以看到整个过程主要有三个组件参与,包括 CRR 的 admission webhook, controller manager,以及我们上一篇就提到过的原地升级中的重要组件 - kruise-daemon 中的 crr daemon controller

然后我们再逐步拆开讲解每一步的内容。

1. create CRR

先看一下 CRR 这个自定义资源的 schema 定义:

1
2
3
4
5
6
7
8
9
10
11
12
13
14
15
16
17
18
apiVersion: apps.kruise.io/v1alpha1
kind: ContainerRecreateRequest
metadata:
namespace: pod-namespace
name: xxx
spec:
podName: pod-name
containers: # 要重建的容器名字列表,至少要有 1 个
- name: app
- name: sidecar
strategy:
failurePolicy: Fail # 'Fail' 或 'Ignore',表示一旦有某个容器停止或重建失败, CRR 立即结束
orderedRecreate: false # 'true' 表示要等前一个容器重建完成了,再开始重建下一个
terminationGracePeriodSeconds: 30 # 等待容器优雅退出的时间,不填默认用 Pod 中定义的
unreadyGracePeriodSeconds: 3 # 在重建之前先把 Pod 设为 not ready,并等待这段时间后再开始执行重建
minStartedSeconds: 10 # 重建后新容器至少保持运行这段时间,才认为该容器重建成功
activeDeadlineSeconds: 300 # 如果 CRR 执行超过这个时间,则直接标记为结束(未结束的容器标记为失败)
ttlSecondsAfterFinished: 1800 # CRR 结束后,过了这段时间自动被删除掉

然后开始走读代码流程。

1.1 检查 feature-gate

当我们创建一个 CRR 的时候,会最先经过 adminssion webhook,webhook 中会最先检查当前 feature gates 中是否开启了 kruise-daemon ,因为这个功能依赖于 kruise-daemon 组件来停止 Pod 容器,如果 KruiseDaemon feature-gate 被关闭了,ContainerRecreateRequest 也将无法使用。

1
2
3
4
5
6
func (h *ContainerRecreateRequestHandler) Handle(ctx context.Context, req admission.Request) admission.Response {
if !utilfeature.DefaultFeatureGate.Enabled(features.KruiseDaemon) {
return admission.Errored(http.StatusForbidden, fmt.Errorf("feature-gate %s is not enabled", features.KruiseDaemon))
}
...
}

1.2 注入默认值并检查 Pod

创建 CRR 的时候要为其注入一些特定的标签,为后面控制启动容器的流程做准备,比如打上 ContainerRecreateRequestPodNameKeyContainerRecreateRequestActiveKey的标签:

1
2
obj.Labels[appsv1alpha1.ContainerRecreateRequestPodNameKey] = obj.Spec.PodName
obj.Labels[appsv1alpha1.ContainerRecreateRequestActiveKey] = "true"

检查当前处理的 Pod 是否符合更新条件,比如 Pod 是否是 active 的:

1
2
3
4
5
func IsPodActive(p *v1.Pod) bool {
return v1.PodSucceeded != p.Status.Phase &&
v1.PodFailed != p.Status.Phase &&
p.DeletionTimestamp == nil
}

以及 Pod 是否已经完成调度,如果未完成调度的话就无法完成原地重启(无法使用部署到节点上的 kruise-daemon):

1
2
3
4
5
if !kubecontroller.IsPodActive(pod) {
return admission.Errored(http.StatusBadRequest, fmt.Errorf("not allowed to recreate containers in an inactive Pod"))
} else if pod.Spec.NodeName == "" {
return admission.Errored(http.StatusBadRequest, fmt.Errorf("not allowed to recreate containers in a pending Pod"))
}

1.3 将 Pod 中的信息注入到 CRR

CRR 的运行需要获取 Pod 的信息,比如获取 Pod 中的 Lifecycle.PreStop 让 kruise-daemon 执行 preStop hook 后把容器停掉,获取指定容器的 containerID 来判断重启后 containerID 的变化等。

1
2
3
4
5
6
7
8
9
10
11
12
13
err = injectPodIntoContainerRecreateRequest(obj, pod)
if err != nil {
return admission.Errored(http.StatusBadRequest, err)
}
...
if podContainer.Lifecycle != nil && podContainer.Lifecycle.PreStop != nil {
c.PreStop = &appsv1alpha1.ProbeHandler{
Exec: podContainer.Lifecycle.PreStop.Exec,
HTTPGet: podContainer.Lifecycle.PreStop.HTTPGet,
TCPSocket: podContainer.Lifecycle.PreStop.TCPSocket,
}
}
......

2. CRR controller

创建 CRR 并为其注入相关信息后,CRR 的 controller manager 接管 CRR 的更新。

2.1 同步 container status

CRR 的 status 中包含所要重启的 container 的相关状态信息:

1
2
3
4
5
6
7
8
9
10
11
12
13
14
15
16
17
18
19
20
type ContainerRecreateRequestStatus struct {
// Phase of this ContainerRecreateRequest, e.g. Pending, Recreating, Completed
Phase ContainerRecreateRequestPhase `json:"phase"`
// Represents time when the ContainerRecreateRequest was completed. It is not guaranteed to
// be set in happens-before order across separate operations.
// It is represented in RFC3339 form and is in UTC.
CompletionTime *metav1.Time `json:"completionTime,omitempty"`
// A human readable message indicating details about this ContainerRecreateRequest.
Message string `json:"message,omitempty"`
// ContainerRecreateStates contains the recreation states of the containers.
ContainerRecreateStates []ContainerRecreateRequestContainerRecreateState `json:"containerRecreateStates,omitempty"`
}
type ContainerRecreateRequestContainerRecreateState struct {
// Name of the container.
Name string `json:"name"`
// Phase indicates the recreation phase of the container.
Phase ContainerRecreateRequestPhase `json:"phase"`
// A human readable message indicating details about this state.
Message string `json:"message,omitempty"`
}

CRR controller 不断更新 container 的重启信息到 status 中。

1
2
3
func (r *ReconcileContainerRecreateRequest) syncContainerStatuses(crr *appsv1alpha1.ContainerRecreateRequest, pod *v1.Pod) error {
...
}

controller 同步 container status 的逻辑非常重要,在这里笔者曾经遇到一个诡异的问题,就是创建了好几个 CRR 后,其中几个 CRR 一直卡在 Recreating 的状态,即使 container 已经重启完成或者 TTL 到期也不会发生变化,详情可以见这个 issue。原因就是同步 container status 的逻辑跟时钟同步有关:

1
2
3
4
5
6
7
8
9
containerStatus := util.GetContainerStatus(c.Name, pod)
if containerStatus == nil {
klog.Warningf("Not found %s container in Pod Status for CRR %s/%s", c.Name, crr.Namespace, crr.Name)
continue
} else if containerStatus.State.Running == nil || containerStatus.State.Running.StartedAt.Before(&crr.CreationTimestamp) {
// 只有 container 的创建时间晚于 crr 的创建时间,才认为 crr 重启了 container,假如此时 CRR 所处节点或者 Pod 所在节点的时钟发生漂移,那有可能出现 container 创建的时间早于 crr 创建时间,即使该 container 是由 crr 控制重启。
continue
}
...

经过排查后发现确实是好多 k8s Node 的 NTP server 出现问题导致时钟漂移,再加上上述的逻辑,就不难解释为何 CRR 会卡住不动了。

2.2 make pod not ready

CRR 在重启 container 之前会给 Pod 注入一个 v1.PodConditionType - KruisePodReadyConditionType 并置为 false, 使 Pod 进入 not ready 状态,从 service 的 Endpoint 上摘掉流量。

1
2
3
4
5
6
7
8
9
10
11
12
13
14
15
16
17
condition := GetReadinessCondition(newPod) // 获取 KruisePodReadyConditionType condition
if condition == nil { // 如果没有设置,就新建一个
_, messages := addMessage("", msg)
newPod.Status.Conditions = append(newPod.Status.Conditions, v1.PodCondition{
Type: appspub.KruisePodReadyConditionType,
Message: messages.dump(),
LastTransitionTime: metav1.Now(),
})
} else {// 如果存在该 condition,就置为 false
changed, messages := addMessage(condition.Message, msg)
if !changed {
return nil
}
condition.Status = v1.ConditionFalse
condition.Message = messages.dump()
condition.LastTransitionTime = metav1.Now()
}

3. kruise daemon controller

CRR kruise daemon controller 会监听 CRR 资源的 create, update, delete 事件,然后在 manage 函数中更新 CRR。

3.1 watch CRR

CRR controller 将 update 和 create 事件都加入到 process 队列中,等待处理。

1
2
3
4
5
6
7
8
9
10
11
12
13
14
15
16
17
18
19
20
informer.AddEventHandler(cache.ResourceEventHandlerFuncs{
AddFunc: func(obj interface{}) {
crr, ok := obj.(*appsv1alpha1.ContainerRecreateRequest)
if ok {
enqueue(queue, crr)
}
},
UpdateFunc: func(oldObj, newObj interface{}) {
crr, ok := newObj.(*appsv1alpha1.ContainerRecreateRequest)
if ok {
enqueue(queue, crr)
}
},
DeleteFunc: func(obj interface{}) {
crr, ok := obj.(*appsv1alpha1.ContainerRecreateRequest)
if ok {
resourceVersionExpectation.Delete(crr)
}
},
})

3.2 CRR phase to recreating

daemon controller 的代码入口处先把 CRR 的 phase 设置为 ContainerRecreateRequestRecreating

1
2
3
4
// once first update its phase to recreating
if crr.Status.Phase != appsv1alpha1.ContainerRecreateRequestRecreating {
return c.updateCRRPhase(crr, appsv1alpha1.ContainerRecreateRequestRecreating)
}

3.3 wait for unready grace period

CRR 中的 unreadyGracePeriodSeconds 表示在 2.2 步骤中将 Pod 设置为 not ready 后等待多久再执行 restart container。

1
2
3
4
5
6
7
8
// crr_daemon_controller.go

leftTime := time.Duration(*crr.Spec.Strategy.UnreadyGracePeriodSeconds)*time.Second - time.Since(unreadyTime)
if leftTime > 0 {
klog.Infof("CRR %s/%s is waiting for unready grace period %v left time.", crr.Namespace, crr.Name, leftTime)
c.queue.AddAfter(crr.Namespace+"/"+crr.Spec.PodName, leftTime+100*time.Millisecond)
return nil
}

3.4 KillContainer

kruise-daemon 会执行 preStop hook 后把容器停掉,然后 kubelet 感知到容器退出,则会新建一个容器并启动。 最后 kruise-daemon 看到新容器已经启动成功超过 minStartedSeconds 时间后,会上报这个容器的 phase 状态为 Succeeded。

1
2
// crr_daemon_controller.go
err := runtimeManager.KillContainer(pod, kubeContainerStatus.ID, state.Name, msg, nil)

3.5 更新 CRRContainerRecreateStates

不断更新 CRR status 中关于 container 的状态信息 - containerRecreateStates

1
c.patchCRRContainerRecreateStates(crr, newCRRContainerRecreateStates)

4. 完成 CRR

4.1 CRR 置为 completed

这部分逻辑在 controller managerkruise daemon 都有,而且判定 CRR completed 的方式比较多,这里举几个典型的例子:

4.1.1

当完成重启 container 的数量跟 CRR 中 ContainerRecreateStates 的数组长度一致的时候认为已经完成所有容器的重启工作,可以标记 CRR 为完成。

1
2
3
if completedCount == len(newCRRContainerRecreateStates) {
return c.completeCRRStatus(crr, "")
}

4.1.2

当发现有容器重启失败了,并且策略是 ignore 就直接标记本次 CRR 为 completed。

1
2
3
4
5
6
case appsv1alpha1.ContainerRecreateRequestFailed:
completedCount++
if crr.Spec.Strategy.FailurePolicy == appsv1alpha1.ContainerRecreateRequestFailurePolicyIgnore {
continue
}
return c.completeCRRStatus(crr, "")

4.1.3

上面两个例子都是在 crr_daemon_controller.go 中的,这里列一个 crr_controller 判定完成的例子:

1
2
3
4
5
6
7
8
if crr.Spec.ActiveDeadlineSeconds != nil {
leftTime := time.Duration(*crr.Spec.ActiveDeadlineSeconds)*time.Second - time.Since(crr.CreationTimestamp.Time)
if leftTime <= 0 {
klog.Warningf("Complete CRR %s/%s as failure for recreating has exceeded the activeDeadlineSeconds", crr.Namespace, crr.Name)
return reconcile.Result{}, r.completeCRR(crr, "recreating has exceeded the activeDeadlineSeconds")
}
duration.Update(leftTime)
}

CRR 在规定的 TTL 时间里没有完成任务,会被在这里标记为完成,但是会标记一个含有失败信息的 message。

4.2 到期删除 CRR

如果 CRR 设置了 TTLSecondsAfterFinished 字段,达到该时间后,系统就会将 CRR 删除,这对定期清理已经完成的 CRR 很有帮助。

1
2
3
4
5
6
7
8
9
10
if crr.Spec.TTLSecondsAfterFinished != nil {
leftTime = time.Duration(*crr.Spec.TTLSecondsAfterFinished)*time.Second - time.Since(crr.Status.CompletionTime.Time)
if leftTime <= 0 {
klog.Infof("Deleting CRR %s/%s for ttlSecondsAfterFinished", crr.Namespace, crr.Name)
if err = r.Delete(context.TODO(), crr); err != nil {
return reconcile.Result{}, fmt.Errorf("delete CRR error: %v", err)
}
return reconcile.Result{}, nil
}
}

结语

文章的结尾再来回顾一下 CRR 是如何在几个组件协作之下工作的:

传统的 Pod 重启就是将原有的 Pod 删除,等待重建新的 Pod,而 CRR 的出现为我们提供了一种全新的重启服务的方式。


]]>
OpenKruise 源码剖析之 ContainerRecreateRequest
OpenKruise 源码剖析之原地升级 https://cloudsjhan.github.io/2022/06/19/OpenKruise-源码解读之原地升级/ 2022-06-19T03:00:33.000Z 2022-07-02T03:23:38.796Z

OpenKruise 是基于 CRD 的拓展,包含了很多应用工作负载和运维增强能力,本系列文章会从源码和底层原理上解读各个组件,以帮助大家更好地使用和理解 OpenKruise。让我们开始 OpenKruise 的源码之旅吧!

1. 背景

OpenKruise 是针对 Kubernetes 的增强能力套件,聚焦于云原生应用的部署、升级、运维、稳定性防护等领域。OpenKruise 提供的绝大部分能力都是基于 CRD 扩展来定义,它们不存在于任何外部依赖,可以运行在任意纯净的 Kubernetes 集群中。它包含了一系列增强版本的 Workloads(工作负载),比如 CloneSet、Advanced StatefulSet、Advanced DaemonSet、BroadcastJob 等, 它们不仅支持类似于 Kubernetes 原生 Workloads 的基础功能,还提供了如原地升级、可配置的扩缩容/发布策略、并发操作等。

其中原地升级是 OpenKruise 的核心功能, 它只需要使用新的镜像重建 Pod 中的特定容器,整个 Pod 以及其中的其他容器都不会被影响。因此它带来了更快的发布速度,以及避免了对其他 Scheduler、CNI、CSI 等组件的负面影响, 像 CloneSet、AdvancedStatefulSet、AdvancedDaemonSet、SidecarSet 的热更新机制,ContainerRestartRequest 等功能都依赖原地升级。理解原地升级之后再去研究其他组件就会事半功倍,所以本文首先带大家分析原地升级的源码,来一窥其底层原理。

有关原地升级的使用和介绍可以先阅读这篇文档,下面让我们开始解读源码。

2. 源码解读

2.1 Before Pod Update

2.1.1 reconcile 入口函数

我们以 CloneSet 为例,当 CloneSet 更新后,相应的 controller 感知到资源变化,此时代码会走到 cloneset_controller.godoReconcile 函数,该函数是处理 CloneSet 更新的主干入口。

1
func (r *ReconcileCloneSet) doReconcile(request reconcile.Request) (res reconcile.Result, retErr error)

2.1.2 syncCloneSet

经过一系列检查后,执行到 syncCloneSet, 该函数主要是处理 CloneSet 的 scale 和 update pod 的细节, 我们这里只关注 update 操作。

1
2
3
4
5
func (r *ReconcileCloneSet) syncCloneSet(
instance *appsv1alpha1.CloneSet, newStatus *appsv1alpha1.CloneSetStatus,
currentRevision, updateRevision *apps.ControllerRevision, revisions []*apps.ControllerRevision,
filteredPods []*v1.Pod, filteredPVCs []*v1.PersistentVolumeClaim,
) error

Kruise 专门为这两个操作声明了两个 interface,

1
2
3
4
5
6
7
8
9
10
11
12
13
// Interface for managing pods scaleing and updating.
type Interface interface {
Scale(
currentCS, updateCS *appsv1alpha1.CloneSet,
currentRevision, updateRevision string,
pods []*v1.Pod, pvcs []*v1.PersistentVolumeClaim,
) (bool, error)

Update(cs *appsv1alpha1.CloneSet,
currentRevision, updateRevision *apps.ControllerRevision, revisions []*apps.ControllerRevision,
pods []*v1.Pod, pvcs []*v1.PersistentVolumeClaim,
) error
}

cloneset_update.go 中实现了上述接口。

1
2
3
4
func (c *realControl) Update(cs *appsv1alpha1.CloneSet,
currentRevision, updateRevision *apps.ControllerRevision, revisions []*apps.ControllerRevision,
pods []*v1.Pod, pvcs []*v1.PersistentVolumeClaim,
) error {}

2.1.3 Pod 状态检查

在对 pod 执行真正的 Update 之前,Kruise 做了很多的校验,比如更新 pod 的 lifecycle 的 state,设置可以更新的最大数量,过滤掉不符合 update 条件的 pod等。下面代码的注释中给出了详细的分析。

有关 lifecycle(生命周期钩子) 的更多介绍,可以继续阅读 这篇文档

1
2
3
4
5
6
7
8
9
10
11
12
13
14
15
16
17
18
19
20
21
22
23
24
25
26
27
28
29
30
31
32
33
34
35
36
37
38
39
40
for i, pod := range pods {
// 判断该 pod 是否暂停升级
if coreControl.IsPodUpdatePaused(pod) {
continue
}

var waitUpdate, canUpdate bool
if diffRes.updateNum > 0 {
waitUpdate = !clonesetutils.EqualToRevisionHash("", pod, updateRevision.Name)
} else {
waitUpdate = clonesetutils.EqualToRevisionHash("", pod, updateRevision.Name)
}
if waitUpdate {
switch lifecycle.GetPodLifecycleState(pod) {
// 准备删除的 Pod 就不升级了
case appspub.LifecycleStatePreparingDelete:
klog.V(3).Infof("CloneSet %s/%s find pod %s in state %s, so skip to update it",
cs.Namespace, cs.Name, pod.Name, lifecycle.GetPodLifecycleState(pod))
// 已经更新完成的 Pod 无须升级
case appspub.LifecycleStateUpdated:
klog.V(3).Infof("CloneSet %s/%s find pod %s in state %s but not in updated revision",
cs.Namespace, cs.Name, pod.Name, appspub.LifecycleStateUpdated)
canUpdate = true
default:
if gracePeriod, _ := appspub.GetInPlaceUpdateGrace(pod); gracePeriod != "" {
// 原地升级中提供了 graceful period 选项,作为优雅原地升级的策略。用户如果配置了 gracePeriodSeconds 这个字段,控制器在原地升级的过程中会先把 Pod status 改为 not-ready,然后等一段时间(gracePeriodSeconds),最后再去修改 Pod spec 中的镜像版本。 这样,就为 endpoints-controller 这些控制器留出了充足的时间来将 Pod 从 endpoints 端点列表中去除。
klog.V(3).Infof("CloneSet %s/%s find pod %s still in grace period %s, so skip to update it",
cs.Namespace, cs.Name, pod.Name, gracePeriod)
} else {
canUpdate = true
}
}
}
if canUpdate {
waitUpdateIndexes = append(waitUpdateIndexes, i)
}
}
......
// PUB 是 OPenKruise 的可用性防护组件,是原生 PDB 的升级版,在升级的场景里也需要检查一下是否符合 PUB 的要求
allowed, _, err := pubcontrol.PodUnavailableBudgetValidatePod(c.Client, pod, pubcontrol.NewPubControl(pub, c.controllerFinder, c.Client), pubcontrol.UpdateOperation, false)

这里有关于 PUB 的详细介绍,感兴趣的可以继续深入了解。

2.2 Check About Pod Inplace Update

2.2.1 选择 UpdateStrategy = Inplace

进入到 updatePod 函数,开始升级 Pod。要想使用原地升级机制,必须在 CloneSet 的 Spec 中指定 UpdateStrategy 的 Type 为 InPlaceIfPossible 或者 InPlaceOnly

1
2
3
4
if cs.Spec.UpdateStrategy.Type == appsv1alpha1.InPlaceIfPossibleCloneSetUpdateStrategyType ||
cs.Spec.UpdateStrategy.Type == appsv1alpha1.InPlaceOnlyCloneSetUpdateStrategyType {
...
}

2.2.2 CanUpdateInPlace 检查是否满足原地升级的条件

当 Kruise workload 的升级类型名为 InplaceOnly 的时候,表示强制使用原地升级,如果不满足原地升级条件,就会报错; 如果是 InPlaceIfPossible,它意味着 Kruise 会尽量对 Pod 采取原地升级,如果不能则退化到重建升级。

只有满足以下的改动条件会被允许执行原地升级:

  1. 更新 workload 中的 spec.template.metadata.*,比如 labels/annotations,Kruise 只会将 metadata 中的改动更新到存量 Pod 上。
  2. 更新 workload 中的 spec.template.spec.containers[x].image,Kruise 会原地升级 Pod 中这些容器的镜像,而不会重建整个 Pod。
  3. 从 Kruise v1.0 版本开始(包括 v1.0 alpha/beta),更新 spec.template.metadata.labels/annotations 并且 container 中有配置 env from 这些改动的 labels/anntations,Kruise 会原地升级这些容器来生效新的 env 值。

否则,其他字段的改动,比如 spec.template.spec.containers[x].env 或 spec.template.spec.containers[x].resources,都是会回退为重建升级。

完成这项检查的代码如下:

1
2
3
4
5
6
7
8
9
10
11
12
13
14
15
16
17
func defaultCalculateInPlaceUpdateSpec(oldRevision, newRevision *apps.ControllerRevision, opts *UpdateOptions) *UpdateSpec {
...
patches, err := jsonpatch.CreatePatch(oldRevision.Data.Raw, newRevision.Data.Raw)
if err != nil {
return nil
}

oldTemp, err := GetTemplateFromRevision(oldRevision)
if err != nil {
return nil
}
newTemp, err := GetTemplateFromRevision(newRevision)
if err != nil {
return nil
}
...
}

defaultCalculateInPlaceUpdateSpec 会计算出新旧两个版本的差异,如果 diff 中只包含第2步骤中的改动,就执行原地升级。

2.2.3 更新 Pod Readiness-gate

符合原地升级条件的 pod 都会在 condition 中增加 InPlaceUpdateReady 的 ConditionType,开始原地升级的时候,将该值置为 false,如果 Pod 上层有 Service 的话,就会自动将准备升级的 pod 从 Endpoint 上摘下,避免升级过程中有流量损失。

1
2
3
4
5
6
7
8
if containsReadinessGate(pod) {
newCondition := v1.PodCondition{
Type: appspub.InPlaceUpdateReady,
LastTransitionTime: metav1.NewTime(Clock.Now()),
Status: v1.ConditionFalse,
Reason: "StartInPlaceUpdate",
}
}

2.3 Begin Inplace update

2.3.1 Pod annotation 中记录升级信息

1
2
3
4
5
6
7
inPlaceUpdateState := appspub.InPlaceUpdateState{
Revision: spec.Revision,
UpdateTimestamp: metav1.NewTime(Clock.Now()),
UpdateEnvFromMetadata: spec.UpdateEnvFromMetadata,
}
inPlaceUpdateStateJSON, _ := json.Marshal(inPlaceUpdateState)
clone.Annotations[appspub.InPlaceUpdateStateKey] = string(inPlaceUpdateStateJSON)

2.3.2 根据配置设置 GracefulPeriod

原地升级中提供了 graceful period 选项,作为优雅原地升级的策略。用户如果配置了 gracePeriodSeconds 这个字段,控制器在原地升级的过程中会先把 Pod status 改为 not-ready,然后等一段时间(gracePeriodSeconds),最后再去修改 Pod spec 中的镜像版本。 这样,就为 endpoints-controller 这些控制器留出了充足的时间来将 Pod 从 endpoints 端点列表中去除。

1
2
3
4
5
6
7
8
9
if spec.GraceSeconds <= 0 {
if clone, err = opts.PatchSpecToPod(clone, spec, &inPlaceUpdateState); err != nil {
return err
}
appspub.RemoveInPlaceUpdateGrace(clone)
} else {
// Put the info into annotation
// 此处设置了 GracePeriod 后,效果会在 上面的 reconcile controller 中体现
}

2.3.3 Update Pod

在这里就调用 UpdatePod 方法开始真正对 Pod 做升级了。

1
newPod, updateErr := c.podAdapter.UpdatePod(clone)

以上原地升级相关的逻辑都是由 kruise_manager 组件负责的,但是当执行 UpdatePod 后,Kruise_manager 就只负责正常的 workload 状态更新,Container 的更新由原地升级的核心组件 Kruise-demaon 接管。

2.4 kruise_daemon

当 Kubelet 收到一个 Pod 创建之后,通过 CRI(Container Runtime Interface) , CNI 以及类似的公共接口(例如 CSI)来调用底层真正的接口实现者去完成操作。对于容器运行时来说,是通过 CRI 接口调用底层真正的 Runtime 运行时来完成对容器的创建和启动镜像拉取这些操作。其中 CRI 是 Kubernetes1.5 之后加入的一个新功能,由协议缓冲区和 gRPC API 组成,提供了一个明确定义的抽象层,它的目的是对于 Kubelet 能屏蔽底下 Runtime 实现的细节而只显示所需的接口。

Kruise_daemon 就是一个全新的组件,作为 DaemonSet 部署到每个节点上,可以连接到节点上的 CRI API,来拓展 Kubernetes 容器进行时的操作, 它也可以调用 CRI 这一层来实现 Container Runtime 层面的能力,比如它可以拉镜像,可以重启容器。

2.4.1 Kruise_daemon 入口

kruise_daemon 的入口函数在 kruise/cmd/daemon/main.go 中,

1
2
3
4
d, err := daemon.NewDaemon(cfg, *bindAddr)
if err != nil {
klog.Fatalf("Failed to new daemon: %v", err)
}

进入到 NewDaemon 函数中看一眼,发现这个 daemon 服务本质上也是几个 controller,用来监听相应的 Pod 变化并执行操作。

1
2
3
4
5
6
7
8
9
10
11
// kruise/pkg/daemon/daemon.go
// 在这里也能看到很多组件都在这个函数中注册了 controller,因为这些组件都依赖原地升级的能力,比如 ImagePull, ContaienrRestartRequest 等。

if utilfeature.DefaultFeatureGate.Enabled(features.DaemonWatchingPod) {
// DaemonWatchingPod enables kruise-daemon to list watch pods that belong to the same node.
containerMetaController, err := containermeta.NewController(opts)
if err != nil {
return nil, fmt.Errorf("failed to new containermeta controller: %v", err)
}
runnables = append(runnables, containerMetaController)
}

2.4.2 计算 PlainHash 或者 ExtractedEnvFromMetadataHash

2.4.2.1 如果只是 image update 的话,只需要更新 image 字段,kubelet 来执行 preStop 和 container restart。这是因为 Kubelet 在创建每个容器时,会为容器计算一个 hash 值,当上层修改了容器的 image 之后,Kubelet 就认为容器的 hash 值发生了变化。当 Kubelet 发现 Pod spec 中容器的 hash 值和实际的,如 container 对应的 hash 值不一致时,就会把旧的容器停掉,用新的镜像再重建新的容器,从而实现容器的原地升级的能力。

2.4.2.2 从 Kruise v1.0 版本开始(包括 v1.0 alpha/beta),更新 spec.template.metadata.labels/annotations 并且 container 中有配置 env from 这些改动的 labels/anntations,Kruise 会原地升级这些容器来生效新的 env 值。也就是修改环境变量 kruise 也支持原地重启,这部分工作就是由 kruise daemon 来完成的,核心的代码在 kruise/pkg/daemon/containermeta/container_meta_controller.go 中。

  1. 开启 InPlaceUpdateEnvFromMetadata feature gate
1
if utilfeature.DefaultFeatureGate.Enabled(features.InPlaceUpdateEnvFromMetadata)
  1. 计算 ExtractedEnvFromMetadataHash

    1
    containerMeta.Hashes.ExtractedEnvFromMetadataHash, err = envHasher.GetCurrentHash(containerSpec, envGetter)
  2. 将 container ID 传到 restarter 的处理队列中

    1
    c.restarter.queue.AddRateLimited(status.ID)

restarter controller 专门用来处理需要原地重启的 container 队列,核心逻辑在 sync 函数中,上一步中加到队列的 containerID 就会在这里被处理。

1
func (c *restartController) sync(containerID kubeletcontainer.ContainerID) error
  1. 执行 killCOntainer
1
func (m *genericRuntimeManager) KillContainer(pod *v1.Pod, containerID kubeletcontainer.ContainerID, containerName string, message string, gracePeriodOverride *int64) error

KillContainer 中有两个重要的操作,首先调用对旧的 container 执行 preStop (如果有的话),然后调用容器运行时接口 StopContainer将容器停止。

1
2
3
4
5
6
7
// Run the pre-stop lifecycle hooks if applicable and if there is enough time to run it
if containerSpec.Lifecycle != nil && containerSpec.Lifecycle.PreStop != nil && gracePeriod > 0 {
gracePeriod = gracePeriod - m.executePreStopHook(pod, containerID, containerSpec, gracePeriod)
}
...
err := m.runtimeService.StopContainer(containerID.ID, gracePeriod)
...

2.4.3 kubelet image pull & create container

在上一步中容器被停止后,kubelet 会开始新建容器,然后更新容器的状态。

2.4.4 kruise manager 同步 pod 状态

与此同时,相关的 controller 也在同步 Pod/workloads 升级的状态。

1
2
3
if err = r.statusUpdater.UpdateCloneSetStatus(instance, &newStatus, filteredPods); err != nil {
return reconcile.Result{}, err
}

2.4.5 kubelet 标记 Pod Ready

完成更新后,由 kubelet 标记 Pod Ready,kruise manager 将相应的 worklod 同步为更新完成。

至此,整个原地升级的流程就完成了。不难发现,原地升级除了用到原生 kubernetes 提供的 informer controller 机制外,最核心的也是最有亮点的地方就是巧妙地实现了一个类似 kubelet 的 plugin - kruise daemon, 为我们提供了一种全新的 Kubernetes 容器运行时 operations 的拓展思路。

3. 源码流程图

以上的代码可以总结简化为下面这张图

4. 总结

原地升级是 OpenKruise 的核心能力,是其他组件和功能实现的基石。了解其底层实现原理和源码能够扩宽自己的技术视野,加深对 kubernetes 的理解,给我们提供了一种新的拓展 kubelet 的新思路。同时,当我们在使用 Openkruise 遇到问题的时候,了解源码也有助于问题的排查。


]]>
从源码解读 OpenKruise 原地升级的原理
[摘要]如何构建分布式数据库 severless 服务? https://cloudsjhan.github.io/2022/06/12/摘要-如何构建分布式数据库-severless-服务/ 2022-06-12T09:37:32.000Z 2022-06-12T10:28:08.637Z

分布式数据库 severless 服务要点

最近在读一些分布式数据库 serverless 服务化的文章,从中总结出一些构建此类服务面临的痛点以及如何破局的要点,算是一个读书笔记。主要参考的文章有 cockroachdb severless 解读, How we built a forever-free serverless SQL database

大致内容提纲

内容提要

为什么要云原生数据库

数据库的 scale 能力决定了这个产品的上限,而一家公司能用多少人服务多少客户的 scale 能力,决定了公司营收的上限。而破局的方式就是数据库上云,把数据库的服务化,降低门槛。

为什么要 serverless 化

serverless 卖服务的形式,一个集群就可以服务”无穷”个租户,只要没有实际的使用,并不会产生成本。多增加一个租户,它的边际成本是零。所以这个模式是 scalable 的。

而为了实现 serverless 的目的,云原生数据库的架构大多是存储和计算分离的。

多租户的资源隔离问题

如果是多租户共享计算层和存储层,那复杂 SQL 就会将整个集群的资源耗尽,影响其他租户;

如果是每个租户独享各自的计算层和存储层,也就是回到了每个租户一套集群的模式,成本非常高。

综上因素,比较好的方式是独享计算层,共享存储层。上层的 SQL 是租户之间物理隔离的,下面的 kv 存储是由所有租户去共享的。

共享存储之后,如何区分租户数据

共享存储层后,可以在请求的 key 的编码中添加 tenant-id,多租户模式下,SQL 的表的数据映射成 kv 数据,最终的编码是 /tenant-id/table-id/index-id/key

集群架构

云原生数据库集群架构

名词解释

Block storage: 多租户共享的存储

SQL Pod: 租户独享的 SQL 计算节点

Proxy Pod : 负责将租户的请求路由到正确的 SQL 节点上

计算节点无状态,这意味着 SQL pod 可以随用随起,也就是说,当某个 tenant 没有流量时,完全可以把它的 SQL 节点停下关掉,需要的时候再动态拉起。

拓展阅读

以上。


]]>
一点学习笔记
云原生应用发布组件 Triton 开源之旅 https://cloudsjhan.github.io/2021/09/13/云原生应用发布组件-Triton-开源之旅/ 2021-09-13T14:34:04.000Z 2021-09-13T14:36:34.319Z

Triton 概述

伴随着云原生技术在越来越多的企业落地,如今的 Kubernetes 和容器已经完全进入主流市场,成为云计算的新界面,帮助企业充分享受云原生的优势,加速应用迭代创新效率,降低开发运维成本。但在向着云原生架构转型的过程中,也有许多问题需要被解决。比如原生 Kubernetes 的复杂性、容器化应用的生命周期管理,以及向以容器为基础设施迁移的过程中可能出现的服务稳定性挑战等等。

开源云原生应用发布组件 Triton 的出现,就是为了解决企业应用在容器化过程中安全落地生产的问题。Triton 以 OpenKruise 作为容器应用自动化引擎,实现应用负载的扩展增强能力,为原有持续交付系统带来全面升级,不仅解决了应用生命周期管理的问题,包括开发、部署、运维等,同时打通微服务治理,可以帮助研发提升持续交付的效率。

有关 Trion 设计方案、实现原理的详细介绍可以参考这篇文章。本文将从源码级安装、debug、demo 应用发布演示三个方面介绍 Triton 的核心特性以及 Triton 的快速上手使用、开发,最后介绍 Triton 的 Roadmap。由于时间关系,一键安装、Helm 安装的方式正在开发中,会在正式版本 release 中提供。

核心能力

本次带来的 v0.1.0 开源版本在代码上进行了重构,暂时去掉了对网络方案、微服务架构的依赖,抽象出应用模型的概念,更具备普适性,核心特性如下:

  • 全托管于 k8s 集群,便于组件安装、维护和升级;

  • 支持使用 API 和 kubectl 插件(规划中)完成应用创建、部署、升级,并支持单批发布、分批发布和金丝雀发布;

  • 提供从创建到运行的应用全生命周期管理服务,包括应用的发布、启动、停止、扩容、缩容和删除等服务,可以轻松管理上千个应用实例的交付问题;

  • Triton 提供了大量 API 来简化部署等操作,如Next、Cancel、Pause、Resume、Scale、Gets、Restart 等,轻松对接公司内部的 PaaS 系统;

操作指南

在开始之前,检查一下当前环境是否满足一下前提条件:

  1. 确保环境能够与 kube-apiserver 连通;

  2. 确保 OpenKruise 已经在当前操作 k8s 集群安装,若未安装可以参考文档

  3. 确保有 Golang 开发环境,Fork & git clone 代码后,执行 make install 安装 CRD DeployFlow

  4. 操作 API 的过程中需要 grpcurl 这个工具,参考 grpcurl 文档进行安装;

创建 DeployFlow 来发布 Nginx Demo Application

运行 DeployFlow controller

进入到代码根目录下执行 make run

创建 DeployFlow 准备发布应用

1
kubectl apply -f https://github.com/triton-io/triton/raw/main/docs/tutorial/v1/nginx-deployflow.yaml

会创建出一个 DeployFlow 资源和本应用对应的 Service,可以查看该 yaml 文件了解详细的 DeployFlow 定义。

1
2
3
4
5
6
7
8
9
10
11
12
13
14
15
16
17
18
19
20
21
22
23
24
25
26
27
28
29
30
31
32
33
34
35
36
37
38
39
40
41
apiVersion: apps.triton.io/v1alpha1
kind: DeployFlow
metadata:
labels:
app: "12122"
app.kubernetes.io/instance: 12122-sample-10010
app.kubernetes.io/name: deploy-demo-hello
group: "10010"
managed-by: triton-io
name: 12122-sample-10010-df
namespace: default
spec:
action: create
application:
appID: 12122
appName: deploy-demo-hello
groupID: 10010
instanceName: 12122-sample-10010
replicas: 3
selector:
matchLabels:
app: "12122"
app.kubernetes.io/instance: 12122-sample-10010
app.kubernetes.io/name: deploy-demo-hello
group: "10010"
managed-by: triton-io
template:
metadata: {}
spec:
containers:
- image: nginx:latest
name: 12122-sample-10010-container
ports:
- containerPort: 80
protocol: TCP
resources: {}
updateStrategy:
batchSize: 1
batchIntervalSeconds: 10
canary: 1 # the number of canary batch
mode: auto # the mode is auto after canary batch

可以看到我们本次发布的应用名字是 12122-sample-10010,副本数量是 3,批次大小是 1,有一个金丝雀批次,批次大小是 1,发布的模式是 auto,意味着本次发布只会在金丝雀批次和普通批次之间暂停,后续两个批次会以 batchIntervalSeconds 为时间间隔自动触发。

检查 DeployFlow 状态

可以看到我们创建出一个名为 12122-sample-10010-df 的 DeployFlow 资源,通过展示的字段了解到本次发布分为 3 个批次,当前批次的大小是 1,已升级和已完成的副本数量都是 0。

启动几十秒后,检查 DeployFlow 的 status 字段:

1
kubectl get df  12122-sample-10010-df -o yaml
1
2
3
4
5
6
7
8
9
10
11
12
13
14
15
16
17
18
19
20
21
22
23
24
25
26
27
28
29
30
31
32
33
34
status:
availableReplicas: 0
batches: 3
conditions:
- batch: 1
batchSize: 1
canary: true
failedReplicas: 0
finishedAt: null
phase: Smoked
pods:
- ip: 172.31.230.23
name: 12122-sample-10010-2mwkt
phase: ContainersReady
port: 80
pullInStatus: ""
pulledInAt: null
startedAt: "2021-09-13T12:49:04Z"
failedReplicas: 0
finished: false
finishedAt: null
finishedBatches: 0
finishedReplicas: 0
paused: false
phase: BatchStarted
pods:
- 12122-sample-10010-2mwkt
replicas: 1
replicasToProcess: 3
startedAt: "2021-09-13T12:49:04Z"
updateRevision: 12122-sample-10010-6ddf9b7cf4
updatedAt: "2021-09-13T12:49:21Z"
updatedReadyReplicas: 0
updatedReplicas: 1

可以看到目前在启动的是 canary 批次,该批次已经处于 smoked 阶段,该批次中的 pod 是 12122-sample-10010-2mwkt ,同时也能看到当前批次中 pod 的拉入状态、拉入时间等信息。

将应用拉入流量

在此之前我们可以先检查一下 Service 的状态:

1
kubectl describe svc sample-12122-svc -o yaml

从显示的结果来看,pod 12122-sample-10010-2mwkt 并没有出现在 Service 的 Endpoints 中,意味着当前应用没有正式接入流量:

1
2
3
4
5
6
7
8
9
10
11
12
13
14
15
16
17
18
Name:              sample-12122-svc
Namespace: default
Labels: app=12122
app.kubernetes.io/instance=12122-sample-10010
app.kubernetes.io/name=deploy-demo-hello
group=10010
managed-by=triton-io
Annotations: <none>
Selector: app.kubernetes.io/instance=12122-sample-10010,app.kubernetes.io/name=deploy-demo-hello,app=12122,group=10010,managed-by=triton-io
Type: ClusterIP
IP Families: <none>
IP: 10.22.6.154
IPs: <none>
Port: web 80/TCP
TargetPort: 80/TCP
Endpoints:
Session Affinity: None
Events: <none>

接下来我们执行拉入操作(Bake),对应 pod 的状态会从 ContainerReady 变为 Ready,从而被挂载到对应 Service 的 Endpoints 上开始正式接入流量:

1
grpcurl --plaintext -d '{"deploy":{"name":"12122-sample-10010-df","namespace":"default"}}' localhost:8099 deployflow.DeployFlow/Next

再次检查 DeployFlow,Service,CloneSet 的状态后,发现 Pod 已被挂载到 Endpoints,DeployFlow 的 UPDATED_READY_REPLICAS 字段变为 1,金丝雀批次进入 baking 阶段,如果此时应用正常工作,我们再次执行上面的 Next 操作,将 DeployFlow 置为 baked 阶段,表示本批次点火成功,应用流量正常。

Rollout 操作

金丝雀批次到达 baked 阶段后,执行 Next 操作就会进入后面的普通批次发布,由于我们应用的副本数量设置为 3,去掉金丝雀批次中的一个副本后,还剩 2 个,而 batchSize 的大小为 1,所有剩余的普通批次会分两个批次发布,两个批次之间会间隔 10s 触发。

1
grpcurl --plaintext -d '{"deploy":{"name":"12122-sample-10010-df","namespace":"default"}}' localhost:8099 deployflow.DeployFlow/Next

最后应用发布完成,检查 DeployFlow 的状态为 Success:

再次查看 Service 的 Endpoints 可以看到本次发布的 3 个副本都已经挂载上去。

再次回顾整个发布流程,可以总结为下面的状态流转图:

deployflow-status

暂停/继续 DeployFlow

在部署过程中,如果要暂停 DeployFlow,可以执行 Pause 操作:

1
grpcurl --plaintext -d '{"deploy":{"name":"12122-sample-10010-df","namespace":"default"}}' localhost:8099 deployflow.DeployFlow/Pause

可以继续发布了,就执行 Resume 操作:

1
grpcurl --plaintext -d '{"deploy":{"name":"12122-sample-10010-df","namespace":"default"}}' localhost:8099 deployflow.DeployFlow/Resume

取消本次发布

如果在发布过程中,遇到启动失败,或者拉入失败的情况,要取消本次发布,可执行 Cancel 操作:

1
grpcurl --plaintext -d '{"deploy":{"name":"12122-sample-10010-df","namespace":"default"}}' localhost:8099 deployflow.DeployFlow/Cancel

启动一个扩缩容 DeployFlow

同样可以使用 automannual 模式划分多个批次来执行扩缩容操作。 当一个 CloneSet 缩容时,有时用户倾向于删除特定的 Pod,可以使用 podsToDelete 字段实现指定 Pod 缩容:

1
2
3
4
kubectl get pod | grep 12122-sample
12122-sample-10010-2mwkt 1/1 Running 0 29m
12122-sample-10010-hgdp6 1/1 Running 0 9m55s
12122-sample-10010-zh98f 1/1 Running 0 10m

我们在缩容的时候指定被缩掉的 Pod 为 12122-sample-10010-zh98f:

1
2
3
4
5
6
7
8
9
grpcurl --plaintext -d '{"instance":{"name":"12122-sample-10010","namespace":"default"},"replicas":2,"strategy":{"podsToDelete":["12122-sample-10010-zh98f"],"batchSize":"1","batches":"1","batchIntervalSeconds":10}}' \
localhost:8099 application.Application/Scale
{
"deployName": "12122-sample-10010-kvn6b"
}

❯ kubectl get pod | grep 12122-sample
12122-sample-10010-2mwkt 1/1 Running 0 29m
12122-sample-10010-zh98f 1/1 Running 0 11m

CloneSet 被缩容为 2 个副本,被缩容的 Pod 正是指定的那个。该功能的实现得益于 OpenKruise 中增强型无状态 workload CloneSet 提供的能力,具体的功能描述可以参考 OpenKruise 文档。

在操作过程中,Triton 也提供了 Get 方法实时获取当前 DeployFlow 的 Pod 信息:

1
grpcurl --plaintext -d '{"deploy":{"name":"12122-sample-10010-df","namespace":"default"}}' localhost:8099 deployflow.DeployFlow/Get
1
2
3
4
5
6
7
8
9
10
11
12
13
14
15
16
17
18
19
20
21
22
23
24
25
26
27
28
29
30
31
32
33
34
35
36
37
38
39
40
41
42
43
44
45
46
47
48
49
50
51
52
53
54
55
56
57
58
59
60
61
62
63
64
65
66
67
68
69
70
71
72
73
74
75
76
77
78
79
{
"deploy": {
"namespace": "default",
"name": "12122-sample-10010-df",
"appID": 12122,
"groupID": 10010,
"appName": "deploy-demo-hello",
"instanceName": "12122-sample-10010",
"replicas": 3,
"action": "create",
"availableReplicas": 3,
"updatedReplicas": 3,
"updatedReadyReplicas": 3,
"updateRevision": "6ddf9b7cf4",
"conditions": [
{
"batch": 1,
"batchSize": 1,
"canary": true,
"phase": "Baked",
"pods": [
{
"name": "12122-sample-10010-2mwkt",
"ip": "172.31.230.23",
"port": 80,
"phase": "Ready",
"pullInStatus": "PullInSucceeded"
}
],
"startedAt": "2021-09-13T12:49:04Z",
"finishedAt": "2021-09-13T13:07:43Z"
},
{
"batch": 2,
"batchSize": 1,
"phase": "Baked",
"pods": [
{
"name": "12122-sample-10010-zh98f",
"ip": "172.31.226.94",
"port": 80,
"phase": "Ready",
"pullInStatus": "PullInSucceeded"
}
],
"startedAt": "2021-09-13T13:07:46Z",
"finishedAt": "2021-09-13T13:08:03Z"
},
{
"batch": 3,
"batchSize": 1,
"phase": "Baked",
"pods": [
{
"name": "12122-sample-10010-hgdp6",
"ip": "172.31.227.215",
"port": 80,
"phase": "Ready",
"pullInStatus": "PullInSucceeded"
}
],
"startedAt": "2021-09-13T13:08:15Z",
"finishedAt": "2021-09-13T13:08:45Z"
}
],
"phase": "Success",
"finished": true,
"batches": 3,
"batchSize": 1,
"finishedBatches": 3,
"finishedReplicas": 3,
"startedAt": "2021-09-13T12:49:04Z",
"finishedAt": "2021-09-13T13:08:45Z",
"mode": "auto",
"batchIntervalSeconds": 10,
"canary": 1,
"updatedAt": "2021-09-13T13:08:45Z"
}
}

TODOS

上面演示的就是 Triton 提供的核心能力。对于基础团队来说,Triton 不仅仅是一个开源项目,它也是一个真实的比较接地气的云原生持续交付项目。通过开源,我们希望 Triton 能丰富云原生社区的持续交付工具体系,为更多开发者和企业搭建云原生化的 PaaS 平台助力,提供一种现代的、高效的的技术方案。

开源只是迈出的一小步,未来我们会进一步推动 Triton 不断走向完善,包括但不限于以下几点:

  • 支持自定义注册中心,可以看到目前 Triton 采用的是 k8s 原生的 Service 作为应用的注册中心,但据我们所了解,很多企业都使用自定义的注册中心,比如 spring cloud 的 Nacos 等;
  • 提供 helm 安装方式;
  • 完善 REST & GRPC API 以及相应文档;
  • 结合内外部用户需求,持续迭代。项目开源后,我们也会根据开发者需求开展迭代。

欢迎大家向 Triton 提交 issue 和 PR 共建 Triton 社区。我们诚心期待更多的开发者加入,也期待 Triton 能够助力越来越多的企业快速构建云原生持续交付平台。如果有企业或者用户感兴趣,我们可以提供专项技术支持和交流,欢迎入群咨询。

相关链接

项目地址:https://github.com/triton-io/triton

交流群

triton-wechat


]]>
云原生应用发布组件 Triton 开源之旅
掌门下一代容器发布系统 Triton https://cloudsjhan.github.io/2021/07/21/掌门下一代容器发布系统-Triton/ 2021-07-21T05:45:59.000Z 2021-07-21T06:02:21.266Z

掌门下一代容器发布系统 Triton

CD 平台是掌门的持续交付系统,Triton 作为 CD 平台的核心容器发布组件,自 2020.4 月在 CD 平台上正式上线,支撑了掌门近 1000 个应用从虚机迁移至容器的过程,保障了虚机迁容器过程的稳定性。目前,Triton 除了提供日常的应用容器发布、网络策略配置、Ingress 域名配置等能力之外,也成为其他组件、平台的资源交付基座,比如,大规模的流水线交付,压测平台等。Triton 解决了应用生命周期管理的问题,包括开发、部署、运维等,同时打通了微服务治理,极大地帮助研发提升了持续交付的效率。

1. 背景

云原生架构的快速普及带来了企业基础设施和应用架构等技术层面的革新。在 CNCF 2020 年度中国区云原生调查报告里面有一个亮眼的数字,72% 的受访者已经在生产环境当中使用 Kubernetes,同期全球调查报告的数字是 83%。可以看到,在 Kubernetes 的使用率上,中国和全球是持平的。如果看纯容器使用率,则更加惊人,超过 92%。从这些数据来看,我们可以得出结论:Kubernetes 和容器已经完全进入主流市场,成为所有人都在使用的技术。

在此之前,掌门的应用一直跑在虚机里,但是随着应用规模的不断扩大,虚机数量也随之快速增加,我们开始在运维成本、交付效率、应用管理上面临一些痛点:

  1. 应用数量不断增加,基础设施的成本随之上升,降本迫在眉睫;
  2. 业务飞速发展,内部对资源、环境、应用的交付效率的要求不断提高;
  3. 应用数量增长很快,大量应用的管理给运维带来很大压力。

所以,为了能够充分发挥云原生的优势,灵活地应对变化和弹性扩展以提升开发效率,加速迭代并降低成本,掌门于 2020 年 4 月份正式启动容器化项目。

为了最大程度降低迁移容器过程中对开发和业务的影响,我们决定在应用发布中完成从虚机到容器的迁移,以保障迁移过程中服务的稳定性,实现不停服迁移。要实现这个目标,一个全新的、支持容器发布的平台呼之欲出,Triton 就是在这种背景下诞生的。下面将介绍容器发布平台 Triton 的设计原理、实现方案。

2. Triton 设计原理及实现方案

在介绍 Triton 之前我们先看一下 CNCF 对持续交付的定义,涵盖了一个云原生应用的全生命周期流程,图中的一些技术术语在本文中也会用到,比如 workloadrolloutcanary等, 这篇文档 中有详细的介绍,需要的话可以查阅。

同时通过这张图,也可以清晰地了解 Triton 在整个持续发布系统中的定位。Topic 1,Topic 1.5 的主要内容是应用模型描述,打包、参数配置;Topic 4 是资源管理,网络,日志 / 监控等平台侧的功能;而 Triton 聚焦的工作是在 Topic 2 和 Topic 3 ,主要内容是应用生命周期管理,流量管理,workload 管理,提供发布策略,比如蓝绿部署、金丝雀部署等。

CNCF SIG App Delivery

了解了 Triton 的定位后,下面将从方案选型,架构设计,UI 交互 3 个维度来详细介绍 Triton 的设计原理和实现方案。

2.1 方案选型

2.1.1 workload 选型

众所周知,不管是无状态的 Deployment 还是有状态的 StatefulSet,kubernetes 都是支持服务的滚动更新的。我们也经常在一些文章中看到有基于原生 Deployment 实现应用的滚动发布和灰度发布,这种方式开发简单容易上手,但是随之带来了很多缺陷,使得我们无法细粒度控制发布的过程,比如不支持发布过程中暂停、继续,以及流量的优雅拉入拉出等能力。

为了实现更丰富的发布策略以及更加细粒度的发布控制,以保障容器发布过程的安全、稳定,Triton 选择 OpenKruise 作为应用的 workload。OpenKruise 是 Kubernetes 的一个标准扩展,它可以配合原生 Kubernetes 使用,并为管理应用容器、sidecar、镜像分发等方面提供更加强大和高效的能力。OpenKruise 提供了很多原生 kubernetes 的增强型资源,CloneSet、Advanced StatefulSet、SidecarSet 等。其中,CloneSet 提供了更加高效、确定可控的应用管理和部署能力,支持优雅原地升级、指定删除、发布顺序可配置、并行 / 灰度发布等丰富的策略,可以满足更多样化的应用场景,所以 Triton 选择基于 CloneSet 来实现无状态应用的发布流程。

2.1.2 发布流程技术选型

如何定义一种发布流程,并按照流程的定义去实现本次发布?为了寻找一些灵感,在设计 Triton 之前我们调研了目前在云原生领域做得比较好的的一些 CI/CD 组件,像云原生 CI 工具 Tekton,交付工具 Argo 都是设计了一套 CRD (自定义资源),然后在 Operator 中实现相应的逻辑以达到最终的目标状态(Operator 是由 CoreOS 开发的,用来扩展 Kubernetes API,特定的应用程序控制器,其基于 Kubernetes 的资源和控制器概念之上构建,但同时又包含了应用程序特定的领域知识。创建 Operator 的关键是 CRD 的设计)。

于是我们采用云原生的方式设计容器发布,原生为云而设计,在云上运行,充分利用和发挥云平台的弹性 + 分布式优势。我们设计了一种 CRD 来描述一次容器发布的完整流程,这样每次发布只需要创建 CRD 资源,就能定义好本次的发布流程,后续只需要在此资源基础上修改即可。经过内部讨论,最终该 CRD 被命名为 DeployFlow,即发布流的意思,关于 DeployFlow 的详细介绍请继续阅读下面的架构设计。

2.2 架构设计

在解决了 workload 和发布流程的技术选型后,DeployFlow 这个 CRD 的设计就成为了我们要去聚焦的核心工作。下图展示了 Triton 的主要设计架构,可以看到在 Kubernetes 和 OpenKruise 的基础之上,完成一次发布需要的配置由 CRD 定义,发布流程相关的逻辑控制通过 Operator 实现,同时 Triton 提供 REST、GRPC API 和前端 UI 实现交互。

Triton 架构图

2.2.1 DeployFlow 和 Operator 实现

首先介绍下 DeployFlow 这个 CRD,通过 DeployFlow 我们定义了一次发布中需要的配置以及发布过程中需要的状态展示。

1
2
3
4
5
6
7
8
// DeployFlow is the Schema for the deploys API
type DeployFlow struct {
metav1.TypeMeta `json:",inline"`
metav1.ObjectMeta `json:"metadata,omitempty"`

Spec DeployFlowSpec `json:"spec,omitempty"`
Status DeployFlowStatus `json:"status,omitempty"`
}

Spec 字段的内容分为两部分,一部分是与应用相关的信息,比如 AppIDGroupId副本数量AppName等,另一部分是指定发布策略,比如是 create还是 update 操作,是 scale in 还是 scale out,不同的操作对应不同的发布策略,详细的字段解释可以通过下面代码来理解。

1
2
3
4
5
6
7
8
9
10
11
12
13
14
15
type DeployFlowSpec struct {
// Important: Run "make" to regenerate code after modifying this file

AppID int `json:"appID"`
GroupID int `json:"groupID"`
AppName string `json:"appName"`
......
Action string `json:"action"`

// +nullable
UpdateStrategy *DeployUpdateStrategy `json:"updateStrategy,omitempty"`

// +nullable
NonUpdateStrategy *DeployNonUpdateStrategy `json:"nonUpdateStrategy,omitempty"`
}

DeployUpdateStrategy 代表了本次发布是一次更新操作,也就是会使 CloneSet 中的 UpdateRevision 字段发生变化,一般 createupdate rollback 就是采用 DeployUpdateStrategy 的字段定义。

DeployNonUpdateStrategy 代表本次发布不会触发资源更新,也就是 UpdateRevision 不会发生变化,一般 scale inscale outrestart 等操作要采用 DeployNonUpdateStrategy

不同的发布策略肯定有不同的字段,但大部分的策略都是可以共用的,所以在此之上我们抽象出一个基础发布策略 BaseStrategy,由于 BaseStrategy 中的字段太多,我们这里放一张 CRD 的 schema 资源视图,然后再选择其中重要的字段进行解释。

DeployFlow

先介绍 DeployPhase 字段,DeployPhase 表示一次发布过程中,DeployFlow 所经历的阶段。

DeployPhase

字段的意思都比较好理解,这里就不展开讲 了。

BaseStrategy 中有个比较重要的字段 - BatchSize ,表示批次大小。这意味着 DeployFlow 支持分批次发布,用户可以自定义每个批次最大发布的副本数量,DeployFlow 会计算出本次发布的总批次是多少从而提前给出发布概览。

deploy overview

BaseStrategypausedcanceled 字段就可以知道,在发布过程中可以随时暂停、继续或者取消本次发布。Mode 表示 DeployFlow 不同批次之间的触发方式,分为 automanual 两种,当选择 auto 模式的时候,通过字段 BatchIntervalSeconds 可以设置不同批次之间的时间间隔,如果选择手动模式则每个批次之间需要手工触发。

由于 DeployFlow 是分批次发布,所以每个批次需要有阶段显示 - BatchPhase ,以表示当前的批次所处的阶段,我们来详细解释每种阶段的含义。

BatchPending: 表示当前批次的 pod 正在准备资源,比如此时 pod 正在被调度中,image 在下载中,对应 Kubernetes 中的 pod 处于 PendingContainerCreating 状态。

BatchSmoking: 表示当前批次的 pod 正在启动过程中,pod 处于 Running 状态,但是 ContainerReady 字段还没有置为 true。

BatchSmoked: 表示当前批次的所有 pod 都已经启动成功,也就是 pod 中的 ContainerReady 字段已经被置为 true,但是 Ready 字段还处于 false。此时如果通过 service 来处理服务流量的话,启动的 pod 并不会被加入到对应 service 的 endpoint,如果是微服务架构,则该 pod 并不会被拉入到微服务的注册中心,从而保证了业务流量的安全。正是拥有了这种机制以及批次间可暂停的能力,我们可以轻松实现应用的金丝雀发布,这个在后面还会详细讲到。

BatchBaking: 表示当前批次的所有 pod 都已经启动成功,正在执行流量拉入操作,也就是将 pod 的 Ready 字段置为 true。

BatchBaked: 表示当前批次的所有 pod 的 Ready 字段都已被置为 true,pod 开始接收生产流量,至此也意味着本批次的结束,可以开始下一批次的操作。

在批次进行过程中,会有 smoke 失败或者 bake 失败的情况,对应的状态就是 SmokeFailedBakeFailed

UpdateStrategy 中有一个 canary 字段,意味着 DeployFlow 支持金丝雀发布。其实在讲解了上述 DeployFlow 分批次处理的能力后,在此基础之上实现金丝雀发布是比较简单的。也就是在金丝雀批次处于 BatchSmoked 状态的时候,让发布暂停,在流量拉入之前也可以进行一些 API 验证的操作,开发者在验证没问题之后手工将该批次拉入,拉入金丝雀批次后, DeployFlow 也处于暂停的状态,此时开发者可以观察线上流量的监控,确认没有问题后再执行后面批次的发布。后面的 UI 交互会更加直观地展示该功能,这里我们先通过一张 DeployFlow 的状态流转示意图完整地展示一次发布的过程,我们以本次发布分为两个批次为例,金丝雀批次和普通批次。结合本图与上文的 CRD 解释,相信读者会对 DeployFlow 有一个更加清晰的认知。

deployflow 状态流转

至此,在 DeployUpdateStrategyBaseStrategy 中的核心字段都已经介绍完了,在 DeployNonUpdateStrategy 中还有一个 PodsToDelete 字段,这个字段是在应用缩容、重启操作时起作用的,原生 Kubernetes 对于资源的缩容操作有自己的规则,不能随意选择想要缩容的 pod。但是在 DeployFlow 中,你可以指定 pod 缩容,指定 pod 重启。

通过上面的介绍,读者对 DeployFlow 这个 CRD 的 spec 字段有了一定了解,下面来看下发布过程中我们需要展示的 status 字段。

DeployStatus

熟悉 Kubernetes 的同学应该能够从字段的字面意思了解这些字段的含义,这里就不详细展开了。

CRD 设计完成后,Operator 的实现也就是水到渠成的事情了,除了 DeployFlow 的 Operator,Triton 中还重新实现了一些 controller 来满足个性化的需求,比如 Event controller 用来将发布过程中 pod、Cloneset、DeployFlow 等组件的日志发送到 ES 以方便开发者查看发布的情况,ReadinessGates controller 用来控制自定义 ReadinessGate 的拉入拉出操作等。

同时 Triton 提供 REST & GRPC API 来操作 DeployFlow,调用方即使不了解容器和 Kubernetes 的知识,也可以很容易对接到 Triton 上实现发布的功能。

2.3 UI 交互

底层架构以及核心组件 DeployFlow 的设计逻辑虽然稍显复杂,但得益于 Triton 暴露的 REST & GRPC API 以及丰富的 status 字段,使得前端在发布的 UI 交互逻辑上能够做到简洁直观。下面让我们从 UI 入手,看下 Triton 如何进行应用的交付以及对应用的副本实例的规划。

2.3.1 发布入口及发布清单

进入生产发布页面,在容器发布页签,选择需要发布的 group,点击“发布”。

点击后弹出一个发布清单的页面,在这里需要配置本次发布需要的策略以及相关参数。

发布单页

其中有些参数在上面的 CRD 设计篇章中已经有所描述,比如应用描述,批次大小,批次间处理方式,批次间隔等,这里不再赘述。启动超时时间 是开放给开发者自定义应用需要用来启动的时间,比如有些应用尤其是 java 应用,在真正启动之前需要执行一些 warm up 的操作,开发者就可以根据自己应用的实际情况填写该值,避免这类应用启动失败。微服务拉出等待时间 是用来支持微服务 pod 优雅退出的。

那何谓优雅退出,为什么要优雅退出呢?在 Kubernetes 中当删掉一个 pod 的时候,理想状况当然是 Kubernetes 从对应的 Service(假如有的话)把这个 pod 摘掉,同时给 pod 发 SIGTERM 信号让 pod 中的各个容器优雅退出就行了。但实际上 pod 有可能犯各种幺蛾子:

  • 已经卡死了,处理不了优雅退出的代码逻辑或需要很久才能处理完成;
  • 优雅退出的逻辑有 BUG,自己死循环了;
  • 代码写得野,根本不理会 SIGTERM;

因此,Kubernetes 的 pod 终止流程中还有一个”最多可以容忍的时间”,即 grace period (在 pod 的 .spec.terminationGracePeriodSeconds 字段中定义),这个值默认是 30 秒,我们在执行 kubectl delete 的时候也可通过 --grace-period 参数显式指定一个优雅退出时间来覆盖 pod 中的配置。而当 grace period 超出之后,Kubernetes 就只能选择 SIGKILL 强制干掉 pod 了。

但是在微服务的场景下,除了把 pod 从 Kubernetes 的 Service 上摘下来以及进程内部的优雅退出之外,我们还必须做一些额外的事情,比如说从 Kubernetes 外部的服务注册中心上反注册,不然可能会出现 pod 已经被删掉,但是注册中心上还留着已删掉 pod 的服务信息,此时有流量进入的话就会出现服务不可用的情况。所以我们在 prestop hook 中定义了一个名为 gracefully_shutdown 的文件来处理 pod 删除后的微服务优雅退出。

1
2
3
4
5
6
7
spec:
contaienrs:
- name: demo-container
lifecycle:
preStop:
exec:
command: ["/bin/sh","-c","/gracefully_shutdown"]

右侧的发布策略以及本次发布概览在之前的架构设计中已经讲过,这里不在赘述。

2.3.2 开始发布

完成发布配置后,即可开始发布。

deploy-layout

  • 发布进度:展示发布的批次,及各个批次所启动的实例数量和状态。在发布过程中,人工操作的入口也在此区域;
  • 实例列表:展示发布的实例,可以切换实例版本查看各版本的实例;
  • 副本状态:形如 0/1/0/0 对应 Pending/Running/Ready/Failed 四个状态的数量 (1 个 pod 在发布中),其中 Running 对应发布中实例数,Ready 发布成功实例数,Failed 发布失败实例数。
2.3.3 发布过程

一个典型的发布包括“金丝雀批次启动(Smoking)”-“金丝雀批次点火(Baking)”-“滚动发布(Rollout)” 三个阶段。

  1. 金丝雀批次启动中(Smoking)

canary smoking

  1. 金丝雀批次启动成功,可以验证接口,确认没问题,可将其拉入点火(Baking)

canary smoked

  1. 金丝雀批次点火中,实例已接流量,由于此时 DeployFlow 处于暂停状态,开发者可以有充足的时间可观察日志、监控等是否有异常,确认没问题后再触发滚动发布(Rollout)

canary baked

  1. 滚动发布中,如选择“手动” 模式,每个滚动批次都需要人为触发

rollout

滚动发布过程中,可以看到新旧实例的版本数量在交替变化。

  1. 发布成功

deploy success

至此,一次完整的 DeployFlow 流程就走完了,发布到达成功的状态。可以看到每个批次所负责的 pod 数量以及 pod 状态、日志等信息。

2.3.4 指定实例的操作

在实例运行过程中,如果发现实例负载异常或需要重新加载 apollo 配置,就会有重启实例的需求。Kubernetes 本身没有提供重启的操作逻辑,一般通过杀掉一个 pod 来达到重启的效果,但这种方式比较粗暴而且存在安全隐患。Triton 提供了安全的重启策略,会先新增一个 pod 如果该 pod 启动成功成功,再删掉你所指定要重启的 pod,以此来达到安全重启的效果,这就是 Triton 的指定实例重启的功能。

specify-pod-restart

同样的原理,缩容的操作也可以指定想要缩掉的 pod 。

该功能的实现得益于 OpenKruise 中增强型无状态 workload CloneSet 提供的能力,具体的功能描述可以参考 OpenKruise 文档。

上面的内容就是有关 Triton 核心能力的 UI 交互,整个过程力求简洁、清晰,避免给开发者造成额外的理解负担,这为我们容器的接入、推进提供了很大的便捷。

3. 总结与展望

每个公司的容器发布平台都不尽相同,可能会有读者看完说 Triton 封装了太多的 Kubernetes 细节,没有向开发者真正展示原生 Kubenetes 的状态、含义或者理念。其实从一开始,我们的目标就是设计适用于掌门自身研发体系的容器发布系统,减少开发对发布操作的学习成本,从而快速上手以更快地赋能研发流程的迭代,加速业务应用的上线。而简洁清晰的 API 也有利于我们设计出更加简单的用户界面,简单的用户界面又让我们在推广时受益。

上图是 Triton 的一些关键指标,可见 Triton 已经成为 CD 平台的核心能力,在用户需求的迭代中不断进化,不过,现在的 Triton 依然有很大的优化空间,主要有:

  1. 掌门有大量的 socket 长连接应用,对于这类应用的容器化,以及容器化后如何发布,还没有清晰的设计方案;
  2. Triton 按应用粒度进行发布,不支持跨应用的发布流程编排;
  3. 对开发者快速拉起本地测试环境的支持较弱。

我们目前也在进行针对这些优化项的工作。


]]>
掌门下一代容器发布系统 Triton
深入理解 Kubernetes Deletion https://cloudsjhan.github.io/2021/07/21/深入理解-Kubernetes-Deletion/ 2021-07-21T04:08:12.000Z 2021-07-21T04:10:58.319Z

kubectl delete 这个命令我们几乎每天都在使用,看起来很容易理解,不就是删除 Kubernetes 的某种资源吗?但是要完全理解 Delete 操作还是很有挑战的,理解删除操作背后真正的原理,能够帮助你从容应对一些奇葩场景。这篇文章将从以下几个方面详细解释删除操作背后的故事:

  1. 基本的删除操作
  2. Finalizers 和 Owner Reference 会对删除操作产生什么影响
  3. 如何利用 propagation policy 改变删除的顺序
  4. 通过 examples 演示上述删除操作

简单起见,所有示例都将使用 ConfigMaps 和 Basic Shell 命令来演示操作过程。

The basic delete

Kubernetes 有几种不同的命令,您可以使用它允许您创建,读取,更新和删除对象。 出于本博客文章的目的,我们将专注于四个 kubectl 命令:create,get,patch, 和delete。

下面是几个最简单的 kubectl delete 使用场景:

1
2
kubectl create configmap mymap
configmap/mymap created
1
2
3
kubectl get configmap/mymap
NAME DATA AGE
mymap 0 12s
1
2
kubectl delete configmap/mymap
configmap "mymap" deleted
1
2
kubectl get configmap/mymap
Error from server (NotFound): configmaps "mymap" not found

演示了一个 configMap 从创建、查询、到删除、再查询的过程,这个过程可以用下面的状态图表示:

state diagra for delete

这种 delete 操作是非常简单直观的,但当你遇到 FinalizerOwner References 的时候就会出现各种难以理解的现象。

Understanding Finalizers

在理解 Kubernetes 的资源删除时,了解 Finalizers 的工作原理能够在你无法删除资源时给你一些解决问题的灵感。

Finalizers 是触发 pre-delete 操作的关键,能够控制资源的垃圾回收。Finalizers 设计的初衷是帮助 controller 在处理资源删除之前,优先处理一些 clean up 的逻辑。但是 Finalizers 并不包含代码逻辑,使用上跟 Annotation 有些相似,很容易被添加或者删除。

你可以已经见过下面的 Finalizers:

1
2
kubernetes.io/pv-protection
kubernetes.io/pvc-protection

这两个 Finalizer 是用来防止误删除 volume 的,类似功能的 Finalizer 还有很多。

下面是一个自定义的 configmap,只包含一个 Finalizer:

1
2
3
4
5
6
7
8
cat <<EOF | kubectl create -f -
apiVersion: v1
kind: ConfigMap
metadata:
name: mymap
finalizers:
- kubernetes
EOF

负责管理 configmap 的 controller 并不知道该如何处理 kubernetes 这个 Finalizer。现在我尝试去删除这个 configmap:

1
2
3
4
kubectl delete configmap/mymap &
configmap "mymap" deleted
jobs
[1]+ Running kubectl delete configmap/mymap

Kubernetes 会返回一个信息告诉你这个 configmap 已经被删除了,然而并不是传统意义上的删除,而是出于一个 deleting 的状态。当我们再次执行 get 操作去获取该 configmap,会发现 configmap 资源已经被修改过了,deletionTimeStamp 设置了值。

1
2
3
4
5
6
7
8
9
10
11
12
13
14
kubectl get configmap/mymap -o yaml
apiVersion: v1
kind: ConfigMap
metadata:
creationTimestamp: "2020-10-22T21:30:18Z"
deletionGracePeriodSeconds: 0
deletionTimestamp: "2020-10-22T21:30:34Z"
finalizers:
- kubernetes
name: mymap
namespace: default
resourceVersion: "311456"
selfLink: /api/v1/namespaces/default/configmaps/mymap
uid: 93a37fed-23e3-45e8-b6ee-b2521db81638

换句话说,这个 configmap 资源并没有被删除而是被更新了,这是因为 Kubernetes 看到资源中有一个 Finalizer 后把它置为了 read-only 状态。这个 configmap 只有在移除了 Finalizer 后,才会真正从集群中删除。

我们使用 patch 命令移除 Finalizer 来验证一下上面的说法。

1
2
3
4
5
kubectl patch configmap/mymap \
--type json \
--patch='[ { "op": "remove", "path": "/metadata/finalizers" } ]'
configmap/mymap patched
[1]+ Done kubectl delete configmap/mymap

此时我们再去 get configmap,发现已经获取不到了。

1
2
kubectl get configmap/mymap -o yaml
Error from server (NotFound): configmaps "mymap" not found

state diagram for finalize

上面展示了当一个资源带有 Finalizer 时,执行删除操作后的状态流转图。

Owner References

Owner reference 描述了多种资源之间的关联关系。它们是关于资源的属性,可以彼此指定关联关系,因此可以做到级联删除。

Kubernetes 中最常见的具备 owner reference 关系的场景就是 pod 将 replica set 作为自己的 owner,所以当 deployment 或者 statefulSet 删除的时候,作为子资源的 replica set 和 pod 都将被删除。

下面的例子解释了 owner reference 的工作原理。我们首先创建了一个父资源,然后创建子资源的时候指定其 owner reference:

1
2
3
4
5
6
7
8
9
10
11
12
13
14
15
16
17
18
19
cat <<EOF | kubectl create -f -
apiVersion: v1
kind: ConfigMap
metadata:
name: mymap-parent
EOF
CM_UID=$(kubectl get configmap mymap-parent -o jsonpath="{.metadata.uid}")

cat <<EOF | kubectl create -f -
apiVersion: v1
kind: ConfigMap
metadata:
name: mymap-child
ownerReferences:
- apiVersion: v1
kind: ConfigMap
name: mymap-parent
uid: $CM_UID
EOF

当删除子资源时,父资源并不会被删除:

1
2
3
4
5
6
7
8
9
10
11
kubectl get configmap
NAME DATA AGE
mymap-child 0 12m4s
mymap-parent 0 12m4s

kubectl delete configmap/mymap-child
configmap "mymap-child" deleted

kubectl get configmap
NAME DATA AGE
mymap-parent 0 12m10s

我们再根据上面的 yaml 建立资源,然后我们删除父资源,这时发现所有的资源都被删除了:

1
2
3
4
5
6
7
8
9
10
kubectl get configmap
NAME DATA AGE
mymap-child 0 10m2s
mymap-parent 0 10m2s

kubectl delete configmap/mymap-parent
configmap "mymap-parent" deleted

kubectl get configmap
No resources found in default namespace.

简而言之,当父 - 子资源之间存在 owner reference 关系的时候,我们删除父资源,子资源也会随之删除,这叫做 cascade (级联删除)。默认情况下,cascade 的值是 true,你可以执行 kubectl delete 的时候加上参数 --cascade=false ,这样就可以只删除父资源而保留子资源。

在以下示例中,有一对父子资源,如果我使用 --cascade = false 删除父资源,但子资源仍然存在:

1
2
3
4
5
6
7
8
9
10
11
kubectl get configmap
NAME DATA AGE
mymap-child 0 13m8s
mymap-parent 0 13m8s

kubectl delete --cascade=false configmap/mymap-parent
configmap "mymap-parent" deleted

kubectl get configmap
NAME DATA AGE
mymap-child 0 13m21s

——cascade 参数能够控制 API 中的删除传播策略( propagation policy),它允许控制删除对象的顺序。在下面的示例中,使用 API 访问创建一个带有 background 传播策略的自定义 delete API 调用:

1
2
3
4
5
6
7
8
9
10
11
12
13
14
kubectl proxy --port=8080 &
Starting to serve on 127.0.0.1:8080

curl -X DELETE \
localhost:8080/api/v1/namespaces/default/configmaps/mymap-parent \
-d '{ "kind":"DeleteOptions", "apiVersion":"v1", "propagationPolicy":"Background" }' \
-H "Content-Type: application/json"
{
"kind": "Status",
"apiVersion": "v1",
"metadata": {},
"status": "Success",
"details": { ... }
}

要注意,不能使用 kubectl 在命令行上指定传播策略。必须使用自定义 API 调用来指定。需要创建一个代理,这样就可以从客户端访问 API Server,并执行 curl 命令来执行该删除命令。

一共有三种传播策略:

Foreground:先删除子资源再删除父资源(post-order)

Background:先删除父资源再删除子资源(pre-order)

Orphan:忽略 owner reference

要注意,假如一个资源中同时设置了 owner reference 和 finalizer,finalizer 的优先级是最高的。

Forcing a Deletion of a Namespace

你可以已经遇到过执行 kubectl delete ns NS 后,ns 无法删除的情况,这时候你可以通过 update 所删除 ns 的 Finalizer 字段来实行强制删除。这个操作会通知到 namespace controller 移除 finalizer :

1
2
3
4
5
6
7
8
9
10
11
12
13
14
15
cat <<EOF | curl -X PUT \
localhost:8080/api/v1/namespaces/test/finalize \
-H "Content-Type: application/json" \
--data-binary @-
{
"kind": "Namespace",
"apiVersion": "v1",
"metadata": {
"name": "test"
},
"spec": {
"finalizers": null
}
}
EOF

这个操作要谨慎,因为它可能只删除名称空间,而将孤立资源留在现在不存在的名称空间中,会让集群处于让人很迷惑的状态。如果发生这种情况,可以手动重新创建该名称空间,有孤立的资源对象将重新出现在刚刚创建的名称空间下,可以手动清理和恢复。

Key Takeaways

上面的例子说明,Finalizer 能够阻止 Kubernetes 删除资源,但是通常在代码中添加 Finalizer 是有原因的,因此应该在手动删除它之前进行检查。Owner reference 支持级联删除资源,但 Finalizer 的优先级更高。最后,可以使用传播策略通过自定义 API 调用指定删除顺序,从而控制对象的删除方式。通过上面的例子,相信大家对 Kubernetes 中的删除工作原理有了更多的了解,现在可以使用测试集群自己尝试一下。

原文地址:https://kubernetes.io/blog/2021/05/14/using-finalizers-to-control-deletion/


]]>
深入理解 kubernetes Deletion
Fuzzing is Beta Ready https://cloudsjhan.github.io/2021/06/15/Fuzzing-is-Beta-Ready/ 2021-06-15T02:12:20.000Z 2021-06-15T02:15:13.000Z

近日 Golang 团队宣布,go 原生支持的模糊测试 (fuzzing) 的 beta 版本在 development 分支上已经可以使用了。开发人员可以使用该特性为项目构建 fuzzing 测试。

那么先来看下什么是 Fuzzing 呢?

什么是 Fuzzing?

Fuzz 本意是“羽毛、细小的毛发、使模糊、变得模糊”,后来用在软件测试领域,中文一般指“模糊测试”,英文有的叫“Fuzzing”,有的叫“Fuzz Testing”。本文用 fuzzing 表示模糊测试。

Fuzzing 技术可以追溯到 1950 年,当时计算机的数据主要保存在打孔卡片上,计算机程序读取这些卡片的数据进行计算和输出。如果碰到一些垃圾卡片或一些废弃不适配的卡片,对应的计算机程序就可能产生错误和异常甚至崩溃,这样,Bug 就产生了。所以,Fuzzing 技术并不是什么新鲜技术,而是随着计算机的产生一起产生的古老的测试技术。

Fuzzing 技术是一种基于黑盒(或灰盒)的测试技术,通过自动化生成并执行大量的随机测试用例来发现产品或协议的未知漏洞。随着计算机的发展,Fuzzing 技术也在不断发展。

Fuzzing有用么?

Fuzzing 是模糊测试,顾名思义,意味着测试用例是不确定的、模糊的。

计算机是精确的科学和技术,测试技术应该也是一样的,有什么的输入,对应什么样的输出,都应该是明确的,怎么会有模糊不确定的用例呢?这些不确定的测试用例具体会有什么作用呢?

为什么会有不确定的测试用例,我想主要的原因是下面几点:

1、我们无法穷举所有的输入作为测试用例。我们编写测试用例的时候,一般考虑正向测试、反向测试、边界值、超长、超短等一些常见的场景,但我们是没有办法把所有的输入都遍历进行测试的。

2、我们无法想到所有可能的异常场景。由于人类脑力的限制,我们没有办法想到所有可能的异常组合,尤其是现在的软件越来越多的依赖操作系统、中间件、第三方组件,这些系统里的bug或者组合后形成的 bug,是我们某个项目组的开发人员、测试人员无法预知的。

3、Fuzzing 软件也同样无法遍历所有的异常场景。随着现在软件越来越复杂,可选的输入可以认为有无限个组合,所以即使是使用软件来遍历也是不可能实现的,否则你的版本可能就永远也发布不了。Fuzzing 技术本质是依靠随机函数生成随机测试用例来进行测试验证,所以是不确定的。

这些不确定的测试用例会起到我们想要的测试结果么?能发现真正的 Bug 么?

1、Fuzzing 技术首先是一种自动化技术,即软件自动执行相对随机的测试用例。因为是依靠计算机软件自动执行,所以测试效率相对人来讲远远高出几个数量级。比如,一个优秀的测试人员,一天能执行的测试用例数量最多也就是几十个,很难达到 100 个。而 Fuzzing 工具可能几分钟就可以轻松执行上百个测试用例。

2、Fuzzing 技术本质是依赖随机函数生成随机测试用例,随机性意味着不重复、不可预测,可能有意想不到的输入和结果。

3、根据概率论里面的“大数定律”,只要我们重复的次数够多、随机性够强,那些概率极低的偶然事件就必然会出现。Fuzzing 技术就是大数定律的典范应用,足够多的测试用例和随机性,就可以让那些隐藏的很深很难出现的Bug成为必然现象。

目前,Fuzzing 技术已经是软件测试、漏洞挖掘领域的最有效的手段之一。Fuzzing 技术特别适合用于发现 0 Day 漏洞,也是众多黑客或黑帽子发现软件漏洞的首选技术。Fuzzing 虽然不能直接达到入侵的效果,但是 Fuzzing 非常容易找到软件或系统的漏洞,以此为突破口深入分析,就更容易找到入侵路径,这就是黑客喜欢 Fuzzing 技术的原因。

想要了解更多特性可以参考 golang fuzzing 的设计草案 draft-fuzzing)

快速上手

1
2
$ go get golang.org/dl/gotip
$ gotip download dev.fuzz

这将从 Dev.Fuzz 开发分支中构建 Go Toolchain,等将来代码合并到 Master 分支后就不需要自己构建了。

1
gotip test -fuzz=FuzzFoo

DEV.Fuzz 分支中会有正在进行的开发和错误修复,需要每次运行 gotip download dev.fuzz 以拉取最新的代码。

为了保障代码兼容性,在提交包含模糊测试的源文件时使用 gofuzzbeta 构建 tag。 默认情况下在Dev.Fuzz分支中的构建时已经启用此 tag。

1
// +build gofuzzbeta

Fuzz 测试样例

Fuzz 测试与普通的单元测试类似,需要在 *_test.go 中定义 Fuzzxxx 函数。 此函数必须传递*testing.f 参数,就像 * testing.t 参数传递给 testxxx 函数一样。

下面是测试 net/url 的 fuzzing target 的示例。

1
2
3
4
5
6
7
8
9
10
11
12
13
14
15
16
17
18
19
20
21
22
23
24
25
26
27
// +build gofuzzbeta

package fuzz

import (
"net/url"
"reflect"
"testing"
)

func FuzzParseQuery(f *testing.F) {
f.Add("x=1&y=2")
f.Fuzz(func(t *testing.T, queryStr string) {
query, err := url.ParseQuery(queryStr)
if err != nil {
t.Skip()
}
queryStr2 := query.Encode()
query2, err := url.ParseQuery(queryStr2)
if err != nil {
t.Fatalf("ParseQuery failed to decode a valid encoded query %s: %v", queryStr2, err)
}
if !reflect.DeepEqual(query, query2) {
t.Errorf("ParseQuery gave different query after being encoded\nbefore: %v\nafter: %v", query, query2)
}
})
}

可以通过下面的命令使用 Go Doc 阅读有关 Fuzz API 的更多信息。

1
2
3
4
gotip doc testing
gotip doc testing.F
gotip doc testing.F.Add
gotip doc testing.F.Fuzz

须知

  1. 模糊测试会消耗大量内存,并在运行时可能会影响机器的性能。 go test -fuzz 默认值以并行运行 $ gomaxProcs 进程中的模糊。 可以在运行 Go Test 时加上 --parallel 来限制并发使用 cpu 的数量。
  2. 要注意目前没有限制写入 fuzzing 缓存的文件数或总字节数,因此它可能占据大量存储(即几个GB),可以通过运行 gotip clean -fuzzcache 来清除模糊测试后的缓存。

最后

这个特性并不会出现在即将发布的 Go1.17 中,但是计划在未来的某个 Go 版本中正式 release 这个特性。官方希望这个特性能够帮助 Go 开发人员开始编写 fuzzing 测试,并提供关于 fuzzing 的设计的反馈,为未来该功能的代码正式合并 master 做准备。

Happy fuzzing!

]]>
Golang Fuzzing is beta ready
Go 1.16 is released, Apple silicon M1 可以放心买啦 https://cloudsjhan.github.io/2021/02/20/Go-1-16-is-released-Apple-silicon-M1-可以放心买啦/ 2021-02-20T07:32:51.000Z 2021-02-20T07:35:16.002Z

https://p3-juejin.byteimg.com/tos-cn-i-k3u1fbpfcp/e6cc0de3ef1945649039cabc8c7e1580~tplv-k3u1fbpfcp-zoom-1.image

2021 年 2 月 16 日,春节假期的最后一天,Go 官方终于将 1.16 版本 released。

下面简要介绍一下 1.16 版本最重要的一些特性:

核心库加入了新的成员 - embed

package embed 可访问正在运行的 Go 程序中所嵌入的静态文件。

使用 embed 可以使用 // go:embed 指令在编译时从包目录或子目录读取的文件的内容并使用它们。

例如,以下三种方法可以嵌入名为 hello.txt 的文件,然后在运行时打印其内容。

  • 将一个文件嵌入到字符串中
1
2
3
4
5
import _ "embed"

//go:embed hello.txt
var s string
print(s)
  • 将一个文件嵌入 []byte
1
2
3
4
5
import _ "embed"

//go:embed hello.txt
var b []byte
print(string(b))
  • 将一个或多个文件嵌入到文件系统中
1
2
3
4
5
6
import "embed"

//go:embed hello.txt
var f embed.FS
data, _ := f.ReadFile("hello.txt")
print(string(data))

这种将静态文件在编译时嵌入可执行文件的方式,在极大地提高了 go 访问静态文件的灵活性的同时,也能提高了敏感配置文件的安全性。更大胆一点,是不是在前端领域,golang 也能插一脚了?

增加对 Apple silicon ARM 64 架构的支持

Go 1.16 还添加了macOS ARM64 支持(也称为Apple silicon)。 自 Apple 宣布其新的 ARM64 架构以来,go team 一直在与他们紧密合作以确保 Go 得到完全的支持。一直在 观望 M1 的开发者这下可以放心去买新的 Mac 啦。

默认开启 Go modules

Go 1.16 默认使用 Go modules。因为根据 go team 的 2020 Go 开发人员调查,现在有96%的 Go 开发人员已经在使用 Go modules了。

其他的性能改善与提高

最后,还有许多其他改进和 bug fix,比如构建速度提高了25%,内存使用量减少了15%。 有关更改的完整列表以及有关上述改进的更多信息,可以参考 Go 1.16发行说明)。

以上就是 Go 1.16 带来的新特性,有开发者调侃到 “最大的特性就是离泛型的版本号更近了(狗头)”哈哈哈。


]]>
Go 1.16 is released, Apple silicon M1 可以放心买啦'
Redirecting godoc.org requests to pkg.go.dev https://cloudsjhan.github.io/2020/12/16/Redirecting-godoc-org-requests-to-pkg-go-dev/ 2020-12-16T06:54:42.000Z 2020-12-16T07:30:18.000Z

现状

随着 Go Module 的引入和 Go 生态系统的发展,pkg.go.dev 于 2019 年启动,为开发人员提供了了一个查找 Go package 的地方,官方称之为 center place。 像 godoc.org 一样,pkg.go.dev 提供 Go 文档,但它也支持 Go Module、更好的搜索功能以及帮助 Go 用户找到正确软件包的指引。

正如官方在 2020年1月分享 的那样,官方的目标是最终将流量从 godoc.org 重定向到 pkg.go.dev 上的相应页面。 用户可以还可以选择将自己的请求从godoc.org 重定向到 pkg.go.dev。

今年官方收到了很多反馈,很多问题已经在 pkgsite/godoc.org-redirectpkgsite/design-2020 进行跟踪和解决。 用户的反馈意见支持对 pkg.go.dev 上的高频功能的改进,以及最近对pkg.go.dev 的重新设计都有很大的帮助。

下一步

一旦在 pkgsite/godoc.org-redirect 里程碑中跟踪的工作完成, 官方就会将所有请求从 godoc.org 重定向到pkg.go.dev上的相应页面,这大概会在2021 年初开始。

官方鼓励大家现状就开始使用 pkg.go.dev, 可以通过访问 godoc.org?redirect=on 或单击任何godoc.org 页面右上角的 “Always use pkg.go.dev” 来实现。

FAQs

  • A: godoc.org 还可以继续使用吗?
    Q: YES! 我们会将所有访问 godoc.org 的请求重定向到 pkg.go.dev 上的相应页面,因此你所有的书签和链接依然有效。

  • A: golang/gddo repo 将会如何处理?
    Q: repo 可以继续 fork 和使用,但是官方将对其标记为 archived

  • A: api.godoc.org 还能继续使用吗?
    Q: 此过渡不会对 api.godoc.org 产生影响。 在 pkg.go.dev 提供 API 之前,api.godoc.org 将继续为流量提供服务。 有关 pkg.go.dev 的 API 的更新,请参见 issue 36785

Contributing

Pkg.go.dev 是一个开源项目。 如果你有兴趣为 pkg site 做出贡献,可以加入 Gophers Slack 上的 #pkgsite 频道以了解更多信息。


]]>
Redirecting godoc.org requests to pkg.go.dev
Can I convert a []T to an []interface{}? https://cloudsjhan.github.io/2020/12/09/Can-I-convert-a-T-to-an-interface/ 2020-12-09T12:33:50.000Z 2020-12-09T12:35:21.000Z

Can I convert a []T to an []interface{}?

众所周知,在 Golang 中,interface 是一种抽象类型,相对于抽象类型的是具体类型(concrete type):int,string。interface{} 是一个空的 interface 类型,一个类型如果实现了一个 interface 的所有方法就说该类型实现了这个 interface,空的 interface 没有方法,所以可以认为所有的类型都实现了 interface{}。如果定义一个函数参数是 interface{} 类型,这个函数应该可以接受任何类型作为它的参数。

1
2
func changeType(v interface{}){    
}

既然空的 interface 可以接受任何类型的参数,那么一个 interface{}类型的 slice 是不是就可以接受任何类型的 slice ?看下面的代码:

1
2
3
4
5
6
7
8
9
10
func traverseSlice(vals []interface{}) { 
for _, val := range vals {
fmt.Println(val)
}
}

func main(){
nums := []string{"1", "2", "3"}
traverseSlice(nums)
}

不是说空的 interface 可以是任何类型吗?为何报了下面的错误?

image-20201209202110198

这个错误说明 go 没有自动把 []string 转换成 []interface{} ,所以出错了。go 不会对 类型是interface{} 的 slice 进行转换 。为什么 go 不帮我们自动转换? 在 golang 官方 blog 的 FAQ 中找到了对这个问题的解释,由于interface{} 会占用两部分存储空间,一个是自身的 methods 数据,一个是指向其存储值的指针,也就是 interface 变量存储的值,因而 slice []interface{} 其长度是固定的N*2,但是 []T 的长度是N*sizeof(T),用官方的解释就是两种类型在内存中的表现是不一样的。那该如何去转换呢?可以按照单个元素来转换:

1
2
3
4
5
6
7
8
9
10
11
12
import "fmt"

func main() {
t := []int{1, 2, 3, 4}
s := make([]interface{}, len(t))

for i, v := range t {
s[i] = v
}

fmt.Println(s)
}

image-20201209203108747

https://golang.org/doc/faq#convert_slice_of_interface 对这个问题的解释:

image-20201209203306491


]]>
Can I convert a []T to an []interface{}?
kubectl delete pod 等待 30s 的问题排查与解决 https://cloudsjhan.github.io/2020/11/23/kubectl-delete-pod-等待-30s-的问题排查与解决/ 2020-11-23T05:56:03.000Z 2020-11-23T07:50:19.908Z

我们平时在使用 Kubernetes 的时候,一般会使用 kubectl delete pod podName 的方式删除一个容器。 但我们发现,每次执行 kubectl delete pod 之后都要等待 30s kubectl 才会返回。也许你会觉得 30s 是一个可以忍受的时间, 只要最终能删掉 pod 就行,但这样的问题真的只有 30s 这么简单吗? 为什么不能很快关闭容器呢? 或者为什么恰好就是 30s 呢?下面就让我们从根源弄清楚这件事情并解决它。

kubectl delete 如何关闭并删除容器?

kubectl delete 命令是在对容器发出停止命令时使用的,从发送信号上来讲,它将发送 SIGTERM 信号给容器,通知其结束运行。

SIGINT 一般用于关闭前台进程,SIGTERM 会要求进程自己正常退出。

当我们在 shell 中给进程发送 SIGTERM 和 SIGINT 信号的时候,这些进程往往都能正确的处理。 但是在容器中却不生效, 这是因为在 docker 中,只会将 SIGTERM 等所有的 signal 信号发送给 PID 为 1 的进程,当我们 docker 中运行的进程的 PID 不是 1 时,就不会收到这样的信号。

那么为什么是等待 30s ?

上图是官方文档的一段截图,Kubernetes 的 pod 中有一个参数 terminationGracePeriodSeconds,此时,k8s 等待指定的时间称为优雅终止宽限期。默认情况下,这个值是 30s。值得注意的是,这个过程中 preStop Hook 和 SIGTERM 信号并行发生。Kubernetes 不会等待 preStop Hook 完成。
这意味着如果你的应用程序完成关闭并在 terminationGracePeriod 完成之前退出,Kubernetes 会立即进入下一步。如果你的 Pod 通常需要超过 30s 才能关闭,那么必须增加这个参数的大小,可以通过在 pod 模板中设置 terminationGracePeriodSeconds 来实现。

如果达到上面的时间限制,k8s 将会通过给内核发送 SIGKILL 从而强制结束容器。
这就解释了为什么每次 delete pod 都要等待 30s,根本原因还是容器中的 java 进程的 PID 不是 1,所以该进程不会理解收到 SIGTERM,在等待 default terminationGracePeriodSeconds 的时长后被强制结束。

强制关闭容器的后果是什么?

现在我们已经了解了 kubectl delete pod 等待 30s 的原因了。 我们再来看看另一个问题: 强制关闭容器,真的就没问题吗?

或许你能想到,很多进程在结束阶段会做一些清理工作:比如删除临时目录、执行 shutdown hook 等。 但是当进程被强制关闭时,这些任务就不会被执行,那么我们就可能得到一些并不期望的结果。

以 Eureka 为例,Eureka client 在结束进程时,需要向 Eureka server 发送 shutdown 信号,以注销 client。 这本来没什么问题,因为 Eureka server 即使没有收到这样的信息,也会定期清理 client 信息。 但是 Eureka server 还有一个 self preservation 模式,以防止意外的网络事件导致大量的 client 下线。 这就有可能导致 Eureka 集群的注册表中出现大量的 client 信息,但它们其实已经关闭了。

那么如何优雅地关闭容器?

通过上面的分析我们不难找出解决这个问题的方法,就是让容器中的启动的进程 PID 为 1。
先看下之前的容器中 java 进程的 PID,确实不是 1, 是 8:

可以看到 PID 为 1 的是启动 java 进程的 shell 脚本。

这就要追溯到 Dockerfile 的 ENTRYPOINT 的两种写法,即 exec 和 shell,两者的区别在于:

  • exec 形式的命令会使用 PID 1 的进程;

  • shell 形式的命令会被执行为 /bin/sh -c ,不会执行在 PID 1 上,也就不会收到 signal。

我们检查了下启动 java 进程的脚本,发现确实是用 exec 的方式启动的,那为什么 java 进程的 PID 还不是 1 呢?

原因是 exec 形式的 ENTRYPOINT 只能解决 无需任何准备工作就启动进程 的场景,而不能解决一些需要准备工作的复杂场景。举个栗子,我们的 ENTRYPOINT 往往需要执行一个 shell 脚本,然后在脚本的最后才会去执行 java -jar xxx,这时候,我们的 java 进程就无法成为 PID 1 进程。

我们可以在 shell 中使用 exec 命令来解决。这个命令的作用就是使用新的进程替代原有的进程,并保持 PID 不变。 这就意味着我们可以在执行 java 命令的时候使用它,从而替换掉 PID 1 的 shell 脚本。

entrypoint.sh demo

1
2
3
#!/bin/sh
echo "prepare..."
exec java -jar app.jar

修改后我们再来看下容器中的 java 进程的 PID:

使用 exec 之后,容器中 java 进程的 PID 成为 1,我们发出 delete pod 请求能让进程接收到 SIGTERM 信号,执行相应的操作后立即退出。

篇外:docker 是如何创建容器的 PID 为 1 的进程?

当我们执行 docker run -it busybox /bin/sh 的时候,对于操作系统来讲是个进程, 操作系统会分配一个 PID 给这个进程, 比如这个进程号是 PID=8, 对于操作系统全局来讲它是 PID=8 的一个进程, 但是我们进入容器执行命令ps, 会发现 /bin/sh 的 PID=1。
这种就是 docker 的 namespace 机制, 对于全局来讲, 这条 docker 命令的的 PID 可能是 8, 但是对于容器内部来讲 , 它构建了一个假的命名空间, 使 /bin/sh 的 PID 进程等于 1。

其中用到的技术就是Linux的创建线程的 system call, 对应的系统调用函数就是 clone()

1
int pid = clone(main_function, stack_size, SIGCHLD, NULL);

这个系统调用创建一个新的进程,并且返回它的 PID,而当我们用 clone() 系统调用创建一个新进程时,就可以在参数中指定 CLONE_NEWPID 参数:

1
int pid = clone(main_function, stack_size, CLONE_NEWPID | SIGCHLD, NULL);

这时,新创建的这个进程将会看到一个全新的进程空间,在这个进程空间里,它的 PID 是 1。但是在宿主机真实的进程空间里,这个进程的 PID 还是系统的数值 8。

以上。


]]>
kubectl delete pod 等待 30s 的问题排查与解决
Why is there no Goroutine ID? https://cloudsjhan.github.io/2020/11/09/Why-is-there-no-goroutine-ID/ 2020-11-09T03:32:25.000Z 2020-11-09T03:35:41.000Z

在C/C++/Java等语言中,我们可以直接获取Thread Id,然后通过映射Thread Id和二级调度Task Id的关系,可以在日志中打印当前的TaskId,即用户不感知Task Id的打印,适配层统一封装,这使得多线程并发的日志的查看或过滤变得非常容易。

Goroutine 是 Golang 中轻量级线程的实现,由 Go Runtime 管理。Golang 在语言级别支持轻量级线程,叫协程。Golang 标准库提供的所有系统调用操作(当然也包括所有同步 IO 操作),都会出让 CPU 给其他 Goroutine。这让事情变得非常简单,让轻量级线程的切换管理不依赖于系统的线程和进程,也不依赖于 CPU 的核心数量。

官方曾经使用 IIRC 来暴露 GoId ,但是自从 go1.4 版本以后,Goroutine Id 无法直接从 Go Runtime 获取了。

禁用的原因有以下两点:

  1. 当 Goroutine 关闭时,Goroutine 的 local storage 并不会立即被垃圾回收,这意味你只能拿到当前的 Goroutine 的 ID,但是不能正确拿到系统中所有正在运行的 GoId 列表。
  2. 你只能获取你写的代码生成的 Goroutine ID,但是通常你不能确保所有的标准库以及第三方代码库都做了这些工作。

这样就很难对高并发日志进行查看和过滤。尽管在日志中可以使用业务本身的 ID ,但是在很多函数中仅仅为了打印而增加一些参数 ID 会让代码看起来没有那么优雅。

可以到 https://golang.org/doc/faq#no_Goroutine_id 中看到官方对这个问题的详细解释,原文不长所以放在文章里。


Why is there no Goroutine ID?

Goroutines do not have names; they are just anonymous workers. They expose no unique identifier, name, or data structure to the programmer. Some people are surprised by this, expecting the go statement to return some item that can be used to access and control the Goroutine later.

The fundamental reason Goroutines are anonymous is so that the full Go language is available when programming concurrent code. By contrast, the usage patterns that develop when threads and Goroutines are named can restrict what a library using them can do.

Here is an illustration of the difficulties. Once one names a Goroutine and constructs a model around it, it becomes special, and one is tempted to associate all computation with that Goroutine, ignoring the possibility of using multiple, possibly shared Goroutines for the processing. If the net/http package associated per-request state with a Goroutine, clients would be unable to use more Goroutines when serving a request.

Moreover, experience with libraries such as those for graphics systems that require all processing to occur on the “main thread” has shown how awkward and limiting the approach can be when deployed in a concurrent language. The very existence of a special thread or Goroutine forces the programmer to distort the program to avoid crashes and other problems caused by inadvertently operating on the wrong thread.

For those cases where a particular Goroutine is truly special, the language provides features such as channels that can be used in flexible ways to interact with it.


]]>
Why is there no Goroutine ID?
Go team 关于如何保持 Go Modules 兼容性的一些实践 https://cloudsjhan.github.io/2020/08/13/Go-team-关于如何保持-Go-Modules-兼容性的一些实践/ 2020-08-13T06:05:13.000Z 2020-08-13T06:07:27.552Z

近日,Go team 在其官方 blog 上讨论了如何让你的 Go Modules 保持兼容性的话题,并给出了一些建议,这些建议都是该团队在实际开发中不断踩坑总结出来的精华,可以说是最佳实践。我们站在巨人的肩膀上,可以写出更优雅,更具有兼容性的代码,下面让我们深入逐条解读这些建议。


随着新功能的添加,或者重构 Go Module 的某些公共部分,Go Module 将随着时间的推移而不断发生变化。

但是,发布新的 Go Module 版本对使用者来是一个噩耗。 他们必须找到新版本,学习新的API,并更改其代码。 而且某些用户可能永远不会更新,这意味着您必须永远为代码维护两个版本。 因此,通常最好以兼容的方式更改现有的 Go Module。

在本文中,我们将探讨一些代码技巧,能够让你保持 Go Module 的兼容性。 核心的思想就是是:添加,但是不要更改或删除你的 Go Module 代码。 我们还将从宏观角度讨论如何设计具备高度兼容性的 API 。

新增函数

通常来说,改变函数的形参是破坏代码兼容性最常见的情况。我们讲过讨论几个解决这种问题的方式,但让我们首先看一个不好的实践。

有这么一个函数:

1
func Run(name string)

当我们出于某个情况要扩展这个函数,为这个函数添加一个形参 size

1
func Run(name string, size ...int)

假如你在其他代码中,或者 Go Module 的使用者更新了,那么像下面的代码就会出现问题:

1
2
package mypkg
var runner func(string) = yourpkg.Run

原来的 Run 函数的类型是 func(string),但是新的 Run 函数的类型变成了 func(string, ...int),所以在编译阶段就会报错。必须要根据新的函数类型修改调用方式,这给使用 Go Module 的开发者造成很多不便,甚至出现 bug。

针对这种情况,我们可以新增一个函数来解决这个问题,而不是修改函数签名。我们都知道,context 包是 Golang 1.17 版本之后才引入的,通常 ctx 会做为函数的第一个参数传入。但是现有的已经很稳定的 API 的可导出函数不可能去修改函数签名,在其函数第一个入参添加 context.Context,这样会影响所有函数调用方,尤其在一些底层代码库中,这是非常危险的操作。

Go team 使用新增函数 的方法解决了这个问题。举个栗子,database/sql 这个 package 的 Query 方法的签名一直是:

1
func (db *DB) Query(query string, args ...interface{}) (*Rows, error)

context package 引入的时候,Go team 新增了这样一个函数:

1
func (db *DB) QueryContext(ctx context.Context, query string, args ...interface{}) (*Rows, error)

并且只修改了一处代码:

1
2
3
func (db *DB) Query(query string, args ...interface{}) (*Rows, error) {
return db.QueryContext(context.Background(), query, args...)
}

通过这种方式,Go team 能够在平滑地升级一个 package 的同时不对代码的可读性、兼容性造成影响。类似的代码在 golang 源码中随处可见。

可选参数(optional arguments)

如果你在实现 package 之前就确定这个函数后面可能会需要添加参数来扩展某些功能,那么你可以提前在函数签名是使用可选参数(optional arguments)。最简单的方法是在函数签名中使用结构体参数,下面是 golang 源码中 crypto/tls.Dial 的一段代码:

1
func Dial(network, addr string, config *Config) (*Conn, error)

Dial 函数实现 TLS 的握手操作,这个过程中需要其他很多参数,同时还支持默认值。当给 config 传递 nil 的时候就是使用默认值;当传递 Config struct 的时候将会覆盖默认值。假如以后出现了新的 TLS 配置参数,可以很轻松地通过在 Config struct 中添加新字段来实现,这种方式是向后兼容的。

有些情况下,新增函数和使用可选参数的方式可以结合起来,通过把可选参数的结构体变成一个方法的接收者(receiver)。比如,在 Go 1.11 之前,net package 中的Listen 方法的签名是:

1
func Listen(network, address string) (Listener, error)

但是在 Go 1.11 中,Go team 新增加了两个 feature :

  1. 传递了 context 参数;
  2. 增加了 control function,允许调用者在网络连接还没有 bind 的时候调整原始连接的参数。

这看起来是相当大的调整了,如果是一般开发者,最多也就会新增一个函数,参数中添加 context, control function。但是 Go team 的开发者非等闲之辈,net package 的作者想到未来的某一天这个函数是不是会有调整,或者需要更多的参数?于是就预留了一个 ListenConfig 的结构体,为这个 strcut 实现了 Listen 方法,从而也不用再新增一个函数才能解决问题。

1
2
3
4
5
type ListenConfig struct {
Control func(network, address string, c syscall.RawConn) error
}

func (*ListenConfig) Listen(ctx context.Context, network, address string) (Listener, error)

还有一种叫做可选类型的设计模式,是把可选的函数作为函数形参,每一个可选函数都可以通过参数来调整其状态。在 Rob Pike 的 blog (https://commandcenter.blogspot.com/2014/01/self-referential-functions-and-design.html) 里对这种模式进行了详细的解读。这种设计模式在 grpc 的源码中大量使用。

option types 与函数参数中的 option struct具有相同的作用:它们是传递行为,修改配置的可扩展方式。 决定选择哪个很大程度上取决于具体场景。 来看一下 gRPC 的 DialOption 选项类型的用法:

1
2
3
4
grpc.Dial("some-target",
grpc.WithAuthority("some-authority"),
grpc.WithMaxDelay(time.Second),
grpc.WithBlock())

当然你也可以作为 struct 选项实现:

1
2
3
4
5
notgrpc.Dial("some-target", &notgrpc.Options{
Authority: "some-authority",
MaxDelay: time.Minute,
Block: true,
})

以上,任一种方式都是能够维持 Go Module 兼容性的方法,可以根据不同的场景选择合理的实现。

保证 interfaces 的兼容性

有时候,新特性的支持需要更改对外暴露的(public)的接口: 需要使用新的方法来扩展接口。直接向接口添加方法是不合适的,这会导致接口的实现方都需要修改代码。那么,我们如何才能在公开的接口上支持新方法呢?

Go team 给出的建议是:使用新方法定义一个新接口,然后在使用旧接口的任何地方动态检查提供的类型是旧类型还是新类型。

让我们以 golang 源码中 archive/tar package 来详细说明一下。 tar.NewReaderio.Reader 作为参数,但是后来 Go team 觉得应该提供一种更加高效的方式,就是当调用 Seek 方法的时候可以跳过一个文件的 header。但是又不能直接在 io.Reader 中新增 Seek 方法,这会影响所有实现了 io.Reader 的方法(如果你有看过 golang 源码,就会知道 io.Reader 接口的应用有多广泛了)。

另外一种方法是将 tar.NeaReader 的入参改成 io.ReaderSeeker interface,因为该 interface 同时支持 io.ReaderSeek 。但是正如前面所讲,改变一个函数的签名,不是一种好的方式。

所以 Go team 决定维持 tar.NewReader 的签名不变,在 Read 方法中进行类型检查:

1
2
3
4
5
6
7
8
9
10
11
12
13
14
15
16
package tar

type Reader struct {
r io.Reader
}

func NewReader(r io.Reader) *Reader {
return &Reader{r: r}
}

func (r *Reader) Read(b []byte) (int, error) {
if rs, ok := r.r.(io.Seeker); ok {
// Use more efficient rs.Seek.
}
// Use less efficient r.r.Read.
}

如果遇到要向现有接口添加方法的情况,则可以遵循此策略。 首先使用新方法创建新接口,或者使用新方法标识现有接口。 接下来,确定需要添加的相关代码啊,对第二个接口进行类型检查,并添加使用它的代码。

在可能的情况下,最好避免这种问题。 例如,在设计构造函数时,最好返回具体类型。 与接口不同,使用具体类型可以让你将来在不中断用户使用的情况下添加新方法,同时将来可以更轻松地扩展你的 Go Module。

Tip: 如果你用到了一个 interface,但是你不想用户去实现它,你可以为 interface 添加 unexported 的方法。

1
2
3
4
5
6
7
8
9
10
11
type TB interface {
Error(args ...interface{})
Errorf(format string, args ...interface{})
// ...

// A private method to prevent users implementing the
// interface and so future additions to it will not
// violate Go 1 compatibility.
// private 避免用户去实现它
private()
}

新增配置方法

到目前为止,我们讨论了修改函数签名或者为 interface 添加方法,会影响到用户的代码导致编译失败。实际上,函数行为的改变会造成同样的问题。例如,很多开发者希望 json.Decoder 可以忽略 struct 中没有的 json 字段。但是当 Go team 想要在这种情况下返回一些错误的时候,就必须要小心,因为这样做会导致很多使用该方法的用户突然收到以前从未遇到的错误。

因此,他们没有更改所有用户的行为,而是向Decoder结构添加了一种配置方法:Decoder.DisallowUnknownFields 。 调用此方法会使用户选择新行为,同时会为现有用户保留旧的方法。

保持 struct 的兼容性

通过上面的内容我们了解到,对函数签名的任何更改都是一种破坏性的改动。 但是如果使用 struct 就会让你的代码灵活很多, 如果具有可导出的结构体类型,则几乎可以随时添加一个字段或删除一个未导出的字段而不会破坏兼容性。 添加字段时,请确保其零值有意义并保留旧的行为,以便未设置该字段的现有代码继续起作用。

还记得上面讲到的 net package 的作者在 Go 1.11 的时候添加的 ListenConfig struct 吗?事实证明他的设计是对的。在 Go 1.13 中,新增了 KeepAlive 字段,允许取消或使用 keep-alive 的功能。有了之前的设计,这个字段的加入就容易多了。

关于 struct 的使用,有一个细节如果你没有注意到的话,也会对用户造成很大的影响。如果 struct 中所有的字段都是可判等的(意思是可用通过 == or !=来比较,或者可以作为 map 的 key),那么这个 struct 就是可判等的。这种情况下,如果你为 struct 添加了一个不可判等的类型,将会导致这个 struct 也变成不可判等的。如果用户在代码中使用了你的 struct 进行判等操作,那么就会遇到代码错误。

如果你要保持结构体可判等,就不要向其添加不可比较的字段。可以为此编写测试用例来避免遗忘。

Conclusion

从头开始规划 API 的时候,请仔细考虑 API 在将来的可扩展性。 而且当你确实需要添加新功能时,请记住以下规则:添加,不要更改或删除。请牢记,添加接口方法,函数参数和返回值都会导致 Go Module 不能向后兼容。

如果你确实需要大规模更改 API,或者要添加更多新特性,那么使用新的 API 版本会是更好的方式。 但是大多数时候,进行向后兼容的更改应该是你的首选,能够避免给用户带来麻烦。


]]>
Go team 关于如何保持 Go Modules 兼容性的一些实践
lxcfs 实现容器资源视图隔离的最佳实践 https://cloudsjhan.github.io/2020/07/04/lxcfs-实现容器资源视图隔离的最佳时间/ 2020-07-04T12:49:46.000Z 2020-07-04T12:55:06.656Z

LXCFS is a small FUSE filesystem written with the intention of making Linux containers feel more like a virtual machine. It started as a side-project of LXC but is useable by any runtime.

用人话解释一下就是:

xcfs 是一个开源的 FUSE(用户态文件系统)实现来支持 LXC 容器,它也可以支持 Docker 容器。让容器内的应用在读取内存和 CPU 信息的时候通过 lxcfs 的映射,转到自己的通过对 cgroup 中容器相关定义信息读取的虚拟数据上。

什么是资源视图隔离?

容器技术提供了不同于传统虚拟机技术的环境隔离方式。通常的Linux容器对容器打包和启动进行了加速,但也降低了容器的隔离强度。其中Linux容器最为知名的问题就是资源视图隔离问题。

容器可以通过 cgroup 的方式对资源的使用情况进行限制,包括: 内存,CPU 等。但是需要注意的是,如果容器内的一个进程使用一些常用的监控命令,如: free, top 等命令其实看到还是物理机的数据,而非容器的数据。这是由于容器并没有做到对 /proc, /sys 等文件系统的资源视图隔离。

为什么要做容器的资源视图隔离?

  1. 从容器的视角来看,通常有一些业务开发者已经习惯了在传统的物理机,虚拟机上使用 top, free` 等命令来查看系统的资源使用情况,但是容器没有做到资源视图隔离,那么在容器里面看到的数据还是物理机的数据。

  2. 从应用程序的视角来看,在容器里面运行进程和在物理机虚拟机上运行进程的运行环境是不同的。并且有些应用在容器里面运行进程会存在一些安全隐患:

    对于很多基于 JVM 的 java 程序,应用启动时会根据系统的资源上限来分配 JVM 的堆和栈的大小。而在容器里面运行运行 JAVA 应用由于 JVM 获取的内存数据还是物理机的数据,而容器分配的资源配额又小于 JVM 启动时需要的资源大小,就会导致程序启动不成功。

    对于需要获取 host cpu info 的程序,比如在开发 golang 服务端需要获取 golang中 runtime.GOMAXPROCS(runtime.NumCPU()) 或者运维在设置服务启动进程数量的时候( 比如 nginx 配置中的 worker_processes auto ),都喜欢通过程序自动判断所在运行环境CPU的数量。但是在容器内的进程总会从/proc/cpuinfo中获取到 CPU 的核数,而容器里面的/proc文件系统还是物理机的,从而会影响到运行在容器里面服务的运行状态。

    如何做容器的资源视图隔离?

    lxcfs 横空出世就是为了解决这个问题。

    lxcfs 是通过文件挂载的方式,把 cgroup 中关于系统的相关信息读取出来,通过 docker 的 volume 挂载给容器内部的 proc 系统。 然后让 docker 内的应用读取 proc 中信息的时候以为就是读取的宿主机的真实的 proc。

    下面是 lxcfs 的工作原理架构图:

    lxcfs

    解释一下这张图,当我们把宿主机的 /var/lib/lxcfs/proc/memoinfo 文件挂载到 Docker 容器的 /proc/meminfo 位置后,容器中进程读取相应文件内容时,lxcfs 的 /dev/fuse 实现会从容器对应的 Cgroup 中读取正确的内存限制。从而使得应用获得正确的资源约束。 cpu 的限制原理也是一样的。

    通过 lxcfs 实现资源视图隔离

    安装 lxcfs

    1
    2
    wget <https://copr-be.cloud.fedoraproject.org/results/ganto/lxc3/epel-7-x86_64/01041891-lxcfs/lxcfs-3.1.2-0.2.el7.x86_64.rpm>
    rpm -ivh lxcfs-3.1.2-0.2.el7.x86_64.rpm

    检查一下安装是否成功

    1
    2
    3
    4
    5
    6
    7
    [root@ifdasdfe2344 system]# lxcfs -h
    Usage:

    lxcfs [-f|-d] [-p pidfile] mountpoint
    -f running foreground by default; -d enable debug output
    Default pidfile is /run/lxcfs.pid
    lxcfs -h

    启动 lxcfs

    1. 直接后台启动
    1
    lxcfs /var/lib/lxcfs &
    1. 通过 systemd 启动(推荐)
    1
    2
    3
    4
    5
    6
    7
    8
    9
    10
    11
    12
    13
    14
    15
    16
    17
    touch /usr/lib/systemd/system/lxcfs.service

    cat > /usr/lib/systemd/system/lxcfs.service <<EOF
    [Unit]
    Description=lxcfs

    [Service]
    ExecStart=/usr/bin/lxcfs -f /var/lib/lxcfs
    Restart=on-failure
    #ExecReload=/bin/kill -s SIGHUP $MAINPID

    [Install]
    WantedBy=multi-user.target
    EOF

    systemctl daemon-reload
    systemctl start lxcfs.service

    检查启动是否成功

    1
    2
    3
    [root@ifdasdfe2344 system]# ps aux | grep lxcfs
    root 3276 0.0 0.0 112708 980 pts/2 S+ 15:45 0:00 grep --color=auto lxcfs
    root 18625 0.0 0.0 234628 1296 ? Ssl 14:16 0:00 /usr/bin/lxcfs -f /var/lib/lxcfs

    启动成功。

    验证 lxcfs 效果

    未开启 lxcfs

    我们首先在未开启 lxcfs 的机器上运行一个容器,进入到容器中观察 cpu, memory 的信息。为了看出明显的差别,我们用了一台高配置服务器(32c128g)。

    1
    2
    3
    4
    5
    6
    # 执行以下操作
    systemctl stop lxcfs

    docker run -it ubuntu /bin/bash # 进入到 nginx 容器中

    free -h

    image-20200704180911456

    通过上面的结果我们可以看到虽然是在容器中查看内存信息,但是显示的还是宿主机的 meminfo。

    1
    2
    # 看一下 CPU 的核数
    cat /proc/cpuinfo| grep "processor"| wc -l

    image-20200704181007610

    结果符合我们的猜想,没有开启 lxcfs ,容器所看到的 cpuinfo 就是宿主机的。

    开启 lxcfs

    1
    2
    3
    4
    5
    6
    7
    8
    9
    10
    11
    12
    13
    systemctl start lxcfs

    # 启动一个容器,用 lxcfs 的 /proc 文件映射到容器中的 /proc 文件,容器内存设置为 256M:
    docker run -it -m 256m \\
    -v /var/lib/lxcfs/proc/cpuinfo:/proc/cpuinfo:rw \\
    -v /var/lib/lxcfs/proc/diskstats:/proc/diskstats:rw \\
    -v /var/lib/lxcfs/proc/meminfo:/proc/meminfo:rw \\
    -v /var/lib/lxcfs/proc/stat:/proc/stat:rw \\
    -v /var/lib/lxcfs/proc/swaps:/proc/swaps:rw \\
    -v /var/lib/lxcfs/proc/uptime:/proc/uptime:rw \\
    ubuntu:latest /bin/bash

    free -h

    image-20200704181044965

    可以看到容器本身的内存被正确获取到了,对于内存的资源视图隔离是成功的。

    1
    2
    3
    4
    5
    6
    7
    8
    9
    10
    # --cpus 2,限定容器最多只能使用两个逻辑CPU

    docker run -it --rm -m 256m --cpus 2 \\
    -v /var/lib/lxcfs/proc/cpuinfo:/proc/cpuinfo:rw \\
    -v /var/lib/lxcfs/proc/diskstats:/proc/diskstats:rw \\
    -v /var/lib/lxcfs/proc/meminfo:/proc/meminfo:rw \\
    -v /var/lib/lxcfs/proc/stat:/proc/stat:rw \\
    -v /var/lib/lxcfs/proc/swaps:/proc/swaps:rw \\
    -v /var/lib/lxcfs/proc/uptime:/proc/uptime:rw \\
    ubuntu:latest /bin/sh

    image-20200704181153515

    cpuinfo 也是我们所限制容器所能使用的逻辑 cpu 的数量了。指定容器只能在指定的 CPU 数量上运行应当是利大于弊的,就是在创建容器的时候需要额外做点工作,合理分配 cpuset。

    lxcfs 的 Kubernetes实践

    在kubernetes中使用lxcfs需要解决两个问题:

    第一个问题是每个node上都要启动 lxcfs;

    第二个问题是将 lxcfs 维护的 /proc 文件挂载到每个容器中;

    DaemonSet方式来运行 lxcfs FUSE文件系统

    针对第一个问题,我们使用 daemonset 在每个 k8s node 上都安装 lxcfs。

    直接使用下面的 yaml 文件:

    1
    2
    3
    4
    5
    6
    7
    8
    9
    10
    11
    12
    13
    14
    15
    16
    17
    18
    19
    20
    21
    22
    23
    24
    25
    26
    27
    28
    29
    30
    31
    32
    33
    34
    35
    36
    37
    38
    39
    40
    41
    42
    43
    44
    apiVersion: apps/v1
    kind: DaemonSet
    metadata:
    name: lxcfs
    labels:
    app: lxcfs
    spec:
    selector:
    matchLabels:
    app: lxcfs
    template:
    metadata:
    labels:
    app: lxcfs
    spec:
    hostPID: true
    tolerations:
    - key: node-role.kubernetes.io/master
    effect: NoSchedule
    containers:
    - name: lxcfs
    image: registry.cn-hangzhou.aliyuncs.com/denverdino/lxcfs:3.0.4
    imagePullPolicy: Always
    securityContext:
    privileged: true
    volumeMounts:
    - name: cgroup
    mountPath: /sys/fs/cgroup
    - name: lxcfs
    mountPath: /var/lib/lxcfs
    mountPropagation: Bidirectional
    - name: usr-local
    mountPath: /usr/local
    volumes:
    - name: cgroup
    hostPath:
    path: /sys/fs/cgroup
    - name: usr-local
    hostPath:
    path: /usr/local
    - name: lxcfs
    hostPath:
    path: /var/lib/lxcfs
    type: DirectoryOrCreate
    1
    kubectl apply -f lxcfs-daemonset.yaml

    image-20200704181243710

    可以看到 lxcfs 的 daemonset 已经部署到每个 node 上。

    映射 lxcfs 的 proc 文件到容器

    针对第二个问题,我们两种方法来解决。

    第一种就是简单地在 k8s deployment 的 yaml 文件中声明对宿主机 /var/lib/lxcfs/proc 一系列文件的挂载。

    第二种方式利用Kubernetes的扩展机制 Initializer,实现对 lxcfs 文件的自动化挂载。但是 InitializerConfiguration 的功能在 k8s 1.14 之后就不再支持了,这里不再赘述。但是我们可以实现 admission-webhook (准入控制(Admission Control)在授权后对请求做进一步的验证或添加默认参数, https://kubernetes.feisky.xyz/extension/auth/admission)来达到同样的目的。

    1
    2
    3
    # 验证你的 k8s 集群是否支持 admission
    $ kubectl api-versions | grep admissionregistration.k8s.io/v1beta1
    admissionregistration.k8s.io/v1beta1

    关于 admission-webhook 的编写不属于本文的讨论范围,可以到官方文档中深入了解。

    这里有一个实现 lxcfs admission webhook 的范例,可以参考:https://github.com/hantmac/lxcfs-admission-webhook

    总结

    本文介绍了通过 lxcfs 提供容器资源视图隔离的方法,可以帮助一些容器化应用更好的识别容器运行时的资源限制。

    同时,在本文中我们介绍了利用容器和 DaemonSet 的方式部署 lxcfs FUSE,这不但极大简化了部署,也可以方便地利用 Kubernetes 自身的容器管理能力,支持 lxcfs 进程失效时自动恢复,在集群伸缩时也可以保证节点部署的一致性。这个技巧对于其他类似的监控或者系统扩展都是适用的。

    另外我们介绍了利用Kubernetes的 admission webhook,实现对 lxcfs 文件的自动化挂载。整个过程对于应用部署人员是透明的,可以极大简化运维复杂度。


]]>
lxcfs 实现容器资源隔离的最佳实践
重磅!微软 VS Code 的 Go 语言插件迁移至由 Go 官方团队维护 https://cloudsjhan.github.io/2020/06/12/重磅!微软-VS-Code-的-Go-语言插件迁移至由-Go-官方团队维护/ 2020-06-12T11:49:44.000Z 2020-06-12T11:51:42.038Z

Go 官方 6月 9日电:VS Code 的 Go plugin 已经转为 Go 官方团队维护的项目。其中有两个重要的标志性事件:

  1. GitHub 仓库已经从 https://github.com/microsoft/vscode-go 迁移至 https://github.com/golang/vscode-go
  2. 在 VS Code 插件市场中的发布者也由 Microsoft 变更为 Go Team at Google

自去年 Go modules 发布以来,VS Code 团队就和 Go 团队开始了紧密的合作,让插件得以支持 Go 的官方语言服务器 gopls,目前还正在改进对 Delve 调试器的支持。

从另一方面来看,迁移至由 Go 团队维护意味着此插件成为了 Go 项目的一部分,可确保 Go 社区成员能参与到项目的每一步。插件目前依赖于许多不同的工具和库,而这些工具和库均由社区维护,VS Code 团队希望与这些项目的所有者合作,以帮助减少 Go 社区的维护工作负担,并鼓励更多 Gophers 参与进来共同维护。

原文地址: https://blog.golang.org/vscode-go


]]>
重磅!微软 VS Code 的 Go 语言插件迁移至由 Go 官方团队维护
Uber Go 语言编码规范 https://cloudsjhan.github.io/2020/06/09/Uber-Go-语言编码规范/ 2020-06-09T02:36:29.000Z 2020-06-09T02:37:57.862Z

uber-go/guide 的中文翻译

English

Uber Go 语言编码规范

Uber 是一家美国硅谷的科技公司,也是 Go 语言的早期 adopter。其开源了很多 golang 项目,诸如被 Gopher 圈熟知的 zapjaeger 等。2018 年年末 Uber 将内部的 Go 风格规范 开源到 GitHub,经过一年的积累和更新,该规范已经初具规模,并受到广大 Gopher 的关注。本文是该规范的中文版本。本版本会根据原版实时更新。

版本

  • 当前更新版本:2020-06-05 版本地址:commit:#93
  • 如果您发现任何更新、问题或改进,请随时 fork 和 PR
  • Please feel free to fork and PR if you find any updates, issues or improvement.

目录

介绍

样式 (style) 是支配我们代码的惯例。术语样式有点用词不当,因为这些约定涵盖的范围不限于由 gofmt 替我们处理的源文件格式。

本指南的目的是通过详细描述在 Uber 编写 Go 代码的注意事项来管理这种复杂性。这些规则的存在是为了使代码库易于管理,同时仍然允许工程师更有效地使用 Go 语言功能。

该指南最初由 Prashant VaranasiSimon Newton 编写,目的是使一些同事能快速使用 Go。多年来,该指南已根据其他人的反馈进行了修改。

本文档记录了我们在 Uber 遵循的 Go 代码中的惯用约定。其中许多是 Go 的通用准则,而其他扩展准则依赖于下面外部的指南:

  1. Effective Go
  2. The Go common mistakes guide

所有代码都应该通过golintgo vet的检查并无错误。我们建议您将编辑器设置为:

  • 保存时运行 goimports
  • 运行 golintgo vet 检查错误

您可以在以下 Go 编辑器工具支持页面中找到更为详细的信息:
https://github.com/golang/go/wiki/IDEsAndTextEditorPlugins

指导原则

指向 interface 的指针

您几乎不需要指向接口类型的指针。您应该将接口作为值进行传递,在这样的传递过程中,实质上传递的底层数据仍然可以是指针。

接口实质上在底层用两个字段表示:

  1. 一个指向某些特定类型信息的指针。您可以将其视为”type”。
  2. 数据指针。如果存储的数据是指针,则直接存储。如果存储的数据是一个值,则存储指向该值的指针。

如果希望接口方法修改基础数据,则必须使用指针传递。

Interface 合理性验证

在编译时验证接口的符合性。这包括:

  • 将实现特定接口所需的导出类型作为其 API 的一部分
  • 导出或未导出的类型是实现同一接口的类型集合的一部分
  • 其他违反接口的情况会破坏用户。


BadGood


1
2
3
4
5
6
7
8
9
type Handler struct {
// ...
}
func (h *Handler) ServeHTTP(
w http.ResponseWriter,
r *http.Request,
) {
...
}


1
2
3
4
5
6
7
8
9
10
type Handler struct {
// ...
}
var _ http.Handler = (*Handler)(nil)
func (h *Handler) ServeHTTP(
w http.ResponseWriter,
r *http.Request,
) {
// ...
}


如果 *Handler 永远不会与 http.Handler 接口匹配,那么语句 var _ http.Handler = (*Handler)(nil) 将无法编译

赋值的右边应该是断言类型的零值。对于指针类型(如 *Handler)、切片和映射,这是 nil;对于结构类型,这是空结构。

1
2
3
4
5
6
7
8
9
10
11
type LogHandler struct {
h http.Handler
log *zap.Logger
}
var _ http.Handler = LogHandler{}
func (h LogHandler) ServeHTTP(
w http.ResponseWriter,
r *http.Request,
) {
// ...
}

接收器 (receiver) 与接口

使用值接收器的方法既可以通过值调用,也可以通过指针调用。

例如,

1
2
3
4
5
6
7
8
9
10
11
12
13
14
15
16
17
18
19
20
21
22
23
24
25
type S struct {
data string
}

func (s S) Read() string {
return s.data
}

func (s *S) Write(str string) {
s.data = str
}

sVals := map[int]S{1: {"A"}}

// 你只能通过值调用 Read
sVals[1].Read()

// 这不能编译通过:
// sVals[1].Write("test")

sPtrs := map[int]*S{1: {"A"}}

// 通过指针既可以调用 Read,也可以调用 Write 方法
sPtrs[1].Read()
sPtrs[1].Write("test")

同样,即使该方法具有值接收器,也可以通过指针来满足接口。

1
2
3
4
5
6
7
8
9
10
11
12
13
14
15
16
17
18
19
20
21
22
23
24
type F interface {
f()
}

type S1 struct{}

func (s S1) f() {}

type S2 struct{}

func (s *S2) f() {}

s1Val := S1{}
s1Ptr := &S1{}
s2Val := S2{}
s2Ptr := &S2{}

var i F
i = s1Val
i = s1Ptr
i = s2Ptr

// 下面代码无法通过编译。因为 s2Val 是一个值,而 S2 的 f 方法中没有使用值接收器
// i = s2Val

Effective Go 中有一段关于 pointers vs. values 的精彩讲解。

零值 Mutex 是有效的

零值 sync.Mutexsync.RWMutex 是有效的。所以指向 mutex 的指针基本是不必要的。


BadGood


1
2
mu := new(sync.Mutex)
mu.Lock()


1
2
var mu sync.Mutex
mu.Lock()


如果你使用结构体指针,mutex 可以非指针形式作为结构体的组成字段,或者更好的方式是直接嵌入到结构体中。
如果是私有结构体类型或是要实现 Mutex 接口的类型,我们可以使用嵌入 mutex 的方法:


1
2
3
4
5
6
7
8
9
10
11
12
13
14
15
16
17
18
type smap struct {
sync.Mutex // only for unexported types(仅适用于非导出类型)

data map[string]string
}

func newSMap() *smap {
return &smap{
data: make(map[string]string),
}
}

func (m *smap) Get(k string) string {
m.Lock()
defer m.Unlock()

return m.data[k]
}


1
2
3
4
5
6
7
8
9
10
11
12
13
14
15
16
17
18
type SMap struct {
mu sync.Mutex // 对于导出类型,请使用私有锁

data map[string]string
}

func NewSMap() *SMap {
return &SMap{
data: make(map[string]string),
}
}

func (m *SMap) Get(k string) string {
m.mu.Lock()
defer m.mu.Unlock()

return m.data[k]
}


为私有类型或需要实现互斥接口的类型嵌入。对于导出的类型,请使用专用字段。

在边界处拷贝 Slices 和 Maps

slices 和 maps 包含了指向底层数据的指针,因此在需要复制它们时要特别注意。

接收 Slices 和 Maps

请记住,当 map 或 slice 作为函数参数传入时,如果您存储了对它们的引用,则用户可以对其进行修改。


Bad Good


1
2
3
4
5
6
7
8
9
func (d *Driver) SetTrips(trips []Trip) {
d.trips = trips
}

trips := ...
d1.SetTrips(trips)

// 你是要修改 d1.trips 吗?
trips[0] = ...


1
2
3
4
5
6
7
8
9
10
func (d *Driver) SetTrips(trips []Trip) {
d.trips = make([]Trip, len(trips))
copy(d.trips, trips)
}

trips := ...
d1.SetTrips(trips)

// 这里我们修改 trips[0],但不会影响到 d1.trips
trips[0] = ...


返回 slices 或 maps

同样,请注意用户对暴露内部状态的 map 或 slice 的修改。


BadGood


1
2
3
4
5
6
7
8
9
10
11
12
13
14
15
16
17
18
type Stats struct {
mu sync.Mutex

counters map[string]int
}

// Snapshot 返回当前状态。
func (s *Stats) Snapshot() map[string]int {
s.mu.Lock()
defer s.mu.Unlock()

return s.counters
}

// snapshot 不再受互斥锁保护
// 因此对 snapshot 的任何访问都将受到数据竞争的影响
// 影响 stats.counters
snapshot := stats.Snapshot()


1
2
3
4
5
6
7
8
9
10
11
12
13
14
15
16
17
18
19
type Stats struct {
mu sync.Mutex

counters map[string]int
}

func (s *Stats) Snapshot() map[string]int {
s.mu.Lock()
defer s.mu.Unlock()

result := make(map[string]int, len(s.counters))
for k, v := range s.counters {
result[k] = v
}
return result
}

// snapshot 现在是一个拷贝
snapshot := stats.Snapshot()


使用 defer 释放资源

使用 defer 释放资源,诸如文件和锁。


BadGood


1
2
3
4
5
6
7
8
9
10
11
12
13
p.Lock()
if p.count < 10 {
p.Unlock()
return p.count
}

p.count++
newCount := p.count
p.Unlock()

return newCount

// 当有多个 return 分支时,很容易遗忘 unlock


1
2
3
4
5
6
7
8
9
10
11
p.Lock()
defer p.Unlock()

if p.count < 10 {
return p.count
}

p.count++
return p.count

// 更可读


Defer 的开销非常小,只有在您可以证明函数执行时间处于纳秒级的程度时,才应避免这样做。使用 defer 提升可读性是值得的,因为使用它们的成本微不足道。尤其适用于那些不仅仅是简单内存访问的较大的方法,在这些方法中其他计算的资源消耗远超过 defer

Channel 的 size 要么是 1,要么是无缓冲的

channel 通常 size 应为 1 或是无缓冲的。默认情况下,channel 是无缓冲的,其 size 为零。任何其他尺寸都必须经过严格的审查。我们需要考虑如何确定大小,考虑是什么阻止了 channel 在高负载下和阻塞写时的写入,以及当这种情况发生时系统逻辑有哪些变化。(翻译解释:按照原文意思是需要界定通道边界,竞态条件,以及逻辑上下文梳理)


BadGood


1
2
// 应该足以满足任何情况!
c := make(chan int, 64)


1
2
3
4
// 大小:1
c := make(chan int, 1) // 或者
// 无缓冲 channel,大小为 0
c := make(chan int)


枚举从 1 开始

在 Go 中引入枚举的标准方法是声明一个自定义类型和一个使用了 iota 的 const 组。由于变量的默认值为 0,因此通常应以非零值开头枚举。


BadGood


1
2
3
4
5
6
7
8
9
type Operation int

const (
Add Operation = iota
Subtract
Multiply
)

// Add=0, Subtract=1, Multiply=2


1
2
3
4
5
6
7
8
9
type Operation int

const (
Add Operation = iota + 1
Subtract
Multiply
)

// Add=1, Subtract=2, Multiply=3


在某些情况下,使用零值是有意义的(枚举从零开始),例如,当零值是理想的默认行为时。

1
2
3
4
5
6
7
8
9
type LogOutput int

const (
LogToStdout LogOutput = iota
LogToFile
LogToRemote
)

// LogToStdout=0, LogToFile=1, LogToRemote=2

使用 time 处理时间

时间处理很复杂。关于时间的错误假设通常包括以下几点。

  1. 一天有 24 小时
  2. 一小时有 60 分钟
  3. 一周有七天
  4. 一年 365 天
  5. 还有更多

例如,1 表示在一个时间点上加上 24 小时并不总是产生一个新的日历日。

因此,在处理时间时始终使用 "time" 包,因为它有助于以更安全、更准确的方式处理这些不正确的假设。

使用 time.Time 表达瞬时时间

在处理时间的瞬间时使用 time.time,在比较、添加或减去时间时使用 time.Time 中的方法。


BadGood


1
2
3
func isActive(now, start, stop int) bool {
return start <= now && now < stop
}


1
2
3
func isActive(now, start, stop time.Time) bool {
return (start.Before(now) || start.Equal(now)) && now.Before(stop)
}


使用 time.Duration 表达时间段

在处理时间段时使用 time.Duration .


BadGood


1
2
3
4
5
6
7
func poll(delay int) {
for {
// ...
time.Sleep(time.Duration(delay) * time.Millisecond)
}
}
poll(10) // 是几秒钟还是几毫秒?


1
2
3
4
5
6
7
func poll(delay time.Duration) {
for {
// ...
time.Sleep(delay)
}
}
poll(10*time.Second)


回到第一个例子,在一个时间瞬间加上 24 小时,我们用于添加时间的方法取决于意图。如果我们想要下一个日历日(当前天的下一天)的同一个时间点,我们应该使用 Time.AddDate。但是,如果我们想保证某一时刻比前一时刻晚 24 小时,我们应该使用 Time.Add

1
2
newDay := t.AddDate(0 /* years */, 0, /* months */, 1 /* days */)
maybeNewDay := t.Add(24 * time.Hour)

对外部系统使用 time.Timetime.Duration

尽可能在与外部系统的交互中使用 time.Durationtime.Time 例如 :

当不能在这些交互中使用 time.Duration 时,请使用 intfloat64,并在字段名称中包含单位。

例如,由于 encoding/json 不支持 time.Duration,因此该单位包含在字段的名称中。


BadGood


1
2
3
4
// {"interval": 2}
type Config struct {
Interval int `json:"interval"`
}


1
2
3
4
// {"intervalMillis": 2000}
type Config struct {
IntervalMillis int `json:"intervalMillis"`
}


当在这些交互中不能使用 time.Time 时,除非达成一致,否则使用 stringRFC 3339 中定义的格式时间戳。默认情况下,Time.UnmarshalText 使用此格式,并可通过 time.RFC3339Time.Formattime.Parse 中使用。

尽管这在实践中并不成问题,但请记住,"time" 包不支持解析闰秒时间戳(8728),也不在计算中考虑闰秒(15190)。如果您比较两个时间瞬间,则差异将不包括这两个瞬间之间可能发生的闰秒。

错误类型

Go 中有多种声明错误(Error) 的选项:

返回错误时,请考虑以下因素以确定最佳选择:

  • 这是一个不需要额外信息的简单错误吗?如果是这样,errors.New 足够了。
  • 客户需要检测并处理此错误吗?如果是这样,则应使用自定义类型并实现该 Error() 方法。
  • 您是否正在传播下游函数返回的错误?如果是这样,请查看本文后面有关错误包装 section on error wrapping) 部分的内容。
  • 否则 fmt.Errorf 就可以了。

如果客户端需要检测错误,并且您已使用创建了一个简单的错误 errors.New,请使用一个错误变量。


BadGood


1
2
3
4
5
6
7
8
9
10
11
12
13
14
15
16
17
// package foo

func Open() error {
return errors.New("could not open")
}

// package bar

func use() {
if err := foo.Open(); err != nil {
if err.Error() == "could not open" {
// handle
} else {
panic("unknown error")
}
}
}


1
2
3
4
5
6
7
8
9
10
11
12
13
14
15
16
17
// package foo

var ErrCouldNotOpen = errors.New("could not open")

func Open() error {
return ErrCouldNotOpen
}

// package bar

if err := foo.Open(); err != nil {
if err == foo.ErrCouldNotOpen {
// handle
} else {
panic("unknown error")
}
}


如果您有可能需要客户端检测的错误,并且想向其中添加更多信息(例如,它不是静态字符串),则应使用自定义类型。


BadGood


1
2
3
4
5
6
7
8
9
10
11
12
13
func open(file string) error {
return fmt.Errorf("file %q not found", file)
}

func use() {
if err := open("testfile.txt"); err != nil {
if strings.Contains(err.Error(), "not found") {
// handle
} else {
panic("unknown error")
}
}
}


1
2
3
4
5
6
7
8
9
10
11
12
13
14
15
16
17
18
19
20
21
type errNotFound struct {
file string
}

func (e errNotFound) Error() string {
return fmt.Sprintf("file %q not found", e.file)
}

func open(file string) error {
return errNotFound{file: file}
}

func use() {
if err := open("testfile.txt"); err != nil {
if _, ok := err.(errNotFound); ok {
// handle
} else {
panic("unknown error")
}
}
}


直接导出自定义错误类型时要小心,因为它们已成为程序包公共 API 的一部分。最好公开匹配器功能以检查错误。

1
2
3
4
5
6
7
8
9
10
11
12
13
14
15
16
17
18
19
20
21
22
23
24
25
26
27
28
// package foo

type errNotFound struct {
file string
}

func (e errNotFound) Error() string {
return fmt.Sprintf("file %q not found", e.file)
}

func IsNotFoundError(err error) bool {
_, ok := err.(errNotFound)
return ok
}

func Open(file string) error {
return errNotFound{file: file}
}

// package bar

if err := foo.Open("foo"); err != nil {
if foo.IsNotFoundError(err) {
// handle
} else {
panic("unknown error")
}
}

错误包装 (Error Wrapping)

一个(函数/方法)调用失败时,有三种主要的错误传播方式:

  • 如果没有要添加的其他上下文,并且您想要维护原始错误类型,则返回原始错误。
  • 添加上下文,使用 "pkg/errors".Wrap 以便错误消息提供更多上下文 ,"pkg/errors".Cause 可用于提取原始错误。
  • 如果调用者不需要检测或处理的特定错误情况,使用 fmt.Errorf

建议在可能的地方添加上下文,以使您获得诸如“调用服务 foo:连接被拒绝”之类的更有用的错误,而不是诸如“连接被拒绝”之类的模糊错误。

在将上下文添加到返回的错误时,请避免使用“failed to”之类的短语以保持上下文简洁,这些短语会陈述明显的内容,并随着错误在堆栈中的渗透而逐渐堆积:


BadGood


1
2
3
4
5
s, err := store.New()
if err != nil {
return fmt.Errorf(
"failed to create new store: %s", err)
}


1
2
3
4
5
s, err := store.New()
if err != nil {
return fmt.Errorf(
"new store: %s", err)
}


1
failed to x: failed to y: failed to create new store: the error


1
x: y: new store: the error


但是,一旦将错误发送到另一个系统,就应该明确消息是错误消息(例如使用err标记,或在日志中以”Failed”为前缀)。

另请参见 Don’t just check errors, handle them gracefully. 不要只是检查错误,要优雅地处理错误

处理类型断言失败

type assertion 的单个返回值形式针对不正确的类型将产生 panic。因此,请始终使用“comma ok”的惯用法。


BadGood


1
t := i.(string)


1
2
3
4
t, ok := i.(string)
if !ok {
// 优雅地处理错误
}


不要 panic

在生产环境中运行的代码必须避免出现 panic。panic 是 cascading failures 级联失败的主要根源 。如果发生错误,该函数必须返回错误,并允许调用方决定如何处理它。


BadGood


1
2
3
4
5
6
7
8
9
10
11
12
13
14
func foo(bar string) {
if len(bar) == 0 {
panic("bar must not be empty")
}
// ...
}

func main() {
if len(os.Args) != 2 {
fmt.Println("USAGE: foo <bar>")
os.Exit(1)
}
foo(os.Args[1])
}


1
2
3
4
5
6
7
8
9
10
11
12
13
14
15
16
17
func foo(bar string) error {
if len(bar) == 0 {
return errors.New("bar must not be empty")
}
// ...
return nil
}

func main() {
if len(os.Args) != 2 {
fmt.Println("USAGE: foo <bar>")
os.Exit(1)
}
if err := foo(os.Args[1]); err != nil {
panic(err)
}
}


panic/recover 不是错误处理策略。仅当发生不可恢复的事情(例如:nil 引用)时,程序才必须 panic。程序初始化是一个例外:程序启动时应使程序中止的不良情况可能会引起 panic。

1
var _statusTemplate = template.Must(template.New("name").Parse("_statusHTML"))

即使在测试代码中,也优先使用t.Fatal或者t.FailNow而不是 panic 来确保失败被标记。


BadGood


1
2
3
4
5
6
// func TestFoo(t *testing.T)

f, err := ioutil.TempFile("", "test")
if err != nil {
panic("failed to set up test")
}


1
2
3
4
5
6
// func TestFoo(t *testing.T)

f, err := ioutil.TempFile("", "test")
if err != nil {
t.Fatal("failed to set up test")
}


使用 go.uber.org/atomic

使用 sync/atomic 包的原子操作对原始类型 (int32, int64等)进行操作,因为很容易忘记使用原子操作来读取或修改变量。

go.uber.org/atomic 通过隐藏基础类型为这些操作增加了类型安全性。此外,它包括一个方便的atomic.Bool类型。


BadGood


1
2
3
4
5
6
7
8
9
10
11
12
13
14
15
type foo struct {
running int32 // atomic
}

func (f* foo) start() {
if atomic.SwapInt32(&f.running, 1) == 1 {
// already running…
return
}
// start the Foo
}

func (f *foo) isRunning() bool {
return f.running == 1 // race!
}


1
2
3
4
5
6
7
8
9
10
11
12
13
14
15
type foo struct {
running atomic.Bool
}

func (f *foo) start() {
if f.running.Swap(true) {
// already running…
return
}
// start the Foo
}

func (f *foo) isRunning() bool {
return f.running.Load()
}


避免可变全局变量

使用选择依赖注入方式避免改变全局变量。
既适用于函数指针又适用于其他值类型


BadGood


1
2
3
4
5
6
// sign.go
var _timeNow = time.Now
func sign(msg string) string {
now := _timeNow()
return signWithTime(msg, now)
}


1
2
3
4
5
6
7
8
9
10
11
12
13
// sign.go
type signer struct {
now func() time.Time
}
func newSigner() *signer {
return &signer{
now: time.Now,
}
}
func (s *signer) Sign(msg string) string {
now := s.now()
return signWithTime(msg, now)
}


1
2
3
4
5
6
7
8
9
// sign_test.go
func TestSign(t *testing.T) {
oldTimeNow := _timeNow
_timeNow = func() time.Time {
return someFixedTime
}
defer func() { _timeNow = oldTimeNow }()
assert.Equal(t, want, sign(give))
}


1
2
3
4
5
6
7
8
// sign_test.go
func TestSigner(t *testing.T) {
s := newSigner()
s.now = func() time.Time {
return someFixedTime
}
assert.Equal(t, want, s.Sign(give))
}


避免在公共结构中嵌入类型

这些嵌入的类型泄漏实现细节、禁止类型演化和模糊的文档。

假设您使用共享的 AbstractList 实现了多种列表类型,请避免在具体的列表实现中嵌入 AbstractList
相反,只需手动将方法写入具体的列表,该列表将委托给抽象列表。

1
2
3
4
5
6
7
8
9
type AbstractList struct {}
// 添加将实体添加到列表中。
func (l *AbstractList) Add(e Entity) {
// ...
}
// 移除从列表中移除实体。
func (l *AbstractList) Remove(e Entity) {
// ...
}


BadGood


1
2
3
4
// ConcreteList 是一个实体列表。
type ConcreteList struct {
*AbstractList
}


1
2
3
4
5
6
7
8
9
10
11
12
// ConcreteList 是一个实体列表。
type ConcreteList struct {
list *AbstractList
}
// 添加将实体添加到列表中。
func (l *ConcreteList) Add(e Entity) {
return l.list.Add(e)
}
// 移除从列表中移除实体。
func (l *ConcreteList) Remove(e Entity) {
return l.list.Remove(e)
}


Go 允许 类型嵌入 作为继承和组合之间的折衷。
外部类型获取嵌入类型的方法的隐式副本。
默认情况下,这些方法委托给嵌入实例的同一方法。

结构还获得与类型同名的字段。
所以,如果嵌入的类型是 public,那么字段是 public。为了保持向后兼容性,外部类型的每个未来版本都必须保留嵌入类型。

很少需要嵌入类型。
这是一种方便,可以帮助您避免编写冗长的委托方法。

即使嵌入兼容的抽象列表 interface,而不是结构体,这将为开发人员提供更大的灵活性来改变未来,但仍然泄露了具体列表使用抽象实现的细节。


BadGood


1
2
3
4
5
6
7
8
9
// AbstractList 是各种实体列表的通用实现。
type AbstractList interface {
Add(Entity)
Remove(Entity)
}
// ConcreteList 是一个实体列表。
type ConcreteList struct {
AbstractList
}


1
2
3
4
5
6
7
8
9
10
11
12
// ConcreteList 是一个实体列表。
type ConcreteList struct {
list *AbstractList
}
// 添加将实体添加到列表中。
func (l *ConcreteList) Add(e Entity) {
return l.list.Add(e)
}
// 移除从列表中移除实体。
func (l *ConcreteList) Remove(e Entity) {
return l.list.Remove(e)
}


无论是使用嵌入式结构还是使用嵌入式接口,嵌入式类型都会限制类型的演化.

  • 向嵌入式接口添加方法是一个破坏性的改变。
  • 删除嵌入类型是一个破坏性的改变。
  • 即使使用满足相同接口的替代方法替换嵌入类型,也是一个破坏性的改变。

尽管编写这些委托方法是乏味的,但是额外的工作隐藏了实现细节,留下了更多的更改机会,还消除了在文档中发现完整列表接口的间接性操作。

避免使用内置名称

Go语言规范language specification 概述了几个内置的,
不应在Go项目中使用的名称标识predeclared identifiers

根据上下文的不同,将这些标识符作为名称重复使用,
将在当前作用域(或任何嵌套作用域)中隐藏原始标识符,或者混淆代码。
在最好的情况下,编译器会报错;在最坏的情况下,这样的代码可能会引入潜在的、难以恢复的错误。


BadGood


1
2
3
4
5
6
7
8
var error string
// `error` 作用域隐式覆盖

// or

func handleErrorMessage(error string) {
// `error` 作用域隐式覆盖
}


1
2
3
4
5
6
7
8
var errorMessage string
// `error` 指向内置的非覆盖

// or

func handleErrorMessage(msg string) {
// `error` 指向内置的非覆盖
}


1
2
3
4
5
6
7
8
9
10
11
12
13
14
15
type Foo struct {
// 虽然这些字段在技术上不构成阴影,但`error`或`string`字符串的重映射现在是不明确的。
error error
string string
}

func (f Foo) Error() error {
// `error` 和 `f.error` 在视觉上是相似的
return f.error
}

func (f Foo) String() string {
// `string` and `f.string` 在视觉上是相似的
return f.string
}


1
2
3
4
5
6
7
8
9
10
11
12
13
type Foo struct {
// `error` and `string` 现在是明确的。
err error
str string
}

func (f Foo) Error() error {
return f.err
}

func (f Foo) String() string {
return f.str
}


注意,编译器在使用预先分隔的标识符时不会生成错误,
但是诸如go vet之类的工具会正确地指出这些和其他情况下的隐式问题。

性能

性能方面的特定准则只适用于高频场景。

优先使用 strconv 而不是 fmt

将原语转换为字符串或从字符串转换时,strconv速度比fmt快。


BadGood


1
2
3
for i := 0; i < b.N; i++ {
s := fmt.Sprint(rand.Int())
}


1
2
3
for i := 0; i < b.N; i++ {
s := strconv.Itoa(rand.Int())
}


1
BenchmarkFmtSprint-4    143 ns/op    2 allocs/op


1
BenchmarkStrconv-4    64.2 ns/op    1 allocs/op


避免字符串到字节的转换

不要反复从固定字符串创建字节 slice。相反,请执行一次转换并捕获结果。


BadGood


1
2
3
for i := 0; i < b.N; i++ {
w.Write([]byte("Hello world"))
}


1
2
3
4
data := []byte("Hello world")
for i := 0; i < b.N; i++ {
w.Write(data)
}


1
BenchmarkBad-4   50000000   22.2 ns/op


1
BenchmarkGood-4  500000000   3.25 ns/op


尽量初始化时指定 Map 容量

在尽可能的情况下,在使用 make() 初始化的时候提供容量信息

1
make(map[T1]T2, hint)

make() 提供容量信息(hint)尝试在初始化时调整 map 大小,
这减少了在将元素添加到 map 时增长和分配的开销。
注意,map 不能保证分配 hint 个容量。因此,即使提供了容量,添加元素仍然可以进行分配。


BadGood


1
2
3
4
5
6
m := make(map[string]os.FileInfo)

files, _ := ioutil.ReadDir("./files")
for _, f := range files {
m[f.Name()] = f
}


1
2
3
4
5
6
7

files, _ := ioutil.ReadDir("./files")

m := make(map[string]os.FileInfo, len(files))
for _, f := range files {
m[f.Name()] = f
}


m 是在没有大小提示的情况下创建的; 在运行时可能会有更多分配。


m 是有大小提示创建的;在运行时可能会有更少的分配。

规范

一致性

本文中概述的一些标准都是客观性的评估,是根据场景、上下文、或者主观性的判断;

但是最重要的是,保持一致.

一致性的代码更容易维护、是更合理的、需要更少的学习成本、并且随着新的约定出现或者出现错误后更容易迁移、更新、修复 bug

相反,一个单一的代码库会导致维护成本开销、不确定性和认知偏差。所有这些都会直接导致速度降低、
代码审查痛苦、而且增加 bug 数量

将这些标准应用于代码库时,建议在 package(或更大)级别进行更改,子包级别的应用程序通过将多个样式引入到同一代码中,违反了上述关注点。

相似的声明放在一组

Go 语言支持将相似的声明放在一个组内。


BadGood


1
2
import "a"
import "b"


1
2
3
4
import (
"a"
"b"
)


这同样适用于常量、变量和类型声明:


BadGood


1
2
3
4
5
6
7
8
9

const a = 1
const b = 2

var a = 1
var b = 2

type Area float64
type Volume float64


1
2
3
4
5
6
7
8
9
10
11
12
13
14
const (
a = 1
b = 2
)

var (
a = 1
b = 2
)

type (
Area float64
Volume float64
)


仅将相关的声明放在一组。不要将不相关的声明放在一组。


BadGood


1
2
3
4
5
6
7
8
type Operation int

const (
Add Operation = iota + 1
Subtract
Multiply
ENV_VAR = "MY_ENV"
)


1
2
3
4
5
6
7
8
9
type Operation int

const (
Add Operation = iota + 1
Subtract
Multiply
)

const ENV_VAR = "MY_ENV"


分组使用的位置没有限制,例如:你可以在函数内部使用它们:


BadGood


1
2
3
4
5
6
7
func f() string {
var red = color.New(0xff0000)
var green = color.New(0x00ff00)
var blue = color.New(0x0000ff)

...
}


1
2
3
4
5
6
7
8
9
func f() string {
var (
red = color.New(0xff0000)
green = color.New(0x00ff00)
blue = color.New(0x0000ff)
)

...
}


import 分组

导入应该分为两组:

  • 标准库
  • 其他库

默认情况下,这是 goimports 应用的分组。


BadGood


1
2
3
4
5
6
import (
"fmt"
"os"
"go.uber.org/atomic"
"golang.org/x/sync/errgroup"
)


1
2
3
4
5
6
7
import (
"fmt"
"os"

"go.uber.org/atomic"
"golang.org/x/sync/errgroup"
)


包名

当命名包时,请按下面规则选择一个名称:

  • 全部小写。没有大写或下划线。
  • 大多数使用命名导入的情况下,不需要重命名。
  • 简短而简洁。请记住,在每个使用的地方都完整标识了该名称。
  • 不用复数。例如net/url,而不是net/urls
  • 不要用“common”,“util”,“shared”或“lib”。这些是不好的,信息量不足的名称。

另请参阅 Package NamesGo 包样式指南.

函数名

我们遵循 Go 社区关于使用 MixedCaps 作为函数名 的约定。有一个例外,为了对相关的测试用例进行分组,函数名可能包含下划线,如:TestMyFunction_WhatIsBeingTested.

导入别名

如果程序包名称与导入路径的最后一个元素不匹配,则必须使用导入别名。

1
2
3
4
5
6
import (
"net/http"

client "example.com/client-go"
trace "example.com/trace/v2"
)

在所有其他情况下,除非导入之间有直接冲突,否则应避免导入别名。


BadGood


1
2
3
4
5
6
import (
"fmt"
"os"

nettrace "golang.net/x/trace"
)


1
2
3
4
5
6
7
import (
"fmt"
"os"
"runtime/trace"

nettrace "golang.net/x/trace"
)


函数分组与顺序

  • 函数应按粗略的调用顺序排序。
  • 同一文件中的函数应按接收者分组。

因此,导出的函数应先出现在文件中,放在struct, const, var定义的后面。

在定义类型之后,但在接收者的其余方法之前,可能会出现一个 newXYZ()/NewXYZ()

由于函数是按接收者分组的,因此普通工具函数应在文件末尾出现。


BadGood


1
2
3
4
5
6
7
8
9
10
11
12
13
func (s *something) Cost() {
return calcCost(s.weights)
}

type something struct{ ... }

func calcCost(n []int) int {...}

func (s *something) Stop() {...}

func newSomething() *something {
return &something{}
}


1
2
3
4
5
6
7
8
9
10
11
12
13
type something struct{ ... }

func newSomething() *something {
return &something{}
}

func (s *something) Cost() {
return calcCost(s.weights)
}

func (s *something) Stop() {...}

func calcCost(n []int) int {...}


减少嵌套

代码应通过尽可能先处理错误情况/特殊情况并尽早返回或继续循环来减少嵌套。减少嵌套多个级别的代码的代码量。


BadGood


1
2
3
4
5
6
7
8
9
10
11
12
for _, v := range data {
if v.F1 == 1 {
v = process(v)
if err := v.Call(); err == nil {
v.Send()
} else {
return err
}
} else {
log.Printf("Invalid v: %v", v)
}
}


1
2
3
4
5
6
7
8
9
10
11
12
for _, v := range data {
if v.F1 != 1 {
log.Printf("Invalid v: %v", v)
continue
}

v = process(v)
if err := v.Call(); err != nil {
return err
}
v.Send()
}


不必要的 else

如果在 if 的两个分支中都设置了变量,则可以将其替换为单个 if。


BadGood


1
2
3
4
5
6
var a int
if b {
a = 100
} else {
a = 10
}


1
2
3
4
a := 10
if b {
a = 100
}


顶层变量声明

在顶层,使用标准var关键字。请勿指定类型,除非它与表达式的类型不同。


BadGood


1
2
3
var _s string = F()

func F() string { return "A" }


1
2
3
4
5
var _s = F()
// 由于 F 已经明确了返回一个字符串类型,因此我们没有必要显式指定_s 的类型
// 还是那种类型

func F() string { return "A" }


如果表达式的类型与所需的类型不完全匹配,请指定类型。

1
2
3
4
5
6
7
8
type myError struct{}

func (myError) Error() string { return "error" }

func F() myError { return myError{} }

var _e error = F()
// F 返回一个 myError 类型的实例,但是我们要 error 类型

对于未导出的顶层常量和变量,使用_作为前缀

在未导出的顶级varsconsts, 前面加上前缀_,以使它们在使用时明确表示它们是全局符号。

例外:未导出的错误值,应以err开头。

基本依据:顶级变量和常量具有包范围作用域。使用通用名称可能很容易在其他文件中意外使用错误的值。


BadGood


1
2
3
4
5
6
7
8
9
10
11
12
13
14
15
16
17
// foo.go

const (
defaultPort = 8080
defaultUser = "user"
)

// bar.go

func Bar() {
defaultPort := 9090
...
fmt.Println("Default port", defaultPort)

// We will not see a compile error if the first line of
// Bar() is deleted.
}


1
2
3
4
5
6
// foo.go

const (
_defaultPort = 8080
_defaultUser = "user"
)


结构体中的嵌入

嵌入式类型(例如 mutex)应位于结构体内的字段列表的顶部,并且必须有一个空行将嵌入式字段与常规字段分隔开。


BadGood


1
2
3
4
type Client struct {
version int
http.Client
}


1
2
3
4
5
type Client struct {
http.Client

version int
}


使用字段名初始化结构体

初始化结构体时,几乎始终应该指定字段名称。现在由 go vet 强制执行。


BadGood


1
k := User{"John", "Doe", true}


1
2
3
4
5
k := User{
FirstName: "John",
LastName: "Doe",
Admin: true,
}


例外:如果有 3 个或更少的字段,则可以在测试表中省略字段名称。

1
2
3
4
5
6
7
tests := []struct{
op Operation
want string
}{
{Add, "add"},
{Subtract, "subtract"},
}

本地变量声明

如果将变量明确设置为某个值,则应使用短变量声明形式 (:=)。


BadGood


1
var s = "foo"


1
s := "foo"


但是,在某些情况下,var 使用关键字时默认值会更清晰。例如,声明空切片。


BadGood


1
2
3
4
5
6
7
8
func f(list []int) {
filtered := []int{}
for _, v := range list {
if v > 10 {
filtered = append(filtered, v)
}
}
}


1
2
3
4
5
6
7
8
func f(list []int) {
var filtered []int
for _, v := range list {
if v > 10 {
filtered = append(filtered, v)
}
}
}


nil 是一个有效的 slice

nil 是一个有效的长度为 0 的 slice,这意味着,

  • 您不应明确返回长度为零的切片。应该返回nil 来代替。


    BadGood


    1
    2
    3
    if x == "" {
    return []int{}
    }


    1
    2
    3
    if x == "" {
    return nil
    }


  • 要检查切片是否为空,请始终使用len(s) == 0。而非 nil


    BadGood


    1
    2
    3
    func isEmpty(s []string) bool {
    return s == nil
    }


    1
    2
    3
    func isEmpty(s []string) bool {
    return len(s) == 0
    }


  • 零值切片(用var声明的切片)可立即使用,无需调用make()创建。


    BadGood


    1
    2
    3
    4
    5
    6
    7
    8
    9
    10
    nums := []int{}
    // or, nums := make([]int)

    if add1 {
    nums = append(nums, 1)
    }

    if add2 {
    nums = append(nums, 2)
    }


    1
    2
    3
    4
    5
    6
    7
    8
    9
    var nums []int

    if add1 {
    nums = append(nums, 1)
    }

    if add2 {
    nums = append(nums, 2)
    }


记住,虽然nil切片是有效的切片,但它不等于长度为0的切片(一个为nil,另一个不是),并且在不同的情况下(例如序列化),这两个切片的处理方式可能不同。

缩小变量作用域

如果有可能,尽量缩小变量作用范围。除非它与 减少嵌套的规则冲突。


BadGood


1
2
3
4
err := ioutil.WriteFile(name, data, 0644)
if err != nil {
return err
}


1
2
3
if err := ioutil.WriteFile(name, data, 0644); err != nil {
return err
}


如果需要在 if 之外使用函数调用的结果,则不应尝试缩小范围。


BadGood


1
2
3
4
5
6
7
8
9
10
11
if data, err := ioutil.ReadFile(name); err == nil {
err = cfg.Decode(data)
if err != nil {
return err
}

fmt.Println(cfg)
return nil
} else {
return err
}


1
2
3
4
5
6
7
8
9
10
11
data, err := ioutil.ReadFile(name)
if err != nil {
return err
}

if err := cfg.Decode(data); err != nil {
return err
}

fmt.Println(cfg)
return nil


避免参数语义不明确(Avoid Naked Parameters)

函数调用中的意义不明确的参数可能会损害可读性。当参数名称的含义不明显时,请为参数添加 C 样式注释 (/* ... */)


BadGood


1
2
3
// func printInfo(name string, isLocal, done bool)

printInfo("foo", true, true)


1
2
3
// func printInfo(name string, isLocal, done bool)

printInfo("foo", true /* isLocal */, true /* done */)


对于上面的示例代码,还有一种更好的处理方式是将上面的 bool 类型换成自定义类型。将来,该参数可以支持不仅仅局限于两个状态(true/false)。

1
2
3
4
5
6
7
8
9
10
11
12
13
14
15
16
type Region int

const (
UnknownRegion Region = iota
Local
)

type Status int

const (
StatusReady Status= iota + 1
StatusDone
// Maybe we will have a StatusInProgress in the future.
)

func printInfo(name string, region Region, status Status)

使用原始字符串字面值,避免转义

Go 支持使用 原始字符串字面值,也就是 “ ` “ 来表示原生字符串,在需要转义的场景下,我们应该尽量使用这种方案来替换。

可以跨越多行并包含引号。使用这些字符串可以避免更难阅读的手工转义的字符串。


BadGood


1
wantError := "unknown name:\"test\""


1
wantError := `unknown error:"test"`


初始化 Struct 引用

在初始化结构引用时,请使用&T{}代替new(T),以使其与结构体初始化一致。


BadGood


1
2
3
4
5
sval := T{Name: "foo"}

// inconsistent
sptr := new(T)
sptr.Name = "bar"


1
2
3
sval := T{Name: "foo"}

sptr := &T{Name: "bar"}


初始化 Maps

对于空 map 请使用 make(..) 初始化, 并且 map 是通过编程方式填充的。
这使得 map 初始化在表现上不同于声明,并且它还可以方便地在 make 后添加大小提示。


BadGood


1
2
3
4
5
6
var (
// m1 读写安全;
// m2 在写入时会 panic
m1 = map[T1]T2{}
m2 map[T1]T2
)


1
2
3
4
5
6
var (
// m1 读写安全;
// m2 在写入时会 panic
m1 = make(map[T1]T2)
m2 map[T1]T2
)


声明和初始化看起来非常相似的。


声明和初始化看起来差别非常大。

在尽可能的情况下,请在初始化时提供 map 容量大小,详细请看 尽量初始化时指定 Map 容量

另外,如果 map 包含固定的元素列表,则使用 map literals(map 初始化列表) 初始化映射。


BadGood


1
2
3
4
m := make(map[T1]T2, 3)
m[k1] = v1
m[k2] = v2
m[k3] = v3


1
2
3
4
5
m := map[T1]T2{
k1: v1,
k2: v2,
k3: v3,
}


基本准则是:在初始化时使用 map 初始化列表 来添加一组固定的元素。否则使用 make (如果可以,请尽量指定 map 容量)。

字符串 string format

如果你在函数外声明Printf-style 函数的格式字符串,请将其设置为const常量。

这有助于go vet对格式字符串执行静态分析。


BadGood


1
2
msg := "unexpected values %v, %v\n"
fmt.Printf(msg, 1, 2)


1
2
const msg = "unexpected values %v, %v\n"
fmt.Printf(msg, 1, 2)


命名 Printf 样式的函数

声明Printf-style 函数时,请确保go vet可以检测到它并检查格式字符串。

这意味着您应尽可能使用预定义的Printf-style 函数名称。go vet将默认检查这些。有关更多信息,请参见 Printf 系列

如果不能使用预定义的名称,请以 f 结束选择的名称:Wrapf,而不是Wrapgo vet可以要求检查特定的 Printf 样式名称,但名称必须以f结尾。

1
$ go vet -printfuncs=wrapf,statusf

另请参阅 go vet: Printf family check.

编程模式

表驱动测试

当测试逻辑是重复的时候,通过 subtests 使用 table 驱动的方式编写 case 代码看上去会更简洁。


BadGood


1
2
3
4
5
6
7
8
9
10
11
12
13
14
15
16
17
18
19
20
21
// func TestSplitHostPort(t *testing.T)

host, port, err := net.SplitHostPort("192.0.2.0:8000")
require.NoError(t, err)
assert.Equal(t, "192.0.2.0", host)
assert.Equal(t, "8000", port)

host, port, err = net.SplitHostPort("192.0.2.0:http")
require.NoError(t, err)
assert.Equal(t, "192.0.2.0", host)
assert.Equal(t, "http", port)

host, port, err = net.SplitHostPort(":8000")
require.NoError(t, err)
assert.Equal(t, "", host)
assert.Equal(t, "8000", port)

host, port, err = net.SplitHostPort("1:8")
require.NoError(t, err)
assert.Equal(t, "1", host)
assert.Equal(t, "8", port)


1
2
3
4
5
6
7
8
9
10
11
12
13
14
15
16
17
18
19
20
21
22
23
24
25
26
27
28
29
30
31
32
33
34
35
36
37
// func TestSplitHostPort(t *testing.T)

tests := []struct{
give string
wantHost string
wantPort string
}{
{
give: "192.0.2.0:8000",
wantHost: "192.0.2.0",
wantPort: "8000",
},
{
give: "192.0.2.0:http",
wantHost: "192.0.2.0",
wantPort: "http",
},
{
give: ":8000",
wantHost: "",
wantPort: "8000",
},
{
give: "1:8",
wantHost: "1",
wantPort: "8",
},
}

for _, tt := range tests {
t.Run(tt.give, func(t *testing.T) {
host, port, err := net.SplitHostPort(tt.give)
require.NoError(t, err)
assert.Equal(t, tt.wantHost, host)
assert.Equal(t, tt.wantPort, port)
})
}


很明显,使用 test table 的方式在代码逻辑扩展的时候,比如新增 test case,都会显得更加的清晰。

我们遵循这样的约定:将结构体切片称为tests。 每个测试用例称为tt。此外,我们鼓励使用givewant前缀说明每个测试用例的输入和输出值。

1
2
3
4
5
6
7
8
9
10
11
tests := []struct{
give string
wantHost string
wantPort string
}{
// ...
}

for _, tt := range tests {
// ...
}

功能选项

功能选项是一种模式,您可以在其中声明一个不透明 Option 类型,该类型在某些内部结构中记录信息。您接受这些选项的可变编号,并根据内部结构上的选项记录的全部信息采取行动。

将此模式用于您需要扩展的构造函数和其他公共 API 中的可选参数,尤其是在这些功能上已经具有三个或更多参数的情况下。


BadGood


1
2
3
4
5
6
7
8
9
// package db

func Open(
addr string,
cache bool,
logger *zap.Logger
) (*Connection, error) {
// ...
}


1
2
3
4
5
6
7
8
9
10
11
12
13
14
15
16
17
18
19
20
21
// package db

type Option interface {
// ...
}

func WithCache(c bool) Option {
// ...
}

func WithLogger(log *zap.Logger) Option {
// ...
}

// Open creates a connection.
func Open(
addr string,
opts ...Option,
) (*Connection, error) {
// ...
}


必须始终提供缓存和记录器参数,即使用户希望使用默认值。

1
2
3
4
db.Open(addr, db.DefaultCache, zap.NewNop())
db.Open(addr, db.DefaultCache, log)
db.Open(addr, false /* cache */, zap.NewNop())
db.Open(addr, false /* cache */, log)


只有在需要时才提供选项。

1
2
3
4
5
6
7
8
db.Open(addr)
db.Open(addr, db.WithLogger(log))
db.Open(addr, db.WithCache(false))
db.Open(
addr,
db.WithCache(false),
db.WithLogger(log),
)


Our suggested way of implementing this pattern is with an Option interface
that holds an unexported method, recording options on an unexported options
struct.

我们建议实现此模式的方法是使用一个 Option 接口,该接口保存一个未导出的方法,在一个未导出的 options 结构上记录选项。

1
2
3
4
5
6
7
8
9
10
11
12
13
14
15
16
17
18
19
20
21
22
23
24
25
26
27
28
29
30
31
32
33
34
35
36
37
38
39
40
41
42
43
44
45
46
47
type options struct {
cache bool
logger *zap.Logger
}

type Option interface {
apply(*options)
}

type cacheOption bool

func (c cacheOption) apply(opts *options) {
opts.cache = bool(c)
}

func WithCache(c bool) Option {
return cacheOption(c)
}

type loggerOption struct {
Log *zap.Logger
}

func (l loggerOption) apply(opts *options) {
opts.logger = l.Log
}

func WithLogger(log *zap.Logger) Option {
return loggerOption{Log: log}
}

// Open creates a connection.
func Open(
addr string,
opts ...Option,
) (*Connection, error) {
options := options{
cache: defaultCache,
logger: zap.NewNop(),
}

for _, o := range opts {
o.apply(&options)
}

// ...
}

注意: 还有一种使用闭包实现这个模式的方法,但是我们相信上面的模式为作者提供了更多的灵活性,并且更容易对用户进行调试和测试。特别是,在不可能进行比较的情况下它允许在测试和模拟中对选项进行比较。此外,它还允许选项实现其他接口,包括 fmt.Stringer,允许用户读取选项的字符串表示形式。

还可以参考下面资料:

Stargazers over time

Stargazers over time


]]>
Uber Go 编码规范
关于 golang 错误处理的一些思考 https://cloudsjhan.github.io/2020/06/01/关于-golang-错误处理的一些思考/ 2020-06-01T07:03:21.000Z 2020-06-01T07:04:45.637Z

写在前面:你是还没在error上栽跟头,当你栽了跟头时才会哭着想起来,当年为什么没好好思考和反省错误处理这么一个宏大的话题

关于 Golang 错误处理的实践

Golang有很多优点,这也是它如此流行的主要原因。但是 Go 1 对错误处理的支持过于简单了,以至于日常开发中会有诸多不便利,遭到很多开发者的吐槽。
这些不足催生了一些开源解决方案。与此同时, Go 官方也在从语言和标准库层面作出改进。
这篇文章将给出几种常见创建错误的方式并分析一些常见问题,对比各种解决方案,并展示了迄今为止(go 1.13)的最佳实践。

几种创建错误的方式

首先介绍几种常见的创建错误的方法

  1. 基于字符串的错误
1
2
3
4

err1 := errors.New("math: square root of negative number")

err2 := fmt.Errorf("math: square root of negative number %g", x)
  1. 带有数据的自定义错误
    1
    2
    3
    4
    5
    6
    7
    8
    9
    10
    11
    12
    13
    14
    15
    16
    17
    18
    19
    20
    21
    22
    23
    24
    25
    26
    27
    28
    29
    30
    package zError

    import (
    "fmt"
    "github.com/satori/go.uuid"
    "log"
    "runtime/debug"
    "time"
    )

    type BaseError struct {
    InnerError error
    Message string
    StackTrace string
    Misc map[string]interface{}
    }

    func WrapError(err error, message string, messageArgs ...interface{}) BaseError {
    return BaseError{
    InnerError: err,
    Message: fmt.Sprintf(message, messageArgs),
    StackTrace: string(debug.Stack()),
    Misc: make(map[string]interface{}),
    }
    }

    func (err *BaseError) Error() string {
    // 实现 Error 接口
    return err.Message
    }

抛出问题

开发中经常需要检查返回的错误值并作相应处理。下面给出一个最简单的示例。

1
2
3
4
5
6
7
8
9
10
11
12
13
14
15
16
17
18
19
20
21
import (
"database/sql"
"fmt"
)

func GetSql() error {
return sql.ErrNoRows
}

func Call() error {
return GetSql()
}

func main() {
err := Call()
if err != nil {
fmt.Printf("got err, %+v\n", err)
}
}
//Outputs:
// got err, sql: no rows in result set

有时需要根据返回的error类型作不同处理,例如:

1
2
3
4
5
6
7
8
9
10
11
12
13
14
15
16
17
18
19
20
21
22
23
24
25
26

import (
"database/sql"
"fmt"
)

func GetSql() error {
return sql.ErrNoRows
}

func Call() error {
return GetSql()
}

func main() {
err := Call()
if err == sql.ErrNoRows {
fmt.Printf("data not found, %+v\n", err)
return
}
if err != nil {
// Unknown error
}
}
//Outputs:
// data not found, sql: no rows in result set

实践中经常需要为错误增加上下文信息后再返回,以方便调用者了解错误场景。例如 Getcall 方法时常写成:

1
2
3
func Getcall() error {
return fmt.Errorf("GetSql err, %v", sql.ErrNoRows)
}

不过这个时候 err == sql.ErrNoRows 就不成立了。除此之外,上述写法都在返回错误时都丢掉了调用栈这个重要的信息。我们需要更灵活、更通用的方式来应对此类问题。

解决方案

针对存在的不足,目前有几种解决方案。这些方式可以对错误进行上下文包装,并携带原始错误信息, 还能尽量保留完整的调用栈

方案 1: github.com/pkg/errors

如果只有错误的文本,我们很难定位到具体的出错地点。虽然通过在代码中搜索错误文本也是有可能找到出错地点的,但是信息有限。所以,在实践中,我们往往会将出错时的调用栈信息也附加上去。调用栈对消费方是没有意义的,从隔离和自治的角度来看,消费方唯一需要关心的就是错误文本和错误类型。调用栈对实现者自身才是是有价值的。所以,如果一个方法需要返回错误,我们一般会使用errors.WithStack(err)或者errors.Wrap(err, “custom message”)的方式,把此刻的调用栈加到error里去,并且在某个统一地方记录日志,方便开发者快速定位问题。

  1. Wrap 方法用来包装底层错误,增加上下文文本信息并附加调用栈。 一般用于包装对第三方代码(标准库或第三方库)的调用。
  2. WithMessage 方法仅增加上下文文本信息,不附加调用栈。 如果确定错误已被 Wrap 过或不关心调用栈,可以使用此方法。 注意:不要反复 Wrap ,会导致调用栈重复
  3. Cause方法用来判断底层错误 。

现在我们用这三个方法来重写上面的代码:

1
2
3
4
5
6
7
8
9
10
11
12
13
14
15
16
17
18
19
20
21
22
23
24
25
26
27
28
29
30
31
32
33
34
35
36
37
38
import (
"database/sql"
"fmt"

"github.com/pkg/errors"
)

func GetSql() error {
return errors.Wrap(sql.ErrNoRows, "GetSql failed")
}

func Call() error {
return errors.WithMessage(GetSql(), "bar failed")
}

func main() {
err := Call()
if errors.Cause(err) == sql.ErrNoRows {
fmt.Printf("data not found, %v\n", err)
fmt.Printf("%+v\n", err)
return
}
if err != nil {
// unknown error
}
}
/*Output:
data not found, Call failed: GetSql failed: sql: no rows in result set
sql: no rows in result set
main.GetSql
/usr/three/main.go:11
main.Call
/usr/three/main.go:15
main.main
/usr/three/main.go:19
runtime.main
...
*/

从输出内容可以看到, 使用 %v 作为格式化参数,那么错误信息会保持一行, 其中依次包含调用栈的上下文文本。 使用 %+v ,则会输出完整的调用栈详情。
如果不需要增加额外上下文信息,仅附加调用栈后返回,可以使用 WithStack 方法:

1
2
3
func GetSql() error {
return errors.WithStack(sql.ErrNoRows)
}

注意:无论是 Wrap , WithMessage 还是 WithStack ,当传入的 err 参数为 nil 时, 都会返回nil, 这意味着我们在调用此方法之前无需作 nil 判断,保持了代码简洁

方案 2:golang.org/x/xerrors

结合社区反馈,Go 团队完成了在 Go 2 中简化错误处理的提案。 Go核心团队成员 Russ Cox 在xerrors中部分实现了提案中的内容。它用与 github.com/pkg/errors相似的思路解决同一问题, 引入了一个新的 fmt 格式化动词: %w,使用 Is 进行判断。

1
2
3
4
5
6
7
8
9
10
11
12
13
14
15
16
17
18
19
20
21
22
23
24
25
26
27
28
29
30
31
32
33
34
35
36
37
38
39
40

import (
"database/sql"
"fmt"

"golang.org/x/xerrors"
)

func Call() error {
if err := GetSql(); err != nil {
return xerrors.Errorf("bar failed: %w", GetSql())
}
return nil
}

func GetSql() error {
return xerrors.Errorf("GetSql failed: %w", sql.ErrNoRows)
}

func main() {
err := Call()
if xerrors.Is(err, sql.ErrNoRows) {
fmt.Printf("data not found, %v\n", err)
fmt.Printf("%+v\n", err)
return
}
if err != nil {
// unknown error
}
}
/* Outputs:
data not found, Call failed: GetSql failed: sql: no rows in result set
bar failed:
main.Call
/usr/four/main.go:12
- GetSql failed:
main.GetSql
/usr/four/main.go:18
- sql: no rows in result set
*/

与 github.com/pkg/errors 相比,它有几点不足:

  1. 使用 : %w 代替了 Wrap , 看似简化, 但失去了编译期检查。 如果没有冒号,或 : %w 不位于于格式化字符串的结尾,或冒号与百分号之间没有空格,包装将失效且不报错;
  2. 而且,调用 xerrors.Errorf 之前需要对参数进行nil判断。 这完全没有简化开发者的工作

方案 3:Go 1.13 内置支持

Go 1.13 将 xerrors 的部分功能(不是全部)整合进了标准库。 它继承了上面提到的 xerrors 的全部缺点, 并额外贡献了一项。因此目前没有使用它的必要。

1
2
3
4
5
6
7
8
9
10
11
12
13
14
15
16
17
18
19
20
21
22
23
24
25
26
27
28
29
30
31

import (
"database/sql"
"errors"
"fmt"
)

func Call() error {
if err := GetSql(); err != nil {
return fmt.Errorf("Call failed: %w", GetSql())
}
return nil
}

func GetSql() error {
return fmt.Errorf("GetSql failed: %w", sql.ErrNoRows)
}

func main() {
err := Call()
if errors.Is(err, sql.ErrNoRows) {
fmt.Printf("data not found, %+v\n", err)
return
}
if err != nil {
// unknown error
}
}
/* Outputs:
data not found, Call failed: GetSql failed: sql: no rows in result set
*/

上面的代码与 xerrors 版本非常接近。但是它不支持调用栈信息输出, 根据官方的说法, 此功能没有明确的支持时间。因此其实用性远低于 github.com/pkg/errors。

Golang 中将来可能的错误处理方式

在Go 2的草案中,我们看到了有关于error相关的一些提案,那就是check/handle函数。

我们也许在下一个大版本的Golang可以像下面这样处理错误:

1
2
3
4
5
6
7
8
9
10
11
12
13
14
15
16
17
18
import "fmt"
func game() error {
handle err {
return fmt.Errorf("dependencies error: %v", err)
}

resource := check findResource() // return resource, error
defer func() {
resource.Release()
}()

profile := check loadProfile() // return profile, error
defer func() {
profile.Close()
}

// ...
}

感兴趣的同学可以关注下这个提案:https://go.googlesource.com/proposal/+/master/design/go2draft-error-handling-overview.md

得出结论

重要的是要记住,包装错误会使该错误成为您API的一部分。如果您不想将来将错误作为API的一部分来支持,则不应包装该错误。
无论是否包装错误,错误文本都将相同。那些试图理解错误的人将得到相同的信息,无论采用哪种方式; 是否要包装错误的选择取决于是否要给程序提供更多信息,以便他们可以做出更明智的决策,还是保留该信息以保留抽象层。

通过以上对比, 相信你已经有了选择。 再明确一下我的看法,如果你正在使用 github.com/pkg/errors ,那就保持现状吧。目前还没有比它更好的选择。如果你已经大量使用 golang.org/x/xerrors , 别盲目换成 go 1.13 的内置方案。

总的来说,Go 在诞生之初就在各个方面表现得相当成熟、稳健。 在演进路线上很少出现犹疑和摇摆, 而在错误处理方面却是个例外。 除了被广泛吐槽的 if err != nil 之外, 就连其改进路线也备受争议、分歧明显,以致于一个改进提案都会因为压倒性的反对意见而不得不作出调整。 好在 Go 团队比以前更加乐于倾听社区意见,团队甚至专门就此问题建了个反馈收集页面。相信最终大家会找到更好的解决方案。


]]>
关于 golang 错误处理的一些思考
官宣:2019 年 Go 开发者调查报告 https://cloudsjhan.github.io/2020/05/10/官宣:2019-年-Go-开发者调查报告/ 2020-05-10T08:30:53.000Z 2020-05-10T08:36:16.496Z

2019 年 Go 开发者调查

4月20日,Go 官方释出 2019 年的 Go 开发者调研报告。官方非常感谢参与本次调查的数千名Go开发人员。 在2019年,官方收到了 10,975 份问卷,几乎是去年的两倍! 团队成员非常感谢开发者花时间和精力填写这份 Go 开发者调研。

本次调研,官方改进了对开放式、自由文本回答的问题的分析。去年使用的是机器学习来粗略但快速地对这些问卷进行分类。今年,两名研究人员手动分析和分类了这些问卷,允许进行更细致的分析,与去年的数字进行有效的比较。这个变化的目的是提供一个 2019 年以后的可靠基线。


一分钟速读

这篇文章很长。以下是本次调研的主要结论:

  • 这次的受访者的受众特征与 Stack Overflow 的调查受访者相似,使得这些结果可以代表更多的 Go 开发人员的心声。
  • 大多数受访者每天都使用 Go,而且这个数字每年都在上升。
  • Go 的使用仍集中在技术公司,但是 Go 在越来越多的行业中被用到,例如金融行业和媒体相关。
  • 开发者使用 Go 解决的问题很相似,基本集中在构建 API, RPC 服务和 CLI 工具。
  • 大多数团队都试图尽快更新到最新的 Go 版本。 但是第三方 package 的 provider 更新地会相对慢一点。
  • 现在,Go生态系统中的几乎每个人都在使用 Go Modules,但是用户对软件包管理方面仍然存在困惑。
  • 有待改进的重点领域包括改善开发人员的 debug 体验,Go Modules 和 cloud service 方面的体验。
  • VS Code 和 GoLand 仍然是最受欢迎的编辑器,受访的四个人中就有三个在使用他们。

受访的开发者群体

受访者公司规模

受访者的编程工作年限

受访者使用 Go 编程的时间

从使用 Go 的经验来看,我们发现大多数受访者(56%)使用 Go 的时间不到两年,相对较新。 多数人还说,他们在工作中(72%)和工作外(62%)使用Go。 可以看到在工作中使用 Go 的受访者比例每年都在上升。

受访者的开发背景

使用 Go 时间较长的受访者与新的 Go 开发人员的背景不同。 这些 Go 老兵更有可能拥有 C / C ++ 的专业知识,而不太可能具备 JavaScript,TypeScript 和 PHP 的专业知识。 但是不管他们使用 Go 已有多长时间,Python似乎都是大多数受访者熟悉的语言(不是Go🤔)。

受访者所从事的行业

去年,我们询问了受访者从事哪些行业,发现大多数人在软件,互联网或网络服务公司工作。 今年看来,受访者所从事的行业更加广泛了。

受访者对 Go 开源项目的贡献

Go 是一个成功的开源项目,但这并不意味着使用它的开发人员也正在编写​​免费或开源软件。 与往年一样,我们发现大多数受访者并不是 Go 开源项目的频繁贡献者,有 75% 的受访者表示他们“很少”或“从不”参与 Go 开源项目。 随着Go社区的扩展,我们发现从未为 Go 开源项目做出过贡献的受访者所占的比例正在缓慢上升。

开发工具篇

受访者开发中使用的 OS

与往年一样,绝大多数开发者表示在 Linux 和 macOS 系统上使用 Go。 这是我们的受访者与StackOverflow的2019 年调查结果之间存在很大差异的一个方面:在我们的调查中,只有20%的受访者使用 Windows 作为主要开发平台,而对于 StackOverflow 而言,这一比例为 45%。 Linux 的使用率为 66%,macOS 的使用率为 53%,这两者都远远高于 StackOverflow 的受众,后者分别报告了 25% 和 30%(看来 Gopher 还是喜欢 UNIX 多一些)。

受访者使用的 IDE

今年,IDE 整合的趋势仍在继续。 GoLand 今年的使用量增长最快,从 24% → 34% 上升。 VS Code的增长速度有所放缓,但仍然是受访者中最受欢迎的编辑器,占41%。 结合起来,这两个 IDE 现在的占有率是 75%。

关于自建 Go document server

今年,我们添加了一个有关内部 Go 文档工具(例如 gddo )的问题。 少数受访者( 6% )表示他们的组织运行自己的Go文档服务器,尽管当我们查看大公司受访者(拥有至少5,000名员工)时,这一比例几乎翻了一番(达到11%),但当我们与后者交流时,他们说基本已经停止了自建 document server,原因是收益小,成本高。

受访者对 Go 的使用意向

大部分受访者都认为 Go 在他们的团队中表现良好(86%),并且他们希望将其用于下一个项目(89%)。 我们还发现,超过一半的受访者(59%)认为 Go 对其公司的成功至关重要。 自2016年以来,这些指标一直保持稳定。

受访者对 Go 生态的满意度

在 Go 生态的满意度上,我们看到很大比例的受访者同意每种说法(82%–88%),并且在过去四年中,这些比率在很大程度上保持稳定。

受访者所在行业对 Go 生态的满意度

今年,我们对各个行业的满意度进行了更细微的考察,以建立基准。 总体而言,无论行业如何,受访者都对在工作中使用Go表示满意。 我们确实在几个领域(尤其是制造业)中看到了一些不满,我们计划通过后续研究进行调查。

受访者对 Go 特性的关注度

同样,我们调查了对 Go 开发各个方面的满意度以及重要性。 将这些结果结合在一起可以突出显示三个特别关注的主题:debug(包括调试并发性),go modules 和 cloud service。 大多数人都将这些主题中的每一个评为“非常”或“至关重要”,但与其他主题相比,这些方面的满意度得分明显较低。

受访者对 Go 社区的满意度

上面的调查结果可能不足为奇,因为参与 Go 开发者调查的人们喜欢 Go 的概率更大(手动狗头)。

使用 Go 完成的工作内容

构建API / RPC服务(71%)和CLI(62%)仍然是 Go 的重头戏。

我们调查了受访者使用 Go 的更大领域。 到目前为止,最常见的领域是 Web 开发(66%),但其他常见的领域包括数据库(45%),网络编程(42%),系统编程(38%)和 DevOps (37%)。

Go 开发过程的常用技术

除了受访者正在构建的内容之外,我们还询问了他们使用的一些开发技术。 绝大多数受访者表示,他们依靠 log 进行调试(88%),而他们的回答表明,这是因为提供的调试工具难以有效使用。 但是,本地逐步调试(例如,使用Delve),性能分析和使用竞争检测器进行测试的情况并不少见,约有50%的受访者其使用中至少一种技术。

关于 Go Modules

在包管理方面,我们发现绝大多数受访者(89%)采用了 Go Modules。对于开发者来说,这是一个巨大的转变,几乎整个社区都在同时经历这一转变。

云原生时代的 Go

Go在设计时考虑到了现代分布式计算,我们希望继续改进使用Go构建云服务的开发人员体验。今年,我们扩展了关于云开发的问题,以便更好地了解受访者如何与云提供商合作,他们喜欢当前开发者体验的哪些方面,以及哪些方面可以改进。

我们可以清晰地感受到以下两个趋势:

  1. 全球三大云提供商(Amazon Web Services,Google Cloud Platform和Microsoft Azure)在受访者中的使用率均呈上升趋势,而大多数其他提供商每年使用的受访者比例都较小。
  2. 到自有或公司拥有的服务器的本地部署继续减少,并且在统计上已与AWS(44%比42%)绑定为最常见的部署平台。

Go project 的部署云平台

总体而言,大多数受访者对在所有三大主要云提供商上使用 Go 感到满意。 受访者具有对 Go(AWS)(80%满意)和GCP(78%)的 满意度。

Go project 的部署服务类型

存在的痛点

受访者表示无法使用Go的主要原因有三个:

  1. (56%)当前的项目正在使用其他语言;
  2. 团队更倾向于使用其他语言(37%);
  3. Go本身缺乏一些关键功能 (25%)。

对一些 Go 特性的期待

在 25% 的受访者中,认为 Go 缺乏他们需要的语言特性。其中 79% 认为泛型是一个严重缺失的特性。22% 的人提到了对错误处理的持续改进(除了 Go 1.13 的更改之外),13 %的人要求更多的函数式编程特性,尤其是内置的map/filter/reduce 功能。需要说明的是,这些数字来自受访者的子集,他们表示,如果提供了他们需要的一个或多个关键功能,他们将能够更多地使用 Go。

没有使用 Go 作为项目的语言的一些原因

对于他们所从事的工作来说,Go “不是一种合适的语言”的受访者有各种各样的理由和用例。最常见的是他们从事某种形式的前端开发(22%),例如用于 web、桌面或移动设备的g ui。另一个常见的回答是,受访者说他们工作的领域中已经有占主导地位的语言(9%),因此很难使用不同的语言。一些受访者还告诉我们他们指的是哪个领域(或者只是提到了一个领域,而没有提到另一种更常见的语言),我们通过下面的“I work on [domain]”行来说明这一点。受访者提到的另一个主要原因是需要更好的性能(9%),尤其是实时计算。

受访者认为目前存在的最大的阻碍

受访者报告的最大阻碍与去年基本保持一致。 Go 缺乏泛型和模块,包管理工具仍然是最主要的问题(分别占反馈的15%和12%),并且强调工具问题的受访者比例有所增加。 这些数字与上面的图表不同,因为这个问题是所有受访者都提出的,无论他们说最大的阻碍什么。 这三个问题都是今年 Go 团队关注的领域,我们希望在未来几个月内极大地改善开发人员的体验,尤其是在模块,工具和入门经验方面。

Debug Go project 的痛点

任何一种语言的 debug 和 benchmark 都具有挑战性。 受访者告诉我们,这两个方面的最大挑战不是 Go 的工具所特有的,而是一个更根本的问题:缺乏知识,经验或最佳实践。 我们希望在今年晚些时候通过文档和其他材料来帮助解决这些问题。 其他主要问题涉及到工具的使用,尤其是在学习/使用 Go 的调试和 profile 分析工具时,在成本/收益方面存在不利的权衡,以及使工具在各种环境中工作的挑战(例如,在容器中进行调试或从生产环境中获取性能分析)。

Go community

大约三分之二的受访者使用 Stack Overflow 来回答与 go 相关的问题(64%)。其他排名靠前的答案来源是godoc.org(47%),直接阅读源代码(42%)和 golang.org (33%)。

关于 MeetUp

上表突展示了不同的寻求帮助的方式(几乎都是社区驱动的),受访者在使用Go开发过程中依靠它们来克服挑战。事实上,对于许多 gopher 来说,这可能是他们与更大的社区互动的主要要点之一: 随着我们的社区不断扩大,我们看到越来越多的受访者不用参加任何与 go 相关的活动。在2019年,这一比例接近三分之二的受访者(62%)。

受访者的语言

由于谷歌更新了全谷歌范围内的隐私指南,我们无法再询问受访者生活在哪个国家。相反,我们询问了首选的口语/书面语作为 Go 在全球使用的粗略调查,这有助于为潜在的本地化工作提供数据。

由于本次调查是用英语进行的,因此对于讲英语的人和英语为第二或第三种常见语言的人群可能会有很大的误差。 因此,非英语数字应解释为可能的最小值,而不是Go的全球受众人数的近似值。

Conclusion

我们希望你了解这次 2019 年开发者调查的结果。了解开发人员的经验和挑战有助于我们为 2020 年制定计划并确定工作的优先级。再一次,非常感谢所有参与调查的人,你们的反馈将有助于在未来一年甚至更长的时间内引导 Go 前进的方向。


]]>
官宣:2019 年 Go 开发者调查报告
手把手教你实现高性能 kubernetes web terminal https://cloudsjhan.github.io/2020/04/24/手把手教你实现高性能-kubernetes-web-terminal/ 2020-04-24T10:03:44.000Z 2020-04-24T10:03:44.116Z

##

##

##


]]>
<p class="description"></p> <p><img src="https://" alt="" style="width:100%"></p>
并发访问 slice 如何做到优雅和安全? https://cloudsjhan.github.io/2020/04/22/并发访问-slice-如何做到优雅和安全?/ 2020-04-22T03:43:15.000Z 2020-04-22T04:04:52.297Z

抛出问题

由于 slice/map 是引用类型,golang函数是传值调用,所用参数副本依然是原来的 slice, 并发访问同一个资源会导致竟态条件。

看下面这段代码:

1
2
3
4
5
6
7
8
9
10
11
12
13
14
15
16
17
18
19
20
21
22
23
24
25
26
27
28
29
30
package main

import (
"fmt"
"sync"
)

func main() {
var (
slc = []int{}
n = 10000
wg sync.WaitGroup
)

wg.Add(n)
for i := 0; i < n; i++ {
go func() {
slc = append(slc, i)
wg.Done()
}()
}
wg.Wait()

fmt.Println("len:", len(slc))
fmt.Println("done")
}

// Output:
len: 8586
done

真实的输出并没有达到我们的预期,len(slice) < n。 问题出在哪?我们都知道slice是对数组一个连续片段的引用,当slice长度增加的时候,可能底层的数组会被换掉。当出在换底层数组之前,切片同时被多个goroutine拿到,并执行append操作。那么很多goroutine的append结果会被覆盖,导致n个gouroutine append后,长度小于n。

那么如何解决这个问题呢?
map 在 go 1.9 以后官方就给出了 sync.map 的解决方案,但是如果要并发访问 slice 就要自己好好设计一下了。下面提供两种方式,帮助你解决这个问题。

方案 1: 加锁 🔐

1
2
3
4
5
6
7
8
9
10
11
12
13
14
15
16
17
18
19
20
func main() {
slc := make([]int, 0, 1000)
var wg sync.WaitGroup
var lock sync.Mutex

for i := 0; i < 1000; i++ {
wg.Add(1)
go func(a int) {
defer wg.Done()
// 加🔐
lock.Lock()
defer lock.Unlock()
slc = append(slc, a)
}(i)
wg.Wait()

}

fmt.Println(len(slc))
}

优点是比较简单,适合对性能要求不高的场景。

方案 2: 使用 channel 串行化操作

1
2
3
4
5
6
7
8
9
10
11
12
13
14
15
16
17
18
19
20
21
22
23
24
25
26
27
28
29
30
31
32
33
34
35
36
37
38
39
40
41
42
43
44
45
46
47
48
49
50
51
52
53
54
55
56
57
58
59
60
61
type ServiceData struct {
ch chan int // 用来 同步的channel
data []int // 存储数据的slice
}

func (s *ServiceData) Schedule() {
// 从 channel 接收数据
for i := range s.ch {
s.data = append(s.data, i)
}
}

func (s *ServiceData) Close() {
// 最后关闭 channel
close(s.ch)
}

func (s *ServiceData) AddData(v int) {
s.ch <- v // 发送数据到 channel
}

func NewScheduleJob(size int, done func()) *ServiceData {
s := &ServiceData{
ch: make(chan int, size),
data: make([]int, 0),
}

go func() {
// 并发地 append 数据到 slice
s.Schedule()
done()
}()

return s
}

func main() {
var (
wg sync.WaitGroup
n = 1000
)
c := make(chan struct{})

// new 了这个 job 后,该 job 就开始准备从 channel 接收数据了
s := NewScheduleJob(n, func() { c <- struct{}{} })

wg.Add(n)
for i := 0; i < n; i++ {
go func(v int) {
defer wg.Done()
s.AddData(v)

}(i)
}

wg.Wait()
s.Close()
<-c

fmt.Println(len(s.data))
}

实现相对复杂,优点是性能很好,利用了channel的优势

以上代码都有比较详细的注释,就不展开讲了。


]]>
并发访问 slice 如何做到优雅和安全?
java转go遇到Apollo?让agollo来帮你平滑迁移 https://cloudsjhan.github.io/2020/04/17/java转go遇到Apollo-让agollo来帮你平滑迁移/ 2020-04-17T07:50:33.000Z 2020-04-17T07:52:46.723Z

Introduction

agollo 是Apollo的 Golang 客户端

Apollo(阿波罗)是携程框架部门研发的分布式配置中心,能够集中化管理应用不同环境、不同集群的配置,配置修改后能够实时推送到应用端,并且具备规范的权限、流程治理等特性,适用于微服务配置管理场景。

如果在使用 golang 重构 java 的过程中,使用到了分布式配置中心 Apollo,那么最快的方式就是使用原来的配置,保持最平滑的迁移,这个时候你就需要一个 Apollo 的 golang 客户端,agollo 可以是你的一个选择。

使用指南

1.1.环境要求

  • Go 1.11+ (最好使用Go 1.12)

1.2.依赖

1.2.1.使用 go get 方式

1
go get -u github.com/zouyx/agollo/v3@latest

1.2.2.使用 go mod 方式

go.mod

1
require github.com/zouyx/agollo/v3 latest

执行

1
go mod tidy

import

1
2
3
import (
"github.com/zouyx/agollo/v3"
)

FAQ

1.3.必要设置

Apollo 客户端依赖于 AppId,Environment 等环境信息来工作,所以请确保阅读下面的说明并且做正确的配置:

  • main : your application
  • app.properties (必要) : 连接服务端必要配置
  • seelog.xml(非必要)

1.3.1.配置

加载优先级:

  1. 类配置
  2. 环境变量指定配置文件
  3. 默认(app.properties)配置文件
1.3.1.1.类配置

会覆盖app.properties中配置,在调用Start方法之前调用

1
2
3
4
5
6
7
8
9
10
readyConfig:=&AppConfig{
AppId:"test1",
Cluster:"dev1",
NamespaceName:"application1",
Ip:"localhost:8889",
}

InitCustomConfig(func() (*AppConfig, error) {
return readyConfig,nil
})

类配置 agollo 的 demo:

1
2
3
4
5
6
7
8
9
10
11
12
13
14
15
16
17
18
19
20
21
22
23
24
25
26
27
28
29
30
31
32
33
34
35
36
37
38
39
40
package main

import (
"fmt"
"github.com/zouyx/agollo/v3"
"github.com/zouyx/agollo/v3/env/config"
)

func InitAgolloConfig() error {
readyConfig := &config.AppConfig{
AppID: "test",
Cluster: "default",
NamespaceName: "application",
IP: "localhost:8080",
}
agollo.InitCustomConfig(func() (*config.AppConfig, error) {
return readyConfig, nil
})
err := agollo.Start()
if err != nil {
fmt.Errorf("%v", err)
return err
}

return nil
}

func main(){
//Init Apollo
err := config.InitAgolloConfig()
if err != nil {
fmt.Errorf("初始化Apollo失败", err)
panic(err)
}
fmt.Println("初始化Apollo配置成功")

//Use your apollo key to test
value := agollo.GetStringValue("key", "")
fmt.Println(value)
}
1.3.1.2.环境变量指定配置文件

Linux/Mac

1
export AGOLLO_CONF=/a/conf.properties

Windows

1
set AGOLLO_CONF=c:/a/conf.properties

配置文件内容与app.properties内容一样

1.3.1.3.文件配置 - app.properties

1.开发:请确保 app.properties 文件存在于workingdir目录下

2.打包后:请确保 app.properties 文件存在于与打包程序同级目录下,参考1.3.必要配置。

目前只支持json形式,其中字段包括:

  • appId :应用的身份信息,是从服务端获取配置的一个重要信息。
  • cluster :需要连接的集群,默认default
  • namespaceName :命名空间,默认:application(具体定义参考:namespace),多namespace使用英文逗号分割
    非key/value配置(json,properties,yml等),则配置为:namespace.文件类型。如:namespace.json

  • ip :Apollo的CONFIG_SERVICE的ip,非META_SERVICE地址

配置例子如下:

一般配置

1
2
3
4
5
6
{
"appId": "test",
"cluster": "dev",
"namespaceName": "application",
"ip": "localhost:8888"
}

多namespace配置

1
2
3
4
5
6
{
"appId": "test",
"cluster": "dev",
"namespaceName": "application, applications1",
"ip": "localhost:8888"
}

非key/value namespace配置

1
2
3
4
5
6
{
"appId": "test",
"cluster": "dev",
"namespaceName": "application.json,a.yml",
"ip": "localhost:8888"
}

1.4日志组件

参考:

启动方式

  • 异步启动 agollo

场景:启动程序不依赖加载Apollo的配置。

1
2
3
func main() {
go agollo.Start()
}
  • 同步启动 agollo(v1.2.0+)

场景:启动程序依赖加载 Apollo 的配置。例:初始化程序基础配置。

1
2
3
func main() {
agollo.Start()
}
  • 启动 agollo - 自定义 logger 控件
1
2
3
func main() {
agollo.StartWithLogger(loggerInterface)
}
  • 启动 agollo - 自定义 cache 控件 (v1.7.0+)
1
2
3
func main() {
agollo.StartWithCache(cacheInterface)
}
  • 启动 agollo - 自定义各种控件 (v1.8.0+)
1
2
3
4
5
func main() {
agollo.SetLogger(loggerInterface)
agollo.SetCache(cacheInterface)
agollo.Start()
}
  • 监听变更事件(阻塞)
1
2
3
4
5
6
func main() {
event := agollo.ListenChangeEvent()
changeEvent := <-event
bytes, _ := json.Marshal(changeEvent)
fmt.Println("event:", string(bytes))
}

基本方法

  • String
1
agollo.GetStringValue(Key,DefaultValue)
  • Int
1
agollo.GetIntValue(Key,DefaultValue)
  • Float
1
agollo.GetFloatValue(Key,DefaultValue)
  • Bool
1
agollo.GetBoolValue(Key,DefaultValue)

切换namespace获取配置

  • 根据namespace获取配置
1
config := agollo.GetConfig(namespace)
  • String
1
config.GetStringValue(Key,DefaultValue)
  • Int
1
config.GetIntValue(Key,DefaultValue)
  • Float
1
config.GetFloatValue(Key,DefaultValue)
  • Bool
1
config.GetBoolValue(Key,DefaultValue)

自定义日志组件

复制以下代码至项目中,并在其中引用日志组件的方法进行打印 log

1
2
3
4
5
6
7
8
9
10
11
12
13
14
15
16
17
18
19
20
21
22
23
24
25
26
27
28
29
30
31
32
33
34
35
type DefaultLogger struct {
}

func (this *DefaultLogger)Debugf(format string, params ...interface{}) {

}

func (this *DefaultLogger)Infof(format string, params ...interface{}) {

}


func (this *DefaultLogger)Warnf(format string, params ...interface{}) error {
return nil
}

func (this *DefaultLogger)Errorf(format string, params ...interface{}) error {
return nil
}


func (this *DefaultLogger)Debug(v ...interface{}) {

}
func (this *DefaultLogger)Info(v ...interface{}){

}

func (this *DefaultLogger)Warn(v ...interface{}) error{
return nil
}

func (this *DefaultLogger)Error(v ...interface{}) error{
return nil
}

启动

1
2
3
4
func main() {
agollo.SetLogger(&DefaultLogger{})
agollo.Start()
}

自定义缓存组件

声明自定义缓存组件

1
2
3
4
5
6
7
8
9
10
11
12
13
14
15
16
17
18
19
20
21
22
23
24
25
26
27
28
29
30
31
32
33
34
35
36
37
38
39
40
41
42
43
44
45
46
47
48
49
50
51
52
53
54
55
//DefaultCache 默认缓存
type DefaultCache struct {
defaultCache sync.Map
}

//Set 获取缓存
func (d *DefaultCache)Set(key string, value []byte, expireSeconds int) (err error) {
d.defaultCache.Store(key,value)
return nil
}

//EntryCount 获取实体数量
func (d *DefaultCache)EntryCount() (entryCount int64){
count:=int64(0)
d.defaultCache.Range(func(key, value interface{}) bool {
count++
return true
})
return count
}

//Get 获取缓存
func (d *DefaultCache)Get(key string) (value []byte, err error){
v, ok := d.defaultCache.Load(key)
if !ok{
return nil,errors.New("load default cache fail")
}
return v.([]byte),nil
}

//Range 遍历缓存
func (d *DefaultCache)Range(f func(key, value interface{}) bool){
d.defaultCache.Range(f)
}

//Del 删除缓存
func (d *DefaultCache)Del(key string) (affected bool) {
d.defaultCache.Delete(key)
return true
}

//Clear 清除所有缓存
func (d *DefaultCache)Clear() {
d.defaultCache=sync.Map{}
}

//DefaultCacheFactory 构造默认缓存组件工厂类
type DefaultCacheFactory struct {

}

//Create 创建默认缓存组件
func (d *DefaultCacheFactory) Create()CacheInterface {
return &DefaultCache{}
}

使用自定义缓存

1
2
agollo.SetCache(&DefaultCacheFactory{})
agollo.Start()

方资讯\最新技术*独家解读*


]]>
java 转 go 遇到 Apollo? 让 agollo 来帮你平滑迁移
fuckdb Lite, 帮助你更快地生成go struct代码 https://cloudsjhan.github.io/2020/04/06/fuckdb-Lite-帮助你更快地生成go-struct代码/ 2020-04-06T01:07:07.000Z 2020-04-06T01:12:34.978Z

前言&背景

在golang的开发过程中,当我们使用orm的时候,常常需要将数据库表对应到golang的一个struct,这些struct会携带orm对应的tag,就像下面的struct定义一样:

1
2
3
4
5
6
7
8
9
10
11
12
13
14
15
16
type InsInfo struct {
Connections string `gorm:"column:connections"`
CPU int `gorm:"column:cpu"`
CreateTime time.Time `gorm:"column:create_time"`
Env int `gorm:"column:env"`
ID int64 `gorm:"column:id;primary_key"`
IP string `gorm:"column:ip"`
Organization string `gorm:"column:organization"`
Pass string `gorm:"column:pass"`
Port string `gorm:"column:port"`
RegionId string `gorm:"column:regionid"`
ServerIP string `gorm:"column:server_ip"`
Status int `gorm:"column:status"`
Type string `gorm:"column:type"`
UUID string `gorm:"column:uuid"`
}

这是gorm对应的数据库表的struct映射,即使数据表的字段不多,如果是手动写起来也是一些重复性的工作。像MySQL这种关系型数据库,我们一般会用orm去操作数据库,于是就想mysql的数据表能不能来自动生成golang 的struct定义 ,减少重复性的开发工作(早点下班)。

现状

调研了一下目前有一些工具,比如chrome插件SQL2Struct(一款根据sql语句自动生成golang结构体的chrome插件),感觉用起来比较繁琐,每次需要进入数据库,执行SQL语句拿到建表语句copy到浏览器中,才能使用。在想能不能提供一个开箱即用的环境,提供web界面,我们只需要填写数据库信息,就可以一键生成对应的ORM的struct,于是就诞生了这个项目:https://github.com/hantmac/fuckdb

原理

mysql有个自带的数据库information_schema,有一张表COLUMNS,它的字段包含数据库名、表名、字段名、字段类型等,我们可以利用这个表的数据,把对应的表的字段信息读取出来,然后再根据golang的语法规则,生成对应的struct。具体不详细展开了,感兴趣的可以去看下源码。

Web 版

连接本地数据库

如果你的数据库在本地,那么只需要执行 docker-compose up -d
访问localhost:8000,你就会得到下面的界面:

服务器上的数据库

如果你的数据库在内网服务器上,你需要先修改后端接口的ip:port,然后重新build Docker镜像,push到自己的镜像仓库,然后修改docker-compose.yaml,再执行docker-compose up -d。修改的位置是:fuckdb/frontend/src/config/index.js.

1
2
3
4
5
6
7
8
9
10
11
let APIdb2struct

if(process.env.NODE_ENV === "development"){
APIdb2struct = "http://0.0.0.0:8000" //修改为部署服务器的ip
}else{
APIdb2struct = "http://0.0.0.0:8000" //修改为部署服务器的ip
}

export default {
APIdb2struct
}

只需要填入数据库相关信息,以及你想得到的golang代码的package namestruct name,然后点击生成,就可以得到gorm对应的结构体映射。

在你的项目项目中只要 Ctrl+C&Ctrl+V 即可。我们知道golang的struct的tag有很多功能,这里也提供了很多tag的可选项,比如json,xml等,后面会增加更多的tag可选项支持。

web版的特色功能是数据库信息缓存功能,能够记忆你之前填写过的数据库信息,省去了大量重复的操作,你不用再填写繁琐的数据库名,表名,只需一键,就可以得到对应的代码,配合附带json-to-go插件(https://github.com/mholt/json-to-go),开发效率得到极速提升。目前这个工具在我们组内已经开始使用,反馈比较好,节省了很多重复的工作,尤其是在开发的时候用到同一个库的多张表,很快就可以完成数据库表->strcut的映射。

来看一段演示视频。

插曲

前几天有同学找上门,说fuckdb的web版部署后无法使用,解决了半天也没能让用户部署起来,反馈过来还是感觉部署有些复杂。反思了一下,对于一个工具化的软件,有些用户并不想做一些复杂的部署流程或者不熟悉部署操作,可能就是想暂时使用一下,所以应该让工具更加轻量化,更加开箱即用,于是连夜写了一个fuckdb lite, 更容易上手使用,更方便的安装流程,1分钟拿到你想要的代码。

fuckdb Lite

原理

基于 cobra(https://github.com/spf13/cobra),核心代码继承web版。

安装

听取用户反馈,安装流程极简化,Mac用户可以直接brew install 安装

1
brew tap hantmac/tap && brew install fuckdb
  • Linux用户:
    curl https://github.com/hantmac/fuckdb/releases/download/v0.2/fuckdb_linux.tar.gz 下载、解压、安装
  • windows用户emmm, 就去GitHub的release手动下载吧

使用

1
2
3
4
5
6
7
8
9
10
11
12
13
14
15
fuckdb --help
From mysql schema generate golang struct with gorm, json tag

Usage:
fuckdb [command]

Available Commands:
generate use `fuckdb generate` to generate fuckdb.json
go fuckdb go to generate golang struct with gorm and json tag
help Help about any command

Flags:
-h, --help help for fuckdb

Use "fuckdb [command] --help" for more information about a command.

目前提供了两个主要命令,fuckdb generatefuckdb go,我们依次来看。

1
fuckdb generate

生成一个存储MySQL信息的fuckdb.json文件,
编辑 fuckdb.json ,填写你的MySQL信息,该文件可复用,简单修改表名即可。

1
2
3
4
5
6
7
8
9
10
11
12
13
14
15
{
"db": {
"host": "localhost",
"port": 3306,
"password": "password",
"user": "root",
"table": "tableName",
"database": "example",
"packageName": "packageName",
"structName": "structName",
"jsonAnnotation": true,
"gormAnnotation": true
}
}

修改完文件后,就完成了准备工作,go go go!

​执行

1
fuckdb go


Enjoy Your Code!

来看一段演示操作(说好一分钟拿到代码,绝不超1秒)

比之前的web版的安装简直方便了太多,妈妈再也不用担心我加班啦。

ps: fuckdb.json文件必须在操作目录下。

欢迎试用&反馈&Contribute。代码地址:https://github.com/hantmac/fuckdb


官方资讯*最新技术*独家解读


]]>
fuckdb Lite, 帮助你更快地生成go struct代码
Proposals for Go 1.15(译) https://cloudsjhan.github.io/2020/02/01/Proposals-for-Go-1-15-译/ 2020-02-01T02:48:54.000Z 2020-04-01T09:03:03.550Z


Proposals for Go 1.15(译)


本文是Golang官方对于Go近期版本的现状总结以及Go 1.15版本的一些提案,原文发布于 The Go Blog

Robert Griesemer, for the Go team
28 January 2020

现状

Go 1.14的RC1版本已经准备就绪,如果一切顺利,Go 1.14计划将于今年2月份发布。按照Go 2,here we come!的规划,在我们的开发周期中又到了这样的一个时刻:考虑下一个版本中(暂定于几年8月份发布的Go 1.15),到底要提供哪些Golang本身或者Go lib中的新特性。

当前版本的Go的优化目标仍然围绕着软件包和版本管理,更好的错误处理支持以及泛型特性。Go Module 目前使用状态比较好,并且每天都在不断完善,对泛型的支持也有一些推进(今年晚些时候会有更多进展)。为了提供更好的错误处理机制,大约在7个月前我们提出了try_proposal的提案,有少部分人支持该提案,但是大部分还是持强烈的反对态度,于是我们决定放弃这个想法。在此之后,也有许多建议,但它们有些都没有足够的说服力,有些还不如try_proposal。因此,我们暂时没有进一步的计划去改善错误处理机制,也许未来会出现一些比较好的点子帮助我们解决这个问题。

提案

鉴于Go Module和泛型正在积极的推进中,且错误处理机制没有进一步的计划,那么还有哪些特性值得我们去关注呢?如果非要说有的话,有一些编程语言中经久不衰的特性,例如枚举类型和不可变类型的需求,但是这些idea还没有被Go团队深入地思考,所以Go团队也没有投入过多精力在其中,尤其是改进这些语言特性需要很大的成本。

Go team不希望在没有长期计划的情况下增添很多新的特性,在审核了大量可行的提案之后,Go 团队得出结论:这一次不进行重大更改。相反,我们会集中精力做一些新的 go vet支持和语言层面的一下小调整。我们选择了以下三个提案:

#32479 go vet中支持string(int) 转换的检测

我们原计划在即将发布的Go 1.14版本中实现该功能,但我们并没有解决这个问题,所以放在Go 1.15中解决。string(int) 转换在很早的Go版本中就已经引入了,但是有些特性(string(10)是”\n”,并不是”10”)会让Go新手迷惑,并且unicode/utf8包中也已经提供了该功能。自从removing this coversion的提案不是一个向后兼容的改变,所以我们需要在go vet中提供string(int)的错误检测能力。

#4483 go vet中支持错误的x.(T)的类型断言

当前,Go允许任何类型断言x.(T)(以及相应的类型切换情况),其中x和T为接口类型。但是,如果x和T有相同名字的方法,但是签名不同,则分配给x的任何值也不能实现T(这种类型的断言在运行时总是失败,panic或evaluate to false)。因为我们在编译时就知道这一点,所以编译器会报告错。在这种情况下,编译报错不是向后兼容的,因此我们也将在go vet中添加对该情况的检查。

#28591 使用常量字符串和索引进行常量求值的索引和切片表达式

当前,用一个或多个常量索引对常量字符串进行索引或切片会分别产生一个非常量字节或字符串值。 但是,如果所有操作数都是常量,则编译器可以对这些表达式进行常量求值,并生成常量(可能是无类型的)结果。 这是完全向后兼容的更改,我们将对开发规范和编译器进行必要的调整。

时间线

Go team认为这三个提案应该是没有什么争议的,但是人非圣贤孰能无过,因此我们计划在Go 1.15的发布周期开发(Go 1.14发布时或之后)开始采纳开发者对该三个提案的建议,以便有足够的时间收集反馈。在proposal evalution process,最终的提案将在2020年5月初决定。

One more thing…

我们收到了大量的语言特性修正的提案(issue label LanguageChange),但是我们没有时间去仔细地彻底地评估。举个栗子,单是关于错误处理机制的提案,就有57个issue,到目前为止还有5个处于open的状态。由于进行语言更改的成本,无论大小如何,对于开发者来说其实都很高,而且收益往往很小,因此我们必须谨慎行事。由于大多数提案反馈的人数很少,这些提案都会遭到拒绝。但是有些开发者花费了大量时间去写提案的细节,到头来还是被拒;另一方面,由于总体提案流程比较简单,因此提交一些无关紧要的语言变更提案非常容易,从而给审核委员会带来大量不必要的工作,也有可能埋没比较好的提案。为了解决这个问题我们新增了一个关于Go提案的问卷:填写该模板将有助于审核者更有效地评估提案,因为他们无需尝试自己回答这些问题。 它能从一开始就设定一些限制,从而为提议者提供更好的指导。 这是一个实验性的尝试,我们会根据需要随着时间的推移进行完善。

感谢您帮助我们改善Go的体验!


原文地址:https://blog.golang.org/go1.15-proposals


]]>
本文是Golang官方对于Go近期版本的现状总结以及Go 1.15版本的一些提案,原文发布于 The Go Blog
Go GC 20问 https://cloudsjhan.github.io/2020/01/06/Go-GC-20问/ 2020-01-06T06:05:44.000Z 2020-01-06T13:18:19.500Z


Go GC 20 问

原创: 欧长坤 码农桃花源 https://mp.weixin.qq.com/s/o2oMMh0PF5ZSoYD0XOBY2Q

本文作者欧长坤,德国慕尼黑大学在读博士,Go/etcd/Tensorflow contributor,开源书籍《Go 语言原本》作者,《Go 夜读》SIG 成员/讲师,对 Go 有很深的研究。Github:@changkun,https://changkun.de。

本文首发于 Github 开源项目 《Go-Questions》,点击阅读原文直达。全文不计代码,共 1.7w+ 字,建议收藏后精读。另外,本文结尾有彩蛋。

按惯例,贴上本文的目录:

img

本文写于 Go 1.14 beta1,当文中提及目前、目前版本等字眼时均指 Go 1.14,此外,文中所有 go 命令版本均为 Go 1.14。

GC 的认识

1. 什么是 GC,有什么作用?

GC,全称 Garbage Collection,即垃圾回收,是一种自动内存管理的机制。

当程序向操作系统申请的内存不再需要时,垃圾回收主动将其回收并供其他代码进行内存申请时候复用,或者将其归还给操作系统,这种针对内存级别资源的自动回收过程,即为垃圾回收。而负责垃圾回收的程序组件,即为垃圾回收器。

垃圾回收其实一个完美的 “Simplicity is Complicated” 的例子。一方面,程序员受益于 GC,无需操心、也不再需要对内存进行手动的申请和释放操作,GC 在程序运行时自动释放残留的内存。另一方面,GC 对程序员几乎不可见,仅在程序需要进行特殊优化时,通过提供可调控的 API,对 GC 的运行时机、运行开销进行把控的时候才得以现身。

通常,垃圾回收器的执行过程被划分为两个半独立的组件:

  • 赋值器(Mutator):这一名称本质上是在指代用户态的代码。因为对垃圾回收器而言,用户态的代码仅仅只是在修改对象之间的引用关系,也就是在对象图(对象之间引用关系的一个有向图)上进行操作。
  • 回收器(Collector):负责执行垃圾回收的代码。

2. 根对象到底是什么?

根对象在垃圾回收的术语中又叫做根集合,它是垃圾回收器在标记过程时最先检查的对象,包括:

  1. 全局变量:程序在编译期就能确定的那些存在于程序整个生命周期的变量。
  2. 执行栈:每个 goroutine 都包含自己的执行栈,这些执行栈上包含栈上的变量及指向分配的堆内存区块的指针。
  3. 寄存器:寄存器的值可能表示一个指针,参与计算的这些指针可能指向某些赋值器分配的堆内存区块。

3. 常见的 GC 实现方式有哪些?Go 语言的 GC 使用的是什么?

所有的 GC 算法其存在形式可以归结为追踪(Tracing)和引用计数(Reference Counting)这两种形式的混合运用。

  • 追踪式 GC

    从根对象出发,根据对象之间的引用信息,一步步推进直到扫描完毕整个堆并确定需要保留的对象,从而回收所有可回收的对象。Go、 Java、V8 对 JavaScript 的实现等均为追踪式 GC。

  • 引用计数式 GC

    每个对象自身包含一个被引用的计数器,当计数器归零时自动得到回收。因为此方法缺陷较多,在追求高性能时通常不被应用。Python、Objective-C 等均为引用计数式 GC。

目前比较常见的 GC 实现方式包括:

  • 追踪式,分为多种不同类型,例如:
    • 标记清扫:从根对象出发,将确定存活的对象进行标记,并清扫可以回收的对象。
    • 标记整理:为了解决内存碎片问题而提出,在标记过程中,将对象尽可能整理到一块连续的内存上。
    • 增量式:将标记与清扫的过程分批执行,每次执行很小的部分,从而增量的推进垃圾回收,达到近似实时、几乎无停顿的目的。
    • 增量整理:在增量式的基础上,增加对对象的整理过程。
    • 分代式:将对象根据存活时间的长短进行分类,存活时间小于某个值的为年轻代,存活时间大于某个值的为老年代,永远不会参与回收的对象为永久代。并根据分代假设(如果一个对象存活时间不长则倾向于被回收,如果一个对象已经存活很长时间则倾向于存活更长时间)对对象进行回收。
  • 引用计数:根据对象自身的引用计数来回收,当引用计数归零时立即回收。

关于各类方法的详细介绍及其实现不在本文中详细讨论。对于 Go 而言,Go 的 GC 目前使用的是无分代(对象没有代际之分)、不整理(回收过程中不对对象进行移动与整理)、并发(与用户代码并发执行)的三色标记清扫算法。原因在于:

  1. 对象整理的优势是解决内存碎片问题以及“允许”使用顺序内存分配器。但 Go 运行时的分配算法基于 tcmalloc,基本上没有碎片问题。 并且顺序内存分配器在多线程的场景下并不适用。Go 使用的是基于 tcmalloc 的现代内存分配算法,对对象进行整理不会带来实质性的性能提升。
  2. 分代 GC 依赖分代假设,即 GC 将主要的回收目标放在新创建的对象上(存活时间短,更倾向于被回收),而非频繁检查所有对象。但 Go 的编译器会通过逃逸分析将大部分新生对象存储在栈上(栈直接被回收),只有那些需要长期存在的对象才会被分配到需要进行垃圾回收的堆中。也就是说,分代 GC 回收的那些存活时间短的对象在 Go 中是直接被分配到栈上,当 goroutine 死亡后栈也会被直接回收,不需要 GC 的参与,进而分代假设并没有带来直接优势。并且 Go 的垃圾回收器与用户代码并发执行,使得 STW 的时间与对象的代际、对象的 size 没有关系。Go 团队更关注于如何更好地让 GC 与用户代码并发执行(使用适当的 CPU 来执行垃圾回收),而非减少停顿时间这一单一目标上。

4. 三色标记法是什么?

理解三色标记法的关键是理解对象的三色抽象以及波面(wavefront)推进这两个概念。三色抽象只是一种描述追踪式回收器的方法,在实践中并没有实际含义,它的重要作用在于从逻辑上严密推导标记清理这种垃圾回收方法的正确性。也就是说,当我们谈及三色标记法时,通常指标记清扫的垃圾回收。

从垃圾回收器的视角来看,三色抽象规定了三种不同类型的对象,并用不同的颜色相称:

  • 白色对象(可能死亡):未被回收器访问到的对象。在回收开始阶段,所有对象均为白色,当回收结束后,白色对象均不可达。
  • 灰色对象(波面):已被回收器访问到的对象,但回收器需要对其中的一个或多个指针进行扫描,因为他们可能还指向白色对象。
  • 黑色对象(确定存活):已被回收器访问到的对象,其中所有字段都已被扫描,黑色对象中任何一个指针都不可能直接指向白色对象。

这样三种不变性所定义的回收过程其实是一个波面不断前进的过程,这个波面同时也是黑色对象和白色对象的边界,灰色对象就是这个波面。

当垃圾回收开始时,只有白色对象。随着标记过程开始进行时,灰色对象开始出现(着色),这时候波面便开始扩大。当一个对象的所有子节点均完成扫描时,会被着色为黑色。当整个堆遍历完成时,只剩下黑色和白色对象,这时的黑色对象为可达对象,即存活;而白色对象为不可达对象,即死亡。这个过程可以视为以灰色对象为波面,将黑色对象和白色对象分离,使波面不断向前推进,直到所有可达的灰色对象都变为黑色对象为止的过程。如下图所示:

三色标记法全貌

图中展示了根对象、可达对象、不可达对象,黑、灰、白对象以及波面之间的关系。

5. STW 是什么意思?

STWStop the World 的缩写,即万物静止,是指在垃圾回收过程中为了保证实现的正确性、防止无止境的内存增长等问题而不可避免的需要停止赋值器进一步操作对象图的一段过程。

在这个过程中整个用户代码被停止或者放缓执行, STW 越长,对用户代码造成的影响(例如延迟)就越大,早期 Go 对垃圾回收器的实现中 STW 长达几百毫秒,对时间敏感的实时通信等应用程序会造成巨大的影响。我们来看一个例子:

1
2
3
4
5
6
7
8
9
10
11
12
13
14
15
16
17
package main

import (
"runtime"
"time"
)

func main() {
go func() {
for {
}
}()

time.Sleep(time.Millisecond)
runtime.GC()
println("OK")
}

上面的这个程序在 Go 1.14 以前永远都不会输出 OK,其罪魁祸首是 STW 无限制的被延长。

尽管 STW 如今已经优化到了半毫秒级别以下,但这个程序被卡死原因在于仍然是 STW 导致的。原因在于,GC 在进入 STW 时,需要等待让所有的用户态代码停止,但是 for {} 所在的 goroutine 永远都不会被中断,从而停留在 STW 阶段。实际实践中也是如此,当程序的某个 goroutine 长时间得不到停止,强行拖慢 STW,这种情况下造成的影响(卡死)是非常可怕的。好在自 Go 1.14 之后,这类 goroutine 能够被异步地抢占,从而使得 STW 的时间如同普通程序那样,不会超过半个毫秒,程序也不会因为仅仅等待一个 goroutine 的停止而停顿在 STW 阶段。

6. 如何观察 Go GC?

我们以下面的程序为例,先使用四种不同的方式来介绍如何观察 GC,并在后面的问题中通过几个详细的例子再来讨论如何优化 GC。

1
2
3
4
5
6
7
8
9
10
11
package main

func allocate() {
_ = make([]byte, 1<<20)
}

func main() {
for n := 1; n < 100000; n++ {
allocate()
}
}

方式1:GODEBUG=gctrace=1

我们首先可以通过

1
2
3
4
5
6
7
8
9
10
11
12
13
14
15
16
17
18
19
20
21
$ go build -o main
$ GODEBUG=gctrace=1 ./main

gc 1 @0.000s 2%: 0.009+0.23+0.004 ms clock, 0.11+0.083/0.019/0.14+0.049 ms cpu, 4->6->2 MB, 5 MB goal, 12 P
scvg: 8 KB released
scvg: inuse: 3, idle: 60, sys: 63, released: 57, consumed: 6 (MB)
gc 2 @0.001s 2%: 0.018+1.1+0.029 ms clock, 0.22+0.047/0.074/0.048+0.34 ms cpu, 4->7->3 MB, 5 MB goal, 12 P
scvg: inuse: 3, idle: 60, sys: 63, released: 56, consumed: 7 (MB)
gc 3 @0.003s 2%: 0.018+0.59+0.011 ms clock, 0.22+0.073/0.008/0.042+0.13 ms cpu, 5->6->1 MB, 6 MB goal, 12 P
scvg: 8 KB released
scvg: inuse: 2, idle: 61, sys: 63, released: 56, consumed: 7 (MB)
gc 4 @0.003s 4%: 0.019+0.70+0.054 ms clock, 0.23+0.051/0.047/0.085+0.65 ms cpu, 4->6->2 MB, 5 MB goal, 12 P
scvg: 8 KB released
scvg: inuse: 3, idle: 60, sys: 63, released: 56, consumed: 7 (MB)
scvg: 8 KB released
scvg: inuse: 4, idle: 59, sys: 63, released: 56, consumed: 7 (MB)
gc 5 @0.004s 12%: 0.021+0.26+0.49 ms clock, 0.26+0.046/0.037/0.11+5.8 ms cpu, 4->7->3 MB, 5 MB goal, 12 P
scvg: inuse: 5, idle: 58, sys: 63, released: 56, consumed: 7 (MB)
gc 6 @0.005s 12%: 0.020+0.17+0.004 ms clock, 0.25+0.080/0.070/0.053+0.051 ms cpu, 5->6->1 MB, 6 MB goal, 12 P
scvg: 8 KB released
scvg: inuse: 1, idle: 62, sys: 63, released: 56, consumed: 7 (MB)

在这个日志中可以观察到两类不同的信息:

1
2
3
gc 1 @0.000s 2%: 0.009+0.23+0.004 ms clock, 0.11+0.083/0.019/0.14+0.049 ms cpu, 4->6->2 MB, 5 MB goal, 12 P
gc 2 @0.001s 2%: 0.018+1.1+0.029 ms clock, 0.22+0.047/0.074/0.048+0.34 ms cpu, 4->7->3 MB, 5 MB goal, 12 P
...

以及:

1
2
3
4
scvg: 8 KB released
scvg: inuse: 3, idle: 60, sys: 63, released: 57, consumed: 6 (MB)
scvg: inuse: 3, idle: 60, sys: 63, released: 56, consumed: 7 (MB)
...

对于用户代码向运行时申请内存产生的垃圾回收:

1
gc 2 @0.001s 2%: 0.018+1.1+0.029 ms clock, 0.22+0.047/0.074/0.048+0.34 ms cpu, 4->7->3 MB, 5 MB goal, 12 P

含义由下表所示:

字段含义
gc 2第二个 GC 周期
0.001程序开始后的 0.001 秒
2%该 GC 周期中 CPU 的使用率
0.018标记开始时, STW 所花费的时间(wall clock)
1.1标记过程中,并发标记所花费的时间(wall clock)
0.029标记终止时, STW 所花费的时间(wall clock)
0.22标记开始时, STW 所花费的时间(cpu time)
0.047标记过程中,标记辅助所花费的时间(cpu time)
0.074标记过程中,并发标记所花费的时间(cpu time)
0.048标记过程中,GC 空闲的时间(cpu time)
0.34标记终止时, STW 所花费的时间(cpu time)
4标记开始时,堆的大小的实际值
7标记结束时,堆的大小的实际值
3标记结束时,标记为存活的对象大小
5标记结束时,堆的大小的预测值
12P 的数量

wall clock 是指开始执行到完成所经历的实际时间,包括其他程序和本程序所消耗的时间;
cpu time 是指特定程序使用 CPU 的时间;
他们存在以下关系:

  • wall clock < cpu time: 充分利用多核
  • wall clock ≈ cpu time: 未并行执行
  • wall clock > cpu time: 多核优势不明显

对于运行时向操作系统申请内存产生的垃圾回收(向操作系统归还多余的内存):

1
2
scvg: 8 KB released
scvg: inuse: 3, idle: 60, sys: 63, released: 57, consumed: 6 (MB)

含义由下表所示:

字段含义
8 KB released向操作系统归还了 8 KB 内存
3已经分配给用户代码、正在使用的总内存大小 (MB)。MB used or partially used spans
60空闲以及等待归还给操作系统的总内存大小(MB)。MB spans pending scavenging
63通知操作系统中保留的内存大小(MB)MB mapped from the system
57已经归还给操作系统的(或者说还未正式申请)的内存大小(MB)。MB released to the system
6已经从操作系统中申请的内存大小(MB)。MB allocated from the system

方式2:go tool trace

go tool trace 的主要功能是将统计而来的信息以一种可视化的方式展示给用户。要使用此工具,可以通过调用 trace API:

1
2
3
4
5
6
7
8
9
package main

func main() {
f, _ := os.Create("trace.out")
defer f.Close()
trace.Start(f)
defer trace.Stop()
(...)
}

并通过

1
2
3
4
$ go tool trace trace.out
2019/12/30 15:50:33 Parsing trace...
2019/12/30 15:50:38 Splitting trace...
2019/12/30 15:50:45 Opening browser. Trace viewer is listening on http://127.0.0.1:51839

命令来启动可视化界面:

选择第一个链接可以获得如下图示:

右上角的问号可以打开帮助菜单,主要使用方式包括:

  • w/s 键可以用于放大或者缩小视图
  • a/d 键可以用于左右移动

方式3:debug.ReadGCStats

此方式可以通过代码的方式来直接实现对感兴趣指标的监控,例如我们希望每隔一秒钟监控一次 GC 的状态:

1
2
3
4
5
6
7
8
9
10
11
12
13
14
15
func printGCStats() {
t := time.NewTicker(time.Second)
s := debug.GCStats{}
for {
select {
case <-t.C:
debug.ReadGCStats(&s)
fmt.Printf("gc %d last@%v, PauseTotal %v\n", s.NumGC, s.LastGC, s.PauseTotal)
}
}
}
func main() {
go printGCStats()
(...)
}

我们能够看到如下输出:

1
2
3
4
5
6
7
$ go run main.go

gc 4954 last@2019-12-30 15:19:37.505575 +0100 CET, PauseTotal 29.901171ms
gc 9195 last@2019-12-30 15:19:38.50565 +0100 CET, PauseTotal 77.579622ms
gc 13502 last@2019-12-30 15:19:39.505714 +0100 CET, PauseTotal 128.022307ms
gc 17555 last@2019-12-30 15:19:40.505579 +0100 CET, PauseTotal 182.816528ms
gc 21838 last@2019-12-30 15:19:41.505595 +0100 CET, PauseTotal 246.618502ms

方式4:runtime.ReadMemStats

除了使用 debug 包提供的方法外,还可以直接通过运行时的内存相关的 API 进行监控:

1
2
3
4
5
6
7
8
9
10
11
12
13
14
15
16
func printMemStats() {
t := time.NewTicker(time.Second)
s := runtime.MemStats{}

for {
select {
case <-t.C:
runtime.ReadMemStats(&s)
fmt.Printf("gc %d last@%v, next_heap_size@%vMB\n", s.NumGC, time.Unix(int64(time.Duration(s.LastGC).Seconds()), 0), s.NextGC/(1<<20))
}
}
}
func main() {
go printMemStats()
(...)
}
1
2
3
4
5
6
$ go run main.go

gc 4887 last@2019-12-30 15:44:56 +0100 CET, next_heap_size@4MB
gc 10049 last@2019-12-30 15:44:57 +0100 CET, next_heap_size@4MB
gc 15231 last@2019-12-30 15:44:58 +0100 CET, next_heap_size@4MB
gc 20378 last@2019-12-30 15:44:59 +0100 CET, next_heap_size@6MB

当然,后两种方式能够监控的指标很多,读者可以自行查看 debug.GCStats
runtime.MemStats 的字段,这里不再赘述。

7. 有了 GC,为什么还会发生内存泄露?

在一个具有 GC 的语言中,我们常说的内存泄漏,用严谨的话来说应该是:预期的能很快被释放的内存由于附着在了长期存活的内存上、或生命期意外地被延长,导致预计能够立即回收的内存而长时间得不到回收。

在 Go 中,由于 goroutine 的存在,所谓的内存泄漏除了附着在长期对象上之外,还存在多种不同的形式。

形式1:预期能被快速释放的内存因被根对象引用而没有得到迅速释放

当有一个全局对象时,可能不经意间将某个变量附着在其上,且忽略的将其进行释放,则该内存永远不会得到释放。例如:

1
2
3
4
5
6
7
8
var cache = map[interface{}]interface{}{}

func keepalloc() {
for i := 0; i < 10000; i++ {
m := make([]byte, 1<<10)
cache[i] = m
}
}

形式2:goroutine 泄漏

Goroutine 作为一种逻辑上理解的轻量级线程,需要维护执行用户代码的上下文信息。在运行过程中也需要消耗一定的内存来保存这类信息,而这些内存在目前版本的 Go 中是不会被释放的。因此,如果一个程序持续不断地产生新的 goroutine、且不结束已经创建的 goroutine 并复用这部分内存,就会造成内存泄漏的现象,例如:

1
2
3
4
5
6
7
func keepalloc2() {
for i := 0; i < 100000; i++ {
go func() {
select {}
}()
}
}

验证

我们可以通过如下形式来调用上述两个函数:

1
2
3
4
5
6
7
8
9
10
11
12
13
14
15
package main

import (
"os"
"runtime/trace"
)

func main() {
f, _ := os.Create("trace.out")
defer f.Close()
trace.Start(f)
defer trace.Stop()
keepalloc()
keepalloc2()
}

运行程序:

1
go run main.go

会看到程序中生成了 trace.out 文件,我们可以使用 go tool trace trace.out 命令得到下图:

可以看到,途中的 Heap 在持续增长,没有内存被回收,产生了内存泄漏的现象。

值得一提的是,这种形式的 goroutine 泄漏还可能由 channel 泄漏导致。而 channel 的泄漏本质上与 goroutine 泄漏存在直接联系。Channel 作为一种同步原语,会连接两个不同的 goroutine,如果一个 goroutine 尝试向一个没有接收方的无缓冲 channel 发送消息,则该 goroutine 会被永久的休眠,整个 goroutine 及其执行栈都得不到释放,例如:

1
2
3
4
5
6
7
8
var ch = make(chan struct{})

func keepalloc3() {
for i := 0; i < 100000; i++ {
// 没有接收方,goroutine 会一直阻塞
go func() { ch <- struct{}{} }()
}
}

8. 并发标记清除法的难点是什么?

在没有用户态代码并发修改三色抽象的情况下,回收可以正常结束。但是并发回收的根本问题在于,用户态代码在回收过程中会并发地更新对象图,从而造成赋值器和回收器可能对对象图的结构产生不同的认知。这时以一个固定的三色波面作为回收过程前进的边界则不再合理。

我们不妨考虑赋值器写操作的例子:

时序回收器赋值器说明
1shade(A, gray)回收器:根对象的子节点着色为灰色对象
2shade(C, black)回收器:当所有子节点着色为灰色后,将节点着为黑色
3C.ref3 = C.ref2.ref1赋值器:并发的修改了 C 的子节点
4A.ref1 = nil赋值器:并发的修改了 A 的子节点
5shade(A.ref1, gray)回收器:进一步灰色对象的子节点并着色为灰色对象,这时由于 A.ref1nil,什么事情也没有发生
6shade(A, black)回收器:由于所有子节点均已标记,回收器也不会重新扫描已经被标记为黑色的对象,此时 A 被着色为黑色,scan(A) 什么也不会发生,进而 B 在此次回收过程中永远不会被标记为黑色,进而错误地被回收。
  • 初始状态:假设某个黑色对象 C 指向某个灰色对象 A ,而 A 指向白色对象 B;
  • C.ref3 = C.ref2.ref1:赋值器并发地将黑色对象 C 指向(ref3)了白色对象 B;
  • A.ref1 = nil:移除灰色对象 A 对白色对象 B 的引用(ref2);
  • 最终状态:在继续扫描的过程中,白色对象 B 永远不会被标记为黑色对象了(回收器不会重新扫描黑色对象),进而对象 B 被错误地回收。

gc-mutator

总而言之,并发标记清除中面临的一个根本问题就是如何保证标记与清除过程的正确性。

9. 什么是写屏障、混合写屏障,如何实现?

要讲清楚写屏障,就需要理解三色标记清除算法中的强弱不变性以及赋值器的颜色,理解他们需要一定的抽象思维。写屏障是一个在并发垃圾回收器中才会出现的概念,垃圾回收器的正确性体现在:不应出现对象的丢失,也不应错误的回收还不需要回收的对象。

可以证明,当以下两个条件同时满足时会破坏垃圾回收器的正确性:

  • 条件 1: 赋值器修改对象图,导致某一黑色对象引用白色对象;
  • 条件 2: 从灰色对象出发,到达白色对象的、未经访问过的路径被赋值器破坏。

只要能够避免其中任何一个条件,则不会出现对象丢失的情况,因为:

  • 如果条件 1 被避免,则所有白色对象均被灰色对象引用,没有白色对象会被遗漏;
  • 如果条件 2 被避免,即便白色对象的指针被写入到黑色对象中,但从灰色对象出发,总存在一条没有访问过的路径,从而找到到达白色对象的路径,白色对象最终不会被遗漏。

我们不妨将三色不变性所定义的波面根据这两个条件进行削弱:

  • 当满足原有的三色不变性定义(或上面的两个条件都不满足时)的情况称为强三色不变性(strong tricolor invariant)
  • 当赋值器令黑色对象引用白色对象时(满足条件 1 时)的情况称为弱三色不变性(weak tricolor invariant)

当赋值器进一步破坏灰色对象到达白色对象的路径时(进一步满足条件 2 时),即打破弱三色不变性,也就破坏了回收器的正确性;或者说,在破坏强弱三色不变性时必须引入额外的辅助操作。弱三色不变形的好处在于:只要存在未访问的能够到达白色对象的路径,就可以将黑色对象指向白色对象。

如果我们考虑并发的用户态代码,回收器不允许同时停止所有赋值器,就是涉及了存在的多个不同状态的赋值器。为了对概念加以明确,还需要换一个角度,把回收器视为对象,把赋值器视为影响回收器这一对象的实际行为(即影响 GC 周期的长短),从而引入赋值器的颜色:

  • 黑色赋值器:已经由回收器扫描过,不会再次对其进行扫描。
  • 灰色赋值器:尚未被回收器扫描过,或尽管已经扫描过但仍需要重新扫描。

赋值器的颜色对回收周期的结束产生影响:

  • 如果某种并发回收器允许灰色赋值器的存在,则必须在回收结束之前重新扫描对象图。
  • 如果重新扫描过程中发现了新的灰色或白色对象,回收器还需要对新发现的对象进行追踪,但是在新追踪的过程中,赋值器仍然可能在其根中插入新的非黑色的引用,如此往复,直到重新扫描过程中没有发现新的白色或灰色对象。

于是,在允许灰色赋值器存在的算法,最坏的情况下,回收器只能将所有赋值器线程停止才能完成其跟对象的完整扫描,也就是我们所说的 STW。

为了确保强弱三色不变性的并发指针更新操作,需要通过赋值器屏障技术来保证指针的读写操作一致。因此我们所说的 Go 中的写屏障、混合写屏障,其实是指赋值器的写屏障,赋值器的写屏障用来保证赋值器在进行指针写操作时,不会破坏弱三色不变性。

有两种非常经典的写屏障:Dijkstra 插入屏障和 Yuasa 删除屏障。

灰色赋值器的 Dijkstra 插入屏障的基本思想是避免满足条件 1:

1
2
3
4
5
// 灰色赋值器 Dijkstra 插入屏障
func DijkstraWritePointer(slot *unsafe.Pointer, ptr unsafe.Pointer) {
shade(ptr)
*slot = ptr
}

为了防止黑色对象指向白色对象,应该假设 *slot 可能会变为黑色,为了确保 ptr 不会在被赋值到 *slot 前变为白色,shade(ptr) 会先将指针 ptr 标记为灰色,进而避免了条件 1。但是,由于并不清楚赋值器以后会不会将这个引用删除,因此还需要重新扫描来重新确定关系图,这时需要 STW,如图所示:

Dijkstra 插入屏障的好处在于可以立刻开始并发标记,但由于产生了灰色赋值器,缺陷是需要标记终止阶段 STW 时进行重新扫描。

黑色赋值器的 Yuasa 删除屏障的基本思想是避免满足条件 2:

1
2
3
4
5
// 黑色赋值器 Yuasa 屏障
func YuasaWritePointer(slot *unsafe.Pointer, ptr unsafe.Pointer) {
shade(*slot)
*slot = ptr
}

为了防止丢失从灰色对象到白色对象的路径,应该假设 *slot 可能会变为黑色,为了确保 ptr 不会在被赋值到 *slot 前变为白色,shade(*slot) 会先将 *slot 标记为灰色,进而该写操作总是创造了一条灰色到灰色或者灰色到白色对象的路径,进而避免了条件 2。

Yuasa 删除屏障的优势则在于不需要标记结束阶段的重新扫描,缺陷是依然会产生丢失的对象,需要在标记开始前对整个对象图进行快照。

Go 在 1.8 的时候为了简化 GC 的流程,同时减少标记终止阶段的重扫成本,将 Dijkstra 插入屏障和 Yuasa 删除屏障进行混合,形成混合写屏障。该屏障提出时的基本思想是:对正在被覆盖的对象进行着色,且如果当前栈未扫描完成,则同样对指针进行着色。

但在最终实现时原提案中对 ptr 的着色还额外包含对执行栈的着色检查,但由于时间有限,并未完整实现过,所以混合写屏障在目前的实现伪代码是:

1
2
3
4
5
6
// 混合写屏障
func HybridWritePointerSimple(slot *unsafe.Pointer, ptr unsafe.Pointer) {
shade(*slot)
shade(ptr)
*slot = ptr
}

在这个实现中,如果无条件对引用双方进行着色,自然结合了 Dijkstra 和 Yuasa 写屏障的优势,但缺点也非常明显,因为着色成本是双倍的,而且编译器需要插入的代码也成倍增加,随之带来的结果就是编译后的二进制文件大小也进一步增加。为了针对写屏障的性能进行优化,Go 1.10 前后,Go 团队随后实现了批量写屏障机制。其基本想法是将需要着色的指针同一写入一个缓存,每当缓存满时统一对缓存中的所有 ptr 指针进行着色。

GC 的实现细节

10. Go 语言中 GC 的流程是什么?

当前版本的 Go 以 STW 为界限,可以将 GC 划分为五个阶段:

阶段说明赋值器状态
GCMark标记准备阶段,为并发标记做准备工作,启动写屏障STW
GCMark扫描标记阶段,与赋值器并发执行,写屏障开启并发
GCMarkTermination标记终止阶段,保证一个周期内标记任务完成,停止写屏障STW
GCoff内存清扫阶段,将需要回收的内存归还到堆中,写屏障关闭并发
GCoff内存归还阶段,将过多的内存归还给操作系统,写屏障关闭并发

具体而言,各个阶段的触发函数分别为:

gc-process

11. 触发 GC 的时机是什么?

Go 语言中对 GC 的触发时机存在两种形式:

  1. 主动触发,通过调用 runtime.GC 来触发 GC,此调用阻塞式地等待当前 GC 运行完毕。

  2. 被动触发,分为两种方式:

    • 使用系统监控,当超过两分钟没有产生任何 GC 时,强制触发 GC。

    • 使用步调(Pacing)算法,其核心思想是控制内存增长的比例。

通过 GOGC 或者 debug.SetGCPercent 进行控制(他们控制的是同一个变量,即堆的增长率 $\rho$)。整个算法的设计考虑的是优化问题:如果设上一次 GC 完成时,内存的数量为 $H_m$(heap marked),估计需要触发 GC 时的堆大小 $H_T$(heap trigger),使得完成 GC 时候的目标堆大小 $H_g$(heap goal) 与实际完成时候的堆大小 $H_a$(heap actual)最为接近,即: $\min |H_g - H_a| = \min|(1+\rho)H_m - H_a|$。

gc-pacing

除此之外,步调算法还需要考虑 CPU 利用率的问题,显然我们不应该让垃圾回收器占用过多的 CPU,即不应该让每个负责执行用户 goroutine 的线程都在执行标记过程。理想情况下,在用户代码满载的时候,GC 的 CPU 使用率不应该超过 25%,即另一个优化问题:如果设 $u_g$为目标 CPU 使用率(goal utilization),而 $u_a$为实际 CPU 使用率(actual utilization),则 $\min|u_g - u_a|$。

求解这两个优化问题的具体数学建模过程我们不在此做深入讨论,有兴趣的读者可以参考两个设计文档:Go 1.5 concurrent garbage collector pacingSeparate soft and hard heap size goal

计算 $H_T$ 的最终结论(从 Go 1.10 时开始 $h_t$ 增加了上界 $0.95 \rho$,从 Go 1.14 开始时 $h_t$ 增加了下界 0.6)是:

  • 设第 n 次触发 GC 时 (n > 1),估计得到的堆增长率为 $h_t^{(n)}$、运行过程中的实际堆增长率为 $h_a^{(n)}$,用户设置的增长率为 $\rho = \text{GOGC}/100$( $\rho > 0$)则第 $n+1$ 次出触发 GC 时候,估计的堆增长率为:

$$
h_t^{(n+1)} = h_t^{(n)} + 0.5 \left[ \frac{H_g^{(n)} - H_a^{(n)}}{H_a^{(n)}} - h_t^{(n)} - \frac{u_a^{(n)}}{u_g^{(n)}} \left( h_a^{(n)} - h_t^{(n)} \right) \right]
$$

  • 特别的,$h_t^{(1)} = 7 / 8$,$u_a^{(1)} = 0.25$,$u_g^{(1)} = 0.3$。第一次触发 GC 时,如果当前的堆小于 $4\rho$ MB,则强制调整到 $4\rho$ MB 时触发 GC

  • 特别的,当 $h_t^{(n)}<0.6$时,将其调整为 $0.6$,当 $h_t^{(n)} > 0.95 \rho$ 时,将其设置为 $0.95 \rho$

  • 默认情况下,$\rho = 1$(即 GOGC = 100),第一次触发 GC 时强制设置触发第一次 GC 为 4MB,可以写如下程序进行验证:

1
2
3
4
5
6
7
8
9
10
11
12
13
14
15
16
17
18
19
20
21
22
23
24
25
26
27
28
29
30
31
32
33
34
35
36
37
38
39
40
41
package main

import (
"os"
"runtime"
"runtime/trace"
"sync/atomic"
)

var stop uint64

// 通过对象 P 的释放状态,来确定 GC 是否已经完成
func gcfinished() *int {
p := 1
runtime.SetFinalizer(&p, func(_ *int) {
println("gc finished")
atomic.StoreUint64(&stop, 1) // 通知停止分配
})
return &p
}

func allocate() {
// 每次调用分配 0.25MB
_ = make([]byte, int((1<<20)*0.25))
}

func main() {
f, _ := os.Create("trace.out")
defer f.Close()
trace.Start(f)
defer trace.Stop()

gcfinished()

// 当完成 GC 时停止分配
for n := 1; atomic.LoadUint64(&stop) != 1; n++ {
println("#allocate: ", n)
allocate()
}
println("terminate")
}

我们先来验证最简单的一种情况,即第一次触发 GC 时的堆大小:

1
2
3
4
5
6
7
8
9
10
$ go build -o main
$ GODEBUG=gctrace=1 ./main
#allocate: 1
(...)
#allocate: 20
gc finished
gc 1 @0.001s 3%: 0.016+0.23+0.019 ms clock, 0.20+0.11/0.060/0.13+0.22 ms cpu, 4->5->1 MB, 5 MB goal, 12 P
scvg: 8 KB released
scvg: inuse: 1, idle: 62, sys: 63, released: 58, consumed: 5 (MB)
terminate

通过这一行数据我们可以看到:

1
gc 1 @0.001s 3%: 0.016+0.23+0.019 ms clock, 0.20+0.11/0.060/0.13+0.22 ms cpu, 4->5->1 MB, 5 MB goal, 12 P
  1. 程序在完成第一次 GC 后便终止了程序,符合我们的设想
  2. 第一次 GC 开始时的堆大小为 4MB,符合我们的设想
  3. 当标记终止时,堆大小为 5MB,此后开始执行清扫,这时分配执行到第 20 次,即 20*0.25 = 5MB,符合我们的设想

我们将分配次数调整到 50 次

1
2
3
4
for n := 1; n < 50; n++ {
println("#allocate: ", n)
allocate()
}

来验证第二次 GC 触发时是否满足公式所计算得到的值(为 GODEBUG 进一步设置 gcpacertrace=1):

1
2
3
4
5
6
7
8
9
10
11
12
13
14
$ go build -o main
$ GODEBUG=gctrace=1,gcpacertrace=1 ./main
#allocate: 1
(...)

pacer: H_m_prev=2236962 h_t=+8.750000e-001 H_T=4194304 h_a=+2.387451e+000 H_a=7577600 h_g=+1.442627e+000 H_g=5464064 u_a=+2.652227e-001 u_g=+3.000000e-001 W_a=152832 goalΔ=+5.676271e-001 actualΔ=+1.512451e+000 u_a/u_g=+8.840755e-001
#allocate: 28
gc 1 @0.001s 5%: 0.032+0.32+0.055 ms clock, 0.38+0.068/0.053/0.11+0.67 ms cpu, 4->7->3 MB, 5 MB goal, 12 P

(...)
#allocate: 37
pacer: H_m_prev=3307736 h_t=+6.000000e-001 H_T=5292377 h_a=+7.949171e-001 H_a=5937112 h_g=+1.000000e+000 H_g=6615472 u_a=+2.658428e-001 u_g=+3.000000e-001 W_a=154240 goalΔ=+4.000000e-001 actualΔ=+1.949171e-001 u_a/u_g=+8.861428e-001
#allocate: 38
gc 2 @0.002s 9%: 0.017+0.26+0.16 ms clock, 0.20+0.079/0.058/0.12+1.9 ms cpu, 5->5->0 MB, 6 MB goal, 12 P

我们可以得到数据:

  • 第一次估计得到的堆增长率为 $h_t^{(1)} = 0.875$
  • 第一次的运行过程中的实际堆增长率为 $h_a^{(1)} = 0.2387451$
  • 第一次实际的堆大小为 $H_a^{(1)}=7577600$
  • 第一次目标的堆大小为 $H_g^{(1)}=5464064$
  • 第一次的 CPU 实际使用率为 $u_a^{(1)} = 0.2652227$
  • 第一次的 CPU 目标使用率为 $u_g^{(1)} = 0.3$

我们据此计算第二次估计的堆增长率:

$$
\begin{align}
h_t^{(2)} &= h_t^{(1)} + 0.5 \left[ \frac{H_g^{(1)} - H_a^{(1)}}{H_a^{(1)}} - h_t^{(1)} - \frac{u_a^{(1)}}{u_g^{(1)}} \left( h_a^{(1)} - h_t^{(1)} \right) \right] \
&= 0.875 + 0.5 \left[ \frac{5464064 - 7577600}{5464064} - 0.875 - \frac{0.2652227}{0.3} \left( 0.2387451 - 0.875 \right) \right] \
& \approx 0.52534543909 \
\end{align}
$$

因为 $0.52534543909 < 0.6\rho = 0.6$,因此下一次的触发率为 $h_t^{2} = 0.6$,与我们实际观察到的第二次 GC 的触发率 0.6 吻合。

12. 如果内存分配速度超过了标记清除的速度怎么办?

目前的 Go 实现中,当 GC 触发后,会首先进入并发标记的阶段。并发标记会设置一个标志,并在 mallocgc 调用时进行检查。当存在新的内存分配时,会暂停分配内存过快的那些 goroutine,并将其转去执行一些辅助标记(Mark Assist)的工作,从而达到放缓继续分配、辅助 GC 的标记工作的目的。

编译器会分析用户代码,并在需要分配内存的位置,将申请内存的操作翻译为 mallocgc 调用,而 mallocgc 的实现决定了标记辅助的实现,其伪代码思路如下:

1
2
3
4
5
6
7
8
func mallocgc(t typ.Type, size uint64) {
if enableMarkAssist {
// 进行标记辅助,此时用户代码没有得到执行
(...)
}
// 执行内存分配
(...)
}

GC 的优化问题

13. GC 关注的指标有哪些?

Go 的 GC 被设计为成比例触发、大部分工作与赋值器并发、不分代、无内存移动且会主动向操作系统归还申请的内存。因此最主要关注的、能够影响赋值器的性能指标有:

  • CPU 利用率:回收算法会在多大程度上拖慢程序?有时候,这个是通过回收占用的 CPU 时间与其它 CPU 时间的百分比来描述的。
  • GC 停顿时间:回收器会造成多长时间的停顿?目前的 GC 中需要考虑 STW 和 Mark Assist 两个部分可能造成的停顿。
  • GC 停顿频率:回收器造成的停顿频率是怎样的?目前的 GC 中需要考虑 STW 和 Mark Assist 两个部分可能造成的停顿。
  • GC 可扩展性:当堆内存变大时,垃圾回收器的性能如何?但大部分的程序可能并不一定关心这个问题。

14. Go 的 GC 如何调优?

Go 的 GC 被设计为极致简洁,与较为成熟的 Java GC 的数十个可控参数相比,严格意义上来讲,Go 可供用户调整的参数只有 GOGC 环境变量。当我们谈论 GC 调优时,通常是指减少用户代码对 GC 产生的压力,这一方面包含了减少用户代码分配内存的数量(即对程序的代码行为进行调优),另一方面包含了最小化 Go 的 GC 对 CPU 的使用率(即调整 GOGC)。

GC 的调优是在特定场景下产生的,并非所有程序都需要针对 GC 进行调优。只有那些对执行延迟非常敏感、
当 GC 的开销成为程序性能瓶颈的程序,才需要针对 GC 进行性能调优,几乎不存在于实际开发中 99% 的情况。
除此之外,Go 的 GC 也仍然有一定的可改进的空间,也有部分 GC 造成的问题,目前仍属于 Open Problem。

总的来说,我们可以在现在的开发中处理的有以下几种情况:

  1. 对停顿敏感:GC 过程中产生的长时间停顿、或由于需要执行 GC 而没有执行用户代码,导致需要立即执行的用户代码执行滞后。
  2. 对资源消耗敏感:对于频繁分配内存的应用而言,频繁分配内存增加 GC 的工作量,原本可以充分利用 CPU 的应用不得不频繁地执行垃圾回收,影响用户代码对 CPU 的利用率,进而影响用户代码的执行效率。

从这两点来看,所谓 GC 调优的核心思想也就是充分的围绕上面的两点来展开:优化内存的申请速度,尽可能的少申请内存,复用已申请的内存。或者简单来说,不外乎这三个关键字:控制、减少、复用

我们将通过三个实际例子介绍如何定位 GC 的存在的问题,并一步一步进行性能调优。当然,在实际情况中问题远比这些例子要复杂,这里也只是讨论调优的核心思想,更多的时候也只能具体问题具体分析。

例1:合理化内存分配的速度、提高赋值器的 CPU 利用率

我们来看这样一个例子。在这个例子中,concat 函数负责拼接一些长度不确定的字符串。并且为了快速完成任务,出于某种原因,在两个嵌套的 for 循环中一口气创建了 800 个 goroutine。在 main 函数中,启动了一个 goroutine 并在程序结束前不断的触发 GC,并尝试输出 GC 的平均执行时间:

1
2
3
4
5
6
7
8
9
10
11
12
13
14
15
16
17
18
19
20
21
22
23
24
25
26
27
28
29
30
31
32
33
34
35
36
37
38
39
40
41
42
43
44
45
46
47
48
49
50
package main

import (
"fmt"
"os"
"runtime"
"runtime/trace"
"sync/atomic"
"time"
)

var (
stop int32
count int64
sum time.Duration
)

func concat() {
for n := 0; n < 100; n++ {
for i := 0; i < 8; i++ {
go func() {
s := "Go GC"
s += " " + "Hello"
s += " " + "World"
_ = s
}()
}
}
}

func main() {
f, _ := os.Create("trace.out")
defer f.Close()
trace.Start(f)
defer trace.Stop()

go func() {
var t time.Time
for atomic.LoadInt32(&stop) == 0 {
t = time.Now()
runtime.GC()
sum += time.Since(t)
count++
}
fmt.Printf("GC spend avg: %v\n", time.Duration(int64(sum)/count))
}()

concat()
atomic.StoreInt32(&stop, 1)
}

这个程序的执行结果是:

1
2
3
$ go build -o main
$ ./main
GC spend avg: 2.583421ms

GC 平均执行一次需要长达 2ms 的时间,我们再进一步观察 trace 的结果:

程序的整个执行过程中仅执行了一次 GC,而且仅 Sweep STW 就耗费了超过 1 ms,非常反常。甚至查看赋值器 mutator 的 CPU 利用率,在整个 trace 尺度下连 40% 都不到:

主要原因是什么呢?我们不妨查看 goroutine 的分析:

在这个榜单中我们不难发现,goroutine 的执行时间占其生命周期总时间非常短的一部分,但大部分时间都花费在调度器的等待上了(蓝色的部分),说明同时创建大量 goroutine 对调度器产生的压力确实不小,我们不妨将这一产生速率减慢,一批一批地创建 goroutine:

1
2
3
4
5
6
7
8
9
10
11
12
13
14
15
16
func concat() {
wg := sync.WaitGroup{}
for n := 0; n < 100; n++ {
wg.Add(8)
for i := 0; i < 8; i++ {
go func() {
s := "Go GC"
s += " " + "Hello"
s += " " + "World"
_ = s
wg.Done()
}()
}
wg.Wait()
}
}

这时候我们再来看:

1
2
3
$ go build -o main
$ ./main
GC spend avg: 328.54µs

GC 的平均时间就降到 300 微秒了。这时的赋值器 CPU 使用率也提高到了 60%,相对来说就很可观了:

当然,这个程序仍然有优化空间,例如我们其实没有必要等待很多 goroutine 同时执行完毕才去执行下一组 goroutine。而可以当一个 goroutine 执行完毕时,直接启动一个新的 goroutine,也就是 goroutine 池的使用。
有兴趣的读者可以沿着这个思路进一步优化这个程序中赋值器对 CPU 的使用率。

例2:降低并复用已经申请的内存

我们通过一个非常简单的 Web 程序来说明复用内存的重要性。在这个程序中,每当产生一个 /example2
的请求时,都会创建一段内存,并用于进行一些后续的工作。

1
2
3
4
5
6
7
8
9
10
11
12
13
14
15
16
17
18
19
20
21
22
23
24
25
26
27
28
29
package main

import (
"fmt"
"net/http"
_ "net/http/pprof"
)

func newBuf() []byte {
return make([]byte, 10<<20)
}

func main() {
go func() {
http.ListenAndServe("localhost:6060", nil)
}()

http.HandleFunc("/example2", func(w http.ResponseWriter, r *http.Request) {
b := newBuf()

// 模拟执行一些工作
for idx := range b {
b[idx] = 1
}

fmt.Fprintf(w, "done, %v", r.URL.Path[1:])
})
http.ListenAndServe(":8080", nil)
}

为了进行性能分析,我们还额外创建了一个监听 6060 端口的 goroutine,用于使用 pprof 进行分析。
我们先让服务器跑起来:

1
2
$ go build -o main
$ ./main

我们这次使用 pprof 的 trace 来查看 GC 在此服务器中面对大量请求时候的状态,要使用 trace 可以通过访问 /debug/pprof/trace 路由来进行,其中 seconds 参数设置为 20s,并将 trace 的结果保存为 trace.out:

1
2
3
4
$ wget http://127.0.0.1:6060/debug/pprof/trace\?seconds\=20 -O trace.out
--2020-01-01 22:13:34-- http://127.0.0.1:6060/debug/pprof/trace?seconds=20
Connecting to 127.0.0.1:6060... connected.
HTTP request sent, awaiting response...

这时候我们使用一个压测工具 ab,来同时产生 500 个请求
-n 一共 500 个请求,-c 一个时刻执行请求的数量,每次 100 个并发请求):

1
2
3
4
5
6
7
8
9
10
11
12
13
14
15
16
17
18
19
20
21
22
23
24
25
26
27
28
29
30
31
32
33
34
35
36
37
38
39
40
41
42
43
44
45
46
47
48
49
$ ab -n 500 -c 100 http://127.0.0.1:8080/example2
This is ApacheBench, Version 2.3 <$Revision: 1843412 $>
Copyright 1996 Adam Twiss, Zeus Technology Ltd, http://www.zeustech.net/
Licensed to The Apache Software Foundation, http://www.apache.org/

Benchmarking 127.0.0.1 (be patient)
Completed 100 requests
Completed 200 requests
Completed 300 requests
Completed 400 requests
Completed 500 requests
Finished 500 requests


Server Software:
Server Hostname: 127.0.0.1
Server Port: 8080

Document Path: /example2
Document Length: 14 bytes

Concurrency Level: 100
Time taken for tests: 0.987 seconds
Complete requests: 500
Failed requests: 0
Total transferred: 65500 bytes
HTML transferred: 7000 bytes
Requests per second: 506.63 [#/sec] (mean)
Time per request: 197.382 [ms] (mean)
Time per request: 1.974 [ms] (mean, across all concurrent requests)
Transfer rate: 64.81 [Kbytes/sec] received

Connection Times (ms)
min mean[+/-sd] median max
Connect: 0 1 1.1 0 7
Processing: 13 179 77.5 170 456
Waiting: 10 168 78.8 162 455
Total: 14 180 77.3 171 458

Percentage of the requests served within a certain time (ms)
50% 171
66% 203
75% 222
80% 239
90% 281
95% 335
98% 365
99% 400
100% 458 (longest request)

GC 反复被触发,一个显而易见的原因就是内存分配过多。我们可以通过 go tool pprof 来查看究竟是谁分配了大量内存(使用 web 指令来使用浏览器打开统计信息的可视化图形):

1
2
3
4
5
6
7
8
9
$ go tool pprof http://127.0.0.1:6060/debug/pprof/heap
Fetching profile over HTTP from http://localhost:6060/debug/pprof/heap
Saved profile in /Users/changkun/pprof/pprof.alloc_objects.alloc_space.inuse_o
bjects.inuse_space.003.pb.gz
Type: inuse_space
Time: Jan 1, 2020 at 11:15pm (CET)
Entering interactive mode (type "help" for commands, "o" for options)
(pprof) web
(pprof)

可见 newBuf 产生的申请的内存过多,现在我们使用 sync.Pool 来复用 newBuf 所产生的对象:

1
2
3
4
5
6
7
8
9
10
11
12
13
14
15
16
17
18
19
20
21
22
23
24
25
26
27
28
29
30
package main

import (
"fmt"
"net/http"
_ "net/http/pprof"
"sync"
)

// 使用 sync.Pool 复用需要的 buf
var bufPool = sync.Pool{
New: func() interface{} {
return make([]byte, 10<<20)
},
}

func main() {
go func() {
http.ListenAndServe("localhost:6060", nil)
}()
http.HandleFunc("/example2", func(w http.ResponseWriter, r *http.Request) {
b := bufPool.Get().([]byte)
for idx := range b {
b[idx] = 0
}
fmt.Fprintf(w, "done, %v", r.URL.Path[1:])
bufPool.Put(b)
})
http.ListenAndServe(":8080", nil)
}

其中 ab 输出的统计结果为:

1
2
3
4
5
6
7
8
9
10
11
12
13
14
15
16
17
18
19
20
21
22
23
24
25
26
27
28
29
30
31
32
33
34
35
36
37
38
39
40
41
42
43
44
45
46
47
48
49
$ ab -n 500 -c 100 http://127.0.0.1:8080/example2
This is ApacheBench, Version 2.3 <$Revision: 1843412 $>
Copyright 1996 Adam Twiss, Zeus Technology Ltd, http://www.zeustech.net/
Licensed to The Apache Software Foundation, http://www.apache.org/

Benchmarking 127.0.0.1 (be patient)
Completed 100 requests
Completed 200 requests
Completed 300 requests
Completed 400 requests
Completed 500 requests
Finished 500 requests


Server Software:
Server Hostname: 127.0.0.1
Server Port: 8080

Document Path: /example2
Document Length: 14 bytes

Concurrency Level: 100
Time taken for tests: 0.427 seconds
Complete requests: 500
Failed requests: 0
Total transferred: 65500 bytes
HTML transferred: 7000 bytes
Requests per second: 1171.32 [#/sec] (mean)
Time per request: 85.374 [ms] (mean)
Time per request: 0.854 [ms] (mean, across all concurrent requests)
Transfer rate: 149.85 [Kbytes/sec] received

Connection Times (ms)
min mean[+/-sd] median max
Connect: 0 1 1.4 1 9
Processing: 5 75 48.2 66 211
Waiting: 5 72 46.8 63 207
Total: 5 77 48.2 67 211

Percentage of the requests served within a certain time (ms)
50% 67
66% 89
75% 107
80% 122
90% 148
95% 167
98% 196
99% 204
100% 211 (longest request)

但从 Requests per second 每秒请求数来看,从原来的 506.63 变为 1171.32 得到了近乎一倍的提升。从 trace 的结果来看,GC 也没有频繁的被触发从而长期消耗 CPU 使用率:

sync.Pool 是内存复用的一个最为显著的例子,从语言层面上还有很多类似的例子,例如在例 1 中,concat 函数可以预先分配一定长度的缓存,而后再通过 append 的方式将字符串存储到缓存中:

1
2
3
4
5
6
7
8
9
10
11
12
13
14
15
16
17
18
19
func concat() {
wg := sync.WaitGroup{}
for n := 0; n < 100; n++ {
wg.Add(8)
for i := 0; i < 8; i++ {
go func() {
s := make([]byte, 0, 20)
s = append(s, "Go GC"...)
s = append(s, ' ')
s = append(s, "Hello"...)
s = append(s, ' ')
s = append(s, "World"...)
_ = string(s)
wg.Done()
}()
}
wg.Wait()
}
}

原因在于 + 运算符会随着字符串长度的增加而申请更多的内存,并将内容从原来的内存位置拷贝到新的内存位置,造成大量不必要的内存分配,先提前分配好足够的内存,再慢慢地填充,也是一种减少内存分配、复用内存形式的一种表现。

例3:调整 GOGC

我们已经知道了 GC 的触发原则是由步调算法来控制的,其关键在于估计下一次需要触发 GC 时,堆的大小。可想而知,如果我们在遇到海量请求的时,为了避免 GC 频繁触发,是否可以通过将 GOGC 的值设置得更大,让 GC 触发的时间变得更晚,从而减少其触发频率,进而增加用户代码对机器的使用率呢?答案是肯定的。

我们可以非常简单粗暴的将 GOGC 调整为 1000,来执行上一个例子中未复用对象之前的程序:

1
$ GOGC=1000 ./main

这时我们再重新执行压测:

1
2
3
4
5
6
7
8
9
10
11
12
13
14
15
16
17
18
19
20
21
22
23
24
25
26
27
28
29
30
31
32
33
34
35
36
37
38
39
40
41
42
43
44
45
46
47
48
49
$ ab -n 500 -c 100 http://127.0.0.1:8080/example2
This is ApacheBench, Version 2.3 <$Revision: 1843412 $>
Copyright 1996 Adam Twiss, Zeus Technology Ltd, http://www.zeustech.net/
Licensed to The Apache Software Foundation, http://www.apache.org/

Benchmarking 127.0.0.1 (be patient)
Completed 100 requests
Completed 200 requests
Completed 300 requests
Completed 400 requests
Completed 500 requests
Finished 500 requests


Server Software:
Server Hostname: 127.0.0.1
Server Port: 8080

Document Path: /example2
Document Length: 14 bytes

Concurrency Level: 100
Time taken for tests: 0.923 seconds
Complete requests: 500
Failed requests: 0
Total transferred: 65500 bytes
HTML transferred: 7000 bytes
Requests per second: 541.61 [#/sec] (mean)
Time per request: 184.636 [ms] (mean)
Time per request: 1.846 [ms] (mean, across all concurrent requests)
Transfer rate: 69.29 [Kbytes/sec] received

Connection Times (ms)
min mean[+/-sd] median max
Connect: 0 1 1.8 0 20
Processing: 9 171 210.4 66 859
Waiting: 5 158 199.6 62 813
Total: 9 173 210.6 68 860

Percentage of the requests served within a certain time (ms)
50% 68
66% 133
75% 198
80% 292
90% 566
95% 696
98% 723
99% 743
100% 860 (longest request)

可以看到,压测的结果得到了一定幅度的改善(Requests per second 从原来的 506.63 提高为了 541.61),
并且 GC 的执行频率明显降低:

在实际实践中可表现为需要紧急处理一些由 GC 带来的瓶颈时,人为将 GOGC 调大,加钱加内存,扛过这一段峰值流量时期。

当然,这种做法其实是治标不治本,并没有从根本上解决内存分配过于频繁的问题,极端情况下,反而会由于 GOGC 太大而导致回收不及时而耗费更多的时间来清理产生的垃圾,这对时间不算敏感的应用还好,但对实时性要求较高的程序来说就是致命的打击了。

因此这时更妥当的做法仍然是,定位问题的所在,并从代码层面上进行优化。

小结

通过上面的三个例子我们可以看到在 GC 调优过程中 go tool pprofgo tool trace 的强大作用是帮助我们快速定位 GC 导致瓶颈的具体位置,但这些例子中仅仅覆盖了其功能的很小一部分,我们也没有必要完整覆盖所有的功能,因为总是可以通过http pprof 官方文档runtime pprof官方文档以及trace 官方文档来举一反三。

现在我们来总结一下前面三个例子中的优化情况:

  1. 控制内存分配的速度,限制 goroutine 的数量,从而提高赋值器对 CPU 的利用率。
  2. 减少并复用内存,例如使用 sync.Pool 来复用需要频繁创建临时对象,例如提前分配足够的内存来降低多余的拷贝。
  3. 需要时,增大 GOGC 的值,降低 GC 的运行频率。

这三种情况几乎涵盖了 GC 调优中的核心思路,虽然从语言上还有很多小技巧可说,但我们并不会在这里事无巨细的进行总结。实际情况也是千变万化,我们更应该着重于培养具体问题具体分析的能力。

当然,我们还应该谨记 过早优化是万恶之源这一警语,在没有遇到应用的真正瓶颈时,将宝贵的时间分配在开发中其他优先级更高的任务上。

15. Go 的垃圾回收器有哪些相关的 API?其作用分别是什么?

在 Go 中存在数量极少的与 GC 相关的 API,它们是

  • runtime.GC:手动触发 GC
  • runtime.ReadMemStats:读取内存相关的统计信息,其中包含部分 GC 相关的统计信息
  • debug.FreeOSMemory:手动将内存归还给操作系统
  • debug.ReadGCStats:读取关于 GC 的相关统计信息
  • debug.SetGCPercent:设置 GOGC 调步变量
  • debug.SetMaxHeap(尚未发布):设置 Go 程序堆的上限值

GC 的历史及演进

16. Go 历史各个版本在 GC 方面的改进?

  • Go 1:串行三色标记清扫

  • Go 1.3:并行清扫,标记过程需要 STW,停顿时间在约几百毫秒

  • Go 1.5:并发标记清扫,停顿时间在一百毫秒以内

  • Go 1.6:使用 bitmap 来记录回收内存的位置,大幅优化垃圾回收器自身消耗的内存,停顿时间在十毫秒以内

  • Go 1.7:停顿时间控制在两毫秒以内

  • Go 1.8:混合写屏障,停顿时间在半个毫秒左右

  • Go 1.9:彻底移除了栈的重扫描过程

  • Go 1.12:整合了两个阶段的 Mark Termination,但引入了一个严重的 GC Bug 至今未修(见问题 20),尚无该 Bug 对 GC 性能影响的报告

  • Go 1.13:着手解决向操作系统归还内存的,提出了新的 Scavenger

  • Go 1.14:替代了仅存活了一个版本的 scavenger,全新的页分配器,优化分配内存过程的速率与现有的扩展性问题,并引入了异步抢占,解决了由于密集循环导致的 STW 时间过长的问题

可以用下图直观地说明 GC 的演进历史:

在 Go 1 刚发布时的版本中,甚至没有将 Mark-Sweep 的过程并行化,当需要进行垃圾回收时,所有的代码都必须进入 STW 的状态。而到了 Go 1.1 时,官方迅速地将清扫过程进行了并行化的处理,即仅在标记阶段进入 STW。

这一想法很自然,因为并行化导致算法结果不一致的情况仅仅发生在标记阶段,而当时的垃圾回收器没有针对并行结果的一致性进行任何优化,因此才需要在标记阶段进入 STW。对于 Scavenger 而言,早期的版本中会有一个单独的线程来定期将多余的内存归还给操作系统。

而到了 Go 1.5 后,Go 团队花费了相当大的力气,通过引入写屏障的机制来保证算法的一致性,才得以将整个 GC 控制在很小的 STW 内,而到了 1.8 时,由于新的混合屏障的出现,消除了对栈本身的重新扫描,STW 的时间进一步缩减。

从这个时候开始,Scavenger 已经从独立线程中移除,并合并至系统监控这个独立的线程中,并周期性地向操作系统归还内存,但仍然会有内存溢出这种比较极端的情况出现,因为程序可能在短时间内应对突发性的内存申请需求时,内存还没来得及归还操作系统,导致堆不断向操作系统申请内存,从而出现内存溢出。

到了 Go 1.13,定期归还操作系统的问题得以解决,Go 团队开始将周期性的 Scavenger 转化为可被调度的 goroutine,并将其与用户代码并发执行。而到了 Go 1.14,这一向操作系统归还内存的操作时间进一步得到缩减。

17. Go GC 在演化过程中还存在哪些其他设计?为什么没有被采用?

并发栈重扫

正如我们前面所说,允许灰色赋值器存在的垃圾回收器需要引入重扫过程来保证算法的正确性,除了引入混合屏障来消除重扫这一过程外,有另一种做法可以提高重扫过程的性能,那就是将重扫的过程并发执行。然而这一方案并没有得以实现,原因很简单:实现过程相比引入混合屏障而言十分复杂,而且引入混合屏障能够消除重扫这一过程,将简化垃圾回收的步骤。

ROC

ROC 的全称是面向请求的回收器(Request Oriented Collector),它其实也是分代 GC 的一种重新叙述。它提出了一个请求假设(Request Hypothesis):与一个完整请求、休眠 goroutine 所关联的对象比其他对象更容易死亡。这个假设听起来非常符合直觉,但在实现上,由于垃圾回收器必须确保是否有 goroutine 私有指针被写入公共对象,因此写屏障必须一直打开,这也就产生了该方法的致命缺点:昂贵的写屏障及其带来的缓存未命中,这也是这一设计最终没有被采用的主要原因。

传统分代 GC

在发现 ROC 性能不行之后,作为备选方案,Go 团队还尝试了实现传统的分代式 GC。但最终同样发现分代假设并不适用于 Go 的运行栈机制,年轻代对象在栈上就已经死亡,扫描本就该回收的执行栈并没有为由于分代假设带来明显的性能提升。这也是这一设计最终没有被采用的主要原因。

18. 目前提供 GC 的语言以及不提供 GC 的语言有哪些?GC 和 No GC 各自的优缺点是什么?

从原理上而言,所有的语言都能够自行实现 GC。从语言诞生之初就提供 GC 的语言,例如:

  • Python
  • JavaScript
  • Java
  • Objective-C
  • Swift

而不以 GC 为目标,被直接设计为手动管理内存、但可以自行实现 GC 的语言有:

  • C
  • C++

也有一些语言可以在编译期,依靠编译器插入清理代码的方式,实现精准的清理,例如:

  • Rust

垃圾回收使程序员无需手动处理内存释放,从而能够消除一些需要手动管理内存才会出现的运行时错误:

  1. 在仍然有指向内存区块的指针的情况下释放这块内存时,会产生悬挂指针,从而后续可能错误的访问已经用于他用的内存区域。
  2. 多重释放同一块申请的内存区域可能导致不可知的内存损坏。

当然,垃圾回收也会伴随一些缺陷,这也就造就了没有 GC 的一些优势:

  1. 没有额外的性能开销
  2. 精准的手动内存管理,极致的利用机器的性能

19. Go 对比 Java、V8 中 JavaScript 的 GC 性能如何?

无论是 Java 还是 JavaScript 中的 GC 均为分代式 GC。分代式 GC 的一个核心假设就是分代假说:将对象依据存活时间分配到不同的区域,每次回收只回收其中的一个区域。

V8 的 GC

在 V8 中主要将内存分为新生代和老生代。新生代中的对象为存活时间较短的对象,老生代中的对象为存活时间较长、常驻内存、占用内存较大的对象:

  1. 新生代中的对象主要通过副垃圾回收器进行回收。该回收过程是一种采用复制的方式实现的垃圾回收算法,它将堆内存一分为二,这两个空间中只有一个处于使用中,另一个则处于闲置状态。处于使用状态的空间称为 From 空间,处于闲置的空间称为 To 空间。分配对象时,先是在 From 空间中进行分配,当开始垃圾回收时,会检查 From 空间中的存活对象,并将这些存活对象复制到 To 空间中,而非存活对象占用的空间被释放。完成复制后,From 空间和 To 空间的角色互换。也就是通过将存活对象在两个空间中进行复制。
  2. 老生代则由主垃圾回收器负责。它实现的是标记清扫过程,但略有不同之处在于它还会在清扫完成后对内存碎片进行整理,进而是一种标记整理的回收器。

Java 的 GC

Java 的 GC 称之为 G1,并将整个堆分为年轻代、老年代和永久代。包括四种不同的收集操作,从上往下的这几个阶段会选择性地执行,触发条件是用户的配置和实际代码行为的预测。

  1. 年轻代收集周期:只对年轻代对象进行收集与清理
  2. 老年代收集周期:只对老年代对象进行收集与清理
  3. 混合式收集周期:同时对年轻代和老年代进行收集与清理
  4. 完整 GC 周期:完整的对整个堆进行收集与清理

在回收过程中,G1 会对停顿时间进行预测,竭尽所能地调整 GC 的策略从而达到用户代码通过系统参数(-XX:MaxGCPauseMillis)所配置的对停顿时间的要求。

这四个周期的执行成本逐渐上升,优化得当的程序可以完全避免完整 GC 周期。

性能比较

在 Go、Java 和 V8 JavaScript 之间比较 GC 的性能本质上是一个不切实际的问题。如前面所说,垃圾回收器的设计权衡了很多方面的因素,同时还受语言自身设计的影响,因为语言的设计也直接影响了程序员编写代码的形式,也就自然影响了产生垃圾的方式。

但总的来说,他们三者对垃圾回收的实现都需要 STW,并均已达到了用户代码几乎无法感知到的状态(据 Go GC 作者 Austin 宣称 STW 小于 100 微秒)。当然,随着 STW 的减少,垃圾回收器会增加 CPU 的使用率,这也是程序员在编写代码时需要手动进行优化的部分,即充分考虑内存分配的必要性,减少过多申请内存带给垃圾回收器的压力。

20. 目前 Go 语言的 GC 还存在哪些问题?

尽管 Go 团队宣称 STW 停顿时间得以优化到 100 微秒级别,但这本质上是一种取舍。原本的 STW 某种意义上来说其实转移到了可能导致用户代码停顿的几个位置;除此之外,由于运行时调度器的实现方式,同样对 GC 存在一定程度的影响。

目前 Go 中的 GC 仍然存在以下问题:

1. Mark Assist 停顿时间过长

1
2
3
4
5
6
7
8
9
10
11
12
13
14
15
16
17
18
19
20
21
22
23
24
25
26
27
28
29
30
31
32
33
34
35
36
37
38
39
40
41
42
43
44
45
46
47
48
49
50
51
52
53
54
55
56
57
58
59
60
61
62
63
64
65
66
67
68
69
70
71
72
73
package main

import (
"fmt"
"os"
"runtime"
"runtime/trace"
"time"
)

const (
windowSize = 200000
msgCount = 1000000
)

var (
best time.Duration = time.Second
bestAt time.Time
worst time.Duration
worstAt time.Time

start = time.Now()
)

func main() {
f, _ := os.Create("trace.out")
defer f.Close()
trace.Start(f)
defer trace.Stop()

for i := 0; i < 5; i++ {
measure()
worst = 0
best = time.Second
runtime.GC()
}
}

func measure() {
var c channel
for i := 0; i < msgCount; i++ {
c.sendMsg(i)
}
fmt.Printf("Best send delay %v at %v, worst send delay: %v at %v. Wall clock: %v \n", best, bestAt.Sub(start), worst, worstAt.Sub(start), time.Since(start))
}

type channel [windowSize][]byte

func (c *channel) sendMsg(id int) {
start := time.Now()

// 模拟发送
(*c)[id%windowSize] = newMsg(id)

end := time.Now()
elapsed := end.Sub(start)
if elapsed > worst {
worst = elapsed
worstAt = end
}
if elapsed < best {
best = elapsed
bestAt = end
}
}

func newMsg(n int) []byte {
m := make([]byte, 1024)
for i := range m {
m[i] = byte(n)
}
return m
}

运行此程序我们可以得到类似下面的结果:

1
2
3
4
5
6
7
$ go run main.go

Best send delay 330ns at 773.037956ms, worst send delay: 7.127915ms at 579.835487ms. Wall clock: 831.066632ms
Best send delay 331ns at 873.672966ms, worst send delay: 6.731947ms at 1.023969626s. Wall clock: 1.515295559s
Best send delay 330ns at 1.812141567s, worst send delay: 5.34028ms at 2.193858359s. Wall clock: 2.199921749s
Best send delay 338ns at 2.722161771s, worst send delay: 7.479482ms at 2.665355216s. Wall clock: 2.920174197s
Best send delay 337ns at 3.173649445s, worst send delay: 6.989577ms at 3.361716121s. Wall clock: 3.615079348s

在这个结果中,第一次的最坏延迟时间高达 7.12 毫秒,发生在程序运行 578 毫秒左右。通过 go tool trace 可以发现,这个时间段中,Mark Assist 执行了 7112312ns,约为 7.127915ms;可见,此时最坏情况下,标记辅助拖慢了用户代码的执行,是造成 7 毫秒延迟的原因。

2. Sweep 停顿时间过长

同样还是刚才的例子,如果我们仔细观察 Mark Assist 后发生的 Sweep 阶段,竟然对用户代码的影响长达约 30ms,根据调用栈信息可以看到,该 Sweep 过程发生在内存分配阶段:

3. 由于 GC 算法的不正确性导致 GC 周期被迫重新执行

此问题很难复现,但是一个已知的问题,根据 Go 团队的描述,能够在 1334 次构建中发生一次,我们可以计算出其触发概率约为 0.0007496251874。虽然发生概率很低,但一旦发生,GC 需要被重新执行,非常不幸。

4. 创建大量 Goroutine 后导致 GC 消耗更多的 CPU

这个问题可以通过以下程序进行验证:

1
2
3
4
5
6
7
8
9
10
11
12
13
14
15
16
17
18
19
20
21
22
23
24
25
26
27
28
func BenchmarkGCLargeGs(b *testing.B) {
wg := sync.WaitGroup{}

for ng := 100; ng <= 1000000; ng *= 10 {
b.Run(fmt.Sprintf("#g-%d", ng), func(b *testing.B) {
// 创建大量 goroutine,由于每次创建的 goroutine 会休眠
// 从而运行时不会复用正在休眠的 goroutine,进而不断创建新的 g
wg.Add(ng)
for i := 0; i < ng; i++ {
go func() {
time.Sleep(100 * time.Millisecond)
wg.Done()
}()
}
wg.Wait()

// 现运行一次 GC 来提供一致的内存环境
runtime.GC()

// 记录运行 b.N 次 GC 需要的时间
b.ResetTimer()
for i := 0; i < b.N; i++ {
runtime.GC()
}
})

}
}

其结果可以通过如下指令来获得:

1
2
3
4
5
6
7
8
$ go test -bench=BenchmarkGCLargeGs -run=^$ -count=5 -v . | tee 4.txt
$ benchstat 4.txt
name time/op
GCLargeGs/#g-100-12 192µs ± 5%
GCLargeGs/#g-1000-12 331µs ± 1%
GCLargeGs/#g-10000-12 1.22ms ± 1%
GCLargeGs/#g-100000-12 10.9ms ± 3%
GCLargeGs/#g-1000000-12 32.5ms ± 4%

这种情况通常发生于峰值流量后,大量 goroutine 由于任务等待被休眠,从而运行时不断创建新的 goroutine,
旧的 goroutine 由于休眠未被销毁且得不到复用,导致 GC 需要扫描的执行栈越来越多,进而完成 GC 所需的时间越来越长。
一个解决办法是使用 goroutine 池来限制创建的 goroutine 数量。

总结

GC 是一个复杂的系统工程,本文讨论的二十个问题尽管已经展现了一个相对全面的 Go GC。但它们仍然只是 GC 这一宏观问题的一些较为重要的部分,还有非常多的细枝末节、研究进展无法在有限的篇幅内完整讨论。

从 Go 诞生之初,Go 团队就一直在对 GC 的表现进行实验与优化,但仍然有诸多未解决的问题,我们不妨对 GC 未来的改进拭目以待。

推荐阅读

【Why golang garbage-collector not implement Generational and Compact gc?】https://groups.google.com/forum/#!msg/golang-nuts/KJiyv2mV2pU/wdBUH1mHCAAJ

【写一个内存分配器】http://dmitrysoshnikov.com/compilers/writing-a-memory-allocator/#more-3590

【观察 GC】https://www.ardanlabs.com/blog/2019/05/garbage-collection-in-go-part2-gctraces.html

【煎鱼 Go debug】https://segmentfault.com/a/1190000020255157

【煎鱼 go tool trace】https://eddycjy.gitbook.io/golang/di-9-ke-gong-ju/go-tool-trace

【trace 讲解】https://www.itcodemonkey.com/article/5419.html

【An Introduction to go tool trace】https://about.sourcegraph.com/go/an-introduction-to-go-tool-trace-rhys-hiltner

【http pprof 官方文档】https://golang.org/pkg/net/http/pprof/

【runtime pprof 官方文档】https://golang.org/pkg/runtime/pprof/

【trace 官方文档】https://golang.org/pkg/runtime/trace/


]]>
Go GC 20问
golang自动生成对应MySQL数据库表的struct定义 https://cloudsjhan.github.io/2020/01/01/golang自动生成对应MySQL数据库表的struct定义/ 2020-01-01T14:37:14.000Z 2020-01-01T15:16:15.693Z


在golang的开发过程中,当我们使用orm的时候,常常需要将数据库表对应到golang的一个struct,这些struct会携带orm对应的tag,就像下面的struct定义一样:

1
2
3
4
5
6
7
8
9
10
11
12
13
14
15
16
type InsInfo struct {
Connections string `gorm:"column:connections"`
CPU int `gorm:"column:cpu"`
CreateTime time.Time `gorm:"column:create_time"`
Env int `gorm:"column:env"`
ID int64 `gorm:"column:id;primary_key"`
IP string `gorm:"column:ip"`
Organization string `gorm:"column:organization"`
Pass string `gorm:"column:pass"`
Port string `gorm:"column:port"`
RegionId string `gorm:"column:regionid"`
ServerIP string `gorm:"column:server_ip"`
Status int `gorm:"column:status"`
Type string `gorm:"column:type"`
UUID string `gorm:"column:uuid"`
}

这是gorm对应的数据库表的struct映射,即使数据表的字段不多,如果是手动写起来也是一些重复性的工作。像MySQL这种关系型数据库,我们一般会用orm去操作数据库,于是就想,mysql的数据表能不能来自动生成golang 的struct定义。我们知道mysql有个自带的数据库information_schema,有一张表COLUMNS,它的字段包含数据库名、表名、字段名、字段类型等,我们可以利用这个表的数据,把对应的表的字段信息读取出来,然后再根据golang的语法规则,生成对应的struct。
调研了一下目前有一些命令行工具像 db2struct等,感觉用起来比较繁琐,在想能不能提供一个开箱即用的环境,提供web界面,我们只需要填写数据库信息,就可以一键生成对应的ORM的struct,于是就诞生了这个项目:https://github.com/hantmac/fuckdb

如果你的数据库在本地,那么只需要执行 docker-compose up -d,访问localhost:8088,你就会得到下面的界面:

如果你的数据库在内网服务器上,你需要先修改后端接口的ip:port,然后重新build Docker镜像,push到自己的镜像仓库,然后修改docker-compose.yaml,再执行docker-compose up -d。修改的位置是:fuckdb/frontend/src/config/index.js.

只需要填入数据库相关信息,以及你想得到的golang代码的package namestruct name,然后点击生成,就可以得到gorm对应的结构体映射:

你只需要拷贝你的代码到项目中即可。我们都知道golang的struct的tag有很多功能,这里也提供了很多tag的可选项,比如json,xml等,后面会曾加更多的tag可选项支持。

上面的GIF展示了增加了缓存功能的版本,记忆你之前填写过的数据库信息,省去了大量重复的操作,你不用再填写繁琐的数据库名,表名,等等,只需一键,就可以得到对应的代码,是不是很方便啊。ps:目前数据库信息没有做加密,所以不方便放到公网上使用,仅限于内网,后面会进行相应的开发支持。目前这个工具在我们组内已经开始使用,反馈比较好,节省了很多重复的工作,尤其是在开发的时候用到同一个库的多张表,很快就可以完成数据库表->strcut的映射。

欢迎试用&反馈&Contribute。代码地址:https://github.com/hantmac/fuckdb


]]>
golang自动生成对应MySQL数据库表的struct定义
viper配置详解 https://cloudsjhan.github.io/2019/12/23/viper配置详解/ 2019-12-23T02:31:52.000Z 2019-12-23T02:33:51.501Z


viper 读取配置文件

viper

项目地址 :github.com/spf13/viper

viper 是什么

  • go 开发工具,主要是用于处理各种格式的配置文件,简化程序配置的读取问题
  • viper 支持:
    • 设置默认配置
    • 支持读取 JSON TOML YAML HCL 和 Java 属性配置文件
    • 监听配置文件变化,实时读取读取配置文件内容
    • 读取环境变量值
    • 读取远程配置系统 (etcd Consul) 和监控配置变化
    • 读取命令 Flag 值
    • 读取 buffer 值
    • 读取确切值

安装

1
2
go get github.com/fsnotify/fsnotify
go get github.com/spf13/viper

viper 的基本用法

配置文件

  • json 配置文件 (config.json)

    1
    2
    3
    4
    5
    6
    7
    8
    9
    10
    11
    12
    13
    14
    15
    16
    {
    "port": 10666,
    "mysql": {
    "url": "(127.0.0.1:3306)/biezhi",
    "username": "root",
    "password": "123456"
    },
    "redis": ["127.0.0.1:6377", "127.0.0.1:6378", "127.0.0.1:6379"],
    "smtp": {
    "enable": true,
    "addr": "mail_addr",
    "username": "mail_user",
    "password": "mail_password",
    "to": ["xxx@gmail.com", "xxx@163.com"]
    }
    }
  • yaml 配置文件 (config1.yaml)

    1
    2
    3
    4
    5
    6
    7
    8
    9
    10
    11
    12
    13
    14
    15
    16
    17
    port: 10666
    mysql:
    url: "(127.0.0.1:3306)/biezhi"
    username: root
    password: 123456
    redis:
    - 127.0.0.1:6377
    - 127.0.0.1:6378
    - 127.0.0.1:6379
    smtp:
    enable: true
    addr: mail_addr
    username: mail_user
    password: mail_password
    to:
    - xxx@gmail.com
    - xxx@163.com

本地配置文件读取方式

  • 将上述两个配置文件和下面的 main.go 放在统一目录之下,即可实现读取配置文件
1
2
3
4
5
6
7
8
9
10
11
12
13
14
15
16
17
18
19
20
21
22
23
24
25
26
27
28
29
30
31
32
33
34
35
package main

import (
"fmt"
"log"

"github.com/spf13/viper"
)

func init() {
// viper.SetConfigName("config1") // 读取yaml配置文件
viper.SetConfigName("config") // 读取json配置文件
//viper.AddConfigPath("/etc/appname/") //设置配置文件的搜索目录
//viper.AddConfigPath("$HOME/.appname") // 设置配置文件的搜索目录
viper.AddConfigPath(".") // 设置配置文件和可执行二进制文件在用一个目录
if err := viper.ReadInConfig(); err != nil {
if _, ok := err.(viper.ConfigFileNotFoundError); ok {
// Config file not found; ignore error if desired
log.Println("no such config file")
} else {
// Config file was found but another error was produced
log.Println("read config error")
}
log.Fatal(err) // 读取配置文件失败致命错误
}
}

func main() {
fmt.Println("获取配置文件的port", viper.GetInt("port"))
fmt.Println("获取配置文件的mysql.url", viper.GetString(`mysql.url`))
fmt.Println("获取配置文件的mysql.username", viper.GetString(`mysql.username`))
fmt.Println("获取配置文件的mysql.password", viper.GetString(`mysql.password`))
fmt.Println("获取配置文件的redis", viper.GetStringSlice("redis"))
fmt.Println("获取配置文件的smtp", viper.GetStringMap("smtp"))
}
  • 代码详解
    • viper.SetConfigName (“config”) 设置配置文件名为 config, 不需要配置文件扩展名,配置文件的类型 viper 会自动根据扩展名自动匹配.
    • viper.AddConfigPath (“.”) 设置配置文件搜索的目录,. 表示和当前编译好的二进制文件在同一个目录。可以添加多个配置文件目录,如在第一个目录中找到就不不继续到其他目录中查找.
    • viper.ReadInConfig () 加载配置文件内容
    • viper.Get*** 获取配置文件中配置项的信息

viper 的一些高级用法

  • viper 设置配置项的默认值
1
2
3
4
5
6
7
8
// set default config
viper.SetDefault("ContentDir", "content")
viper.SetDefault("LayoutDir", "layouts")
viper.SetDefault("Taxonomies", map[string]string{"tag": "tags", "category": "categories"})

fmt.Println(viper.GetBool("ContentDir"))
fmt.Println(viper.GetString("LayoutDir"))
fmt.Println(viper.GetStringMapString("Taxonomies"))
  • 监听和重新读取配置文件
    • import “github.com/fsnotify/fsnotify”
1
2
3
4
5
viper.WatchConfig()
viper.OnConfigChange(func(e fsnotify.Event) {
//viper配置发生变化了 执行响应的操作
fmt.Println("Config file changed:", e.Name)
})

从环境变量变量中读取

  • 主要用到的是下面三个个方法
1
2
3
4
5
6
7
8
9
10
11
12
13
14
// AutomaticEnv has Viper check ENV variables for all.
// keys set in config, default & flags
AutomaticEnv()

// BindEnv binds a Viper key to a ENV variable.
// ENV variables are case sensitive.
// If only a key is provided, it will use the env key matching the key, uppercased.
// EnvPrefix will be used when set when env name is not provided.
BindEnv(string…) : error

// SetEnvPrefix defines a prefix that ENVIRONMENT variables will use.
// E.g. if your prefix is "spf", the env registry will look for env
// variables that start with "SPF_".
SetEnvPrefix(string)
  • 简单的使用 demo 如下所示
1
2
3
4
5
6
7
8
9
10
11
12
13
14
15
16
17
18
19
20
21
22
23
24
25
26
27
28
29
package main 

import (
"fmt"
"os"

"github.com/spf13/viper"
)

func main() {
prefix := "PROJECTNAME"
envs := map[string]string{
"LOG_LEVEL": "INFO",
"MODE": "DEV",
"MYSQL_USERNAME": "root",
"MYSQL_PASSWORD": "xxxx",
}
for k, v := range envs {
os.Setenv(fmt.Sprintf("%s_%s", prefix, k), v)
}

v := viper.New()
v.SetEnvPrefix(prefix)
v.AutomaticEnv()

for k, _ := range envs {
fmt.Printf("env `%s` = %s\n", k, v.GetString(k))
}
}

获取远程配置

  • 使用 github.com/spf13/viper/remote 包 import _ “github.com/spf13/viper/remote”

  • Viper 可以从例如 etcd、Consul 的远程 Key/Value 存储系统的一个路径上,读取一个配置字符串(JSON, TOML, YAML 或 HCL 格式). 这些值优先于默认值,但会被从磁盘文件、命令行 flag、环境变量的配置所覆盖.

  • 本人对 consul 比较熟悉,用它来做例子

    • 首先在本地启动 consul

      1
      consul agent -dev
    • 并在 consul 上设置名为 config 的 json 配置文件

      viper

  • 代码如下

    1
    2
    3
    4
    5
    6
    7
    8
    9
    10
    11
    12
    13
    14
    15
    16
    17
    18
    19
    20
    21
    22
    23
    24
    25
    26
    package main

    import (
    "fmt"
    "log"

    "github.com/spf13/viper"
    _ "github.com/spf13/viper/remote"
    )

    func main() {
    v := viper.New()
    v.AddRemoteProvider("consul", "localhost:8500", "config")
    v.SetConfigType("json") // Need to explicitly set this to json
    if err := v.ReadRemoteConfig(); err != nil {
    log.Println(err)
    return
    }

    fmt.Println("获取配置文件的port", v.GetInt("port"))
    fmt.Println("获取配置文件的mysql.url", v.GetString(`mysql.url`))
    fmt.Println("获取配置文件的mysql.username", v.GetString(`mysql.username`))
    fmt.Println("获取配置文件的mysql.password", v.GetString(`mysql.password`))
    fmt.Println("获取配置文件的redis", v.GetStringSlice("redis"))
    fmt.Println("获取配置文件的smtp", v.GetStringMap("smtp"))
    }

从 io.Reader 中读取配置信息

  • 首先给大家来段例子
1
2
3
4
5
6
7
8
9
10
11
12
13
14
15
16
17
18
19
20
21
22
23
24
25
26
27
28
29
30
31
32
33
34
35
36
37
38
39
40
41
42
package main

import (
"bytes"
"fmt"

"github.com/spf13/viper"
)

func main() {
v := viper.New()
v.SetConfigType("json") // 设置配置文件的类型

// 配置文件内容
var jsonExample = []byte(`
{
"port": 10666,
"mysql": {
"url": "(127.0.0.1:3306)/biezhi",
"username": "root",
"password": "123456"
},
"redis": ["127.0.0.1:6377", "127.0.0.1:6378", "127.0.0.1:6379"],
"smtp": {
"enable": true,
"addr": "mail_addr",
"username": "mail_user",
"password": "mail_password",
"to": ["xxx@gmail.com", "xxx@163.com"]
}
}
`)
//创建io.Reader
v.ReadConfig(bytes.NewBuffer(jsonExample))

fmt.Println("获取配置文件的port", v.GetInt("port"))
fmt.Println("获取配置文件的mysql.url", v.GetString(`mysql.url`))
fmt.Println("获取配置文件的mysql.username", v.GetString(`mysql.username`))
fmt.Println("获取配置文件的mysql.password", v.GetString(`mysql.password`))
fmt.Println("获取配置文件的redis", v.GetStringSlice("redis"))
fmt.Println("获取配置文件的smtp", v.GetStringMap("smtp"))
}
  • 这个功能日常的使用情况较少,例如这样的一个情景:
    • 配置文件放在 oss 上或者 github 某个私有仓库上,viper 并没有提供直接的接口去获取,这样我们可以基于第三方托管平台的 sdk 写一套获取配置文件 bytes 的工具,将结果放入 io.Reader 中,再进行配置文件的解析。
  • 上述流程感觉好像比较鸡肋,复杂了整个流程:我既然可以通过第三方的 sdk 直接拿到 bytes,为何不自己直接进行解析呢?而要借助 viper 来解析。可能有人会说,配置文件如果格式不同呢?确实,viper 的出现就是为了针对多种格式的配置文件。但是在正式的项目中,配置文件的格式一般不会变,可以自己写一套解析的工具,也就没有使用 viper 的需求了。而且对于某一种特定格式的配置文件(JSON,YAML…),Golang 已经有足够强大的包来进行解析了。
  • 但是不得不承认 viper 的实现确实是很流弊的。在一般的快速开发过程中,直接使用 viper 确实可以帮助我们省去很多的麻烦,让我们集中精力针对于业务逻辑的实现。
  • 个人觉得可以根据实际需求在 viper 再进行一层封装,接入一些常用的第三方平台的 sdk(github,aliyun oss…), 这样即可以读取本地配置文件,也可以读取远端的配置文件,可以通过命令行参数来实现 dev 模式和 deploy 模式的切换。

]]>
golang配置文件viper详解
使用swaggo自动生成API文档 https://cloudsjhan.github.io/2019/12/10/使用swaggo自动生成API文档/ 2019-12-10T07:16:23.000Z 2019-12-10T07:19:03.588Z


本文转载自: https://razeencheng.com/post/go-swagger.html

相信很多程序猿和我一样不喜欢写API文档。写代码多舒服,写文档不仅要花费大量的时间,有时候还不能做到面面具全。但API文档是必不可少的,相信其重要性就不用我说了,一份含糊的文档甚至能让前后端人员打起来。 而今天这篇博客介绍的swaggo就是让你只需要专注于代码就可以生成完美API文档的工具。废话说的有点多,我们直接看文章。

大概最后文档效果是这样的:

关于Swaggo

或许你使用过Swagger, 而 swaggo就是代替了你手动编写yaml的部分。只要通过一个命令就可以将注释转换成文档,这让我们可以更加专注于代码。

目前swaggo主要实现了swagger 2.0 的以下部分功能:

  • 基本结构(Basic Structure)

  • API 地址与基本路径(API Host and Base Path)

  • 路径与操作 (Paths and Operations)

  • 参数描述(Describing Parameters)

  • 请求参数描述(Describing Request Body)

  • 返回描述(Describing Responses)

  • MIME 类型(MIME Types)

  • 认证(Authentication)

    • Basic Authentication
    • API Keys
  • 添加实例(Adding Examples)

  • 文件上传(File Upload)

  • 枚举(Enums)

  • 按标签分组(Grouping Operations With Tags)

  • 扩展(Swagger Extensions)

下文内容均以gin-swaggo为例

这里是demo地址

使用

安装swag cli 及下载相关包

要使用swaggo,首先需要安装swag cli

复制

1
go get -u github.com/swaggo/swag/cmd/swag

然后我们还需要两个包。

复制

1
2
3
4
# gin-swagger 中间件
go get github.com/swaggo/gin-swagger
# swagger 内置文件
go get github.com/swaggo/gin-swagger/swaggerFiles

main.go内添加注释

复制

1
2
3
4
5
6
7
8
9
10
11
12
13
14
15
16
17
18
19
20
21
22
23
24
25
26
27
28
29
30
31
32
33
34
35
36
37
38
39
40
41
42
43
44
package main

import (
"github.com/gin-gonic/gin"
ginSwagger "github.com/swaggo/gin-swagger"
"github.com/swaggo/gin-swagger/swaggerFiles"
)

// @title Swagger Example API
// @version 1.0
// @description This is a sample server celler server.
// @termsOfService https://razeen.me

// @contact.name Razeen
// @contact.url https://razeen.me
// @contact.email me@razeen.me

// @license.name Apache 2.0
// @license.url http://www.apache.org/licenses/LICENSE-2.0.html

// @host 127.0.0.1:8080
// @BasePath /api/v1

func main() {

r := gin.Default()
store := sessions.NewCookieStore([]byte("secret"))
r.Use(sessions.Sessions("mysession", store))

r.GET("/swagger/*any", ginSwagger.WrapHandler(swaggerFiles.Handler))

v1 := r.Group("/api/v1")
{
v1.GET("/hello", HandleHello)
v1.POST("/login", HandleLogin)
v1Auth := r.Use(HandleAuth)
{
v1Auth.POST("/upload", HandleUpload)
v1Auth.GET("/list", HandleList)
}
}

r.Run(":8080")
}

如上所示,我们需要导入

复制

1
2
ginSwagger "github.com/swaggo/gin-swagger"
"github.com/swaggo/gin-swagger/swaggerFiles"

同时,添加注释。其中:

  • titile: 文档标题
  • version: 版本
  • description,termsOfService,contact ... 这些都是一些声明,可不写。
  • license.name 额,这个是必须的。
  • host,BasePath: 如果你想直接swagger调试API,这两项需要填写正确。前者为服务文档的端口,ip。后者为基础路径,像我这里就是“/api/v1”。
  • 在原文档中还有securityDefinitions.basic,securityDefinitions.apikey等,这些都是用来做认证的,我这里暂不展开。

到这里,我们在mian.go同目录下执行swag init就可以自动生成文档,如下:

复制

1
2
3
4
➜  swaggo-gin git:(master) ✗ swag init
2019/01/12 21:29:14 Generate swagger docs....
2019/01/12 21:29:14 Generate general API Info
2019/01/12 21:29:14 create docs.go at docs/docs.go

然后我们导入这个自动生成的docs包,运行:

复制

1
2
3
4
5
6
7
8
9
10
11
12
13
package main

import (
"github.com/gin-gonic/gin"
ginSwagger "github.com/swaggo/gin-swagger"
"github.com/swaggo/gin-swagger/swaggerFiles"

_ "github.com/razeencheng/demo-go/swaggo-gin/docs"
)

// @title Swagger Example API
// @version 1.0
// ...

复制

1
2
3
4
5
6
7
8
9
10
11
12
13
14
➜  swaggo-gin git:(master) ✗ go build
➜ swaggo-gin git:(master) ✗ ./swaggo-gin
[GIN-debug] [WARNING] Creating an Engine instance with the Logger and Recovery middleware already attached.

[GIN-debug] [WARNING] Running in "debug" mode. Switch to "release" mode in production.
- using env: export GIN_MODE=release
- using code: gin.SetMode(gin.ReleaseMode)

[GIN-debug] GET /api/v1/hello --> main.HandleHello (3 handlers)
[GIN-debug] POST /api/v1/login --> main.HandleLogin (3 handlers)
[GIN-debug] POST /upload --> main.HandleUpload (4 handlers)
[GIN-debug] GET /list --> main.HandleList (4 handlers)
[GIN-debug] GET /swagger/*any --> github.com/swaggo/gin-swagger.WrapHandler.func1 (4 handlers)
[GIN-debug] Listening and serving HTTP on :8080

浏览器打开http://127.0.0.1:8080/swagger/index.html, 我们可以看到如下文档标题已经生成。

img

在Handle函数上添加注释

接下来,我们需要在每个路由处理函数上加上注释,如:

复制

1
2
3
4
5
6
7
8
9
10
11
12
13
14
15
16
17
18
19
// @Summary 测试SayHello
// @Description 向你说Hello
// @Tags 测试
// @Accept mpfd
// @Produce json
// @Param who query string true "人名"
// @Success 200 {string} json "{"msg": "hello Razeen"}"
// @Failure 400 {string} json "{"msg": "who are you"}"
// @Router /hello [get]
func HandleHello(c *gin.Context) {
who := c.Query("who")

if who == "" {
c.JSON(http.StatusBadRequest, gin.H{"msg": "who are u?"})
return
}

c.JSON(http.StatusOK, gin.H{"msg": "hello " + who})
}

我们再次swag init, 运行一下。

img

此时,该API的相关描述已经生成了,我们点击Try it out还可以直接测试该API。

img

是不是很好用,当然这并没有结束,这些注释字段,我们一个个解释。

img

这些注释对应出现在API文档的位置,我在上图中已经标出,这里我们主要详细说说下面参数:

Tags

Tags 是用来给API分组的。

Accept

接收的参数类型,支持表单(mpfd) 和 JSON(json)

Produce

返回的数据结构,一般都是json, 其他支持如下表:

Mime Type声明
application/jsonjson
text/xmlxml
text/plainplain
htmlhtml
multipart/form-datampfd
application/x-www-form-urlencodedx-www-form-urlencoded
application/vnd.api+jsonjson-api
application/x-json-streamjson-stream
application/octet-streamoctet-stream
image/pngpng
image/jpegjpeg
image/gifgif
Param

参数,从前往后分别是:

@Param 1.参数名 2.参数类型 3.参数数据类型 4.是否必须 5.参数描述 6.其他属性

  • 1.参数名

    参数名就是我们解释参数的名字。

  • 2.参数类型

    参数类型主要有四种:

    • path 该类型参数直接拼接在URL中,如DemoHandleGetFile

      复制

      1
      // @Param id path integer true "文件ID"
    • query 该类型参数一般是组合在URL中的,如DemoHandleHello

      复制

      1
      // @Param who query string true "人名"
    • formData 该类型参数一般是POST,PUT方法所用,如DemoHandleLogin

      复制

      1
      // @Param user formData string true "用户名" default(admin)
  • bodyAcceptJSON格式时,我们使用该字段指定接收的JSON类型

    复制

    1
    // @Param param body main.JSONParams true "需要上传的JSON"
  • 3.参数数据类型

    数据类型主要支持一下几种:

    • string (string)
    • integer (int, uint, uint32, uint64)
    • number (float32)
    • boolean (bool)

    注意,如果你是上传文件可以使用file, 但参数类型一定是formData, 如下:

    复制

    1
    // @Param file formData file true "文件"
  • 4.是否是必须

    表明该参数是否是必须需要的,必须的在文档中会黑体标出,测试时必须填写。

  • 5.参数描述

    就是参数的一些说明

  • 6.其他属性

    除了上面这些属性外,我们还可以为该参数填写一些额外的属性,如枚举,默认值,值范围等。如下:

    复制

    1
    2
    3
    4
    5
    6
    7
    8
    9
    10
    11
    枚举
    // @Param enumstring query string false "string enums" Enums(A, B, C)
    // @Param enumint query int false "int enums" Enums(1, 2, 3)
    // @Param enumnumber query number false "int enums" Enums(1.1, 1.2, 1.3)

    值添加范围
    // @Param string query string false "string valid" minlength(5) maxlength(10)
    // @Param int query int false "int valid" mininum(1) maxinum(10)

    设置默认值
    // @Param default query string false "string default" default(A)

    而且这些参数是可以组合使用的,如:

    复制

    1
    // @Param enumstring query string false "string enums" Enums(A, B, C) default(A)
Success

指定成功响应的数据。格式为:

// @Success 1.HTTP响应码 {2.响应参数类型} 3.响应数据类型 4.其他描述

  • 1.HTTP响应码

    也就是200,400,500那些。

  • 2.响应参数类型 / 3.响应数据类型

    返回的数据类型,可以是自定义类型,可以是json。

    • 自定义类型

    在平常的使用中,我都会返回一些指定的模型序列化JSON的数据,这时,就可以这么写:

    复制

    1
    // @Success 200 {object} main.File

    其中,模型直接用包名.模型即可。你会说,假如我返回模型数组怎么办?这时你可以这么写:

    复制

    1
    // @Success 200 {anrry} main.File
    • json

    将如你只是返回其他的json数据可如下写:

    复制

    1
    // @Success 200 {string} json ""
  • 4.其他描述

    可以添加一些说明。

Failure

同Success。

Router

指定路由与HTTP方法。格式为:

// @Router /path/to/handle [HTTP方法]

不用加基础路径哦。

生成文档与测试

其实上面已经穿插的介绍了。

main.go下运行swag init即可生成和更新文档。

点击文档中的Try it out即可测试。 如果部分API需要登陆,可以Try登陆接口即可。

优化

看到这里,基本可以使用了。但文档一般只是我们测试的时候需要,当我的产品上线后,接口文档是不应该给用户的,而且带有接口文档的包也会大很多(swaggo是直接build到二进制里的)。

想要处理这种情况,我们可以在编译的时候优化一下,如利用build tag来控制是否编译文档。

main.go声明swagHandler,并在该参数不为空时才加入路由:

复制

1
2
3
4
5
6
7
8
9
10
11
12
13
14
15
package main

//...

var swagHandler gin.HandlerFunc

func main(){
// ...

if swagHandler != nil {
r.GET("/swagger/*any", swagHandler)
}

//...
}

同时,我们将该参数在另外加了build tag的包中初始化。

复制

1
2
3
4
5
6
7
8
9
10
11
12
13
14
// +build doc

package main

import (
_ "github.com/razeencheng/demo-go/swaggo-gin/docs"

ginSwagger "github.com/swaggo/gin-swagger"
"github.com/swaggo/gin-swagger/swaggerFiles"
)

func init() {
swagHandler = ginSwagger.WrapHandler(swaggerFiles.Handler)
}

之后我们就可以使用go build -tags "doc"来打包带文档的包,直接go build来打包不带文档的包。

你会发现,即使我这么小的Demo,编译后的大小也要相差19M !

复制

1
2
3
4
5
6
➜  swaggo-gin git:(master) ✗ go build
➜ swaggo-gin git:(master) ✗ ll swaggo-gin
-rwxr-xr-x 1 xxx staff 15M Jan 13 00:23 swaggo-gin
➜ swaggo-gin git:(master) ✗ go build -tags "doc"
➜ swaggo-gin git:(master) ✗ ll swaggo-gin
-rwxr-xr-x 1 xxx staff 34M Jan 13 00:24 swaggo-gin

文章到这里也就结束了,完整的Demo地址在这里

相关链接


]]>
使用swaggo自动生成API文档
golang开发效率神奇汇总 https://cloudsjhan.github.io/2019/12/06/golang开发效率神奇汇总/ 2019-12-06T09:46:58.000Z 2019-12-06T11:03:09.961Z

一. 开发工具
1)sql2go
用于将 sql 语句转换为 golang 的 struct. 使用 ddl 语句即可。
例如对于创建表的语句: show create table xxx. 将输出的语句,直接粘贴进去就行。
http://stming.cn/tool/sql2go.html

2)toml2go
用于将编码后的 toml 文本转换问 golang 的 struct.
https://xuri.me/toml-to-go/

3)curl2go
用来将 curl 命令转化为具体的 golang 代码.
https://mholt.github.io/curl-to-go/

4)json2go
用于将 json 文本转换为 struct.
https://mholt.github.io/json-to-go/

5)mysql 转 ES 工具
http://www.ischoolbar.com/EsParser/

6)golang
模拟模板的工具,在支持泛型之前,可以考虑使用。
https://github.com/cheekybits/genny

7)查看某一个库的依赖情况,类似于 go list 功能
https://github.com/KyleBanks/depth

8)一个好用的文件压缩和解压工具,集成了 zip,tar 等多种功能,主要还有跨平台。
https://github.com/mholt/archiver

9)go 内置命令
go list 可以查看某一个包的依赖关系.
go vet 可以检查代码不符合 golang 规范的地方。

10)热编译工具
https://github.com/silenceper/gowatch

11)revive
golang 代码质量检测工具
https://github.com/mgechev/revive

12)Go Callvis
golang 的代码调用链图工具
https://github.com/TrueFurby/go-callvis

13)Realize
开发流程改进工具
https://github.com/oxequa/realize

14)Gotests
自动生成测试用例工具
https://github.com/cweill/gotests

二.调试工具
1)perf
代理工具,支持内存,cpu,堆栈查看,并支持火焰图.
perf 工具和 go-torch 工具,快捷定位程序问题.
https://github.com/uber-archive/go-torch
https://github.com/google/gops

2)dlv 远程调试
基于 goland+dlv 可以实现远程调式的能力.
https://github.com/go-delve/delve
提供了对 golang 原生的支持,相比 gdb 调试,简单太多。

3)网络代理工具
goproxy 代理,支持多种协议,支持 ssh 穿透和 kcp 协议.
https://github.com/snail007/goproxy

4)抓包工具
go-sniffer 工具,可扩展的抓包工具,可以开发自定义协议的工具包. 现在只支持了 http,mysql,redis,mongodb.
基于这个工具,我们开发了 qapp 协议的抓包。
https://github.com/40t/go-sniffer

5)反向代理工具,快捷开放内网端口供外部使用。
ngrok 可以让内网服务外部调用
https://ngrok.com/
https://github.com/inconshreveable/ngrok

6)配置化生成证书
从根证书,到业务侧证书一键生成.
https://github.com/cloudflare/cfssl

7)免费的证书获取工具
基于 acme 协议,从 letsencrypt 生成免费的证书,有效期 1 年,可自动续期。
https://github.com/Neilpang/acme.sh

8)开发环境管理工具,单机搭建可移植工具的利器。支持多种虚拟机后端。
vagrant常被拿来同 docker 相比,值得拥有。
https://github.com/hashicorp/vagrant

9)轻量级容器调度工具
nomad 可以非常方便的管理容器和传统应用,相比 k8s 来说,简单不要太多.
https://github.com/hashicorp/nomad

10)敏感信息和密钥管理工具
https://github.com/hashicorp/vault

11)高度可配置化的 http 转发工具,基于 etcd 配置。
https://github.com/gojek/weaver

12)进程监控工具 supervisor
https://www.jianshu.com/p/39b476e808d8

13)基于procFile进程管理工具. 相比 supervisor 更加简单。
https://github.com/ddollar/foreman

14)基于 http,https,websocket 的调试代理工具,配置功能丰富。在线教育的 nohost web 调试工具,基于此开发.
https://github.com/avwo/whistle

15)分布式调度工具
https://github.com/shunfei/cronsun/blob/master/README_ZH.md
https://github.com/ouqiang/gocron

16)自动化运维平台 Gaia
https://github.com/gaia-pipeline/gaia

三. 网络工具

四. 常用网站
go 百科全书: https://awesome-go.com/

json 解析: https://www.json.cn/

出口 IP: https://ipinfo.io/

redis 命令: http://doc.redisfans.com/

ES 命令首页:

https://www.elastic.co/guide/cn/elasticsearch/guide/current/index.html

UrlEncode: http://tool.chinaz.com/Tools/urlencode.aspx

Base64: https://tool.oschina.net/encrypt?type=3

Guid: https://www.guidgen.com/

常用工具: http://www.ofmonkey.com/

五. golang 常用库
日志
https://github.com/Sirupsen/logrus
https://github.com/uber-go/zap

配置
兼容 json,toml,yaml,hcl 等格式的日志库.
https://github.com/spf13/viper

存储
mysql: https://github.com/go-xorm/xorm
es: https://github.com/elastic/elasticsearch
redis: https://github.com/gomodule/redigo
mongo: https://github.com/mongodb/mongo-go-driver
kafka: https://github.com/Shopify/sarama

数据结构
https://github.com/emirpasic/gods

命令行
https://github.com/spf13/cobra

框架
https://github.com/grpc/grpc-go
https://github.com/gin-gonic/gin

并发
https://github.com/Jeffail/tunny
https://github.com/benmanns/goworker
现在我们框架在用的,虽然 star 不多,但是确实好用,当然还可以更好用.
https://github.com/rafaeldias/async

工具
定义了实用的判定类,以及针对结构体的校验逻辑,避免业务侧写复杂的代码.
https://github.com/asaskevich/govalidator
https://github.com/bytedance/go-tagexpr

protobuf 文件动态解析的接口,可以实现反射相关的能力。
https://github.com/jhump/protoreflect

表达式引擎工具
https://github.com/Knetic/govaluate
https://github.com/google/cel-go

字符串处理
https://github.com/huandu/xstrings

ratelimit 工具
https://github.com/uber-go/ratelimit
https://blog.csdn.net/chenchongg/article/details/85342086
https://github.com/juju/ratelimit

golang 熔断的库
熔断除了考虑频率限制,还要考虑 qps,出错率等其他东西.
https://github.com/afex/hystrix-go
https://github.com/sony/gobreaker

表格
https://github.com/chenjiandongx/go-echarts

tail 工具库
https://github.com/hpcloud/taglshi


]]>
<p class="description"></p> <p><img src="https://" alt="" style="width:100%"></p>
golang设计模式之装饰器模式 https://cloudsjhan.github.io/2019/11/30/golang设计模式之装饰器模式/ 2019-11-30T07:21:30.000Z 2019-11-30T07:34:02.841Z


装饰器

装饰器结构模式允许动态地扩展现有对象的功能,而不改变其内部结构。

装饰器提供了一种灵活的方法来扩展对象的功能。

golang 实现

下面的LogDecorate用signature func(int)int修饰函数,该函数操作整数并添加输入/输出日志记录功能。

1
2
3
4
5
6
7
8
9
10
11
12
13
type Object func(int) int

func LogDecorate(fn Object) Object {
return func(n int) int {
log.Println("Starting the execution with the integer", n)

result := fn(n)

log.Println("Execution is completed with the result", result)

return result
}
}

如何使用

1
2
3
4
5
6
7
func Double(n int) int {
return n*2
}
f := LogDecorate(Double)
f(5)
//参数为5,开始执行
//执行的结果是10

经验

  • 与适配器模式不同,要修饰的对象是通过注入获得的。

  • 装饰器不应更改对象的接口。


]]>
golang设计模式之装饰器模式
github&Daocloud演讲稿整理与总结 https://cloudsjhan.github.io/2019/11/23/githubXDaocloud演讲稿整理与总结-md/ 2019-11-23T14:27:40.000Z 2019-11-23T14:37:12.828Z


大家下午好,今天给大家带来的分享主题是 golang 的内存分析以及优化,主要分为两部分内容,一是 以开源项目crawlab的内存分析与优化为例,讲解golang内存调优的一些工具和分析的过程;

第二部分是介绍平时开发中容易忽略的和容易带来性能问题的点,以及如何去优化。

当时这个话题的灵感来自一个开源项目 crawlab, crawlab是一个分布式任务调度平台,这里不展开详细解释了,大家有兴趣可以到GitHub主页看一下,https://github.com/crawlab-team/crawlab

crawlab_pic

当时是有用户报出crawlab启动一段时间后,主节点机器会出现内存占用过高的问题,一台4G内存的服务器在运行crawlab后竟然能占用3G以的内存,然后整个master就会down掉,于是我开始对crawlab的后端服务进行性能的分析,下面将带大家回顾这一过程。

首先介绍,Golang的性能分析主要分为两种方式,截屏2019-11-2322.14.47

一种是通过文件方式输出profile,特点是灵活性高,适用于特定代码片段的分析,我们通过调用/runtime包中的/pprof的API生成相应的pprof文件,然后使用 pprof就可以进入类似GDB的窗口。在这个窗口中你就可以用top,list function等命令去查看cpu,memory的状况以及goroutine运行情况。

第二种方式就是通过HTTP输出profile,

截屏2019-11-2322.17.33

这种方式就适合于你还不清楚到底哪一段代码出现问题,而且你的应用要持续运行的情况。在分析crawlab的时候,采用的是这种方式。首先,我们在crawlab项目中嵌入如下几行代码,将crawlab后端服务启动后,浏览器中输入http://ip:8899/debug/pprof/就可以看到一个汇总分析页面,显示如下信息,点击heap,在汇总分析页面的最上方可以看到如下图所示,

heap_server

红色箭头所指的就是当前已经使用的堆内存是25M,!在我只上传一个爬虫文件,而且这个文件还不是特别打大的情况下,一个后端服务所用的内存使用竟然能达到25M。

我们再用这个命令进入命令行详细看一下,这个命令进入后,输入top命令可以显示前10的内存分配,flat是堆栈中当前层的inuse内存值,cum是堆栈中本层级的累计inuse内存值。

可以看到,bytes.makeSlice这个内置方法竟然使用了24M内存,那么我们就考虑谁会用到makeslice呢,heap_gdb

继续往下看,可以看到ReadFrom这个方法,看下源码,发现 ioutil.ReadAll() 里会调用 bytes.Buffer.ReadFrom,

image-20191123222106249

而 ReadFrom 会进行 makeSlice。让我们再回头看一下readAll的代码实现:

image-20191123222129984

这个函数主要作用就是从 io.Reader 里读取的数据放入 buffer 中,如果 buffer 空间不够,就按照每次 2x 所读取内容的大小+ MinRead 的算法递增,这里 MinRead 的大小是 512 个字节,也就是说如果我们一次性读取的内容过大,就会导致所使用的内存倍增,假设我们的所有任务文件总共有500M,那么所用的内存就有500M * 2 + 512B,所以我们分析很可能是这个原因导致的,那看看crawlab源码中是哪一段使用ReadAll读了文件,定位到了这里

image-20191123222147655

这段代码直接将全部的文件内容,以二进制的形式读了进来,导致内存倍增,令人窒息的操作。至此,问题已经发现,那么如何去优化呢,其实在读大文件的时候,把文件内容全部读到内存,直接就翻车了,正确是处理方法有两种,一种是流式处理 ,如代码所示

image-20191123222203534

第二种方案就是分片处理,当读取的是二进制文件,没有换行符的时候,使用这种方案比较合适。

image-20191123222215908

我们这里采用的第二种方式来优化,优化后再来看下内存占用情况

我们采样程序运行30s的平均内存,并且在此期间访问上传文件的接口后,看到内存占用已经降到正常的水平了。

image-20191123222231369v

刚刚我用一个实际案例介绍了如何去一步一步的分析及优化go程序的内存问题,大家可以在平时开发中多去探索,多使用。

接下来介绍一些go 开发中的小技巧,从细节上提高你的golang应用程序的性能。

众所周知Json 作为一种重要的数据格式,大家开发者经常用到。Go 语言里面原生支持了json的序列化以及反序列化,内部使用反射机制实现,我们都知道,反射的性能有点差,在高度依赖 json 解析的接口里,这往往会成为性能瓶颈,好在已有很多第三方库帮我们解决了这个问题,但是这么多库,到底要怎么选择呢,下面就给大家来一一分析一下,这里介绍4个json序列化反序列化的库,

截屏2019-11-2322.23.03

看完这些你可能不知道到底该用哪一个,让我们来看下benchmark.

image-20191123222330976

  • ​ •easyjson 无论是序列化还是反序列化都是最优的,序列化提升了1倍,反序列化提升了3倍

  • ​ •jsoniter 性能也很好,接近于easyjson,关键是没有预编译过程,100%兼容原生库

  • ​ •ffjson 的序列化提升并不明显,反序列化提升了1倍

  • 所以综合考虑,建议大家使用 jsoniter,如果追求极致的性能,考虑 easyjson

    字符串拼接在开发中肯定是经常用到的,当你的应用中的某一部分大量用到字符串拼接,你最好留意一下下面的内容。我们列举4中字符串拼接的方式,看看你经常用的是哪个?

    截屏2019-11-2322.24.48

第一种 + 号运算符,第二种是golang特有的一种方式,第三中是 strings.builder, 最后一种是strings.buffer。

看下benchmark你就会做出你最终的选择。性能最好的是strings.builder,而sprintf性能最差,+ 号运算符也没好到哪里去。

image-20191123222511309

以上就是我今天分享的全部内容,希望能帮助到大家,下面是我的联系方式,有问题的可以线下继续交流。谢谢!


]]>
github&Daocloud演讲总结
golang cron使用 https://cloudsjhan.github.io/2019/10/29/golang-cron使用/ 2019-10-29T11:10:03.000Z 2019-10-29T11:12:04.488Z


Go定时器cron的使用详解

更新时间:2018年01月11日 10:51:02 作者:骑头猪逛街 img 我要评论

本篇文章主要介绍了Go定时器cron的使用详解,小编觉得挺不错的,现在分享给大家,也给大家做个参考。一起跟随小编过来看看吧

cron是什么

cron的意思就是:计划任务,说白了就是定时任务。我和系统约个时间,你在几点几分几秒或者每隔几分钟跑一个任务(job),就那么简单。

cron表达式  

cron表达式是一个好东西,这个东西不仅Java的quartZ能用到,Go语言中也可以用到。我没有用过Linux的cron,但网上说Linux也是可以用crontab -e 命令来配置定时任务。Go语言和Java中都是可以精确到秒的,但是Linux中不行。

cron表达式代表一个时间的集合,使用6个空格分隔的字段表示:

字段名是否必须允许的值允许的特定字符
秒(Seconds)0-59* / , -
分(Minute)0-59* / , -
时(Hours)0-23* / , -
日(Day of month)1-31* / , - ?
月(Month)1-12 或 JAN-DEC* / , -
星期(Day of week)0-6 或 SUM-SAT* / , - ?

1.月(Month)和星期(Day of week)字段的值不区分大小写,如:SUN、Sun 和 sun 是一样的。

2.星期(Day of week)字段如果没提供,相当于是 *

?

1
`# ┌───────────── min (0 - 59)``# │ ┌────────────── hour (0 - 23)``# │ │ ┌─────────────── day of month (1 - 31)``# │ │ │ ┌──────────────── month (1 - 12)``# │ │ │ │ ┌───────────────── day of week (0 - 6) (0 to 6 are Sunday to``# │ │ │ │ │     Saturday, or use names; 7 is also Sunday)``# │ │ │ │ │``# │ │ │ │ │``# * * * * * command to execute`

cron特定字符说明

1)星号(*)

表示 cron 表达式能匹配该字段的所有值。如在第5个字段使用星号(month),表示每个月

2)斜线(/)

表示增长间隔,如第1个字段(minutes) 值是 3-59/15,表示每小时的第3分钟开始执行一次,之后每隔 15 分钟执行一次(即 3、18、33、48 这些时间点执行),这里也可以表示为:3/15

3)逗号(,)

用于枚举值,如第6个字段值是 MON,WED,FRI,表示 星期一、三、五 执行

4)连字号(-)

表示一个范围,如第3个字段的值为 9-17 表示 9am 到 5pm 直接每个小时(包括9和17)

5)问号(?)

只用于 日(Day of month) 和 星期(Day of week),表示不指定值,可以用于代替 *

6)L,W,#

Go中没有L,W,#的用法,下文作解释。

cron举例说明

每隔5秒执行一次:/5 * ?

每隔1分钟执行一次:0 /1 ?

每天23点执行一次:0 0 23 ?

每天凌晨1点执行一次:0 0 1 ?

每月1号凌晨1点执行一次:0 0 1 1 * ?

在26分、29分、33分执行一次:0 26,29,33 * ?

每天的0点、13点、18点、21点都执行一次:0 0 0,13,18,21 ?

下载安装

控制台输入 go get github.com/robfig/cron去下载定时任务的Go包,前提是你的$GOPATH已经配置好

源码解析

文件目录讲解 

?

1
`constantdelay.go  #一个最简单的秒级别定时系统。与cron无关``constantdelay_test.go #测试``cron.go    #Cron系统。管理一系列的cron定时任务(Schedule Job)``cron_test.go   #测试``doc.go    #说明文档``LICENSE    #授权书 ``parser.go    #解析器,解析cron格式字符串城一个具体的定时器(Schedule)``parser_test.go  #测试``README.md    #README``spec.go    #单个定时器(Schedule)结构体。如何计算自己的下一次触发时间``spec_test.go   #测试`

cron.go

结构体:

?

1
`// Cron keeps track of any number of entries, invoking the associated func as``// specified by the schedule. It may be started, stopped, and the entries may``// be inspected while running. ``// Cron保持任意数量的条目的轨道,调用相关的func时间表指定。它可以被启动,停止和条目,可运行的同时进行检查。``type Cron struct {`` ``entries []*Entry     // 任务`` ``stop  chan struct{}  // 叫停止的途径`` ``add  chan *Entry  // 添加新任务的方式`` ``snapshot chan []*Entry  // 请求获取任务快照的方式`` ``running bool    // 是否在运行`` ``ErrorLog *log.Logger  // 出错日志(新增属性)`` ``location *time.Location  // 所在地区(新增属性)  ``}`

?

1
`// Entry consists of a schedule and the func to execute on that schedule.``// 入口包括时间表和可在时间表上执行的func``type Entry struct {``  ``// 计时器`` ``Schedule Schedule`` ``// 下次执行时间`` ``Next time.Time`` ``// 上次执行时间`` ``Prev time.Time`` ``// 任务`` ``Job Job``}`

关键方法:

?

1
`// 开始任务``// Start the cron scheduler in its own go-routine, or no-op if already started.``func (c *Cron) Start() {`` ``if c.running {``  ``return`` ``}`` ``c.running = true`` ``go c.run()``}``// 结束任务``// Stop stops the cron scheduler if it is running; otherwise it does nothing.``func (c *Cron) Stop() {`` ``if !c.running {``  ``return`` ``}`` ``c.stop <- struct{}{}`` ``c.running = false``}` `// 执行定时任务``// Run the scheduler.. this is private just due to the need to synchronize``// access to the 'running' state variable.``func (c *Cron) run() {`` ``// Figure out the next activation times for each entry.`` ``now := time.Now().In(c.location)`` ``for _, entry := range c.entries {``  ``entry.Next = entry.Schedule.Next(now)`` ``}``  ``// 无限循环`` ``for {``   ``//通过对下一个执行时间进行排序,判断那些任务是下一次被执行的,防在队列的前面.sort是用来做排序的``  ``sort.Sort(byTime(c.entries))` `  ``var effective time.Time``  ``if len(c.entries) == 0 || c.entries[0].Next.IsZero() {``   ``// If there are no entries yet, just sleep - it still handles new entries``   ``// and stop requests.``   ``effective = now.AddDate(10, 0, 0)``  ``} else {``   ``effective = c.entries[0].Next``  ``}` `  ``timer := time.NewTimer(effective.Sub(now))``  ``select {``  ``case now = <-timer.C: // 执行当前任务``   ``now = now.In(c.location)``   ``// Run every entry whose next time was this effective time.``   ``for _, e := range c.entries {``    ``if e.Next != effective {``     ``break``    ``}``    ``go c.runWithRecovery(e.Job)``    ``e.Prev = e.Next``    ``e.Next = e.Schedule.Next(now)``   ``}``   ``continue` `  ``case newEntry := <-c.add: // 添加新的任务``   ``c.entries = append(c.entries, newEntry)``   ``newEntry.Next = newEntry.Schedule.Next(time.Now().In(c.location))` `  ``case <-c.snapshot: // 获取快照``   ``c.snapshot <- c.entrySnapshot()` `  ``case <-c.stop: // 停止任务``   ``timer.Stop()``   ``return``  ``}` `  ``// 'now' should be updated after newEntry and snapshot cases.``  ``now = time.Now().In(c.location)``  ``timer.Stop()`` ``}``}`

spec.go

结构体及关键方法:

?

1
`// SpecSchedule specifies a duty cycle (to the second granularity), based on a``// traditional crontab specification. It is computed initially and stored as bit sets.``type SpecSchedule struct {`` ``// 表达式中锁表明的,秒,分,时,日,月,周,每个都是uint64`` ``// Dom:Day of Month,Dow:Day of week`` ``Second, Minute, Hour, Dom, Month, Dow uint64``}` `// bounds provides a range of acceptable values (plus a map of name to value).``// 定义了表达式的结构体``type bounds struct {`` ``min, max uint`` ``names map[string]uint``}` `// The bounds for each field.``// 这样就能看出各个表达式的范围``var (``  ``seconds = bounds{0, 59, nil}``  ``minutes = bounds{0, 59, nil}``  ``hours = bounds{0, 23, nil}``  ``dom  = bounds{1, 31, nil}``  ``months = bounds{1, 12, map[string]uint{``    ``"jan": 1,``    ``"feb": 2,``    ``"mar": 3,``    ``"apr": 4,``    ``"may": 5,``    ``"jun": 6,``    ``"jul": 7,``    ``"aug": 8,``    ``"sep": 9,``    ``"oct": 10,``    ``"nov": 11,``    ``"dec": 12,``  ``}}``  ``dow = bounds{0, 6, map[string]uint{``    ``"sun": 0,``    ``"mon": 1,``    ``"tue": 2,``    ``"wed": 3,``    ``"thu": 4,``    ``"fri": 5,``    ``"sat": 6,``  ``}}``)` `const (``  ``// Set the top bit if a star was included in the expression.``  ``starBit = 1 << 63``)`

看了上面的东西肯定有人疑惑为什么秒分时这些都是定义了unit64,以及定义了一个常量starBit = 1 << 63这种写法,这是逻辑运算符。表示二进制1向左移动63位。原因如下:

cron表达式是用来表示一系列时间的,而时间是无法逃脱自己的区间的 , 分,秒 0 - 59 , 时 0 - 23 , 天/月 0 - 31 , 天/周 0 - 6 , 月0 - 11 。 这些本质上都是一个点集合,或者说是一个整数区间。 那么对于任意的整数区间 , 可以描述cron的如下部分规则。

  1. * | ? 任意 , 对应区间上的所有点。 ( 额外注意 日/周 , 日 / 月 的相互干扰。)
  2. 纯数字 , 对应一个具体的点。
  3. / 分割的两个数字 a , b, 区间上符合 a + n * b 的所有点 ( n >= 0 )。
  4. - 分割的两个数字, 对应这两个数字决定的区间内的所有点。
  5. L | W 需要对于特定的时间特殊判断, 无法通用的对应到区间上的点。

至此, robfig/cron为什么不支持 L | W的原因已经明了了。去除这两条规则后, 其余的规则其实完全可以使用点的穷举来通用表示。 考虑到最大的区间也不过是60个点,那么使用一个uint64的整数的每一位来表示一个点便很合适了。所以定义unit64不为过

下面是go中cron表达式的方法:

?

1
`/* `` ``------------------------------------------------------------`` ``第64位标记任意 , 用于 日/周 , 日 / 月 的相互干扰。`` ``63 - 0 为 表示区间 [63 , 0] 的 每一个点。`` ``------------------------------------------------------------` ` ``假设区间是 0 - 63 , 则有如下的例子 :` ` ``比如 0/3 的表示如下 : (表示每隔两位为1)`` ``* / ?  `` ``+---+--------------------------------------------------------+`` ``| 0 | 1 0 0 1 0 0 1 ~~ ~~     1 0 0 1 0 0 1 |`` ``+---+--------------------------------------------------------+ ``  ``63 ~ ~           ~~ 0` ` ``比如 2-5 的表示如下 : (表示从右往左2-5位上都是1)`` ``* / ?  `` ``+---+--------------------------------------------------------+`` ``| 0 | 0 0 0 0 ~ ~  ~~   ~ 0 0 0 1 1 1 1 0 0 |`` ``+---+--------------------------------------------------------+ ``  ``63 ~ ~           ~~ 0` ` ``比如 * 的表示如下 : (表示所有位置上都为1)`` ``* / ?  `` ``+---+--------------------------------------------------------+`` ``| 1 | 1 1 1 1 1 ~ ~     ~ 1 1 1 1 1 1 1 1 1 |`` ``+---+--------------------------------------------------------+ ``  ``63 ~ ~           ~~ 0 ``*/`

parser.go

将字符串解析为SpecSchedule的类。

?

1
`package cron` `import (`` ``"fmt"`` ``"math"`` ``"strconv"`` ``"strings"`` ``"time"``)` `// Configuration options for creating a parser. Most options specify which``// fields should be included, while others enable features. If a field is not``// included the parser will assume a default value. These options do not change``// the order fields are parse in.``type ParseOption int` `const (`` ``Second  ParseOption = 1 << iota // Seconds field, default 0`` ``Minute        // Minutes field, default 0`` ``Hour        // Hours field, default 0`` ``Dom         // Day of month field, default *`` ``Month        // Month field, default *`` ``Dow         // Day of week field, default *`` ``DowOptional       // Optional day of week field, default *`` ``Descriptor       // Allow descriptors such as @monthly, @weekly, etc.``)` `var places = []ParseOption{`` ``Second,`` ``Minute,`` ``Hour,`` ``Dom,`` ``Month,`` ``Dow,``}` `var defaults = []string{`` ``"0",`` ``"0",`` ``"0",`` ``"*",`` ``"*",`` ``"*",``}` `// A custom Parser that can be configured.``type Parser struct {`` ``options ParseOption`` ``optionals int``}` `// Creates a custom Parser with custom options.``//``// // Standard parser without descriptors``// specParser := NewParser(Minute | Hour | Dom | Month | Dow)``// sched, err := specParser.Parse("0 0 15 */3 *")``//``// // Same as above, just excludes time fields``// subsParser := NewParser(Dom | Month | Dow)``// sched, err := specParser.Parse("15 */3 *")``//``// // Same as above, just makes Dow optional``// subsParser := NewParser(Dom | Month | DowOptional)``// sched, err := specParser.Parse("15 */3")``//``func NewParser(options ParseOption) Parser {`` ``optionals := 0`` ``if options&DowOptional > 0 {``  ``options |= Dow``  ``optionals++`` ``}`` ``return Parser{options, optionals}``}` `// Parse returns a new crontab schedule representing the given spec.``// It returns a descriptive error if the spec is not valid.``// It accepts crontab specs and features configured by NewParser.``// 将字符串解析成为SpecSchedule 。 SpecSchedule符合Schedule接口` `func (p Parser) Parse(spec string) (Schedule, error) {``  // 直接处理特殊的特殊的字符串`` ``if spec[0] == '@' && p.options&Descriptor > 0 {``  ``return parseDescriptor(spec)`` ``}` ` ``// Figure out how many fields we need`` ``max := 0`` ``for _, place := range places {``  ``if p.options&place > 0 {``   ``max++``  ``}`` ``}`` ``min := max - p.optionals` ` ``// cron利用空白拆解出独立的items。`` ``fields := strings.Fields(spec)` ` ``// 验证表达式取值范围`` ``if count := len(fields); count < min || count > max {``  ``if min == max {``   ``return nil, fmt.Errorf("Expected exactly %d fields, found %d: %s", min, count, spec)``  ``}``  ``return nil, fmt.Errorf("Expected %d to %d fields, found %d: %s", min, max, count, spec)`` ``}` ` ``// Fill in missing fields`` ``fields = expandFields(fields, p.options)` ` ``var err error`` ``field := func(field string, r bounds) uint64 {``  ``if err != nil {``   ``return 0``  ``}``  ``var bits uint64``  ``bits, err = getField(field, r)``  ``return bits`` ``}` ` ``var (``  ``second  = field(fields[0], seconds)``  ``minute  = field(fields[1], minutes)``  ``hour  = field(fields[2], hours)``  ``dayofmonth = field(fields[3], dom)``  ``month  = field(fields[4], months)``  ``dayofweek = field(fields[5], dow)`` ``)`` ``if err != nil {``  ``return nil, err`` ``}`` ``// 返回所需要的SpecSchedule`` ``return &SpecSchedule{``  ``Second: second,``  ``Minute: minute,``  ``Hour: hour,``  ``Dom: dayofmonth,``  ``Month: month,``  ``Dow: dayofweek,`` ``}, nil``}` `func expandFields(fields []string, options ParseOption) []string {`` ``n := 0`` ``count := len(fields)`` ``expFields := make([]string, len(places))`` ``copy(expFields, defaults)`` ``for i, place := range places {``  ``if options&place > 0 {``   ``expFields[i] = fields[n]``   ``n++``  ``}``  ``if n == count {``   ``break``  ``}`` ``}`` ``return expFields``}` `var standardParser = NewParser(`` ``Minute | Hour | Dom | Month | Dow | Descriptor,``)` `// ParseStandard returns a new crontab schedule representing the given standardSpec``// (https://en.wikipedia.org/wiki/Cron). It differs from Parse requiring to always``// pass 5 entries representing: minute, hour, day of month, month and day of week,``// in that order. It returns a descriptive error if the spec is not valid.``//``// It accepts``// - Standard crontab specs, e.g. "* * * * ?"``// - Descriptors, e.g. "@midnight", "@every 1h30m"``// 这里表示不仅可以使用cron表达式,也可以使用@midnight @every等方法` `func ParseStandard(standardSpec string) (Schedule, error) {`` ``return standardParser.Parse(standardSpec)``}` `var defaultParser = NewParser(`` ``Second | Minute | Hour | Dom | Month | DowOptional | Descriptor,``)` `// Parse returns a new crontab schedule representing the given spec.``// It returns a descriptive error if the spec is not valid.``//``// It accepts``// - Full crontab specs, e.g. "* * * * * ?"``// - Descriptors, e.g. "@midnight", "@every 1h30m"``func Parse(spec string) (Schedule, error) {`` ``return defaultParser.Parse(spec)``}` `// getField returns an Int with the bits set representing all of the times that``// the field represents or error parsing field value. A "field" is a comma-separated``// list of "ranges".``func getField(field string, r bounds) (uint64, error) {`` ``var bits uint64`` ``ranges := strings.FieldsFunc(field, func(r rune) bool { return r == ',' })`` ``for _, expr := range ranges {``  ``bit, err := getRange(expr, r)``  ``if err != nil {``   ``return bits, err``  ``}``  ``bits |= bit`` ``}`` ``return bits, nil``}` `// getRange returns the bits indicated by the given expression:``// number | number "-" number [ "/" number ]``// or error parsing range.``func getRange(expr string, r bounds) (uint64, error) {`` ``var (``  ``start, end, step uint``  ``rangeAndStep  = strings.Split(expr, "/")``  ``lowAndHigh  = strings.Split(rangeAndStep[0], "-")``  ``singleDigit  = len(lowAndHigh) == 1``  ``err    error`` ``)` ` ``var extra uint64`` ``if lowAndHigh[0] == "*" || lowAndHigh[0] == "?" {``  ``start = r.min``  ``end = r.max``  ``extra = starBit`` ``} else {``  ``start, err = parseIntOrName(lowAndHigh[0], r.names)``  ``if err != nil {``   ``return 0, err``  ``}``  ``switch len(lowAndHigh) {``  ``case 1:``   ``end = start``  ``case 2:``   ``end, err = parseIntOrName(lowAndHigh[1], r.names)``   ``if err != nil {``    ``return 0, err``   ``}``  ``default:``   ``return 0, fmt.Errorf("Too many hyphens: %s", expr)``  ``}`` ``}` ` ``switch len(rangeAndStep) {`` ``case 1:``  ``step = 1`` ``case 2:``  ``step, err = mustParseInt(rangeAndStep[1])``  ``if err != nil {``   ``return 0, err``  ``}` `  ``// Special handling: "N/step" means "N-max/step".``  ``if singleDigit {``   ``end = r.max``  ``}`` ``default:``  ``return 0, fmt.Errorf("Too many slashes: %s", expr)`` ``}` ` ``if start < r.min {``  ``return 0, fmt.Errorf("Beginning of range (%d) below minimum (%d): %s", start, r.min, expr)`` ``}`` ``if end > r.max {``  ``return 0, fmt.Errorf("End of range (%d) above maximum (%d): %s", end, r.max, expr)`` ``}`` ``if start > end {``  ``return 0, fmt.Errorf("Beginning of range (%d) beyond end of range (%d): %s", start, end, expr)`` ``}`` ``if step == 0 {``  ``return 0, fmt.Errorf("Step of range should be a positive number: %s", expr)`` ``}` ` ``return getBits(start, end, step) | extra, nil``}` `// parseIntOrName returns the (possibly-named) integer contained in expr.``func parseIntOrName(expr string, names map[string]uint) (uint, error) {`` ``if names != nil {``  ``if namedInt, ok := names[strings.ToLower(expr)]; ok {``   ``return namedInt, nil``  ``}`` ``}`` ``return mustParseInt(expr)``}` `// mustParseInt parses the given expression as an int or returns an error.``func mustParseInt(expr string) (uint, error) {`` ``num, err := strconv.Atoi(expr)`` ``if err != nil {``  ``return 0, fmt.Errorf("Failed to parse int from %s: %s", expr, err)`` ``}`` ``if num < 0 {``  ``return 0, fmt.Errorf("Negative number (%d) not allowed: %s", num, expr)`` ``}` ` ``return uint(num), nil``}` `// getBits sets all bits in the range [min, max], modulo the given step size.``func getBits(min, max, step uint) uint64 {`` ``var bits uint64` ` ``// If step is 1, use shifts.`` ``if step == 1 {``  ``return ^(math.MaxUint64 << (max + 1)) & (math.MaxUint64 << min)`` ``}` ` ``// Else, use a simple loop.`` ``for i := min; i <= max; i += step {``  ``bits |= 1 << i`` ``}`` ``return bits``}` `// all returns all bits within the given bounds. (plus the star bit)``func all(r bounds) uint64 {`` ``return getBits(r.min, r.max, 1) | starBit``}` `// parseDescriptor returns a predefined schedule for the expression, or error if none matches.``func parseDescriptor(descriptor string) (Schedule, error) {`` ``switch descriptor {`` ``case "@yearly", "@annually":``  ``return &SpecSchedule{``   ``Second: 1 << seconds.min,``   ``Minute: 1 << minutes.min,``   ``Hour: 1 << hours.min,``   ``Dom: 1 << dom.min,``   ``Month: 1 << months.min,``   ``Dow: all(dow),``  ``}, nil` ` ``case "@monthly":``  ``return &SpecSchedule{``   ``Second: 1 << seconds.min,``   ``Minute: 1 << minutes.min,``   ``Hour: 1 << hours.min,``   ``Dom: 1 << dom.min,``   ``Month: all(months),``   ``Dow: all(dow),``  ``}, nil` ` ``case "@weekly":``  ``return &SpecSchedule{``   ``Second: 1 << seconds.min,``   ``Minute: 1 << minutes.min,``   ``Hour: 1 << hours.min,``   ``Dom: all(dom),``   ``Month: all(months),``   ``Dow: 1 << dow.min,``  ``}, nil` ` ``case "@daily", "@midnight":``  ``return &SpecSchedule{``   ``Second: 1 << seconds.min,``   ``Minute: 1 << minutes.min,``   ``Hour: 1 << hours.min,``   ``Dom: all(dom),``   ``Month: all(months),``   ``Dow: all(dow),``  ``}, nil` ` ``case "@hourly":``  ``return &SpecSchedule{``   ``Second: 1 << seconds.min,``   ``Minute: 1 << minutes.min,``   ``Hour: all(hours),``   ``Dom: all(dom),``   ``Month: all(months),``   ``Dow: all(dow),``  ``}, nil`` ``}` ` ``const every = "@every "`` ``if strings.HasPrefix(descriptor, every) {``  ``duration, err := time.ParseDuration(descriptor[len(every):])``  ``if err != nil {``   ``return nil, fmt.Errorf("Failed to parse duration %s: %s", descriptor, err)``  ``}``  ``return Every(duration), nil`` ``}` ` ``return nil, fmt.Errorf("Unrecognized descriptor: %s", descriptor)``}`

项目中应用

1
`package main``import (`` ``"github.com/robfig/cron"`` ``"log"``)` `func main() {`` ``i := 0`` ``c := cron.New()`` ``spec := "*/5 * * * * ?"`` ``c.AddFunc(spec, func() {``  ``i++``  ``log.Println("cron running:", i)`` ``})`` ``c.AddFunc("@every 1h1m", func() {``  ``i++``  ``log.Println("cron running:", i)`` ``})`` ``c.Start()``}`

注: @every 用法比较特殊,这是Go里面比较特色的用法。同样的还有 @yearly @annually @monthly @weekly @daily @midnight @hourly 这里面就不一一赘述了。希望大家能够自己探索。


]]>
Go定时器cron的使用详解
Docker compose 网络设置 https://cloudsjhan.github.io/2019/10/27/Docker-compose-网络设置/ 2019-10-27T12:00:22.000Z 2019-10-27T12:21:28.385Z


Docker Compose 网络设置

基本概念

默认情况下,Compose会为我们的应用创建一个网络,服务的每个容器都会加入该网络中。这样,容器就可被该网络中的其他容器访问,不仅如此,该容器还能以服务名称作为hostname被其他容器访问。

默认情况下,应用程序的网络名称基于Compose的工程名称,而项目名称基于docker-compose.yml所在目录的名称。如需修改工程名称,可使用–project-name标识或COMPOSE_PORJECT_NAME环境变量。

举个例子,假如一个应用程序在名为myapp的目录中,并且docker-compose.yml如下所示:

1
2
3
4
5
6
7
8
version: '2'
services:
web:
build: .
ports:
- "8000:8000"
db:
image: postgres

当我们运行docker-compose up时,将会执行以下几步:

  • 创建一个名为myapp_default的网络;
  • 使用web服务的配置创建容器,它以“web”这个名称加入网络myapp_default;
  • 使用db服务的配置创建容器,它以“db”这个名称加入网络myapp_default。

容器间可使用服务名称(web或db)作为hostname相互访问。例如,web这个服务可使用postgres://db:5432 访问db容器。

更新容器

当服务的配置发生更改时,可使用docker-compose up命令更新配置。

此时,Compose会删除旧容器并创建新容器。新容器会以不同的IP地址加入网络,名称保持不变。任何指向旧容器的连接都会被关闭,容器会重新找到新容器并连接上去。

前文讲过,默认情况下,服务之间可使用服务名称相互访问。links允许我们定义一个别名,从而使用该别名访问其他服务。举个例子:

1
2
3
4
5
6
7
8
version: '2'
services:
web:
build: .
links:
- "db:database"
db:
image: postgres

这样web服务就可使用db或database作为hostname访问db服务了。

指定自定义网络

一些场景下,默认的网络配置满足不了我们的需求,此时我们可使用networks命令自定义网络。networks命令允许我们创建更加复杂的网络拓扑并指定自定义网络驱动和选项。不仅如此,我们还可使用networks将服务连接到不是由Compose管理的、外部创建的网络。

如下,我们在其中定义了两个自定义网络。

1
2
3
4
5
6
7
8
9
10
11
12
13
14
15
16
17
18
19
20
21
22
23
24
25
26
27
version: '2'

services:
proxy:
build: ./proxy
networks:
- front
app:
build: ./app
networks:
- front
- back
db:
image: postgres
networks:
- back

networks:
front:
# Use a custom driver
driver: custom-driver-1
back:
# Use a custom driver which takes special options
driver: custom-driver-2
driver_opts:
foo: "1"
bar: "2"

其中,proxy服务与db服务隔离,两者分别使用自己的网络;app服务可与两者通信。

由本例不难发现,使用networks命令,即可方便实现服务间的网络隔离与连接。

配置默认网络

除自定义网络外,我们也可为默认网络自定义配置。

1
2
3
4
5
6
7
8
9
10
11
12
13
14
version: '2'

services:
web:
build: .
ports:
- "8000:8000"
db:
image: postgres

networks:
default:
# Use a custom driver
driver: custom-driver-1

这样,就可为该应用指定自定义的网络驱动。

使用已存在的网络

一些场景下,我们并不需要创建新的网络,而只需加入已存在的网络,此时可使用external选项。示例:

1
2
3
4
networks:
default:
external:
name: my-pre-existing-network

Docker Compose 链接外部容器的几种方式

在Docker中,容器之间的链接是一种很常见的操作:它提供了访问其中的某个容器的网络服务而不需要将所需的端口暴露给Docker Host主机的功能。Docker Compose中对该特性的支持同样是很方便的。然而,如果需要链接的容器没有定义在同一个docker-compose.yml中的时候,这个时候就稍微麻烦复杂了点。

在不使用Docker Compose的时候,将两个容器链接起来使用—link参数,相对来说比较简单,以nginx镜像为例子:

1
2
docker run --rm --name test1 -d nginx  #开启一个实例test1
docker run --rm --name test2 --link test1 -d nginx #开启一个实例test2并与test1建立链接

这样,test2test1便建立了链接,就可以在test2中使用访问test1中的服务了。

如果使用Docker Compose,那么这个事情就更简单了,还是以上面的nginx镜像为例子,编辑docker-compose.yml文件为:

1
2
3
4
5
6
7
8
9
10
version: "3"
services:
test2:
image: nginx
depends_on:
- test1
links:
- test1
test1:
image: nginx

最终效果与使用普通的Docker命令docker run xxxx建立的链接并无区别。这只是一种最为理想的情况。

  1. 如果容器没有定义在同一个docker-compose.yml文件中,应该如何链接它们呢?
  2. 又如果定义在docker-compose.yml文件中的容器需要与docker run xxx启动的容器链接,需要如何处理?

针对这两种典型的情况,下面给出我个人测试可行的办法:

方式一:让需要链接的容器同属一个外部网络

我们还是使用nginx镜像来模拟这样的一个情景:假设我们需要将两个使用Docker Compose管理的nignx容器(test1test2)链接起来,使得test2能够访问test1中提供的服务,这里我们以能ping通为准。

首先,我们定义容器test1docker-compose.yml文件内容为:

1
2
3
4
5
6
7
8
9
10
11
version: "3"
services:
test2:
image: nginx
container_name: test1
networks:
- default
- app_net
networks:
app_net:
external: true

容器test2内容与test1基本一样,只是多了一个external_links,需要特别说明的是:最近发布的Docker版本已经不需要使用external_links来链接容器,容器的DNS服务可以正确的作出判断,因此如果你你需要兼容较老版本的Docker的话,那么容器test2docker-compose.yml文件内容为:

1
2
3
4
5
6
7
8
9
10
11
12
13
version: "3"
services:
test2:
image: nginx
networks:
- default
- app_net
external_links:
- test1
container_name: test2
networks:
app_net:
external: true

否则的话,test2docker-compose.ymltest1的定义完全一致,不需要额外多指定一个external_links。相关的问题请参见stackoverflow上的相关问题:docker-compose + external container

正如你看到的那样,这里两个容器的定义里都使用了同一个外部网络app_net,因此,我们需要在启动这两个容器之前通过以下命令再创建外部网络:

1
docker network create app_net

之后,通过docker-compose up -d命令启动这两个容器,然后执行docker exec -it test2 ping test1,你将会看到如下的输出:

1
2
3
4
5
6
7
8
docker exec -it test2 ping test1
PING test1 (172.18.0.2): 56 data bytes
64 bytes from 172.18.0.2: icmp_seq=0 ttl=64 time=0.091 ms
64 bytes from 172.18.0.2: icmp_seq=1 ttl=64 time=0.146 ms
64 bytes from 172.18.0.2: icmp_seq=2 ttl=64 time=0.150 ms
64 bytes from 172.18.0.2: icmp_seq=3 ttl=64 time=0.145 ms
64 bytes from 172.18.0.2: icmp_seq=4 ttl=64 time=0.126 ms
64 bytes from 172.18.0.2: icmp_seq=5 ttl=64 time=0.147 ms

证明这两个容器是成功链接了,反过来在test1中pingtest2也是能够正常ping通的。

如果我们通过docker run --rm --name test3 -d nginx这种方式来先启动了一个容器(test3)并且没有指定它所属的外部网络,而需要将其与test1或者test2链接的话,这个时候手动链接外部网络即可:

1
docker network connect app_net test3

这样,三个容器都可以相互访问了。

方式二:更改需要链接的容器的网络模式

通过更改你想要相互链接的容器的网络模式为bridge,并指定需要链接的外部容器(external_links)即可。与同属外部网络的容器可以相互访问的链接方式一不同,这种方式的访问是单向的。

还是以nginx容器镜像为例子,如果容器实例nginx1需要访问容器实例nginx2,那么nginx2doker-compose.yml定义为:

1
2
3
4
5
6
version: "3"
services:
nginx2:
image: nginx
container_name: nginx2
network_mode: bridge

与其对应的,nginx1docker-compose.yml定义为:

1
2
3
4
5
6
7
8
version: "3"
services:
nginx1:
image: nginx
external_links:
- nginx2
container_name: nginx1
network_mode: bridge

需要特别说明的是,这里的external_links是不能省略的,而且nginx1的启动必须要在nginx2之后,否则可能会报找不到容器nginx2的错误。

接着我们使用ping来测试下连通性:

1
2
3
4
5
6
7
8
$ docker exec -it nginx1 ping nginx2  # nginx1 to nginx2
PING nginx2 (172.17.0.4): 56 data bytes
64 bytes from 172.17.0.4: icmp_seq=0 ttl=64 time=0.141 ms
64 bytes from 172.17.0.4: icmp_seq=1 ttl=64 time=0.139 ms
64 bytes from 172.17.0.4: icmp_seq=2 ttl=64 time=0.145 ms

$ docker exec -it nginx2 ping nginx1 #nginx2 to nginx1
ping: unknown host

以上也能充分证明这种方式是属于单向联通的。

在实际应用中根据自己的需要灵活的选择这两种链接方式,如果想偷懒的话,大可选择第二种。不过我更推荐第一种,不难看出无论是联通性还是灵活性,第一种都比较好。

附docker-compose.yml文件详解

1
2
3
4
5
6
7
8
9
10
11
12
13
14
15
16
17
18
19
20
21
22
23
24
25
26
27
28
29
30
31
32
33
34
35
36
37
38
39
40
41
42
43
44
45
46
47
48
49
50
51
52
53
54
55
56
57
58
59
60
61
62
63
64
65
66
67
68
69
70
71
72
73
74
75
76
77
78
79
80
81
82
83
84
85
86
87
88
89
90
91
92
93
94
95
96
97
98
99
100
101
102
103
104
105
106
107
108
109
110
111
112
113
114
115
116
117
118
119
120
121
122
123
124
125
126
127
128
129
130
131
132
133
134
135
136
137
138
139
140
141
142
143
144
145
146
147
148
149
150
151
152
153
154
155
156
157
158
159
160
161
162
163
164
165
166
167
168
169
170
171
172
173
174
175
176
177
178
179
180
181
182
183
184
185
186
187
188
189
190
191
192
193
194
195
196
197
198
199
200
201
202
203
204
205
206
207
208
209
210
211
212
213
214
215
216
217
218
219
220
221
222
223
224
225
226
227
228
229
230
231
232
233
234
235
236
237
238
239
240
241
242
243
244
245
246
247
248
249
250
251
252
253
254
255
256
257
258
259
260
261
262
263
264
265
266
267
268
269
270
271
272
273
274
275
276
277
278
279
280
281
282
283
284
285
286
287
288
289
290
291
292
293
294
Compose和Docker兼容性:
Compose 文件格式有3个版本,分别为1, 2.x 和 3.x
目前主流的为 3.x 其支持 docker 1.13.0 及其以上的版本

常用参数:
version # 指定 compose 文件的版本
services # 定义所有的 service 信息, services 下面的第一级别的 key 是一个 service 的名称

build # 指定包含构建上下文的路径, 或作为一个对象,该对象具有 context 和指定的 dockerfile 文件以及 args 参数值
context # context: 指定 Dockerfile 文件所在的路径
dockerfile # dockerfile: 指定 context 指定的目录下面的 Dockerfile 的名称(默认为 Dockerfile)
args # args: Dockerfile 在 build 过程中需要的参数 (等同于 docker container build --build-arg 的作用)
cache_from # v3.2中新增的参数, 指定缓存的镜像列表 (等同于 docker container build --cache_from 的作用)
labels # v3.3中新增的参数, 设置镜像的元数据 (等同于 docker container build --labels 的作用)
shm_size # v3.5中新增的参数, 设置容器 /dev/shm 分区的大小 (等同于 docker container build --shm-size 的作用)

command # 覆盖容器启动后默认执行的命令, 支持 shell 格式和 [] 格式

configs # 不知道怎么用

cgroup_parent # 不知道怎么用

container_name # 指定容器的名称 (等同于 docker run --name 的作用)

credential_spec # 不知道怎么用

deploy # v3 版本以上, 指定与部署和运行服务相关的配置, deploy 部分是 docker stack 使用的, docker stack 依赖 docker swarm
endpoint_mode # v3.3 版本中新增的功能, 指定服务暴露的方式
vip # Docker 为该服务分配了一个虚拟 IP(VIP), 作为客户端的访问服务的地址
dnsrr # DNS轮询, Docker 为该服务设置 DNS 条目, 使得服务名称的 DNS 查询返回一个 IP 地址列表, 客户端直接访问其中的一个地址
labels # 指定服务的标签,这些标签仅在服务上设置
mode # 指定 deploy 的模式
global # 每个集群节点都只有一个容器
replicated # 用户可以指定集群中容器的数量(默认)
placement # 不知道怎么用
replicas # deploy 的 mode 为 replicated 时, 指定容器副本的数量
resources # 资源限制
limits # 设置容器的资源限制
cpus: "0.5" # 设置该容器最多只能使用 50% 的 CPU
memory: 50M # 设置该容器最多只能使用 50M 的内存空间
reservations # 设置为容器预留的系统资源(随时可用)
cpus: "0.2" # 为该容器保留 20% 的 CPU
memory: 20M # 为该容器保留 20M 的内存空间
restart_policy # 定义容器重启策略, 用于代替 restart 参数
condition # 定义容器重启策略(接受三个参数)
none # 不尝试重启
on-failure # 只有当容器内部应用程序出现问题才会重启
any # 无论如何都会尝试重启(默认)
delay # 尝试重启的间隔时间(默认为 0s)
max_attempts # 尝试重启次数(默认一直尝试重启)
window # 检查重启是否成功之前的等待时间(即如果容器启动了, 隔多少秒之后去检测容器是否正常, 默认 0s)
update_config # 用于配置滚动更新配置
parallelism # 一次性更新的容器数量
delay # 更新一组容器之间的间隔时间
failure_action # 定义更新失败的策略
continue # 继续更新
rollback # 回滚更新
pause # 暂停更新(默认)
monitor # 每次更新后的持续时间以监视更新是否失败(单位: ns|us|ms|s|m|h) (默认为0)
max_failure_ratio # 回滚期间容忍的失败率(默认值为0)
order # v3.4 版本中新增的参数, 回滚期间的操作顺序
stop-first #旧任务在启动新任务之前停止(默认)
start-first #首先启动新任务, 并且正在运行的任务暂时重叠
rollback_config # v3.7 版本中新增的参数, 用于定义在 update_config 更新失败的回滚策略
parallelism # 一次回滚的容器数, 如果设置为0, 则所有容器同时回滚
delay # 每个组回滚之间的时间间隔(默认为0)
failure_action # 定义回滚失败的策略
continue # 继续回滚
pause # 暂停回滚
monitor # 每次回滚任务后的持续时间以监视失败(单位: ns|us|ms|s|m|h) (默认为0)
max_failure_ratio # 回滚期间容忍的失败率(默认值0)
order # 回滚期间的操作顺序
stop-first # 旧任务在启动新任务之前停止(默认)
start-first # 首先启动新任务, 并且正在运行的任务暂时重叠

注意:
支持 docker-compose up 和 docker-compose run 但不支持 docker stack deploy 的子选项
security_opt container_name devices tmpfs stop_signal links cgroup_parent
network_mode external_links restart build userns_mode sysctls

devices # 指定设备映射列表 (等同于 docker run --device 的作用)

depends_on # 定义容器启动顺序 (此选项解决了容器之间的依赖关系, 此选项在 v3 版本中 使用 swarm 部署时将忽略该选项)
示例:
docker-compose up 以依赖顺序启动服务,下面例子中 redis 和 db 服务在 web 启动前启动
默认情况下使用 docker-compose up web 这样的方式启动 web 服务时,也会启动 redis 和 db 两个服务,因为在配置文件中定义了依赖关系
version: '3'
services:
web:
build: .
depends_on:
- db
- redis
redis:
image: redis
db:
image: postgres

dns # 设置 DNS 地址(等同于 docker run --dns 的作用)

dns_search # 设置 DNS 搜索域(等同于 docker run --dns-search 的作用)

tmpfs # v2 版本以上, 挂载目录到容器中, 作为容器的临时文件系统(等同于 docker run --tmpfs 的作用, 在使用 swarm 部署时将忽略该选项)

entrypoint # 覆盖容器的默认 entrypoint 指令 (等同于 docker run --entrypoint 的作用)

env_file # 从指定文件中读取变量设置为容器中的环境变量, 可以是单个值或者一个文件列表, 如果多个文件中的变量重名则后面的变量覆盖前面的变量, environment 的值覆盖 env_file 的值
文件格式:
RACK_ENV=development

environment # 设置环境变量, environment 的值可以覆盖 env_file 的值 (等同于 docker run --env 的作用)

expose # 暴露端口, 但是不能和宿主机建立映射关系, 类似于 Dockerfile 的 EXPOSE 指令

external_links # 连接不在 docker-compose.yml 中定义的容器或者不在 compose 管理的容器(docker run 启动的容器, 在 v3 版本中使用 swarm 部署时将忽略该选项)

extra_hosts # 添加 host 记录到容器中的 /etc/hosts 中 (等同于 docker run --add-host 的作用)

healthcheck # v2.1 以上版本, 定义容器健康状态检查, 类似于 Dockerfile 的 HEALTHCHECK 指令
test # 检查容器检查状态的命令, 该选项必须是一个字符串或者列表, 第一项必须是 NONE, CMD 或 CMD-SHELL, 如果其是一个字符串则相当于 CMD-SHELL 加该字符串
NONE # 禁用容器的健康状态检测
CMD # test: ["CMD", "curl", "-f", "http://localhost"]
CMD-SHELL # test: ["CMD-SHELL", "curl -f http://localhost || exit 1"] 或者 test: curl -f https://localhost || exit 1
interval: 1m30s # 每次检查之间的间隔时间
timeout: 10s # 运行命令的超时时间
retries: 3 # 重试次数
start_period: 40s # v3.4 以上新增的选项, 定义容器启动时间间隔
disable: true # true 或 false, 表示是否禁用健康状态检测和 test: NONE 相同

image # 指定 docker 镜像, 可以是远程仓库镜像、本地镜像

init # v3.7 中新增的参数, true 或 false 表示是否在容器中运行一个 init, 它接收信号并传递给进程

isolation # 隔离容器技术, 在 Linux 中仅支持 default 值

labels # 使用 Docker 标签将元数据添加到容器, 与 Dockerfile 中的 LABELS 类似

links # 链接到其它服务中的容器, 该选项是 docker 历史遗留的选项, 目前已被用户自定义网络名称空间取代, 最终有可能被废弃 (在使用 swarm 部署时将忽略该选项)

logging # 设置容器日志服务
driver # 指定日志记录驱动程序, 默认 json-file (等同于 docker run --log-driver 的作用)
options # 指定日志的相关参数 (等同于 docker run --log-opt 的作用)
max-size # 设置单个日志文件的大小, 当到达这个值后会进行日志滚动操作
max-file # 日志文件保留的数量

network_mode # 指定网络模式 (等同于 docker run --net 的作用, 在使用 swarm 部署时将忽略该选项)

networks # 将容器加入指定网络 (等同于 docker network connect 的作用), networks 可以位于 compose 文件顶级键和 services 键的二级键
aliases # 同一网络上的容器可以使用服务名称或别名连接到其中一个服务的容器
ipv4_address # IP V4 格式
ipv6_address # IP V6 格式

示例:
version: '3.7'
services:
test:
image: nginx:1.14-alpine
container_name: mynginx
command: ifconfig
networks:
app_net: # 调用下面 networks 定义的 app_net 网络
ipv4_address: 172.16.238.10
networks:
app_net:
driver: bridge
ipam:
driver: default
config:
- subnet: 172.16.238.0/24

pid: 'host' # 共享宿主机的 进程空间(PID)

ports # 建立宿主机和容器之间的端口映射关系, ports 支持两种语法格式
SHORT 语法格式示例:
- "3000" # 暴露容器的 3000 端口, 宿主机的端口由 docker 随机映射一个没有被占用的端口
- "3000-3005" # 暴露容器的 3000 到 3005 端口, 宿主机的端口由 docker 随机映射没有被占用的端口
- "8000:8000" # 容器的 8000 端口和宿主机的 8000 端口建立映射关系
- "9090-9091:8080-8081"
- "127.0.0.1:8001:8001" # 指定映射宿主机的指定地址的
- "127.0.0.1:5000-5010:5000-5010"
- "6060:6060/udp" # 指定协议

LONG 语法格式示例:(v3.2 新增的语法格式)
ports:
- target: 80 # 容器端口
published: 8080 # 宿主机端口
protocol: tcp # 协议类型
mode: host # host 在每个节点上发布主机端口, ingress 对于群模式端口进行负载均衡

secrets # 不知道怎么用

security_opt # 为每个容器覆盖默认的标签 (在使用 swarm 部署时将忽略该选项)

stop_grace_period # 指定在发送了 SIGTERM 信号之后, 容器等待多少秒之后退出(默认 10s)

stop_signal # 指定停止容器发送的信号 (默认为 SIGTERM 相当于 kill PID; SIGKILL 相当于 kill -9 PID; 在使用 swarm 部署时将忽略该选项)

sysctls # 设置容器中的内核参数 (在使用 swarm 部署时将忽略该选项)

ulimits # 设置容器的 limit

userns_mode # 如果Docker守护程序配置了用户名称空间, 则禁用此服务的用户名称空间 (在使用 swarm 部署时将忽略该选项)

volumes # 定义容器和宿主机的卷映射关系, 其和 networks 一样可以位于 services 键的二级键和 compose 顶级键, 如果需要跨服务间使用则在顶级键定义, 在 services 中引用
SHORT 语法格式示例:
volumes:
- /var/lib/mysql # 映射容器内的 /var/lib/mysql 到宿主机的一个随机目录中
- /opt/data:/var/lib/mysql # 映射容器内的 /var/lib/mysql 到宿主机的 /opt/data
- ./cache:/tmp/cache # 映射容器内的 /var/lib/mysql 到宿主机 compose 文件所在的位置
- ~/configs:/etc/configs/:ro # 映射容器宿主机的目录到容器中去, 权限只读
- datavolume:/var/lib/mysql # datavolume 为 volumes 顶级键定义的目录, 在此处直接调用

LONG 语法格式示例:(v3.2 新增的语法格式)
version: "3.2"
services:
web:
image: nginx:alpine
ports:
- "80:80"
volumes:
- type: volume # mount 的类型, 必须是 bind、volume 或 tmpfs
source: mydata # 宿主机目录
target: /data # 容器目录
volume: # 配置额外的选项, 其 key 必须和 type 的值相同
nocopy: true # volume 额外的选项, 在创建卷时禁用从容器复制数据
- type: bind # volume 模式只指定容器路径即可, 宿主机路径随机生成; bind 需要指定容器和数据机的映射路径
source: ./static
target: /opt/app/static
read_only: true # 设置文件系统为只读文件系统
volumes:
mydata: # 定义在 volume, 可在所有服务中调用

restart # 定义容器重启策略(在使用 swarm 部署时将忽略该选项, 在 swarm 使用 restart_policy 代替 restart)
no # 禁止自动重启容器(默认)
always # 无论如何容器都会重启
on-failure # 当出现 on-failure 报错时, 容器重新启动

其他选项:
domainname, hostname, ipc, mac_address, privileged, read_only, shm_size, stdin_open, tty, user, working_dir
上面这些选项都只接受单个值和 docker run 的对应参数类似

对于值为时间的可接受的值:
2.5s
10s
1m30s
2h32m
5h34m56s
时间单位: us, ms, s, m, h
对于值为大小的可接受的值:
2b
1024kb
2048k
300m
1gb
单位: b, k, m, g 或者 kb, mb, gb
networks # 定义 networks 信息
driver # 指定网络模式, 大多数情况下, 它 bridge 于单个主机和 overlay Swarm 上
bridge # Docker 默认使用 bridge 连接单个主机上的网络
overlay # overlay 驱动程序创建一个跨多个节点命名的网络
host # 共享主机网络名称空间(等同于 docker run --net=host)
none # 等同于 docker run --net=none
driver_opts # v3.2以上版本, 传递给驱动程序的参数, 这些参数取决于驱动程序
attachable # driver 为 overlay 时使用, 如果设置为 true 则除了服务之外,独立容器也可以附加到该网络; 如果独立容器连接到该网络,则它可以与其他 Docker 守护进程连接到的该网络的服务和独立容器进行通信
ipam # 自定义 IPAM 配置. 这是一个具有多个属性的对象, 每个属性都是可选的
driver # IPAM 驱动程序, bridge 或者 default
config # 配置项
subnet # CIDR格式的子网,表示该网络的网段
external # 外部网络, 如果设置为 true 则 docker-compose up 不会尝试创建它, 如果它不存在则引发错误
name # v3.5 以上版本, 为此网络设置名称
文件格式示例:
version: "3"
services:
redis:
image: redis:alpine
ports:
- "6379"
networks:
- frontend
deploy:
replicas: 2
update_config:
parallelism: 2
delay: 10s
restart_policy:
condition: on-failure
db:
image: postgres:9.4
volumes:
- db-data:/var/lib/postgresql/data
networks:
- backend
deploy:
placement:
constraints: [node.role == manager]

]]>
Docker compose 网络设置以打通同一宿主机的多个容器
python with的原理及在异常处理中的应用 https://cloudsjhan.github.io/2019/09/11/python-with的原理及在异常处理中的应用/ 2019-09-11T03:37:54.000Z 2019-09-11T03:39:08.498Z


只要对象内实现 enter() 和 exit() 方法,就能兼容 with 语句,触发上下文管理。

一、上下文管理的简单执行流程
with 工作原理 (1)紧跟with后面的语句被求值后,返回对象的“enter()”方法被调用,这个方法的返回值将被赋值给as后面的变量; (2)当with后面的代码块全部被执行完之后,将调用前面返回对象的“exit()”方法。

class Sample:
def enter(self):
print “in enter
return “Foo”
def exit(self, exc_type, exc_val, exc_tb):
‘’’
若在执行流程中因为错误而退出,调用exit时,会自动捕获错误信息
exc_type: 错误的类型(异常类型)
exc_val: 错误类型对应的值 (异常值)
exc_tb: 代码中错误发生的位置 (错误栈)
‘’’
print “in exit

def get_sample():
return Sample()

with get_sample() as sample:
print “Sample: “, sample
‘’’
流程总结:
1- 执行get_sample()函数
2- 函数内实例化Sample对象,执行enter返回字符串赋予sample变量
3- 执行with内的代码块,输出sample变量值
4- 执行Sample对象内的exit方法
‘’’
二、错误执行流程
class Sample():
def enter(self):
print(‘in enter’)
return self

def __exit__(self, exc_type, exc_val, exc_tb):    print "type: ", exc_type    print "val: ", exc_val    print "tb: ", exc_tbdef do_something(self):    bar = 1 / 0    return bar + 10

with Sample() as sample:
sample.do_something()

‘’’
in enter
Traceback (most recent call last):
type:
val: integer division or modulo by zero
File “/home/user/cltdevelop/Code/TF_Practice_2017_06_06/with_test.py”, line 36, in
tb:
sample.do_something()
File “/home/user/cltdevelop/Code/TF_Practice_2017_06_06/with_test.py”, line 32, in do_something
bar = 1 / 0
ZeroDivisionError: integer division or modulo by zero

Process finished with exit code 1

‘’’
三、异常处理 with 应用
异常处理逻辑太多,以至于扰乱了代码核心逻辑。具体表现就是,代码里充斥着大量的 try、except、raise 语句,让核心逻辑变得难以辨识。

def upload_avatar(request):
“””用户上传新头像”””
try:
avatar_file = request.FILES[‘avatar’]
except KeyError:
raise error_codes.AVATAR_FILE_NOT_PROVIDED

try:   resized_avatar_file = resize_avatar(avatar_file)except FileTooLargeError as e:    raise error_codes.AVATAR_FILE_TOO_LARGEexcept ResizeAvatarError as e:    raise error_codes.AVATAR_FILE_INVALIDtry:    request.user.avatar = resized_avatar_file    request.user.save()except Exception:    raise error_codes.INTERNAL_SERVER_ERRORreturn HttpResponse({})

这是一个处理用户上传头像的视图函数。这个函数内做了三件事情,并且针对每件事都做了异常捕获。如果做某件事时发生了异常,就返回对用户友好的错误到前端。

这样的处理流程纵然合理,但是显然代码里的异常处理逻辑有点“喧宾夺主”了。一眼看过去全是代码缩进,很难提炼出代码的核心逻辑。

早在 2.5 版本时,Python 语言就已经提供了对付这类场景的工具:“上下文管理器(context manager)”。上下文管理器是一种配合 with 语句使用的特殊 Python 对象,通过它,可以让异常处理工作变得更方便。

class raise_api_error:
“””
captures specified exception and raise ApiErrorCode instead
捕获指定的异常并改为引发ApiErrorCode
:raises: AttributeError if code_name is not valid
“””
def init(self, captures, code_name):
self.captures = captures
self.code = getattr(error_codes, code_name)

def __enter__(self):    # 刚方法将在进入上下文时调用    return selfdef __exit__(self, exc_type, exc_val, exc_tb):    # 该方法将在退出上下文时调用    # exc_type, exc_val, exc_tb 分别表示该上下文内抛出的    # 异常类型、异常值、错误栈    if exc_type is None:        return False    if exc_type == self.captures:        raise self.code from exc_val    return False

在上面的代码里,我们定义了一个名为 raise_api_error 的上下文管理器,它在进入上下文时什么也不做。但是在退出上下文时,会判断当前上下文中是否抛出了类型为 self.captures 的异常,如果有,就用 APIErrorCode 异常类替代它。

使用该上下文管理器后,整个函数可以变得更清晰简洁:

def upload_avatar(request):
“””用户上传新头像”””
with raise_api_error(KeyError, ‘AVATAR_FILE_NOT_PROVIDED’):
avatar_file = request.FILES[‘avatar’]

with raise_api_error(ResizeAvatarError, 'AVATAR_FILE_INVALID'),\        raise_api_error(FileTooLargeError, 'AVATAR_FILE_TOO_LARGE'):    resized_avatar_file = resize_avatar(avatar_file)with raise_api_error(Exception, 'INTERNAL_SERVER_ERROR'):    request.user.avatar = resized_avatar_file    request.user.save()return HttpResponse({})

四、raies 和 raise……from 的区别

try:
… print(1 / 0)
… except:
… raise RuntimeError(“Something bad happened”)

Traceback (most recent call last):
File ““, line 2, in
ZeroDivisionError: division by zero

在处理上述异常期间,发生了另一个异常:

During handling of the above exception, another exception occurred:

Traceback (most recent call last):
File ““, line 4, in
RuntimeError: Something bad happened

try:
… print(1 / 0)
… except Exception as exc:
… raise RuntimeError(“Something bad happened”) from exc

Traceback (most recent call last):
File ““, line 2, in
ZeroDivisionError: division by zero

上述异常是以下异常的直接原因:

The above exception was the direct cause of the following exception:

Traceback (most recent call last):
File ““, line 4, in
RuntimeError: Something bad happened
不同之处在于,from 会为异常对象设置 cause 属性表明异常的是由谁直接引起的。

处理异常时发生了新的异常,在不使用 from 时更倾向于新异常与正在处理的异常没有关联。而 from 则是能指出新异常是因旧异常直接引起的。这样的异常之间的关联有助于后续对异常的分析和排查。from 语法会有个限制,就是第二个表达式必须是另一个异常类或实例。

如果在异常处理程序或 finally 块中引发异常,默认情况下,异常机制会隐式工作会将先前的异常附加为新异常的 _context _属性。

当然,也可以通过 with_traceback() 方法为异常设置上下文 context 属性,这也能在 traceback 更好的显示异常信息。


]]>
python with的原理及在异常处理中的应用
TCP/IP详解--TCP连接中time_wait状态过多 https://cloudsjhan.github.io/2019/09/10/TCP-IP详解-TCP连接中time-wait状态过多/ 2019-09-10T06:00:46.000Z 2019-09-10T06:02:48.381Z


本文链接:https://blog.csdn.net/yusiguyuan/article/details/21445883
TIMEWAIT状态本身和应用层的客户端或者服务器是没有关系的。仅仅是主动关闭的一方,在使用FIN|ACK|FIN|ACK四分组正常关闭TCP连接的时候会出现这个TIMEWAIT。服务器在处理客户端请求的时候,如果你的程序设计为服务器主动关闭,那么你才有可能需要关注这个TIMEWAIT状态过多的问题。如果你的服务器设计为被动关闭,那么你首先要关注的是CLOSE_WAIT。

原则
TIMEWAIT并不是多余的。在TCP协议被创造,经历了大量的实际场景实践之后,TIMEWAIT出现了,因为TCP主动关闭连接的一方需要TIMEWAIT状态,它是我们的朋友。这是《UNIX网络编程》的作者—-Steven对TIMEWAIT的态度。

TIMEWAIT是友好的
TCP要保证在所有可能的情况下使得所有的数据都能够被正确送达。当你关闭一个socket时,主动关闭一端的socket将进入TIME_WAIT状态,而被动关闭一方则转入CLOSED状态,这的确能够保证所有的数据都被传输。当一个socket关闭的时候,是通过两端四次握手完成的,当一端调用close()时,就说明本端没有数据要发送了。这好似看来在握手完成以后,socket就都可以处于初始的CLOSED状态了,其实不然。原因是这样安排状态有两个问题, 首先,我们没有任何机制保证最后的一个ACK能够正常传输,第二,网络上仍然有可能有残余的数据包(wandering duplicates),我们也必须能够正常处理。
TIMEWAIT就是为了解决这两个问题而生的。
1.假设最后一个ACK丢失了,被动关闭一方会重发它的FIN。主动关闭一方必须维持一个有效状态信息(TIMEWAIT状态下维持),以便能够重发ACK。如果主动关闭的socket不维持这种状态而进入CLOSED状态,那么主动关闭的socket在处于CLOSED状态时,接收到FIN后将会响应一个RST。被动关闭一方接收到RST后会认为出错了。如果TCP协议想要正常完成必要的操作而终止双方的数据流传输,就必须完全正确的传输四次握手的四个节,不能有任何的丢失。这就是为什么socket在关闭后,仍然处于TIME_WAIT状态的第一个原因,因为他要等待以便重发ACK。

2.假设目前连接的通信双方都已经调用了close(),双方同时进入CLOSED的终结状态,而没有走TIME_WAIT状态。会出现如下问题,现在有一个新的连接被建立起来,使用的IP地址与端口与先前的完全相同,后建立的连接是原先连接的一个完全复用。还假定原先的连接中有数据报残存于网络之中,这样新的连接收到的数据报中有可能是先前连接的数据报。为了防止这一点,TCP不允许新连接复用TIME_WAIT状态下的socket。处于TIME_WAIT状态的socket在等待两倍的MSL时间以后(之所以是两倍的MSL,是由于MSL是一个数据报在网络中单向发出到认定丢失的时间,一个数据报有可能在发送途中或是其响应过程中成为残余数据报,确认一个数据报及其响应的丢弃的需要两倍的MSL),将会转变为CLOSED状态。这就意味着,一个成功建立的连接,必然使得先前网络中残余的数据报都丢失了。

大量TIMEWAIT在某些场景中导致的令人头疼的业务问题
大量TIMEWAIT出现,并且需要解决的场景
在高并发短连接的TCP服务器上,当服务器处理完请求后立刻按照主动正常关闭连接。。。这个场景下,会出现大量socket处于TIMEWAIT状态。如果客户端的并发量持续很高,此时部分客户端就会显示连接不上。
我来解释下这个场景。主动正常关闭TCP连接,都会出现TIMEWAIT。为什么我们要关注这个高并发短连接呢?有两个方面需要注意:

  1. 高并发可以让服务器在短时间范围内同时占用大量端口,而端口有个0~65535的范围,并不是很多,刨除系统和其他服务要用的,剩下的就更少了。
  2. 在这个场景中,短连接表示“业务处理+传输数据的时间 远远小于 TIMEWAIT超时的时间”的连接。这里有个相对长短的概念,比如,取一个web页面,1秒钟的http短连接处理完业务,在关闭连接之后,这个业务用过的端口会停留在TIMEWAIT状态几分钟,而这几分钟,其他HTTP请求来临的时候是无法占用此端口的。单用这个业务计算服务器的利用率会发现,服务器干正经事的时间和端口(资源)被挂着无法被使用的时间的比例是 1:几百,服务器资源严重浪费。(说个题外话,从这个意义出发来考虑服务器性能调优的话,长连接业务的服务就不需要考虑TIMEWAIT状态。同时,假如你对服务器业务场景非常熟悉,你会发现,在实际业务场景中,一般长连接对应的业务的并发量并不会很高)
    综合这两个方面,持续的到达一定量的高并发短连接,会使服务器因端口资源不足而拒绝为一部分客户服务。同时,这些端口都是服务器临时分配,无法用SO_REUSEADDR选项解决这个问题:(

一对矛盾
TIMEWAIT既友好,又令人头疼。
但是我们还是要抱着一个友好的态度来看待它,因为它尽它的能力保证了服务器的健壮性。

可行而且必须存在,但是不符合原则的解决方式

  1. linux没有在sysctl或者proc文件系统暴露修改这个TIMEWAIT超时时间的接口,可以修改内核协议栈代码中关于这个TIMEWAIT的超时时间参数,重编内核,让它缩短超时时间,加快回收;
  2. 利用SO_LINGER选项的强制关闭方式,发RST而不是FIN,来越过TIMEWAIT状态,直接进入CLOSED状态。详见我的博文《TCP之选项SO_LINGER》。

我如何看待这个问题
为什么说上述两种解决方式我觉得可行,但是不符合原则?
我首先认为,我要依靠TIMEWAIT状态来保证我的服务器程序健壮,网络上发生的乱七八糟的问题太多了,我先要服务功能正常。
那是不是就不要性能了呢?并不是。如果服务器上跑的短连接业务量到了我真的必须处理这个TIMEWAIT状态过多的问题的时候,我的原则是尽量处理,而不是跟TIMEWAIT干上,非先除之而后快:)如果尽量处理了,还是解决不了问题,仍然拒绝服务部分请求,那我会采取分机器的方法,让多台机器来抗这些高并发的短请求。持续十万并发的短连接请求,两台机器,每台5万个,应该够用了吧。一般的业务量以及国内大部分网站其实并不需要关注这个问题,一句话,达不到需要关注这个问题的访问量。
真正地必须使用上述我认为不合理的方式来解决这个问题的场景有没有呢?答案是有。
像淘宝、百度、新浪、京东商城这样的站点,由于有很多静态小图片业务,如果过度分服会导致需要上线大量机器,多买机器多花钱,得多配机房,多配备运维工程师来守护这些机器,成本增长非常严重。。。这个时候就要尽一切可能去优化。
题外话,服务器上的技术问题没有绝对,一切都是为业务需求服务的。

如何尽量处理TIMEWAIT过多
sysctl改两个内核参数就行了,如下:
net.ipv4.tcp_tw_reuse = 1
net.ipv4.tcp_tw_recycle = 1
简单来说,就是打开系统的TIMEWAIT重用和快速回收,至于怎么重用和快速回收,这个问题我没有深究,实际场景中这么做确实有效果。用netstat或者ss观察就能得出结论。
还有些朋友同时也会打开syncookies这个功能,如下:
net.ipv4.tcp_syncookies = 1
打开这个syncookies的目的实际上是:“在服务器资源(并非单指端口资源,拒绝服务有很多种资源不足的情况)不足的情况下,尽量不要拒绝TCP的syn(连接)请求,尽量把syn请求缓存起来,留着过会儿有能力的时候处理这些TCP的连接请求”。
如果并发量真的非常非常高,打开这个其实用处不大。


]]>
TCP/IP详解--TCP连接中time_wait状态过多
crawlab的golang后端内存分析及优化-基于go pprof https://cloudsjhan.github.io/2019/08/20/crawlab的内存分析及优化-基于go-pprof/ 2019-08-20T11:09:59.000Z 2019-08-20T12:12:46.921Z


背景

Crawlab发布几个月以来,其中经历过多次迭代,在使用者们的积极反馈下,crawlab爬虫平台逐渐稳定,但是最近有用户报出crawlab启动一段时间后,主节点机器会出现内存占用过高的问题,一台4G内存的机器在运行crawlab后竟然能占用3.5G以上,几乎可以肯定后端服务的某个接口由于代码不规范导致内存占用,于是决定对crawlab进行一次内存分析。

2. 分析

分析内存光靠手撕代码是比较困难的,总要借助一些工具。Golang pprof是Go官方的profiling工具,非常强大,使用起来也很方便。

首先,我们在crawlab项目中嵌入如下几行代码:

1
2
3
4
_ "net/http/pprof"
go func() {
http.ListenAndServe("0.0.0.0:8888", nil)
}()

将crawlab后端服务启动后,浏览器中输入http://ip:8899/debug/pprof/就可以看到一个汇总分析页面,显示如下信息:

1
2
3
4
5
6
7
8
9
10
/debug/pprof/

profiles:
0 block
32 goroutine
552 heap
0 mutex
51 threadcreate

full goroutine stack dump

点击heap,在汇总分析页面的最上方可以看到如下图所示,红色箭头所指的就是当前已经使用的堆内存是25M,amazing!在我只上传一个爬虫文件的情况下,一个后端服务所用的内存竟然能达到25M

mYnJuF.jpg

接下来我们需要借助go tool pprof来分析:

1
go tool pprof -inuse_space http://本机Ip:8888/debug/pprof/heap

这个命令进入后,是一个类似gdb的交互式界面,输入top命令可以前10大的内存分配,flat是堆栈中当前层的inuse内存值,cum是堆栈中本层级的累计inuse内存值(包括调用的函数的inuse内存值,上面的层级)

mYMF91.png

可以看到,bytes.makeSlice这个内置方法竟然使用了24M内存,继续往下看,可以看到ReadFrom这个方法,搜了一下,发现 ioutil.ReadAll() 里会调用 bytes.Buffer.ReadFrom, 而 bytes.Buffer.ReadFrom 会进行 makeSlice。再回头看一下io/ioutil.readAll的代码实现,

1
2
3
4
5
6
7
8
9
10
11
12
13
14
15
16
17
18
19
20
21
func readAll(r io.Reader, capacity int64) (b []byte, err error) {
buf := bytes.NewBuffer(make([]byte, 0, capacity))
defer func() {
e := recover()
if e == nil {
return
}
if panicErr, ok := e.(error); ok && panicErr == bytes.ErrTooLarge {
err = panicErr
} else {
panic(e)
}
}()
_, err = buf.ReadFrom(r)
return buf.Bytes(), err
}

// bytes.MinRead = 512
func ReadAll(r io.Reader) ([]byte, error) {
return readAll(r, bytes.MinRead)
}

可以看到,ioutil.ReadAll 每次都会分配初始化一个大小为 bytes.MinRead 的 buffer ,bytes.MinRead 在 Golang 里是一个常量,值为 512 。就是说每次调用 ioutil.ReadAll 都会分配一块大小为 512 字节的内存,看起来是正常的,但我们再看一下ReadFrom的实现,

1
2
3
4
5
6
7
8
9
10
11
12
13
14
15
16
17
18
19
20
21
22
23
24
25
26
27
28
29
30
31
32
33
34
35
// ReadFrom reads data from r until EOF and appends it to the buffer, growing
// the buffer as needed. The return value n is the number of bytes read. Any
// error except io.EOF encountered during the read is also returned. If the
// buffer becomes too large, ReadFrom will panic with ErrTooLarge.
func (b *Buffer) ReadFrom(r io.Reader) (n int64, err error) {
b.lastRead = opInvalid
// If buffer is empty, reset to recover space.
if b.off >= len(b.buf) {
b.Truncate(0)
}
for {
if free := cap(b.buf) - len(b.buf); free < MinRead {
// not enough space at end
newBuf := b.buf
if b.off+free < MinRead {
// not enough space using beginning of buffer;
// double buffer capacity
newBuf = makeSlice(2*cap(b.buf) + MinRead)
}
copy(newBuf, b.buf[b.off:])
b.buf = newBuf[:len(b.buf)-b.off]
b.off = 0
}
m, e := r.Read(b.buf[len(b.buf):cap(b.buf)])
b.buf = b.buf[0 : len(b.buf)+m]
n += int64(m)
if e == io.EOF {
break
}
if e != nil {
return n, e
}
}
return n, nil // err is EOF, so return nil explicitly
}

这个函数主要作用就是从 io.Reader 里读取的数据放入 buffer 中,如果 buffer 空间不够,就按照每次 2x + MinRead 的算法递增,这里 MinRead 的大小也是 512 Bytes ,也就是说如果我们一次性读取的文件过大,就会导致所使用的内存倍增,假设我们的爬虫文件总共有500M,那么所用的内存就有500M * 2 + 512B,况且爬虫文件中还带了那么多log文件,那看看crawlab源码中是哪一段使用ioutil.ReadAll读了爬虫文件,定位到了这里:

mYQTWn.jpg

这里直接将全部的文件内容,以二进制的形式读了进来,导致内存倍增,令人窒息的操作。

其实在读大文件的时候,把文件内容全部读到内存,直接就翻车了,正确是处理方法有两种,一种是流式处理:

1
2
3
4
5
6
7
8
9
10
11
12
13
14
15
16
17
18
19
20
21
func ReadFile(filePath string, handle func(string)) error {
f, err := os.Open(filePath)
defer f.Close()
if err != nil {
return err
}
buf := bufio.NewReader(f)

for {
line, err := buf.ReadLine("\n")
line = strings.TrimSpace(line)
handle(line)
if err != nil {
if err == io.EOF{
return nil
}
return err
}
return nil
}
}

第二种方案就是分片处理,当读取的是二进制文件,没有换行符的时候,使用这种方案比较合适:

1
2
3
4
5
6
7
8
9
10
11
12
13
14
15
16
17
18
19
20
21
func ReadBigFile(fileName string, handle func([]byte)) error {
f, err := os.Open(fileName)
if err != nil {
fmt.Println("can't opened this file")
return err
}
defer f.Close()
s := make([]byte, 4096)
for {
switch nr, err := f.Read(s[:]); true {
case nr < 0:
fmt.Fprintf(os.Stderr, "cat: error reading: %s\n", err.Error())
os.Exit(1)
case nr == 0: // EOF
return nil
case nr > 0:
handle(s[0:nr])
}
}
return nil
}

我们这类采用的第二种方式来优化,优化后再来看下内存分析:

mYltYj.png

占用1M内存,这才是一个正常后端服务该有的内存大小,源码已push到crawlab,可以在GitHub项目源码中阅读。

最后附上项目链接,https://github.com/tikazyq/crawlab,为crawlab打电话,欢迎大家一起贡献,让crawlab变得更好用!


]]>
crawlab的golang后端内存分析及优化-基于go pprof
Python中使用正则表达式的环视功能 https://cloudsjhan.github.io/2019/08/16/Python中使用正则表达式的环视功能/ 2019-08-16T05:28:30.000Z 2019-08-16T05:30:21.477Z


什么是环视

环视只是进行子表达式的匹配,并不占字符,匹配到的内容不保存,因此也叫做零宽断言,环视最终的匹配结果就是一个位置。

环视按照方向可以分为顺序环视和逆序环视两种,按是否进行匹配分为肯定和否定两种,组合起来就是四种模式。

环视表达式解释
(?=expression)顺序肯定环视,表示所在位置右侧能匹配expression
(?!rexpression)顺序否定环视,表示所在位置右侧不匹配expression
(?<=expression)逆序肯定环视,表示所在位置左侧能匹配expression
(?<!expression)逆序否定环视,表示所在位置左侧不匹配expression

只说概念可能有些抽象,分别举例子来演示一下具体的使用场景。

一些示例

  1. 顺序肯定环视
1
2
3
4
# s = 'xiaomi9iphone8iphone7',需要在每个手机型号后面加上逗号,变成 s= 'xiaomi9,iphone8,iphone7'
import re
print(re.sub(r'(?=iphone)',',',s))
# 顺序肯定环视,所确定的位置右边是字符串iPhone,在此位置即可添加逗号
  1. 逆序肯定环视
1
2
3
4
5
6
# s = 'Takes Reservations:No Delivery:No Take-out:Yes Accepts Credit Cards:Yes Good for Groups:No'
# 需求是要在Yes,和No的后面加上逗号,使之变成
# s = 'Takes Reservations:No, Delivery:No, Take-out:Yes, Accepts Credit Cards:Yes, Good for Groups:No'
import re
re.sub(r"(?<=(No))(?=(\s+))|(?<=(Yes))(?=(\s+))",',',s)
# 逆序肯定环视,所要确定的位左边必须能匹配上No,或者Yes
  1. 顺序否定环视
1
2
3
4
# s = '123aaa',将s字符串变成 s='123,a,a,a,'
# 分析一下,就是在字符串右侧非数字的位置,添加逗号,即使用顺序否定环视,匹配右侧非数字位置
s = '123aaa'
re.sub(r'(?!\d+)',',',s)
  1. 逆序否定环视
1
2
3
4
# 将 s= 'aaa123'变成 s=  ',a,a,a,123'
# 分析一下,就是在非数字左侧的位置加逗号,使用逆序否定环视,匹配左侧非数字的位置
s= 'aaa123'
re.sub(r'(?<!\d)',',',b)

有些例子不是很合理,尽量能表达清楚环视的含义即可。

总结:

1
环视的功能非常强大,也是正则中的一个难点,对于环视的理解,可以从应用和原理两个角度理解,如果想理解得更清晰、深入一些,还是从原理的角度理解好一些,正则匹配基本原理参考 NFA引擎匹配原理

]]>
正则表达式中的环视功能解析以及在Python中的使用
centos7 编译、安装、配置、启动redis https://cloudsjhan.github.io/2019/08/02/centos7-编译、安装、配置、启动reds/ 2019-08-02T09:00:22.000Z 2019-08-16T06:17:00.636Z


  1. 下载Redis的安装包

    wget http://download.redis.io/releases/redis-4.0.6.tar.gz

  2. 解压

    tar -zxvf redis-4.0.6.tar.gz

  3. cd redis-4.0.6

  4. 编译

    make MALLOC=libc

  5. 环境配置,将配置文件以你想暴露的Redis为名,复制到/etc/redis

    mkdir /etc/redis(需要root权限)

    cp redis.conf /etc/redis/6379.conf

  6. cd utils & vim redis_init_script

    修改 redis_init_script中如图所示的部分

    配置chkconfig是为了开机配置开机自启Redis,下面的横线部分换成你自己的Redis安装路径,可选择自己想要暴露的端口

  7. 将修改后的redis_init_script拷贝至开机启动目录,并修改文件名为redisd, 一般后台服务都已d结尾

    cp redis_init_script /etc/init.d/redisd

  8. 设置开机启动

    chkconfig redisd on

    如果之前没有在redis_init_script中添加chkconfig,就会提示不支持该命令

  9. service redisd start 启动Redis

  10. 后台启动的话,service redis start &


]]>
centos7 编译,安装,配置,启动Redis
mysql数据去重 https://cloudsjhan.github.io/2019/07/01/mysql数据去重/ 2019-07-01T07:40:05.000Z 2019-07-01T07:44:23.308Z


从excel中导入了一部分数据到mysql中,有很多数据是重复的,而且没有主键,需要按照其中已经存在某一列对数据进行去重。

添加主键

由于之前的字段中没有主键,所以需要新增一个字段,并且将其作为主键。

添加一个新的字段id,对id中的值进行递增操作,然后再设置为主键。

对id字段进行递增的赋值操作如下:

1
2
SET @r:=0;
UPDATE table SET id=(@r:=@r+1);

然后设置为主键即可。

去重

添加递增的id字段后,就可以对数据根据某个字段进行去重操作,策略就是保存id最小的那条数据。

1
2
3
4
5
6
7
8
9
10
11
12
13
14
15
16
17
18
19
20
21
DELETE FROM `table`
WHERE
`去重字段名` IN (
SELECT x FROM
(
SELECT `去重字段名` AS x
FROM `table`
GROUP BY `去重字段名`
HAVING COUNT(`去重字段名`) > 1
) tmp0
)
AND
`递增主键名` NOT IN (
SELECT y FROM
(
SELECT min(`递增主键名`) AS y
FROM `table`
GROUP BY `去重字段名`
HAVING COUNT(`去重字段名`) > 1
) tmp1
)

]]>
mysql数据去重
dokcer.service 提示缺失bridge网络,导致Cannot connect to the Docker daemon at unix:///var/run/docker.sock. Is the docker daemon running? https://cloudsjhan.github.io/2019/06/04/dokcer-service-提示缺失bridge网络,导致Cannot-connect-to-the-Docker-daemon-at-unix-var-run-docker-sock-Is-the-docker-daemon-running/ 2019-06-04T07:25:01.000Z 2019-06-06T08:39:54.660Z

操作过程:

  1. 为CentOS7安装Docker,安装成功后,可以执行docker,但是docker ps等命令会报错:

  2. 1
    Cannot connect to the Docker daemon at unix:///var/run/docker.sock. Is the docker daemon running?

分析:

一般这种错误都是由于操作者没有root权限,但是使用sudo执行也是同样的问题,这就纳闷了,没关系,看一下docker.service的执行日志:

1
systemctl status docker.service

发现有一句很重要的话:

1
Error starting daemon: Error initializing network controller: list bridge addresses failed: no available network

这是由于启动Docker的时候,默认的网络模式是桥接模式,这就需要向操作系统发送信号,让它帮我们建立一个bridge网络命名为docker0, 并且分配172.17.0.1/16。但是出于某种原因,该网络没有建立起来,我们只要手动执行这一系列操作就可以:

1
2
3
ip link add name docker0 type bridge

ip addr add dev docker0 172.17.0.1/16

最后重启docker:

1
systemclt restart docker

]]>
dokcer.service 提示缺失bridge网络,导致Cannot connect to the Docker daemon at unix:///var/run/docker.sock. Is the docker daemon running?
python 正则表达式及re详解 https://cloudsjhan.github.io/2019/04/28/python-正则表达式及re详解/ 2019-04-28T06:52:31.000Z 2019-04-28T08:15:06.233Z

Python 正则表达式 re 模块

简介

正则表达式(regular expression)是可以匹配文本片段的模式。最简单的正则表达式就是普通字符串,可以匹配其自身。比如,正则表达式 ‘hello’ 可以匹配字符串 ‘hello’。

要注意的是,正则表达式并不是一个程序,而是用于处理字符串的一种模式,如果你想用它来处理字符串,就必须使用支持正则表达式的工具,比如 Linux 中的 awk, sed, grep,或者编程语言 Perl, Python, Java 等等。

正则表达式有多种不同的风格,下表列出了适用于 Python 或 Perl 等编程语言的部分元字符以及说明:

img

re 模块

在 Python 中,我们可以使用内置的 re 模块来使用正则表达式。

有一点需要特别注意的是,正则表达式使用 \ 对特殊字符进行转义,比如,为了匹配字符串 ‘python.org’,我们需要使用正则表达式 'python\.org',而 Python 的字符串本身也用 \ 转义,所以上面的正则表达式在 Python 中应该写成 'python\\.org',这会很容易陷入 \ 的困扰中,因此,我们建议使用 Python 的原始字符串,只需加一个 r 前缀,上面的正则表达式可以写成:

1
r'python\.org'

re 模块提供了不少有用的函数,用以匹配字符串,比如:

  • compile 函数
  • match 函数
  • search 函数
  • findall 函数
  • finditer 函数
  • split 函数
  • sub 函数
  • subn 函数

re 模块的一般使用步骤如下:

  • 使用 compile 函数将正则表达式的字符串形式编译为一个 Pattern 对象
  • 通过 Pattern 对象提供的一系列方法对文本进行匹配查找,获得匹配结果(一个 Match 对象)
  • 最后使用 Match 对象提供的属性和方法获得信息,根据需要进行其他的操作

compile 函数

compile 函数用于编译正则表达式,生成一个 Pattern 对象,它的一般使用形式如下:

1
re.compile(pattern[, flag])

其中,pattern 是一个字符串形式的正则表达式,flag 是一个可选参数,表示匹配模式,比如忽略大小写,多行模式等。

下面,让我们看看例子。

1
2
3
4
import re

# 将正则表达式编译成 Pattern 对象
pattern = re.compile(r'\d+')

在上面,我们已将一个正则表达式编译成 Pattern 对象,接下来,我们就可以利用 pattern 的一系列方法对文本进行匹配查找了。Pattern 对象的一些常用方法主要有:

  • match 方法
  • search 方法
  • findall 方法
  • finditer 方法
  • split 方法
  • sub 方法
  • subn 方法

match 方法

match 方法用于查找字符串的头部(也可以指定起始位置),它是一次匹配,只要找到了一个匹配的结果就返回,而不是查找所有匹配的结果。它的一般使用形式如下:

1
match(string[, pos[, endpos]])

其中,string 是待匹配的字符串,pos 和 endpos 是可选参数,指定字符串的起始和终点位置,默认值分别是 0 和 len (字符串长度)。因此,当你不指定 pos 和 endpos 时,match 方法默认匹配字符串的头部

当匹配成功时,返回一个 Match 对象,如果没有匹配上,则返回 None。

看看例子。

1
2
3
4
5
6
7
8
9
10
11
12
13
14
15
16
17
18
19
>>> import re
>>> pattern = re.compile(r'\d+') # 用于匹配至少一个数字
>>> m = pattern.match('one12twothree34four') # 查找头部,没有匹配
>>> print m
None
>>> m = pattern.match('one12twothree34four', 2, 10) # 从'e'的位置开始匹配,没有匹配
>>> print m
None
>>> m = pattern.match('one12twothree34four', 3, 10) # 从'1'的位置开始匹配,正好匹配
>>> print m # 返回一个 Match 对象
<_sre.SRE_Match object at 0x10a42aac0>
>>> m.group(0) # 可省略 0
'12'
>>> m.start(0) # 可省略 0
3
>>> m.end(0) # 可省略 0
5
>>> m.span(0) # 可省略 0
(3, 5)

在上面,当匹配成功时返回一个 Match 对象,其中:

  • group([group1, …]) 方法用于获得一个或多个分组匹配的字符串,当要获得整个匹配的子串时,可直接使用 group()group(0)
  • start([group]) 方法用于获取分组匹配的子串在整个字符串中的起始位置(子串第一个字符的索引),参数默认值为 0;
  • end([group]) 方法用于获取分组匹配的子串在整个字符串中的结束位置(子串最后一个字符的索引+1),参数默认值为 0;
  • span([group]) 方法返回 (start(group), end(group))

再看看一个例子:

1
2
3
4
5
6
7
8
9
10
11
12
13
14
15
16
17
18
19
20
21
22
23
>>> import re
>>> pattern = re.compile(r'([a-z]+) ([a-z]+)', re.I) # re.I 表示忽略大小写
>>> m = pattern.match('Hello World Wide Web')
>>> print m # 匹配成功,返回一个 Match 对象
<_sre.SRE_Match object at 0x10bea83e8>
>>> m.group(0) # 返回匹配成功的整个子串
'Hello World'
>>> m.span(0) # 返回匹配成功的整个子串的索引
(0, 11)
>>> m.group(1) # 返回第一个分组匹配成功的子串
'Hello'
>>> m.span(1) # 返回第一个分组匹配成功的子串的索引
(0, 5)
>>> m.group(2) # 返回第二个分组匹配成功的子串
'World'
>>> m.span(2) # 返回第二个分组匹配成功的子串
(6, 11)
>>> m.groups() # 等价于 (m.group(1), m.group(2), ...)
('Hello', 'World')
>>> m.group(3) # 不存在第三个分组
Traceback (most recent call last):
File "<stdin>", line 1, in <module>
IndexError: no such group

search 方法

search 方法用于查找字符串的任何位置,它也是一次匹配,只要找到了一个匹配的结果就返回,而不是查找所有匹配的结果,它的一般使用形式如下:

1
search(string[, pos[, endpos]])

其中,string 是待匹配的字符串,pos 和 endpos 是可选参数,指定字符串的起始和终点位置,默认值分别是 0 和 len (字符串长度)。

当匹配成功时,返回一个 Match 对象,如果没有匹配上,则返回 None。

让我们看看例子:

1
2
3
4
5
6
7
8
9
10
11
12
13
14
>>> import re
>>> pattern = re.compile('\d+')
>>> m = pattern.search('one12twothree34four') # 这里如果使用 match 方法则不匹配
>>> m
<_sre.SRE_Match object at 0x10cc03ac0>
>>> m.group()
'12'
>>> m = pattern.search('one12twothree34four', 10, 30) # 指定字符串区间
>>> m
<_sre.SRE_Match object at 0x10cc03b28>
>>> m.group()
'34'
>>> m.span()
(13, 15)

再来看一个例子:

1
2
3
4
5
6
7
8
9
10
11
12
13
14
15
# -*- coding: utf-8 -*-

import re

# 将正则表达式编译成 Pattern 对象
pattern = re.compile(r'\d+')

# 使用 search() 查找匹配的子串,不存在匹配的子串时将返回 None
# 这里使用 match() 无法成功匹配
m = pattern.search('hello 123456 789')

if m:
# 使用 Match 获得分组信息
print 'matching string:',m.group()
print 'position:',m.span()

执行结果:

1
2
matching string: 123456
position: (6, 12)

findall 方法

上面的 match 和 search 方法都是一次匹配,只要找到了一个匹配的结果就返回。然而,在大多数时候,我们需要搜索整个字符串,获得所有匹配的结果。

findall 方法的使用形式如下:

1
findall(string[, pos[, endpos]])

其中,string 是待匹配的字符串,pos 和 endpos 是可选参数,指定字符串的起始和终点位置,默认值分别是 0 和 len (字符串长度)。

findall 以列表形式返回全部能匹配的子串,如果没有匹配,则返回一个空列表。

看看例子:

1
2
3
4
5
6
7
8
import re

pattern = re.compile(r'\d+') # 查找数字
result1 = pattern.findall('hello 123456 789')
result2 = pattern.findall('one1two2three3four4', 0, 10)

print result1
print result2

执行结果:

1
2
['123456', '789']
['1', '2']

finditer 方法

finditer 方法的行为跟 findall 的行为类似,也是搜索整个字符串,获得所有匹配的结果。但它返回一个顺序访问每一个匹配结果(Match 对象)的迭代器。

看看例子:

1
2
3
4
5
6
7
8
9
10
11
12
13
14
15
16
17
18
19
# -*- coding: utf-8 -*-

import re

pattern = re.compile(r'\d+')

result_iter1 = pattern.finditer('hello 123456 789')
result_iter2 = pattern.finditer('one1two2three3four4', 0, 10)

print type(result_iter1)
print type(result_iter2)

print 'result1...'
for m1 in result_iter1: # m1 是 Match 对象
print 'matching string: {}, position: {}'.format(m1.group(), m1.span())

print 'result2...'
for m2 in result_iter2:
print 'matching string: {}, position: {}'.format(m2.group(), m2.span())

执行结果:

1
2
3
4
5
6
7
8
<type 'callable-iterator'>
result1...
matching string: 123456, position: (6, 12)
matching string: 789, position: (13, 16)
result2...
matching string: 1, position: (3, 4)
matching string: 2, position: (7, 8)

split 方法

split 方法按照能够匹配的子串将字符串分割后返回列表,它的使用形式如下:

1
split(string[, maxsplit])

其中,maxsplit 用于指定最大分割次数,不指定将全部分割。

看看例子:

1
2
3
4
import re

p = re.compile(r'[\s\,\;]+')
print p.split('a,b;; c d')

执行结果:

1
['a', 'b', 'c', 'd']

sub 方法

sub 方法用于替换。它的使用形式如下:

1
sub(repl, string[, count])

其中,repl 可以是字符串也可以是一个函数:

  • 如果 repl 是字符串,则会使用 repl 去替换字符串每一个匹配的子串,并返回替换后的字符串,另外,repl 还可以使用 \id 的形式来引用分组,但不能使用编号 0;
  • 如果 repl 是函数,这个方法应当只接受一个参数(Match 对象),并返回一个字符串用于替换(返回的字符串中不能再引用分组)。

count 用于指定最多替换次数,不指定时全部替换。

看看例子:

1
2
3
4
5
6
7
8
9
10
11
12
import re

p = re.compile(r'(\w+) (\w+)')
s = 'hello 123, hello 456'

def func(m):
return 'hi' + ' ' + m.group(2)

print p.sub(r'hello world', s) # 使用 'hello world' 替换 'hello 123' 和 'hello 456'
print p.sub(r'\2 \1', s) # 引用分组
print p.sub(func, s)
print p.sub(func, s, 1) # 最多替换一次

执行结果:

1
2
3
4
hello world, hello world
123 hello, 456 hello
hi 123, hi 456
hi 123, hello 456

subn 方法

subn 方法跟 sub 方法的行为类似,也用于替换。它的使用形式如下:

1
subn(repl, string[, count])

它返回一个元组:

1
(sub(repl, string[, count]), 替换次数)

元组有两个元素,第一个元素是使用 sub 方法的结果,第二个元素返回原字符串被替换的次数。

看看例子:

1
2
3
4
5
6
7
8
9
10
11
12
import re

p = re.compile(r'(\w+) (\w+)')
s = 'hello 123, hello 456'

def func(m):
return 'hi' + ' ' + m.group(2)

print p.subn(r'hello world', s)
print p.subn(r'\2 \1', s)
print p.subn(func, s)
print p.subn(func, s, 1)

执行结果:

1
2
3
4
('hello world, hello world', 2)
('123 hello, 456 hello', 2)
('hi 123, hi 456', 2)
('hi 123, hello 456', 1)

其他函数

事实上,使用 compile 函数生成的 Pattern 对象的一系列方法跟 re 模块的多数函数是对应的,但在使用上有细微差别。

match 函数

match 函数的使用形式如下:

1
re.match(pattern, string[, flags]):

其中,pattern 是正则表达式的字符串形式,比如 \d+, [a-z]+

而 Pattern 对象的 match 方法使用形式是:

1
match(string[, pos[, endpos]])

可以看到,match 函数不能指定字符串的区间,它只能搜索头部,看看例子:

1
2
3
4
5
6
7
8
9
10
11
12
13
import re

m1 = re.match(r'\d+', 'One12twothree34four')
if m1:
print 'matching string:',m1.group()
else:
print 'm1 is:',m1

m2 = re.match(r'\d+', '12twothree34four')
if m2:
print 'matching string:', m2.group()
else:
print 'm2 is:',m2

执行结果:

1
2
m1 is: None
matching string: 12

search 函数

search 函数的使用形式如下:

1
re.search(pattern, string[, flags])

search 函数不能指定字符串的搜索区间,用法跟 Pattern 对象的 search 方法类似。

findall 函数

findall 函数的使用形式如下:

1
re.findall(pattern, string[, flags])

findall 函数不能指定字符串的搜索区间,用法跟 Pattern 对象的 findall 方法类似。

看看例子:

1
2
3
4
5
6
import re

print re.findall(r'\d+', 'hello 12345 789')

# 输出
['12345', '789']

finditer 函数

finditer 函数的使用方法跟 Pattern 的 finditer 方法类似,形式如下:

1
re.finditer(pattern, string[, flags])

split 函数

split 函数的使用形式如下:

1
re.split(pattern, string[, maxsplit])

sub 函数

sub 函数的使用形式如下:

1
re.sub(pattern, repl, string[, count])

subn 函数

subn 函数的使用形式如下:

1
re.subn(pattern, repl, string[, count])

到底用哪种方式

从上文可以看到,使用 re 模块有两种方式:

  • 使用 re.compile 函数生成一个 Pattern 对象,然后使用 Pattern 对象的一系列方法对文本进行匹配查找;
  • 直接使用 re.match, re.search 和 re.findall 等函数直接对文本匹配查找;

下面,我们用一个例子展示这两种方法。

先看第 1 种用法:

1
2
3
4
5
6
7
8
import re

# 将正则表达式先编译成 Pattern 对象
pattern = re.compile(r'\d+')

print pattern.match('123, 123')
print pattern.search('234, 234')
print pattern.findall('345, 345')

再看第 2 种用法:

1
2
3
4
5
import re

print re.match(r'\d+', '123, 123')
print re.search(r'\d+', '234, 234')
print re.findall(r'\d+', '345, 345')

如果一个正则表达式需要用到多次(比如上面的 \d+),在多种场合经常需要被用到,出于效率的考虑,我们应该预先编译该正则表达式,生成一个 Pattern 对象,再使用该对象的一系列方法对需要匹配的文件进行匹配;而如果直接使用 re.match, re.search 等函数,每次传入一个正则表达式,它都会被编译一次,效率就会大打折扣。

因此,我们推荐使用第 1 种用法。

匹配中文

在某些情况下,我们想匹配文本中的汉字,有一点需要注意的是,中文的 unicode 编码范围 主要在 [\u4e00-\u9fa5],这里说主要是因为这个范围并不完整,比如没有包括全角(中文)标点,不过,在大部分情况下,应该是够用的。

假设现在想把字符串 title = u'你好,hello,世界' 中的中文提取出来,可以这么做:

1
2
3
4
5
6
7
8
9
# -*- coding: utf-8 -*-

import re

title = u'你好,hello,世界'
pattern = re.compile(ur'[\u4e00-\u9fa5]+')
result = pattern.findall(title)

print result

注意到,我们在正则表达式前面加上了两个前缀 ur,其中 r 表示使用原始字符串,u 表示是 unicode 字符串。

执行结果:

1
[u'\u4f60\u597d', u'\u4e16\u754c']

贪婪匹配

在 Python 中,正则匹配默认是贪婪匹配(在少数语言中可能是非贪婪),也就是匹配尽可能多的字符

比如,我们想找出字符串中的所有 div 块:

1
2
3
4
5
6
7
import re

content = 'aa<div>test1</div>bb<div>test2</div>cc'
pattern = re.compile(r'<div>.*</div>')
result = pattern.findall(content)

print result

执行结果:

1
['<div>test1</div>bb<div>test2</div>']

由于正则匹配是贪婪匹配,也就是尽可能多的匹配,因此,在成功匹配到第一个 </div> 时,它还会向右尝试匹配,查看是否还有更长的可以成功匹配的子串。

如果我们想非贪婪匹配,可以加一个 ?,如下:

1
2
3
4
5
6
7
import re

content = 'aa<div>test1</div>bb<div>test2</div>cc'
pattern = re.compile(r'<div>.*?</div>') # 加上 ?
result = pattern.findall(content)

print result

结果:

1
['<div>test1</div>', '<div>test2</div>']

小结

  • re 模块的一般使用步骤如下:
    • 使用 compile 函数将正则表达式的字符串形式编译为一个 Pattern 对象;
    • 通过 Pattern 对象提供的一系列方法对文本进行匹配查找,获得匹配结果(一个 Match 对象);
    • 最后使用 Match 对象提供的属性和方法获得信息,根据需要进行其他的操作;
  • Python 的正则匹配默认是贪婪匹配。

]]>
python正则表达式及re模块详解
vim常用命令与技巧(不定期更新).md https://cloudsjhan.github.io/2019/04/21/vim常用命令与技巧-md/ 2019-04-21T13:38:14.000Z 2019-04-21T14:37:49.394Z

Vim常用的命令与技巧总结:

  1. 在每行行首添加相同的内容:
1
:%s/^/要添加的内容
  1. 在每行行尾添加相同的内容:
1
:%s/$/要添加的内容
  1. 利用正则表达式删除代码段每行的行号
1
2
3
:%s/^\s*[0-9]*\s*//gc

其中,^表示行首,$表示行尾,\s表示空格,[0-9]表示0~9的数字,*表示0或多个,%s/^\s*[0-9]*\s*//gc的意思是将每行以0或多个空格开始中间包含0或多个数字并以0或多个空格结束的字符串替换为空。
  1. 指定行首添加”#”
1
2
:447,945 s/^/#
447-945行的行首添加 #
  1. 删除每行前面的内容
1
:10,15 s/^/#//gc
  1. 统计m到n行中”字符串”出现的次数
1
:m,n s/字符串//gn
  1. 统计”字符串”在当前编辑文件出现的次数

    1
    : %s/字符串/ng
  2. 统计词语在文件中出现的行数:

1
cat file|grep -i 字符串 |wc -l
  1. pycharm中vim插件批量缩进:
1
2
3
4
5
:m,n >
//向右缩进4空格

:m,n <
//向左缩进4空格
  1. 跳转到行首: ^
  2. 跳转到行尾:$
  3. 跳转到文件开头: gg
  4. 跳转到行尾:G

]]>
vim常用的命令与技巧总结
IRC常用命令 https://cloudsjhan.github.io/2019/04/19/IRC常用命令/ 2019-04-19T02:38:29.000Z 2019-04-19T02:44:55.593Z

下面是常用命令

/在不引起混淆的情况下,IRC命令允许简写。例如,/join 命令可以简写为/j,/jo或者/joi。

/nick

更改昵称的基本方法是:/n(ick) 新的昵称

您的昵称可以包含英文字母,数字,汉字及下划线等。但是,昵称不能超过50个(每个字符和汉字都算一个字),而且不能包含$,+,!和空格。

/nick 命令等价于工具按钮中的“改变别名”。

/join

/join命令的格式是:/j(oin) 聊天室名

如果聊天室已经存在,您就进入该聊天室。此时,/join 命令等价于聊天室列表工具按钮中的“进入”。

如果聊天室不存在,您就建立了一个新的聊天室并进入。此时,/join 命令等价于工具按钮中的“建聊天室”。

聊天室的名字可以包含英文字母,数字,汉字及下划线等。但是,不能超过50个字(每个字符和汉字都算一个字),而且不能包含$,+,!和空格。

/mode +(-)i

/mode +(-)i 命令可以用来锁住(解锁)用户自建的聊天室(私人聊天室)。其命令格式是:/m(ode)

+i 或 /m(ode) -i

只有用户自建的聊天室才能加锁。

未经管理员邀请,其他用户不能进入私人聊天室。

/mode +(-)o

/mode +(-)o 命令可以让聊天室管理员赋予或者剥夺其他用户的管理员身份。其命令格式是:/m(ode)

+o 用户昵称或/m(ode)-o用户昵称只有聊天室管理员才能使用这个命令。

/knock

/knock 命令可以让您询问私人聊天室管理员是否可以进入该私人聊天室。其命令格式是:/k(nock) 房间名

消息]

/invite

/invite 命令可以让聊天室管理员邀请其他用户进入私人聊天室。其命令格式是:/i(nvite) 用户昵称

只有私人聊天室的管理员才能使用这个命令。

/privmsg

/privmsg 命令用来向在同一间聊天室的某个用户发送私人消息(悄悄话)。也就是说,您的消息只送给指定的人,而不会显示给其他用户。

/privmsg 命令的基本格式是: /p(rivmsg) 用户昵称 消息

接受您的私人消息的用户必须和您在同一间聊天室。

“用户昵称”和“消息”这两个参数是不能省略的。

如果某个用户的昵称太长,在不会产生混淆的情况下,您可以只输入用户昵称的头几个字母,系统会进行自动匹配。

例如:聊天室里除了您之外还有两个用户,他们的昵称分别是xiaobao和softman。您若想给softman发送悄悄话,可以在输入框里输入下面的命令:

/p s Have you etanged today?

由于xiaobao和softman的第一个字母就不一样,所以系统会把您输入的昵称“s”自动匹配为“softman”。另外,“/p”是“/privmsg”的缩写。

/ignore

/ignore 命令用来把某个用户加入您的“坏人黑名单”。一旦某个用户进入了您的黑名单,他说的任何话都将不会显示在您的终端上。

/ignore 命令的基本格式是:/ig(nore) 用户昵称

用户昵称所代表的用户必须和您在同一个聊天室。

/ignore 命令等价于用户列表工具按钮中的“忽略”。

如果某个用户的昵称太长,在不会产生混淆的情况下,您可以只输入用户昵称的头几个字母,系统会进行自动匹配。

在您的用户列表中,如果某个用户昵称前有一个#,表示该用户已经被您列入黑名单。

如果一个用户已经在您的黑名单中,您可以用 /ignore 用户昵称 把他从黑名单中去掉。

/away

/away 命令用来把自己设为“暂时离开”状态,并可以留言给其他用户。当其他用户和您说悄悄话时,您预先设置的留言会自动回复给其他用户。

/away 命令的基本格式是:/a(way) [留言]

“留言”这个参数是可选的。如果有这个参数,您的状态会被设置为“暂时离开”。否则,您的状态会被设置为“我回来了”。

当您暂时离开聊天室时,用户列表中您的昵称前会出现一个?,表示您处于“离开”状态。工具按钮中的“暂时离开”也会变为“我回来了”。

当您回来继续聊天时,您可以点击工具按钮中的“我回来了”,或者在输入框里输入 /away 命令,将自己设置为正常状态。

/away 命令等价于工具按钮中的“暂时离开”

/whois

/whois 命令用来查询某个用户的信息,包括用户的亿唐ID,IP地址,目前所在的聊天室和发呆时间。

/whois 命令的基本格式是:/w(hois) 用户昵称

/whois命令等价于用户列表工具按钮中的“查询”。

/names

/names 命令用来查看当前所有(或某个聊天室内)的在线聊天用户。其命令格式是:/na(mes) [聊天室]

/topic

/topic 命令用来设定当前聊天室的主题。

/topic 命令的基本格式是:/t(opic) 聊天室主题

只有当前聊天室的管理员(op)才有权利设定聊天室主题。

聊天室的创建者就是该聊天室的管理员。

管理员权限可以通过 /mode +o 命令转交。

/kick

/kick 命令用来把某个用户踢出当前聊天室。

/kick 命令的基本格式是:/ki(ck) 用户昵称 [消息]

只有当前聊天室的管理员(op)才有权利把其他用户踢出当前聊天室。

聊天室的创建者就是该聊天室的管理员。

管理员权限可以通过/mode +o命令转交。

请诸位网友慎用这个命令。“君子动口不动手”嘛!

/quit

/quit 命令用来退出聊天室。

/quit 命令的基本格式是:/q(uit) [消息]

“消息”这个参数是可选的。如果您指定退出时的消息,该消息会发送给当前聊天室中的其他用户。您可以使用这个消息向其他用户道别。

/quit 命令等价于工具按钮中的“结束聊天”


]]>
IRC常用命令
golang面试问题汇总 https://cloudsjhan.github.io/2019/04/12/golang面试问题汇总/ 2019-04-12T02:01:08.000Z 2019-04-12T02:02:41.696Z

本文转载自:https://github.com/KeKe-Li/golang-interview-questions

Golang面试问题汇总

通常我们去面试肯定会有些不错的Golang的面试题目的,所以总结下,让其他Golang开发者也可以查看到,同时也用来检测自己的能力和提醒自己的不足之处,欢迎大家补充和提交新的面试题目.

Golang面试问题汇总:

1. Golang中除了加Mutex锁以外还有哪些方式安全读写共享变量?

Golang中Goroutine 可以通过 Channel 进行安全读写共享变量。

2. 无缓冲 Chan 的发送和接收是否同步?

1
2
ch := make(chan int)    无缓冲的channel由于没有缓冲发送和接收需要同步.
ch := make(chan int, 2) 有缓冲channel不要求发送和接收操作同步.
  • channel无缓冲时,发送阻塞直到数据被接收,接收阻塞直到读到数据。
  • channel有缓冲时,当缓冲满时发送阻塞,当缓冲空时接收阻塞。

3. go语言的并发机制以及它所使用的CSP并发模型.

CSP模型是上个世纪七十年代提出的,不同于传统的多线程通过共享内存来通信,CSP讲究的是“以通信的方式来共享内存”。用于描述两个独立的并发实体通过共享的通讯 channel(管道)进行通信的并发模型。 CSP中channel是第一类对象,它不关注发送消息的实体,而关注与发送消息时使用的channel。

Golang中channel 是被单独创建并且可以在进程之间传递,它的通信模式类似于 boss-worker 模式的,一个实体通过将消息发送到channel 中,然后又监听这个 channel 的实体处理,两个实体之间是匿名的,这个就实现实体中间的解耦,其中 channel 是同步的一个消息被发送到 channel 中,最终是一定要被另外的实体消费掉的,在实现原理上其实类似一个阻塞的消息队列。

Goroutine 是Golang实际并发执行的实体,它底层是使用协程(coroutine)实现并发,coroutine是一种运行在用户态的用户线程,类似于 greenthread,go底层选择使用coroutine的出发点是因为,它具有以下特点:

  • 用户空间 避免了内核态和用户态的切换导致的成本。
  • 可以由语言和框架层进行调度。
  • 更小的栈空间允许创建大量的实例。

Golang中的Goroutine的特性:

Golang内部有三个对象: P对象(processor) 代表上下文(或者可以认为是cpu),M(work thread)代表工作线程,G对象(goroutine).

正常情况下一个cpu对象启一个工作线程对象,线程去检查并执行goroutine对象。碰到goroutine对象阻塞的时候,会启动一个新的工作线程,以充分利用cpu资源。 所有有时候线程对象会比处理器对象多很多.

我们用如下图分别表示P、M、G:

img

G(Goroutine) :我们所说的协程,为用户级的轻量级线程,每个Goroutine对象中的sched保存着其上下文信息.

M(Machine) :对内核级线程的封装,数量对应真实的CPU数(真正干活的对象).

P(Processor) :即为G和M的调度对象,用来调度G和M之间的关联关系,其数量可通过GOMAXPROCS()来设置,默认为核心数.

在单核情况下,所有Goroutine运行在同一个线程(M0)中,每一个线程维护一个上下文(P),任何时刻,一个上下文中只有一个Goroutine,其他Goroutine在runqueue中等待。

一个Goroutine运行完自己的时间片后,让出上下文,自己回到runqueue中(如下图所示)。

当正在运行的G0阻塞的时候(可以需要IO),会再创建一个线程(M1),P转到新的线程中去运行。

img

当M0返回时,它会尝试从其他线程中“偷”一个上下文过来,如果没有偷到,会把Goroutine放到Global runqueue中去,然后把自己放入线程缓存中。 上下文会定时检查Global runqueue。

Golang是为并发而生的语言,Go语言是为数不多的在语言层面实现并发的语言;也正是Go语言的并发特性,吸引了全球无数的开发者。

Golang的CSP并发模型,是通过Goroutine和Channel来实现的。

Goroutine 是Go语言中并发的执行单位。有点抽象,其实就是和传统概念上的”线程“类似,可以理解为”线程“。 Channel是Go语言中各个并发结构体(Goroutine)之前的通信机制。通常Channel,是各个Goroutine之间通信的”管道“,有点类似于Linux中的管道。

通信机制channel也很方便,传数据用channel <- data,取数据用<-channel。

在通信过程中,传数据channel <- data和取数据<-channel必然会成对出现,因为这边传,那边取,两个goroutine之间才会实现通信。

而且不管传还是取,必阻塞,直到另外的goroutine传或者取为止。

4. Golang 中常用的并发模型?

Golang 中常用的并发模型有三种:

  • 通过channel通知实现并发控制

无缓冲的通道指的是通道的大小为0,也就是说,这种类型的通道在接收前没有能力保存任何值,它要求发送 goroutine 和接收 goroutine 同时准备好,才可以完成发送和接收操作。

从上面无缓冲的通道定义来看,发送 goroutine 和接收 gouroutine 必须是同步的,同时准备后,如果没有同时准备好的话,先执行的操作就会阻塞等待,直到另一个相对应的操作准备好为止。这种无缓冲的通道我们也称之为同步通道。

1
2
3
4
5
6
7
8
9
10
11
12
func main() {
ch := make(chan struct{})
go func() {
fmt.Println("start working")
time.Sleep(time.Second * 1)
ch <- struct{}{}
}()

<-ch

fmt.Println("finished")
}

当主 goroutine 运行到 <-ch 接受 channel 的值的时候,如果该 channel 中没有数据,就会一直阻塞等待,直到有值。 这样就可以简单实现并发控制

  • 通过sync包中的WaitGroup实现并发控制

Goroutine是异步执行的,有的时候为了防止在结束mian函数的时候结束掉Goroutine,所以需要同步等待,这个时候就需要用 WaitGroup了,在 sync 包中,提供了 WaitGroup ,它会等待它收集的所有 goroutine 任务全部完成。在WaitGroup里主要有三个方法:

  • Add, 可以添加或减少 goroutine的数量.
  • Done, 相当于Add(-1).
  • Wait, 执行后会堵塞主线程,直到WaitGroup 里的值减至0.

在主 goroutine 中 Add(delta int) 索要等待goroutine 的数量。 在每一个 goroutine 完成后 Done() 表示这一个goroutine 已经完成,当所有的 goroutine 都完成后,在主 goroutine 中 WaitGroup 返回返回。

1
2
3
4
5
6
7
8
9
10
11
12
13
14
15
func main(){
var wg sync.WaitGroup
var urls = []string{
"http://www.golang.org/",
"http://www.google.com/",
}
for _, url := range urls {
wg.Add(1)
go func(url string) {
defer wg.Done()
http.Get(url)
}(url)
}
wg.Wait()
}

在Golang官网中对于WaitGroup介绍是A WaitGroup must not be copied after first use,在 WaitGroup 第一次使用后,不能被拷贝

应用示例:

1
2
3
4
5
6
7
8
9
10
11
12
func main(){
wg := sync.WaitGroup{}
for i := 0; i < 5; i++ {
wg.Add(1)
go func(wg sync.WaitGroup, i int) {
fmt.Printf("i:%d", i)
wg.Done()
}(wg, i)
}
wg.Wait()
fmt.Println("exit")
}

运行:

1
2
3
4
5
6
7
8
9
10
i:1i:3i:2i:0i:4fatal error: all goroutines are asleep - deadlock!

goroutine 1 [semacquire]:
sync.runtime_Semacquire(0xc000094018)
/home/keke/soft/go/src/runtime/sema.go:56 +0x39
sync.(*WaitGroup).Wait(0xc000094010)
/home/keke/soft/go/src/sync/waitgroup.go:130 +0x64
main.main()
/home/keke/go/Test/wait.go:17 +0xab
exit status 2

它提示所有的 goroutine 都已经睡眠了,出现了死锁。这是因为 wg 给拷贝传递到了 goroutine 中,导致只有 Add 操作,其实 Done操作是在 wg 的副本执行的。

因此 Wait 就死锁了。

这个第一个修改方式:将匿名函数中 wg 的传入类型改为 *sync.WaitGrou,这样就能引用到正确的WaitGroup了。 这个第二个修改方式:将匿名函数中的 wg 的传入参数去掉,因为Go支持闭包类型,在匿名函数中可以直接使用外面的 wg 变量

  • 在Go 1.7 以后引进的强大的Context上下文,实现并发控制

通常,在一些简单场景下使用 channel 和 WaitGroup 已经足够了,但是当面临一些复杂多变的网络并发场景下 channel 和 WaitGroup 显得有些力不从心了。 比如一个网络请求 Request,每个 Request 都需要开启一个 goroutine 做一些事情,这些 goroutine 又可能会开启其他的 goroutine,比如数据库和RPC服务。 所以我们需要一种可以跟踪 goroutine 的方案,才可以达到控制他们的目的,这就是Go语言为我们提供的 Context,称之为上下文非常贴切,它就是goroutine 的上下文。 它是包括一个程序的运行环境、现场和快照等。每个程序要运行时,都需要知道当前程序的运行状态,通常Go 将这些封装在一个 Context 里,再将它传给要执行的 goroutine 。

context 包主要是用来处理多个 goroutine 之间共享数据,及多个 goroutine 的管理。

context 包的核心是 struct Context,接口声明如下:

1
2
3
4
5
6
7
8
9
10
11
12
13
14
15
16
17
18
// A Context carries a deadline, cancelation signal, and request-scoped values
// across API boundaries. Its methods are safe for simultaneous use by multiple
// goroutines.
type Context interface {
// Done returns a channel that is closed when this `Context` is canceled
// or times out.
Done() <-chan struct{}

// Err indicates why this Context was canceled, after the Done channel
// is closed.
Err() error

// Deadline returns the time when this Context will be canceled, if any.
Deadline() (deadline time.Time, ok bool)

// Value returns the value associated with key or nil if none.
Value(key interface{}) interface{}
}

Done() 返回一个只能接受数据的channel类型,当该context关闭或者超时时间到了的时候,该channel就会有一个取消信号

Err() 在Done() 之后,返回context 取消的原因。

Deadline() 设置该context cancel的时间点

Value() 方法允许 Context 对象携带request作用域的数据,该数据必须是线程安全的。

Context 对象是线程安全的,你可以把一个 Context 对象传递给任意个数的 gorotuine,对它执行 取消 操作时,所有 goroutine 都会接收到取消信号。

一个 Context 不能拥有 Cancel 方法,同时我们也只能 Done channel 接收数据。 其中的原因是一致的:接收取消信号的函数和发送信号的函数通常不是一个。 典型的场景是:父操作为子操作操作启动 goroutine,子操作也就不能取消父操作。

5. JSON 标准库对 nil slice 和 空 slice 的处理是一致的吗? 

首先JSON 标准库对 nil slice 和 空 slice 的处理是不一致.

通常错误的用法,会报数组越界的错误,因为只是声明了slice,却没有给实例化的对象。

1
2
var slice []int
slice[1] = 0

此时slice的值是nil,这种情况可以用于需要返回slice的函数,当函数出现异常的时候,保证函数依然会有nil的返回值。

empty slice 是指slice不为nil,但是slice没有值,slice的底层的空间是空的,此时的定义如下:

1
2
slice := make([]int,0)
slice := []int{}

当我们查询或者处理一个空的列表的时候,这非常有用,它会告诉我们返回的是一个列表,但是列表内没有任何值。

总之,nil slice 和 empty slice是不同的东西,需要我们加以区分的.

6. 协程,线程,进程的区别。

  • 进程

进程是具有一定独立功能的程序关于某个数据集合上的一次运行活动,进程是系统进行资源分配和调度的一个独立单位。每个进程都有自己的独立内存空间,不同进程通过进程间通信来通信。由于进程比较重量,占据独立的内存,所以上下文进程间的切换开销(栈、寄存器、虚拟内存、文件句柄等)比较大,但相对比较稳定安全。

  • 线程

线程是进程的一个实体,是CPU调度和分派的基本单位,它是比进程更小的能独立运行的基本单位.线程自己基本上不拥有系统资源,只拥有一点在运行中必不可少的资源(如程序计数器,一组寄存器和栈),但是它可与同属一个进程的其他的线程共享进程所拥有的全部资源。线程间通信主要通过共享内存,上下文切换很快,资源开销较少,但相比进程不够稳定容易丢失数据。

  • 协程

协程是一种用户态的轻量级线程,协程的调度完全由用户控制。协程拥有自己的寄存器上下文和栈。协程调度切换时,将寄存器上下文和栈保存到其他地方,在切回来的时候,恢复先前保存的寄存器上下文和栈,直接操作栈则基本没有内核切换的开销,可以不加锁的访问全局变量,所以上下文的切换非常快。

7. 互斥锁,读写锁,死锁问题是怎么解决。

  • 互斥锁

互斥锁就是互斥变量mutex,用来锁住临界区的.

条件锁就是条件变量,当进程的某些资源要求不满足时就进入休眠,也就是锁住了。当资源被分配到了,条件锁打开,进程继续运行;读写锁,也类似,用于缓冲区等临界资源能互斥访问的。

  • 读写锁

通常有些公共数据修改的机会很少,但其读的机会很多。并且在读的过程中会伴随着查找,给这种代码加锁会降低我们的程序效率。读写锁可以解决这个问题。

img

注意:写独占,读共享,写锁优先级高

  • 死锁

一般情况下,如果同一个线程先后两次调用lock,在第二次调用时,由于锁已经被占用,该线程会挂起等待别的线程释放锁,然而锁正是被自己占用着的,该线程又被挂起而没有机会释放锁,因此就永远处于挂起等待状态了,这叫做死锁(Deadlock)。 另外一种情况是:若线程A获得了锁1,线程B获得了锁2,这时线程A调用lock试图获得锁2,结果是需要挂起等待线程B释放锁2,而这时线程B也调用lock试图获得锁1,结果是需要挂起等待线程A释放锁1,于是线程A和B都永远处于挂起状态了。

死锁产生的四个必要条件:

  1. 互斥条件:一个资源每次只能被一个进程使用
  2. 请求与保持条件:一个进程因请求资源而阻塞时,对已获得的资源保持不放。
  3. 不剥夺条件:进程已获得的资源,在末使用完之前,不能强行剥夺。
  4. 循环等待条件:若干进程之间形成一种头尾相接的循环等待资源关系。 这四个条件是死锁的必要条件,只要系统发生死锁,这些条件必然成立,而只要上述条件之一不满足,就不会发生死锁。

a. 预防死锁

可以把资源一次性分配:(破坏请求和保持条件)

然后剥夺资源:即当某进程新的资源未满足时,释放已占有的资源(破坏不可剥夺条件)

资源有序分配法:系统给每类资源赋予一个编号,每一个进程按编号递增的顺序请求资源,释放则相反(破坏环路等待条件)

b. 避免死锁

预防死锁的几种策略,会严重地损害系统性能。因此在避免死锁时,要施加较弱的限制,从而获得 较满意的系统性能。由于在避免死锁的策略中,允许进程动态地申请资源。因而,系统在进行资源分配之前预先计算资源分配的安全性。若此次分配不会导致系统进入不安全状态,则将资源分配给进程;否则,进程等待。其中最具有代表性的避免死锁算法是银行家算法。

c. 检测死锁

首先为每个进程和每个资源指定一个唯一的号码,然后建立资源分配表和进程等待表.

d. 解除死锁

当发现有进程死锁后,便应立即把它从死锁状态中解脱出来,常采用的方法有.

e. 剥夺资源

从其它进程剥夺足够数量的资源给死锁进程,以解除死锁状态.

f. 撤消进程

可以直接撤消死锁进程或撤消代价最小的进程,直至有足够的资源可用,死锁状态.消除为止.所谓代价是指优先级、运行代价、进程的重要性和价值等。

8. Golang的内存模型,为什么小对象多了会造成gc压力。

通常小对象过多会导致GC三色法消耗过多的GPU。优化思路是,减少对象分配.

9. Data Race问题怎么解决?能不能不加锁解决这个问题?

同步访问共享数据是处理数据竞争的一种有效的方法.golang在1.1之后引入了竞争检测机制,可以使用 go run -race 或者 go build -race来进行静态检测。 其在内部的实现是,开启多个协程执行同一个命令, 并且记录下每个变量的状态.

竞争检测器基于C/C++的ThreadSanitizer 运行时库,该库在Google内部代码基地和Chromium找到许多错误。这个技术在2012年九月集成到Go中,从那时开始,它已经在标准库中检测到42个竞争条件。现在,它已经是我们持续构建过程的一部分,当竞争条件出现时,它会继续捕捉到这些错误。

竞争检测器已经完全集成到Go工具链中,仅仅添加-race标志到命令行就使用了检测器。

1
2
3
4
$ go test -race mypkg    // 测试包
$ go run -race mysrc.go // 编译和运行程序
$ go build -race mycmd // 构建程序
$ go install -race mypkg // 安装程序

要想解决数据竞争的问题可以使用互斥锁sync.Mutex,解决数据竞争(Data race),也可以使用管道解决,使用管道的效率要比互斥锁高.

10. 什么是channel,为什么它可以做到线程安全?

Channel是Go中的一个核心类型,可以把它看成一个管道,通过它并发核心单元就可以发送或者接收数据进行通讯(communication),Channel也可以理解是一个先进先出的队列,通过管道进行通信。

Golang的Channel,发送一个数据到Channel 和 从Channel接收一个数据 都是 原子性的。而且Go的设计思想就是:不要通过共享内存来通信,而是通过通信来共享内存,前者就是传统的加锁,后者就是Channel。也就是说,设计Channel的主要目的就是在多任务间传递数据的,这当然是安全的。

11. Epoll原理.

开发高性能网络程序时,windows开发者们言必称Iocp,linux开发者们则言必称Epoll。大家都明白Epoll是一种IO多路复用技术,可以非常高效的处理数以百万计的Socket句柄,比起以前的Select和Poll效率提高了很多。

先简单了解下如何使用C库封装的3个epoll系统调用。

1
2
3
int epoll_create(int size);  
int epoll_ctl(int epfd, int op, int fd, struct epoll_event *event);
int epoll_wait(int epfd, struct epoll_event *events,int maxevents, int timeout);

使用起来很清晰,首先要调用epoll_create建立一个epoll对象。参数size是内核保证能够正确处理的最大句柄数,多于这个最大数时内核可不保证效果。 epoll_ctl可以操作上面建立的epoll,例如,将刚建立的socket加入到epoll中让其监控,或者把 epoll正在监控的某个socket句柄移出epoll,不再监控它等等。

epoll_wait在调用时,在给定的timeout时间内,当在监控的所有句柄中有事件发生时,就返回用户态的进程。

从调用方式就可以看到epoll相比select/poll的优越之处是,因为后者每次调用时都要传递你所要监控的所有socket给select/poll系统调用,这意味着需要将用户态的socket列表copy到内核态,如果以万计的句柄会导致每次都要copy几十几百KB的内存到内核态,非常低效。而我们调用epoll_wait时就相当于以往调用select/poll,但是这时却不用传递socket句柄给内核,因为内核已经在epoll_ctl中拿到了要监控的句柄列表。

所以,实际上在你调用epoll_create后,内核就已经在内核态开始准备帮你存储要监控的句柄了,每次调用epoll_ctl只是在往内核的数据结构里塞入新的socket句柄。

在内核里,一切皆文件。所以,epoll向内核注册了一个文件系统,用于存储上述的被监控socket。当你调用epoll_create时,就会在这个虚拟的epoll文件系统里创建一个file结点。当然这个file不是普通文件,它只服务于epoll。

epoll在被内核初始化时(操作系统启动),同时会开辟出epoll自己的内核高速cache区,用于安置每一个我们想监控的socket,这些socket会以红黑树的形式保存在内核cache里,以支持快速的查找、插入、删除。这个内核高速cache区,就是建立连续的物理内存页,然后在之上建立slab层,通常来讲,就是物理上分配好你想要的size的内存对象,每次使用时都是使用空闲的已分配好的对象。

1
2
3
4
5
6
7
8
9
10
11
12
13
14
static int __init eventpoll_init(void)  {  
... ...

/* Allocates slab cache used to allocate "struct epitem" items */
epi_cache = kmem_cache_create("eventpoll_epi", sizeof(struct epitem),
0, SLAB_HWCACHE_ALIGN|EPI_SLAB_DEBUG|SLAB_PANIC,
NULL, NULL);

/* Allocates slab cache used to allocate "struct eppoll_entry" */
pwq_cache = kmem_cache_create("eventpoll_pwq",
sizeof(struct eppoll_entry), 0,
EPI_SLAB_DEBUG|SLAB_PANIC, NULL, NULL);
... ...
}

epoll的高效就在于,当我们调用epoll_ctl往里塞入百万个句柄时,epoll_wait仍然可以飞快的返回,并有效的将发生事件的句柄给我们用户。这是由于我们在调用epoll_create时,内核除了帮我们在epoll文件系统里建了个file结点,在内核cache里建了个红黑树用于存储以后epoll_ctl传来的socket外,还会再建立一个list链表,用于存储准备就绪的事件,当epoll_wait调用时,仅仅观察这个list链表里有没有数据即可。有数据就返回,没有数据就sleep,等到timeout时间到后即使链表没数据也返回。所以,epoll_wait非常高效。

而且,通常情况下即使我们要监控百万计的句柄,大多一次也只返回很少量的准备就绪句柄而已,所以,epoll_wait仅需要从内核态copy少量的句柄到用户态而已,因此就会非常的高效!

然而,这个准备就绪list链表是怎么维护的呢?当我们执行epoll_ctl时,除了把socket放到epoll文件系统里file对象对应的红黑树上之外,还会给内核中断处理程序注册一个回调函数,告诉内核,如果这个句柄的中断到了,就把它放到准备就绪list链表里。所以,当一个socket上有数据到了,内核在把网卡上的数据copy到内核中后就来把socket插入到准备就绪链表里了。

如此,一个红黑树,一张准备就绪句柄链表,少量的内核cache,就帮我们解决了大并发下的socket处理问题。执行epoll_create时,创建了红黑树和就绪链表,执行epoll_ctl时,如果增加socket句柄,则检查在红黑树中是否存在,存在立即返回,不存在则添加到树干上,然后向内核注册回调函数,用于当中断事件来临时向准备就绪链表中插入数据。执行epoll_wait时立刻返回准备就绪链表里的数据即可。

最后看看epoll独有的两种模式LT和ET。无论是LT和ET模式,都适用于以上所说的流程。区别是,LT模式下,只要一个句柄上的事件一次没有处理完,会在以后调用epoll_wait时每次返回这个句柄,而ET模式仅在第一次返回。

当一个socket句柄上有事件时,内核会把该句柄插入上面所说的准备就绪list链表,这时我们调用epoll_wait,会把准备就绪的socket拷贝到用户态内存,然后清空准备就绪list链表,最后,epoll_wait需要做的事情,就是检查这些socket,如果不是ET模式(就是LT模式的句柄了),并且这些socket上确实有未处理的事件时,又把该句柄放回到刚刚清空的准备就绪链表了。所以,非ET的句柄,只要它上面还有事件,epoll_wait每次都会返回。而ET模式的句柄,除非有新中断到,即使socket上的事件没有处理完,也是不会每次从epoll_wait返回的。

因此epoll比select的提高实际上是一个用空间换时间思想的具体应用.对比阻塞IO的处理模型, 可以看到采用了多路复用IO之后, 程序可以自由的进行自己除了IO操作之外的工作, 只有到IO状态发生变化的时候由多路复用IO进行通知, 然后再采取相应的操作, 而不用一直阻塞等待IO状态发生变化,提高效率.

12. Golang GC 时会发生什么?

首先我们先来了解下垃圾回收.什么是垃圾回收?

内存管理是程序员开发应用的一大难题。传统的系统级编程语言(主要指C/C++)中,程序开发者必须对内存小心的进行管理操作,控制内存的申请及释放。因为稍有不慎,就可能产生内存泄露问题,这种问题不易发现并且难以定位,一直成为困扰程序开发者的噩梦。如何解决这个头疼的问题呢?

过去一般采用两种办法:

  • 内存泄露检测工具。这种工具的原理一般是静态代码扫描,通过扫描程序检测可能出现内存泄露的代码段。然而检测工具难免有疏漏和不足,只能起到辅助作用。
  • 智能指针。这是 c++ 中引入的自动内存管理方法,通过拥有自动内存管理功能的指针对象来引用对象,是程序员不用太关注内存的释放,而达到内存自动释放的目的。这种方法是采用最广泛的做法,但是对程序开发者有一定的学习成本(并非语言层面的原生支持),而且一旦有忘记使用的场景依然无法避免内存泄露。

为了解决这个问题,后来开发出来的几乎所有新语言(java,python,php等等)都引入了语言层面的自动内存管理 – 也就是语言的使用者只用关注内存的申请而不必关心内存的释放,内存释放由虚拟机(virtual machine)或运行时(runtime)来自动进行管理。而这种对不再使用的内存资源进行自动回收的行为就被称为垃圾回收。

常用的垃圾回收的方法:

  • 引用计数(reference counting)

这是最简单的一种垃圾回收算法,和之前提到的智能指针异曲同工。对每个对象维护一个引用计数,当引用该对象的对象被销毁或更新时被引用对象的引用计数自动减一,当被引用对象被创建或被赋值给其他对象时引用计数自动加一。当引用计数为0时则立即回收对象。

这种方法的优点是实现简单,并且内存的回收很及时。这种算法在内存比较紧张和实时性比较高的系统中使用的比较广泛,如ios cocoa框架,php,python等。

但是简单引用计数算法也有明显的缺点:

  1. 频繁更新引用计数降低了性能。

一种简单的解决方法就是编译器将相邻的引用计数更新操作合并到一次更新;还有一种方法是针对频繁发生的临时变量引用不进行计数,而是在引用达到0时通过扫描堆栈确认是否还有临时对象引用而决定是否释放。等等还有很多其他方法,具体可以参考这里。

  1. 循环引用。

当对象间发生循环引用时引用链中的对象都无法得到释放。最明显的解决办法是避免产生循环引用,如cocoa引入了strong指针和weak指针两种指针类型。或者系统检测循环引用并主动打破循环链。当然这也增加了垃圾回收的复杂度。

  • 标记-清除(mark and sweep)

标记-清除(mark and sweep)分为两步,标记从根变量开始迭代得遍历所有被引用的对象,对能够通过应用遍历访问到的对象都进行标记为“被引用”;标记完成后进行清除操作,对没有标记过的内存进行回收(回收同时可能伴有碎片整理操作)。这种方法解决了引用计数的不足,但是也有比较明显的问题:每次启动垃圾回收都会暂停当前所有的正常代码执行,回收是系统响应能力大大降低!当然后续也出现了很多mark&sweep算法的变种(如三色标记法)优化了这个问题。

  • 分代搜集(generation)

java的jvm 就使用的分代回收的思路。在面向对象编程语言中,绝大多数对象的生命周期都非常短。分代收集的基本思想是,将堆划分为两个或多个称为代(generation)的空间。新创建的对象存放在称为新生代(young generation)中(一般来说,新生代的大小会比 老年代小很多),随着垃圾回收的重复执行,生命周期较长的对象会被提升(promotion)到老年代中(这里用到了一个分类的思路,这个是也是科学思考的一个基本思路)。

因此,新生代垃圾回收和老年代垃圾回收两种不同的垃圾回收方式应运而生,分别用于对各自空间中的对象执行垃圾回收。新生代垃圾回收的速度非常快,比老年代快几个数量级,即使新生代垃圾回收的频率更高,执行效率也仍然比老年代垃圾回收强,这是因为大多数对象的生命周期都很短,根本无需提升到老年代。

Golang GC 时会发生什么?

Golang 1.5后,采取的是“非分代的、非移动的、并发的、三色的”标记清除垃圾回收算法。

golang 中的 gc 基本上是标记清除的过程:

img

gc的过程一共分为四个阶段:

  1. 栈扫描(开始时STW)
  2. 第一次标记(并发)
  3. 第二次标记(STW)
  4. 清除(并发)

整个进程空间里申请每个对象占据的内存可以视为一个图,初始状态下每个内存对象都是白色标记。

  1. 先STW,做一些准备工作,比如 enable write barrier。然后取消STW,将扫描任务作为多个并发的goroutine立即入队给调度器,进而被CPU处理
  2. 第一轮先扫描root对象,包括全局指针和 goroutine 栈上的指针,标记为灰色放入队列
  3. 第二轮将第一步队列中的对象引用的对象置为灰色加入队列,一个对象引用的所有对象都置灰并加入队列后,这个对象才能置为黑色并从队列之中取出。循环往复,最后队列为空时,整个图剩下的白色内存空间即不可到达的对象,即没有被引用的对象;
  4. 第三轮再次STW,将第二轮过程中新增对象申请的内存进行标记(灰色),这里使用了write barrier(写屏障)去记录

Golang gc 优化的核心就是尽量使得 STW(Stop The World) 的时间越来越短。

详细的Golang的GC介绍可以参看Golang垃圾回收.

13. Golang 中 Goroutine 如何调度?

goroutine是Golang语言中最经典的设计,也是其魅力所在,goroutine的本质是协程,是实现并行计算的核心。 goroutine使用方式非常的简单,只需使用go关键字即可启动一个协程,并且它是处于异步方式运行,你不需要等它运行完成以后在执行以后的代码。

1
go func()//通过go关键字启动一个协程来运行函数

协程:

协程拥有自己的寄存器上下文和栈。协程调度切换时,将寄存器上下文和栈保存到其他地方,在切回来的时候,恢复先前保存的寄存器上下文和栈。 因此,协程能保留上一次调用时的状态(即所有局部状态的一个特定组合),每次过程重入时,就相当于进入上一次调用的状态,换种说法:进入上一次离开时所处逻辑流的位置。 线程和进程的操作是由程序触发系统接口,最后的执行者是系统;协程的操作执行者则是用户自身程序,goroutine也是协程。

groutine能拥有强大的并发实现是通过GPM调度模型实现.

img

Go的调度器内部有四个重要的结构:M,P,S,Sched,如上图所示(Sched未给出).

  • M:M代表内核级线程,一个M就是一个线程,goroutine就是跑在M之上的;M是一个很大的结构,里面维护小对象内存cache(mcache)、当前执行的goroutine、随机数发生器等等非常多的信息
  • G:代表一个goroutine,它有自己的栈,instruction pointer和其他信息(正在等待的channel等等),用于调度。
  • P:P全称是Processor,处理器,它的主要用途就是用来执行goroutine的,所以它也维护了一个goroutine队列,里面存储了所有需要它来执行的goroutine
  • Sched:代表调度器,它维护有存储M和G的队列以及调度器的一些状态信息等。

调度实现:

img

从上图中可以看到,有2个物理线程M,每一个M都拥有一个处理器P,每一个也都有一个正在运行的goroutine。P的数量可以通过GOMAXPROCS()来设置,它其实也就代表了真正的并发度,即有多少个goroutine可以同时运行。

图中灰色的那些goroutine并没有运行,而是出于ready的就绪态,正在等待被调度。P维护着这个队列(称之为runqueue),Go语言里,启动一个goroutine很容易:go function 就行,所以每有一个go语句被执行,runqueue队列就在其末尾加入一个goroutine,在下一个调度点,就从runqueue中取出(如何决定取哪个goroutine?)一个goroutine执行。

当一个OS线程M0陷入阻塞时,P转而在运行M1,图中的M1可能是正被创建,或者从线程缓存中取出。

img

当MO返回时,它必须尝试取得一个P来运行goroutine,一般情况下,它会从其他的OS线程那里拿一个P过来, 如果没有拿到的话,它就把goroutine放在一个global runqueue里,然后自己睡眠(放入线程缓存里)。所有的P也会周期性的检查global runqueue并运行其中的goroutine,否则global runqueue上的goroutine永远无法执行。

另一种情况是P所分配的任务G很快就执行完了(分配不均),这就导致了这个处理器P很忙,但是其他的P还有任务,此时如果global runqueue没有任务G了,那么P不得不从其他的P里拿一些G来执行。

img

通常来说,如果P从其他的P那里要拿任务的话,一般就拿run queue的一半,这就确保了每个OS线程都能充分的使用。

14. 并发编程概念是什么?

并行是指两个或者多个事件在同一时刻发生;并发是指两个或多个事件在同一时间间隔发生。

并行是在不同实体上的多个事件,并发是在同一实体上的多个事件。在一台处理器上“同时”处理多个任务,在多台处理器上同时处理多个任务。如hadoop分布式集群

并发偏重于多个任务交替执行,而多个任务之间有可能还是串行的。而并行是真正意义上的“同时执行”。

并发编程是指在一台处理器上“同时”处理多个任务。并发是在同一实体上的多个事件。多个事件在同一时间间隔发生。并发编程的目标是充分的利用处理器的每一个核,以达到最高的处理性能。

15. 负载均衡原理是什么?

负载均衡Load Balance)是高可用网络基础架构的关键组件,通常用于将工作负载分布到多个服务器来提高网站、应用、数据库或其他服务的性能和可靠性。负载均衡,其核心就是网络流量分发,分很多维度。

负载均衡(Load Balance)通常是分摊到多个操作单元上进行执行,例如Web服务器、FTP服务器、企业关键应用服务器和其它关键任务服务器等,从而共同完成工作任务。

负载均衡是建立在现有网络结构之上,它提供了一种廉价有效透明的方法扩展网络设备和服务器的带宽、增加吞吐量、加强网络数据处理能力、提高网络的灵活性和可用性。

通过一个例子详细介绍:

  • 没有负载均衡 web 架构

img

在这里用户是直连到 web 服务器,如果这个服务器宕机了,那么用户自然也就没办法访问了。 另外,如果同时有很多用户试图访问服务器,超过了其能处理的极限,就会出现加载速度缓慢或根本无法连接的情况。

而通过在后端引入一个负载均衡器和至少一个额外的 web 服务器,可以缓解这个故障。 通常情况下,所有的后端服务器会保证提供相同的内容,以便用户无论哪个服务器响应,都能收到一致的内容。

  • 有负载均衡 web 架构

img

用户访问负载均衡器,再由负载均衡器将请求转发给后端服务器。在这种情况下,单点故障现在转移到负载均衡器上了。 这里又可以通过引入第二个负载均衡器来缓解。

那么负载均衡器的工作方式是什么样的呢,负载均衡器又可以处理什么样的请求?

负载均衡器的管理员能主要为下面四种主要类型的请求设置转发规则:

  • HTTP (七层)
  • HTTPS (七层)
  • TCP (四层)
  • UDP (四层)

负载均衡器如何选择要转发的后端服务器?

负载均衡器一般根据两个因素来决定要将请求转发到哪个服务器。首先,确保所选择的服务器能够对请求做出响应,然后根据预先配置的规则从健康服务器池(healthy pool)中进行选择。

因为,负载均衡器应当只选择能正常做出响应的后端服务器,因此就需要有一种判断后端服务器是否健康的方法。为了监视后台服务器的运行状况,运行状态检查服务会定期尝试使用转发规则定义的协议和端口去连接后端服务器。 如果,服务器无法通过健康检查,就会从池中剔除,保证流量不会被转发到该服务器,直到其再次通过健康检查为止。

负载均衡算法

负载均衡算法决定了后端的哪些健康服务器会被选中。 其中常用的算法包括:

  • Round Robin(轮询):为第一个请求选择列表中的第一个服务器,然后按顺序向下移动列表直到结尾,然后循环。
  • Least Connections(最小连接):优先选择连接数最少的服务器,在普遍会话较长的情况下推荐使用。
  • Source:根据请求源的 IP 的散列(hash)来选择要转发的服务器。这种方式可以一定程度上保证特定用户能连接到相同的服务器。

如果你的应用需要处理状态而要求用户能连接到和之前相同的服务器。可以通过 Source 算法基于客户端的 IP 信息创建关联,或者使用粘性会话(sticky sessions)。

除此之外,想要解决负载均衡器的单点故障问题,可以将第二个负载均衡器连接到第一个上,从而形成一个集群。

16. LVS相关了解.

LVS是 Linux Virtual Server 的简称,也就是Linux虚拟服务器。这是一个由章文嵩博士发起的一个开源项目,它的官方网站是LinuxVirtualServer现在 LVS 已经是 Linux 内核标准的一部分。使用 LVS 可以达到的技术目标是:通过 LVS 达到的负载均衡技术和 Linux 操作系统实现一个高性能高可用的 Linux 服务器集群,它具有良好的可靠性、可扩展性和可操作性。 从而以低廉的成本实现最优的性能。LVS 是一个实现负载均衡集群的开源软件项目,LVS架构从逻辑上可分为调度层、Server集群层和共享存储。

LVS的基本工作原理:

img

  1. 当用户向负载均衡调度器(Director Server)发起请求,调度器将请求发往至内核空间
  2. PREROUTING链首先会接收到用户请求,判断目标IP确定是本机IP,将数据包发往INPUT链
  3. IPVS是工作在INPUT链上的,当用户请求到达INPUT时,IPVS会将用户请求和自己已定义好的集群服务进行比对,如果用户请求的就是定义的集群服务,那么此时IPVS会强行修改数据包里的目标IP地址及端口,并将新的数据包发往POSTROUTING链
  4. POSTROUTING链接收数据包后发现目标IP地址刚好是自己的后端服务器,那么此时通过选路,将数据包最终发送给后端的服务器

LVS的组成:

LVS 由2部分程序组成,包括 ipvsipvsadm

  1. ipvs(ip virtual server):一段代码工作在内核空间,叫ipvs,是真正生效实现调度的代码。
  2. ipvsadm:另外一段是工作在用户空间,叫ipvsadm,负责为ipvs内核框架编写规则,定义谁是集群服务,而谁是后端真实的服务器(Real Server)

详细的LVS的介绍可以参考LVS详解.

17. 微服务架构是什么样子的?

通常传统的项目体积庞大,需求、设计、开发、测试、部署流程固定。新功能需要在原项目上做修改。

但是微服务可以看做是对大项目的拆分,是在快速迭代更新上线的需求下产生的。新的功能模块会发布成新的服务组件,与其他已发布的服务组件一同协作。 服务内部有多个生产者和消费者,通常以http rest的方式调用,服务总体以一个(或几个)服务的形式呈现给客户使用。

微服务架构是一种思想对微服务架构我们没有一个明确的定义,但简单来说微服务架构是:

采用一组服务的方式来构建一个应用,服务独立部署在不同的进程中,不同服务通过一些轻量级交互机制来通信,例如 RPC、HTTP 等,服务可独立扩展伸缩,每个服务定义了明确的边界,不同的服务甚至可以采用不同的编程语言来实现,由独立的团队来维护。

Golang的微服务框架kit中有详细的微服务的例子,可以参考学习.

微服务架构设计包括:

  1. 服务熔断降级限流机制 熔断降级的概念(Rate Limiter 限流器,Circuit breaker 断路器).
  2. 框架调用方式解耦方式 Kit 或 Istio 或 Micro 服务发现(consul zookeeper kubeneters etcd ) RPC调用框架.
  3. 链路监控,zipkin和prometheus.
  4. 多级缓存.
  5. 网关 (kong gateway).
  6. Docker部署管理 Kubenetters.
  7. 自动集成部署 CI/CD 实践.
  8. 自动扩容机制规则.
  9. 压测 优化.
  10. Trasport 数据传输(序列化和反序列化).
  11. Logging 日志.
  12. Metrics 指针对每个请求信息的仪表盘化.

微服务架构介绍详细的可以参考:

18. 分布式锁实现原理,用过吗?

在分析分布式锁的三种实现方式之前,先了解一下分布式锁应该具备哪些条件:

  1. 在分布式系统环境下,一个方法在同一时间只能被一个机器的一个线程执行;
  2. 高可用的获取锁与释放锁;
  3. 高性能的获取锁与释放锁;
  4. 具备可重入特性;
  5. 具备锁失效机制,防止死锁;
  6. 具备非阻塞锁特性,即没有获取到锁将直接返回获取锁失败。

分布式的CAP理论告诉我们“任何一个分布式系统都无法同时满足一致性(Consistency)、可用性(Availability)和分区容错性(Partition tolerance),最多只能同时满足两项。”所以,很多系统在设计之初就要对这三者做出取舍。在互联网领域的绝大多数的场景中,都需要牺牲强一致性来换取系统的高可用性,系统往往只需要保证“最终一致性”,只要这个最终时间是在用户可以接受的范围内即可。

通常分布式锁以单独的服务方式实现,目前比较常用的分布式锁实现有三种:

  • 基于数据库实现分布式锁。
  • 基于缓存(redis,memcached,tair)实现分布式锁。
  • 基于Zookeeper实现分布式锁。

尽管有这三种方案,但是不同的业务也要根据自己的情况进行选型,他们之间没有最好只有更适合!

  • 基于数据库的实现方式

基于数据库的实现方式的核心思想是:在数据库中创建一个表,表中包含方法名等字段,并在方法名字段上创建唯一索引,想要执行某个方法,就使用这个方法名向表中插入数据,成功插入则获取锁,执行完成后删除对应的行数据释放锁。

创建一个表:

1
2
3
4
5
6
7
8
9
DROP TABLE IF EXISTS `method_lock`;
CREATE TABLE `method_lock` (
`id` int(11) unsigned NOT NULL AUTO_INCREMENT COMMENT '主键',
`method_name` varchar(64) NOT NULL COMMENT '锁定的方法名',
`desc` varchar(255) NOT NULL COMMENT '备注信息',
`update_time` timestamp NOT NULL DEFAULT CURRENT_TIMESTAMP ON UPDATE CURRENT_TIMESTAMP,
PRIMARY KEY (`id`),
UNIQUE KEY `uidx_method_name` (`method_name`) USING BTREE
) ENGINE=InnoDB AUTO_INCREMENT=3 DEFAULT CHARSET=utf8 COMMENT='锁定中的方法';

想要执行某个方法,就使用这个方法名向表中插入数据:

1
INSERT INTO method_lock (method_name, desc) VALUES ('methodName', '测试的methodName');

因为我们对method_name做了唯一性约束,这里如果有多个请求同时提交到数据库的话,数据库会保证只有一个操作可以成功,那么我们就可以认为操作成功的那个线程获得了该方法的锁,可以执行方法体内容。

成功插入则获取锁,执行完成后删除对应的行数据释放锁:

1
delete from method_lock where method_name ='methodName';

注意:这里只是使用基于数据库的一种方法,使用数据库实现分布式锁还有很多其他的用法可以实现!

使用基于数据库的这种实现方式很简单,但是对于分布式锁应该具备的条件来说,它有一些问题需要解决及优化:

1、因为是基于数据库实现的,数据库的可用性和性能将直接影响分布式锁的可用性及性能,所以,数据库需要双机部署、数据同步、主备切换;

2、不具备可重入的特性,因为同一个线程在释放锁之前,行数据一直存在,无法再次成功插入数据,所以,需要在表中新增一列,用于记录当前获取到锁的机器和线程信息,在再次获取锁的时候,先查询表中机器和线程信息是否和当前机器和线程相同,若相同则直接获取锁;

3、没有锁失效机制,因为有可能出现成功插入数据后,服务器宕机了,对应的数据没有被删除,当服务恢复后一直获取不到锁,所以,需要在表中新增一列,用于记录失效时间,并且需要有定时任务清除这些失效的数据;

4、不具备阻塞锁特性,获取不到锁直接返回失败,所以需要优化获取逻辑,循环多次去获取。

5、在实施的过程中会遇到各种不同的问题,为了解决这些问题,实现方式将会越来越复杂;依赖数据库需要一定的资源开销,性能问题需要考虑。

  • 基于Redis的实现方式

选用Redis实现分布式锁原因:

  1. Redis有很高的性能;
  2. Redis命令对此支持较好,实现起来比较方便

主要实现方式:

  1. SET lock currentTime+expireTime EX 600 NX,使用set设置lock值,并设置过期时间为600秒,如果成功,则获取锁;
  2. 获取锁后,如果该节点掉线,则到过期时间ock值自动失效;
  3. 释放锁时,使用del删除lock键值;

使用redis单机来做分布式锁服务,可能会出现单点问题,导致服务可用性差,因此在服务稳定性要求高的场合,官方建议使用redis集群(例如5台,成功请求锁超过3台就认为获取锁),来实现redis分布式锁。详见RedLock。

优点:性能高,redis可持久化,也能保证数据不易丢失,redis集群方式提高稳定性。

缺点:使用redis主从切换时可能丢失部分数据。

  • 基于ZooKeeper的实现方式

ZooKeeper是一个为分布式应用提供一致性服务的开源组件,它内部是一个分层的文件系统目录树结构,规定同一个目录下只能有一个唯一文件名。基于ZooKeeper实现分布式锁的步骤如下:

  1. 创建一个目录mylock;
  2. 线程A想获取锁就在mylock目录下创建临时顺序节点;
  3. 获取mylock目录下所有的子节点,然后获取比自己小的兄弟节点,如果不存在,则说明当前线程顺序号最小,获得锁;
  4. 线程B获取所有节点,判断自己不是最小节点,设置监听比自己次小的节点;
  5. 线程A处理完,删除自己的节点,线程B监听到变更事件,判断自己是不是最小的节点,如果是则获得锁。

这里推荐一个Apache的开源库Curator,它是一个ZooKeeper客户端,Curator提供的InterProcessMutex是分布式锁的实现,acquire方法用于获取锁,release方法用于释放锁。

优点:具备高可用、可重入、阻塞锁特性,可解决失效死锁问题。

缺点:因为需要频繁的创建和删除节点,性能上不如Redis方式。

上面的三种实现方式,没有在所有场合都是完美的,所以,应根据不同的应用场景选择最适合的实现方式。

在分布式环境中,对资源进行上锁有时候是很重要的,比如抢购某一资源,这时候使用分布式锁就可以很好地控制资源。

19. Etcd怎么实现分布式锁?

首先思考下Etcd是什么?可能很多人第一反应可能是一个键值存储仓库,却没有重视官方定义的后半句,用于配置共享和服务发现。

1
A highly-available key value store for shared configuration and service discovery.

实际上,etcd 作为一个受到 ZooKeeper 与 doozer 启发而催生的项目,除了拥有与之类似的功能外,更专注于以下四点。

  • 简单:基于 HTTP+JSON 的 API 让你用 curl 就可以轻松使用。
  • 安全:可选 SSL 客户认证机制。
  • 快速:每个实例每秒支持一千次写操作。
  • 可信:使用 Raft 算法充分实现了分布式。

但是这里我们主要讲述Etcd如何实现分布式锁?

因为 Etcd 使用 Raft 算法保持了数据的强一致性,某次操作存储到集群中的值必然是全局一致的,所以很容易实现分布式锁。锁服务有两种使用方式,一是保持独占,二是控制时序。

  • 保持独占即所有获取锁的用户最终只有一个可以得到。etcd 为此提供了一套实现分布式锁原子操作 CAS(CompareAndSwap)的 API。通过设置prevExist值,可以保证在多个节点同时去创建某个目录时,只有一个成功。而创建成功的用户就可以认为是获得了锁。
  • 控制时序,即所有想要获得锁的用户都会被安排执行,但是获得锁的顺序也是全局唯一的,同时决定了执行顺序。etcd 为此也提供了一套 API(自动创建有序键),对一个目录建值时指定为POST动作,这样 etcd 会自动在目录下生成一个当前最大的值为键,存储这个新的值(客户端编号)。同时还可以使用 API 按顺序列出所有当前目录下的键值。此时这些键的值就是客户端的时序,而这些键中存储的值可以是代表客户端的编号。

在这里Ectd实现分布式锁基本实现原理为:

  1. 在ectd系统里创建一个key
  2. 如果创建失败,key存在,则监听该key的变化事件,直到该key被删除,回到1
  3. 如果创建成功,则认为我获得了锁

应用示例:

1
2
3
4
5
6
7
8
9
10
11
12
13
14
15
16
17
18
19
20
21
22
23
24
25
26
27
28
29
30
31
32
33
34
35
36
37
38
39
40
41
42
43
44
45
46
47
48
49
50
51
52
53
54
55
56
57
58
59
60
61
62
63
64
65
66
67
68
69
70
71
72
73
74
75
76
77
78
79
80
81
82
83
84
85
86
87
88
89
90
91
92
93
94
95
96
97
98
99
100
101
102
103
104
105
106
107
108
109
110
111
112
113
114
115
116
117
118
119
120
121
122
123
124
125
126
127
128
129
130
131
132
133
134
135
136
137
138
139
140
141
142
143
144
145
146
147
148
149
150
151
152
153
154
155
156
157
158
159
160
161
162
163
164
165
166
167
168
169
170
171
172
173
174
175
176
package etcdsync

import (
"fmt"
"io"
"os"
"sync"
"time"

"github.com/coreos/etcd/client"
"github.com/coreos/etcd/Godeps/_workspace/src/golang.org/x/net/context"
)

const (
defaultTTL = 60
defaultTry = 3
deleteAction = "delete"
expireAction = "expire"
)

// A Mutex is a mutual exclusion lock which is distributed across a cluster.
type Mutex struct {
key string
id string // The identity of the caller
client client.Client
kapi client.KeysAPI
ctx context.Context
ttl time.Duration
mutex *sync.Mutex
logger io.Writer
}

// New creates a Mutex with the given key which must be the same
// across the cluster nodes.
// machines are the ectd cluster addresses
func New(key string, ttl int, machines []string) *Mutex {
cfg := client.Config{
Endpoints: machines,
Transport: client.DefaultTransport,
HeaderTimeoutPerRequest: time.Second,
}

c, err := client.New(cfg)
if err != nil {
return nil
}

hostname, err := os.Hostname()
if err != nil {
return nil
}

if len(key) == 0 || len(machines) == 0 {
return nil
}

if key[0] != '/' {
key = "/" + key
}

if ttl < 1 {
ttl = defaultTTL
}

return &Mutex{
key: key,
id: fmt.Sprintf("%v-%v-%v", hostname, os.Getpid(), time.Now().Format("20060102-15:04:05.999999999")),
client: c,
kapi: client.NewKeysAPI(c),
ctx: context.TODO(),
ttl: time.Second * time.Duration(ttl),
mutex: new(sync.Mutex),
}
}

// Lock locks m.
// If the lock is already in use, the calling goroutine
// blocks until the mutex is available.
func (m *Mutex) Lock() (err error) {
m.mutex.Lock()
for try := 1; try <= defaultTry; try++ {
if m.lock() == nil {
return nil
}

m.debug("Lock node %v ERROR %v", m.key, err)
if try < defaultTry {
m.debug("Try to lock node %v again", m.key, err)
}
}
return err
}

func (m *Mutex) lock() (err error) {
m.debug("Trying to create a node : key=%v", m.key)
setOptions := &client.SetOptions{
PrevExist:client.PrevNoExist,
TTL: m.ttl,
}
resp, err := m.kapi.Set(m.ctx, m.key, m.id, setOptions)
if err == nil {
m.debug("Create node %v OK [%q]", m.key, resp)
return nil
}
m.debug("Create node %v failed [%v]", m.key, err)
e, ok := err.(client.Error)
if !ok {
return err
}

if e.Code != client.ErrorCodeNodeExist {
return err
}

// Get the already node's value.
resp, err = m.kapi.Get(m.ctx, m.key, nil)
if err != nil {
return err
}
m.debug("Get node %v OK", m.key)
watcherOptions := &client.WatcherOptions{
AfterIndex : resp.Index,
Recursive:false,
}
watcher := m.kapi.Watcher(m.key, watcherOptions)
for {
m.debug("Watching %v ...", m.key)
resp, err = watcher.Next(m.ctx)
if err != nil {
return err
}

m.debug("Received an event : %q", resp)
if resp.Action == deleteAction || resp.Action == expireAction {
return nil
}
}

}

// Unlock unlocks m.
// It is a run-time error if m is not locked on entry to Unlock.
//
// A locked Mutex is not associated with a particular goroutine.
// It is allowed for one goroutine to lock a Mutex and then
// arrange for another goroutine to unlock it.
func (m *Mutex) Unlock() (err error) {
defer m.mutex.Unlock()
for i := 1; i <= defaultTry; i++ {
var resp *client.Response
resp, err = m.kapi.Delete(m.ctx, m.key, nil)
if err == nil {
m.debug("Delete %v OK", m.key)
return nil
}
m.debug("Delete %v falied: %q", m.key, resp)
e, ok := err.(client.Error)
if ok && e.Code == client.ErrorCodeKeyNotFound {
return nil
}
}
return err
}

func (m *Mutex) debug(format string, v ...interface{}) {
if m.logger != nil {
m.logger.Write([]byte(m.id))
m.logger.Write([]byte(" "))
m.logger.Write([]byte(fmt.Sprintf(format, v...)))
m.logger.Write([]byte("\n"))
}
}

func (m *Mutex) SetDebugLogger(w io.Writer) {
m.logger = w
}

其实类似的实现有很多,但目前都已经过时,使用的都是被官方标记为deprecated的项目。且大部分接口都不如上述代码简单。 使用上,跟Golang官方sync包的Mutex接口非常类似,先New(),然后调用Lock(),使用完后调用Unlock(),就三个接口,就是这么简单。示例代码如下:

1
2
3
4
5
6
7
8
9
10
11
12
13
14
15
16
17
18
19
20
21
22
23
24
25
26
27
28
29
30
package main

import (
"github.com/zieckey/etcdsync"
"log"
)

func main() {
//etcdsync.SetDebug(true)
log.SetFlags(log.Ldate|log.Ltime|log.Lshortfile)
m := etcdsync.New("/etcdsync", "123", []string{"http://127.0.0.1:2379"})
if m == nil {
log.Printf("etcdsync.NewMutex failed")
}
err := m.Lock()
if err != nil {
log.Printf("etcdsync.Lock failed")
} else {
log.Printf("etcdsync.Lock OK")
}

log.Printf("Get the lock. Do something here.")

err = m.Unlock()
if err != nil {
log.Printf("etcdsync.Unlock failed")
} else {
log.Printf("etcdsync.Unlock OK")
}
}

20. Redis的数据结构有哪些,以及实现场景?

Redis的数据结构有五种:

  • string 字符串

String 数据结构是简单的 key-value 类型,value 不仅可以是 String,也可以是数字(当数字类型用 Long 可以表示的时候encoding 就是整型,其他都存储在 sdshdr 当做字符串)。使用 Strings 类型,可以完全实现目前 Memcached 的功能,并且效率更高。还可以享受 Redis 的定时持久化(可以选择 RDB 模式或者 AOF 模式),操作日志及 Replication 等功能。

除了提供与 Memcached 一样的 get、set、incr、decr 等操作外,Redis 还提供了下面一些操作:

  1. LEN niushuai:O(1)获取字符串长度.
  2. APPEND niushuai redis:往字符串 append 内容,而且采用智能分配内存(每次2倍).
  3. 设置和获取字符串的某一段内容.
  4. 设置及获取字符串的某一位(bit).
  5. 批量设置一系列字符串的内容.
  6. 原子计数器.
  7. GETSET 命令的妙用,请于清空旧值的同时设置一个新值,配合原子计数器使用.
  • Hash 字典

在 Memcached 中,我们经常将一些结构化的信息打包成 hashmap,在客户端序列化后存储为一个字符串的值(一般是 JSON 格式),比如用户的昵称、年龄、性别、积分等。这时候在需要修改其中某一项时,通常需要将字符串(JSON)取出来,然后进行反序列化,修改某一项的值,再序列化成字符串(JSON)存储回去。简单修改一个属性就干这么多事情,消耗必定是很大的,也不适用于一些可能并发操作的场合(比如两个并发的操作都需要修改积分)。而 Redis 的 Hash 结构可以使你像在数据库中 Update 一个属性一样只修改某一项属性值。

Hash可以用来存储、读取、修改用户属性。

  • List 列表

List 说白了就是链表(redis 使用双端链表实现的 List),相信学过数据结构知识的人都应该能理解其结构。使用 List 结构,我们可以轻松地实现最新消息排行等功能(比如新浪微博的 TimeLine )。List 的另一个应用就是消息队列,可以利用 List 的 *PUSH 操作,将任务存在 List 中,然后工作线程再用 POP 操作将任务取出进行执行。

Redis 还提供了操作 List 中某一段元素的 API,你可以直接查询,删除 List 中某一段的元素。

List 列表应用:

  1. 微博 TimeLine.
  2. 消息队列.
  • Set 集合

Set 就是一个集合,集合的概念就是一堆不重复值的组合。利用 Redis 提供的 Set 数据结构,可以存储一些集合性的数据。比如在微博应用中,可以将一个用户所有的关注人存在一个集合中,将其所有粉丝存在一个集合。因为 Redis 非常人性化的为集合提供了求交集、并集、差集等操作,那么就可以非常方便的实现如共同关注、共同喜好、二度好友等功能,对上面的所有集合操作,你还可以使用不同的命令选择将结果返回给客户端还是存集到一个新的集合中。

Set 集合应用:

  1. 共同好友、二度好友
  2. 利用唯一性,可以统计访问网站的所有独立 IP.
  3. 好友推荐的时候,根据 tag 求交集,大于某个 threshold 就可以推荐.
  • Sorted Set有序集合

和Sets相比,Sorted Sets是将 Set 中的元素增加了一个权重参数 score,使得集合中的元素能够按 score 进行有序排列,比如一个存储全班同学成绩的 Sorted Sets,其集合 value 可以是同学的学号,而 score 就可以是其考试得分,这样在数据插入集合的时候,就已经进行了天然的排序。另外还可以用 Sorted Sets 来做带权重的队列,比如普通消息的 score 为1,重要消息的 score 为2,然后工作线程可以选择按 score 的倒序来获取工作任务。让重要的任务优先执行。

Sorted Set有序集合应用:

1.带有权重的元素,比如一个游戏的用户得分排行榜. 2.比较复杂的数据结构,一般用到的场景不算太多.

Redis 其他功能使用场景:

  • 订阅-发布系统

Pub/Sub 从字面上理解就是发布(Publish)与订阅(Subscribe),在 Redis 中,你可以设定对某一个 key 值进行消息发布及消息订阅,当一个 key 值上进行了消息发布后,所有订阅它的客户端都会收到相应的消息。这一功能最明显的用法就是用作实时消息系统,比如普通的即时聊天,群聊等功能。

  • 事务——Transactions

谁说 NoSQL 都不支持事务,虽然 Redis 的 Transactions 提供的并不是严格的 ACID 的事务(比如一串用 EXEC 提交执行的命令,在执行中服务器宕机,那么会有一部分命令执行了,剩下的没执行),但是这个 Transactions 还是提供了基本的命令打包执行的功能(在服务器不出问题的情况下,可以保证一连串的命令是顺序在一起执行的,中间有会有其它客户端命令插进来执行)。Redis 还提供了一个 Watch 功能,你可以对一个 key 进行 Watch,然后再执行 Transactions,在这过程中,如果这个 Watched 的值进行了修改,那么这个 Transactions 会发现并拒绝执行。

21. Mysql高可用方案有哪些?

Mysql高可用方案包括:

  1. 主从复制方案

这是MySQL自身提供的一种高可用解决方案,数据同步方法采用的是MySQL replication技术。MySQL replication就是从服务器到主服务器拉取二进制日志文件,然后再将日志文件解析成相应的SQL在从服务器上重新执行一遍主服务器的操作,通过这种方式保证数据的一致性。为了达到更高的可用性,在实际的应用环境中,一般都是采用MySQL replication技术配合高可用集群软件keepalived来实现自动failover,这种方式可以实现95.000%的SLA。

  1. MMM/MHA高可用方案

MMM提供了MySQL主主复制配置的监控、故障转移和管理的一套可伸缩的脚本套件。在MMM高可用方案中,典型的应用是双主多从架构,通过MySQL replication技术可以实现两个服务器互为主从,且在任何时候只有一个节点可以被写入,避免了多点写入的数据冲突。同时,当可写的主节点故障时,MMM套件可以立刻监控到,然后将服务自动切换到另一个主节点,继续提供服务,从而实现MySQL的高可用。

  1. Heartbeat/SAN高可用方案

在这个方案中,处理failover的方式是高可用集群软件Heartbeat,它监控和管理各个节点间连接的网络,并监控集群服务,当节点出现故障或者服务不可用时,自动在其他节点启动集群服务。在数据共享方面,通过SAN(Storage Area Network)存储来共享数据,这种方案可以实现99.990%的SLA。

  1. Heartbeat/DRBD高可用方案

这个方案处理failover的方式上依旧采用Heartbeat,不同的是,在数据共享方面,采用了基于块级别的数据同步软件DRBD来实现。DRBD是一个用软件实现的、无共享的、服务器之间镜像块设备内容的存储复制解决方案。和SAN网络不同,它并不共享存储,而是通过服务器之间的网络复制数据。

  1. NDB CLUSTER高可用方案

国内用NDB集群的公司非常少,貌似有些银行有用。NDB集群不需要依赖第三方组件,全部都使用官方组件,能保证数据的一致性,某个数据节点挂掉,其他数据节点依然可以提供服务,管理节点需要做冗余以防挂掉。缺点是:管理和配置都很复杂,而且某些SQL语句例如join语句需要避免。

22. Go语言的栈空间管理是怎么样的?

Go语言的运行环境(runtime)会在goroutine需要的时候动态地分配栈空间,而不是给每个goroutine分配固定大小的内存空间。这样就避免了需要程序员来决定栈的大小。

分块式的栈是最初Go语言组织栈的方式。当创建一个goroutine的时候,它会分配一个8KB的内存空间来给goroutine的栈使用。我们可能会考虑当这8KB的栈空间被用完的时候该怎么办?

为了处理这种情况,每个Go函数的开头都有一小段检测代码。这段代码会检查我们是否已经用完了分配的栈空间。如果是的话,它会调用morestack函数。morestack函数分配一块新的内存作为栈空间,并且在这块栈空间的底部填入各种信息(包括之前的那块栈地址)。在分配了这块新的栈空间之后,它会重试刚才造成栈空间不足的函数。这个过程叫做栈分裂(stack split)。

在新分配的栈底部,还插入了一个叫做lessstack的函数指针。这个函数还没有被调用。这样设置是为了从刚才造成栈空间不足的那个函数返回时做准备的。当我们从那个函数返回时,它会跳转到lessstacklessstack函数会查看在栈底部存放的数据结构里的信息,然后调整栈指针(stack pointer)。这样就完成了从新的栈块到老的栈块的跳转。接下来,新分配的这个块栈空间就可以被释放掉了。

分块式的栈让我们能够按照需求来扩展和收缩栈的大小。 Go开发者不需要花精力去估计goroutine会用到多大的栈。创建一个新的goroutine的开销也不大。当 Go开发者不知道栈会扩展到多少大时,它也能很好的处理这种情况。

这一直是之前Go语言管理栈的的方法。但这个方法有一个问题。缩减栈空间是一个开销相对较大的操作。如果在一个循环里有栈分裂,那么它的开销就变得不可忽略了。一个函数会扩展,然后分裂栈。当它返回的时候又会释放之前分配的内存块。如果这些都发生在一个循环里的话,代价是相当大的。 这就是所谓的热分裂问题(hot split problem)。它是Go语言开发者选择新的栈管理方法的主要原因。新的方法叫做栈复制法(stack copying)

栈复制法一开始和分块式的栈很像。当goroutine运行并用完栈空间的时候,与之前的方法一样,栈溢出检查会被触发。但是,不像之前的方法那样分配一个新的内存块并链接到老的栈内存块,新的方法会分配一个两倍大的内存块并把老的内存块内容复制到新的内存块里。这样做意味着当栈缩减回之前大小时,我们不需要做任何事情。栈的缩减没有任何代价。而且,当栈再次扩展时,运行环境也不需要再做任何事。它可以重用之前分配的空间。

栈的复制听起来很容易,但实际操作并非那么简单。存储在栈上的变量的地址可能已经被使用到。也就是说程序使用到了一些指向栈的指针。当移动栈的时候,所有指向栈里内容的指针都会变得无效。然而,指向栈内容的指针自身也必定是保存在栈上的。这是为了保证内存安全的必要条件。否则一个程序就有可能访问一段已经无效的栈空间了。

因为垃圾回收的需要,我们必须知道栈的哪些部分是被用作指针了。当我们移动栈的时候,我们可以更新栈里的指针让它们指向新的地址。所有相关的指针都会被更新。我们使用了垃圾回收的信息来复制栈,但并不是任何使用栈的函数都有这些信息。因为很大一部分运行环境是用C语言写的,很多被调用的运行环境里的函数并没有指针的信息,所以也就不能够被复制了。当遇到这种情况时,我们只能退回到分块式的栈并支付相应的开销。

这也是为什么现在运行环境的开发者正在用Go语言重写运行环境的大部分代码。无法用Go语言重写的部分(比如调度器的核心代码和垃圾回收器)会在特殊的栈上运行。这个特殊栈的大小由运行环境的开发者设置。

这些改变除了使栈复制成为可能,它也允许我们在将来实现并行垃圾回收。

另外一种不同的栈处理方式就是在虚拟内存中分配大内存段。由于物理内存只是在真正使用时才会被分配,因此看起来好似你可以分配一个大内存段并让操 作系统处理它。下面是这种方法的一些问题

首先,32位系统只能支持4G字节虚拟内存,并且应用只能用到其中的3G空间。由于同时运行百万goroutines的情况并不少见,因此你很可 能用光虚拟内存,即便我们假设每个goroutine的stack只有8K。

第二,然而我们可以在64位系统中分配大内存,它依赖于过量内存使用。所谓过量使用是指当你分配的内存大小超出物理内存大小时,依赖操作系统保证 在需要时能够分配出物理内存。然而,允许过量使用可能会导致一些风险。由于一些进程分配了超出机器物理内存大小的内存,如果这些进程使用更多内存 时,操作系统将不得不为它们补充分配内存。这会导致操作系统将一些内存段放入磁盘缓存,这常常会增加不可预测的处理延迟。正是考虑到这个原因,一 些新系统关闭了对过量使用的支持。

23. Goroutine和Channel的作用分别是什么?

进程是内存资源管理和cpu调度的执行单元。为了有效利用多核处理器的优势,将进程进一步细分,允许一个进程里存在多个线程,这多个线程还是共享同一片内存空间,但cpu调度的最小单元变成了线程。

那协程又是什么呢,以及与线程的差异性??

协程,可以看作是轻量级的线程。但与线程不同的是,线程的切换是由操作系统控制的,而协程的切换则是由用户控制的。

最早支持协程的程序语言应该是lisp方言scheme里的continuation(续延),续延允许scheme保存任意函数调用的现场,保存起来并重新执行。Lua,C#,python等语言也有自己的协程实现。

Go中的goroutinue就是协程,可以实现并行,多个协程可以在多个处理器同时跑。而协程同一时刻只能在一个处理器上跑(可以把宿主语言想象成单线程的就好了)。 然而,多个goroutine之间的通信是通过channel,而协程的通信是通过yield和resume()操作。

goroutine非常简单,只需要在函数的调用前面加关键字go即可,例如:

1
go elegance()

我们也可以启动5个goroutines分别打印索引。

1
2
3
4
5
6
7
8
9
func main() {
for i:=1;i<5;i++ {
go func(i int) {
fmt.Println(i)
}(i)
}
// 停歇5s,保证打印全部结束
time.Sleep(5*time.Second)
}

在分析goroutine执行的随机性和并发性,启动了5个goroutine,再加上main函数的主goroutine,总共有6个goroutines。由于goroutine类似于”守护线程“,异步执行的,如果主goroutine不等待片刻,可能程序就没有输出打印了。

在Golang中channel则是goroutinues之间进行通信的渠道。

可以把channel形象比喻为工厂里的传送带,一头的生产者goroutine往传输带放东西,另一头的消费者goroutinue则从输送带取东西。channel实际上是一个有类型的消息队列,遵循先进先出的特点。

  1. channel的操作符号

ch <- data 表示data被发送给channel ch;

data <- ch 表示从channel ch取一个值,然后赋给data。

  1. 阻塞式channel

channel默认是没有缓冲区的,也就是说,通信是阻塞的。send操作必须等到有消费者accept才算完成。

应用示例:

1
2
3
4
5
6
7
8
9
10
11
func main() {
ch1 := make(chan int)
go pump(ch1) // pump hangs
fmt.Println(<-ch1) // prints only 1
}

func pump(ch chan int) {
for i:= 1; ; i++ {
ch <- i
}
}

在函数pump()里的channel在接受到第一个元素后就被阻塞了,直到主goroutinue取走了数据。最终channel阻塞在接受第二个元素,程序只打印 1。

没有缓冲(buffer)的channel只能容纳一个元素,而带有缓冲(buffer)channel则可以非阻塞容纳N个元素。发送数据到缓冲(buffer) channel不会被阻塞,除非channel已满;同样的,从缓冲(buffer) channel取数据也不会被阻塞,除非channel空了。

24. 怎么查看Goroutine的数量?

GOMAXPROCS中控制的是未被阻塞的所有Goroutine,可以被Multiplex到多少个线程上运行,通过GOMAXPROCS可以查看Goroutine的数量。

25. 说下Go中的锁有哪些?三种锁,读写锁,互斥锁,还有map的安全的锁?

Go中的三种锁包括:互斥锁,读写锁,sync.Map的安全的锁.

  • 互斥锁

Go并发程序对共享资源进行访问控制的主要手段,由标准库代码包中sync中的Mutex结构体表示。

1
2
3
4
5
//Mutex 是互斥锁, 零值是解锁的互斥锁, 首次使用后不得复制互斥锁。
type Mutex struct {
state int32
sema uint32
}

sync.Mutex包中的类型只有两个公开的指针方法Lock和Unlock。

1
2
3
4
5
6
7
8
9
10
11
12
13
14
15
16
//Locker表示可以锁定和解锁的对象。
type Locker interface {
Lock()
Unlock()
}

//锁定当前的互斥量
//如果锁已被使用,则调用goroutine
//阻塞直到互斥锁可用。
func (m *Mutex) Lock()

//对当前互斥量进行解锁
//如果在进入解锁时未锁定m,则为运行时错误。
//锁定的互斥锁与特定的goroutine无关。
//允许一个goroutine锁定Mutex然后安排另一个goroutine来解锁它。
func (m *Mutex) Unlock()

声明一个互斥锁:

1
var mutex sync.Mutex

不像C或Java的锁类工具,我们可能会犯一个错误:忘记及时解开已被锁住的锁,从而导致流程异常。但Go由于存在defer,所以此类问题出现的概率极低。关于defer解锁的方式如下:

1
2
3
4
5
var mutex sync.Mutex
func Write() {
mutex.Lock()
defer mutex.Unlock()
}

如果对一个已经上锁的对象再次上锁,那么就会导致该锁定操作被阻塞,直到该互斥锁回到被解锁状态.

1
2
3
4
5
6
7
8
9
10
11
12
13
14
15
16
17
18
19
20
21
22
23
24
25
26
27
28
fpackage main

import (
"fmt"
"sync"
"time"
)

func main() {

var mutex sync.Mutex
fmt.Println("begin lock")
mutex.Lock()
fmt.Println("get locked")
for i := 1; i <= 3; i++ {
go func(i int) {
fmt.Println("begin lock ", i)
mutex.Lock()
fmt.Println("get locked ", i)
}(i)
}

time.Sleep(time.Second)
fmt.Println("Unlock the lock")
mutex.Unlock()
fmt.Println("get unlocked")
time.Sleep(time.Second)
}

我们在for循环之前开始加锁,然后在每一次循环中创建一个协程,并对其加锁,但是由于之前已经加锁了,所以这个for循环中的加锁会陷入阻塞直到main中的锁被解锁, time.Sleep(time.Second) 是为了能让系统有足够的时间运行for循环,输出结果如下:

1
2
3
4
5
6
7
8
9
> go run mutex.go 
begin lock
get locked
begin lock 3
begin lock 1
begin lock 2
Unlock the lock
get unlocked
get locked 3

这里可以看到解锁后,三个协程会重新抢夺互斥锁权,最终协程3获胜。

互斥锁锁定操作的逆操作并不会导致协程阻塞,但是有可能导致引发一个无法恢复的运行时的panic,比如对一个未锁定的互斥锁进行解锁时就会发生panic。避免这种情况的最有效方式就是使用defer。

我们知道如果遇到panic,可以使用recover方法进行恢复,但是如果对重复解锁互斥锁引发的panic却是无用的(Go 1.8及以后)。

1
2
3
4
5
6
7
8
9
10
11
12
13
14
15
16
17
18
19
20
21
22
23
24
package main

import (
"fmt"
"sync"
)

func main() {
defer func() {
fmt.Println("Try to recover the panic")
if p := recover(); p != nil {
fmt.Println("recover the panic : ", p)
}
}()
var mutex sync.Mutex
fmt.Println("begin lock")
mutex.Lock()
fmt.Println("get locked")
fmt.Println("unlock lock")
mutex.Unlock()
fmt.Println("lock is unlocked")
fmt.Println("unlock lock again")
mutex.Unlock()
}

运行:

1
2
3
4
5
6
7
8
9
10
11
12
13
14
15
16
17
18
19
20
21
22
> go run mutex.go 
begin lock
get locked
unlock lock
lock is unlocked
unlock lock again
fatal error: sync: unlock of unlocked mutex

goroutine 1 [running]:
runtime.throw(0x4bc1a8, 0x1e)
/home/keke/soft/go/src/runtime/panic.go:617 +0x72 fp=0xc000084ea8 sp=0xc000084e78 pc=0x427ba2
sync.throw(0x4bc1a8, 0x1e)
/home/keke/soft/go/src/runtime/panic.go:603 +0x35 fp=0xc000084ec8 sp=0xc000084ea8 pc=0x427b25
sync.(*Mutex).Unlock(0xc00001a0c8)
/home/keke/soft/go/src/sync/mutex.go:184 +0xc1 fp=0xc000084ef0 sp=0xc000084ec8 pc=0x45f821
main.main()
/home/keke/go/Test/mutex.go:25 +0x25f fp=0xc000084f98 sp=0xc000084ef0 pc=0x486c1f
runtime.main()
/home/keke/soft/go/src/runtime/proc.go:200 +0x20c fp=0xc000084fe0 sp=0xc000084f98 pc=0x4294ec
runtime.goexit()
/home/keke/soft/go/src/runtime/asm_amd64.s:1337 +0x1 fp=0xc000084fe8 sp=0xc000084fe0 pc=0x450ad1
exit status 2

这里试图对重复解锁引发的panic进行recover,但是我们发现操作失败,虽然互斥锁可以被多个协程共享,但还是建议将对同一个互斥锁的加锁解锁操作放在同一个层次的代码中。

  • 读写锁

读写锁是针对读写操作的互斥锁,可以分别针对读操作与写操作进行锁定和解锁操作 。

读写锁的访问控制规则如下:

① 多个写操作之间是互斥的 ② 写操作与读操作之间也是互斥的 ③ 多个读操作之间不是互斥的

在这样的控制规则下,读写锁可以大大降低性能损耗。

在Go的标准库代码包中sync中的RWMutex结构体表示为:

1
2
3
4
5
6
7
8
9
10
11
12
// RWMutex是一个读/写互斥锁,可以由任意数量的读操作或单个写操作持有。
// RWMutex的零值是未锁定的互斥锁。
//首次使用后,不得复制RWMutex。
//如果goroutine持有RWMutex进行读取而另一个goroutine可能会调用Lock,那么在释放初始读锁之前,goroutine不应该期望能够获取读锁定。
//特别是,这种禁止递归读锁定。 这是为了确保锁最终变得可用; 阻止的锁定会阻止新读操作获取锁定。
type RWMutex struct {
w Mutex //如果有待处理的写操作就持有
writerSem uint32 // 写操作等待读操作完成的信号量
readerSem uint32 //读操作等待写操作完成的信号量
readerCount int32 // 待处理的读操作数量
readerWait int32 // number of departing readers
}

sync中的RWMutex有以下几种方法:

1
2
3
4
5
6
7
8
9
10
11
//对读操作的锁定
func (rw *RWMutex) RLock()
//对读操作的解锁
func (rw *RWMutex) RUnlock()
//对写操作的锁定
func (rw *RWMutex) Lock()
//对写操作的解锁
func (rw *RWMutex) Unlock()

//返回一个实现了sync.Locker接口类型的值,实际上是回调rw.RLock and rw.RUnlock.
func (rw *RWMutex) RLocker() Locker

Unlock方法会试图唤醒所有想进行读锁定而被阻塞的协程,而 RUnlock方法只会在已无任何读锁定的情况下,试图唤醒一个因欲进行写锁定而被阻塞的协程。若对一个未被写锁定的读写锁进行写解锁,就会引发一个不可恢复的panic,同理对一个未被读锁定的读写锁进行读写锁也会如此。

由于读写锁控制下的多个读操作之间不是互斥的,因此对于读解锁更容易被忽视。对于同一个读写锁,添加多少个读锁定,就必要有等量的读解锁,这样才能其他协程有机会进行操作。

1
2
3
4
5
6
7
8
9
10
11
12
13
14
15
16
17
18
19
20
21
22
23
24
25
26
package main

import (
"fmt"
"sync"
"time"
)

func main() {
var rwm sync.RWMutex
for i := 0; i < 5; i++ {
go func(i int) {
fmt.Println("try to lock read ", i)
rwm.RLock()
fmt.Println("get locked ", i)
time.Sleep(time.Second * 2)
fmt.Println("try to unlock for reading ", i)
rwm.RUnlock()
fmt.Println("unlocked for reading ", i)
}(i)
}
time.Sleep(time.Millisecond * 1000)
fmt.Println("try to lock for writing")
rwm.Lock()
fmt.Println("locked for writing")
}

运行:

1
2
3
4
5
6
7
8
9
10
11
12
13
14
15
16
17
18
19
20
21
22
23
> go run rwmutex.go 
try to lock read 0
get locked 0
try to lock read 4
get locked 4
try to lock read 3
get locked 3
try to lock read 1
get locked 1
try to lock read 2
get locked 2
try to lock for writing
try to unlock for reading 0
unlocked for reading 0
try to unlock for reading 2
unlocked for reading 2
try to unlock for reading 1
unlocked for reading 1
try to unlock for reading 3
unlocked for reading 3
try to unlock for reading 4
unlocked for reading 4
locked for writing

这里可以看到创建了五个协程用于对读写锁的读锁定与读解锁操作。在 rwm.Lock()种会对main中协程进行写锁定,但是for循环中的读解锁尚未完成,因此会造成mian中的协程阻塞。当for循环中的读解锁操作都完成后就会试图唤醒main中阻塞的协程,main中的写锁定才会完成。

  • sync.Map安全锁

golang中的sync.Map是并发安全的,其实也就是sync包中golang自定义的一个名叫Map的结构体。

应用示例:

1
2
3
4
5
6
7
8
9
10
11
12
13
14
15
16
17
18
19
20
21
22
23
24
25
26
27
28
29
30
31
32
package main
import (
"sync"
"fmt"
)

func main() {
//开箱即用
var sm sync.Map
//store 方法,添加元素
sm.Store(1,"a")
//Load 方法,获得value
if v,ok:=sm.Load(1);ok{
fmt.Println(v)
}
//LoadOrStore方法,获取或者保存
//参数是一对key:value,如果该key存在且没有被标记删除则返回原先的value(不更新)和true;不存在则store,返回该value 和false
if vv,ok:=sm.LoadOrStore(1,"c");ok{
fmt.Println(vv)
}
if vv,ok:=sm.LoadOrStore(2,"c");!ok{
fmt.Println(vv)
}
//遍历该map,参数是个函数,该函数参的两个参数是遍历获得的key和value,返回一个bool值,当返回false时,遍历立刻结束。
sm.Range(func(k,v interface{})bool{
fmt.Print(k)
fmt.Print(":")
fmt.Print(v)
fmt.Println()
return true
})
}

运行 :

1
2
3
4
5
a
a
c
1:a
2:c

sync.Map的数据结构:

1
2
3
4
5
6
7
8
9
10
 type Map struct {
// 该锁用来保护dirty
mu Mutex
// 存读的数据,因为是atomic.value类型,只读类型,所以它的读是并发安全的
read atomic.Value // readOnly
//包含最新的写入的数据,并且在写的时候,会把read 中未被删除的数据拷贝到该dirty中,因为是普通的map存在并发安全问题,需要用到上面的mu字段。
dirty map[interface{}]*entry
// 从read读数据的时候,会将该字段+1,当等于len(dirty)的时候,会将dirty拷贝到read中(从而提升读的性能)。
misses int
}

read的数据结构是:

1
2
3
4
5
type readOnly struct {
m map[interface{}]*entry
// 如果Map.dirty的数据和m 中的数据不一样是为true
amended bool
}

entry的数据结构:

1
2
3
4
type entry struct {
//可见value是个指针类型,虽然read和dirty存在冗余情况(amended=false),但是由于是指针类型,存储的空间应该不是问题
p unsafe.Pointer // *interface{}
}

Delete 方法:

1
2
3
4
5
6
7
8
9
10
11
12
13
14
15
16
17
18
19
20
21
22
23
24
25
26
27
28
29
30
31
32
func (m *Map) Delete(key interface{}) {
read, _ := m.read.Load().(readOnly)
e, ok := read.m[key]
//如果read中没有,并且dirty中有新元素,那么就去dirty中去找
if !ok && read.amended {
m.mu.Lock()
//这是双检查(上面的if判断和锁不是一个原子性操作)
read, _ = m.read.Load().(readOnly)
e, ok = read.m[key]
if !ok && read.amended {
//直接删除
delete(m.dirty, key)
}
m.mu.Unlock()
}
if ok {
//如果read中存在该key,则将该value 赋值nil(采用标记的方式删除!)
e.delete()
}
}

func (e *entry) delete() (hadValue bool) {
for {
p := atomic.LoadPointer(&e.p)
if p == nil || p == expunged {
return false
}
if atomic.CompareAndSwapPointer(&e.p, p, nil) {
return true
}
}
}

Store 方法:

1
2
3
4
5
6
7
8
9
10
11
12
13
14
15
16
17
18
19
20
21
22
23
24
25
26
27
28
29
30
31
32
33
34
35
36
37
38
39
40
41
42
43
44
45
46
47
48
49
50
51
52
53
54
55
56
57
58
59
60
61
62
63
64
65
66
67
68
69
70
71
72
73
74
75
76
77
78
79
80
81
82
83
84
85
86
87
88
func (m *Map) Store(key, value interface{}) {
// 如果m.read存在这个key,并且没有被标记删除,则尝试更新。
read, _ := m.read.Load().(readOnly)
if e, ok := read.m[key]; ok && e.tryStore(&value) {
return
}
// 如果read不存在或者已经被标记删除
m.mu.Lock()
read, _ = m.read.Load().(readOnly)
if e, ok := read.m[key]; ok {
//如果entry被标记expunge,则表明dirty没有key,可添加入dirty,并更新entry
if e.unexpungeLocked() {
//加入dirty中
m.dirty[key] = e
}
//更新value值
e.storeLocked(&value)
//dirty 存在该key,更新
} else if e, ok := m.dirty[key]; ok {
e.storeLocked(&value)
//read 和dirty都没有,新添加一条
} else {
//dirty中没有新的数据,往dirty中增加第一个新键
if !read.amended {
//将read中未删除的数据加入到dirty中
m.dirtyLocked()
m.read.Store(readOnly{m: read.m, amended: true})
}
m.dirty[key] = newEntry(value)
}
m.mu.Unlock()
}

//将read中未删除的数据加入到dirty中
func (m *Map) dirtyLocked() {
if m.dirty != nil {
return
}
read, _ := m.read.Load().(readOnly)
m.dirty = make(map[interface{}]*entry, len(read.m))
//read如果较大的话,可能影响性能
for k, e := range read.m {
//通过此次操作,dirty中的元素都是未被删除的,可见expunge的元素不在dirty中
if !e.tryExpungeLocked() {
m.dirty[k] = e
}
}
}

//判断entry是否被标记删除,并且将标记为nil的entry更新标记为expunge
func (e *entry) tryExpungeLocked() (isExpunged bool) {
p := atomic.LoadPointer(&e.p)
for p == nil {
// 将已经删除标记为nil的数据标记为expunged
if atomic.CompareAndSwapPointer(&e.p, nil, expunged) {
return true
}
p = atomic.LoadPointer(&e.p)
}
return p == expunged
}

//对entry 尝试更新
func (e *entry) tryStore(i *interface{}) bool {
p := atomic.LoadPointer(&e.p)
if p == expunged {
return false
}
for {
if atomic.CompareAndSwapPointer(&e.p, p, unsafe.Pointer(i)) {
return true
}
p = atomic.LoadPointer(&e.p)
if p == expunged {
return false
}
}
}

//read里 将标记为expunge的更新为nil
func (e *entry) unexpungeLocked() (wasExpunged bool) {
return atomic.CompareAndSwapPointer(&e.p, expunged, nil)
}

//更新entry
func (e *entry) storeLocked(i *interface{}) {
atomic.StorePointer(&e.p, unsafe.Pointer(i))
}

因此,每次操作先检查read,因为read 并发安全,性能好些;read不满足,则加锁检查dirty,一旦是新的键值,dirty会被read更新。

Load方法:

Load方法是一个加载方法,查找key。

1
2
3
4
5
6
7
8
9
10
11
12
13
14
15
16
17
18
19
20
21
22
23
24
25
26
27
28
29
30
31
32
33
34
35
func (m *Map) Load(key interface{}) (value interface{}, ok bool) {
//因read只读,线程安全,先查看是否满足条件
read, _ := m.read.Load().(readOnly)
e, ok := read.m[key]
//如果read没有,并且dirty有新数据,那从dirty中查找,由于dirty是普通map,线程不安全,这个时候用到互斥锁了
if !ok && read.amended {
m.mu.Lock()
// 双重检查
read, _ = m.read.Load().(readOnly)
e, ok = read.m[key]
// 如果read中还是不存在,并且dirty中有新数据
if !ok && read.amended {
e, ok = m.dirty[key]
// mssLocked()函数是性能是sync.Map 性能得以保证的重要函数,目的讲有锁的dirty数据,替换到只读线程安全的read里
m.missLocked()
}
m.mu.Unlock()
}
if !ok {
return nil, false
}
return e.load()
}

//dirty 提升至read 关键函数,当misses 经过多次因为load之后,大小等于len(dirty)时候,讲dirty替换到read里,以此达到性能提升。
func (m *Map) missLocked() {
m.misses++
if m.misses < len(m.dirty) {
return
}
//原子操作,耗时很小
m.read.Store(readOnly{m: m.dirty})
m.dirty = nil
m.misses = 0
}

sync.Map是通过冗余的两个数据结构(read、dirty),实现性能的提升。为了提升性能,load、delete、store等操作尽量使用只读的read;为了提高read的key击中概率,采用动态调整,将dirty数据提升为read;对于数据的删除,采用延迟标记删除法,只有在提升dirty的时候才删除。

26. 读写锁或者互斥锁读的时候能写吗?

Go中读写锁包括读锁和写锁,多个读线程可以同时访问共享数据;写线程必须等待所有读线程都释放锁以后,才能取得锁;同样的,读线程必须等待写线程释放锁后,才能取得锁,也就是说读写锁要确保的是如下互斥关系,可以同时读,但是读-写,写-写都是互斥的。

27. 怎么限制Goroutine的数量.

在Golang中,Goroutine虽然很好,但是数量太多了,往往会带来很多麻烦,比如耗尽系统资源导致程序崩溃,或者CPU使用率过高导致系统忙不过来。所以我们可以限制下Goroutine的数量,这样就需要在每一次执行go之前判断goroutine的数量,如果数量超了,就要阻塞go的执行。第一时间想到的就是使用通道。每次执行的go之前向通道写入值,直到通道满的时候就阻塞了,

1
2
3
4
5
6
7
8
9
10
11
12
13
14
15
16
17
18
19
20
21
package main

import "fmt"

var ch chan int

func elegance(){
<-ch
fmt.Println("the ch value receive",ch)
}

func main(){
ch = make(chan int,5)
for i:=0;i<10;i++{
ch <-1
fmt.Println("the ch value send",ch)
go elegance()
fmt.Println("the result i",i)
}

}

运行:

1
2
3
4
5
6
7
8
9
10
11
12
13
14
15
16
17
18
19
20
21
22
23
24
25
26
27
28
29
30
31
32
33
34
35
36
37
38
39
40
41
42
43
44
45
46
47
48
49
50
51
52
53
54
55
56
57
58
59
60
61
62
63
64
65
66
67
68
> go run goroutine.go 
the ch value send 0xc00009c000
the result i 0
the ch value send 0xc00009c000
the result i 1
the ch value send 0xc00009c000
the result i 2
the ch value send 0xc00009c000
the result i 3
the ch value send 0xc00009c000
the result i 4
the ch value send 0xc00009c000
the result i 5
the ch value send 0xc00009c000
the ch value receive 0xc00009c000
the result i 6
the ch value receive 0xc00009c000
the ch value send 0xc00009c000
the result i 7
the ch value send 0xc00009c000
the result i 8
the ch value send 0xc00009c000
the result i 9
the ch value send 0xc00009c000
the ch value receive 0xc00009c000
the result i 10
the ch value send 0xc00009c000
the result i 11
the ch value send 0xc00009c000
the result i 12
the ch value send 0xc00009c000
the result i 13
the ch value send 0xc00009c000
the ch value receive 0xc00009c000
the result i 14
the ch value receive 0xc00009c000
> go run goroutine.go
the ch value send 0xc00007e000
the result i 0
the ch value send 0xc00007e000
the result i 1
the ch value send 0xc00007e000
the result i 2
the ch value send 0xc00007e000
the result i 3
the ch value send 0xc00007e000
the ch value receive 0xc00007e000
the result i 4
the ch value send 0xc00007e000
the ch value receive 0xc00007e000
the result i 5
the ch value send 0xc00007e000
the ch value receive 0xc00007e000
the result i 6
the ch value send 0xc00007e000
the result i 7
the ch value send 0xc00007e000
the ch value receive 0xc00007e000
the result i 8
the ch value send 0xc00007e000
the result i 9

这样每次同时运行的goroutine就被限制为5个了。但是新的问题于是就出现了,因为并不是所有的goroutine都执行完了,在main函数退出之后,还有一些goroutine没有执行完就被强制结束了。这个时候我们就需要用到sync.WaitGroup。使用WaitGroup等待所有的goroutine退出。

1
2
3
4
5
6
7
8
9
10
11
12
13
14
15
16
17
18
19
20
21
22
23
24
25
26
27
28
29
30
31
32
33
34
35
36
37
38
39
40
41
42
43
44
45
46
47
48
49
50
51
52
53
54
55
56
57
58
59
60
package main

import (
"fmt"
"runtime"
"sync"
"time"
)
// Pool Goroutine Pool
type Pool struct {
queue chan int
wg *sync.WaitGroup
}
// New 新建一个协程池
func NewPool(size int) *Pool{
if size <=0{
size = 1
}
return &Pool{
queue:make(chan int,size),
wg:&sync.WaitGroup{},
}
}
// Add 新增一个执行
func (p *Pool)Add(delta int){
// delta为正数就添加
for i :=0;i<delta;i++{
p.queue <-1
}
// delta为负数就减少
for i:=0;i>delta;i--{
<-p.queue
}
p.wg.Add(delta)
}
// Done 执行完成减一
func (p *Pool) Done(){
<-p.queue
p.wg.Done()
}
// Wait 等待Goroutine执行完毕
func (p *Pool) Wait(){
p.wg.Wait()
}

func main(){
// 这里限制5个并发
pool := NewPool(5)
fmt.Println("the NumGoroutine begin is:",runtime.NumGoroutine())
for i:=0;i<20;i++{
pool.Add(1)
go func(i int) {
time.Sleep(time.Second)
fmt.Println("the NumGoroutine continue is:",runtime.NumGoroutine())
pool.Done()
}(i)
}
pool.Wait()
fmt.Println("the NumGoroutine done is:",runtime.NumGoroutine())
}

运行:

1
2
3
4
5
6
7
8
9
10
11
12
13
14
15
16
17
18
19
20
21
22
the NumGoroutine begin is: 1
the NumGoroutine continue is: 6
the NumGoroutine continue is: 7
the NumGoroutine continue is: 6
the NumGoroutine continue is: 3
the NumGoroutine continue is: 2
the NumGoroutine done is: 1

其中,Go的GOMAXPROCS默认值已经设置为CPU的核数, 这里允许我们的Go程序充分使用机器的每一个CPU,最大程度的提高我们程序的并发性能。runtime.NumGoroutine函数在被调用后,会返回系统中的处于特定状态的Goroutine的数量。这里的特指是指Grunnable\Gruning\Gsyscall\Gwaition。处于这些状态的Groutine即被看做是活跃的或者说正在被调度。

这里需要注意下:垃圾回收所在Groutine的状态也处于这个范围内的话,也会被纳入该计数器。

28. Channel是同步的还是异步的.

Channel是异步进行的。

channel存在3种状态:

  • nil,未初始化的状态,只进行了声明,或者手动赋值为nil
  • active,正常的channel,可读或者可写
  • closed,已关闭,千万不要误认为关闭channel后,channel的值是nil

29. 说一下异步和非阻塞的区别?

  • 异步和非阻塞的区别:
  1. 异步:调用在发出之后,这个调用就直接返回,不管有无结果;异步是过程。
  2. 非阻塞:关注的是程序在等待调用结果(消息,返回值)时的状态,指在不能立刻得到结果之前,该调用不会阻塞当前线程。
  • 同步和异步的区别:
  1. 步:一个服务的完成需要依赖其他服务时,只有等待被依赖的服务完成后,才算完成,这是一种可靠的服务序列。要么成功都成功,失败都失败,服务的状态可以保持一致。
  2. 异步:一个服务的完成需要依赖其他服务时,只通知其他依赖服务开始执行,而不需要等待被依赖的服务完成,此时该服务就算完成了。被依赖的服务是否最终完成无法确定,一次它是一个不可靠的服务序列。
  • 消息通知中的同步和异步:
  1. 同步:当一个同步调用发出后,调用者要一直等待返回消息(或者调用结果)通知后,才能进行后续的执行。
  2. 异步:当一个异步过程调用发出后,调用者不能立刻得到返回消息(结果)。在调用结束之后,通过消息回调来通知调用者是否调用成功。
  • 阻塞与非阻塞的区别:
  1. 阻塞:阻塞调用是指调用结果返回之前,当前线程会被挂起,一直处于等待消息通知,不能够执行其他业务,函数只有在得到结果之后才会返回。
  2. 非阻塞:非阻塞和阻塞的概念相对应,指在不能立刻得到结果之前,该函数不会阻塞当前线程,而会立刻返回。

同步与异步是对应的,它们是线程之间的关系,两个线程之间要么是同步的,要么是异步的。

阻塞与非阻塞是对同一个线程来说的,在某个时刻,线程要么处于阻塞,要么处于非阻塞。

阻塞是使用同步机制的结果,非阻塞则是使用异步机制的结果。

30. Log包线程安全吗?

Golang的标准库提供了log的机制,但是该模块的功能较为简单(看似简单,其实他有他的设计思路)。在输出的位置做了线程安全的保护。

31. Goroutine和线程的区别?

从调度上看,goroutine的调度开销远远小于线程调度开销。

OS的线程由OS内核调度,每隔几毫秒,一个硬件时钟中断发到CPU,CPU调用一个调度器内核函数。这个函数暂停当前正在运行的线程,把他的寄存器信息保存到内存中,查看线程列表并决定接下来运行哪一个线程,再从内存中恢复线程的注册表信息,最后继续执行选中的线程。这种线程切换需要一个完整的上下文切换:即保存一个线程的状态到内存,再恢复另外一个线程的状态,最后更新调度器的数据结构。某种意义上,这种操作还是很慢的。

Go运行的时候包涵一个自己的调度器,这个调度器使用一个称为一个M:N调度技术,m个goroutine到n个os线程(可以用GOMAXPROCS来控制n的数量),Go的调度器不是由硬件时钟来定期触发的,而是由特定的go语言结构来触发的,他不需要切换到内核语境,所以调度一个goroutine比调度一个线程的成本低很多。

从栈空间上,goroutine的栈空间更加动态灵活。

每个OS的线程都有一个固定大小的栈内存,通常是2MB,栈内存用于保存在其他函数调用期间哪些正在执行或者临时暂停的函数的局部变量。这个固定的栈大小,如果对于goroutine来说,可能是一种巨大的浪费。作为对比goroutine在生命周期开始只有一个很小的栈,典型情况是2KB, 在go程序中,一次创建十万左右的goroutine也不罕见(2KB*100,000=200MB)。而且goroutine的栈不是固定大小,它可以按需增大和缩小,最大限制可以到1GB。

goroutine没有一个特定的标识。

在大部分支持多线程的操作系统和编程语言中,线程有一个独特的标识,通常是一个整数或者指针,这个特性可以让我们构建一个线程的局部存储,本质是一个全局的map,以线程的标识作为键,这样每个线程可以独立使用这个map存储和获取值,不受其他线程干扰。

goroutine中没有可供程序员访问的标识,原因是一种纯函数的理念,不希望滥用线程局部存储导致一个不健康的超距作用,即函数的行为不仅取决于它的参数,还取决于运行它的线程标识。

32. 滑动窗口的概念以及应用?

滑动窗口概念不仅存在于数据链路层,也存在于传输层,两者有不同的协议,但基本原理是相近的。其中一个重要区别是,一个是针对于帧的传送,另一个是字节数据的传送。

滑动窗口(Sliding window)是一种流量控制技术。早期的网络通信中,通信双方不会考虑网络的拥挤情况直接发送数据。由于大家不知道网络拥塞状况,同时发送数据,导致中间节点阻塞掉包,谁也发不了数据,所以就有了滑动窗口机制来解决此问题。参见滑动窗口如何根据网络拥塞发送数据仿真视频。

滑动窗口协议是用来改善吞吐量的一种技术,即容许发送方在接收任何应答之前传送附加的包。接收方告诉发送方在某一时刻能送多少包(称窗口尺寸)。

CP中采用滑动窗口来进行传输控制,滑动窗口的大小意味着接收方还有多大的缓冲区可以用于接收数据。发送方可以通过滑动窗口的大小来确定应该发送多少字节的数据。当滑动窗口为0时,发送方一般不能再发送数据报,但有两种情况除外,一种情况是可以发送紧急数据,例如,允许用户终止在远端机上的运行进程。另一种情况是发送方可以发送一个1字节的数据报来通知接收方重新声明它希望接收的下一字节及发送方的滑动窗口大小。

33. 怎么做弹性扩缩容,原理是什么?

弹性伸缩(Auto Scaling)根据您的业务需求和伸缩策略,为您自动调整计算资源。您可设置定时、周期或监控策略,恰到好处地增加或减少CVM实例,并完成实例配置,保证业务平稳健康运行。在需求高峰期时,弹性伸缩自动增加CVM实例的数量,以保证性能不受影响;当需求较低时,则会减少CVM实例数量以降低成本。弹性伸缩既适合需求稳定的应用程序,同时也适合每天、每周、每月使用量不停波动的应用程序。

34. 让你设计一个web框架,你要怎么设计,说一下步骤.

35. 说一下中间件原理.

中间件(middleware)是基础软件的一大类,属于可复用软件的范畴。中间件处于操作系统软件与用户的应用软件的中间。中间件在操作系统、网络和数据库之上,应用软件的下层,总的作用是为处于自己上层的应用软件提供运行与开发的环境,帮助用户灵活、高效地开发和集成复杂的应用软件 IDC的定义是:中间件是一种独立的系统软件或服务程序,分布式应用软件借助这种软件在不同的技术之间共享资源,中间件位于客户机服务器的操作系统之上,管理计算资源和网络通信。

中间件解决的问题是:

在中间件产生以前,应用软件直接使用操作系统、网络协议和数据库等开发,这些都是计算机最底层的东西,越底层越复杂,开发者不得不面临许多很棘手的问题,如操作系统的多样性,繁杂的网络程序设计、管理,复杂多变的网络环境,数据分散处理带来的不一致性问题、性能和效率、安全,等等。这些与用户的业务没有直接关系,但又必须解决,耗费了大量有限的时间和精力。于是,有人提出能不能将应用软件所要面临的共性问题进行提炼、抽象,在操作系统之上再形成一个可复用的部分,供成千上万的应用软件重复使用。这一技术思想最终构成了中间件这类的软件。中间件屏蔽了底层操作系统的复杂性,使程序开发人员面对一个简单而统一的开发环境,减少程序设计的复杂性,将注意力集中在自己的业务上,不必再为程序在不同系统软件上的移植而重复工作,从而大大减少了技术上的负担。

36. 怎么设计orm,让你写,你会怎么写?

37. 用过原生的http包吗?

38. 一个非常大的数组,让其中两个数想加等于1000怎么算?

39. 各个系统出问题怎么监控报警.

可以使用prometheus搭配kong网关,监控各个系统的接口转发处,进行处理报警,然后上报之后,设置阈值,报警和自恢复系统设计。

40. 常用测试工具,压测工具,方法?

1
goconvey,vegeta

41. 复杂的单元测试怎么测试,比如有外部接口mysql接口的情况

42. redis集群,哨兵,持久化,事务

43. mysql和redis区别是什么?

  • mysql和redis的数据库类型

mysql是关系型数据库,主要用于存放持久化数据,将数据存储在硬盘中,读取速度较慢。

redis是NOSQL,即非关系型数据库,也是缓存数据库,即将数据存储在缓存中,缓存的读取速度快,能够大大的提高运行效率,但是保存时间有限。

  • mysql的运行机制

mysql作为持久化存储的关系型数据库,相对薄弱的地方在于每次请求访问数据库时,都存在着I/O操作,如果反复频繁的访问数据库。第一:会在反复链接数据库上花费大量时间,从而导致运行效率过慢;第二:反复的访问数据库也会导致数据库的负载过高,那么此时缓存的概念就衍生了出来。

  • 缓存

缓存就是数据交换的缓冲区(cache),当浏览器执行请求时,首先会对在缓存中进行查找,如果存在,就获取;否则就访问数据库。

缓存的好处就是读取速度快。

  • redis数据库

redis数据库就是一款缓存数据库,用于存储使用频繁的数据,这样减少访问数据库的次数,提高运行效率。

  • redis和mysql的区别总结

(1)类型上

从类型上来说,mysql是关系型数据库,redis是缓存数据库

(2)作用上

mysql用于持久化的存储数据到硬盘,功能强大,但是速度较慢

redis用于存储使用较为频繁的数据到缓存中,读取速度快

(3)需求上

mysql和redis因为需求的不同,一般都是配合使用。

44. 高可用软件是什么?

  • Heartbeat

Heartbeat是一个比较老牌的集群管理软件,最新版本是V3.0, 也称为Heartbeat 3.通过Heartbeat,可以实现对服务器资源(ip以及程序服务等资源)的监控和管理,并在出现故障的情况下,将资源集合从一台已经故障的计算机快速转移到另一台正常运转的机器上继续提供服务。

  • Keepalived

Keepalived也是一款高可用集群管理软件,其基本功能与Heartbeat非常类似。

Keepalived它的功能主要包括两方面:

1)通过IP漂移,实现服务的高可用:服务器集群共享一个虚拟IP,同一时间只有一个服务器占有虚拟IP并对外提供服务,若该服务器不可用,则虚拟IP漂移至另一台服务器并对外提供服务;

2)对LVS应用服务层的应用服务器集群进行状态监控:若应用服务器不可用,则keepalived将其从集群中摘除,若应用服务器恢复,则keepalived将其重新加入集群中。

Keepalived可以单独使用,即通过IP漂移实现服务的高可用,也可以结合LVS使用,即一方面通过IP漂移实现LVS负载均衡层的高可用,另一方面实现LVS应用服务层的状态监控。

45. 怎么搞一个并发服务程序?

46. 讲解一下你做过的项目,然后找问题问实现细节。

47. mysql事务说下

事务是一组原子性的sql命令或者说是一个独立的工作单元,如果数据库引擎能够成功的对数据库应用该组的全部sql语句,那么就执行该组命令如果其中有任何一条语句因为崩溃或者其它原因无法执行,那么该组中所有的sql语句都不会执行,如果没有显示启动事务,数据库会根据autocommit的值.默认每条sql操作都会自动提交。

  • 原子性

一个事务中的所有操作,要么都完成,要么都不执行.对于一个事务来说,不可能只执行其中的一部分。

  • 一致性

数据库一致性是指事务必须使数据库从一个一致的状态变到另外一个一致的状态,也就是执行事务之前和之后的状态都必须处于一致的状态。

1
在事务T开始时,此时数据库有一种状态,这个状态是所有的MySQL对象处于一致的状态,例如数据库完整性约束正确,日志状态一致等,当事务T提交后,这时数据库又有了一个新的状态,不同的数据,不同的索引,不同的日志等,但此时,约束,数据,索引,日志等MySQL各种对象还是要保持一致性(正确性)。 这就是 从一个一致性的状态,变到另一个一致性的状态。也就是事务执行后,并没有破坏数据库的完整性约束(一切都是对的)。
  • 隔离性

隔离性是指当多个用户并发访问数据库时,比如操作同一张表时,数据库为每一个用户开启的事务,不能被其他事务的操作所干扰,多个并发事务之间要相互隔离。

1
对于任意两个并发的事务T1和T2,在事务T1看来,T2要么在T1开始之前就已经结束,要么在T1结束之后才开始,这样每个事务都感觉不到有其他事务在并发地执行。
  • 持久性

持久性是指一个事务一旦被提交了,那么对于数据库中的数据改变就是永久性的,即便是在数据库系统遭遇到故障的情况下也不会丢失提交事务的操作。

1
我们在使用连接池操作数据库时,在提交事务方法后,提示用户事务操作完成,当我们程序执行完成直到看到提示后,就可以认定事务以及正确提交,即使这时候数据库出现了问题,也必须要将我们的事务完全执行完成,否则就会造成我们看到提示事务处理完毕,但是数据库因为故障而没有执行事务的重大错误。

48. 怎么做一个自动化配置平台系统?

49. grpc遵循什么协议?

50. grpc内部原理是什么?

51. http2的特点是什么,与http1.1的对比。

HTTP1.1HTTP2QUIC
持久连接二进制分帧基于UDP的多路传输(单连接下)
请求管道化多路复用(或连接共享)极低的等待时延(相比于TCP的三次握手)
增加缓存处理(新的字段如cache-control)头部压缩QUIC为 传输层 协议 ,成为更多应用层的高性能选择
增加Host字段、支持断点传输等(把文件分成几部分)服务器推送

52. Go的调度原理.

53. go struct能不能比较

  • 相同struct类型的可以比较
  • 不同struct类型的不可以比较,编译都不过,类型不匹配
1
2
3
4
5
6
7
8
9
10
11
12
13
14
15
16
17
18
19
20
21
package main
import "fmt"
func main() {
type A struct {
a int
}
type B struct {
a int
}
a := A{1}
//b := A{1}
b := B{1}
if a == b {
fmt.Println("a == b")
}else{
fmt.Println("a != b")
}
}
// output
// command-line-arguments [command-line-arguments.test]
// ./.go:14:7: invalid operation: a == b (mismatched types A and B)
  1. go defer(for defer)
  1. select可以用于什么?

Go的select主要是处理多个channel的操作.

  1. context包的用途是什么?

godoc: https://golang.org/pkg/context/

  1. client如何实现长连接?
  1. 主协程如何等其余协程完再操作?
  1. slice,len,cap,共享,扩容.
  2. map如何顺序读取?

可以通过sort中的排序包进行对map中的key进行排序

1
2
3
4
5
6
7
8
9
10
11
12
13
14
15
16
17
18
19
20
21
22
23
package main

import (
"fmt"
"sort"
)

func main() {
var m = map[string]int{
"hello": 0,
"morning": 1,
"my": 2,
"girl": 3,
}
var keys []string
for k := range m {
keys = append(keys, k)
}
sort.Strings(keys)
for _, k := range keys {
fmt.Println("Key:", k, "Value:", m[k])
}
}
  1. 实现set

根据go中map的keys的无序性和唯一性,可以将其作为set

  1. 实现消息队列(多生产者,多消费者)

根据Goroutine和channel的读写可以实现消息队列,

  1. 大文件排序

64.基本排序,哪些是稳定的

选择排序、快速排序、希尔排序、堆排序不是稳定的排序算法,

冒泡排序、插入排序、归并排序和基数排序是稳定的排序算法

  1. Http get跟head

get:获取由Request-URI标识的任何信息(以实体的形式),如果Request-URI引用某个数据处理过程,则应该以它产生的数据作为在响应中的实体,而不是该过程的源代码文本,除非该过程碰巧输出该文本。

head: 除了服务器不能在响应中返回消息体,HEAD方法与GET相同。用来获取暗示实体的元信息,而不需要传输实体本身。常用于测试超文本链接的有效性、可用性和最近的修改。

  1. Http 401,403

401 Unauthorized: 该HTTP状态码表示认证错误,它是为了认证设计的,而不是为了授权设计的。收到401响应,表示请求没有被认证—压根没有认证或者认证不正确—但是请重新认证和重试。(一般在响应头部包含一个WWW-Authenticate来描述如何认证)。通常由web服务器返回,而不是web应用。从性质上来说是临时的东西。(服务器要求客户端重试)

403 Forbidden:该HTTP状态码是关于授权方面的。从性质上来说是永久的东西,和应用的业务逻辑相关联。它比401更具体,更实际。收到403响应表示服务器完成认证过程,但是客户端请求没有权限去访问要求的资源。

总的来说,401 Unauthorized响应应该用来表示缺失或错误的认证;403 Forbidden响应应该在这之后用,当用户被认证后,但用户没有被授权在特定资源上执行操作。

67.Http keep-alive

  1. Http能不能一次连接多次请求,不等后端返回
  2. TCP 和 UDP 有什么区别,适用场景
  • TCP 是面向连接的,UDP 是面向无连接的;故 TCP 需要建立连接和断开连接,UDP 不需要。
  • TCP 是流协议,UDP 是数据包协议;故 TCP 数据没有大小限制,UDP 数据报有大小限制(UDP 协议本身限制、数据链路层的 MTU、缓存区大小)。
  • TCP 是可靠协议,UDP 是不可靠协议;故 TCP 会处理数据丢包重发以及乱序等情况,UDP 则不会处理。

UDP 的特点及使用场景:

UDP 不提供复杂的控制机制,利用 IP 提供面向无连接的通信服务,随时都可以发送数据,处理简单且高效,经常用于以下场景:

包总量较小的通信(DNS、SNMP)

视频、音频等多媒体通信(即时通信)

广播通信

TCP 的特点及使用场景:

相对于 UDP,TCP 实现了数据传输过程中的各种控制,可以进行丢包时的重发控制,还可以对次序乱掉的分包进行顺序控制。

在对可靠性要求较高的情况下,可以使用 TCP,即不考虑 UDP 的时候,都可以选择 TCP。

  1. time-wait的作用
  1. 数据库如何建索引
  1. 孤儿进程,僵尸进程
  • 孤儿进程:一个父进程退出,而它的一个或多个子进程还在运行,那么那些子进程将成为孤儿进程。孤儿进程将被init进程(进程号为1)所收养,并由init进程对它们完成状态收集工作。
  • 僵尸进程:一个进程使用fork创建子进程,如果子进程退出,而父进程并没有调用wait或waitpid获取子进程的状态信息,那么子进程的进程描述符仍然保存在系统中。这种进程称之为僵死进程。
  1. 死锁条件,如何避免
  2. linux命令,查看端口占用,cpu负载,内存占用,如何发送信号给一个进程
  3. git文件版本,使用顺序,merge跟rebase
  4. 通常一般会用到哪些数据结构?
  5. 链表和数组相比, 有什么优缺点?
  6. 如何判断两个无环单链表有没有交叉点?
  7. 如何判断一个单链表有没有环, 并找出入环点?
  8. 描述一下 TCP 四次挥手的过程中
  9. TCP 有哪些状态?
  10. TCP 的 LISTEN 状态是什么?
  11. TCP 的 CLOSE_WAIT 状态是什么?
  12. 建立一个 socket 连接要经过哪些步骤?
  13. 常见的 HTTP 状态码有哪些?
  14. 301和302有什么区别?
  15. 504和500有什么区别?
  16. HTTPS 和 HTTP 有什么区别?
  17. 算法题: 手写一个快速排序

快速排序:

1
2
3
4
5
6
7
8
9
10
11
12
13
14
15
16
17
18
19
20
21
22
23
24
25
26
27
28
29
30
31
32
33
34
35
36
37
38
39
40
41
42
43
44
45
46
47
48
49
50
51
52
53
54
55
56
57
58
59
60
61
62
63
64
func main() {
var arr = []int{19,8,16,15,23,34,6,3,1,0,2,9,7}
quickAscendingSort(arr, 0, len(arr)-1)
fmt.Println("quickAscendingSort:",arr)

quickDescendingSort(arr, 0, len(arr)-1)
fmt.Println("quickDescendingSort:",arr)
}

//升序
func quickAscendingSort(arr []int, start, end int) {
if (start < end) {
i, j := start, end
key := arr[(start + end)/2]
for i <= j {
for arr[i] < key {
i++
}
for arr[j] > key {
j--
}
if i <= j {
arr[i], arr[j] = arr[j], arr[i]
i++
j--
}
}

if start < j {
quickAscendingSort(arr, start, j)
}
if end > i {
quickAscendingSort(arr, i, end)
}
}
}

//降序
func quickDescendingSort(arr []int, start, end int) {
if (start < end) {
i, j := start, end
key := arr[(start + end)/2]
for i <= j {
for arr[i] > key {
i++
}
for arr[j] < key {
j--
}
if i <= j {
arr[i], arr[j] = arr[j], arr[i]
i++
j--
}
}

if start < j {
quickDescendingSort(arr, start, j)
}
if end > i {
quickDescendingSort(arr, i, end)
}
}
}
  1. Golang 里的逃逸分析是什么?怎么避免内存逃逸?
  2. 配置中心如何保证一致性?
  3. Golang 的GC触发时机是什么?
  4. Redis 里数据结构的实现熟悉吗?
  5. Etcd的Raft一致性算法原理?
  6. 微服务概念.
  7. SLB原理.
  8. 分布式一直性原则.
  9. 如何保证服务宕机造成的分布式服务节点处理问题?
  10. 服务发现怎么实现的.
  11. Go中切片,map,struct 在64位机器中占用字节是多少?

在64位系统下,Golang的切片占用字节是24位,map和struct都是8位.

  1. Go中的defer函数使用下面的两种情况下结果是多少,为什么?
1
2
3
4
5
6
7
a := 1
defer fmt.Println("the value of a1:",a)
a++

defer func() {
fmt.Println("the value of a2:",a)
}()

运行:

1
2
the value of a1: 1
the value of a1: 2

第一种情况:

1
defer fmt.Println("the value of a1:",a)

defer延迟函数调用的fmt.Println(a)函数的参数值在defer语句出现时就已经确定了,所以无论后面如何修改a变量都不会影响延迟函数。

第二种情况:

1
2
3
defer func() {
fmt.Println("the value of a2:",a)
}()

defer延迟函数调用的函数参数的值在defer定义时候就确定了,而defer延迟函数内部所使用的值需要在这个函数运行时候才确定。

Golang面试参考


]]>
golang面试问题汇总
mongodb 命令行登录操作 https://cloudsjhan.github.io/2019/04/11/mongodb-命令行登录操作/ 2019-04-11T07:07:14.000Z 2019-04-22T02:55:05.331Z

Mac OS下载安装及配置

使用brew可以直接搞定,简单方便!

1
brew install mongodb

安装完成后会提示启动的方式,安装位置等等信息。

img

安装完成

安装完成后,按照提示启动MongoDB:

1
mongod --config /usr/local/etc/mongod.conf

配置文件已修改fork=true,因此启动后将以后台进程方式存在。

img

MongoDB启动

终端输入mongo连接MongoDB数据库(默认连接本机的27017端口)

1
mongo

img

客户端连接

配置文件

MongoDB引入一个YAML-based格式的配置文件。
现在的配置文件/usr/local/etc/mongod.conf显示如下:

1
2
3
4
5
6
7
8
9
10
11
12
13
14
15
16
17
18
19
# 日志
systemLog:
# 日志为文件
destination: file
# 文件位置
path: /usr/local/var/log/mongodb/mongo.log
# 是否追加
logAppend: true
#进程
processManagement:
# 守护进程方式
fork: true
storage:
dbPath: /usr/local/var/mongodb
net:
# 绑定IP,默认127.0.0.1,只能本机访问
bindIp: 127.0.0.1
# 端口
port: 27017

CentOS 7 安装MongoDB详细步骤

创建/etc/yum.repos.d/mongodb-org-4.0.repo文件,编辑内容如下:

1
2
3
4
5
6
[mongodb-org-4.0]
name=MongoDB Repository
baseurl=https://repo.mongodb.org/yum/redhat/$releasever/mongodb-org/4.0/x86_64/
gpgcheck=1
enabled=1
gpgkey=https://www.mongodb.org/static/pgp/server-4.0.asc

运行以下命令安装最新版的mongodb:

1
sudo yum install -y mongodb-org

配置mongod.conf允许远程连接:

1
2
3
4
$ vim /etc/mongod.conf

# Listen to all ip address
bind_ip = 0.0.0.0

启动mongodb:

1
sudo service mongod start

创建管理员用户:

1
2
3
4
5
6
7
8
9
$ mongo
>use admin
db.createUser(
{
user: "myUserAdmin",
pwd: "abc123",
roles: [ { role: "userAdminAnyDatabase", db: "admin" }, "readWriteAnyDatabase" ]
}
)

启用权限管理:

1
2
3
4
5
$ vim /etc/mongod.conf

#security
security:
authorization: enabled

重启mongodb:

1
sudo service mongod restart

Mongodb 用户验证登陆

启动带访问控制的 Mongodb
新建终端

1
mongod --auth --port 27017 --dbpath /data/db1

现在有两种方式进行用户身份的验证
第一种 (类似 MySql)
客户端连接时,指定用户名,密码,db名称

1
mongo --port 27017 -u "adminUser" -p "adminPass" --authenticationDatabase "admin"

第二种
客户端连接后,再进行验证

1
2
3
4
5
6
mongo --port 27017

use admin
db.auth("adminUser", "adminPass")

// 输出 1 表示验证成功

创建普通用户

过程类似创建管理员账户,只是 role 有所不同

1
2
3
4
5
6
7
8
9
10
use foo

db.createUser(
{
user: "simpleUser",
pwd: "simplePass",
roles: [ { role: "readWrite", db: "foo" },
{ role: "read", db: "bar" } ]
}
)

现在我们有了一个普通用户
用户名:simpleUser
密码:simplePass
权限:读写数据库 foo, 只读数据库 bar。

注意
NOTE
WARN
use foo表示用户在 foo 库中创建,就一定要 foo 库验证身份,即用户的信息跟随随数据库。比如上述 simpleUser 虽然有 bar 库的读取权限,但是一定要先在 foo 库进行身份验证,直接访问会提示验证失败。

1
2
3
4
5
use foo
db.auth("simpleUser", "simplePass")

use bar
show collections

还有一点需要注意,如果 admin 库没有任何用户的话,即使在其他数据库中创建了用户,启用身份验证,默认的连接方式依然会有超级权限


]]>
mongodb 命令行登录操作
Scrapy 解决URL被重定向无法抓取到数据问题301和302 https://cloudsjhan.github.io/2019/04/10/Scrapy-解决URL被重定向无法抓取到数据问题301和302/ 2019-04-10T08:48:20.000Z 2019-04-10T08:50:53.627Z

1.什么是状态码301,302

301 Moved Permanently(永久重定向) 被请求的资源已永久移动到新位置,并且将来任何对此资源的引用都应该使用本响应返回的若干个URI之一。

解决(一)

1.在Request中将scrapy的dont_filter=True,因为scrapy是默认过滤掉重复的请求URL,添加上参数之后即使被重定向了也能请求到正常的数据了

example

Request(url, callback=self.next_parse, dont_filter=True)
解决(二)

在scrapy框架中的 settings.py文件里添加

HTTPERROR_ALLOWED_CODES = [301]
解决(三)

使用requests模块遇到301和302问题时

def website():
‘url’
headers = {‘Accept’: ‘text/html,application/xhtml+xml,application/xml;q=0.9,image/webp,/;q=0.8’,
‘Accept-Encoding’: ‘gzip, deflate, sdch, br’,
‘Accept-Language’: ‘zh-CN,zh;q=0.8’,
‘Connection’: ‘keep-alive’,
‘Host’: ‘pan.baidu.com’,
‘Upgrade-Insecure-Requests’: ‘1’,
‘User-Agent’: ‘Mozilla/5.0 (Windows NT 10.0; Win64; x64) AppleWebKit/537.36 (KHTML, like Gecko) Chrome/55.0.2883.87 Safari/537.36’}

url = 'https://www.baidu.com/'html = requests.get(url, headers=headers, allow_redirects=False)return html.headers['Location']

allow_redirects=False的意义为拒绝默认的301/302重定向从而可以通过html.headers[‘Location’]拿到重定向的URL。


]]>
Scrapy 解决URL被重定向无法抓取到数据问题301和302
scrapy 源码分析之retry中间件与应用 https://cloudsjhan.github.io/2019/03/29/scrapy-源码分析之retry中间件/ 2019-03-29T11:33:40.000Z 2019-03-29T13:57:34.558Z

这次让我们分析scrapy重试机制的源码,学习其中的思想,编写定制化middleware,捕捉爬取失败的URL等信息。

scrapy简介

Scrapy是一个为了爬取网站数据,提取结构性数据而编写的应用框架。 可以应用在包括数据挖掘,信息处理或存储历史数据等一系列的程序中。

其最初是为了 页面抓取 (更确切来说, 网络抓取 )所设计的, 也可以应用在获取API所返回的数据(例如 Amazon Associates Web Services ) 或者通用的网络爬虫。

一张图可看清楚scrapy中数据的流向:

简单了解一下各个部分的功能,可以看下面简化版数据流:

总有漏网之鱼

不管你的主机配置多么吊炸天,还是网速多么给力,在scrapy的大规模任务中,最终爬取的item数量都不会等于期望爬取的数量,也就是说总有那么一些爬取失败的漏网之鱼,通过分析scrapy的日志,可以知道造成失败的原因有以下两种情况:

  1. exception_count
  2. httperror

以上的不管是exception还是httperror, scrapy中都有对应的retry机制,在settings.py文件中我们可以设置有关重试的参数,等运行遇到异常和错误时候,scrapy就会自动处理这些问题,其中最关键的部分就是重试中间件,下面让我们看一下scrapy的retry middleware。

RetryMiddle源码分析

在scrapy项目的middlewares.py文件中 敲如下代码:

1
from scrapy.downloadermiddlewares.retry import RetryMiddleware

按住ctrl键(Mac是command键),鼠标左键点击RetryMiddleware进入该中间件所在的项目文件的位置,也可以通过查看文件的形式找到该该中间件的位置,路径是:

1
site-packages/scrapy/downloadermiddlewares/retry.RetryMiddleware

源码如下:

1
2
3
4
5
6
7
8
9
10
11
12
13
14
15
16
17
18
19
20
21
22
23
24
25
26
27
28
29
30
31
32
33
34
35
36
37
38
39
40
41
42
43
44
45
46
47
48
49
50
51
52
53
54
55
56
57
58
59
60
61
62
63
64
class RetryMiddleware(object):

# IOError is raised by the HttpCompression middleware when trying to
# decompress an empty response
# 需要重试的异常状态,可以看出,其中有些是上面log中的异常
EXCEPTIONS_TO_RETRY = (defer.TimeoutError, TimeoutError, DNSLookupError,
ConnectionRefusedError, ConnectionDone, ConnectError,
ConnectionLost, TCPTimedOutError, ResponseFailed,
IOError, TunnelError)

def __init__(self, settings):
# 读取 settings.py 中关于重试的配置信息,如果没有配置重试的话,直接跳过
if not settings.getbool('RETRY_ENABLED'):
raise NotConfigured
self.max_retry_times = settings.getint('RETRY_TIMES')
self.retry_http_codes = set(int(x) for x in settings.getlist('RETRY_HTTP_CODES'))
self.priority_adjust = settings.getint('RETRY_PRIORITY_ADJUST')

@classmethod
def from_crawler(cls, crawler):
return cls(crawler.settings)
# 如果response的状态码,是我们要重试的
def process_response(self, request, response, spider):
if request.meta.get('dont_retry', False):
return response
if response.status in self.retry_http_codes:
reason = response_status_message(response.status)
return self._retry(request, reason, spider) or response
return response
# 出现了需要重试的异常状态,
def process_exception(self, request, exception, spider):
if isinstance(exception, self.EXCEPTIONS_TO_RETRY) \
and not request.meta.get('dont_retry', False):
return self._retry(request, exception, spider)
# 重试操作
def _retry(self, request, reason, spider):
retries = request.meta.get('retry_times', 0) + 1

retry_times = self.max_retry_times

if 'max_retry_times' in request.meta:
retry_times = request.meta['max_retry_times']

stats = spider.crawler.stats
if retries <= retry_times:
logger.debug("Retrying %(request)s (failed %(retries)d times): %(reason)s",
{'request': request, 'retries': retries, 'reason': reason},
extra={'spider': spider})
retryreq = request.copy()
retryreq.meta['retry_times'] = retries
retryreq.dont_filter = True
retryreq.priority = request.priority + self.priority_adjust

if isinstance(reason, Exception):
reason = global_object_name(reason.__class__)

stats.inc_value('retry/count')
stats.inc_value('retry/reason_count/%s' % reason)
return retryreq
else:
stats.inc_value('retry/max_reached')
logger.debug("Gave up retrying %(request)s (failed %(retries)d times): %(reason)s",
{'request': request, 'retries': retries, 'reason': reason},
extra={'spider': spider})

查看源码我们可以发现,对于返回http code的response,该中间件会通过process_response方法来处理,处理办法比较简单,判断response.status是否在retry_http_codes集合中,这个集合是读取的配置文件:

1
2
3
RETRY_ENABLED = True                  # 默认开启失败重试,一般关闭
RETRY_TIMES = 3 # 失败后重试次数,默认两次
RETRY_HTTP_CODES = [500, 502, 503, 504, 522, 524, 408] # 碰到这些验证码,才开启重试

对于httperror的处理也是同样的道理,定义了一个 EXCEPTIONS_TO_RETRY的列表,里面存放所有的异常类型,然后判断传入的异常是否存在于该集合中,如果在就进入retry逻辑,不在就忽略。

源码思想的应用

了解scrapy如何处理异常后,就可以利用这种思想,写一个middleware,对爬取失败的漏网之鱼进行捕获,方便以后做补爬。

  1. 在middlewares.py中 from scrapy.downloadermiddlewares.retry import RetryMiddleware, 写一个class,继承自RetryMiddleware;
  2. 对父类的process_response()process_exception()方法进行重写;
  3. 将该middleware加入setting.py;
  4. 注意事项:该中间件的Order_code不能过大,如果过大就会越接近下载器,就会优先于RetryMiddleware处理response,但这个中间件是用来处理最终的错误的,即当一个response 500进入中间件链路时,需要先经过retry中间件处理,不能先由我们写的中间件来处理,它不具有retry的功能,接收到500的response就直接放弃掉该request直接return了,这是不合理的。只有经过retry后仍然有异常的request才应当由我们写的中间件来处理,这时候你想怎么处理都可以,比如再次retry、return一个重新构造的response,但是如果你为了加快爬虫速度,不设置retry也是可以的。

Talk is cheap, show the code:

1
2
3
4
5
6
7
8
9
10
11
12
13
14
15
16
17
18
19
20
class GetFailedUrl(RetryMiddleware):
def __init__(self, settings):
self.max_retry_times = settings.getint('RETRY_TIMES')
self.retry_http_codes = set(int(x) for x in settings.getlist('RETRY_HTTP_CODES'))
self.priority_adjust = settings.getint('RETRY_PRIORITY_ADJUST')

def process_response(self, request, response, spider):
if response.status in self.retry_http_codes:
# 将爬取失败的URL存下来,你也可以存到别的存储
with open(str(spider.name) + ".txt", "a") as f:
f.write(response.url + "\n")
return response
return response

def process_exception(self, request, exception, spider):
# 出现异常的处理
if isinstance(exception, self.EXCEPTIONS_TO_RETRY):
with open(str(spider.name) + ".txt", "a") as f:
f.write(str(request) + "\n")
return None

setting.py中添加该中间件:

1
2
3
4
5
DOWNLOADER_MIDDLEWARES = {
'myspider.middlewares.TabelogDownloaderMiddleware': 543,
'myspider.middlewares.RandomProxy': 200,
'myspider.middlewares.GetFailedUrl': 220,
}

为了测试,我们故意写错URL,或者将download_delay缩短,就会出现各种异常,但是我们现在能够捕获它们了:


]]>
分析scrapy的retry源码,定制化重试机制
Go Modules使用方法 https://cloudsjhan.github.io/2019/03/29/Go-Modules使用方法/ 2019-03-29T11:14:26.000Z 2019-03-29T11:17:02.471Z

Go Modules使用教程

引入

https://talks.godoc.org/github.com/myitcv/talks/2018-08-15-glug-modules/main.slide#1

Go Modules介绍

Modules是Go 1.11中新增的实验性功能,基于vgo演变而来,是一个新型的包管理工具。

常见的包管理工具

  • govendor
  • dep
  • glide
  • godep

这些包管理工具都是基于GOPATH或者vendor目录,并不能很好的解决不同版本依赖问题。Modules是在GOPATH之外一套新的包管理方式。

如何激活Modules

首先要把go升级到1.11。

升级后,可以设置通过一个环境变量GO111MODULE来激活modules:

  • GO111MODULE=off,go命令行将不会支持module功能,寻找依赖包的方式将会沿用旧版本那种通过vendor目录或者GOPATH模式来查找。
  • GO111MODULE=on,go命令行会使用modules,而一点也不会去GOPATH目录下查找。
  • GO111MODULE=auto,默认值,go命令行将会根据当前目录来决定是否启用module功能。这种情况下可以分为两种情形:当前目录在GOPATH/src之外且该目录包含go.mod文件,或者当前文件在包含go.mod文件的目录下面。

当module功能启用时,GOPATH在项目构建过程中不再担当import的角色,但它仍然存储下载的依赖包,具体位置在$GOPATH/pkg/mod

初始化Modules

Go1.11新增了命令go mod来支持Modules的使用。

1
2
3
4
5
6
7
8
9
10
11
12
13
14
15
16
17
18
19
20
21
22
23
24
> go help mod
Go mod provides access to operations on modules.

Note that support for modules is built into all the go commands,
not just 'go mod'. For example, day-to-day adding, removing, upgrading,
and downgrading of dependencies should be done using 'go get'.
See 'go help modules' for an overview of module functionality.

Usage:

go mod <command> [arguments]

The commands are:

download download modules to local cache
edit edit go.mod from tools or scripts
graph print module requirement graph
init initialize new module in current directory
tidy add missing and remove unused modules
vendor make vendored copy of dependencies
verify verify dependencies have expected content
why explain why packages or modules are needed

Use "go help mod <command>" for more information about a command.

首先创建一个项目helloworld:

1
cd && mkdir helloworld && cd helloworld

然后创建文件main.go并写入:

1
2
3
4
5
6
7
8
9
10
11
package main

import (
log "github.com/sirupsen/logrus"
)

func main() {
log.WithFields(log.Fields{
"animal": "walrus",
}).Info("A walrus appears")
}

初始化mod:

1
go mod init helloworld

系统生成了一个go.mod的文件:

1
module helloworld

然后执行go build,再次查看go.mod文件发现多了一些内容:

1
2
3
module helloworld

require github.com/sirupsen/logrus v1.1.1

同时多了一个go.sum的文件:

1
2
3
4
5
6
7
8
9
10
github.com/davecgh/go-spew v1.1.1/go.mod h1:J7Y8YcW2NihsgmVo/mv3lAwl/skON4iLHjSsI+c5H38=
github.com/konsorten/go-windows-terminal-sequences v0.0.0-20180402223658-b729f2633dfe/go.mod h1:T0+1ngSBFLxvqU3pZ+m/2kptfBszLMUkC4ZK/EgS/cQ=
github.com/pmezard/go-difflib v1.0.0/go.mod h1:iKH77koFhYxTK1pcRnkKkqfTogsbg7gZNVY4sRDYZ/4=
github.com/sirupsen/logrus v1.1.1 h1:VzGj7lhU7KEB9e9gMpAV/v5XT2NVSvLJhJLCWbnkgXg=
github.com/sirupsen/logrus v1.1.1/go.mod h1:zrgwTnHtNr00buQ1vSptGe8m1f/BbgsPukg8qsT7A+A=
github.com/stretchr/testify v1.2.2/go.mod h1:a8OnRcib4nhh0OaRAV+Yts87kKdq0PP7pXfy6kDkUVs=
golang.org/x/crypto v0.0.0-20180904163835-0709b304e793 h1:u+LnwYTOOW7Ukr/fppxEb1Nwz0AtPflrblfvUudpo+I=
golang.org/x/crypto v0.0.0-20180904163835-0709b304e793/go.mod h1:6SG95UA2DQfeDnfUPMdvaQW0Q7yPrPDi9nlGo2tz2b4=
golang.org/x/sys v0.0.0-20180905080454-ebe1bf3edb33 h1:I6FyU15t786LL7oL/hn43zqTuEGr4PN7F4XJ1p4E3Y8=
golang.org/x/sys v0.0.0-20180905080454-ebe1bf3edb33/go.mod h1:STP8DvDyc/dI5b8T5hshtkjS+E42TnysNCUPdjciGhY=

go.sum不是一个锁文件,是一个模块版本内容的校验值,用来验证当前缓存的模块。go.sum包含了直接依赖和间接依赖的包的信息,比go.mod要多一些。

go.mod

有四种指令:module,require,exclude,replace。

  • module:模块名称
  • require:依赖包列表以及版本
  • exclude:禁止依赖包列表(仅在当前模块为主模块时生效)
  • replace:替换依赖包列表 (仅在当前模块为主模块时生效)

其他命令

1
2
3
4
5
6
go mod tidy //拉取缺少的模块,移除不用的模块。
go mod download //下载依赖包
go mod graph //打印模块依赖图
go mod vendor //将依赖复制到vendor下
go mod verify //校验依赖
go mod why //解释为什么需要依赖
1
go list -m -json all //依赖详情

]]>
Go modules 使用
Python的map/reduce/filter https://cloudsjhan.github.io/2019/03/27/Python的map-reduce-filter/ 2019-03-27T03:06:12.000Z 2019-03-27T03:09:29.569Z

转载自explore_python


]]>
python的Map、reduce、filter解析
golang的多态实现 https://cloudsjhan.github.io/2019/03/18/golang的多态实现/ 2019-03-18T07:57:27.000Z 2019-03-18T08:14:30.423Z

多态(polymorphism)

多态是接口的一个关键功能和Go语言的一个重要特性。

当非接口类型T的一个值t被包裹在接口类型I的一个接口值i中,通过i调用接口类型I指定的一个方法时,事实上为非接口类型T声明的对应方法将通过非接口值t被调用。 换句话说,调用一个接口值的方法实际上将调用此接口值的动态值的对应方法。 比如,当方法i.m被调用时,其实被调用的是方法t.m。 一个接口值可以通过包裹不同动态类型的动态值来表现出各种不同的行为,这称为多态。

当方法i.m被调用时,i存储的实现关系信息的方法表中的方法t.m将被找到并被调用。 此方法表是一个切片,所以此寻找过程只不过是一个切片元素访问操作,不会消耗很多时间。

注意,在nil接口值上调用方法将产生一个恐慌,因为没有具体的方法可被调用。

一个例子:

1
2
3
4
5
6
7
8
9
10
11
12
13
14
15
16
17
18
19
20
21
22
23
24
25
26
27
28
29
30
31
32
33
34
35
36
37
38
39
40
41
42
43
44
45
46
47
48
49
50
51
52
53
54
55
56
57
58
59
60
61
62
63
64
65
66
package main

import "fmt"

type Filter interface {
About() string
Process([]int) []int
}

// UniqueFilter用来删除重复的数字。
type UniqueFilter struct{}
func (UniqueFilter) About() string {
return "删除重复的数字"
}
func (UniqueFilter) Process(inputs []int) []int {
outs := make([]int, 0, len(inputs))
pusheds := make(map[int]bool)
for _, n := range inputs {
if !pusheds[n] {
pusheds[n] = true
outs = append(outs, n)
}
}
return outs
}

// MultipleFilter用来只保留某个整数的倍数数字。
type MultipleFilter int
func (mf MultipleFilter) About() string {
return fmt.Sprintf("保留%v的倍数", mf)
}
func (mf MultipleFilter) Process(inputs []int) []int {
var outs = make([]int, 0, len(inputs))
for _, n := range inputs {
if n % int(mf) == 0 {
outs = append(outs, n)
}
}
return outs
}

// 在多态特性的帮助下,只需要一个filteAndPrint函数。
func filteAndPrint(fltr Filter, unfiltered []int) []int {
// 在fltr参数上调用方法其实是调用fltr的动态值的方法。
filtered := fltr.Process(unfiltered)
fmt.Println(fltr.About() + ":\n\t", filtered)
return filtered
}

func main() {
numbers := []int{12, 7, 21, 12, 12, 26, 25, 21, 30}
fmt.Println("过滤之前:\n\t", numbers)

// 三个非接口值被包裹在一个Filter切片的三个接口元素中。
filters := []Filter{
UniqueFilter{},
MultipleFilter(2),
MultipleFilter(3),
}

// 每个切片元素将被赋值给类型为Filter的循环变量fltr。
// 每个元素中的动态值也将被同时复制并被包裹在循环变量fltr中。
for _, fltr := range filters {
numbers = filteAndPrint(fltr, numbers)
}
}

输出结果:

1
2
3
4
5
6
7
8
过滤之前:
[12 7 21 12 12 26 25 21 30]
删除重复的数字:
[12 7 21 26 25 30]
保留2的倍数:
[12 26 30]
保留3的倍数:
[12 30]

在上面这个例子中,多态使得我们不必为每个过滤器类型写一个单独的filteAndPrint函数。

除了上述这个好处,多态也使得一个代码包的开发者可以在此代码包中声明一个接口类型并声明一个拥有此接口类型参数的函数(或者方法),从而此代码包的一个用户可以在用户包中声明一个实现了此接口类型的用户类型,并且将此用户类型的值做为实参传递给此代码包中声明的函数(或者方法)的调用。 此代码包的开发者并不用关心一个用户类型具体是如何声明的,只要此用户类型满足此代码包中声明的接口类型规定的行为即可。

事实上,多态对于一个语言来说并非一个不可或缺的特性。我们可以通过其它途径来实现多态的作用。 但是,多态可以使得我们的代码更加简洁和优雅。


]]>
golang的多态实现与原理
mysql关闭update safe mode https://cloudsjhan.github.io/2019/03/11/mysql关闭update-safe-mode/ 2019-03-11T02:28:38.000Z 2019-03-11T02:30:18.232Z

  • SET SQL_SAFE_UPDATES = 0;

]]>
mysql关闭update safe mode
git-保持fork的项目与上游同步 https://cloudsjhan.github.io/2019/02/26/git-保持fork的项目与上游同步/ 2019-02-26T01:48:38.000Z 2019-02-26T01:53:39.122Z

  • 添加上游仓库:

git remote add upstream [upstream_url]

  • fetch 之:

git fetch upstream

  • 切换到本地master分支:

git checkout master

  • 将upstream/master merge到 本地master分支:

git merge upstream/master //可能会报错,如果报错就执行:git pull

  • 同时push到自己的github仓库:

git push origin master


]]>
git-保持fork的项目与上游同步
详解Go regexp包中 ReplaceAllString 的用法 https://cloudsjhan.github.io/2019/02/01/详解Go-regexp包中-ReplaceAllString-的用法/ 2019-02-01T04:23:12.000Z 2019-02-01T09:37:45.426Z

昨天有同事在看k8s源码,突然问了一个看似很简单的问题,https://golang.org/pkg/regexp/#Regexp.ReplaceAllString 官方文档中ReplaceAllString的解释,到底是什么意思?到底怎么用?

官方英文原文:

func (re *Regexp) ReplaceAllString(src, repl string) string

1
2

ReplaceAllString returns a copy of src, replacing matches of the Regexp with the replacement string repl. Inside repl, $ signs are interpreted as in Expand, so for instance $1 represents the text of the first submatch.

中文文档:

1
ReplaceAllLiteral返回src的一个拷贝,将src中所有re的匹配结果都替换为repl。在替换时,repl中的'$'符号会按照Expand方法的规则进行解释和替换,例如$1会被替换为第一个分组匹配结果。

看上去一脸懵逼,还是不理解这个函数到底怎么用。

又去看官方的示例:

1
2
3
4
5
6
7
8
9
10
11
12
13
Example:
re := regexp.MustCompile("a(x*)b")
fmt.Println(re.ReplaceAllString("-ab-axxb-", "T"))
fmt.Println(re.ReplaceAllString("-ab-axxb-", "$1"))
fmt.Println(re.ReplaceAllString("-ab-axxb-", "$1W"))
fmt.Println(re.ReplaceAllString("-ab-axxb-", "${1}W"))

Output:

-T-T-
--xx-
---
-W-xxW-

第一个替换勉强能看明白,是用T去替换-ab-axxb-中符合正则表达式匹配的部分;第二个中的$是什么意思?$1看起来像是匹配正则表达式分组中第一部分,那$1W呢?${1}W呢?带着这些问题,开始深入研究这个函数到底怎么用。

首先,$符号在Expand函数中有解释过:

1
2
3
4
5
6
7
8
9
func (re *Regexp) Expand(dst []byte, template []byte, src []byte, match []int) []byte

Expand返回新生成的将template添加到dst后面的切片。在添加时,Expand会将template中的变量替换为从src匹配的结果。match应该是被FindSubmatchIndex返回的匹配结果起止位置索引。(通常就是匹配src,除非你要将匹配得到的位置用于另一个[]byte)

在template参数里,一个变量表示为格式如:$name或${name}的字符串,其中name是长度>0的字母、数字和下划线的序列。一个单纯的数字字符名如$1会作为捕获分组的数字索引;其他的名字对应(?P<name>...)语法产生的命名捕获分组的名字。超出范围的数字索引、索引对应的分组未匹配到文本、正则表达式中未出现的分组名,都会被替换为空切片。

$name格式的变量名,name会尽可能取最长序列:$1x等价于${1x}而非${1}x,$10等价于${10}而非${1}0。因此$name适用在后跟空格/换行等字符的情况,${name}适用所有情况。

如果要在输出中插入一个字面值'$',在template里可以使用$$。

说了这么多,其实最终要的部分可以概括为三点:

  1. $后面只有数字,则代表正则表达式的分组索引,关于正则表达式的分组解释:

捕获组可以通过从左到右计算其开括号来编号 。例如,在表达式 (A)(B(C)) 中,存在四个这样的组:

0(A)(B(C))
1(A)
2(B(C))
3(C)

组零始终代表整个表达式

之所以这样命名捕获组是因为在匹配中,保存了与这些组匹配的输入序列的每个子序列。捕获的子序列稍后可以通过 Back 引用(反向引用) 在表达式中使用,也可以在匹配操作完成后从匹配器检索。

匹配正则表达式的$1部分,保留该部分,去掉其余部分;

  1. $后面是字符串,即$name,代表匹配对应(?P…)语法产生的命名捕获分组的名字
  2. ${数字}字符串,即${1}xxx,意思是匹配正则表达式的分组1,src中匹配分组1的保留,并删除src剩余部分,追加xxx,后面会有代码示例解释这部分,也是最难理解的部分
  3. 最简单的情况,参数repl是字符串,将src中所有re的匹配结果都替换为repl

下面用代码来解释以上几种情况:

1
2
3
4
5
6
7
8
9
10
11
12
13
14
15
16
17
18
19
20
21
22
23
24
25
26
27
28
29
30
31
32
33
34
35
package main
import (
"fmt"
"regexp"
)
func main() {

s := "Hello World, 123 Go!"
//定义一个正则表达式reg,匹配Hello或者Go
reg := regexp.MustCompile(`(Hell|G)o`)

s2 := "2019-12-01,test"
//定义一个正则表达式reg2,匹配 YYYY-MM-DD 的日期格式
reg2 := regexp.MustCompile(`(\d{4})-(\d{2})-(\d{2})`)

//最简单的情况,用“T替换”"-ab-axxb-"中符合正则"a(x*)b"的部分
reg3 := regexp.MustCompile("a(x*)b")
fmt.Println(re.ReplaceAllString("-ab-axxb-", "T"))

//${1}匹配"Hello World, 123 Go!"中符合正则`(Hell|G)`的部分并保留,去掉"Hello"与"Go"中的'o'并用"ddd"追加
rep1 := "${1}ddd"
fmt.Printf("%q\n", reg.ReplaceAllString(s, rep1))

//首先,"2019-12-01,test"中符合正则表达式`(\d{4})-(\d{2})-(\d{2})`的部分是"2019-12-01",将该部分匹配'(\d{4})'的'2019'保留,去掉剩余部分
rep2 := "${1}"
fmt.Printf("%q\n", reg2.ReplaceAllString(s2,rep2))

//首先,"2019-12-01,test"中符合正则表达式`(\d{4})-(\d{2})-(\d{2})`的部分是"2019-12-01",将该部分匹配'(\d{2})'的'12'保留,去掉剩余部分
rep3 := "${2}"
fmt.Printf("%q\n", reg2.ReplaceAllString(s2,rep3))

//首先,"2019-12-01,test"中符合正则表达式`(\d{4})-(\d{2})-(\d{2})`的部分是"2019-12-01",将该部分匹配'(\d{2})'的'01'保留,去掉剩余部分,并追加"13:30:12"
rep4 := "${3}:13:30:12"
fmt.Printf("%q\n", reg2.ReplaceAllString(s2,rep4))
}

上面代码输出依次是:

1
2
3
4
5
6
$ go run main.go
-T-T-
"Hellddd World, 123 Gddd!"
"2019,test"
"12,test"
"01:13:30:12,test"

总结

Goregexp包中的ReplaceAllString设计有些许反人类,理解和使用上感觉不方便,如果你有更好的理解或者示例代码,Call me!


]]>
详解Go regexp包中 ReplaceAllString 的用法
go语言坑之for range https://cloudsjhan.github.io/2019/01/31/go语言坑之for-range/ 2019-01-31T01:59:59.000Z 2019-01-31T02:05:43.618Z

go语言坑之for range

这篇文章简单清晰地解释了之前遍历struct切片时遇到的一些怪异现象,这个问题当时也写了一篇文章来讨论,文章地址,但是没有切中要点。昨天无意中看到这篇博客,豁然开朗。


go只提供了一种循环方式,即for循环,在使用时可以像c那样使用,也可以通过for range方式遍历容器类型如数组、切片和映射。但是在使用for range时,如果使用不当,就会出现一些问题,导致程序运行行为不如预期。比如,下面的示例程序将遍历一个切片,并将切片的值当成映射的键和值存入,切片类型是一个int型,映射的类型是键为int型,值为*int,即值是一个地址。

1
2
3
4
5
6
7
8
9
10
11
12
13
14
15
16
17
18
19
20
package main

import "fmt"

func main() {
slice := []int{0, 1, 2, 3}
myMap := make(map[int]*int)

for index, value := range slice {
myMap[index] = &value
}
fmt.Println("=====new map=====")
prtMap(myMap)
}

func prtMap(myMap map[int]*int) {
for key, value := range myMap {
fmt.Printf("map[%v]=%v\n", key, *value)
}
}

运行程序输出如下:

1
2
3
4
5
=====new map=====
map[3]=3
map[0]=3
map[1]=3
map[2]=3

由输出可以知道,不是我们预期的输出,正确输出应该如下:

1
2
3
4
5
6
=====new map=====
map[0]=0
map[1]=1
map[2]=2
map[3]=3
(无序输出,但是值是0,1,2,3)

但是由输出可以知道,映射的值都相同且都是3。其实可以猜测映射的值都是同一个地址,遍历到切片的最后一个元素3时,将3写入了该地址,所以导致映射所有值都相同。其实真实原因也是如此,因为for range创建了每个元素的副本,而不是直接返回每个元素的引用,如果使用该值变量的地址作为指向每个元素的指针,就会导致错误,在迭代时,返回的变量是一个迭代过程中根据切片依次赋值的新变量,所以值的地址总是相同的,导致结果不如预期。

修正后程序如下:

1
2
3
4
5
6
7
8
9
10
11
12
13
14
15
16
17
18
19
20
21
package main

import "fmt"

func main() {
slice := []int{0, 1, 2, 3}
myMap := make(map[int]*int)

for index, value := range slice {
num := value
myMap[index] = &num
}
fmt.Println("=====new map=====")
prtMap(myMap)
}

func prtMap(myMap map[int]*int) {
for key, value := range myMap {
fmt.Printf("map[%v]=%v\n", key, *value)
}
}

运行程序输出如下:

1
2
3
4
5
=====new map=====
map[2]=2
map[3]=3
map[0]=0
map[1]=1

引用声明:该博客来自于这里.


]]>
go语言坑之for range
记第一个Vue项目台前幕后的经历 https://cloudsjhan.github.io/2019/01/28/记第一个Vue项目台前幕后的经历/ 2019-01-28T07:28:46.000Z 2019-01-28T15:32:19.505Z

0前端开发经验,初次接触Vue,从后端到前端,从开发、打包到部署,完整的历程。

首先粗略通读了一遍官方文档,动手用webpack搭建了一个简单的demo。

看了Echarts的官方demo,了解了几种数据图表的数据结构。因为我要做的项目就是要将后端接口的数据拿到,然后图形化的形式展示出来。

对接后端,进行axios二次开发

在构建应用时需要访问一个 API 并展示其数据,调研Vue的多种方式后选择了官方推荐的axiox。

从ajax到fetch、axios

前端是个发展迅速的领域,前端请求自然也发展迅速,从原生的XHR到jquery ajax,再到现在的axios和fetch。

jquery ajax

1
2
3
4
5
6
7
8
9
$.ajax({
type: 'POST',
url: url,
data: data,
dataType: dataType,
success: function() {},
error: function() {}
})
复制代码

它是对原生XHR的封装,还支持JSONP,非常方便;真的是用过的都说好。但是随着react,vue等前端框架的兴起,jquery早已不复当年之勇。很多情况下我们只需要使用ajax,但是却需要引入整个jquery,这非常的不合理,于是便有了fetch的解决方案。

fetch

fetch号称是ajax的替代品,它的API是基于Promise设计的,旧版本的浏览器不支持Promise,需要使用polyfill es6-promise

举个例子:

1
2
3
4
5
6
7
8
9
10
11
12
13
14
15
16
17
18
19
// 原生XHR
var xhr = new XMLHttpRequest();
xhr.open('GET', url);
xhr.onreadystatechange = function() {
if (xhr.readyState === 4 && xhr.status === 200) {
console.log(xhr.responseText) // 从服务器获取数据
}
}
xhr.send()
// fetch
fetch(url)
.then(response => {
if (response.ok) {
response.json()
}
})
.then(data => console.log(data))
.catch(err => console.log(err))
复制代码

看起来好像是方便点,then链就像之前熟悉的callback。

在MDN上,讲到它跟jquery ajax的区别,这也是fetch很奇怪的地方:

当接收到一个代表错误的 HTTP 状态码时,从 fetch()返回的 Promise 不会被标记为 reject, 即使该 HTTP 响应的状态码是 404 或 500。相反,它会将 Promise 状态标记为 resolve (但是会将 resolve 的返回值的 ok 属性设置为 false ), 仅当网络故障时或请求被阻止时,才会标记为 reject。 默认情况下, fetch 不会从服务端发送或接收任何 cookies, 如果站点依赖于用户 session,则会导致未经认证的请求(要发送 cookies,必须设置 credentials 选项).

突然感觉这还不如jquery ajax好用呢?别急,再搭配上async/await将会让我们的异步代码更加优雅:

1
2
3
4
5
6
async function test() {
let response = await fetch(url);
let data = await response.json();
console.log(data)
}
复制代码

看起来是不是像同步代码一样?简直完美!好吧,其实并不完美,async/await是ES7的API,目前还在试验阶段,还需要我们使用babel进行转译成ES5代码。

还要提一下的是,fetch是比较底层的API,很多情况下都需要我们再次封装。 比如:

1
2
3
4
5
6
7
8
9
10
// jquery ajax
$.post(url, {name: 'test'})
// fetch
fetch(url, {
method: 'POST',
body: Object.keys({name: 'test'}).map((key) => {
return encodeURIComponent(key) + '=' + encodeURIComponent(params[key]);
}).join('&')
})
复制代码

由于fetch是比较底层的API,所以需要我们手动将参数拼接成’name=test’的格式,而jquery ajax已经封装好了。所以fetch并不是开箱即用的。

另外,fetch还不支持超时控制。

哎呀,感觉fetch好垃圾啊,,还需要继续成长。。

axios

axios是尤雨溪大神推荐使用的,它也是对原生XHR的封装。它有以下几大特性:

  • 可以在node.js中使用
  • 提供了并发请求的接口
  • 支持Promise API

简单使用

1
2
3
4
5
6
axios({
method: 'GET',
url: url,
})
.then(res => {console.log(res)})
.catch(err => {console.log(err)})

并发请求,官方的并发例子:

1
2
3
4
5
6
7
8
9
10
11
12
function getUserAccount() {
return axios.get('/user/12345');
}

function getUserPermissions() {
return axios.get('/user/12345/permissions');
}

axios.all([getUserAccount(), getUserPermissions()])
.then(axios.spread(function (acct, perms) {
// Both requests are now complete
}));

axios体积比较小,也没有上面fetch的各种问题,我认为是当前最好的请求方式

详情参考官方文档

#二次封装axios

首先创建一个request.js,内容如下:

1
2
3
4
5
6
7
8
9
10
11
12
13
14
15
16
17
18
19
20
21
22
23
24
25
26
27
28
29
30
31
32
33
34
35
36
37
38
39
40
41
42
43
44
45
46
47
48
49
50
51
52
53
54
55
56
57
58
59
60
61
62
63
64
65
66
67
68
69
70
71
72
73
74
75
76
77
78
79
80
81
82
83
84
85
86
87
88
import axios from 'axios';
import Qs from 'qs';


function checkStatus(err) {
let msg = "", level = "error";
switch (err.response.status) {
case 401:
msg = "您还没有登陆";
break;
case 403:
msg = "您没有该项权限";
break;
case 404:
msg = "资源不存在";
break;
case 500:
msg = "服务器发生了点意外";
break;
}
try {
msg = res.data.msg;
} catch (err) {
} finally {
if (msg !== "" && msg !== undefined && msg !== null) {
store.dispatch('showSnackBar', {text: msg, level: level});
}
}
return err.response;
}

function checkCode(res) {
if ((res.status >= 200 && res.status < 400) && (res.data.status >= 200 && res.data.status < 400)) {
let msg = "", level = "success";
switch (res.data.status) {
case 201:
msg = "创建成功";
break;
case 204:
msg = "删除成功";
break;
}
try {
msg = res.data.success;
} catch (err) {
} finally {

}
return res;
}

return res;

}

//这里封装axios的get,post,put,delete等方法
export default {
get(url, params) {
return axios.get(
url,
params,
).then(checkCode).catch((error)=>{console.log(error)});
},
post(url, data) {
return axios.post(
url,
Qs.stringify(data),
).then(checkCode).catch(checkStatus);
},
put(url, data) {
return axios.put(
url,
Qs.stringify(data),
).then(checkCode).catch(checkStatus);
},
delete(url, data) {
return axios.delete(
url,
{data: Qs.stringify(data)},
).then(checkCode).catch(checkStatus);
},
patch(url, data) {
return axios.patch(
url,
data,
).then(checkCode).catch(checkStatus);
},
};

创建一个api.js,存放后端的接口:

1
2
3
4
5
6
7
8
9
10
//导入上面的request模块
import request from './request';

//声明后端接口
export const urlUserPrefix = '/v1/users';
export const urlProductPrefix = '/v1/products';

//使用前面封装好的方法,调用后端接口
export const getUserslInfoLast = data => request.get(`${urlUserPrefix}`, data);
export const getProductsInfo = data => request.get(`${urlProductPrefix}`, data);

在.vue文件中使用定义的方法,获取后端接口的数据:

1
2
3
4
5
6
7
8
9
10
11
12
13
14
15
16
17
18
19
20
21
22
23
24
25
26
27
28
29
30
31
32
33
34
35
36
37
38
39
40
41
42
43
44
export default  {

components: {
chart: ECharts,

},
store,
name: 'ResourceTypeLine',
data: () =>({
seconds: -1,

//define dataset
apiResponse:{},


initOptions: {
renderer: options.renderer || 'canvas'
},

mounted:function() {

this.fTimeArray = this.getFormatTime()

//调用method里面的方法
this.getUserInfo()

},
methods: {
//异步方式调用后端接口
async getUserInfo() {
const resThis = await urlUserPrefix({
params: {
//get的参数在这里添加
beginTime: this.fTimeArray[0],
endTime: this.fTimeArray[1],
}

});
this.apiResponseThisMonth = resThis.data
try {
} catch (err) {
console.log(err);
}
},

开发环境配置跨域

为了更方便地与后台联调,需要在用vue脚手架创建地项目中,在config目录地index.js设置proxytable来实现跨域请求,具体代码如下:

1
2
3
4
5
6
7
8
9
10
11
12
13
14
15
16
17
18
19
20
21
22
23
24
25
26
27
28
29
30
31
32
33
34
35
36
37
38
39
40
41
42
43
44
45
46
47
module.exports = {
build: {
env: require('./prod.env'),
index: path.resolve(__dirname, '../dist/index.html'),
assetsRoot: path.resolve(__dirname, '../dist'),
assetsSubDirectory: 'static',
assetsPublicPath: '.',
productionSourceMap: false,
// Gzip off by default as many popular static hosts such as
// Surge or Netlify already gzip all static assets for you.
// Before setting to `true`, make sure to:
// npm install --save-dev compression-webpack-plugin
productionGzip: false,
productionGzipExtensions: ['js', 'css'],
// Run the build command with an extra argument to
// View the bundle analyzer report after build finishes:
// `npm run build --report`
// Set to `true` or `false` to always turn it on or off
bundleAnalyzerReport: process.env.npm_config_report
},
dev: {
env: require('./dev.env'),
port: 8080,
// hosts:"0.0.0.0",
autoOpenBrowser: true,
assetsSubDirectory: 'static',
assetsPublicPath: '/',
//配置跨域请求,注意配置完之后需要重启编译该项目
proxyTable: {
//请求名字变量可以自己定义
'/api': {
target: 'http://test.com', // 请求的接口域名或IP地址,开头是http或https
// secure: false, // 如果是https接口,需要配置这个参数
changeOrigin: true,// 是否跨域,如果接口跨域,需要进行这个参数配置
pathRewrite: {
'^/api':""//表示需要rewrite重写路径
}
}
},
// CSS Sourcemaps off by default because relative paths are "buggy"
// with this option, according to the CSS-Loader README
// (https://github.com/webpack/css-loader#sourcemaps)
// In our experience, they generally work as expected,
// just be aware of this issue when enabling this option.
cssSourceMap: false
}
}

vue 项目打包部署,通过nginx 解决跨域问题

​ 最近将公司vue 项目打包部署服务器时,产生了一点小插曲,开发环境中配置的跨域在将项目打包为静态文件时是没有用的 ,就想到了用 nginx 通过反向代理的方式解决这个问题,但是其中有一个巨大的坑,后面会讲到。

前提条件

liunx 下 nginx 安装配置(将不做多的阐述,请自行百度)

配置nginx

  • 通过 Xshell 连接 liunx 服务器 ,打开 nginx.conf 配置文件,或通过 WinSCP 直接打开并编辑nginx.conf文件 ,这里我选择后者 。(具体配置文件的路径根据你安装时决定)
  • 在配置文件中新增一个server
1
2
3
4
5
6
7
8
9
10
11
12
13
14
15
16
17
18
19
20
21
22
23
24
# 新增的服务 
# 新增的服务
server {
listen 8086; # 监听的端口

location / {
root /var/www; # vue 打包后静态文件存放的地址
index index.html; # 默认主页地址
}

location /v1 {
proxy_pass http://47.106.184.89:9010/v1; # 代理接口地址
}

location /testApi {
proxy_pass http://40.106.197.89:9086/testApi; # 代理接口地址
}
error_page 500 502 503 504 /50x.html;
location = /50x.html {
root html;
}

}
复制代码
  • 解释说明

/var/www是我当前将vue 文件打包后存放在 liunx下的路径 ,

当我们启动 nginx 后 就可以通过http://ip地址:8086/访问到vue 打包的静态文件。

2.location /v1 指拦截以v1开头的请求,http请求格式为http://ip地址:8086/v1/***`,这里有一个坑!一定要按照上面的配置文件**:proxy_pass http://47.106.184.89:9010/v1; # 代理接口地址,如果你像我一开始写的proxy_pass http://47.106.184.89:9010/; # 代理接口地址**,你永远也匹配不到对应的接口!。

proxy_pass http://47.106.197.89:9093/v1;` 当拦截到需要处理的请求时,将拦截请求代理到的 接口地址。

webpack打包

下面是config/index.js配置文件

1
2
3
4
5
6
7
8
9
10
11
12
13
14
15
16
17
18
19
20
21
22
23
24
25
26
27
28
29
30
31
32
33
34
35
36
37
38
39
40
41
42
43
44
45
46
47
48
49
50
// see http://vuejs-templates.github.io/webpack for documentation.
var path = require('path')

module.exports = {
build: {
env: require('./prod.env'),
index: path.resolve(__dirname, '../dist/index.html'),
assetsRoot: path.resolve(__dirname, '../dist'),
assetsSubDirectory: 'static',
assetsPublicPath: '.',
productionSourceMap: false,
// Gzip off by default as many popular static hosts such as
// Surge or Netlify already gzip all static assets for you.
// Before setting to `true`, make sure to:
// npm install --save-dev compression-webpack-plugin
productionGzip: false,
productionGzipExtensions: ['js', 'css'],
// Run the build command with an extra argument to
// View the bundle analyzer report after build finishes:
// `npm run build --report`
// Set to `true` or `false` to always turn it on or off
bundleAnalyzerReport: process.env.npm_config_report
},
dev: {
env: require('./dev.env'),
port: 8080,
// hosts:"0.0.0.0",
autoOpenBrowser: true,
assetsSubDirectory: 'static',
assetsPublicPath: '/',
//配置跨域请求,注意配置完之后需要重启编译该项目
proxyTable: {
//请求名字变量可以自己定义
'/api': {
target: 'http://billing.hybrid.cloud.ctripcorp.com', // 请求的接口域名或IP地址,开头是http或https
// secure: false, // 如果是https接口,需要配置这个参数
changeOrigin: true,// 是否跨域,如果接口跨域,需要进行这个参数配置
pathRewrite: {
'^/api':""//表示需要rewrite重写路径
}
}
},
// CSS Sourcemaps off by default because relative paths are "buggy"
// with this option, according to the CSS-Loader README
// (https://github.com/webpack/css-loader#sourcemaps)
// In our experience, they generally work as expected,
// just be aware of this issue when enabling this option.
cssSourceMap: false
}
}

Dockerfile

打包Docker镜像

1
2
3
4
5
6
7
8
9
10
11
12
FROM Nginx:base

MAINTAINER author <hantmac@outlook.com>

WORKDIR /opt/workDir
RUN mkdir /var/log/workDir

COPY dist /var/www

ADD nginx/default.conf /etc/nginx/conf.d/default.conf

ENTRYPOINT nginx -g "daemon off;"

后记

这是首次接触前端的第一个项目,期间经历了从后端接口开发,前端框架选型(一度想要用react,后来还是放弃),熟悉Vue,到组件开发,webpack构建,Nginx部署,Docker发布的完整过程。虽然页面比较简单,但是期间的采坑无数,后面还要继续努力!


]]>
记第一个Vue项目台前幕后的经历
20181202-Postmortem-debugging-Go-services-with-Delve[翻译] https://cloudsjhan.github.io/2019/01/20/20181202-Postmortem-debugging-Go-services-with-Delve-翻译/ 2019-01-20T15:39:57.000Z 2022-07-04T01:35:34.032Z

使用Delve 调试Go服务的一次经历


Vladimir Varankin 写于 2018/12/02

某天,我们的生产服务上的几个实例突然不能处理外部进入的流量,HTTP请求成功通过负载均衡到达实例,但是之后却hang住了。接下来记录的是一次调试在线Go服务的惊心动魄的经历。

正是下面逐步演示的操作,帮助我们定位了问题的根本原因。

简单起见,我们将起一个Go写的HTTP服务作为调试使用,这个服务实现的细节暂时不做深究(之后我们将深入分析代码)。一个真实的生产应用可能包含很多组件,这些组件实现了业务罗和服务的基础架构。我们可以确信,这些应用已经在生产环境“身经百战” :)。

源代码以及配置细节可以查看GitHub仓库。为了完成接下来的工作,你需要一台Linux系统的虚机,这里我使用vagrant-hostmanager插件。Vagrantfile在GitHub仓库的根目录,可以查看更多细节。

让我们开启虚机,构建HTTP服务并且运行起来,可以看到下面的输出:

1
2
3
4
5
6
7
8
9
10
$ vagrant up
Bringing machine 'server-test-1' up with 'virtualbox' provider...

$ vagrant ssh server-test-1
Welcome to Ubuntu 18.04.1 LTS (GNU/Linux 4.15.0-33-generic x86_64)
···
vagrant@server-test-1:~$ cd /vagrant/example/server
vagrant@server-test-1:/vagrant/example/server$ go build
vagrant@server-test-1:/vagrant/example/server$ ./server --addr=:10080
server listening addr=:10080

通过curl发送请求到所起的HTTP服务,可以判断其是否处于工作状态,新开一个terminal并执行下面的命令:

1
2
$ curl 'http://server-test-1:10080'
OK

为了模拟失败的情况,我们需要发送大量请求到HTTP服务,这里我们使用HTTP benchmark测试工具wrk进行模拟。我的MacBook是4核的,所以使用4个线程运行wrk,能够产生1000个连接,基本能够满足需求。

1
2
3
4
$ wrk -d1m -t4 -c1000 'http://server-test-1:10080'
Running 1m test @ http://server-test-1:10080
4 threads and 1000 connections
···

一会的时间,服务器hang住了。甚至等wrk跑完之后,服务器已经不能处理任何请求:

1
2
$ curl --max-time 5 'http://server-test-1:10080/'
curl: (28) Operation timed out after 5001 milliseconds with 0 bytes received

我们遇到麻烦了!让我们分析一下。


在我们生产服务的真实场景中,服务器起来以后,goroutines的数量由于请求的增多而迅速增加,之后便失去响应。对pprof调试句柄的请求变得非常非常慢,看起来就像服务器“死掉了”。同样,我们也尝试使用SIGQUIT命令杀掉进程以释放所运行goroutines堆栈,但是收不到任何效果。

GDB和Coredump

我们可以使用GDB(GNU Debugger)尝试进入正在运行的服务内部。


在生产环境运行调试器可能需要额外的权限,所以与你的团队提前沟通是很明智的。


在虚机上再开启一个SSH会话,找到服务器的进程id并使用调试器连接到该进程:

1
2
3
4
5
6
7
8
9
$ vagrant ssh server-test-1
Welcome to Ubuntu 18.04.1 LTS (GNU/Linux 4.15.0-33-generic x86_64)
···
vagrant@server-test-1:~$ pgrep server
1628
vagrant@server-test-1:~$ cd /vagrant
vagrant@server-test-1:/vagrant$ sudo gdb --pid=1628 example/server/server
GNU gdb (Ubuntu 8.1-0ubuntu3) 8.1.0.20180409-git
···

调试器连接到服务器进程之后,我们可以运行GDB的bt命令(aka backtrace)来检查当前线程的堆栈信息:

1
2
3
4
5
6
7
8
9
10
(gdb) bt
#0 runtime.futex () at /usr/local/go/src/runtime/sys_linux_amd64.s:532
#1 0x000000000042b08b in runtime.futexsleep (addr=0xa9a160 <runtime.m0+320>, ns=-1, val=0) at /usr/local/go/src/runtime/os_linux.go:46
#2 0x000000000040c382 in runtime.notesleep (n=0xa9a160 <runtime.m0+320>) at /usr/local/go/src/runtime/lock_futex.go:151
#3 0x0000000000433b4a in runtime.stoplockedm () at /usr/local/go/src/runtime/proc.go:2165
#4 0x0000000000435279 in runtime.schedule () at /usr/local/go/src/runtime/proc.go:2565
#5 0x00000000004353fe in runtime.park_m (gp=0xc000066d80) at /usr/local/go/src/runtime/proc.go:2676
#6 0x000000000045ae1b in runtime.mcall () at /usr/local/go/src/runtime/asm_amd64.s:299
#7 0x000000000045ad39 in runtime.rt0_go () at /usr/local/go/src/runtime/asm_amd64.s:201
#8 0x0000000000000000 in ?? ()

说实话我并不是GDB的专家,但是显而易见Go运行时似乎使线程进入睡眠状态了,为什么呢?

调试一个正在运行的进程是不明智的,不如将该线程的coredump保存下来,进行离线分析。我们可以使用GDB的gcore命令,该命令将core文件保存在当前工作目录并命名为core.<process_id>

1
2
3
4
5
6
7
8
9
(gdb) gcore
Saved corefile core.1628
(gdb) quit
A debugging session is active.

Inferior 1 [process 1628] will be detached.

Quit anyway? (y or n) y
Detaching from program: /vagrant/example/server/server, process 1628

core文件保存后,服务器没必要继续运行,使用kill -9结束它。

我们能够注意到,即使是一个简单的服务器,core文件依然会很大(我这一份是1.2G),对于生产的服务来说,可能会更加巨大。

如果需要了解更多使用GDB调试的技巧,可以继续阅读使用GDB调试Go代码

使用Delve调试器

Delve是一个针对Go程序的调试器。它类似于GDB,但是更关注Go的运行时、数据结构以及其他内部的机制。

如果你对Delve的内部实现机制很感兴趣,那么我十分推荐你阅读Alessandro Arzilli在GopherCon EU 2018所作的演讲,[Internal Architecture of Delve, a Debugger For Go]。

Delve是用Go写的,所以安装起来非常简单:

1
$ go get -u github.com/derekparker/delve/cmd/dlv

Delve安装以后,我们就可以通过运行dlv core <path to service binary> <core file>来分析core文件。我们先列出执行coredump时正在运行的所有goroutines。Delve的goroutines命令如下:

1
2
3
4
5
6
7
$ dlv core example/server/server core.1628

(dlv) goroutines
···
Goroutine 4611 - User: /vagrant/example/server/metrics.go:113 main.(*Metrics).CountS (0x703948)
Goroutine 4612 - User: /vagrant/example/server/metrics.go:113 main.(*Metrics).CountS (0x703948)
Goroutine 4613 - User: /vagrant/example/server/metrics.go:113 main.(*Metrics).CountS (0x703948)

不幸的是,在真实生产环境下,这个列表可能会很长,甚至会超出terminal的缓冲区。由于服务器为每一个请求都生成一个对应的goroutine,所以goroutines命令生成的列表可能会有百万条。我们假设现在已经遇到这个问题,并想一个方法来解决它。

Delve支持”headless”模式,并且能够通过JSON-RPC API与调试器交互。

运行dlv core命令,指定想要启动的Delve API server:

1
2
3
$ dlv core example/server/server core.1628 --listen :44441 --headless --log
API server listening at: [::]:44441
INFO[0000] opening core file core.1628 (executable example/server/server) layer=debugger

调试服务器运行后,我们可以发送命令到其TCP端口并将返回结果以原生JSON的格式存储。我们以上面相同的方式得到正在运行的goroutines,不同的是我们将结果存储到文件中:

1
$ echo -n '{"method":"RPCServer.ListGoroutines","params":[],"id":2}' | nc -w 1 localhost 44441 > server-test-1_dlv-rpc-list_goroutines.json

现在我们拥有了一个(比较大的)JSON文件,里面存储大量原始信息。推荐使用jq命令进一步了解JSON数据的原貌,举例:这里我获取JSON数据的result字段的前三个对象:

1
2
3
4
5
6
7
8
9
10
11
12
13
14
15
16
17
18
19
20
21
22
23
24
25
26
27
28
29
30
31
32
33
34
35
36
37
38
39
40
41
42
43
44
45
46
47
48
49
50
51
52
53
54
55
56
57
$ jq '.result[0:3]' server-test-1_dlv-rpc-list_goroutines.json
[
{
"id": 1,
"currentLoc": {
"pc": 4380603,
"file": "/usr/local/go/src/runtime/proc.go",
"line": 303,
"function": {
"name": "runtime.gopark",
"value": 4380368,
"type": 0,
"goType": 0,
"optimized": true
}
},
"userCurrentLoc": {
"pc": 6438159,
"file": "/vagrant/example/server/main.go",
"line": 52,
"function": {
"name": "main.run",
"value": 6437408,
"type": 0,
"goType": 0,
"optimized": true
}
},
"goStatementLoc": {
"pc": 4547433,
"file": "/usr/local/go/src/runtime/asm_amd64.s",
"line": 201,
"function": {
"name": "runtime.rt0_go",
"value": 4547136,
"type": 0,
"goType": 0,
"optimized": true
}
},
"startLoc": {
"pc": 4379072,
"file": "/usr/local/go/src/runtime/proc.go",
"line": 110,
"function": {
"name": "runtime.main",
"value": 4379072,
"type": 0,
"goType": 0,
"optimized": true
}
},
"threadID": 0,
"unreadable": ""
},
···
]

JSON数据中的每个对象都代表了一个goroutine。通过命令手册

可知,goroutines命令可以获得每一个goroutines的信息。通过手册我们能够分析出userCurrentLoc字段是服务器源码中goroutines最后出现的地方。

为了能够了解当core file创建的时候,goroutines正在做什么,我们需要收集JSON文件中包含userCurrentLoc字段的函数名字以及其行号:

1
2
3
4
5
6
7
8
9
$ jq -c '.result[] | [.userCurrentLoc.function.name, .userCurrentLoc.line]' server-test-1_dlv-rpc-list_goroutines.json | sort | uniq -c

1 ["internal/poll.runtime_pollWait",173]
1000 ["main.(*Metrics).CountS",95]
1 ["main.(*Metrics).SetM",105]
1 ["main.(*Metrics).startOutChannelConsumer",179]
1 ["main.run",52]
1 ["os/signal.signal_recv",139]
6 ["runtime.gopark",303]

大量的goroutines(上面是1000个)在函数main.(*Metrics).CoutS的95行被阻塞。现在我们回头看一下我们服务器的源码

main包中找到Metrics结构体并且找到它的CountS方法(example/server/metrics.go)。

1
2
3
4
// CountS increments counter per second.
func (m *Metrics) CountS(key string) {
m.inChannel <- NewCountMetric(key, 1, second)
}

我们的服务器在往inChannel通道发送的时候阻塞住了。让我们找出谁负责从这个通道读取数据,深入研究代码之后我们找到了下面的函数

1
2
3
4
5
6
// starts a consumer for inChannel
func (m *Metrics) startInChannelConsumer() {
for inMetrics := range m.inChannel {
// ···
}
}

这个函数逐个地从通道中读取数据并加以处理,那么什么情况下发送到这个通道的任务会被阻塞呢?

当处理通道的时候,根据Dave Cheney的通道准则,只有四种情况可能导致通道有问题:

  • 向一个nil通道发送
  • 从一个nil通道接收
  • 向一个已关闭的通道发送
  • 从一个已关闭的通道接收并立即返回零值

第一眼就看到了“向一个nil通道发送”,这看起来像是问题的原因。但是反复检查代码后,inChannel是由Metrics初始化的,不可能为nil。

n你可能会注意到,使用jq命令获取到的信息中,没有startInChannelConsumer方法。会不会是因为在main.(*Metrics).startInChannelConsumer的某个地方阻塞而导致这个(可缓冲)通道满了?

Delve能够提供从开始位置到userCurrentLoc字段之间的初始位置信息,这个信息存储到startLoc字段中。使用下面的jq命令可以查询出所有goroutines,其初始位置都在函数startInChannelConsumer中:

1
2
3
4
5
6
7
8
9
10
11
12
13
14
15
16
17
18
19
20
21
22
23
24
25
26
27
28
29
30
31
32
33
34
35
36
37
38
39
40
41
42
$ jq '.result[] | select(.startLoc.function.name | test("startInChannelConsumer$"))' server-test-1_dlv-rpc-list_goroutines.json

{
"id": 20,
"currentLoc": {
"pc": 4380603,
"file": "/usr/local/go/src/runtime/proc.go",
"line": 303,
"function": {
"name": "runtime.gopark",
"value": 4380368,
"type": 0,
"goType": 0,
"optimized": true
}
},
"userCurrentLoc": {
"pc": 6440847,
"file": "/vagrant/example/server/metrics.go",
"line": 105,
"function": {
"name": "main.(*Metrics).SetM",
"value": 6440672,
"type": 0,
"goType": 0,
"optimized": true
}
},
"startLoc": {
"pc": 6440880,
"file": "/vagrant/example/server/metrics.go",
"line": 109,
"function": {
"name": "main.(*Metrics).startInChannelConsumer",
"value": 6440880,
"type": 0,
"goType": 0,
"optimized": true
}
},
···
}

结果中有一条信息非常振奋人心!

main.(*Metrics).startInChannelConsumer,109行(看结果中的startLoc字段),有一个id为20的goroutines阻塞住了!

拿到goroutines的id能够大大降低我们搜索的范围(并且我们再也不用深入庞大的JSON文件了)。使用Delve的goroutines命令我们能够将当前goroutines切换到目标goroutines,然后可以使用stack命令打印该goroutines的堆栈信息:

1
2
3
4
5
6
7
8
9
10
11
12
13
14
15
16
17
18
19
20
21
22
23
24
25
26
27
28
29
30
31
32
33
$ dlv core example/server/server core.1628

(dlv) goroutine 20
Switched from 0 to 20 (thread 1628)

(dlv) stack -full
0 0x000000000042d7bb in runtime.gopark
at /usr/local/go/src/runtime/proc.go:303
lock = unsafe.Pointer(0xc000104058)
reason = waitReasonChanSend
···
3 0x00000000004066a5 in runtime.chansend1
at /usr/local/go/src/runtime/chan.go:125
c = (unreadable empty OP stack)
elem = (unreadable empty OP stack)

4 0x000000000062478f in main.(*Metrics).SetM
at /vagrant/example/server/metrics.go:105
key = (unreadable empty OP stack)
m = (unreadable empty OP stack)
value = (unreadable empty OP stack)

5 0x0000000000624e64 in main.(*Metrics).sendMetricsToOutChannel
at /vagrant/example/server/metrics.go:146
m = (*main.Metrics)(0xc000056040)
scope = 0
updateInterval = (unreadable could not find loclist entry at 0x89f76 for address 0x624e63)

6 0x0000000000624a2f in main.(*Metrics).startInChannelConsumer
at /vagrant/example/server/metrics.go:127
m = (*main.Metrics)(0xc000056040)
inMetrics = main.Metric {Type: TypeCount, Scope: 0, Key: "server.req-incoming",...+2 more}
nextUpdate = (unreadable could not find loclist entry at 0x89e86 for address 0x624a2e)

从下往上分析:

(6)一个来自通道的新inMetrics值在main.(*Metrics).startInChannelConsumer中被接收

(5)我们调用main.(*Metrics).sendMetricsToOutChannel并且在example/server/metrics.go的146行进行处理

(4)然后main.(*Metrics).SetM被调用

一直运行到runtime.gopark中的waitReasonChanSend阻塞!

一切的一切都明朗了!

单个goroutines中,一个从缓冲通道读取数据的函数,同时也在往通道中发送数据。当进入通道的值达到通道的容量时,消费函数继续往已满的通道中发送数据就会造成自身的死锁。由于单个通道的消费者死锁,那么每一个尝试往通道中发送数据的请求都会被阻塞。


这就是我们的故事,使用上述调试技术帮助我们发现了问题的根源。那些代码是很多年前写的,甚至从没有人看过这些代码,也万万没有想到会导致这么大的问题。

如你所见,并不是所有问题都能由工具解决,但是工具能够帮助你更好地工作。我希望,通过此文能够激励你多多尝试这些工具。我非常乐意倾听你们处理类似问题的其它解决方案。

Vladimir是一个后端开发工程师,目前就职于adjust.com. @tvii on Twitter, @narqo on Github


via: https://blog.gopheracademy.com/advent-2018/postmortem-debugging-delve/

作者:Vladimir Varankin
译者:hantmac


]]>
Postmortem-debugging-Go-services-with-Delve[翻译]
自动化脚本实现go安装与升级 https://cloudsjhan.github.io/2019/01/12/自动化脚本实现go安装与升级/ 2019-01-12T15:55:47.000Z 2019-01-20T15:46:40.063Z

源码安装:

在 home 目录下建立 installGo目录,然后在该目录下新建升级与部署文件以及下载最新的 golang 源码包:

以下是 installOrUpdate.sh 具体内容:

1
2
3
4
5
6
7
8
9
10
11
12
13
14
15
16
17
# !/bin/bash

if [ -z "$1" ]; then
​ echo "usage: ./install.sh go-package.tar.gz"
​ exit
fiif [ -d "/usr/local/go" ]; then
​ echo "Uninstalling old go version..."
​ sudo rm -rf /usr/local/go
fi
echo "Installing..."
sudo tar -C /usr/local -xzf $1
echo export GOPATH=/go" >> /etc/profile
echo export GOROOT=/usr/local/go >> /etc/profile
echo export PATH=$PATH:$GOROOT/bin:$GOPATH/bin1 >> /etc/profile
source /etc/profile
rm -rf $1
echo "Done"

然后运行:

sudo sh install.sh go1.10.linux-amd64.tar.gz

  • 或者手动设置好GOPATH,GOROOT

    编辑 /etc/profile 在文件尾部加入:

1
2
3
4
5
export GOPATH=/go
export GOROOT=/usr/local/go
export PATH=$PATH:$GOROOT/bin:$GOPATH/bin1

运行 source /etc/profile 让环境变量生效

至此,Go 已安装成功

  • 升级

    如果需要升级的话只需要将最新的源码包下载到第一步的 installGo 文件夹下,然后运行sudo sh install.sh go1.xx.linux-amd64.tar.gz 即可。

  • shell脚本更新地址github

]]>
自动化脚本实现go安装与升级
beego注解路由中@Param的参数解释 https://cloudsjhan.github.io/2019/01/03/beego注解路由中-Param的参数解释/ 2019-01-03T08:56:19.000Z 2019-01-03T09:00:27.642Z

beego注解路由的注释,我们可以把我们的注释分为以下类别:

  • @Title

    接口的标题,用来标示唯一性,唯一,可选

    格式:之后跟一个描述字符串

  • @Description

    接口的作用,用来描述接口的用途,唯一,可选

    格式:之后跟一个描述字符串

  • @Param

    请求的参数,用来描述接受的参数,多个,可选

    格式:变量名 传输类型 类型 是否必须 描述

    传输类型:paht or body

    类型:

    变量名和描述是一个字符串

    是否必须:true 或者false

    • string
    • int
    • int64
    • 对象,这个地方大家写的时候需要注意,需要是相对于当前项目的路径.对象,例如models.Object表示models目录下的Object对象,这样bee在生成文档的时候会去扫描改对象并显示给用户改对象。
    • query 表示带在url串里面?aa=bb&cc=dd
    • form 表示使用表单递交数据
    • path 表示URL串中得字符,例如/user/{uid} 那么uid就是一个path类型的参数
    • body 表示使用raw body进行数据的传输
    • header 表示通过header进行数据的传输
  • @Success

    成功返回的code和对象或者信息

    格式:code 对象类型 信息或者对象路径

    code:表示HTTP的标准status code,200 201等

    对象类型:{object}表示对象,其他默认都认为是字符类型,会显示第三个参数给用户,如果是{object}类型,那么就会去扫描改对象,并显示给用户

    对象路径和上面Param中得对象类型一样,使用路径.对象的方式来描述

  • @Failure

    错误返回的信息,

    格式: code 信息

    code:同上Success

    错误信息:字符串描述信息

  • @router

    上面已经描述过支持两个参数,第一个是路由,第二个表示支持的HTTP方法


]]>
beego注解路由中@Param的参数解释
golang use reflect to judge type of variable https://cloudsjhan.github.io/2018/12/25/golang-use-reflect-to-judge-type-of-variable/ 2018-12-25T11:38:43.000Z 2018-12-25T11:48:50.260Z

  • 众所周知,golang中可以使用空接口即interface{}代表任何类型的数据,那么在使用的时候,我们有时需要获取返回值的具体类型
  • 场景:beego框架中的orm.Params类型,实际上是map[string]interface{},在使用values接口的时候,需要从返回Map中获取数据,需要这样获取:Id:m["Id"].(string),这时m[“Id”]实际上是String类型,我们可以用reflect模块来获取实际的类型
1
2
reflect.TypeOf(m["Id"])
//返回为String
1
2
3
4
5
6
7
8
9
10
11
package main

import (
"fmt"
"reflect"
)

func main() {
var x int32 = 20
fmt.Println("type:", reflect.TypeOf(x))
}

]]>
golang use reflect to judge type of variable
mysql add primary key auto_increment https://cloudsjhan.github.io/2018/12/25/mysql-add-primary-key-auto-increment/ 2018-12-25T11:08:53.000Z 2018-12-25T11:52:17.418Z

添加字段id,并将其设置为主键自增

  • alter table TABLE_NAME add id int not null primary key Auto_increment

如果想添加已经有了一列为主键,可以用:

  • alter table TABLE_NAME add primary key(COL_NAME);

  • 如果想修改一列为主键,则需要先删除原来的主键:

alter table TABLE_NAME drop primary key;

再重新添加主键:

  • alter table TABLE_NAME add primary key(COL_NAME);

]]>
MySQL add primary key auto_increment for established table
Go关于time包的解析与使用 https://cloudsjhan.github.io/2018/12/16/Go关于time包的解析与使用/ 2018-12-16T15:16:34.000Z 2019-01-09T11:24:47.279Z

Go关于时间与日期的处理

关于time的数据类型

  • time包依赖的数据类型有:time.Time,time.Month,time.WeekDay,time.Duration,time.Location.

  • 详细介绍以上几种数据类型

    • time.Time

    • /usr/local/go/src/time/time.go 定义如下:

      1
      2
      3
      4
      5
      type Time struct {
      sec int64 // 从1年1月1日 00:00:00 UTC 至今过去的秒数
      nsec int32 // 最近一秒到下一秒过去的纳秒数
      loc *Location // 时区
      }

      time.Time会返回纳秒时间精度的时间

      1
      2
      3
      4
      var ti time.Time
      ti = time.Now()
      fmt.Printf("时间: %v, 时区: %v, 时间类型: %T\n", t, t.Location(), t)
      //时间: 2018-12-15 09:06:05.816187261 +0800 CST, 时区: Local, 时间类型: time.Time
    • time.Month, go中自己重新定义了month的类型,与time.year和time.day不同。

      1
      2
      3
      4
      5
      6
      7
      8
      9
      10
      11
      12
      13
      14
      15
      16
      type Month int

      const (
      January Month = 1 + iota
      February
      March
      April
      May
      June
      July
      August
      September
      October
      November
      December
      )

      iota是golang语言的常量计数器,只能在常量的表达式中使用。
      iota在const关键字出现时将被重置为0(const内部的第一行之前),const中每新增一行常量声明将使iota计数一次(iota可理解为const语句块中的行索引)。 使用iota能简化定义,在定义枚举时很有用。

    • time.WeekDay,代表一周之中的星期几(当然是按照西方的规则,他们把周日当做是一周的开始)

      1
      2
      3
      4
      5
      6
      7
      8
      9
      10
      11
      type WeekDay int

      const (
      Sunday Weekday = iota
      Monday
      Tuesday
      Wednesday
      Thursday
      Friday
      Saturday
      )
    • time.Duration,代表两个时间点之间的纳秒差值。

      1
      2
      3
      4
      5
      6
      7
      8
      9
      10
      type Duration int64

      const (
      Nanosecond Duration = 1
      Microsecond = 1000 * Nanosecond
      Millisecond = 1000 * Microsecond
      Second = 1000 * Millisecond
      Minute = 60 * Second
      Hour = 60 * Minute
      )
    • time.Location,时区信息

      1
      2
      3
      4
      5
      6
      7
      8
      9
      type Location struct {
      name string
      zone []zone
      tx []zoneTrans
      cacheStart int64
      cacheEnd int64
      cacheZone *zone
      }
      //北京时间:Asia/Shanghai

    以上类型receiver的实现方法

    • time.Time相关方法

    func Now() Time {} // 当前本地时间

    func Unix(sec int64, nsec int64) Time {} // 根据时间戳返回本地时间

    func Date(year int, month Month, day, hour, min, sec, nsec int, loc *Location) Time {} // 返回指定时间

    1
    2
    3
    4
    5
    6
    7
    8
    9
    10
    11
    / 当前本地时间
    t = time.Now()
    fmt.Println("'time.Now': ", t)

    // 根据时间戳返回本地时间
    t_by_unix := time.Unix(1487780010, 0)
    fmt.Println("'time.Unix': ", t_by_unix)

    // 返回指定时间
    t_by_date := time.Date(2017, time.Month(2), 23, 1, 30, 30, 0, l)
    fmt.Println("'time.Date': ", t_by_date)
    • 按照时区信息显示时间

    • func (t Time) UTC() Time {} // 获取指定时间在UTC 时区的时间表示

    • func (t Time) Local() Time {} // 以本地时区表示
    • func (t Time) In(loc *Location) Time {} // 时间在指定时区的表示
    • func (t Time) Format(layout string) string {} // 按指定格式显示时间
1
2
3
4
5
6
7
8
9
10
11
12
13
14
// 获取指定时间在UTC 时区的时间表示
t_by_utc := t.UTC()
fmt.Println("'t.UTC': ", t_by_utc)

// 获取本地时间表示
t_by_local := t.Local()
fmt.Println("'t.Local': ", t_by_local)

// 时间在指定时区的表示
t_in := t.In(time.UTC)
fmt.Println("'t.In': ", t_in)

// Format
fmt.Println("t.Format", t.Format(time.RFC3339))
  • 获取年月日等信息

func (t Time) Date() (year int, month Month, day int) {} // 返回时间的日期信息

func (t Time) Year() int {} // 返回年

func (t Time) Month() Month {} // 月

func (t Time) Day() int {} // 日

func (t Time) Weekday() Weekday {} // 星期

func (t Time) ISOWeek() (year, week int) {} // 返回年,星期范围编号

func (t Time) Clock() (hour, min, sec int) {} // 返回时间的时分秒

func (t Time) Hour() int {} // 返回小时

func (t Time) Minute() int {} // 分钟

func (t Time) Second() int {} // 秒

func (t Time) Nanosecond() int {} // 纳秒

func (t Time) YearDay() int {} // 一年中对应的天

func (t Time) Location() *Location {} // 时间的时区

func (t Time) Zone() (name string, offset int) {} // 时间所在时区的规范名和想对UTC 时间偏移量

func (t Time) Unix() int64 {} // 时间转为时间戳

func (t Time) UnixNano() int64 {} // 时间转为时间戳(纳秒)

1
2
3
4
5
6
7
8
9
10
11
12
13
14
15
// 返回时间的日期信息
year, month, day := t.Date()
fmt.Println("'t.Date': ", year, month, day)

// 星期
week := t.Weekday()
fmt.Println("'t.Weekday': ", week)

// 返回年,星期范围编号
year, week_int := t.ISOWeek()
fmt.Println("'t.ISOWeek': ", year, week_int)

// 返回时间的时分秒
hour, min, sec := t.Clock()
fmt.Println("'t.Clock': ", hour, min, sec)
  • 时间运算

func (t Time) IsZero() bool {} // 是否是零时时间

func (t Time) After(u Time) bool {} // 时间在u 之前

func (t Time) Before(u Time) bool {} // 时间在u 之后

func (t Time) Equal(u Time) bool {} // 时间与u 相同

func (t Time) Add(d Duration) Time {} // 返回t +d 的时间点

func (t Time) Sub(u Time) Duration {} // 返回 t-u

func (t Time) AddDate(years int, months int, days int) Time {} 返回增加了给出的年份、月份和天数的时间点Time

1
2
3
4
5
6
7
// 返回增加了给出的年份、月份和天数的时间点Time
t_new := t.AddDate(0, 1, 1)
fmt.Println("'t.AddDate': ", t_new)

// 时间在u 之前
is_after := t.After(t_new)
fmt.Println("'t.After': ", is_after)
  • time.Duration的类型receiver实现的方法

func (d Duration) String() string // 格式化输出 Duration

func (d Duration) Nanoseconds() int64 // 将时间段表示为纳秒

func (d Duration) Seconds() float64 // 将时间段表示为秒

func (d Duration) Minutes() float64 // 将时间段表示为分钟

func (d Duration) Hours() float64 // 将时间段表示为小时

1
2
3
4
5
6
7
// time.Duration 时间段
fmt.Println("time.Duration 时间段")
d = time.Duration(10000000000000)//输入参数为int64类型

fmt.Printf("'String: %v', 'Nanoseconds: %v', 'Seconds: %v', 'Minutes: %v', 'Hours: %v'\n",
d.String(), d.Nanoseconds(), d.Seconds(), d.Minutes(), d.Hours())
// 'String: 2h46m40s', 'Nanoseconds: 10000000000000', 'Seconds: 10000', 'Minutes: 166.66666666666666', 'Hours: 2.7777777777777777'
  • time.Location的receiver实现的方法

func (l *Location) String() string // 输出时区名

func FixedZone(name string, offset int) *Location // FixedZone 使用给定的地点名name和时间偏移量offset(单位秒)创建并返回一个Location

func LoadLocation(name string) (*Location, error) // LoadLocation 使用给定的名字创建Location

func Sleep(d Duration) // Sleep阻塞当前go程至少d代表的时间段。d<=0时,Sleep会立刻返回

1
2
d_second := time.Second
time.Sleep(d_second)

一些常用的技巧与代码示例

  • string与time.Time互转

    1
    2
    3
    4
    5
    6
    7
    8
    const (
    date = "2006-01-02"
    datetime = "2006-01-02 15:04:02"
    )

    timeStamp := time.Now().Format(date) //将当前时间,即time.Time类型转为string

    billTimeStamp, err := time.Parse(date,timeStamp)//将String类型的时间转为time.Time类型
  • unix time与String互转

1
2
3
4
5
6
7
8
9
10
11
12
13
14
15
16
17
18
19
20
21
22
23
24
25
26
27
28
29
30
31
32
33
34
35
36
37
38
endTime := time.Unix(time.Now().Unix(), 0)//此时endTime是time.Time类型
endStr := endTime.Format(datetime)//将unix time 转为了String,再根据上面的例子,可转为time.Time

package main


import (

"fmt"

"time"
)

func main() {

//获取时间戳

timestamp := time.Now().Unix()

fmt.Println(timestamp)

//格式化为字符串,tm为Time类型

tm := time.Unix(timestamp, 0)

fmt.Println(tm.Format("2006-01-02 03:04:05 PM"))

fmt.Println(tm.Format("02/01/2006 15:04:05 PM"))


//从字符串转为时间戳,第一个参数是格式,第二个是要转换的时间字符串

tm2, _ := time.Parse("01/02/2006", "02/08/2018")

fmt.Println(tm2.Unix())

}

相关参考

pkg/time中文翻译

pkg/time英文

]]>
golang time包的解析与使用
从冒泡排序优化到Go基准测试 https://cloudsjhan.github.io/2018/12/15/从冒泡排序优化到Go基准测试/ 2018-12-15T15:12:08.000Z 2018-12-15T16:03:47.813Z

Go的测试

单元测试

  • 测试文件命名:文件命名使用 xx_test.go 保存在项目目录里即可,也可以新建个test目录,TestAll;
  • 测试函数命名:单元测试函数名Test开头,接收一个指针型参数(*testing.T);
  • 运行测试程序:go run test -v -run=”函数名”,其中-v意思是输出详细的测试信息;

基准测试

  • 测试文件命名:测试文件命名:文件命名使用 xx_test.go 保存在项目目录里即可,也可以新建个test目录,TestAll;
  • 测试函数命名:基准测试以Benchmark开头,接收一个指针型参数(*testing.B);
  • 运行测试程序:go test -v -bench=”函数名”;
  • 还有一个参数是 -benchmem, -benchmem 表示分配内存的次数和字节数,-benchtime=”3s” 表示持续3秒

冒泡排序及其简单优化

冒泡排序

前几天看一个公众号,说是有个人去美团面试,被要求手写冒泡排序算法,这人心想这还不简单的,分分钟写下了下面的代码,可以说是非常标准的冒泡排序了

1
2
3
4
5
6
7
8
9
10
11
12
func BubbleSort(array []int)  {
i := 0
for i = 0; i<len(array)-1;i++{
for j :=0;j<len(array)-i-1;j++{
if array[j]>array[j+1]{
swap(j, j+1)

}
}

}
}

但是随之,面试官说让他优化一下这个算法,问他有没有可优化的地方,这人就懵逼了。其实冒泡排序可优化的地方很多,最简单的一种就是加一个标志位,检查是否已经排序完毕,排序已经完成的话就没有必要再比较下去,浪费时间。上面的代码添加几行,那人就很可能拿到offer了。

1
2
3
4
5
6
7
8
9
10
11
12
13
14
15
func BubbleSort(array []int)  {
i := 0
for i = 0; i<len(array)-1;i++{
exchanged := false
for j :=0;j<len(array)-i-1;j++{
if array[j]>array[j+1]{
swap(j, j+1)
exchanged = true
}
}
if exchanged == false {
return
}
}
}

那么,如何更直观的看出,优化过的代码确实有效呢,我们就可以使用go自带的基准测试,测试一下两段代码的性能,优化与否就一目了然。

基准测试冒泡排序

  • 首先我们创建一个存放测试文件的文件夹

    1
    mkdir testAll
  • 然后创建基准测试文件

1
touch benchmark_test.go
  • 编写基准测试代码
1
2
3
4
5
6
7
var sortArray = []int{41, 24, 76, 11, 45, 64, 21, 69, 19, 36}
func BenchmarkBubbleSort(b *testing.B) {

for i:=0;i<b.N;i++ {
BubbleSort(sortArray)
}
}

测试基本冒泡排序

  • 我们首先测试最原始的冒泡排序

  • 在testAll文件夹下执行

    1
    go test -v -bench="BubbleSort"

    基准测试结果如图所示,解释一下几个关键参数,

    81.2ns/op 表示每次操作耗时81.2纳秒,1.725s表示程序运行的时间。

    测试优化的冒泡排序

    • 执行
    1
    go test -v -bench="BubbleSort"

可以看到优化过的代码,执行时间为1.2s,而且每次操作的耗时为23.0纳秒,足足降低了60%多。可见一个很简单的优化就可以使代码提升这么多,在以后的工作中,对于代码的设计与优化还是要重视。


]]>
从冒泡排序看Go的基准测试及其使用
postman 接口测试神器 https://cloudsjhan.github.io/2018/12/08/postman-接口测试神器/ 2018-12-08T15:41:16.000Z 2018-12-08T15:54:58.525Z

Postman 接口测试神器

Postman 是一个接口测试和 http 请求的神器,非常好用。

官方 github 地址: https://github.com/postmanlabs

Postman 的优点:

  • 支持各种的请求类型: get、post、put、patch、delete 等
  • 支持在线存储数据,通过账号就可以进行迁移数据
  • 很方便的支持请求 header 和请求参数的设置
  • 支持不同的认证机制,包括 Basic Auth,Digest Auth,OAuth 1.0,OAuth 2.0 等
  • 响应数据是自动按照语法格式高亮的,包括 HTML,JSON 和 XML

以下内容主要参考: Github: api_tool_postman

安装

Postman 可以单独作为一个应用安装,也可以作为 chrome 的一个插件安装。

下面主要介绍下载安装独立版本app 软件的 Postman 的过程:

去主页Postman 官网找到:Postman | Apps

img

去下载自己平台的版本:

  • Mac
  • Windows(x86/x64)
  • Linux(x86/x64) 即可。

快速入门,总体使用方略

安装成功后,打开软件。

新建接口

对应的Request:New -> Request

img

或,在右边的 Tab 页面中点击加号+:

img

即可看到新建的 Tab 页:

img

设置 HTTP 请求的方法

设置 HTTP 的 Method 方法和输入 api 的地址

img

设置相关请求头信息

img

img

设置相关 GET 或 POST 等的参数

img

发送请求

都填写好之后,点击 Send 去发送请求 Request:

img

查看响应 Response的信息

img

然后可以重复上述修改 Request 的参数,点击 Send 去发送请求的过程,以便调试到 API 接口正常工作为止。

保存接口配置

待整个接口都调试完毕后,记得点击 Save 去保存接口信息:

img

去保存当前 API 接口,然后需要填写相关的接口信息:

  • Request Name: 请求的名字
    • 我一般习惯用保存为 接口的最后的字段名,比如http://{{server_address}}/ucows/login/login中的/login/login
  • Request Description: 接口的描述
    • 可选 最好写上该接口的要实现的基本功能和相关注意事项
    • 支持 Markdown 语法
  • Select a collection or folder to save: 选择要保存到哪个分组(或文件夹)
    • 往往保存到某个 API 接口到所属的该项目名的分组

img

填写好内容,选择好分组,再点击保存:

img

此时,Tab 的右上角的黄色点(表示没有保存)消失了,表示已保存。

且对应的分组中可以看到对应的接口了:

img

[warning] 默认不保存返回的 Response 数据

  • 直接点击 Save 去保存,只能保存 API 本身(的 Request 请求),不会保存 Response 的数据
  • 想要保存 Response 数据,需要用后面要介绍的 多个 Example

Request 的多参数操作详解

自动解析多个参数 Params

比如,对于一个 GET 的请求的 url 是: http://openapi.youdao.com/api?q=纠删码(EC)的学习&from=zh_CHS&to=EN&appKey=152e0e77723a0026&salt=4&sign=6BE15F1868019AD71C442E6399DB1FE4

对应着其实是?key=value形式中包含多个 Http 的 GET 的 query string=query parameters

Postman 可以自动帮我们解析出对应参数,可以点击 Params:

img

看到展开的多个参数:

img

如此就可以很方便的修改,增删对应的参数了。

临时禁用参数

且还支持,在不删除某参数的情况下,如果想要暂时不传参数,可以方便的通过不勾选的方式去实现:

img

批量编辑 GET 的多个参数

当然,如果想要批量的编辑参数,可以点击右上角的Bulk Edit,去实现批量编辑。

img

接口描述与自动生成文档

API 的描述中,也支持 Markdown,官方的接口说明文档:Intro to API documentation

所以,可以很方便的添加有条理的接口描述,尤其是参数解释了:

img

描述支持 markdown 语法

img

而对于要解释的参数,可以通过之前的Param -> Bulk Edit的内容:

img

拷贝过来,再继续去编辑:

img

以及添加更多解释信息:

img

点击 Update 后,即可保存。

发布接口并生成 markdown 的描述文件

去发布后:

img

对应的效果:有道翻译

img

img

Response 深入

Response 数据显示模式

Postman 对于返回的 Response 数据,支持三种显示模式。

  • 默认格式化后的 Pretty 模式

img

  • Raw 原始模式

点击Raw,可以查看到返回的没有格式化之前的原始数据:

img

  • Preview 预览模式

以及 Preview,是对应 Raw 原始格式的预览模式:

img

Preview 这种模式的显示效果,好像是对于返回的是 html 页面这类,才比较有效果。

Response 的 Cookies

很多时候普通的 API 调用,倒是没有 Cookie 的:

img

Response 的 Headers 头信息

举例,此处返回的是有 Headers 头信息的:

img

可以从中看到服务器是 Nginx 的。

保存多个 Example

之前想要实现,让导出的 API 文档中能看到接口返回的 Response 数据。后来发现是Example这个功能去实现此效果的。

如何添加 Example

img

继续点击Save Example:

img

保存后,就能看到Example(1)了:

img

单个 Example 在导出的 API 文档中的效果

然后再去导出文档,导出文档中的确能看到返回数据的例子:

img

多个 Example 在导出的 API 文档中的效果

img

img

其他好用的功能及工具

分组 Collection

在刚开始一个项目时,为了后续便于组织和管理,把同属该项目的多个 API,放在一组里

所以要先去新建一个 Collection: New -> Collection

img

使用了段时间后,建了多个分组的效果:

img

单个分组展开后的效果:

img

历史记录 History

Postman 支持 history 历史记录,显示出最近使用过的 API:

img

用环境变量实现多服务器版本

现存问题

在测试 API 期间,往往存在多种环境,对应 IP 地址(或域名也不同)

比如:

  • Prod:

    1
    http://116.62.25.57/ucows
    • 用于开发完成发布到生产环境
  • Dev:

    1
    http://123.206.191.125/ucows
    • 用于开发期间的线上的 Development 的测试环境
  • LocalTest:

    1
    http://192.168.0.140:80/ucows
    • 用于开发期间配合后台开发人员的本地局域网内的本地环境,用于联合调试 API 接口

而在测试 API 期间,往往需要手动去修改 API 的地址:

img

效率比较低,且地址更换后之前地址就没法保留了。

另外,且根据不同 IP 地址(或者域名)也不容易识别是哪套环境。

Postman 支持用 Environment 环境变量去实现多服务器版本

后来发现 Postman 中,有 Environment 和 Global Variable,用于解决这个问题,实现不同环境的管理:

img

很明显,就可以用来实现不用手动修改 url 中的服务器地址,从而动态的实现,支持不同服务器环境:

  • Production 生产环境
  • Development 开发环境
  • Local 本地局域网环境

如何使用 Enviroment 实现多服务器版本

img

或者:

img

img

Environments are a group of variables & values, that allow you to quickly switch the context for your requests and collections. Learn more about environments You can declare a variable in an environment and give it a starting value, then use it in a request by putting the variable name within curly-braces. Create an environment to get started.

输入 Key 和 value:

img

点击 Add 后:

img

[info] 环境变量可以使用的地方

  • URL
  • URL params
  • Header values
  • form-data/url-encoded values
  • Raw body content
  • Helper fields
  • 写 test 测试脚本中
  • 通过 postman 的接口,获取或设置环境变量的值。

此处把之前的在 url 中的 IP 地址(或域名)换成环境变量:

img

鼠标移动到环境变量上,可以动态显示出具体的值:

img

再去添加另外一个开发环境:

img

则可添加完 2 个环境变量,表示两个服务器地址,两个版本:

img

然后就可以切换不同服务器环境了:

img

可以看到,同样的变量 server_address,在切换后对应 IP 地址就变成希望的开发环境的 IP 了:

img

Postman 导出 API 文档中多个环境变量的效果

顺带也去看看,导出为 API 文档后,带了这种 Environment 的变量的接口,文档长什么样子:

发现是在发布之前,需要选择对应的环境的:

img

img

img

发布后的文档,可以看到所选环境和对应服务器的 IP 的:

img

当然发布文档后,也可以实时切换环境:

img

img

环境变量的好处

当更换服务器时,直接修改变量的 IP 地址:

img

img

即可实时更新,当鼠标移动到变量上即可看到效果:

img

代码生成工具

查看当前请求的 HTTP 原始内容

对于当前的请求,还可以通过点击 Code

img

去查看对应的符合 HTTP 协议的原始的内容:

img

各种语言的示例代码Code Generation Tools

比如:

  • Swift 语言

img

  • Java 语言

img

  • 其他各种语言 还支持其他各种语言:

img

目前支持的语言有:

  • HTTP
  • C (LibCurl)
  • cURL
  • C#(RestSharp)
  • Go
  • Java
    • OK HTTP
    • Unirest
  • Javascript
  • NodeJS
  • Objective-C(NSURL)
  • OCaml(Cohttp)
  • PHP
  • Python
  • Ruby(NET::Http)
  • Shell
  • Swift(NSURL)

代码生成工具的好处是:在写调用此 API 的代码时,就可以参考对应代码,甚至拷贝粘贴对应代码,即可。

测试接口

选中某个分组后,点击 Runner

img

选中某个分组后点击 Run

img

即可看到测试结果:

img

关于此功能的介绍可参考Postman 官网git 图

MockServer

直接参考官网。

功能界面

多 Tab 分页

Postman 支持多 tab 页,于此对比之前有些 API 调试工具就不支持多 Tab 页,比如Advanced Rest Client

多 tab 的好处:

方便在一个 tab 中测试,得到结果后,复制粘贴到另外的 tab 中,继续测试其它接口

比如此处 tab1 中,测试了获取验证码接口后,拷贝手机号和验证码,粘贴到 tab2 中,继续测试注册的接口

img

img

界面查看模式

Postman 的默认的 Request 和 Response 是上下布局:

img

此处点击右下角的Two pane view,就变成左右的了:

img

[info] 左右布局的用途 对于数据量很大,又想要同时看到请求和返回的数据的时候,应该比较有用。

多颜色主题

Posman 支持两种主题:

  • 深色主题

当前是深色主题,效果很不错:

img

img

  • 浅色主题

可以切换到 浅色主题:

img

img

API 文档生成

在服务端后台的开发人员测试好了接口后,打算把接口的各种信息发给使用此 API 的前端的移动端人员时,往往会遇到:

要么是用复制粘贴 -> 格式不友好 要么是用 Postman 中截图 -> 方便看,但是不方便获得 API 接口和字段等文字内容 要么是用 Postman 中导出为 JSON -> json 文件中信息太繁杂,不利于找到所需要的信息 要么是用文档,比如去编写 Markdown 文档 -> 但后续 API 的变更需要实时同步修改文档,也会很麻烦 这都会导致别人查看和使用 API 时很不方便。

-> 对此,Postman 提供了发布 API

预览和发布 API 文档 下面介绍 Postman 中如何预览和发布 API 文档。

简要概述步骤

  1. Collection
  2. 鼠标移动到某个 Collection,点击 三个点
  3. Publish Docs
  4. Publish
  5. 得到 Public URL
  6. 别人打开这个 Public URL,即可查看 API 文档

预览 API 文档

点击分组右边的大于号>

img

如果只是预览,比如后台开发员自己查看 API 文档的话,可以选择:View in web

img

等价于点击Publish Docs去发布:

img

View in Web 后,有 Publish 的选项(见后面的截图)

View in Web 后,会打开预览页面:

比如:

奶牛云

1
https://documenter.getpostman.com/collection/view/669382-42273840-6237-dbae-5455-26b16f45e2b9

img

img

而右边的示例代码,也可以从默认的 cURL 换成其他的:

img

img

发布 API 文档

如果想要让其他人能看到这个文档,则点击 Publish:

img

然后会打开类似于这样的地址:

Postman Documenter

1
https://documenter.getpostman.com/collection/publish?meta=Y29sbGVjdGlvbl9pZD00MjI3Mzg0MC02MjM3LWRiYWUtNTQ1NS0yNmIxNmY0NWUyYjkmb3duZXI9NjY5MzgyJmNvbGxlY3Rpb25fbmFtZT0lRTUlQTUlQjYlRTclODklOUIlRTQlQkElOTE=

img

点击 Publish 后,可以生成对应的公开的网页地址:

img

打开 API 接口文档地址:

1
https://documenter.getpostman.com/view/669382/collection/77fd4RM

即可看到(和前面预览一样效果的 API 文档了):

img

如此,别人即可查看对应的 API 接口文档。

已发布的 API 文档支持自动更新

后续如果自己的 API 接口修改后:

比如:

img

img

(后来发现,不用再去进入此预览和发布的流程,去更新文档,而是 Postman 自动支持)

别人去刷新该文档的页面:

1
https://documenter.getpostman.com/view/669382/collection/77fd4RM

即可看到更新后的内容:

img

参考资料

  • 主要参考:Github: api_tool_postman
  • Manage environments
  • postman-变量/环境/过滤等 - 简书
  • Postman 使用手册 3——环境变量 - 简书
  • postman 使用之四:切换环境和设置读取变量 - 乔叶叶 - 博客园

]]>
postman接口测试神器使用技巧
技术周刊之influxDB使用入门 https://cloudsjhan.github.io/2018/12/08/技术周刊之influxDB使用入门/ 2018-12-08T15:25:10.000Z 2018-12-08T15:31:29.239Z

前言

InfluxDB是一个用于存储和分析时间序列数据的开源数据库。

主要特性有:

  • 内置HTTP接口,使用方便
  • 数据可以打标记,查让查询可以很灵活
  • 类SQL的查询语句
  • 安装管理很简单,并且读写数据很高效
  • 能够实时查询,数据在写入时被索引后就能够被立即查出
  • ……

在最新的DB-ENGINES给出的时间序列数据库的排名中,InfluxDB高居第一位,可以预见,InfluxDB会越来越得到广泛的使用。

  • influxDB使用go语言编写,采用了SQL like的语法,非常灵活高效,如果你的数据是与时间相关的,那么使用influxDB做数据可视化是最合适不过的,尤其是influxDB自身就提供数据库CRUD所需要的API,虽然不是RESTFul的,但是也省去了编写后端接口的力气。

  • 下面从influxDB的安装、使用CLI的influxdb基本操作、使用API对influxdb操作及golang代码实现、经历的坑,几个方面分享influxDB的入门经历。

安装

  • 本次安装的环境是:

    • CentOS 7
    • 内核版本:4.4.135-1.el7.elrepo.x86_64
  • 直接使用yum安装

    • 1
      2
      3
      4
      5
      6
      7
      8
      9
      cat <<EOF | sudo tee /etc/yum.repos.d/influxdb.repo # 输入influxDB的repoURL地址等信息
      [influxdb]
      name = InfluxDB Repository - RHEL \$releasever
      baseurl = https://repos.influxdata.com/rhel/\$releasever/\$basearch/stable
      enabled = 1
      gpgcheck = 1
      gpgkey = https://repos.influxdata.com/influxdb.key
      EOF
      #EOF是文本的结束符
  • 1
    sudo yum install influxdb
  • influxd config

    安装完成后使用该命令查看influxDB的配置内容,default的config文件路径在:/etc/influxdb/influxdb.conf

  • 启动influxDB

1
2
3
4
5
[root@k8s-m1 ~]# influx
Connected to http://localhost:8086 version 1.7.1
InfluxDB shell version: 1.7.1
Enter an InfluxQL query
>

到此完成了influxDB的安装,接下来我们做基本的配置。

配置

  • 用户管理
1
2
3
4
5
6
7
8
9
10
-- 创建一个管理员用户
CREATE USER "admin" WITH PASSWORD 'xxxx' WITH ALL PRIVILEGES
-- 创建一个普通用户
CREATE USER "user" WITH PASSWORD 'xxxxx'
-- 为用户授权读权限
GRANT READ ON [database] to "user"
-- 为用户授权写权限
GRANT WRITE ON [database] to "user"
---------------------
# 需要修改InfluxDB的配置文件/etc/influxdb/influxdb.conf,设置http下的auth-enabled = true,重启后,使用influx命令登录数据库就需要用户名和密码了。(Influx命令实际上也是使用API来操作InfluxDB的,InfluxDB只提供了API接口)
  • 查看用户
1
2
3
4
5
6
> show users
user admin
---- -----
admin true
sjhan true
>

influxDB的配置项目有很多,剩下的可以根据自己的需求继续研究,这里就不展开了。

在进行数据库基本操作之前我们必须了解一下infuxDB的一些基本概念

influxDB基本概念

  • influxDB里面最基本的概念就是,measurement,tags,fields,points。我们可以类比于MySQL来理解这几个字段:
  • measurement类似于SQL中的table;
  • tags类似SQL中的被索引的列;
  • fields类似于SQL中没有被索引的列;
  • points对应SQL的table中的每行数据。
  • 知道了这几个概念,便可以继续往下进行,如需更加详细的文档,英文版文档猛戳这里,当然也有中文版,猛戳这里。不知为何中文版我只有番蔷才能访问。

influxDB基本操作

  • 首先,跟MySQL一样,我们需要创建一个数据库
1
2
3
4
5
-- 创建数据库,默认设置
CREATE DATABASE "first_db"
-- 创建数据库,同时创建一个Retention Policy,数据保留时间描述
-- Retention Policy各部分描述:DURATION为数据存储时长,下面的1d即只存1天的数据;REPLICATION为数据副本,一般在使用集群的时候才会设置为>1;SHARD DURATION为分区间隔,InfluxDB默认对数据分区,填写30m即对数据每隔30分钟做一个新的分区;Name是RP的名字。
CREATE DATABASE "first_db" WITH DURATION 1d REPLICATION 1 SHARD DURATION 30m NAME "myrp"

我们创建了一个influxDB的数据库,名字为first_db, 数据存储时间为一天,一个副本,每30分钟做一个新的分区。

  • influxDB插入数据

    influx -username admin -password

    我们插入一条数据到刚刚创建的数据库中

    1
    insert product,productName=disk,usageType=pay,creator=zhangsan,appId=105 cost=3421.6

    我们分析一下这条插入语句,其中product字段是influxDB中的measurement,前面讲基本概念的时候已经解释过,类似于MySQL中的table,“productName=disk,usageType=pay,creator=zhangsan,appId=105”,这一坨在influxDB中叫做tag set,可以理解为tag的一个集合,tag的类型只能是字符串的K-V,还有需要注意的是tag set与前面的measurement之间只有一个逗号,并没有空格!,一开始不知道这回事,怎么插入都是失败。“cost=3421.6”这个叫做filed set,filed的类型可以是float、boolean、integer。这样插入的一条数据,influxDB中叫做一个point。

  • 查询操作

    查询之前要选择你想查询的数据库

    1
    use first_db
    1
    select * from product
  • 可以看到influxDB自动为我们的这个point加了一个timestamp,这个是数据的UNIX时间格式的时间精度,我们在启动数据库时可以定义这个precision,像下面这样

    1
    influx --precision rfc3339

    influxDB规定了很多时间精度,具体可以在命令行输出help查看

    1
    2
    precision <format>    specifies the format of the timestamp: rfc3339, h, m, s, ms, u or ns
    # 可指定的时间精度
    • 使用influxDB内置CLI执行查询操作

      还是查询我们刚刚插入的那条数据,在命令行中输入以下命令

      1
      curl -G 'http://localhost:8086/query?pretty=true' --data-urlencode "db=first_db" --data-urlencode "q=SELECT \"cost\" FROM \"product\" WHERE \"productName\"='disk'"

      得到输出为json结构的查询结果

      influxDB内置的API很大程度简化了后端的开发,使各种项目可以快速上线。

    • 插入操作的API

    在命令行中输入

    1
    2
    curl -i -XPOST 'http://localhost:8086/write?db=first_db' --data-binary 'weather,location=us-midwes temperature=125'
    # 插入一条数据,measurement=weather,tag=location,filed=temperature,时间戳为当地服务器时间
    • 我们使用postman测试这个插入接口,以确定该接口的header,body等,为接下来使用go编写请求代码做好准备。通过分析URL,我们可知请求的param是db=first_db,–dat-binary这个参数,意味着你的request body必须是raw,而且header的content-Type=”text”,具体的postman设置参照下图:
    • 点击Send之后,可以在下面看到response的statusCode是204,在http协议中,这个状态码意思是返回体中没有内容。
    • 我们回到influxDB的terminal中查看一下,可以看到这条数据已经插入成功了。

    GO操作influxDB的API实现插入数据

    • 可以利用这样方便的API,编写代码,实现数据的批量采集、管理、展示,这里我用GO对插入数据的操作简单实现。

      1
      2
      3
      4
      5
      6
      7
      8
      9
      10
      11
      func main() {
      reqBody := "weather,location=us-midwes temperature=521 1475839730100400200"
      rb := []byte(reqBody)
      headers := map[string]string{
      "Content-type": "text",
      }
      resp, _,err := simpleHttpClient.DoRequest("POST","http://10.18.5.30:8086/write?db=first_db",headers,rb,10)
      if err != nil {
      panic(err)
      }
      fmt.Println(string(resp))
      • 使用的DoRequest方法来自这里,这个库对golang的http操作进行简单的封装,而且加入了错误处理,timeout异常检测等。

      • 当然也可以使用Go自带的net/http包中的POST方法

        1
        2
        3
        4
        5
        6
        7
        8
        reqBody := "weather,location=us-midwes temperature=521 1475839730100400200"
        //rb := []byte(reqBody)
        rb := io.NewReader(reqBody)
        resp, err := http.Post("http://10.18.5.30:8086/write?db=first_db","text",rb)
        if err != nil {
        panic(err)
        }
        fmt.Println(string(resp))
        • 需要注意的是对request body的类型处理,net/http.post方法要求该参数的类型是io.reader,所以要使用io.NewReader()进行转换。

        总结

        • 以上就是对influxDB的入门介绍,包括基本概念,安装,配置,基本操作(CLI,API)以及使用GO编写操作数据库的代码。但influxDB的奥秘远不止这些,如需更加深入的研究可参阅官方文档

]]>
介绍influxDB的基本概念,基本操作以及如何使用go实现influxDB的操作
(转载)golang语言并发与并行——goroutine和channel的详细理解(2) https://cloudsjhan.github.io/2018/12/07/转载-golang语言并发与并行——goroutine和channel的详细理解-2/ 2018-12-07T03:48:11.000Z 2018-12-07T03:50:05.116Z

本文转载自,版权属于原作者。

Go语言的并发和并行

不知道你有没有注意到一个现象,还是这段代码,如果我跑在两个goroutines里面的话:

1
2
3
4
5
6
7
8
9
10
11
12
13
14
15
16
17
18
19
var quit chan int = make(chan int)

func loop() {
for i := 0; i < 10; i++ {
fmt.Printf("%d ", i)
}
quit <- 0
}


func main() {
// 开两个goroutine跑函数loop, loop函数负责打印10个数
go loop()
go loop()

for i := 0; i < 2; i++ {
<- quit
}
}

我们观察下输出:

1
0 1 2 3 4 5 6 7 8 9 0 1 2 3 4 5 6 7 8 9

这是不是有什么问题??

以前我们用线程去做类似任务的时候,系统的线程会抢占式地输出, 表现出来的是乱序地输出。而goroutine为什么是这样输出的呢?

goroutine是在并行吗?

我们找个例子测试下:

1
2
3
4
5
6
7
8
9
10
11
12
13
14
15
16
17
18
19
20
21
22
23
24
25
26
package main

import "fmt"
import "time"

var quit chan int

func foo(id int) {
fmt.Println(id)
time.Sleep(time.Second) // 停顿一秒
quit <- 0 // 发消息:我执行完啦!
}


func main() {
count := 1000
quit = make(chan int, count) // 缓冲1000个数据

for i := 0; i < count; i++ { //开1000个goroutine
go foo(i)
}

for i :=0 ; i < count; i++ { // 等待所有完成消息发送完毕。
<- quit
}
}

让我们跑一下这个程序(之所以先编译再运行,是为了让程序跑的尽量快,测试结果更好):

1
2
3
go build test.go
time ./test
./test 0.01s user 0.01s system 1% cpu 1.016 total

我们看到,总计用时接近一秒。 貌似并行了!

我们需要首先考虑下什么是并发, 什么是并行

并行和并发

从概念上讲,并发和并行是不同的, 简单来说看这个图片(原图来自这里)

img

  • 两个队列,一个Coffee机器,那是并发
  • 两个队列,两个Coffee机器,那是并行

更多的资料: 并发不是并行, 当然Google上有更多关于并行和并发的区别。

那么回到一开始的疑问上,从上面的两个例子执行后的表现来看,多个goroutine跑loop函数会挨个goroutine去进行,而sleep则是一起执行的。

这是为什么?

默认地, Go所有的goroutines只能在一个线程里跑 。

也就是说, 以上两个代码都不是并行的,但是都是是并发的。

如果当前goroutine不发生阻塞,它是不会让出CPU给其他goroutine的, 所以例子一中的输出会是一个一个goroutine进行的,而sleep函数则阻塞掉了 当前goroutine, 当前goroutine主动让其他goroutine执行, 所以形成了逻辑上的并行, 也就是并发。

真正的并行

为了达到真正的并行,我们需要告诉Go我们允许同时最多使用多个核。

回到起初的例子,我们设置最大开2个原生线程, 我们需要用到runtime包(runtime包是goroutine的调度器):

1
2
3
4
5
6
7
8
9
10
11
12
13
14
15
16
17
18
19
20
21
22
23
24
import (
"fmt"
"runtime"
)

var quit chan int = make(chan int)

func loop() {
for i := 0; i < 100; i++ { //为了观察,跑多些
fmt.Printf("%d ", i)
}
quit <- 0
}

func main() {
runtime.GOMAXPROCS(2) // 最多使用2个核

go loop()
go loop()

for i := 0; i < 2; i++ {
<- quit
}
}

这下会看到两个goroutine会抢占式地输出数据了。

我们还可以这样显式地让出CPU时间:

1
2
3
4
5
6
7
8
9
10
11
12
13
14
15
16
17
18
func loop() {
for i := 0; i < 10; i++ {
runtime.Gosched() // 显式地让出CPU时间给其他goroutine
fmt.Printf("%d ", i)
}
quit <- 0
}


func main() {

go loop()
go loop()

for i := 0; i < 2; i++ {
<- quit
}
}

观察下结果会看到这样有规律的输出:

1
0 0 1 1 2 2 3 3 4 4 5 5 6 6 7 7 8 8 9 9

其实,这种主动让出CPU时间的方式仍然是在单核里跑。但手工地切换goroutine导致了看上去的“并行”。

其实作为一个Python程序员,goroutine让我更多地想到的是gevent的协程,而不是原生线程。

关于runtime包对goroutine的调度,在stackoverflow上有一个不错的答案:http://stackoverflow.com/questions/13107958/what-exactly-does-runtime-gosched-do

一个小问题

我在Segmentfault看到了这个问题: http://segmentfault.com/q/1010000000207474

题目说,如下的程序,按照理解应该打印下5次 "world"呀,可是为什么什么也没有打印

1
2
3
4
5
6
7
8
9
10
11
12
13
14
15
16
17
package main

import (
"fmt"
)

func say(s string) {
for i := 0; i < 5; i++ {
fmt.Println(s)
}
}

func main() {
go say("world") //开一个新的Goroutines执行
for {
}
}

楼下的答案已经很棒了,这里Go仍然在使用单核,for死循环占据了单核CPU所有的资源,而main线和say两个goroutine都在一个线程里面, 所以say没有机会执行。解决方案还是两个:

  • 允许Go使用多核(runtime.GOMAXPROCS)
  • 手动显式调动(runtime.Gosched)

runtime调度器

runtime调度器是个很神奇的东西,但是我真是但愿它不存在,我希望显式调度能更为自然些,多核处理默认开启。

关于runtime包几个函数:

  • Gosched 让出cpu
  • NumCPU 返回当前系统的CPU核数量
  • GOMAXPROCS 设置最大的可同时使用的CPU核数
  • Goexit 退出当前goroutine(但是defer语句会照常执行)

总结

我们从例子中可以看到,默认的, 所有goroutine会在一个原生线程里跑,也就是只使用了一个CPU核。

在同一个原生线程里,如果当前goroutine不发生阻塞,它是不会让出CPU时间给其他同线程的goroutines的,这是Go运行时对goroutine的调度,我们也可以使用runtime包来手工调度。

本文开头的两个例子都是限制在单核CPU里执行的,所有的goroutines跑在一个线程里面,分析如下:

  • 对于代码例子一(loop函数的那个),每个goroutine没有发生堵塞(直到quit流入数据), 所以在quit之前每个goroutine不会主动让出CPU,也就发生了串行打印
  • 对于代码例子二(time的那个),每个goroutine在sleep被调用的时候会阻塞,让出CPU, 所以例子二并发执行。

那么关于我们开启多核的时候呢?Go语言对goroutine的调度行为又是怎么样的?

我们可以在Golang官方网站的这里 找到一句话:

When a coroutine blocks, such as by calling a blocking system call, the run-time automatically moves other coroutines on the same operating system thread to a different, runnable thread so they won’t be blocked.

也就是说:

当一个goroutine发生阻塞,Go会自动地把与该goroutine处于同一系统线程的其他goroutines转移到另一个系统线程上去,以使这些goroutines不阻塞

开启多核的实验

仍然需要做一个实验,来测试下多核支持下goroutines的对原生线程的分配, 也验证下我们所得到的结论“goroutine不阻塞不放开CPU”。

实验代码如下:

1
2
3
4
5
6
7
8
9
10
11
12
13
14
15
16
17
18
19
20
21
22
23
24
25
26
27
package main

import (
"fmt"
"runtime"
)

var quit chan int = make(chan int)

func loop(id int) { // id: 该goroutine的标号
for i := 0; i < 10; i++ { //打印10次该goroutine的标号
fmt.Printf("%d ", id)
}
quit <- 0
}

func main() {
runtime.GOMAXPROCS(2) // 最多同时使用2个核

for i := 0; i < 3; i++ { //开三个goroutine
go loop(i)
}

for i := 0; i < 3; i++ {
<- quit
}
}

多跑几次会看到类似这些输出(不同机器环境不一样):

1
2
3
4
5
0 0 0 0 0 1 1 0 0 1 0 0 1 0 1 2 1 2 1 2 1 2 1 2 1 2 2 2 2 2
0 0 0 0 0 0 0 0 0 0 1 1 1 1 1 1 1 1 1 1 2 2 2 2 2 2 2 2 2 2
0 0 0 0 0 0 0 1 1 1 1 1 0 1 0 1 0 1 2 1 2 1 2 2 2 2 2 2 2 2
0 0 0 0 0 0 0 1 1 1 1 1 1 1 1 1 1 0 2 0 2 0 2 2 2 2 2 2 2 2
0 0 0 0 0 0 0 1 0 0 1 0 1 2 1 2 1 2 1 2 1 2 1 2 1 2 1 2 2 2

执行它我们会发现以下现象:

  • 有时会发生抢占式输出(说明Go开了不止一个原生线程,达到了真正的并行)
  • 有时会顺序输出, 打印完0再打印1, 再打印2(说明Go开一个原生线程,单线程上的goroutine不阻塞不松开CPU)

那么,我们还会观察到一个现象,无论是抢占地输出还是顺序的输出,都会有那么两个数字表现出这样的现象:

  • 一个数字的所有输出都会在另一个数字的所有输出之前

原因是, 3个goroutine分配到至多2个线程上,就会至少两个goroutine分配到同一个线程里,单线程里的goroutine 不阻塞不放开CPU, 也就发生了顺序输出。


]]>
golang语言并发与并行——goroutine和channel的详细理解
(转载)golang语言并发与并行——goroutine和channel的详细理解(1) https://cloudsjhan.github.io/2018/12/07/转载-golang语言并发与并行——goroutine和channel的详细理解-1/ 2018-12-07T03:38:01.000Z 2018-12-07T03:50:54.511Z

本篇博文转载自go语言中文网,版权属原作者所有。

如果不是我对真正并行的线程的追求,就不会认识到Go有多么的迷人。

Go语言从语言层面上就支持了并发,这与其他语言大不一样,不像以前我们要用Thread库 来新建线程,还要用线程安全的队列库来共享数据。

以下是我入门的学习笔记。

Go语言的goroutines、信道和死锁

goroutine

Go语言中有个概念叫做goroutine, 这类似我们熟知的线程,但是更轻。

以下的程序,我们串行地去执行两次loop函数:

1
2
3
4
5
6
7
8
9
10
11
func loop() {
for i := 0; i < 10; i++ {
fmt.Printf("%d ", i)
}
}


func main() {
loop()
loop()
}

毫无疑问,输出会是这样的:

1
0 1 2 3 4 5 6 7 8 9 0 1 2 3 4 5 6 7 8 9

下面我们把一个loop放在一个goroutine里跑,我们可以使用关键字go来定义并启动一个goroutine:

1
2
3
4
func main() {
go loop() // 启动一个goroutine
loop()
}

这次的输出变成了:

1
0 1 2 3 4 5 6 7 8 9

可是为什么只输出了一趟呢?明明我们主线跑了一趟,也开了一个goroutine来跑一趟啊。

原来,在goroutine还没来得及跑loop的时候,主函数已经退出了。

main函数退出地太快了,我们要想办法阻止它过早地退出,一个办法是让main等待一下:

1
2
3
4
5
func main() {
go loop()
loop()
time.Sleep(time.Second) // 停顿一秒
}

这次确实输出了两趟,目的达到了。

可是采用等待的办法并不好,如果goroutine在结束的时候,告诉下主线说“Hey, 我要跑完了!”就好了, 即所谓阻塞主线的办法,回忆下我们Python里面等待所有线程执行完毕的写法:

1
2
for thread in threads:
thread.join()

是的,我们也需要一个类似join的东西来阻塞住主线。那就是信道

信道

信道是什么?简单说,是goroutine之间互相通讯的东西。类似我们Unix上的管道(可以在进程间传递消息), 用来goroutine之间发消息和接收消息。其实,就是在做goroutine之间的内存共享。

使用make来建立一个信道:

1
2
3
var channel chan int = make(chan int)
// 或
channel := make(chan int)

那如何向信道存消息和取消息呢? 一个例子:

1
2
3
4
5
6
7
8
func main() {
var messages chan string = make(chan string)
go func(message string) {
messages <- message // 存消息
}("Ping!")

fmt.Println(<-messages) // 取消息
}

默认的,信道的存消息和取消息都是阻塞的 (叫做无缓冲的信道,不过缓冲这个概念稍后了解,先说阻塞的问题)。

也就是说, 无缓冲的信道在取消息和存消息的时候都会挂起当前的goroutine,除非另一端已经准备好。

比如以下的main函数和foo函数:

1
2
3
4
5
6
7
8
9
10
var ch chan int = make(chan int)

func foo() {
ch <- 0 // 向ch中加数据,如果没有其他goroutine来取走这个数据,那么挂起foo, 直到main函数把0这个数据拿走
}

func main() {
go foo()
<- ch // 从ch取数据,如果ch中还没放数据,那就挂起main线,直到foo函数中放数据为止
}

那既然信道可以阻塞当前的goroutine, 那么回到上一部分「goroutine」所遇到的问题「如何让goroutine告诉主线我执行完毕了」 的问题来, 使用一个信道来告诉主线即可:

1
2
3
4
5
6
7
8
9
10
11
12
13
14
15
var complete chan int = make(chan int)

func loop() {
for i := 0; i < 10; i++ {
fmt.Printf("%d ", i)
}

complete <- 0 // 执行完毕了,发个消息
}


func main() {
go loop()
<- complete // 直到线程跑完, 取到消息. main在此阻塞住
}

如果不用信道来阻塞主线的话,主线就会过早跑完,loop线都没有机会执行、、、

其实,无缓冲的信道永远不会存储数据,只负责数据的流通,为什么这么讲呢?

  • 从无缓冲信道取数据,必须要有数据流进来才可以,否则当前线阻塞
  • 数据流入无缓冲信道, 如果没有其他goroutine来拿走这个数据,那么当前线阻塞

所以,你可以测试下,无论如何,我们测试到的无缓冲信道的大小都是0 (len(channel))

如果信道正有数据在流动,我们还要加入数据,或者信道干涩,我们一直向无数据流入的空信道取数据呢? 就会引起死锁

死锁

一个死锁的例子:

1
2
3
4
func main() {
ch := make(chan int)
<- ch // 阻塞main goroutine, 信道c被锁
}

执行这个程序你会看到Go报这样的错误:

1
fatal error: all goroutines are asleep - deadlock!

何谓死锁? 操作系统有讲过的,所有的线程或进程都在等待资源的释放。如上的程序中, 只有一个goroutine, 所以当你向里面加数据或者存数据的话,都会锁死信道, 并且阻塞当前 goroutine, 也就是所有的goroutine(其实就main线一个)都在等待信道的开放(没人拿走数据信道是不会开放的),也就是死锁咯。

我发现死锁是一个很有意思的话题,这里有几个死锁的例子:

  1. 只在单一的goroutine里操作无缓冲信道,一定死锁。比如你只在main函数里操作信道:

    1
    2
    3
    4
    5
    func main() {
    ch := make(chan int)
    ch <- 1 // 1流入信道,堵塞当前线, 没人取走数据信道不会打开
    fmt.Println("This line code wont run") //在此行执行之前Go就会报死锁
    }
  2. 如下也是一个死锁的例子:

    1
    2
    3
    4
    5
    6
    7
    8
    9
    10
    11
    12
    var ch1 chan int = make(chan int)
    var ch2 chan int = make(chan int)

    func say(s string) {
    fmt.Println(s)
    ch1 <- <- ch2 // ch1 等待 ch2流出的数据
    }

    func main() {
    go say("hello")
    <- ch1 // 堵塞主线
    }

    其中主线等ch1中的数据流出,ch1等ch2的数据流出,但是ch2等待数据流入,两个goroutine都在等,也就是死锁。

  3. 其实,总结来看,为什么会死锁?非缓冲信道上如果发生了流入无流出,或者流出无流入,也就导致了死锁。或者这样理解 Go启动的所有goroutine里的非缓冲信道一定要一个线里存数据,一个线里取数据,要成对才行 。所以下面的示例一定死锁:

    1
    2
    3
    4
    5
    6
    7
    8
    c, quit := make(chan int), make(chan int)

    go func() {
    c <- 1 // c通道的数据没有被其他goroutine读取走,堵塞当前goroutine
    quit <- 0 // quit始终没有办法写入数据
    }()

    <- quit // quit 等待数据的写

    仔细分析的话,是由于:主线等待quit信道的数据流出,quit等待数据写入,而func被c通道堵塞,所有goroutine都在等,所以死锁。

    简单来看的话,一共两个线,func线中流入c通道的数据并没有在main线中流出,肯定死锁。

但是,是否果真 所有不成对向信道存取数据的情况都是死锁?

如下是个反例:

1
2
3
4
5
6
7
func main() {
c := make(chan int)

go func() {
c <- 1
}()
}

程序正常退出了,很简单,并不是我们那个总结不起作用了,还是因为一个让人很囧的原因,main又没等待其它goroutine,自己先跑完了, 所以没有数据流入c信道,一共执行了一个goroutine, 并且没有发生阻塞,所以没有死锁错误。

那么死锁的解决办法呢?

最简单的,把没取走的数据取走,没放入的数据放入, 因为无缓冲信道不能承载数据,那么就赶紧拿走!

具体来讲,就死锁例子3中的情况,可以这么避免死锁:

1
2
3
4
5
6
7
8
9
c, quit := make(chan int), make(chan int)

go func() {
c <- 1
quit <- 0
}()

<- c // 取走c的数据!
<-quit

另一个解决办法是缓冲信道, 即设置c有一个数据的缓冲大小:

1
c := make(chan int, 1)

这样的话,c可以缓存一个数据。也就是说,放入一个数据,c并不会挂起当前线, 再放一个才会挂起当前线直到第一个数据被其他goroutine取走, 也就是只阻塞在容量一定的时候,不达容量不阻塞。

这十分类似我们Python中的队列Queue不是吗?

无缓冲信道的数据进出顺序

我们已经知道,无缓冲信道从不存储数据,流入的数据必须要流出才可以。

观察以下的程序:

1
2
3
4
5
6
7
8
9
10
11
12
13
14
15
16
17
var ch chan int = make(chan int)

func foo(id int) { //id: 这个routine的标号
ch <- id
}

func main() {
// 开启5个routine
for i := 0; i < 5; i++ {
go foo(i)
}

// 取出信道中的数据
for i := 0; i < 5; i++ {
fmt.Print(<- ch)
}
}

我们开了5个goroutine,然后又依次取数据。其实整个的执行过程细分的话,5个线的数据 依次流过信道ch, main打印之, 而宏观上我们看到的即 无缓冲信道的数据是先到先出,但是 无缓冲信道并不存储数据,只负责数据的流通

缓冲信道

终于到了这个话题了, 其实缓存信道用英文来讲更为达意: buffered channel.

缓冲这个词意思是,缓冲信道不仅可以流通数据,还可以缓存数据。它是有容量的,存入一个数据的话 , 可以先放在信道里,不必阻塞当前线而等待该数据取走。

当缓冲信道达到满的状态的时候,就会表现出阻塞了,因为这时再也不能承载更多的数据了,「你们必须把 数据拿走,才可以流入数据」。

在声明一个信道的时候,我们给make以第二个参数来指明它的容量(默认为0,即无缓冲):

1
var ch chan int = make(chan int, 2) // 写入2个元素都不会阻塞当前goroutine, 存储个数达到2的时候会阻塞

如下的例子,缓冲信道ch可以无缓冲的流入3个元素:

1
2
3
4
5
6
func main() {
ch := make(chan int, 3)
ch <- 1
ch <- 2
ch <- 3
}

如果你再试图流入一个数据的话,信道ch会阻塞main线, 报死锁。

也就是说,缓冲信道会在满容量的时候加锁。

其实,缓冲信道是先进先出的,我们可以把缓冲信道看作为一个线程安全的队列:

1
2
3
4
5
6
7
8
9
10
func main() {
ch := make(chan int, 3)
ch <- 1
ch <- 2
ch <- 3

fmt.Println(<-ch) // 1
fmt.Println(<-ch) // 2
fmt.Println(<-ch) // 3
}

信道数据读取和信道关闭

你也许发现,上面的代码一个一个地去读取信道简直太费事了,Go语言允许我们使用range来读取信道:

1
2
3
4
5
6
7
8
9
10
func main() {
ch := make(chan int, 3)
ch <- 1
ch <- 2
ch <- 3

for v := range ch {
fmt.Println(v)
}
}

如果你执行了上面的代码,会报死锁错误的,原因是range不等到信道关闭是不会结束读取的。也就是如果 缓冲信道干涸了,那么range就会阻塞当前goroutine, 所以死锁咯。

那么,我们试着避免这种情况,比较容易想到的是读到信道为空的时候就结束读取:

1
2
3
4
5
6
7
8
9
10
ch := make(chan int, 3)
ch <- 1
ch <- 2
ch <- 3
for v := range ch {
fmt.Println(v)
if len(ch) <= 0 { // 如果现有数据量为0,跳出循环
break
}
}

以上的方法是可以正常输出的,但是注意检查信道大小的方法不能在信道存取都在发生的时候用于取出所有数据,这个例子 是因为我们只在ch中存了数据,现在一个一个往外取,信道大小是递减的。

另一个方式是显式地关闭信道:

1
2
3
4
5
6
7
8
9
10
11
ch := make(chan int, 3)
ch <- 1
ch <- 2
ch <- 3

// 显式地关闭信道
close(ch)

for v := range ch {
fmt.Println(v)
}

被关闭的信道会禁止数据流入, 是只读的。我们仍然可以从关闭的信道中取出数据,但是不能再写入数据了。

等待多gorountine的方案

那好,我们回到最初的一个问题,使用信道堵塞主线,等待开出去的所有goroutine跑完。

这是一个模型,开出很多小goroutine, 它们各自跑各自的,最后跑完了向主线报告。

我们讨论如下2个版本的方案:

  1. 只使用单个无缓冲信道阻塞主线
  2. 使用容量为goroutines数量的缓冲信道

对于方案1, 示例的代码大概会是这个样子:

1
2
3
4
5
6
7
8
9
10
11
12
13
14
15
16
17
18
19
var quit chan int // 只开一个信道

func foo(id int) {
fmt.Println(id)
quit <- 0 // ok, finished
}

func main() {
count := 1000
quit = make(chan int) // 无缓冲

for i := 0; i < count; i++ {
go foo(i)
}

for i := 0; i < count; i++ {
<- quit
}
}

对于方案2, 把信道换成缓冲1000的:

1
quit = make(chan int, count) // 容量1000

其实区别仅仅在于一个是缓冲的,一个是非缓冲的。

对于这个场景而言,两者都能完成任务, 都是可以的。

  • 无缓冲的信道是一批数据一个一个的「流进流出」
  • 缓冲信道则是一个一个存储,然后一起流出去

]]>
golang语言并发与并行——goroutine和channel的详细理解
mysql中字段名与保留字冲突 https://cloudsjhan.github.io/2018/12/04/mysql中字段名与保留字冲突/ 2018-12-04T07:24:50.000Z 2018-12-04T07:51:27.453Z

  • 在设计数据库的时候不小心将数据库的字段设置成了其内置的保留字,例如下面的这段:
1
2
3
4
5
6
CREATE TABLE IF NOT EXISTS `test_billing` (
`vendor` varchar(255),
`cn` varchar(255),
`current_date` varchar(255),
`cost` varchar(255)
) ENGINE=InnoDB DEFAULT CHARSET=utf8;
  • 这样你在执行类似下面的查询时:
1
select cn, cost from test_billing where current_date like"2018-10%";

返回值中什么都没有,还带了一个warning:

1
Empty set, 1 warning (0.00 sec)

原因就是字段current_date与MySQL内置的保留字冲突了,那么这时候你还急需查看这些数据,比较快的方法就是:在冲突字段上加反引号 current_date,即

1
select cn, cost from test_billing where `current_date` like"2018-10%";

就可以解决了。


]]>
不小心将MySQL的字段与保留字冲突的解决方法
git常用操作 https://cloudsjhan.github.io/2018/12/02/git常用操作/ 2018-12-02T02:38:11.000Z 2018-12-02T02:40:20.339Z

首先来一遍从fork到pull request这个过程的基础流程
首先,fork 一个repository,实际上是复制了一份 repository 到自己的 GitHub 账户下,然后就可以从 GitHub 将它 clone 到你的电脑上,命令如下:

git clone
连接到原始的Repository,因为如果原始的Repository内容有所改变时,我们希望能够pull这些变化,所以新增一个远端链接,并把它命名为’upstream’,命令如下:

git remote add upstream
新增branch分支,并选用新增分支。避免与主分支master造成冲突,当我们在新增分支上完成了自己的功能后再合并到主分支,命令如下:

git branch
git checkout
git checkout -b –创建新的分支并切换到新的分支上
记录,在我们自己的分支上修改后,需要记录下来。

git status –查看当前状态
git add -A –记录修改文件,加上 -A,會將新增檔案跟刪除檔案的動作一起記錄下來
git commit -m “add a file” –提交全部修改
git checkout master –第二天开始工作前,切换到master分支
git pull origin master –从master的远程分支拉取代码
git checkout –切换到task所在的本地分支
git rebase -i master –将master上的最新的代码合并到当前分支上,这里的-i的作用是将我们 当前分支之前的commit压缩成为一个commit,这样做的好处在于当我们之后创建pull request并进行相应的code review的时候,代码的改动会集中在一个commit,使得code review更直观方便
git push –set-upstream origin –最后,当task的所有编码完成之后,将代码push到远程分支
先获取远端,再提交,每次提交代码前,都需要先获取最新代码,防止覆盖他人代码

git fetch –dry-run –检查远端是否有变动
git pull –从远端分支更新最新代码
建立Pull Requests,进入你的github项目页,一般情况下 GitHub会检测到你有了新的推送,会主动提示你,点击Create pull request,写上说明,再按Send pull request就完成了,如果 Pull Request 沒有问题的话,很快就會被自动合并 merged 了哦!

本地合并分支,并删除分支,将分支合并到主分支上,并删除之

git checkout master –首先切换到主分支中
git merge –合并另一个分支进来
git branch -d –删掉刚刚合并的分支
git push –delete –也可以把合并分支从GitHub上的副本repository中刪除
其他常用命令
git init –将一个文件夹初始化为git仓库
git status –检查当前repository中的修改
git diff –查看对文件的修改
git add –准备提交对于一个文件的修改
git add . –准备提交对所有文件的修改
git commit -m ““ –提交你所准备好的修改,并附上简短说明
git config –global user.username –配置github账号
git remote add –新增远端链接
git remote set-url –对一个远端设定地址
git remote add –新增带地址的远端链接
git remote -v –查看所有远端
git pull –从一个远端收取更新(默认为主分支)
git push –提交代码到指定远端(默认为主分支)
git branch -M –修改当前分支名字
git branch –列出所有分支


]]>
git常用基本操作
ionic project-Could not find module @angular-devkit/build-angular from XXX https://cloudsjhan.github.io/2018/11/30/ionic-project-Could-not-find-module-angular-devkit-build-angular-from-XXX/ 2018-11-30T14:02:49.000Z 2018-11-30T14:45:25.088Z

  • 从GitHub上找了一个ionic的demo,准备运行一下,报错:Could not find module @angular-devkit/build-angular from XXX

  • 操作步骤:


]]>
ionic project-Could not find module @angular-devkit/build-angular from XXX
快排之golang实现 https://cloudsjhan.github.io/2018/11/18/快排之golang实现/ 2018-11-18T06:36:38.000Z 2018-11-19T02:09:59.522Z

  • 快速排序由C. A. R. Hoare在1962年提出。它的基本思想是:通过一趟排序将要排序的数据分割成独立的两部分,其中一部分的所有数据都比另外一部分的所有数据都要小,然后再按此方法对这两部分数据分别进行快速排序,整个排序过程可以递归进行,以此达到整个数据变成有序序列。

利用分治法可将快速排序的分为三步:

  • 在数据集之中,选择一个元素作为”基准”(pivot)。
  • 所有小于”基准”的元素,都移到”基准”的左边;所有大于”基准”的元素,都移到”基准”的右边。这个操作称为分区 (partition) 操作,分区操作结束后,基准元素所处的位置就是最终排序后它的位置。
  • 对”基准”左边和右边的两个子集,不断重复第一步和第二步,直到所有子集只剩下一个元素为止。

快速排序平均时间复杂度为O(n log n),最坏情况为O(n2),不稳定排序。

这里实现了两种方式的快排,第一种是单路的,实现代码如下:

1
2
3
4
5
6
7
8
9
10
11
12
13
14
15
func partition(sortArray []int, left, right int) int {
key := sortArray[right]
i := left - 1

for j := left; j < right; j++ {
if sortArray[j] <= key {
i++
swap(i, j)
}
}

swap(i+1, right)

return i + 1
}

第二种是双路的:

1
2
3
4
5
6
7
8
9
10
11
12
13
14
15
16
17
18
19
20
21
22
23
24
25
26
27
unc partition2(arr []int,left,right int)(p int)  {

if left > right {
return
}

i,j,pivot := left,right ,arr[left]

for i<j {

for i < j && arr[j] >pivot {
j--
}

for i < j && arr[i] <= pivot {
i++
}

if i < j {
arr[i] ,arr[j] = arr[j],arr[i]
}

}

arr[i],arr[left] = arr[left],arr[i]

return i

测试代码如下:

1
2
3
4
5
6
7
8
9
10
11
12
13
14
15
16
17
18
19
20
21
22
import ("fmt")


const MAX = 10

var sortArray = []int{41, 24, 76, 11, 45, 64, 21, 69, 19, 36}
func main() {
fmt.Println("before sort:")

quickSort(sortArray, 0, MAX-1)

fmt.Println("after sort:")

}

func quickSort(sortArray []int, left, right int) {
if left < right {
pos := partition2(sortArray, left, right)//修改此处测试不同的实现方式
quickSort(sortArray, left, pos-1)
quickSort(sortArray, pos+1, right)
}
}

BUT!

要表达快排的思想,还是使用Python比较透彻:

1
2
3
4
5
6
7
8
9
def quickSort(array):

if len(array) < 2:
return array
else:
pivot = array[0]
less = [i for i in array[1:] if i <= pivot]
greater = [i for i in array[1:] if i > pivot]
return quickSort(less) + [pivot] + quickSort(greater)

是不是将快排的分治思想表达地淋漓尽致,简洁美观。

​ End!


]]>
快速排序的go实现
git如何找回被删除的分支 https://cloudsjhan.github.io/2018/11/15/git如何找回被删除的分支/ 2018-11-15T10:37:28.000Z 2018-11-15T10:39:44.797Z

在使用git的过程中,因为人为因素造成分支(commit)被删除,可以使用以下步骤进行恢复。

首先用以下步骤创建一个新分支,修改一些文件后删除,以便进行恢复。
1.创建分支 abc

git branch abc
1

2.查看分支列表

git branch -a
abc

  • develop
    remotes/origin-dev/develop
    1
    2
    3
    4

3.切换到abc分支,随便修改一下东西后 commit

切换分支
git checkout abc
Switched to branch ‘abc’

创建一个文件
echo ‘abc’ > test.txt

commit
git add .
git commit -m ‘add test.txt’
[abc 3eac14d] add test.txt
1 file changed, 1 insertion(+)
create mode 100644 test.txt
1
2
3
4
5
6
7
8
9
10
11
12
13

4.删除分支abc

git branch -D abc
Deleted branch abc (was 3eac14d).
1
2

5.查看分支列表,abc分支已不存在

git branch -a

  • develop
    remotes/origin-dev/develop
    1
    2
    3

恢复步骤如下:
1.使用git log -g 找回之前提交的commit
commit 3eac14d05bc1264cda54a7c21f04c3892f32406a
Reflog: HEAD@{1} (fdipzone fdipzone@sina.com)
Reflog message: commit: add test.txt
Author: fdipzone fdipzone@sina.com
Date: Sun Jan 31 22:26:33 2016 +0800

add test.txt

1
2
3
4
5
6
7
8
9

2.使用git branch recover_branch[新分支] commit_id命令用这个commit创建一个分支
git branch recover_branch_abc 3eac14d05bc1264cda54a7c21f04c3892f32406a

git branch -a

  • develop
    recover_branch_abc
    remotes/origin-dev/develop
    1
    2
    3
    4
    5
    6
    可以见到recover_branch_abc已创建

3.切换到recover_branch_abc分支,检查文件是否存在
git checkout recover_branch_abc
Switched to branch ‘recover_branch_abc’

ls -lt
total 8
-rw-r–r– 1 fdipzone staff 4 1 31 22:38 test.txt
1
2
3
4
5
6

这样就可以恢复被误删的分支了

原文:https://blog.csdn.net/fdipzone/article/details/50616386
版权声明:本文为博主原创文章,转载请附上博文链接!


]]>
git找回被删除的分支
golang读取命令行传来的参数 https://cloudsjhan.github.io/2018/11/06/golang读取命令行传来的参数/ 2018-11-06T06:59:04.000Z 2018-11-06T07:13:58.650Z

Golang-使用命令行参数

Golang有两个标准包中都有获得命令行参数的方法:

1
2
[*]os/Args可以简单地获得一个类似C语言中的argv结构
[*]flag则提供了一个更为复杂的标志与值的方法

os.Argsos.Args返回一个字符串数组[] string.

使用方法很简单:package main

1
2
3
4
5
6
7
8
import (
"fmt"
"os"
)

func main() {
fmt.Println(os.Args)
}

使用命令:go run test.go arg1 arg2

可见返回了一个三个元素的数组,第0个元素是程序的名字包括路径,os.Args就第一个参数,os.Args就是第二个参数。


flag包flag包提供的功能非常复杂。

它将命令行参数分为非标志类参数(nonflag arguments)和Flags,标志参数是这样的-flagname=x,比如说-baudrate=1200。

非标志类参数为arg1 arg2。

flag参数处理流程由于标志类参数是参数的一部分,但又特殊,为了将标志类参数区别处理

flag包有两类方法,一类是flag处理方法,另一类是正常的参数处理方法。

正常的参数处理方法正常参数处理方法与os.Args差不多,这里是一个方法,flag.Args(),返回也是[]string.

1
2
3
4
5
6
7
8
9
10
11
12
13
14
package main
import (
"fmt"
/* "os/exec"
"bytes"*/
"flag"
)

func main() {
flag.Parse()
fmt.Println(flag.Args())
}

go run test.go arg1 arg2

如果有标志类参数呢?

1
go run test.go arg1 arg2 -baudrate=1200

这里充分证明了标志类参数也是参数。

标志类参数Parse前定义如果使用标志类参数,要提前定义,定义之后再调用Parse才能解析出来:

1
2
3
4
5
6
7
8
9
10
11
12
13
14
15
16
package main
import (
"fmt"
"flag"
)

func main() {
baudrate:=flag.Int("baudrate",1200, "help message for flagname")
databits:=flag.Int("databits",10,"number of data bits")
flag.Parse()
fmt.Println(*baudrate)
fmt.Println(*databits)
fmt.Println(flag.Args())
}

go run test.go -baudrate=9600 -databits=8 arg1 arg2

标志类参数必须在Parse之定义,否则会出错:

1
2
3
4
5
6
7
8
9
10
11
12
13
14
15
16
17
18
19
20
21
package main
import (
"fmt"
"flag"
)

func main() {
flag.Parse()
baudrate:=flag.Int("baudrate",1200, "help message for flagname")
databits:=flag.Int("databits",10,"number of data bits")
fmt.Println(*baudrate)
fmt.Println(*databits)
fmt.Println(flag.Args())
}

go run test.go -baudrate=9600 -databits=8 arg1 arg2

flag provided but not defined: -baudrate

Usage of /tmp/go-build944578075/command-line-arguments/_obj/a.out:
exit status 2

flag.Int返回的是地址

需要注意的是这里flag.Int返回的值为一个地址,你可以随时到这个地址里去取值

但在Parse之前取值,取到的是默认值,Parse之后去随值,取到的才是真正的值:

1
2
3
4
5
6
7
8
9
10
11
12
13
14
15
16
17
package main
import (
"fmt"
"flag"
)

func main() {
baudrate:=flag.Int("baudrate",1200, "help message for flagname")
databits:=flag.Int("databits",10,"number of data bits")

fmt.Println(*baudrate)
fmt.Println(*databits)
flag.Parse()
fmt.Println(flag.Args())
}

go run test.go -baudrate=9600 -databits=8 arg1 arg2

标志类参数顺序

标志类参数之间的前后顺序可以改变,但是似乎标志类参数非要放到非标志类参数之前才能正确解析。

1
2
3
4
5
6
7
8
9
10
11
12
13
14
15
16
package main
import (
"fmt"
"flag"
)

func main() {
databits:=flag.Int("databits",10,"number of data bits")
baudrate:=flag.Int("baudrate",1200, "help message for flagname")
flag.Parse()
fmt.Println(*baudrate)
fmt.Println(*databits)
fmt.Println(flag.Args())
}

go run test.go -baudrate=9600 -databits=8 arg1 arg2

上面的命令正确解析了,调换了baudrate和databits的顺序

1
go run test.go arg1 -baudrate=9600 -databits=8  arg2

上前这里没能正确解析,可以baudrate和databits得到的还是默认值,而非标志类参数获取到了所有的参数。

–help

flag.Int的最后一个参数是help信息:

1
2
3
4
5
6
go run test.go --help

Usage of /tmp/go-build327358548/command-line-arguments/_obj/a.out:
-baudrate=1200: help message for flagname
-databits=10: number of data bits
exit status 2

flag.String传入的参数显然不能都是数字,实际go语言提供的类型都支持,与flag.Int类似,所有其他函数都有:

1
flag.String flag.Uint flag.Float64....

flag.IntVarflag.Int返回的是指针,用起来可以有点不太好,flag.IntVar可能用起来更好的些:

1
2
3
4
var baudrate int
flag.IntVar(&baudrate,"baudrate",1200,"baudrate of serial port")
flag.Parse()
fmt.Println(baudrate)

当前你一样可以用flag.UintVar flag.Float64Var flag.StringVar

参数个数参数个数也分为标志类参数的非标志类参数,两个方法为NArg和NFlag,

1
2
3
4
5
6
7
8
9
10
11
12
13
14
15
16
17
18
package main
import (
"fmt"
"flag"
)

func main() {
databits:=flag.Int("databits",10,"number of data bits")
baudrate:=flag.Int("baudrate",1200, "help message for flagname")
flag.Parse()
fmt.Println(*baudrate)
fmt.Println(*databits)
fmt.Println(flag.Args())
fmt.Println(flag.NArg())
fmt.Println(flag.NFlag())
}

go run test.go -baudrate=9600 -databits=8 arg1 arg2

以上代码的执行的过程以及执行结果是:

从上到下打印出的参数含义分别是:

1111:指定的标志类参数baudrate,默认值是1200,可随意更改;

1011: 指定的标志类参数databits,默认值是10,可随意更改;

[la, la]:非标志类参数为arg1 arg2;

2:非标志类参数的数量

2:标志类参数的数量

​ The End!


]]>
golang使用命令行参数
MySQL使用group by分组后对每组操作 https://cloudsjhan.github.io/2018/11/05/MySQL使用group-by分组后对每组操作/ 2018-11-05T08:54:14.000Z 2018-11-06T02:07:42.708Z


group by 操作

  • 分组能够将数据分成几个逻辑组,然后对其进行聚集操作

  • 前几天开发的时候遇到这样的一个问题,有一个vender-cost表:

mysql> select * from vendor-cost;
+———+————–+————–+———–+————+———-+———-+

vendorhostvendor_idstart_datecost

+———+————–+————–+———–+————+———-+———-+
| Tencent | ins-m9faipc4 | 100014390 | 2018-10 | 0.015456 |
| ——- | ———— | ——— | ——- | ——– |
| | | | | |
| Tencent | ins-r76jxurv | 100015923 | 2018-10 | 0.284697 |
| ——- | ———— | ——— | ——- | ——– |
| | | | | |
| Tencent | ins-ramdkuqz | 100015923 | 2018-10 | 0.021175 |
| ——- | ———— | ——— | ——- | ——– |
| | | | | |
| Tencent | ins-q7o1dhsa | 100014390 | 2018-10 | 0.113501 |
| ——- | ———— | ——— | ——- | ——– |
| | | | | |
| Tencent | ins-5xxrgd65 | 100015923 | 2018-10 | 0.058623 |
| ——- | ———— | ——— | ——- | ——– |
| | | | | |
| Tencent | ins-79g28kn6 | 100015923 | 2018-10 | 0.03808 |
| ——- | ———— | ——— | ——- | ——- |
| | | | | |
| Tencent | ins-rw54ka4k | 100015923 | 2018-10 | 0.150595 |
| ——- | ———— | ——— | ——- | ——– |
| | | | | |
| Tencent | ins-ggxrtm1v | 100015923 | 2018-10 | 0.068281 |
| ——- | ———— | ——— | ——- | ——– |
| | | | | |
为了统计出每个vendor_id的cost,就需要使用分组语句,将同一个vendor_id的cost求和:

select vendor_id, sum(cost) from vendor_cost group by vendor_id;

得出的结果就是每个vendor_id的总cost。

  • 还有一种group by的用法:GROUP BY X, Y意思是将所有具有相同X字段值和Y字段值的记录放到一个分组里。
  • 举个栗子:

现在有表格

Table: Subject_Selection

Subject Semester Attendee

ITB001 1 John
ITB001 1 Bob
ITB001 1 Mickey
ITB001 2 Jenny
ITB001 2 James
MKB114 1 John
MKB114 1 Erica

  • 我们下面再接着要求统计出每门学科每个学期有多少人选择,应用如下SQL
1
2
3
SELECT Subject, Semester, Count(*)
FROM Subject_Selection
GROUP BY Subject, Semester
  • 得到的结果是:

得到的结果是:

1
2
3
4
5
Subject    Semester   Count
------------------------------
ITB001 1 3
ITB001 2 2
MKB114 1 2
  • 从表中的记录我们可以看出这个分组结果是正确的有3个学生在第一学期选择了ITB001, 2个学生在第二学期选择了ITB001,还有两个学生在第一学期选择了MKB114, 没人在第二学期选择MKB114。

]]>
在MySQL中使用group by对字段进行分组,并对每组进行统计操作
golang xorm 操作指南 https://cloudsjhan.github.io/2018/10/31/golang-xorm-操作指南/ 2018-10-31T07:42:15.000Z 2018-10-31T07:44:25.132Z

https://www.kancloud.cn/xormplus/xorm/167077


]]>
golang xorm 操作指南 官方版
技术周刊之golang中修改struct的slice的值 https://cloudsjhan.github.io/2018/10/27/技术周刊之golang中修改struct的slice的值/ 2018-10-27T02:30:10.000Z 2018-10-29T02:01:09.050Z

前言

  • 前段时间写go的时候遇到一个问题,需要修改由struct构成的slice中struct的某个字段值,类似于下面的需求:
1
2
3
4
5
6
7
8
9
10
11
12
13
14
15
16
17
18
19
20
type Docker struct {
Ip string
ID string
}


docker1 := Docker{
Ip: "222",
ID: "aaa",
}

docker2 := Docker{
Ip: "111",
ID: "bbb",
}

var tmpDocker []Docker
tmpDocker = append(tmpDocker, docker1)
tmpDocker = append(tmpDocker, docker2)
现在需要修改tmpDocker中,Ip这个字段的值, 你可以先自己尝试修改一下,然后再往下看

由这个问题我查阅很多资料,我们先从语言中经典的传值、传引用说起来

  • 对于一门语言,我们关心传递参数的过程中,是传值还是传引用,其实对于传值和传引用是一个比较古老的问题,在大学入门的时候,你可能就接触过这样的C语言代码:
1
2
3
4
5
6
7
8
9
10
11
12
13
14
15
16
17
18
19
//以下哪个函数能实现交换两个数?
#include<iostream>
using namespace std;

void swap1(int p,int q)
{
int temp;
temp=p;
p=q;
q=temp;
}

void swap2(int *p,int *q)
{
int *temp;
*temp=*p;
*p=*q;
*q=*temp;
}

其实对于C语言来说,并没有传引用的概念,看似传引用的操控,实际上传的是指针的地址,也算是一种传值,先看一下传值,传引用,传指针的概念:

  • 传值:可能很多人都听说,传值无非就是实参拷贝传递给形参。这句话没有错,但是理解起来还是有点抽象。一句话,传值就是把实参赋值给形参,赋值完毕后实参就和形参没有任何联系,对形参的修改就不会影响到实参。
  • 传地址:为什么说传地址也是一种传值呢?因为传地址是把实参地址的拷贝传递给形参。还是一句话,传地址就是把实参的地址复制给形参。复制完毕后实参的地址和形参的地址没有任何联系,对实参形参地址的修改不会影响到实参, 但是对形参地址所指向对象的修改却直接反应在实参中,因为形参指向的对象就是形参的对象。
  • 传引用:传引用本质没有任何实参的拷贝,一句话,就是让另外一个变量也执行该实参。就是两个变量指向同一个对象。这是对形参的修改,必然反映到实参上。

那么对于go语言来说,是没有引用传递的,go作为云计算时代的C语言,采用的都是值传递,即使是指针,也是将指针的地址即指针的指针,拷贝一份传递,可以参考这篇博文的讲解:Go语言参数传递是传值还是传引用

回到正题

  • 了解基本的知识背景之后,让我们回到文章开头的代码,即要修改slice中struct某字段的值。

    1
    2
    3
    4
    5
    6
    7
    8
    9
    10
    11
    12
    13
    14
    15
    16
    17
    18
    type Docker struct {
    Ip string
    ID string
    }

    docker1 := Docker{
    Ip: "222",
    ID: "aaa",
    }

    docker2 := Docker{
    Ip: "111",
    ID: "bbb",
    }

    var tmpDocker []Docker
    tmpDocker = append(tmpDocker, docker1)
    tmpDocker = append(tmpDocker, docker2)

    先将我最初的代码实现贴出来:

    1
    2
    3
    4
    5
      
    for _, dockerInfo := range tmpDocker {
    dockerInfo.Ip = "192.168,.1.1"
    }
    fmt.Println(tmpDocker)

    让我们看一下运行结果:

    发现struct中Ip字段的值并没有改变,是为什么呢?

    原因就是:range的过程中产生了一个新的对象,即dockerInfo是temDocker中每个元素的一个副本,所以你改变的只是副本中Ip字段的值,并没有改变真实的。那么如何解决呢?

    这里我提出两种解决的方法,代码如下:

    1
    2
    3
    4
    5
    6
    7
    //方法1:赋给一个新的对象
    newTmpDocker := []Docker{}//新的对象
    for _, dockerInfo := range tmpDocker {
    dockerInfo.Ip = "192.168.1.1"
    newTmpDocker = append(newTmpDocker, dockerInfo)
    }
    fmt.Println(newTmpDocker)

    可以看到最终输出的struct的slice中我们想要改变的字段已经修改成功。

    第二种方法是将副本修改后赋值

    1
    2
    3
    4
    5
    6
    方法2:修改副本后,将副本赋值给原来的
    for i, dockerInfo := range tmpDocker{
    dockerInfo.Ip = "192.168.1.1"
    tmpDocker[i] = dockerInfo
    }
    fmt.Println(tmpDocker)

    运行结果:

    可以看到同样修改成功。

总结,在go中,所有传参都是传值,都是一个副本,即一个拷贝,因为拷贝的内容有时候是非引用类型(int、string、struct等这些),这样就在函数中就无法修改原内容数据;有的是引用类型(指针、map、slice、chan等这些),这样就可以修改原内容数据。

是否可以修改原内容数据,和传值、传引用没有必然的关系。在C++中,传引用肯定是可以修改原内容数据的,在Go语言里,虽然只有传值,但是我们也可以修改原内容数据,因为参数是引用类型。

这里也要记住,引用类型和传引用是两个概念。

再记住,Go里只有传值(值传递)。


]]>
如何优雅地修改go中struct的slice的值
golang中string,rune,byte的关系 https://cloudsjhan.github.io/2018/10/25/golang中string-rune-byte的关系/ 2018-10-25T01:55:40.000Z 2018-10-25T02:26:19.271Z

  1. golang中String的底层是使用byte[]数组存储的,不可改变
1
2
str := "Golang 测试"
fmt.Println(len(str))

这段代码按道理应该输出6+1+2.

实际运行之后输出却是13, 原因是中文字符在utf-8编码的系统中是3个字节存储的,在Unicode中是2个字节存储的,go的默认编码格式是utf-8,so。。

这时候,我们使用下标访问字符串中的中文字符是不行的,想要使用下标访问,就需要rune出马。

  1. 在官方文档中,rune的定义是:
1
2
3
4
5
6
 rune is an alias for int32 and is equivalent to int32 in all ways. It is
used, by convention, to distinguish character values from integer values.

int32的别名,几乎在所有方面等同于int32
它用来区分字符值和整数值
type rune int32

那么我们想要得到预期字符串的长度,就要使用rune切片来实现。

1
fmt.Println("rune:", len([]rune(str)))

就会输出预期的rune: 9.

这时我们也可以按照下标去访问str中的字符了。即[7]rune(str) = “测”。

3.总结

string的底层是byte,byte与rune的不同之处是:

byte 等同于int8,常用来处理ascii字符
rune 等同于int32,常用来处理unicode或utf-8字符

或者可以这样说:

rune 能操作任何字符
byte 不支持中文的操作

​ END


]]>
浅析golang中String,rune, byte的关系
上海QCon之Go专家David Cheney关于GO最佳实践的演讲 https://cloudsjhan.github.io/2018/10/21/上海QCon之Go专家David-Cheney关于GO最佳实践的演讲/ 2018-10-21T14:07:15.000Z 2018-10-21T14:17:36.133Z

本周六有幸参加了2018QCon上海的会议,听了David关于GO最佳实践的一些建议,下面贴出的就是David的演讲稿,内容相对来说比较基础,但是又是编程中不可避免的一些问题,希望可以给大家带来一些启发。

Table of Contents

Introduction
\1. Guiding principles

1.1. Simplicity 1.2. Readability 1.3. Productivity

\2. Identiers
2.1. Choose identiers for clarity, not brevity 2.2. Identier length
2.3. Don’t name your variables for their types 2.4. Use a consistent naming style
2.5. Use a consistent declaration style
2.6. Be a team player

\3. Comments
3.1. Comments on variables and constants should describe their contents not their purpose 3.2. Always document public symbols

\4. Package Design
4.1. A good package starts with its name
4.2. Avoid package names like base , common , or util 4.3. Return early rather than nesting deeply
4.4. Make the zero value useful
4.5. Avoid package level state

\5. Project Structure
5.1. Consider fewer, larger packages
5.2. Keep package main small as small as possible

\6. API Design
6.1. Design APIs that are hard to misuse.
6.2. Design APIs for their default use case
6.3. Let functions dene the behaviour they requires

\7. Error handling
7.1. Eliminate error handling by eliminating errors 7.2. Only handle an error once

\8. Concurrency
8.1. Keep yourself busy or do the work yourself
8.2. Leave concurrency to the caller
8.3. Never start a goroutine without when it will stop.

Introduction

Hello,
My goal over the next two sessions is to give you my advice for best practices writing Go code.

https://dave.cheney.net/practical-go/presentations/qcon-china.html 1/45

2018/10/21 Practical Go: Real world advice for writing maintainable Go programs

This is a workshop style presentation, I’m going to dispense with the usual slide deck and we’ll work directly from the document which you can take away with you today.

TIP

You can find the latest version of this presentation at https://dave.cheney.net/practical-go/presentations/qcon-china.html

\1. Guiding principles

If I’m going to talk about best practices in any programming language I need some way to define what I mean by best. If you came to my keynote yesterday you would have seen this quote from the Go team lead, Russ Cox:

“Software engineering is what happens to programming when you add time and other programmers.

— Russ Cox

Russ is making the distinction between software programming and software engineering. The former is a program you write for yourself. The latter is a product that many people will work on over time. Engineers will come and go, teams will grow and shrink over time, requirements will change, features will be added and bugs fixed. This is the nature of software engineering.

I’m possibly one of the earliest users of Go in this room, but to argue that my seniority gives my views more weight is false. Instead, the advice I’m going to present today is informed by what I believe to be the guiding principles underlying Go itself. They are:

\1. Simplicity
\2. Readability 3. Productivity

NOTE

You’ll note that I didn’t say performance, or concurrency. There are languages which are a bit faster than Go, but they’re certainly not as simple as Go. There are languages which make concurrency their highest goal, but they are not as readable, nor as productive.

Performance and concurrency are important attributes, but not as important as simplicity, readability, and productivity.

1.1. Simplicity

Why should we strive for simplicity? Why is important that Go programs be simple?

We’ve all been in a situation where you say “I can’t understand this code”, yes? We’ve all worked on programs where you’re scared to make a change because you’re worried it’ll break another part of the program; a part you don’t understand and don’t know how to fix.

This is complexity. Complexity turns reliable software in unreliable software. Complexity is what kills software projects.

Simplicity is the highest goal of Go. Whatever programs we write, we should be able to agree that they are simple.

1.2. Readability

https://dave.cheney.net/practical-go/presentations/qcon-china.html 2/45

2018/10/21 Practical Go: Real world advice for writing maintainable Go programs

“Readability is essential for maintainability. — Mark Reinhold

JVM language summit 2018

Why is it important that Go code be readable? Why should we strive for readability?

“Programs must be written for people to read, and only incidentally for machines to execute. — Hal Abelson and Gerald Sussman

Structure and Interpretation of Computer Programs

Readability is important because all software, not just Go programs, is written by humans to be read by other humans. The fact that software is also consumed by machines is secondary.

Code is read many more times than it is written. A single piece of code will, over its lifetime, be read hundreds, maybe thousands of times.

“The most important skill for a programmer is the ability to effectively communicate ideas. — Gastón Jorquera [1]

Readability is key to being able to understand what the program is doing. If you can’t understand what a program is doing, how can you hope to maintain it? If software cannot be maintained, then it will be rewritten; and that could be the last time your company will invest in Go.

If you’re writing a program for yourself, maybe it only has to run once, or you’re the only person who’ll ever see it, then do what ever works for you. But if this is a piece of software that more than one person will contribute to, or that will be used by people over a long enough time that requirements, features, or the environment it runs in changes, then your goal must be for your program to be maintainable.

The first step towards writing maintainable code is making sure the code is readable.

“1.3. Productivity
Design is the art of arranging code to work today, and be changeable forever.

— Sandi Metz

The last underlying principle I want to highlight is productivity. Developer productivity is a sprawling topic but it boils down to this; how much time do you spend doing useful work verses waiting for your tools or hopelessly lost in a foreign code-base. Go programmers should feel that they can get a lot done with Go.

The joke goes that Go was designed while waiting for a C++ program to compile. Fast compilation is a key feature of Go and a key recruiting tool to attract new developers. While compilation speed remains a constant battleground, it is fair to say that compilations which take minutes in other languages, take seconds in Go. This helps Go developers feel as productive as their counterparts working in dynamic languages without the reliability issues inherent in those languages.

More fundamental to the question of developer productivity, Go programmers realise that code is written to be read and so place the act of reading code above the act of writing it. Go goes so far as to enforce, via tooling and custom, that all code be formatted in a specific style. This removes the friction of learning a project specific dialect and helps spot mistakes because they just look incorrect.

Go programmers don’t spend days debugging inscrutable compile errors. They don’t waste days with complicated build scripts or deploying code to production. And most importantly they don’t spend their time trying to understand what their coworker wrote.

https://dave.cheney.net/practical-go/presentations/qcon-china.html 3/45

2018/10/21 Practical Go: Real world advice for writing maintainable Go programs

Productivity is what the Go team talk about when they say the language must scale. 2. Identiers

The first topic we’re going to discuss is identifiers. An identifier is a fancy word for a name; the name of a variable, the name of a function, the name of a method, the name of a type, the name of a package, and so on.

“Poor naming is symptomatic of poor design. — Dave Cheney

Given the limited syntax of Go, the names we choose for things in our programs have an oversized impact on the readability of our programs. Readability is the defining quality of good code thus choosing good names is crucial to the readability of Go code.

“2.1. Choose identiers for clarity, not brevity
Obvious code is important. What you can do in one line you should do in three.

— Ukiah Smith

Go is not a language that optimises for clever one liners. Go is not a language which optimises for the least number of lines in a program. We’re not optimising for the size of the source code on disk, nor how long it takes to type.

“Good naming is like a good joke. If you have to explain it, it’s not funny. — Dave Cheney

Key to this clarity is the names we choose for identifies in Go programs. Let’s talk about the qualities of a good name:

A good name is concise. A good name need not be the shortest it can possibly be, but a good name should waste no space on things which are extraneous. Good names have a high signal to noise ratio.

A good name is descriptive. A good name should describe the application of a variable or constant, not their contents. A good name should describe the result of a function, or behaviour of a method, not their operation. A good name should describe the purpose of a package, not its contents. The more accurately a name describes the thing it identifies, the better the name.

A good name is should be predictable. You should be able to infer the way a name will be used from its name alone. This is a function of choosing descriptive names, but it also about following tradition. This is what Go programmers talk about when they say idiomatic.

Let’s talk about each of these properties in depth.

2.2. Identier length

Sometimes people criticise the Go style for recommending short variable names. As Rob Pike said, “Go programmers want the right length identifiers”. [1]

Andrew Gerrand suggests that by using longer identifies for some things we indicate to the reader that they are of higher importance.

“The greater the distance between a name’s declaration and its uses, the longer the name should be.

— Andrew Gerrand [2]

From this we can draw some guidelines:

https://dave.cheney.net/practical-go/presentations/qcon-china.html 4/45

2018/10/21 Practical Go: Real world advice for writing maintainable Go programs

Short variable names work well when the distance between their declaration and last use is short.
Long variable names need to justify themselves; the longer they are the more value they need to provide. Lengthy

bureaucratic names carry a low amount of signal compared to their weight on the page.

Don’t include the name of your type in the name of your variable.

Constants should describe the value they hold, not how that value is used.

Single letter variables for loops and branches, single words for parameters and return values, multiple words for functions and package level declarations

Single words for methods, interfaces, and packages.
Remember that the name of a package is part of the name the caller uses to to refer to it, so make use of that.

Let’s look at an example to

1
2
type Person struct {
Name string

Age int }

1
2
3
4
// AverageAge returns the average age of people.
func AverageAge(people []Person) int {
if len(people) == 0 {
return 0

}

1
2
var count, sum int
for _, p := range people {

sum += p.Age

count += 1 }

1
2
    return sum / count
}

GO

In this example, the range variable p is declared on line 10 and only referenced on the following line. p lives for a very short time both on the page, and during the execution of the function. A reader who is interested in the effect values of p have on the program need only read two lines.

By comparison people is declared in the function parameters and lives for seven lines. The same is true for sum , and count , thus they justify their longer names. The reader has to scan a wider number of lines to locate them so they are

given more distinctive names.

I could have chosen s for sum and c (or possibly n ) for but this would have reduced all the variables in the program to the same level of importance. I could have chosen instead of but that would have left the problem of what to call the for … range iteration variable. The singular would look odd as the loop iteration variable which lives for little time has a longer name than the slice of values it was derived from.

count

TIP

Use blank lines to break up the flow of a function in the same way you use paragraphs to break up the flow of a document. In AverageAge we have three operations occurring in sequence. The first is the precondition, checking that we don’t divide by zero if people is empty, the second is the accumulation of the sum and count, and the final is the computation of the average.

2.2.1. Context is key

https://dave.cheney.net/practical-go/presentations/qcon-china.html 5/45

p

people

person

2018/10/21 Practical Go: Real world advice for writing maintainable Go programs

It’s important to recognise that most advice on naming is contextual. I like to say it is a principle, not a rule.

What is the difference between two identifiers, i , and index . We cannot say conclusively that one is better than another, for example is

fundamentally more readable than

I argue it is not, because it is likely the scope of i , and index for that matter, is limited to the body of the for loop and the extra verbosity of the latter adds little to comprehension of the program.

However, which of these functions is more readable?

1
func (s *SNMP) Fetch(oid []int, index int) (int, error)

or

1
func (s *SNMP) Fetch(o []int, i int) (int, error)

In this example, oid is an abbreviation for SNMP Object ID, so shortening it to o would mean programmers have to translate from the common notation that they read in documentation to the shorter notation in your code. Similarly, reducing index to i obscures what i stands for as in SNMP messages a sub value of each OID is called an Index.

TIP Don’t mix and match long and short formal parameters in the same declaration. 2.3. Don’t name your variables for their types

You shouldn’t name your variables after their types for the same reason you don’t name your pets “dog” and “cat”. You also probably shouldn’t include the name of your type in the name of your variable’s name for the same reason.

The name of the variable should describe its contents, not the type of the contents. Consider this example: var usersMap map[string]*User

What’s good about this declaration? We can see that its a map, and it has something to do with the *User type, that’s probably good. But usersMap is a map, and Go being a statically typed language won’t let us accidentally use it where a scalar variable is required, so the Map suffix is redundant.

Now, consider what happens if we were to declare other variables like:

1
2
for index := 0; index < len(s); index++ {
//

}

1
2
for i := 0; i < len(s); i++ {
//

}

https://dave.cheney.net/practical-go/presentations/qcon-china.html 6/45

2018/10/21 Practical Go: Real world advice for writing maintainable Go programs

1
2
3
var (
companiesMap map[string]*Company
productsMap map[string]*Products

)

Now we have three map type variables in scope, usersMap , companiesMap , and productsMap , all mapping strings to different types. We know they are maps, and we also know that their map declarations prevent us from using one in place of another—the compiler will throw an error if we try to use companiesMap where the code is expecting a

map[string]*User . In this situation it’s clear that the Map suffix does not improve the clarity of the code, its just extra boilerplate to type.

My suggestion is to avoid any suffix that resembles the type of the variable.
TIP If users isn’t descriptive enough, then usersMap won’t be either.

This advice also applies to function parameters. For example:

Naming the Config parameter config is redundant. We know its a Config , it says so right there. In this case consider conf or maybe c will do if the lifetime of the variable is short enough.

If there is more that one in scope at any one time then calling them conf1 and conf2 is less descriptive than calling them and as the latter are less likely to be mistaken for one another.

1
2
3
4
type Config struct {
//
}
func WriteConfig(w io.Writer, config *Config)

*Config

original

updated

Don’t let package names steal good variable names.

The name of an imported identifier includes its package name. For example the context package will be known as context.Context . This makes it impossible to use

a variable or type in your package.

type in the as

func WriteLog(context context.Context, message string)
Will not compile. This is why the local declaration for context.Context types is traditionally ctx .

eg.

func WriteLog(ctx context.Context, message string)

2.4. Use a consistent naming style

Another property of a good name is it should be predictable. The reader should be able to understand the use of a name when they encounter it for the first time. When they encounter a common name, they should be able to assume it has not changed meanings since the last time they saw it.

NOTE

https://dave.cheney.net/practical-go/presentations/qcon-china.html 7/45

Context

context

2018/10/21 Practical Go: Real world advice for writing maintainable Go programs

For example, if your code passes around a database handle, make sure each time the parameter appears, it has the same name. Rather than a combination of d sql.DB , dbase sql.DB , DB sql.DB , and database sql.DB , instead consolidate on something like;

db sql.DB
Doing so promotes familiarity; if you see a db , you know it’s a
sql.DB and that it has either been declared locally or

provided for you by the caller.

Similarly for method receivers; use the same receiver name every method on that type. This makes it easier for the reader to internalise the use of the receiver across the methods in this type.

The convention for short receiver names in Go is at odds with the advice provided so far. This is just NOTE one of the choices made early on that has become the preferred style, just like the use of CamelCase

TIP

rather than snake_case .

Go style dictates that receivers have a single letter name, or acronyms derived from their type. You may find that the name of your receiver sometimes conflicts with name of a parameter in a method. In this case, consider making the parameter name slightly longer, and don’t forget to use this new parameter name consistently.

Finally, certain single letter variables have traditionally been associated with loops and counting. For example, i , j , and k are commonly the loop induction variable for simple for loops. n is commonly associated with a counter or accumulator. v is a common shorthand for a value in a generic encoding function, k is commonly used for the key of a map, and s is often used as shorthand for parameters of type string .

As with the db example above programmers expect to be a loop induction variable. If you ensure that is always a loop variable, not used in other contexts outside a loop. When readers encounter a variable called , or j , they know that a loop is close by.

i

i

for

i

TIP

If you found yourself with so many nested loops that you exhaust your supply of i , j , and k variables, its probably time to break your function into smaller units.

2.5. Use a consistent declaration style

Go has at least six different ways to declare a variable

varxint=1 varx=1 varxint;x=1 var x = int(1) x:=1

I’m sure there are more that I haven’t thought of. This is something that Go’s designers recognise was probably a mistake, but its too late to change it now. With all these different ways of declaring a variable, how do we avoid each Go programmer choosing their own style?

I want to present a suggestions for how I declare variables in my programs. This is the style I try to use where possible.

https://dave.cheney.net/practical-go/presentations/qcon-china.html 8/45

2018/10/21 Practical Go: Real world advice for writing maintainable Go programs

When declaring, but not initialising, a variable, use var . When declaring a variable that will be explicitly initialised later in the function, use the var keyword.

The var acts as a clue to say that this variable has been deliberately declared as the zero value of the indicated type. This is also consistent with the requirement to declare variables at the package level using var as opposed to the short declaration syntax—although I’ll argue later that you shouldn’t be using package level variables at all.

When declaring and initialising, use := . When declaring and initialising the variable at the same time, that is to say we’re not letting the variable be implicitly initialised to its zero value, I recommend using the short variable declaration form. This makes it clear to the reader that the variable on the left hand side of the := is being deliberately initialised.

To explain why, Let’s look at the previous example, but this time deliberately initialising each variable:

In the first and third examples, because in Go there are no automatic conversions from one type to another; the type on the left hand side of the assignment operator must be identical to the type on the right hand side. The compiler can infer the type of the variable being declared from the type on the right hand side, to the example can be written more concisely like this:

This leaves us with explicitly initialising players to 0 which is redundant because 0 is `players’ zero value. So its better to make it clear that we’re going to use the zero value by instead writing

1
var players int

What about the second statement? We cannot elide the type and write

var things = nil
Because nil does not have a type. [2] Instead we have a choice, do we want the zero value for a slice?

1
2
3
4
5
6
7
8
9
10
11
12
var players int    // 0
var things []Thing // an empty slice of Things
var thing Thing // empty Thing struct
json.Unmarshall(reader, &thing)
var players int = 0
var things []Thing = nil
var thing *Thing = new(Thing)
json.Unmarshall(reader, thing)
var players = 0
var things []Thing = nil
var thing = new(Thing)
json.Unmarshall(reader, thing)

https://dave.cheney.net/practical-go/presentations/qcon-china.html 9/45

2018/10/21 Practical Go: Real world advice for writing maintainable Go programs

1
var things []Thing

or do we want to create a slice with zero elements?

1
var things = make([]Thing, 0)

If we wanted the latter then this is not the zero value for a slice so we should make it clear to the reader that we’re making this choice by using the short declaration form:

things := make([]Thing, 0)
Which tells the reader that we have chosen to initialise things explicitly.

This brings us to the third declaration,

var thing = new(Thing)
Which is both explicitly initialising a variable and introduces the uncommon use of the new keyword which some Go

programmer dislike. If we apply our short declaration syntax recommendation then the statement becomes

thing := new(Thing)
Which makes it clear that thing is explicitly initialised to the result of new(Thing) –a pointer to a Thing –but still

leaves us with the unusual use of new . We could address this by using the compact literal struct initialiser form, thing := &Thing{}

Which does the same as
means we’re explicitly initialising

, hence why some Go programmers are upset by the duplication. However this with a pointer to a Thing{} , which is the zero value for a Thing .

new(Thing)

thing

Instead we should recognise that is being declared as its zero value and use the address of operator to pass the address of thing to

thing

1
2
3
json.Unmarshall
var thing Thing
json.Unmarshall(reader, &thing)

https://dave.cheney.net/practical-go/presentations/qcon-china.html 10/45

2018/10/21

Practical Go: Real world advice for writing maintainable Go programs

NOTE

Of course, with any rule of thumb, there are exceptions. For example, sometimes two variables are closely related so writing

Would be odd. The declaration may be more readable like this

min, max := 0, 1000

1
2
var min int
max := 1000

In summary:
When declaring a variable without initialisation, use the var syntax.

When declaring and explicitly initialising a variable, use := . Make tricky declarations obvious.

When something is complicated, it should look complicated. var length uint32 = 0x80

Here length may be being used with a library which requires a specific numeric type and is more TIP explicit that length is being explicitly chosen to be uint32 than the short declaration form:

length := uint32(0x80)

In the first example I’m deliberately breaking my rule of using the var declaration form with an explicit initialiser. This decision to vary from my usual form is a clue to the reader that something unusual is happening.

2.6. Be a team player

I talked about a goal of software engineering to produce readable, maintainable, code. Therefore you will likely spend most of your career working on projects of which you are not the sole author. My advice in this situation is to follow the local style.

Changing styles in the middle of a file is jarring. Uniformity, even if its not your preferred approach, is more valuable for maintenance than your personal preference. My rule of thumb is; if it fits through gofmt then its usually not worth holding up a code review for.

If you want to do a renaming across a code-base, do not mix this into another change. If someone is TIP using git bisect they don’t want to wade through thousands of lines of renaming to find the code you

changed as well.

\3. Comments

Before we move on to larger items I want to spend a few minutes talking about comments.

https://dave.cheney.net/practical-go/presentations/qcon-china.html 11/45

2018/10/21 Practical Go: Real world advice for writing maintainable Go programs

“Good code has lots of comments, bad code requires lots of comments. — Dave Thomas and Andrew Hunt

The Pragmatic Programmer

Comments are very important to the readability of a Go program. A comments should do one of three things:

\1. The comment should explain what the thing does.
\2. The comment should explain how the thing does what it does. 3. The comment should explain why the thing is why it is.

The first form is ideal for commentary on public symbols:

The second form is ideal for commentary inside a method:

The third form, the why , is unique as it does not displace the first two, but at the same time it’s not a replacement for the what, or the how. The why style of commentary exists to explain the external factors that drove the code you read on the page. Frequently those factors rarely make sense taken out of context, the comment exists to provide that context.

In this example it may not be immediately clear what the effect of setting HealthyPanicThreshold to zero percent will do. The comment is needed to clarify that the value of 0 will disable the panic threshold behaviour.

3.1. Comments on variables and constants should describe their contents not their purpose

I talked earlier that the name of a variable, or a constant, should describe its purpose. When you add a comment to a variable or constant, that comment should describe the variables contents, not the variables purpose.

1
const randomNumber = 6 // determined from an unbiased die

In this example the comment describes why is assigned the value six, and where the six was derived from. The comment does not describe where will be used. Here are some more examples:

1
2
3
4
5
// Open opens the named file for reading.
// If successful, methods on the returned file can be used for reading.
// queue all dependant actions
var results []chan error
for _, dep := range a.Deps {

}

1
2
3
4
5
results = append(results, execute(seen, dep))
return &v2.Cluster_CommonLbConfig{
// Disable HealthyPanicThreshold
HealthyPanicThreshold: &envoy_type.Percent{
Value: 0,

}, }

https://dave.cheney.net/practical-go/presentations/qcon-china.html

12/45

1
2
randomNumber
randomNumber

2018/10/21 Practical Go: Real world advice for writing maintainable Go programs

1
2
3
4
5
const (
StatusContinue = 100 // RFC 7231, 6.2.1
StatusSwitchingProtocols = 101 // RFC 7231, 6.2.2
StatusProcessing = 102 // RFC 2518, 10.1
StatusOK = 200 // RFC 7231, 6.3.1

In the context of HTTP the number 100 is known as StatusContinue , as defined in RFC 7231, section 6.2.1. For variables without an initial value, the comment should describe who is responsible for

// sizeCalculationDisabled indicates whether it is safe // to calculate Types’ widths and alignments. See dowidth. var sizeCalculationDisabled bool

TIP

initialising this variable.

Here the comment lets the reader know that the dowidth function is responsible for maintaining the state of sizeCalculationDisabled .

Hiding in plain sight

This is a tip from Kate Gregory. [3] Sometimes you’ll find a better name for a variable hiding in a comment.

The comment was added by the author because registry doesn’t explain enough about its purpose —it’s a registry, but a registry of what?

By renaming the variable to sqlDrivers its now clear that the purpose of this variable is to hold SQL drivers.

var sqlDrivers = make(map[string]*sql.Driver)

Now the comment is redundant and can be removed.

// registry of SQL drivers
var registry = make(map[string]*sql.Driver)

TIP

3.2. Always document public symbols

Because godoc is the documentation for your package, you should always add a comment for every public symbol— variable, constant, function, and method—declared in your package.

Here are two rules from the Google Style guide

Any public function that is not both obvious and short must be commented.
Any function in a library must be commented regardless of length or complexity

https://dave.cheney.net/practical-go/presentations/qcon-china.html 13/45

2018/10/21 Practical Go: Real world advice for writing maintainable Go programs

1
2
3
4
5
6
package ioutil
// ReadAll reads from r until an error or EOF and returns the data it read.
// A successful call returns err == nil, not err == EOF. Because ReadAll is
// defined to read from src until EOF, it does not treat an EOF from Read
// as an error to be reported.
func ReadAll(r io.Reader) ([]byte, error)

There is one exception to this rule; you don’t need to document methods that implement an interface. Specifically don’t do this:

This comment says nothing. It doesn’t tell you what the method does, in fact it’s worse, it tells you to go look somewhere else for the documentation. In this situation I suggest removing the comment entirely.

Here is an example from the io package

1
2
3
4
5
6
7
8
9
10
11
12
13
14
15
16
17
18
19
20
21
22
23
24
// Read implements the io.Reader interface
func (r *FileReader) Read(buf []byte) (int, error)
// LimitReader returns a Reader that reads from r
// but stops with EOF after n bytes.
// The underlying implementation is a *LimitedReader.
func LimitReader(r Reader, n int64) Reader { return &LimitedReader{r, n} }
// A LimitedReader reads from R but limits the amount of
// data returned to just N bytes. Each call to Read
// updates N to reflect the new amount remaining.
// Read returns EOF when N <= 0 or when the underlying R returns EOF.
type LimitedReader struct {
R Reader // underlying reader
N int64 // max bytes remaining
}
func (l *LimitedReader) Read(p []byte) (n int, err error) {
if l.N <= 0 {
return 0, EOF
}
if int64(len(p)) > l.N {
p = p[0:l.N]
}
n, err = l.R.Read(p)
l.N -= int64(n)
return

}

Note that the declaration is directly preceded by the function that uses it, and the declaration of follows the declaration of LimitedReader itself. Even though LimitedReader.Read has no

documentation itself, its clear from that it is an implementation of io.Reader .

1
2
LimitedReader
LimitedReader.Read

TIP

Before you write the function, write the comment describing the function. If you find it hard to write the comment, then it’s a sign that the code you’re about to write is going to be hard to understand.

3.2.1. Don’t comment bad code, rewrite it

https://dave.cheney.net/practical-go/presentations/qcon-china.html 14/45

2018/10/21 Practical Go: Real world advice for writing maintainable Go programs

“ Don’t comment bad code — rewrite it — Brian Kernighan

Comments highlighting the grossness of a particular piece of code are not sufficient. If you encounter one of these comments, you should raise an issue as a reminder to refactor it later. It is okay to live with technical debt, as long as the amount of debt is known.

The tradition in the standard library is to annotate a TODO style comment with the username of the person who noticed it.

1
// TODO(dfc) this is O(N^2), find a faster way to do this.

The username is not a promise that that person has committed to fixing the issue, but they may be the best person to ask when the time comes to address it. Other projects annotate TODOs with a date or an issue number.

“3.2.2. Rather than commenting a block of code, refactor it

Good code is its own best documentation. As you’re about to add a comment, ask yourself, ‘How can I improve the code so that this comment isn’t needed?’ Improve the code and then document it to make it even clearer.

— Steve McConnell

Functions should do one thing only. If you find yourself commenting a piece of code because it is unrelated to the rest of the function, consider extracting it into a function of its own.

In addition to be easier to comprehend, smaller functions are easier to test in isolation, and now you’ve isolated the orthogonal code into its own function, its name may be all the documentation required.

“4. Package Design
Write shy code - modules that don’t reveal anything unnecessary to other modules and that

don’t rely on other modules’ implementations.

— Dave Thomas

Each Go package is in effect it’s own small Go program. Just as the implementation of a function or method is unimportant to the caller, the implementation of the functions and methods and types that make your package’s public API—its behaviour—is unimportant for the caller.

A good Go package should strive to have a low degree of source level coupling such that, as the project grows, changes to one package do not cascade across the code-base. These stop-the-world refactorings place a hard limit on the rate of change in a code base and thus the productivity of the members working in that code-base.

In this section we’ll talk about designing a package including the package’s name, naming types, and tips for writing methods and functions.

4.1. A good package starts with its name

Writing a good Go package starts with the package’s name. Think of your package’s name as an elevator pitch to describe what it does using just one word.

https://dave.cheney.net/practical-go/presentations/qcon-china.html

15/45

2018/10/21 Practical Go: Real world advice for writing maintainable Go programs

Just as I talked about names for variables in the previous section, the name of a package is very important. The rule of thumb I follow is not, “what types should I put in this package?”. Instead the question I ask “what does service does package provide?” Normally the answer to that question is not “this package provides the X type”, but “this package let’s you speak HTTP”.

TIP Name your package after what is provides, not what it contains. 4.1.1. Good package names should be unique.

Within your project, each package name should be unique. This advice is pretty easy to follow if the advice that a package’s name should derive from its purpose—if you find you have two packages which need the same name, it is likely either;

a. The name of the package is too generic.

b. The package overlaps another package of a similar name. In this case either you should review your design, or consider merging the packages.

4.2. Avoid package names like base , common , or util

A common cause of poor package names is what call utility packages. These are packages where common helpers and utility code congeals over time. As these packages contain an assortment of unrelated functions, their utility is hard to describe in terms of what the package provides. This often leads to the package’s name being derived from what the package contains–utilities.

Package names like utils or helpers are commonly found in larger projects which have developed deep package hierarchies and want to share helper functions without encountering import loops. By extracting utility functions to new package the import loop is broken, but because the package stems from a design problem in the project, its name doesn’t reflect its purpose, only its function of breaking the import cycle.

My recommendation to improve the name of utils or helpers packages is to analyse where they are called and if possible move the relevant functions into their caller’s package. Even if this involves duplicating some helper code this is better than introducing an import dependency between two packages.

“[A little] duplication is far cheaper than the wrong abstraction. — Sandy Metz

In the case where utility functions are used in many places prefer multiple packages, each focused on a single aspect, to a single monolithic package.

TIP Use plurals for naming utility packages. For example the strings for string handling utilities.

Packages with names like base or common are often found when functionality common to two or more implementations, or common types for a client and server, has been refactored into a separate package. I believe the solution to this is to reduce the number of packages, to combine the client, server, and common code into a single package named after the function of the package.

For example, the net/http package does not have client and sub packages, instead it has a client.go and server.go file, each holding their respective types, and a file for the common message transport code.

server

https://dave.cheney.net/practical-go/presentations/qcon-china.html

16/45

1
transport.go

2018/10/21

Practical Go: Real world advice for writing maintainable Go programs

TIP

An identifier’s name includes its package name.

It’s important to remember that the name of an identifier includes the name of its package.

The Get function from the net/http package becomes http.Get when referenced by another package.

The Reader type from the strings package becomes strings.Reader when imported into other packages.

The Error interface from the net package is clearly related to network errors. 4.3. Return early rather than nesting deeply

As Go does not use exceptions for control flow there is no requirement to deeply indent your code just to provide a top level structure for the try and catch blocks. Rather than the successful path nesting deeper and deeper to the right, Go code is written in a style where the success path continues down the screen as the function progresses. My friend Mat Ryer calls this practice ‘line of sight’ coding. [4]

This is achieved by using guard clauses; conditional blocks with assert preconditions upon entering a function. Here is an example from the bytes package,

1
2
func (b *Buffer) UnreadRune() error {
if b.lastRead <= opInvalid {

GO

1
2
3
4
5
6
7
        return errors.New("bytes.Buffer: UnreadRune: previous operation was not a successful
ReadRune")
}
if b.off >= int(b.lastRead) {
b.off -= int(b.lastRead)
}
b.lastRead = opInvalid

return nil }

Upon entering UnreadRune the state of b.lastRead is checked and if the previous operation was not an error is returned immediately. From there the rest of the function proceeds with the assertion that is greater that opInvalid .

Compare this to the same function written without a guard clause,

1
2
3
4
5
6
7
func (b *Buffer) UnreadRune() error {
if b.lastRead > opInvalid {
if b.off >= int(b.lastRead) {
b.off -= int(b.lastRead)
}
b.lastRead = opInvalid
return nil

}

1
2
    return errors.New("bytes.Buffer: UnreadRune: previous operation was not a successful
ReadRune")

}

GO

The body of the successful case, the most common, is nested inside the first if condition and the successful exit condition, return nil , has to be discovered by careful matching of closing braces. The final line of the function now returns an error, and the called must trace the execution of the function back to the matching opening brace to know

https://dave.cheney.net/practical-go/presentations/qcon-china.html 17/45

ReadRune

b.lastRead

2018/10/21 Practical Go: Real world advice for writing maintainable Go programs

when control will reach this point.

This is more error prone for the reader, and the maintenance programmer, hence why Go prefer to use guard clauses and returning early on errors.

4.4. Make the zero value useful

Every variable declaration, assuming no explicit initialiser is provided, will be automatically initialised to a value that matches the contents of zeroed memory. This is the values zero value. The type of the value determines its zero value; for numeric types it is zero, for pointer types nil, the same for slices, maps, and channels.

This property of always setting a value to a known default is important for safety and correctness of your program and can make your Go programs simpler and more compact. This is what Go programmers talk about when they say “give your structs a useful zero value”.

Consider the sync.Mutex type. sync.Mutex contains two unexported integer fields, representing the mutex’s internal state. Thanks to the zero value those fields will be set to will be set to 0 whenever a sync.Mutex is declared.

sync.Mutex has been deliberately coded to take advantage of this property, making the type usable without explicit initialisation.

1
2
type MyInt struct {
mu sync.Mutex

val int }

1
2
3
4
5
6
func main() {
var i MyInt
// i.mu is usable without explicit initialisation.
i.mu.Lock()
i.val++
i.mu.Unlock()

}

GO

Another example of a type with a useful zero value is bytes.Buffer . You can declare a bytes.Buffer and start writing to it without explicit initialisation.

A useful property of slices is their zero value is nil . This makes sense if we look at the runtime’s definition of a slice header.

1
2
3
4
func main() {
var b bytes.Buffer
b.WriteString("Hello, world!\n")
io.Copy(os.Stdout, &b)

}

GO

1
2
3
4
type slice struct {
array *[...]T // pointer to the underlying array
len int
cap int

}

https://dave.cheney.net/practical-go/presentations/qcon-china.html 18/45

2018/10/21 Practical Go: Real world advice for writing maintainable Go programs

The zero value of this struct would imply len and cap have the value 0 , and array , the pointer to memory holding the contents of the slice’s backing array, would be nil . This means you don’t need to explicitly make a slice, you can just declare it.

1
2
3
4
5
6
7
func main() {
// s := make([]string, 0)
// s := []string{}
var s []string
s = append(s, "Hello")
s = append(s, "world")
fmt.Println(strings.Join(s, " "))

}

GO

var s []string is similar to the two commented lines above it, but not identical. It is possible to detect the difference between a slice value that is nil and a slice value that has zero length. The following code will output false.

NOTE

A surprising, but useful, property of uninitialised pointer variables—nil pointers—is you can call methods on types that have a nil value. This can be used to provide default values simply.

func main() {
var s1 = []string{}
var s2 []string fmt.Println(reflect.DeepEqual(s1, s2))

}

GO

1
2
type Config struct {
path string

}

1
2
3
4
5
6
7
8
9
10
func (c *Config) Path() string {
if c == nil {
return "/usr/home"
}
return c.path
}
func main() {
var c1 *Config
var c2 = &Config{
path: "/export",

}

1
2
    fmt.Println(c1.Path(), c2.Path())
}

GO

4.5. Avoid package level state

The key to writing maintainable programs is that they should be loosely coupled—a change to one package should have a low probability of affecting another package that does not directly depend on the first.

There are two excellent ways to achieve loose coupling in Go

https://dave.cheney.net/practical-go/presentations/qcon-china.html

19/45

2018/10/21 Practical Go: Real world advice for writing maintainable Go programs

\1. Use interfaces to describe the behaviour your functions or methods require. 2. Avoid the use of global state.

In Go we can declare variables at the function or method scope, and also at the package scope. When the variable is public, given a identifier starting with a capital letter, then its scope is effectively global to the entire program—any package may observe the type and contents of that variable at any time.

Mutable global state introduces tight coupling between independent parts of your program as global variables become an invisible parameter to every function in your program! Any function that relies on a global variable can be broken if that variable’s type changes. Any function that relies on the state of a global variable can be broken if another part of the program changes that variable.

If you want to reduce the coupling a global variable creates,

\1. Move the relevant variables as fields on structs that need them.
\2. Use interfaces to reduce the coupling between the behaviour and the implementation of that behaviour.

\5. Project Structure

Let’s talk about combining packages together into a project. Commonly this will be a single git repository, but in the future Go developers will use module and project interchangeably.

Just like a package, each project should have a clear purpose. If your project is a library, it should provide one thing, say XML parsing, or logging. You should avoid combining multiple purposes into a single package, this will help avoid the dreaded common library.

In my experience, the common repo ends up tightly coupled to its biggest consumer and that makes TIP it hard to back-port fixes without upgrading both common and consumer in lock step, bringing in a

lot of unrelated changes and API breakage along the way.

If your project is an application, like your web application, Kubernetes controller, and so on, then you might have one or more packages inside your project. For example, the Kubernetes controller I work on has a single

package which serves as both the server deployed to a Kubernetes cluster, and a client for debugging

purposes.

5.1. Consider fewer, larger packages

One of the things I tend to pick up in code review for programmers who are transitioning from other languages to Go is they tend to overuse packages.

Go does not provide elaborate ways of establishing visibility; thing Java’s public , protected , private , and implicit default access modifiers. There is no equivalent of C++’s notion of friend classes.

In Go we have only two access modifiers, public and private, indicated by the capitalisation of the first letter of the identifier. If an identifier is public, it’s name starts with a capital letter, that identifier can be referenced by any other Go package.

NOTE You may hear people say exported and not exported as synonyms for public and private.
Given the limited controls available to control access to a package’s symbols, what practices should Go programmers

follow to avoid creating over-complicated package hierarchies?

main

cmd/contour

https://dave.cheney.net/practical-go/presentations/qcon-china.html 20/45

2018/10/21 Practical Go: Real world advice for writing maintainable Go programs

TIP Every package, with the exception of cmd/ and internal/ , should contain some source code.

The advice I find myself repeating is to prefer fewer, larger packages. Your default position should be to not create a new package. That will lead to too many types being made public creating a wide, shallow, API surface for your package..

The sections below explores this suggestion in more detail.

TIP

Coming from Java?

If you’re coming from a Java or C# background, consider this rule of thumb. - A Java package is equivalent to a single .go source file. - A Go package is equivalent to a whole Maven module or .NET assembly.

5.1.1. Arrange code into les by import statements

If you’re arranging your packages by what they provide to callers, should you do the same for files within a Go package? How do you know when you should break up a .go file into multiple ones? How do you know when you’ve gone to far and should consider consolidating .go file?

Here are the rules of thumb I use:
Start each package with one file. Give that file the same name as the name of the folder. eg. package http

should be placed in a file called in a directory named http .

As your package grows you may decide to split apart the various responsibilities into different files. eg,
contains the `Request and Response types, client.go contains the Client type, server.go

contains the type.

If you find your files have similar import declarations, consider combining them. Alternatively, identify the differences between the import sets and move those

Different files should be responsible for different areas of the package. may be responsible for marshalling of HTTP requests and responses on and off the network, may contain the low level network handling logic, client.go and server.go implement the HTTP business logic of request construction or routing, and so on.

TIP Prefer nouns for source file names.

The Go compiler compiles each package in parallel. Within a package the compiler compiles each NOTE function (methods are just fancy functions in Go) in parallel. Changing the layout of your code within

a package does not affect compilation time.

5.1.2. Prefer internal tests to external tests

The go tool supports writing your testing package tests in two places. Assuming your package is called http2 , you can write a file and use the declaration. Doing so will compile the code in

as if it were part of the package. This is known colloquially as an internal test.

The go tool also supports a special package declaration, ending in test , ie., package http_test . This allows your test files to live alongside your code in the same package, however when those tests are compiled they are not part of your package’s code, they live in their own package. This allows you to write your tests as if you were another package calling into your code. This is known as an _external test.

.go

http.go

messages.go

Server

messages.go

http.go

1
http2_test.go

package http2

1
http2_test.go

http2

https://dave.cheney.net/practical-go/presentations/qcon-china.html 21/45

2018/10/21 Practical Go: Real world advice for writing maintainable Go programs

I recommend using internal tests when writing unit tests for your package. This allows you to test each function or method directly, avoiding the bureaucracy of external testing.

However, you should place your Example test functions in an external test file. This ensures that when viewed in godoc, the examples have the appropriate package prefix and can be easily copy pasted.

TIP

Avoid elaborate package hierarchies, resist the desire to apply taxonomy

With one exception, which we’ll talk about next, the hierarchy of Go packages has no meaning to the go tool. For example, the net/http package is not a child or sub-package of the net package.

If you find you have created intermediate directories in your project which contain no .go files, you may have failed to follow this advice.

5.1.3. Use internal packages to reduce your public API surface

If your project contains multiple packages you may have some exported functions which are intended to be used by other packages in your project, but are not intended to be part of your project’s public API. If you find yourself in this situation the go tool recognises a special folder name—not package name–, internal/ which can be used to place code which is public to your project, but private to other projects.

To create such a package, place it in a directory named internal/ or in a sub-directory of a directory named internal/ . When the go command sees an import of a package with in its path, it verifies that the

package doing the import is within the tree rooted at the parent of the directory.
For example, a package can be imported only by code in the directory tree rooted at …

/a/b/c . It cannot be imported by code in or in any other repository. [5] 5.2. Keep package main small as small as possible

Your main function, and package should do as little as possible. This is because main.main acts as a singleton; there can only be one function in a program, including tests.

Because main.main is a singleton there are a lot of assumptions built into the things that main.main will call that they will only be called during main.main or main.init, and only called once. This makes it hard to write tests for code written in main.main , thus you should aim to move as much of your business logic out of your main function and ideally out of your main package.

TIP

main should parse flags, open connections to databases, loggers, and such, then hand off execution to a high level object.

\6. API Design

The last piece of design advice I’m going to give today I feel is the most important.

All of the suggestions I’ve made so far are just that, suggestions. These are the way I try to write my Go, but I’m not going to push them hard in code review.

However when it comes to reviewing APIs during code review, I am less forgiving. This is because everything I’ve talked about so far can be fixed without breaking backward compatibility; they are, for the most part, implementation details.

When it comes to the public API of a package, it pays to put considerable thought into the initial design, because changing that design later is going to be disruptive for people who are already using your API.

https://dave.cheney.net/practical-go/presentations/qcon-china.html 22/45

internal

main

…/a/b/g

internal

1
.../a/b/c/internal/d/e/f

main

2018/10/21 Practical Go: Real world advice for writing maintainable Go programs

“6.1. Design APIs that are hard to misuse.
APIs should be easy to use and hard to misuse.

— Josh Bloch [3]

If you take anything away from this presentation, it should be this advice from Josh Bloch. If an API is hard to use for simple things, then every invocation of the API will look complicated. When the actual invocation of the API is complicated it will be less obvious and more likely to be overlooked.

6.1.1. Be wary of functions which take several parameters of the same type

A good example of a simple looking, but hard to use correctly API is one which takes two or more parameters of the same type. Let’s compare two function signatures:

What’s the difference between these two functions? Obviously one returns the maximum of two numbers, the other copies a file, but that’s not the important thing.

Max is commutative; the order of the parameters does not matter. The maximum of eight and ten is ten regardless of if I compare eight to ten or ten two eight.

However, this property does not hold true for CopyFile .

Which one of these statements made a backup of your presentation and which one overwrite your presentation with last week’s version? You can’t tell without consulting the documentation. A code reviewer cannot know if you’ve got the order correct without consulting the documentation.

One possible solution to this is to introduce a helper type which will be responsible for calling CopyFile correctly.

1
2
3
4
5
6
7
8
9
func Max(a, b int) int
func CopyFile(to, from string) error
Max(8, 10) // 10
Max(10, 8) // 10
CopyFile("/tmp/backup", "presentation.md")
CopyFile("presentation.md", "/tmp/backup")
type Source string
func (src Source) CopyTo(dest string) error {
return CopyFile(dest, string(src))

}

1
2
3
func main() {
var from Source = "presentation.md"
from.CopyTo("/tmp/backup")

}

GO

In this way CopyFile is always called correctly—this can be asserted with a unit test—and can possibly be made private, further reducing the likelihood of misuse.

https://dave.cheney.net/practical-go/presentations/qcon-china.html 23/45

2018/10/21 Practical Go: Real world advice for writing maintainable Go programs

TIP APIs with multiple parameters of the same type are hard to use correctly. 6.2. Design APIs for their default use case

A few years ago I gave a talk [6] about using functional options [7] to make APIs easier to use for their default case.

The gist of this talk was you should design your APIs for the common use case. Sad another way, your API should not require the caller to provide parameters which they don’t care about.

6.2.1. Discourage the use of nil as a parameter

I opened this chapter with the suggestion that you shouldn’t force the caller of your API into providing you parameters when they don’t really care what those parameters mean. This is what I mean when I say design APIs for their default use case.

Here’s an example from the net/http package

package http

1
2
3
4
5
6
7
8
// ListenAndServe listens on the TCP network address addr and then calls
// Serve with handler to handle requests on incoming connections.
// Accepted connections are configured to enable TCP keep-alives.
//
// The handler is typically nil, in which case the DefaultServeMux is used.
//
// ListenAndServe always returns a non-nil error.
func ListenAndServe(addr string, handler Handler) error {

ListenAndServe takes two parameters, a TCP address to listen for incoming connections, and http.Handler to handle the incoming HTTP request. Serve allows the second parameter to be nil , and notes that usually the caller will pass nil indicating that they want to use http.DefaultServeMux as the implicit parameter.

Now the caller of Serve has two ways to do the same thing.

Both do exactly the same thing.

This behaviour is viral. The http package also has a http.Serve helper, which you can reasonably imagine that builds upon like this

1
2
http.ListenAndServe("0.0.0.0:8080", nil)
http.ListenAndServe("0.0.0.0:8080", http.DefaultServeMux)

nil

1
2
3
4
ListenAndServe
func ListenAndServe(addr string, handler Handler) error {
l, err := net.Listen("tcp", addr)
if err != nil {

return err }

1
2
3
    defer l.Close()
return Serve(l, handler)
}

GO

https://dave.cheney.net/practical-go/presentations/qcon-china.html 24/45

http.Serve

1
ListenAndServe

nil
handler

DefaultServeMux`” logic.

http.Serve

Accepting `nil

nil

Serve

1
2
3
http.Serve(nil, nil)
http.ListenAndServe
DefaultServeMux

nil

1
2
3
const root = http.Dir("/htdocs")
http.Handle("/", http.FileServer(root))
http.ListenAndServe("0.0.0.0:8080", nil)

GO

1
2
3
const root = http.Dir("/htdocs")
http.Handle("/", http.FileServer(root))
http.ListenAndServe("0.0.0.0:8080", http.DefaultServeMux)

GO

1
2
3
4
const root = http.Dir("/htdocs")
mux := http.NewServeMux()
http.Handle("/", http.FileServer(root))
http.ListenAndServe("0.0.0.0:8080", mux)

GO

1
func ShutdownVMs(ids []string) error

2018/10/21

Practical Go: Real world advice for writing maintainable Go programs

Because behaviour. In fact,

permits the caller to pass for the second parameter, also supports this is the one that implements the “if is nil , use

for one parameter may lead the caller into thinking they can pass for both parameters. However calling like this,

results in an ugly panic.
TIP Don’t mix nil and non nil-able parameters in the same function signature.

The author of was trying to make the API user’s life easier in the common case, but possibly made the package harder to use safely.

There is no difference in line count between using explicitly, or implicitly via .

verses

and a was this confusion really worth saving one line?

TIP

Give serious consideration to how much time helper functions will save the programmer. Clear is better than concise.

Avoid public APIs with test only parameters

TIP Avoid exposing APIs with values who only differ in test scope. Instead, use Public wrappers to hide those parameters, use test scoped helpers to set the property in test scope.

6.2.2. Prefer var args to []T parameters

It’s very common to write a function or method that takes a slice of values.

https://dave.cheney.net/practical-go/presentations/qcon-china.html

25/45

2018/10/21 Practical Go: Real world advice for writing maintainable Go programs

This is just an example I made up, but its common to a lot of code I’ve worked on. The problem with signatures like these is they presume that they will be called with more than one entry. However, what I have found is many times these type of functions are called with only one argument, which has to be “boxed” inside a slice just to meet the requirements of the functions signature.

Additionally, because the ids parameter is a slice, you can pass an empty slice or nil to the function and the compiler will be happy. This adds extra testing load because you should cover these cases in your testing.

To give an example of this class of API, recently I was refactoring a piece of logic that required me to set some extra fields if at least one of a set of parameters was non zero. The logic looked like this:

As the if statement was getting very long I wanted to pull the logic of the check out into its own function. This is what I came up with:

1
2
3
4
5
6
7
8
if svc.MaxConnections > 0 || svc.MaxPendingRequests > 0 || svc.MaxRequests > 0 ||
svc.MaxRetries > 0 {
// apply the non zero parameters
}
// anyPostive indicates if any value is greater than zero.
func anyPositive(values ...int) bool {
for _, v := range values {
if v > 0 {

return true }

}

1
2
    return false
}

GO

This enabled me to make the condition where the inner block will be executed clear to the reader:

However there is a problem with anyPositive , someone could accidentally invoke it like this if anyPositive() { … }

In this case anyPositive would return false because it would execute zero iterations and immediately return false . This isn’t the worst thing in the world — that would be if anyPositive returned true when passed no

arguments.

Nevertheless it would be be better if we could change the signature of anyPositive to enforce that the caller should pass at least one argument. We can do that by combining normal and vararg parameters like this:

1
2
if anyPositive(svc.MaxConnections, svc.MaxPendingRequests, svc.MaxRequests, svc.MaxRetries) {
// apply the non zero parameters

}

https://dave.cheney.net/practical-go/presentations/qcon-china.html 26/45

2018/10/21 Practical Go: Real world advice for writing maintainable Go programs

Now anyPositive cannot be called with less than one argument. 6.3. Let functions dene the behaviour they requires

Let’s say I’ve been given a task to write a function that persists a Document structure to disk.

I could specify this function, Save, which takes an *os.File as the destination to write the Document . But this has a few problems

The signature of Save precludes the option to write the data to a network location. Assuming that network storage is likely to become requirement later, the signature of this function would have to change, impacting all its callers.

Save is also unpleasant to test, because it operates directly with files on disk. So, to verify its operation, the test would have to read the contents of the file after being written.

And I would have to ensure that f was written to a temporary location and always removed afterwards.

os.File also defines a lot of methods which are not relevant to , like reading directories and checking to see if a path is a symlink. It would be useful if the signature of the function could describe only the parts of os.File that were relevant.

What can we do ?

Using io.ReadWriteCloser we can apply the interface segregation principle to redefine Save to take an interface that describes more general file shaped things.

With this change, any type that implements the io.ReadWriteCloser interface can be substituted for the previous *os.File .

This makes Save both broader in its application, and clarifies to the caller of Save which methods of the *os.File type are relevant to its operation.

1
2
// Save writes the contents of doc to the file f.
func Save(f *os.File, doc *Document) error

Save

Save

1
2
3
4
5
6
7
8
9
10
11
// Save writes the contents of doc to the supplied
// ReadWriterCloser.
func Save(rwc io.ReadWriteCloser, doc *Document) error
// anyPostive indicates if any value is greater than zero.
func anyPositive(first int, rest ...int) bool {
if first > 0 {
return true
}
for _, v := range rest {
if v > 0 {
return true

} }

1
2
    return false
}

GO

https://dave.cheney.net/practical-go/presentations/qcon-china.html 27/45

2018/10/21 Practical Go: Real world advice for writing maintainable Go programs

And as the author of I no longer have the option to call those unrelated methods on as it is hidden behind the interface.

But we can take the interface segregation principle a bit further.

Firstly, it is unlikely that if Save follows the single responsibility principle, it will read the file it just wrote to verify its contents—that should be responsibility of another piece of code.

So we can narrow the specification for the interface we pass to Save to just writing and closing.
Secondly, by providing Save with a mechanism to close its stream, which we inherited in this desire to make it still

look like a file, this raises the question of under what circumstances will wc be closed.
Possibly Save will call Close unconditionally, or perhaps Close will be called in the case of success.

This presents a problem for the caller of Save as it may want to write additional data to the stream after the document is written.

A better solution would be to redefine Save to take only an io.Writer , stripping it completely of the responsibility to do anything but write data to a stream.

By applying the interface segregation principle to our Save function, the results has simultaneously been a function which is the most specific in terms of its requirements—it only needs a thing that is writable—and the most general in its function, we can now use Save to save our data to anything which implements io.Writer.

\7. Error handling

I’ve given several presentations about error handling [8] and written a lot about error handling on my blog. I also spoke a lot about error handling in yesterday’s session so I won’t repeat what I’ve said.

https://dave.cheney.net/2014/12/24/inspecting-errors https://dave.cheney.net/2016/04/07/constant-errors

Instead I want to cover two other areas related to error handling.

7.1. Eliminate error handling by eliminating errors

If you were in my presentation yesterday I talked about the draft proposals for improving error handling. But do you know what is better than an improved syntax for handling errors? Not needing to handle errors at all.

Save

*os.File

1
2
3
4
5
6
// Save writes the contents of doc to the supplied
// WriteCloser.
func Save(wc io.WriteCloser, doc *Document) error
// Save writes the contents of doc to the supplied
// Writer.
func Save(w io.Writer, doc *Document) error

NOTE

I’m not saying “remove your error handling”. What I am suggesting is, change your code so you do not have errors to handle.

1
io.ReadWriteCloser

https://dave.cheney.net/practical-go/presentations/qcon-china.html 28/45

2018/10/21 Practical Go: Real world advice for writing maintainable Go programs

This section draws inspiration from John Ousterhout’s recently book, A philosophy of Software Design [9]. One of the chapters in that book is called “Define Errors Out of Existence”. We’re going to try to apply this advice to Go.

7.1.1. Counting lines

Let’s write a function to count the number of lines in a file.

1
2
3
4
5
func CountLines(r io.Reader) (int, error) {
var (
br = bufio.NewReader(r)
lines int
err error

)

1
2
3
4
for {
_, err = br.ReadString('\n')
lines++
if err != nil {

break }

}

1
2
if err != io.EOF {
return 0, err

}

1
2
    return lines, nil
}

GO

Because we’re following our advice from previous sections, CountLines takes an io.Reader, not a *File; its the job of the caller to provide the io.Reader who’s contents we want to count.

We construct a bufio.Reader , and then sit in a loop calling the ReadString method, incrementing a counter until we reach the end of the file, then we return the number of lines read.

At least that’s the code we want to write, but instead this function is made more complicated by error handling. For example, there is this strange construction,

We increment the count of lines before checking the error—that looks odd.
The reason we have to write it this way is ReadString will return an error if it encounters and end-of-file before

hitting a newline character. This can happen if there is no final newline in the file.
To try to fix this, we rearrange the logic to increment the line count, then see if we need to exit the loop.

NOTE this logic still isn’t perfect, can you spot the bug?

1
2
3
_, err = br.ReadString('\n')
lines++
if err != nil {

break }

GO

https://dave.cheney.net/practical-go/presentations/qcon-china.html 29/45

2018/10/21 Practical Go: Real world advice for writing maintainable Go programs

But we’re not done checking errors yet. will return when it hits the end of the file. This is expected, needs some way of saying stop, there is nothing more to read. So before we return the error to the caller of , we need to check if the error was not io.EOF , and in that case propagate it up, otherwise we return nil to say that everything worked fine.

I think this is a good example of Russ Cox’s observation that error handling can obscure the operation of the function. Let’s look at an improved version.

ReadString

io.EOF

ReadString

CountLine

1
2
3
4
5
func CountLines(r io.Reader) (int, error) {
sc := bufio.NewScanner(r)
lines := 0
for sc.Scan() {
lines++

}

1
2
    return lines, sc.Err()
}

GO

This improved version switches from using bufio.Reader to bufio.Scanner .

Under the hood bufio.Scanner uses , but it adds a nice layer of abstraction which helps remove the error handling with obscured the operation of .

1
bufio.Reader

CountLines

NOTE

The method, the body of our

bufio.Scanner can scan for any pattern, but by default it looks for newlines.

returns true if the scanner has matched a line of text and has not encountered an error. So, loop will be called only when there is a line of text in the scanner’s buffer. This means our revised

sc.Scan()

for

CountLines correctly handles the case where there is no trailing newline, and also handles the case where the file was empty.

Secondly, as sc.Scan returns false once an error is encountered, our for loop will exit when the end-of-file is reached or an error is encountered. The type memoises the first error it encountered and we can recover that error once we’ve exited the loop using the method.

Lastly, sc.Err() takes care of handling io.EOF and will convert it to a nil if the end of file was reached without encountering another error.

1
bufio.Scanner

sc.Err()

TIP

When you find yourself faced with overbearing error handling, try to extract some of the operations into a helper type.

7.1.2. WriteResponse

My second example is inspired from the Errors are values blog post [10].

Earlier in this presentation We’ve seen examples dealing with opening, writing and closing files. The error handling is present, but not overwhelming as the operations can be encapsulated in helpers like ioutil.ReadFile and

ioutil.WriteFile . However when dealing with low level network protocols it becomes necessary to build the response directly using I/O primitives the error handling can become repetitive. Consider this fragment of a HTTP server which is constructing the HTTP response.

https://dave.cheney.net/practical-go/presentations/qcon-china.html 30/45

2018/10/21 Practical Go: Real world advice for writing maintainable Go programs

First we construct the status line using fmt.Fprintf , and check the error. Then for each header we write the header key and value, checking the error each time. Lastly we terminate the header section with an additional \r\n , check the error, and copy the response body to the client. Finally, although we don’t need to check the error from io.Copy , we need to translate it from the two return value form that io.Copy returns into the single return value that

WriteResponse returns.
That’s a lot of repetitive work. But we can make it easier on ourselves by introducing a small wrapper type,

errWriter .

errWriter fulfils the io.Writer contract so it can be used to wrap an existing io.Writer . errWriter passes writes through to its underlying writer until an error is detected. From that point on, it discards any writes and returns the previous error.

1
2
type Header struct {
Key, Value string

}

1
2
3
4
5
6
7
type Status struct {
Code int
Reason string
}
func WriteResponse(w io.Writer, st Status, headers []Header, body io.Reader) error {
_, err := fmt.Fprintf(w, "HTTP/1.1 %d %s\r\n", st.Code, st.Reason)
if err != nil {

return err }

1
2
3
for _, h := range headers {
_, err := fmt.Fprintf(w, "%s: %s\r\n", h.Key, h.Value)
if err != nil {

return err }

}

1
2
if _, err := fmt.Fprint(w, "\r\n"); err != nil {
return err

}

1
_, err = io.Copy(w, body)

return err }

GO

https://dave.cheney.net/practical-go/presentations/qcon-china.html 31/45

2018/10/21 Practical Go: Real world advice for writing maintainable Go programs

Applying errWriter to WriteResponse dramatically improves the clarity of the code. Each of the operations no longer needs to bracket itself with an error check. Reporting the error is moved to the end of the function by inspecting the ew.err field, avoiding the annoying translation from `io.Copy’s return values.

7.2. Only handle an error once

Lastly, I want to mention that you should only handle errors once. Handling an error means inspecting the error value, and making a single decision.

If you make less than one decision, you’re ignoring the error. As we see here, the error from w.WriteAll is being discarded.

But making more than one decision in response to a single error is also problematic. The following is code that I come across frequently.

1
2
// WriteAll writes the contents of buf to the supplied writer.
func WriteAll(w io.Writer, buf []byte) {

}

1
2
3
w.Write(buf)
type errWriter struct {
io.Writer

err error }

1
2
3
4
5
6
7
func (e *errWriter) Write(buf []byte) (int, error) {
if e.err != nil {
return 0, e.err
}
var n int
n, e.err = e.Writer.Write(buf)
return n, nil

}

1
2
3
4
5
func WriteResponse(w io.Writer, st Status, headers []Header, body io.Reader) error {
ew := &errWriter{Writer: w}
fmt.Fprintf(ew, "HTTP/1.1 %d %s\r\n", st.Code, st.Reason)
for _, h := range headers {
fmt.Fprintf(ew, "%s: %s\r\n", h.Key, h.Value)

}

1
2
3
fmt.Fprint(ew, "\r\n")
io.Copy(ew, body)
return ew.err

}

GO

1
2
3
4
5
6
func WriteAll(w io.Writer, buf []byte) error {
_, err := w.Write(buf)
if err != nil {
log.Println("unable to write:", err) // annotated error goes to log file
return err // unannotated error returned to caller
}

return nil }

GO

https://dave.cheney.net/practical-go/presentations/qcon-china.html 32/45

2018/10/21 Practical Go: Real world advice for writing maintainable Go programs

In this example if an error occurs during , a line will be written to a log file, noting the file and line that the error occurred, and the error is also returned to the caller, who possibly will log it, and return it, all the way back up to the top of the program.

The caller is probably doing the same

1
2
3
4
func WriteConfig(w io.Writer, conf *Config) error {
buf, err := json.Marshal(conf)
if err != nil {
log.Printf("could not marshal config: %v", err)

return err }

1
2
3
if err := WriteAll(w, buf); err != nil {
log.Println("could not write config: %v", err)
return err

}

return nil }

GO

So you get a stack of duplicate lines in your log file,

but at the top of the program you get the original error without any context.

I want to dig into this a little further because I don’t see the problems with logging and returning as just a matter of personal preference.

1
2
3
4
5
6
7
8
9
10
11
12
13
unable to write: io.EOF
could not write config: io.EOF
err := WriteConfig(f, &conf)
fmt.Println(err) // io.EOF
func WriteConfig(w io.Writer, conf *Config) error {
buf, err := json.Marshal(conf)
if err != nil {
log.Printf("could not marshal config: %v", err)
// oops, forgot to return
}
if err := WriteAll(w, buf); err != nil {
log.Println("could not write config: %v", err)
return err

}

return nil }

GO

The problem I see a lot is programmers forgetting to return from an error. As we talked about earlier, Go style is to use guard clauses, checking preconditions as the function progresses and returning early.

In this example the author checked the error, logged it, but forgot to return. This has caused a subtle bug.

w.Write

https://dave.cheney.net/practical-go/presentations/qcon-china.html 33/45

2018/10/21 Practical Go: Real world advice for writing maintainable Go programs

The contract for error handling in Go says that you cannot make any assumptions about the contents of other return values in the presence of an error. As the JSON marshalling failed, the contents of buf are unknown, maybe it contains nothing, but worse it could contain a 1/2 written JSON fragment.

Because the programmer forgot to return after checking and logging the error, the corrupt buffer will be passed to WriteAll , which will probably succeed and so the config file will be written incorrectly. However the function will

return just fine, and the only indication that a problem happened will be a single log line complaining about marshalling JSON, not a failure to write the config.

7.2.1. Adding context to errors

The bug occurred because the author was trying to add context to the error message. They were trying to leave themselves a breadcrumb to point them back to the source of the error.

Let’s look at another way to do the same thing using fmt.Errorf .

1
2
3
4
5
6
7
func WriteConfig(w io.Writer, conf *Config) error {
buf, err := json.Marshal(conf)
if err != nil {
return fmt.Errorf("could not marshal config: %v", err)
}
if err := WriteAll(w, buf); err != nil {
return fmt.Errorf("could not write config: %v", err)

}

return nil }

1
2
3
4
5
func WriteAll(w io.Writer, buf []byte) error {
_, err := w.Write(buf)
if err != nil {
return fmt.Errorf("write failed: %v", err)
}

return nil }

GO

By combining the annotation of the error with returning onto one line there it is harder to forget to return an error and avoid continuing accidentally.

If an I/O error occurs writing the file, the error’s `Error() method will report something like this; could not write config: write failed: input/output error

7.2.2. Wrapping errors with github.com/pkg/errors

The fmt.Errorf pattern works well for annotating the error message, but it does so at the cost of obscuring the type of the original error. I’ve argued that treating errors as opaque values is important to producing software which is loosely coupled, so the face that the type of the original error should not matter if the only thing you do with an error value is

\1. Check that it is not nil . 2. Print or log it.

However there are some cases, I believe they are infrequent, where you do need to recover the original error. In that case you can use something like my errors package to annotate errors like this

https://dave.cheney.net/practical-go/presentations/qcon-china.html 34/45

2018/10/21 Practical Go: Real world advice for writing maintainable Go programs

Now the error reported will be the nice K&D [11] style error,

1
could not read config: open failed: open /Users/dfc/.settings.xml: no such file or directory

and the error value retains a reference to the original cause.

1
2
3
4
5
6
func main() {
_, err := ReadConfig()
if err != nil {
fmt.Printf("original error: %T %v\n", errors.Cause(err), errors.Cause(err))
fmt.Printf("stack trace:\n%+v\n", err)
os.Exit(1)

} }

GO

Thus you can recover the original error and print a stack trace;

1
2
3
4
5
6
7
8
9
10
11
12
13
14
15
16
func ReadFile(path string) ([]byte, error) {
f, err := os.Open(path)
if err != nil {
return nil, errors.Wrap(err, "open failed")
}
defer f.Close()
buf, err := ioutil.ReadAll(f)
if err != nil {
return nil, errors.Wrap(err, "read failed")
}
return buf, nil
}
func ReadConfig() ([]byte, error) {
home := os.Getenv("HOME")
config, err := ReadFile(filepath.Join(home, ".settings.xml"))
return config, errors.WithMessage(err, "could not read config")

}

1
2
3
4
func main() {
_, err := ReadConfig()
if err != nil {
fmt.Println(err)

os.Exit(1) }

}

GO

https://dave.cheney.net/practical-go/presentations/qcon-china.html 35/45

2018/10/21 Practical Go: Real world advice for writing maintainable Go programs

Using the errors package gives you the ability to add context to error values, in a way that is inspectable by both a human and a machine. If you came to my presentation yesterday you’ll know that wrapping is moving into the standard library in an upcoming Go release.

\8. Concurrency

Often Go is chosen for a project because of its concurrency features. The Go team have gone to great lengths to make concurrency in Go cheap (in terms of hardware resources) and performant, however it is possible to use Go’s concurrency features to write code which is neither performent or reliable. With the time I have left I want to leave you with some advice for avoid some of the pitfalls that come with Go’s concurrency features.

Go features first class support for concurrency with channels, and the select and go statements. If you’ve learnt Go formally from a book or training course, you might have noticed that the concurrency section is always one of the last you’ll cover. This workshop is no different, I have chosen to cover concurrency last, as if it is somehow additional to the regular the skills a Go programmer should master.

There is a dichotomy here; Go’s headline feature is our simple, lightweight concurrency model. As a product, our language almost sells itself on this on feature alone. On the other hand, there is a narrative that concurrency isn’t actually that easy to use, otherwise authors wouldn’t make it the last chapter in their book and we wouldn’t look back on our formative efforts with regret.

This section discusses some pitfalls of naive usage of Go’s concurrency features.

8.1. Keep yourself busy or do the work yourself

What is the problem with this program?

1
2
3
4
5
6
7
8
9
10
11
12
13
14
15
original error: *os.PathError open /Users/dfc/.settings.xml: no such file or directory
stack trace:
open /Users/dfc/.settings.xml: no such file or directory
open failed
main.ReadFile
/Users/dfc/devel/practical-go/src/errors/readfile2.go:16
main.ReadConfig
/Users/dfc/devel/practical-go/src/errors/readfile2.go:29
main.main
/Users/dfc/devel/practical-go/src/errors/readfile2.go:35
runtime.main
/Users/dfc/go/src/runtime/proc.go:201
runtime.goexit
/Users/dfc/go/src/runtime/asm_amd64.s:1333
could not read config

https://dave.cheney.net/practical-go/presentations/qcon-china.html 36/45

2018/10/21 Practical Go: Real world advice for writing maintainable Go programs

The program does what we intended, it serves a simple web server. However it also does something else at the same time, it wastes CPU in an infinite loop. This is because the for{} on the last line of main is going to block the main goroutine because it doesn’t do any IO, wait on a lock, send or receive on a channel, or otherwise communicate with the scheduler.

As the Go runtime is mostly cooperatively scheduled, this program is going to spin fruitlessly on a single CPU, and may eventually end up live-locked.

How could we fix this? Here’s one suggestion.

package main

1
2
3
import (
"fmt"
"log"

“net/http”

“runtime” )

1
2
3
4
5
6
7
8
func main() {
http.HandleFunc("/", func(w http.ResponseWriter, r *http.Request) {
fmt.Fprintln(w, "Hello, GopherCon SG")
})
go func() {
if err := http.ListenAndServe(":8080", nil); err != nil {
log.Fatal(err)
}

}()

1
2
for {
runtime.Gosched()

} }

GO

package main

GO

1
2
3
import (
"fmt"
"log"

“net/http” )

1
2
3
4
5
6
7
8
func main() {
http.HandleFunc("/", func(w http.ResponseWriter, r *http.Request) {
fmt.Fprintln(w, "Hello, GopherCon SG")
})
go func() {
if err := http.ListenAndServe(":8080", nil); err != nil {
log.Fatal(err)
}

}()

for {

} }

https://dave.cheney.net/practical-go/presentations/qcon-china.html 37/45

2018/10/21 Practical Go: Real world advice for writing maintainable Go programs

This might look silly, but it’s a common common solution I see in the wild. It’s symptomatic of not understanding the underlying problem.

Now, if you’re a little more experienced with go, you might instead write something like this.

package main

1
2
3
import (
"fmt"
"log"

“net/http” )

1
2
3
4
5
6
7
8
func main() {
http.HandleFunc("/", func(w http.ResponseWriter, r *http.Request) {
fmt.Fprintln(w, "Hello, GopherCon SG")
})
go func() {
if err := http.ListenAndServe(":8080", nil); err != nil {
log.Fatal(err)
}

}()

select {} }

GO

An empty select statement will block forever. This is a useful property because now we’re not spinning a whole CPU just to call runtime.GoSched() . However, we’re only treating the symptom, not the cause.

I want to present to you another solution, one which has hopefully already occurred to you. Rather than run
in a goroutine, leaving us with the problem of what to do with the main goroutine, simply run

1
2
http.ListenAndServe
http.ListenAndServe

TIP

on the main goroutine itself.

If the main.main function of a Go program returns then the Go program will unconditionally exit no matter what other goroutines started by the program over time are doing.

package main

1
2
3
import (
"fmt"
"log"

“net/http” )

1
2
3
4
5
6
func main() {
http.HandleFunc("/", func(w http.ResponseWriter, r *http.Request) {
fmt.Fprintln(w, "Hello, GopherCon SG")
})
if err := http.ListenAndServe(":8080", nil); err != nil {
log.Fatal(err)

} }

GO

So this is my first piece of advice: if your goroutine cannot make progress until it gets the result from another, oftentimes it is simpler to just do the work yourself rather than to delegate it.

https://dave.cheney.net/practical-go/presentations/qcon-china.html 38/45

2018/10/21 Practical Go: Real world advice for writing maintainable Go programs

This often eliminates a lot of state tracking and channel manipulation required to plumb a result back from a goroutine to its initiator.

TIP

Many Go programmers overuse goroutines, especially when they are starting out. As with all things in life, moderation is the key the key to success.

8.2. Leave concurrency to the caller

What is the difference between these two APIs?

1
2
3
4
5
6
// ListDirectory returns the contents of dir.
func ListDirectory(dir string) ([]string, error)
// ListDirectory returns a channel over which
// directory entries will be published. When the list
// of entries is exhausted, the channel will be closed.
func ListDirectory(dir string) chan string

Firstly, the obvious differences; the first example reads a directory into a slice then returns the whole slice, or an error if something went wrong. This happens synchronously, the caller of ListDirectory blocks until all directory entries have been read. Depending on how large the directory, this could take a long time, and could potentially allocate a lot of memory building up the slide of directory entry names.

Lets look at the second example. This is a little more Go like, ListDirectory returns a channel over which directory entries will be passed. When the channel is closed, that is your indication that there are no more directory entries. As the population of the channel happens after ListDirectory returns, ListDirectory is probably starting a goroutine to populate the channel.

NOTE

Its not necessary for the second version to actually use a Go routine; it could allocate a channel sufficient to hold all the directory entries without blocking, fill the channel, close it, then return the channel to the caller. But this is unlikely, as this would have the same problems with consuming a large amount of memory to buffer all the results in a channel.

The channel version of ListDirectory has two further problems:

By using a closed channel as the signal that there are no more items to process there is no way for ListDirectory to tell the caller that the set of items returned over the channel is incomplete because an error was encountered partway through. There is no way for the caller to tell the difference between an empty directory and an error to read from the directory entirely. Both result in a channel returned from ListDirectory which appears to be closed immediately.

The caller must continue to read from the channel until it is closed because that is the only way the caller can know that the goroutine which was started to fill the channel has stopped. This is a serious limitation on the use of

ListDirectory , the caller has to spend time reading from the channel even though it may have received the answer it wanted. It is probably more efficient in terms of memory usage for medium to large directories, but this method is no faster than the original slice based method.

The solution to the problems of both implementations is to use a callback, a function that is called in the context of each directory entry as it is executed.

https://dave.cheney.net/practical-go/presentations/qcon-china.html 39/45

2018/10/21 Practical Go: Real world advice for writing maintainable Go programs

Not surprisingly this is how the filepath.WalkDir function works.

If your function starts a goroutine you must provide the caller with a way to explicitly stop that TIP goroutine. It is often easier to leave decision to execute a function asynchronously to the caller of

that function.

8.3. Never start a goroutine without when it will stop.

The previous example showed using a goroutine when one wasn’t really necessary. But one of the driving reasons for using Go is the first class concurrency features the language offers. Indeed there are many instances where you want to exploit the parallelism available in your hardware. To do so, you must use goroutines.

This simple application serves http traffic on two different ports, port 8080 for application traffic and port 8001 for access to the /debug/pprof endpoint.

package main

1
2
import (
"fmt"

“net/http”

1
2
3
4
5
6
7
8
9
10
    _ "net/http/pprof"
)
func main() {
mux := http.NewServeMux()
mux.HandleFunc("/", func(resp http.ResponseWriter, req *http.Request) {
fmt.Fprintln(resp, "Hello, QCon!")
})
go http.ListenAndServe("127.0.0.1:8001", http.DefaultServeMux) // debug
http.ListenAndServe("0.0.0.0:8080", mux) // app traffic
}

GO

Although this program isn’t very complicated, it represents the basis of a real application.

There are a few problems with the application as it stands which will reveal themselves as the application grows, so lets address a few of them now.

1
func ListDirectory(dir string, fn func(string))

https://dave.cheney.net/practical-go/presentations/qcon-china.html 40/45

2018/10/21 Practical Go: Real world advice for writing maintainable Go programs

By breaking the serveApp and serveDebug handlers out into their own functions we’ve decoupled them from main.main . We’ve also followed the advice from above and make sure that serveApp and serveDebug leave their

concurrency to the caller.

But there are some operability problems with this program. If serveApp returns then main.main will return causing the program to shutdown and be restarted by whatever process manager you’re using.

TIP

Just as functions in Go leave concurrency to the caller, applications should leave the job of monitoring their status and restarting them if they fail to the program that invoked them. Do not make your applications responsible for restarting themselves, this is a procedure best handled from outside the application.

However, serveDebug is run in a separate goroutine and if it returns just that goroutine will exit while the rest of the program continues on. Your operations staff will not be happy to find that they cannot get the statistics out of your application when they want too because the /debug handler stopped working a long time ago.

What we want to ensure is that if any of the goroutines responsible for serving this application stop, we shut down the application.

1
2
3
4
5
6
7
8
9
func serveApp() {
mux := http.NewServeMux()
mux.HandleFunc("/", func(resp http.ResponseWriter, req *http.Request) {
fmt.Fprintln(resp, "Hello, QCon!")
})
http.ListenAndServe("0.0.0.0:8080", mux)
}
func serveDebug() {
http.ListenAndServe("127.0.0.1:8001", http.DefaultServeMux)

}

1
2
func main() {
go serveDebug()

serveApp() }

GO

https://dave.cheney.net/practical-go/presentations/qcon-china.html 41/45

2018/10/21 Practical Go: Real world advice for writing maintainable Go programs

Now serverApp and serveDebug check the error returned from ListenAndServe and call if required. Because both handlers are running in goroutines, we park the main goroutine in a .

This approach has a number of problems:

\1. If ListenAndServer returns with a nil error, log.Fatal won’t be called and the HTTP service on that port will shut down without stopping the application.

\2. log.Fatal calls os.Exit which will unconditionally exit the program; defers won’t be called, other goroutines won’t be notified to shut down, the program will just stop. This makes it difficult to write tests for those functions.

TIP Only use log.Fatal from main.main or init functions.

What we’d really like is to pass any error that occurs back to the originator of the goroutine so that it can know why the goroutine stopped, can shut down the process cleanly.

log.Fatal

select{}

1
2
3
4
5
6
7
func serveApp() {
mux := http.NewServeMux()
mux.HandleFunc("/", func(resp http.ResponseWriter, req *http.Request) {
fmt.Fprintln(resp, "Hello, QCon!")
})
if err := http.ListenAndServe("0.0.0.0:8080", mux); err != nil {
log.Fatal(err)

} }

1
2
3
4
func serveDebug() {
if err := http.ListenAndServe("127.0.0.1:8001", http.DefaultServeMux); err != nil {
log.Fatal(err)
}

}

1
2
3
func main() {
go serveDebug()
go serveApp()

select {} }

GO

https://dave.cheney.net/practical-go/presentations/qcon-china.html 42/45

2018/10/21 Practical Go: Real world advice for writing maintainable Go programs

We can use a channel to collect the return status of the goroutine. The size of the channel is equal to the number of goroutines we want to manage so that sending to the done channel will not block, as this will block the shutdown the of goroutine, causing it to leak.

As there is no way to safely close the done channel we cannot use the for range idiom to loop of the channel until all goroutines have reported in, instead we loop for as many goroutines we started, which is equal to the capacity of the channel.

Now we have a way to wait for each goroutine to exit cleanly and log any error they encounter. All that is needed is a way to forward the shutdown signal from the first goroutine that exits to the others.

It turns out that asking a http.Server to shut down is a little involved, so I’ve spun that logic out into a helper function. The serve helper takes an address and http.Handler , similar to http.ListenAndServe , and also a stop channel which we use to trigger the Shutdown method.

1
2
3
4
5
6
7
8
9
func serveApp() error {
mux := http.NewServeMux()
mux.HandleFunc("/", func(resp http.ResponseWriter, req *http.Request) {
fmt.Fprintln(resp, "Hello, QCon!")
})
return http.ListenAndServe("0.0.0.0:8080", mux)
}
func serveDebug() error {
return http.ListenAndServe("127.0.0.1:8001", http.DefaultServeMux)

}

1
2
3
4
5
6
7
func main() {
done := make(chan error, 2)
go func() {
done <- serveDebug()
}()
go func() {
done <- serveApp()

}()

1
2
3
4
for i := 0; i < cap(done); i++ {
if err := <-done; err != nil {
fmt.Println("error: %v", err)
}

} }

GO

https://dave.cheney.net/practical-go/presentations/qcon-china.html 43/45

2018/10/21 Practical Go: Real world advice for writing maintainable Go programs

Now, each time we receive a value on the channel, we close the stop channel which causes all the goroutines waiting on that channel to shut down their . This in turn will cause all the remaining ListenAndServe goroutines to return. Once all the goroutines we started have stopped, main.main returns and the process stops cleanly.

done

http.Server

TIP

Writing this logic yourself is repetitive and subtle. Consider something like this package, https://github.com/heptio/workgroup which will do most of the work for you.

1
2
func serve(addr string, handler http.Handler, stop <-chan struct{}) error {
s := http.Server{

Addr: addr,

1
2
3
4
5
    Handler: handler,
}
go func() {
<-stop // wait for stop signal
s.Shutdown(context.Background())

}()

1
2
3
4
5
6
7
8
9
10
11
    return s.ListenAndServe()
}
func serveApp(stop <-chan struct{}) error {
mux := http.NewServeMux()
mux.HandleFunc("/", func(resp http.ResponseWriter, req *http.Request) {
fmt.Fprintln(resp, "Hello, QCon!")
})
return serve("0.0.0.0:8080", mux, stop)
}
func serveDebug(stop <-chan struct{}) error {
return serve("127.0.0.1:8001", http.DefaultServeMux, stop)

}

1
2
3
4
5
6
7
8
func main() {
done := make(chan error, 2)
stop := make(chan struct{})
go func() {
done <- serveDebug(stop)
}()
go func() {
done <- serveApp(stop)

}()

1
2
3
4
5
6
7
8
9
var stopped bool
for i := 0; i < cap(done); i++ {
if err := <-done; err != nil {
fmt.Println("error: %v", err)
}
if !stopped {
stopped = true
close(stop)
}

} }

GO

  • 下面是David给出的一下关于go的学习参考资料的链接:

https://dave.cheney.net/practical-go/presentations/qcon-china.html 44/45

2018/10/21 Practical Go: Real world advice for writing maintainable Go programs

  1. https://gaston.life/books/effective-programming/

  2. https://talks.golang.org/2014/names.slide#4

  3. https://www.infoq.com/articles/API-Design-Joshua-Bloch

  4. https://www.lysator.liu.se/c/pikestyle.html

  5. https://speakerdeck.com/campoy/understanding-nil

  6. https://www.youtube.com/watch?v=Ic2y6w8lMPA

  7. https://medium.com/@matryer/line-of-sight-in-code-186dd7cdea88

  8. https://golang.org/doc/go1.4#internalpackages

  9. https://dave.cheney.net/2014/10/17/functional-options-for-friendly-apis

  10. https://commandcenter.blogspot.com/2014/01/self-referential-functions-and-design.html

  11. https://dave.cheney.net/2016/04/27/dont-just-check-errors-handle-them-gracefully

  12. https://www.amazon.com/Philosophy-Software-Design-John-Ousterhout/dp/1732102201

  13. https://blog.golang.org/errors-are-values

  14. http://www.gopl.io/


]]>
博客内容为GO专家David关于Go最佳实践的一些建议
技术周刊之改善 Python 程序的 91 个建议(转载) https://cloudsjhan.github.io/2018/10/21/技术周刊之改善-Python-程序的-91-个建议(转载/ 2018-10-21T13:49:17.000Z 2018-10-21T13:54:09.690Z

本篇博客转载自zhuanlan.zhihu.com/p/32817459。

除了Google的Python代码规范外,从来没有类似的书籍。偶然的机会看到这么一本书,读完之后觉得还不错,所以做个简单的笔记。有想学习类似知识的朋友,又懒得去读完整本书籍,可以参考一下。

1:引论

建议1、理解Pythonic概念—-详见Python中的《Python之禅》

建议2、编写Pythonic代码

(1)避免不规范代码,比如只用大小写区分变量、使用容易混淆的变量名、害怕过长变量名等。有时候长的变量名会使代码更加具有可读性。

(2)深入学习Python相关知识,比如语言特性、库特性等,比如Python演变过程等。深入学习一两个业内公认的Pythonic的代码库,比如Flask等。

建议3:理解Python与C的不同之处,比如缩进与{},单引号双引号,三元操作符?,Switch-Case语句等。

建议4:在代码中适当添加注释

建议5:适当添加空行使代码布局更加合理

建议6:编写函数的4个原则

(1)函数设计要尽量短小,嵌套层次不宜过深

(2)函数声明应该做到合理、简单、易用

(3)函数参数设计应该考虑向下兼容

(4)一个函数只做一件事,尽量保证函数粒度的一致性

建议7:将常量集中在一个文件,且常量名尽量使用全大写字母

2:编程惯用法

建议8:利用assert语句来发现问题,但要注意,断言assert会影响效率

建议9:数据交换值时不推荐使用临时变量,而是直接a, b = b, a

建议10:充分利用惰性计算(Lazy evaluation)的特性,从而避免不必要的计算

建议11:理解枚举替代实现的缺陷(最新版Python中已经加入了枚举特性)

建议12:不推荐使用type来进行类型检查,因为有些时候type的结果并不一定可靠。如果有需求,建议使用isinstance函数来代替

建议13:尽量将变量转化为浮点类型后再做除法(Python3以后不用考虑)

建议14:警惕eval()函数的安全漏洞,有点类似于SQL注入

建议15:使用enumerate()同时获取序列迭代的索引和值

建议16:分清==和is的适用场景,特别是在比较字符串等不可变类型变量时(详见评论)

建议17:尽量使用Unicode。在Python2中编码是很让人头痛的一件事,但Python3就不用过多考虑了

建议18:构建合理的包层次来管理Module

3:基础用法

建议19:有节制的使用from…import语句,防止污染命名空间

建议20:优先使用absolute import来导入模块(Python3中已经移除了relative import)

建议21:i+=1不等于++i,在Python中,++i前边的加号仅表示正,不表示操作

建议22:习惯使用with自动关闭资源,特别是在文件读写中

建议23:使用else子句简化循环(异常处理)

建议24:遵循异常处理的几点基本原则

(1)注意异常的粒度,try块中尽量少写代码

(2)谨慎使用单独的except语句,或except Exception语句,而是定位到具体异常

(3)注意异常捕获的顺序,在合适的层次处理异常

(4)使用更加友好的异常信息,遵守异常参数的规范

建议25:避免finally中可能发生的陷阱

建议26:深入理解None,正确判断对象是否为空。Python中下列数据会判断为空:

img

建议27:连接字符串应优先使用join函数,而不是+操作

建议28:格式化字符串时尽量使用.format函数,而不是%形式

建议29:区别对待可变对象和不可变对象,特别是作为函数参数时

建议30:[], {}和():一致的容器初始化形式。使用列表解析可以使代码更清晰,同时效率更高

建议31:函数传参数,既不是传值也不是传引用,而是传对象或者说对象的引用

建议32:警惕默认参数潜在的问题,特别是当默认参数为可变对象时

建议33:函数中慎用变长参数*args和**kargs

(1)这种使用太灵活,从而使得函数签名不够清晰,可读性较差

(2)如果因为函数参数过多而是用变长参数简化函数定义,那么一般该函数可以重构

建议34:深入理解str()和repr()的区别

(1)两者之间的目标不同:str主要面向客户,其目的是可读性,返回形式为用户友好性和可读性都比较高的字符串形式;而repr是面向Python解释器或者说Python开发人员,其目的是准确性,其返回值表示Python解释器内部的定义

(2)在解释器中直接输入变量,默认调用repr函数,而print(var)默认调用str函数

(3)repr函数的返回值一般可以用eval函数来还原对象

(4)两者分别调用对象的内建函数str__()和__repr()

建议35:分清静态方法staticmethod和类方法classmethod的使用场景

4:库

建议36:掌握字符串的基本用法

建议37:按需选择sort()和sorted()函数

》sort()是列表在就地进行排序,所以不能排序元组等不可变类型。

》sorted()可以排序任意的可迭代类型,同时不改变原变量本身。

建议38:使用copy模块深拷贝对象,区分浅拷贝(shallow copy)和深拷贝(deep copy)

建议39:使用Counter进行计数统计,Counter是字典类的子类,在collections模块中

建议40:深入掌握ConfigParser

建议41:使用argparse模块处理命令行参数

建议42:使用pandas处理大型CSV文件

》Python本身提供一个CSV文件处理模块,并提供reader、writer等函数。

》Pandas可提供分块、合并处理等,适用于数据量大的情况,且对二维数据操作更方便。

建议43:使用ElementTree解析XML

建议44:理解模块pickle的优劣

》优势:接口简单、各平台通用、支持的数据类型广泛、扩展性强

》劣势:不保证数据操作的原子性、存在安全问题、不同语言之间不兼容

建议45:序列化的另一个选择JSON模块:load和dump操作

建议46:使用traceback获取栈信息

建议47:使用logging记录日志信息

建议48:使用threading模块编写多线程程序

建议49:使用Queue模块使多线程编程更安全

5:设计模式

建议50:利用模块实现单例模式

建议51:用mixin模式让程序更加灵活

建议52:用发布-订阅模式实现松耦合

建议53:用状态模式美化代码

6:内部机制

建议54:理解build-in对象

建议55:init__()不是构造方法,理解__new()与它之间的区别

建议56:理解变量的查找机制,即作用域

》局部作用域

》全局作用域

》嵌套作用域

》内置作用域

建议57:为什么需要self参数

建议58:理解MRO(方法解析顺序)与多继承

建议59:理解描述符机制

建议60:区别getattr__()与__getattribute()方法之间的区别

建议61:使用更安全的property

建议62:掌握元类metaclass

建议63:熟悉Python对象协议

img

建议64:利用操作符重载实现中缀语法

建议65:熟悉Python的迭代器协议

建议66:熟悉Python的生成器

建议67:基于生成器的协程和greenlet,理解协程、多线程、多进程之间的区别

建议68:理解GIL的局限性

建议69:对象的管理和垃圾回收

7:使用工具辅助项目开发

建议70:从PyPI安装第三方包

建议71:使用pip和yolk安装、管理包

建议72:做paster创建包

建议73:理解单元测试的概念

建议74:为包编写单元测试

建议75:利用测试驱动开发(TDD)提高代码的可测性

建议76:使用Pylint检查代码风格

》代码风格审查

》代码错误检查

》发现重复以及不合理的代码,方便重构

》高度的可配置化和可定制化

》支持各种IDE和编辑器的集成

》能够基于Python代码生成UML图

》能够与Jenkins等持续集成工具相结合,支持自动代码审查

建议77:进行高效的代码审查

建议78:将包发布到PyPI

8:性能剖析与优化

建议79:了解代码优化的基本原则

建议80:借助性能优化工具

建议81:利用cProfile定位性能瓶颈

建议82:使用memory_profiler和objgraph剖析内存使用

建议83:努力降低算法复杂度

建议84:掌握循环优化的基本技巧

》减少循环内部的计算

》将显式循环改为隐式循环,当然这会牺牲代码的可读性

》在循环中尽量引用局部变量

》关注内层嵌套循环

建议85:使用生成器提高效率

建议86:使用不同的数据结构优化性能

建议87:充分利用set的优势

建议88:使用multiprocessing模块克服GIL缺陷

建议89:使用线程池提高效率

建议90:使用C/C++模块扩展提高性能

建议91:使用Cythonb编写扩展模块


]]>
如何写出规范优雅的Python代码
技术周刊之基于beego web框架的RESTful API的构建之旅 https://cloudsjhan.github.io/2018/10/14/技术周刊之基于beego-web框架的RESTful-API的构建之旅/ 2018-10-14T07:44:03.000Z 2018-10-14T10:10:09.837Z

前言

​ beego是一个快速开发GO应用的http框架,作者是go语言方向的大牛,astaxie。beego可以用来快速开发API、web、后端服务等应用,是一个RESTFul风格的框架,主要的设计灵感来自于Python web开发框架tornado、flask、sinstra,很好的结合了Go语言本身的一些特性(interface,struct继承等)。

​ beego是基于八大独立模块来实现的,很好的实现了模块间的解耦,即使用户不使用http的逻辑,也可以很好的使用其中的各个模块。作者自己说,他的这种思想来自于乐高积木,设计beego的时候,这些模块就是积木,而最终搭建好的机器人就是beego。

​ 这篇博文通过使用beego来构建API,讲解实现过程中的细节以及遇到的一些坑,让我们马上开始beego的API构建之旅吧!

项目创建

  • 进入到你的$GOPATH/src
  • 安装beego开发包自己快速开发工具bee
1
2
3
go get github.com/astaxie/beego
go get github.com/astaxie/beego/orm
go get github.com/beego/bee
  • 使用快速开发工具bee,创建我们的API项目
1
bee new firstAPI

我们得到的项目结构如下图所示:

可以看出这是一个典型的MVC架构的应用,beego把我们项目所需要的一些都准备好了,例如配置文件conf,测试文件tests等,我们只需要专注于API代码的编写即可。

运行项目并获得API自动化文档

1
bee run -gendoc=true -downdoc=true

运行上述代码输出如下图所示:

我们在浏览器中访问:本机IP:8080/swagger,就会看到swagger的API文档,我们代码更新后,该文档就会自动更新,非常方便。

models设计

  • 对 数据库object 操作有四个方法 Read / Insert / Update / Delete
1
2
3
4
5
6
7
8
9
10
11
示例代码:
o := orm.NewOrm()
user := new(User)
user.Name = "slene"

fmt.Println(o.Insert(user))

user.Name = "Your"
fmt.Println(o.Update(user))
fmt.Println(o.Read(user))
fmt.Println(o.Delete(user))

还有其他的方法可以参阅beego官方文档,里面对orm操作有着详细的介绍。

  • 创建一个数据库并设计一张数据库表
1
2
3
4
5
6
7
CREATE TABLE IF NOT EXISTS `student` (
`Id` int(11),
`Name` varchar(255),
`Birthdate` varchar(255),
`Gender` bool,
`Score` int(11)
) ENGINE=InnoDB DEFAULT CHARSET=utf8;
  • 在models文件夹下新建一个文件Student.go,并实现以下代码,代码中关键点都有注释
1
2
3
4
5
6
7
8
9
10
11
12
13
14
15
16
17
18
19
20
21
22
23
24
25
26
27
28
29
30
31
32
33
34
35
36
37
38
39
40
41
42
43
44
45
46
47
48
49
50
51
52
53
54
55
56
57
58
59
60
61
62
63
64
65
66
67
68
69
70
71
72
package models

import (
"fmt"
"github.com/astaxie/beego/orm"
)


//在models模块中创建一个struct,目的是使用beego的orm框架,使struct与数据库中的字段产生对应关系
type Student struct {
Id int`orm:"column(Id)"` //column()括号中的字段就是在定义数据库时的相应字段,这一段必须严格填写,不然在API读写数据时就会出现读不到或者写不进去的问题
Name string `orm:"column(Name)"`
BirthDate string `orm:"column(Birthdate)"`
Gender bool `orm:"column(Gender)"`
Score int `orm:"column(Score)"`
}


//该函数获得数据库中所有student的信息,返回值是一个结构体数组指针
func GetAllStudents() []*Student {
o := orm.NewOrm() //产生一个orm对象
o.Using("default") //这句话的意思是使用定义的默认数据库,与main.go中的orm.RegisterDataBase()对应
var students []*Student //定义指向结构体数组的指针
q := o.QueryTable("student")//获得一个数据库表的请求
q.All(&students)//取到这个表中的所有数据

return students

}


//该函数根据student中的Id,返回该学生的信息
func GetStudentById(id int) Student {
u := Student{Id:id}//根据所传入的Id得到对应student的对象
o := orm.NewOrm()//new 一个orm对象
o.Using("default")//使用最开始定义的default数据库
err := o.Read(&u)//读取Id=id的student的信息

if err == orm.ErrNoRows {
fmt.Println("查询不到")//对应操作,不一定是print
} else if err == orm.ErrMissPK {
fmt.Println("没有主键")
}

return u
}


//添加一个学生的信息到数据库中,参数是指向student结构题的指针
func AddStudent(student *Student) Student {
o := orm.NewOrm()
o.Using("default")
o.Insert(student)//插入数据库

return *student
}

func UpdateStudent(student *Student) {
o := orm.NewOrm()
o.Using("default")
o.Update(student)//更新该student的信息
}

func DeleteStudent(id int) {
o := orm.NewOrm()
o.Using("default")
o.Delete(&Student{Id:id})//删除对应id的student的信息
}

func init() {
orm.RegisterModel(new(Student))//将数据库注册到orm
}
  • model这一层主要是定义struct,并为上层编写读写数据库。处理数据的代码。

controller层实现

基于 beego 的 Controller 设计,只需要匿名组合 beego.Controller 就可以了,如下所示:

1
2
3
type xxxController struct {
beego.Controller
}

beego.Controller 实现了接口 beego.ControllerInterfacebeego.ControllerInterface 定义了如下函数:

  • Init(ct *context.Context, childName string, app interface{})

    这个函数主要初始化了 Context、相应的 Controller 名称,模板名,初始化模板参数的容器 Data,app 即为当前执行的 Controller 的 reflecttype,这个 app 可以用来执行子类的方法。

  • Prepare()

    这个函数主要是为了用户扩展用的,这个函数会在下面定义的这些 Method 方法之前执行,用户可以重写这个函数实现类似用户验证之类。

  • Get()

    如果用户请求的 HTTP Method 是 GET,那么就执行该函数,默认是 405,用户继承的子 struct 中可以实现了该方法以处理 Get 请求。

  • Post()

    如果用户请求的 HTTP Method 是 POST,那么就执行该函数,默认是 405,用户继承的子 struct 中可以实现了该方法以处理 Post 请求。

  • Delete()

    如果用户请求的 HTTP Method 是 DELETE,那么就执行该函数,默认是 405,用户继承的子 struct 中可以实现了该方法以处理 Delete 请求。

  • Put()

    如果用户请求的 HTTP Method 是 PUT,那么就执行该函数,默认是 405,用户继承的子 struct 中可以实现了该方法以处理 Put 请求.

  • Head()

    如果用户请求的 HTTP Method 是 HEAD,那么就执行该函数,默认是 405,用户继承的子 struct 中可以实现了该方法以处理 Head 请求。

  • Patch()

    如果用户请求的 HTTP Method 是 PATCH,那么就执行该函数,默认是 405,用户继承的子 struct 中可以实现了该方法以处理 Patch 请求.

  • Options()

    如果用户请求的HTTP Method是OPTIONS,那么就执行该函数,默认是 405,用户继承的子 struct 中可以实现了该方法以处理 Options 请求。

  • Finish()

    这个函数是在执行完相应的 HTTP Method 方法之后执行的,默认是空,用户可以在子 struct 中重写这个函数,执行例如数据库关闭,清理数据之类的工作。

  • Render() error

    这个函数主要用来实现渲染模板,如果 beego.AutoRender 为 true 的情况下才会执行。

所以通过子 struct 的方法重写,用户就可以实现自己的逻辑。

routers层实现

什么是路由设置呢?前面介绍的 MVC 结构执行时,介绍过 beego 存在三种方式的路由:固定路由、正则路由、自动路由,与RESTFul API相关的就是固定路由和正则路由。

下面就是固定路由的例子

1
2
3
4
beego.Router("/", &controllers.MainController{})
beego.Router("/admin", &admin.UserController{})
beego.Router("/admin/index", &admin.ArticleController{})
beego.Router("/admin/addpkg", &admin.AddController{})

下面是正则路由的例子:

  • beego.Router(“/api/?:id”, &controllers.RController{})

    默认匹配 //例如对于URL”/api/123”可以匹配成功,此时变量”:id”值为”123”

  • beego.Router(“/api/:id”, &controllers.RController{})

    默认匹配 //例如对于URL”/api/123”可以匹配成功,此时变量”:id”值为”123”,但URL”/api/“匹配失败

  • beego.Router(“/api/:id([0-9]+)“, &controllers.RController{})

    自定义正则匹配 //例如对于URL”/api/123”可以匹配成功,此时变量”:id”值为”123”

  • beego.Router(“/user/:username([\w]+)“, &controllers.RController{})

    正则字符串匹配 //例如对于URL”/user/astaxie”可以匹配成功,此时变量”:username”值为”astaxie”

  • beego.Router(“/download/.”, &controllers.RController{})

    *匹配方式 //例如对于URL”/download/file/api.xml”可以匹配成功,此时变量”:path”值为”file/api”, “:ext”值为”xml”

  • beego.Router(“/download/ceshi/*“, &controllers.RController{})

    *全匹配方式 //例如对于URL”/download/ceshi/file/api.json”可以匹配成功,此时变量”:splat”值为”file/api.json”

  • beego.Router(“/:id:int”, &controllers.RController{})

    int 类型设置方式,匹配 :id为int 类型,框架帮你实现了正则 ([0-9]+)

  • beego.Router(“/:hi:string”, &controllers.RController{})

    string 类型设置方式,匹配 :hi 为 string 类型。框架帮你实现了正则 ([\w]+)

  • beego.Router(“/cms_:id([0-9]+).html”, &controllers.CmsController{})

    带有前缀的自定义正则 //匹配 :id 为正则类型。匹配 cms_123.html 这样的 url :id = 123

个人觉得,最方便的还是类似于Python框架flask的注解路由,也是在这个项目中使用的:

  • 在routers/routers.go里面添加你所希望的API

  • 1
    2
    3
    4
    5
    6
    7
    8
    9
    10
    11
    12
    13
    14
    15
    16
    17
    18
    19
    20
    21
    22
    23
    24
    25
    26
    27
    28
    package routers

    import (
    "firstAPI/controllers"

    "github.com/astaxie/beego"
    )

    func init() {
    ns := beego.NewNamespace("/v1",
    beego.NSNamespace("/object",
    beego.NSInclude(
    &controllers.ObjectController{},
    ),
    ),
    beego.NSNamespace("/user",
    beego.NSInclude(
    &controllers.UserController{},
    ),
    ),
    beego.NSNamespace("/student",
    beego.NSInclude(
    &controllers.StudentController{},
    ),
    ),
    )
    beego.AddNamespace(ns)
    }

以上代码实现了如下的API:

/v1/object

/v1/user

/v1/student

非常清晰明了。

main.go的数据库配置

1
2
3
4
5
6
7
8
9
10
11
12
13
14
15
16
17
18
19
20
21
22
23
package main

import (
_ "firstAPI/routers"
"github.com/astaxie/beego"
"github.com/astaxie/beego/orm"
_ "github.com/go-sql-driver/mysql"
)
func init() {
orm.RegisterDriver("mysql", orm.DRMySQL)//注册MySQL的driver
orm.RegisterDataBase("default", "mysql", "root:test@tcp(127.0.0.1:3306)/restapi_test?charset=utf8")//本地数据库的账号。密码等
orm.RunSyncdb("default", false, true)

}
func main() {

if beego.BConfig.RunMode == "dev" {
beego.BConfig.WebConfig.DirectoryIndex = true
beego.BConfig.WebConfig.StaticDir["/swagger"] = "swagger"//静态文档
}

beego.Run()
}

关键点都在代码中以注释的形式展现。

postman测试

bee run 运行代码后,我们使用postman测试一下我们所构建的API效果如何。

这里节省篇幅,只测试一个接口。

到此为止,我们基于beego就实现了简单API接口的构建,是不是既清晰又简单呢?赶快自己动手试试吧!

本期技术周刊结束,代码已上传到GitHub,可以查阅,我们下期再会!


]]>
本文介绍通过使用golang web开发框架beego搭建RESTFUL风格的API
总结版图解http https://cloudsjhan.github.io/2018/10/12/总结版图解http/ 2018-10-12T02:20:37.000Z 2018-10-12T02:28:44.744Z

该博客转载自公众号freeCodeCamp

作为一个前端,如果对一个网页从发起请求到返回数据这期间具体发生了什么都不知道的话,那不是一个好前端。最近,读了图解http,以及有关http相关的文章,还有自己也下载了wireshark抓包工具,实际观察了一下这个过程,下面就此做些总结。

一.从输入一个url到返回数据,中间到底发生了什么?

假设,我们在浏览器输入http://www.baidu.com:80/index.html,假设解析出的ip地址是202.43.78.3

1.浏览器解析出主机名

解析出的主机名是www.baidu.com

2.浏览器查询这个主机名的ip地址(dns)

dns解析的作用就是把域名解析成ip地址,这样才能在广域网路由器转发报文给目标ip,不然路由器不知道要把报文发给谁。下面就讲下大概的过程,不会涉及太多细节。(以chrome为例子)

(1)浏览器启动时,首先浏览器会去操作系统获取dns服务器地址,然后把这个地址缓存下来。同时浏览器还会去读取和解析hosts文件,同样放到缓存中。浏览器对解析过的域名和ip地址,都会保存着这两者的映射关系。(存到cache中)

(2)当解析域名的时候,首先浏览器会去cache中查找有没有缓存好的映射关系,如果没有的话,就去hosts文件中查找,如果也没有的话,浏览器就会发起请求去dns服务器缓存查询了,如果缓存里面也没有,那最后就是dns服务器去查询了。

3.浏览器获取端口号

4.浏览器向目标ip地址发起一条到202.43.78.3:80的tcp连接

为了传输的可靠性,tcp协议要有三次握手过程:

(1)首先浏览器会向服务器发起一个连接请求

(2)服务器会对连接请求做出响应,表示同意建立连接

(3)浏览器收到响应后,再告知对方,它知道服务器同意它建立连接了。

5.数据包在ip层传输

数据包在ip层传输,通过多台计算机和网络设备中转,在中转时,利用中转设备的mac地址搜索下一个中转目标(采用ARP协议,根据通信方的ip地址就可以反查出对应的mac地址),直到目标ip地址。

6.数据链路层处理网络连接的硬件部分

数据链路层处理网络连接的硬件部分,比如网卡,找到服务器的网卡

7.浏览器向服务器发送一条http报文

每一条http报文的组成:

起始行+首部+主体(可选)

起始行:http/1.0 200 ok (一般包括http版本,返回状态码,返回码原因)

首部:content-type:text/plain content-length:19

主体:name=jane

8.服务器接受客户端请求,进行一些处理,返回响应报文

web服务器接收到请求之后,实际上会做些什么呢?

(1)建立连接,如果接受一个客户端连接,就建立连接,如果不同意,就将其关闭。

(2)接收请求,读取http请求报文

(3)访问资源,访问报文中指定的资源

(4)构建响应,创建带有首部的http响应报文

(5)发送响应,将响应回送给客户端

9.浏览器读取http响应报文

10.浏览器关闭连接

看了上面的一个简单过程,大家会不会有这样一个问题,难道每次发起一个http请求,都要建立一次tcp连接吗,我们经常写的并发ajax请求,每条请求都是各自独立建立的tcp连接?一条tcp连接建立之后,是什么时候关闭的?带着这些问题,看看下面要讲的http的特性

二.http的特性

1.http是不保存状态的协议

http协议是一种无状态的协议,意思就是说它不会对每次的请求和响应之间的通信状态进行保存。你之前发过的任何请求的信息,没有任何记录。之所以这样设计,也是为了让http变得比较简单,可以处理大量事物。但是无状态的特性,也会导致一些问题,比如说一个用户登录一家网站之后,跳到另一个页面,应该还保持着登录状态,所以后面就出了cookie状态管理技术。相信大家应该都很熟悉了。

2.请求只能从客户端开始,客户端不可以接收除响应以外的指令

服务器必须等待客户端的请求,才能给客户端发送响应数据,所以说服务器是不能主动给客户端推送数据的。对于一些实时监控的功能,常常用websocket来代替

3.没有用户认证,任何人都可以发起请求

在http协议通信时,是不存在确认通信方的处理步骤的,任何人都可以发起请求。另外,服务器只要收到请求,无论是谁,都会返回一个响应。所以会存在伪装的隐患。后面出现的https就可以解决这个问题。

4.通信使用的是明文

5.无法证明报文完整性

6.可任意选择数据压缩格式,非强制压缩发送

7.http持久连接和并行连接

一开始,http请求是串行的,一个http请求,就会建立一条tcp连接,浏览器收到响应之后,就会断开连接。等上一个请求回来了,下一个请求才能继续请求。这样做的缺点是,比较耗时间和内存,后面就出现了下面一系列的优化连接性能的方法。

(1)并行连接

原理:通过多条tcp连接发起并发的http请求

并行连接可以同时发起多个http请求,每次发起一个http请求,就会建立一个tcp连接。每个http请求是独立的,不会相互等待,这样做,很可能会提高页面的加载速度,因为人们会看到页面上面,很多个东西会同时出现,所以感觉页面加载变快了。实际上有时候是真的变快了,因为它是并行工作的。但是有时候不是真的快了。比如说,客户端的网络带宽不足时,(浏览器是通过一个28kbps的modem连接到因特网上去的),如果并行加载多个请求,每个请求就会去竞争这个有限的带宽,每个请求就会以比较慢的速度加载。这样带来的性能提升就很小。

(2)持久连接

原理:重用tcp连接,以消除连接及关闭时延

从http1.1开始,就允许当http响应结束后,tcp连接可以保持在打开状态,以便给未来的http请求重用现在的连接。那么,这个tcp连接什么时候会关闭呢,一般情况下,40s内,如果没有新的请求,就会关闭。

(3)管道化连接

原理:通过共享的tcp连接发起并发的http请求

并行连接可以提高复合页面的传输速度,但是也有许多缺点,比如每次都会建立一次tcp连接,会耗费时间和带宽。持久连接的优势就是降低了时延和tcp的连接数量。但是持久连接可能会导致的一个问题是,可能会累积大量的空闲连接。耗费资源。

持久连接和并行连接配合使用才是最高效的方式。

一般浏览器会限制,同个域名下的并行连接的个数是4个,即打开少量的并行连接,其中每个都是持久连接。这也是现在用的最多的方式。


]]>
对于《图解HTTP》一书进行言简意赅的总结
python apscheduler - skipped: maximum number of running instances reached https://cloudsjhan.github.io/2018/09/28/python-apscheduler-skipped-maximum-number-of-running-instances-reached/ 2018-09-28T08:04:43.000Z 2018-09-28T08:14:25.410Z

出现问题的代码

1
2
3
scheduler = BackgroundScheduler()
scheduler.add_job(runsync, 'interval', seconds=1)
scheduler.start()

问题出现的情况

  • 运行一段代码,时而报错时而不报错
  • 报错是:
1
WARNING:apscheduler.scheduler:Execution of job "runsync (trigger: interval[0:00:01], next run at: 2015-12-01 11:50:42 UTC)" skipped: maximum number of running instances reached (1)

分析

  • apscheduler这个模块,在你的代码运行时间大于interval的时候,就会报错

    也就是说,你的代码运行时间超出了你的定时任务的时间间隔。

解决

  • 增大时间间隔即可

###


]]>
python apscheduler - skipped: maximum number of running instances reached
python 的logging模块实现json格式的日志输出 https://cloudsjhan.github.io/2018/09/27/python-的logging模块实现json格式的日志输出/ 2018-09-27T08:28:21.000Z 2018-09-29T01:14:39.201Z

前言:

  • 想要让开发过程或者是上线后的bug无处可藏,最好的方式便是在程序运行过程中,不断收集重要的日志,以供分析使用。Python中内置的log收集模块是logging,该模块使用起来比较方便,但是美中不足的地方就是日志的格式转成json比较麻烦。于是我结合logging和另一个模块python-json-logger(pip install python-json-logger) ,实现json格式的日志输出。

源码:以下代码可以做成模块,直接导入使用

1
2
3
4
5
6
7
8
9
10
11
12
13
14
15
16
17
18
19
20
21
22
23
24
25
26
27
28
29
30
31
32
33
34
35
36
37
38
39
40
41
42
43
44
45
46
47
48
49
50
51
52
53
54
55
56
57
58
59
60
61
62
63
64
65
66
67
68
69
70
71
72
73
74
75
76
77
78
79
80
81
82
83
84
import logging, logging.config, os
import structlog
from structlog import configure, processors, stdlib, threadlocal
from pythonjsonlogger import jsonlogger
BASE_DIR = BASE_DIR = os.path.dirname(os.path.abspath(__file__))
DEBUG = True # 标记是否在开发环境


# 给过滤器使用的判断
class RequireDebugTrue(logging.Filter):
# 实现filter方法
def filter(self, record):
return DEBUG

def get_logger():
LOGGING = {
# 基本设置
'version': 1, # 日志级别
'disable_existing_loggers': False, # 是否禁用现有的记录器

# 日志格式集合
'formatters': {
# 标准输出格式
'json': {
# [具体时间][线程名:线程ID][日志名字:日志级别名称(日志级别ID)] [输出的模块:输出的函数]:日志内容
'format': '[%(asctime)s][%(threadName)s:%(thread)d][%(name)s:%(levelname)s(%(lineno)d)]\n[%(module)s:%(funcName)s]:%(message)s',
'class': 'pythonjsonlogger.jsonlogger.JsonFormatter',
}
},
# 过滤器
'filters': {
'require_debug_true': {
'()': RequireDebugTrue,
}
},
# 处理器集合
'handlers': {
# 输出到控制台
# 输出到文件
'TimeChecklog': {
'level': 'DEBUG',
'class': 'logging.handlers.RotatingFileHandler',
'formatter': 'json',
'filename': os.path.join("./log/", 'TimeoutCheck.log'), # 输出位置
'maxBytes': 1024 * 1024 * 5, # 文件大小 5M
'backupCount': 5, # 备份份数
'encoding': 'utf8', # 文件编码
},
},
# 日志管理器集合
'loggers': {
# 管理器
'proxyCheck': {
'handlers': ['TimeChecklog'],
'level': 'DEBUG',
'propagate': True, # 是否传递给父记录器
},
}
}

configure(
logger_factory=stdlib.LoggerFactory(),
processors=[
stdlib.render_to_log_kwargs]
)


logging.config.dictConfig(LOGGING)
logger = logging.getLogger("proxyCheck")
return logger


# 测试用例,你可以把get_logger()封装成一个模块,from xxx import get_logger()
logger1 = get_logger()
def test():
try:
a = 1 / 0
except Exception as e:
logger1.error(e) # 写入错误日志
#如果需要添加额外的信息,使用extra关键字即可
logger1.error(e, extra={key1: value1, key2:value2})
# 其他错误处理代码
pass
test()

### 测试结果

  • 测试的结果,可以在./log/xxx.log文件中看到输出的日志
1
{"asctime": "2018-09-28 09:52:12,622", "threadName": "MainThread", "thread": 4338656704, "name": "proxyCheck", "levelname": "ERROR", "%(lineno": null, "module": "mylog", "funcName": "test", "message": "division by zero"}
  • 可以看到日志是json格式,这样你就可以很方便的使用grafna和ES将日志做成看板来展示了。

]]>
使用Python的内置logging实现json格式的日志输出
python 发送各种格式的邮件 https://cloudsjhan.github.io/2018/09/17/python-发送各种格式的邮件/ 2018-09-17T02:55:56.000Z 2018-09-28T02:06:31.935Z

1
2
3
4
5
6
7
8
9
10
11
12
13
14
15
16
17
18
19
20
21
22
23
24
25
26
27
28
29
30
31
32
33
34
35
36
37
38
39
40
41
42
43
import smtplib
from email.mime.multipart import MIMEMultipart
from email.mime.text import MIMEText
from email.mime.application import MIMEApplication
_user = "sigeken@qq.com"
_pwd = "***"
_to = "402363522@qq.com"

#如名字所示Multipart就是分多个部分
msg = MIMEMultipart()
msg["Subject"] = "don't panic"
msg["From"] = _user
msg["To"] = _to

#---这是文字部分---
part = MIMEText("乔装打扮,不择手段")
msg.attach(part)

#---这是附件部分---
#xlsx类型附件
part = MIMEApplication(open('foo.xlsx','rb').read())
part.add_header('Content-Disposition', 'attachment', filename="foo.xlsx")
msg.attach(part)

#jpg类型附件
part = MIMEApplication(open('foo.jpg','rb').read())
part.add_header('Content-Disposition', 'attachment', filename="foo.jpg")
msg.attach(part)

#pdf类型附件
part = MIMEApplication(open('foo.pdf','rb').read())
part.add_header('Content-Disposition', 'attachment', filename="foo.pdf")
msg.attach(part)

#mp3类型附件
part = MIMEApplication(open('foo.mp3','rb').read())
part.add_header('Content-Disposition', 'attachment', filename="foo.mp3")
msg.attach(part)

s = smtplib.SMTP("smtp.qq.com", timeout=30)#连接smtp邮件服务器,端口默认是25
s.login(_user, _pwd)#登陆服务器
s.sendmail(_user, _to, msg.as_string())#发送邮件
s.close()

]]>
使用Python发送各种格式的邮件
技术周刊之当你ping的时候,发生了什么? https://cloudsjhan.github.io/2018/09/16/技术周刊之当你ping的时候,发生了什么?/ 2018-09-16T13:40:02.000Z 2018-09-16T13:49:36.202Z

我们在遇到网络不通的情况,大家都知道去 ping 一下,看一下网络状况。那你知道「ping」命令后背的逻辑是什么吗?知道它是如何实现的吗?本周就让我们深入浅出ping的机制。

ping的作用和原理

简单来说,「ping」是用来探测本机与网络中另一主机之间是否可达的命令,如果两台主机之间ping不通,则表明这两台主机不能建立起连接。ping是定位网络通不通的一个重要手段。

ping 命令是基于 ICMP 协议来工作的,「 ICMP 」全称为 Internet 控制报文协议( Internet Control Message Protocol)。ping 命令会发送一份ICMP回显请求报文给目标主机,并等待目标主机返回ICMP回显应答。因为ICMP协议会要求目标主机在收到消息之后,必须返回ICMP应答消息给源主机,如果源主机在一定时间内收到了目标主机的应答,则表明两台主机之间网络是可达的。

举一个例子来描述「ping」命令的工作过程:

  1. 假设有两个主机,主机A(192.168.0.1)和主机B(192.168.0.2),现在我们要监测主机A和主机B之间网络是否可达,那么我们在主机A上输入命令:ping 192.168.0.2
  2. 此时,ping命令会在主机A上构建一个 ICMP的请求数据包(数据包里的内容后面再详述),然后 ICMP协议会将这个数据包以及目标IP(192.168.0.2)等信息一同交给IP层协议。
  3. IP层协议得到这些信息后,将源地址(即本机IP)、目标地址(即目标IP:192.168.0.2)、再加上一些其它的控制信息,构建成一个IP数据包。
  4. IP数据包构建完成后,还不够,还需要加上MAC地址,因此,还需要通过ARP映射表找出目标IP所对应的MAC地址。当拿到了目标主机的MAC地址和本机MAC后,一并交给数据链路层,组装成一个数据帧,依据以太网的介质访问规则,将它们传送出出去。
  5. 当主机B收到这个数据帧之后,会首先检查它的目标MAC地址是不是本机,如果是就接收下来处理,接收之后会检查这个数据帧,将数据帧中的IP数据包取出来,交给本机的IP层协议,然后IP层协议检查完之后,再将ICMP数据包取出来交给ICMP协议处理,当这一步也处理完成之后,就会构建一个ICMP应答数据包,回发给主机A
  6. 在一定的时间内,如果主机A收到了应答包,则说明它与主机B之间网络可达,如果没有收到,则说明网络不可达。除了监测是否可达以外,还可以利用应答时间和发起时间之间的差值,计算出数据包的延迟耗时。

通过ping的流程可以发现,ICMP协议是这个过程的基础,是非常重要的,因此下面就把ICMP协议再详细解释一下。

ICMP简介

我们知道,ping命令是基于ICMP协议来实现的。那么我们再来看下图,就明白了ICMP协议又是通过IP协议来发送的,即ICMP报文是封装在IP包中。

IP协议是一种无连接的,不可靠的数据包协议,它并不能保证数据一定被送达,那么我们要保证数据送到就需要通过其它模块来协助实现,这里就引入的是ICMP协议。

当传送的IP数据包发送异常的时候,ICMP就会将异常信息封装在包内,然后回传给源主机。

将上图再细拆一下可见:

将ICMP部分拆开继续分析:

由图可知,ICMP数据包由8bit的类型字段和8bit的代码字段以及16bit的校验字段再加上选项数据组成。

ICMP协议大致可分为两类:

  • 查询报文类型
  • 差错报文类型

  1. 查询报文类型:

查询报文主要应用于:ping查询、子网掩码查询、时间戳查询等等。

上面讲到的ping命令的流程其实就对应ICMP协议查询报文类型的一种使用。在主机A构建ICMP请求数据包的时候,其ICMP的类型字段中使用的是 8 (回送请求),当主机B构建ICMP应答包的时候,其ICMP类型字段就使用的是 0 (回送应答),更多类型值参考上表。

对 查询报文类型 的理解可参考一下文章最开始讲的ping流程,这里就不做赘述。

  1. 差错报文类型:

差错报文主要产生于当数据传送发送错误的时候。

它包括:目标不可达(网络不可达、主机不可达、协议不可达、端口不可达、禁止分片等)、超时、参数问题、重定向(网络重定向、主机重定向等)等等。

差错报文通常包含了引起错误的IP数据包的第一个分片的IP首部,加上该分片数据部分的前8个字节。

当传送IP数据包发生错误的时候(例如 主机不可达),ICMP协议就会把错误信息封包,然后传送回源主机,那么源主机就知道该怎么处理了。

那是不是只有遇到错误的时候才能使用 差错报文类型 呢?也不一定。

Traceroute 就是一个例外,Traceroute是用来侦测源主机到目标主机之间所经过路由情况的常用工具。Traceroute 的原理就是利用ICMP的规则,制造一些错误的事件出来,然后根据错误的事件来评估网络路由情况。

具体做法就是:

Traceroute会设置特殊的TTL值,来追踪源主机和目标主机之间的路由数。首先它给目标主机发送一个 TTL=1 的UDP数据包,那么这个数据包一旦在路上遇到一个路由器,TTL就变成了0(TTL规则是每经过一个路由器都会减1),因为TTL=0了,所以路由器就会把这个数据包丢掉,然后产生一个错误类型(超时)的ICMP数据包回发给源主机,也就是差错包。这个时候源主机就拿到了第一个路由节点的IP和相关信息了。

接着,源主机再给目标主机发一个 TTL=2 的UDP数据包,依旧上述流程走一遍,就知道第二个路由节点的IP和耗时情况等信息了。

如此反复进行,Traceroute就可以拿到从主机A到主机B之间所有路由器的信息了。

但是有个问题是,如果数据包到达了目标主机的话,即使目标主机接收到TTL值为1的IP数据包,它也是不会丢弃该数据包的,也不会产生一份超时的ICMP回发数据包的,因为数据包已经达到了目的地嘛。那我们应该怎么认定数据包是否达到了目标主机呢?

Traceroute的方法是在源主机发送UDP数据包给目标主机的时候,会设置一个不可能达到的目标端口号(例如大于30000的端口号),那么当这个数据包真的到达目标主机的时候,目标主机发现没有对应的端口号,因此会产生一份“端口不可达”的错误ICMP报文返回给源主机。

traceroot的具体使用方法网上都有很多讲解,可以实际操作一下。


]]>
我们在遇到网络不通的情况,大家都知道去 ping 一下,看一下网络状况。那你知道「ping」命令后背的逻辑是什么吗?知道它是如何实现的吗?
CentOS7-安装docker-compose时由于pip10包管理导致的错误 https://cloudsjhan.github.io/2018/09/13/CentOS7-安装docker-compose时由于pip10包管理导致的错误/ 2018-09-13T02:11:49.000Z 2018-09-13T02:15:53.522Z

  • 今天在CentOS下安装docker-compose,遇到了Cannot uninstall ‘requests’. It is a distutils installed project and thus we cannot accurately determine which files belong to it which would lead to only a partial uninstall.
    错误的原因是requests默认版本为2.6.0,但是docker-compose要2.9以上才支持,但是无法正常卸载2.9版本,是pip10对包的管理存在变化。
  • 解决方案:
    • pip install -l requests==2.9

]]>
CentOS下安装Docker-compose时出现了 Cannot uninstall 'requests'. It is a distutils installed project and thus we cannot accurately determine which files belong to it which would lead to only a partial uninstall.
技术周刊之解析Python中的赋值、浅拷贝、深拷贝 https://cloudsjhan.github.io/2018/09/09/技术周刊之解析Python中的赋值、浅拷贝、深拷贝/ 2018-09-09T06:39:05.000Z 2018-09-09T08:03:48.727Z

事情的起因

  • 本周我们分享的主题是Python中关于浅拷贝和深拷贝的特性,想要深入研究Python中的浅拷贝和深拷贝的起因在于,我想生成一个json字符串,该字符串未dumps之前是一个Python的数据结构,里面包含字典,以及List,在遍历生成dictionary时候,出现一个bug,就是每次遍历生成的dictionary都是上一次的值,现象可以看以下代码。

    1
    2
    3
    4
    5
    6
    7
    8
    9
    10
    11
    12
    13
    14
    15
    16
    17
    18
    # 这里我们定义一个函数get_data()
    def get_data():
    ...: appid_dict = {}
    ...: appid_all_dict = {}
    ...: import pdb;pdb.set_trace()
    ...: for i in range(10):
    ...: appid_dict['a'] = i
    ...: appid_all_dict[i] = appid_dict
    # 我们的初衷是想要得到
    # {0: {'a': 0}, 1: {'a': 1}, 2: {'a': 2}, 3: {'a': 3}}....这样的一个dict

    # 但是在调试过程中,发现得到的结果是这样的:
    # (Pdb) appid_all_dict
    # {0: {'a': 2}, 1: {'a': 2}, 2: {'a': 2}}
    # (Pdb)
    # 即,后面的appid_dict都会把前面的覆盖掉,这是什么原因呢?
    # 我们这里先把原因说一下:因为Python中对dict的操作默认是浅拷贝,即同样的字典,使用多次的话,每次使用都是指向同一片内存地址(引用),所以在上面的程序中后面对appid_dict的赋值,都将前面的给覆盖掉了,导致每一个appid_dict指向同一片内存,读取的当然就是最后一次的appid_dict的值,即上面程序的执行结果:
    {0: {'a': 9}, 1: {'a': 9}, 2: {'a': 9}, 3: {'a': 9}, 4: {'a': 9}, 5: {'a': 9}, 6: {'a': 9}, 7: {'a': 9}, 8: {'a': 9}, 9: {'a': 9}}
    • 那么如何修改这个bug,让程序输出我们想要得到的结果:

      1
      {0: {'a': 0}, 1: {'a': 1}, 2: {'a': 2}, 3: {'a': 3}, 4: {'a': 4}, 5: {'a': 5}, 6: {'a': 6}, 7: {'a': 7}, 8: {'a': 8}, 9: {'a': 9}}
    • 看完下面对于Python赋值、浅拷贝、深拷贝的解析,相信你就可以自己解决这个问题了

    Python中的赋值操作

    • 赋值:就是对象的引用
    • 举例: a = b: 赋值引用,a和b都指向同一个对象,如图所示

    Python中浅拷贝

    • a = b.copy(): a 是b的浅拷贝,a和b是一个独立的对象,但是它们的子对象还是指向同一片引用。
    • Python中对字典的默认赋值操作就是浅拷贝,所以导致了文章开头所出现的情况。

    Python中的深拷贝

    • 首先import copy,导入copy模块(Python中自带),b = copy.deepcopy(a), 我们就说b是a的深拷贝,b拷贝了a所有的资源对象,并新开辟了一块地址空间,两者互不干涉。

    实际的例子来进一步说明

    1
    2
    3
    4
    5
    6
    7
    8
    9
    10
    11
    12
    13
    14
    15
    16
    17
    18
    19
    20
    21
    22
    In [13]: import copy

    In [14]: def temp():
    ...: a = [1, 2, 3, 4, ['a', 'b']]
    ...: b = a # 赋值操作,直接传所有对象的引用
    ...: c = copy.copy(a) # 浅拷贝,子对象指向同一引用
    ...: d = copy.deepcopy(a) # 深拷贝,互不干涉
    ...: a.append(5) # 修改对象a
    ...: a[4].append('c') # 修改a中的数组
    ...: print( 'a = ', a )
    ...: print( 'b = ', b )
    ...: print( 'c = ', c )
    ...: print( 'd = ', d )
    ...:

    In [15]:

    In [15]: temp()
    a = [1, 2, 3, 4, ['a', 'b', 'c'], 5]
    b = [1, 2, 3, 4, ['a', 'b', 'c'], 5]
    c = [1, 2, 3, 4, ['a', 'b', 'c']]
    d = [1, 2, 3, 4, ['a', 'b']]

解决最初的问题

  • 看到这里,我们再回头看文章最初的那个问题,就可以很easy地解决了。

    1
    2
    3
    4
    5
    6
    7
    8
    def get_data():
    ...: appid_dict = {}
    ...: appid_all_dict = {}
    ...: import pdb;pdb.set_trace()
    ...: for i in range(10):
    appid_dict = copy.deepcopy(appid_dict)# 只需要加上这一行,使其成为深拷贝,问题解决!
    ...: appid_dict['a'] = i
    ...: appid_all_dict[i] = appid_dict

总结

要对Python的dictionary进行迭代分析,一定要注意其中的深拷贝问题,出现问题后,也要多往这方面考虑。

本期技术周刊到此结束。


]]>
这周让我们来看一下Python中关于赋值、浅拷贝、深拷贝的特性
golang 编译针对不同平台的可执行程序 https://cloudsjhan.github.io/2018/09/07/golang-编译针对不同平台的可执行程序/ 2018-09-07T07:46:32.000Z 2018-09-07T07:48:43.584Z

1
2
3
4
5
6
7
8
9
10
11
12
13
14
15
16
17
18
19
20
21
22
23
24
25
26
27
28
29
30
31
32
33
34
35
36
37
38
Golang 支持在一个平台下生成另一个平台可执行程序的交叉编译功能。


Mac下编译Linux, Windows平台的64位可执行程序:


CGO_ENABLED=0 GOOS=linux GOARCH=amd64 go build test.go
CGO_ENABLED=0 GOOS=windows GOARCH=amd64 go build test.go
Linux下编译Mac, Windows平台的64位可执行程序:


CGO_ENABLED=0 GOOS=darwin GOARCH=amd64 go build test.go
CGO_ENABLED=0 GOOS=windows GOARCH=amd64 go build test.go
Windows下编译Mac, Linux平台的64位可执行程序:


SET CGO_ENABLED=0
SET GOOS=darwin3
SET GOARCH=amd64
go build test.go


SET CGO_ENABLED=0
SET GOOS=linux
SET GOARCH=amd64
go build test.go


GOOS:目标可执行程序运行操作系统,支持 darwin,freebsd,linux,windows
GOARCH:目标可执行程序操作系统构架,包括 386,amd64,arm


Golang version 1.5以前版本在首次交叉编译时还需要配置交叉编译环境:


CGO_ENABLED=0 GOOS=linux GOARCH=amd64 ./make.bash
CGO_ENABLED=0 GOOS=windows GOARCH=amd64 ./make.bash

]]>
使用go build 编译同一套代码,在不同的平台运行
常用的Python小模块 https://cloudsjhan.github.io/2018/09/06/常用的Python小模块/ 2018-09-06T08:24:41.000Z 2018-09-28T02:06:00.780Z

  • 工作或者生活中总会遇到一些常用的Python模块,为了避免重复的工作,将这些自己写过的Python模块记录下来,方便使用的时候查找。

Python写CSV文件,并防止中文乱码

1
2
3
4
5
6
7
8
def write_csv(a_list,b_list):
with open('vm_data.csv', 'w') as f:
f.write(codecs.BOM_UTF8.decode())
writer1 = csv.writer(f, dialect='excel')
#写CVS的标题
writer1.writerow(['a', 'b'])
#将数据写入CSV文件
writer1.writerows(zip(a_list, b_list))

Python将数据结构转为json,并优化json字符串的结构,处理中文乱码

1
2
3
4
5
with open("appid.json", 'w', encoding='utf8', ) as f:
f.write(json.dumps(final, sort_keys=True, indent=2, ensure_ascii=False))
# sort_keys = True: 将字典的key按照字母排序
# ident = 2: 优化json字符串结构,看起来更美观
# ensure_ascii=False: 防止json字符串中的中文乱码

使用requests包进行网络请求(以post为例)

1
2
3
4
5
6
7
8
9
10
11
def  get_data(url):
final = {}
url = "http://xxxx.com"
request_body = {
'access_token': access_token,
'request_body': {"params1": param1, 'params2': param2}
}
headers = {
'Content-type': 'application/json'
}
data = requests.post(url, headers=headers, data=json.dumps(request_body))

]]>
常用的Python模块,即查即用
Mysql无法连接[MySql Host is blocked because of many connection errors] https://cloudsjhan.github.io/2018/09/01/Mysql无法连接/ 2018-09-01T05:20:54.000Z 2018-09-01T05:38:58.657Z

  • 测试环境,发现数据库(MySQL数据库)无法登录,报错如下:

    Host is blocked because of many connection errors; unblock with ‘mysqladmin flush-hosts’

  • 解决方案:使用mysqladmin flush-hosts 命令清理一下hosts文件(不知道mysqladmin在哪个目录下可以使用命令查找:whereis mysqladmin);

  • 登录到MySQL数据库中,mysql -uroot -h host -p

  • 执行

    1
    mysqladmin flush-hosts

    问题解决。


]]>
mysql 出现[MySql Host is blocked because of many connection errors]的错误
mysql 开启远程连接 https://cloudsjhan.github.io/2018/08/29/mysql-开启远程连接/ 2018-08-29T03:17:20.000Z 2018-09-01T05:35:43.913Z

  • 背景: 建站的时候会出现数据库和网站是不同的ip,就需要开启MySQL的远程连接服务,但是MySQL由于安全原因,默认设置是不允许远程只能本地连接,要开启远程连接就需要修改某些配置文件。

按照下面的步骤,开启MySQL的远程连接

  • 进入数据库cmd

    1
    2
    mysql -uroot -h host -p
    Enter password:***
  • 连接到默认mysql数据库

    1
    2
    3
    show databases;

    use mysql;
  • 配置

    1
    Grant all privileges on *.* to 'root'@'host' identified by 'password' with grant option;

    host表示你远程连接数据库设备的ip地址(如果你想让所有机器都能远程连接,host改为‘%’,不推荐这样使用),password表示MySQL的root用户密码

  • 刷新or重启MySQL

    1
    mysql> flush privileges;
  • 最后非常重要的一点

    1
    2
    3
    vim /etc/vim /etc/mysql/my.cnf
    屏蔽bing-server 127.0.0.0
    #bing-server 127.0.0.0
  • 完成,可以远程连接你的数据库了


]]>
不管是在测试还是开发中,MySQL经常需要开启远程连接功能
golang factory design 引发的一系列思考 https://cloudsjhan.github.io/2018/08/29/golang-factory-design-引发的一系列思考/ 2018-08-29T02:21:56.000Z 2018-09-01T07:18:05.039Z

  • 写在前面,突然萌生一个念头,做一个技术周刊系列,将每周工作或者生活当中遇到的比较有趣的问题记录下来,一来时总结一下,二来是为了以后退役了,可以回顾自己的技术生涯。
  • 没有什么意外的话,我会每周六晚更新。
  • 最近在整合三家公有云(AWS,ali, ucloud)的接口,考虑到代码复用的问题,于是开始考虑使用一种设计模式,这种场景下,最合适的便是工厂模式,将三家厂商的公有接口放入工厂方法中,然后对每一家new一个实例即可,以后再有新的厂商加入,改动的代码也不会太多。但是设计模式这种东西天然适合于java,对于golang这种比较新的语言来说,实现起来相对没有那么容易,对于刚接触golang的我来说,对一些golang的特性上并不是很熟悉,所以在此期间遇到一些不解的问题,写出来分享一下。

首先,什么是工厂模式

  • 简单工厂模式就是通过传递不同的参数,生成不同的实例,工厂方法为每一个product提供一个工程类,通过不同的工厂创建不同的实例。

典型工厂模式的实现方式(即典型oop实现方式)

  • 1
    2
    3
    4
    5
    6
    7
    8
    9
    10
    11
    12
    13
    14
    15
    16
    17
    18
    19
    20
    21
    22
    class ProviderModel{
    provider string
    func factory(providerName string, test string){
    if providerName == "AWS" {
    return new AWS(test)
    }
    if providerName == "Ali"{
    return new Ali(test)
    }
    }
    }
    class AWS extends ProviderModel {
    func construct(test string){
    this.test = test
    }
    func doRequest(){}
    }
    awsmodel := ProviderModel::factory("AWS")
    awsmodel.doRequest()

    alimodel := ProviderModel ::factory("Ali")
    alimodel.doRequest()

golang实现工厂模式存在的问题

  • golang的特性中并没有像java一样的继承和重载,所以我们要利用golang存在的特性,透过工厂模式的表面透析其本质。

  • 我们看一下工厂模式就知道,所谓工厂其实就是定义了一些需要去实现的方法,golang的interface正是可以做到。于是先到Google上搜了一段golang实现的工厂模式的代码。

    1
    2
    3
    4
    5
    6
    7
    8
    9
    10
    11
    12
    13
    14
    15
    16
    17
    18
    19
    20
    21
    22
    23
    24
    25
    26
    27
    28
    29
    30
    31
    32
    33
    34
    35
    36
    37
    38
    39
    40
    41
    42
    43
    44
    45
    46
    47
    package main

    import (
    "fmt"
    )

    type Operater interface {
    Operate(int, int) int
    }

    type AddOperate struct {
    }

    func (this *AddOperate) Operate(rhs int, lhs int) int {
    return rhs + lhs
    }

    type MultipleOperate struct {
    }

    func (this *MultipleOperate) Operate(rhs int, lhs int) int {
    return rhs * lhs
    }

    type OperateFactory struct {
    }

    func NewOperateFactory() *OperateFactory {
    return &OperateFactory{}
    }

    func (this *OperateFactory) CreateOperate(operatename string) Operater {
    switch operatename {
    case "+":
    return &AddOperate{}
    case "*":
    return &MultipleOperate{}
    default:
    panic("无效运算符号")
    return nil
    }
    }

    func main() {
    Operator := NewOperateFactory().CreateOperate("+")
    fmt.Printf("add result is %d\n", Operator.Operate(1, 2))
    }

    代码看起来没什么问题,后来又看到一种实现方式,来自这篇博客,代码如下:

    1
    2
    3
    4
    5
    6
    7
    8
    9
    10
    11
    12
    13
    14
    15
    16
    17
    18
    19
    20
    21
    22
    23
    24
    25
    26
    27
    28
    type site interface {
    fetch()
    }

    type siteModel struct {
    URL string
    }
    type site1 struct {
    siteModel
    }

    func (s site1) fetch() {
    fmt.Println("site1 fetch data")
    }

    func factory(s string) site {
    if s == "site" {
    return site1{
    siteModel{URL: "http://www.xxxx.com"},
    }
    }
    return nil
    }

    func main() {
    s := factory("site")
    s.fetch()
    }

    代码初看上去跟第一个实现没什么不一样,但是当我详细阅读代码时,下面的这句代码着实把我弄晕了

    1
    2
    3
    4
    5
    6
    7
    8
    func factory(s string) site {
    if s == "site" {
    return site1{
    siteModel{URL: "http://www.xxxx.com"},
    }
    }
    return nil
    }

    factory函数的返回值定义明明是一个interface, 但是在return的时候,却返回一个struct,查阅很多资料后,这篇博客帮了我的大忙,其中对interface的解释有这么一句话:在 Golang 中,interface 是一组 method 的集合,是 duck-type programming 的一种体现。不关心属性(数据),只关心行为(方法)。具体使用中你可以自定义自己的 struct,并提供特定的 interface 里面的 method 就可以把它当成 interface 来使用。之后又详细看了几遍这篇博文,犹如醍醐灌顶,对golanginterface的理解更深了一层。读完这篇后再去实现工厂模式,或者再去写golang的代码,对interface的使用就会更自如一些。

总结

  • 本期技术周刊主要由golang工厂模式的讨论引起,之后又涉及到golang interface特性的讨论,对以后使用golang编写更加复杂的代码很有帮助。

  • 本期结束,欲知后事如何,且看下周分解。


]]>
工作需要,看了一下golang如何实现工厂模式,遇到一些难以理解的知识点,查资料,写demo验证后,记录下来以供参考
golang中的工厂模式 https://cloudsjhan.github.io/2018/08/27/golang中的工厂模式-md/ 2018-08-27T10:53:24.000Z 2018-08-27T11:18:09.576Z

1
2
3
4
5
6
7
8
9
10
11
12
13
14
15
16
17
18
19
20
21
22
23
24
25
26
27
28
29
30
31
32
33
34
35
36
37
38
39
40
41
42
43
44
45
46
47
48
49
* 简单工厂模式

package main

import (
"fmt"
)

type Operater interface {
Operate(int, int) int
}

type AddOperate struct {
}

func (this *AddOperate) Operate(rhs int, lhs int) int {
return rhs + lhs
}

type MultipleOperate struct {
}

func (this *MultipleOperate) Operate(rhs int, lhs int) int {
return rhs * lhs
}

type OperateFactory struct {
}

func NewOperateFactory() *OperateFactory {
return &OperateFactory{}
}

func (this *OperateFactory) CreateOperate(operatename string) Operater {
switch operatename {
case "+":
return &AddOperate{}
case "*":
return &MultipleOperate{}
default:
panic("无效运算符号")
return nil
}
}

func main() {
Operator := NewOperateFactory().CreateOperate("+")
fmt.Printf("add result is %d\n", Operator.Operate(1, 2))
}
1
2
3
4
5
6
7
8
9
10
11
12
13
14
15
16
17
18
19
20
21
22
23
24
25
26
27
28
29
30
31
32
33
34
35
36
37
38
39
40
41
42
43
44
45
46
47
48
49
50
51
52
53
54
55
56
57
58
59
60
61
62
63
64
65
66
67
68
69
70
71
72
73
74
75
76
77
78
79
80
81
82
83
84
85
86
87
88
89
90
91
92
93
94
95
96
97
* 工厂方法
package main

import (
"fmt"
)

type Operation struct {
a float64
b float64
}

type OperationI interface {
GetResult() float64
SetA(float64)
SetB(float64)
}

func (op *Operation) SetA(a float64) {
op.a = a
}

func (op *Operation) SetB(b float64) {
op.b = b
}

type AddOperation struct {
Operation
}

func (this *AddOperation) GetResult() float64 {
return this.a + this.b
}

type SubOperation struct {
Operation
}

func (this *SubOperation) GetResult() float64 {
return this.a - this.b
}

type MulOperation struct {
Operation
}

func (this *MulOperation) GetResult() float64 {
return this.a * this.b
}

type DivOperation struct {
Operation
}

func (this *DivOperation) GetResult() float64 {
return this.a / this.b
}

type IFactory interface {
CreateOperation() Operation
}

type AddFactory struct {
}

func (this *AddFactory) CreateOperation() OperationI {
return &(AddOperation{})
}

type SubFactory struct {
}

func (this *SubFactory) CreateOperation() OperationI {
return &(SubOperation{})
}

type MulFactory struct {
}

func (this *MulFactory) CreateOperation() OperationI {
return &(MulOperation{})
}

type DivFactory struct {
}

func (this *DivFactory) CreateOperation() OperationI {
return &(DivOperation{})
}

func main() {
fac := &(AddFactory{})
oper := fac.CreateOperation()
oper.SetA(1)
oper.SetB(2)
fmt.Println(oper.GetResult())
}
1
2
3
4
5
6
7
8
9
10
11
12
13
14
15
16
17
18
19
20
21
22
23
24
25
26
27
28
29
30
31
32
33
34
35
36
37
38
39
40
41
42
43
44
45
46
47
48
49
* 抽象工厂方法
package main

import "fmt"

type GirlFriend struct {
nationality string
eyesColor string
language string
}

type AbstractFactory interface {
CreateMyLove() GirlFriend
}

type IndianGirlFriendFactory struct {
}

type KoreanGirlFriendFactory struct {
}

func (a IndianGirlFriendFactory) CreateMyLove() GirlFriend {
return GirlFriend{"Indian", "Black", "Hindi"}
}

func (a KoreanGirlFriendFactory) CreateMyLove() GirlFriend {
return GirlFriend{"Korean", "Brown", "Korean"}
}

func getGirlFriend(typeGf string) GirlFriend {

var gffact AbstractFactory
switch typeGf {
case "Indian":
gffact = IndianGirlFriendFactory{}
return gffact.CreateMyLove()
case "Korean":
gffact = KoreanGirlFriendFactory{}
return gffact.CreateMyLove()
}
return GirlFriend{}
}

func main() {

a := getGirlFriend("Indian")

fmt.Println(a.eyesColor)
}

]]>
<p class="description"></p> <p><img src="https://" alt="" style="width:100%"></p>
Mac os 环境配置ruby on rails 及其Hello world https://cloudsjhan.github.io/2018/08/26/Mac-os-配置-ruby-on-rails-md/ 2018-08-26T15:20:33.000Z 2018-08-27T15:39:24.975Z

今天在Mac OS环境中倒腾ruby on rails,遇到一些坑并排坑后总结一个搭建过程,供大家参考。

大纲

  • 本着IT届能用最新的就不用前面的版本的宗旨,在进行之前必须将你的Mac升级到最新的macOS High Sierra

  • 安装 XCode Command Line Tools

  • 配置Git

  • 安装Homebrew

  • 安装GPG

  • 安装RVM

  • 安装ruby

  • 升级RubyGems

  • 安装rails

  • 基本MVC探究之Hello world

    Ruby On rails for mac os High Sierra

    • Mac OS是自带ruby的,但是这些ruby的版本都不是最新的,我们也不要用这些过时的版本

    • 首先,升级你的Mac OS到10.13

    • 查看是否安装xcode command line tool:

      1
      2
      3
      4
      $:xcode-select -p
      如果你看到:
      xcode-select: error: unable to get active developer directory...
      说明你没有安装xcode command line tool,需要按照下面的步骤安装。
      1
      2
      3
      如果你看到:
      $:/Applications/Xcode.app/Contents/Developer 或者/Library/Developer/CommandLineTools
      恭喜你,xcode command line tool你已经安装好了
      1
      2
      3
      But,如果你很不幸运地看到了这句话:
      $: /Applications/Apple Dev Tools/Xcode.app/Contents/Developer
      那么你就要卸掉xcode重新安装了,具体原因看

      这里

    • 安装xcode

    • 1
      xcode-select --install
    • 一路确认之后,就可以安好xcode,但是如果你的网速不好,等待时间过长,你可以从这里输入你的APPID下载。

    • 确认一下是否安好

    • 1
      2
      $ xcode-select -p
      /Library/Developer/CommandLineTools

    配置Git

    • 在安装ruby on rails 之前,你应该配置你的Git。Git在Mac OS上使自动安装的软件

    • 检查Git版本并确认已经安装让你放心

    • 1
      2
      $ git version
      git version 2.4.9 (Apple Git-60)
    • 配置Git之前,你应该到GitHub上注册你的账号并记住密码和邮箱。并使用下面的命令配置:

      1
      2
      3
      4
      5
      6
      7
      $ git config -l --global
      fatal: unable to read config file '/Users/.../.gitconfig': No such file or directory
      $ git config --global user.name "Your Real Name"
      $ git config --global user.email me@example.com
      $ git config -l --global
      user.name=Your Real Name
      user.email=me@example.com
    • Git配置完成,在你想用Git的时候,它就会蹦出来了。

    安装Homebrow

    • 检查homebrow是否已经安装

      1
      2
      $ brew
      -bash: brew: command not found

      RVM需要Homebrow,其实一个Mac OS额安装包管理工具,用来下载一些软件,类似于Ubuntu的apt-get和centos的yum install.为避免安装RM出现问题,我们必须安装homebrow:

      1
      $ ruby -e "$(curl -fsSL https://raw.githubusercontent.com/Homebrew/install/master/install)"

      安装过程中可能会出现一些warning并让你输入密码:

      1
      2
      3
      WARNING: Improper use of the sudo command could lead to data loss...
      To proceed, enter your password...
      Password:

      尽管输入密码,忽略warning。

      我们这里是使用了Mac OS内置的ruby来安装homebrow。

    安装GPG

    • gpg是一个用来检查RVM下载包的安全性的程序,我们使用homebrew来安装gpg:

    • 1
      $ brew install gpg
    • gpg安装之后,为RVM安装key:

      1
      $ command curl -sSL https://rvm.io/mpapis.asc | gpg --import -

    安装RVM

    • RVM,是Ruby version manager的简写,用来安装ruby或者管理rails版本。这个网站详细说明了安装ruby的方式,但是我们有一种最简便的方式:

    • 1
      $ \curl -L https://get.rvm.io | bash -s stable

      “curl”前面的“\”用来避免ruby版本的冲突,不要漏掉。

    • 安装过程中你可能会看到

      1
      2
      3
      mkdir: /etc/openssl: Permission denied
      mkdir -p "/etc/openssl" failed, retrying with sudo
      your password required for 'mkdir -p /etc/openssl':

      请输入密码并继续。

    • 如果你已经安装过RVM,使用下面的命令update:

      1
      $ rvm get stable --autolibs=enable
    • 重启terminal窗口或者使用:使RVM生效

      1
      $ source ~/.rvm/scripts/rvm

    安装ruby

    • 在安装RVM之后,我们安装最新版本的ruby。ruby 2.5.1是写此博客时当前最新的ruby版本,还请查看ruby官网查看最新版本的ruby。必须指定ruby的版本:

      1
      $ rvm install ruby-2.5.1

      安装后检查是否安装成功:

      1
      2
      $ ruby -v
      ruby 2.5.1...

    升级rubyGemset

    • RubyGems是一个ruby的包管理工具,用来安装ruby的工具或者额外功能的包。

    • 查看gem版本:

      1
      $ gem -v

      将gem升级到最新版本

      1
      $ gem update --system
    • 显示RVM gemsets的最初两个设置

      1
      2
      3
      4
      $ rvm gemset list
      gemsets for ruby-2.5.0
      => (default)
      global

      一般使用global:

      1
      $ rvm gemset use global
    • 安装bundle,Bundle是一个管理gem的必须的工具

      1
      $ gem install Bundler
    • 安装Nokogiri,Nokogiri需要编译成指定的系统,在上面的配置下,号称最难安装的包,也将安装好

      1
      $ gem install nokogiri

      如果你真的不幸运在安装时遇到问题,Stack Overflow能帮到你。

    安装rails

    • 这里是ruby On rail最新的版本,5.1是最新稳定版本,5.2是release版本,我们安装5.1.

      1
      $ gem install rails --version=5.1

      如果你喜欢尝鲜,可以使用

      1
      $ gem install rails --pre

      安装release版本。

      检查一下rails是否装好:

      1
      2
      $ rails -v
      Rails 5.2.0
    • 到此为止,ruby on rails 以及其环境配置都已妥当,可以开始你的ruby之旅了。

    ruby on rails 的Hello world

]]>
<p class="description"></p>
go实现UNIX command https://cloudsjhan.github.io/2018/08/22/go-unix-cmd-md/ 2018-08-22T11:27:41.000Z 2018-09-01T05:38:25.962Z

1
2
3
4
5
6
7
8
9
10
11
12
13
14
15
16
17
18
19
20
21
22
23
24
25
26
27
28
29
30
31
32
33
34
35
36
37
38
39
40
41
42
43
44
45
46
47
48
49
50
51
52
53
54
55
56
57
58
59
60
61
62
63
64
65
66
67
68
69
70
package main

import (
"bufio"
"errors"
"fmt"
"os"
"os/exec"
"strings"
)

func main() {
reader := bufio.NewReader(os.Stdin)
for {
fmt.Print("> ")
// 读取键盘的输入.
input, err := reader.ReadString('\n')
if err != nil {
fmt.Fprintln(os.Stderr, err)
}

// 执行并解析command.
err = execInput(input)
if err != nil {
fmt.Fprintln(os.Stderr, err)
}
}
}

// 如果cd命令没有路径的话,就报下面的错误
var ErrNoPath = errors.New("path required")

func execInput(input string) error {
// 移除换行符.
input = strings.TrimSuffix(input, "\n")

// 将输入分割成参数.
args := strings.Split(input, " ")

// 对cd命令的情况进行区分.
switch args[0] {
case "cd":
// 暂时不支持cd加空格进入home目录.
if len(args) < 2 {
return ErrNoPath
}
err := os.Chdir(args[1])
if err != nil {
return err
}
// Stop further processing.
return nil
case "exit":
os.Exit(0)
}

// Prepare the command to execute.
cmd := exec.Command(args[0], args[1:]...)

// Set the correct output device.
cmd.Stderr = os.Stderr
cmd.Stdout = os.Stdout

// Execute the command and save it's output.
err := cmd.Run()
if err != nil {
return err
}
return nil
}
1
2
//执行并测试
go run main.go

暂时不支持tab键自动补全命令,只是提供一种简单的思路。


]]>
使用go实现UNIX环境下的命令行工具
iterm2 突然报很奇怪的错误-Error No user exists for uid 501 https://cloudsjhan.github.io/2018/08/21/iterm2-strange-err-md-md/ 2018-08-21T15:18:21.000Z 2018-08-21T15:33:12.206Z

1
2
3
No user exists for uid 501
fatal: Could not read from remote repository.
Please make sure you have the correct access rightsand the repository exists.
  • 上午还好好的,刚刚连接GitHub报这个错误,排查后了解到是iterm2的神坑。
  • 重启iterm终端就好 系统有更新的话 需要重启终端 更新。

]]>
iterm2 突然报很奇怪的错误-Error No user exists for uid 501
golang中interface的通用设计方法 https://cloudsjhan.github.io/2018/08/21/golang通用接口设计方法/ 2018-08-21T14:18:58.000Z 2018-08-21T15:10:30.131Z golang中接口设计的通用方法

1
2
3
4
5
6
7
8
9
10
11
12
13
14
15
16
17
18
19
20
21
22
23
24
25
1. 接口定义
type XxxManager interface {
Create(args argsType) (*XxxStruct, error)
Get(args argsType) (**XxxStruct, error)
Update(args argsType) (*XxxStruct, error)
Delete(name string, options *DeleleOptions) error
}
2. 结构体定义
type XxxManagerImpl struct {
Name string
Namespace string
kubeCli *kubernetes.Clientset
}
3,构造函数
func NewXxxManagerImpl (namespace, name string, kubeCli *kubernetes.Clientset) XxxManager {
return &XxxManagerImpl{
Name name,
Namespace namespace,
kubeCli: kubeCli,
}
}
4. 方法具体实现
func (xm *XxxManagerImpl) Create(args argsType) (*XxxStruct, error) {
//具体的方法实现
}

golang通用接口设计

根据以上设计cdosapi封装接口:

]]>
golang中interface的通用设计方法
python3中遇到'TypeError Unicode-objects must be encoded before hashing' https://cloudsjhan.github.io/2018/08/20/python-md5-err-md/ 2018-08-20T14:18:58.000Z 2018-09-28T02:06:52.282Z Python3中进行MD5加密,遇到编码问题

1
2
3
4
5
6
7
8
9
10
11
12
13
14
15
16
17
18
19
20
21
22
23
24
25
26
27
28
29
30
31
32
33
34
35
36
37
38
39
40
import hashlib
from urllib.parse import urlencode, quote_plus
import urllib


def verfy_ac(private_key):

item = {
"Action" : "CreateUHostInstance",
"CPU" : 2,
"ChargeType" : "Month",
"DiskSpace" : 10,
"ImageId" : "f43736e1-65a5-4bea-ad2e-8a46e18883c2",
"LoginMode" : "Password",
"Memory" : 2048,
"Name" : "Host01",
"Password" : "VUNsb3VkLmNu",
"PublicKey" : "ucloudsomeone%40example.com1296235120854146120",
"Quantity" : 1,
"Region" : "cn-bj2",
"Zone" : "cn-bj2-04"
}
# 将参数串排序

params_data = ""
import pdb;pdb.set_trace()
for key, value in item.items():
params_data = params_data + str(key) + str(value)
params_data = params_data + private_key
params_data_en = quote_plus(params_data)

sign = hashlib.sha1()
sign.update(params_data_en.encode('utf8'))
signature = sign.hexdigest()

return signature


print(verfy_ac("46f09bb9fab4f12dfc160dae12273d5332b5debe"))

这是ucloud官方的API教程,想根据此教程生成签名,教程中的代码是基于Python2.7编写,我将其改成了Python3.但是在执行时报错:

1
TypeError: Unicode-objects must be encoded before hashing

排错后发现python3中字符对象是unicode对象,不能直接加密,需要编码后才能进行update。

就是改成如下即可:

1
sign.update(params_data_en.encode('utf8'))

]]>
Python中进行md5加密时遇到的编码问题
Hello World https://cloudsjhan.github.io/2018/08/18/hello-world/ 2018-08-18T14:05:08.000Z 2018-08-18T14:05:08.000Z Welcome to Hexo! This is your very first post. Check documentation for more info. If you get any problems when using Hexo, you can find the answer in troubleshooting or you can ask me on GitHub.
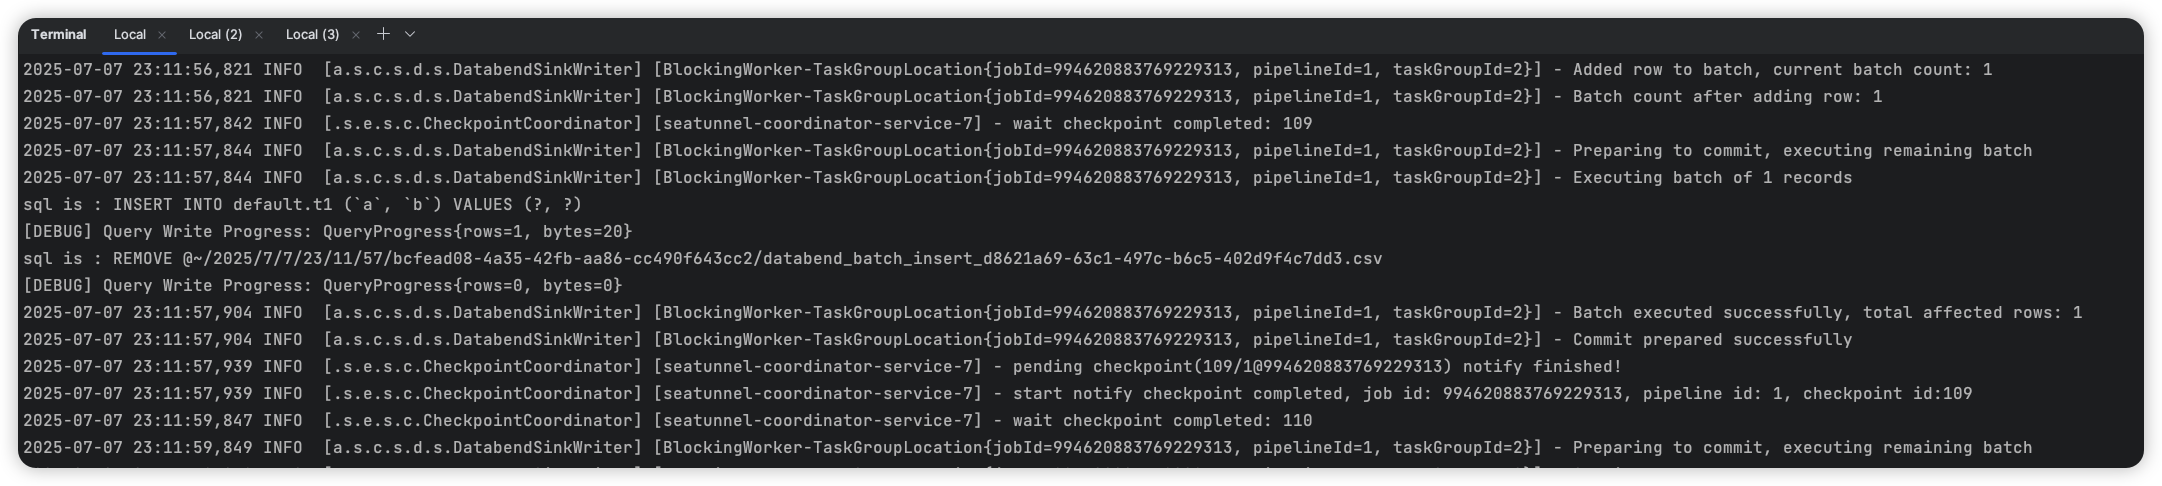
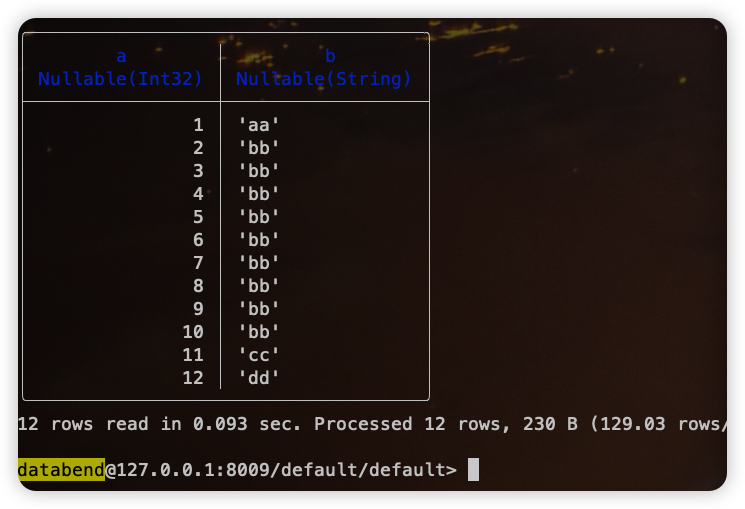
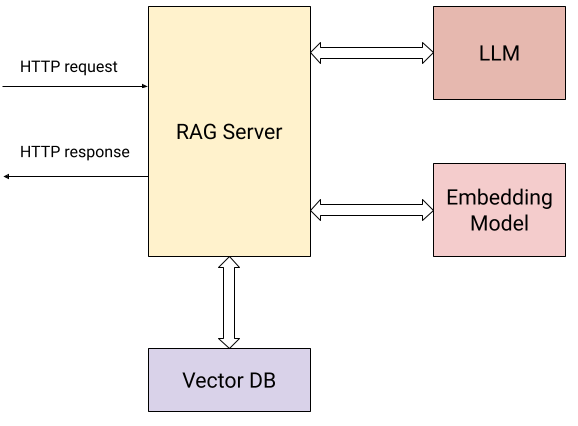
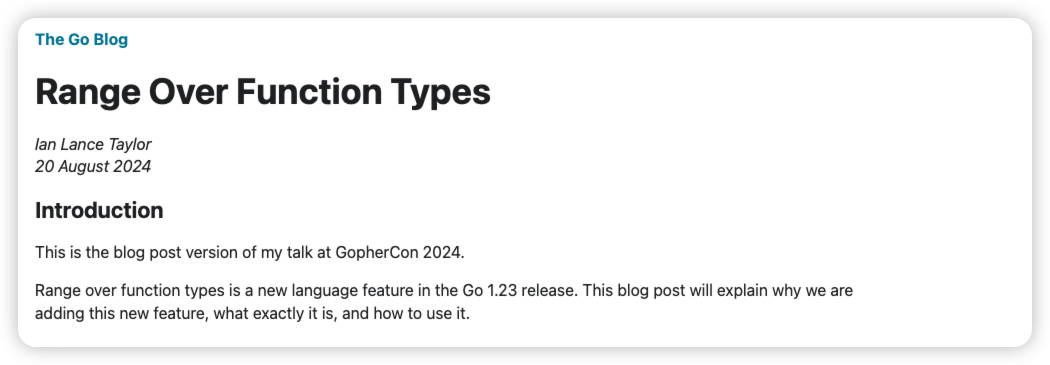
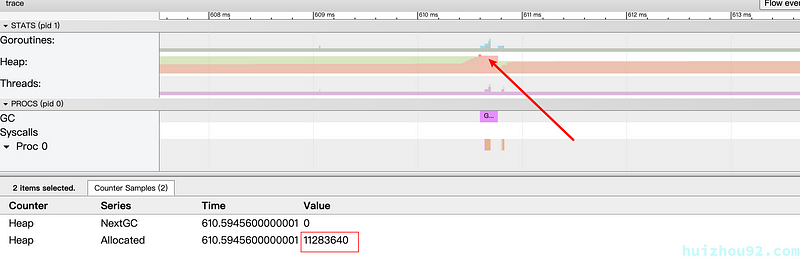
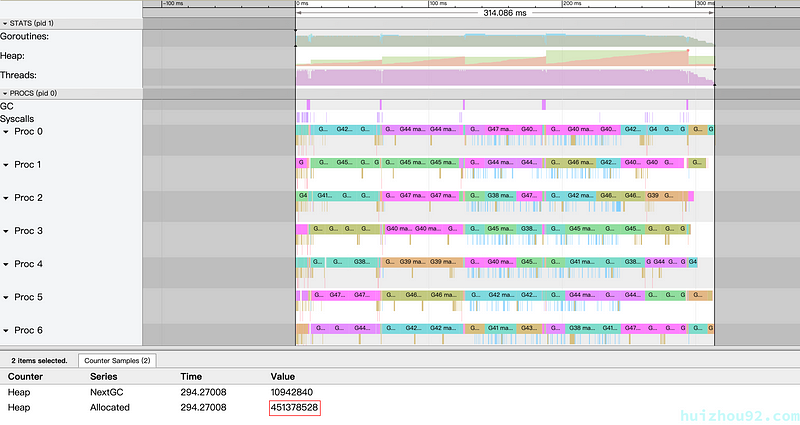
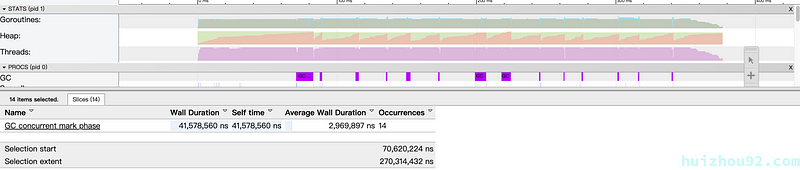
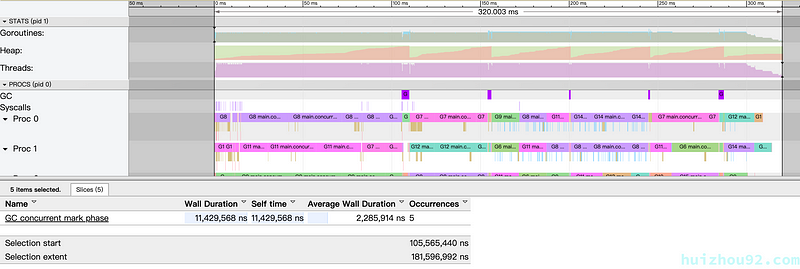
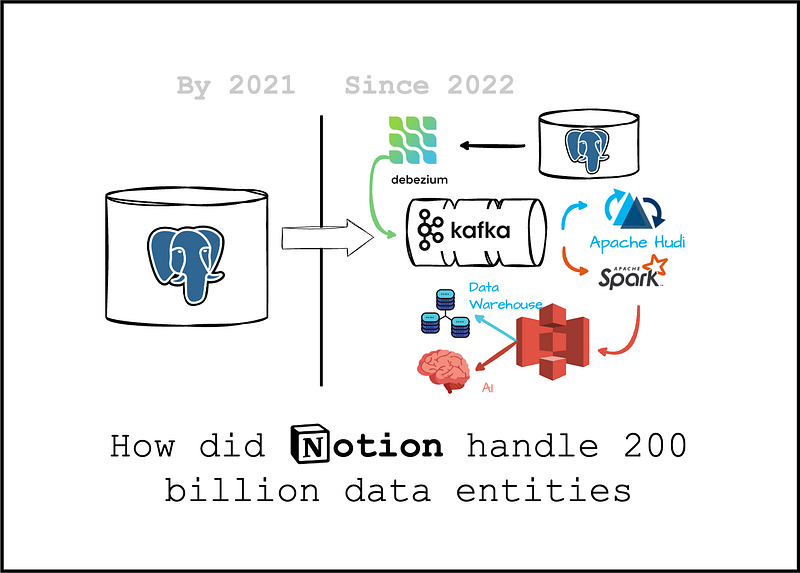
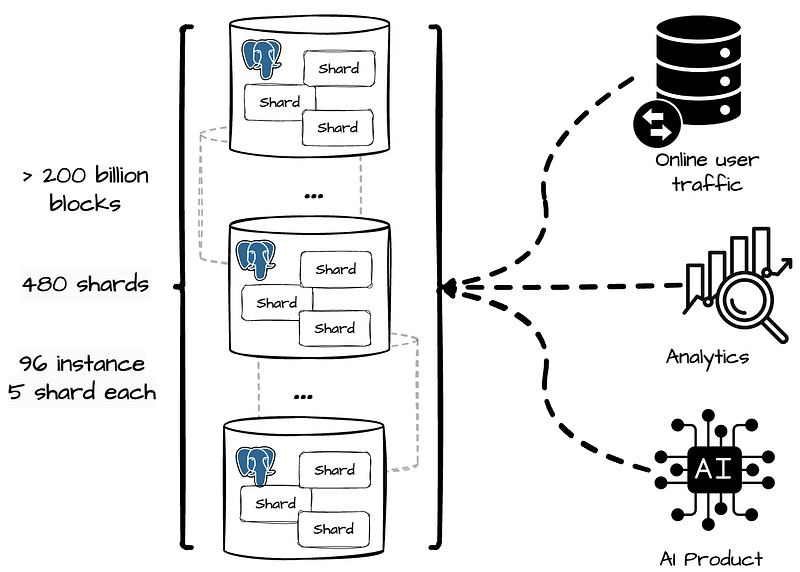
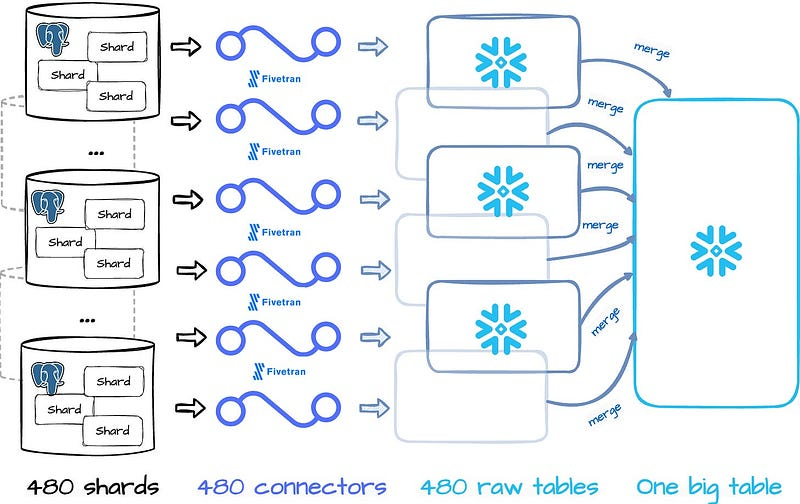
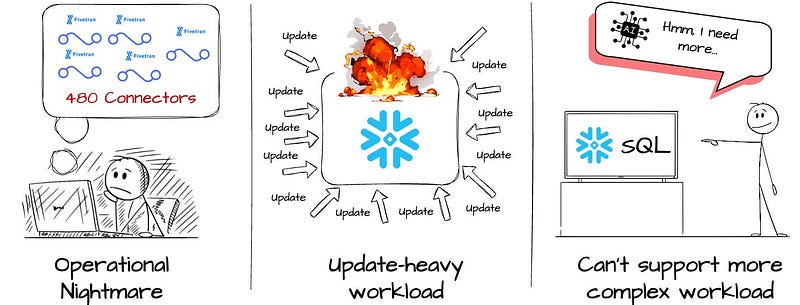
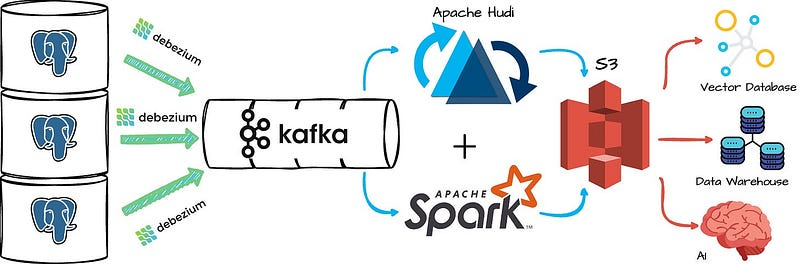
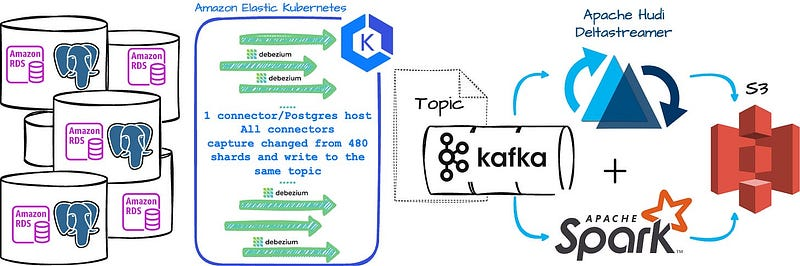
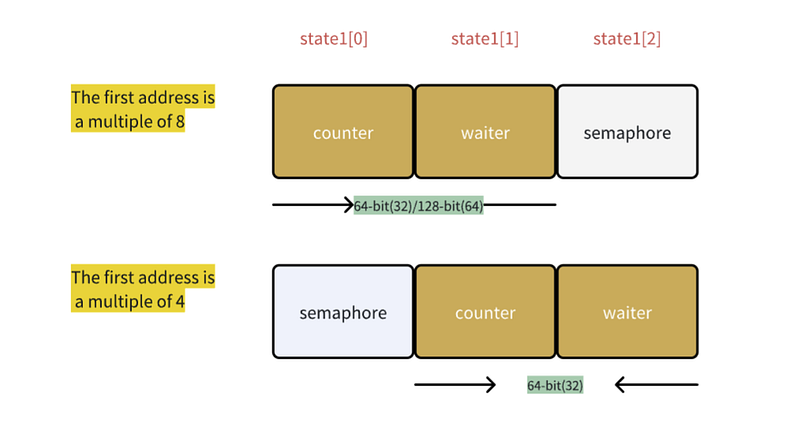
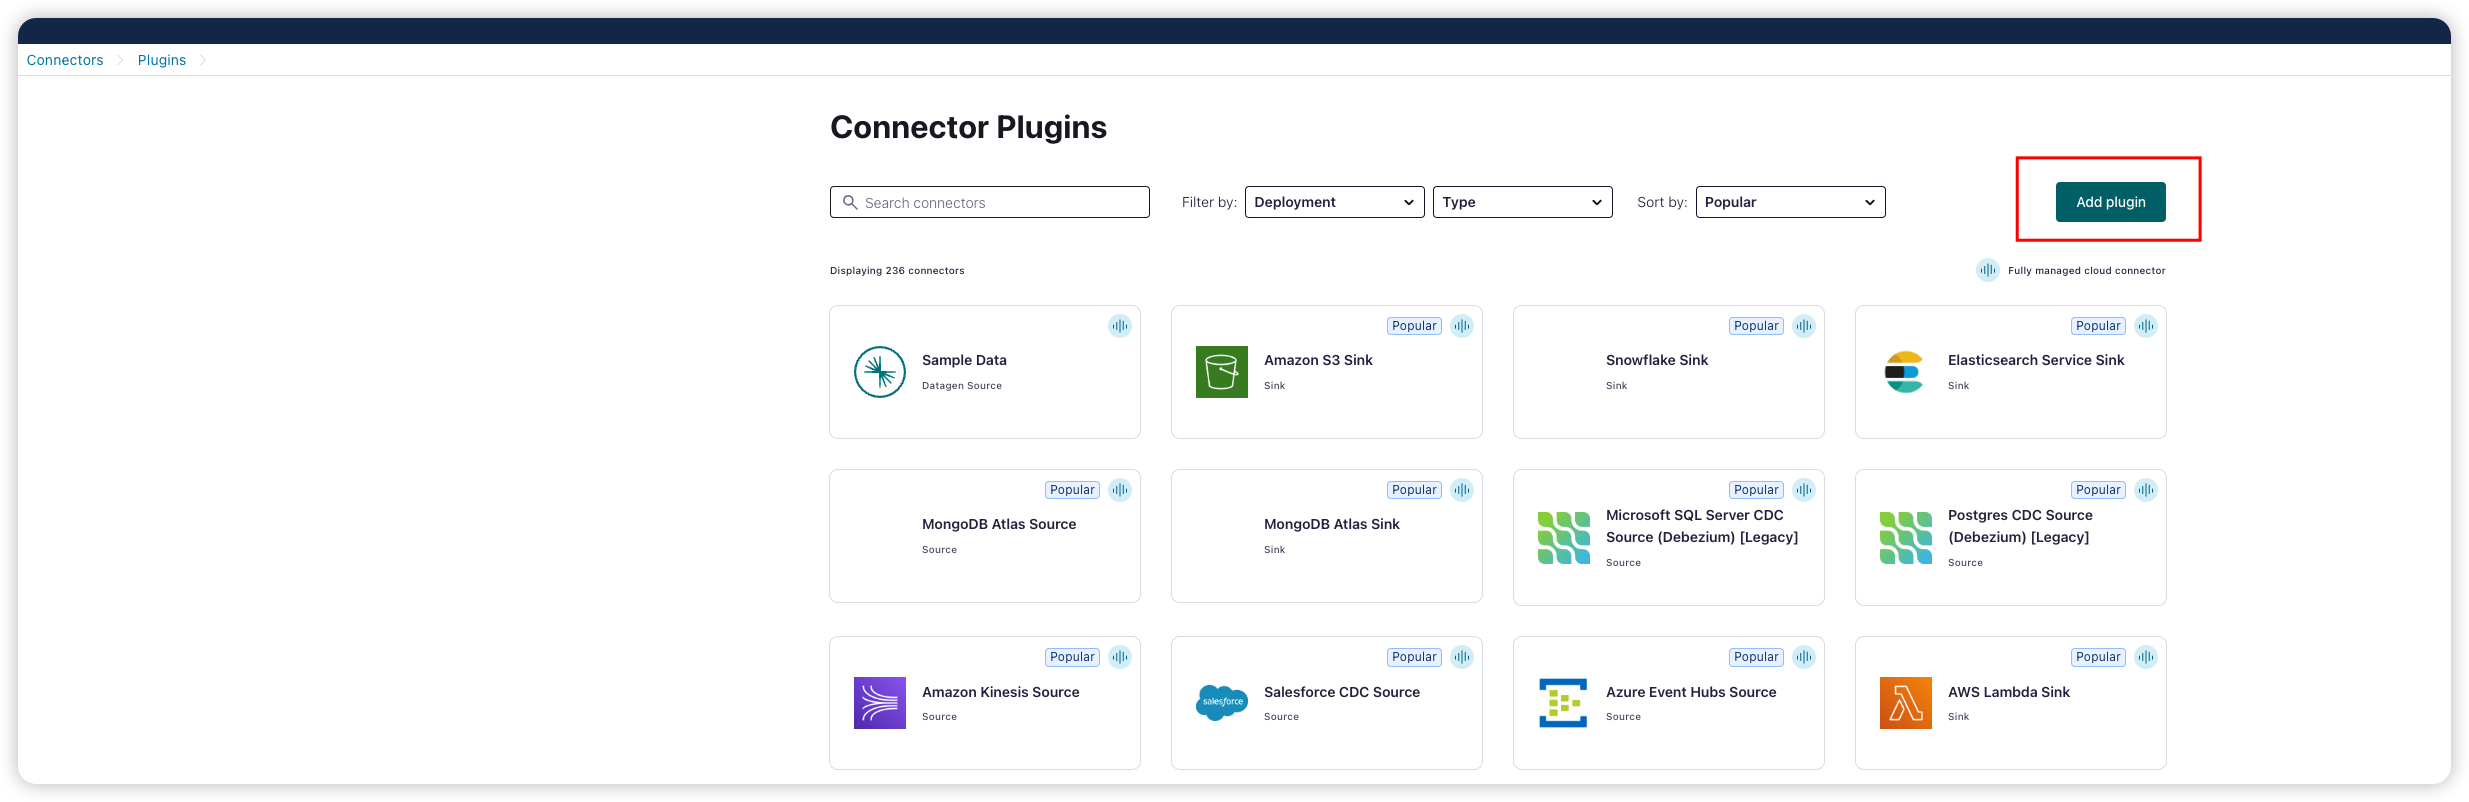
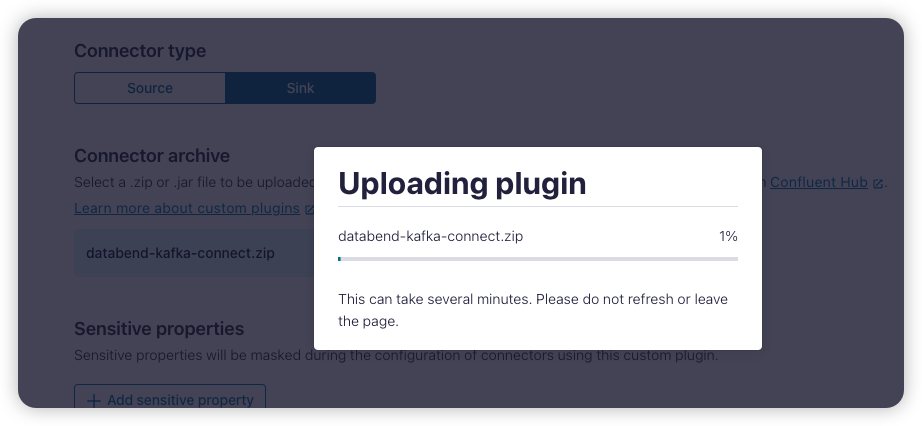
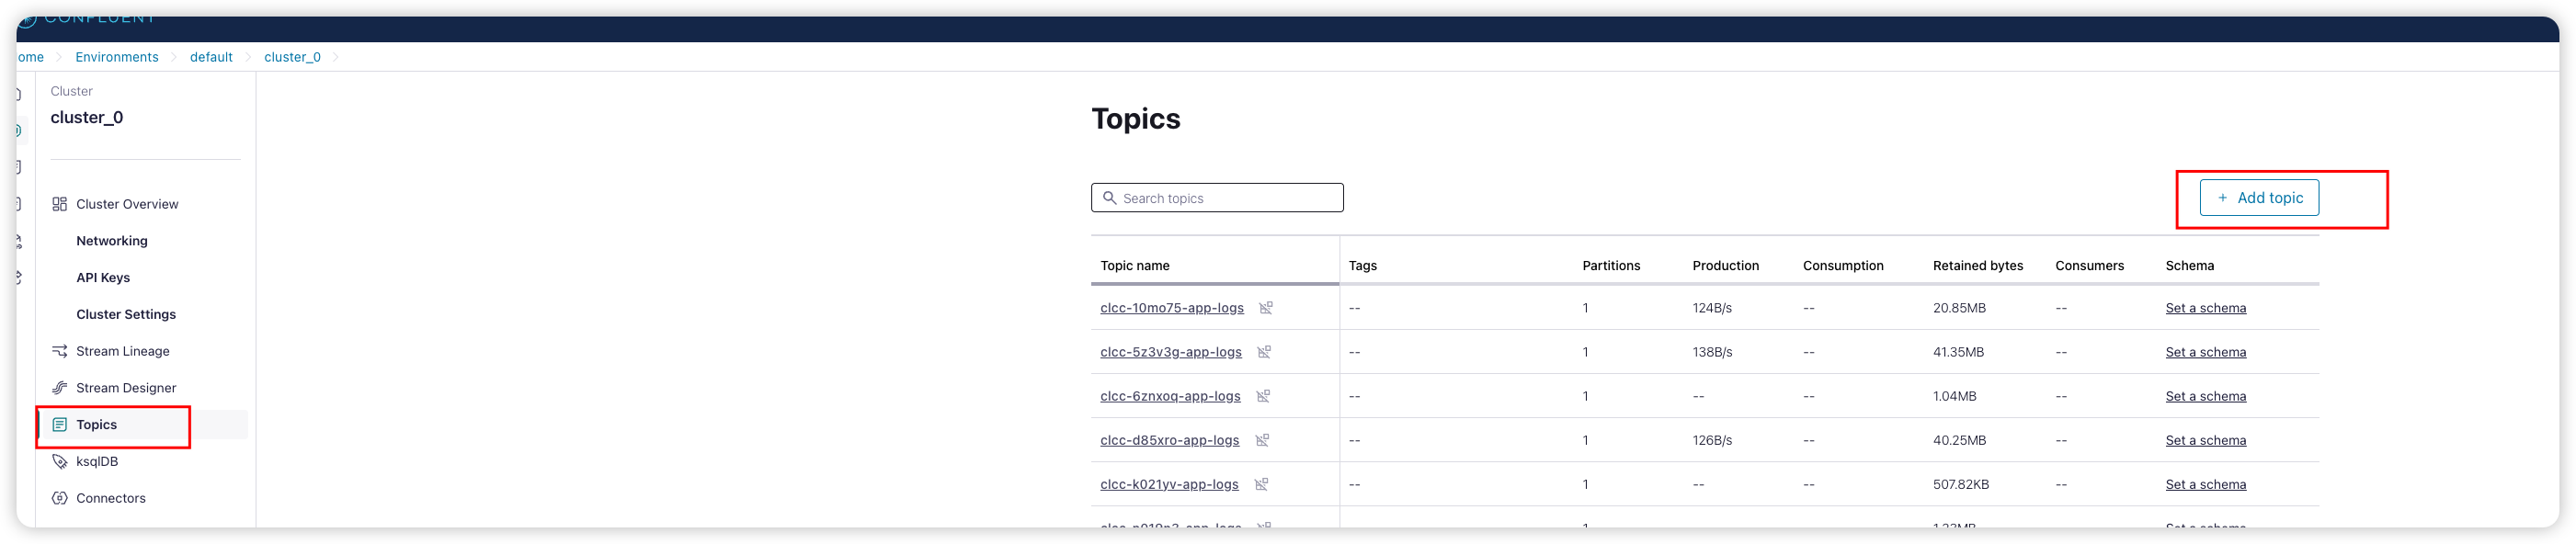
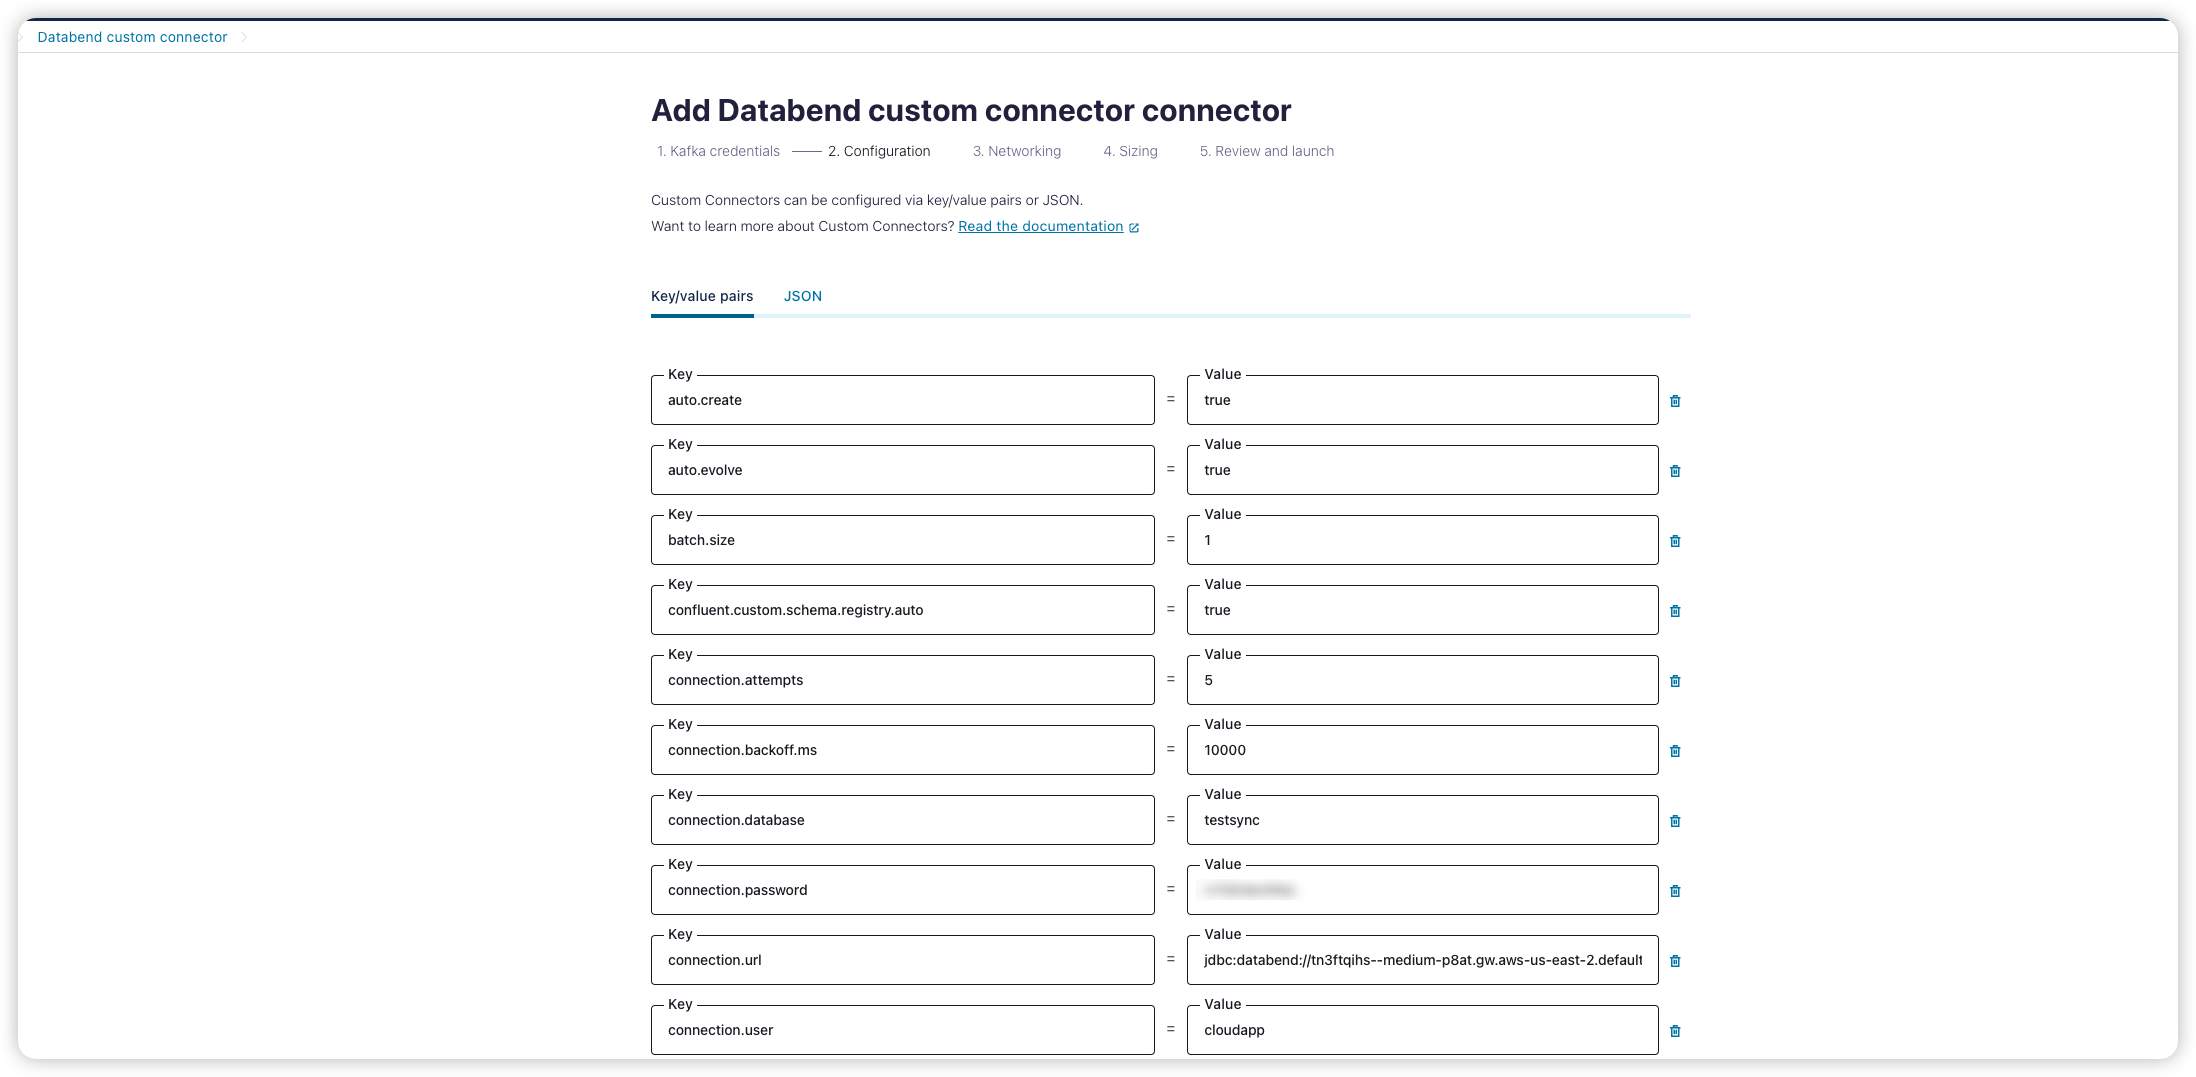
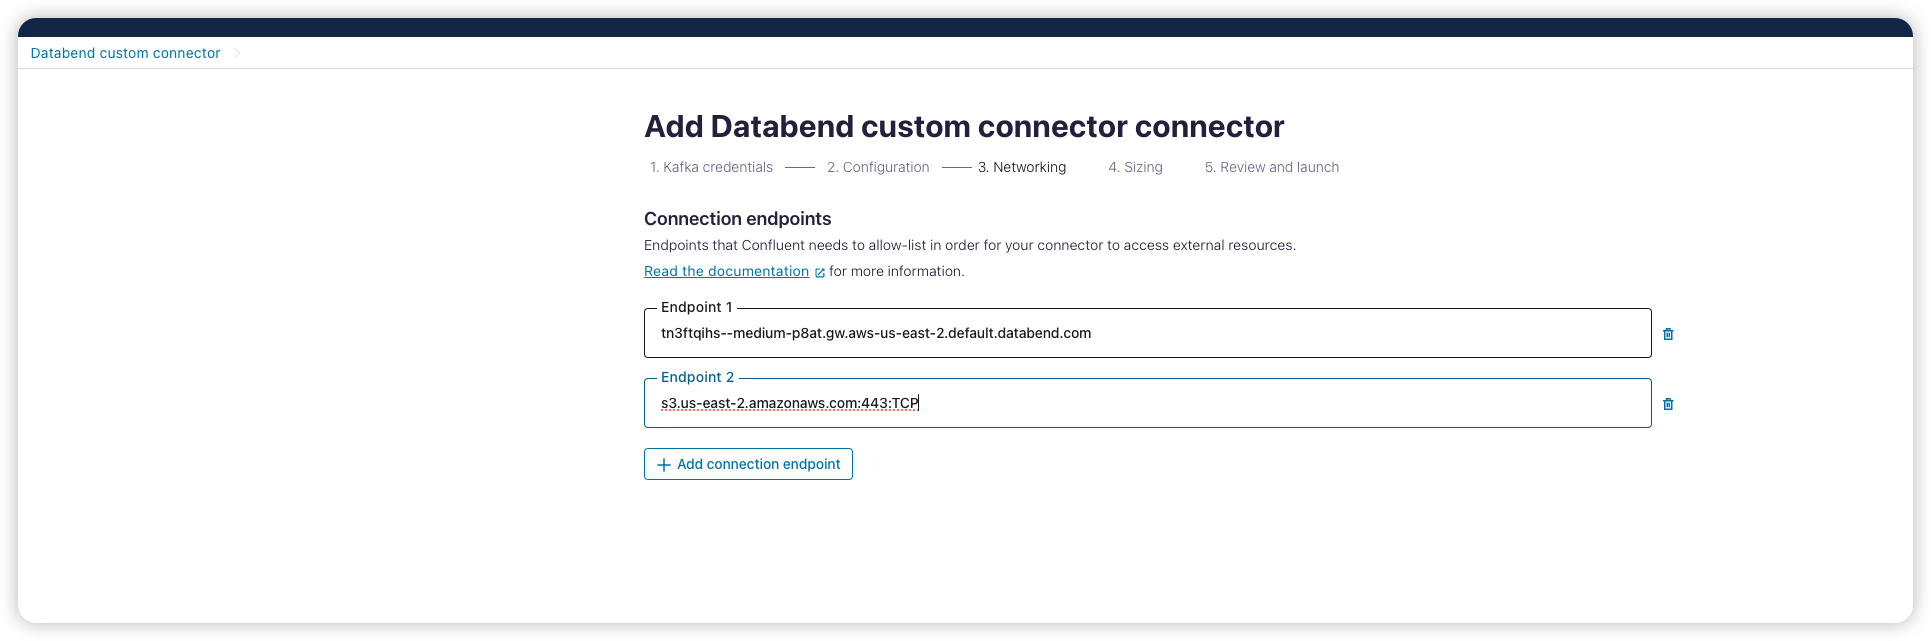
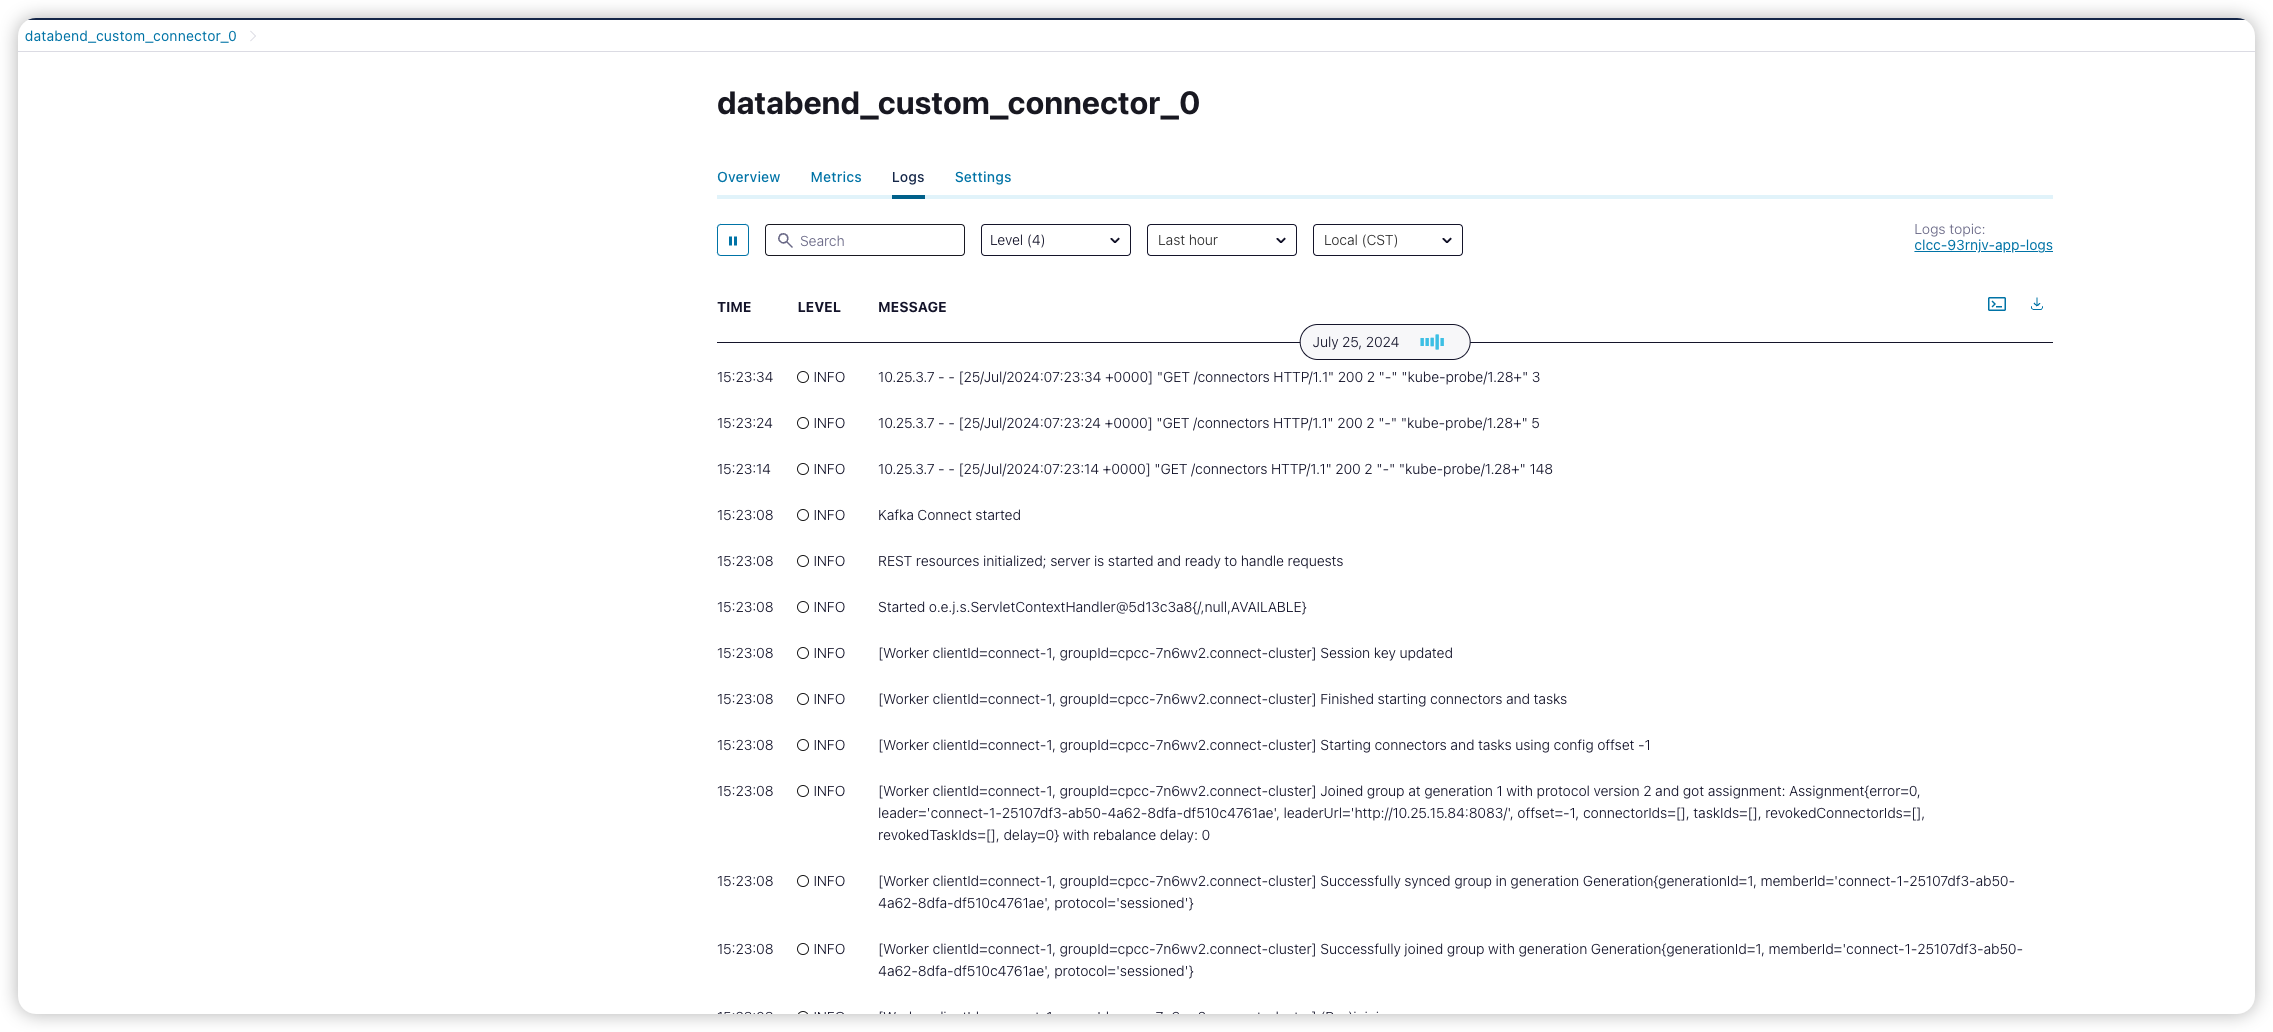
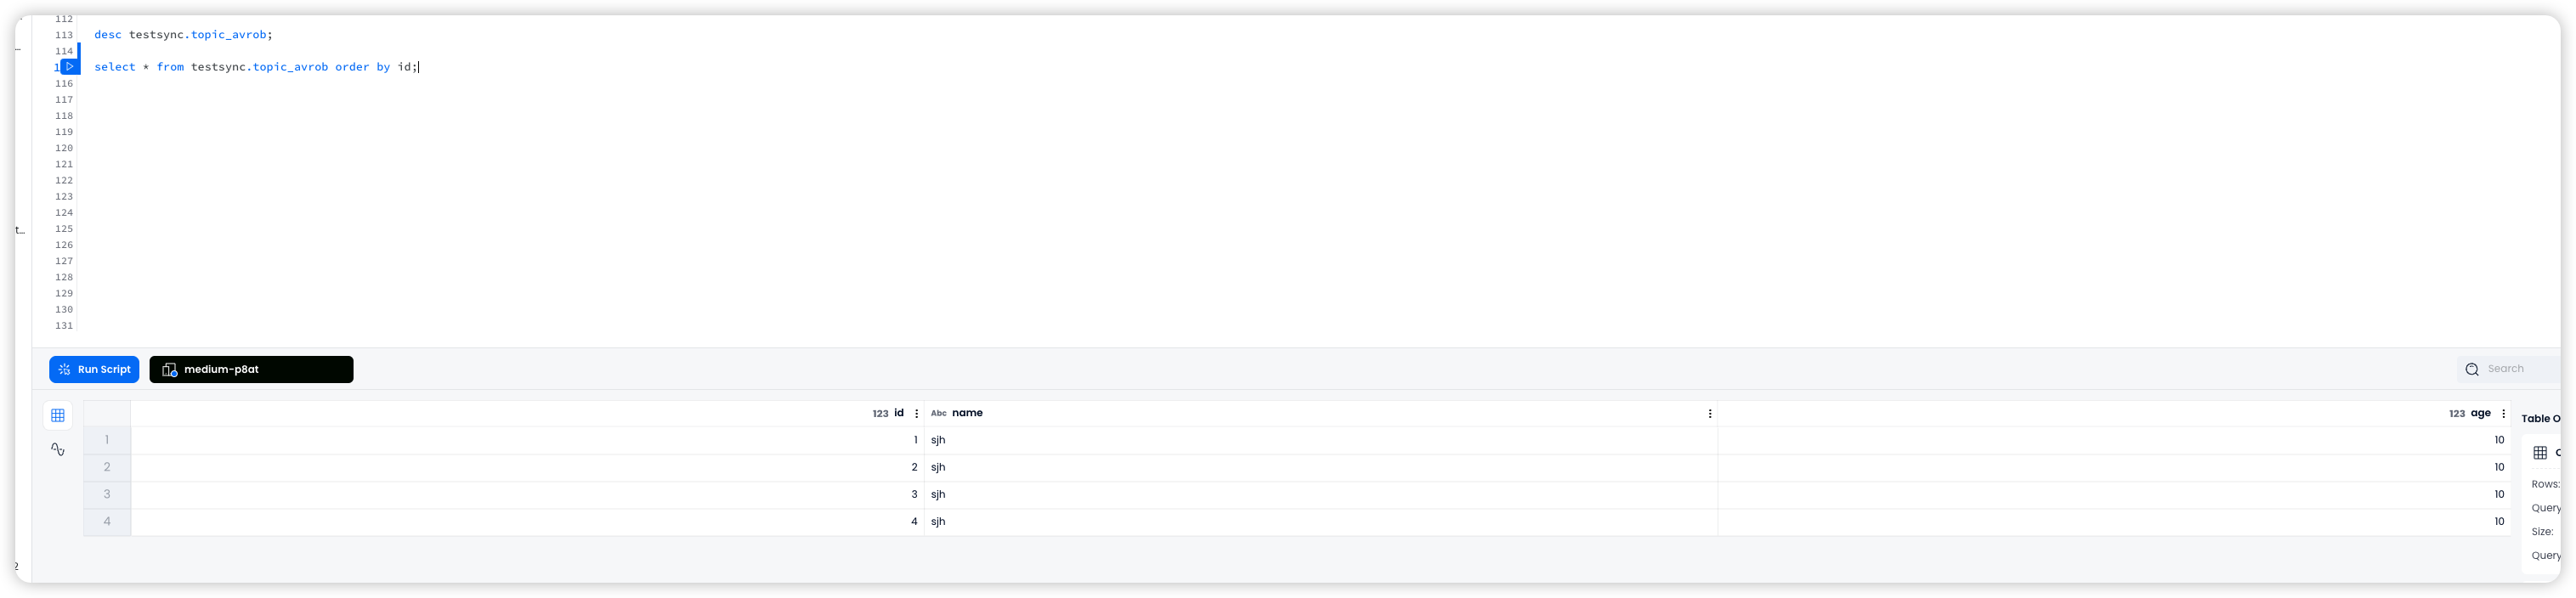
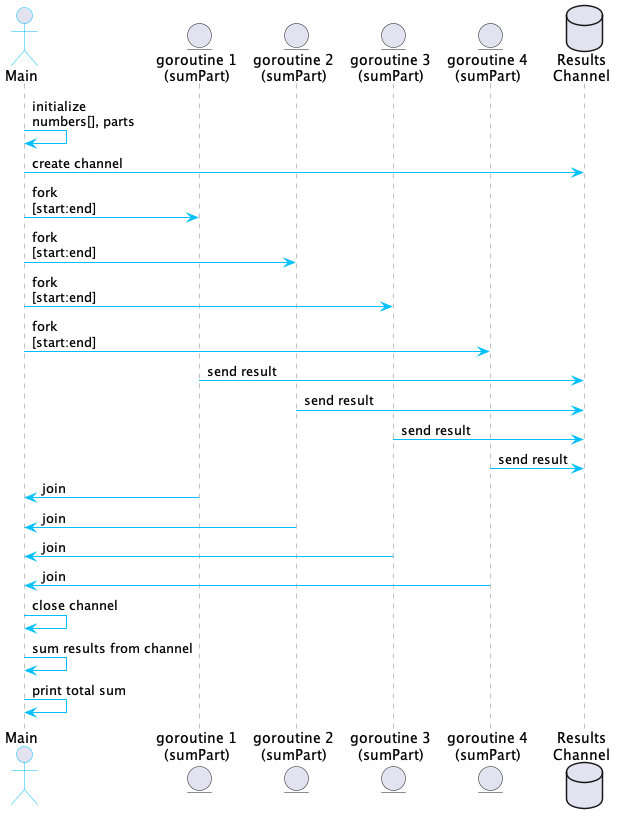
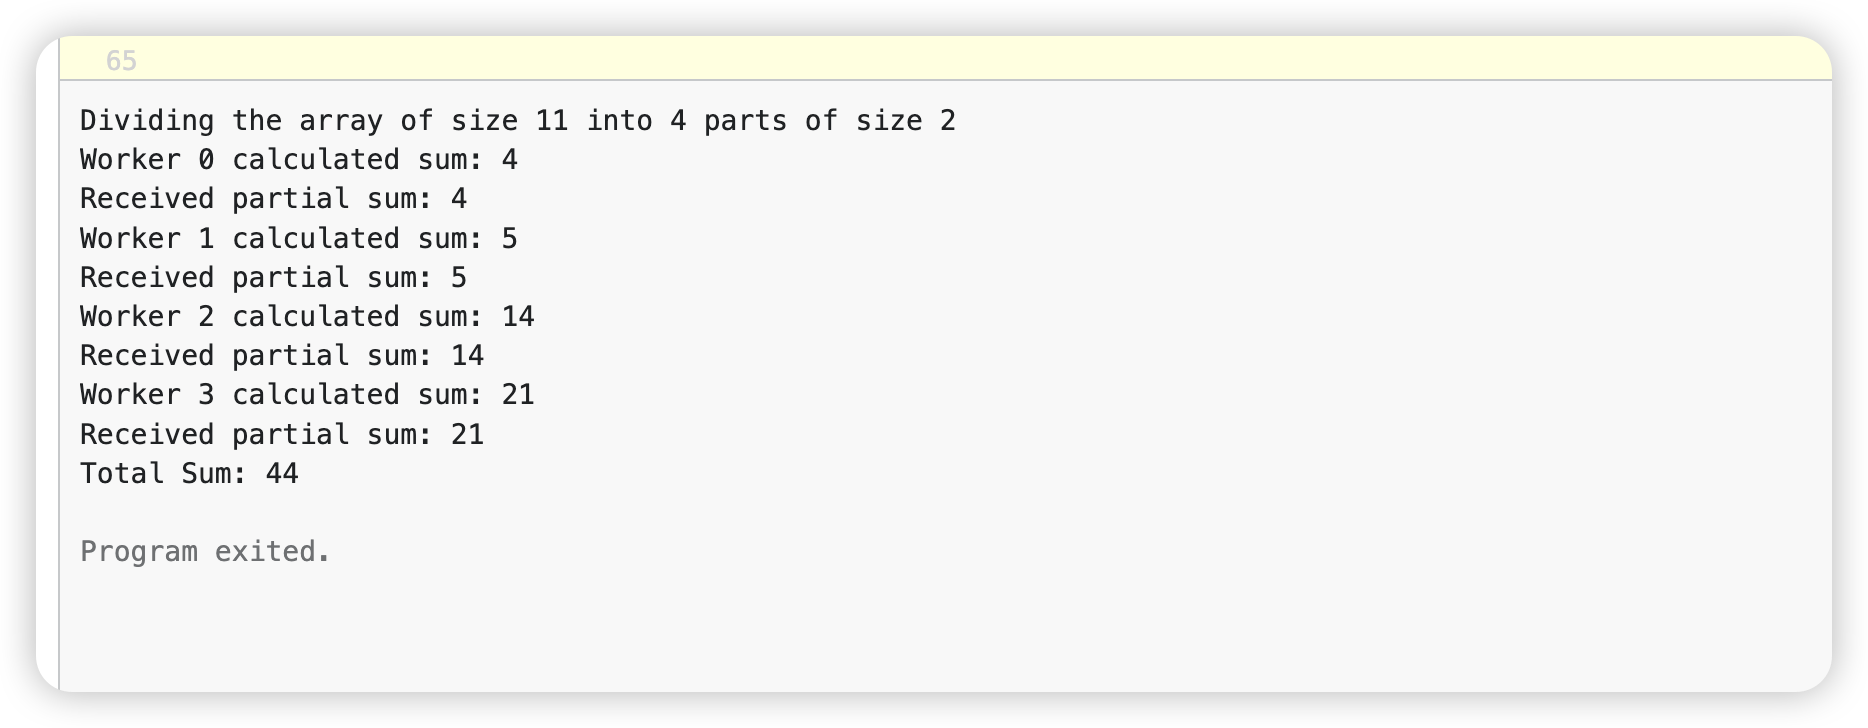
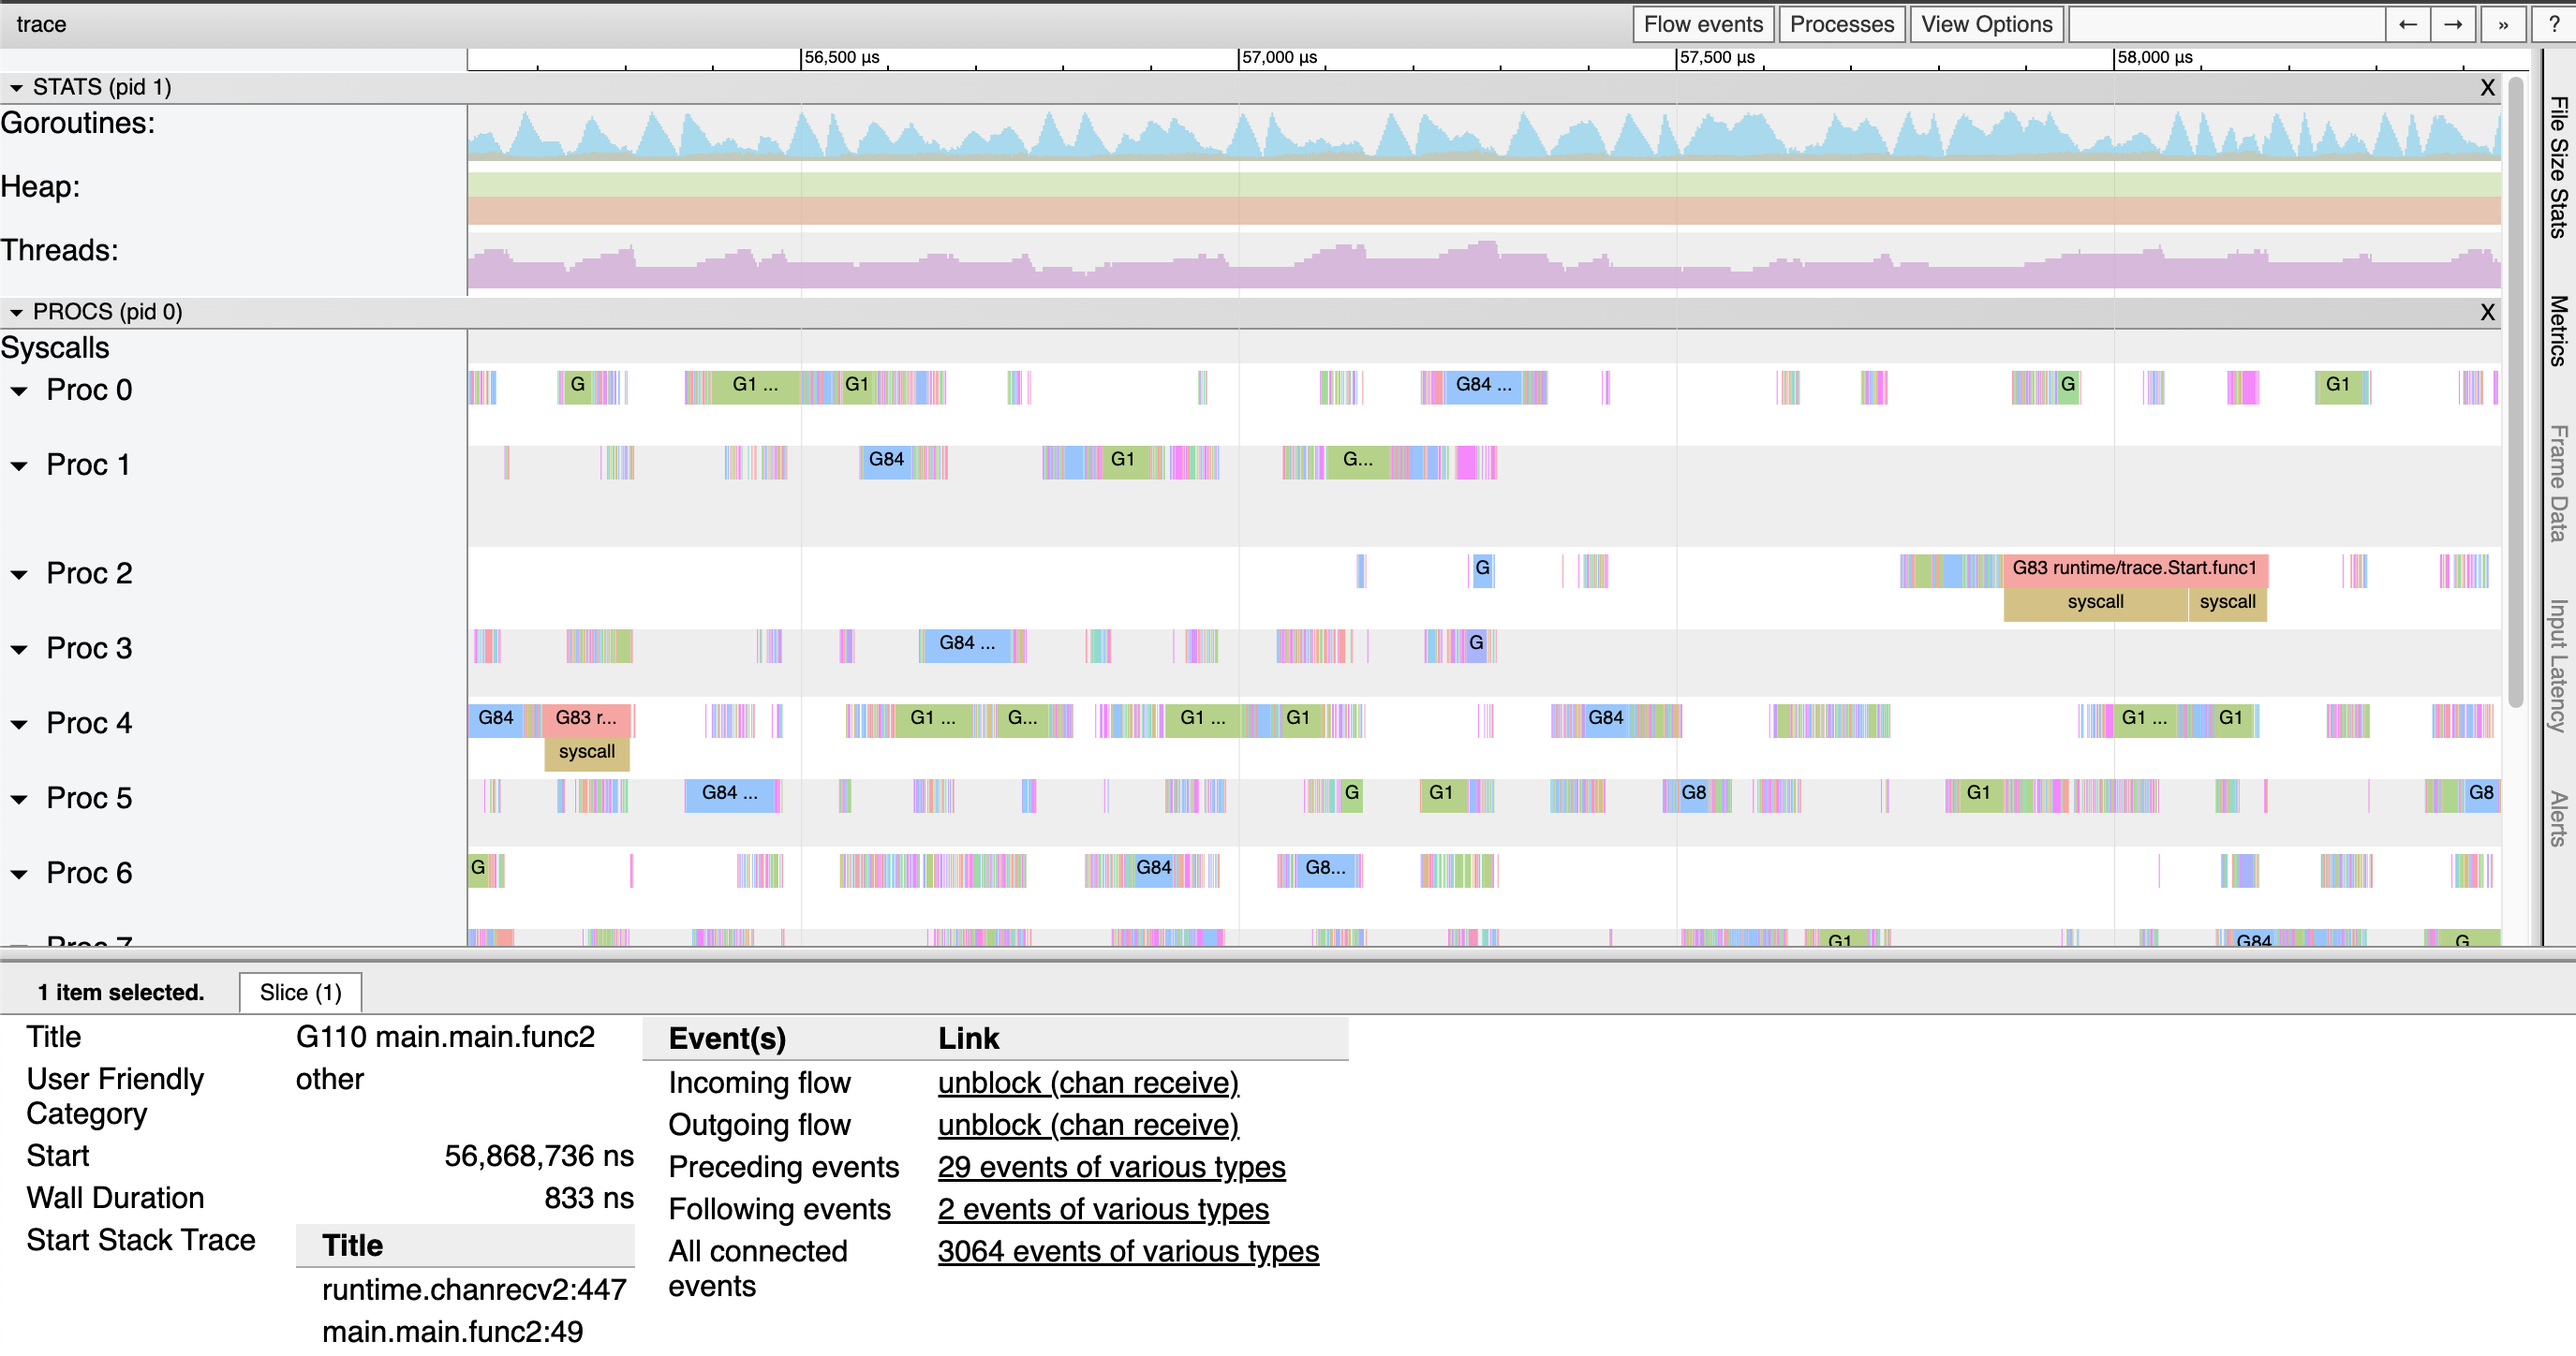
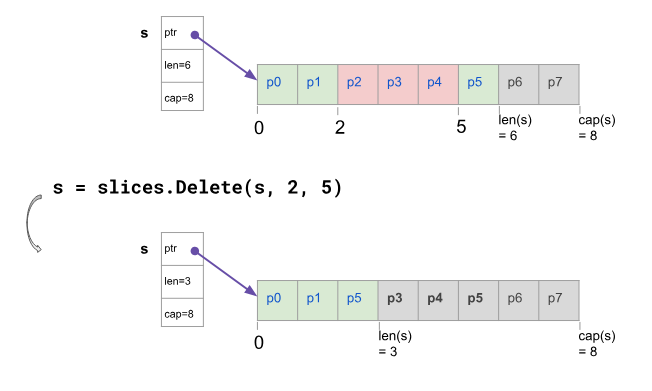
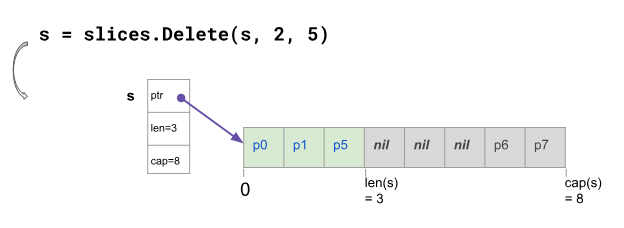
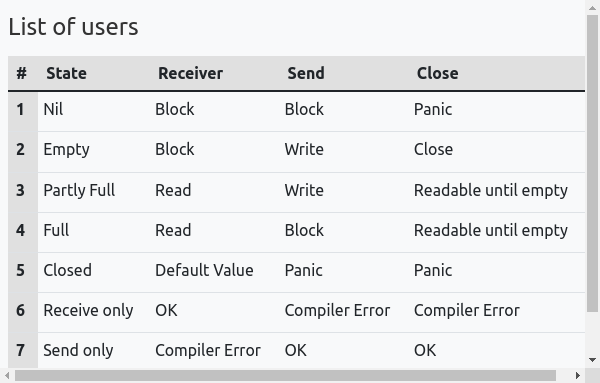
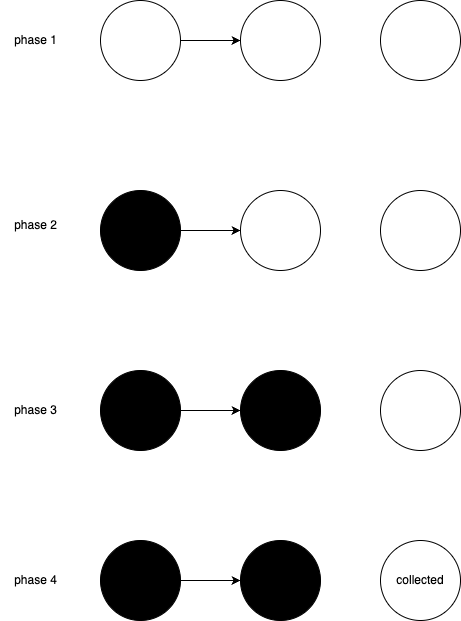
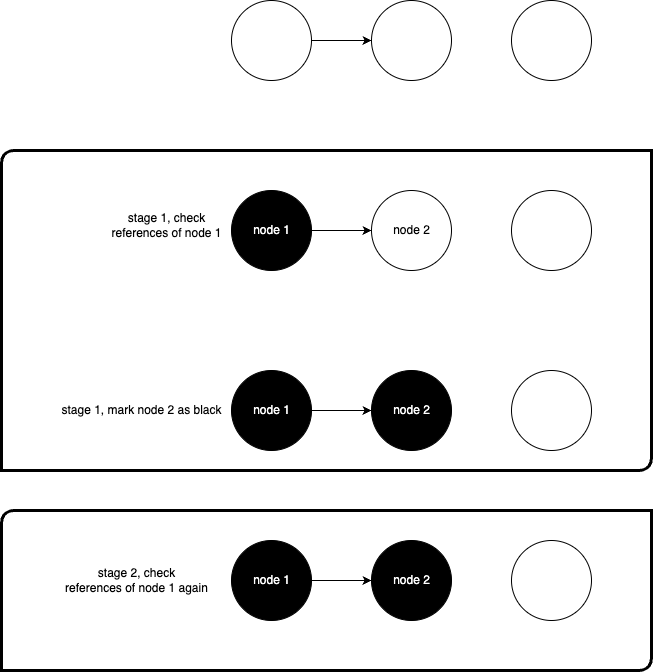
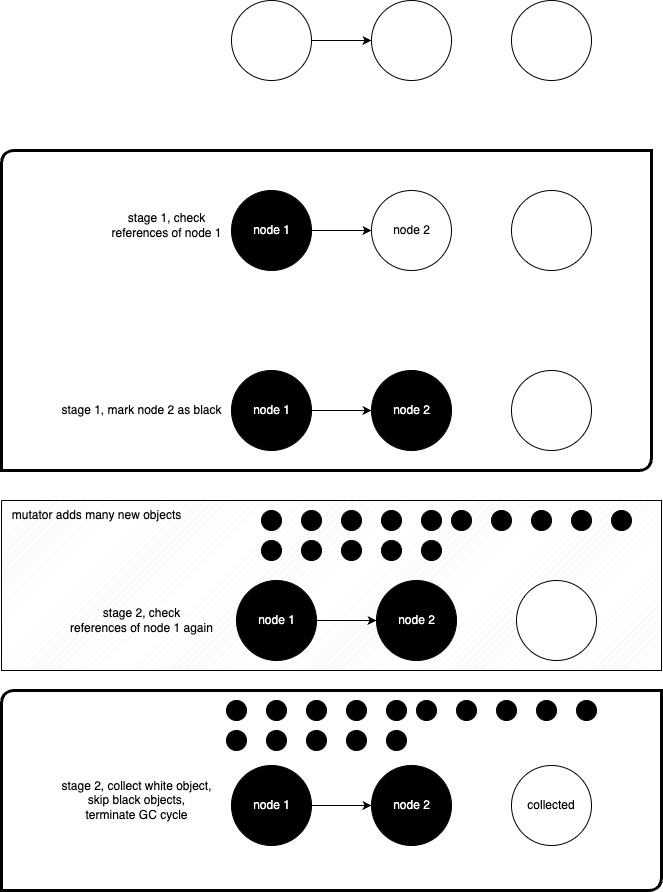
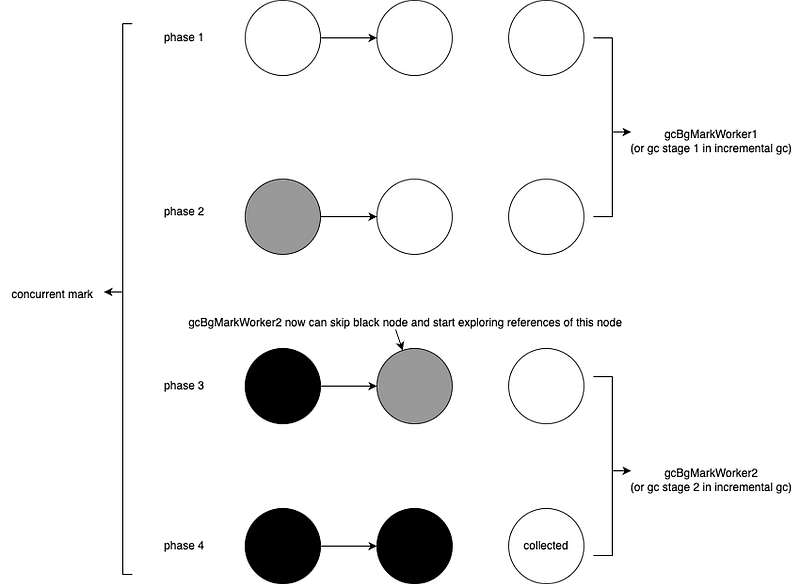
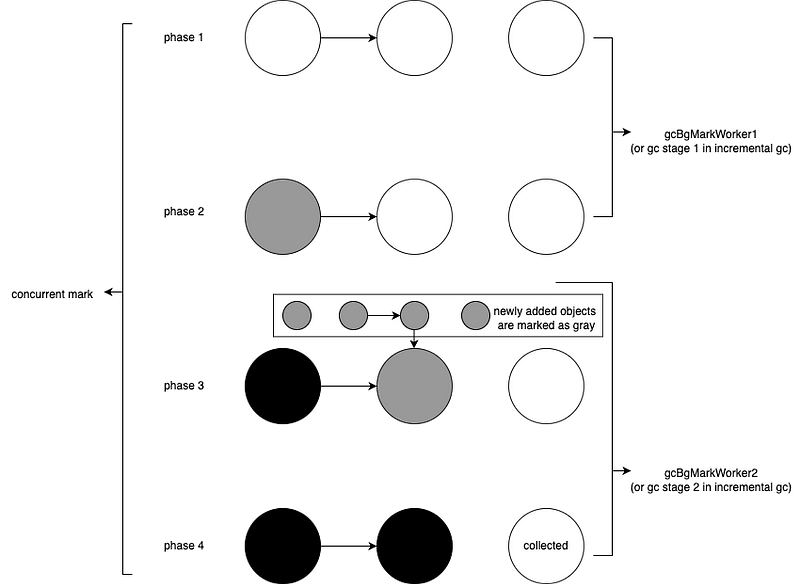
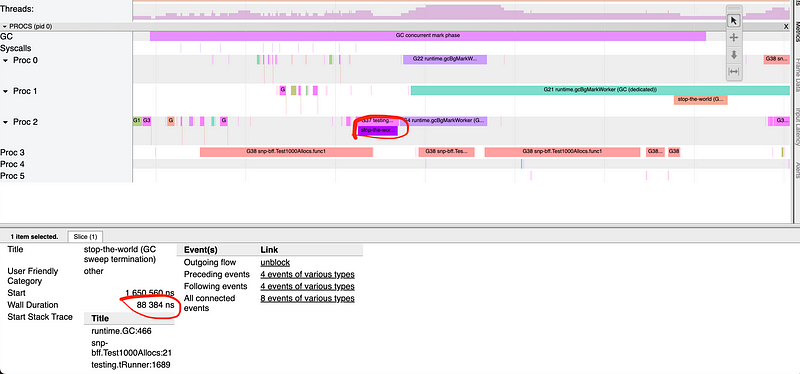
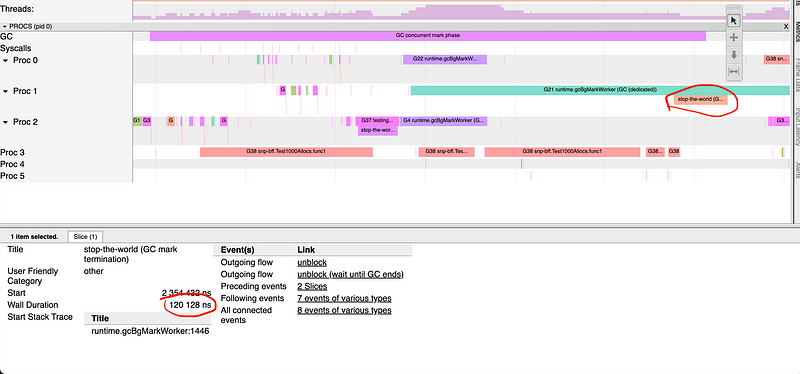
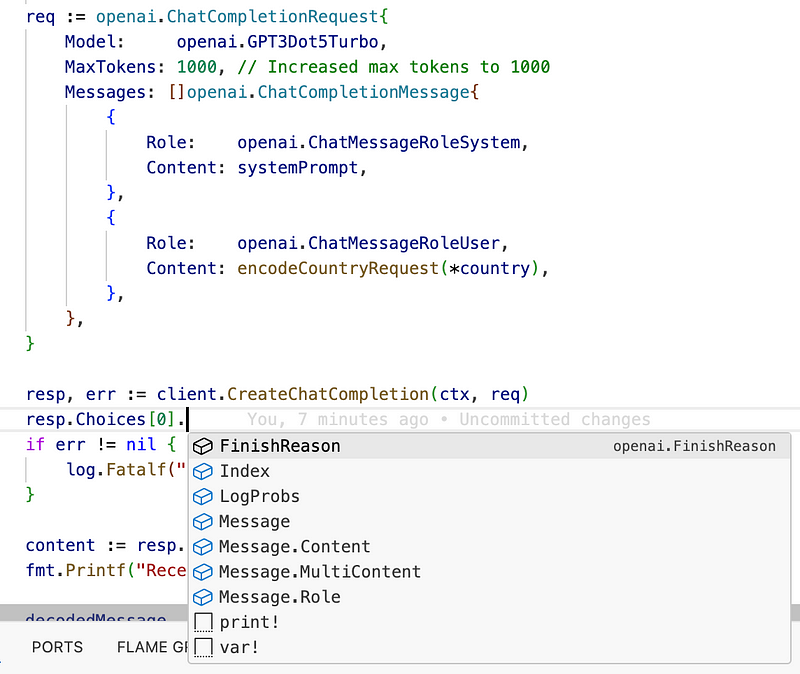
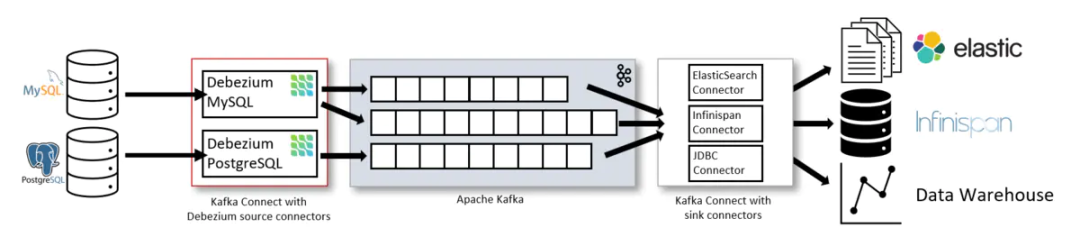
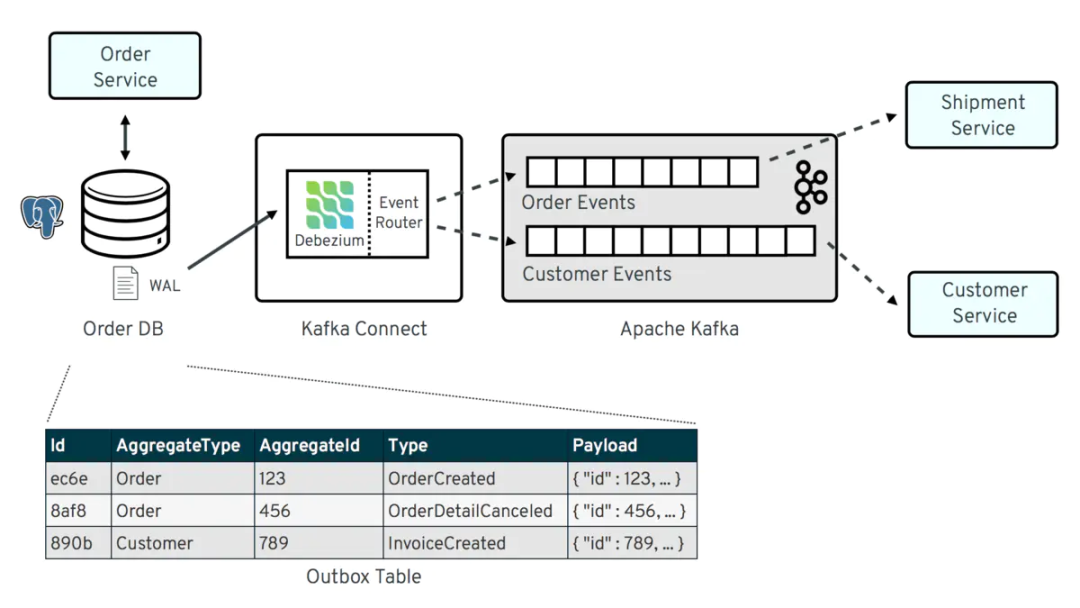
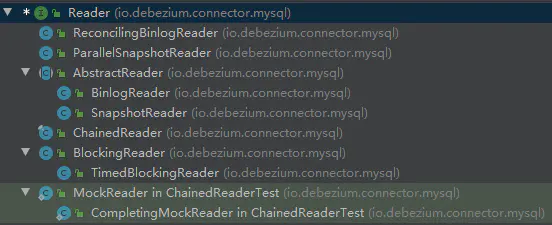
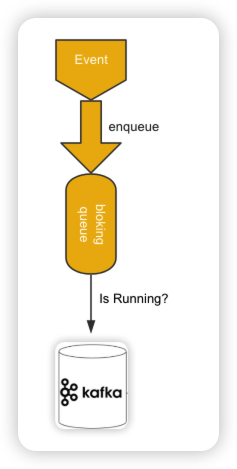
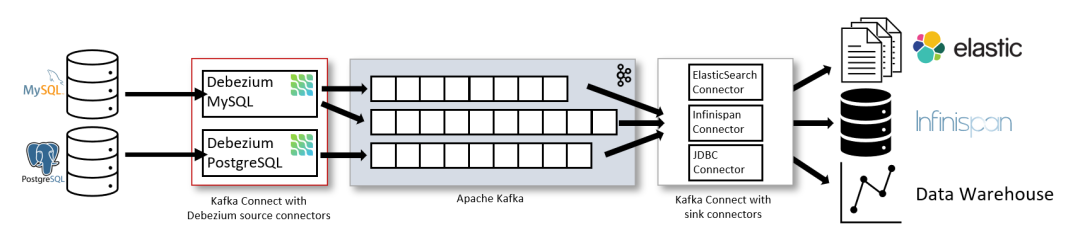
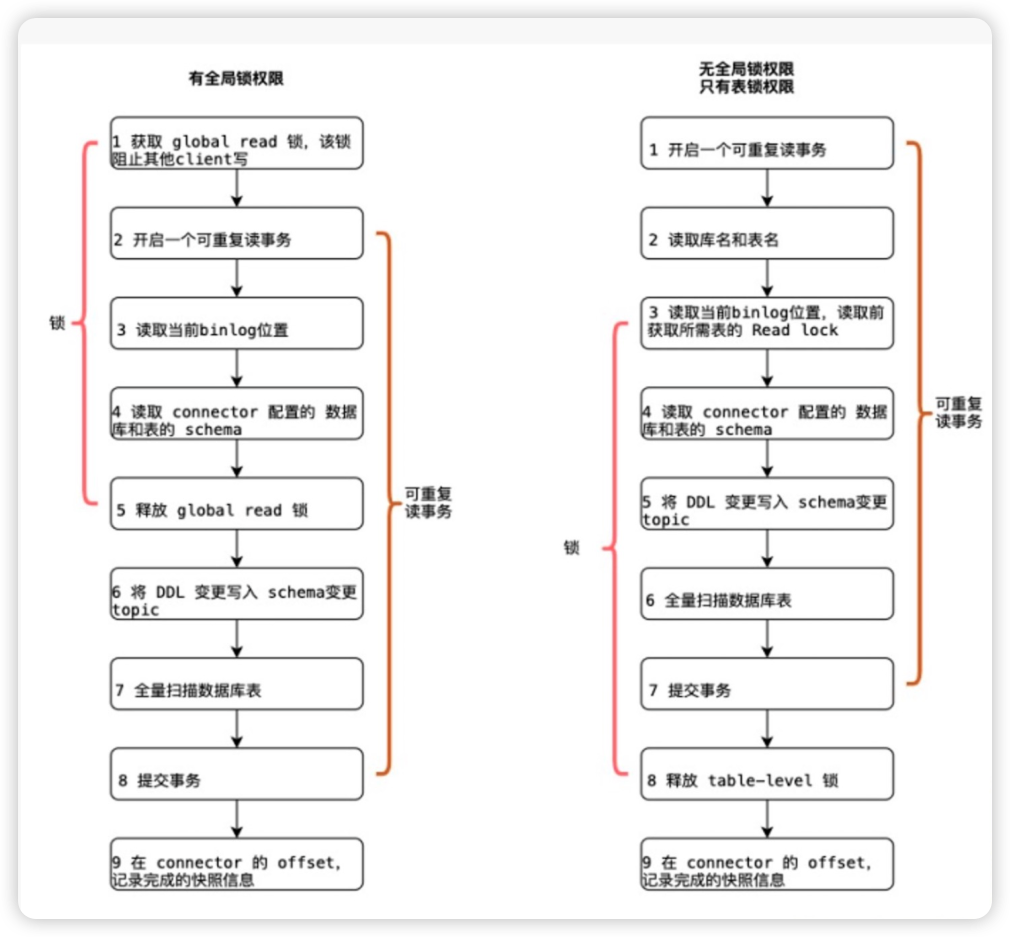
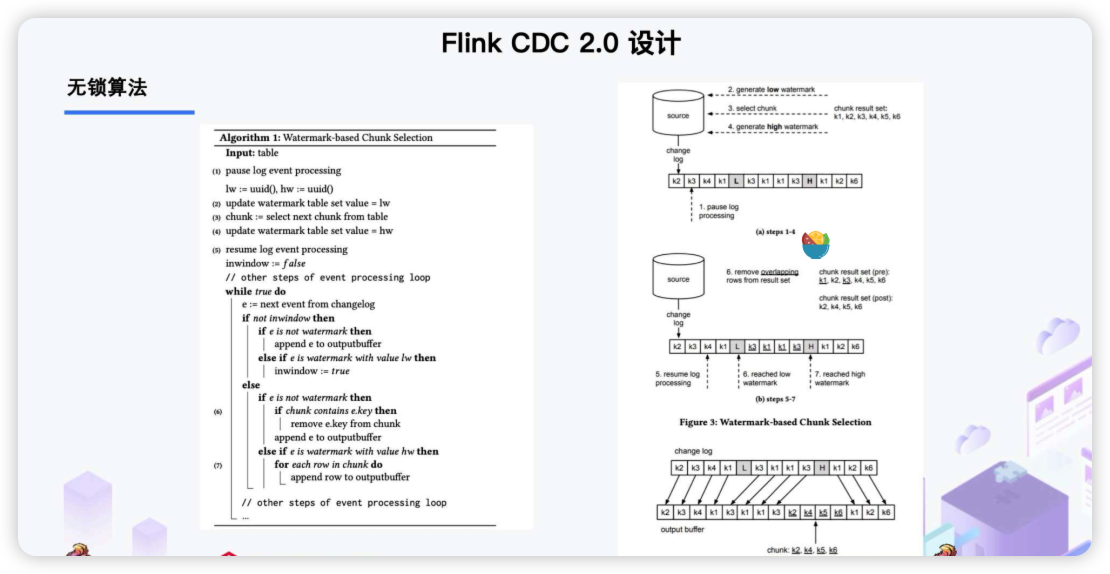
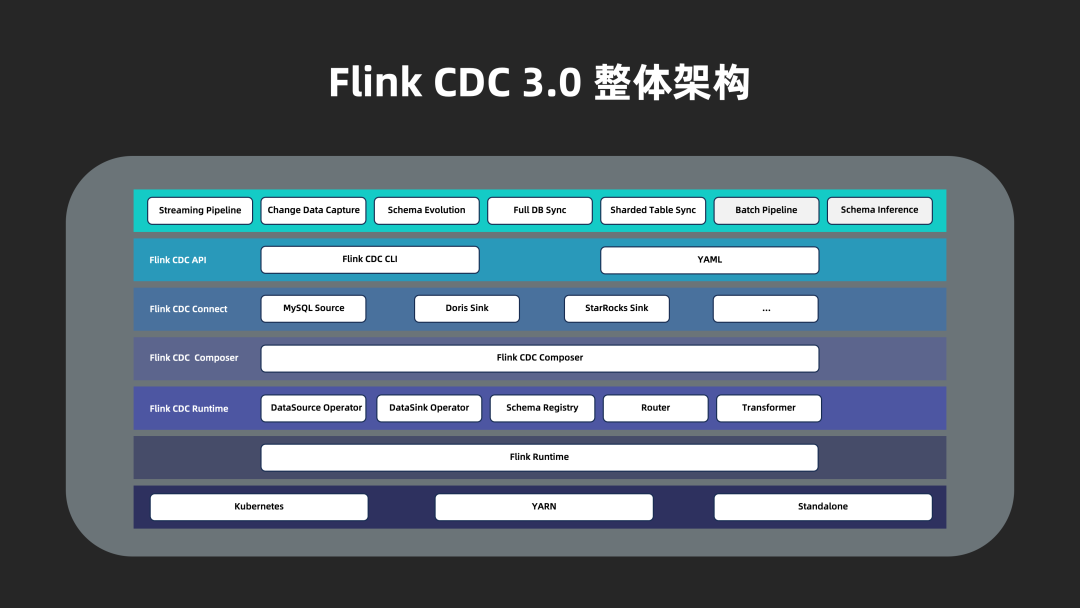
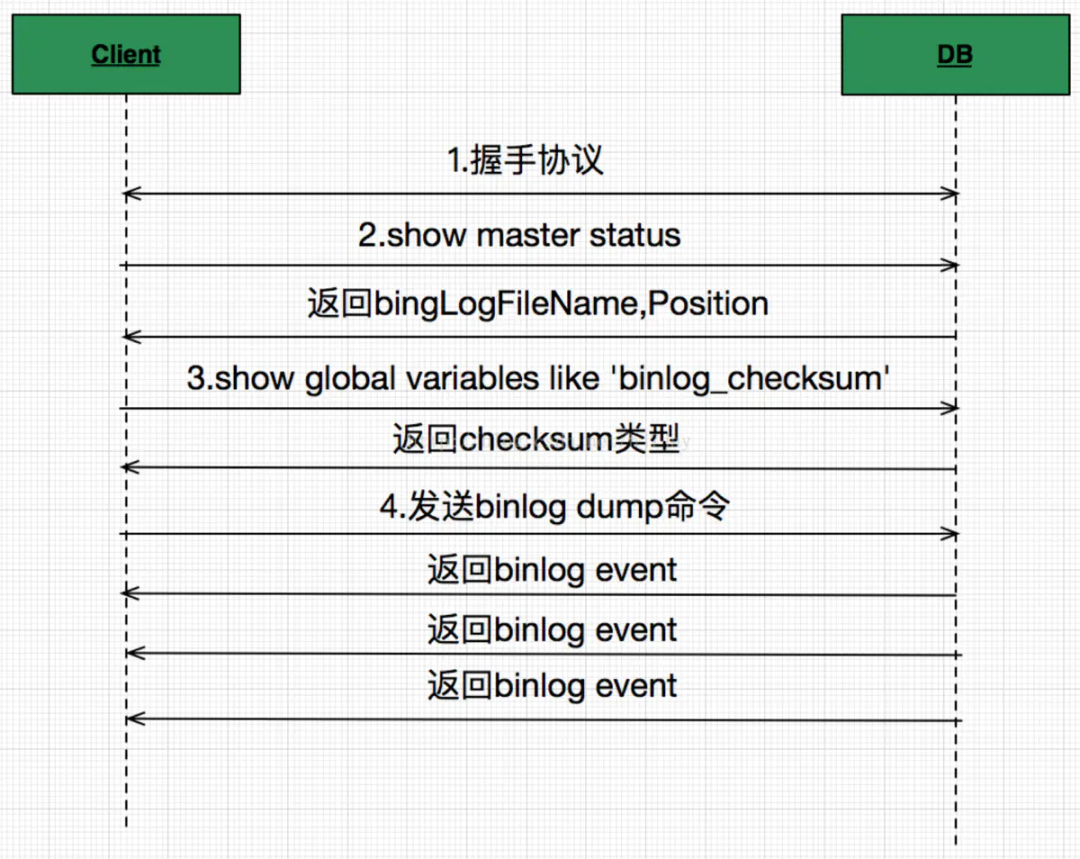
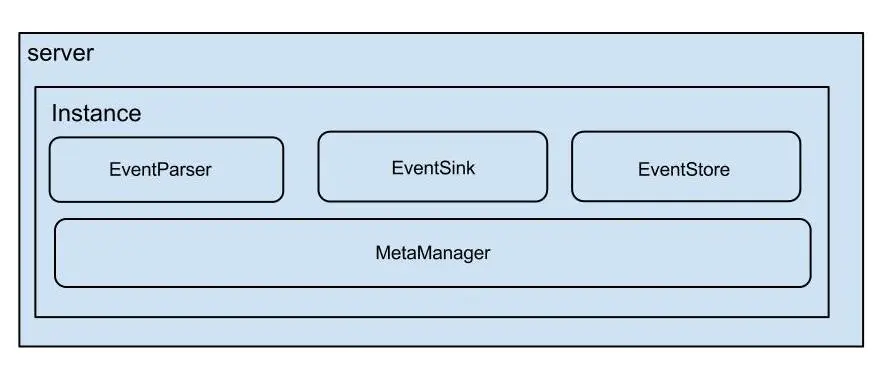
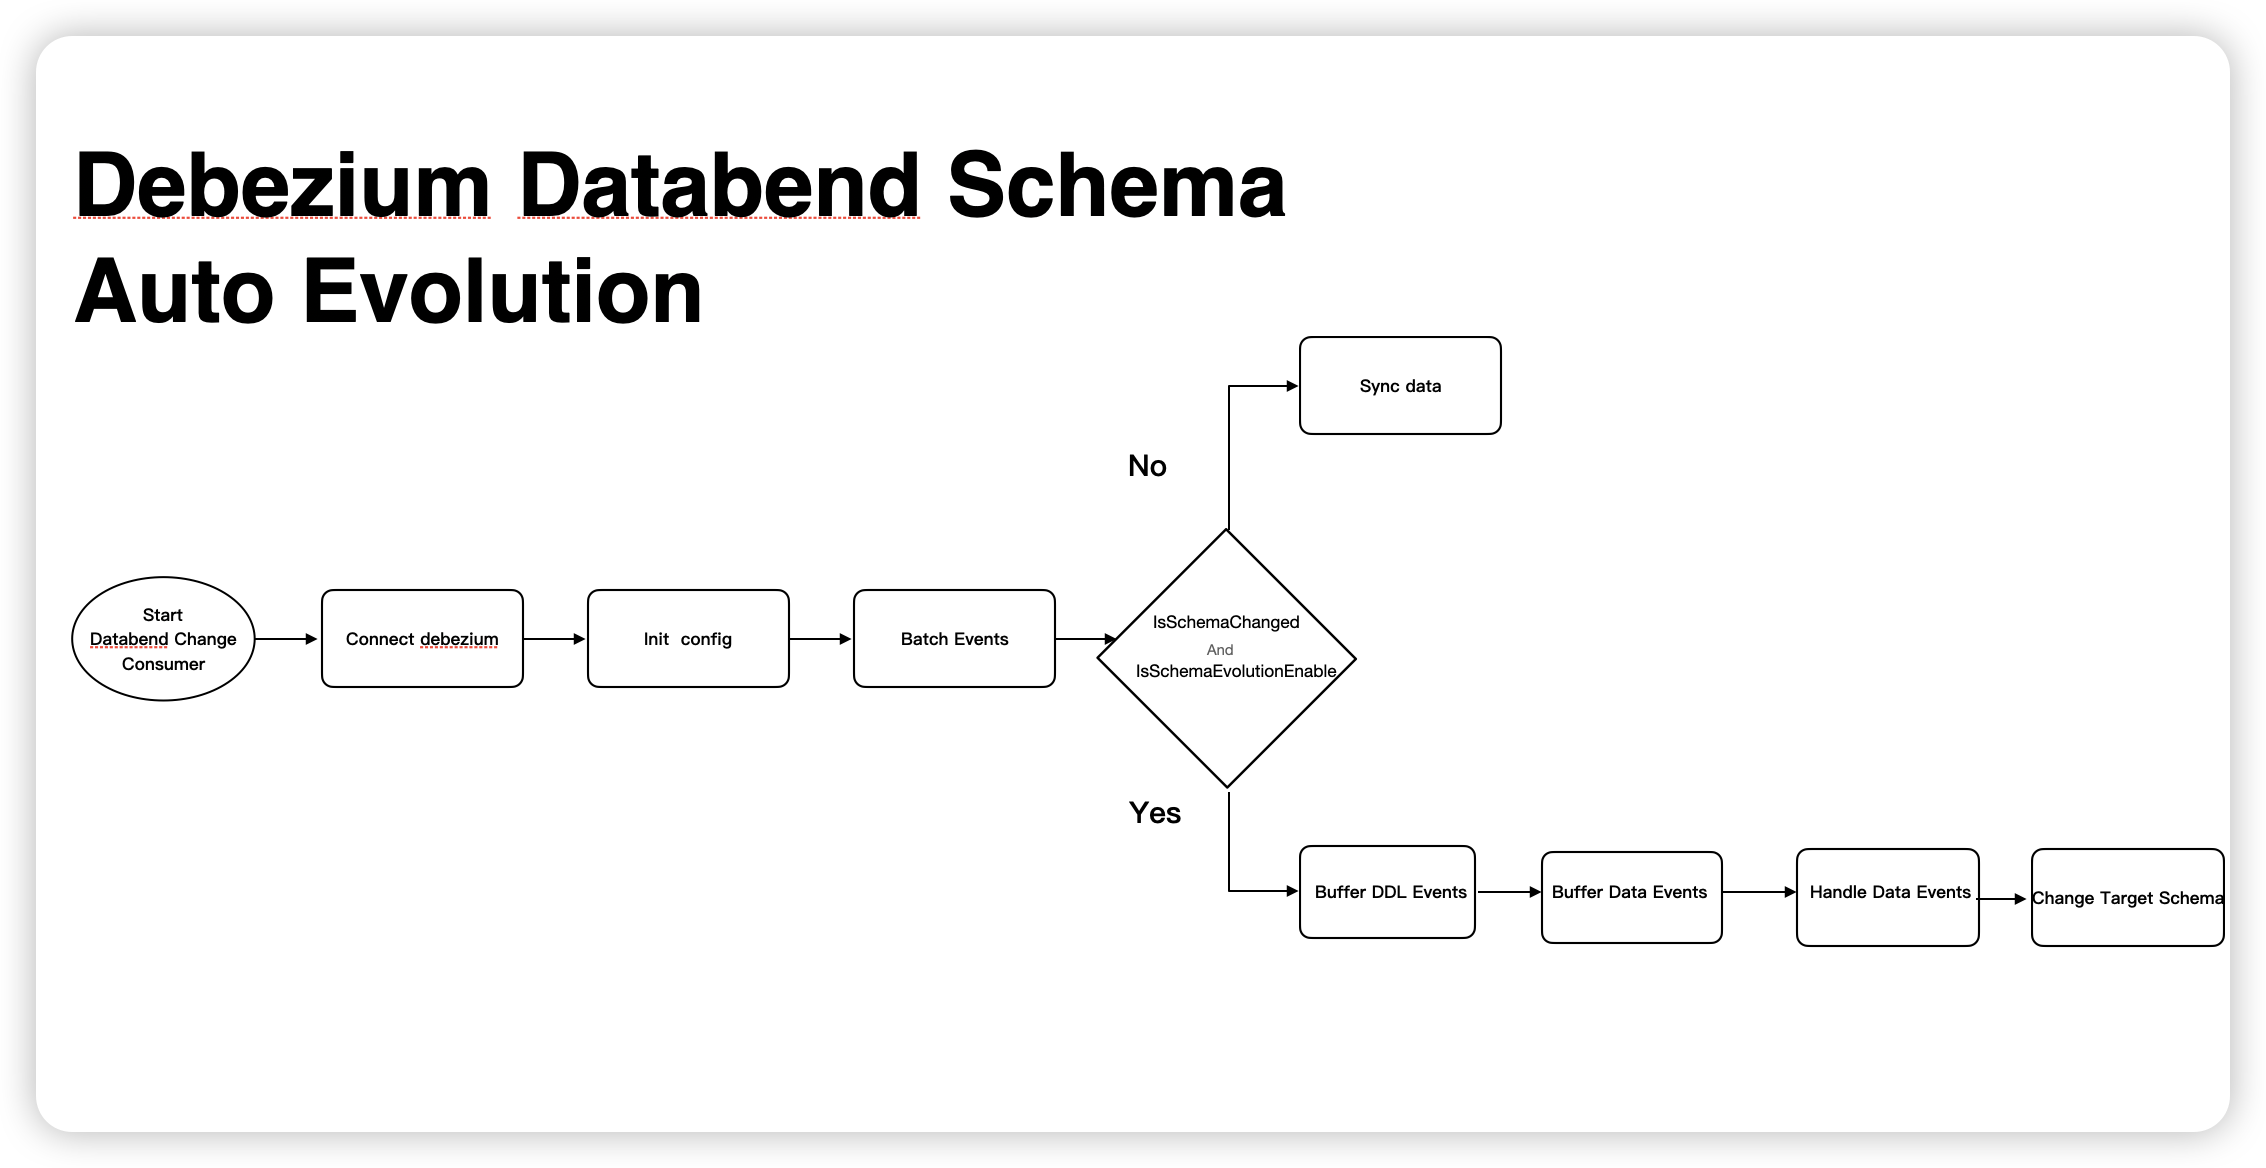
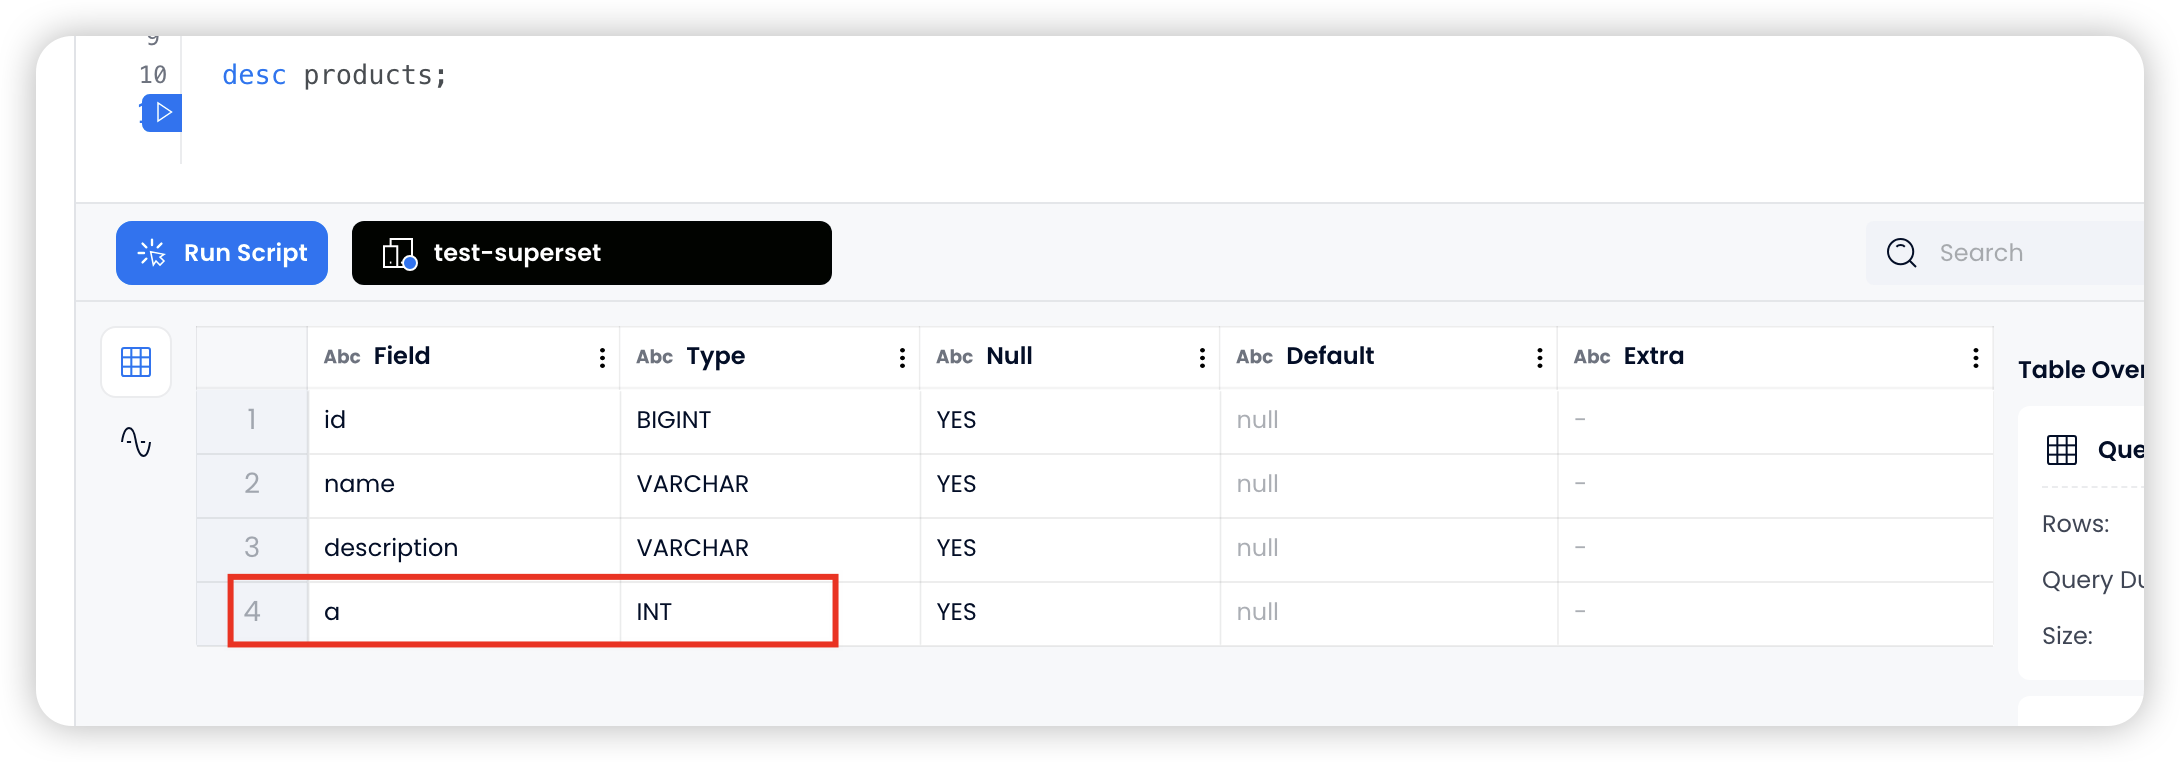
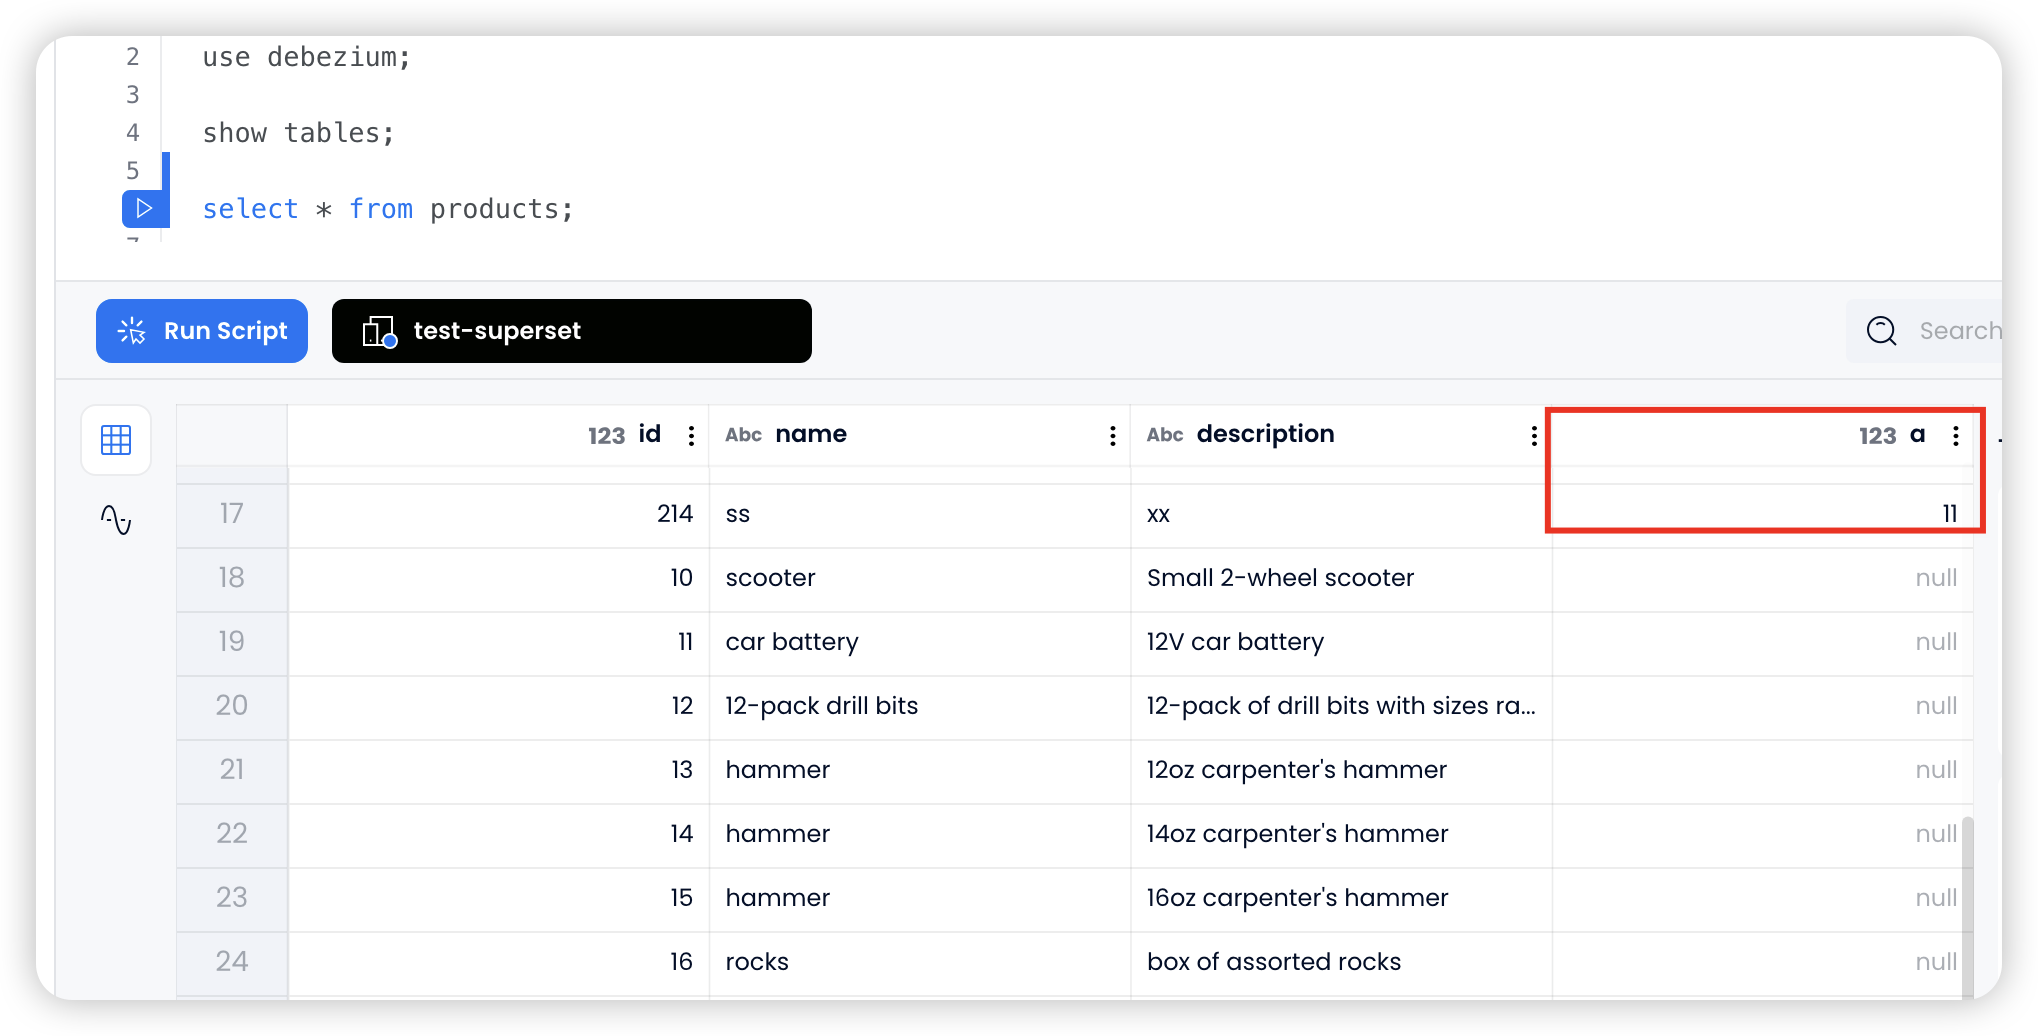
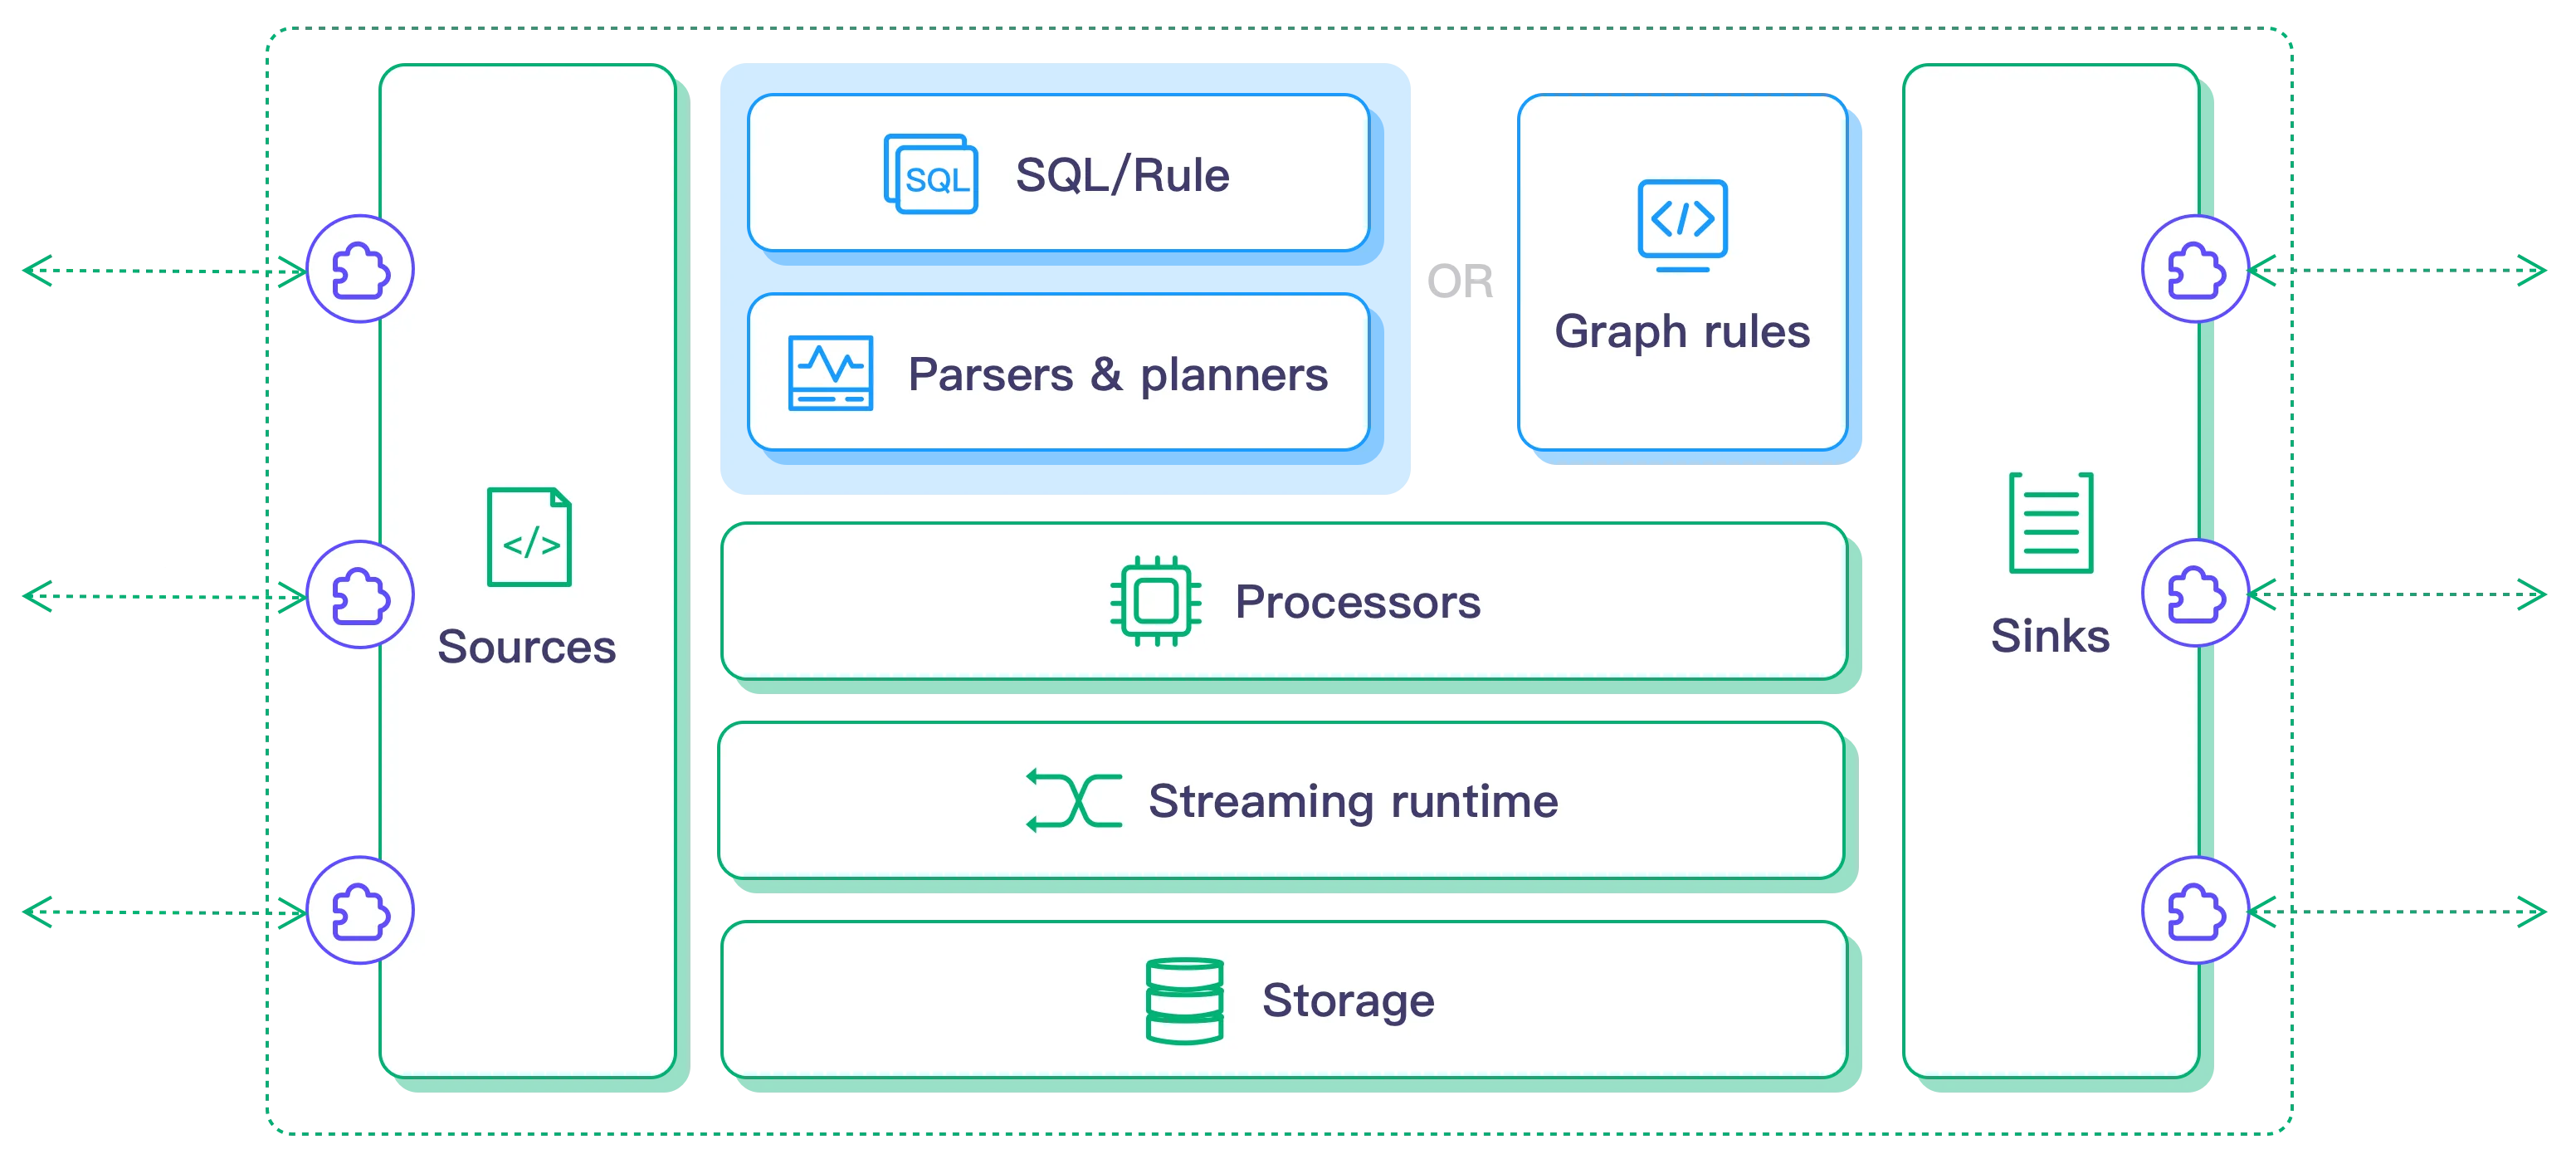
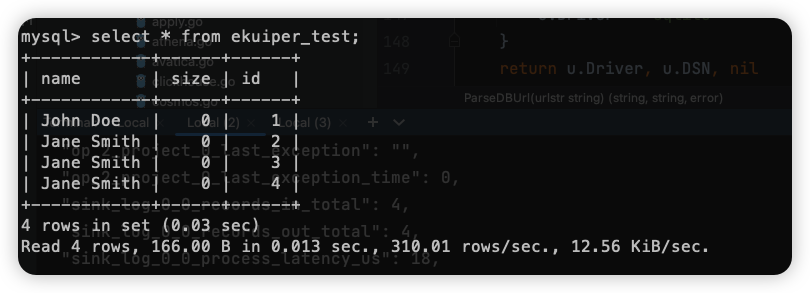
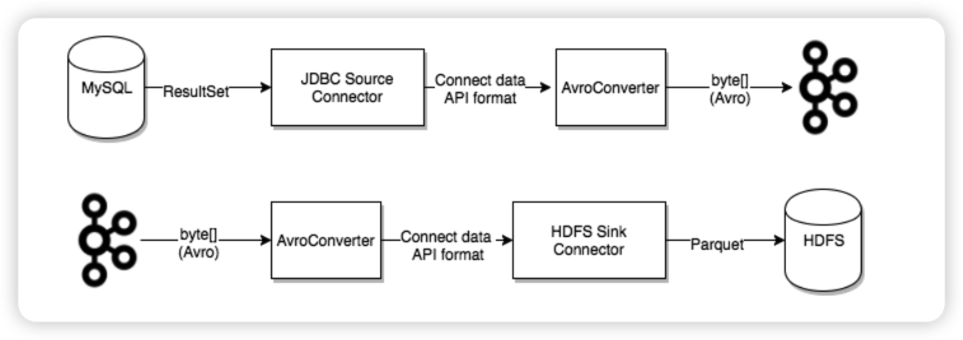
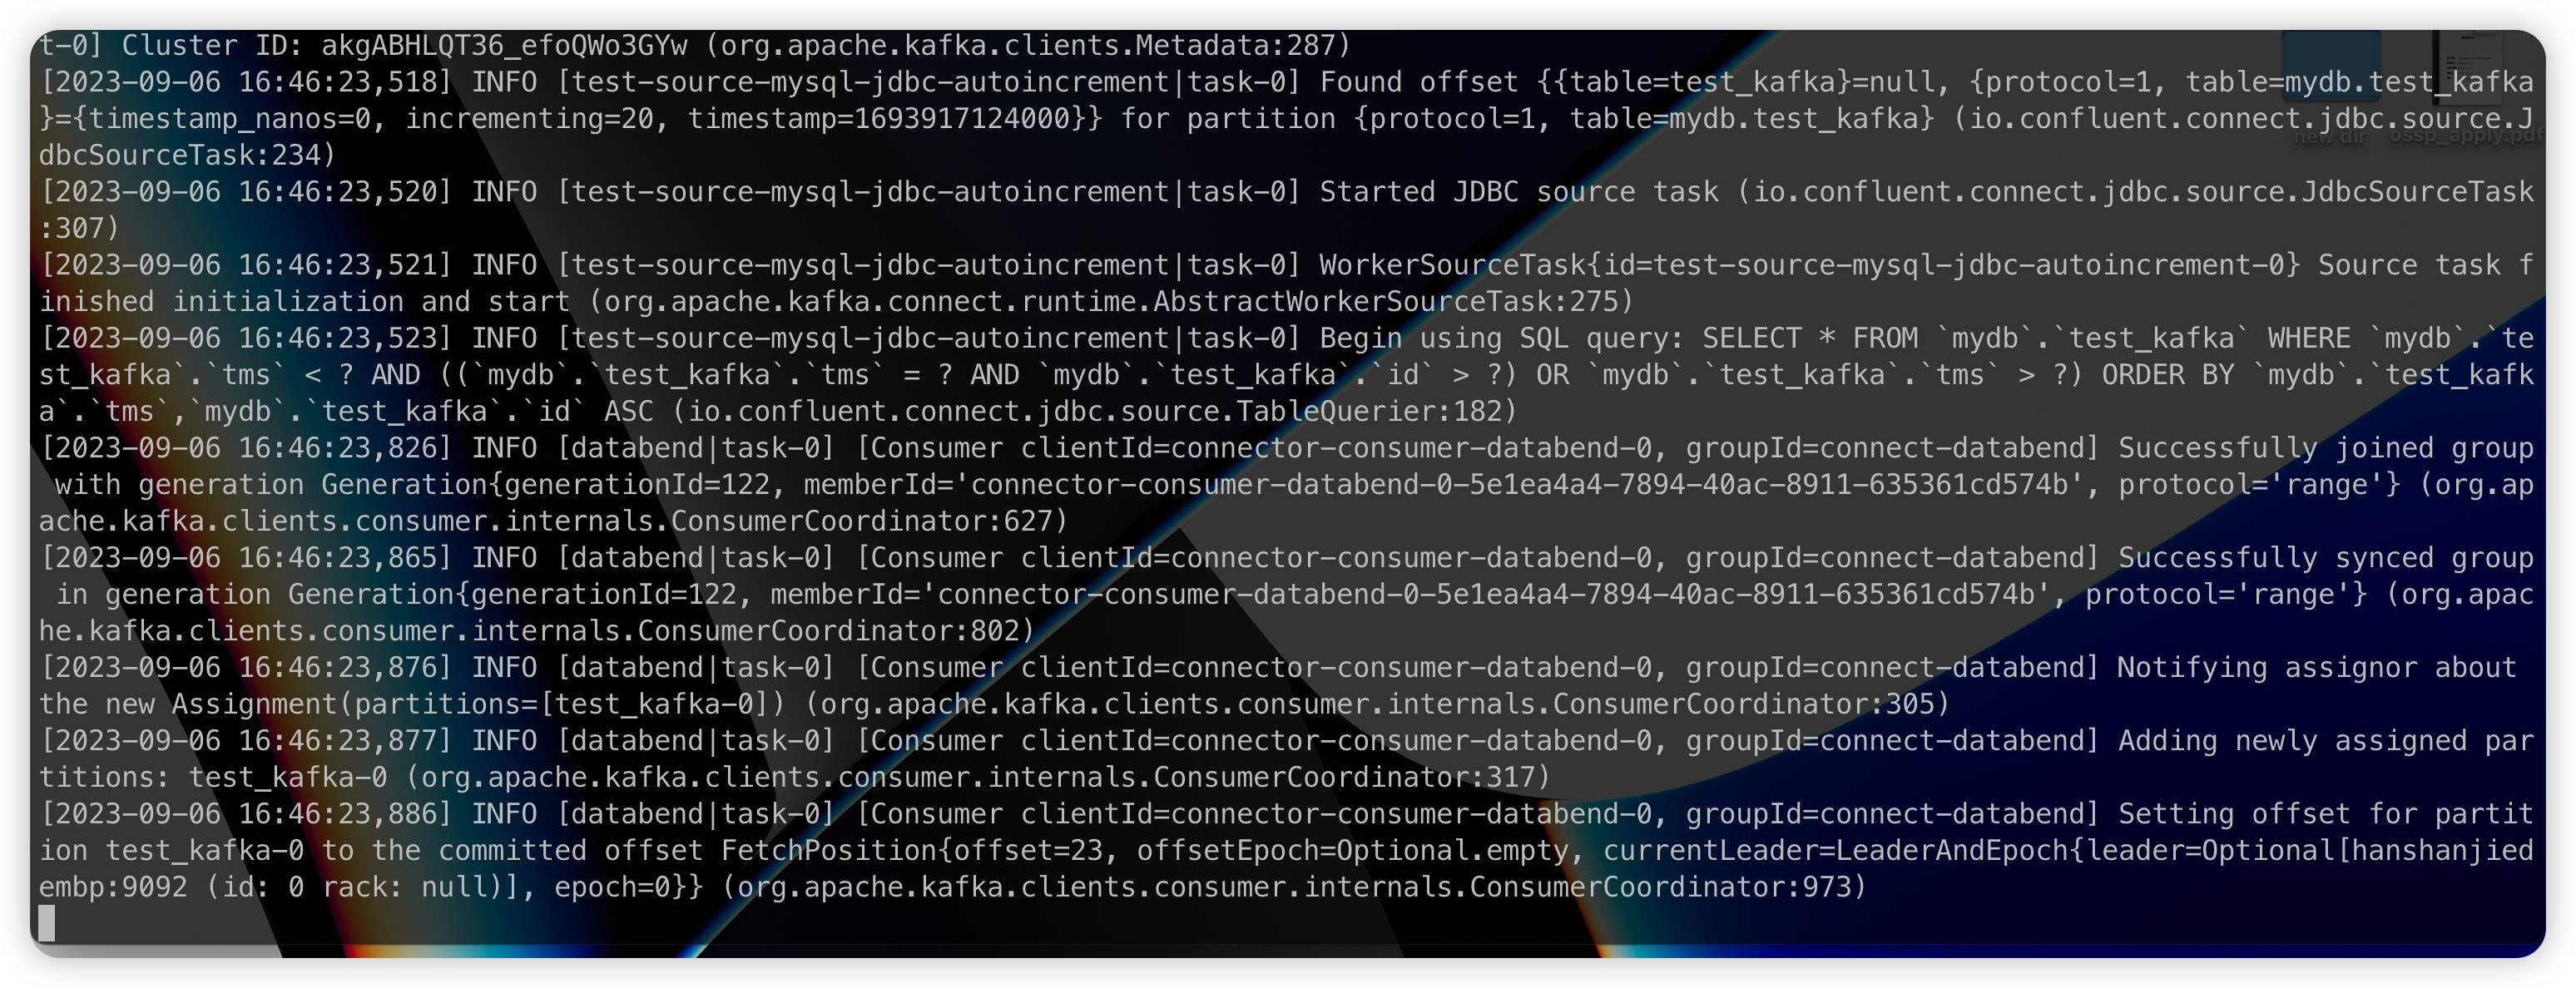
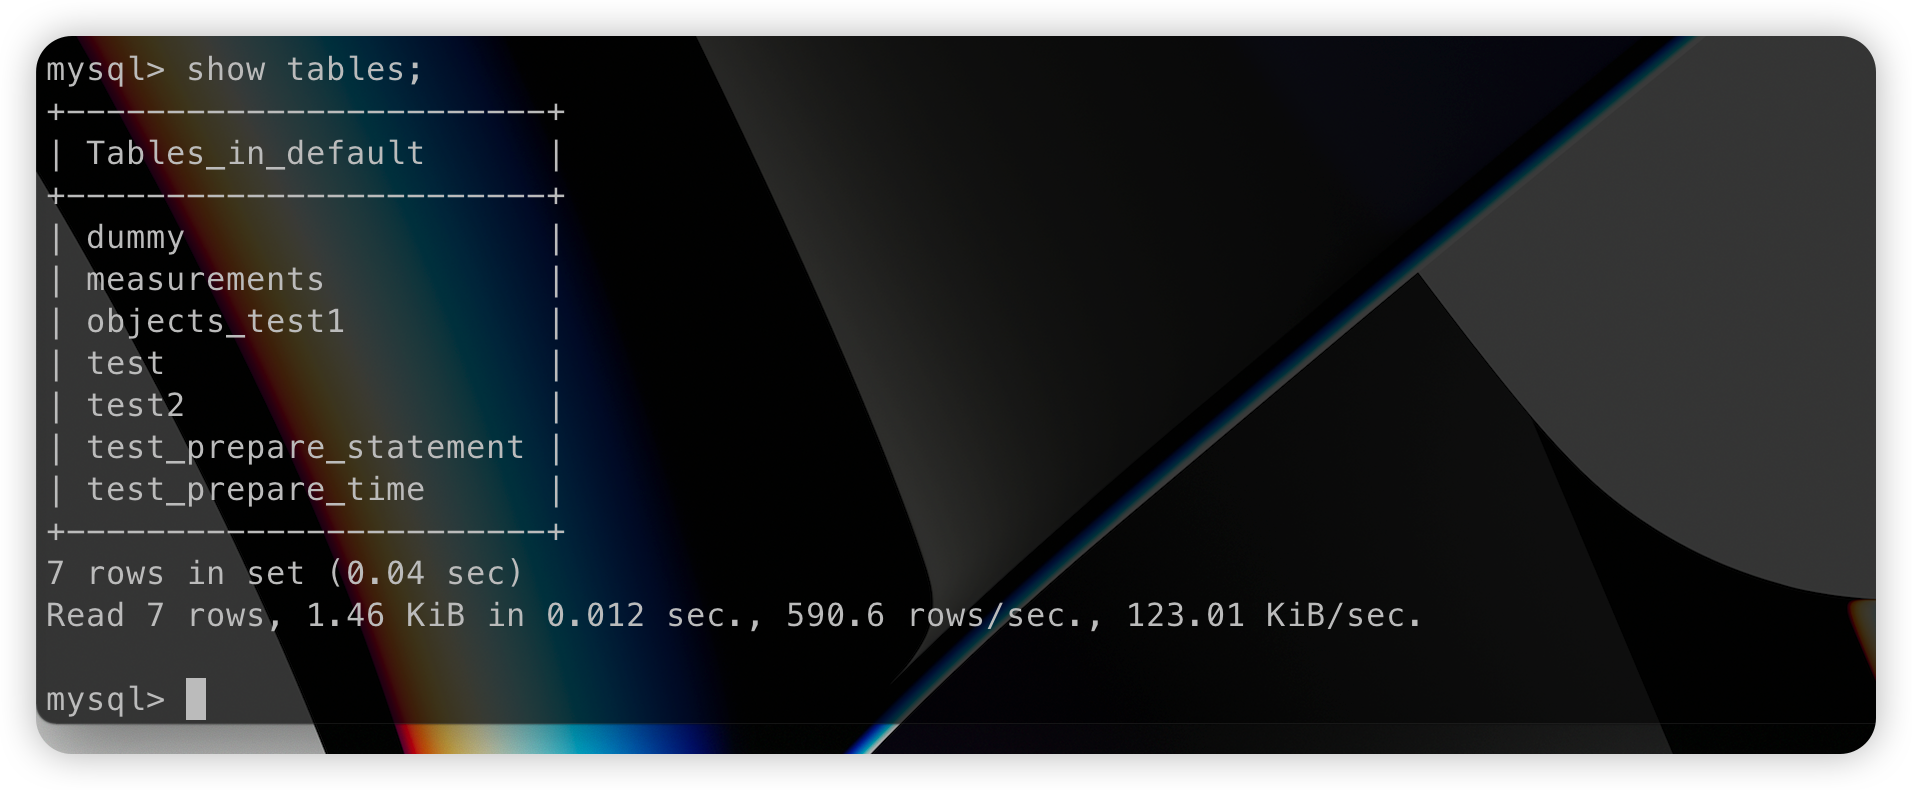
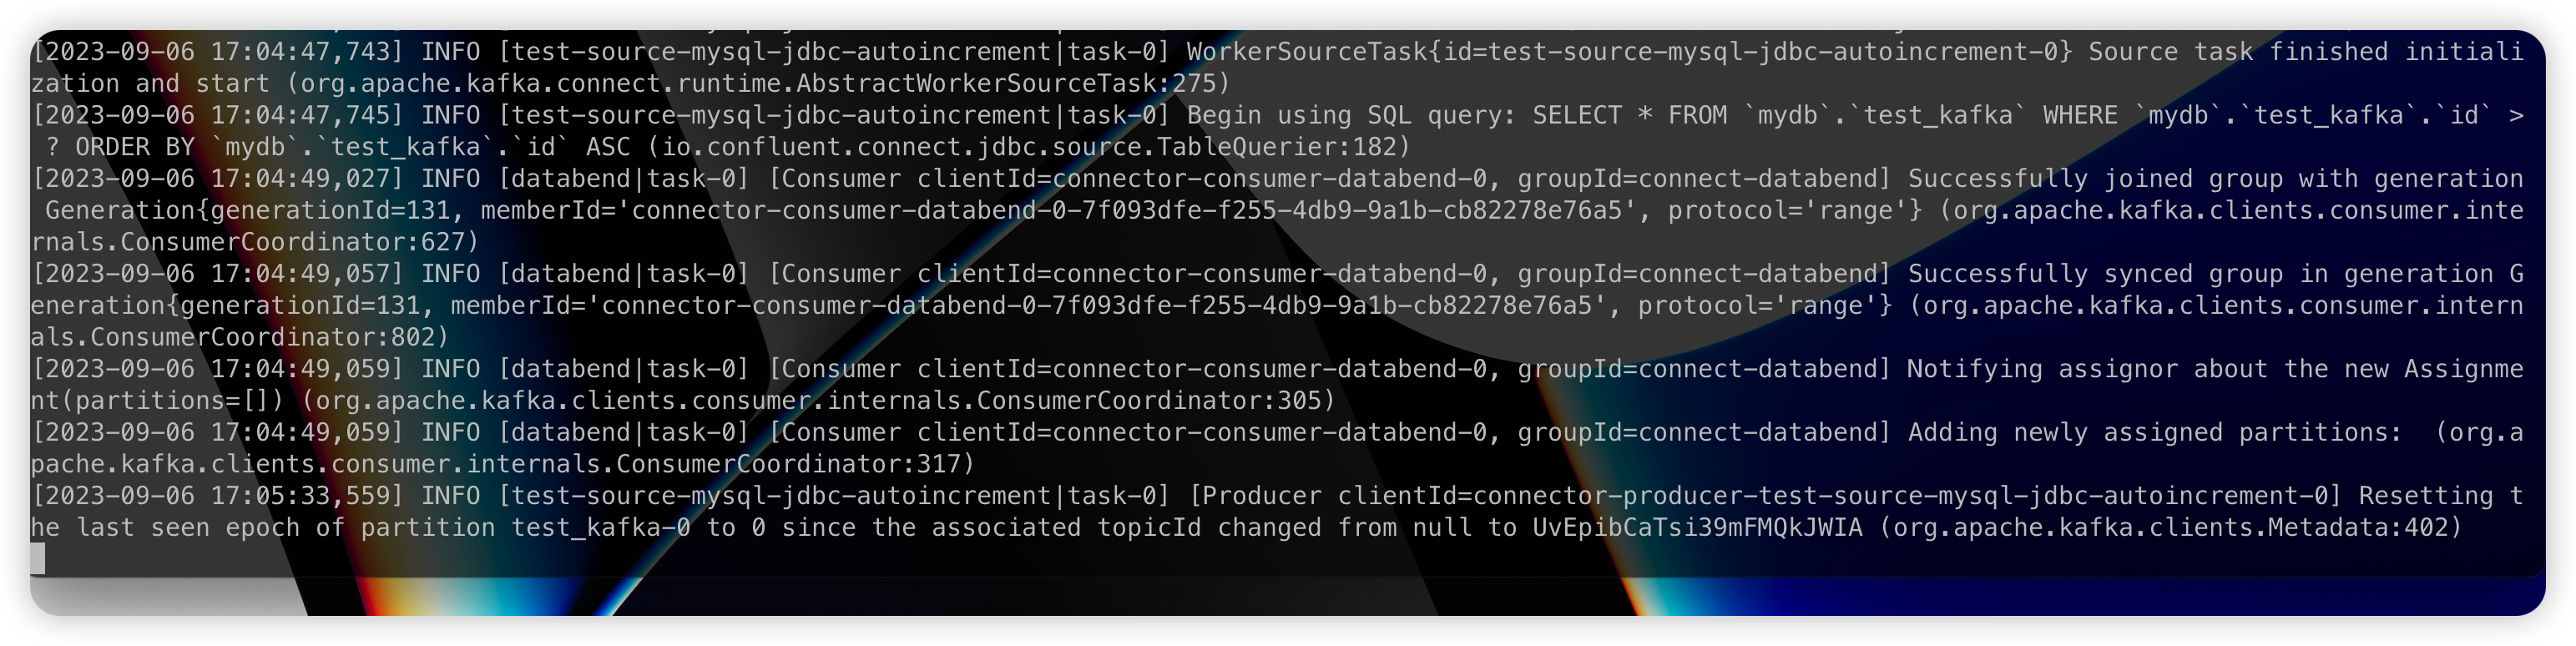
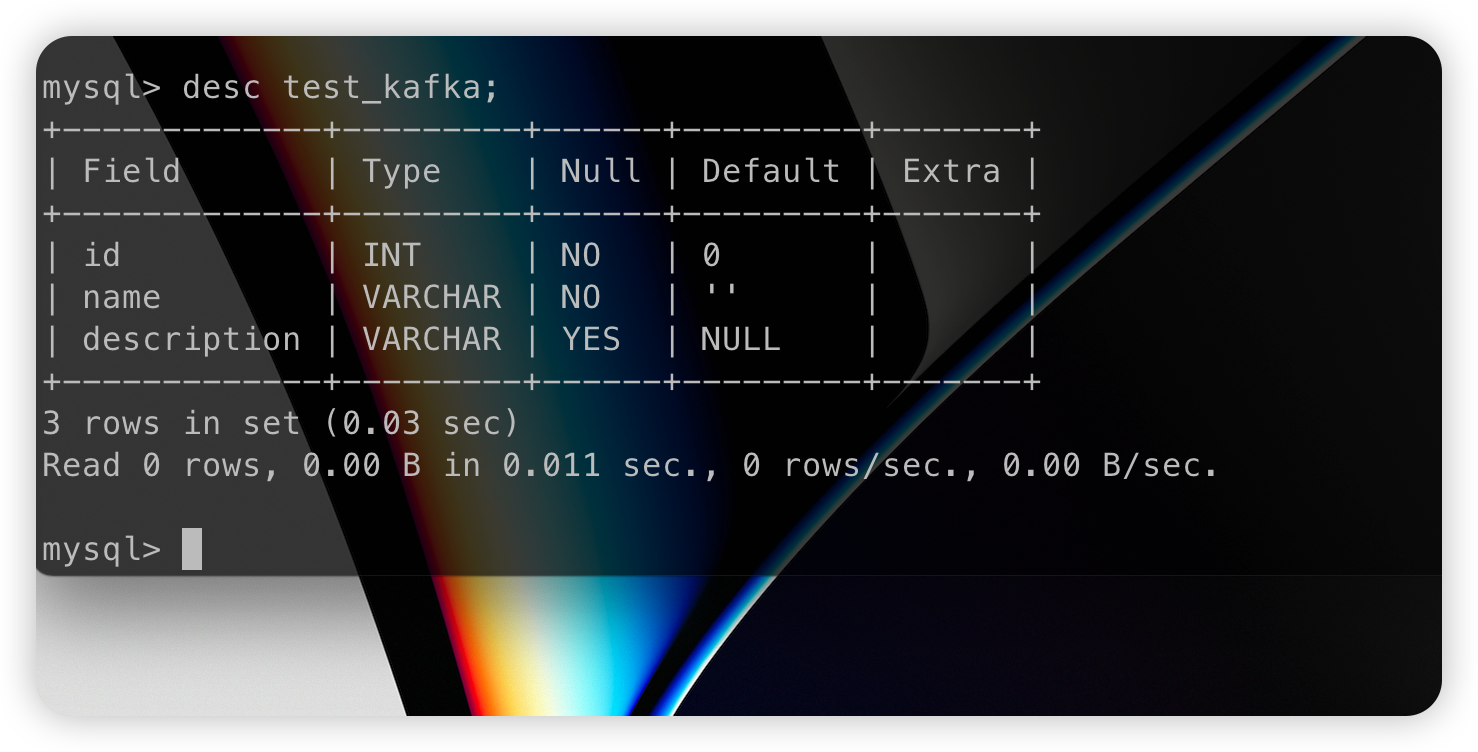
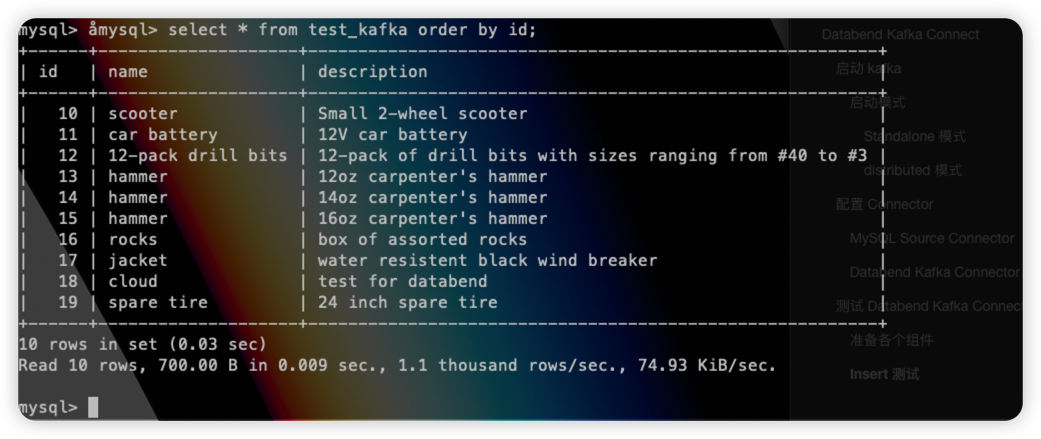
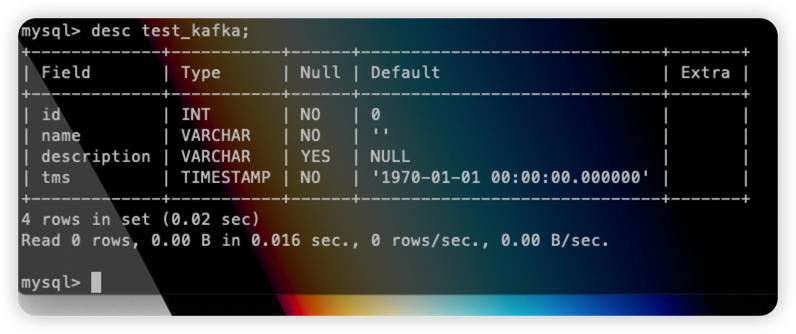
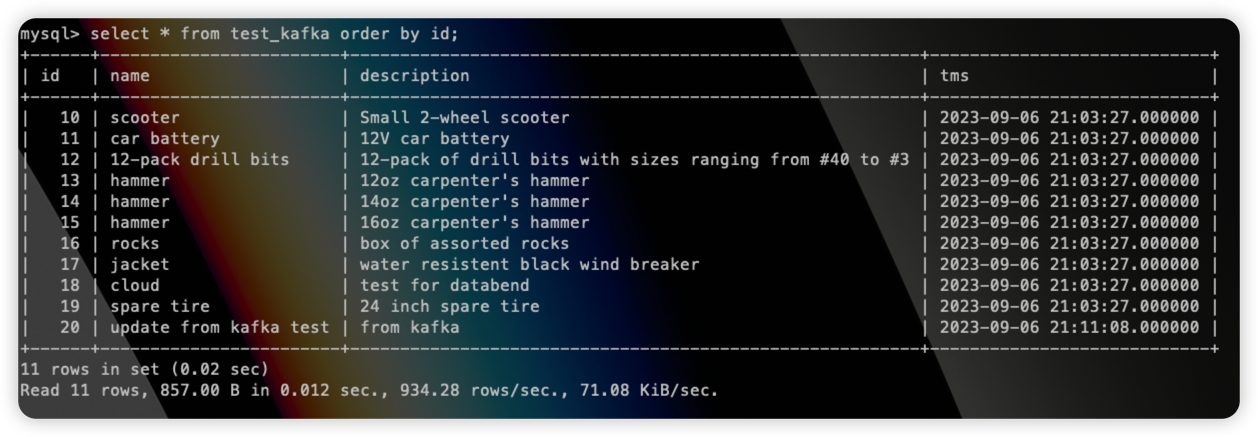
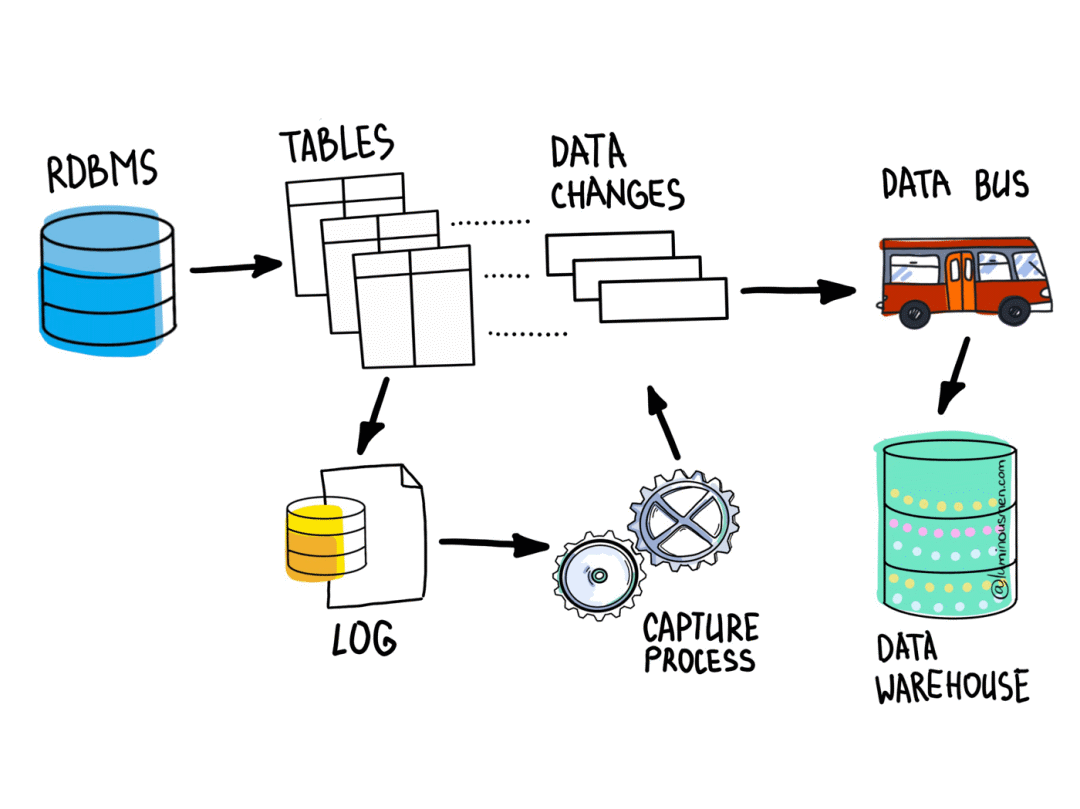
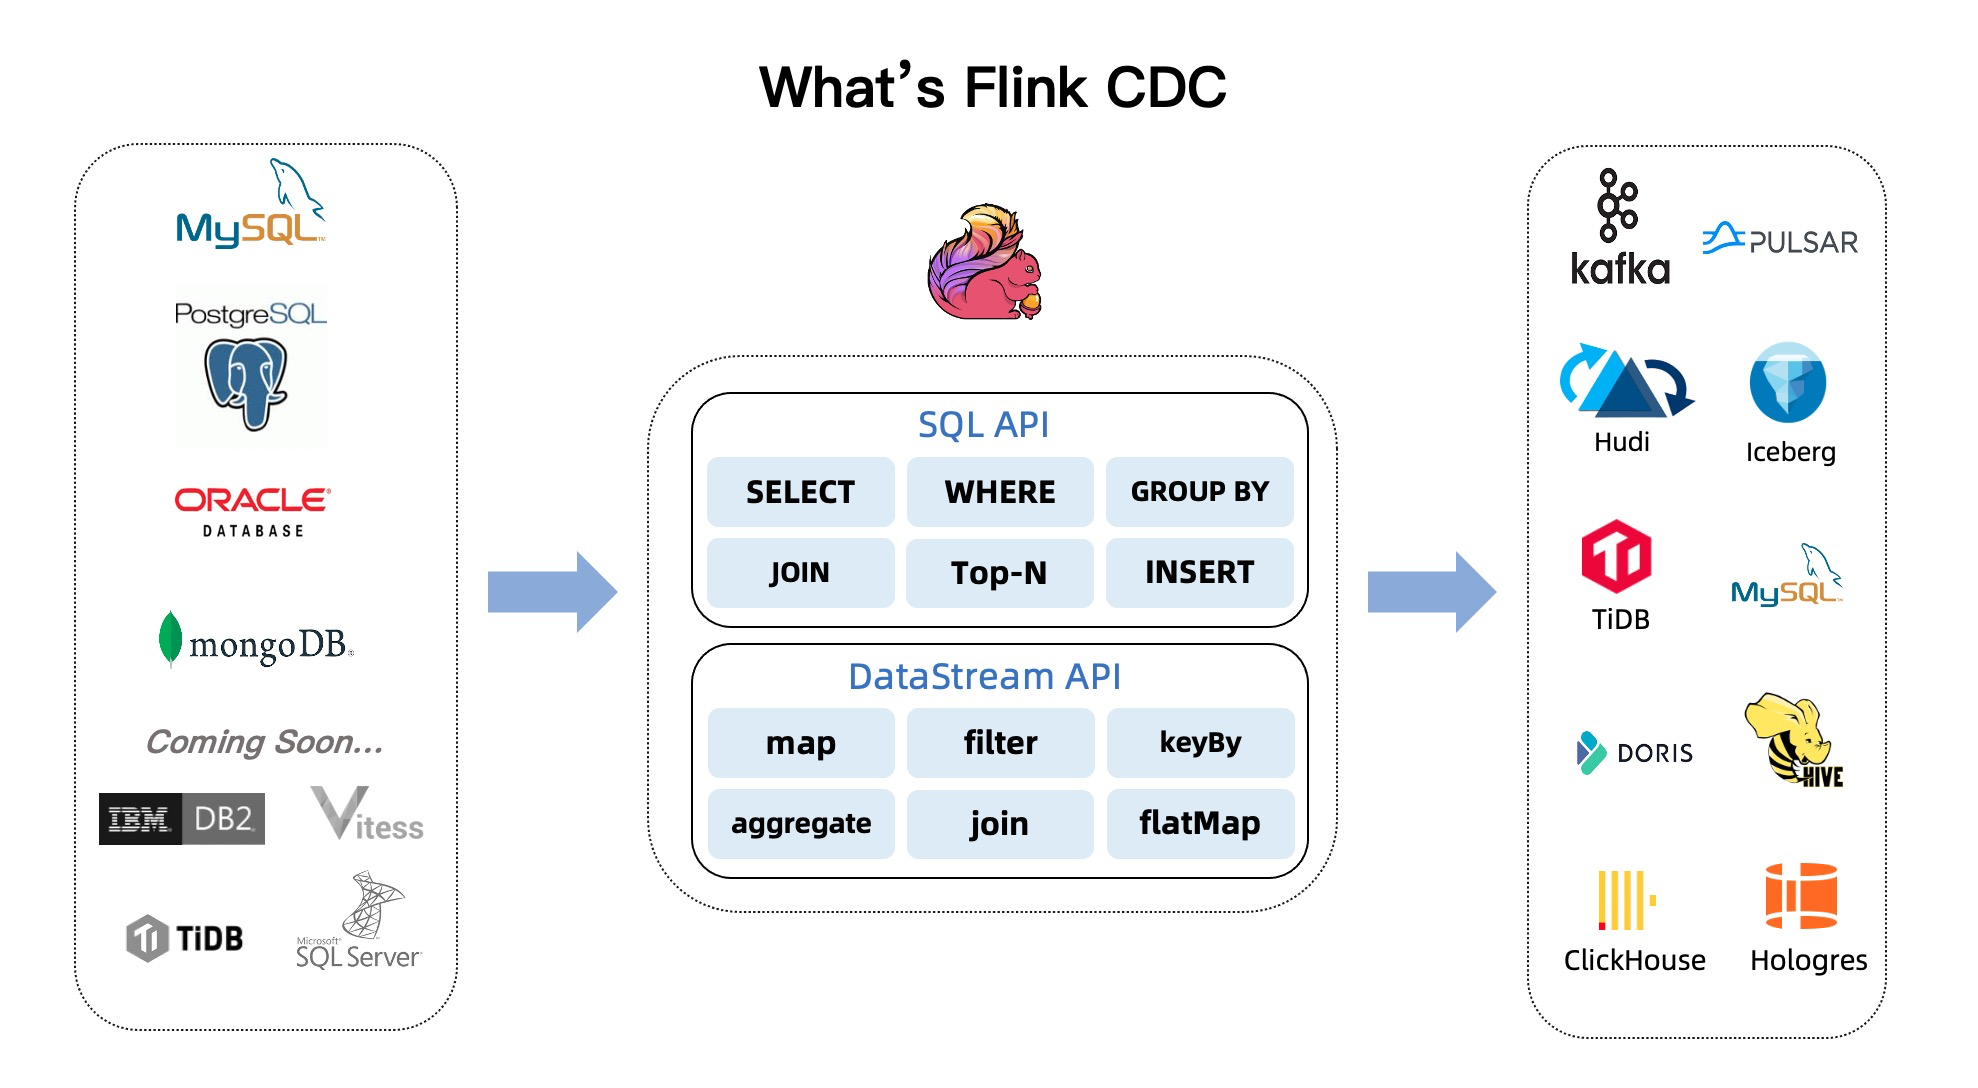
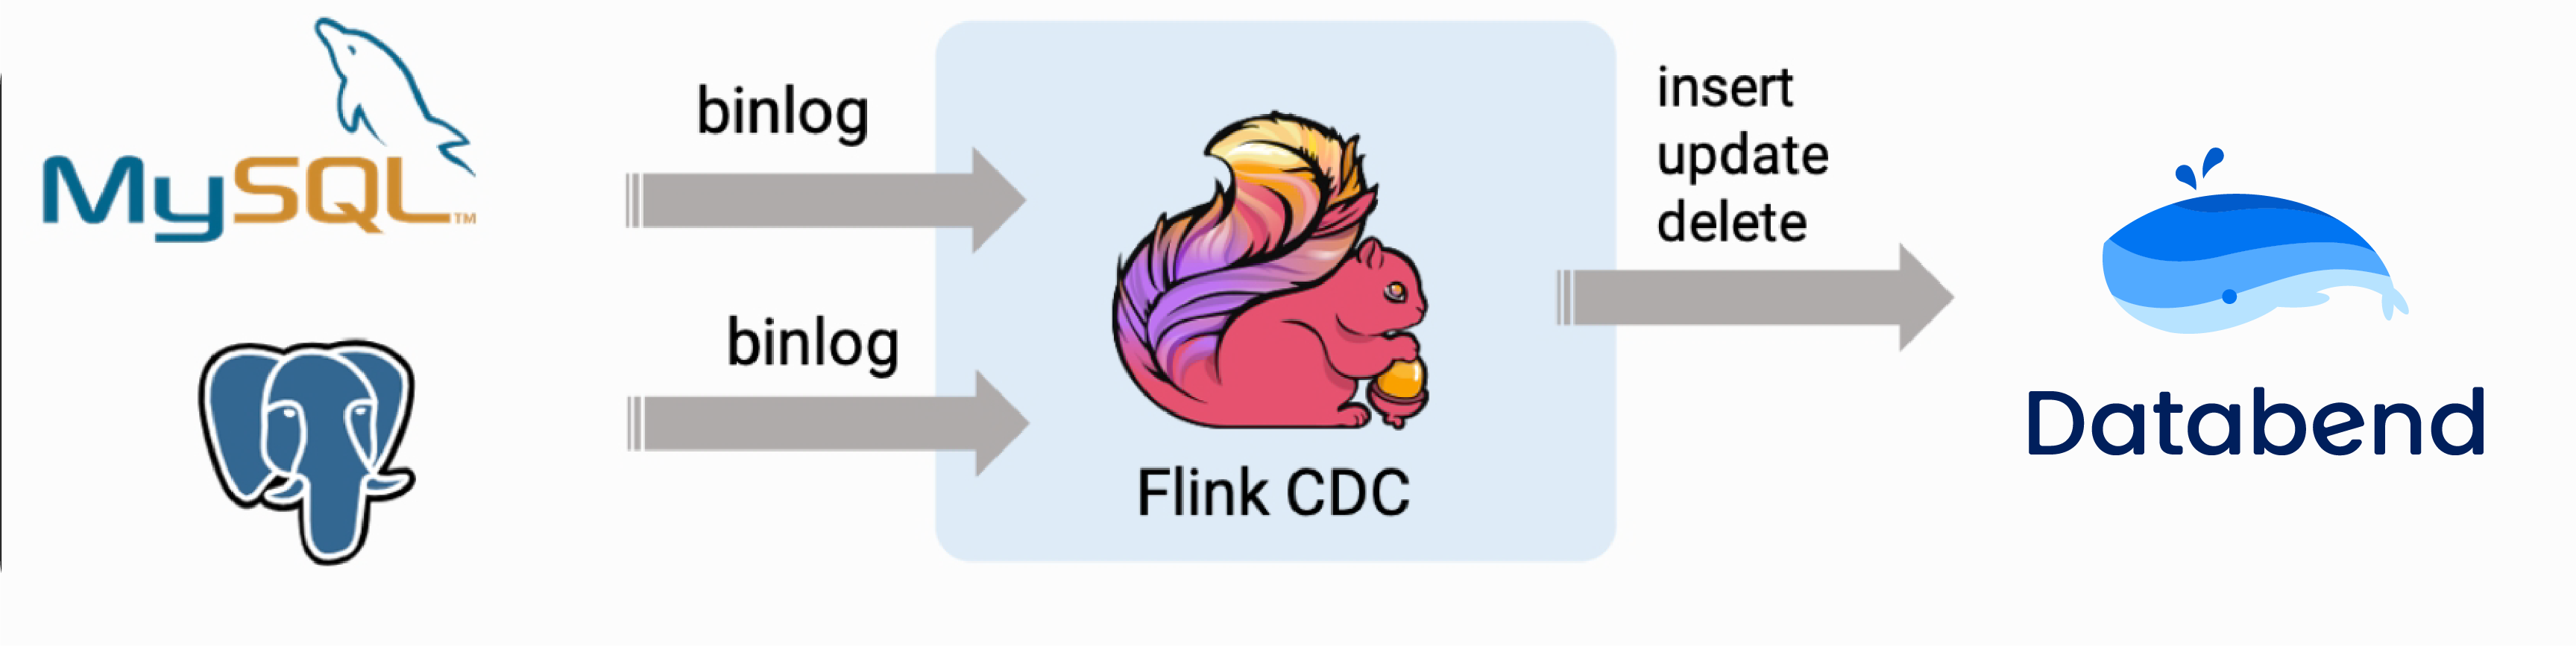
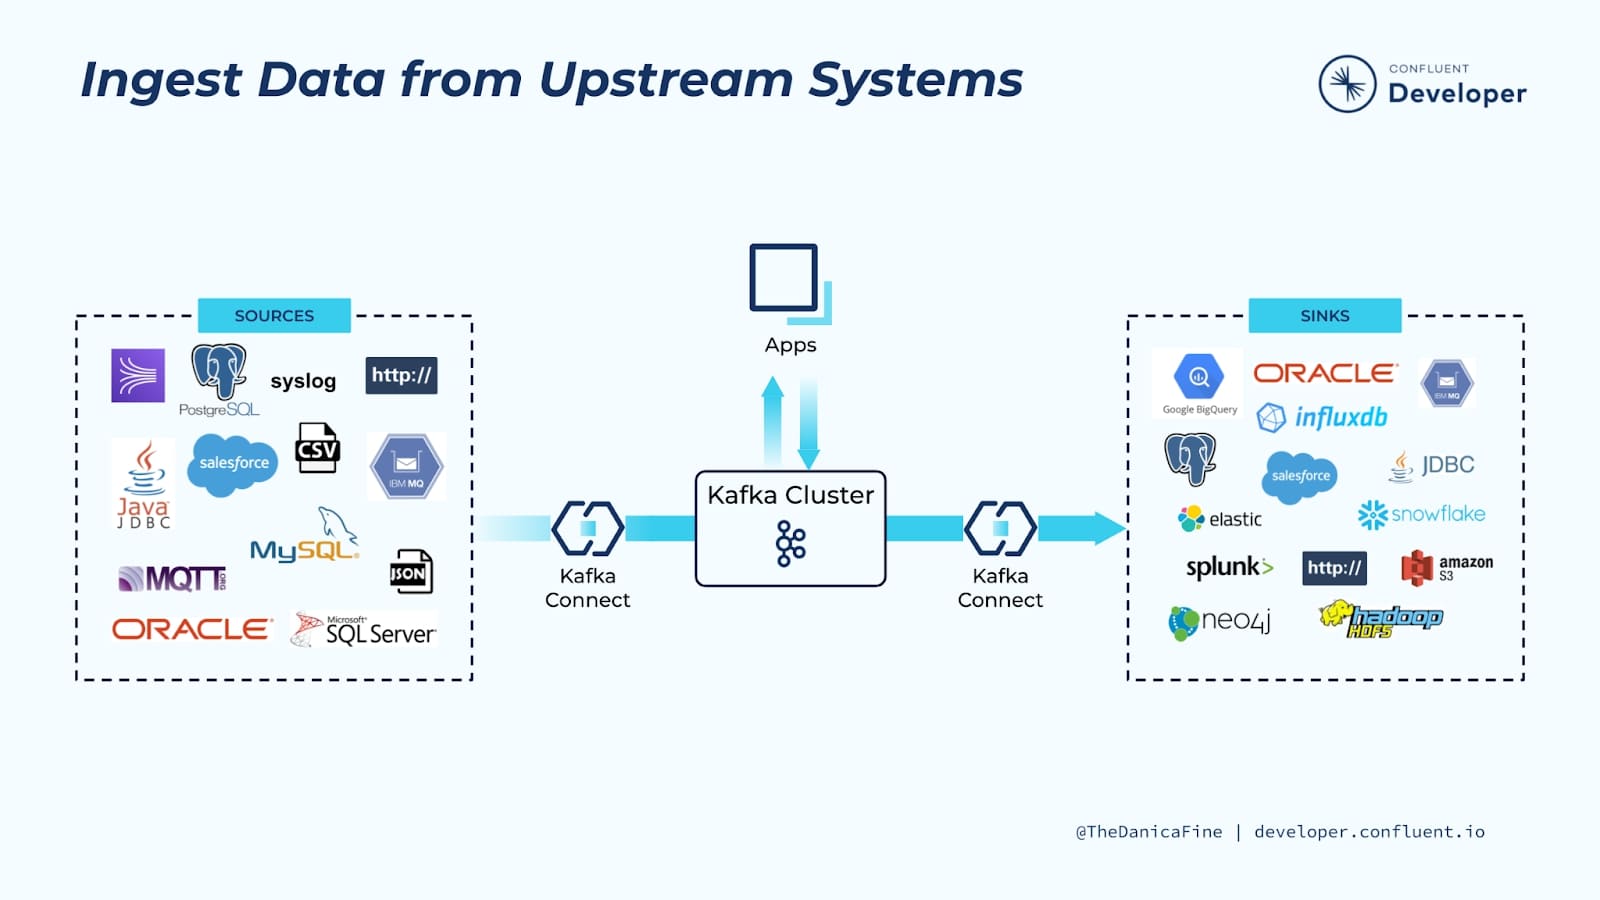
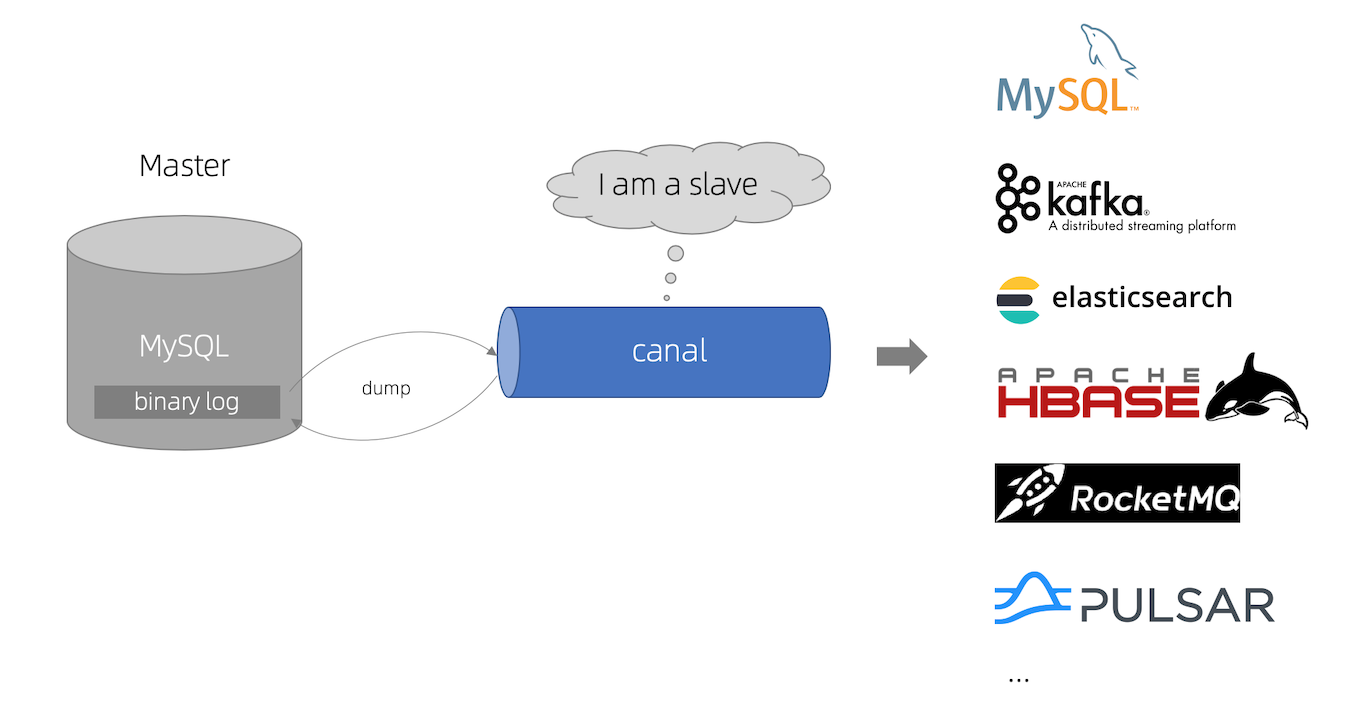
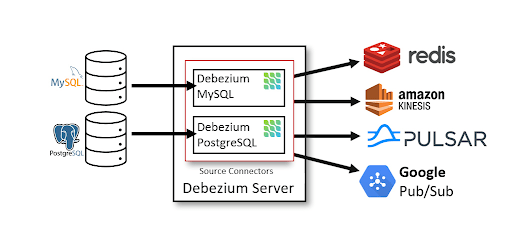
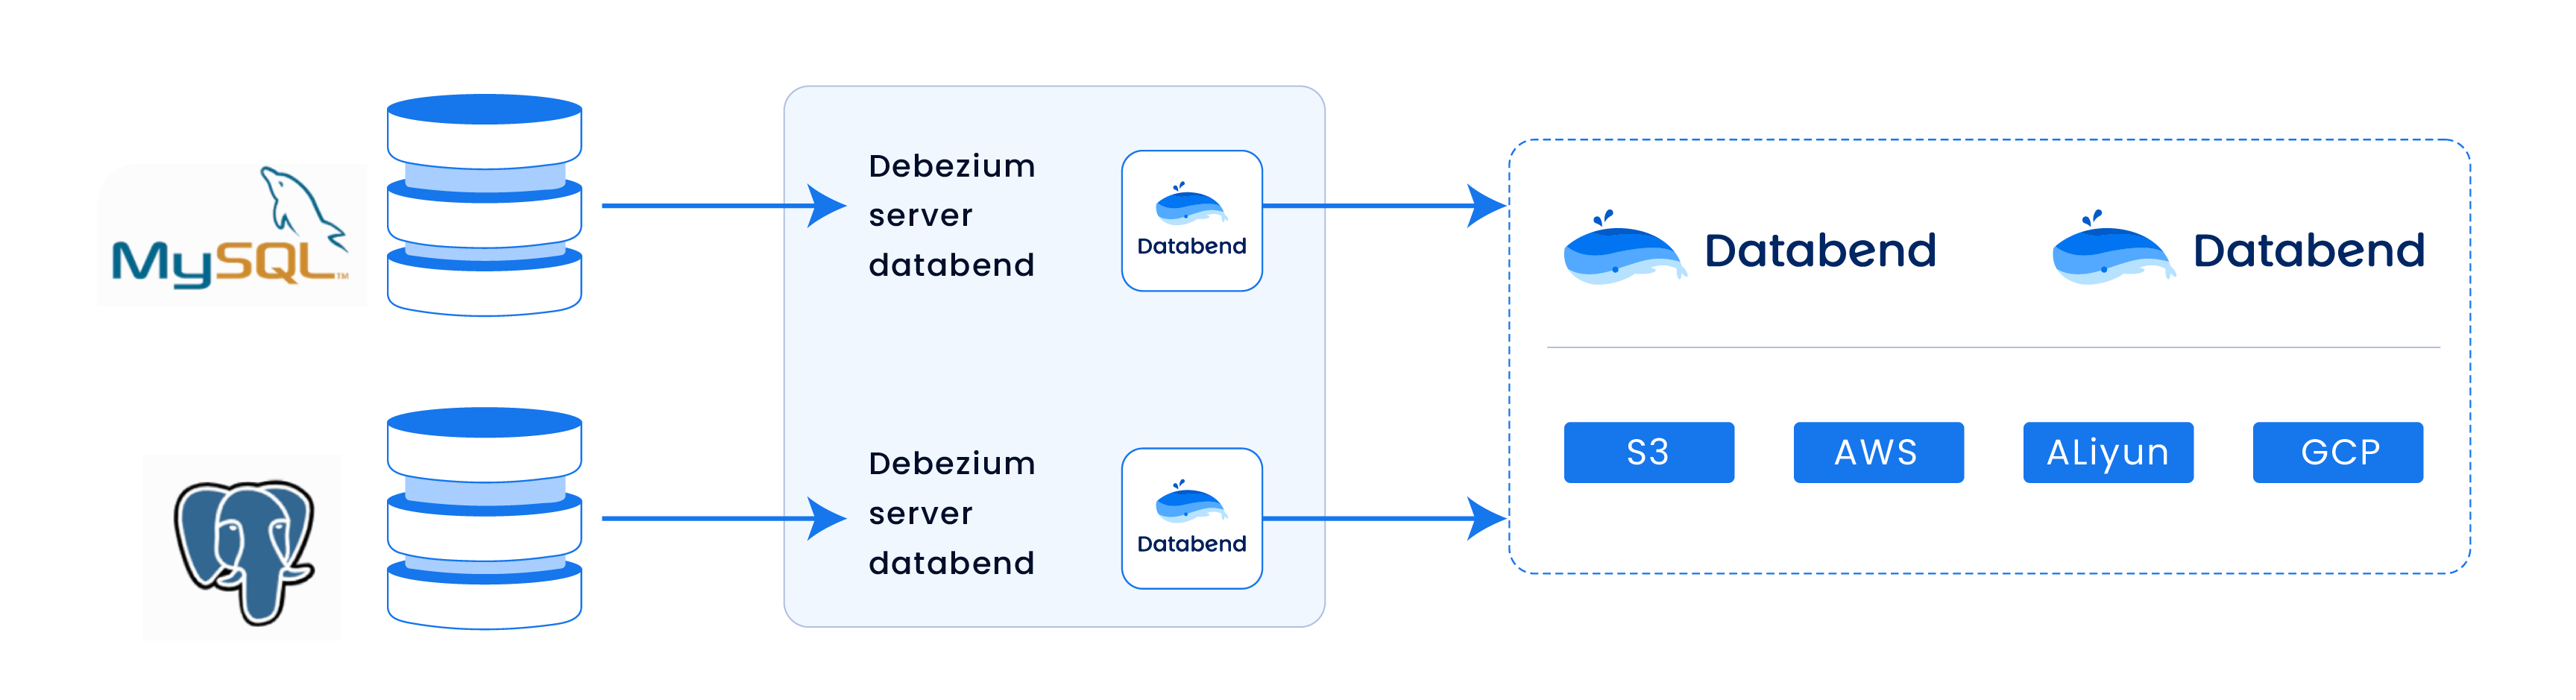
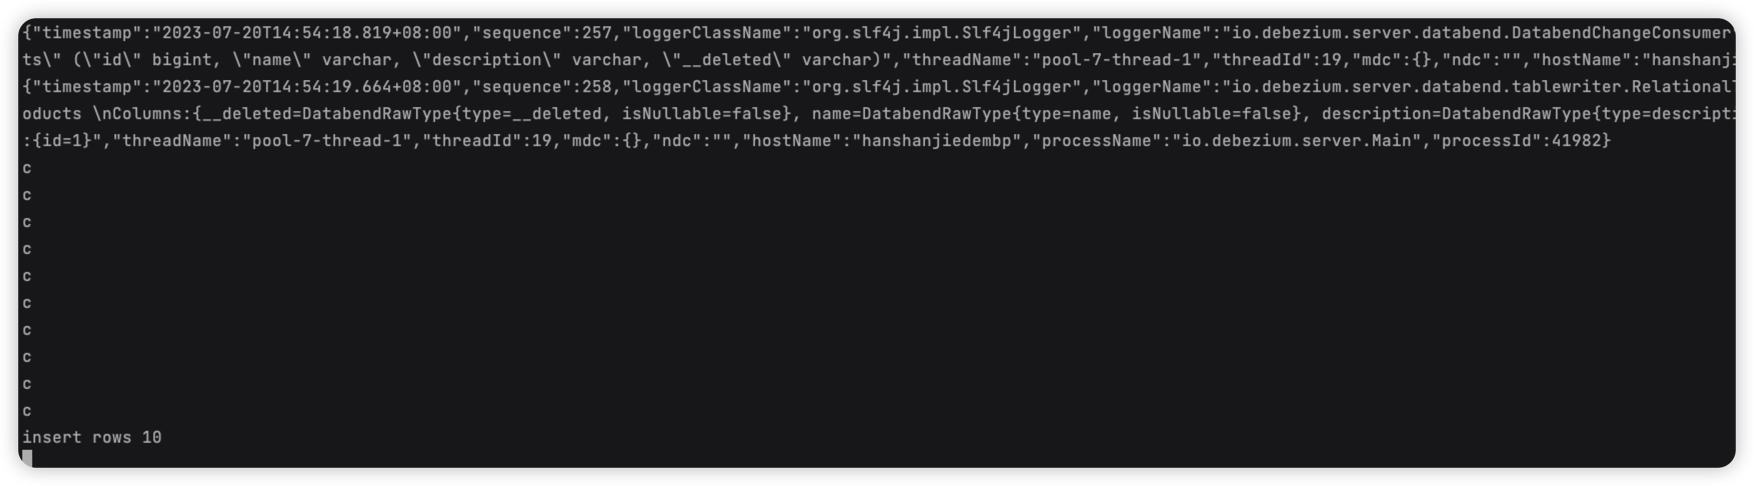
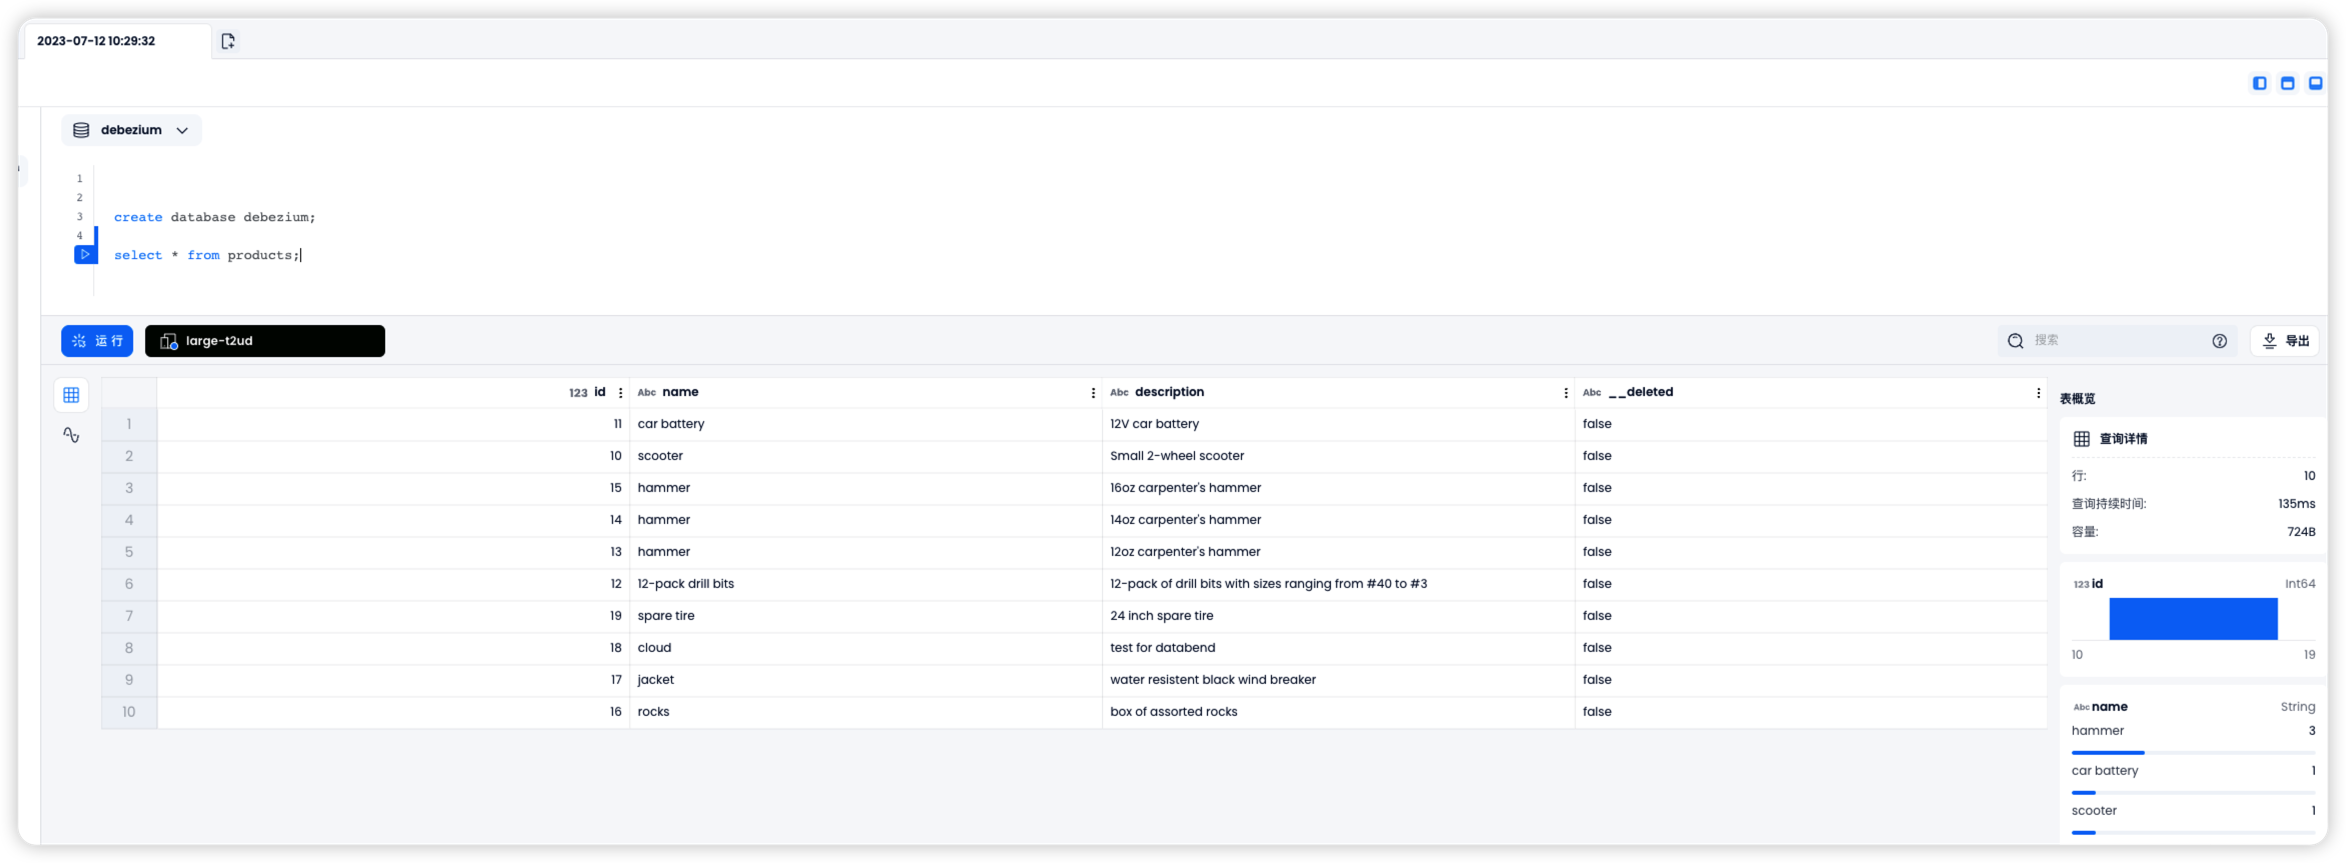
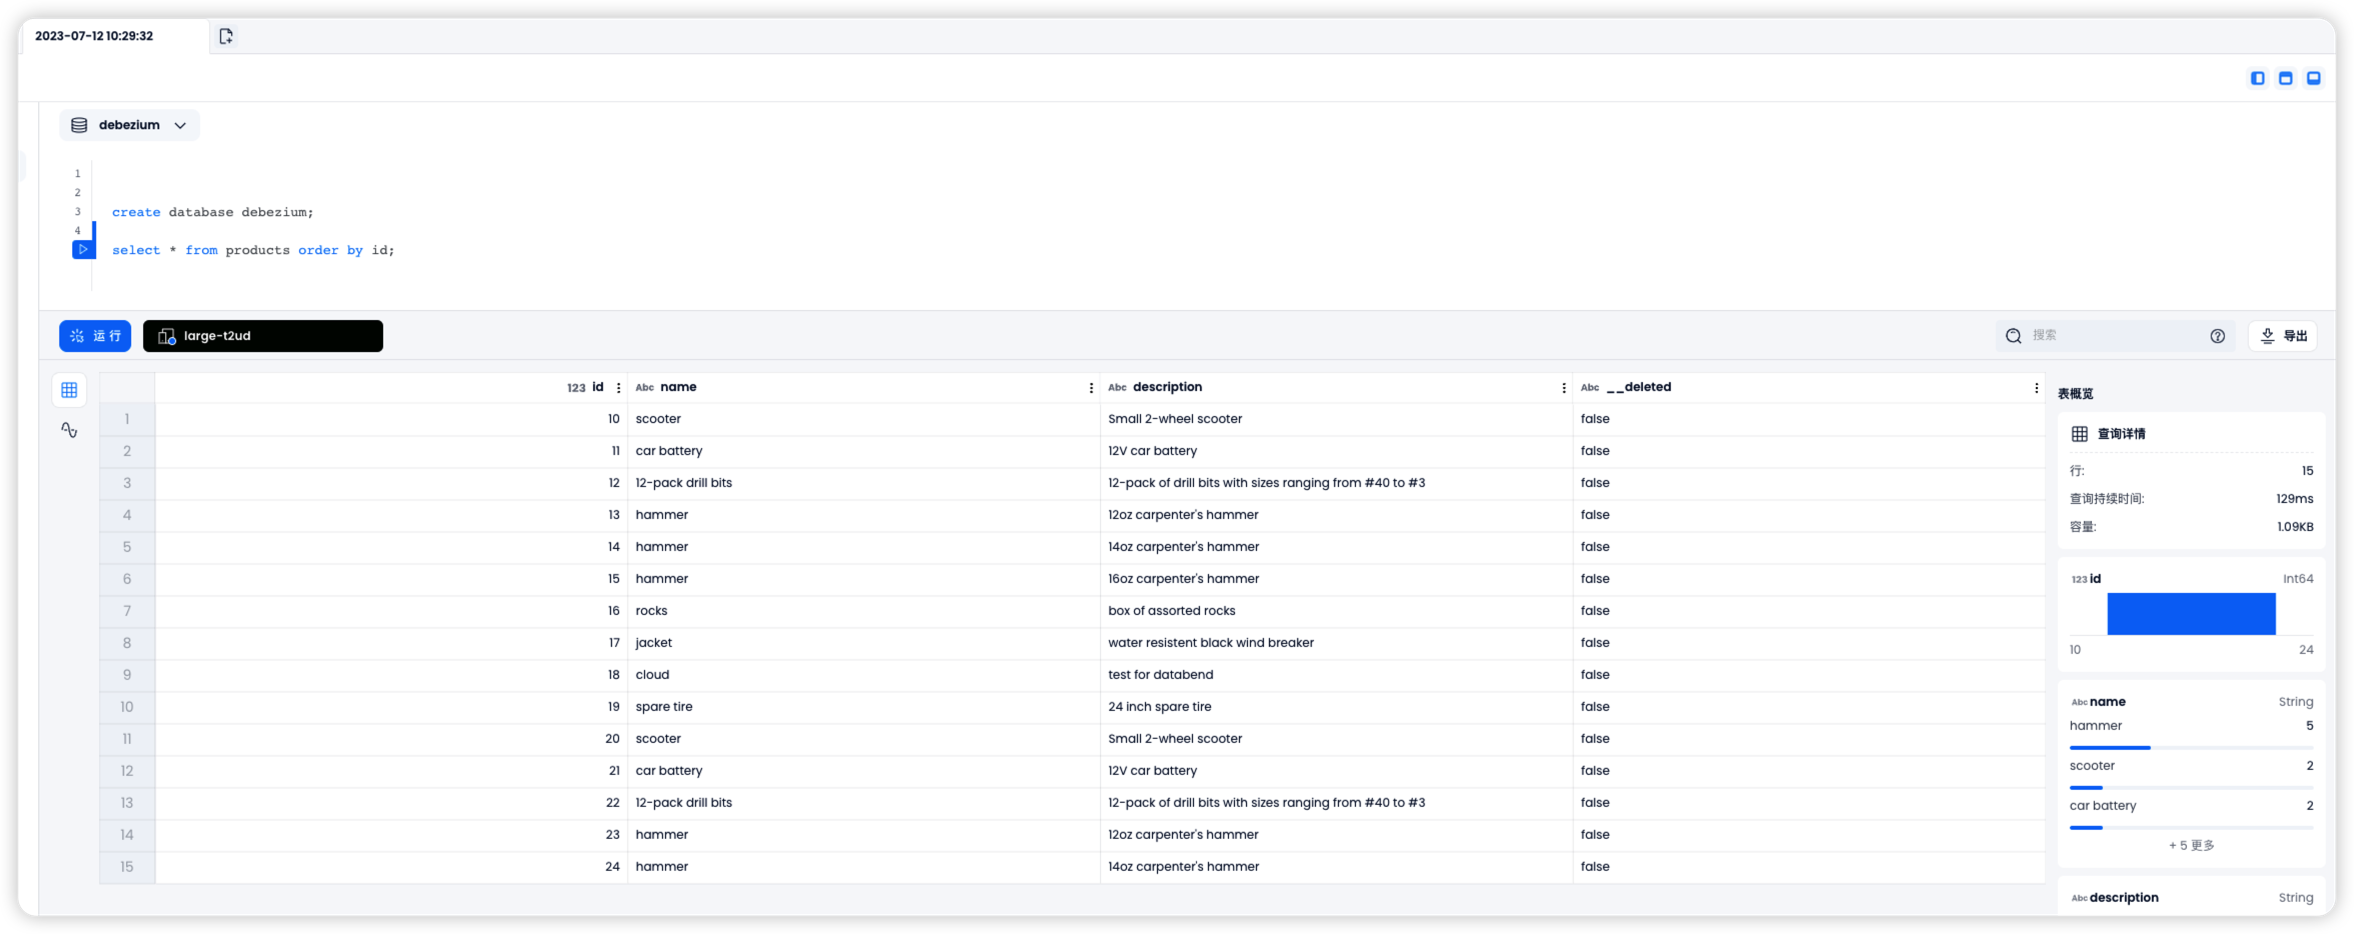
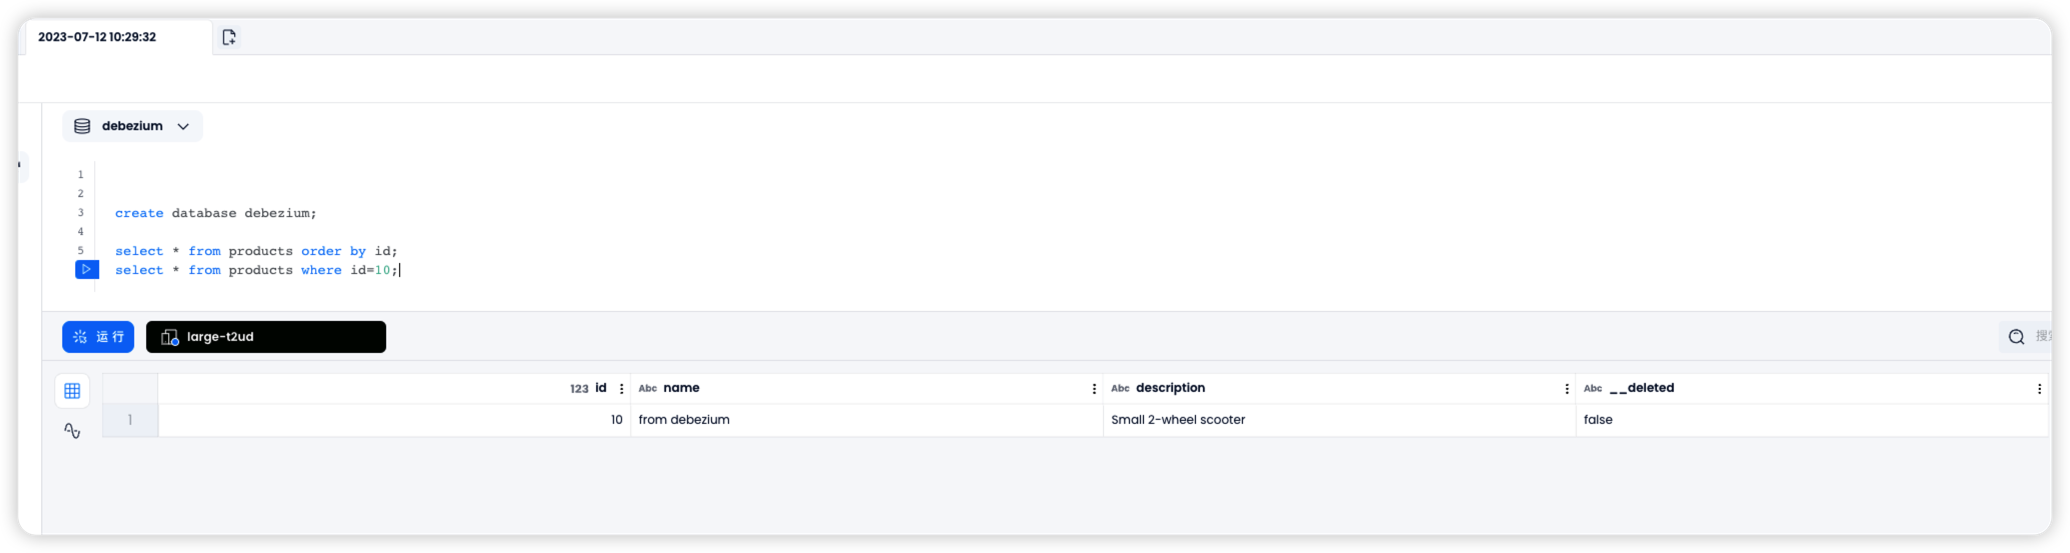
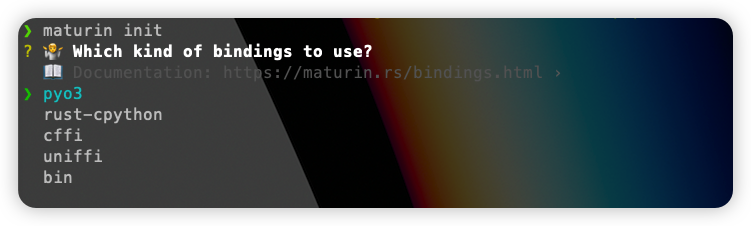
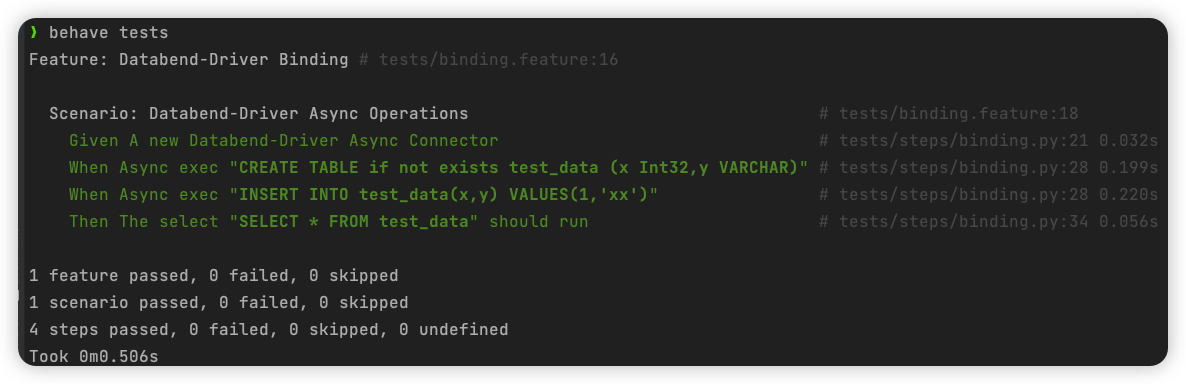
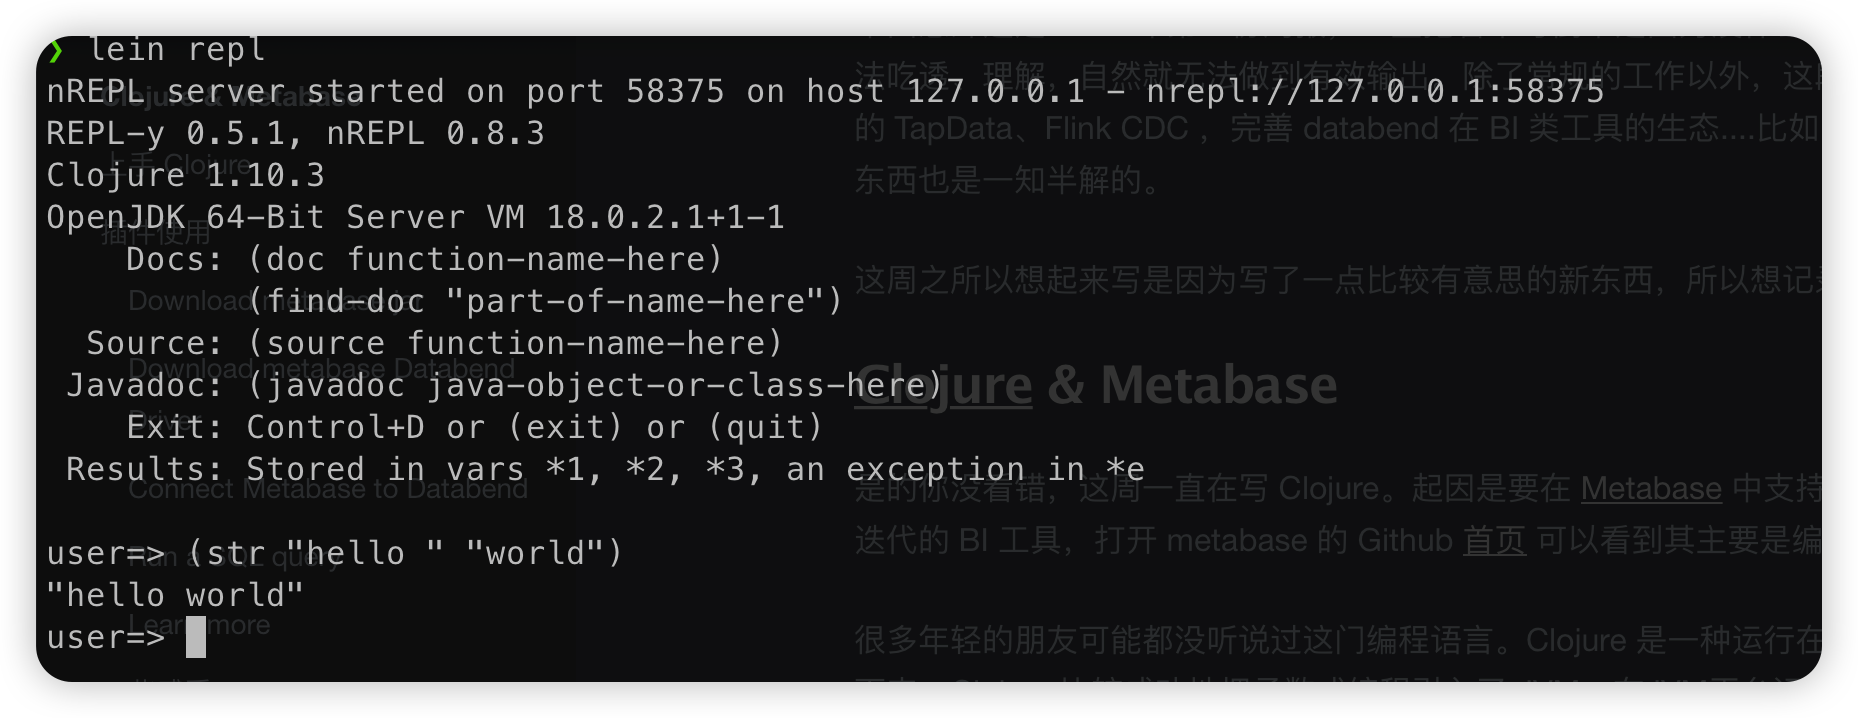
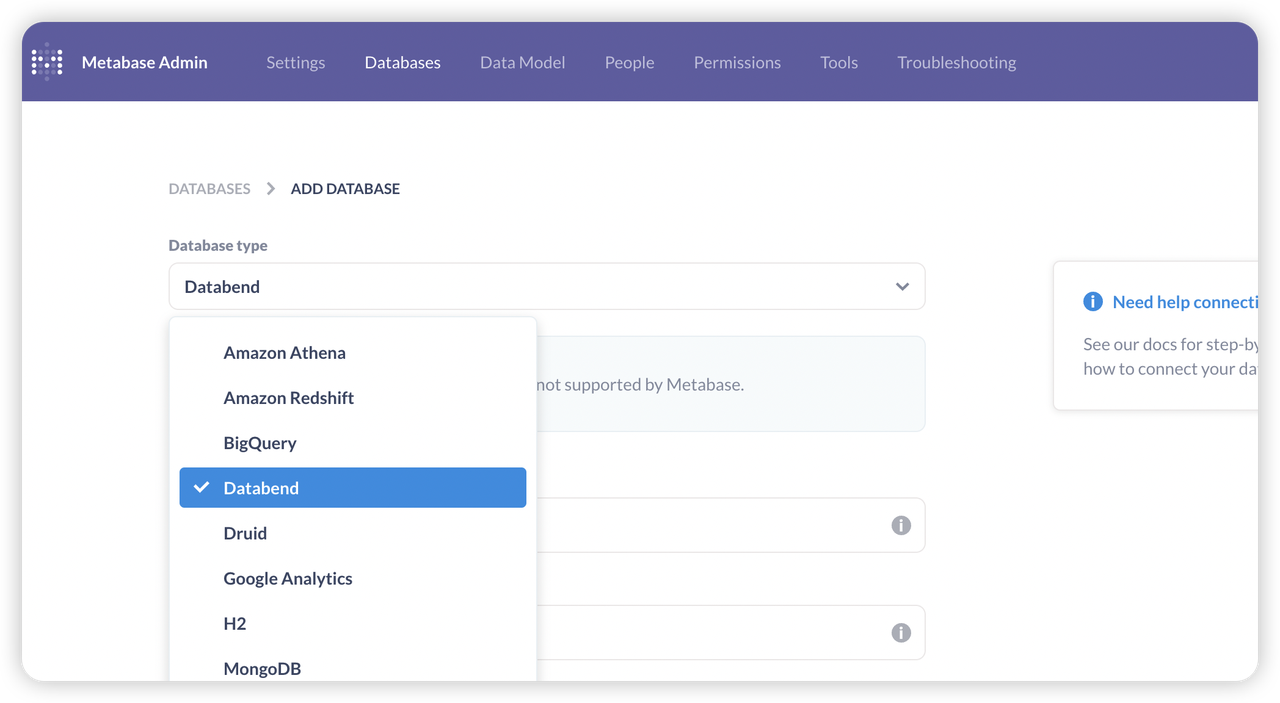
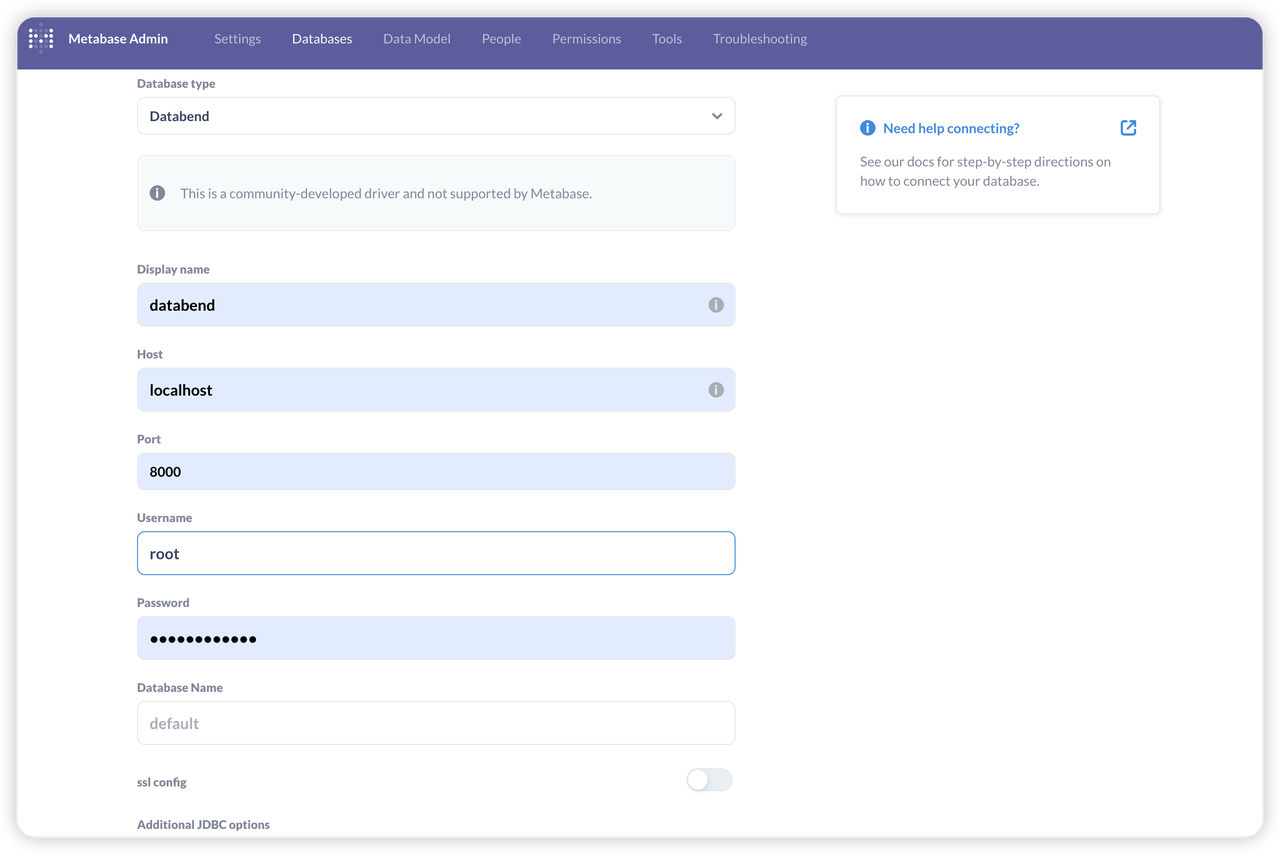
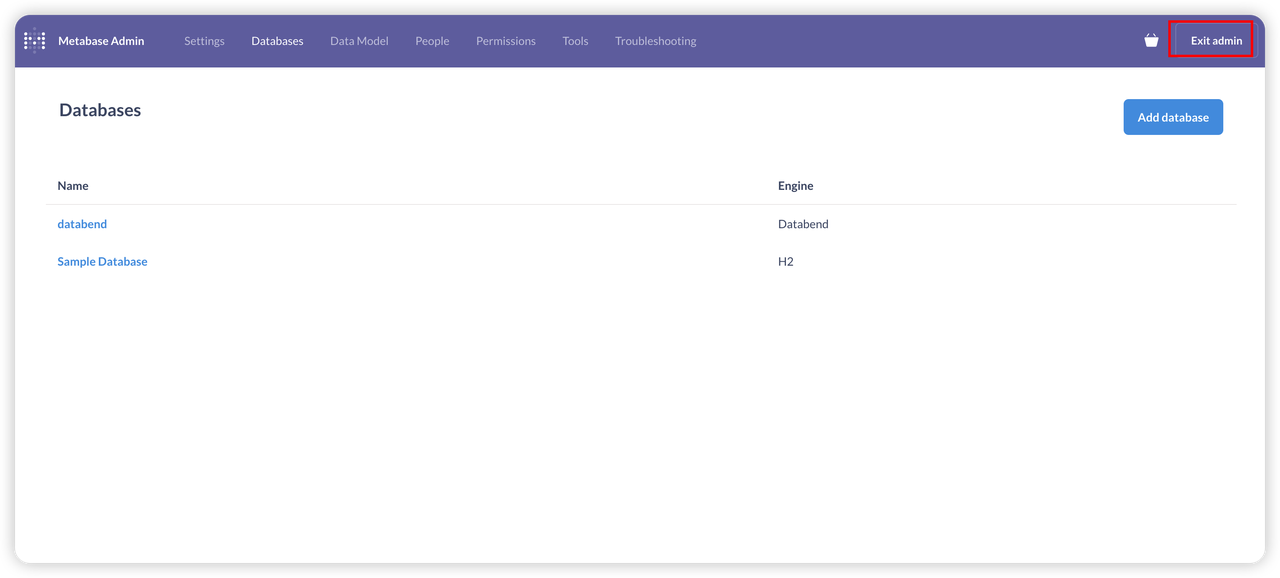
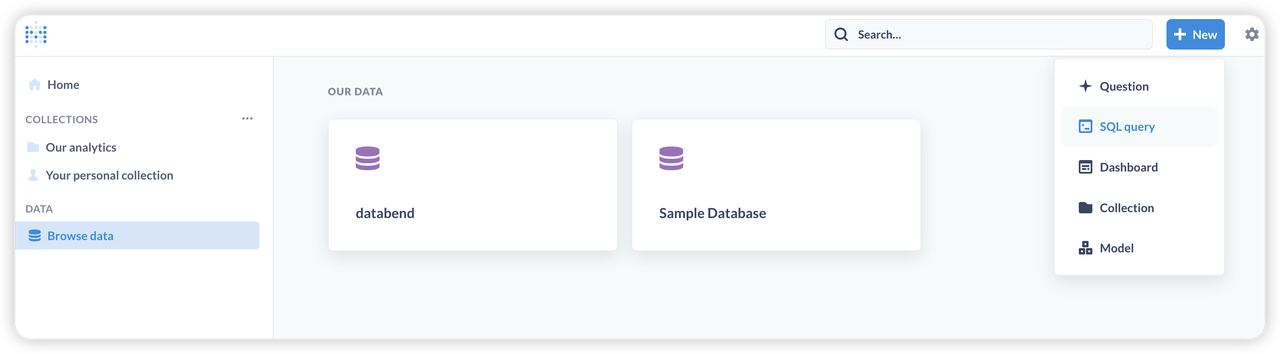
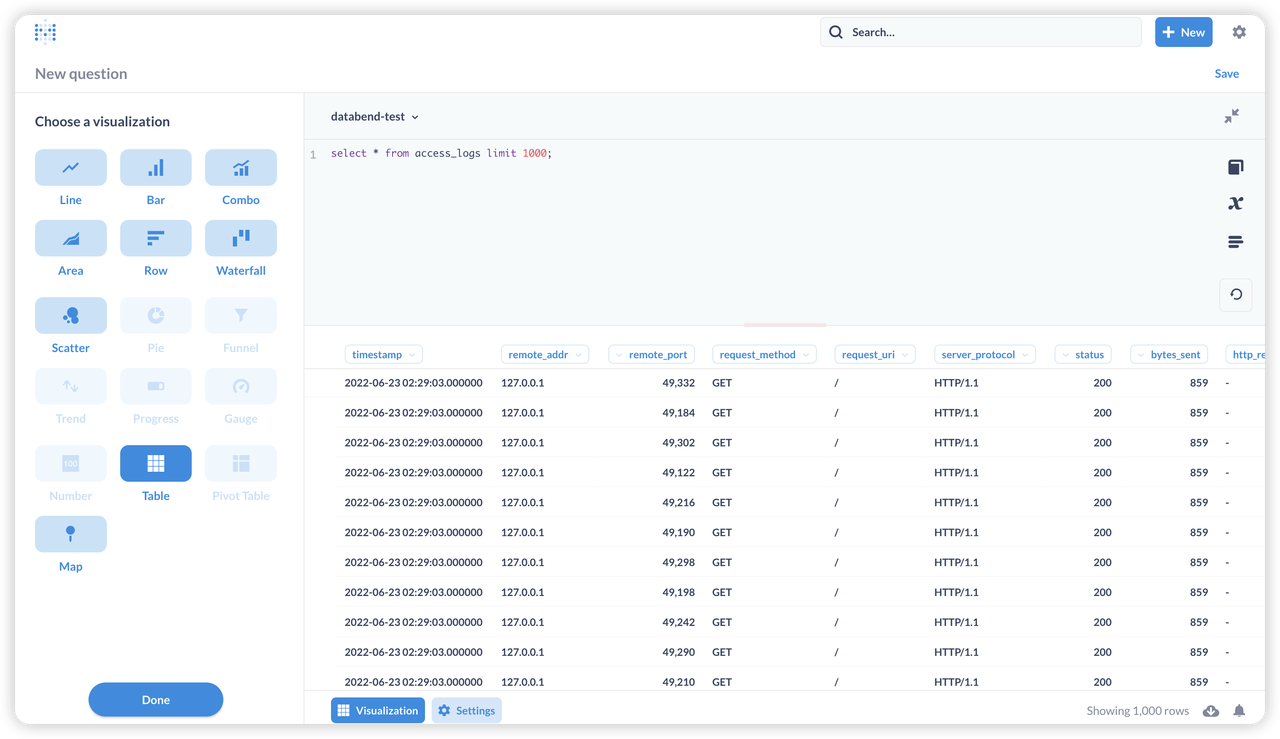
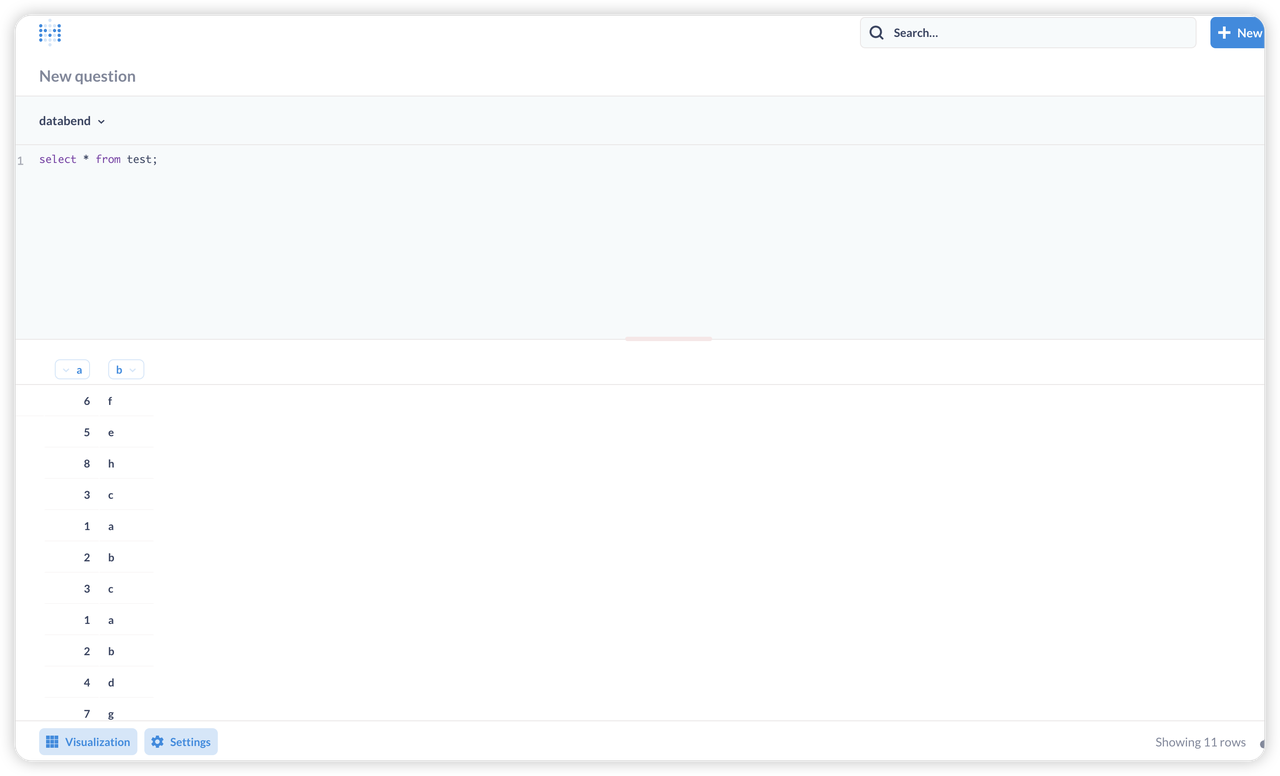
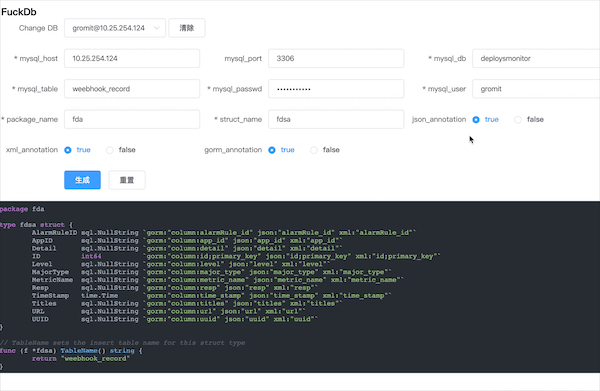
Quick Start

Create a new post

1
$ hexo new "My New Post"

More info: Writing

Run server

1
$ hexo server

More info: Server

Generate static files

1
$ hexo generate

More info: Generating

Deploy to remote sites

1
$ hexo deploy

More info: Deployment

]]>
<p>Welcome to <a href="https://hexo.io/" target="_blank" rel="noopener">Hexo</a>! This is your very first post. Check <a href="https://hexo.