Jekyll2025-02-10T06:29:36+00:00/feed.xmlart and science of codingDerek LeeThe Art of Multiplatform Programming: The Secret to Maximizing Shared Code2022-10-01T00:00:00+00:002022-10-01T00:00:00+00:00/science/kmm-maximizing-shared-codeTL/DR;
  • Writing your platform-dependent code for iOS or Android requires first understanding the platform API dependencies to help you craft a shared platform-independent interface.
  • Isolate platform dependencies to the smallest surface area possible to increase maintainability and reusability.
  • Leveraging Dependency Injection (DI) and the Dependency Inversion Principle (DIP) is key to effective multiplatform programming.
  • We can use UML class diagrams as a tool to illustrate the relationship between the platform-dependent code (the low-level components) and the responsibilities of the shared platform-independent interface (the high-level blueprint).


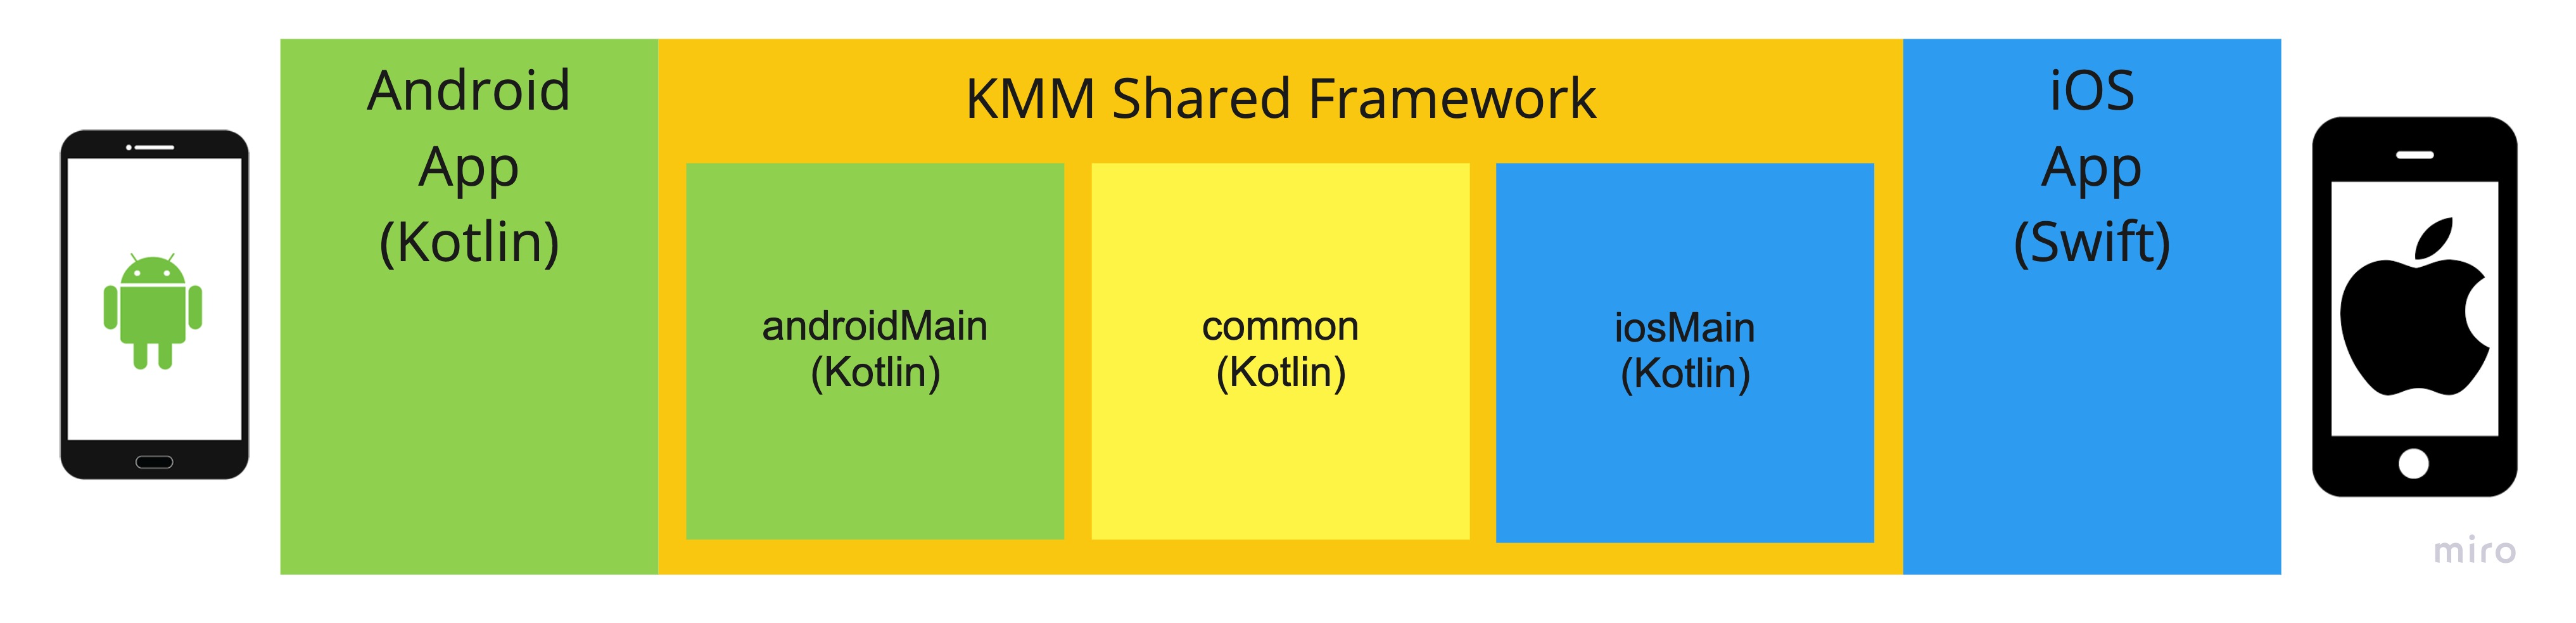
The Holy Grail of Mobile Development

For as long as mobile development has existed with multiple platforms, the “holy grail” of being able to share code between platforms has been elusive. Additionally, the number of tools already in the graveyard (or on their way there) is steadily increasing, with Kotlin Multiplatform being one of the first to allow sharing code in effectively the same ecosystem while maintaining the ability to access native features as needed. Yet, programmatically one of the biggest challenges is how to accomplish this in a way that is easy to maintain while maximizing the amount of code you can share.

This post will walk you through the steps to identify and isolate platform-dependent code in your app to maximize the amount of code you can share between iOS and Android. Better yet, whether you consider yourself an iOS or Android engineer, you can learn and deploy this technique in your applications today.

This post is part of a series on Kotlin Multiplatform:

  1. The iOS Engineer’s Guide to Beginning Kotlin Multiplatform Development
  2. Why iOS Engineers Should Avoid This Glorified KMM Technique
  3. The Art of Multiplatform Programming: The Secret to Maximizing Shared Code


Isolating Platform-Dependent Code, Step by Step

There are only four simple steps to understand, isolate, and implement a platform dependency in your multiplatform application:

  1. Understand the platform-dependent APIs that you need to implement.
  2. Define the interface needed to satisfy your requirements using only platform-independent types.
  3. Create a concrete class implementing this interface using Swift inside your iOS app.
  4. Create a concrete class implementing this interface using Kotlin inside your Android app.


Haptic Feedback

Haptic feedback is a fantastic example. It’s simple to understand and practical when dealing with multiple platforms because it requires calling platform-specific APIs.

Use-Case

We want to provide haptic feedback (device vibration) to the user when they perform an action in our application.

Step #1: Understand Platform-Dependent APIs

As the last blog post mentioned, crafting a platform-independent API is a challenging part of multiplatform development. Understanding how the implementation looks on all the platforms you’re aiming to support is an essential first step to deciding on what your shared platform-independent interface will be.

iOS Platform-Dependent APIs

In iOS, we can use any concrete class that implements the UIFeedbackGenerator interface to provide haptic feedback to the user. As Apple’s documentation indicates, we simply initialize and prepare the generator and then trigger the feedback when needed.

NOTE: Haptic APIs vary depending upon what version of iOS you’re supporting, so please dig into this further if you need to implement this functionality. 📚

An example of triggering haptic feedback on iOS might look like this:

1
2
3
let selectionFeedbackGenerator = UISelectionFeedbackGenerator()
selectionFeedbackGenerator.prepare()
selectionFeedbackGenerator.selectionChanged()

From this code, we can discern that besides having to create an instance of UISelectionFeedbackGenerator, there are no other platform-specific dependencies to execute this code.

Android Platform-Dependent APIs

For Android, so far as I understand, one way to access haptic feedback API is from the activity’s Window object. In addition, there are many HapticFeedbackConstants available for you to choose from.

An example of triggering haptic feedback on Android might look like this:

1
2
3
4
window
    ?.decorView
    ?.rootView
    ?.performHapticFeedback(HapticFeedbackConstants.CLOCK_TICK)

Is there a better way to do this on Android? Do you have a recommendation based on the varying API levels? Let me know!

Pro-Tip #1: Encapsulate Platform-Dependent APIs

This example raises a common question regarding multiplatform development: how do I handle platform-dependent APIs?

The answer to this is straightforward but requires a shift in mindset to become proficient with:

Inject platform-dependent objects
into concrete instances
conforming to a platform-independent interface

(No worries if you read that sentence three or four times, and it still doesn’t make sense… it will soon enough!)

Discussing how to accomplish this opens the door for us to explore two topics crucial to becoming comfortable with multiplatform development: dependency injection (DI) and the Dependency Inversion Principle (DIP).

Dependency Injection in Five Sentences or Fewer

DI is simply the act of passing an instance of an object into another object as opposed to creating dependent objects inside an object.

The following Swift example returns a new UserModel object and generates the user id as a new random UUID directly inside the function (line #4).

1
2
3
4
5
6
7
8
class UserRepository {
    func createUser(username: String) -> UserModel {
        return UserModel(
            id: UUID().uuidString,
            username: username
        )
    }
}

With dependency injection, we modify the above code to inject the object responsible for generating the UUID, so neither the createUser() method nor the UserRepository is accountable for this logic:

1
2
3
4
5
6
7
8
9
10
11
12
13
14
class UserRepository {
    private let uuidProvider: UUIDProvider

    init(uuidProvider: UUIDProvider) {
        self.uuidProvider = uuidProvider
    }

    func createUser(username: String) -> UserModel {
        return UserModel(
            id: uuidProvider.randomUUID,
            username: username
        )
    }
}

The UUIDProvider protocol (interface) is defined separately and implements generating a random UUID in the same way as it originally was, only now it is isolated into its own object:

1
2
3
4
5
6
7
8
9
10
11
protocol UUIDProvider {
    var randomUUID: String { get }
}

final class RandomUUIDProvider: UUIDProvider {
    var randomUUID: String {
        get {
            return UUID().uuidString
        }
    }
}

At its most basic level, dependency injection externalizes the creation of any objects used by an object.

In this case, the UserRepository calls a method on the UUID object. We can also say the UserRepository uses UUID or the UserRepository depends upon UUID.

Identifying what objects a block of code depends upon is crucial to leveraging dependency injection.

When and How to Preform Dependency Injection

Ideally, we want to inject our dependencies during object creation through the constructor, as this forces the consumer to provide the dependencies at the time of object creation. However, if this isn’t possible, you can also inject dependencies directly into functions or by setting properties.

The benefit we reap, in this case, is isolating platform-specific dependencies. Additionally, another advantage is improved testability.

Dependency Inversion Principle (DIP) in Five Sentences or Fewer

Yes!! Now we’re getting into the fun stuff! 🎉

Representing the “D” of the “SOLID” principles, the Dependency Inversion Principle (DIP) essentially states that an interface defines responsibilities that an object has, or the high-level blueprint, and only the concrete classes that satisfy this interface should contain the implementation details. These are details like what kinds of objects, specifically platform-dependent components, are needed to fulfill that behavior.

Typical Applications of the DIP

You have likely already seen many DIP examples where object wrappers are used for third-party code to protect oneself from the details of that API leaking into your application. Yet, when engineers don’t take the appropriate precautions to protect themselves and their teams against third-party code, that code can pollute other parts of your codebase and result in a “leaky abstraction.”

This mistake is often easily made when dealing with third-party code because the compiler won’t inform you when you’ve violated this heuristic.

However, it’s nearly impossible to make this mistake when working with multiple platforms because you can’t even use platform-dependent objects in your shared code. You cannot use these objects because they are inaccessible.

As a result, it can be quite frustrating to integrate with platform-specific dependencies in multiplatform projects if you cannot recognize this limitation. In fact, this challenge is one of the most difficult to overcome with multiplatform programming.

Once you wrap your head around this concept (believe me, if I can do it, then I know you can!), you’re well on your way to mastering multiplatform development.

Overcoming this challenge benefits not only your multiplatform programming skills but also your general programming skills. You’ll also start to see how this can benefit your testing skills.

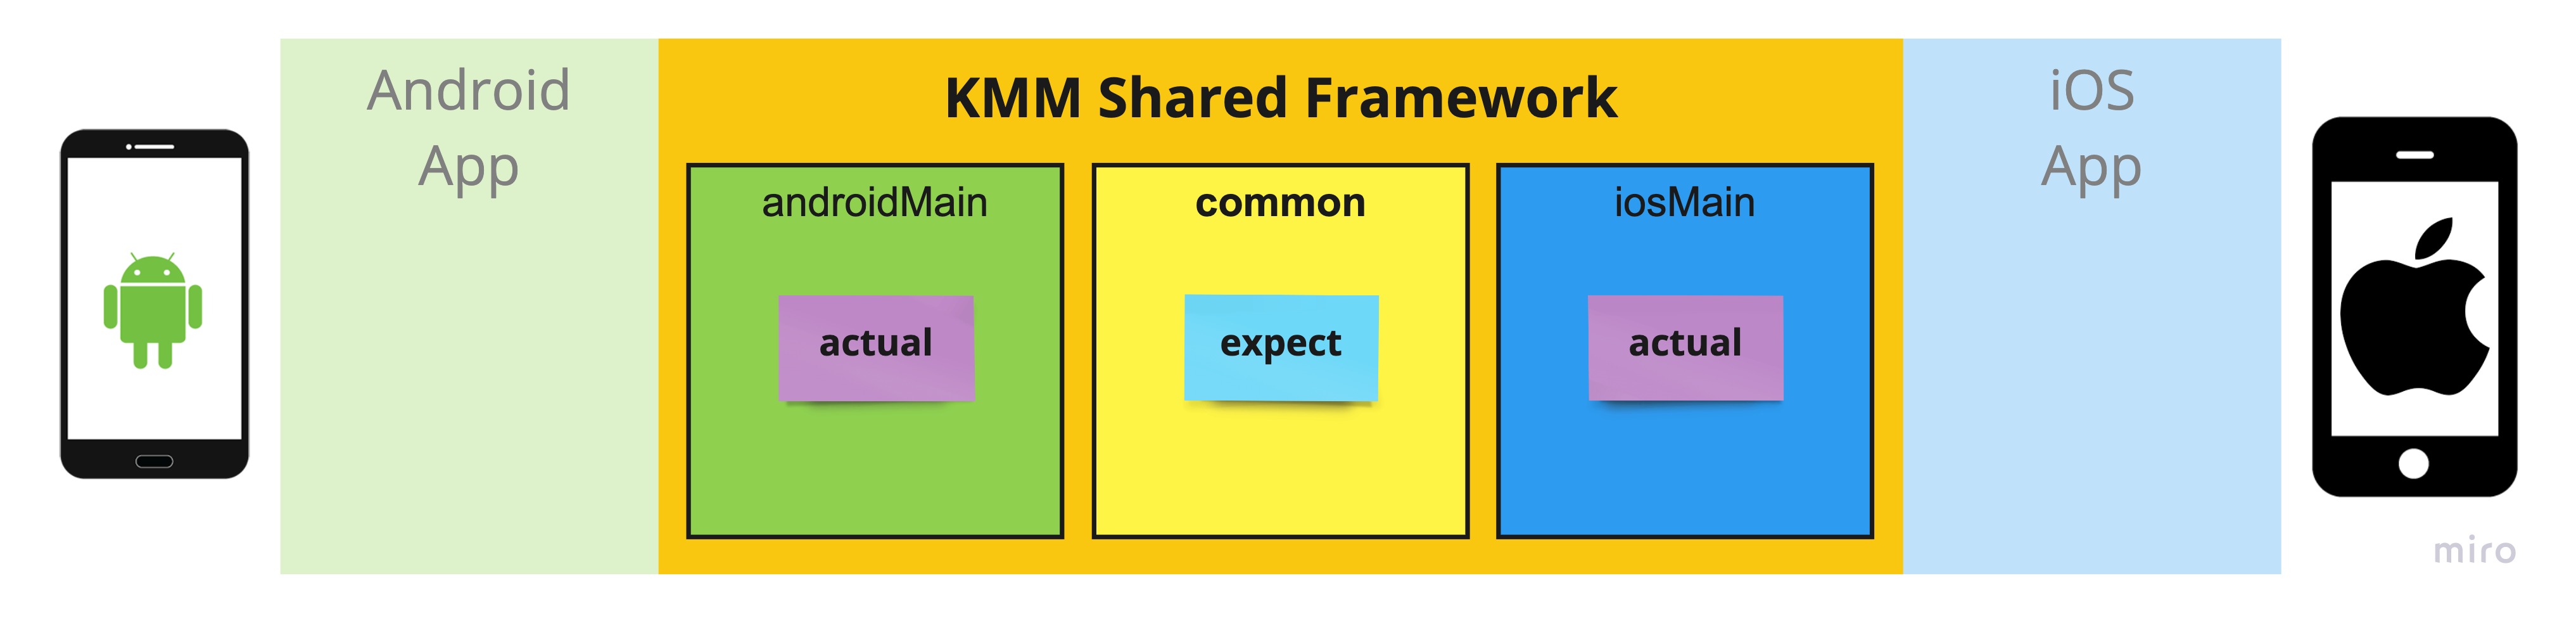
Step #2: Define the Platform-Independent Interface

Your multiplatform interfaces define the responsibilities of your object and must be platform-independent.

In other words, the interface must only include:

  • platform-independent primitive types (strings, integers, floats, etc)
  • types supported across all of your supported platforms (such as those defined in libraries with multiplatform support, for example kotlinx.datetime), or
  • objects composed only of these types

Sometimes it’s easy to know when a type is platform-dependent, for example, anything in iOS beginning with “UI,” such as UIApplication or UIViewController. Sometimes this is more difficult to discern, like a URL or UUID.

(Note that this requirement also applies when defining expect/actual classes.)

Defining Our (Platform-Independent) Haptics Interface

Let’s say we want two different vibrations depending on the user’s action. Naming is hard, so I’ll leverage musical terminology to devise an appropriately named interface in this case. One haptic will be a shorter, more staccato style feedback, and another will be a slightly longer, more marcato style feedback. The interface might look like this:

1
2
3
4
interface HapticFeedbackGenerator {
    fun staccatoFeedback()
    fun marcatoFeedback()
}

This interface is the high-level blueprint.

Let’s notice a few important points about this interface:

  • The interface only describes the object’s supported behaviors
  • Nothing in this interface is dependent upon any platform details

Thus, when working with this object in our code, there’s no need to indicate anything related to a platform. Instead, we invoke a function and expect it is handled appropriately within the platform-dependent code:

1
2
3
4
5
6
class SomePresenter(...) {
    fun didTapSomeButton() {
        // Handle the user interaction...
        hapticFeedbackGenerator.staccatoFeedback()
    }
}

This example showcases the beauty of writing code in Kotlin Multiplatform: when writing code common to any platform, you don’t need to be concerned with the implementation details. Once you have written the platform-dependent HapticFeedbackGenerator classes, objects that conform to that interface can be used freely in shared code.

(Of course, this object can be used inside Swift, too, if you have a use case where you need haptics in iOS but not Android.)

Step #3: Concrete Implementation using Swift for iOS

In iOS, we can use two different classes that implement the UIFeedbackGenerator interface to give the user various kinds of haptic feedback.

We can initialize and prepare these generators in the initializer of our object so the feedback can be triggered when needed. Since we can instantiate these objects on their own, there’s no need to inject them into this class.

NOTE: This is just one example of how we could implement this. Haptic APIs differ depending on what version of iOS you are targeting.

1
2
3
4
5
6
7
8
9
10
11
12
13
14
15
16
17
18
19
20
class DarwinHapticFeedbackGenerator: HapticFeedbackGenerator {
  private let selectionFeedbackGenerator: UISelectionFeedbackGenerator
  private let impactFeedbackGenerator: UIImpactFeedbackGenerator

  init() {
    selectionFeedbackGenerator = UISelectionFeedbackGenerator()
    selectionFeedbackGenerator.prepare()

    impactFeedbackGenerator = UIImpactFeedbackGenerator()
    impactFeedbackGenerator.prepare()
  }

  func staccatoFeedback() {
    selectionFeedbackGenerator.selectionChanged()
  }

  func marcatoFeedback() {
    impactFeedbackGenerator.impactOccurred()
  }
}

New-Up and Use/Inject in Your iOS App

Our app likely has an object to manage user interactions. Therefore we can new up an instance of our DarwinHapticFeedbackGenerator and pass it in as needed:

1
2
let hapticFeedbackGenerator = DarwinHapticFeedbackGenerator()
let presenter = SomePresenter(hapticFeedbackGenerator: hapticFeedbackGenerator)

Step #4: Concrete Implementation using Kotlin for Android

As we saw above, the Android implementation depends on the Window object. Therefore, the AndroidHapticsFeedbackGenerator can take this dependency in the object’s constructor.

If you just thought to yourself, “isn’t this constructor dependency injection?” you’d be absolutely right! 👏🏻

1
2
3
4
5
6
7
8
9
10
11
12
13
14
15
16
17
class AndroidHapticsFeedbackGenerator(
    private val window: Window?
) : HapticFeedbackGenerator {
    override fun staccatoFeedback() {
        window
            ?.decorView
            ?.rootView
            ?.performHapticFeedback(HapticFeedbackConstants.CLOCK_TICK)
    }

    override fun marcatoFeedback() {
        window
            ?.decorView
            ?.rootView
            ?.performHapticFeedback(HapticFeedbackConstants.CONTEXT_CLICK)
    }
}

New-Up and Use/Inject in Your Android App

As with iOS, you’ll need to instantiate this in Kotlin within your application and inject it. Injecting the Window object we need from the Activity when creating this class allows us to invoke methods on it when needed.

1
2
val hapticFeedbackGenerator = DefaultHapticsFeedbackGenerator(window)
val presenter = SomePresenter(hapticFeedbackGenerator)

You can choose to create and inject your dependencies manually, or there are also DI frameworks, such as Koin and Kodein, that you can consider.

Pro-Tip #2: Visualize Platform-Dependent Objects to Illuminate Relationships

Hopefully, it’s clear from this example that your multiplatform concrete classes are a platform-dependent implementation.

As the Dependency Inversion Principle describes:

  • Depend on an interface abstraction (a high-level blueprint)
  • The abstracted interface (high-level blueprint) is independent of the implementation details (the low-level components)
  • Depend in the direction of stability

Let’s draw a simple class diagram to illustrate this.

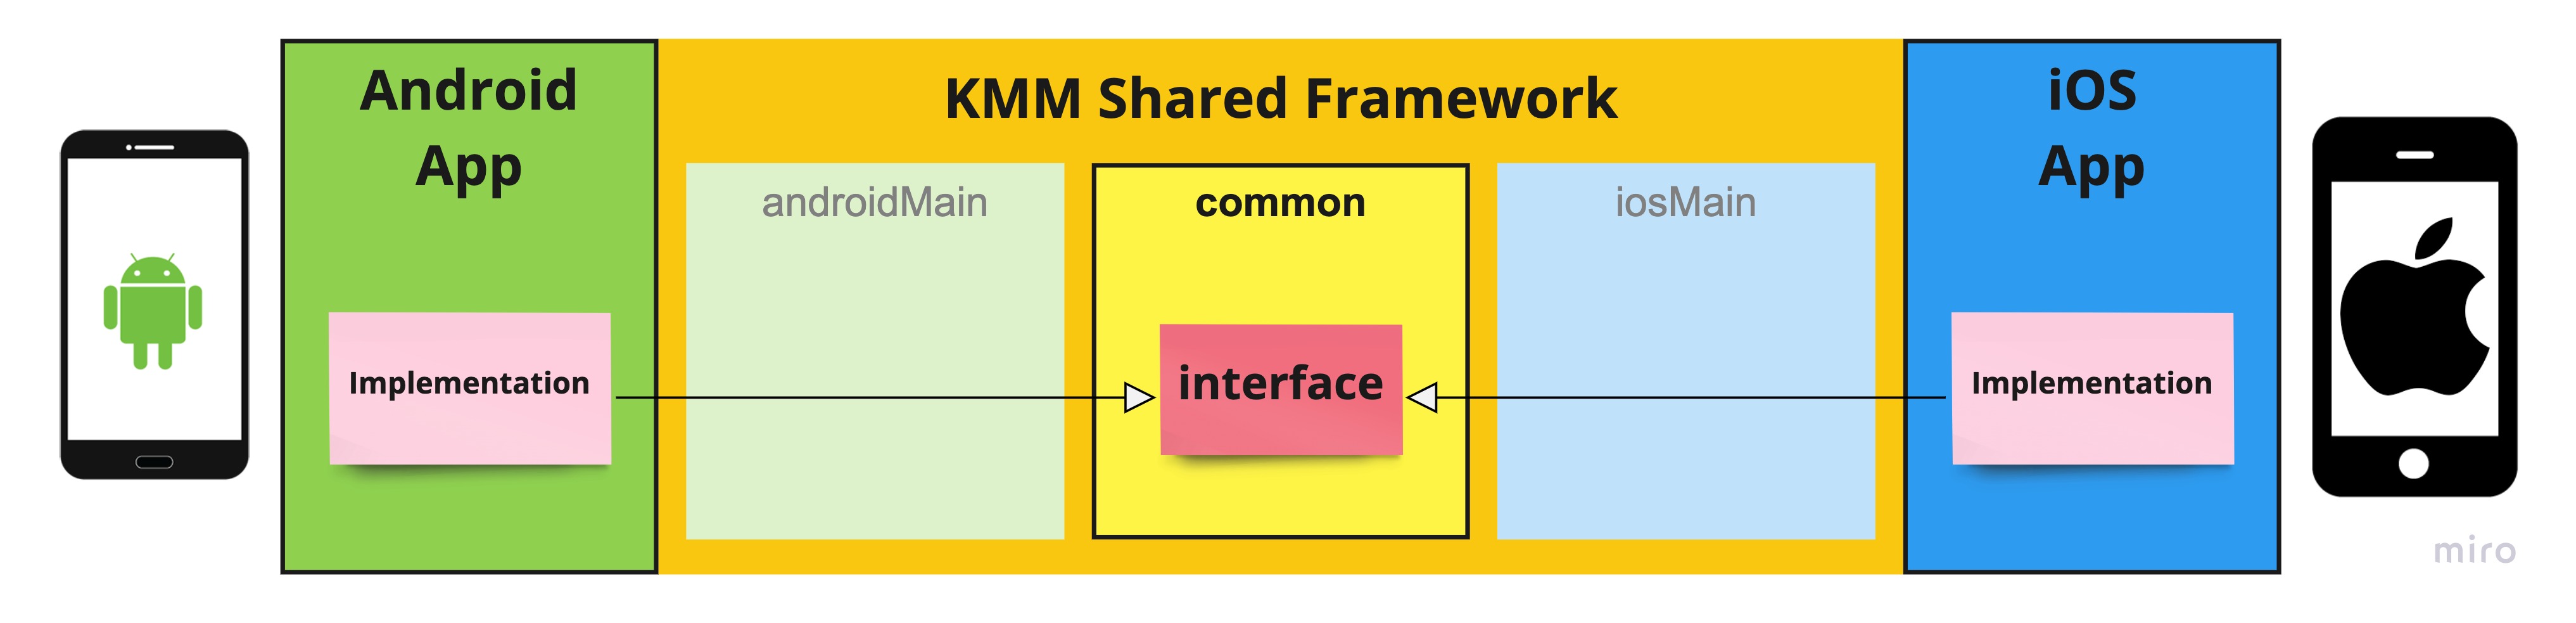
We have a platform-independent interface defined to manage haptics in our shared framework:

alternate text

We’ll also have two implementations of this class: one for Android and one for Apple (Darwin) platforms:

alternate text

Need a quick review of reading UML class diagrams?

  • The white arrow head points from a concrete class to the interface it implements. You can read this arrow as: “is a.”
  • For example:
    • “The AndroidHapticFeedbackGenerator is a HapticFeedbackGenerator.”
    • “The DarwinHapticFeedbackGenerator is a HapticFeedbackGenerator.”


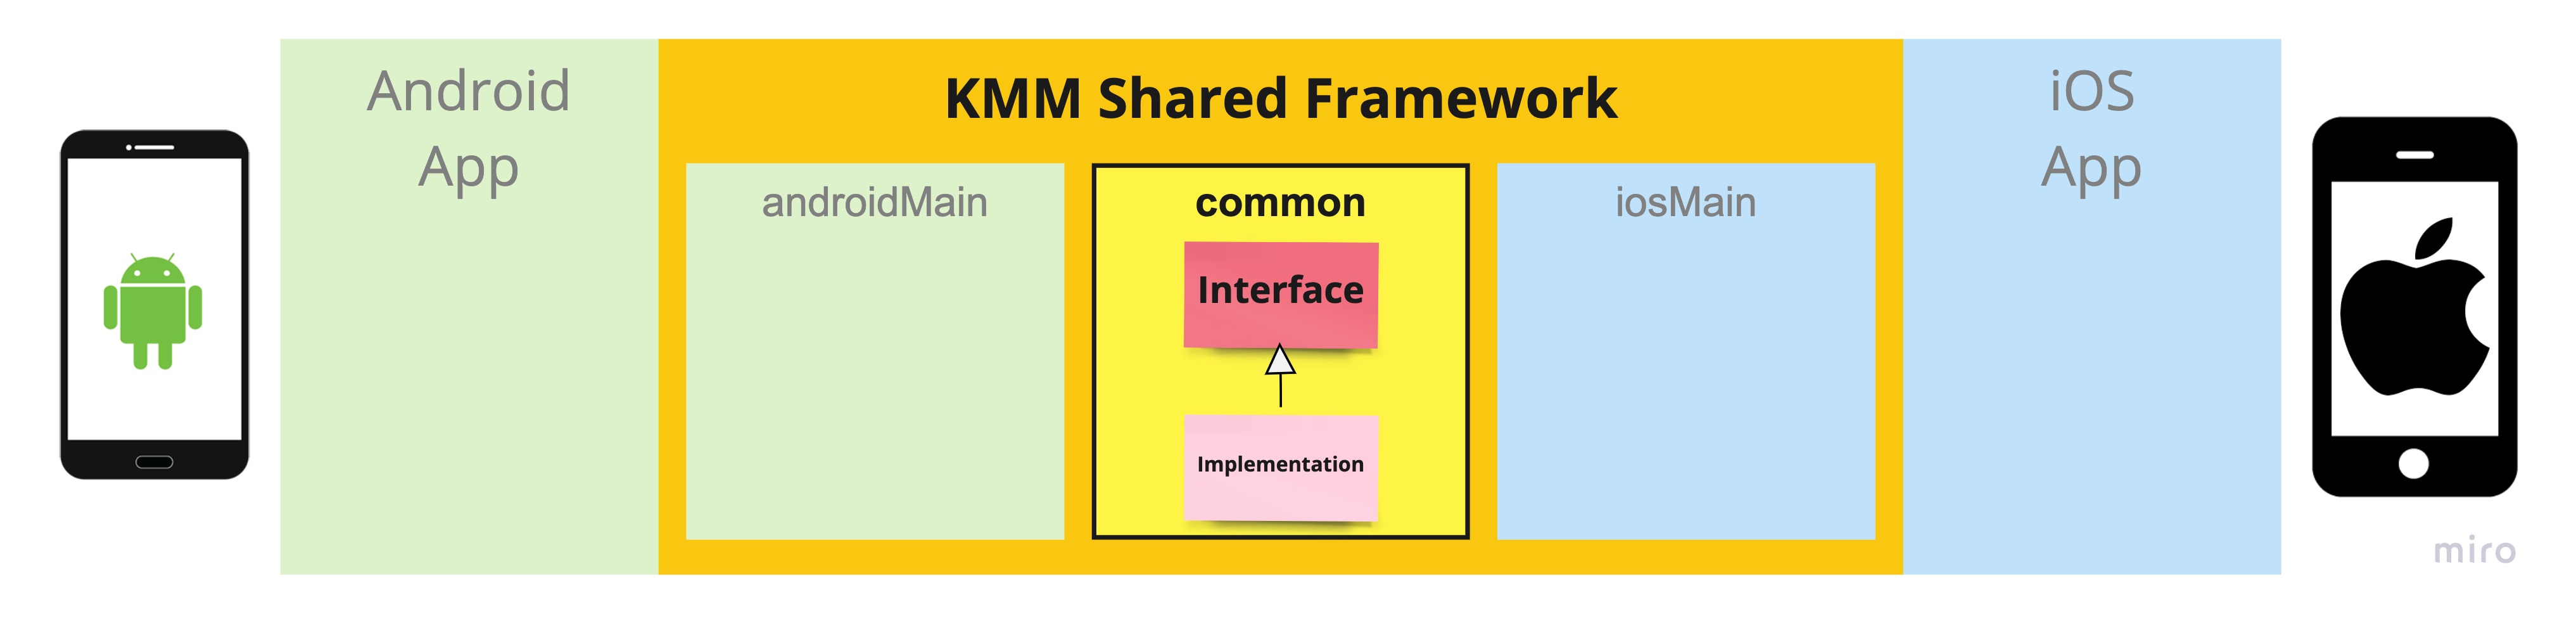
The objects needed to implement the concrete classes are dependent upon platform-specific APIs. We want to honor encapsulation, so these will be private for each implementation. These are the low-level components. Let’s add these to the diagram to see how this would look:

alternate text

Need a quick review of reading UML class diagrams?

  • The solid black arrow points from an object to an object it holds an instance of. You can read this arrow as: “has a.”
  • For example:
    • “The AndroidHapticFeedbackGenerator has a Window.”
    • “The DarwinHapticFeedbackGenerator has a UISelectionFeedbackGenerator and has a UIImpactFeedbackGenerator.”


Any object can use our HapticFeedbackGenerator in our shared framework, such as SomePresenter, simply by injecting a concrete implementation. And SomePresenter doesn’t need to be concerned about platform-specific APIs.

In the following diagram, SomePresenter has a HapticFeedbackGenerator.

alternate text

Take note of the direction the arrows are pointing and what is pointing to what. UML class diagrams are a great tool to visualize dependencies between objects.

Comprehending the DIP

Another way I like to think about the DIP is “to depend on that which provides stability.” In our case, the high-level blueprint, which we have created and is entirely within our control, is stable because we have defined it.

To deepen our comprehension, we can also say the opposite: “do not depend on that which does not provide stability.” The low-level components, in our case being platform-specific APIs, are entirely outside our control. If we were to depend upon these platform-specific APIs in our abstract blueprint, any changes to these platform APIs would impact our blueprint.

“But what happens when Google or Apple changes an API we depend on?” you might ask. Naturally, the respective concrete implementation that satisfies the interface will need to change. However, anything outside of that scope is under the protection of the interface.

Revisiting the Solution to Platform-Dependent APIs

Earlier, we asked: “How do I handle platform-dependent APIs?” and answered with the following:

Inject platform-dependent objects
into concrete instances
conforming to a platform-independent interface

In the haptics example, we are:

injecting a Window (a platform-dependent object)
into an AndroidHapticFeedbackGenerator (a concrete instance)
conforming to the HapticFeedbackGenerator (platform-independent) interface

This example illustrates how we isolate a platform dependency to the smallest possible surface area.

Tradeoffs

The primary benefit of isolating platform-dependent code behind a platform-independent interface is any code that utilizes these components can be oblivious to platform-specific details and thus shared throughout the codebase.

Of course, a natural result is the added indirection when working with these components. This is a reasonable tradeoff, given the benefit of supporting multiple platforms. Additionally, the more limited and isolated the platform-dependent code is, the easier it is to maintain and troubleshoot.

If something were to change within Apple or Google’s haptics APIs, we would only have a single location that would need to be updated. Therefore, the rest of our application code is protected from these changes.

Summarizing

  • We created a platform-independent interface, the high-level blueprint, for how we want our application to interact with haptics.
  • We defined platform-specific Android and iOS concrete class implementations that utilize platform-specific APIs. These are the low-level components.
  • These concrete platform-specific implementations are injected into the object(s) that need to use them and can be called from shared code without concern about which platform uses it.
  • Understanding how to employ the Dependency Injection (DI) technique and applying the SOLID Dependency Inversion Principle (DIP) are critical to isolating platform dependencies.
  • Drawing UML class diagrams to illustrate relationships between these objects is a valuable tool to deepen our understanding of how these objects relate to each other.

Would you like to see more real-world examples of isolating platform dependencies? Do you have unresolved challenges with Kotlin Multiplatform development? Would more examples of dependency injection or dependency inversion be useful? Let me know how I can help. 👍🏻

]]>
Derek Lee
Why iOS Engineers Should Avoid This Glorified KMM Technique2022-09-22T00:00:00+00:002022-09-22T00:00:00+00:00/science/avoid-this-kmm-techniqueTL;DR
  • If you’re an iOS engineer who wants to build multiplatform apps using KMM, the few benefits of using the expect/actual syntax do not outweigh those of writing your platform-dependent code in Swift.
  • The use-case for iOS engineers to consider leveraging expect/actual syntax would be when building a multiplatform framework.
  • If you’re going to use expect/actual, be sure to reference Apple’s Objective-C documentation over Swift documentation and use the Kotlin/Native headers for the most accurate representation of the iOS APIs available in Kotlin.


The expect/actual Syntax of Kotlin Multiplatform Mobile (KMM)

The Kotlin Multiplatform SDK includes a syntactical construct integrated into JetBrains IDEs that engineers can use to define classes and functions that are expect -ed (pun intended) to have platform-specific implementations. The actual implementations are also written in Kotlin separately for Android and iOS.

When looking at the code modules in a KMM project: within the KMM shared framework module, you first define a class or a function as expected. Then the actual implementations are written for each supported platform module. The following example illustrates what module the code is defined within for Android and iOS:

alternate text
The `common` module defines the expected classes and functions, and platform modules define the actual implementation.

We looked at some simple examples in the last blog. These examples are helpful because they allow us to wrap our heads around the concept before diving into something more complicated.

I want to take you on a journey of writing some code using this approach to illustrate how this can become more complicated in practice than expected.

In fact, I’m going to make a bold statement and propose that there’s only a single scenario where you, the iOS Engineer, should even consider using the expect/actual syntax.


This post is part of a series on Kotlin Multiplatform:

  1. The iOS Engineer’s Guide to Beginning Kotlin Multiplatform Development
  2. Why iOS Engineers Should Avoid This Glorified KMM Technique


Case Study #1: The “Hello World!” of KMM

This example is included in new KMM projects and confirms the setup of your development environment is correct by ensuring your Android app and iOS app can integrate appropriately with the shared KMM framework.

Common Module expect declaration

The Platform class defines a single property called platform, and returns a string on all supported platforms.

1
2
3
expect class Platform() {
    val platform: String
}

androidMain Module actual implementation

For Android, the platform string indicates the platform is Android along with the SDK version number.

1
2
3
actual class Platform actual constructor() {
    actual val platform: String = "Android ${android.os.Build.VERSION.SDK_INT}"
}

Important: Given that this is the “Hello World!” of KMM, I include the Android implementation here for thoroughness. However, for the remainder of the examples, I will omit the actual Android implementation as it’s unrelated to the primary goal of this post: to illustrate the tradeoffs involved in using expect/actual for writing the platform-dependent iOS code.

iosMain Module actual Implementation

For iOS, we can use the Foundation class of UIDevice, which provides access to the device’s systemName and systemVersion properties.

1
2
3
4
5
6
import platform.UIKit.UIDevice

actual class Platform actual constructor() {
    actual val platform: String = UIDevice.currentDevice.systemName + " " 
        + UIDevice.currentDevice.systemVersion
}

Like any example of “Hello World!”, this is the simplest use case illustrating how you can write platform-dependent code for two platforms (Android and iOS) using the expect/actual syntax.

Writing all of your code in Kotlin

As you likely noticed, you get to write all of this code in Kotlin! This is the main benefit of leveraging the expect/actual syntax. In addition, I find Kotlin delightful to program in with its support for object-oriented and functional programming styles, its modern syntax, tight integration with modern IDEs (Android Studio and IntelliJ), and what I perceive to be highly active support from JetBrains and the community.

Although I would argue that switching from one programming language to another in the context of full-stack development and pair programming doesn’t carry a heavy burden, objectively speaking, being able to write all of your platform-dependent code in a single language does mean less context-switching for the author.

What would this look like in Swift?

If we were to have written the above code in Swift, it would look surprisingly similar:

1
UIDevice.current.systemName + " " + UIDevice.current.systemVersion

Can you spot any differences between this and the Kotlin version above? 🤔


Case Study #2: Persisting Simple Data Structures

One of the most common tasks for mobile engineers is data persistence, and UserDefaults is often a common approach for saving simple data structures.

In this case, we will start with how we might write this code in Swift and abstract a familiar interface to use with expect/actual.

NOTE: In a real-life example, before taking concrete code and abstracting it to a generic interface, it’s prudent to look at all platforms that need to be supported before crafting that interface. Are you interested in seeing detailed examples of how to do this? Let me know!

In Swift if we wanted to save a string value to user defaults, it might look like this:

1
UserDefaults.standard.set("Some value", forKey: "some-key")

Likewise, retrieving that data might be something like:

1
let someValue = UserDefaults.standard.string(forKey: "some-key")

Let’s use expect/actual to implement something similar in KMM.

Common Module expect declaration

Starting with the expect declaration, this acts as the interface that we expect each platform to implement.

There are naturally a variety of ways we can choose how to organize and save data. However, for the sake of simplicity, we’ll use saving and retrieving a string.

1
2
3
4
expect class LocalPersistence {
    fun save(string: String, key: String)
    fun get(key: String): String?
}

iosMain Module actual Implementation

For iOS, instead of re-typing the methods defined in the interface, let’s make the most of the IDE’s tight integration.

Writing out just the actual class declaration…

1
2
actual class LocalPersistence {
}

… shows the familiar red underline on the LocalPersistence class name. A swift stroke of ⌥ + ↵ (Option+Enter) reveals the “Add missing actual members” option:

alternate text

Selecting this will automatically populate our class with the function declarations defined in the expected “interface”:

1
2
3
4
5
6
7
8
actual class LocalPersistence {
    actual fun save(string: String, key: String) {
    }

    actual fun get(key: String): String? {
        TODO("Not yet implemented")
    }
}

+ IDE-Integration Supports expect/actual

Here we can introduce another benefit of this approach: support for expect/actual is baked right into the IDE (thanks to the Kotlin Multiplatform Mobile Plugin). So if you’re missing an implementation somewhere, the IDE will let you know, and assuming you have set up your project correctly, it’s possible to leverage the IDE to help create the actual function/class declaration.

Writing iOS-Platform Dependent Code in Kotlin

Let’s start by implementing the save() method of our actual implementation. First, we type UserDefaults to begin, as we already know from the Swift code that this is the object we want to use.

As expected, the IDE finds the class that we’re looking for.

alternate text

Well, kind of.

Oh! That’s right.

NS-UserDefaults!

Hm. I thought Swift dropped the ‘NS’ from the Foundation classes a while ago, didn’t they?

Ok, so NSUserDefaults.standard

alternate text

Ah! Yes, yes. standardUserDefaults!

Wait.
A.
Second.

This doesn’t seem right. The Swift API that we called above was UserDefaults.standard. I clearly remember migrating Swift code from one version to another when all the APIs suddenly become much more readable. So what’s going on here?

Surprise! Writing KMM code for iOS uses Objective-C APIs, not Swift APIs. 😱

When writing platform-dependent code for iOS using KMM, at least for now, you’ll be integrating with the old Objective-C APIs. That means sometimes slight differences between what is possible, and sometimes major differences such as missing APIs that are not available in Objective-C. With Swift interoperability having been recently removed from the Kotlin Roadmap, we’ll have to keep an eye on their progress to see how this evolves in the future.

It might be a smooth transition if you’ve programmed in Objective-C before and understand the APIs and some lower-level aspects of the C language, such as pointers and memory allocation. However, this could be a stretch if you’ve only programmed in Swift or have yet to experience a language operating at a lower level than Swift.

All those improvements to the Swift language over the last few years…

Yup, that’s right.

😅

Wait, what about the Codable protocol?

😭

(It’s a bummer that you can’t use the Codable protocol in Kotlin/Native, but it’s OK because there’s an even better way to share this kind of code.)

While it’s not impossible to leverage Swift-only APIs from a shared Kotlin/Native framework, it does require quite a bit of complicated tooling to access these in KMM via a static Swift Library.

Aaaaand we march on…

Time to save the string to NSUserDefaults. No biggie, right?

alternate text

There’s no method to set a string in iOS (interestingly, unlike Android), but at least the Objective-C APIs match those that are in Swift. We can use setObject to save a string value for the given key.

1
2
3
4
5
6
7
actual class LocalPersistence {
    actual fun save(string: String, key: String) {
        NSUserDefaults.standardUserDefaults.setObject(string, key)
    }
    
    ...
}

Great! Now onto retrieval. Thankfully, this pretty much matches what we would expect and completes our implementation on iOS:

1
2
3
4
5
6
7
8
9
actual class LocalPersistence {
    actual fun save(string: String, key: String) {
        NSUserDefaults.standardUserDefaults.setObject(string, key)
    }

    actual fun get(key: String): String? {
        return NSUserDefaults.standardUserDefaults.stringForKey(key)
    }
}

Pro-Tip #1: When writing KMM code for iOS using expect/actual, reference Apple’s Objective-C (not Swift)! API documentation

Given that KMM code integrates with the Objective-C framework APIs, your best resource is to reference the Objective-C(not Swift!) API documentation. This will solve a lot of your initial struggles with writing Kotlin/Native code for iOS.

Apple makes this easy for all of their online documentation references with a drop-down to change the language:

alternate text


Case Study #3: Getting the user’s current location

Another everyday use case for mobile developers is getting the user’s current location. Again, we’ll keep things simple by exploring only the prominent use cases: getting permission to acquire a user’s location and retrieving the user’s location.

Let’s start with the Swift code to request user permission to access their location:

1
2
let locationManager = CLLocationManager()
locationManager.requestWhenInUseAuthorization()

Once the user has granted us the ability to access this date, requesting the user’s current location might look like this:

1
2
3
4
5
6
if (
    CLLocationManager.authorizationStatus() == .authorizedWhenInUse ||
    CLLocationManager.authorizationStatus() == .authorizedAlways
) {
    let coordinate = locationManager.location?.coordinate
}

The location property of type CLLocation contains the coordinate property of type CLLocationCoordinate2D. This then exposes latitude and longitude as parameters:

alternate text

And CLLocationDegrees is simply a type alias for a Double:

alternate text

Great! Now we have an idea of what this might look like to help inform our interface definition… at least for iOS.

Note: We could generalize this for the single-use case we have in iOS now, only to learn later that Android approaches solving this problem quite differently. As mentioned previously, generalizing to a platform-independent interface requires additional consideration, and for the sake of this example, I will only focus on the iOS use case.

Common Module expect declaration

We can define the expected “interface” for our use case based on the iOS API:

1
2
3
4
expect class PhysicalLocationServices {
    fun requestPermissions()
    fun currentLocation(): PhysicalLocation?
}

Since we’ll return a user’s PhysicalLocation, let’s define a data class to hold that data:

1
2
3
4
data class PhysicalLocation(
    val longitude: Double,
    val latitude: Double,
)

iosMain Module actual Implementation

Requesting permission for location data

Requesting permissions in Objective-C closely matches the same in Swift. One might keep the locationManager as a property (line #2), and the same API requestWhenInUseAuthorization() can be called to request permissions (line #5):

1
2
3
4
5
6
7
8
9
actual class LocationServices {
    private val locationManager = CLLocationManager()

    actual fun requestPermission() {
        locationManager.requestWhenInUseAuthorization()
    }

    ...
}

Requesting the user’s location

The first step in checking for the user’s location is to confirm that the user has given authorization for the type of permission we expect.

This is an excellent example of an API that seems straightforward, but in this case, is a bit tricky to find because these constants differ slightly between Swift and Objective-C:

Swift   Objective-C
.notDetermined kCLAuthorizationStatusNotDetermined
.restricted kCLAuthorizationStatusRestricted
.denied kCLAuthorizationStatusDenied
.authorizedAlways kCLAuthorizationStatusAuthorizedAlways
.authorizedWhenInUse kCLAuthorizationStatusAuthorizedWhenInUse

The easiest way to find this difference is to reference the Objective-C documentation mentioned above. However, if you’re already in the Android Studio IDE and want to stay in that environment, you can also dig through the Kotlin code.

Pro-Tip #2: All iOS framework Objective-C API headers are accessible in Kotlin

The fastest way to get into these headers is to navigate in the IDE directly to the definition of any object you’re already using (for example, requestWhenInUseAuthorization()) via ⌥ + ⌘ + B (or right-click, Go Toimplementation(s)).

alternate text

This takes you directly to the definition of the API:

alternate text

… where you can then search through to find what you might be looking for:

alternate text

This helps us to write the first check to ensure proper permissions to gather location:

1
2
3
4
5
6
7
8
9
10
11
12
13
actual class LocationServices {
    ...
    
    actual fun currentLocation(): PhysicalLocation? {
        if (locationManager.authorizationStatus == kCLAuthorizationStatusAuthorizedWhenInUse ||
            locationManager.authorizationStatus == kCLAuthorizationStatusAuthorizedAlways
        ) {
            
        }

        return null
    }
}

The next step is to get the latitude and longitude values of the location. Simple, right?

As we saw above with Swift, locationManager.location.coordinate should return a CLLocationCoordinate2D object where we can access the latitude and longitude values:

alternate text

Interesting.

There is a CLLocationCoordinate2D object, but it’s wrapped in a CValue object.

What is a CValue object?

If we take a look at the Objective-C documentation for CLLocationCoordinate2D, we can see that this is a C-struct (not to be mistaken for a Swift struct!):

alternate text

… and the Kotlin/Native header files shows the return type as a kotlinx.cinterop.CValue:

alternate text

The documentation on CValue is thin and IMHO not very easy to understand, though it appears as though the useContents method could be used to access the data:

alternate text

This gives us the final implementation to gather this data, including some handling in case the value is null:

1
2
3
4
5
6
7
8
9
10
11
12
13
14
15
actual class LocationServices {
    ...
    
    actual fun currentLocation(): PhysicalLocation? {
        if (locationManager.authorizationStatus == kCLAuthorizationStatusAuthorizedWhenInUse ||
            locationManager.authorizationStatus == kCLAuthorizationStatusAuthorizedAlways
        ) {
            locationManager.location?.coordinate?.useContents {
                return PhysicalLocation(latitude, longitude)
            }
        }

        return null
    }
}

Although it’s not clear in the code sample above, the IDE helps us to understand what useContents is giving us by showing that it is, in fact, a CLLocationCoordinate2D object. A screenshot shows the hint given by the IDE that this is of type CLLocationCoordinate2D:

alternate text

Reflecting

As you can see with this example, we’re not just dealing with Objective-C APIs over Swift APIs but also with how Objective-C manages memory.

As with many Objective-C APIs, this involves interacting with C-level APIs and objects. Even though these constructs are exposed within Kotlin/Native through the kotlinx.cinterop package, they can be confusing to use and have very thin documentation. A foundational understanding of C- and Objective-C concepts is a pre-requite to ensure you interact with these constructs safely.


On Practicality

As an iOS engineer whose goal is to more easily share code between iOS and Android to simplify how I can expand my app footprint to additional users, based on the limitations and complexities of using expect/actual, I honestly cannot recommend this approach for sharing platform-dependent code in KMM.


What about Android engineers?

This approach could be attractive for Android developers unfamiliar with iOS development and who want to expand to iOS. However, it’s not easy to recommend this approach even to Android developers. It would be easier to take the time to learn the basics of iOS development instead of trying to slog through understanding limited and dated Objective-C frameworks and manual memory constructs even with the conveniences of the Kotlin language.

Besides, Swift and Kotlin share a lot from a syntactical perspective, so the most significant hurdle to overcome (as with many languages and frameworks these days) would be learning SwiftUI or UIKit over the language itself.


Is there a better way?

You wouldn’t be remiss for thinking this is the only approach to writing platform-dependent code in KMM, given that this is the dominant recommendation from the Kotlin team.

There is a better way: writing your iOS platform-dependent code directly in Swift.

And that will be the deep dive for the next installment of this series!


Is there a time you would recommend using expect/actual?

Yes! It makes sense to go down this route if you’re creating a shared Kotlin/Native framework that supports iOS and other platforms.

While my current experience here is limited, I plan to dig into this soon by releasing a shared framework I am building as a part of an app. Given the current landscape of KMM, I’d recommend you consider porting something you’re making to the open-source community to contribute as well!


Summary: Tradeoffs of expect/actual:

In favor of:

+ Code is 100% written in Kotlin.
+ Syntax is fully supported within JetBrains IDEs for compilation and code generation.
+ Objective-C documentation provides an accurate API reference (over the Swift documentation).
+ Is useful when building a shared Kotlin/Native framework that targets the iOS platform.

Challenges:

- Kotlin/Native iOS APIs support interop with Objective-C APIs, not Swift APIs.
- As such, Kotlin/Native iOS APIs lack many of the modern conveniences of Swift APIs, and any Swift-exclusive APIs are inaccessible.
- While accessing Swift APIs not exposed via Kotlin/Native is technically possible, it requires a manual workaround and considerable effort.
- Working with Objective-C APIs means working with C-APIs, and Kotlin/Native cinterop interface makes this possible but is complicated due to how the APIs are structured and how you manage memory.

]]>
Derek Lee
The iOS Engineer’s Guide to Beginning Kotlin Multiplatform Development2022-08-27T02:00:00+00:002022-08-27T02:00:00+00:00/science/kmm-for-ios-engineersTL;DR
  • One of the most essential skills for Kotlin Multiplatform Mobile cross-platform development is sensitivity to what code is platform-dependent or not.
  • Platform-dependent code can be written entirely in Kotlin using KMM’s expect and actual syntax or by defining an interface in the KMM common module and implementing it natively in Android (using Kotiln) and iOS (using Swift).
  • Platform-independent code is written inside the KMM shared framework and can be used for any business logic for your application that does not directly depend upon any platform-specific code.
  • Given the complexities of writing multi-platform code, this post provides an overview, and future posts will dive deeper into these topics.


Why Multi-Platform Development

After I released Gap Click on iOS, Android users were not shy about sharing their feedback that they, too, were excited about it. As an iOS engineer with almost no Android experience, I investigated various ways to expand to Android.

With the Kotlin Multiplatform version of GapClick in production for over 18 months and having released another app utilizing KMM, I have valuable lessons to share for the technology I’ve chosen.

This post discusses what platform-dependent code is versus platform-independent code and overviews the three primary approaches for sharing code between iOS and Android applications using Kotlin Multiplatform, explicitly targeted at iOS engineers. In subsequent blogs, I’ll dig into the trade-offs with representative code samples and my personal recommendations.

This post is part of a series on Kotlin Multiplatform:

  1. The iOS Engineer’s Guide to Beginning Kotlin Multiplatform Development
  2. Why iOS Engineers Should Avoid This Glorified KMM Technique


Clarifying KMM vs. K/N

Before we jump in, let’s make sure we’re on the same page by differentiating between Kotlin Multiplatform and Kotlin Native:

Kotlin Multiplatform
/kɒt lɪn muhl-tee plat-fawrm/

Kotlin Multiplatform Mobile (KMM) is an SDK designed to simplify the development of cross-platform mobile applications. You can share common code between iOS and Android apps and write platform-specific code only where necessary. Common use cases for Kotlin Multiplatform Mobile include implementing a native UI or working with platform-specific APIs.

Kotlin/Native
/kɒt lɪn ney-tiv/

a technology for compiling Kotlin code to native binaries, which can run without a virtual machine.

I will refer to the technology or SDK of Kotlin Multiplatform (which utilizes Kotlin Native) as “Kotlin Multiplatform” (or KMM, short for Kotlin Multiplatform Mobile). I will use “native platform” (the lowercase ‘n’ is on purpose) to refer to actual native implementations on either iOS (Swift) or Android (Kotlin).

(Side note: Although Kotlin/Native also supports other platforms, such as JavaScript, these articles will focus specifically on iOS and Android only.)


Step #1: Is Your Code Platform-Dependent?

The first step in determining where to put your code is to understand if your code is platform-dependent or not. Sometimes this is easy to discern, and other times it can be confusing. Let’s look at some examples to start.

Platform-Dependent Code

As an iOS engineer, you’ll know your code depends upon a platform framework if you’ve either added it to your project under “Frameworks, Libraries, and Embedded Content”:

Xcode Frameworks, Libraries, and Embedded Content
Xcode Frameworks, Libraries, and Embedded Content.

… or you have imported it at the top of a Swift file:

Importing the Foundation framework
Importing the Foundation framework.

The most obvious ones might be Foundation or UIKit. Some other obvious ones could be StoreKit, CoreGraphics, AVFoundation, or CoreLocation.

There are also some gray areas you might not realize are platform-dependent, such as networking APIs, accessing the application bundle, or file URLs, to name a few.

Platform-Independent Code

This is any code that you can write without importing any iOS frameworks or libraries. Model objects (or value objects) fall under this category. Of course, your application’s business logic would also be included. I also like to include the code required to implement the mobile architecture approach you’ve chosen, whether it be MVC, MVP, MVVM, or something else. Depending on how sensitive you become to platform dependencies, you’ll find there’s a lot more code that can be shared than you might initially think is possible.

How Code Is Organized Within a KMM Project

It might be challenging for those new to KMM to understand how code can be organized inside the project.

Platform-dependent code can be located either:

  1. Within the native Android mobile application (written in Kotlin), or within the native iOS mobile application (written in Swift), or
  2. Within the KMM shared framework written in Kotlin, placed in either:
    • “androidMain” for Android-specific implementation code
    • “iosMain” for iOS-specific implementation code

Platform-independent code can be placed:

  • Within the KMM shared framework written in Kotlin, placed in the “common” module
KMM Code Organization
Android and iOS Platforms leveraging a shared framework.


Step #2: Writing Platform-Dependent Code

Option #1. Using KMM’s expect and actual Syntax

The Kotlin Multiplatform SDK includes a syntactical construct integrated into Android Studio, which can be used to define classes and functions that are expect -ed (pun intended) to have platform-specific implementations.

This approach is included in the Kotlin Multiplatform for iOS and Android tutorial, and the Kotlin documentation also references this as the way to access platform-specific APIs. Given this, I assume that this is the recommended approach from the KMM team.

In code: define a class or a function as expected, then provide the actual implementations for each supported platform - all written in Kotlin.

Code organization using expect/actual
The common module defines the expected classes and functions, and platform modules define the actual implementation.

Code Example

Both the Platform class example in the KMM Tutorial, as well as the UUID function example in the KMM documentation, are straightforward and simple examples of this approach. In the spirit of simple and practical examples, here’s another example of an expected function declaration and the actual implementations for generating the epoch date/time number of seconds since 1970 for UTC:

Common Module expect declaration:

1
expect fun currentDateTimeInSecondsUTC(): Long

androidMain Module actual implementation:

1
2
3
4
5
6
import java.time.LocalDateTime
import java.time.ZoneOffset

actual fun currentDateTimeInSecondsUTC(): Long {
    return LocalDateTime.now(ZoneOffset.UTC).toEpochSecond(ZoneOffset.UTC)
}

iosMain Module actual Implementation:

1
2
3
4
5
import platform.Foundation.*

actual fun currentDateTimeInSecondsUTC(): Long {
    return NSDate.date().timeIntervalSince1970().toLong()
}

Suppose you’re not already programming in Swift for iOS. In that case, it might not be apparent that the above Kotlin source code for the iOS implementation is based on Objective-C APIs, not Swift APIs. (“NSDate” might give this away.) This means that the Kotlin code you’re writing for iOS is effectively “Objective-C-ified Kotlin” and lacks many pleasantries that the Swift language provides. I’ll explain this further when deep-diving into this topic.


Option #2. Swift Implementation For a “Common” Kotlin Interface

As an iOS engineer, I quite enjoy writing code in Swift. Therefore, it’s no surprise that I’d prefer to write any iOS platform-specific implementation code directly in that language. This approach allows you to do exactly that! This is the primary benefit for iOS engineers when utilizing this method: writing your code in Swift instead of Objective-C-ified Kotlin.

For the platform-specific Android implementation, the code is still written in Kotlin; the only difference is that the code is placed within the Android app, not the shared framework.

So long as you have defined the interface in the shared framework “common” module, you can implement that interface within your iOS app using Swift (or Objective-C if you like) and within your Android app.

Code organization using a common interface and native implementation.
The common module only defines the interface while the platform-specific implementation is done natively.

Code Example

For simplicity, I’ll continue to utilize the same example of retrieving the current epoch date/time in milliseconds.

Kotlin common Module Interface:

This is just an interface that we can program to. Nothing fancy here - just the function definition. (iOS friends, you can compare this to a protocol in Swift.)

* Note the package name defined on line #1.

1
2
3
4
5
package com.company.product.shared.dateprovider.EpochDateProvider

interface EpochDateProvider {
    fun currentDateTimeInSecondsUTC(): Long
}

Native Android Implementation:

On the Android side, we simply implement this interface. Since we already did something similar above, the implementation here isn’t any different.

* Note that the interface is being imported from the shared framework on line #1.

1
2
3
4
5
6
7
8
9
import com.company.product.shared.dateprovider.EpochDateProvider
import java.time.LocalDateTime
import java.time.ZoneOffset

class AndroidEpochDateProvider : EpochDateProvider {
    override fun currentDateTimeInSecondsUTC(): Long {
        return LocalDateTime.now(ZoneOffset.UTC).toEpochSecond(ZoneOffset.UTC)
    }
}

Native iOS Implementation:

On the iOS side, we also simply implement the interface in Swift.

You’ll notice that the function definition in Swift has changed slightly. For example, instead of returning a Long, the return type is Int64. There are several type differences when converting between Swift/Objective-C and Kotlin code that I’ll need to discuss when deep-diving into this technique.

1
2
3
4
5
6
7
import SharedFramework

final class DarwinEpochDateProvider: EpochDateProvider {
    func currentDateTimeInSecondsUTC() -> Int64 {
        return Int64(Date().timeIntervalSince1970)
    }
}

Regardless of our platform (Android or iOS), we still get compile-time safety in all of our code because we’re implementing an interface.


What are the differences between this and using expect/actual?

From a code perspective, there isn’t much of a difference. With this technique, the implementation naturally needs to conform to the interface. If you omit the implementation, the compiler will still notify you to implement it, albeit in a different manner than expect/actual.

For example…

A repository retrieves flight data for a specific date in your shared framework. To create this repository, you need to pass in an EpochDateProvider so it knows what the current date and time are:

1
2
3
4
class NetworkFlightStatusRepository(
    private val dateProvider: EpochDateProvider,
    ...
) : FlightStatusRepository { ... }

Therefore, in your Swift code, when you new up an instance of the NetworkFlightStatusRepository object, an instance of the EpochDateProvider dependency must be passed in, and the compiler will complain until this is done. This gives us compile-time safety at the platform level even without expect/actual:

Instantiating the FlightStatusRepository
Instantiating the FlightStatusRepository requires an EpochDateProvider to be passed in.

Uh oh! This sounds like dependency injection! But… isn’t that hard?

If you’re unaccustomed to it, dependency injection might initially be stifling. Once you get some practice using it (and experience the benefits while testing!), it should become natural to use.

Hopefully, it’s clear from this example that there are ancillary topics, such as dependency injection, that are key to understanding how to make the most of this approach. I know that a proper discussion of this wouldn’t be complete without explaining these other topics, and to keep this post concise, I’ll cover these later in the series.


Step #3: Writing Platform-Independent Code

KMM Shared Framework Code

Platform-independent code is written inside the KMM Shared Framework 100% in Kotlin and utilized by Android and iOS applications via the shared framework.

100% Code in Kotlin Common
All code lives in the shared framework common module.

Kotlin Implementation For Shared Framework Code

1
2
3
4
5
6
7
8
9
10
11
import com.soywiz.klock.DateTime

interface EpochDateProvider {
    fun currentDateTimeInSecondsUTC(): Long
}

class DefaultEpochDateProvider : EpochDateProvider {
    override fun currentDateTimeInSecondsUTC(): Long {
        return DateTime.nowUnixLong()
    }
}

Given that this code is written entirely in the shared framework, it can be used by other classes within the shared framework as well as the Android or iOS code.

Those readers with a keen eye likely noticed the import com.soywiz.klock.DateTime on line #1. Remember how I mentioned that there are some examples of code that appear platform-independent but are actually platform-dependent? Date and times fall under this category. Anyone who has worked with dates and times likely has felt the pain associated with them.

As such, at this time, KMM does not include support for dates and times out of the box, and there are a couple of open-source libraries available for multi-platform development, including Klock and kotlinx-datetime.


Given these different approaches, you’re probably wondering:

  • How do I determine what code is platform-dependent or independent?
  • What are the trade-offs of each approach?
  • When should I use one over the other?
  • What are some practical code examples of how to use each one?

These will be the main points that I’ll dive into for each one of these approaches next. If you’re considering using KMM in a project and have additional concerns, please let me know so I can include those as well!

]]>
Derek Lee
PostgreSQL2022-03-01T00:00:00+00:002022-03-01T00:00:00+00:00/devrecipes/database/PostgreSQLInstallation / Setup

Install via Brew

1
$ brew install postgresql

Start Postgres Service (via Brew)x

1
$ brew services start postgresql

Creating / Dropping Databases

Create a new database

1
2
$ createdb <db_name>      # Creates a new database with the given name
$ createdb `whoami`       # Creates a new database for the current logged in user, and allow connection via psql

Drop Database

1
2
3
$ dropdb --help               # Drop database
$ dropdb -i <database_name>   # With confirmation
$ dropdb <database_name>      # Without confirmation

PSQL

Help

1
2
3
$ psql --help             # Command line options
$ psql --help=commands    # Backslash commands
$ psql --help=variables   # Special variables

Connect to a specific database

1
2
$ psql -d <db_name>
$ psql <db_name>          # No need to use -d option

List available databases

1
$ psql -l

Export DB Schema

1
2
3
$ pg_dump --help
$ pg_dump -s <database_name> > filename    # To file
$ pg_dump -s <database_name> | pbcopy      # To clipboard

Output PostgreSQL History (Shows all previously run SQL commands)

1
$ cat ~/.psql_history

Load a SQL File into a DB

1
2
3
4
5
$ psql -d <database_name> -f <path_and_filename>
$ psql -h <host> -p <port> -u <database>

# Example (will prompt for password)
$ psql -h somehost-012345.db.elephantsql.com -p 5432 -d mydatabase -U username -f ./sql/initial_schema.ddl

psql Console Commands

1
2
3
4
5
6
7
8
9
10
11
12
13
14
15
16
17
\h                     # Show help (does not show backslash commands)
\h CREATE              # Show help for the CREATE command

\l                     # Show all databases

\c <database_name>     # Connect to database

\d                     # Show tables/views/sequences
\dt                    # Show all tables
\d <tablename>         # Describe table

\i <filename>          # Load SQL file

\q                     # Quit

show config_file;      # Output the location of the postgresql.conf file
show time zone;        # Output Time Zone (current session only)

Postgresql Time Zone Setting

Defaults to the system time zone at the time of install if not specified.

Location of postgresql.conf file: /usr/local/var/postgres/postgresql.conf
Timezone setting: timezone = "UTC"

Sample SQL Statements

Create Database

1
create database studioreservations_dev;

Create User + Grant Access

1
2
3
create user admin with encrypted password 'my-secret-password';

grant all privileges on database <database_name> to admin;

Create Table Using various data types

1
2
3
4
5
6
7
8
CREATE TABLE users (
  id integer NOT NULL,
  email character varying,
  password_digest character varying,
  created_at timestamp without time zone default current_timestamp NOT NULL,
  updated_at timestamp without time zone default current_timestamp NOT NULL,
  name character varying
);

Insert data into table

1
insert into users (email, password) values ('name@domain.com', 'my-secret-Password-123');

Delete all rows from table

1
truncate table <tablename>

Drop Database

1
drop database <database_name>

Rename Table

1
alter table <current_table_name> rename to <new_table_name>

Notes on SQL Queries

  • Need to use single quotes when inserting data via the console.
  • Matching on wildcard characters:
    • _ matches on a single character (as compared to ? in Oracle SQL)
    • % matches on any number of characters (as compared to * in Oracle SQL)

Configuration

Default Postgres configuration file location: /usr/local/var/postgres/postgresql.conf

Useful settings:

  • max_connections = 100 (requires restart)

Troubleshooting

Server was running but client could not connect

Error Message:

1
2
3
"psql: could not connect to server: No such file or directory
Is the server running locally and accepting
connections on Unix domain socket "/var/run/postgresql/.s.PGSQL.5432"?"

Solved by: Removing postmaster.pid file: rm /usr/local/var/postgres/postmaster.pid

Reference: Stackoverflow post

Error: psql: error: could not connect to server: No such file or directory

Try to start the server manually: $ pg_ctl -D /usr/local/var/postgres/ start

A different error explains what is wrong:

1
2
3
4
5
6
7
waiting for server to start....2021-05-04 09:24:12.203 JST [56328] FATAL: database files are incompatible with server

2021-05-04 09:24:12.203 JST [56328] DETAIL: The data directory was initialized by PostgreSQL version 11, which is not compatible with this version 13.2.

stopped waiting
pg_ctl: could not start server
Examine the log output.

Resolution:

  • Upgrade the database using brew: $ brew postgresql-upgrade-database
  • Can now connect to the DB via psql

Research Topics

  • Differences between Postgresql and MySql as it relates to TIMESTAMP fields
  • The Postgresql “JSON” column type

References

]]>
Derek Lee
README as Code2022-02-19T05:00:00+00:002022-02-19T05:00:00+00:00/science/readme-as-codeI make a point of always running the test suite (at least the fastest of the bunch: the unit tests) from the command line before pushing code to CI to confirm that all has gone smoothly.

Why is this important to do?

One of my changes could have impacted another part of the codebase, or merging someone else’s changes might have affected mine.

Additionally, since the CI machine runs the tests from the command line and not through the IDE, running the tests in the same manner locally is expected to produce the same results.

I recently helped kick off a new iOS project and taught the engineers how to run the tests from the command line.

1
$ xcodebuild -project MyProject.xcodeproj -scheme MyProject -destination "platform=iOS Simulator,OS=latest,name=iPhone 13" clean build test

Their initial response?

“Do we have to type this every time?”

Compare this to running tests for a JavaScript application:

1
$ npm run test

Or even a simple Gradle (Java or Kotlin) test suite:

1
$ ./gradlew clean build test

While these two examples are arguably more straightforward to execute, each build chain requires different commands.

Remembering all of these commands is like memorizing trivial facts. Of course, there’s no harm in doing it, and it could come in handy someday, but aren’t there more complicated problems that deserve our focus and brainpower?

Natural Tendencies

Thankfully, one is naturally inclined to make such a complicated task simpler to perform. For example, single-stack software engineers focusing solely on mobile development might suggest a tool like Fastlane. While Fastlane is a great tool, it is specific to iOS and Android development. Other developers might recommend using a shell script which, while extremely powerful, can become more challenging to organize once you have more than a few.

An Unlikely Candidate

The idea of using a Makefile was introduced to me without much explanation by a long-time Pivot1 when I first joined Pivotal Labs for precisely these kinds of tasks. Since that time, I’ve come to understand the benefits of leveraging Makefiles are much more than just saving a few keystrokes, and I recommend utilizing them on all projects now.

Getting Started

Intended as a build tool for C programs, Make’s documentation states:

“You can use make with any programming language whose compiler can be run with a shell command.”

Let’s take a look at a sample Makefile for an iOS application that contains a couple Make “targets”:

1
2
3
4
5
6
7
8
9
tests:
	xcodebuild \
		-project "MyProject.xcodeproj" \
		-scheme "MyProject" \
		-destination "platform=iOS Simulator,OS=latest,name=iPhone 13" \
		clean build test

beta:
	./bin/testflight-deploy.sh

A “target” is the name of an action to carry out. There are two “targets” here: tests and beta.

tests:

This Make target leverages the xcodebuild command-line tool to execute the test suite associated with the provided Xcode project and scheme on an iPhone 13 Simulator device running the latest version of iOS.

This Make target can be run simply by typing:

1
$ make tests

beta:

The steps needed to deploy a beta version of the application are more complicated than a single line. Therefore, this Make target executes a shell script in the bin folder to deploy the application to TestFlight and can be run simply by typing:

1
$ make beta


The Hidden Power of Makefiles

Great! So we’ve saved a few keystrokes by doing this. But is that all we’ve accomplished? Hardly!

Simplicity

In addition to saving some keystrokes, this dramatically simplifies executing complex commands. Now you only need to remember a short word or phrase instead of the entire command to run these tasks!

Discoverability

How do I build the code? How do I run the tests? How do I deploy the code?

Placing your most important and frequently used commands into a Makefile makes them immediately discoverable by other members of your team. Now it can all be collected into a single location, ready to be discovered by anyone, anytime!

I like to define discoverability as:

How easy or difficult it is for someone to discover and understand for themselves any aspect of your software project.

Uncle Bob calls this Clean Code as it directly relates to code, and in the case of consuming an API, many may refer to the “developer experience.” However, I like to apply this concept to all aspects of software using the term “Discoverability.”

Learning + Executable Documentation

What if this developer is entirely new to the tech stack you are using?

Referencing a Makefile, the developer not only knows what tasks are possible to run but can also understand the commands executed to perform that task. In addition, they can see how to perform these tasks and independently learn by reading the Makefile or referenced scripts.

Consistency Within Projects

Your source code repository may contain multiple applications such as a back-end and multiple front-ends (web, iOS, Android, etc.). Given each one has a Makefile, the tasks can be consistent across all platforms.

Need to run the tests on the iOS app?

1
$ cd ios && make tests

Need to run the tests for the back-end?

1
$ cd server && make tests

Need to run the tests for the web app?

1
$ cd web && make tests

Consistency Across Organizations

Are you transferring to a new project within your department?

Applying Makefiles across an entire organization or company further increases their benefits. No need to stress as you will already know how to find and execute the most common tasks!

Automation

Last and not least is automation. At the risk of belaboring an already well-supported argument, I will keep this brief:

  • Automation ensures consistent execution each time
  • Automating laborious tasks removes the possibility of human error
  • Automation removes process deviation as a possible cause of bugs


Common Questions and Concerns

“What do I need to know to get started using a Makefile?”

There are only two things you need to know to get started using a Makefile:

#1. Indent execution lines using tabs (not spaces)

The majority of modern IDEs understand this and will take care of it for you.

1
2
3
4
beta:
	./bin/testflight-deploy.sh
^^^^^^^^
   ↑↑ Caution! This needs to be a single tab, not multiple spaces.

#2. Use .PHONY: for targets that match directories in the execution location

Your Makefile exists with a target named test: in a location where a directory called test also exists:

1
2
3
4
5
6
7
8
$ ls -la

drwxr-xr-x@ username 704 Dec 14 18:02 .
drwxr-xr-x@ username 256 Dec 14 18:02 ..
-rw-r--r--@ username 425 Apr 30  2021 Makefile
drwxr-xr-x@ username  96 Dec 14 18:04 test

...

Therefore, in your Makefile, you need to indicate that the test directory is not something that the Makefile should be concerned with by marking it as .PHONY:

1
2
3
4
.PHONY: test

test:
	npm run test

IMPORTANT: Don’t forget the period “.” before PHONY and also ensure PHONY is written in all caps, otherwise this won’t work.


“Can I call one make task from another?”

Absolutely! Define your new target the same way and denote which other targets it should invoke.

In this following example, the tests target sorts the Xcode project file first before executing the unit tests:

1
2
3
4
5
6
7
8
9
10
11
sort:
	@perl ./bin/sortXcodeProject "MyProject.xcodeproj/project.pbxproj"

unit-tests:
	@/usr/bin/time xcodebuild \
		-project "MyProject.xcodeproj" \
		-scheme "MyProject" \
		-destination "platform=iOS Simulator,OS=latest,name=iPhone 13" \
		clean build test

tests: sort unit-tests


“What if the script I want to execute is long?”

Using a backslash (“\”) character, you can break long commands across multiple lines. This limits the length of a line so the reader can easily consume the entire command without scrolling horizontally and improves the readability of the command by placing each option on a new line:

1
2
3
4
5
6
tests:
	xcodebuild \
		-project "MyProject.xcodeproj" \
		-scheme "MyProject" \
		-destination "platform=iOS Simulator,OS=latest,name=iPhone 13" \
		clean build test

For multi-line or complex commands, simplify a Make target by extracting its contents into a separate shell script and calling that from the Makefile:

1
2
beta:
	./bin/testflight-deploy.sh

I follow a rule of thumb similar to what Uncle Bob proposes for the maximum number of arguments to a function: if a command is three lines or less, then chances are it’s OK to place directly inside the Makefile. Anything longer should be extracted to a separate script and placed in a /bin directory.


“How can I show or hide the command executed in the output?”

When executing a Makefile, they naturally output the commands for each task.

If you would like to hide these commands from the output, add a “@” character to the beginning of the command:

1
2
beta:
	@./bin/testflight-deploy.sh


“Why use Make when there are other tools available?”

I consider the primary benefits of leveraging Make to be significant:

  • Make comes installed with Unix-based operating systems by default.
  • Make target execution is consistent across operating systems.
  • Anyone who is already comfortable executing basic shell commands on a Linux-based OS can easily use Make.
  • Make doesn’t require any additional dependencies or knowledge of a specific language.
  • Make it super simple to use.


“What alternatives to Make could be considered?”

A quick internet search will result in a long list of alternatives to using a Makefile.

However, I would consider that any alternative would likely:

  • Require you to install a new tool.
  • Require you to learn the custom format or structure that the tool utilizes.
  • Create a dependency upon that tool.
  • Require you to update that tool as it is maintained.


Wrapping Up

How ‘discoverable’ are the most common tasks a team member performs on your project? For example, if someone new were to join the team tomorrow, how much hand-holding would be necessary for them to get started? Conversely, how easy would it be for them to get started without any assistance from anyone else?

Leveraging Makefiles in your applications provides:

  • A simple and repeatable way to automate complex tasks.
  • A menu of tasks allowing team members to discover what is possible quickly.
  • Documentation of these processes for team members to learn from.
  • Task consistency across all platforms for a single application.

Leveraging Makefiles across your organization provides:

  • Consistency across projects.
  • A simple way for new members to come up to speed when joining a new project.

Introduce a Makefile to your project and take a step closer to “README as code”!

  1. A “Pivot” is someone who works at Pivotal. We’re still using this word today because “VMware-ers” doesn’t have the same ring to it. VMware-mates, anyone? Bueller? 

]]>
Derek Lee
Efficiently Learning IDE Keyboard Shortcuts2022-01-29T03:00:00+00:002022-01-29T03:00:00+00:00/art/how-to-learn-keyboard-shortcutsThere are few low-investment, yet incredibly high-gain, productivity hacks to supercharge your developer skills, such as learning a few keyboard shortcuts. If you’re like me, you might’ve thought that starting with your favorite IDE’s typical keyboard shortcut reference documentation might be an excellent place to start… that is, until you open it up and feel your head start to spin:

IntelliJ macOS Keyboard Shortcuts PDF
This may be a good choice of reading if you’re having difficulty sleeping at night.

Thankfully, there are only a couple of challenges you’ll need to overcome to learn keyboard shortcuts more effectively.

Challenge #1: There are so many!! Where to start? 🤷🏽‍♂️

Pair programming

Arguably, one of the easiest ways to learn keyboard shortcuts (among other things!) is through pair programming.

Regardless of experience level, chances are both engineers already know a few shortcuts. For example, if you’re pairing, and your pair uses a shortcut you don’t know, you could stop and ask: “How did you do that?” If you don’t want to interrupt the “flow” of your pairing session, jot a note down on a sticky and ask during your next break.

Or better yet, make it easier for you to discern what keyboard shortcuts are being used by installing a plugin such as Presentation Assistant (for JetBrains IDEs), which displays the keyboard shortcuts along the bottom of the screen as you type them.

IntelliJ Presentation Assistant Demo
IntelliJ Presentation Assistant Plugin in action!

Another tool to consider for macOS is KeyLimePie which displays keyboard shortcuts typed with any IDE or application.

Soloing

If you don’t have a pair to learn from, then you might need to do a little digging to find a good place to start. If you know what you want to do but don’t know how to do it, there are a few ways to discover these.

(I’m using a JetBrains IDE for these examples, however many of these tips apply across IDEs.)

Have the IDE teach you

There’s nothing like getting reprimanded when not doing something correctly to help you learn! 😅 Yet another excellent example of feedback!

Plugins like Key Promoter X will let you know each time you use the mouse for an action that has a corresponding keyboard shortcut.

And as if scolding you each time wasn’t enough, it keeps track of how many times you’ve made a mistake, so that you can feel even more guilty.

IntelliJ Key Promoter X Demo
IntelliJ Key Promoter X Plugin in action!

Dig through menus

Have an idea of what you want to do but aren’t sure what the shortcut is? With most IDEs, there are a few ways you can go digging for this information, the first of which is the menus.

JetBrians’ menus, in particular, are intuitively organized. Whether it’s navigation, code, refactoring, or any other topic, a simple peek at the menu shows the commands with their respective keyboard shortcut right next to them.

IntelliJ Code Menu
IntelliJ ‘Code’ menu options, showing commands with the respective keyboard shortcut to the right

Search all

Another approach specific to JetBrains is their handy “search all” feature. Double-tap the shift key in any Jetbrains IDE to show a list of everything the IDE has. Options here include commands with keyboard shortcuts, IDE settings, and all sorts of other goodies.

IntelliJ Search All
IntelliJ ‘Search All’ menu, showing commands with the respective keyboard shortcut right next to it

Keymap settings

Accessing the preferences (⌘ + ,) and selecting Keymap displays the complete list. Conveniently, you can search by title or by keystroke as well. IntelliJ will also warn you of duplicate mappings.

IntelliJ Keymap Settings

Challenge #2: Remembering them

Step #1: Put it in view

When I first joined Pivotal Labs (now Tanzu Labs), the idea of using sticky notes to the extent that they do just wasn’t natural to me (nowadays it seems their reputation proceeds them 😂). However, I saw these experienced practitioners using sticky notes for everything and found this very inspiring! So much so that I ended up ditching my Moleskin for a sharpie and stack of stickies.

Therefore, when I struggled to remember keyboard shortcuts, I started to write them down on a sticky note and stick it on my monitor.

Anytime I forget, it just takes a glance down to jog my mind.

Sticky note on monitor for 'Reveal In Finder'
This one took me quite some time to discover!

Step #2: Make a point to practice

When learning a new command or keyboard shortcut, I’ll go out of my way to try it a few times to get the feel of it. You could compare this to increasing your vocabulary when studying a new language: the more times you recall it with high accuracy, the longer you can go without quizzing yourself. When learning a new shortcut for the first time, practice it a few times. Increase your awareness and be deliberate to try out your new skill. After several days, it should start to sink in.

Step #3: Removing the guard rails

Toss the sticky note into the trash before you feel comfortable with your new skill. Or better yet, replace it with a new one.

If you find yourself struggling to remember several shortcuts, make a cheat sheet and put them all on a single sticky note.

If you added a sticky note to your monitor for even just one new keyboard shortcut each day, you’d be surprised at how quickly these add up!

BONUS: Task Switching

Having been initially most comfortable with Xcode, I was admittedly hesitant about learning a new IDE, afraid that my brain would not be able to tell them apart. However, after learning how to navigate IntelliJ on macOS effectively, I gained additional confidence.

However, at one point, I found myself assisting with a workshop held outside my company’s office in an external classroom equipped with only Windows machines. Using IntelliJ, my fingers instinctively tried the familiar macOS keyboard shortcuts. Simply switching the command key to the control key got me part of the way there, but alas, many of them were different.

Whether switching IDEs or OSs, using the “sticky note” method mentioned above, I was surprised at how quickly my brain and fingers could adapt.

I like to compare this to renting a car. When you first sit in a rental car, most aspects of your environment are familiar. However, there might be some notable differences. For example, whether the vehicle is an automatic or manual transmission or if you are traveling outside your native country, you may find yourself driving while sitting on the car’s left-hand side or the right-hand side. While at first uncomfortable, once you’ve acquired the skill, these cues are enough to switch your brain to the right setting for the action you’re about to take. Likewise, task-switching from one OS to another or one IDE to another provides a similar cue to help you switch to the proper keyboard shortcut settings in your mind.

Practice most certainly helps, too!

Further Personalization

Sometimes there aren’t keyboard shortcuts for aspects of the IDE that I want further control over. But, particularly for JetBrains, I have a few favorites that I find to be productivity boosters that I always tend to use.

If you’re pair programming, talk this through with your pair to ensure that you don’t have any keyboard shortcut conflicts between the two of you. Ideally, try to find an agreement on a keymap within the team of engineers who are pairing, and maybe take advantage of JetBrain’s feature for sharing these settings across machines.

Wrapping Up

It won’t take long until you feel increased productivity after learning even just a few keyboard shortcuts. You can make this process more effective by:

  • Learning new shortcuts through pair programming or installing a plugin to remind you when you miss one
  • Writing new keyboard shortcuts down on sticky notes and putting them into easy view
  • Practicing these shortcuts and refreshing your sticky notes regularly

Do you have any other helpful tips for learning keyboard shortcuts? Let me know!

]]>
Derek Lee
Git Bisect2020-01-01T00:00:00+00:002020-01-01T00:00:00+00:00/devrecipes/git/bisectReference Documentation

Git Bisect is a super helpful tool to determine where a bug or issue was introduced into the codebase when you’re not sure what commit caused it.

Finding the Commit that Introduced a Bug

Step #1: Tell Git to start the bisect process

1
$ git bisect start

Step #2: Tell Git that the current commit is where the problem exists

1
$ git bisect bad

Step #3: Tell Git which commit you know things were working properly

1
$ git bisect good <commit hash or tag>

Next, Git will check out a commit somewhere approximately in the middle.

You test to see if the issue still exists in that commit or not.

Step #4: Then, you just need to tell Git the result of your test

If the issue still exists, tell Git the commit is bad:

1
$ git bisect bad

If the issue isn’t there, tell Git the commit is good:

1
$ git bisect good

Git will split the remaining commits in half and check out a commit somewhere in the middle of this set.

Return to Step #4 and repeat until Git has found the commit that introduced the issue.


Once You’ve Found the Commit that Introduced the Issue

Once you have the commit that caused the unexpected behavior, tell Git you’re done with the bisect process:

1
$ git bisect reset

Voila! You now know which commit introduced the issue. Now for the fun part: fixing it!


What does the output look like?

Let’s check out a sample output from a real-world example:

Starting the bisect process

1
2
3
4
5
6
[project-directory (Current Branch: main)]$ git bisect start
[project-directory (Current Branch: main)]$ git bisect bad
[project-directory (Current Branch: main)]$ git bisect good ef6c9010
Bisecting: 61 revisions left to test after this (roughly 6 steps)

<Git displays information about the commit it checked out for testing>

Finding the commit that introduced the issue

1
2
3
4
5
6
7
8
9
10
11
12
13
14
15
16
17
18
19
20
21
22
23
24
25
26
27
28
29
30
31
32
33
34
35
36
[project-directory ((no branch, bisect started on main))]$ git bisect bad
Bisecting: 30 revisions left to test after this (roughly 5 steps)

<Git displays information about the commit it checked out for testing>

[project-directory ((no branch, bisect started on main))]$ git bisect bad
Bisecting: 14 revisions left to test after this (roughly 4 steps)

<Git displays information about the commit it checked out for testing>

[project-directory ((no branch, bisect started on main))]$ git bisect bad
Bisecting: 7 revisions left to test after this (roughly 3 steps)

<Git displays information about the commit it checked out for testing>

[project-directory ((no branch, bisect started on main))]$ git bisect good
Bisecting: 3 revisions left to test after this (roughly 2 steps)

<Git displays information about the commit it checked out for testing>

[project-directory ((no branch, bisect started on main))]$ git bisect good
Bisecting: 1 revision left to test after this (roughly 1 step)

<Git displays information about the commit it checked out for testing>

[project-directory ((no branch, bisect started on main))]$ git bisect good
Bisecting: 0 revisions left to test after this (roughly 0 steps)

<Git displays information about the commit it checked out for testing>

[project-directory ((no branch, bisect started on main))]$ git bisect good
<commit hash> is the first bad commit

_<Git displays information about the commit>_

x files changed, y insertions(+)

Wrapping up the bisect process

1
2
3
4
5
6
7
[project-directory ((no branch, bisect started on main))]$ git bisect reset

Previous HEAD position was <Commit Hash and Message>
Switched to branch 'main'
Your branch is up to date with 'origin/main'.

[project-directory (Current Branch: main)] $
]]>
Derek Lee