The post The Curious Case of Enum and Map Serialization appeared first on { 4Comprehension }.
]]>The root cause turns out to be a subtle property of Java enums that most Java developers are not aware of.
Before we get to the core issue, let’s recall how Java’s native serialization works.
To serialize an object, JVM traverses the object graph and writes each field’s value to a byte stream.
For primitive fields, the raw value is written directly. For object references, the referenced object is serialised recursively.
On deserialization, the object is reconstructed by reading those bytes back and assigning them to fields directly, bypassing the constructor entirely:
private static byte[] serialize(Object obj) throws Exception {
var baos = new ByteArrayOutputStream();
try (var oos = new ObjectOutputStream(baos)) {
oos.writeObject(obj);
}
return baos.toByteArray();
}
private static <T> T deserialize(byte[] bytes) throws Exception {
try (var ois = new ObjectInputStream(new ByteArrayInputStream(bytes))) {
return (T) ois.readObject();
}
}
Let’s start with a simple enum:
enum Type { A, B }
A quick question – what does Type.A.hashCode()return?
If you don’t know the exact answer, I’m willing to bet that you’re going to go for one of these:
0 (the ordinal)65(the hashcode of A, or something derived from it)In both cases, you’d be wrong. Enum doesn’t override hashCode(), it inherits the default implementation directly from Object, which is identity-based and derived from whatever the JVM uses internally to assign identity hash codes.
To be fully precise, enums do override the hashCode() implementation, but internally delegates the work to super.hashCode().
Within a single JVM, this is perfectly fine since enum constants are singletons. However, across JVM instances, the identity hash code of the same constant will almost certainly be different.
To see why this matters, let’s write a trivial map implementation that stores a single key-value pair:
class SingleEntryMap<K, V> implements Serializable {
private final int bucket;
private final K key;
private final V value;
SingleEntryMap(K key, V value) {
this.bucket = key.hashCode();
this.key = key;
this.value = value;
}
public Optional<V> get(K key) {
return key.hashCode() == bucket && key.equals(this.key)
? Optional.of(value)
: Optional.empty();
}
// ...
}
The map captures the key’s hash code at construction time and stores it alongside the key/value pair.
On lookup, it first checks hash equality (the bucket), and only then performs the ultimate equality test, which mirrors what real hash-based data structures do.
Within a single JVM, this works correctly every single time:
var map = new SingleEntryMap<>(Type.A, "hello");
assertThat(map.get(Type.A)).contains("hello");
assertThat(map.get(Type.B)).isEmpty();
Even if we serialize and then deserialize it within the same process, it works. The deserialized enum constant resolves back to the same singleton object, which still has the same identity hash code:
var original = new SingleEntryMap<>(Type.A, "hello");
byte[] bytes = serialize(original);
SingleEntryMap<Type, String> deserialized = deserialize(bytes);
assertThat(deserialized.get(Type.A)).contains("hello");
Now let’s serialize the map in one JVM process and deserialize it in another:
void main() throws Exception {
var map = new SingleEntryMap<>(Type.A, "hello");
try (var out = new ObjectOutputStream(new FileOutputStream("/tmp/map.bin"))) {
out.writeObject(map);
IO.println("Type.A.hashCode() = " + Type.A.hashCode());
}
}
void main() throws Exception {
try (var in = new ObjectInputStream(new FileInputStream("/tmp/map.bin"))) {
SingleEntryMap<Type, String> map = (SingleEntryMap<Type, String>) in.readObject();
IO.println("Type.A.hashCode() = " + Type.A.hashCode());
IO.println("stored bucket = " + map.bucket());
IO.println("map contains: " + map.key() + " -> " + map.value());
IO.println("map.get(Type.A) = " + map.get(Type.A));
}
}
The output will look something like:
// Process 1
Type.A.hashCode() = 713338599
// Process 2
Type.A.hashCode() = 1147985808
stored bucket = 713338599
map contains: A -> hello
map.get(Type.A) = Optional.empty
We can clearly see that the key is there, the value is there, but get(Type.A) returns empty!
The stored bucket came from the first process. In the second process, Type.A has a different identity hash code. The bucket check fails before we get to the true equality check!
How come JDK’s HashMap doesn’t have this problem?
It implements custom readObject/writeObject methods which serialize only the keys and values, then rehashes everything during deserialization.
If you get hooked, you might even want to try this yourself… and quickly get confused!
class Main {
enum Foo {BAR}
public static void main(String[] args) {
System.out.println(Foo.BAR.hashCode());
}
}
Running the above code repeatedly prints out the same value, and it might sound counterintuitive to what you just read. Weren’t those values supposed to change on every run?
Not exactly. While it’s not safe to assume that hashcodes stay deterministic across runs, this might actually happen quite often!
To understand why, we need to look at how HotSpot actually generates identity hash codes. The default strategy is a Marsaglia xor-shift, which is a fast, thread-local pseudo-random number generator that lives inside each Thread.
This thread-local state is initialized in the thread constructor:
_hashStateX = CDSConfig::is_dumping_static_archive() ? 0x12345678 : os::random(); _hashStateY = 842502087; _hashStateZ = 0x8767; // (int)(3579807591LL & 0xffff) ; _hashStateW = 273326509;
If you look inside os::random(), you will find another hardcoded value!
volatile unsigned int os::_rand_seed = 1234567;
It turns out that the entire chain is deterministic and produces a fixed sequence of hash codes!
In a trivial program, JVM bootstraps same internal classes, creates same threads in the same order, and computes the same number of identity hashcodes.
To see this in action, run this example multiple times and play with the number of loop runs:
class Main {
enum Foo {BAR}
public static void main(String[] args) {
for (int i = 0; i < 3; i++) {
System.out.println("new Object().hashCode() = " + new Object().hashCode());
}
System.out.println("Foo.BAR.hashCode() = " + Foo.BAR.hashCode());
}
}
This is precisely what makes this bug so sneaky. Same program run on same JVM will often consistently produce same hash codes, reinforcing the false assumption about enum’s hashcode stability.
This isn’t a hypothetical problem. Vavr’s HashMap had the same bug!
Vavr’s HashMap is backed by a Hash Array Mapped Trie, and its serialization mechanism would dump the entire internal tree structure to the stream, including the pre-computed hash values of keys.
For keys with deterministic hash codes (strings, integers), this worked fine. But for enums or any key type relying on identity hash codes, deserializing in a different process produced a map containing same entries, which could never be fetched!
The fix in Vavr 1.0.1 was to adopt the serialization proxy pattern: serialize only the key-value pairs, then rebuild the HAMT from scratch during deserialization, which is essentially the same approach the JDK has used all along (just implemented using a different pattern).
If you’re working with hashcodes, never leak them outside a single JVM process unless you’re sure that those are deterministic. Generally, a much safer solution would be to focus on the logical content, and then rebuild the physical structure when needed, but that can come up with extra performance penalty.
The source code is available on GitHub.
The post The Curious Case of Enum and Map Serialization appeared first on { 4Comprehension }.
]]>The post tdocker: A Terminal UI for Everyday Docker Commands appeared first on { 4Comprehension }.
]]>docker ps.
You scan the output, find the container you are interested in, copy its ID, and then use one of most popular commands:
Rinse, repeat, dozens of times a day.
I tried the most popular existing solutions, but they turned out overwhelming and clunky – overpacked with stuff that I did not need, so I ended up falling back to my scripts collection. Eventually, I got tired of the copy-paste loop.and eventually wrote a simple wrapper on top of Docker CLI.
Someone eventually suggested I should finish it up and release, and that’s how tdocker was born – a terminal UI that puts a navigable container list on screen and lets you do the most common Docker operations with a single keypress:
If you want to try right away, go for:brew install pivovarit/tap/tdocker
Source code can be found on GitHub.
tdocker is not a Docker dashboard. It’s not a full management suite. It doesn’t create containers, manage images, or configure networks.
It’s supposed to give you convenient access to everyday operations you’d normally do right after looking up container id from docker ps:
That’s the philosophy: if an operation isn’t something you’d do multiple times a week, it doesn’t belong here. No plugin system, no YAML configs, no container creation wizards.
Everything provided in a clean, readable and aesthetic terminal UI.
The main view is a responsive table that adapts column widths proportionally to your terminal size. It shows the same information you’d get from docker ps, but navigable with arrow keys (or j/k if that’s your thing).
Press / to filter. The filter matches against container name, image, ID, and Compose project/service, basically everything you’d grep for.
If you work with Docker Compose, containers from the same project are visually grouped together:
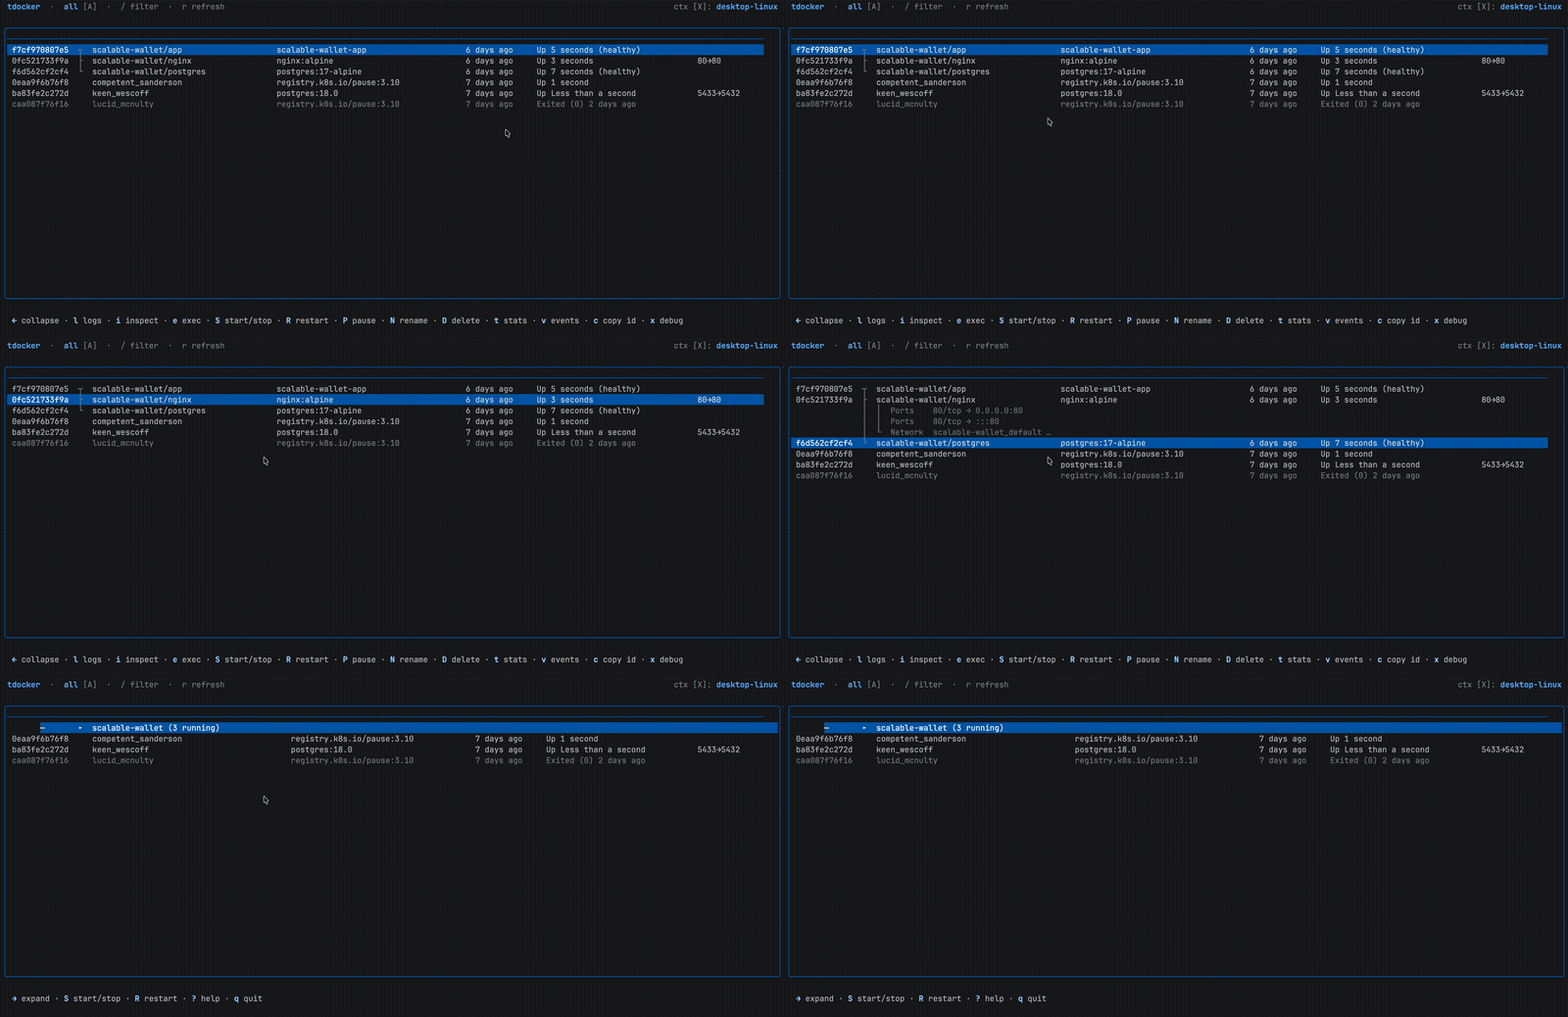
Press ← on any member to collapse the entire group into a single summary row. Press → to expand it back.
Basic lifecycle actions work on the whole group when a collapsed row is selected – one keypress to stop or restart an entire Compose stack.
What’s more, if you keep expanding right, you’ll be able to view port bindings and network information as navigable sub-rows directly in the table.
Press c on a detail row to copy its value.
Press l to open a log viewer that auto-scrolls as new lines arrive. Scroll up to pause the auto-scroll; scroll back to the bottom to resume.
Press / inside the log viewer to search – the search can run either client-side or server-side (Ctrl+G toggles between the two when docker logs --grep is available).
Press e to exec into a container. tdocker auto-detects which shell is available – bash, sh, or whatever the container has.
For distroless or scratch-based images where no shell exists, press x instead to launch a docker debug session.
Press X to open a context picker overlay – useful when you switch between local Docker Desktop and a remote daemon.
tdocker is written in Go using Bubble Tea v2 – the Elm-architecture TUI framework from Charm. The entire UI is a single Bubble Tea program with the table component from Bubbles and styling from Lip Gloss.
There’s no Docker SDK dependency for the core operations. Container data comes from parsing docker ps --format '{{json .}}'. This keeps the binary tiny and avoids coupling to a specific Docker API version.
Clipboard support works across macOS, Linux/X11, Wayland, and even SSH sessions via OSC 52 escape sequences.
Install with Homebrew:
brew install pivovarit/tap/tdocker
Or with go install:
go install github.com/pivovarit/tdocker@latest
Then just run tdocker. Press ? for a full keybinding reference.
The source code is on GitHub. If it saves you a few hundred copy-pastes a week, it’s done its job.
The post tdocker: A Terminal UI for Everyday Docker Commands appeared first on { 4Comprehension }.
]]>The post Implementing a PID Controller in Java appeared first on { 4Comprehension }.
]]>The task was about writing a controller for a remotely-controlled drone, and its controls were accessible over gRPC.
I remember it not just because it was fun, but because I had an eureka moment – in my university, we went through a similar problem, which allowed me to implement the solution right away. That solution was a PID controller.
PID Controllers are one of the most widely used control mechanisms in engineering. They adjust a system’s control input to keep a process variable at a desired value while accounting for momentum and avoiding overshoots.
The underlying algorithm is surprisingly simple. The basic idea behind any feedback controller loop is trivial:
However, there are various ways for us to utilize that difference between the measured value and the setpoint.
We’ll use a cruise control simulation as our running example, which should make the behavior of each controller variant easy to reason about.
Let’s say we want to get to and maintain a setpoint of 100 km/h.
double error = setpoint - measured;
The setpoint is our target, measured is where we are right now, and error is the gap between the two.
The most obvious approach is to push hard when we’re far from the target and push gently when we’re close:
record PController(double kp) {
double compute(double setpoint, double measured) {
double error = setpoint - measured;
return kp * error;
}
}
The controller parameter kp controls how aggressively the controller reacts by making the output proportional to the error. That’s where P comes from.
Let’s see it in action. Simulating those scenarios is actually easier than expected:
Drag’s existence means that the car needs continuous throttle just to maintain speed.
// double TARGET_SPEED = 100.0;
// double DRAG = 0.1;
// double DT = 0.1;
// int STEPS = 1000;
var controller = new PController(1.0);
double speed = 0;
for (int i = 0; i < STEPS; i++) {
double throttle = controller.compute(TARGET_SPEED, speed);
speed += (throttle - DRAG * speed) * DT;
System.out.println(i + ": speed = " + speed);
}
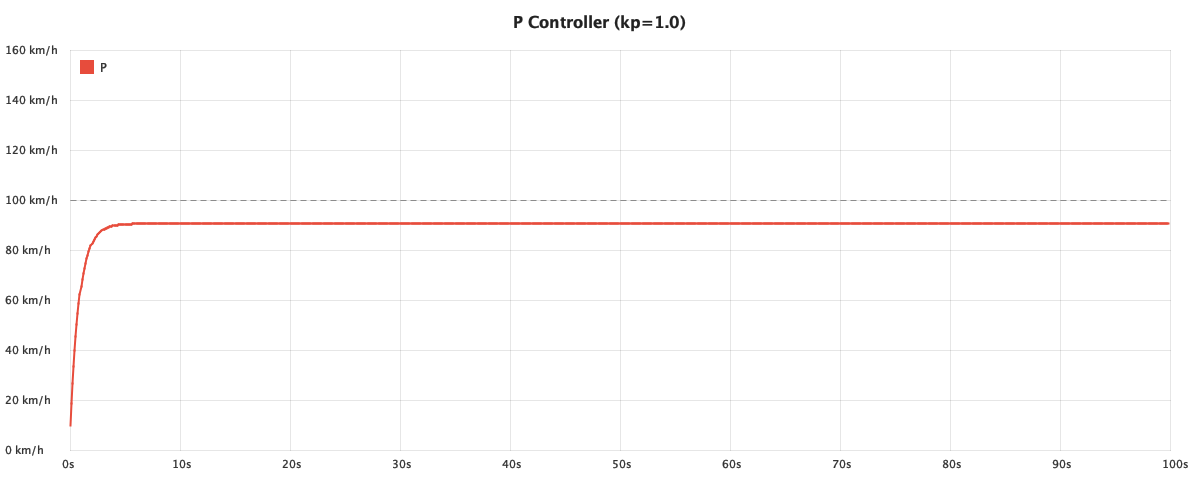
Let’s have a look at the results:
As we get closer to the target speed, the error shrinks, and the throttle decreases, but drag keeps pulling the speed down, and we end up with a phenomenon called steady-state error.
It’s the fundamental limitation of proportional-only control.
We need to address this somehow.
The problem with the above solution is that it doesn’t acknowledge momentum in any way. It doesn’t care if the error is increasing/decreasing – it sees just the difference.
In order to do something about this, we need to start looking at the error’s rate of change, which means we need to start tracking previous error:
private double previousError;
And then calculate the rate of change (derivative):
double rateOfChange = (error - previousError) / dt;
And incorporate it into the equation:
return kp * error + kd * rateOfChange;
And here’s our new implementation:
class PDController {
private final double kp;
private final double kd;
private double previousError;
PDController(double kp, double kd) {
this.kp = kp;
this.kd = kd;
}
double compute(double setpoint, double measured, double dt) {
double error = setpoint - measured;
double rateOfChange = (error - previousError) / dt;
previousError = error;
return kp * error + kd * rateOfChange;
}
}
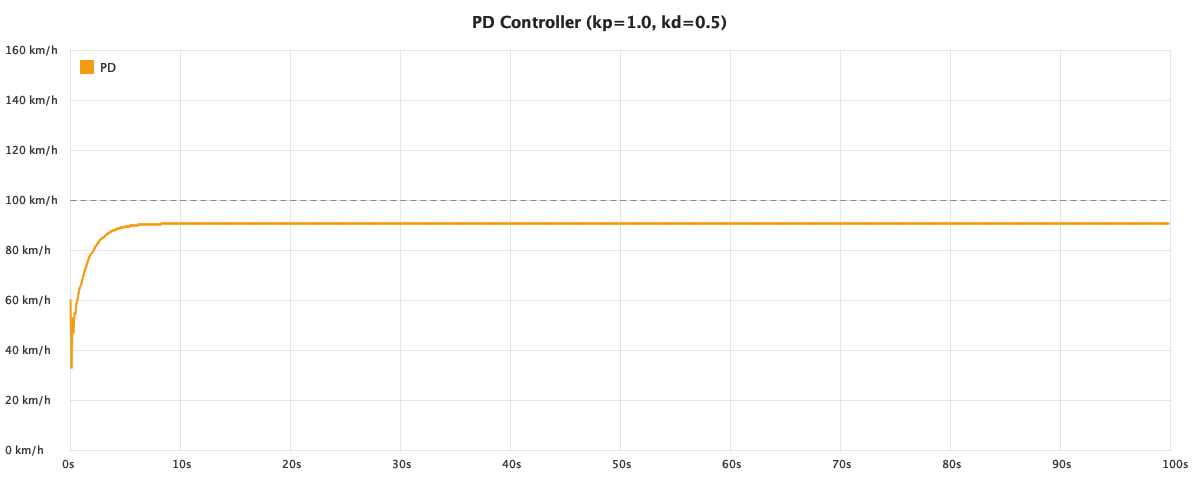
Let’s see it in action:
The result is a much smoother response, but it doesn’t help with the core issue much. At the end of the day, the rate of change of a constant error is close to zero, so in the long run, we’re back to the same P-only behavior.
Let’s try something else.
To close that persistent gap, we need something that accumulates error over time.
If you recall calculus, an integral represents the area under a curve. Here, the curve is our error over time, and integral += error * dt is just us summing up tiny rectangles of width dt and height error, so the longer the error persists, the larger the area grows, which results in throttle increase:
class PIController {
private final double kp;
private final double ki;
private double integral;
PIController(double kp, double ki) {
this.kp = kp;
this.ki = ki;
}
double compute(double setpoint, double measured, double dt) {
double error = setpoint - measured;
integral += error * dt;
return kp * error + ki * integral;
}
}
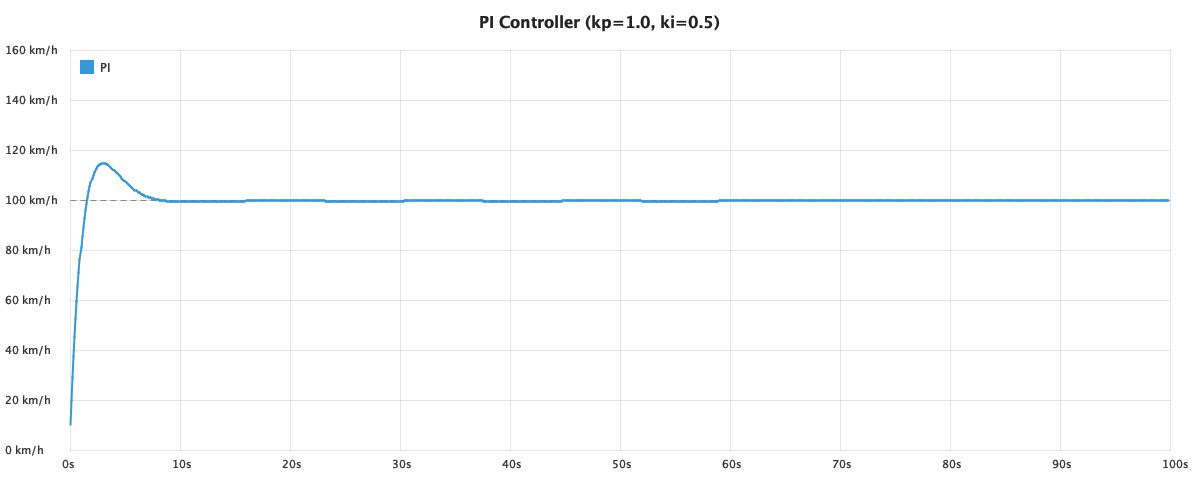
Whoa! This actually works! Our car actually reaches 100km/h! Our integral makes sure that as long as there’s error, throttle adjusts, so the controller never settles below/above the target.
However, if you look closely, you can see that it oscillates a bit.
This is already pretty good for many real-world systems where overshoot isn’t a problem.
However, there’s one more thing we need to address. Our PI controller has no output limits so let’s add output clamping:
return Math.clamp(output, outputMin, outputMax);
And let’s see what happens.
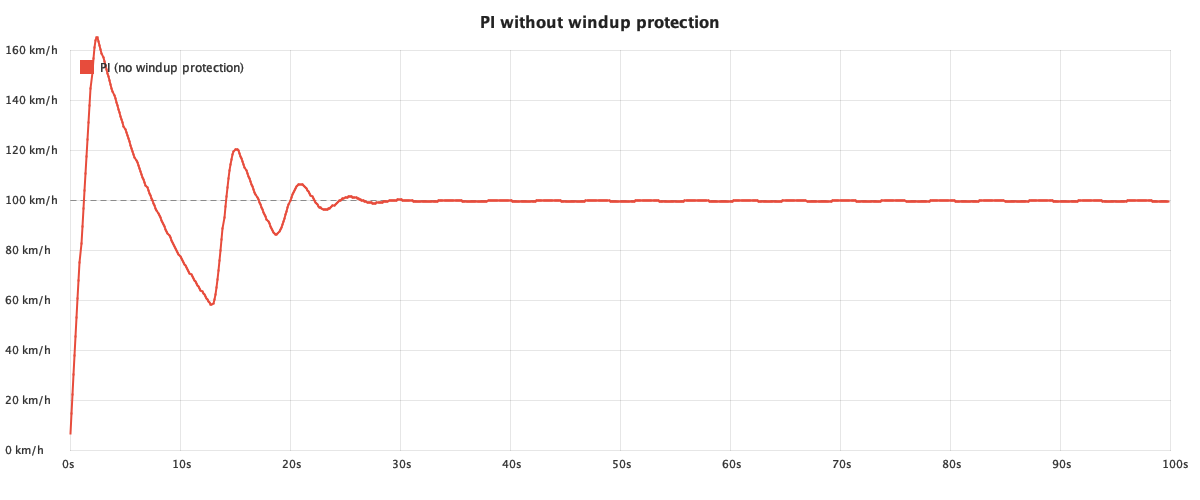
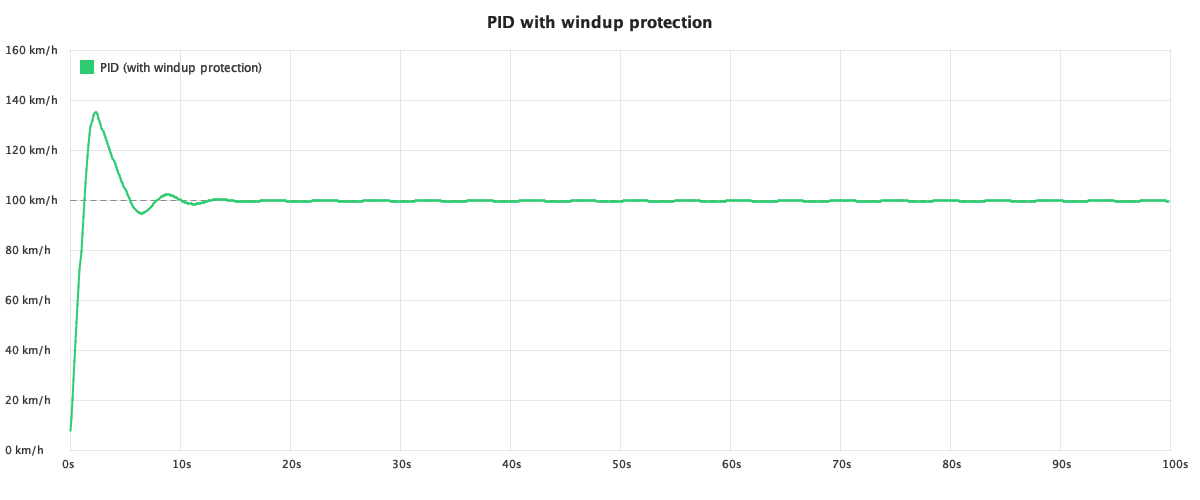
Whoa! that’s actually much worse! That massive overshoot and oscillation is caused by a phenomenon called integral windup.
During startup, the car is at 0 km/h and the target is 100 km/h. The error is large, and the integral term keeps accumulating it every time step so it just piles up silently.
When the car reaches 100 km/h, the integral has grown huge. Even though the error is now zero, the accumulated integral causes massive overshoot. The controller then has to offload (or rather unwind) all that accumulated integral.
The fix is straightforward: when the output hits the min/max limits, we undo the last integral accumulation:
if (output > outputMax) {
accumulatedError -= error * dt;
return outputMax;
}
if (output < outputMin) {
accumulatedError -= error * dt;
return outputMin;
}
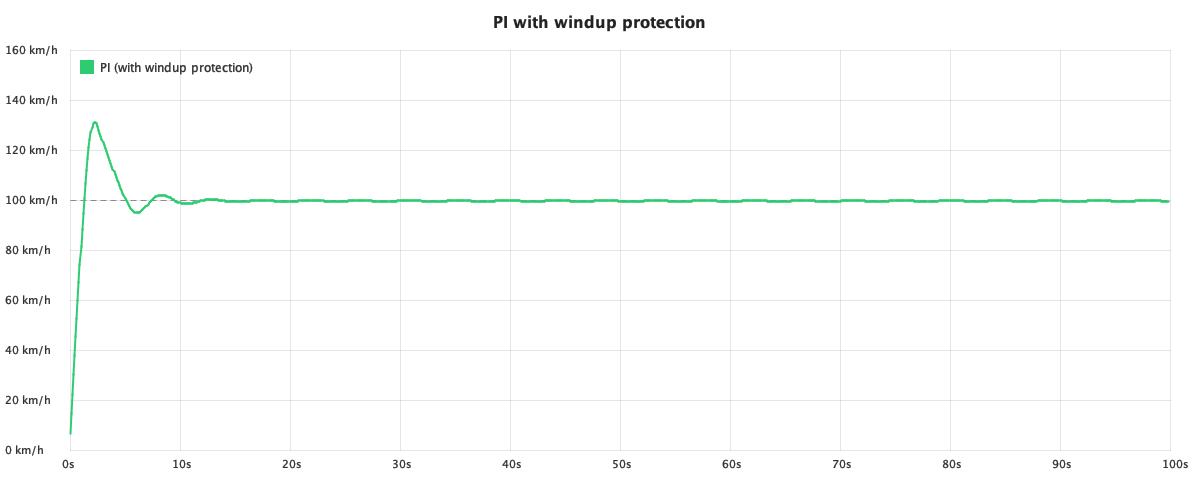
This way, the integral only accumulates when the controller’s output is actually being used.
The difference is drastic:
But our controller still oscillates more than it should. Let’s bring back the derivative term.
In order to end up with the ultimate solution, we need to combine all three approaches into a single controller that eliminates steady-state error and dampens overshoot.
We already know about windup protection, so let’s bake it in from the start:
class PIDController {
private final double kp;
private final double ki;
private final double kd;
private final double outputMin;
private final double outputMax;
private double accumulatedError;
private double previousError;
PIDController(double kp, double ki, double kd, double outputMin, double outputMax) {
this.kp = kp;
this.ki = ki;
this.kd = kd;
this.outputMin = outputMin;
this.outputMax = outputMax;
}
double compute(double setpoint, double measured, double dt) {
double error = setpoint - measured;
accumulatedError += error * dt;
double changeRate = (error - previousError) / dt;
previousError = error;
double output = kp * error + ki * accumulatedError + kd * changeRate;
if (output > outputMax) {
accumulatedError -= error * dt;
return outputMax;
}
if (output < outputMin) {
accumulatedError -= error * dt;
return outputMin;
}
return output;
}
}
Each term handles a different aspect of the control problem now, but the final result doesn’t seem significantly better than the previous result:
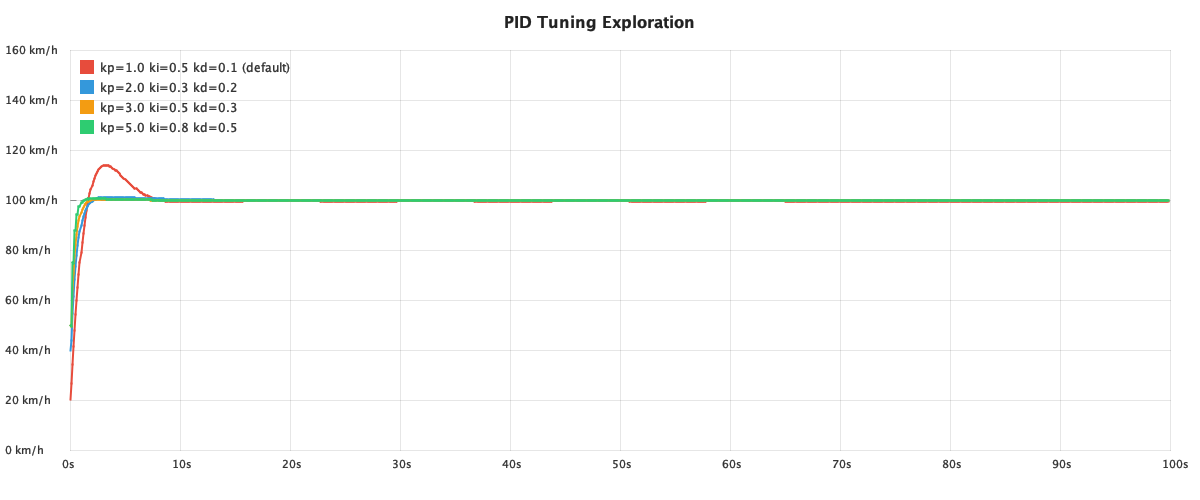
The implementation of PID is easy, but it’s the tuning that’s hard. The right values depend entirely on the system being controlled, and the trade-offs between responsiveness, overshoot, and stability.
Let’s see what a difference tuning makes for our cruise control. Here are four parameter sets, all using the same PID controller:
So how did I do it? Well, good old trial and error. While this might sound disappointing, quite often it’s the most pragmatic choice in real life systems. However, for formal approaches, look into the Ziegler-Nichols method or Cohen-Coon tuning.
Here are a few tips to make your trial and error easier:
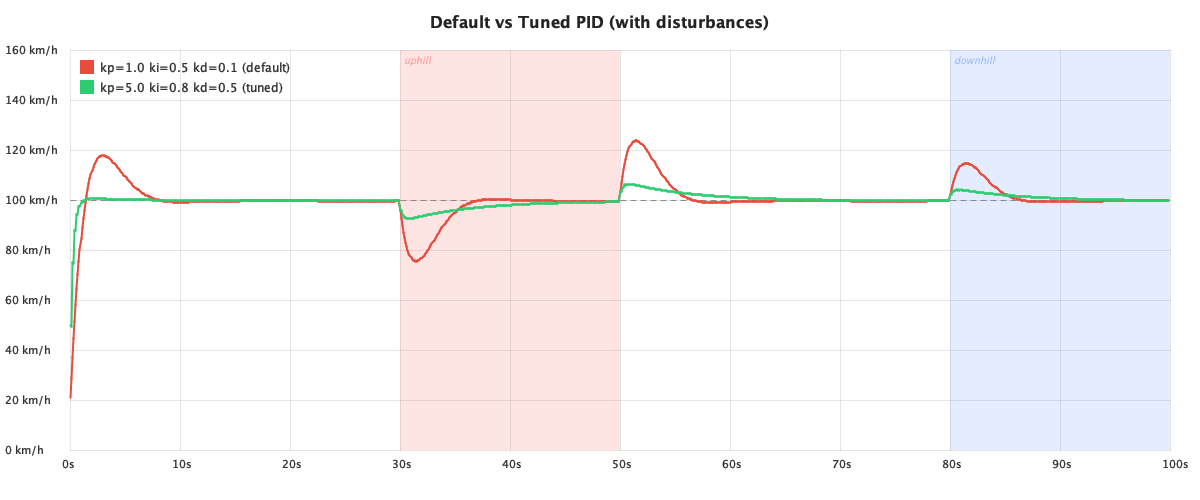
As a bonus, here’s our tuned controller running though disturbances:
As always, the source code is available on GitHub.
The post Implementing a PID Controller in Java appeared first on { 4Comprehension }.
]]>The post Writing JDK8-Compatible Libraries with JPMS Support appeared first on { 4Comprehension }.
]]>A common trade-off is adding an Automatic-Module-Name entry to a manifest. While convenient, it’s inferior to a proper JPMS setup (automatic modules are not supported by jlink).
The good news is that you can have both with a bit of extra work.
We can add:
Automatic-Module-Name: com.example.mylib
to our manifest. That helps module naming, but automatic modules are inferior to standard ones.
Automatic modules:
A real module-info.class is the clean solution.
The key enabler is the Multi-Release JAR format (JEP 238), introduced in Java 9. A Multi-Release JAR can contain version-specific class files in META-INF/versions/{version}/.
In Java 8, the JVM simply ignores the directory and uses the root classes. On Java 9+, it picks up the version-specific entries – including module-info.class.
This means we can compile our library with Java 8, then inject a module-info.class under META-INF/versions/9/. Such a JAR works as a plain library on Java 8 and as a proper named module on Java 9+.
The Moditect Maven plugin lets you add a module-info file to your JAR without requiring the project to compile with Java 9+. It compiles the module descriptor separately and injects it into the JAR as a Multi-Release entry.
Let’s say we have a simple utility library compiled with Java 8:
package com.pivovarit.utils;
public final class StringUtils {
private StringUtils() {
}
public static String reverse(String input) {
return input == null ? null : new StringBuilder(input).reverse().toString();
}
public static boolean isPalindrome(String input) {
if (input == null) {
return false;
}
String reversed = reverse(input);
return input.equalsIgnoreCase(reversed);
}
}
The Maven build uses the maven-compiler-plugin targeting Java 8, and the moditect-maven-plugin to inject a module descriptor:
<build>
<plugins>
<plugin>
<groupId>org.apache.maven.plugins</groupId>
<artifactId>maven-compiler-plugin</artifactId>
<version>3.14.0</version>
<configuration>
<release>8</release>
</configuration>
</plugin>
<plugin>
<groupId>org.moditect</groupId>
<artifactId>moditect-maven-plugin</artifactId>
<version>1.2.2.Final</version>
<executions>
<execution>
<id>add-module-infos</id>
<phase>package</phase>
<goals>
<goal>add-module-info</goal>
</goals>
<configuration>
<jvmVersion>9</jvmVersion>
<module>
<moduleInfoSource>
module com.pivovarit.utils {
exports com.pivovarit.utils;
}
</moduleInfoSource>
</module>
</configuration>
</execution>
</executions>
</plugin>
<plugin>
<artifactId>maven-surefire-plugin</artifactId>
<version>3.5.2</version>
</plugin>
</plugins>
</build>
The <jvmVersion>9</jvmVersion> setting is what makes the magic happen. It tells Moditect to place the compiled module-info.class under META-INF/versions/9/ instead of the JAR root, producing a Multi-Release JAR.
After building, the resulting JAR has the following structure:
And the manifest contains:
Multi-Release: true
On Java 8, the JVM sees a regular JAR with StringUtils.class. On Java 9+, the JVM recognizes the Multi-Release marker and picks up module-info.class, making the library a proper named module (com.pivovarit.utils) with explicitly declared exports.
The only downside is that we don’t get dedicated IDE support because our module-info is effectively just a string in the Maven plugin configuration.
This is precisely how modularity support for Vavr was delivered in 1.0.0.
In this article, we saw that supporting Java 8 and JPMS doesn’t have to be a compromise.
By combining:
We managed to ship a single polymorphic jar with a no-compromise Java Platform Module System support.
The above example is available on GitHub.
The post Writing JDK8-Compatible Libraries with JPMS Support appeared first on { 4Comprehension }.
]]>The post Implementing Efficient Last Stream Elements Gatherer in Java appeared first on { 4Comprehension }.
]]>However, what if someone wanted to implement a custom intermediate operation? While most of those you could shoehorn into the Collectors API, it has one major limitation – Collectors evaluate the whole Stream without any short-circuiting. This is precisely what Gatherers are for.
More about them in the upcoming article, but today we’ll go through a case study of implementing an efficient Gatherer that takes N last Stream elements (think limit() but from the other side).
This example is not about short-circuiting; it’s about implementing an intermediate operation efficiently without materialising the whole stream first.
Implementing Gatherers is similar to implementing Collectors, but with one major difference – the Integrator:
public interface Gatherer<T, A, R> {
Supplier<A> initializer();
Integrator<A, T, R> integrator();
BinaryOperator<A> combiner();
BiConsumer<A, Downstream<? super R>> finisher();
}
Integrator is what allows signalling up that a Stream should stop pushing new elements by returning a boolean indicator:
boolean integrate(A state, T element, Downstream<? super R> downstream);
However, in our case, we’ll not be leveraging this.
Our goal is to implement a gatherer that returns the last N elements of a given Stream:
Stream.of(1,2,3,4) .gather(last(2)) .forEach(...); // 3, 4
Now, we’ll go through a few iterations: start simple, and then see what we can do to make it perform better.
Probably the easiest way to end up with something that produces correct results is to use a List to accumulate the last N elements and update it whenever new elements arrive.
Firstly, we need to initialize our accumulator:
@Override
public Supplier<ArrayList<T>> initializer() {
return ArrayList::new;
}
Then, we need to implement the Integrator with a core logic:
@Override
public Integrator<ArrayList<T>, T, T> integrator() {
return Integrator.ofGreedy((state, elem, ignored) -> {
if (state.size() >= n) {
state.removeFirst();
}
state.add(elem);
return true;
});
}
And finally, we need to push those elements downstream in the finalizer:
@Override
public BiConsumer<ArrayList<T>, Downstream<? super T>> finisher() {
return (state, downstream) -> {
for (T e : state) {
if (!downstream.push(e)) {
break;
}
}
};
}
And now together:
public record LastGathererTake1<T>(int n) implements Gatherer<T, ArrayList<T>, T> {
@Override
public Supplier<ArrayList<T>> initializer() {
return ArrayList::new;
}
@Override
public Integrator<ArrayList<T>, T, T> integrator() {
return Integrator.ofGreedy((state, elem, ignored) -> {
if (state.size() >= n) {
state.removeFirst();
}
state.add(elem);
return true;
});
}
@Override
public BiConsumer<ArrayList<T>, Downstream<? super T>> finisher() {
return (state, downstream) -> {
for (T e : state) {
if (!downstream.push(e)) {
break;
}
}
};
}
}
Let’s try to benchmark and profile our creation. We’ll use JMH and async-profiler (conveniently integrated into JMH nowadays).
Here’s our benchmark (the full setup can be found on GitHub):
@Benchmark
public void take_1(Blackhole bh) {
Stream.of(data)
.gather(new LastGathererTake1<>(n))
.forEach(bh::consume);
}
And here’s our result:
Benchmark (n) (size) Mode Cnt Score Error Units LastBenchmark.take_1 1000 10000000 thrpt 3 1,338 ± 0,239 ops/s
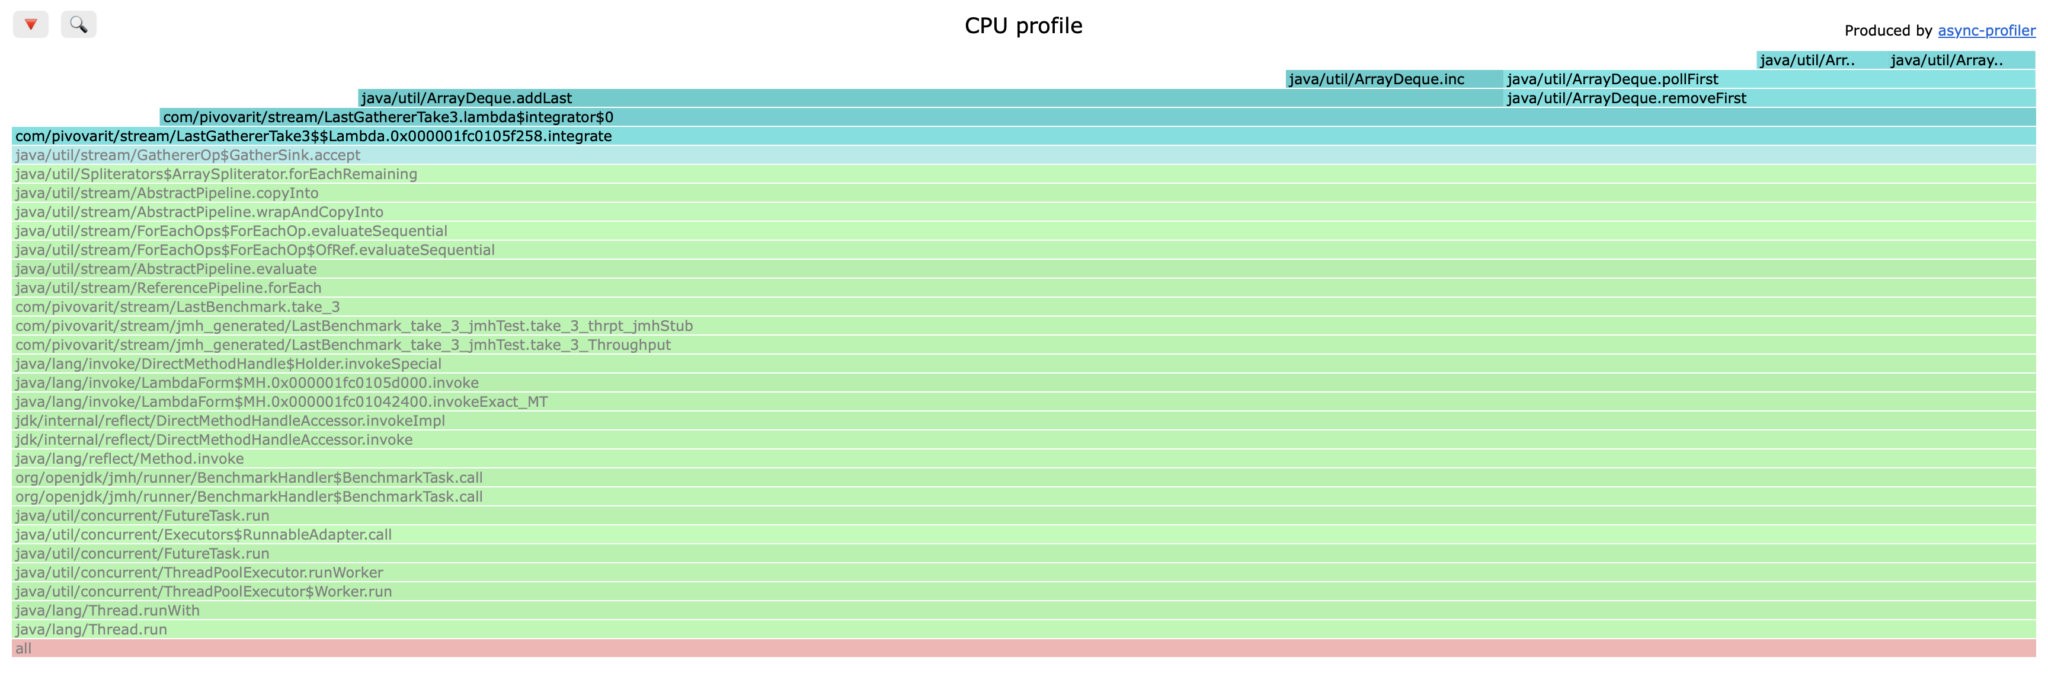
Is this good or bad? Probably good enough for most use cases, but… if you look closely into the flamegraph, you will see that the ArrayList#removeFirst() method takes significant portion of processing time!
In newer JDKs
removeFirst()exists via sequenced collections, but forArrayListit’s effectivelyremove(0)which does a relatively expensive array copying
Let’s remove the bottleneck!
From the above data, it’s clear that removal takes much more time than addition, so let’s address it. The easiest way is to simply buffer all results in a List, and then simply iterate through desired elements:
public record LastGathererTake2<T>(int n) implements Gatherer<T, ArrayList<T>, T> {
@Override
public Supplier<ArrayList<T>> initializer() {
return ArrayList::new;
}
@Override
public Integrator<ArrayList<T>, T, T> integrator() {
return Gatherer.Integrator.ofGreedy((state, elem, ignored) -> {
state.add(elem);
return true;
}
);
}
@Override
public BiConsumer<ArrayList<T>, Downstream<? super T>> finisher() {
return (state, downstream) -> {
int start = Math.max(0, state.size() - n);
for (int i = start; i < state.size(); i++) {
if (!downstream.push(state.get(i))) {
break;
}
}
};
}
}
Let’s run our benchmarks again!
Benchmark (n) (size) Mode Cnt Score Error Units LastBenchmark.take_1 1000 10000000 thrpt 3 1,348 ± 0,201 ops/s LastBenchmark.take_2 1000 10000000 thrpt 3 19,052 ± 7,252 ops/s
Wow, the new implementation did ~15 times better! It’s something!
Flamegraph has also drastically changed, now it’s the ArrayList.add method that dominates, and we can see that this is mostly due to internal ArrayList.grow method that internally allocates a larger array (roughly 1.5× the previous size) and copies all existing elements into it (arrays can’t be resized).
Similar problem was the core issue of the previous bottleneck – removal of the first item from ArrayList involves copying the whole array content and shifting it by one! (ironically, the internal ArrayList method is called fastRemove()).
We’re an order of magnitude faster, but still inefficient. The original idea wasn’t that bad – we just used wrong data structure for it!
Maintaining a fixed-size buffer was not a bad idea, but it required a dedicated data structure which allowed efficient insertion/removal on both ends. ArrayDeque (double-ended queue) is one of such data structures.
If we take the code from step 1, and swap ArrayList with ArrayDeque, we get something like this:
public record LastGathererTake3<T>(int n) implements Gatherer<T, ArrayDeque<T>, T> {
@Override
public Supplier<ArrayDeque<T>> initializer() {
return ArrayDeque::new;
}
@Override
public Integrator<ArrayDeque<T>, T, T> integrator() {
return Integrator.ofGreedy((state, element, ignored) -> {
if (state.size() == n) {
state.removeFirst();
}
state.addLast(element);
return true;
});
}
@Override
public BiConsumer<ArrayDeque<T>, Downstream<? super T>> finisher() {
return (state, ds) -> {
for (Iterator<T> it = state.iterator(); it.hasNext() && !ds.isRejecting(); ) {
if (!ds.push(it.next())) {
break;
}
}
};
}
}
And here are benchmark results:
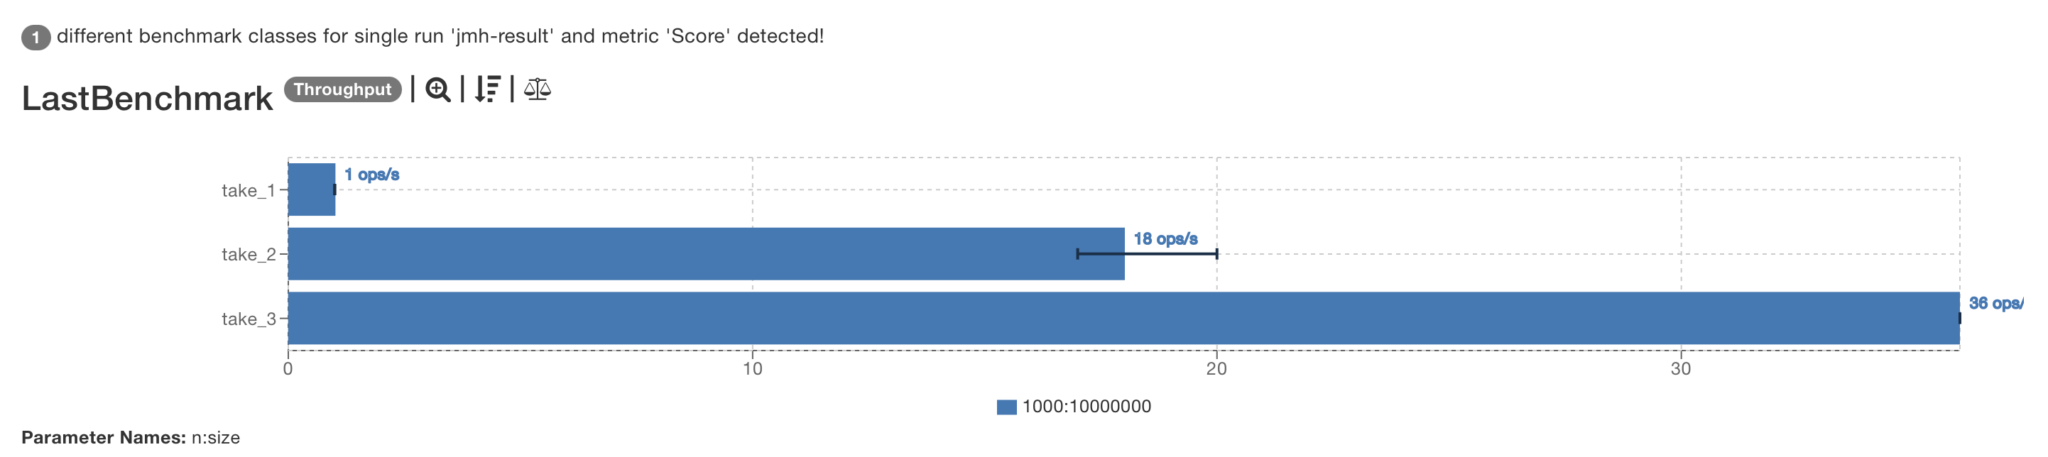
Benchmark (n) (size) Mode Cnt Score Error Units LastBenchmark.take_1 1000 10000000 thrpt 3 1,340 ± 0,032 ops/s LastBenchmark.take_2 1000 10000000 thrpt 3 17,685 ± 33,776 ops/s LastBenchmark.take_3 1000 10000000 thrpt 3 35,751 ± 3,629 ops/s
Whoa! We’re doing twice better than the previous attempt!
Could we find even more bottlenecks? 
At first sight, there are no obvious candidates, but… what if we could get rid of that removal altogether?
What if we could avoiding paying the price of removals by introducing overwriting semantics?
The standard library doesn’t have a data structure like this, so we’ll need to roll out our own!
One of data structures with such properties is circular buffer – it’s a fixed-size data structure which overwrites oldest entries on overflow, and it’s quite easy to implement:
static class AppendOnlyCircularBuffer<T> {
private final T[] buffer;
private int endIdx = 0;
private int size = 0;
public AppendOnlyCircularBuffer(int size) {
this.buffer = (T[]) new Object[size];
}
public void add(T element) {
buffer[endIdx++ % buffer.length] = element;
if (size < buffer.length) {
size++;
}
}
public void forEach(Consumer<T> consumer) {
int startIdx = (endIdx - size + buffer.length) % buffer.length;
for (int i = 0; i < size; i++) {
consumer.accept(buffer[(startIdx + i) % buffer.length]);
}
}
}
In this implementation an array serves as storage and an additional index is used to keep track of the position of the last element. We also need an extra int for keeping track of the actual buffer size.
Let’s see it in action!
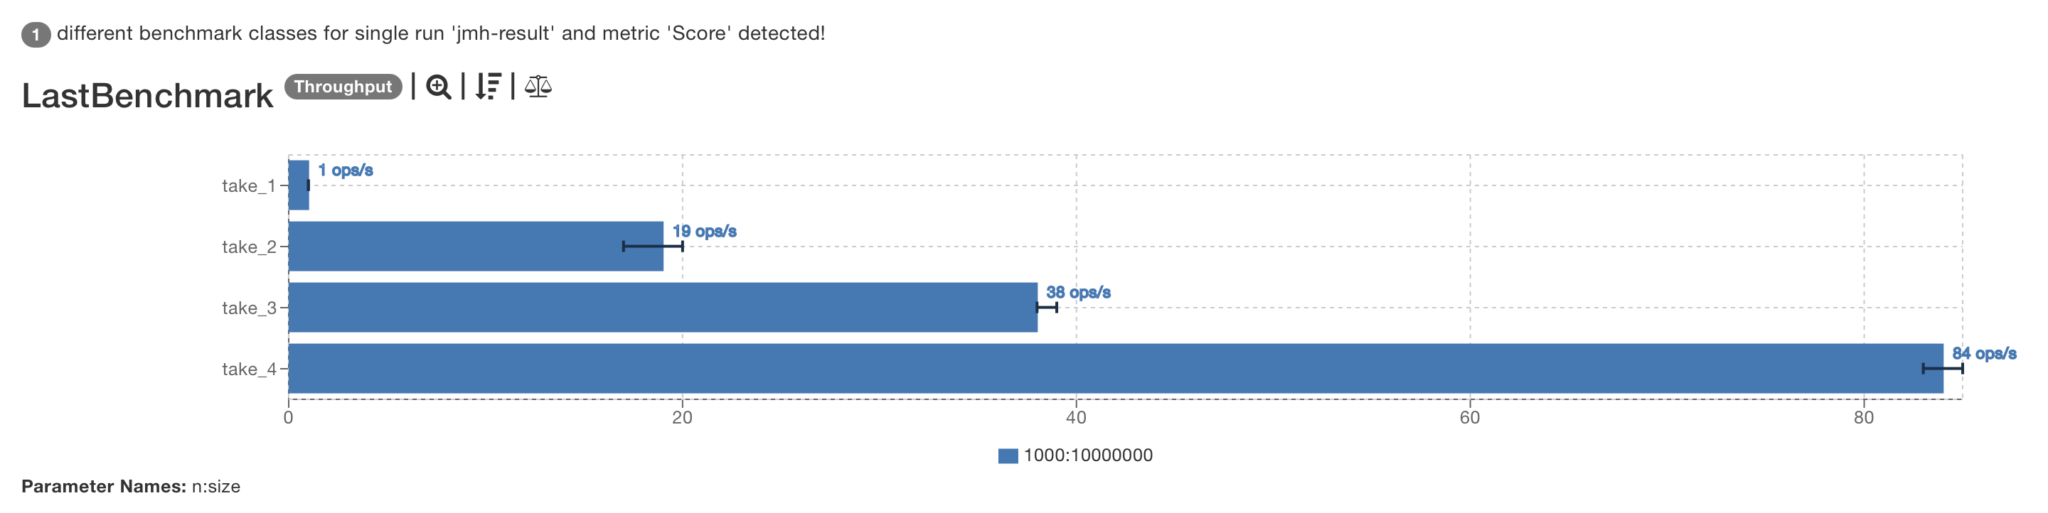
Benchmark (n) (size) Mode Cnt Score Error Units LastBenchmark.take_1 1000 10000000 thrpt 3 1,360 ± 0,216 ops/s LastBenchmark.take_2 1000 10000000 thrpt 3 19,060 ± 28,949 ops/s LastBenchmark.take_3 1000 10000000 thrpt 3 38,050 ± 8,296 ops/s LastBenchmark.take_4 1000 10000000 thrpt 3 84,340 ± 15,607 ops/s
We’ve now improved over 60 times! But could we do even better?
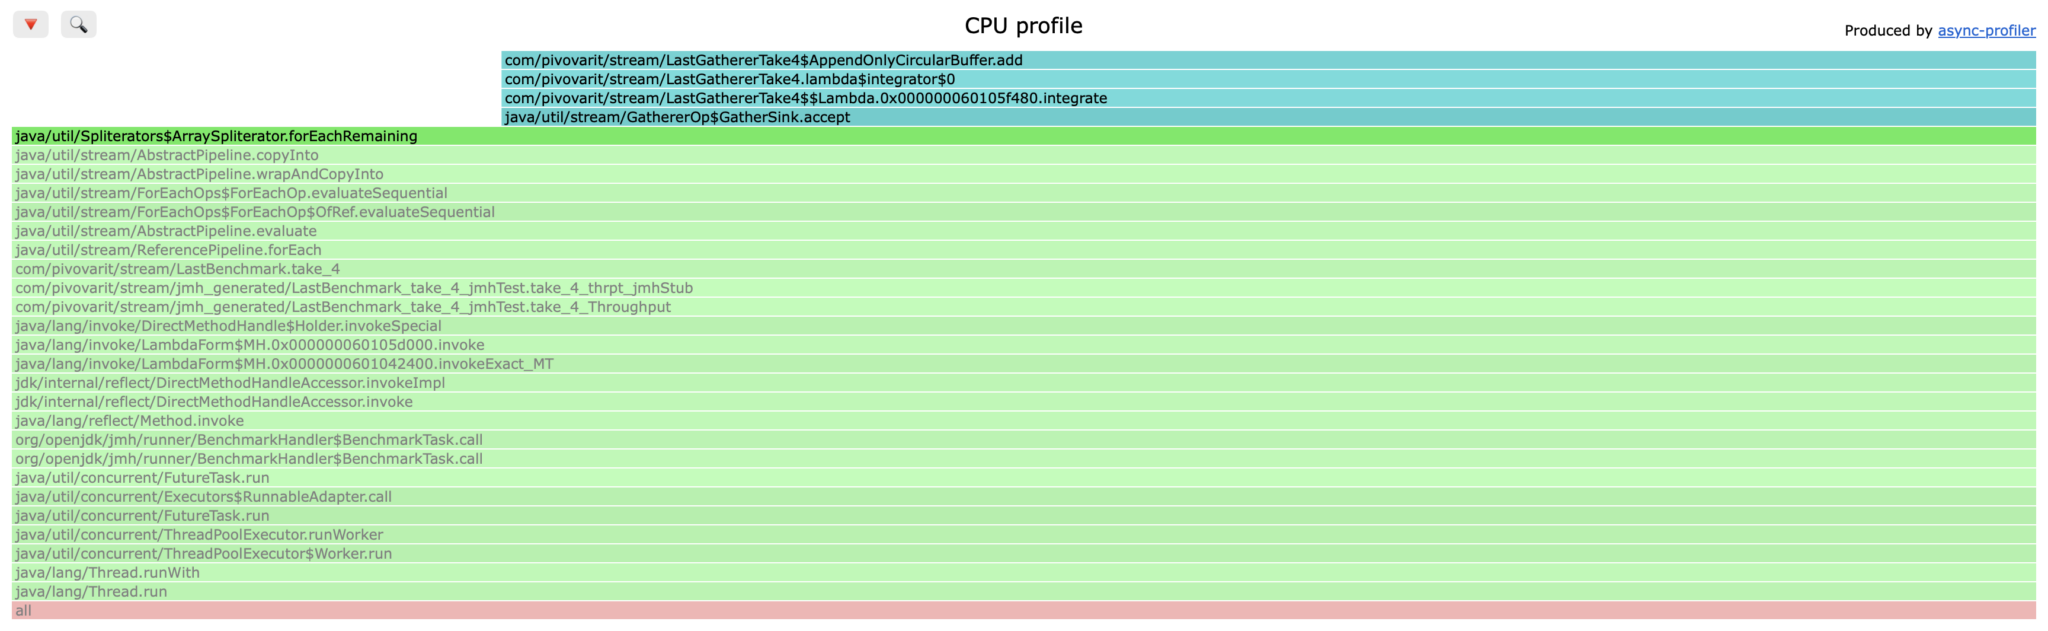
As you can see, AppendOnlyCircularBuffer.add method is the main bottleneck now (not counting Stream internals) and this is going to get tough now:
public void add(T element) {
buffer[endIdx++ % buffer.length] = element;
if (size < buffer.length) {
size++;
}
}
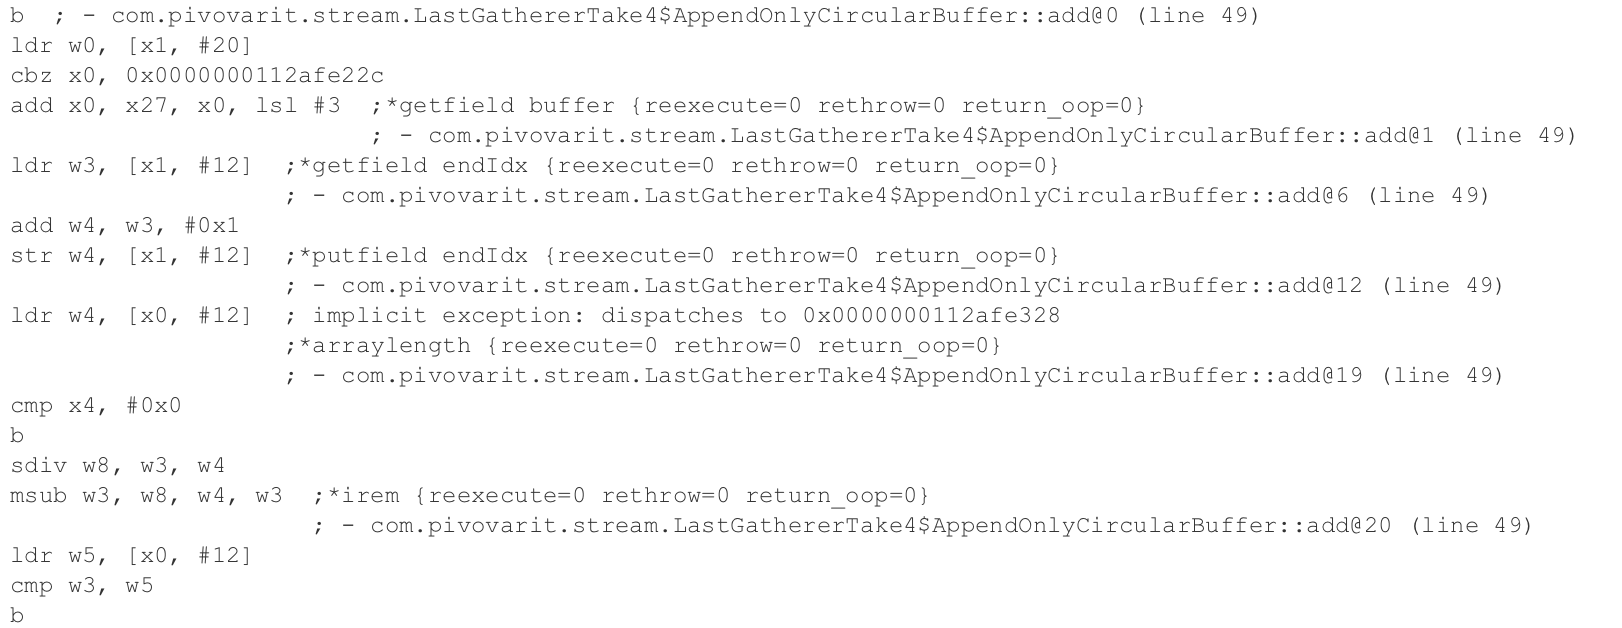
This is pretty lean already, but let’s go deeper and look up the assembly code produced by JIT:
And the most relevant part:
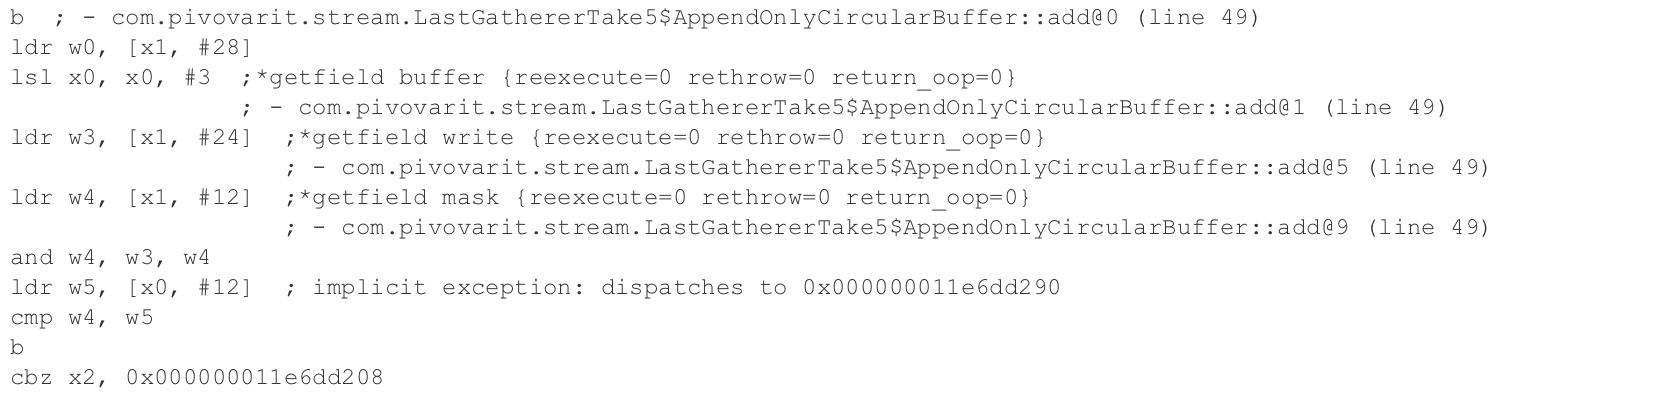
0x0000000112afe244: sdiv w8, w3, w4
0x0000000112afe248: msub w3, w8, w4, w3 ;*irem {reexecute=0 rethrow=0 return_oop=0}
Yes, it’s the modulo operation, which is implemented by a combination of two operations: sdiv and msub. According to Apple Silicon CPU Optimization Guide: 4.0, SDIV can take anywhere from 7 to 21 cycles and MSUB 1-2 cycles.
This is relatively expensive. Could we avoid paying this extra price?
One of the classic tricks involves replacing modulo operation with bit masking, but there’s a catch – it works only when modulus is a power of two. We can’t guarantee our modulus to be a power of two… or can we?
Nothing is stopping us from aligning our buffer’s size to the next available power of two. We’d just need to be careful to read last N elements properly.
First, we’d need to have an efficient method of finding it:
private static int nextPowerOfTwo(int x) {
int highest = Integer.highestOneBit(x);
return (x == highest) ? x : (highest << 1);
}
Now, we’d need to use it to initialize buffer and a mask:
int capacity = nextPowerOfTwo(Math.max(1, this.limit)); this.buffer = new Object[capacity]; this.mask = capacity - 1;
Our add() method becomes:
void add(T e) {
buffer[writeIdx & mask] = e;
writeIdx++;
if (size < limit) {
size++;
}
}
And we need a helper method for fetching an element at a given index:
T get(int index, int start) {
return (T) buffer[(start + index) & mask];
}
void pushAll(Gatherer.Downstream<? super T> ds) {
int start = (writeIdx - size) & mask;
for (int i = 0; i < size && !ds.isRejecting(); i++) {
if (!ds.push(get(i, start))) {
break;
}
}
}
We’re no longer relying on an expensive modulo operation, if we look up assembly produced by JIT, we can see that expensive instructions are gone, and we have a cheap AND(1-2 cycles) in their place:
Here’s the whole thing:
final class AppendOnlyCircularBuffer<T> {
private final Object[] buffer;
private final int mask;
private final int limit;
private int size;
private int writeIdx;
AppendOnlyCircularBuffer(int limit) {
this.limit = Math.max(0, limit);
int capacity = nextPowerOfTwo(Math.max(1, this.limit));
this.buffer = new Object[capacity];
this.mask = capacity - 1;
}
void add(T e) {
buffer[writeIdx & mask] = e;
writeIdx++;
if (size < limit) {
size++;
}
}
T get(int index, int start) {
return (T) buffer[(start + index) & mask];
}
void pushAll(Gatherer.Downstream<? super T> ds) {
int start = (writeIdx - size) & mask;
for (int i = 0; i < size && !ds.isRejecting(); i++) {
if (!ds.push(get(i, start))) {
break;
}
}
}
private static int nextPowerOfTwo(int x) {
int highest = Integer.highestOneBit(x);
return (x == highest) ? x : (highest << 1);
}
}
Let’s finally run it and see the benchmarks!
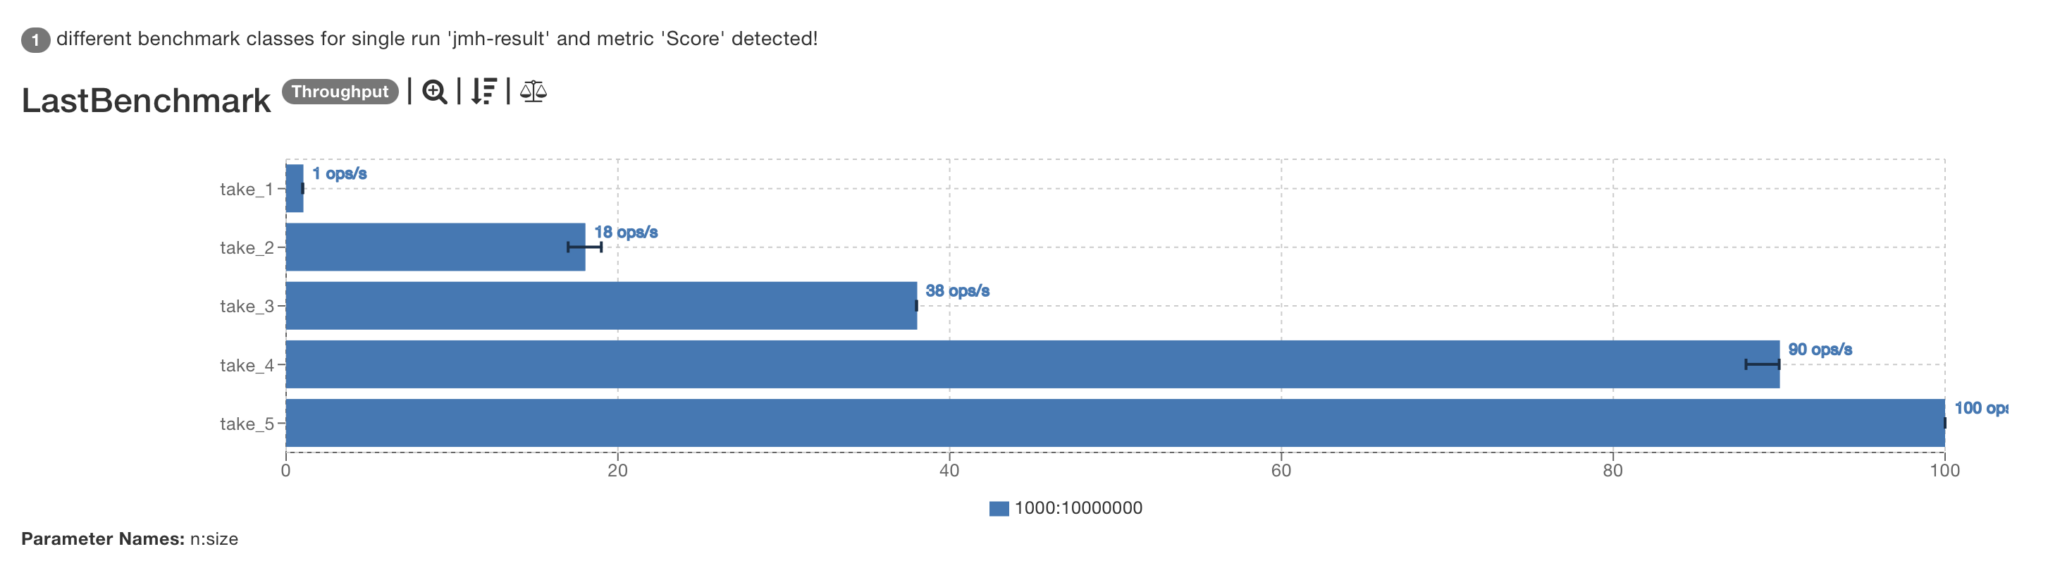
Benchmark (n) (size) Mode Cnt Score Error Units LastBenchmark.take_1 1000 10000000 thrpt 3 1,352 ± 0,232 ops/s LastBenchmark.take_2 1000 10000000 thrpt 3 17,885 ± 14,921 ops/s LastBenchmark.take_3 1000 10000000 thrpt 3 38,229 ± 1,599 ops/s LastBenchmark.take_4 1000 10000000 thrpt 3 89,591 ± 18,486 ops/s LastBenchmark.take_5 1000 10000000 thrpt 3 100,454 ± 1,073 ops/s
This is where I genuinely run out of good ideas. I had a couple of them (like avoiding masking on each access), but benchmarks proved those were not as good as I had thought.
This is one of the most important takeaways here – performance optimisation cycle involves measuring, finding a bottleneck, forming a hypothesis and then evaluating it.
A few months after publishing this article, I was struck by a sudden clarity.
Our implementation does a few things we never asked for.
For example, in the below, the size/limit comparison runs on every element even though once the buffer fills, it never does anything again:
void add(T e) {
buffer[writeIdx & mask] = e;
writeIdx++;
if (size < limit) {
size++;
}
}
We don’t really need this value until the very end so there’s no reason to maintain it element by element – we can keep a single monotonic counter and work out size once, in the finisher:
int size = (int) Math.min(count, limit);
That’s the easy one, but there’s also the other one, which is way more sneaky:
buffer[writeIdx & mask] = e
We know that writeIdx & mask always lands inside the array – this is the whole point of that power-of-two size adjustment. However, for JIT mask is just some int field initialized outside the analysis scope.
The irony is: we tried to help JIT by precomputing the mask, but it made things worse!
The solution is to just inline the computation:
However, there’s still an important corner case to have a look at… a single last element lookup!
If all we care about is just the last element, then we can ditch the circular buffer and use a simple object wrapper:
record SingleElementLastGatherer<T>() implements Gatherer<T, SingleElementLastGatherer.ValueHolder<T>, T> {
@Override
public Supplier<ValueHolder<T>> initializer() {
return ValueHolder::new;
}
@Override
public Integrator<ValueHolder<T>, T, T> integrator() {
return Integrator.ofGreedy((state, element, _) -> {
state.value = element;
state.isSet = true;
return true;
});
}
@Override
public BiConsumer<ValueHolder<T>, Downstream<? super T>> finisher() {
return (state, downstream) -> {
if (state.isSet && !downstream.isRejecting()) {
downstream.push(state.value);
}
};
}
static class ValueHolder<T> {
private T value;
private boolean isSet;
}
}
Benchmark results are now brutal:
Benchmark (n) (size) Mode Cnt Score Error Units circular_buffer 1 10000000 thrpt 3 100,963 ± 1,941 ops/s value_holder 1 10000000 thrpt 3 46678566,613 ± 340533,213 ops/s
So our ultimate solution is going to choose a strategy depending on the number of requested elements:
static <T> Gatherer<T, ?, T> last(int n) {
return switch (n) {
case 1 -> new SingleElementLastGatherer<>();
default -> new CircularBufferLastGatherer<>(n);
};
}
And this is precisely what I’m doing in more-gatherers – library filling in the Stream API gaps.
Now, let’s benchmark this against a similar utility from gatherers4j:
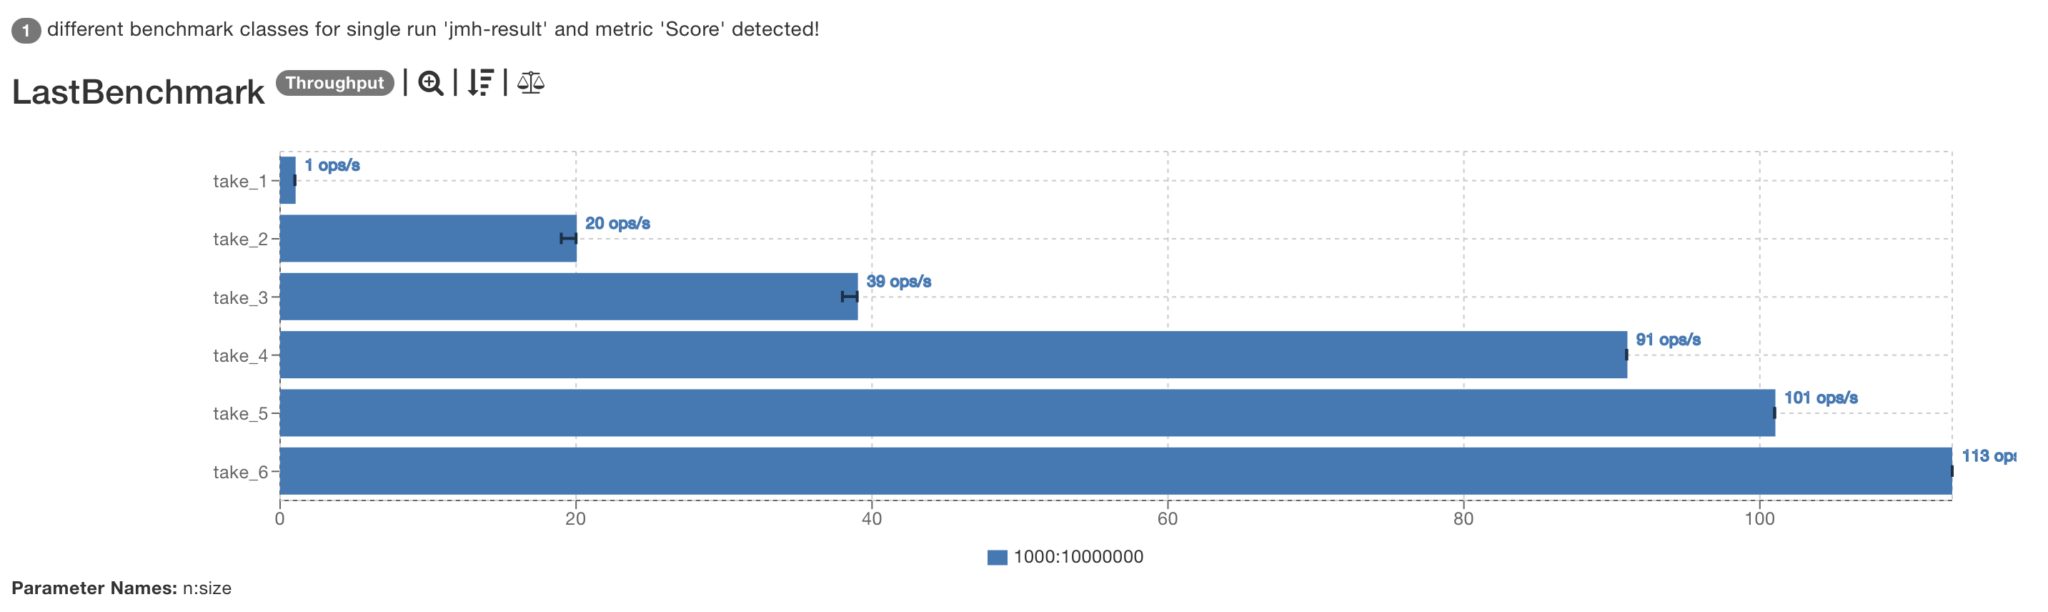
Benchmark (n) (size) Mode Cnt Score Error Units gatherers4j 1 10000000 thrpt 3 33,746 ± 1,762 ops/s gatherers4j 10 10000000 thrpt 3 32,794 ± 0,291 ops/s gatherers4j 100 10000000 thrpt 3 33,068 ± 0,135 ops/s gatherers4j 1000 10000000 thrpt 3 33,388 ± 0,754 ops/s more_gatherers 1 10000000 thrpt 3 46719898,497 ± 1661311,151 ops/s more_gatherers 10 10000000 thrpt 3 124,397 ± 13,737 ops/s more_gatherers 100 10000000 thrpt 3 124,481 ± 14,503 ops/s more_gatherers 1000 10000000 thrpt 3 124,480 ± 1,520 ops/s
Benchmarked on MacBook Pro Nov 2023 with Apple M3 Pro with 36GB RAM and Tahoe 26.2.
The code supporting this article along with benchmarking suite and full results can be found on GitHub. Here’s the more-gatherers library that features this Gatherer implementation.
The post Implementing Efficient Last Stream Elements Gatherer in Java appeared first on { 4Comprehension }.
]]>The post Avoiding Fake Drift in Unit Tests appeared first on { 4Comprehension }.
]]>This is impossible if you rely on mocks that verify whether some implementation details were called or not. Mocks push you to design internal components first.
A common concern, however, is that fake implementations can gradually drift away from the real ones, leading your tests to validate a homegrown blob rather than the real thing.
Let me show you a great trick that can minimize this drift.
First things first, let’s address a common misconception.
Many developers casually call any test double a mock, but that’s not accurate and can lead to misunderstandings.
What distinguishes a mock from a stub is method call expectations. We’re essentially verifying if some method of some component was called:
var emailService = Mockito.mock(EmailService.class);
// ...
Mockito.verify(emailService).send("alice@example.com", "Welcome!");
The irony is, if you’re using Mockito.mock() only to make it return predefined values, you’re not really creating a mock – you’ve created a stub instead.
When I say “avoid mocks” in favour of fakes, it’s not a contradiction. The key is that fakes help you test behavior, whereas mocks encourage coupling your tests to implementation details.
Now, let’s get to the main point.
In order for a fake to be useful, it needs to mirror the behaviour of the thing it’s supposed to fake.
Obviously, it doesn’t mean that you need to reimplement all Postgres functionality in your in-memory fake, and if some functionality is too hard to mimic, the pragmatic move would be to simply… just rely on integration tests instead.
As a rule of thumb, if a fake is not immediately obvious how to implement, you should probably not do it. Typical examples include geospatial queries, full-text search, or transaction isolation, and locking semantics, etc.
Luckily, most cases are much simpler than that.
Let’s start with a simple CRUD example:
public interface MovieRepository {
long save(Movie movie);
List<Movie> findAll();
List<Movie> findAllByType(String type);
Optional<Movie> findById(long id);
}
public record Movie(String title, String type) {
}
Now, the trick is to run both (real and fake) implementations through the same tests. This will make your fakes be as good as your actual tests.
Those tests define the behavioural contract of the component. Whatever passes them is, by definition, a valid implementation – whether it talks to Postgres or stores data in a list.
If the real implementation changes asserted behaviour, fakes are forced to catch up.
JUnit allows you to define test skeletons using abstract classes:
abstract class MovieRepositoryTest {
abstract MovieRepository getRepository();
private MovieRepository repository;
@BeforeEach
void setUp() {
repository = getRepository();
}
// compressed into a single case for convenience
@Test
void shouldSaveAndFetchMovie() {
var m1 = new Movie("Tenet", "NEW");
var m2 = new Movie("Casablanca", "OLD");
assertThat(repository.findAll()).isEmpty();
long id1 = repository.save(m1);
long id2 = repository.save(m2);
assertThat(repository.findAll())
.containsExactlyInAnyOrder(m1, m2);
assertThat(repository.findAllByType("NEW"))
.containsExactly(m1);
assertThat(repository.findById(id1)).hasValue(m1);
assertThat(repository.findById(id2)).hasValue(m2);
}
// ...
}
And here you go! Now you have a single test suite run against N different MovieRepository implementations, but… we have no actual implementations yet!
That’s also the beauty of that approach – focus on observable behaviour instead of implementation details enables true TDD where tests are written before internal components are even defined, and all that is left to do is to fill in the blanks.
Your tests are the arbiter of truth now.
Let’s fill in the blanks. We’re going to store our movies in a Postgres table:
CREATE TABLE movies
(
id SERIAL PRIMARY KEY,
title TEXT NOT NULL,
type TEXT NOT NULL
);
We’re going to use JDBI to implement the Postgres integration:
public class PostgresMovieRepository implements MovieRepository {
private final Jdbi jdbi;
public PostgresMovieRepository(DataSource dataSource) {
this.jdbi = Jdbi.create(dataSource)
.installPlugin(new PostgresPlugin());
}
@Override
public long save(Movie movie) {
return jdbi.withHandle(handle ->
handle.createQuery("INSERT INTO movies (title, type) VALUES (:title, :type) RETURNING id")
.bind("title", movie.title())
.bind("type", movie.type())
.mapTo(Long.class)
.one()
);
}
@Override
public List<Movie> findAll() {
return jdbi.withHandle(handle ->
handle.createQuery("SELECT title, type FROM movies")
.map(toMovie())
.list()
);
}
@Override
public List<Movie> findAllByType(String type) {
return jdbi.withHandle(handle ->
handle.createQuery("SELECT title, type FROM movies WHERE type = :type")
.bind("type", type)
.map(toMovie())
.list()
);
}
@Override
public Optional<Movie> findById(long id) {
return jdbi.withHandle(handle ->
handle.createQuery("SELECT title, type FROM movies WHERE id = :id")
.bind("id", id)
.map(toMovie())
.findOne()
);
}
private static RowMapper<Movie> toMovie() {
return (rs, _) -> new Movie(rs.getString("title"), rs.getString("type"));
}
}
We’ll wire it up in tests by using Testcontainers:
@Testcontainers
class PostgresMovieRepositoryTest extends MovieRepositoryTest {
private static final Logger log = LoggerFactory
.getLogger(PostgresMovieRepositoryTest.class);
@Container
static final PostgreSQLContainer postgres = new PostgreSQLContainer("postgres:18")
.withNetworkAliases("postgres")
.withDatabaseName("postgres")
.withUsername("postgres")
.withPassword("password")
.withLogConsumer(new Slf4jLogConsumer(log).withPrefix("postgres"))
.waitingFor(Wait.forListeningPort());
@Override
MovieRepository getRepository() {
return new PostgresMovieRepository(getDatasource());
}
private DataSource getDatasource() {
PGSimpleDataSource ds = new PGSimpleDataSource();
ds.setUrl(postgres.getJdbcUrl());
ds.setPassword(postgres.getPassword());
ds.setUser(postgres.getUsername());
Flyway.configure()
.dataSource(ds)
.locations("classpath:db/migration")
.load()
.migrate();
return ds;
}
}
And now, let’s implement our fake:
public class InMemoryFakeMovieRepository implements MovieRepository {
private final Map<Long, Movie> movies = new ConcurrentHashMap<>();
@Override
public long save(Movie movie) {
long id = ThreadLocalRandom.current().nextLong();
movies.put(id, movie);
return id;
}
@Override
public List<Movie> findAll() {
return List.copyOf(movies.values());
}
@Override
public List<Movie> findAllByType(String type) {
return movies.values().stream()
.filter(movie -> movie.type().equals(type))
.toList();
}
@Override
public Optional<Movie> findById(long id) {
return Optional.ofNullable(movies.get(id));
}
}
And wire it up in tests as well:
class FakeMovieRepositoryTest extends MovieRepositoryTest {
@Override
MovieRepository getRepository() {
return new InMemoryFakeMovieRepository();
}
}
As you can see, our fake is trivial, and with AI assistance, it takes seconds to implement.
We live in a non-ideal world, and there might be implementation-specific tests, which can be simply added to extending classes.
One day, someone realizes it’s probably a bad idea to allow blank titles and types to be persisted, and they write such a migration:
ALTER TABLE movies
ADD CONSTRAINT movies_title_not_empty CHECK (title <> '');
ALTER TABLE movies
ADD CONSTRAINT movies_type_not_empty CHECK (type <> '');
And adjust the real implementation:
@Override
public long save(Movie movie) {
try {
return jdbi.withHandle(handle ->
handle.createQuery("INSERT INTO movies (title, type) VALUES (:title, :type) RETURNING id")
.bind("title", movie.title())
.bind("type", movie.type())
.mapTo(Long.class)
.one()
);
} catch (UnableToExecuteStatementException e) {
if (e.getCause() instanceof PSQLException psqle) {
switch (psqle.getSQLState()) {
case "23502": throw new IllegalArgumentException("Movie title cannot be blank", e);
case "23514": throw new IllegalArgumentException("Movie title cannot be null", e);
}
}
throw new RuntimeException(e);
}
}
And as long as this is captured in tests:
@Test
void shouldRejectMovieWithEmptyTitle() {
assertThatThrownBy(() -> repository.save(new Movie("", "NEW")))
.isInstanceOf(IllegalArgumentException.class);
}
@Test
void shouldRejectMovieWithNullTitle() {
assertThatThrownBy(() -> repository.save(new Movie(null, "NEW")))
.isInstanceOf(IllegalArgumentException.class);
}
The drift is immediately caught and can be immediately corrected:
@Override
public long save(Movie movie) {
if (movie.title() == null || movie.title().isBlank()) {
throw new IllegalArgumentException("Movie title cannot be blank or null");
}
long id = ThreadLocalRandom.current().nextLong();
movies.put(id, movie);
return id;
}
Naturally, the fake doesn’t have to behave exactly like the real implementation in every detail – things like ID generation, ordering, or performance characteristics may differ. If you were paying attention, you could notice that even exception messages don’t align perfectly, but it’s fine.
What matters is that the fake satisfies the behavioral contract defined by your tests. In other words, a fake is as accurate as your tests require it to be.
Also, remember that the first validation should happen at the system boundary – database-level validation is the last line of defense.
The post Avoiding Fake Drift in Unit Tests appeared first on { 4Comprehension }.
]]>The post Accidental Time Travel with WireMock and SimpleDateFormat appeared first on { 4Comprehension }.
]]>This is a story about one of the latter, involving accidental time travel.
A common integration testing pattern involves stubbing external REST APIs, and Wiremock is one of the most popular tools for that, and my personal go-to choice. It can be easily set up with Testcontainers and JUnit5:
@Testcontainers
@ExtendWith(TestcontainersExtension.class)
class WireMockExampleTest {
@Container
static GenericContainer<?> wiremock = new GenericContainer<>("wiremock/wiremock:3.13.1")
.withExposedPorts(8080)
.withCommand("--port 8080");
@BeforeAll
static void setup() {
WireMock.configureFor(wiremock.getHost(), wiremock.getMappedPort(8080));
}
@Test
void example() {
WireMock.stubFor(WireMock.get("/hello")
.willReturn(WireMock.aResponse()
.withStatus(200)
.withBody("""
"message": "hello"
""")));
// ...
}
}
And now, we can point our code at WireMock and pretend it’s our external service and benefit from determinism!
Naturally, static responses won’t get us far, so soon we’ll need to start parameterizing:
WireMock.stubFor(WireMock.get("/timestamp")
.willReturn(WireMock.aResponse()
.withStatus(200)
.withBody("""
"value": "%s
"""
.formatted(Instant.now()))));
Right?
The problem with this approach is that Instant is resolved eagerly during the test setup and returned on every call, which is fine as long as we need a mere timestamp placeholder:
var baseUrl = "http://%s:%d".formatted(wiremock.getHost(), wiremock.getMappedPort(8080));
try (var client = HttpClient.newHttpClient()) {
System.out.println(client.send(HttpRequest.newBuilder()
.uri(URI.create(baseUrl + "/timestamp"))
.header("Accept", "application/json")
.build(), HttpResponse.BodyHandlers.ofString()).body());
Thread.sleep(1000);
System.out.println(client.send(HttpRequest.newBuilder()
.uri(URI.create(baseUrl + "/timestamp"))
.header("Accept", "application/json")
.build(), HttpResponse.BodyHandlers.ofString()).body());
}
// "value": "2025-07-08T17:30:13.415723Z
But what if we start relying on that value?
Let’s take this example, where we resolve timestamps twice and then use it for sorting our messages:
Set<Message> log = new HashSet<>();
log.add(new Message(Instant.now(), "first"));
var baseUrl = "http://%s:%d".formatted(wiremock.getHost(), wiremock.getMappedPort(8080));
try (var client = HttpClient.newHttpClient()) {
var json = client.send(HttpRequest.newBuilder()
.uri(URI.create(baseUrl + "/timestamp"))
.header("Accept", "application/json")
.build(), HttpResponse.BodyHandlers.ofString()).body();
log.add(new Message(parseKeyAsInstant(json.trim(), "value"), "second"));
}
log.stream()
.sorted(Comparator.comparing(Message::timestamp))
.forEach(System.out::println);
The result is obviously wrong! We got our messages in the wrong order!
Message[timestamp=2025-07-08T17:53:04.410Z, value=second] Message[timestamp=2025-07-08T17:53:04.581948Z, value=first]
This is precisely why it’s a bad idea for distributed systems to rely on the wall clock to establish global ordering. We have known this since the late 1970s.
Wiremock supports dynamic templating, which allows timestamps (and many other things) to be resolved exactly when the call happens – this is precisely what we need!
This can be achieved by placing {{now}} in the body! Problem solved… right?
Unfortunately, from time to time, messages can still appear out of order:
Message[timestamp=2025-07-08T19:14:48Z, value=second] Message[timestamp=2025-07-08T19:14:48.722149Z, value=first]
If you look closely, that’s because {{now}} defaults to ISO8601-compliant timestamp truncated to seconds. Ironically, this introduces a similar problem because those milliseconds matter here!
In order to increase the precision, we need to instruct Wiremock to use a custom format and make sure to include enough S:
{{now format="yyyy-MM-dd'T'HH:mm:ss.SSSSSS'Z'"}}
Unfortunately, again, the issue remains unsolved! Entries are still out of order from time to time, but at least the timestamp includes the desired precision:
Message[timestamp=2025-07-08T19:58:08.000519Z, value=second] Message[timestamp=2025-07-08T19:58:08.433615Z, value=first]
But… does it? Have a closer look at both timestamps. Can you see anything suspicious?
Let me help you. Here are the results from a few more runs:
Message[timestamp=2025-07-08T20:00:37.000086Z, value=second] Message[timestamp=2025-07-08T20:00:37.003508Z, value=first] Message[timestamp=2025-07-08T20:01:05.000155Z, value=second] Message[timestamp=2025-07-08T20:01:05.062106Z, value=first] Message[timestamp=2025-07-08T20:01:25.000413Z, value=second] Message[timestamp=2025-07-08T20:01:25.326382Z, value=first]
The milliseconds part of the timestamp of the second message seems to always start with a couple of zeros. Nothing really impossible, but statistically unlikely.
However, look at the microseconds part. This seems to be consistently higher than milliseconds part of the first timestamp!
WireMock, via Handlebars templating, relies on Java’s SimpleDateFormat, a legacy class from the pre-java.time era. This formatter doesn’t understand microsecond or nanosecond precision.
So when you specify more than 3 S characters in the format string, it doesn’t round or truncate as you might expect, but it zero-pads the millisecond value instead, leading to subtly wrong timestamps that look ok, but are slightly in the past:
var date = new Date(Instant.parse("2025-07-07T15:23:11.123000Z").toEpochMilli());
var formatter = new SimpleDateFormat("yyyy-MM-dd'T'HH:mm:ss.SSSSSS'Z'");
formatter.setTimeZone(TimeZone.getTimeZone("UTC"));
assertThat(formatter.format(date)).isEqualTo("2025-07-07T15:23:11.000123Z");
Such an important feature is not documented well by SimpleDateFormat. All you can find in the documentation is one vague line:
For formatting, the number of pattern letters is the minimum number of digits, and shorter numbers are zero-padded to this amount.
Luckily, it turns out that, if we want to make SimpleDateFormat return correct timestamps, all we need to do is reduce the number of Ss to match the maximum precision to avoid left-padding issues.
This is not the issue with DateTimeFormatter, which is right-padded:
var instant = Instant.parse("2025-07-07T15:23:11.123000Z");
var date = new Date(instant.toEpochMilli());
var simpleDateFormat = new SimpleDateFormat("yyyy-MM-dd'T'HH:mm:ss.SSS'Z'");
simpleDateFormat.setTimeZone(TimeZone.getTimeZone("UTC"));
var simpleDateFormatter = simpleDateFormat.format(date);
var dateTimeFormatter = DateTimeFormatter.ofPattern("yyyy-MM-dd'T'HH:mm:ss.SSSSSS'Z'")
.format(instant.atZone(ZoneOffset.UTC));
assertThat(simpleDateFormatter).isEqualTo("2025-07-07T15:23:11.123Z");
assertThat(dateTimeFormatter).isEqualTo("2025-07-07T15:23:11.123000Z");
There’s no practical reason to be using SimpleDateFormat in 2025 other than historical reasons.
That said, there’s a certain joy in debugging this kind of subtle failures but the moment this kind of issue appears in production that joy turns to dread, so to help prevent this kind of headache for others, I submitted two Pull Requests to WireMock that, once merged, should make this less of a problem for the future:
The post Accidental Time Travel with WireMock and SimpleDateFormat appeared first on { 4Comprehension }.
]]>The post Project Reactor: Thread-Locals and Context Propagation appeared first on { 4Comprehension }.
]]>Naturally, the approach has evolved significantly over the last couple of years. Let’s explore all the options!
What’s context? (the concept, not Context class). It’s essentially a collection of information that provides the relevant background or state needed to execute a task correctly.
Imagine you’re dining at a restaurant. Your table number, order details, and special requests all form an execution context.
One way of handling it would be to have your waiter memorize all the details, which would work great if you had guarantees that the same waiter would serve you during the whole task execution lifecycle dinner.
This is your ThreadLocal storage! And when you see ThreadLocal<X>, think Map<Thread, X>.
Now, what happens if your waiter suddenly passes out and someone else needs to take over?
public static void main(String[] args) throws InterruptedException {
// think Map<Waiter, OrderDetails>
ThreadLocal<OrderDetails> preferences = new ThreadLocal<>();
Thread waiter1 = Thread.ofPlatform().start(() -> {
preferences.set(new OrderDetails("lactose-free"));
System.out.printf("preferences: %s%n", preferences.get());
});
waiter1.join();
Thread waiter2 = Thread.ofPlatform().start(() -> {
System.out.printf("preferences: %s%n", preferences.get());
});
waiter2.join();
}
public record OrderDetails(String preferences) {
}
result:
preferences: OrderDetails[preferences=lactose-free] preferences: null
The second waiter doesn’t have the contextual information and it might lead to a disastrous dining experience.
In Reactor, tasks often jump between various workers and if the context isn’t passed properly, important details (like your lactose intolerance) might be lost:
public static void main(String[] args) {
ThreadLocal<String> preferences = new ThreadLocal<>();
preferences.set("lactose-free");
Mono.just("table 42")
.publishOn(Schedulers.newSingle("waiter"))
.map(i -> {
System.out.printf("preferences: %s, thread: %s%n", preferences.get(), Thread.currentThread().getName());
return i;
})
.publishOn(Schedulers.newSingle("barista"))
.map(i -> {
System.out.printf("preferences: %s, thread: %s%n", preferences.get(), Thread.currentThread().getName());
return i;
})
.block();
// preferences: null, thread: waiter-1
// preferences: null, thread: barista-2
}
The most obvious solution to the above problem, would be to either make waiters write everything on a piece of paper and pass it around, or simply use some centralized system for order management.
Reactor’s Context API is this centralized system. Instead of passing your preferences via ThreadLocal, you can write it to Reactor’s context using the contextWrite() method:
Mono.just("table 42")
// ...
.contextWrite(Context.of("preferences", "lactose-free"))
.block();
While writing to Reactor’s Context is trivial, it’s not that intuitive to access it!
If you look at map() signature, there’s no Context in the parameter list. However, there’s a smart trick to obtain access to a hidden second parameter – Mono.deferContextual(), which is used to wrap your lambda.
So, if you want to have a map() call like:
.map(i -> i.toUpperCase())
And you want to access the Context, object, you need to change map() to flatMap(), and wrap the call using deferContextual():
.flatMap(i -> Mono.deferContextual(ctx -> Mono.just(i.toUpperCase())))
If we now apply this to our original example, that’s what we get:
Mono.just("table 42")
.publishOn(Schedulers.newSingle("waiter"))
.flatMap(i -> Mono.deferContextual(ctx -> {
System.out.printf("preferences: %s, thread: %s%n", ctx.get("preferences"), Thread.currentThread().getName());
// ...
return Mono.just(i);
}))
.publishOn(Schedulers.newSingle("barista"))
.flatMap(i -> Mono.deferContextual(ctx -> {
System.out.printf("preferences: %s, thread: %s%n", ctx.get("preferences"), Thread.currentThread().getName());
// ...
return Mono.just(i);
}))
.contextWrite(Context.of("preferences", "lactose-free"))
.block();
// preferences: lactose-free, thread: waiter-1
// preferences: lactose-free, thread: barista-2
However, I bet some of you might start asking questions… why even use Context if we can easily resolve the value before entering the reactive stream?
That’s absolutely a valid question and… the way to go in cases where it’s possible to easily isolate the value in your context:
String preferences = "lactose-free";
Mono.just("table 42")
.publishOn(Schedulers.newSingle("waiter"))
.map(i -> {
System.out.printf("preferences: %s, thread: %s%n", preferences, Thread.currentThread().getName());
// ...
return i;
})
.publishOn(Schedulers.newSingle("barista"))
.map(i -> {
System.out.printf("preferences: %s, thread: %s%n", preferences, Thread.currentThread().getName());
// ...
return i;
})
.block();
// preferences: lactose-free, thread: waiter-1
// preferences: lactose-free, thread: barista-2
However, this is easy. The real fun starts when we need to integrate with tools that internally rely on thread-local values.
One of such classic ThreadLocal-based tools is… logging with Mapped Diagnostic Context (MDC), which enables adding contextual information to log statements without the need to pass it explicitly through method arguments.
Since MDC relies on ThreadLocal storage, using it in a reactive environment where execution may switch threads can lead to lost or inconsistent context.
Imagine, we access an HTTP request and start by saving tenant information to MDC.
That’s our logback.xml configuration:
<?xml version="1.0" encoding="UTF-8" ?>
<configuration>
<appender name="CONSOLE" class="ch.qos.logback.core.ConsoleAppender">
<layout>
<Pattern>%-4r [%thread] %-5level tenantId:%X{tid:-!missing!} - %msg%n</Pattern>
</layout>
</appender>
<root level="info">
<appender-ref ref="CONSOLE"/>
</root>
</configuration>
And that’s the actual code:
public static void main(String[] args) {
MDC.put("tid", "4comprehension");
Mono.just("table 42")
.publishOn(Schedulers.newSingle("waiter"))
.map(i -> {
log.info("processing i");
// ...
return i;
})
.publishOn(Schedulers.newSingle("barista"))
.map(i -> {
log.info("processing i");
// ...
return i;
})
.block();
}
Unfortunately, we can see in logs that tenant information is missing:
// 124 [waiter-1] INFO tenantId:!missing! - processing i // 125 [barista-2] INFO tenantId:!missing! - processing i
The only way to go forward is to restore the thread-local value before we execute our lambda expressions.
If we reuse what we learned before, we get:
MDC.put("tid", "4comprehension");
Mono.just("table 42")
.publishOn(Schedulers.newSingle("waiter"))
.flatMap(i -> Mono.deferContextual(ctx -> {
try (var ignored = MDC.putCloseable("tid", ctx.get("tid"))) {
log.info("processing i");
// ...
return Mono.just(i);
}
}))
.publishOn(Schedulers.newSingle("barista"))
.flatMap(i -> Mono.deferContextual(ctx -> {
try (var ignored = MDC.putCloseable("tid", ctx.get("tid"))) {
log.info("processing i");
// ...
return Mono.just(i);
}
}))
.contextWrite(Context.of("tid", MDC.get("tid")))
.block();
// 157 [waiter-1] INFO tenantId:4comprehension - processing i
// 159 [barista-2] INFO tenantId:4comprehension - processing i
As you can see, the code is getting quite verbose, but at least MDC works!
Luckily, we can leverage execute-around/template method design pattern here:
static <T, R> Function<? super T, Mono<? extends R>> withMDC(Function<? super T, ? extends R> mapper) {
Objects.requireNonNull(mapper);
return i -> Mono.deferContextual(ctx -> {
try (var ignored = MDC.putCloseable("tid", ctx.get("tid"))) {
return Mono.just(mapper.apply(i));
}
});
}
And now it looks way better:
.flatMap(withMDC(i -> {
log.info("processing i");
// ...
return Mono.just(i);
}))
doOnNext()Trying to access Context object from doOnNext() is tricky… to be more precise, it’s actually not possible.
However, you can use a slightly different method – doOnEach() to achieve the same result.
The main difference is that doOnEach() is called for every signal flowing through our stream, so we need to simply check if we’re processing the right signal type.
So, instead of:
.doOnNext(i -> log.info("processing :{}", i))
We’d need to do:
.doOnEach(signal -> {
if (signal.isOnNext()) {
log.info("processing :{}", signal.get());
}
})
And Context is accessible directly from the Signal object:
MDC.put("tid", "4comprehension");
Mono.just("table 42")
.publishOn(Schedulers.newSingle("waiter"))
.doOnEach(signal -> {
if (signal.isOnNext()) {
try (var ignored = MDC.putCloseable("tid", signal.getContextView().get("tid"))) {
log.info("processing :{}", signal.get());
}
}
})
.contextWrite(Context.of("tid", MDC.get("tid")))
.block();
Which we can again extract to a utility method:
static <T> Consumer<Signal<? extends T>> withMDC(Consumer<? super T> consumer) {
return signal -> {
if (signal.isOnNext()) {
try (var ignored = MDC.putCloseable("tid", signal.getContextView().get("tid"))) {
consumer.accept(signal.get());
}
}
};
}
And the final result is:
Mono.just("table 42")
.publishOn(Schedulers.newSingle("waiter"))
.doOnEach(withMDC(c -> log.info("processing :{}", c)))
.contextWrite(Context.of("tid", MDC.get("tid")))
.block();
If the above feels like too much hassle, there’s another option to try – automatic context propagation!
As the name suggests, Project Reactor can automatically restore thread-local values once we provide it with a ThreadLocalAccessor instance that defines basic CRUD operations on a thread-local resource.
In order to enable this magic, we need to add an additional dependency: io.micrometer:context-propagation, and use a magical incantation:
Hooks.enableAutomaticContextPropagation();
And then, register a custom ThreadLocalAccessor:
ContextRegistry.getInstance().registerThreadLocalAccessor(new ThreadLocalAccessor<String>() {
@Override
public Object key() {
return "tid";
}
@Override
public String getValue() {
return MDC.get("tid");
}
@Override
public void setValue(String value) {
MDC.put("tid", value);
}
@Override
public void setValue() {
MDC.remove("tid");
}
});
And then, if we simply run our original example, thread-local values are properly set!
Complete code:
record Example() {
private static final Logger log = LoggerFactory.getLogger(Example.class);
public static void main(String[] args) {
Hooks.enableAutomaticContextPropagation();
ContextRegistry.getInstance().registerThreadLocalAccessor(new ThreadLocalAccessor<String>() {
@Override
public Object key() {
return "tid";
}
@Override
public String getValue() {
return MDC.get("tid");
}
@Override
public void setValue(String value) {
MDC.put("tid", value);
}
@Override
public void setValue() {
MDC.remove("tid");
}
});
MDC.put("tid", "4comprehension");
Mono.just("table 42")
.publishOn(Schedulers.newSingle("waiter"))
.map(i -> {
log.info("processing i");
// ...
return i;
})
.publishOn(Schedulers.newSingle("barista"))
.doOnNext(i -> log.info("processing i: {}", i))
.block();
}
}
However, note that this approach might end up being more expensive than the manual approach due to inducing potentially unnecessary operations on our thread-local resource.
Keep in mind that this is very contextual (pun intended) and requires analysis on a case-by-case basis.
Before reaching for automatic context propagation, there’s an important caveat that’s easy to miss: Hooks.enableAutomaticContextPropagation() is a JVM-wide, static, mutable global.
Calling it affects every Reactor pipeline in the entire process – not just the one you’re working on. This has a few practical consequences worth understanding.
The above can be found on GitHub.
The post Project Reactor: Thread-Locals and Context Propagation appeared first on { 4Comprehension }.
]]>The post Has my JVM Lost Exception Stacktraces?! appeared first on { 4Comprehension }.
]]>Exceptions are not ordinary POJOs. I mean, they mostly are, but with one extra tiny detail:
public synchronized Throwable fillInStackTrace() {
// ...
}
This makes exception creation proportional to stack depth because the JVM must eagerly walk the call stack and materialize StackTraceElement objects, and in the world of contemporary frameworks, those can get pretty impressive!

Internally, it’s calling a native method which doesn’t speed things up.
That’s why many performance-critical libraries prefer skipping collecting stack traces, which makes those exceptions easily cacheable.
Netty’s Norman Maurer did benchmark that some time ago, and, as you can see, the difference is significant:
As you can see, the concept is quite trivial. If you want to leverage it, it’s enough to create a static exception instance, reset the stacktrace, and… keep throwing it:
class StaticStacklessExceptionExample {
private static final NullPointerException NULL_POINTER_EXCEPTION = new NullPointerException();
static {
NULL_POINTER_EXCEPTION.setStackTrace(new StackTraceElement[0]);
}
public static void main(String[] args) {
throw NULL_POINTER_EXCEPTION;
}
}
Keep in mind that this pattern is typically reserved for internal, domain-specific exceptions in low-level libraries! In other words, don’t use it until you can prove that exception throwing is your bottleneck.
However, this is where the fun starts. The JVM knows that collecting stacktraces is expensive, and it can optimize them on the spot when they’re needed. By “optimizing”, I mean “dropping”.
Let’s try to reproduce it! In order to do this, we’ll induce a NullPointerException by calling a method on a null String repeatedly and log the results when the stack trace is empty:
class StacktraceDropExample {
public static void main(String[] args) {
NullPointerException previous = null;
String foo = null;
for (int i = 0; i < Integer.MAX_VALUE; i++) {
try {
foo.toUpperCase();
} catch (NullPointerException e) {
if (e.getStackTrace().length == 0) {
System.out.printf("Stacktrace dropped at iteration %d%n", i);
if (previous != null) {
System.out.printf("Last stacktrace: %s%n",
Arrays.toString(previous.getStackTrace()));
}
System.out.printf("New stacktrace: %s%n",
Arrays.toString(e.getStackTrace()));
return;
}
previous = e;
}
}
}
}
Here’s my result
Stacktrace dropped at iteration 41984 Last stacktrace: [com.pivovarit.exception.StacktraceDropExample.main(StacktraceDropExample.java:14)] New stacktrace: []
As you can see, we forced the JVM to drop stacktraces of that exception after 41984 iterations! Amazing!
What’s more, let’s try to spice things up. Instead of printing stacktraces, let’s try to collect all witnessed exceptions and count distinct instances according to reference equality:
class ExceptionCacheExample {
public static void main(String[] args) {
var exceptions = Collections.newSetFromMap(new IdentityHashMap<>());
String foo = null;
for (int i = 0; i < Integer.MAX_VALUE; i++) {
try {
foo.toUpperCase();
} catch (NullPointerException e) {
exceptions.add(e);
}
}
System.out.println(exceptions.size());
}
}
Note that we can’t use classic HashSet, since we need to rely on reference equality:
Collections.newSetFromMap(new IdentityHashMap<>());
Let’s run it Integer.MAX_VALUE times:
99327
Despite 2147483647 iterations, there were only 99327 distinct instances! This means that JVM started caching exceptions and reusing them!
This behaviour is configurable and can be turned off by using the -XX:-OmitStackTraceInFastThrow switch. When we start the above with this argument, the first example doesn’t print anything, and the second one… consumes all the heap space:
Exception in thread "main" java.lang.OutOfMemoryError: Java heap space at com.pivovarit.exception.ExceptionCacheExample.main(ExceptionCacheExample.java:14)
Creating stackless reusable static instances of Exceptions is one of the classic performance tricks, which JVM can apply automatically under certain circumstances. This can be turned off, but I wouldn’t recommend it since it makes JVMs more resilient when exceptions start falling from the sky.
Also, when you start dropping stack traces on your own, make sure that it brings more value than stack traces themselves, which are quite useful.
The complete example can be found on GitHub.
The post Has my JVM Lost Exception Stacktraces?! appeared first on { 4Comprehension }.
]]>The post Nulls Against Collectors appeared first on { 4Comprehension }.
]]>This is one of the most basic and mocked ways of converting Streams to Lists – I’m sure you know what I’m talking about, and I’m sure you’ve done this hundreds of times already:
stream().map(...).collect(Collectors.toList());
You might ask… what’s wrong with it? And the answer is: absolutely nothing.
However, you need to accept the fact that the result List is mutable(not enforced by any contract), supports null values, and that the syntax is overly verbose:
https://twitter.com/lukaseder/status/639802749878697984
Luckily, in JDK10 and JDK16, we got alternatives that deal with the mentioned issues… and also brought some confusion.
Since JDK10, converting a Stream instance into an unmodifiable List is as easy as applying a dedicated Collector:
List<Integer> l = Stream.of(1).collect(Collectors.toUnmodifiableList());
However, this is not as easy as replacing every Collectors.toList() call with Collectors.toUnmodifiableList(). It turns out that the Collector returns a List that does not support null values!
And we learn it the hard way:
Stream.of(1, 2, null).collect(Collectors.toUnmodifiableList()).add(2); // java.lang.NullPointerException // at java.base/java.util.Objects.requireNonNull(Objects.java:208)
If you want to have an unmodifiable List with null values support, you need to fall back to the JDK8 unmodifiable List trick:
List<Integer> l = Stream.of(1, 2, null)
.collect(Collectors.collectingAndThen(
Collectors.toList(),
Collections::unmodifiableList));
However, if you’re on a JDK16+, there’s a better way.
Luckily, JDK16 brought in the most convenient of all options: Stream#toList.
This is not a Collector but a convenience method callable right on a Stream instance:
List<Integer> l = Stream.of(1, 2, null).toList();
The resulting List is unmodifiable and supports null values (however, this is not explicitly enforced by the contract).
But, I would be cautious when blindly replacing Collectors.toList() and Collectors.toUnmodifiableList() with it because of two reasons:
Unfortunately, IntelliJ IDEA will suggest converting from one to the other right away, which can backfire at times:
Two new additions to Stream API provide convenient ways of converting a Stream instance into a List.
However, those should be used carefully since they are not drop-in replacements due to slightly different semantics.
The post Nulls Against Collectors appeared first on { 4Comprehension }.
]]>