AI SEO Content Quality Analyzer for WordPress Using PHP and OpenAI
I've used Yoast and Rank Math for years. Both are solid, but they kept telling me what was wrong, keyword density too low, meta too long without ever telling me why the content wasn't ranking. So I built something different.
This tutorial walks through building a WordPress plugin that uses OpenAI to analyze your post content the way a search engine actually thinks about it, checking search intent alignment, content depth, and semantic quality then gives you a score and specific suggestions right inside the post editor.
Once installed, the plugin analyzes each post and:
- Analyze the alignment of search intent
- Verify the content's completeness
- Identify generic or thin sections
- Examine the quality of semantic SEO
- Make suggestions for headings, FAQs, and enhancements
- Give an AI SEO score between 0 and 100.
This is much more advanced than conventional SEO plugins.
Requirements
- WordPress 6.x
- PHP 8.1+
- Composer (optional)
- An OpenAI API key
- Basic WordPress plugin development knowledge
Step 1: Create the WordPress Plugin
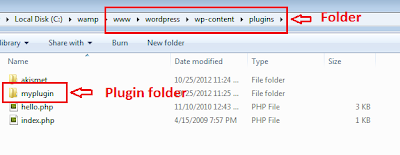
Create a new plugin folder:
wp-content/plugins/ai-seo-analyzer/
Create ai-seo-analyzer.php
        /**
        * Plugin Name: AI SEO Content Quality Analyzer
        * Description: Analyzes WordPress content quality using AI and provides SEO recommendations.
        * Version: 1.0.0
        * Author: phpcmsframework.com
        */

        if (!defined('ABSPATH')) exit;
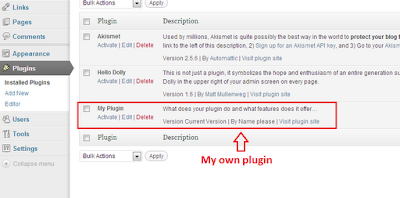
Activate the plugin from WP Admin → Plugins.
Step 2: Add Meta Box in Post Editor
        add_action('add_meta_boxes', function () {
            add_meta_box(
                'ai_seo_box',
                'AI SEO Content Analyzer',
                'ai_seo_meta_box',
                ['post', 'page'],
                'side',
                'high'
            );
        });

        function ai_seo_meta_box($post)
        {
            echo '<button class="button button-primary" id="ai-seo-analyze">Analyze Content</button>';
            echo '<div id="ai-seo-result" style="margin-top:10px;"></div>';
        }
Step 3: AJAX Handler (PHP Only)
        add_action('wp_ajax_ai_seo_analyze', 'ai_seo_analyze');

        function ai_seo_analyze()
        {
            $postId = intval($_POST['post_id']);
            $post = get_post($postId);

            if (!$post) {
                wp_send_json_error('Post not found');
            }

            $analysis = ai_seo_analyze_content($post->post_title, $post->post_content);

            wp_send_json_success($analysis);
        }
Step 4: AI Content Analysis Function
        function ai_seo_analyze_content($title, $content)
        {
            $prompt = "
        Analyze the SEO quality of the following content.

        Return JSON with:
        - seo_score (0-100)
        - intent_match (Good/Average/Poor)
        - strengths (list)
        - weaknesses (list)
        - improvement_suggestions (list)
        - suggested_headings
        - suggested_faqs

        Title:
        $title

        Content:
        " . strip_tags($content);

            $payload = [
                'model' => 'gpt-4o-mini',
                'messages' => [
                    ['role' => 'system', 'content' => 'You are an expert SEO auditor.'],
                    ['role' => 'user', 'content' => $prompt]
                ],
                'temperature' => 0.2
            ];

            $ch = curl_init('https://api.openai.com/v1/chat/completions');
            curl_setopt_array($ch, [
                CURLOPT_RETURNTRANSFER => true,
                CURLOPT_HTTPHEADER => [
                    'Content-Type: application/json',
                    'Authorization: Bearer ' . getenv('OPENAI_API_KEY')
                ],
                CURLOPT_POST => true,
                CURLOPT_POSTFIELDS => json_encode($payload)
            ]);

            $response = json_decode(curl_exec($ch), true);
            curl_close($ch);

            return json_decode($response['choices'][0]['message']['content'], true);
        }
Step 5: JavaScript for Admin UI
        add_action('admin_footer', function () {
        ?>
        <script>
        jQuery(function ($) {
            $('#ai-seo-analyze').on('click', function () {
                $('#ai-seo-result').html('Analyzing...');
                $.post(ajaxurl, {
                    action: 'ai_seo_analyze',
                    post_id: $('#post_ID').val()
                }, function (res) {
                    if (res.success) {
                        let r = res.data;
                        $('#ai-seo-result').html(`
                            <strong>SEO Score:</strong> ${r.seo_score}/100<br><br>
                            <strong>Strengths:</strong><ul>${r.strengths.map(i => `<li>${i}</li>`).join('')}</ul>
                            <strong>Weaknesses:</strong><ul>${r.weaknesses.map(i => `<li>${i}</li>`).join('')}</ul>
                        `);
                    } else {
                        $('#ai-seo-result').html('Error analyzing content.');
                    }
                });
            });
        });

        <?php
        });
How It Works (Editor View)
- Open any post or page
- Click “Analyze Content”
- AI reviews search intent, depth, structure
- You get a quality score + fixes
- Update content → re-analyze
Smart Enhancements You Can Add
- Compare against top-ranking competitor URLs
- Detect keyword stuffing vs natural language
- Analyze internal linking opportunities
- Auto-generate missing sections
- Save score history per post
- Bulk audit via WP-CLI
Security & Performance Notes
- Store API key in wp-config.php
- Limit analysis frequency
- Strip shortcodes before sending content
- Cache analysis results
- Use nonces for AJAX calls in production
Automatically Create a Bit.ly URL for WordPress Posts
In order to make use of Bit.ly's API, you'll need to:
Now that you have a login and API key, open your WordPress theme's functions.php (just create one if you don't have one) and paste the following code at the top of the document:
//create bit.ly url
function bitly()
{
//login information
$url = get_permalink(); //generates wordpress' permalink
$login = 'imjp'; //your bit.ly login
$apikey = 'R_11882237eac772b5d6126e895a06c43f'; //bit.ly apikey
$format = 'json'; //choose between json or xml
$version = '2.0.1';
//create the URL
$bitly = 'http://api.bit.ly/shorten?version='.$version.'&longUrl='.urlencode($url).'&login='.$login.'&apiKey='.$apikey.'&format='.$format;
//get the url
//could also use cURL here
$response = file_get_contents($bitly);
//parse depending on desired format
if(strtolower($format) == 'json')
{
$json = @json_decode($response,true);
echo $json['results'][$url]['shortUrl'];
}
else //xml
{
$xml = simplexml_load_string($response);
echo 'http://bit.ly/'.$xml->results->nodeKeyVal->hash;
}
}
The code above is pretty much self explanatory.
Don't forget to change the login and apikey strings to match yours.
I hope you guys found this article useful.
Create a XML and JSON web service using WordPress
Create a wordpress page and call it json or whatever you like and then add a json.php file within your wordpress theme then add the code below.
<?php
/*
Template Name: json
*/
/* require the user as the parameter */
if(isset($_GET['user']) && intval($_GET['user'])) {
/* soak in the passed variable or set our own */
$number_of_posts = isset($_GET['num']) ? intval($_GET['num']) : 10; //10 is the default
$format = strtolower($_GET['format']) == 'json' ? 'json' : 'xml'; //xml is the default
$user_id = intval($_GET['user']); //no default
/* connect to the db */
global $wpdb;
/* create one master array of the records */
$posts = array();
$the_query = new WP_Query( "author=$user_id&showposts=$number_of_posts" );
while ( $the_query->have_posts() ) : $the_query->the_post();
// add any extras that you would like to this array
$posts[] = array('title'=> get_the_title(),'content'=>get_the_content(),'link'=>get_permalink(get_the_ID()));
endwhile;
/* output in necessary format */
if($format == 'json') {
header('Content-type: application/json');
echo json_encode(array('posts'=>$posts));
}
else {
header('Content-type: text/xml');
echo '<posts>';
foreach($posts as $index => $post) {
if(is_array($post)) {
foreach($post as $key => $value) {
echo '<',$key,'>';
if(is_array($value)) {
foreach($value as $tag => $val) {
echo '<',$tag,'>',htmlentities($val),'</',$tag,'>';
}
}
echo '</',$key,'>';
}
}
}
echo '</posts>';
}
/* reset query */
wp_reset_postdata();
}
http://example.co.uk/json/?user=1&num=3&format=json
Adding Mailchimp forms to Wordpress site
Collecting an email list is not an easy task. Many email newsletter companies will provide you a link to a page that contains an email capture form that is hosted by them. This means every time a visitor tries to sign up to your mailing list they will have to exit your site.
Adding a New MailChimp Form
To add a new MailChimp list you will need to obtain an API key and the List Id of the specific list you want to display on your site. This setup enables you to host multiple MailChimp lists/forms even from multiple accounts.
- Navigate to Big MailChimp page
- Click Add New
- Enter your Api Key and MailChimp List id
- Modify the submit button text or leave the default (Subscribe to list)
- Decide whether you want the double opt-in enabled or disabled
- Click Save Changes
Publishing MailChimp Forms
In pages/posts
Big Mailchimp adds a new meta-box in post/page edit page alongside of your WYSIWIG editor for ease of access. Use the Screen Options on the top right corner of the page to enable/disable this box. Use Big MailChimp meta box to select the list you want to display on a page/post. Toggle the checkbox to only display required fields if necessary. Click `Insert Into Page`. This will produce the shortcode and place it on the visual editor.

The generated shortcode format is
...
[bigmailchimp list_id=# required_fields=1]
...
The shortcode identifier is `bigmailchimp`. It takes two parameters list_id and required_fields.
list_id (required) The id of the list saved in your database.
default: none
required_fields (optional) Whether to show required fields only or display the entire form. Possible values are 0 or 1
default: 0
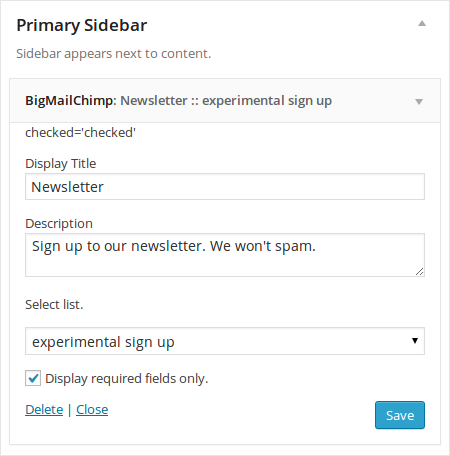
Display MailChimp forms in widget areas
Navigate to the Appearance menu and select Widgets. Under Available Widgets drag and drop the Big MailChimp widget into a widget area (Sidebar/Footer Area). Here you can add a title and a brief description to your form. Select the list/form you want to display from the widget settings and decide to display the full form or just the required fields. Repeat these step to add other lists/forms.
WP Super Cache - Wordpress caching plugin free download
The static html files will be served to the vast majority of your users, but because a user's details are displayed in the comment form after they leave a comment those requests are handled by the legacy caching engine. Static files are served to:
- Users who are not logged in.
- Users who have not left a comment on your blog.
- Or users who have not viewed a password protected post.
99% of your visitors will be served static html files. Those users who don't see the static files will still benefit because they will see different cached files that aren't quite as efficient but still better than uncached. This plugin will help your server cope with a front page appearance on digg.com or other social networking site.
If for some reason "supercaching" doesn't work on your server then don't worry. Caching will still be performed, but every request will require loading the PHP engine. In normal circumstances this isn't bad at all. Visitors to your site will notice no slowdown or difference. Supercache really comes into it's own if your server is underpowered, or you're experiencing heavy traffic. Super Cached html files will be served more quickly than PHP generated cached files but in every day use, the difference isn't noticeable.
The plugin serves cached files in 3 ways (ranked by speed):
- Mod_Rewrite: The fastest method is by using Apache mod_rewrite (or whatever similar module your web server supports) to serve "supercached" static html files. This completely bypasses PHP and is extremely quick. If your server is hit by a deluge of traffic it is more likely to cope as the requests are "lighter". This does require the Apache mod_rewrite module (which is probably installed if you have custom permalinks) and a modification of your .htaccess file. Visits by anonymous or unknown users will be served this way.
- PHP: Supercached static files can now be served by PHP. The plugin will serve a "supercached" file if it exists and it's almost as fast as the mod_rewrite method. It's easier to configure as the .htaccess file doesn't need to be changed. You still need a custom permalink. You can keep portions of your page dynamic in this caching mode. Your server may not cope as well with a really large amount of traffic. (You're gaming Digg aren't you? You'll need mod_rewrite, the rest of us are ok with PHP!)
- Legacy caching: This is mainly used to cache pages for known users. These are logged in users, visitors who leave comments or those who should be shown custom per-user data. It's the most flexible caching method but also the slowest. As each page is different it's often better not to cache pages for these users at all and avoid legacy caching. Legacy caching will also cache visits by unknown users if this caching mode is selected. You can have dynamic parts to your page in this mode too.
If you're new to caching use PHP caching. It's easy to set up and very fast. Avoid legacy caching if you can.
For Installation steps Click Here
To download this plugin Click Here
Steps to Protect the Uploads Folder in WordPress
By default WordPress is configured to use the 'wp-content/uploads' directory. You can think of it as 'box' where your media files or images are saved when you upload them while creating your articles under WordPress.
This example will only accept images files. If you want to upload other file types, add the file extensions to the list.
# BEGIN WordPress
<Files ~ ".*..*">
Order Allow,Deny
Deny from all
</Files>
<FilesMatch ".(jpg|jpeg|jpe|gif|png|tif|tiff)$">
Order Deny,Allow
Allow from all
</FilesMatch>
# END WordPress
Follow the above steps and you will have a more secure WordPress uploads folder that you can start using to be able to save those photos you need to include into your blog/site articles.
Restrict Access to WordPress files using htaccess
Htacess to restrict access to a single WordPress file
In the .htaccess file example below, we are restricting access to the WordPress wp-config.php file.
<files wp-config.php>
order allow,deny
deny from all
</files>
The .htaccess file in the above example should be uploaded to the same directory where the file resides, in this case in the WordPress root directory. If you would like to restrict access to any other individual file on your website change the file name in the first line and upload the .htaccess file to the directory where the file resides. Keep in mind that if you already have an .htaccess file in that directory, simply add the above directives at the end of the .htaccess file.
Restrict file access to by file type with htaccess
To restrict access to a variety of files which share the same file extension, you can use the syntax of the .htaccess file below. Such .htaccess file should be uploaded to the root of your website to apply file restriction site wide. In the below example, we are restricting access to .htaccess files, .htpasswd files, log files and ini files.
<FilesMatch "\.(htaccess|htpasswd|log|ini)$">
Order Allow,Deny
Deny from all
</FilesMatch>
If you would like to restrict access to more file extensions than the ones specified above, add the extension to the first line between the brackets next to the ini extension.
Fix Too Many Redirects Loop Error in WordPress
The page isn't redirecting properly, This web page has a redirect loop, Error 310 (net::ERR_TOO_MANY_REDIRECTS) or an HTTP 404 error.
This is not a WordPress problem or error, but is an issue related to the configuration of your web server or hosting provider. If you do encounter such error, you can solve the issue by adding 1 line to the WordPress root .htaccess file. Follow the below step by step procedure to solve such issue:
- Connect to your WordPress website using FTP.
- Download the .htaccess file from the root of your WordPress website.
- Add the below line before the WordPress rules (above the # BEGIN WordPress line)
ErrorDocument 401 default
That does the trick. Now your WordPress administrator dashboard is protected with double authentication.
Create Ajax Comments System in WordPress
Here is the code for creating ajax comments system in WordPress.
var commentform = $('#commentform');
// find the comment form
commentform.prepend('<div id="comment-status" ></div>');
// add info panel before the form to provide feedback or errors
var statusdiv = $('#comment-status');
var commentsdiv = $('.commentlist');
// define the infopanel
commentform.submit(function() {
//serialize and store form data in a variable
var formdata = commentform.serialize();
//Add a status message
statusdiv.html('<p>Processing...</p>');
//Extract action URL from commentform
var formurl = commentform.attr('action');
//Post Form with data
$.ajax({
type : 'post',
dataType: 'json',
url : formurl,
data : formdata,
error : function(XMLHttpRequest, textStatus, errorThrown) {
statusdiv.html('<p class="wdpajax-error" >You might have left one of the fields blank, or be posting too quickly</p>');
},
success : function(data, textStatus) {
console.log(data);
if (data.comment_approved === "1"){
statusdiv.html('<p class="ajax-success" >Thanks for your comment. We appreciate your response.</p>');
commentsdiv.prepend('<li class="comment byuser comment-author-admin bypostauthor even thread-even depth-1" id="comment-1"><div class="comment-body" id="comment-body-1"><div class="comment-avatar-box"><div class="avb"><a href="http://vidibase.com/members/' + data.comment_author + '/" rel="nofollow"><img src="http://i0.wp.com/vidibase.com/wp-content/plugins/buddypress/bp-core/images/mystery-man.jpg" class="avatar user-1-avatar avatar-60 photo" width="60" height="60" alt="Avatar Image"></a></div></div><div class="comment-content"><div class="comment-meta"><p><a href="http://vidibase.com/members/' + data.comment_author + '/" rel="nofollow">' + data.comment_author + '</a> said on <a href="#"><span class="time-since">Just now</span></a></p></div><div class="comment-entry"><p>' + data.comment_content + '</p></div><div class="comment-options"></div><div class="clear"> </div></div></li>');
}else{
statusdiv.html('<p class="ajax-error" >Please wait a while before posting your next comment</p>');
commentform.find('textarea[name=comment]').val('');
}
}
});
return false;
});
Add the below code in functions.php file
add_action('comment_post', 'ajaxify_comments',20, 2);
function ajaxify_comments($comment_ID, $comment_status){
if(!empty($_SERVER['HTTP_X_REQUESTED_WITH']) && strtolower($_SERVER['HTTP_X_REQUESTED_WITH']) == 'xmlhttprequest'){
//If AJAX Request Then
switch($comment_status){
case '0':
//notify moderator of unapproved comment
wp_notify_moderator($comment_ID);
case '1': //Approved comment
$commentdata=&get_comment($comment_ID, ARRAY_A);
$post=&get_post($commentdata['comment_post_ID']);
wp_notify_postauthor($comment_ID, $commentdata['comment_type']);
echo json_encode($commentdata);
break;
default:
echo "error";
}
exit;
}
}
Create a simple wordpress ajax contact form without plugin
Below is the code to create a simple ajax contact form without plugin in wordpress.
Step 1 :
Add the below code to your functions.php file
<?php
function addme_ajaxurl() {
?>
<script type="text/javascript">
var ajaxurl = '<?php echo admin_url('admin-ajax.php'); ?>';
</script>
<?php
}
add_action('wp_head','addme_ajaxurl');
add_action('wp_ajax_submit_form', 'submit_form_callback');
function submit_form_callback(){
$params = array();
parse_str($_POST['data'], $params);
$name = trim($params['name']);
$email = $params['email'];
$message = $params['message'];
$subject = $params['subject'];
$site_owners_email = 'email@sitename.com'; // Replace this with your own email address
if ($name=="") {
$error['name'] = "Please enter your name";
}
if (!preg_match('/^[a-z0-9&.-_+]+@[a-z0-9-]+.([a-z0-9-]+.)*+[a-z]{2}/is', $email)) {
$error['email'] = "Please enter a valid email address";
}
if ($message== "") {
$error['message'] = "Please leave a comment.";
}
if ($subject=="") {
$error['subject'] = "Please leave a subject.";
}
if (!$error) {
$mail = mail($site_owners_email, $subject, $message,
"From: ".$name." <".$email.">rn"
."Reply-To: ".$email."rn"
."X-Mailer: PHP/" . phpversion());
$success['success'] = "<div class='success'>" . $name . ", We've received your email. We'll be in touch with you as soon as possible! </div>";
echo json_encode($success);
} # end if no error
else {
echo json_encode($error);
} # end if there was an error sending
die(); // this is required to return a proper result
}
?>
Step 2 :
Add the below code in your html and JavaScript where you want show your form
<form method="post" action="#" name="contact-form" id="contact-form">
<div id="main">
<div id="response"></div>
<div class="fullwidth">
<label>Name:</label>
<p>
<input type="text" name="name" id="name" size="30" />
</p>
</div>
<div class="fullwidth">
<label>Email:</label>
<p>
<input type="text" name="email" id="email" size="30" />
</p>
</div>
<div class="fullwidth">
<label>Subject:</label>
<p>
<input type="text" name="subject" id="subject" size="30" />
</p>
</div>
<div class="fullwidth">
<label>Message:</label>
<p>
<textarea name="message" id="message" cols="30" rows="10"></textarea>
</p>
<p>
<input class="contact_button button" type="submit" name="submit" id="submit" value="Email Us!" />
</p>
</div>
<div class="fullwidth"></div>
</div>
</form>
<script type="text/javascript">
$( "form" ).on( "submit", function( event ) {
event.preventDefault();
$('#response').empty();
var data = {
action: 'submit_form',
data: $( this ).serialize()
};
$.post(ajaxurl, data, function(response) {
console.log(response);
if(response.success){
$('#response').append(response.success);
}
if(response.name){
$('#response').append(response.name + "<br>");
}
if(response.email){
$('#response').append(response.email + "<br>");
}
if(response.message){
$('#response').append(response.message + "<br>");
}
if(response.subject){
$('#response').append(response.subject + "<br>");
}
},'json');
});
</script>
Steps to add Menu Items to WordPress Admin Menu
Open the "functions.php" file of our current theme and add the following codes.
// Add menu item for draft posts
function add_drafts_admin_menu_item() {
// $page_title, $menu_title, $capability, $menu_slug, $callback_function
add_posts_page(__('Drafts'), __('Drafts'), 'read', 'edit.php?post_status=draft&post_type=post');
}
add_action('admin_menu', 'add_drafts_admin_menu_item');
The add_posts_page method is actually a shortcut for add_submenu_page, which allows you to add a submenu item for any existing menu item. And WordPress allows you to get pretty detailed with your own menus, as you can see here.
Roles and permission of User groups in Wordpress

Features include a plug-in architecture and a template system. WordPress is used by more than 18.9% of the top 10 million websites as of August 2013. WordPress is the most popular blogging system in use on the Web, at more than 60 million websites. Wordpress having a set of User groups roles and permission. They are
- Super Admin – somebody with access to the site network administration features and all other features. See the Create a Network article.
- Administrator – somebody who has access to all the administration features within a single site.
- Editor – somebody who can publish and manage posts including the posts of other users.
- Author – somebody who can publish and manage their own posts.
- Contributor – somebody who can write and manage their own posts but cannot publish them.
- Subscriber – somebody who can only manage their profile.
Graphical User Roles and permission in WordPress:

Creating web services in wordpress using WPWS
WPWS (WordPress Web Service) wordpress plugin gives you also the opportunity to program alternative (graphical) interfaces for your WordPress installation.
Furthermore alternative interpretations of WordPress resources are possible. For example you can interpret a post/page as a gallery; a datatype consisting of all included images with the corresponding attributes.
After installation simply open http://yoursite.com/blog/index.php/wpws to test your plugin. That is to add "/wpws" to the index.php part in your WordPress' url.
For more details : WordPress Web Service
Tips and Tricks to speed up your wordpress blog
1. Use caching
To use caching, Install the WP Super Cache plugin and enable the Gzip option. This will load only the appropriate cached content to visitors rather than loading every single script and element of your WordPress site. Your bandwidth is greatly reduced and you avoid your site going down during traffic spikes (and if you're making a kick-butt site with kick-butt content, you should expect them more often than not).
2. Reduce the CSS files to as few as possible
Combine multiple custom CSS files into one big one. The less individual CSS files the theme needs to read the faster it'll load. Simply copy/paste the code from individual CSS files into the main style.css or a custom.css file in your theme.
3. Reduce the Javascript files to as few as possible
Combine multiple .js files into one big one. The less individual .js files the theme needs to read the faster it'll load. You can copy/paste the code from individual Javascript files (/js/jquery.js, /js/jquery.slider.js, /js/jquery.tooltip.js) into a new single Javascript file (/js/jquery.js,jquery.slider.js,jquery.tooltip.js).
3. Put as much Javascript code as possible in the footer
In the footer.php file of your theme, or in the footer section in your theme's customization panel if applicable. This is so that the Javscript calls load last. This way, your visitors will be able to quickly read the content while the Javascript loads in the background.
4. Use as few plugins as possible
The less plugins need to load the more stable your WordPress site can be (and slightly faster in certain cases if a plugin isn't properly coded). Do that by seeing if you can copy/paste code or hand-code the functionality into your theme, or using a theme that has the functionality built-in, or having it designed or customized for you. This doesn't mean don't use any plugins, especially since this article is suggesting plugins for WordPress optimization – just stick to only the essential ones rather than random sidebar widgets and whatnot.
5. Speed up image loading
Use the Amazon S3 storage service to upload and host your files. The images will load faster and your visitors won't have to wait as long for them to load – especially important for web and visual designers with lots of images and portfolios to showcase. You can use the Amazon S3 for WordPress plugin to streamline image uploading and inserting into your pages and posts.
Tips to secure your wordpress site using .htaccess
- wp-config.php
- wp-contents folder
- .htaccess file
Steps to change the Default Admin Username in WordPress
Step to change default username into your new name:
UPDATE wp_users SET user_login = 'YourNewUsername' WHERE user_login = 'Admin';
Please don't forget to share and subscribe to latest updates of the blog.
Thanks. Have a great day!
Add/Remove Profile Fields in WordPress User Form - Step by Step tutorial
To do the above process, no need to add the additional new plugins.
Step 1 : Filter Setup
Creating new function called "modify_contact_methods" in functions.php file which accept an array of profile keys and values.
function modify_contact_methods($profile_fields)
{
// Field addition and removal will be done here
}
add_filter('user_contactmethods', 'modify_contact_methods');
This function returns the list of user profile fields.
Step 2 : Adding a New Profile Field
Adding a new field, Twitter handle for example, includes adding a key to the passed in array, with a value which will act as the field label:
function modify_contact_methods($profile_fields)
{
// Add new fields
$profile_fields['twitter'] = 'Twitter Username';
$profile_fields['facebook'] = 'Facebook URL';
$profile_fields['gplus'] = 'Google+ URL';
return $profile_fields;
}
add_filter('user_contactmethods', 'modify_contact_methods');
Step 3 : Removing a Profile Field
Removing a key from said array removes a field from the user profile form:
function modify_contact_methods($profile_fields)
{
// Add new fields
$profile_fields['twitter'] = 'Twitter Username';
$profile_fields['facebook'] = 'Facebook URL';
$profile_fields['gplus'] = 'Google+ URL';
// Remove old fields
unset($profile_fields['aim']);
return $profile_fields;
}
add_filter('user_contactmethods', 'modify_contact_methods');
The code above removes the AIM field from the edit profile form.
A step by step procedure to develop wordpress plugin
Step 4 : Diving Into Hooks, Actions and Filters
Hooks are provided by wordpress which allows your plugin to hook into the core functionality of your blog. The hooks are divided into two parts that’s Actions and Filters.
Actions are occured during specific events. Below are list of few important actions of Worpdress.
Facebook Comments Point (FCP), Ajax Comments WordPress plugin Free Download
Writing a first code to your own custom theme in wordpress
In the previous post we have discussed about "Building your own theme in Wordpress". At this post, we try to show a article at front page. So, we will write simple code.
Open "index.php", enter following code:

Open your browser. Point to http://localhost/wordpress.
Now, we will try to loop and show all posts:

No more posts to load.