Build a RAG Pipeline Inside Joomla for Intelligent Site Search
Joomla's built-in search has always had the same fundamental limitation. It is keyword-based. A visitor types "how do I reset my account" and the search engine looks for articles containing those exact words. If your article uses the phrase "recover your login credentials" instead, it does not show up. The visitor gets no results, concludes your site does not have the answer, and leaves.
This is not a Joomla problem specifically. It is what keyword search does. It matches strings, not meaning. RAG, Retrieval-Augmented Generation, solves this at the architecture level. Instead of matching keywords, it converts both your content and the search query into vector embeddings, finds content that is semantically similar, and uses an LLM to generate a direct answer from that content. A visitor asking "how do I reset my account" gets a proper answer even if none of your articles use those exact words.
I will walk through the full implementation. We will cover the three main vector storage options honestly so you can make the right choice for your setup, then go deep on building the complete RAG pipeline inside a custom Joomla component using PostgreSQL with pgvector and OpenAI.
What you need: Joomla 4 or 5, PHP 8.1+, Composer, PostgreSQL with the pgvector extension installed, and an OpenAI API key.
What RAG Actually Does, Step by Step
Before writing any code it is worth being clear about what the pipeline actually does at each stage. RAG is one of those terms that gets thrown around loosely and the implementation details matter.
Phase 1: Indexing (runs once, then on content updates)
        ↓
Fetch all published Joomla articles
        ↓
Split long articles into chunks
        ↓
Send each chunk to OpenAI Embeddings API
        ↓
Store the chunk text and its embedding vector in PostgreSQL

Phase 2: Search (runs on every user query)
        ↓
User submits a search query
        ↓
Convert query to an embedding vector via OpenAI
        ↓
Find the most semantically similar chunks using pgvector
        ↓
Send retrieved chunks plus the original query to GPT-4o
        ↓
GPT-4o generates a direct answer grounded in your content
        ↓
Return the answer and source article links to the user
The indexing phase is the slower one and only needs to run when content changes. The search phase is what your visitors experience and it needs to be fast. Keeping those two concerns separate in the architecture makes both easier to manage.
Three Vector Storage Options for Joomla
This is the decision that shapes the rest of the implementation. There is no universally correct answer here, the right choice depends on your infrastructure, team, and content volume.
Option 1: PostgreSQL with pgvector
pgvector is an open source PostgreSQL extension that adds a native vector data type and similarity search operators. You store embeddings directly in a PostgreSQL table alongside your chunk text and metadata. Similarity search runs as a standard SQL query using the cosine distance operator.
The big advantage is that you are not adding a new infrastructure dependency. If you are already running PostgreSQL, this is just an extension install and a new table. Queries are fast, the data lives in your existing database stack, and you have full control. The limitation is that at very large scale, hundreds of thousands of chunks, you need to tune the index carefully to maintain query speed.
This is what we are building in this post. It is the right default for most Joomla sites.
Option 2: MySQL with a Vector Similarity Workaround
Joomla ships with MySQL as its default database, so this is the path of least resistance from an infrastructure standpoint. MySQL 9.0 added experimental vector support but it is not production-ready for most use cases yet. The practical workaround is to store embeddings as JSON or a serialised float array, fetch candidate chunks using a broad text filter, then do the cosine similarity calculation in PHP.
This works for small content sets, a few hundred articles. It gets slow quickly as the content volume grows because you are doing similarity math in PHP rather than in an optimised database index. If your Joomla site runs MySQL and you cannot add PostgreSQL, this is a viable starting point but plan for a migration if the search volume grows.
Option 3: External Vector Store, Pinecone or Qdrant
Pinecone and Qdrant are purpose-built vector databases. You send embeddings to their API, they handle storage and indexing, and you query them via HTTP. Both have generous free tiers for getting started.
The advantage is performance at scale and zero infrastructure management on your end. The disadvantages are an additional external dependency, data leaving your infrastructure, API rate limits, and ongoing costs that grow with your content volume. For enterprise Joomla sites with strict data residency requirements, an external service is often a non-starter.
Good fit for teams that want to move fast without managing PostgreSQL, or sites with very high search volume where a dedicated vector store makes sense operationally.
We are going with pgvector. Here is the full build.
Install pgvector and Set Up the Database Table
First, install the pgvector extension in your PostgreSQL database. If you have superuser access:
CREATE EXTENSION IF NOT EXISTS vector;If you are on a managed PostgreSQL service like AWS RDS or Supabase, pgvector is available as an enabled extension in the console without needing superuser access.
Create the table that will store your article chunks and their embeddings. Run this in your PostgreSQL database, this is a separate database from Joomla's MySQL database:
CREATE TABLE joomla_article_embeddings (
    id           SERIAL PRIMARY KEY,
    article_id   INTEGER NOT NULL,
    article_title TEXT NOT NULL,
    chunk_index  INTEGER NOT NULL,
    chunk_text   TEXT NOT NULL,
    embedding    vector(1536),
    url          TEXT,
    created_at   TIMESTAMP DEFAULT NOW(),
    updated_at   TIMESTAMP DEFAULT NOW()
);

CREATE INDEX ON joomla_article_embeddings
    USING ivfflat (embedding vector_cosine_ops)
    WITH (lists = 100);

CREATE INDEX ON joomla_article_embeddings (article_id);
The embedding dimension is 1536 because that is what OpenAI's text-embedding-3-small model outputs. If you use text-embedding-3-large instead, change this to 3072. The ivfflat index is what makes similarity search fast at scale. The lists value of 100 is a reasonable starting point, tune it upward if you have more than 100,000 chunks.
Custom Joomla Component Structure
We will build this as a custom Joomla component. Create the following structure under components/com_ragsearch:
components/com_ragsearch/
    ragsearch.xml
    src/
        Service/
            OpenAIService.php
            VectorStoreService.php
            ArticleChunkerService.php
            RAGSearchService.php
        Controller/
            SearchController.php
        View/
            Search/
                HtmlView.php
                tmpl/
                    default.php
    tmpl/
        index.php

administrator/components/com_ragsearch/
    src/
        Controller/
            IndexController.php
Install the OpenAI PHP client and a PostgreSQL driver via Composer in your Joomla root:
composer require openai-php/client
composer require doctrine/dbal
The OpenAI Service
Create src/Service/OpenAIService.php:
<?php

namespace Joomla\Component\Ragsearch\Site\Service;

use OpenAI;

class OpenAIService
{
    private $client;

    public function __construct()
    {
        $params      = \JComponentHelper::getParams('com_ragsearch');
        $apiKey      = $params->get('openai_api_key');
        $this->client = OpenAI::client($apiKey);
    }

    public function embed(string $text): array
    {
        $response = $this->client->embeddings()->create([
            'model' => 'text-embedding-3-small',
            'input' => $text,
        ]);

        return $response->embeddings[0]->embedding;
    }

    public function embedBatch(array $texts): array
    {
        $response = $this->client->embeddings()->create([
            'model' => 'text-embedding-3-small',
            'input' => $texts,
        ]);

        $embeddings = [];
        foreach ($response->embeddings as $item) {
            $embeddings[$item->index] = $item->embedding;
        }

        return $embeddings;
    }

    public function generateAnswer(string $query, array $chunks): string
    {
        $context = implode("\n\n---\n\n", array_column($chunks, 'chunk_text'));

        $response = $this->client->chat()->create([
            'model'       => 'gpt-4o',
            'temperature' => 0.3,
            'max_tokens'  => 600,
            'messages'    => [
                [
                    'role'    => 'system',
                    'content' => 'You are a helpful site assistant. Answer the user question
                                  using only the content provided below. If the content does
                                  not contain enough information to answer, say so honestly.
                                  Do not make up information. Keep answers clear and concise.',
                ],
                [
                    'role'    => 'user',
                    'content' => "Content from our site:\n\n{$context}\n\nQuestion: {$query}",
                ],
            ],
        ]);

        return $response->choices[0]->message->content;
    }
}
Notice the embedBatch method. When indexing articles, sending texts in batches rather than one at a time cuts the number of API calls significantly and speeds up the indexing process. Use it during the indexing phase, use embed for single query embeddings at search time.
The Article Chunker Service
Long articles need to be split into chunks before embedding. Embedding an entire 3,000-word article as a single vector produces a representation that is too diffuse to be useful for retrieval. Smaller focused chunks give the similarity search something meaningful to match against.
Create src/Service/ArticleChunkerService.php:
<?php

namespace Joomla\Component\Ragsearch\Site\Service;

class ArticleChunkerService
{
    private int $chunkSize    = 400;
    private int $chunkOverlap = 50;

    public function chunk(string $text): array
    {
        // Strip HTML tags from article body
        $clean = strip_tags($text);

        // Normalise whitespace
        $clean = preg_replace('/\s+/', ' ', $clean);
        $clean = trim($clean);

        $words  = explode(' ', $clean);
        $total  = count($words);
        $chunks = [];
        $start  = 0;

        while ($start < $total) {
            $end        = min($start + $this->chunkSize, $total);
            $chunkWords = array_slice($words, $start, $end - $start);
            $chunks[]   = implode(' ', $chunkWords);

            // Move forward by chunkSize minus overlap
            // so consecutive chunks share some context
            $start += ($this->chunkSize - $this->chunkOverlap);

            if ($start >= $total) {
                break;
            }
        }

        return array_filter($chunks, fn($c) => strlen(trim($c)) > 50);
    }
}
The overlap between chunks matters more than it might seem. If a key sentence sits right at the boundary between two chunks, without overlap it gets split in half and neither chunk represents that idea well. A 50-word overlap means boundary content appears in both adjacent chunks, so the similarity search is more likely to retrieve it when it is relevant.
The Vector Store Service
Create src/Service/VectorStoreService.php:
<?php

namespace Joomla\Component\Ragsearch\Site\Service;

use Doctrine\DBAL\DriverManager;

class VectorStoreService
{
    private $conn;

    public function __construct()
    {
        $params      = \JComponentHelper::getParams('com_ragsearch');

        $this->conn = DriverManager::getConnection([
            'dbname'   => $params->get('pg_database'),
            'user'     => $params->get('pg_user'),
            'password' => $params->get('pg_password'),
            'host'     => $params->get('pg_host', 'localhost'),
            'port'     => $params->get('pg_port', 5432),
            'driver'   => 'pdo_pgsql',
        ]);
    }

    public function upsertChunk(
        int    $articleId,
        string $title,
        int    $chunkIndex,
        string $chunkText,
        array  $embedding,
        string $url
    ): void {
        // Delete existing chunks for this article and index first
        $this->conn->executeStatement(
            'DELETE FROM joomla_article_embeddings
             WHERE article_id = :id AND chunk_index = :idx',
            ['id' => $articleId, 'idx' => $chunkIndex]
        );

        $vectorLiteral = '[' . implode(',', $embedding) . ']';

        $this->conn->executeStatement(
            'INSERT INTO joomla_article_embeddings
                (article_id, article_title, chunk_index, chunk_text, embedding, url)
             VALUES
                (:article_id, :title, :chunk_index, :chunk_text, :embedding, :url)',
            [
                'article_id'  => $articleId,
                'title'       => $title,
                'chunk_index' => $chunkIndex,
                'chunk_text'  => $chunkText,
                'embedding'   => $vectorLiteral,
                'url'         => $url,
            ]
        );
    }

    public function similaritySearch(array $queryEmbedding, int $topK = 5): array
    {
        $vectorLiteral = '[' . implode(',', $queryEmbedding) . ']';

        $sql = "SELECT
                    article_id,
                    article_title,
                    chunk_text,
                    url,
                    1 - (embedding <=> :embedding::vector) AS similarity
                FROM joomla_article_embeddings
                ORDER BY embedding <=> :embedding::vector
                LIMIT :limit";

        $stmt = $this->conn->executeQuery(
            $sql,
            [
                'embedding' => $vectorLiteral,
                'limit'     => $topK,
            ]
        );

        return $stmt->fetchAllAssociative();
    }

    public function deleteArticle(int $articleId): void
    {
        $this->conn->executeStatement(
            'DELETE FROM joomla_article_embeddings WHERE article_id = :id',
            ['id' => $articleId]
        );
    }
}
The <=> operator is pgvector's cosine distance operator. Cosine distance measures the angle between two vectors rather than the straight-line distance between them, which works better for text embeddings because it focuses on direction, meaning, rather than magnitude. The similarity score in the SELECT is calculated as 1 - cosine_distance, so a score of 1.0 is a perfect match and 0.0 is completely unrelated.
The Indexing Controller
This runs from the Joomla administrator backend. It fetches all published articles, chunks them, embeds them in batches, and stores everything in PostgreSQL. You run this once to build the initial index and then on a schedule or via a hook when articles are updated.
Create administrator/components/com_ragsearch/src/Controller/IndexController.php:
<?php

namespace Joomla\Component\Ragsearch\Administrator\Controller;

use Joomla\CMS\MVC\Controller\BaseController;
use Joomla\Component\Ragsearch\Site\Service\OpenAIService;
use Joomla\Component\Ragsearch\Site\Service\VectorStoreService;
use Joomla\Component\Ragsearch\Site\Service\ArticleChunkerService;

class IndexController extends BaseController
{
    private int $batchSize = 20;

    public function build(): void
    {
        $db      = $this->app->getDatabase();
        $chunker = new ArticleChunkerService();
        $openai  = new OpenAIService();
        $store   = new VectorStoreService();

        // Fetch all published Joomla articles
        $query = $db->getQuery(true)
            ->select(['a.id', 'a.title', 'a.introtext', 'a.fulltext'])
            ->from($db->quoteName('#__content', 'a'))
            ->where($db->quoteName('a.state') . ' = 1');

        $articles = $db->setQuery($query)->loadObjectList();

        $indexed = 0;
        $errors  = 0;

        foreach ($articles as $article) {
            try {
                $fullContent = $article->title . "\n\n"
                             . strip_tags($article->introtext) . "\n\n"
                             . strip_tags($article->fulltext);

                $chunks = $chunker->chunk($fullContent);

                if (empty($chunks)) {
                    continue;
                }

                $url = \JRoute::_(
                    'index.php?option=com_content&view=article&id=' . $article->id
                );

                // Delete old embeddings for this article before re-indexing
                $store->deleteArticle($article->id);

                // Process chunks in batches to reduce API calls
                $chunkBatches = array_chunk($chunks, $this->batchSize);

                foreach ($chunkBatches as $batchIndex => $batch) {
                    $embeddings = $openai->embedBatch($batch);

                    foreach ($batch as $i => $chunkText) {
                        $globalIndex = ($batchIndex * $this->batchSize) + $i;
                        $embedding   = $embeddings[$i] ?? null;

                        if (!$embedding) {
                            continue;
                        }

                        $store->upsertChunk(
                            $article->id,
                            $article->title,
                            $globalIndex,
                            $chunkText,
                            $embedding,
                            $url
                        );
                    }

                    // Small pause between batches to stay within API rate limits
                    usleep(200000);
                }

                $indexed++;

            } catch (\Exception $e) {
                $errors++;
                \JLog::add(
                    'RAG indexing failed for article ' . $article->id . ': ' . $e->getMessage(),
                    \JLog::ERROR,
                    'com_ragsearch'
                );
            }
        }

        $this->app->enqueueMessage(
            "Indexing complete. Articles indexed: {$indexed}. Errors: {$errors}.",
            $errors > 0 ? 'warning' : 'success'
        );

        $this->setRedirect('index.php?option=com_ragsearch');
    }
}
The RAG Search Service
Create src/Service/RAGSearchService.php:
<?php

namespace Joomla\Component\Ragsearch\Site\Service;

class RAGSearchService
{
    public function __construct(
        private OpenAIService     $openai,
        private VectorStoreService $store
    ) {}

    public function search(string $query): array
    {
        if (strlen(trim($query)) < 3) {
            return [
                'answer'  => 'Please enter a more specific question.',
                'sources' => [],
            ];
        }

        // Convert the query to a vector embedding
        $queryEmbedding = $this->openai->embed($query);

        // Find the most semantically similar chunks
        $chunks = $this->store->similaritySearch($queryEmbedding, topK: 5);

        if (empty($chunks)) {
            return [
                'answer'  => 'No relevant content found for your query. Try rephrasing your question.',
                'sources' => [],
            ];
        }

        // Filter out low-similarity results
        $relevantChunks = array_filter(
            $chunks,
            fn($c) => ($c['similarity'] ?? 0) > 0.75
        );

        if (empty($relevantChunks)) {
            return [
                'answer'  => 'I could not find content closely matching your question. Please try different keywords.',
                'sources' => [],
            ];
        }

        // Generate a direct answer grounded in the retrieved chunks
        $answer = $this->openai->generateAnswer($query, $relevantChunks);

        // Deduplicate sources by article ID
        $sources = [];
        foreach ($relevantChunks as $chunk) {
            $aid = $chunk['article_id'];
            if (!isset($sources[$aid])) {
                $sources[$aid] = [
                    'title' => $chunk['article_title'],
                    'url'   => $chunk['url'],
                ];
            }
        }

        return [
            'answer'  => $answer,
            'sources' => array_values($sources),
        ];
    }
}
The similarity threshold of 0.75 is worth paying attention to. Below that score the retrieved chunks are probably not relevant enough to be useful for generating an answer. You can adjust this up or down depending on how your content is structured and how specific the queries on your site tend to be. Start at 0.75 and tune based on real search results.
The Search Controller and View
Create src/Controller/SearchController.php:
<?php

namespace Joomla\Component\Ragsearch\Site\Controller;

use Joomla\CMS\MVC\Controller\BaseController;
use Joomla\Component\Ragsearch\Site\Service\OpenAIService;
use Joomla\Component\Ragsearch\Site\Service\VectorStoreService;
use Joomla\Component\Ragsearch\Site\Service\RAGSearchService;

class SearchController extends BaseController
{
    public function search(): void
    {
        $query = trim($this->input->getString('q', ''));

        $result = ['answer' => '', 'sources' => [], 'query' => $query];

        if (!empty($query)) {
            try {
                $service = new RAGSearchService(
                    new OpenAIService(),
                    new VectorStoreService()
                );

                $result = array_merge($result, $service->search($query));

            } catch (\Exception $e) {
                $result['answer'] = 'Search is temporarily unavailable. Please try again shortly.';
                \JLog::add('RAG search error: ' . $e->getMessage(), \JLog::ERROR, 'com_ragsearch');
            }
        }

        $this->app->setUserState('com_ragsearch.result', $result);
        $this->setRedirect(\JRoute::_('index.php?option=com_ragsearch&view=search'));
    }
}
The Blade-equivalent Joomla view template at src/View/Search/tmpl/default.php:
<?php defined('_JEXEC') or die; ?>

<div class="rag-search">

    <form method="POST" action="<?php echo JRoute::_('index.php?option=com_ragsearch&task=search.search'); ?>">
        <?php echo JHtml::_('form.token'); ?>
        <input type="text"
               name="q"
               value="<?php echo htmlspecialchars($this->result['query'] ?? ''); ?>"
               placeholder="Ask anything about our site..."
               autocomplete="off">
        <button type="submit">Search</button>
    </form>

    <?php if (!empty($this->result['answer'])) : ?>

        <div class="rag-answer">
            <h3>Answer</h3>
            <p><?php echo nl2br(htmlspecialchars($this->result['answer'])); ?></p>
        </div>

        <?php if (!empty($this->result['sources'])) : ?>
            <div class="rag-sources">
                <h4>Sources</h4>
                <ul>
                    <?php foreach ($this->result['sources'] as $source) : ?>
                        <li>
                            <a href="<?php echo htmlspecialchars($source['url']); ?>">
                                <?php echo htmlspecialchars($source['title']); ?>
                            </a>
                        </li>
                    <?php endforeach; ?>
                </ul>
            </div>
        <?php endif; ?>

    <?php endif; ?>

</div>
Keeping the Index fresh
The index goes stale the moment an article is updated and not re-indexed. There are two clean ways to handle this in Joomla.
The first is a Joomla plugin that hooks into onContentAfterSave and triggers re-indexing for the saved article specifically. This keeps the index fresh in real time but adds latency to every article save operation.
<?php

class PlgContentRagsearchIndex extends JPlugin
{
    public function onContentAfterSave(
        string $context,
        object $article,
        bool   $isNew
    ): void {
        if ($context !== 'com_content.article') {
            return;
        }

        if ((int) $article->state !== 1) {
            return;
        }

        // Dispatch a Joomla queue task instead of indexing synchronously
        // to avoid blocking the article save response
        \Joomla\CMS\Queue\QueueFacade::push('ragsearch.index_article', [
            'article_id' => $article->id,
        ]);
    }
}
The second approach is a scheduled CLI task that re-indexes all articles on a schedule, say every hour or every night. For sites where content does not change frequently, a nightly re-index via Joomla's task scheduler is simpler and puts zero overhead on the save operation.
For most sites the scheduled approach is the right default. Use the plugin approach only if your content changes continuously throughout the day and freshness matters within minutes.
What this looks like for a Real Visitor
Here is a concrete example. Say your Joomla site has articles about software products and a visitor types: "what happens if I cancel my subscription mid-month?"
Your articles probably use phrases like "pro-rata refund policy", "billing cycle", "account downgrade", not the exact words the visitor used. Keyword search returns nothing. The RAG pipeline converts the query to a vector, finds three chunks from your billing and account articles that are semantically close to that question, feeds them to GPT-4o, and returns something like:
"If you cancel mid-month, your account remains active until the end of your current billing period. You will not be charged for the following month. Refunds for unused days are not issued automatically but can be requested within 7 days of cancellation by contacting support."
Below the answer, the visitor sees links to the two source articles that information came from. They got a direct answer, they can read the full policy if they want to, and they did not have to trawl through search results guessing which article might be relevant.
A Few things to know before Go Live
The embedding cost for the initial indexing run is usually smaller than people expect. A site with 500 articles at 400 words each, split into chunks of 400 words with 50-word overlap, produces roughly 600 to 700 chunks. At OpenAI's current pricing for text-embedding-3-small, that initial index costs well under a dollar. Ongoing costs per search query are minimal, one embedding call per query.
Caching search results is worth adding early. Many visitors on the same site ask very similar questions. Store recent query-answer pairs in Joomla's cache layer with a TTL of a few hours. The cache hit rate on popular queries tends to be high and it cuts both API costs and response time meaningfully.
Finally, keep an eye on what people actually search for. Log the queries, log whether the similarity search returned results above the threshold, and log whether users clicked the source links. After a few weeks you will see which questions the pipeline handles well and which ones consistently miss. That data tells you whether your chunking strategy needs adjusting, whether your similarity threshold is set correctly, and whether there are content gaps on your site worth addressing.
The RAG pattern is one of the most practically useful things you can add to a content-heavy Joomla site. It turns a search box that frustrates visitors into one that actually helps them find what they need, in their own words, without requiring your content to match their exact phrasing.
Building a Sentiment Analysis Plugin in Joomla Using PHP and OpenAI API
Joomla's content plugin system is underused. Most developers reach for components when a simple content plugin hooked into onContentBeforeSave would do the job in a fraction of the code.
This tutorial is a good example of that. The idea is simple: every time an article is saved, we send the text to OpenAI and get back one word, positive, negative, or neutral.
That result gets appended to the meta keywords field and flashed as an admin message. Nothing fancy, but on a community site or news portal where editors are processing dozens of submissions a day, having that sentiment label right in the save workflow saves real time.
Two files, no Composer, no service container. Just a manifest XML and a single PHP class extending CMSPlugin.
What You’ll Need
Before we start, make sure you have:
- Joomla 5.x installed
- PHP 8.1 or newer
- cURL enabled on your server
- An OpenAI API key
Once that’s ready, let’s code.
Step 1: Creation of the Plugin
In your Joomala system, make a new folder within the system under the name of the plugin:
/plugins/content/aisentiment/
Thereupon in that folder generate two files:
- aisentiment.php
- aisentiment.xml
aisentiment.xml
This is the manifest file that the Joomla plugin identifies the identity of this particular plugin and the files that should be loaded into it.
<?xml version="1.0" encoding="utf-8"?><extension type="plugin" version="5.0" group="content" method="upgrade">
<name>plg_content_aisentiment</name>
<author>PHP CMS Framework</author>
<version>1.0.0</version>
<description>Analyze sentiment of comments or articles using OpenAI API.</description>
<files>
<filename plugin="aisentiment">aisentiment.php</filename>
</files>
</extension>
Step 2: Add the PHP Logic
Now let’s write the plugin code.
aisentiment.php
Step 3:Install and activate the Plugin.
Step 4: Test It
This product is out of my expectations and it works excellently!
Bonus Tips:
- Store your API key securely in Joomla’s configuration or an environment variable (not hard-coded).
- Add caching if you’re analyzing large volumes of content.
- Trim long text before sending to OpenAI to save API tokens.
- Handle failed API calls gracefully with proper fallbacks.
Real-World Use Cases:
- Highlight positive user reviews automatically.
- Flag negative feedback for moderation.
- Generate sentiment dashboards for community comments.
TZ Portfolio - A joomla portpolio component / Module / Plugin download
We also upgrade tag and authority information management function, along with photo smart resize and crop. With TZ Portfolio you can own a smart blog, a flexible portfolio, and more than a complete content management system.
Extension Name: TZ Portfolio
Price: Free
More info and reviews: TZ Portfolio on JED
For Demo - Click Here
To download the component - Click Here
For Documentation - Click Here
For Support - Click Here
Web Site Tour Builder - Joomla extension download
Features
- Support Continued Tour in Multiple Pages
- 5 Types of Display ad ( Button, Link, Autostart on Load, LightBox on Load, Manual )
- 3 Types of Popup Box ( Modal, Tooltip, Nohighlight )
- 3 Selectors Type ( id, class, name) You can append tour to all html class
- 4 Positions (Top, Bottom, Left, Right )
- Draggable Box
- Keywords Controls to change step
- Rotation Control
- Steps Title
- Steps Text with Editor WYSIWYG for J3
- Redirect to Control
Usefult to continue tour in multiple pages
- 2 Popup Tour Themes
- 2 LightBox Themes
- Cookies Options - to not show always the tour
Compatible With All recents Popular Browsers
- Google Chrome
- Firefox
- Safari
- Opera
- Internet Explorer(IE7+)
Check this short tutorial video here: https://www.youtube.com/watch?v=mOdl9xbQAEw
Extension Name: Web Site Tour Builder
Price: Paid (€ 19,00)
More info and reviews: Web Site Tour Builder on JED
For Demo - Click Here
Download Paid Version - Click Here
For Documentation - Click Here
Improved AJAX Login and Register - Joomla extension free download
Need a new Login and Registration interface?
Improved AJAX Login is a very elegant extension, it speeds up the Login, Logout and Registration procedures with AJAX technology. These process never were so simple and easy, and the clean & smooth design, of course.
How does it work so fast?
The Improved AJAX Login does the dirty work in the background, the login process will only take a moment, it's lightning fast! This module does not need to reload your webpage, the user is logged in as soon as he hits the login button. The Login also warns the user on unsuccesful login attempts with nicely decorated popup fields. The validation of the registration form is also make in the background, and mark the incorrect fields with an error massage. Go ahead to the demo page and try it yourself!
AJAX-powered User menu
After login with Improved AJAX Login a stylish User menu will appear instead of the login form. User menu is fully customisable and have some default menu items like Edit Your Details, Show Cart (only if VirtueMart installed) and of course Logout. User menu is also AJAX-powered so all menu items are loading in the background.
Some more words of the registration
The Improved Ajax Login & Register has an own popup-box for the fields. You can use captcha, to avoid bots registration to your site. As it previously mentioned, this extension make the validation and the register process with the AJAX technology, so there won't be any page-refresh during the registration.
Live Form Editor
Live editor using the WYSIWYG method (What You See is What You Get) to make well-planned forms in seconds, because you see the result live. There are many predefined fields like Address, Date of birth, Terms of Services, etc. But you can also add custom fields: textfield, select list, checkbox, etc.
Check this short tutorial video here: http://www.youtube.com/watch?v=mmYhhh3V6Wc
Extension Name: Improved AJAX Login and Register
Price: Free
More info and reviews: Improved AJAX Login and Register on JED
For Demo - Click Here
Download Free Version - Click Here
For Documentation - Click Here
iCagenda - Joomla Events Management extension free download
Display of events takes the form of a list, for which you can apply filters (upcoming dates and/or past, category(ies), ordering by dates...) and customize graphic elements (choice of theme, size of the Google map, number events displayed per page, date format in your culture (for languages available in iCagenda), etc ...)
The Theme Manager allows you to create your own theme pack for iCagenda and install it easily via the component.
Two Themes are included in iCagenda : default and ic_rounded.
Other themes are currently in process, and a documentation will soon be opened to give users all the help and tips for creating a custom theme pack!
Extension Name: iCagenda
Price: Free
More info and reviews: iCagenda on JED
For Demo - Click Here
Download Free Version - Click Here
AcyMailing Starter - Joomla Newsletter Extension Free Download
Have you struggled with similar extensions in the past? Well if you are looking for a great newsletter extension for Joomla, AcyMailing will save you time and make your life easier.
Extension Name: AcyMailing Starter
Extension Provider: Acyba.com
Price: Free
More info and reviews: AcyMailing Starter on JED
Download Free Version - Click Here
Content Templater - Joomla Content Templates Extension Free Download
Under the editor you will get a list of available templates. If you select a template, your predefined content will be pasted in your article or other content item. And all the options you have set in the template will be automatically set (like title, alias, publishing settings, show icons settings, etc.)
Easy to use and set up, Content Templater is a great time saver in your website development, ,you'll find that this joomla extension along with any others released by No Number will live up to expectations and do the job perfectly.
Extension Name: Content Templater
Extension Provider: Nonumber.nl
Price: Free
More info and reviews: Content Templater on JED
Download Free Version - Click Here
Download Pro version - Click Here
AllVideos - Joomla Video and Multimedia Extension free download
Additionally, it allows you to playback almost any video/audio filetype directly from your server or a remote server, giving you the competitive edge when it comes to rich media content.
Extension Name: AllVideos
Extension Provider: JoomlaWorks
Price: Free
More info and reviews: AllVideos on JED
To download this extension Click Here
Create Secure Joomla Extensions
In order Joomla extensions to be secure the following important aspects have to be observed:
The first and foremost important statement in any Joomla extension php file is making sure that the file is not accessed directly:
defined('_JEXEC') or die( 'Restricted access' );
The next important statement is making sure the visitor has the necessary privileges to access it. This is especially important when the extension is in the administrator panel. The simplest way to check if the user is authorized to open a sensitive file is:
$user = & JFactory::getUser();
if (!$user->authorize( 'com_users', 'manage' )) {
$mainframe->redirect( 'index.php', JText::_('ALERTNOTAUTH') );
}
If the user is authorized to manage the users then he should be allowed to do anything.
The general rule is, to follow the best practices of Joomla native Model View Controller concept. This ensures that your code will be tidier, easier to maintain and secure.
The essential part in writing a secure Joomla extension is using native Joomla classes and avoiding using your own code for the basic operations such as executing MySQL queries, including files and others. That's why make sure to be acquainted with all the Joomla Framework classes
http://docs.joomla.org/Framework
When studying the native Joomla classes pay special attention to JFilterInput and JFilterOutput. Their methods should be used regularly for filtering user input and output to avoid anything from MySQL injections to XSS flaws.
Finally, always take into consideration that Joomla runs on different environments and what is secure on yours might not be on others. Ensure that RG_emulation, register_globals or even allow_url_include will not allow anyone to tamper with your variables. If you cannot ensure it at least make sure to warn users about potential problems.
The above short secure Joomla extensions guidilines should give you an idea on how to write more secure Joomla extensions.
Joomla - Duplicate Meta Description in Google Webmaster Optimization
In general and as default, almost all Joomla user especially from the beginner (I'm at this level =)) to intermediate knowledge will experienced this kind of issue. We thought that it was nothing to be alarmed off until you started to feel uneasy on the rising amount of duplicate meta and title in your Google Webmaster report. Not until I watched videos on Matt comments (watch the videos below) on how Google use our meta description and keywords that I start to prioritise the importance of eliminating or reducing the duplication rate.
In this article, we are not going to install anything, just a little hard works. This has been done on my website and the result is satisfactory as the number or duplicate meta reduced from 50 (urrgh,) to 10. Another advice worth mentioned here is that, sometimes the duplicate meta description is caused by 'old link's from your internal pages that still pointed to 'old url' or the duplicate links (I'll explained it in the next post).
Global Configuration
Meta description and keywords should be empty. Leave it blank as mentioned in Joomla documentation. If you haven't read the document, you should better read sometimes.
Hard works Parts
Now, everytime you create a new page, you will need to create a unique meta description and keywords related to each pages. Most user will ignore this part but try to make a good habit of practicing this method. The option to add specific meta description to every pages is located in your article manager at the right side.
Regardless the techniques on how to improve our page ranking, here's some video worth our attention on the topic of whether Google use our meta keywords in search ranking and emphasize the use of 'unique' description by Matt Cutts.
Regarding the use of meta description
Regarding the use of meta keywords
Images Hotlink Protection using htaccess in Joomla
Setting up .htaccess specific to Joomla is a little bit different from ordinary website. It depends on your server type and also your access to this file.
But for some reason, not all .htaccess setting work on any server such as those who hosted their website on litespeed server. For the purpose of adding the function of hotlink protection, you may need to add in these lines on the very top of your .htaccess file.
RewriteEngine on
RewriteCond %{HTTP_REFERER} !^$
RewriteCond %{HTTP_REFERER} !^http://(www\.)?yourdomain\.com/.*$ [NC]
RewriteRule \.(gif|jpg|png)$ http://www.yourdomain.com/x.gif [R,NC,L]
Why at the top?
To be true, I'm not in the position of really understanding the terms and explaining it to you. However, in Joomla 2.5 (as I know), you will need to put it on top of the list or else it won't work (It took me 2 days to figured it out...only after my web host provider informed me).
One thing that to note here - when you are using cPanel to manage your hotlink protection, it will automatically update your .htaccess file BUT the updated lines are usually added at the bottom of the .htaccess file. If that happened, you just need to relocate the lines.
For some reason, for those hosting on speedlite server, you'll need to extra lines:
RewriteEngine on
RewriteOptions Inherit
RewriteCond %{HTTP_REFERER} !^$
RewriteCond %{HTTP_REFERER} !^http://(www\.)?exadomain\.com/.*$ [NC]
RewriteRule \.(gif|jpg|png)$ http://www.exadomain.com/x.gif [R,NC,L]
As I said before, just contact your hosting provider should you encountered problem pertaining your .htaccess file (only after you failed to follow general guide). After all, your payment for hosting inclusive of after sale services.
Create Tabbed Content Module in Joomla
1) <div> tag is added for each Tabbed Menu, which is placed in one row in <table>. Provide Unique id to each tabbed menu.
2) Content to be displayed is also placed in <div> tag in another row of the <table>, with another id.
3) Click event is added to each tabbed menu in Javascript when the document is loaded using addEventListener() function for non IE and attachEvent() function for IE.
For non Internet Explorer add the below code
document.getElementById('divTitleTab1').addEventListener("click",titleDivTab1Func, false,true);
For Internet Explorer add the below code
document.getElementById('divTitleTab1').attachEvent("onclick",titleDivTab1Func);
titleDivTab1Func is the name of the function to be executed when click event occurs.
How to determine whether IE or non IE?
window.addEventListener returns true for non IE and false for IE.
if(window.addEventListener) {
}
else {
}
4) titleDivTab1Func function contains the code to be executed when user clicks on the tabbed menu. If user clicks on the tabbed menu its content should be displayed below it. It is done by setting innerHTML of the element with id of the content div.
document.getElementById("divContentTab").innerHTML = " you are under Tab 1";
5) Calling Javascript from helper.php
It is done by script() function of the JHtml class, which is used as shown below.
JHTML::_('script',"tabbed.js",JURI::base().'/modules/mod_tabbed/js/',true);
The last argument determines whether to load Mootools or not. Mootools is loaded if this argument is true. Here we have created 4 tabbed menu.
Files Required
1) mod_tabbed.php: This file is the entry point for the module. It will perform necessary initializations and call helper routine to collect necessary data and include the template which will display module output.
2) helper.php: This file contains the helper class which will collect necessary data to be used in the module from database or any other sources.
3) mod_tabbed.xml: This file contains the information about the module. This is the installation file for the module.
4) tmpl/default.php: This is the file used for displaying the module output.
5) js/tabbed.js: This file will contain necessary javascript code to be executed.
1) Creating file mod_tabbed.php with the below code
<?php
// no direct access
defined( '_JEXEC' ) or die( 'Restricted access' );
// Include the syndicate functions only once
require_once( dirname(__FILE__).DS.'helper.php' );
$hello = modTabbedHelper::getHello( $params );
require( JModuleHelper::getLayoutPath( 'mod_tabbed' ) );
?>
2) Creating file helper.php
This file contains the class as defined in mod_ varreq.php ,here it is modVarreqHelper class and contains function getHello(). The complete code of helper.php is
<?php
// no direct access
defined( '_JEXEC' ) or die( 'Restricted access' );
class modTabbedHelper
{
static function getHello($params)
{
JHTML::_('script',"tabbed.js",JURI::base().'/modules/mod_tabbed/js/',true);
return 'Helper Tabbed Pane';
}
}
?>
3) Creating installation file mod_tabbed.xml
This file contains the information about the module. The complete code of mod_tabbed.xml is
<?xml version="1.0" encoding="utf-8"?>
<extension type="module" version="2.5" client="site" method="upgrade">
<name>tabbed</name>
<author>Larenge Kamal</author>
<version>1.7</version>
<description>Tabbed Pane! module.</description>
<files>
<filename>mod_tabbed.xml</filename>
<filename module="mod_tabbed">mod_tabbed.php</filename>
<filename>index.html</filename>
<filename>helper.php</filename>
<filename>tmpl/default.php</filename>
<filename>tmpl/index.html</filename>
<filename>tmpl/logo1.bmp</filename>
<filename>js/tabbed.js</filename>
</files>
<config>
</config>
</extension>
4) Creating file tmpl\default.php
This file contains the output to be displayed by the module. This file has the same scope as that of the mod_tabbed.php. So the variables defined in mod_tabbed.php can be directly accessed in this file. '$hello' variable defined in mod_tabbed.php can be directly accessed here.
The complete code of tmpl\default.php is
<?php
// no direct access
defined( '_JEXEC' ) or die( 'Restricted access' );
?>
<html>
<body>
<table style="border:2px solid #E0E0E0; padding:0px; margin:0px" width="100%" cellspacing="0" cellpadding="0">
<tr>
<td style="padding:0px; margin:0px" width="auto">
<div style="background-color: #F3F3F3; color: black;font-weight: bold; padding: 0px 0px 0px 10px;cursor: pointer; border:2px solid #E0E0E0" id="divTitleTab1" class="mainTitle">
<b id="subTitle">Tab1</b>
</div>
</td>
<td style="padding:0px; margin:0px">
<div style="background-color: #F3F3F3; color: black;font-weight: bold; padding: 0px 0px 0px 10px;cursor: pointer; border:2px solid #E0E0E0" id="divTitleTab2" class="mainTitle">
<b id="subTitle">Tab2</b>
</div>
</td>
<td style="padding:0px; margin:0px">
<div style="background-color: #F3F3F3; color: black;font-weight: bold; padding: 0px 0px 0px 10px;cursor: pointer; border:2px solid #E0E0E0" id="divTitleTab3" class="mainTitle">
<b id="subTitle">Tab3</b>
</div>
</td>
<td style="padding:0px; margin:0px">
<div style="background-color: #F3F3F3; color: black;font-weight: bold; padding: 0px 0px 0px 10px;cursor: pointer; border:2px solid #E0E0E0" id="divTitleTab4" class="mainTitle">
<b id="subTitle">Tab4</b>
</div>
</td>
</tr>
<tr>
<td colspan="4" style="padding:0px; margin:0px">
<div style="color: black;padding: 0px 0px 0px 10px;border:2px solid #E0E0E0" id="divContentTab" class="mainTitle">
here is tab content
</div>
</td>
</tr>
</table>
</body>
</html>
5) Creating file index.html common to all
The complete code of index.html is
<html><body bgcolor="#FFFFFF"></body></html>
6) Creating file js\tabbed.js
This file contains the javascript code. The complete code of js\tabbed.js is
window.addEvent("domready",function(){
if(window.addEventListener) {
document.getElementById('divTitleTab1').addEventListener("click",titleDivTab1Func, false,true);
document.getElementById('divTitleTab2').addEventListener("click",titleDivTab2Func, false,true);
document.getElementById('divTitleTab3').addEventListener("click",titleDivTab3Func, false,true);
document.getElementById('divTitleTab4').addEventListener("click",titleDivTab4Func, false,true);
}
else if(window.attachEvent) { //IE
document.getElementById('divTitleTab1').attachEvent("onclick",titleDivTab1Func);
document.getElementById('divTitleTab2').attachEvent("onclick",titleDivTab2Func);
document.getElementById('divTitleTab3').attachEvent("onclick",titleDivTab3Func);
document.getElementById('divTitleTab4').attachEvent("onclick",titleDivTab4Func);
}
});
function titleDivTab1Func() {
var oDiv = document.getElementById("divContentTab");
oDiv.style.display = "block";
document.getElementById("divTitleTab1").style.background = "#FFFFFF";
document.getElementById("divTitleTab2").style.background = "#F3F3F3";
document.getElementById("divTitleTab3").style.background = "#F3F3F3";
document.getElementById("divTitleTab4").style.background = "#F3F3F3";
oDiv.innerHTML = " you are under Tab 1";
}
function titleDivTab2Func() {
var oDiv = document.getElementById("divContentTab");
oDiv.style.display = "block";
document.getElementById("divTitleTab2").style.background = "#FFFFFF";
document.getElementById("divTitleTab1").style.background = "#F3F3F3";
document.getElementById("divTitleTab3").style.background = "#F3F3F3";
document.getElementById("divTitleTab4").style.background = "#F3F3F3";
oDiv.innerHTML =" You are in Tab 2" ;
}
function titleDivTab3Func() {
var oDiv = document.getElementById("divContentTab");
oDiv.style.display = "block";
document.getElementById("divTitleTab3").style.background = "#FFFFFF";
document.getElementById("divTitleTab1").style.background = "#F3F3F3";
document.getElementById("divTitleTab2").style.background = "#F3F3F3";
document.getElementById("divTitleTab4").style.background = "#F3F3F3";
oDiv.innerHTML ="Congratulations! You have a Joomla! site! Joomla! makes it easy to build a website just the way you want it and keep it simple to update and maintain.in tab3" ;
}
function titleDivTab4Func() {
var oDiv = document.getElementById("divContentTab");
oDiv.style.display = "block";
document.getElementById("divTitleTab4").style.background = "#FFFFFF";
document.getElementById("divTitleTab1").style.background = "#F3F3F3";
document.getElementById("divTitleTab2").style.background = "#F3F3F3";
document.getElementById("divTitleTab3").style.background = "#F3F3F3";
oDiv.innerHTML ="Joomla! is a flexible and powerful platform, whether you are building a small site for yourself or a huge site with hundreds of thousands of visitors. You are in Tab 4" ;
}
Now create the zip file of the folder 'mod_tabbed' which contains the following files.
- mod_tabbed.php
- index.html
- mod_tabbed.xml
- helper.php
- tmpl\default.php
- tmpl\index.html
- js\tabbed.js
The above zip file can now be installed using Joomla extension manager. After installing the module,' tabbed' module will appear in the module manager.
Steps to resolve the broken Captcha in Joomla 2.5 and 3
Using Captchas can greatly reduce the amount of spam you receive.
However, many of these forms (including mine) stopped working because Google changed the URL used for ReCaptchas.
This is mostly impacting Joomla 2.5 and 3.0+ sites at the minimum. This fix will be included in the next Joomla 3 release but in the meantime, it's not good to have a broken contact form.
Here's the fix for Joomla 2.5 and 3 sites
The fix is taken from this joomla.org doc.
Go to plugins/captcha/recaptcha/recaptcha.php and change:
line 22 (or thereabouts) to the new RECAPTCHA_API_SERVER URL of 'http://www.google.com/recaptcha/api'
line 24 (or thereabouts) to the new RECAPTCHA_VERIFY_SERVER URL of 'www.google.com'
line 129 (or thereabouts) to the new RECAPTCHA_VERIFY_SERVER value of '/recaptcha/api/verify'
You will need FTP access to make this change, or perhaps your hosting control panel has a file manager that lets you edit files. In either case be sure to make a backup of the existing recaptcha.php file before making the recommended edits.
Steps to integrate Google Authorship with Joomla
Step 1 : Install SD Google Authorship
Download and unzip the SD Google Authorship. Then, Extract this file to get the available versions for Joomla 1, 2 and 3. Install the unzipped "SD Google Authorship" package in Joomla and Enable it in Plugin Manager page.
Step 2 : Add your Google Plus link to Contacts
- The SD Google Authorship plugin using the default Contacts component. So, go to Extensions >> Contacts >> Contact >> and either create a new contact or edit an existing one.
- Set the Linked User field to link to your user account.
- Set the Website field using your own Google+ profile URL.
- Complete the other fields as you need and click Save & Close.
Step 3 : Register your site with Google
- Go to https://plus.google.com/authorship and add your Joomla site's URL to your profile.
- Google says it will take between several days to several weeks before it starts showing your photo and profile information in search results.
Steps to create Joomla Components with Component Creator
Step 1:
To create an own joomla component in component creator website, we need to create a new user account. (It's free). Click on the below link and create an account.
http://www.component-creator.com
Step 2:
After creating an account, login in to the website and click on the button "Add Component".
Step 3 :
Enter the following details to create a new Joomla component.
Name - Name of your component. Use the prefix (com_) - Be sure you use a unique when you create several components.
Display Name - This one will be displayed in your menu under "Components" section.
Target Joomla version - Select the joomla version. It supports Joomla 2.5 and Joomla 3.x.x
Also you can select the language, Copyright information, license information, Author Details.
After entering all the above details click on the "Save Component" button.
Now you will get a success message like "Component saved successfully. How about adding a table".
Step 4: Add tables
Adding a database table to your newly created component is the way that you will get a back-end and front-end interface for managing content.
To add table to your component follow the below steps.
- Click on the "Manually add tables" button.
- Add the table's name using as prefix #__yourcomponent_ like: #__yourcomponent_mytable
- Mark the checkbox to create the list view in administrator. Use the plural of the name to displays a label, like: My Tables
- Check the checkbox to add the form view in administrator. Place the label name for this one.
- Check the checkbox to enable the Frontend view.
- Check the checkbox to enable the ACL Control.
- After entering all the above details click on the "Create table" button.
Now you will get a success message like "Your table was added successfully".
Step 5: Add fields to your table
You may need to add custom fields to manage and display custom content.
- Click on the "Add field" button.
- Field name - unique name; use lowercase without spaces.
- Fieldtype - like text, textarea, checkbox, radio buttons, etc.
- Optional fields.
- Check the checkbox to enable the form view and assign a custom name.
- Check the checkbox to enable a list view.
- After entering all the above details click on the "Add field" button.
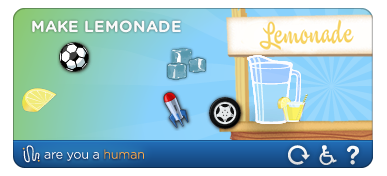
Steps to Install the AreYouaHuman Game CAPTCHA plugin in Joomla
We have analysed many Captcha plugins and finally found the Are You a Human Captcha plugin to avoid the spam registrants. Actually it makes fun, interactive and seemingly quick for users. I found myself playing the game several times just for the fun of it and it left me with a smile on my face. In this tutorial, we will cover the step-by-step instructions to install and enable the PlayThru CAPTCHA game on a Joomla registration form.
Preview of the game CAPTCHA
Step 1 : Register at AreYouaHuman.com

In order to activate the captcha, you have to register at http://portal.areyouahuman.com/signup, where there's a free account and other premium ones.
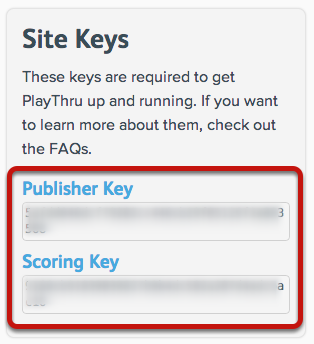
Step 2 : Find your site keys
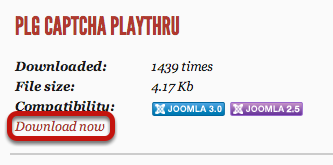
Step 3 : Download the PlayThru Captcha plugin

Go to http://www.fabbricabinaria.it/en/download/playthru-captcha and download the latest version of PlayThru Captcha.
Step 4 : Install the plugin
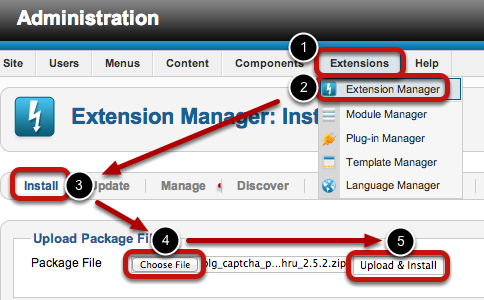
- Extensions
- Extension Manager
- Install
- Choose File
- Upload & Install
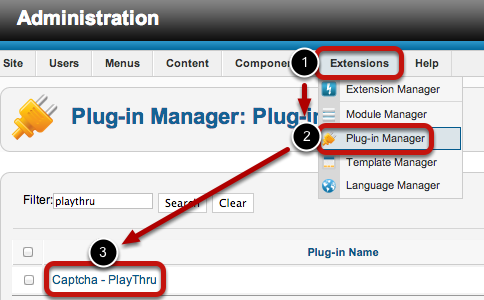
- Extensions
- Plugin Manager
- Captcha - PlayThru
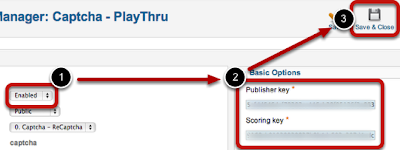
- Set the status to Enabled
- Enter the copy and paste the Publisher Key and Scoring Key from step #2 of the tutorial (see above).
- Save & Close
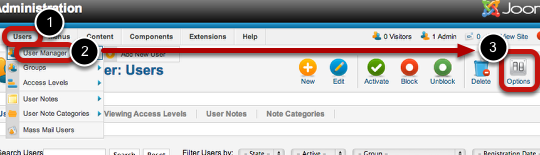
- Users
- User Manager
- Options
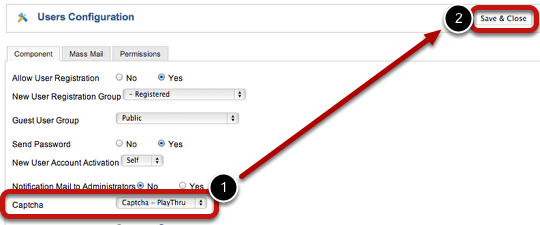
- Select Captcha - PlayThru
- Save & Close
Migrating a wordpress website to Joomla website
Download Dropbox Component and Plugin for Joomla 1.5 and Joomla 2.5
You can use the extension as a component or as a plugin
Version 1.x is for Joomla 1.5.x version 2.x is for Joomla 1.6 and 1.7
Caution!: The version for Joomla 1.6 / 1.7 is still beta - please report problems in the forum
NEW: since 2.0_beta1 its possible to create private folders for every user
Requirements:
- PHP 5 >= 5.2.0 with PECL json >= 1.2.0
- cURL with SSL
- Joomla 1.5.x / 1.6.x / 1.7.x
No more posts to load.