Feb 19 2007

Rails Flash Charting Plugin

Flash charts just look a lot better than what we could do with plan images. Flash is a lot more interactive and since they are vector base you can zoom in and out without image deterioration. The PHP folks have a lot of great libraries for working with Flash such as Ming, PHP/SWF Charts, and Amfphp. If you want flashy graphs, pun intended, you can do so thanks to ZiYa, an XML/SWF Charts based Ruby on Rails plugin. ZiYa can be installed from the following SVN repository.

svn://rubyforge.org/var/svn/liquidrail/plugins/ziya/trunk

You typically install a Rails plugin by executing ‘script/plugin install URL’ from the application directory where you replace URL with the one above.

Once ZiYa has been installed you need to include one line into the controller to load the required graphing capabilities. Add the following line in the controller near the top.

[source:ruby]
include Ziya
[/source]

To follow along with the code examples, create a bargraph action in the controller so that we can create a bar graph. In the bargraph action we will create a bar chart object with code similar to the following.

[source:ruby]
def bargraph
chart = Ziya::Charts::Bar.new
render :text => chart
end
[/source]

The new bar chart will contain default data so that at this point we can quickly move onto the view and see ZiYa and XML/SWF in action. You do not have to create a rhtml view for bargraph since the action will generate the necessary XML required for the chart. You can render the chart in any rhtml view by adding the following view helper code.

[source:ruby]
<%= gen_chart(“chart_id”,
url_for(:controller => ‘mycontroller’, :action => “bargraph”),
“#ffffff”,
400,
300) %>
[/source]

The above action and view code will generate a chart with default data that looks like the following.

ZiYa Bar Chart Example

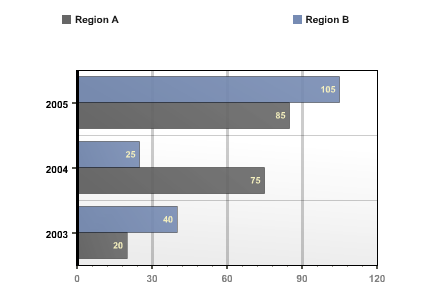
if you want to create a similar graph with code replace the action with the following code.

[source:ruby]
def bargraph
chart = Ziya::Charts::Bar.new
chart.add(:axis_category_text, [ “2003”, “2004”, “2005”])
chart.add(:series, “Region A”, [100, 25, 40], [‘Large’, ‘Low’, ‘Soso’])
chart.add(:series, “Region A”, [80, 70, 20])
render :text => chart
end
[/source]

For this graph, the :axis_category_text symbol indicate that the following values are the y-axis labels. To produce x-axis labels you can add data for :axis_value_text. The series symbol indicates your data points. You will also notice that when setting the series data point there is an optional string array. That string array is used as legend or label for the bars in this series. The chart is highly customizable, you can create yml files that describe the theme such as color, border, and even animation effect for each charts.

The other graph types are just as easy to generate. Just as an example below is the action code required to generate a pie chart.

[source:ruby]
def piegraph
chart = Ziya::Charts::Pie.new
chart.add :axis_category_text, [“2003”, “2004”, “2005”]
chart.add :series, “Region I”, [200, 100, 50], [‘Super’, ‘Large’, ‘Medium’]
render :text => chart
end
[/source]

ZiYa is such a large and rich plugin that I obviously can’t do it justice. Please take a look at the Google Groups and official documentation.

Technorati Tags: , , , , , , , , , , , , ,


Feb 18 2007

Rails Acts As Authenticated Plugin

What is the first model you would create when developing a Ruby on Rails based web service? Mostly likely you would create a user model so as to authenticate users and grant them certain business specific privileges. Creating the required table, model, and views for a user is so common that there exists a great Rails plugin for the task. Acts as Authenticated is a plugin generator that will create your base user model and views required for a user-centric web application. Just like previous plugins, you need download and install the plugin by using the ‘script/plugin install URL’ command where you replace URL with the following.

http://svn.techno-weenie.net/projects/plugins/acts_as_authenticated

Unlike other plugins that provide additional methods to ActiveRecord models, this plugin is a generator. Run the following command to create a user model and a login controller.

script/generate authenticated user login

As mentioned, the above command will create a login controller with associated views (index, login, signup), a user model, some files under lib (authenticated_system, authenticated_test_helper), a controller helper, a controller functional test, a user unit test, a user fixture yml, and a create users migration. Wow, that is a powerful.

At this point you need to run the migration to update your database with the Acts as Authenticated users table.

rake migrate

At this point you can direct your browser to http://localhost:3000/login/signup to create a new user or http://localhost:3000/login/login to log into the system with a user and password.

The Acts as Authenticated plugin provides some functionality that allows any and all of your controllers to validate that your a user has logged in, if not they will be sent to the login page. There is also a ‘remember me’ feature that stores a cookie in the client’s browser that helps to detect that the user has previously logged in. To activate these functionality open the login controller that was created by the generator, cut the following lines and paste them in the application controller.

[source:ruby]
include AuthenticatedSystem
before_filter :login_from_cookie
[/source]

With the above two lines in your base application controller you can add the a before_filter to any other controller to ensure that your visitors first login.

[source:ruby]
before_filter :login_required
[/source]

To have access to the currently logged in user you can do so through session[:user] or current_user.

The Acts as Authenticated also provides a authenticated_mailer generator. Once activated correctly the mailer will send an email to new users with an activation URL. New users would be able to login only after they activate their account by clicking the activation URL.

Technorati Tags: , , , , , , , , , , , ,


Feb 7 2007

Rails Google Maps Plugin

I still remember the awe that struck me when I first saw for the first time Google Maps in action. I was able zoom in and out, and even circumnavigate the globe by just clicking and moving the cursor around. Google Maps really demonstrated what a web 2.0 mashup could be like. Housing Maps is mashup between Google Maps and Craigslist apartment/housing ads. If you want show all the locations of Wi-Fi hot spots in your Rails app like Hotspotr, then you need to take a look at Yellow Maps 4 Ruby on Rails Plugin for Google Maps.

Before you get started you will need to sign up for a Google Maps API access. Once you have your Maps API key install the Rails plugin by executing the ‘script/plugin install <URL>’ command from your application directory where URL is replaced with the following.

svn://rubyforge.org/var/svn/ym4r/Plugins/GM/trunk/ym4r_gm

The installation process will copy files in the under config, vendor/plugins, and in the public/javascripts directory. Open config/gmaps_api_key.yml in your favorite text editor and add your Google Maps API key under production for you domain. It was my experience that I did not have to change the Google Maps API key for the development and test environment. Now you are ready to start producing maps.

Update the HTML header of your template layout file so that some required JavaScript include statement are insert. Next to other javascript_include_tag statement add the following.

<%= GMap.header %>

In the controller you instantiate a GMap object with a id name. You will also need to supply the center of the map with the longitude and latitude and the zoom factor. If you want a little map balloon to appear you will need to create a marker. Your map can have any number of markers, each position separately with a title and info window when clicked. Here is the code used to construct a map, which can be placed in your controller.

@map = GMap.new("map_div_id")
@map.control_init(:large_map => true, :map_type => true)
@map.center_zoom_init([75.5,-42.56], 4)

marker = GMarker.new([75.6, -42.467],
  :title => "Where Am I?", :info_window => "Hello, Greenland")
@map.overlay_init(marker)

To display your map in the action’s rhtml view file you will need to lines of code. The first line will produce JavaScript code that describes your map. The second line of code will produce the div that will display the map. If any of these two lines are omitted the map will not be displayed.

<%= @map.to_html %>
<%= @map.div(:width => 600, :height => 400) %>

These are the basics of using Google Maps in your Ruby on Rails application but YM4R can do a whole lot more. Do take the time to read the Google Maps FAQ and the YM4R GM ruby docs.


Feb 4 2007

Rails Google Analytics Plugin

I am a big fan of Google Analytics. If you manage a blog, or any type of website for that matter, you should think of adding the little bit of JavaScript code that Google Analytics requires to start breaking down your page views. If you are developing a Rails app take a look at the Google Analytics Plugin. To install the plugin run the following command from the base directory of your Rails app.

script/plugin install http://svn.rubaidh.com/plugins/trunk/google_analytics

Before Google Analytics starts collecting stats on your site you need to configure the plugin. At the very bottom of your config/environment.rb file add the following configuration magic.

[source:ruby]
Rubaidh::GoogleAnalytics.tracker_id = ‘UA-123456-7’
Rubaidh::GoogleAnalytics.domain_name = ‘mydomain.com’
Rubaidh::GoogleAnalytics.environments = [‘production’]
[/source]

Make sure you have the right value for the tracker_id and domain_name. At this point, the Google Analytics code will be placed at the bottom of each page when running under the production environment. If you want to see the plugin in action under a development environment, replace production by development in the configuration snippet above.

One word of warning, the plugin basically works by replaces ‘</body>’ with analytics_code+'</body>’. If you, like me, normally capitalize HTML tag names then plugin will not output the analytics code. Make sure the your view template uses the lower case version of the ending body tag.

Also, you might not want to have Google Analytics collect stats on all your pages. To disable the Google Analytics code from a given action use the following filter function call on your controller.

[source:ruby]
# Don’t collection analytics stats on the about page
skip_after_filter :add_google_analytics_code, :only => [:about]
[/source]

To disable Google Analytics from most of the actions in a controller, except one for the show action, you can use the following code in your controller.

[source:ruby]
# Collect analytics stats only on the show action
skip_after_filter :add_google_analytics_code, :except => [:show]
[/source]

Technorati Tags: , , , , , , , , , ,


Feb 4 2007

Rails Named Routes

I have already gone in some detail about creating custom routes for your Ruby on Rails application. At this time, I would like to recall that you can pass additional parameters to your controller by adding them in your routes.

[source:ruby]
# Sometimes I need an extra parameter xid
map.connect ‘:controller/:action/:id/:xid’
[/source]

The route above will resolve for a url such as the following.

http://mydomain.com/mycontroller/myaction/1/2

For the above url, the controller can access two parameters, params[:id] and params[:xid]. Before nested routes where available in Rails, I would fake nested routes by creating routes like the following.

[source:ruby]
map.connect ‘:controller/:action/:id/comment/:xid’
[/source]

The route above would resolve for a url such as the one below if you had an action post in a controller blog.

http://mydomain.com/blog/post/1/comment/2

Because I was able to fake nested routes for my urls I really don’t understand why there is the need behind them.

Now, with the above background lets create a named route to view a blog post without naming both the controller and action.

[source:ruby]
map.post ‘post/:id’, :controller => ‘post’, :action => ‘show’
[/source]

The name of the route is post, named for the function call map.post. The route will resolve the following url to an action show in the post controller.

http://mydomain.com/post/1

Rails will create a post_url method which can be used in your rhtml view. In the rhtml view you can create the url for this route with the following snippet.

[source:ruby]
<%= post_url :id => @link.id %>
[/source]

In Rails 1.2 this will return an url as you expect.

http://mydomain.com/post/1

In Rails 1.6.1 this would return an string url with the controller and action name in it. If you are using Rails 1.6.1 and want your named route to resolve to the above url, use a different name for :id, such as :xid, in the routes definition.

If you are using Rails 1.2, you don’t have to pass in a hash parameter to the post_url view method. In Rails 1.2, you can pass in your ActiveRecord model for which the post_url method will use the models id in the generated url.

[source:ruby]
<%= post_url @link %>
[/source]

Technorati Tags: , , , , , ,


Jan 22 2007

Ruby Class Tutorial

Classes and interfaces are the primary building blocks of a typical Java application. Classes are the blue prints used to create objects in a running system. In contrast to Java, Ruby’s building blocks are classes, modules, and mixins. In this post we will take a tour of classes in Ruby.

Classes
To get started, lets define a basic Person class.

class Person
end

The above class is the simplest class type we can define in Ruby. The first thing you will notice is that the curly braces that are so pervasive in other programming languages are omitted here. This is not a typo. It is intentional. In fact, curly braces are rarely used in Ruby code blocks.

As in Java, we use the class reserve keyword to define a class type and the class name is capitalized in camel case. In Ruby, end is the reserved keyword used to demarcate the end of a code block such as an if statement, a method declaration, or a class definition. At this point, the Person class is the simplest class that we can define. Our Person class implicitly inherits from Object.

So far the Person class defined above is not even interesting enough to instantiate. As we know a class typically has state and behavior. Lets add two instance variables to our Person class to hold the first and last name and the necessary getters and setters in a very Java-like fashion.

class Person
  def fname
    @fname
  end
  def fname=(fname)
    @fname = fname
  end
  def lname
    @lname
  end
  def lname=(lname)
    @lname = lname
  end
end

Continue reading