Licensing
A Spine license is Main Components
The spine-unity runtime provides you with a set of components that allow to display, animate, follow and modify skeletons exported from Spine. These components reference skeleton data and texture atlas assets you import as described in the Adding a Skeleton to a Scene
To quickly display a Spine skeleton in your Unity project:
- Import the skeleton data and texture atlas as described in the Advanced - Instantiation at Runtime
Note: Prefer using the normal workflow of adding a skeleton to a scene and storing them in a prefabs or reusing pooled objects from an instance pool for instantiation. This makes customization and adjustments easier.
While it's not the recommended workflow, the spine-unity API allows you to instantiate
SkeletonAnimationandSkeletonGraphicGameObjects at runtime from aSkeletonDataAsset, or even directly from the three exported assets. Instantiation directly from the exported assets is only recommended if you can't use the normal Unity import pipeline to automatically createSkeletonDataAssetandSpineAtlasAssetassets beforehand.C#// instantiating a SkeletonAnimation GameObject from a SkeletonDataAsset
SkeletonAnimation instance = SkeletonAnimation.NewSkeletonAnimationGameObject(skeletonDataAsset);
// instantiating a SkeletonGraphic GameObject from a SkeletonDataAsset
SkeletonGraphic instance
= SkeletonGraphic.NewSkeletonGraphicGameObject(skeletonDataAsset, transform, skeletonGraphicMaterial);C#// instantiation from exported assets without prior import
// 1. Create the AtlasAsset (needs atlas text asset and textures, and materials/shader);
// 2. Create SkeletonDataAsset (needs json or binary asset file, and an AtlasAsset)
SpineAtlasAsset runtimeAtlasAsset
= SpineAtlasAsset.CreateRuntimeInstance(atlasTxt, textures, materialPropertySource, true);
SkeletonDataAsset runtimeSkeletonDataAsset
= SkeletonDataAsset.CreateRuntimeInstance(skeletonJson, runtimeAtlasAsset, true);
// 3. Create SkeletonAnimation (needs a valid SkeletonDataAsset)
SkeletonAnimation instance = SkeletonAnimation.NewSkeletonAnimationGameObject(runtimeSkeletonDataAsset);You can examine the example scene
Spine Examples/Other Examples/Instantiate from Scriptand the used example scriptsSpawnFromSkeletonDataExample.cs,RuntimeLoadFromExportsExample.csandSpawnSkeletonGraphicExample.csfor additional information.SkeletonAnimation Component
The
SkeletonAnimationcomponent is one of three ways to use a Spine skeleton in Unity. These alternatives are: Setting Skeleton DataA Setting Initial Skin and Animation
Root motion for
SkeletonAnimationand Setting Advanced ParametersUnfold the
Advancedsection in the Life-cycle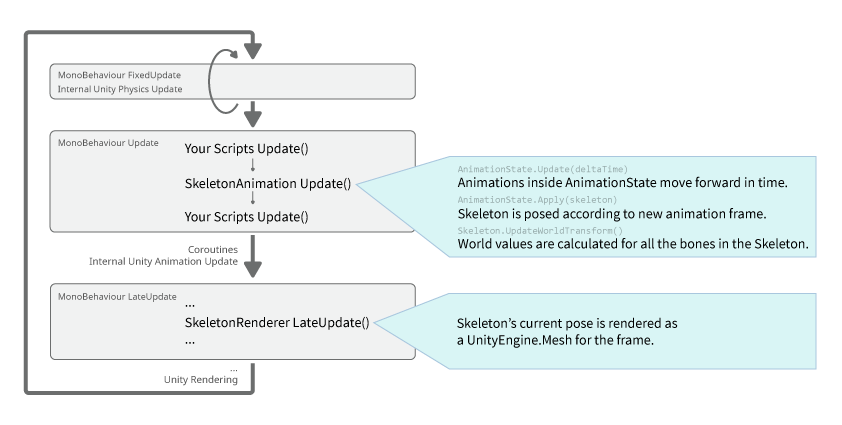
In the C#Interacting with a skeleton via code requires accessing the SkeletonAnimation component. As applies to Unity components in general, it is recommended to query the reference once and store it for further use.
C#...
using Spine.Unity;
public class YourComponent : MonoBehaviour {
SkeletonAnimation skeletonAnimation;
Spine.AnimationState animationState;
Spine.Skeleton skeleton;
void Awake () {
skeletonAnimation = GetComponent<SkeletonAnimation>();
skeleton = skeletonAnimation.Skeleton;
//skeletonAnimation.Initialize(false); // when not accessing skeletonAnimation.Skeleton,
// use Initialize(false) to ensure everything is loaded.
animationState = skeletonAnimation.AnimationState;
}Your scripts may run before or after SkeletonAnimation's
Update. If your code takes Skeleton or bone values before SkeletonAnimation's Update, your code will read values from the previous frame instead of the current one.The component exposes the event callback delegates as properties that allow you to intercept this life-cycle before and after the world transforms of all bones are calculated. You can bind to these delegates to modify bone positions and other aspects of the skeleton without having to care for the update order of your actors and components.
SkeletonAnimation Update Callbacks
SkeletonAnimation.BeforeApplyis raised before the animations for the frame are applied. Use this callback when you want to change the skeleton state before animations are applied on top.SkeletonAnimation.UpdateLocalis raised after the animations for the frame are updated and applied to the skeleton's local values. Use this if you need to read or modify bone local values.SkeletonAnimation.UpdateCompleteis raised after world values are calculated for all bones in the Skeleton. SkeletonAnimation makes no further operations in Update after this. Use this if you only need to read bone world values. Those values may still change if any of your scripts modify them after SkeletonAnimation's Update.SkeletonAnimation.UpdateWorldis raised after the world values are calculated for all the bones in the Skeleton. If you subscribe to this event, it will callskeleton.UpdateWorldTransforma second time. Depending on the complexity of your skeleton or what you are doing, this may be unnecessary, or wasteful. Use this event if you need to modify bone local values based on bone world values. This is useful for implementing custom constraints in Unity code.
C#// your delegate method
void AfterUpdateComplete (ISkeletonAnimation anim) {
// this is called after animation updates have been completed.
}
// register your delegate method
void Start() {
skeletonAnimation.UpdateComplete -= AfterUpdateComplete;
skeletonAnimation.UpdateComplete += AfterUpdateComplete;
}SkeletonRenderer Update Callbacks
OnRebuildis raised after the Skeleton is successfully initialized.OnMeshAndMaterialsUpdatedis raised at the end ofLateUpdate()after the Mesh and all materials have been updated.
C#// your delegate method for OnMeshAndMaterialsUpdated
void AfterMeshAndMaterialsUpdated (SkeletonRenderer renderer) {
// this is called after mesh and materials have been updated.
}
// your delegate method for OnRebuild
void AfterRebuild (SkeletonRenderer renderer) {
// this is called after the Skeleton is successfully initialized.
}
// register your delegate method
void Start() {
skeletonAnimation.OnMeshAndMaterialsUpdated -= AfterMeshAndMaterialsUpdated;
skeletonAnimation.OnMeshAndMaterialsUpdated += AfterMeshAndMaterialsUpdated;
skeletonAnimation.OnRebuild -= AfterRebuild;
skeletonAnimation.OnRebuild += AfterRebuild;
}As an alternative, you can change Script Execution Order
In Unity, each component's
UpdateandLateUpdatecalls are ordered according to script execution order (see Manual UpdatesAfter certain modifications it may be desired to immediately re-apply animations to your skeleton, or re-generate the skeleton mesh based on the modified skeleton. Compared to the Skeleton
To set an attachment, provide the slot and attachment name.
C#bool success = skeletonAnimation.Skeleton.SetAttachment("slotName", "attachmentName");C#// using properties
[SpineSlot] public string slotProperty = "slotName";
[SpineAttachment] public string attachmentProperty = "attachmentName";
...
bool success = skeletonAnimation.Skeleton.SetAttachment(slotProperty, attachmentProperty);Note that
[SpineSlot]and[SpineAttachment]in the above code are Resetting to Setup PoseFor Setting Skins
A Spine skeleton may have multiple Combining Skins
Spine skins can be combined to e.g. form a complete character skin from single cloth item skins. See the Runtime Repacking
While combining skins, multiple materials may be accumulated. This leads to additional draw calls. The
Skin.GetRepackedSkin()method can be used to combine used texture regions of a collected skin to a single texture at runtime.C#using Spine.Unity.AttachmentTools;
// Create a repacked skin.
Skin repackedSkin = collectedSkin.GetRepackedSkin("Repacked skin", skeletonAnimation.SkeletonDataAsset.atlasAssets[0].PrimaryMaterial, out runtimeMaterial, out runtimeAtlas);
collectedSkin.Clear();
// Use the repacked skin.
skeletonAnimation.Skeleton.Skin = repackedSkin;
skeletonAnimation.Skeleton.SetSlotsToSetupPose();
skeletonAnimation.AnimationState.Apply(skeletonAnimation.Skeleton); // skeletonMecanim.Update() for SkeletonMecanim
// You can optionally clear the cache after multiple repack operations.
AtlasUtilities.ClearCache();Important Note: If repacking fails or creates unexpected results, it is most likely due to any of the following causes:
- Read/Write is disabled: Depending on platform capabilities, you may need to set the
Read/Write Enabledparameter at source textures that shall be combined to a repacked texture. - Compression is enabled: Depending on the platform, ensure that the source texture has Texture import setting
Compressionset toNoneinstead ofNormal Quality. - Quality tier uses half/quarter resolution textures: There is a known Unity bug that copies incorrect regions when half or quarter resolution rextures are used. Ensure that all Quality tiers in Project Settings are using full resolution textures.
- The source texture is not a power-of-two texture but Unity enlarges it to the closest power: Either a) export from Spine with Advanced - Runtime Repacking with Normalmaps
You can also repack normal maps and other additional texture layers alongside the main texture. Pass
int[] additionalTexturePropertyIDsToCopy = new int[] { Shader.PropertyToID("_BumpMap") };as parameter toGetRepackedSkin()to repack both the main texture and the normal map layer.C#Material runtimeMaterial;
Texture2D runtimeAtlas;
Texture2D[] additionalOutputTextures = null;
int[] additionalTexturePropertyIDsToCopy = new int[] { Shader.PropertyToID("_BumpMap") };
Skin repackedSkin = prevSkin.GetRepackedSkin("Repacked skin", skeletonAnimation.SkeletonDataAsset.atlasAssets[0].PrimaryMaterial, out runtimeMaterial, out runtimeAtlas,
additionalTexturePropertyIDsToCopy : additionalTexturePropertyIDsToCopy, additionalOutputTextures : additionalOutputTextures);
// Use the repacked skin.
skeletonAnimation.Skeleton.Skin = repackedSkin;
skeletonAnimation.Skeleton.SetSlotsToSetupPose();
skeletonAnimation.AnimationState.Apply(skeletonAnimation.Skeleton); // skeletonMecanim.Update() for SkeletonMecanimNote: Typically the normal map property is named
"_BumpMap". When using a custom shader, be sure to use the respective property name. Note that this name is the property name in the shader, not the"Normal Map"label string shown in the Inspector.On-Demand Loading of Atlas Textures
Your project may require many skins and atlas page textures per skeleton where only a fraction needs to be loaded up front. Note that all atlas textures are indirectly referenced by the Scaling and Flipping a Skeleton
Flipping a skeleton vertically or horizontally allows you to reuse animations, e.g. a walk animation facing left can be played back to face right.
C#bool isFlippedX = skeleton.ScaleX < 0;
skeleton.ScaleX = -1;
bool isFlippedY = skeleton.ScaleY < 0;
skeleton.ScaleY = -1;
skeleton.ScaleX = -skeleton.ScaleX; // toggle flip x stateManually Accessing Bone Transforms
Note: Recommended for very special use cases only. The Spine Animation - AnimationState
Life-cycle
The Time Scale
You can set the time scale of the skeleton animation component to slow down or speed up the playback of animations. The delta time used to advance animations is simply multiplied with the time scale, e.g. a time scale of 0.5 slows the animation down to half the normal speed, a time scale of 2 speeds it up to twice the normal speed.
C#float timeScale = skeletonAnimation.timeScale;
skeletonAnimation.timeScale = 0.5f;Setting Animations
To set an animation, provide the track index, animation name and whether to loop the animation.
C#TrackEntry entry = skeletonAnimation.AnimationState.SetAnimation(trackIndex, "walk", true);C#// using properties
[SpineAnimation] public string animationProperty = "walk";
...
TrackEntry entry = skeletonAnimation.AnimationState.SetAnimation(trackIndex, animationProperty, true);As an alternative, you can use an Queueing Animations
To queue an animation, provide the track index, animation name, whether to loop the animation, and the delay after which this animation should start playing on the track in seconds.
C#TrackEntry entry = skeletonAnimation.AnimationState.AddAnimation(trackIndex, "run", true, 2);C#// using properties
[SpineAnimation] public string animationProperty = "run";
...
TrackEntry entry = skeletonAnimation.AnimationState.AddAnimation(trackIndex, animationProperty, true, 2);Empty Animation and Clearing
When a track has no current animation and an animation is set, it begins playing right away. When a track is cleared, the track's animations are no longer applied, leaving the skeletons in their current pose. As described in the Track Entries
You'll receive a Processing AnimationState Events
While animations are played back by the underlying
AnimationState, various events will be emitted that notify listeners that- An animation started.
- An animation was interrupted, e.g. by clearing a track or setting a new animation.
- An animation was completed without interruption, which may occur multiple times if looped.
- An animation has ended.
- An animation and its corresponding
TrackEntryhave been disposed. - A user defined event was fired.
Note: When setting a new animation which interrupts a previous one, no
completeevent will be raised butinterruptandendevents will be raised instead.The skeleton animation component provides delegates to which C# code can bind in order to react to these events for all queued animations on all tracks. Listeners can also be bound to the corresponding delegates of a specific
TrackEntryonly. So you can register to e.g.AnimationState.Completeto handle event callbacks for any future animationCompleteevent, or instead register to a singleTrackEntry.Completeevent to handleCompleteevents issued by a single specific enqueued animation.C#
In the class that should react to
AnimationStateevents, add delegates for the events you want to listen to:C#SkeletonAnimation skeletonAnimation;
Spine.AnimationState animationState;
void Awake () {
skeletonAnimation = GetComponent<SkeletonAnimation>();
animationState = skeletonAnimation.AnimationState;
// registering for events raised by any animation
animationState.Start += OnSpineAnimationStart;
animationState.Interrupt += OnSpineAnimationInterrupt;
animationState.End += OnSpineAnimationEnd;
animationState.Dispose += OnSpineAnimationDispose;
animationState.Complete += OnSpineAnimationComplete;
animationState.Event += OnUserDefinedEvent;
// registering for events raised by a single animation track entry
Spine.TrackEntry trackEntry = animationState.SetAnimation(trackIndex, "walk", true);
trackEntry.Start += OnSpineAnimationStart;
trackEntry.Interrupt += OnSpineAnimationInterrupt;
trackEntry.End += OnSpineAnimationEnd;
trackEntry.Dispose += OnSpineAnimationDispose;
trackEntry.Complete += OnSpineAnimationComplete;
trackEntry.Event += OnUserDefinedEvent;
}
public void OnSpineAnimationStart(TrackEntry trackEntry) {
// Add your implementation code here to react to start events
}
public void OnSpineAnimationInterrupt(TrackEntry trackEntry) {
// Add your implementation code here to react to interrupt events
}
public void OnSpineAnimationEnd(TrackEntry trackEntry) {
// Add your implementation code here to react to end events
}
public void OnSpineAnimationDispose(TrackEntry trackEntry) {
// Add your implementation code here to react to dispose events
}
public void OnSpineAnimationComplete(TrackEntry trackEntry) {
// Add your implementation code here to react to complete events
}
string targetEventName = "targetEvent";
string targetEventNameInFolder = "eventFolderName/targetEvent";
public void OnUserDefinedEvent(Spine.TrackEntry trackEntry, Spine.Event e) {
if (e.Data.Name == targetEventName) {
// Add your implementation code here to react to user defined event
}
}
// you can cache event data to save the string comparison
Spine.EventData targetEventData;
void Start () {
targetEventData = skeletonAnimation.Skeleton.Data.FindEvent(targetEventName);
}
public void OnUserDefinedEvent(Spine.TrackEntry trackEntry, Spine.Event e) {
if (e.Data == targetEventData) {
// Add your implementation code here to react to user defined event
}
}See the Changing AnimationState or Game State in Callbacks
While you can modify
AnimationStateby e.g. callingAnimationState.SetAnimation()from within anAnimationStateevent callback, there are some potential timing issues to consider. This also applies when changing your game state from an event callback.AnimationStateevent callbacks are issued when animations are applied inSkeletonAnimation.Update(), before the mesh is updated inSkeletonAnimation.LateUpdate().- If you call
AnimationState.SetAnimation()from the Coroutine Yield InstructionsThe spine-unity runtime provides a set of yield instructions for use with Unity's Coroutines. If you are new to Unity Coroutines, the Tutorial Page
You can find a tutorial page on spine-unity events Scripting String Property Attributes
It is not convenient to type e.g. animation names manually in the Inspector. Thus spine-unity provides popup fields for string parameters instead. You can precede a
stringproperty with one of the following property attributes to automatically receive a popup selection field, populated with e.g. all available animations at a skeleton. If you can see such popup fields in one of the provided Spine components, you can also use the same popup via property attributes in your custom components. The following list shows available property attributes.C#[SpineBone] public string bone;
[SpineSlot] public string slot;
[SpineAttachment] public string attachment;
[SpineSkin] public string skin;
[SpineAnimation] public string animation;
[SpineEvent] public string event;
[SpineIkConstraint] public string ikConstraint;
[SpineTransformConstraint] public string transformConstraint;
[SpinePathConstraint] public string pathConstraint;Please take a look at the SkeletonMecanim Component
The
SkeletonMecanimcomponent is one of three ways to use a Spine skeleton in Unity. These alternatives are: Required Additional KeysTo smoothly mix out a timeline state (e.g. bone rotation) from one animation to the next, the second animation requires an additional key at the first frame when in setup pose. Otherwise the previous animation would leave a leftover timeline state. This is one of the drawbacks of
SkeletonMecanimcompared to Animation Blending ControlThe
SkeletonMecanimInspector exposes the following additional parameters:-
Mecanim Translator
-
Auto Reset. When set to
true, the skeleton state is mixed out to setup pose when an animation finishes, according to the animation's keyed items. This may be especially important when an animation has changed attachment visibility state: when mixed out, attachment visibility will change back to setup pose state, otherwise current attachment state is held until another animation has a key set at the respective attachment timeline. -
Custom MixMode. When disabled, the recommended
MixModeis used according to the layer blend mode. When enabled, aMix Modessection is shown below allowing you to specify aMixModefor each Mecanim layer. -
Mix Modes. Shown when
Custom MixModeparameter above is enabled. This parameter determines the animation mix mode between successive animations, and also across layers.- Mix Next (recommended for
Base LayerandOverridelayers)
Applies the previous track and then mixes in the next track on top using Mecanim transition weights. - Always Mix (recommended for
Additivelayers)
Fades out the previous track (potentially to setup pose whenAuto Resetis enabled), and mixes in the next track on top using Mecanim transition weights. Note that this may cause an unintended animation dipping effect when used on the base layer. - Hard (previously called
Spine Style)
Applies the next track immediately. - Match (new in 4.2, recommended on any layer using blend tree nodes)
Calculates Spine animation weights to best match the provided Mecanim clip weights.
- Mix Next (recommended for
-
Result of
Auto Resetand layerMix ModeparametersWhen a transition is active, there are four poses -
current state last frame, thesetup pose,previous clip poseandnew clip pose- which will be combined as follows:- Starts with
current state last frame(or other modifications this frame prior to SkeletonMecanim's update). - Apply
setup pose:- When
Auto Resetis enabled, thesetup posereplaces thecurrent state last frame. - When
Auto Resetis disabled,setup poseis not part of the mix.
- When
- Apply
previous clip pose:- When mode is set to
Always Mix, theprevious clip poseis mixed with the current state (so mixed withsetup posewhenAuto Resetis enabled). - When set to
HardorMix Next, theprevious clip poseis applied with full weight, overriding the current state (thus overridingsetup pose).
- When mode is set to
- Apply
new clip pose:- When mode is set to
Always MixorMix Next, thenew clip poseis mixed with the current state. So atAlways MixwithAuto Resetenabled it is a mix ofsetup pose,previous clip poseandnew clip pose. - When mode is set to
Hard, thenew clip poseis applied with full weight, overriding all previously applied poses.
- When mode is set to
The table below shows the case when both previous clip
Pand new clipNmodify the same timeline value, e.g. the same bone rotation.Srepresents the setup pose whenAuto Resetis enabled, and the current state (e.g. of the previous frame) if disabled. Transition weight (0 at transition start, 1 at transition end) is represented by the variablew. The default (recommended) mix mode at each layer blend mode is highlighted in bold.Always Mix Mix Next Hard Base Layer lerp(lerp(S, P, 1-w), N, w) lerp(P, N, w) N Override lerp(
lerp(lower_layers_result,
P, (1-w) * layer_weight),
N, w * layer_weight)lerp(
lerp(lower_layers_result,
P, layer_weight),
N, w * layer_weight)lerp(lower_layers_result,
N,
layer_weight)Additive lower_layers_result +
layer_weight * lerp(P, N, w))counts as Always Mix lower_layers_result +
layer_weight * NAbbreviation Meaning S Setup pose P Previous clip pose N New clip pose w Transition weight lerp(a, b, weight) Linear interpolation from a to b by weight. Controller and Animator
The
SkeletonMecanimcomponent uses the Controller asset assigned at theAnimatorcomponent as usual with Unity Mecanim. The Controller asset is automatically generated and assigned when instantiating a skeleton asSkeletonMecanimvia SkeletonMecanim EventsWhen using
SkeletonMecanim, events are stored in eachAnimationClipand are raised like other Unity animation events. For example, if you named your event"Footstep"in Spine, you need to provide aMonoBehaviourscript on yourSkeletonMecanimGameObject with a method namedFootstep()to handle it. When using folders in Spine, the method name will be a concatenation of the folder name and the animation name. For example when the previous event is placed in a folder namedFoldernameit will beFoldernameFootstep().C#public class YourComponentReceivingEvents : MonoBehaviour {
// to capture event "Footstep" when it's placed outside of folders
void Footstep() {
Debug.Log("Footstep event received");
}
// to capture event "Footstep" when it's placed in a folder named "Foldername"
void FoldernameFootstep () {
Debug.Log("Footstep (in folder Foldername) received");
}
}For more information on Unity Mecanim events, see SkeletonGraphic Component
The
SkeletonGraphiccomponent is one of three ways to use a Spine skeleton in Unity. These alternatives are: Why a specific UI ComponentThe Unity UI (UnityEngine.UI) uses a system of
CanvasandCanvasRenderersto sort and manage its renderable objects. Built-in renderable UI components such asText,Image, andRawImage, rely onCanvasRendererto function correctly. Putting objects likeMeshRenderers(e.g. a default Cube object), orSpriteRenderers(e.g. a Sprite) under a UI will not render in aCanvas.SkeletonAnimationuses aMeshRendererand thus behaves in the same way. The spine-unity runtime therefore provides theSkeletonAnimationvariantSkeletonGraphic, a subclass ofUnityEngine.UI.MaskableGraphicusingCanvasRenderercomponents for rendering.Important Material Requirements
Only use Materials with special
CanvasRenderercompatible shaders atSkeletonGraphiccomponents, such as theSpine/SkeletonGraphic*shaders which are assigned by default. Do not use URP, LWRP or normal shaders likeSpine/Skeletonwith aSkeletonGraphiccomponent. Seeing no visual error does not mean that the shader works withSkeletonGraphic. We have seen cases where it renders incorrectly on target mobile devices while rendering without any issues in the Unity Editor. As other UI components,SkeletonGraphicuses aCanvasRendererinstead of aMeshRenderer, which uses a separate rendering pipeline.Normal Materials assigned at a
SpineAtlasAssetare ignored when instantiating aSkeletonDataAssetasSkeletonGraphic, only the Textures are used. You can use a Correct Configuration and MaterialsUsing special shaders like
"Spine/SkeletonGraphic Tint Black"or usingSkeletonGraphicbelow a CanvasGroup alphaWhen using
Spine/SkeletonGraphic*shaders with a SkeletonGraphic without Tint BlackThe following applies When using a material with the
Spine/SkeletonGraphicshaders except forSpine/SkeletonGraphic TintBlack*. If you use such a material below aCanvasGroupwith alpha fadeout, the material must have the parameterCanvasGroup Compatibleenabled and the SkeletonGraphic componentPMA Vertex Colorsdisabled:-
a) With version 4.2 and newer of the spine-unity runtime, you can find a
CanvasGroup Compatiblevariant of each material in the foldersMaterials/UI-PMATexture/CanvasGroupandMaterials/UI-StraightAlphaTex/CanvasGrouprespectively.
b) On older versions, best create a copy of the sharedSkeletonGraphicDefaultmaterial and rename it to e.g.SkeletonGraphic CanvasGroupinstead of modifying the original material. Note that this shared SkeletonGraphic material needs to be created only once, it can be used with different skeletons as it is independent of the used texture. -
Assign this
CanvasGroup Compatiblematerial at anySkeletonGraphiccomponents below aCanvasGroupinstead of the original material. -
Any
SkeletonGraphiccomponent using thisCanvasGroupcompatible material needs to also haveAdvanced - PMA Vertex Colorsdisabled to avoid a double-darkening effect of semi-transparent parts. This unfortunately prevents rendering of additive slots in a single batch together with normal slots and may thus increase the number of draw calls.
SkeletonGraphic TintBlack
When using a material with the
Spine/SkeletonGraphic TintBlack*shader below aCanvasGroupwith alpha fadeout, the following setup is required:- a) As above, with spine-unity version 4.2 and newer, use the provided
SkeletonGraphic TintBlackmaterials within theCanvasGroupfolder, or
b) on older versions create a copy of the sharedSkeletonGraphicTintBlackmaterial and rename it to e.g.SkeletonGraphicTintBlack CanvasGroupinstead of modifying the original material. Note that this shared SkeletonGraphic material needs to be created only once, it can be used with different skeletons as it is independent of the used texture. - Assign this material at the
SkeletonGraphiccomponent instead of the original material. - Enable
Advanced - CanvasGroup Compatibleat theSkeletonGraphiccomponent
(Advanced - Canvas Group Tint Blackon version 4.1 or older). - a) When using spine-unity 4.2 or newer, both enabled and disabled
Advanced - PMA Vertex ColorsSkeletonGraphicsettings are supported. It is recommended to keepAdvanced - PMA Vertex Colorsenabled to benefit from rendering additive slots in a single draw call.
b) On older versions, disableAdvanced - PMA Vertex Colorsto avoid a double-darkening effect of semi-transparent additive slots.
Bounds and Correct Visibility
Visibility of a
SkeletonGraphicis determined via its RectTransform bounds. When a Skeleton is instantiated via drag-and-drop as a child of aCanvasGameObject, the RectTransform bounds are automatically matched to the initial pose. You can also manually fit the RectTransform to its current pose's dimensions by clicking theMatch RectTransform with Meshbutton. It is important that the RectTransform bounds are not smaller than the mesh, otherwise e.g. aRectMask2Dwill omit drawing the skeleton as soon as the RectTransform is completely outside, even when part of the mesh is still inside and should be rendered. The current RectTransform bounds are shown in Scene view when the ParametersSkeletonGraphicprovides similar parameters as the SkeletonRenderer ComponentThe
SkeletonRenderercomponent is responsible for drawing the current state of a skeleton. It is the base class for SkeletonAnimation and SkeletonMecanim.Note: most of the time you will want to use SkeletonAnimation, SkeletonMecanim or SkeletonGraphic (UI) instead. These components provide sophisticated means to control animation. Only when applying animations manually without transitions, as could be useful at a UI gauge element, this component may be useful as-is.
Rendering is performed via a procedural mesh which is updated at a
MeshRenderercomponent. The component uses the texture atlas asset referenced by the SkeletonDataAsset to find the textures and materials needed to draw the attachments of the skeleton. Please consult the documentation section of SkeletonAnimation for additional information.You can examine the example scene
Spine Examples/Other Examples/SpineGaugeon how to use aSkeletonRenderercomponent directly. -