spine-ue Runtime Documentation
Licensing
Please see the Getting Started
Installation
To use the spine-ue runtime in your Unreal Engine project:
- Download and install Samples
The
spine-runtimes/spine-uedirectory is a project ready to be opened in the Unreal Engine Editor.To explore the spine-ue runtime samples:
Download and install Updating the spine-ue Runtime
Before updating your project' spine-ue runtime, please consult our Updating to Unreal Engine 5.3+
Starting with Unreal Engine 5.3, Epic has introduced a breaking change in the way they handle
UAssets. Imported.skel,.json, and.atlasfiles can no longer share a common prefix. E.g.skeleton.skelandskeleton.atlaswill not work. However,skeleton-data.skelandskeleton.atlaswill work.For projects created with Unreal Engine versions before 5.3, it is not possible to automatically upgrade the imported assets. If you upgrade such a project to Unreal Engine 5.3+, the content browser will no longer show the imported skeleton data and atlas resources due to the regression introduced by Epic. The only way to upgrade a project to Unreal Engine 5.3+ is to manually re-name, re-import and re-wire all skeleton data and .atlas files.
We have filed a bug report with Epic right after the release of Unreal Engine 5.3 but have not heard back from them since. We therefore assume that Epic will not fix this regression, and that the above work around and limitations will stay in place.
Using spine-ue
Overview
The spine-ue runtime is an Unreal Engine plugin supporting playback and manipulation of animations created with Spine. The Asset Management
Exporting for Unreal Engine
Please follow the instructions in the Spine User Guide on how to
- Importing into Unreal Engine
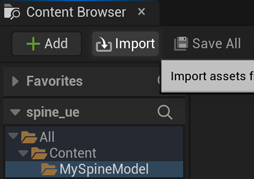
- Open your Unreal Engine project in the Unreal Engine Editor
- Click
Importin the content browser- Select the
.jsonor.skelfile and the.atlasfile you exported from the Spine EditorThe asset importer will create Unreal Engine assets for the skeleton data and texture atlas automatically.
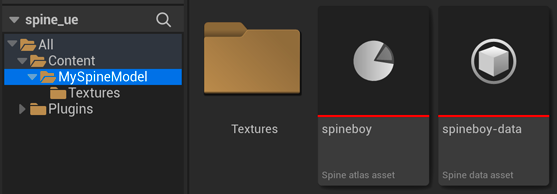
The import creates
- A Spine skeleton data asset for skeleton data files (
.json,.skel)- A Spine texture atlas asset for the texture atlas file (
.atlas)- A texture asset for each texture atlas page (
.png), which will be put in a content folder calledTexturesnext to the texture atlas asset
Updating Spine Assets
During development, you may frequently update your Spine skeleton data and texture atlas files. You can simply overwrite these source files (
.json,.skel,.atlas,.png) by re-exporting from the Spine Editor.The Unreal Engine Editor will detect changes to these source files and prompt you to re-import the assets from these source files. After re-import, all references to previously imported Spine assets will be intact and use the latest source data.
Note: The Unreal Engine Editor sometimes fails to recognize source file changes. In this case, locate your Spine skeleton data or texture atlas asset in the content browser, double click it, then select
Asset -> Reimportfrom the menu of the newly opened window.Skeleton Data Asset
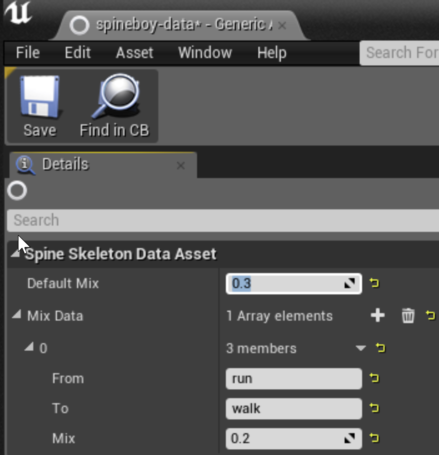
The skeleton data asset stores information about the bone hierarchy, slots, draw order, animations and other data that constitutes your skeleton. Other components provided by the spine-ue runtime reference and share this skeleton data asset to animate and display a skeleton as part of an Unreal Engine actor instance.
The skeleton data asset allows you to specify Texture Atlas Asset
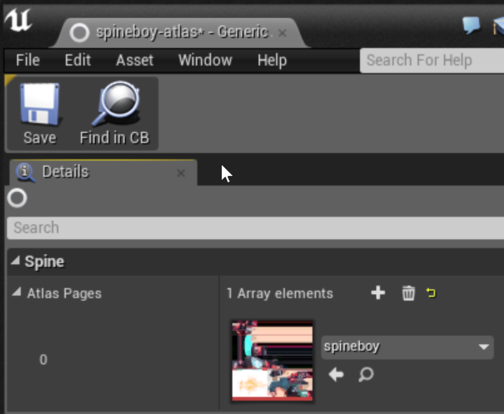
The texture atlas asset contains information about the images used by your skeleton, namely on what texture atlas page an image is stored, as well as its UV texture coordinates on the texture atlas page.
You can view the texture of the texture atlas pages when double clicking the asset in the content browser.
Note: You can modify the textures referenced by the texture atlas asset. In this case, make sure the UV texture coordinates stay valid.
Components
The spine-ue runtime provides you with a set of components that allow to display, animate and modify skeletons exported from Spine. These components reference skeleton data and texture atlas assets you import as described above.
Adding a Skeleton to a Level
To quickly display a Spine skeleton in your Unreal Engine project:
- Import the skeleton data and texture atlas as described above.
- Create an empty actor in your level.
- Add a
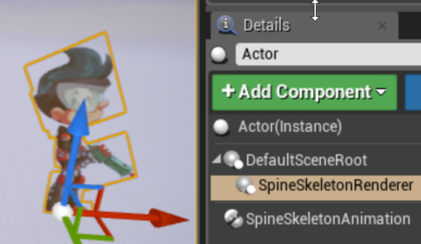
Spine Skeleton Animationcomponent to your actor in its detail panel and set the skeleton data and texture atlas properties to your assets.- Add a
Spine Skeleton Renderer Componentto your actorYou can now either use blueprints or the components' C++ API to animate the skeleton, react to events triggered by animations, etc. Refer to the component documentation below for more details.
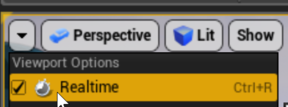
Note: In order for the editor to render your skeleton, please turn on realtime mode in your viewport
Skeleton Component
The skeleton component stores references to a skeleton data and texture atlas asset and will Setting Skeleton Data & Texture Atlas
A skeleton component requires references to a skeleton data asset from which it can get the information about a skeleton's bone hierarchy, slots etc., as well as a reference to a texture atlas asset, from which it gets information about the images used by the skeleton.
To set the skeleton data and texture atlas
- Select the component in an actor's detail panel
- Set the
AtlasandSkeleton DatapropertiesNote: Both the skeleton data and the atlas asset references have to be set for the component to function properly. If one or both are undefined, the component will gracefully ignore all interaction via C++ and blueprints.
Life-cycle
The skeleton component implements the
UActorComponent::Tick()method in which it updates the world transforms of all bones of the skeleton.The component exposes the multicast delegates
BeforeUpdateWorldTransformandAfterUpdateWorldTransformas properties that allow you to intercept this life-cycle before and after the world transforms of all bones are calculated. You can bind to these delegates to modify bone positions and other aspects of the skeleton without having to care for the update order of your actors and components.C++
In the class that should intercept the life-cycle, add a
UFUNCTIONdeclaration to the class header file:UFUNCTION()
void BeforeUpdateWorldTransform(USpineSkeletonComponent* skeleton);Note: It is important to mark the method as a
UFUNCTION, otherwise it can not be bound to the delegate.Next, add a definition of this function to your class'
.cppfile:void MyClass::BeforeUpdateWorldTransform(USpineSkeletonComponent* skeleton) {
... modify the skeleton here ...
}Finally, bind the method to the delegate, e.g. in
BeginPlay()of your actor or component. Assuming you have a reference to theAActorcontaining the skeleton component:AActor* actor = ...
USpineSkeletonComponent* skeletonComponent = static_cast<USpineSkeletonComponent*>(Actor->GetComponentByClass(USpineSkeletonComponent::StaticClass()));
skeletonComponent->BeforeUpdateWorldTransform.AddDynamic(this, &USpineBoneDriverComponent::BeforeUpdateWorldTransform);Binding to the
AfterUpdateWorldTransformdelegate works the same.Blueprint
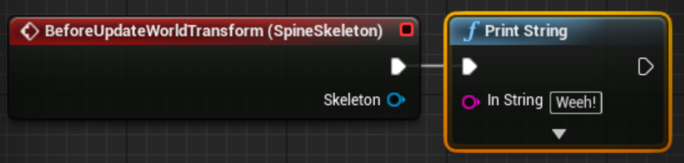
Assuming you have a blueprint for the actor containing the skeleton component
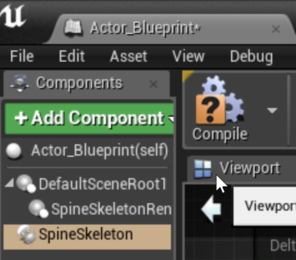
- Open the blueprint in the blueprint editor
- In the components window, select the skeleton component
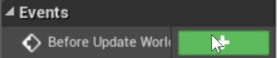
- In the details panel for the skeleton component, click on the
+for theBefore Update World TransormorAfter Update World Transform- Connect other blueprint nodes to the exec pin of the event to implement your custom update logic
Binding to the
AfterUpdateWorldTransformevent works the same.Setting Skins
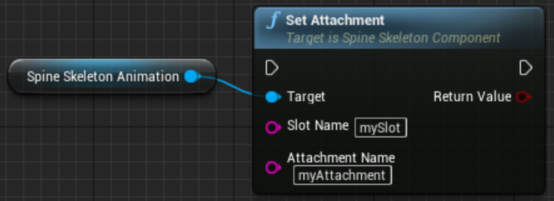
A Spine skeleton may have multiple Setting Attachments
To set an attachment, provide the slot and attachment name.
C++
bool success = skeletonComponent->SetAttachment(FString(TEXT("slotName")), FString(TEXT("attachmentName"));Blueprint
Resetting to Setup Pose
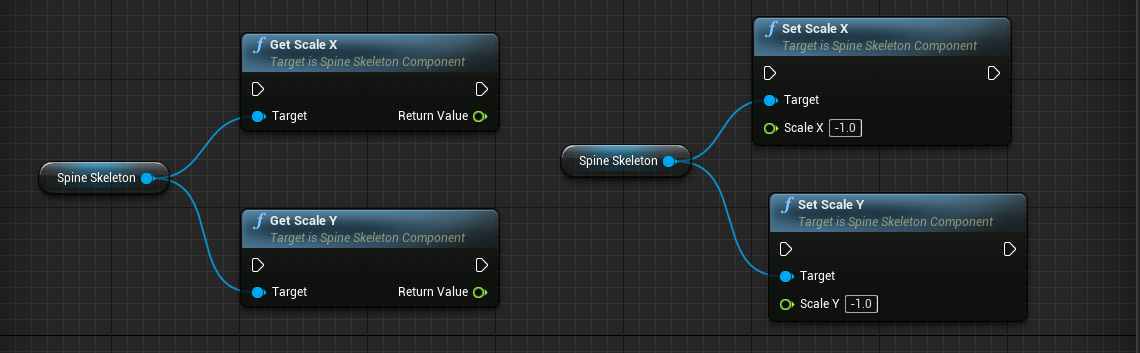
Flipping a skeleton vertically or horizontally allows you to reuse animations, e.g. a walk animation facing left can be played back to face right.
C++
bool isFlippedX = skeletonComponent->GetScaleX() < 1;
skeletonComponent->SetScaleX(-1);
bool isFlippedY = skeletonComponent->GetScaleY() < 1;
skeletonComponent->SetScaleY(-1);Blueprint
Getting and Setting Bone Transforms
The skeleton component lets you set and get bone transforms so you can implement IK terrain following or let other actors and components such as particle systems follow the bones in your skeleton. All transforms are given in the world coordinate system to make interaction easier.
Note: Should you require to modify the local transform of a bone, please use the spine-cpp runtime API in your C++ code.
Note: Make sure you apply new bone positions as part of the update world transform life-cycle, otherwise your modifications may be overwritten by animations.
Note: The Spine bone follower and Spine bone driver components are an easier way to interact with bones.
C++
FTransform boneWorldTransform = skeletonComponent->GetBoneWorldTransform(FString(TEXT("boneName"));
skeletonComponent->SetBoneWorldPosition(FString(TEXT("boneName"), FVector(x, y, z));Blueprint
Skeleton Animation Component
The skeleton animation component is the heart of the spine-ue runtime. It allows you to add a Spine skeleton to an actor, animate it, react to animation events, and so on.
Note: The skeleton animation component is based on the skeleton component, and hence inherits all of skeleton components features described above!
Life-cycle
The skeleton animation component implements the
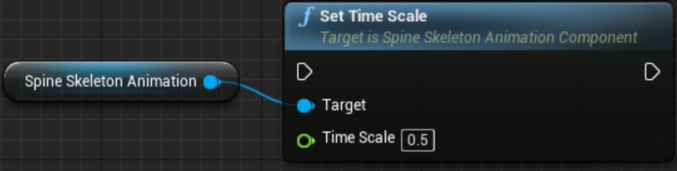
UActorComponent::Tick()method in which it updates the underlying Time ScaleYou can set the time scale of the skeleton animation component to slow down or speed up the playback of animations. The delta time used to advance animations is simply multiplied with the time scale, e.g. a time scale of 0.5 slows the animation down to half the normal speed, a time scale of 2 speeds it up to twice the normal speed.
C++
float timeScale = animationComponent->GetTimeScale();
animationComponent->SetTimeScale(0.5);Blueprint
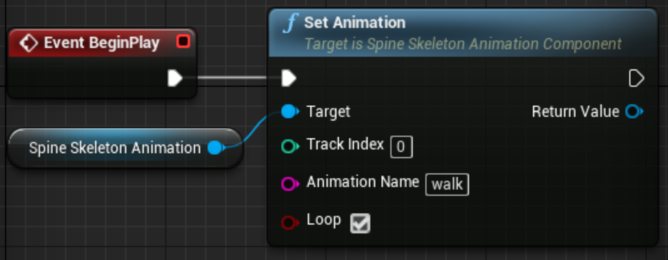
Setting Animations
To set an animation, provide the track index, animation name and whether to loop the animation-
C++
USpineSkeletonAnimationComponent* animationComponent = ... fetch from actor ..
UTrackEntry* entry = animationComponent->SetAnimation(trackIndex, FString(TEXT("walk")), true);Blueprint
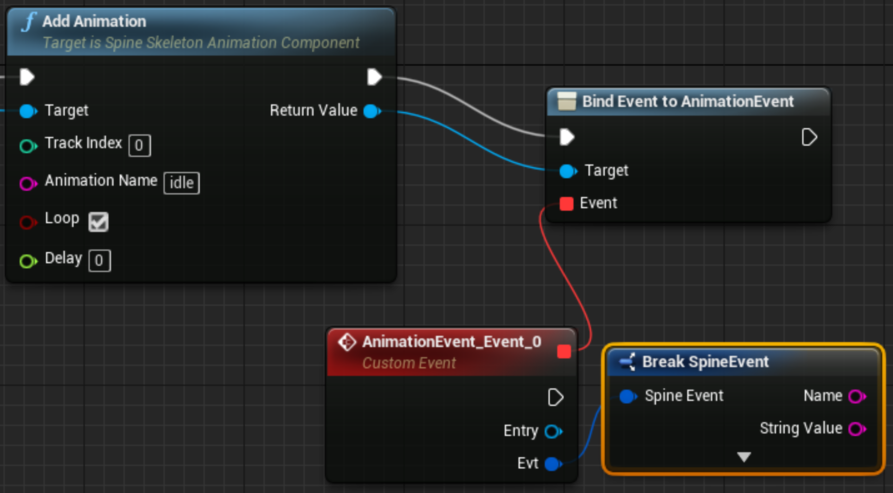
Queueing Animations
To queue an animation, provide the track index, animation name, whether to loop the animation, and the delay after which this animation should start playing on the track in seconds.
C++
UTrackEntry* entry = animationComponent->AddAnimation(trackIndex, FString(TEXT("run")), true, 2);Blueprint
Setting and Queueing Empty Animations, Clearing Tracks
The skeleton animation component also provides methods and blueprint nodes to set an empty animation, queue an empty animation, or clear one or all tracks. All of these work analogous to the methods and nodes shown above.
C++
UTrackEntry* entry = animationComponent->SetEmptyAnimation(trackIndex, mixDuration);
entry = animationComponent->AddEmptyAnimation(trackIndex, mixDuration, delay);
animationComponent->ClearTrack(trackIndex);
animationComponent->ClearTracks();Blueprint
Track Entries
You'll receive a Processing AnimationState Events
While animations are played back by the underlying
AnimationState, various events will be emitted that notify listeners that
- An animation started.
- An animation was interrupted, e.g. by clearing a track or setting a new animation.
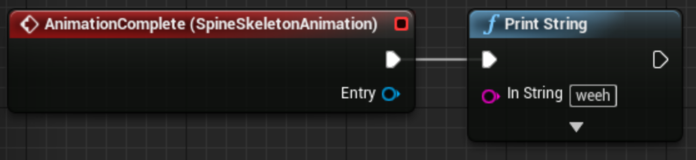
- An animation was completed, which may occur multiple times if looped.
- An animation has ended
- An animation and its corresponding
TrackEntryhave been disposed- A user defined event was fired
The skeleton animation component provides delegates to which C++ code or blueprints can bind in order to react to these events for all queued animations on all tracks. Listeners can also be bound to the corresponding delegates of a specific
TrackEntryonly.C++
In the class that should react to
AnimationStateevents, addUFUNCTIONdeclarations for the events you want to listen to the class header file:UFUNCTION()
void AnimationComplete(UTrackEntry* entry);
UFUNCTION()
void UserDefinedEvent(UTrackEntry* entry, FSpineEvent evt);In the corresponding
.cppimplementation file, add the definitions:void MyClass::AnimationComplete(UTrackEntry* entry) {
... react to complete event here ...
}
void MyClass::UserDefinedEvent(UTrackEntry* entry, FSpineEvent evt) {
... react to user defined event here ...
}Finally, bind to the corresponding delegates of a
USkeletonAnimationComponentorUTrackEntry:USpineAnimationComponent* animationComponent = ...
animationComponent->AnimationComplete.AddDynamic(this, &MyClass::AnimationComplete);
UTrackEntry* entry = ...
animationComponet->AnimationEvent.AddDynamic(this, &MyClass::UserDefinedEvent);Blueprint
To bind to
AnimationStateevents on the skeleton animation component:
- Open the blueprint
- Select the skeleton animation component on your actor
- In the detail panel, click on the
+button next to the event you want to react toTo bind to the delegates of a specific
TrackEntry:
- Drag the return value pin of an
Set Animation,Add Animation,Set Empty AnimationorAdd Empty Animationnode to an empty space in the blueprint.- Select
Assign Animation XXXfrom theComponents -> Spine -> TrackEntrycategory in the popup- Make sure the
Bind Event tonode is wired in such a way that it is executed.Viewport preview
You can preview animations and skins in the UE editor viewports using the
Preview AnimationandPreview Skinproperties of the skeleton animation component. Simply enter the name of the animation and skin.
The reset the animation or skin, set the respective property to an empty text.
Skeleton Renderer Component
The skeleton renderer component is responsible for drawing the current state of a skeleton or skeleton animation component on the same actor. Rendering is performed via a procedural mesh. The component uses the texture atlas asset referenced by the skeleton (animation) component to find the textures needed to draw the attachments of the skeleton.
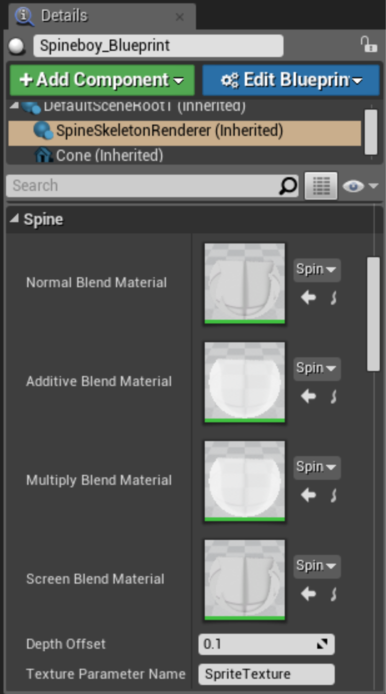
Materials
The skeleton renderer component has 4 material properties, one for each blend mode supported by Spine. By default, these 4 materials are set to unlit materials that are part of the spine-ue plugin (see the
Contentsfolder of the plugin).To modify the materials used by all skeleton renderer components, modify the default materials of the plugin.
To modify the materials used by a specific skeleton renderer component, simply create a new material and assign it to the material property of the skeleton renderer component.
In all cases, you must provide a parameterized material that allows the skeleton renderer component to set the texture source. By default, the renderer component assumes the texture parameter is called
"SpriteTexture". You can customize the parameter name on the skeleton renderer component.Depth Offset
Attachments are rendered back to front in the x/z plane by the skeleton renderer component. Each attachment is offset by a customizable depth offset value on the y-axis to avoid Skeleton Follower Component
This component references a bone of a skeleton (animation) component and sets its own transform to that of the bone on every
Tick.Use this to let objects like particle systems follow a specific bone on the skeleton.
Skeleton Driver Component
This component references a bone of a skeleton (animation) component and sets the bones position to its own position on every
Tick. The component will set the bone position before the skeleton (animation) component updates the world transforms.Use this for use cases such as letting the user drag a bone of the skeleton around.
Spine widget for UMG UI
Since Spine 3.8, the spine-ue runtime offers the Spine widget for integration of Spine skeletons with your Motion blur post processing
spine-ue's default materials use the translucent blend mode supported by Unreal Engine. For this blend mode to work with motion blur post processing, enable the
OutputVelocityoption in the material details.