Unfortunately, we can’t take the mechanics of moving UI out of the way of the keyboard for granted. In fact, when they keyboard appears, it’s the developer’s job to try to keep up with it and UIKit does not make that task particularly easy.
One hot summer day in the Shape office, we decided that we had enough of fighting the keyboard and we wanted to fix it once and for all.
TL;DR: We are pretty happy with the result and we want you to use it as well. Check out SHPKeyboardAwareness on GitHub.
Now for the slightly longer version.
So how do we deal with the keyboard and move our precious UI out of the way? The official documentation has Apple’s take.
Assuming you are not using a UITableViewController (which has some support for avoiding the keyboard), here are the basics:
Listen for notifications about when the keyboard appears and disappears.
1 2 3 4 5 6 7 8 9 10 11 12 | |
Delegate the UITextField and save it in an instance variable when it becomes first responder.
1 2 3 4 5 6 7 8 9 | |
When the keyboard appears, adjust your scroll view (assuming you are using a scroll view) and reset it when the keyboard goes away.
1 2 3 4 5 6 7 8 9 10 11 12 13 14 15 16 17 18 19 20 21 22 23 24 25 26 | |
This code pretty much gets the job done, but has a number of drawbacks:
In order to make this work, we need to rely on two distinct events (we use the term text field to denote the input view, but it also covers text view):
We need the text field so we can get its frame in the (scroll) view and we need the keyboard notification to know the frame of the keyboard and the animation curve and duration with which it enters the screen so we can move the text field out of the way in the same pace. These are two distinct events and with imperative programming, it gets ugly fast. We need to rely on a different paradigm to solve this in a nice way.
Functional Reactive Programming is all over the place these days and at Shape we have really embraced it using Reactive Cocoa. If you don’t know the framework you should read the documentation. Even if you are not familiar with Reactive Cocoa, you can read on even though there may be some unfamiliar terms.
With Reactive Cocoa we can combine and merge distinct events and use their output as parameters to a function that makes the problem much easier to solve. Here’s how we do it:
1 2 3 4 5 6 7 8 9 10 11 12 13 | |
Now we have achieved a unification of the two distinct events and merged them into a single event we can work on to achieve keyboard bliss. When fired, combinedShowSignal will send a tuple of two NSNotification objects which we can unwrap and perform the logic necessary to animate the changes to our UI with the keyboard animation. If you want to check out how that is done, please have a look at the code on GitHub.
We wanted to solve keyboard avoidance in the general case, encapsulating all the logic needed in a separate module. Also, it was a priority that the solution didn’t impose any design requirements or assumptions when integrating it into our projects. In other words, we wanted a very lean, decoupled and easy to use interface.
We decided on isolating all the code in a category, not on UIView or UIViewController but on NSObject which may sound a bit odd. Read on. The interface comes in two flavors and this is what it looks like:
A Reactive Cocoa based interface:
1
| |
A traditional interface:
1
| |
So why an NSObject category? Any object that imports the header can call one of these methods and get either a ‘next’ or a callback when the keyboard is about to appear or disappear. So it’s up to you if you want to handle the keyboard from the view controller, a view or some helper object.
The traditional interface requires that the receiver implements a single method defined in the SHPKeyboardAwarenessClient protocol to get the callback. Whenever the signal or callback is fired, a value of the type SHPKeyboardEvent is provided, which is a simple container object, holding all relevant information to move the UI out of the way. It is thus the job of the receiver to decide how to deal with the keyboard event, but all the necessary bits of information is collected and delivered in a nice package.
Here’s an example where SHPKeyboardAwareness is used from a view controller, managing a collection view:
1 2 3 4 5 6 7 8 9 10 11 12 13 14 15 16 17 18 19 20 21 22 23 24 25 26 27 28 29 30 31 32 33 34 35 36 37 38 39 40 41 | |
Notice that nowhere do we unsubscribe from keyboard events. When the receiver is deallocated, the subscription is silently cancelled so there is no need to do any house cleaning at any point.
There’s another nice feature you might notice in the code sample above. We can store the original offset in the SHPKeyboardEvent object on the ‘show’ event, so we can read it out and restore the collection view to its former state when the keyboard disappears. SHPKeyboardAwareness ensures that the same event instance is passed on ‘show’ and ‘hide’ events so that state can be saved and restored.
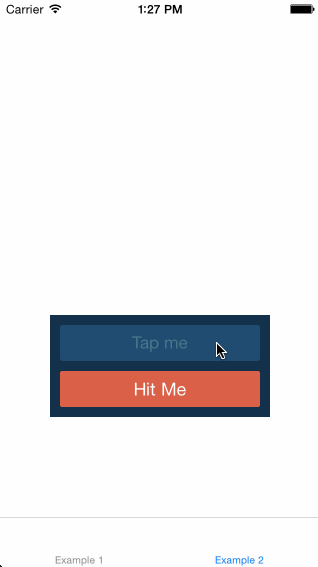
SHPKeyboardAwareness has one last trick up its sleeve. In the example presented above, an event will be fired whenever a ‘UITextField’ or ‘UITextView’ will become first responder. There is a way to limit the scope however. When engaging keyboard awareness, you can pass in a view that you want events for. You will then only get keyboard events if the keyboard frame conflicts with the given view. This is useful, if for instance you have a container view with a text field and an action button inside and you want the entire container to clear the keyboard. The interface looks like this:
Reactive Cocoa based:
1
| |
Traditional:
1
| |
The result may look like this:

We really like how this project turned out and we’re very happy to release it to the world. In fact, SHPKeyboardAwareness is the first open source project from Shape. We encourage you to try it out and if you find any bugs or ways of improving it, pull requests are very welcome. Get SHPKeyboardAwareness here.
]]>Charles Web Proxy is an excellent tool for debugging HTTP requests. It has support for inspecting requests/responses and even more cool features like breakpoints or rewrites. I use it when developing iOS apps that communicate with a server over HTTP but also to figure out how my favorite apps from the App Store works. The Charles documentation is a good resource for understanding the features in Charles.

Support for SSL proxying is built into Charles using man-in-the-middle HTTPS proxy. It is incredibly useful as many apps use HTTPS. Instead of the client seeing the certificate of the server it sees a certificate Charles has signed with its own root certificate. Further Charles communicates with the server using the certificate of the server. In this way the client thinks it is communicating with the server and the server thinks it is communicating with the client, while they are in fact both talking to Charles.
However, since the certificate provided by Charles is not signed by a trusted certificate authority, the client will in most cases reject it. To avoid this you have to add the root certificate of Charles as a trusted certificate on the client. There are both instruction how to do that for Mac/PC and iPhone.
Installing the root certificate of Charles as a trusted certificate on your device however introduces security threats. An evil-minded person could simply use an SSL certificate signed with the root certificate of Charles to perform a man-in-the-middle attack on your device, since this certificate and its key is available for everyone to download on the internet.
Luckily Charles supports using your own custom SSL certificate as the root certificate, which you have to create yourselves. This can be done using openssl. You will be asked some information about the certificate. I recommend at least setting Organization Name to something meaningful as for instance Charles Proxy Custom SSL certificate. This makes it easier to find the certificate in Keychain.
1
| |
An X.509 certificate and a private key will be created. Charles expects a PKCS12 file where these are bundled together. So lets create such a bundle. You will be asked for a password and you must specify one for Charles to accept the bundle. Further every time Charles is launched you will be asked to type in this password. In the end of this post I will show how to avoid this.
1 2 3 | |
Now simply select the charles.pfx file in Proxy Settings SSL Use a Custom CA Certificate in Charles. Notice that Charles only saves the path to the file, so place the file somewhere meaningful.
Remember to install the certificate in keychain by simply opening the charles.crt file. It can be installed in the iOS simulator by dragging the charles.crt into the simulator window and on your iOS device by sending it using email. Remember to delete the old Charles certificate if you had it installed.
Charles is now using our custom SSL certificate and we can be happy and feel secure. However, if you like me use Charles on a daily basis you will quickly get annoyed by having to provide the password of the PKCS12 bundle every time you launch Charles. My method to avoid this is to trick Charles into thinking that it is using the default Charles CA certificate when it is actually using my custom certificate.
Charles stores the used certificate in a keystore file located in a jar file. The trick is to create a new keystore file with our custom certificate and then replace the file. We use keytool to make the keystore file from the charles.pfx file. The file is protected by a password, and it is important that we use the same password as the keystore file bundled with Charles. A quick inspection of the Charles jar file reveals that this password is expected to be Q6uKCvhD6AmtSNn7rAGxrN8pv9t93.
1 2 3 4 | |
This will generate a keystore file. The private key stored is still protected by key provided when it was created. This must be changed as well to the key Charles expects.
1
| |
The last thing to do is to replace the default keystore file with the new generated one, which is located inside the charles.jar file.
1
| |
Remember to disable Use a Custom CA Certificate in Charles. Charles is now using your custom SSL certificate and you don’t have to type in a password every time you launch Charles.
ClassyLiveLayout.

Implementing user interfaces often requires many iterations where you compile your app, launch it in the simulator, navigate to the screen you are working on, check the result and then go back to code and make a change. Then repeat. In many cases this can be a tiresome process. If it takes a long time to compile the app or navigate to the relevant situation I find this particularly frustrating.
I never use nibs or storyboards (for several reasons, but Sam Soffes sums it up pretty well). In contrast I’m a huge fan of DCIntrospect, a tool to inspect and tweak view frames directly in the simulator. I use that all the time and only fall back to Reveal app when there is a more complex case I need to inspect. Using DCIntrospect is convenient because it lets you move and resize views directly in the simulator using the arrow keys. But once you figure out how many pixels you want to move your view you still need to remember that value, make the necessary code change and run the app again to check the result. Wouldn’t it be nice if this process could be made easier? I’ll show a new approach later in this post after mentioning two essential components that makes this possible.
I have been using Jonas Budelmann’s excellent Masonry DSL for AutoLayout for the last few months. It makes setting up layout constraints very easy and declarative compared to the more verbose APIs provided by Apple. Constraining a view to its superview with some padding could look like this using Masonry:
1 2 3 4 5 6 7 8 | |
or even this:
1 2 3 | |
Basically, if you don’t know Masonry you should check it out right now. One very nice feature recently added to Masonry is the mas_updateConstraints: method. It let’s you easily change the layout of a view by automatically updating existing constraints, instead of manually saving pointers to the constraint you may need to update in ivars. We will see how this comes in extremely handy when combined with the next awesome library and a little extra magic.
Another excellent tool from Jonas Budelmann (he is called @cloudkite on twitter and github) that I just recently started using is Classy. Classy is a little like CSS (or actually more like Stylus, but for native iOS apps. Classy let’s you define stylesheets where you can match your views using different kinds of selectors and set styling properties on them. In this way it’s easy to define all your styling in a central place that’s much more convenient and flexible than Apple’s appearance proxy API. A stylesheet could look something like this:
1 2 3 4 5 6 7 8 9 10 11 12 13 14 | |
We can define variables and enjoy shortcuts for declaring colors, fonts, size, etc. You should really check out the features and the syntax on the Classy website.
Another very nice thing about Classy is it’s live reloading feature. When running the app in the simulator we can simply edit the stylesheet file and and as soon as we save the file, the app’s appearance will update immediately. I think this is so cool! But also extremely useful. Now the iteration time for tweaking things like colors, font sizes, scrollview insets etc. is pretty much down to zero.
I have quickly become addicted to this live editing thing and I now enjoy compiling way fewer times during the day. But all adjustments not made using Classy still require a fresh compile and restart of the app. One such adjustment is tweaking the constant numbers used to define the view layout. Like the top margin of a view or the distance between two views. If I were to define a view with two rectangles with the same height and top margin I might do something like this:
1 2 3 4 5 6 7 8 9 10 11 12 13 | |
This is how the layout looks when rendered in the simulator:

In a real app I would probably extract the magic numbers into constants. I thought it would be nice if we could edit those constants at runtime and see the effect immediately like the example with Classy above. So I asked Jonas Budelmann if he had any ideas on how that could be done and he luckily had! So here goes a solution based on Jonas’ idea and a category I wrote on UIView to get rid of the boilerplate.
The UIView+ClassyLayoutProperties category defines the following properties on UIView:
1 2 3 4 5 6 7 8 9 10 11 | |
The first two properties cas_size and cas_margin are the interesting ones, the others are just shorthands to set individual values of the CGSize and UIEdgeInsets structs. We can access these properties from a stylesheet to define our constants:
1 2 3 4 5 6 7 8 9 10 | |
We will also refer to them when we define the layout in -updateConstraints (or -updateViewConstrains if we are lazy and setup the view from the ViewController):
1 2 3 4 5 6 7 8 9 10 11 12 13 14 15 16 17 | |
That’s basically everything needed to be able to live edit margin and size constants and see the results in real time in the simulator. If you want to try this yourself go get the ClassyLiveLayout demo app or follow the extra steps listed in the next section.
Note that we do not have to use all the margin and size values. Also we can use the margin values to specify either the distance to the superview or to a neighbor view.
The cas_size and cas_margin property setter implementations call -setNeedsUpdateConstraints on the superview after storing the new value in an associated object. This causes -updateConstraints to be called if it is overridden or -updateViewConstrains on the ViewController. In either of these methods mas_updateConstraints: can update the constraints with the new constants.
Your podfile should look something like this:
1 2 3 | |
Your Prefix.pch file should include
1 2 3 | |
And the -application:didFinishLaunchingWithOptions: method in your app delegate should include these lines to activate Classy live reload:
1 2 3 4 | |
This assumes your stylesheet is called stylesheet.cas. If you want to call it something else then follow the Classy setup instructions.
So by using Classy, Masonry and a little extra salt we were able to edit and tweak layout constants in real time without adding extra boilerplate to our app.
Do you think this is too much ‘automagic’? Let me know what you think in the comments and also please submit any ideas for improvements.
]]>The RACCommand is one of the essential parts of ReactiveCocoa that eventually can save you a lot of time and help make your iOS or OS X apps more robust.
I’ve met several people new to ReactiveCocoa (hereafter abbreviated RAC) who don’t entirely understand how RACCommand works and when it should be used. So I thought it would be useful to write a small introduction to shed some light. The official documentation doesn’t give many examples of how to use RACCommand, but the comments in the header file are great. However, they may be hard to understand if you’re new to RAC.
The RACCommand class is used to represent the execution of some action. Often the execution is triggered by some action in the UI. Like when the user taps a button. RACCommand instances can be configured to handle reasoning about when it can be executed. This can easily be bound to the UI and the command will also make sure it doesn’t start executing when it’s not enabled. A commonly used strategy for when the command can execute is to leave the allowsConcurrentExecution at it default value of NO. This will make sure the command doesn’t start executing again if it’s already executing. The result of command execution is represented as a RACSignal and can hence yield results with next: (representing new values or results), completed or error:. I’ll show how this is used below.
Let’s assume we are making a simple iOS app that will let the user subscribe to an email list. In the simplest form we will have a text field and a button. When the user has entered his email and taps the button the email address should be posted to some webservice. Easy enough. However there are some edge cases that we should make sure to handle to provide the best experience. What happens if the user taps the button twice? How are errors handled? What if the email is invalid? RACCommand can help us handle those cases. I’ve implemented a small app to demonstrate the concepts discussed in this post.

Get the source code for the example app here: https://github.com/olegam/RACCommandExample
With a very simple view controller the app also demonstrates a way to practice the MVVM pattern in iOS apps. Basically the view controller sets up the view hierarchy and instantiates an instance of the view model.
1 2 3 4 5 | |
The above method (called from viewDidLoad) creates the bindings between the view and the view model. All the interesting stuff is in the view model. It has the following interface:
1 2 3 4 5 6 7 8 9 10 11 | |
The RACCommand property exposed here is what the rest of this post will be about. The two other string properties were bound to properties of the view as shown above. The full implementation of the view model looks like this:
1 2 3 4 5 6 7 8 9 10 11 12 13 14 15 16 17 18 19 20 21 22 23 24 25 26 27 28 29 30 31 32 33 34 35 36 37 38 39 40 41 42 43 44 45 46 47 48 49 50 51 52 53 54 55 56 57 58 59 60 61 62 63 64 65 66 67 | |
This might seem like a big chunk so let’s go through it in smaller parts. The RACCommand that we are most interested in is created like this:
1 2 3 4 5 6 7 8 9 | |
The command is initialized with an enabledSignal parameter. This is a signal indicating when the command can execute. In our case it should be allowed to execute when the email address entered by the user is valid. The self.emailValidSignal is a signal that sends a NO or a YES every time the email changes.
The signalBlock parameter is invoked every time the command needs to execute. The block should return a signal representing the execution. Since we leave the default property of allowsConcurrentExecution on NO the command will watch this signal and not allow any new executions before the execution in progress completes.
Because the command is set on the button’s rac_command property defined in the UIButtton+RACCommandSupport category the button will automatically change between the enabled and disabled state based on when the command can execute.
Also the command will automatically execute when the button is tapped by the user. We get all this for free with RACCommand. If you need to execute the command manually you can do this by messaging -[RACCommand execute:]. The argument is an optional input. We don’t use it here, but it is often very useful (the button sends itself as input when it calls -execute:). The -execute: method is also one of the places you can hook in to watch the status of the execution. You could potentially do something like this:
1 2 3 | |
In our example the button executes the command for us (so we don’t call -execute:) and hence we have to listen for another property of the command in order to update the UI when the command executes. There are several opportunities to chose between here. And this can maybe be a little confusing. The executionSignals property of RACCommand is a signal that sends a next: every time the commands start executing. The argument is the signal created by the command. So it’s a signal of signals. We use that in the mapSubscribeCommandStateToStatusMessage method of the view model to get a signal with a string value every time the command is started:
1 2 3 | |
To get a similar signal with a string every time the command completes execution we have to do a little more work if we want to be purely functional:
1 2 3 4 5 6 7 | |
The flattenMap: method used above invokes a block with the subscribeSignal when the command executes. This block returns a new signal and it’s values are passed down into the resulting signal. The materialize operator let’s us get a signal of RACEvents (ie. the next: complete and error: messages are delivered as RACEvent instances as next: values on the resulting signal). We can then filter those events to only get the ones from when the signal completes and in that case map it to a string value. Did I loose you here? I hope not, but you may need to look up the documentation of flattenMap: and materialize to better understand what they do.
We could have implemented this behavior in a different way that is less functional, but maybe easier to understand:
1 2 3 4 5 6 7 | |
However, I don’t like the above implementation as it involves side effects in the blocks. This also has the disadvantage of referring and retaining self in the block. Thus I have to use the @weakify and @strongify macros (defined in the libextobjc pod) to avoid a retain cycle. So better just avoid side effects altogether when possible as I did with the original implementation.
There is an important details to note about the executionSignals property. The signals sent here do not include error events. For those there is a special errors property. A signal that sends any error during execution of the command as a next:. The errors are not sent as regular error: events as that would terminate the signal. We can easily map the the errors to string messages:
1 2 3 | |
Now when we have 3 signals with status messages we want to show to the user we can merge them into one signal and bind that to the statusMessage property of the view model (bound to the statusLabel.text property of the view controller).
1
| |
So this was an example of how a RACCommand can be used in practice in an iOS app. I think this way of implementing logic has many advantages over the way many people would implement it with a UITextFieldDelegate in the view controller and lots of state stored in ivars or properties.
RACCommand has an executing property that is actually a signal sending YES when execute: is invoked and NO when it terminates. Upon subscription the signal will send it’s current value. If you just need to get the current value and don’t want a signal, you can get it immediately like this:
1
| |
The enabled property is also a signal sending YES and NO. It will send NO when the command was created with an enabledSignal and that signal sends a NO or if the signal is executing and allowsConcurrentExecutions is set to NO.
If you try to message -execute: on a signal that is not enabled it will immediately send an error, but that error will not be sent to the errors signal.
The -execute: method will automatically subscribe to the original signal and multicast it. This basically means that you do not have to subscribe to the returned signal, but if you do so you should not be afraid of side effects happening twice.
Almost all the apps that we develop integrate with some sort of backend web service and a lot of them also require users to authenticate in order to access certain resources.
Using some sort of OAuth 2.0 for authentication is very common today. For example we had to integrate with the Salesforce REST API in one of our recent apps. When developing this app we came to a pretty good solution for automatically and transparently refreshing the user’s access token when needed. In this post we would like to share that solution.
OAuth 2.0 basically works by issuing an access token and a refresh token to an authenticated user. The access token is needed in all requests to the API to ensure the user is authorized to access the requested resources. The access token is typically short-lived and the developer should assume it can expire at any time. The refresh token can be used to request a new access token when the old one has expired without needing the user to re-authenticate.
In order to correctly handle situations where an access token has expired we need to catch all errors and check the reason. In case the error is caused by an expired access token we should try to get a new one using the refresh token and if successful we should replay the original request with the new access token. In case the request failed for any other reason we should just let the regular error handling mechanisms handle the situation.
At Shape we love ReactiveCocoa and try to use it as much as possible to make our apps more reliable and maintainable as well as more enjoyable to develop. Since we already build most of our API clients using ReactiveCocoa we had a feeling that the token refresh problem could be solved beautifully using ReactiveCocoa.
One of the best things about ReactiveCocoa is the amazing efforts put into the project by the developers (primarily Github’s Justin Spahr-Summers and Josh Abernathy). They are always ready to assist with their experience and endless knowledge when you find yourself stuck. In this case we had some great input from Josh Abernathy that helped us arrive at the final solution.
We represent API requests using RACSignals that will next and complete or error when the requests finish. An easy way to do this is to use the AFNetworking-RACExtensions pod that we described in our last post: Wrapping AFNetworking with ReactiveCocoa.
An API request in our solution could look like this:
1 2 3 4 5 6 7 8 | |
In the above example self.requestOperationManager is an instance of AFHTTPRequestOperationManager that has a custom requestSerializer set to take care of adding the access token to every request. Notice how we wrap our API request signal with the doRequestAndRefreshTokenIfNecessary: method to get the desired transparent token refresh behavior. The method looks like this:
1 2 3 4 5 6 7 8 9 10 11 12 | |
This method catches errors on API request signals before they are propagated to its subscribers. This is done with the catch: method that lets us create a new signal when an error is sent on a signal. Inside the catch block we check if the error is caused by an expired token or any other error. If it is any other error we return the original signal so the error can just propagate to the subscribers without any modified behavior.
The magic happens when we receive an expired token error. In this case we use the concat: method to create a new signal composed of the refresh token signal and the original signal. The request signal will be re-subscribed to when the refresh signal completes and thus repeat (using the newly acquired access token). Any error will immediately propagate to the subscriber and terminate the signal.
By wrapping our API requests in the doRequestAndRefreshTokenIfNecessary: method we now get automatic and transparent handling of expired access tokens. Consumers of the API clients should not need to worry about tokens that may expire and how to handle that.
With the solution presented above we solved a common problem using very little code and without using any ivars or properties to store state. As mentioned above the main trick used was given to us on the ReactiveCocoa github issues page, but we thought it would be worth explaining here.
If you have any suggestions for improvements then please let us know in the comments.
]]>One third party library used by a lot of apps is AFNetworking from Mattt Thompson. The latest version 2.0 has many features and offer many conveniences over using NSURLConnection directly. The AFNetworking API is also well documented.
If we write a few categories to offer a RACSignal-based API for the most used methods it will be easy to integrate with the rest of our ReactiveCocoa-based app.
AFHTTPRequestOperationManager is a class that makes it easy to dispatch network requests. One way to make a request is using the -[AFHTTPRequestOperationManager GET:parameters:success:failure] method. The full signature of the method is
1 2 3 4 | |
By creating a category on AFHTTPRequestOperationManager we can get an interface like this:
1 2 3 4 5 | |
The method returns a signal that will be used to communicate the results of the request after it succeeds or fails. My implementation with ReactiveCocoa looks like this:
1 2 3 4 5 6 7 8 9 10 11 12 13 14 15 16 17 18 19 20 | |
There are a few things to note here. First the method creates a new signal using the +[RACSignal createSignal:] method. -[AFHTTPRequestOperationManager GET:parameters:success:failure]’s success block sends a next with the operation object and also completes the signal. The failure block is slightly more complicated. I wrap the AFHTTPRequestOperation instance in the user dictionary of the NSError object. This is useful in cases when the consumer needs to know the exact response data even though the request failed.
Another important detail is the RACDisposable object returned in the createSignal: method. The disposable is used to cancel the request operation in the case the subscriber disposes its subscription. This is a great example of the power of Reactive Cocoa. The request signal may be operated on by many parts of the app and the object eventually subscribing to it may not need to know about the internals of the network layer. Still it can cancel the request if it does not need the response anyway.
Finally I apply the replayLaizily operator on the signal to ensure side effects only occur once even if the signal is subscribed to multiple times.
UPDATE: Turns out there is already a pod that wraps all AFNetwork’s block based methods called AFNetworking-RACExtensions. Unfortunately the original repo and podspec has not been updated for AFNetworking 2.0, but there is a fork that seems to work well. Just put this in your Podfile to use the fixed fork:
1
| |
When you have the AFNetworking-RACExtensions pod you can go ahead and make requests like:
1 2 3 4 5 | |
Of course the real fun doesn’t start until you begin operating on and combining signals, but that’s a topic for another blog post.
]]>Since we mostly work with iOS and Android development many of the posts will likely be related to those technologies. But as we are pretty curious of nature we also work, experiment and play with a broad range of other technologies such as Ruby on Rails, node.js, Go, angular.js, Windows Phone, etc. So we might also blog about any of those or other technologies.
You can reach out to us on twitter (@shapedk) or send us an email at hello@shape.dk.
]]>